Search the Community
Showing results for tags 'billing boats'.
-
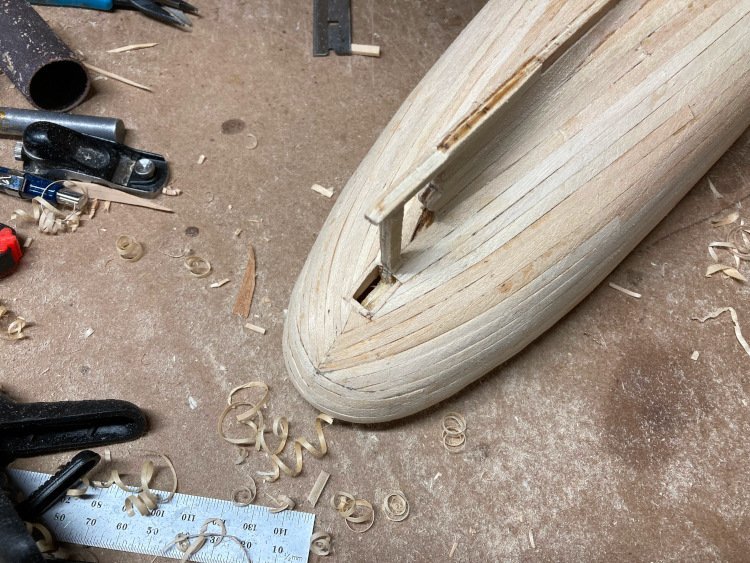
 Hello all. Let me introduce myself. I have built a number of wood ship models over the years and have always wanted to build Calypso, a boat that helped mold my life. As a young man watching "The Undersea World of Jaques Cousteau I was led to a life of diving and sailing and great respect for the ocean. I just opened the box and looking through the non-written pictorial directions am a bit overwhelmed. I was hoping for some form of written guide to go along with the instructions. I will be posting photos as I go and will be asking questions along the way. I have looked over a number of finished Calypso builds and am quite excited and inspired to begin. I am considering planking the hull as I saw another member do to make the model appear more authentic. Is there a glue other than super glue that would work better to bond wood planks to the ABS hull? Lastly, I have not been able to figure out how to make comments or ask questions on others builds. Thanks in advance for any feedback going forward.
-
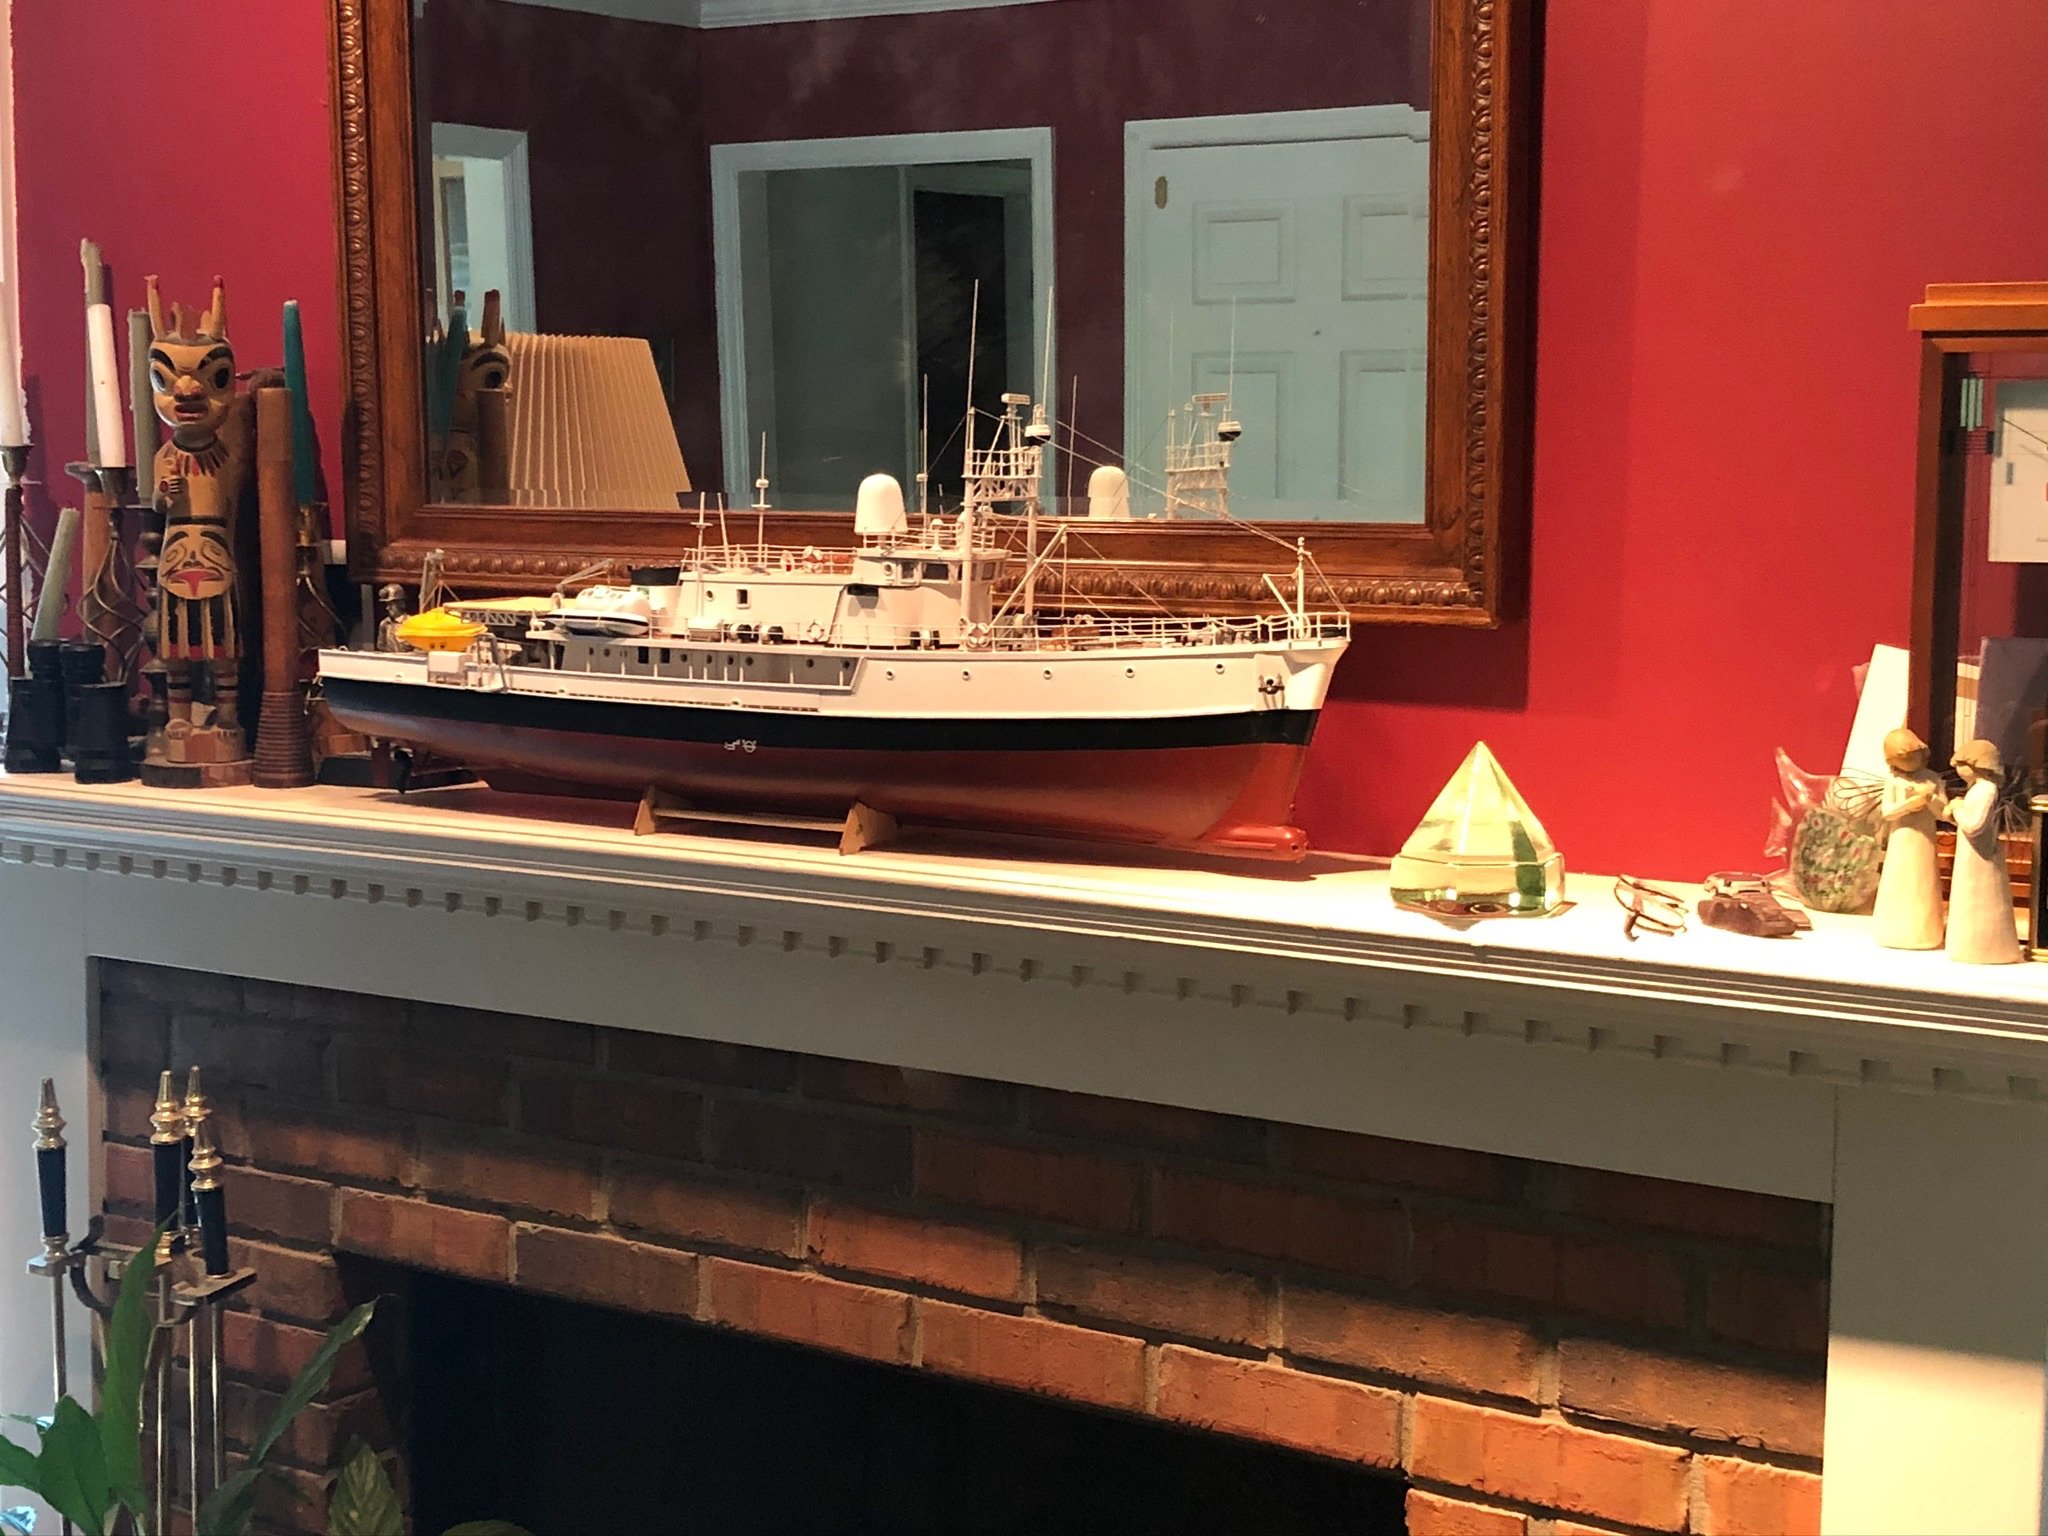
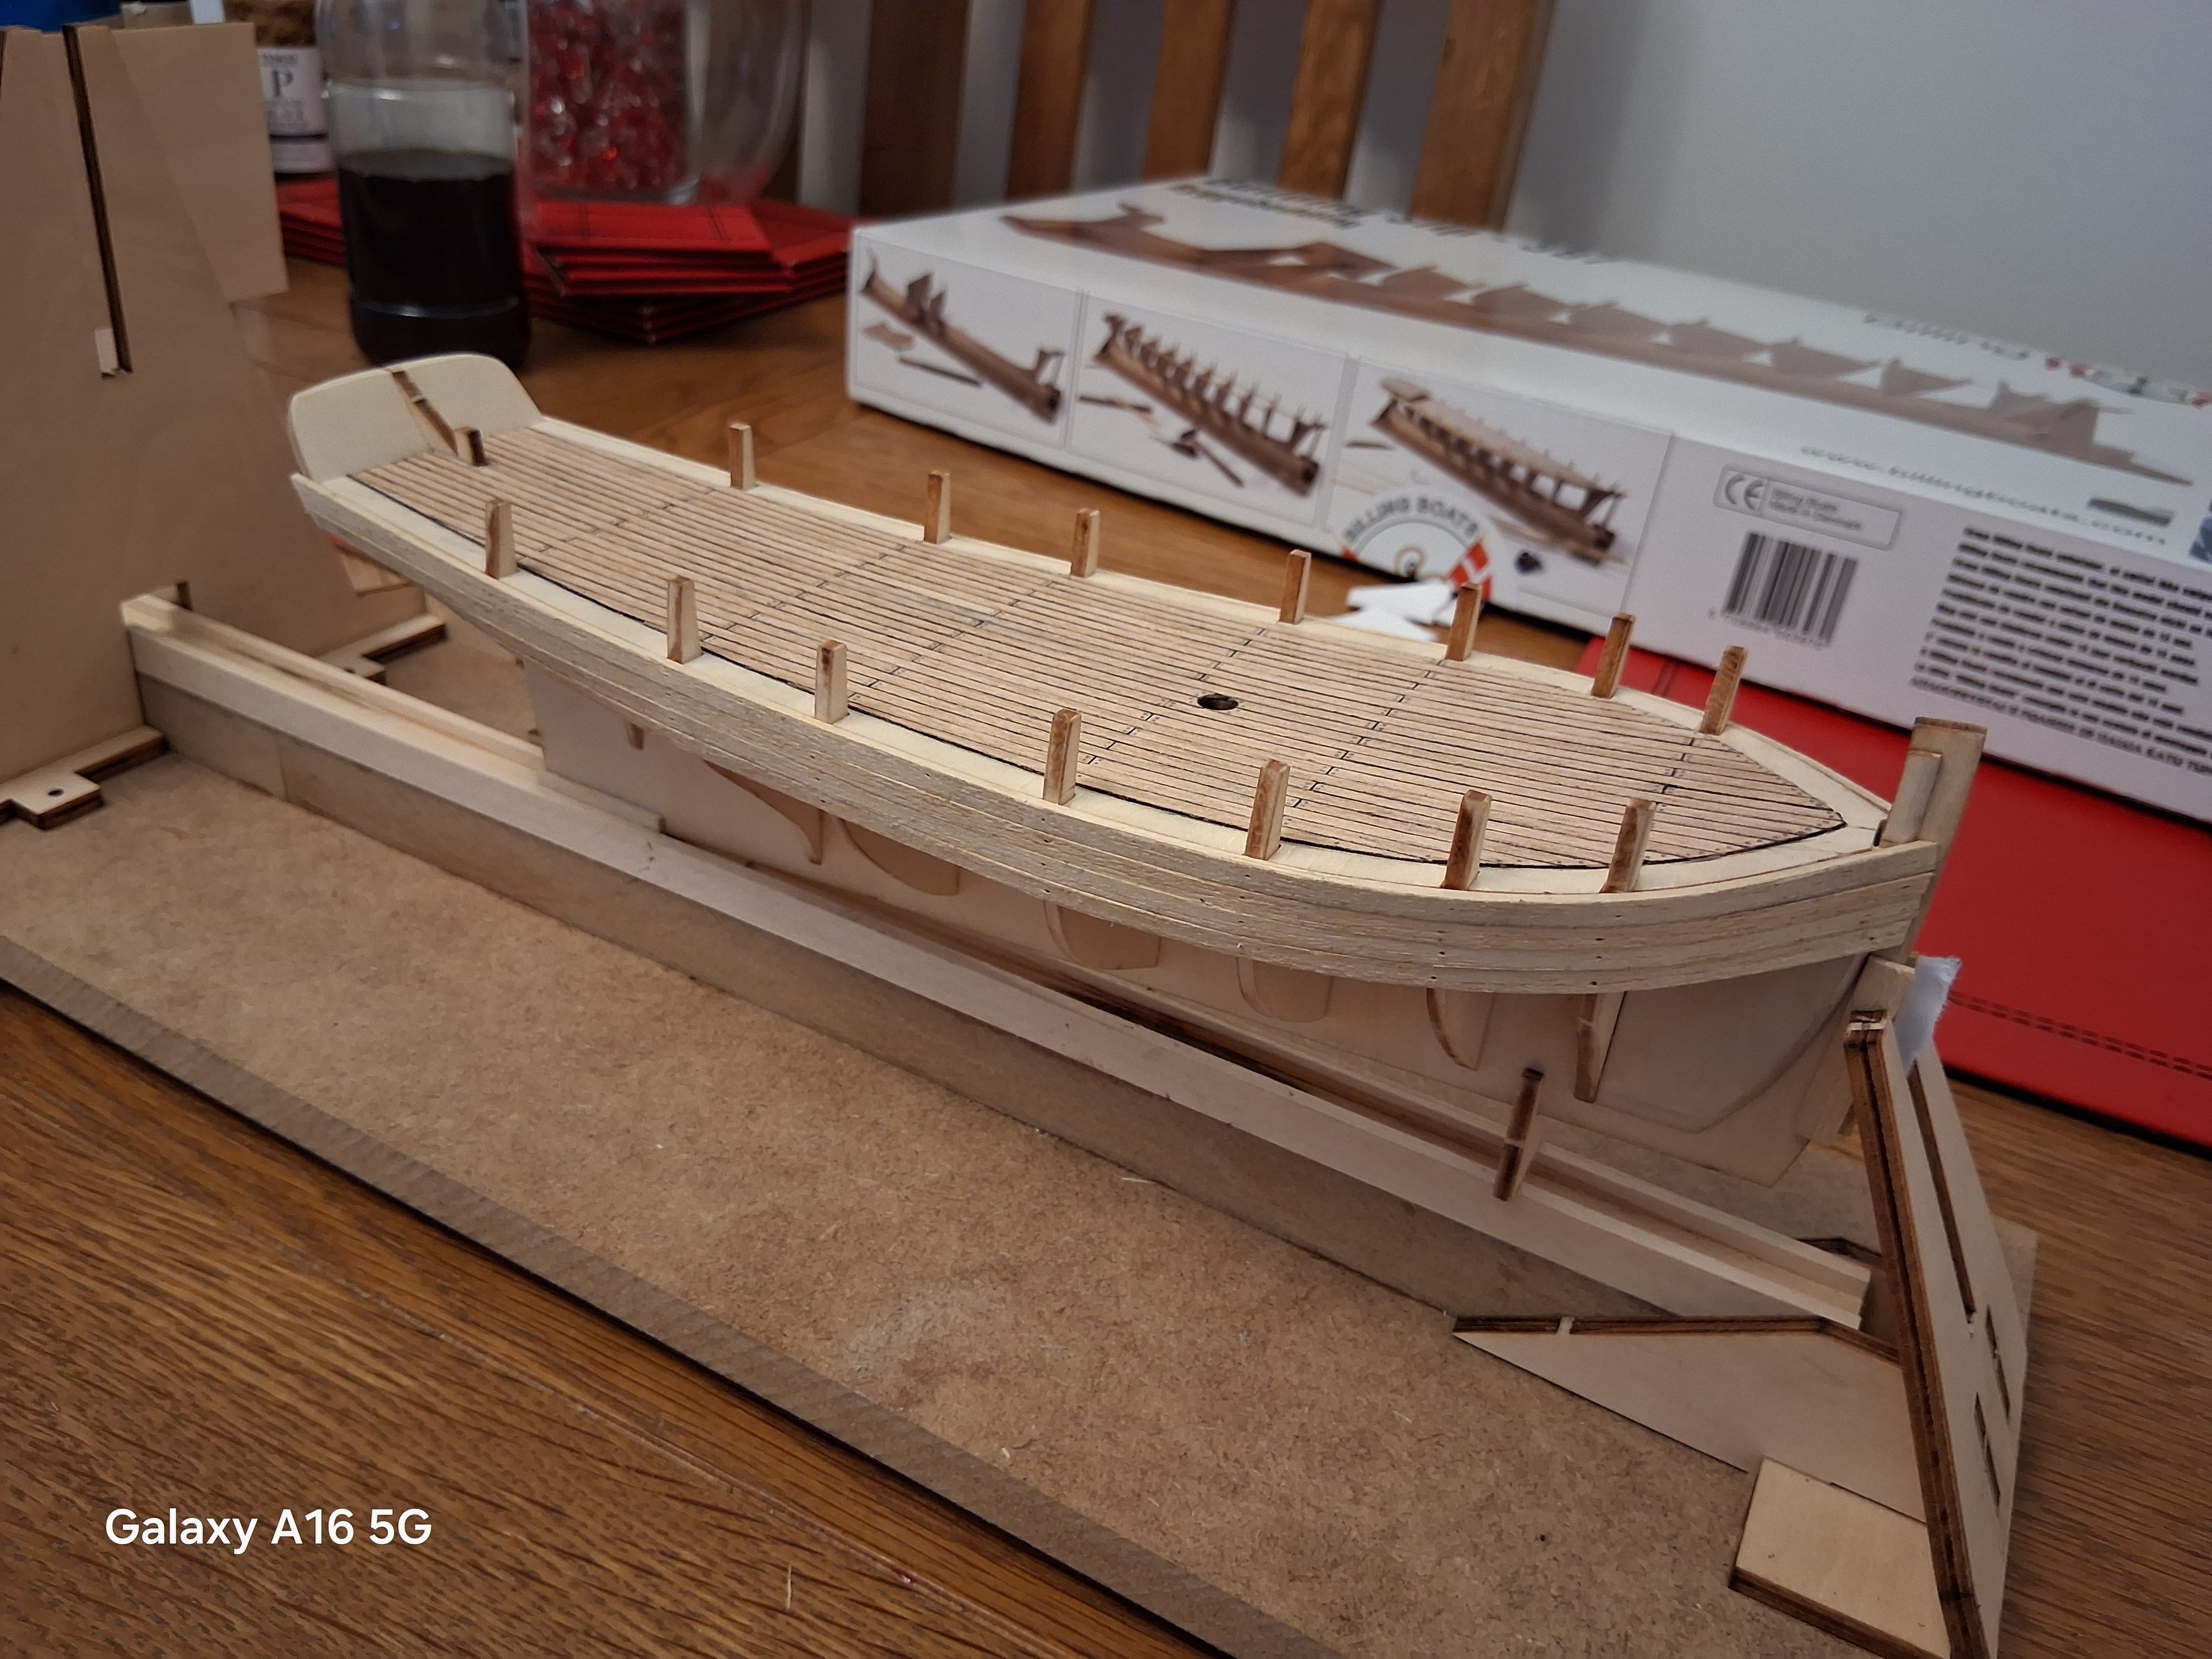
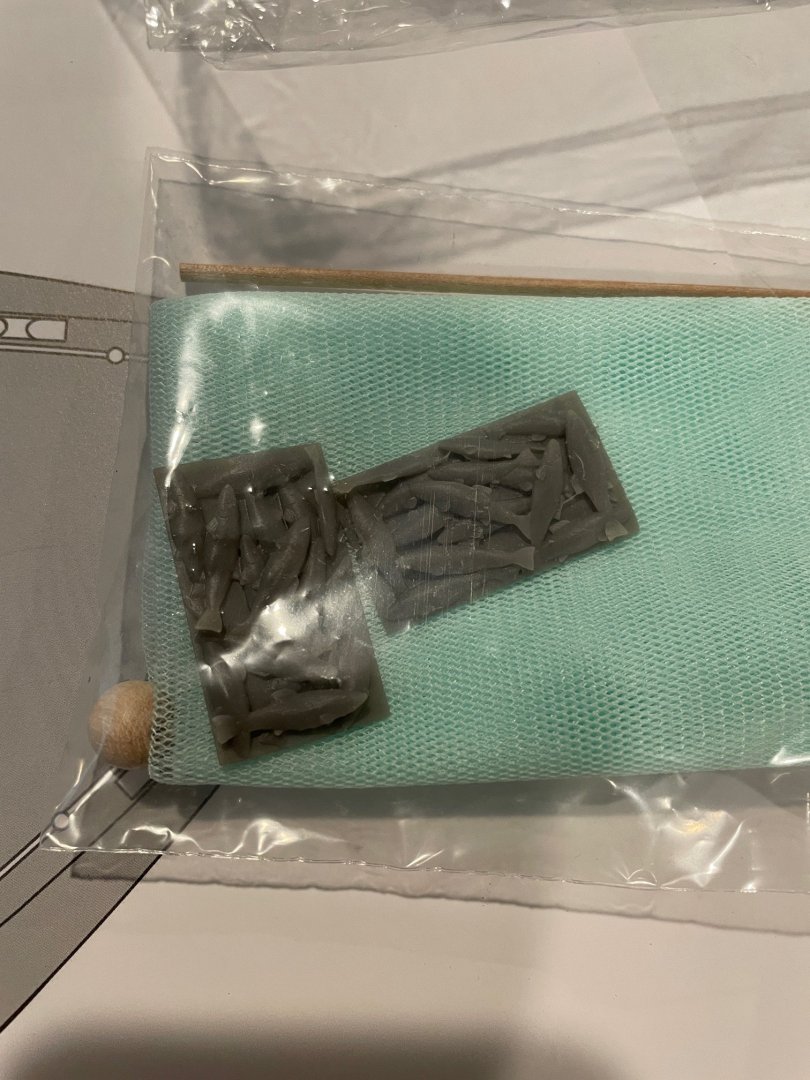
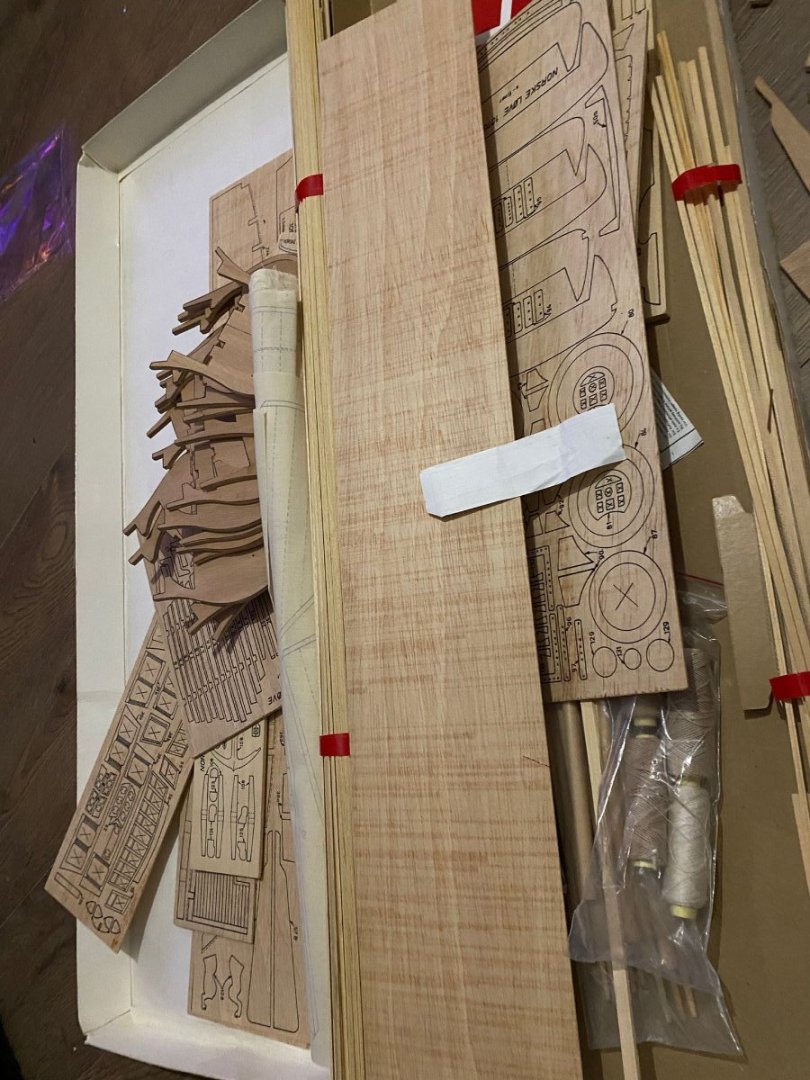
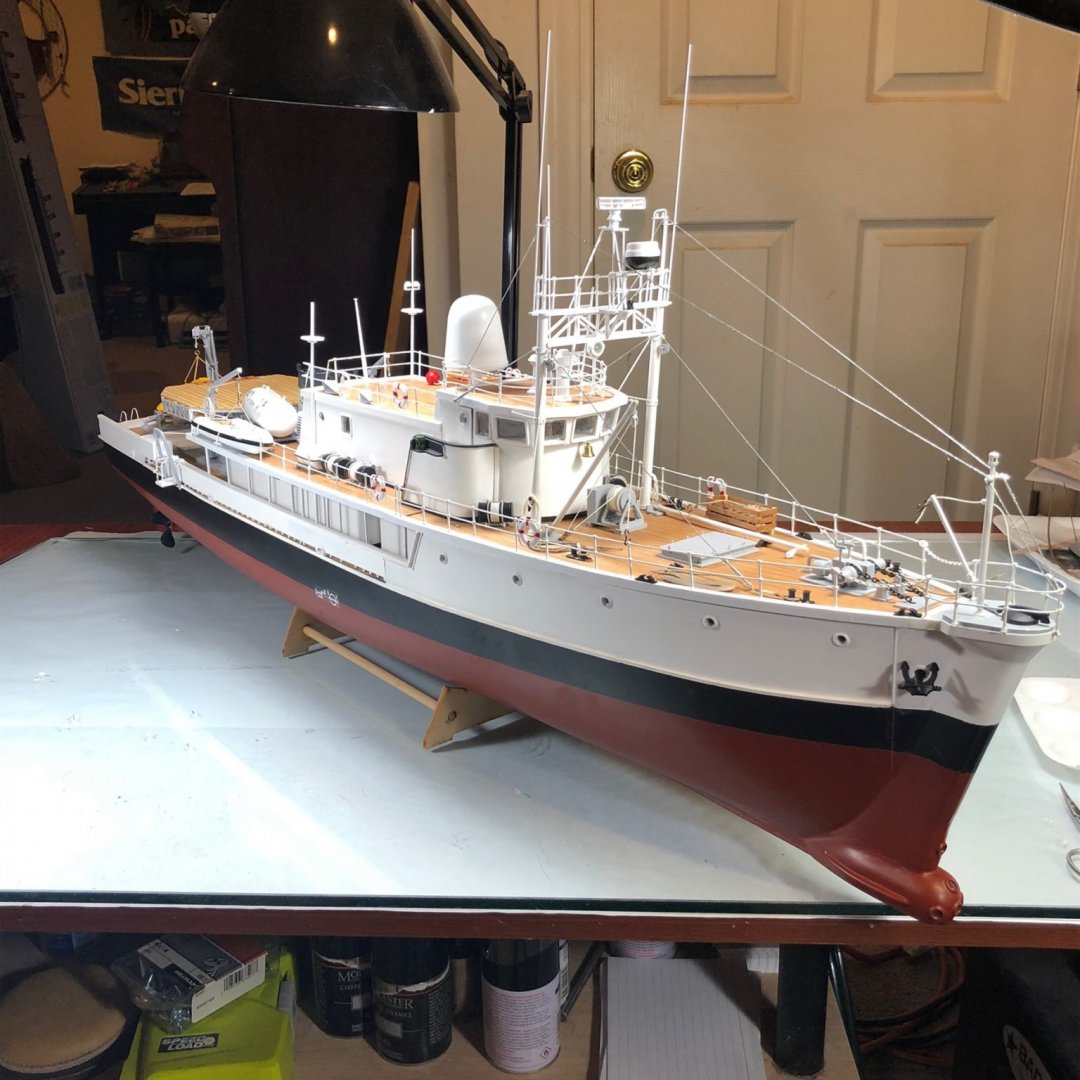
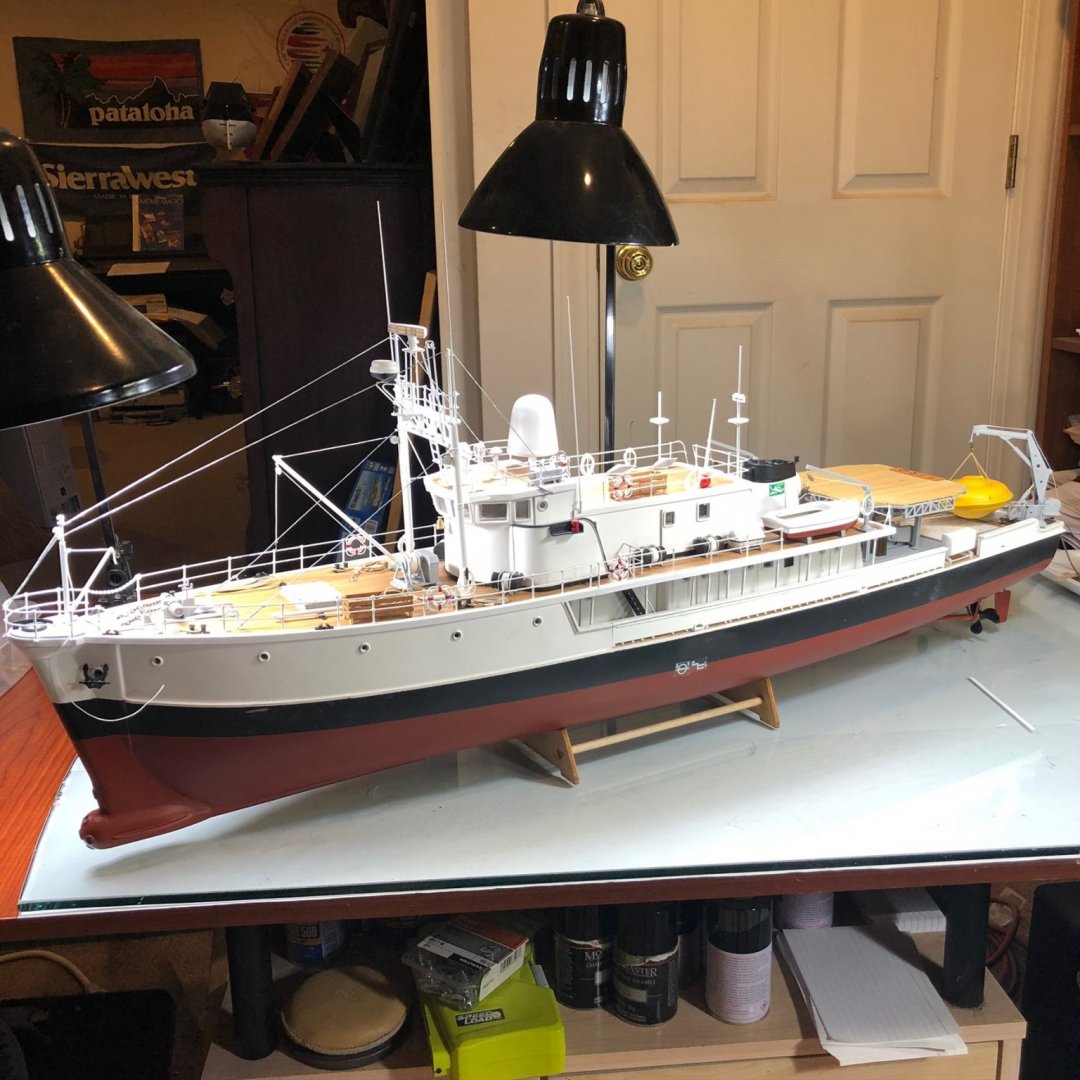
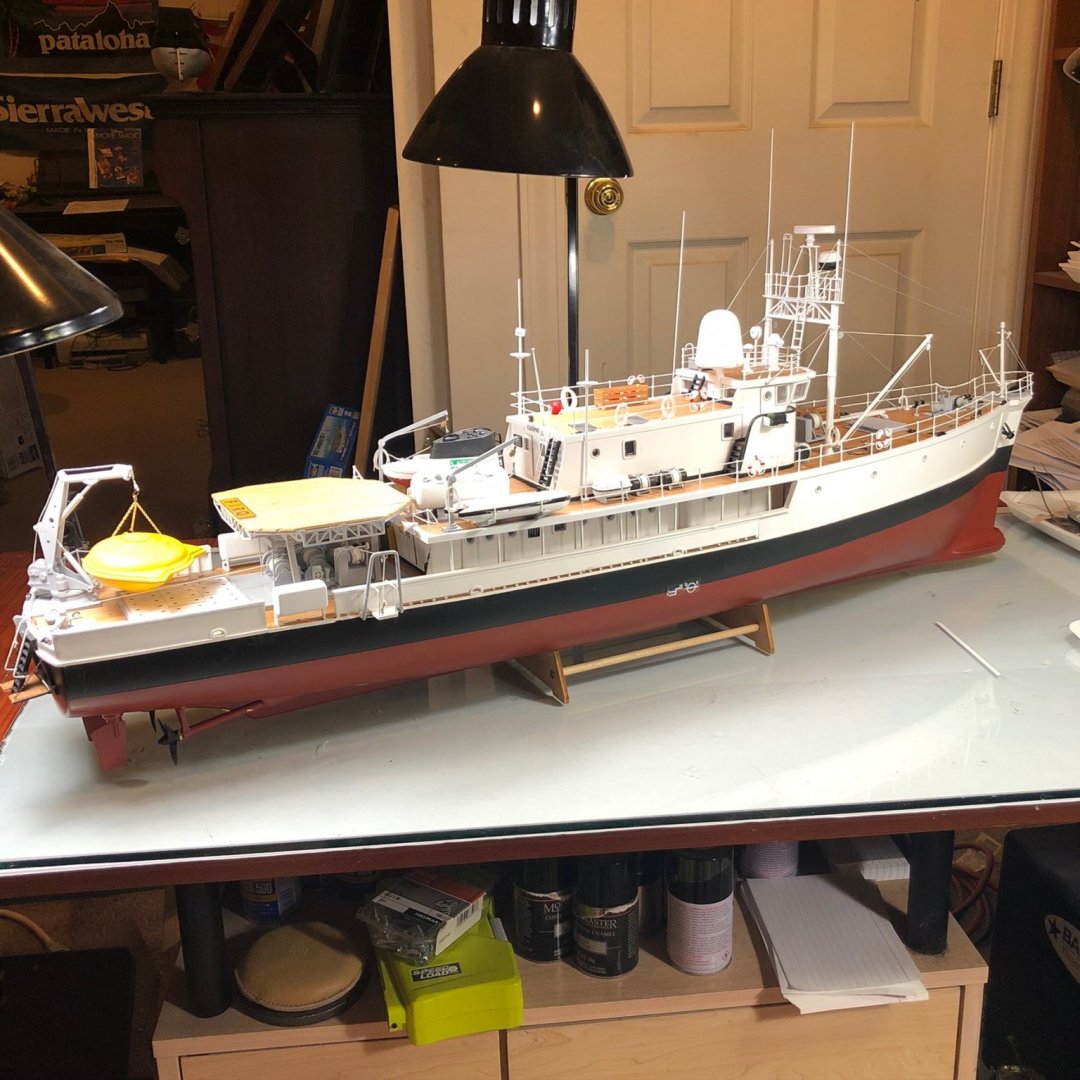
 Hello everyone, Welcome to my new build log for the Nordkap 476 by Billing Boats. I chose this model as my first venture into remote-controlled ships; something I’ve wanted to try for a while. My only previous R/C experience is with an electric plane I built for my brother a few years ago, so this will be my first foray into R/C boating. I’ve been fortunate to connect with 'robdurant', who has a detailed Nordkap build log here on MSW. He’s been incredibly helpful in guiding me through the process and pointing out the key components needed to fully motorize the vessel. A few particulars: Built In 1970 in England, Tonnage 185 gross register tonnage, Length overall 40.0 m, Beam 9.30 m, Motor 1000 HP diesel, Engine speed 12-14 knots, Crew 7-8 men, Fishing tackle Drag net (trawl), Fishing area Around Iceland and Greenland, Haul Herrings, cod and trash fish. Length of model 81.5 cm (32"), Beam of model 19.5 cm (7.68"), Height of model 43.0 cm (17") I guess I was fortunate, because unbeknownst to me when I ordered the kit, it came with a cap and some free extras—a fishing net and even some fish!! Looking forward to sharing this journey with you all!
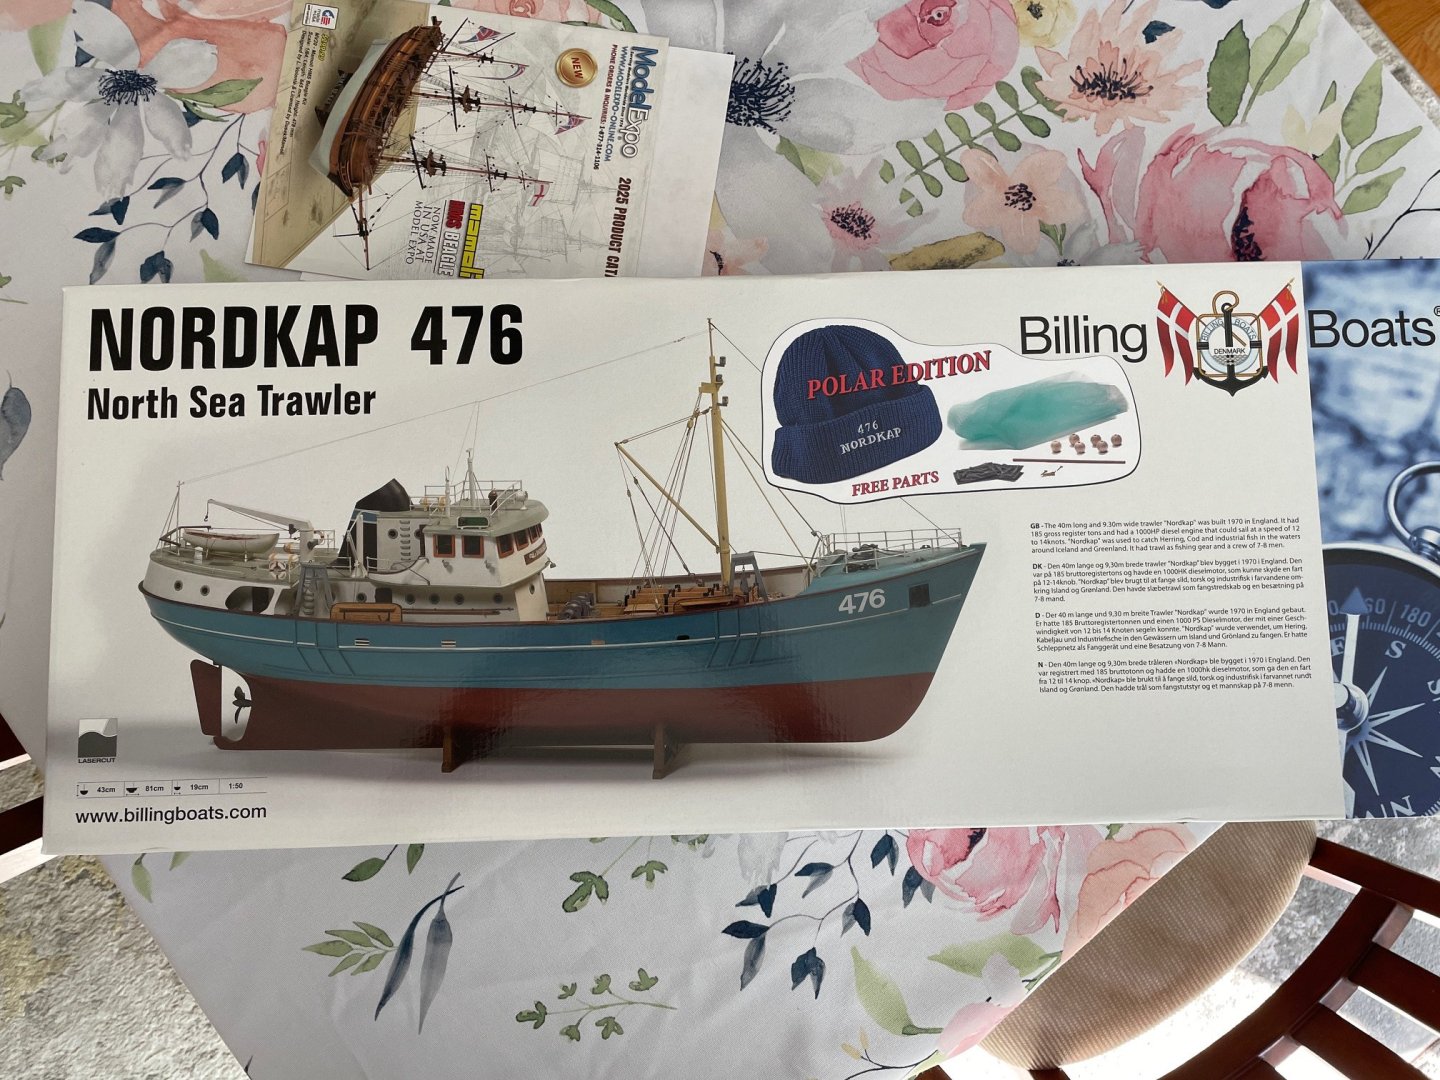

- 3 replies
-
- 5
-

-
- Nordkap
- Billing Boats
- (and 1 more)
-
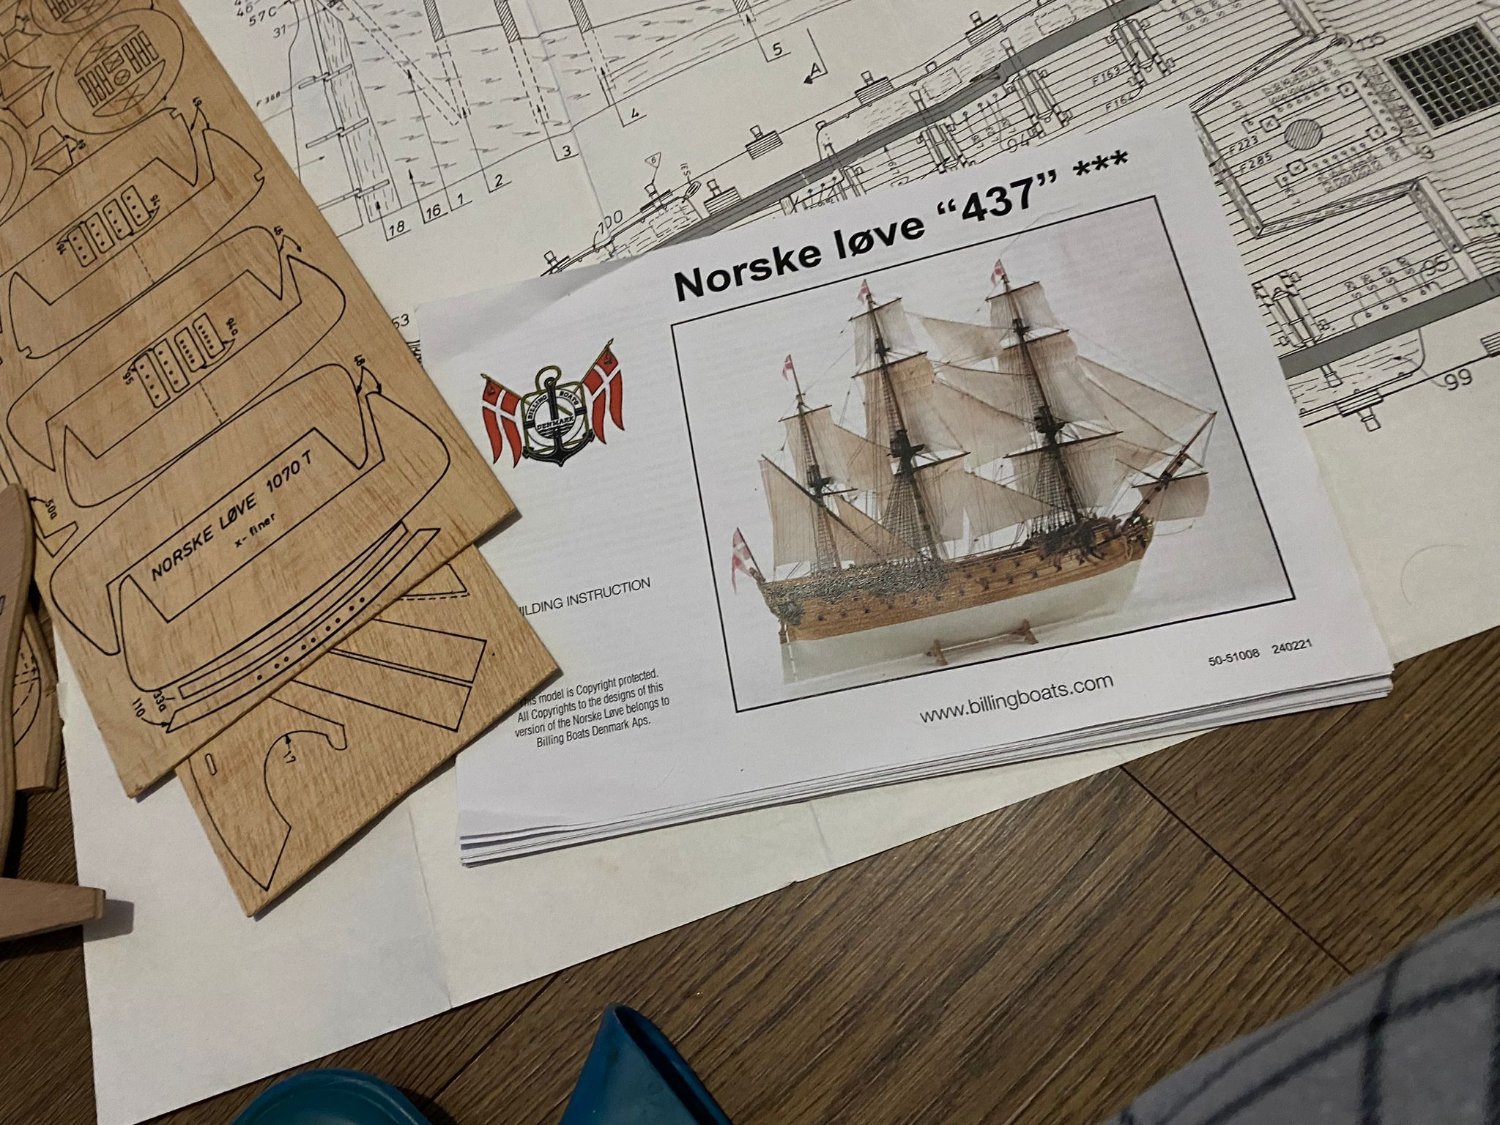
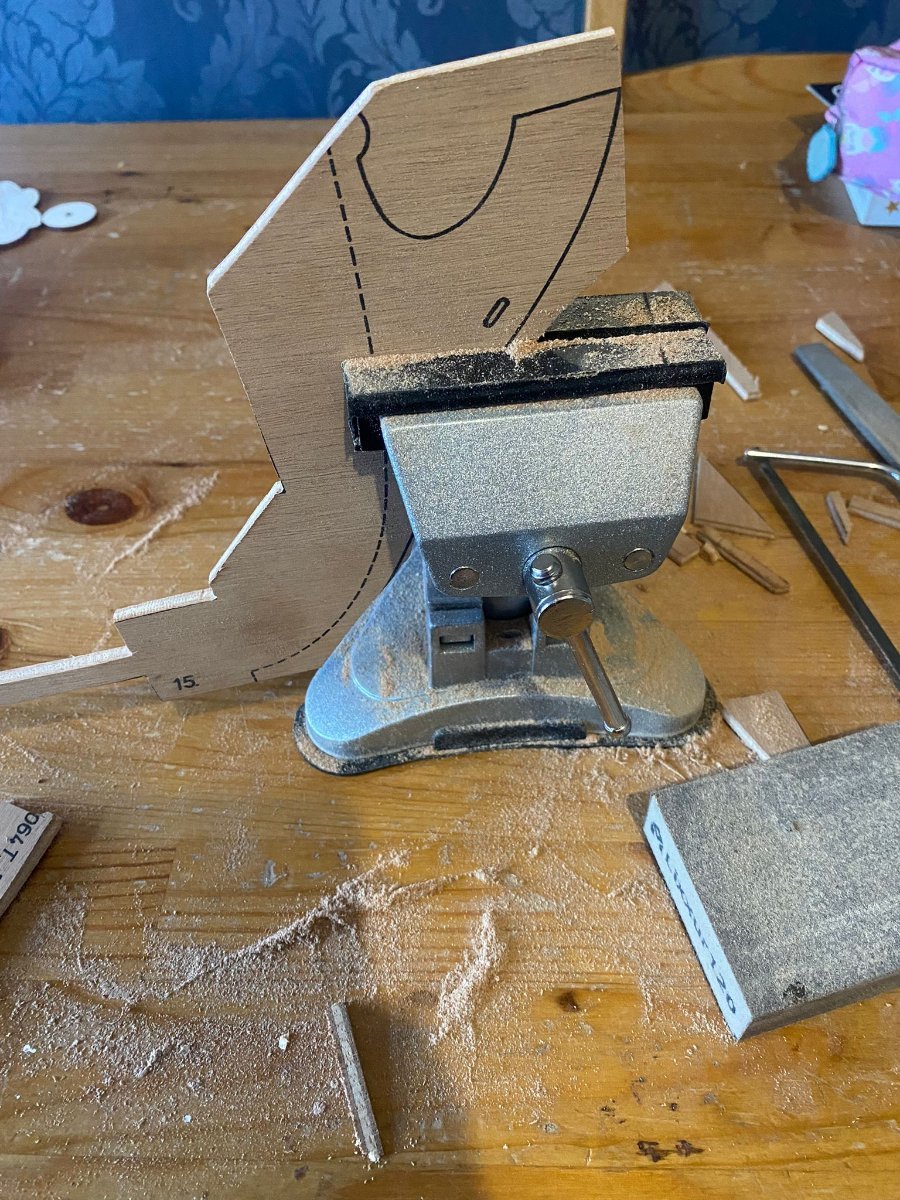
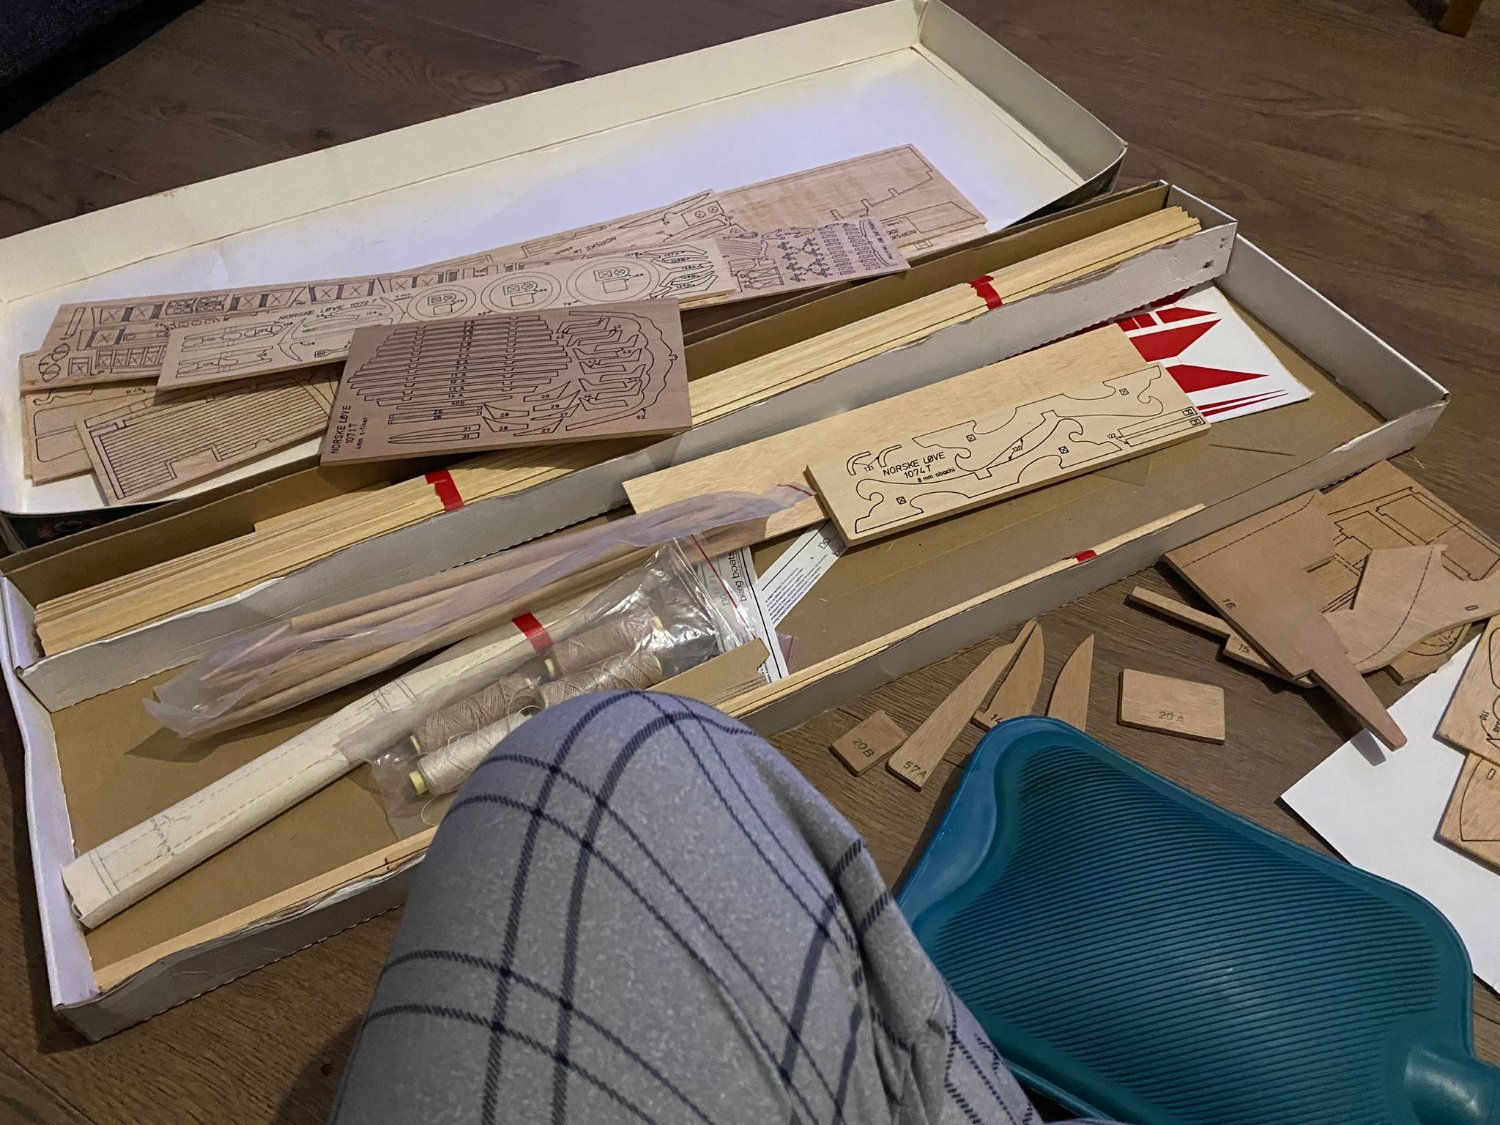
 Hello, first post here but long time lurker. I've recently started building the Norske Love model from Billing Boats that I brought from Ebay. Lets see how it goes, right! Billing Boat Norske Love that I brought from Ebay! Hoping all the pieces are here... Unlike the Occre models that I'm used to, Billing dont Lazer cut the wood fittings that you need. Didnt want to buy a jigsaw, so using the vice and a couple of small saws to cut out the pieces that I need. The model didn't come with instructions, only the massive blue prints in the photo, however, you can find the instructions easy enough online. First step then, cut everything out and sand it all down. Expect lots of cutting and sanding photos! Quick self promotion if its allowed! https://www.instagram.com/byron_dockyard/ I've posted all my previous builds on here plus random boat building / set up photos. I hope this is okay.


-
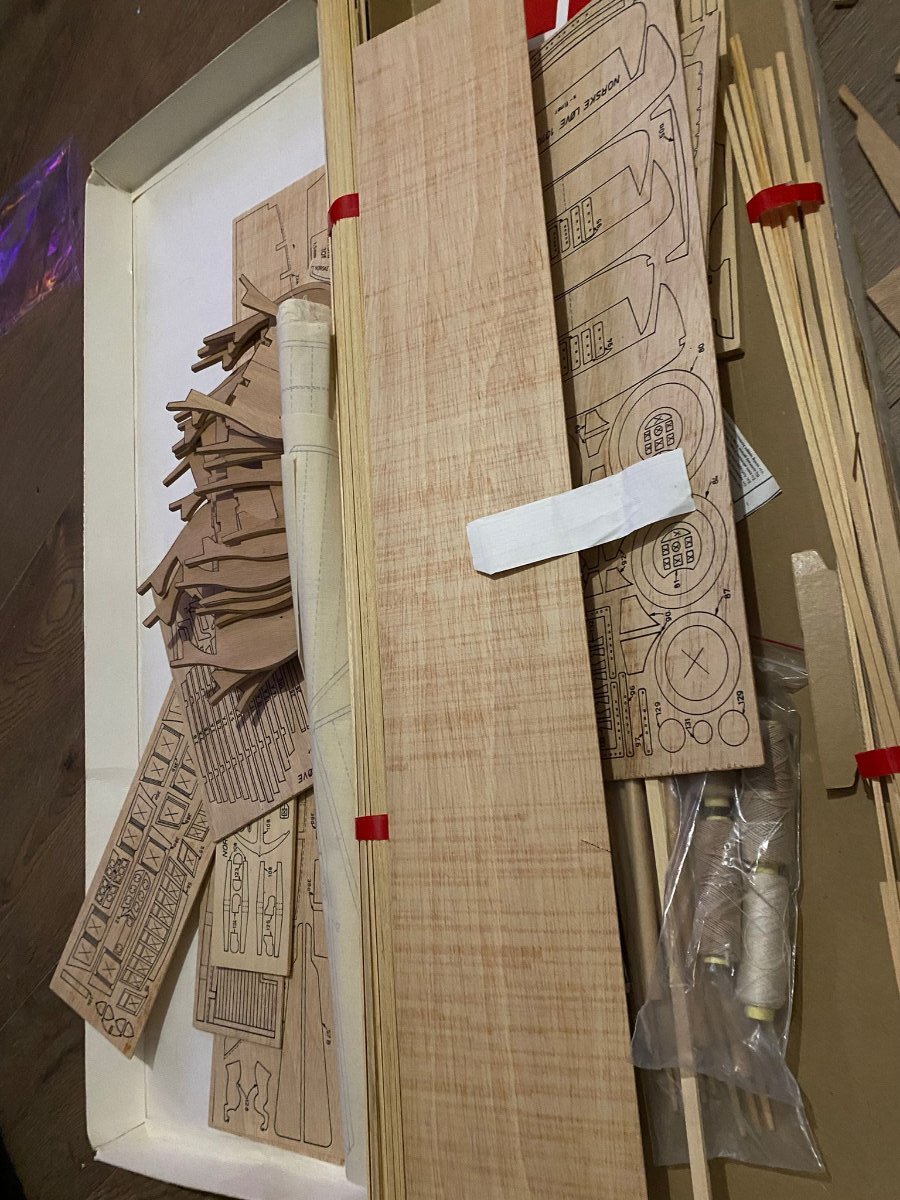
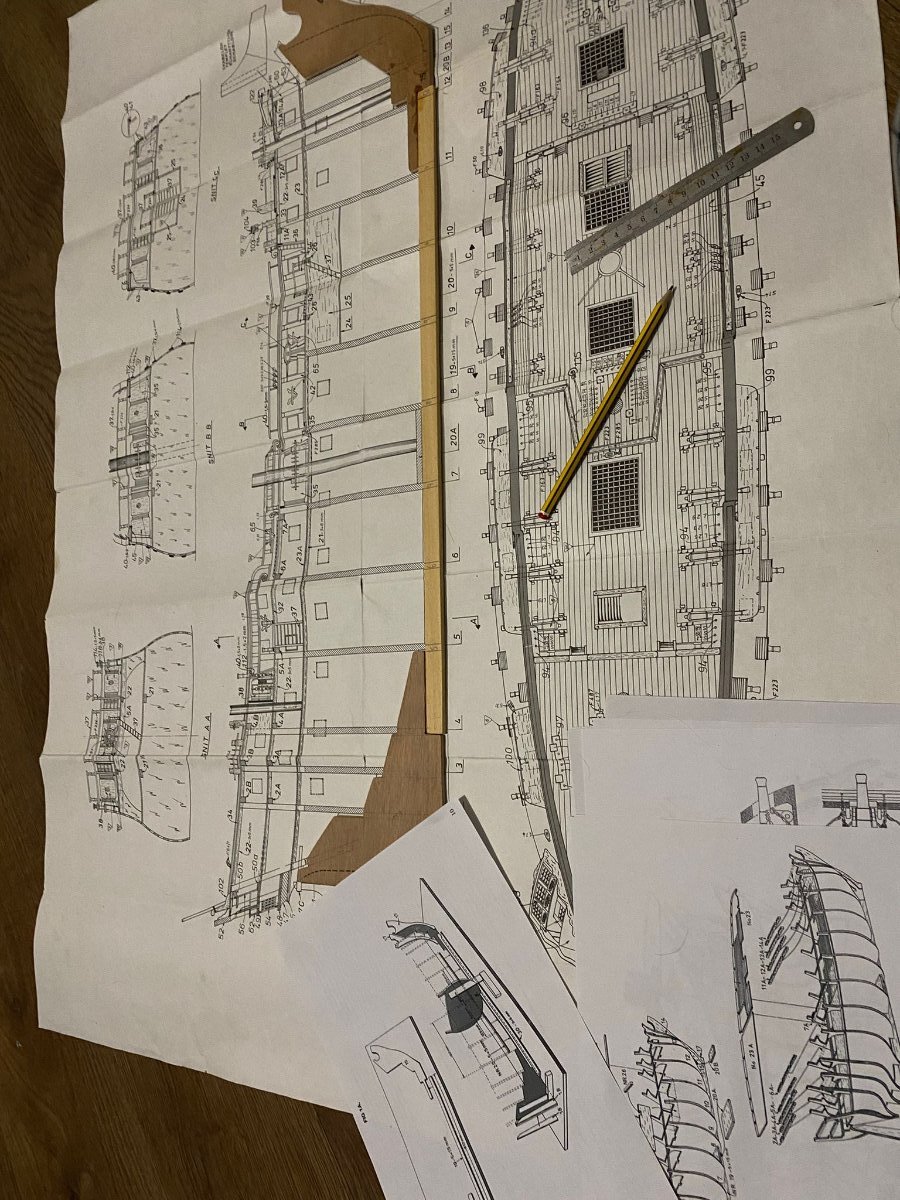
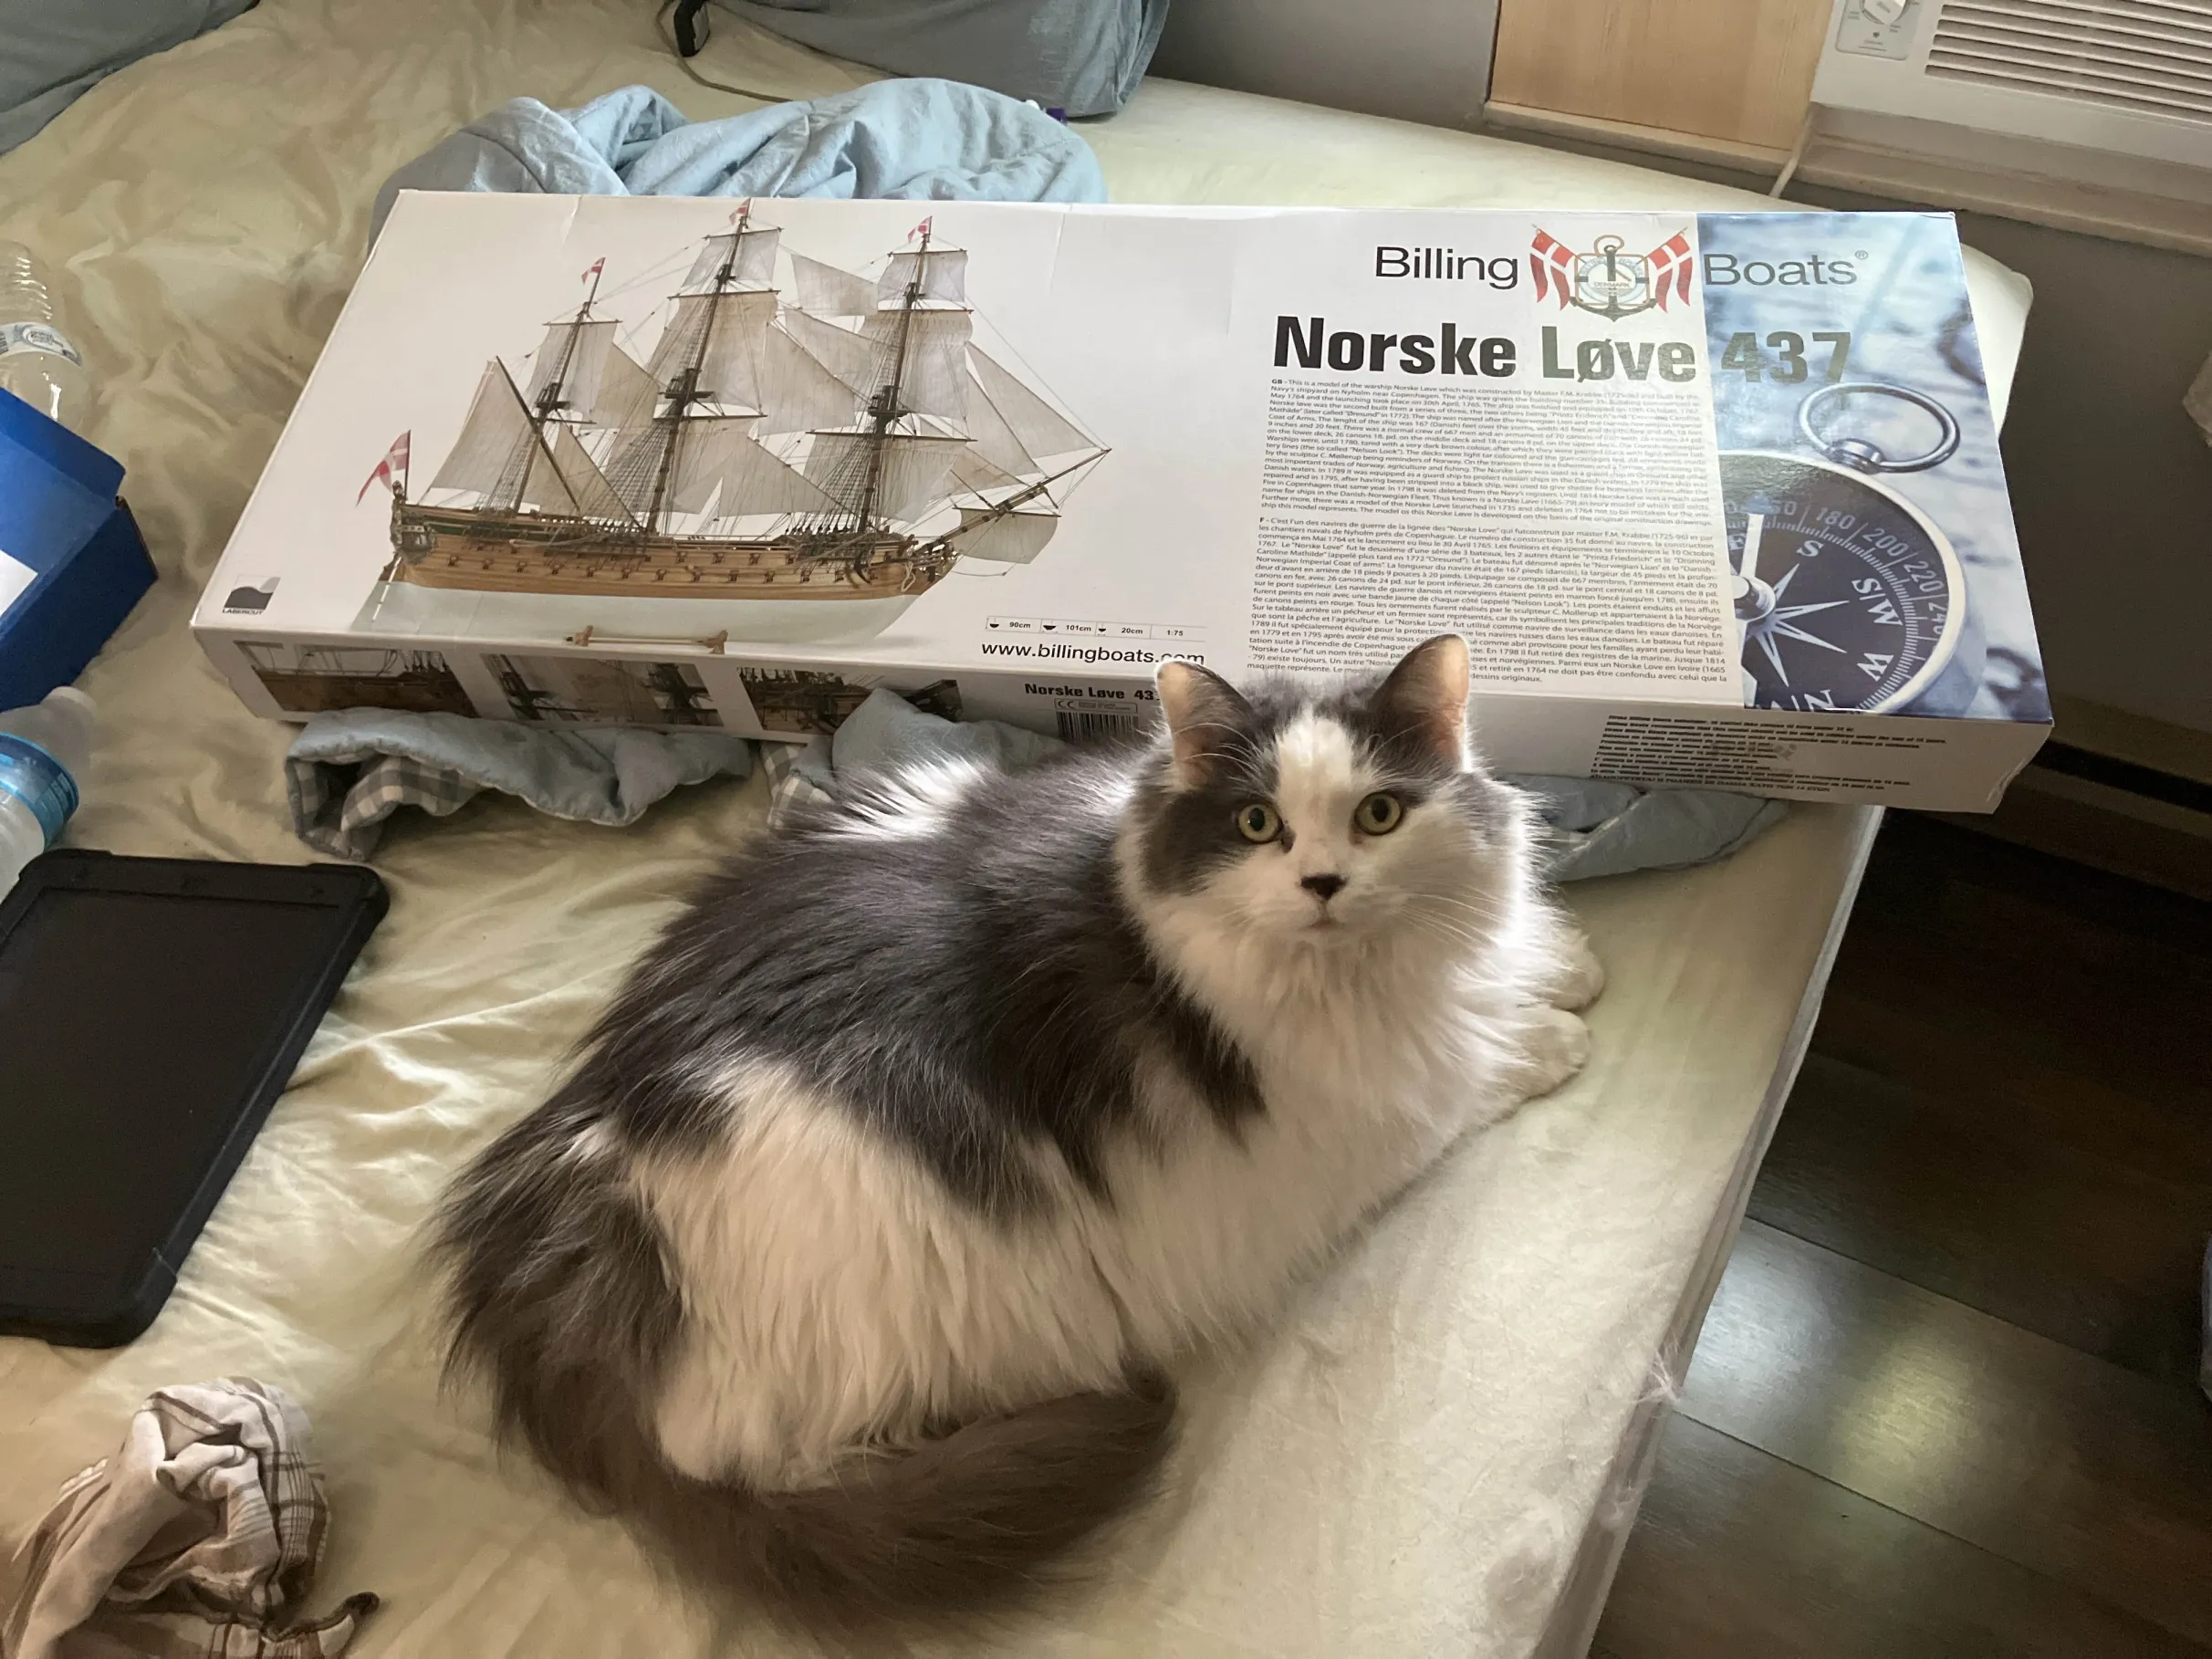
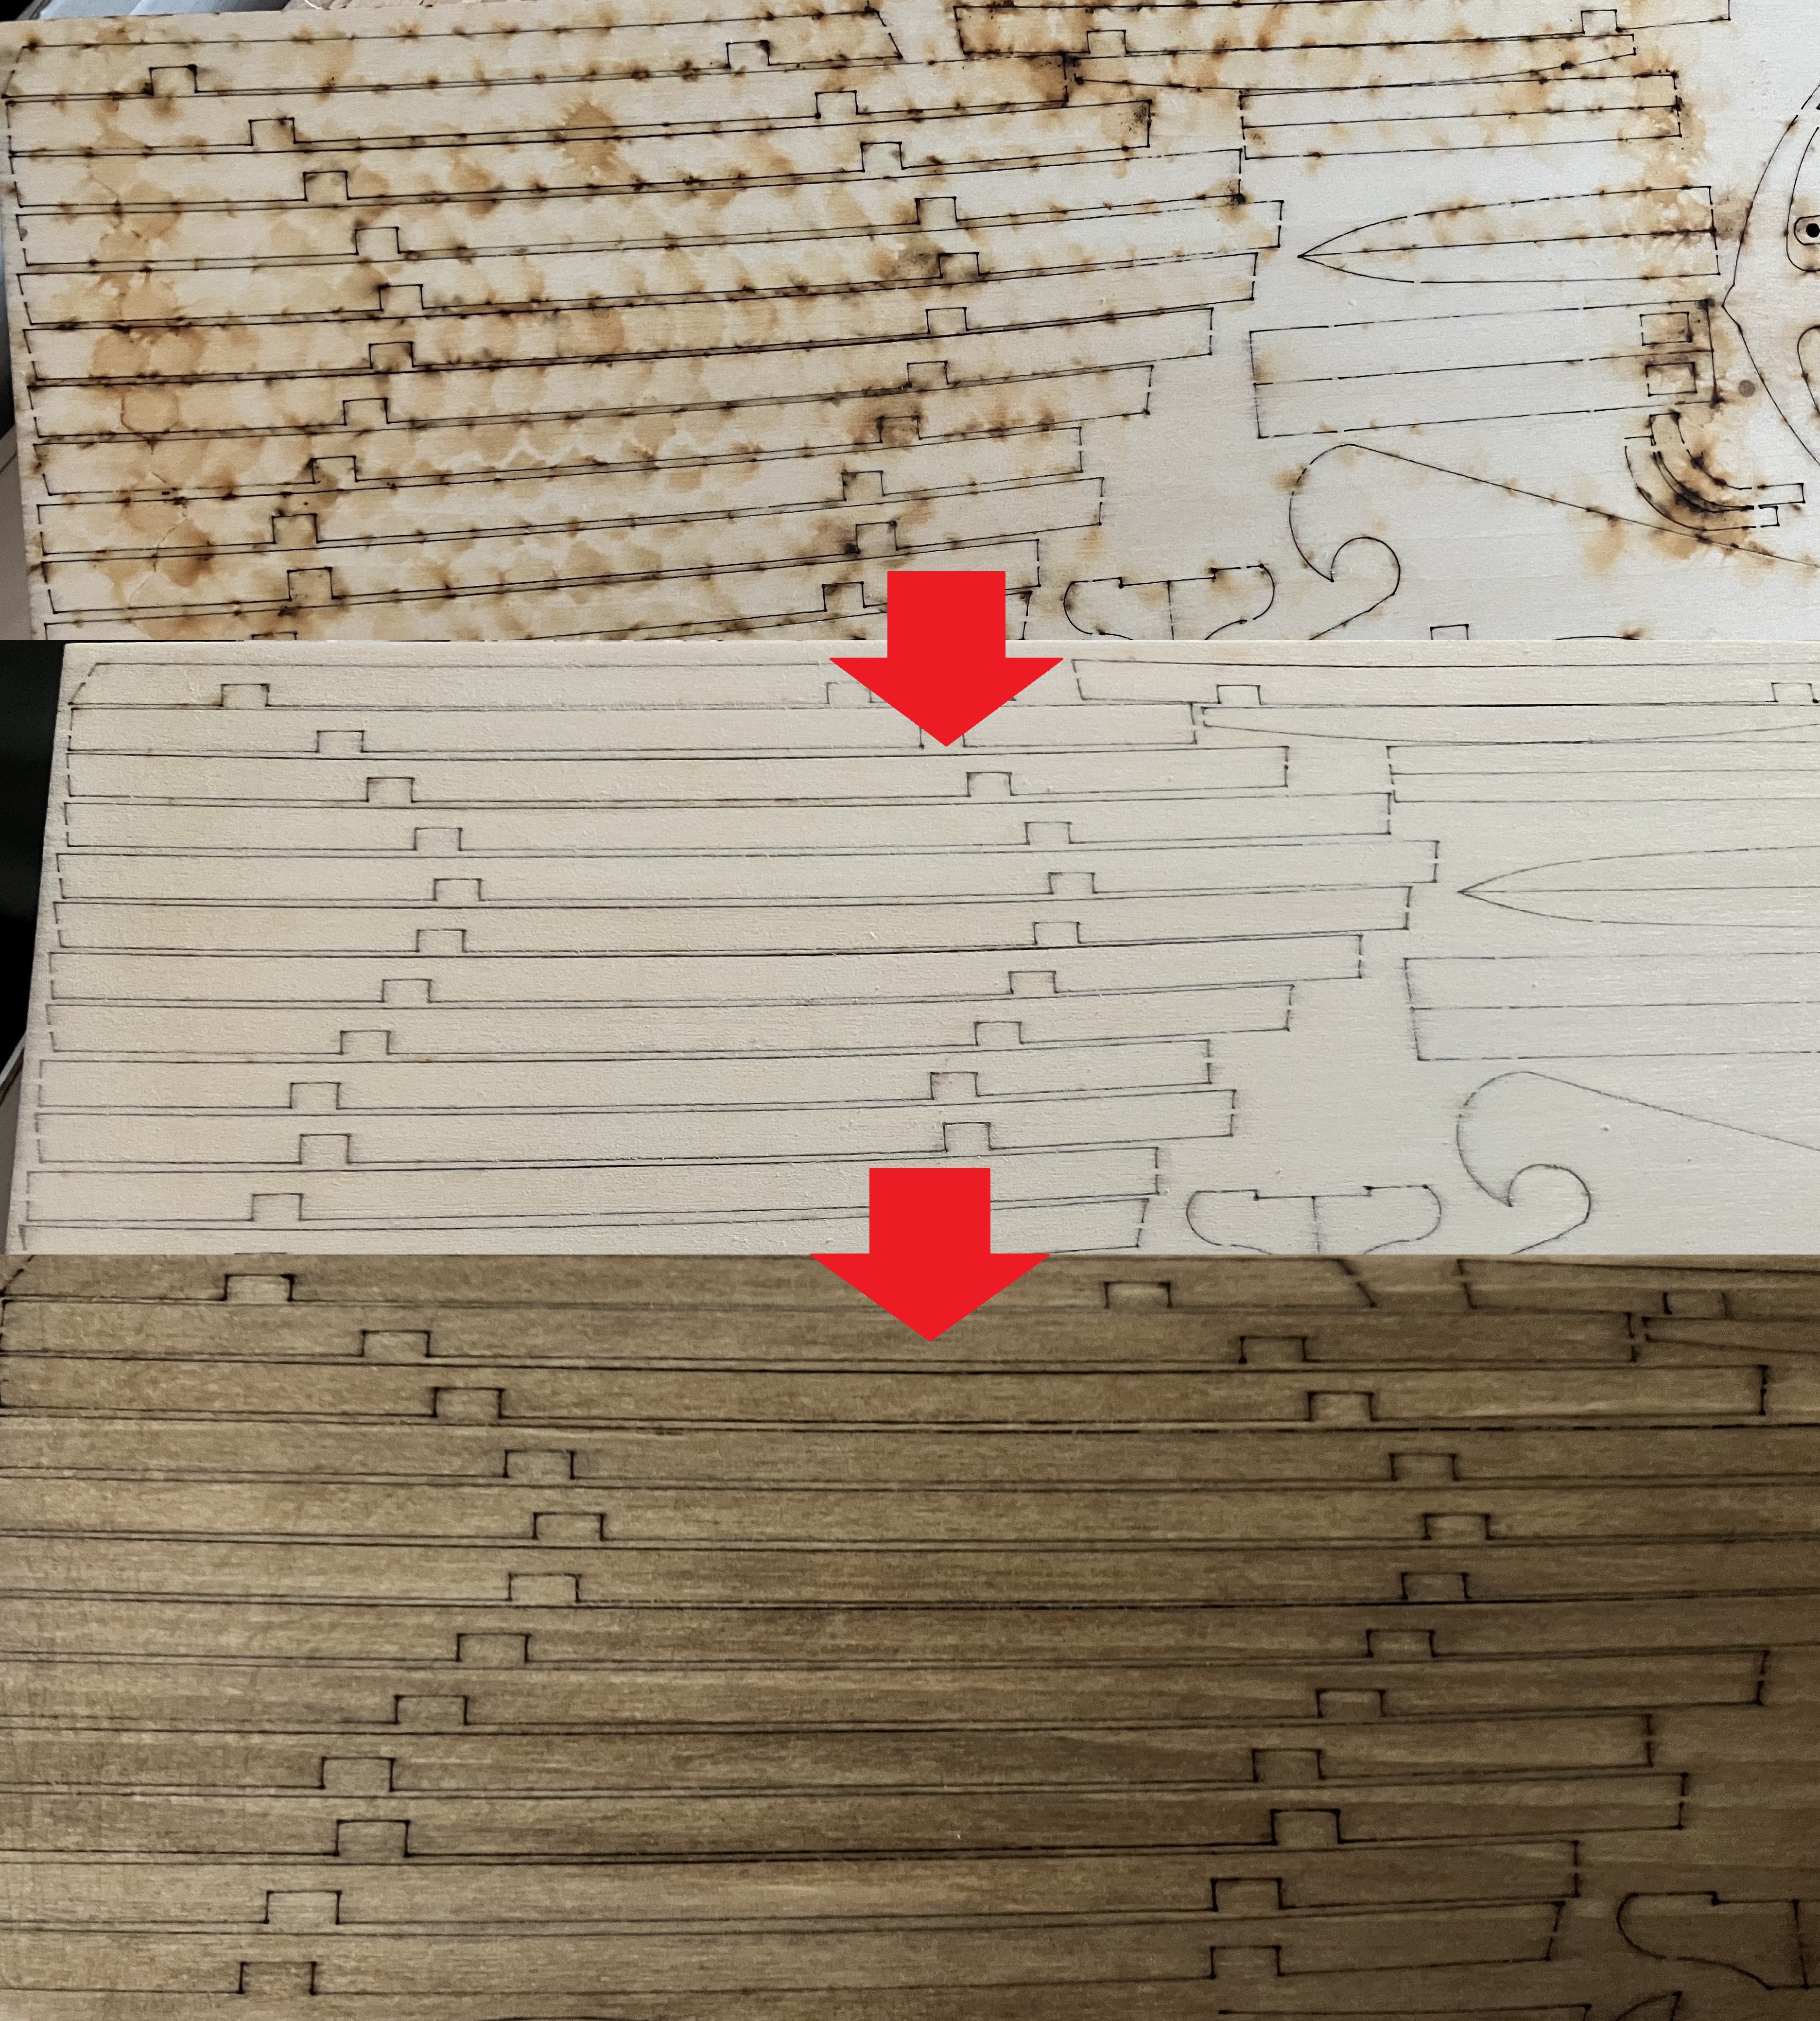
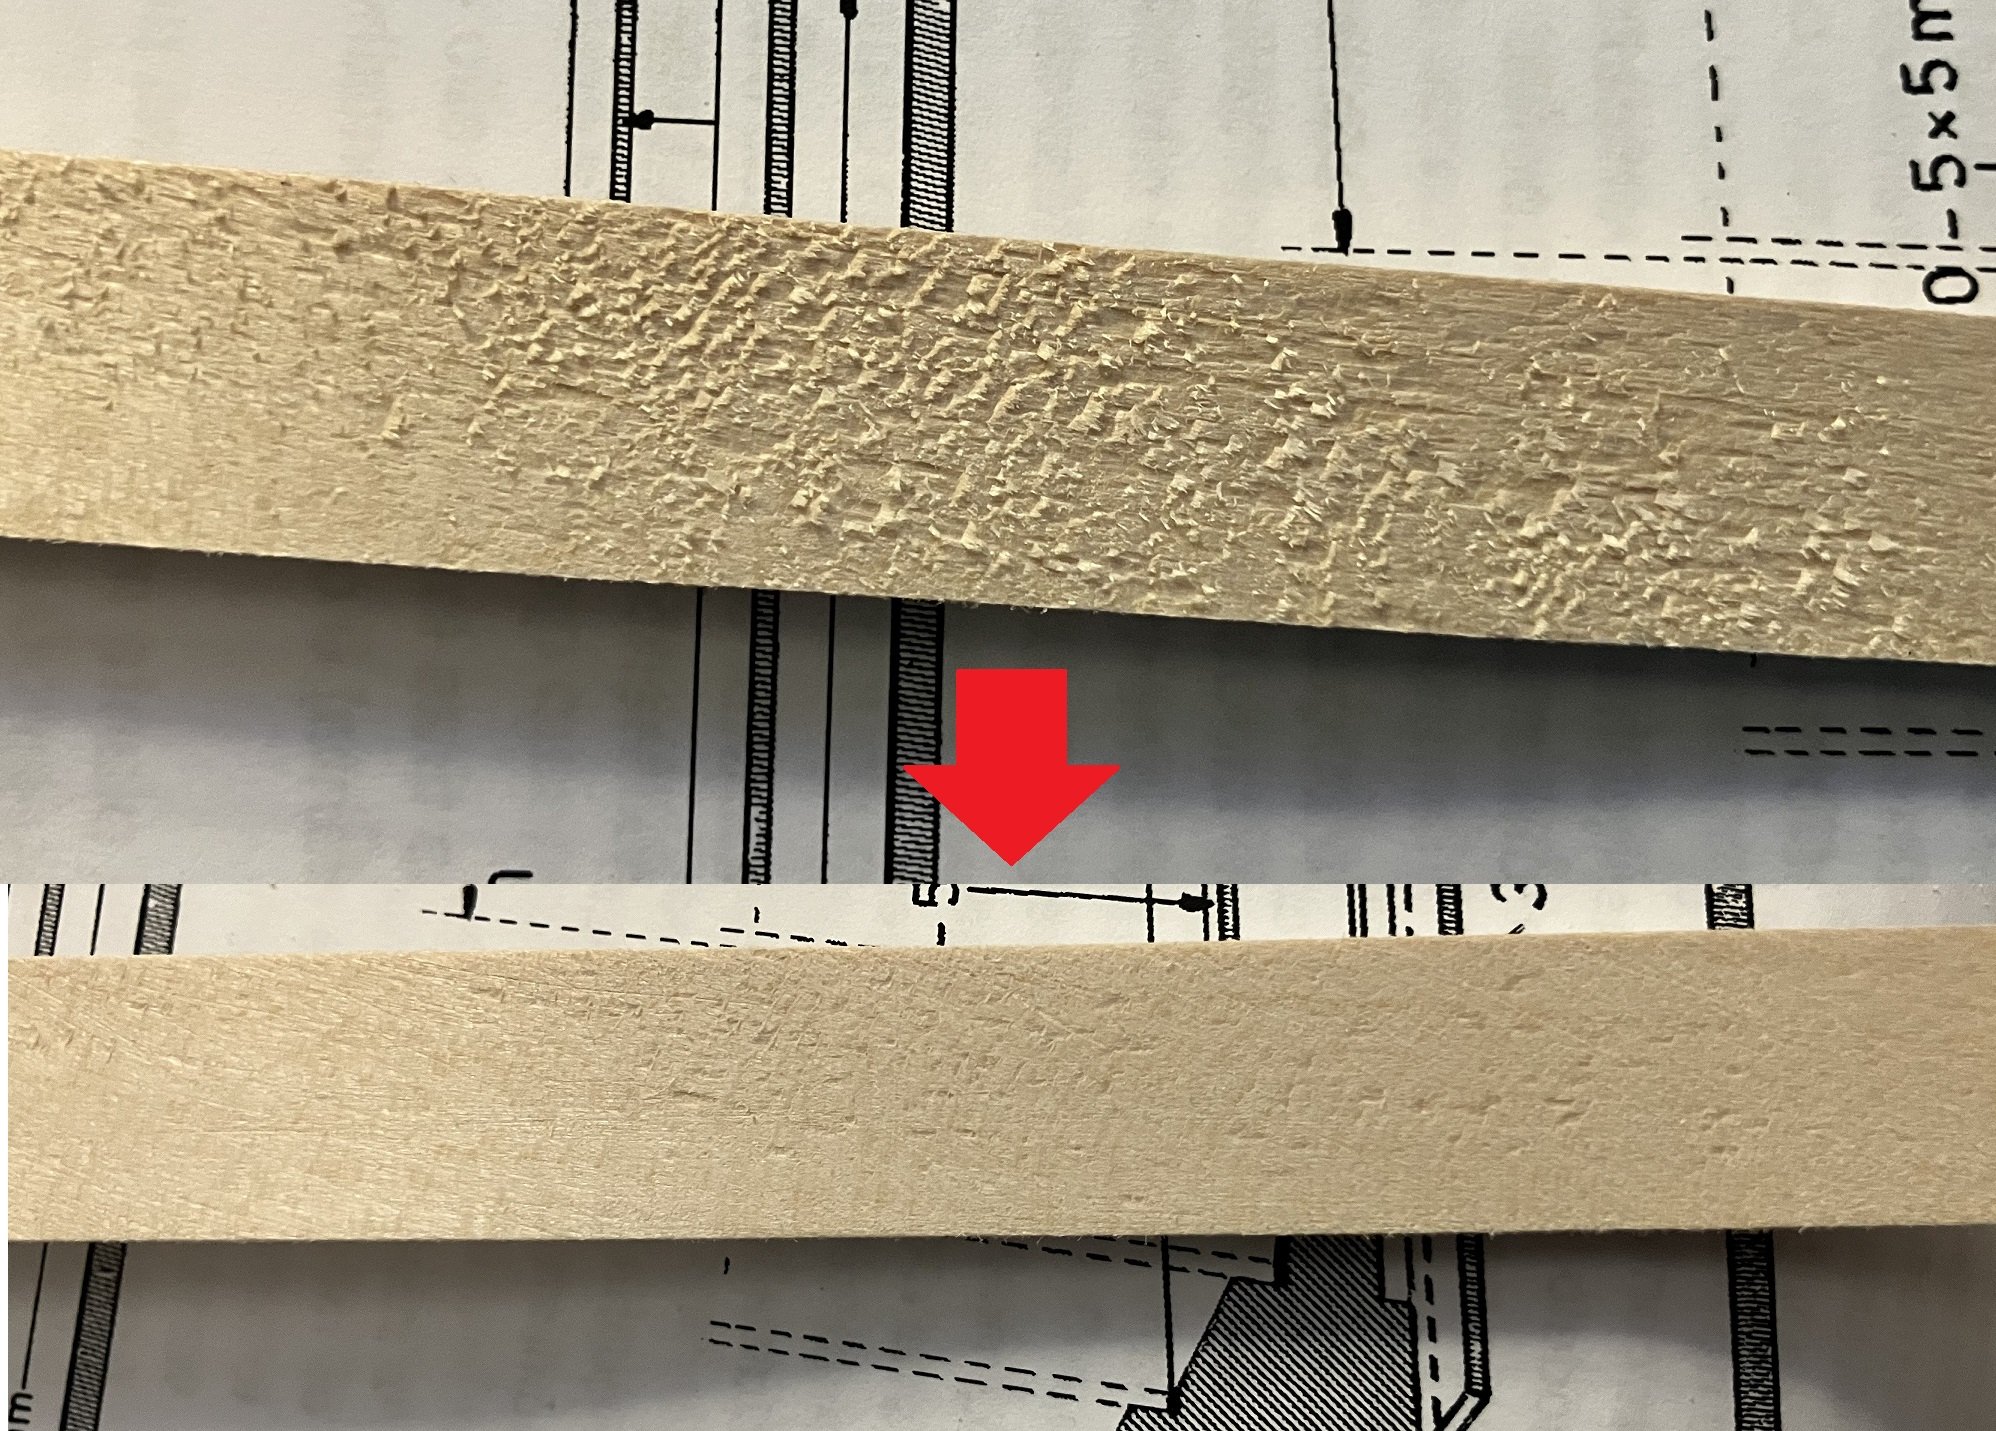
 Having recently finished my second wooden ship kit, I have started the long journey to build this Norske Love kit from Billing Boats that I bought on Model Expo for around 260 USD. I noticed a lot of build logs of this ship have seemingly been abandoned and I aim to not be one of them. Updates might be infrequent but I will try to post weekly on the weekends.  Before I did anything I firstly sanded away the laser scorch marks on the back sides of the wood sheets with 200-600 grit sandpaper, then I stained them with Minwax golden oak. The keel lumber provided was oddly bumpy and required sanding. Now for the problems I have with this kit: most importantly, the instructions are simply incomplete, and I am not talking about the sparse directions, but the fact that three entire laser cut sheets (1067L-A/B/C to be specific) were not labeled in the instructions at all, not even on the digital copies on Billing Boat's official website. I ended up finding a properly labeled copy of the instructions on Model Expo. Coming from a plastic modeler background where every single part was labeled on the sprue itself (meaning you did not have to flip between pages or write on the parts yourself) this was a huge disappointment right off the bat. Secondly, according to the instructions, the decks are to be made from 6 big laser cut parts, with pencil being used to mimic the deck's planking. I hope I am reading it wrong and the pencil was merely intended to be used as guide and that there will be enough wood for me to finish the planking. Lastly, the included blocks are all made from plastic, I read they have replaced these with wooden blocks in a different build log but evidently my kit was not new enough. As with the upsides, the kit does come with 4 sheets of A1 sized plans for the ship and sails which are also included. Enough yapping and I will just end the first post with the current progress after a whole weekend's work. Progress is rather slow because sanding plywood seems to be a lot harder than I had anticipated. Next up is fairing the bulkheads and getting her prepared for planking.


-
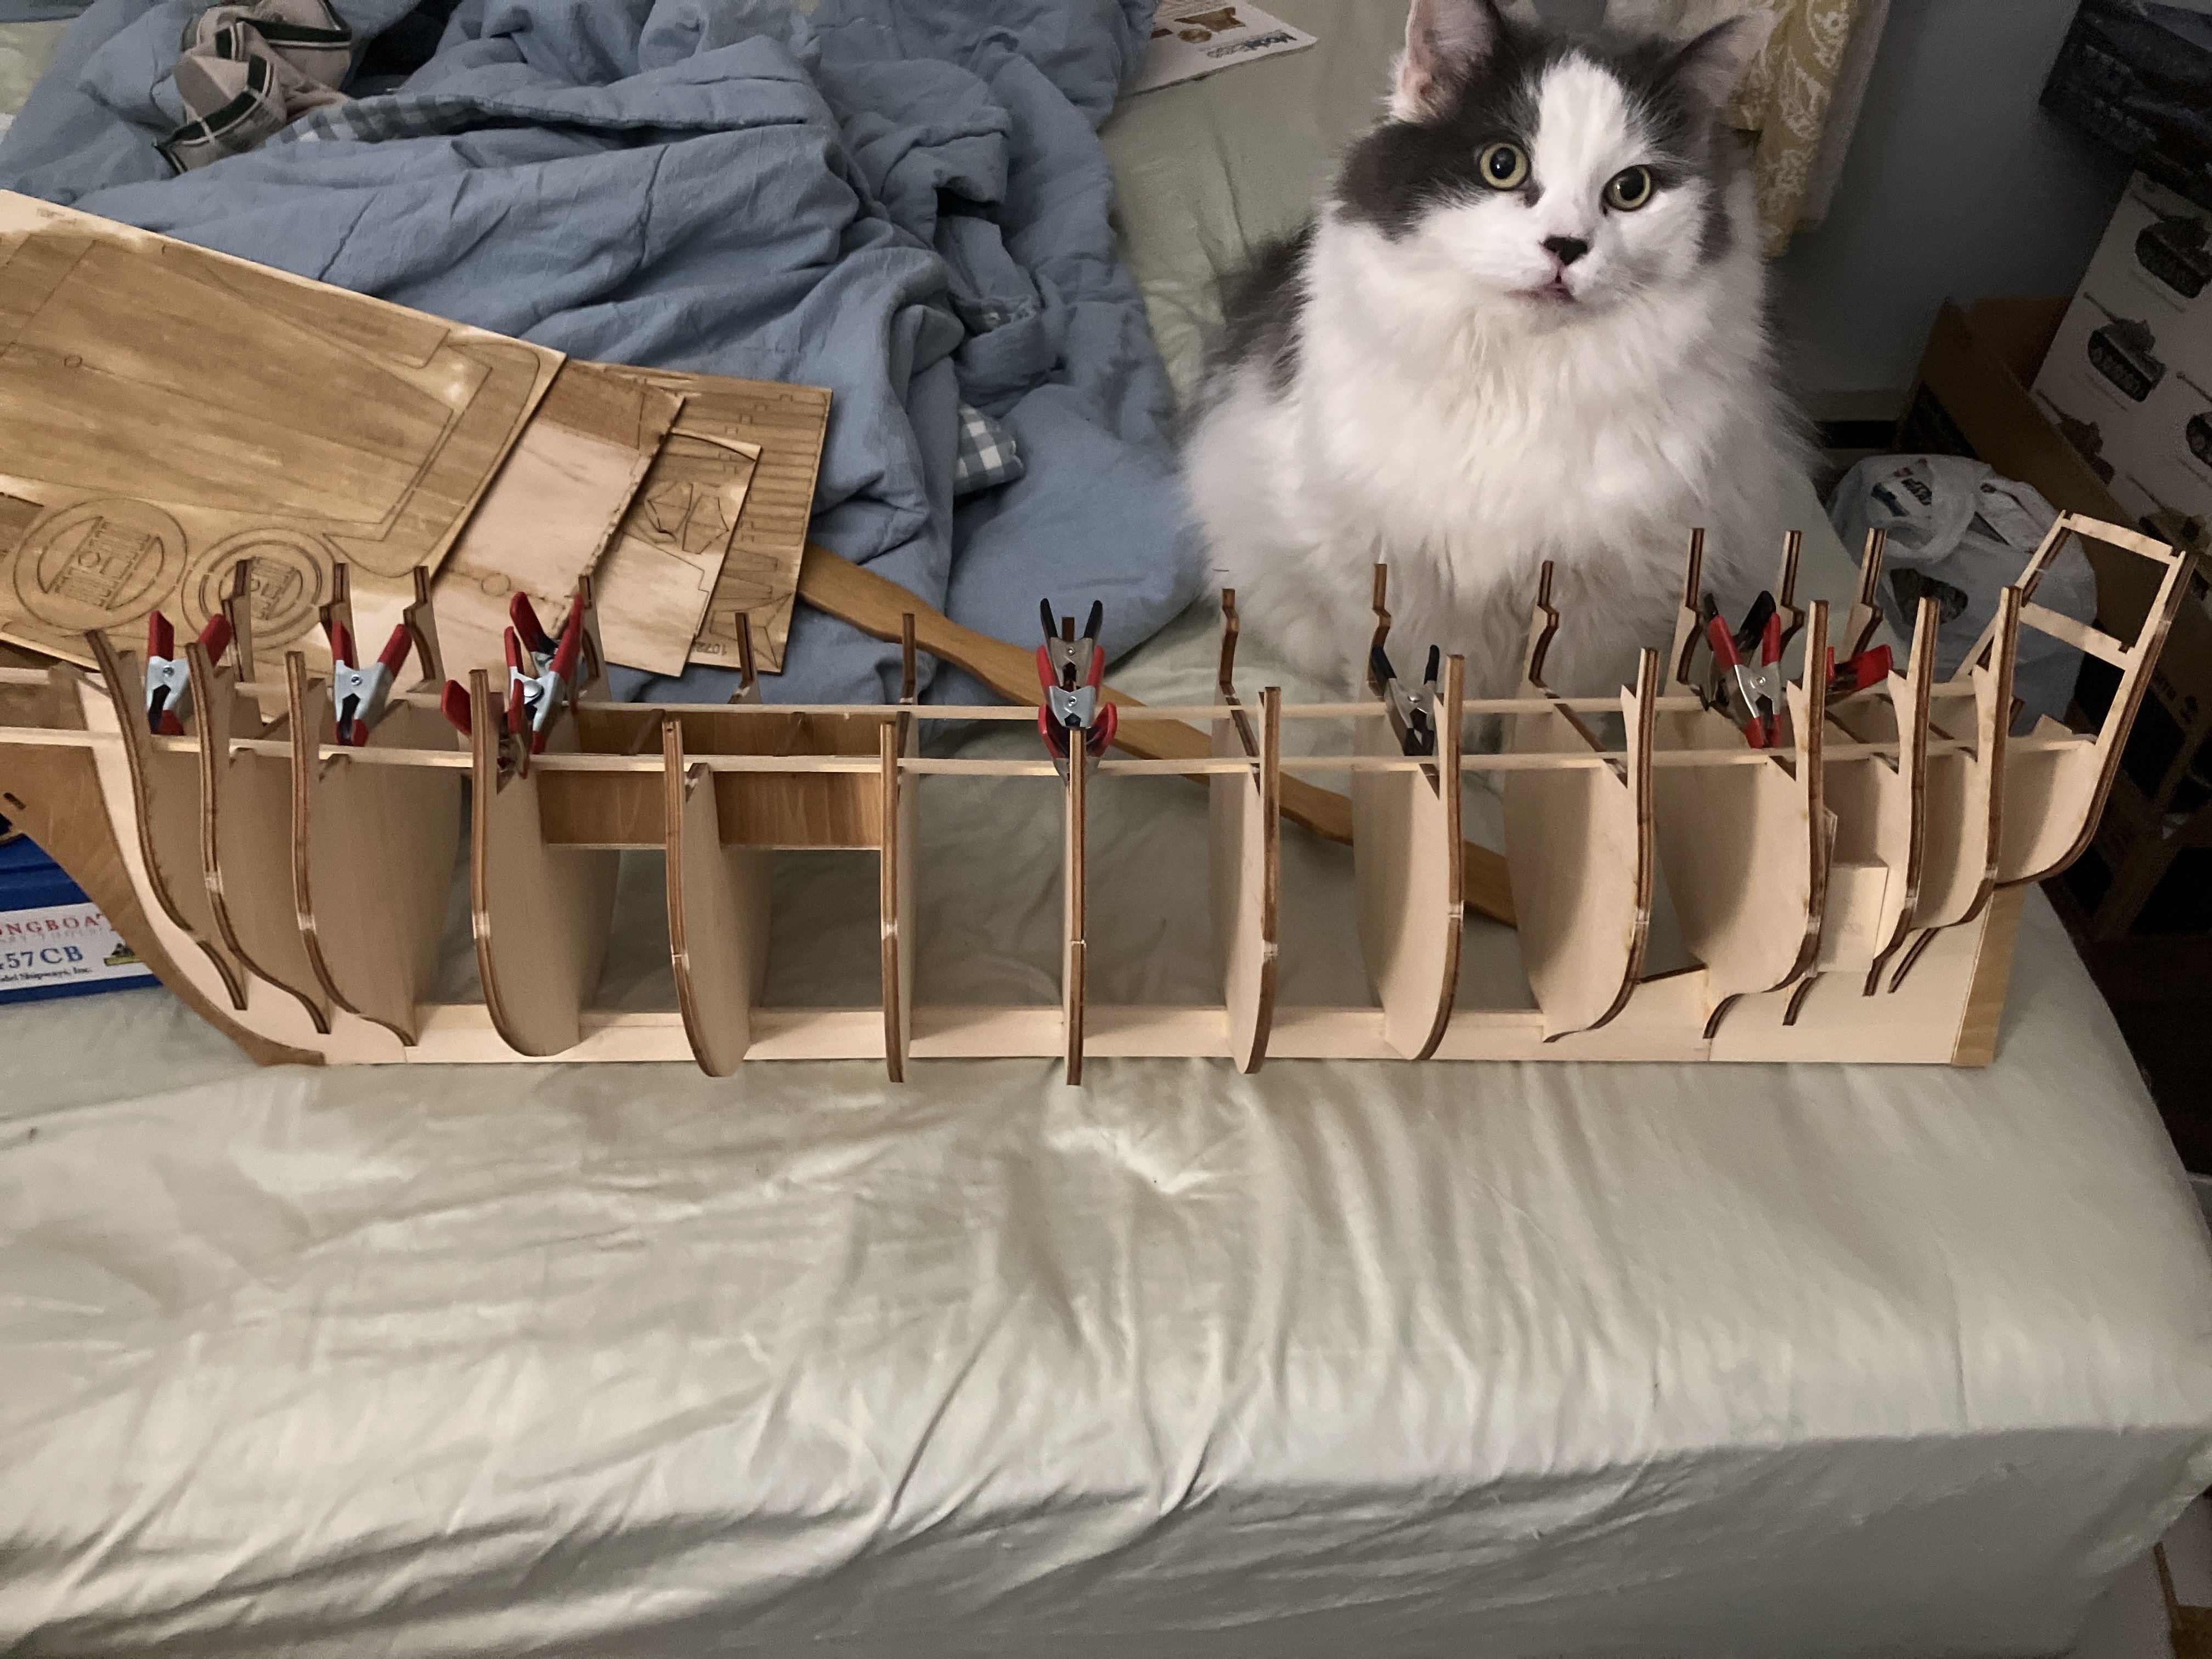
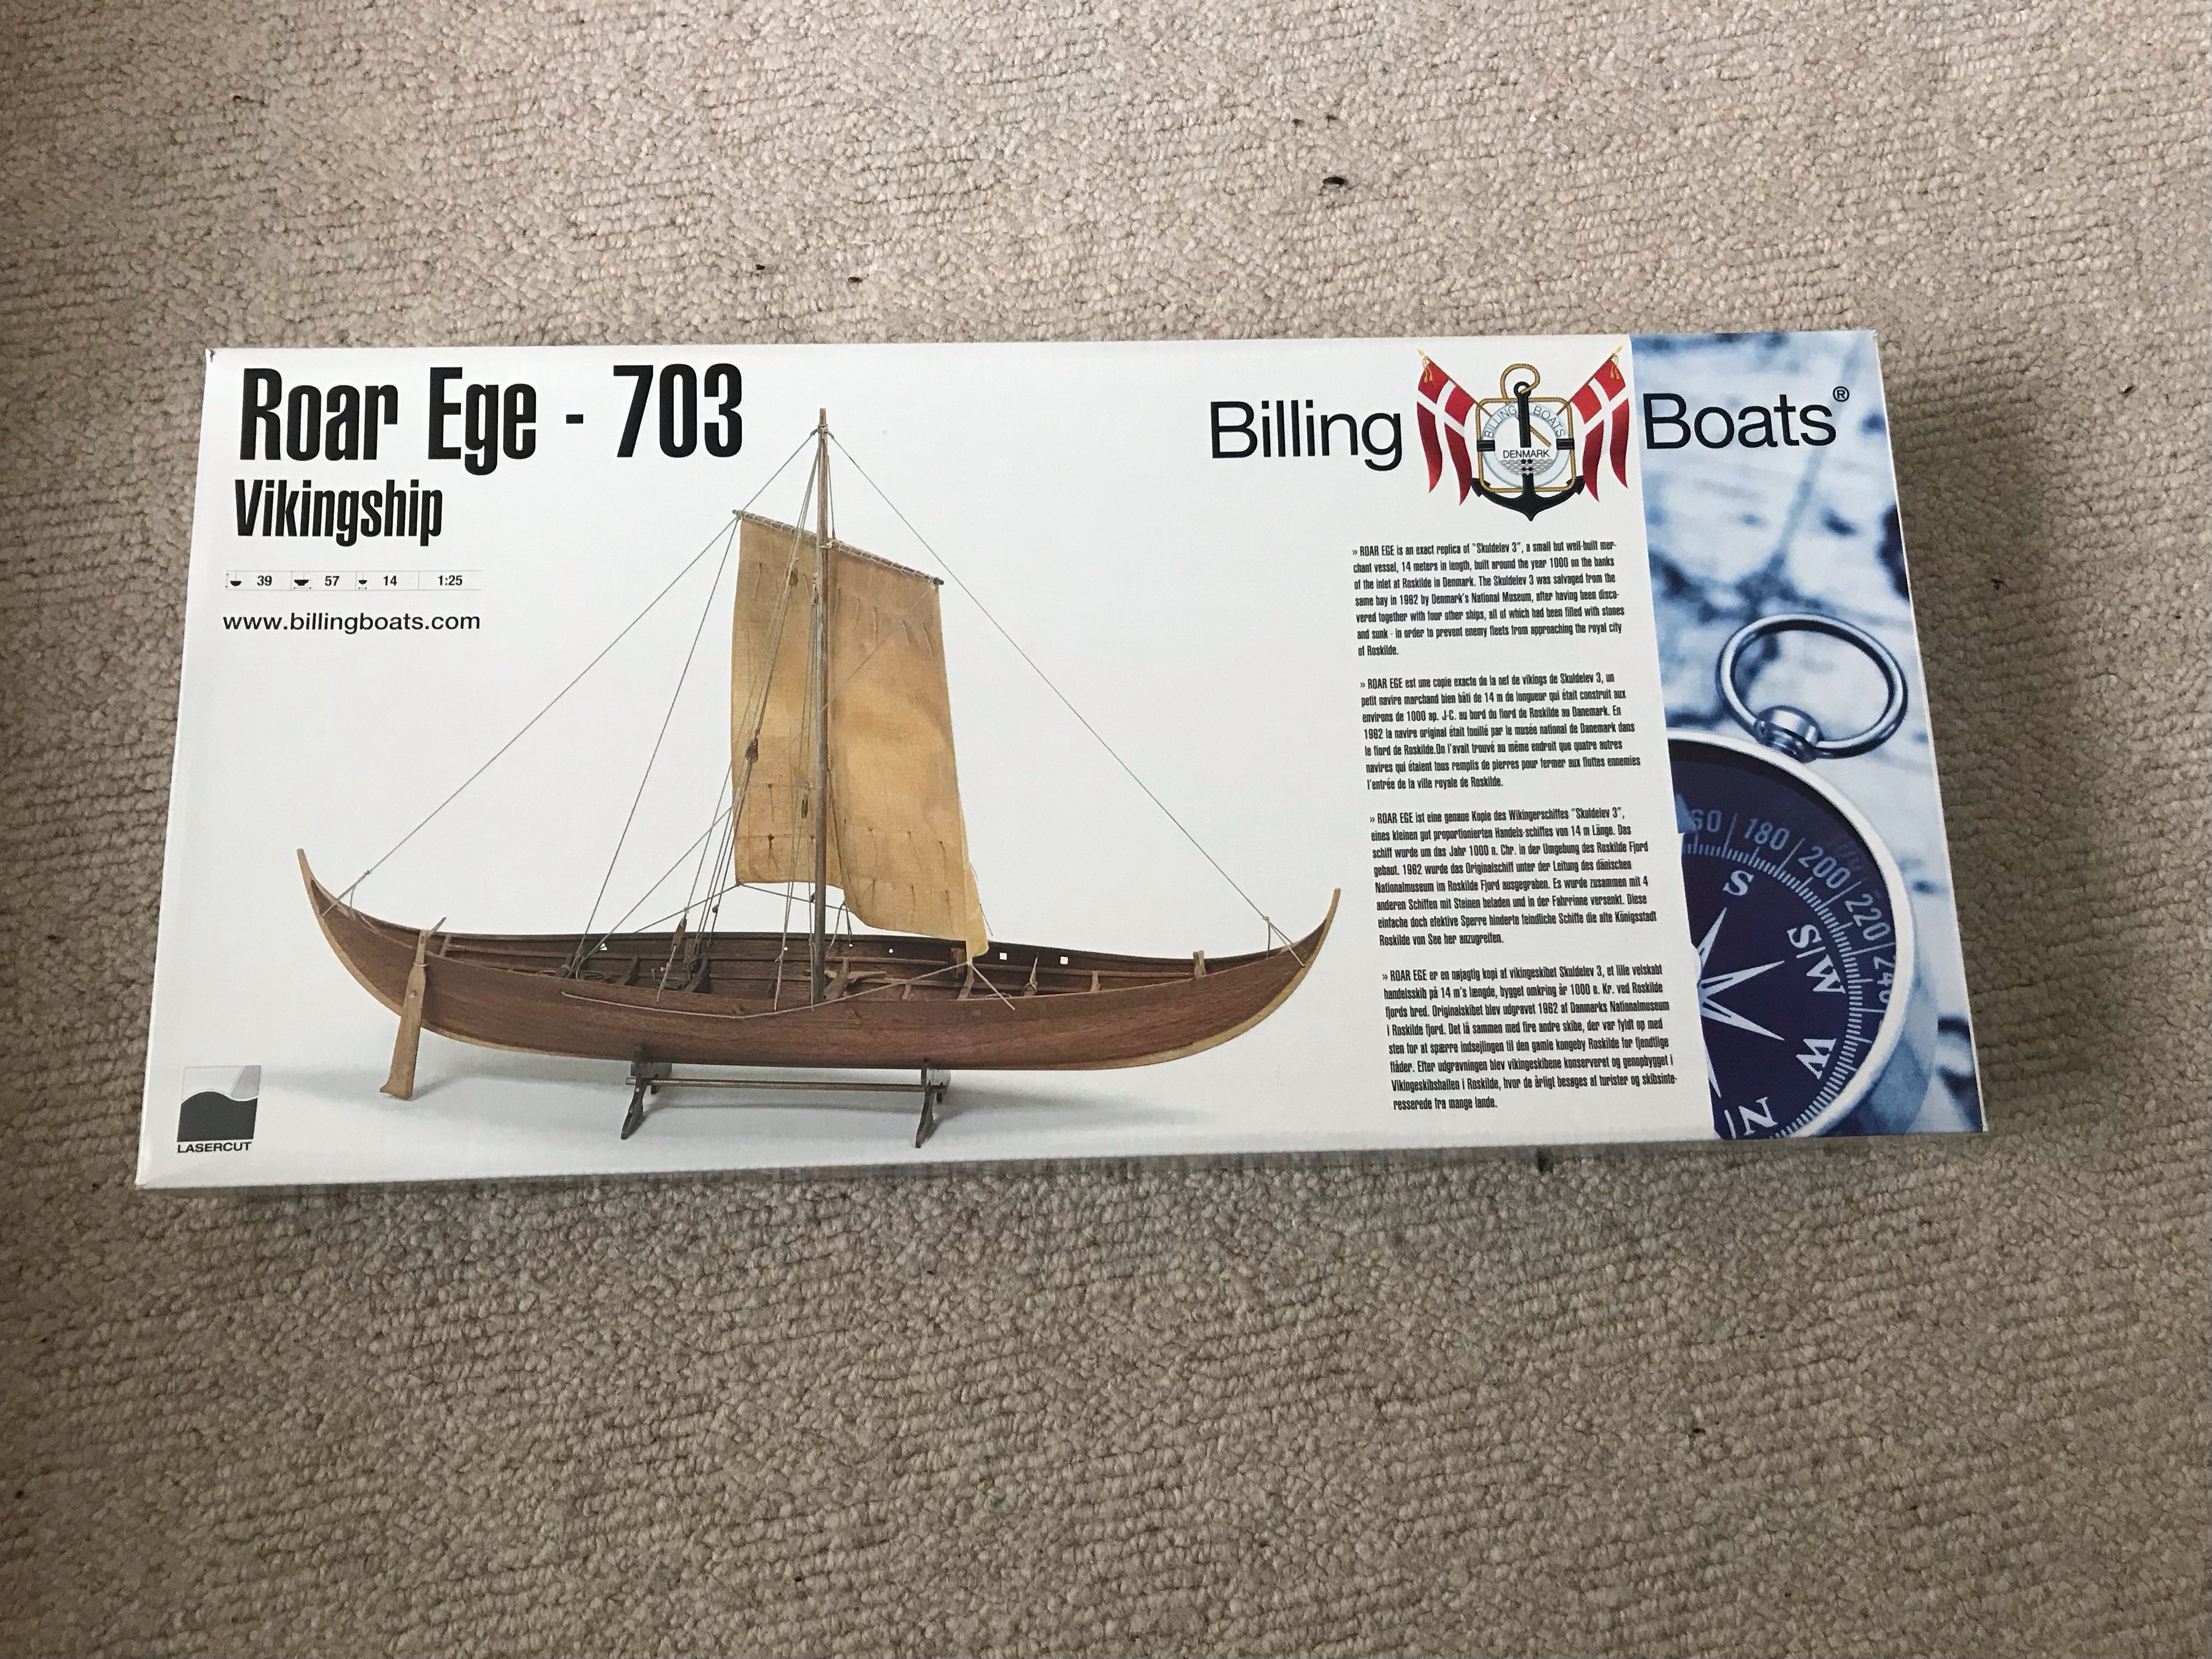
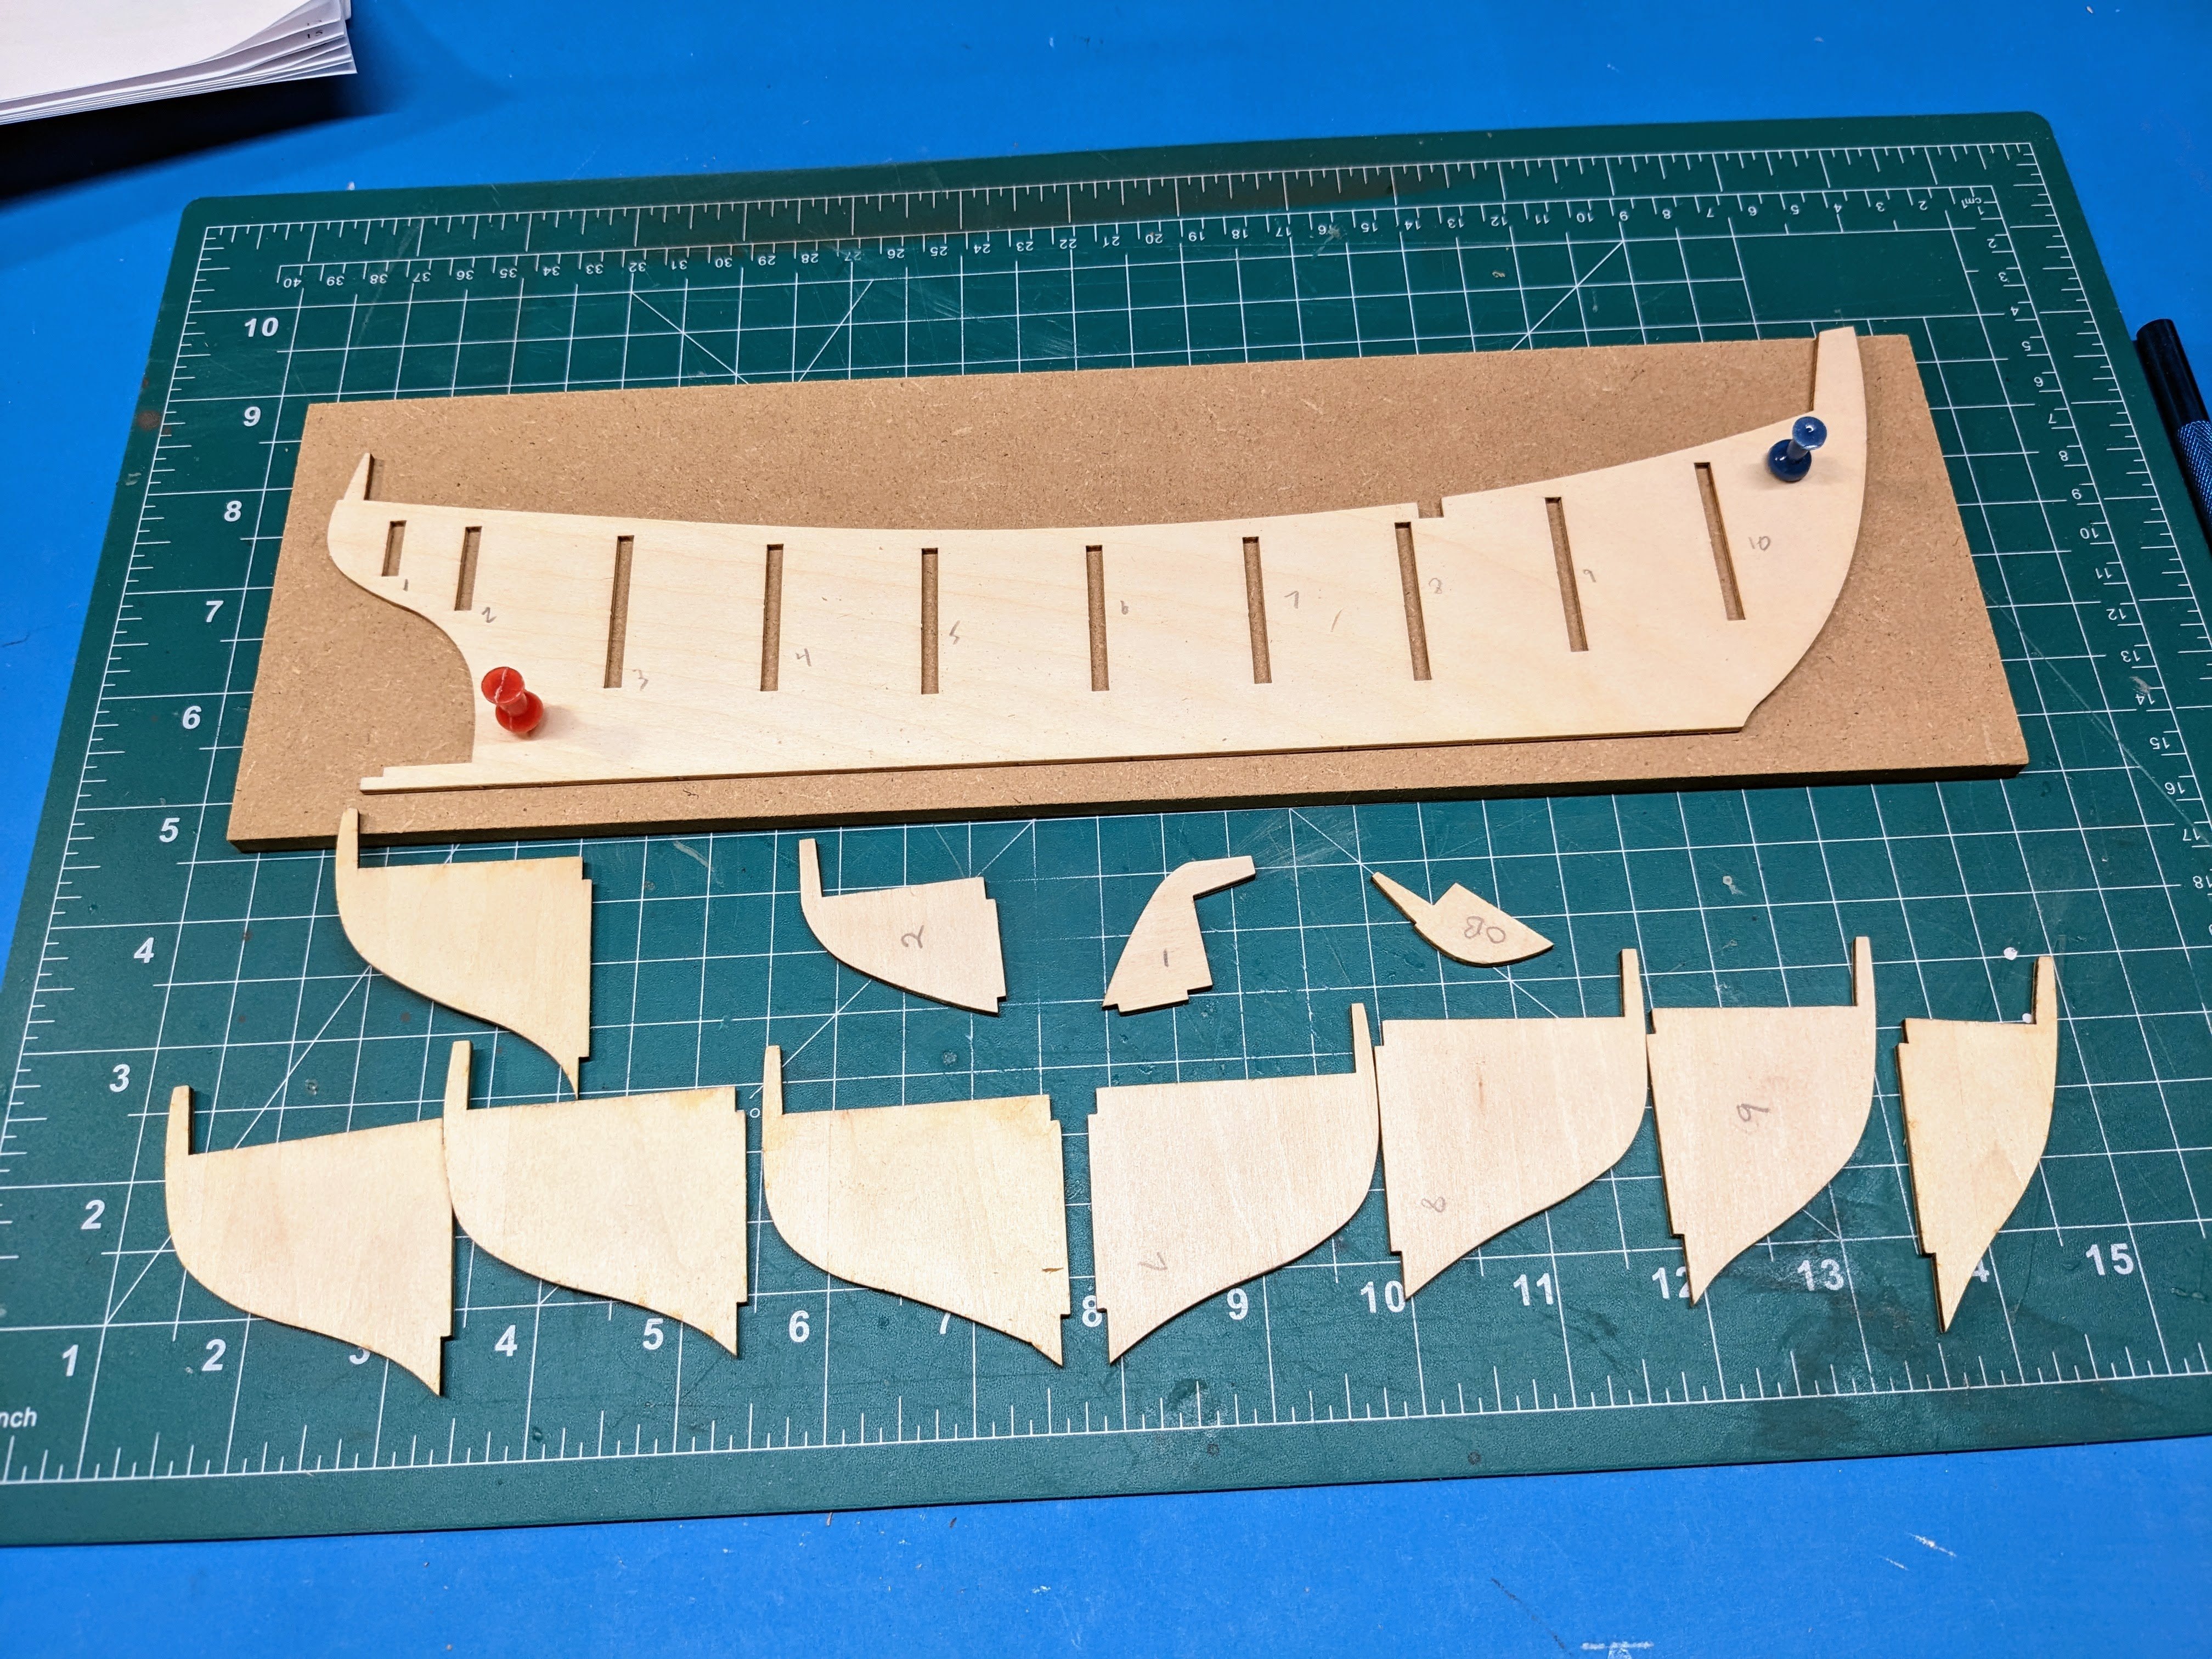
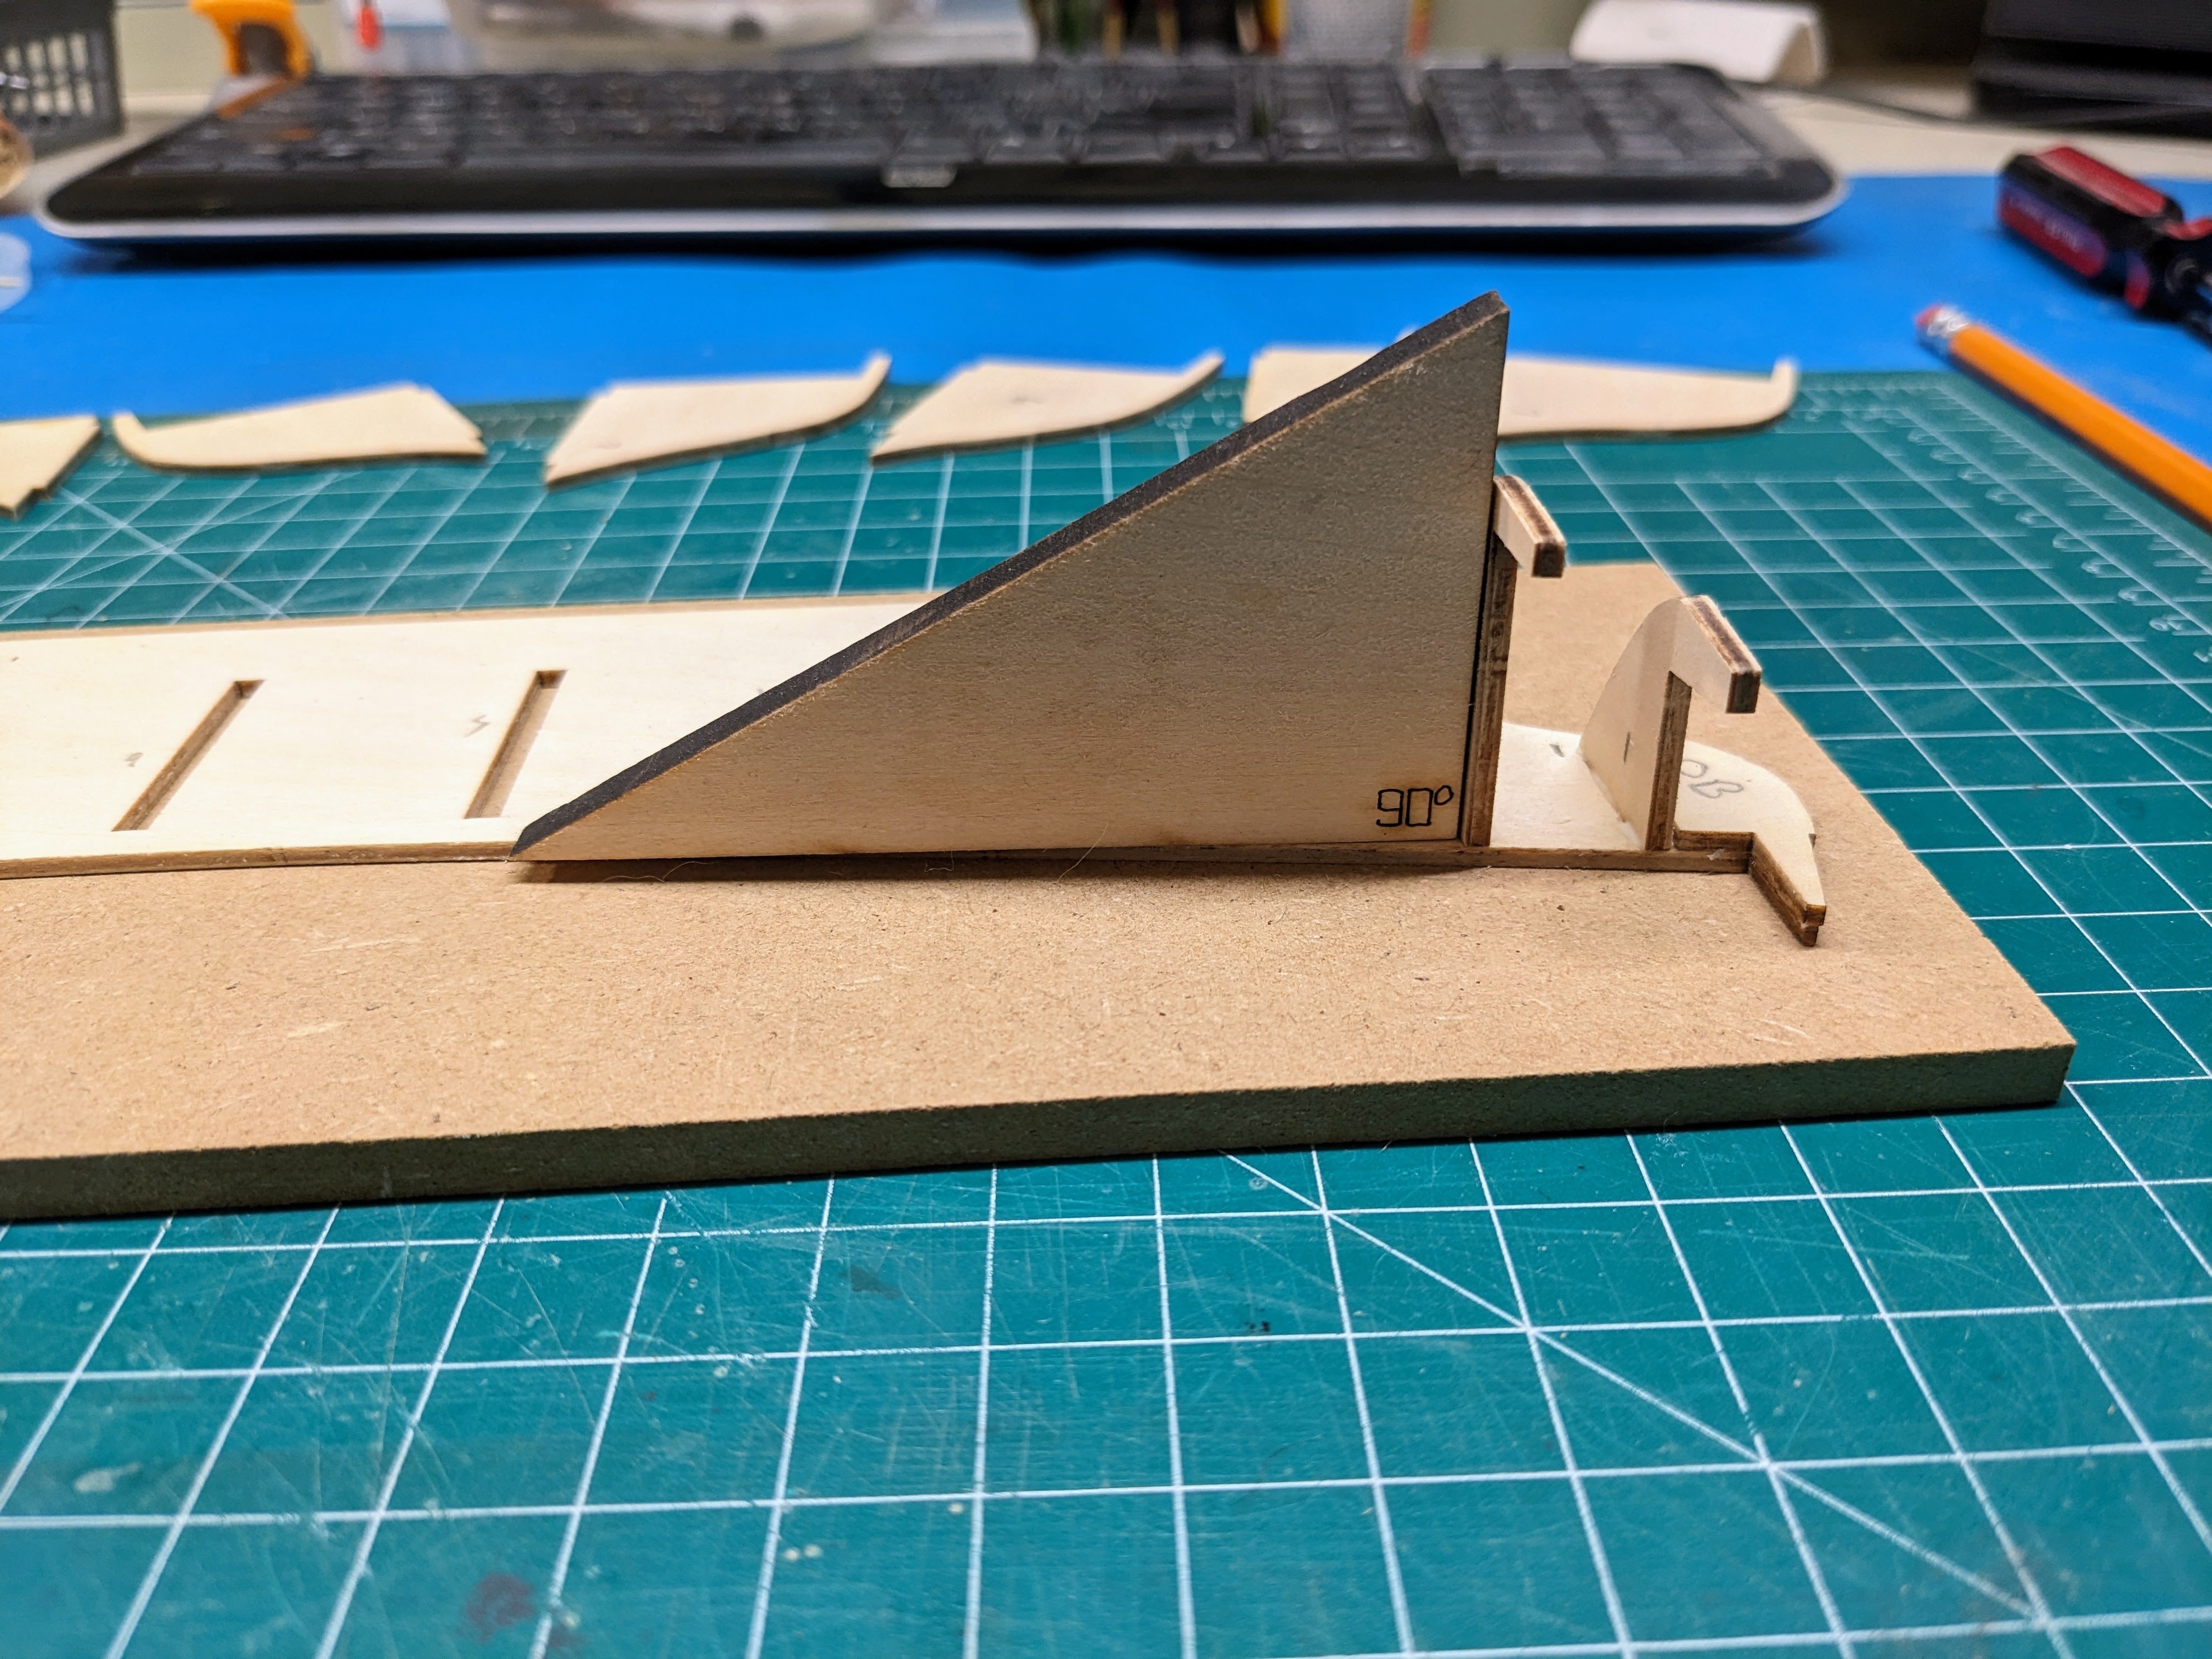
 Welcome to my LOG for the Billing Boats "Roar Ege" in the scale 1:25. The parcel just arrived today. This is my first wooden ship ever and I hope that the journey will be a great one and that I will gain a lot of experience working with wood instead of plastic. I don´t even know what kind of glue I should use, my preference would be the Gorilla Wood Glue (using this one for all other wood works) but not sure if this will be the best option for wooden ship models. The model is a "exact" replica of the "Skuldelev 3". The Skuldelev 3 was a small merchant vessel (LOA 14 m) which has been built around 1,000 AD near the banks of Roskilde in Denmark. The remains have been found in 1982 with four other ships from the same era. The remains have been salvaged and are now displayed in the National Museum of Denmark. On Saturday I will do the unboxing and I will post here the pictures of the unboxing.
- 145 replies
-
- 6
-
-
- Roar Ege
- Billing Boats
- (and 2 more)
-
 This one caught my eye many months ago and has been on my list ever since. This will be my first time doing normal planking, the Shipways Dory and Pram were large planks and the Lobster Smack I am doing on a group build is the Midwest version so big slabs instead of planks. Following a few build logs here on Model Ship World as going from wordy instructions from Shipways to a few pages of pictures and 1:1 scale plans is an adjustment - although one I kinda like. Hummed and Haw'd about doing it in halves or putting it together into one frame for planking but decided to try how Billings wants it done - unless someone on here can convince me of the error of my ways? As always, constructive criticism is welcome so I can continue to learn in this great hobby. I still need to get some lego blocks or 123 blocks for leveling things. On my "to make or purchase" list.


-
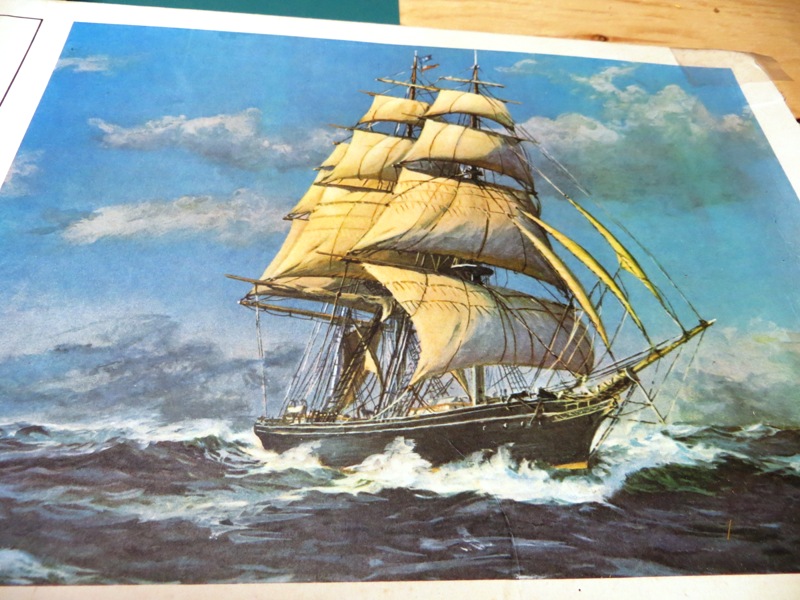
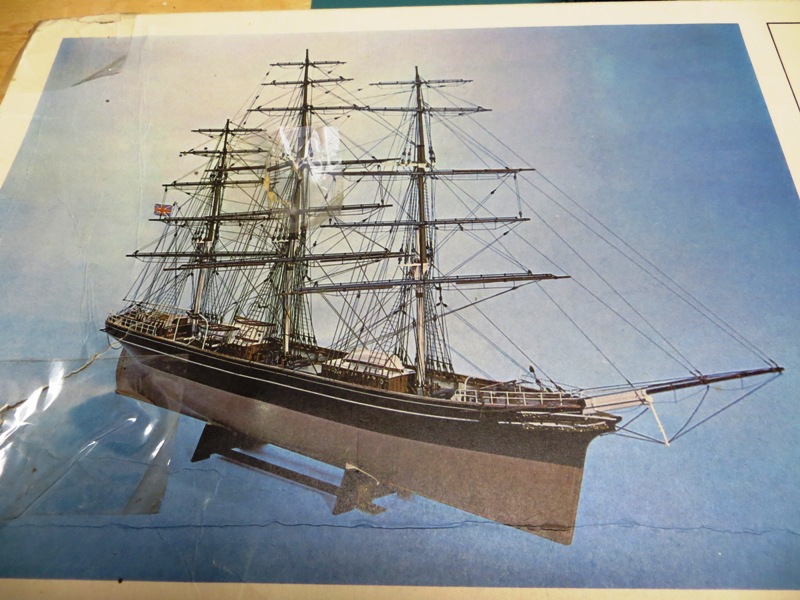
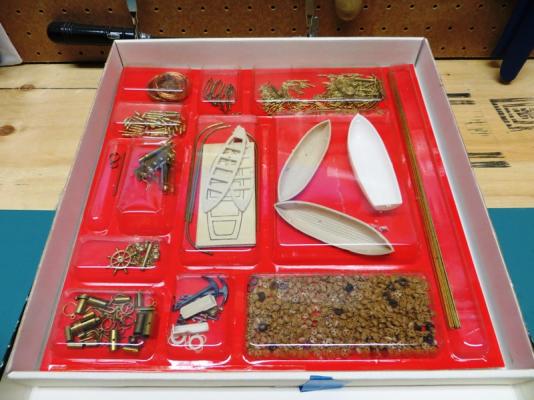
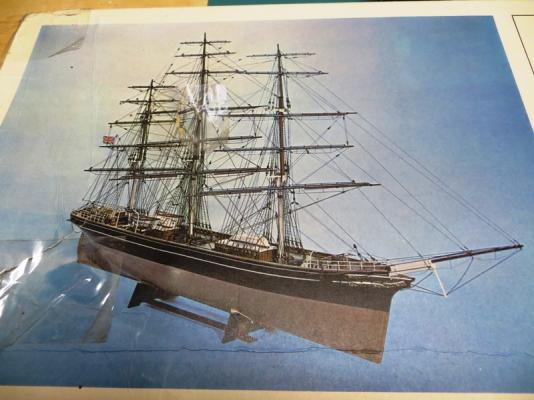
 Well with winter round the corner, it's time to hunker down and get back into the shipyard with Cutty Sark. This is a model I have always wanted to build since starting out in this hobby with Billing's Mary Ann. Thanks to Kip (aka Sawdust), I was able to acquire this second hand model which he purchased from a neighbor for 2 bottles of wine. He also sold me Nepean's book and Campbell's drawings so I have lots of info over and above what Billing supplies which isn't much. Thanks to Lou's lead, I have also purchased J.J. van Griethuysen,s drawings which are spectacular. As you can see from the photos, this is an early Billing kit , from the 70's I would guess. Einar Billing includes a little intro with the Reader's Digest version of instructions they are known for. In them he states that the kit is intended to be built and not merely assembled. He expects the builder to exercise skill and imagination in the building of the kit. Sage advise indeed. As with all earlier Billing kits, the hull and fittings are sold separately. Billing believed some modellers might want to create their own fittings. They also recognized that many models are never completed so why buy a bunch of fittings that might never make it onto the model which will never be used. The majority of the wood in this kit is mahogany, which you can imagine is now rather dried out and a little warped. I have decided to replace the hull planking with obechi which I have used on previous Billing kits. It's not expensive, bends easily with a little steam and will be painted, so no need for top quality timber. As the build progresses, I will decide what other wood needs replacing. As can be seen from the photos, the kit is already started. The original owner of the kit did get it stared but then realized he no longer wanted to continue. So I have the kit framed and with the false deck installed. The rest will be all me. He has done a first rate job, and the keel is straight so it is a good point to resume where he left off. Job one will be to bevel the bulkheads. So here's a couple of pictures of what is to come...
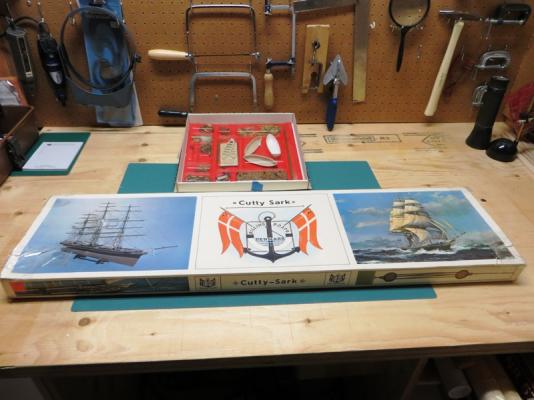


- 195 replies
-
- 3
-
-
- billing boats
- cutty sark
- (and 1 more)
-
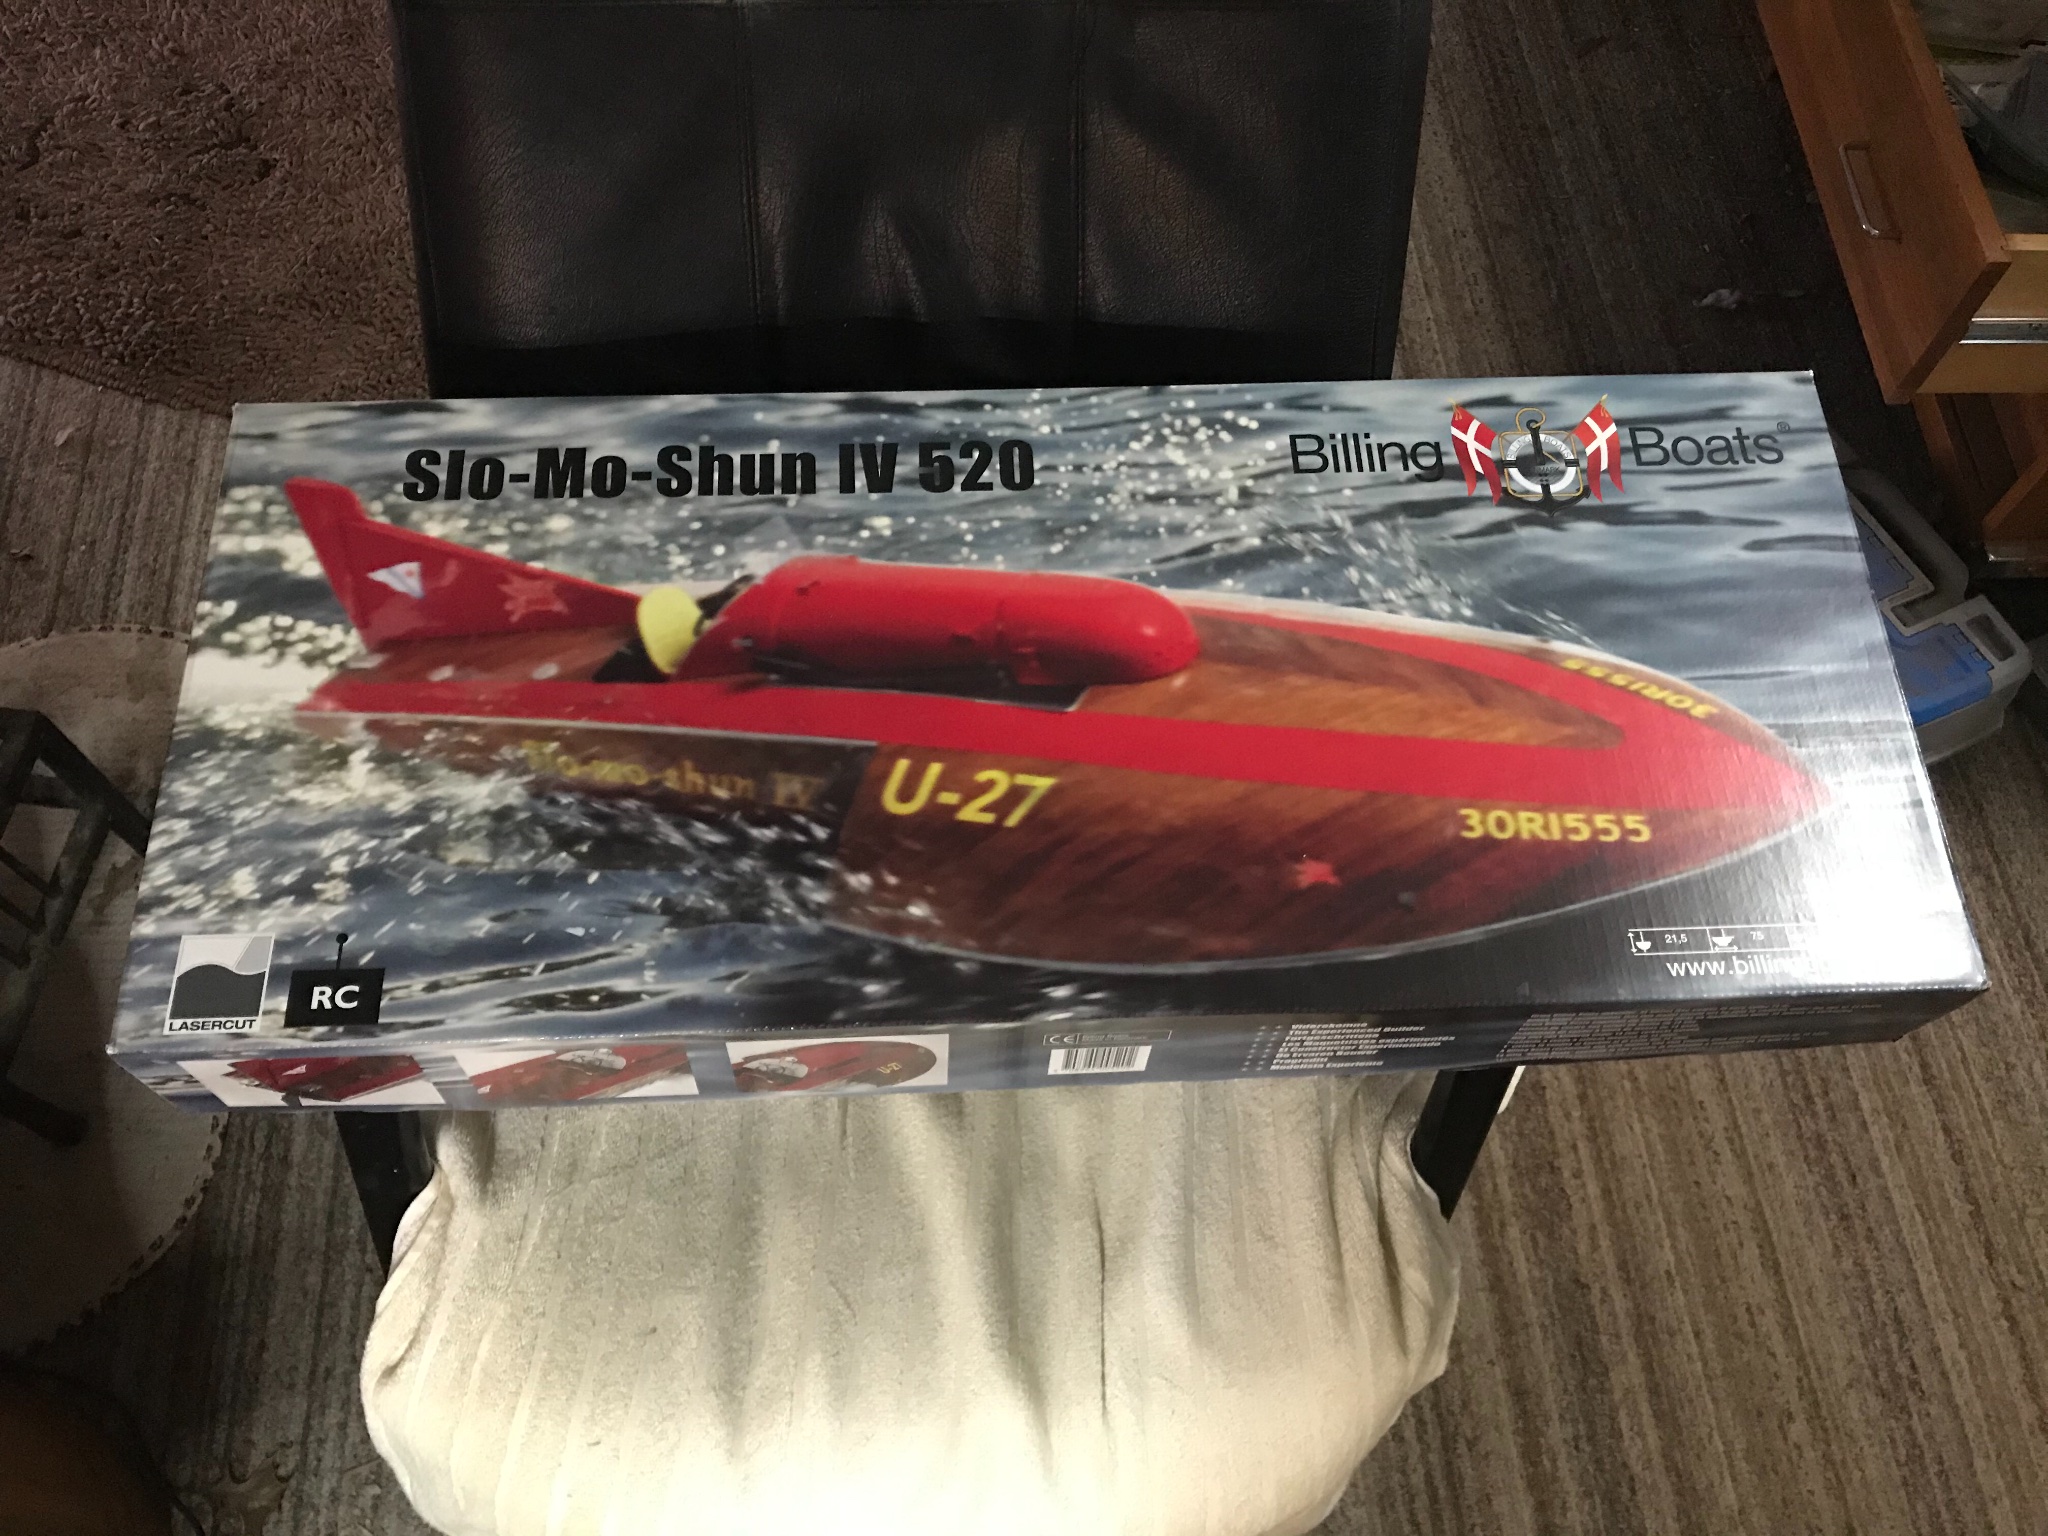
 Hello all, this is my first build log. This boat has been on my models bucket list for some time, and last December model expo had it marked down and it fit right into my budget. After 2 months and a lot of searching I was able to get the engine. I was lucky enough to get an Allison 1710 from TDR innovations, I intend to paint it to resemble the Merlin that SLO-mo-shun ran. My initial take on the kits instructions is some what of a let down, I read through them 3 times, or should I say I looked at the pictures, not understanding any of it, only to decide that I would probably make headway once the parts were in my hands. The actual wood provided is of good quality, I did also forage around for alternative ideas for the hood, I think I’m good there now, we’ll learn as we go.
- 52 replies
-
- 3
-
-
- hydroplane
- Slo-mo-shun IV
- (and 1 more)
-
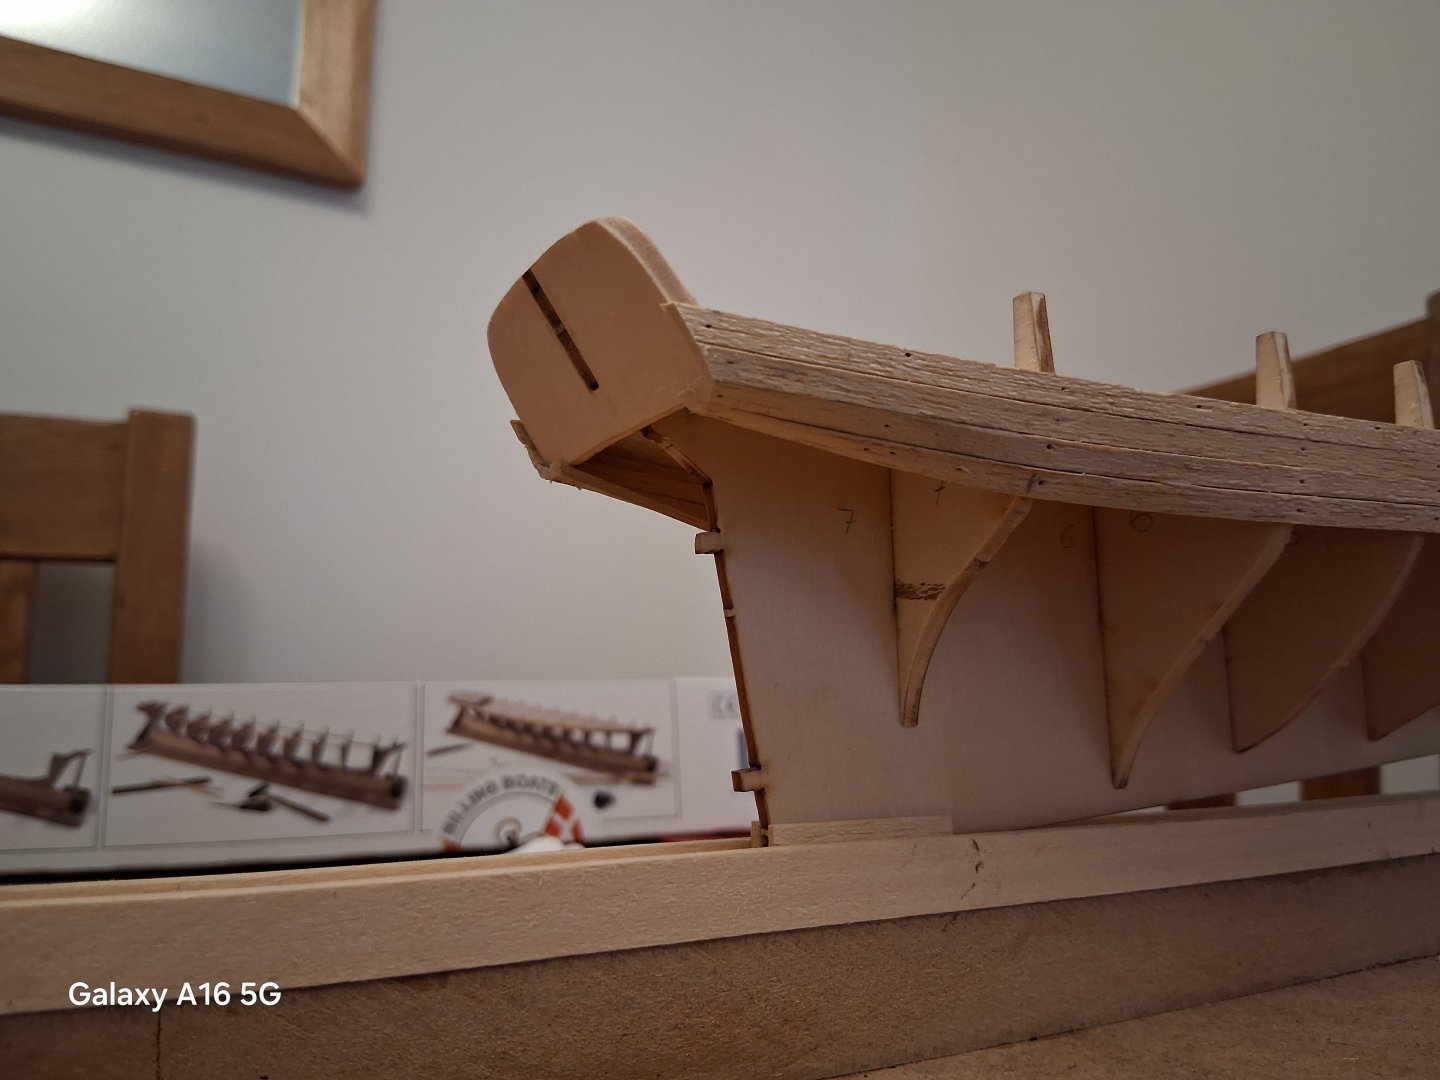
 My Uncle had this one bouncing around his house (un-built) since probably the early 70's if not before. He asked if I could build it which I happily said yes. Win - Win. I build a ship, there is a place for it to go. So here we go! Note: This is the 'original' kit and not the new updated one. Actually pretty rough in the wood department - especially pre-cut stuff. I have spent quite a bit of time getting the pre-cut bulkheads to be usable as well as drafting my own plans off of the supplied ones to make something that fits the actual model. I am just going to jump in from where I am. I kept updating and modifying the plans based on photos and the the Billings Boats downloaded mini plans for the updated model. Finally I just said lets make some wood shavings and glue something. We can figure stuff out as we go. This model is a biggie - 30" hull length. I am adding a 1/32" false deck below the planking. The supplied deck will not be used (doesn't fit and stamped lines). This drawing exercise was essential for figuring out actual locations and good stuff like aft deck rake and bowsprit angle. In this pic the rear three bulkheads have been glued and now am gluing the forth from the back. I abandoned the slots on the left and right in each bulkhead since they didn't line up. I defined and cut the central rib going down the middle. Yes, there are places where things go below deck (faux stairways, etc) but I want it straight and strong. Once the false deck is affixed as well as the top level planking cutting through this rib will be fine. You can also see on the central bulkhead aft how much wood needed to be added for the upper deck. So the build is on, with LOTS of scratch upcoming. Sooner than later need to figure out how far the aft deck goes (my plans show much farther than the museum ship has or the new plans show). Cheers, Mark
.JPG.5942cc515d4a264043adf0905de7b69a.JPG)
.JPG.090be82c3e91d54e738fdf62c007a08c.JPG)
-
 Hi All I¨m new to this page so have a litle pations wit mee . trying figuring out how it all funks. Ennyway My name is Jens and i live in Copenhagen Denmark , so my englis is onfortunaly not the bedst but i vill take Google translate in youse later on . I am building an old Billing Boats no. 459 Cutty sark as i board sekond hand som years ago and has now buildt for at least 2 years . im nerly finish with the ships hull and is about building the lifeboats . The pic. belov is about 1 week old. I planing to schove pic. from the start and the hole proces as if i started on day 1. and sofort to today . I consither this letter therfor as a test in how this page woarks an will therfor erease it again hwen i soone start my "reeal " building log . Cheers All. Jens
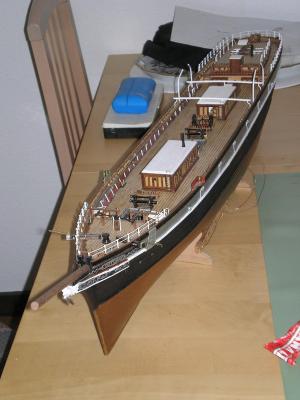
- 188 replies
-
- 10
-
-
- cutty sark
- billing boats
- (and 1 more)
-
After all the hyjinks with the Jylland I remembered I had another Billings Boats model in the cabinet of doom. Started 25-30 years ago on a kitchen table it had been set aside due to issues (mostly created by me) that I didn't know how to proceed with. I pulled the box out and bare bones inner hull assembly. A mixed media kit (as Billings are apt to be) but a smart looking ship. I shouldn't but decided to do a parallel build with the Jylland. The issues that had stopped me where 4 fold: 1. I had clamped the keel so hard I had introduced a rather severe hogging. 2. While the bulkheads where perpendicular to the keel they had 'variations' left to right. 3. The deck (I did add a false deck) was not entirely level (see above). 4. I didn't know how to affix the planking to the forward inner stem. They were supposed to be glued onto the inner stem, then sanded to allow the outer (visible) stem to be affixed. So....first off was the keel. I removed the existing one and introduced a nice straight one. This didn't allow all the bulkheads to seat but that will be handled as I plank. I have high hopes for this one. Largely to be built out of the box. The plastic pieces give me pause but I will use this as test subject to see how well I can get them integrated visually. -Mark
.JPG.6b877b2b9fe9b0fbe260119051800834.JPG)
.JPG.8d95db987c6b18fb6d5dac96f4f5f886.JPG)
.JPG.6ccc700c77bdd9b888e651282a1b0bd4.JPG)
.JPG.1c6178bb82e7da3868fca5156b8391dc.JPG)
-
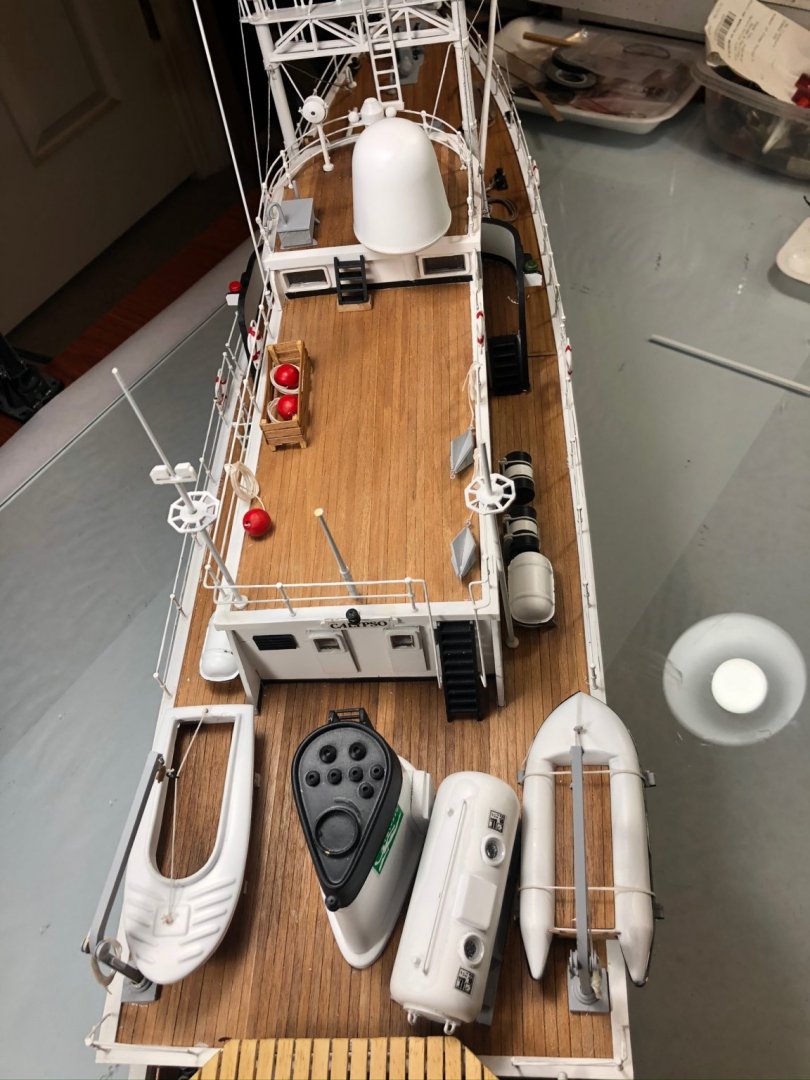
 Back in February, Luekutus started a build log for the Billings Calypso which jogged me into finishing a project that I started probably 10 years ago. I really appreciate that he has planked his, it looks great and I’m looking forward to seeing more! My goal was to build a nice model for the mantel that was a good scale and not a warship. While I’ve done some basic research, my model is not 100% accurate and I’ve taken some artistic license in some areas. The Billings kit is crude by today’s standards but can be spiced up with a bit of detailing and is the best available today in a large scale. The helicopter supplied is AWFUL! I’ve given up on trying to make it look nice and am looking for an after market substitute in 1:48 that’s close. I added some 1:48 welding gas cylinders that look fine and the rope I’ve used is the truly nice stuff from Syren. Most of the trim is Evergreen and a lot of the wood is from my spares stash. Enjoy, Don


- 36 replies
-
- 24
-
-
- calypso
- billing boats
- (and 1 more)
-
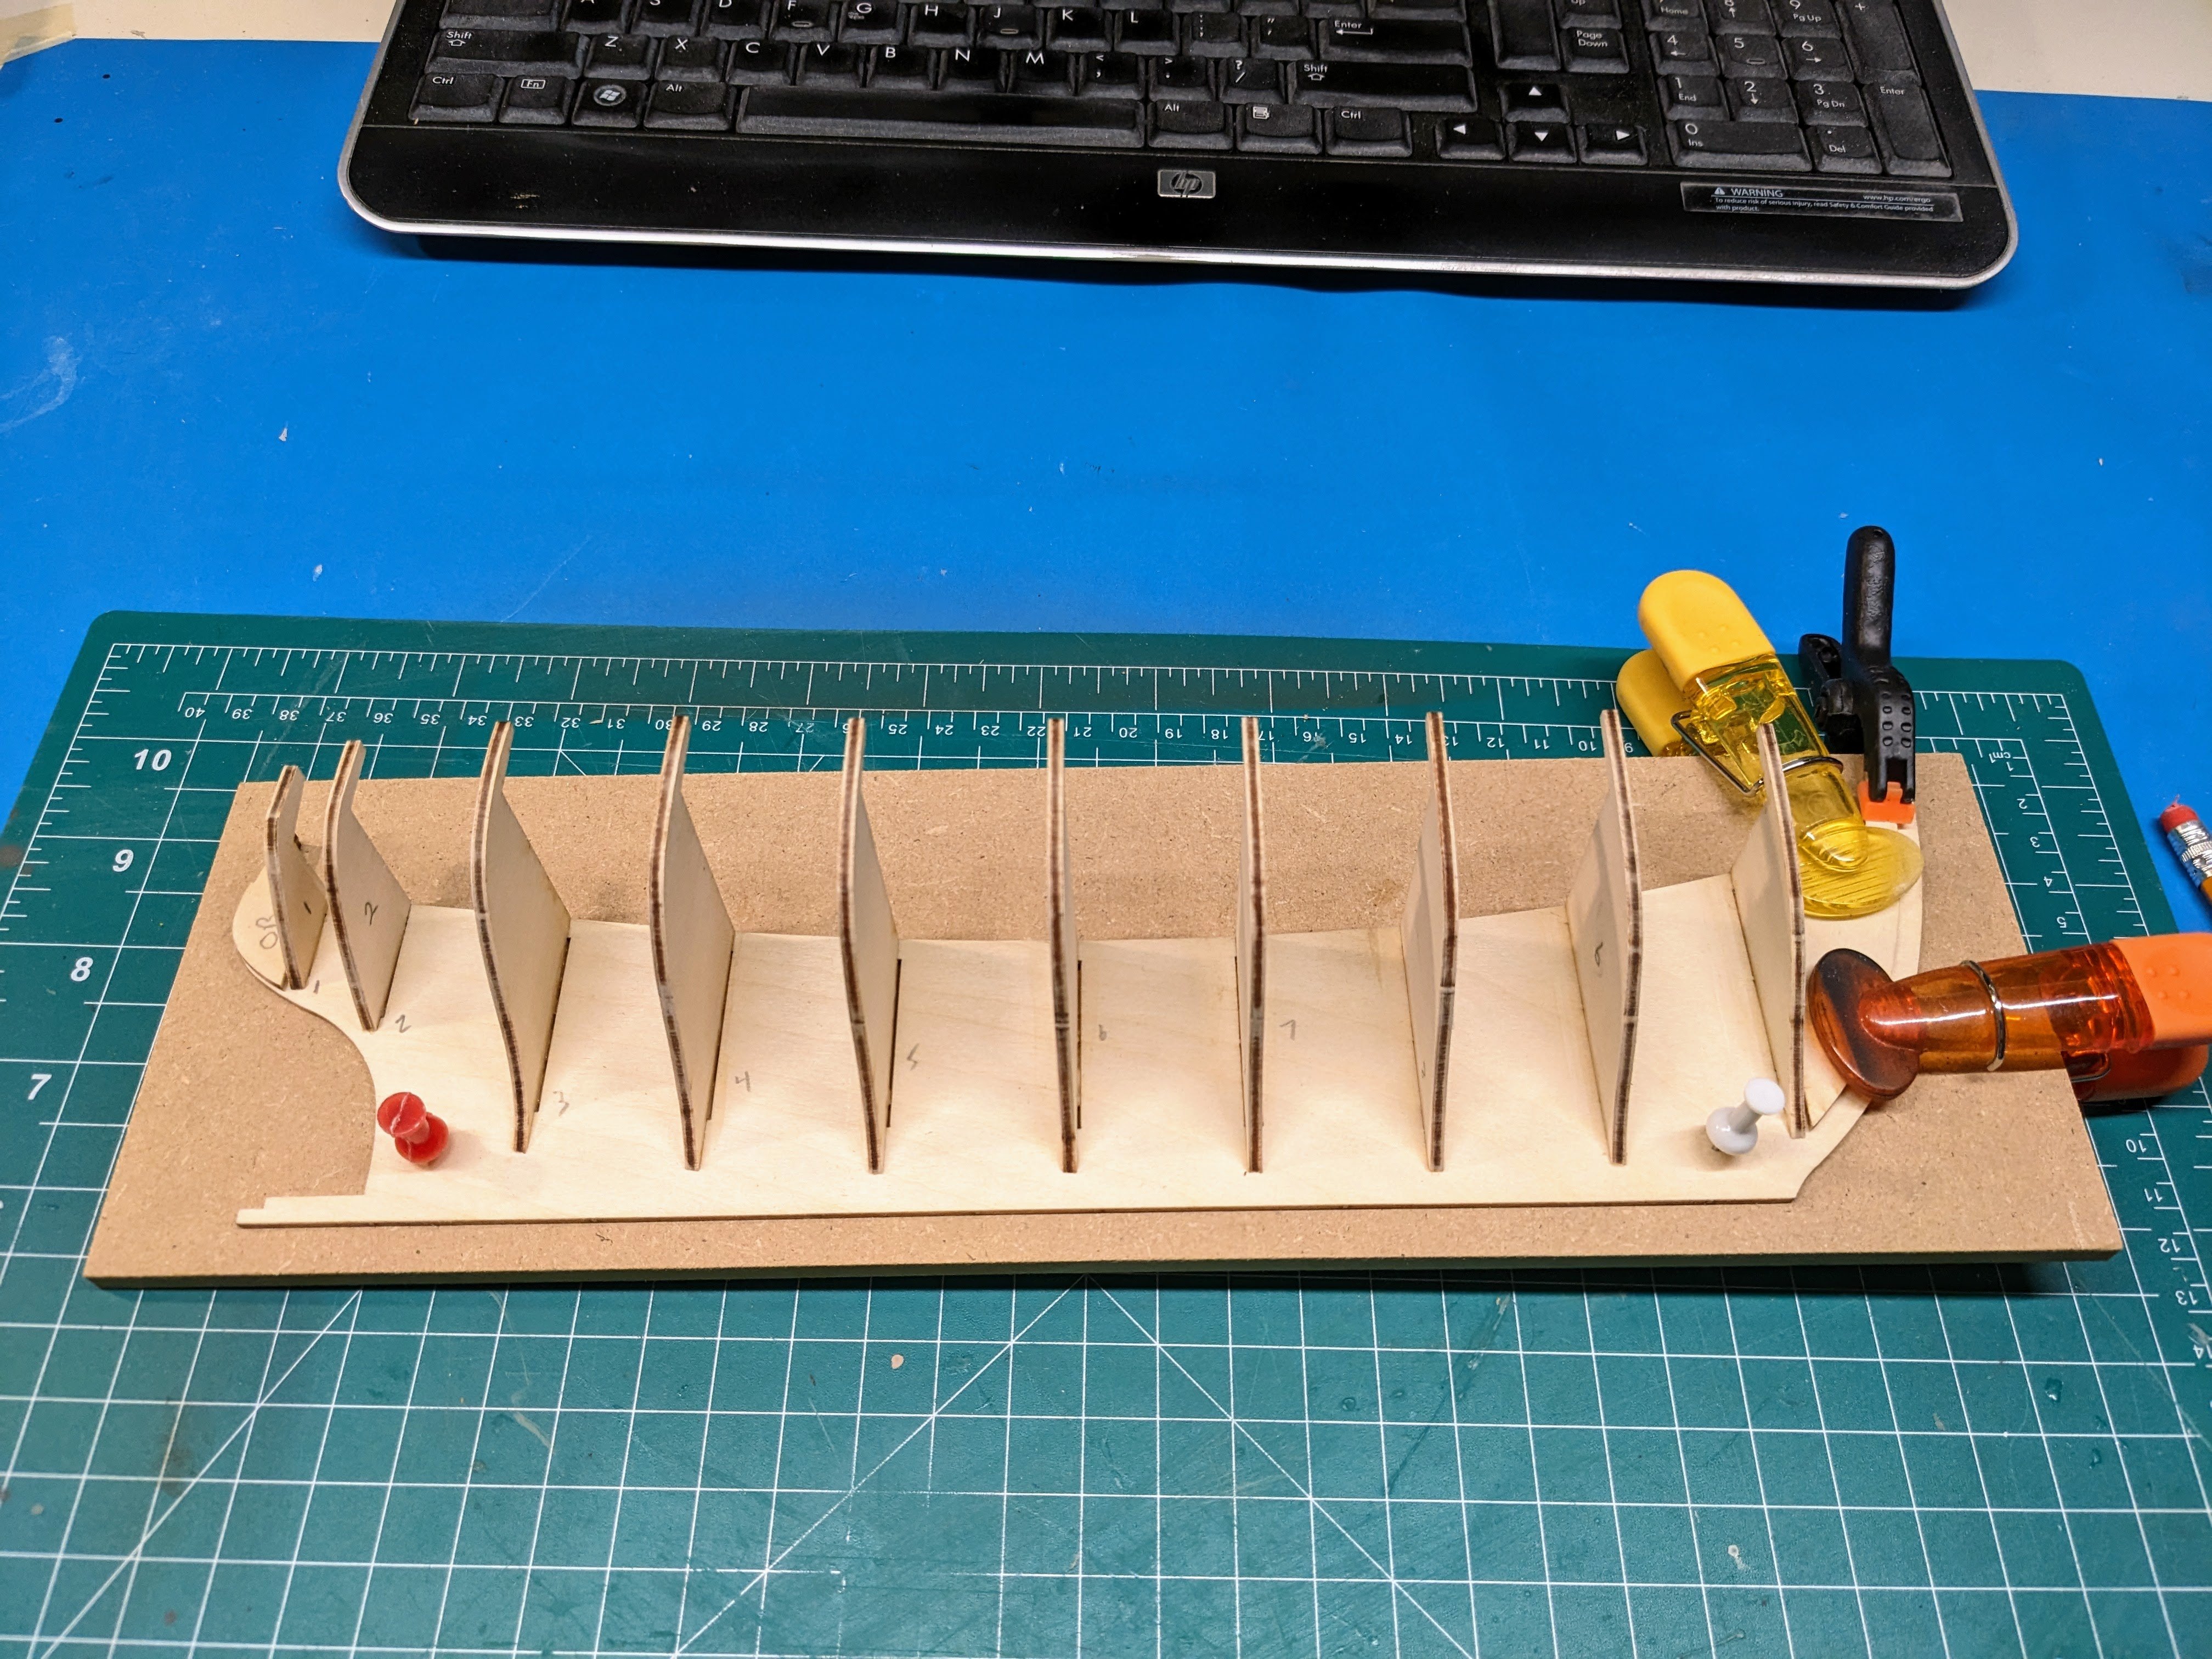
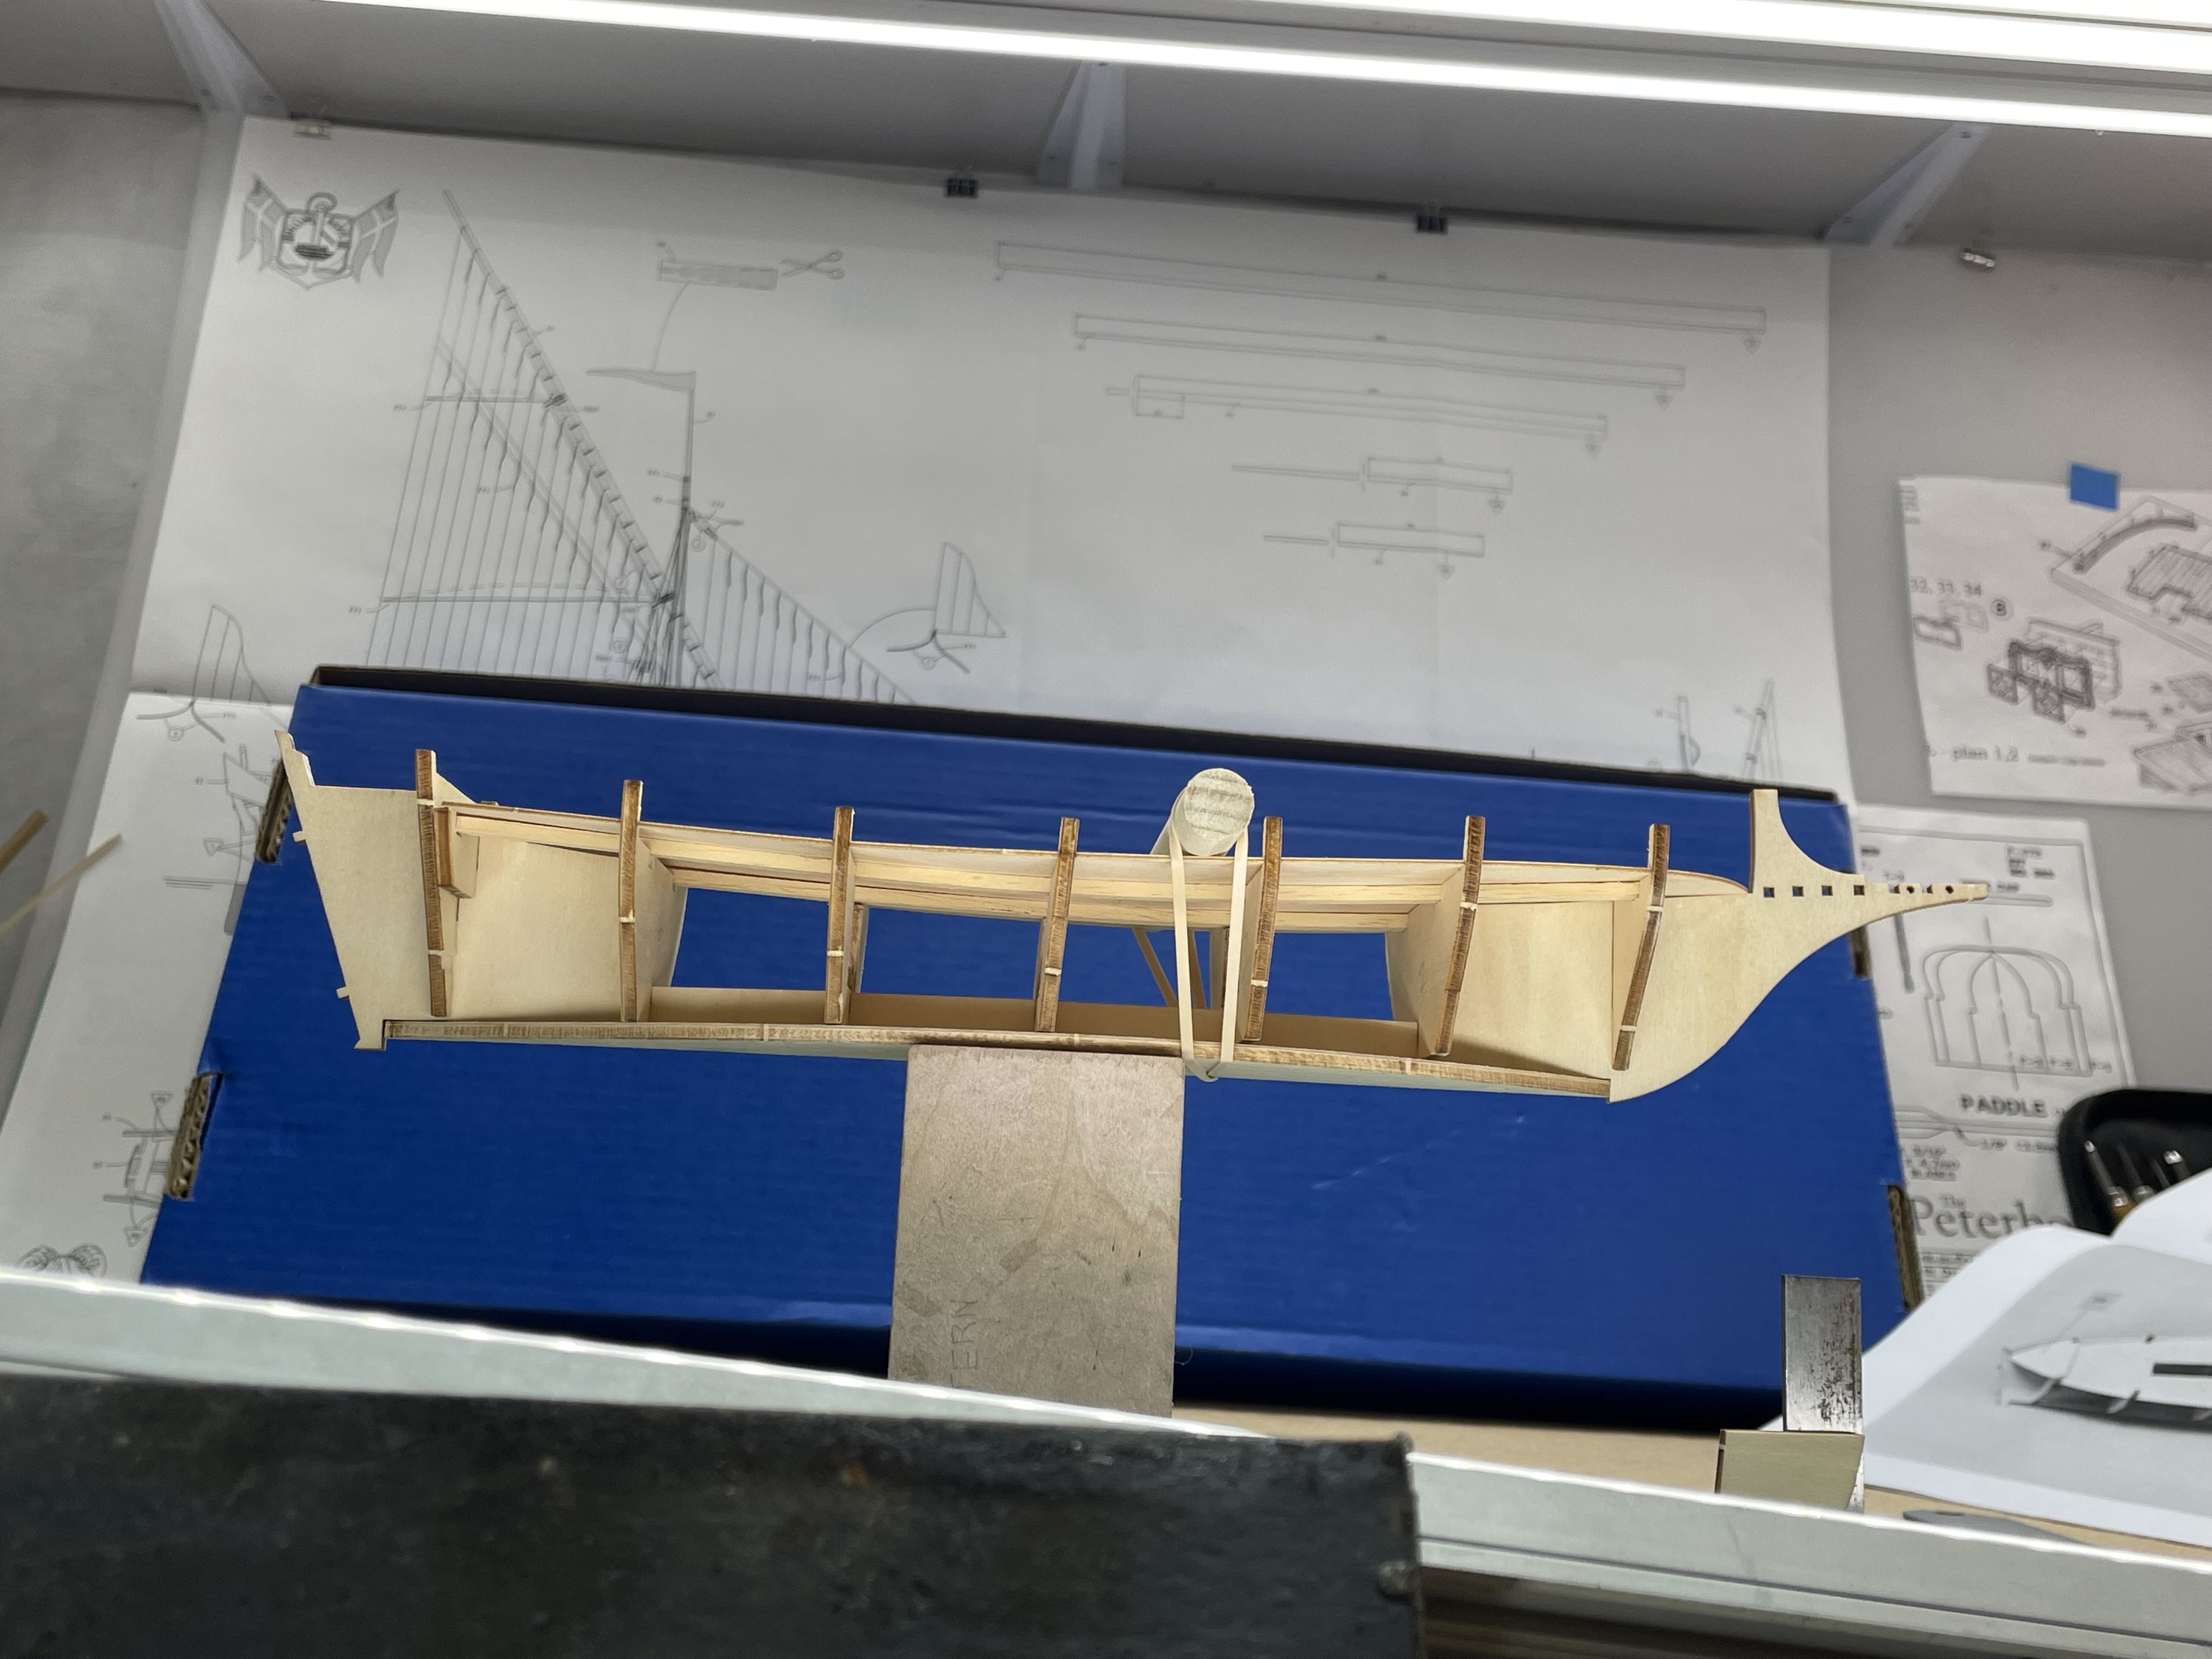
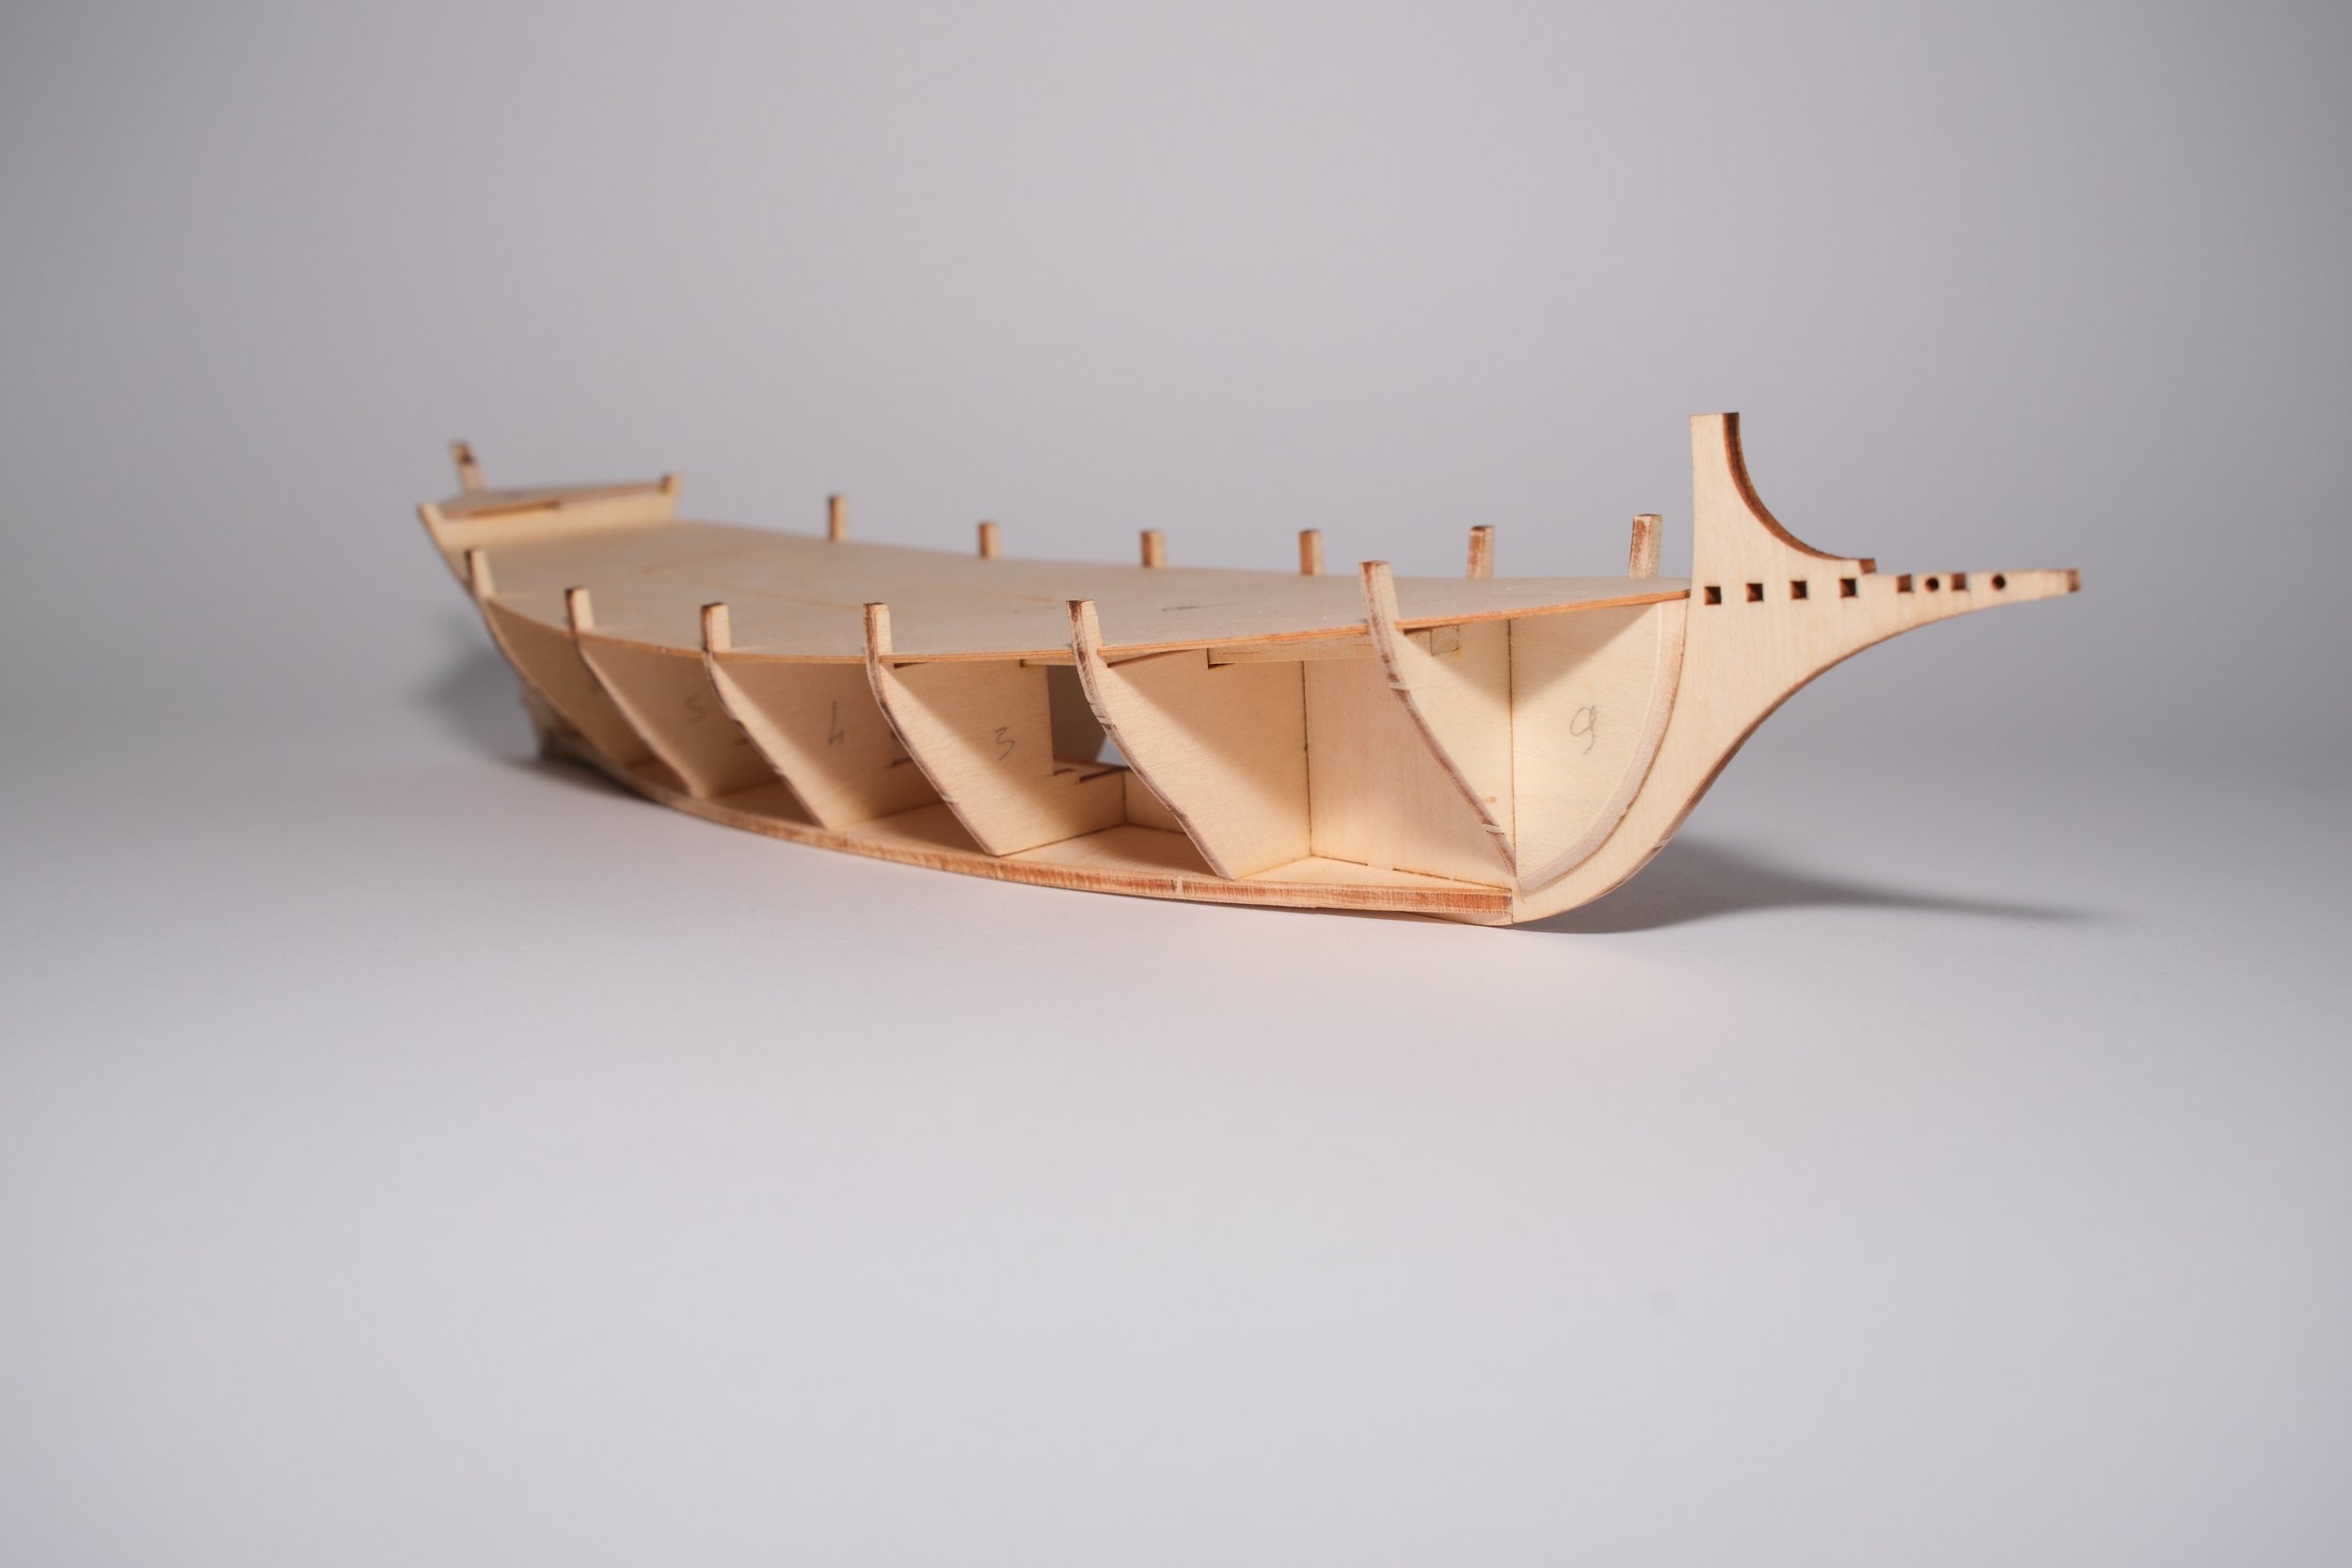
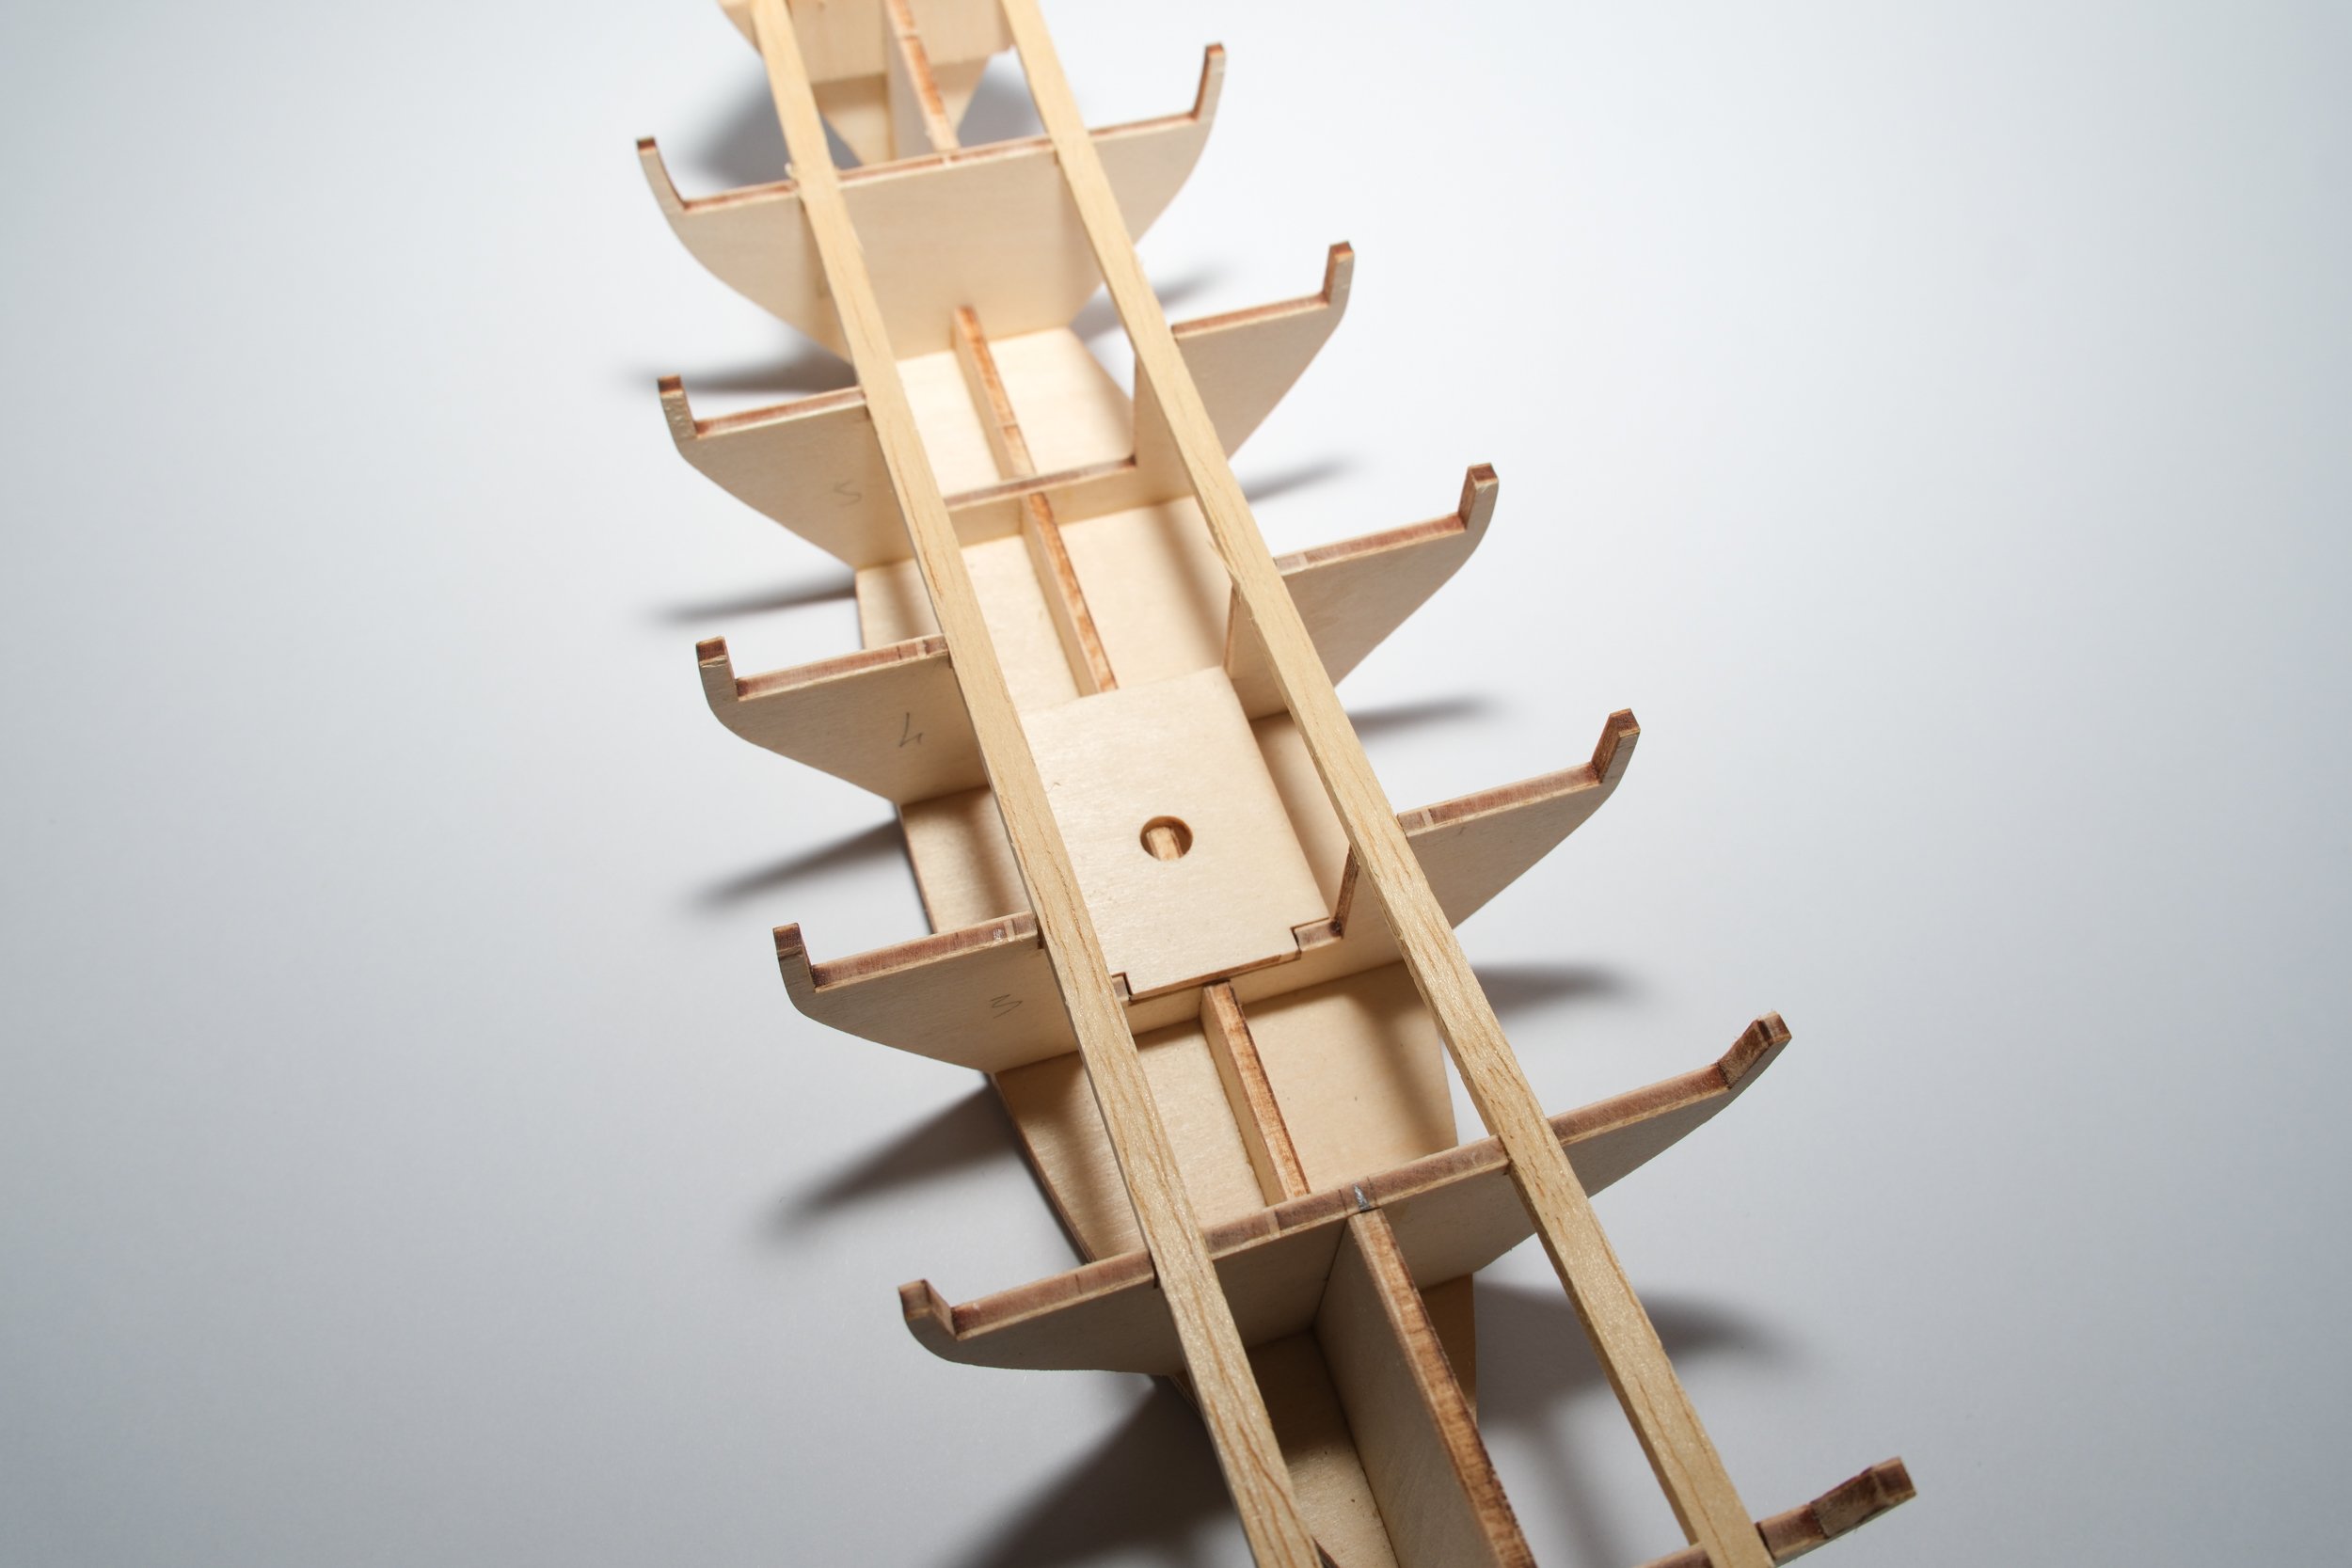
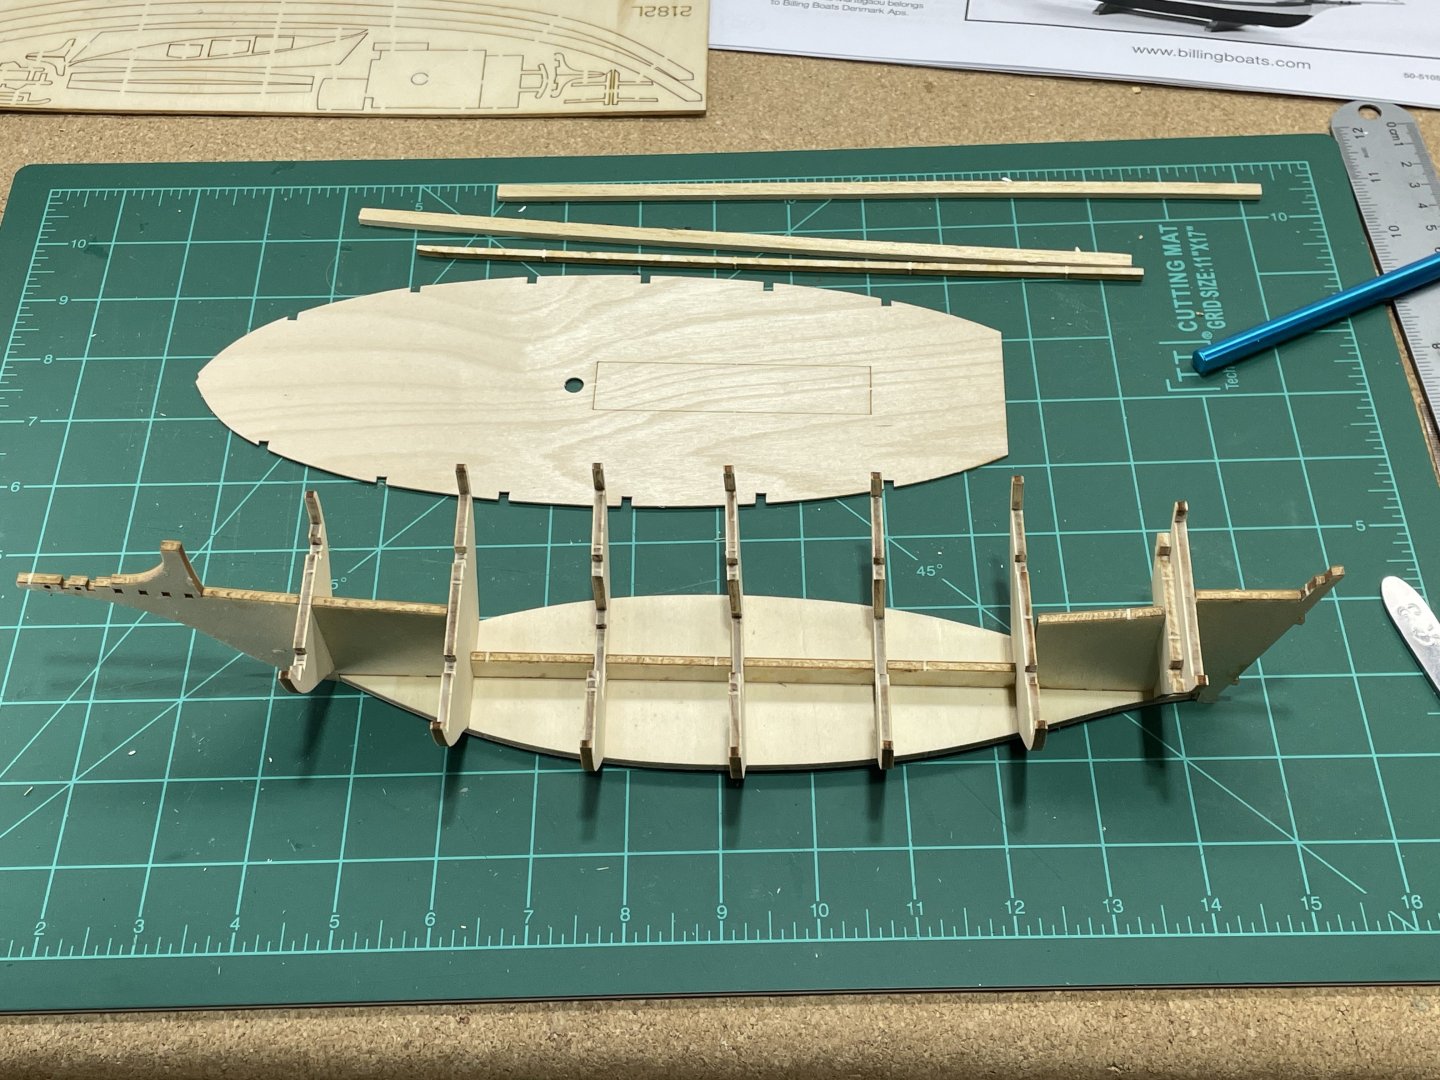
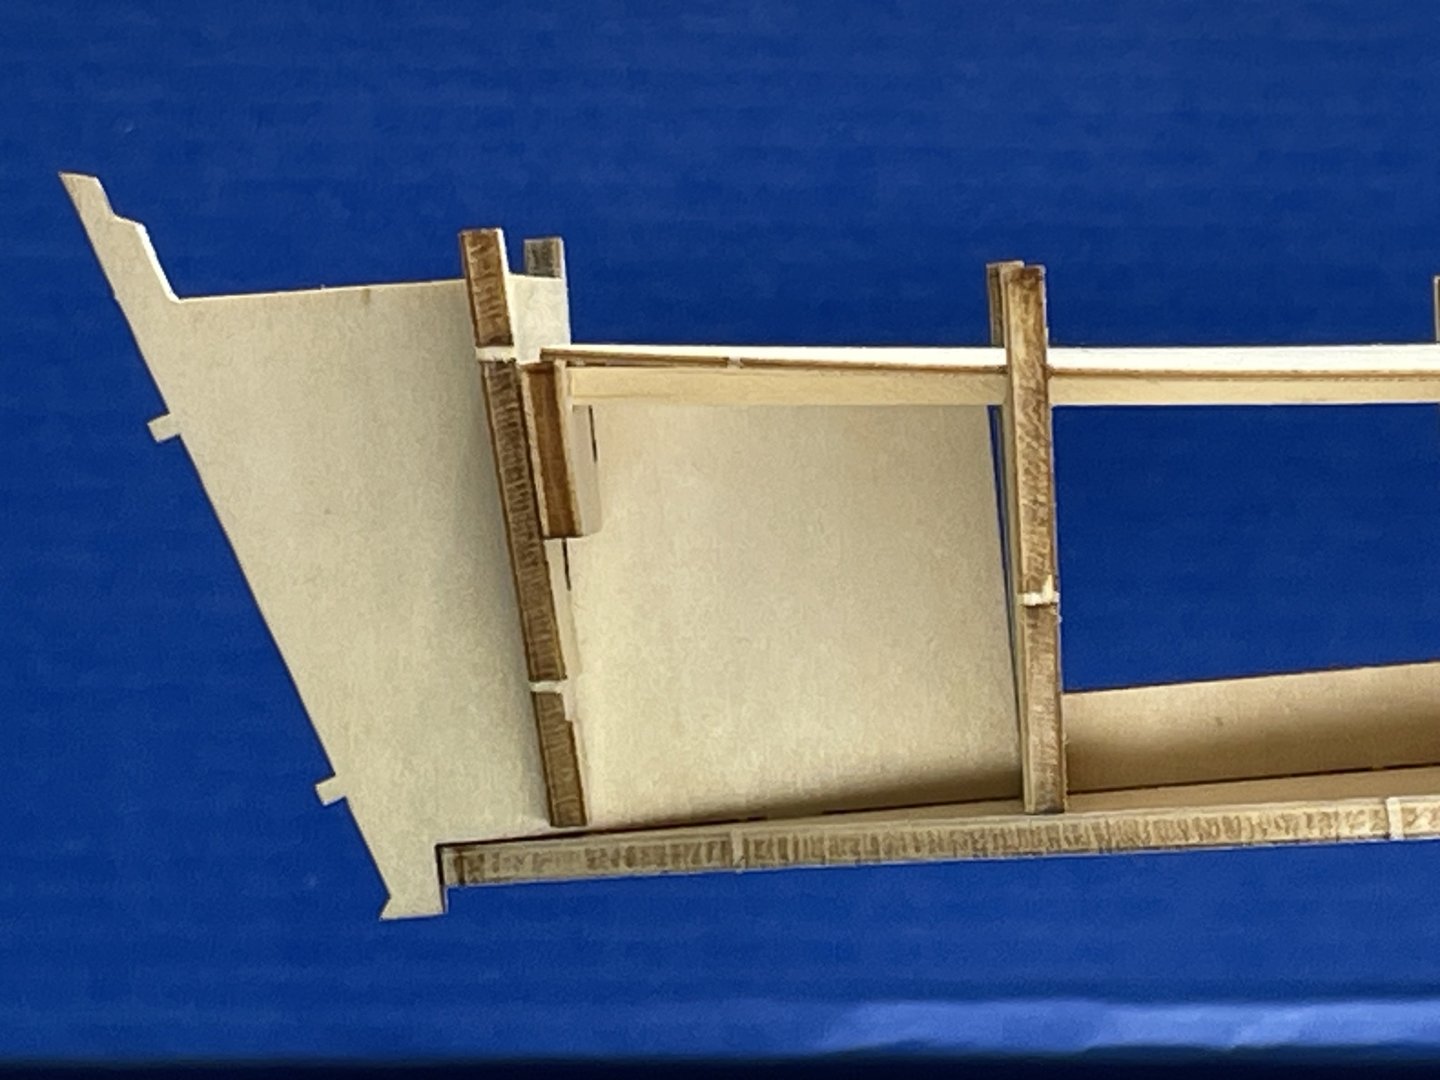
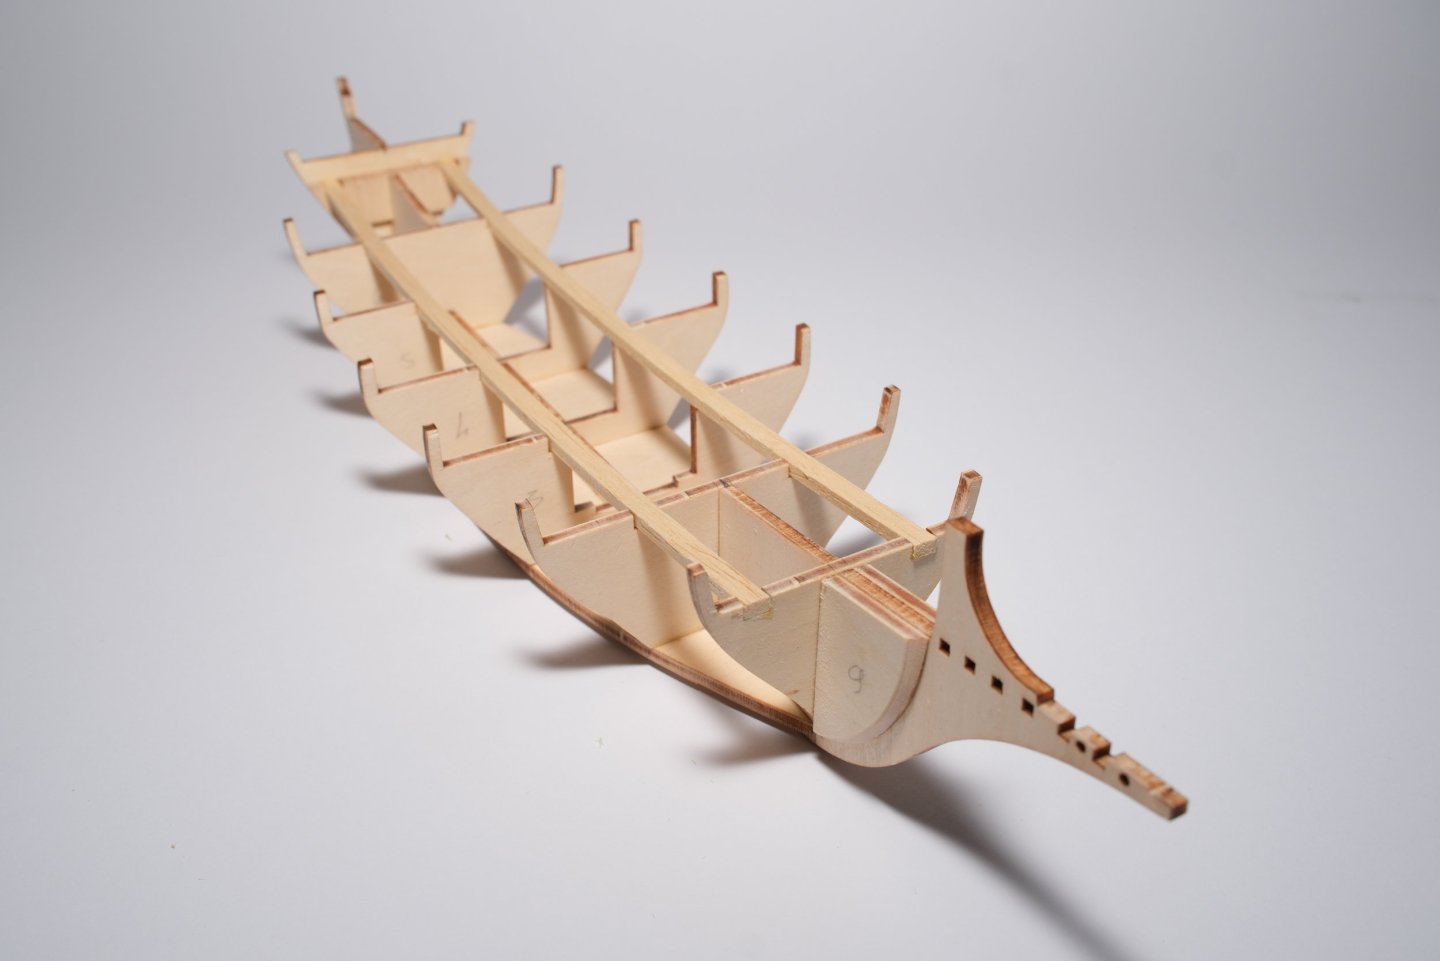
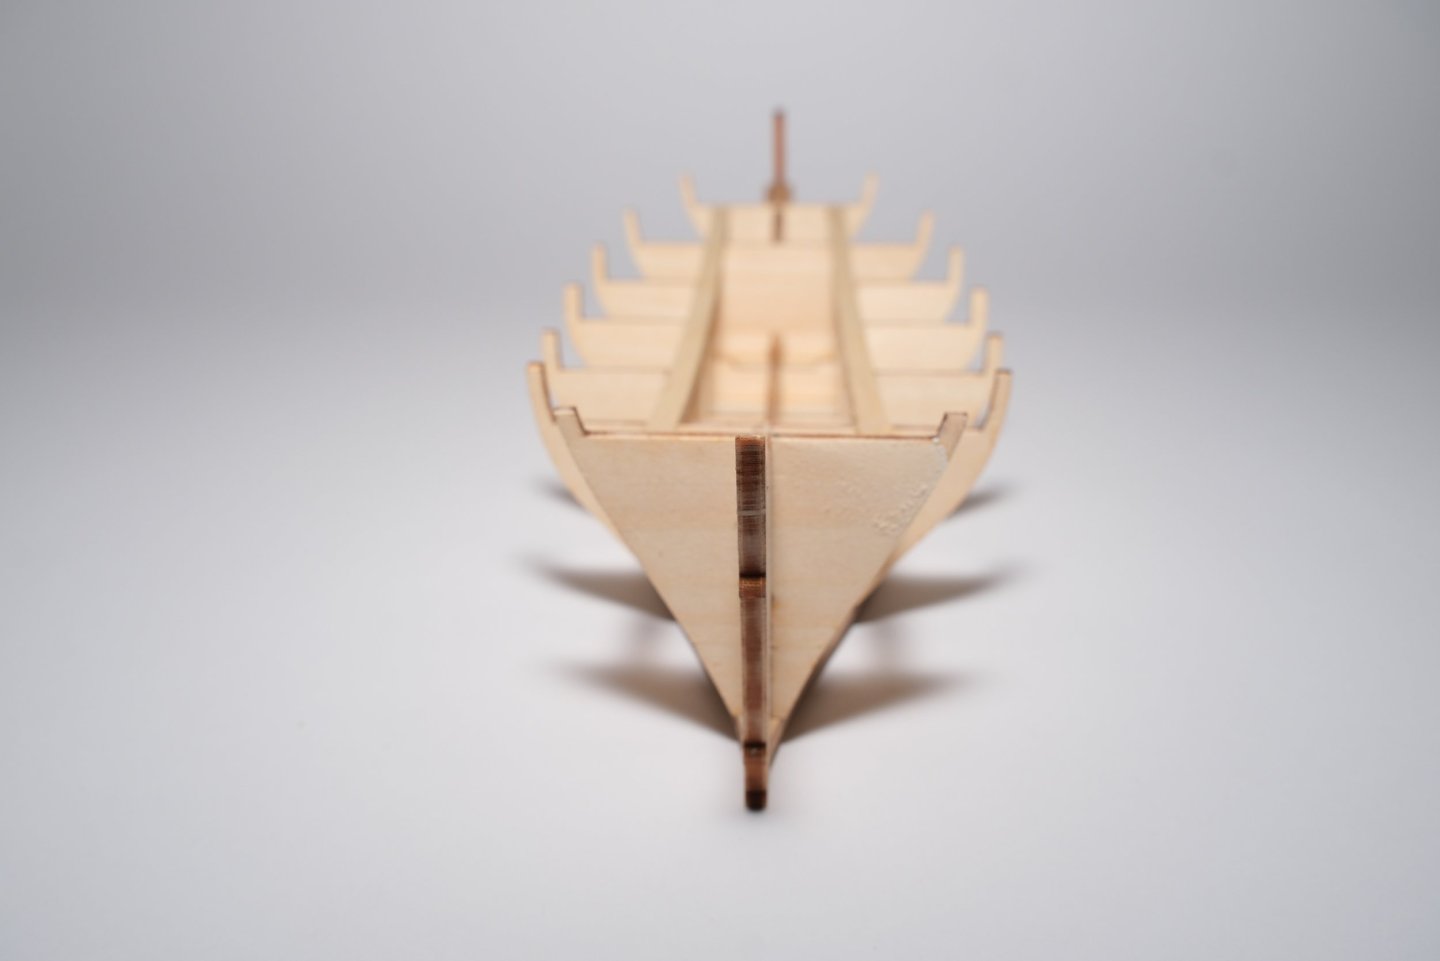
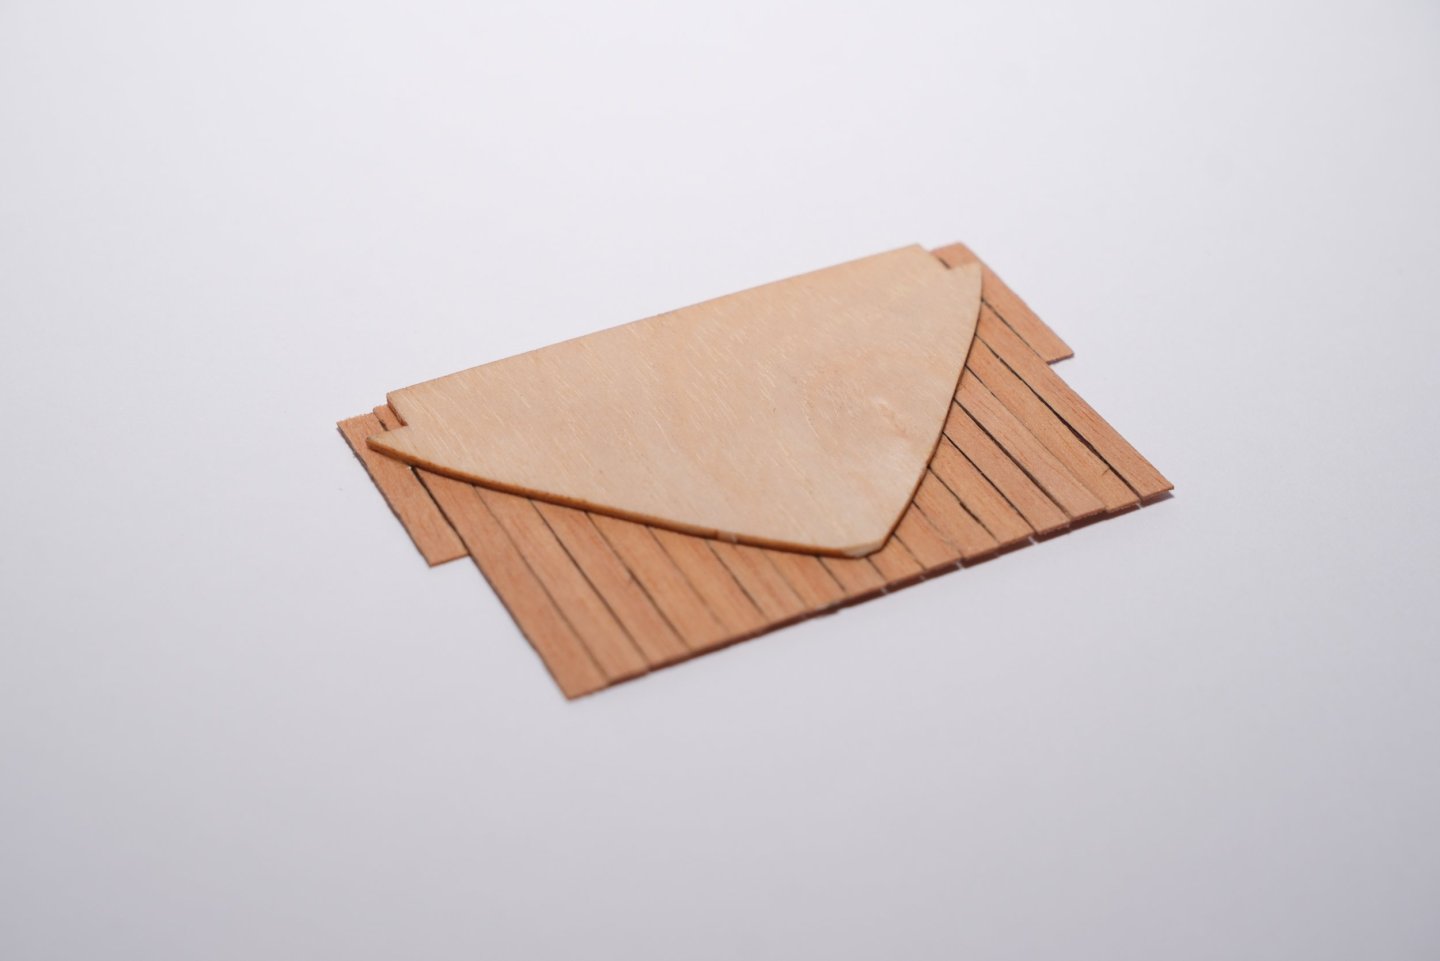
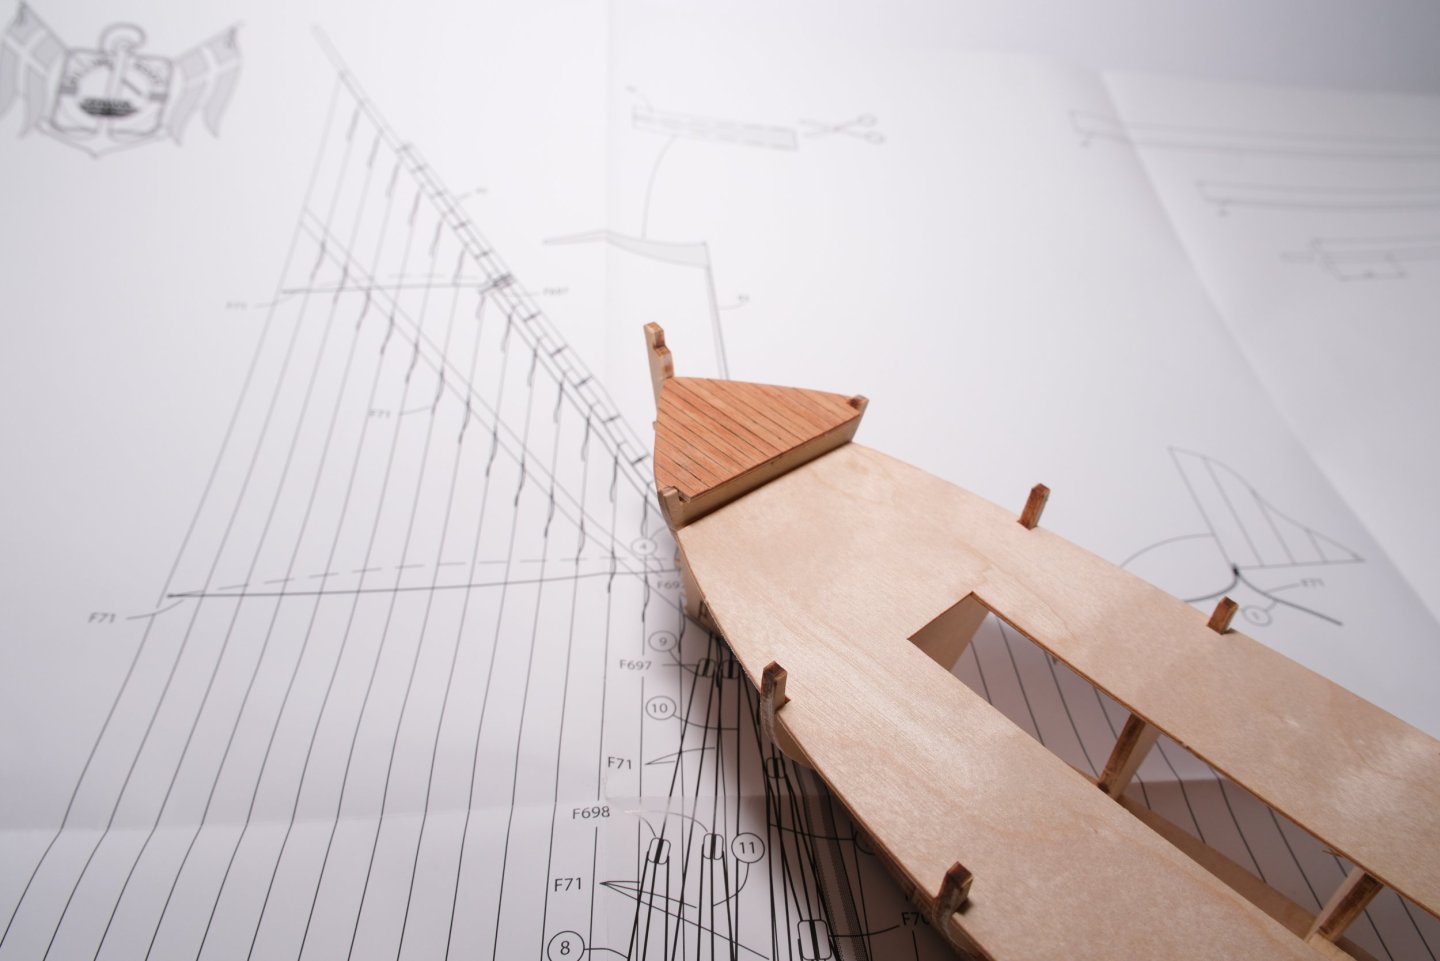
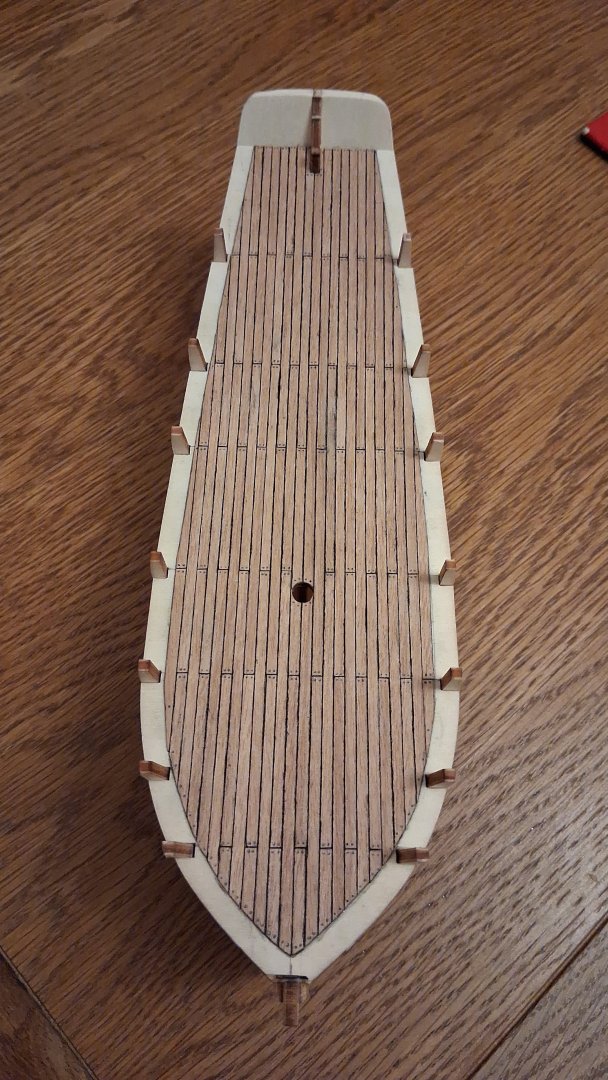
 This is a flat bottom boat used to move goods on the river and coastline of France in the 1800’s. I was thinking it would be easier planking experience with only half the hull:-) I read all the instructions about 20 sentences and 6 black and white figures. This build looks like it could be a challenge for me. The spine, bottom and frames are 3mm plywood. I spent about a hour freeing them from the sheet. After cleaning some of the charr, I dry fitted all of them and placed the deck on hoping to see the plan in my head. It didn’t come to me instantly. Looks like I may try finding it in a dream tonight:-) Some of the questions I have right off the bat are. It doesn’t look like the notches in the deck line up perfectly with the frames. The middle one looks out of plum to me. I’m thinking I may glue the spine to the bottom and the 3 center frames all at one time and dry fit the deck to hold them in place. Then maybe do the 2 at a he stern and then the other 2 at the bow? The stern dips down a little, leaving a gap between the spine and frame 7 and also a small one (you can’t see) at frame 9. 8 is that little piece holding the deck up. There is one other build log here, He did one at a time. I’m not sure I will have the success he had, doing it like that. Any suggestions are welcome. I guess these things wouldn’t be as entertaining if they went together easy without a lot of thought:-)
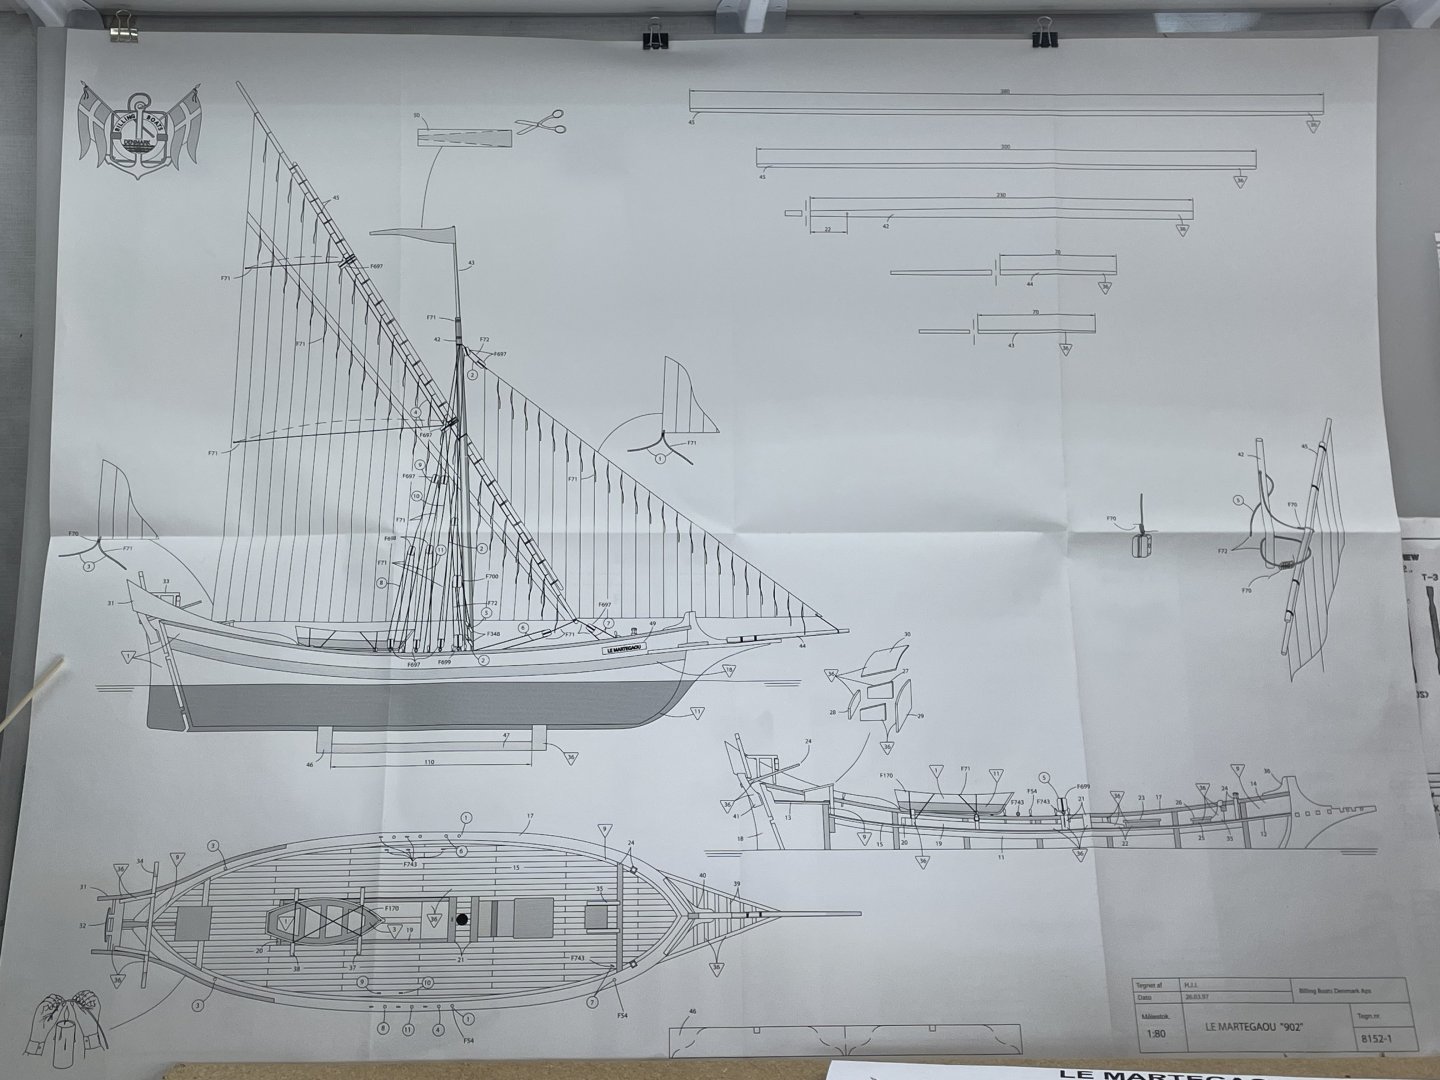

- 55 replies
-
- 6
-
-
- Le Martegaou
- billing boats
- (and 1 more)
-
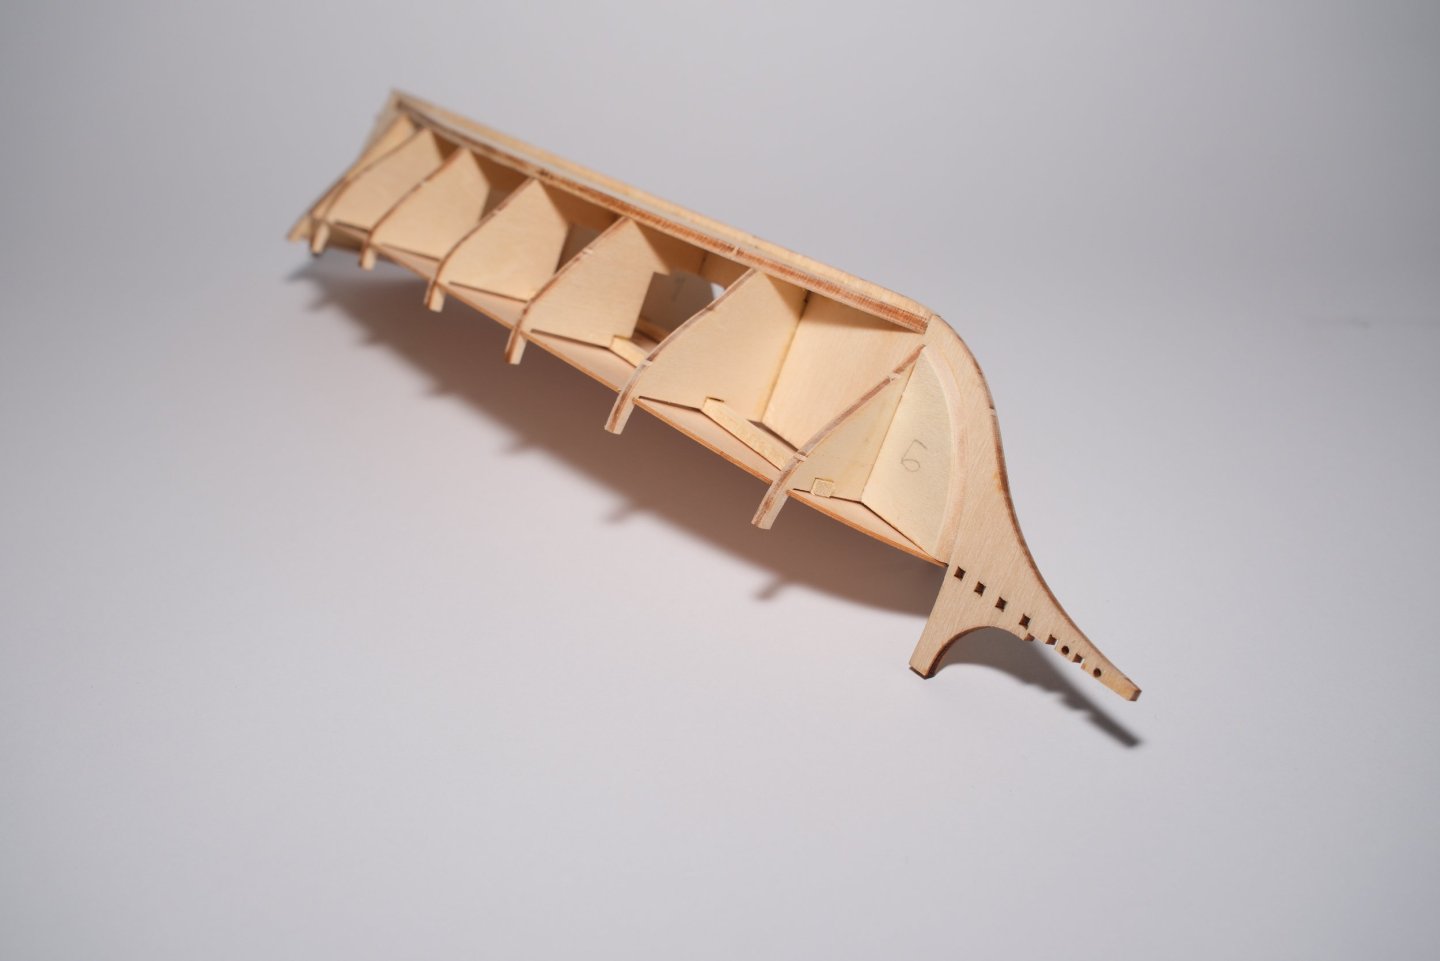
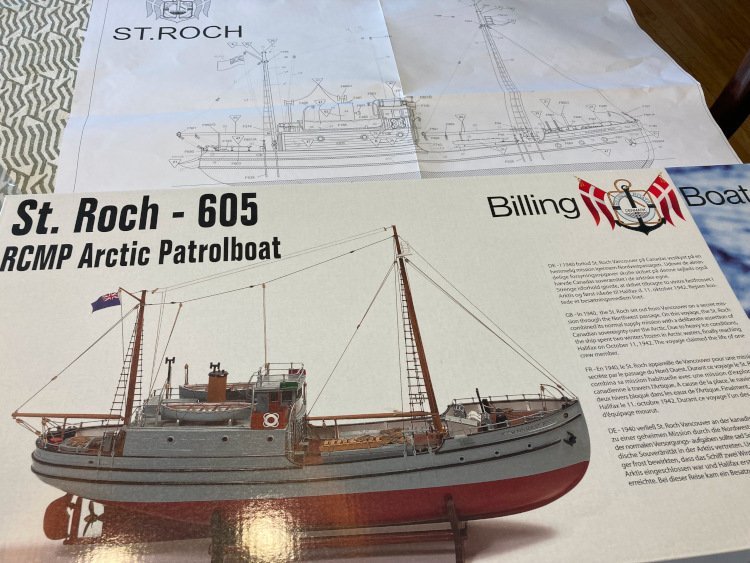
 Santa has been kind to me , looking forward to making a start on this model of a truly historic vessel. St. Roch was designated a national historic site of Canada because: she became the first ship to cross from the Pacific to the Atlantic by the North West Passage; she was also the first ship to complete the hazardous journey in both directions. The Canadian-built St. Roch is valued as an excellent example of Canada’s maritime history. She navigated the Northwest Passage, arriving in Halifax in 1942, after spending two winters frozen in the ice. She was the second ship to make the Passage, and the first to conquer the journey from the Pacific to the Atlantic. In 1944, the refitted St. Roch returned to Vancouver via the more northerly, deep route of the Prince of Wales Strait in eighty-six ice-free days – the first to navigate the Northwest Passage in a single season. Retired in 1948, St. Roch was sent to Halifax via the Panama Canal in 1950, making her the first ship to circumnavigate North America. Under the command and leadership of Sergeant Henry Larsen (1899-1964) who was first mate and captain for twenty years, the voyages of the St. Roch demonstrated Canadian sovereignty in the Arctic. She extended and maintained Canadian control over its vast northern territories as an all-purpose supply, patrol and transport vessel and governmental representative to service isolated and relatively inaccessible R.C.M.P. detachments by settling disputes and conducting a census of the Inuit. During this time the St. Roch was the only federal presence in the far north. During the Second World War the St. Roch was sent through the North West Passage to protect war industries in the north, specifically a mine in Greenland which was the sole source of cyrolite essential to the production of aluminum. The heritage value lies in the original design and the multiple refits that were designed to deal harsh conditions and reflect the changing technologies in marine transportation over the course of her working life. The St. Roch has been restored to her appearance during her epic journeys between 1940-1944 that was a mix of original elements and subsequent refits. Additional value in her material fabric include the spare and well-considered details of her design in terms of the efficiency and economy of her living and working quarters.
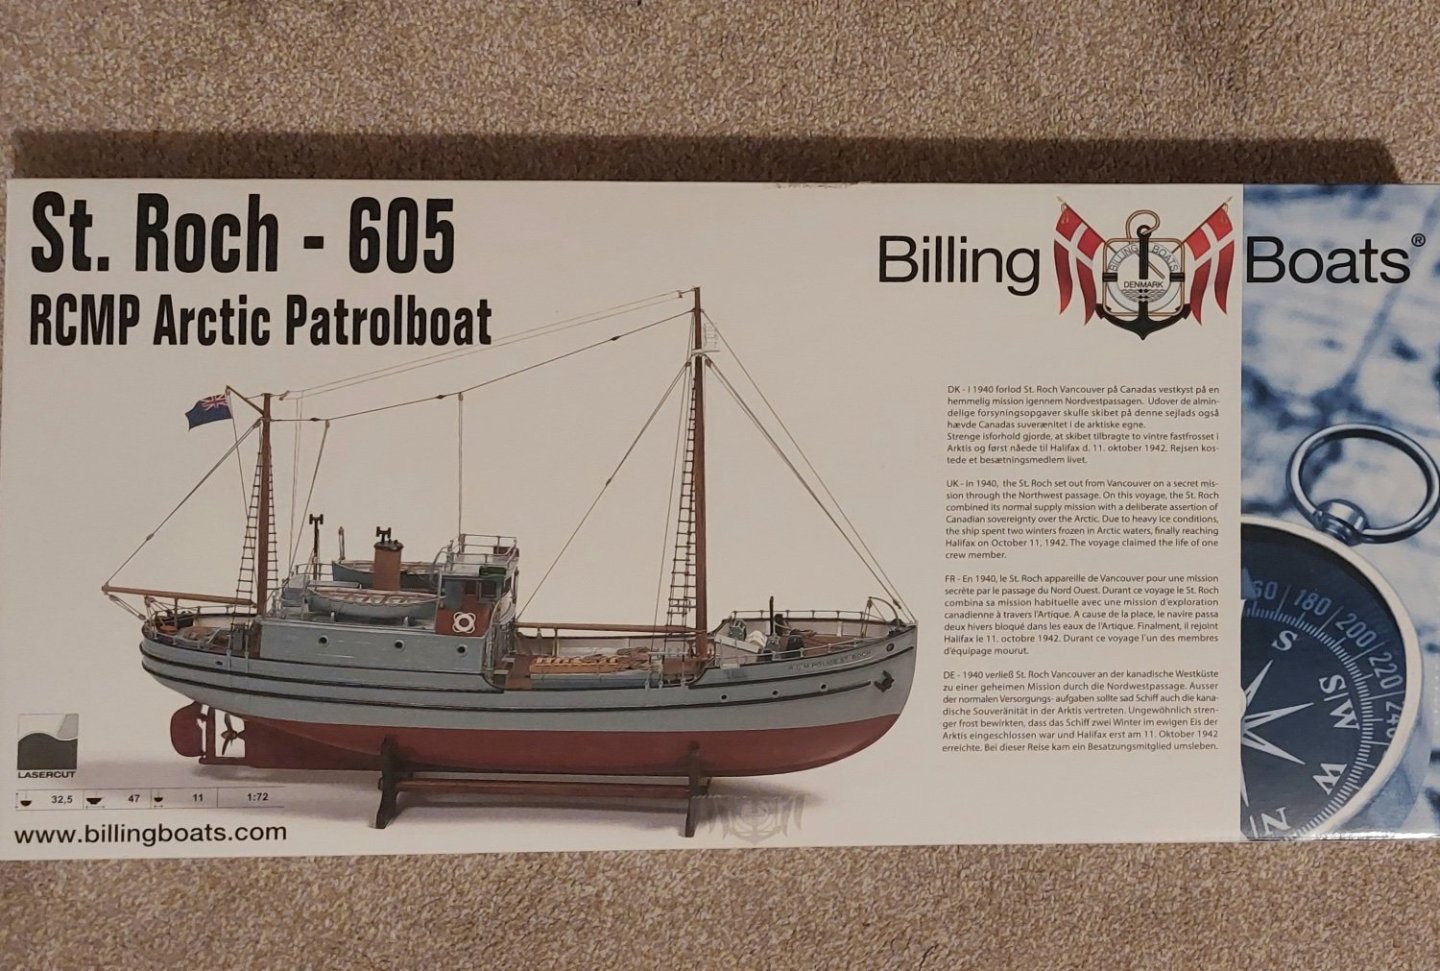
-
 another calypso ship. It took me about 10 years to finish this ship. I was often lazy and did not do anything, but I searched the internet and saw that other modelers made their own ship
 -
 I'm off on a new build of Billing Boats 1:45 scale model of Jacques Cousteau's research ship Calypso! I've always wanted to build this model ever since I saw it back in the early 1980s but could never seem to find the time (nor the money!). Of course now that I have time (and now that by children are grown and on their own) and more income for fun, I couldn't find the Calypso model anywhere! I read that Billing Boats only make a handful of kits of the Calypso every year and what kits you can find are well over $600 USD! I finally was able to find a model on eBay from a seller whose late father had this unopened kit in storage. When the kit arrived I went through the contents and everything appears to be there and in pristine condition! I'll be going through the instruction manual and studying the assembly illustrations for the next few days. Meanwhile, any words of wisdom or advice from any MSW members on building this kit would be appreciated!
- 70 replies
-
- 6
-
-
- calypso
- billing boats
- (and 1 more)
-
 Hello everyone, My name is Felix, and I’m 18 years old. I’m excited to start my first-ever build log for my first ever wooden model ship, and I thought this would be a great place to share my journey. I have a deep love for sailing and I like woodworking. Building a wooden model ship is something I have been wanting to try for very long time. For my first build, I’ve chosen a kit from Billing Boats. From what I understand, many of their kits are inspired by real vessels, but they’re not exact replicas. I don’t know much about the specific history of this boat, aside from what is listed on Billing’s website, but I’m eager to learn more as I go along. From billing, ”A French fishing boat built in Honfleur in the bay of Le Havre in 1866. These typical boats operating in this region had a crew of 3 members, a sail area of 47m2 and a length always less than 10m.” The reason I picked this kit is that I wanted a relatively small ship but something with a deck. Something that would teach me on planking, decking and rigging.—I’m really looking forward to diving into this project, learning new skills, and connecting with other model ship enthusiasts here. My English is not perfect (it’s my third language), I will do my best! Felix
- 9 replies
-
- 6
-
-
- Esperance
- Billing Boats
- (and 1 more)
-
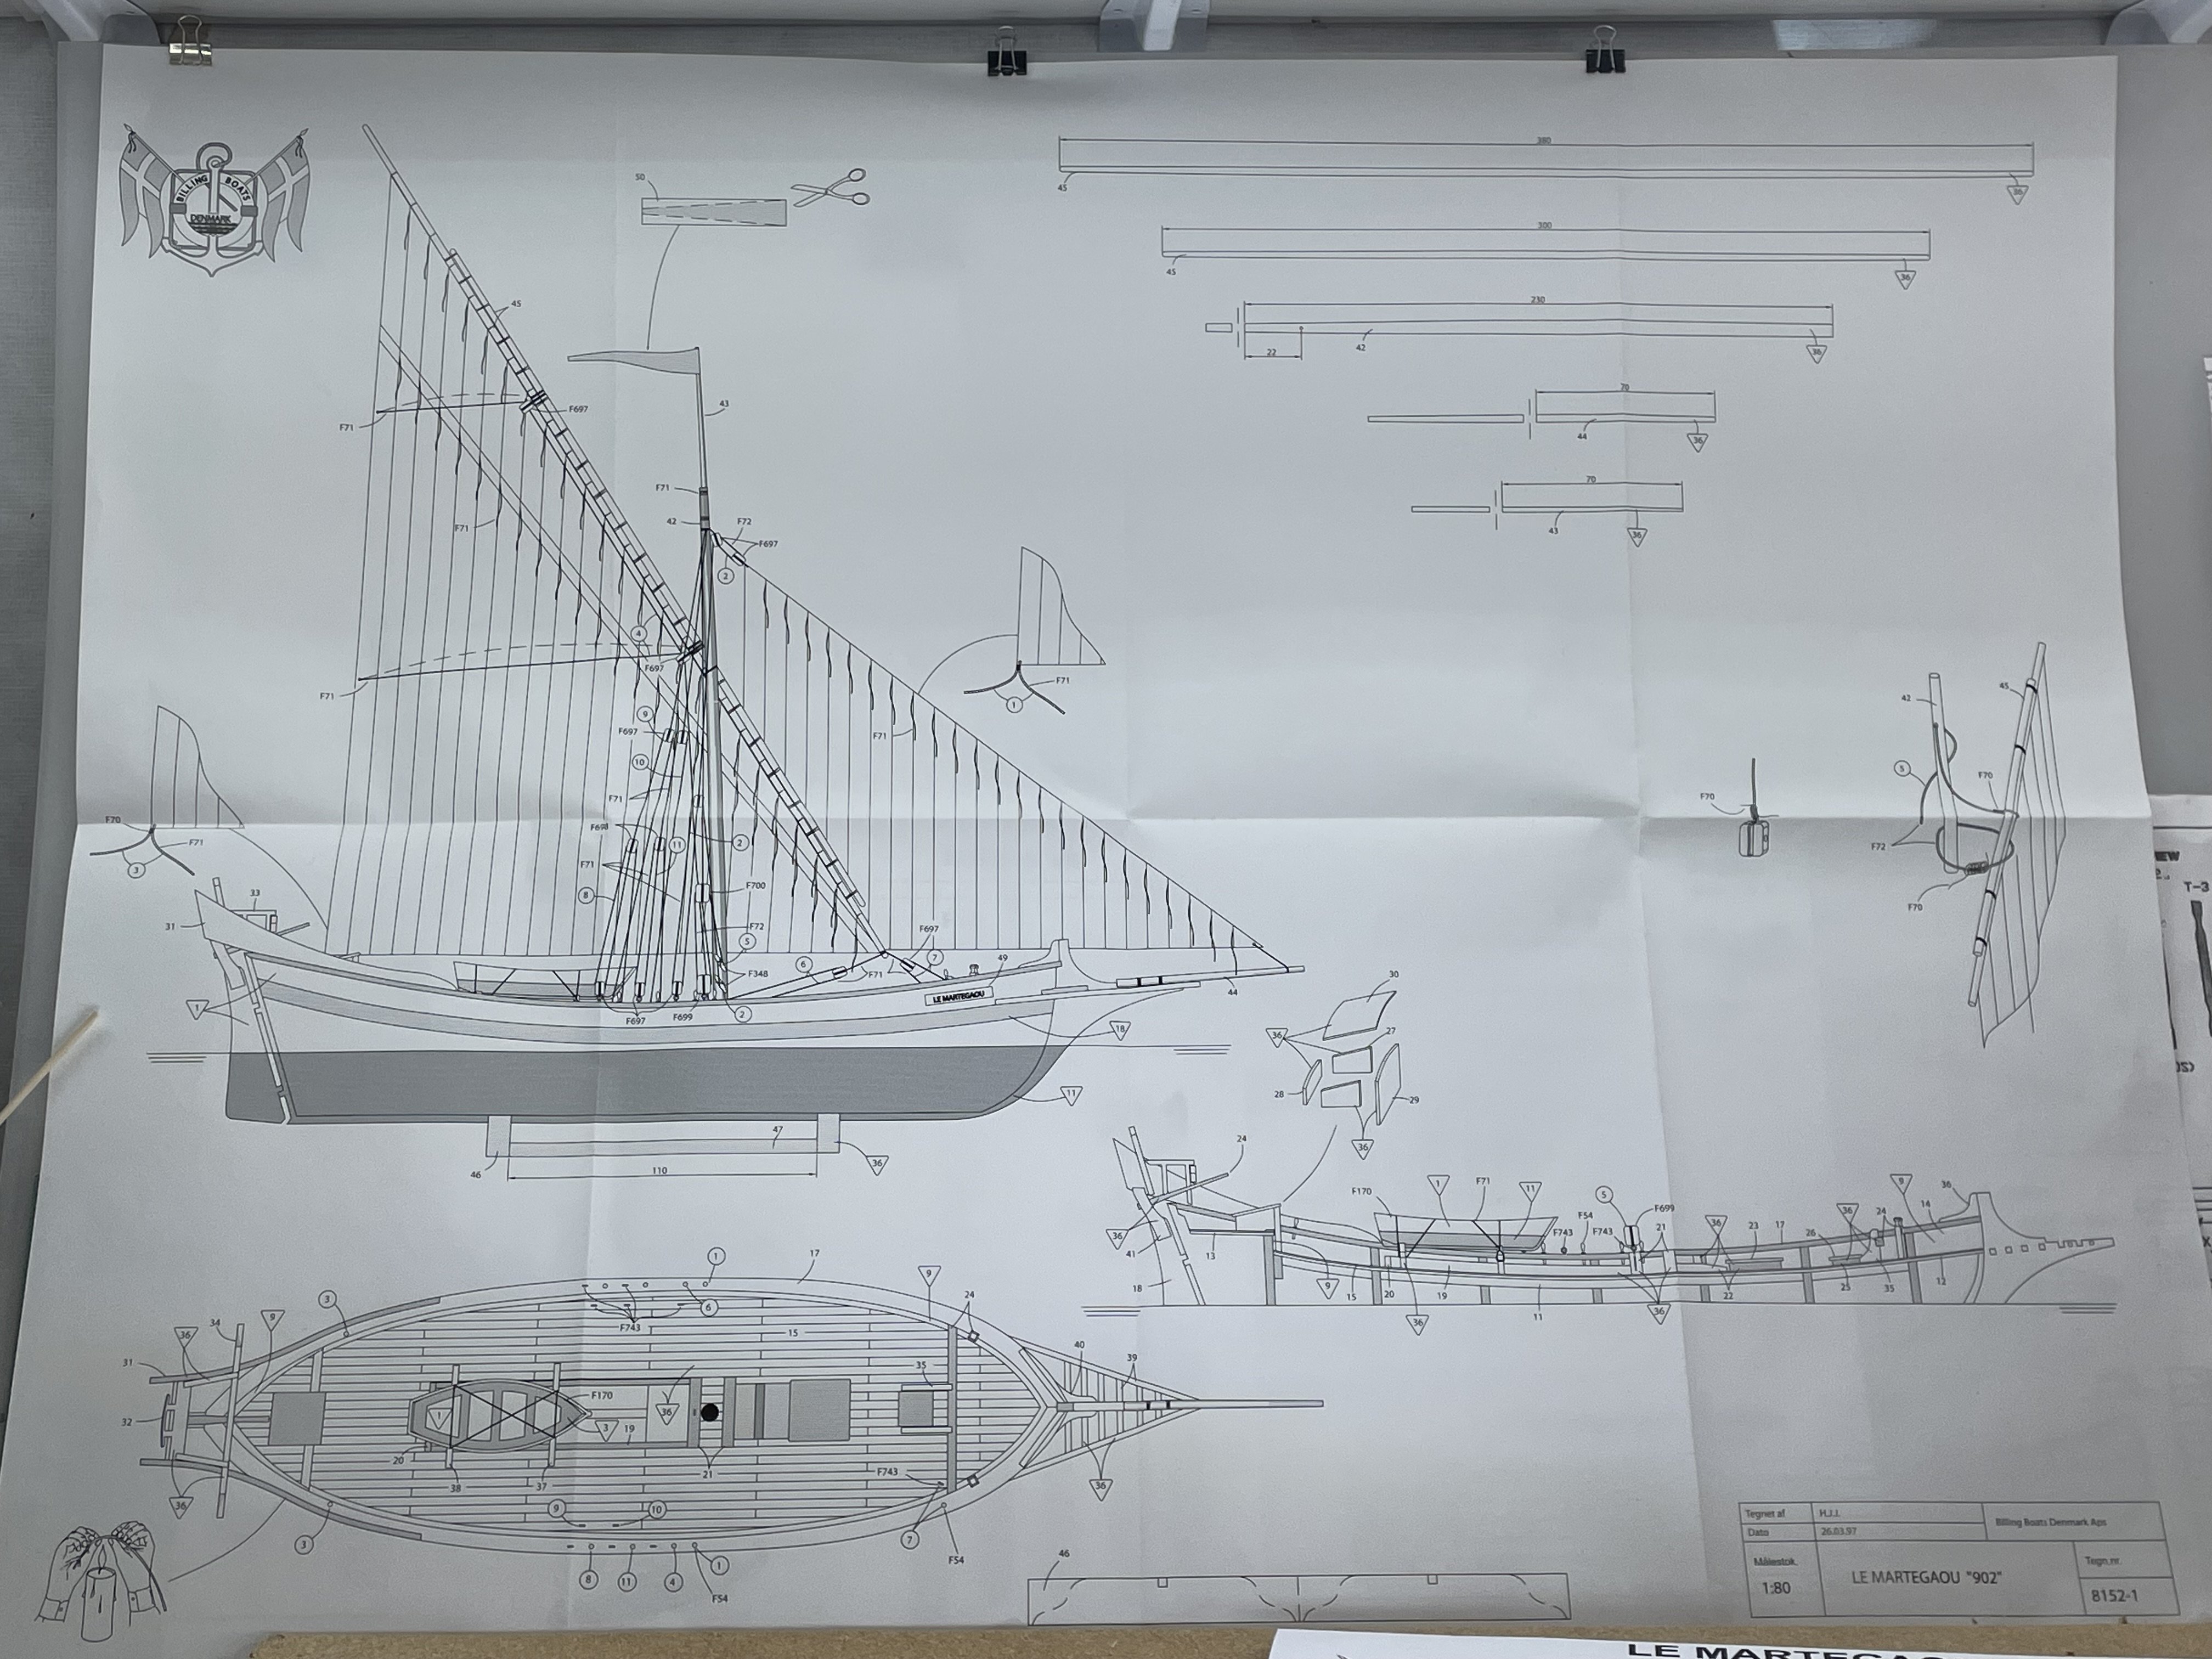
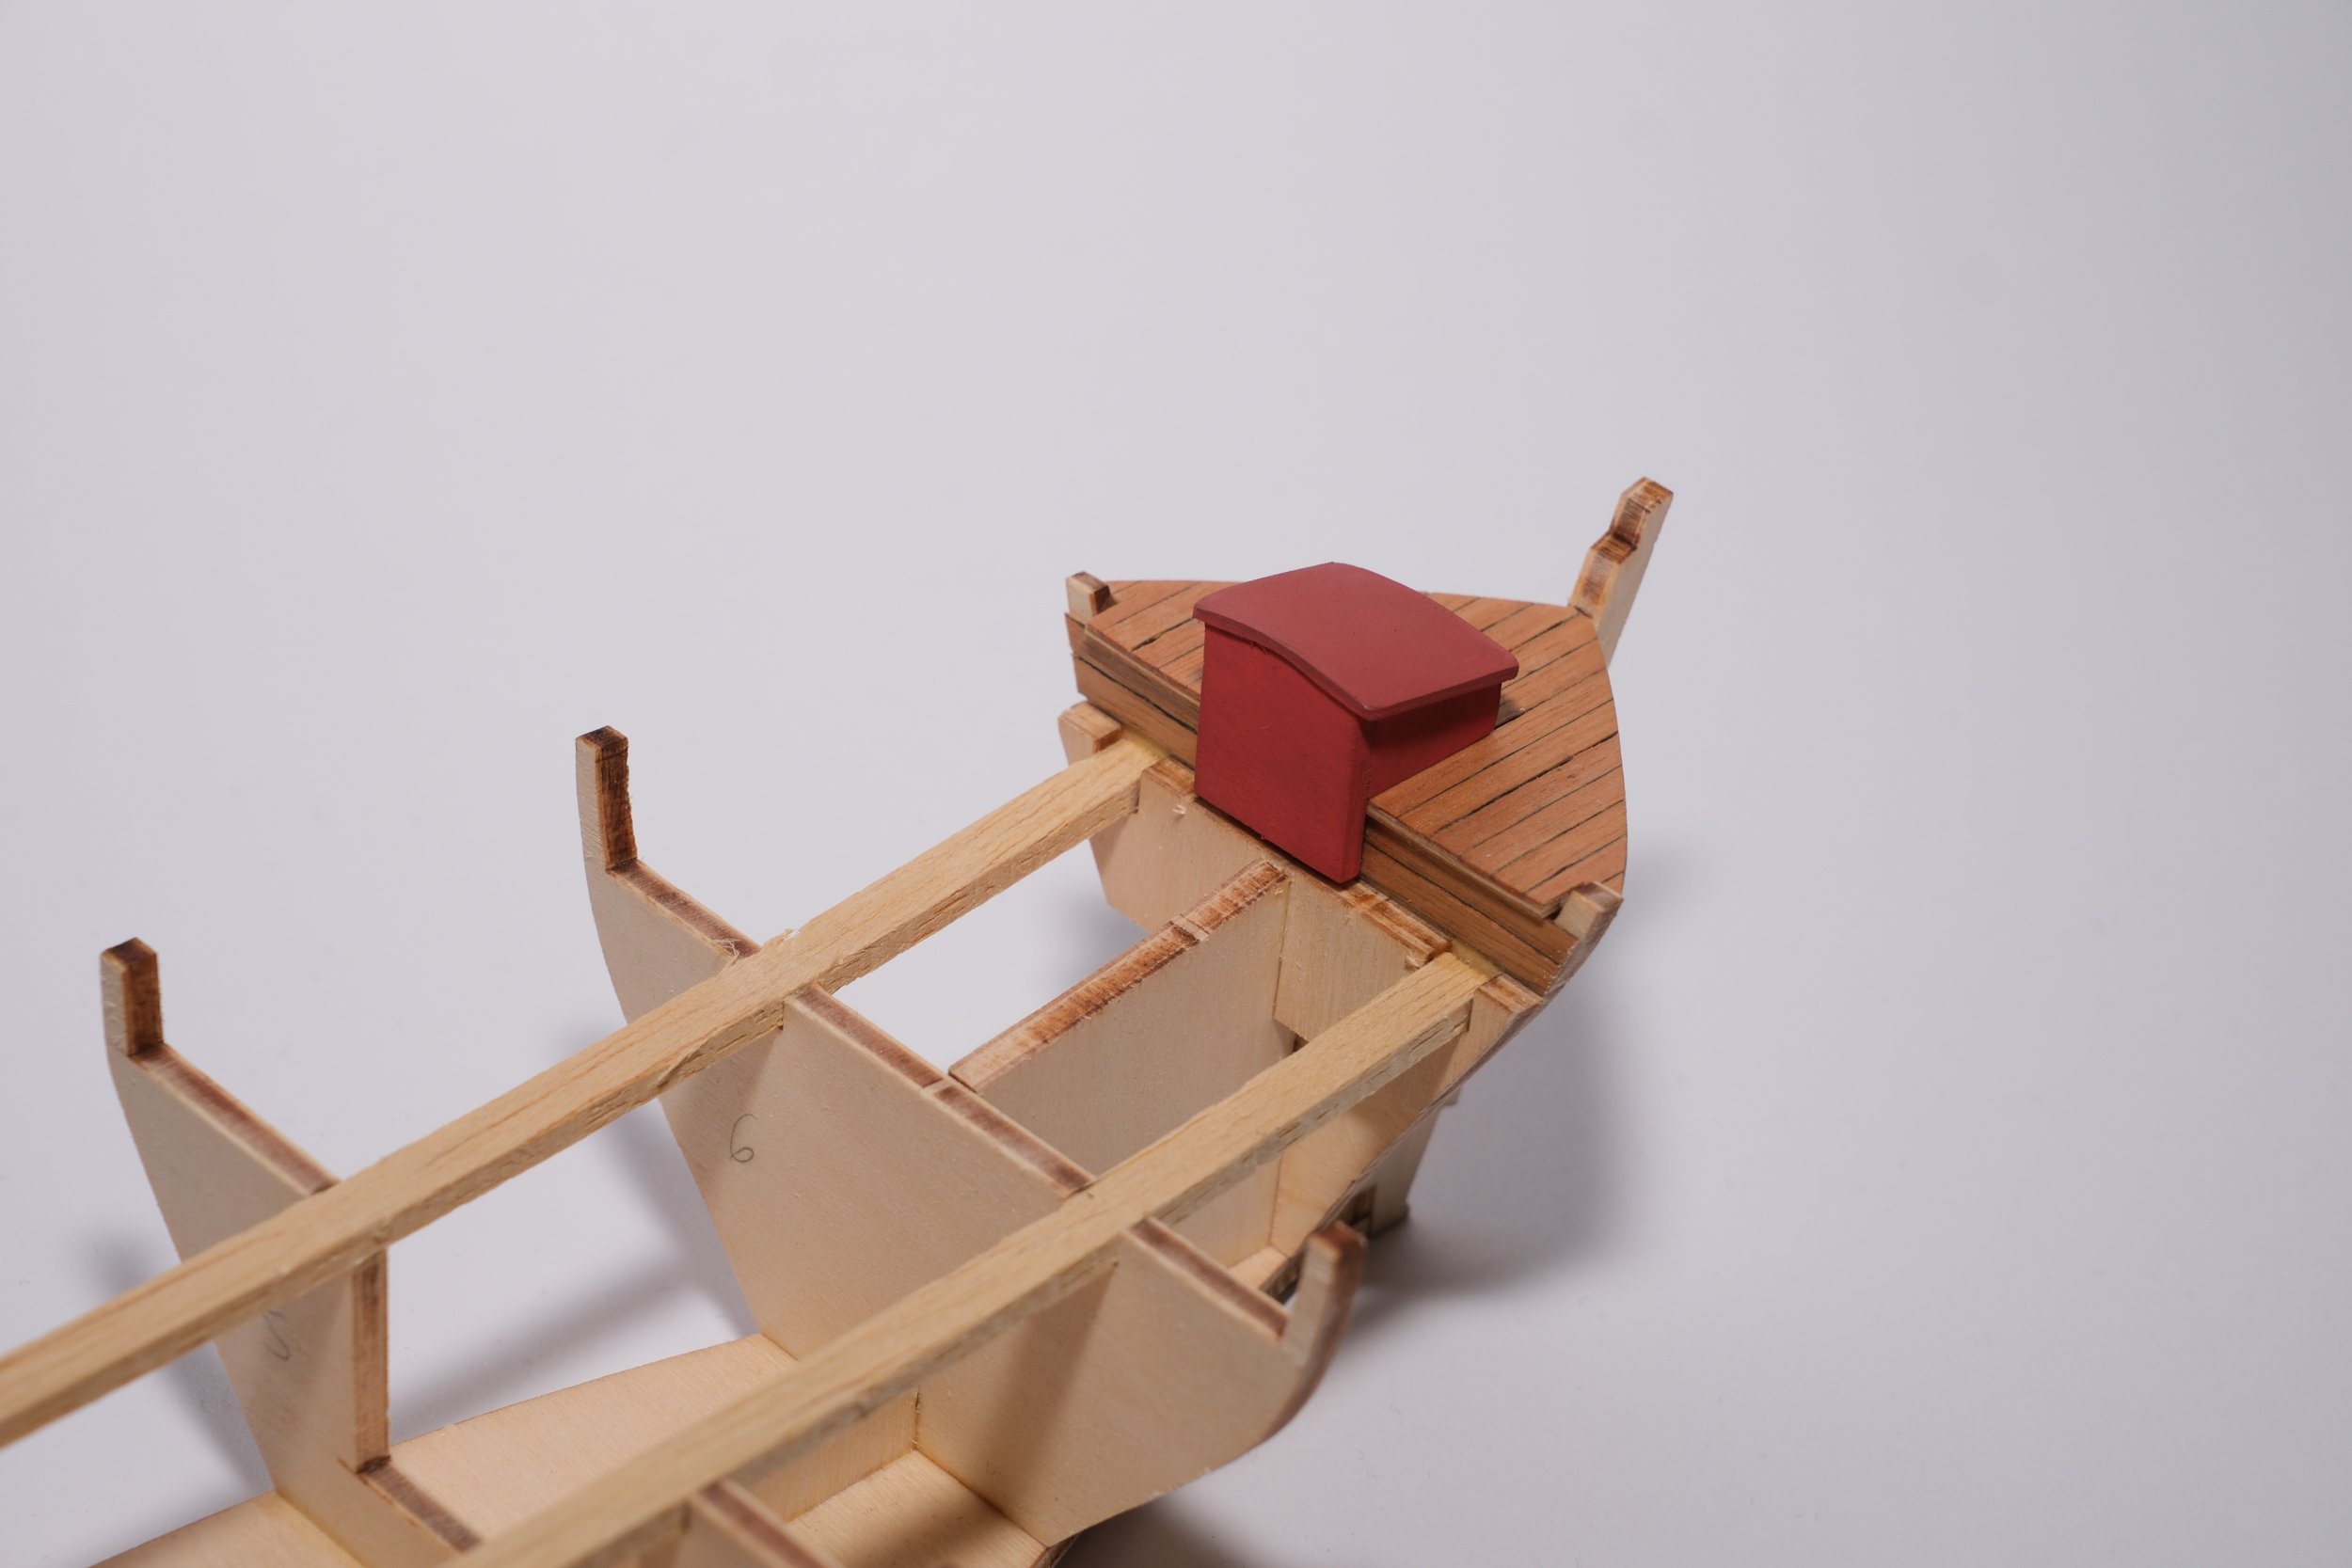
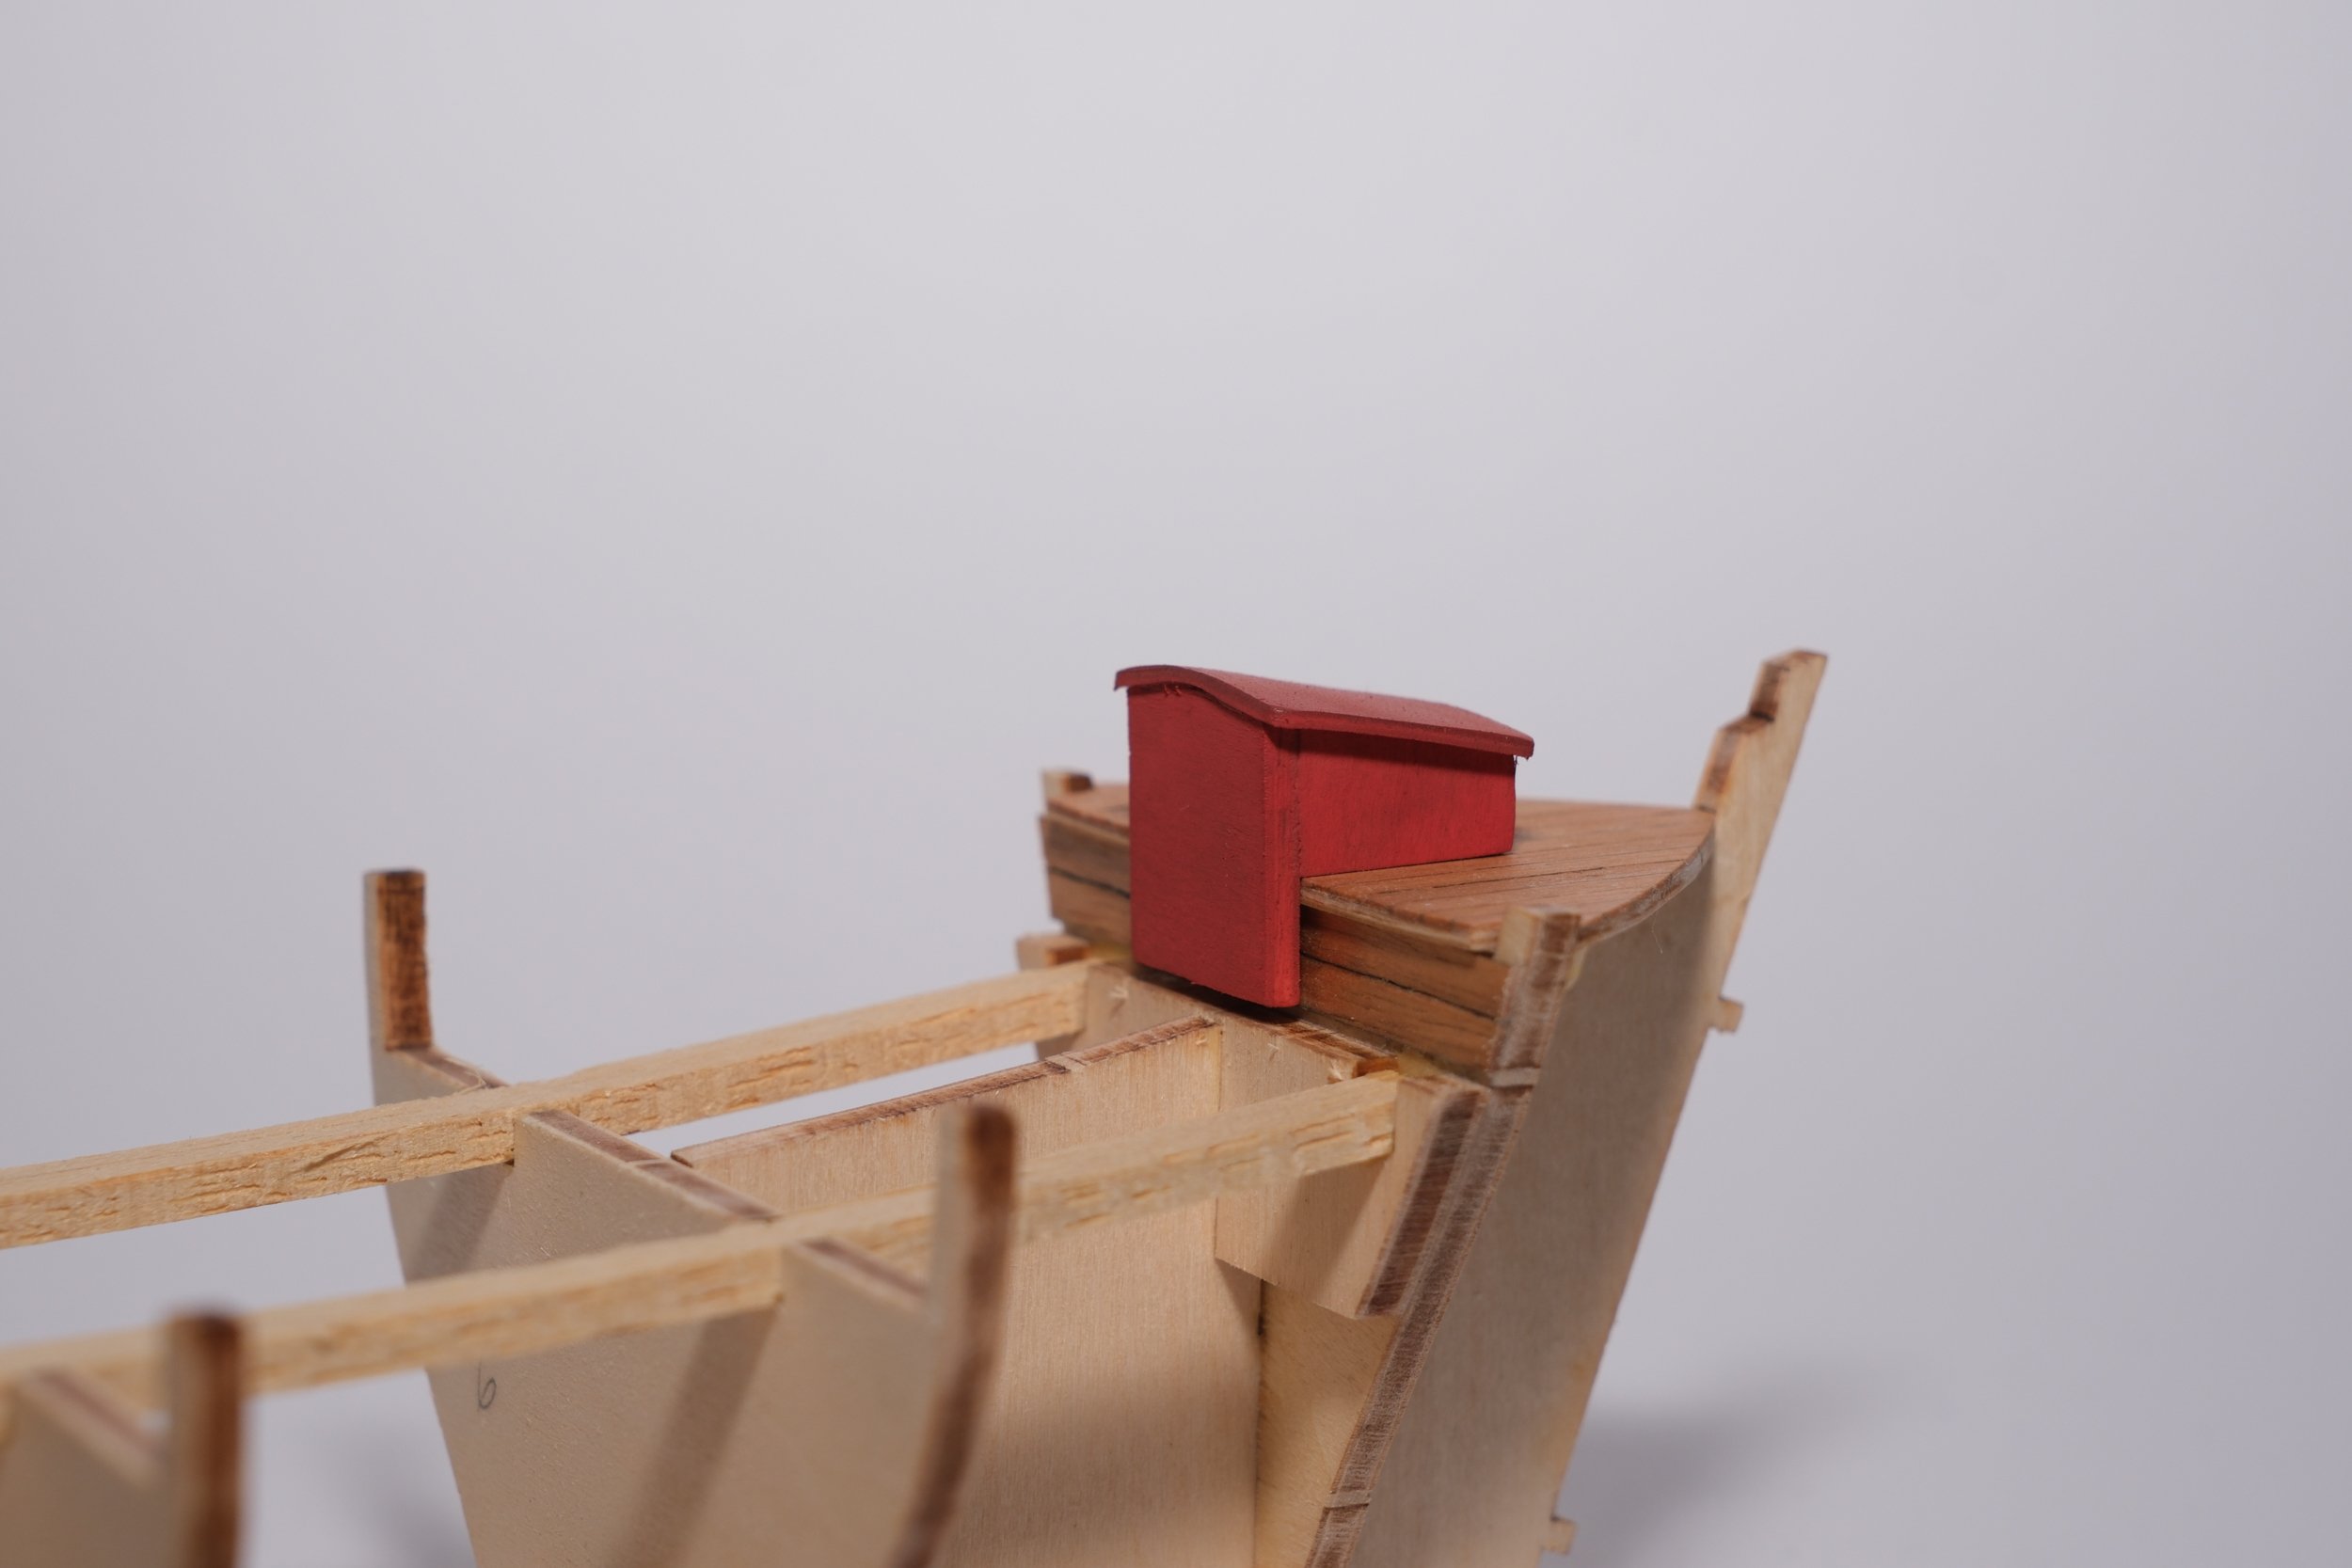
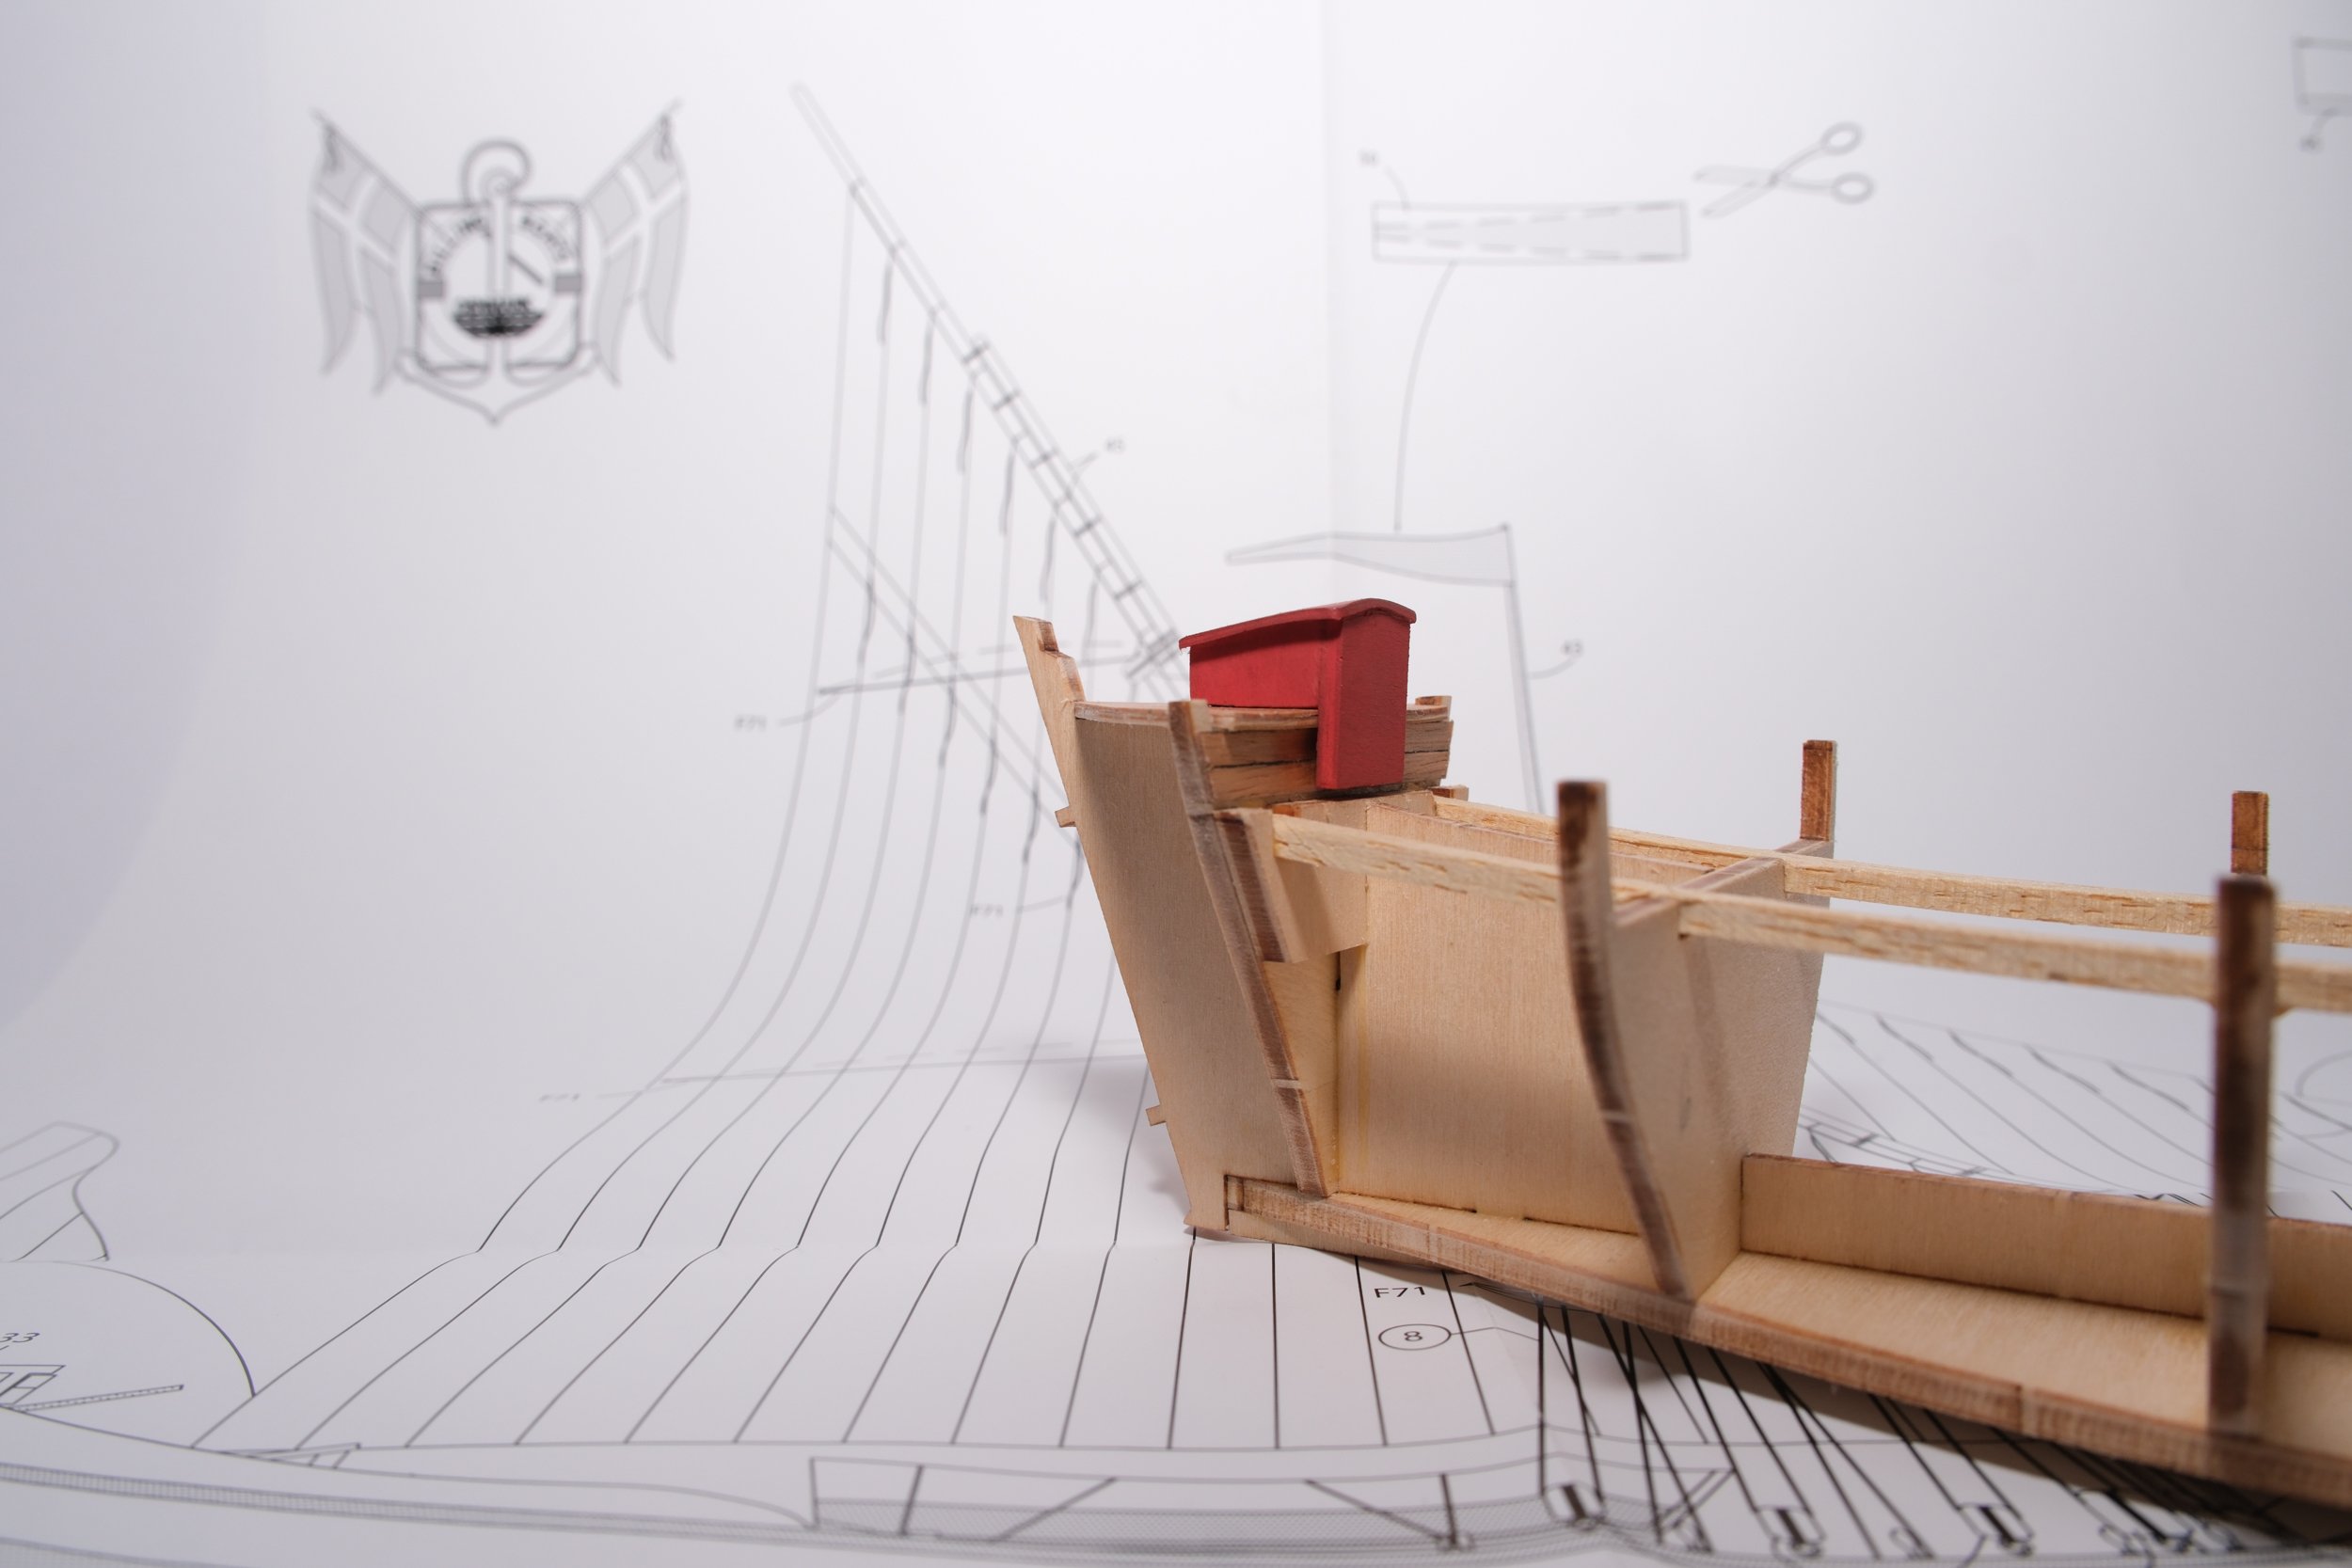
 Hello people, I'm starting build log of fictional boat Le Martegaou by Billing Boats. I made before one smaller boat from scratch and recently I mostly was in plastic modeling. I hope I will finish this project and will not curse it because I've publish it I wanted to wait to start planking and then to publish build log but some feedback and advices can motivate and direct me eventually. Several years before I started Jachinte build log here on MSW and abandoned it because of moving and lack of space Soooo finger crossed. About kit - I'm not best person to judge kits but this is probably not best kit in class But biggest drawback - parts aren't clearly numbered and marked and directions are super short and plain. Small things but I think they should clearly mark parts. There is no indication which wood is for deck or planks etc. I assembled keel and frames and started to work on deck. I needed to tweak one or two frames to have nice alignment. I also glued mast support but as I could see, hole is much bigger then mast itself I also assembled small port on stern/backdeck of the ship. I used wood from the kit for the deck because it is not bad and looks nice I think. I also colored small port into the red color which will be also color of the bulwark so to be a matching and I think it fits nicely with color of the deck. But this can be changed eventually if I decide that is too much. I can't leave it in natural wood color because it is plywood. Also I decided not to complicate to myself or buy anything additional for this but to work with what I have in box and just to finish it! Planking will be challenging I know that in advance. And about sails not sure yet will I made them. Thanks for watching Elmir
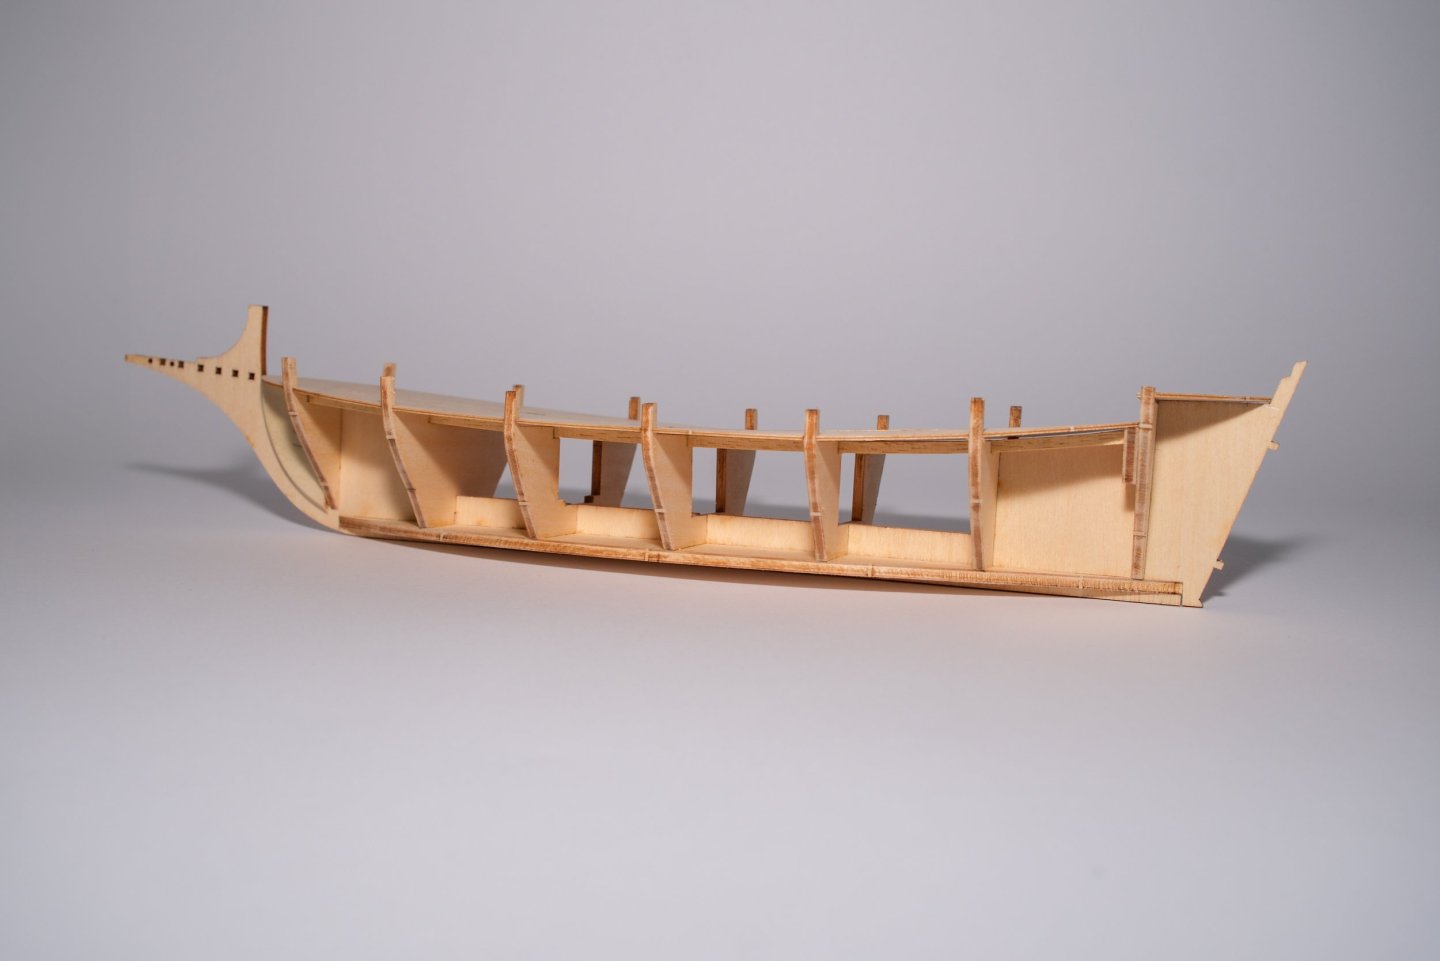


-
 Work in progress Im workin on this ship slowly. Already more than 1 year long. With some conversion
-
 Hello Everybody! I just joined in (have been lurking for a long time though). Very happy to start sharing my first build in decades and my workspace. One of the benefits of being single (divorced) is that my apartment is 100% MY space, so I have my work bench in the living room 😁 Started Calypso over a year ago but life happened and had to pause it until now. Enjoy these couple of pictures and will do my best to post more as I progress through the build. Cheers! S21

-
 Was debating doing a build log for this older kit that was given to me from my brother, as he received it from a co-worker that had recently passed away, and wished to pass it to him and thus to me prior to his passing... It is classified as a beginner build but these "beginner" kits from Billing Boats are in my opinion so basic in design and parts and given the poor tolerances for fitting out of pieces and parts, that it in fact it is not a beginners kit. The high end large kits (now laser cut) with fitment being so perfect, that though classified as advanced, it perhaps could be qualified as much easier to build... anyway my thoughts. I decided to do the build and pass it back to my brother given the emotional connection is truly with him. My wife is Dutch descent and given my trips to Holland and having seen my fair share of Dutch river barges... I do find them absolutely beautiful! I have decided to build it completely out of the box with no upgrades with the exception of the sails. I started this in the fall and worked on it here and there... I did forgot to take some early pictures but this is what I have to show for... This thing was not easy to plank at the bow for me and given it is single planked construction, I knew really quickly that this was a plank and paint project... which all of the working Dutch barges' hulls are anyways - painted.
- 32 replies
-
- 6
-
-
- Sperwer
- Billing Boats
- (and 1 more)
-
 About a year ago, an offer was made on a Swedish model building forum of a barely started model of Billing Boats Meta. At the time, I had just started to work on my Sloop from Roslagen and had begun to read about the costal sailers and small workboats of the late sailing period in the Baltic. I was considering a fore-and-aft schooner as a possible future subject. When I learned that Meta originally had such a rig, I reached out to the man offering the model. As it turned out, he lived just 15 minutes away, and I went over an evening in August last year. He told me that he had gotten the model in about 79 and had started to build it. But soon he went of to university, and it was abandoned. It had then been sitting in first his parent's house, and then in his own basement. Hopefully waiting to be finished. Now he had sold his house and planned to move to something smaller. Apparently he still felt for the model, as he had kept it all these years, and had now reached out to offer it to someone to complete. What I got was the box with all material and fittings, and the bulkheads and keel assembled. As can be seen from the pictures, this kit was made before the introduction of laser cutting. The paler wood looks like Obeche and the darker strips as Walnut. The pale wood is relatively soft and has quite visible grain, but is otherwise of good quality and clean cut. I plan to replace some, possibly all, of the wood with better quality. The same goes for the fitting, a few pieces looks usable, others must be replaced. The brass belaying pins looks OK, while the plastic blocks and dead eyes are terrible. When I got it, the keel and bulkhead assembly was slightly twisted. It might have been assembled such, but I though that it had been lying on the side for many years in a basement. I bought a building slip from Hobbyzone, soaked the assembly and put it to dry for several months while straightened in the building slip. It did not turn out totally straight, the last bulkhead must have been misaligned when installed. I have not decided if I should disassemble the offending bulkhead, or if I can correct it in place with shims on one side and filing on the other? My plan is to modify the model to make the model look like the ship was originally built. In a future post I will present what I have found out about so far, and what I plan to modify in the model to get her to look like it.


- 118 replies
-
- 10
-
-
- billing boats
- meta 484
- (and 1 more)
-
 Hello all, So as my maiden model I've gone with the Henriette Maria by Billings Boats. No particular reason for choosing this kit other than wanting a plank on bulkhead model to cut my teeth on as opposed to a plastic preformed hull. Decking, albeit an arduous process, was completed by cutting individual strips to the requisite length, adding false nail heads with a pencil and blacking the edges with an artists charcoal pencil. Planking the hull, I'm just going with the method of soaking the balsa strips in warm water, bending by hand over a candle before clamping and pinning into place. Once dried out, the strip is removed, checked for a good fit and then glued in place. So far the planking is going on okay and at a steady pace. I'm in no rush so spend one evening shaping and then leaving it a day to dry out before glueing into place, always doing one strip on port and starboard sides each time. I'm not sure how I'm going to form the shape of hull as it starts to join the keel. There is no indication in the kit instructions, but researching other pilot cutters, like the Bristol Channel cutters, shows the planking not seeming to come right up to the stern post. This appears to be the case when looking at models of cutters on the internet. If the planking is kept neat I'd like to try and avoid fillering and painting the hull and losing the detail of the planking. It would seem a shame, after the time spent, to hide all the detail and make the hull look like one solid preformed piece. Is this is a realistic hope I wonder? Would it be easier to second plank the hull to achieve this? Hope you enjoy seeing the progress thus far and constructive criticism is, as ever, always welcome. Mike


- 7 replies
-
- 4
-
-
- Henriette Marie
- Billing Boats
- (and 1 more)
-
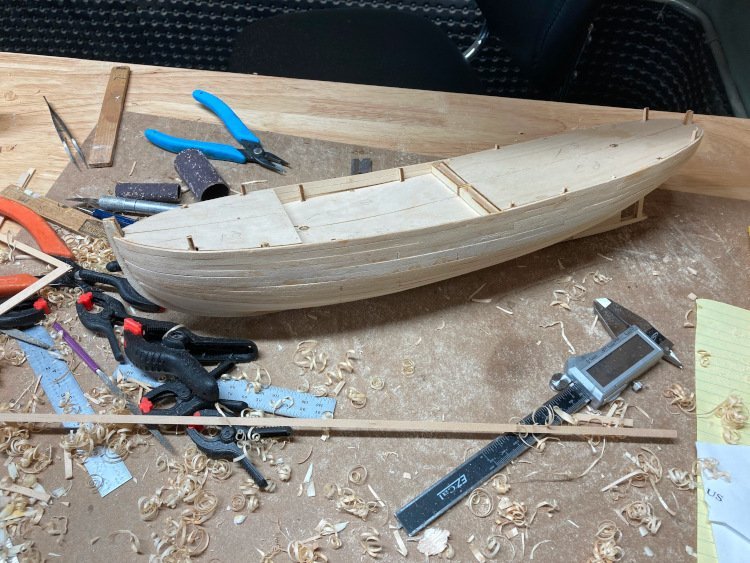
 I'm back with a build log after a bit of an absence. I've had multiple health problems over the past year, which is in part why I didn't do a build log for my HMS Pegasus and why it took me so long to build it, being away from my shop for long periods of time. However, I seem to be in decent shape for the time being (touch wood) and am back at my workbench. In my hiatus I had been pondering what my next project would be when I stumbled across this model on the Billing website, and after a little bit more research I knew I had found it. This one appealed to me for several reasons: -I wanted something simpler than my last few builds had been -this one has almost no rigging! -it's a Canadian boat. I haven't seen any other one available as a model, apart from the Bluenose -it has a remarkable history - it's only the second boat to ever travel through the Northwest Passage and the first to make the trip twice - it's the first do make the voyage in under one year and it's the first to circumnavigate North America - it resides today at the Vancouver Maritime Museum, has been declared a National Historic Site and the great Stan Rogers recorded a song about it. -there are plenty of pictures and videos online to use as a reference -did I mention that it has almost no rigging? When I was in my 20's I built (very badly) a Billing model, but I don't recall if the quality of the kit was good or bad and I had no frame of reference in any case. So this is for all intents and purposes my first Billing kit and I have a mixed reaction to it. So far the good things are: -the laser cutting is very good and the bulkheads and centre keel fit together extremely well. They're as good as I have ever encountered. -there are quite few specialized brass fittings which are really nice and of good quality. -while the model is simplified, there are no glaring errors in its representation of the real boat. However, there are some negatives too: -there are too many poor quality plastic fittings which come on a sprue just like it was a plastic model car kit. -the hull and deck planking material is pretty rough and not very consistent in width. -while I did want a simpler model, there is too much simplification with this one. Built straight out of the box it would look like one of those gift shop ship models. At 1:72 it's large enough for the designer to have incorporated much more detail. -the plans are poorly drawn. The instruction book is all but useless, which is fine - I didn't expect it to be otherwise, but the plans are disappointing. They appear to be a 1:1 representation of the model, but they are very inaccurate. For example for some of the deck components there are discrepancies in size of up to 1/2" between the elevation and plan views. It's impossible to take measurements from the plan. Nevertheless, it's going to be lots of fun adding detail and upgrading many of the fittings. I currently have big orders in at BlueJacket and Cornwall. So far, I have the hull planked, in my usual "suitable for filler and paint" style. I'm a terrible planker, but I never worry about it because filler and paint are my best friends. I've used some planking from my stash, rather than the kit provided planking. I've made two improvements to the stern area. The kit instructions would have you just cut all of the planking off even at the last bulkhead before the stern. Then you add the two stern blocks and sand them even with the finished planking, leaving them unplanked, just to be painted. I chose to install the stern blocks first and plank over them in the usual way, however I found it to be quite a difficult stern to plank. Secondly, the kit provides for no opening to accept the rudder; it's meant to just butt up against the bottom of the hull. The real boat has a framed rectangular opening, so I added that detail. That's where I'm at! David
- 64 replies
-
- 10
-
-
- St. Roch
- Billing Boats
- (and 1 more)
-
 Hello I use Google translate so excuse if the translation gets weird. Here I was going to write about the construction of Billing boats Denmark. I have tried to build several boats before but either I get stuck in some problem or I lose interest. This time around, I have the goal of just building on whatever happens. I do not have the ambition that it will be something fantastic but just ok. One thing I have trouble with is bending the 2 mm thick plywood that sits at the top of the sides of the boat. I have already managed to break such a part when I tried to bend it over steaming water. Should it be soaked and if so how long? So far I have come. Only the deck in the middle is glued, the rear deck is only fixed with a few screws. Here is a small problem, the deck goes 3 mm outside the frame. The plywood to be glued is only 2 mm.