robnbill
-
Posts
841 -
Joined
-
Last visited
Content Type
Profiles
Forums
Gallery
Events
Everything posted by robnbill
-
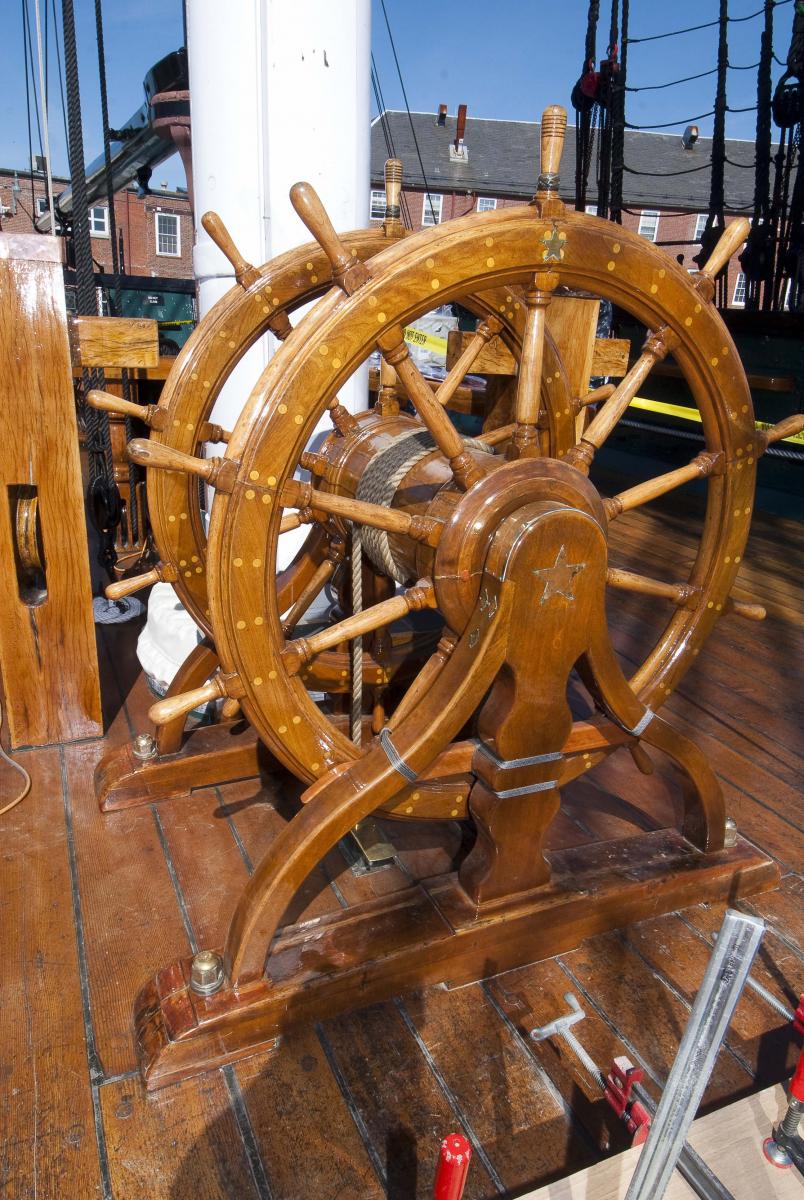
The ones that I have seen up close were painted canvas. My model did not have them either. So I constructed rings made of ⅛" wood and shaped them into rings that fit the mast. Following the Connie's paint scheme, they were painted white. Here is a photo of the USS Constitution Mizzen Mast and wheel. You can see the base of the mast behind the wheel.

-
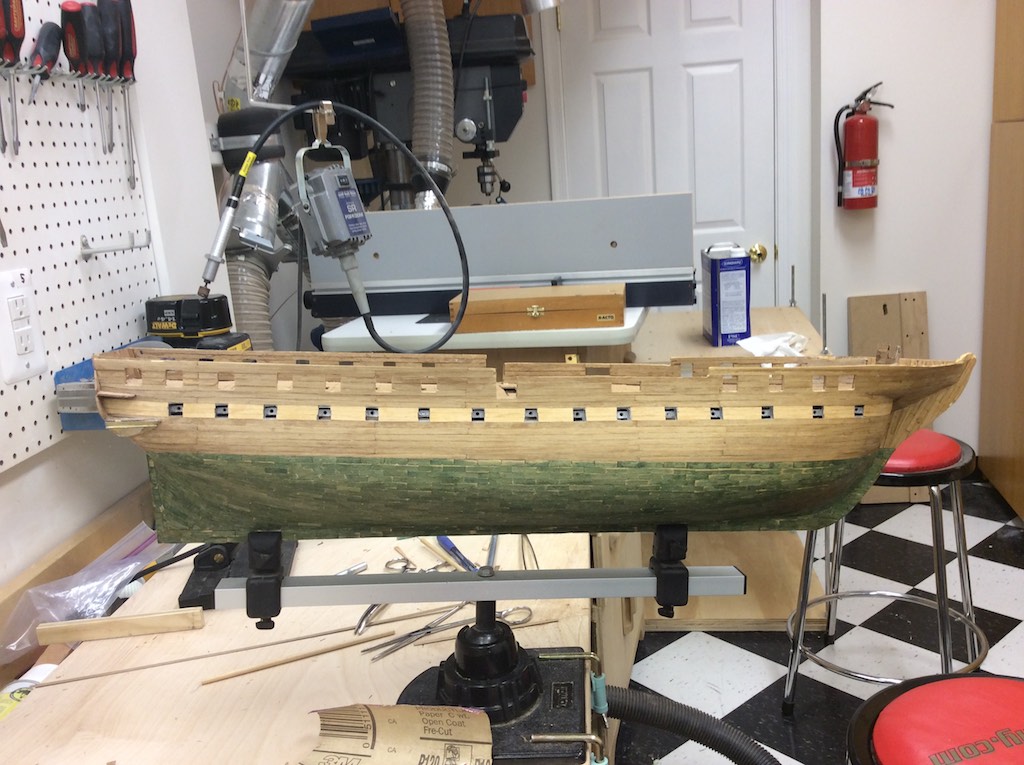
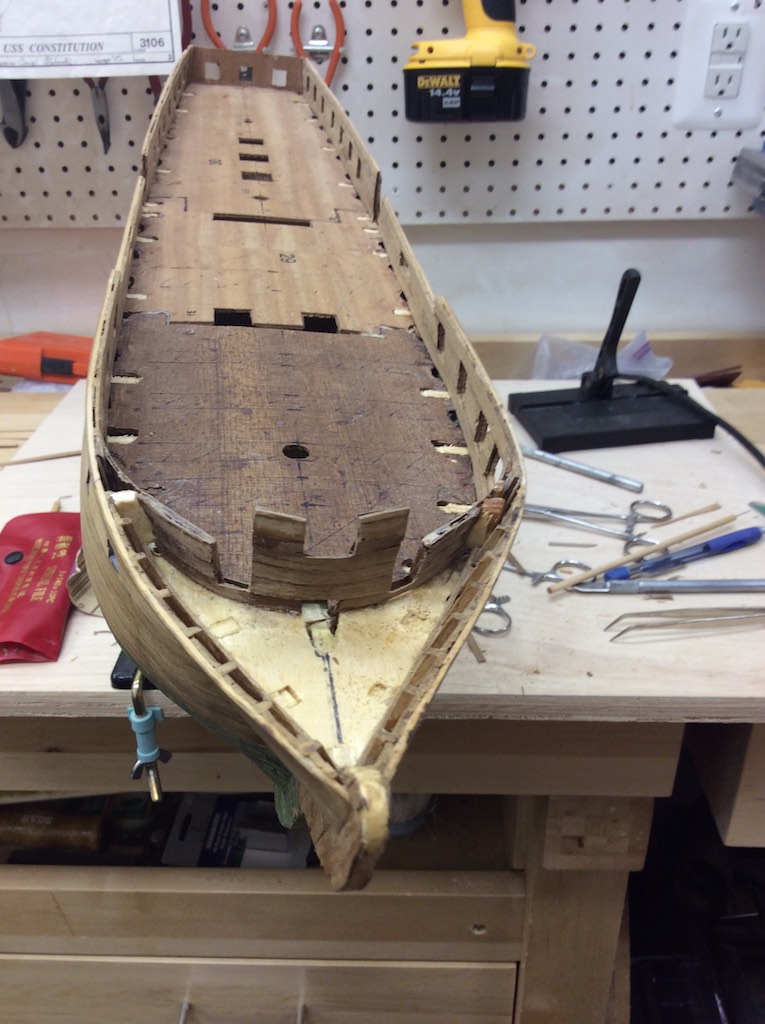
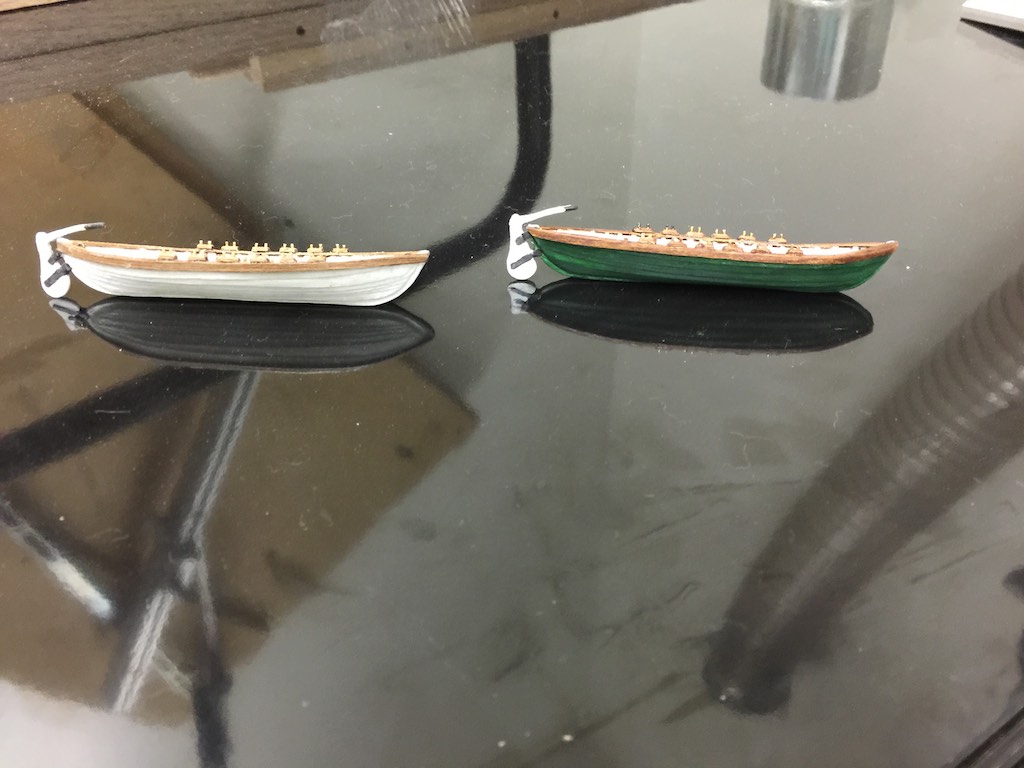
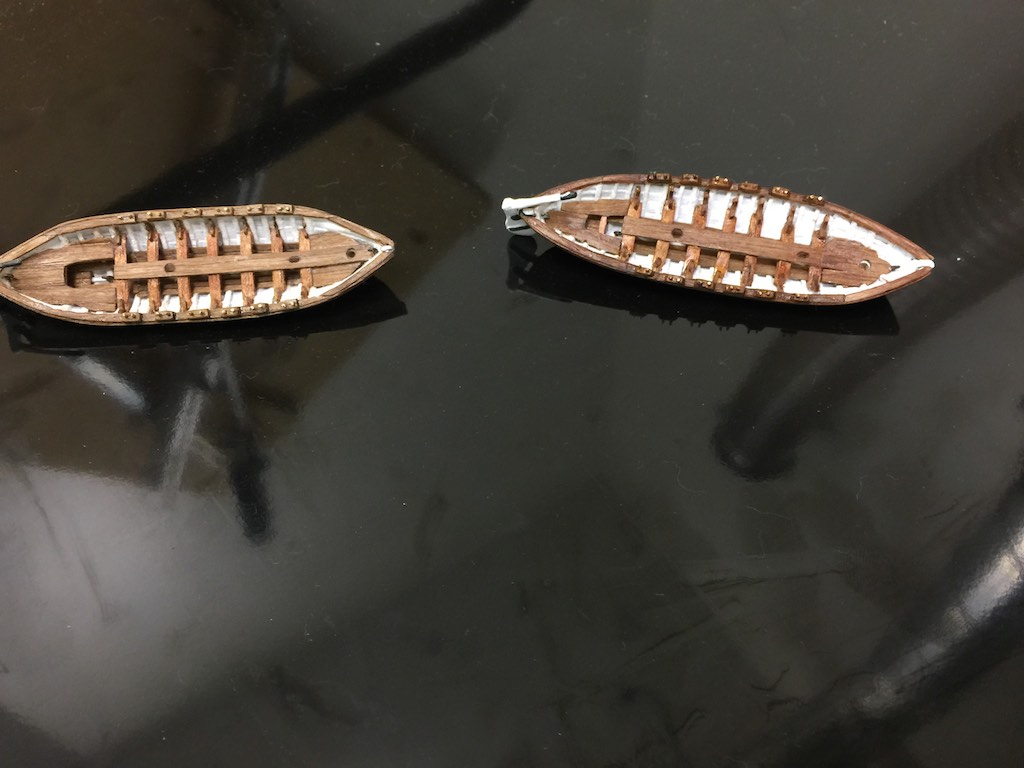
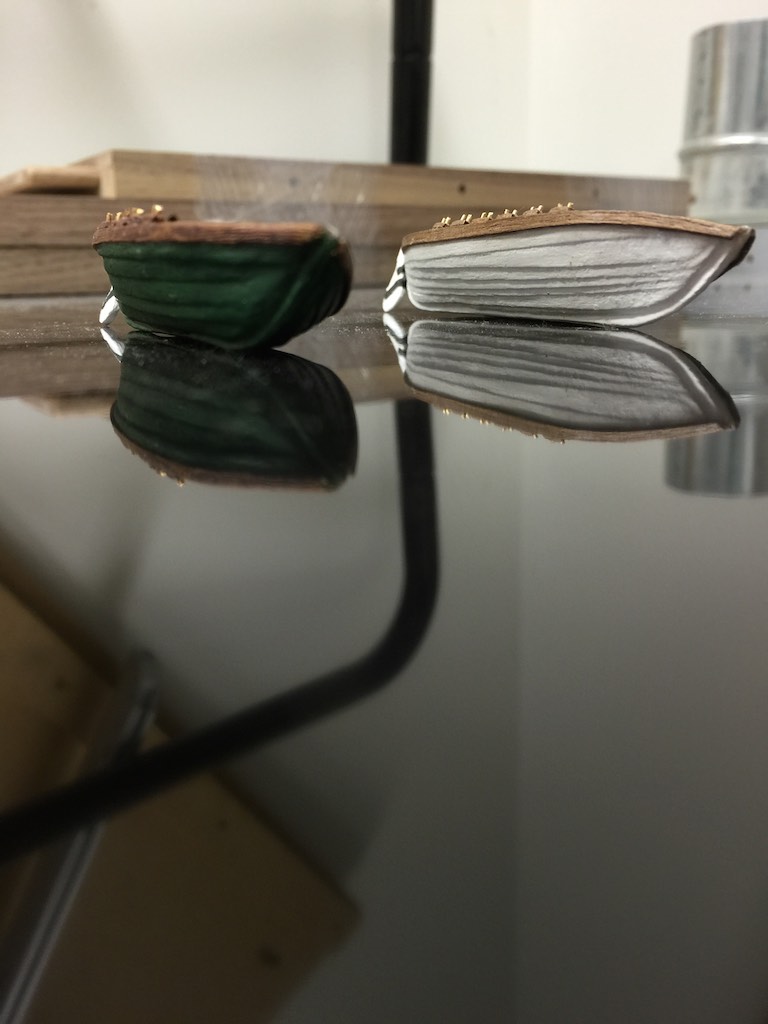
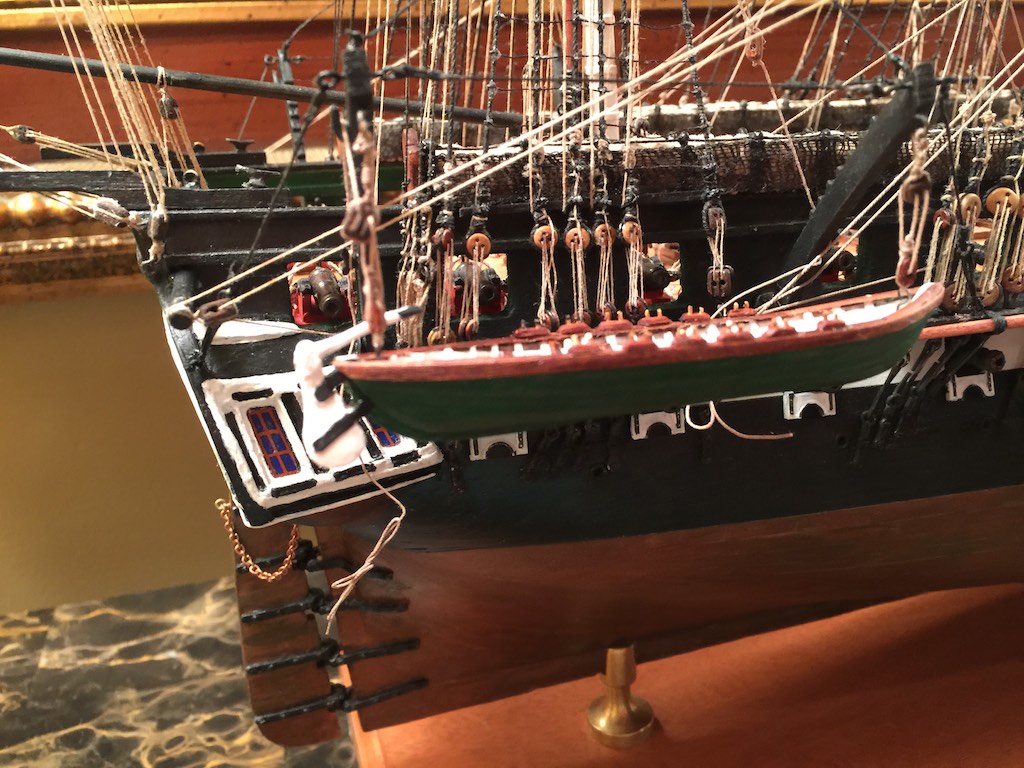
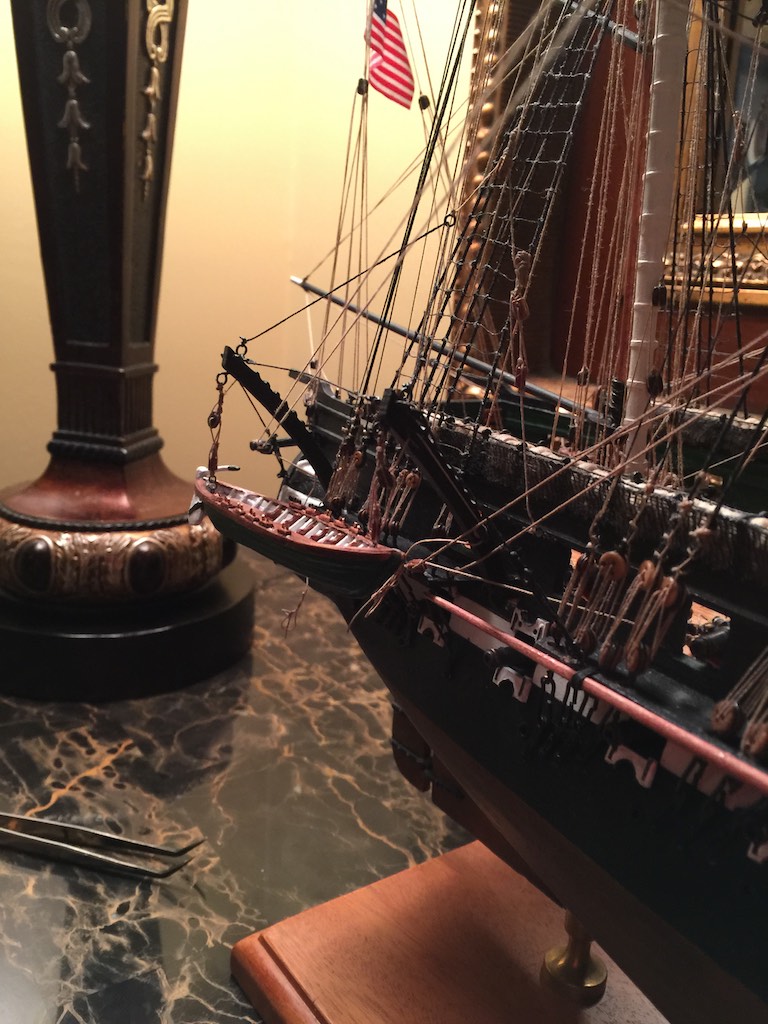
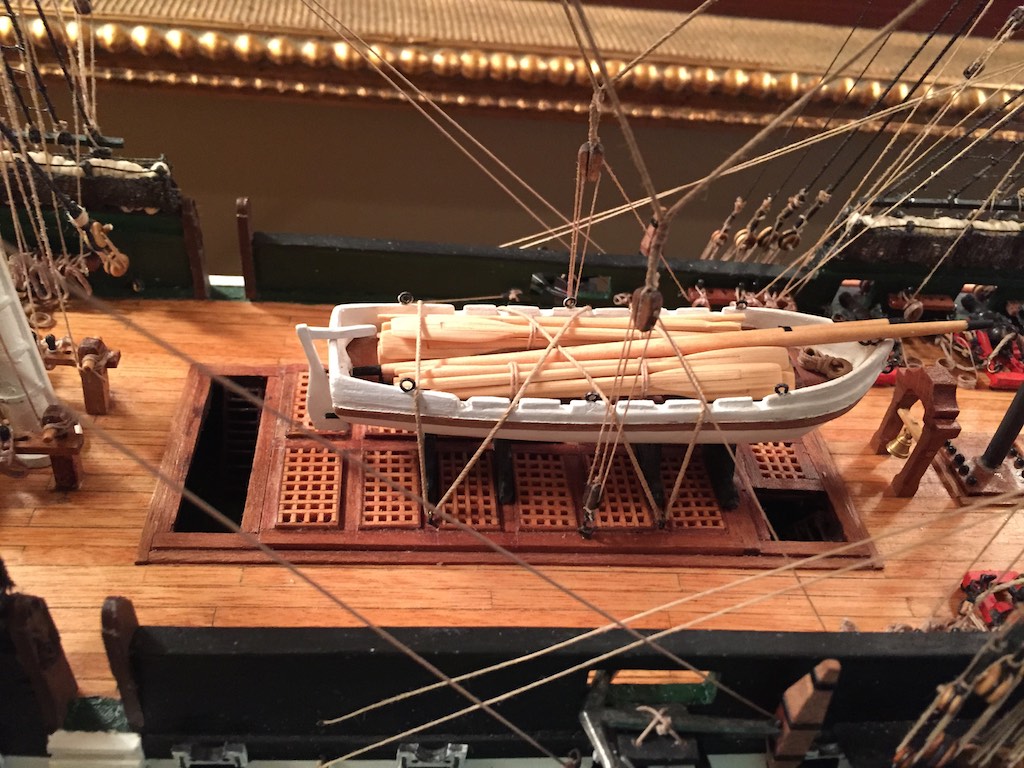
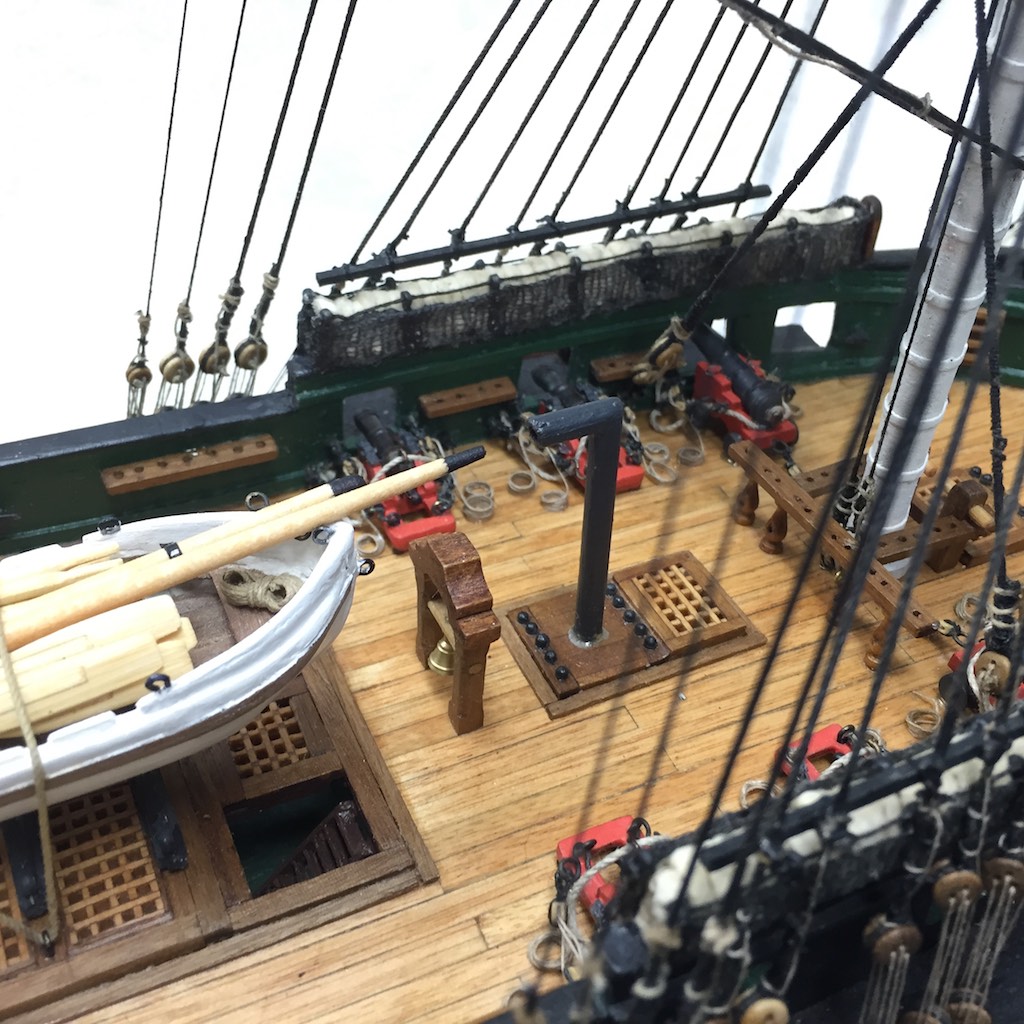
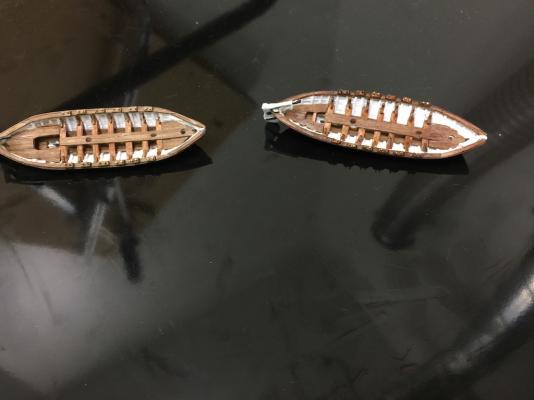
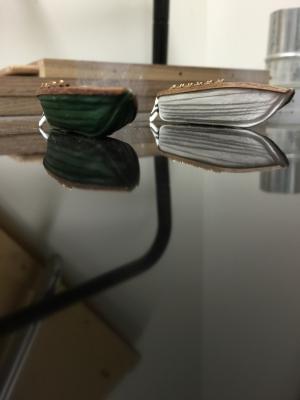
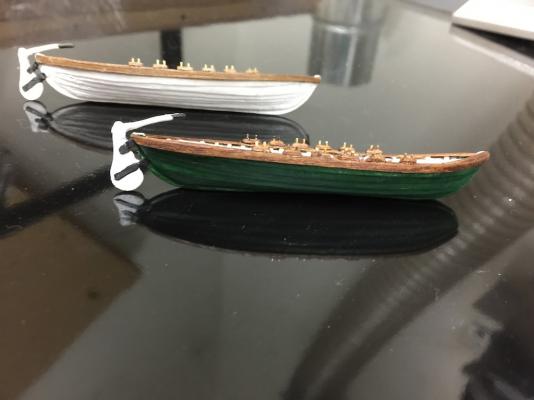
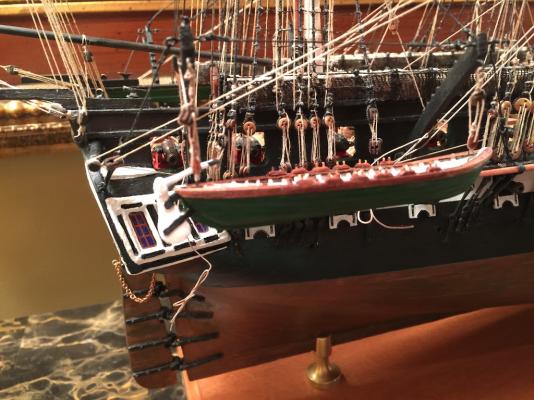
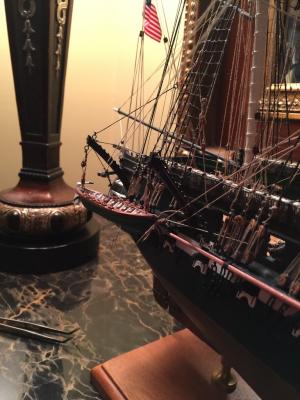
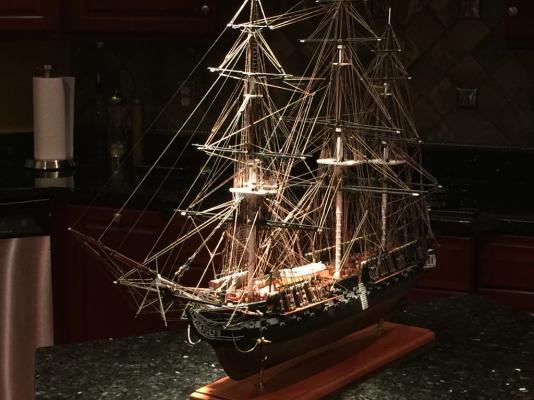
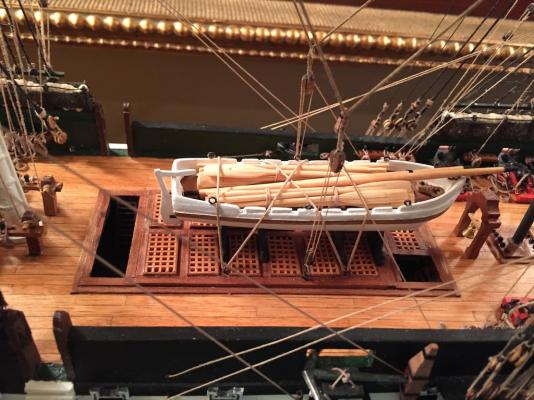
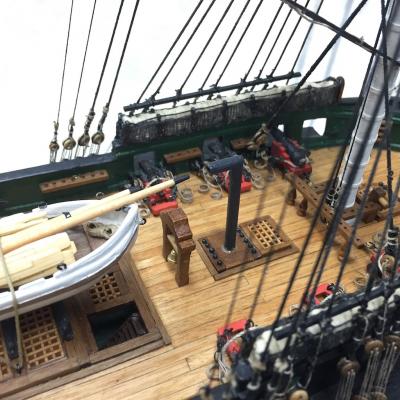
 I completed the second whaleboat today. Now I just have to build the 25 foot captains gig and accessories, and the ship will be ready for the display case. I have the mold ready for the gig, tomorrow I will start cutting the keel and strips to plank it. I will be painting it similar to the starboard whaleboat, white. I have photos of the two whaleboats and the gig's mold below. I also hung the green one in the starboard davits to see it on the ship. It will actually be on the port side. Again, I decided to have the rudder in place since my cannon are all run out, I would think the ship's boats would be ready to go. I will have to make a few more blocks before I can rig the boats to the ship, but I will wait until the gig is complete and I have all the accessories made. I also was refining the joints for the display case construction last night. I was still wrestling with the top mounted piano hinge for the rear access door. THe glass for the rear door weighs in with the frame at over 30 pounds. Putting it on the bottom is not something I want since it puts the door in the way of anything being done in the case. Having it on top though also presents issues. Raising it puts pressure on the entire case to move away from the door as it is being raised. I think that given the weight of the entire case, this would probably not be a problem but it also would cause stress on the doors framing. The frame is thin so it could blend in with the other sides. I planned on gluing the glass into the frame so this would give it strength. However, if the glue ever failed, the door could bend resulting in the thin mortise joints to fail and the frame separate. This would just not be good since the heavy glass would end up either crashing to the floor or into the side of the case. Either way would be a disaster. So I looked at using a drop in door. The bottom and top would be slotted allowing the door frame to be pushed up in the deep top pocket, the bottom would swing in then set down into a shallower pocket in the bottom. This would mean no hinge, and the door would virtually disappear when it is closed. However how to handle the door to perform the shutting and unshutting has to be tackled. The answer is the suction handles used by glass and granite installers. These would adhere to the glass allowing the door to be positioned then removed and stored away once the door is shut. So this is the direction I will go with the case. I also ordered the engraved name plate last night. I will mount it on a stand made from some of the real Connie's spar material. I have used this material in the ship's boats as well. I would have used it in the ship, but the hull was completed by the time I asked for the wood. Oh well, it is still in the model. Next Friday will be the one year anniversary of starting the build where I left off. She has come a long ways and the finish line is within sight. I have also included two photos from the day I uncrated her. The previous time she had seen light was 21 years before. Just as a reminder I have a photo of how she is now.


- 335 replies
-
- 6
-

-
- Constitution
- Mamoli
- (and 3 more)
-
I like the look of her bare poled. I am not tempted to put sails on her. I have loved building her, and will always look proudly on her, but once the Captains gig is mounted on her, she will be done! FYI, next Friday will be the 1 year anniversary of my restarted build. She will almost be done by then I think.
- 335 replies
-
- 4
-
-
- Constitution
- Mamoli
- (and 3 more)
-
No sails. The kit had an option for them, but everything I read said for the first ship, not to think about it. SO her rigging is complete except for rigging the three stern ship's boats. I am almost done with the second whaleboat and I have drawn up in DeltaCAD the 25 foot captain's gig for the stern.
- 335 replies
-
- 2
-
-
- Constitution
- Mamoli
- (and 3 more)
-
It is looking great. The rigging is more intimidating than it is difficult. Just like everything else you have already done, it is just one step after the other. Before you know it, you will have them all done. Bill
- 1,756 replies
-
- 3
-
-
- constitution
- constructo
- (and 1 more)
-
Here is what you are looking for. http://www.amazon.com/Jeweller-Rosary-Beading-Pliers-Cutter/dp/B002EY1Z5Y
- 1,756 replies
-
- 2
-
-
- constitution
- constructo
- (and 1 more)
-
Advice I received was to buy some brass wire and make rings and eyebolts. You need many, if you learn to bend them, and it is easy, there is no fear of dropping one. If you look at the beading section of the hobby store, or at Amazon, you can find some small round nose pliers made to make rings of various sizes. They are well worth having. I used many more rings and eyebolts than were in the kit.
- 1,756 replies
-
- 4
-
-
- constitution
- constructo
- (and 1 more)
-
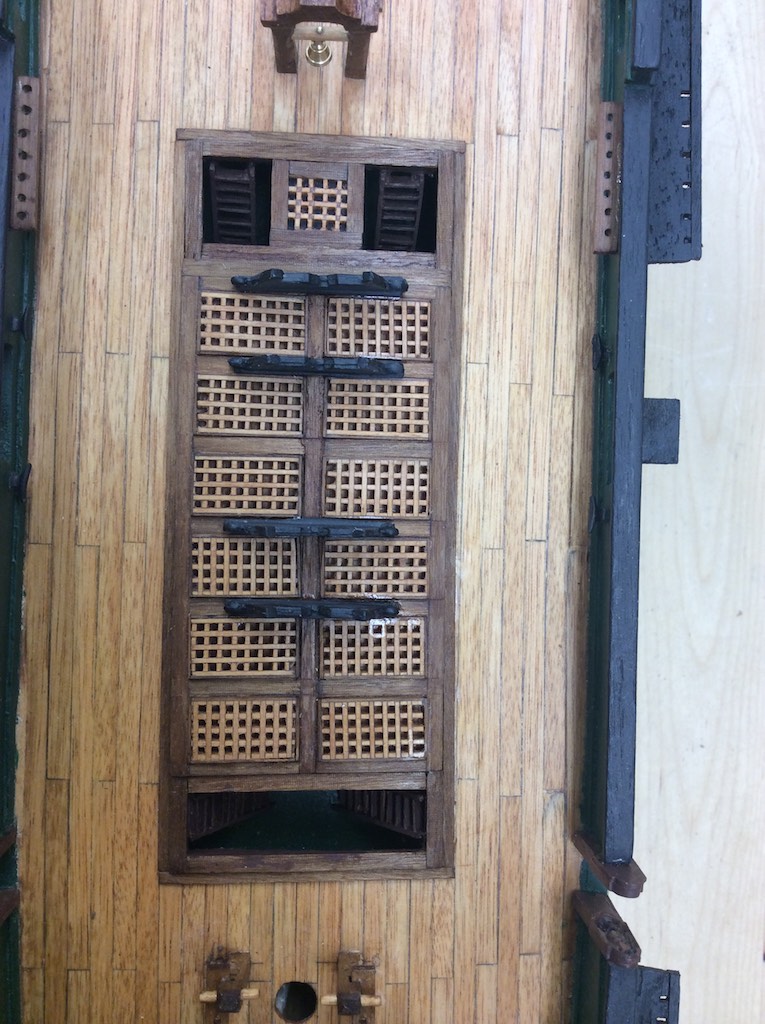
If you can get the Mahogany to cooperate for such small pieces, the grate and combings might look good in contrast with the deck. My decks are Tanganyika, coamings out of walnut and the grate is basswood (maybe). The areas around the ladders were cutouts. So below and around those areas I painted dark green. Underneath the main hatch and other gratings, there were no cutouts. For these I painted the deck black before gluing the hatch assembly down to the deck.

-
Well best of luck. You have done excellent work to date on your ship. I look forward to following you as you complete it. Your technique for making flags saved my bacon when the flag that came with the kit tore. As a bonus, it allowed me to make the correct flag rather than the one supplied by Mamoli.
- 732 replies
-
- 1
-
-
- constitution
- model shipways
- (and 1 more)
-
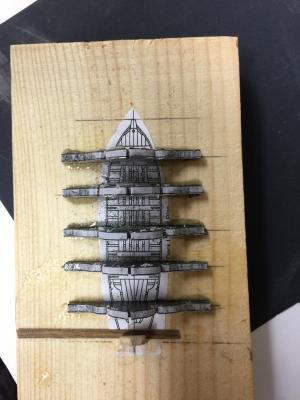
Thanks. I did get a notice that my legs and apron shipped today, so soon I will be headed to the hardwood store to get the case and table top wood. I made a roll-top desk out of walnut a number of years ago and and finished it with tung oil and really liked the color. It is sitting just around the corner from where the ship will be in the foyer. I am getting excited to see the ship in the case. I tried the LED's last night and think the kelvin temperature will look good on the model. Now, I just have to finish the ship's boats before I can start on it. I did make progress on the boats and was able to complete the planking on the second whale boat today. Still a bit of shaping/cleanup to do on the bow and stern but the planking is out of the way. I also cut the mold forms for the remaining 25 foot captain's gig that will be hanging from the stern davits. Given the small size of the strips, I used the bending iron and thick CA to attach the planks. This worked well on the first boat and since I was fresh off the first boat, the second one was as well. I will get some photos of the new ship's boat tomorrow to show the progress. Following Bainbridge's manifest, this one will be painted green.
- 335 replies
-
- 1
-
-
- Constitution
- Mamoli
- (and 3 more)
-
Jay, it might be easier just to tie them at this point. I found that the bent tweezers worked on getting to the hard to reach lines.
- 732 replies
-
- 1
-
-
- constitution
- model shipways
- (and 1 more)
-
Rich, the main issue I had with the spars was learning how to turn the ends down to toothpicks without breaking them. I actually used my full size lathe in doing them. Made turning them to size quicker once I learned how to handle them.
- 1,756 replies
-
- 3
-
-
- constitution
- constructo
- (and 1 more)
-
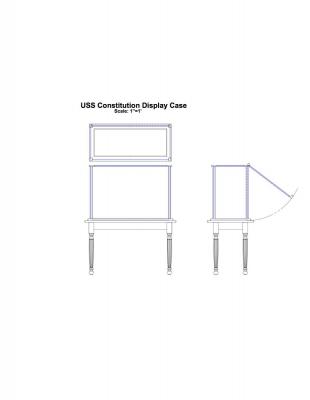
Thanks Rich. I thought about hinges on the bottom and as an alternative on the side. I settled on the top hinge because gravity would tend to keep it closed and it could be lifted out of the way while I worked on getting the ship in place. There are obvious issues with hanging a heavy frame from the side, so that was a non-starter. If it hinged down, I would have to be reaching around the large side to get to the interior of the case. The side is approximately 45" wide by 30" deep, so it really would be in the way. The glass is heavy - about 26 pounds for each front and back, so hinging it from the side would require an extremely strong lock at the top, or screwing it into the top frame to make sure it did not open accidentally, or some one accidentally bumps it and cause the top to fall open. I could use a chain to restrain it when open, but I do not plan on going back into the case other than the extremely occasional dusting, if required, and the chain would show. The top hinge will be hidden and it will appear like a solid case. It will be a two person job to put the ship in the case, but that is okay. A second set of eyes when maneuvering the ship into position will be welcome. The piano hinge I plan on using at the top will allow the top to raise to a horizontal position so it will be out of the way. I thought about a drawer but nixed the idea. A drawer in the foyer would be an attractive place for keys etc, and the movement of the drawer, even on glides, would jiggle the case. This could impact the ship over a number of years. Also, someone might be careless and shut the drawer hard. Not something I want to happen. There will be room underneath the table and I may mount a permanent box to contain the plans, as well as the build log. It would be removable, but would not have the issue of a useable drawer.
- 335 replies
-
- 2
-
-
- Constitution
- Mamoli
- (and 3 more)
-
That makes great sense. I can see having a separate base would be much safer. All of that aside, I still may need to switch it out with a new base if the colors of the mahogany clash with the stand. However, it still would be easier to switch it out in the controlled environment of the workshop than trying to screw it onto the base of the display cabinet. I still will attach the base of the ship to the base of the cabinet but that wil be easier and safer since the ship would be stable on it's base as I do it.
- 335 replies
-
- 1
-
-
- Constitution
- Mamoli
- (and 3 more)
-
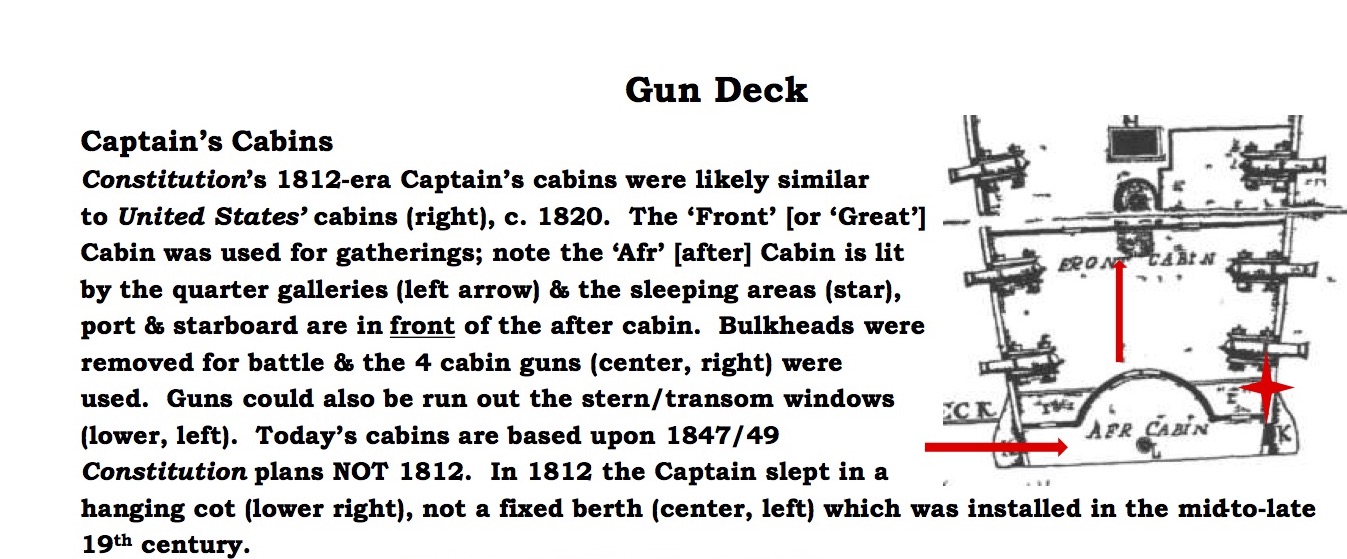
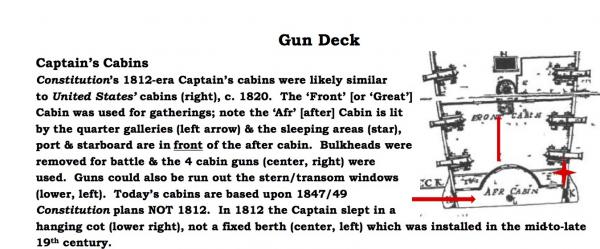
It is interesting. The original article is on the Navy site. I think it is unclear if all the bulkheads were removable or just those between the fore and aft stern cabins. I was thinking they were just talking about the latter, but I reread it and it could have meant them all. One thing you could do is to reach out to the Connie's historian at the museum. She helped me when I was wondering about the color of the fighting tops. Currently, and on some very nice models these are gray. She said that they believe the fighting tops were white during the 1812 period. So I know they are responsive to questions.
-
Clark, when I was going out for the link last night I was rummaging around and found an interesting discussion of the Captains cabin and what it probably looked like in 1812. Very different from today with a small aft cabin open to the gallery, and the sleeping quarters in a forward cabin (sleeping on high end hammocks). It is on the Navy site. I don't remember seeing anyone modeling that but so few model the gun deck. ConstitutionCaptainsCabins.pdf
-
Blackjack, don't forget the spar width when looking on your mantle! We don't want her to slide off.
-
Thanks Steve. I discussed this with the leg manufacturer. These are dining table legs and should be more than substantial enough to hold the ship and case easily. The glass will weight in at right at 100 pounds (45 Kilos). The wood I have not calculated yet, but it will be substantial. This case is not going to move easily once installed. That is very desirable to protect the ship from bumps.
- 335 replies
-
- 2
-
-
- Constitution
- Mamoli
- (and 3 more)
-
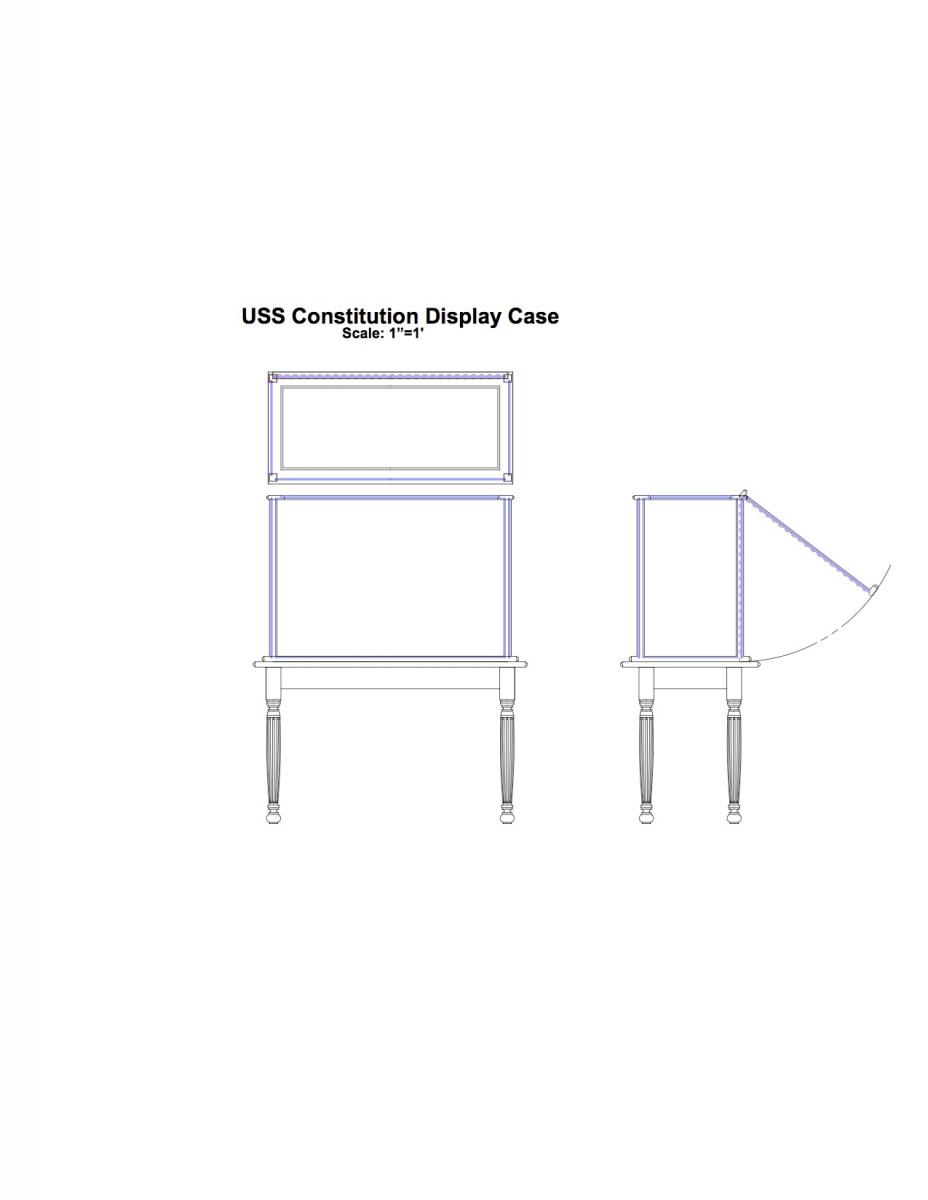
The last few days have been busy ones. I decided the stern ship's boat will be the 25 foot gig. I wanted to have a different look than the two whale boats. Like the whale boats I pulled the details from the AOS and converted it all to CAD. This insures that the scales remain the same as well as forcing reconciliation between the various drawings in the AOS. I have developed the CAD drawings for the 25 foot Gig and have glued the mold shapes to the mold material and will cut it out today. I will also work on the second whaleboat today. Over the last week, I worked on the case design in CAD and am pretty happy with it. I still need to devolve the various parts into cut sheets. For the design research I purchased Wes Marden's book as well as the compilation by Peter Vissar on this site. After reviewing these designs I drew up my list of requirements. 1) It needed to be large enough to adequately display the ship. There were a number of recommendations on the sizing of the final case. I used these to develop the interior dimensions of the case. The ship is 39x28x14in. The interior case will be 2" greater on all sides of the ship, so 43x30x18in. 2) The case would be a wood frame 3) The case will have a top hinged back to allow for access to the ship. Since the case is so large, the prospect of lifting it and setting it down over the ship is extremely accident prone. Also, since I plan on lighting the case, I would need access to the lights and want the wires to be hidden. 4) The case will have glass sides - I debated on this quite a while. First the front and back sides of the case are quite large. This means a very heavy piece of glass. The alternative is Acrylic. It is light, would have to be slightly thicker, but it also has very specific cleaning requirements. It also still can break and would break into large pieces. The deciding factor was the hinged back. Once I decided on the hinged back, glass was back on the table. 5) Glass - During my research of glass or acrylic there were a number of factors that I looked at. a) The medium must be optically clear The medium must be very strong to resist breakage c) If broken, the glass should break into small pieces to minimize danger to the ship or others. d) Weight was not a factor - other than a heavy case would protect the ship from bumps better than a light case. After discussing this with a local supplier of both, I settled on Low Iron, tempered glass, ¼" thick. The low iron glass is optically clear, it can be tempered, and will offer the most resistance to scratching. It will be strong enough that it will be safe from breakage. 6) Lighting - I wanted lighting to enhance the ship while still being low maintenance and produce low heat. Lights like halogen were not desirable since they produce large amounts of heat. In the enclosed space this would result in baking the ship. Florescent lights have very poor color and would detract from the overall ship impact. LED was the desired type, but finding the correct color temperature and fixture required much more research. I found a number of very good articles on LED lighting for museums. This allowed me to settle on what I was looking for which was 2700 - 3000k temperature and bright. While CRI can be subjective, the recommendation was for a CRI of >90. These needed to be dimmable as well. The lighting was to be inset into the top frame so to be unobtrusive when viewing the ship. Market research led me to the conclusion that I would have to do a custom install of the LED's. There were no off the shelf products that would meet my requirements. I found a vendor, Flexfire.com that offered a high CRI, bright LED strip. These could be cut on 1" increments so could be sized for the case easily. They recommended these be installed in a metal channel as a heat sink since LED's do produce some heat. Without a heatsink, the life of the LED is greatly reduced. They helped me find channels made by KLUS which could be inset into the frame and had a flat diffuser. These can be cut to length and soldered together with connecting wires. The wiring can be channeled through the side corners of the case to the power supply and dimmer mounted under the table. 7) I wanted to use an inlay in the base of the case to enhance the look of the ship. I looked at numerous inlays, from very complex to very simple. I decided on a very simple strip ¼" strip of a white wood with black stripes on the outside. 8) The case should be made of black walnut to match other furniture near by. 9) The case should be incorporated with legs. While I could turn the legs, I really wanted fluted legs and would rather buy them if I could find a good design in the correct wood. Tablelegs.com has just such legs. So I ordered the legs and apron from them. This means I just need to build the table and case to mount on the base. 10) The case should allow for a small amount of air exchange. Studies by the US Navy found that outgassing from the glues and paints, caused model deterioration over the years when kept in an airtight display. Since the LED's will produce a small amount of heat they will cause the air in the case to gently rise. The top glass will be flush mount to the top and the felt around the frame will allow a small amount of air to escape. Small amounts of air will be able to enter the case around the edges of the hinged side. So everything is on order. I have not purchased the wood for the case yet since I am waiting on the legs to arrive. I want to match the wood as close as possible. Here is the design of the case. I decided on a top hinge. A number of cases on the market have bottom hinges. Fo a case this size, I was concerned that when the side is opened, it blocks access to the case since you would have to reach around it, and two, since it is heavy, about 30 pounds, a bottom hinge would require a positive locking mechanism to insure it does not accidentally fall open when bumped. I still have not decided if I want to remove the ship from it's current mahogany base and mount it directly to the display case base. That will depend on how it looks with the Walnut. If left on the current base, it will be secured in place to the display base during installation.
- 335 replies
-
- 4
-
-
- Constitution
- Mamoli
- (and 3 more)
-
Hey Jay. Welcome back. It will be good to read your lessons learned. I had made it part of the regular process to read ahead in the Mamoli plans. Then i would have time to review them and decide my approach before i got there. I installed the side shrouds but not the lower rats because i knew they would be in the way. Some areas make obvious choices cor scratch building. Such as the ships boats, i made the gallery da its since they were the more modern metal. I too follwed your lead and installed the Bentinck shrouds, and cross feet. I always learn so much from your build. Aosl one other question i had. Why did you install your deck boat facing aft? Bill
-
If you go to the Navy's site for the Connie there are numerous plans. There is some great reference material there. One is the Booklet of General Plans. It has sections which show how hight the gun ports are. That said, if your cannon carriages are lower or higher you would have to adjust. Here is the link - http://www.history.navy.mil/USSCTour/frDrawings.html.
-
Are you putting it in a case? One option would be the wood the case will be made out of. Rob and i were just discussing whether or not to remove the base that is on my Connie now and attach it directly to the case bottom. Not difficult to do but higher risk of accidents to the ship in the maneuver. I am just not sure the current base's color and wood will match the case i am going to make. Different wood. We shall see.
- 1,756 replies
-
- 1
-
-
- constitution
- constructo
- (and 1 more)
-
One other book would be Petersson's Rigging Period Ship Models. Both books were recommended to me from Mort Stoll. You are going to have a magnificent ship! One rigging area that I found that caused me some rework is once I would get all the lines rigged in an area I would find I would need to rerun a line to the right or left of another that I had not anticipated. The Mamoli plans were clear on what parts the lines would run through and where to terminate them, but what lines you had to go one side or another was by trial and error. I would pull a line and look if it impeded another or not.
- 1,756 replies
-
- 1
-
-
- constitution
- constructo
- (and 1 more)
-
I bow before you. There are so many lines already with the running rigging. When you add those attached to the sails, it will be a huge accomplishment. I would recommend getting the AOS if you are rigging all the sails. It has been an invaluable source of info for me. I know there will be belaying plans etc you are going to want that are in there.
- 1,756 replies
-
- 2
-
-
- constitution
- constructo
- (and 1 more)
-
The Connie has Boomkins on the bow and over the quarter galleries.