


popeye2sea
-
Posts
1,937 -
Joined
-
Last visited
Content Type
Profiles
Forums
Gallery
Events
Everything posted by popeye2sea
-
I would venture a guess that the location of the channel, or what would be the channel, is too low and would probably be located directly under the gun port. If you raise the location to that point a normal width channel should work. Regards,
-
 I don't know why people go to books like Petersons to get information when there are more contemporary and much better sources of information out there. After reading something like Steels works or Falconers I pretty much shelved Petersons, never to be cracked open again.
 -
MD1400cs wrote: PS: whatever these are called I have to pull them all off. Again a novice with rigging when I made those it did not occur to me to be sure that ropes will be able to loop through – well they can’t – did not leave enough space grrrr. Those are called fairleads. Their purpose is to change the direction of the line. The line passes around the outside of the pulley. You do not need to modify them at all. Regards.
-
In general, a parral and truck arrangement was used for yards that would frequently be hoisted or lowered, i.e topsail, topgallant, and royals. The truss pendant was usually reserved for the lower yards that by the 1700's were no longer lowered to furl the sails. You can see that in the photos you posted the crossjack yard, being a lighter spar, employs a lighter truss pendant than the one shown for the lower main and fore yards. Older vessels, up till the late 1600's still lowered their main and for yards to furl sail so you will see the parral and truck arrangement for those. Just to throw another wrench into the works.... the truss pendants did not always lead down to tackles near the deck. Some vessels lead their truss tackles up to eyebolts under the top. Constitutions truss tackle are lead this way. BTW, the diagram that S. Coleman shows is of the Tye and Halyard arrangement for the lower yards, not the truss tackle. Although I have not the first clue as to what the tackle is that is coming down from the center of the yard and terminating in an eyebolt. Regards,
-
What are you missing? I have virtually a complete 2nd kit that I am not using. I had to buy a second one when a couple of major hull sections warped in the first one. Plus, I am not using any of the blocks, deadeyes, eyebolts, etc. from either kit. Regards,
-
I agree with Frank and Gregory. The brace would come inboard through a sheave in the bulwark and belay to a cleat. The cleat would not be on the taffrail. It would be on the inside of the bulwark. Failing that I would use the deck cleat as Frank suggests. Regards,
-
Thanks for the tip on the tools, Michael. That is just what I was searching for to make thimbles for my rigging. Regards,
-
I still feel, with regard to her adding short splices here and there, that she has changed the ship. If someone looked at the ship 200 years from now would they assume that splices were supposed to be there and usual for rigging of the period? Or, would they have to guess which were the efforts of a conservator? If she did lengthen the lines where did she hide the extra length. Has she changed the way the line was belayed. A normal short splice will significantly shorten a line. What did she have to adjust to accommodate the change? Regards,
-
Isn't the fact that she is adding short splices where none existed before, and shortening the line while doing so, effectively changing forever the original character of the object and potentially erasing historic information about practices, materials, contemporary thinking and tradition. I would have thought that obtaining the same material used for the line and replacing it would be more in keeping with the original intent of the builder. Regards,
-
Adjustable height table.
popeye2sea replied to Ulises Victoria's topic in Modeling tools and Workshop Equipment
I have also been on the lookout for an adjustable height table. While I have seen several varieties that adjust upward I have yet to come across one that adjusts downward in order to facilitate the work on the upper rigging while seated. To me, that would be the more useful situation. Regards, -
I think your answer will be 'it depends'. It will depend on the ship type, the boom length, the captain, the circumstances, and probably a host of other factors. I would assume that , just as in today's Navy, the flagstaff is removable. It probably would sit in a step on the deck with a clamp to the tafferail. Regards,
-
Lines that were to be handled together, such as your bunt and leech lines, would often be belayed on the same pin, as you would never be working these lines singly. Regards,
-
Harpin
popeye2sea replied to piratepete007's topic in Building, Framing, Planking and plating a ships hull and deck
What I find interesting about that paragraph is that there are instances of a modern "s" interspersed throughout. There is even a case where the elongated s and a normal s are used together, as in the word "encompafs" Regards -
I disagree, Jud. The modern method of flying the ensign from a gaff is a direct holdover from sailing days when the ensign was flown while underway from the peak of the spanker or driver gaff. The gaff on a modern vessel is called that because it has the same function and location as of old. The only reason the halyard comes down to the signal bridge is because the signal bridge is most conveniently located under all of the halyards for the peak, gaff and yards. Even then the halyard belays to a cleat or pin at the rail or bulwark The halyard on a sailing man-o-war is a very light line. It would not have been any effort at all to have eased or shifted that line as needed to trim the driver. Remember also that the driver would not normally be shifted through a very wide range of motion; it's purpose being to increase or decrease pressure on the after sail area in order to keep a course with less helm (which is why it is called a driver.) Regards, Former Signalman. Flags were my business.
-
Tools You Can't Live Without
popeye2sea replied to Justin P.'s topic in Modeling tools and Workshop Equipment
Rum, rum, and rum. 'Tis all you need. -
I was on a Forrest Sherman class of DD. Only about 10 or so years younger than Cassin Young. That midships passage helped a lot. Regards,
- 742 replies
-
- 5
-

-
- constitution
- frigate
- (and 1 more)
-
Wow! Beautiful work. Looking forward to seeing more. Regards,
-
Definitely bluff bowed. I would go so far to say that every late 16th to early 17th century ship was bluff bowed. That's just the way it was done then.
-
Thanks Dave. I do sometimes fall into using the actual terminology to describe things nautical. I find that nothing else is more concise or better descriptive than the old ways. And, I also think it raises the level of knowledge of the maritime arts. Regards,
-
The sail would have a bolt rope sewn around the entire perimeter. It would have cringles (loops) spliced into the bolt rope to take the brails. The brails were middled and seized to the cringles before leading up on both sides of the sail to the blocks on the yard. The blocks on the yard shared a strop that was long enough to go around the yard and the blocks and then seizings were put on between the blocks and the yard to hold them in place on the yard. Regards,
-
Identifying a line and type of knot used
popeye2sea replied to maaaslo's topic in Masting, rigging and sails
Not sure what the other 5mm block goes to. So, I can not say how it should be rigged. -
Identifying a line and type of knot used
popeye2sea replied to maaaslo's topic in Masting, rigging and sails
This looks like it might be the upper block for the topsail tye? If so I would rig it in this fashion. The strop of the block consists of two tails. One is short with an eye, the other is just a long plain tail. The tail is lead up through the cross tree around abaft the top mast (sometimes held from slipping down by cleats) and back down through the cross trees on the other side where it is put through the eye on the short tail before being seized to itself. Essentially , it forms a sling around the mast.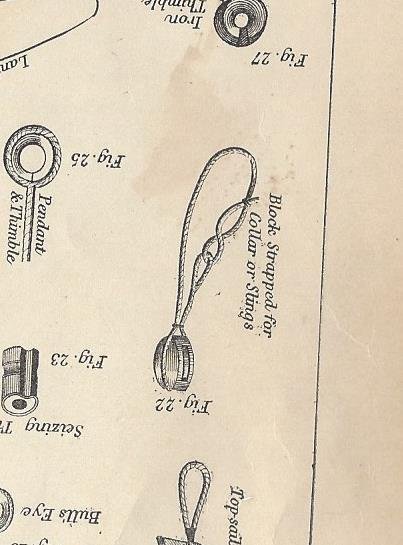
-
Emergency Chains/ Rudder Pendant Tackle
popeye2sea replied to piratepete007's topic in Masting, rigging and sails
Your drawing is basically correct, however you are missing the block that would form the other end of the long tackle. It would be a single block hooked into the thimble on the rudder pendant. The tackle would run in three parts with the standing end of the fall seized to a becket on the single block. The fall would run through the smaller sheave of the fiddle block then through the single block, back through the larger sheave of the fiddle block before leading in through a port to belay on deck. The fiddle block was hooked to an eye bolt on the mizzen channel. Hope that helps. Regards,- 4 replies
-
- 1
-
-
- pendant ropes
- rudder chains
- (and 2 more)
-
You could always use a simple plumb bob suspended from the mast to keep it square while stepping and setting the rigging.