popeye2sea
-
Posts
1,935 -
Joined
-
Last visited
Content Type
Profiles
Forums
Gallery
Events
Everything posted by popeye2sea
-

Rigging yards with no sails - question
popeye2sea replied to heksanol's topic in Masting, rigging and sails
Line number 105 is a bunt line (or possibly a slab line from the way it passes under the sail). If no sail is rigged you can omit this altogether or you can do as suggested above and attach the block to the yard in the proper location and just let it hang there. Line 106 is a clew line. Missing from your diagram is the sheet line that would come down from the lower corners of the sail (the clew) and run through blocks or sheaves in the yard below the sail. This is the key to what to do with the line if there is no sail rigged. If there is no sail the sheet will be attached to the lower clew block and you can haul it up close under the upper clew block. Or you could just omit line 106 and treat the upper block the same as for line 105 Regards, -
I would agree with spyglass. There would be no rigging belayed to the windlass. It's primary function is to raise the anchor with the anchor cable going around the barrel. The drum head (outside of the riding bitts) can be used to provide mechanical advantage when hauling heavy lines, sort of like a horizontal capstan. It is easier to utilize the drum head quickly or on a more temporary basis than the main barrel. Regards,
-
clipper close hauled question
popeye2sea replied to keelhauled's topic in Masting, rigging and sails
Yes, a tail line is just a short rope used to steady something. It would be easy to move it to wherever required. The only reason to have it belayed in the first place is to keep it from hanging in the water or on the deck. It serves no function otherwise. An analogy would be if you ever saw a crane lifting a heavy object. There are often tail lines attached to the corners of the object for workers to control the load and keep it from twisting around. Regards, -
clipper close hauled question
popeye2sea replied to keelhauled's topic in Masting, rigging and sails
Since only one of the lines, tack or sheet, would be under any tension when close hauled, I can see where it would be advantageous to remove the slacked line so that there are less lines to be handled when tacking. Otherwise you would have to be easing one while hauling the other. The tail line could be lead in any direction to help control the clew of the sail while rigging or unrigging the tack or sheet.. In effect it replaces the tack or sheet that was removed. Regards, -
First US Navy uniform reg was 1803, followed by a new reg in 1813. Much discretion was left to the officers as to the stylings on the coat, however the placement of lace or embroidery, and the number and placement of buttons both had a role in denoting the rank of the wearer. Captains had laced buttonholes, 9 buttons on each lapel, and 4 buttons on each cuff and pocket flap Lieutenants had no lacing on the buttonholes, and only 3 buttons on the cuff and pocket. The hat for Captains and Lieutenants was the chapeau de bras with the captain having more lacing on his hat. Master Commandant, Purser, and surgeon had correspondingly less decoration on their uniforms and wore a round or top hat. Enlisted wore blue jackets, red vests, blue wool or white duck trousers, black neckerchief and a round hat. Marines officers of the period had uniforms cut similar to the Navy but the color was Federal Blue with red facings vs. the darker Navy blue Enlisted marines wore a coatee of federal blue with red cuffs and collar, and gold embroidery striping at each button hole. Regards,
-
US Navy currently uses black painted shapes for daytime nav light signals. Black circle represents the same as a red light and a black cone or diamond represents the same as a white light. Regards,
-
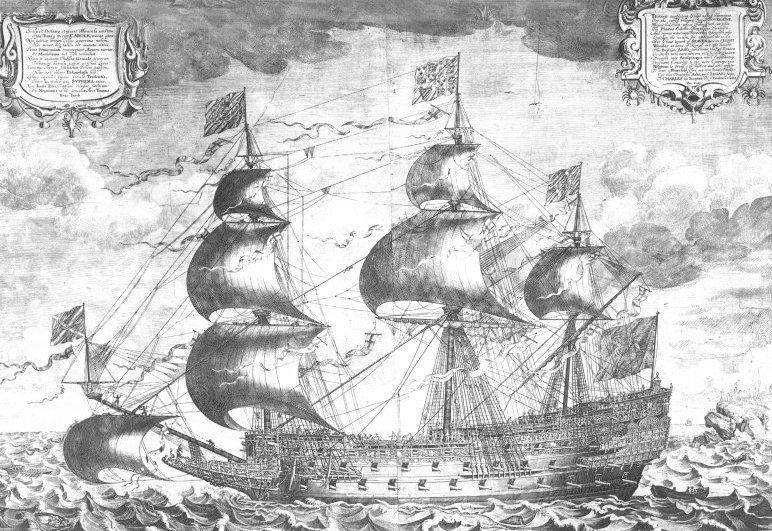
Just found that the image is in the collection of the British Museum and you can request copies of the image from them.
-
I found another copy on wikipedia. The caption reads: 'The true portrait of His Majesty's royal ship theSovereign of the Seas', a contemporaneous engraving by J. Payne I could not find the source for the photo. Regards,
-
I have a copy of the Manual of Seamanship for Boys and Seamen of the Royal Navy, 1904. In it is described the use of the semaphore device (2 arm). The position of the arms for the alphabet are exactly the same as the ones I used as a signalman for the U.S. Navy for semaphore flags. For numbers the numeral pennant was hoisted to alter the meaning of the semaphore. The lower indicator arm shows the direction the semaphore should be read from. The arm points toward the sending signalman's right. A momentary pause is made between each letter or sign, and the arms are dropped between each word or group. The same procedure is still used today. On the receiving ship, the answering pennant is hoisted at the dip when the signal is seen and closed up when ready to read the semaphore signal. Regards,
-
Chain was not used for things like anchors and such until c.1808. Prior to that would have been rope. Regards,
- 608 replies
-
- 4
-

-
- la couronne
- corel
- (and 1 more)
-
Crowsfeet and euphroe block
popeye2sea replied to simon porter's topic in Masting, rigging and sails
The crowsfeet was indeed excessive. But this was also the time period where the bos'n went crazy with crowsfeet all over the rigging. Look at the all the legs for the various backstays of the period and things like martinets vs. leech lines. The rigging of ships evolved much over time as people learned what worked and what could be done better. Regards, -
I guess it depends on how you are making the strops. I would not bother serving them if I was just making them from standard rigging line. The way I make mine is a bit different and time consuming and definitely not for everyone. It does result in a completely served strop. I will attempt a description, but I am not sure if it will come across without pictures. I make the strops on a serving machine using sewing thread. The serving machine is set up a hook on each end. You have to calculate the distance between the hooks for each type of block and strop that will be made. Basically the circumference of the block plus the circumference of the eye plus twice the length of the tails (if necessary). This next part makes a strop with an eye at each end: Make a loop at one end of the thread and put it on one of the serving machine hooks. Then pass several turns around both hooks until you build up the required diameter of the strop. Pass a half hitch around the turns near one hook. The part of the strop from the half hitch around the hook forms one eye. Next, serve the strop back towards the opposite hook. Stop when the second eye is the same size as the first and secure the service with another hitch. You can now take the strop off the hooks. In order to complete the strop you make it into a continuous loop by lashing the two eyes together. Finally serve over the the two eyes and the lashing and you will have a completely served strop ready to be seized around a block. Variations: If you need a block with eyes on the tails, omit the part where you lash the eyes together and instead serve around the eyes separately. If you need a tail block or a block with one eye and a tail, serve over one of the eyes closed. If you need a becketed block, put the becket on the strop before you lash the eyes together. Position the becket at the bottom of the block when you seize the strop around the block. It will be held firmly in place there when the strop is tight Doing the strops this way you can make stropped blocks for any location and usage on the model in the same manner that was done for the actual ship. It bears saying again, this method is very fiddly and time consuming and with hundreds of blocks on some ships may not be worth your effort. But the results are great. Regards,
-
On rope that small I use 6/0 monofiliment thread. Basically it's fly tying thread. Regards,
-
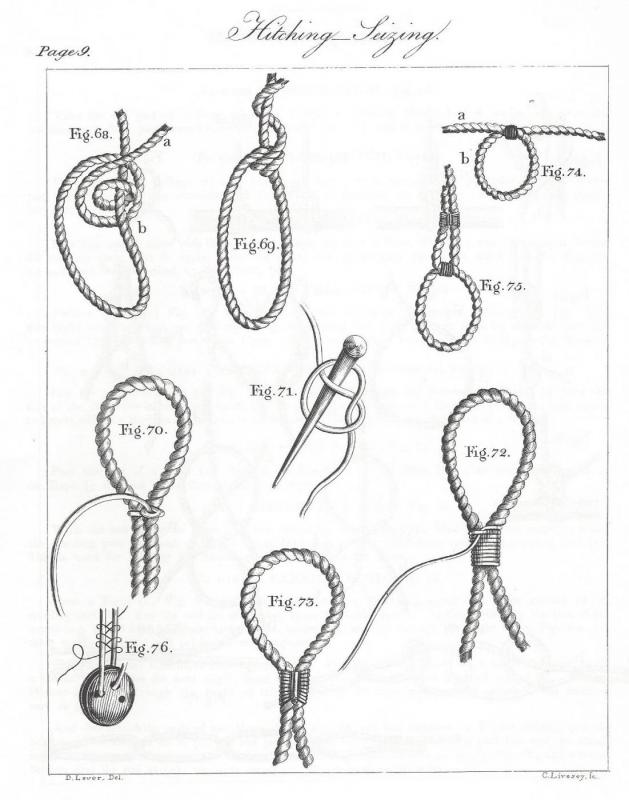
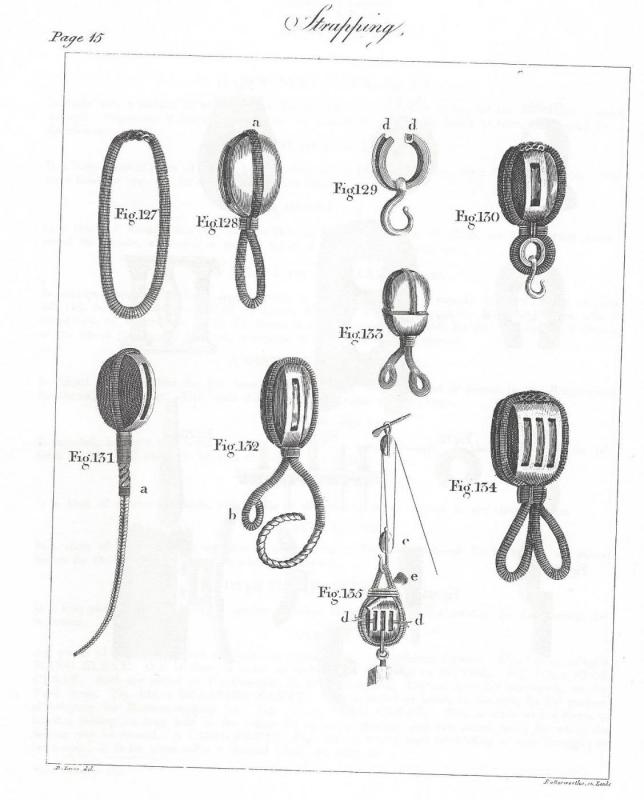
Okay, found some pics. Not exactly the same thing but it will give you an idea. This is a mainstay as it passes next to the foremast. It is set up with hearts. Notice the jumper that functions to hold the stay off the mast to prevent chafing. It is a pendant with and eyesplice at the top and a thimble spliced in at the bottom. The eye is seized to the stay and the thimble is lashed to the eyebolt in the deck. Next up are some seizings. Figure 70 - 73 show how a round seizing is clapped on. Figure 74 and 75 show how to do a throat and a round seizing. This would be one way to fasten the end of a line to a ring bolt or eye bolt. (This is also the way the dead eyes are turned in on the ends of shrouds) Last up is some ways that blocks are stropped. Fig. 127 is the strop. Fig. 128 shows the seizing clapped on at the throat to form the eye. Fig, 129 and 130 show a block with a thimble and hook seized in. Fig. 131 is a tail block Fig. 132 is a block with a long and short leg. The short leg has an eye spliced in. Fig. 133 is a clew line block with two short legs with an eye spliced in each leg Fig. 134 is a three-fold block with a double strop. Hope this helps a little. Regards,

-
Just as a clarification, the strop of the block and the eye bolt are separate from each other and are lashed together with a seizing. The net effect would be the eyebolt and the strop being end to end connected by the seizing. Sorry I do not have a picture at the moment. But I will try to find one. As an aside, pay attention to the nomenclature used to describe fastenings. They are very specific in their meanings. Splicing, seizing, stopping, nippering, lashing, stropping, bending, hitching and knotting are all very different things. I don't mean to get preachy. Just wanted to stress the importance of learning some of the terms. It will really help with understanding how these ships go together. Regards,
-
In general, you would never run the strop of a block directly through an eyebolt. For two reasons: first the blocks were normally stropped off the ship in a rigging loft, and second, if you had to shift that block from it's location for repair, maintenance or otherwise, it would necessitate cutting the strop. Then in order to re-employ the block it would need to be re-stropped. The strop of a block should be seized to an eyebolt. The bitter end of a pendant or other line may have been passed through the eyebolt and seized to itself. This affords you with the same facility for shifting the line if necessary without damaging the line. All you would have to do is cut the seizing. Regards,
-
I can't believe it has been 5 months since I posted anything here. That pesky thing called work keeps getting in the way. Don't worry the build is still active. As soon as I can I will get back to it. Regards,
- 196 replies
-
- 5
-
-
- plastic
- soleil royal
- (and 2 more)
-
He is on the Fine Scale Model Forum
-
Also known as man ropes or monkey lines. Regards,
-
Crowsfeet and euphroe block
popeye2sea replied to simon porter's topic in Masting, rigging and sails
Tension was achieved with a small block and tackle between the euphroe and the stay. Regards, -
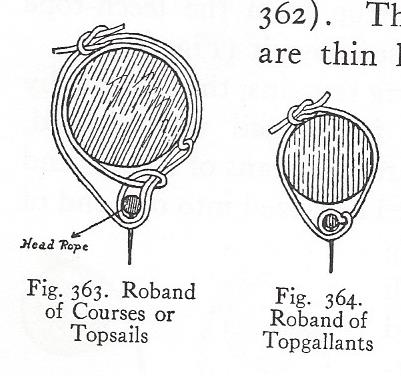
If you make your robands out of one piece of rope as shown in my diagram above you only need to put a square knot in the ends on top of the yard or jackstay.
-
Shrouds on Navy Ships of WW II
popeye2sea replied to captainbob's topic in Masting, rigging and sails
My guess would be rat boards and not ratlines. Regards, -
I always understood there to be one hammock per man, but they were hung two hammocks per set of hooks from the deck beams. That way there were two men sharing the same space, watch on and watch off. Each man would spread his own hammock between the two hooks. Stowage of personal items was not in the hammock , but in a ditty bag. Regards,
-
Ships also sometimes cockbilled their yards when they were made fast alongside a wharf to give more clearance for buildings and other obstructions on the wharf. Regards,
- 5 replies
-
- 8
-
-
- yards
- death of an officer
- (and 1 more)
-
The photo you show seems to have the robands in two parts with eye splices in each end. Probably way too complicated for a roband. I do not know what size rope to use but it should be smaller than the bolt rope of the sail. The diagram below shows robands made in one piece. The roband is doubled and the loop passed through the sail from back to front and then the ends lead as shown in the diagram and are finished with a square knot at the top of the yard. If you are bending to a jackstay then the roband will lead as in the figure below. Regards,