HOLIDAY DONATION DRIVE - SUPPORT MSW - DO YOUR PART TO KEEP THIS GREAT FORUM GOING! (Only 36 donations so far out of 49,000 members - C'mon guys!)
×


popeye2sea
-
Posts
1,935 -
Joined
-
Last visited
Content Type
Profiles
Forums
Gallery
Events
Everything posted by popeye2sea
-
 I think we can assume that working the capstan to haul the ship up till the anchor cable is 'up and down' (the actual term we used to use in the Navy) and then weighing and hoisting the anchor out of the water would take the longest. The stowage of the cable in the cable tier would run concurrent with this. The set up, i.e.: Laying out the messenger, breaking down stanchions, and rigging the fish davits would not take that long. I could see catting, fishing , and stowing the anchor taking , timewise, something in between the two. I bet I could find more info if I spent more time researching.
 -
There is one book that I know of that explains almost every part of the ship and rig. Falconer's New Universal Dictionary of the Marine. My copy is a reprint of the 1815 edition. That being said, learning the ropes just takes time and practice. Soon enough you will no longer be a landsman and you can earn your keep as an able bodied or ordinary sailor. Diligence, attention to detail, and hard experience will merit an assignment as a tops man in no time. Maybe even a promotion to petty officer. Aye lad, that be the life of a sailor!!
-
Nicely done on the gammoning!
-
You will make your eye splice in the end of the line while it is off the ship. Then to start the gammoning loop the eysplice over the bowsprit and pass the other end of the gammoning through the eye. Tighten the line around the bowsprit so that the eye splice lies under the bowsprit and then commence the turns through the hole in the stem. Each successive turn lying forward on the bowsprit and aft in the stem. I think it is best to heave the gammoning well taut as you are passing the turns. The frapping turns at the end will pull the the gammoning closer together no matter how tight you make the gammoning turns. The sides don't need to touch. In fact if they do you probably have the gammoning too loose. Sometimes the gammoning is the only thing holding the bowsprit down against the upward pull of the fore rigging.
-
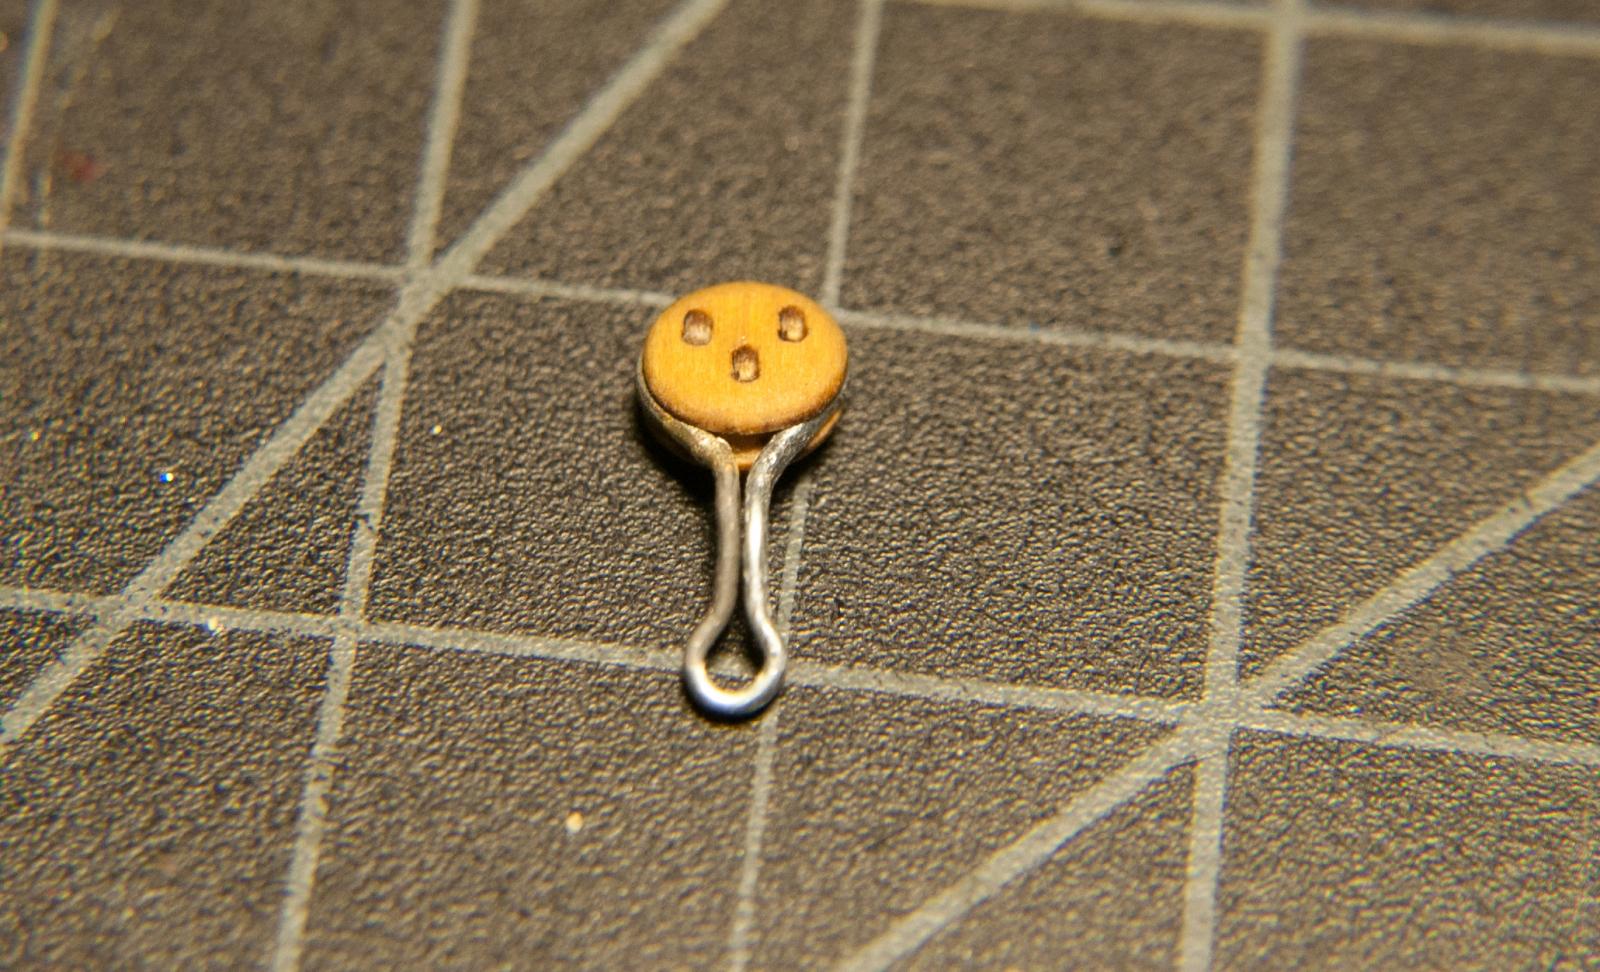
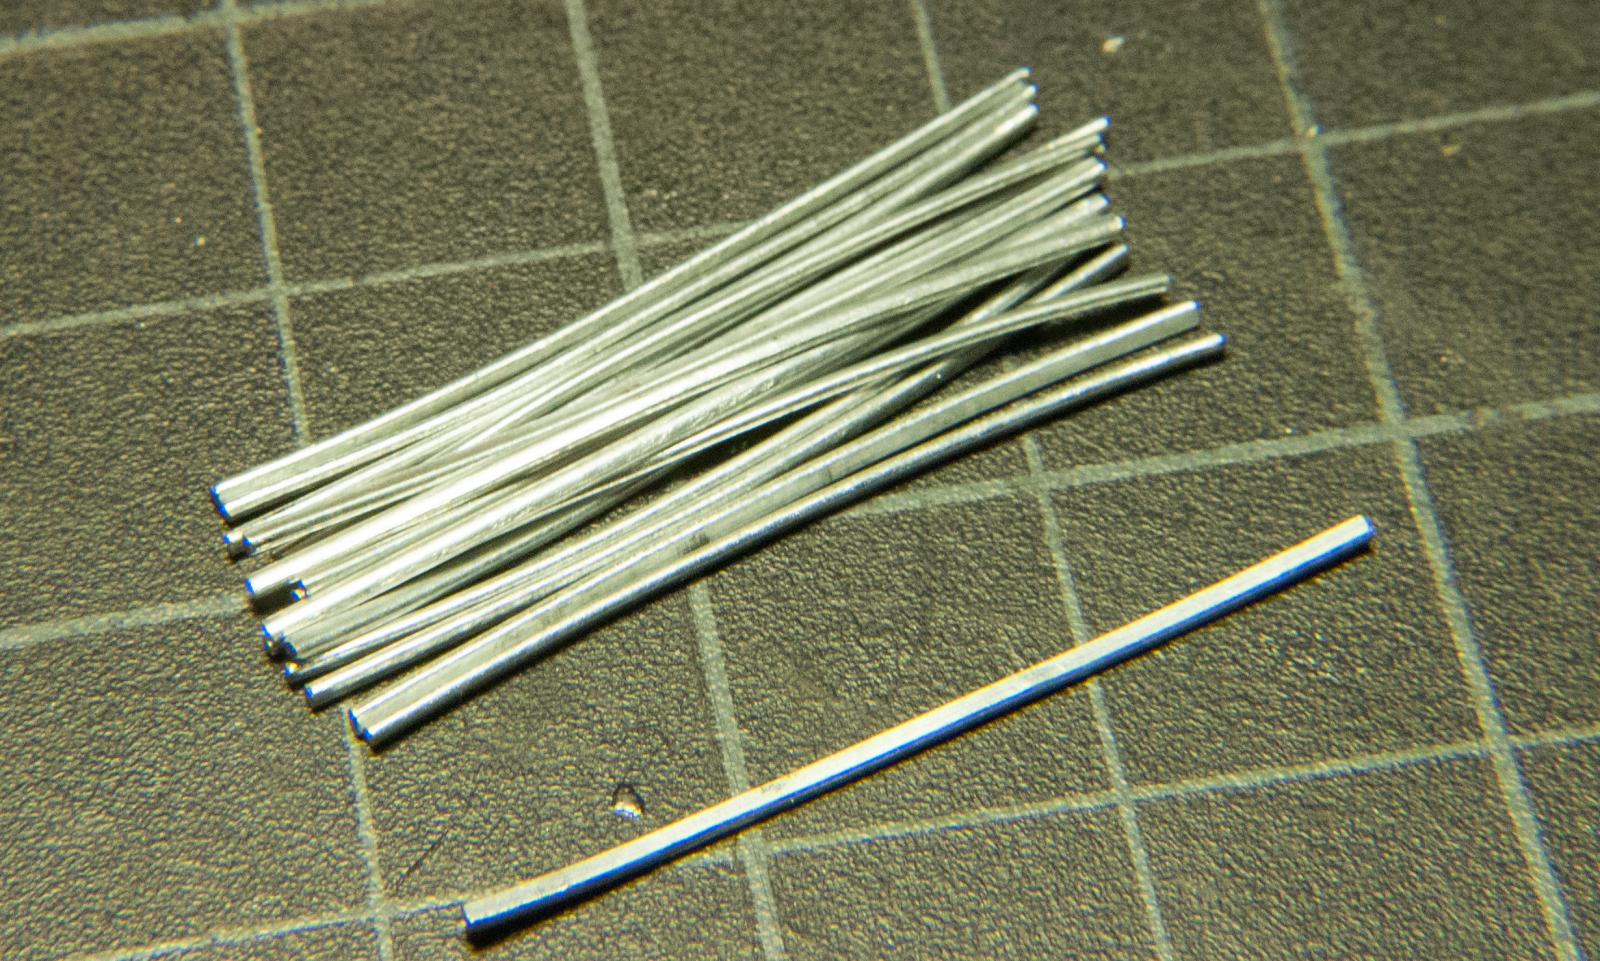
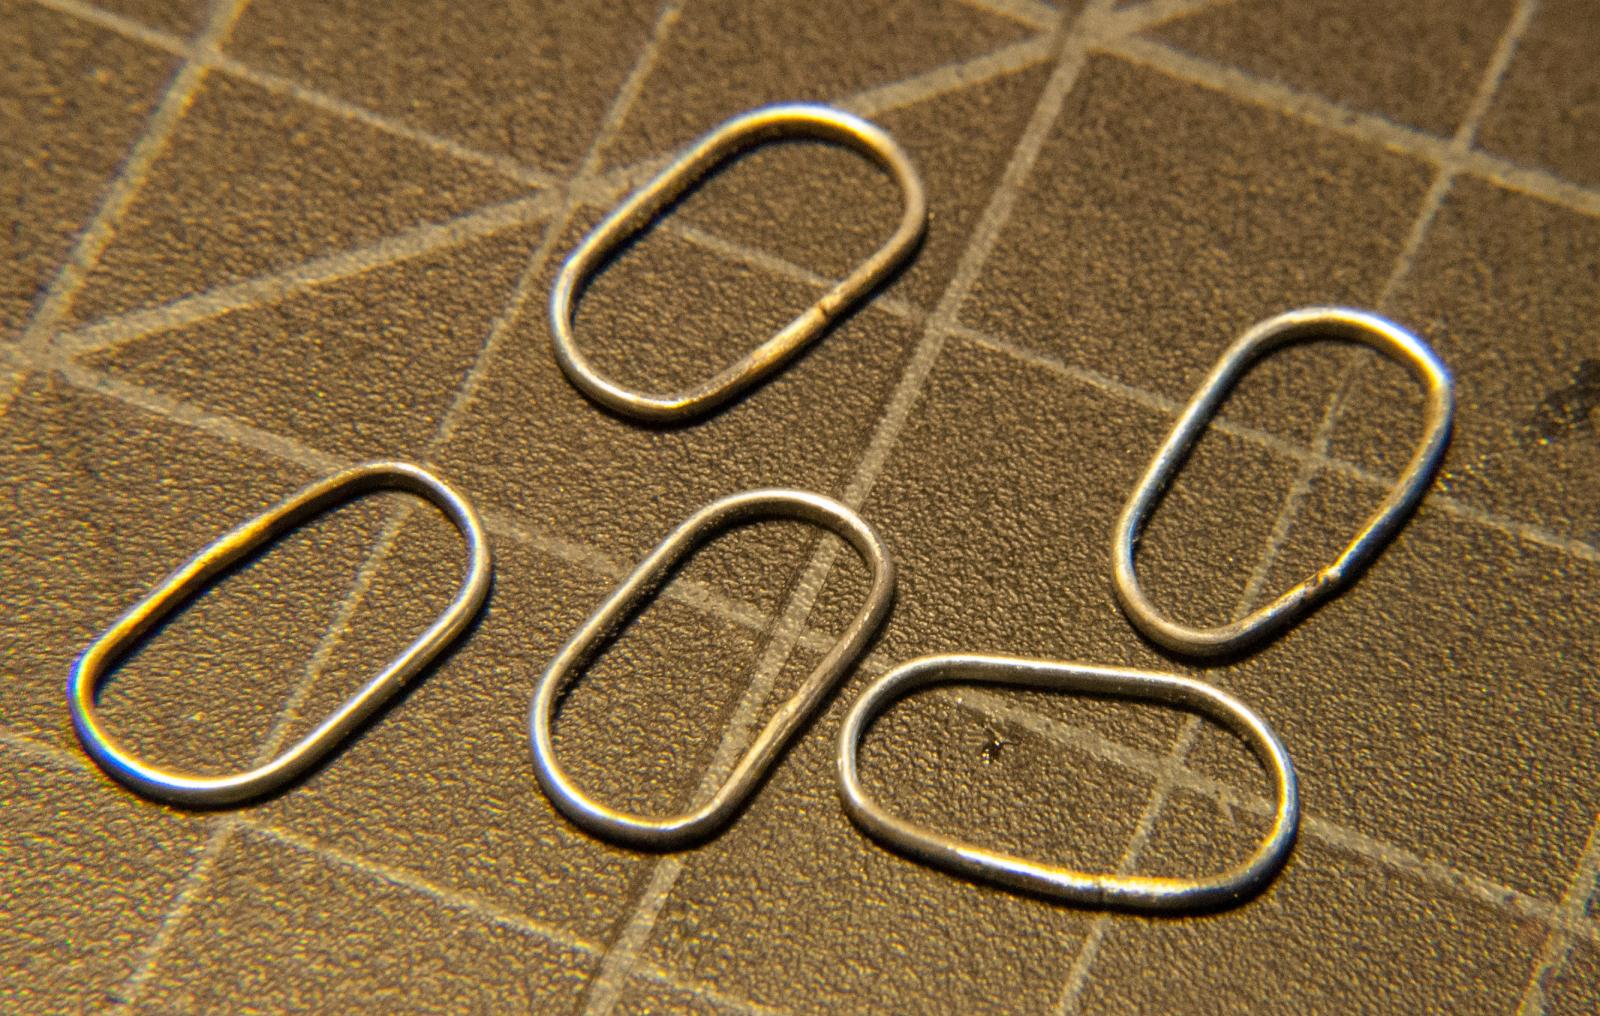
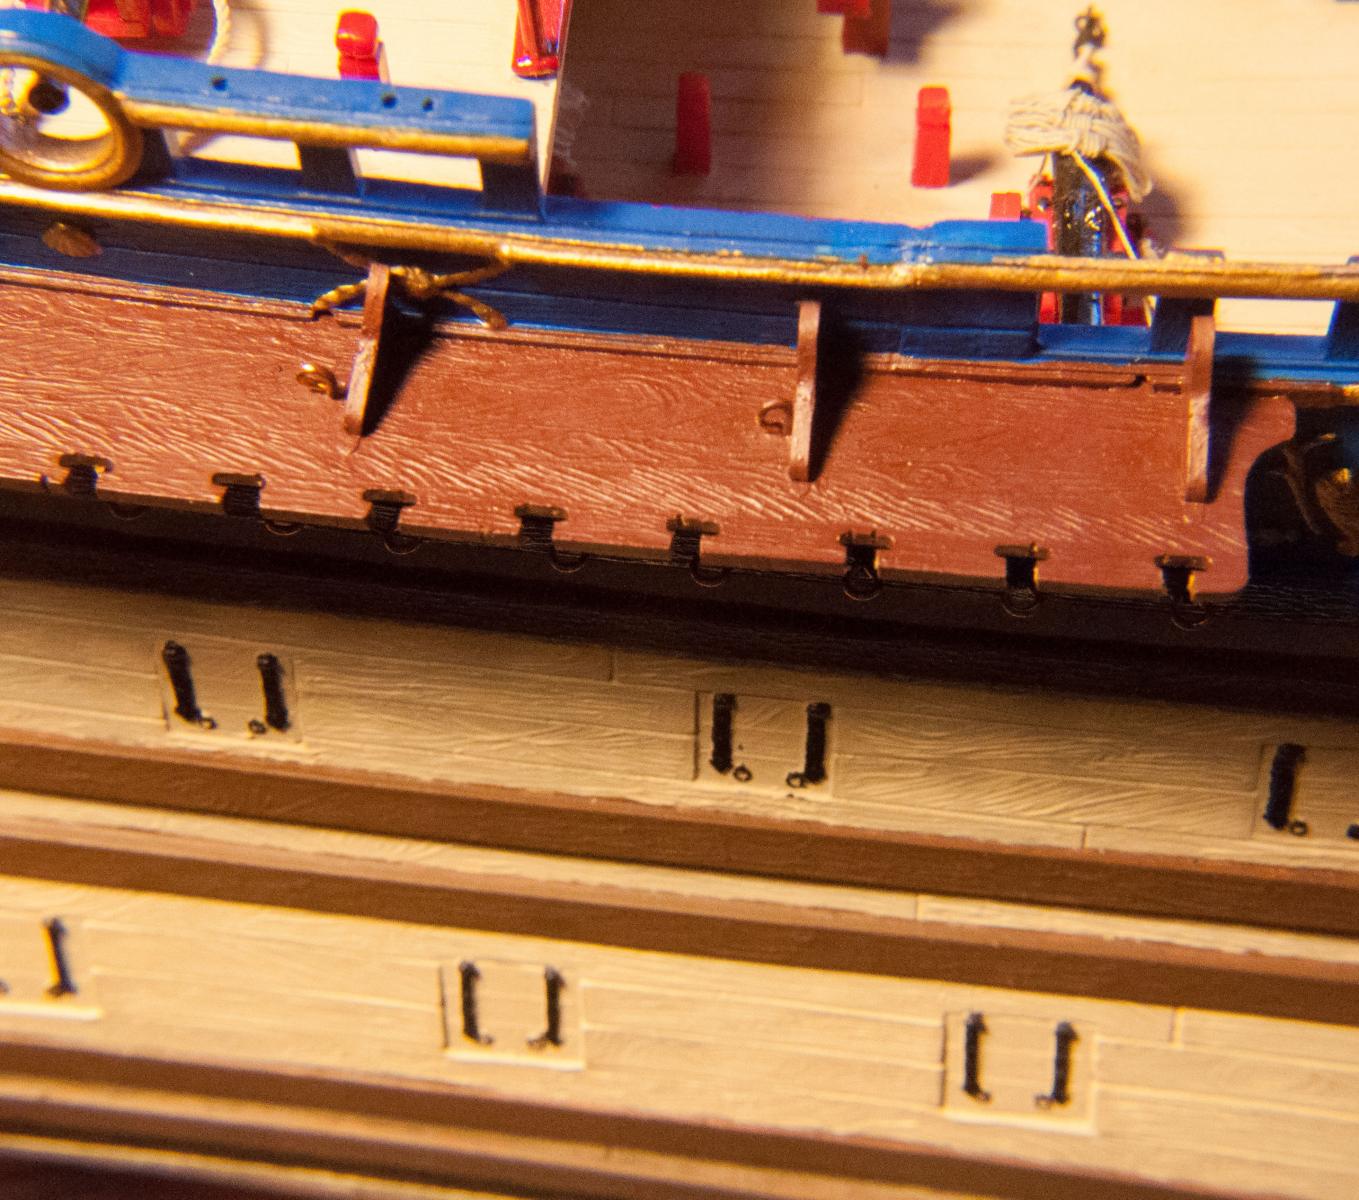
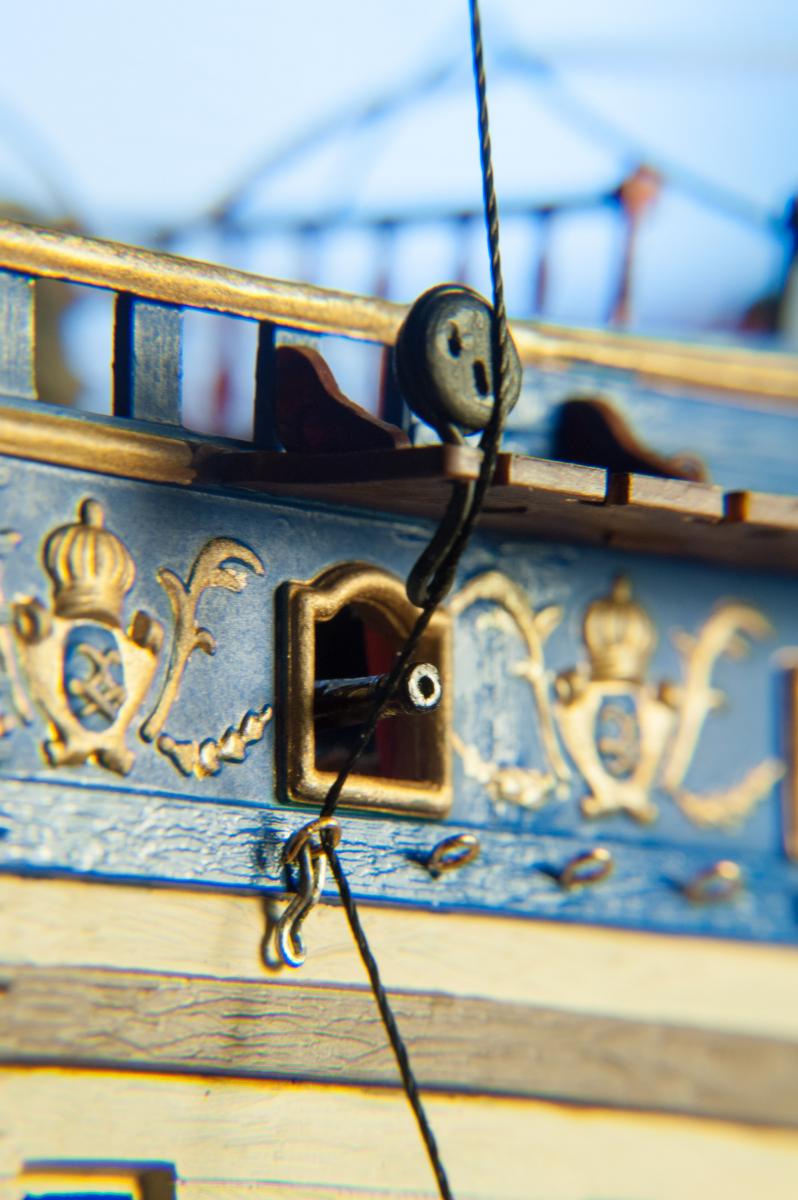
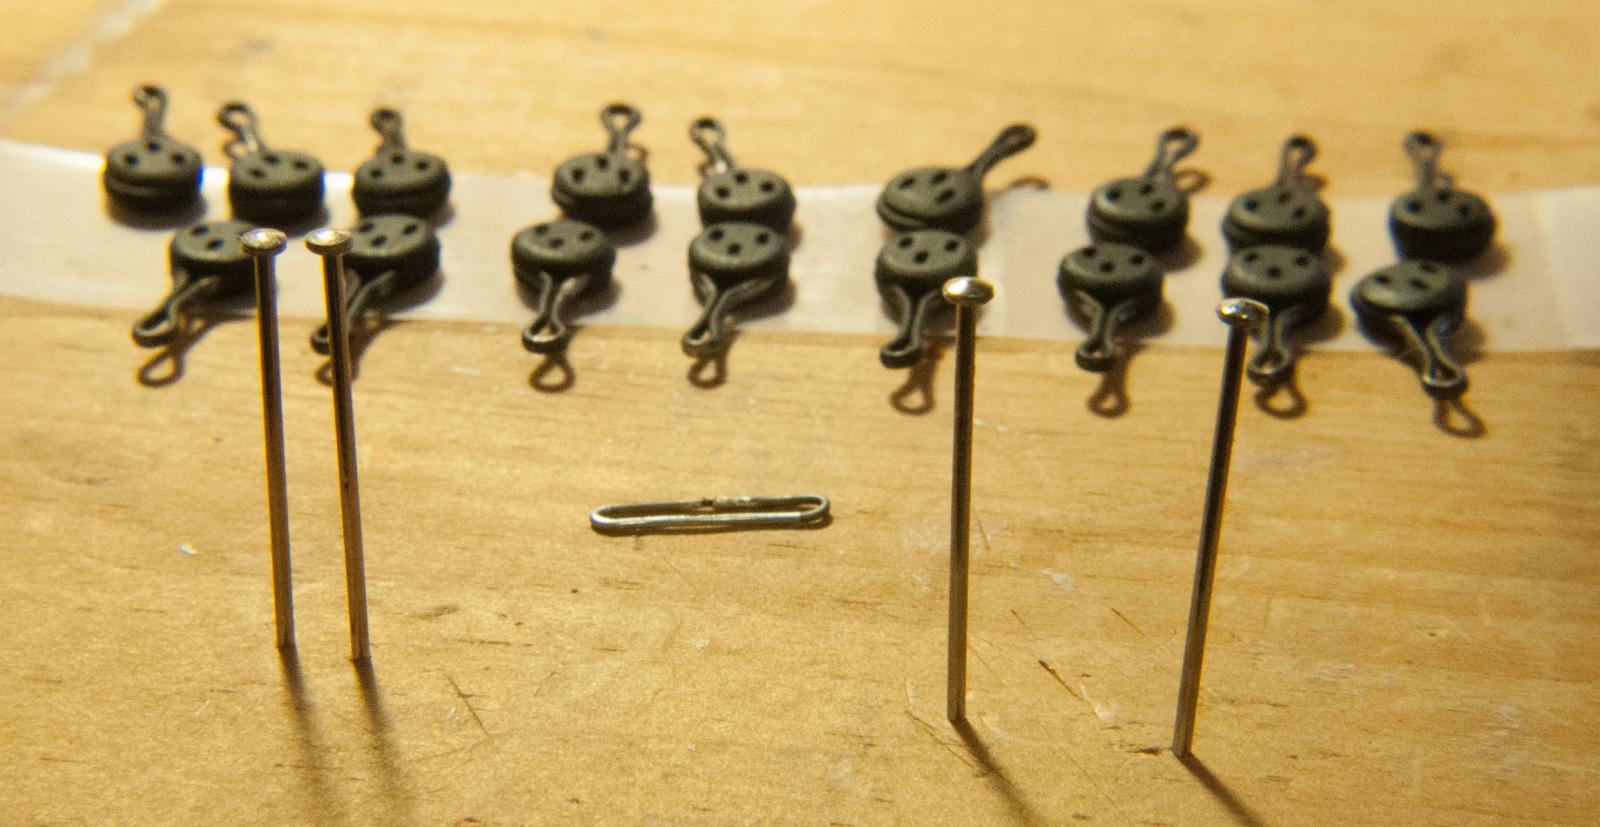
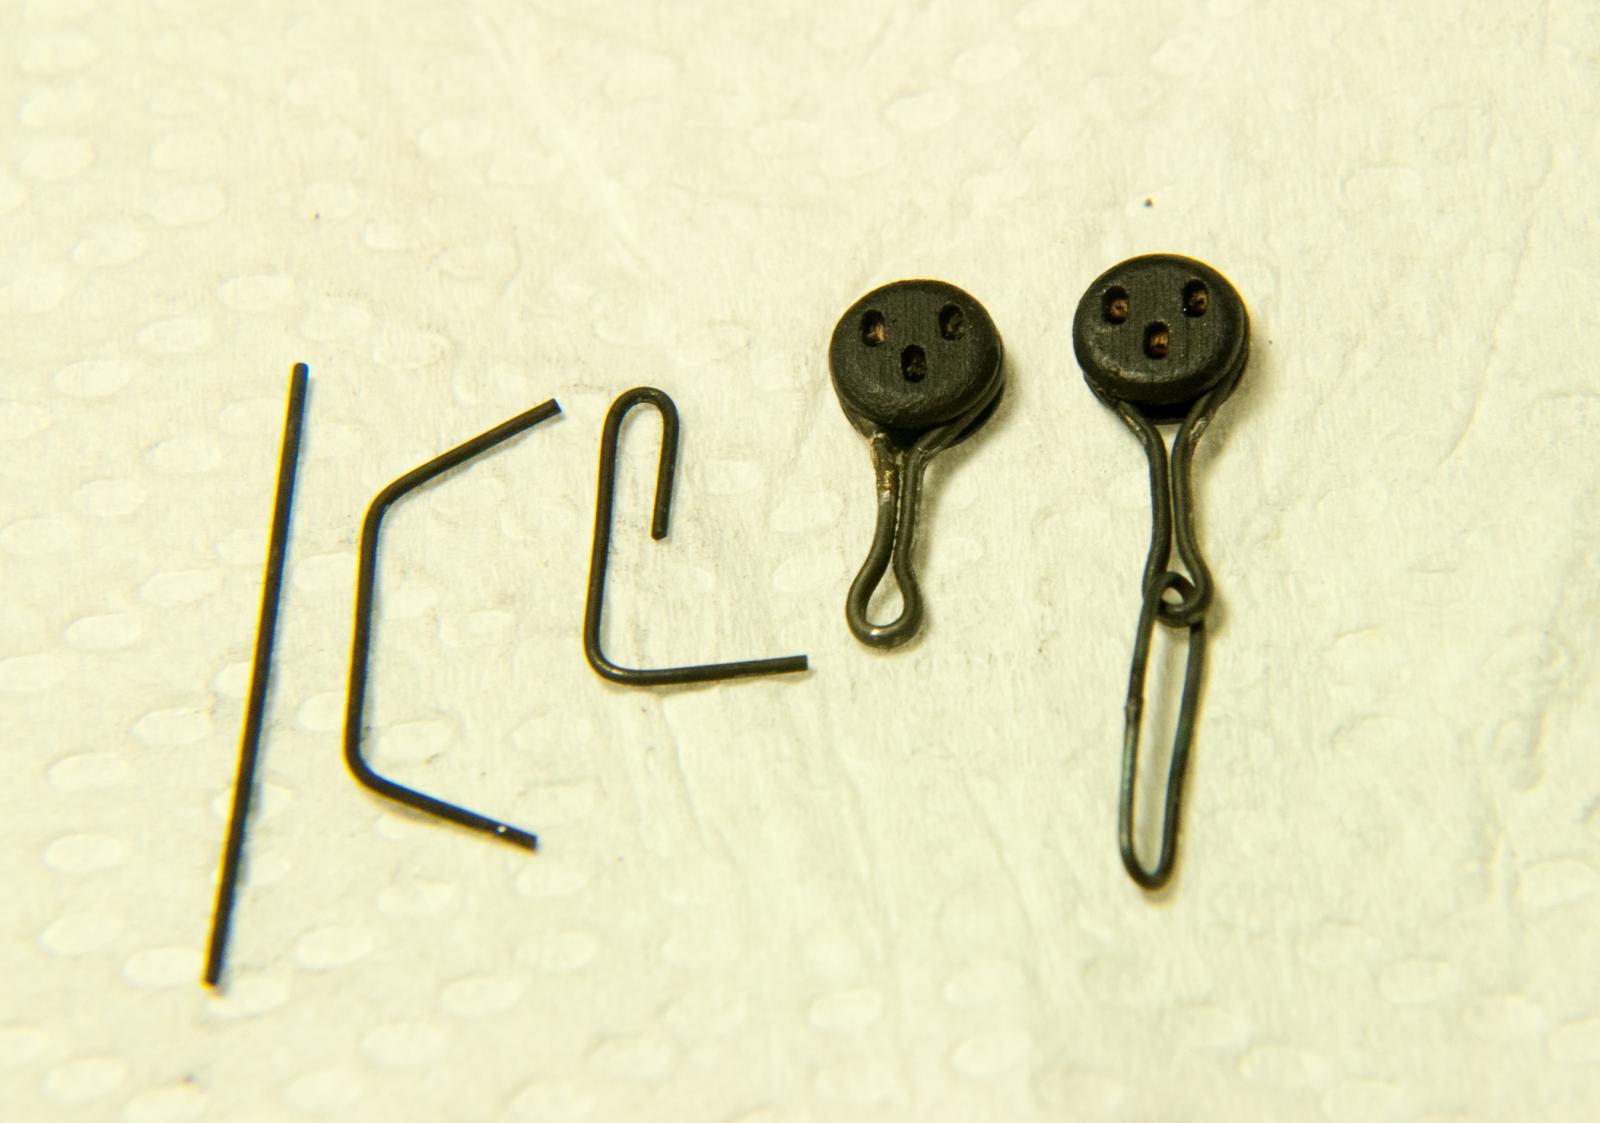
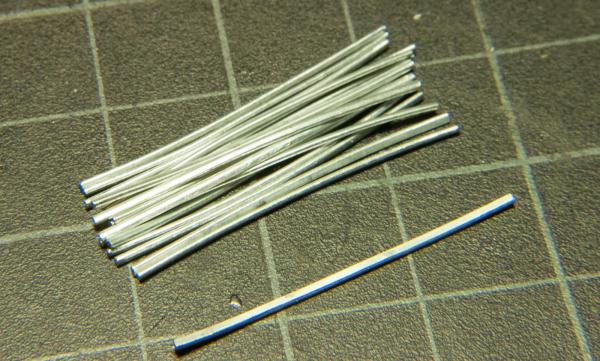
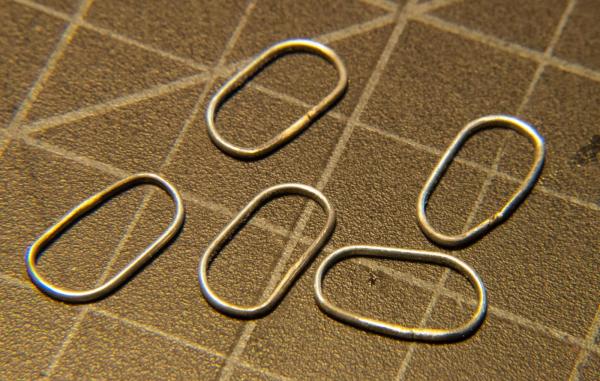
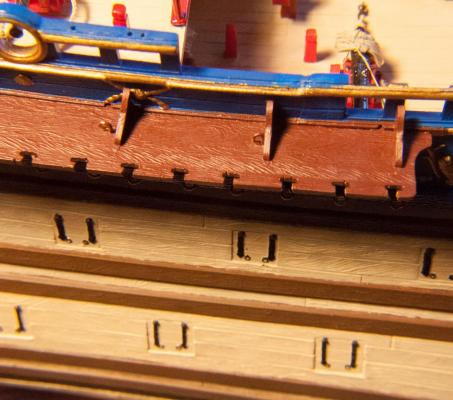
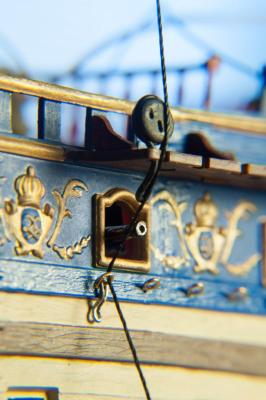
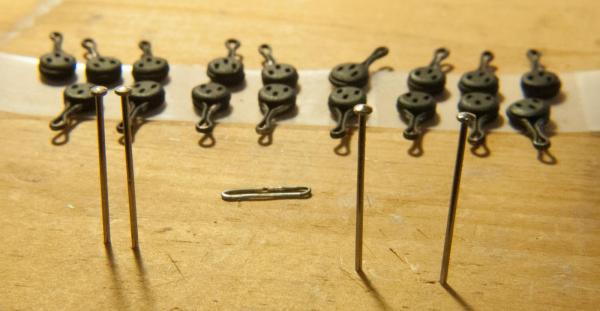
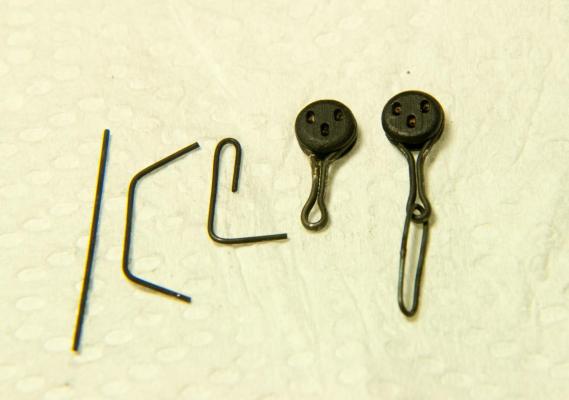
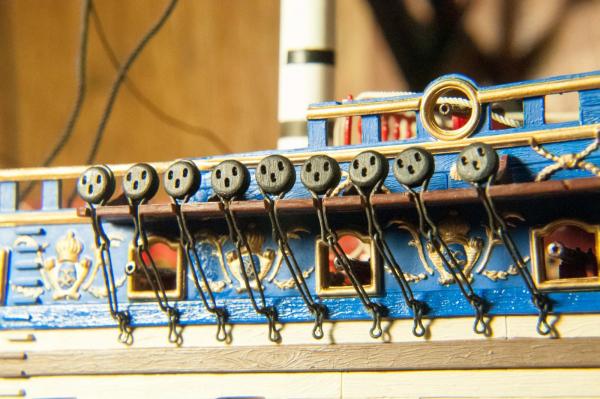
Back to the deadeyes and chains. First up was creating a test piece to determine the look and fit of the channel deadeye strops and to use that to see how much material to cut out of the channels to slide the strops into. The strops are made from 20 guage steel wire, which seems to fit the groove of Syrens 6mm deadeyes nicely. Note: The deadeye on the right is an upper deadeye. I filled in the groove on the left hole. This will be the hole on the inside face that the mathew walker knot on the end of the laniard bears against. For anyone who chooses to go this route...caution!! The 20 guage steel wire is relatively hard to bend around the deadeyes and fills the groove completely. Any sideways torque when bending the wire WILL split apart the deadeye. Although this ability to split the deadeye face off came in handy later when I had a couple of solder joints break! After the concept piece was done I pulled it apart to measure the length of wire for the strop and went into production mode. The wire was cut, the ends cleaned up and the strop was formed into a wide loop (big enough to fit the deadeye) and silver soldered closed. Then the pieces were blackened in a bath of Blacken-it. The strops were then bent into final shape around the deadeyes. Appropriate size slots were cut into the channels to fit the strops. The stropped deadeyes were offered up to the channel and a line was run from the main masthead to determine the proper angles to bend the strops to. More caution here. My original thought was to hide the solder joint in the channel slot. Bad idea. This is where the bending occurs to get the strops pointing in the right direction. I should have planned it better so that the solder joint fell in the lower straight portion of the deadeye strop. The solder joints are barely visible anyway. I had a few joints open up on me and being at the bending point right beneath the deadeye the only way to re-do the solder joint was to pop the face off the deadeye, remove it, re-solder the joint and then re-assemble the deadeye in the strop. The chains were made up and blackened in the same manner using 24 guage wire. The deadeye strops were inserted into the chain loops before soldering closed. I also made up some backing links from the 24 guage wire. These are the same style of elongated loops but with the center portion squeezed together and then the whole thing is bent so the the end loops are offset in order to fit from the wale to the hull planking below the wale. The sharp eyed of you will note that some of the deadeyes are not set straight in the strops. The ones for the aftermost shrouds have a slight angle to accomodate the angle of the shroud. The pins in the above photo are bending jigs set for the size of the chains and the backing links. The eyebolts in the hull were prized open, a backing link was put on each one, and then the chain/deadeye assembly. The deadeye strop was then swung up into place in the slot in the channel. A little flat black touch up paint was used to cover up some spots were the blacking was rubbed off with the pliers. Still to come... filling the holes cut into the edge of the channels and pinning the lower loops of the backing links to the hull. See you next time. Regards,

- 196 replies
-
- 21
-

-
- plastic
- soleil royal
- (and 2 more)
-
Clew lines and their blocks all run behind the square sails; as do the sheet lines. The only lines that run down the front of a square sail are the bunt lines and leech lines. Regards,
-
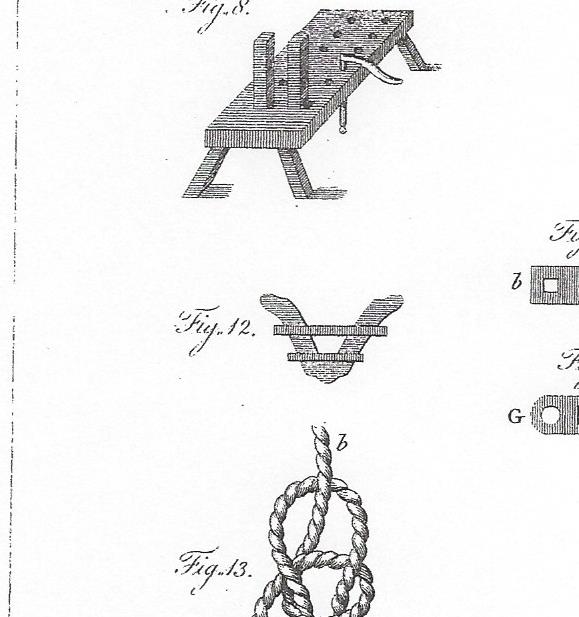
Cleats come in a variety of shapes and sizes. Belaying cleats, stop cleats, comb cleats, shroud cleats, thumb cleats, range cleats, kevels, etc... A staghorn cleat, a range cleat and a kevel are essentially the same thing. I believe in this case the name derives from the shape of the horns on the cleat. For instance the word kevel is from the middle english kevile, which is itself derived from old French keville, originally from the latin clavicula. The same name for the collar bone which it resembles. Figure 12 below shows a kevel or staghorn cleat

-
A Range Cleat is a large cleat, with two arms or branches, bolted in the waist of a ship, to belay the tacks and sheets to. Also known as a Kevel Definition from Falconers Dictionary of the Marine
-
Crowsfeet and euphroe block
popeye2sea replied to simon porter's topic in Masting, rigging and sails
Another way would be to use an even number of holes in the top and the euphroe and start the crows feet at the top. Start with the laniard passing up through one of the center holes. Knot it under the top. Pass it through the first hole in the euphroe and then down through hole number 2. Pass the line under the top and up through hole 3. Repeat on alternate sides moving away from the center. Just remember to pass the line over the rim of the top each time. When you get to hole 10, or whatever number you have you can tie the end off on the previous pass under the top (i.e. between 6 and 7) Hope that makes sense. Regards,
-
I took a look at the tables in The Art of Rigging and for a ship rigged vessel of about 300 tons the Main Shrouds would be 7 inch rope (circumference) and the ratlines would be 1 inch. If you go down to a 200 hundred ton ship the shrouds are 6 inch. Not sure what the tonnage of Bounty was. So, 7 inch rope is 2.2 inch diameter, at your model scale is 0.02 inch (0.5mm) and 1 inch rope is 0.3 inch diameter, at your scale is 0.003 inch(0.07mm) So you see what I mean about the ratlines on the pre-formed stuff being way too thick. The laniards for the deadeyes are half the diameter of the shrouds. Not sure if anyone supplies iron stropped deadeyes, or the chains and backing links. All that being said, since this is your first foray into shrouds and ratlines, don't let all this minutiae intimidate you and cause you to stop your build. I am one of those crazy people who love the rigging of these ships and I tend to go a little nuts with the detail on my build. Do whatever is comfortable for you, and enjoy your build. Regards,
-
I think that if you decide to go with making your own shrouds you will probably want to go all the way and replace the deadeyes and chains with them. You can probably still use the channels. The pre-formed deadeyes do not really have the depth to use with rigging line. As far as what size line to use, the question will be are you using the kit supplied thread or will you purchase or make your own rope? Usually these kits only supply three sizes of thread. If you do use the kit thread, use the largest for the shrouds and probably the smallest for the ratlines. If you are buying your deadeyes and rope, there are general rules of thumb regarding the sizes. Some of the reference material mentioned in your other posts will have this information. But in general, deadeyes were half of the maximum diameter of their masts. Shroud sizes can be calculated as a certain fraction of the main stay (which was the largest line in the standing rigging), or if you find a table of rigging sizes specific to your vessel ( I have most often seen these published tabulated by vessel tonnage). I am in the process of replacing the kit supplied deadeyes and chains on my build. I should have some pics of the process I used uploaded in the next few days. I am sure you can find others who have done this with their builds here in the forums. Regards,
-
Glad to see your build is back on. Looking forward to following this. Regards,
-
What are the best detailed plastic models?
popeye2sea replied to Ray1981's topic in Plastic model kits
There are several resources available that show how to rig shrouds and deadeyes. A small list of books is: The Young Sea Officers Sheet Anchor, Darcy Lever The Art of Rigging, David Steel The Elements and Practice of Rigging and Seamanship The Rigging of Ships in the Days of the Spritsail Topmast, R.C Anderson Falconer's Dictionary of the Marine These are the titles I go to most often. Regards, -
What are the best detailed plastic models?
popeye2sea replied to Ray1981's topic in Plastic model kits
Those are the shrouds and ratlines. The shrouds are the long lines that diverge at an angle, narrow at the top and wide at the bottom. The horizontal cross parts are the ratlines. There are several reasons that most modelers replace these kit parts. The foremost being that they just look too fake. The shrouds are too thin and the ratlines are too thick, and on the whole the geometry is too perfect. Each ratline crosses completely straight and horizontal. Another reason has to do with functionality. The shrouds actually play a role in holding up the mast. Of course you could just put the model together using the supplied shrouds, deadeyes and laniards, but if there is any shift fore and aft or side to side in the masts when you set up your other rigging it will pull these pre-made shrouds out of alignment and they will look warped. You will be much better served by making these parts yourself and setting them up properly. And you will have a much stronger rig because of it. Regards, -
How are the bolt rope loops attached to a spar
popeye2sea replied to Jack12477's topic in Masting, rigging and sails
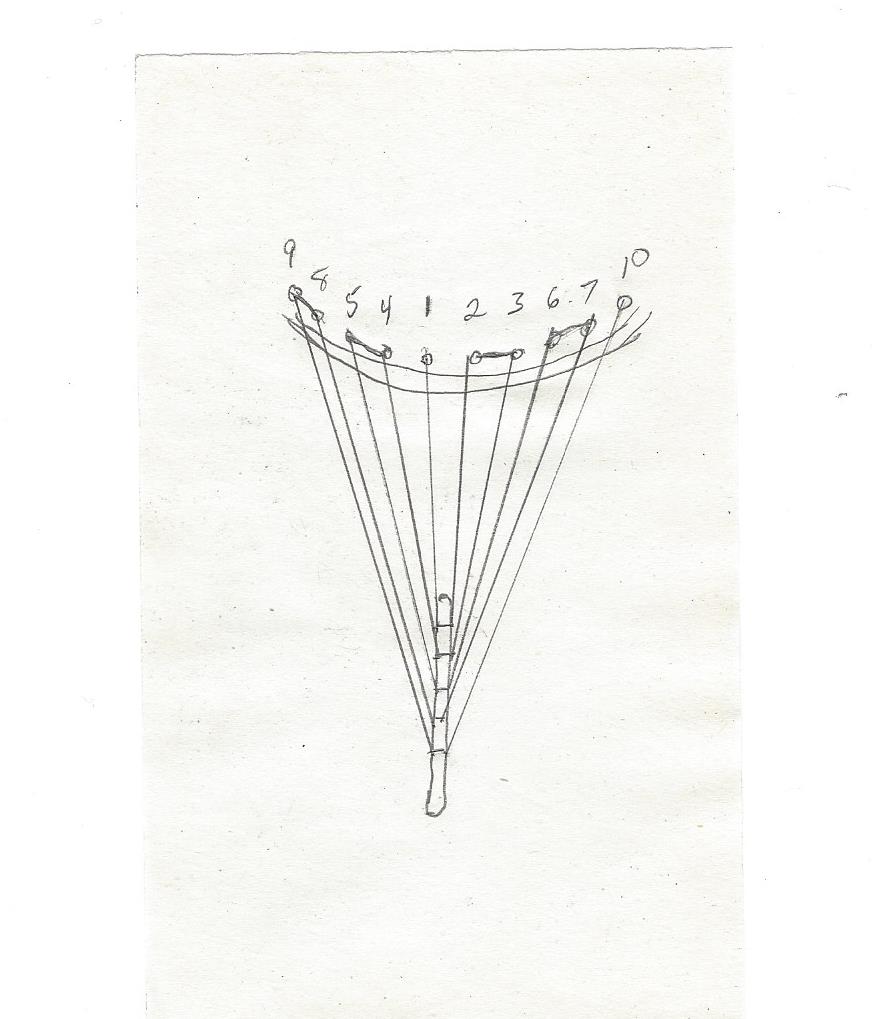
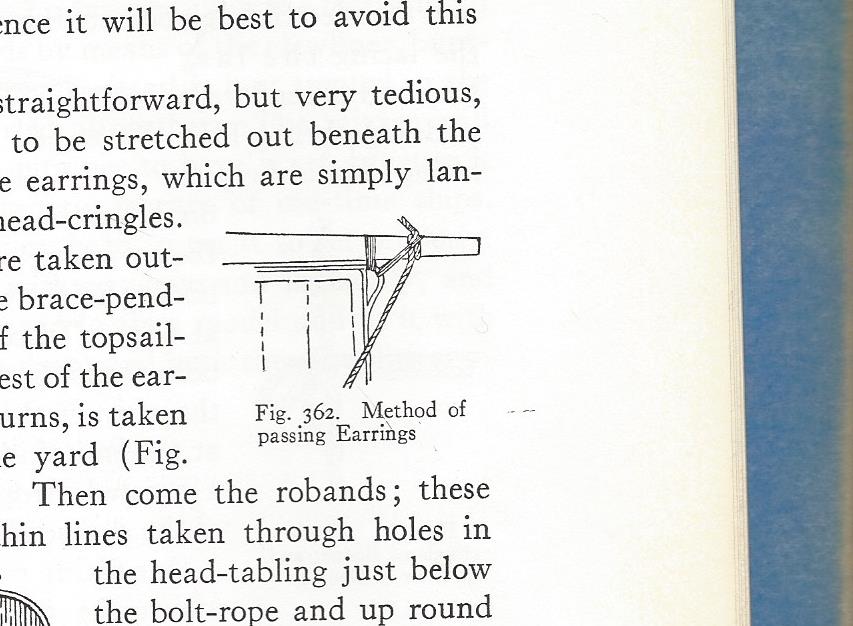
There is a rope laniard called an earing that is hitched to the head cringle. When the sail is bent onto the yard the earing is passed 2 or 3 times between the cringle and the yard arm cleats to stretch the sail head taut. Then the remaining part of the earing is passed vertically around the head cringle and the yard several times till the earing is expended.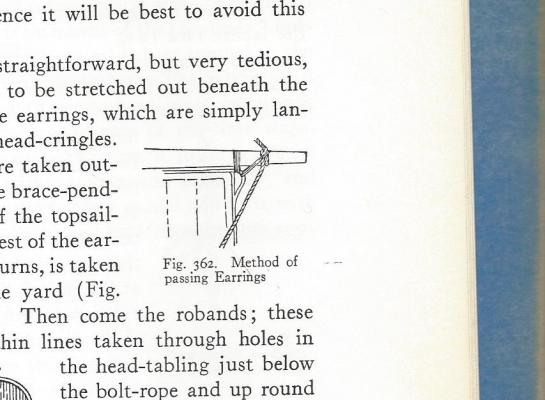
-
More than likely a boy or the midshipman on watch would be detailed to go forward and strike the hour. I doubt that they were really worried about being exactly on time with the bell. The important part was keeping the glass accurate and recording the course and speed on the traverse board. Regards,
- 1 reply
-
- 2
-
-
Rope Making Basics
popeye2sea replied to mikiek's topic in Rope Making/Ropewalks's Discussions about Rope Making
Most of the line you will find on a ship will be 3-strand right hand layed rope. That is the basic, flexible type of rope. Good for the running rigging because it bends nicely around pulleys. Left hand layed rope was slightly stiffer, so you will see it used in some of the standing rigging; like shrouds. Stays were often layed up around a 'heart' strand. This gave the rope additional strength. Larger ropes were made up of three right hand laid ropes layed up left handed into a cable (cable laid); an example would be the anchor cables. While you can tell the difference at scale in right hand, left hand, and cable laid ropes you will never be able to tell if a stay has a heart. Regards, -
There was something like a standing wedge that could be inserted into the barrel of the windlass called a battledore (?) that would keep the line from surging over itself. Regards,
-
That method is from R.C. Anderson, The Rigging of Ships in the Days of the Spritsail Topmast. While it is not the actual method used to raise a mouse, it comes very close and you probably could not tell the difference by appearance. The actual method used nettles doubled over a loop above the mouse. The mouse was padded out from the stay to its shape with parcelling. The nettles were then pointed over ( like weaving, over and under each successive nettle). As the mouse shape got larger additional nettles were woven in and when the mouse narrowed nettles were cut out. After the mouse is pointed over the ends of the nettles were laid along the stay and the stay serving covered over them. I used Andersons method for my stays, and while the method takes some fiddly work with a needle to accomplish the results are great. Regards,
-
It has always been my understanding that all line had some degree of tarring as part of the rope making process. Basically the rope is run through a vat of hot tar at a rate determined by how much tar the rope maker wants in the rope. I have been told that after the shrouds, stays, and other standing rigging have been wormed, parcelled and served where needed and have been set up on the ship they were slushed with additional tar to make them more impervious to the wet. Other, more learned persons than me may have more information. Regards,