JPett
-
Posts
881 -
Joined
-
Last visited
Content Type
Profiles
Forums
Gallery
Events
Everything posted by JPett
-
 Ahoy Mates My kit has 4 gunports (2 per side) that are positioned over bulkheads I am interested in hearing from others who have dealt with this and their solutions. Is there any prep work that can be done to make this task easier. I was thinking about making the vertical cuts in the bulkhead prior to planking as they are dummy cannons. Currently I have not glued anything so all options are on the table It is the HMS Victory by Corel Thank you
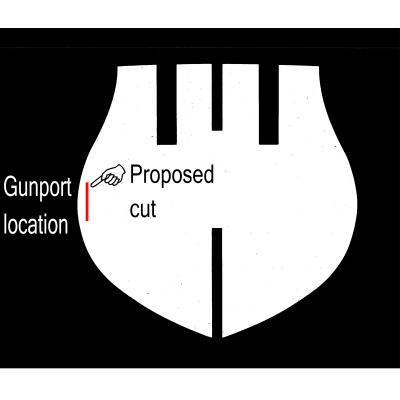
-
Ahoy Zev If you look at early pics of my build you will see I had installed some wood between the bulkheads at the deck line. I figured the instructions had you installing the waterways to reinforce the hull for planking which I had already. In hindsight installing the water way is best. I will just do mine when I plank the interior wales. I am very good at making extra work for myself PS: You will find the filler does not like pins. Keep this in mind when you plank your stern.
-
Ahoy Michael Your work is brilliant
-
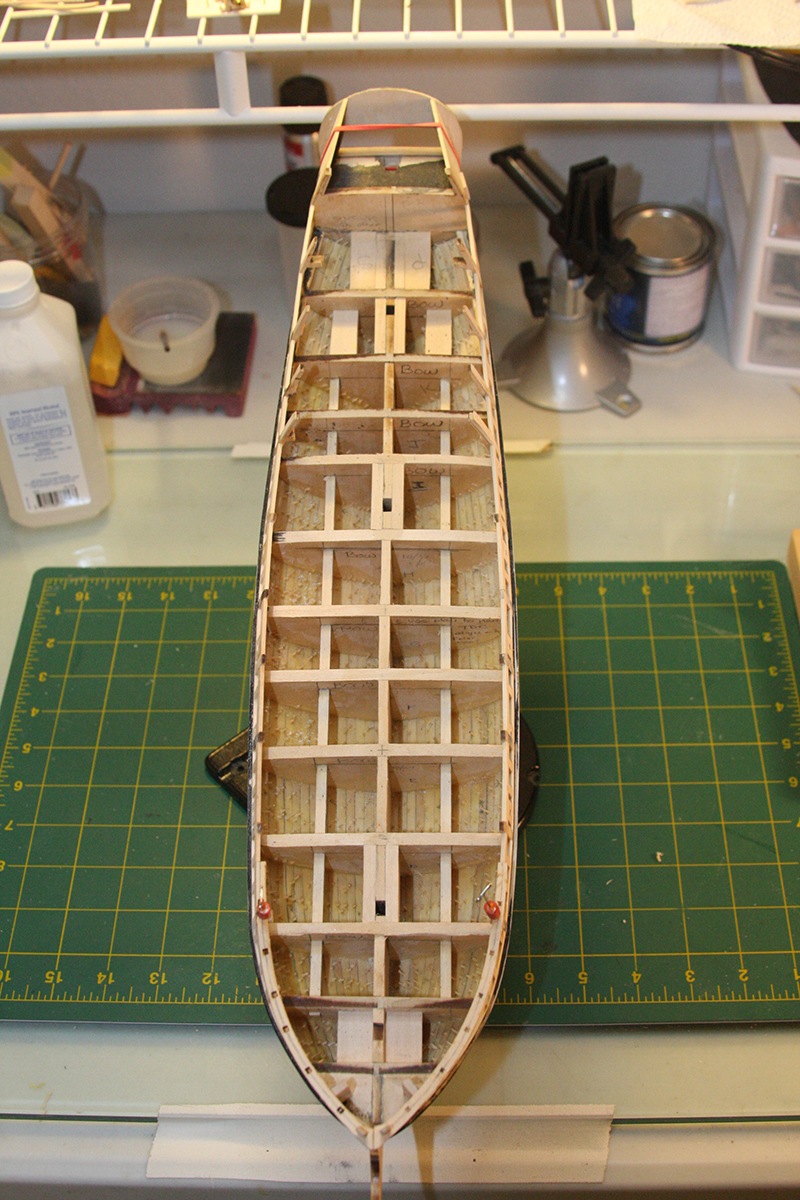
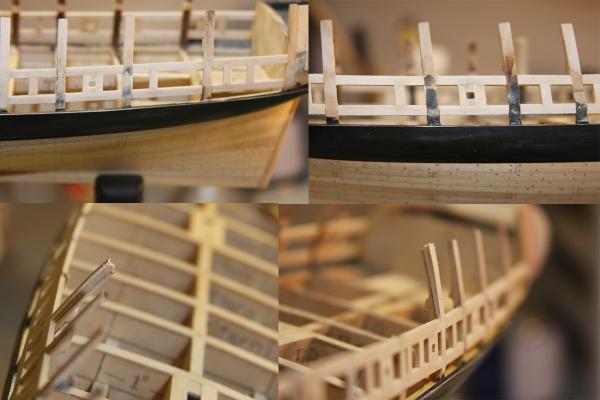
Ahoy Zev Welcome back As for your question Check the plans there is a top down image that shows both the Knighthead and timberhead. I measured from these and used the kit wood. I upgraded my timberheads though, same thickness just deeper so that it sits further back in the hull. I was afraid I would break off the recommended size bending planks around the bow. The Knightheads must past through the laser cut forecastle covering boards so I kept those the same. These laser cut pieces were very helpful in aligning both the Knightheads and timberheads as one terminates there and the other passes through. I found a pic, I hope it helps After all that work to carve the fillers it was for me a little unnerving to start cutting into them PS: My timberheads are only that thick on the top of the fillers. I cut out the part in the filler

-
Ahoy Rich I would think about where you want to be before you start your Opus and make your next project one that brings you there This hobby has a lot to offer and also requires a very diverse skill set. As individuals we all have our strengths but it is addressing our weaknesses that will let us achieve the best build The kit manufactures also have their strengths and weaknesses. Pairing them against yours might be a path to consider. I would also if you have not already; download and read the CC Vic instructions to get a grasp of what will be required and the hills you will need to climb to succeed. I am sure your following some of the logs. These are the manufactures I have some experience with and what I feel they offer Model Expo. The Good: Excellent kits for both beginner and intermediate level builder. Kits are primarily Basswood which is easy to work requiring a minimal investment in tools. Some of the best instructions in the industry. Single Planked. The Bad: kits are Basswood which is soft, difficult to finish unless your painting. and is almost impossible to use to create many of the small details found in the scale of most ship kits. The kits can have inherent flaws. Single planked. Britannia fittings are really bad. ****These weaknesses cause the builder to step up in these areas to complete the kit. Finishing, wood carving, metal work (to replace or correct the Britannia) , and checking parts against plans. Planking the real way (I know it is listed twice and felt it should be) Corel: The Good: Some of the best kit supplied lumber and parts. The Bad: The worst instructions. Sorry my experience ends here. **** Again having only a basic outline for instructions means the builder needs to have an understanding of the process and must to use the plans and research to plan his build. Most kits are double planked which is considerably easier although some are single planked hardwood which is the real deal. I put off my Berlin build for this reason. Not ready. An example of this theory would be "how's your copper plating" As only you know where you really are I think the your next build needs to be up to you. You need to have a connection to the ship and that is another can of worms. Open them one at a time.
-
HMS Victory by JPett - Corel - 1:98
JPett replied to JPett's topic in - Kit build logs for subjects built from 1751 - 1800
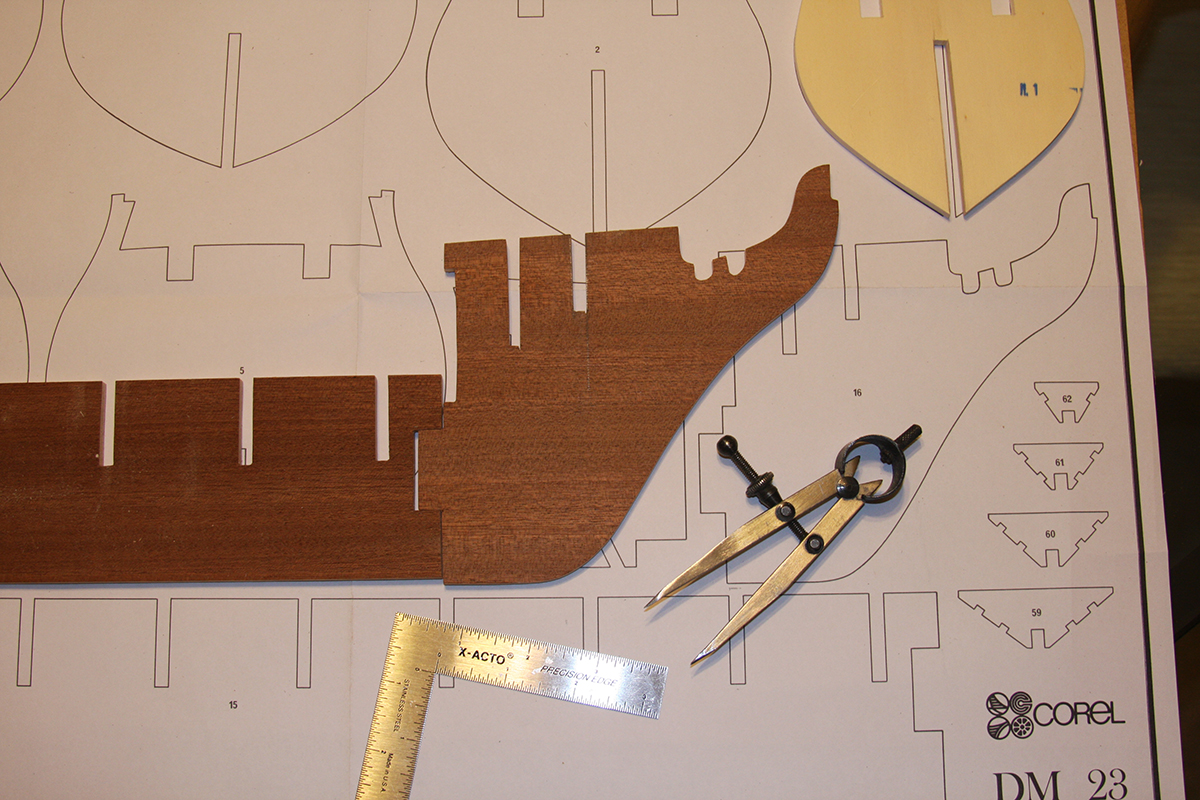
Ahoy Mates Ben: Welcome Aboard, I will go with "hopefully" Mark: Ditto on my response to Ben Eric (Sport): You really are asking for it on all fronts. I think we share a common trait Erik N: Thank you very much for taking the time to post those most helpful images. Augie: Really now, I would not would bet a nickel on that first comment but I will second the second. I would be lost without the help I have received here on MSW. Patrick: Did Augie coach you or just pay you "lol" Back to the build: Time .5hr (Keel and Bulkheads.). Total 5hrs Just to be safe I scanned the plans, cutting out part# 16 and first tested it against part number #15 (keel) on the plans and found the gap between the tab and the slot is in the plans. Perhaps something goes there, maybe it is an expansion joint, I do not know but have removed it from the list of current problems. I should point out that I tested my scan against the original on the plans before I did anything. Next I tested my cutout on the actual part and confirmed my original findings that a small amount could be removed. Not enough to correct the problem but some. Then I aligned the part (with the cut out) to the keel (#15) on the plans and found that the keel is also short. The overage on part #16 and the shortage on part number 15 causing the problem. Simply put I can glue the parts and sand off the excess just as Erik suggested and according to Augie I should have no problems for the next 6 months, although gluing a strip along the bottom of 15 would also work just as Patrick suggested but because this did not come with a guarantee of no problems for 6 months I will have to go with plan A. I think I am good here, problem solved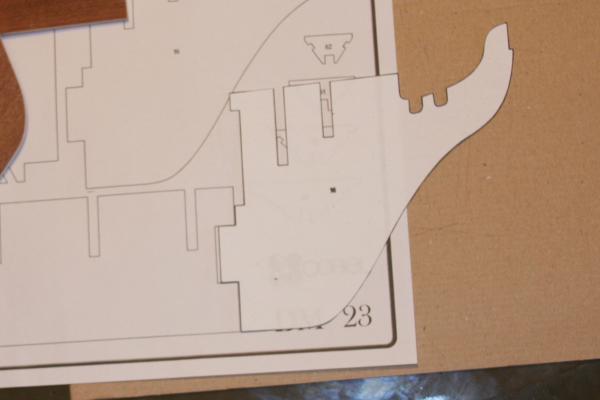
-
X-Y Attachment for Dremel
JPett replied to Martin W's topic in Modeling tools and Workshop Equipment
Ahoy Richard For now I only have this and the image I linked to in my recent post I will try to take some more pics showing other configurations The Dremel can be angled which opens more options for grinding, sanding or milling too.
-
X-Y Attachment for Dremel
JPett replied to Martin W's topic in Modeling tools and Workshop Equipment
Ahoy Mates A while back I posted my purchase of a My Vanda lay Drill Press Plus and Proxxon XY table in this thread. http://modelshipworld.com/index.php?/topic/1643-x-y-attachment-for-dremel/?p=54766 Just thought I would follow up and let you guys know how its working. So far I am very happy Drill Press: After my small modification drilling is smooth and accurate. Milling Operation: As I have no prior experience operating a mill I might not be the best judge here. For me it works as expected. This being to mill hardwoods and soft metals with a precision and on a scale that exceeds my abilities with hand tools. Vanda Lay offers a Z Bar fine Axis adjustment Dial and Screw which would take the milling to another level. It is on my wish list. Sanding and grinding/polishing: Again, for me it works great. Holds the Dremel securely with no noticeable deflection in any axis. I find the Dremel starts to fail before the Vanda Lay mount. I plan to modify the work station by adding a larger work surface to drum sand bigger parts, such as bulkheads. It will just be something with a hole for the Drum that will bolt to the top of the XY table. I will post a pic when I do. Conclusion: This set up is a "Jack of all trades" and with that I am sure a master of none. For my current shipbuilding needs however it more then fits the bill. It does need to be configured for each operation and this can sometimes be time consuming. In the future I might replace some hardware so the same tool or no tool is needed to make adjustments or changes. Taking into account what it would have cost me to buy all these tools individually, this was "Money well spent". I am sure that I would get a higher level of precision with a stand alone mill, drum sander or full on drill press but these tools also require real estate which for me is an issue. When the day comes that my abilities exceed those offered by this tool I will use the experience I gain from it to revisit these options. -
Ahoy Mates Ben: Thx It was good to take a break but it is better to be back Jason: For me, repairs are just a part of the process. Funny how our eye always goes right there. Must be genetic JS: Welcome aboard. I have followed your log and am very jealous. Your carving skills are tremendous. As for the cannon height. I never had a problem there. It was all about the flow of the gunwales and whether the ports themselves should be perfectly square or not. Here is a link to my cannon height jig. http://modelshipworld.com/index.php?/topic/45-rattlesnake-by-jpett-model-shipways-ms2028-scale-164th/?p=399 It was made during Gun Port "take 1" Augie: Don't make me use the "P" word. You know where that goes Sam: Thx, Always good to see you aboard Ferit: See, I told you so. I would never dump my baby for another pretty face. Patrick: Yes, sawdust is a good thing Popeye: Not sure I figured it out this time. Still have lots to learn and God willing many years to learn it. As for the deck. "NO" the instructions have the deck going in after I plank the wales and ceilings (inner wales). I put in the two runners to prevent the planking from warping the hull if that is where you were coming from. They were not in the instructions but from a book I read on planking. Martin: "unobtainable ideal" Can I borrow this ? John: Thx, looking forward to wishing you the same. Be safe on your trip. Michael: Funny, I feel the same way about your log. Treenails and all Eric: Always a pleasure to see another Rattlesnake Shipwright aboard Back to the build Well they are finally done. Are they perfect "no" am I happy with them, happy enough for me to move forward, are they right, that is ironically a good question. As luck would have it the last gun port I did; I managed to make almost perfectly square in a difficult position and it actually "looks right". This contradicts everything I thought I figured out. I was completely dumbfounded. I Photo Shopped a square inside the port to high light it. I am not sure if this is a high point or a low one. On the happy side; my work to maintain the line that the laser cut Forecastle covering board requires looks good so far. Anyone following this build should take note of these parts and their importance to how the top of the wales are shaped at the bow. As for any fix on the gun ports, I may or may not attempt to make some minor adjustments in the ports while planking to see if they could truly all be made square. The plans do not show them as square but a very good source tells me they are. That and most kit supplied gun ports are. I am truly perplexed by this. As for Planking the gun wales I will be pre-staining or actually dying the wood using water based oil paint before installing it. Similar to what I believe Ben did on his Confed, I will be using paint instead. This will again be a learning experience for me which I am very much looking forward to. I also need to trim out the starboard window and then make the call on framing them. Suggestions welcome


-
Ahoy Mates I have a Flexcut Slipstrop, see my review http://modelshipworld.com/index.php?/topic/346-flexcut-slipstrop-review/?p=3290 It cost about the same as a pack of 100 replacement blades and does require a small amount of practice to get the most out of it: But I have not replaced my blade since February. There is a very noticeable difference in the way my knifes slices through wood as compared to the way even a brand new blade cuts it. It only takes me about 10 seconds to tune a blade and it has completely spoiled me. Every tool I own is razor sharp The only person I would not recommend this to is someone who does not know how to safely use a sharp instrument. PS: If you choose to get one add a few drops of baby oil to the leather surface
-
Silly question? Better Corel or other manufacters?
JPett replied to maggsl_01's topic in Wood ship model kits
Ahoy Max I visited your site, Mila is beautiful (as are your other works) and seems like she will be most helpful in this endeavor. In a supportive role of course. Good luck and as I said before I will look forward to your log -
HMS Victory by JPett - Corel - 1:98
JPett replied to JPett's topic in - Kit build logs for subjects built from 1751 - 1800
Ahoy Mates Sjors: I agree "I think" lol Back to the build: Time .5hr (Keel and Bulkheads.). Total 4.5hrs While waiting for the parts to dry elsewhere I decided to do a quick overlay to see if I could spot a quick fix. As it turned out I found a small clue. Sadly I do not see this as a completely correcting the problem but it does seem to be a place to start. The problem, the amount that the image shows that could be removed from the bottom of part #16 does not match the amount needed for proper alignment. Next step will be to scan this section of the plans for complete accuracy and then do a print and paste on part #16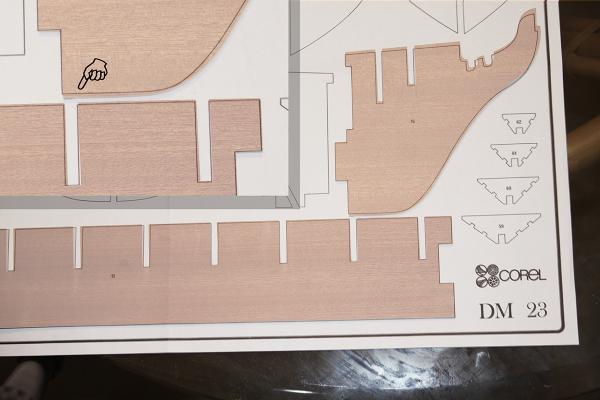
-
Ahoy Augie Amazing progress I do like Ferit's comment. A few nails or even a pins would prevent the part from shifting when pressure is applied.
- 2,191 replies
-
- 1
-

-
- confederacy
- Model Shipways
- (and 1 more)
-
HMS Victory by JPett - Corel - 1:98
JPett replied to JPett's topic in - Kit build logs for subjects built from 1751 - 1800
Ahoy Mates Ferit: First and foremost I have not abandoned my first. Most of my free time goes to her. Why I have started this I am sure could only be answered by spending a couple thousand dollars on a couch Augie: There is no additional piece. My first thought too. After my post I found a drawing on plate #2 which shows the top half of the hull. Using that drawing I should be able to confirm alignment. I want to use the bulkheads to check my findings which also need some minor sanding. I am seeing that all the pieces that make up the hull require some attention. I can tell right now this might be a while and it looks like I have my work cut out for me Welcome to model ship building -
HMS Victory by JPett - Corel - 1:98
JPett replied to JPett's topic in - Kit build logs for subjects built from 1751 - 1800
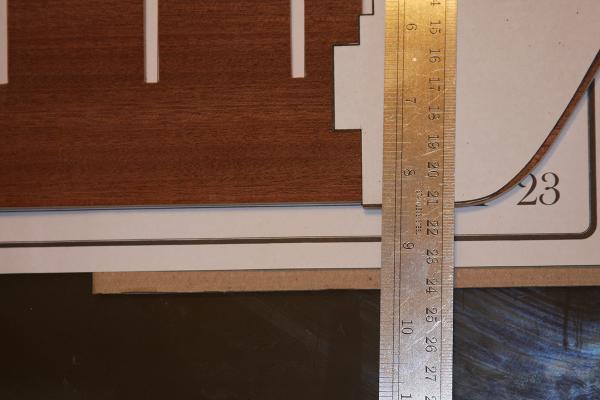
Ahoy Mates B.E.: Welcome aboard Augie: You know I know, don't we both know 'lol" Patrick: I think plug says it all Ferit: TY but I think we both know if it went smoothly it would not be a ship model Sjors: I read you log, your build is beautiful and yes the manual scares me. Michael: Always a pleasure to have you aboard. Back to the build: Time 1hr (Keel and Bulkheads.). Total 4hrs I have postponed the inventory until I can secure some small re-sealable bags to repackage the bitts. The keel section was fully healed after its weight training Well it seems I have my work cut out for me right out of the gate. I decided to start checking the keel fit and bulkheads and found they will all need to be adjusted. I like to think if a block of wood was shipped all over the world it would be a different size depending on the humidity level and air pressure of its current location: That and blaming someone will not magically fix this. For now my focus is on the keel section as three bulkheads attach to part 16 and the remaining bulkheads will be attached to number 15; so these two parts need to be properly aligned. The bulkheads I will deal with later. As per the "little book" I checked the parts against the plans and found that a slight adjustment on both parts might do the trick. I used my calipers to confirm the parts on the plan would actually fit correctly and started deducing from there. Two problems, One, Corel does not supply you with an image directly addressing this. This does not mean there isn't something in the plans I can not use; I just have to find it. And two, it looks like if I were to just sand down the bottom of 16 I would be golden. Sadly I know where that can lead "lol" I have posted a pic, please feel free to comment as I will not be getting back to this for a day or two and as always appreciate input.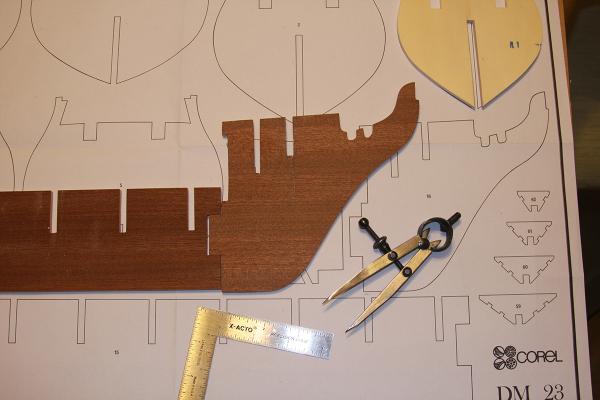
-
Ahoy Augie You should do a review of it in the Modeling tools and Workshop Equipment forum. As I have been eyeballing the Proxxon version I would love to hear some additional comments on the one you bought.
-
Suggestions for an admiralty style model please
JPett replied to Shazmira's topic in Wood ship model kits
Ahoy Robbyn If it is a challenge you seek, why not bash the Syren. I do not know if the plans include a sheer plan or deck structure but I do know there is quite a bit of help here at your disposal. It would also make for a very interesting and I am sure popular log. -
Silly question? Better Corel or other manufacters?
JPett replied to maggsl_01's topic in Wood ship model kits
Ahoy M As for tools, you could spend a fortune but to start all you need are some really sharp hobby knives, a hobby saw with a miter box (fine tooth blade), assorted sandpaper (80 to 360 grid) or glass paper as Corel calls it, some eye protection, a few small hobby files, a pin vise with a couple of bits, a few small clamps (clothes pins will do), good lighting and a place to work. Having a very sharp knife is very important so replacement blades or a strop is also needed. I have a strop. They take some time to master but my blades can split hairs and last for months. Replacement blades are all the beginner needs As you progress you will find certain tasks would be better accomplished with additional tools and your collection with grow. I am a big fan of the "Foremost Miter sander" http://www3.towerhobbies.com/cgi-bin/wti0001p?&I=LXG876&P=FR but others could not build without a plane which I, only after a year have begun to look into. There are also some very good threads here on MSW regarding this same subject with different views. It really is subjective, as a guy I find it hard to not buy a tool. -
Silly question? Better Corel or other manufacters?
JPett replied to maggsl_01's topic in Wood ship model kits
Ahoy Magg Welcome to the MSW I currently own, but have not built two Corel kits. You can find reviews on them here @ MSW. As someone still working on their first build I would never recommend either of these kits to someone new. The wood, supplied parts and plans are of the highest quality, but sadly their instructions are the worst. I would recommend to anyone new to complete at least one plank on frame kit before stepping up to most of Corel's' offerings. Because I feel instructions and guidance are really important for the beginner I would recommend any kit that you buy, first down load the instructions, read them and if they make sense, then "go for it". Choosing a kit that has multiple logs here on MSW is my second bit of advice And I will look forward to your log here on MSW, This would be my third bit of advice -
HMS Victory by JPett - Corel - 1:98
JPett replied to JPett's topic in - Kit build logs for subjects built from 1751 - 1800
Ahoy Mates Thanks for coming aboard JB: I did a Google search and found that there are some vendors stating this "which BTW is a stretch". What I believe they are saying is you can build it "fully rigged" or as a "hull only" which in my opinion is not truly an admiralty model with exposed frames and deck structure. There is no option that I see included with this kit to build it any other way but fully planked. You could however build and display just the hull only which would make a very impressive display piece. David: Thx, I had some difficulty finding information regarding this kit and thought I would start off by addressing this for others. So far I have been spending my time deciphering the "little book" and getting familiar with the plans. It really is a nice kit and I look forward to years of enjoyment. Back to the build: Time 3hrs (inventory and misc.). Total 3hrs As per the "little book" I have acquired a piece of 5/8' composite particle board to make a keel jig from my local Home Depot. I found it in the scrap pile ( 51 cents). The good folks at HD even cut it down to a reasonable 12" by 24" for no additional charge. I am currently using it to take a very slight warp out of the main keel section (Part# 15). I noticed it did not lie perfectly flat while doing my inventory, which BTW is not complete. I wetted one side of the part to introduce some moisture and it currently sits on a glass table top sandwiched between the composite board. I threw a dumbbell on top for good measure. I will check it in a day or two. The inventory: Aside from the slight warp in the keel there was some minor damage to one of the ships boats (repaired) and another seems to have some staining or discoloration in the wood. It can be seen in the upper left of the first picture in the original post. My plan for now is to see if it can be sanded or bleached out. Accounting issues: Corel uses what they call "plate numbers" (the number assigned to the part on the plan) which referances a list in the 'Little Book" to identify parts . Using this to do an inventory has proved to be a bit of a challenge. Problems occur when the same "raw" wood is used by multiple parts. An example would be Plate# 101 Vertical Strake and #105 Port-post. It is the same wood but referanced as another plate number in the list. They do share a part number "LS 229" found in a right hand column which is how I confirmed this. My plan is to inventory everything, see what is missing, and then try to find it on the list already counted as something esle. I have also not yet found anything documenting quantities. All the major parts are all there as per the plans and judging buy the counts I am getting there seems to be plenty of everything else. If I find the time I will post an inventory list. Please do not hold me to this as there are 400 plate numbers. Back to the count -
Ahoy Jack Your work is magnificent. The full size image really shows off your attention to detail and craftsmanship. Thanks for sharing
-
Ahoy Spencer I had this similar problem with my kit. I am a beginner too so please allow others to respond before following my directions This is what I got out of my experience First and foremost check your work, right bulkhead, right slot. You also should have transcribed a reference line on both the bulkhead and the keel section (usually the water line) this will tell you right away that a bulkhead is seated correctly or not Second, if it is possible you should check to make sure the bulkhead has been correctly cut. Some kits include with the plans, templates of the bulkheads. Use these and compare them with what was shipped. This was one problem I had. Corrections are easily made by either the addition or subtraction of some wood. Lastly. If none of the above will work use the deck as your guide and align the bulkheads there. Then pin battens (thin strips) to the hull like temporary planks which will show any high or low spots caused by bulkheads being off. Again, add or subtract wood as needed to. See my Rattlesnake log for pics http://modelshipworld.com/index.php?/topic/45-rattlesnake-by-jpett-model-shipways-ms2028-scale-164th/?p=281 Proceed with patience, check and double check, in the end you will find there is always a fix. PS: welcome to model ship building
-
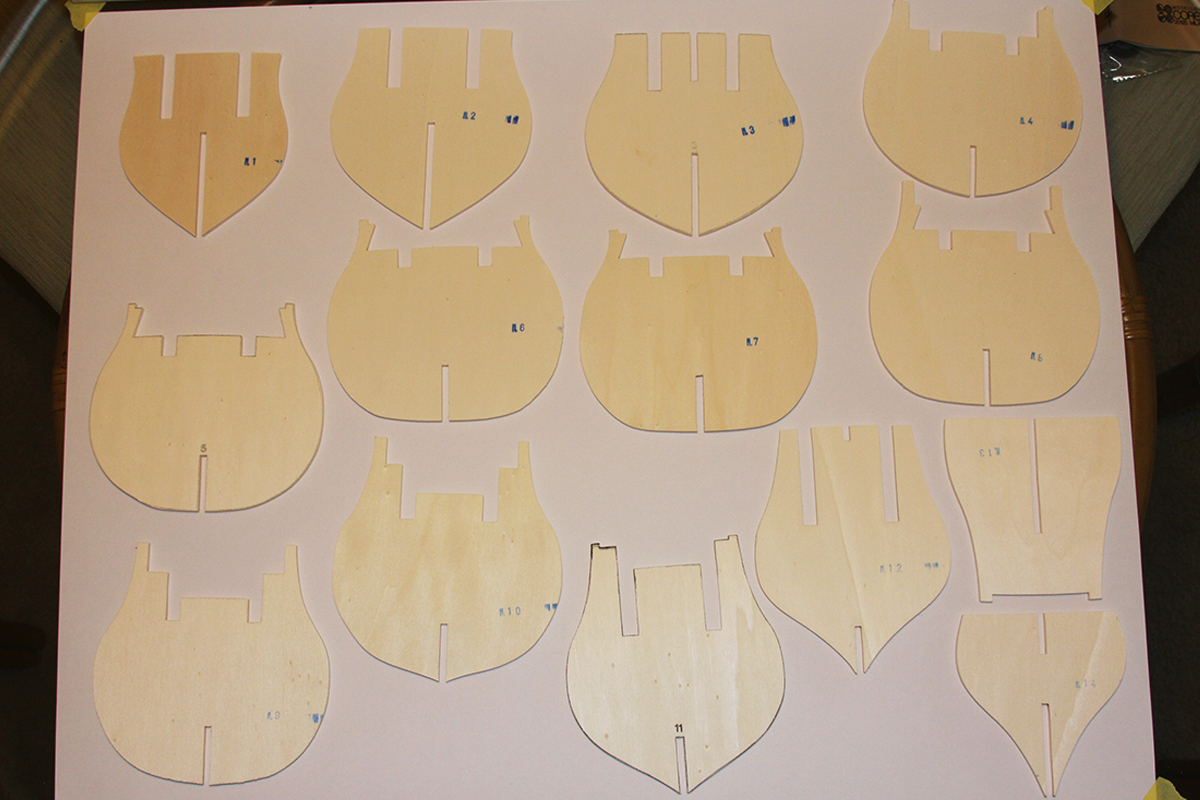
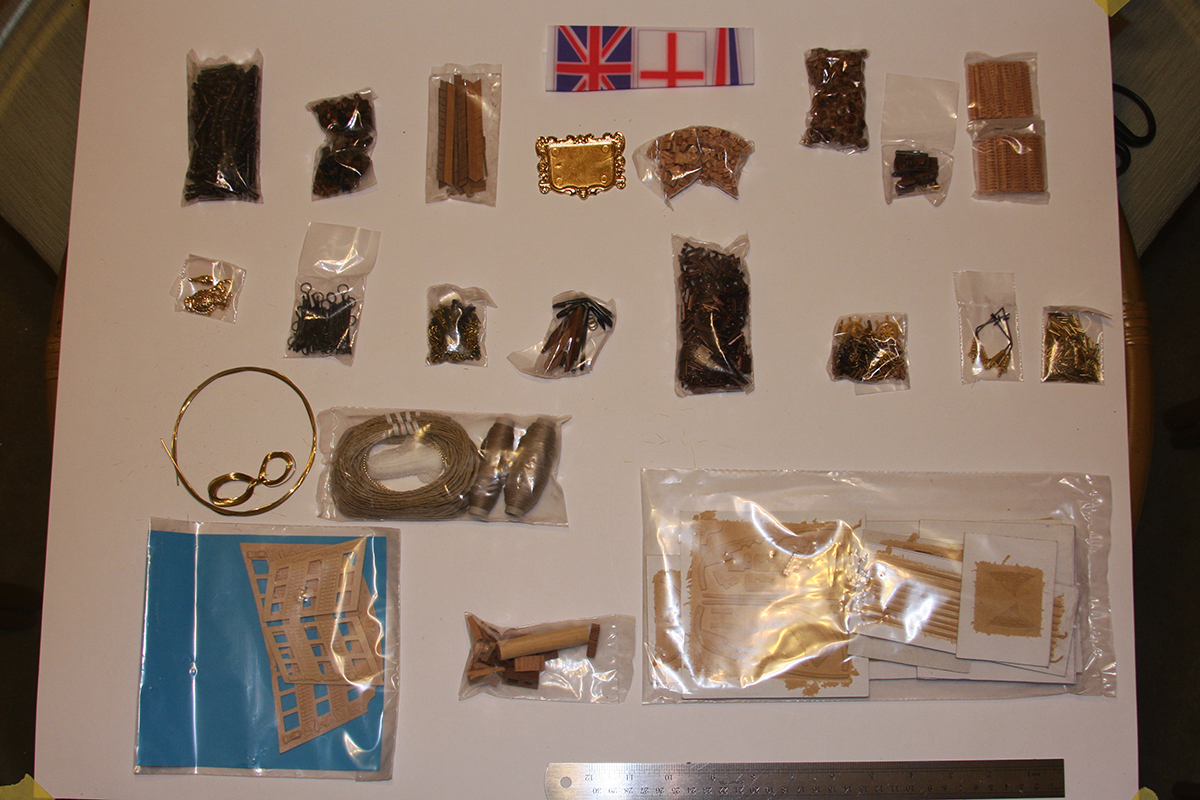
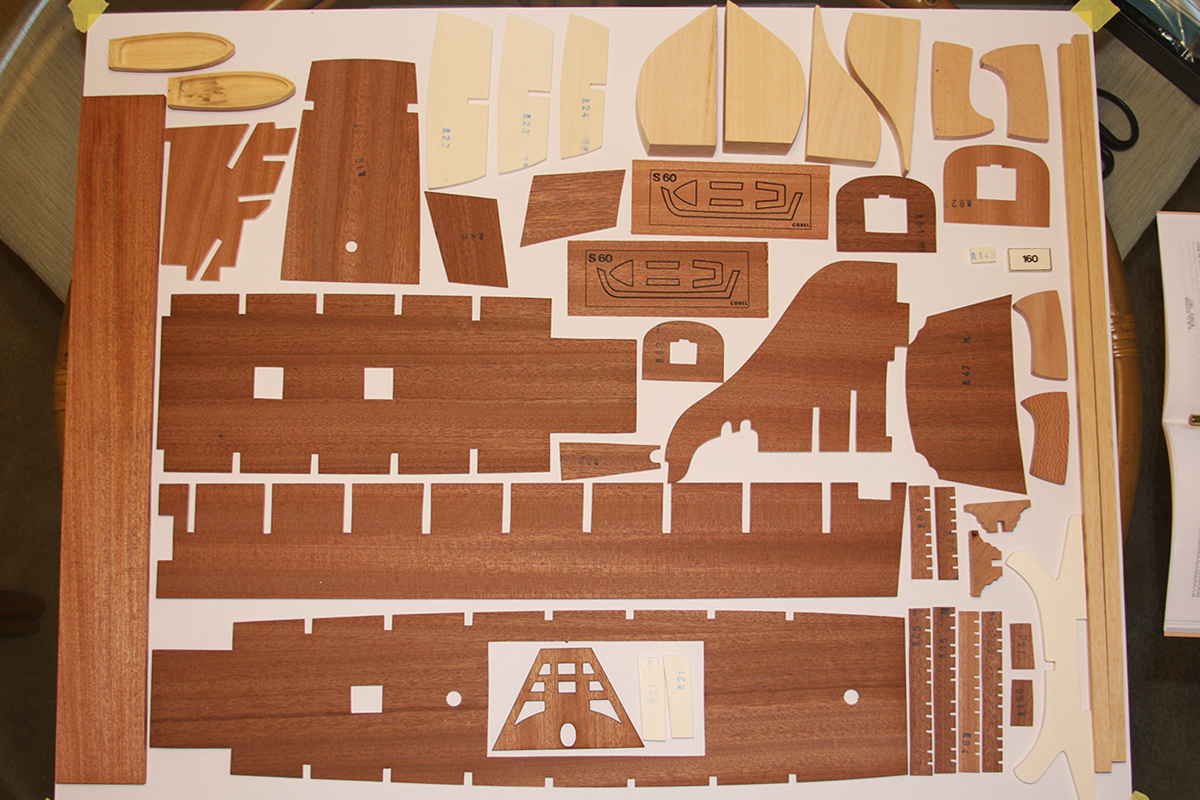
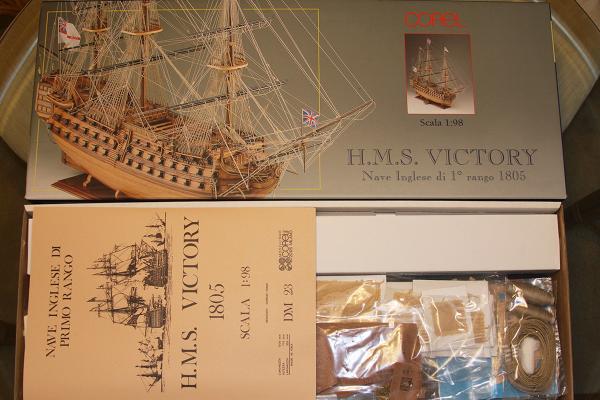
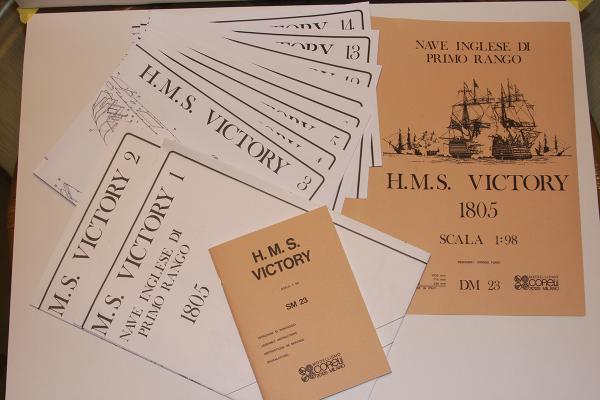
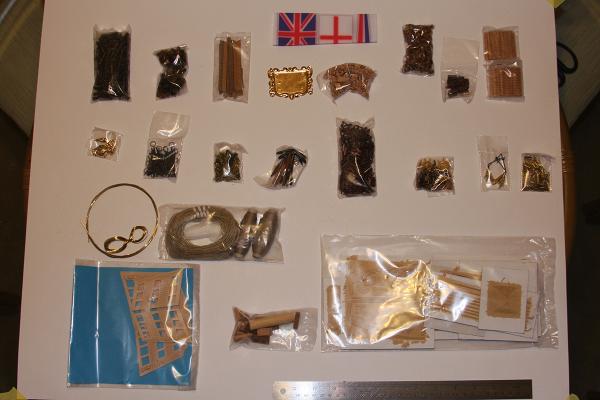
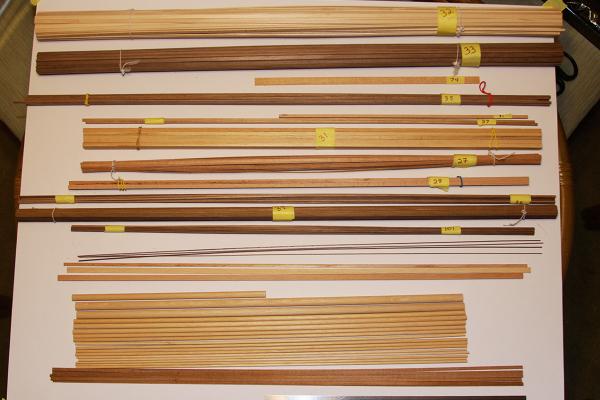
Ahoy Mates First and foremost "Welcome to my Log" From the manufacturer Corel's H.M.S. Victory is designed with a double planked hull in limewood and walnut, with tanganyka strips for planking the deck. All wooden parts are laser-cut to facilitate assembly. Lanterns, railings and other fittings are brass, gilded cast metal and walnut. One hundred cast metal cannon and carronades are burnished for an authentic appearance. Brass gunport frames open and close with hinged lids. Display stand, five diameters or rigging, flags and hammock netting are provided. Fourteen sheets of plans plus an instruction book guarantee a faithful replica. I bought this kit on a whim, my shipbuilding had stalled, it was on one of ME's Super sales (reduced twice), and I was weak, in need of a fix. I had been eyeballing the kit for the last nine months, following similar builds here on MSW, pondering whether or not I would ever be up to this task (this last part is still TBA) and of course watching the price.The owners of Model Expo's recent post regarding their desire to sell may have had some influence on my decision to pull the trigger on this purchase. Regardless I have opened the can and we are now officially at "doors" As this will be a side project for at least the next year (maybe two) please understand future posts maybe few and far between. I have decided to tackle one of my demons on this kit and that is to build it completely using OOB rules (out of box). No upgrades, no side projects, no, I think this would be better if's, but just as Corel designed it along with a practicum of sorts here on MSW. Official OOB modeling rules do allow for painting and I might go there. With that said I will start this build off with a review The box is in a word "packed" and weighs about 11 pounds. Parts were well packaged and in typical Corel fashion; all bulkheads and many parts are precut and bagged. The included lumber was all first rate, cleanly cut, and I would believe "hand picked". I did not find one unusable piece in the entire kit. The Strip lumber was packaged separately in its own box; some bundled by size and type, others a jumbled assortment which will require some effort to sort and identify. Cast pieces come in their own vacuum formed organizer and most are either the gilded brass or the bronzed finish common in most of Corel's offerings. Detail is nice, a step up from the Britannia I have seen included in many other kits . Fourteen sheets ( 2 full sized, 12 half sized ) show both 2D and 3D images of construction steps and various details are included. Accompanying all this are what might be the worst instructions in the industry. Yes that little book is all you get. On a scale of 10, 0 being no instructions I will generously rate this at a 3. In Corel's defense it is listed as an advanced kit and the little book does include what could be considered a basic outline. Conclusion: Corel's version of the HMS Victory looks to be a great kit. Wood and parts are for the most part "top notch". I found one small knot in a 1mm by 1mm strip of walnut and no laser burn what so ever. I do however have some reservations regarding the pressed wood used for the stern and some trim pieces but do not believe them to be a major concern. Overall, I am very happy with my purchase at this point and would have little hesitation recommending this kit . Value wise it is untouchable. Next on my list is to complete the inventory process, and post some close ups. If there is anything you would like to see, now would be a good time to ask.


-
Ahoy Kester It is the fact that they were so good at what they did that is the reason I question what we have done in our interpretation of this great ship.
-
Ahoy John Do not sell America short here. Although she lacks in artistry she has always been able to massage her ego with technology. I am still at a loss as to how that glass house could weather a gale or even her own broadside. All those cannons going off must have produced a small earthquake aboard the ship. I really wonder if we are missing something here in both our interpretation and the one docked across the pond.