JPett
-
Posts
881 -
Joined
-
Last visited
Content Type
Profiles
Forums
Gallery
Events
Everything posted by JPett
-
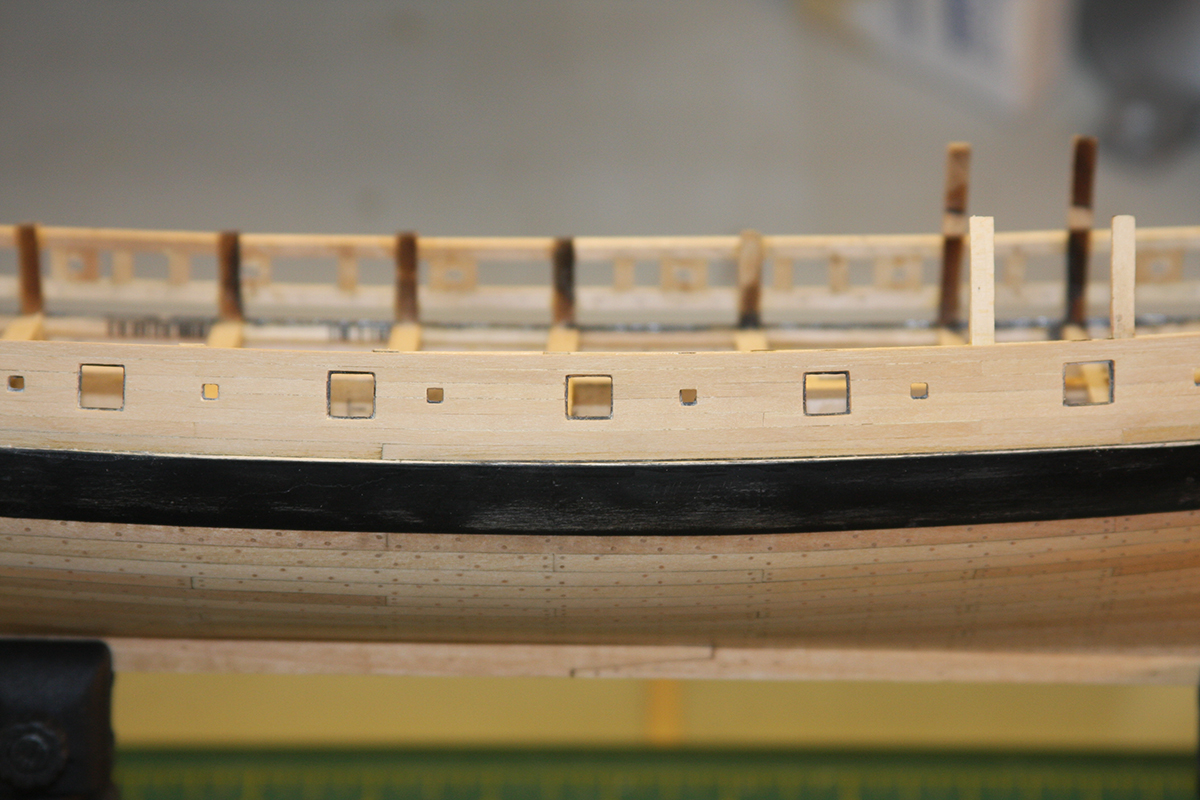
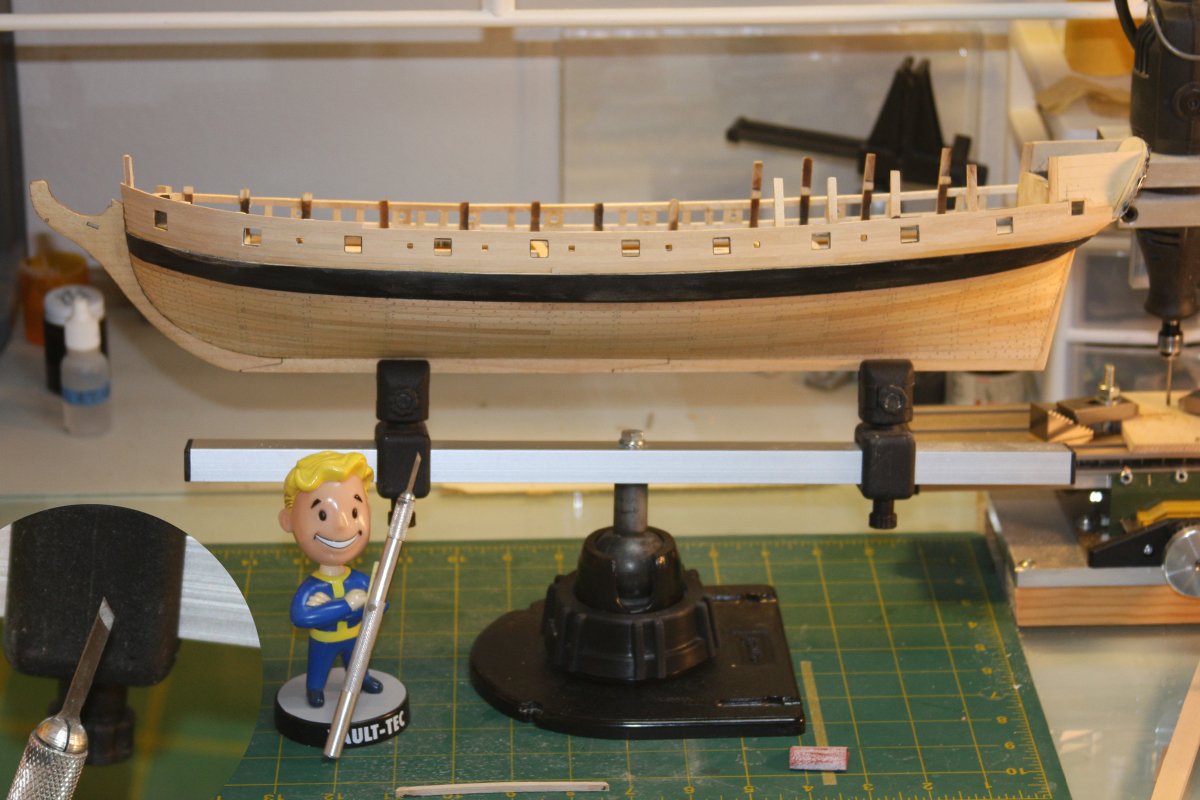
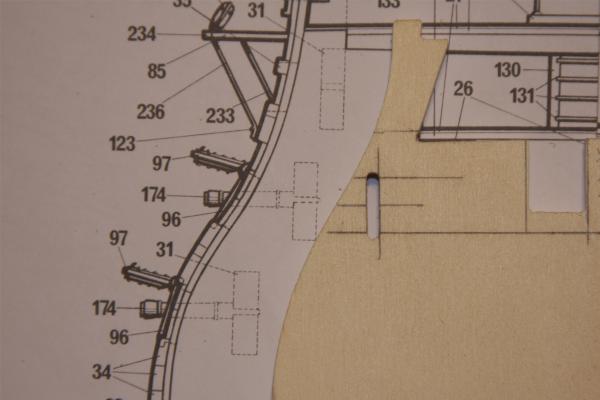
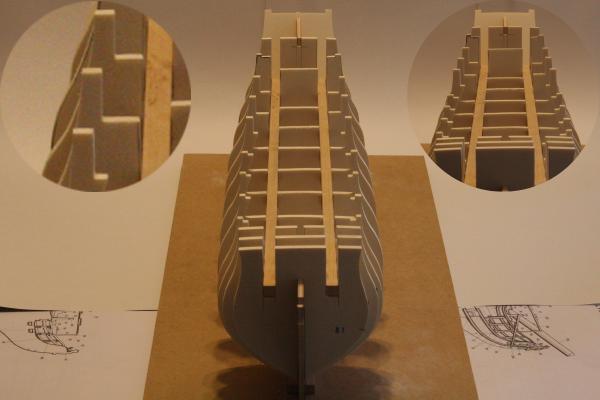
 Ahoy Mates Zev: NP Thought I should post an update on my progress and head off the rumors of another woman in my life. Work has progressed very slowly for me at this stage. As anybody following my log knows, gunports have been a difficult subject for me. With this said, I decided to up the steaks and switch out the supplied 3/32nd by 1/32 basswood with Boxwood. For anybody interested; the boxwood made a considerable difference in the strength of my gunwales: but it required a slightly higher skill level to work and some additional tool expenditures. I used my Vanda Lay to mill out the planks for the ports which was very helpful but in the end I still spent hours tuning them with a super sharp skinny Xacto blade (see pic insert and my Strop post). I also had to throw in a few cheaters to fudge my sills around plank seams. Once done I was treated to the fact that no two of my gunports were the same size. This debacle took me hours to fix. It was very unnerving to trim the hardwood planking and not cut out the basswood gunport sill directly behind it or carve out something unwanted in the front. Beer was used to settle my nerves after each session. While not perfect I am stopping now before I do something I regret. See I can learn. Just not too much at once For reasons unknown. I decided I would sand off the lip of the wales in the bow and create more work for myself. While the bulk of this repair is done. (Sorry no pics, I used CA, tape and accelerator) It still needs a little TLC (wood filler). I also dropped the black wale down slightly in the bow. My earlier error tapering the wale planks (don't do this) was highlighted by this work. It still is, just not as badly now. I am not sure if I will do any treenails on the gunwales. I might flank the gunports ports with railroad spikes "ala" MDJ's Wasa. If I do any treenails they would have be the simulated "bolt" style I recently learned. My concern is how they will look on the 3/32nd wood with the real ones on the hull. I also plan on another full blown TN party for the deck. It just might be too many treenails. If there is such a thing I went with black on the ports (not red) and will be changing the color of the fashion piece on the stern to match this ( I liked what Eric did). For the Gunwales I am currently playing with a light wash of Ochre. My original staining Idea hit a reef and went down like Miley at the VMA's on the 5th plank. The inner wales or ceilings will be basswood with natural finish like the hull. . Am I happy? I will give this a passing grade but hope to do a slightly better job on the Starboard side. Now that I know some of the pitfalls.
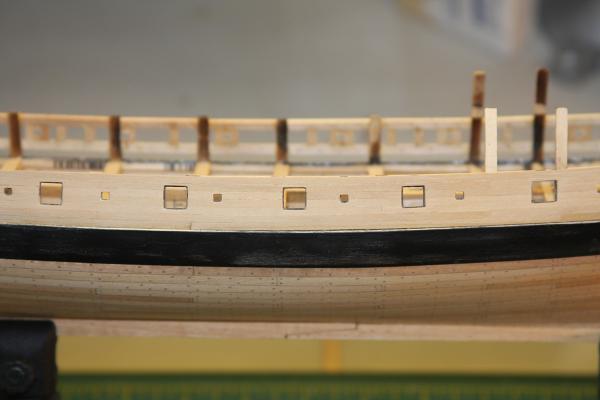

-
Ahoy E Sorry to hear of your troubles, but it sounds like they will be shortly behind you. On the bright side, sometimes it is best to get trouble out of the way right from the start. Especially on a project of this scale. I too have started the climb (or crawl in my case) up Victory mountain and wish you the best. Mine is a side build for now and a Corel Kit which while still a Vic; is a slightly easier take on this monument. Looking forward to seeing some pics and your progress. You are at the right place to do this. MSW is the best
-
Ahoy Kimberly First and foremost "Congratz" on completing your first ship. That is an accomplishment you should be proud of Second: I support your feelings regarding your latest endeavor. If this kit overwhelms you "which kits can do" put it away for another day. Come back to it when you feel ready or use it for practice. Your log will still be here, well provided MSW doesn't hit another iceberg. Third: If you want tips on painting start a thread here on MSW. Something simple like "Looking for painting tips for plastic model ships" here http://modelshipworld.com/index.php?/forum/21-painting-finishing-and-weathering-products-and-techniques/ Many of us are plastic or ex plastic modelers who would love to share their knowledge with others. Painting plastic can be very simple or extremely complex. I recommend starting with simple. I for one could bog down your entire build log with tips on painting plastic; which I would prefer not to do. There are also hundreds of YouTube videos on plastic model painting. Lastly. I would consider a super easy kit to just develop your painting skills. You could finish it in a few days but the knowledge you will acquire will only make your next kit that much better. Painting plastic model kits is an easy skill to learn but one that can take years to master.
- 118 replies
-
- 2
-

-
- jolly roger
- lindberg
- (and 2 more)
-
Ahoy Mates I am wondering if he includes all the time he spends just looking at it I know that would add a zero or two to my build time
- 2,191 replies
-
- 2
-
-
- confederacy
- Model Shipways
- (and 1 more)
-
Ahoy Steamwake Blue Ensign has a great technic for making sales located here http://modelshipworld.com/index.php?/topic/152-le-superbe-by-blue-ensign-heller-plastic-built-as-le-praetorian-after-boudriot/?p=16686 You might even be able to use Toms suggestion to shape them
-
Ahoy Mog Good to see you back in the shipyard
-
Ahoy Zev 1) Yes: In the beginning I would glue them back on after a mishap. In the end I just got rid of them. You need to make one for the forecastle and after doing that it was "for me" a no brainer to just replace all of them. The thought of one breaking after I plank the forecastle or quarter deck made me ill. Structurally they are worthless. I did save them "just in case". 2) If I am understanding you correctly, there are no laser cut pieces for the stern like the forecastle. They are shown on the plan sheet as "rail caps" and the covering boards are what I believe; just the deck planking for the quarter deck. Both are made from the supplied strip board. Hope this helps
-
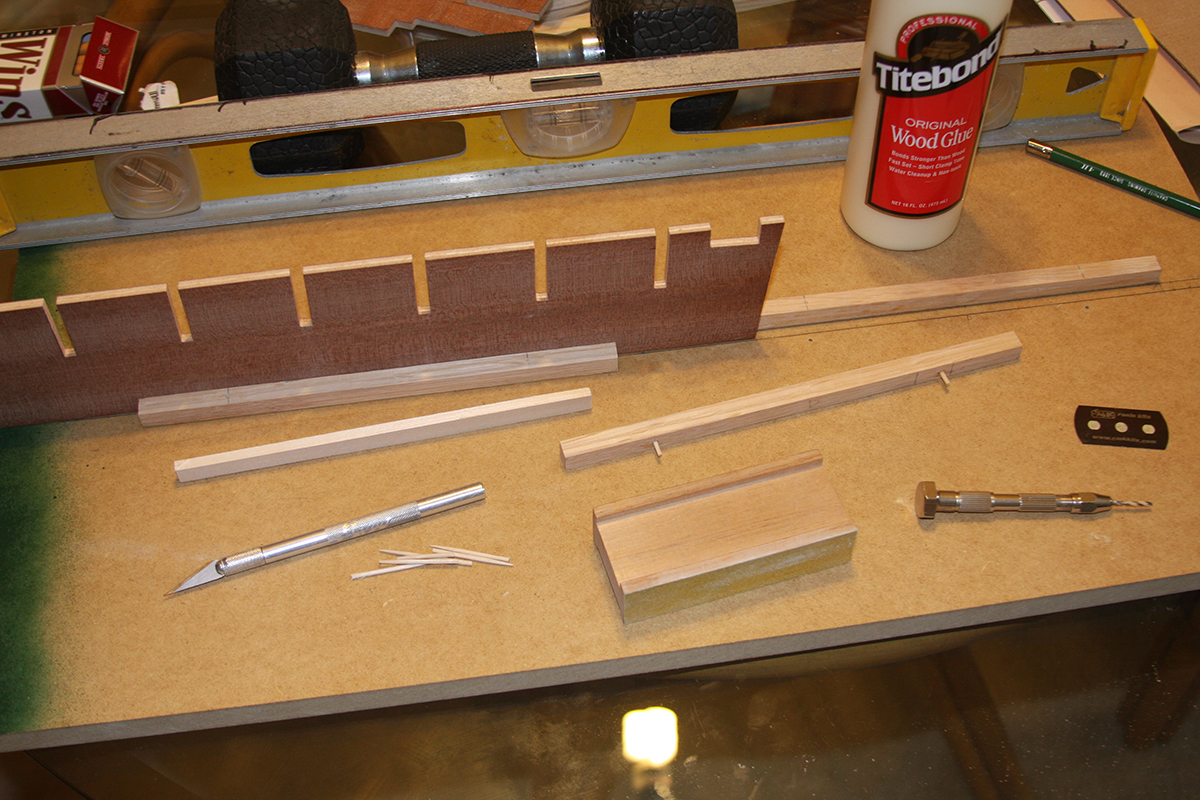
Ahoy Mates Just a follow up on my progress I have decided that this idea requires way too much effort to execute. With the amount of time spent to confirm the gunport position is correct I could have cut this port out of a fully planked hull with a wet noodle. Measurements came from two different plates, which had to be compared and adjusted for the hull in its current state. I allowed myself 2mm on each side for error. I would not rate this as a failure only because I did learn how to correctly measure for the gunports which for this project will be a necessity. This bulkhead will become the point from which the remaining gunports positions will be derived.
-
Ahoy Sid Wow That is an amazing build. Your craftsmanship really shows in the symmetry of both the ships lines and the rigging.
- 439 replies
-
- 1
-
-
- victory
- caldercraft
- (and 1 more)
-
Ahoy Jeff Interesting subject, thanks for posting that great review Looking forward to your progress
-
Ahoy Martin Nice to see you posting Thanks for the tip on the "ratt" lines too. I really like the crows feet, I think it brings the model up a level.
-
Ahoy Jim NP, that does not look too bad at all. It looks like you may also have a deck piece that could help If that matches the keel then it could be as Chuck stated that your plans are a "wee" bit off. Far from the end of the world. Always try to "dry" fit as many parts as possible before you commit to glue. Kit building seems to be about compromises, choosing between the lesser of two evils and problem solving. I do not think two kits ever turn out the same
-
Ahoy Jim It really depends how far off they are and how "to scale" you want to be I have three kits and none of them matched up perfectly. There are just too many variables with the wood, the paper, altitude, humidity and of course human error for the manufacturers to provide perfection. Lay the keel out on the plans, and post a picture. What I did on my kits was when I squared the bulkhead to the hull I sanded towards the discrepancy if needed
-
Ahoy Eric Wow She looks good. Did you disposed of any waterline reference or are you planning on doing another color. Either way it really looks good as is. As for the lip on the gunports. I agree. I am using boxwood to plank my gunwales and my Vanda Lay http://modelshipworld.com/index.php?/topic/1643-x-y-attachment-for-dremel/?p=106929 to rough in the cut outs. I still need to fine tune them and it is a really an "unnerving" process. My advice, make sure your blade is razor sharp. I use a strop and tune even new blades for this kind of work. Don't go big and try to make the cut in one pass. Slowly cut thin slices and work towards where you need to be. I am cutting each plank after I install it with the plan of one "final tune up" at the end. I will try to post something shortly PS> How did you do with maintaining the lip for the bulwarks. I actually sanded into mine while doing my gunwales. OUCH. Took me two days to repair it.
-
HMS Victory by JPett - Corel - 1:98
JPett replied to JPett's topic in - Kit build logs for subjects built from 1751 - 1800
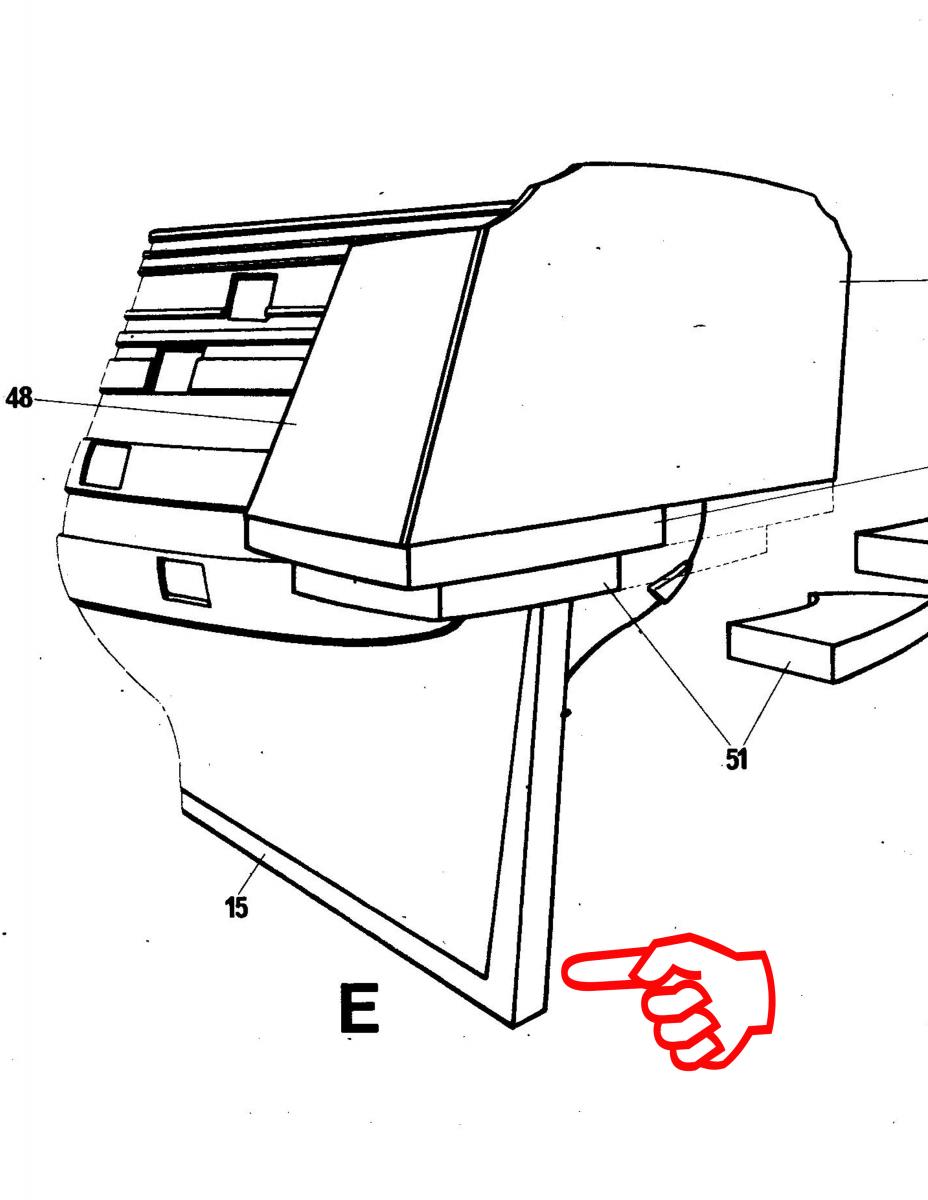
Ahoy Erik Thank you very much for that most informative post And I agree with you about the other half of shipbuilding. Sometimes for me, it is the better half. If I am understanding you correctly I should "NOT" concern myself with cutting a rabbet but should sand down the first layer of planking in the stern so that it is flush with the keel (part# 15) cutting it back to where the sternpost would be. Then apply the second layer again cutting it also at the sternpost. Then add some thin stock to simulate the sternpost and cover up the hideous wood supplied for the keel and stem. The wood supplied for the rudder is slightly wider then the keel in its current state so with the second layer (and sternpost wood) only a minimum amount of sanding should be needed. This also makes better sense of the picture in the plans and of Ferit's earlier query about the stem. With this in mind I will re-read the "little book" to see if this is encrypted in there somewhere. Ironically it usually is. -
HMS Victory by JPett - Corel - 1:98
JPett replied to JPett's topic in - Kit build logs for subjects built from 1751 - 1800
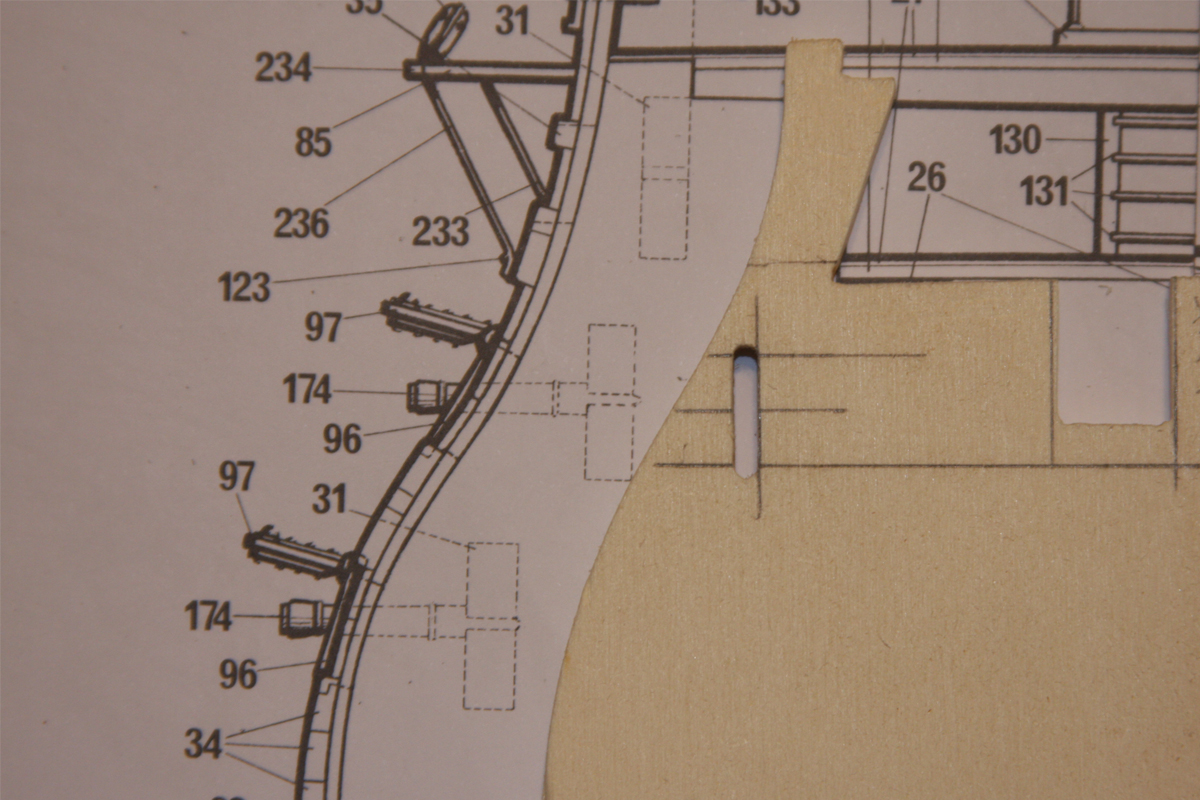
Ahoy Mates Augie. Sure would make any redos a lot easier Back to the build: Time 2hr (Bulkheads) Total 14hrs Boy does time fly First I sanded down the stern piece to match the keel. I experimented before removing the excess by rounding this small section to see how it would look. Wow, did it look bad. I decided I would address this at a later date, removed the wood and moved on to the bulkheads in the back. Why Ferit: Why "lol" After tacking a few bulkheads ( 12,11,10,9, 8) progress ground to a halt. Thankfully they are only tacked with PVA. My plan was to tack everything and then once it all was good to go; go back and glue everything using fillets of thinned PVC. I also decided to tack the bulkheads in with pretty much everything else in place. Took me a while to come up with a working combination. I did have to remove one bulkhead to accommodate the square but felt doing them any other way could lead to small discrepancies that might negatively impact my previous work As a test and because it did not line up "perfectly" I already removed B8. My problem and the cause of the shutdown. The termination of planking as of right now makes no sense. To my knowledge the instructions and even some pics I have seen do not show a rabbet, but in true Corel form there is an image of what could be one in the plates Anyone having any information on this, your two cents would be greatly appreciated. Standing by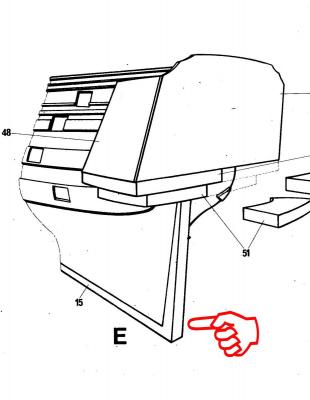
-
X-Y Attachment for Dremel
JPett replied to Martin W's topic in Modeling tools and Workshop Equipment
Ahoy Mates As promised I finally had the necessary motivation to add a drum sander attachment to my Vanda Lay. It is just a piece of 12" square hobby plywood with some properly positioned holes. The Dremel sanding drum is recessed into the plywood but the hole does not go all the way through to protect the deck of the YX table that it is bolted to. Works great, maybe a little too good. I think I need some of the fine sand paper drums. The Vanda Lay holds the Dremel well enough that the wood disappears before the drum head moves. Some thicker hardwood might change this. The tolerance is pretty tight. Have upgraded my happiness with this tool to 4 out of 5. Value 5 out of 5. I used the Vanda Lay in drill press mode to make this Isn't perfect but kicks butt.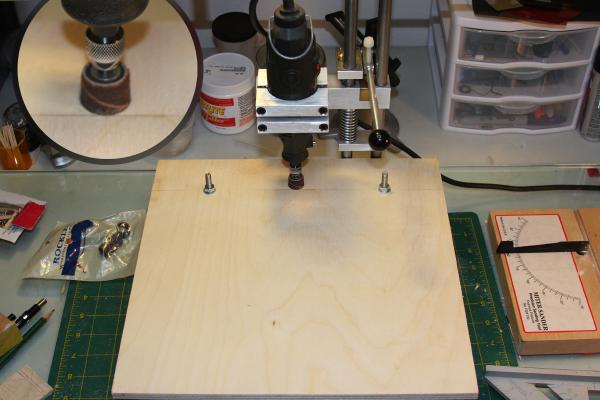
-
Ahoy Divarty Nice build I would agree that you might have painted yourself in a corner here (welcome to model shipbuilding) but judging by what you have done so far it looks like you will manage just fine. She really does look good. The Corel "instructions" and I use that term loosely can be challenging but if it helps the information is there, a bit cryptic but between the little book and the sheets I find most of it is there. I read the entire book, taking notes and review the sheets for each stage. The book is a quick read and for reasons I am yet to understand, Corel seems to believe mentioning some important fact about step 1 should be in step 12 or plate 5. Then I follow my notes
-
Ahoy Sors "They are not treenails. They are bolts (simulated)."
-
Ahoy Wayne I Photo Shopped one for ya It was a quickie Sorry just had to add the smoke

-
Ahoy Andy Found your log on a fluke Really nice job. Looks like your wood working skills are progressing nicely Looking forward to seeing more
-
Ahoy Mates Thank you for you advice After further review it was found that there are eight gunports that will require a section of bulkhead be removed. There is another on the gunwale and B14 I have also decided to mill out an area about two to three mm. back in the bulkhead at each location. It should be no problem to remove the remaining wood when the gunport is cut. I feel this option will allow me to create a slightly larger area to facilitate some room for error without changing the profile of the bulkhead. The depth being determined by the wood needed to mount the false gun.
-
HMS Victory by JPett - Corel - 1:98
JPett replied to JPett's topic in - Kit build logs for subjects built from 1751 - 1800
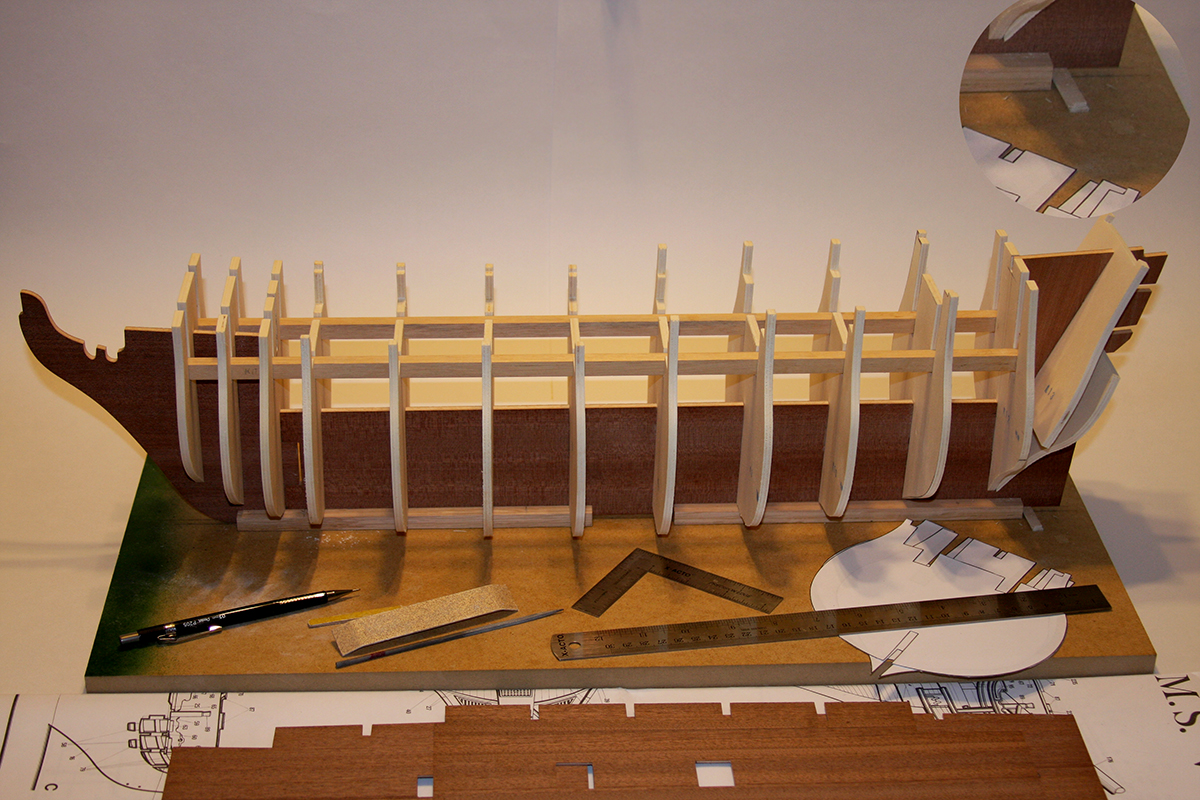
Ahoy Mates Augie: Words are fun. They can be many other things but fun is the best Ferit: Starting trouble already I see (most likely stain, maybe some planking but no to the extras) Patrick: Yes, I would rate the quality as very high. Back to the build: Time 7hr (Bulkheads and base). Total 12hrs Yes, call me slow as I have 12 full hours on this build already and have not yet glued a part. I also have no plans on doing so in the next few days. This is only a ruff fit, although I am very happy with it. It seems that Corel feels that the shipbuilder should "fit" all the bulkheads and I think this is a good idea. Much better then relying on someone else for this most important part of the build. I first sanded the bulkhead slots for the keel. I checked each bulkhead to the plans, penciling in lines to guide (or save me from) my sanding. In the beginning I sanded the bulkheads for a snug fit but when I started the stringers I saw this as a mistake. It is my opinion that these parts should float "just a tiny bit". This was pointed out to me by the keel jig I built (and yes "A"; those are treenails). A snug fit required perfection otherwise any discrepancy would add a little twist the hull. The keel jig was a very good investment of both time and money. Not only does it hold everything nicely but it highlights any little twist you put into your build. This is my first Keel jig but I won't build without one again. It was also helpful to confirm that the bulkheads 5-10 were fully inserted. Due to the shortness on part 16 mine rides a little high and I had to resort to a shim to do this. Next I moved on to the stringers. I started at B11 and B4, filling in the middle. Then I did the bow (B1-B3) and the stern (B12-B14) making sure the stringers dropped in with no required effort but with as little excess as possible. This was a slow process for me. I did learn some tricks which I will share. I found that you could pull up a bulkhead and lay it at an angle keeping the bulkhead keel slot in the keel, just not in the slot in the keel and align the bulkhead top with the one either before or after it to confirm your measurements before sanding. This method sometimes conflicted with my original assessment causing me to recheck what I thought need to be sanded. Flipping the bulkhead and checking it from both sides was another great way to double check work. I found it invaluable while doing the keel slots. Next I have the decks and I am also soaking some battens to check my work, Then I have to make the call on whether or not I will be doing any pre-work on the gunports; see my post here http://modelshipworld.com/index.php?/topic/3815-cutting-gunports-into-bulkheads/?p=107735. Then I want to finish sand any bulkhead areas that will be seen on the completed model. Some look like they will be a pain to do later. For now I must go off and see another, before she gets jealous

-
Ahoy Zev That is still up in the air. We don't use "P" word in my log "lol" For now And: Yes if you do a light enough coat. I might use an airbrush
-
Ahoy Demonborger Thanks for responding The Corel kit uses metal gunport frames with a length of wood installed between the bulkheads to mount the dummy cannon. The bulkheads are pretty substantial on the Corel kits too. The instruction "if I am deciphering them correctly" suggest you to apply the planking and then cut out the gunports. It's going to be a hell of a party