JPett
-
Posts
881 -
Joined
-
Last visited
Content Type
Profiles
Forums
Gallery
Events
Everything posted by JPett
-
 Ahoy Ahoy Ahoy Is there anybody in there? Just nod if you can hear me Is there anyone home?
 -
Ahoy John Welcome back, thanks for sharing the adventure Looking forward to seeing its effect on your build
-
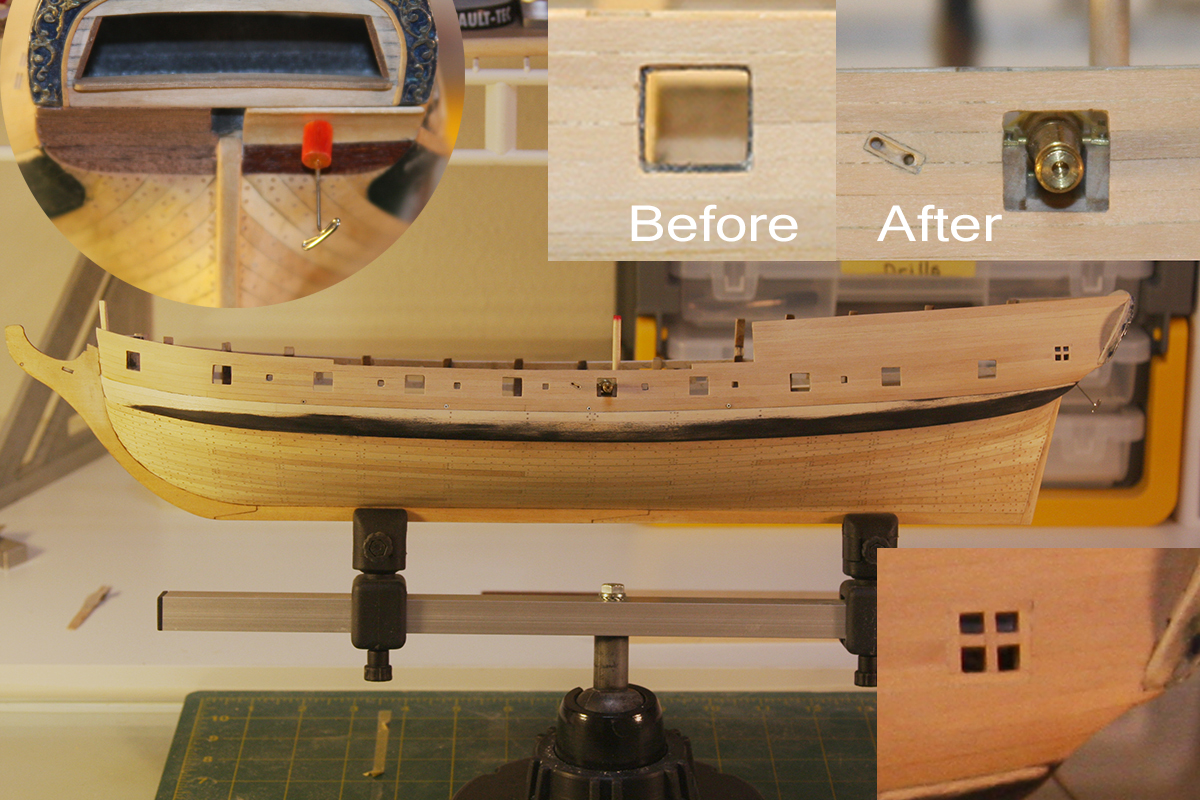
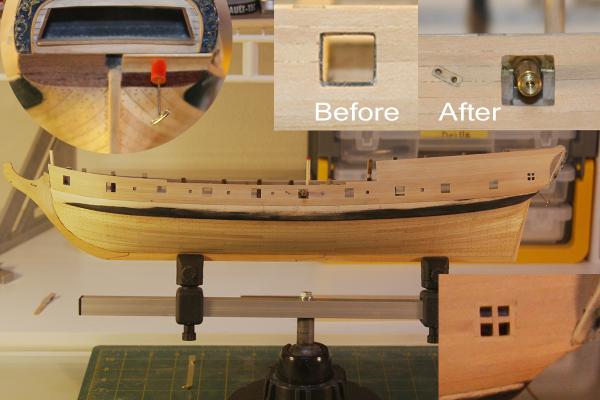
Ahoy Mates Augie: I am still throwing around ideas. I have not been able to come up with something that will play nice with what I have. Call it a lack of foresight on my part. The way I did the hull is something I would rather not repeat. Patrick: What happened was I tried to create a step inside the ports. This meant I had to cut the planks to the correct length. I could not just file the openings, although I ended up doing just that in this post. Martin: I just try my best and if I am not happy I redo it. Some may feel redo's are "unproductive" :P but I think they are very helpful for the newbie shipwright. JSG: Thanks for stopping by. I frequent your log and find much inspiration there. Thanks for posting. For this "my first real build" my goal is to just learn as much as possible and hopefully end up with something I am happy with. Kenneth: I just keep going Popeye: "To do or not to do" I think I saw that play Back to the Build Well It doesn't look like much but as we all know that does not mean many hours were not spent in the shipyard I had to step up and be the Captain. Decisions had to be made. I was just not happy with the gunports. After all the time I spent to frame them I was not going to settle. Originally I tried to do a step inside the gunports which can be seen in the 'before" insert in the pic. This meant that the planks had to be cut precisely before installation. In all honesty my skills just were not up to this task and this resulted in the gunports following the sweep of the planks and not the line I wanted. It was a lot of work but also not correct for the ports not having a lid. Once I filed the "non Lid" ports and saw how nice they came out I made the call to do the remaining ports which I am now much happier with. There was also another casualty. After all my work to save the step in the wales I ended up sanding it entirely out. As much as I tried the end result was in a word 'unattractive". Trying to work the harder boxwood next to the softer basswood resulted in a rather unflattering line. This was further exacerbated by the lack of any step in the stern. Not sure how that happened. I also found that my wale is about 2mm low in the stern. I confirmed this on the plans. This has affected the window height which has created an issue with the trim which I am currently working to resolve. In the plus column; I am very happy with the window and the sheave. Actually the entire project right now. I made the parts with my Vanda lay set up. The sheave I saw in Chuck' s Winchelsea log http://modelshipworld.com/index.php?/topic/99-hms-winchelsea-by-chuck-1764-english-32-gun-frigate-pob-164/?p=1340 I also did the scuppers, slightly adjusting their positions to add a little more symmetry to the gunports and finished the port side of the lower transom. You can see my jig on the starboard side. That is used to get the correct angle for the planks when they butt up to the stern. Comments "as always" are welcome
-
Ahoy Kimberly Congratz on completing another kit As for your Santa Maria, I would suggest that you consider doing some research. Develop a plan that will result in the model you want. Some of us will spend a months or even years on a model. For me it does two things. The models come out more to my liking and my house does not fill up with them. I still end up giving most of them away.
- 118 replies
-
- 1
-

-
- jolly roger
- lindberg
- (and 2 more)
-
Ahoy Kevin I use 5 minute epoxy for most of my PE. Your parts will never pop off. It can be thinned with Alcohol and applied similar to Thin cements using capillary action. Or it can be left on a part for a minute or two to "get tacky" before applying it to the model. Cleaning up any excess is also easy with alcohol. Whatever you use be sure to scuff the PE
-
Ahoy Wackowolf Something in a 1/50 scale with a cutaway would be a very cool kit. These guns were amazing
-
Ahoy Eric Wow Can you share with us how you did that lettering It looks "fabulous"
-
Ahoy Kimberly Humbrol paints are excellent. They are preferred by many modelers for brush painting. So for you they would be a good thing. Stay away from the enamels though. Humbrol has a full Acrylic line. http://www.humbrol.com/shop/paints/acrylic-paints/ I love enamel paints and even use them on my wooden ships, but they are harder to use, less forgiving and require petroleum solvents . I would recommend that you stick with the Acrylics for now. Get some acrylic thinner if you don't have it already. It is much better then water to thin the paint. It has chemicals that slow the drying time and help the paint flow or "lay down". HL and M's both sell it.
- 118 replies
-
- 2
-
-
- jolly roger
- lindberg
- (and 2 more)
-
Ahoy Rich I do I use PVA glue
-
Ahoy Kevin Airbrushing is a skill that requires some time to develop. The curve is pretty steep and unforgiving too. I would buy some cheap kits and get yourself to a point where you have some confidence before embarking on this beauty. I am no pro but would be happy to share with you what I know. I made a mess of a few models, the airbrush really makes it easy.
-
Ahoy Kevin That is a sweet package http://www.model-dockyard.com/acatalog/info_MD20003.html I have not had the pleasure of using any of MK1 PE. I have used their decks before and found them excellent even in the 700 scale
-
Ahoy Kevin Beautiful kit. I was waiting for this one before I switched to wood. You know Eduard has a Big Ed for this http://www.eduard.com/store/Eduard/Bismarck-1-200.html?cur=2&listtype=search&searchparam=Bismarck Will be living the dream through your build, Good luck with her
-
Ahoy Kimberly For the glue http://www.youtube.com/watch?v=oXTK9KdRQN4 He doesn't mention this. Make sure your fingers are no where near the seam as the glue will run up between your fingers and the part, damaging the part. You can use it for just about everything. Practice on the sprues/trees in your kit. Less is more. It is worth the time to learn to use As for the paint. See if you can match it to one of Testors colors. Tamiya also make hobby paint sold at Hobby Lobby so try them too. Olive brown is just a name. Always match the color, not the name when using another manufacturer . http://www.testors.com/category/136648/Acrylic_Paints http://www.tamiyausa.com/articles/ln/72/XF-chart-10ml.pdf PS: Kevin is a very good modeler and has a log here http://modelshipworld.com/index.php?/topic/4011-bismarck-by-kevin-trumpeter-1200/?p=113788 It is a plastic kit and I am sure he would love to have you follow his build
- 118 replies
-
- 2
-
-
- jolly roger
- lindberg
- (and 2 more)
-
Ahoy Kimberly Just thought I would share a few plastic modeling tips. Make sure you wash all the parts before you start the model. I would use one of those plastic storage containers and soak the trees in lukewarm soapy water, never hot as it may warp the parts. Give them a little love with an old toothbrush and a final rinse in cold water. This removes the release agent used by the manufacturer to get the trees out of the mold and makes painting much easier. The tub prevents you from loosing a part down the drain. If you are not already, learn to use Tamiya Extra thin cement http://store.spruebrothers.com/product_p/tam87038xxx.htm You just put the parts together, then touch a seam with the little brush/applicator which is in the cap. It is the bomb, especially for tiny parts I know Hobby Lobby sells it, Michaels might too. Don't forget about the 40% off coupon either
- 118 replies
-
- 3
-
-
- jolly roger
- lindberg
- (and 2 more)
-
HMS Victory by JPett - Corel - 1:98
JPett replied to JPett's topic in - Kit build logs for subjects built from 1751 - 1800
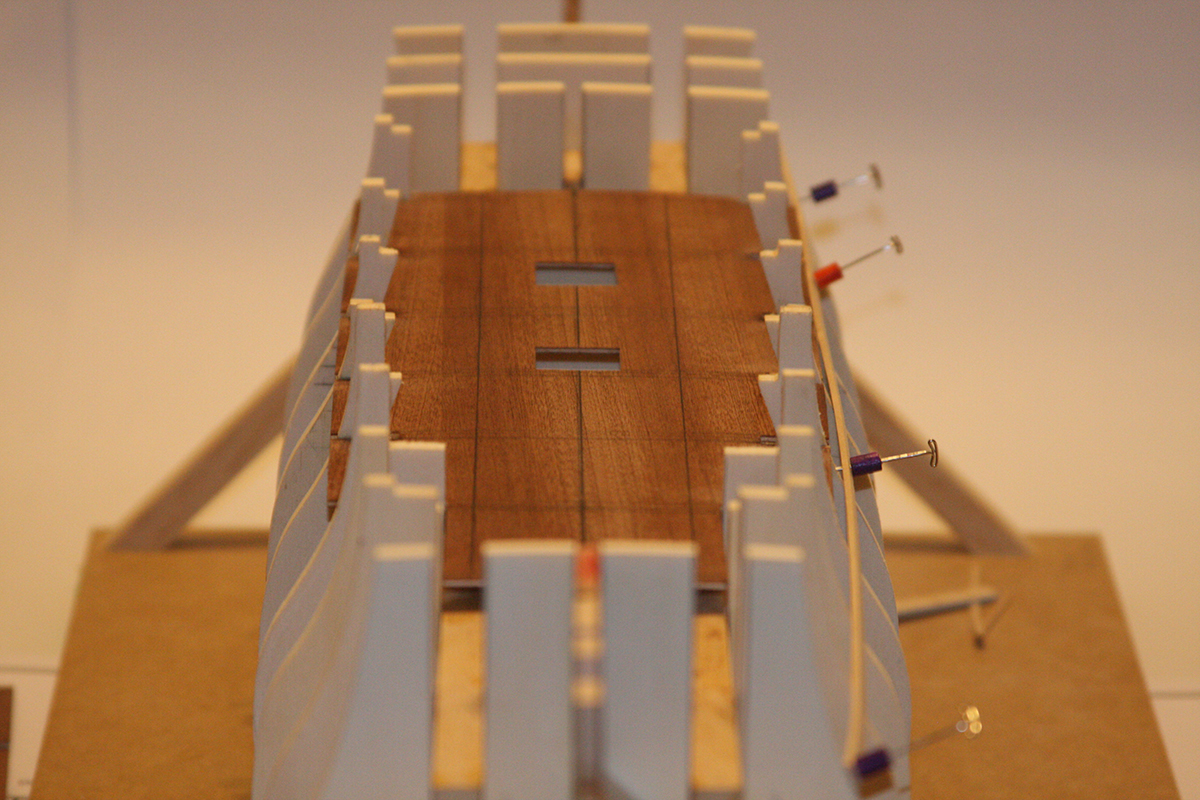
Ahoy Mates Lawrence: Welcome aboard, I draw much inspiration from your log. Thanks for posting Back to the build: Time 16hr (Bulkheads and Deck) Total 30hrs The adventure continues: After making the call on the gunports I re-re-re-read the "little book' and found this. "Therefore, re-move some small portion of the frames whose profile coincides exactly with the gunports (frames No. 2, 4, 6, 7, and 13); in this case the frame itself acts as a support for the half barrels No. 174." Now this statement is the last sentence before the next paragraph on planking. It also doesn't mention that gun port at B7 uses a cannon and not the half barrel. I would love to hear from others as to how they handled the removal of B7 on the gun deck which can be seen and if you followed the instructions has already been planked. I can see I will be deviating I installed the first gun deck supplied with the kit. Having never done one of these plywood pre decks before, it turned into quite a learning experience. It seems ply wood does not like to be bent in two directions at the same time. The whole kit deck/bulkhead thing has in the past been difficult for me: I once sanded a deck flat. I took measurements but because Corel only supplies you with a waterline draft that shows this deck height I decided to take my measurements from the differences. I measured the plans and determined how much higher or lower the deck line was at bulkheads 4-9. Then I measured/marked my bible bulkhead using the deck and used the differences from the plans to mark the rest. Then I refitted the deck and made my adjustments so the deck would lie at each mark. Because I wanted my measurements to be accurate I bolted down the hull. This worked really well for me. The idea came to me after a few beers. I can not overstate how much better it is to just tack things. I am starting to believe full on gluing things was an amateur mistake. Once I started to glue the deck, again only tacking it, the sweep of the hull that the deck need to follow started to fight the crown of the deck. A large concentric pin was used it to apply pressure/mediate the edges making sure the deck edge remained at the correct mark. Because I only tacked the deck in the center this was easy. I also applied some water with a damp rag to get the deck to relax after everything was tacked. It seems a little stressed. With the deck in I started putting in all the fillets to permanently bond all the parts. I start with a very thinned PVA, a small paint brush and let capillary action suck the mixture into the joints. Then I go back with a stronger mix and do the seam. I learned this building RC aircraft where glue was weight and major repairs were just a part of the hobby. These glue joints are not as strong as when you glue both pieces and then apply pressure but this is also not the Queen Mary. Those joints are stronger then the wood, mine are not and are much easier to undo. For anyone following this build there is a relationship between the deck and the bulkheads. Putting in the bulkheads without using the deck as a guide will most likely mean the deck slots will have to be widened which will then require fillers to allow you to glue to, to get the deck height correct at the gunnels. I was able to make some changes because I only "tacked" everything but still needed three 1/32nd shims. The curve of my deck at B4 is slight listing to starboard and I believe the crown on B 7 is a little flatter then it should be. To me these are very minor and will only be noticed now and by me. You might be able to see the slight list in the pic "Bulkheads 6" Next will be the stern and the fillers. There is some chatter on the net regarding the stern bulkheads on the Corel kit so some research will be needed. My hold downs currently prevent the installation of B16, the stern, and the bow fillers so a slight change will be needed there. Let me know what you think. All comments welcome. Especially if it is in regards to the B7 cannon debacle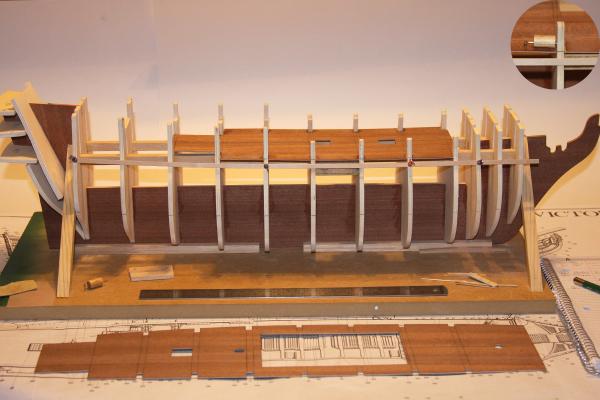

-
Ahoy Andy Looking good. Yes: Spending hours on one small item that no one else but you will ever see is one of the joys of model ship building "lol"
-
Ahoy Ben I will second Chris's comment "sweet"
-
Ahoy Mates I have found heat guns very useful for planking. I do not use them very much for the initial bending but to do repairs or touch ups. For closing seams or fudging around already installed planks I don't think they can be beat. I use the non waterproof PVA glues which can be reactivated. The combination of water and heat allowed me to easily re-position installed planks making for a much better planking job. By using a brush and continually applying water you can protect the wood while heating it. I also found it useful to dry the PVA in areas where clamping was difficult. I use the hobby heat guns sold for RC aircraft shrink wrap which are hotter then blow driers but not as hot as the one sold for paint removal.
-
Ahoy Eric I see the shoe is on the other foot and I will be now following your build. I copied Blue Ensign's work (or at least tried too) in regards to how I terminated the black wale stripe in my stern. I too could not find anything showing how it was done so I went with something I liked by someone who does his homework. On a side note: I am sure you know this but just to be safe. That piece of wood on top of the gunwales between Bulkhead C and D should end in line with the start of the gunport The Gunwales came out nice
-
Ahoy Augie It seems you have become quite a "likable" guy Thx
- 2,191 replies
-
- 1
-
-
- confederacy
- Model Shipways
- (and 1 more)
-
Ahoy Kimberly Cast my vote for the Pinta But Revell also makes the Santa Maria There is a nice build log here http://cs.finescale.com/fsm/modeling_subjects/f/7/t/151638.aspx?sort=DESC Squadron sells it (excellent company) http://www.squadron.com/1-90-Revell-Germany-Columbus-Ship-Santa-Maria-p/rg5405.htm
- 118 replies
-
- 2
-
-
- jolly roger
- lindberg
- (and 2 more)
-
Ahoy Kenneth Looks really nice. Thanks for posting
-
Ahoy Kimberly I am not sure I would use that formula to determine how big the parts are. On a wooden ship where the modeler will be creating most of the detail this is true. For plastic kits however, it is the skill level that will determine the number of parts, the complexity of assemblies and whether or not the kit will include many small parts. Google the kits you are interested. There are many reviews that show the included parts
- 118 replies
-
- 2
-
-
- jolly roger
- lindberg
- (and 2 more)