HOLIDAY DONATION DRIVE - SUPPORT MSW - DO YOUR PART TO KEEP THIS GREAT FORUM GOING! (Only 13 donations so far - C'mon guys!)
×


JPett
-
Posts
881 -
Joined
-
Last visited
Content Type
Profiles
Forums
Gallery
Events
Everything posted by JPett
-
 Ahoy Dragzz I had to do a considerable amount of sanding to fit everything but almost none when it came to the shape of the bulkheads
 -
Ahoy Dragzz Your base looks great Stick a piece of paper in there to shim it I clamp a square to the side of my keel when I take measurements.
-
Ahoy Dragzz And the journey begins. Looks like you off to a good start. If it helps I have not yet committed to following the instructions on my build where the upper decks and gunports are concerned. You will need to cut out bulkheads 2 and 7 for the gunports on the lower gun deck. For now my thoughts are leading towards installing the lower gun deck, doing the first layer of planking above the wales , then cutting out the gunports, followed by the upper decks. I would be interested in your thoughts on this. If anything I am holding off mounting the upper decks until I get this figured out.
-
Ahoy Augie You could always see my log for how not to do treenails.
- 2,191 replies
-
- 3
-

-
- confederacy
- Model Shipways
- (and 1 more)
-
Ahoy Zev As you will be starting your planking soon I would like to share this mistake I made. The position of the first strake is critical. Mine was misplaced in the stern and it caused problems for me when it came time to plank my gunwales which start from the top of this plank and go up. On my next build I plan to mount the hull to a flat building board, then use the plans to mark the proper position of this strake before installing it. Do not just follow the deck like I did. I will most likely fix my mistake by omitting a trim piece.
-
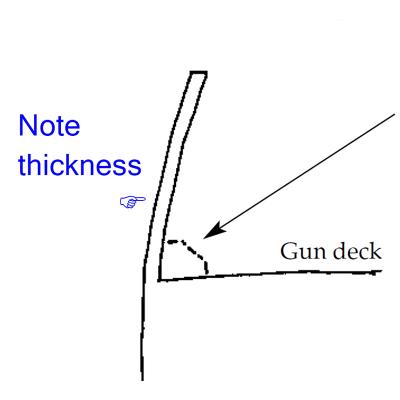
Ahoy Zev Right now It all looks good to me Reduce the thickness of the bulkhead wood from the inside to match the 1/16 width of the wood used to frame the ports: but only after you plank the outer gunwales. Otherwise they will be too weak. The manual shows how the width of the frame is constant and thin. The only minor problem I see is it looks like your waterway strip has been glued in before reducing the bulkhead widths. You should be able to just taper the bulkhead width at the bottom to meet it so it really isn't too much of a worry. I used a very sharp chisel and shaved the bulkhead wood working from the top, down. If you need a pic or more help, just ask. Happy holidays too
-
Congratz Adrieke Beautiful job, excellent log, thanks for sharing it with us
-
Ahoy Sherry Be sure to test first and not on those beauties as I see others are telling you the same. You really have a knack for carving, they're beautiful Basswood takes stain slightly differently then most harder woods. I would also ask you how you vision your model. Every option you mentioned was a good one. But which one do you like. Something's to consider: It will be very hard to match the other wood staining basswood. It is dark and although it is possible basswood can be fussy about darker stains. I Photoshopped a light stain and a darker one. I only adjusted the tone. I did not add any color and these are just expressions but thought they might help you "envision your model"

-
Ahoy Doc I am going to "assume" you are talking about using battens to create belts for single planking a POB hull (We all know what that word can do for us) If so: I found that because planking needs to be softened by either steam or soaking it is not always the best wood to use for this. I used wood that was half as thick and half as wide. It bends easier and better shows which way the wood "wants" to lie. Make sure you let the wood go where it wants to, don't force it to go where you need it. Slight adjustments with sandpaper or shims on the bulkheads will cause the wood to take a different path. Example: A very minor adjustment on B5 will make a big difference where a batten ends up on B1. Please note: There are some hull types and planking methods where this will not work. In the bow "spiling" must sometimes be used
- 3 replies
-
- 1
-
-
- many instructionsline
- first planking
- (and 4 more)
-
Ahoy John Sorry about the typo. Billy boy took away my paste function with his last IE upgrade. I really don't understand that guy and his company. Google will never need to advertise as long as MS keeps sending customers their way. "lol" Click on Augie's link and then page over to post #90. Buck has an excellent pic of his CW Morgan harpoon. Actually his whole build should be good reference material when you do your whaleboats. Buck is very easy going and friendly. I am sure he would not mind a PM
- 2,250 replies
-
- 1
-
-
- model shipways
- Charles W Morgan
- (and 1 more)
-
Ahoy John Buck did a really nice job on this Check SeaSaltlydog CW Morgan whaleboat, post #90
-
Ahoy Eric What was the weight or type/brand of paper you used. It looks great. I think you nailed the spacing. Not sure if I am on board with the "not gluing' thing. I know that planks need to be glued on the bottom and side. Not sure if it applies to decking. I would worry about pulling one out too, but I those are just my completely uneducated thoughts on the matter.
-
Ahoy Danny Regardless of your decision it really shows there is almost no limit. Amazing work Can I ask how you get the symmetry in your tree nails. I noticed that even on your deck they are perfectly spaced.
-
X-Y Attachment for Dremel
JPett replied to Martin W's topic in Modeling tools and Workshop Equipment
Wow That's really nice Did you make that, I read somewhere that your pretty handy like that Sadly I forgot to mention. We were still sticking with Martin's XY theme "lol". It was in the original terms of surrender -
X-Y Attachment for Dremel
JPett replied to Martin W's topic in Modeling tools and Workshop Equipment
I think your here We hijacked Martin's thread a long time ago -
Ahoy Eric I bought the black. Cool Maybe between the two of us we can figure it out. Where I am I found that if you put a very thin layer of glue on a slightly wider strip of paper, let it set a bit you could then stick the planking wood to it. Once dry, trim it up. I discovered that the construction paper I bought was to heavy or thick. Paper thickness is measured in pounds. I also found bending the paper around the butt side to be a problem along with sanding the finished deck which I think will need to be scraped. Next time I will lightly sand the wood first before starting. I also replaced my deck wood with a hard wood. PS: You would need to let Chuck know.
-
Ahoy Michael Your log is an amazing journey. I remember when I first found it. I always look forward to seeing what you will do next. Thx
-
X-Y Attachment for Dremel
JPett replied to Martin W's topic in Modeling tools and Workshop Equipment
Ahoy RT You are a brave man. Ouch, just thinking about what could happen doing that gives me the willies -
Ahoy Andy Not trying to argue, but It is well know fact in the resin community that inhaling the fine dust from sanding the kits is considered hazardous. Maybe Ebony was a bad example. Perhaps asestos would be a better comparison. Not as nearly as bad but worth taking the right precautions. Here are some links http://dreamforge-games.com/workingwithresinmodels.html http://www.ehow.com/info_8306336_dangers-polyurethane-resin-dust.html Some kits I built even came with a warning. Where I got the moist paper towel clean up comment from. This is a great site for resin kits; they are a lot of fun http://www.modelwarships.com/features/how-to/resin/resin-howto.html
- 382 replies
-
- 1
-
-
- stadacona
- sylvan scale models
- (and 1 more)
-
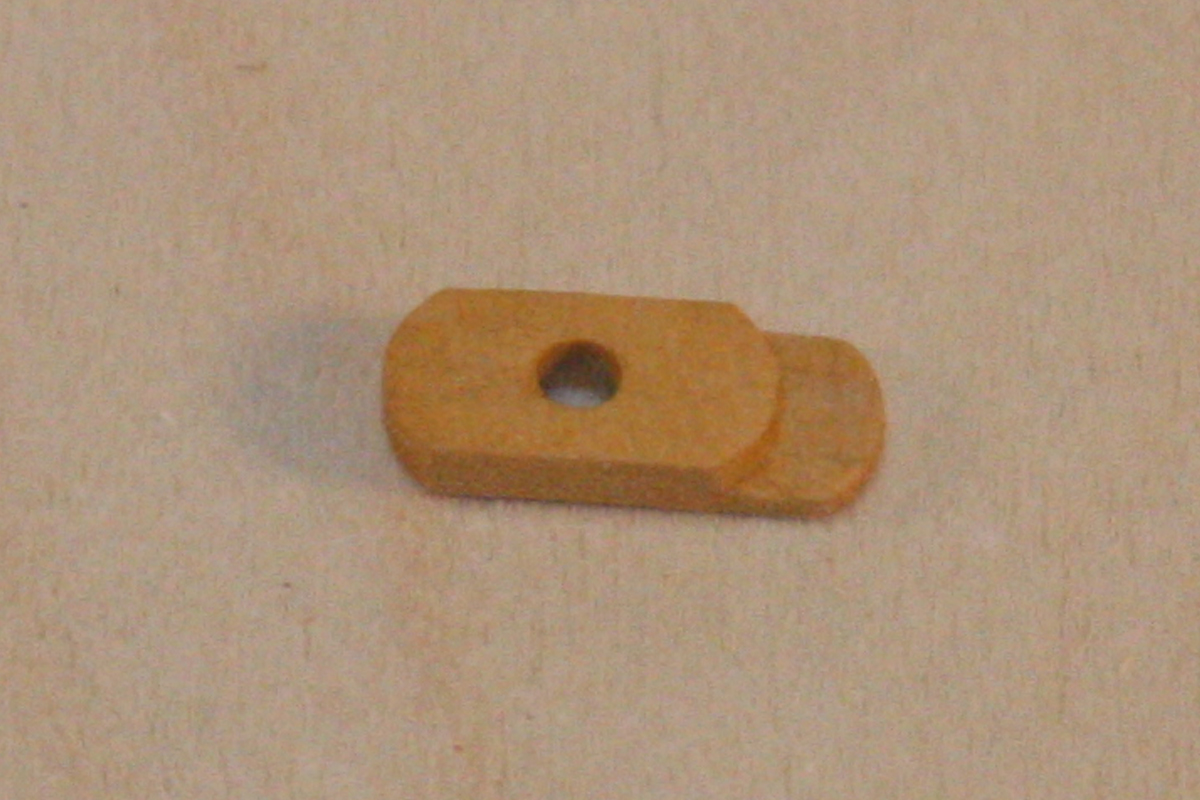
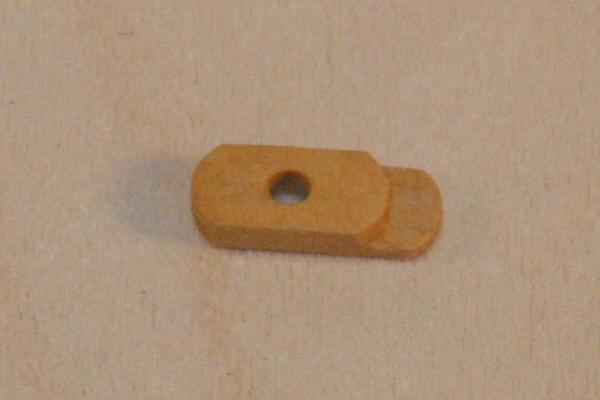
Ahoy Mates Thank you all for your comments and compliments. You guys "rock" Martin: I don't work slowly. It is the fact I spend so much time in reverse that it just seems that way. Ben: I did not find that with the Winsor & Newton acrylic. I actually did the Black in under an hour. Put a coat on, hit it with the heat gun, repeat. I did find this when I used enamel and as I stated it took 4 days to do it the first time. The water based Oils also take more time but the acrylic is surprising fast. I also find their colors much richer then the plastic model paints. It would be hard to convince me to use something else right now. Russ: Well I guess I should publicly thank you for that. The scheme I chose came directly from the image you sent me. I added a little "JPett" to it of course. There were some aspects like the colored border that I felt best if I attempted on future builds. Michael: We both know the idea for the treenails came from your log. Thank you. Jason: one word "beer" and lots of it. As for making sure there is symmetry on both sides I agree. Why I feel it is bad practice. I needed to make sure I was happy with my plan. I am sure I will pay for this decision. I thought it was the best of the bad choices I had. Wes: Welcome to my log. You need to read it from the beginning and I am sorry you missed the 1.0 version. This is merely a bump in the road. There have and I am sure will be many more Whoppers. Stay tuned. For me it is all part of the fun. Eric: Yea you do. You passed me on your build. What the hell, And I liked you too. "lol" Actually I like following your build now. It is so much easier to see how it is done. Please "lead the way" and never take me seriously Thx for the compliment and keep up the good work on your Ratt. It really has become a place of inspiration for me. Blue: Your compliments are "gold" to me. You are truly a inspiration to all of us here at MSW. Not only in your skill as a builder, researcher, friend to all but the effort you make to share your knowledge is not wasted by this humble shipwreck, I mean shipwright. Kenneth: Thank you. I love your log. Again more inspiration and someone else to show me how its done, warn me of the pitfalls and share the solutions Popeye: I will share this with you and only you. I have a dream, no not that dream, another "lol". it is to cut a model in half. Right down the keel, finish the kit and mount it in a shadow box like frame. I think it would be so cool. So in a word "I'm covered. Yea I know it was two words Mark: We both know I am far from that. But is was a nice try, love love Augie: There you go again, Using that "P" word again. I know what your up to and your not fooling anyone. Thanks Augie, as usual you are great. "Sir" Back to the build I thought I would use this post to clarify the rumors that I am slow. I am not slow. I just spend a lot of time in reverse. I am new and have no idea what I am doing. I make so many mistakes it is not funny. Well really it is and I have no problem laughing at myself when it comes to shipbuilding. Take this simple part. I spent about over 6 hours to get here. There were a quite a few failed attempts. It needed to be curved to matched the hull, stepped and have a hole centered in the upper section. it took me three attempts just to figure out the right order which BTW is Mill first, and more then just the needed amount, then soak it. It needs to be long enough so it can be bent and make more then one. They need to be at least three times as long with the milled part about 2/3rds or it won't bend right. Carving the round part doesn't always go as planned either. Use a razor blade and following the milled part make the horizontal cuts first. Then use a chisel to cut down to the first cut to get the rounded edge. Glue sand paper to only one side of a piece of wood to finish the curve. And don't get this far just to drill the hole in the wrong place. That really stinks. The starboard side should be much easier now. Yea I had planned on making them both but used up my extras. I really do not know what I am doing but I know this. I am having fun and that is all that matters to me. Maybe I will spent years on this kit but they will be years I can look back on and remember all the fun I had here on MSW. Thank you all :) You guys truly "ROCK"
-
Ahoy Andy Nice kit WOW Just a word on resign kits. Treat it as you would Ebony. The dust is actually worst from a health stand point. Wear a mask and use a damp paper towel to clean up any dust when you sand. Good luck, got this log "pinned"
-
Ahoy Sport A hundred bucks I agree is a hundred bucks BUT: When you consider the amount of time we all pour into these kits it really becomes pennies for hours of entertainment Something to consider. I have already spent a hundred on my replacement wood for this kit. 200 is a slightly different story "lol" I'm cheap "I know" but I still might do it. I am waiting to see how she looks at that time and my free money when I get there which could be 6 months from now. Until that time I will plank the whole deck to leave all options 'open' I also PM'ed Chuck and asked him about packages that include guns, carriages, rope and blocks. Everything needed to upgrade cannons in one easy to buy set. I asked about 20 but a 10 pack might have been a better request. He said he is really busy, his response implied "maybe" . That is a good thing: I am sure he is getting this from others.
-
PS: A link to Chucks cannons can be found in the sponsors section on the forum main page (Syren Ship Model Company). They are really "really" nice too
-
Ahoy Eric I think that fact that I just dealt with your same problem is why I was able to see what you were dealing with. MSW rocks and it is this kind of "sharing" of our experiences that make this site so great. The fact that I have learned from your posting too only further supports this. As for the Decking. I am really having a problem here myself. I forget his name "sorry" and he did not return so his log has been lost. But someone used black paper between the planks. I have spent countless hours trying to duplicate what he did. I thought it looked great, it was so different from the hull planking and to my eye made the decking stand out and actually look like decking. Too many of us try to do the scale thing. So much so, that although it may be done right it does not look right. Why I liked your planking method so much. Yours is art and makes us think the right way when we look at it; which I believe is the better way. I want to do this with my decking and thought that my "forgotten" poster did just that. So "sorry' I wish I could help "lol" but for right now I can only suggest to test, test, test. You have a great eye and should use it here. In the end I might just copy what you end up doing so please post. The grating, send an email to MS. They have proven that sending you out more is not a problem for them. let them know if it is short. I am sure they have ones that are longer. If you want to add cannons. Chucks are perfect. I looked into them. My kit came with brass so it was kind of wasteful. I was going to ask him to consider doing a package which I think he should do. Right now it was like 90 bucks for all new cannons and carriages. No pizza wheels either "lol" Sorry if I rambled here. I see I really said very little