JPett
-
Posts
881 -
Joined
-
Last visited
Content Type
Profiles
Forums
Gallery
Events
Everything posted by JPett
-
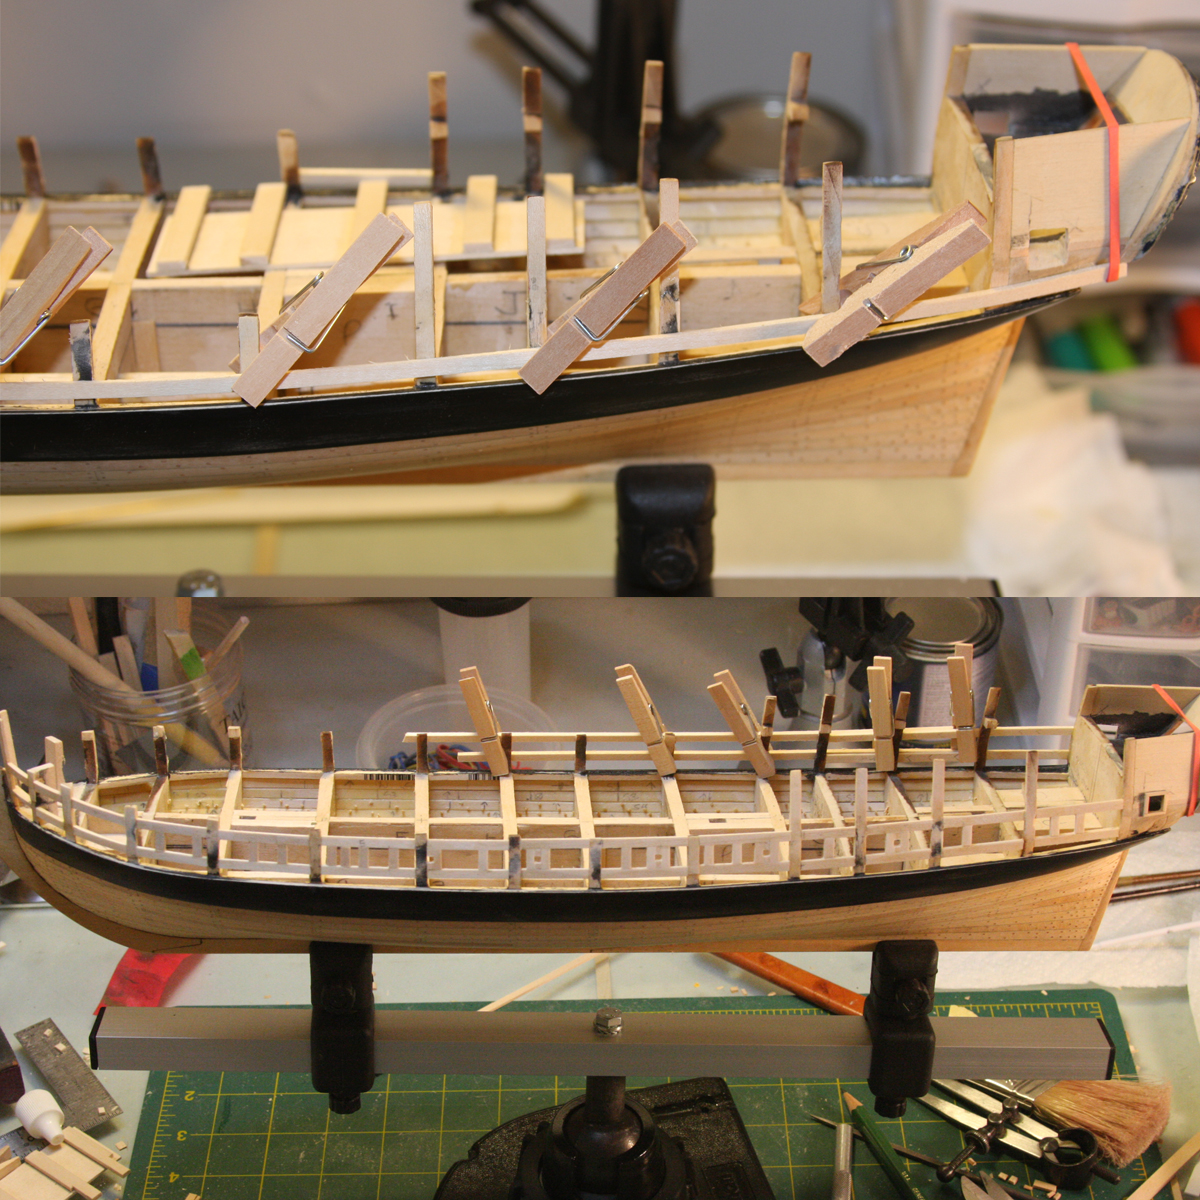
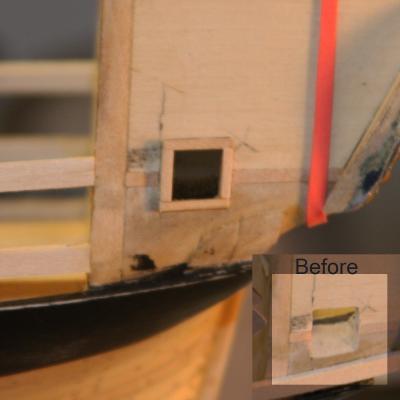
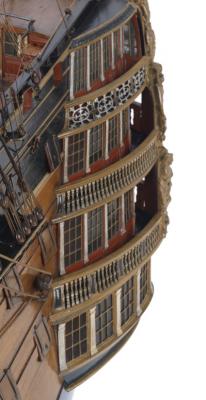
 Ahoy Mates Well it's been a while since my last post. After three attempts to construct the gun ports I felt a break was in order. I was not having any fun shipbuilding so I took the month off. Although I am very happy with my progress so far it should be made clear my intention on this build is not to create a perfect model but is, and has always been to just enjoy this hobby and learn. The Gun ports being no exception With that, I will for the benefit "I hope" of others try to explain what I did and learned. As this was a progression there might be some steps touched on in my previous posts/attempts My kit, as some will remember had a few problems with bulkhead alignment right from the start. Unfortunately these issues were not fully corrected as I had thought and revisited me during the gun port installation. I compounded this with my repeated attempts to create a curved line using straight pieces to form the gun port framing. This does not work BTW. The fix for this however was very simple. Soak all the wood for framing the gun ports and just as with planking; form/clamp it to the hull where it is to be used. After forming the wood along the outside, mark and cut it to the needed lengths, then install them between the bulkheads. Forming the wood in this way highlighted stray bulkheads that were not properly aligned similar to using battens while planking. With battens temporarily installed, stray bulkheads created waves in the line of the gunwales and upper deck walls easily seen when viewed from above. I used up all the kit supplied 1/16" by 1/16" wood in earlier attempts, so I switched up to the kit supplied decking material which ended up being much easier to work with. I also found it easier to make the oar ports smaller and then file them to the correct size. I was still not done learning, It seems I created another problem for myself by not following the instructions. For reasons still unknown I got it in my head that gun ports needed to be square, perfectly square. The plans clearly show this to be untrue. It seems the horizontal sills follow the deck and the vertical ones the bulkheads making gun ports, quadrilaterals on the Ratt. This problem was easily resolved by referencing the big white pieces of paper I use to cover the walls of my work space and repurposing the square gun port jig. Maybe I overthought all of this (Me???) but in my defense I see the gun ports as an important aspect of my build. There needed to be a graceful flow to them that was in step with lines of the hull. The framing was also a surface that would be planked and therefore I felt needed to meet all of those requirements. My first three attempts never did. Well; its almost water under the bridge now and after a brief hiatus it is now time to move forward. For now please find some pics of my current progress. I am very proud of the window framing but slightly concerned about repeating it on the Starboard side.
-
Ahoy Mates I am slightly confused as to the amount of glass on the rear end of something not only exposed to cannon fire but also the vibrations associated with producing it. As I look upon the stern of the ship I can not see how one piece would survive even the first volley from either side.
-
Ahoy Milkinson I use this link http://www.dlumberyard.com/wood.html Select wood from the menu on the left then wood samples Excellent source for wood too
-
Ahoy Ferit I am slightly confused by this current rhetoric. It is apparent to me that regardless of your skill level this hobby brings you joy. I would wish only the best for you in whatever path you choose and can only thank you for taking the time to post this log. Following along has brought enjoyment to my life and it seems; many others. Judging by the pictures in your last post, you still have a ways to go. I will patiently await your next update. She looks great BTW
-
Ahoy Robin Thank you for you post. As a bit of an artist myself I completely understand what you're saying and found your comment regarding the infamous sketch book very enlightening. I would not however just throw the artist under the bus when it comes to taking liberties. Judging by what I have seen during my short stay here, it seems to be human nature and I would not be surprised to find it in many other places: Such as shipbuilding and record keeping. I am sure I will find myself guilty too when it comes time for this build PS: Your work is beautiful
-
Ahoy Mates Just a heads up It seems I may be able to cut apart the Amati Stern castings to accomplish this. http://www.cornwallmodelboats.co.uk/acatalog/amati_decoration.html#aA5371_2f01
-
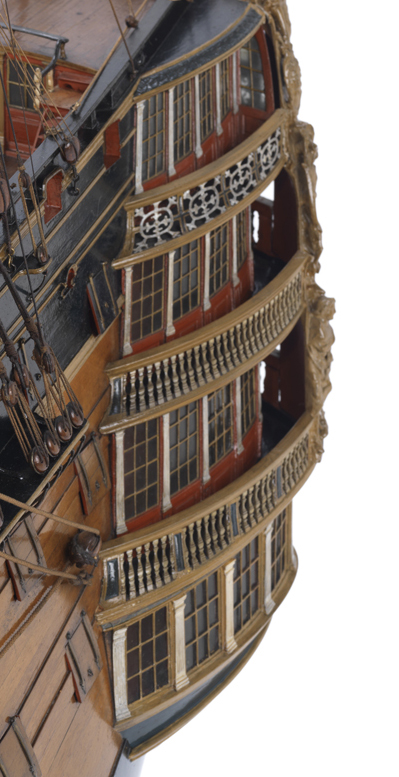
Ahoy Blue Thank You, I am not sure my abilities will ever be up to the level of this master (see pic), but I would love to be able to build her prior to the refit If anyone has any other pictures showing models done during this period please feel free to post a pic or link here. The Corel kit is 1:98 and I think something just a little less detailed might be in my range Thank you
-
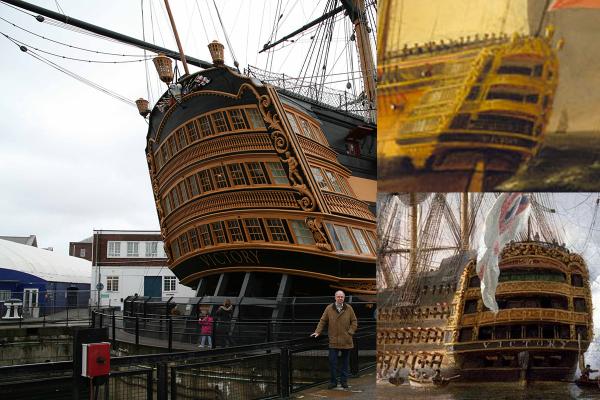
Ahoy Mates Upon doing some research on the stern on the HMS Victory as depicted by most model companies and even the current floating museum/restoration in England I have found it does not coincide with some of the artist renderings, or period models I am seeing. Quotes I have found also indicate that she was "built with three elaborately decorated open galleries at the stern" Was there a change in a refit, enclosing the stern. Information pertaining to this on the Web has to date; been elusive. Bibliography and credits http://shipwreck.net/hmsvictoryhistoricaloverview.php Image insert top right http://www.rmg.co.uk/server/change/searchResults/search_word/hms%20victory/refine/collections/page/1 Additional notes As I have just ordered the Corel version which seems to come with what could be the worst representation of this ships stern I am looking into my options. Suggestions on good books to research this model and or upgrades are welcome and appreciated Thank you All
-
Ahoy Kenneth Great build, thanks for sharing Looking forward to following your progress.
-
Ahoy Eric I must be "rubbing off" on you. What I see does not look bad at all. Unless of course someone is starting to become a bit of a perfectionist If your not satisfied, just fix it or do it again. you'll only get better at it (That is what I tell myself) If it helps I am currently doing my gun ports for the forth time. When it started to suck I just took a break and played Dota. How I roll.
-
Ahoy Augie Just found your new log. Seems you are off to a great start Looking forward to following your progress BTW: Are those treenails ?
-
Ahoy Eric Nice As I will be doing the same on my build I would love to hear more about this adventure of yours. I do have some experience using dry transfers, but I have never put together a string of letters this long; which I am sure was no easy task I trust the dog is doing well.
-
Ahoy Patrick If I have learned anything here @ MSW, it is that in the end, it is really just about having fun. If doing it right sometimes means doing it more then once so be it. I salute your commitment and look forward to this addition in your log. Hopefully these posts and your experience will become a great source of help and inspiration for others, myself included. Good luck on this leg of your journey
- 299 replies
-
- 2
-

-
- niagara
- model shipways
- (and 1 more)
-
Ahoy Eric I am going to use Dry Transfer Decals on my build. http://woodlandscenics.woodlandscenics.com/Show/category/DecalsGraphics/page/1 I have used these on plastics with excellent results. I never tried them on untreated wood but for a painted or sealed surface I do not think you will find a better solution. They require a clear coat should you choose this option. PS: She looks great, looking forward to seeing what you do here.
-
Ahoy Russ Thank you for your response If I am understanding you correctly, that sadly is not what I was doing. I was closer to this with 3.1 and the level. Please confirm that I am correct that the ports sills should be square in their relation to the frames (bulkheads on my build) with their height determined measuring from the deck at each port location. SO: I could use a square placed on the bulkheads to get the angle for the sill and my cannon jig for the height. Awaiting your response to commence with 3.3. I am so glad I posted
-
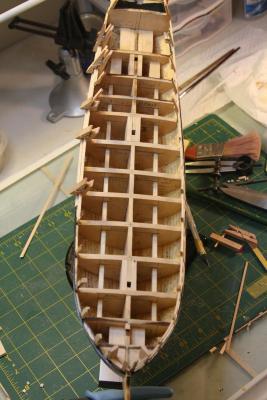
Ahoy Mates Thank you all for the compliments and advise Not much work done in the shipyard over the past few weeks but someone finishing their Syren lite a fire under someone else's ars. I have given up on my attempt to do the decking. It seems that the bulkheads need to be thinned where they support the gunwales. I do not think they are strong enough to withstand this without the support of the outer planking. I did learn that using black construction paper as caulking is not an easy task. As for the sills I am now on mark 3.2. I have decided to try and step them instead of the consistent line they had in the previous two attempts. I am still using my little cannon jig but have thrown overboard the level. I am now using the upper line of the main keel section as a guide (TY Russ). I soaked and pre-bent a length of wood to use for the bow section pieces to eliminate the blocky effect that occurred there on my earlier attempts . You can see in the top view pic the sills now follow the curve of the hull where as before they were straight pieces klinkering up to the bow. The gun ports are also now positioned closer to the angles shown in the plans which is always nice. I am using a piece of my Boxwood gunwale planking to confirm the angle in which the sill is cut into the planking.


-
Ahoy Martin I am so glad you are working all this out for us Ratt Builders. Thank you for taking the time to post. I love the close-ups, They really show off all the extra details in your work I also see you too have been afflicted with "insecta treenailius" or as it is more commonly know as the Treenail disease "lol". I am glad to see your case was only a mild one.
-
Congratz Augie She is beautiful and I, as I am sure many others have enjoyed following this log It has been a lot of fun: Thanks for sharing.
- 1,668 replies
-
- 1
-
-
- syren
- model shipways
- (and 1 more)
-
Ahoy Adrieke Sorry to hear of your misadventure I am glad to see you have an internet connection and can catch up on all the logs you follow. Perhaps even research your next build. Wishing you a speedy recovery and looking forward seeing you back in action. Stay positive, cause we all know negativity solves nothing.
-
Ahoy Augie I would love to tell you whether I will be painting or not; but the community has made it clear they do not think it is a good idea. Being a good listener I have decided to hold off until as Ben suggested, I finish the upper level planking. I hope we will not be waiting that long for your decision, "slow" being my middle name. Over the last week "stagnant" could be a better choice. "lol" So the question is "are you a good listener"
-
So are you going to let the cat or should I say moose out of the bag, or is this a paint thing
- 1,668 replies
-
- 1
-
-
- syren
- model shipways
- (and 1 more)
-
Ahoy Augie Problem SOLVED http://modelshipworld.com/index.php?/topic/882-hms-victory-by-sven-1600-scale/?p=48047
-
Ahoy Eric I think once you're done with the sanding I think you will find yourself very happy with what you have accomplished. This latest photo really shows what a great job you really did. Your use of PVA while wet sanding is an interesting concept. Did you come up with this or has it already been tested. Also: I am saddened to hear you will not be spending the next 3 months doing treenails Smart move