HOLIDAY DONATION DRIVE - SUPPORT MSW - DO YOUR PART TO KEEP THIS GREAT FORUM GOING!
×


fnkershner
-
Posts
1,595 -
Joined
-
Last visited
Content Type
Profiles
Forums
Gallery
Events
Everything posted by fnkershner
-
If you go to Shapeways.com you may find additional parts of interest. they have a huge inventory of recent US Navy ship detailed parts.
-
Fusion 360
fnkershner replied to Williamo's topic in CAD and 3D Modelling/Drafting Plans with Software
It is a powerful program. And as such there is much to learn. But if you take it in bite size pieces I think you will find it rewarding. And yes it took me much longer to learn and I am still learning than TinkerCAD. But you can do so much more. I suggest you install and when you want a break from your latest modeling project you watch video on YouTube. I have a dual monitor on my desktop PC. I run the video on one monitor and Fusion on the other. I frequently stop the video and repeat what is being displayed on Fusion. I have found this very instructive. When you are ready to get serious about the basics I strongly suggest a class - https://www.udemy.com/designing-for-3d-printing-with-fusion-360/ This class only costs $14.00 and it is 4 hours long. It Starts with the assumption that you have never used CAD. It show you how to 3D print several basic items. each item has been chosen to teach you something new about Fusion. It also builds confidence. For $14 it is hard to go wrong. One of the lessons teach you how to install Fusion for free. Enjoy! -
Fusion 360
fnkershner replied to Williamo's topic in CAD and 3D Modelling/Drafting Plans with Software
I couldn't have said it better. And now that I into it my modeling is suffering. -
Fusion 360
fnkershner replied to Williamo's topic in CAD and 3D Modelling/Drafting Plans with Software
I have recently become a F360 disciple. I am new to CAD but I am very impressed with Fusion. I am having way too much fun. It is a professional grade S/W and it is free. It supports 3D as well as 2D drawings. It also does simulations and animation. I doubt you will find something your heart desires that it cannot do. The support is outstanding. There is a regular Video every week from Autodesk which you can join live. and after the session it is posted to YouTube. -
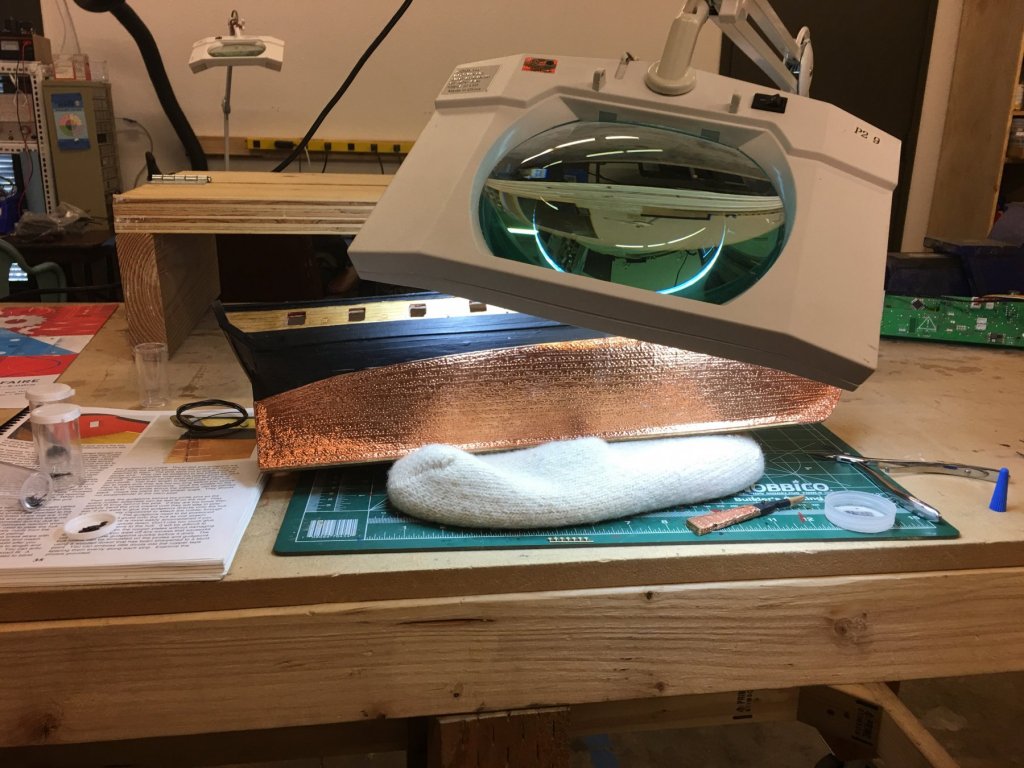
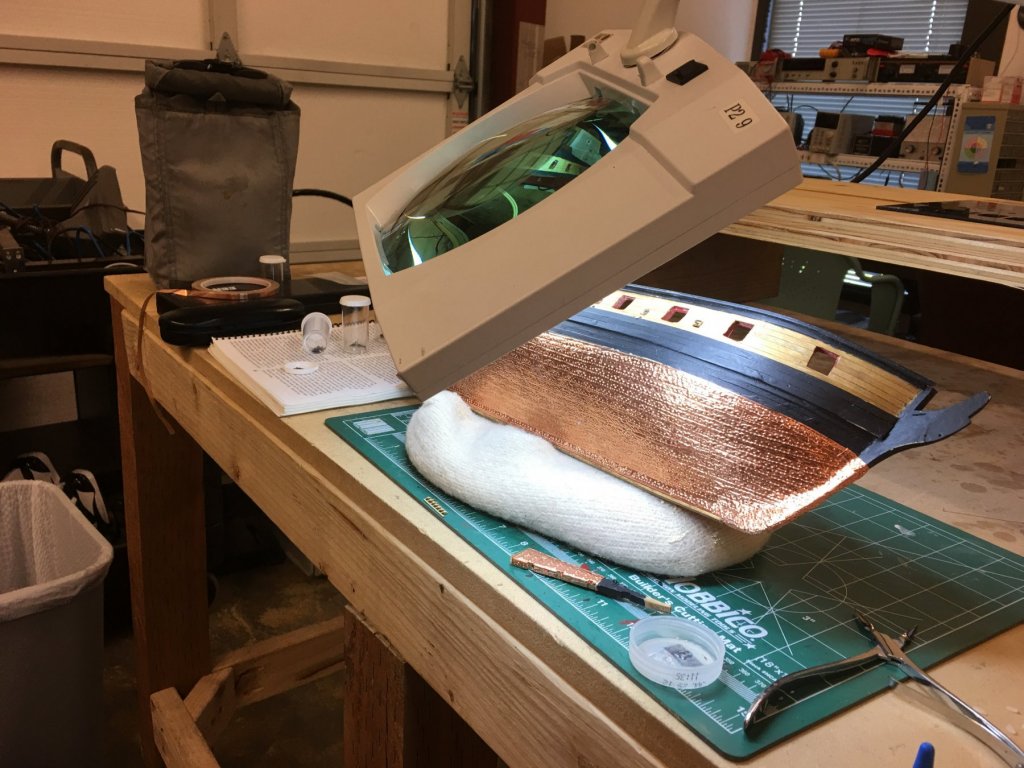
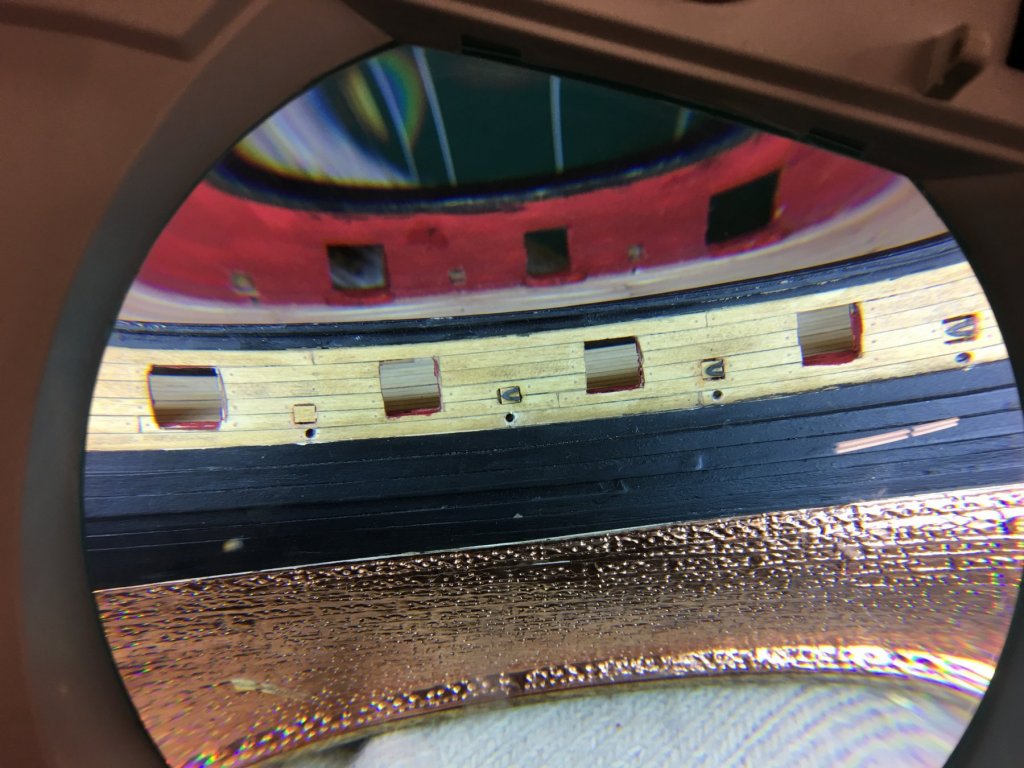
Dirk thanks for the feedback. I read your log with great interest. I have also learned quite a bit from you. But I am afraid I will be in the brig far too long if I age my copper. I have strict orders from the admiral to leave it alone. My good friend Jim has even loaned me a solution he used on his Syren. But for now it stays in the bottle. Now on the other hand if it ages naturally I can't be held responsible. PS dirk when do we see rigging on your Syren? Or is she stuck in the shipyard forever?
-
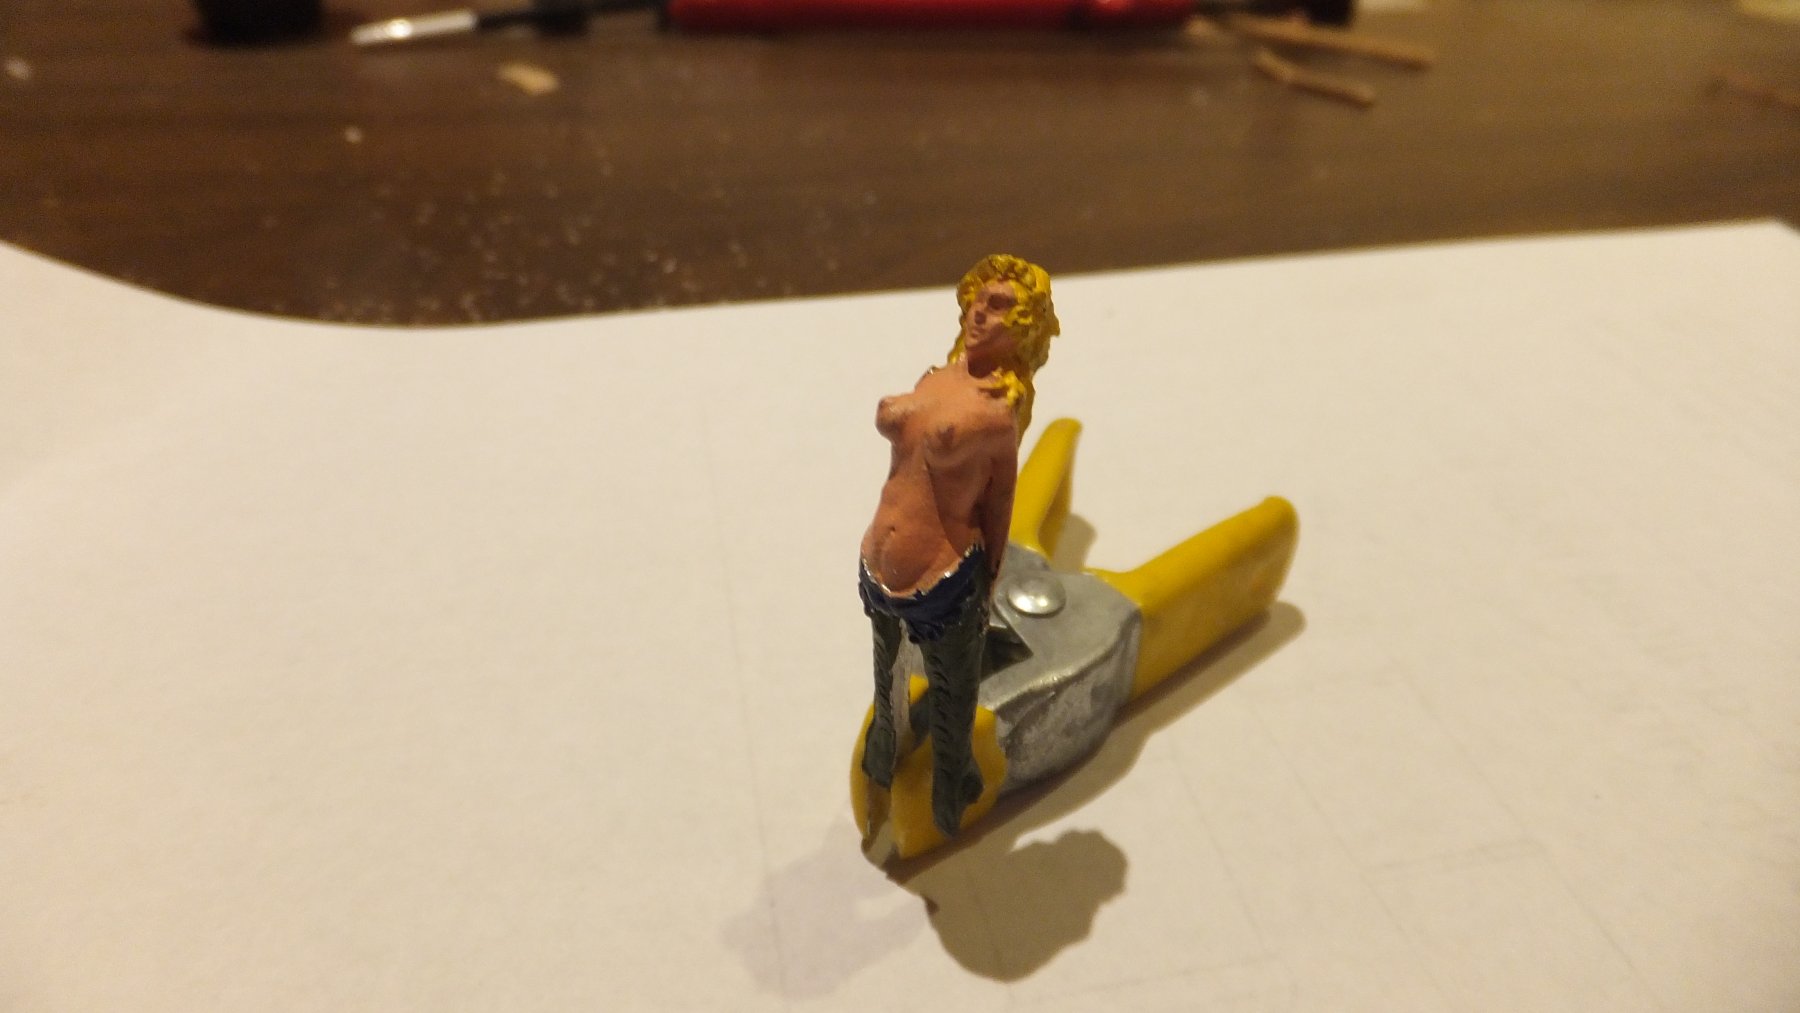
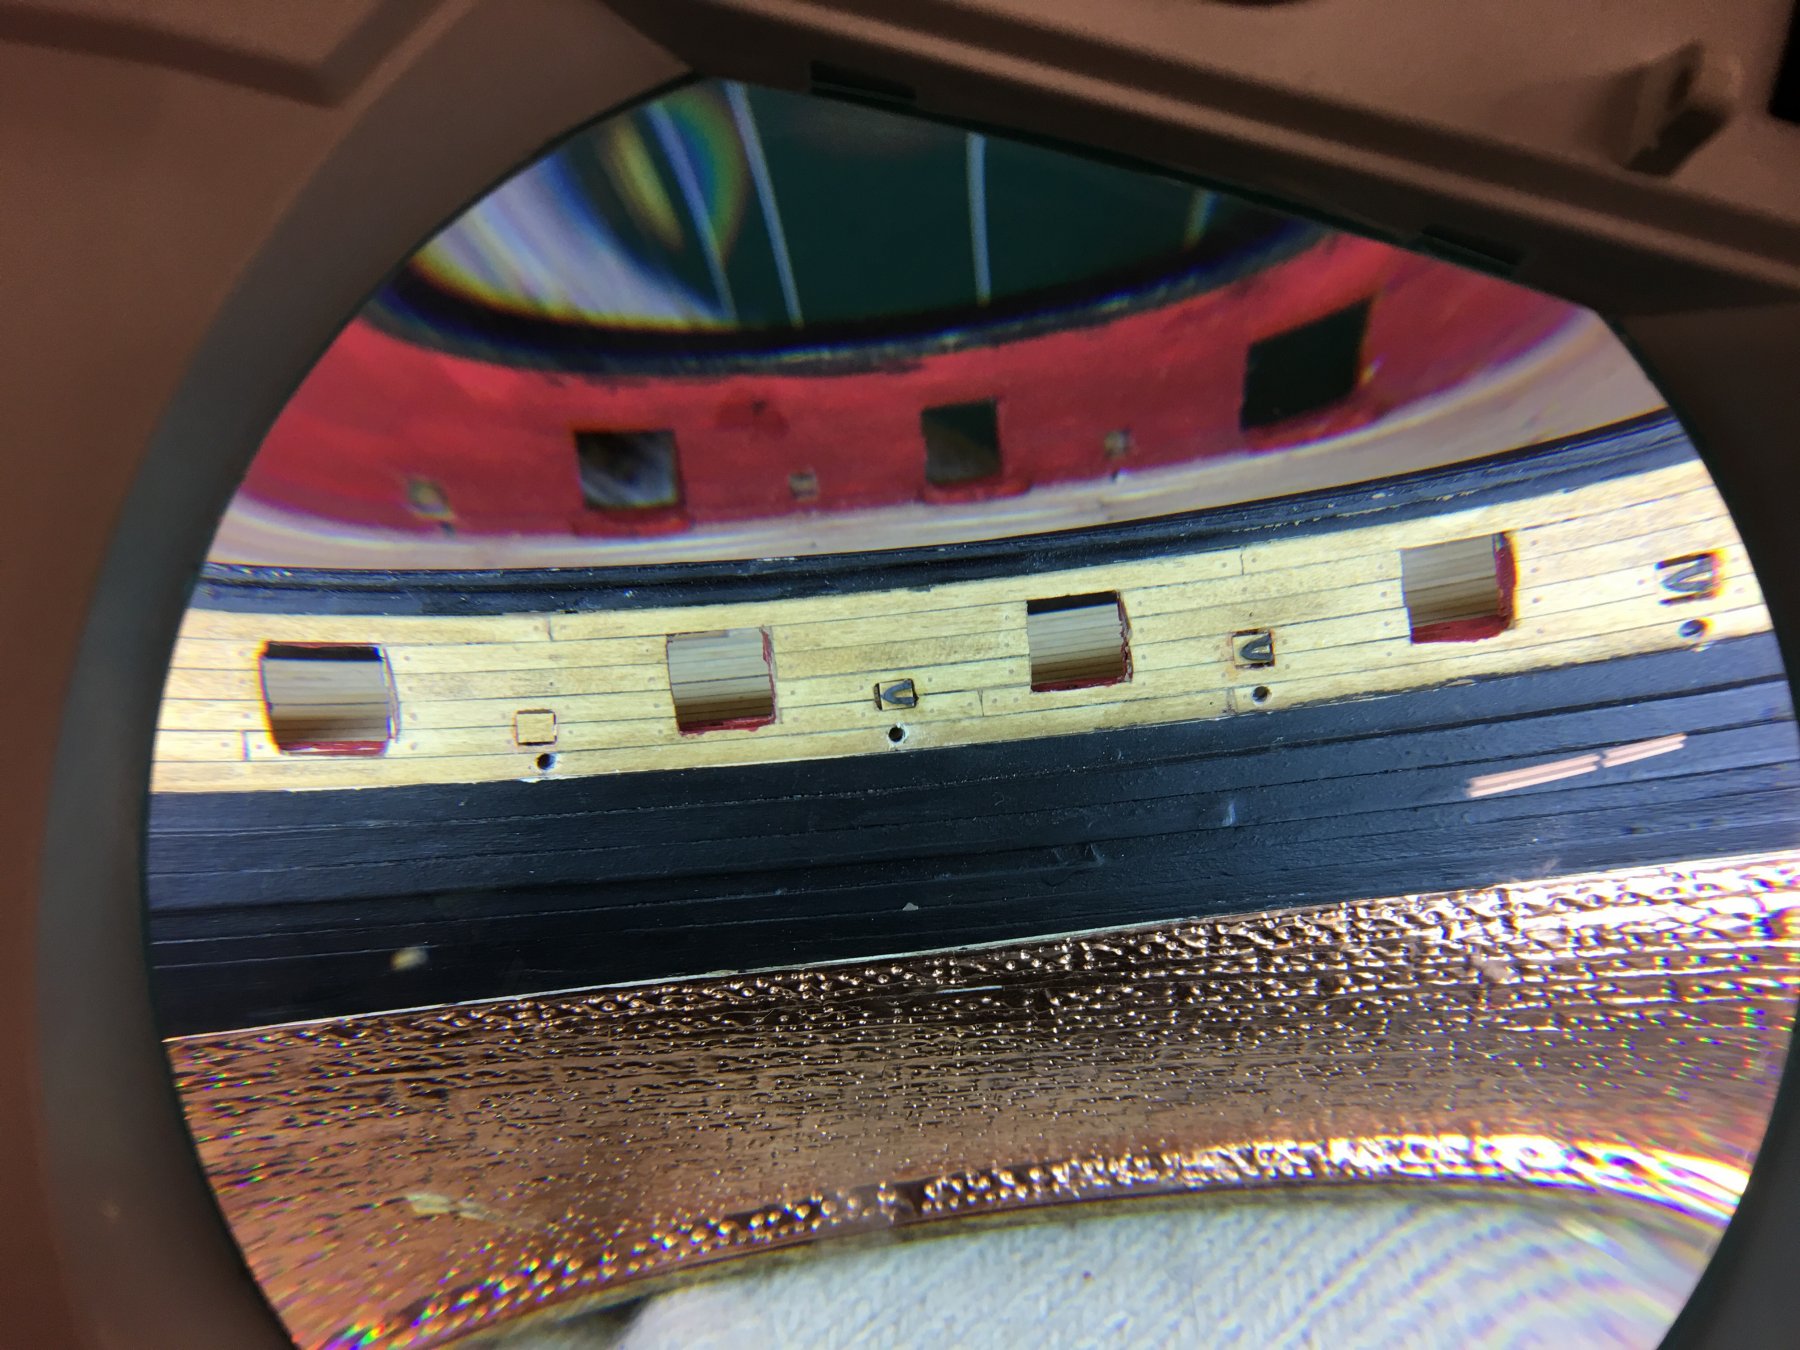
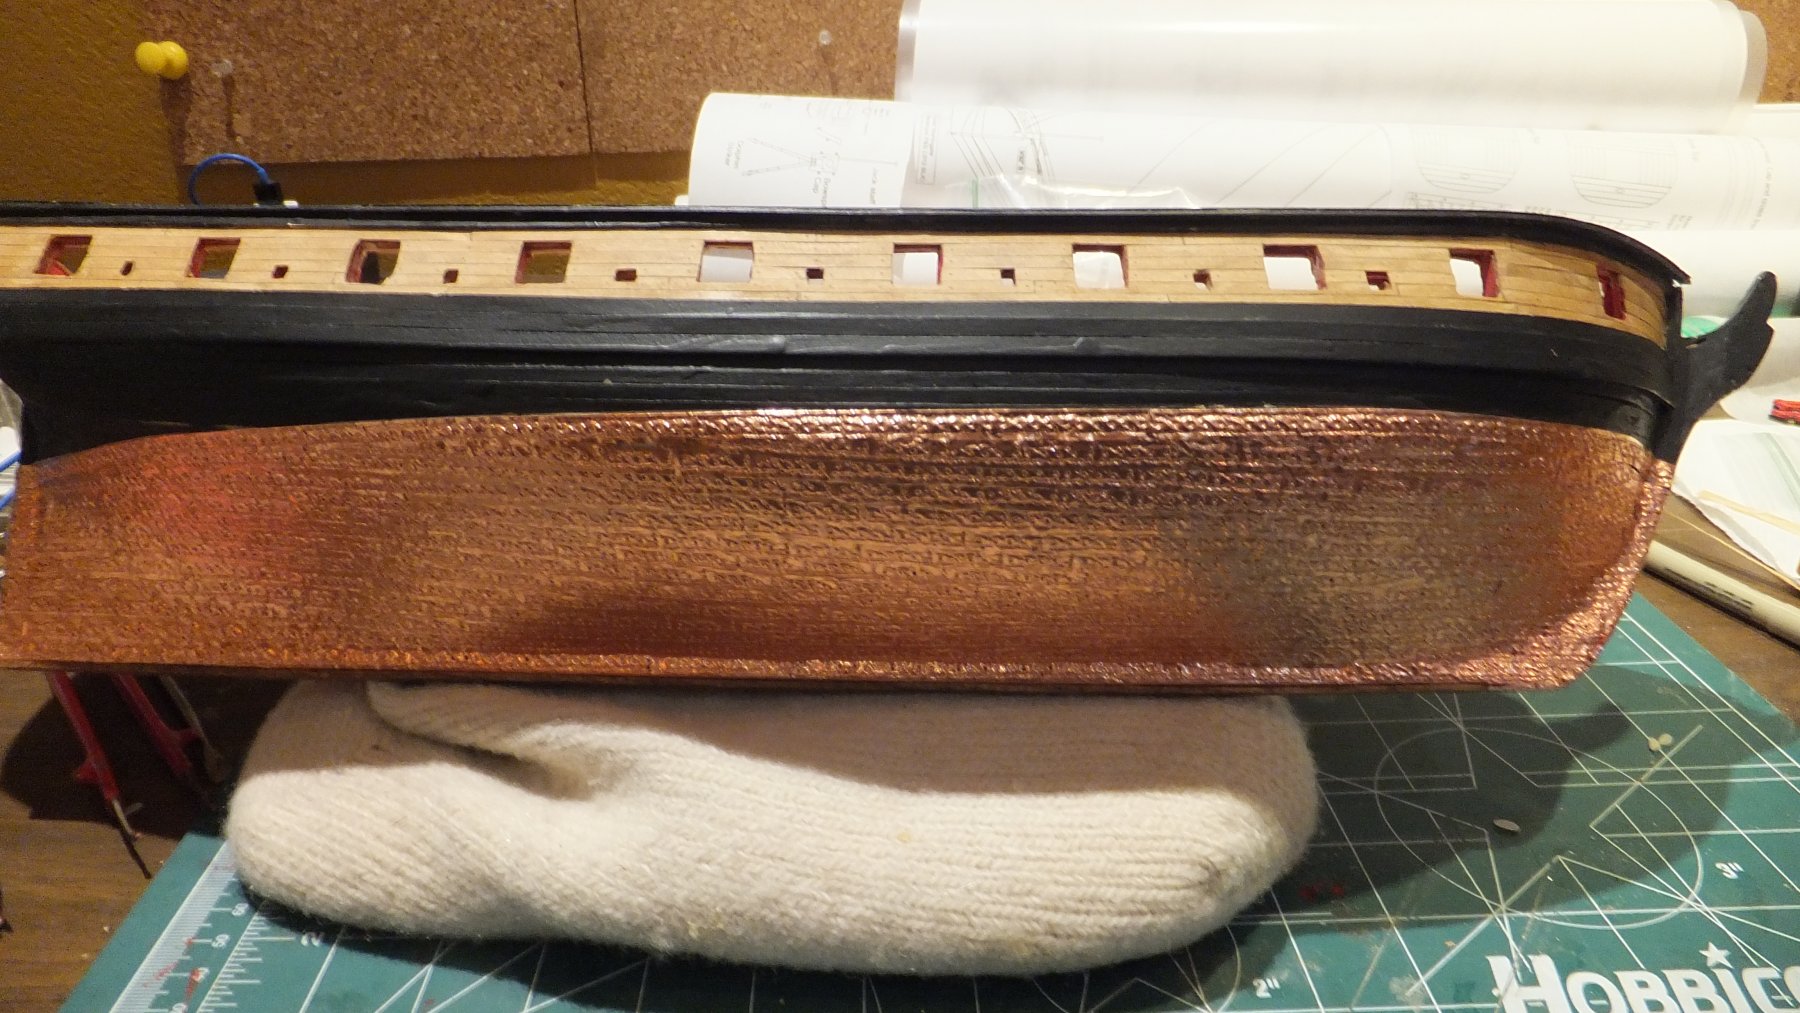
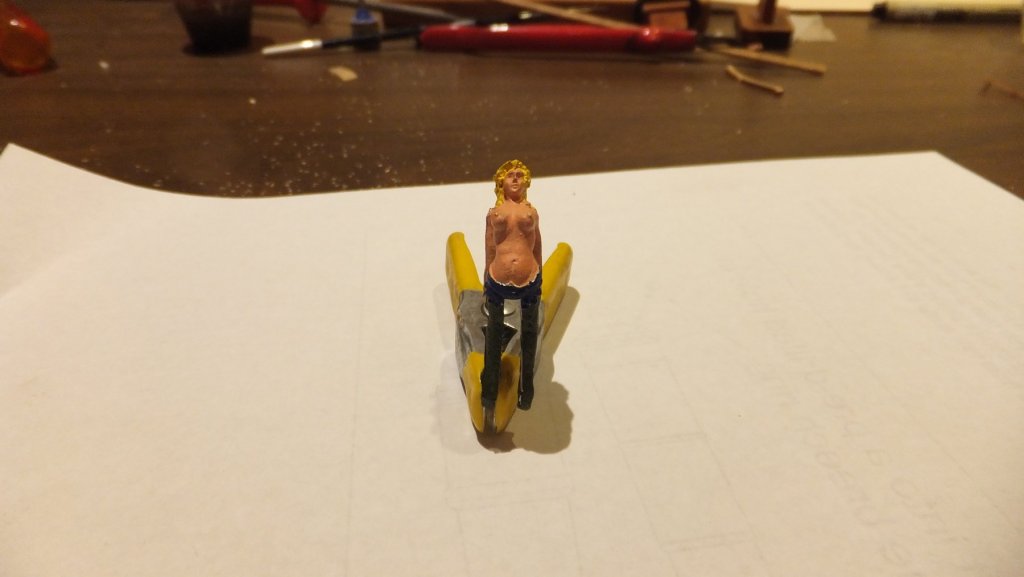
So here is where I need advice. Should I coat it with Wipe On Poly? This is my first copper plated model. I am interested in feedback. And just so you don't think I haven't made much progress. I spent about 2 hours painting the young lady below.

-
Yes Harvey she loves it. She also says I can't do anything to age it.
-
Ok a small update. I spent the day at my Maker Space workshop. Lots of fun with fellow members. lots of different projects underway. I did some 3D printing and also some work on the Syren. The work you guys do is humbling. I struggled to get the horse shoe hinges on until I hit upon a solution. I found the smallest bit of glue applied with a straight pin was the best solution. I am still working on the rudder hinges. And I thought that would be a simple. Hah! Currently I am doing several things in parallel. Preparing the gun port covers, painting the figurehead, finishing the rudder hinges, and preparing the channels.
-
Thank you Peter. I was beginning to think that was the answer. But I only need 3 per side. so I guess there are extras.
-
HMS Pandora
fnkershner replied to Magnus's topic in CAD and 3D Modelling/Drafting Plans with Software
If you can create an STL. I have the printer. The most common request I get from fellow modelers is can you make a scale crew member. I would love to collaborate!! -
Thanks Rusty!
-
Ok, I need some help. I have almost finished attaching the rudder (that will be completed tomorrow). I am looking ahead to the external hull details. I have tried to find a good substitute for the metal decorations on the stern. So far I have failed. Can someone share with me what you used for paint to make them look half way decent? Also the instructions say that I will find the fenders & chesstrees on the 1/16" sheet of bass wood. I am not finding them. Maybe I am assuming a different shape? I spent most of the day today Blackening parts. Did anyone really put hinge pins in those Horseshoe Hinges! Also anything I should look out for, before I install the channels. please let me know.
-
HMS Pandora
fnkershner replied to Magnus's topic in CAD and 3D Modelling/Drafting Plans with Software
OMG! This is Magnificent! How long have you been working on this? I must confess I have been dabbling in CAD recently and I have caught the bug. I will never do something like this. but I am enjoying the power provided. I do have a question - I am sure you are aware that many of us would love to have crew that are to the right scale as our models. It add life and perspective. Would it be possible for me to buy some of your crew from you and print them on a 3D printer? -
So 11 days since my last post. After playing with parts from Chuck & 3D printing. I got back to the primary subject. The tree nailing is now done! Both on the bulwarks and the deck. The coppering is done as well! I cannot say enough thanks to Jim. His jig worked like a charm. I am working on the rudder now. But I have run out of eye bolts. It looks like Model Expo did not include enough in the kit. The note is off and the replacements on the way. I ran out while rigging the Carronades. In the mean time here she is -

-
Thanks Chuck, I get the kerf issue. I have been taking laser cutting classes at my Maker Space. I have not had the chance to try wood. But we have been cutting Plexiglas. So I have the cutter. I also have the plans in a PDF. Now I need to do the tracing. I have also been teaching myself CAD Software. So my 2nd question - Since the drawings show the frames but not the thickness of the planking. I assume I need to subtract from the plans enough width to accommodate the planks.
-
Chuck - This is a bit off topic. Recently I have gained access to a workshop which has both a CO2 & Diode Laser cutter as well as both CNC machines & laser printers. Can you tell me how you go from plans to Model? I.e. I have some plans I bought from the Smithsonian and now I want to create a design to cut on the laser cutter for Bulkheads/Frames.
-
Jesse - Did you drill a hole for the main mast first? And did you drill that hole with the slight rake as shown on the plans? It is hard to tell from the pictures.
- 1,306 replies
-
- 4
-

-
- syren
- model shipways
- (and 1 more)
-
Peter - Can you tell me what you used to paint the stern decorations? I am very close to this step.
-
PS Jim what an amazing Shipyard! I really enjoyed my visit.
-
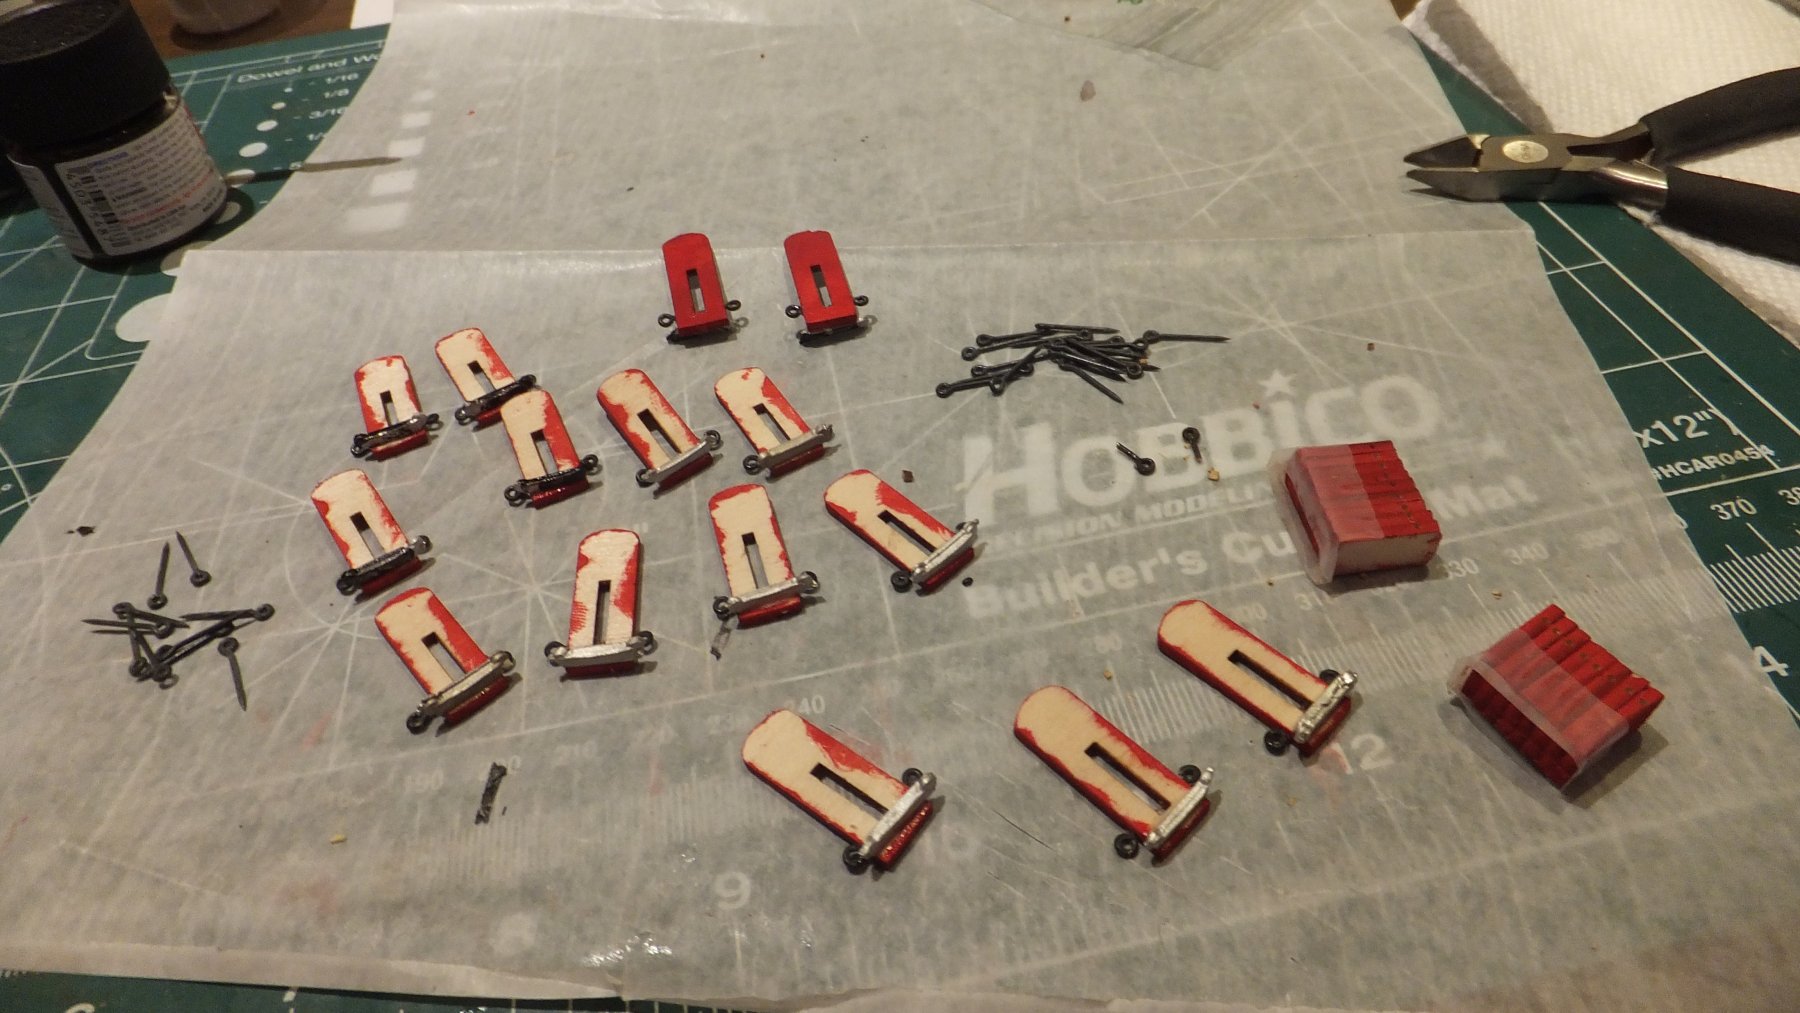
Ok, A bit of an update. I am having some difficulty with the Copper Plating jig that Jim loaned me. I am sure it is something I did not retain from his instructions. But in the mean time I am moving ahead with some other areas. I am still nervous about my Carronades lining up with the ports correctly so I decided to build a few. (How it that for an excuse?) I am just fascinated this these Carronades. Well I am glad I did this. Oh Boy! these little buggers are a model in themselves. So let me walk thru the steps I have taken in the order I did them and comment on the outcome. I hope this helps someone. 1. I replaced the carronade barrels with 3D printed barrels as described above. I am quite please with the result. 2. I painted these barrels flat black (2 coats). 3. I cutout the brackets and painted them. these little buggers as just a bit bigger than saw dust (but I have cried enough on this above) 4. I cutout from the laser cut sheet both the lower and upper sled parts. 5. Painted these wood parts with the same red used elsewhere on the model. 6. Blackened the eyebolts 7. Using my X-Y table I carefully drilled a #65 hole in the sides of all sled parts. (If you look carefully on the picture below you will see a bundle of sled parts taped together and drilled). 8. Cut the eye bolts to the proper length and glued them into the sled parts. (I used CA and this resulted in the splitting of 2 of the sleds - there is 1 spare so there is another request to Model Shipways for parts) 9. I attempted to paint the coasters for the bottom of the sled. (I found that after painting if I used CA to glue the paint came off.) I also found that the coasters were so poorly molded there was no flat surface to glue to the wood. 10. Sanded the tops of the coasters. 11. glued the coasters to the bottom of the sled. 12. repaint the coasters (this is where I am now). 13. Glue the metal arc pieces to the tops of the sleds. (These were previously blackened) 14. Glue the to sled pieces together. 15. Mount the barrels. 16. Test fit on the deck of the model. Enough?

-
Jim - Shall I bring you some of mine? I have 320 of the 3/32" and some 1/8". Joe - I am sorry. it was a long journey but well worth it. I am very happy with the results. Also Joe the guy who did the design on Shapeways was very flexible and willing to make any simple modifications I ask for. I told him I would share this info here. He is hoping for more business. I strongly recommend this for future builds. I continue to work on resolving the stern decorations and the side badges. Stay tuned.
-
Per - Why would I do that? Now that I have these plans in the right scale. The Amati is history. I will use the plans for suggestions but that is about all. Gee another excuse the buy more goodies from Chuck.
-
You will never guess the distraction that just arrived in my mail today! The plans for America from the Smithsonian. They are perfectly drawn in 1:48 scale by Chapelle! Yes I am going to the dark side! But I guess the Syren must come first.
-
You Tin Can sailors are all alike! I wish there was a Spruance that us land lubbers could tour. Most museum ships are older. Dirk - Do you ever finish a model? How many do you have in progress?