
HOLIDAY DONATION DRIVE - SUPPORT MSW - DO YOUR PART TO KEEP THIS GREAT FORUM GOING!
×
.JPG.ca33079f5815b861e67b9c2cccd37982.JPG)

Blue Ensign
-
Posts
4,564 -
Joined
-
Last visited
Content Type
Profiles
Forums
Gallery
Events
Everything posted by Blue Ensign
-
 Hi Phill, I got the case from Just Bases, here's the link. http://www.just-bases.co.uk/ Maurice
- 335 replies
-
- 1
-

-
- alert
- vanguard models
- (and 1 more)
-
I thinks she's looking absolutely splendid Glenn, what a fine model Chuck has designed. B.E.
- 778 replies
-
- 3
-
-
- cheerful
- Syren Ship Model Company
- (and 1 more)
-
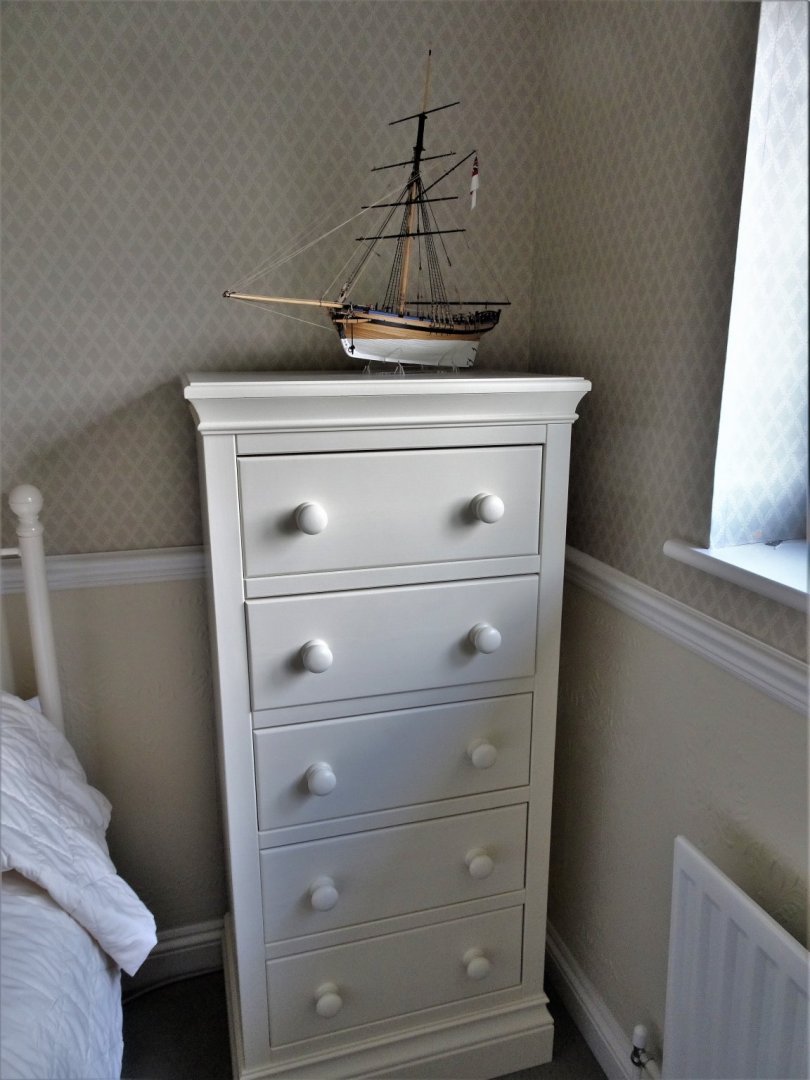
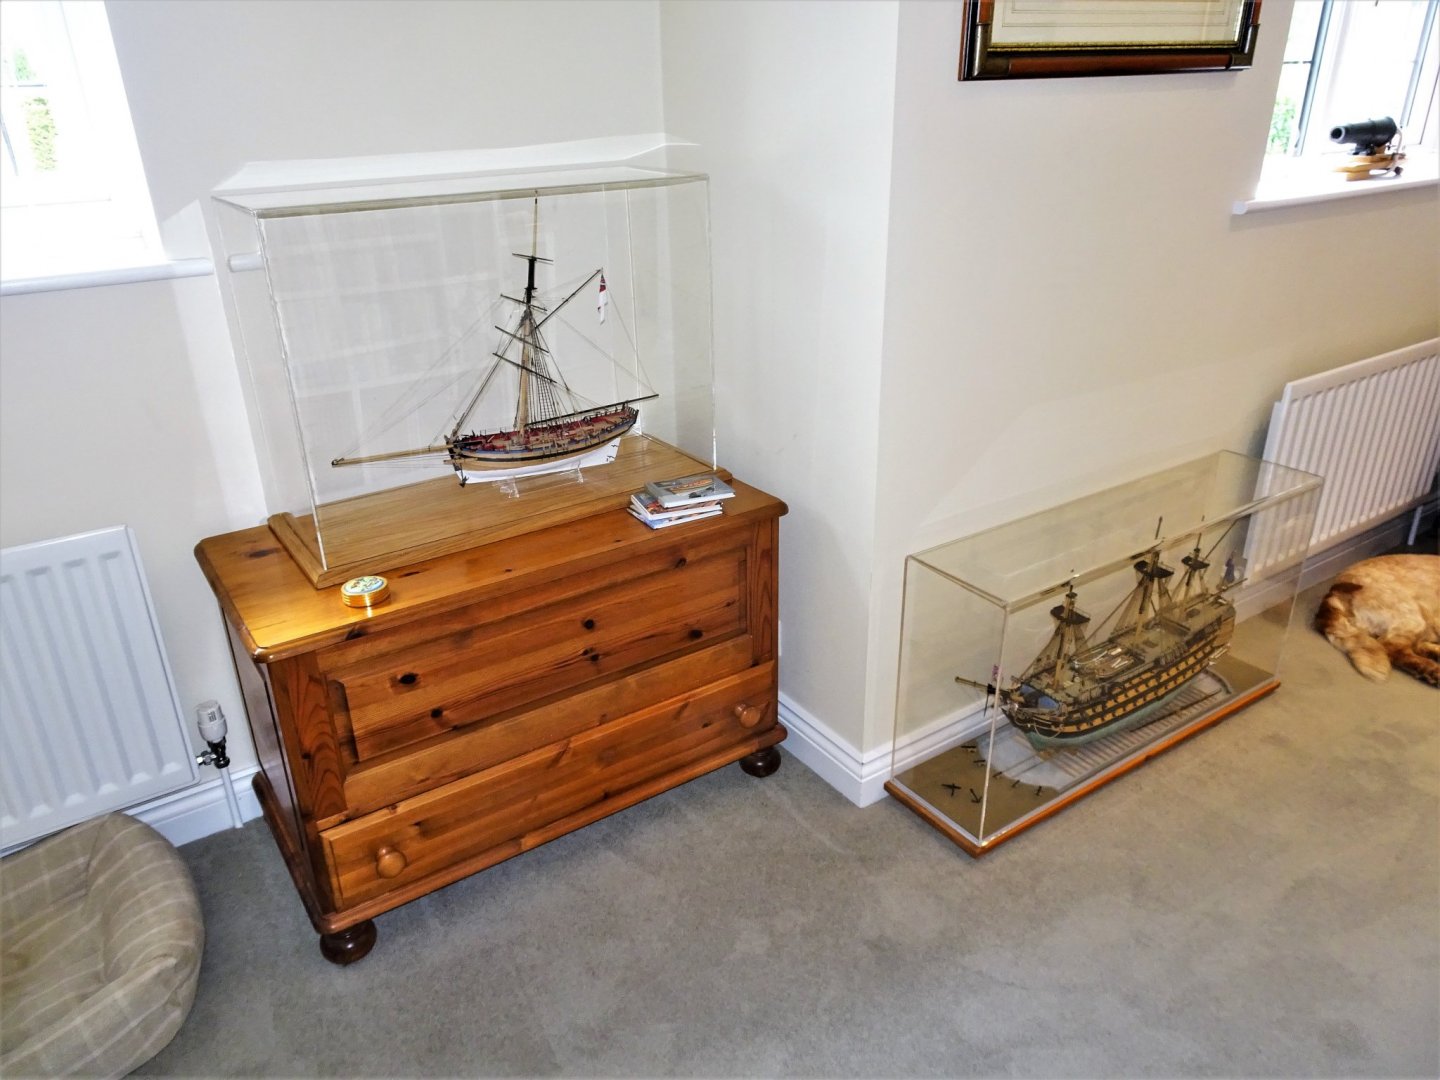
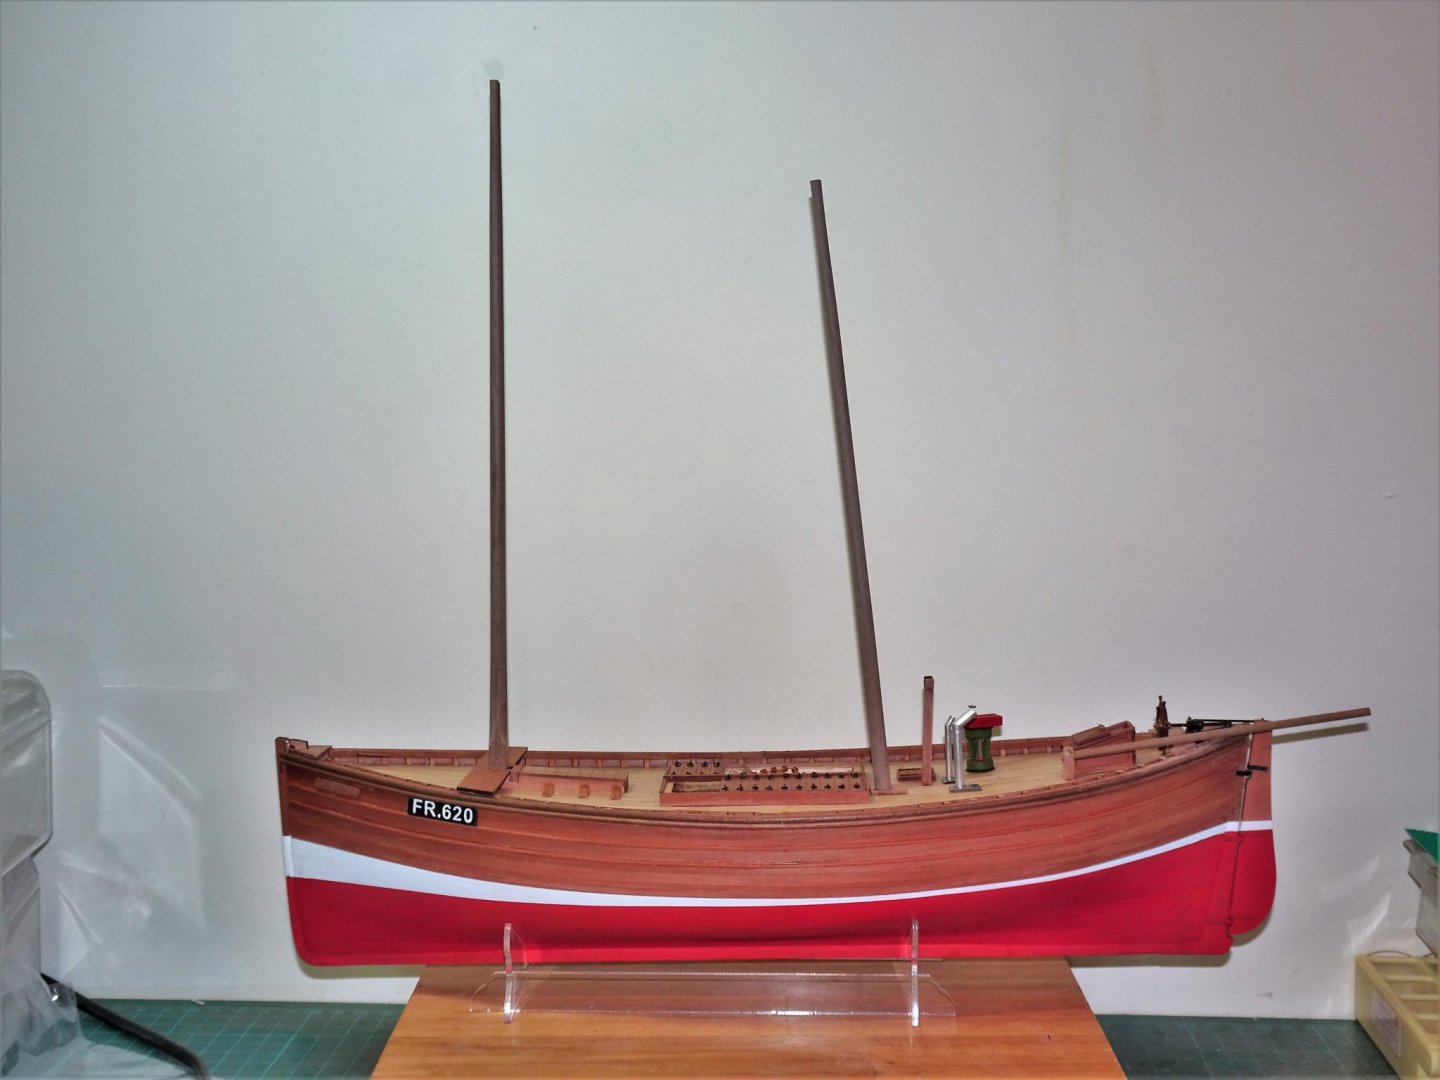
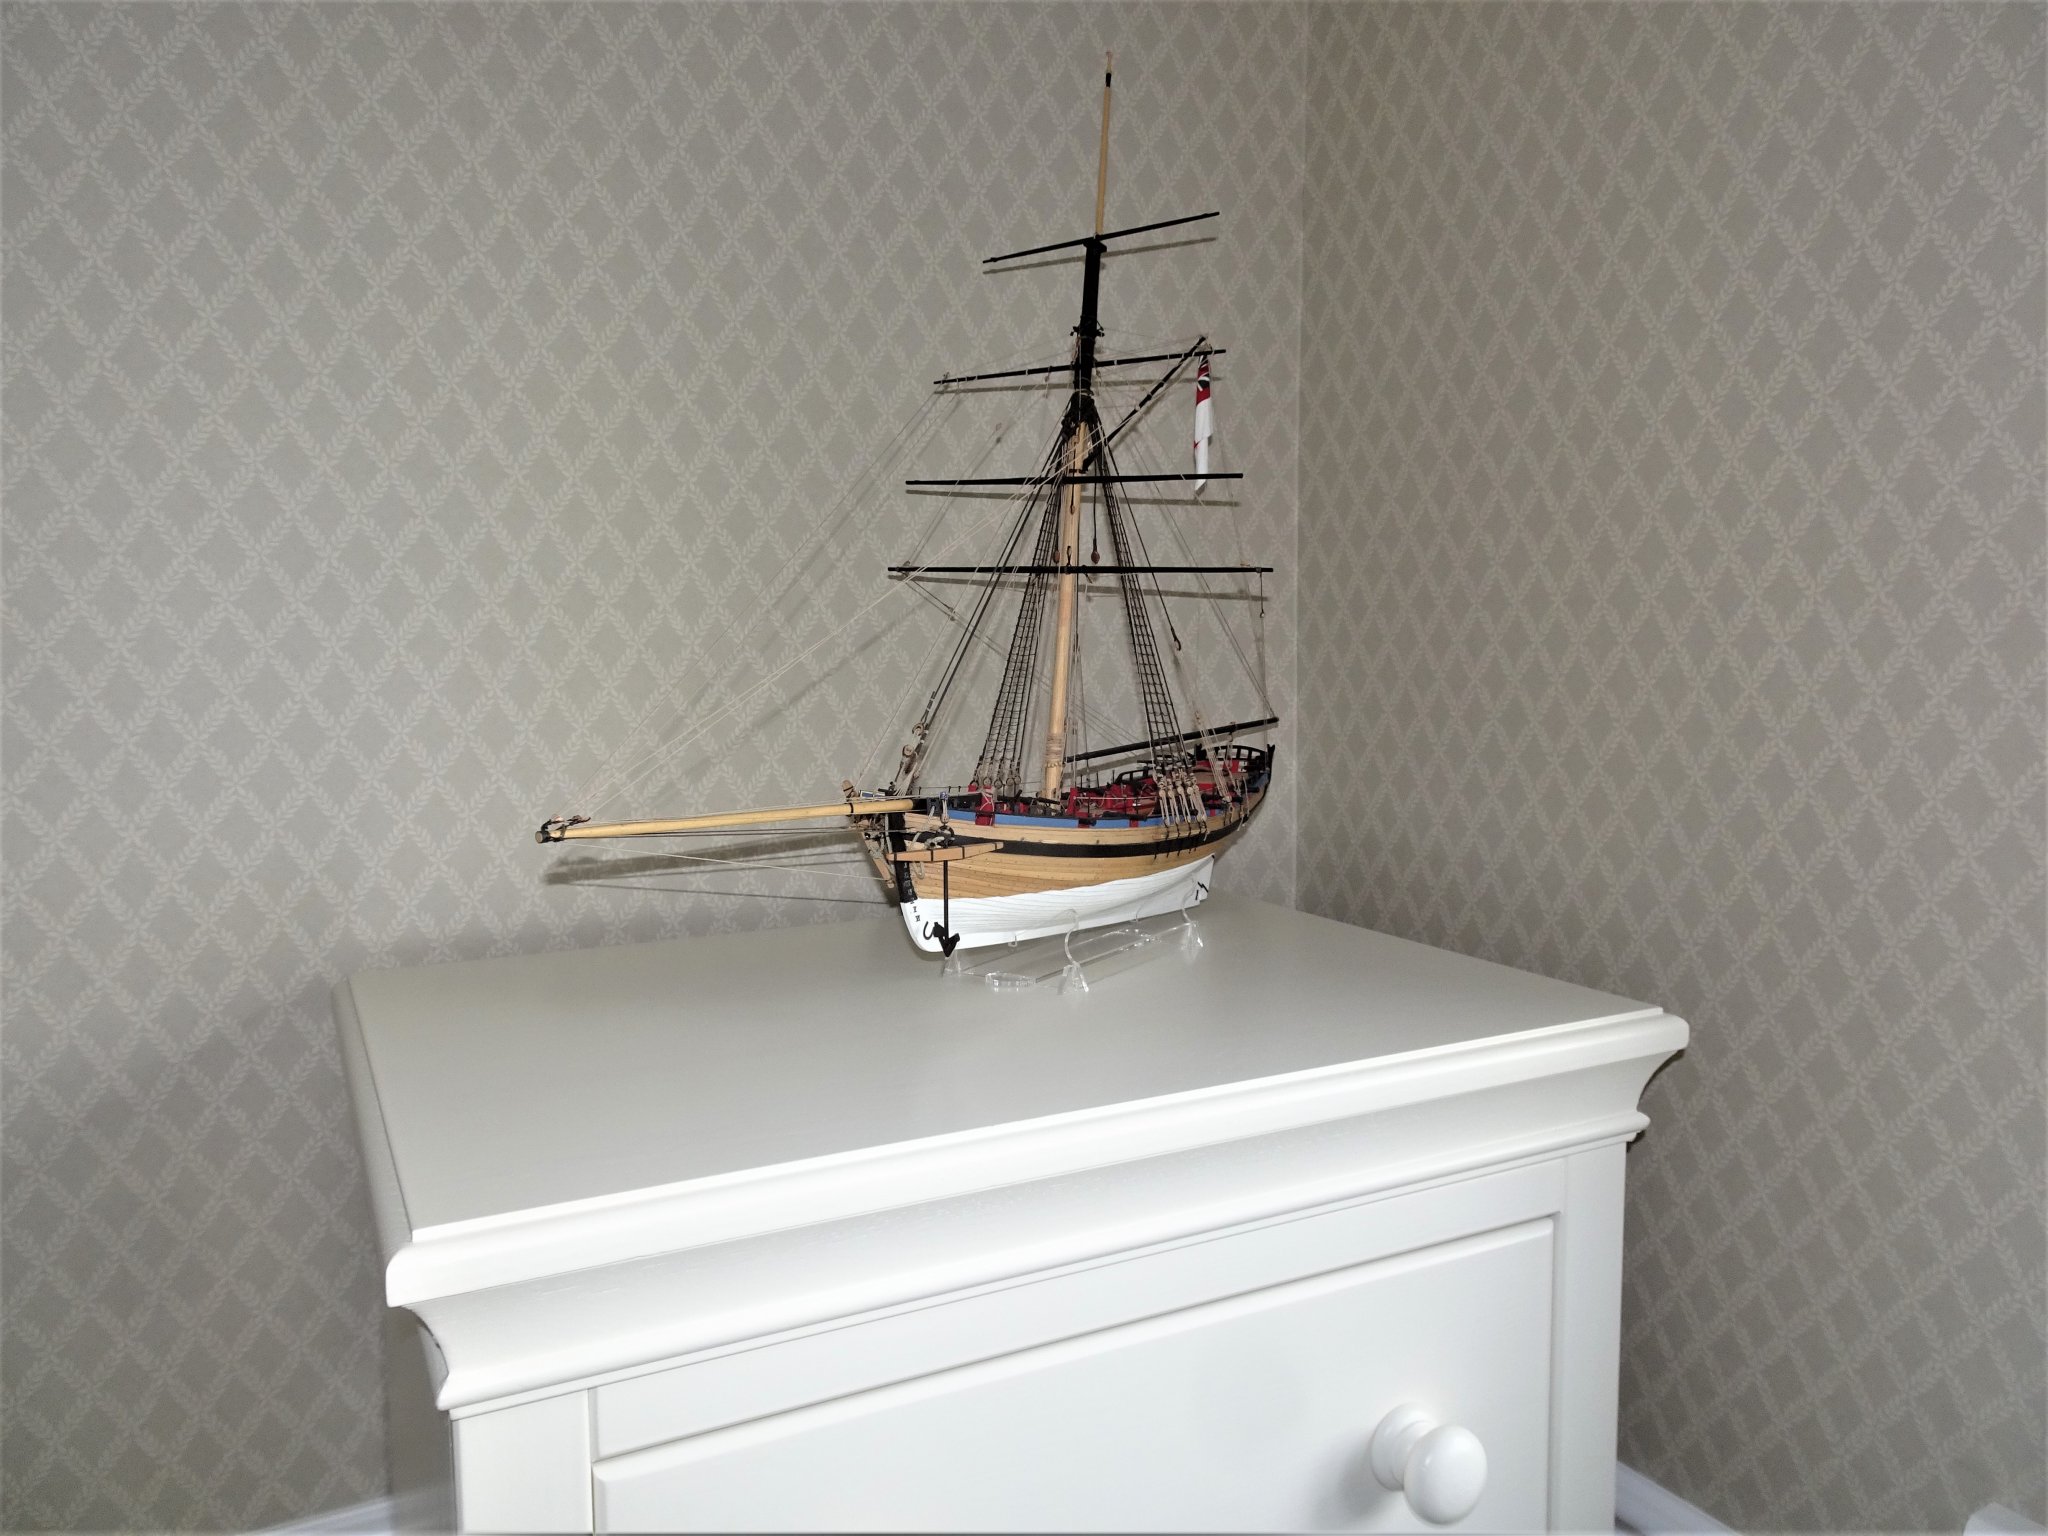
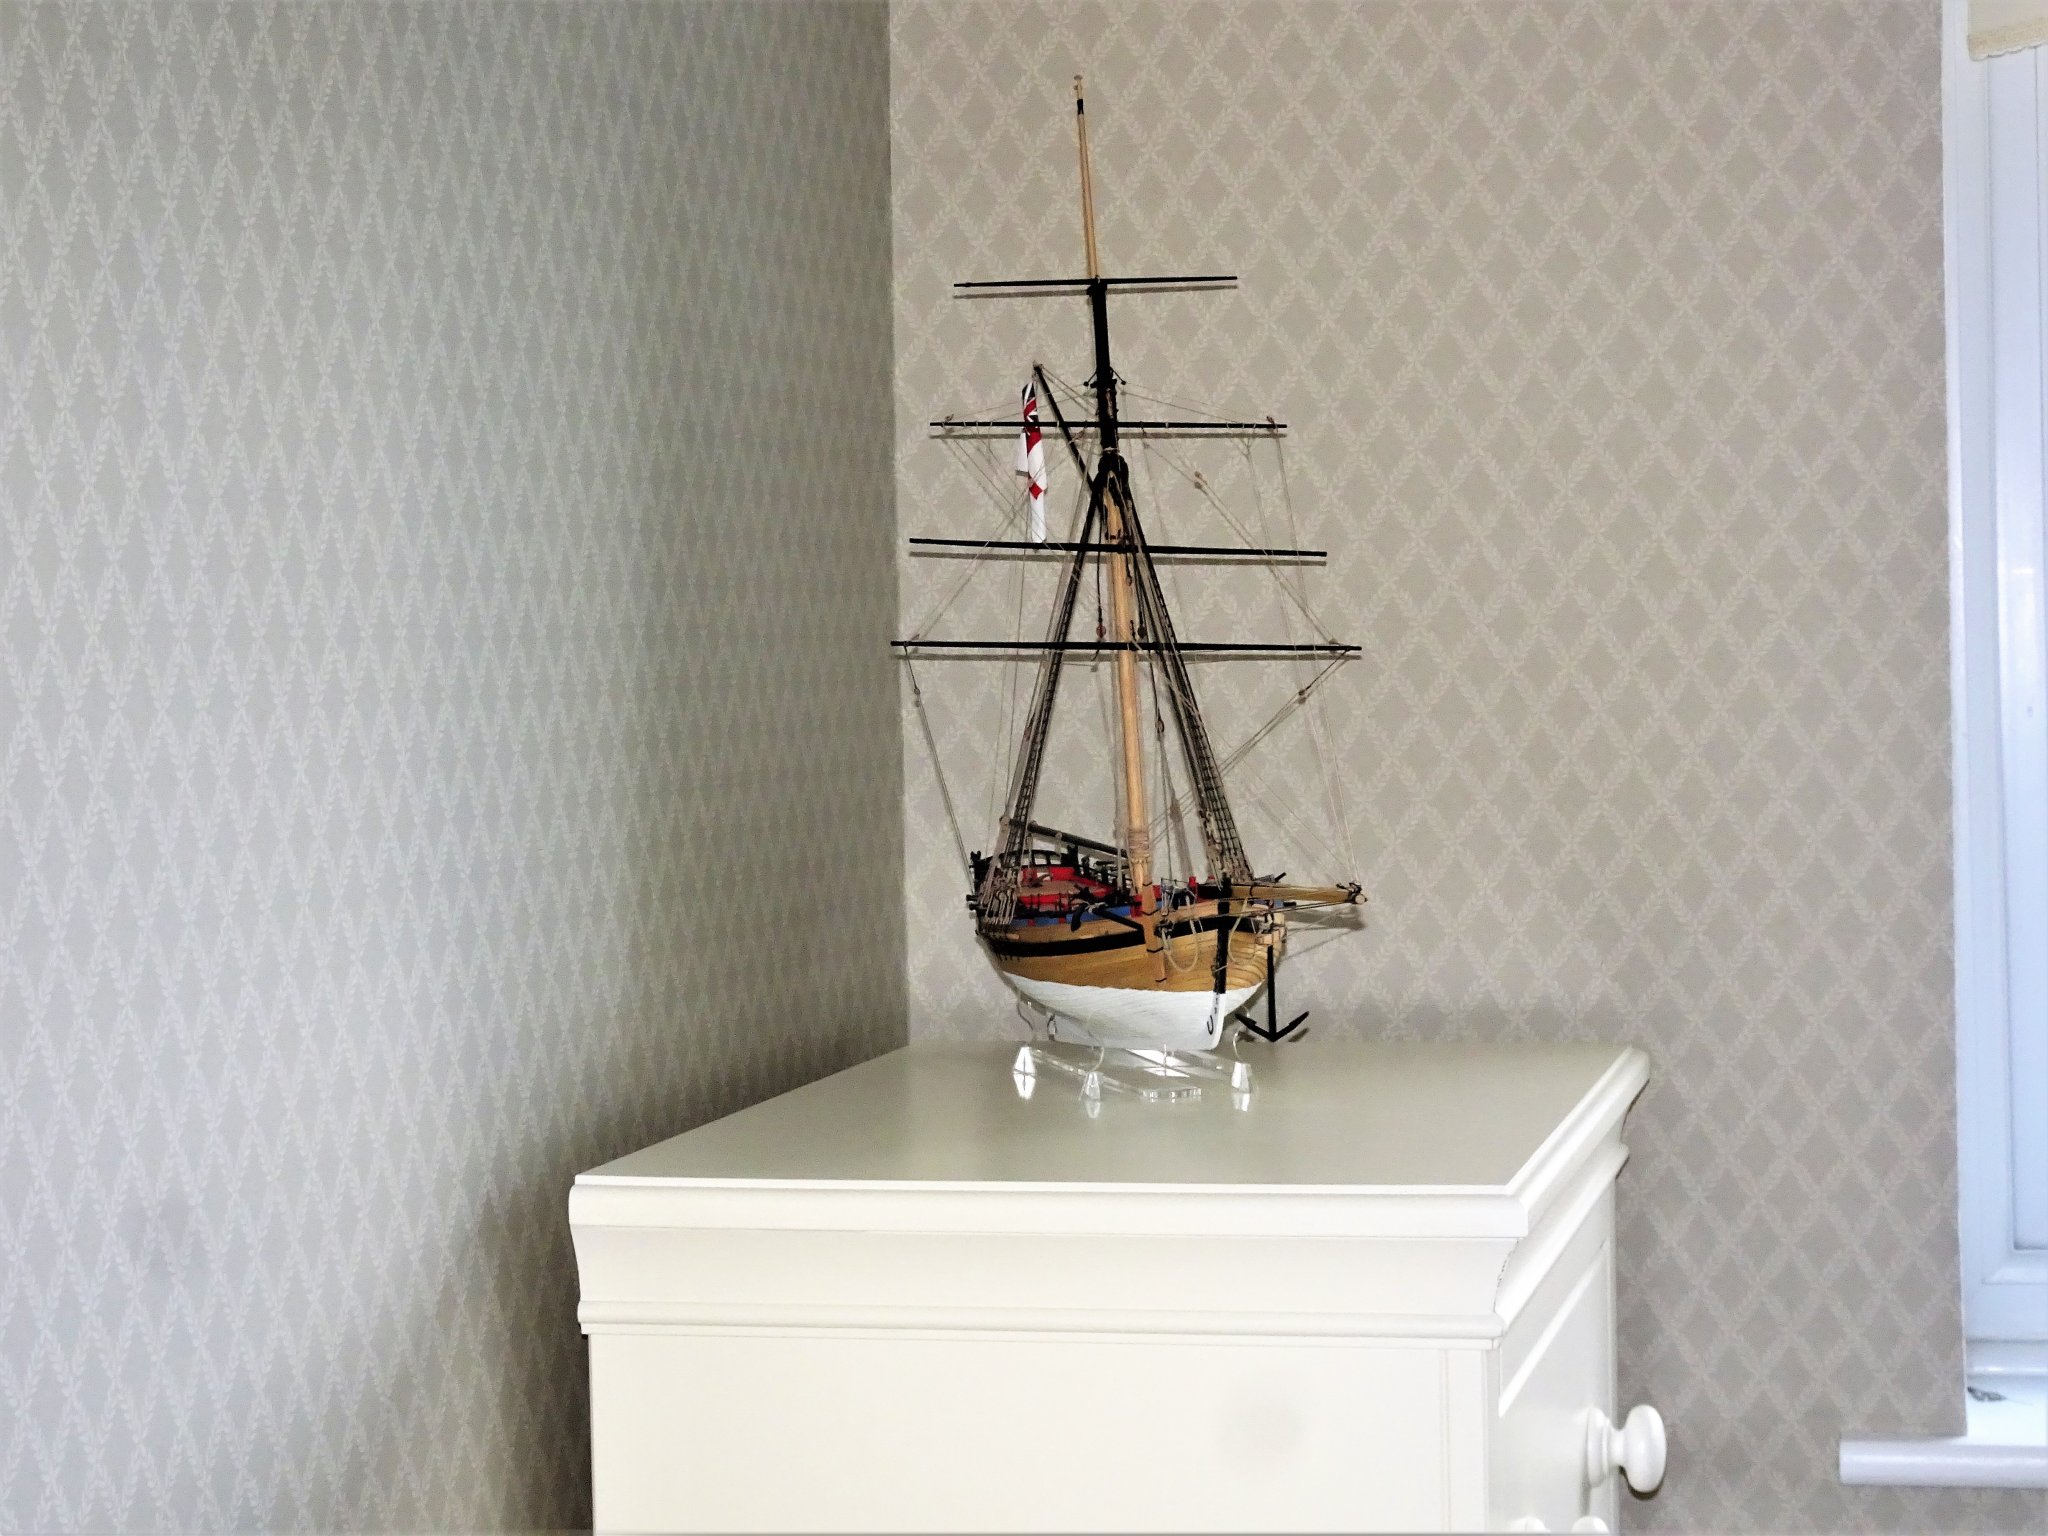
Post build follow up. Since I finished Alert she has been sitting nicely on a chest of drawers measuring only 16 x 24” quietly gathering dust. 6309 6307 Sitting pretty but she really needs to be protected. 6304 I had always intended to encase the model given the delicate rigging, but delivery of the case was delayed due to covid, and it has been sitting in Devonshire for the past four months. 6322(2) It has now arrived, but with the passing of time I am surprised at the size of the beast, necessary because of that very long bowsprit. 6321(2) The case measures 30” long x 11.5” wide x 22.5” high. I could have shaved an inch or so off the length of the case, but some leeway has to be allowed for aesthetic reasons. I am now faced with a rearrangement of my office to accommodate the now covered Alert, and a slightly disappointed wife who rather liked it as it was. 6330 All sorted, at least for the present. I now need to build a mini bookcase to raise up the now displaced Victory, still I can always use some extra book storage. So, if you’re thinking of putting your Alert in a case beware it will take up more room than you may initially think, something I singularly failed to do on this occasion. B.E. 24/07/20


.thumb.JPG.3a80377c324b6b747eed757a4a284856.JPG)
.thumb.JPG.2f1ced55f6ad6d1775b9b3af0b15b3cd.JPG)
- 335 replies
-
- 18
-
-
- alert
- vanguard models
- (and 1 more)
-
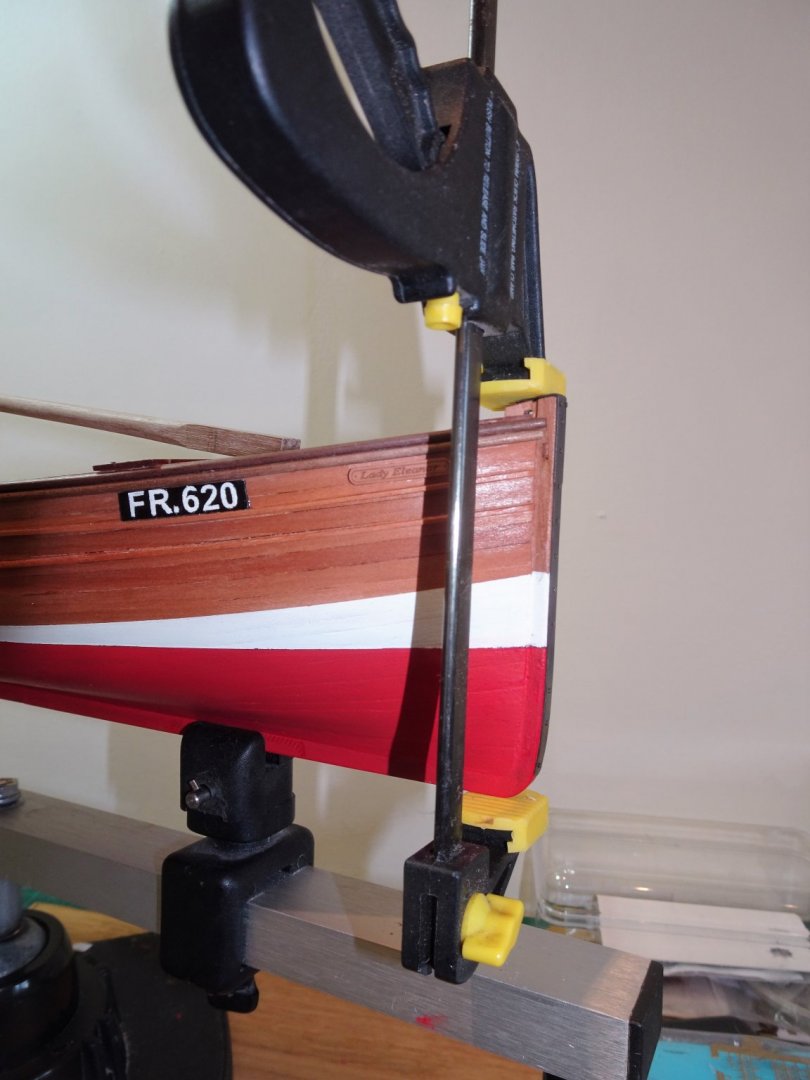
Thanks Dave, I had thought of it, but in the end I was too idle to order any for the short lengths involved.🙄 This has been rectified now and I have ordered some for use in the 'Zulu' build, in 0.5mm, 0.8mm, and 1mm diameters which should cover what is required. Cheers, Maurice
- 195 replies
-
- 2
-
-
- lady eleanor
- vanguard models
- (and 1 more)
-
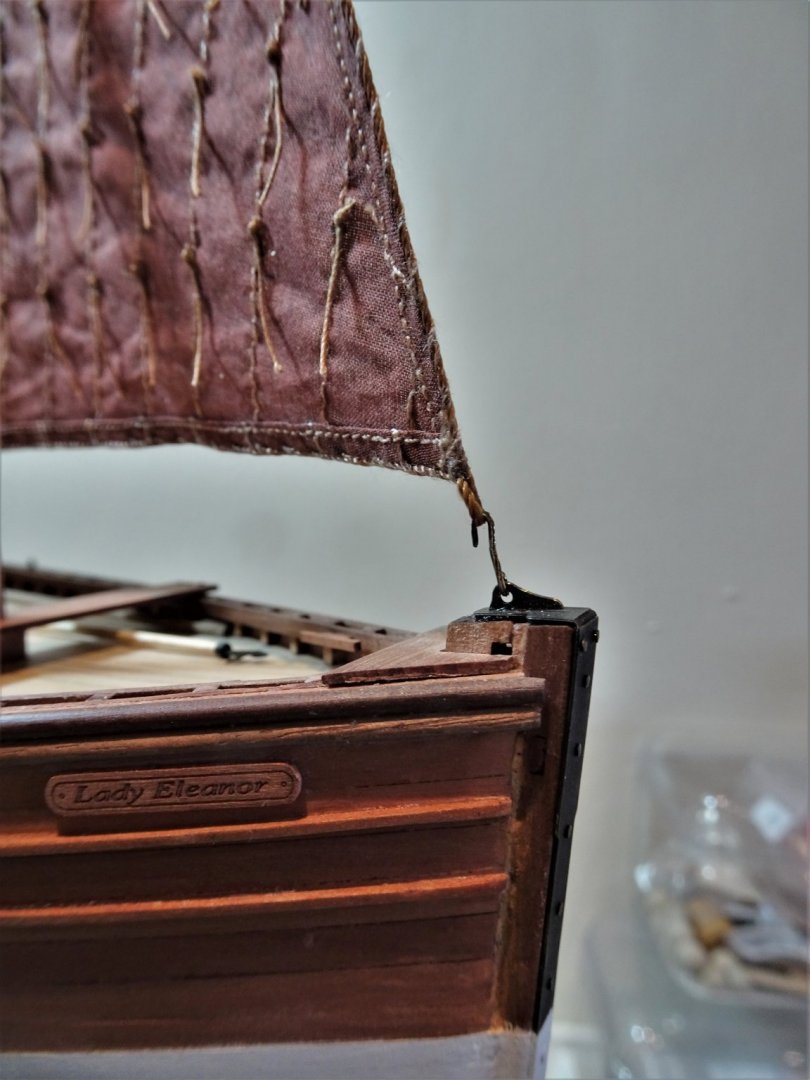
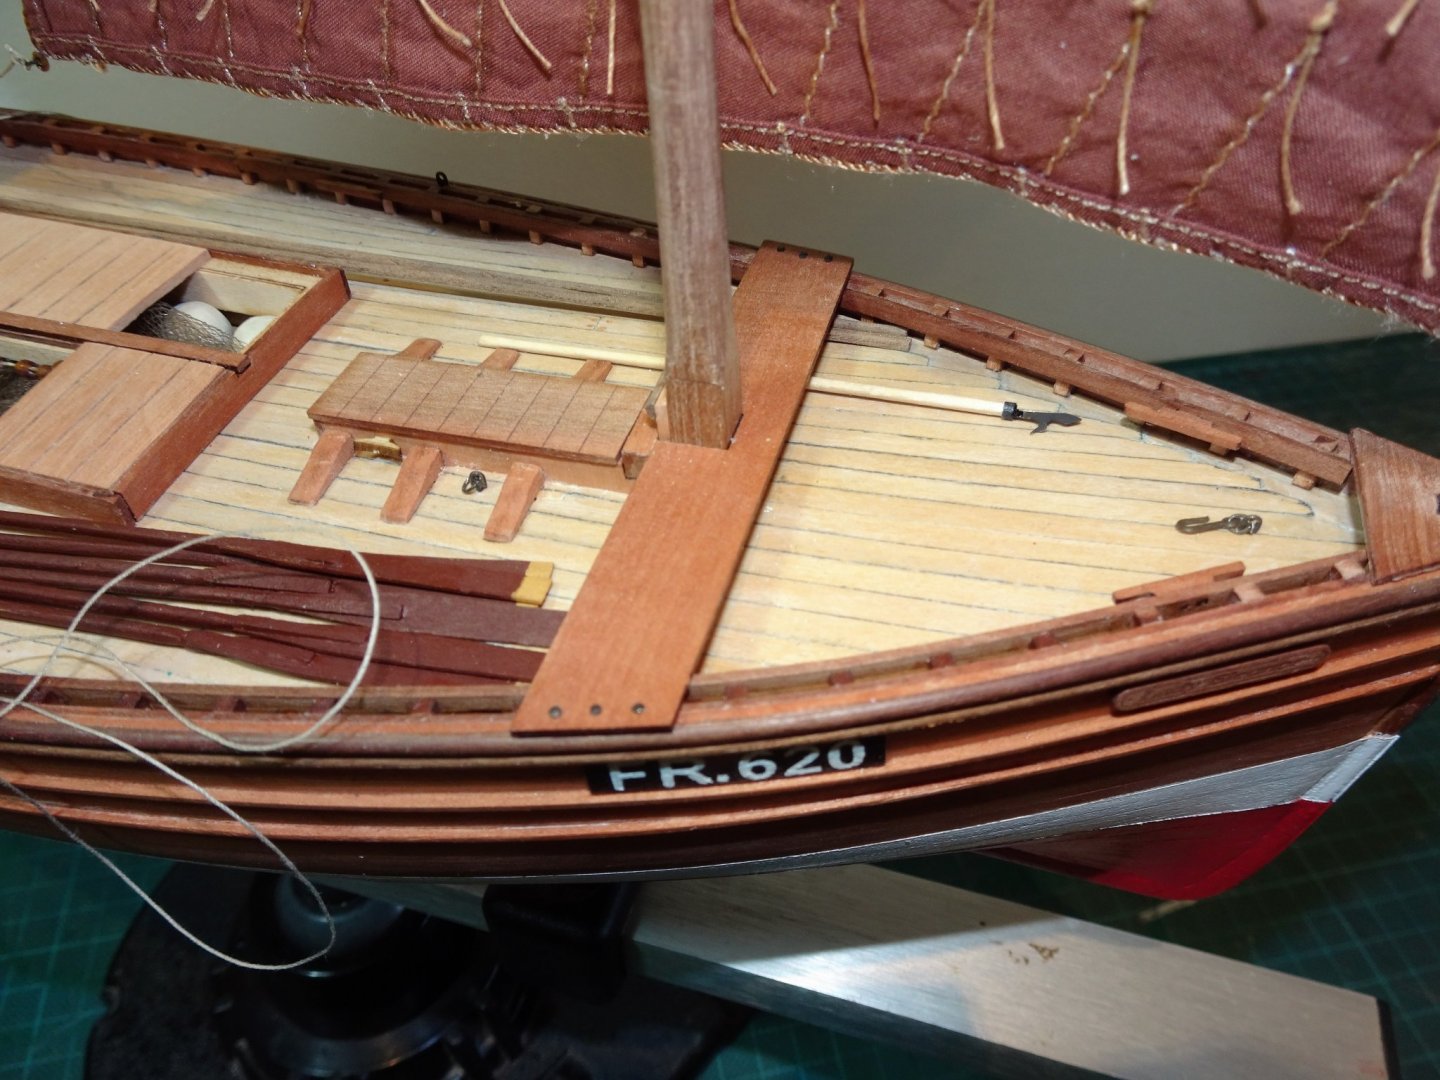
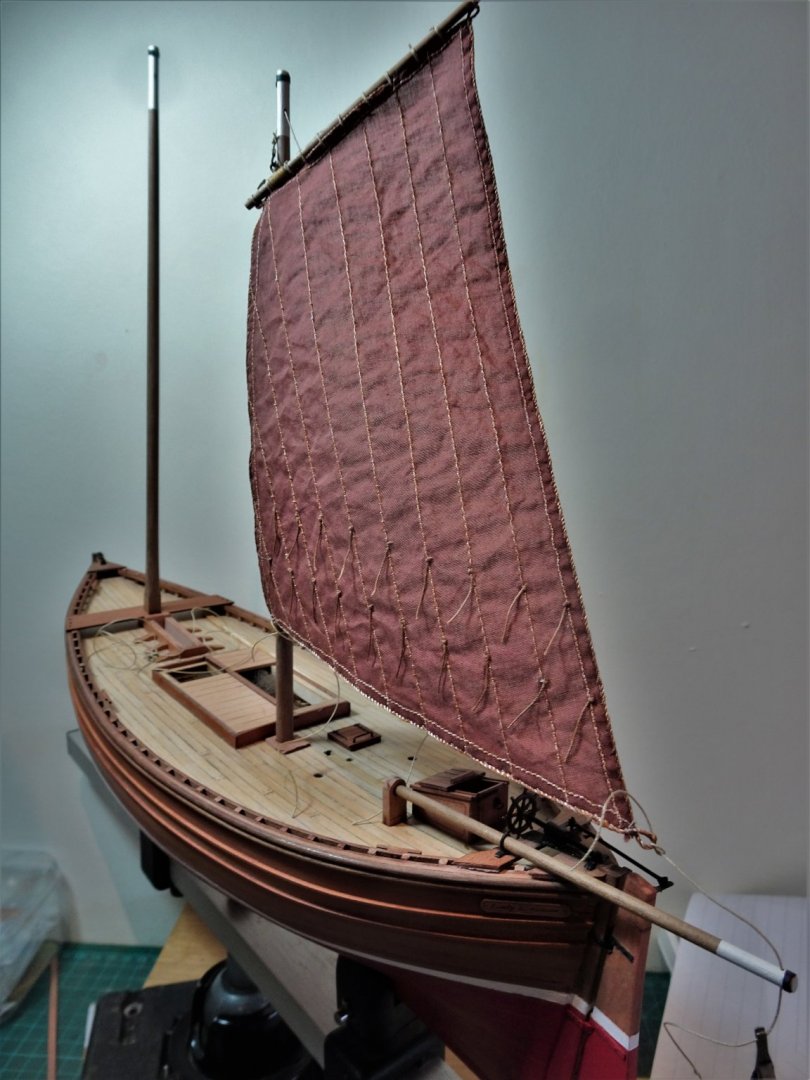
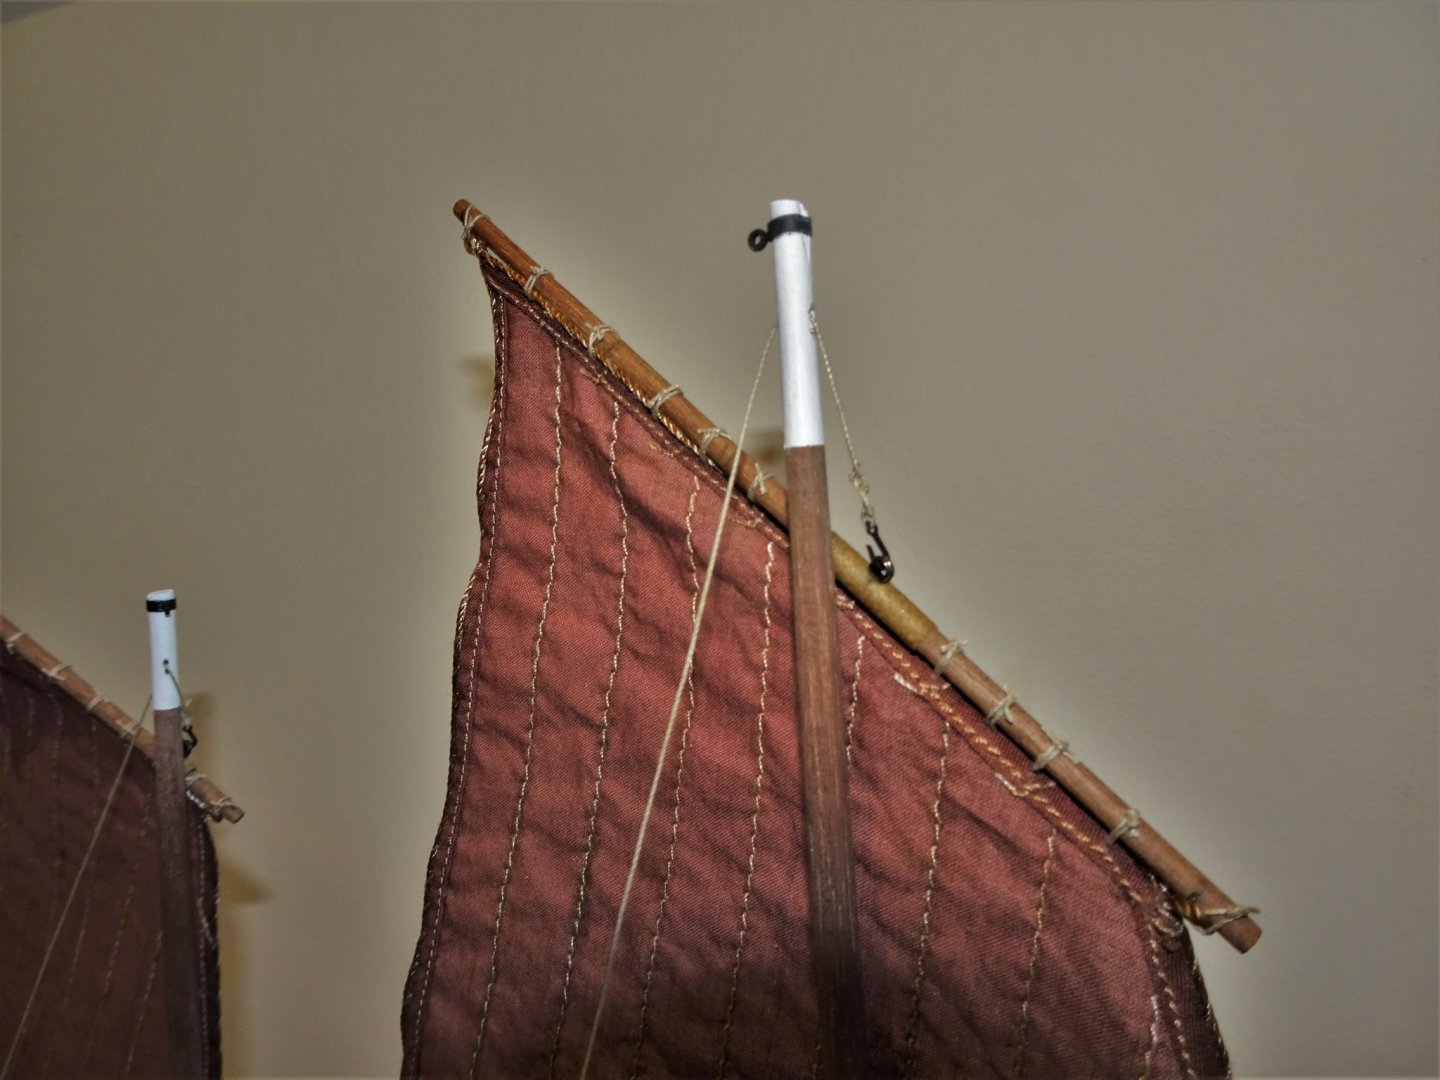
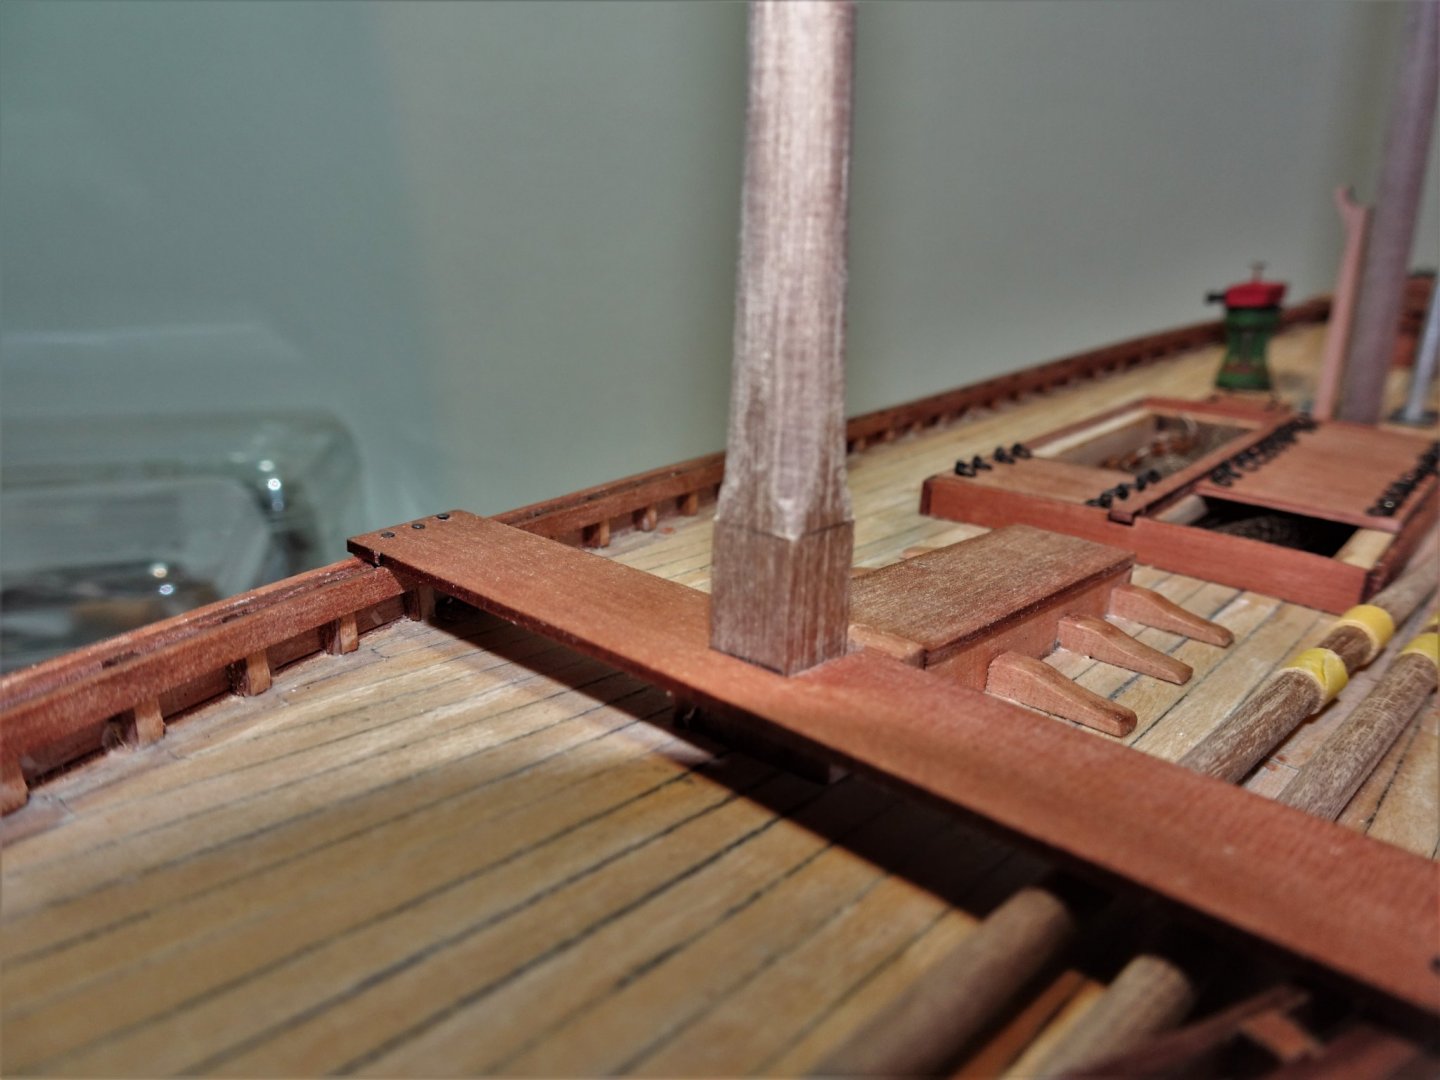
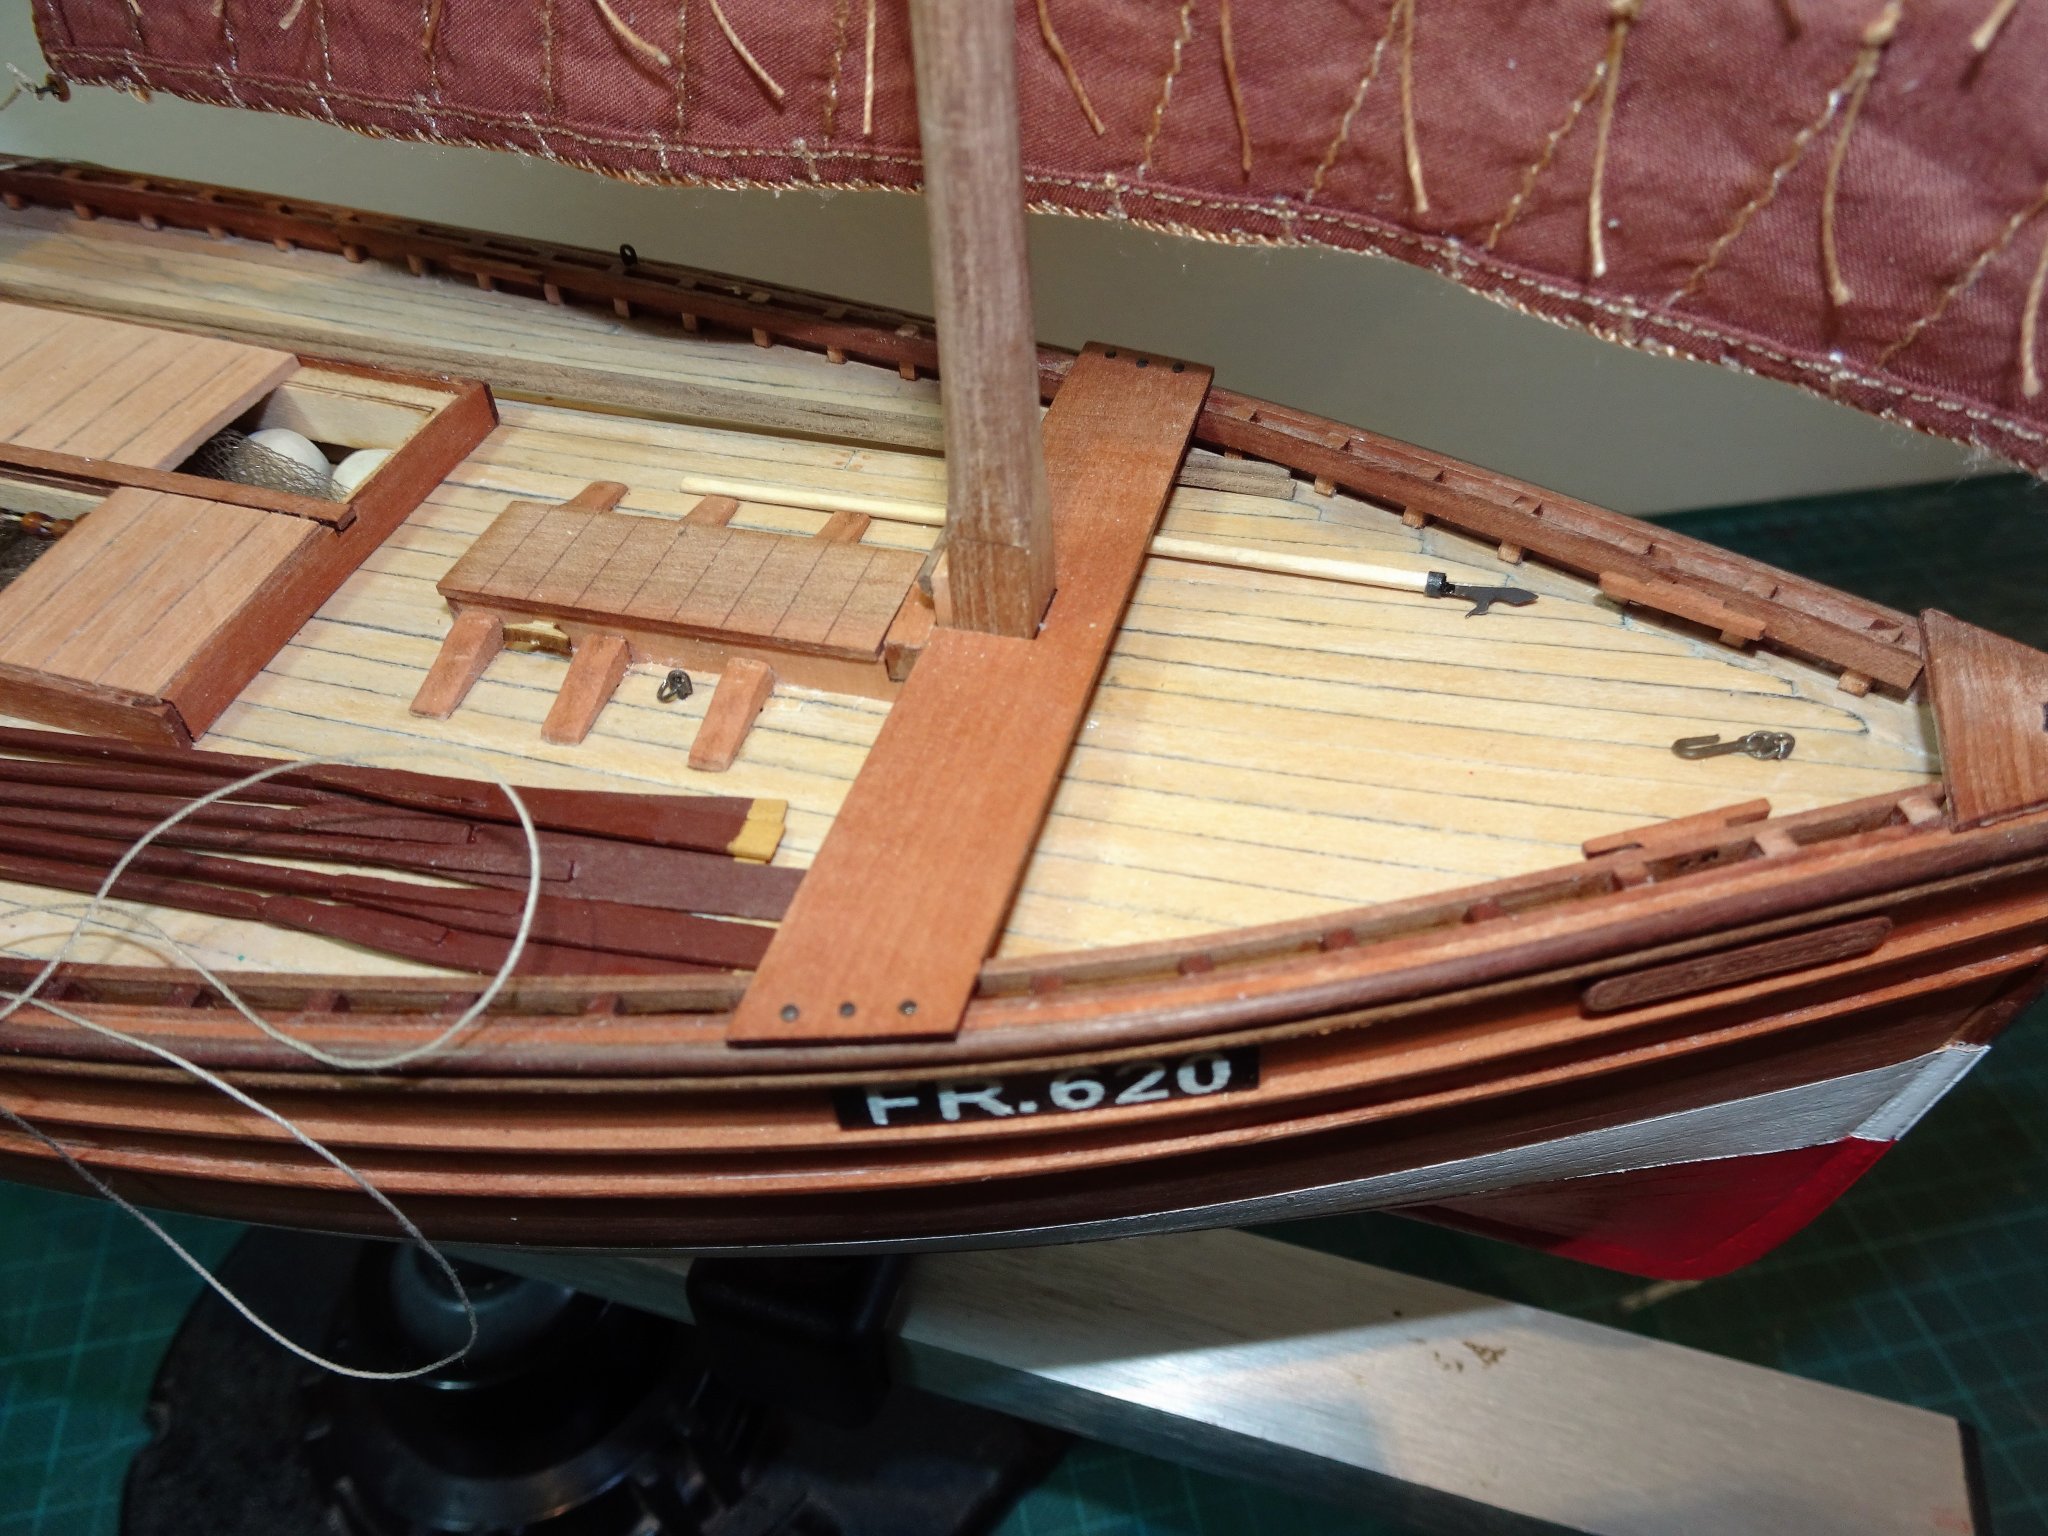
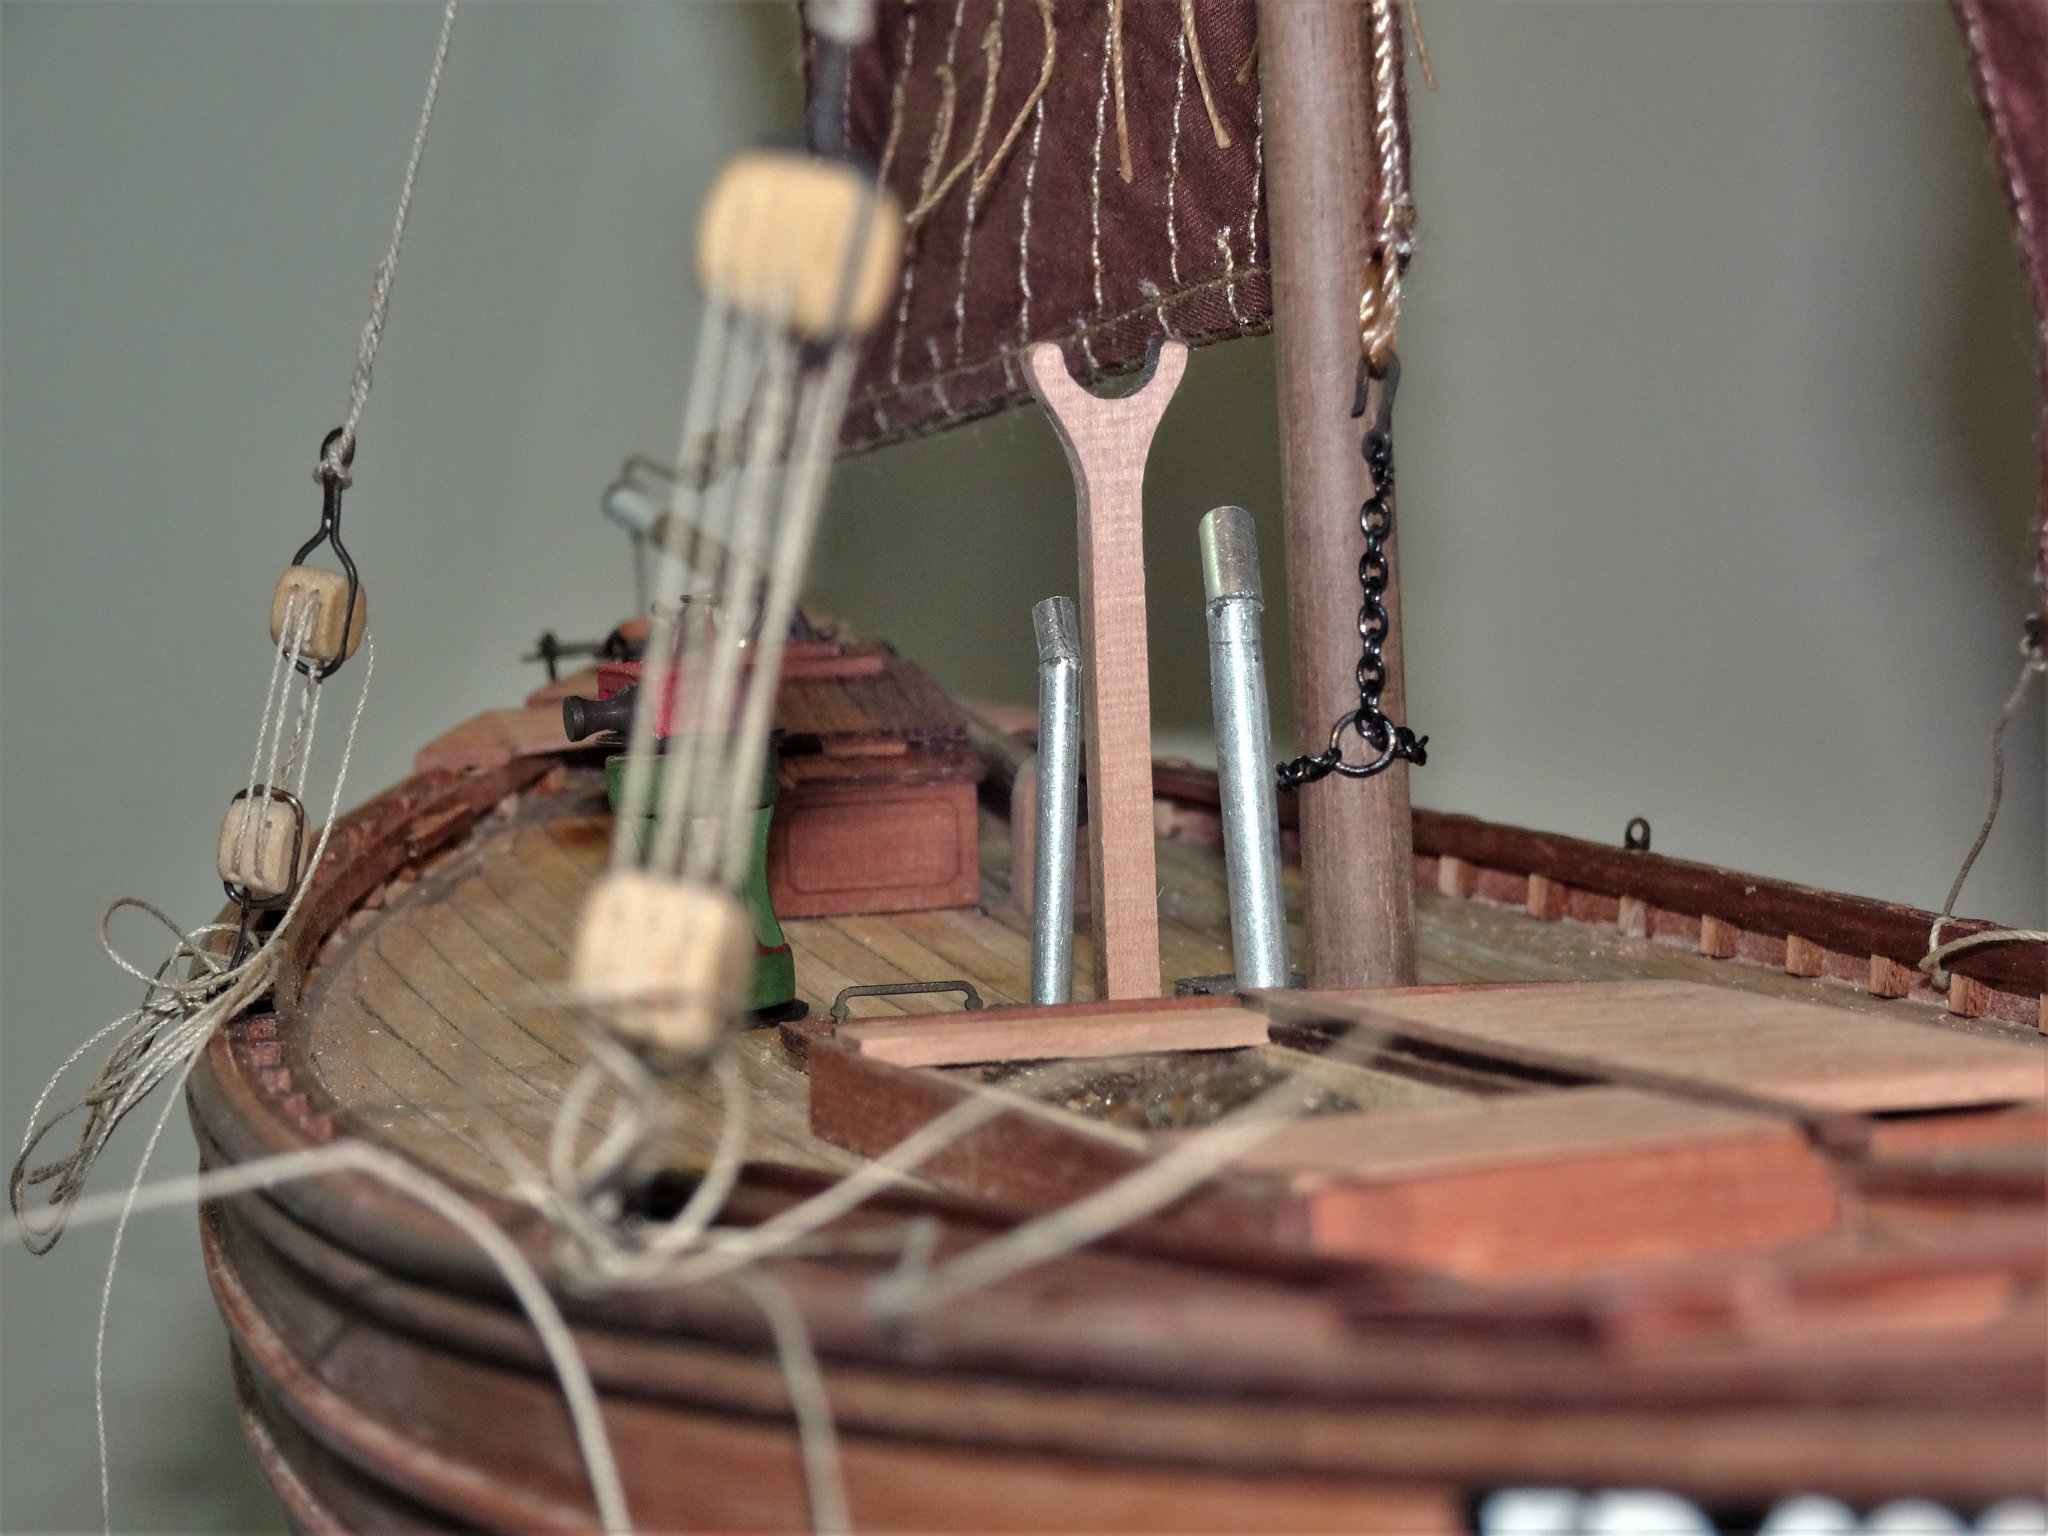
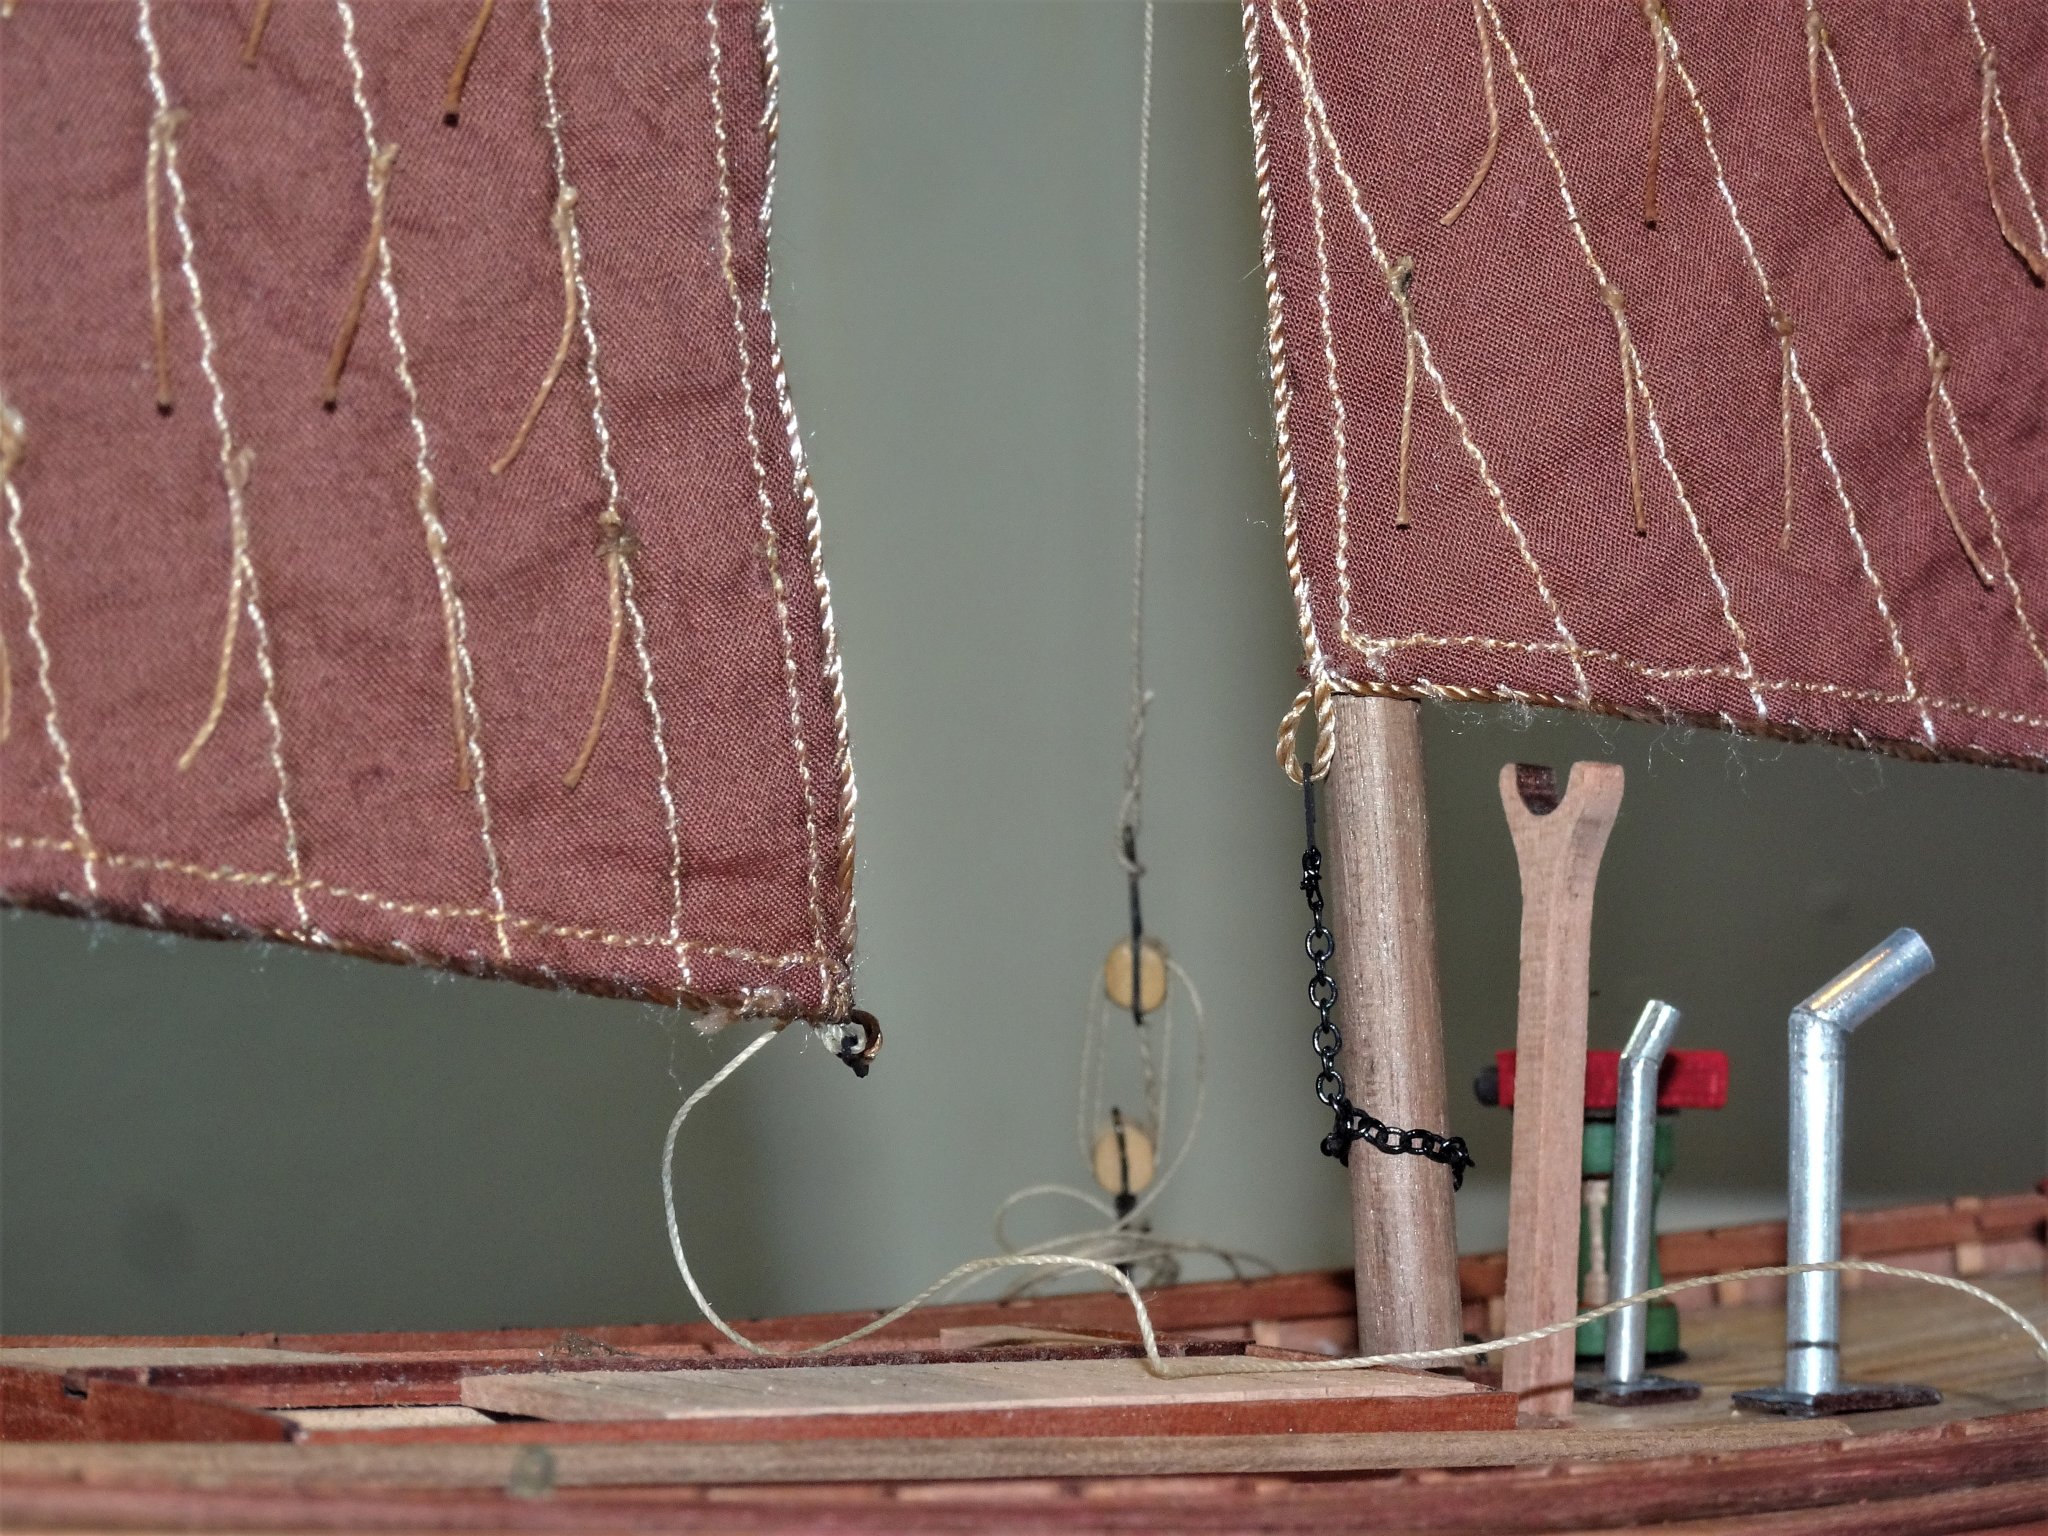
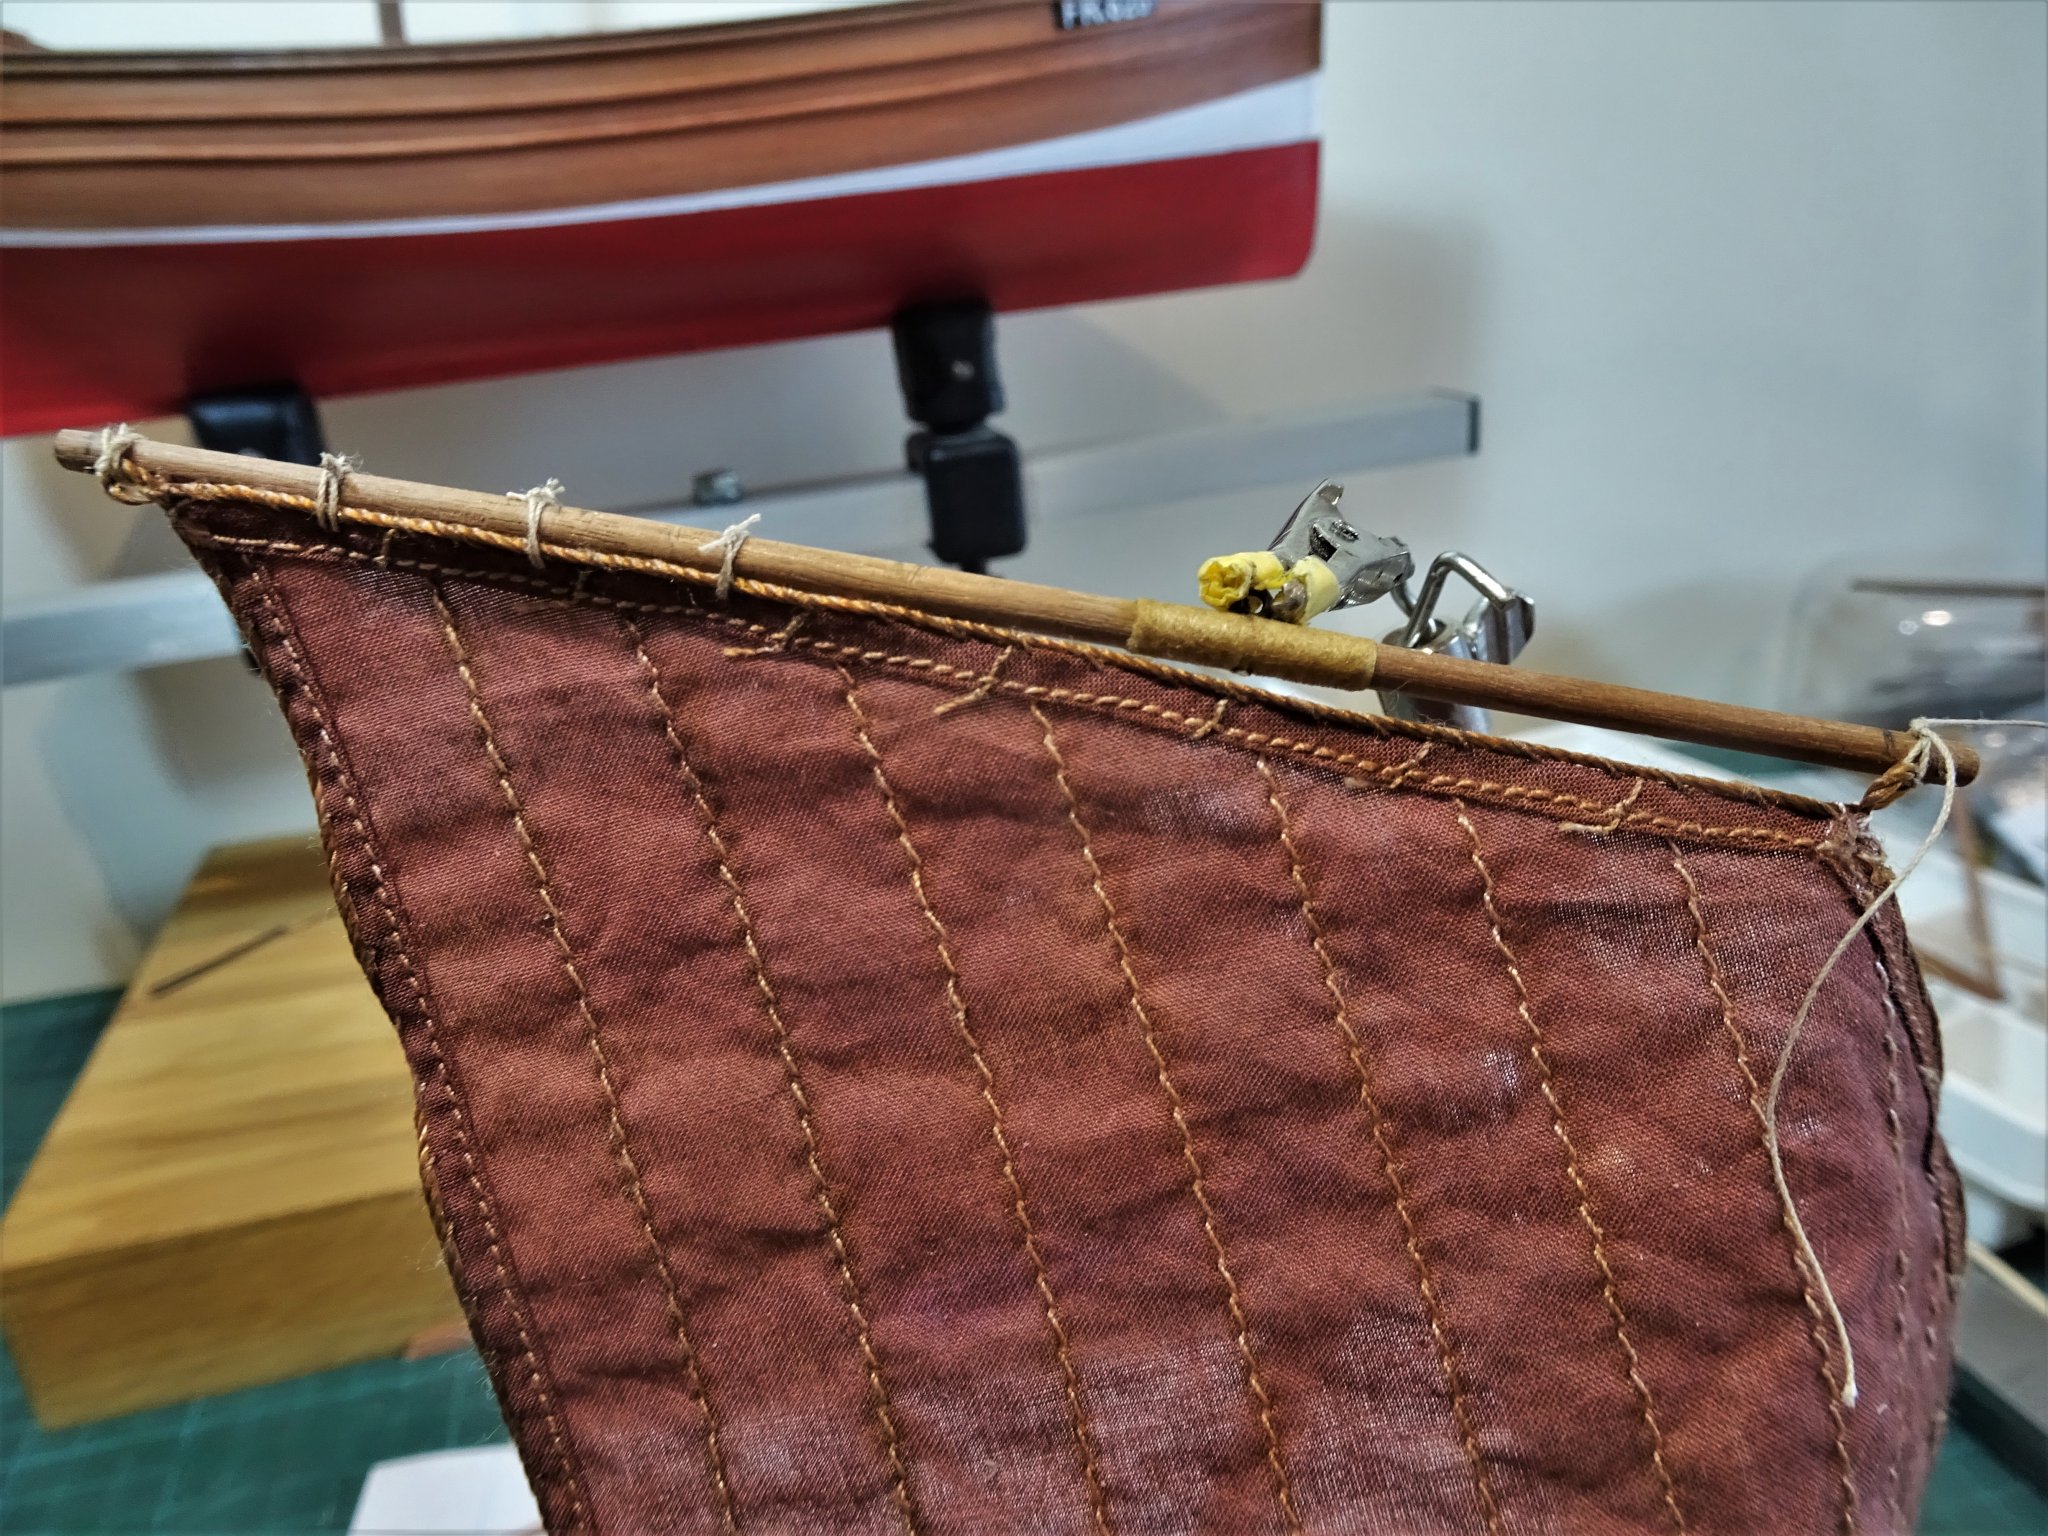
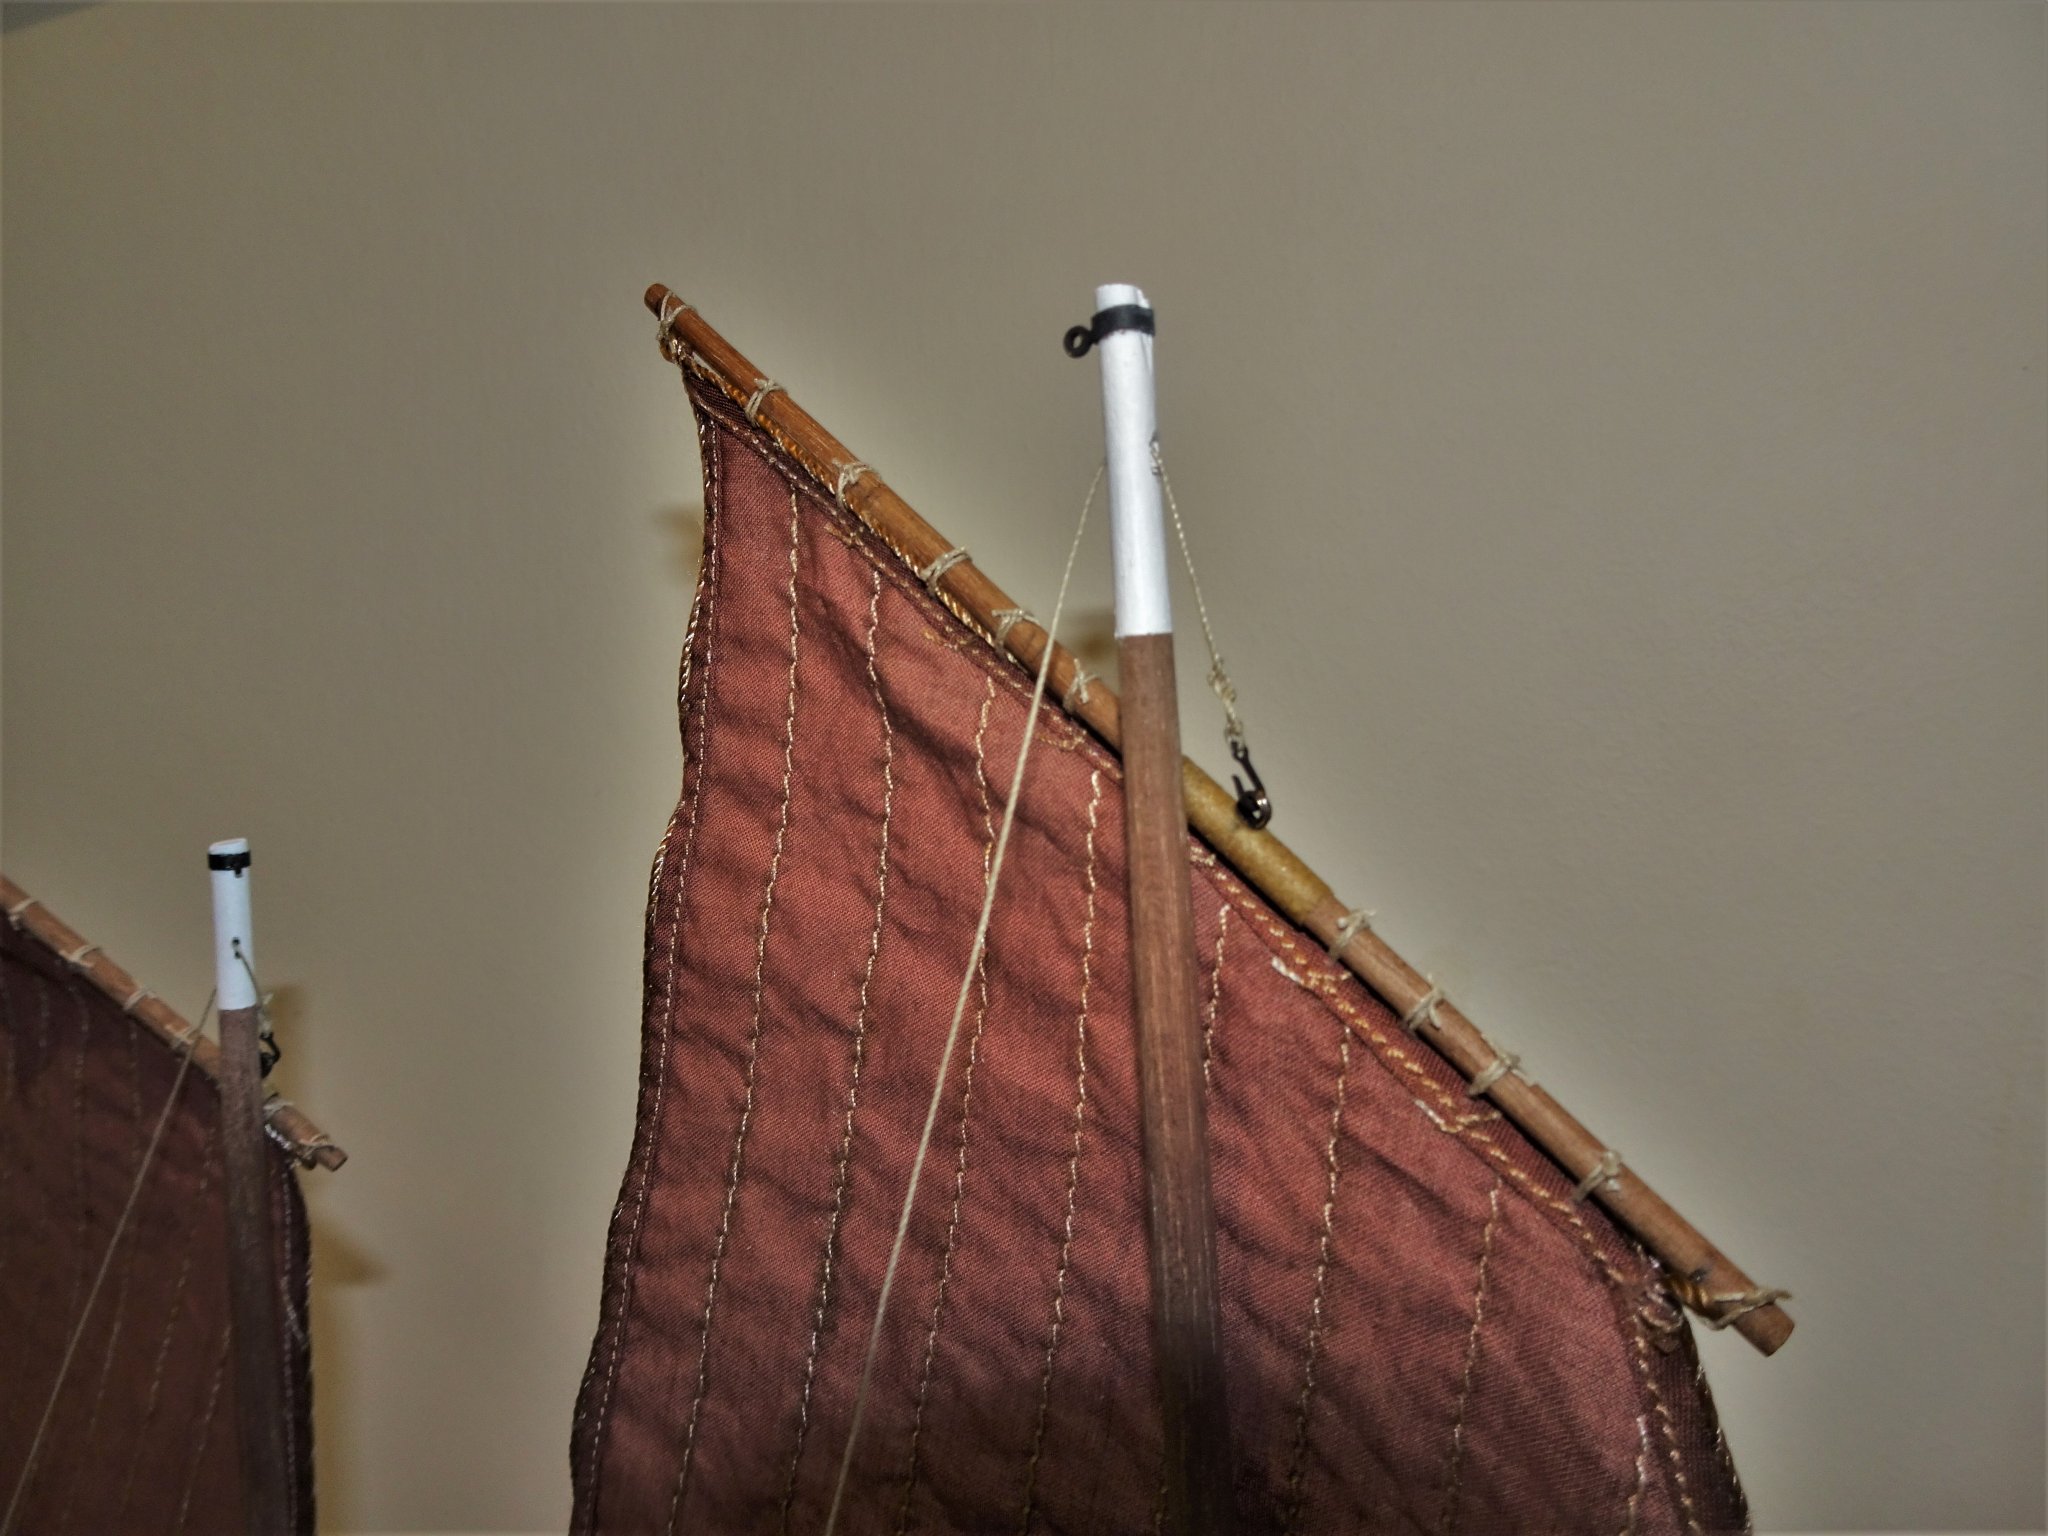
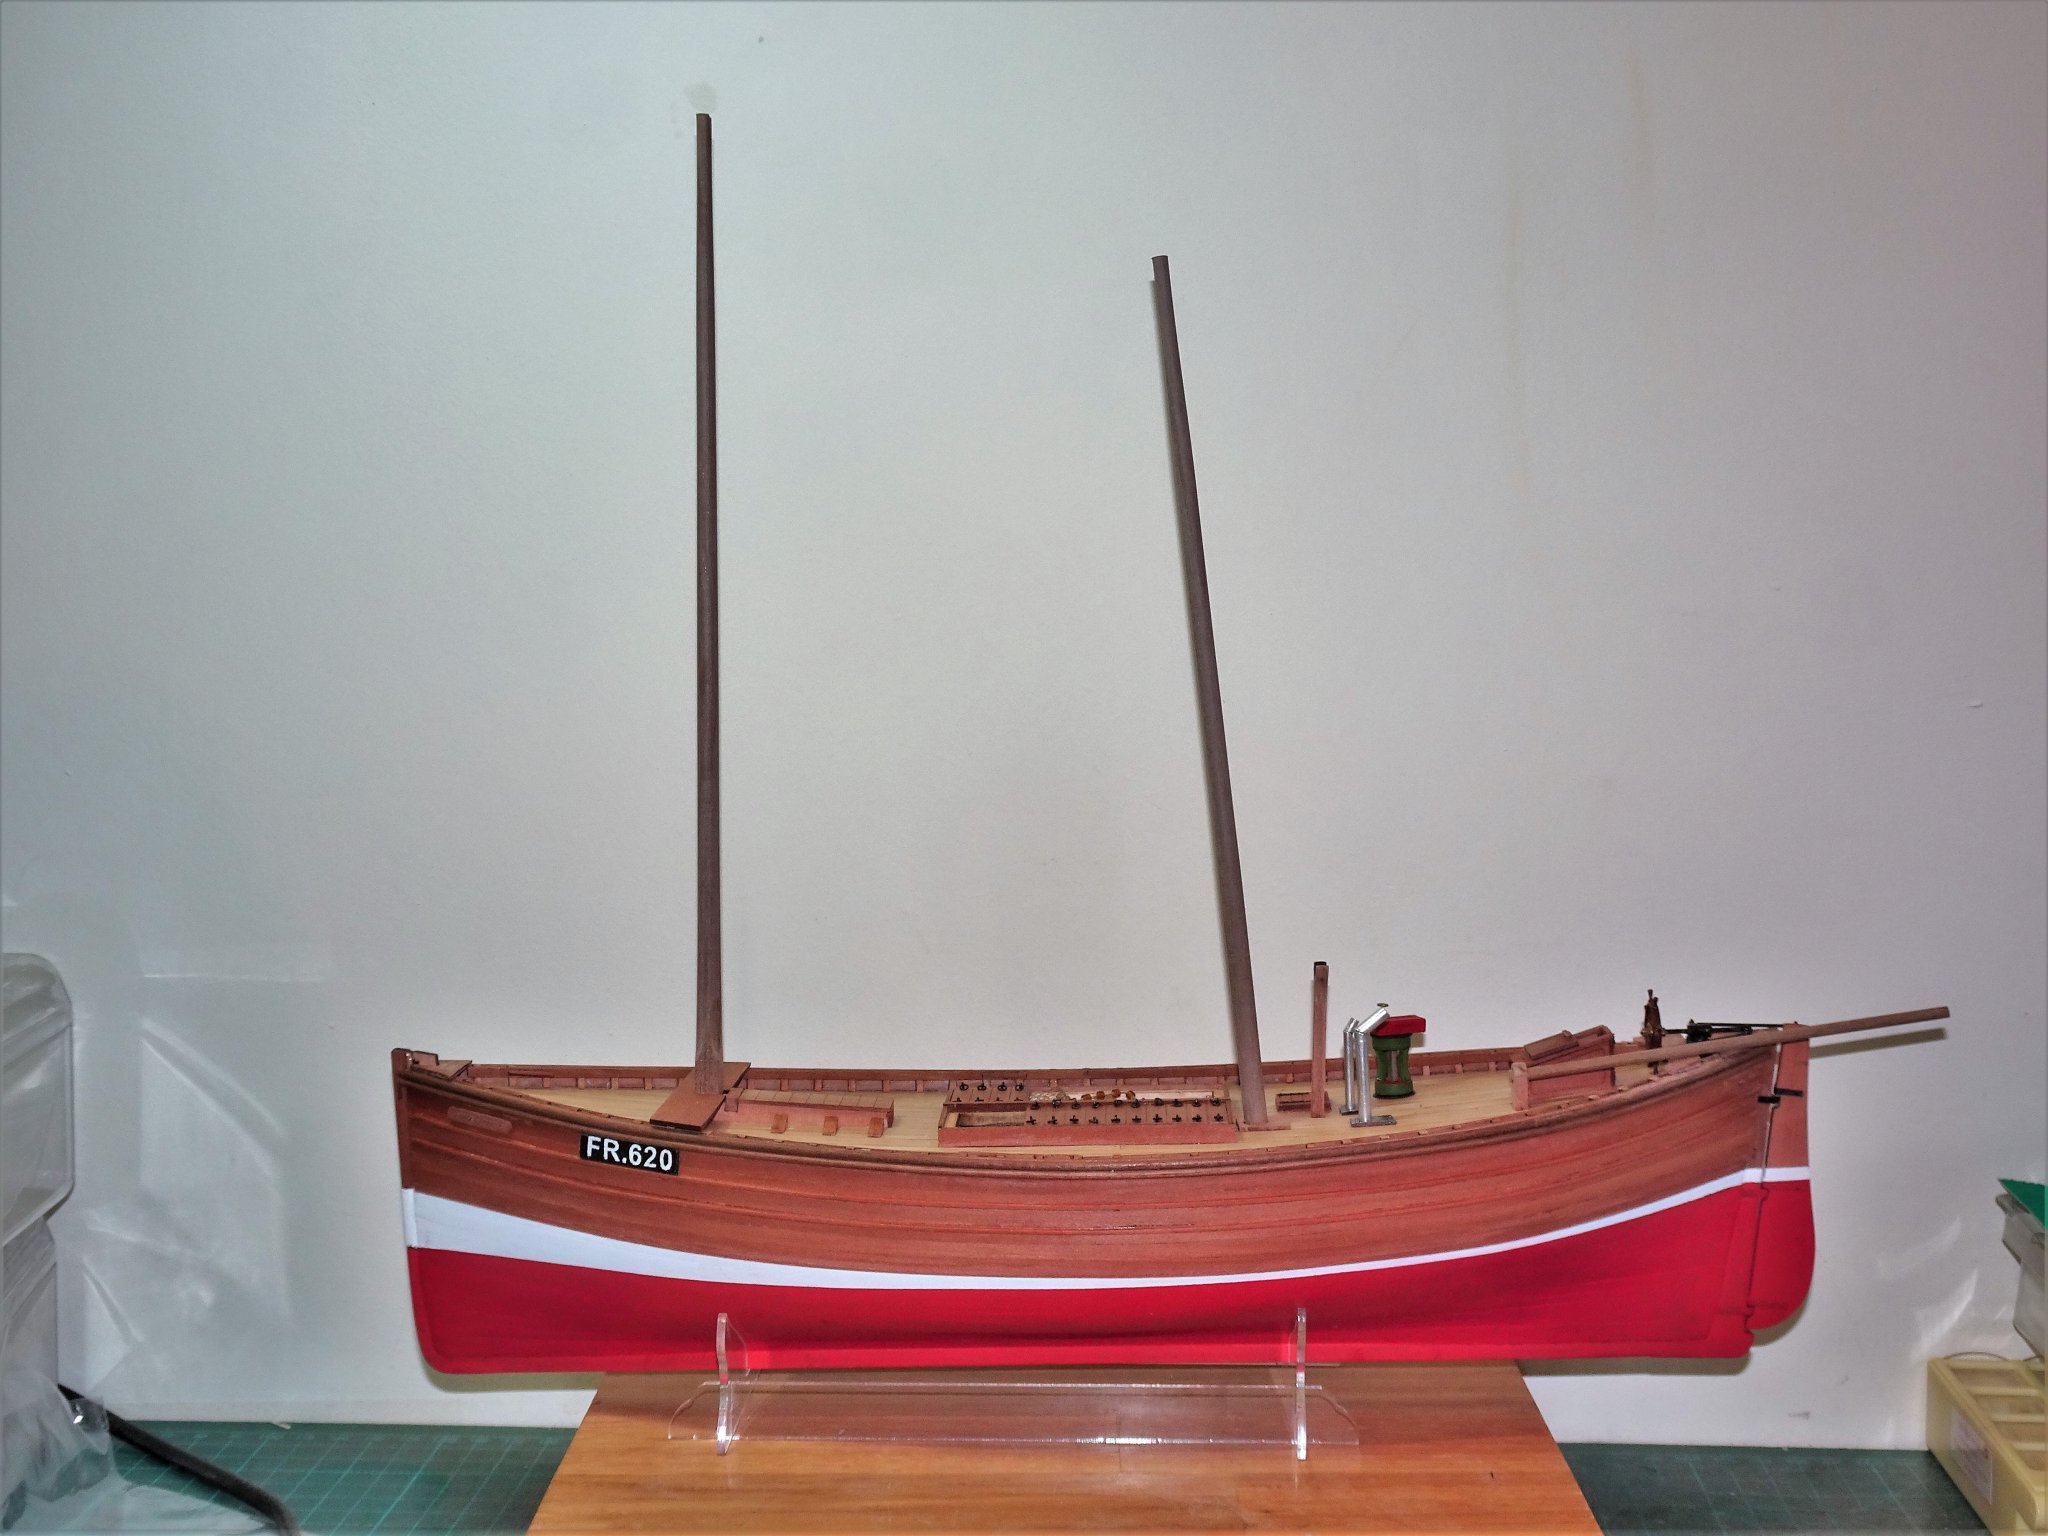
Post 28 Raising canvas With the reef points completed the sails can now be raised and the sheets, tacks, halyards, and Burton pendents attached. 6257(2) 6258(2) Rigging the Fifie, basic as it appears, is an interesting exercise not least because I am unfamiliar with the arrangements on these small commercial vessels, and my researches have revealed details not reflected on the kit plans. I am rigging the model by reference to a combination of reference books, Edgar March, primarily. I have used the plans of Underhill relating to the Zulu Muirneag, and of the Fifie’s Reaper and True Vine. Various photos, both old and of the current Reaper, were also of great assistance. There is an indication on the plans of Reaper that the tyes were of wire rather than rope (not a modern substitution) I did think about using wire, a scale diameter of 0.25mm would be required. This was fairly easy to reproduce from thin twisted copper wire, but I couldn’t get the colour right, so I let it pass. I am using Syren 0.45mm ø line for the Tye, and 0.20mm for the tackle. 6284 The tackle consists of a pendent and two large triple blocks. I am using Syren 6mm blocks. The strops represent iron and wire formed from silver soldered brass wire. 6282 A similar arrangement is used for the Mizen Tye and Halyard with smaller 3/16th double blocks (4.7mm). Mizen Tack. 6295 A chain necklace was used to secure the Mizen tack which I have sought to replicate. The Scots called it a tuckle chain. 6288 A more interesting feature clearly shown on an old photo of the Zulu Muirneag. The Fore tack This is attached to a hook shackled to the eyebolt atop the stem. Often large hooks (horns) were attached to the port and starboard sides of the stem for this purpose. 6248 An alternative attachment point for the Fore tack is set in the deck a few feet aft of the stem. This is as far as I can go with rigging at present, I am awaiting receipt of fresh rigging supplies from Chuck. In the meantime I have been fiddling around with deck fittings. These boats were also equipped with a set of sweeps for rowing. Mine are a scale 23’ overall. There are also two ‘wands’ or hefty push sticks some 36’ long used to fend off and assist movement in harbour situations. A 14’ boat hook completes the set. 6270 In this shot on the near side are the set of six sweeps, on the far side the Boat hook and wands. The alternative hook for the Fore tack can be seen on the foredeck. 6272 Another shot of the sweeps and a glimpse into the hold containing the nets and floats. 6250(2) 6253(2) Not far from completion but I still have the sheets and Burton Pendents to complete, the block sets have been assembled in readiness. B.E 23/07/20
.thumb.JPG.f0ff8a71de8c21134493d5dccaa14918.JPG)
.thumb.JPG.695c14ee8c962b58d980d8fac3427bf0.JPG)
.thumb.JPG.7d75372860bf722fe402e6d9c3379896.JPG)
.thumb.JPG.5226621964cd0492912ee9312545e028.JPG)


- 195 replies
-
- 16
-
-
- lady eleanor
- vanguard models
- (and 1 more)
-
Thanks Glenn, I'm pleased with how the sails turned out. Get what you pay for I suppose Bob, I like them a lot, but that doesn't mean I'm not going to fiddle with them, as you will see below.😉 Post 27 Reef points and other tricky issues.. I have been thinking about reef points, these do not feature on the kit available sails, (didn't expect them to) but neither are they shown on the kit sail plans. Several rows of reef points are appropriate to the sails on these large luggers and at 1:64 scale should really be included. Their absence is noticeable on the prominent sails of the Fifie model. Several things have to be considered. How many points on each sail. How long are the points. What is the vertical spacing of the points. How to apply them to look natural. I have used Harold Underhill’s scale drawings of the Zulu Muirneag as the basis for addressing these points. The points are attached along the vertical seam lines of the sails. To begin I am attaching four bands on the Foresail and two on the Mizen. I have scaled the points to a length of 14mm. From the drawings I have worked on the basis that the tip of upper band is a fraction above the knot of the lower band. Application of the points to the sail is an issue. To do it properly a double length line is passed thro’ a hole in the sail and knotted at the top each side. The issue with this is that getting them to hang naturally can be problematic without resorting to use of pva to hold them down on the sail. This risks marking the previously dyed material. I have decided to simply glue the points to the sail at the knot. This way the point lies flat, and the application of glue is better controlled. 6184(2) The sail is taped down to get the line of the points. 6194 Two lines of points pva’d to the Mizen sail. 6190 I’m happy with the result. 6205 This method seems quite effective and is certainly a lot less time-consuming than feeding them thro’ the sail, adding knots, and then trying to persuade them to lie reasonably flat. I also attended to attaching the parrels. 6200 Still only a temporary rig at present. 6202 The advantage of this simple lugger rig is that I can slip the yard/sails including the parrel over the masthead. Moving on to fix the points to the larger Fore-sail. B.E. 16/07/20
.thumb.JPG.ef0a65cdb6339ab68b52d6540cc664f6.JPG)


- 195 replies
-
- 12
-
-
- lady eleanor
- vanguard models
- (and 1 more)
-
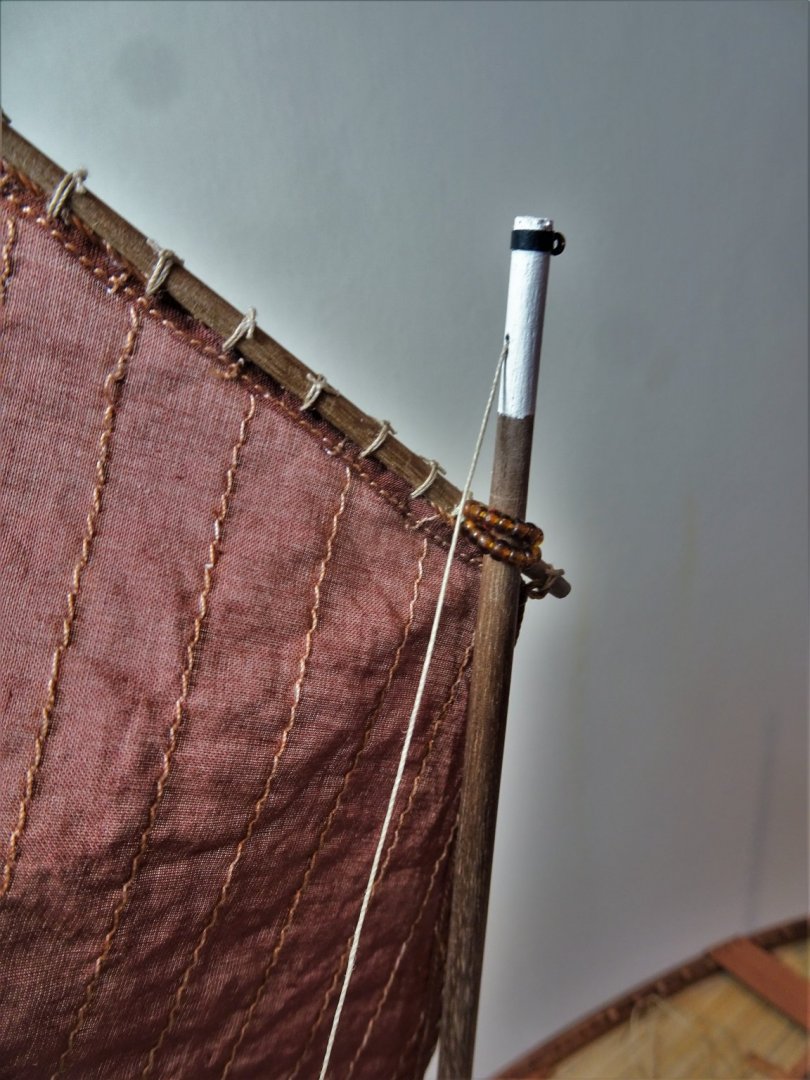
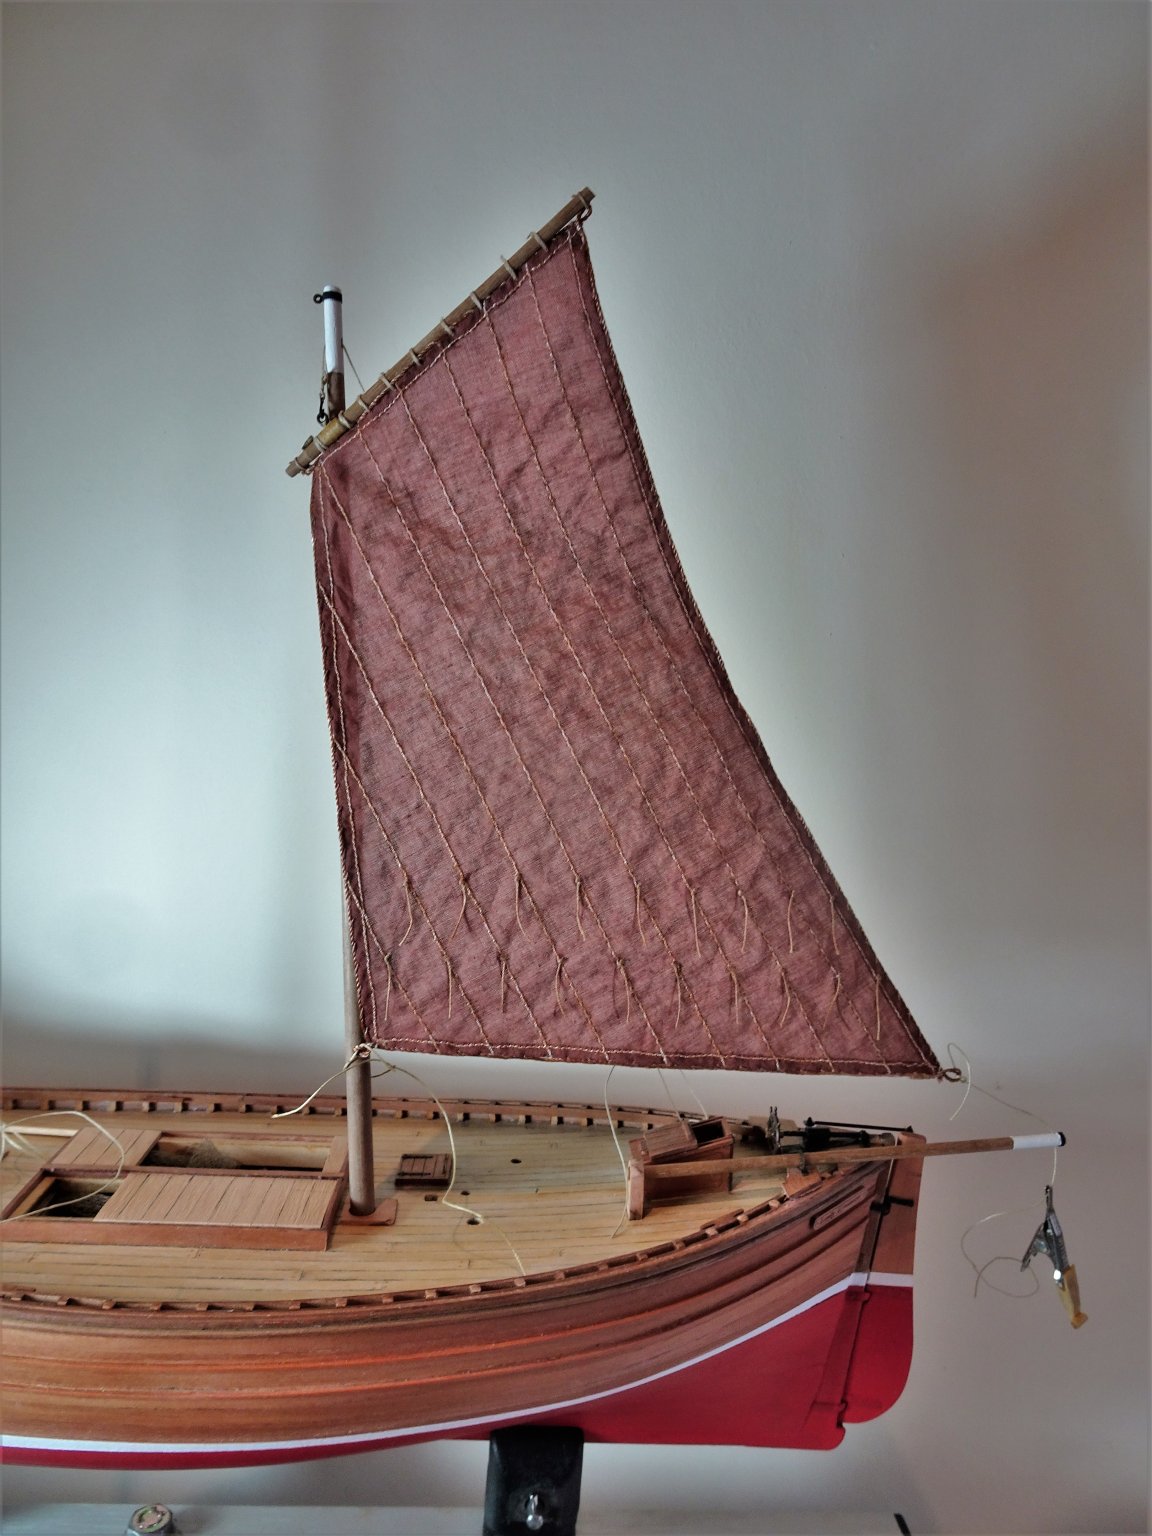
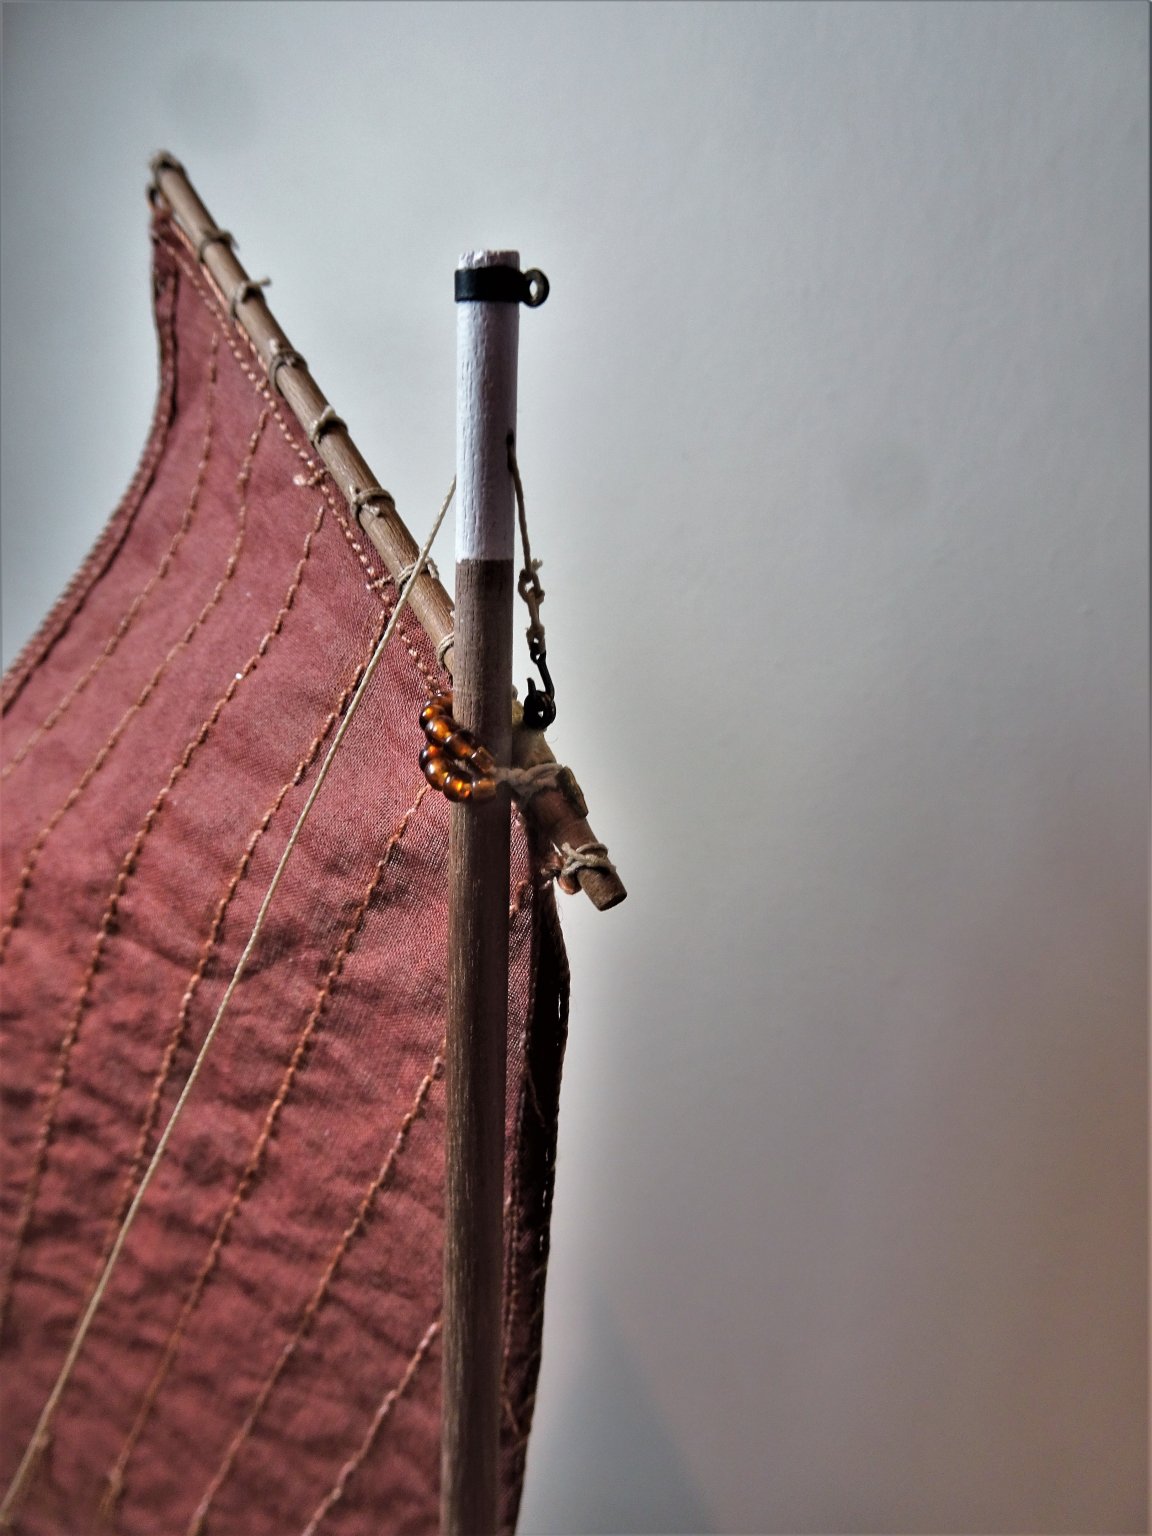
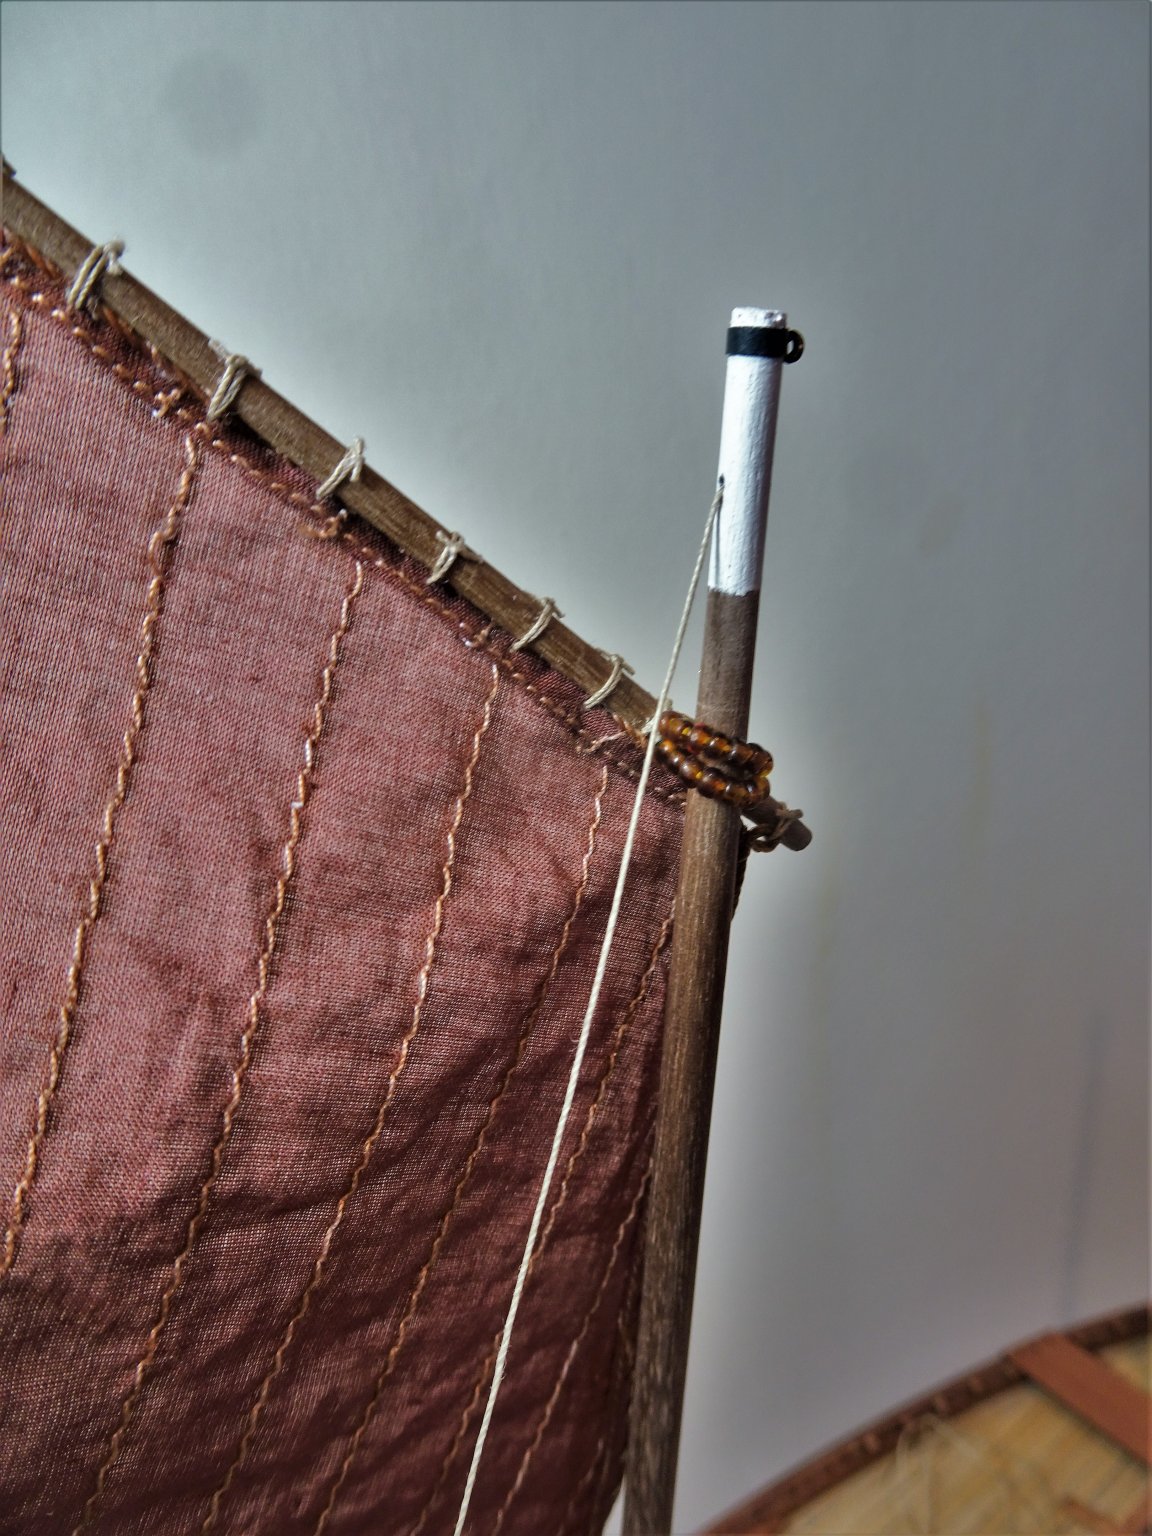
Post 26 Thinking about Masting and rigging. There is not a lot of rigging on this build, but there are simplifications that can be enhanced to better reflect accuracy To rig the Fifie I will be using Syren blocks and thread and referring to details given in the Sailing Drifter book by Eric March. The Foremast can be enhanced by creating a false sheave in the masthead, rather than simply a hole to pass the halyard to the Fore yard through. The kit provides brass etched ‘mast rings’ with six horizontal eyes, one of which is the attachment point for the Burton stays of the masts. 6162(2) I replaced this with an ‘iron’ ring (heatshrink tubing section) and added a vertical eyebolt. The masthead section has been painted white in accordance with practise of the day. The Mizen Mast was treated in the same manner. The Yards 6173 The main change I made to the yards was the replacement of a hitched tye, with an eyebolt/ hook arrangement. The area between the slings I have fitted with a canvas covering, represented by micro-porus tape Attaching the sails These are connected to the yards by Robands. Edgar March (Sailing Drifters) refers to these as Rovings being secured by a ‘Parley’ Knot, no doubt a Scottish description. Given the scale I will use a simple square knot for the purpose. 0.20mm Syren line taken twice thro’ the sail gommets* and secured atop the yard. *For my purposes a hole thro’ the head seam made by a needle. 6168 The top ends of the sail are secured to the yard via the Head cringles using earings thro’ holes in the yard arm. An outstanding question is whether to add the reef points. These can be tricky little additions to get right on model sails, there is a tendency for them to stick out every which way, spoiling the effect. I’ll ponder on that awhile. 🤔 6177(2) A trial fit of the sails in place. 6171 I now need to attend to the tricky business of attaching parrels to the yards. B.E 15/07/20
.thumb.JPG.b2e9840a5ec4d0af574505e8790e0452.JPG)

.thumb.JPG.557914233a9f93c36742f282d7a80ad4.JPG)
- 195 replies
-
- 13
-
-
- lady eleanor
- vanguard models
- (and 1 more)
-
You’re creating a beautiful model Christian, and must feel a real sense of achievement having built the hull from scratch. As with your Diana build, I love the colour scheme you’re adopting, very nicely done. Regards, B.E.
-
The contemporary model of the Hawke in the NMM shows clinker planking below the wale, which would still leave an area of the hull above the waterline. The Alert cutter was also clinkered below the wale, but was apparently coppered which raised the question how was it done. Roger Cole wrote an article as mentioned above, describing how this may have been approached, but even if coppered there would be an area of clinker planking on view which may have remained 'bright' rather than painted, and a popular choice for display models. B.E.
-
Hi Glenn and Bob, The Blackening stuff I use is called Carr's Metal Black for Brass, they are Based in the UK. I think sheen Glenn is more related to the extent the surface is buffed, it's not something I do to any great extent on say period gun barrels which I tend to leave fairly dull. I used Admiralty Paints water based Metal primer in this case, as I wanted to reduce any risk of the painted areas chipping or flaking, but I rarely paint etched brass stuff, I prefer to just blacken it. Regards, B.E.
- 195 replies
-
- 2
-
-
- lady eleanor
- vanguard models
- (and 1 more)
-
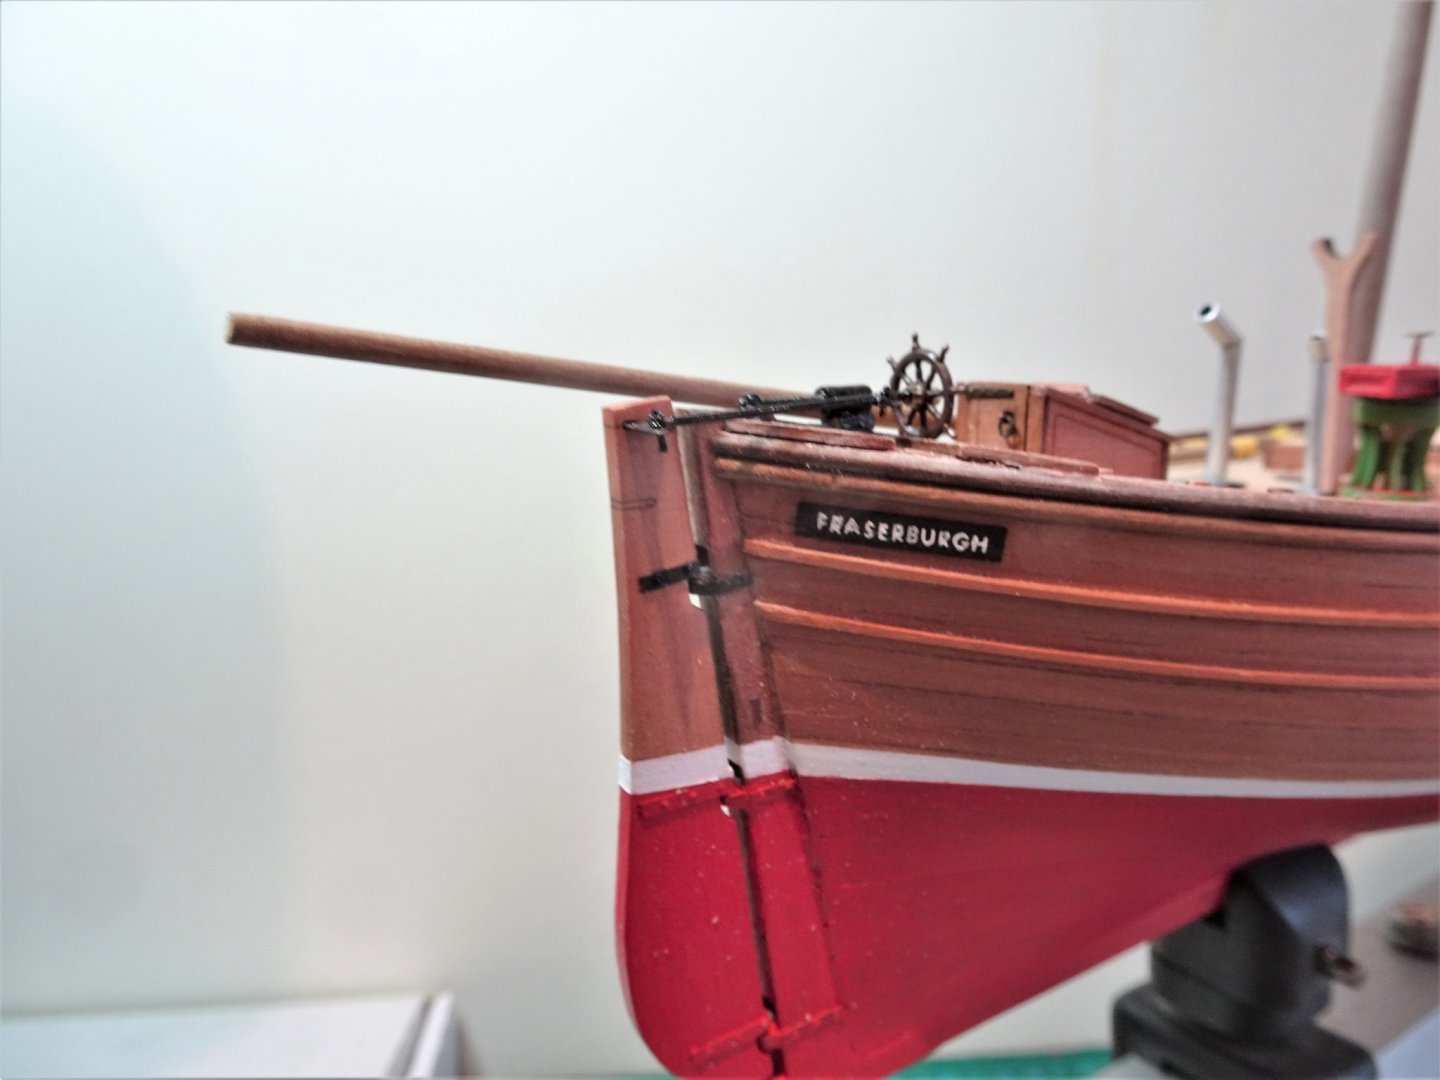
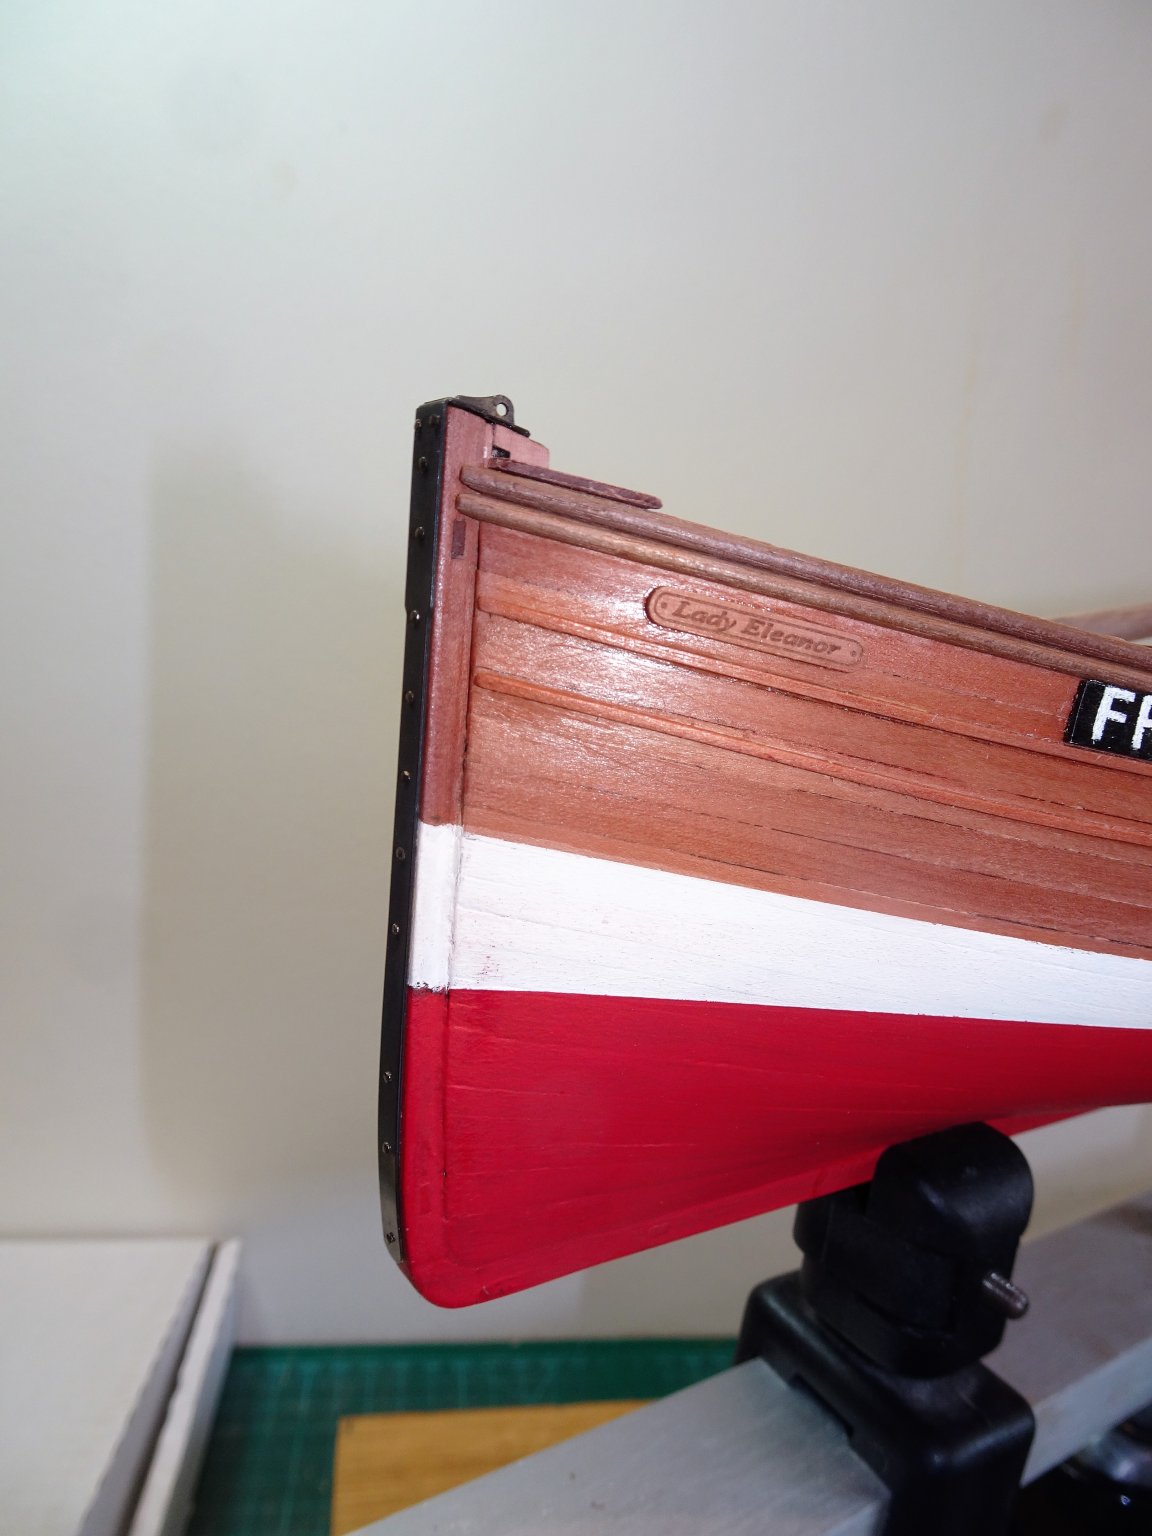
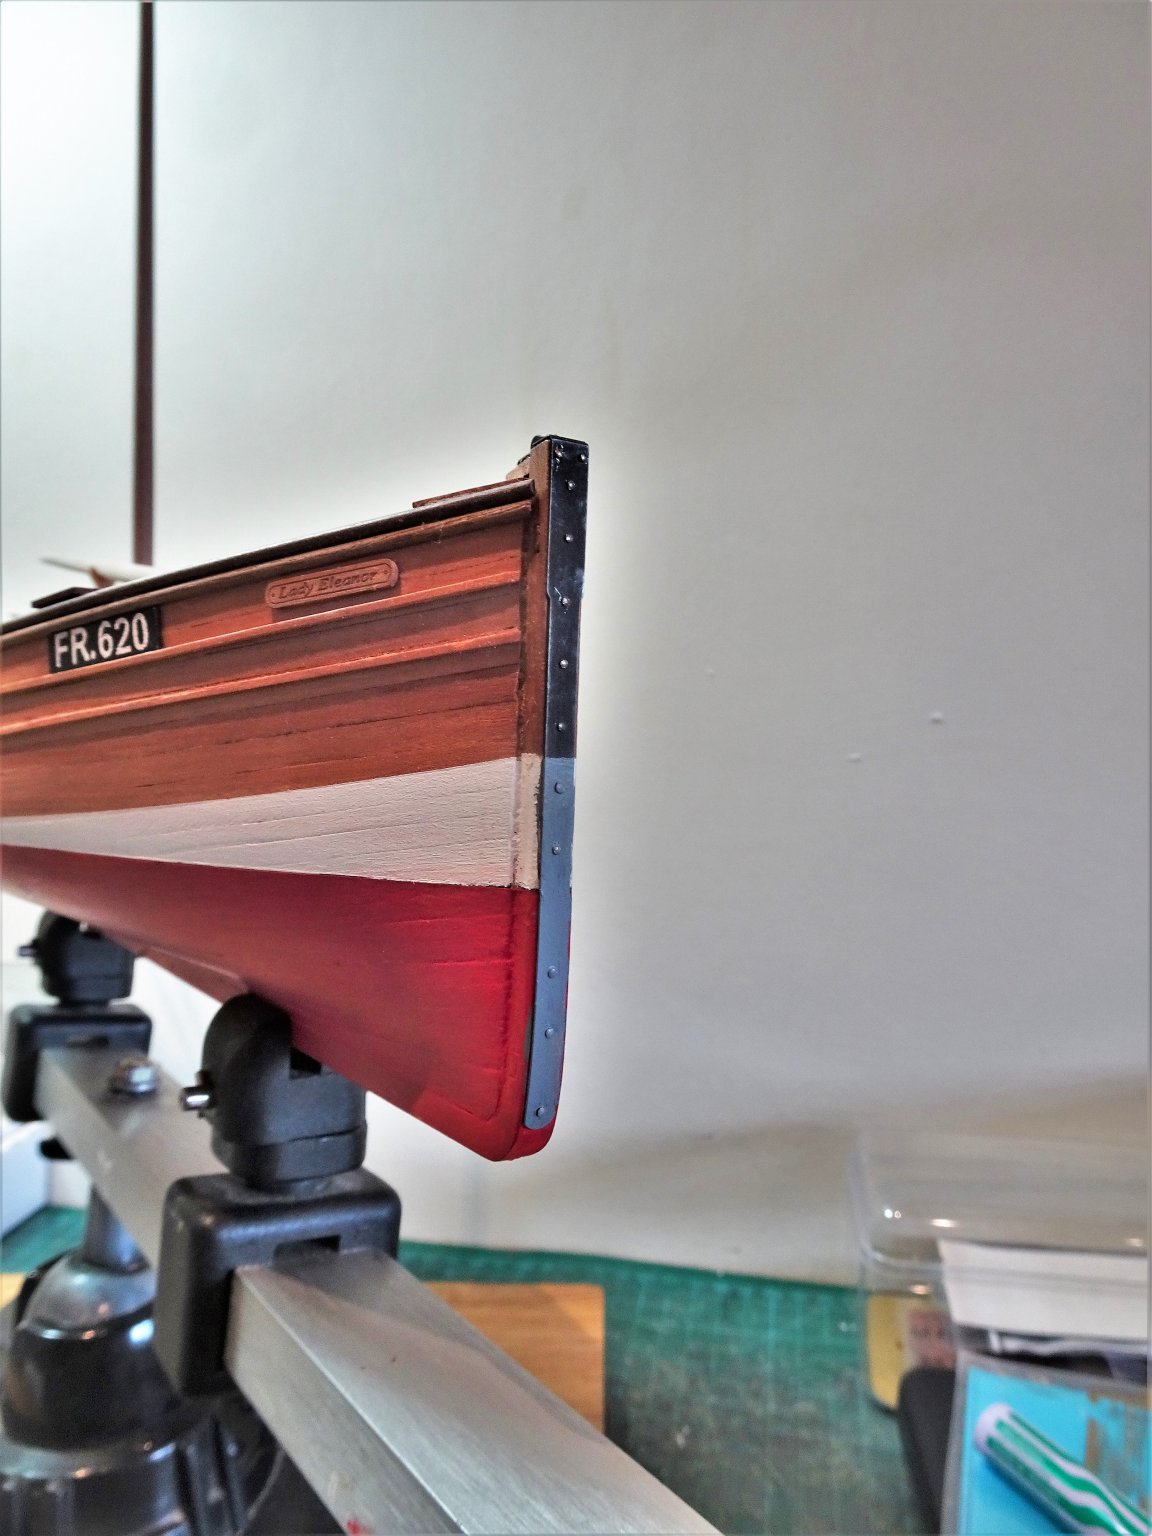
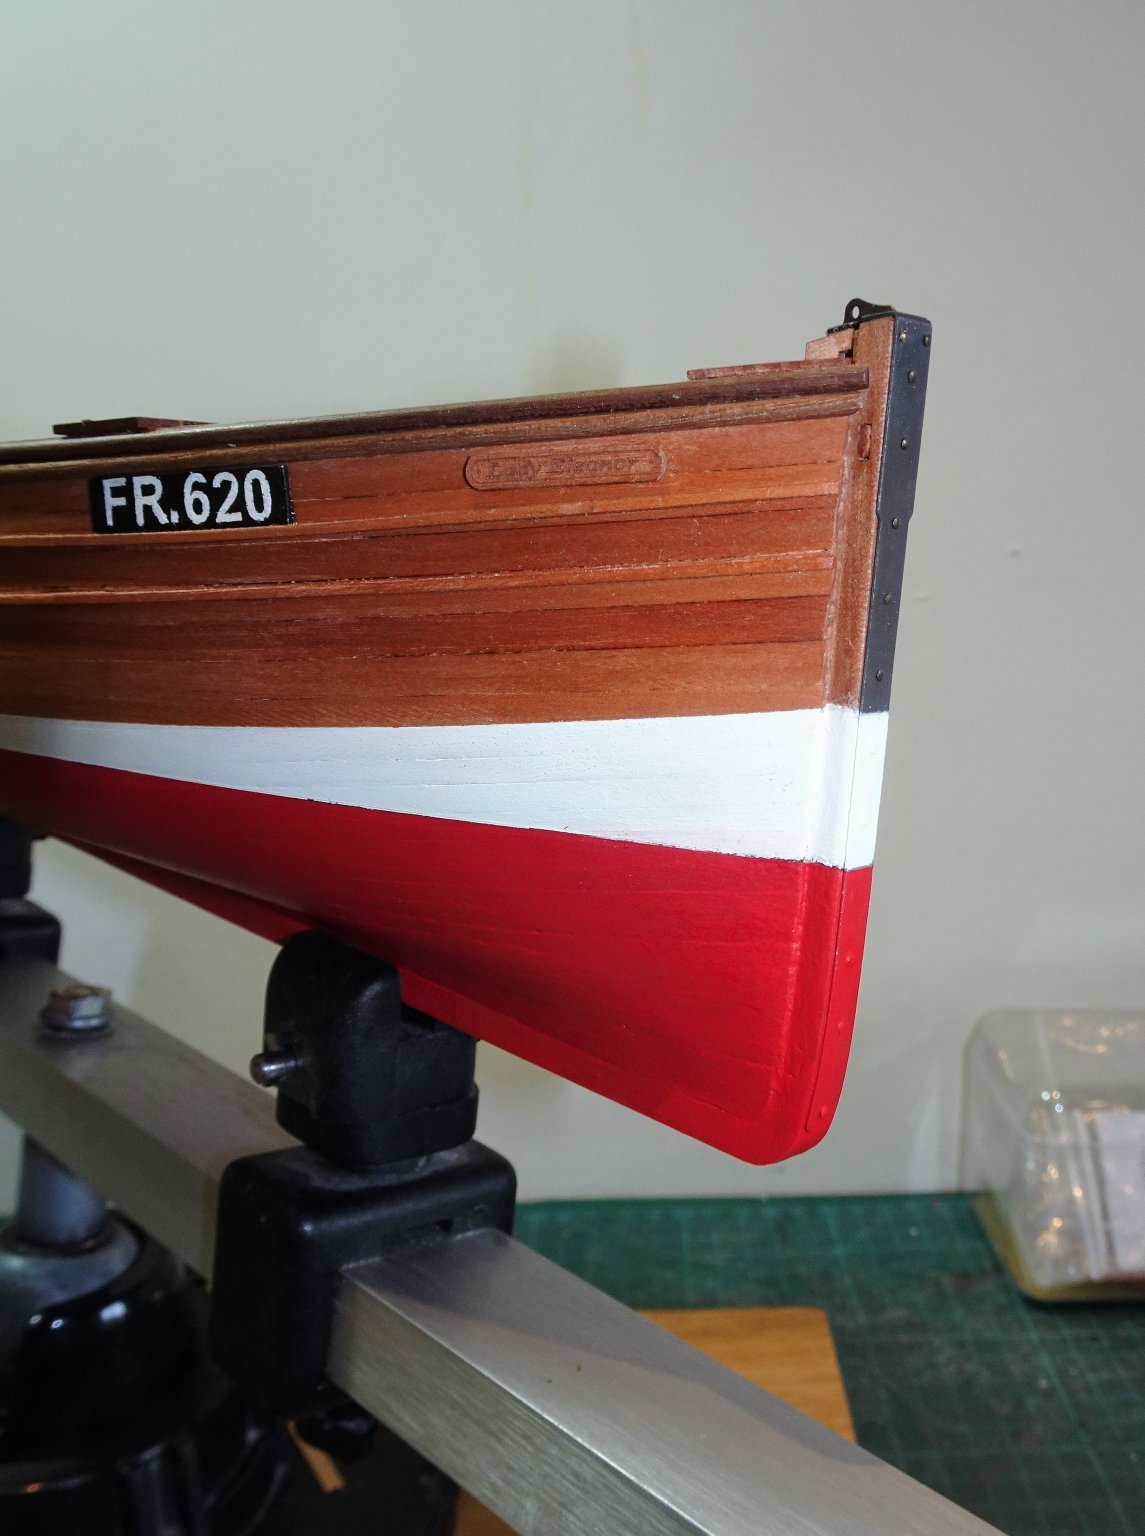
Thanks Glenn, it does help having a scale figure when making fittings, but I'm afraid Willie is far too rough looking to remain as a display feature. It is almost a sort of relief, no more extensive plating, ratlines, gun rigging, and tackle make-ups, and a whole new field to research. 😃 Having said that it is only a few months since I applied 2500 copper nails to the lapstrake planking on the cutter Alert.😉 B.E. Post 25 Bits and pieces It seems it was practise to have the name of the Registered port on the Starboard aft quarter, and the vessel name on the Port side. 6020 The name Fraserburgh (why didn’t I choose Wick) was made up with 1.5mm brass letters from Scale-link, ca’d to a board. Given the tiny size the process went better than I had imagined. I used the name boards to cover the now defunct steering rope ports. At the stern Port side an iron ring is required to retain the Mizen boom. One isn’t provided in the kit but they are easily made by various methods. 6013 I silver soldered a ring to a base plate, secured to the thwart using ca. At the bow the kit provides a brass etched Bow plate, very nicely done, but I hesitated to fit it. Not that there isn’t evidence for such a fitting, the Reaper has one, but I had concerns that if I blackened it the result would be too stark against the varnished hull, and the lower sections would need to be painted. 6019(2) Nevertheless it is a nice feature so I thought I should at least give it a go. The Brass was prepared by washing in soapy water, rubbed with fine wire wool, rinsed in distilled water, and immersed in diluted blackener, before rinsing again. Buffed up before a second dip, a stable colour was obtained. On reflection I decided to add it. The manual suggests that this part be glued to the stem and that short pins be inserted in shallow holes to represent the retaining nails. I didn’t find this necessary and simply pinned the bow plate to the stem using blackened pins only. (shortened pins for the top two) I was conscious of the fact that any stray ca getting on the Bow plate would spoil the look. 6034 The top of the plate did need a spot of ca to hold it secure to the stem top before the provided brass eye (PE12) was inserted. 6045 6048 The lower part of the plate is painted with metal primer, to take the follow thro’ paint lines of the lower hull. 6109 B.E. 11/07/20

.thumb.JPG.59d1ae109ee90a46b2609cdb069cb309.JPG)


- 195 replies
-
- 15
-
-
- lady eleanor
- vanguard models
- (and 1 more)
-
Hello Toni, There are also useful drawings in fairly large scale of the fixing arrangements on page 64 of the Naval cutter Alert book by Peter Goodwin. If you don't have the book I could pm you with the relevant drawing. Regards, B.E.
-
Thank you Christian, good to hear from you. I have seven square rigged models in my house, four of them fairly large. I've sort of reached the stage now where it's time to move away from such models which really need casing to protect the rigging, and house room is becoming an issue. These smaller fore and aft rigged vessels still have a lot of interest particularly if you delve into the detail and history, and importantly they take up far less room on completion. 🙂 Regards, B.E.
- 195 replies
-
- 3
-
-
- lady eleanor
- vanguard models
- (and 1 more)
-
Hi Steven, your mention of 50 figures on my Fifie log aroused my curiosity and led me to your build, and I'm glad it did. Love what you're doing with the figures, and I can see that you also love to delve into the research aspect of model building. I've got 43 pages to go thro' now and I'm looking forward to the journey.🙂 Regards, B.E.
-
Thank you Bob and Richard, for me researching a project is a major part of the pleasure of a build. @ Steven, Thanks for your input. - Re the sails, I am rather reluctant to ditch the expensive but beautifully made sails provided for the kit. The material used is so fine, and the stitching so neat, the best I’ve seen for sail material @1:64 scale. It is a slight disappointment that the stitching stands out quite so much, but the permanent marker route seems to work. Perhaps Chris could discuss the stitching thread with his supplier, given that these sails are traditionally coloured, rather than left undyed. I don’t think the Skipper will make the final cut on the model, but I do find such figures useful for scale purposes. He’s a chopped about plastic figure built up using modelling paste. Regards, B.E.
- 195 replies
-
- 2
-
-
- lady eleanor
- vanguard models
- (and 1 more)
-
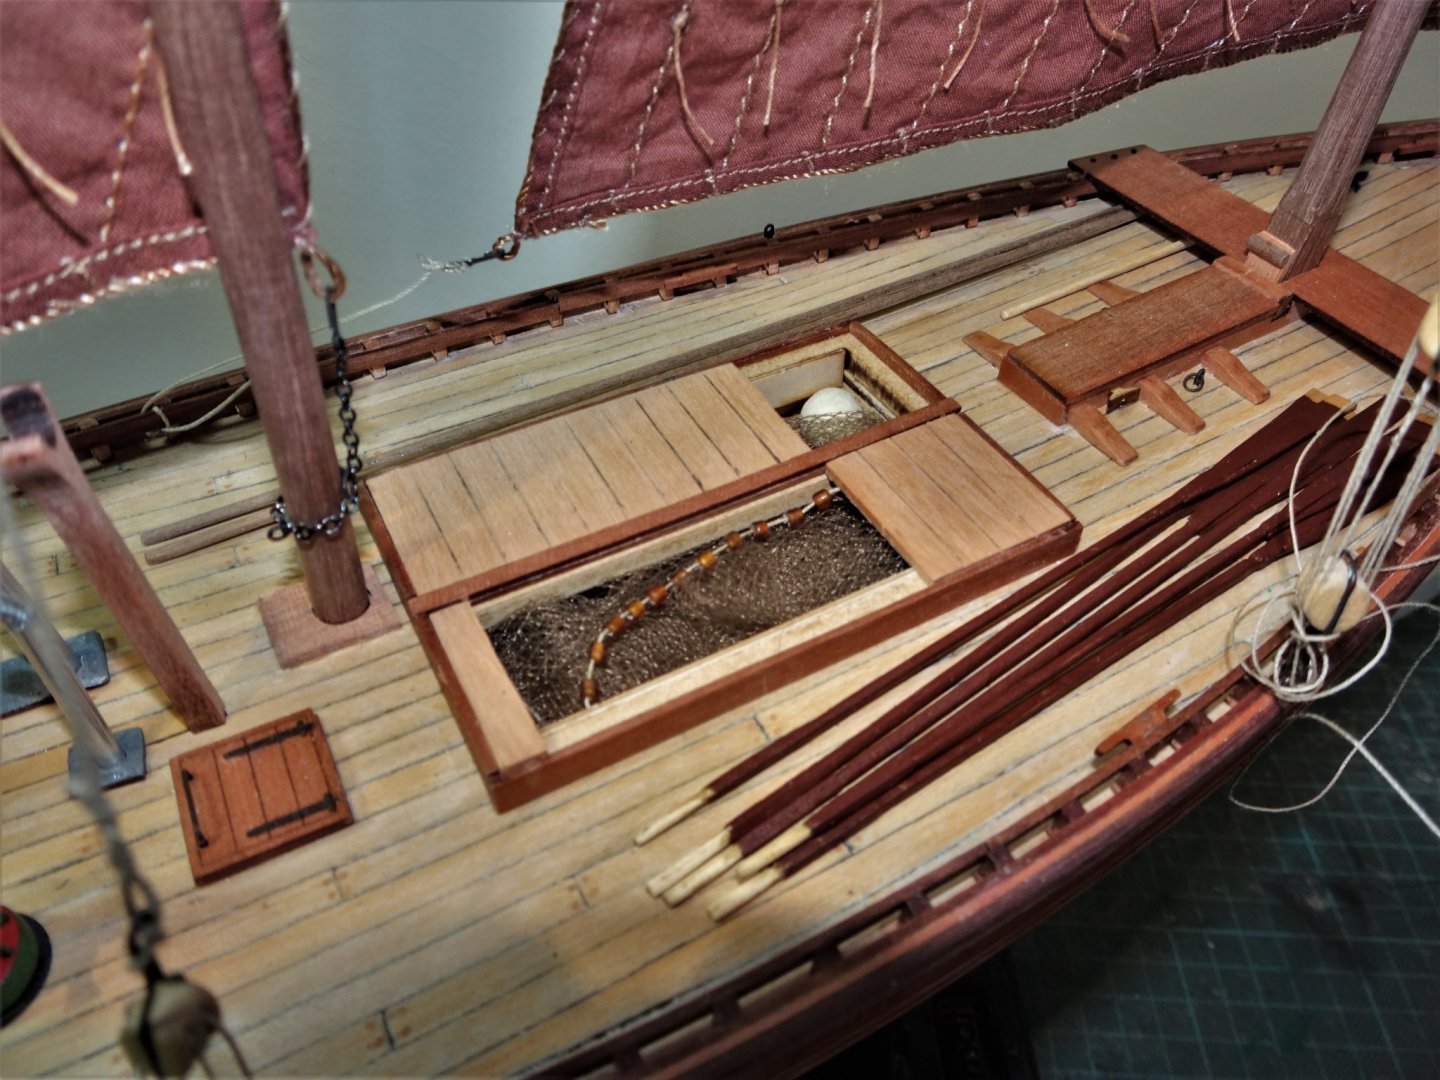
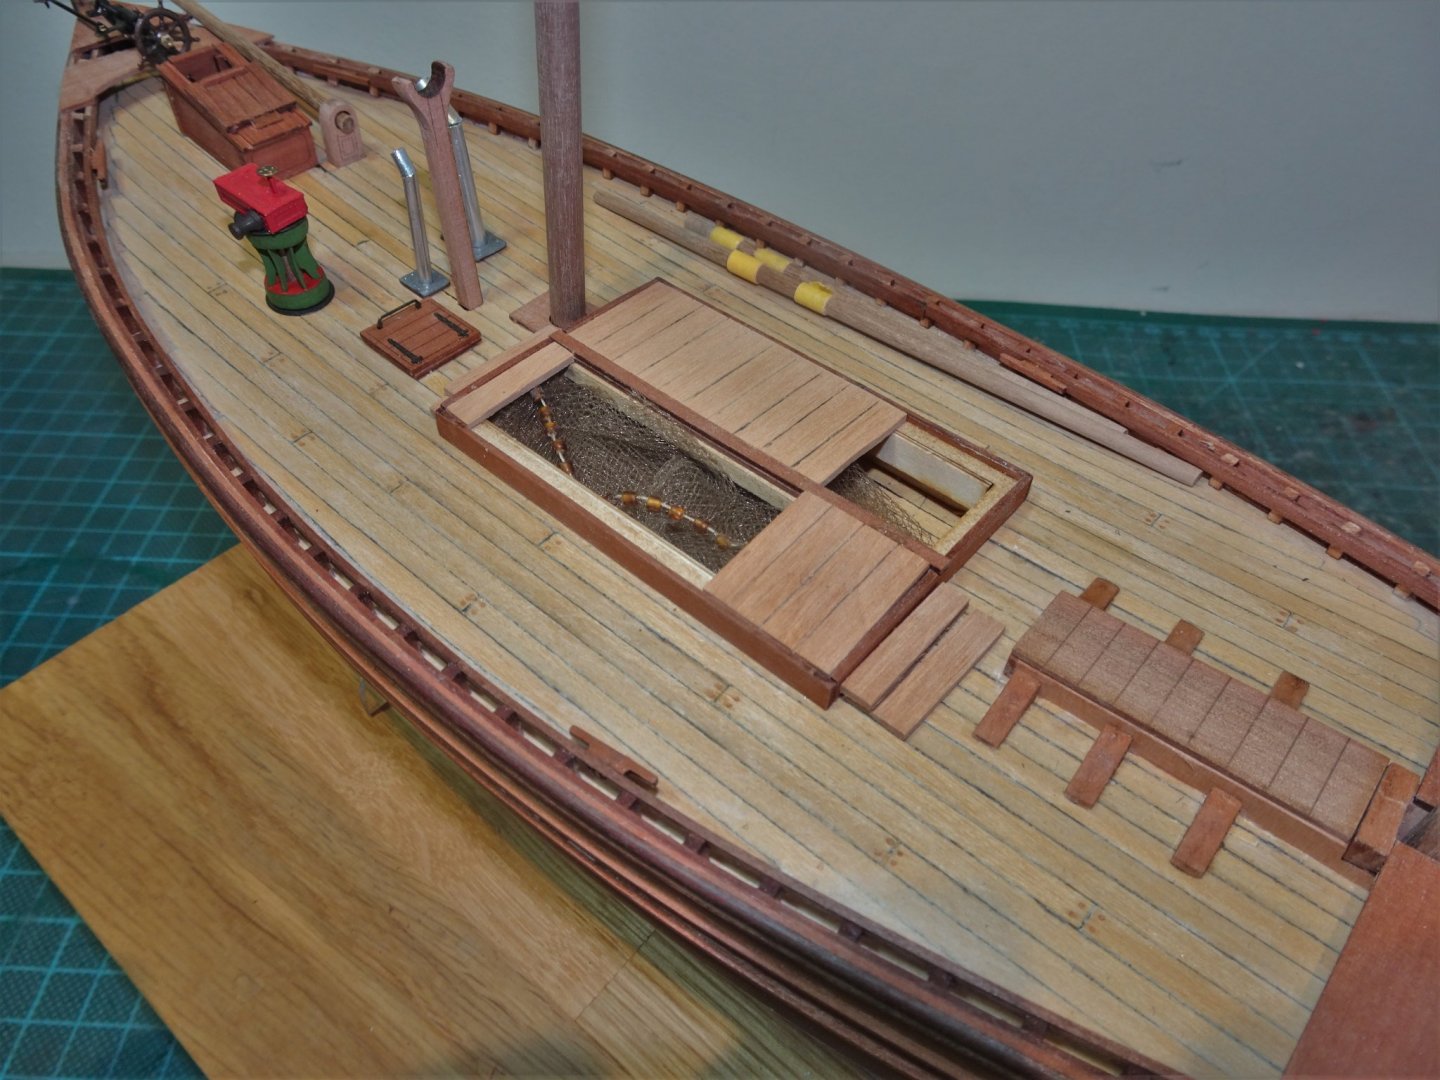
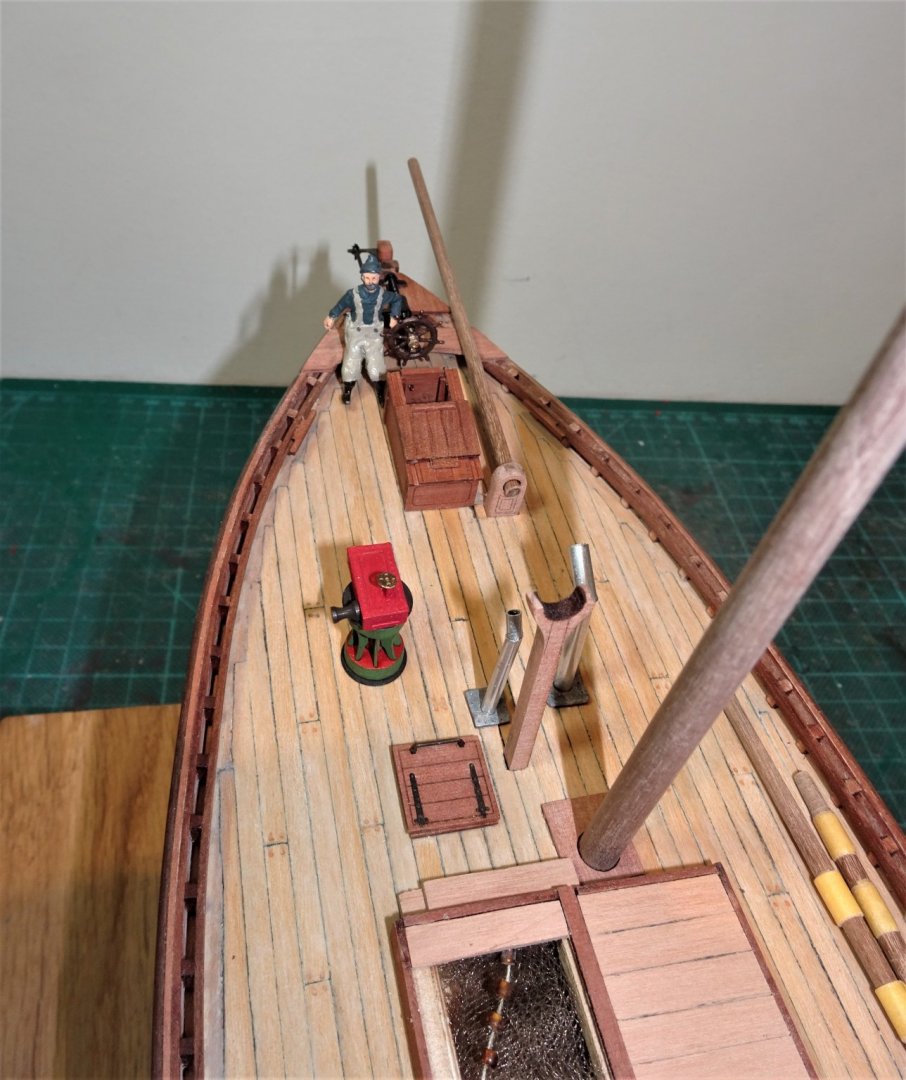
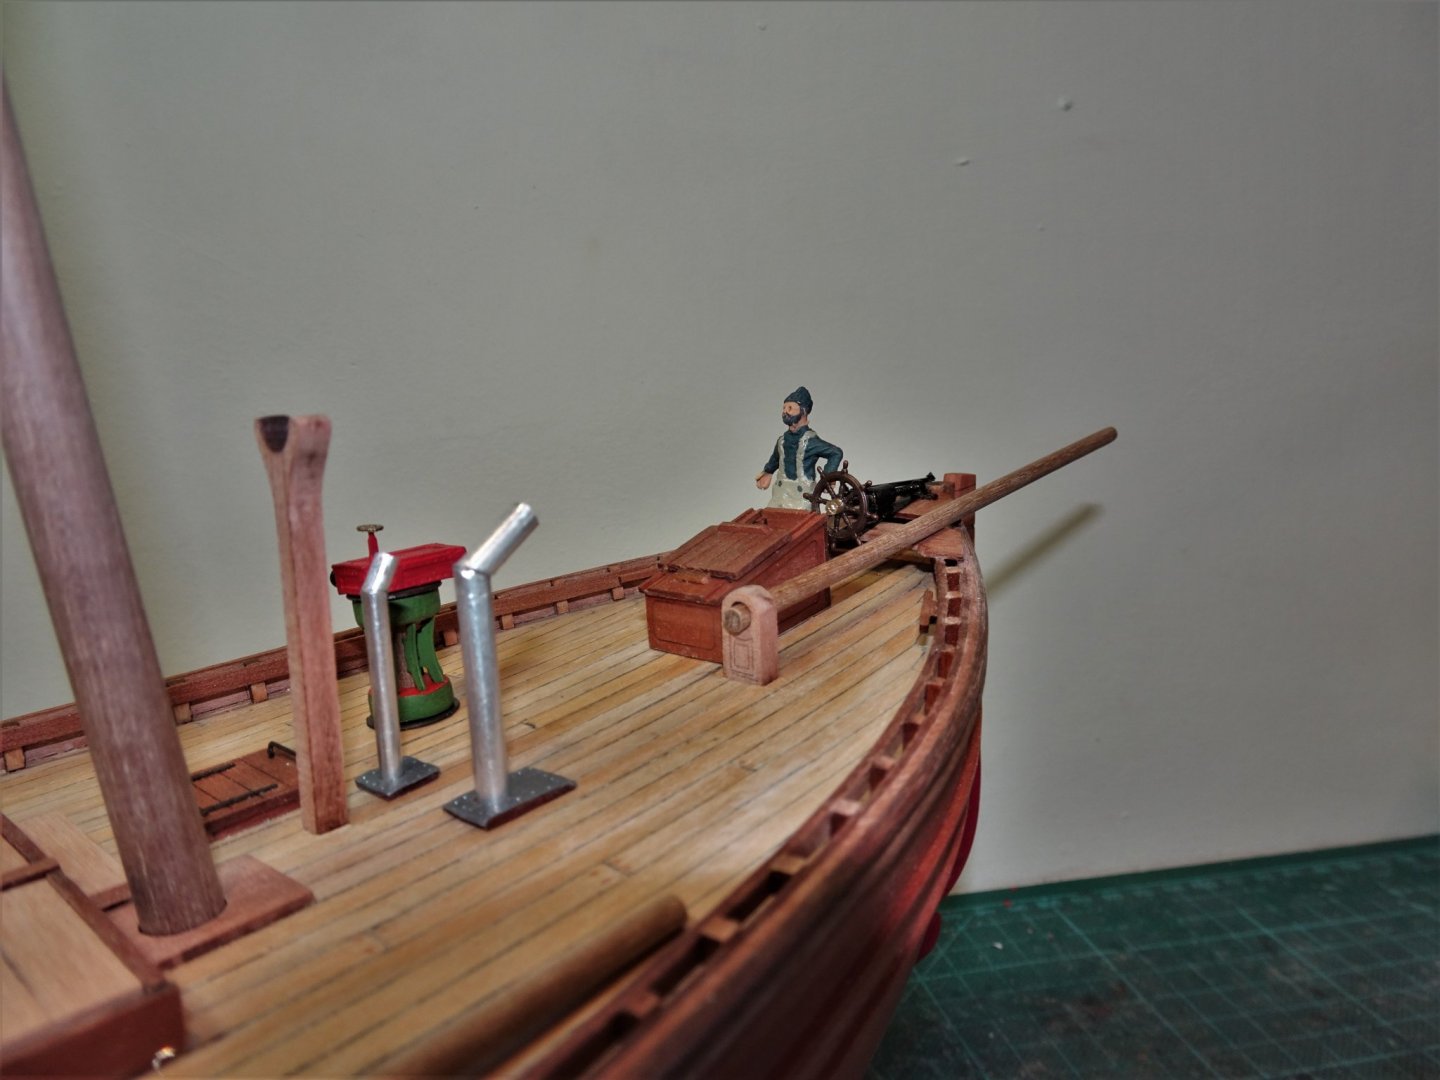
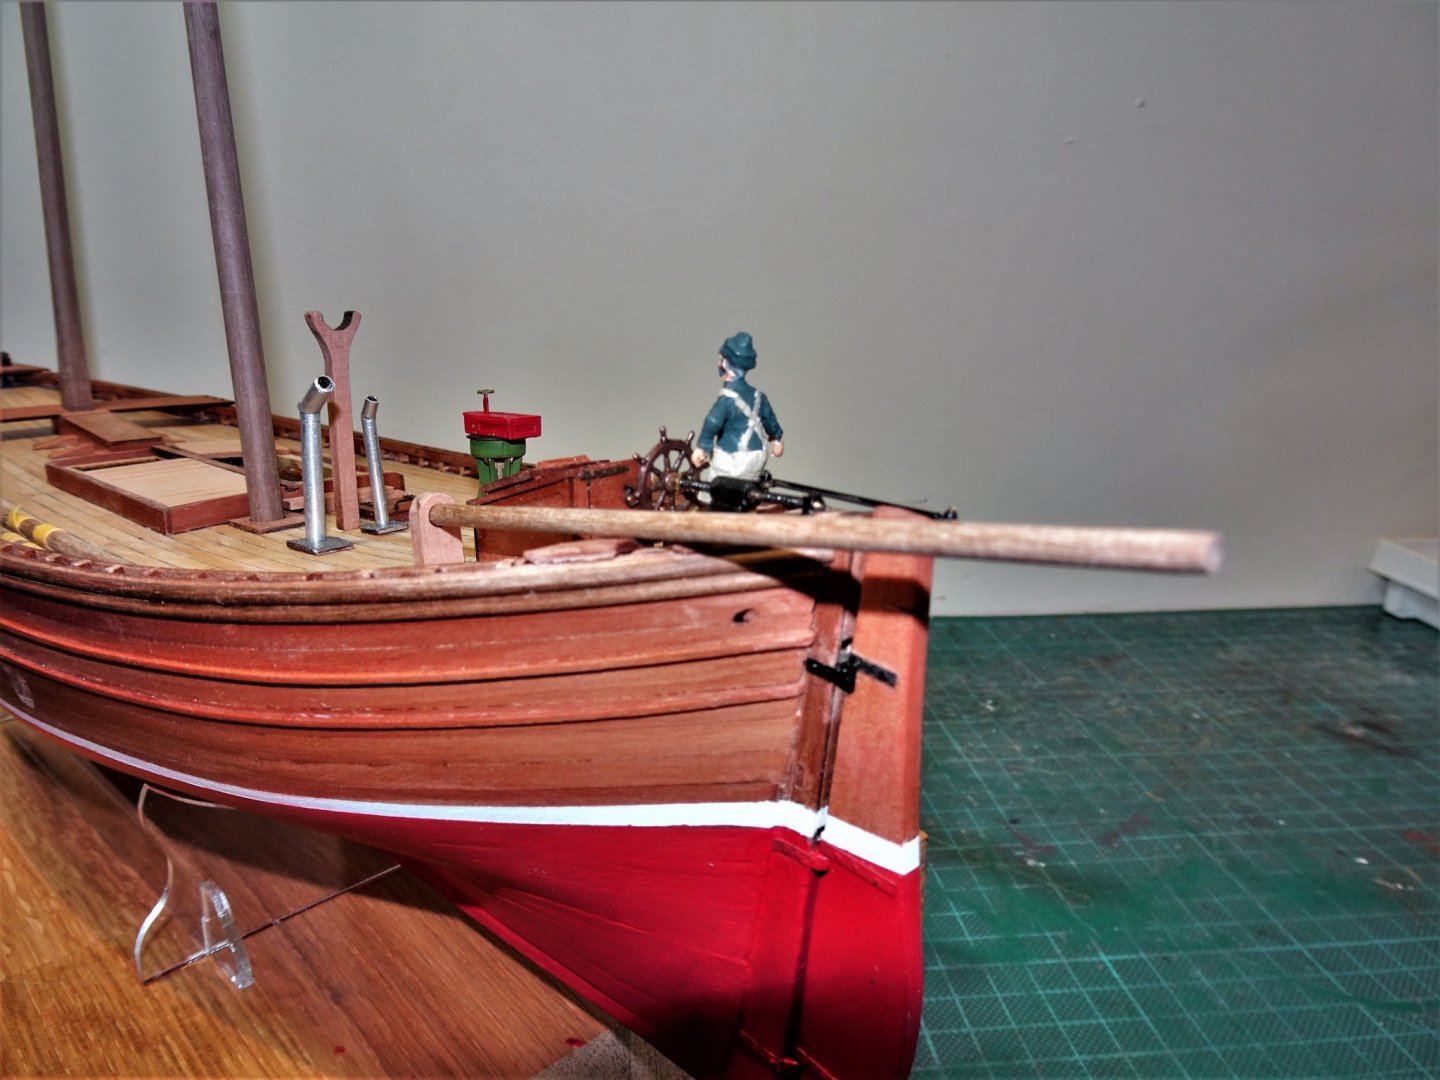
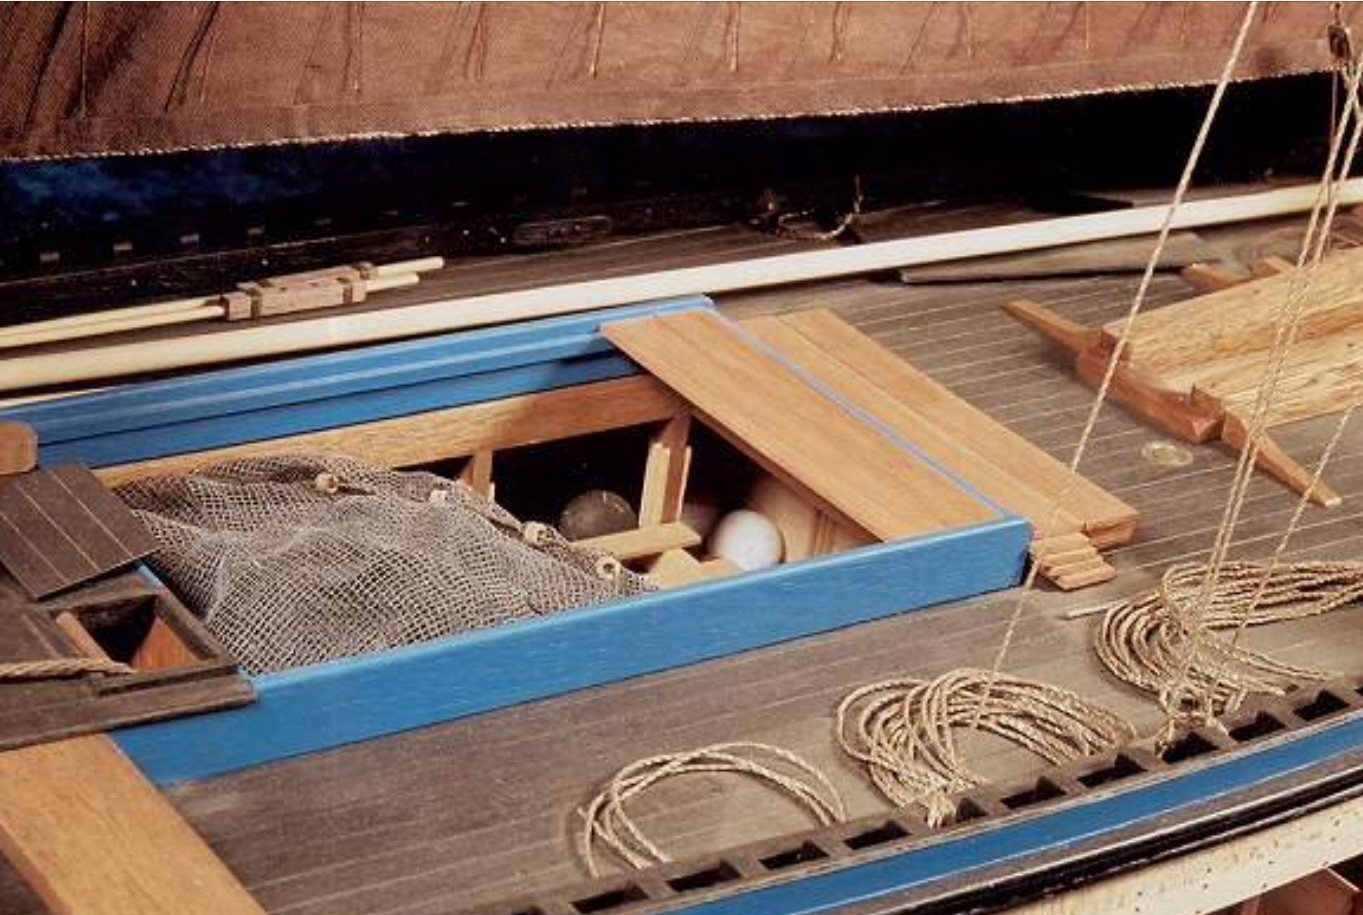
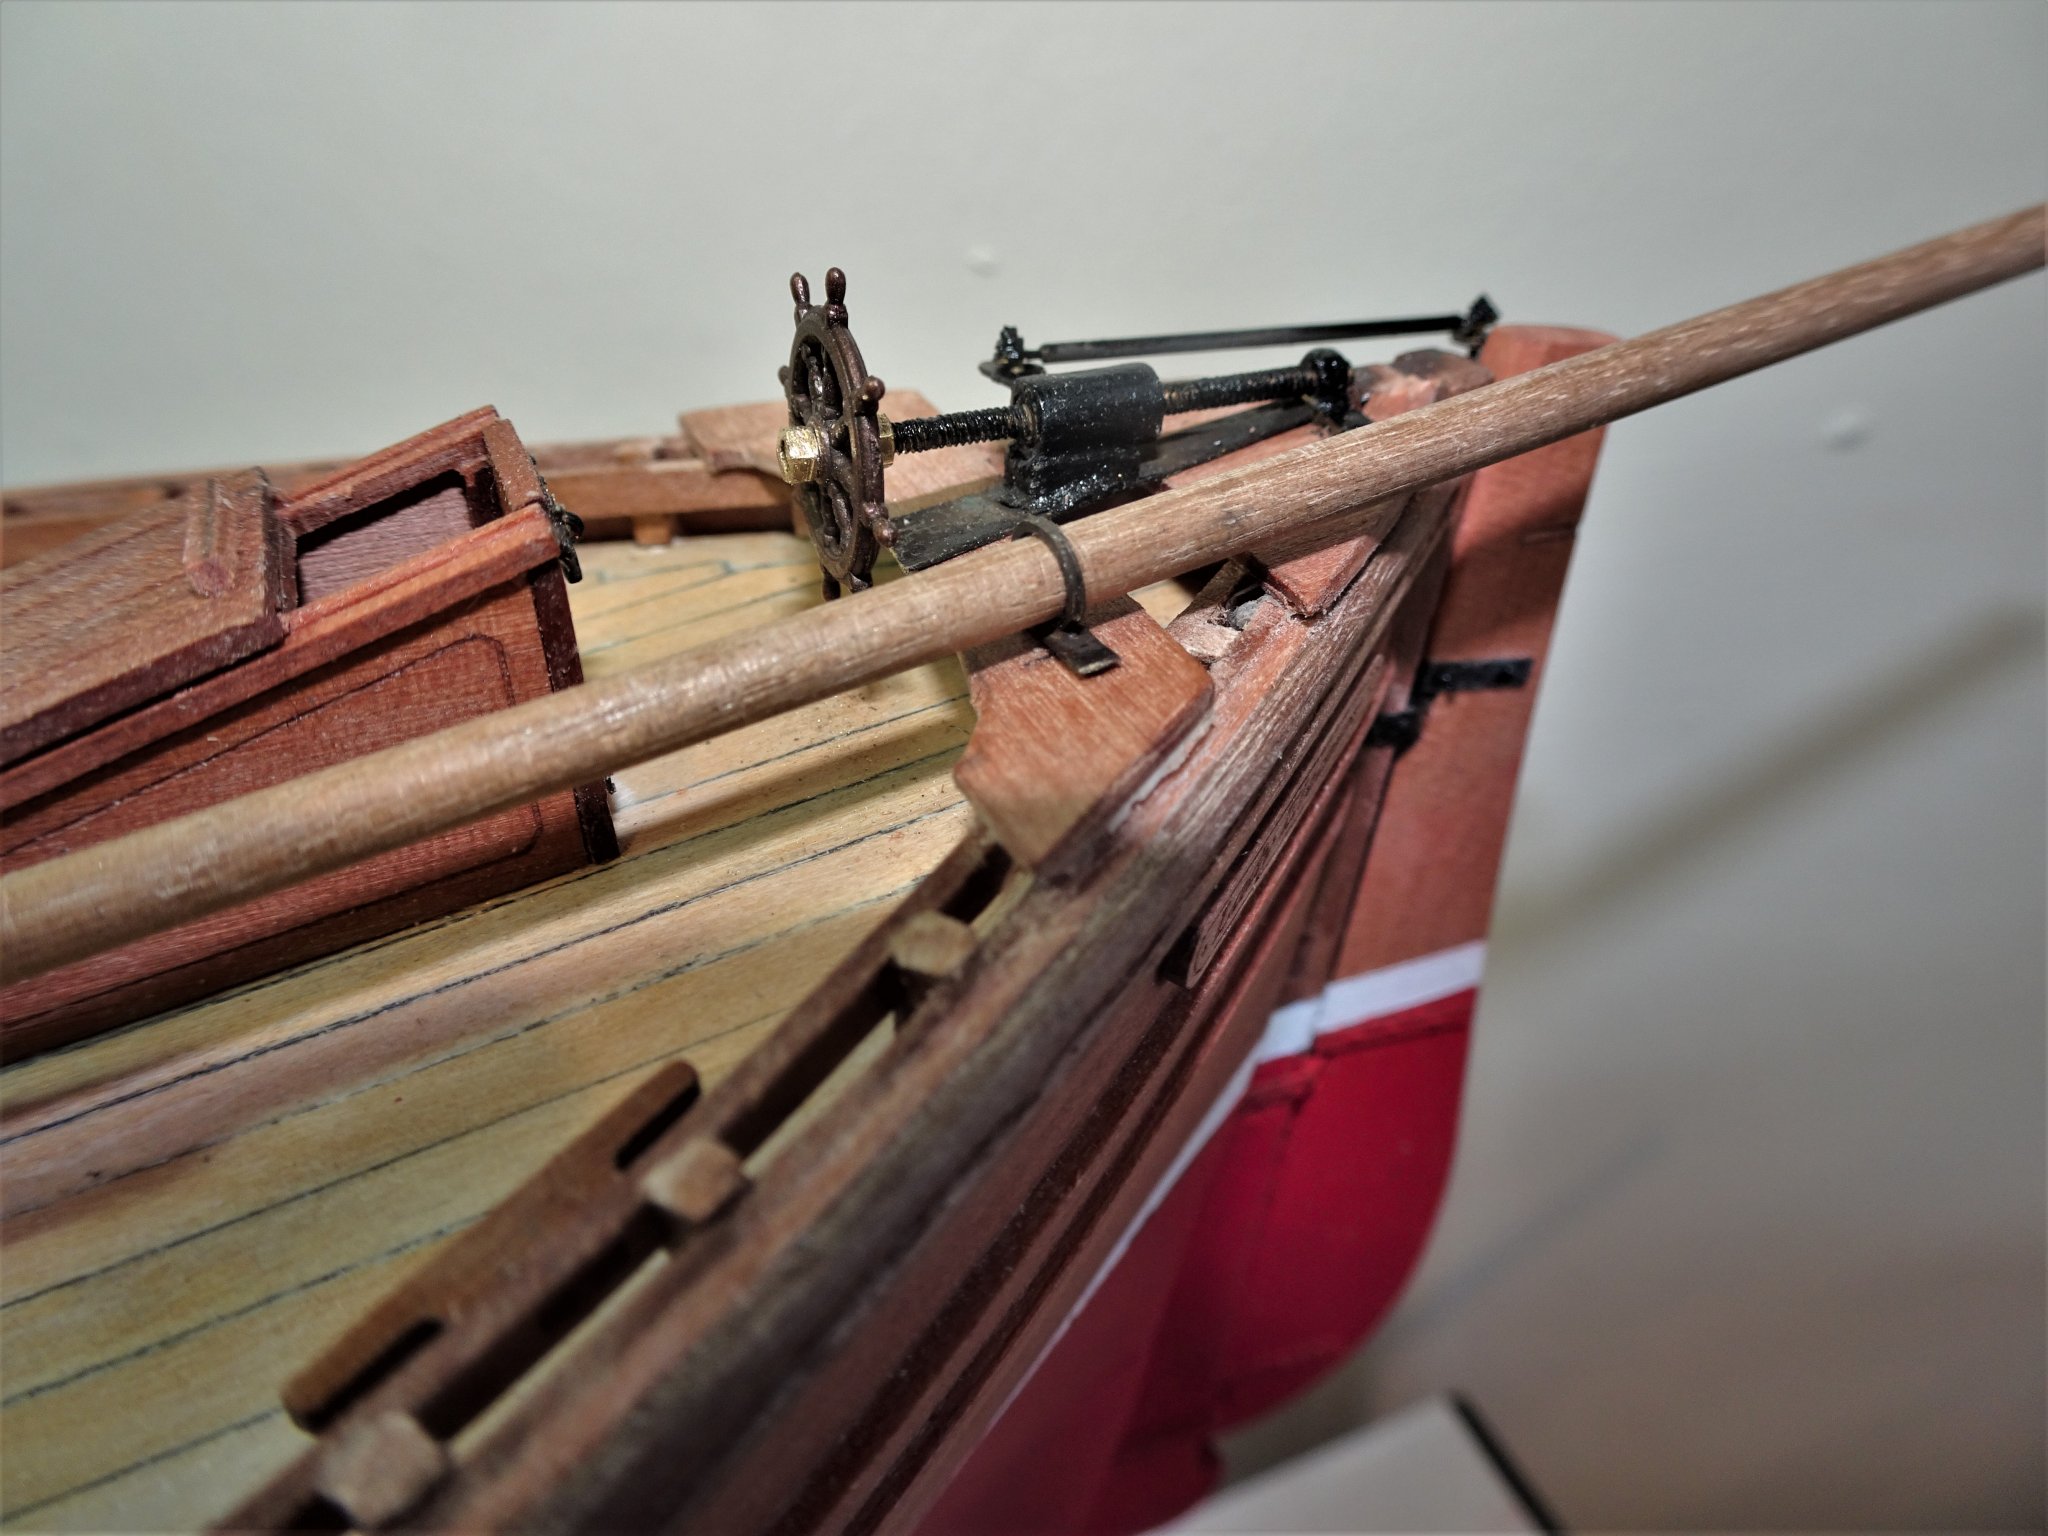
Post 24 A little backtracking. I have been having another look at the ships wheel. 3435 It is of the same dimensions as the kit provided wheel but whilst looking at a photo of a figure standing next to the wheel on Reaper I have come to the conclusion that it is somewhat overscale. I came across a description of the wheel dimensions as relating to ‘True Vine’, another 70’ Fifie of 1905. A wooden wheel, 20” outside diameter., with a 2” rim, 6” boss, 2½” thick, has six spokes 4” by 1”, and is connected by a worm gear. 5897(2) I did a scale mock-up in card to these dimensions, and this is the result, quite a difference. The scale wheel measures 14mm o/a diameter including the spokes. Amati do a 14mm wheel which I ordered as a suitable replacement. 5971(2) A much better scale fit I think. 5978(2) I have also created a Skipper for my Fifie. 5990(2) Willie Buchan is a little rough around the edges, but he is a good 1:64 scale to help me judge relative size. 5991 5995 5994 A re-think on ring bolts Having gone to some length to make ring bolts for the hatch boards, I’m now undecided whether I like the look, or indeed if they are an authentic fitting. I’m beginning to think from looking at mostly unclear old photo’s, that the boards didn’t have such fittings. 3492 This is re-enforced by this finely detailed model of a Zulu. The cover boards as seen both on the hatch and stacked up behind the coamings are free of such fittings. 5984 I remade the boards from Pearwood sheet and they suit my eye better. 6007(2) B.E. 09/07/2020
.thumb.JPG.70a139b7411247a0604182ae8f606a8f.JPG)
.thumb.JPG.93adde1fee7eb933f05dab1bf70c6653.JPG)
.thumb.JPG.46648c4c5a18fcd557a2e98264c9831a.JPG)
.thumb.JPG.583075260aa48a4ada4b59f9715dc954.JPG)
.thumb.JPG.3938a1fe76cf58167500c4888361deb2.JPG)

- 195 replies
-
- 19
-
-
- lady eleanor
- vanguard models
- (and 1 more)
-
Thanks Richard, That's what I did, the stitch lines don't show up in reality as much as on the photo's, but I'll go over them again with the permanent marker before use. Used carefully I didn't get any bleed onto the sails. I can't answer the photo size question, but for me you can't beat a nice large photo.🙂 The Isabella Fortuna is a smaller Fifie, but a beautiful boat. Note the white painted mast tops, yard tips, and blocks. This is an old tradition, not a modern decorative effect, made them easier to see in the dark. I will probably use that scheme on my build, but not sure about painting the blocks white. B.E.
- 195 replies
-
- 4
-
-
- lady eleanor
- vanguard models
- (and 1 more)
-
I thought that may be the case Steven. The Dye blurb says add salt for cotton, rayon, or linen, and vinegar for nylon, silk, and wool. Not sure how these additions aid the dye process, but perhaps I will add a little vinegar to the mix next time. Cheers, B.E.
- 195 replies
-
- 3
-
-
- lady eleanor
- vanguard models
- (and 1 more)
-
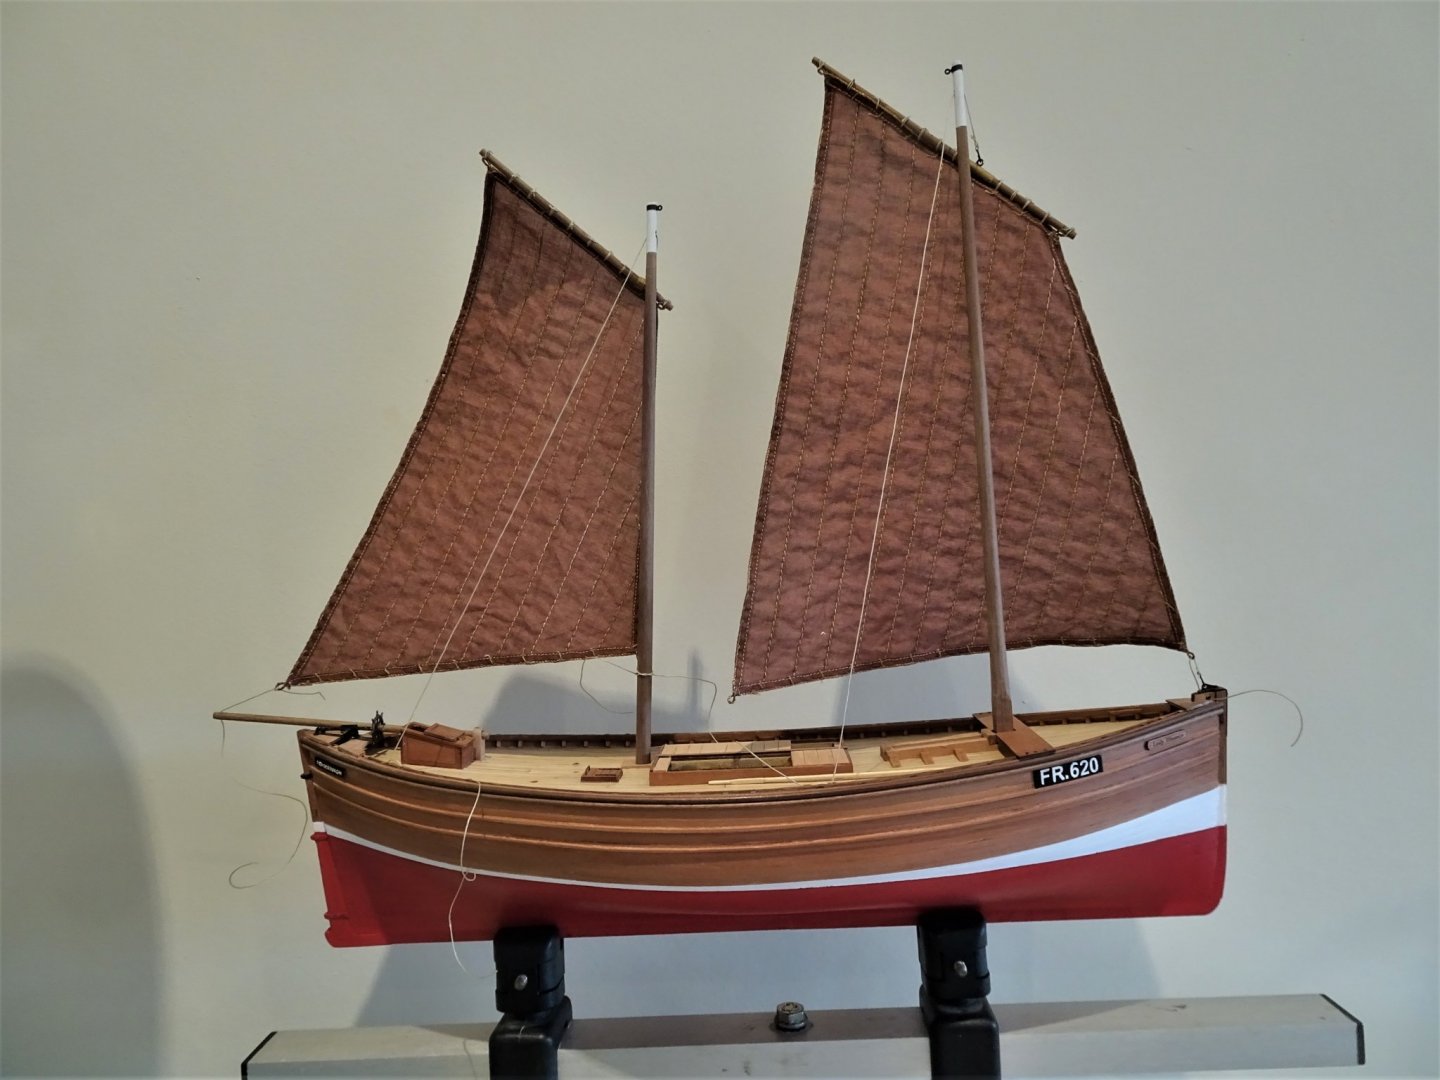
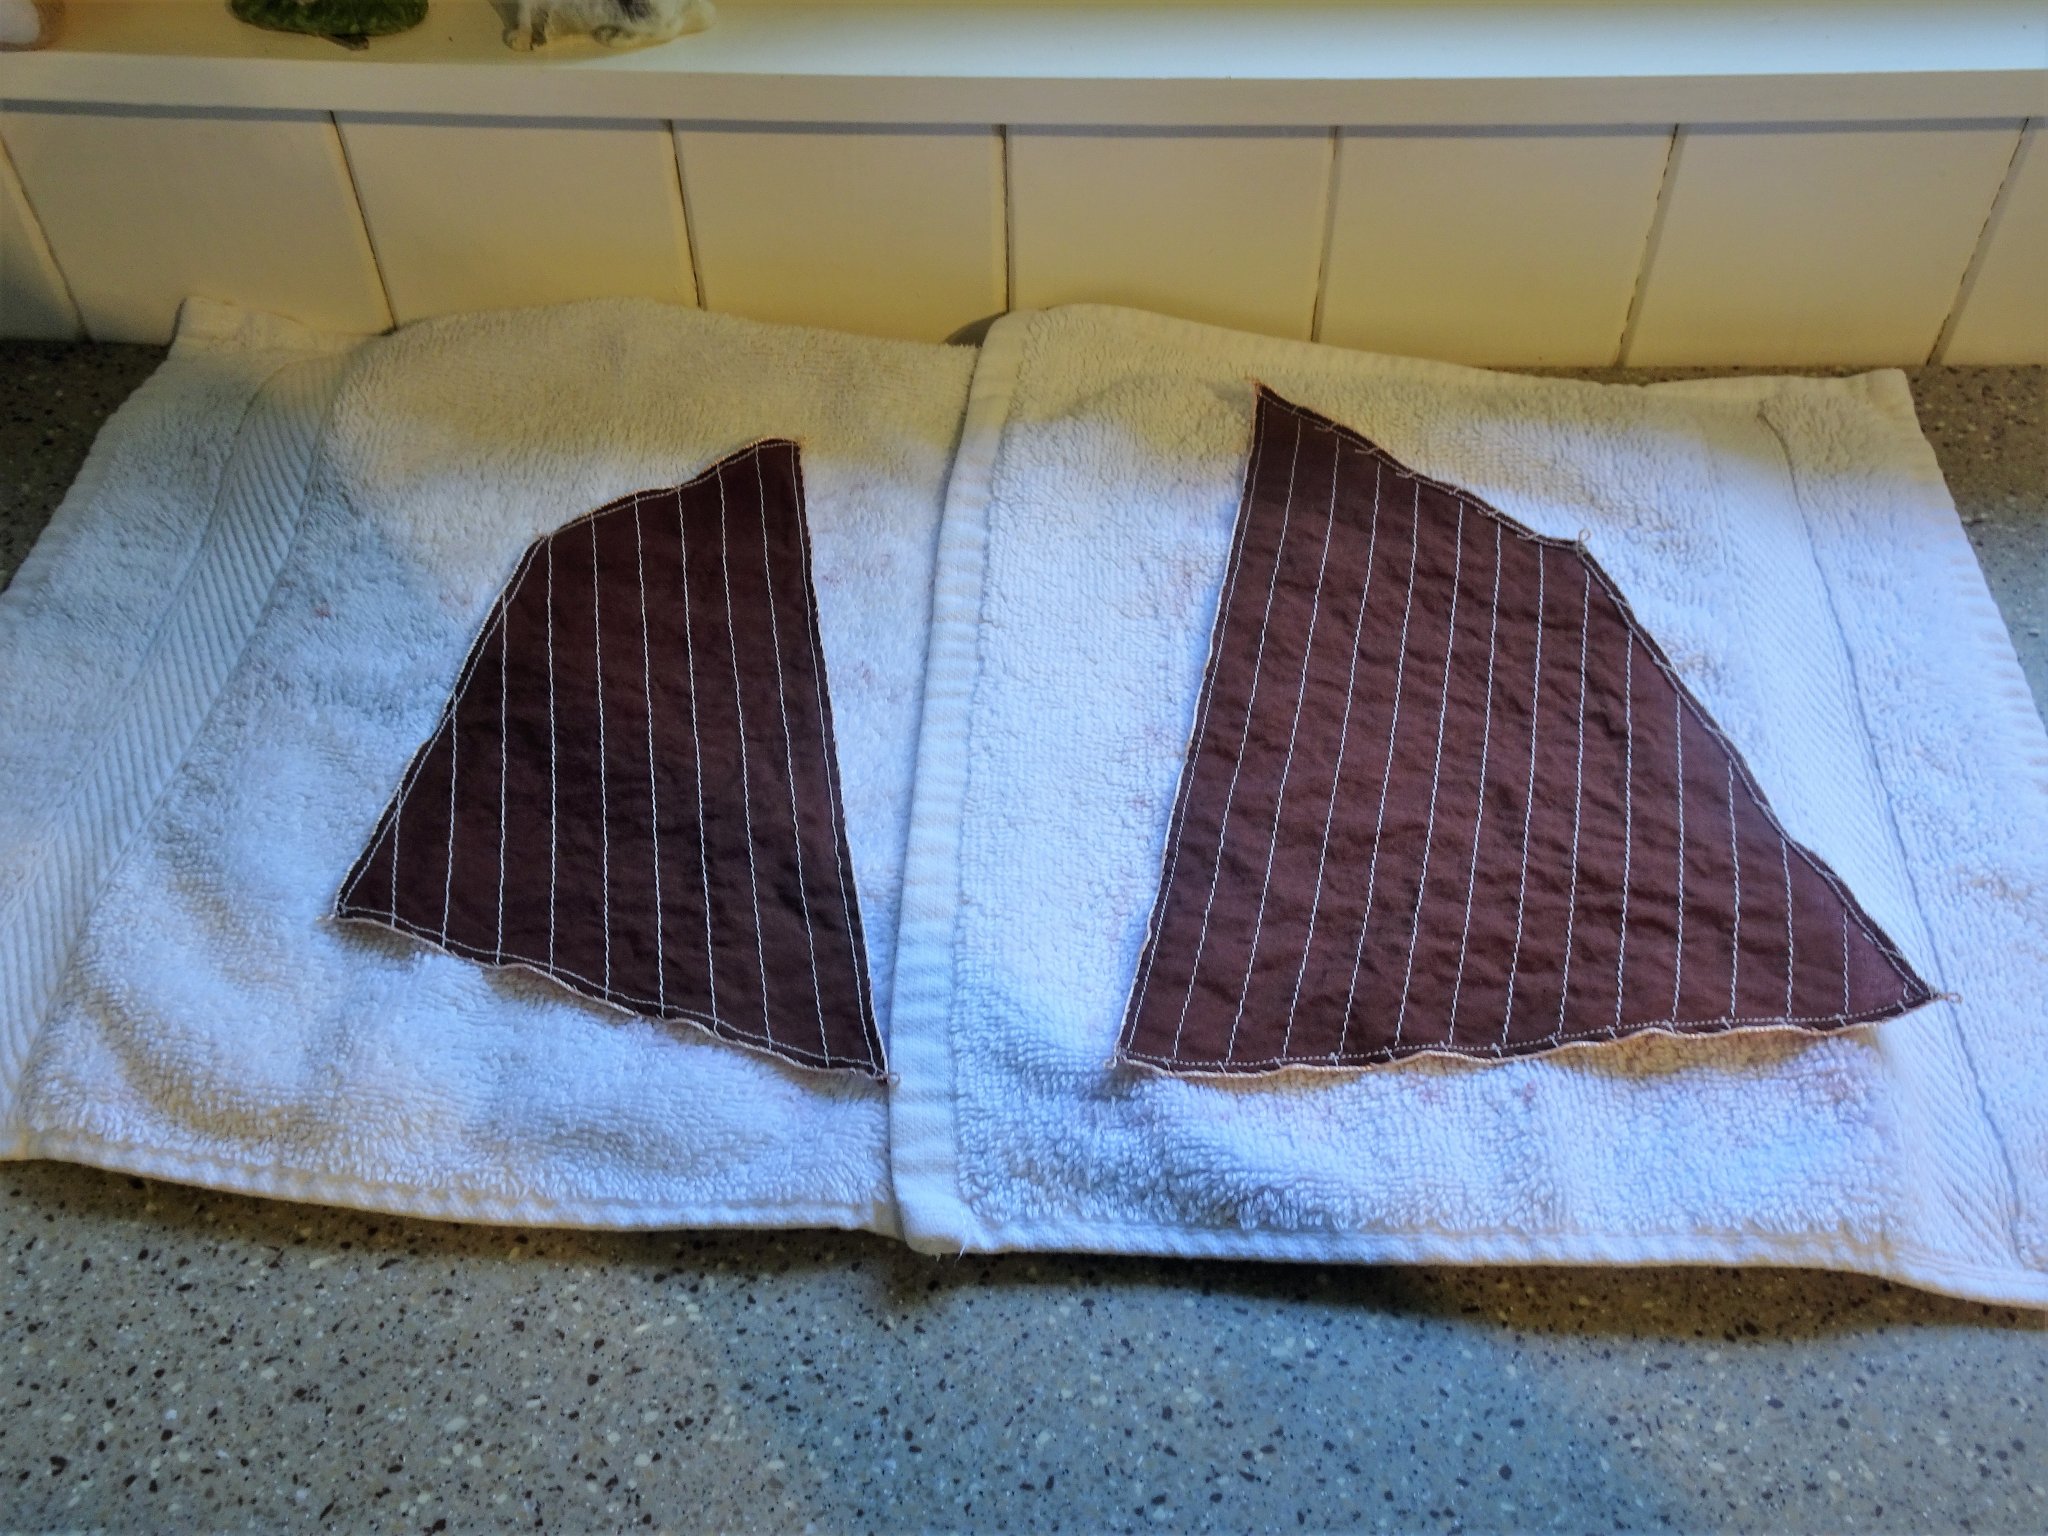
Post 23 Colouring the sails This is the description as given in the Sailing Drifter book. Sails were ‘barked’ a rich, dark brown, almost black colour. They were seldom tanned the warm Red of the English drifters. This is the sort of look I was after. To replicate this effect, I am using Rit brand (cocoa brown) dye powder, as mentioned and used by James in his ‘Zulu’ log. One issue that arose for me, new to this process, is that the quantities given relate to articles of clothing, not two smallish cotton sails so the question of proportions comes to mind. The recipe’ and procedure I used was as follows. Into a plastic bowl I poured 4 pints of hot water. 4 teaspoons of dye powder (virtually the whole packet) were dissolved in a 1pint jug of near boiling water from the kettle. This was added to the bowl followed by a sprinkling of salt. The mixture was well stirred, and the sails added. I stirred them around for approx 20 minutes which gave me the depth of colour I thought was ok. The sails were then rinsed in a bowl of cool water three times, until the water ran all but clear. They were then hand washed in warm water with a mild detergent added, rinsed and put to dry flat on an old towel. 5916(2) The completed sails set out to dry, a slightly lighter hue should ensue. 5922(2) I think this is as close as I will get to the shade I was after, so I can put them aside now until needed. For some reason the sail stitching and bolt ropes remained stubbornly white. I used a fine point waterproof marker to colour these and take the starkness out of the white. An interesting snippet I came across during my subject reading: Early in the 20thc two men, each sewing for a 9-hour day completed a Foresail in a week, a Mizzen in 4 days, 2 jibs in 6days. Finished price – Foresail £30, Mizzen £15, Large Jib £10. B.E. 06/07/20

.thumb.JPG.250885960c9777ebeaac743c5b2e8aed.JPG)
- 195 replies
-
- 13
-
-
- lady eleanor
- vanguard models
- (and 1 more)
-
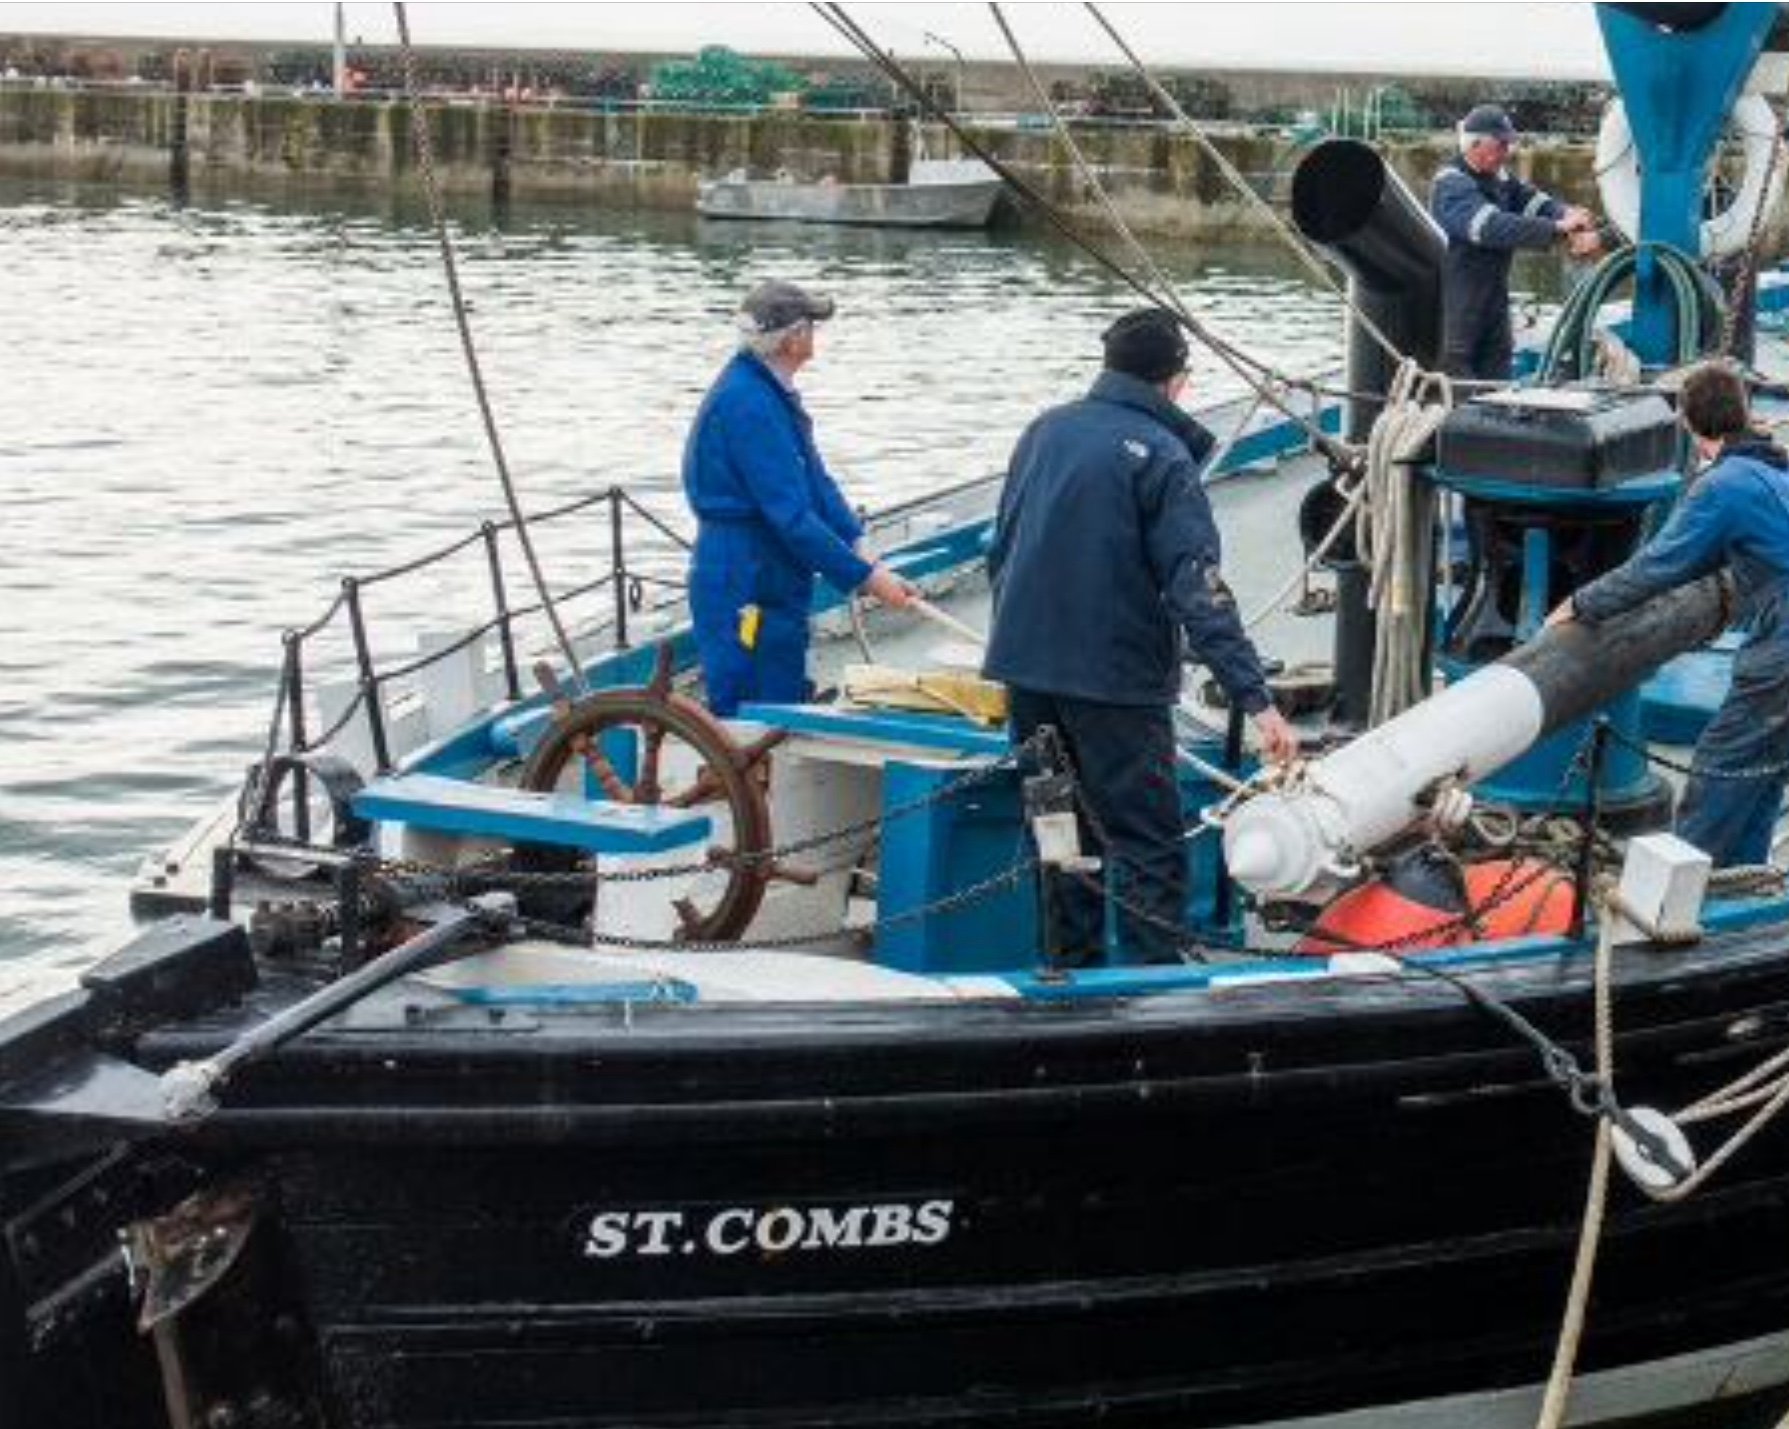
You’re well placed to get some first hand detail on Fifie’s Richard, I’m 324 miles from Anstruther where the Scottish Fishing Museum is based, and the Fifie Reaper is berthed. I hope to get up there one day.🙂 B.E.
- 195 replies
-
- 2
-
-
- lady eleanor
- vanguard models
- (and 1 more)
-
Hi Richard, thanks for looking in. I just use sandpaper to taper, with regular checking of progress with a gauge. I’ve not experienced any whipping between the centres, I just use my hand to steady the stick as I work along it. I am careful not to put too much lateral pressure on the stick. Cheers, B.E.
- 195 replies
-
- 2
-
-
- lady eleanor
- vanguard models
- (and 1 more)
-
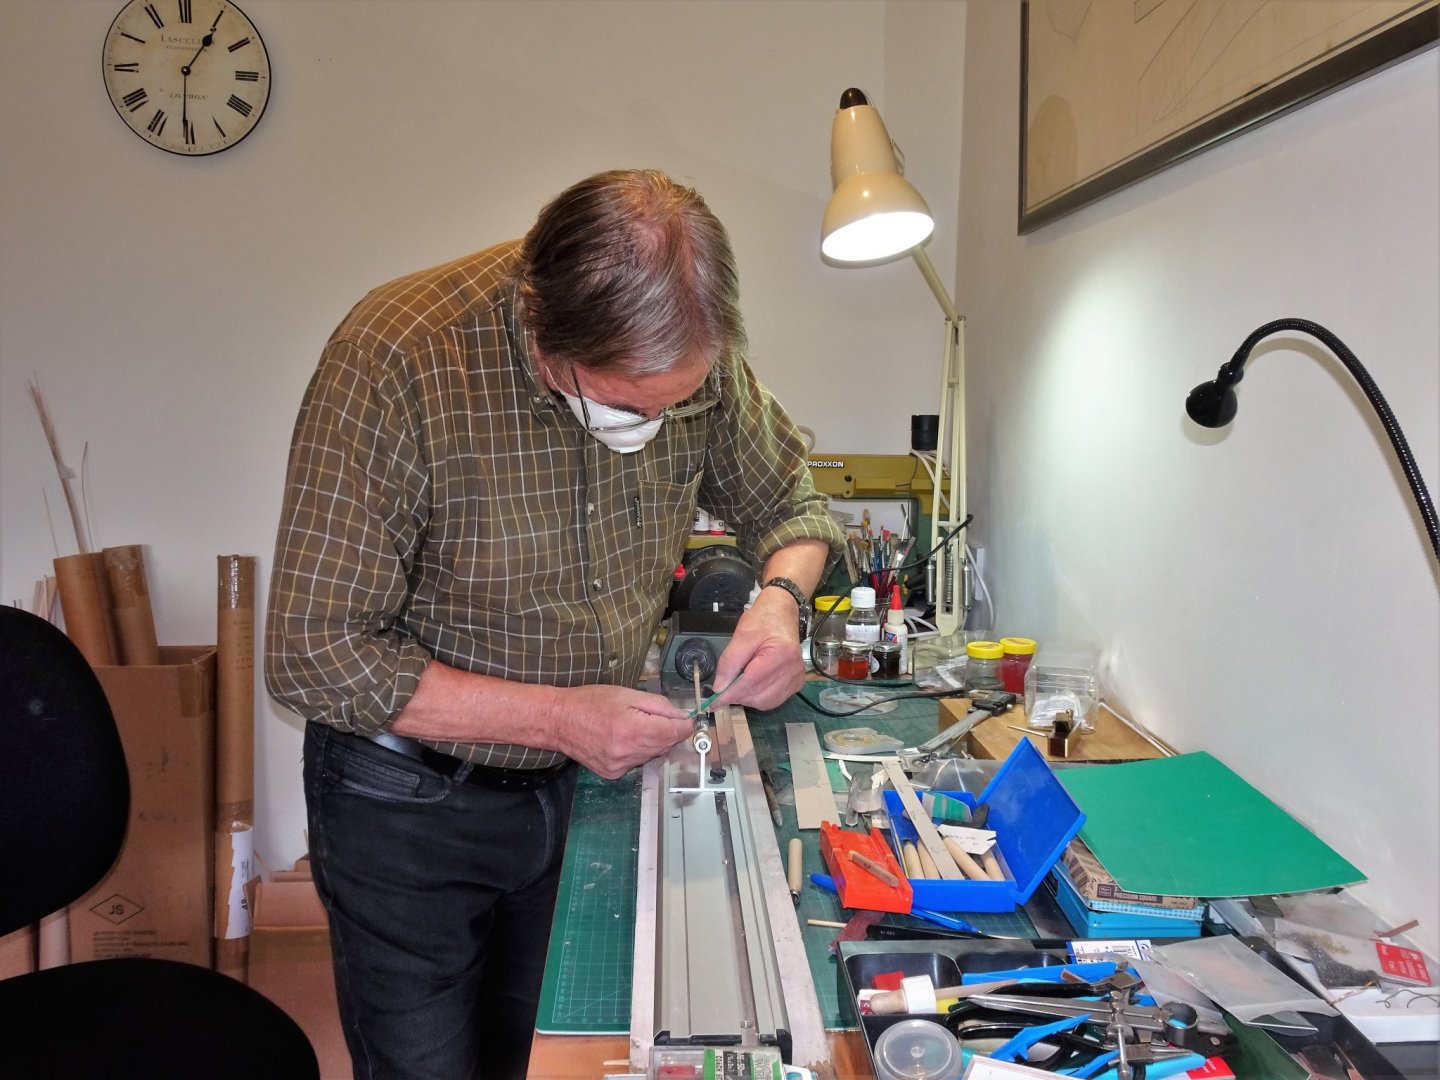
Hi Bob, I bought a bed extension piece for the lathe which adds just shy of 18" to the working length. I've never needed the full length, but I have often used beyond the original length of the lathe, including for the Foremast of the Fifie. The advantage is that the full length of the mast can be worked without having part of it within the jaws of the lathe chuck. B.E.
- 195 replies
-
- 1
-
-
- lady eleanor
- vanguard models
- (and 1 more)
-
Thanks Dave, I think an unintended consequence of the new system is that as more time is spent in our current build era, the other eras tend to get overlooked, and unless I spot something in the latest posts section that catches my eye, things are missed. Under the old system I tended to see more as I scrolled down the build section looking to find my build to update. One of the objectives of the new system was apparently to reduce the incidence of the same old builds hogging the limelight. Well I'm now on a guilt trip as my current build seems to be nearly always towards the top of the list, simply because I am progressing quite quickly, and the pond I'm in is so much smaller.🤔 On with the build, and I may I request that folks don't turn my log into a pro's and cons discussion forum on the new set-up. Post 22 Looking at the masts and booms The Foremast on these large Fifie’s seem almost over-scale but are very stout timbers, necessary to withstand the pressure from the enormous lug sails carried. The kit mast represents a height above deck of 52’6” with a 15” square section at the deck, and 9”ø at the masthead. This is fairly modest by comparison with recorded dimensions given by Edgar March. The True Vine also a 70 ft Fifie had a foremast with a 22” square section at the deck, tapering to 9”. This would equate to 8.75mm at 1:64 scale, something that would not fit on the ‘Lady Eleanor’ Time to get the lathe out. 5848 Walnut square section (6mm) is provided for the mast. Walnut is a good choice I think, as the masts do seem to have been of a dark hue, apart perhaps from a white section to the Mast head. To make the mast I roughly take off the corners above the square section using a micro plane and a ‘V’ jig. 5847 I then use the lathe to create the taper. I use a gauge at marked points along the length to check progress. The Mizen mast more closely follows the given dimensions of the True Vine (15” at deck, tapered to 9” at masthead.) 6mm Walnut dowel is provided. The Mizen boom is a length of 3mm Walnut dowel slightly tapered. This looks a little thin to my eye by comparison with the boom on Reaper. Altho’ I have given lengths of this boom I have not found details of relative diameters as yet. 5853 The Mizen mast was set with a forward tilt, and wooden wedges were used to trim the angle of the Foremast to suit the preference of the Skipper. I intend to display my Fifie with the mast vertical. This seems a common arrangement as seen in a large number of the old photo’s I have looked at. 5850(2) The yards need only a little adjustment to the 3mm dowel and are shaped by hand. 5852(2) What a pleasure it is to only deal with a simple lug rigged two master, no tops, crosstrees, or mast caps to consider. 5900 The masts are a snug fit and I won’t need to glue them in. A wedge aft of the mast will be required to hold it firmly against the baulk. (not necessary if you prefer some rake aft) 5904(2) The kit provides brass etched ‘mast rings’ which perform two purposes, the first to gauge the mast taper at the mast heads, and the second where one of the six eyes that form the ring are the attachment point for the Burton stays of the masts. A hole is also drilled thro’ the mastheads to take the yard halyards. I feel a slight enhancement coming on to this arrangement. I now need to familiarise myself with the rigging set up and attachment points before I proceed further. B.E. 05/07/20

.thumb.JPG.3be70698186949e183d5b69187184621.JPG)
.thumb.JPG.e108268563e9627350d6184c49d6fb7c.JPG)
.thumb.JPG.c088145e20ff4ad5d3d1b492de0d95f9.JPG)
- 195 replies
-
- 16
-
-
- lady eleanor
- vanguard models
- (and 1 more)
-
I was pondering with Mrs W the other day about how to dye the sails, I've no experience of dyeing anything, except perhaps standing rigging in wood dye. I have the Rit stuff which reckons one packet dyes two large tee shirts, but to double the dye for a deeper colour. How this equates to two small sails I've no idea. I guess it's a case of suck it and see. I certainly won't be doing the hot cook method on Mrs W's induction hob, that could end in divorce, in fact I'll probably sub-contract the job to her and keep well away from the whole process. My Scottish reference work says that north of the border a deep brown colour was the tradition, whereas the English preferred a reddish, dare I say even pink hue, as favoured by James.😉 Movin' on... B.E.
- 195 replies
-
- 5
-
-
- lady eleanor
- vanguard models
- (and 1 more)
-
Mark of a good modeller Glenn, fortitude and persistence, and yours has paid off handsomely, well done. 👍 B.E.
- 778 replies
-
- 5
-
-
- cheerful
- Syren Ship Model Company
- (and 1 more)

.JPG.3f063ed2903ef76f88848dfc67df0240.JPG)
.JPG.a50f26d89993c9b3fa002d2a226990c6.JPG)


.JPG.7f1dee57b18d7711aa2ed8bb7d6d2a13.JPG)
.JPG.da87f775de48a4f1772ce5a76bfd7b17.JPG)
.JPG.7da9a3bf97496a9fa7f2d2632c6d8049.JPG)
.JPG.95a62e05d9e9c71e42bfc21bcf6f4458.JPG)


.JPG.128ab5cd1b6c59be71afcbef02156742.JPG)


.JPG.3261787c1ed2f981cb4551f29a494687.JPG)

.JPG.cf9533254181a76bb798af040f2ced9e.JPG)
.JPG.8c388cdb5f1806c97f1765ee08075df7.JPG)


.JPG.6535c2412556d37407b85de2b53320c9.JPG)
.JPG.53a793c22978bc5c3f7770dbe86ed02d.JPG)
.JPG.4355776e6c238e8b7596bf857b7bf2eb.JPG)

.JPG.360ff995721b399e0f735361dc39b69f.JPG)


.JPG.59b126f6242273390a91a9f27af95506.JPG)
.JPG.f9411174384b83a8625432ab3a1bcc94.JPG)


.JPG.3dbdc61a12045e0df28231b1f86b096a.JPG)
.JPG.c4a509f6439a572f4a59890dd9abd9ca.JPG)

.JPG.048f21bedae2d3be5805f58194ad281b.JPG)