DONATION DRIVE - SUPPORT MSW - DO YOUR PART TO KEEP THIS GREAT FORUM GOING!
×
.JPG.ca33079f5815b861e67b9c2cccd37982.JPG)

Blue Ensign
-
Posts
4,566 -
Joined
-
Last visited
Content Type
Profiles
Forums
Gallery
Events
Everything posted by Blue Ensign
-
 You're doing a fine job on her, looking very good. Great to see that you have a new dockyard companion, having a new pup does help ease the loss of a much missed friend. B.E.
 -
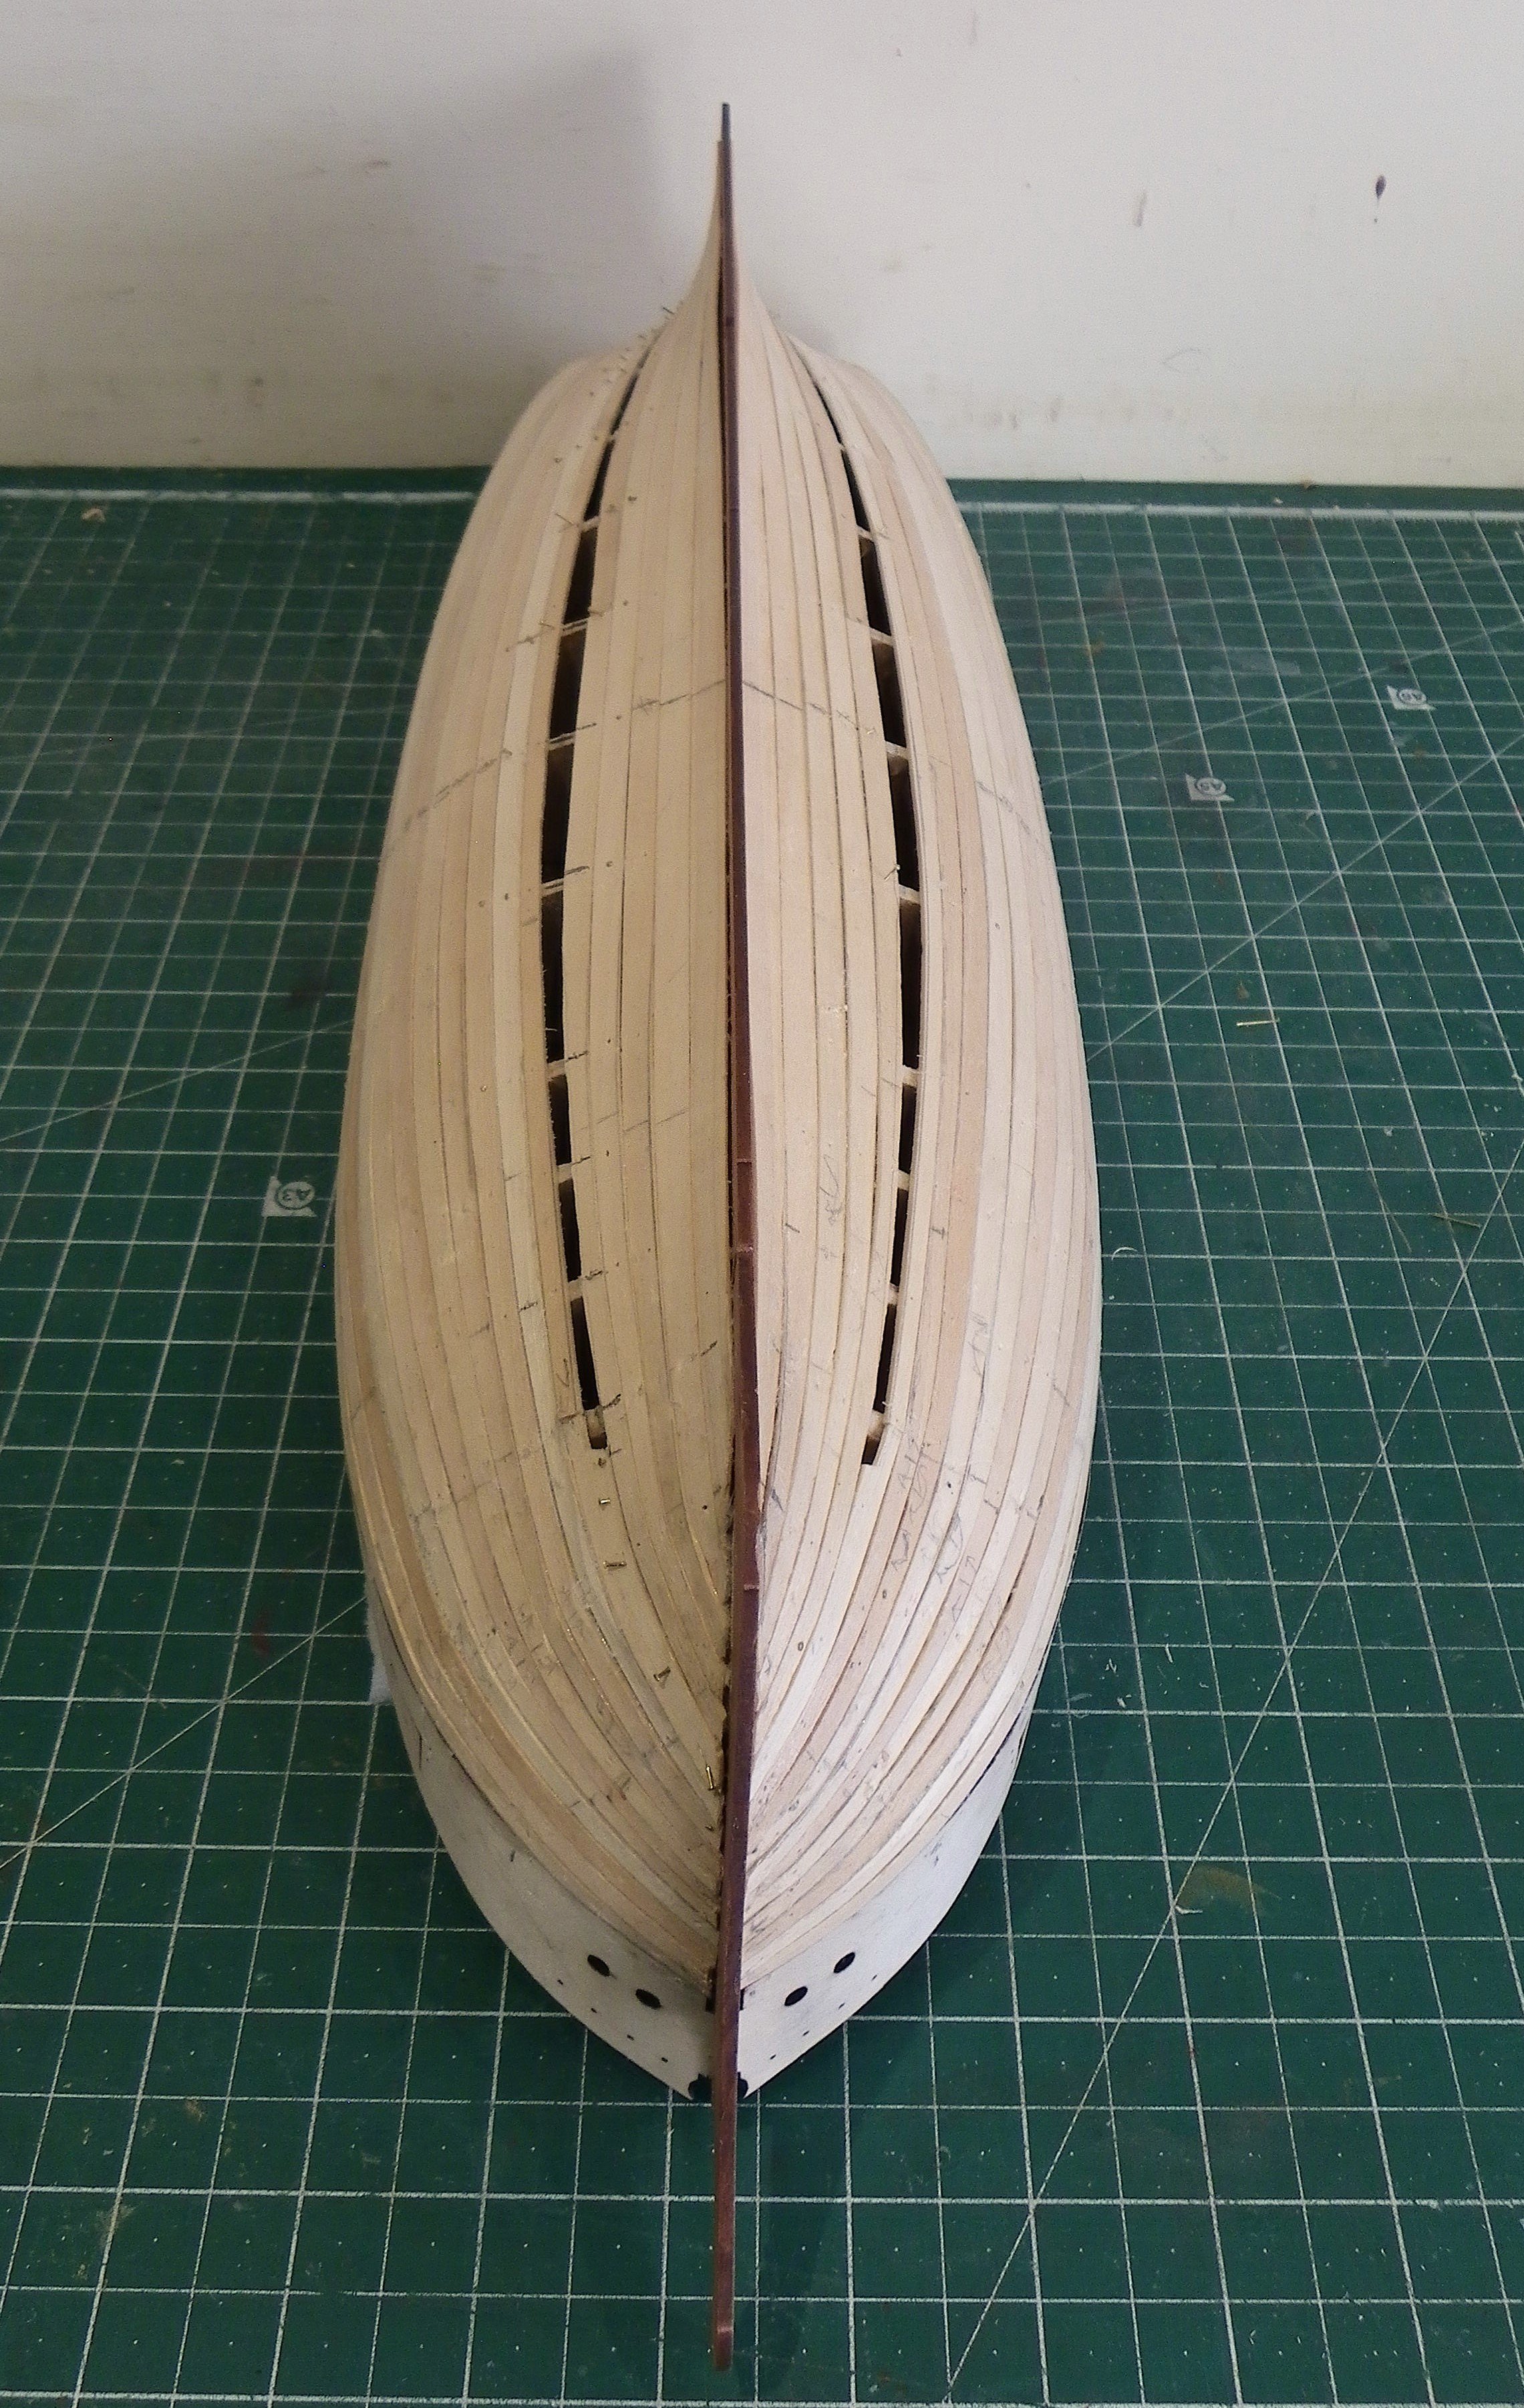
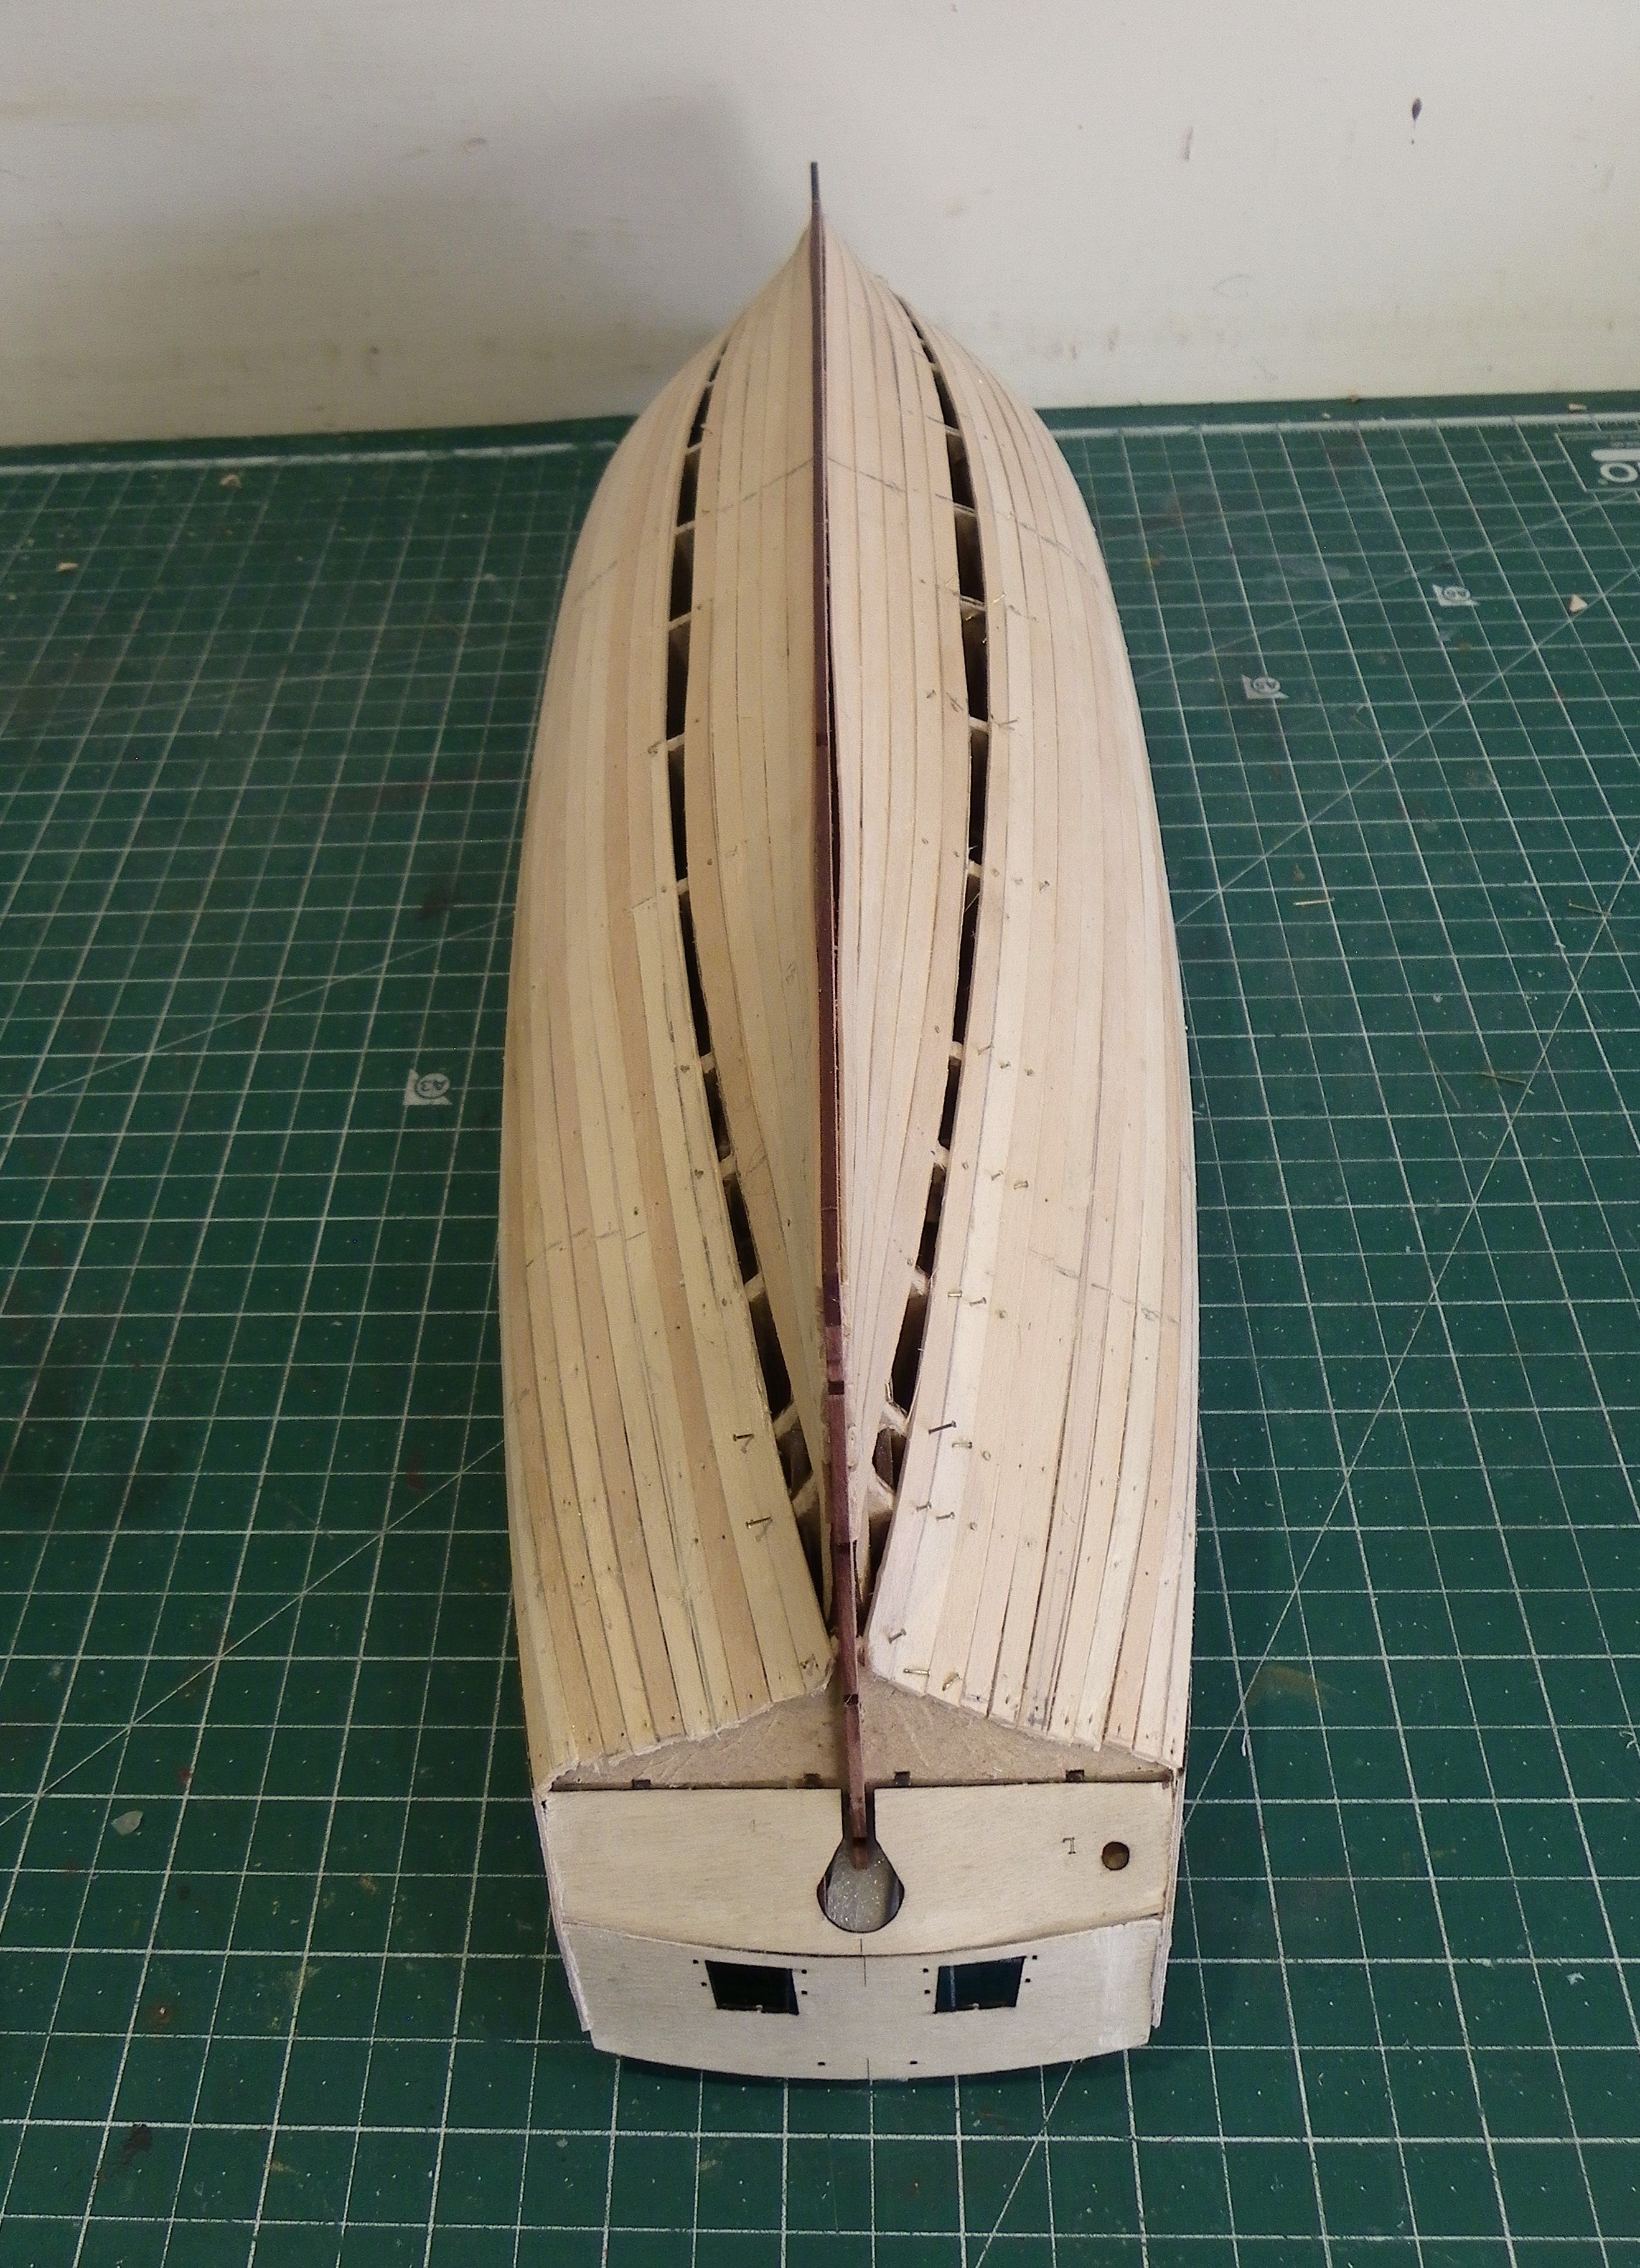
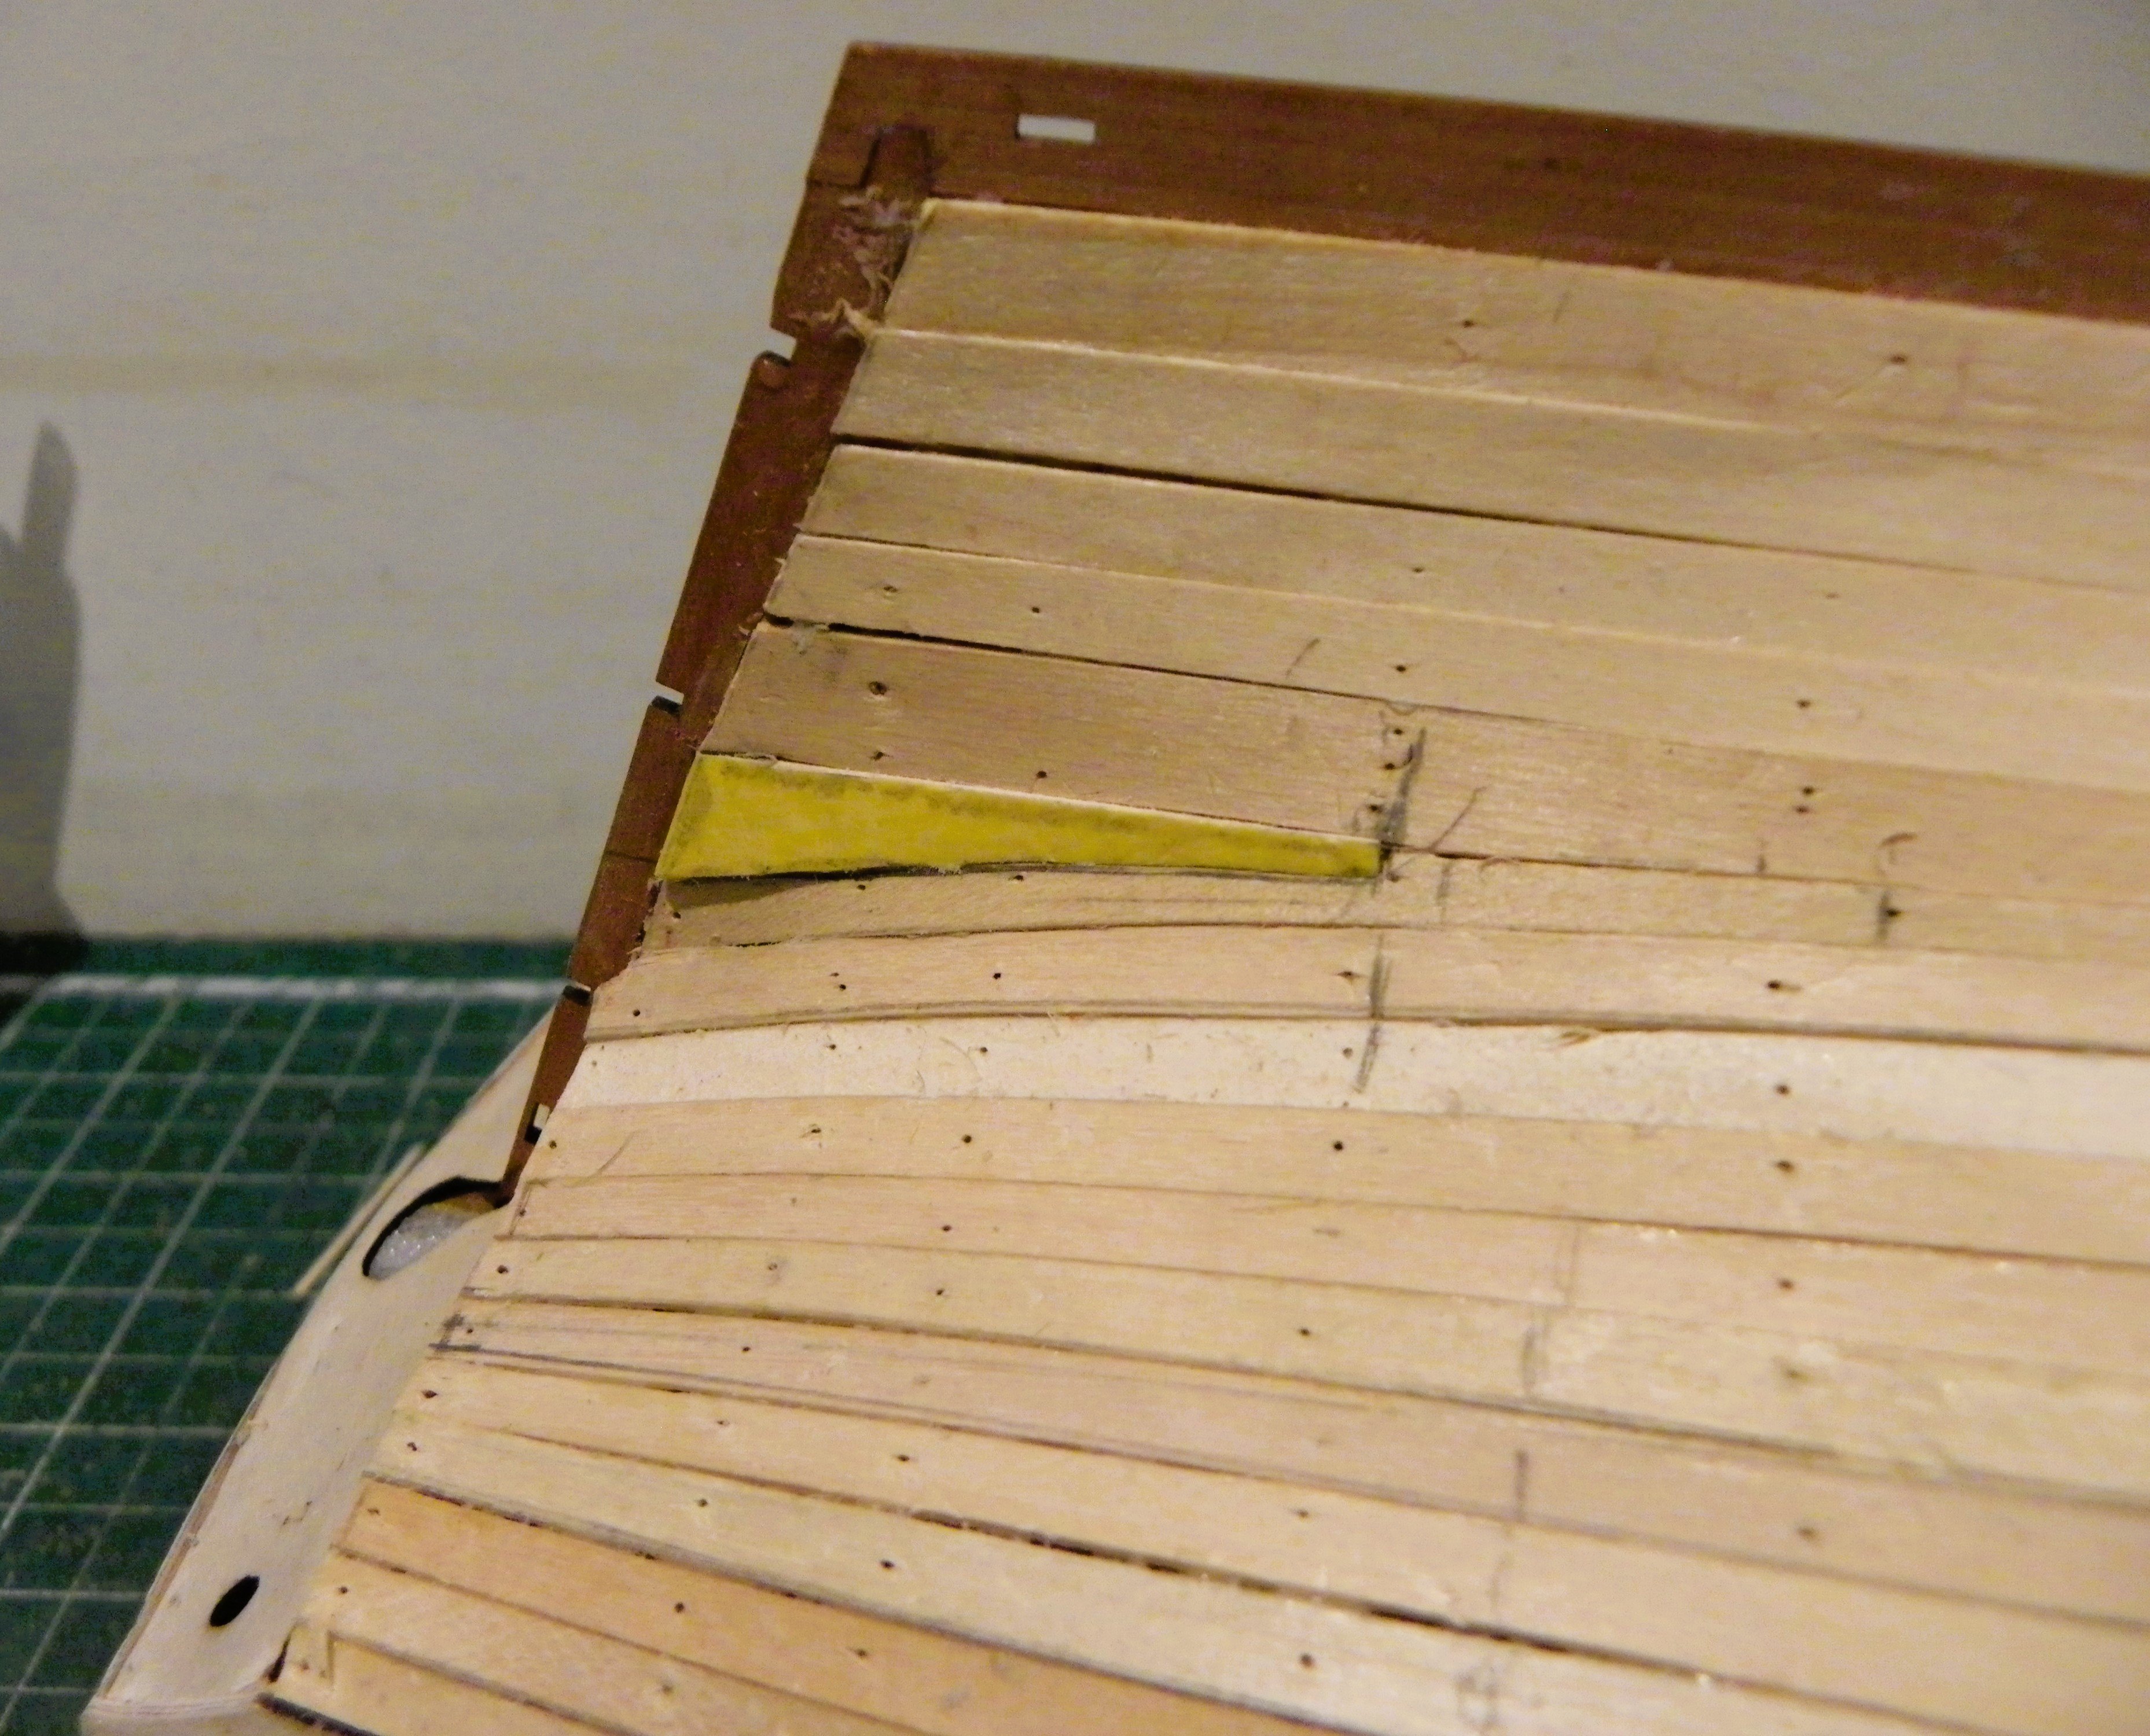
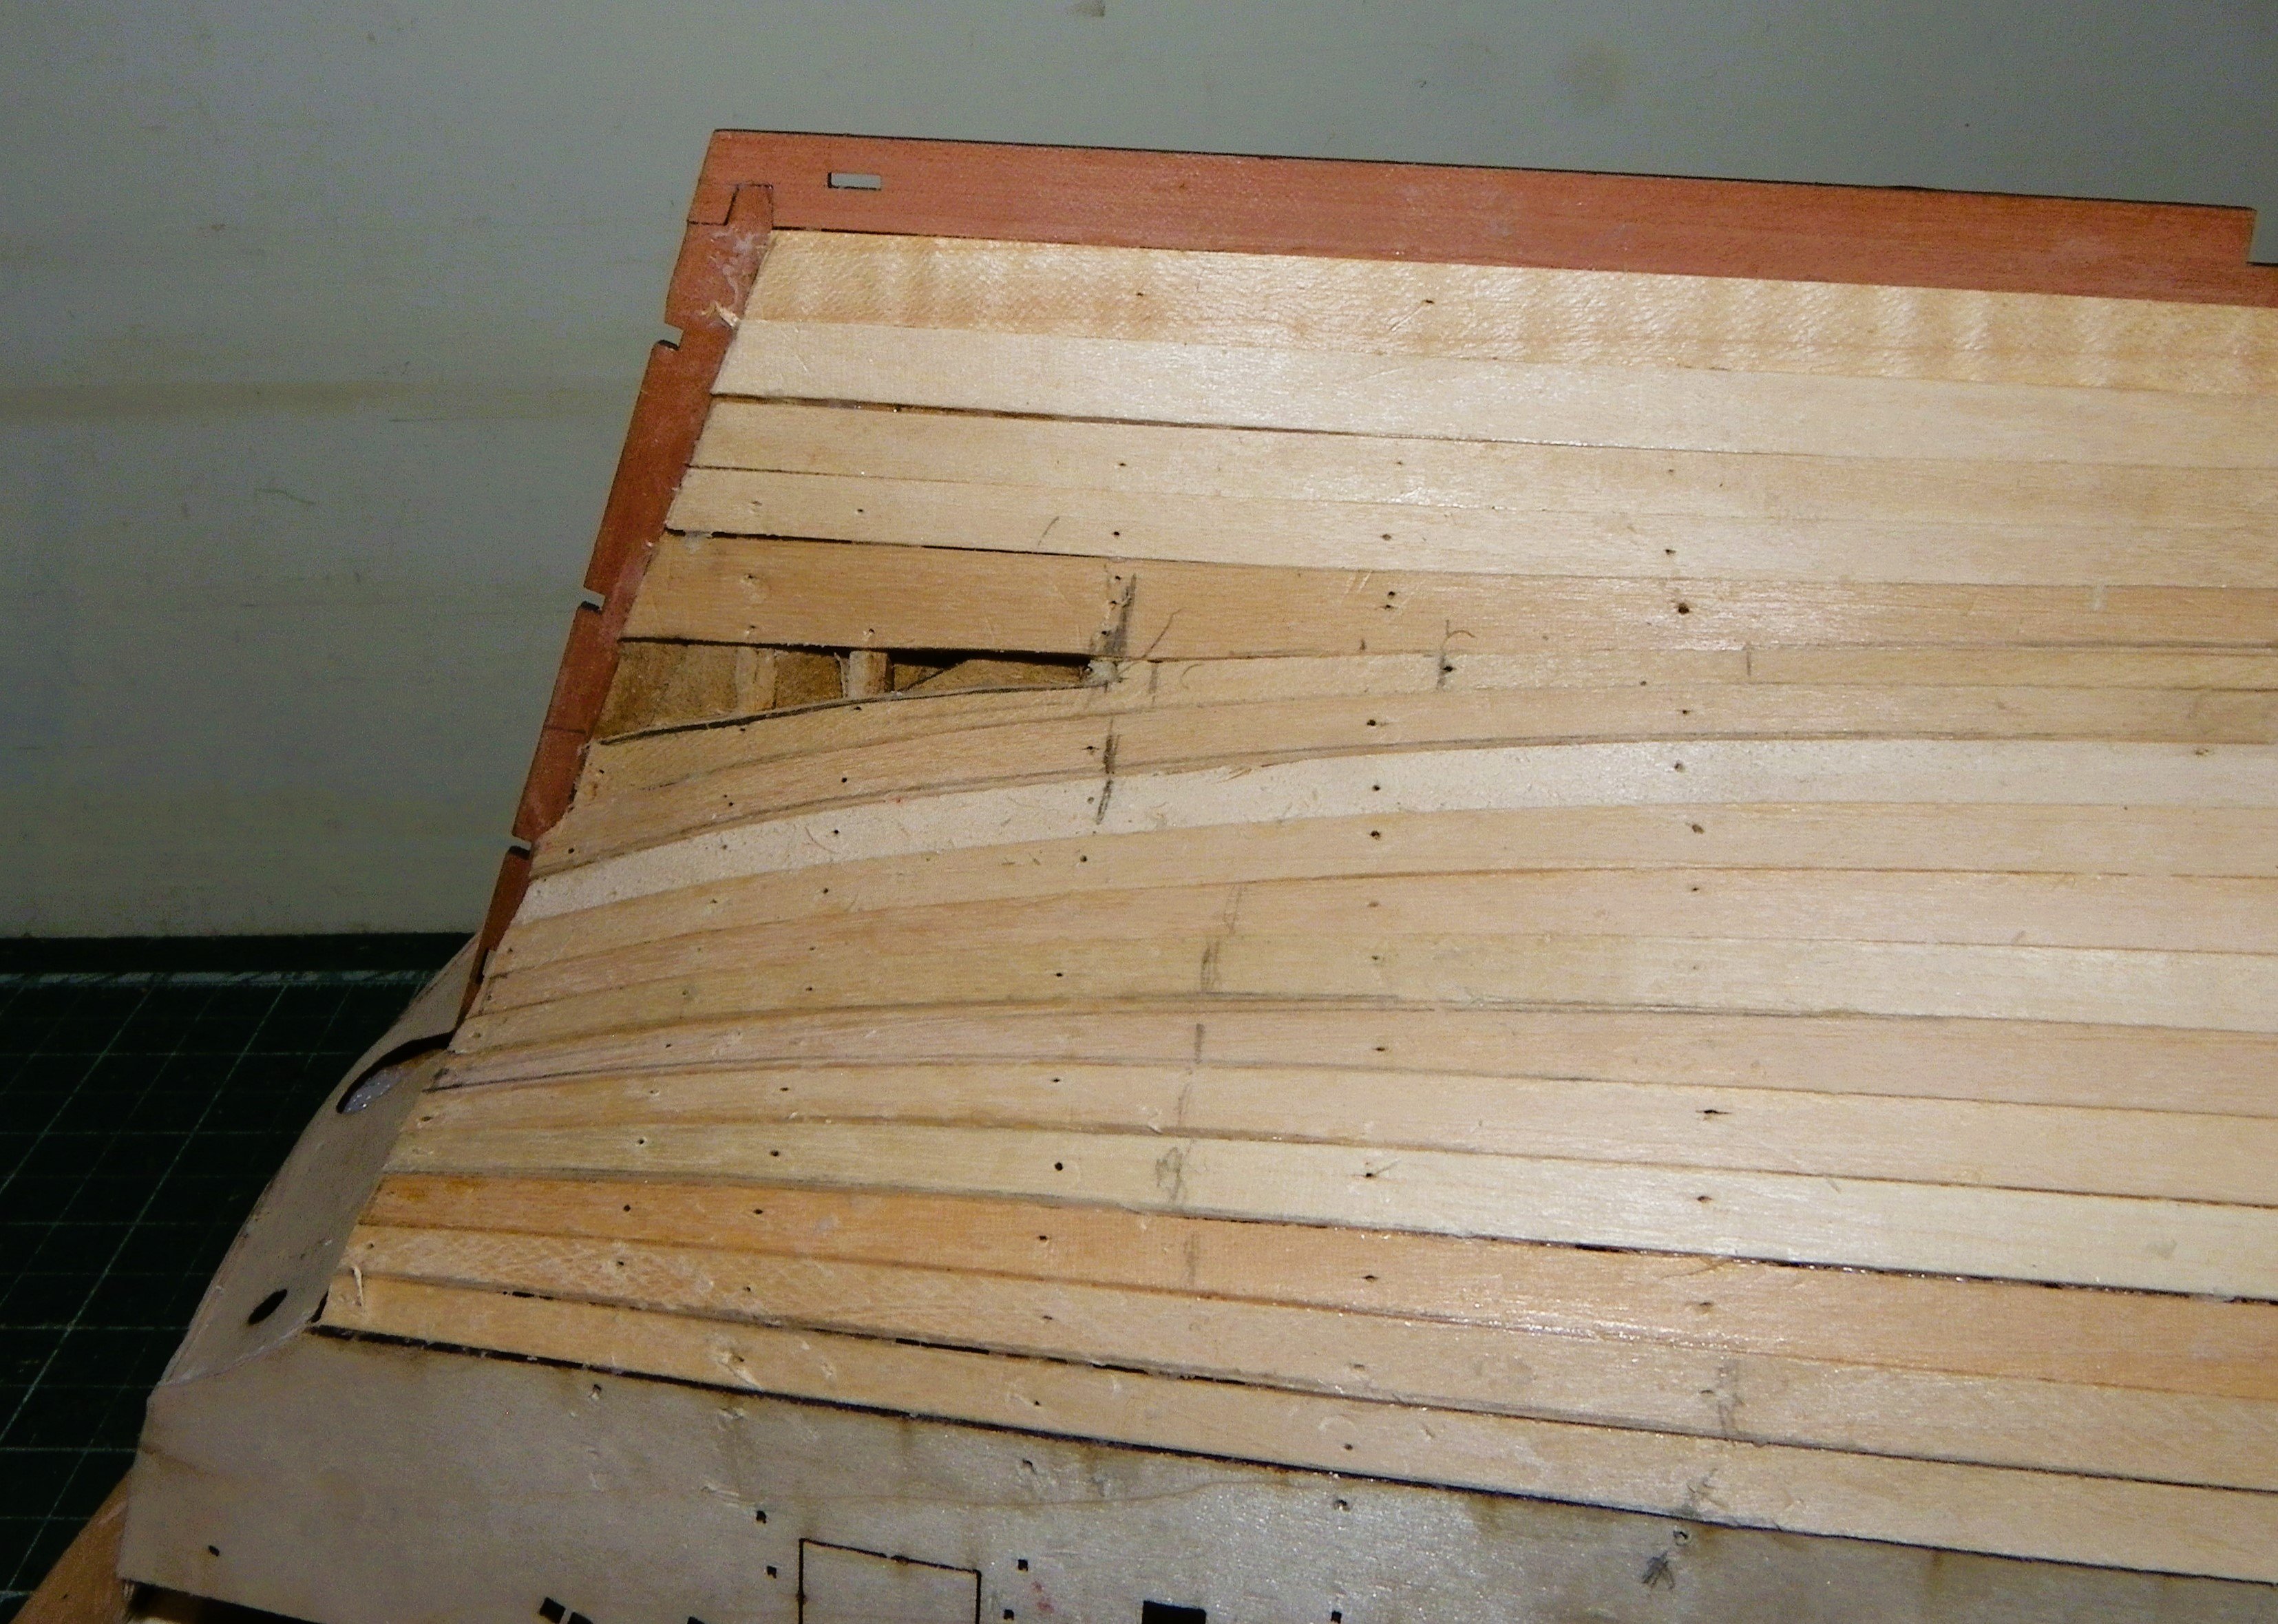
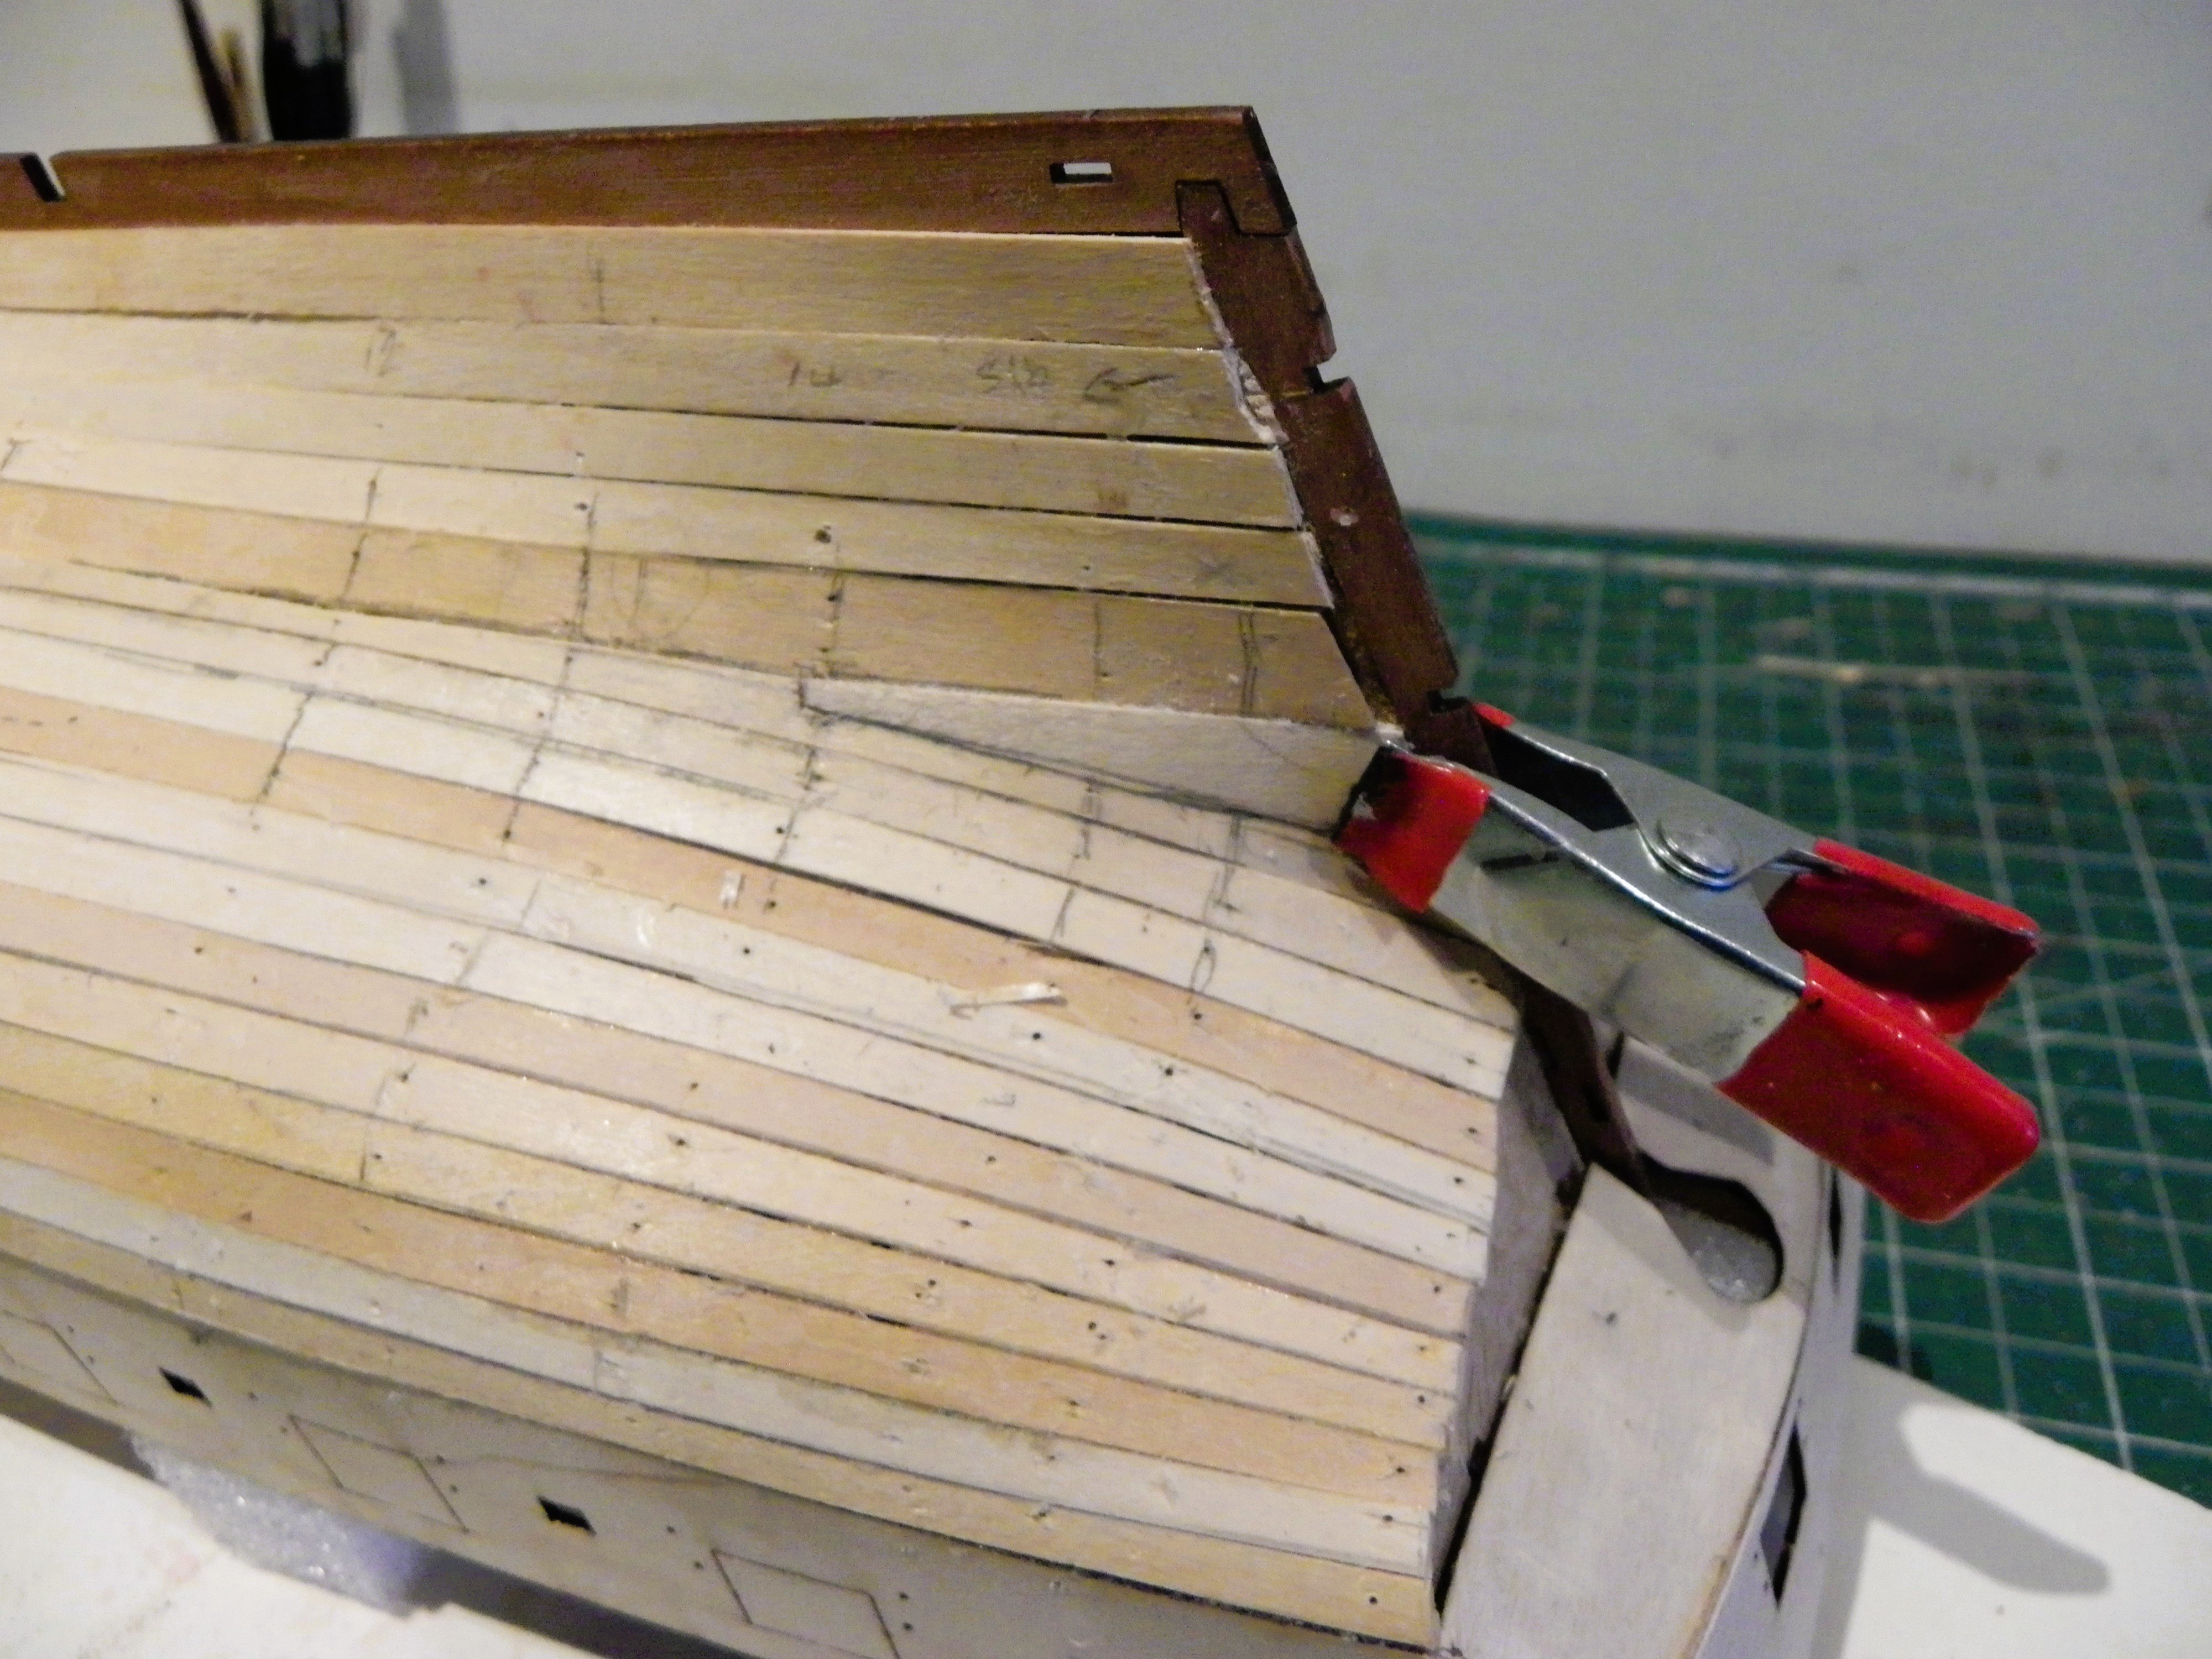
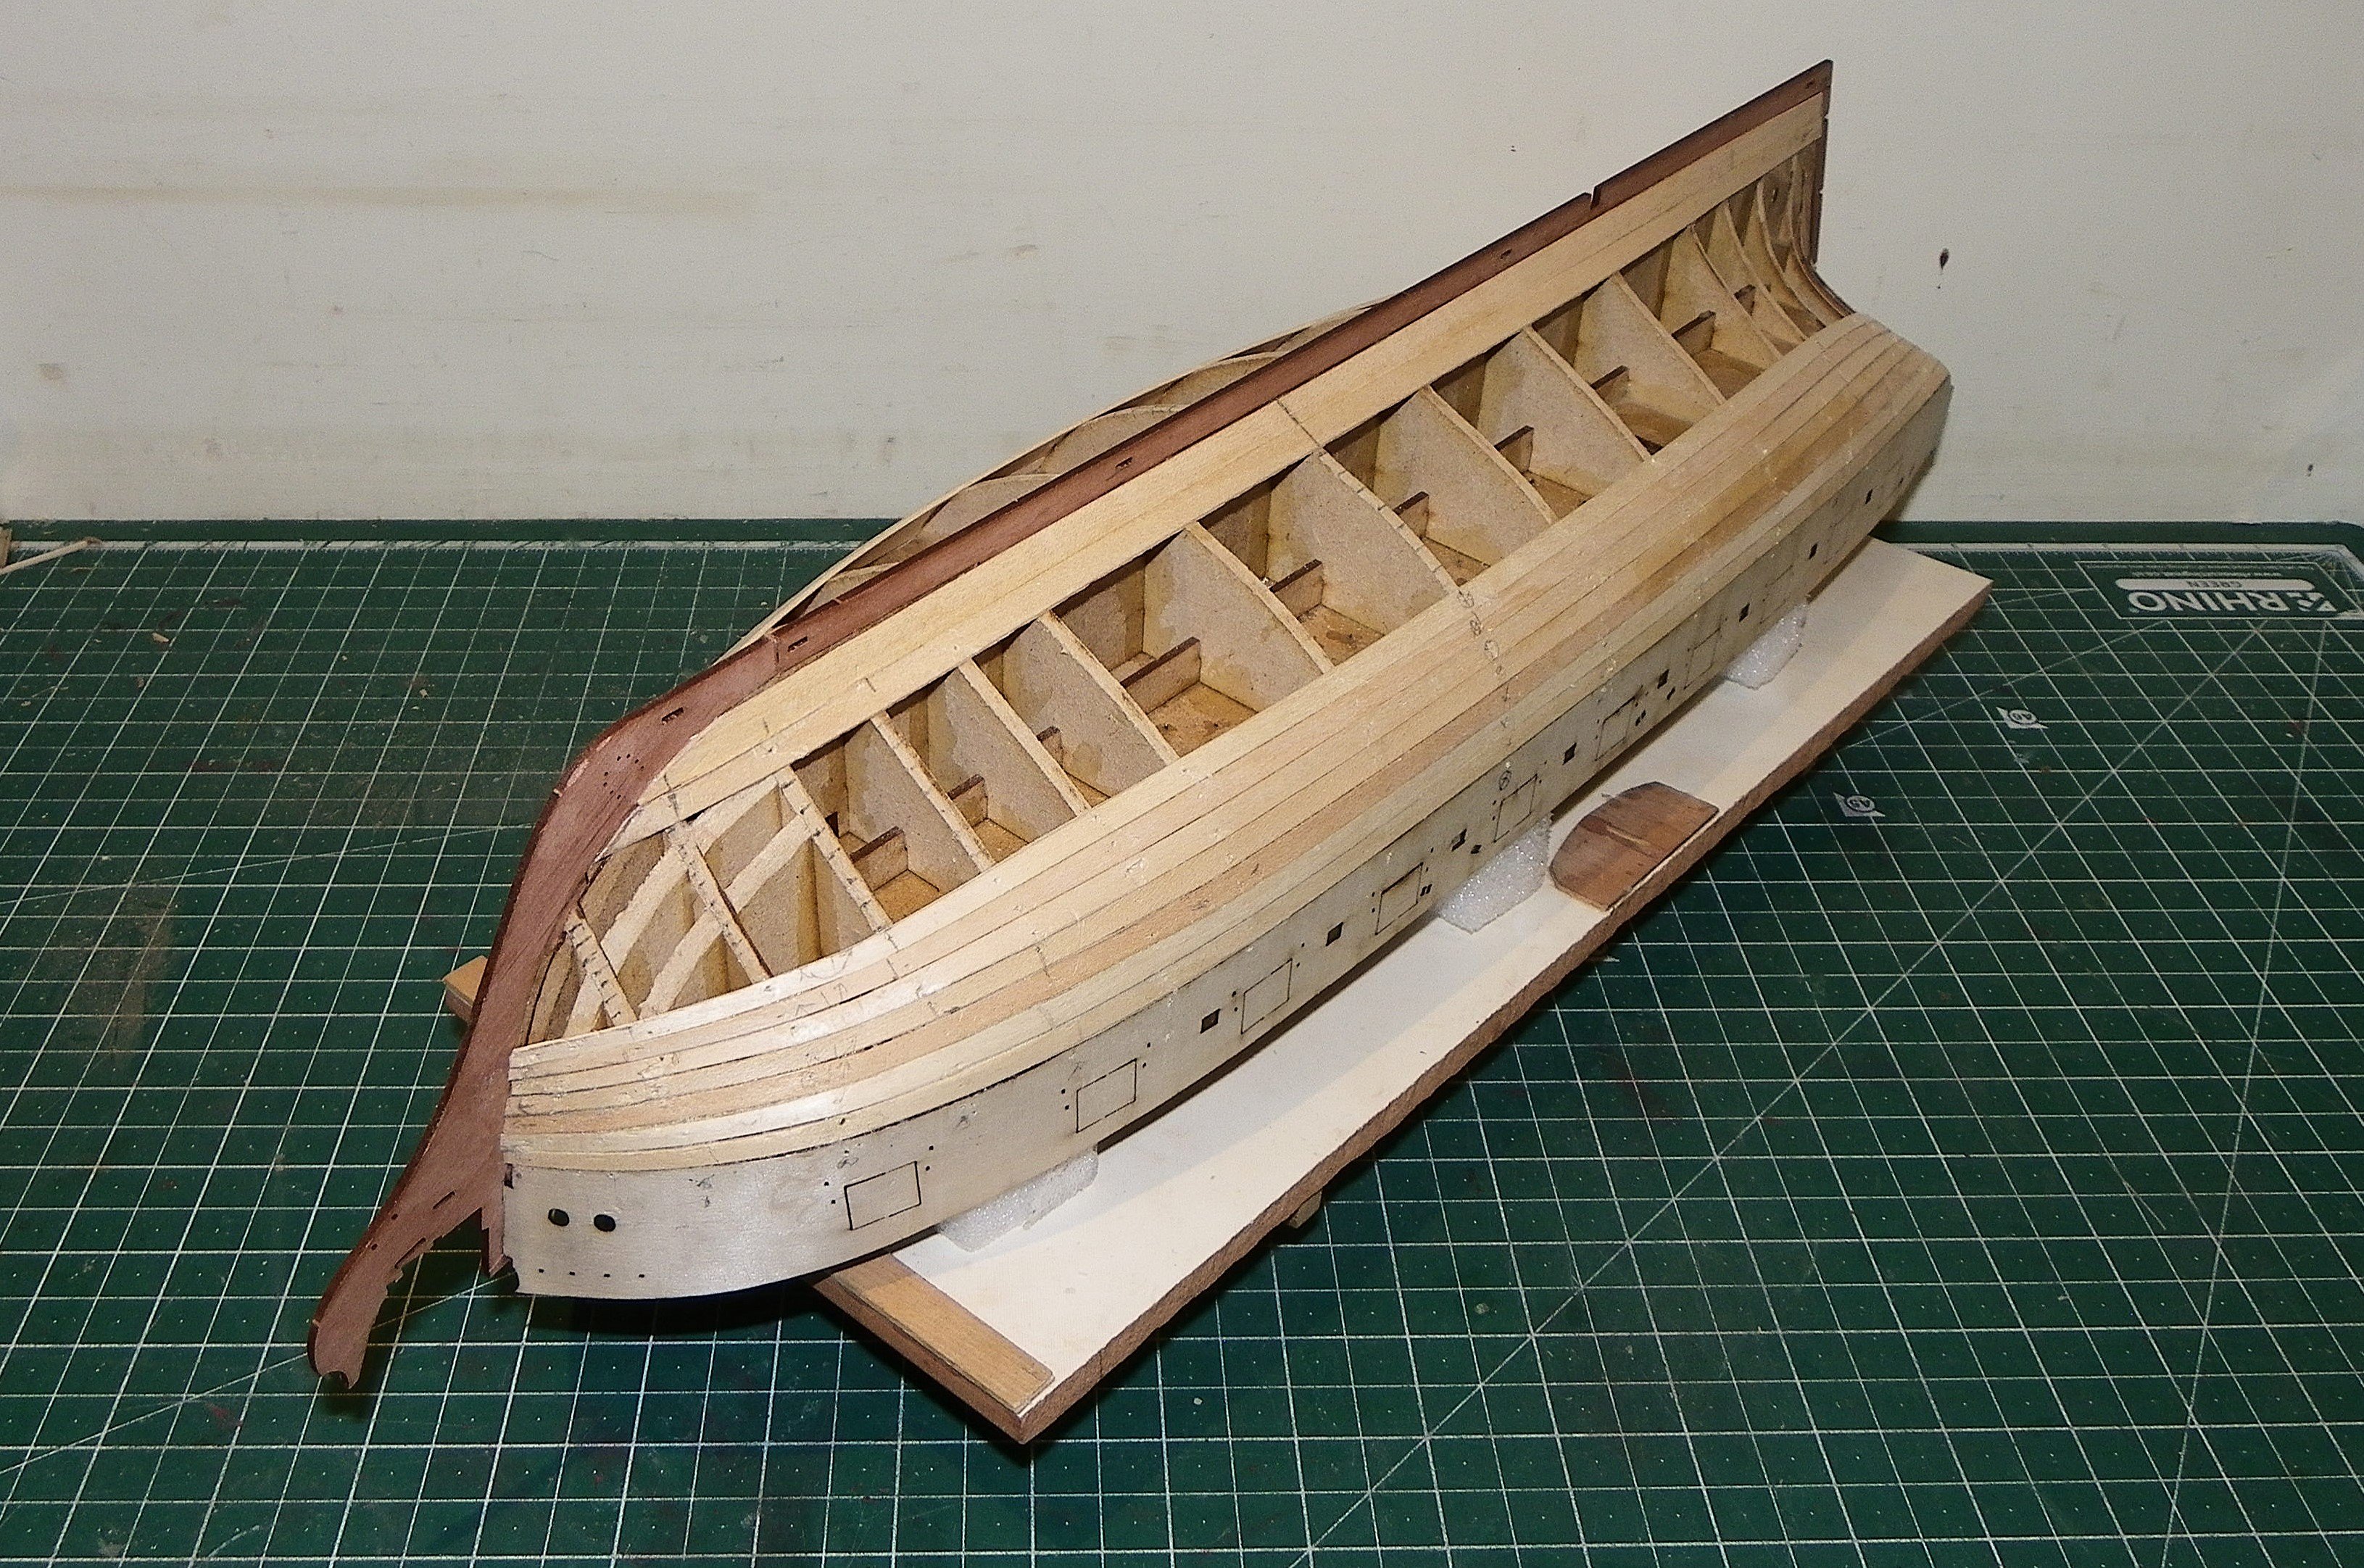
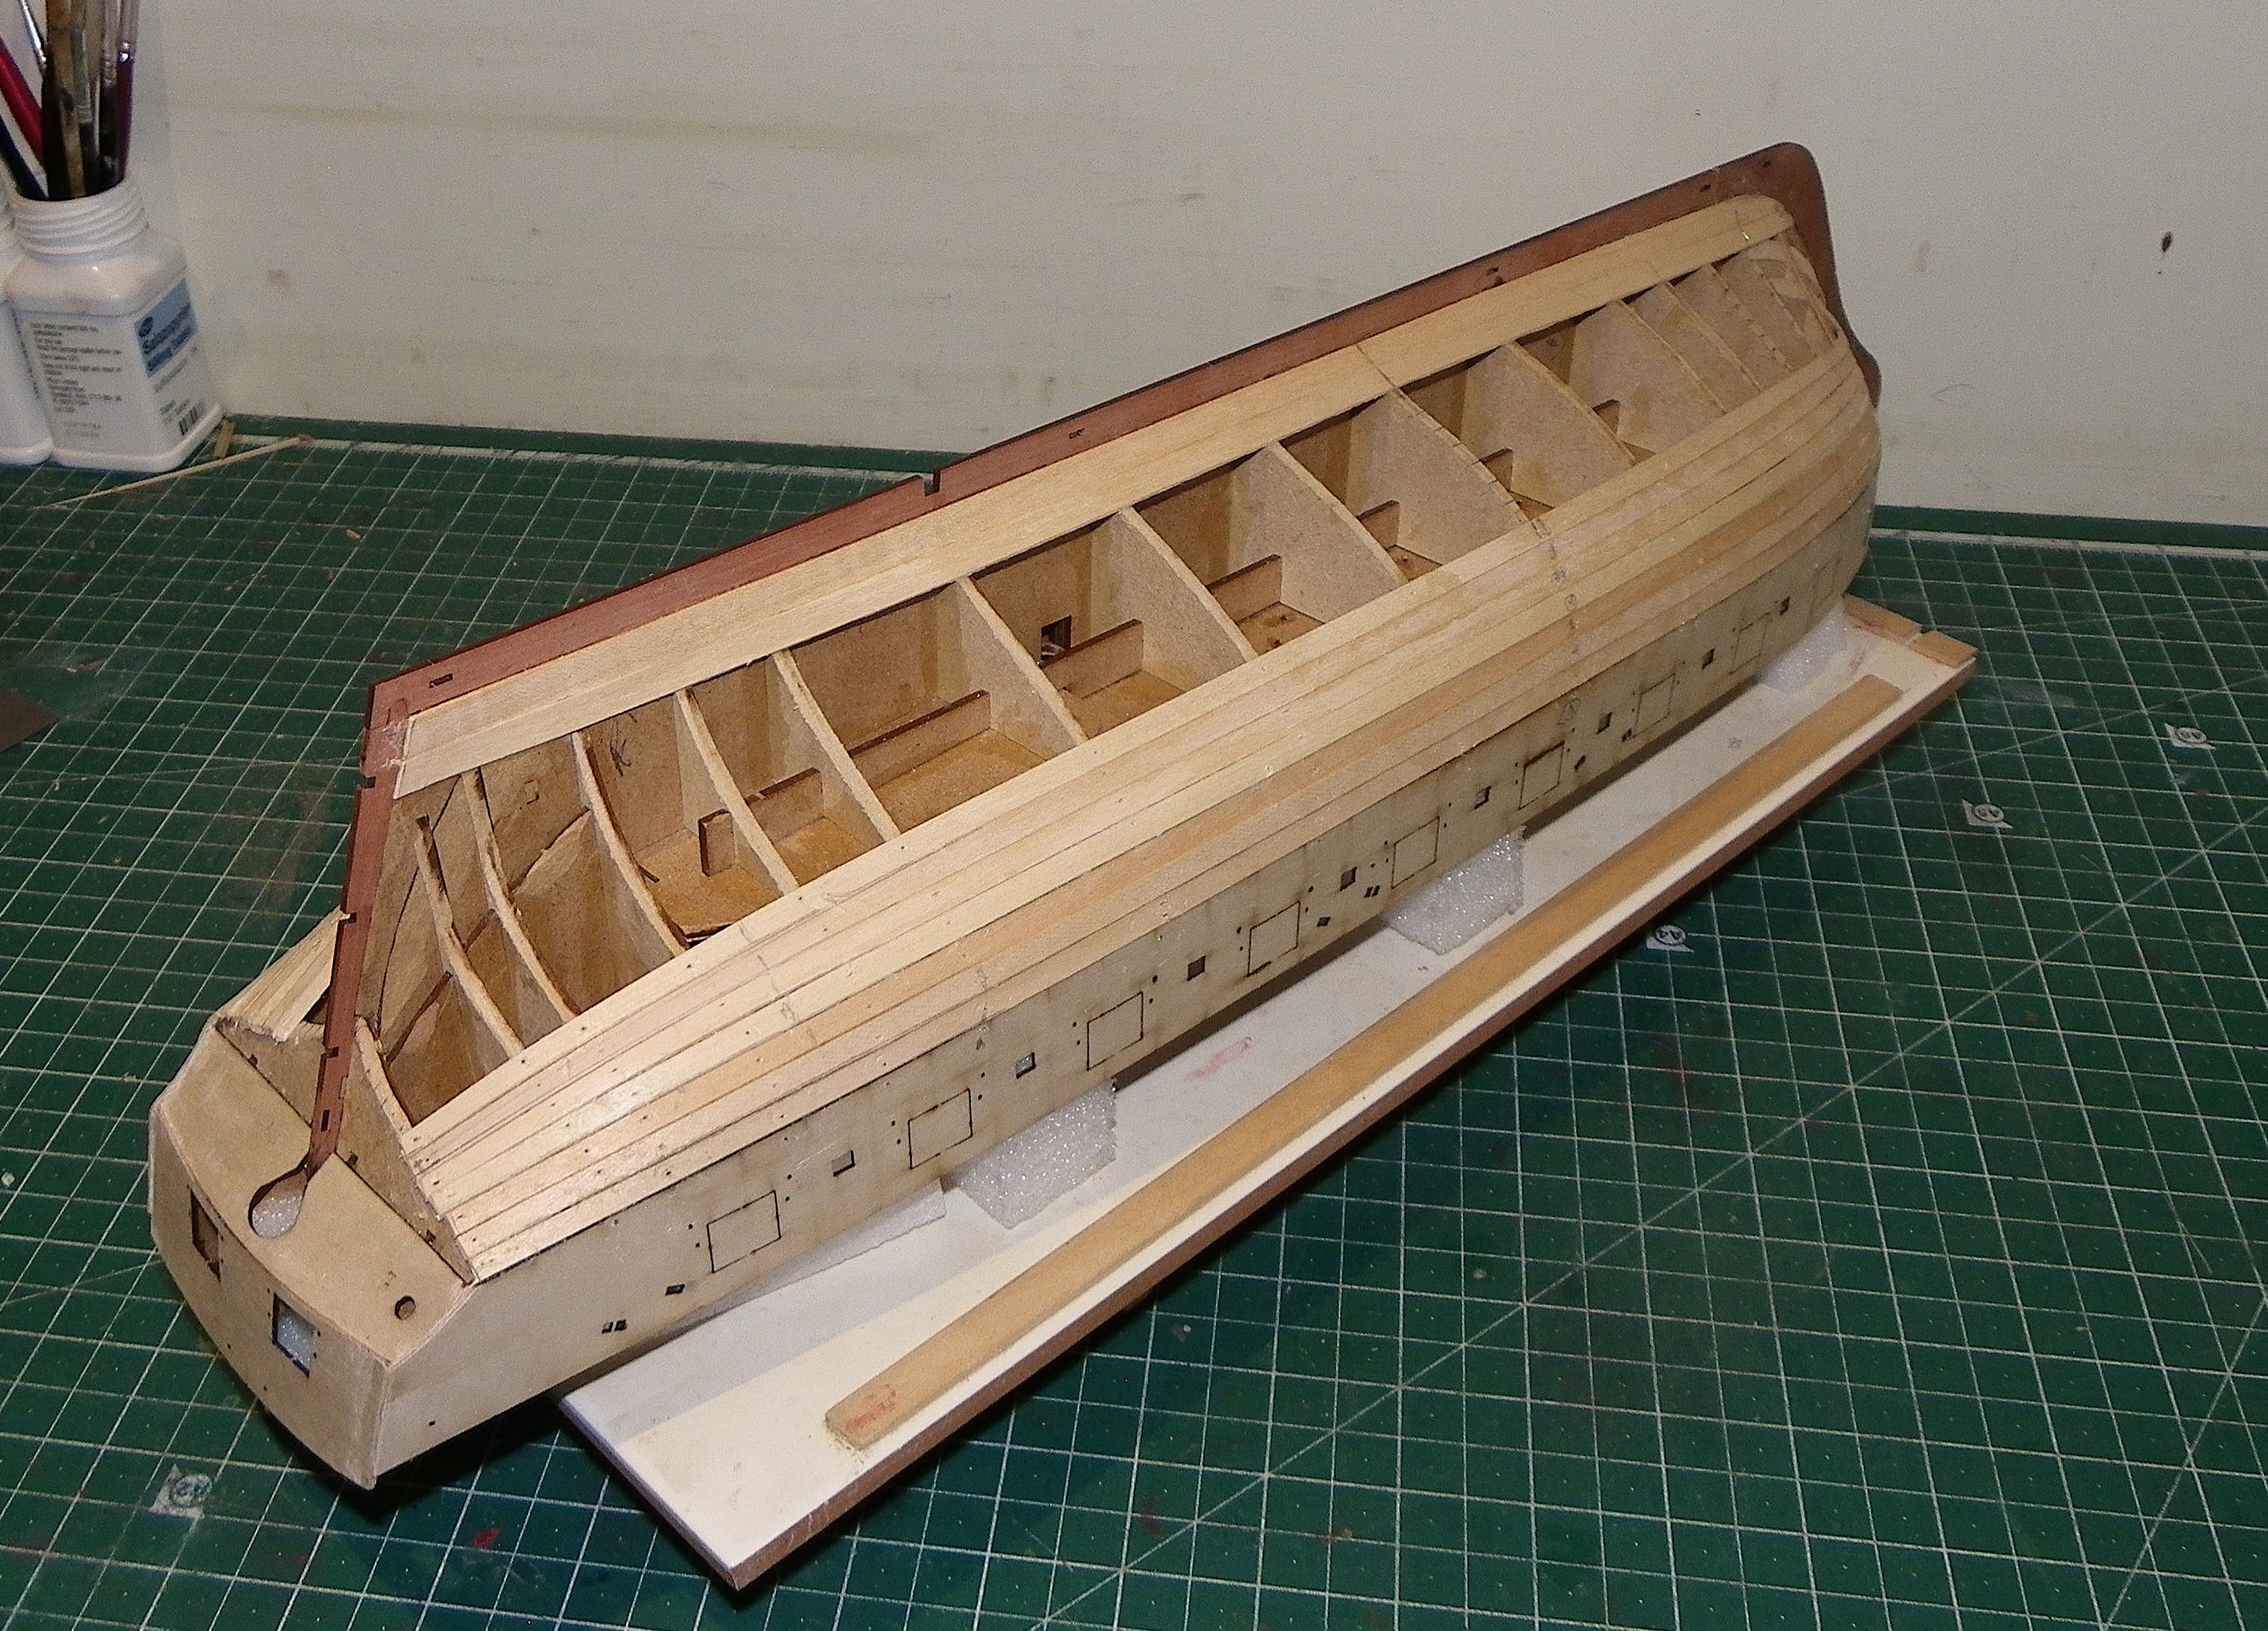
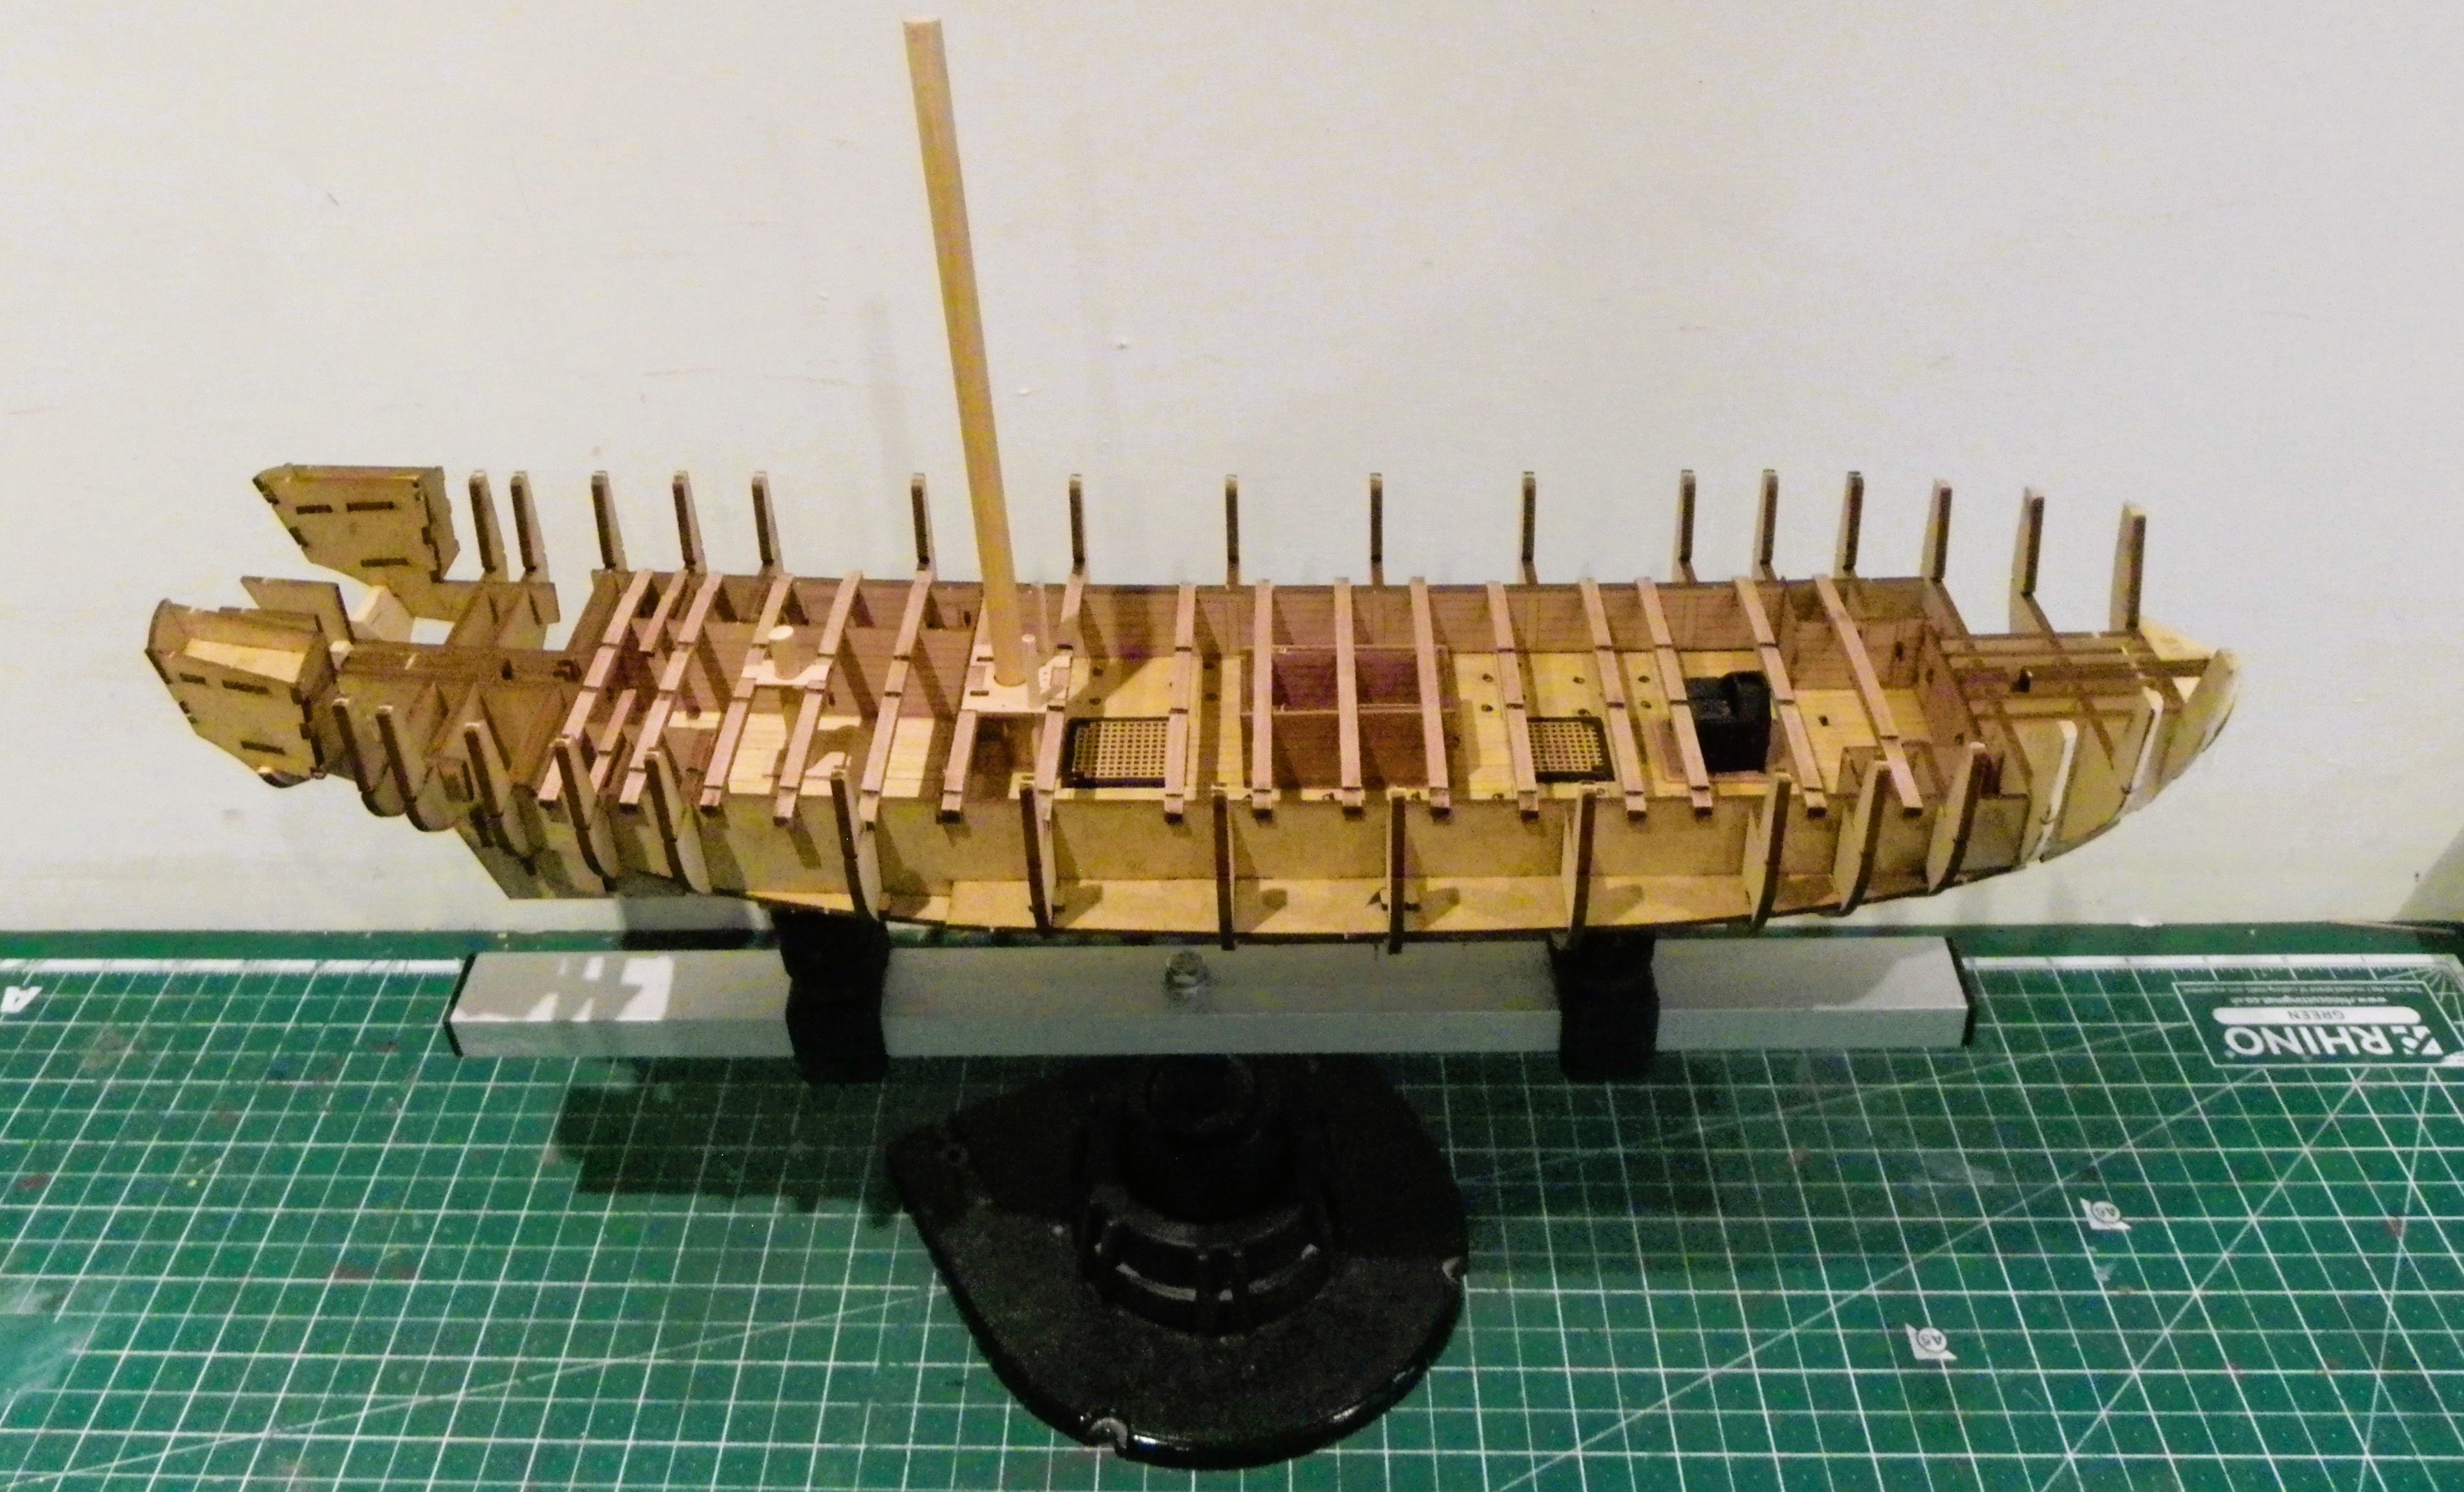
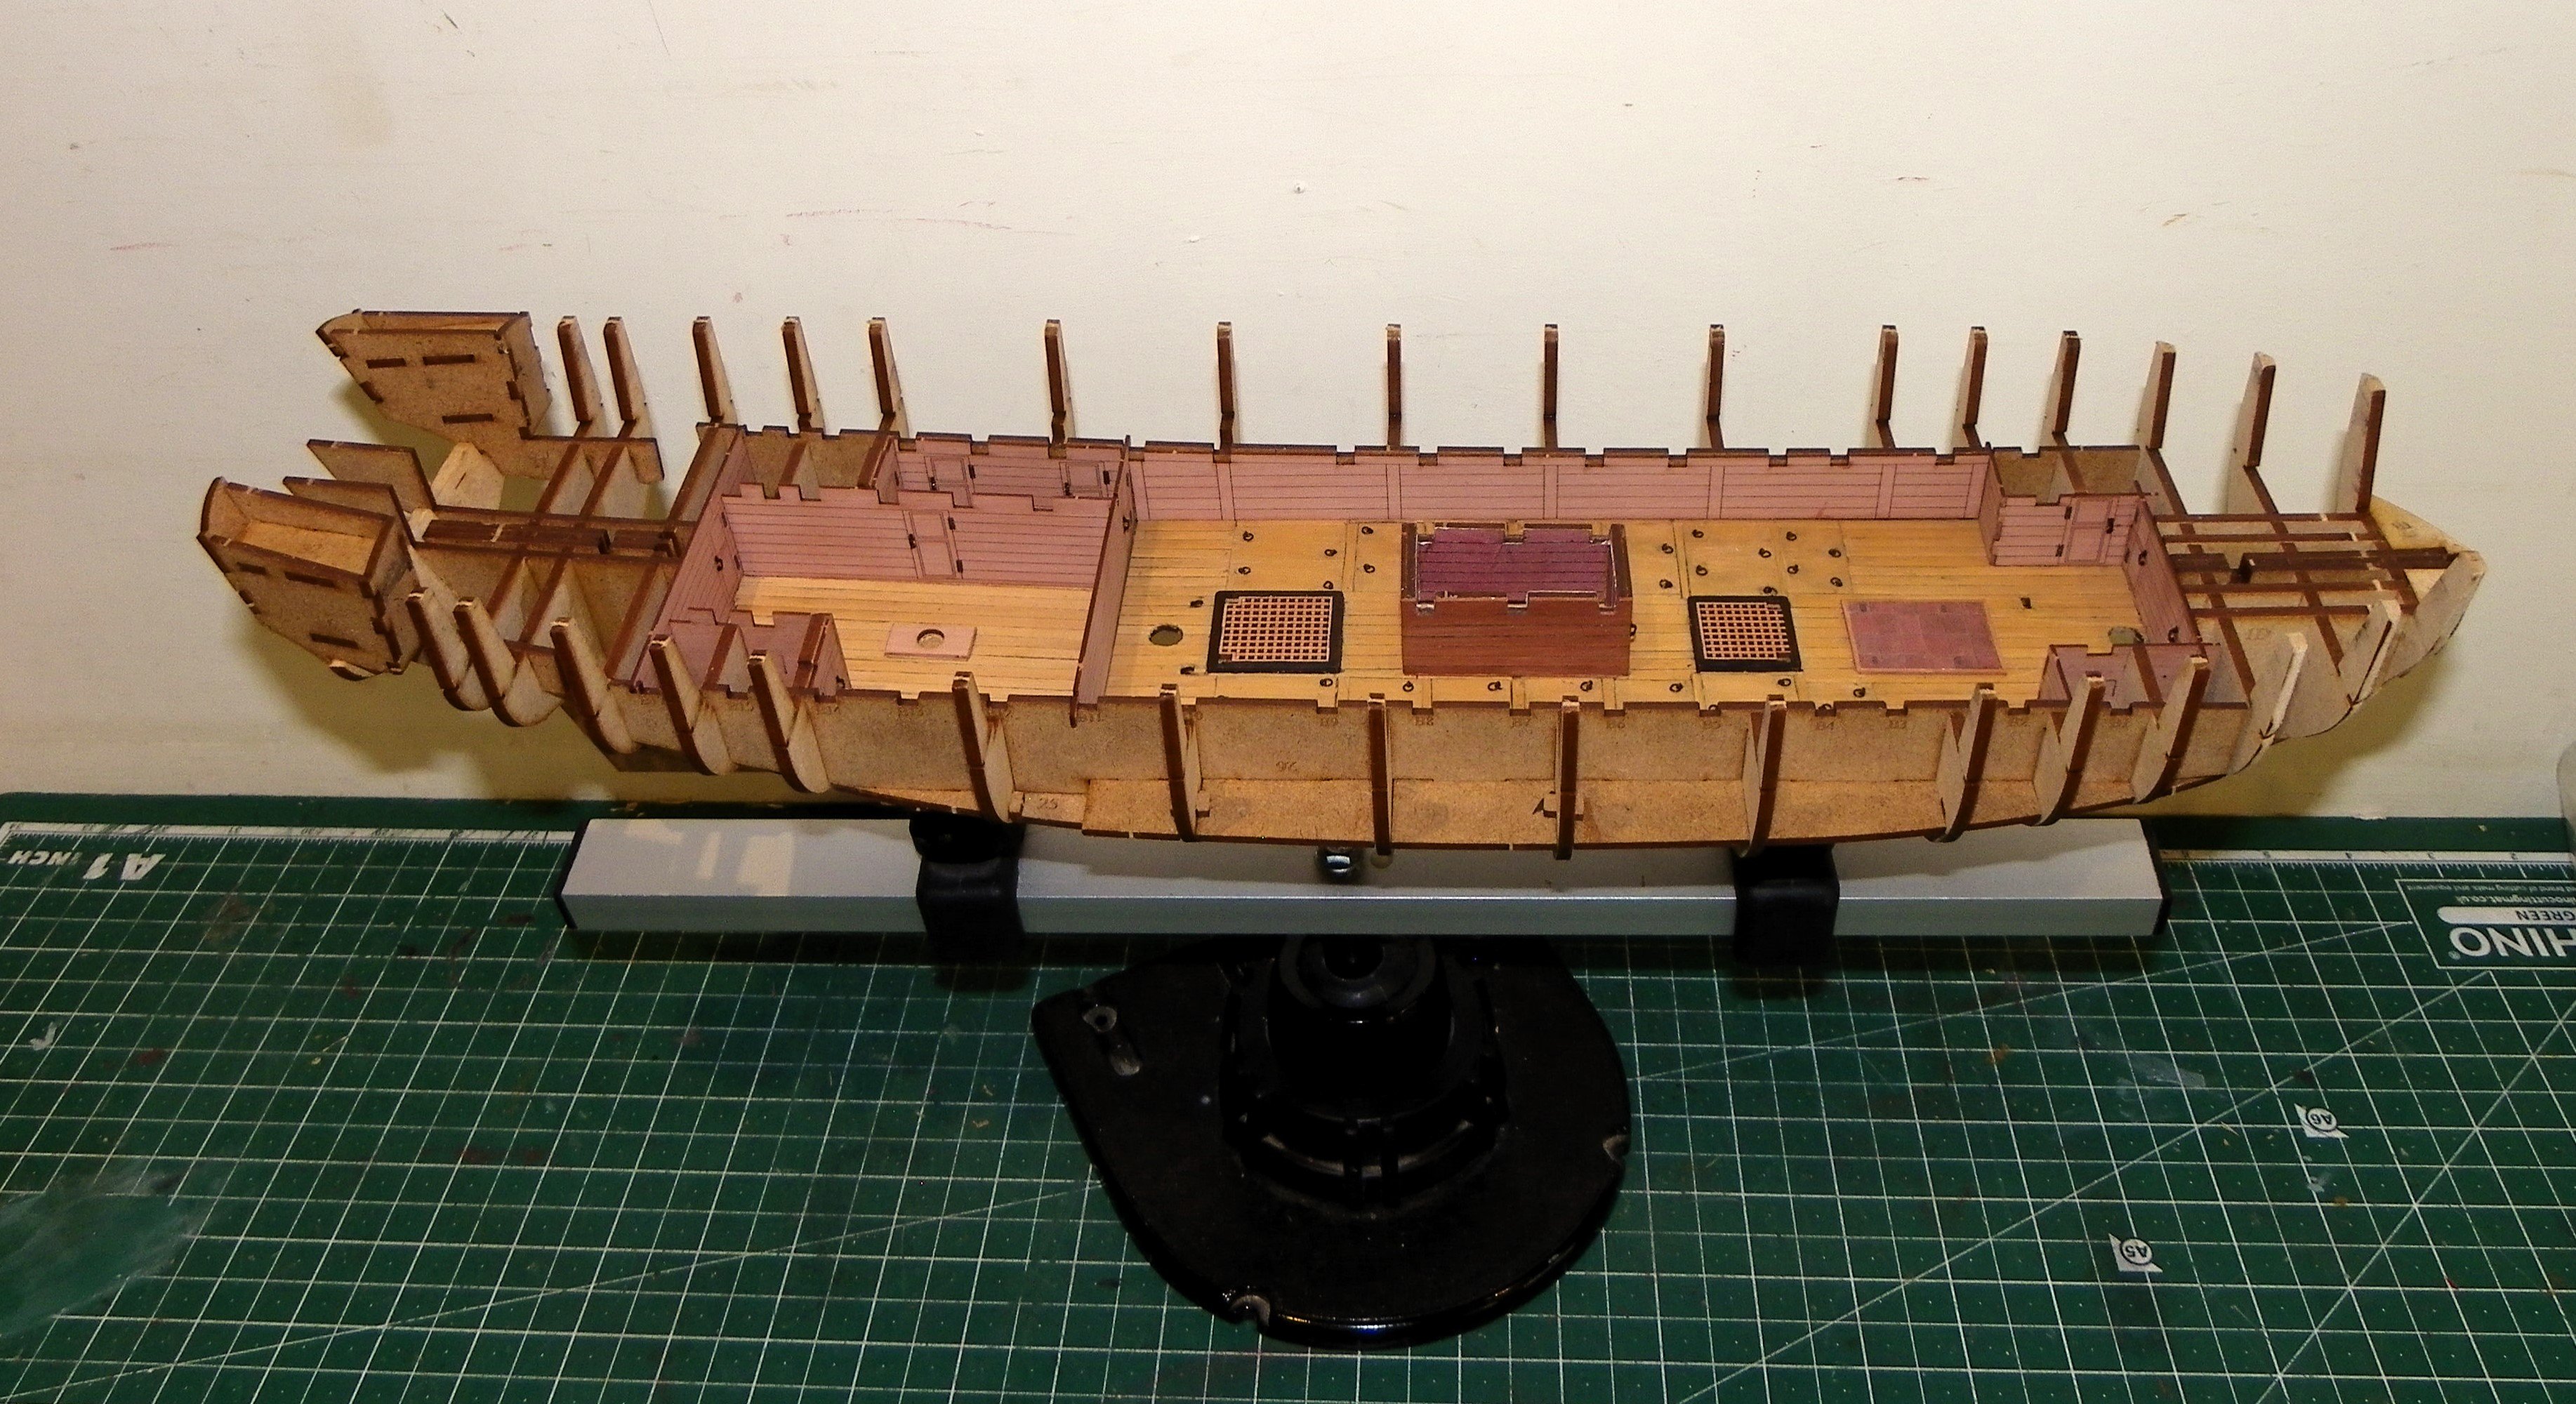
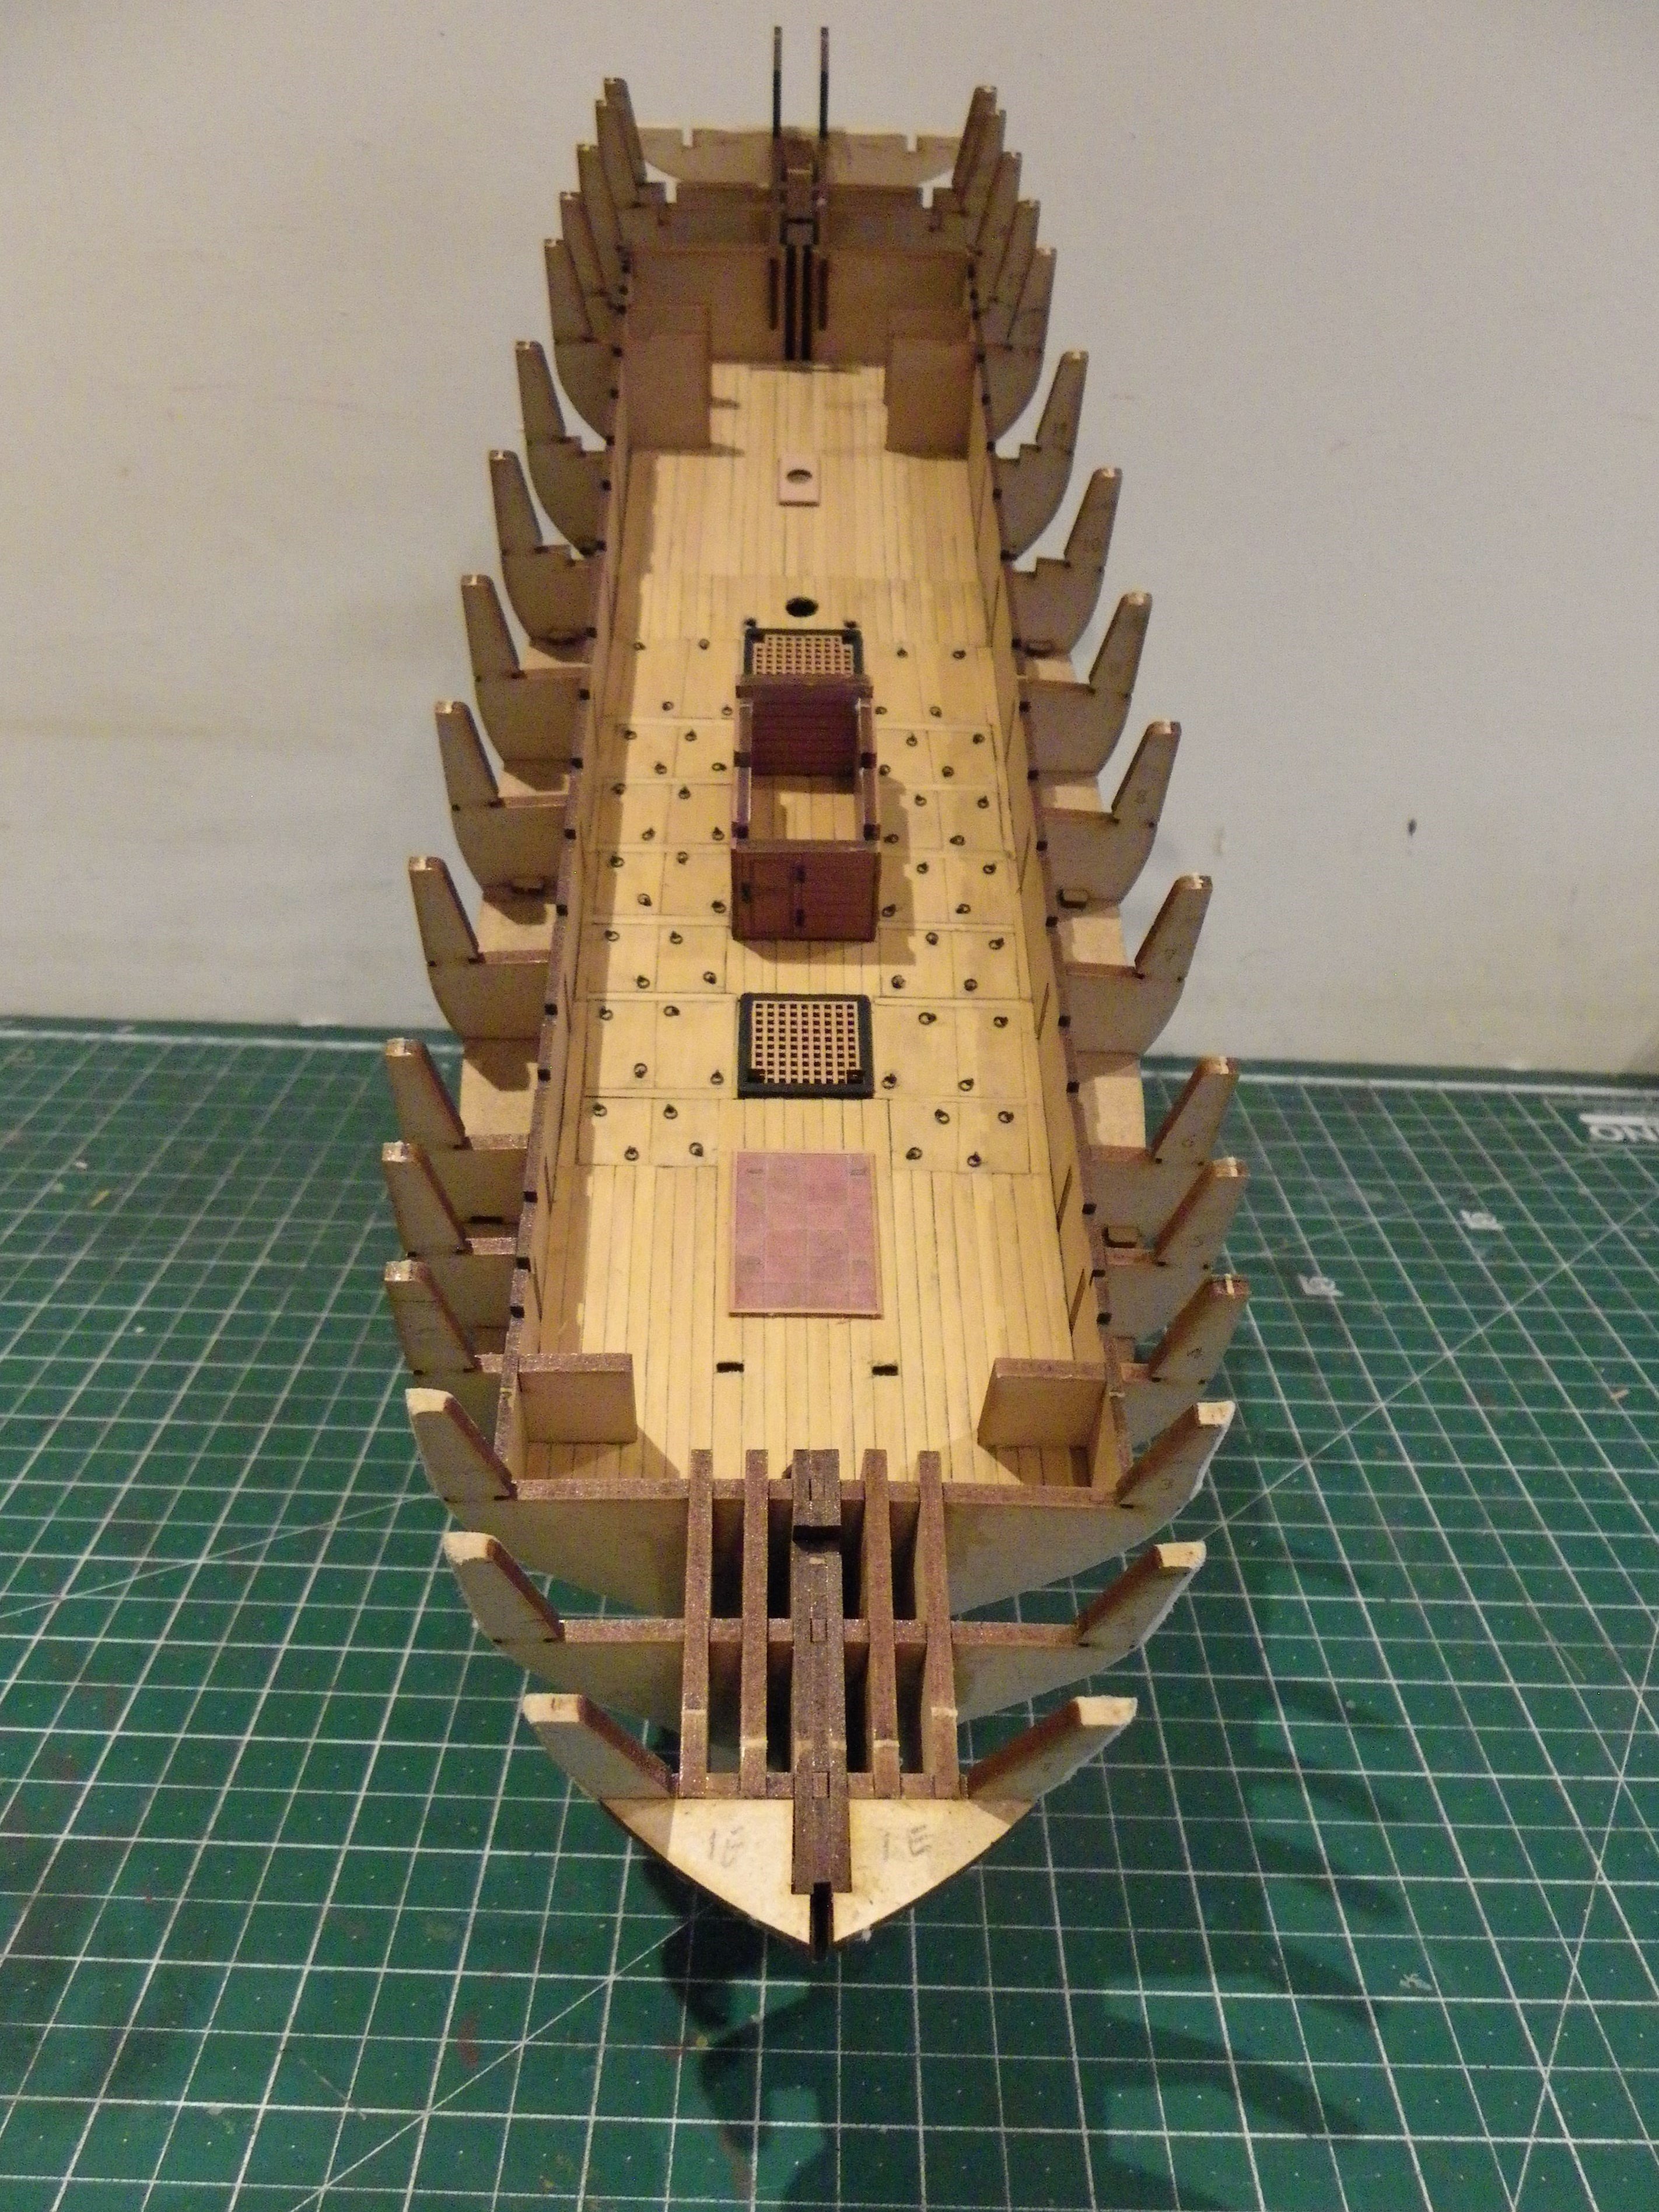
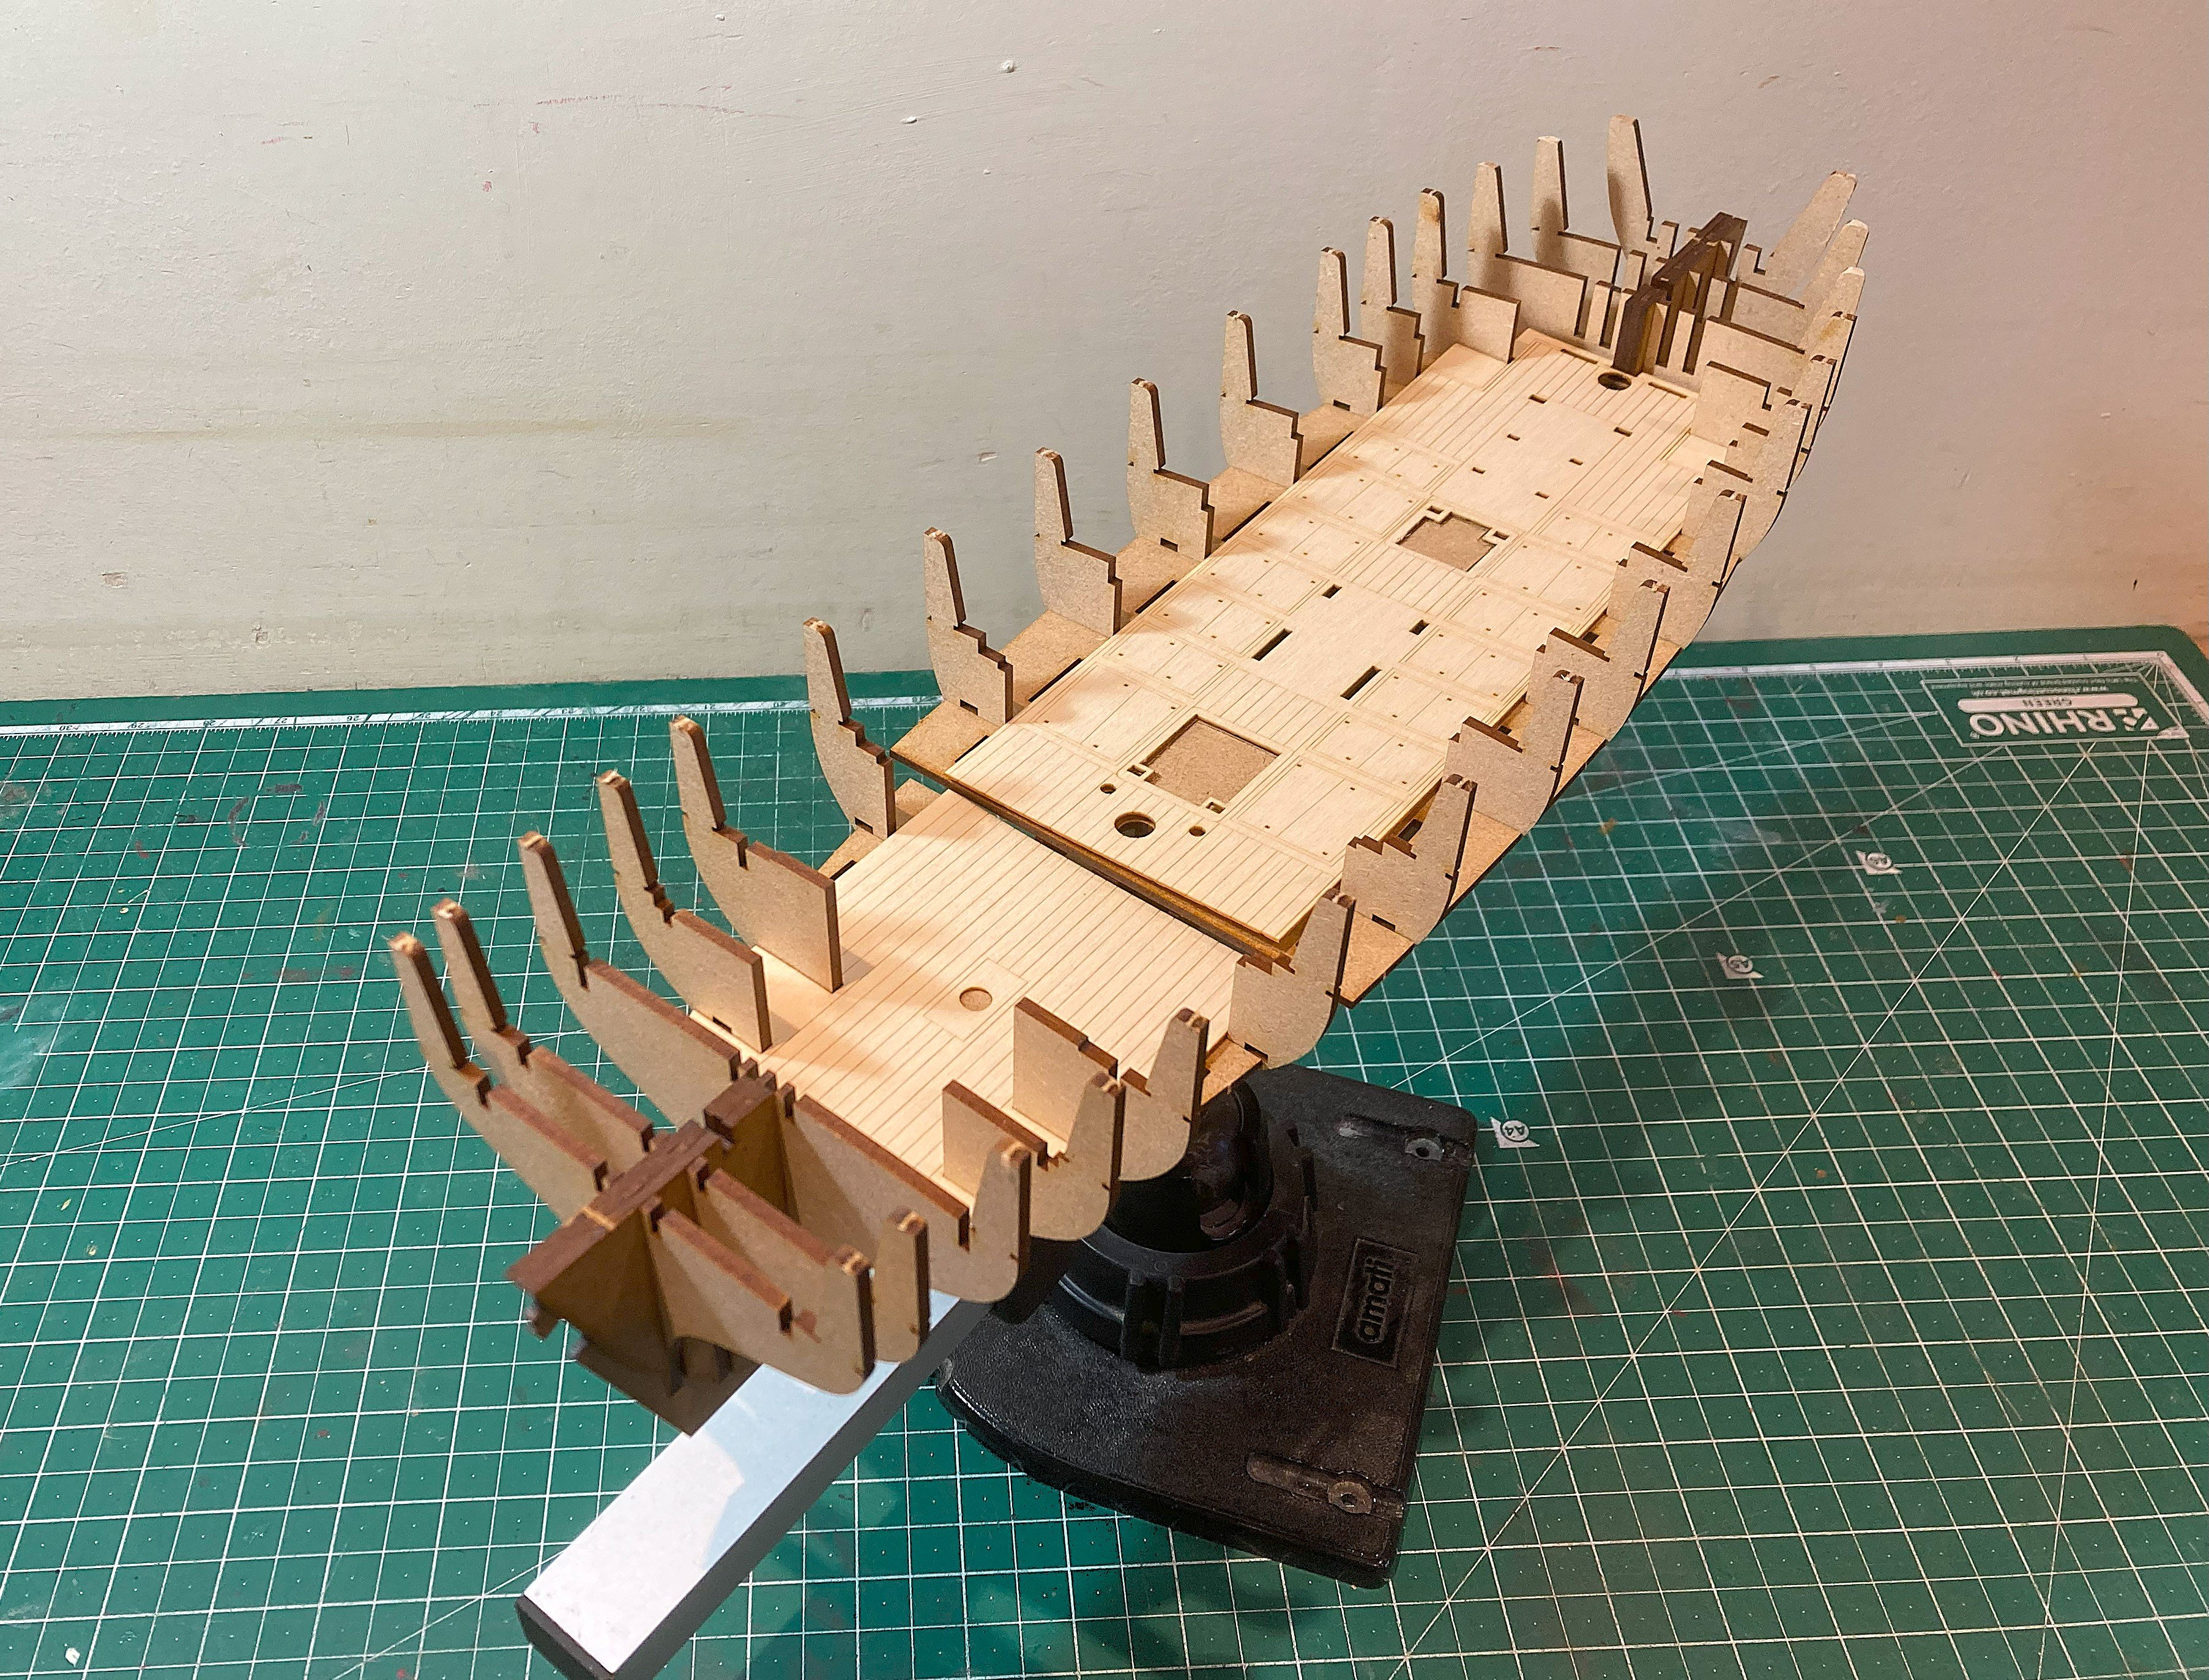
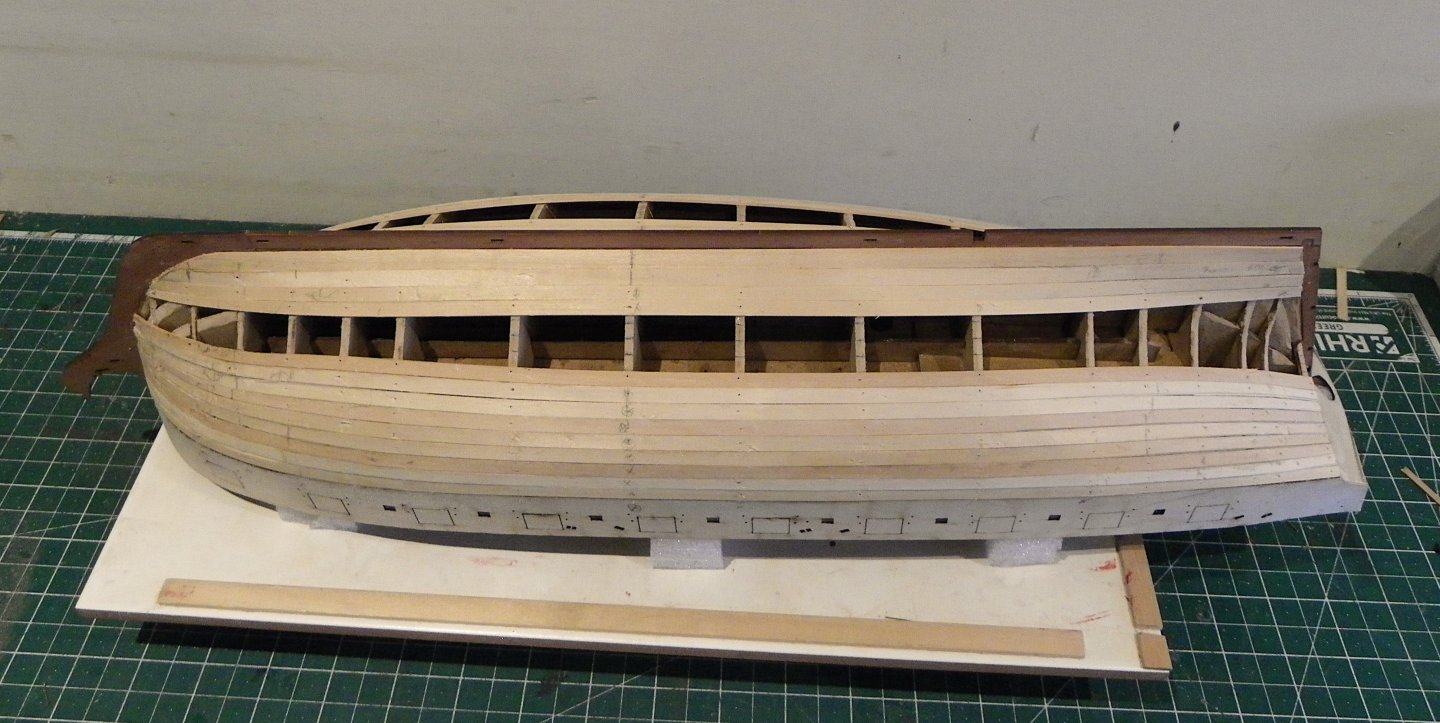
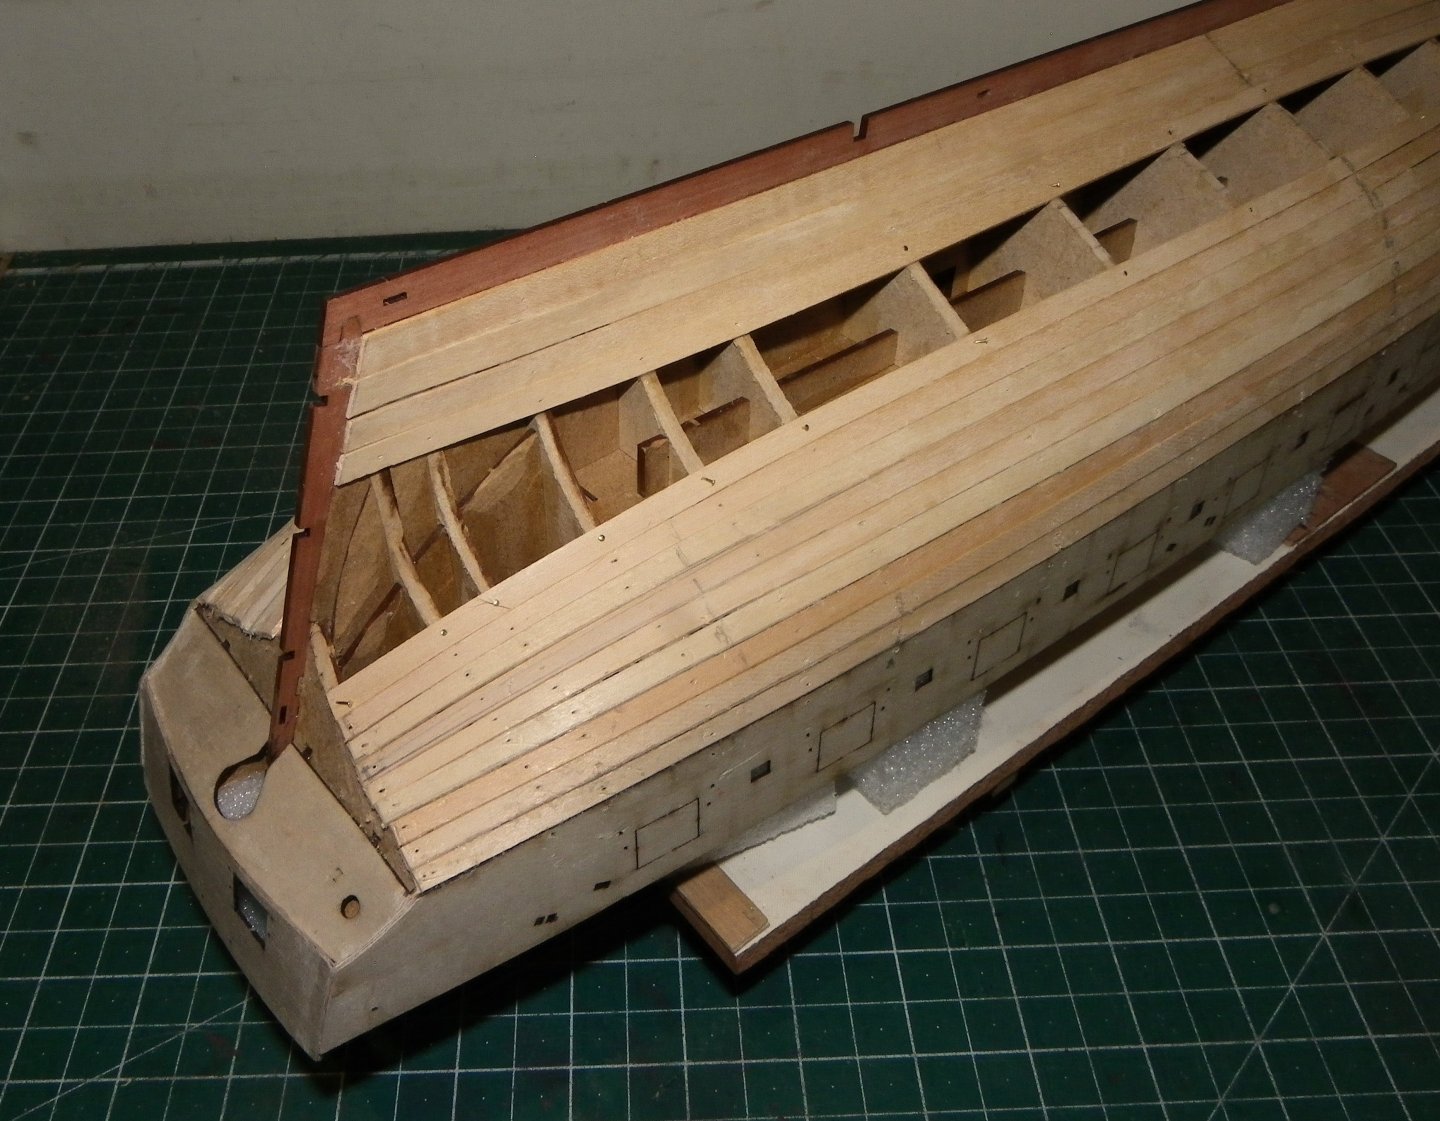
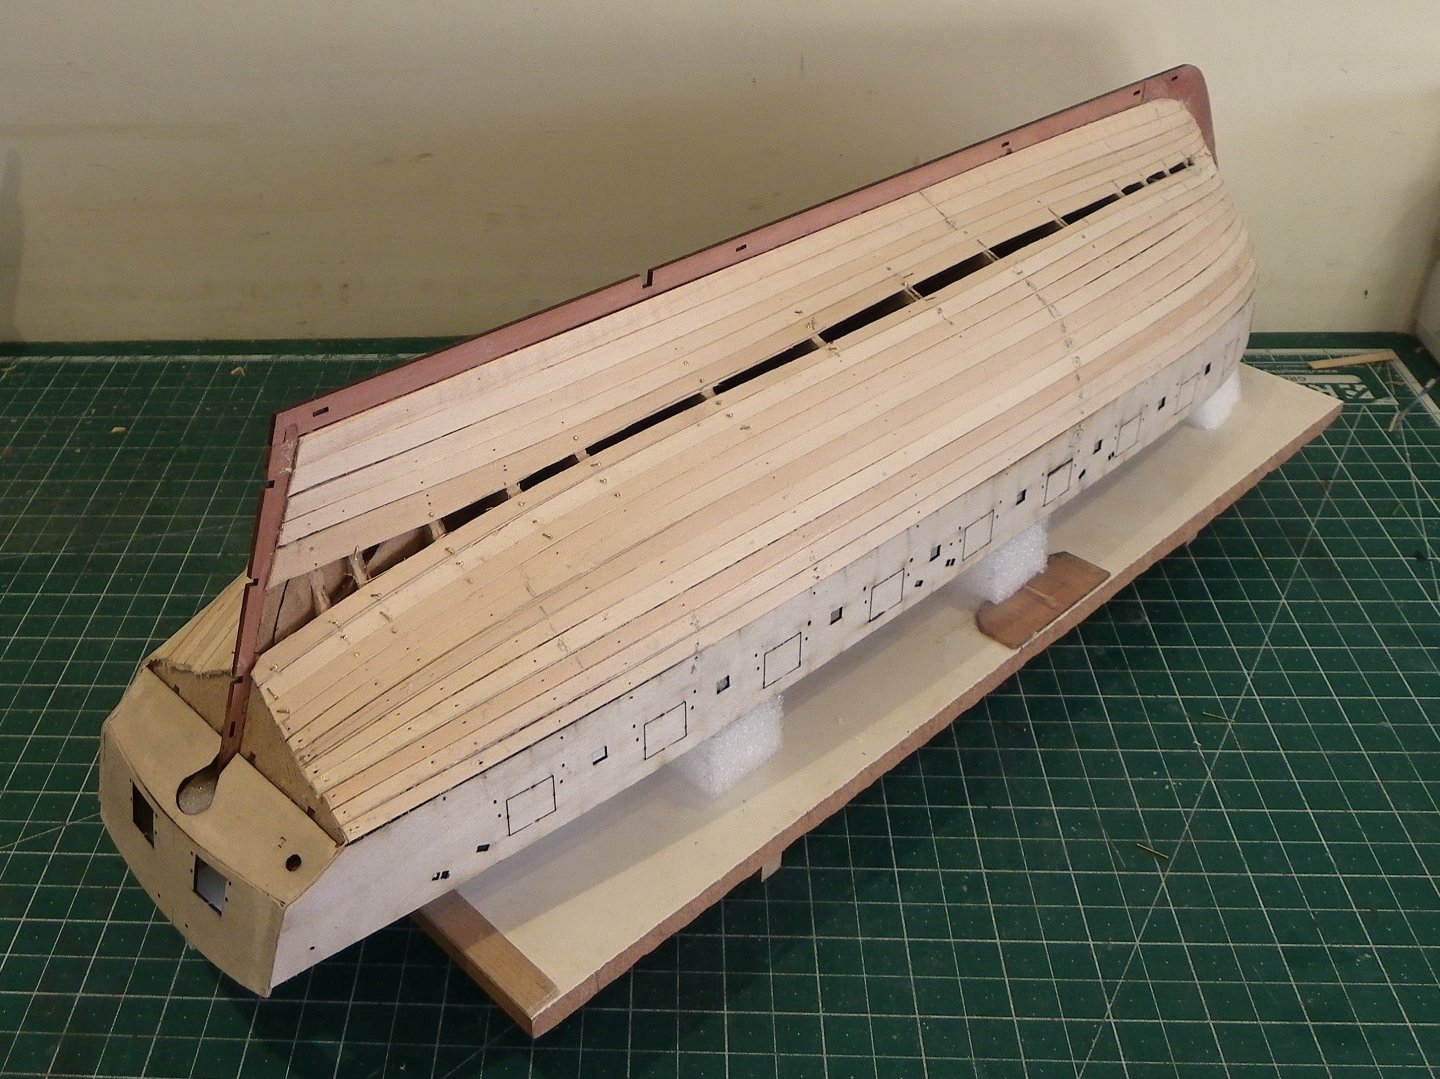
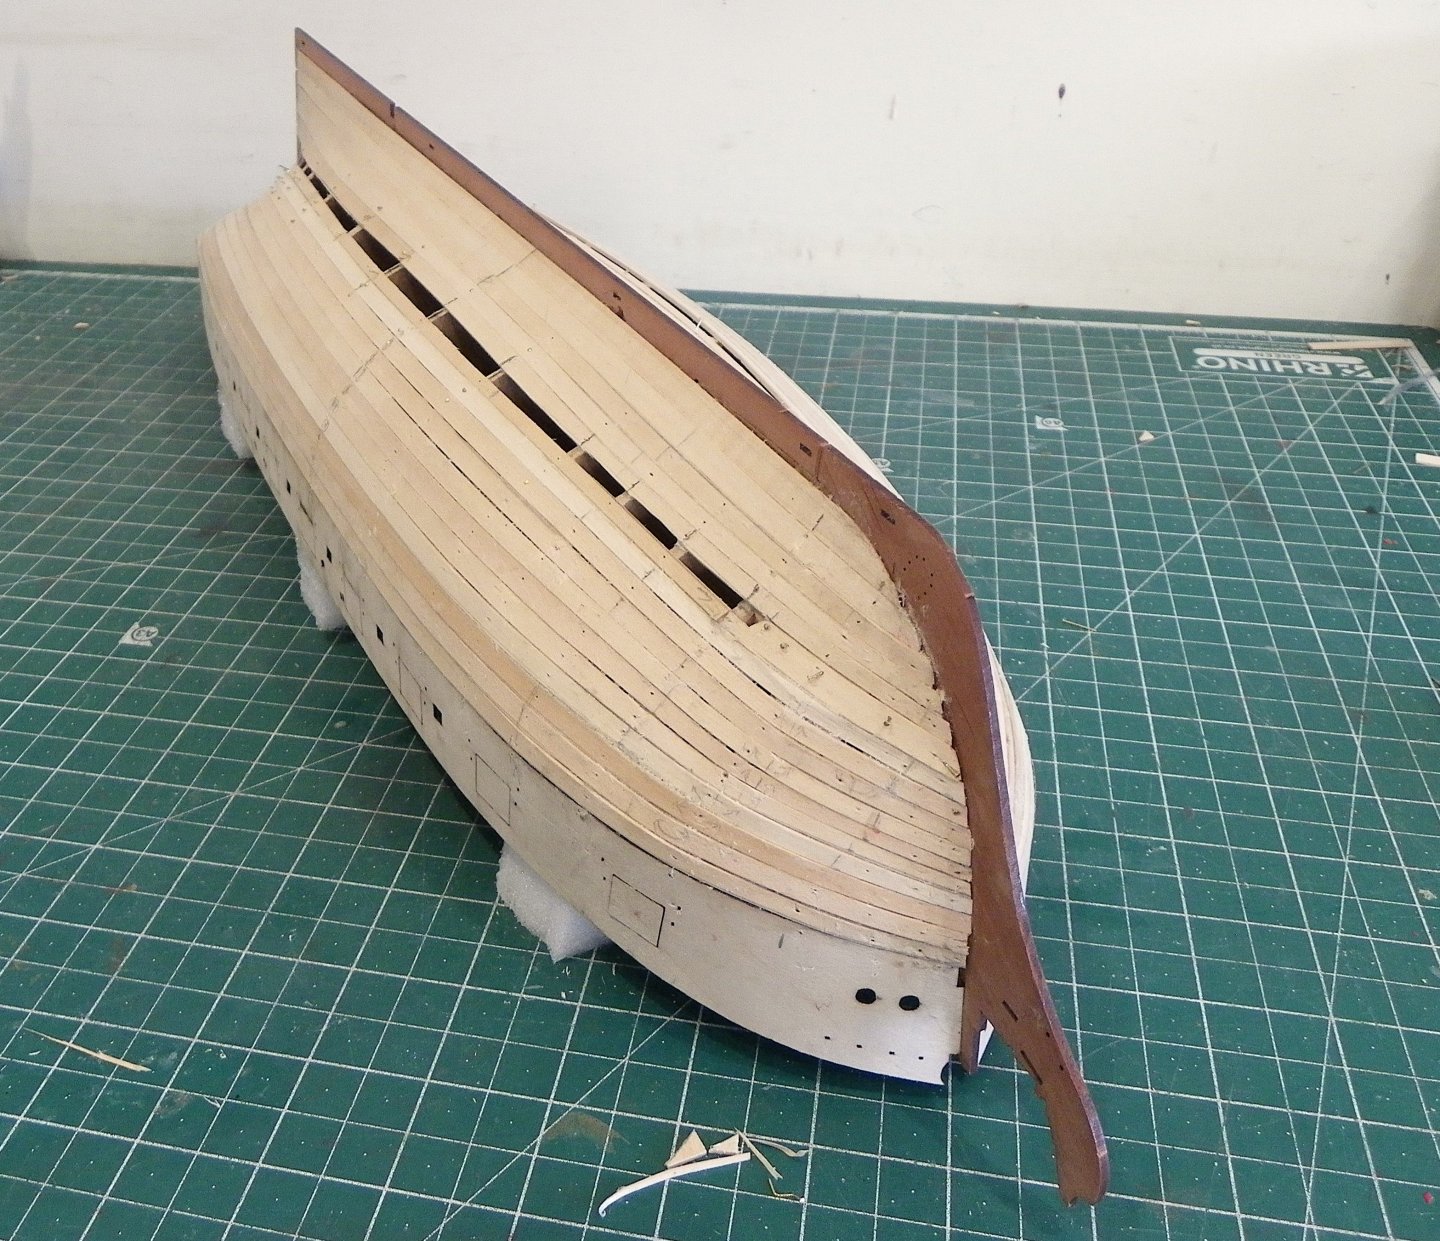
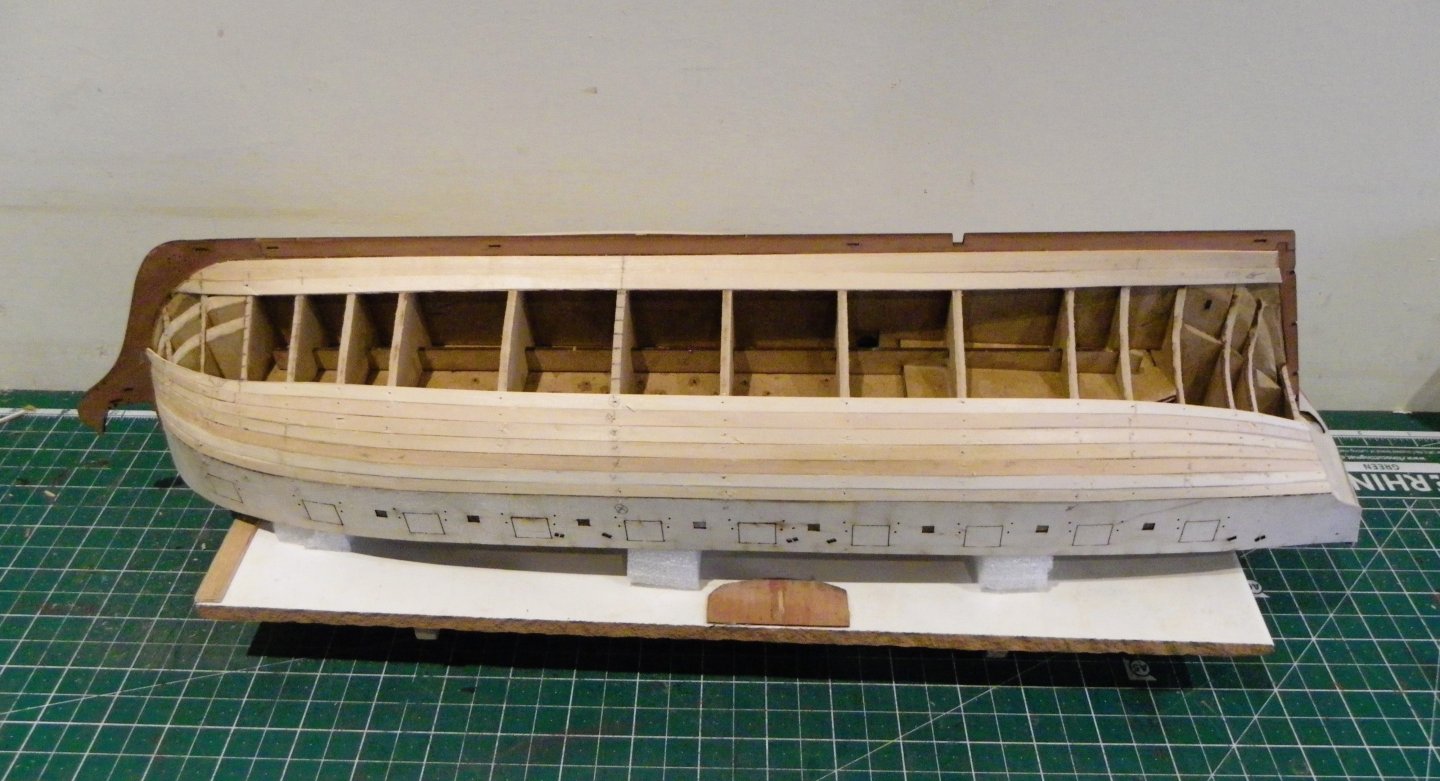
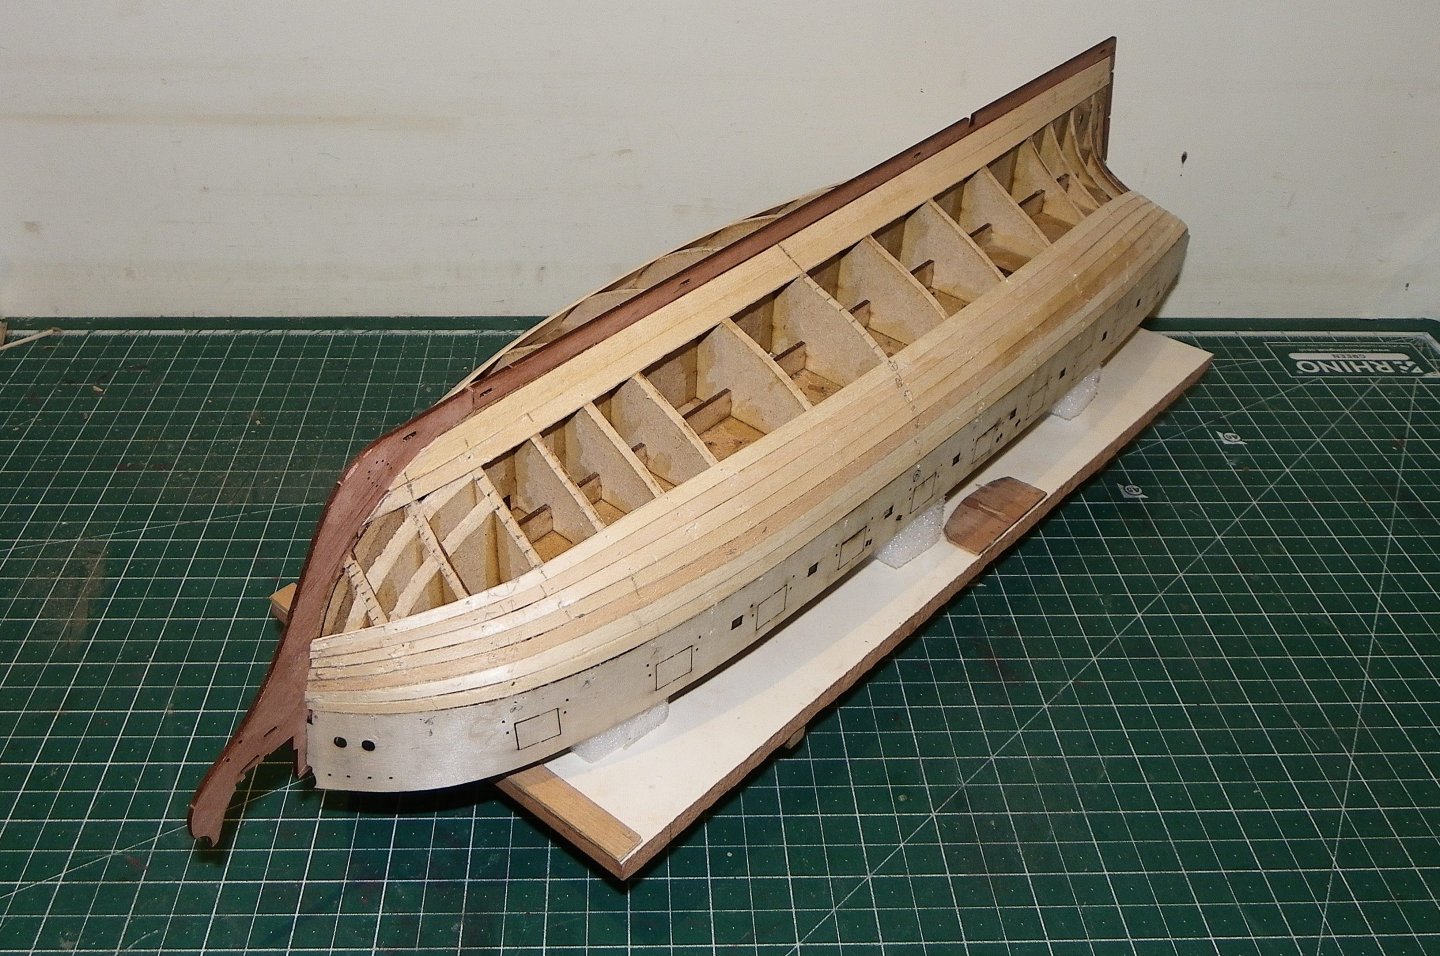
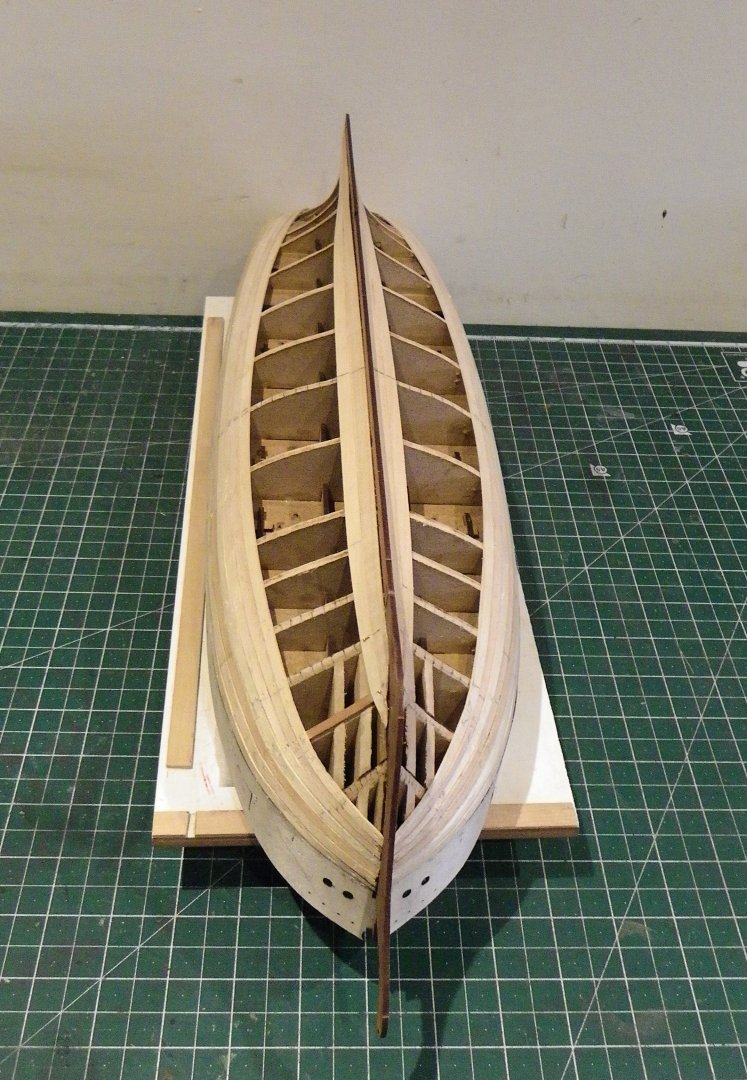
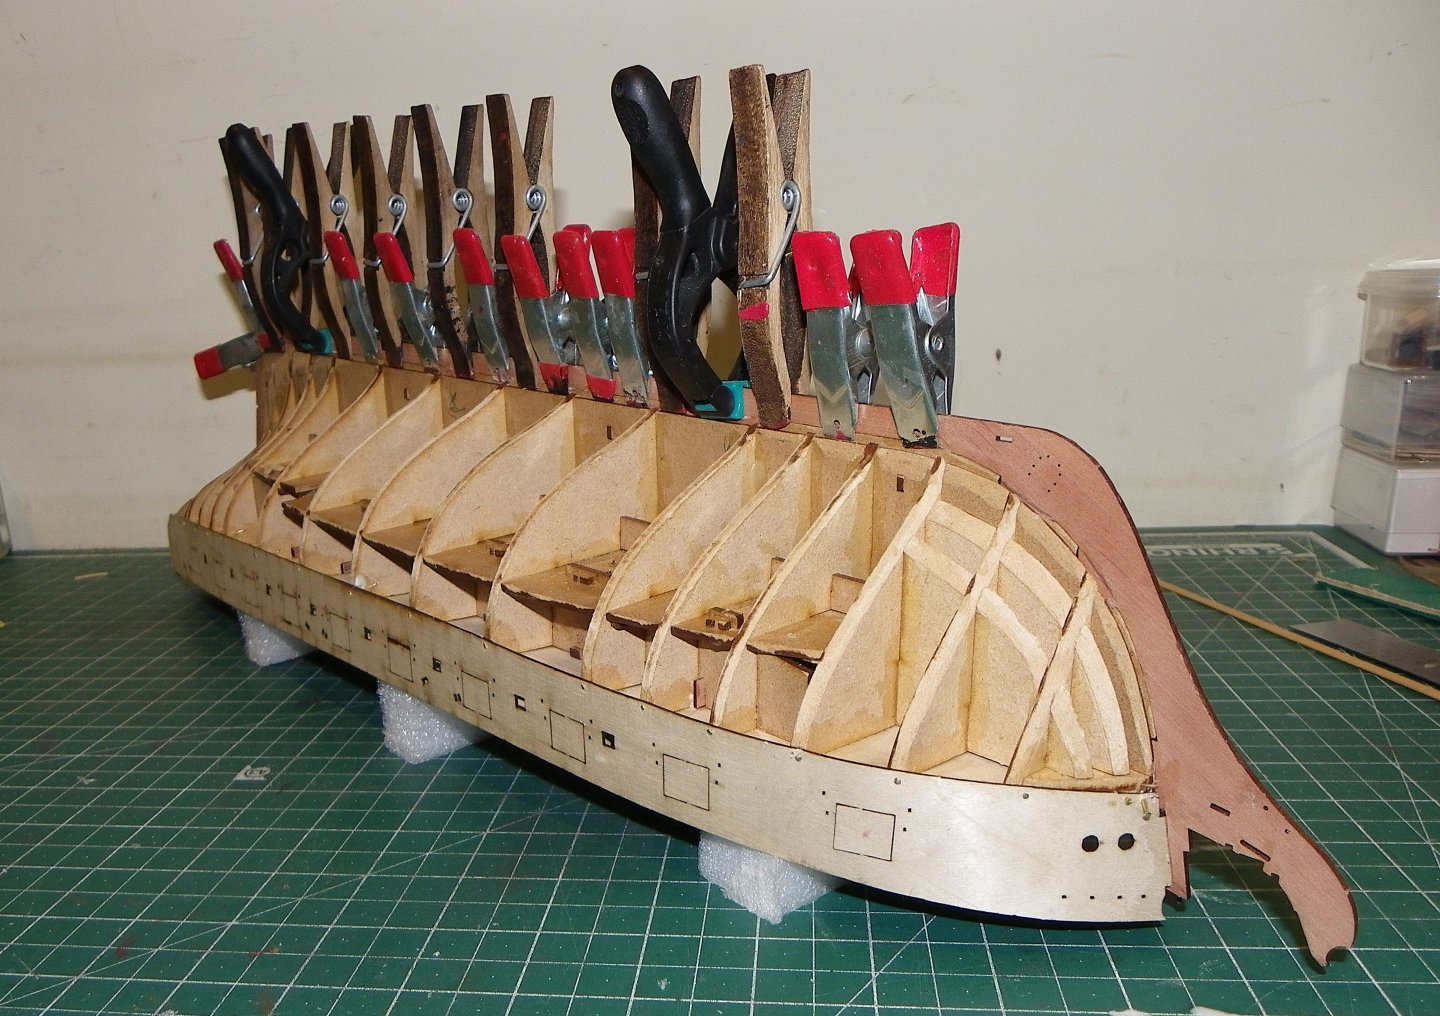
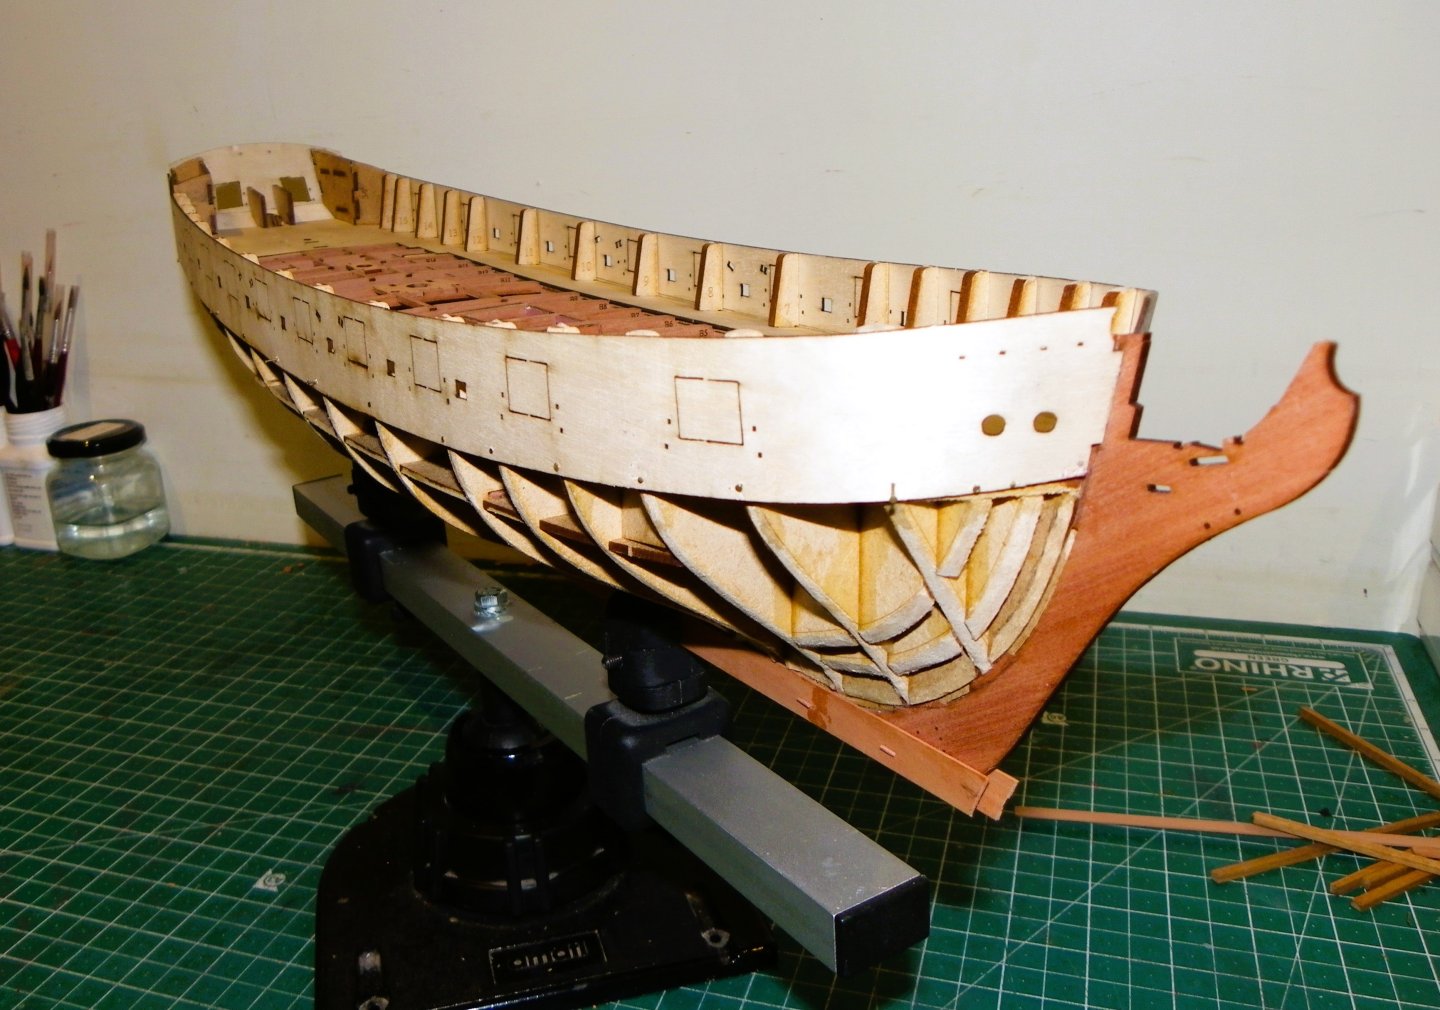
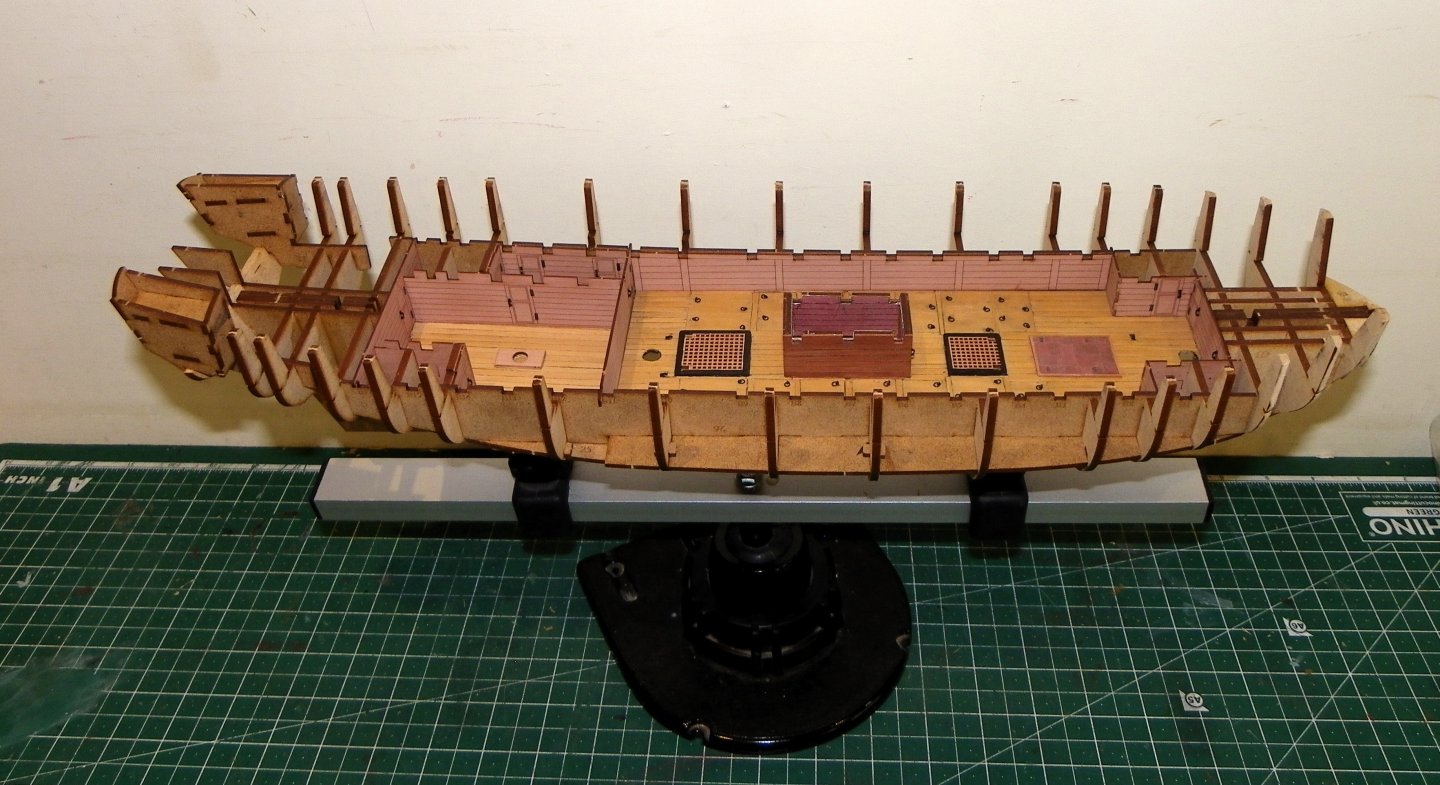
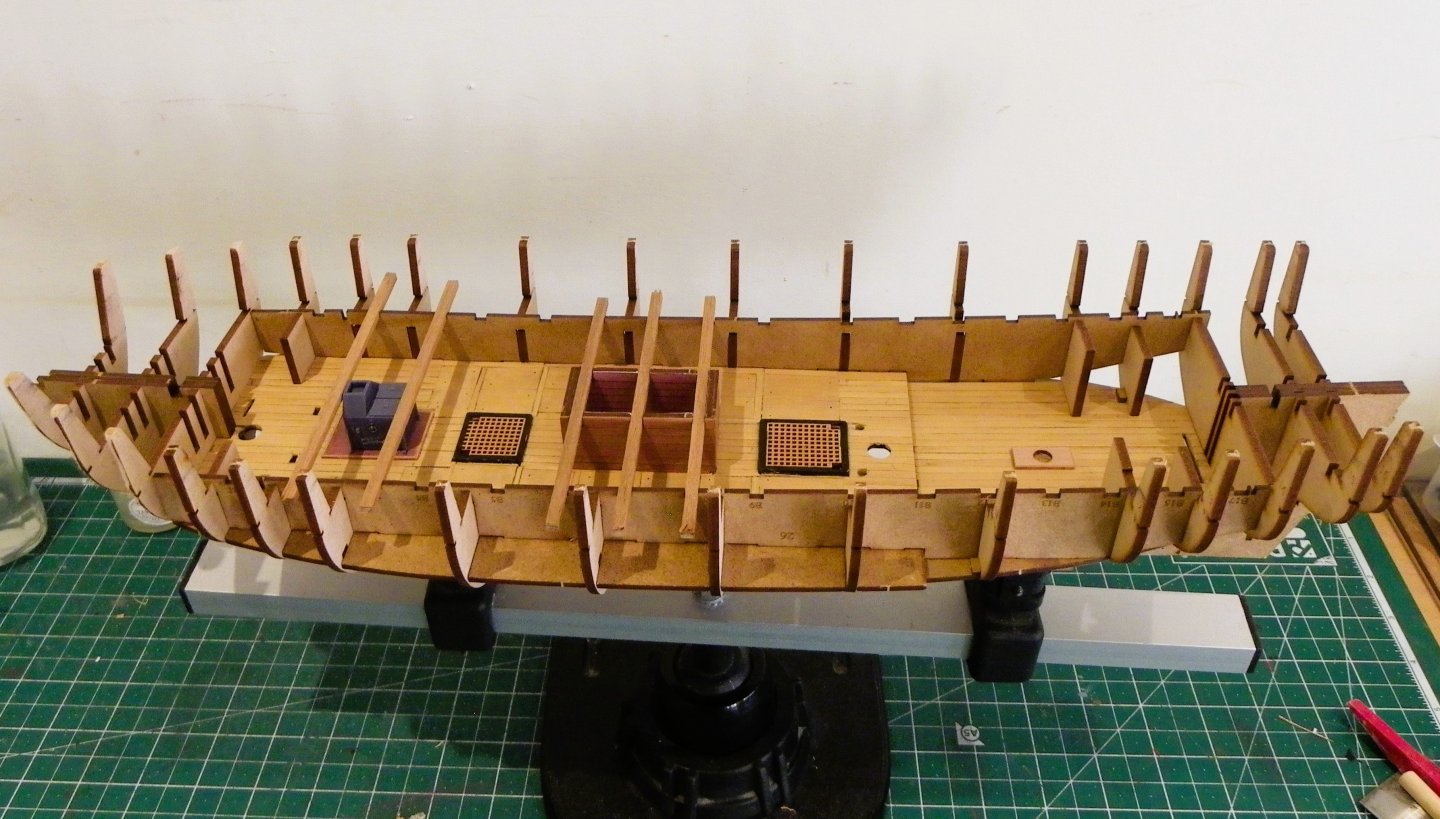
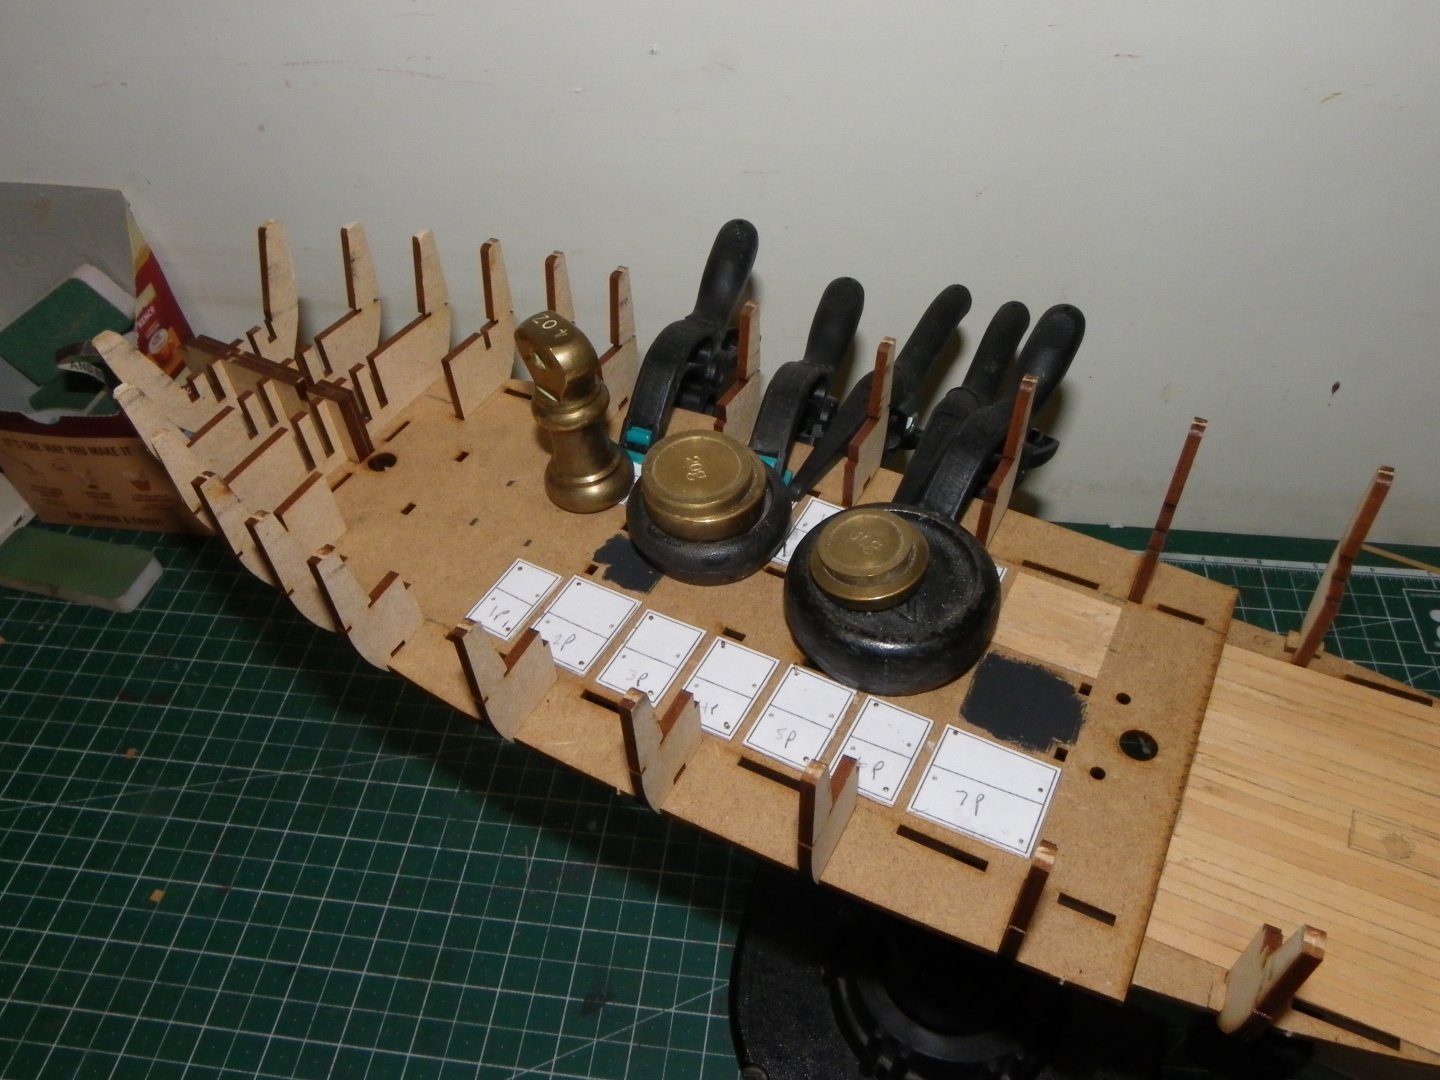
Post 15 Completion of first planking I am now planking alternate strakes from wale down and keel up. 071 My usual approach is to get a final spiled plank beneath the round of the hull. 078 As I proceed, I can see that the stern area would require more planks than the standard 5mm midships planks, resulting in the need of several stealers to fill in. As it turned out I‘ve needed to adopt a combination of techniques to get the hull planked. Tapering, Edge bending, spiling, drop planks, and even a stealer at the stern. 086 088 I used a drop plank at this point. 090 091 096 093 The final piece of the jigsaw is a stealer and the first planking is complete. 097 Note; the stealer doesn’t end in a point but is squared off and cut into the adjoining planks against a frame. Not critical on a first layer, but it should be the arrangement on a show layer should stealers be required. 0100 I am fairly well content at this point, not an arrangement I would accept as a single planking display, but as a base for the second Hardwood layer it is fine. 0104 I am pleased to note that even at this rough stage the hull conforms well to the build cradle. Time to clean up the hull. B.E. 08/01/2025


- 332 replies
-
- 26
-

-
- Harpy
- Vanguard Models
- (and 1 more)
-
A wonderful, wonderful, build Glenn, beautiful beyond words. You are a true craftsman and artist. Regards, B.E.
- 840 replies
-
- 2
-
-
- winchelsea
- Syren Ship Model Company
- (and 1 more)
-
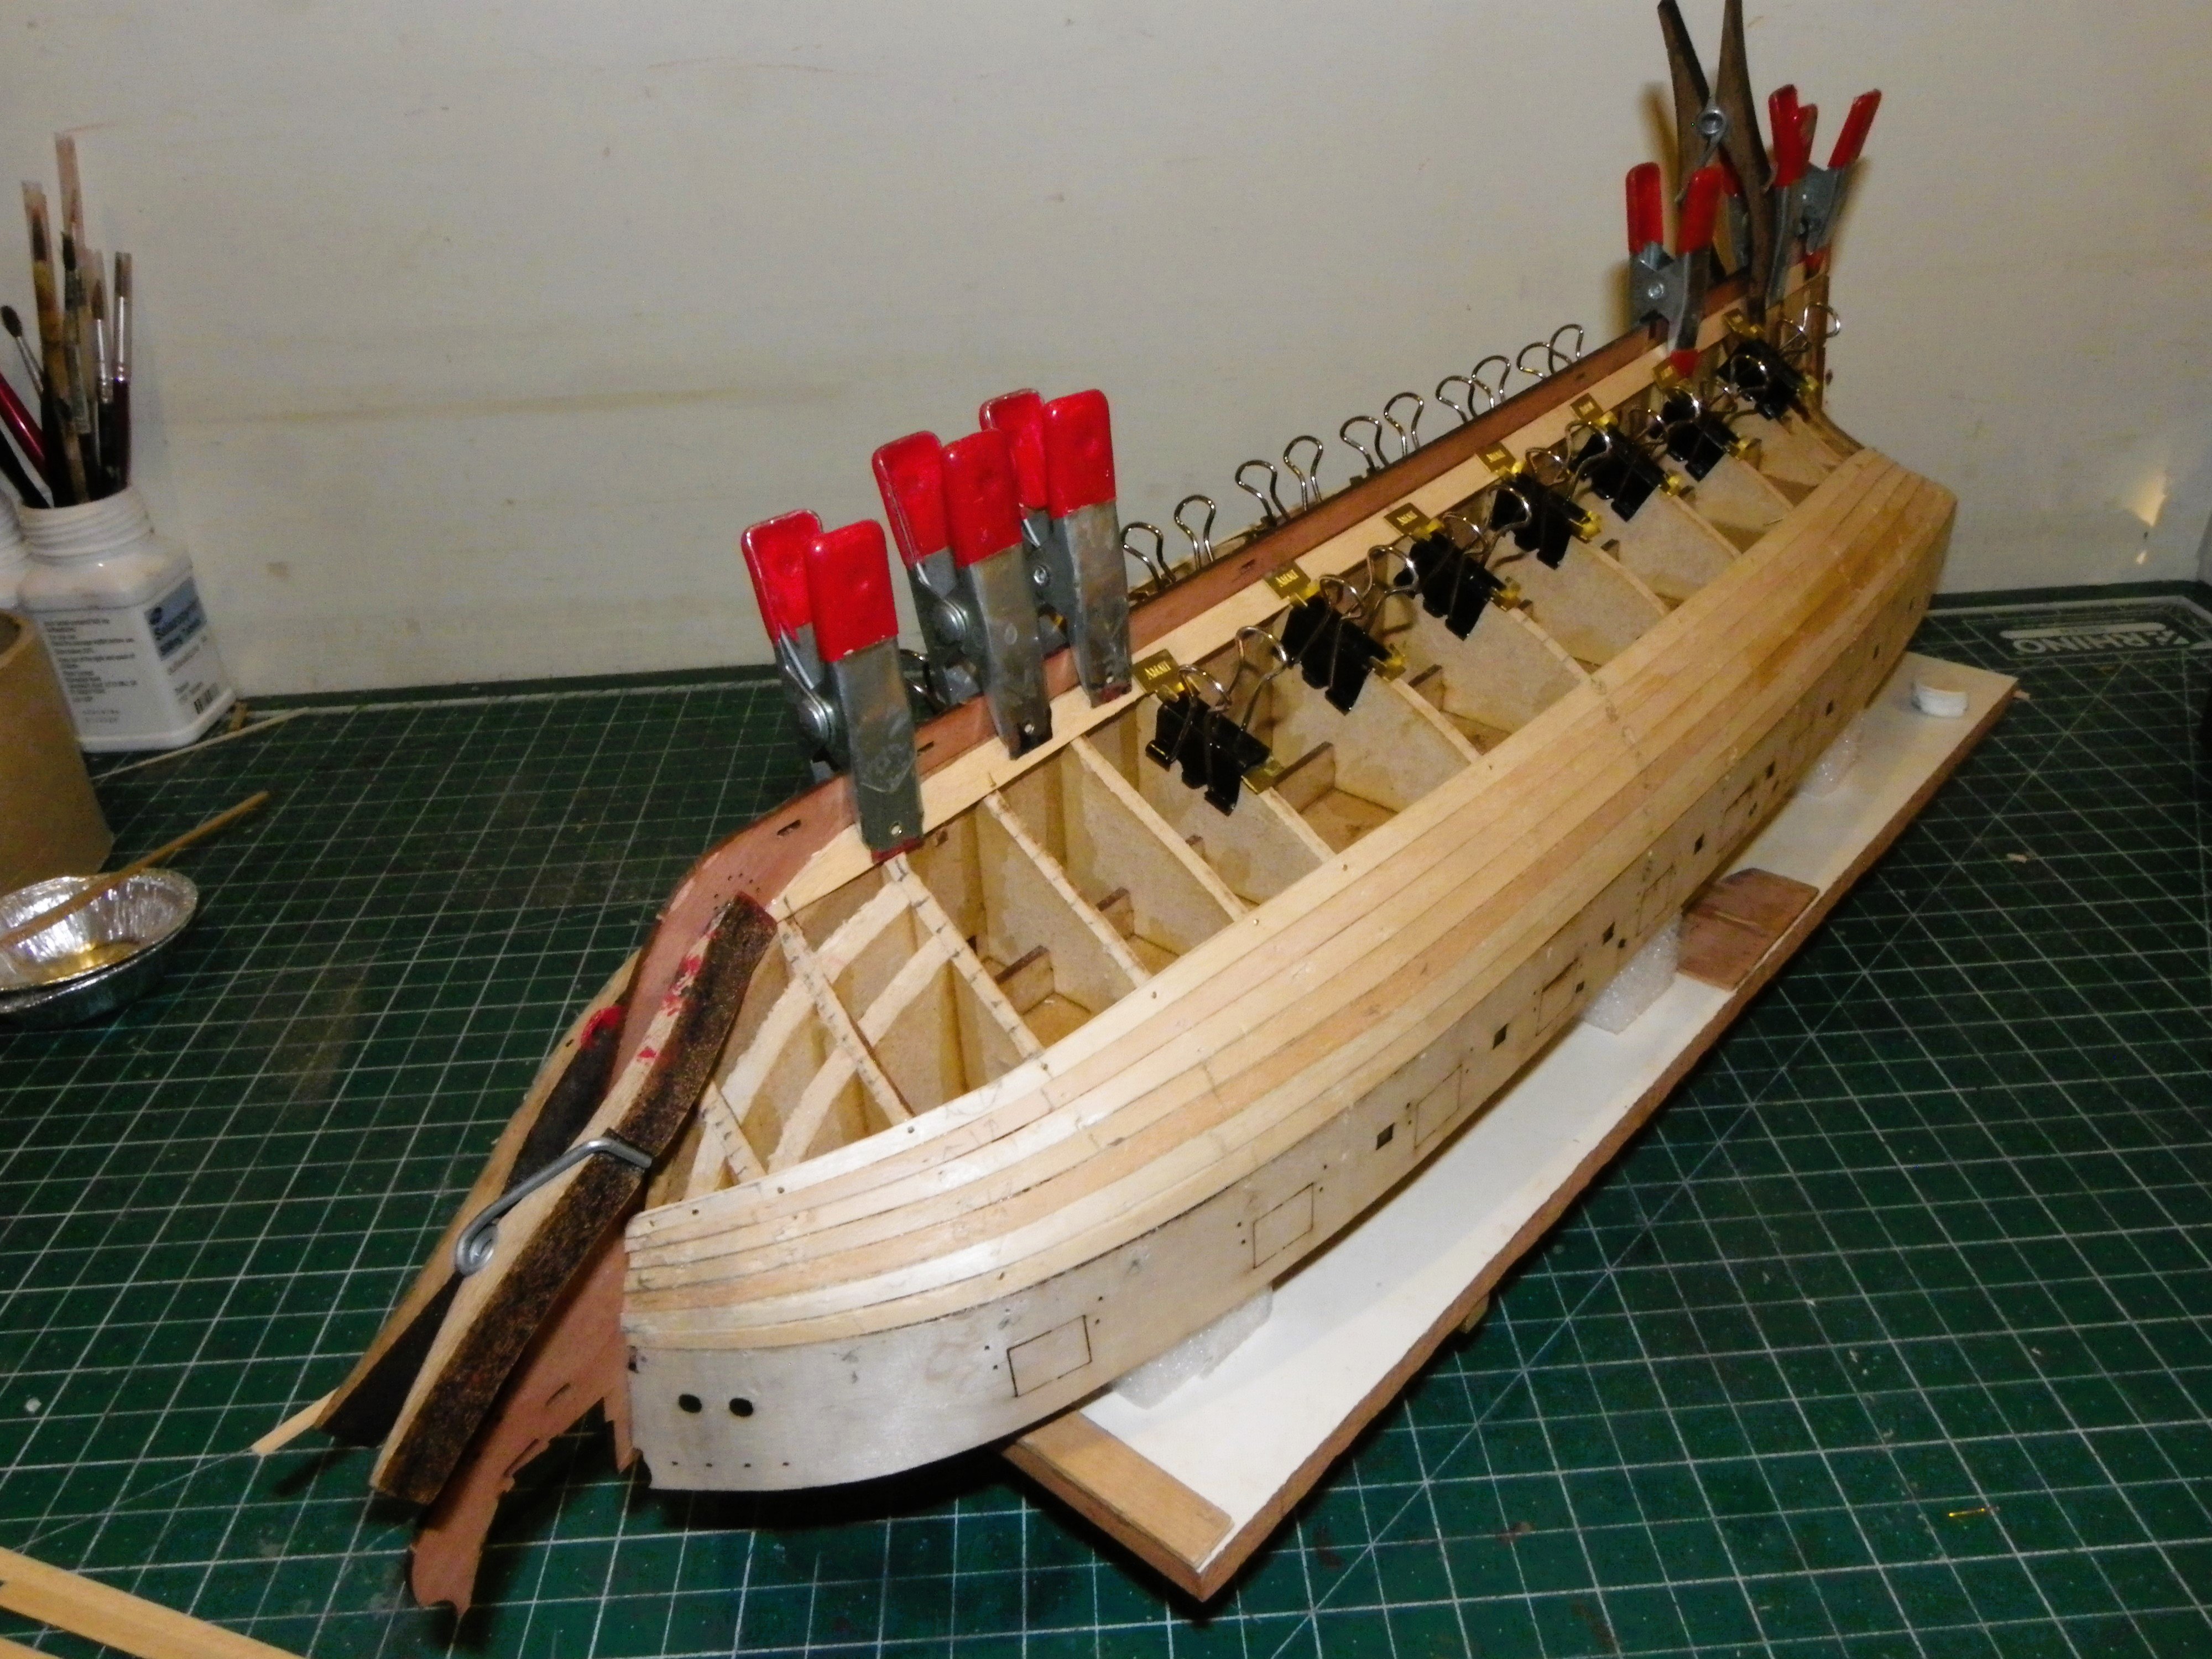
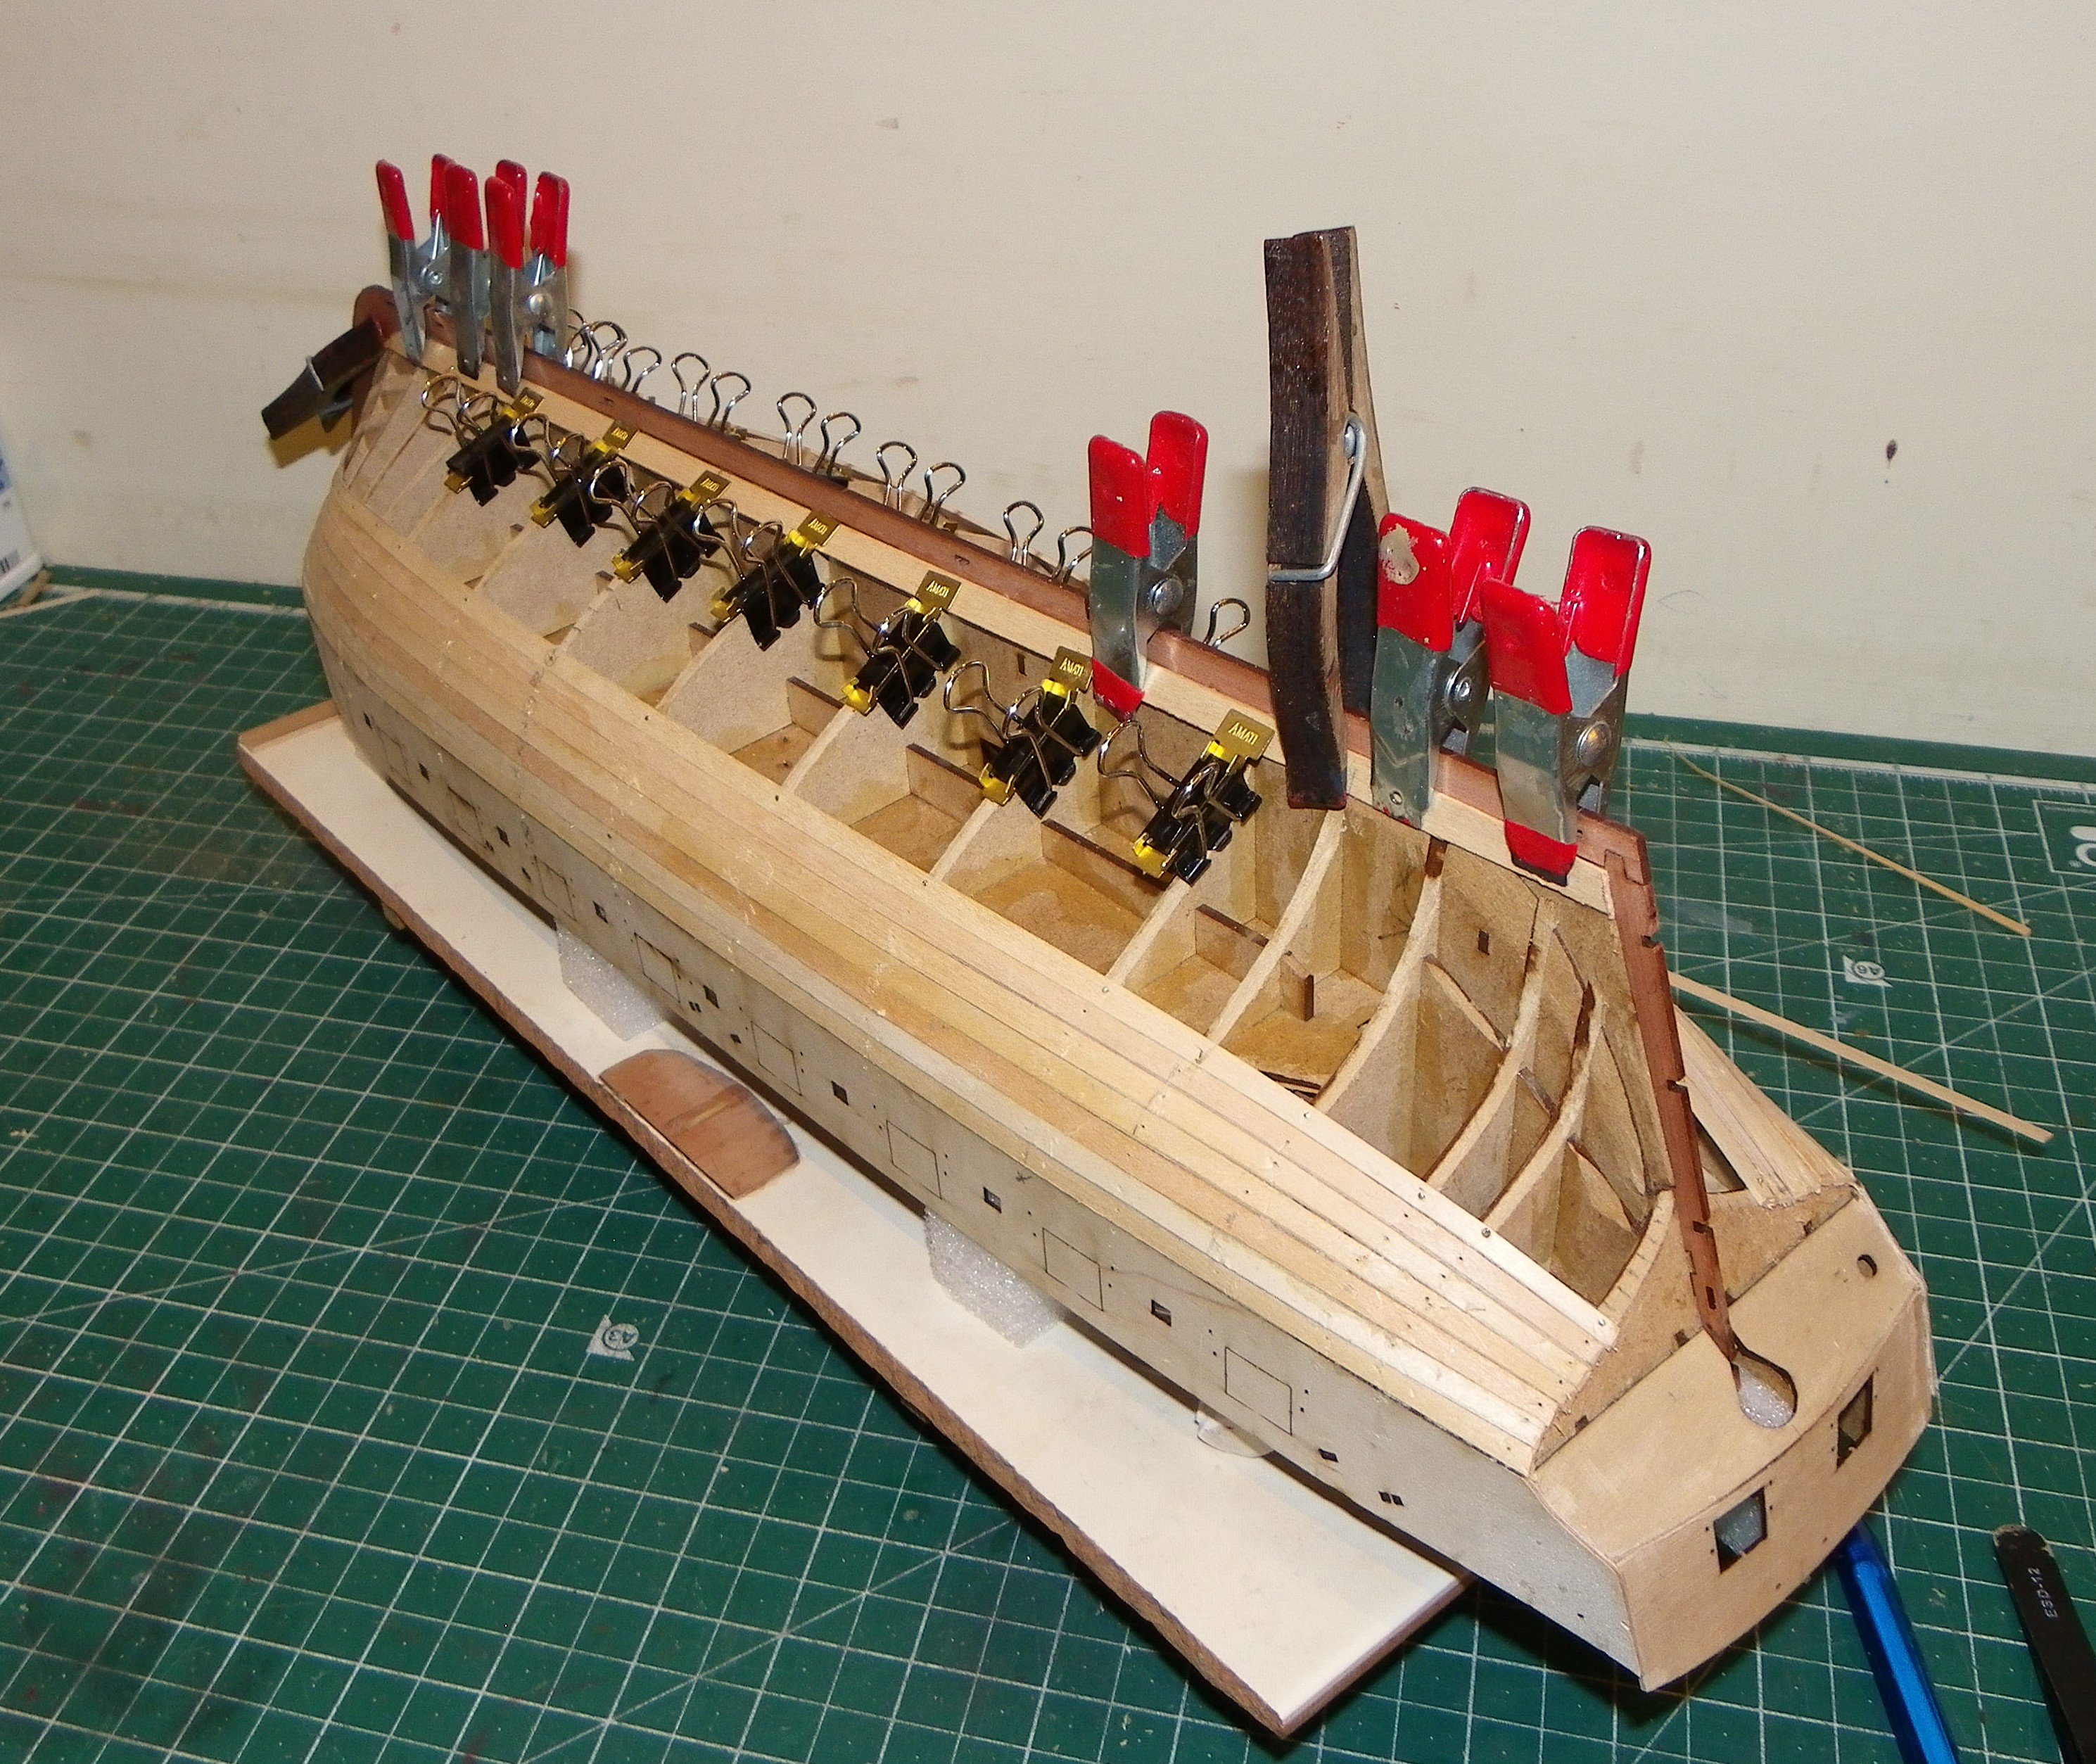
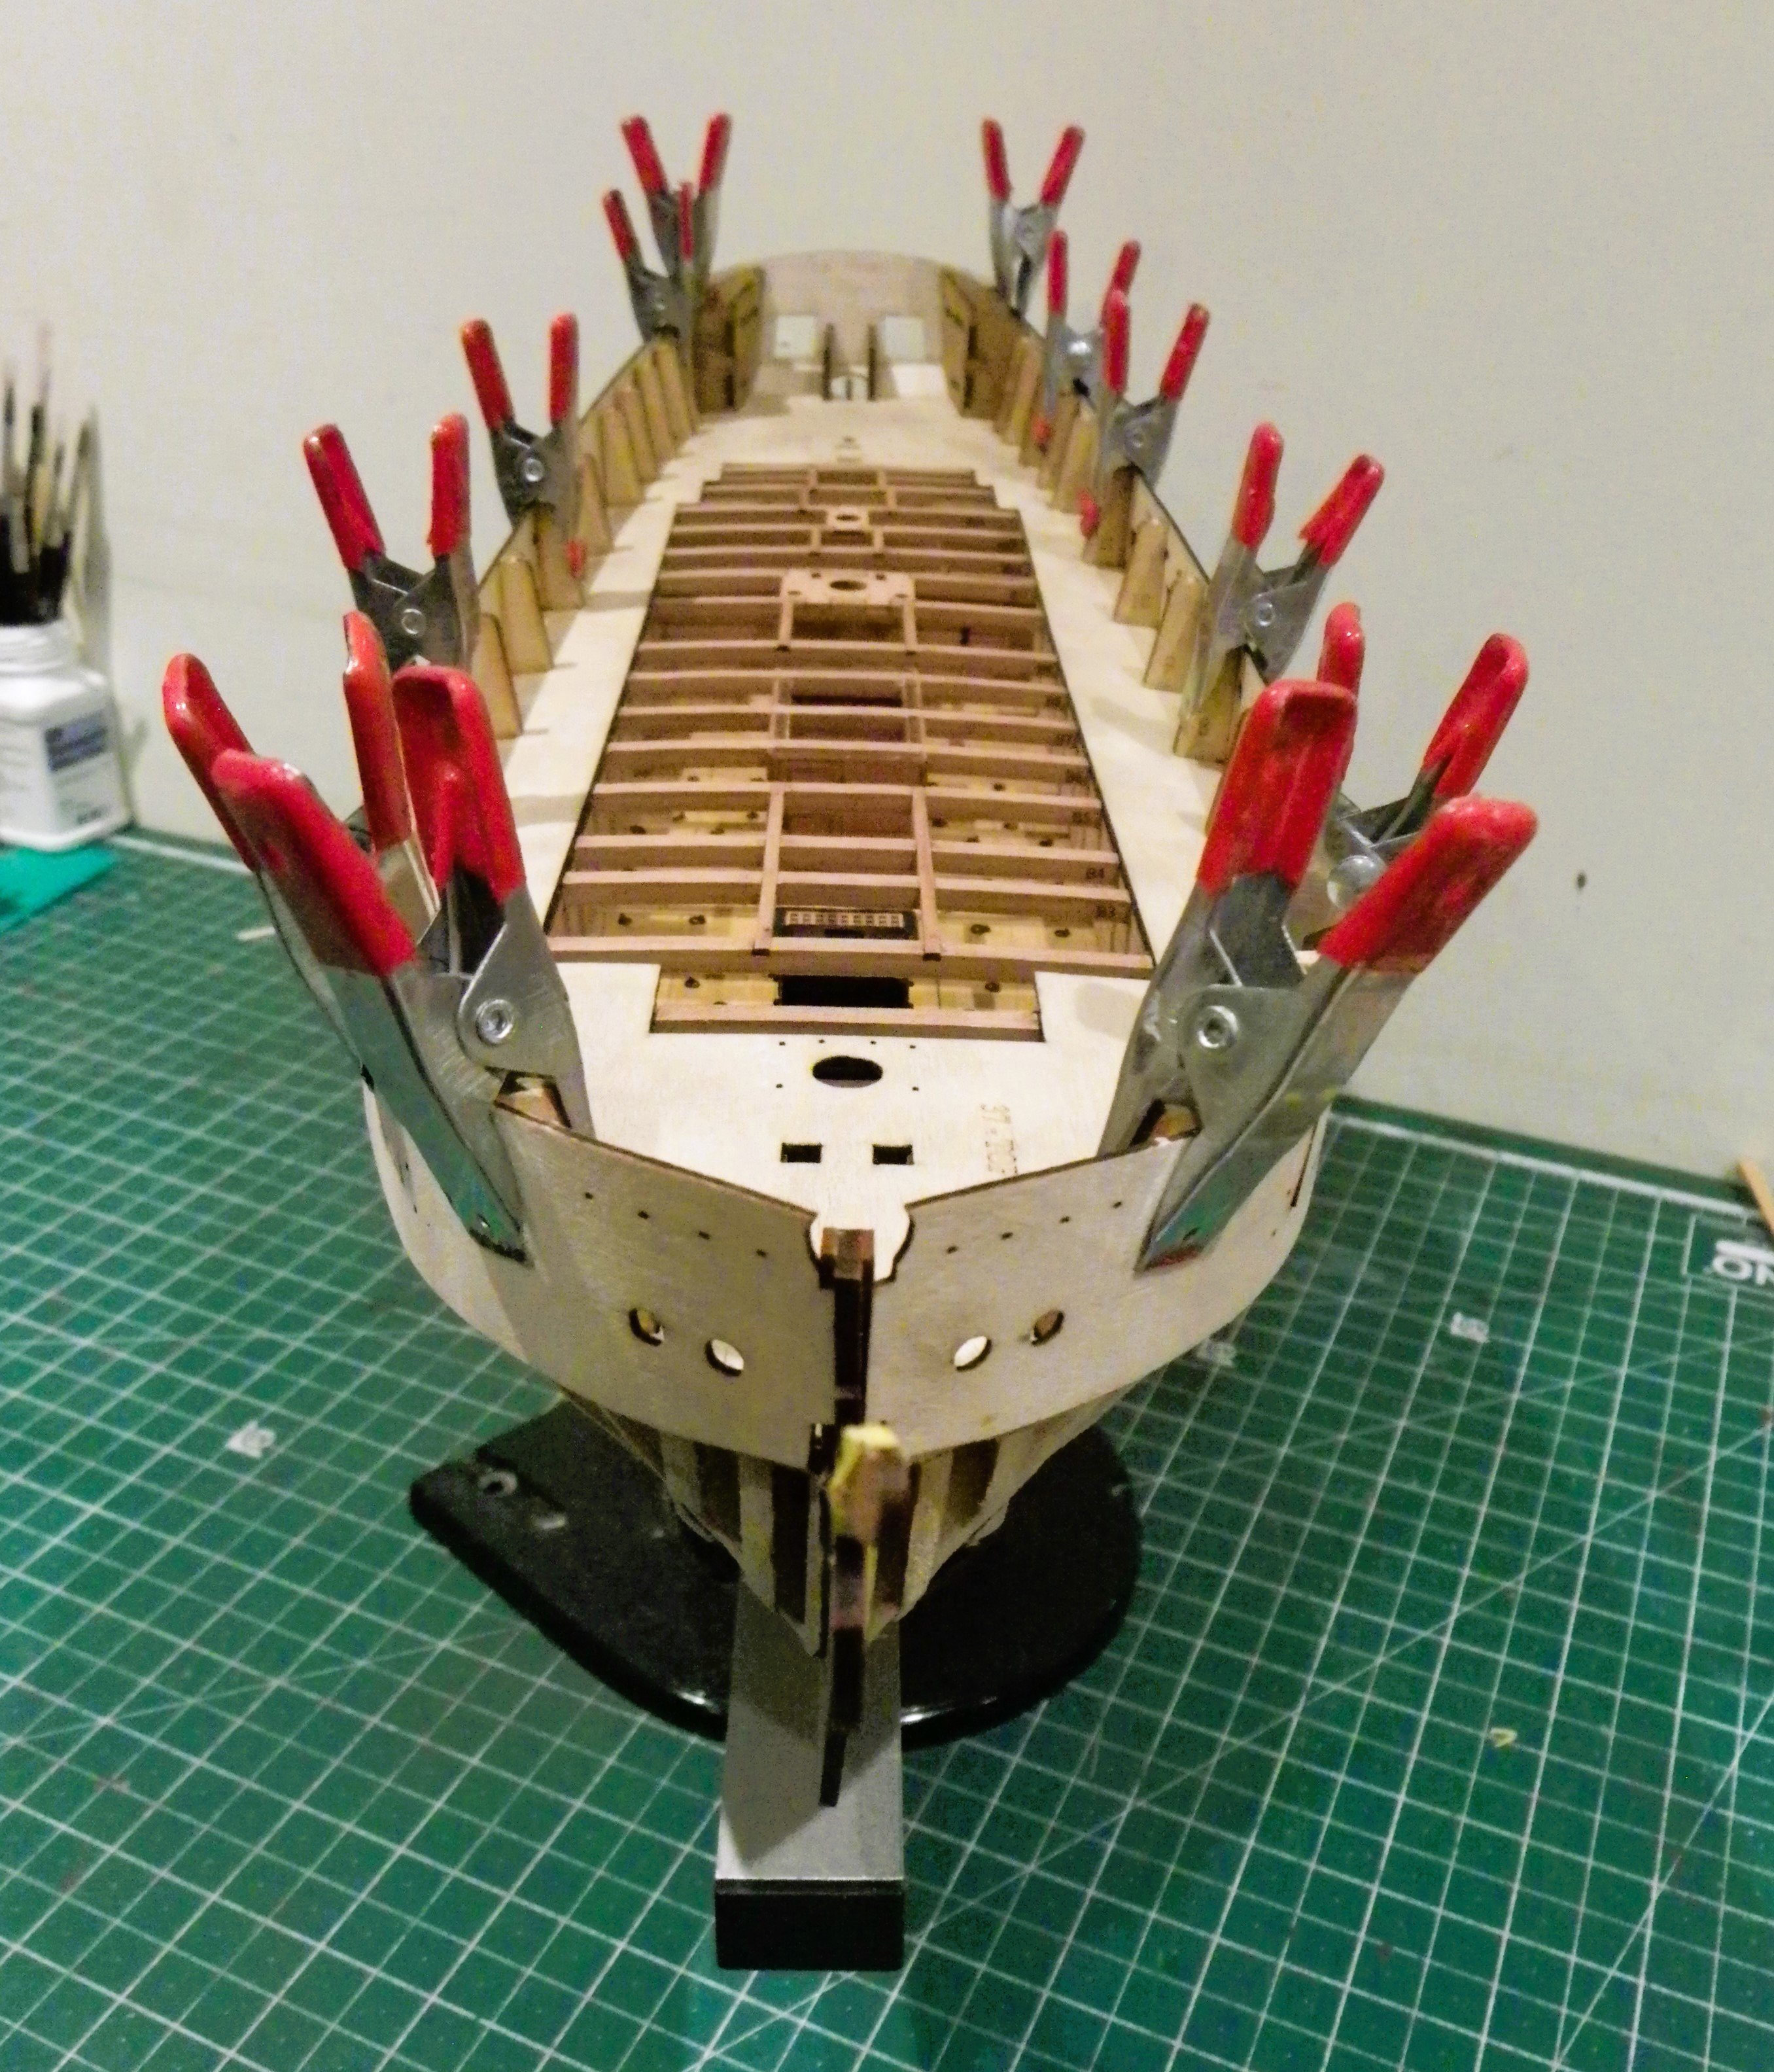
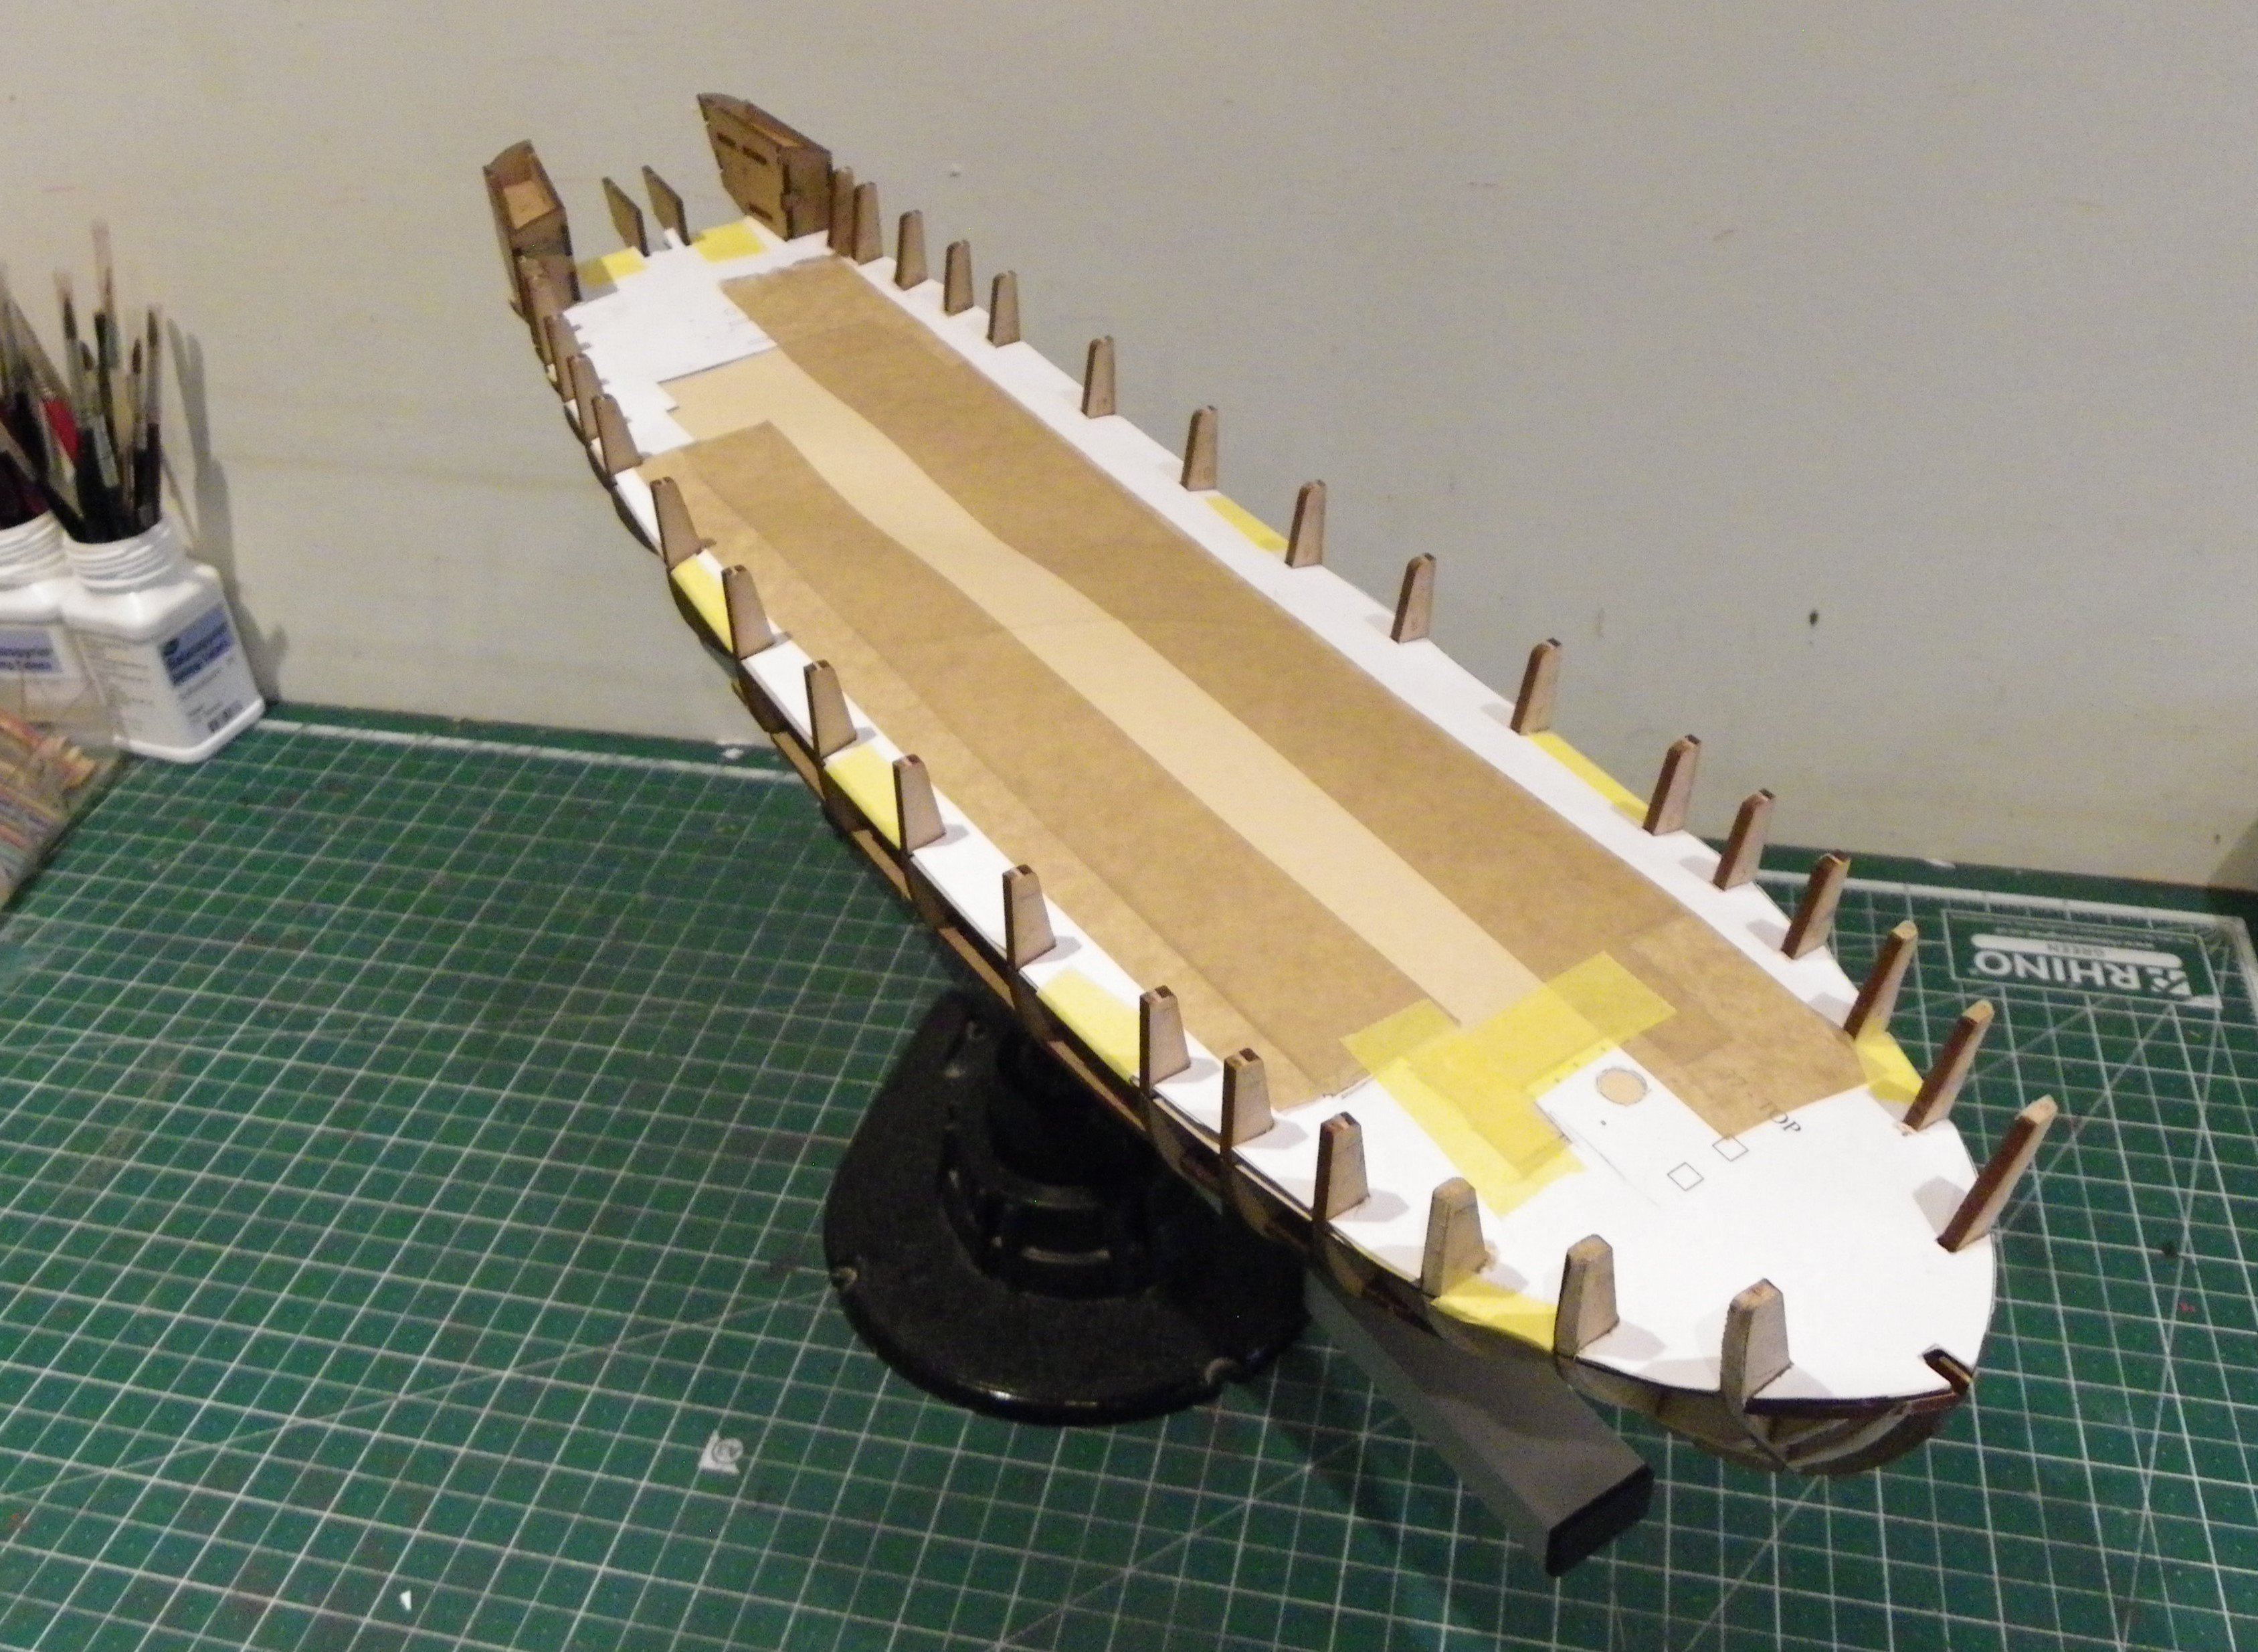
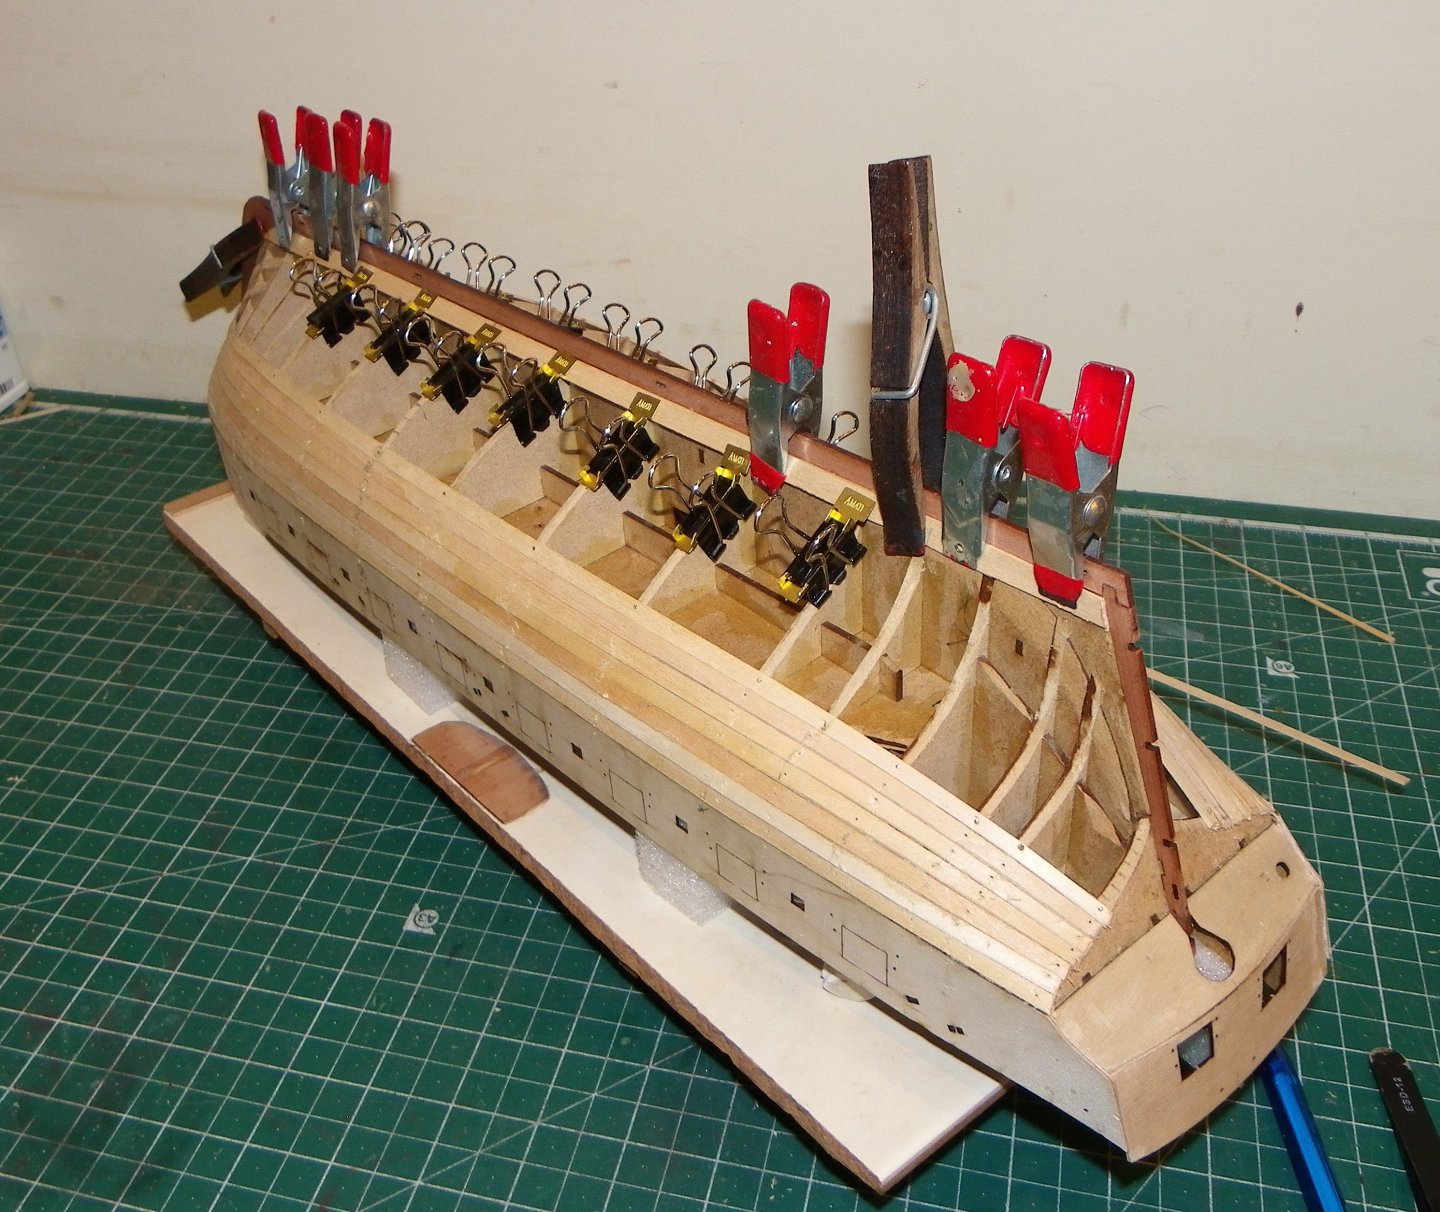
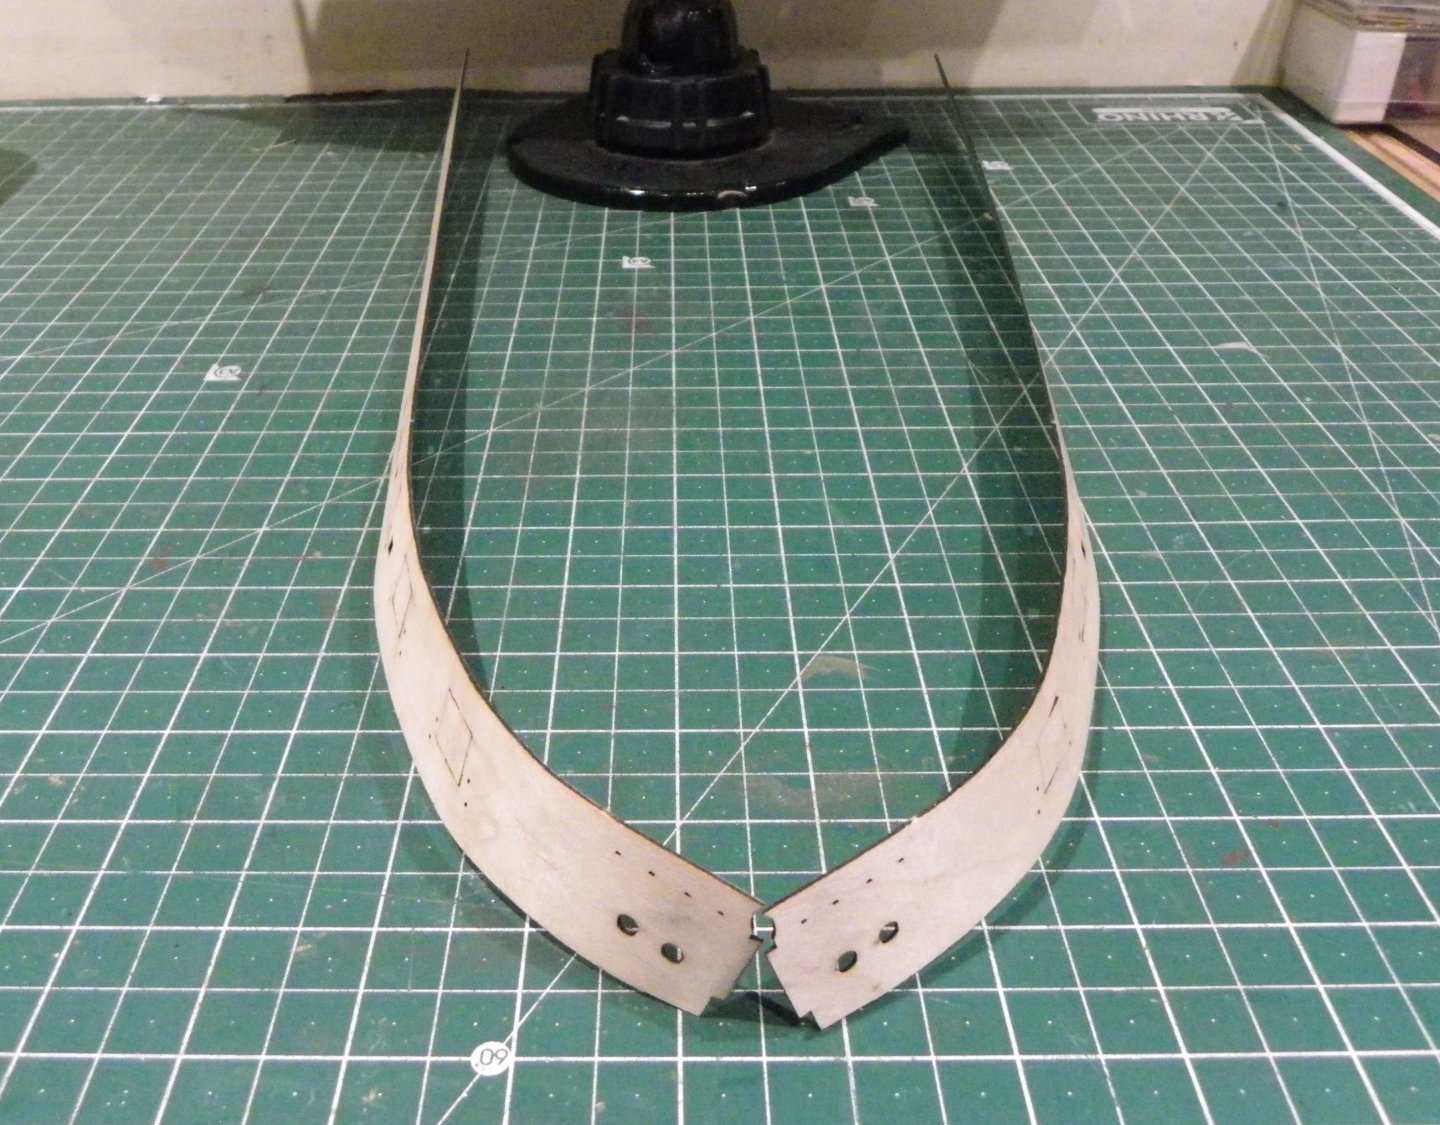
Post 14 Onto First Planking For the past week I have been busy planking the hull. The Gunport patterns have been fitted and trimmed to fit the stern counter and I’m liking the look of her. My younger modelling self of the 1970’s/80/s would be amazed to get this far in only three weeks of work. First Planking. This is in 5 x1mm Limewood and the kit provides a good standard of timber. I have covered my first layer planking method in my previous builds, so I won’t go fully into it here. Suffice to say I use a combination of taper, edge bend, bevel, tick marks, and eye. 035 033 Having completed seven strakes down from the Gunport pattern, the Garboard strake is fitted using a wider 7mm limewood strip. 038 040 046 041 This is followed by the adjacent plank using 6mm strip. Planking continues…. B.E. 05/01/2025


- 332 replies
-
- 26
-
-
- Harpy
- Vanguard Models
- (and 1 more)
-
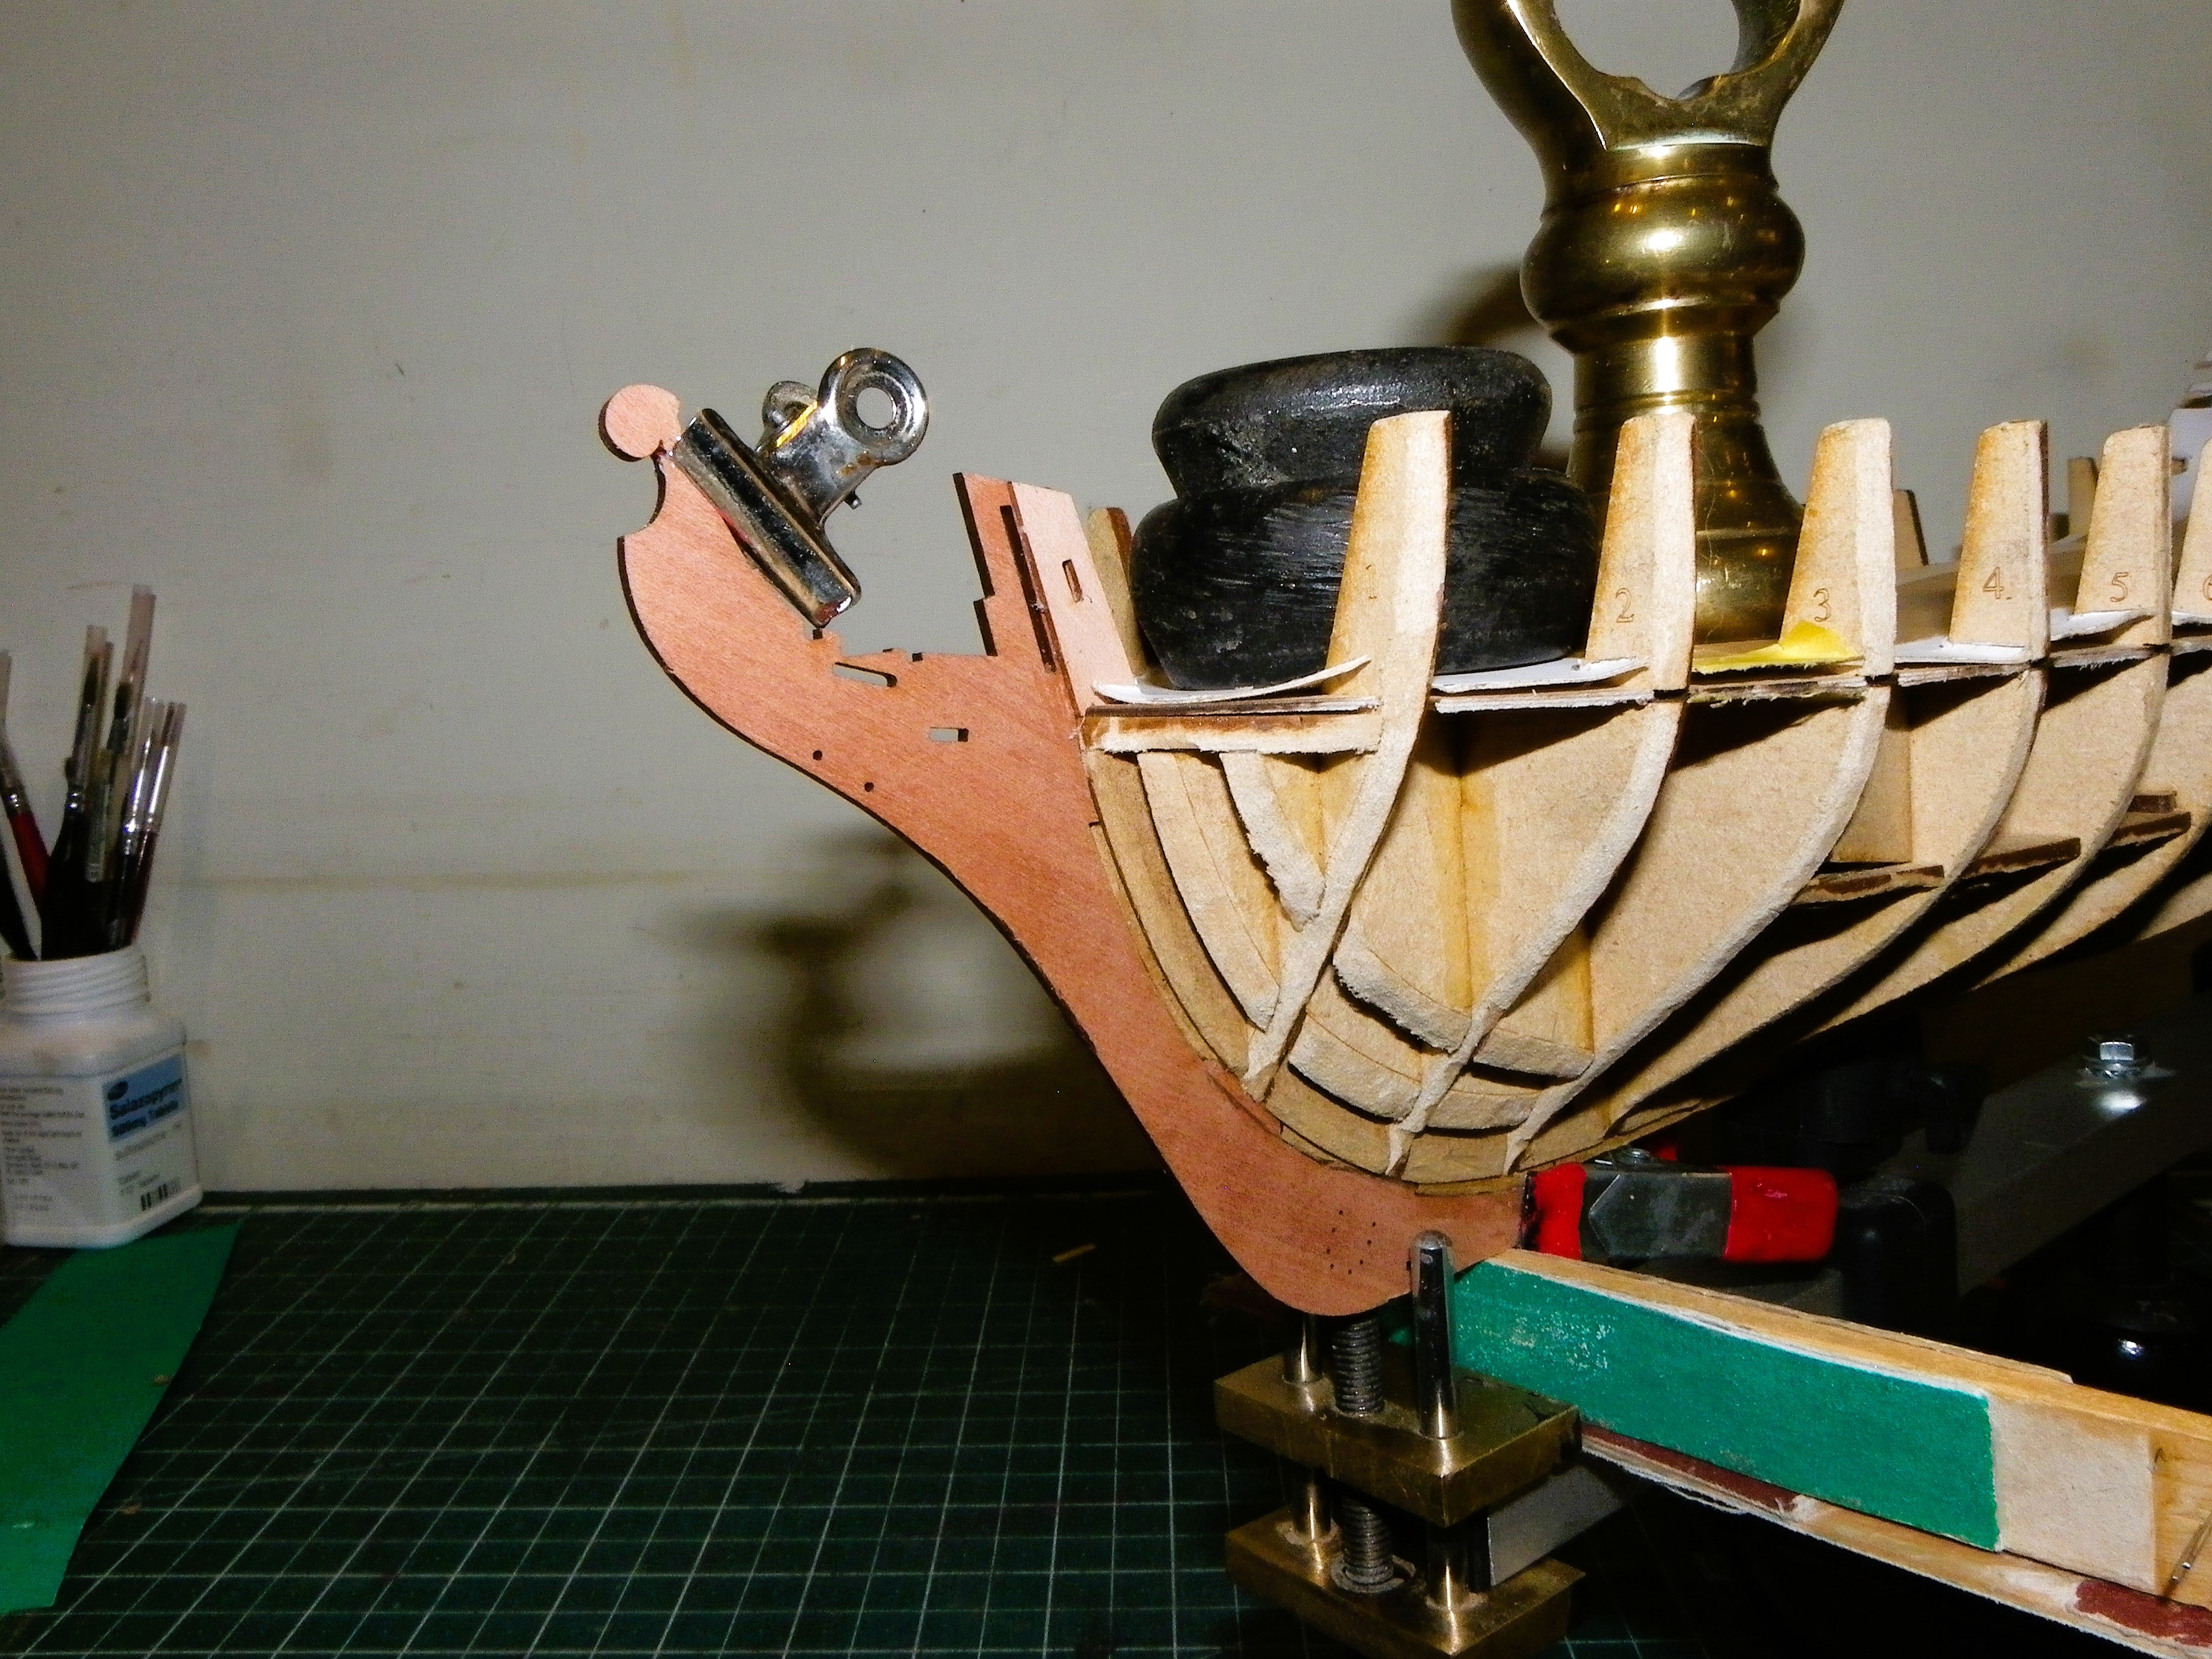
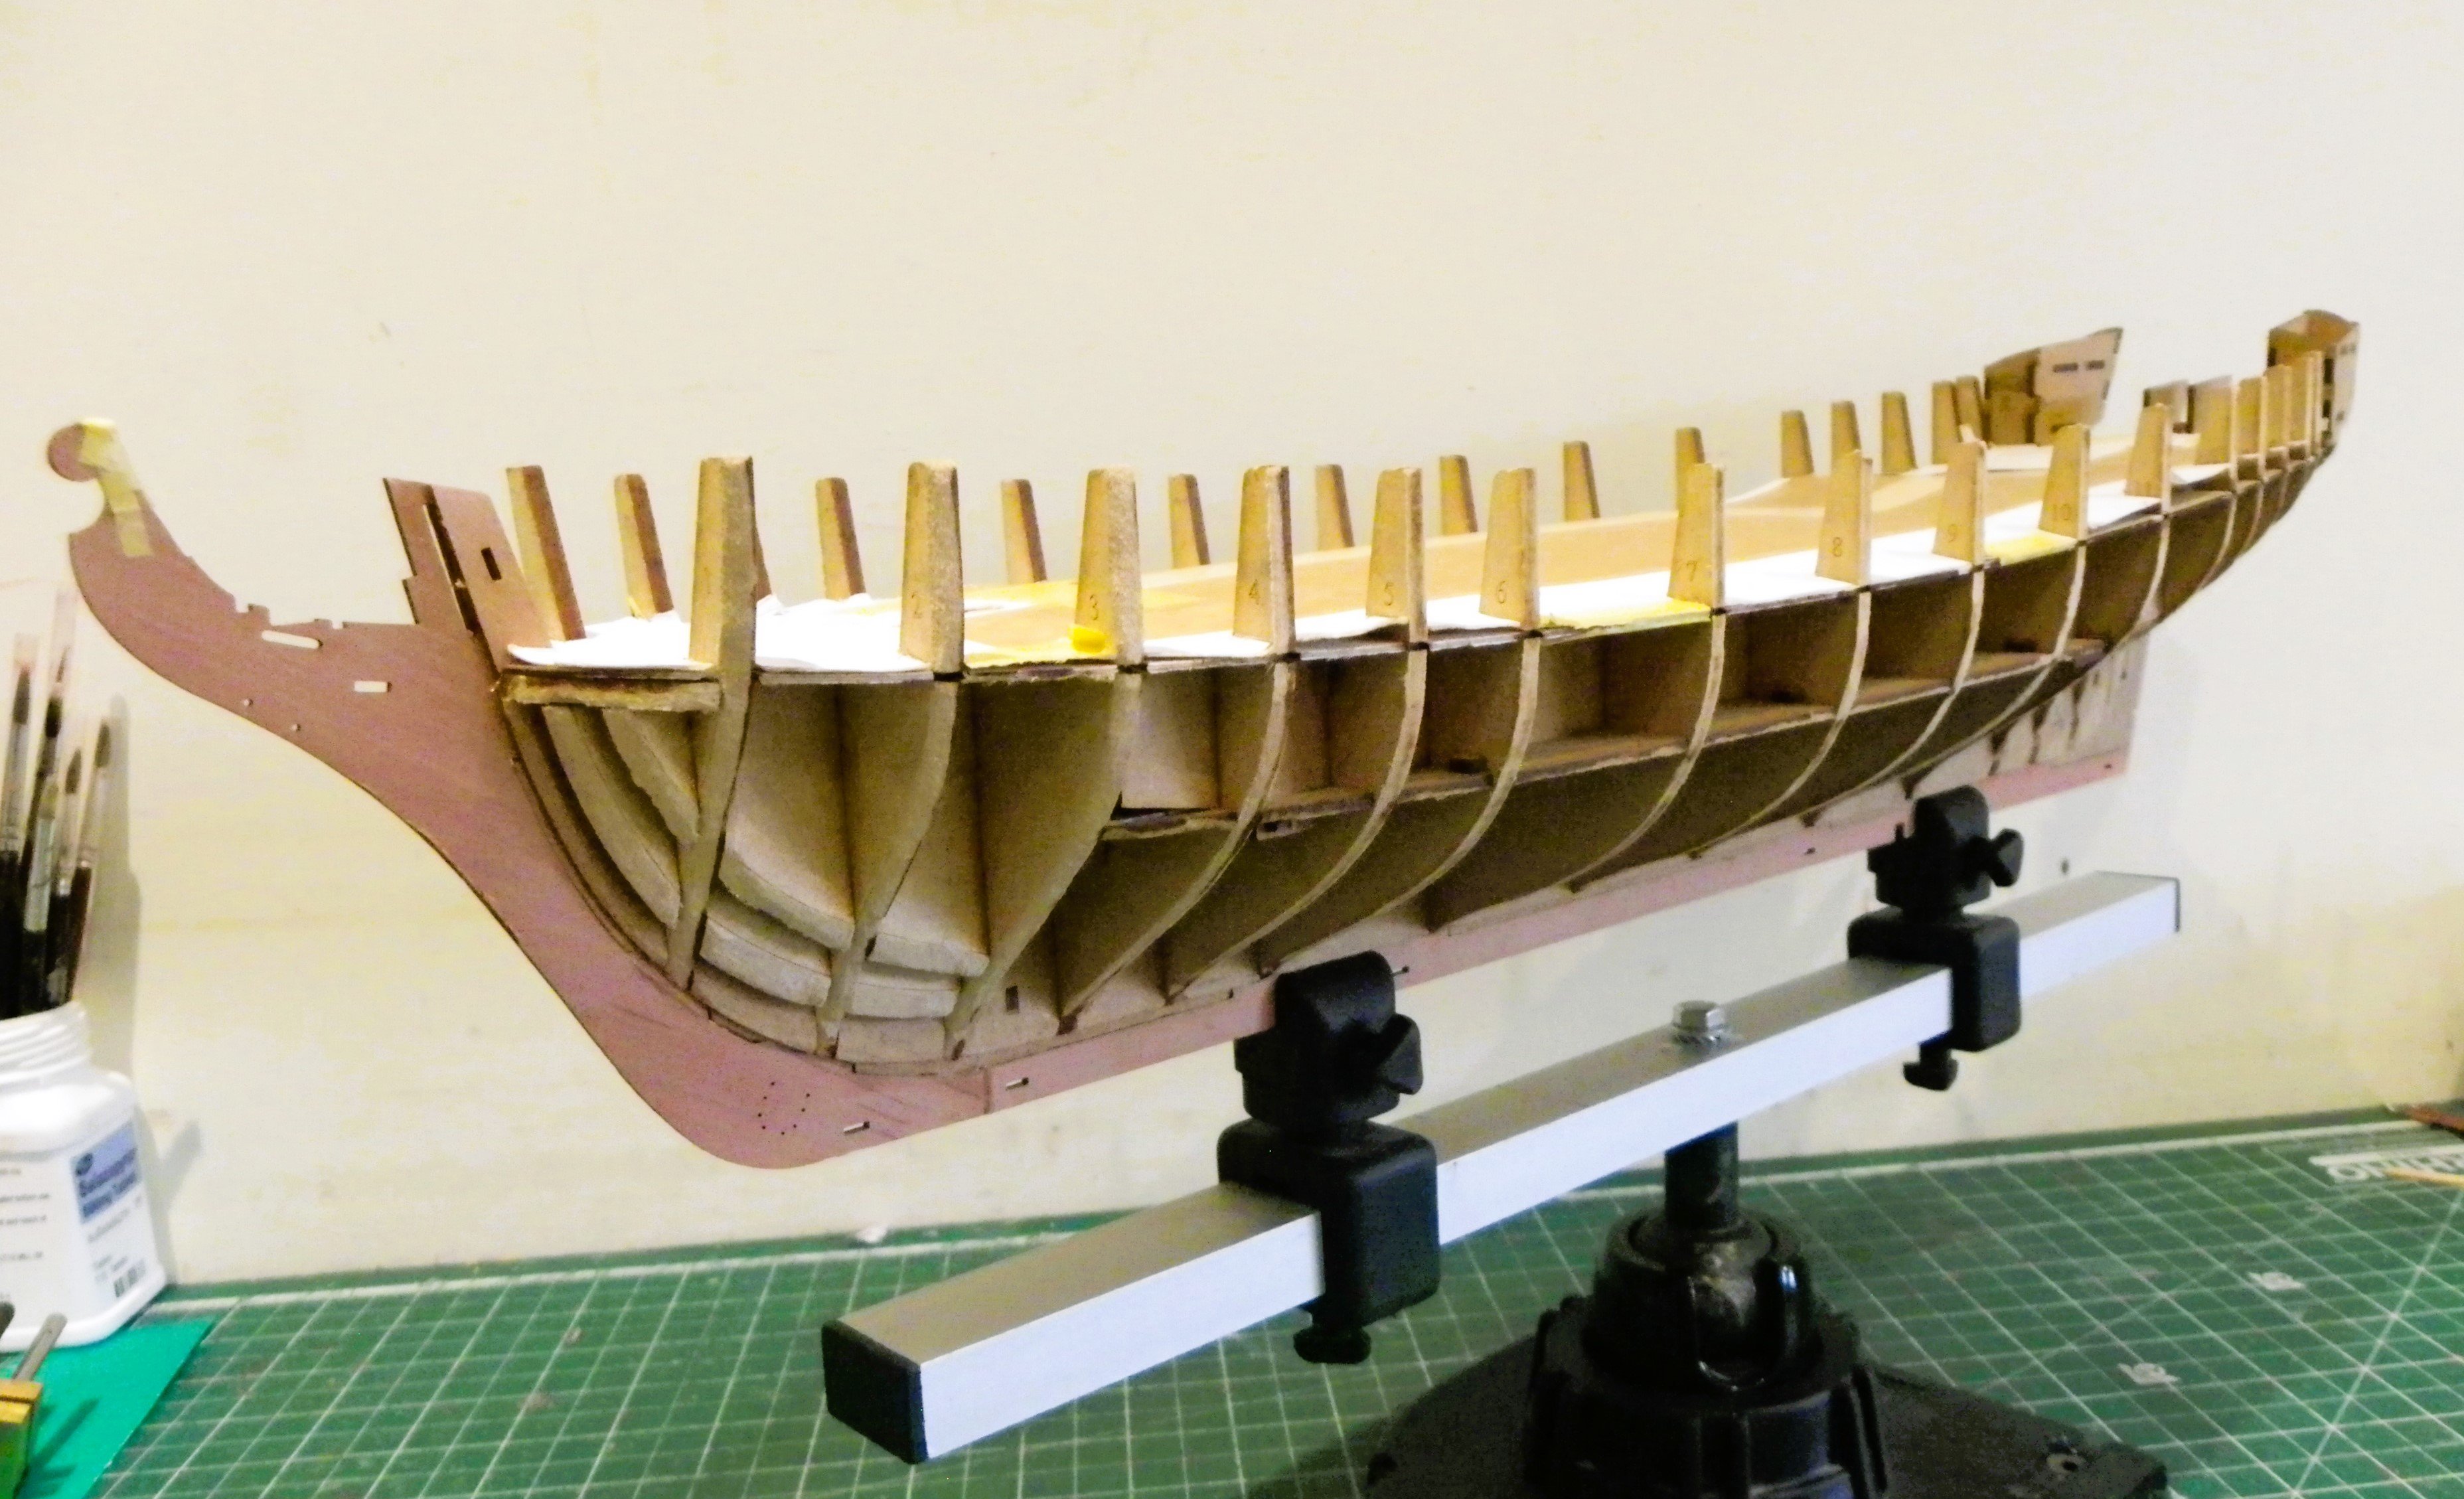
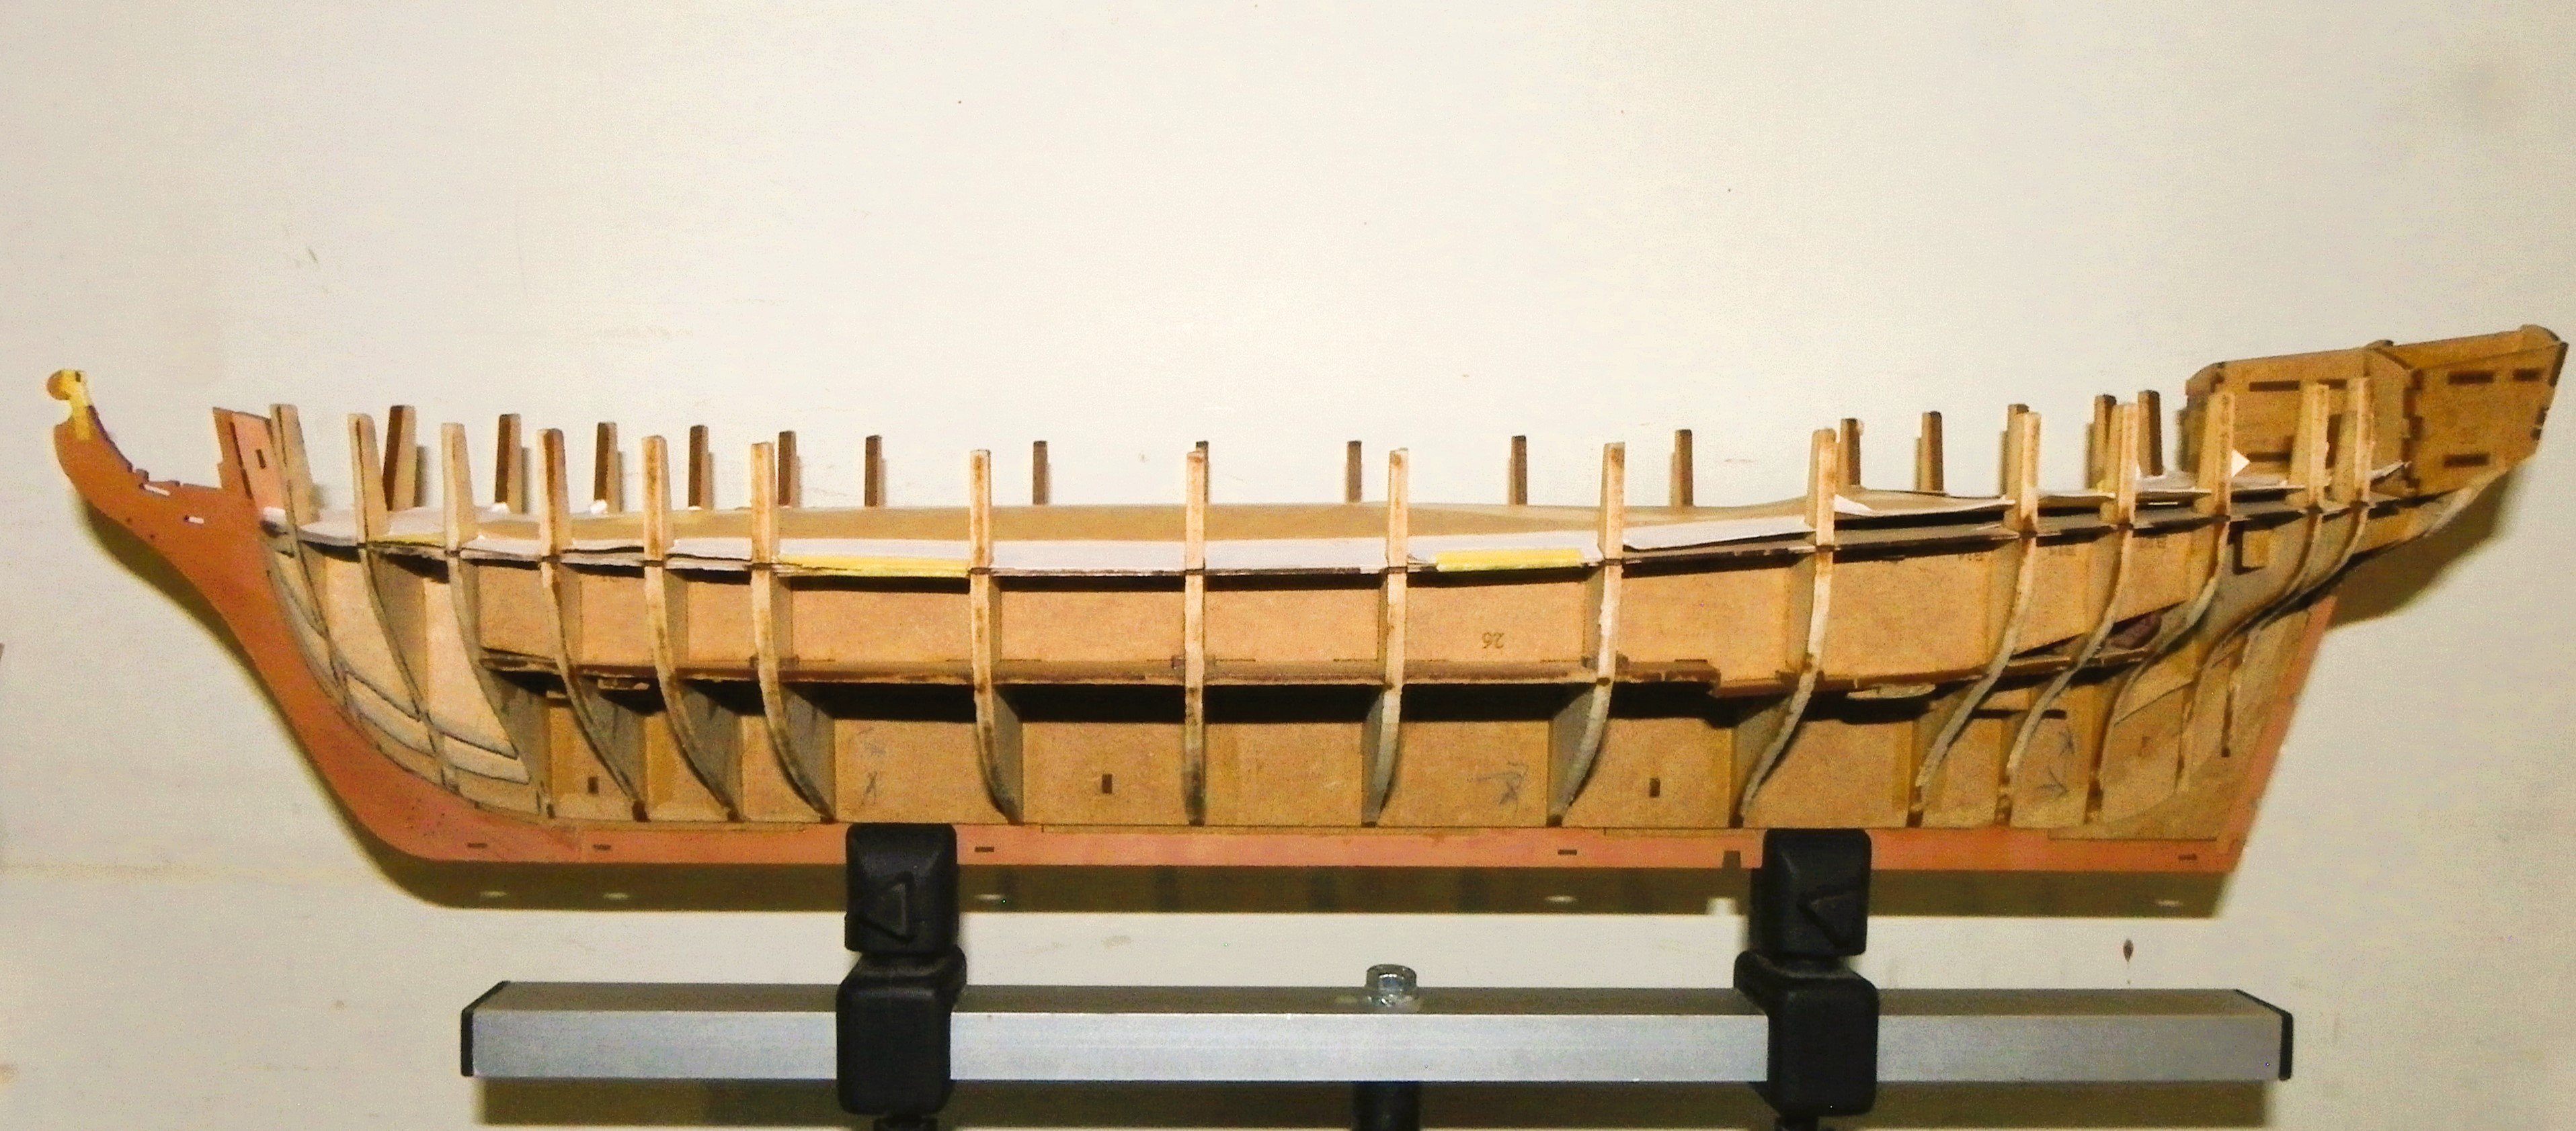
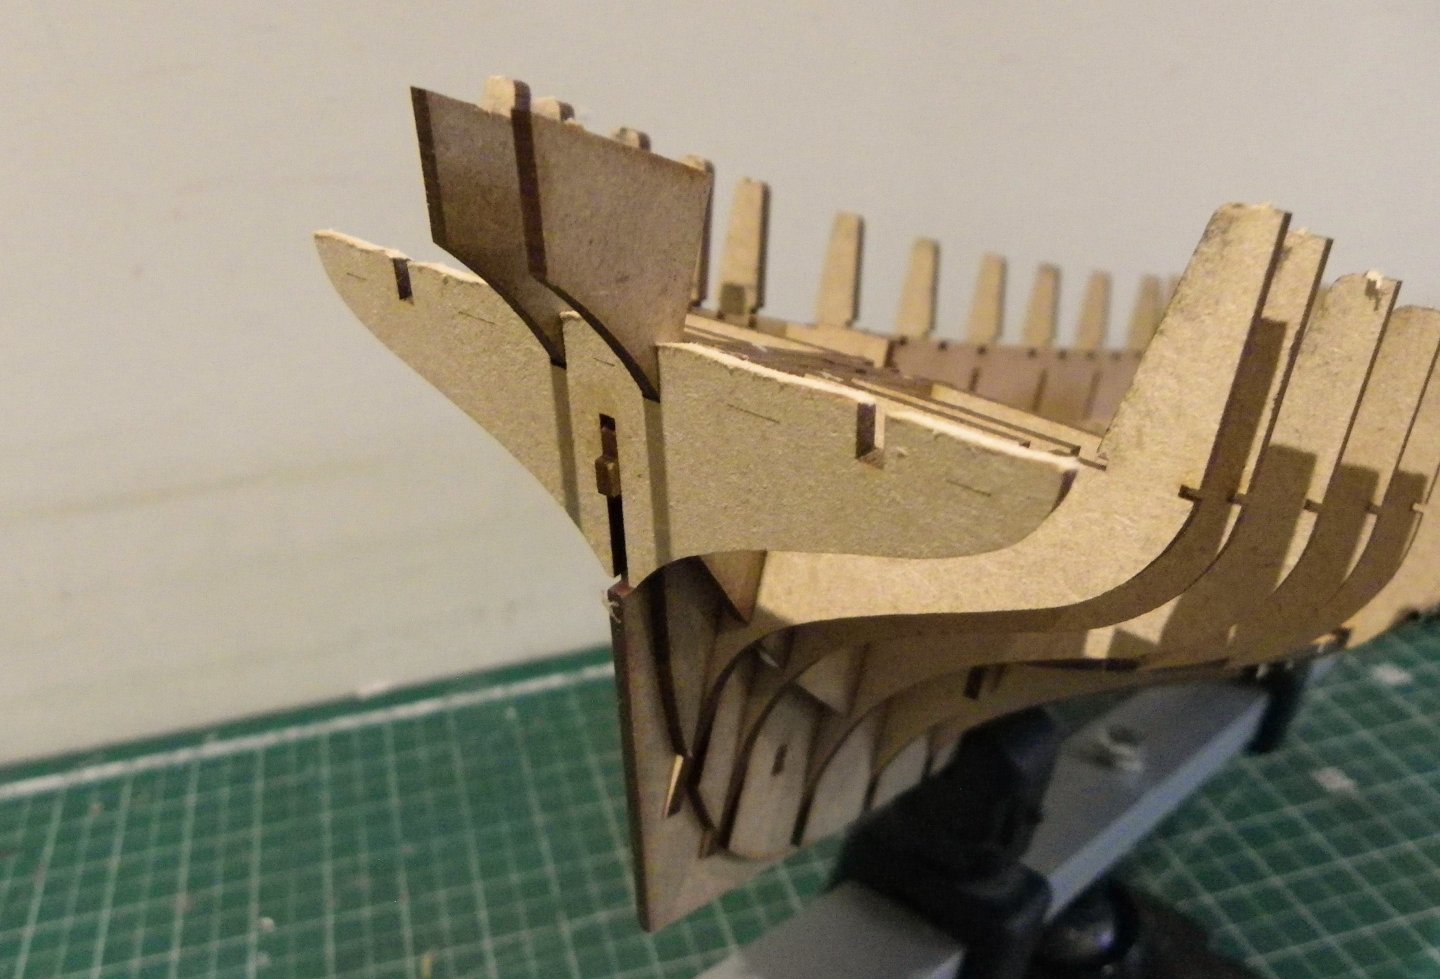
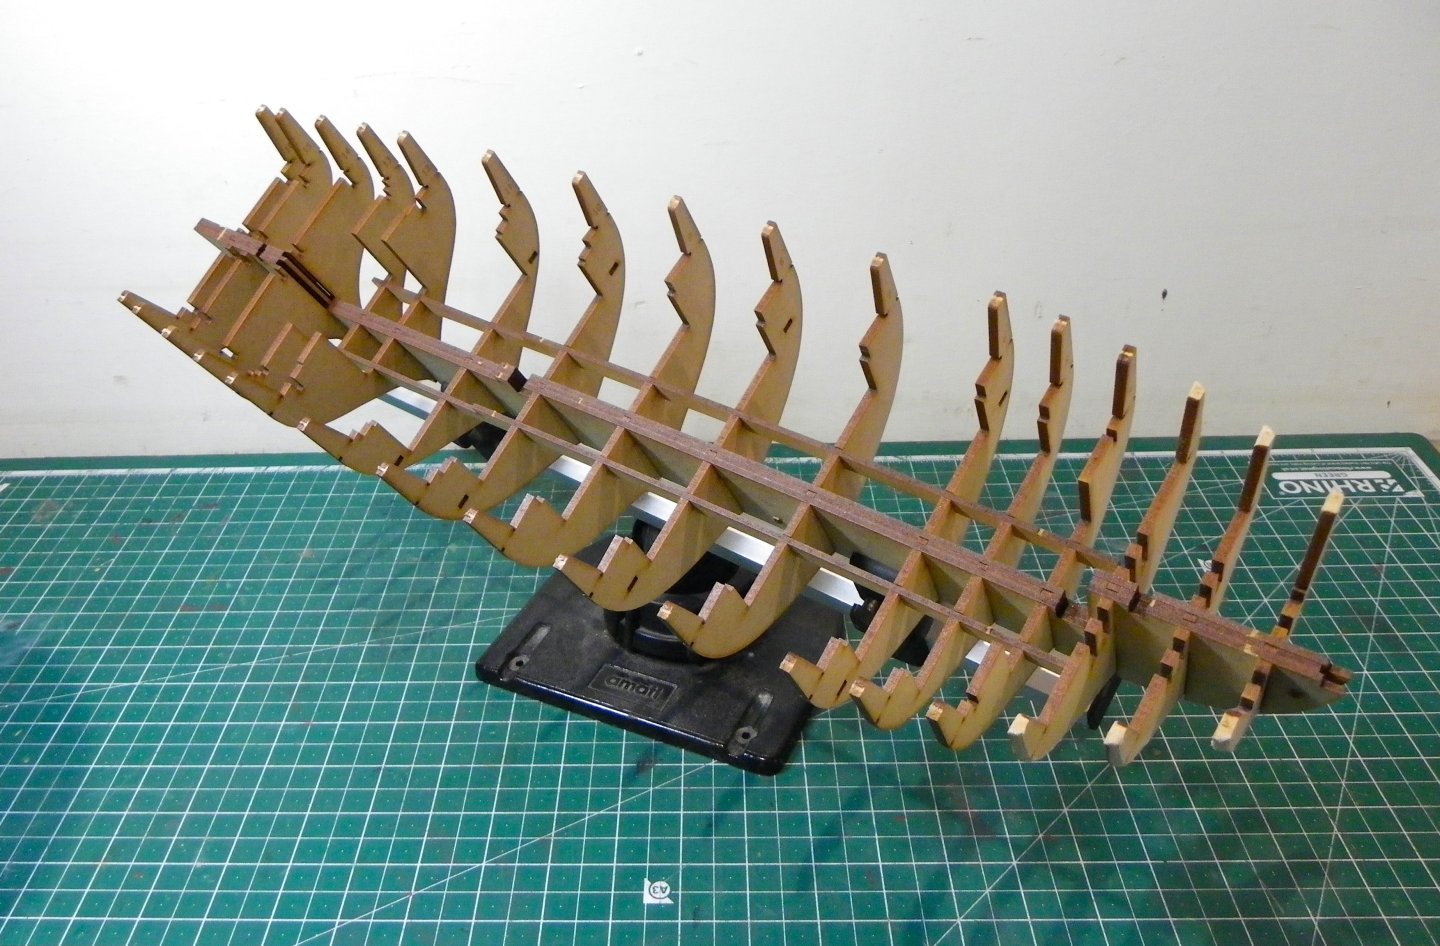
Post 13 – unlucky for some In Post 11 I mentioned the potential hazard of snapping the keel. This turned out to be a self-fulfilling prophecy. 0314 Manoeuvring with the model in the Keel clamp it happened. Re-attached with pva I hope the repair holds until I fit the outer panels. 0320 Styrene provides a useful support when inverting the model. 0345 I took the pre-caution of adding temporary boards to protect the False keel during the next stages. 0333 The Fiddle head at the prow which also split earlier has been removed for safe keeping. These set-backs are minor and won’t have a lasting effect on the model. B.E. 29/12/2024


- 332 replies
-
- 18
-
-
- Harpy
- Vanguard Models
- (and 1 more)
-
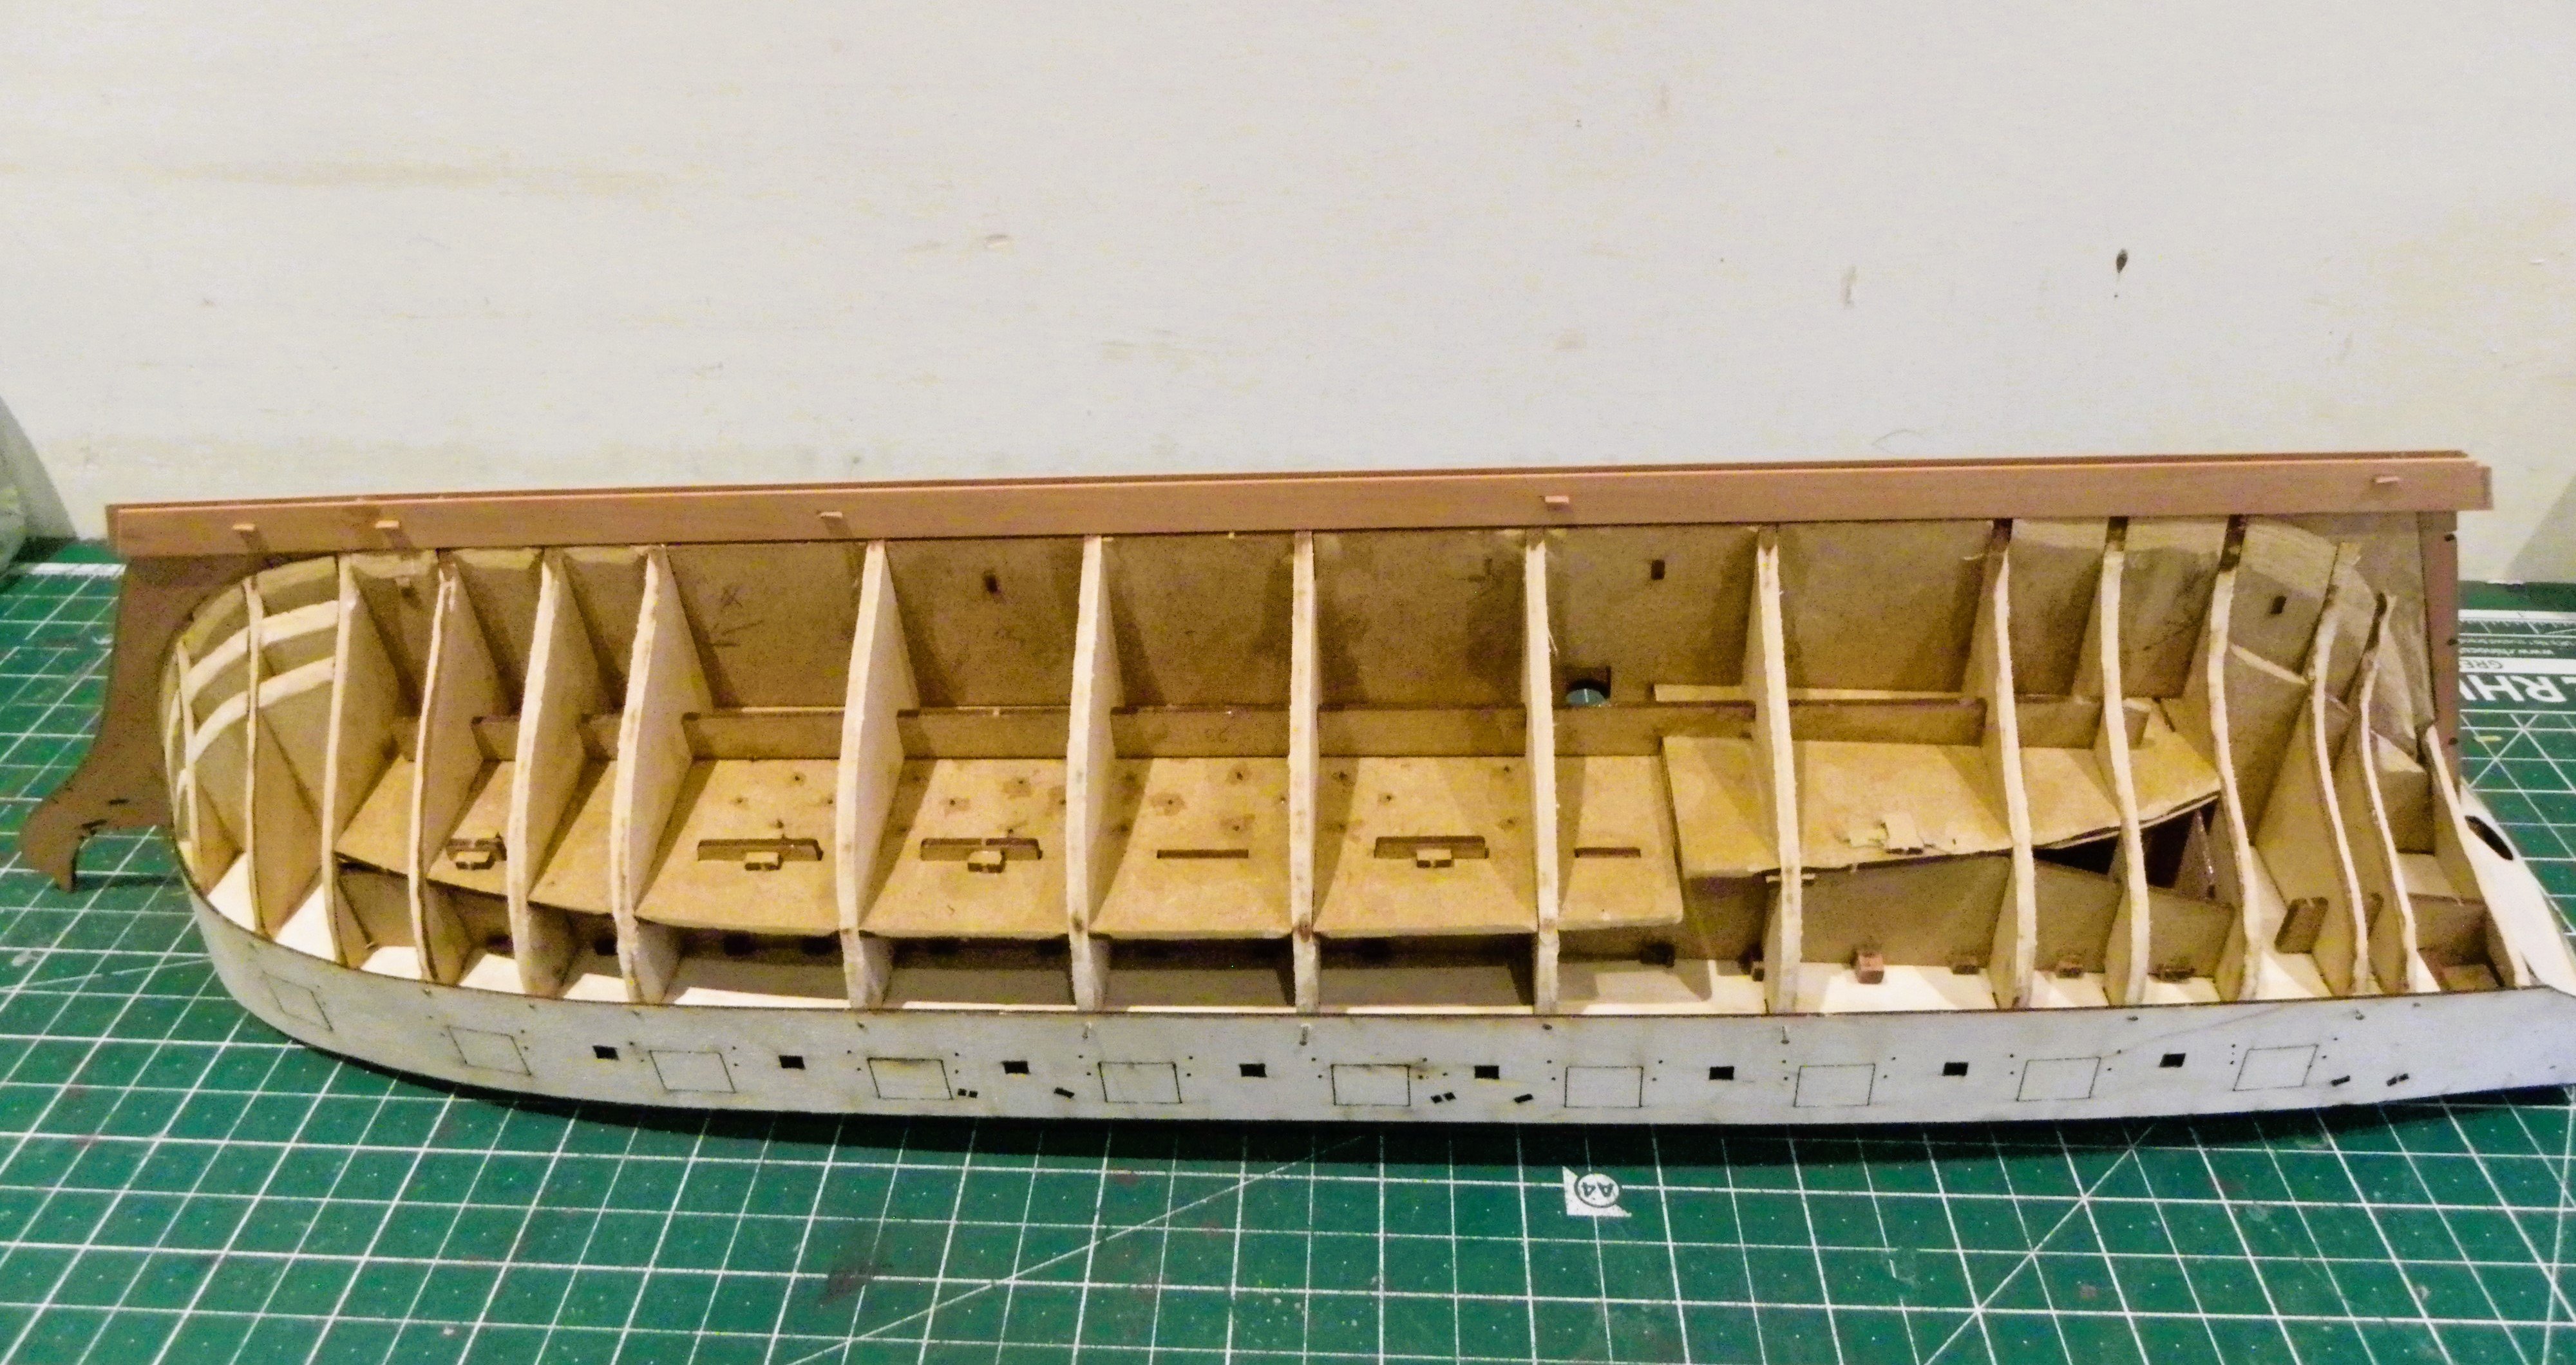
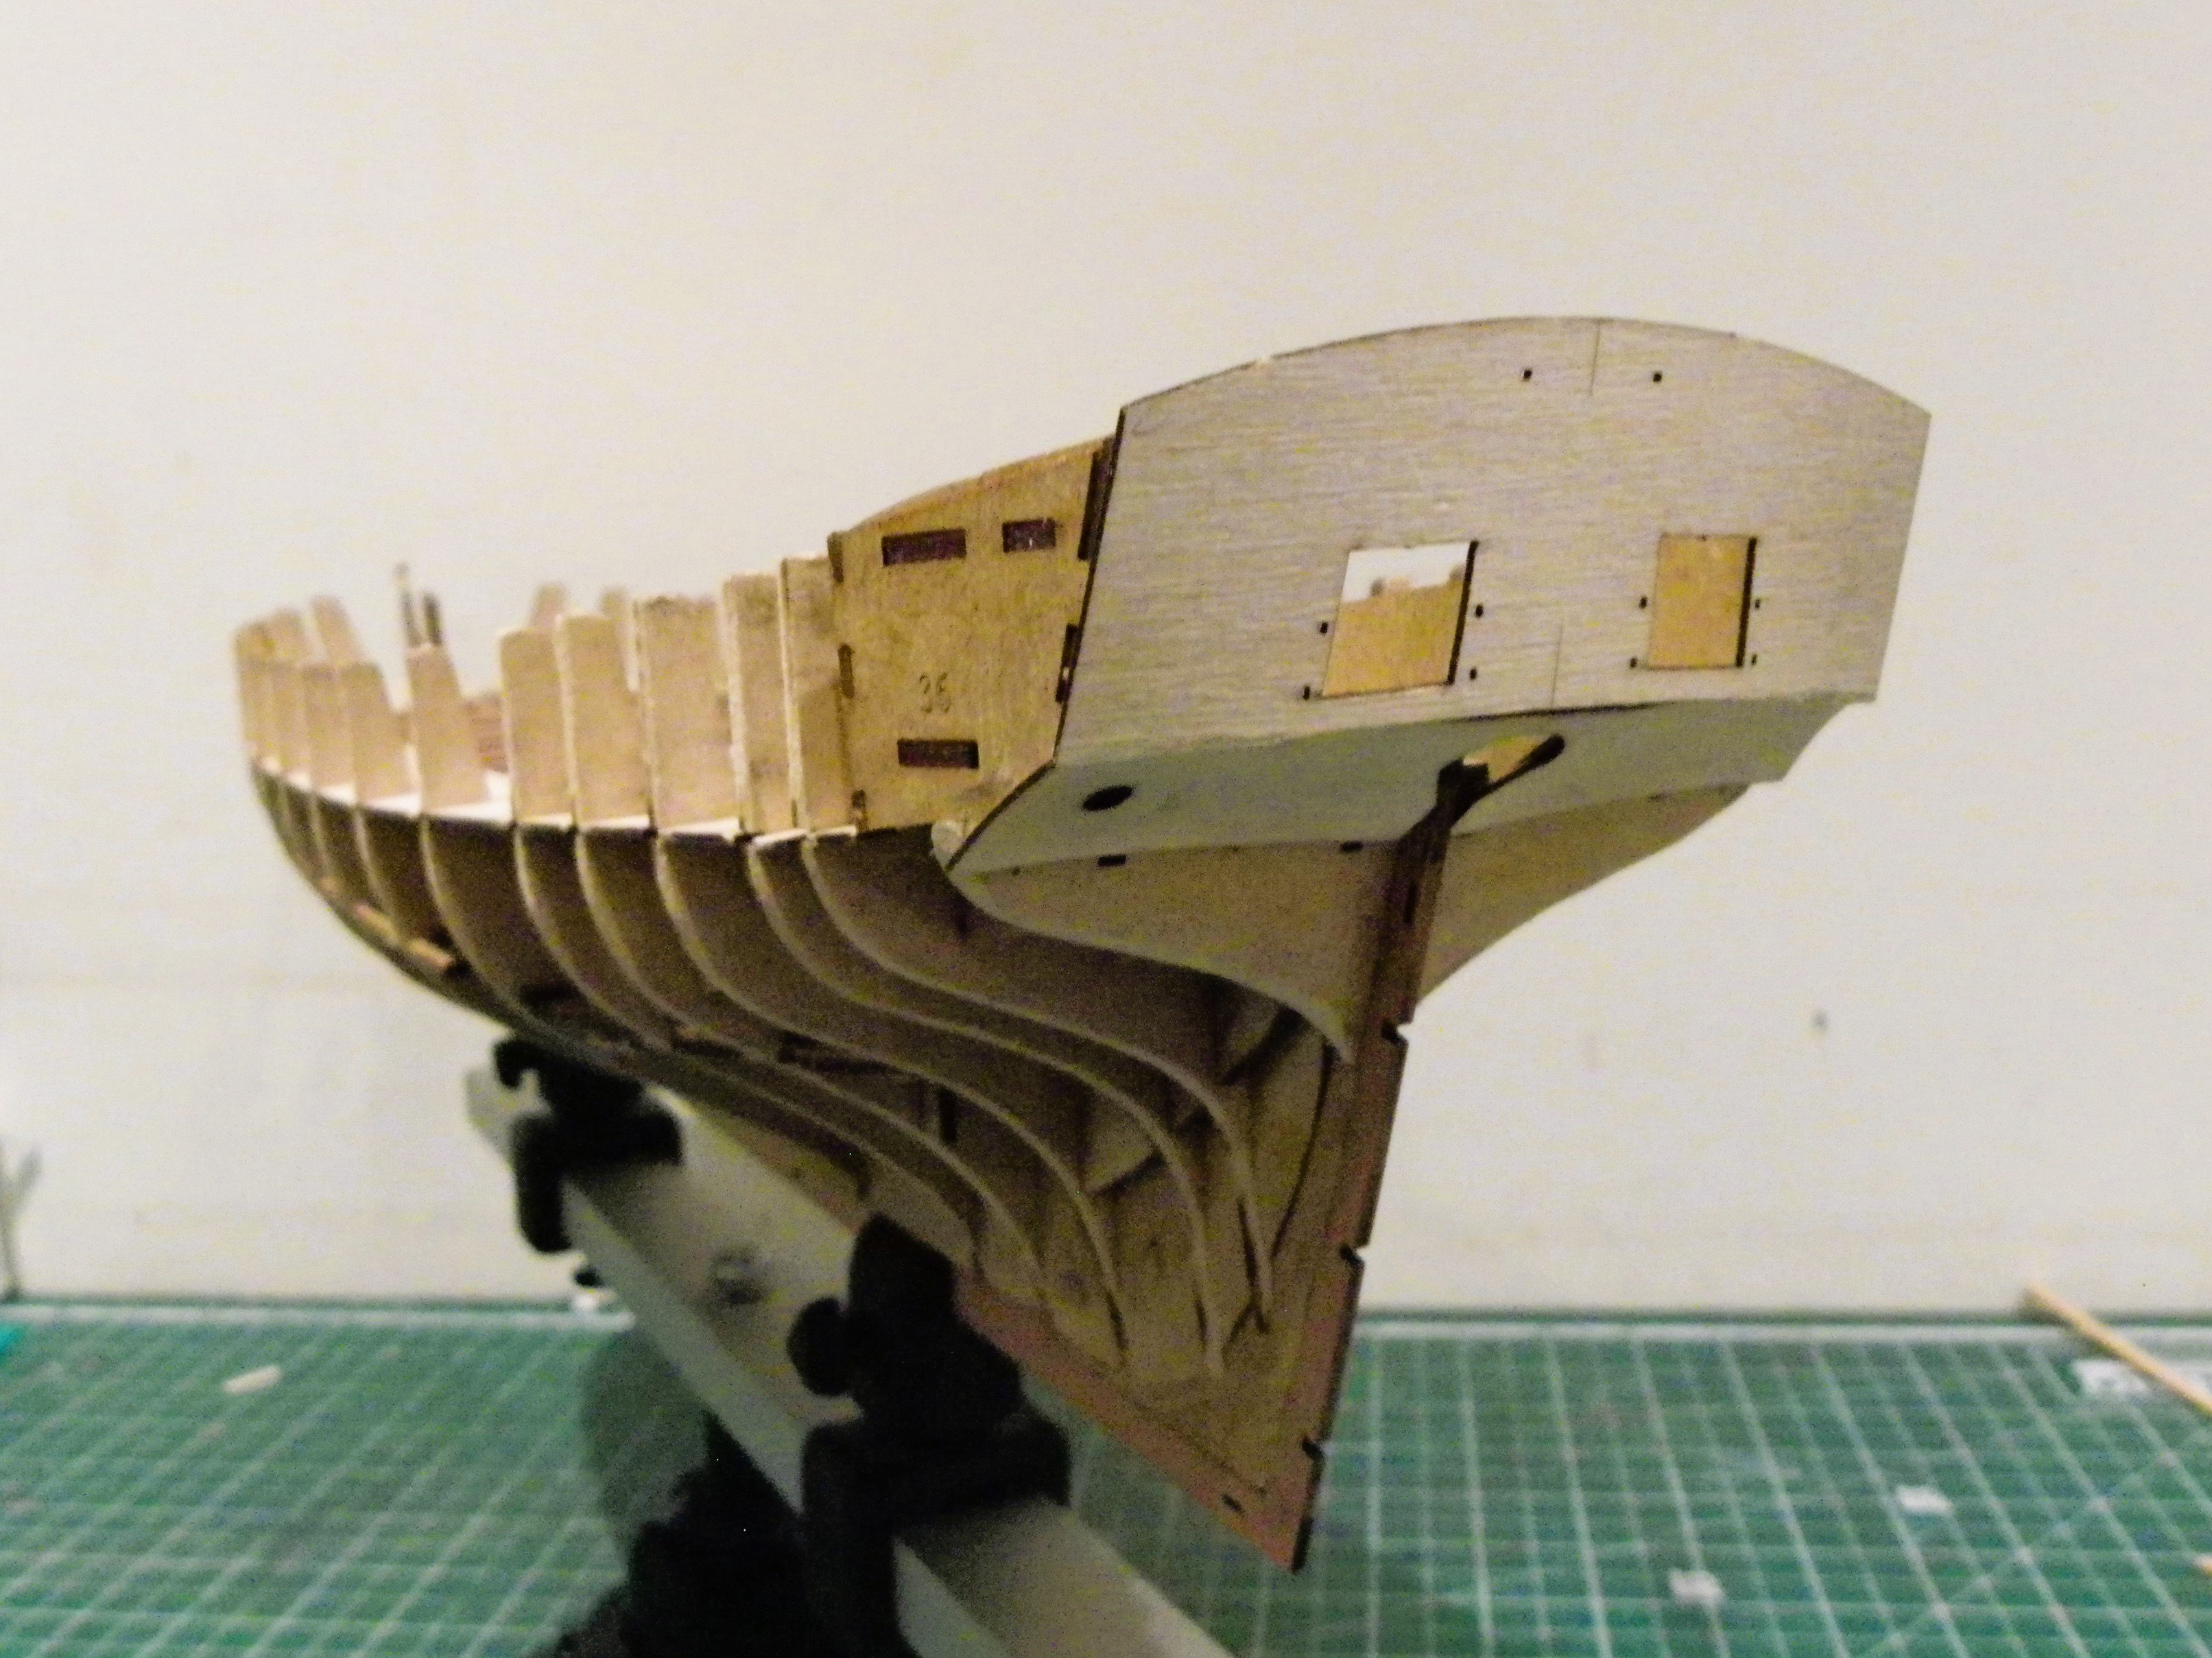
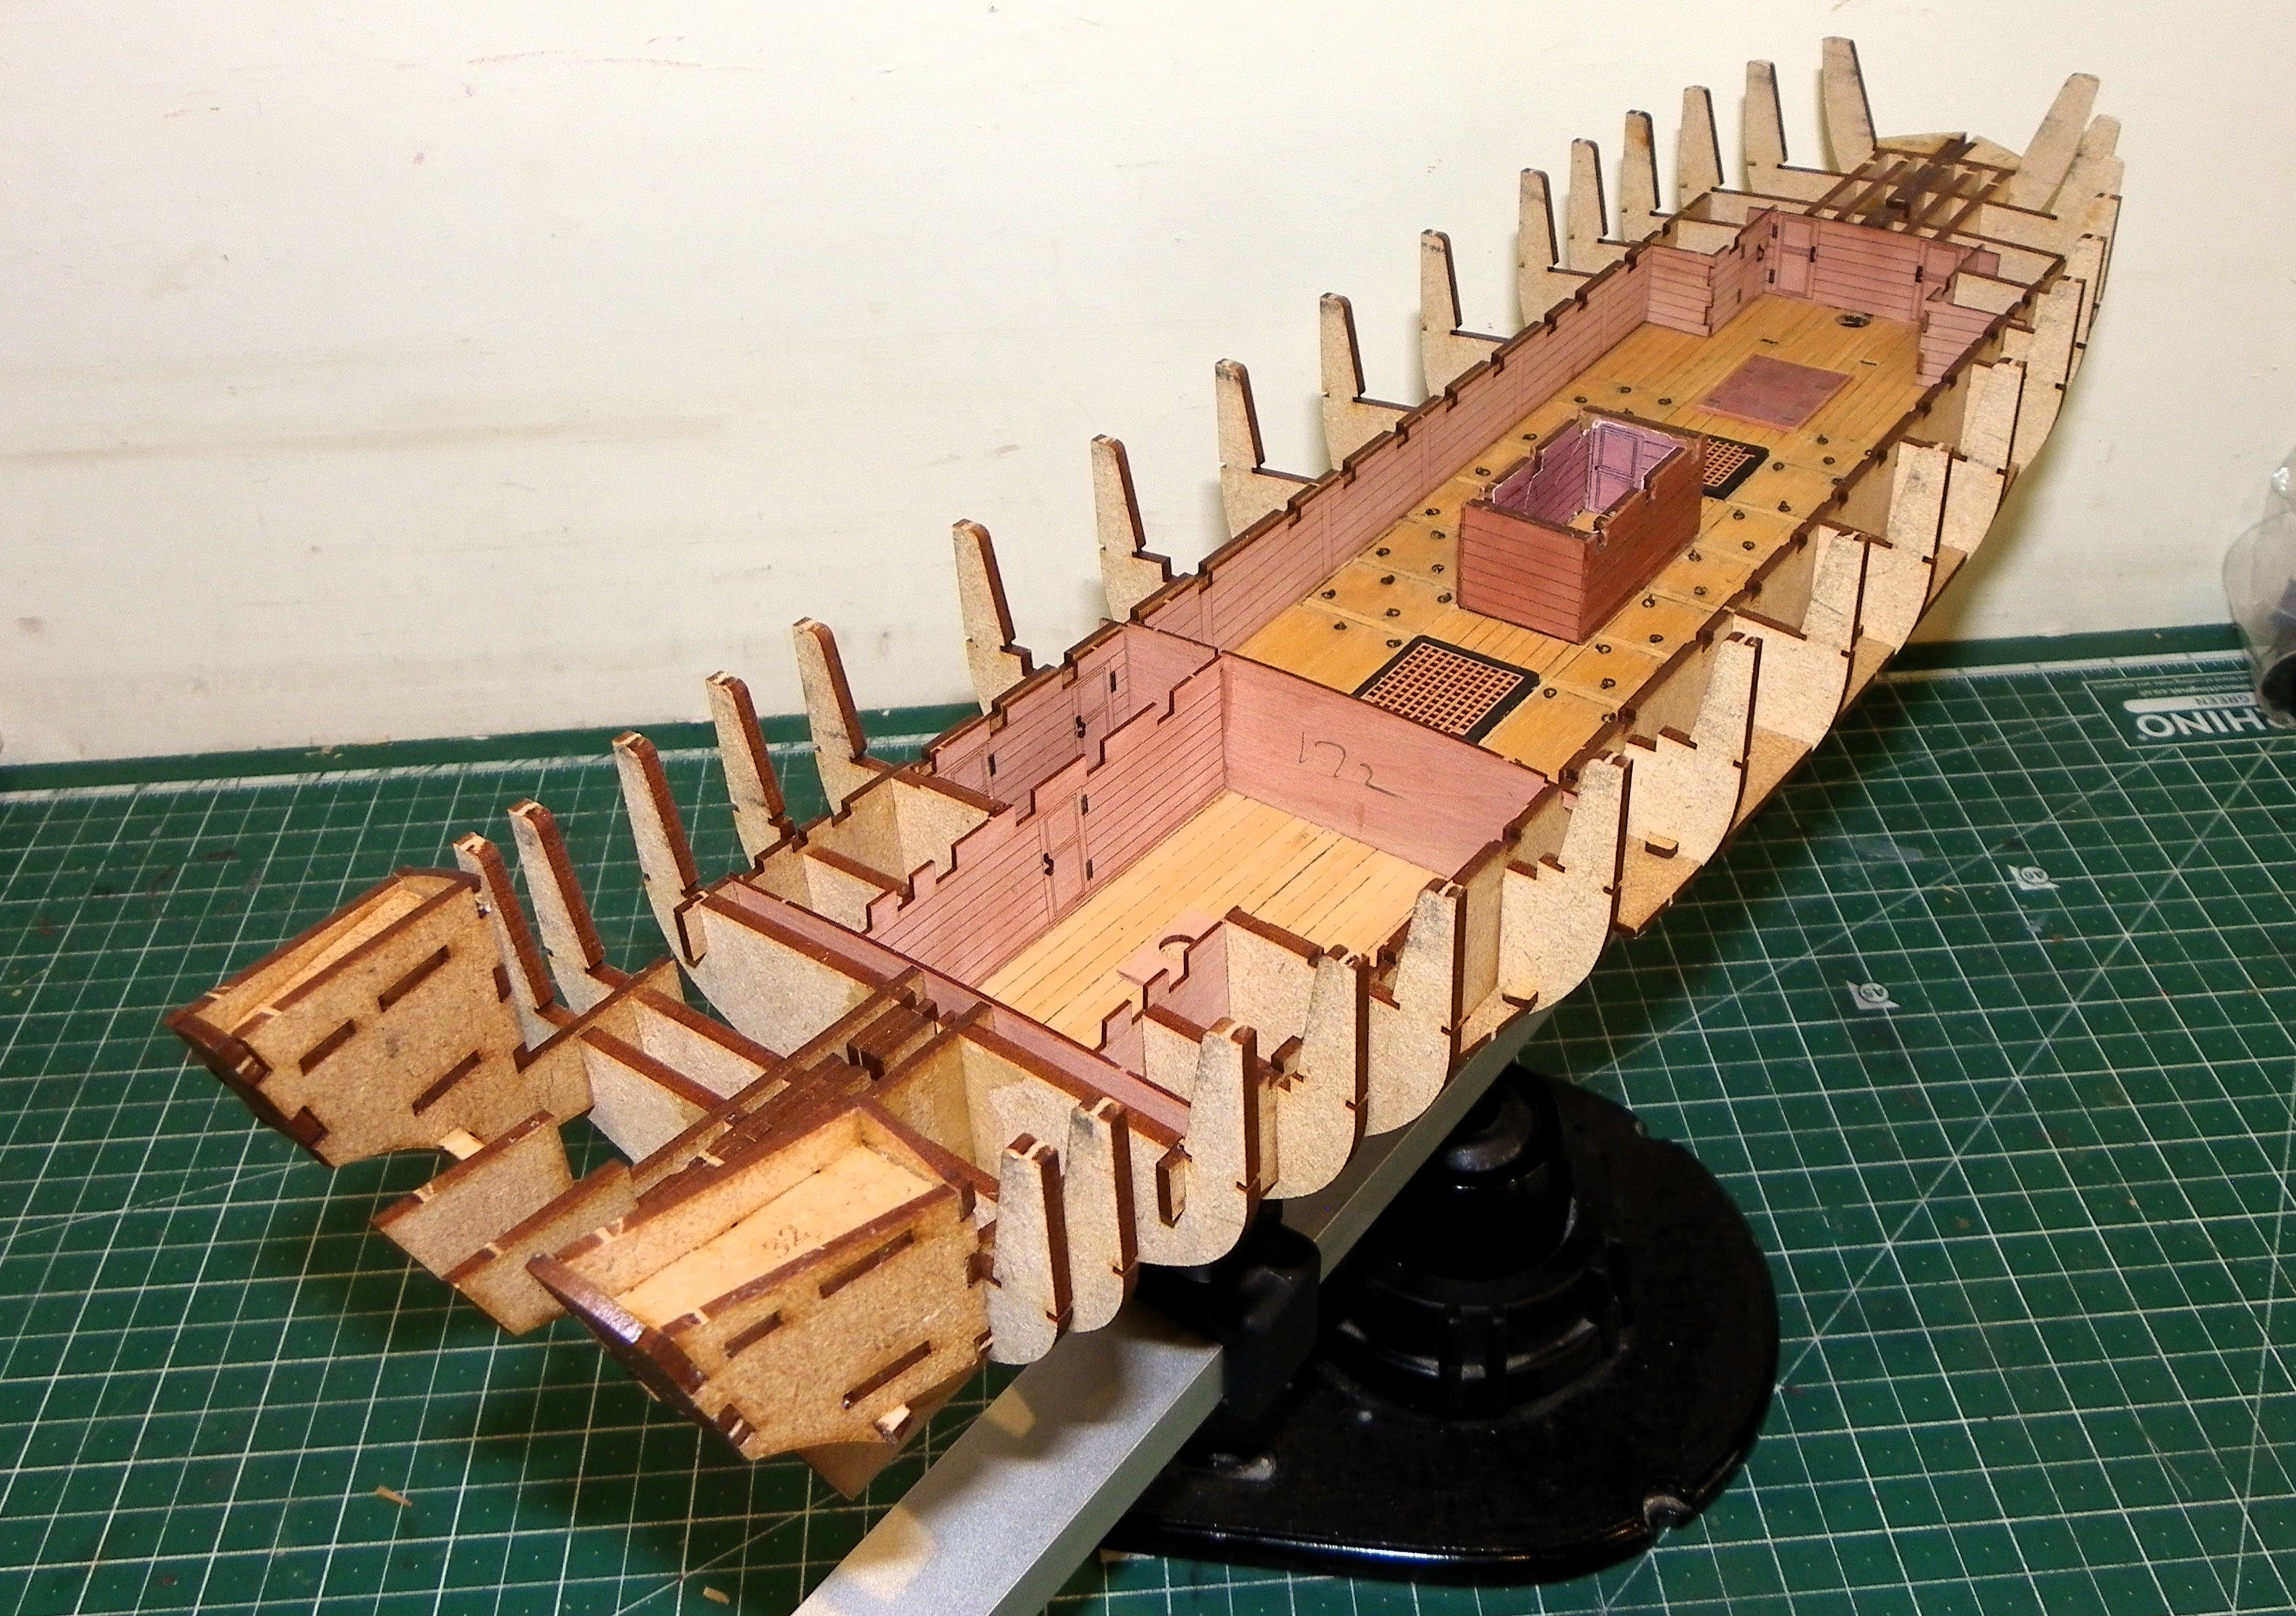
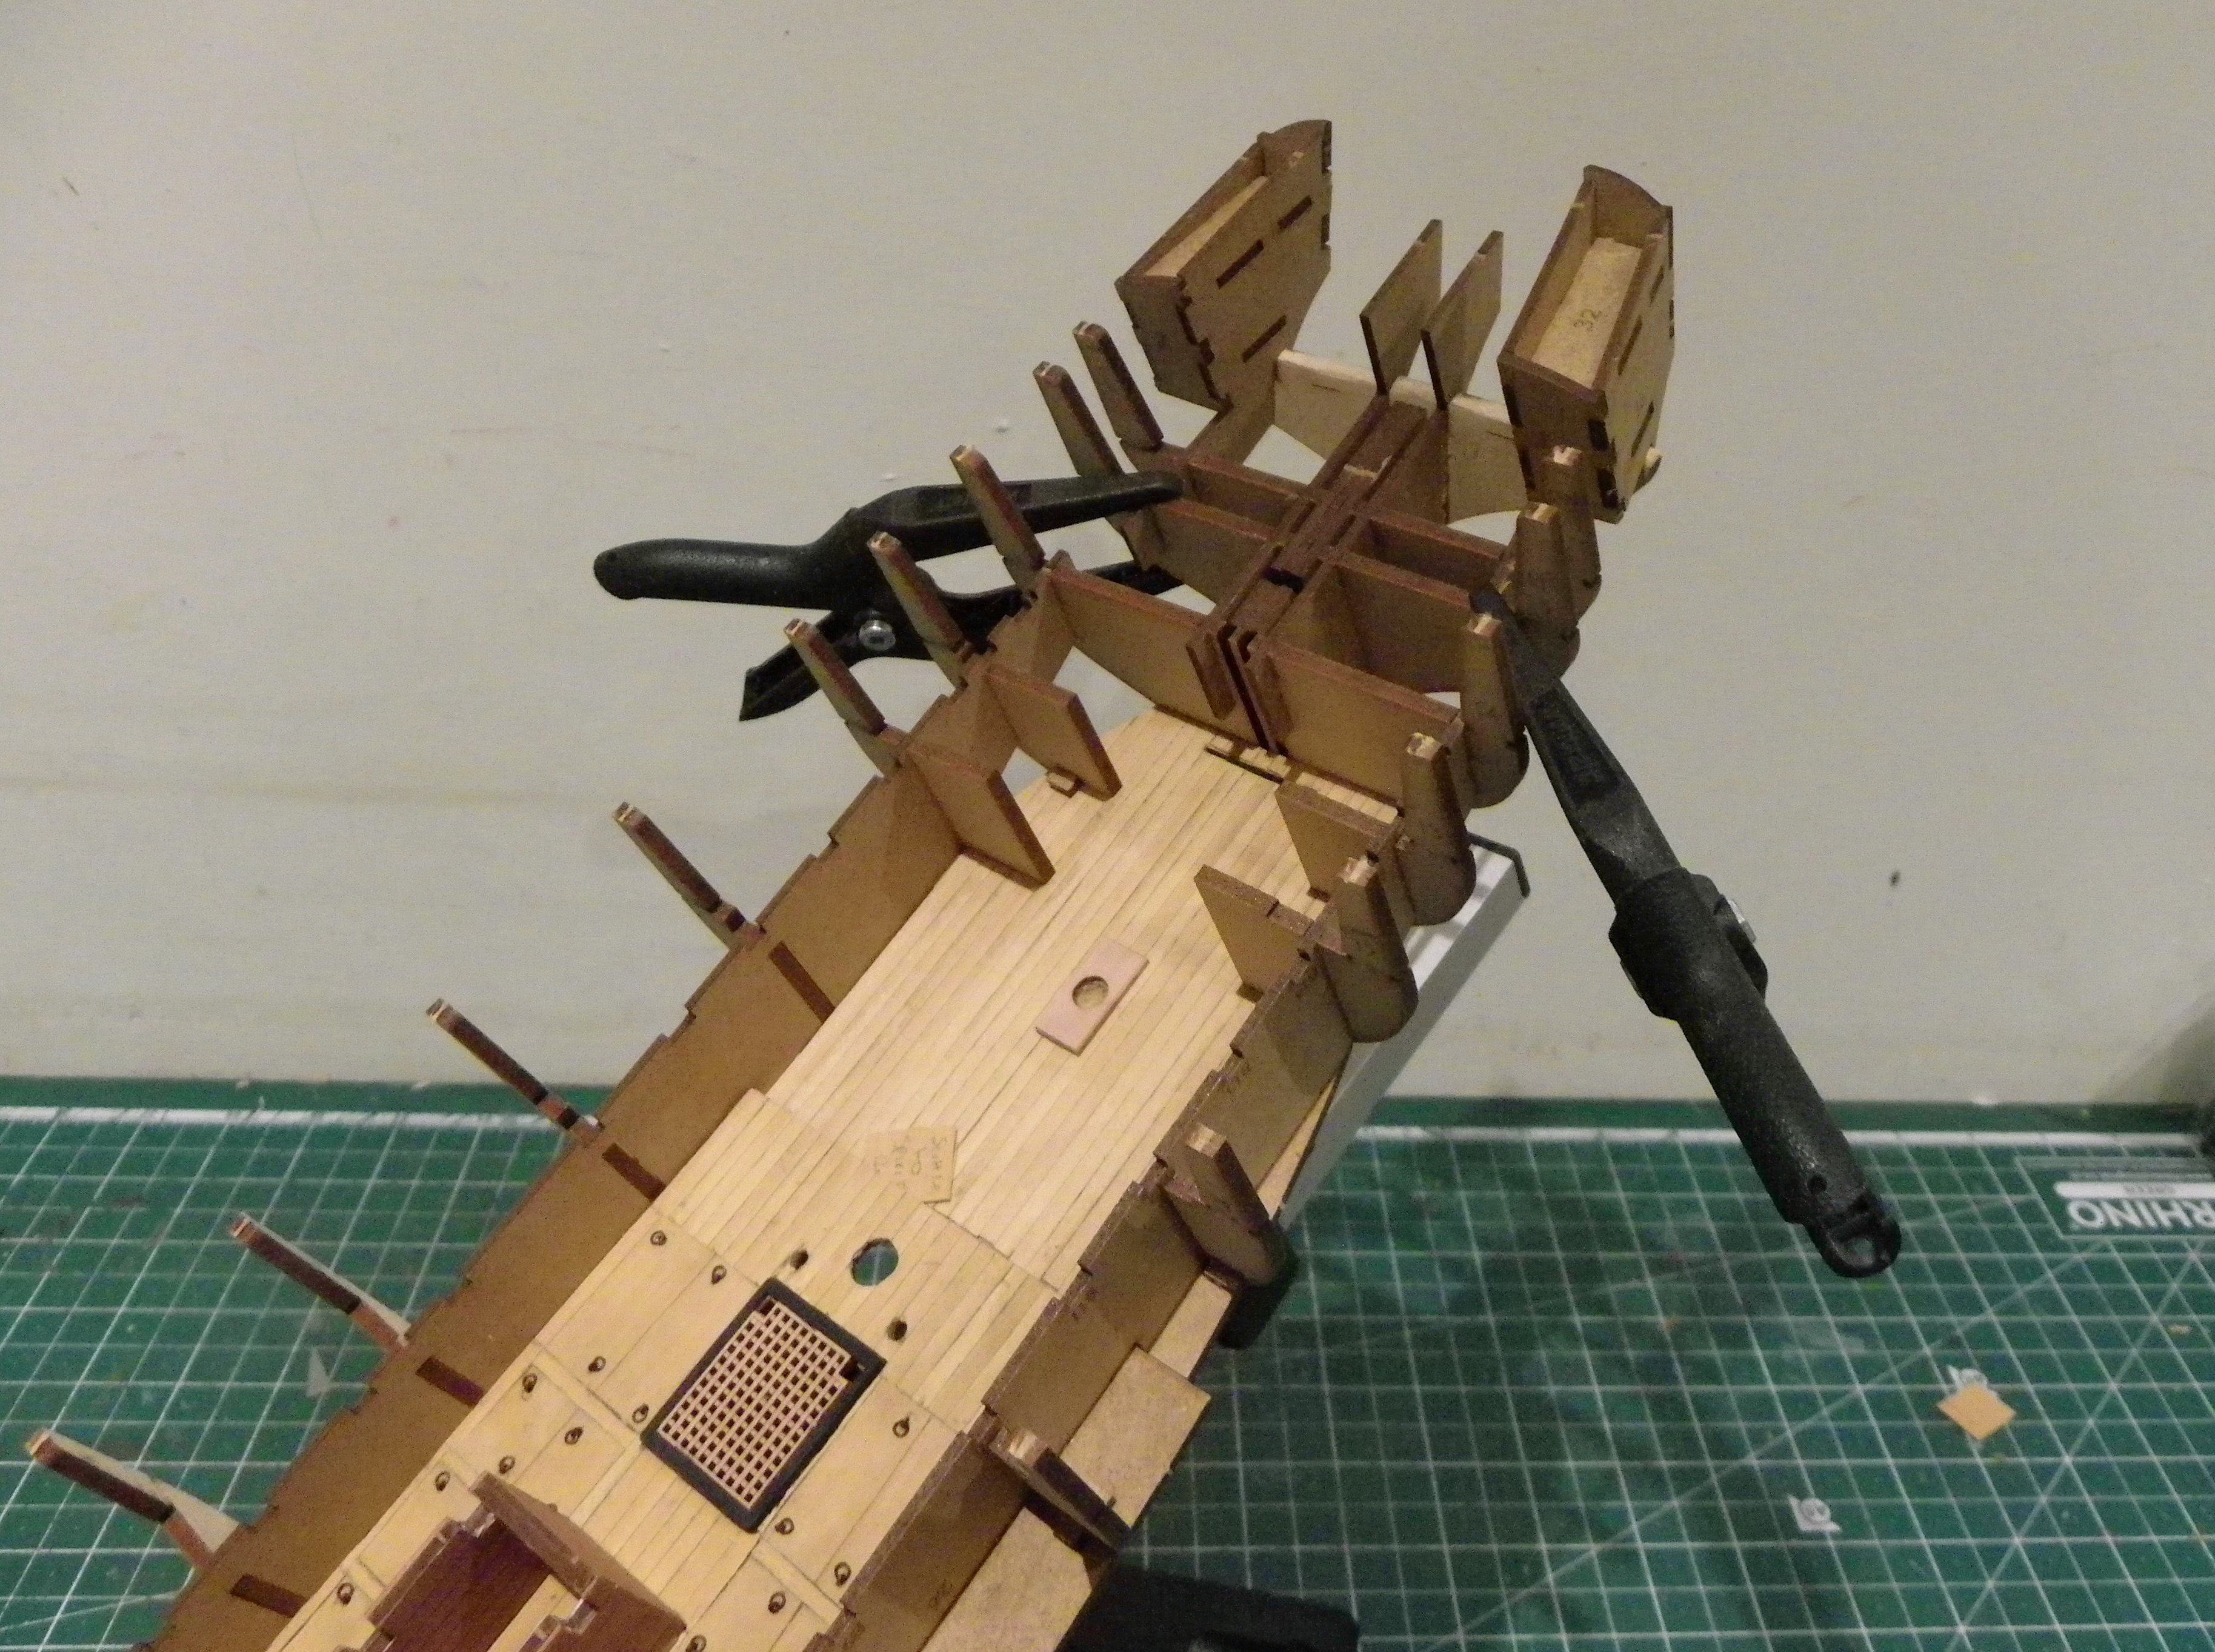
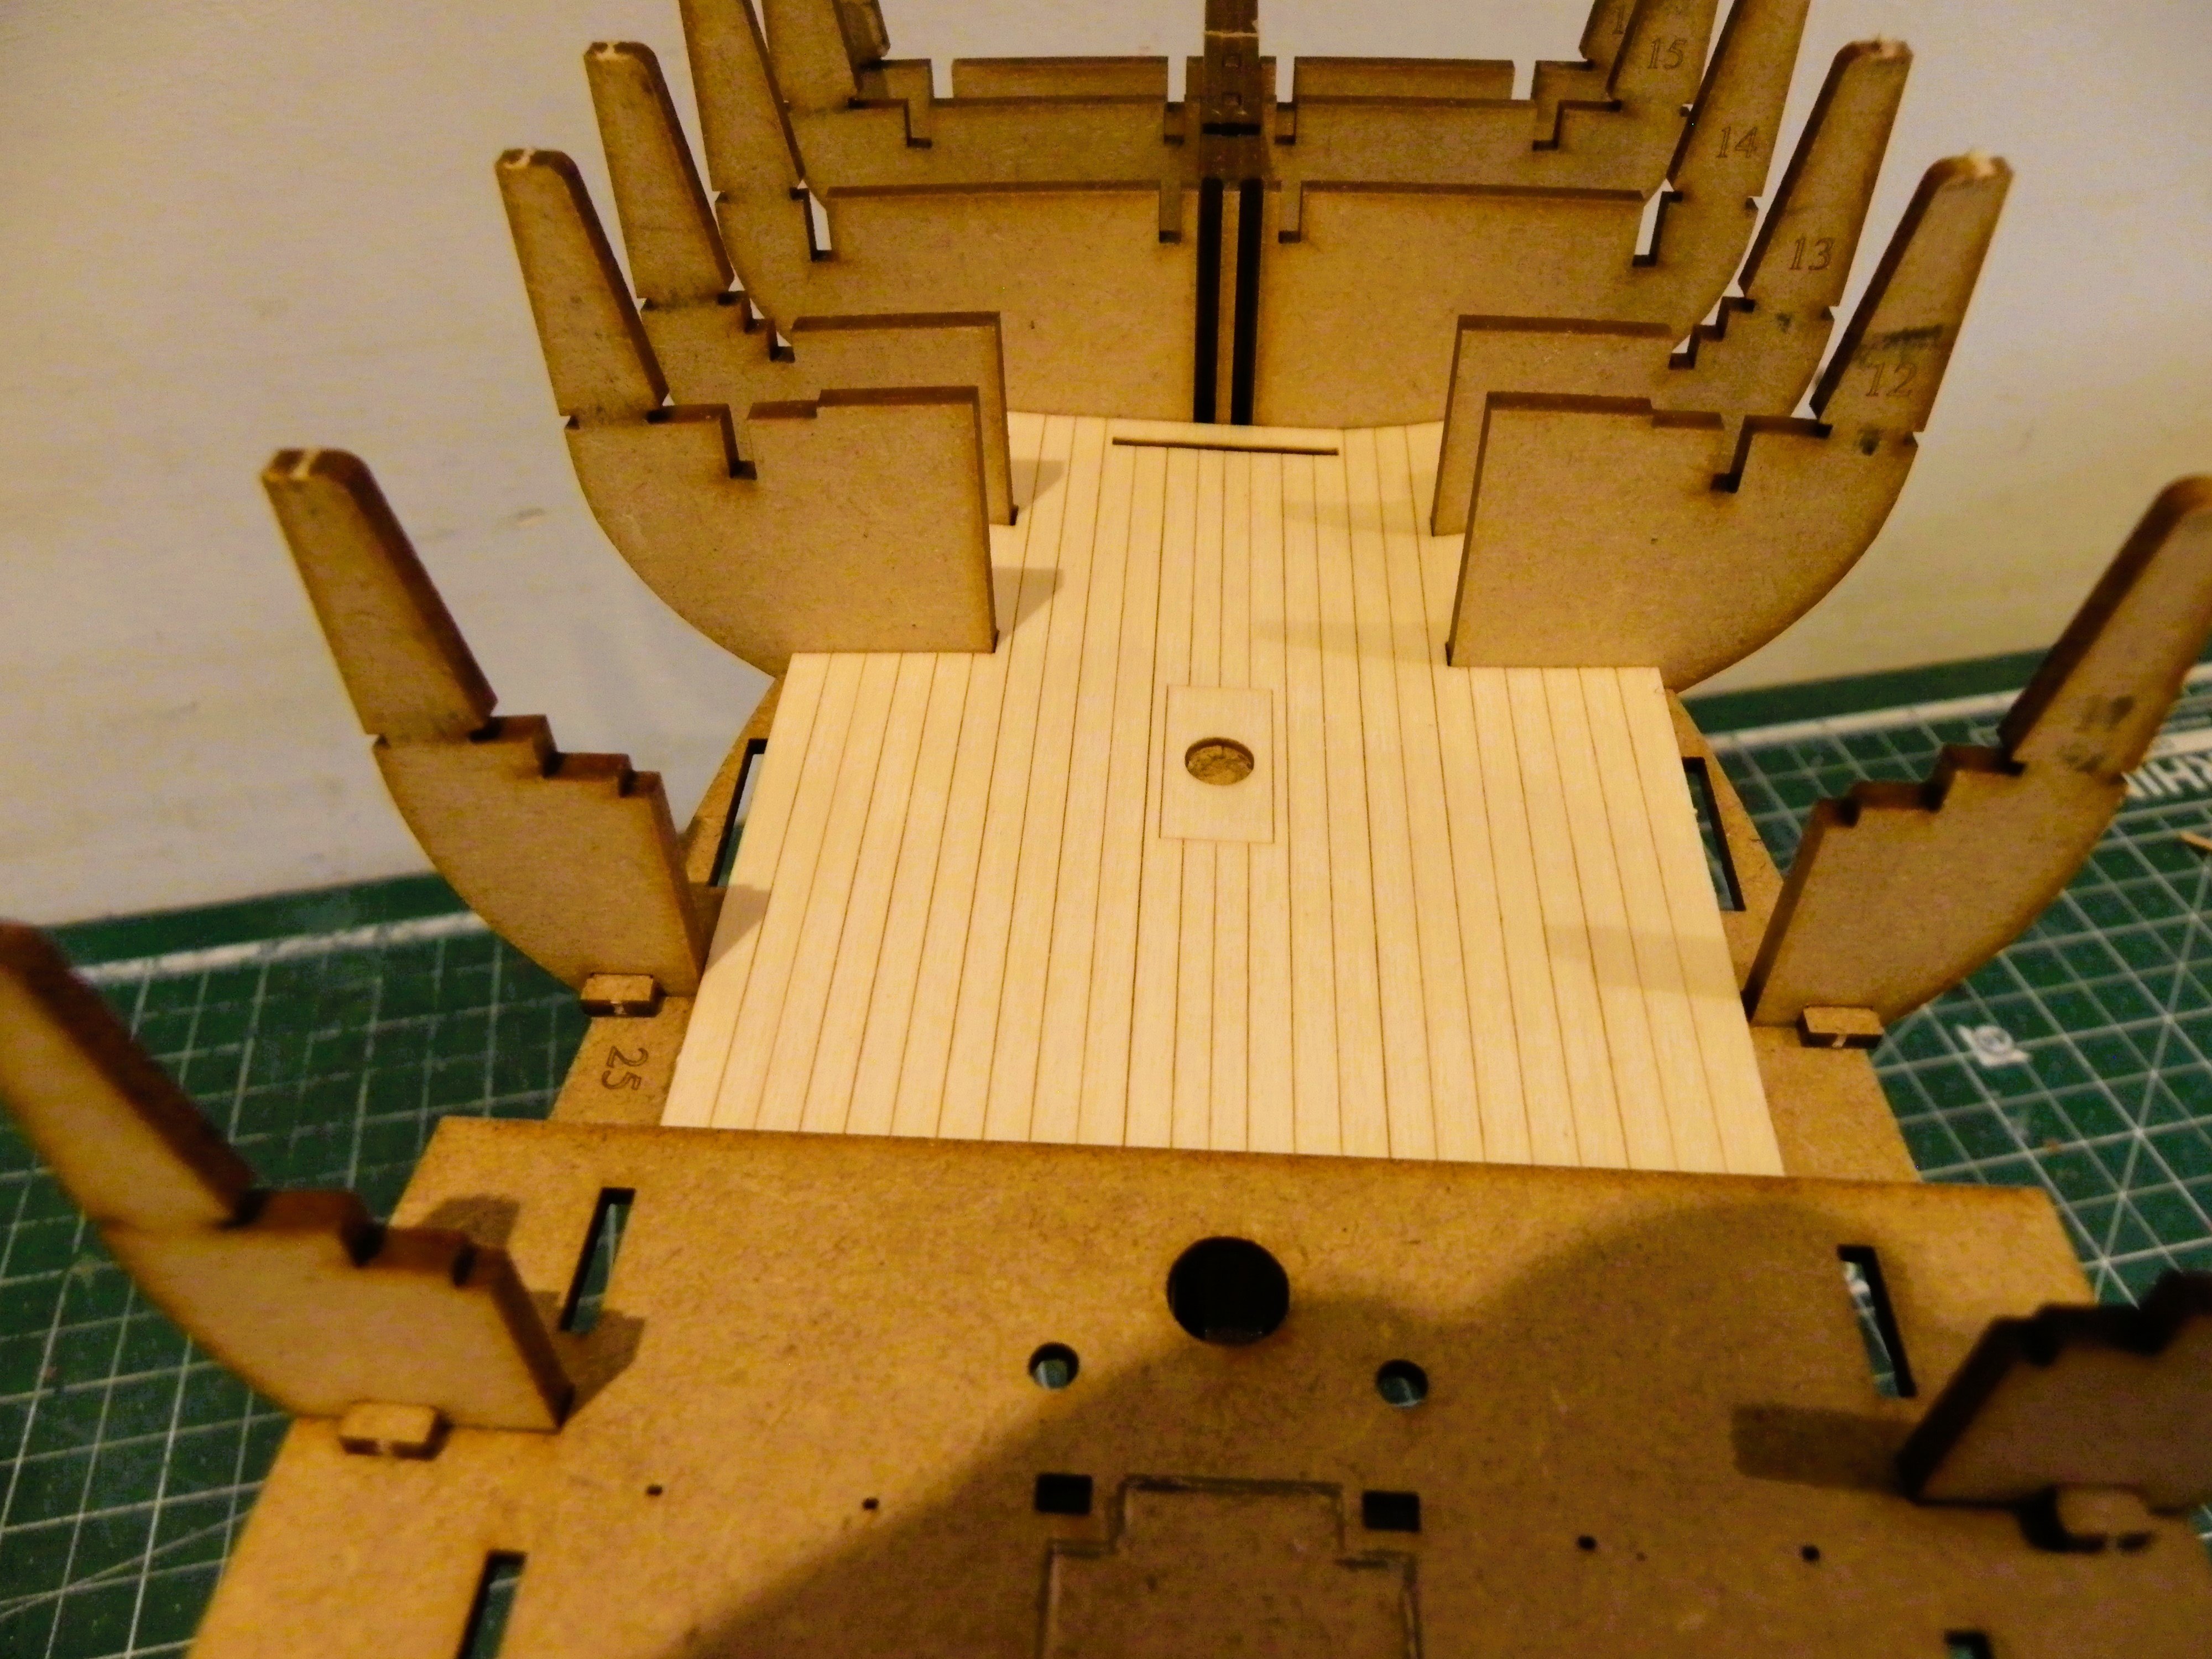
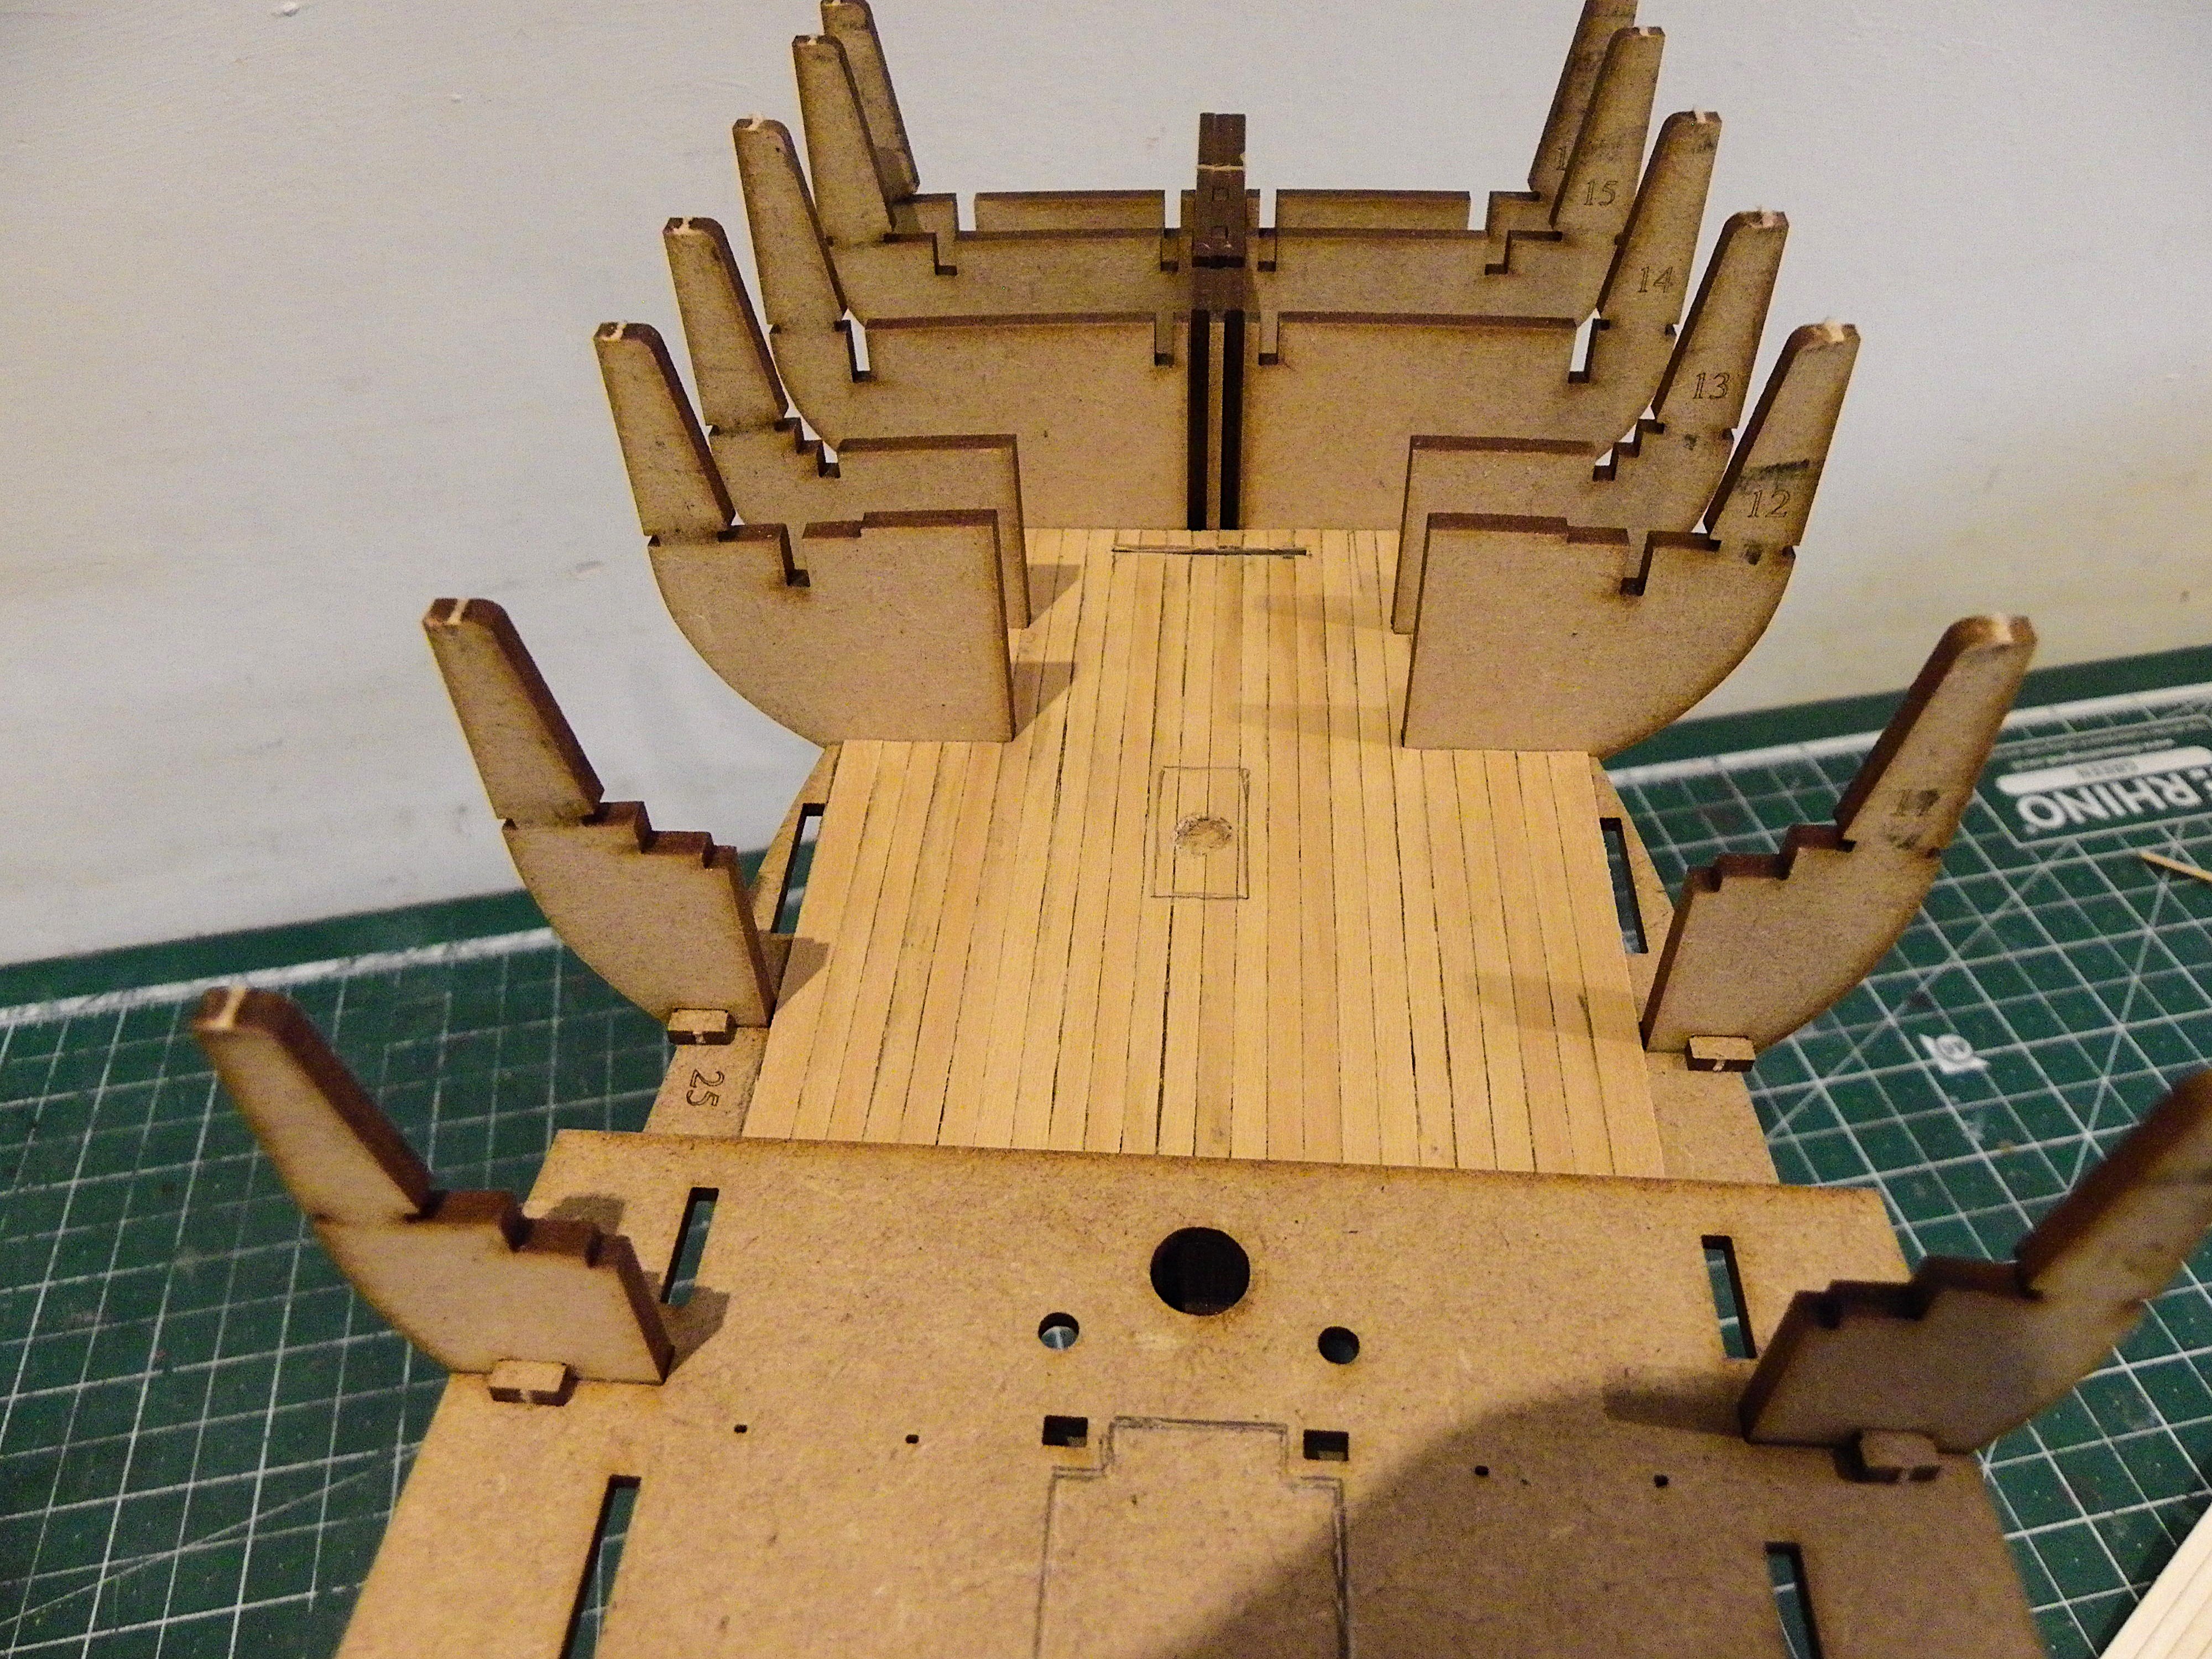
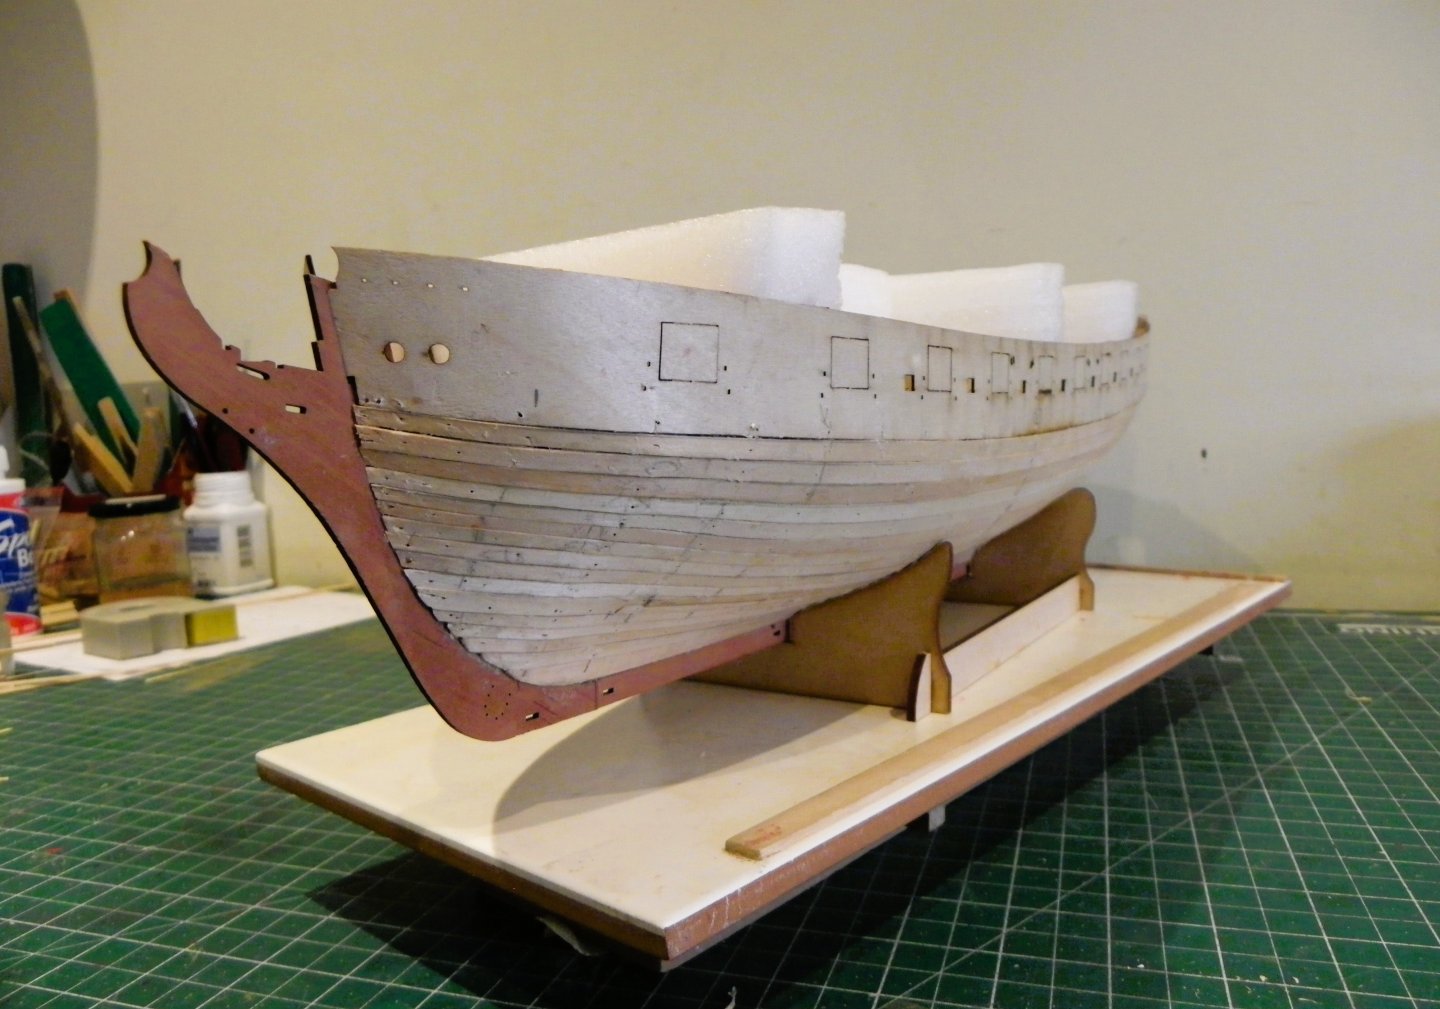
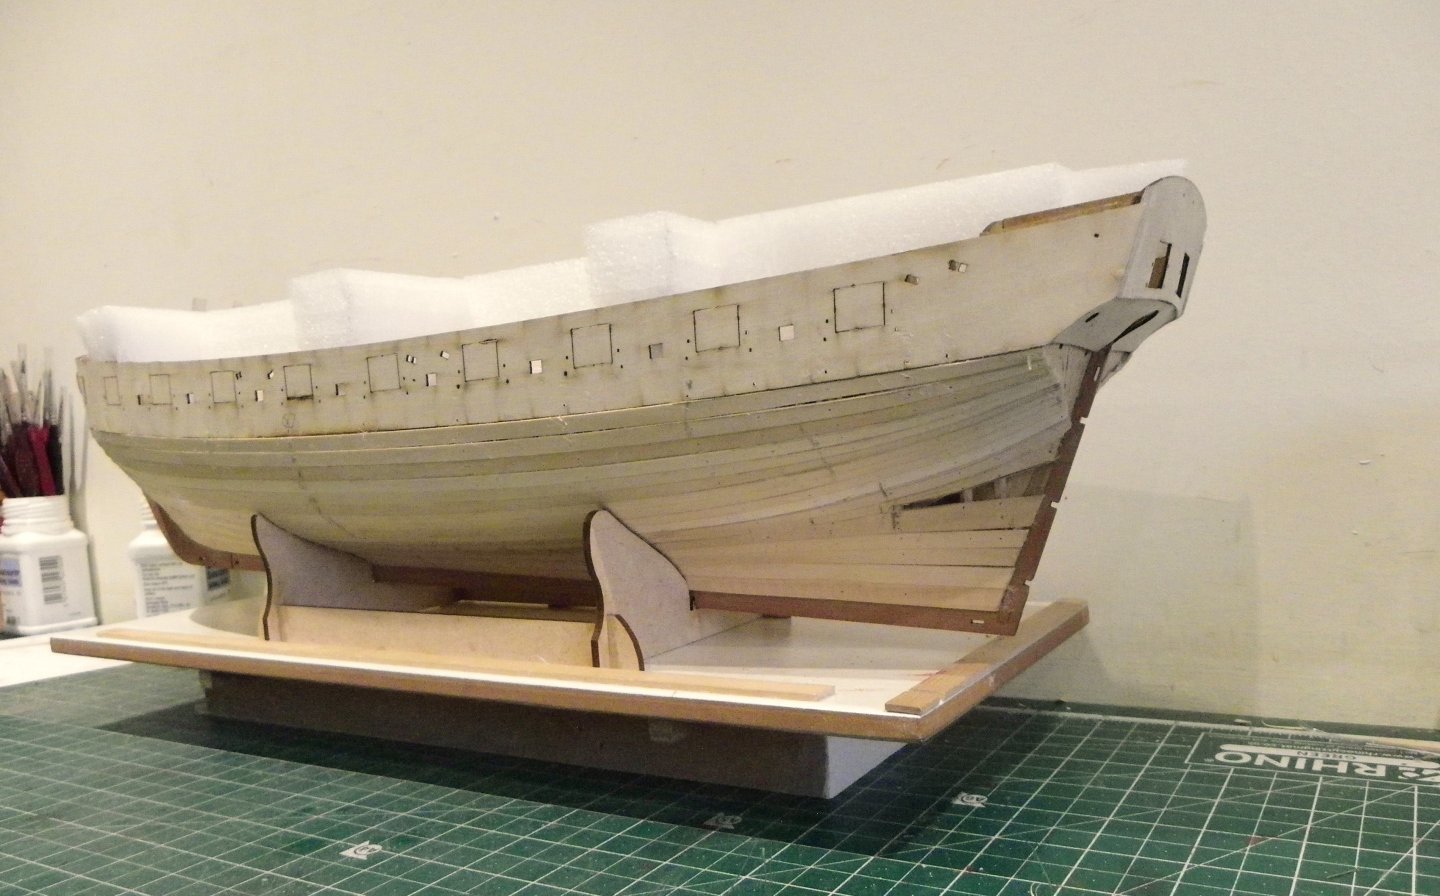
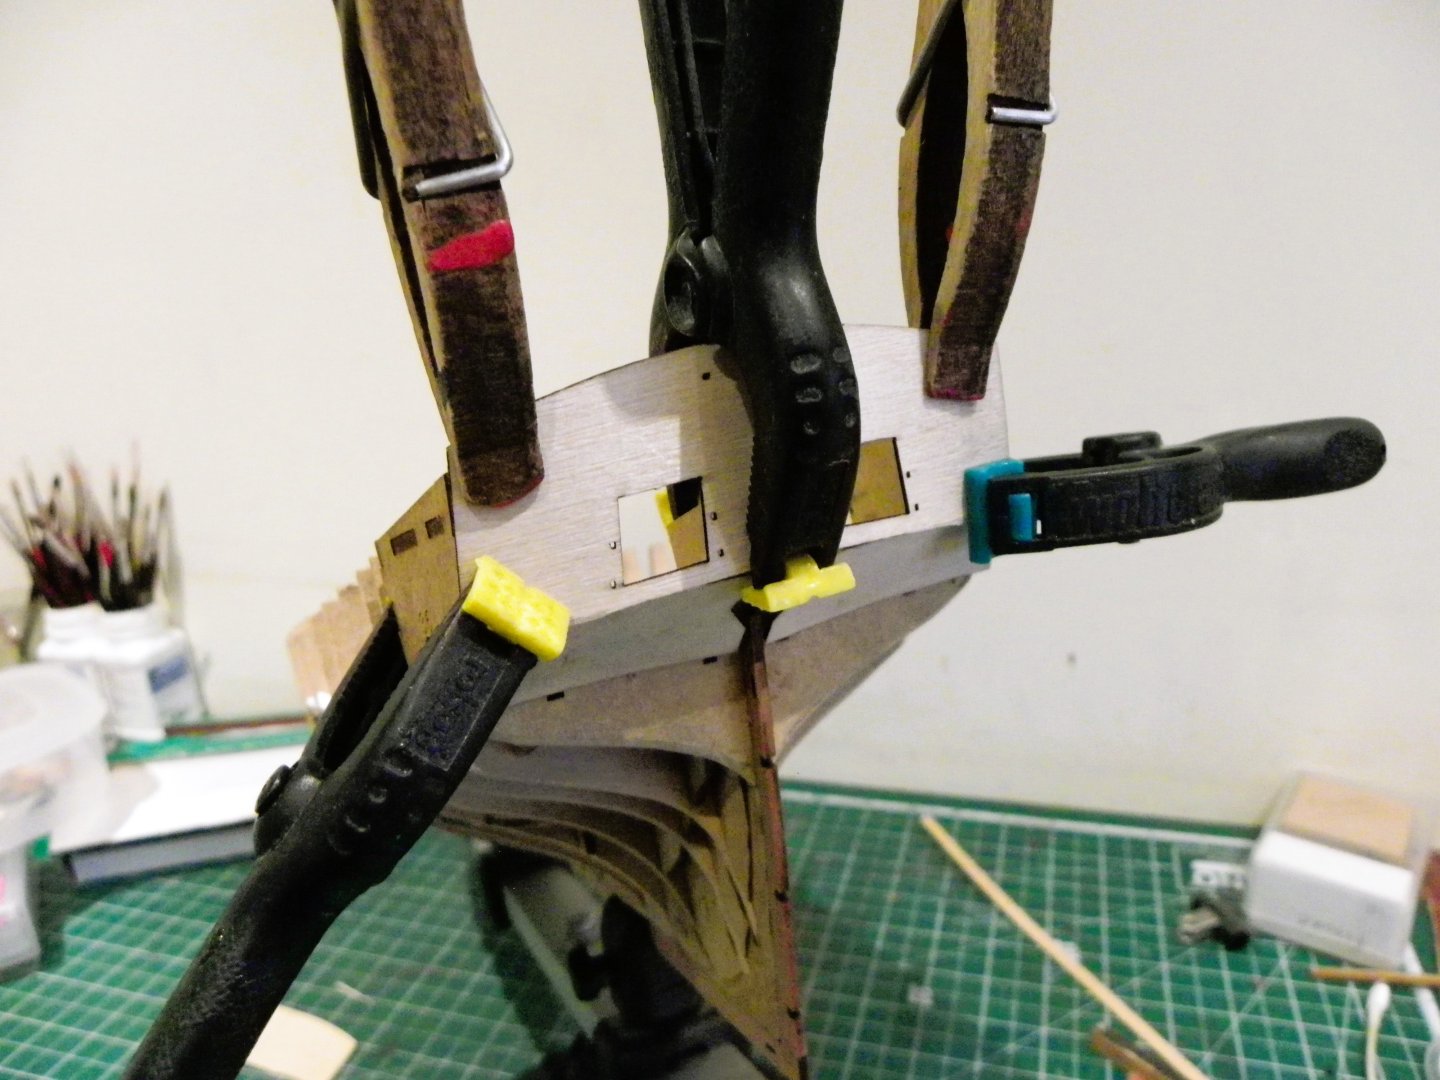
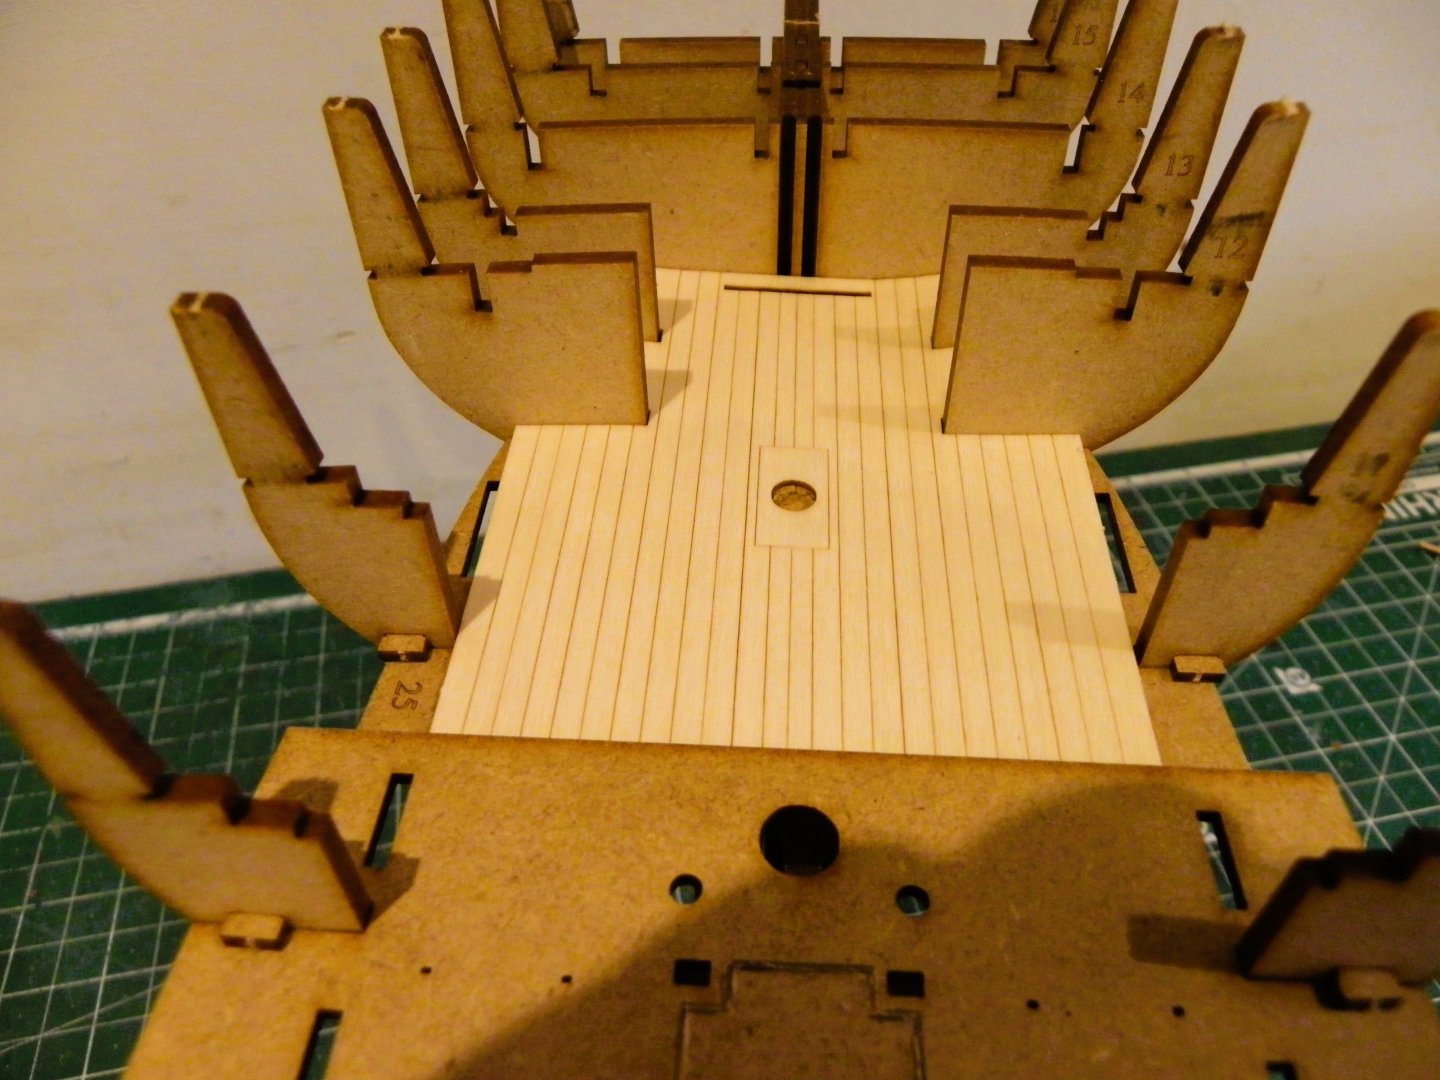
Post 12 More patterns to add. The final action of this section is to add the stern counters and Gunport patterns. 0272 The lower counter is fitted first, I soaked this piece before clamping into place. 0276 The Upper counter follows; I did need to tweak this a little to follow the run of the Lower. 0285 0286 The lower counter includes the discharge hole for the Port side seat of ease, quaintly described as the ‘Necefsary’ on the Adm Plan. Gunport patterns 0304 The forward end was soaked, clamped around a tube, and given the heat treatment. 0295 The parts can then be dry fitted along the hull. 0297 There is a guide-line on the pattern to match with the line of the ply sub-deck, to maintain the ports at the correct level above deck. 0337 On this basis, where the pattern reaches the stern I found it sat just below the level of the stern deck cabins. Not entirely sure if this is correct, but there is not a profile drawing of this stage on the plans. The Manual photos would suggest perhaps not, but not very clear on this particular aspect. Still, I am where I am, and I need to maintain the gunport levels. The Starboard side pattern was fitted using pins and pva. It goes without saying that glue is not applied to the bulkhead extensions, but I did glue against the side of the stern cabins, and the forward end into the prow slot. Diluted glue was then run along the joints below the sub deck. Before pinning I Painted glue on the bulkheads below the subdeck. 0306 0311 The Portside was fitted 24 hrs later, but firstly I checked that the sides were level with each other. Once satisfied I pinned and glued as before. 0336 0343 Some tidying up and then onto planking. B.E. 28/12/2024


- 332 replies
-
- 24
-
-
- Harpy
- Vanguard Models
- (and 1 more)
-
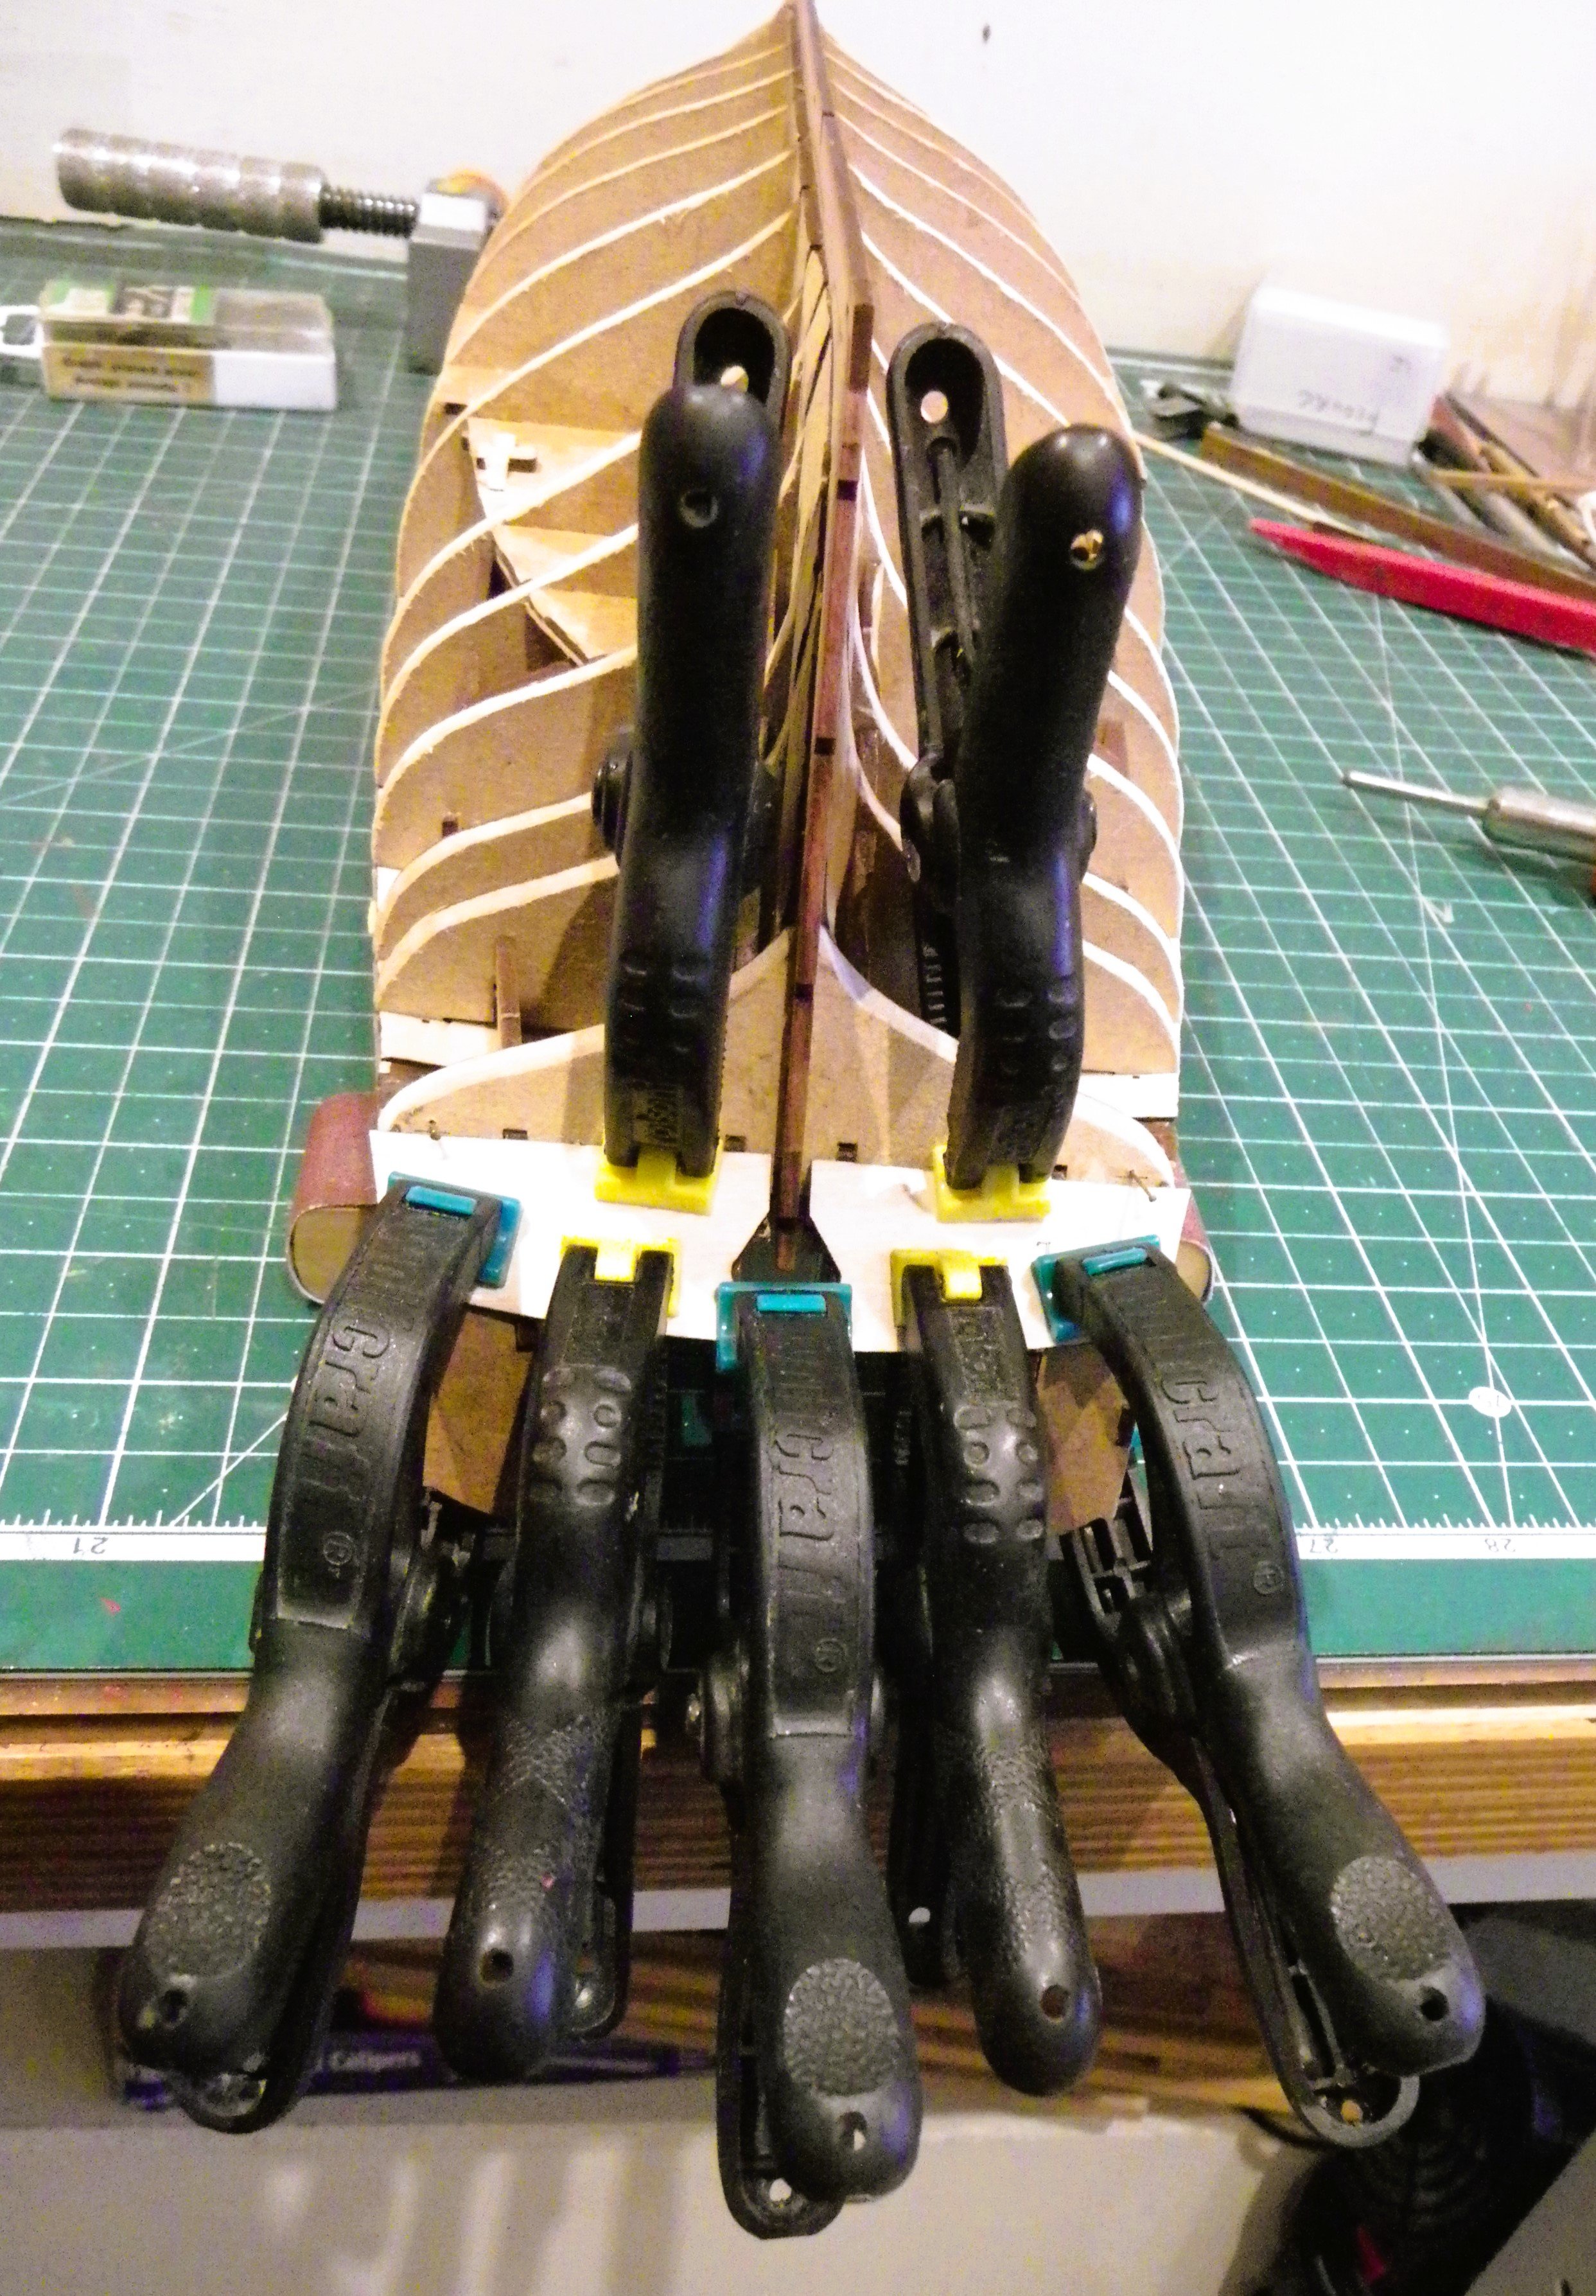
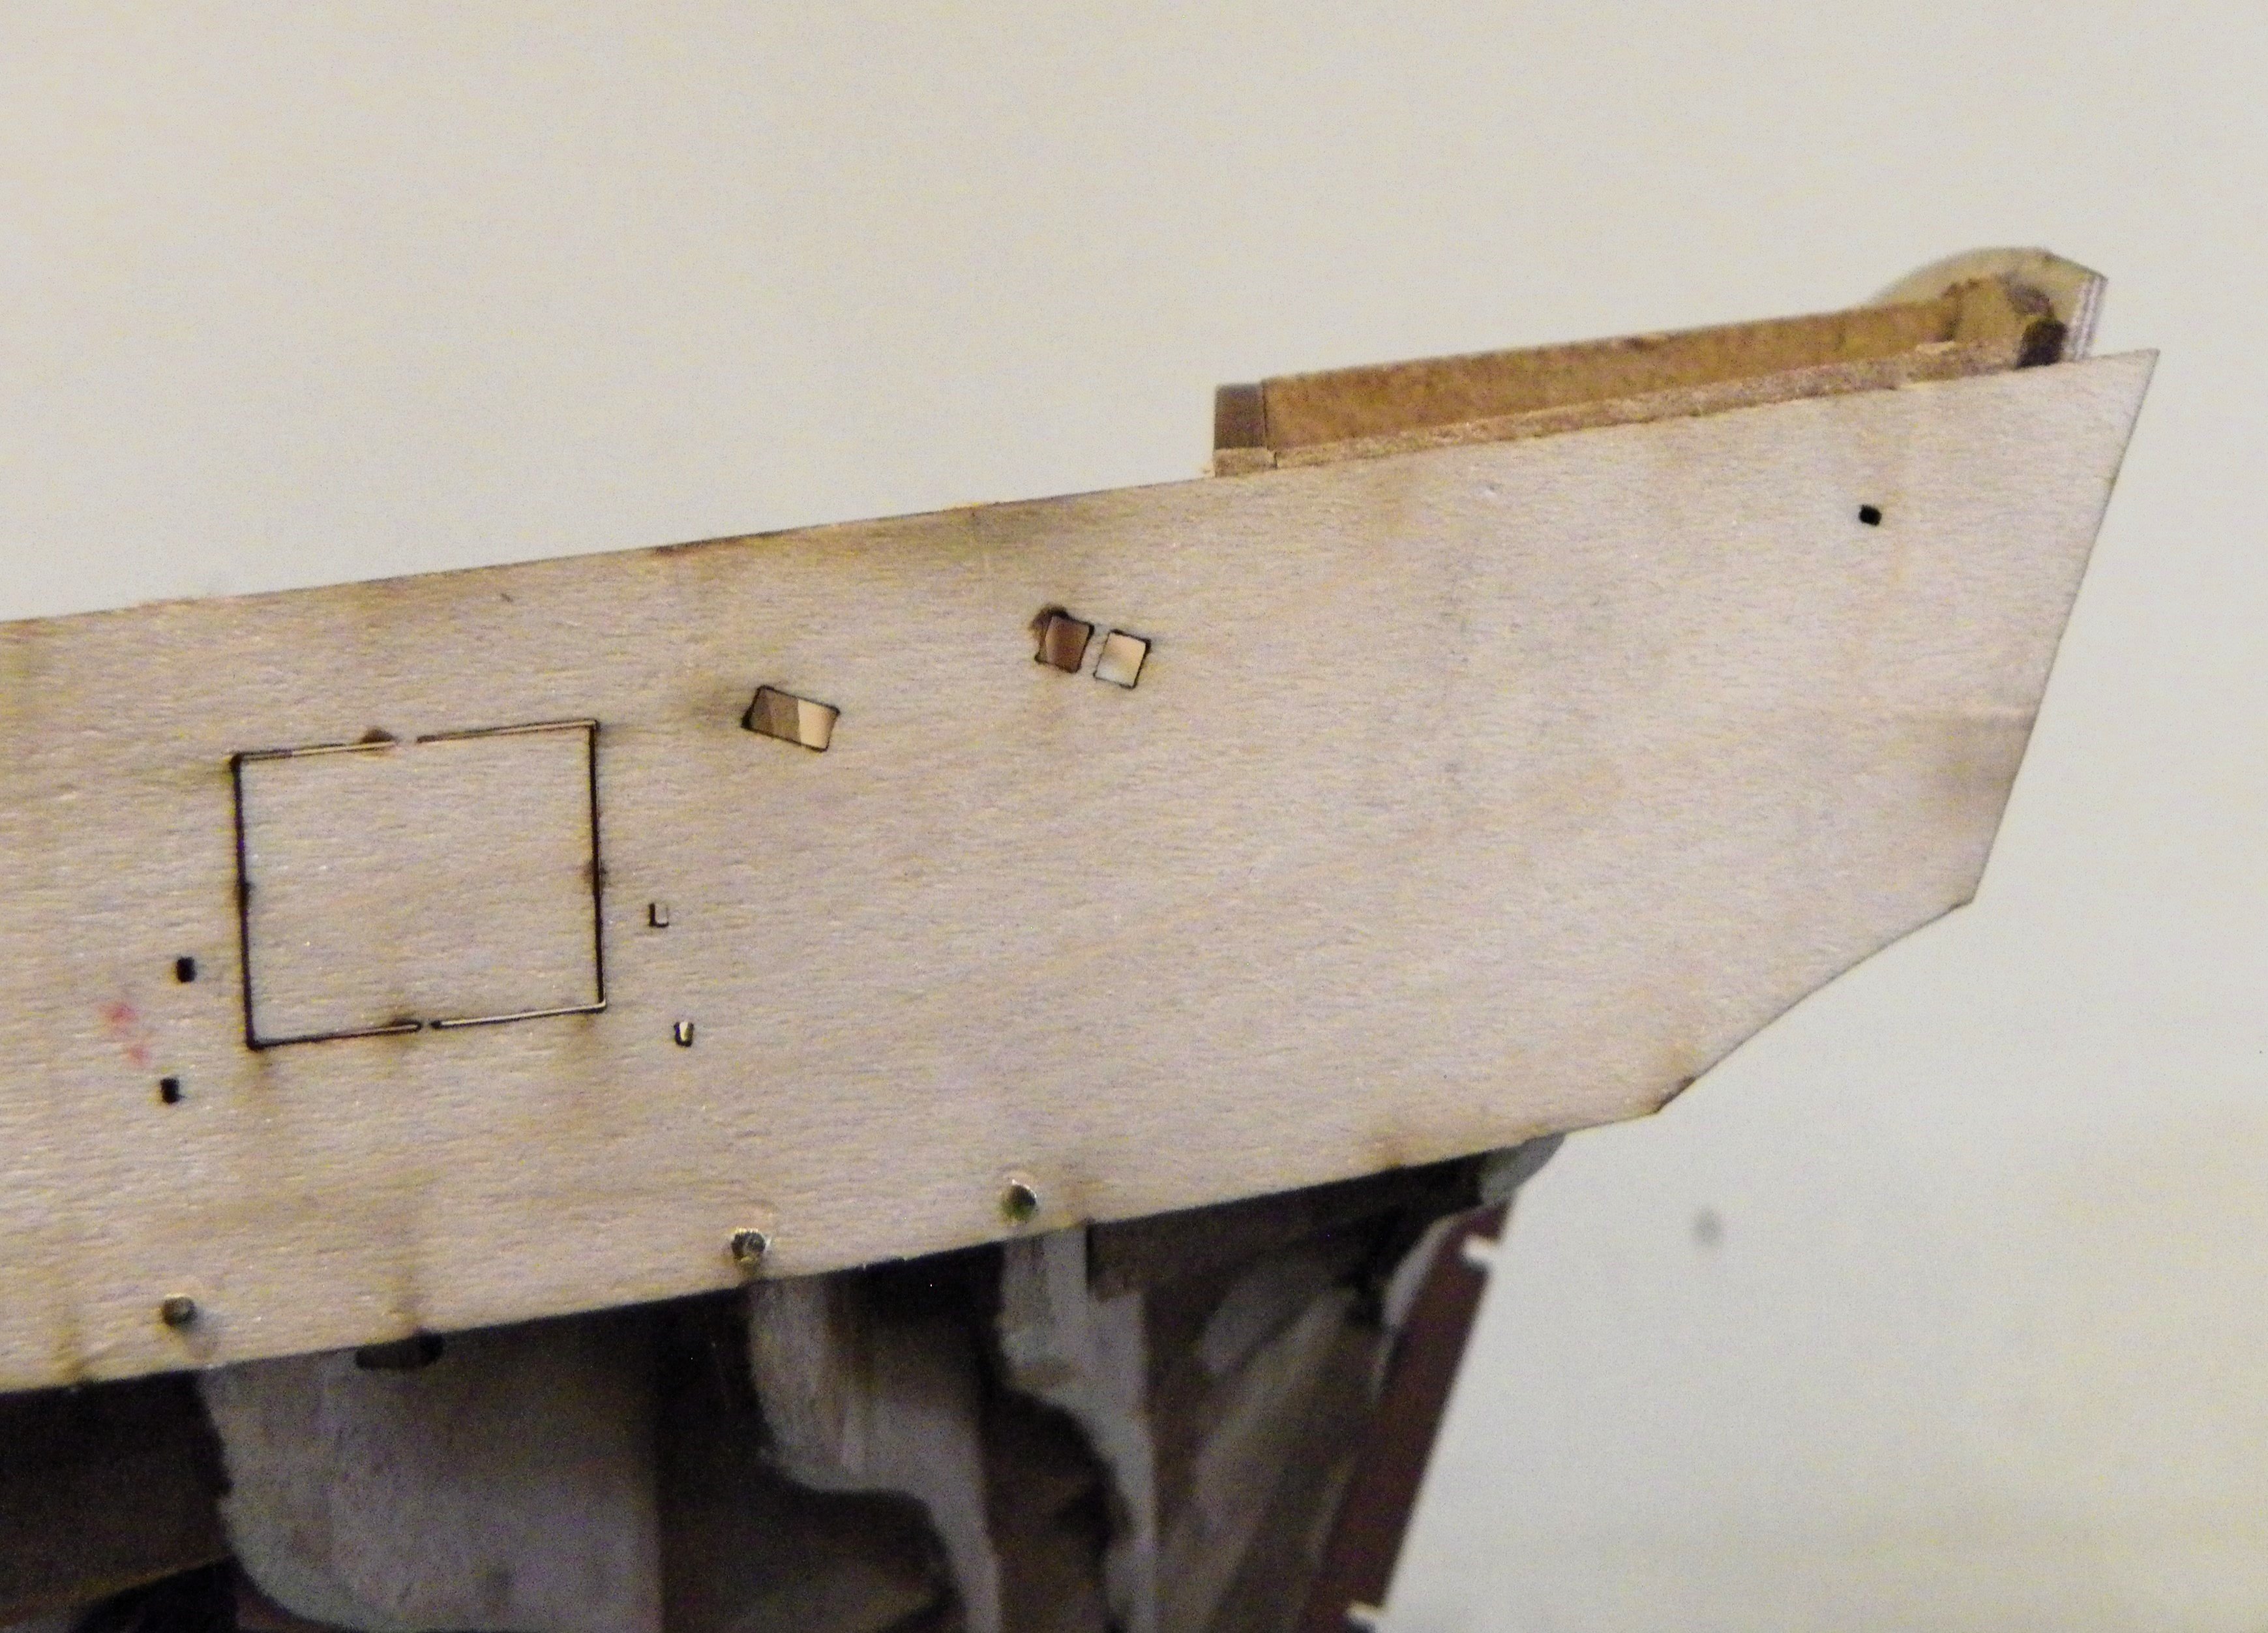
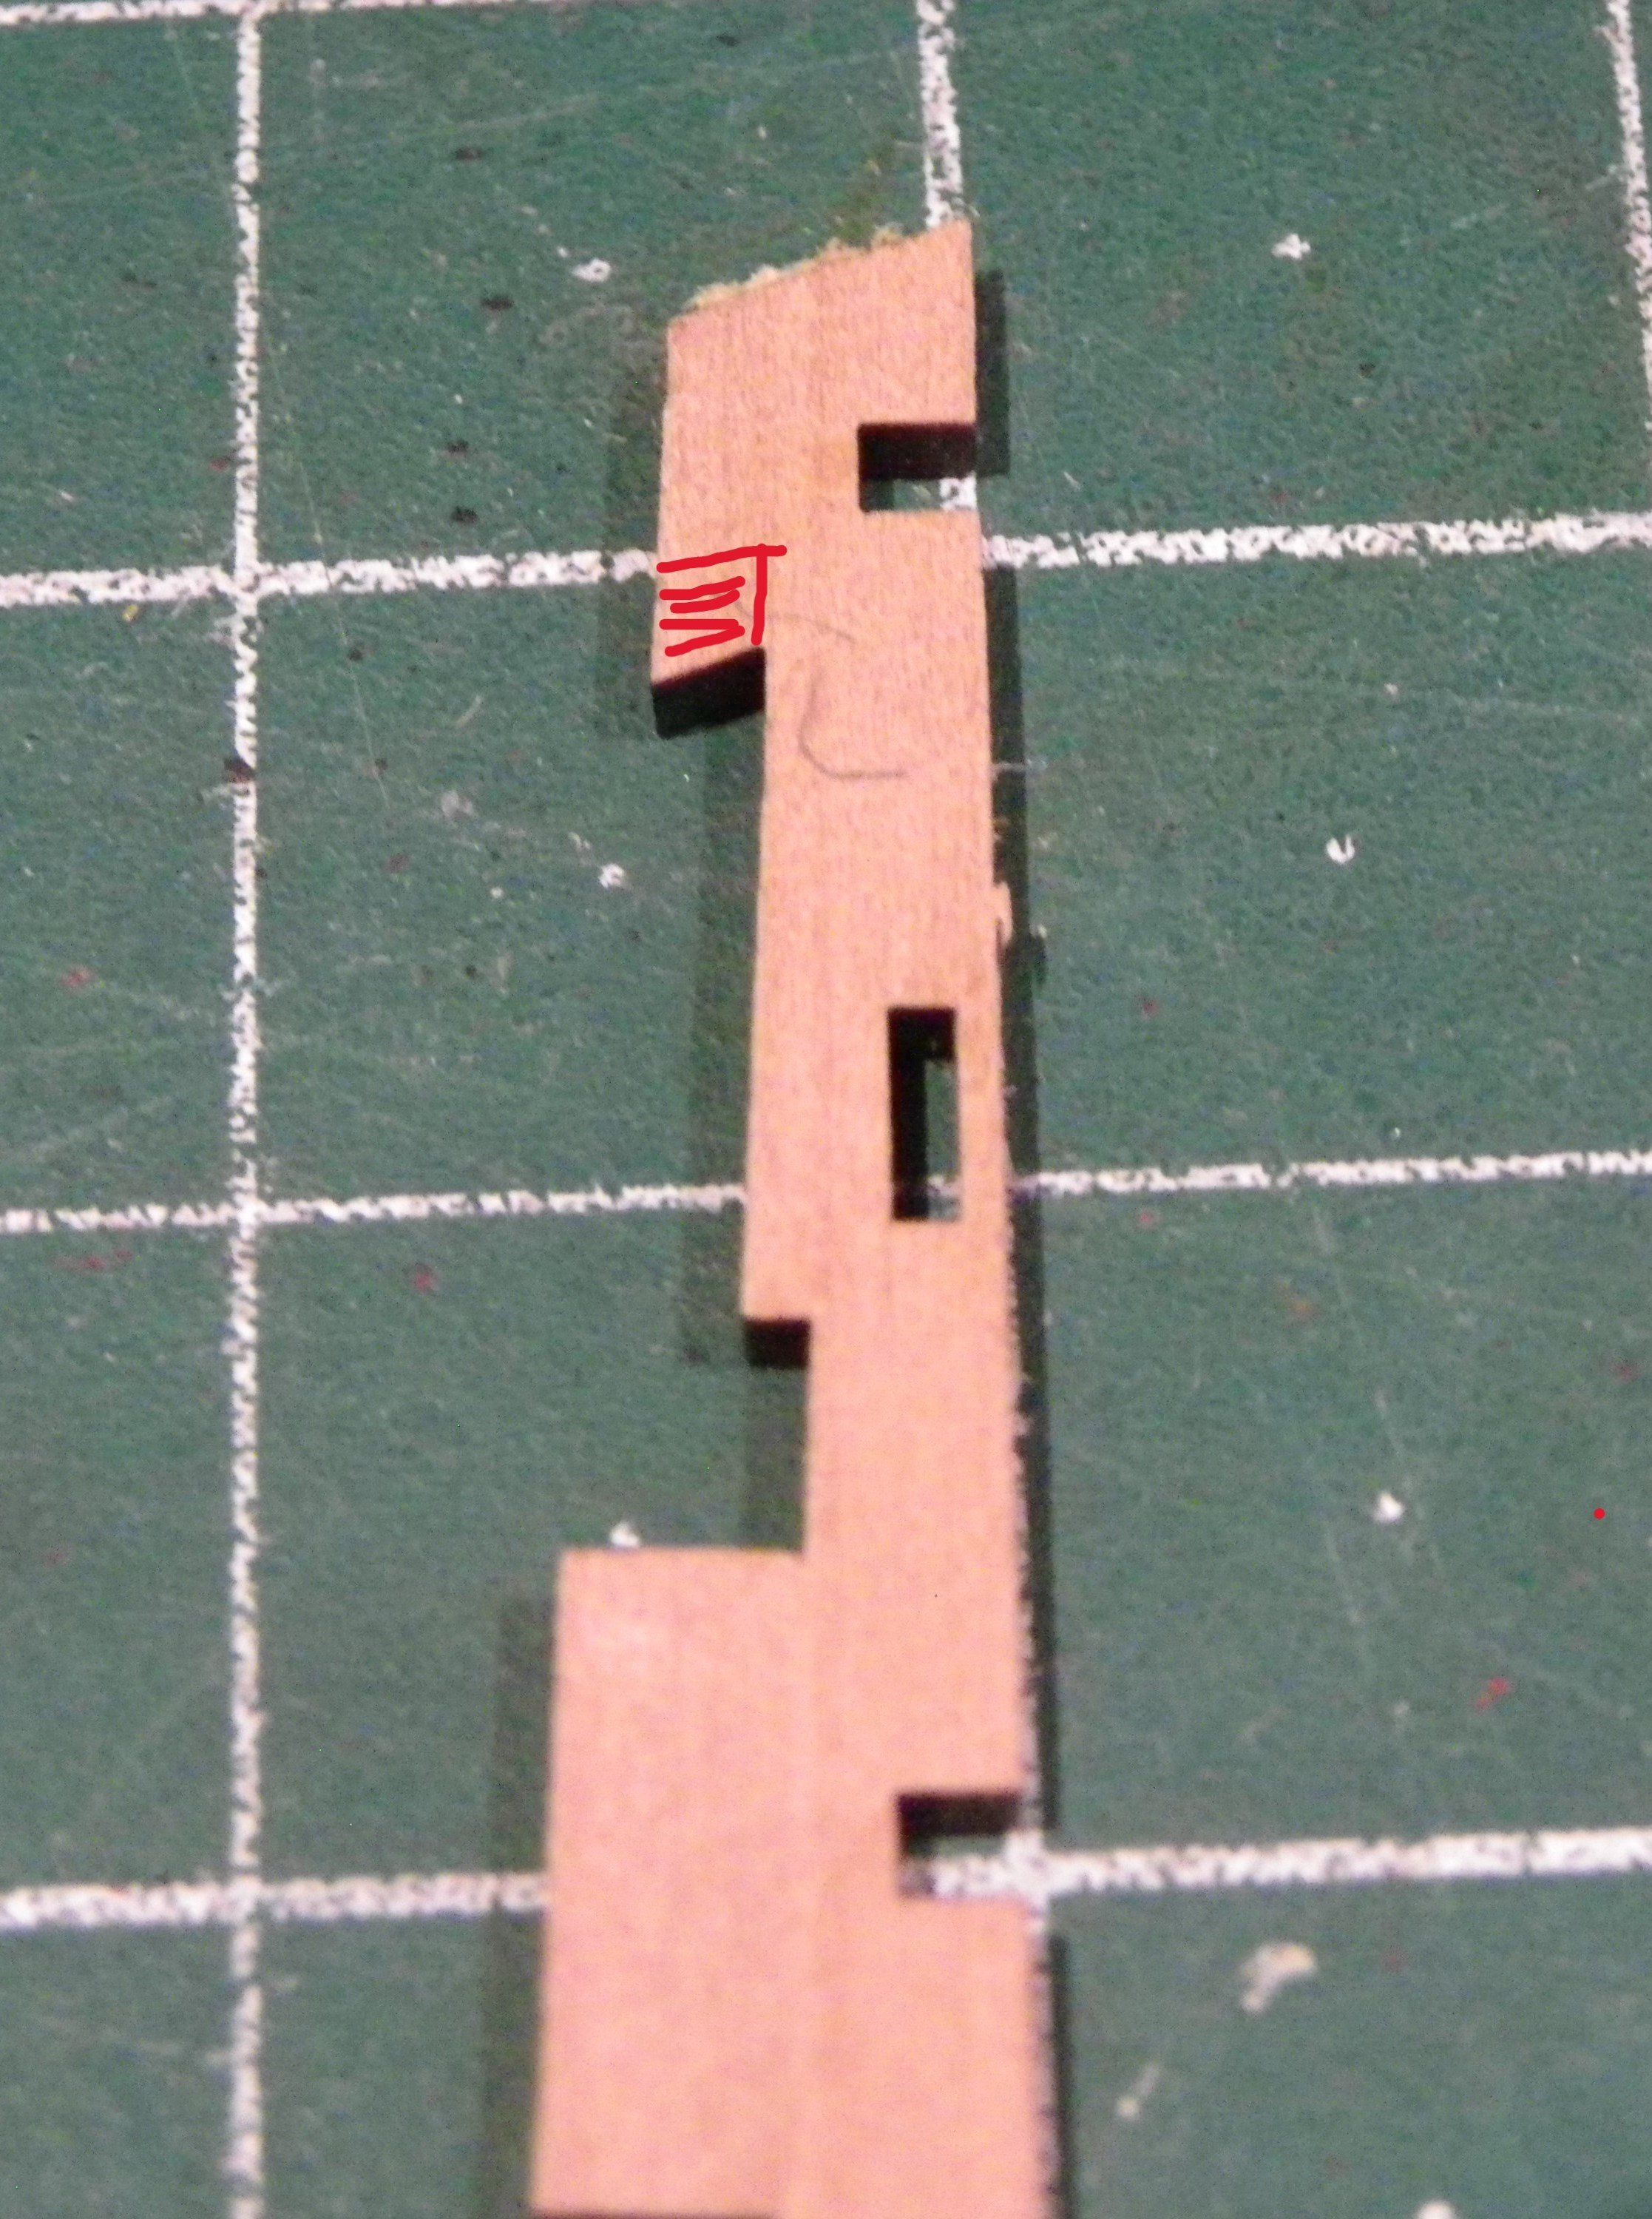
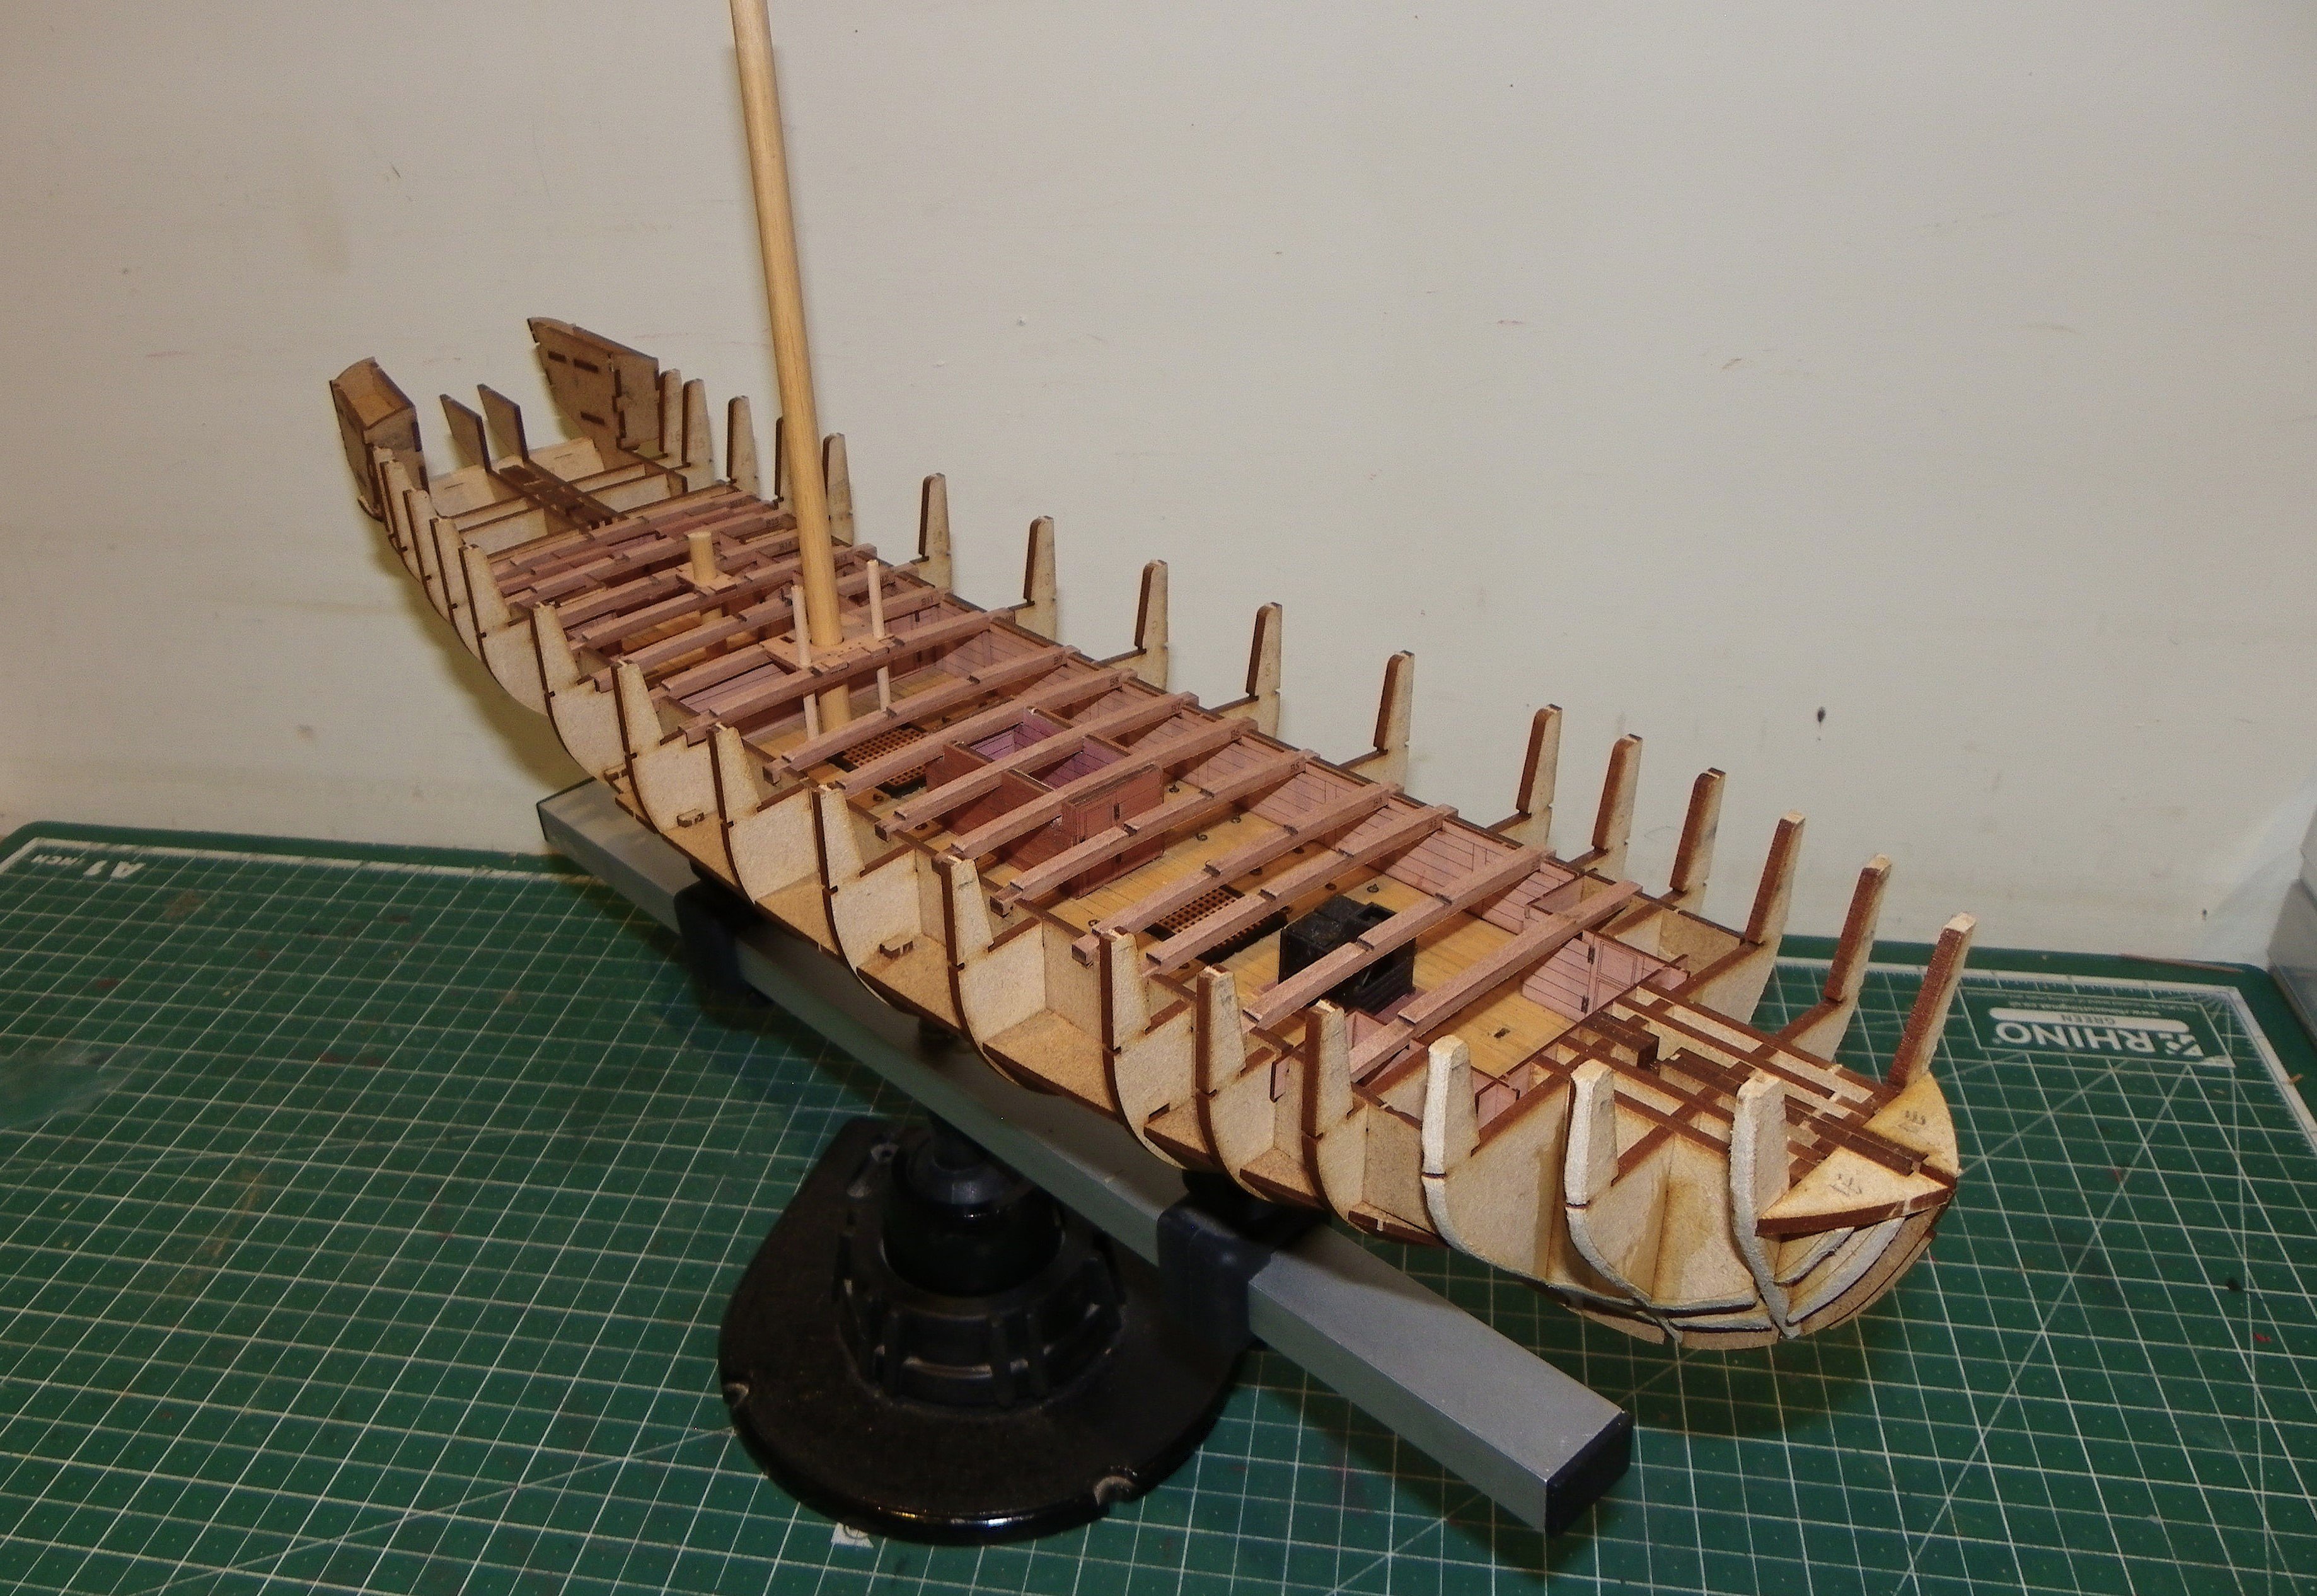
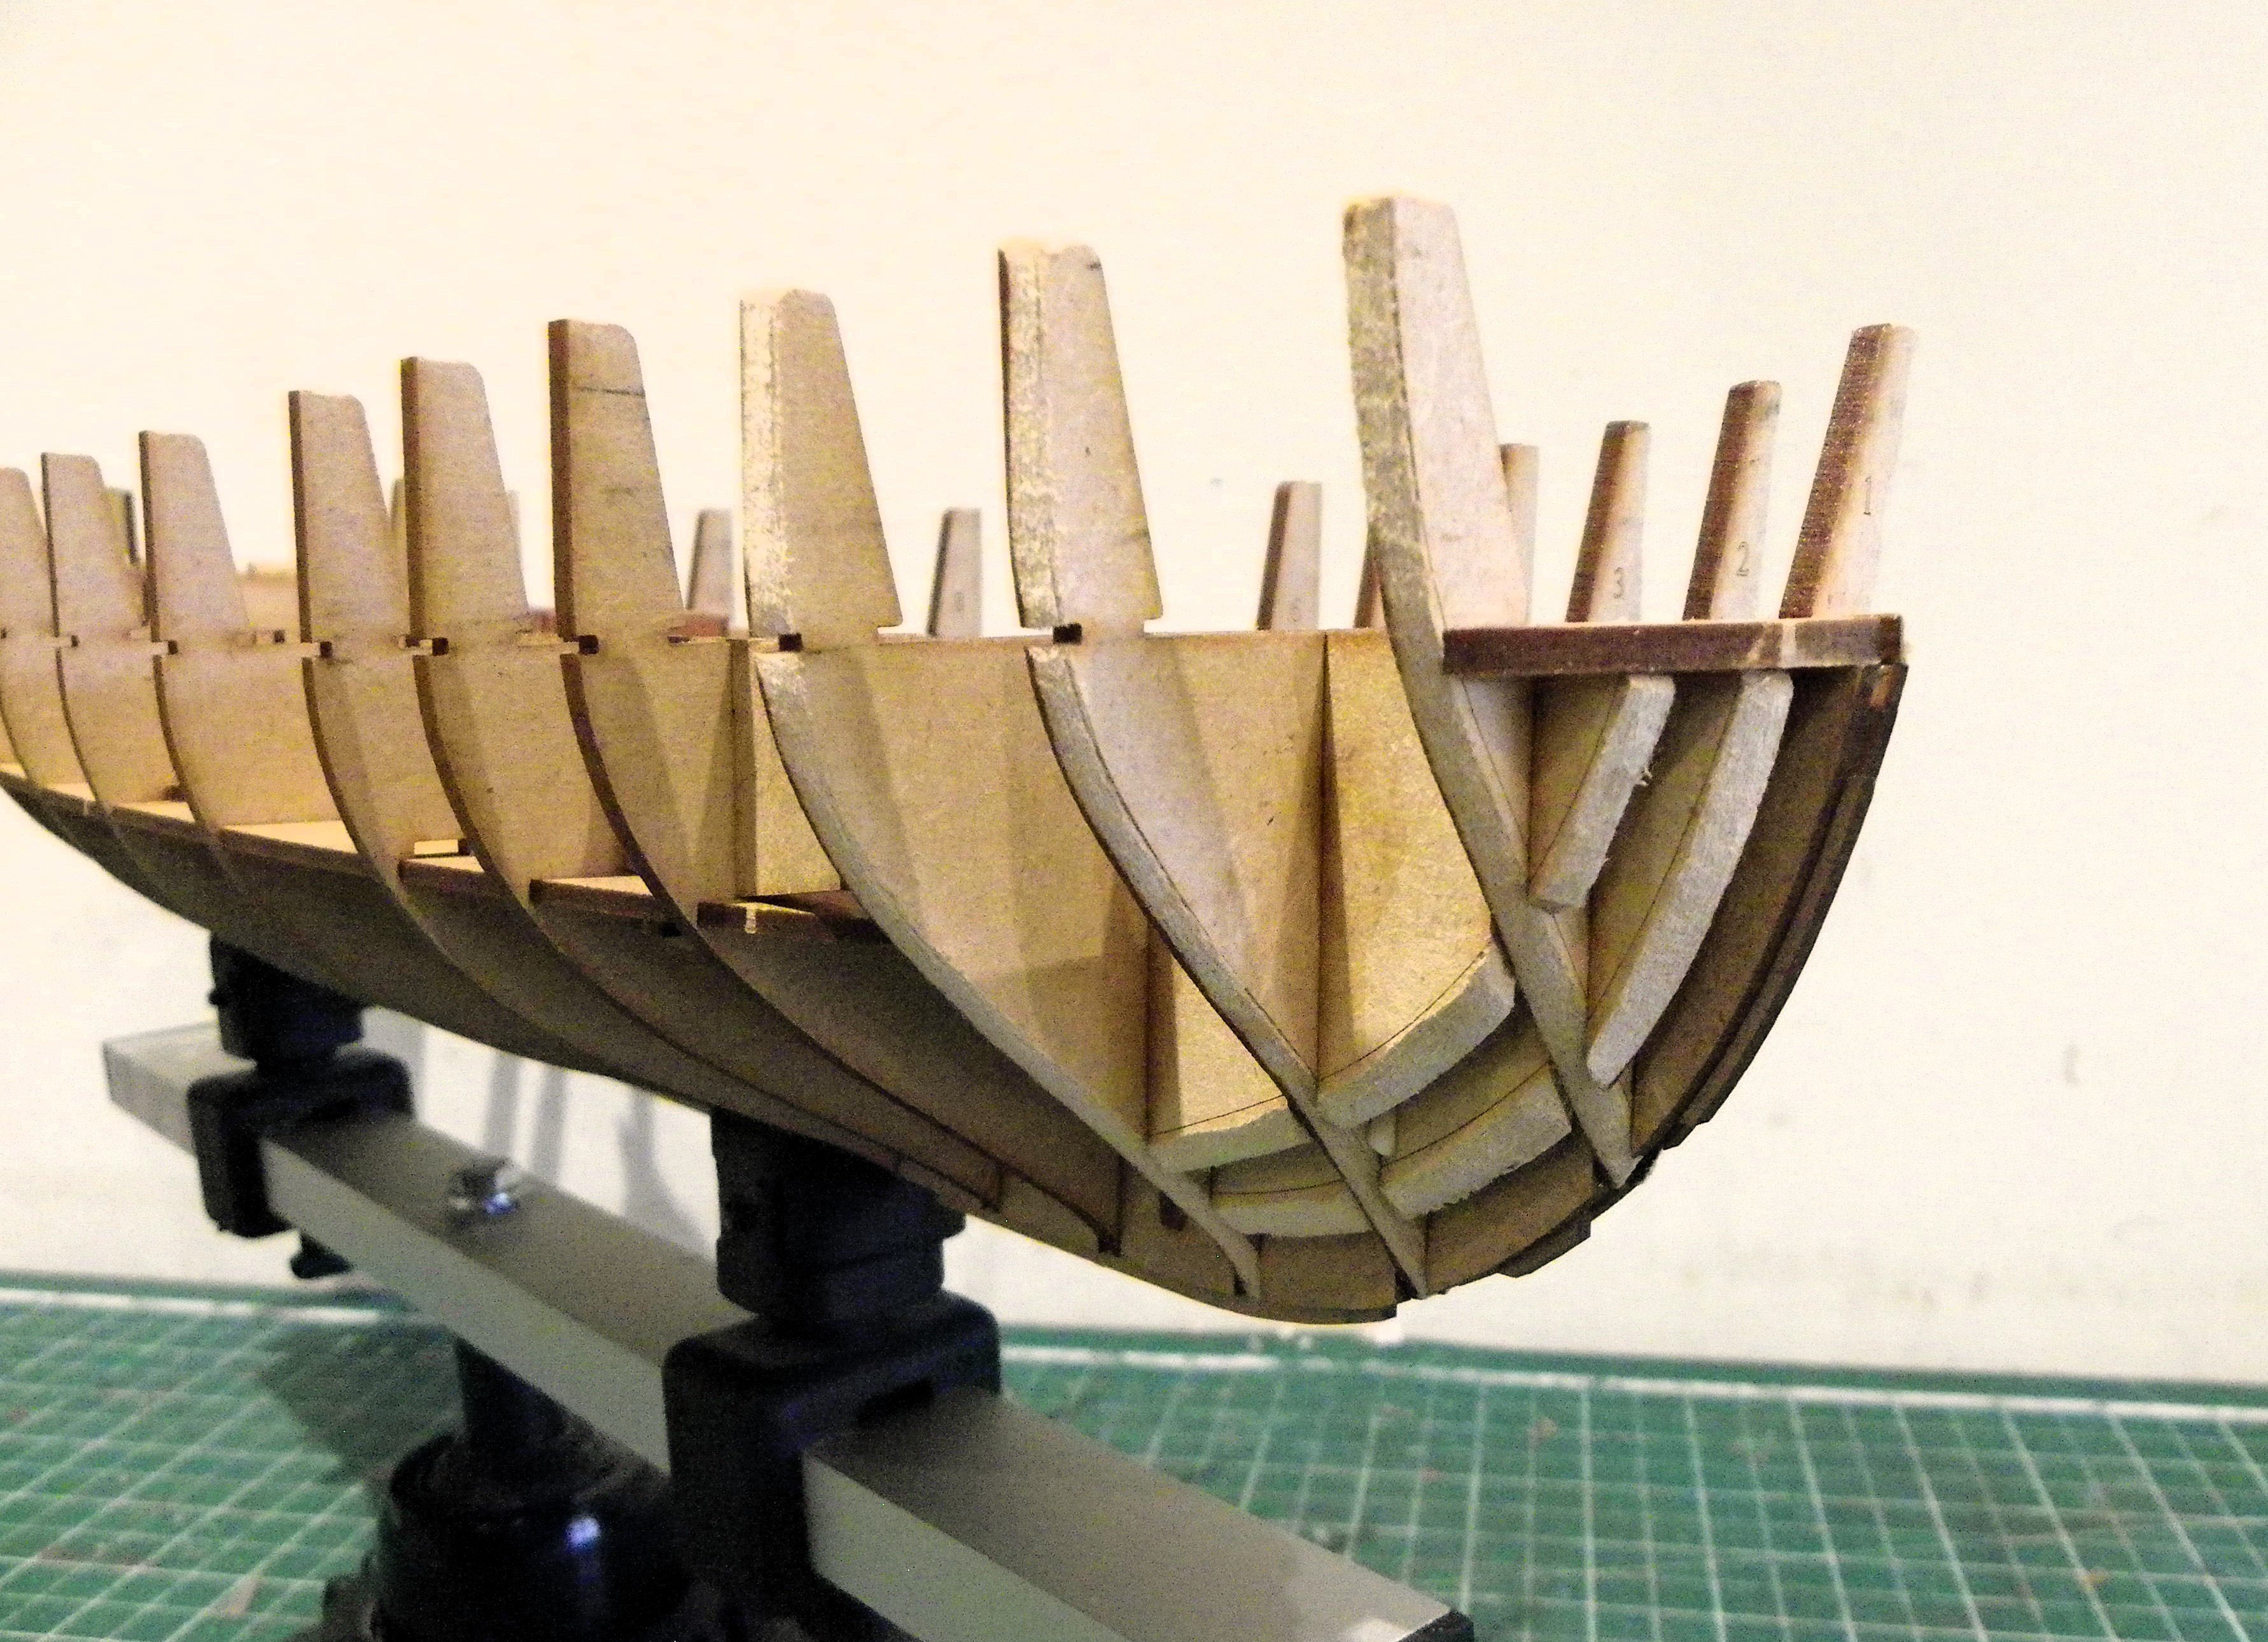
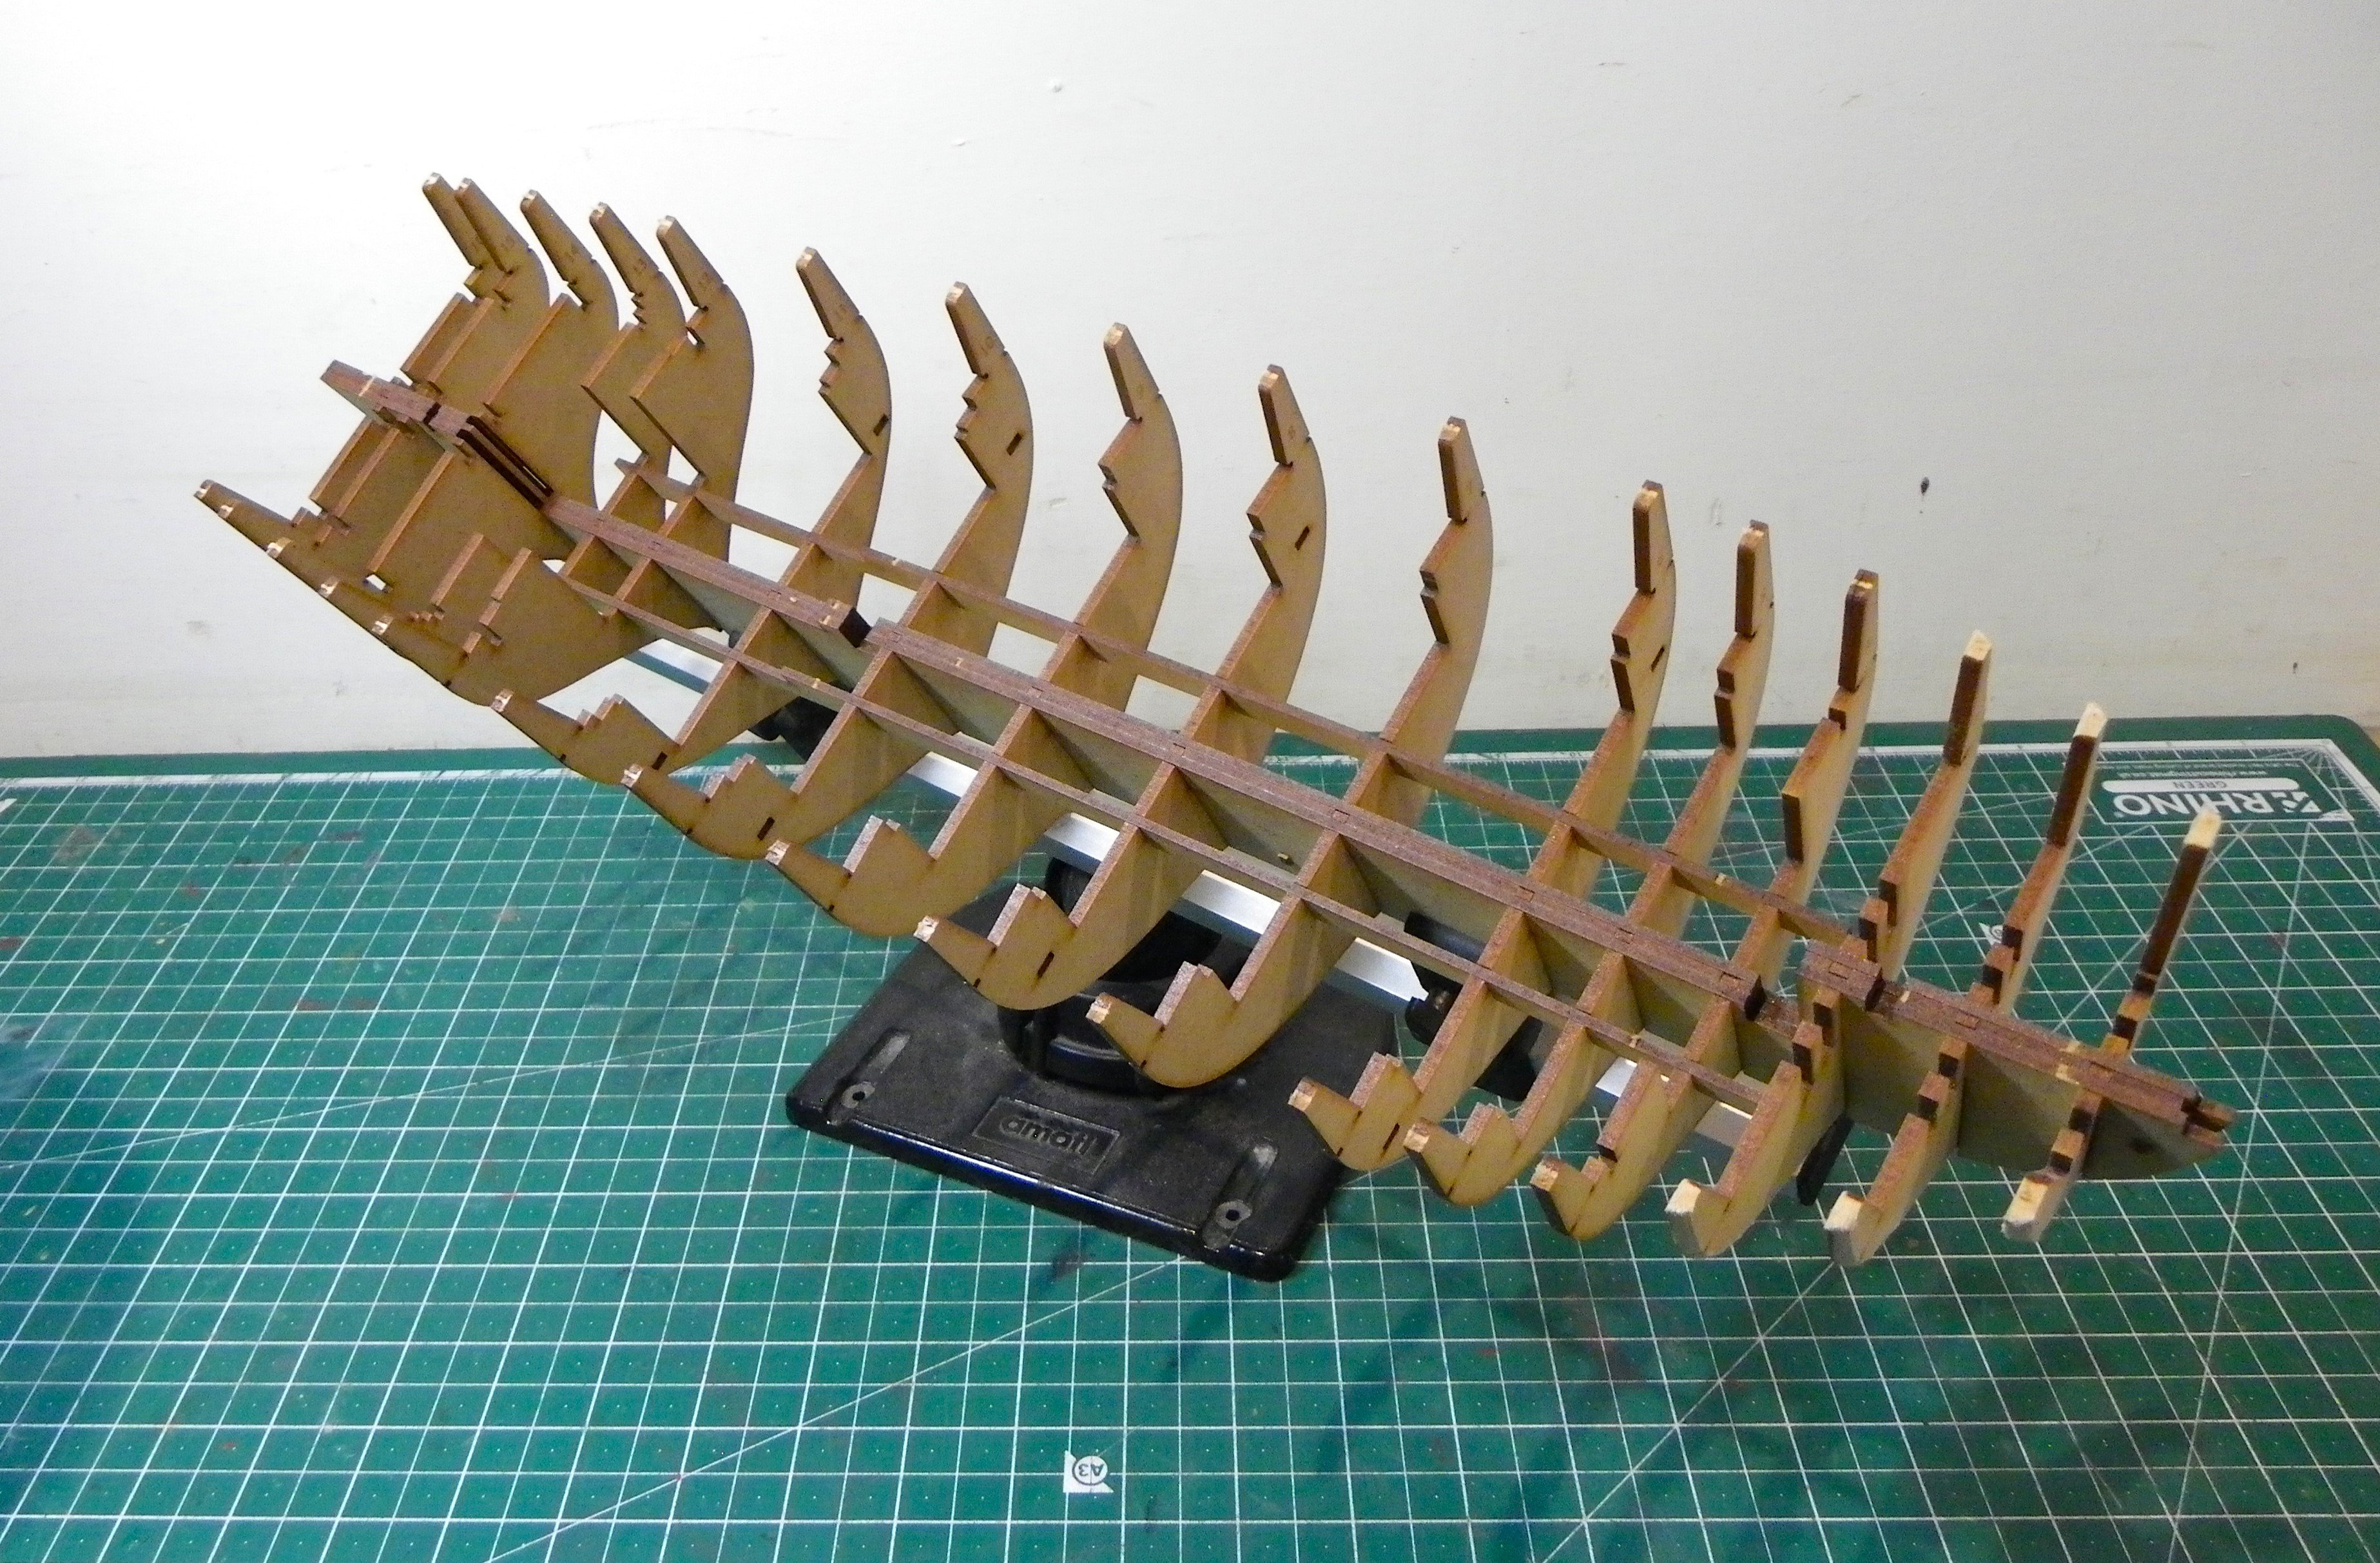
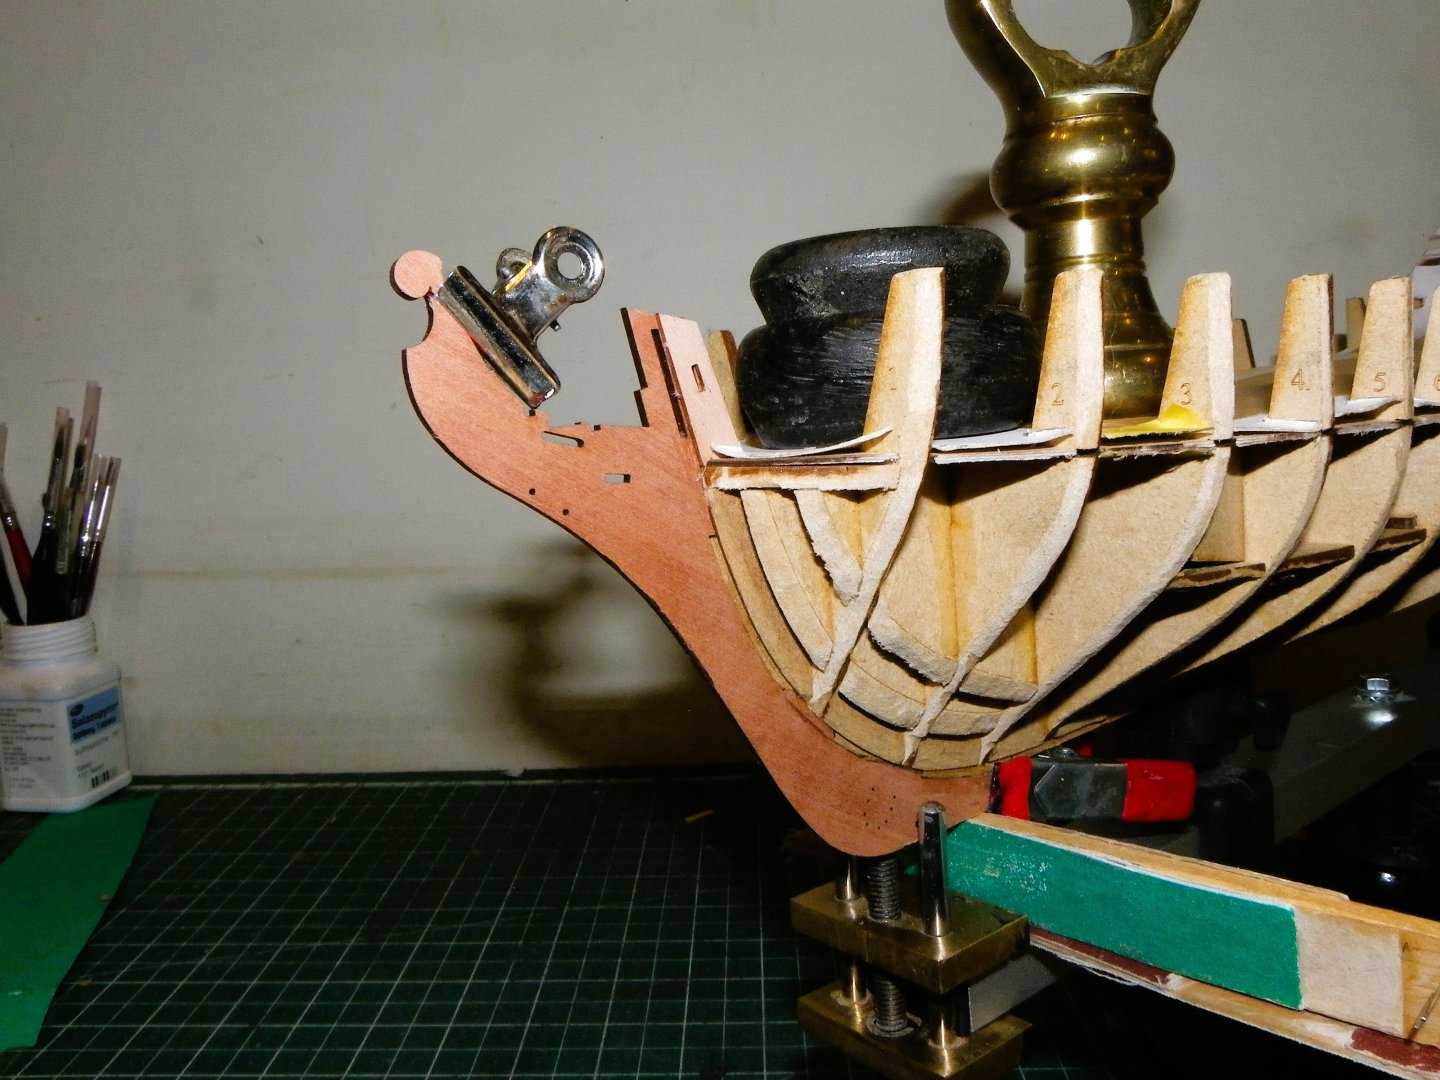
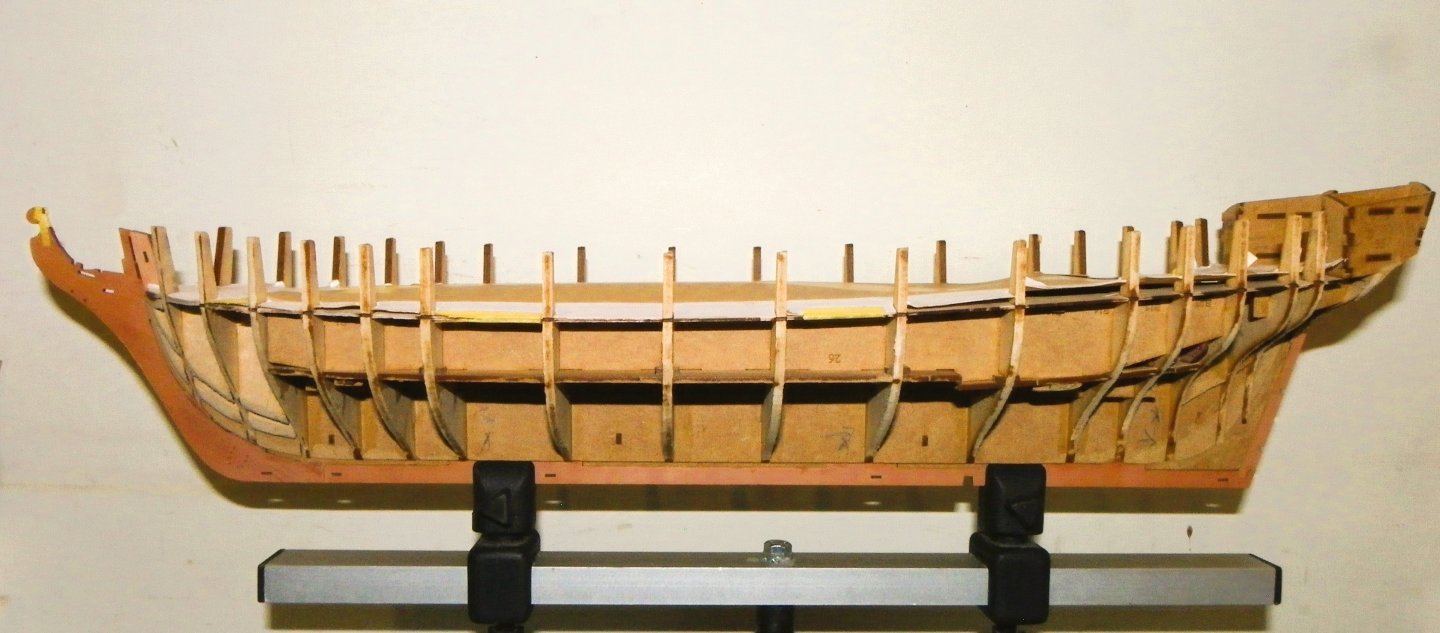
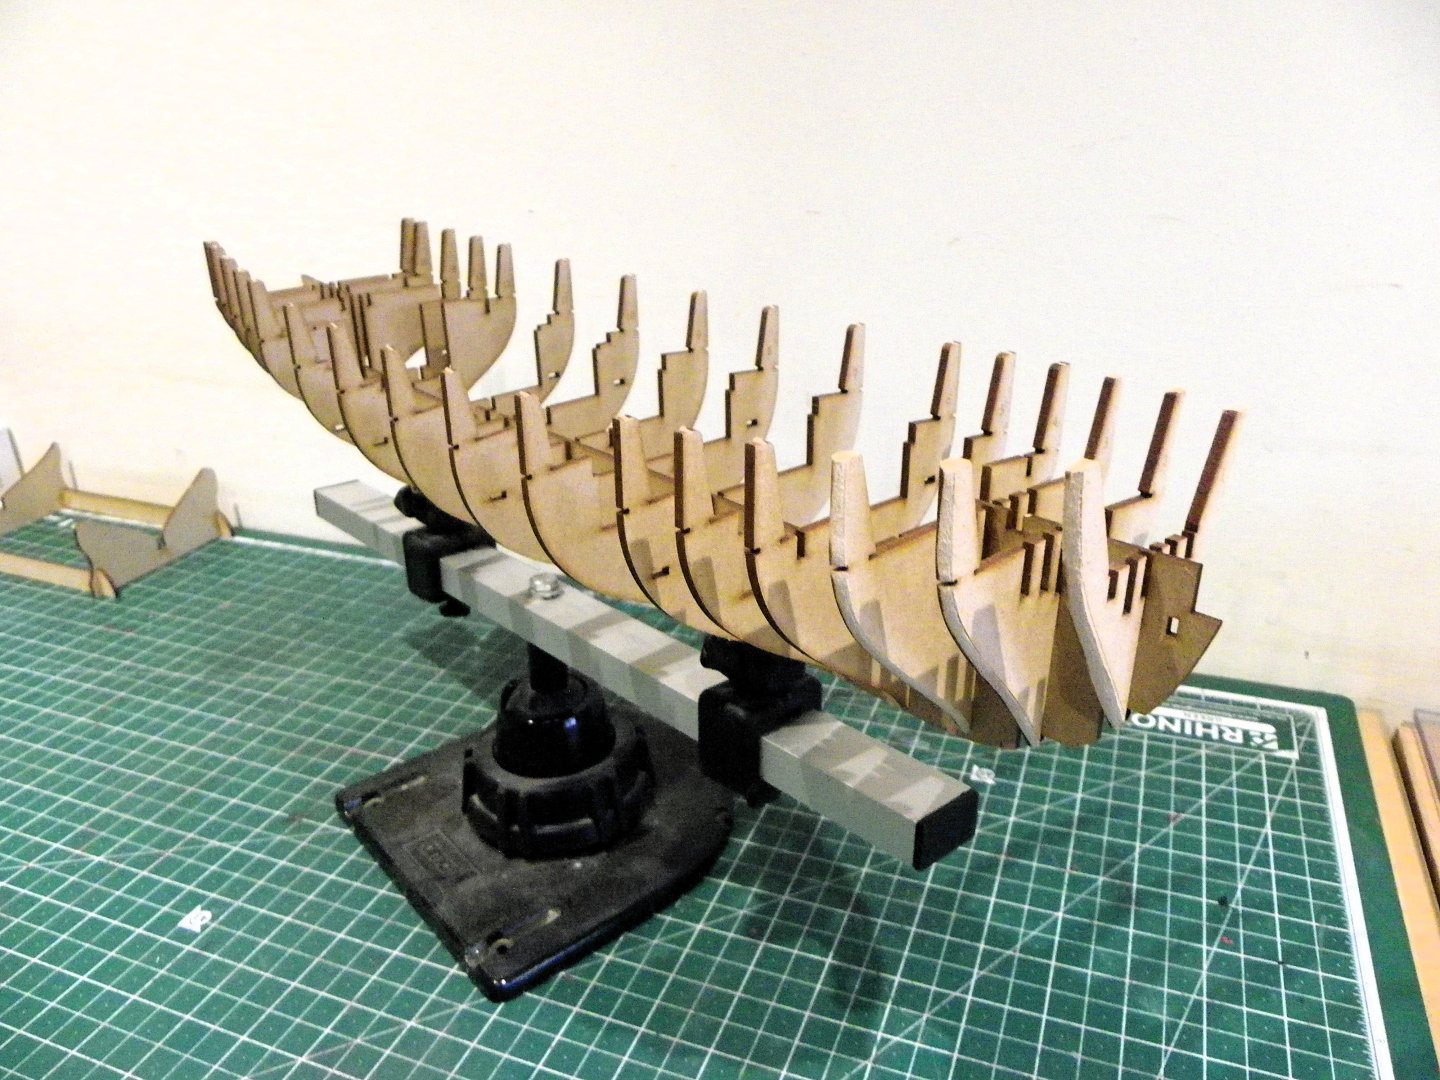
Post 11 Preparing the hull Fairing of the bulkheads didn’t take long, one of the advantages of mdf is that it shapes easily, but care is needed to avoid going too far too fast. Stem, keel, and Sternpost There is a core Pearwood stem, keel, and sternpost, that are ultimately faced up with engraved detail veneers also in Pearwood. 0235 The stem piece fitted ok, but I did manage to break off the fiddle head design which is a weak point. Not too much of a disaster as the veneer side pieces will support it when fitted. The stern post, fitted next, presented me with a problem. 0237 It fitted correctly at the keel and slotted into the keel mortise 2/3 of the way up, but the uppermost end looks to fit over the aftermost bulkhead, but doesn’t, it is too deep. I can’t see a clear photo of this, or on the plan detail. 0241a I opted to increase the rebate. 0247 This seems to cure the problem, and the fit looks good. The final piece is the Keel that slots perfectly into mortises along the false keel. 0244 I seem to have a small gap where the keel meets the stem, hopefully the outer veneers will cover this but I inserted a filler piece. 0265 Reaching this stage is one of the milestones of a build, and in the case of Harpy is reached very quickly. 0257 0259 0269 I am conscious at this stage that the keel is quite thin and could snap where the tabs fit into the false keel should lateral pressure be inadvertently applied to the hull. It is vulnerable in the Amati keel clamp, and I will be moving it to a building board. B.E. 26/12/2024


- 332 replies
-
- 20
-
-
- Harpy
- Vanguard Models
- (and 1 more)
-
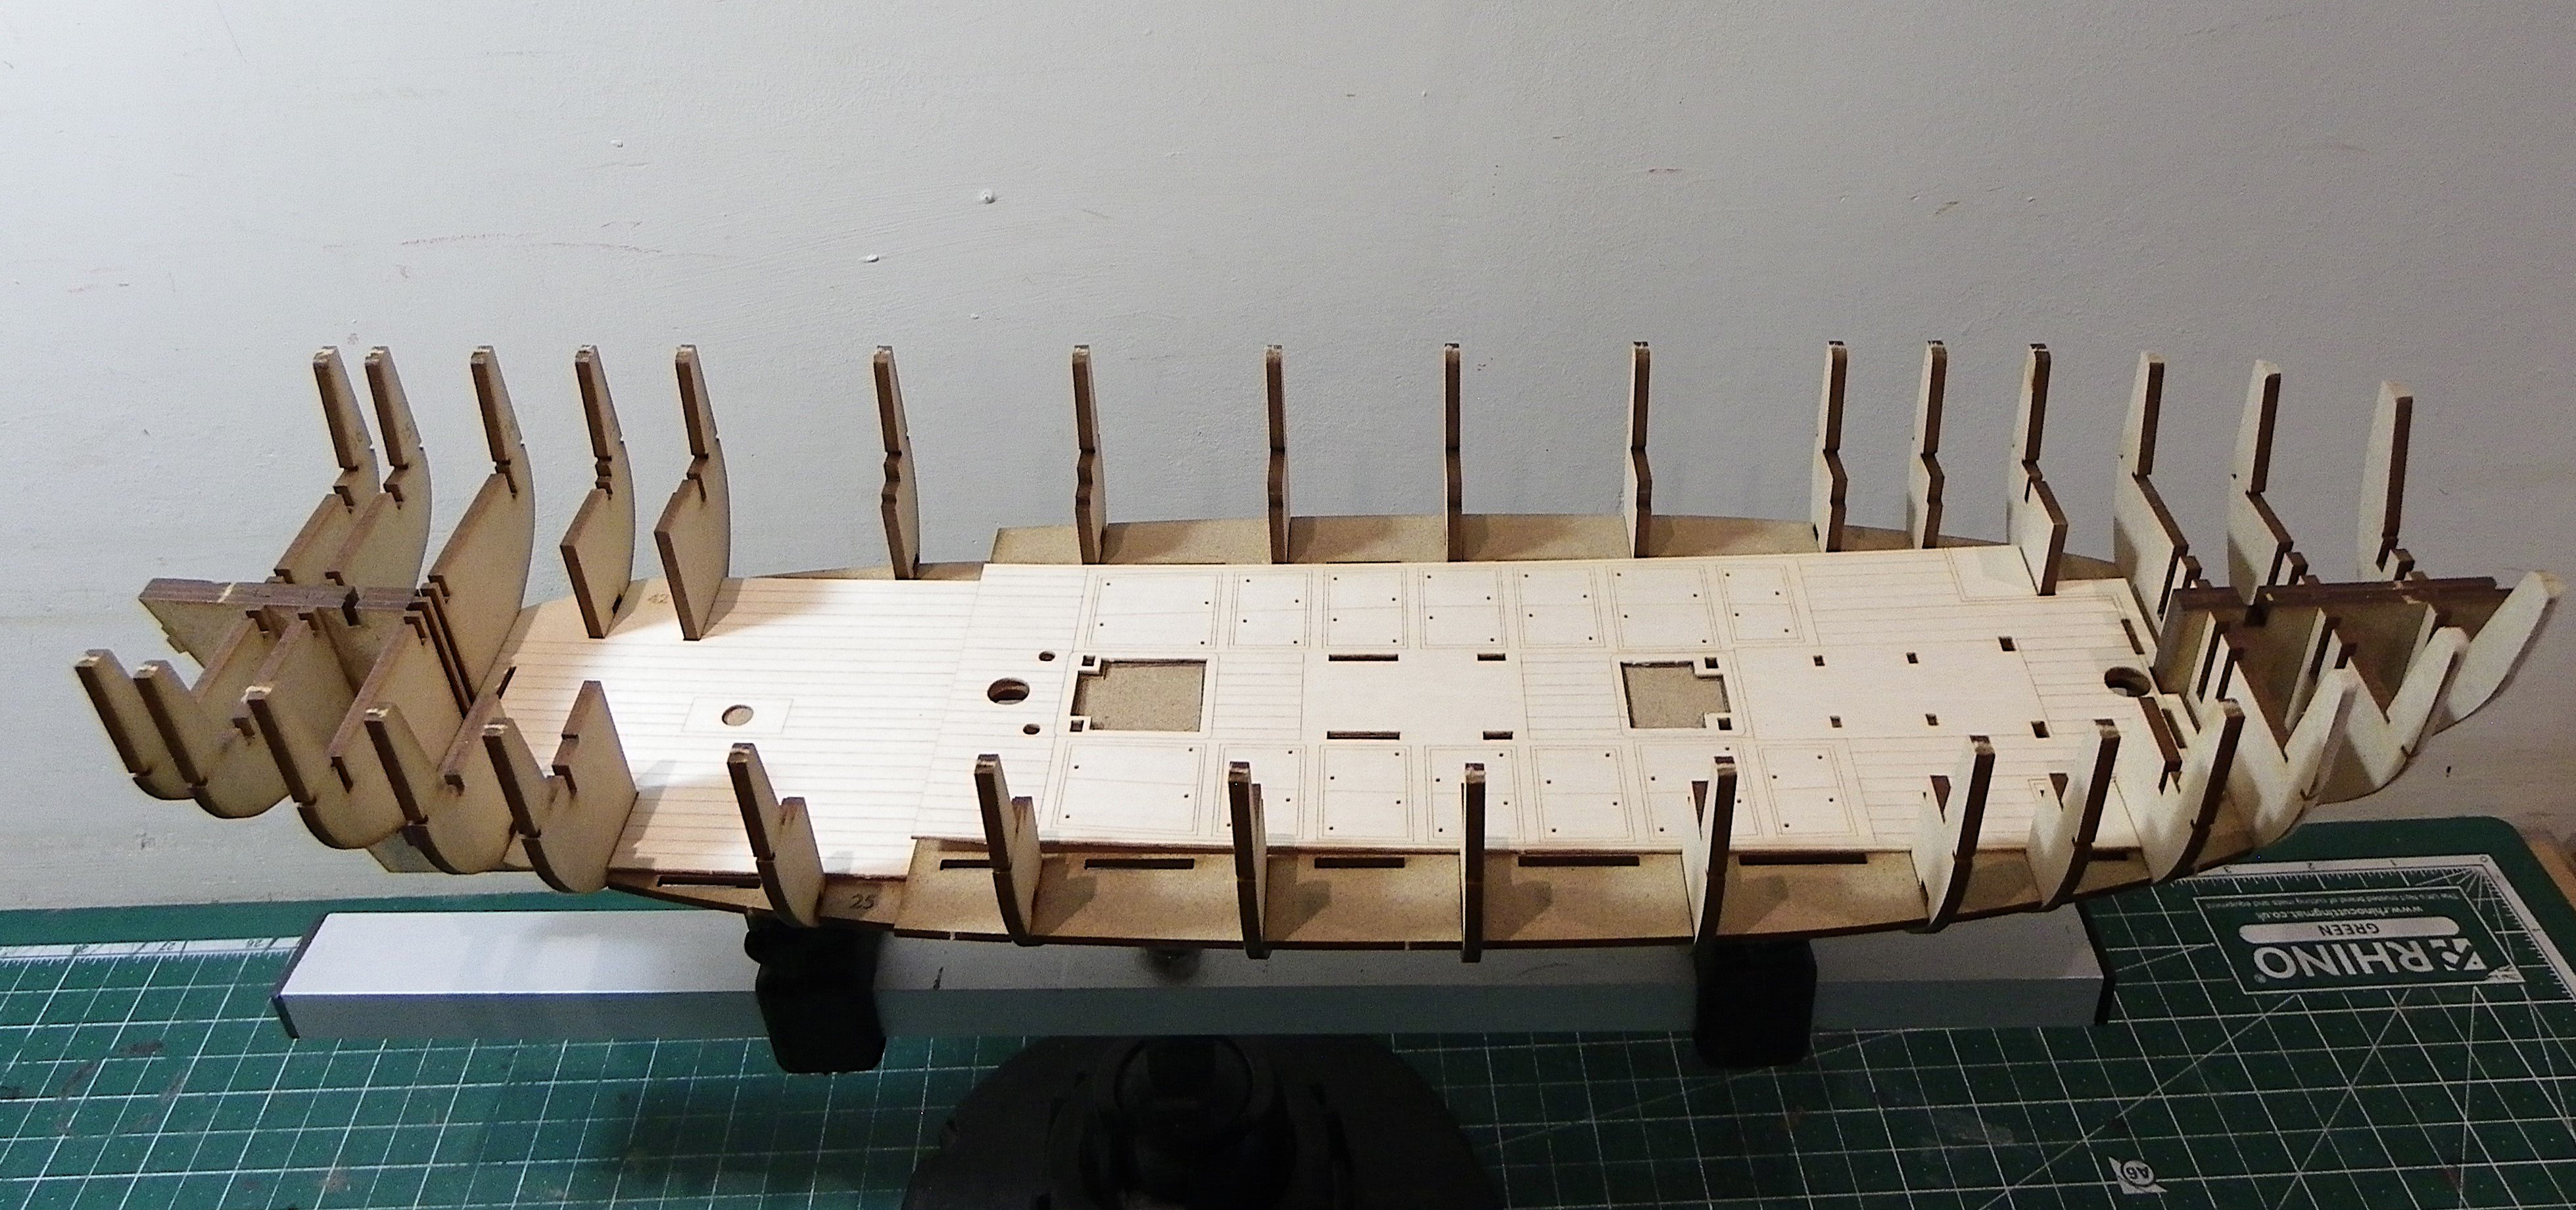
Post 10 A change of plan. I think I may be looking too far ahead to be designing the deck openings. Fitting the Plywood sub deck is the next stage, slotted into notches along the bulkheads. It should fit into rebates in the deck beam ends and sit flush with the deck beams. 0231 The idea is that the engraved upper deck will run over the sub deck directly onto the deck beams, but that’s a good few steps ahead. I cleaned out the bulkhead notches before fitting the sub deck but still found it a bit of a faff. I did get it fully notched but at the stern area and along the rebates for beam 1 at the bow, a little glue will be required when I return to this stage. The hull needs to be faired now and more external construction work done. 0232 It is a good idea to cover the lower deck to keep the dust out during the fairing and hull planking process. B.E. 23/12/2024


- 332 replies
-
- 19
-
-
- Harpy
- Vanguard Models
- (and 1 more)
-
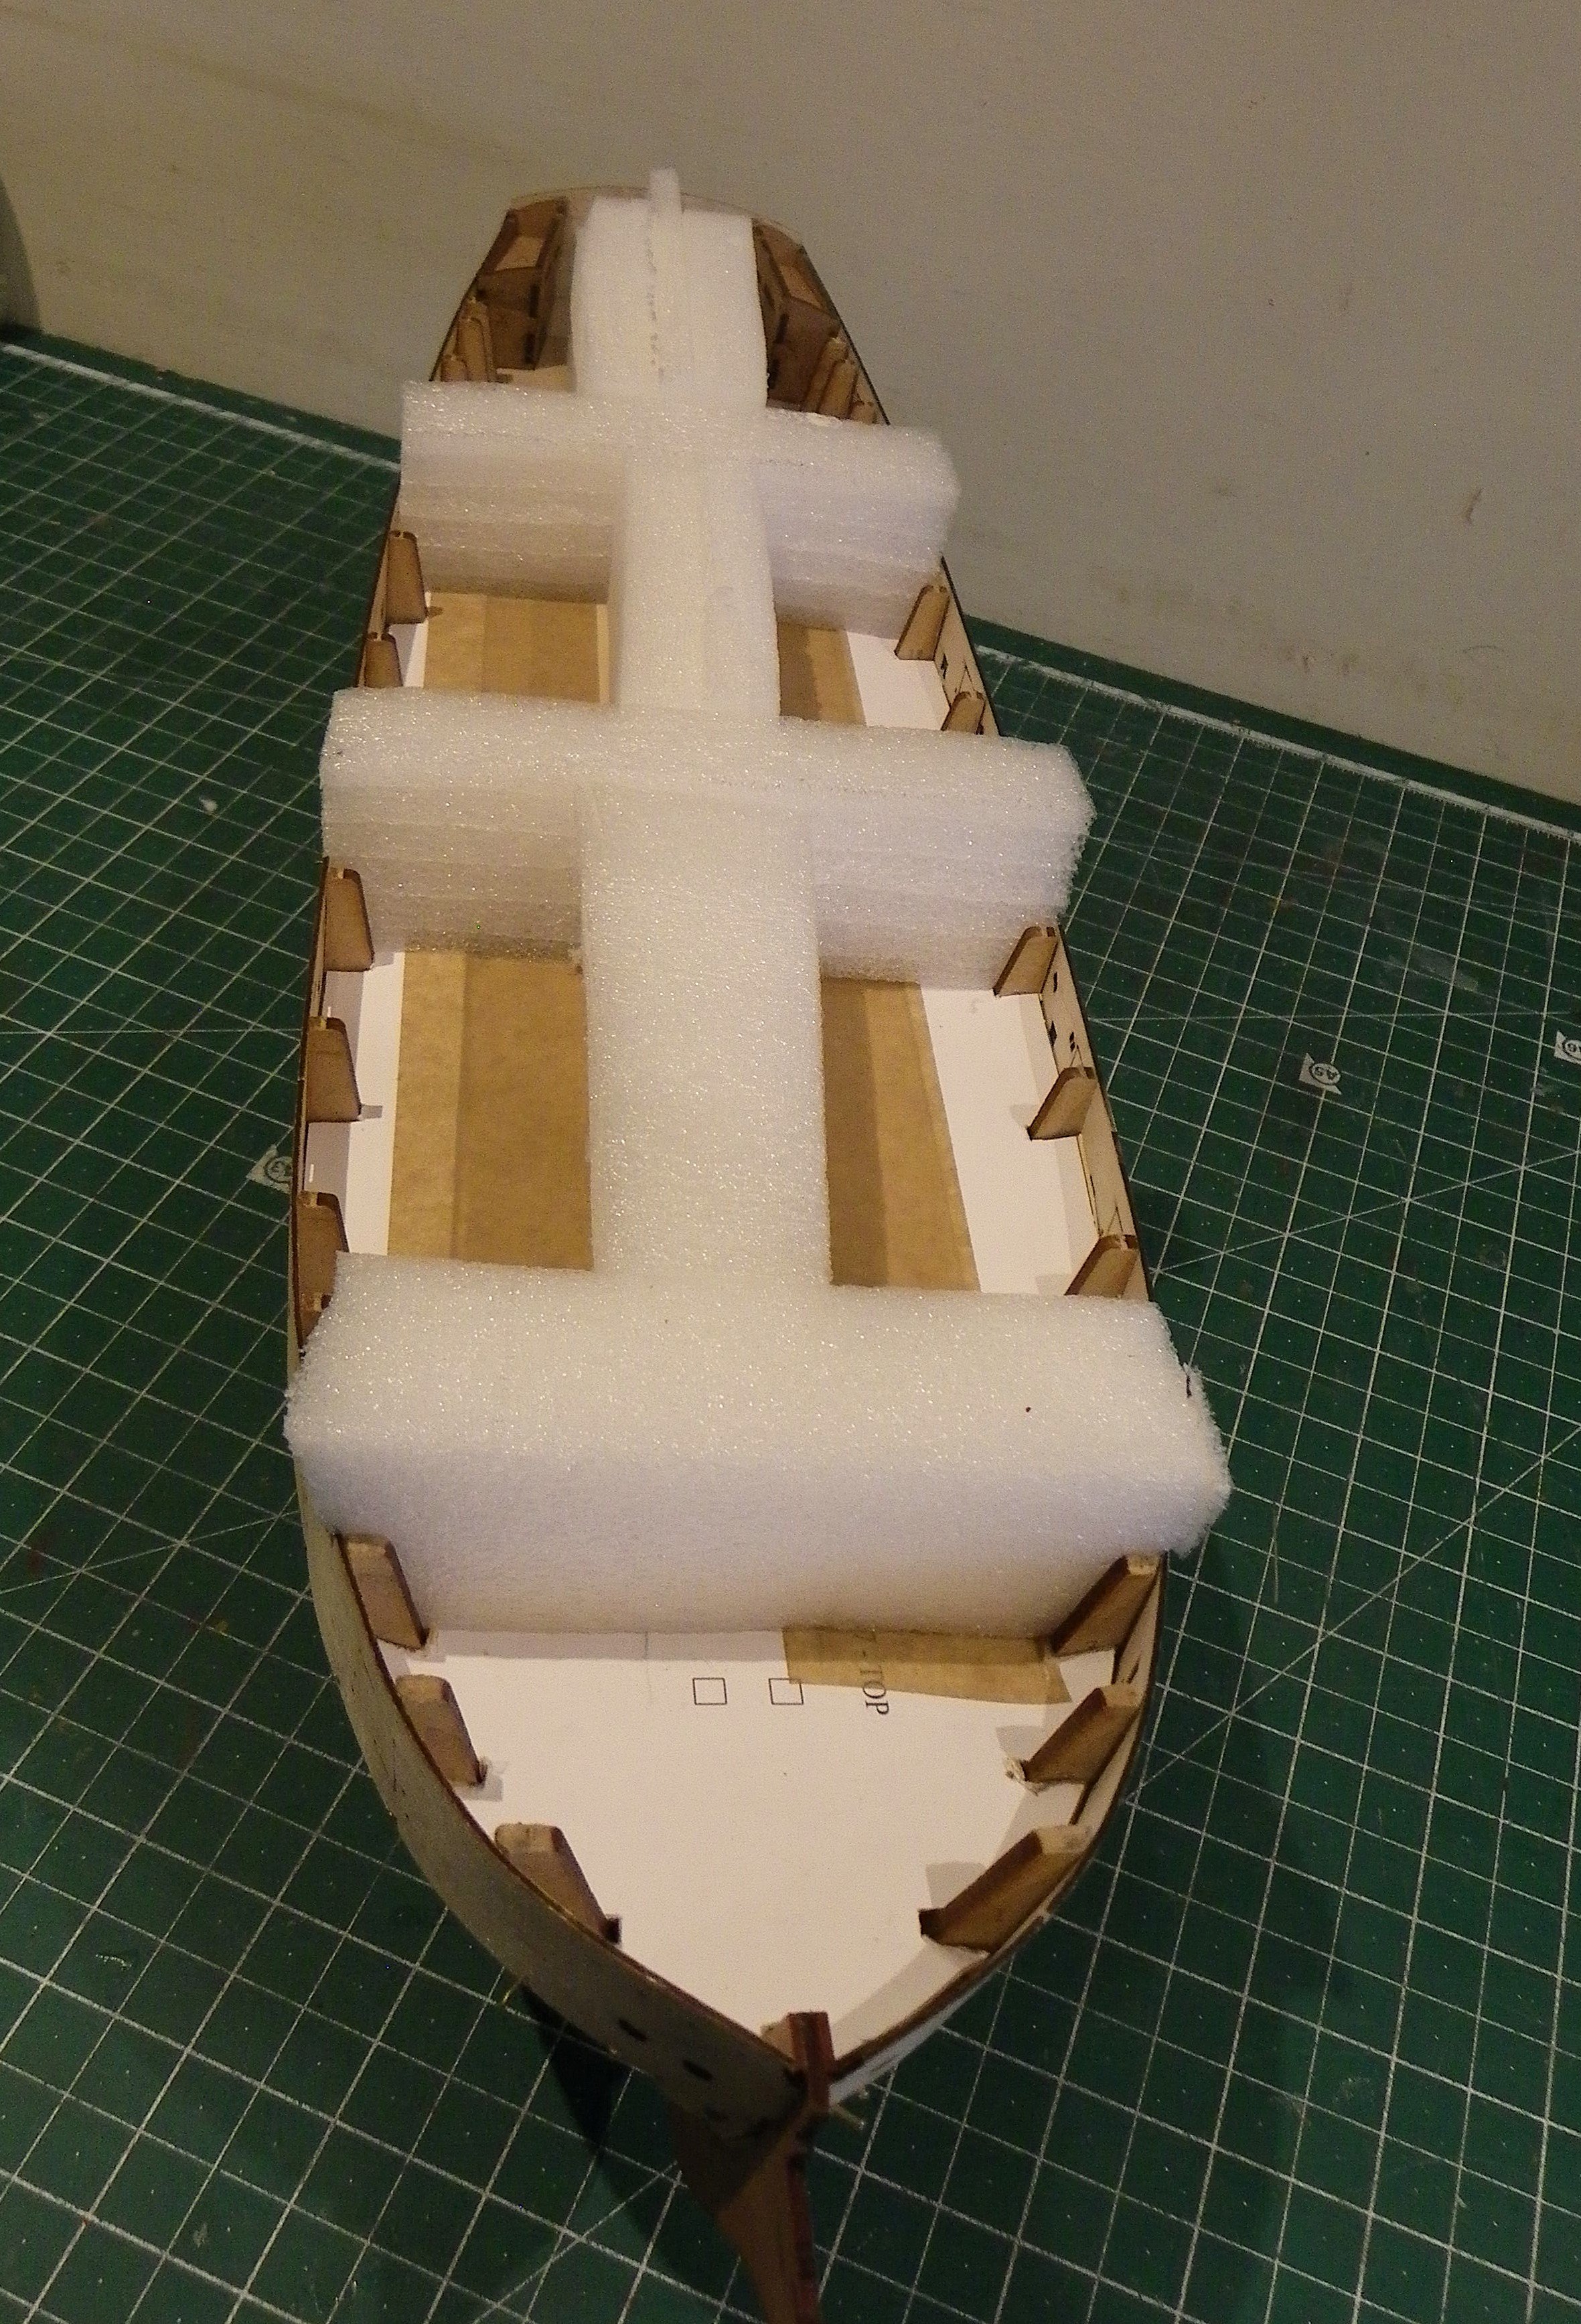
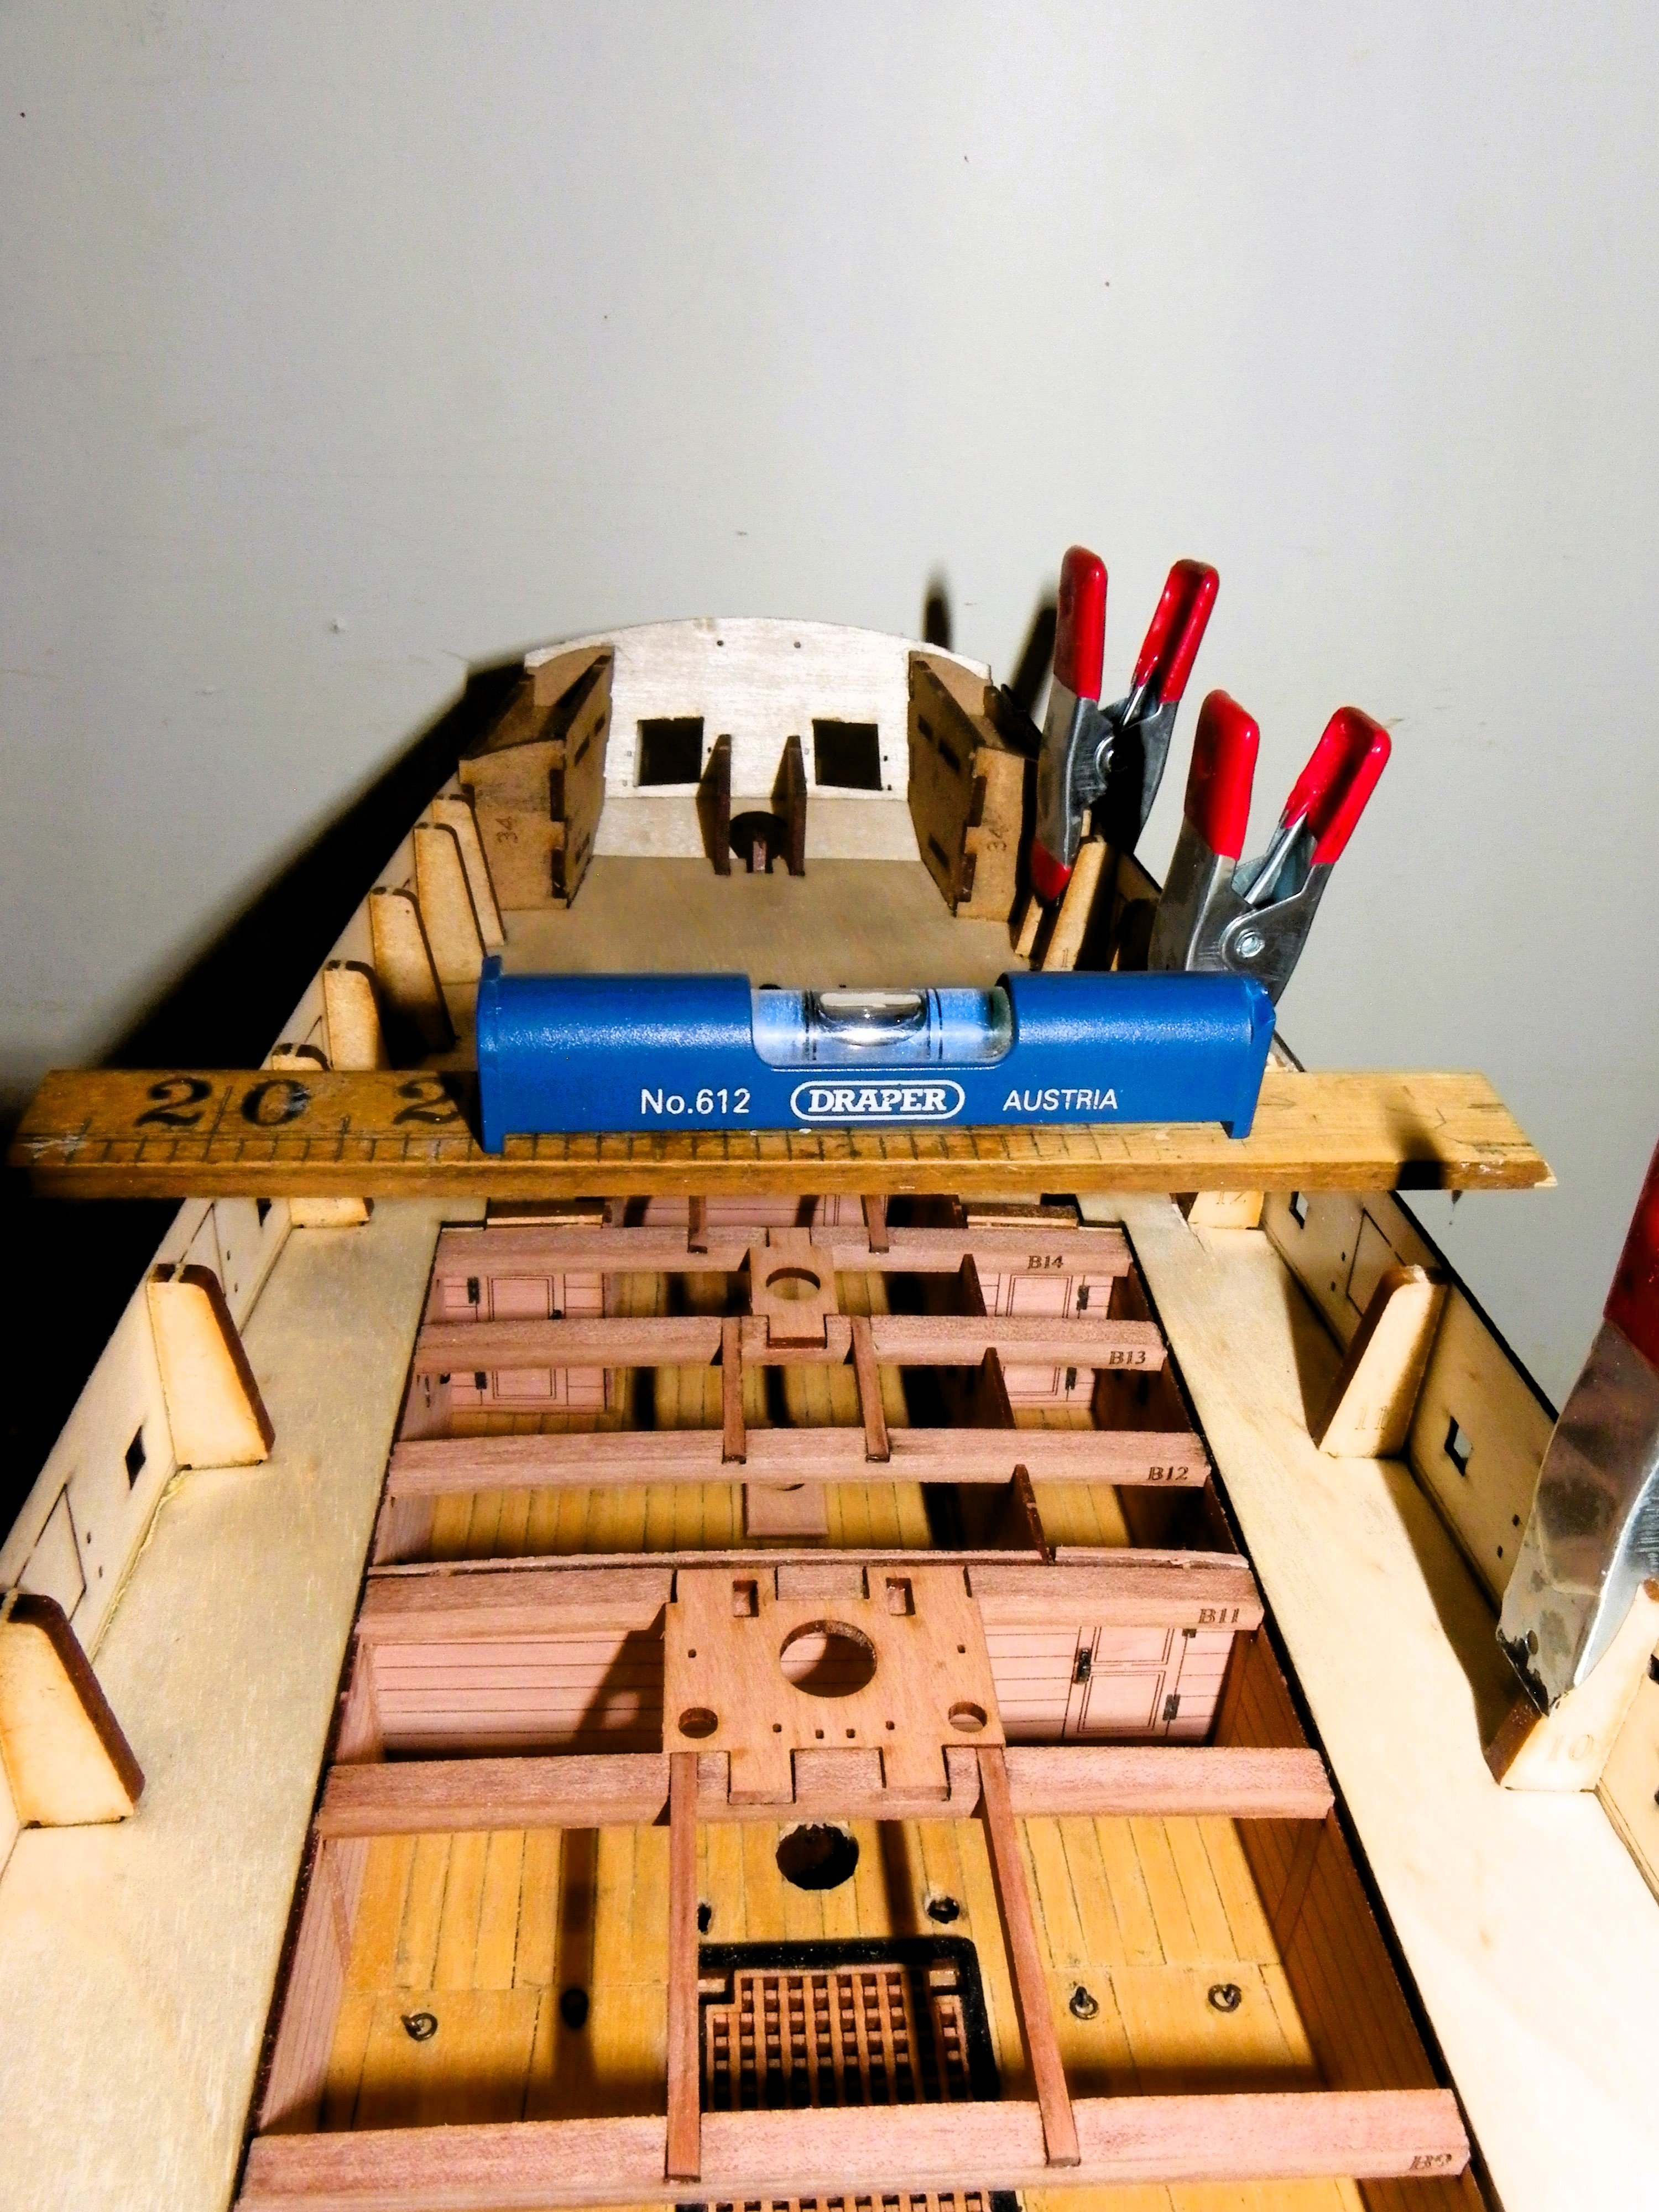
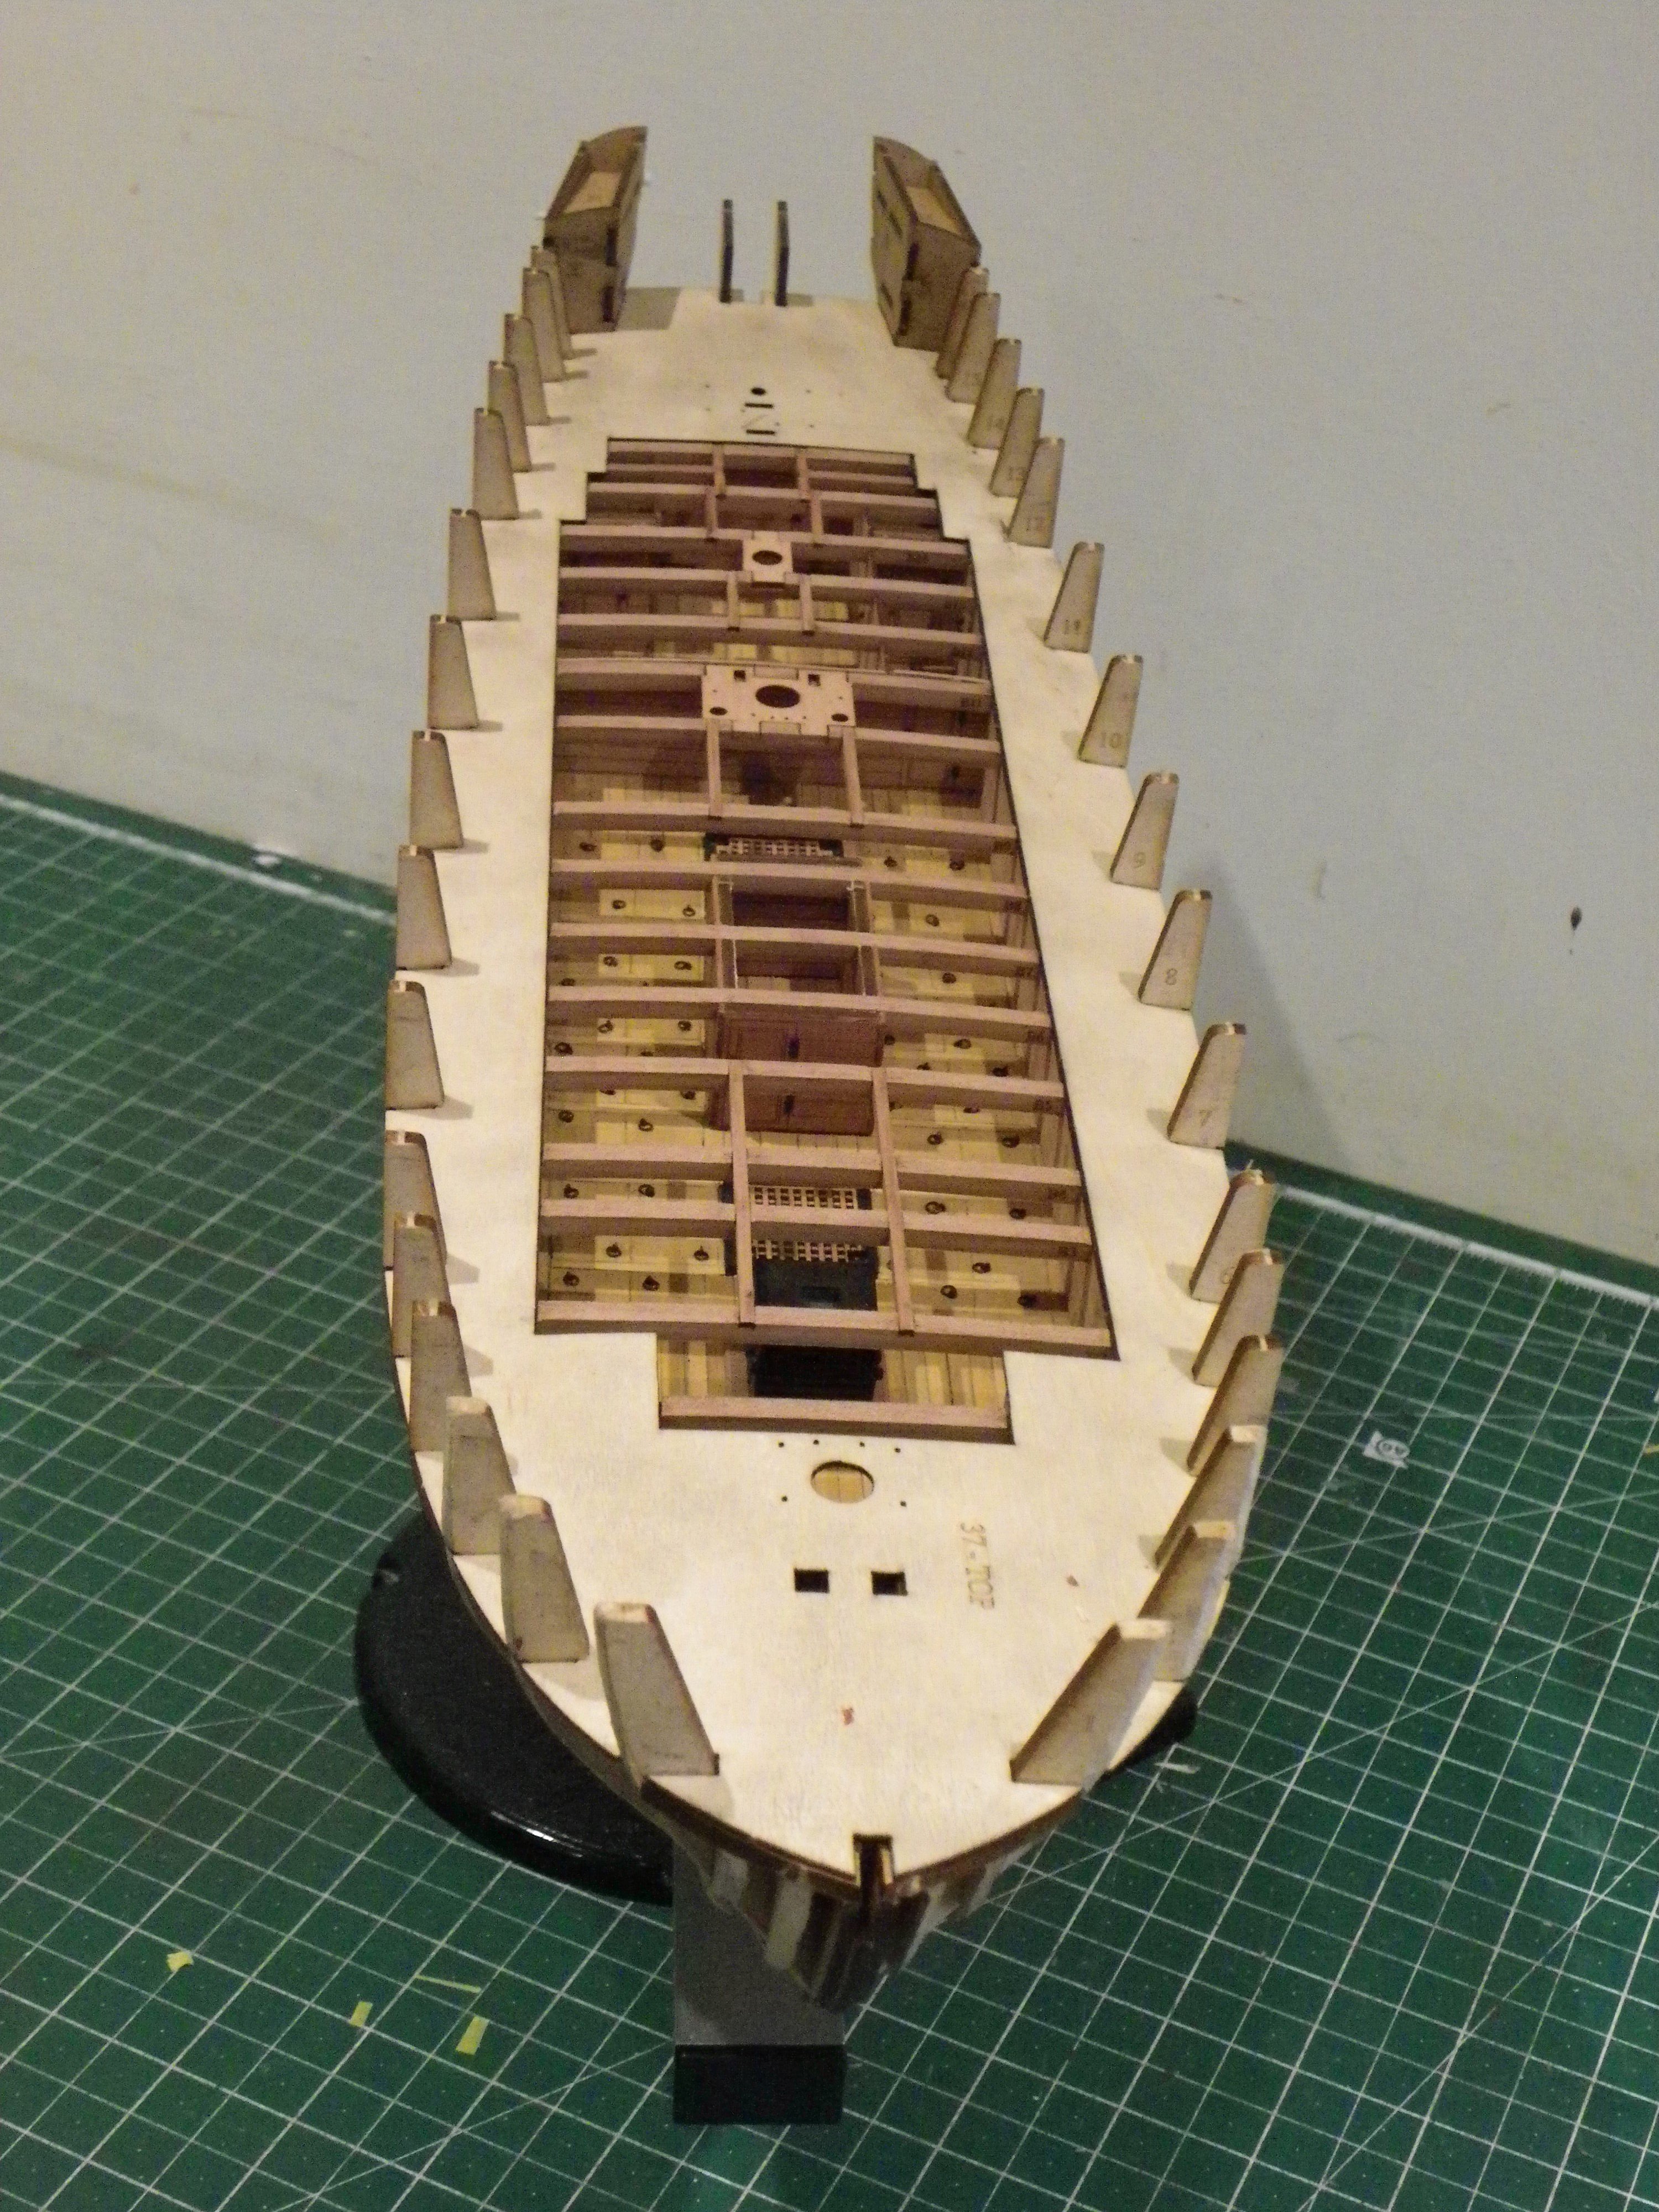
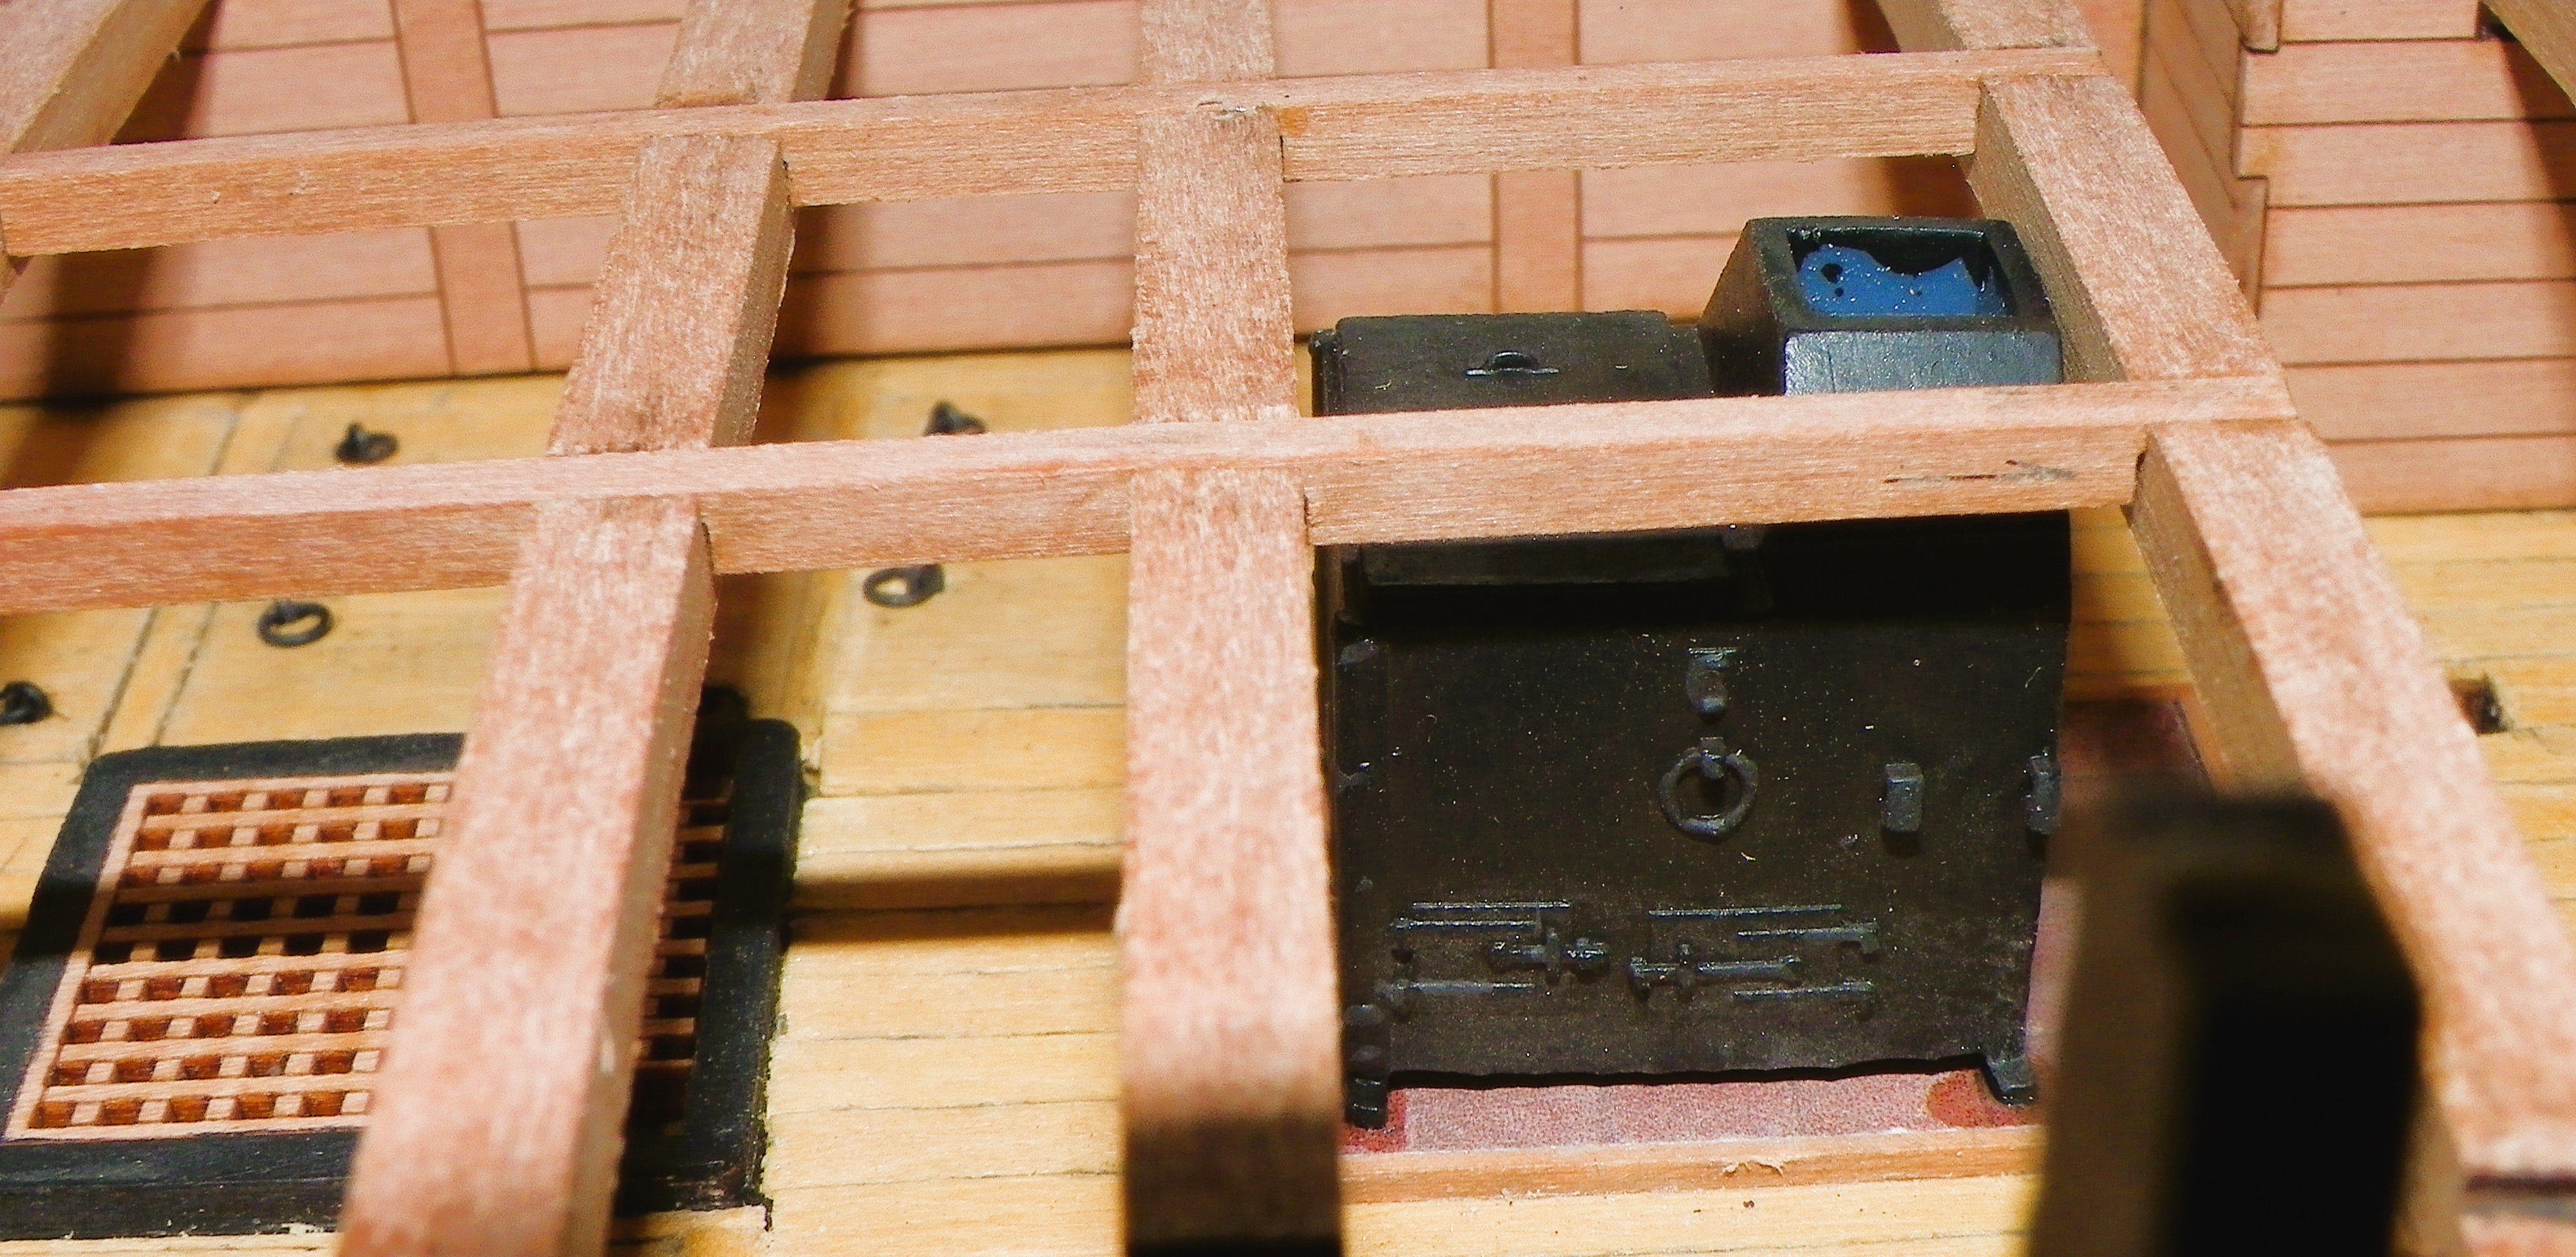
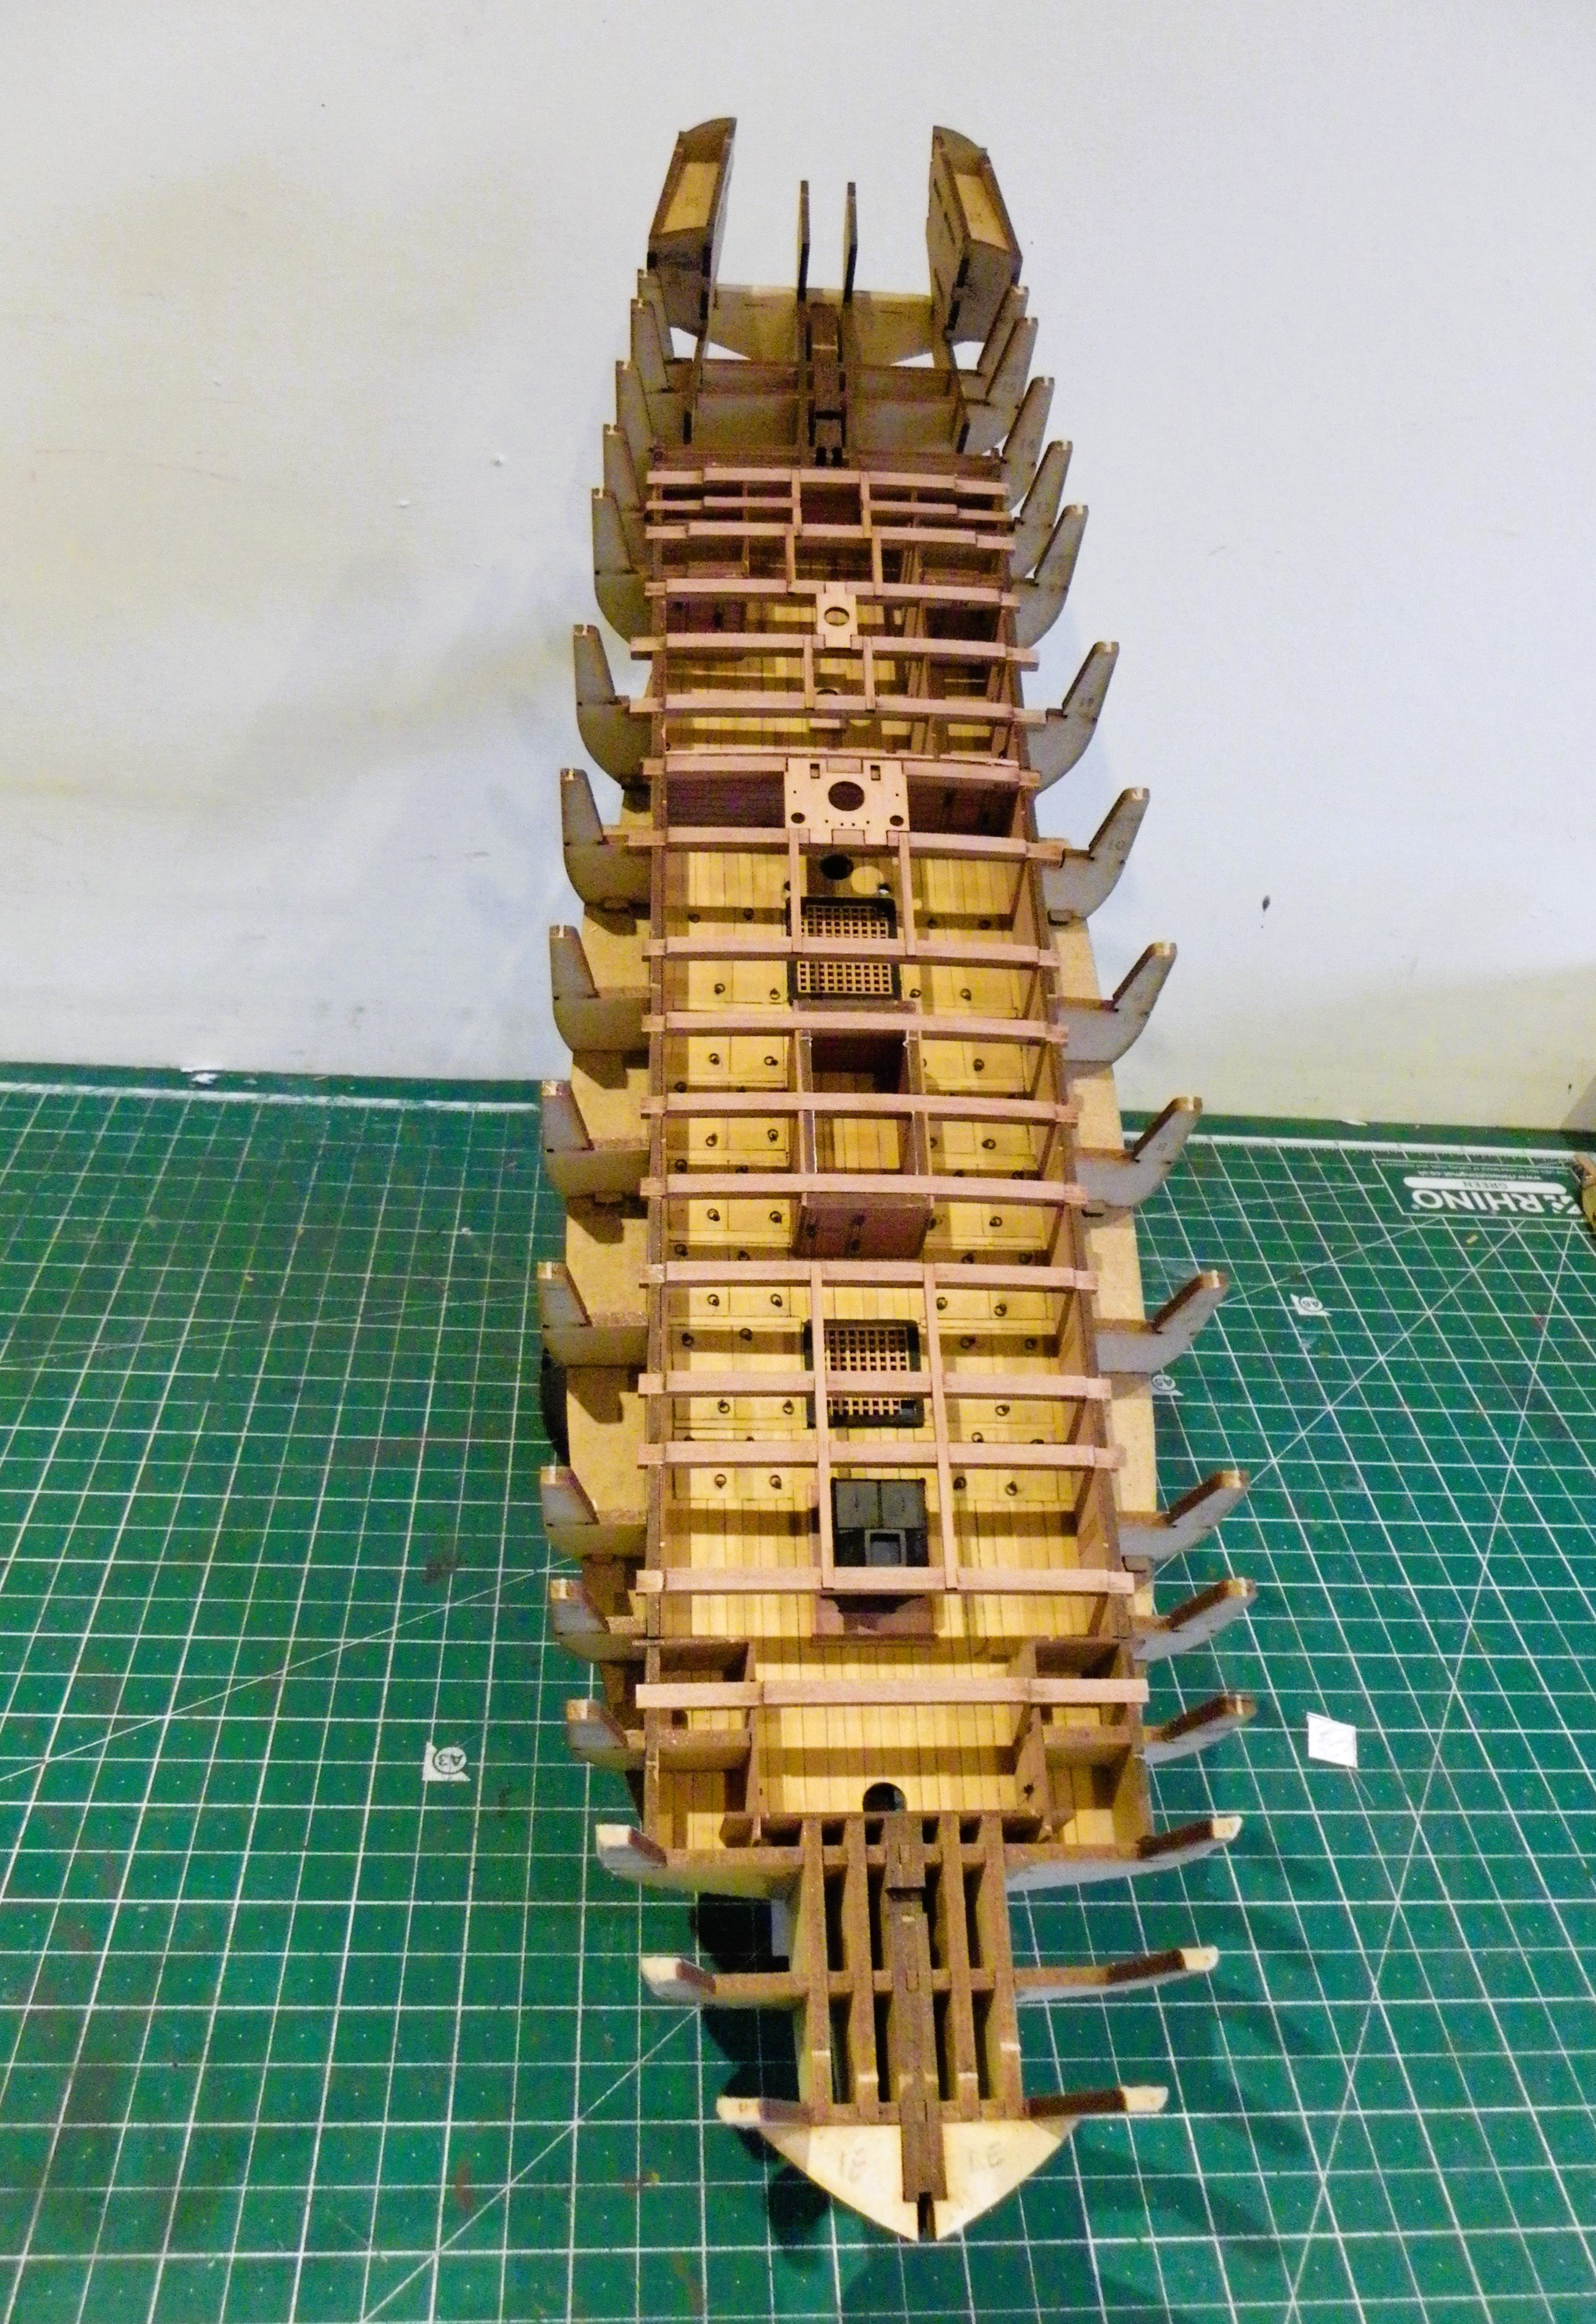
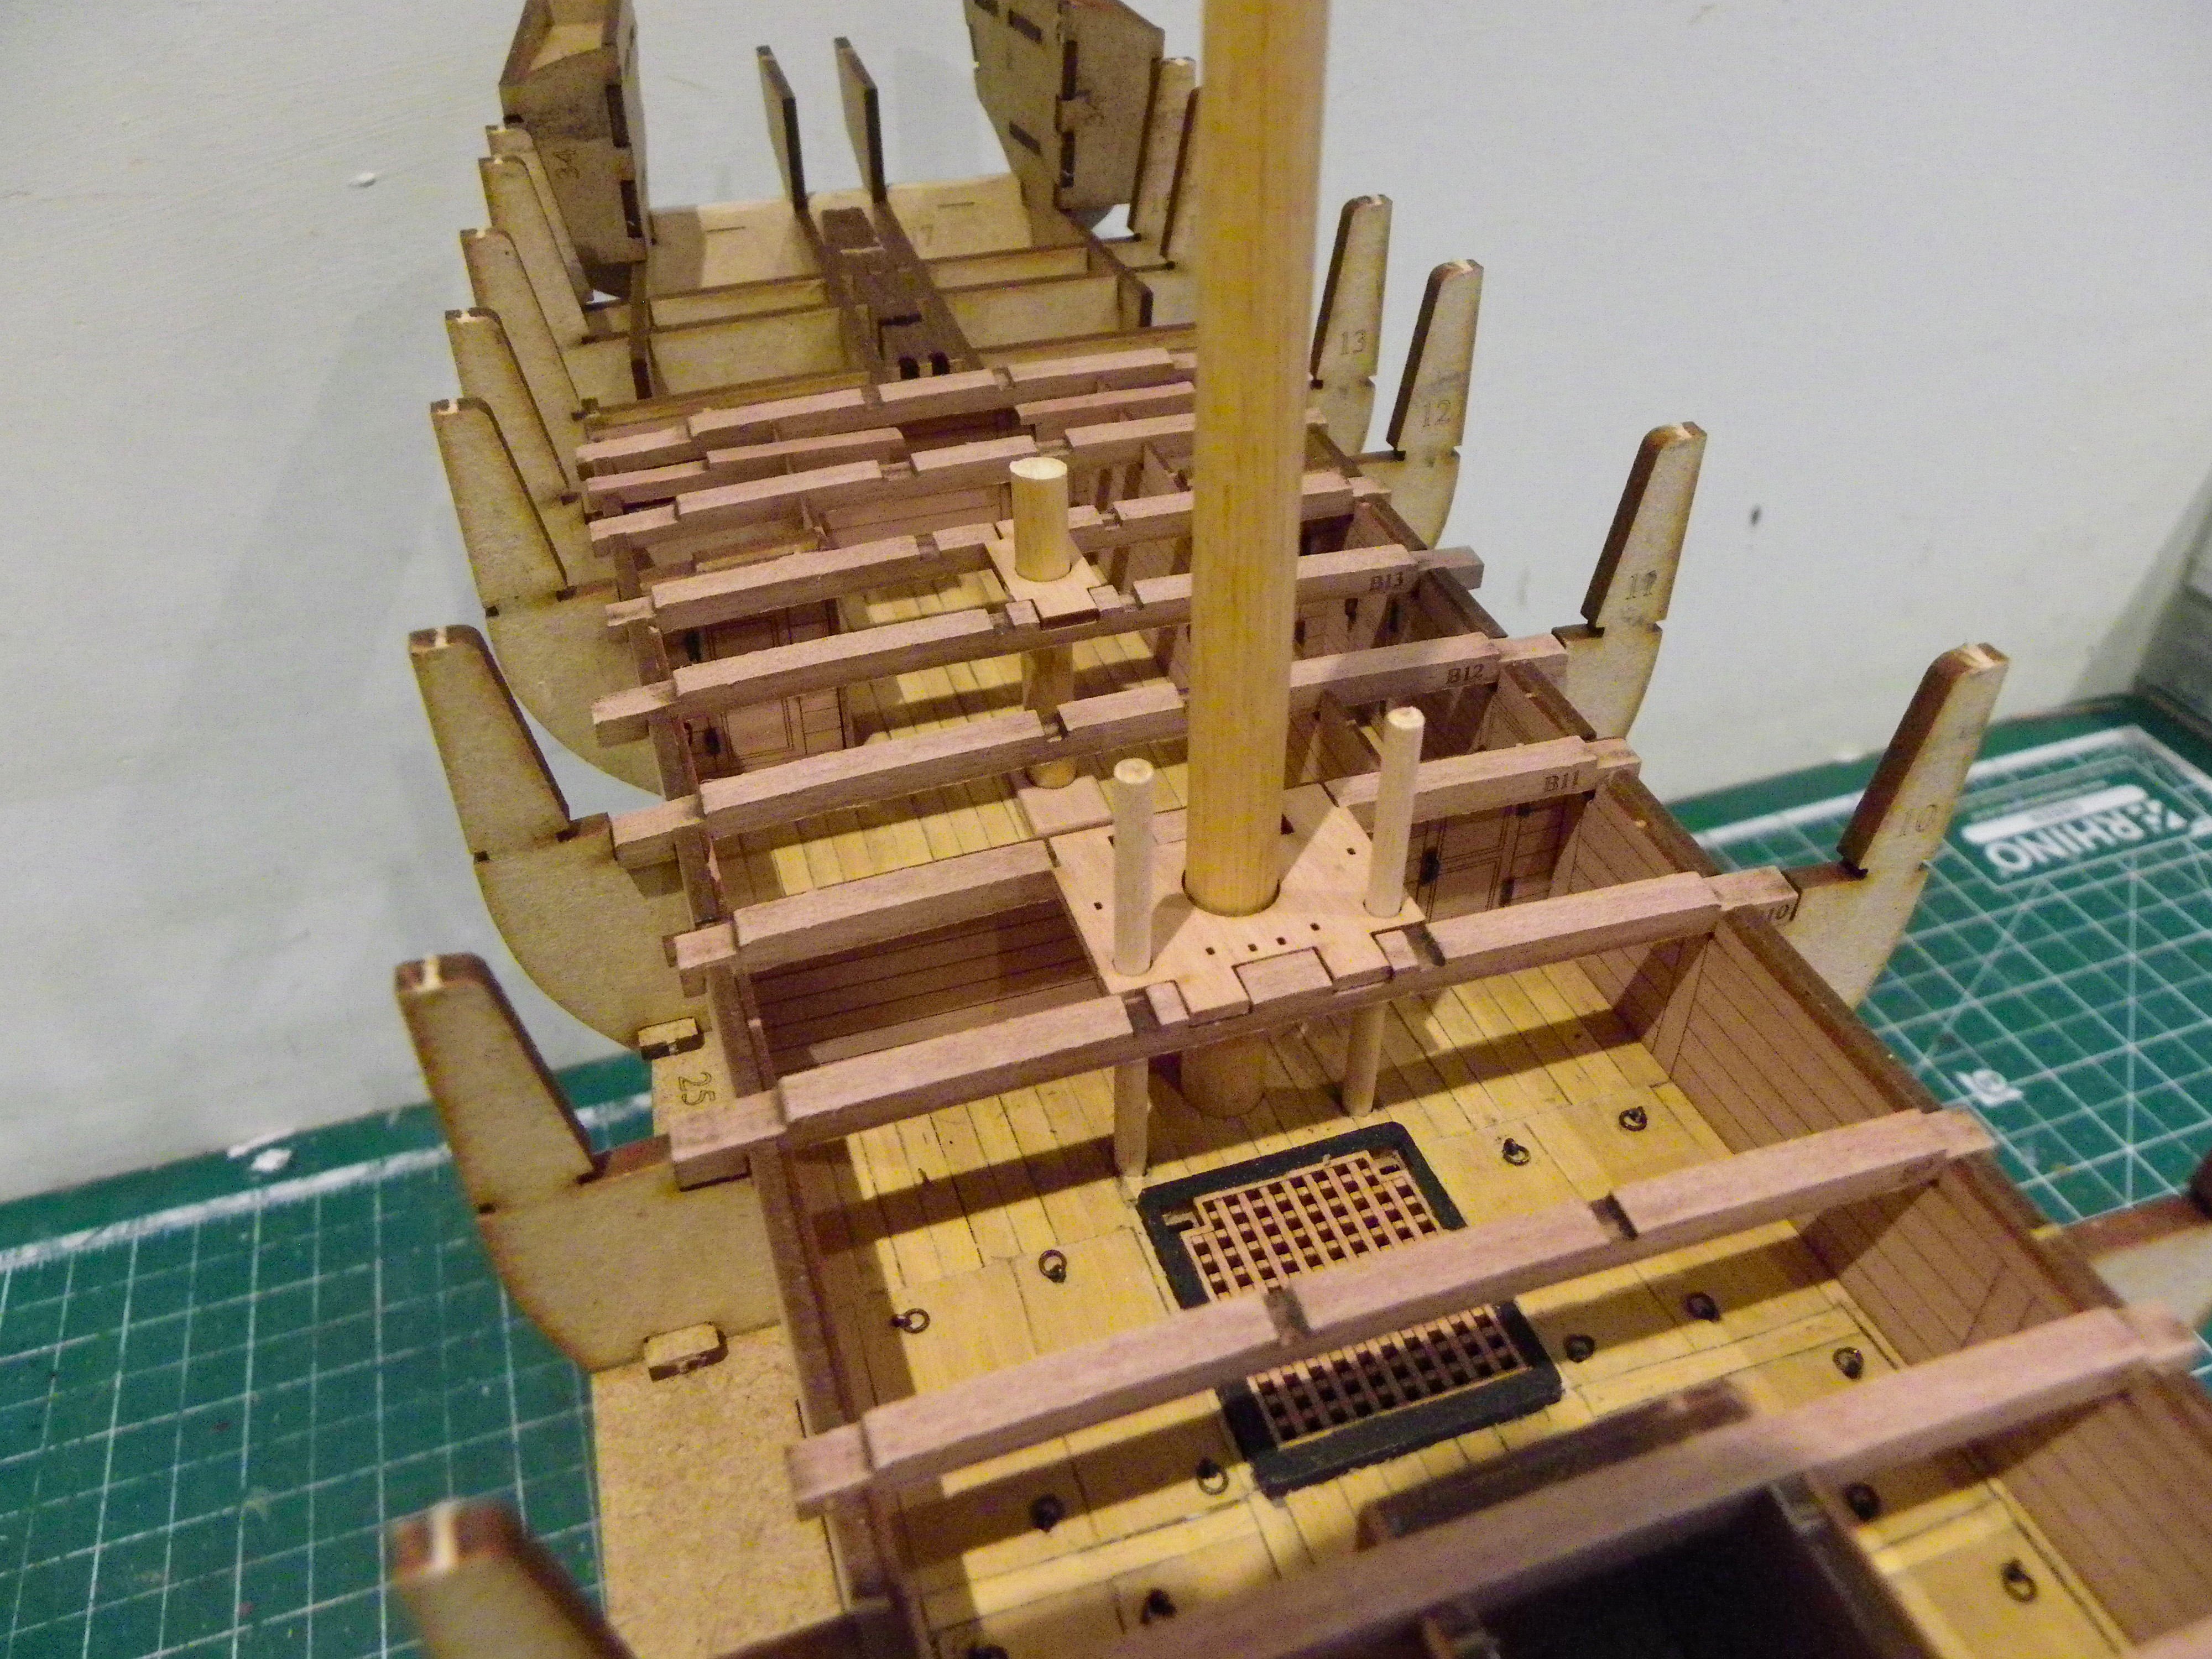
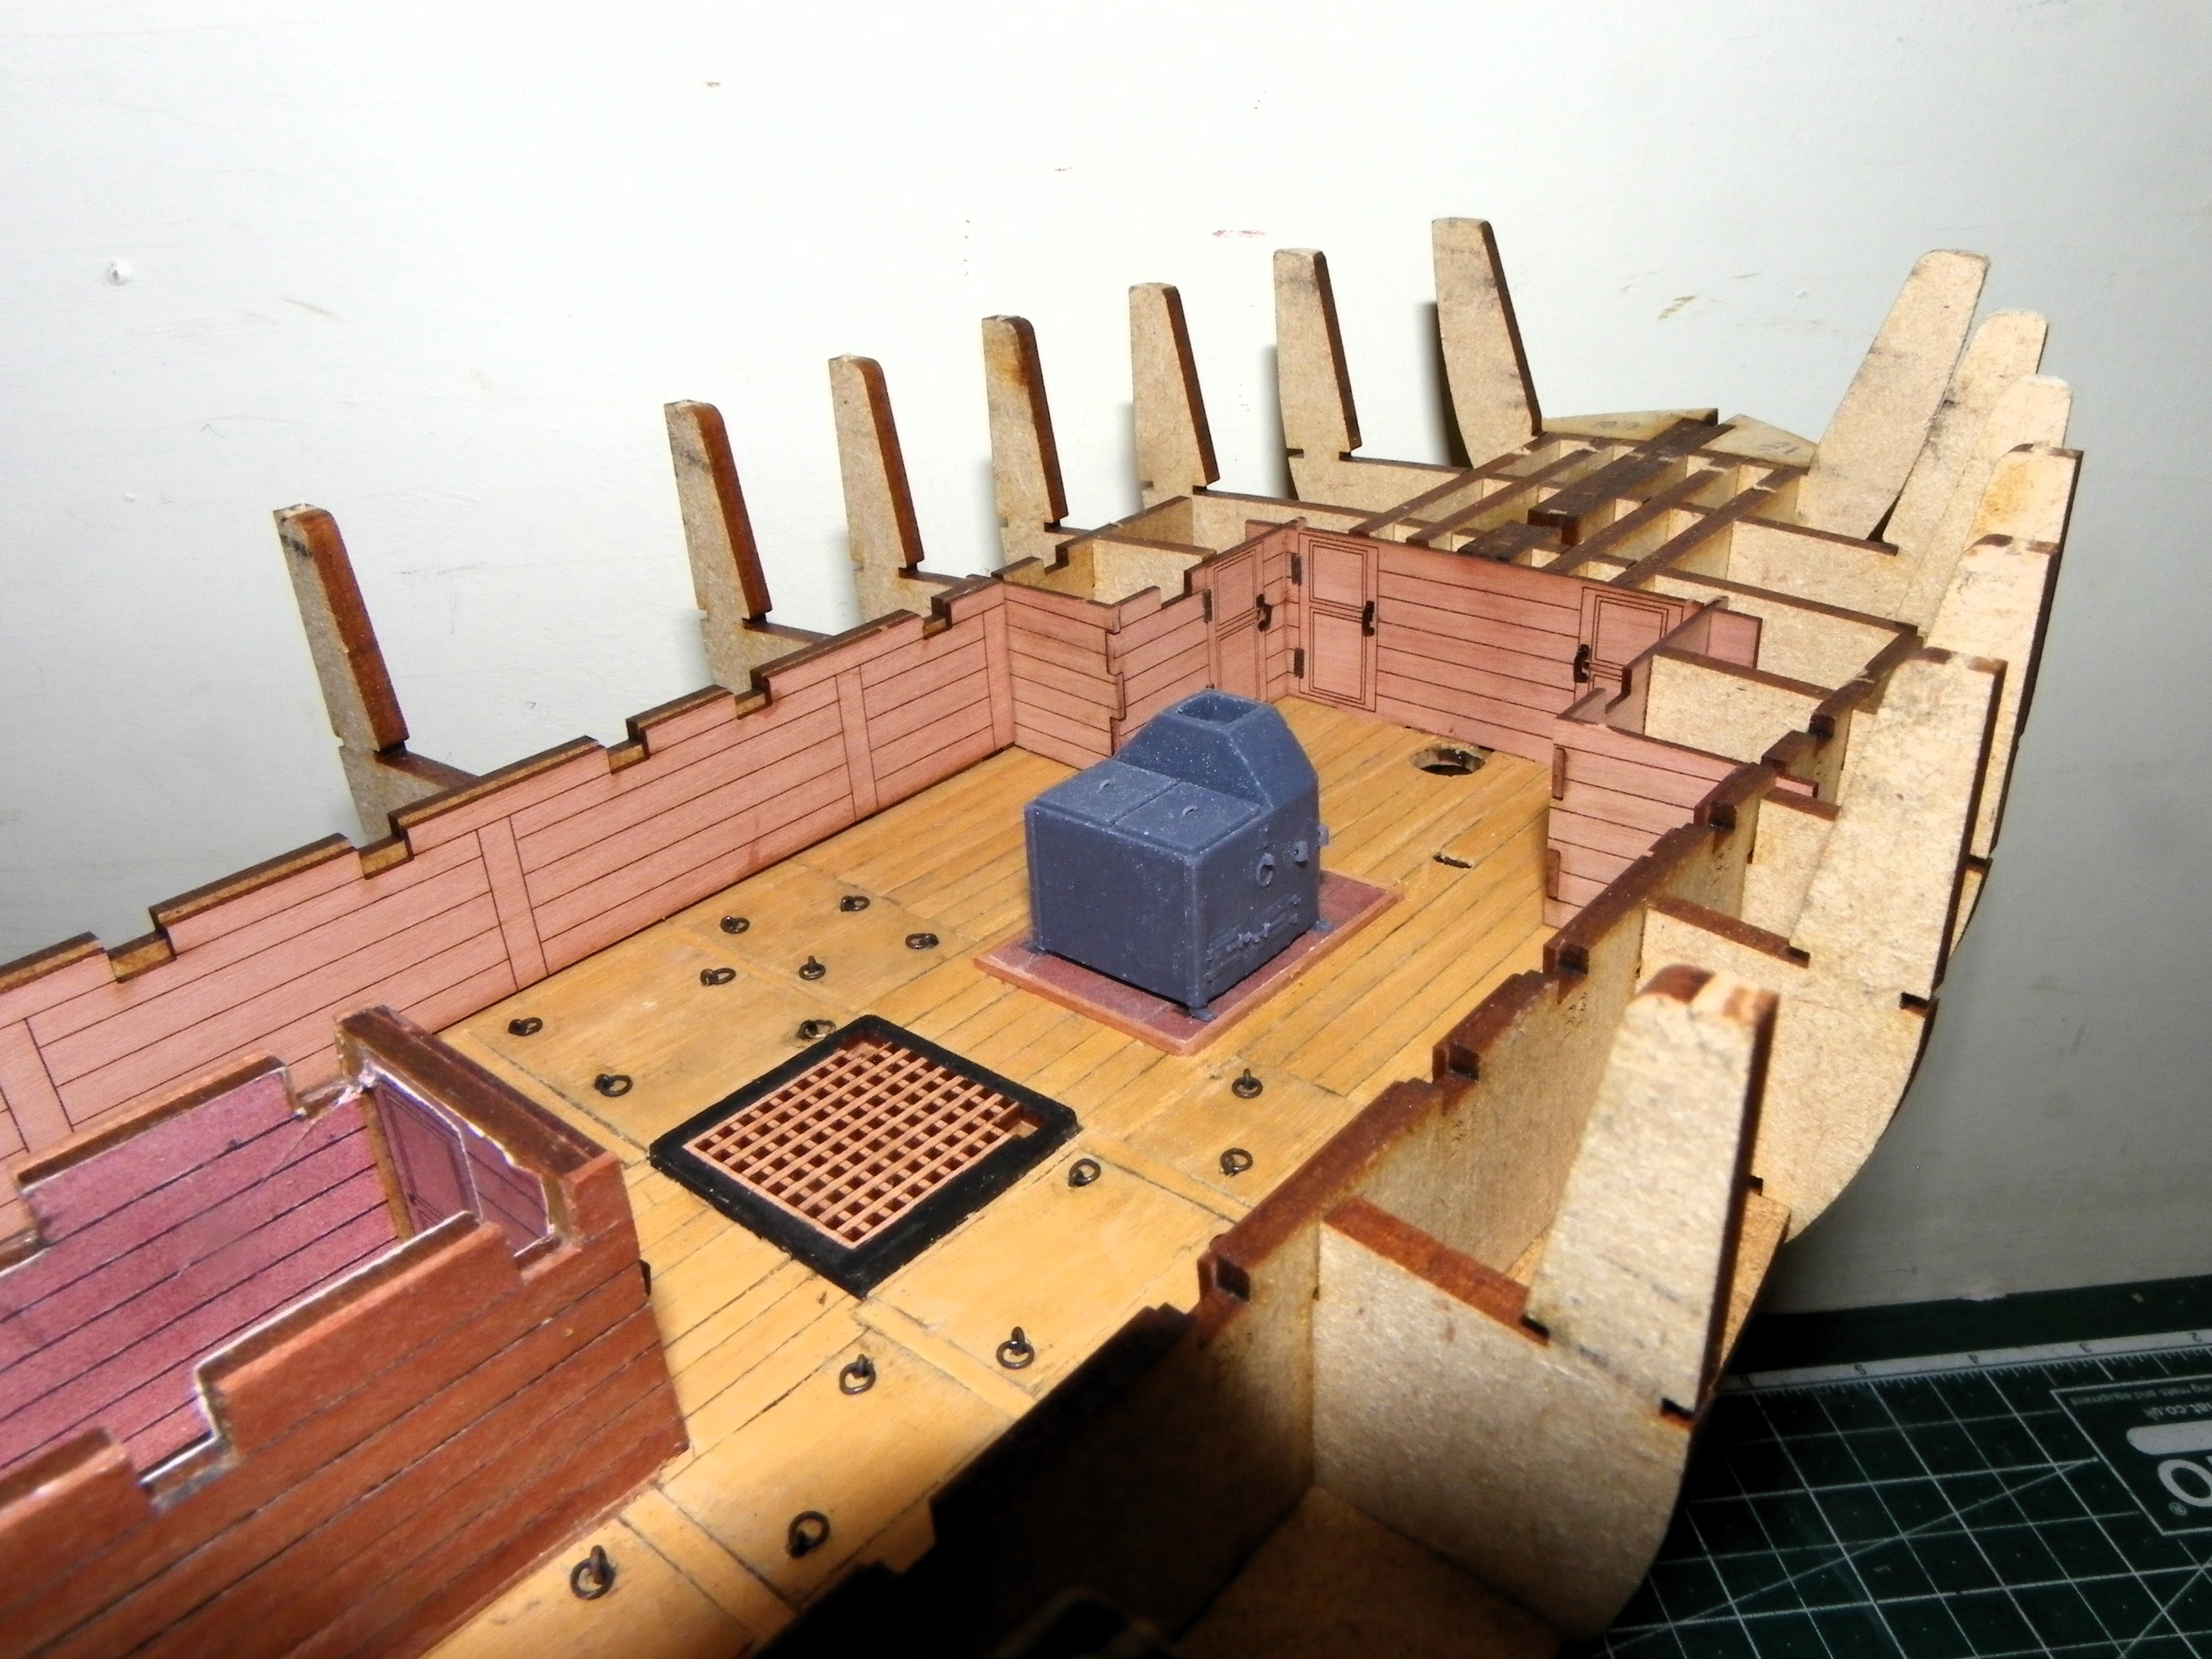
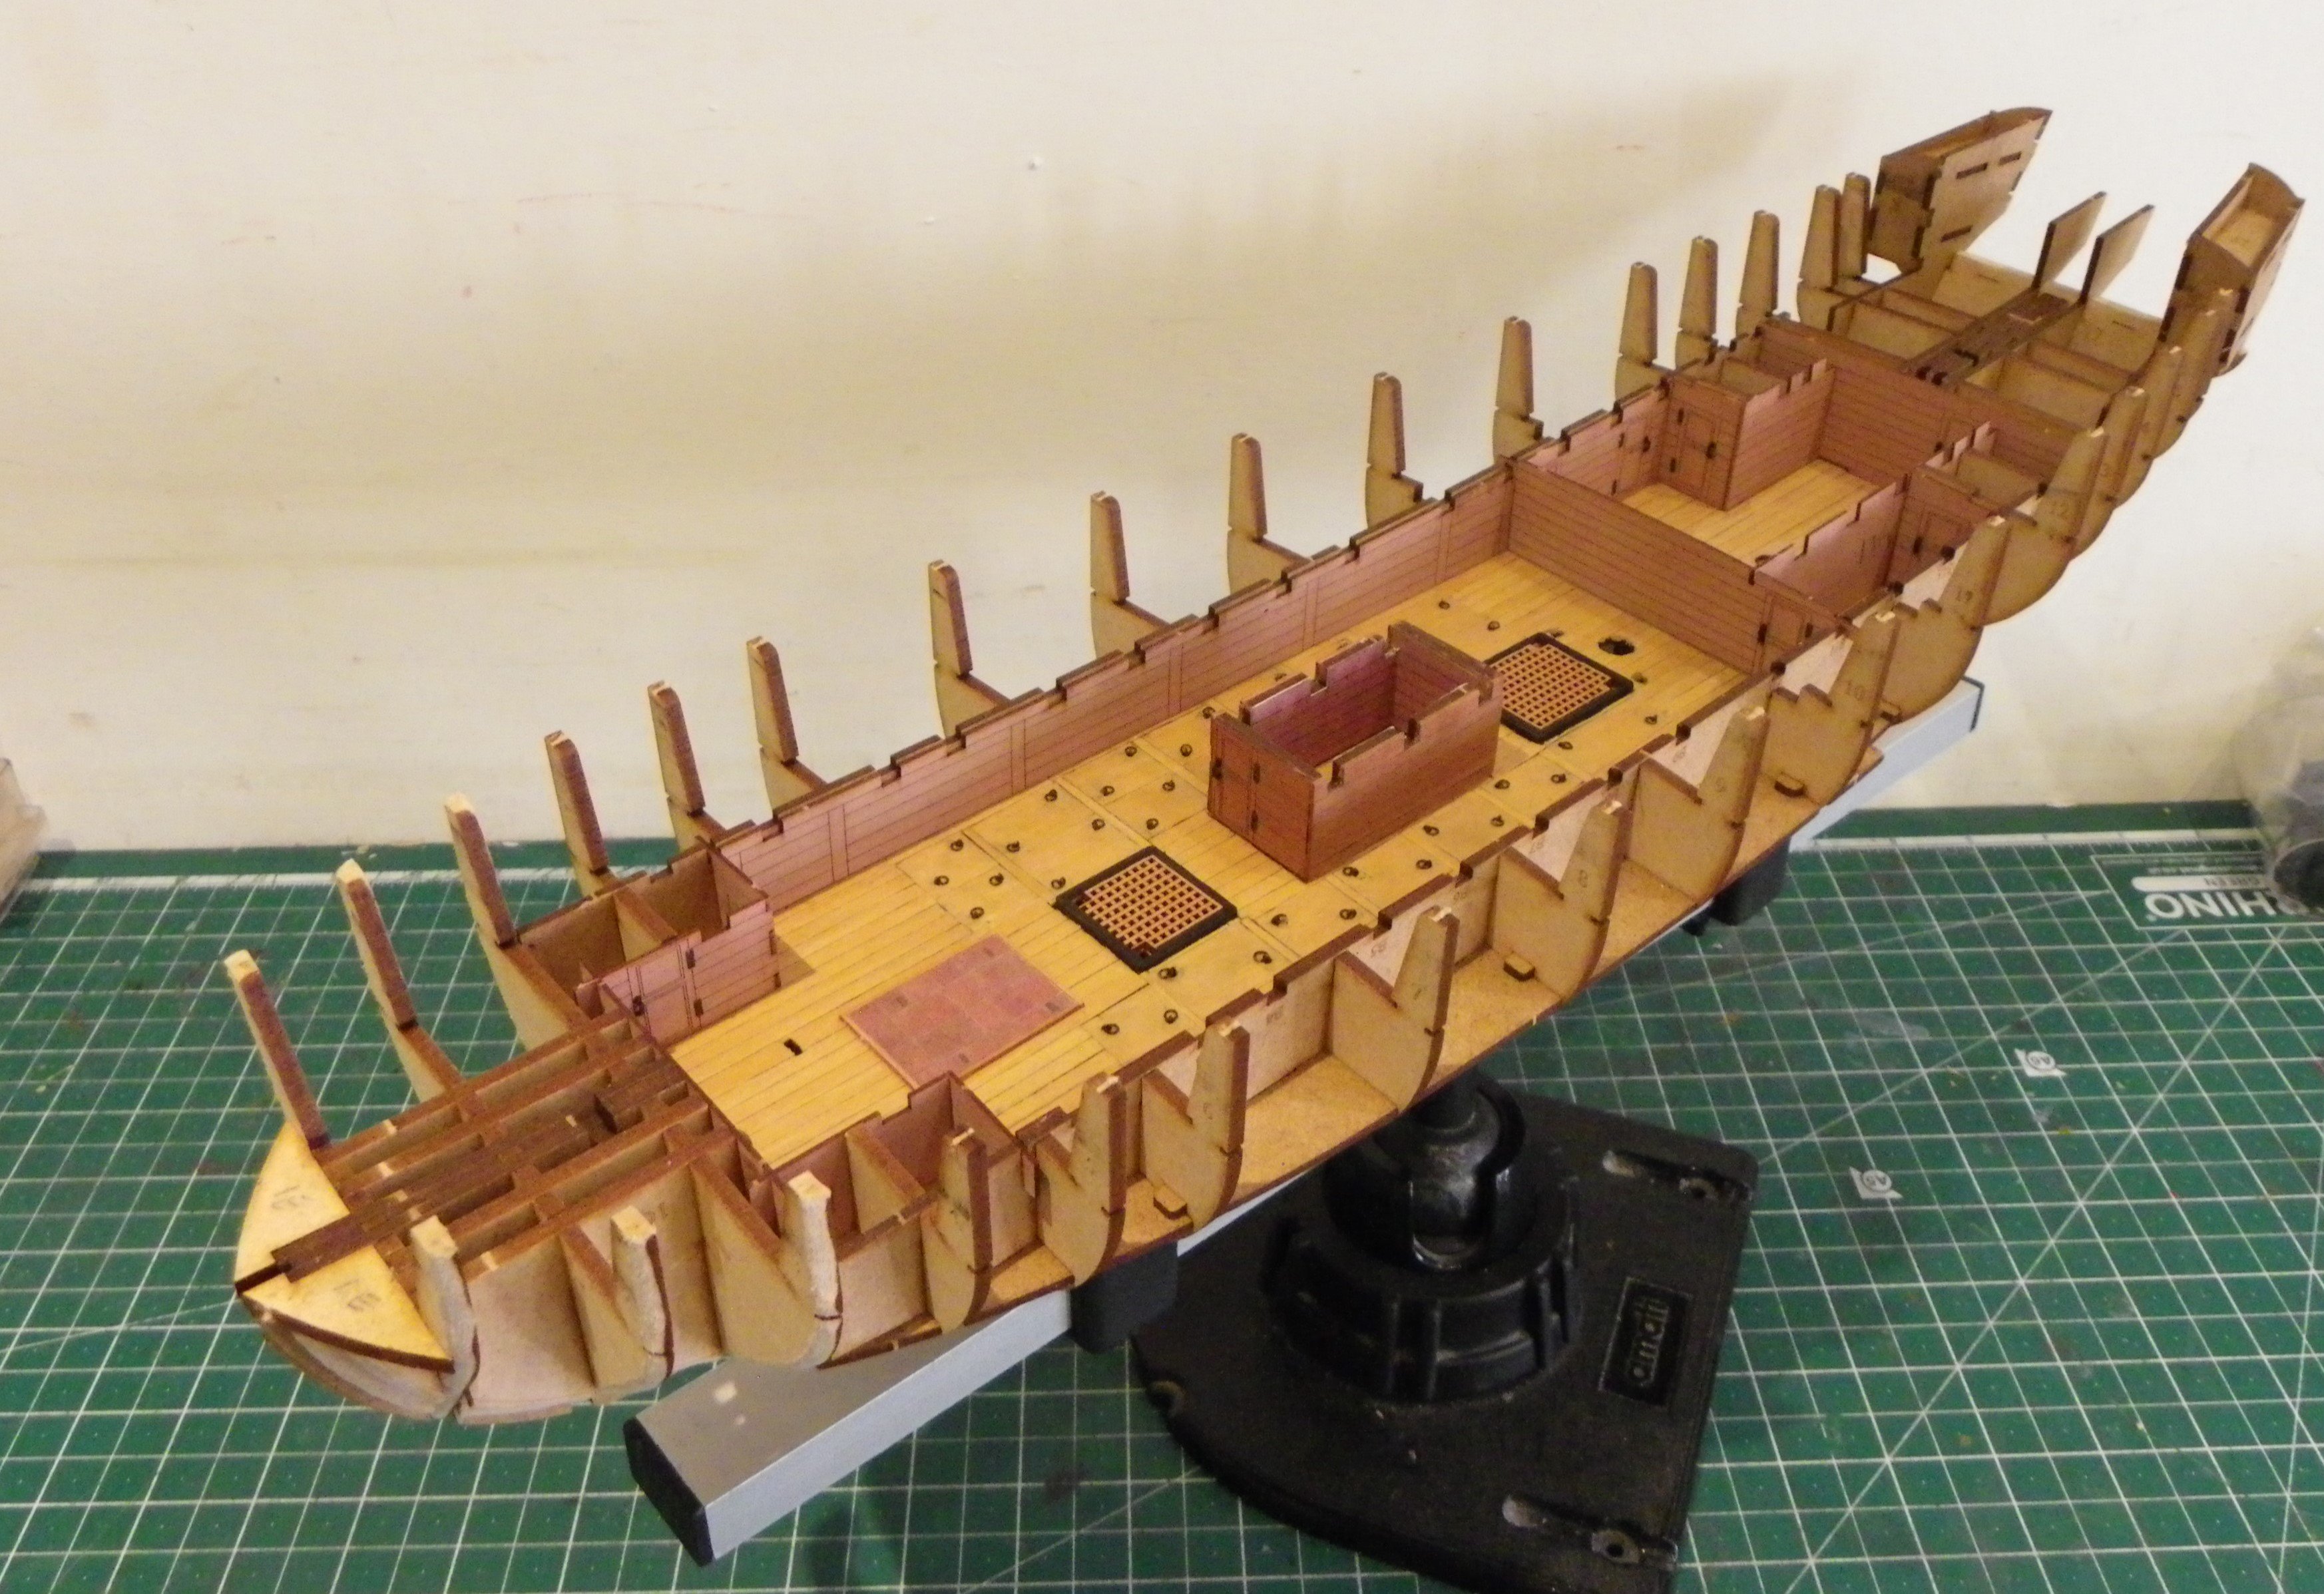
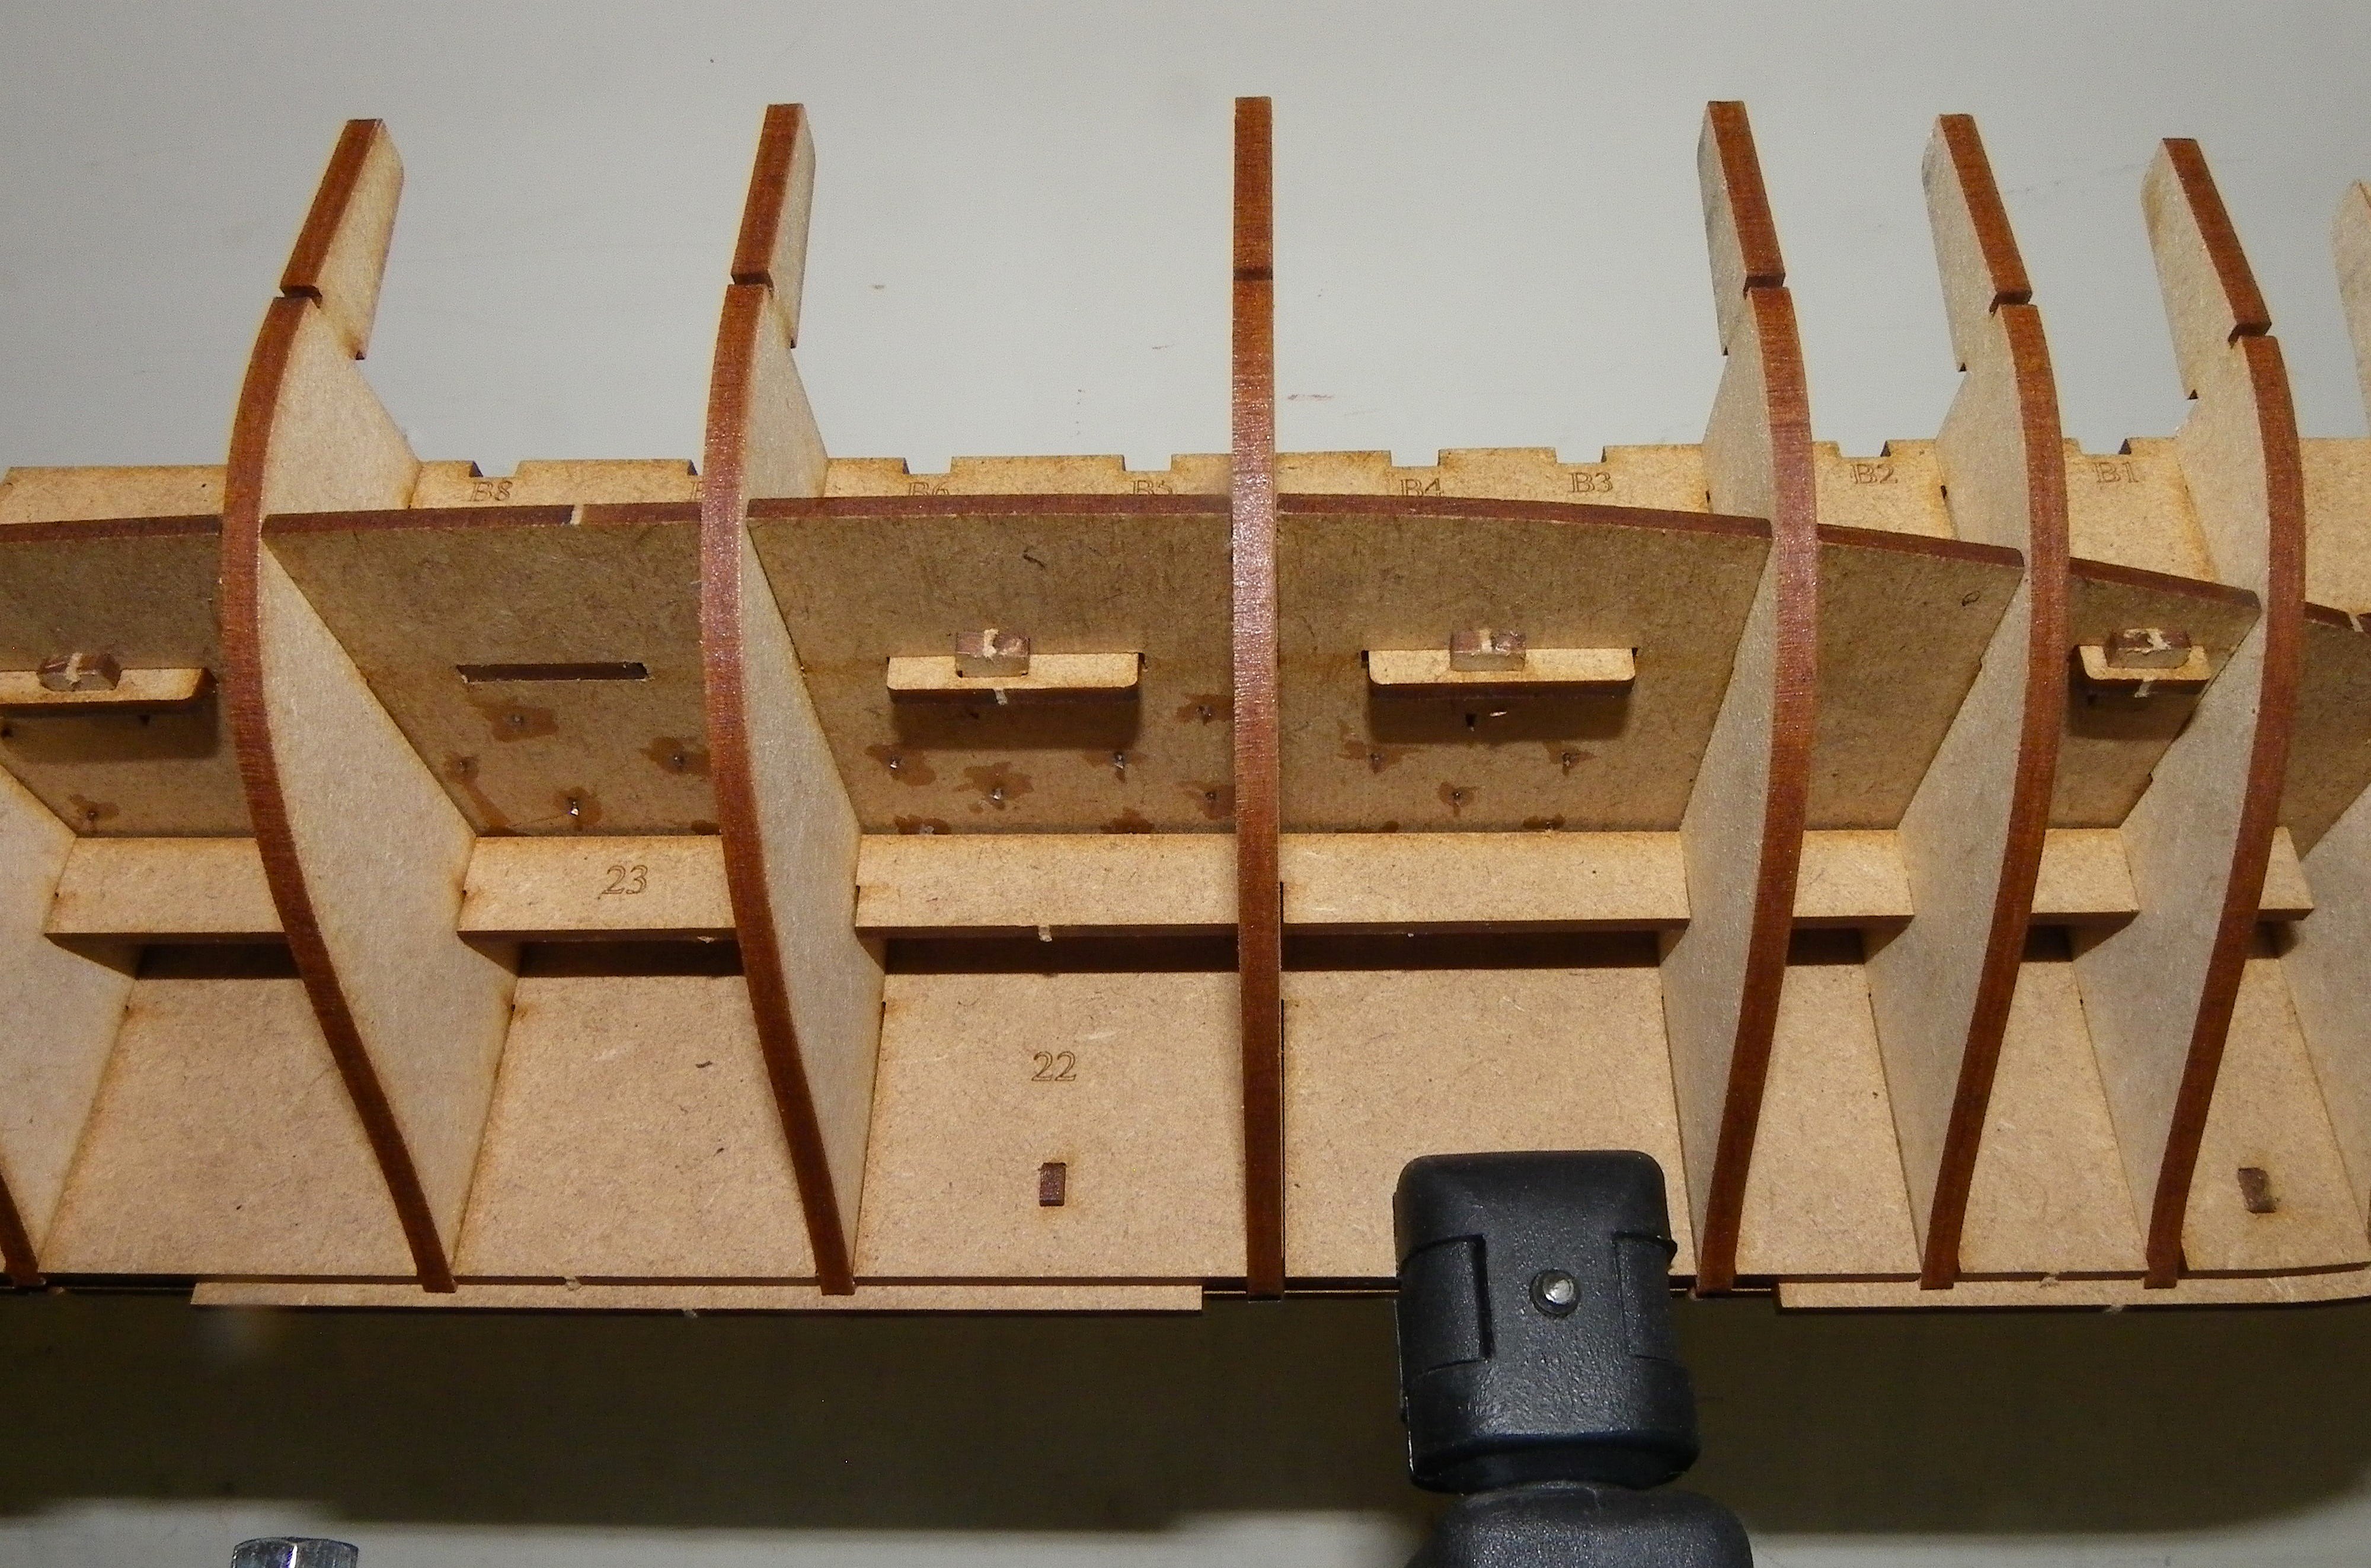
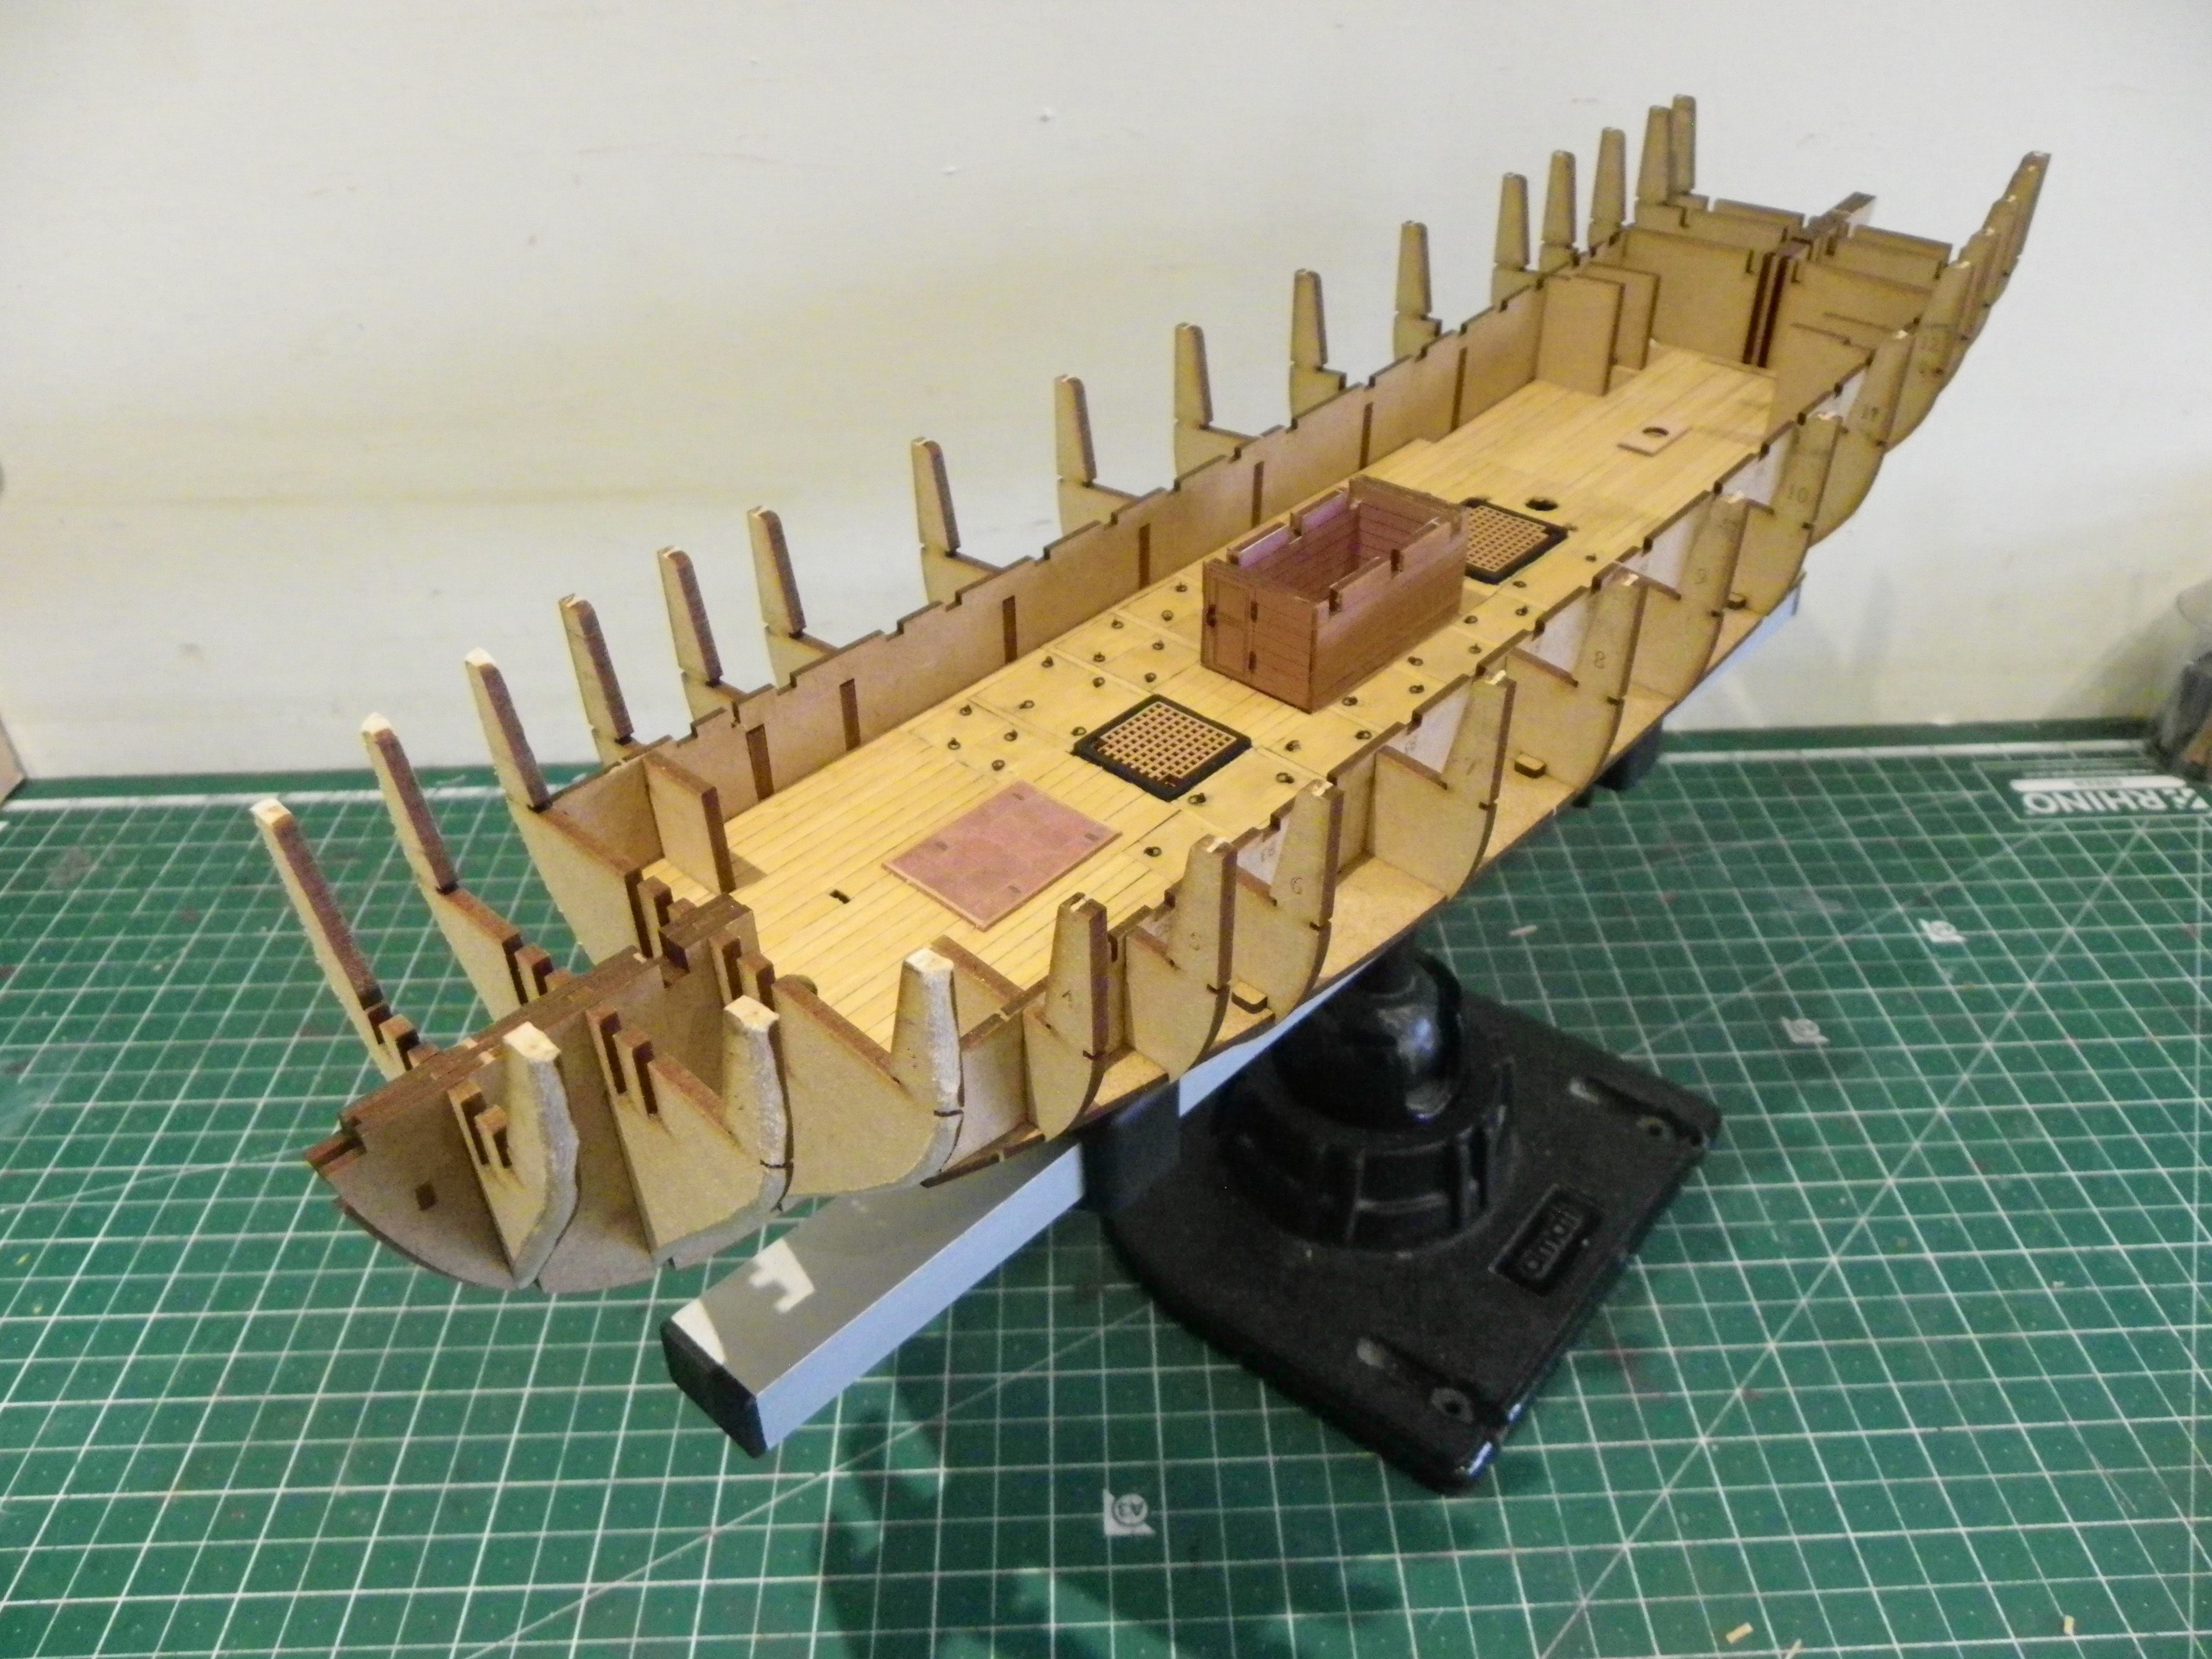
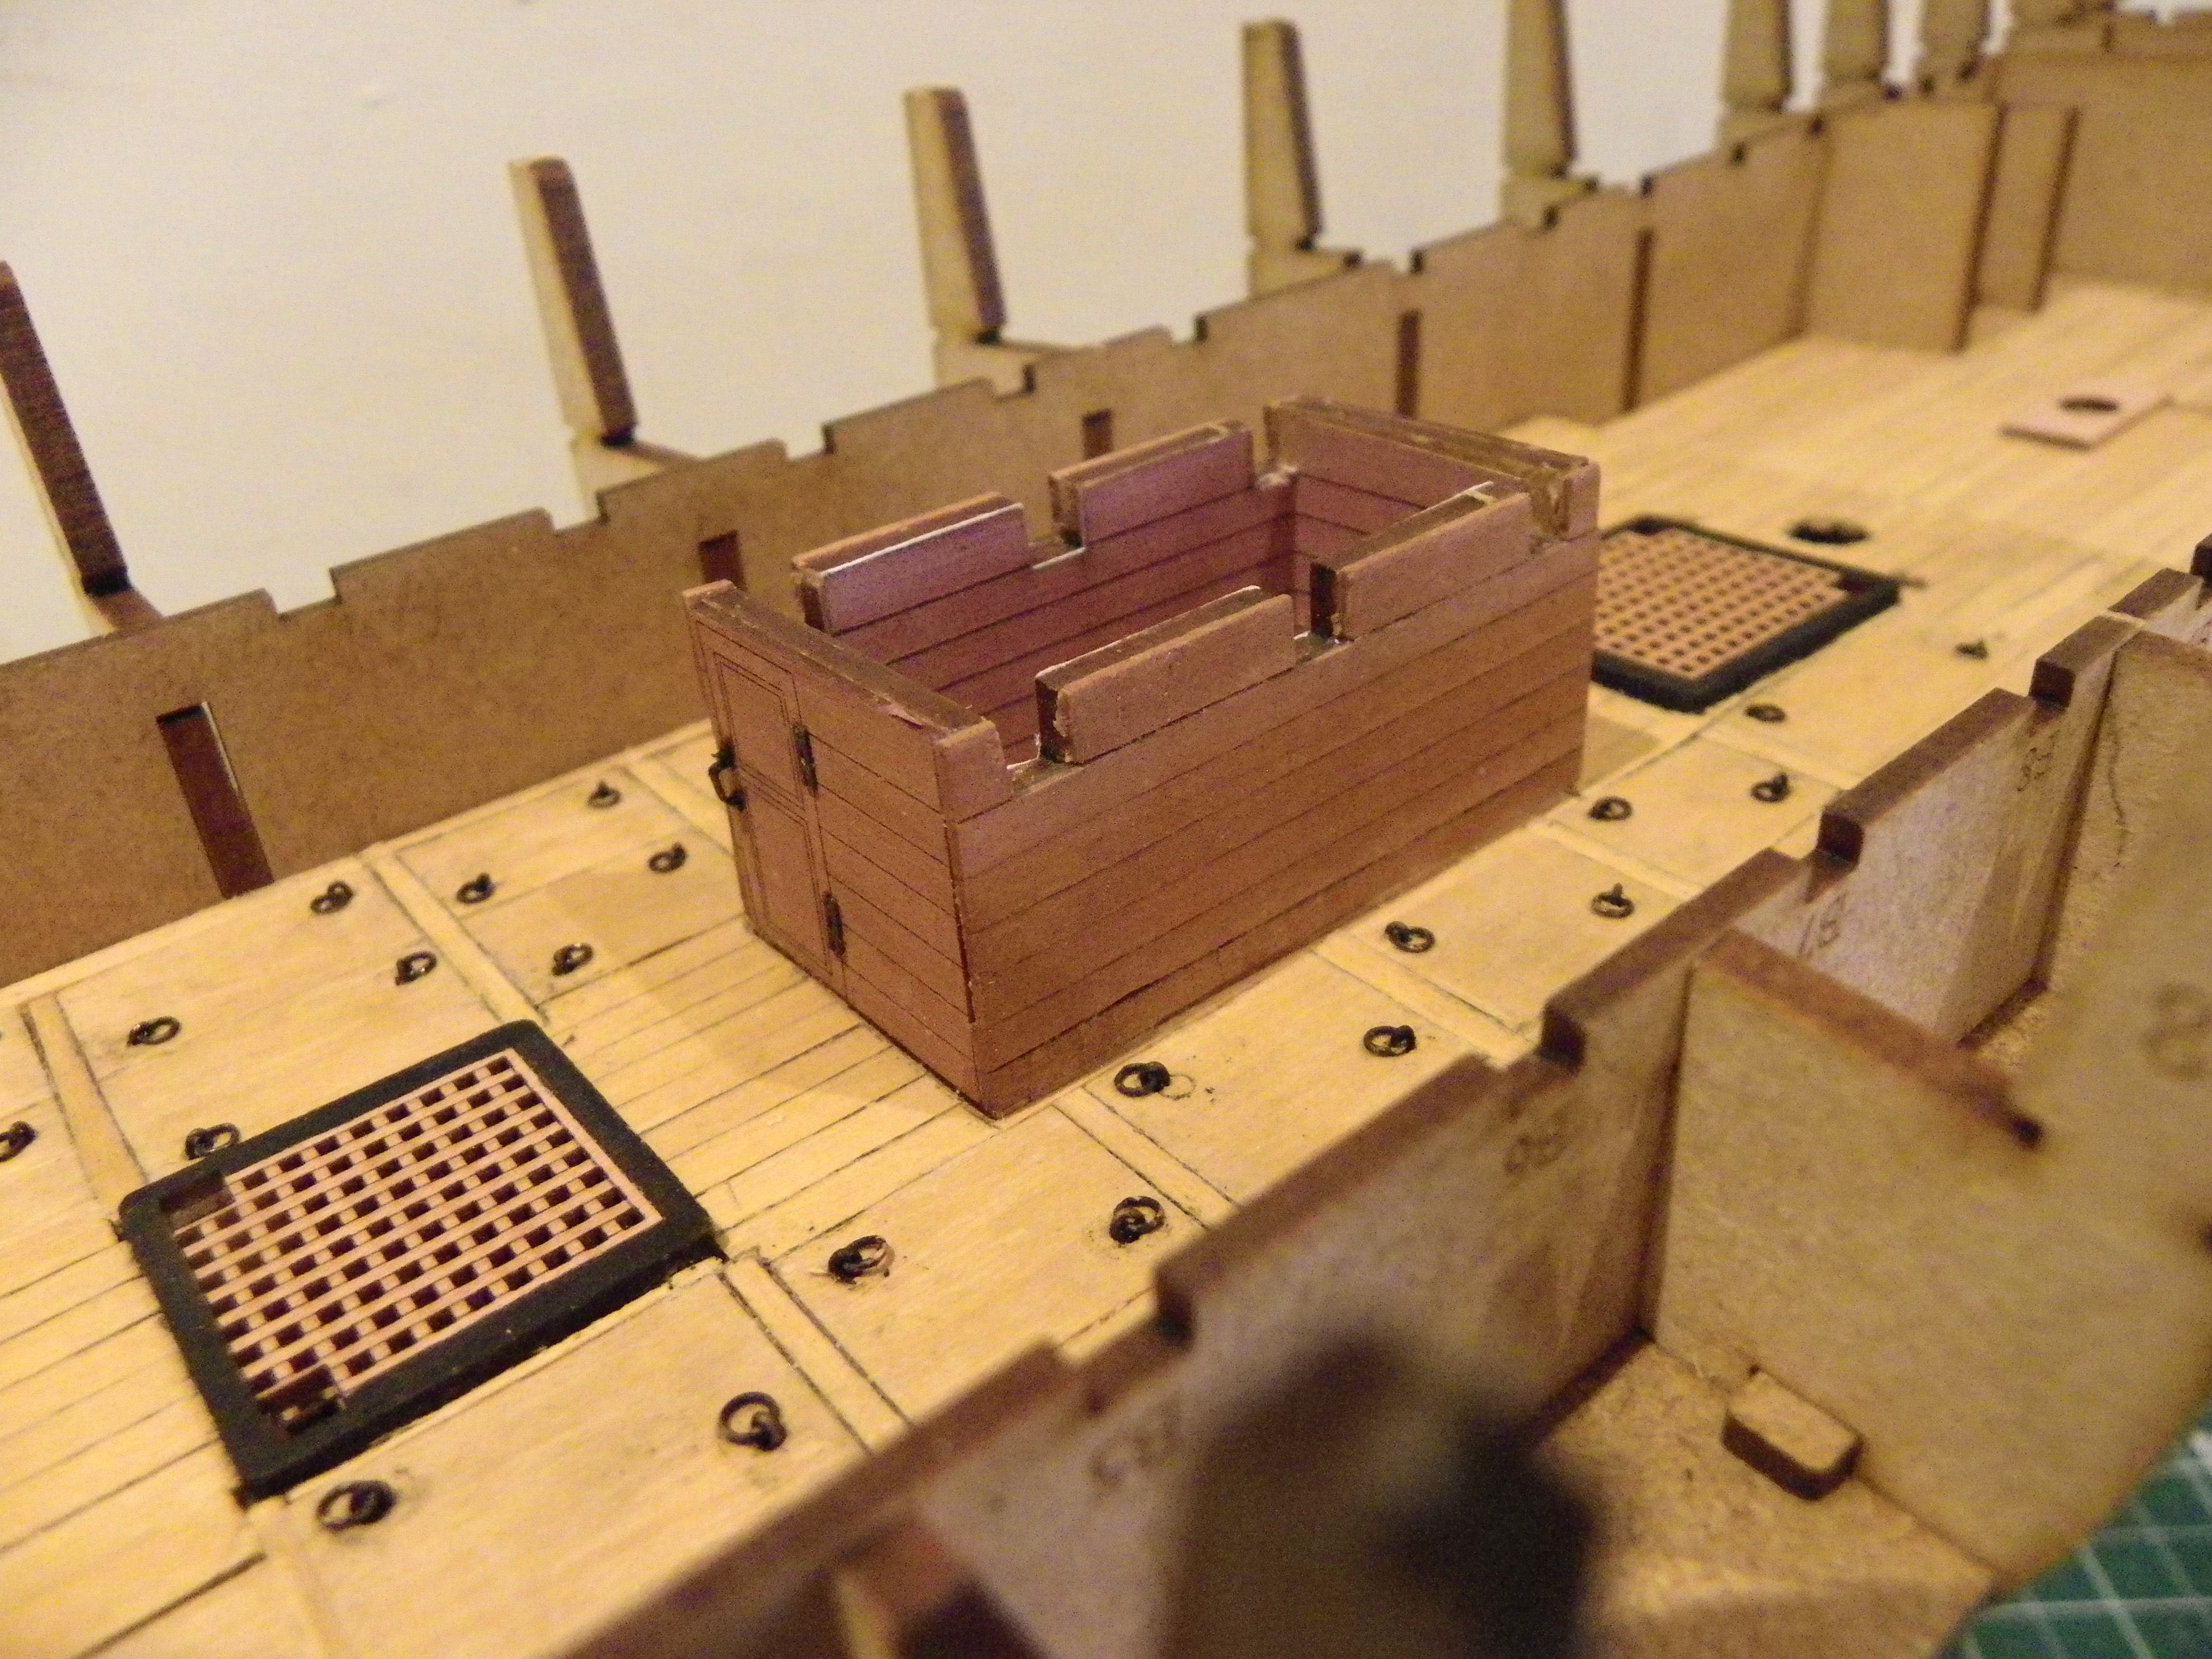
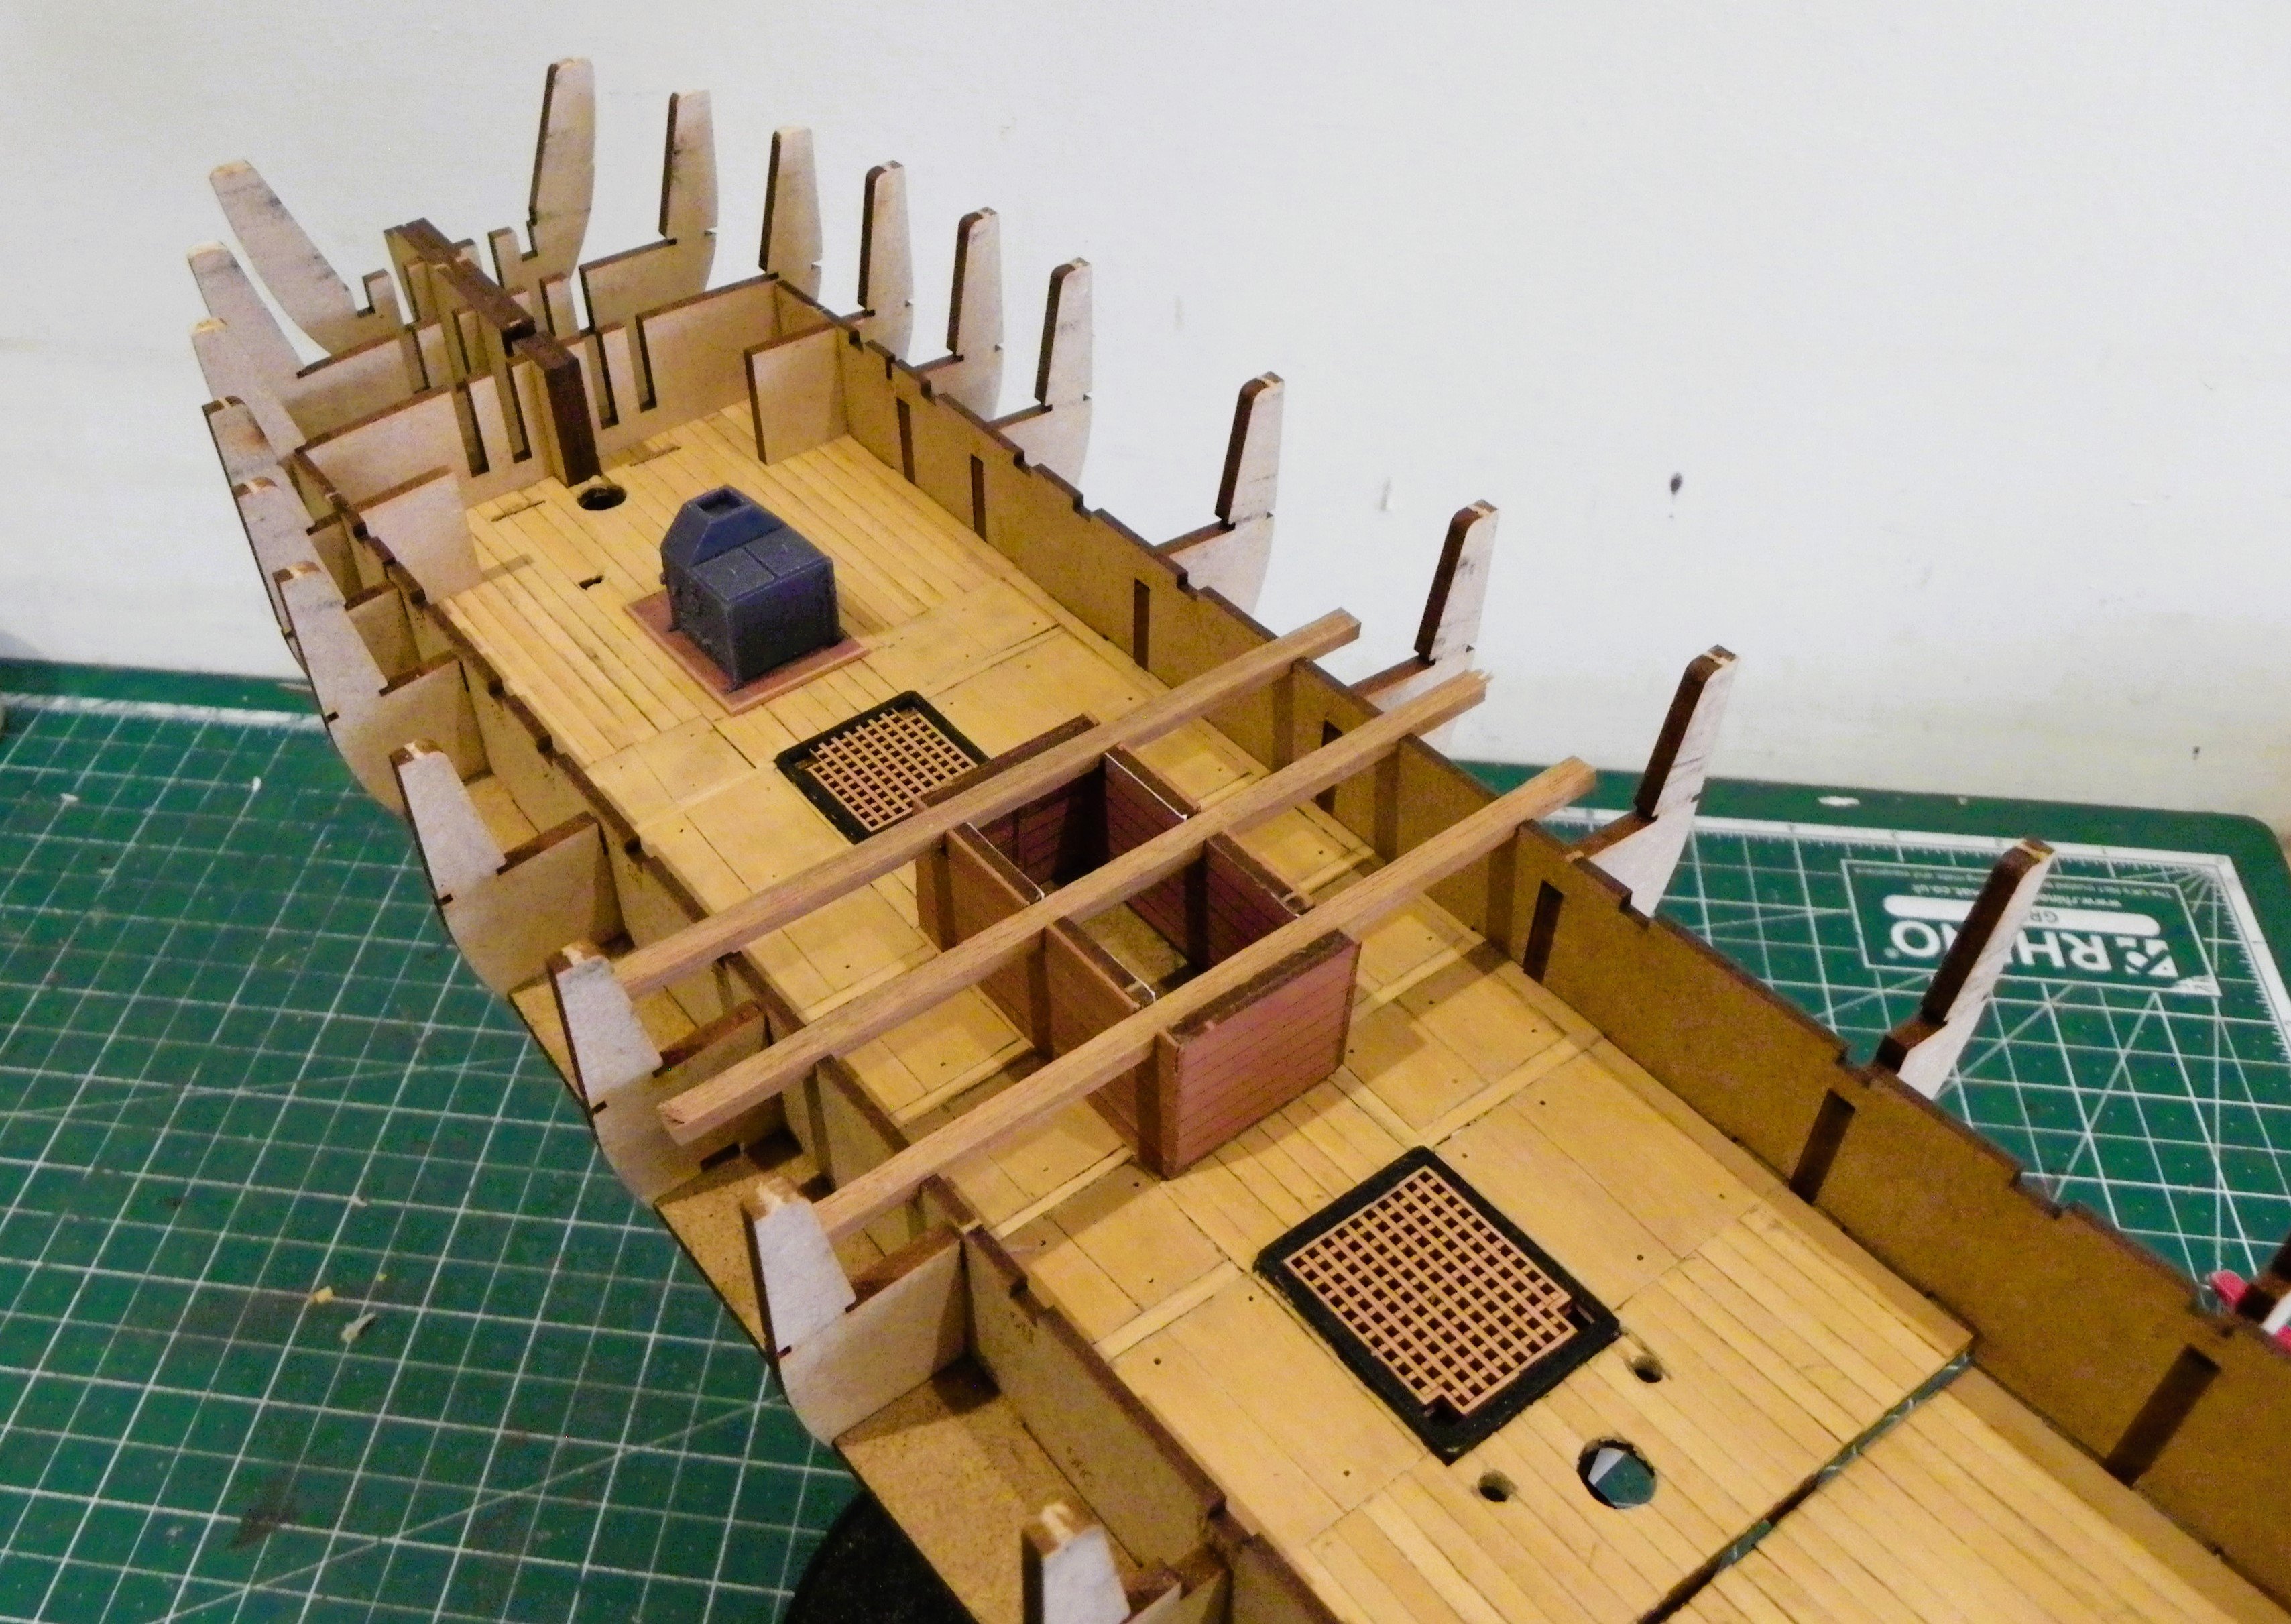
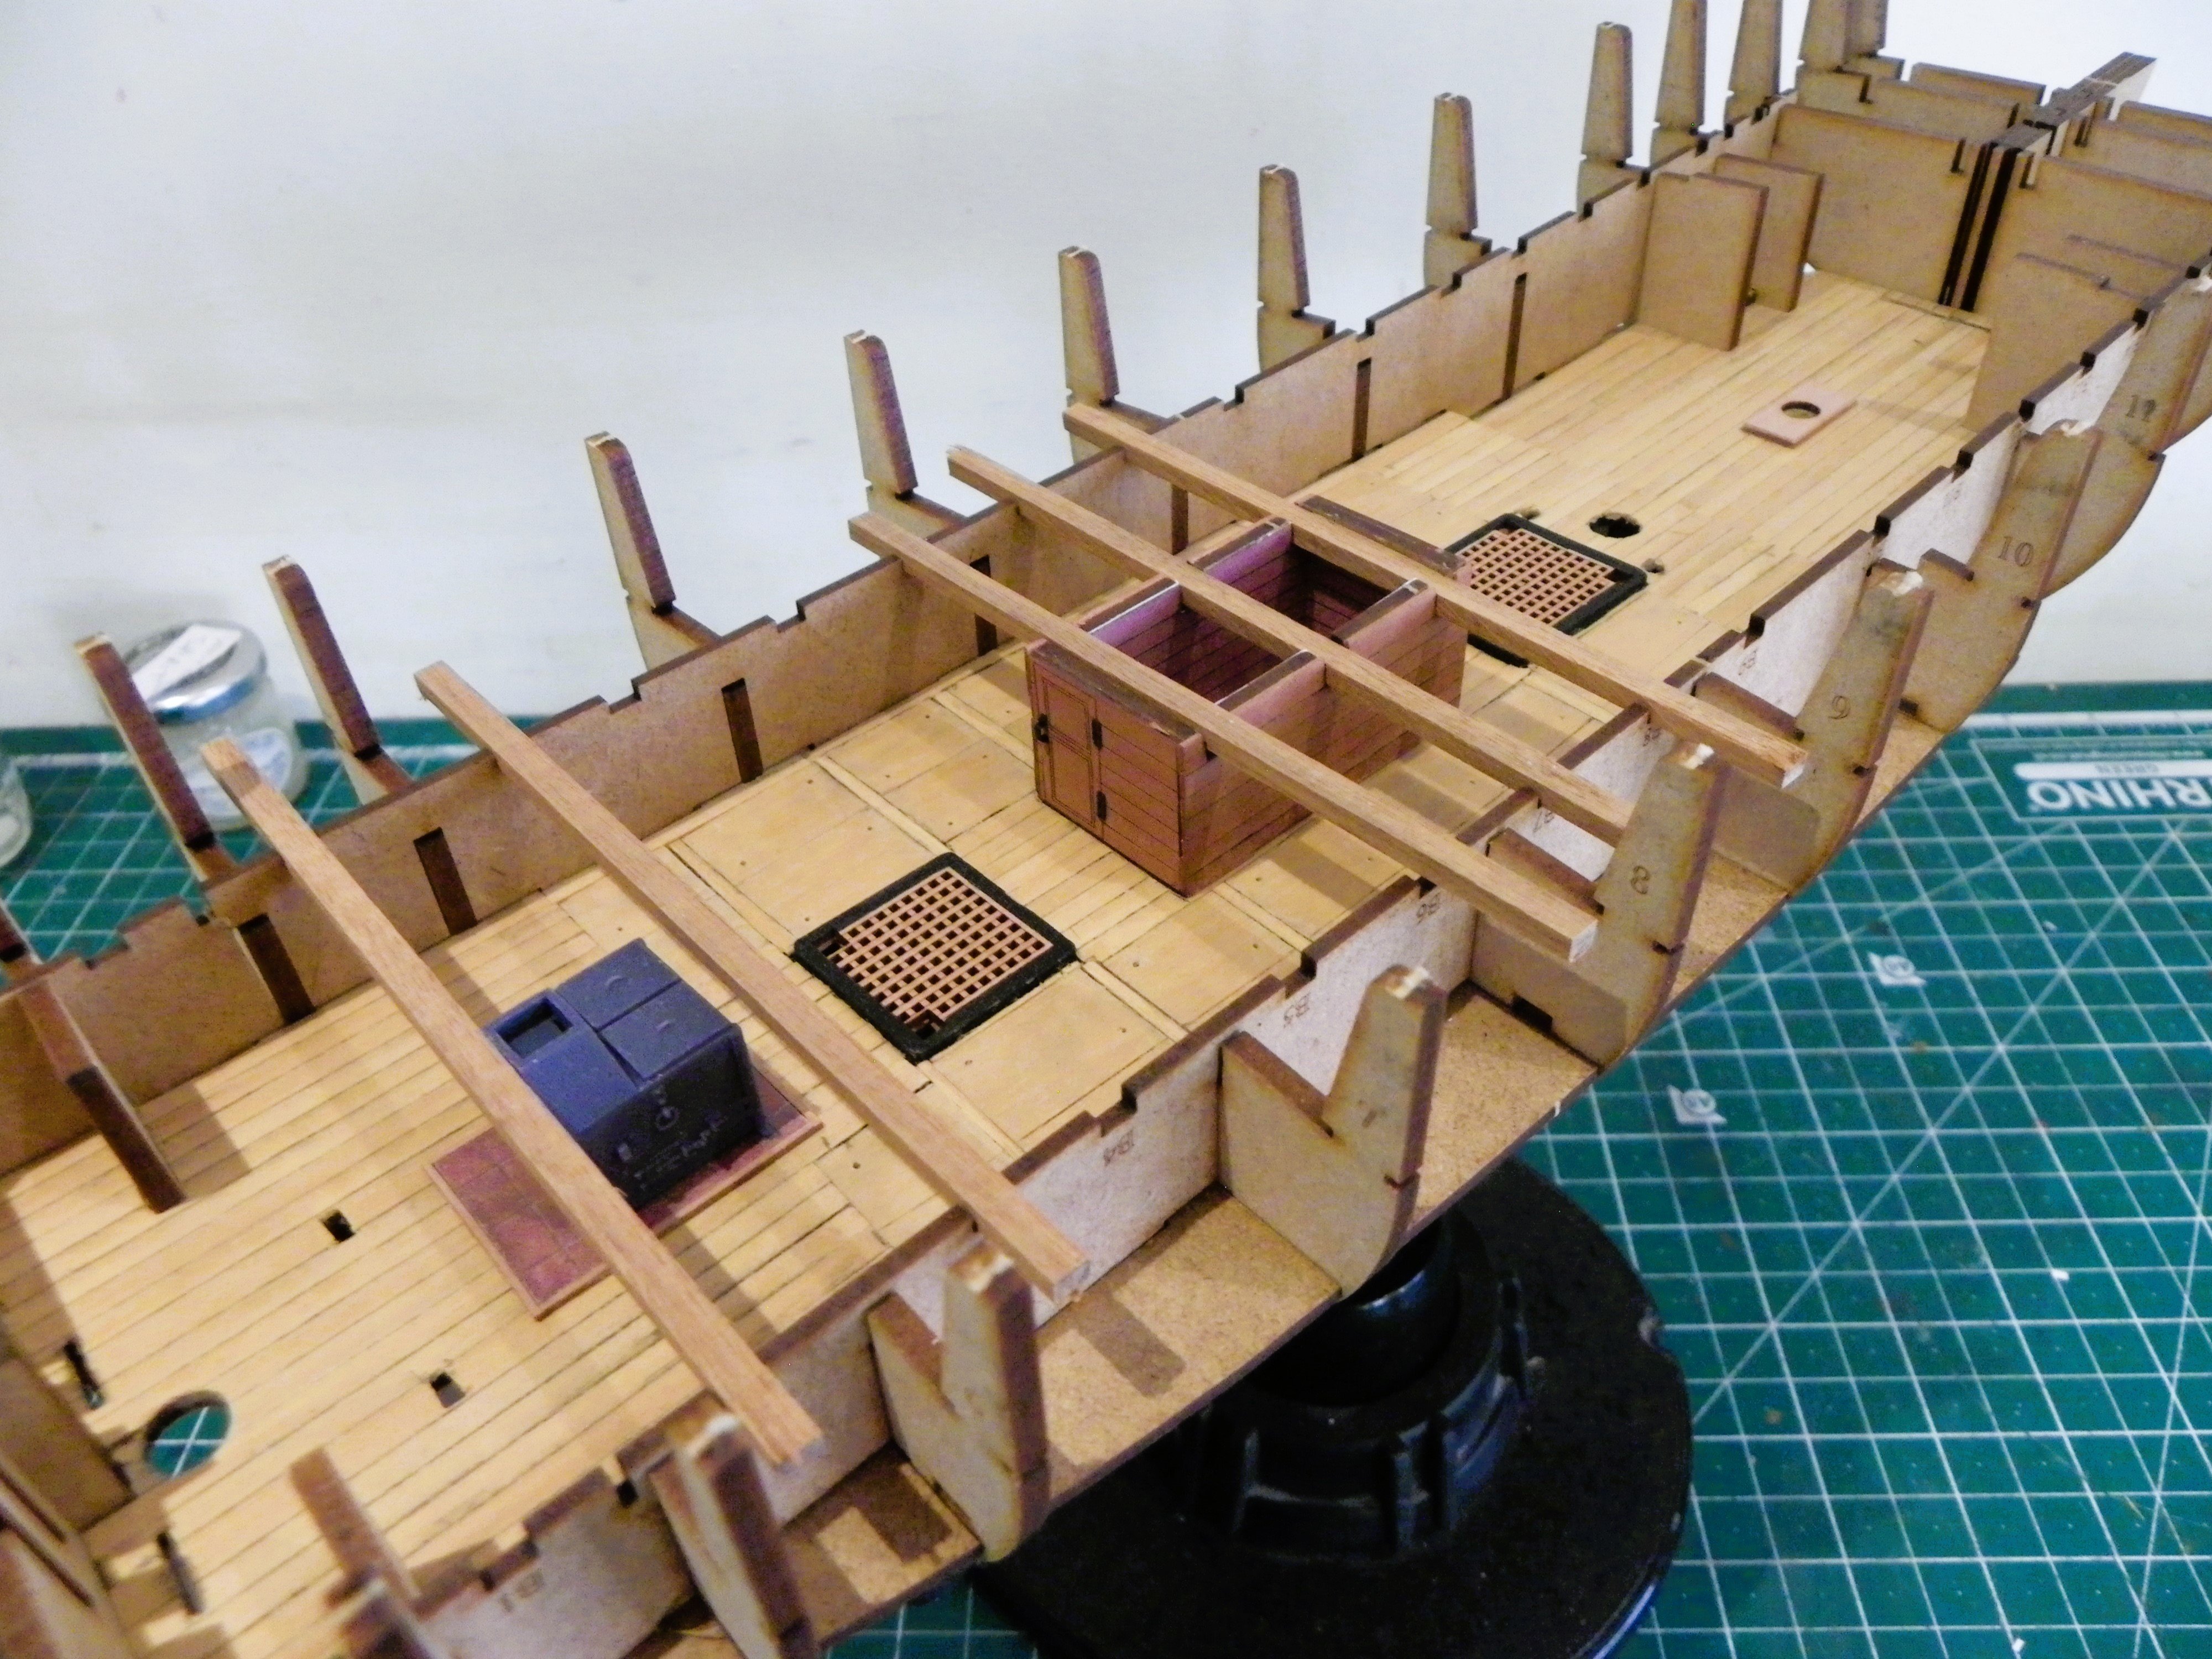
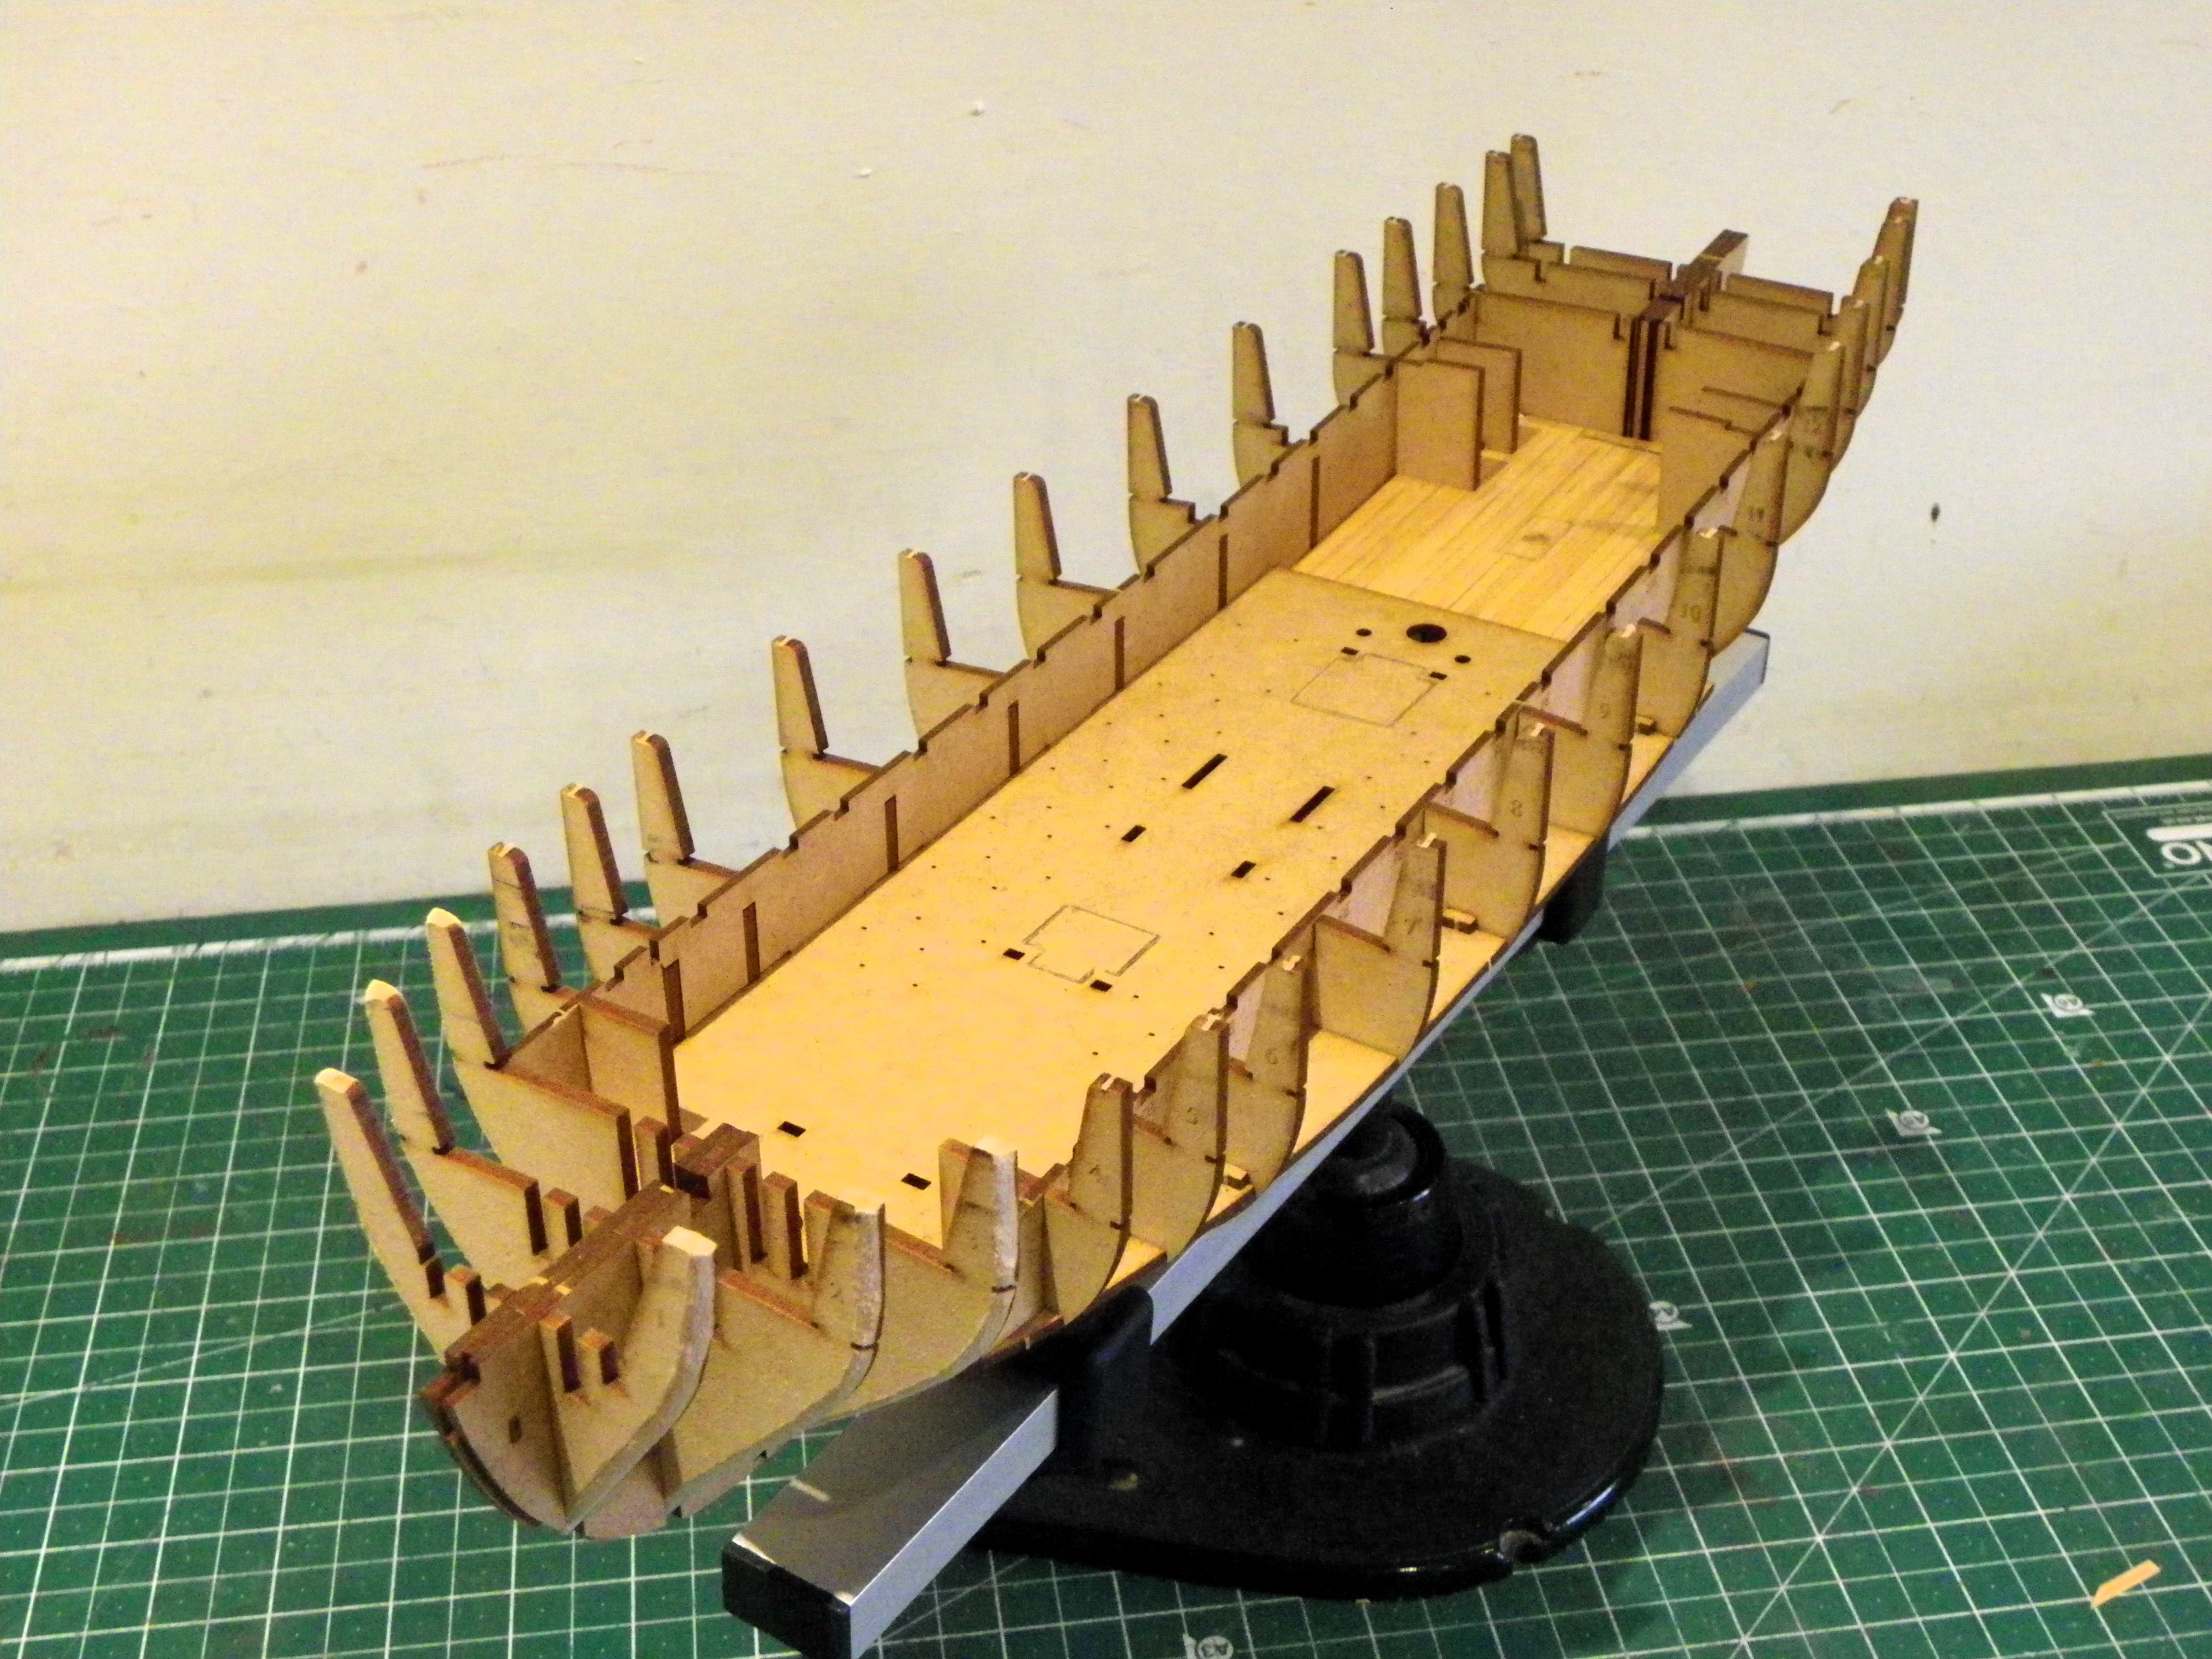
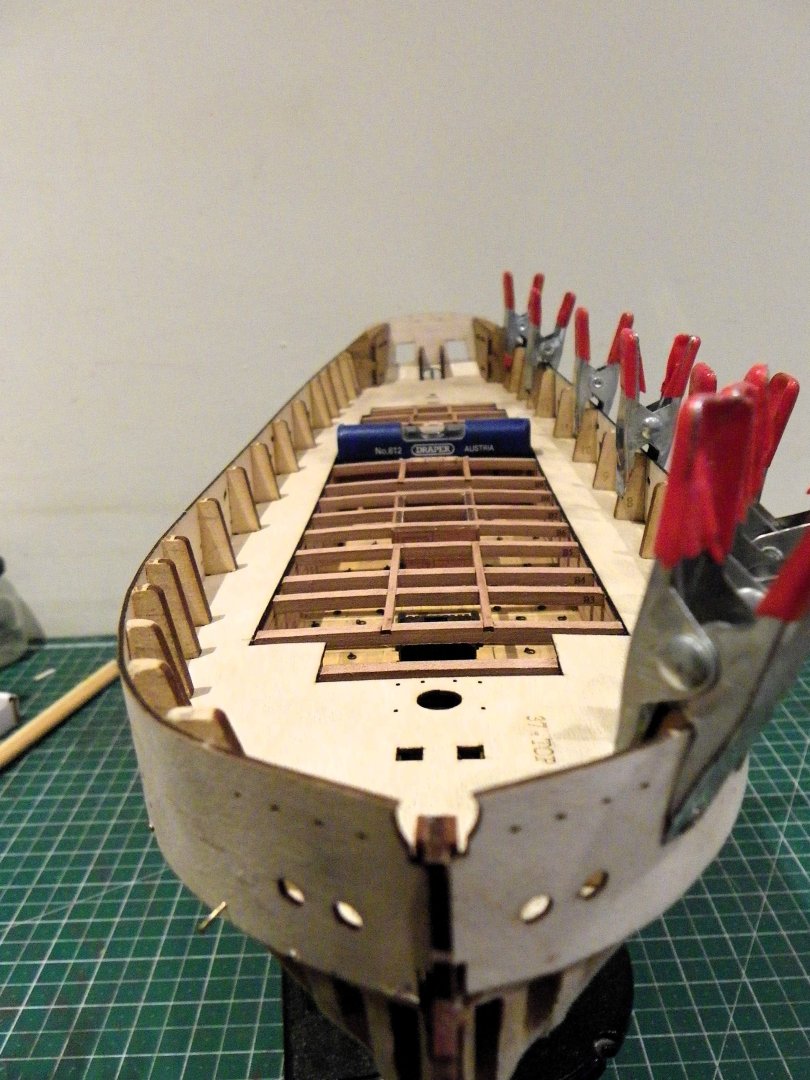
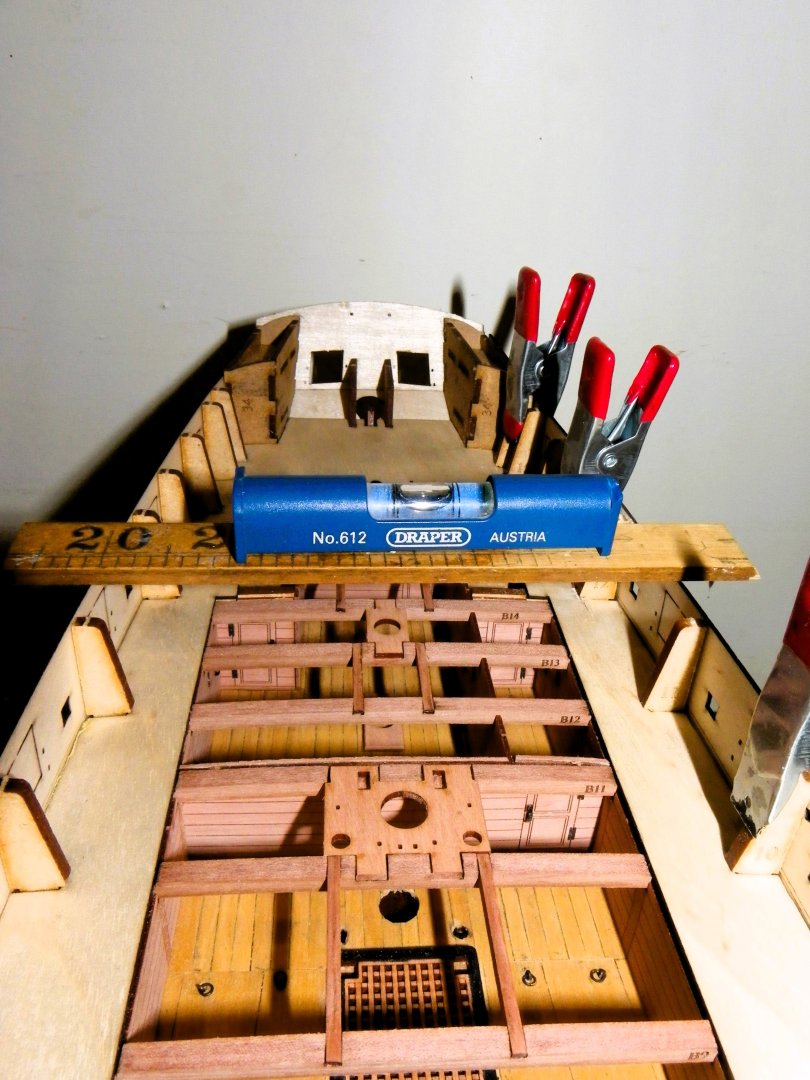
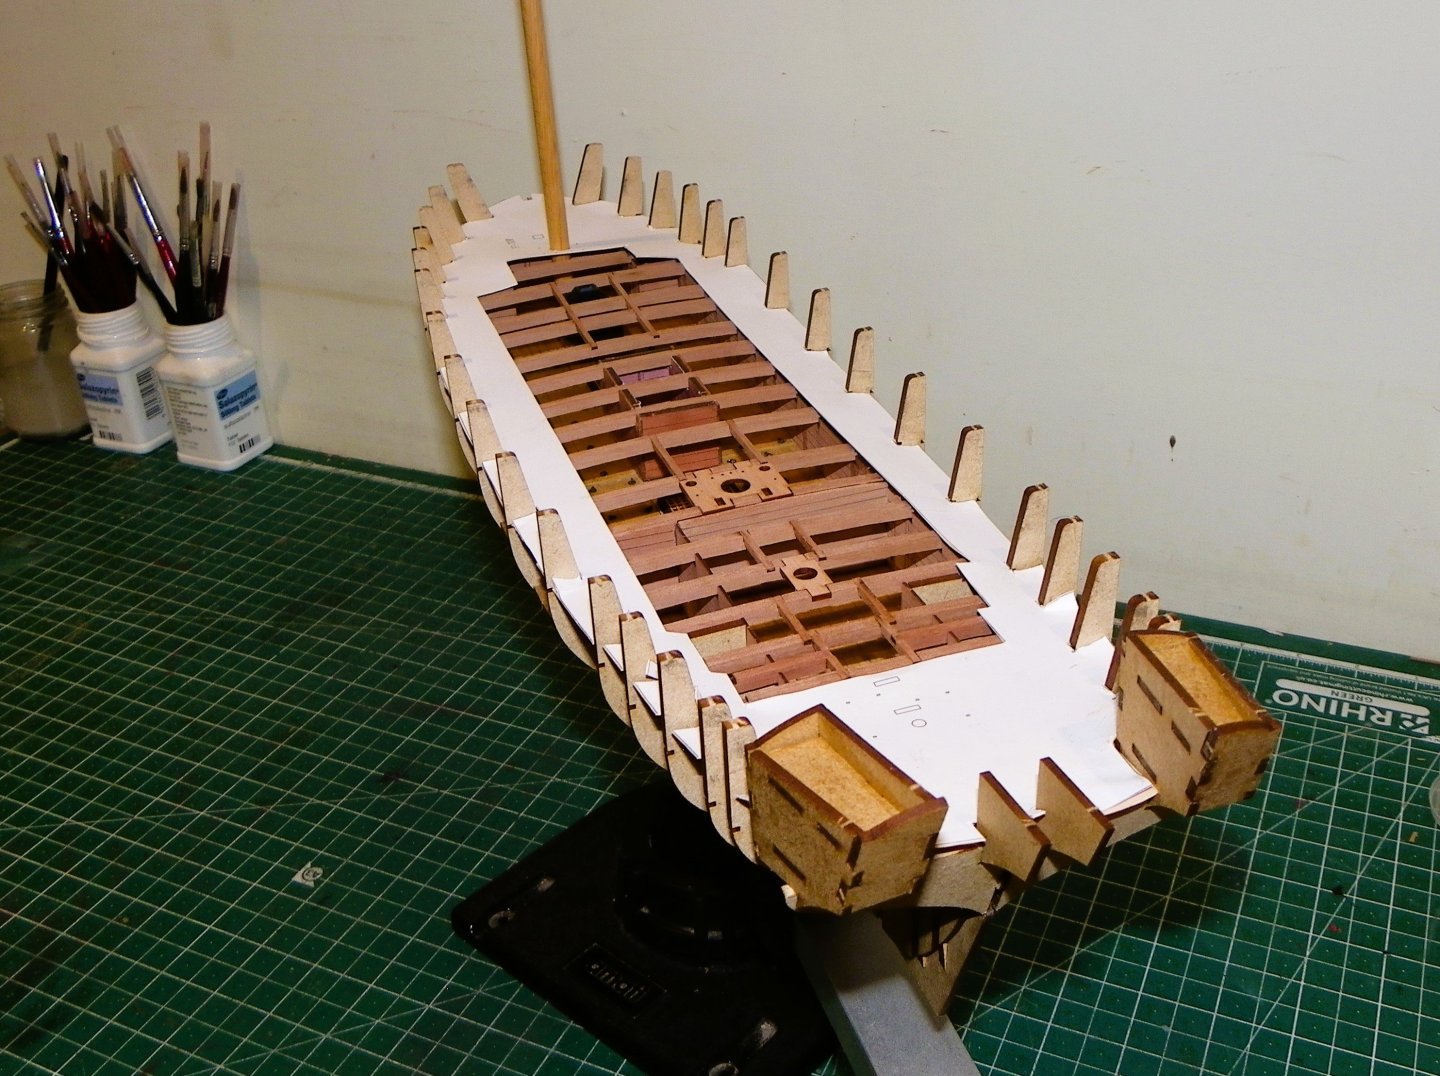
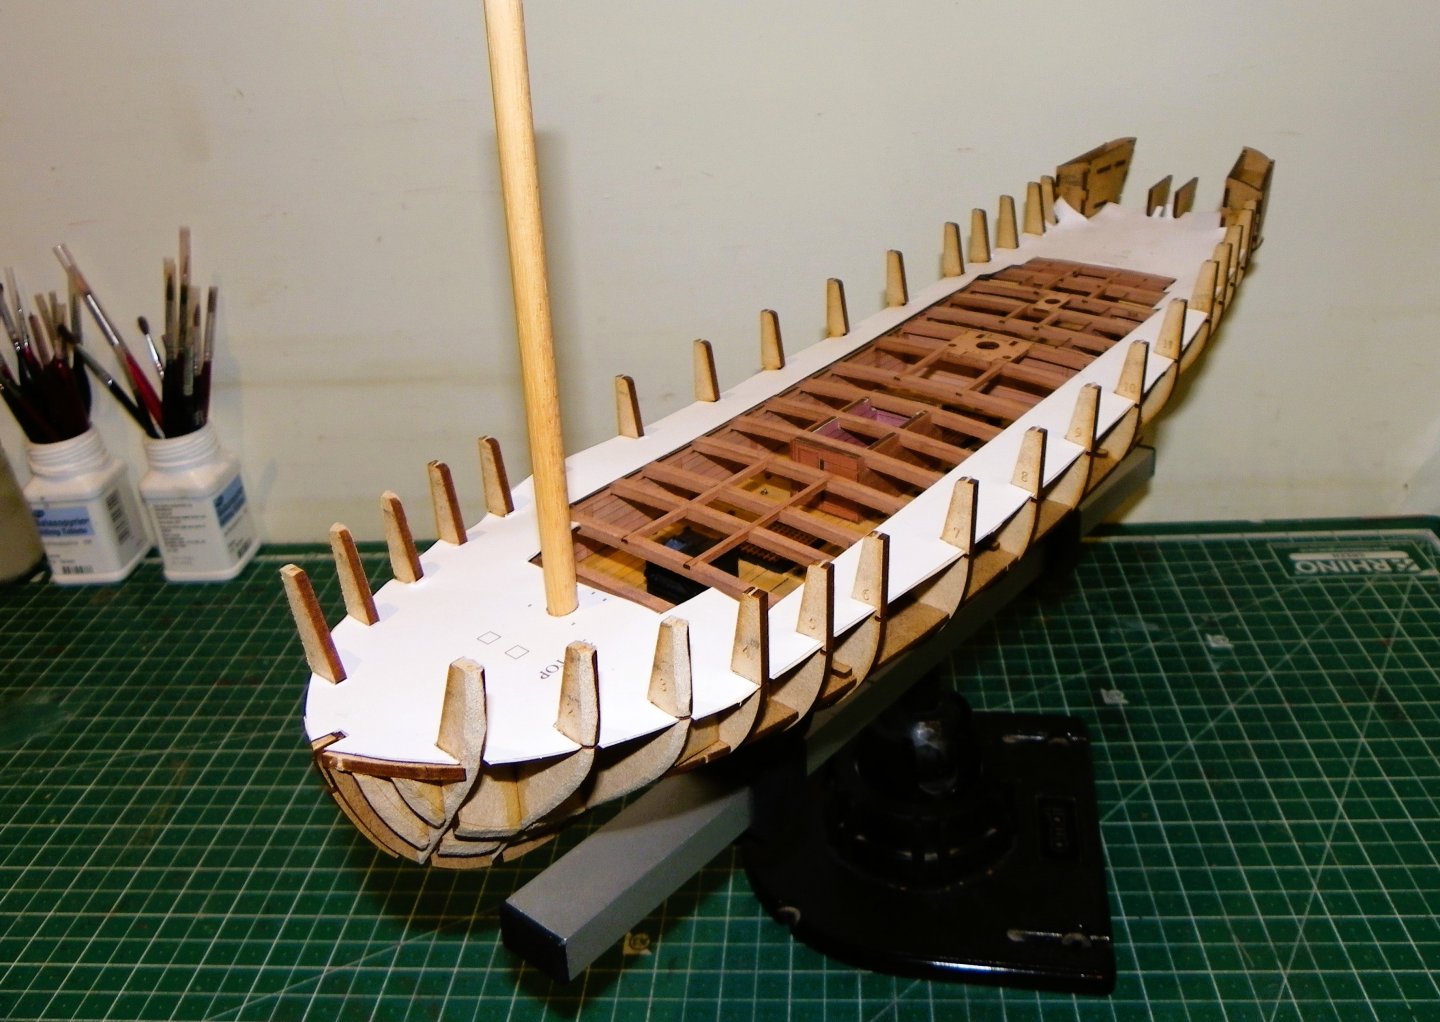
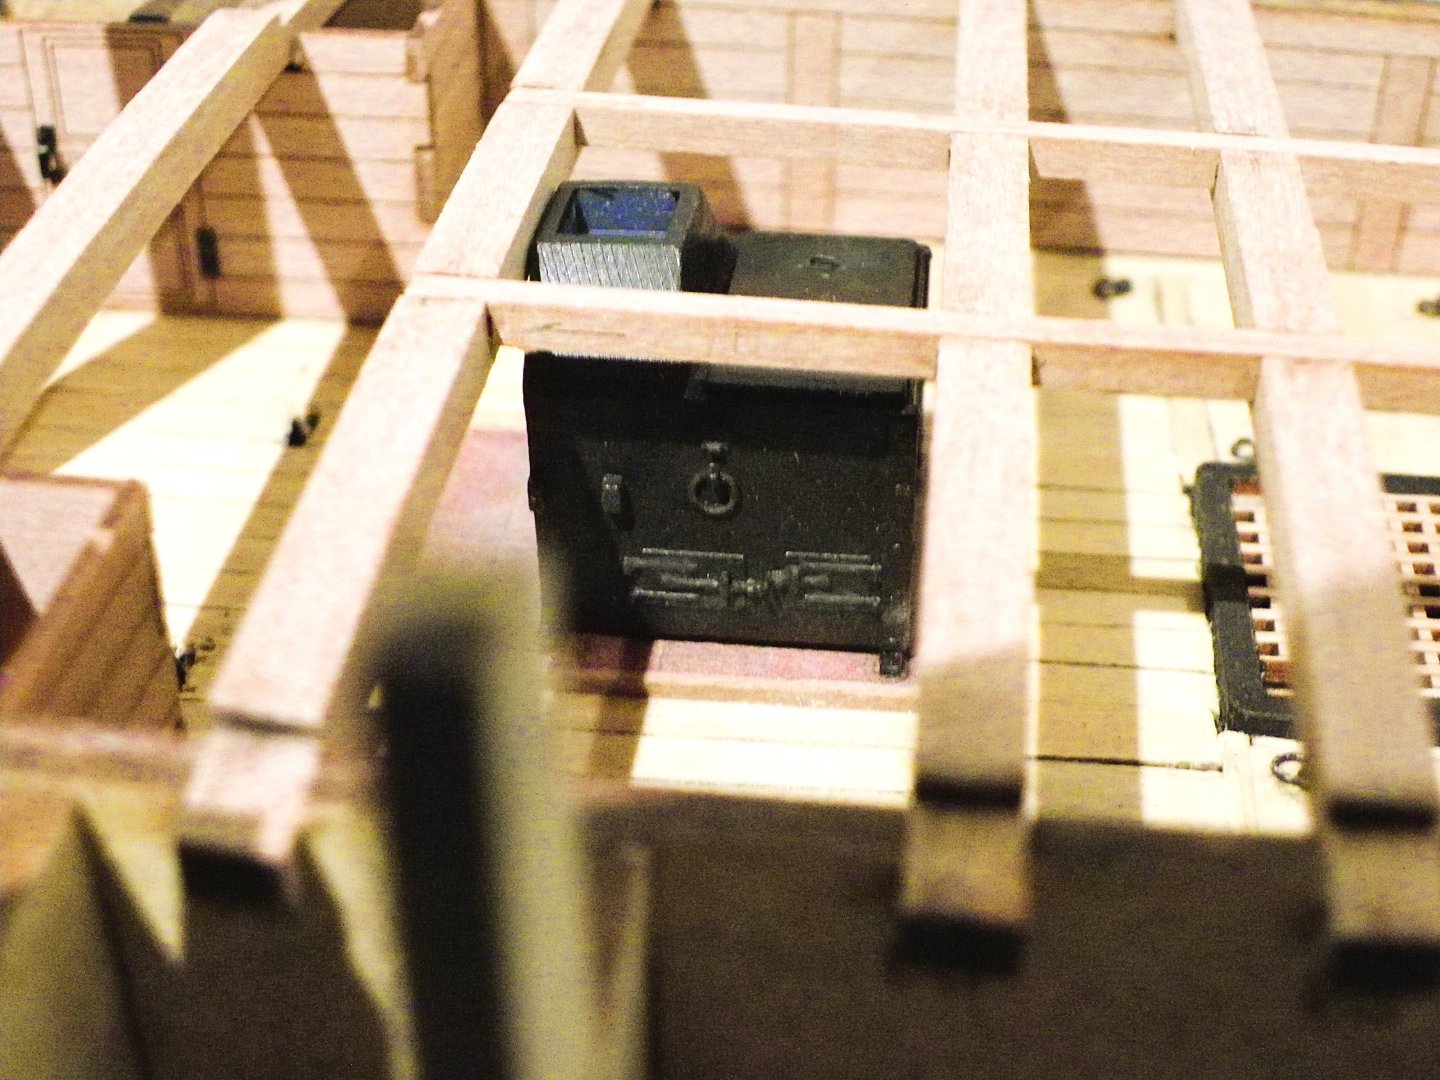
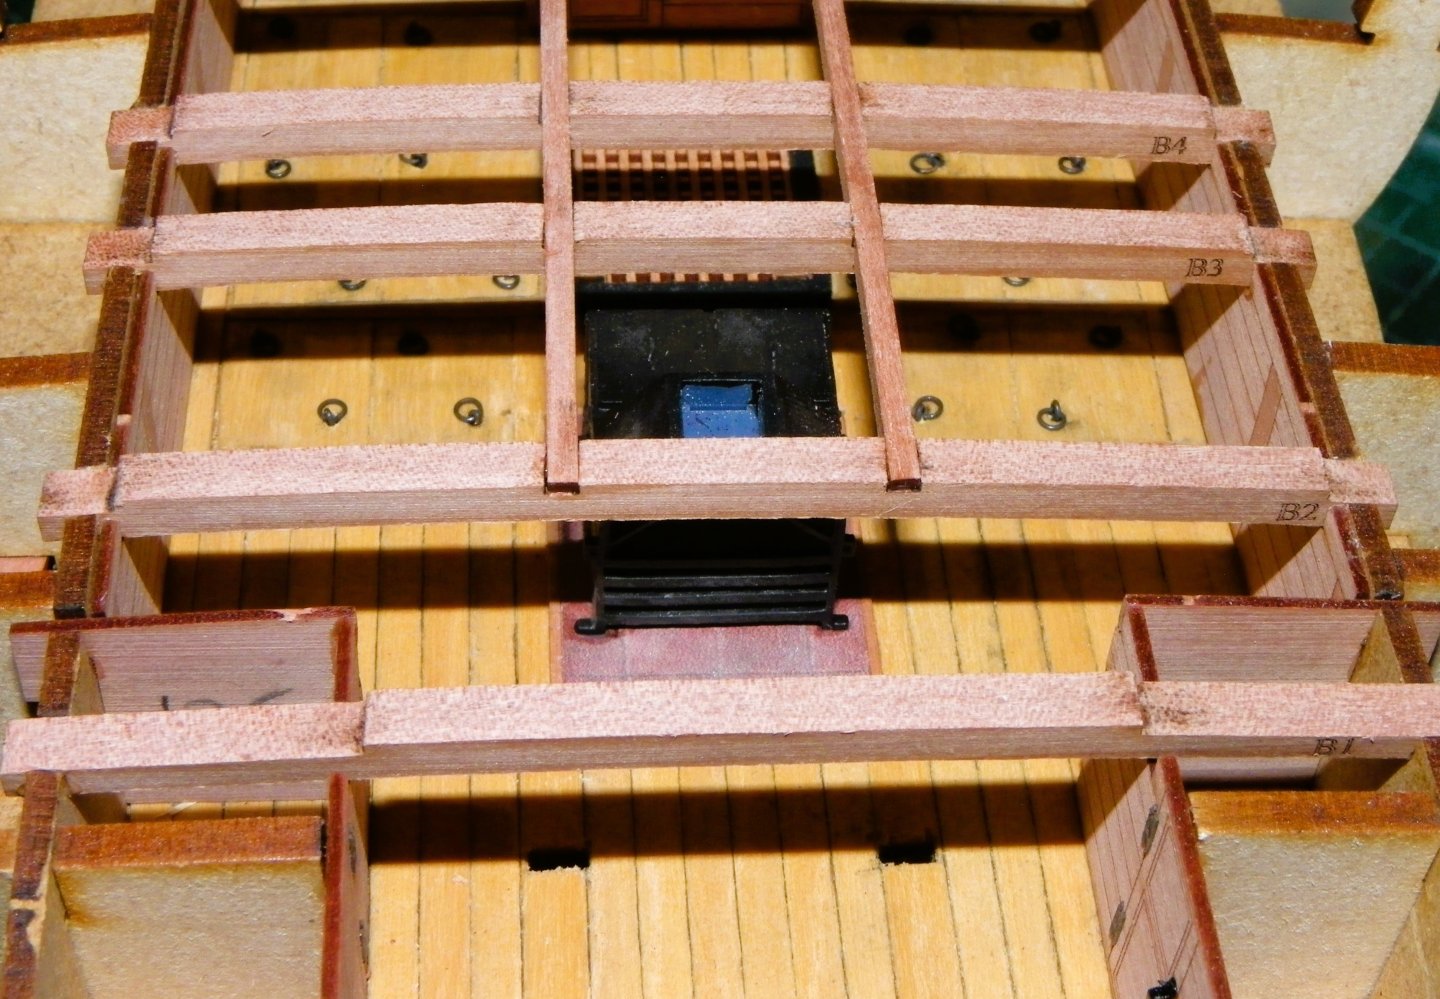
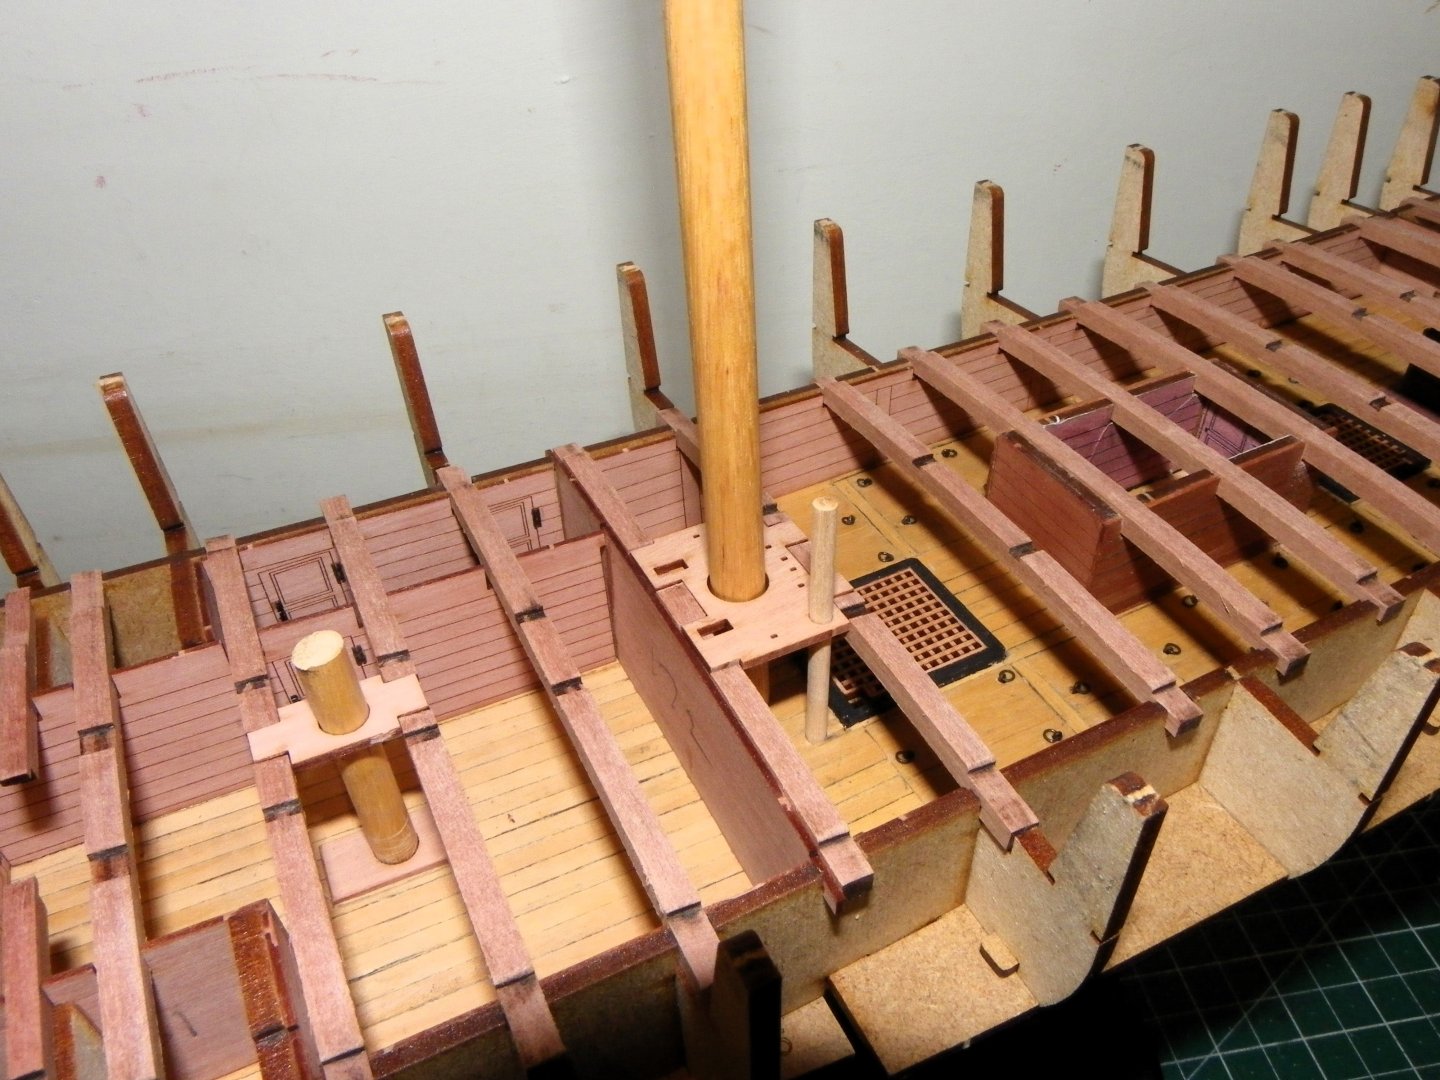
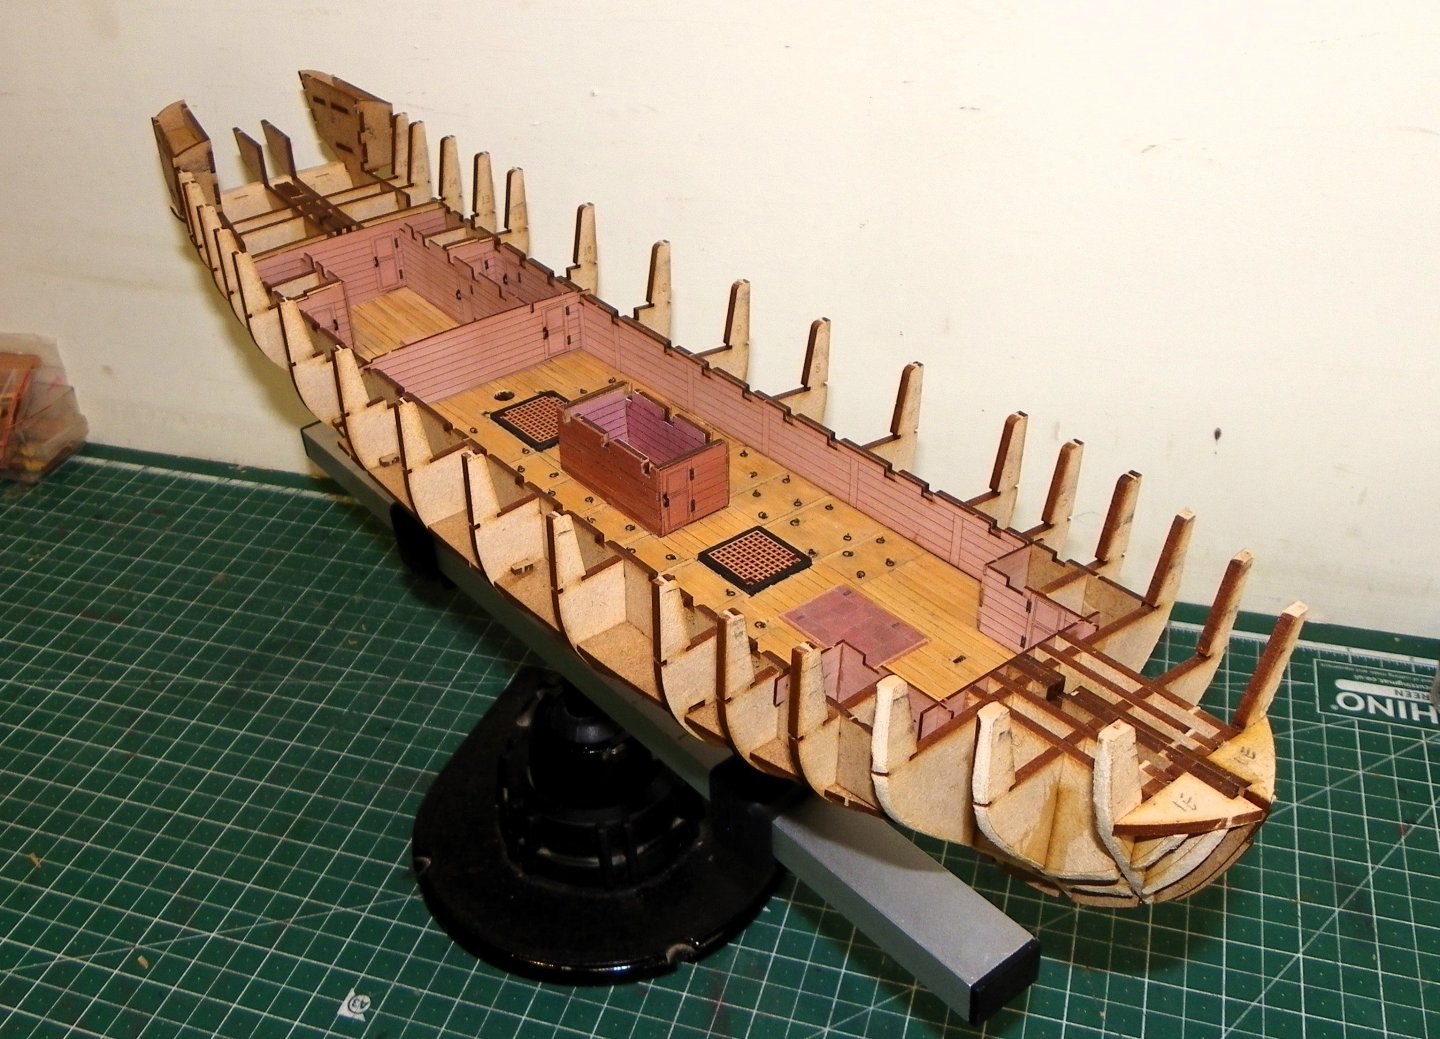
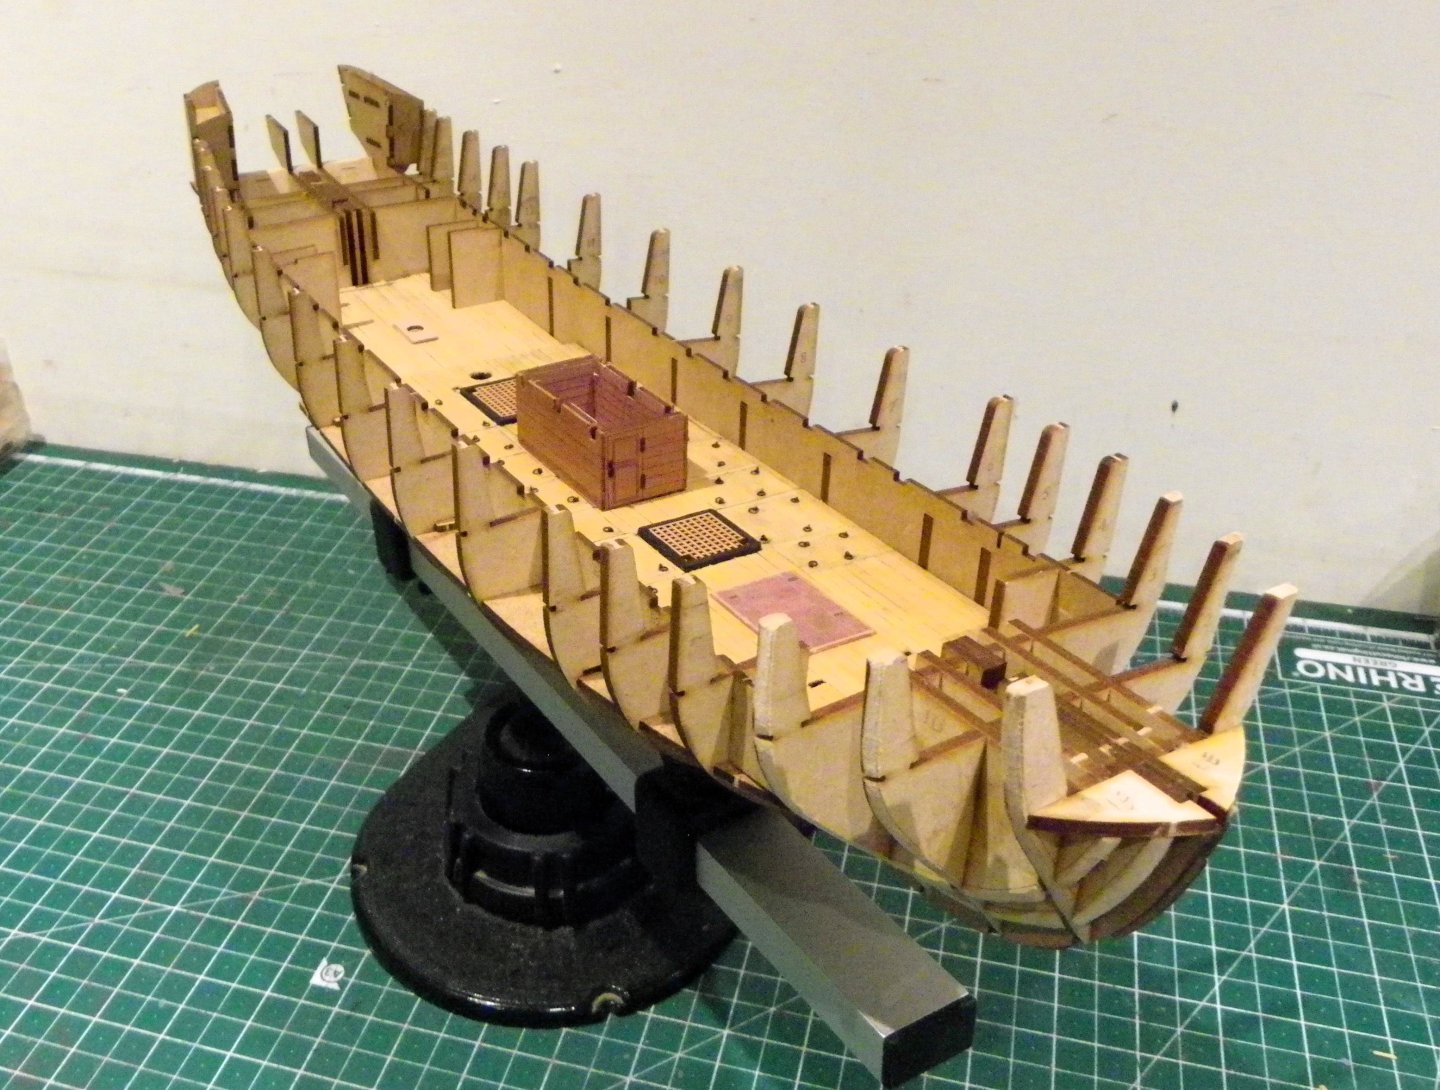
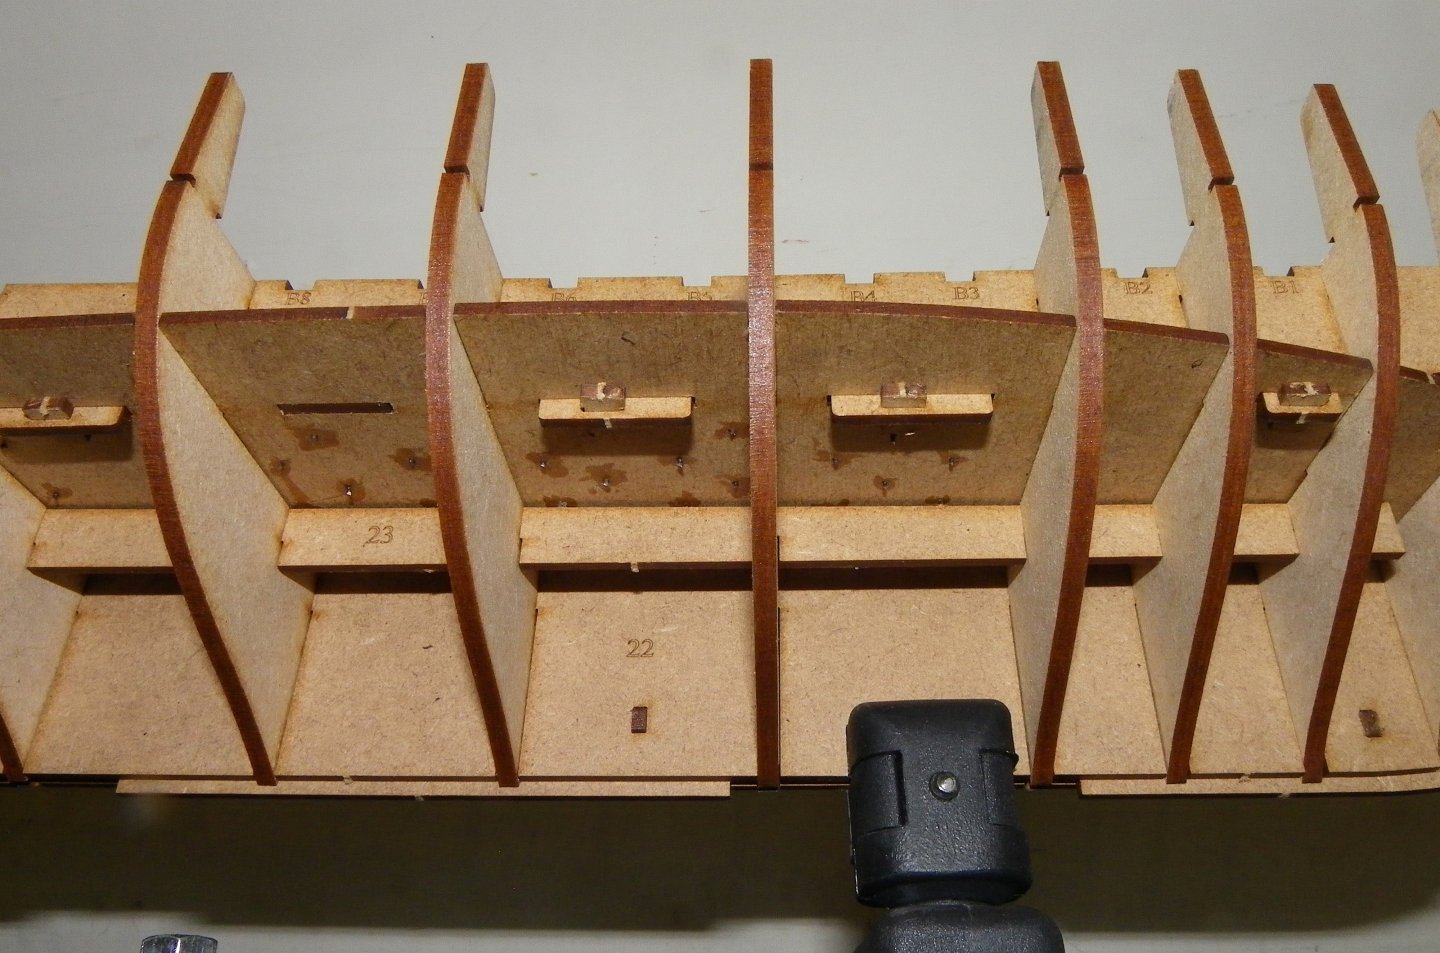
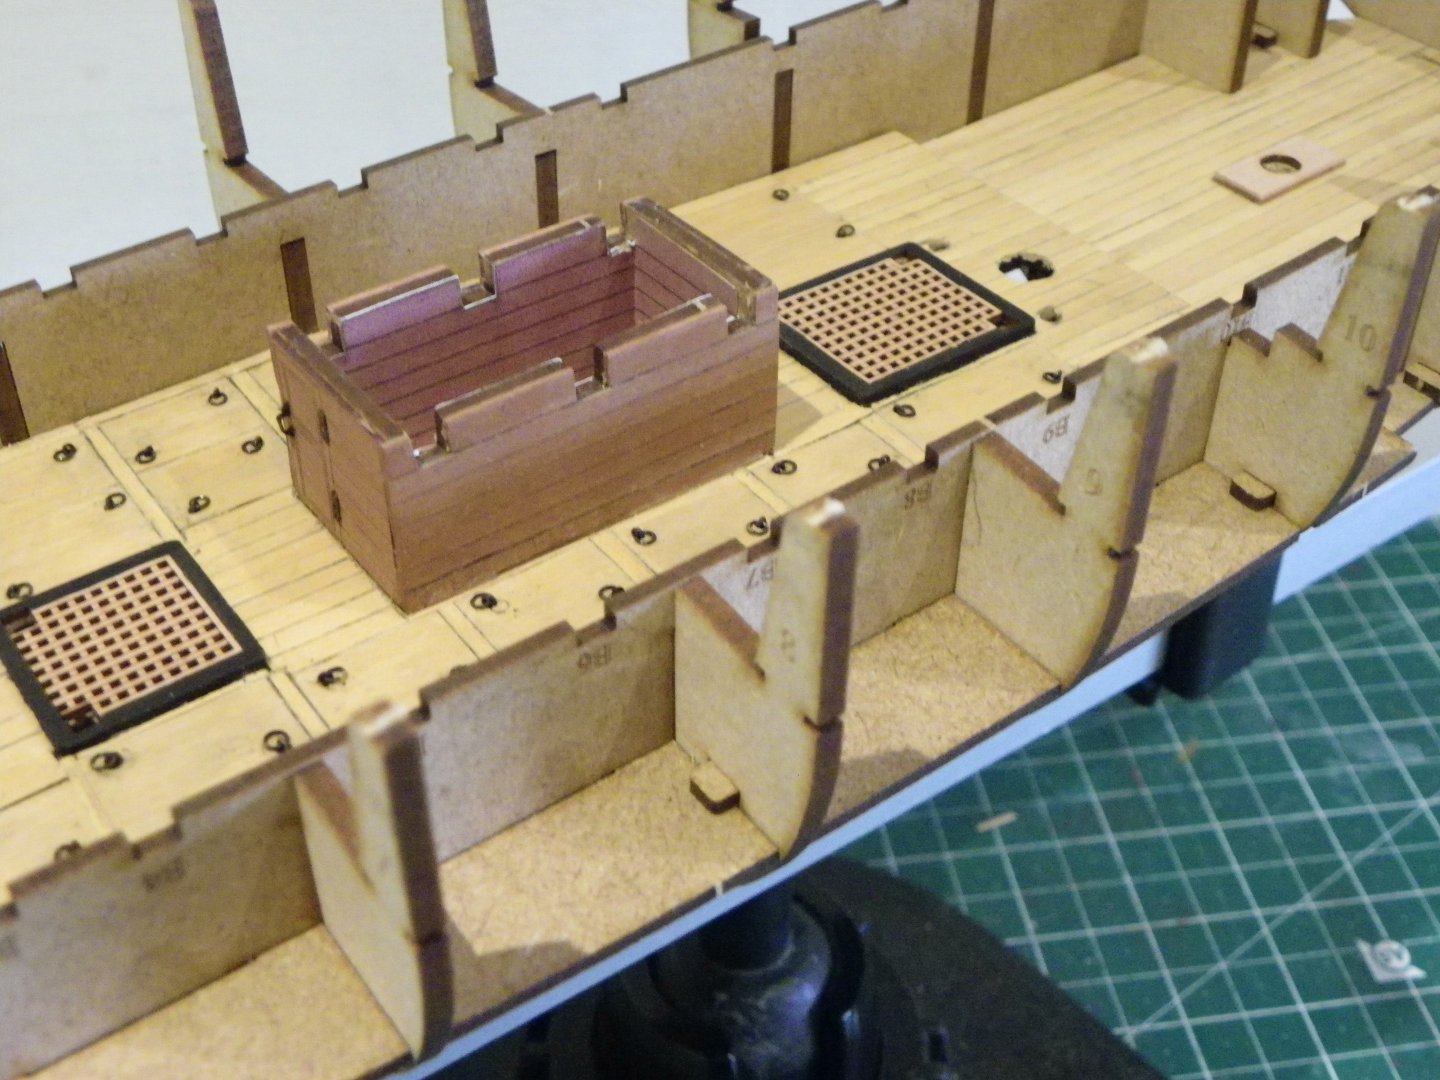
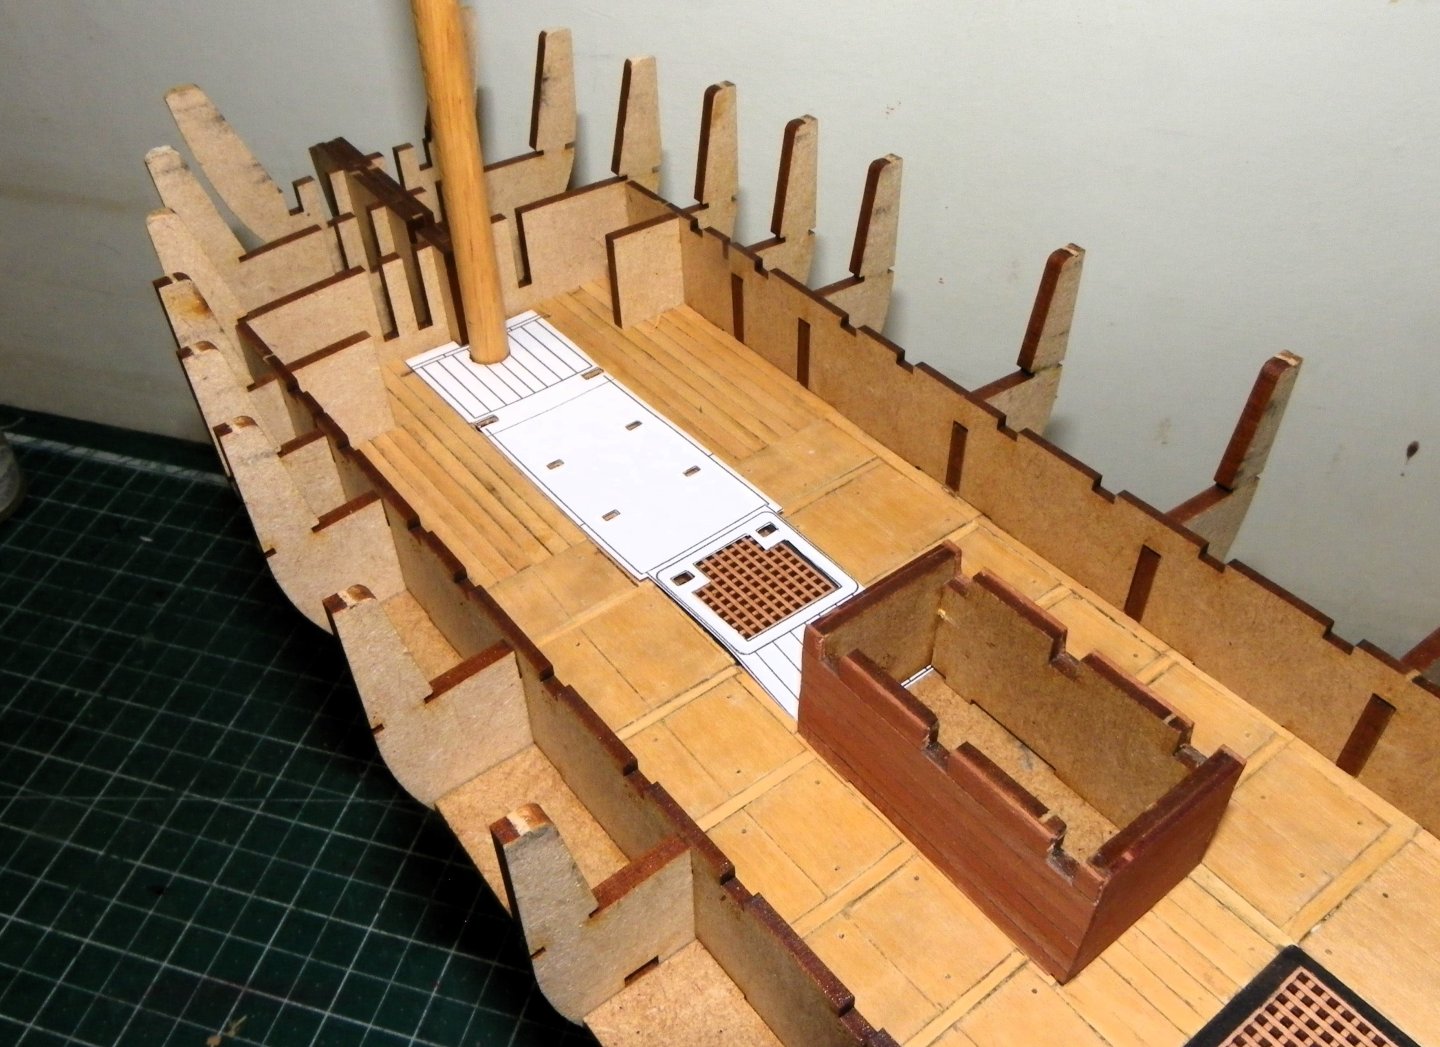
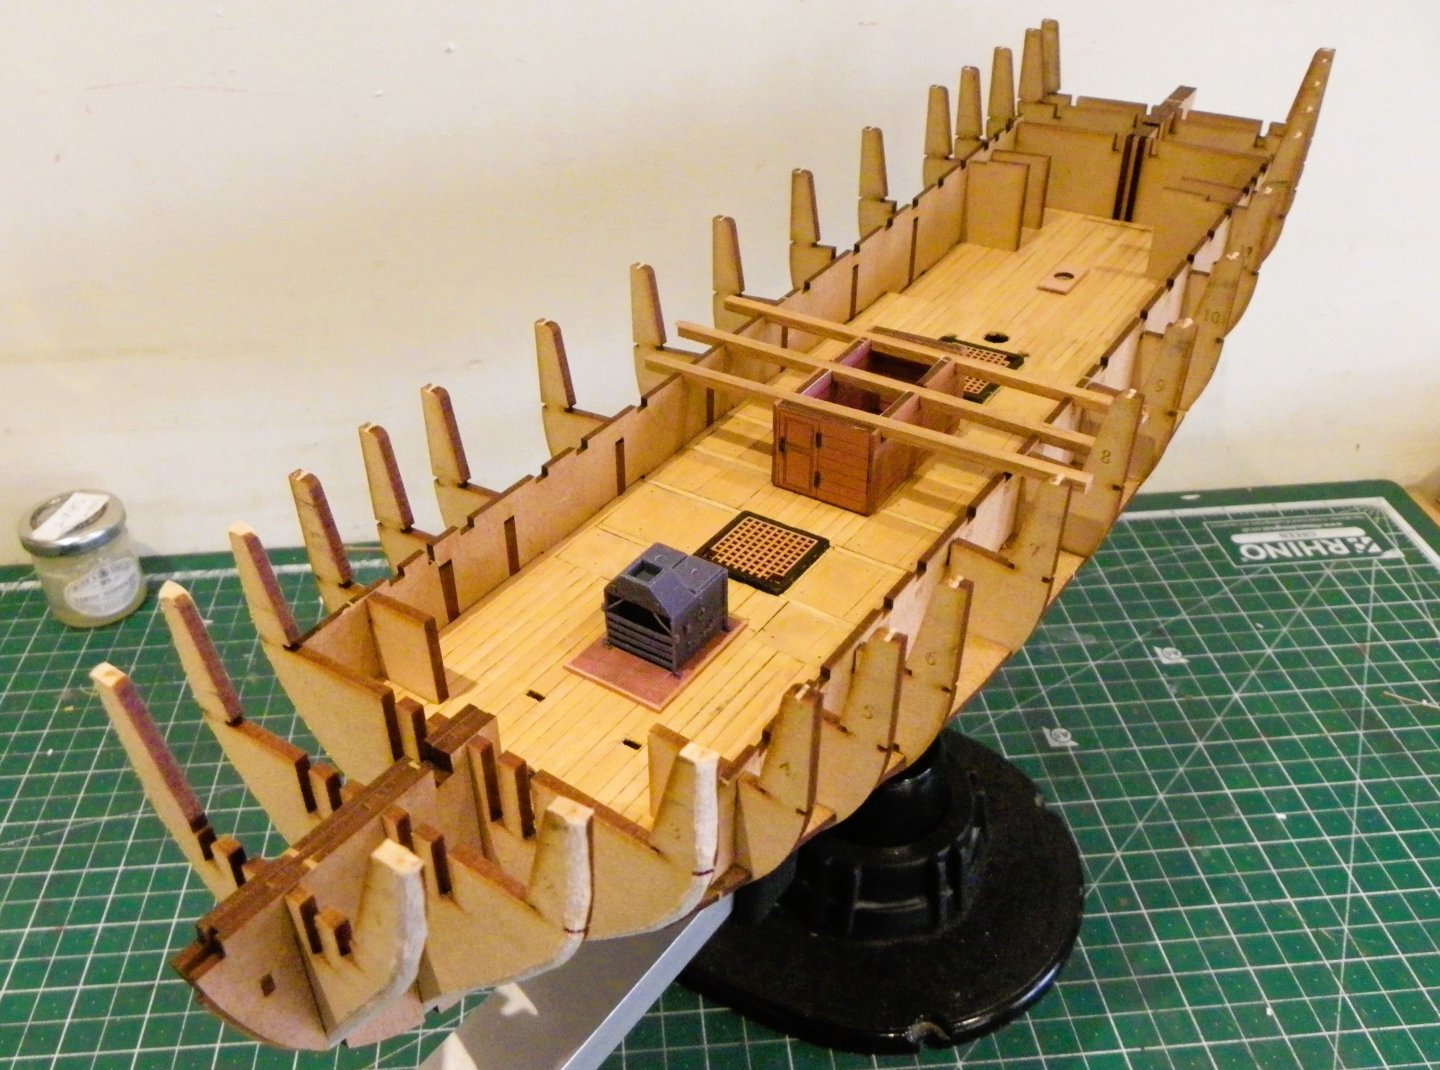
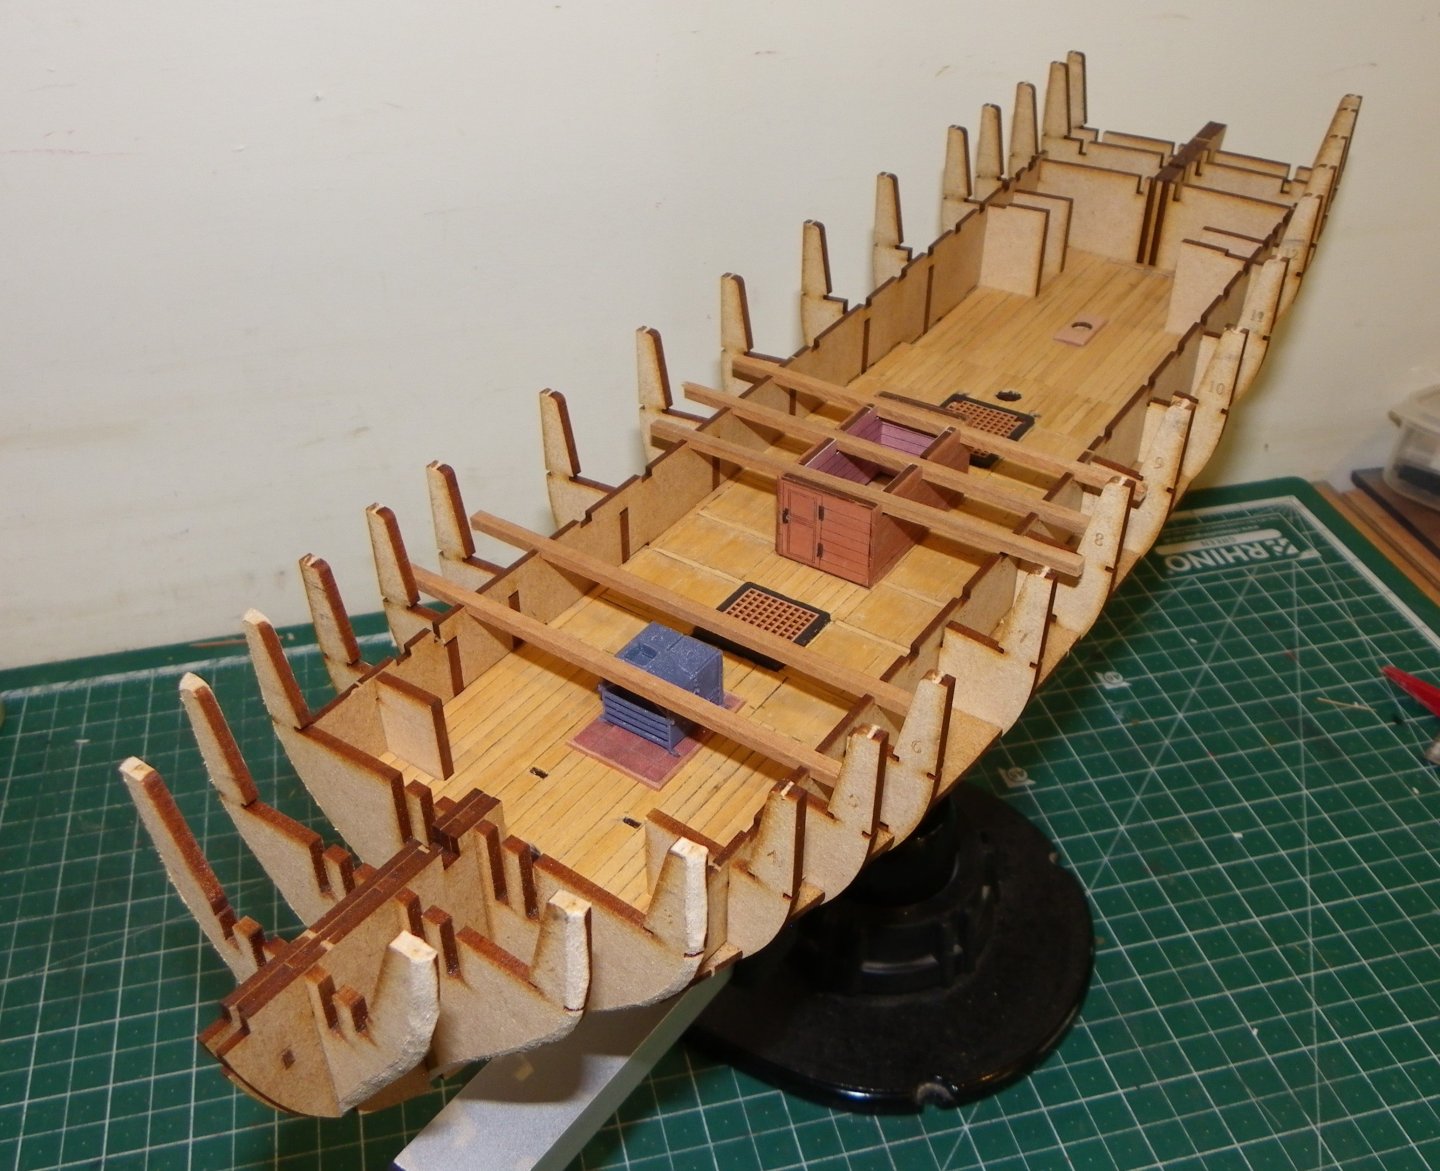
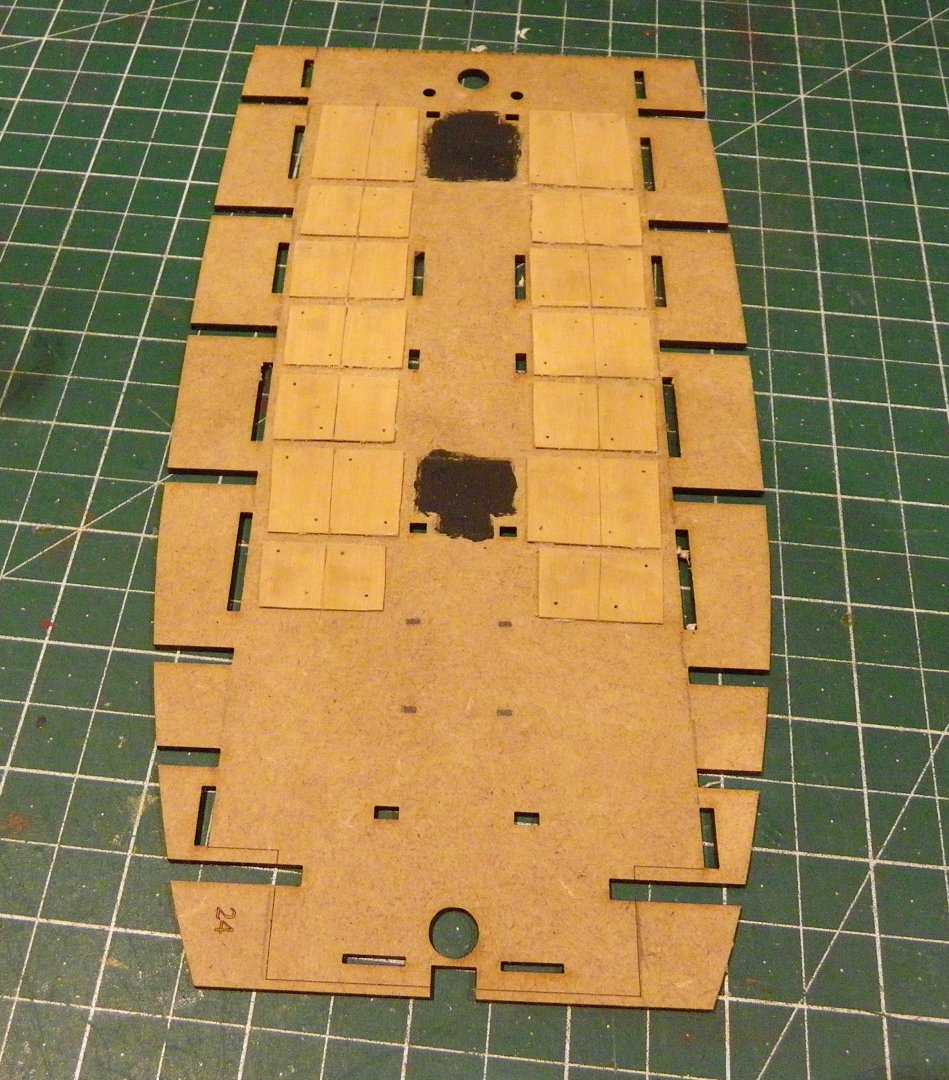
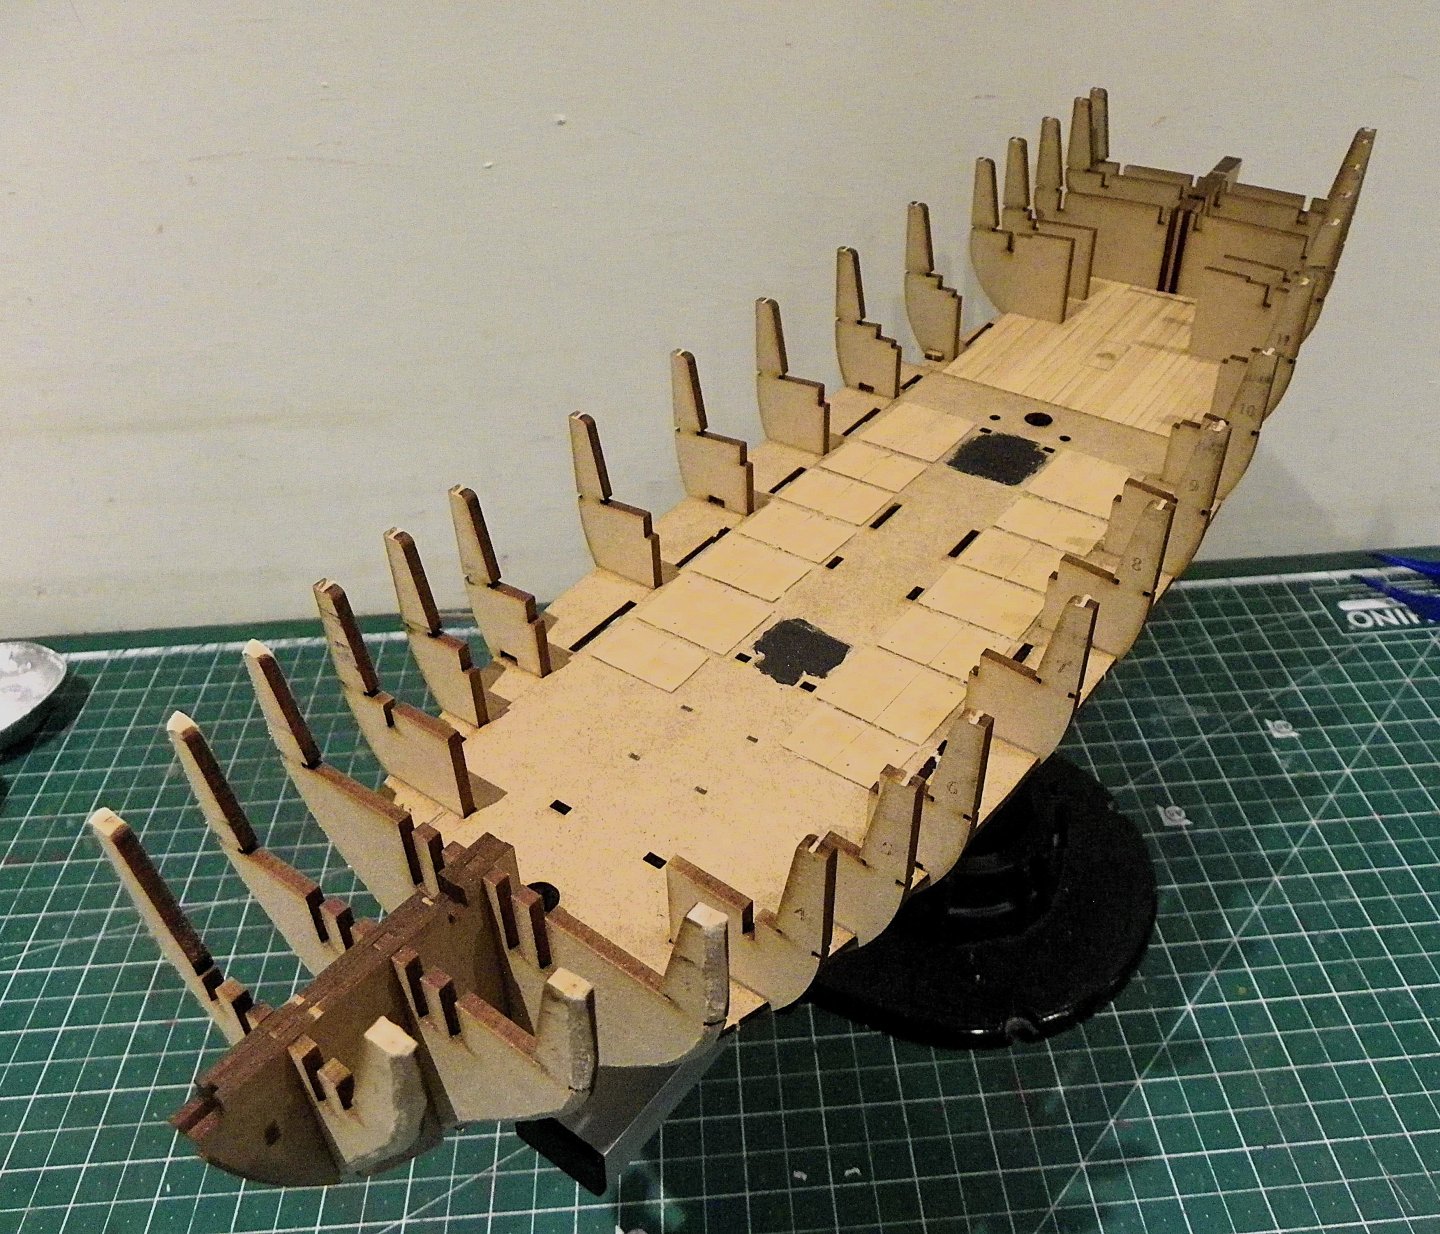
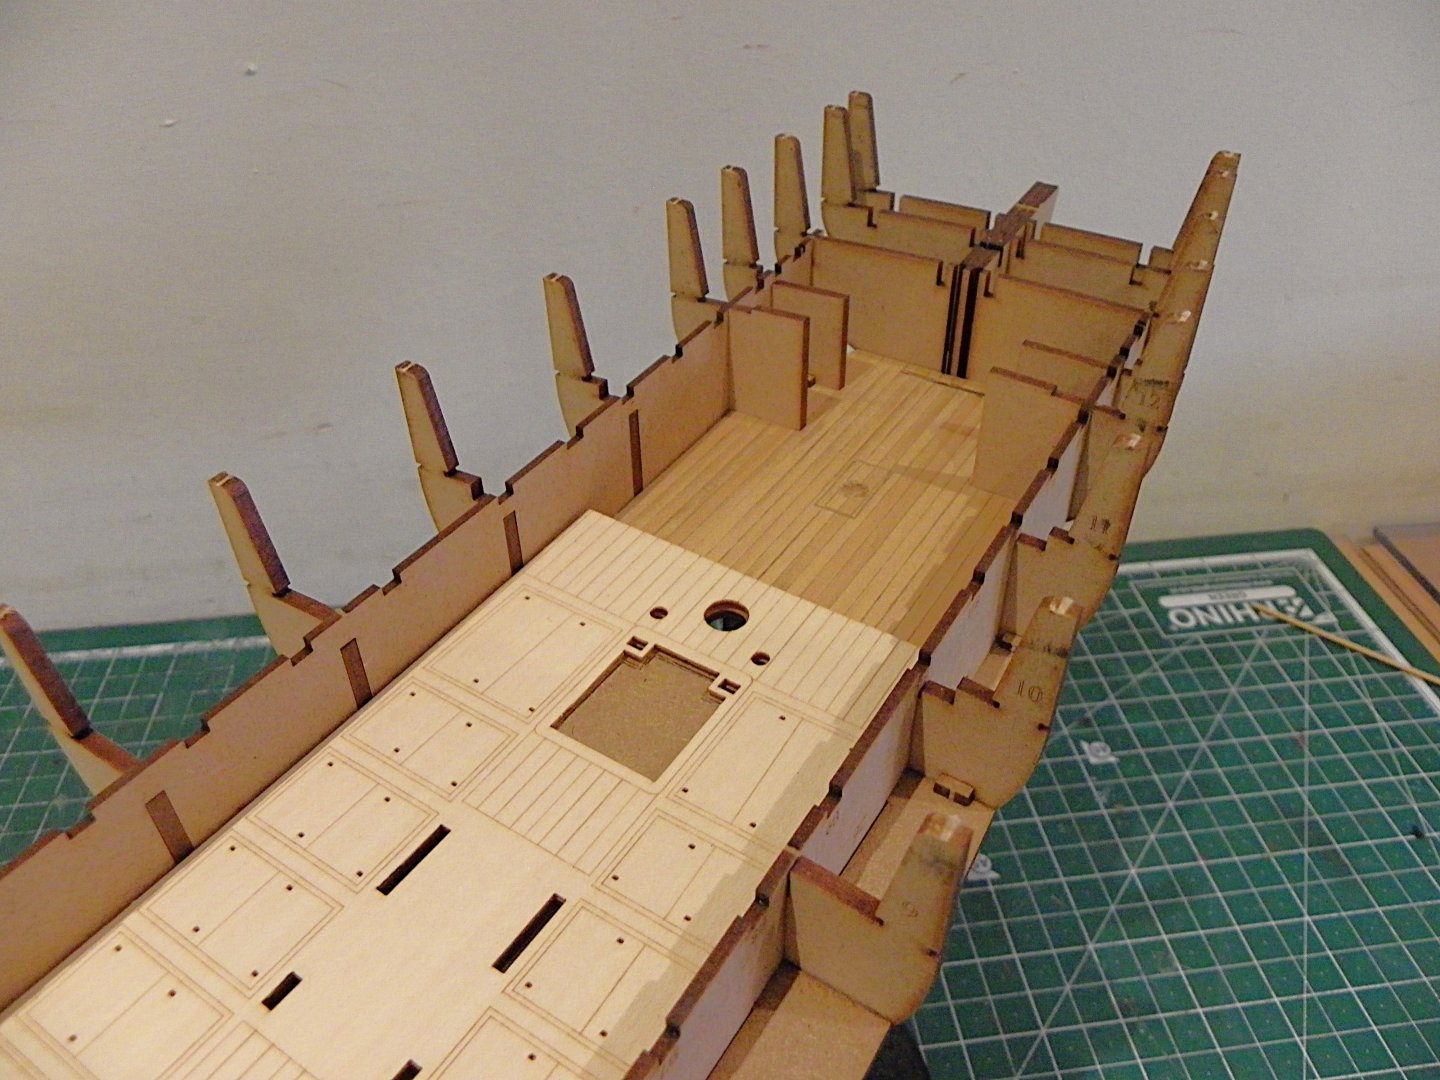
Post 9 Completing the deck beams. Adding the carlings completes this stage of construction. Preliminary to this I took the precaution of planking the inner faces of some of the aft partitions, as I don’t know at this stage how much may be seen. 0220 0221 The fit of the deck beams is very precise, a joy to work with, and how good to see nicely laid out scale beams, a tribute to Chris’s design skills. Note: the Stove needs to be fixed in place before the Carlings that support the Upper deck grating are added. 0207 This is a neat little resin item engraved with all the major features one would expect to find. 0212 I painted the stove with Vallejo Black, highlighted with Black/Grey. A light touch of weathering powders was then applied. 0217 Not a very clear view of the stove will be possible, but I will seek to maximise it. 0206 I do like to open up the lower deck to reveal as much as possible, but there is a trade-off with the Upper deck detail which has to take precedence. 0204 I think Harpy will prove trickier than Indy to get the effect I am looking for. The next stage is playing around with the deck pieces to get a feel for the planking layout. B.E. 22/12/2024


- 332 replies
-
- 27
-
-
- Harpy
- Vanguard Models
- (and 1 more)
-
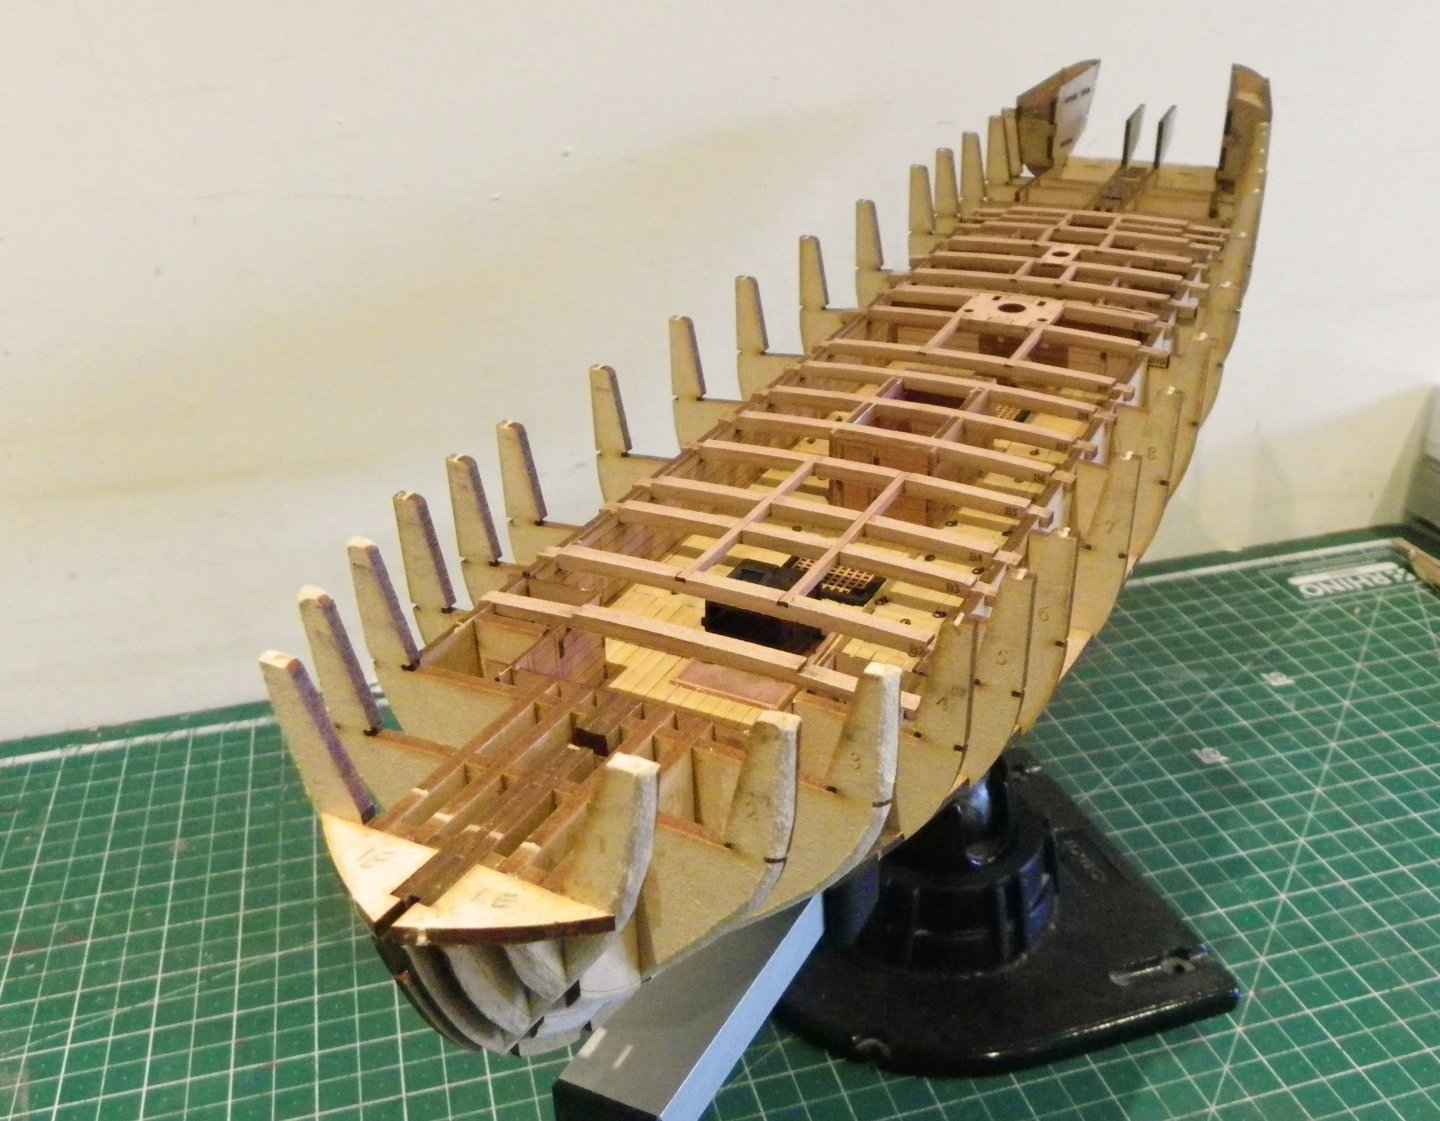
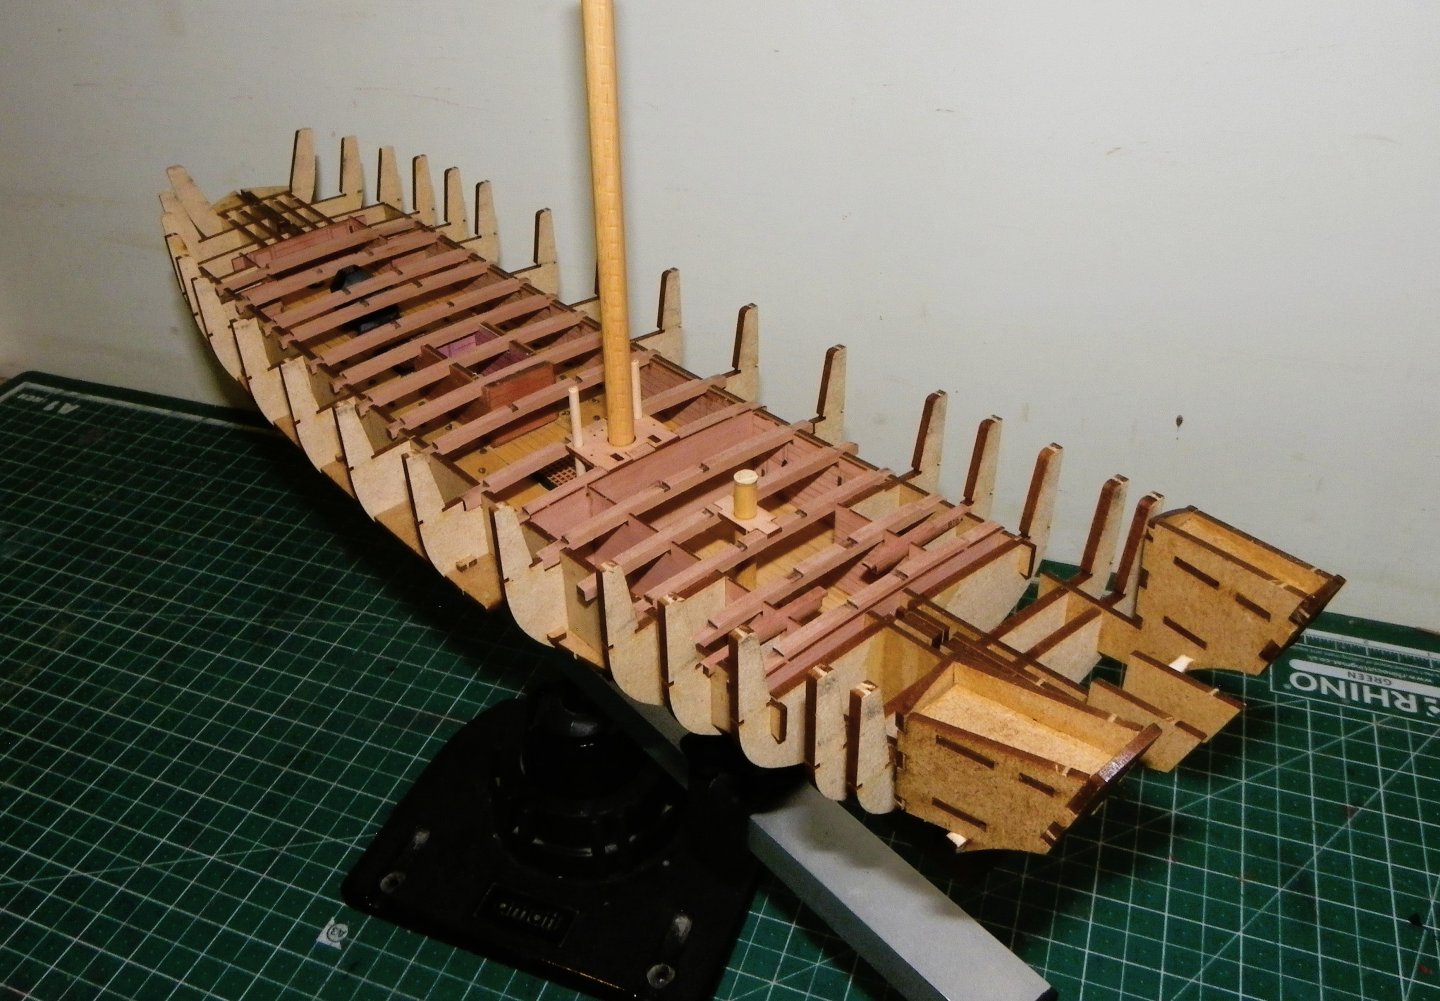
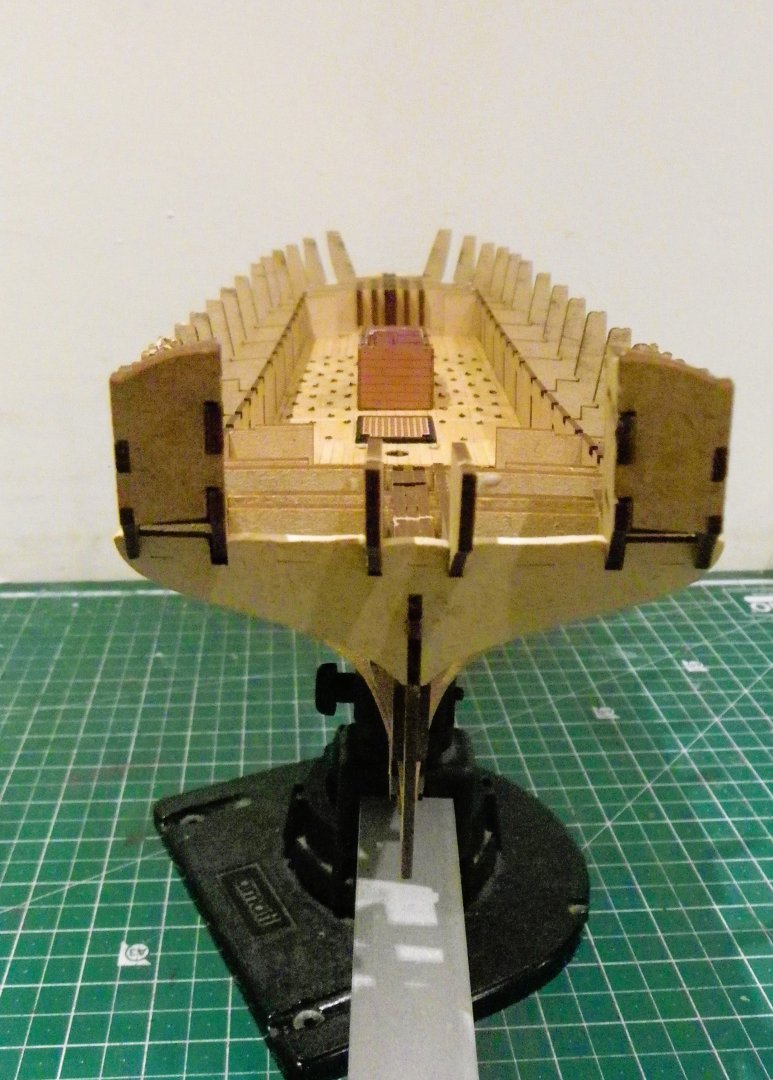
Post 8 Deck beams The next stage in this build is fitting the upper deck beams. There are 17 correctly scaled and shaped beams covering the open areas of the ship. 0181 The beams require the usual Char removal, a job made quick and easy by use of the Proxxon Micromot tool . 0185 The beams are test fitted to ensure that they sit fully down in the pre-cut notches. Only minor tweaking of a couple of the notches was necessary to get a perfect fit. 0195 0185 It is worth dry testing the fit of the Mast and Capstan partners, and the run of the pump shafts down to the hold. 0186 0198 A few carlings yet to add. For those who may think - what about hanging knees and Lodging knees? The design of the kit precludes an opportunity or perhaps burden of including these as the beams don’t stretch to what would be the frames of the hull, an area of necessity, covered by deck planking. Moving on.. B.E 20/12/2024


- 332 replies
-
- 20
-
-
- Harpy
- Vanguard Models
- (and 1 more)
-
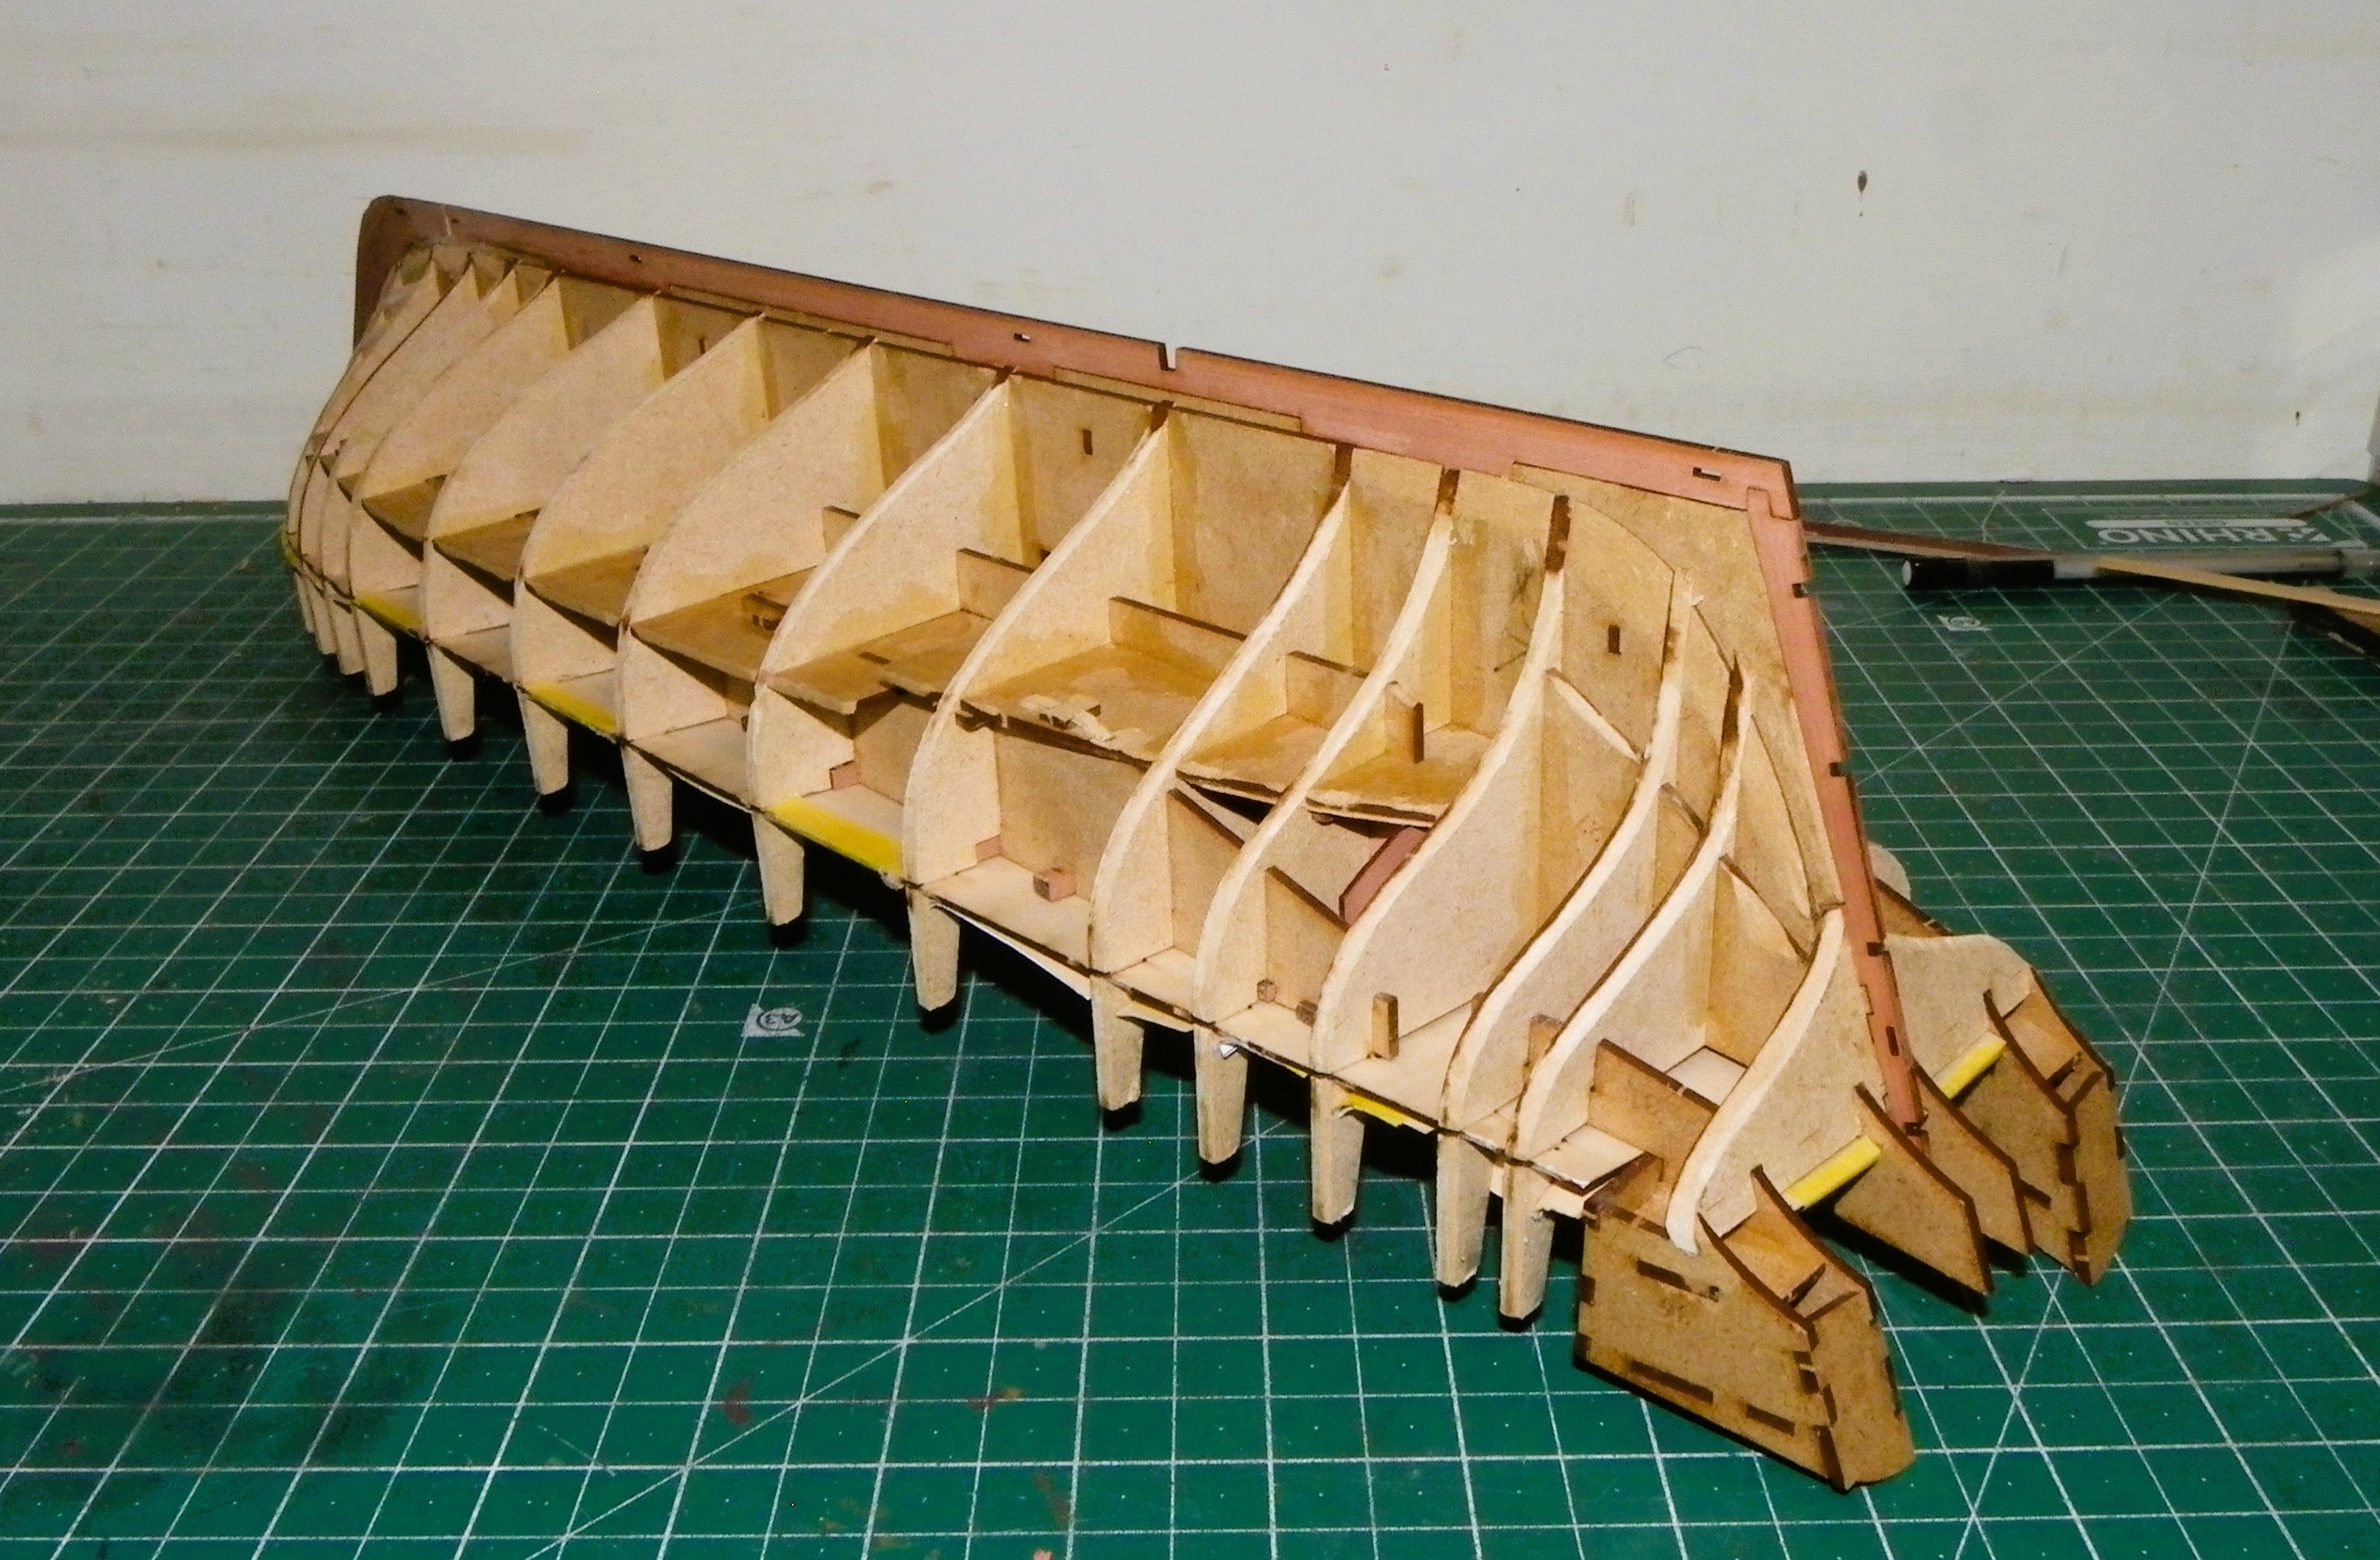
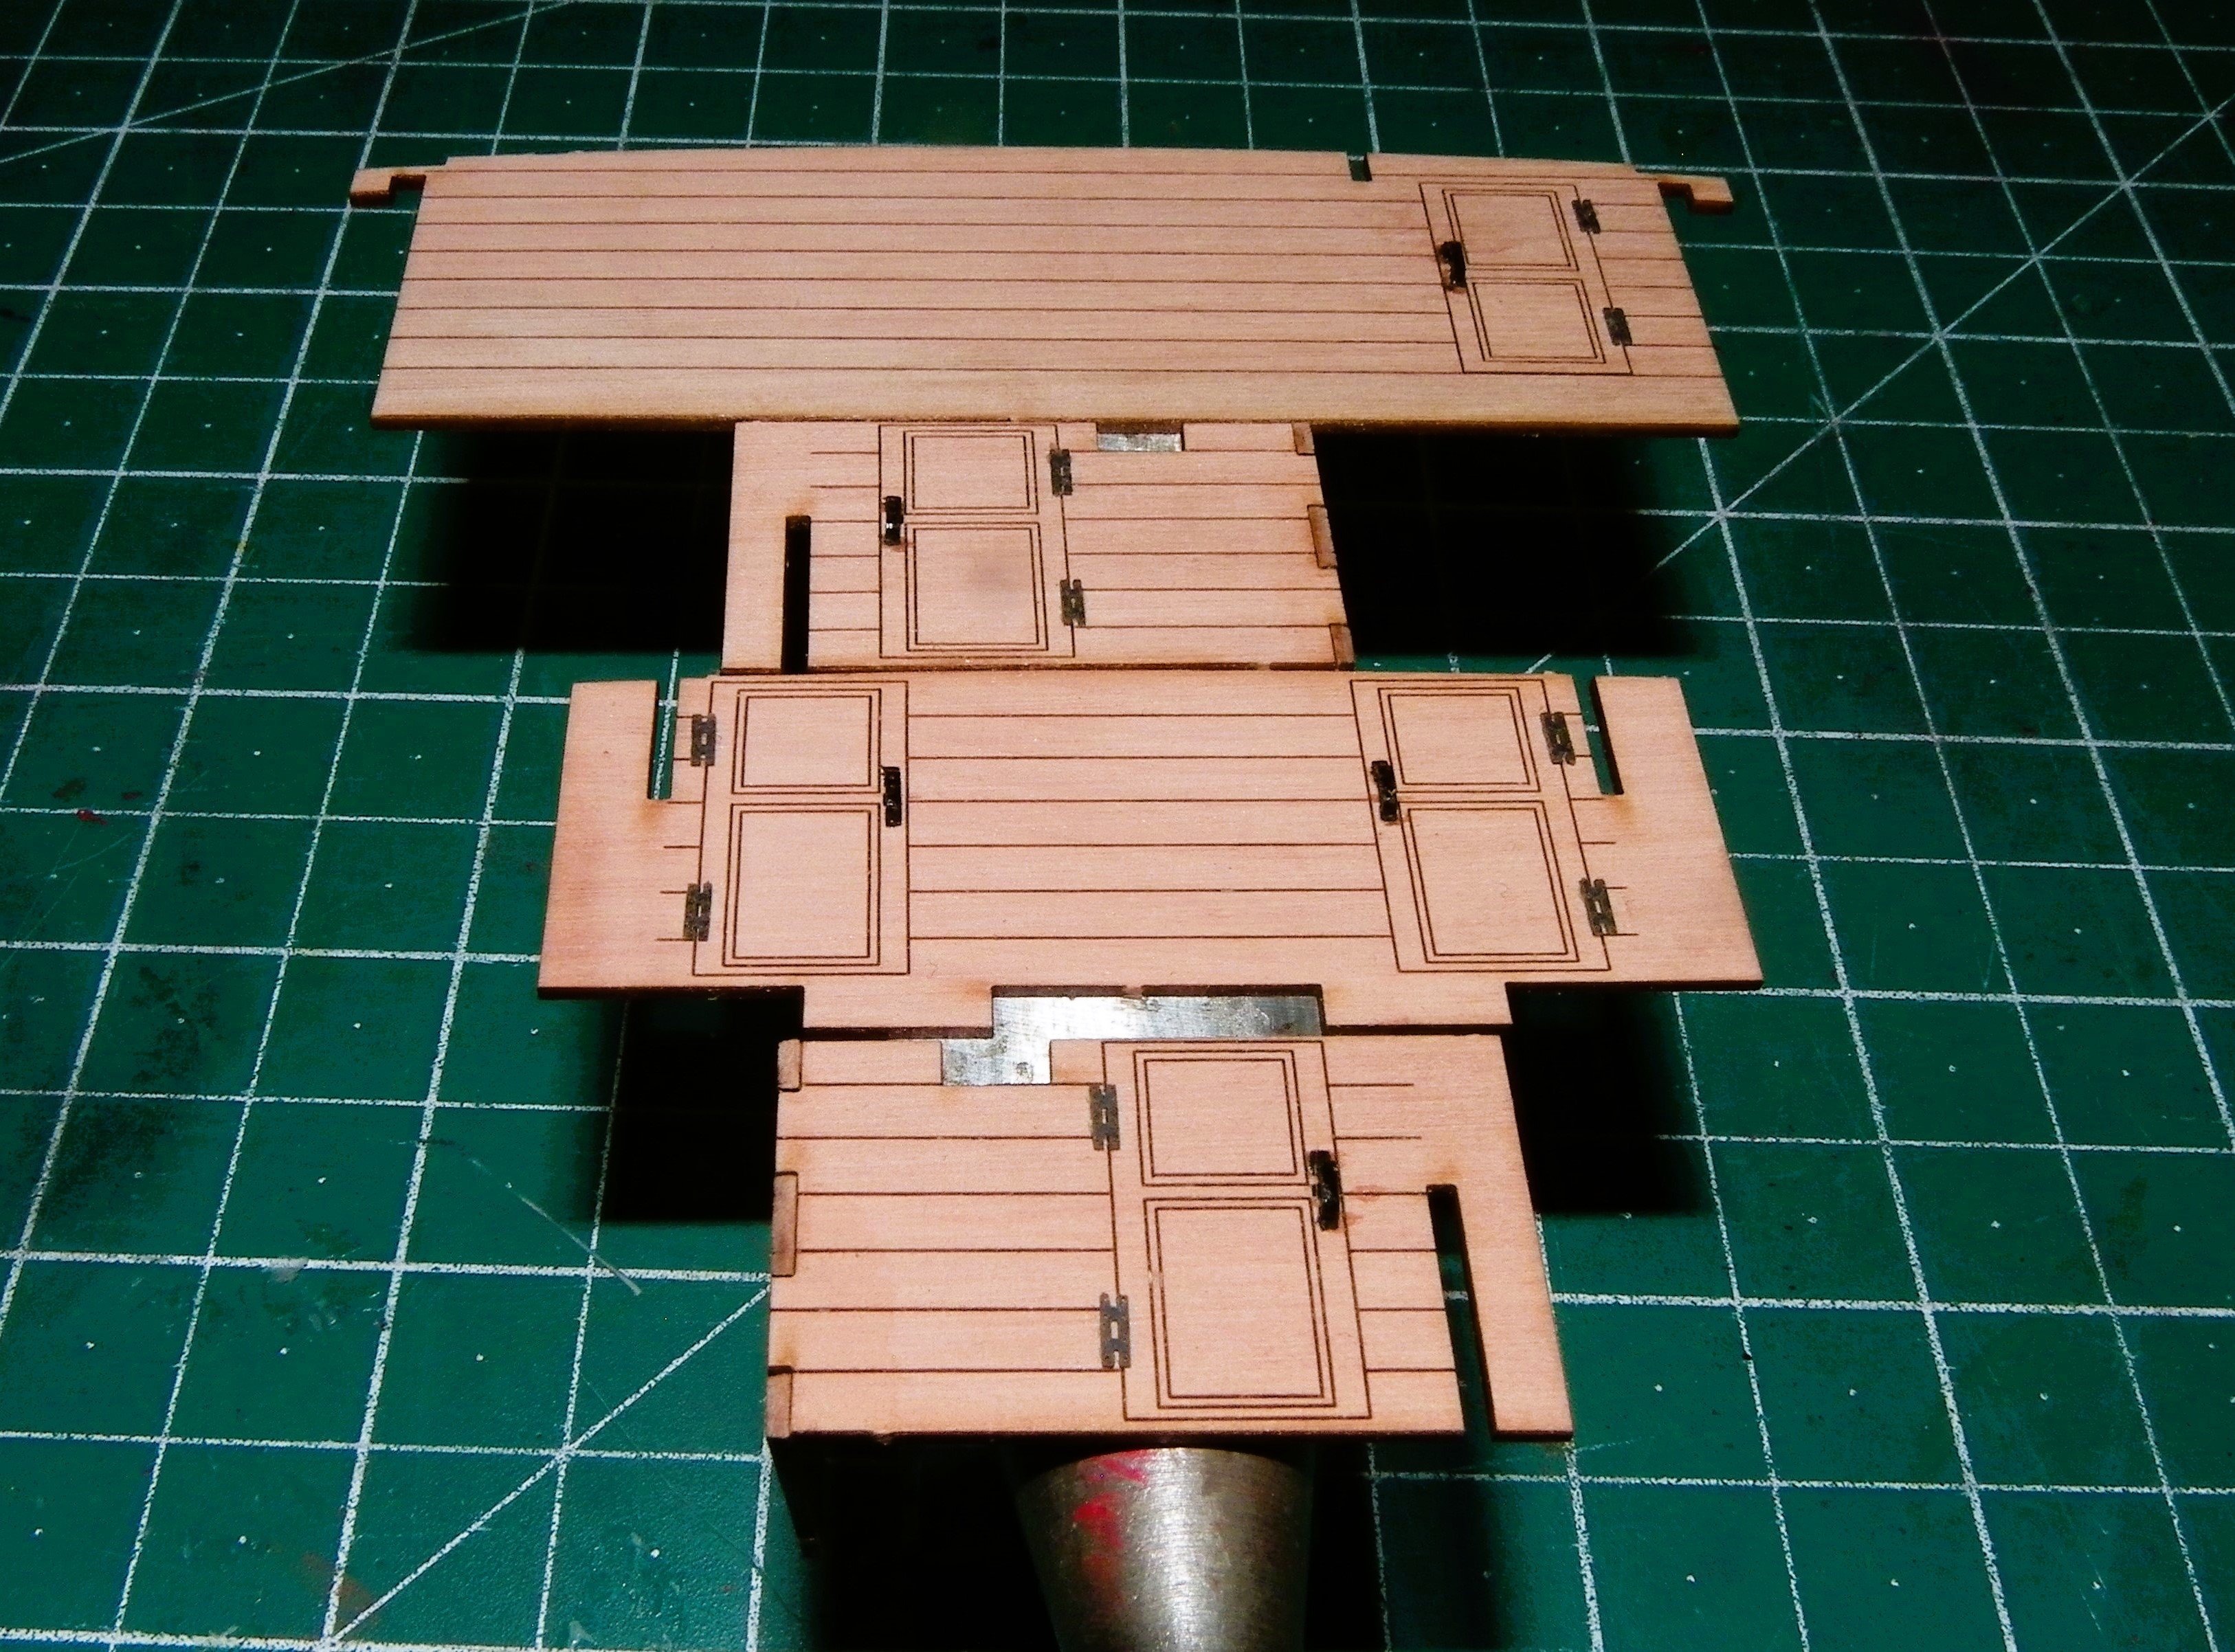
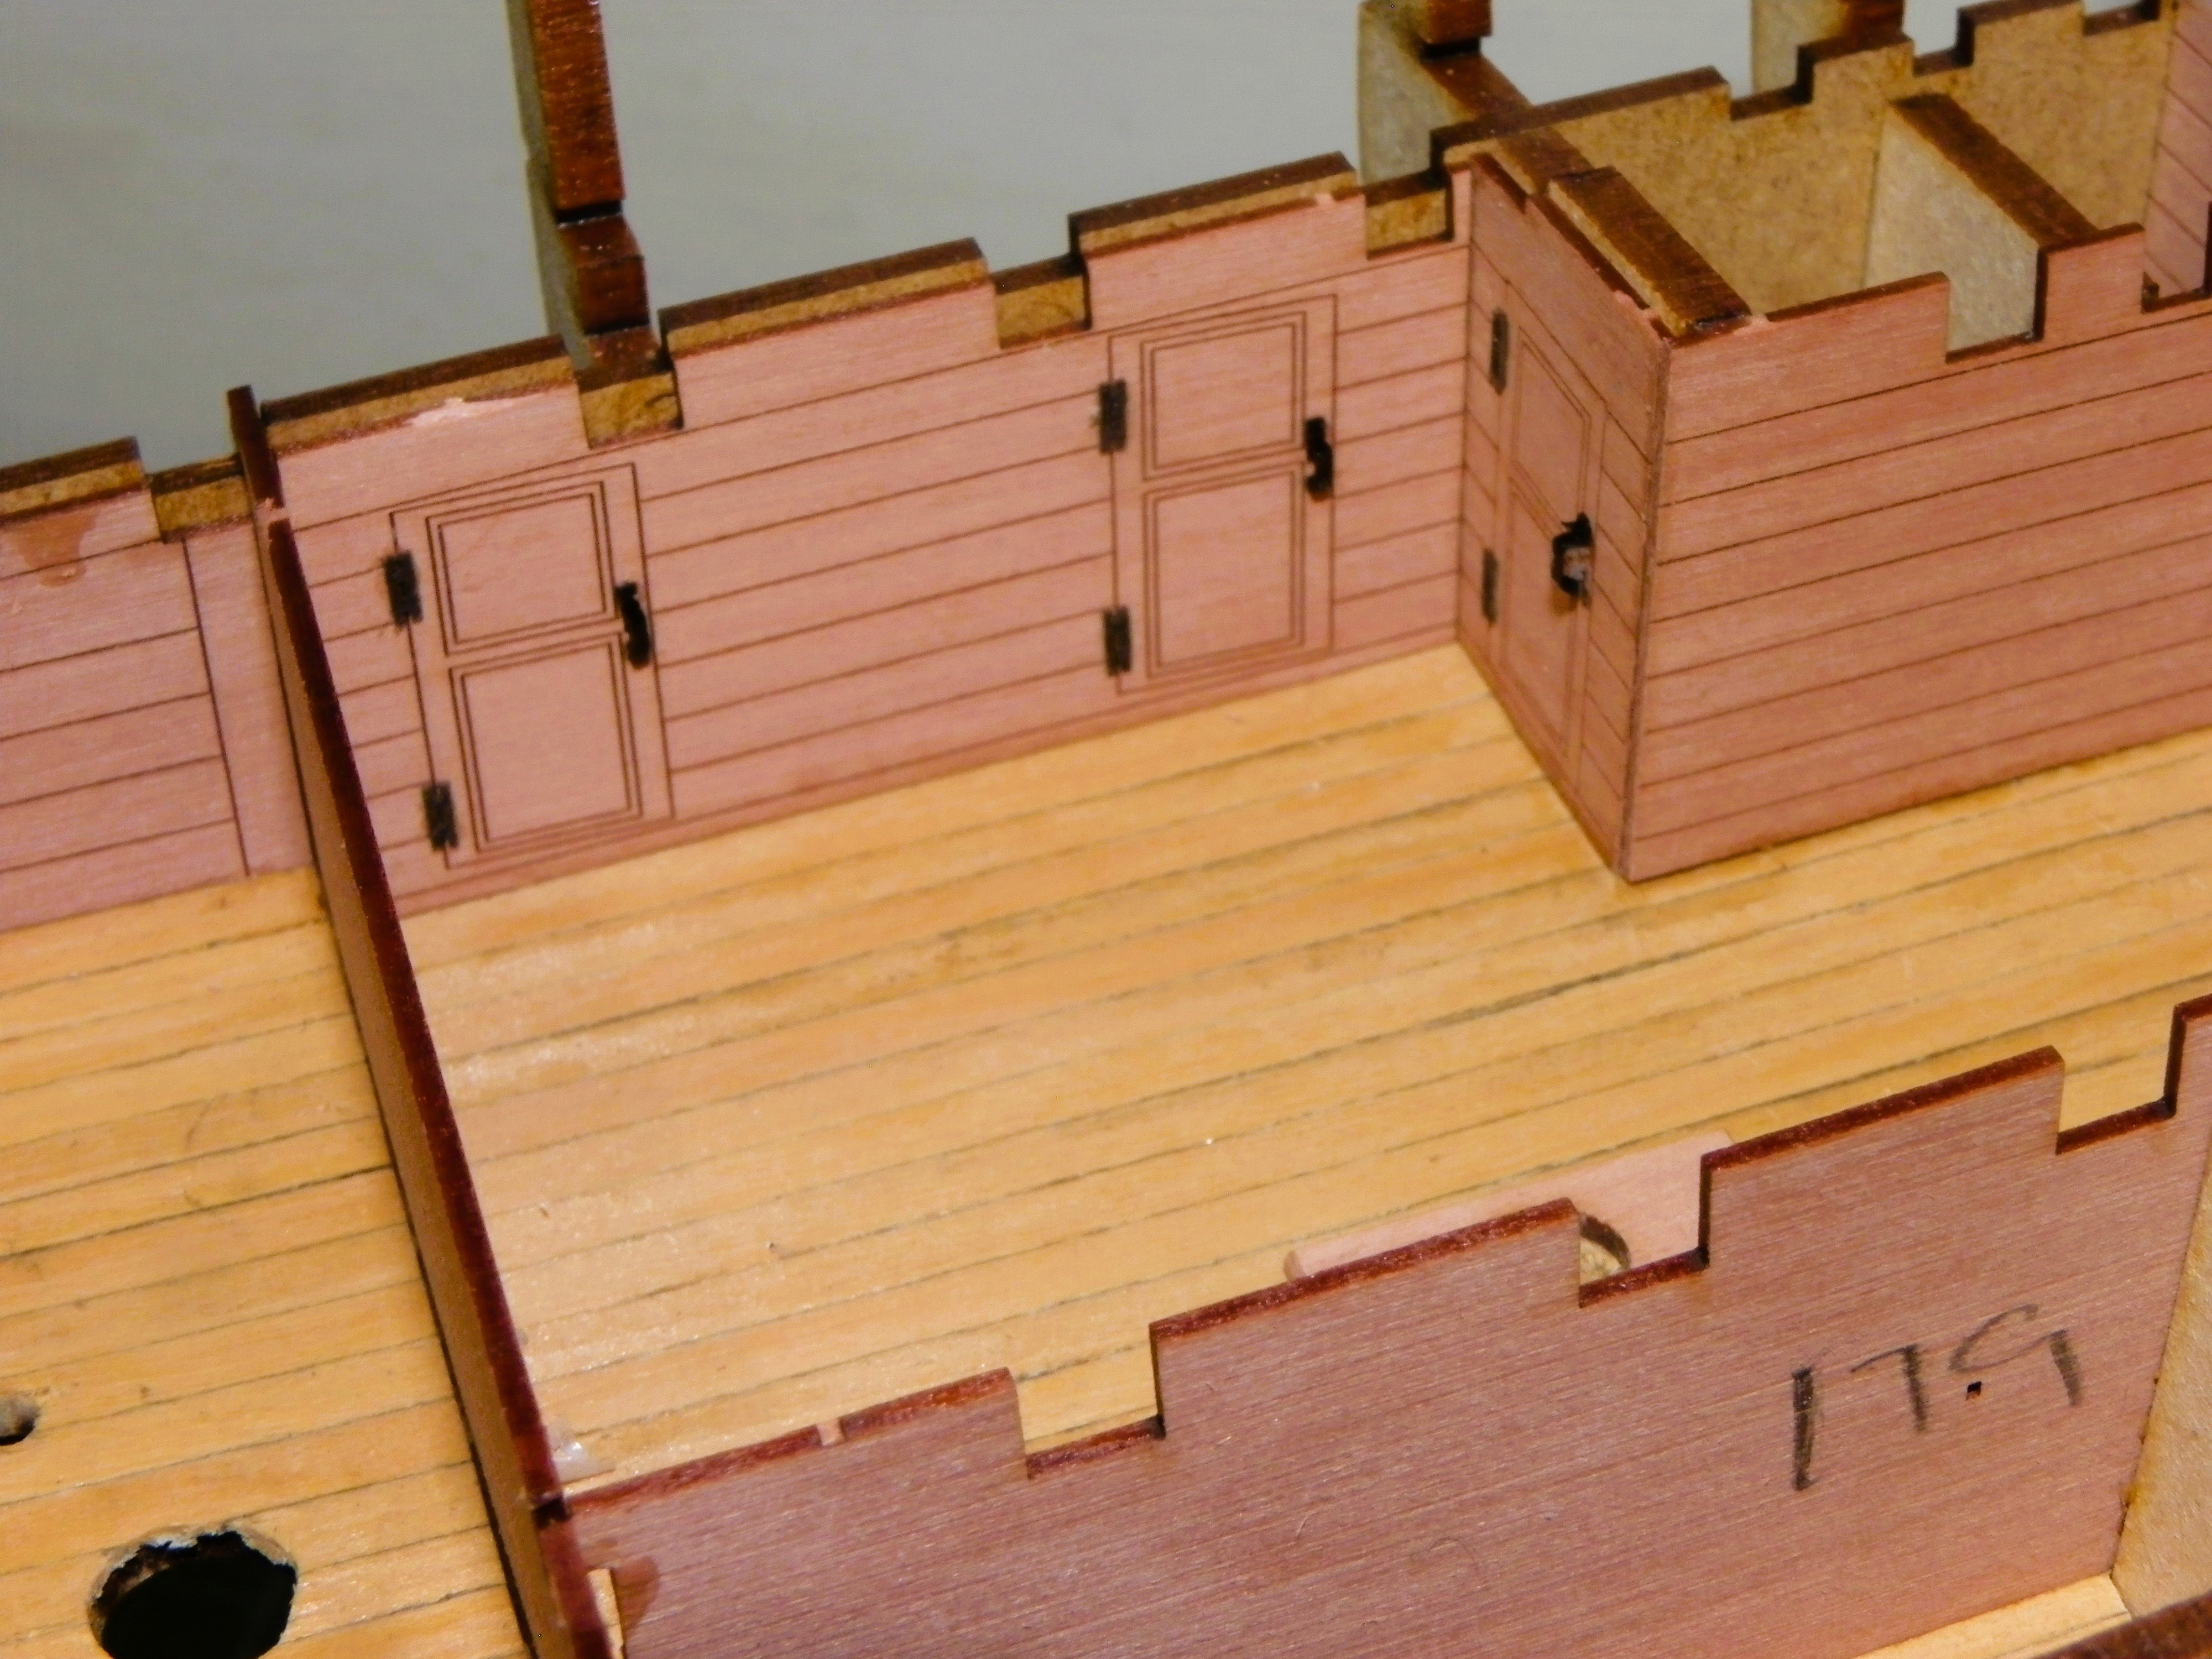
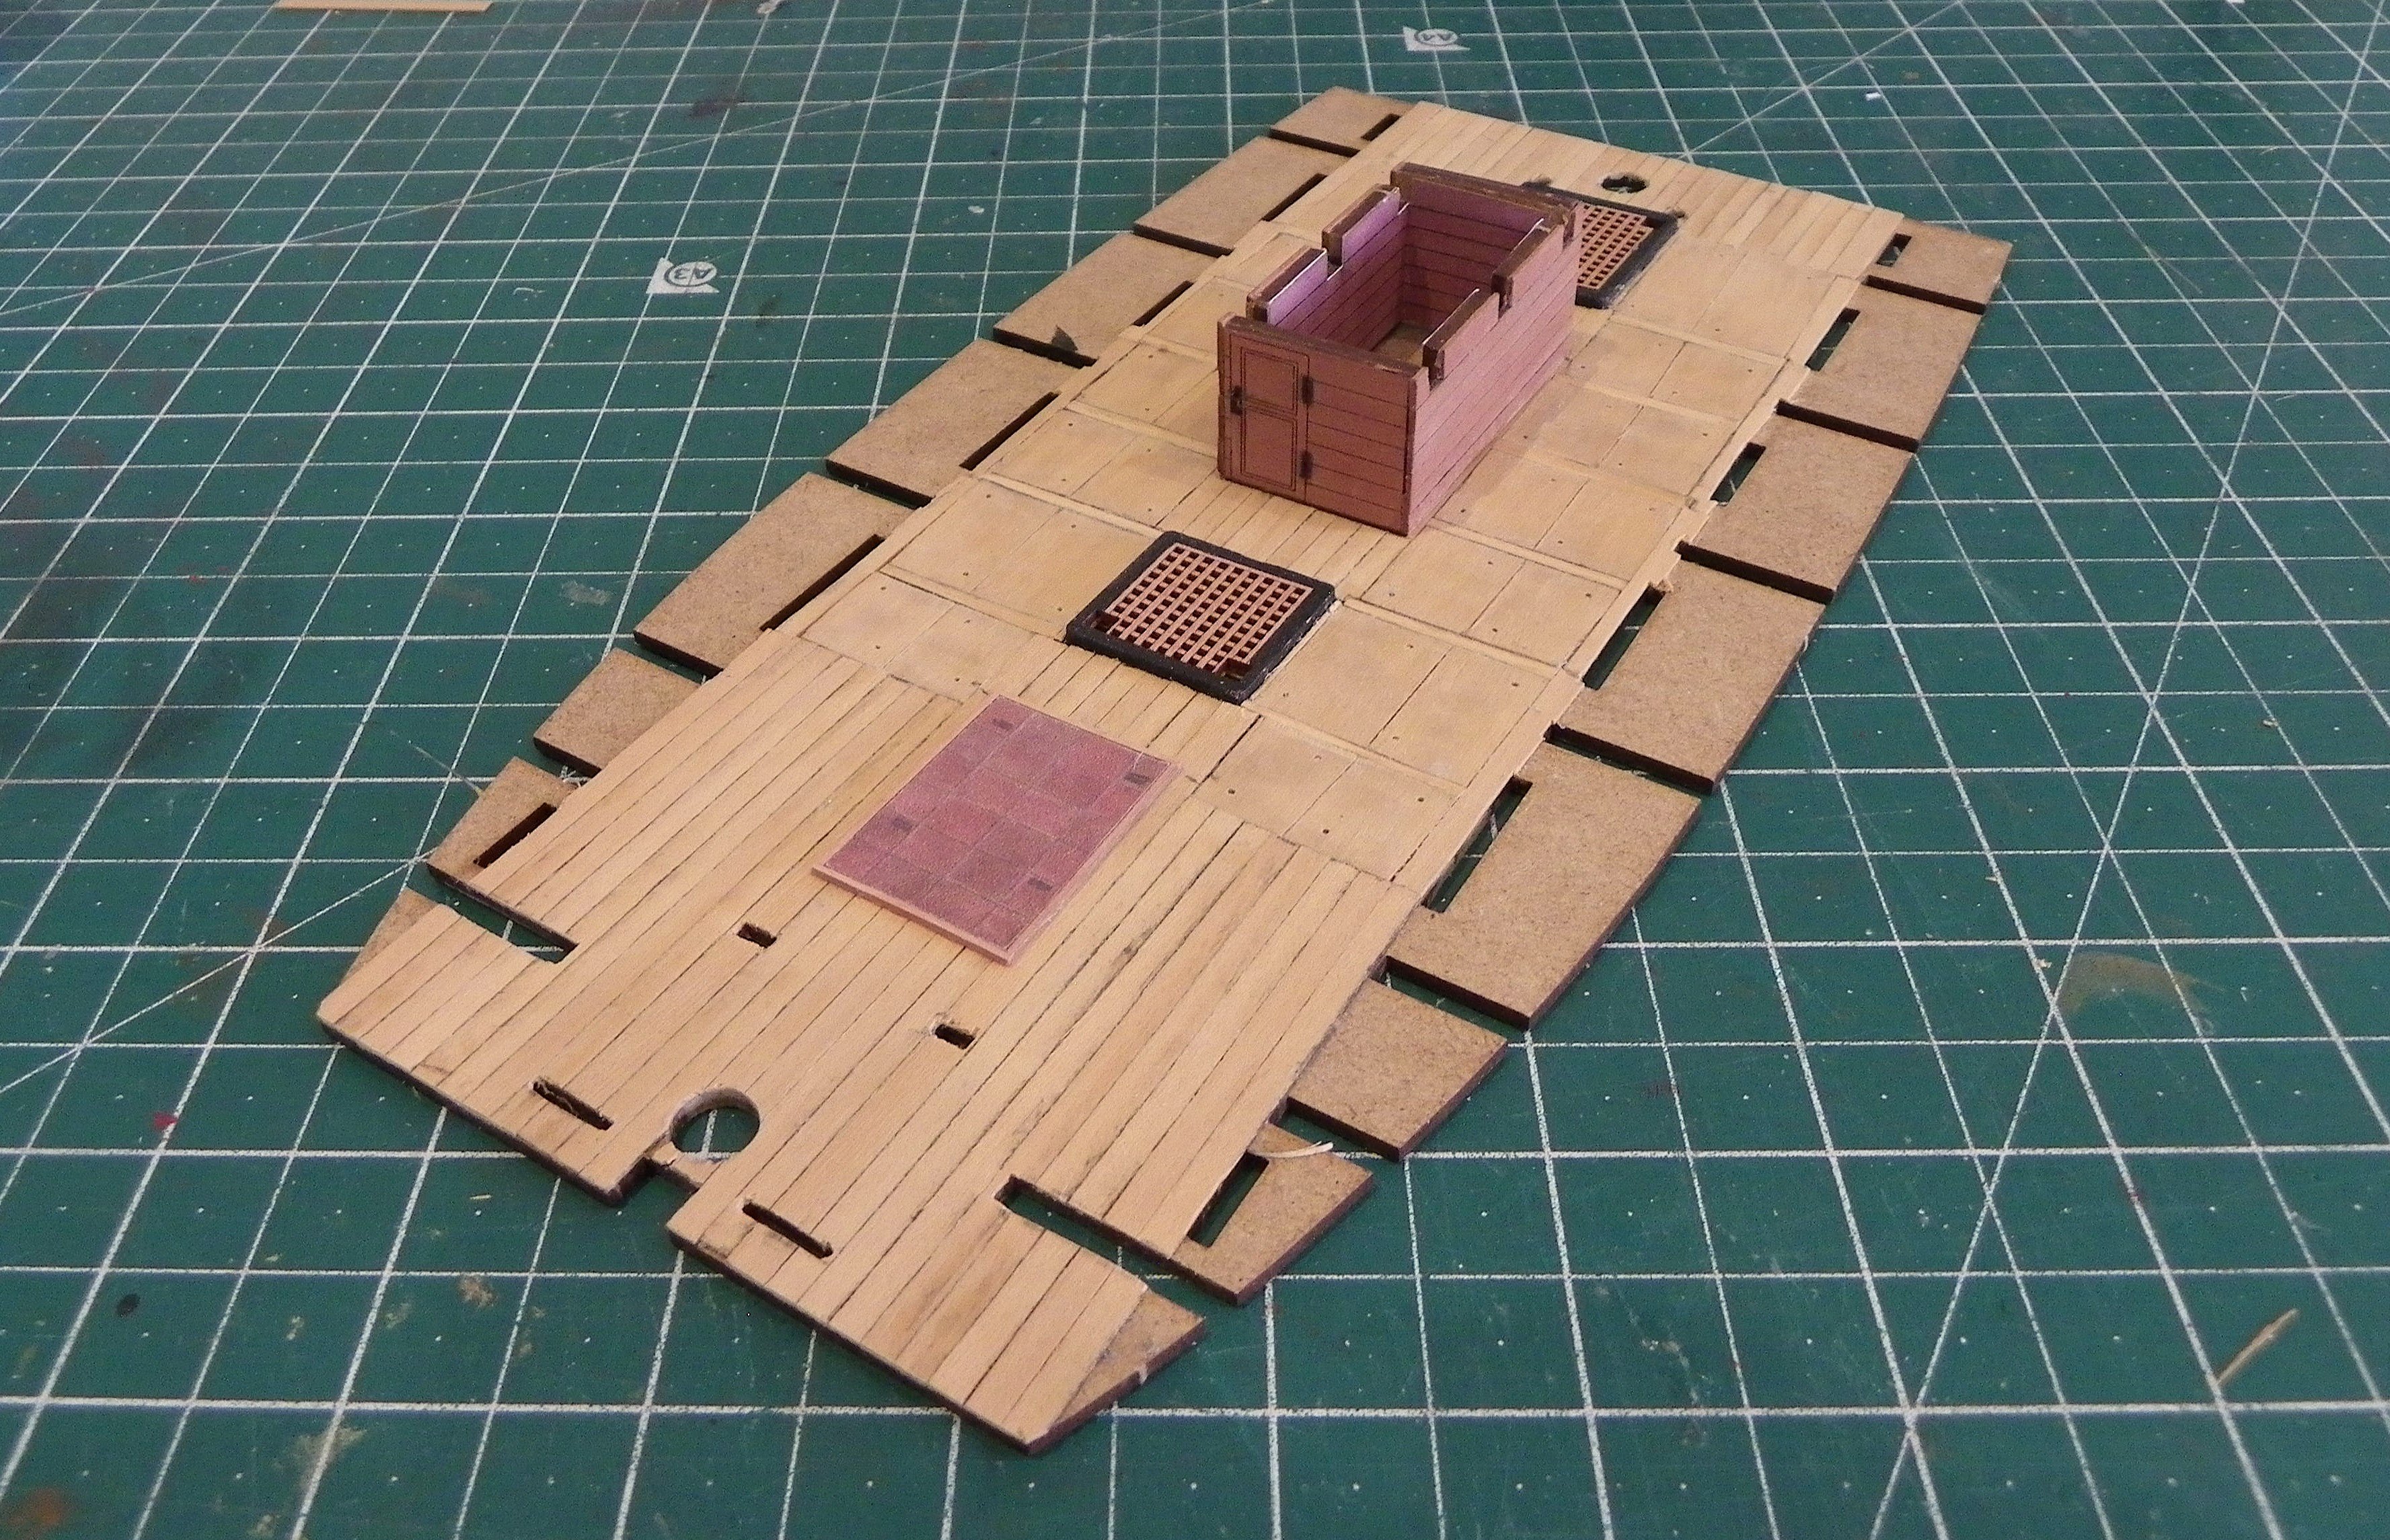
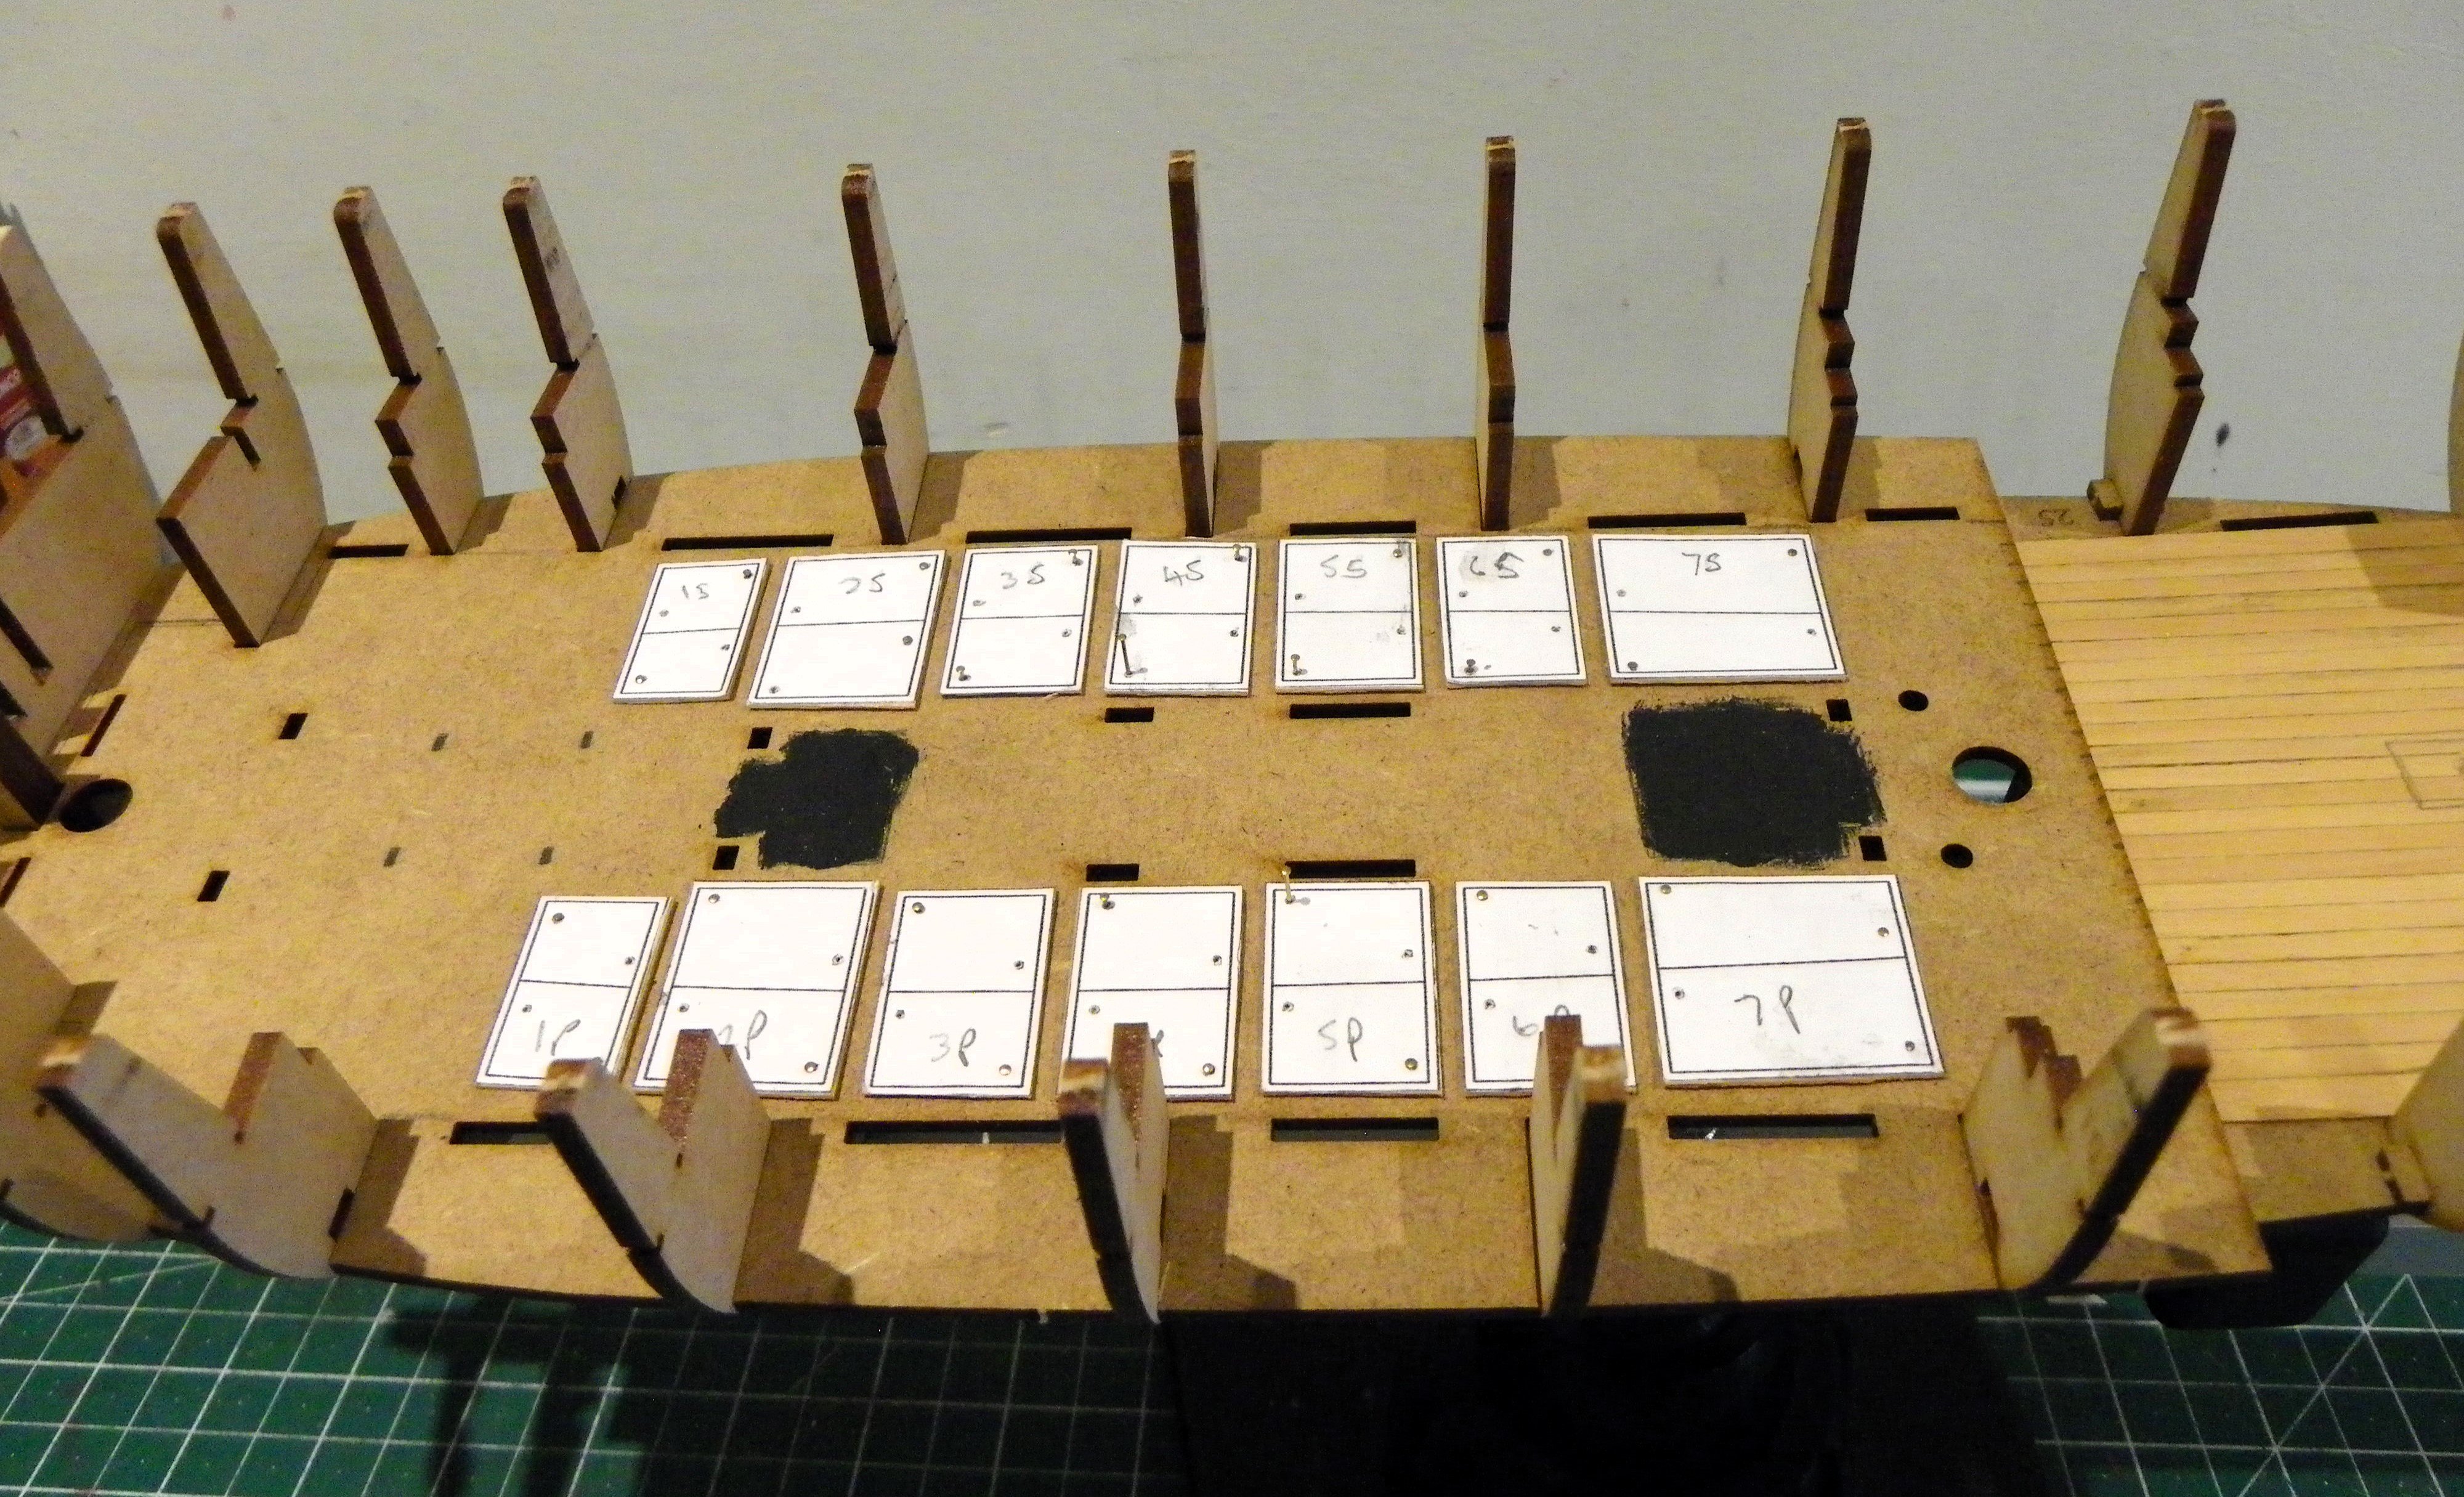
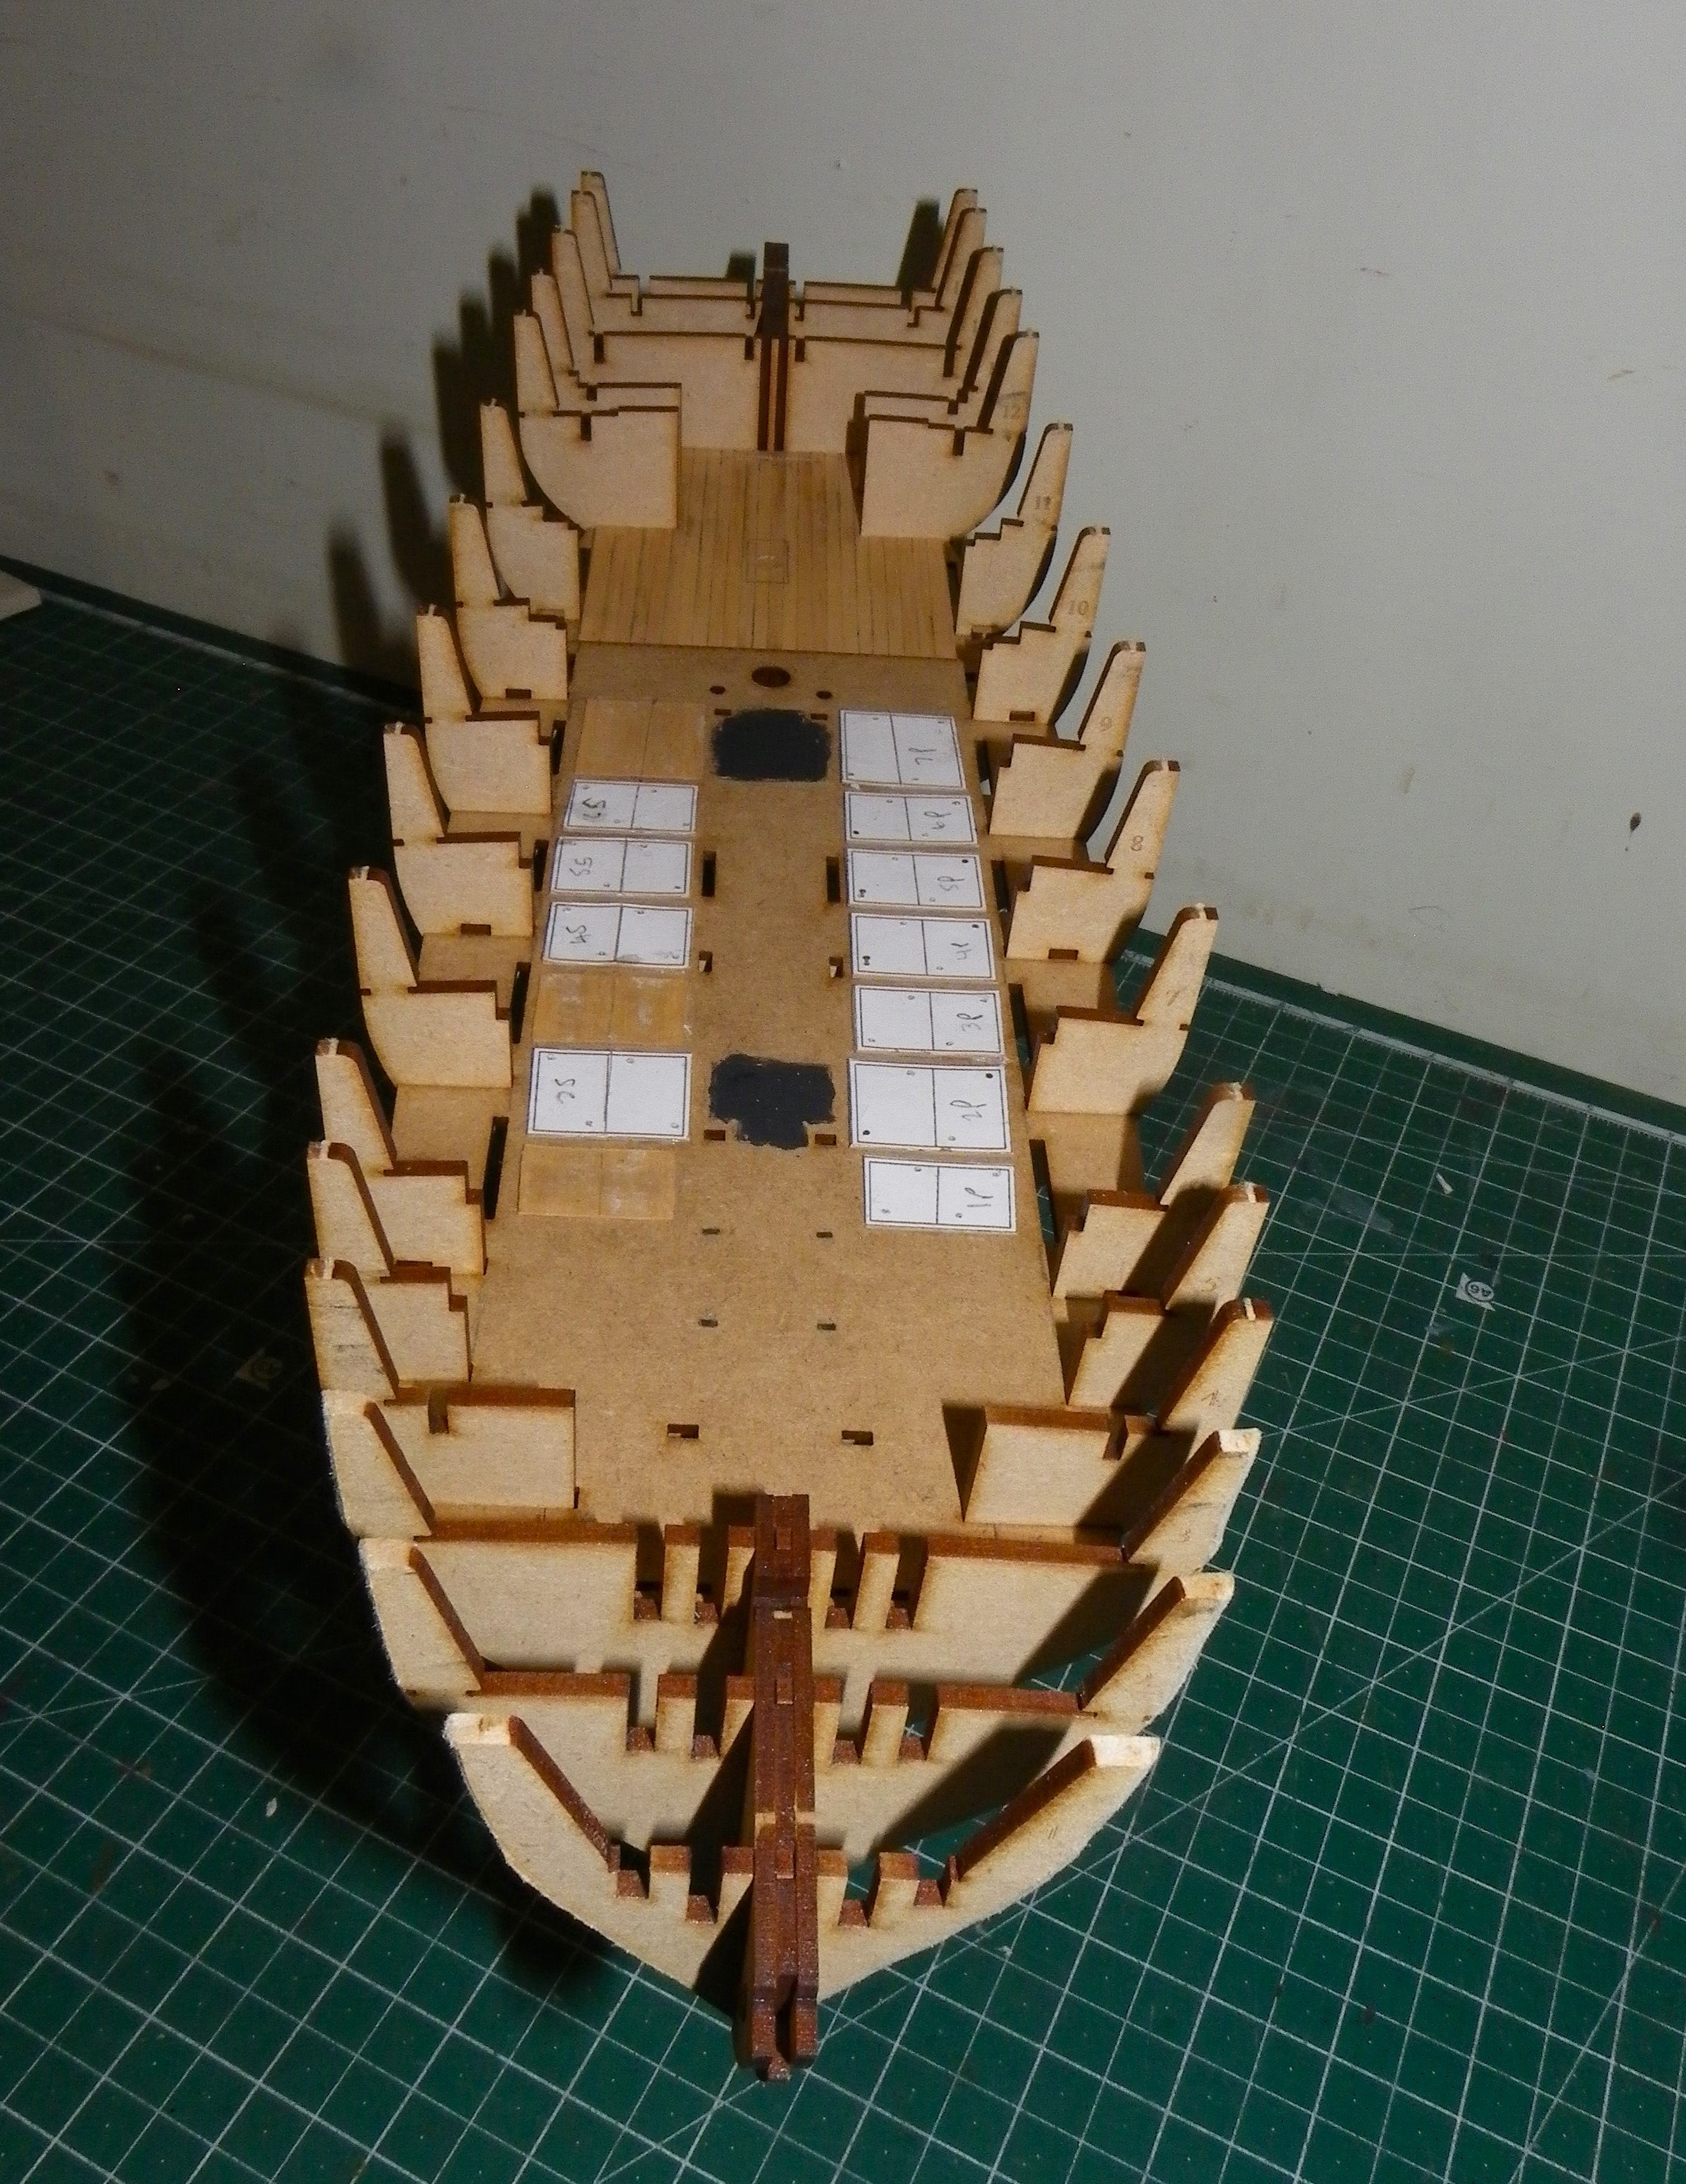
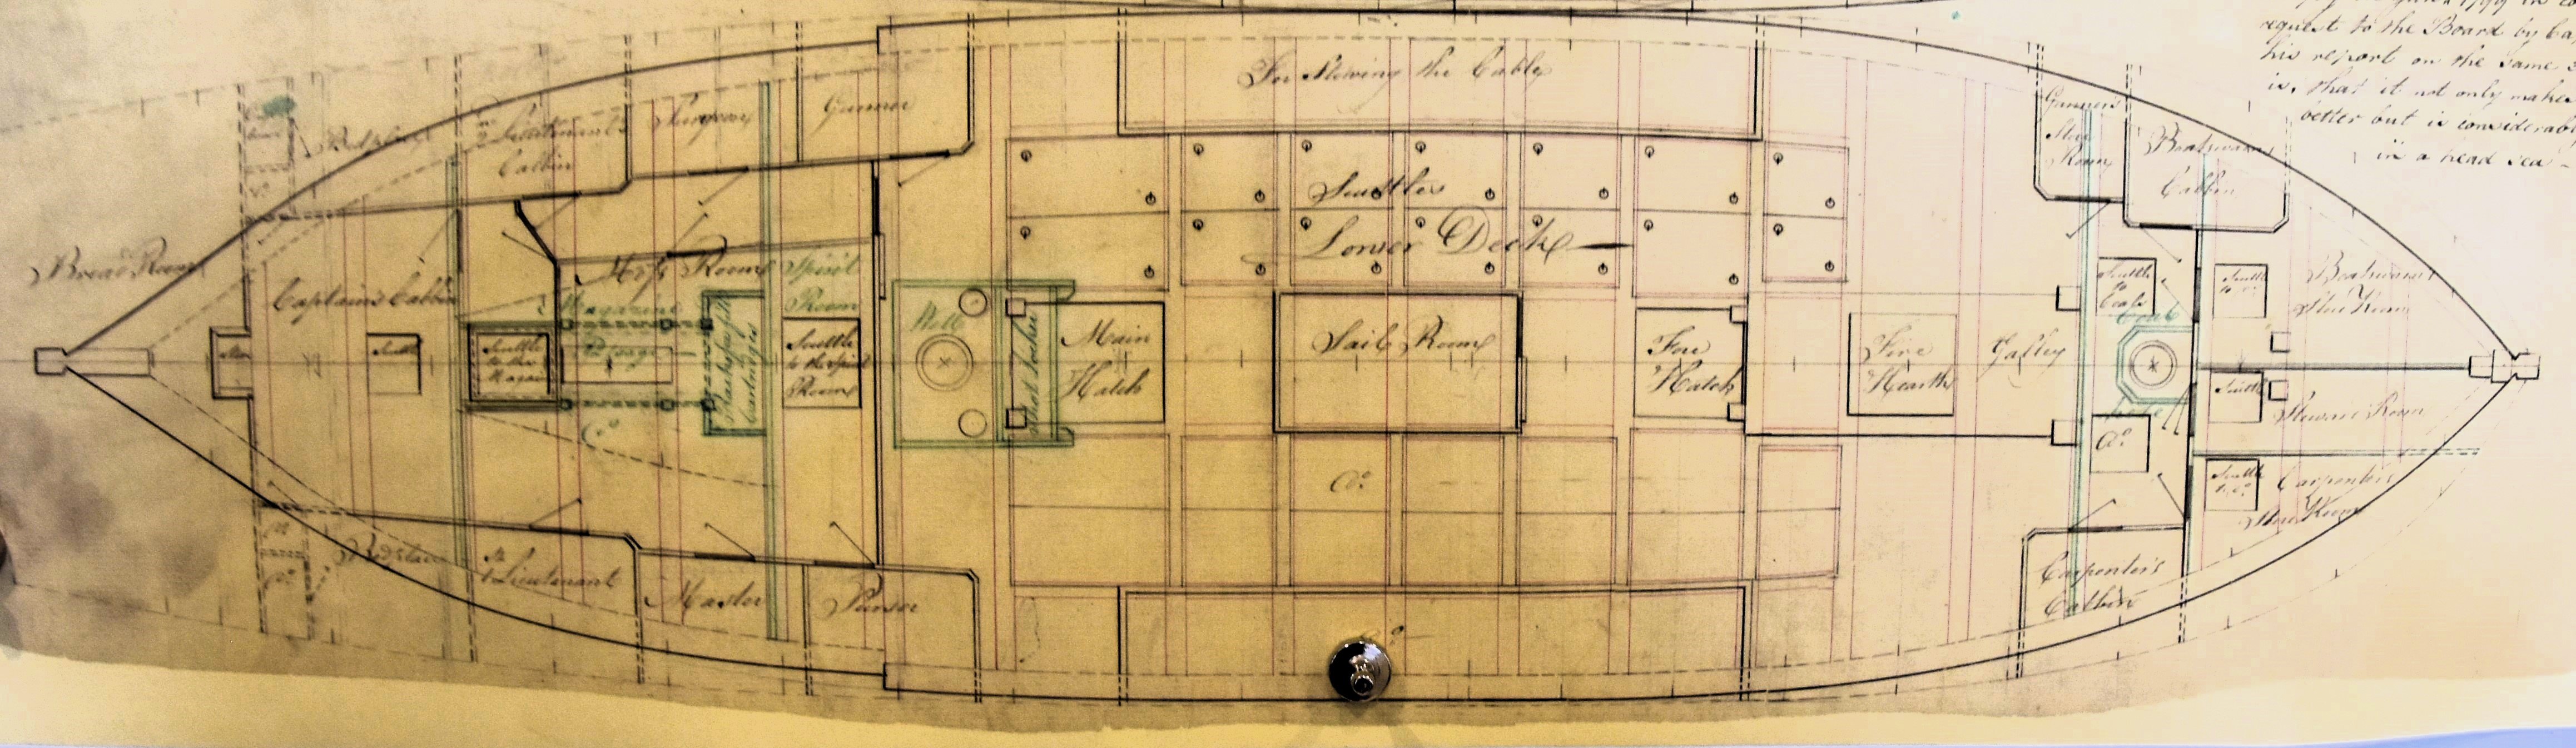
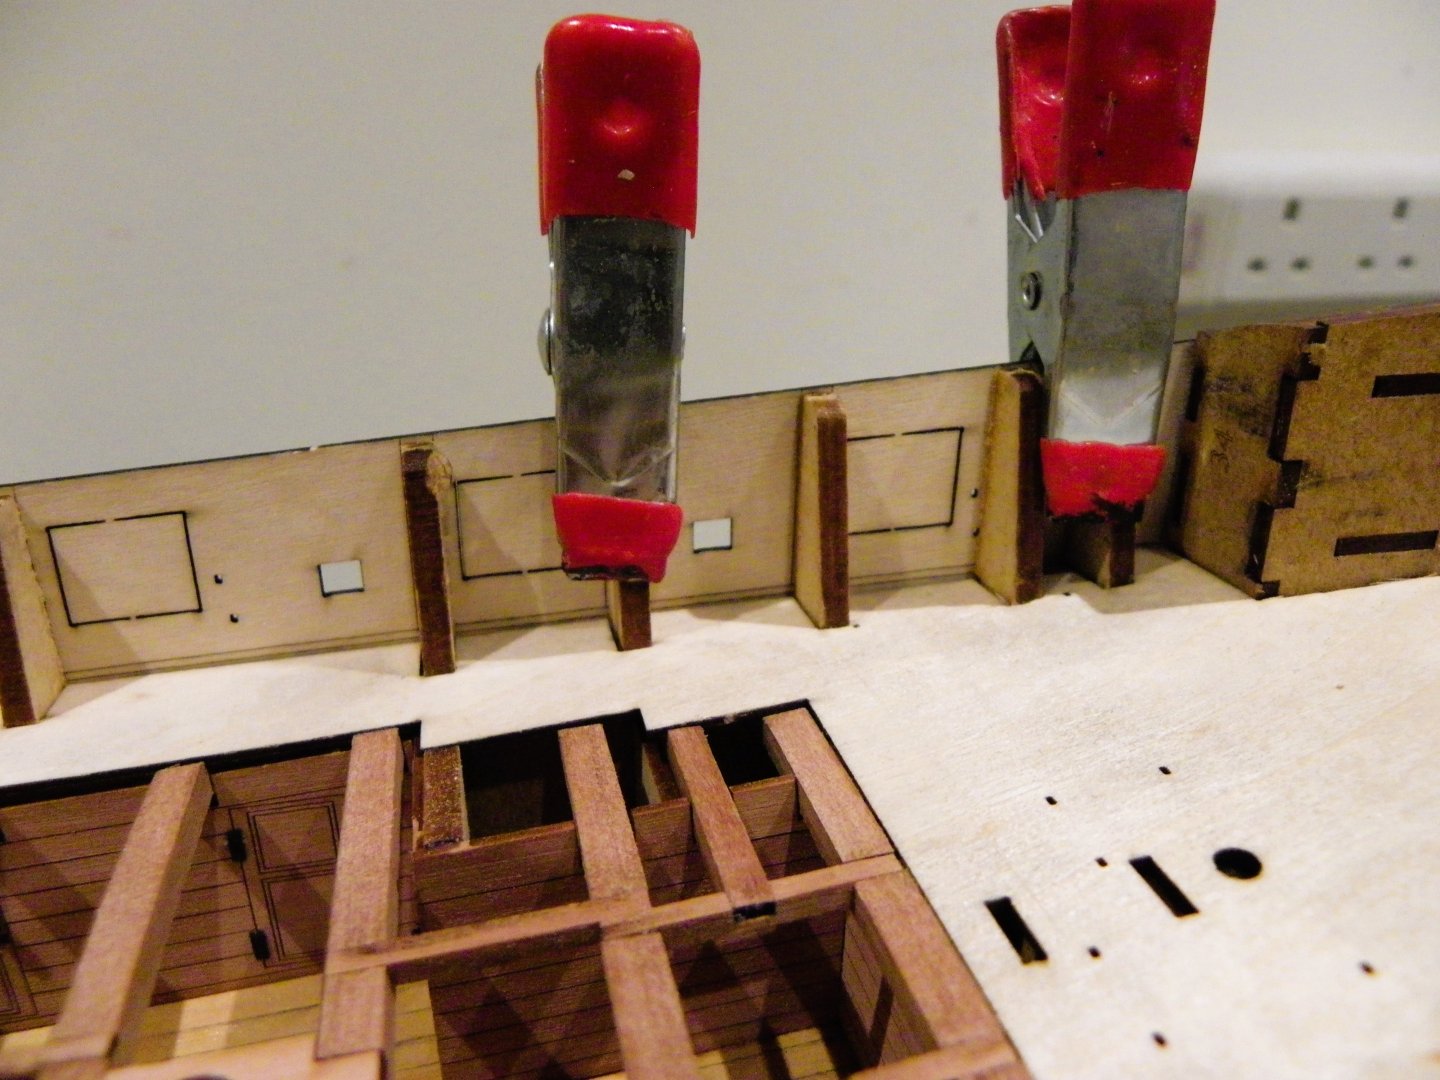
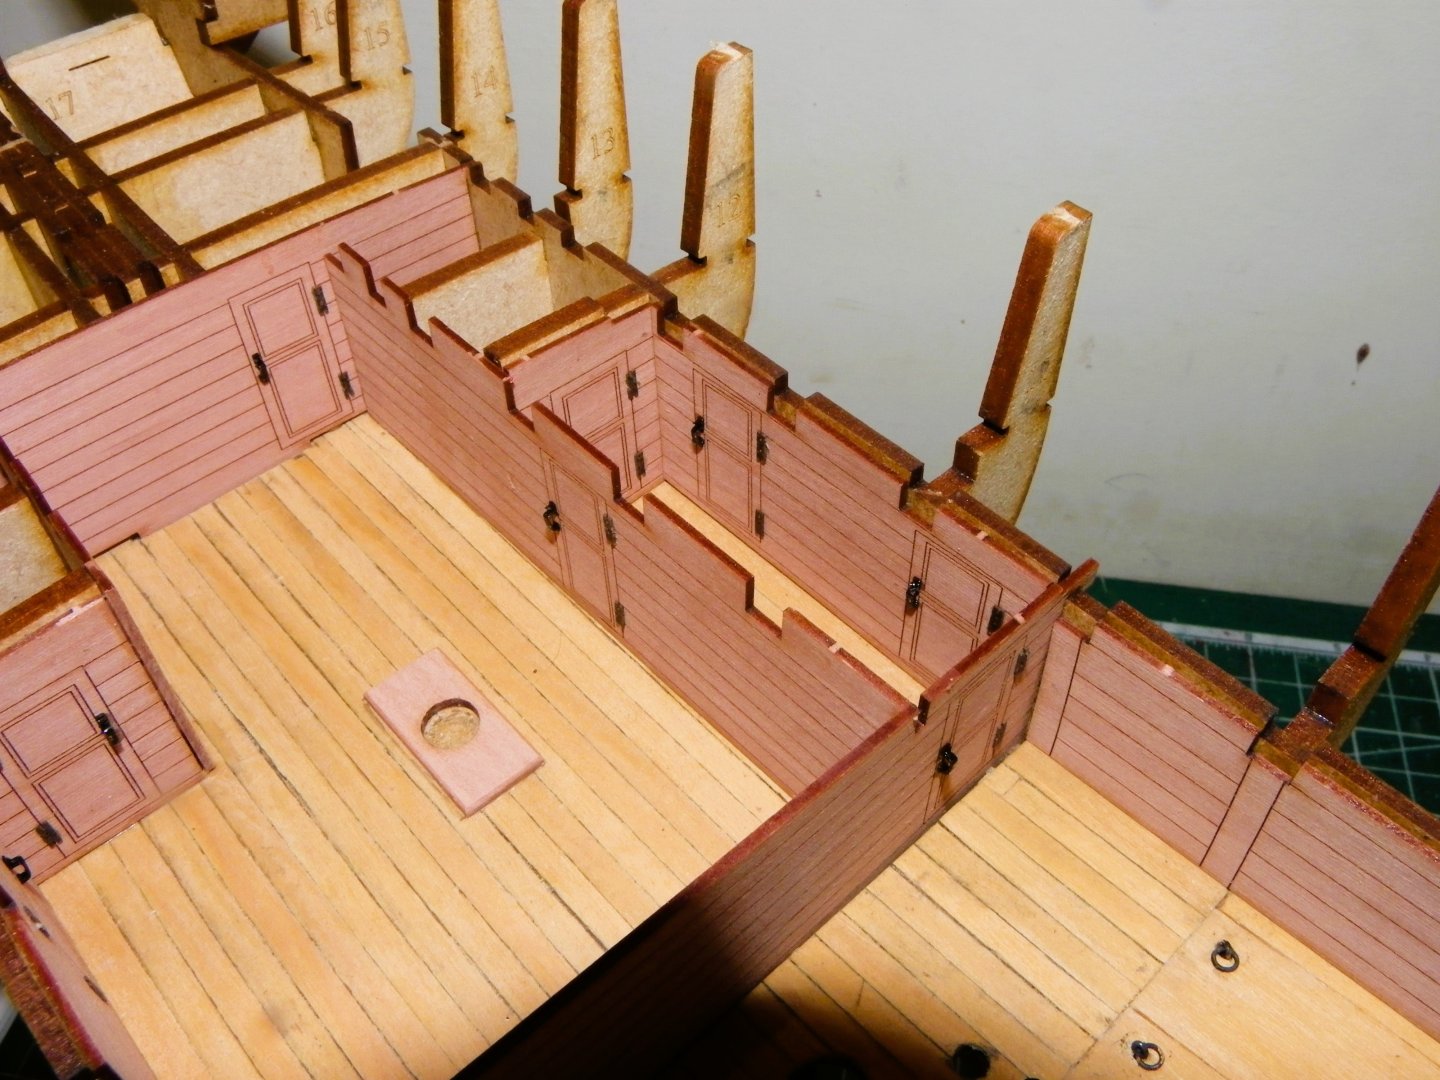
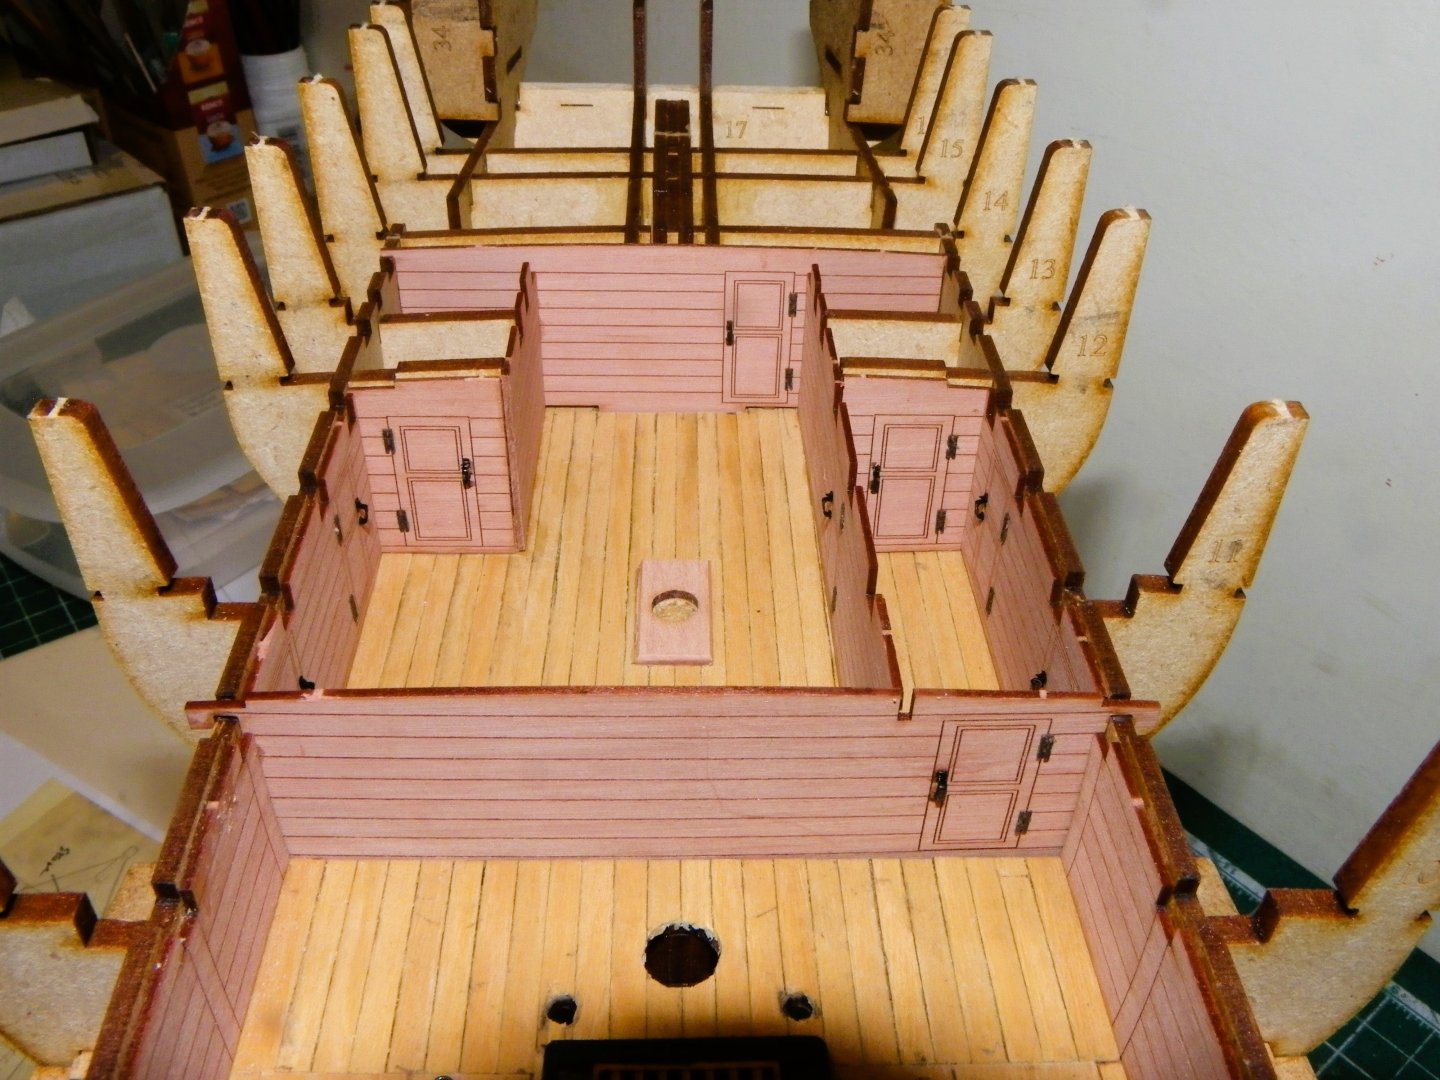
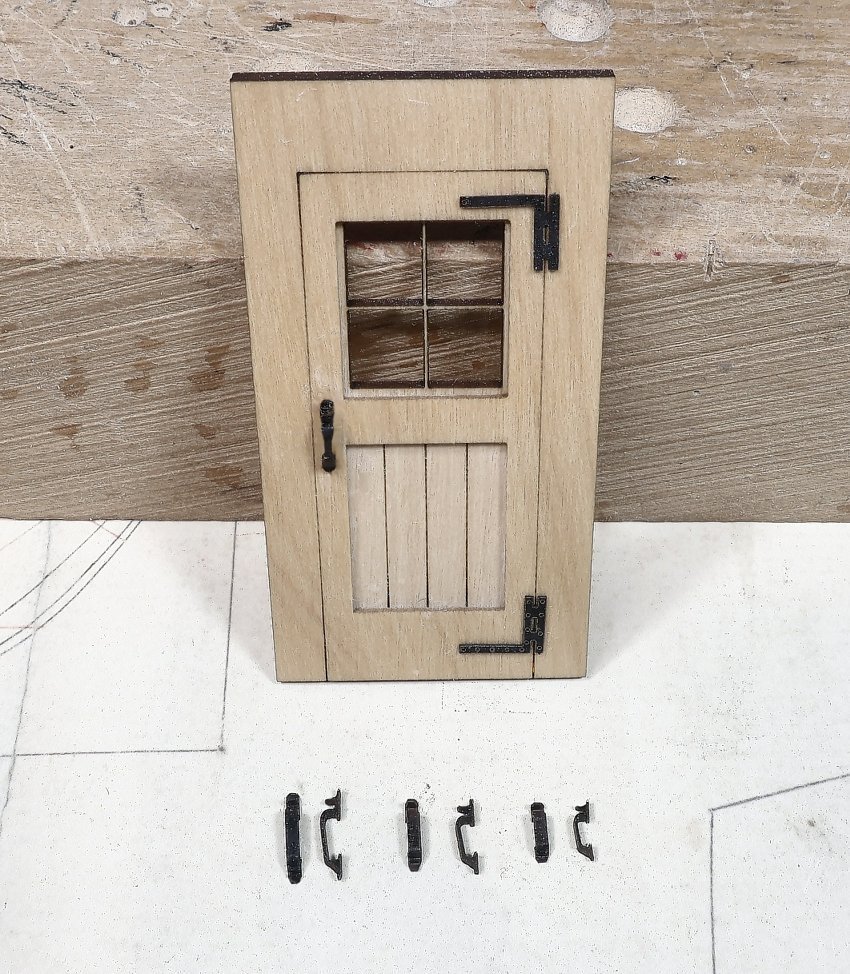
Thank you Glenn, I think you will enjoy building this one.. Post 7 Lower deck work continues. In this post I add the lower deck internal partitions but before fitting, the door hinges and handles must be applied. 0136 I am using the Syren versions from Chuck. 0154 0156 The cabin layouts are a reasonable proximation of those shown on the Adm. plan and I’m not motivated to change them, particularly given the restricted views below the Upper deck. In the Bow area are cabins for the Gunners stores, and Boatswain (Port) and Carpenters Cabin (Starboard) 0161 Stern cabin layout. The Adm. plan is the first I’ve seen which gives specific names to the individual cabins. More divisions are shown than on the model. Forward of the Capt.’s cabin are berths for the Ist Lt. Master, and Pusser (starboard) 2nd Lt. Surgeon, and Gunner. (Port) 0143 0162 There are a lot of door handles and hinges to fit, tiny little beggars that tested my eye sight to the limit, but at least nothing required chemical blackening. 0166 0169 0167 0172 With all the partitions in place I can begin to look at the internal space of the lower deck to see what additional detailing I can do, and start to envisage how much of the lower deck it is practical to expose. B.E. 19/12/2024


- 332 replies
-
- 18
-
-
- Harpy
- Vanguard Models
- (and 1 more)
-
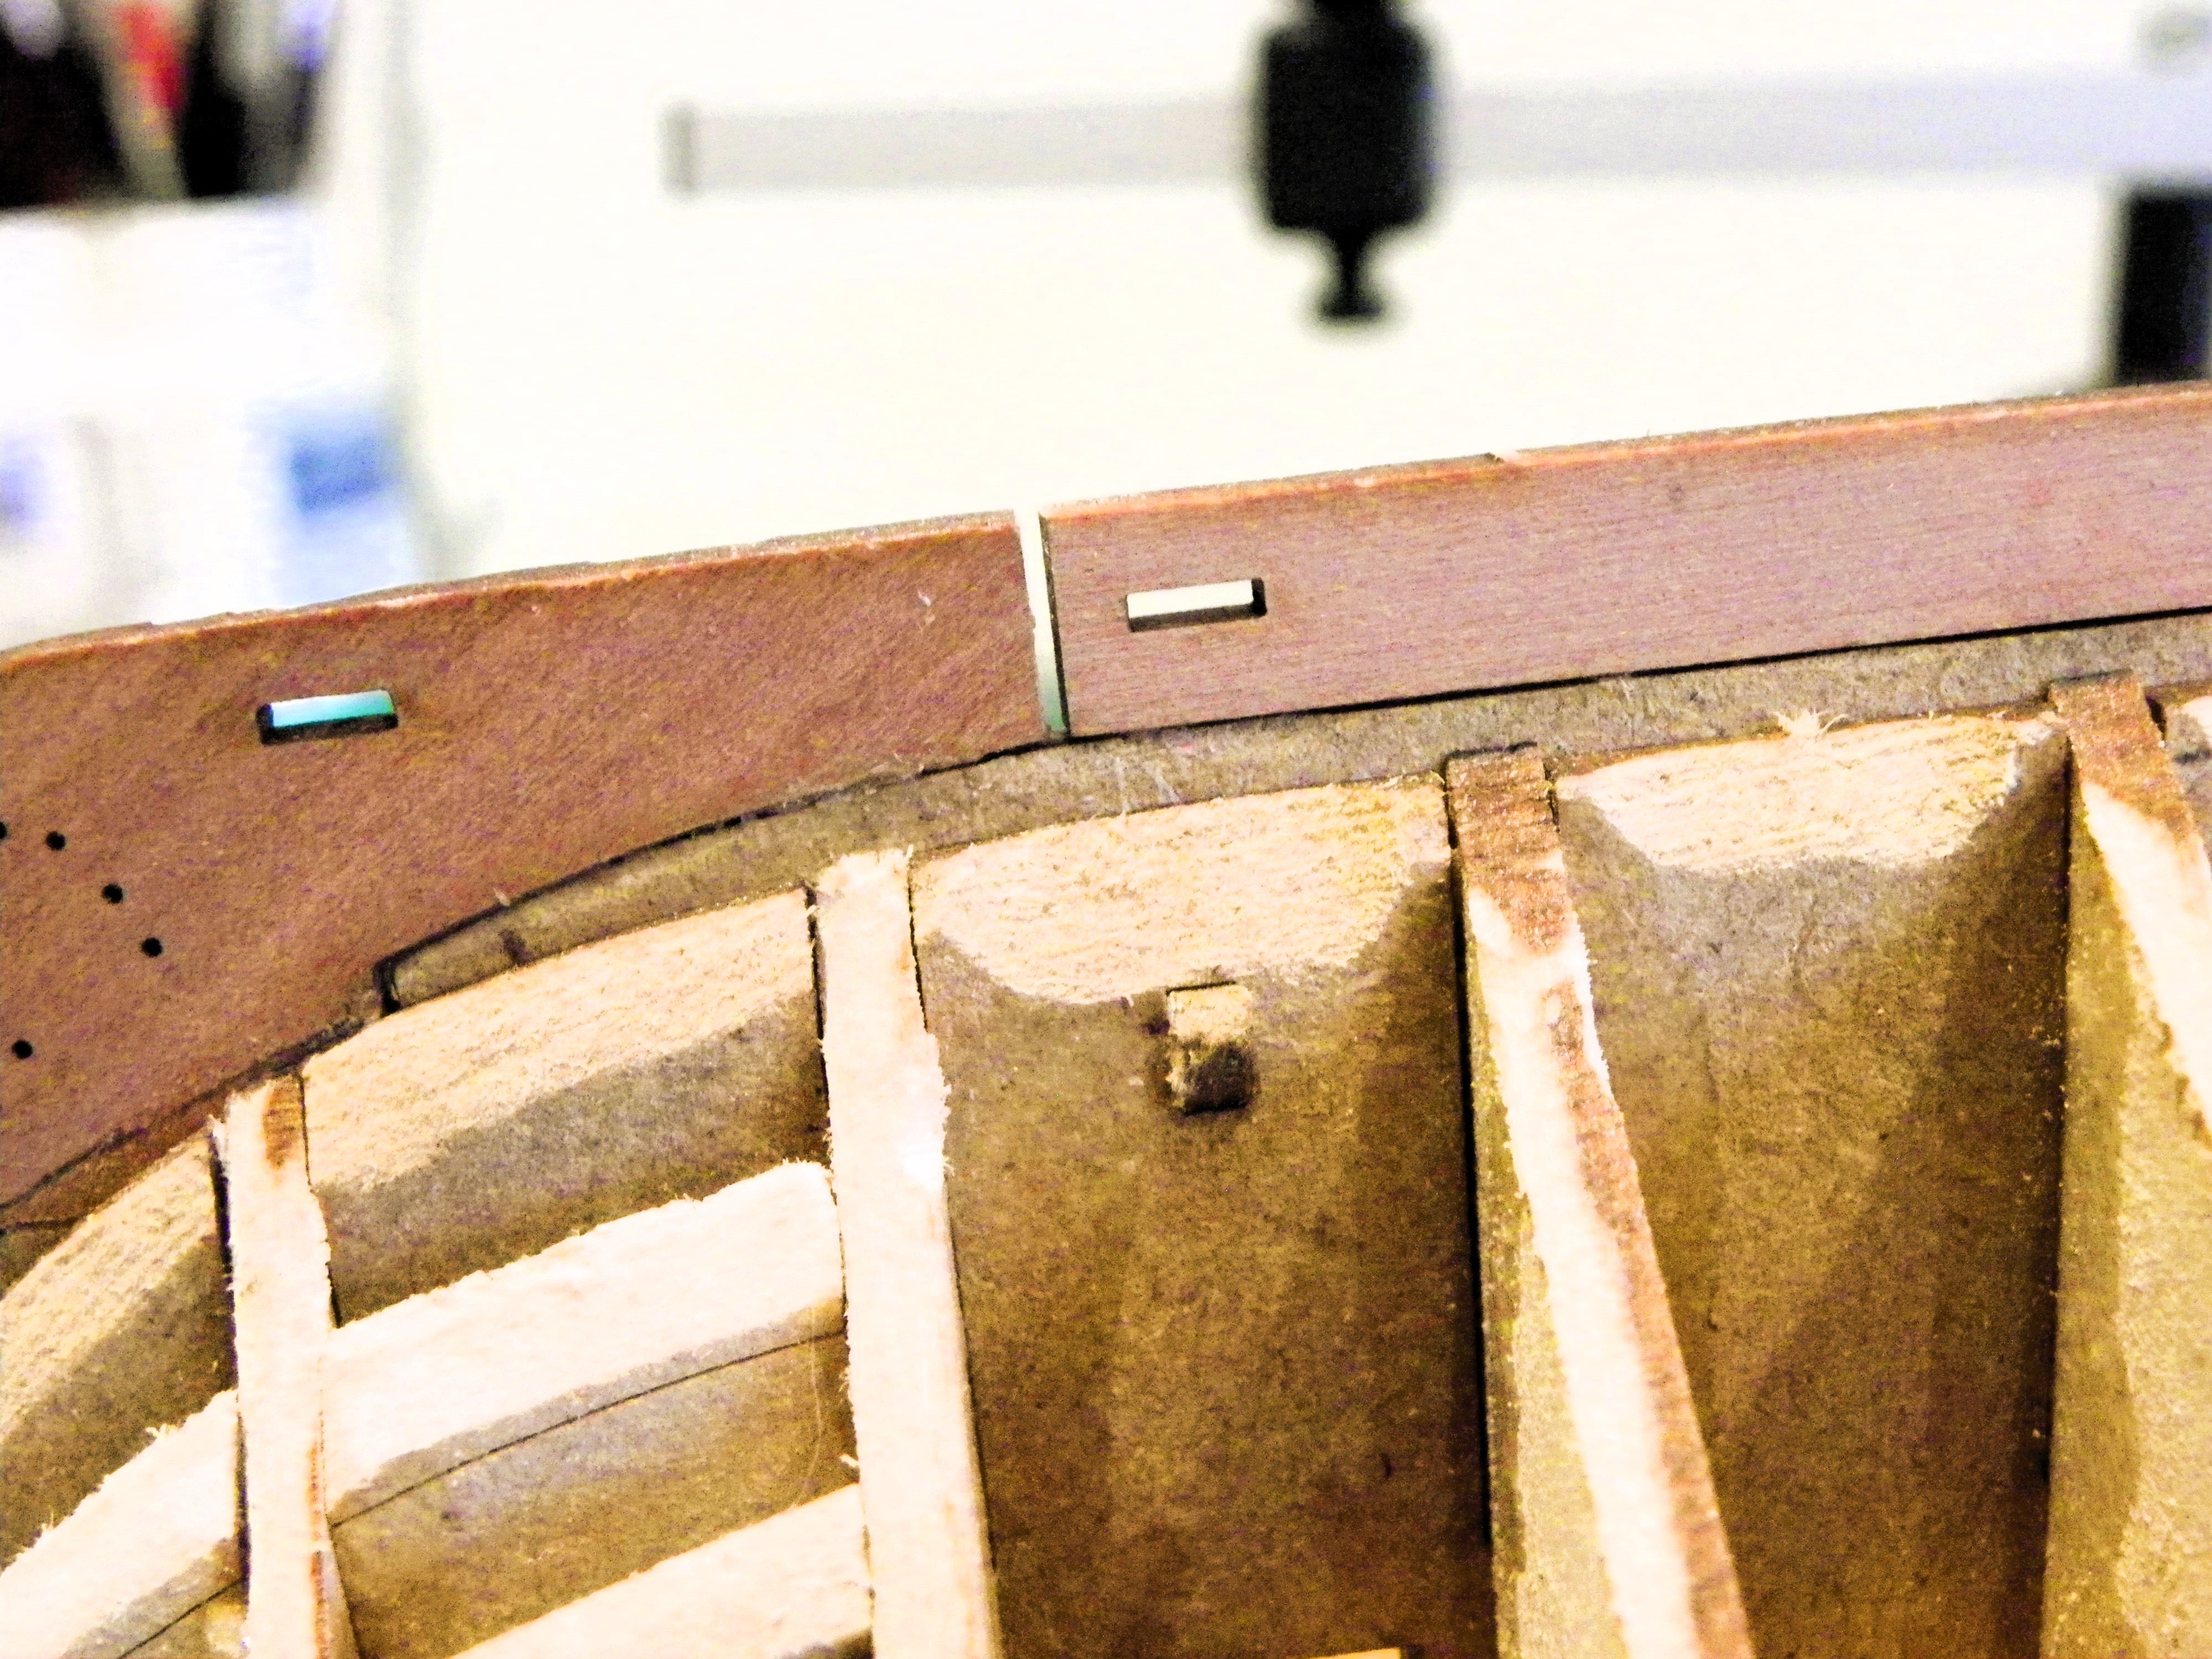
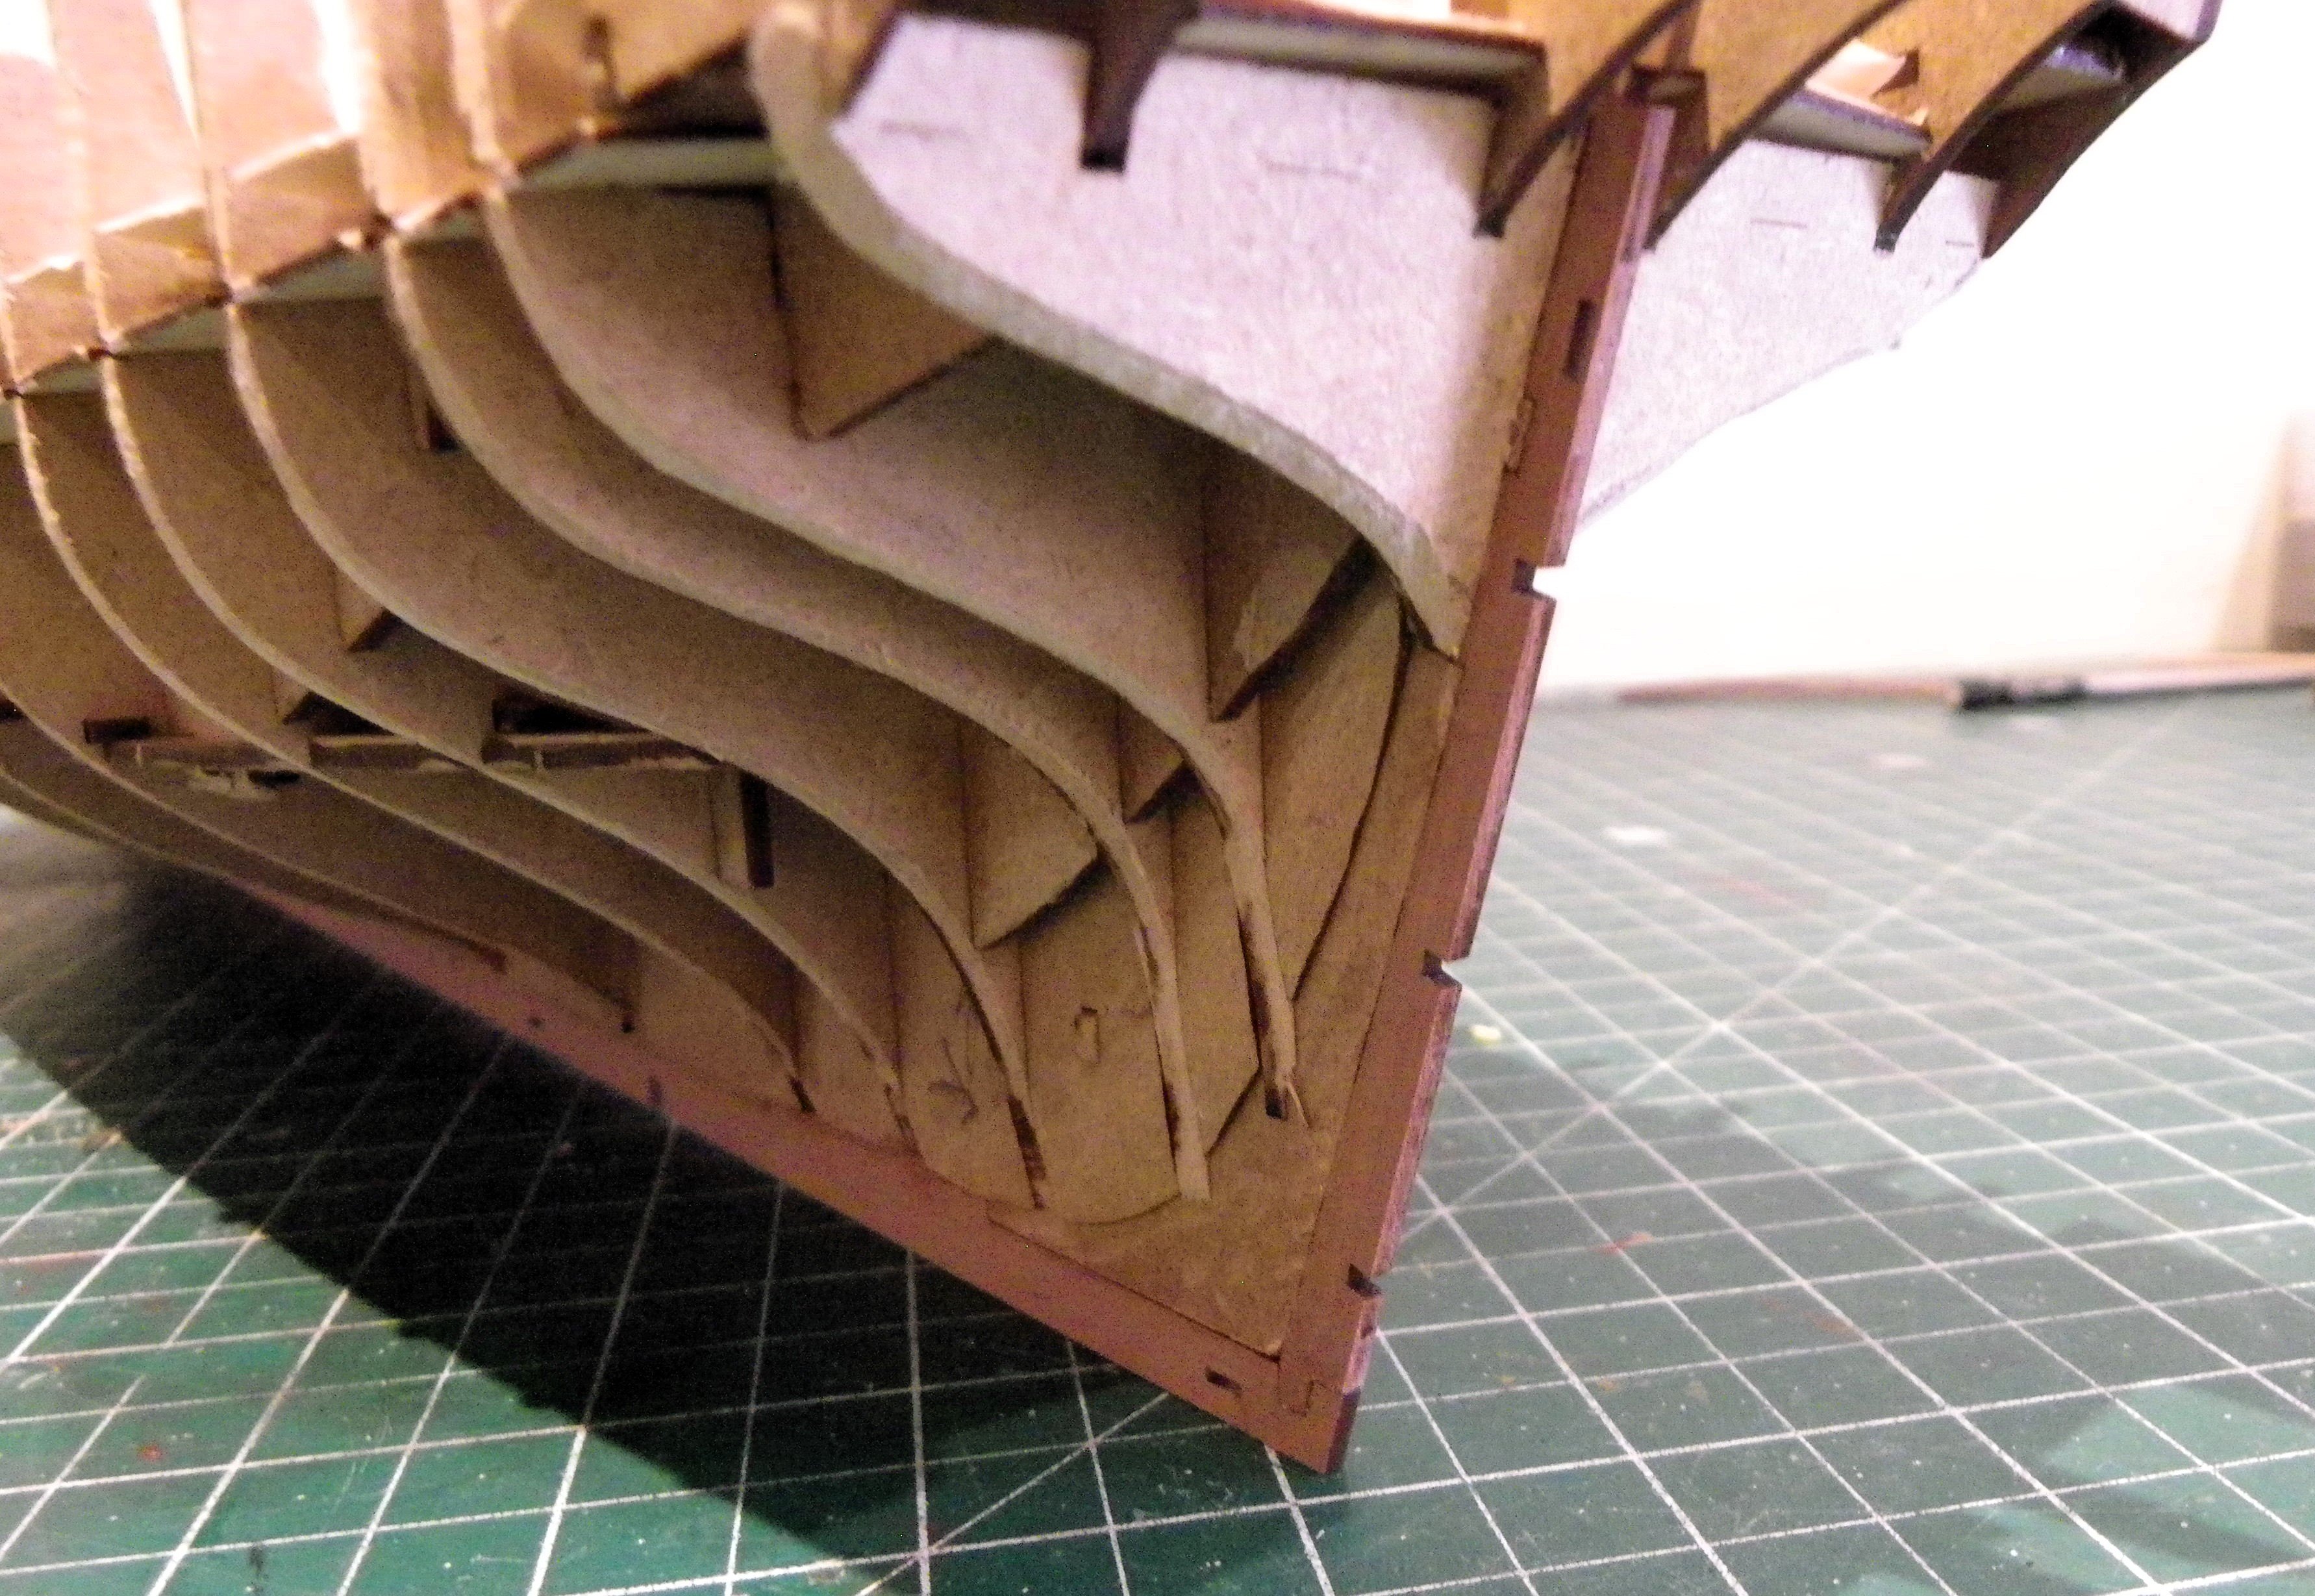
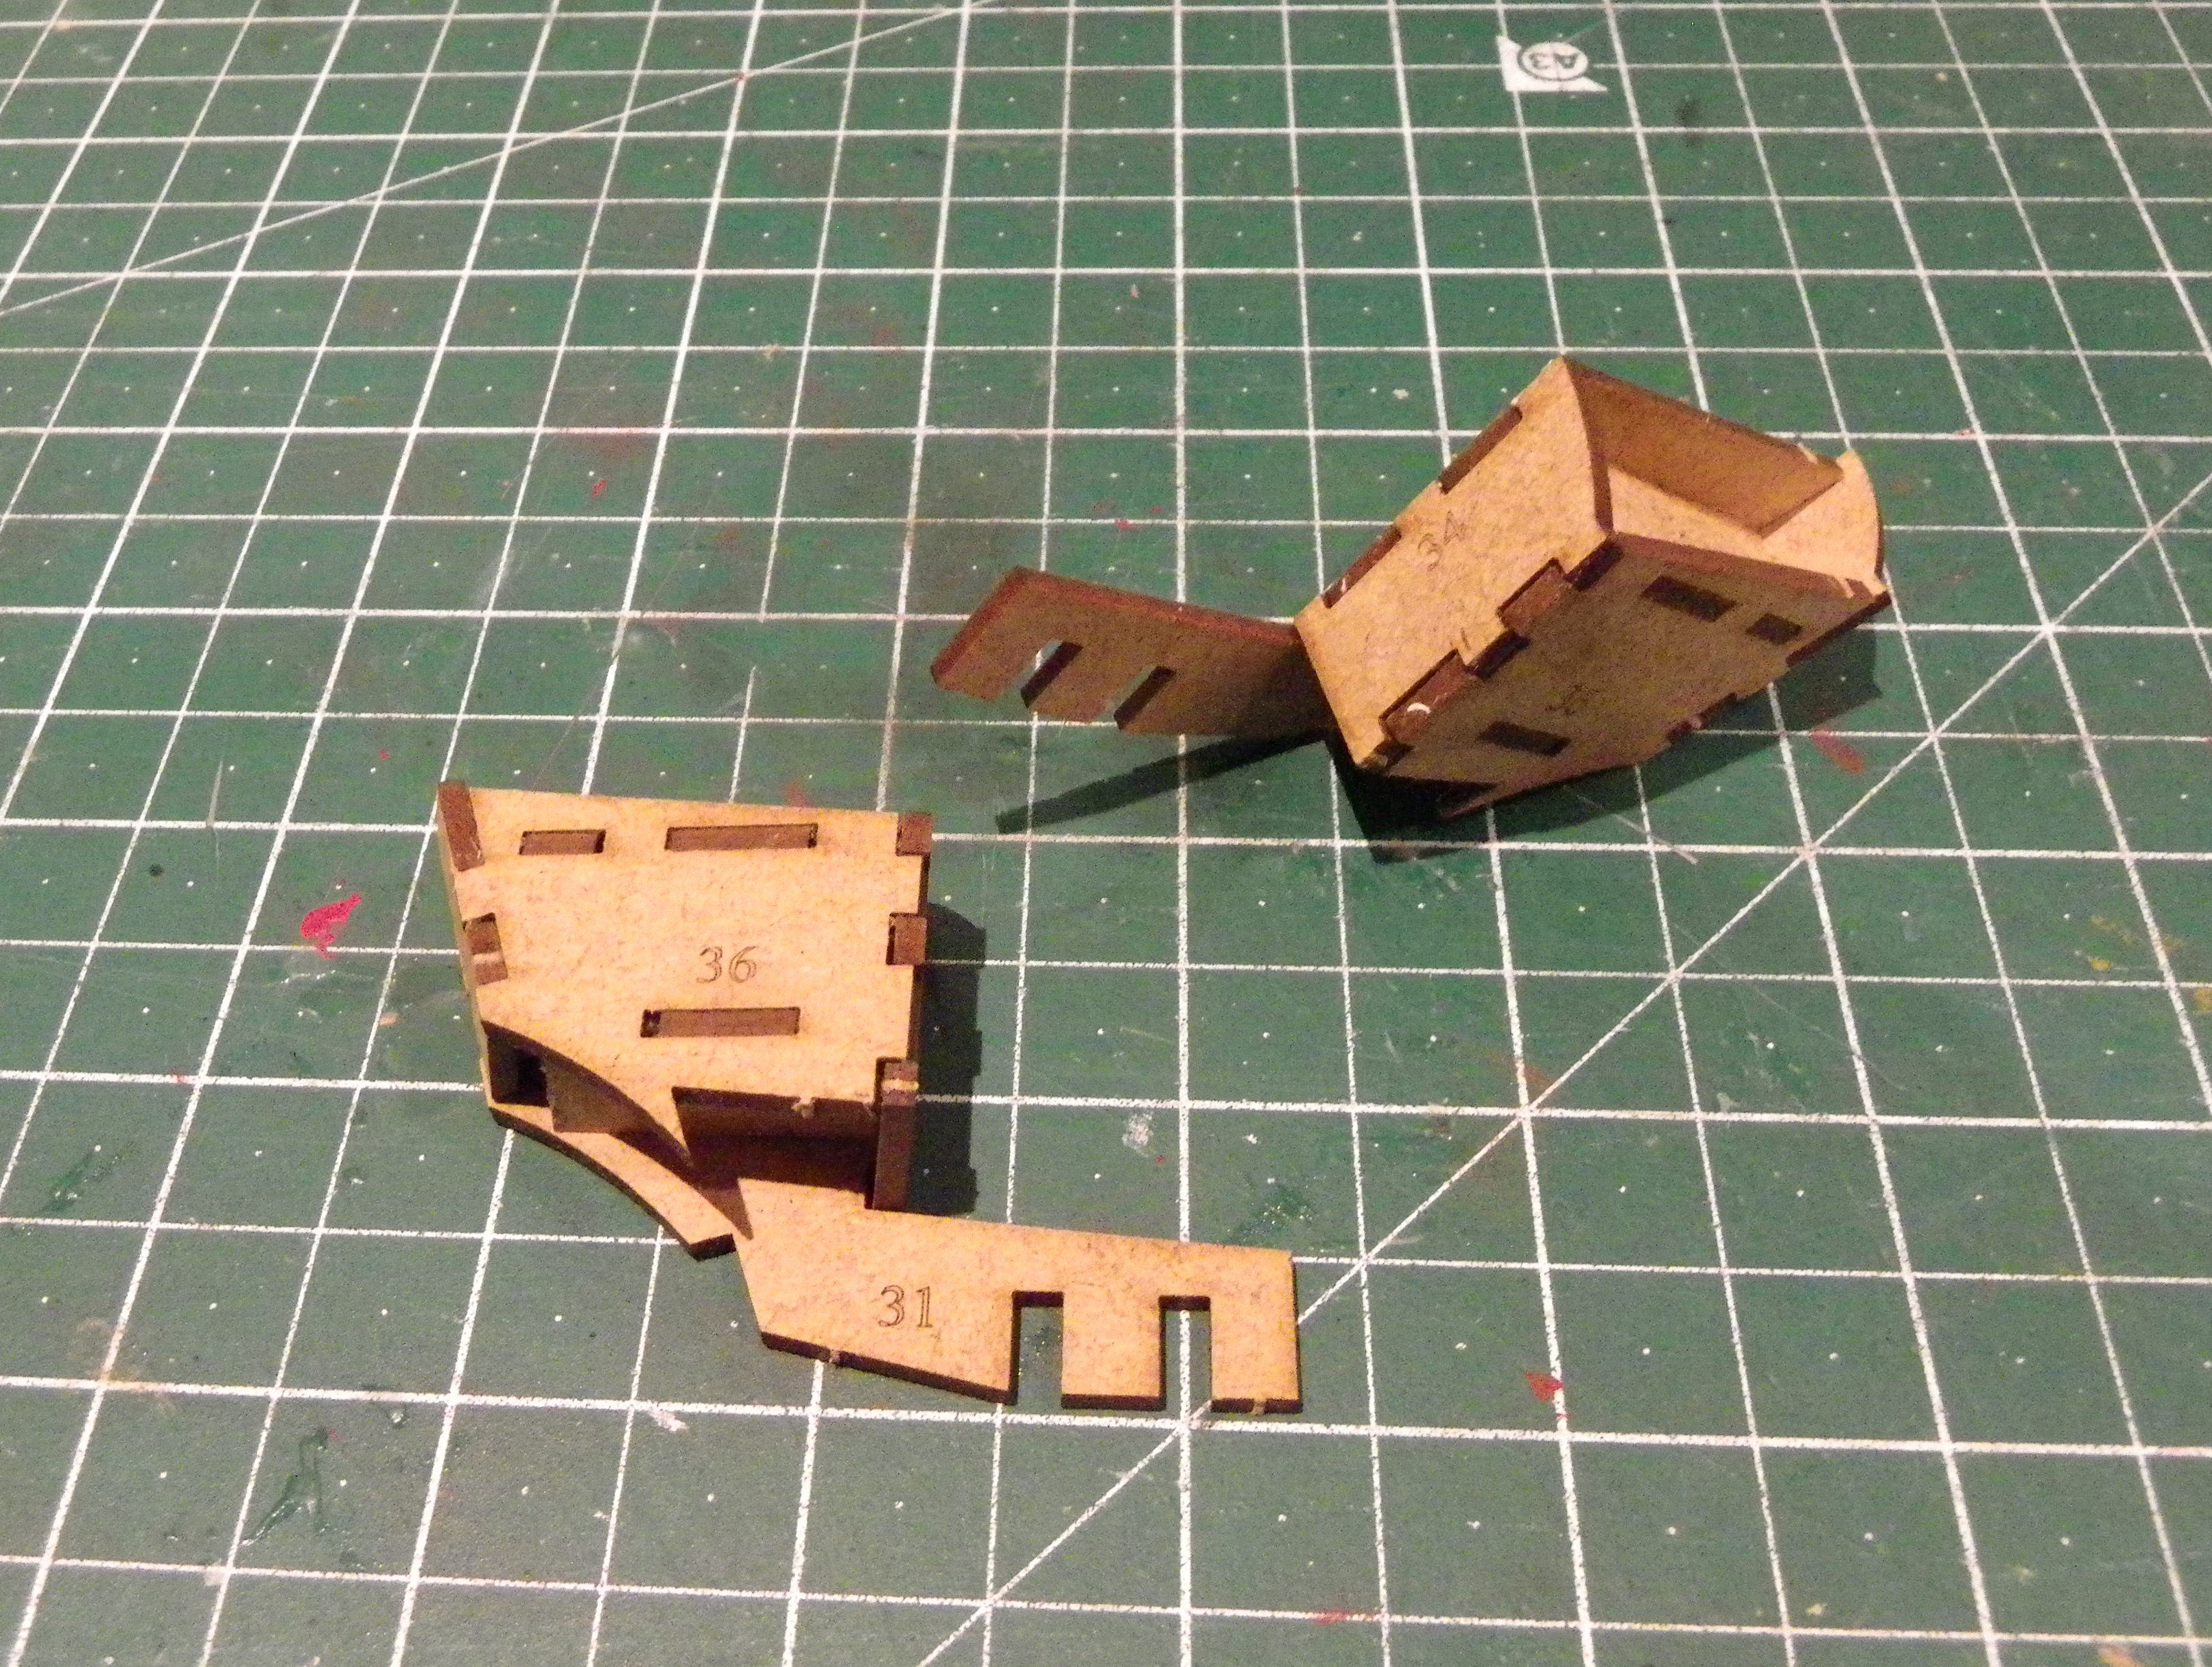
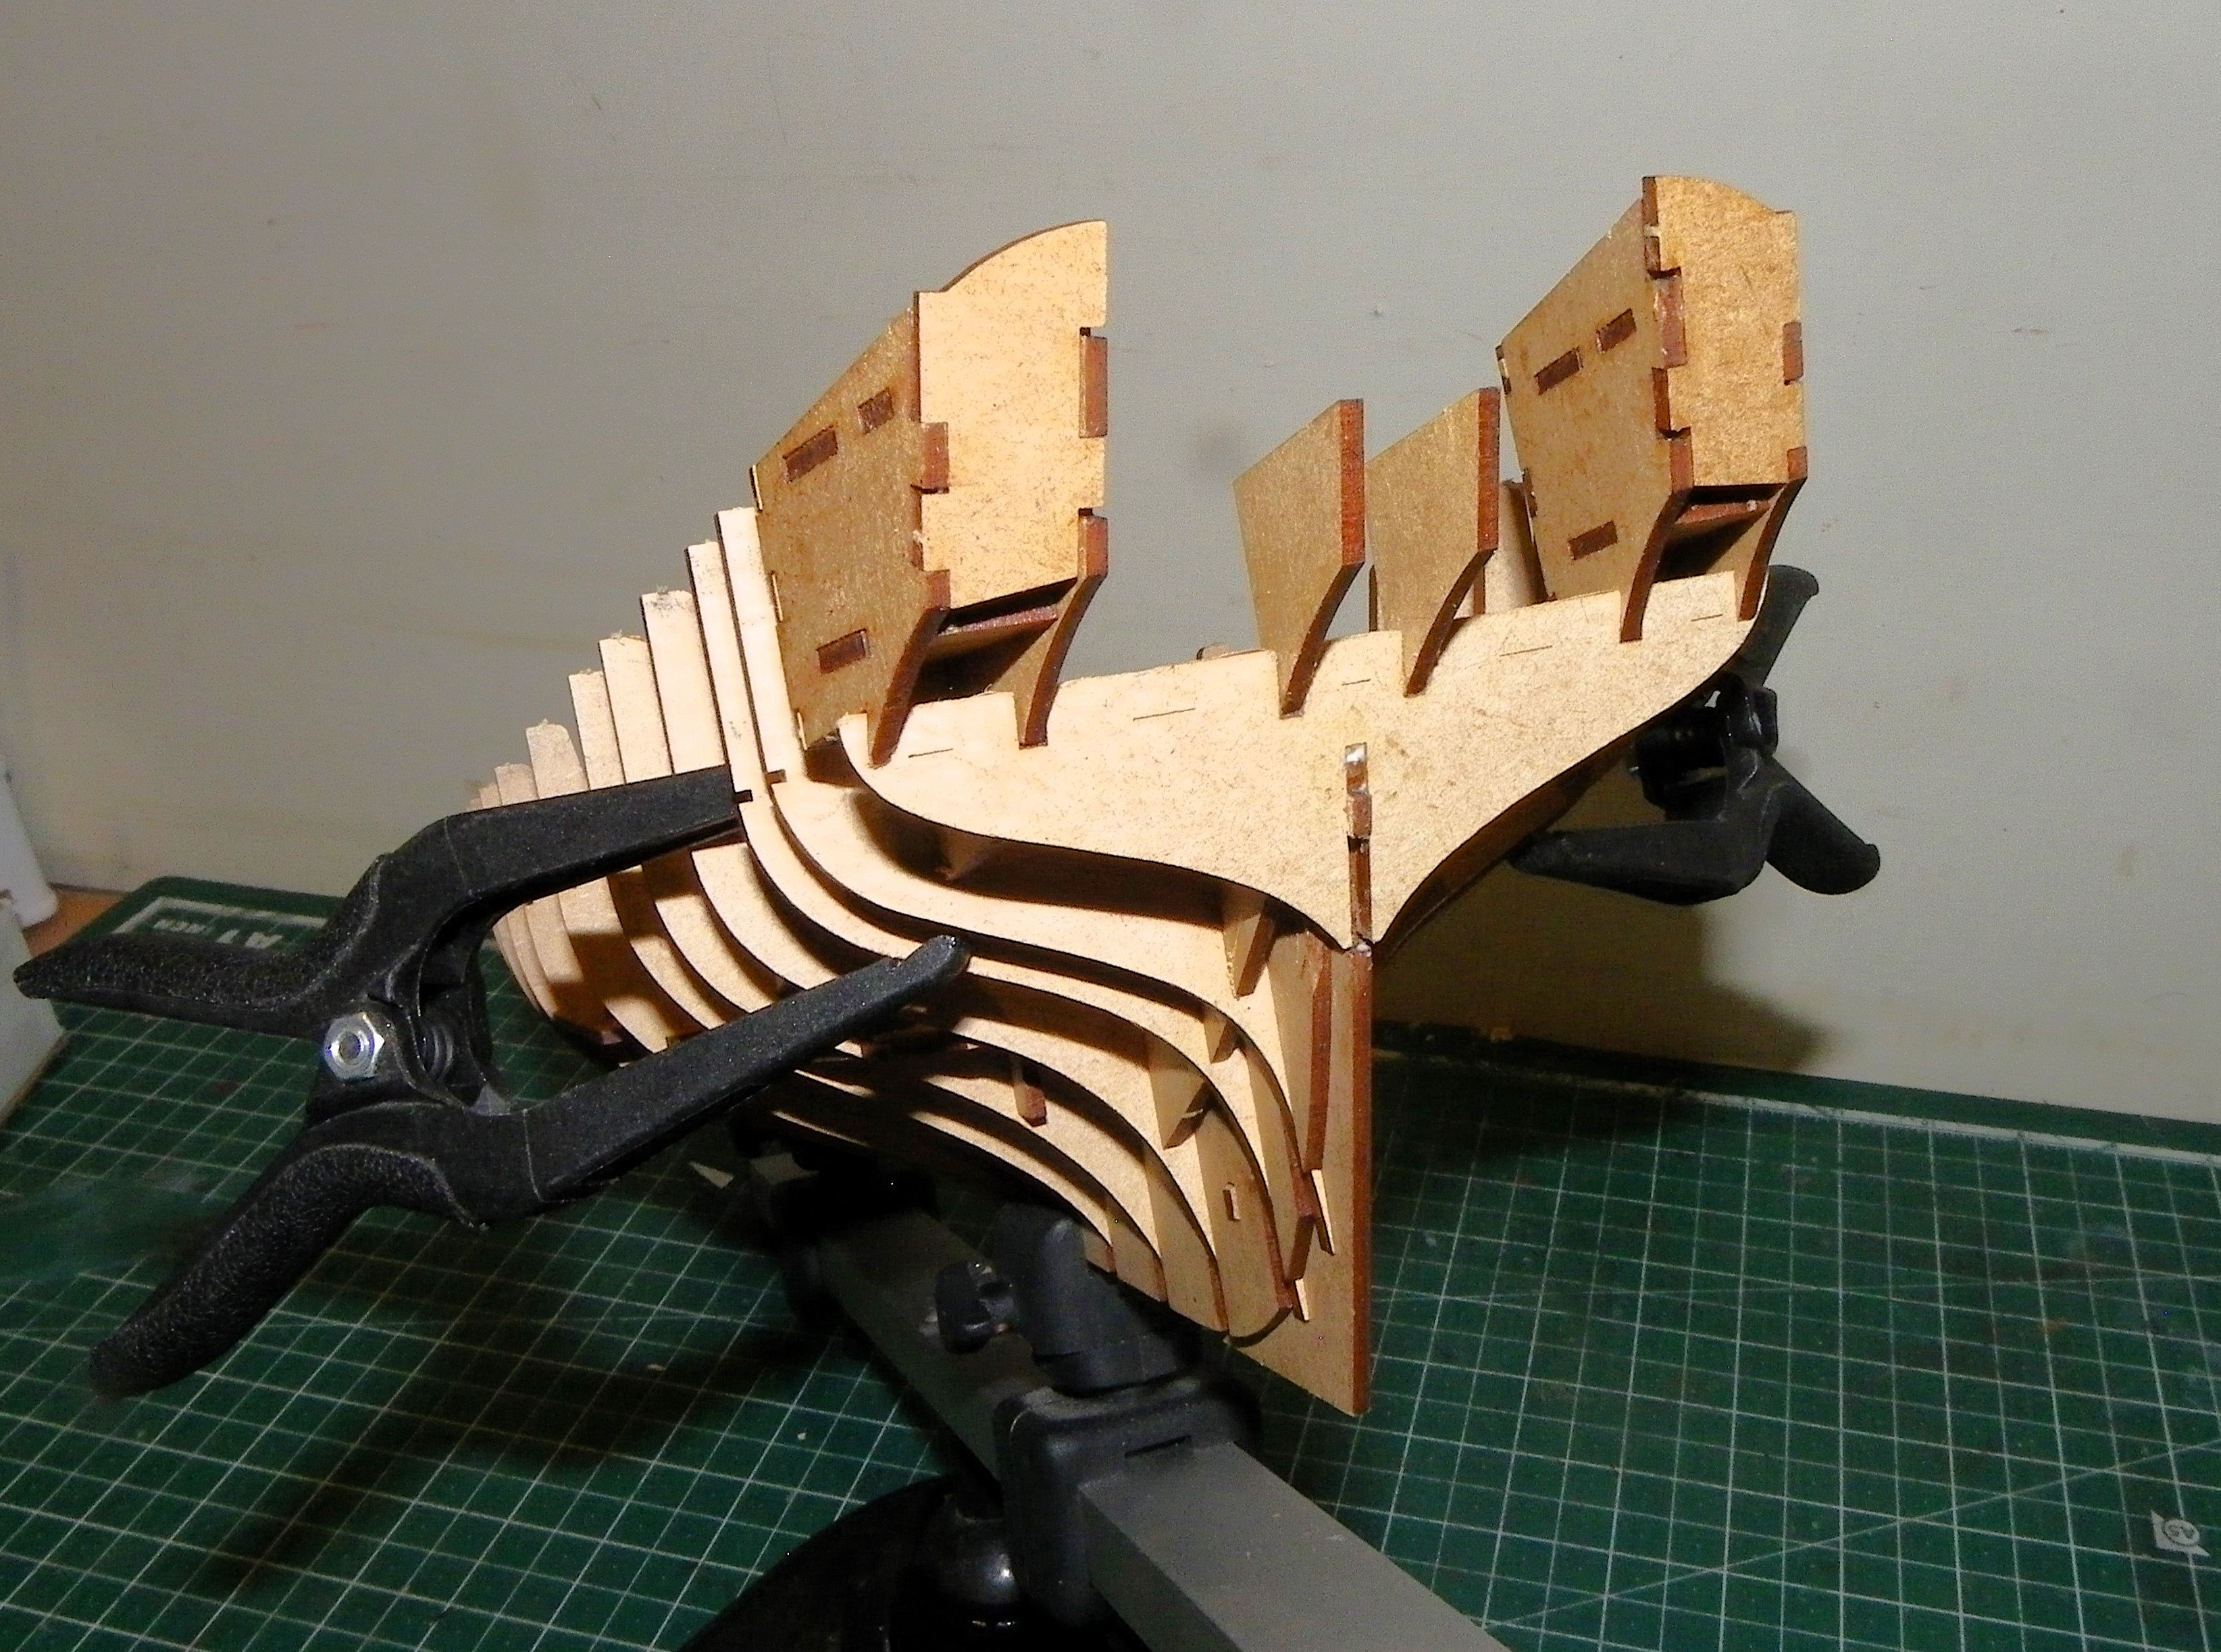
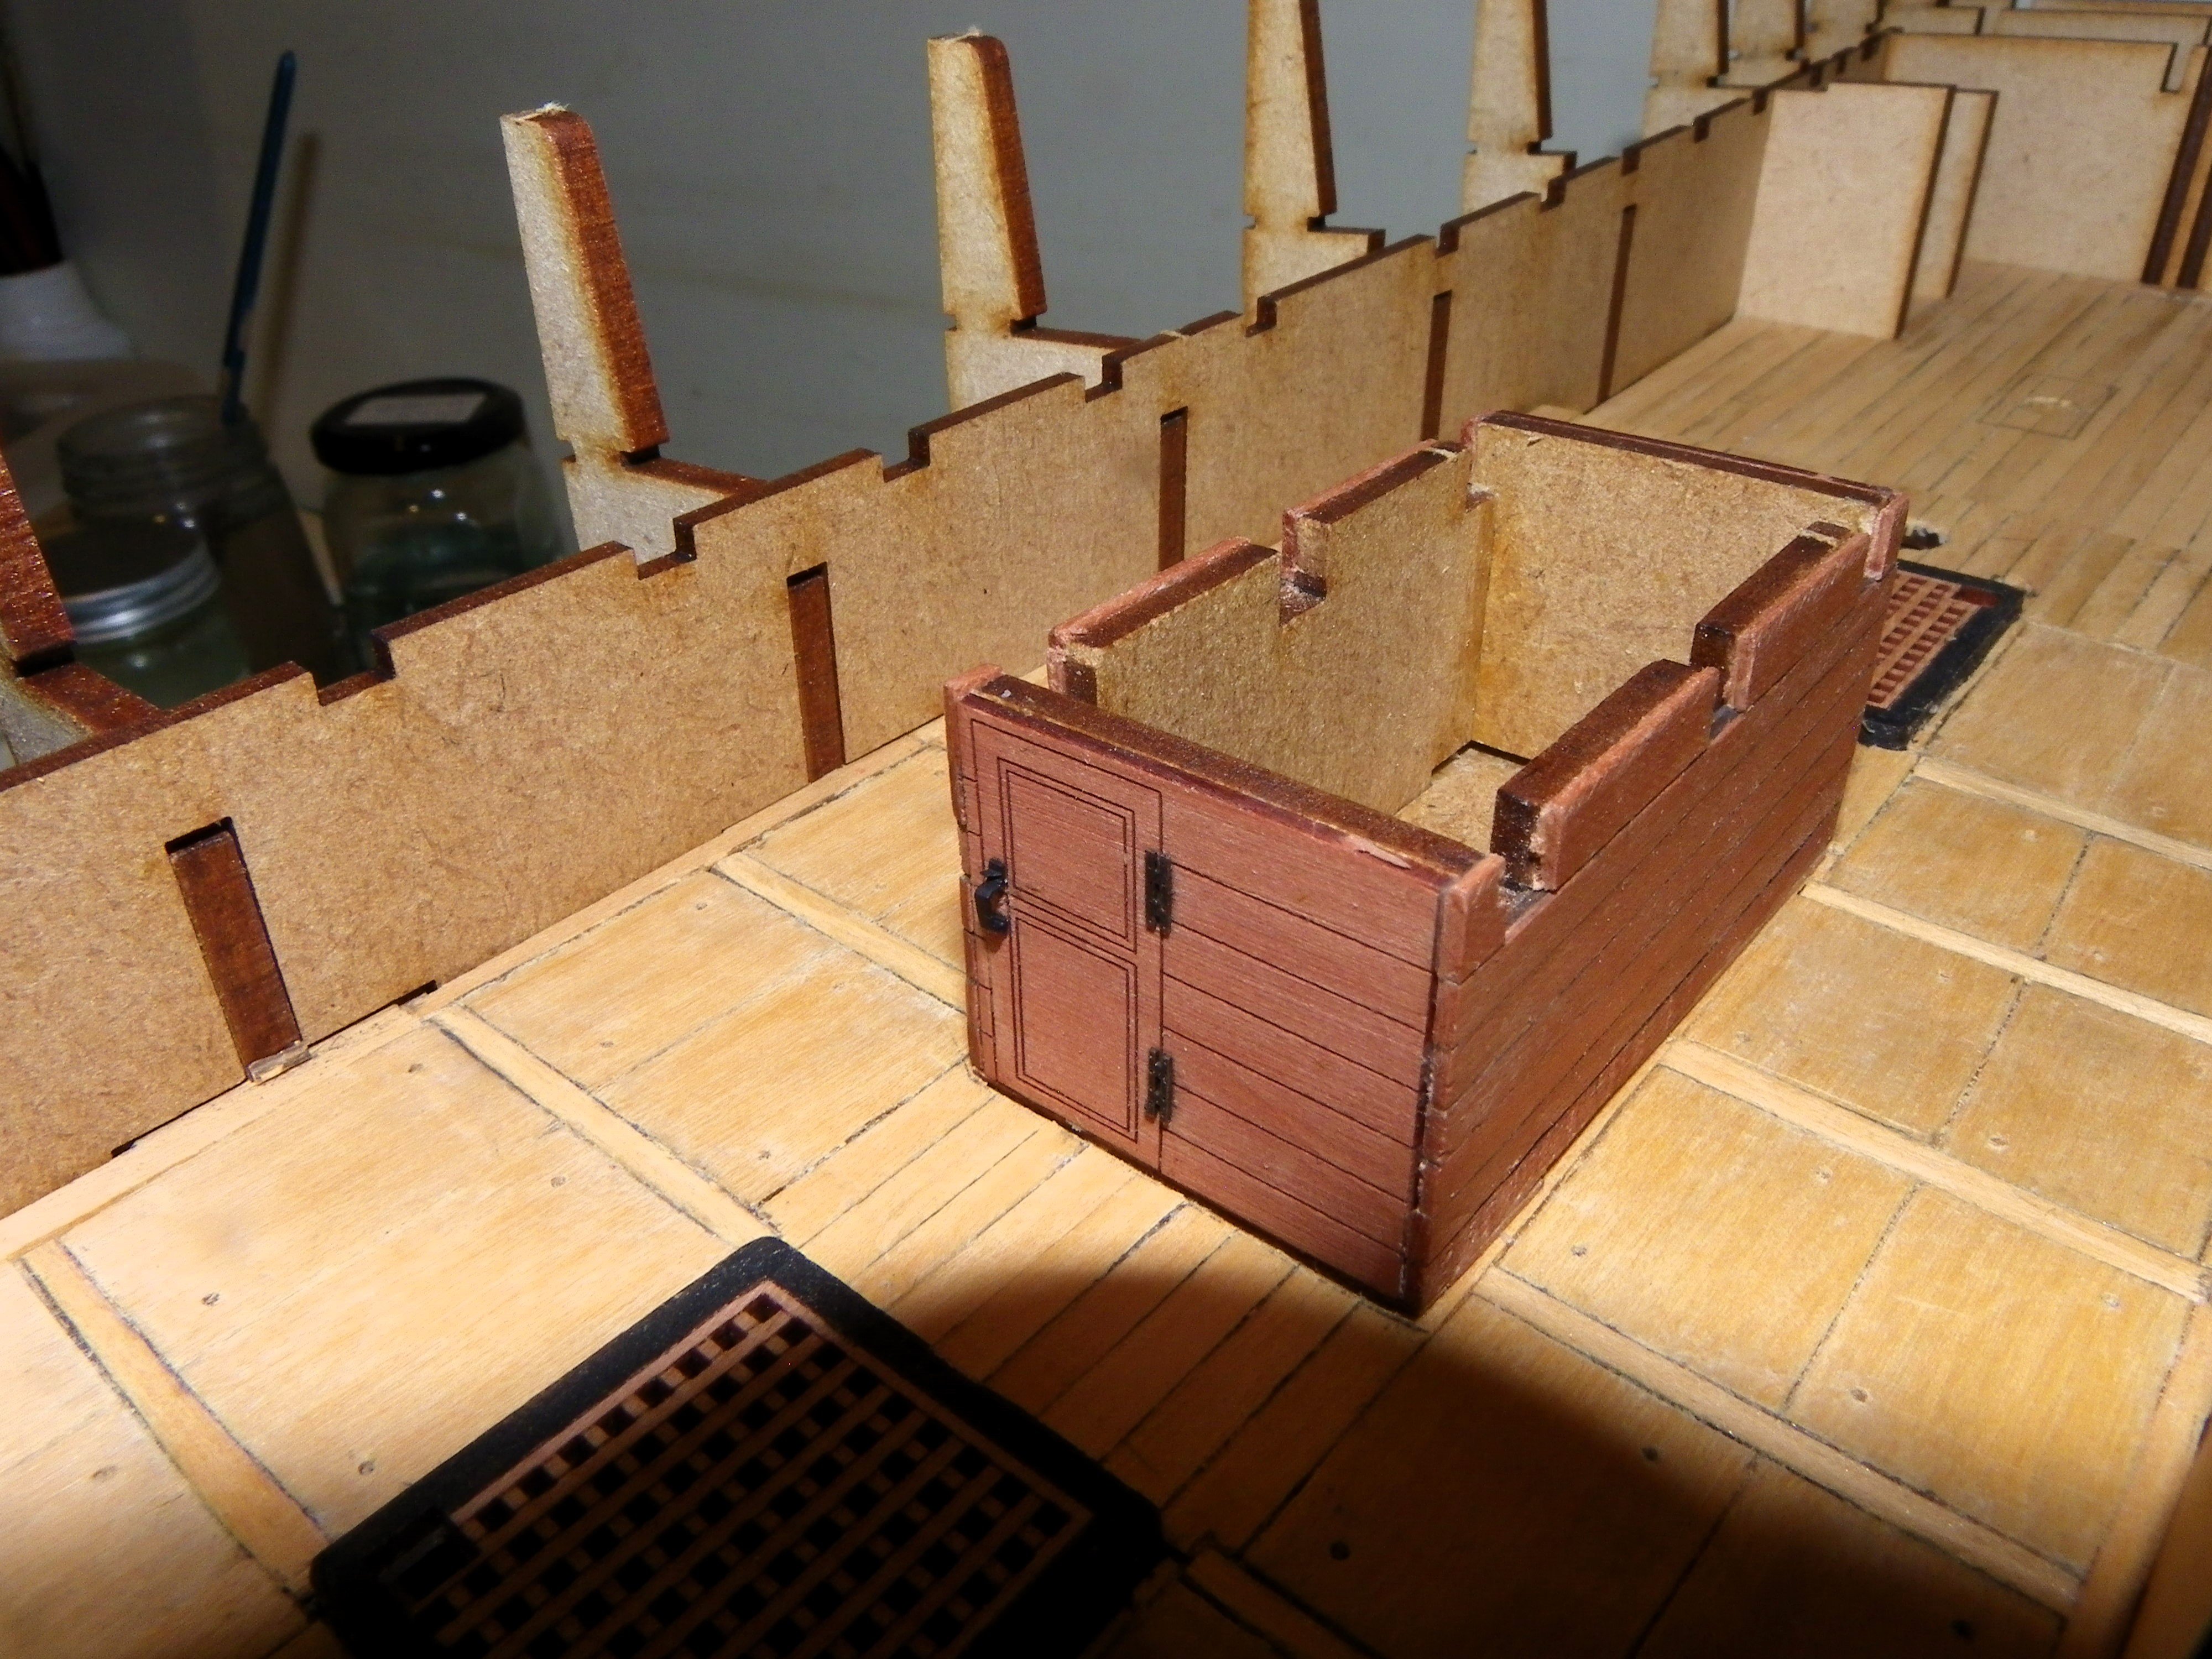
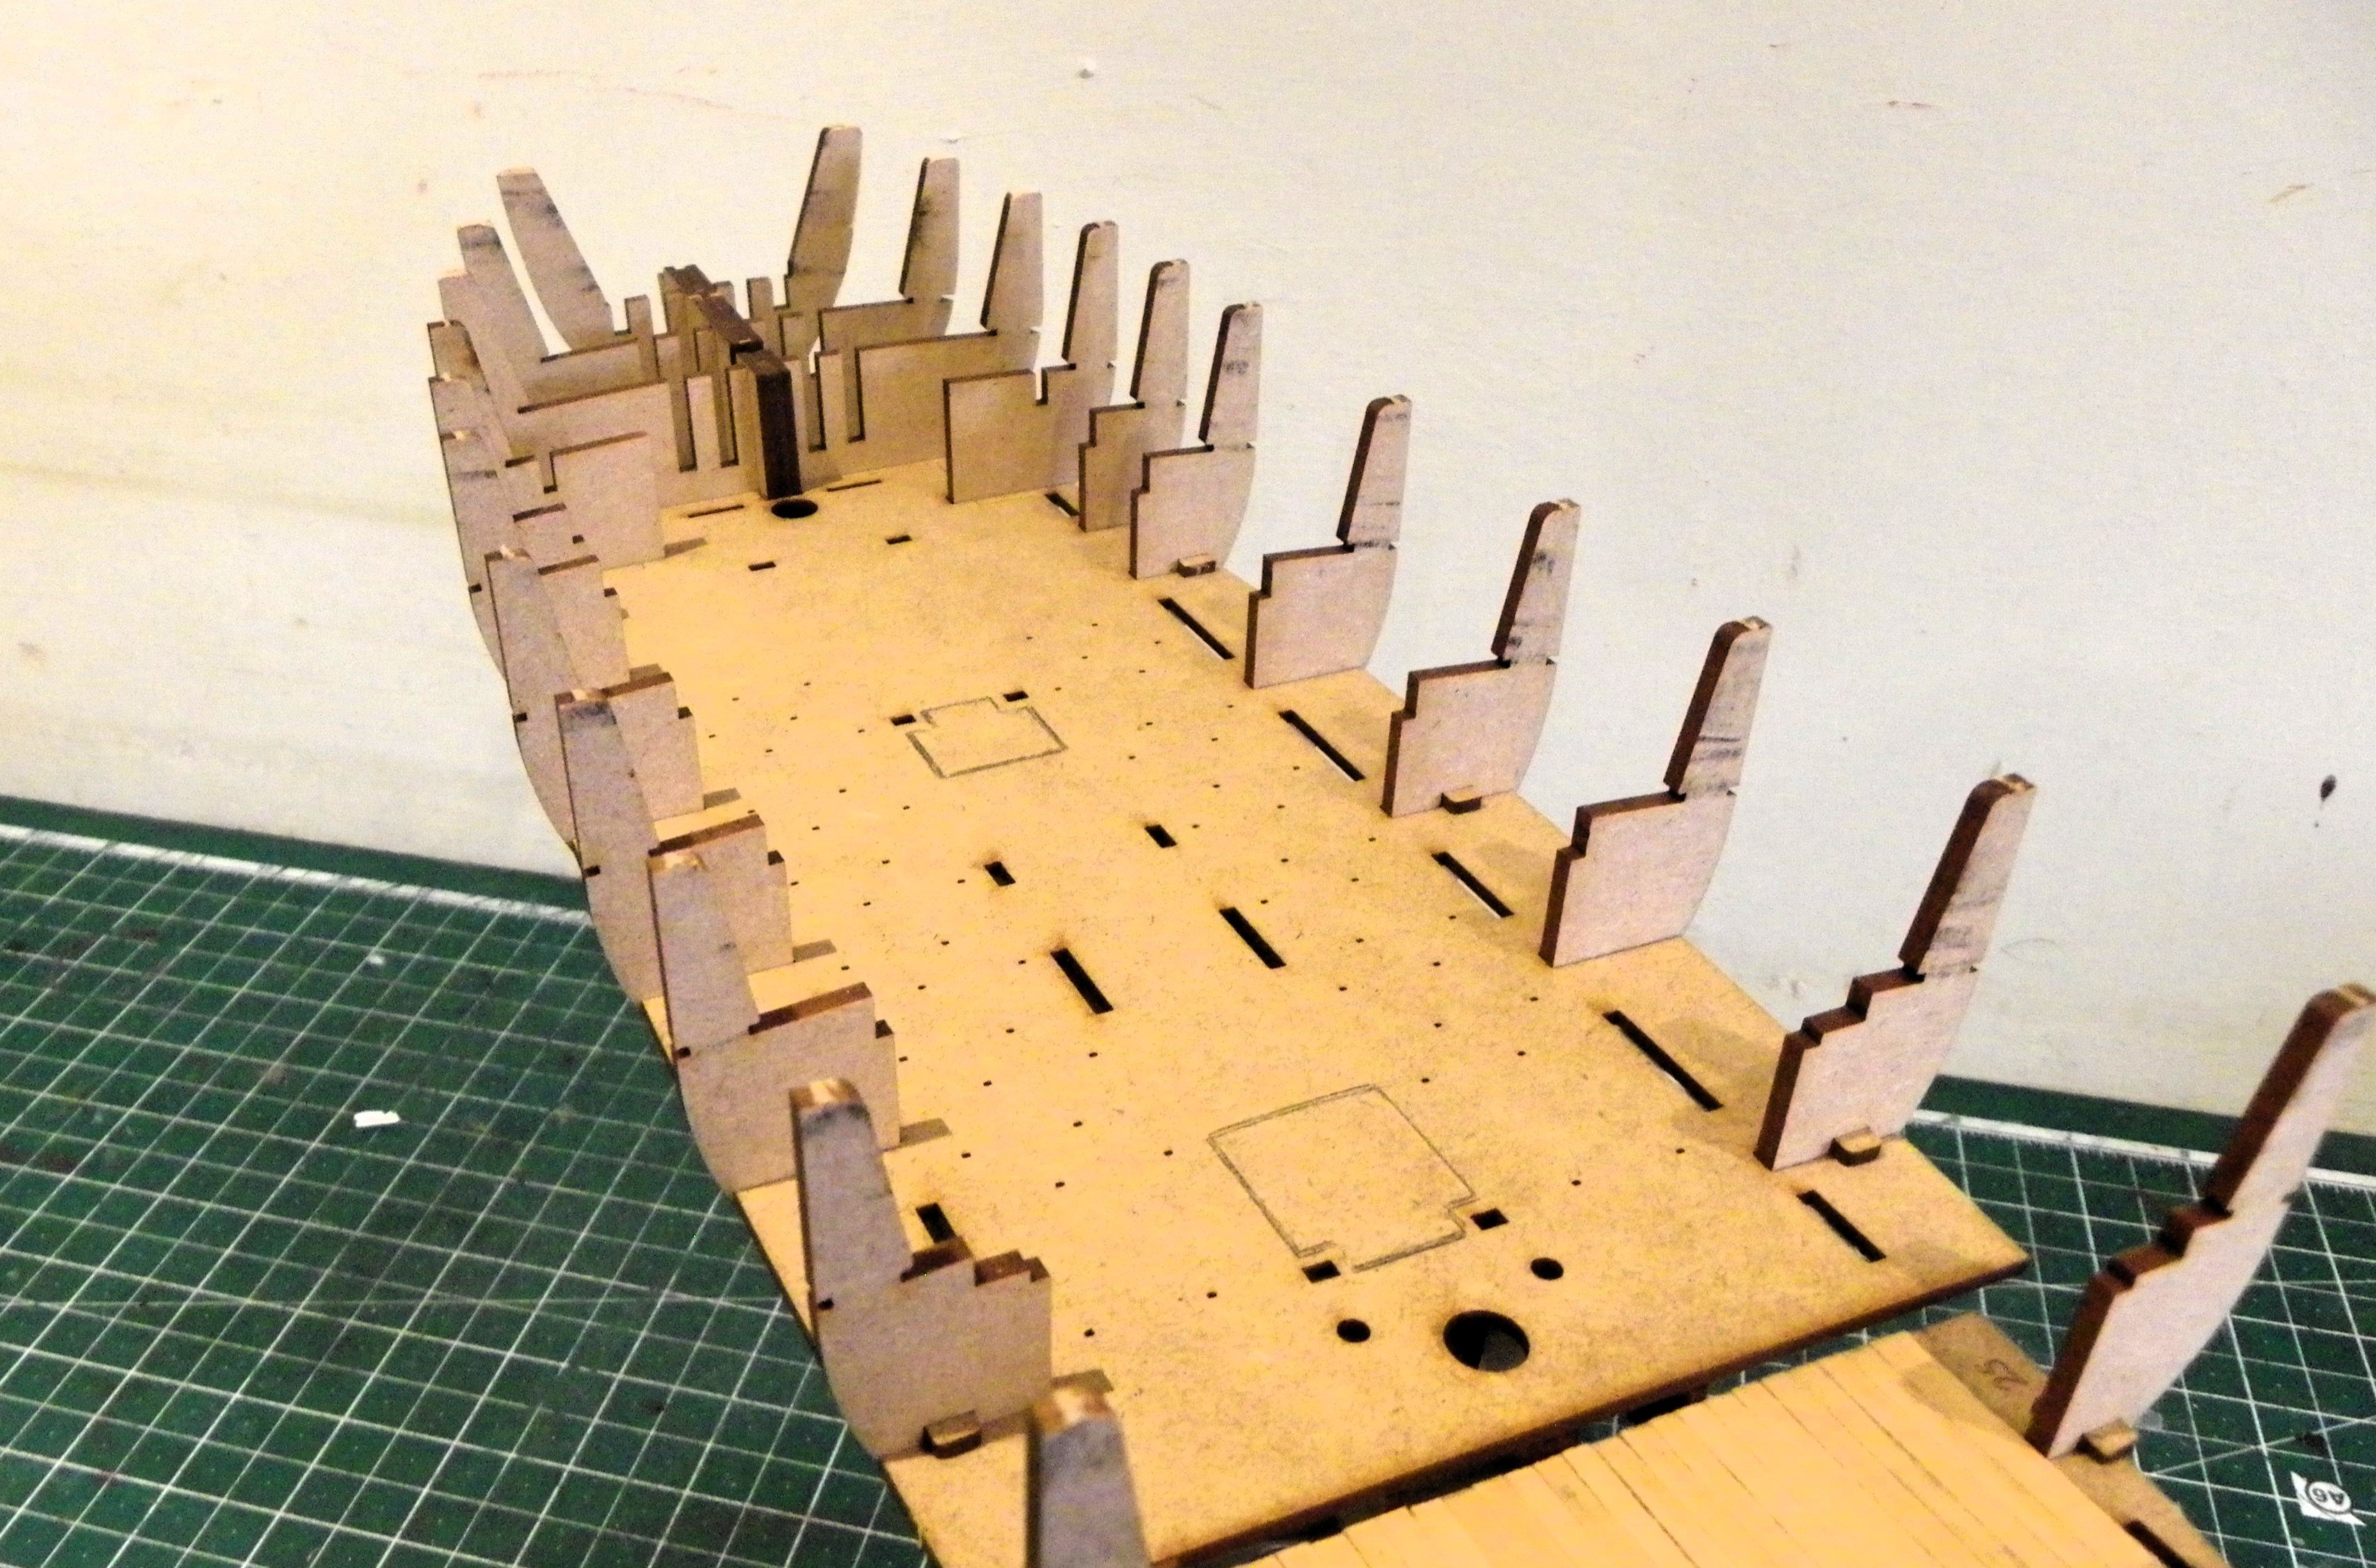
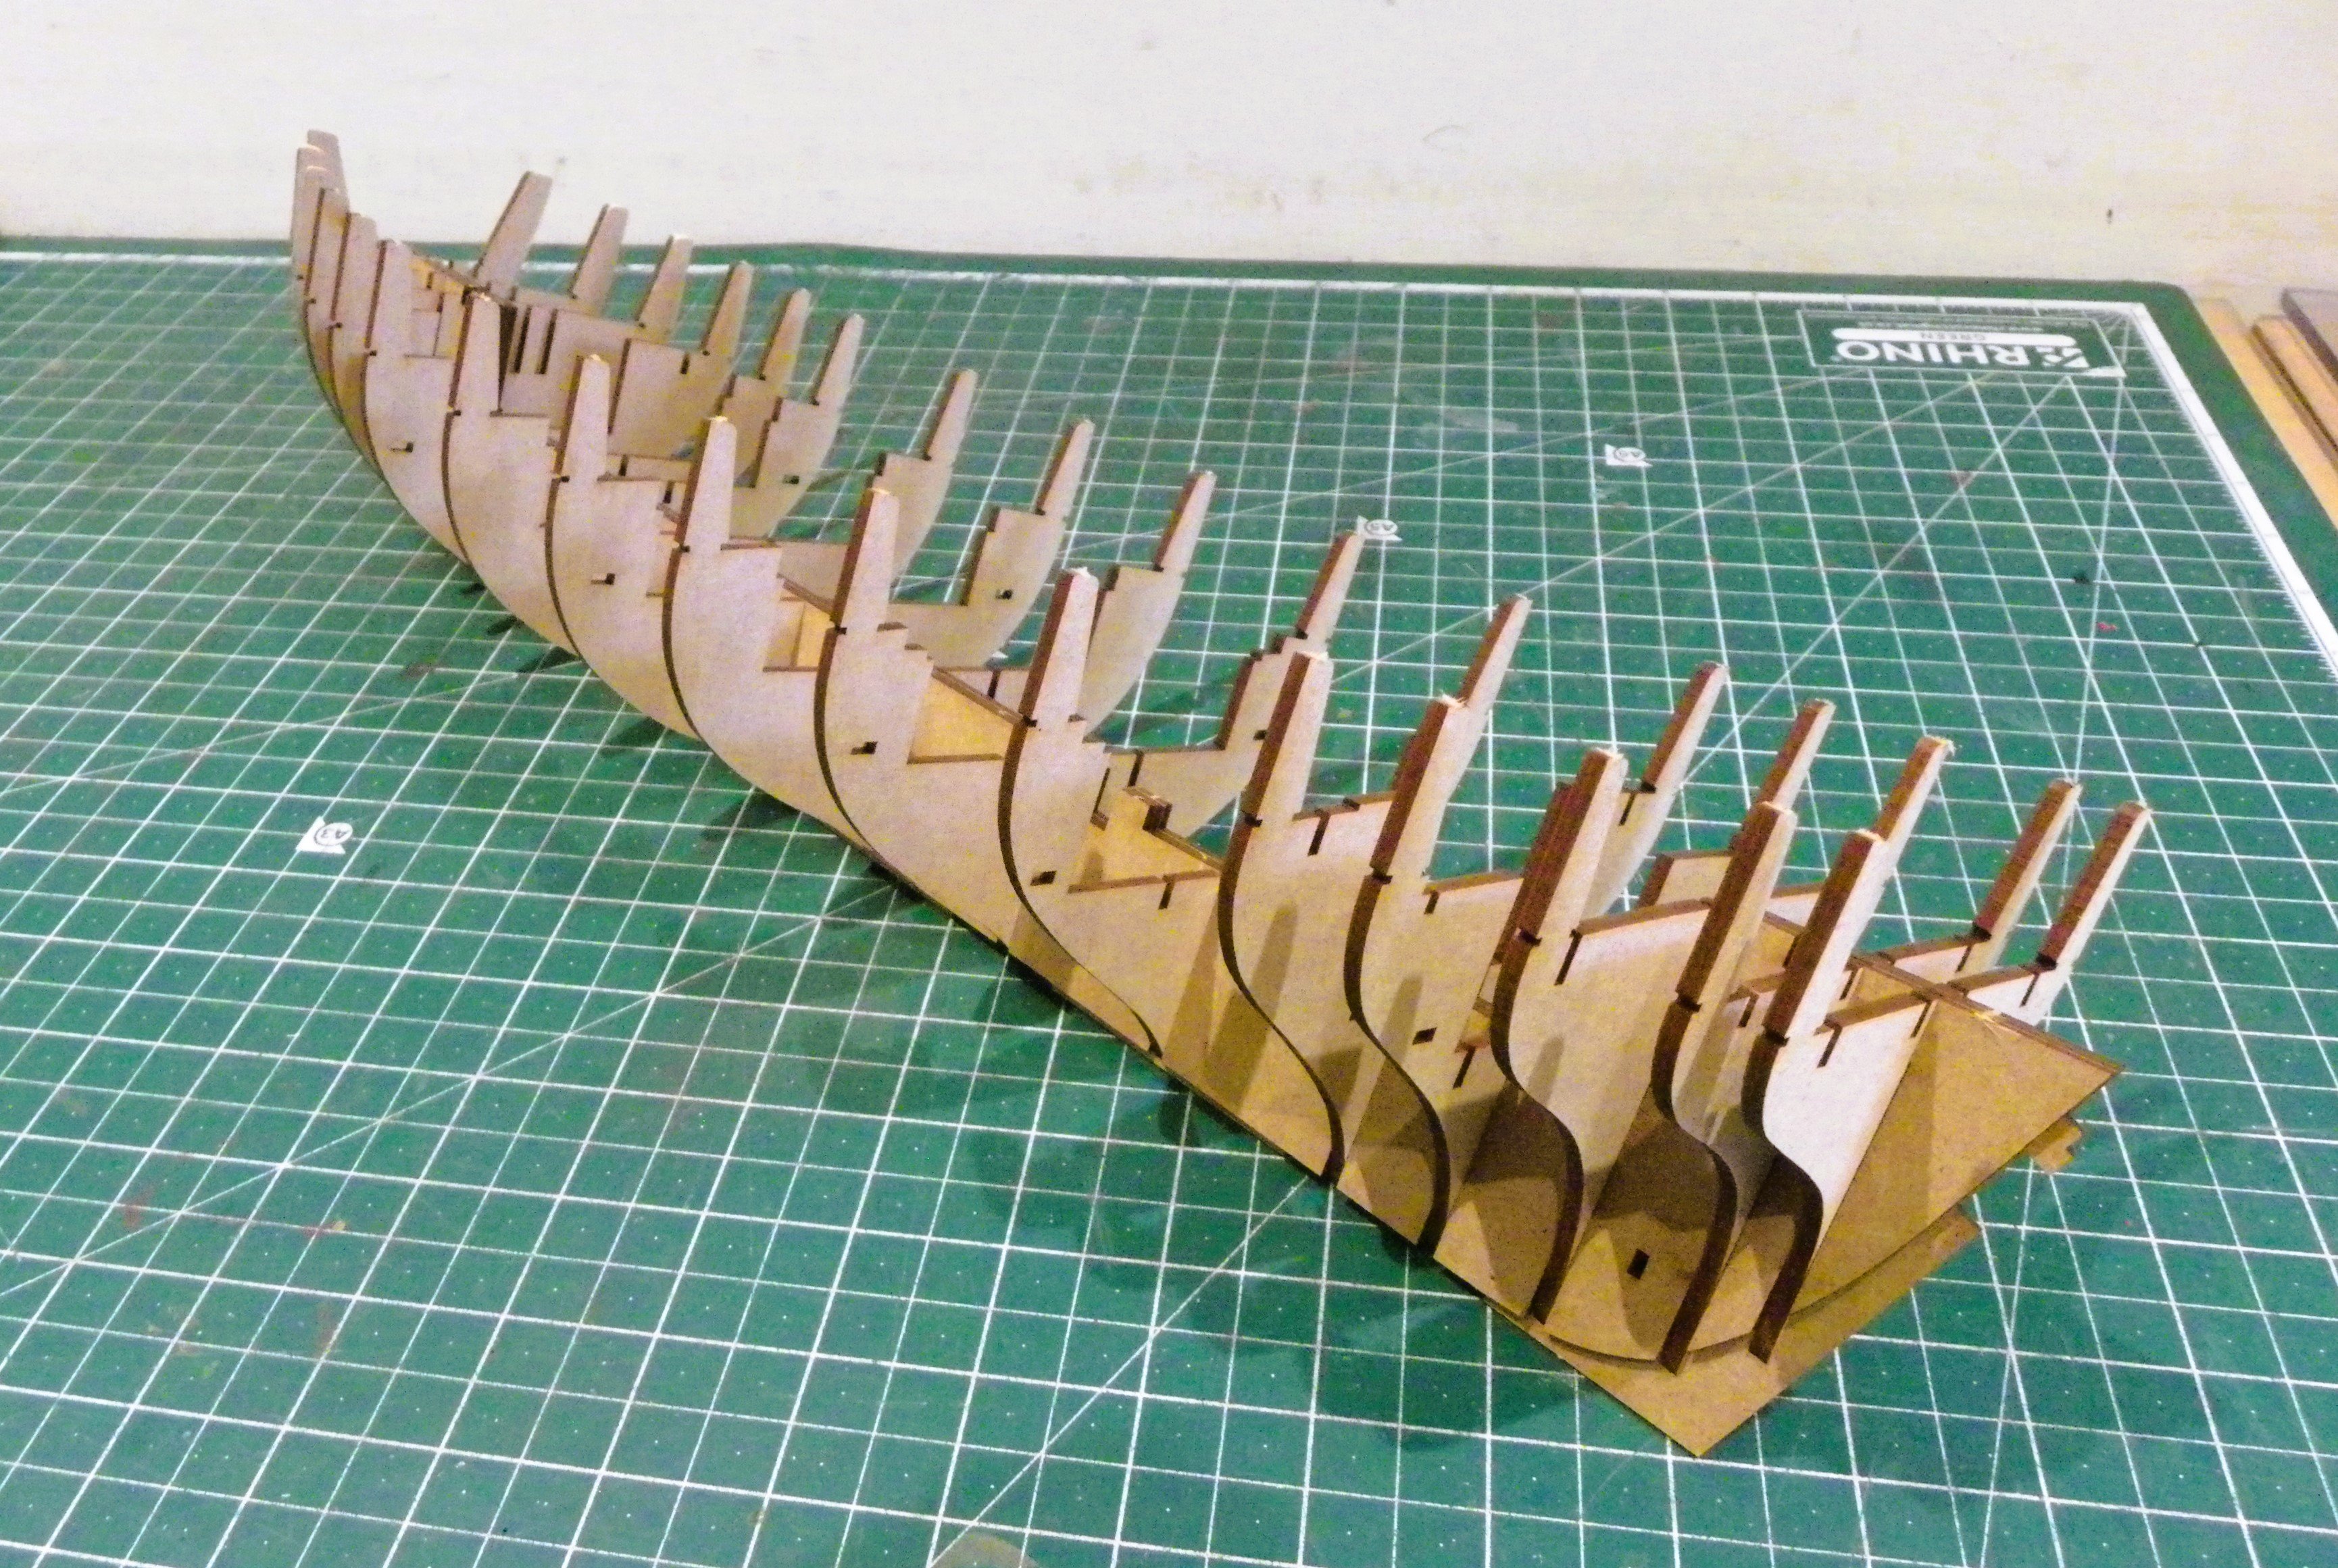
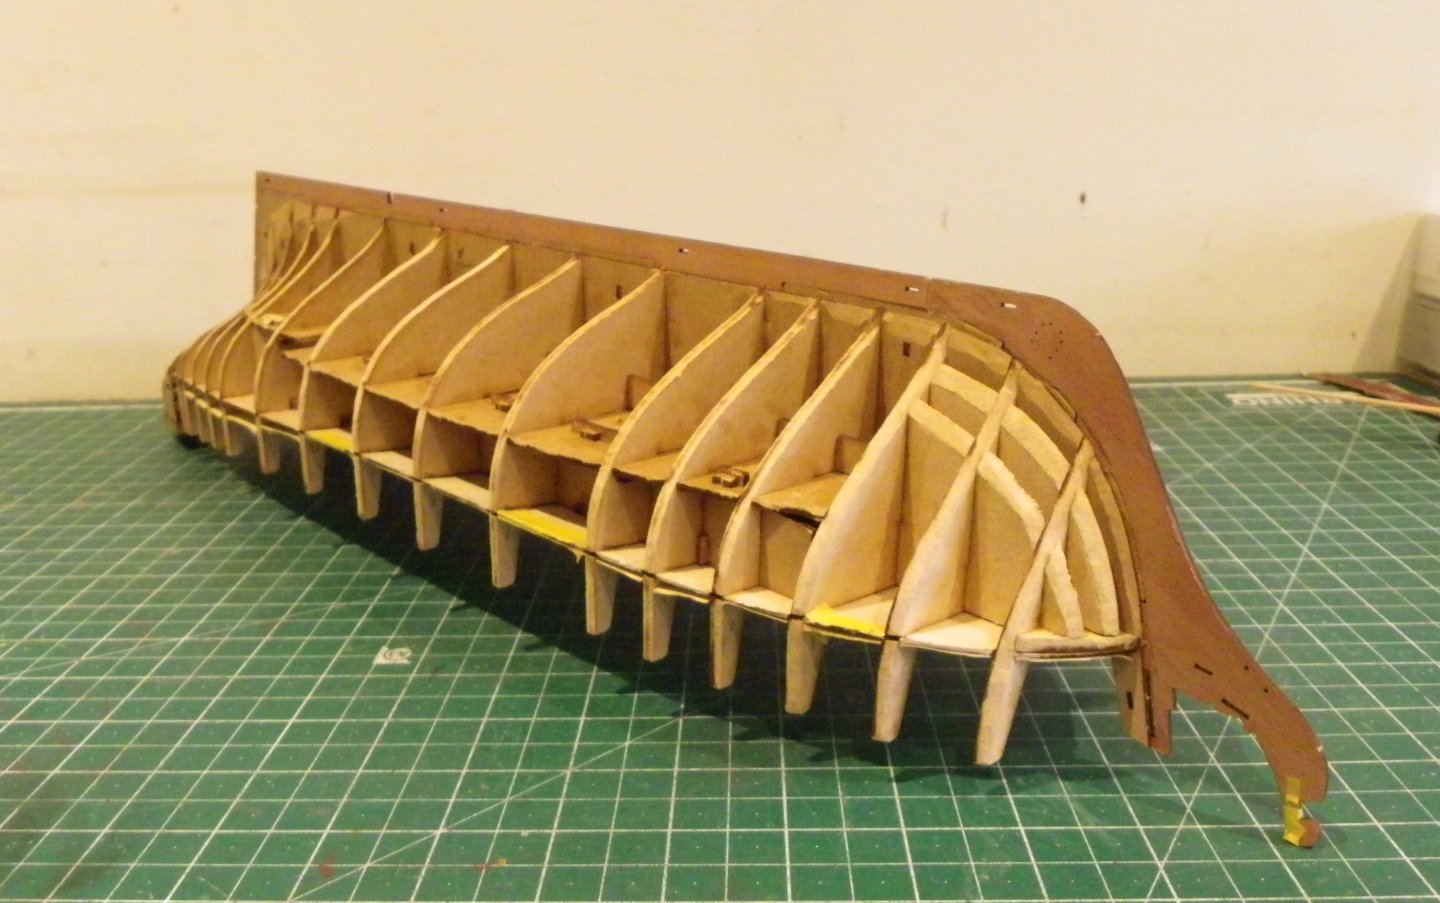
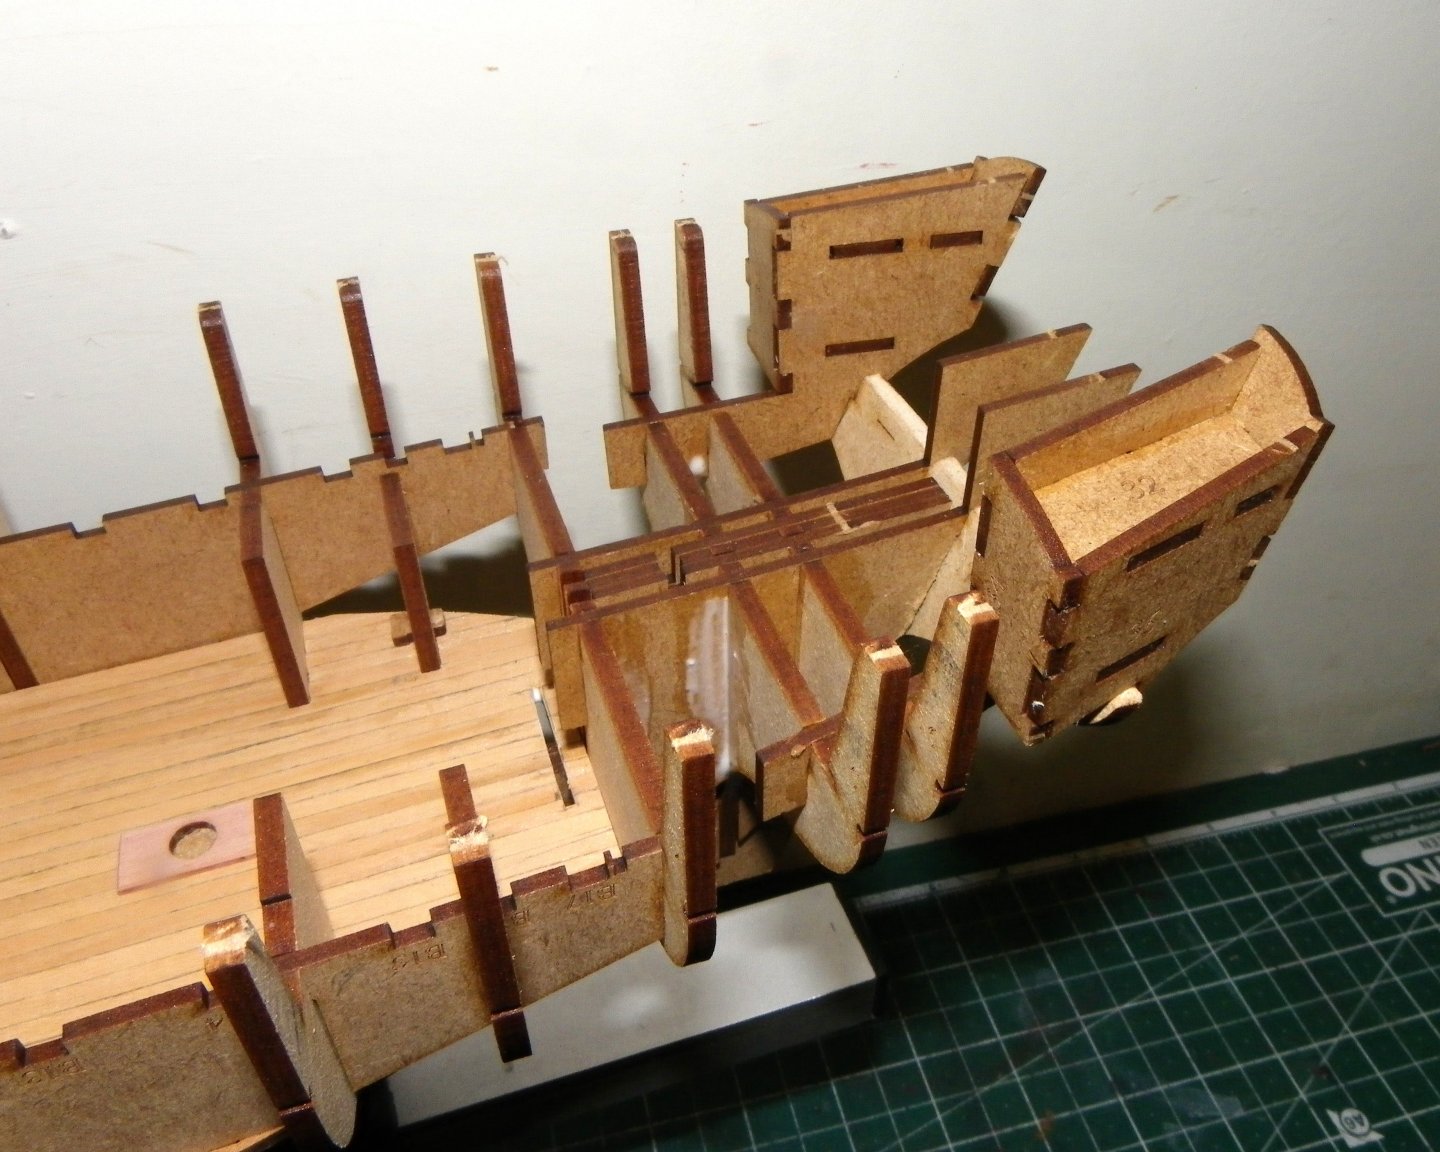
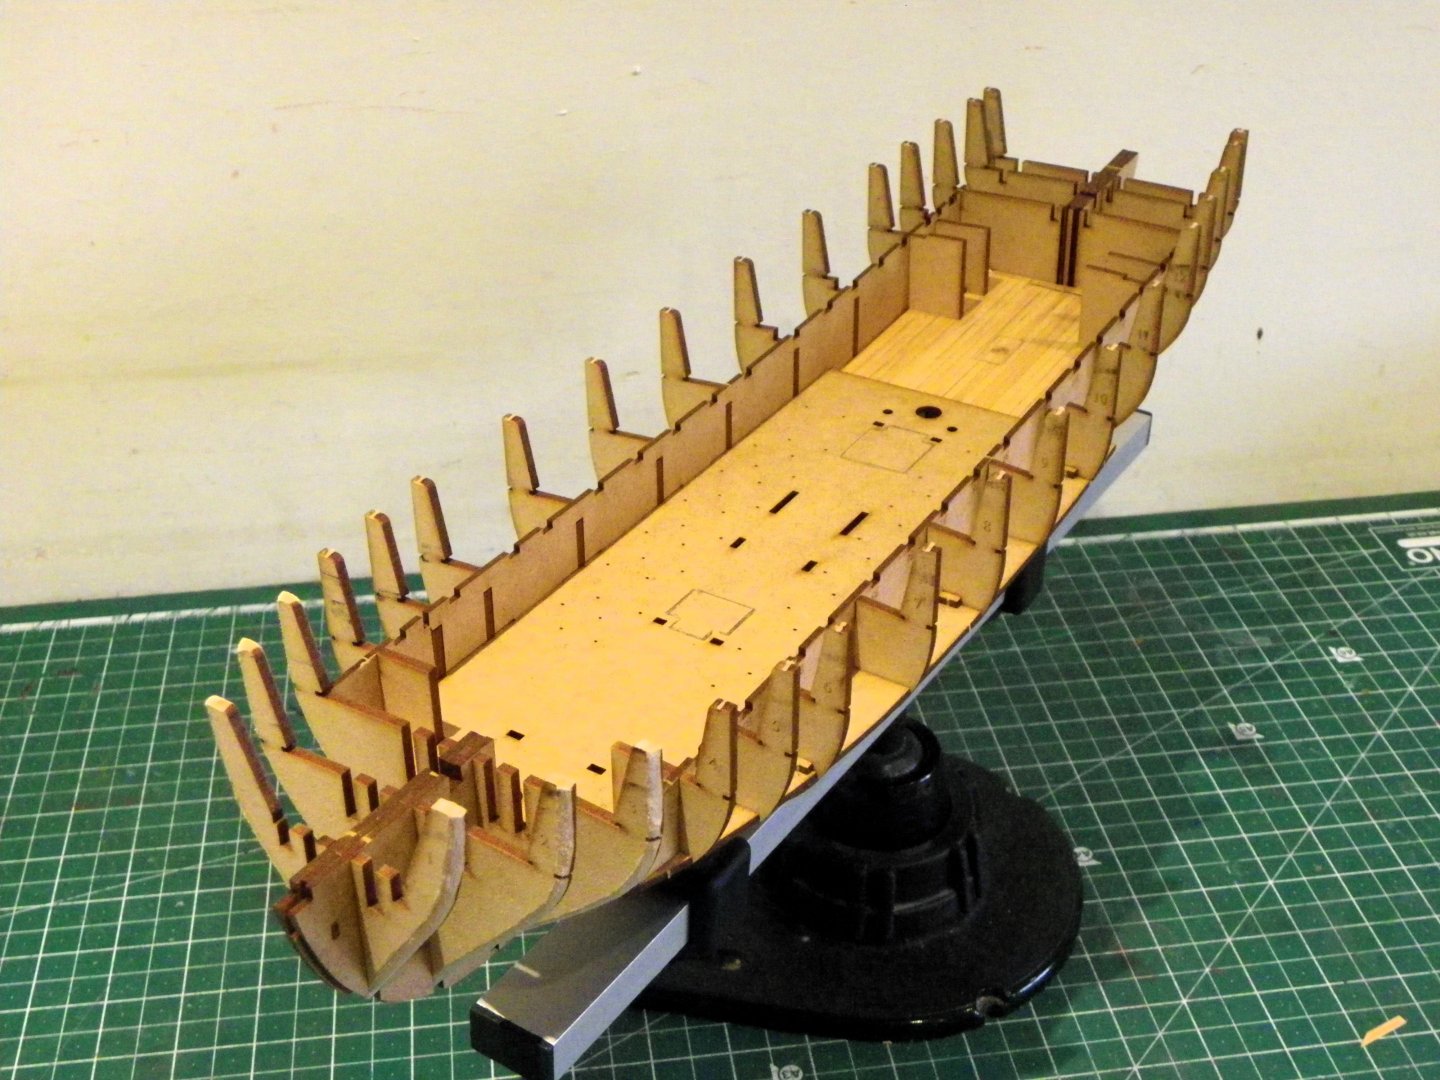
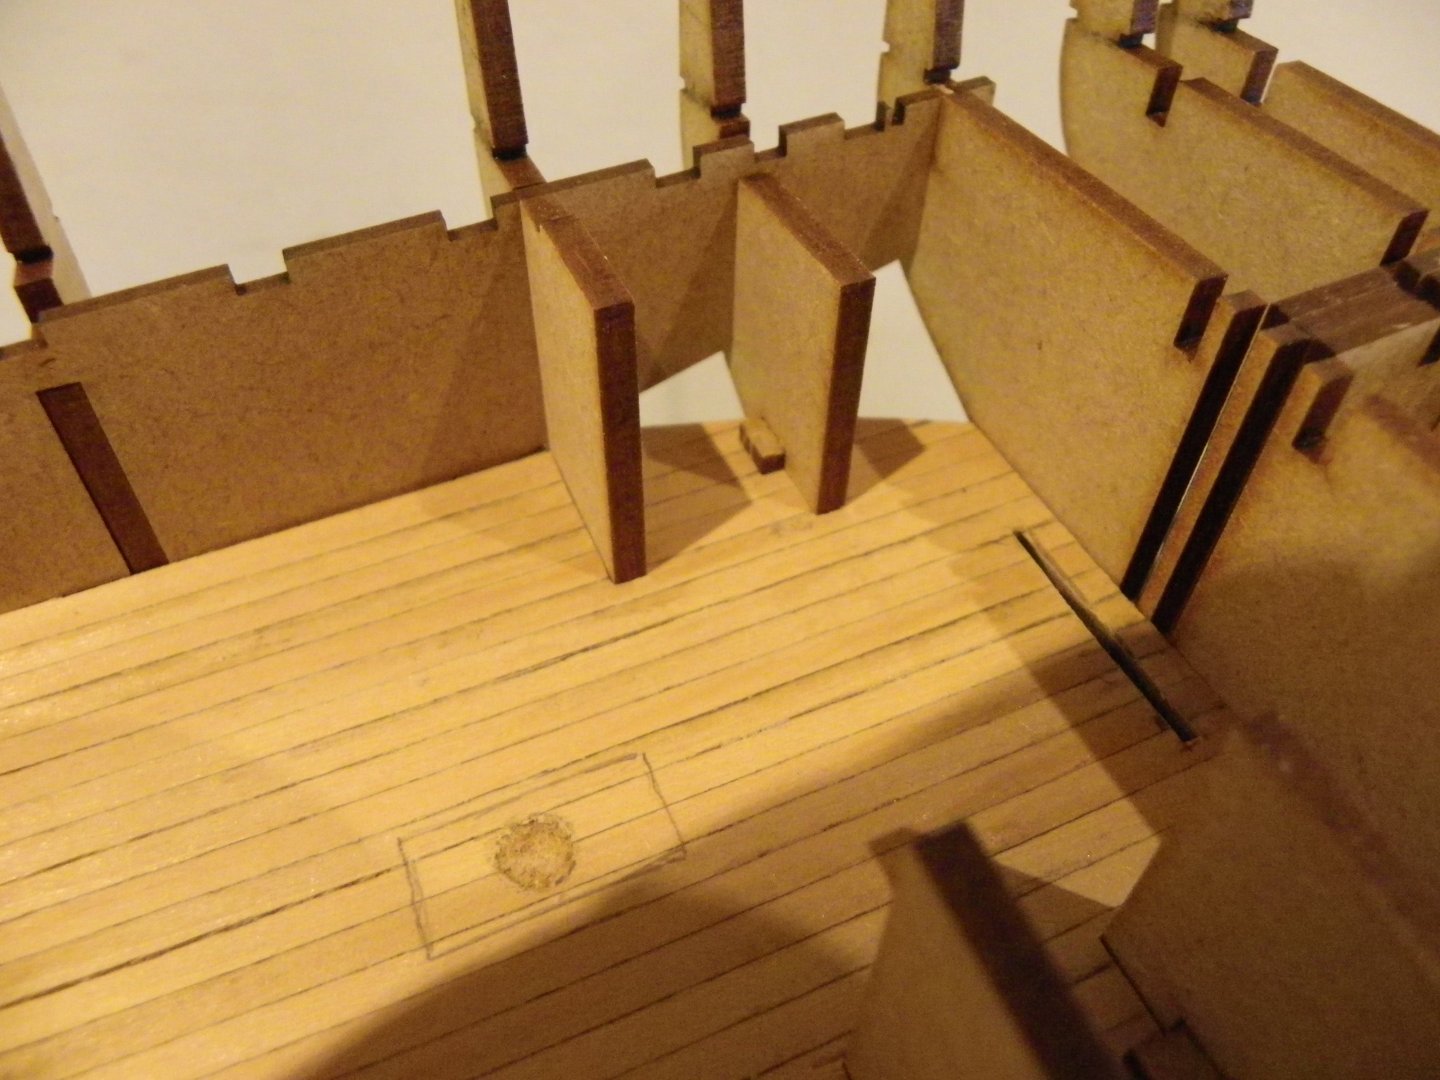
Post 6 Basic construction cont’d This involves adding more bulkheads and fillers to aid shaping of the bow, and frames to form the stern. 0110 0115 The mdf Bow planking patterns are conveniently marked with bevelling lines to start the process, and everything just slots together perfectly. The laser cutting is 100% spot on. I had a slight glitch when fitting the aftermost bulkhead (17) This is fitted prior to adding the two assembled stern cabins on the Upper deck. 0106 No doubt due to a senior moment I failed to make sure that part 17 was fully seated down before gluing to the stern post, with the result that the cabin assemblies would not seat properly in their allotted slots. Fortunately, I managed to deconstruct without damage and rectify the situation. 0118 The carcases for the stern cabins, are a simple assembly and slot into the aftermost bulkheads. 0120 0122 0127 I found it easier to slip the assembly over the aftermost bulkhead first, and then ease into the forward slots. 0132 These two structures are noted on the Adm plan as: ‘Pantry’ starboard side, and ‘Necessary’ Port side. 0123 So that’s the basic carcase stage of construction completed. The more interesting stage of fitting the internal panelling and cabin divisions beckons. B.E. 18/12/2024


- 332 replies
-
- 19
-
-
- Harpy
- Vanguard Models
- (and 1 more)
-
Thanks for that Daniel, an interesting read. These things do cross your mind when looking at a project, even tho' they won't have an impact overall. As far as the Harpy model is concerned alterations won't be required as these areas are covered by the upper deck, and I will be be very selective in what I expose. Thanks again. B.E.
- 332 replies
-
- 3
-
-
- Harpy
- Vanguard Models
- (and 1 more)
-
Thank you Glenn, I don't think Harpy would give you much brain ache, a nice relaxing build I think. @ Tom - I've got most of my Boxwood from the USA, and Estonia, altho' the stuff I'm using on Harpy is from the UK. Post 5 Fitting the Lower deck To complete the deck, w-o-p was applied to the boards, and a final light sand using p1000 paper. To finish the scuttle covers 58 ring bolts are made up. A repetitive and tiresome task but I prefer the look to ‘bent over’ eye bolts to represent these features. For these I use Amati 2mm brass rings and fine eyelets. The holes were countersunk to allow the bolt part to sit lower in the cover. 0085 I still can’t get my head around this scuttle set-up, must have proven awkward walking about with that ring fest on the lower deck. I have also mused about the purpose of the Sail Room. Was it used for storing sail tackle rather than canvas itself? 098 From the Adm. Plan the room is only 9’ x 5’ – a small garden shed in modern terms, not much room for large sails. 092 I can now peg the deck in place and add the cable housing sides, also secured by pegs. 088 These require gentle handling, the mdf will snap at weak points if lateral pressure is applied. It is also important to seat these fully down without pressure to accept the retaining pegs. Because I planked the deck careful trimming of the edges was required to facilitate this. This system is a joy to work with, no more messing about with temporary clamping, and use of tape to check the fit. 089 Regarding the cable store, I wonder how they got the cable into it? There is no apparent access either from the Lower deck or above, shown on the Adm. plan. 095 More puzzlements have occurred to me about this small vessel than any previous build I have done, a ship of mystery. Time to carry on with a bit more of the basic construction. B.E. 16/12/2024


- 332 replies
-
- 23
-
-
- Harpy
- Vanguard Models
- (and 1 more)
-
Post 4 Before planking began, it was necessary to check a few steps ahead to see what additional fitting may impact on the decking. The kit design fortunately allows a stable dry run assembly. A major fitting of the lower deck is the Sail room comprising an mdf carcass with engraved pear outer panels. For whatever reason I couldn’t get a good clean fit of these panels at the corners, so I planked the sides using pear strip. One of my pet dislikes is the use of bent-over eyebolts to represent door handles, a common approach in kit world. A while back I noticed Chuck had produced a range of door handles and hinges that I liked the look of. They come in various sizes the smallest of which are good for 1:64 scale. Door fittings from Syren. The handles are plastic, the hinges laser board. Saves all that blackening of pe brass stuff, and easier to glue into place. This is the way to go. The first door we encounter on the build is to the Sail room. 0059 I removed the hinge straps to better suit the style of the door. Gally stove On the engraved printed deck, the entire section of the Galley area including the forward area of the galley is shown as unplanked. I am thinking that some of this area (around the stove) should at least be represented by an iron plate, or a brick base, and the remainder planked. I downloaded a suitable pattern and reduced it to scale. This was glued to a 0.8 section of boxwood and framed with 1mm Pearwood strip. 0069 A small enhancement but it will be visible below the upper deck. As can be seen there is not a great deal of planking involved, a little tricky maybe, but at least there are no butt shifts. Further scraping is required. 0064 Patterns are used to get the correct position for the Stove base. 0071 0073 These photos also show the use of square section strips to check the alignment of the deck beams across the Sail room. 0075 0077 Temporary Beams are also used to ensure the correct position of the stove upon its base. 0080 The scuttle covers will stand out once the ring bolts are inserted. All of this will now be disassembled and the deck boards scraped to finish. This diversion from the kit has taken three days of work, but I prefer the look to the provided printed deck. B.E. 14/12/2024


- 332 replies
-
- 29
-
-
- Harpy
- Vanguard Models
- (and 1 more)
-
'Indy' is a good subject for lighting with that highly detailed interior and wonderful Great Cabin. Good luck with your project. B.E.
-
Great colour toning Christian, you have created a very attractive model, well done.👍 B.E.
-
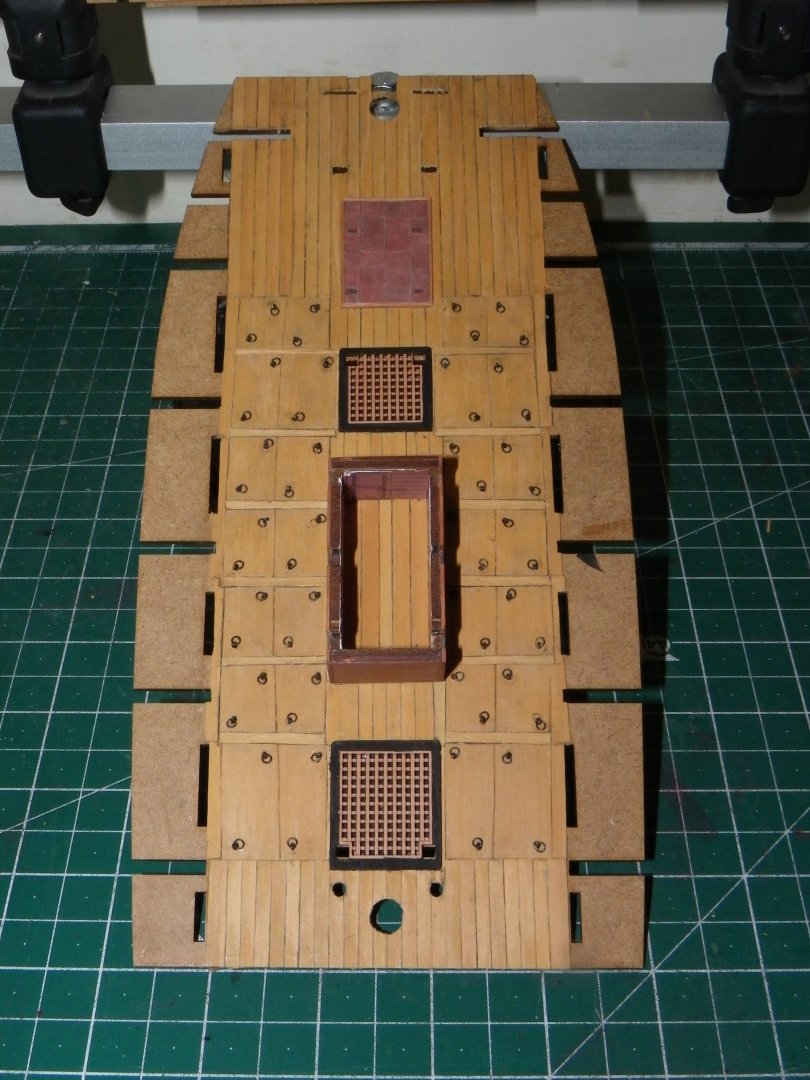
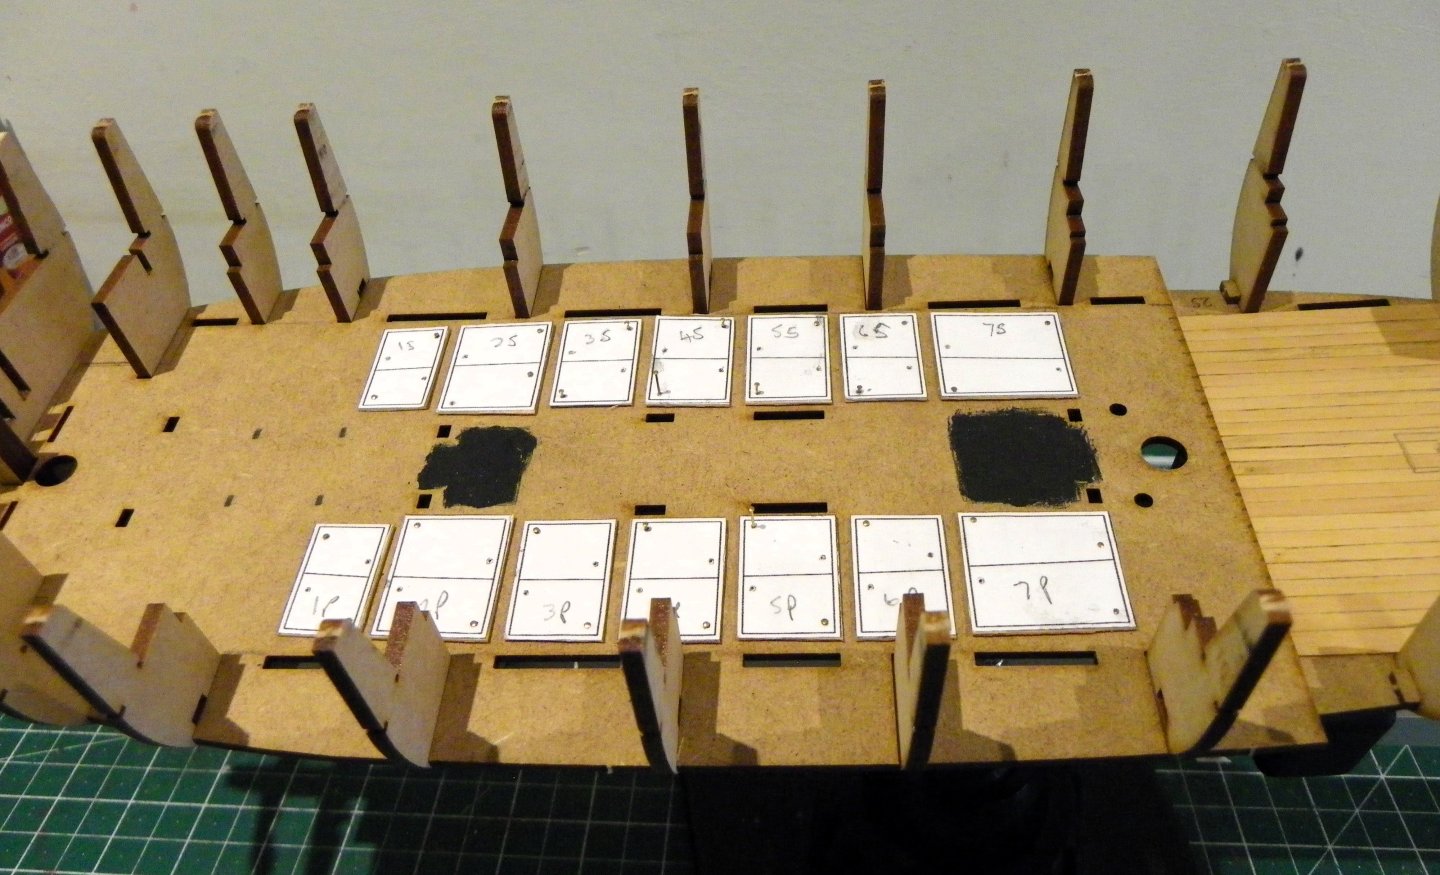
Thank you, John, a long way to go, and many a slip to avoid.🫤 Post 3 Laying out the Lower deck. I have decided to give planking the sub deck a go even tho’ it is covered with incumbrances in the form of scuttles, and will no doubt provide an interesting exercise. I will set the deck fittings first and plank up to them. To this end the deck fittings, coamings/gratings, Sail Room structure, etc will need to be raised by the thickness of the deck planks to give the correct height. This is done by adding 0.8mm Pear strip to the bottom edges of the fittings. Firstly, patterns of the scuttle covers are taken from the plans and glued in place atop 0.8mm Boxwood sheet, cut out, and glued atop the sub deck. 0025 I first pin the covers to the sub-deck using the pre-drilled ring bolt holes, to check position. 0027 0029 Pva is used to glue the covers in place, maintaining the correct positions. With stuff so thin good clamping is required to counter the tendency to curl. 0031 Here the ports side covers are glued, and I have started to remove the paper patterns. 0039 The idea is to have covers that look as if they are removeable rather than lines on a board. That the covers are only 0.8mm thick is neither here nor there, the object is to fool the eye. The engraved covers on the kit plans seem to show a frame-work around them. 0483 The Adm plan seems to show the split between the cover halves extending edge to edge which would suggest to me that the covers sit within ledges cut in the deck frames and on longitudinal carlings. For this reason I have taken the full size of the kit covers which are closer to the overall size as shown on the adm. plans. I have decided to leave the covers plain rather than planked, much in the fashion of loft lids. It will provide a contrast to the planked areas. 0038 With the scuttles in place I will have a firm edge to plank to and I will be able to plank the deck off model. B.E. 11/12/2024.


- 332 replies
-
- 23
-
-
- Harpy
- Vanguard Models
- (and 1 more)
-
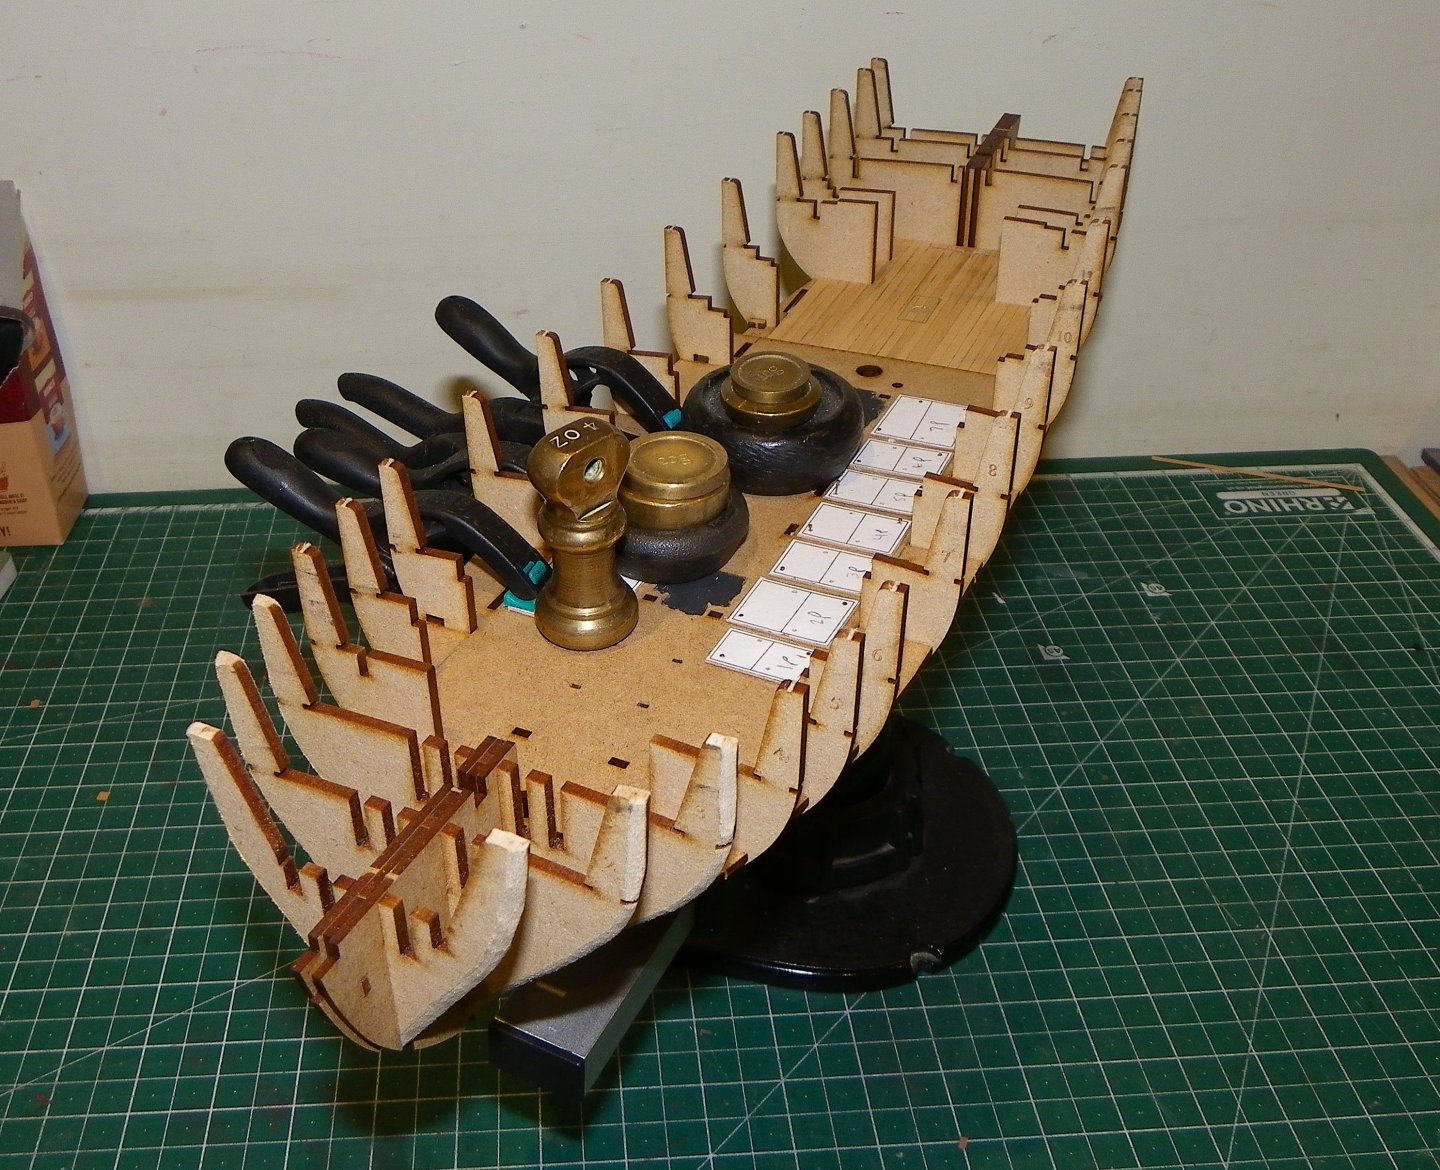
Post 2 Lower deck considerations I can now safely fit the forward mdf lower sub deck which is pegged into place, again without glue. 005 The pegs can be seen located thro’ the bulkheads, again a perfect fit. Altho’ in the prototype James glued the engraved surface deck before fitting, this is not essential and because I’m not clear how I’m going to proceed I opted not to. The aft section of deck is slightly different in that the aftermost securing pegs fit over the engraved deck. If it is to be used it needs to be glued before the pegs are inserted. 010 I decided to plank the after lower deck using 0.7mm x 3.4mm Boxwood strip to gauge the effect. 019 The central hole takes the heel of the Capstan. 009 The provided engraved deck is a perfect fit but looks almost too perfect for my taste. I can’t mix and match, it is either all engraved, or all planked. 017 Inner bulwarks are fitted that form the cable stores and provide additional support for the bulkheads. These also are secured by use of pegs beneath the deck. I am still trying to work out how to proceed with the main section of the Lower deck. I would really prefer to plank it and incorporate separate scuttles giving a more realistic look to the deck. 012 The scuttles, numbering seven each side with double opening would suggest they may be hinged, but the inclusion of two lifting rings to each section would suggest that the scuttles were simply lifted as required. I have not seen this arrangement of scuttles on a deck before and it raises many questions. Why so many, were there ladders beneath, where did they go, were sections of the hold compartmentalised? 0485a The Adm. plans offer no answers; the only items specifically shown are the shot locker and mast footings. There does seem to be an orlop platform below the aft ladderway. 0376a In actual construction were the scuttle covers plain sections of board, as suggested in the kit, or planked as was usual with the upper deck scuttles such as those for the Top ropes? The scuttles range in size with the largest being 32”x 63” and the smallest 29”x 30” There is little room for planking (2.5mm) between the scuttles which seem to be rebated into the deck beams fore and aft. Were fillers of planking running laterally along the beams used to maintain the level with the deck planking? Just thinking aloud, and I doubt I will get answers, always more questions than answers in ship modelling. Readers could be forgiven for thinking why is he bothering about such details, the answer is I can’t help myself.😜 Until I resolve these issues in my mind I can’t really proceed in this area. It is a simple task to remove the sub deck thanks to Chris’s design, and I’ll have a play around off model. B.E. 09/12/2024


- 332 replies
-
- 24
-
-
- Harpy
- Vanguard Models
- (and 1 more)
-
HMS Harpy 1796 – Build Log Post 1 The kit arrived nicely presented and packed as I have come to expect from Vanguard. The plans are beautifully drawn with the usual high quality Build manual created by James. The early stages proceed very quickly taking only a short time to effectively achieve a hull in frame, and all without glue, made possible by Chris’s excellent design innovations. 0365 The parts slot together with precision and at this stage of my modelling career I welcome not having to spend hours doing the basic assembly of the carcase element of a build which will be ultimately hidden. The bulkheads slot seamlessly into the False keel, but as this is quite long and only of 3mm mdf there is quite a bit of longitudinal flex, be careful it isn’t snapped at this early stage. 0360 After the behemoth of Indy it is nice to have a keel that fits conveniently into the keel clamp, and turns easily within the confines of my bench depth. 0370 Additional strength to the false keel is provided by the addition of pieces either side making the total thickness 7mm. Longitudinal strips again fit perfectly to brace and square the bulkheads. Not one spot of glue has been applied at this stage. The next stage is to fit the lower deck and its limewood engraved patterns. I am going to stop at this point as I wish to consider how I’m going to proceed with the lower deck. 0374 I am not entirely convinced by the look of the Limewood deck and how it would react if I decided to darken it a little. Limewood is notorious for having a blotchy appearance if it isn’t sealed first. 0376 3366a There are numerous scuttles shown along both sides of the deck which accord with the Adm plans but they are free of any board markings, and look a little ‘printed’ on, which of course they are. If I decided to plank my own decks as I usually do those scuttles would certainly make things trickier. It is early in the build but I need to work out how much of the lower deck I want, or is feasible to have on view, and what impact those scuttles will have on my eye. The Upper deck is only 20mm above the lower so they would hardly fade into the shadows. B.E. 07/12/2024


- 332 replies
-
- 23
-
-
- Harpy
- Vanguard Models
- (and 1 more)
-
Thank you Andy and Bob, I'm not thinking ahead of this build, but I doubt I will build another Frigate. Between Sphinx and Indy I think I have the type covered.🙂 B.E.
-
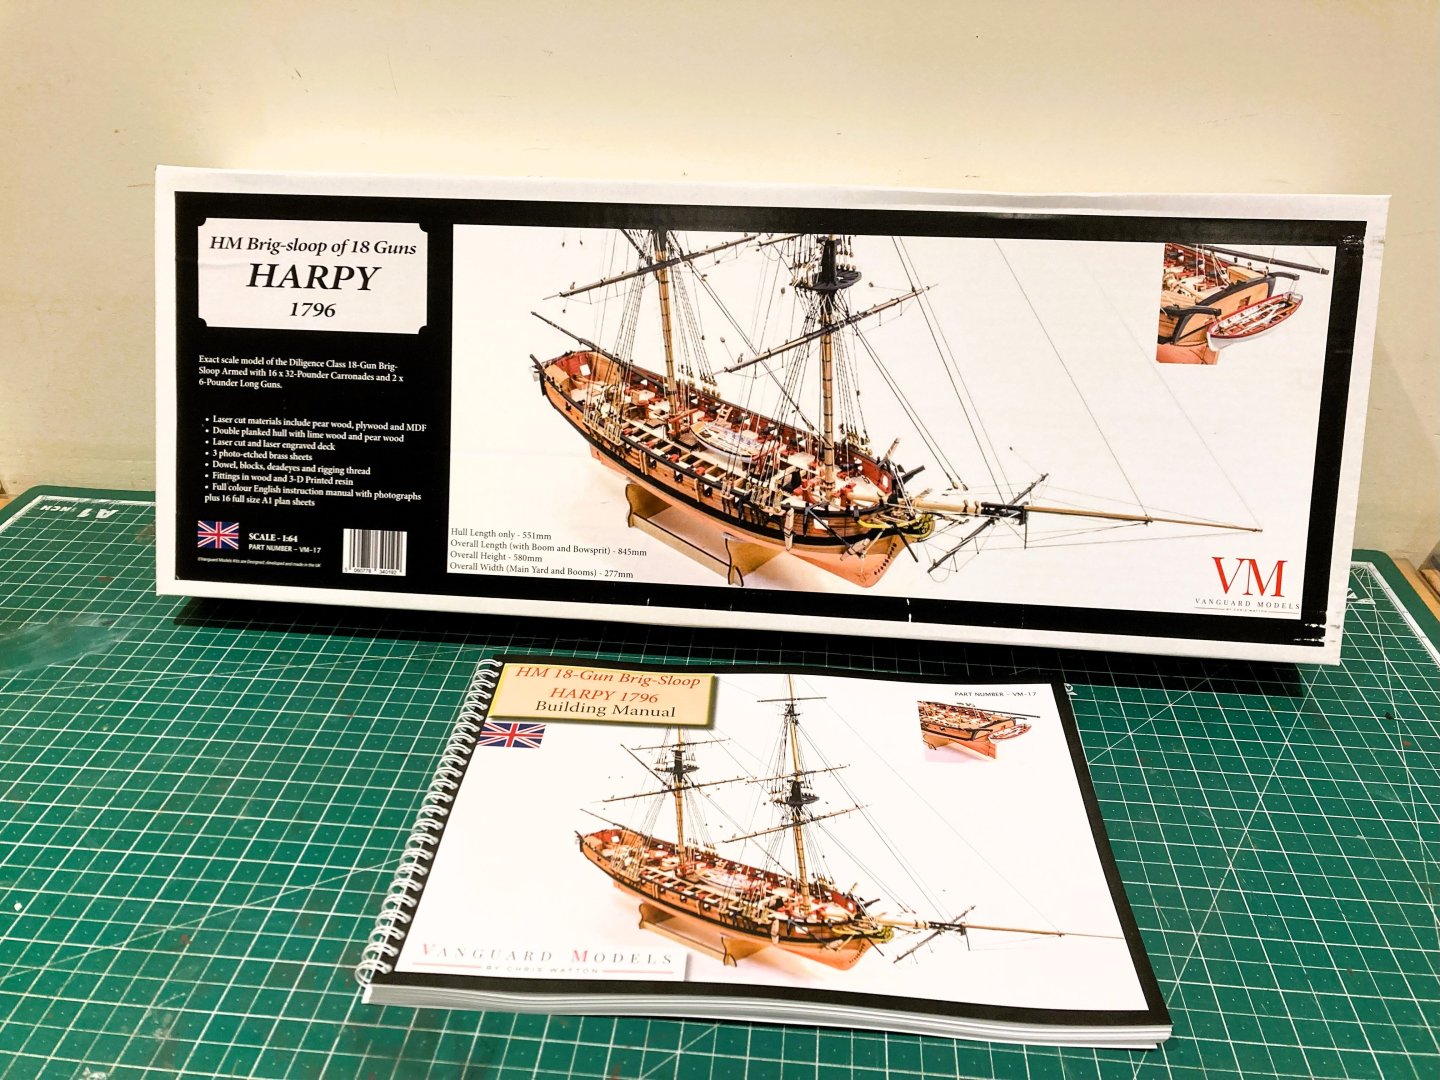
Thank you Grant and Johnathon, 3363A Cheers Chris, Harpy has arrived, and as luck would have it, tomorrow we are promised a severe storm, a perfect day to batten down the hatches and enjoy a day looking thro' this box of delights and savour the contents. Looks like the build log is about to start. B.E. 06/12/2024
- 332 replies
-
- 16
-
-
- Harpy
- Vanguard Models
- (and 1 more)
-
Very nice Chris, I would buy one at 1:48 scale as a stand alone display model. I like that you have included the supports for the stretchers for rowers to brace their feet against. Now where can I get a crew of 1:48 scale rowers.🤔 Great stuff. B.E.
-
Cheers, Guys, I'm looking forward to getting started on Harpy, I don't think delivery is too far away. B.E.
- 332 replies
-
- 4
-
-
- Harpy
- Vanguard Models
- (and 1 more)
-
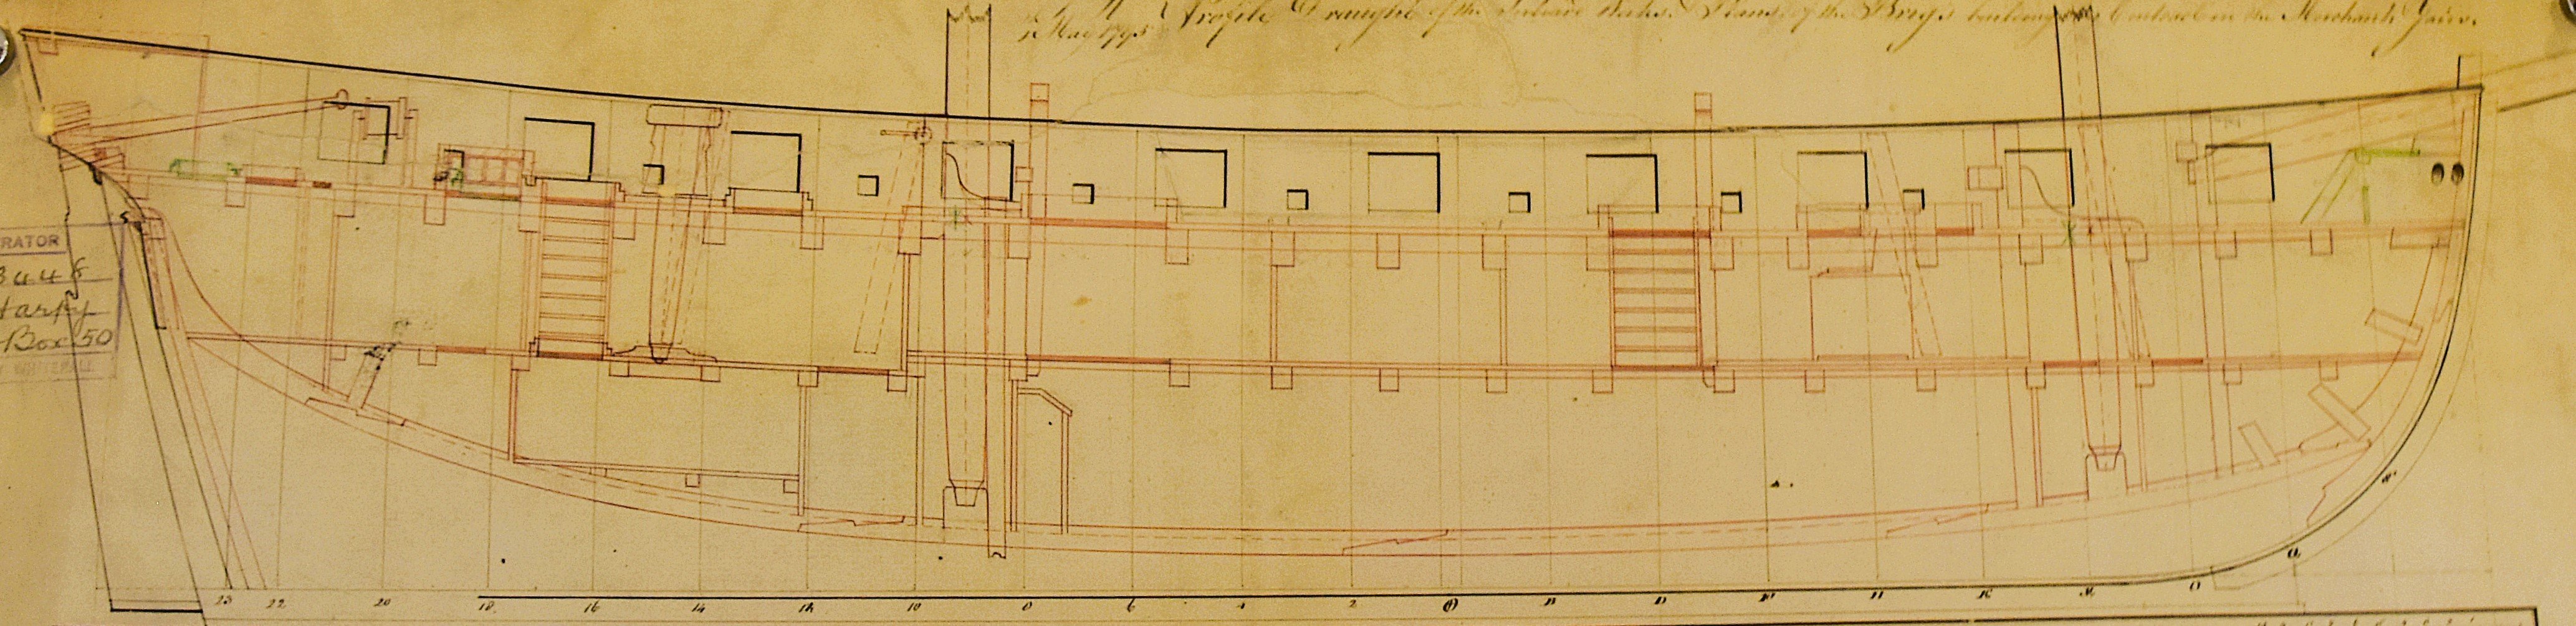
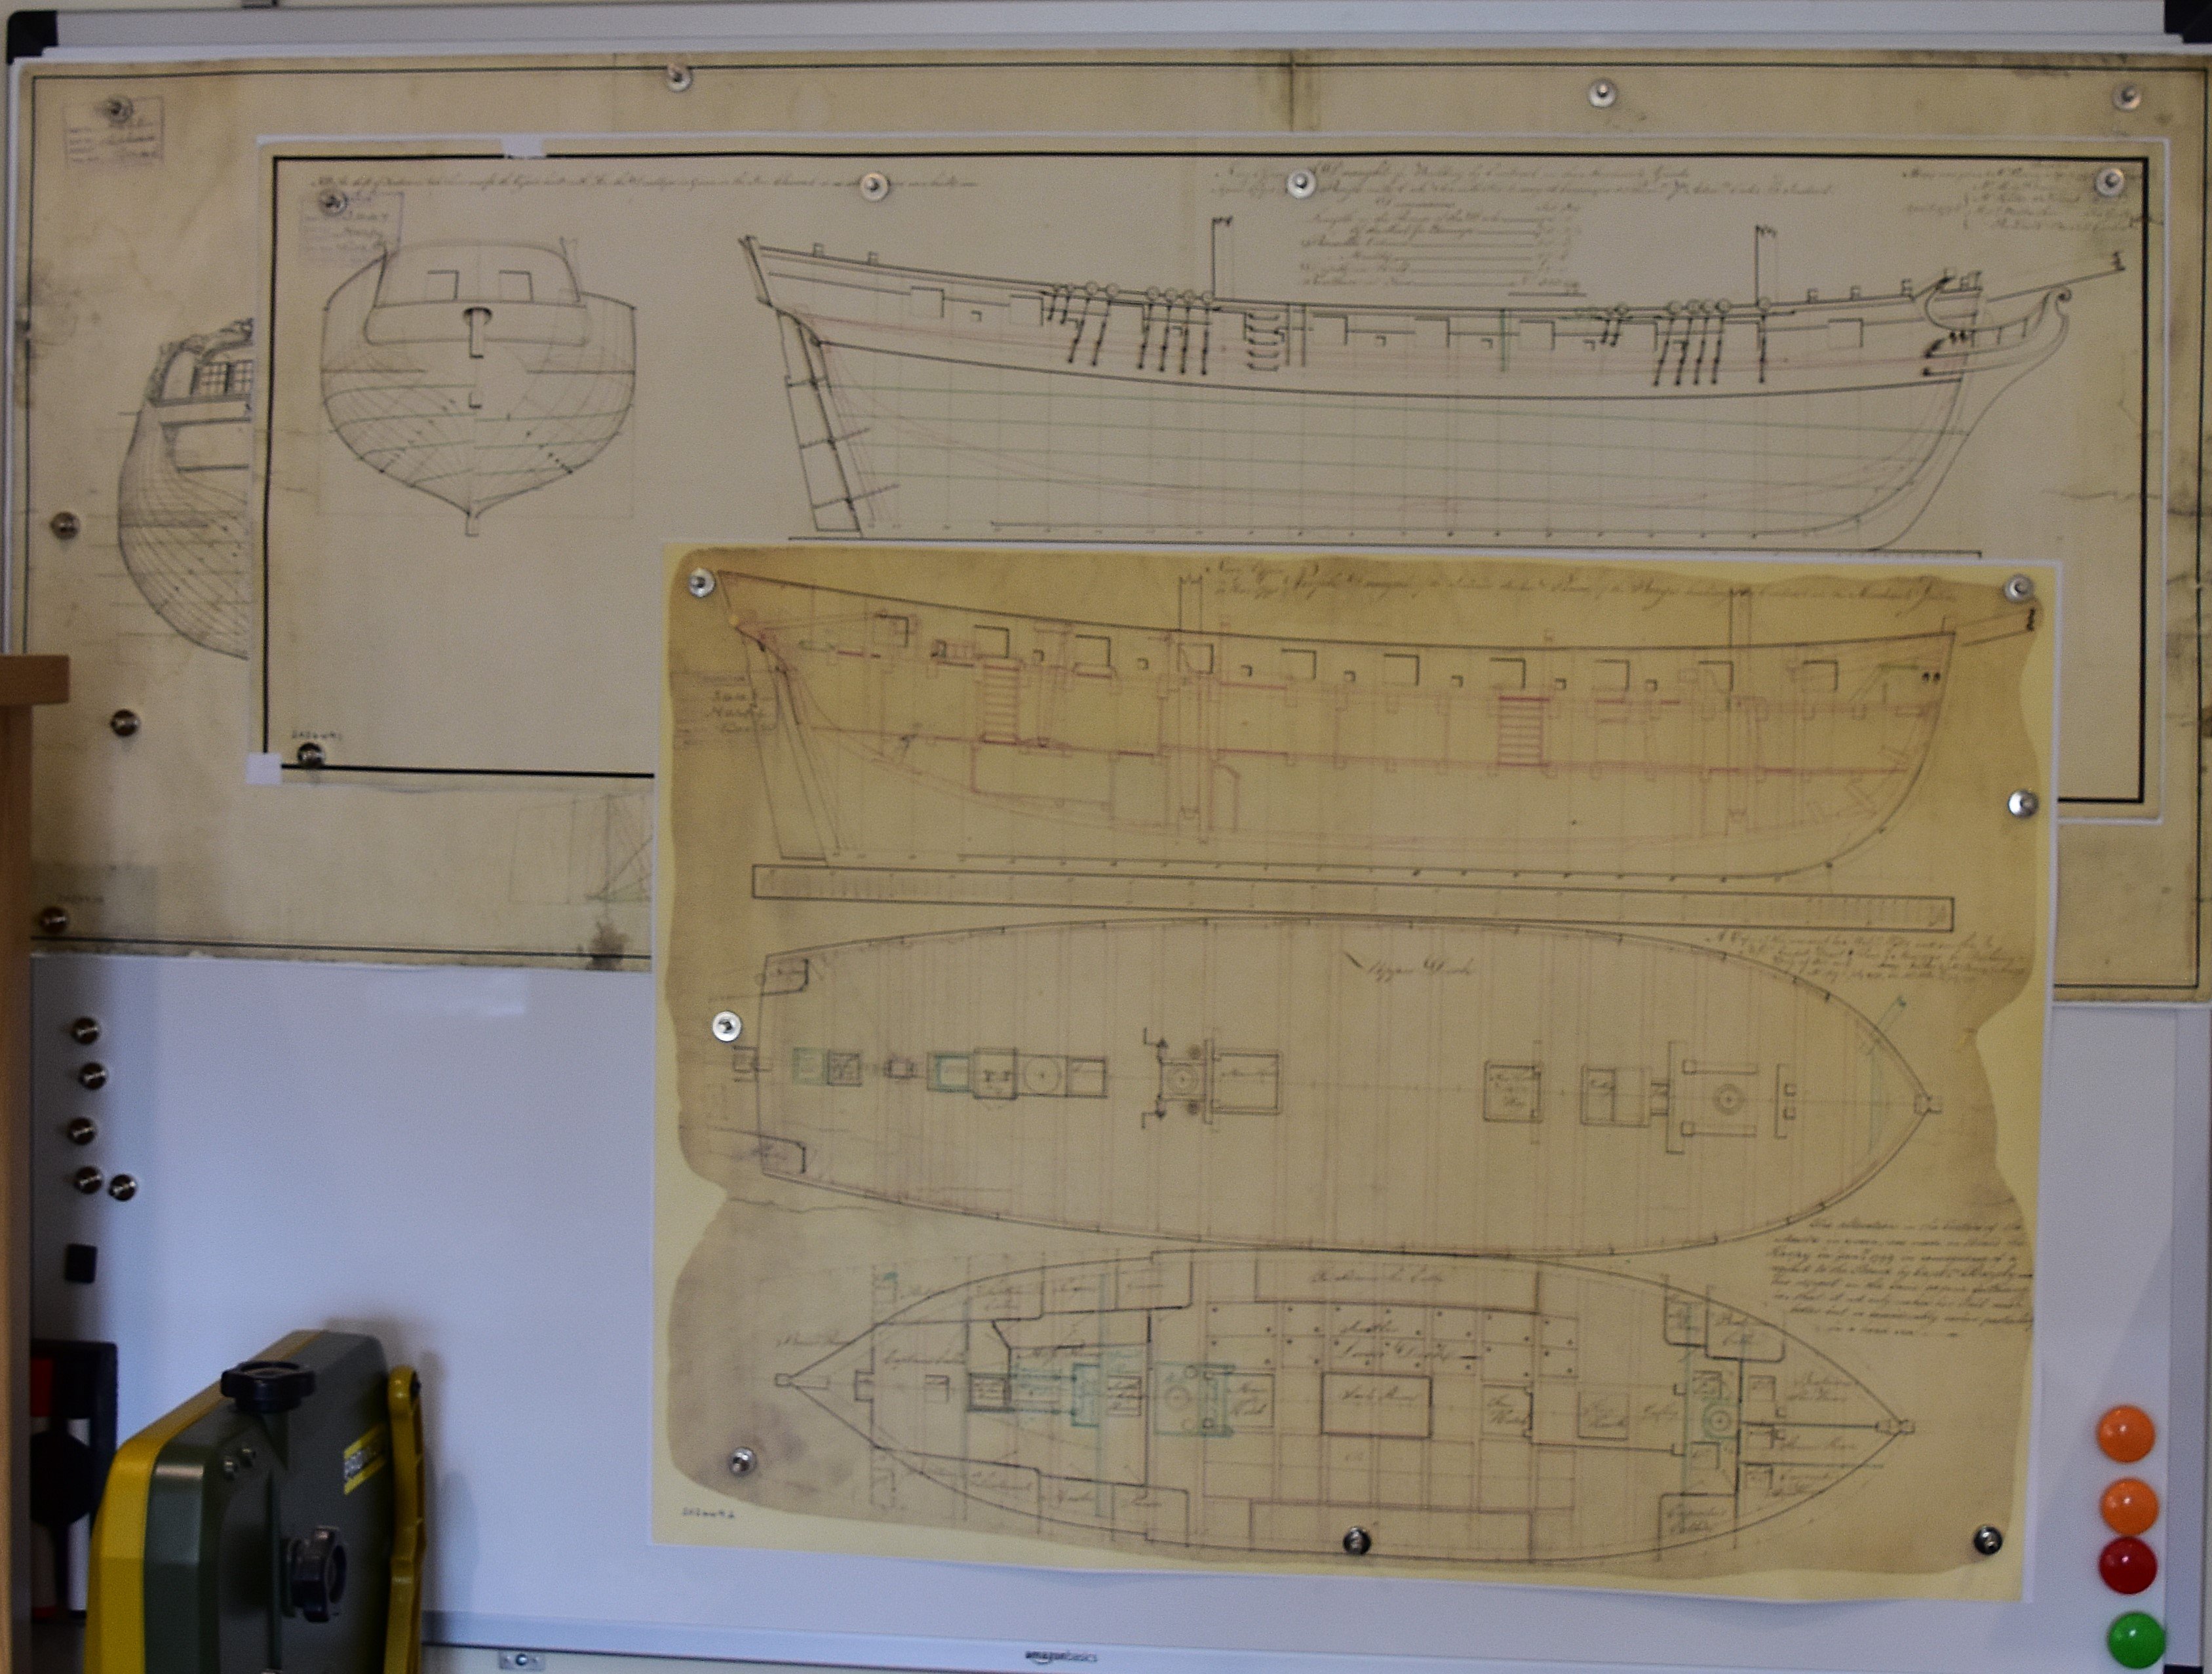
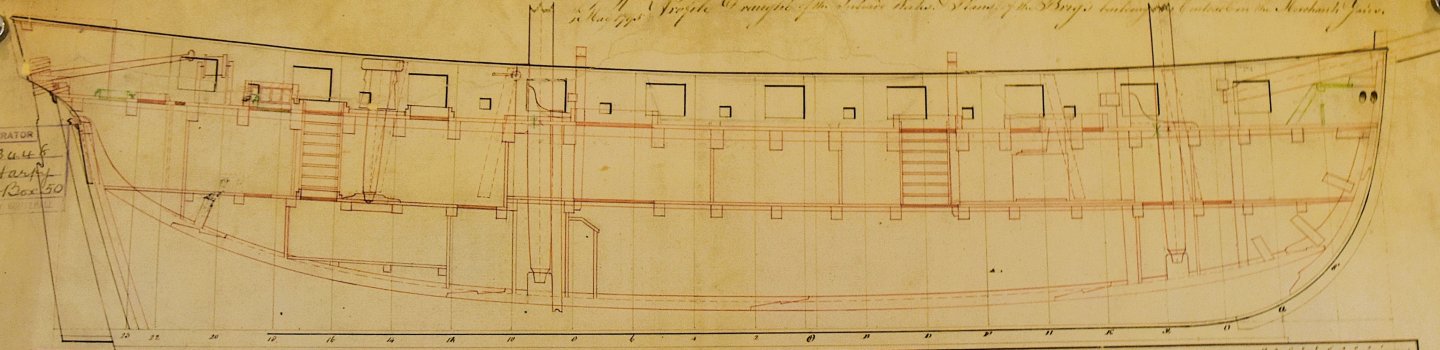
HMS Harpy 1796 by Blue Ensign – Vanguard Models 1:64 scale. Since completing my Indy build my desire for ship modelling has waned somewhat, partly I think because I have been struggling to find a subject to excite my interest. That is until: I looked at Chris’s forthcoming Harpy kit. Once again Mr W has piqued my interest as he did with Alert, Zulu, Fifie, Sphinx, and Indefatigable. Harpy has all the elements that get my creative juices going; Below deck detail, providing intriguing options to detail the cabin areas. Fine lines and a hull length I can accommodate. I am pleased to see at last a round-up to the Head ledges, something I have had to modify on all my builds. I note also the Capstan step is included another authentic detail. Apart from the schooner Pickle, I don’t have a two masted ship type in my collection, and a Brig sloop will fill that gap nicely. I am also interested to try out Chris’s latest innovation in kit development, and as a bonus Mrs W has offered to buy it. (that's my Mrs W , not Chris's) Not entirely altruistic on her part, I suspect; having me ensconced in my office, with my mind occupied, rather than prowling around the house getting under her feet, is a prime consideration. I obtained the relevant plans from the NMM in advance of the kit release, but it’s never too early to start thinking about possible enhancements, and I do have the very clear photos provided by James in his excellent prototype build log. 0488 Plan ZAZ4491 = Lines and Profile. Plan ZAZ4492 = internal detail, Upper and Lower deck plans. 0483 The deck plans include details of the cabin layouts and purposes which will be of great use for any modifications that may come to mind once I get into the project. Looking forward to receiving this latest offering from Vanguard, but in the meantime I have been doing some of the preliminary research. B.E. 02/12/2024


- 332 replies
-
- 23
-
-
- Harpy
- Vanguard Models
- (and 1 more)