.JPG.ca33079f5815b861e67b9c2cccd37982.JPG)

Blue Ensign
-
Posts
4,564 -
Joined
-
Last visited
Content Type
Profiles
Forums
Gallery
Events
Everything posted by Blue Ensign
-
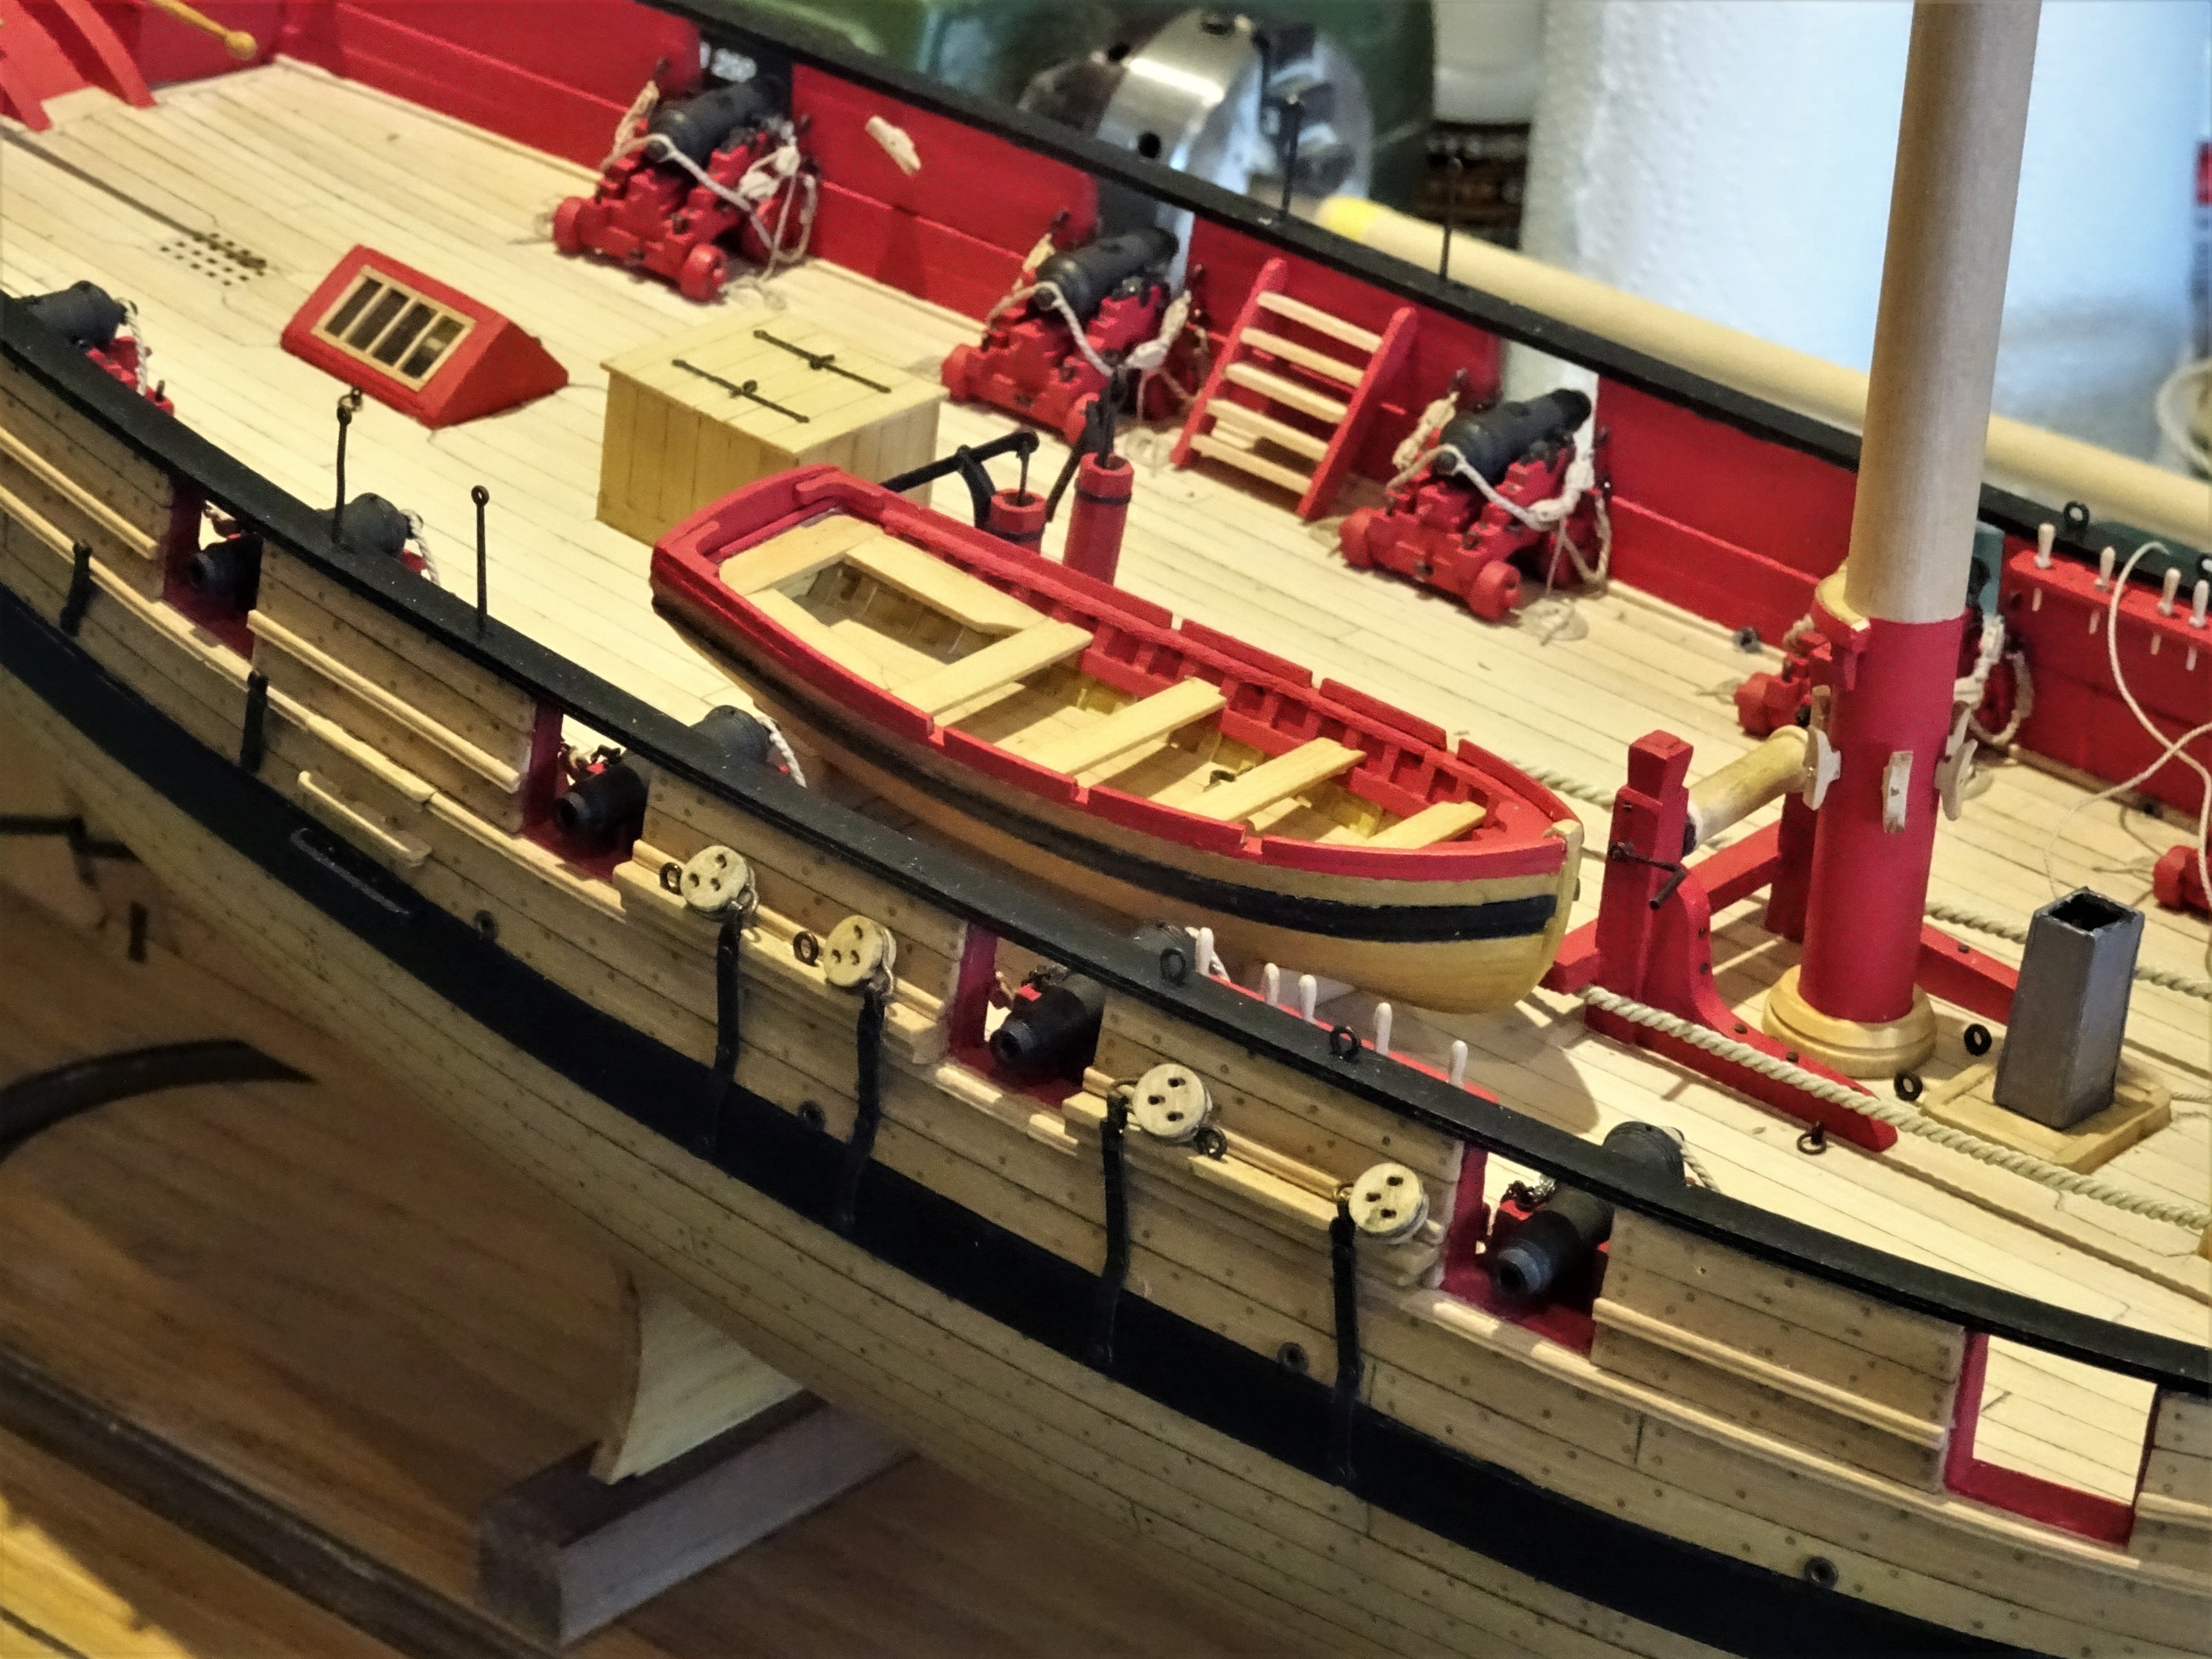
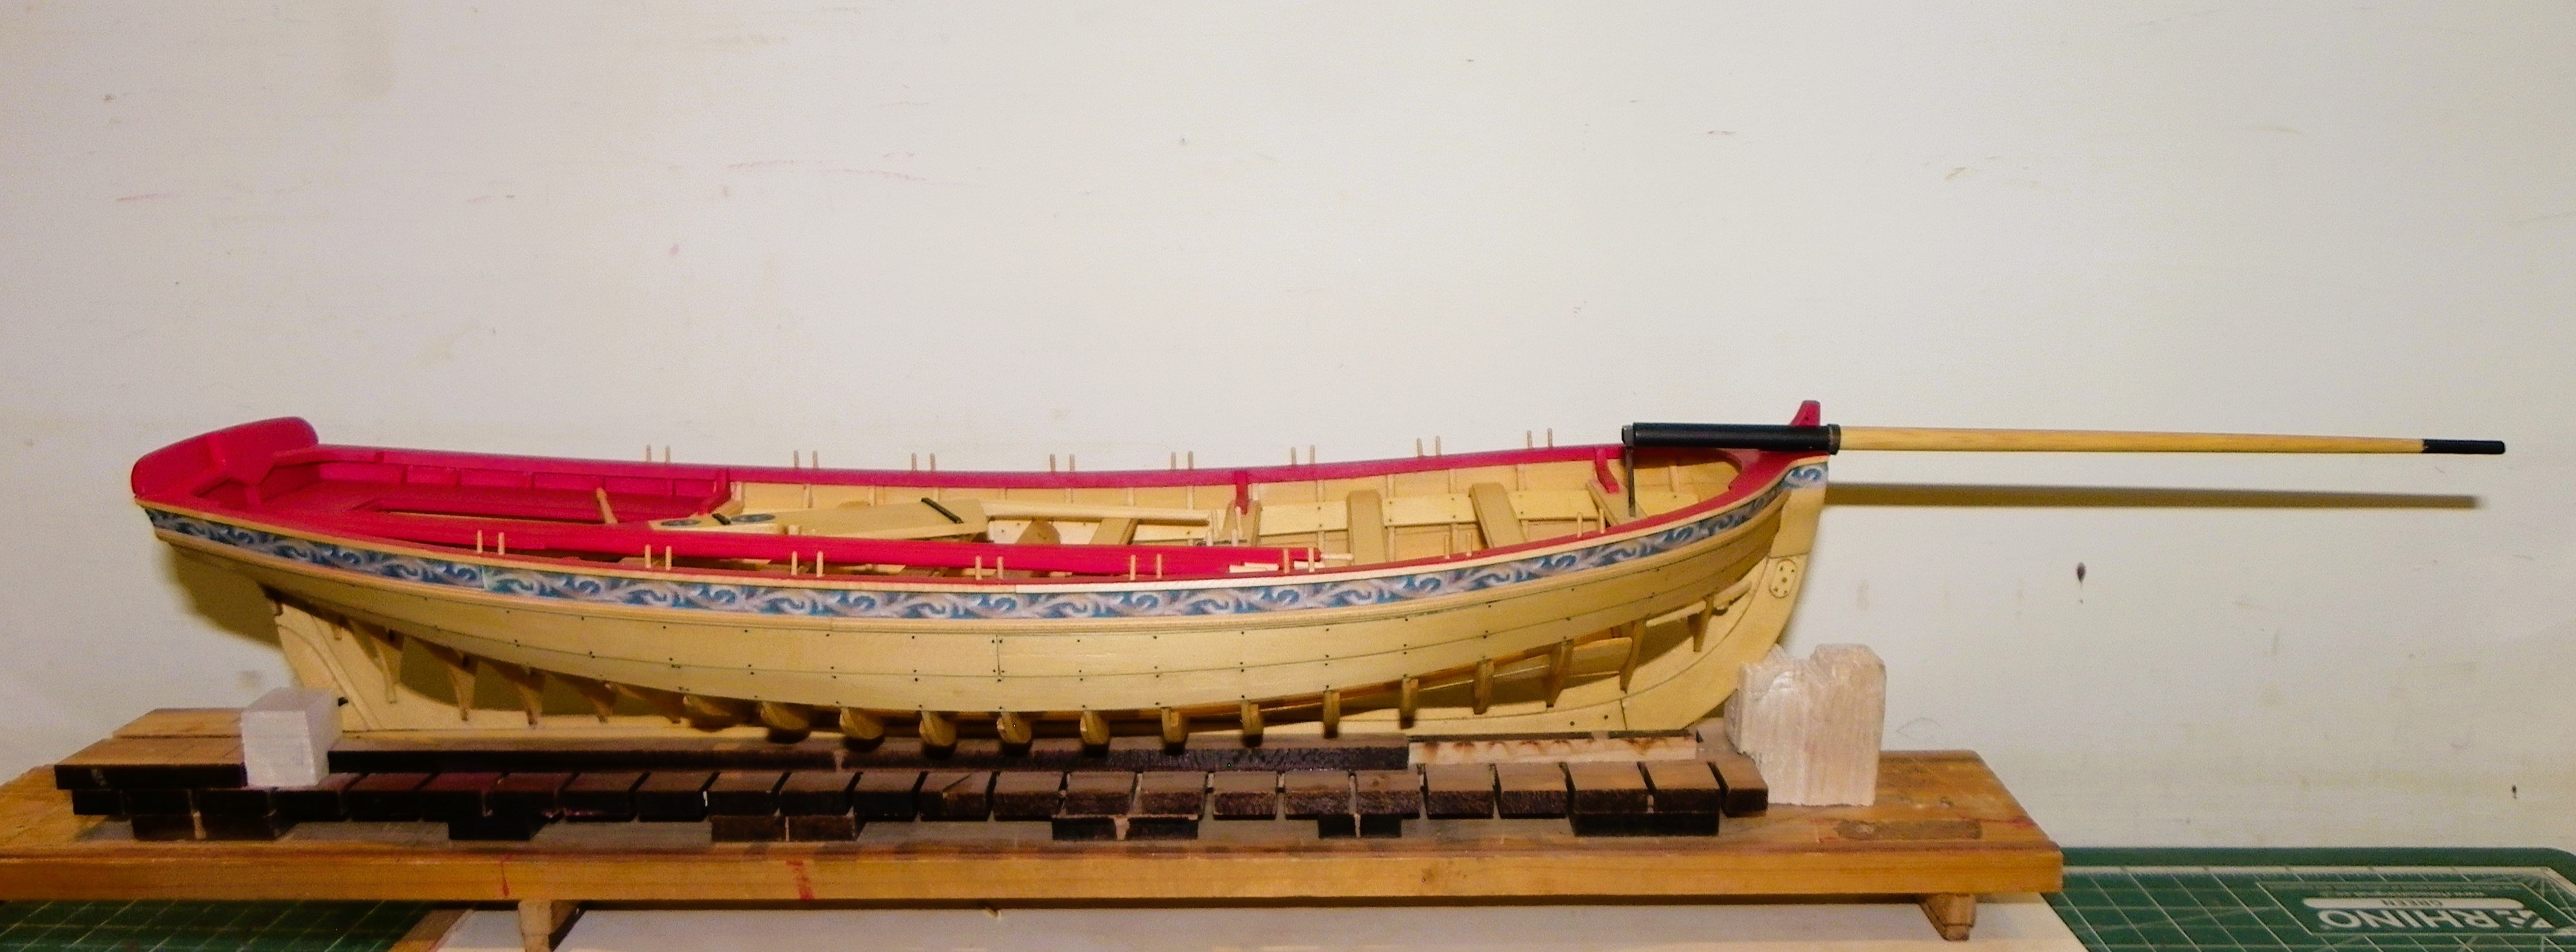
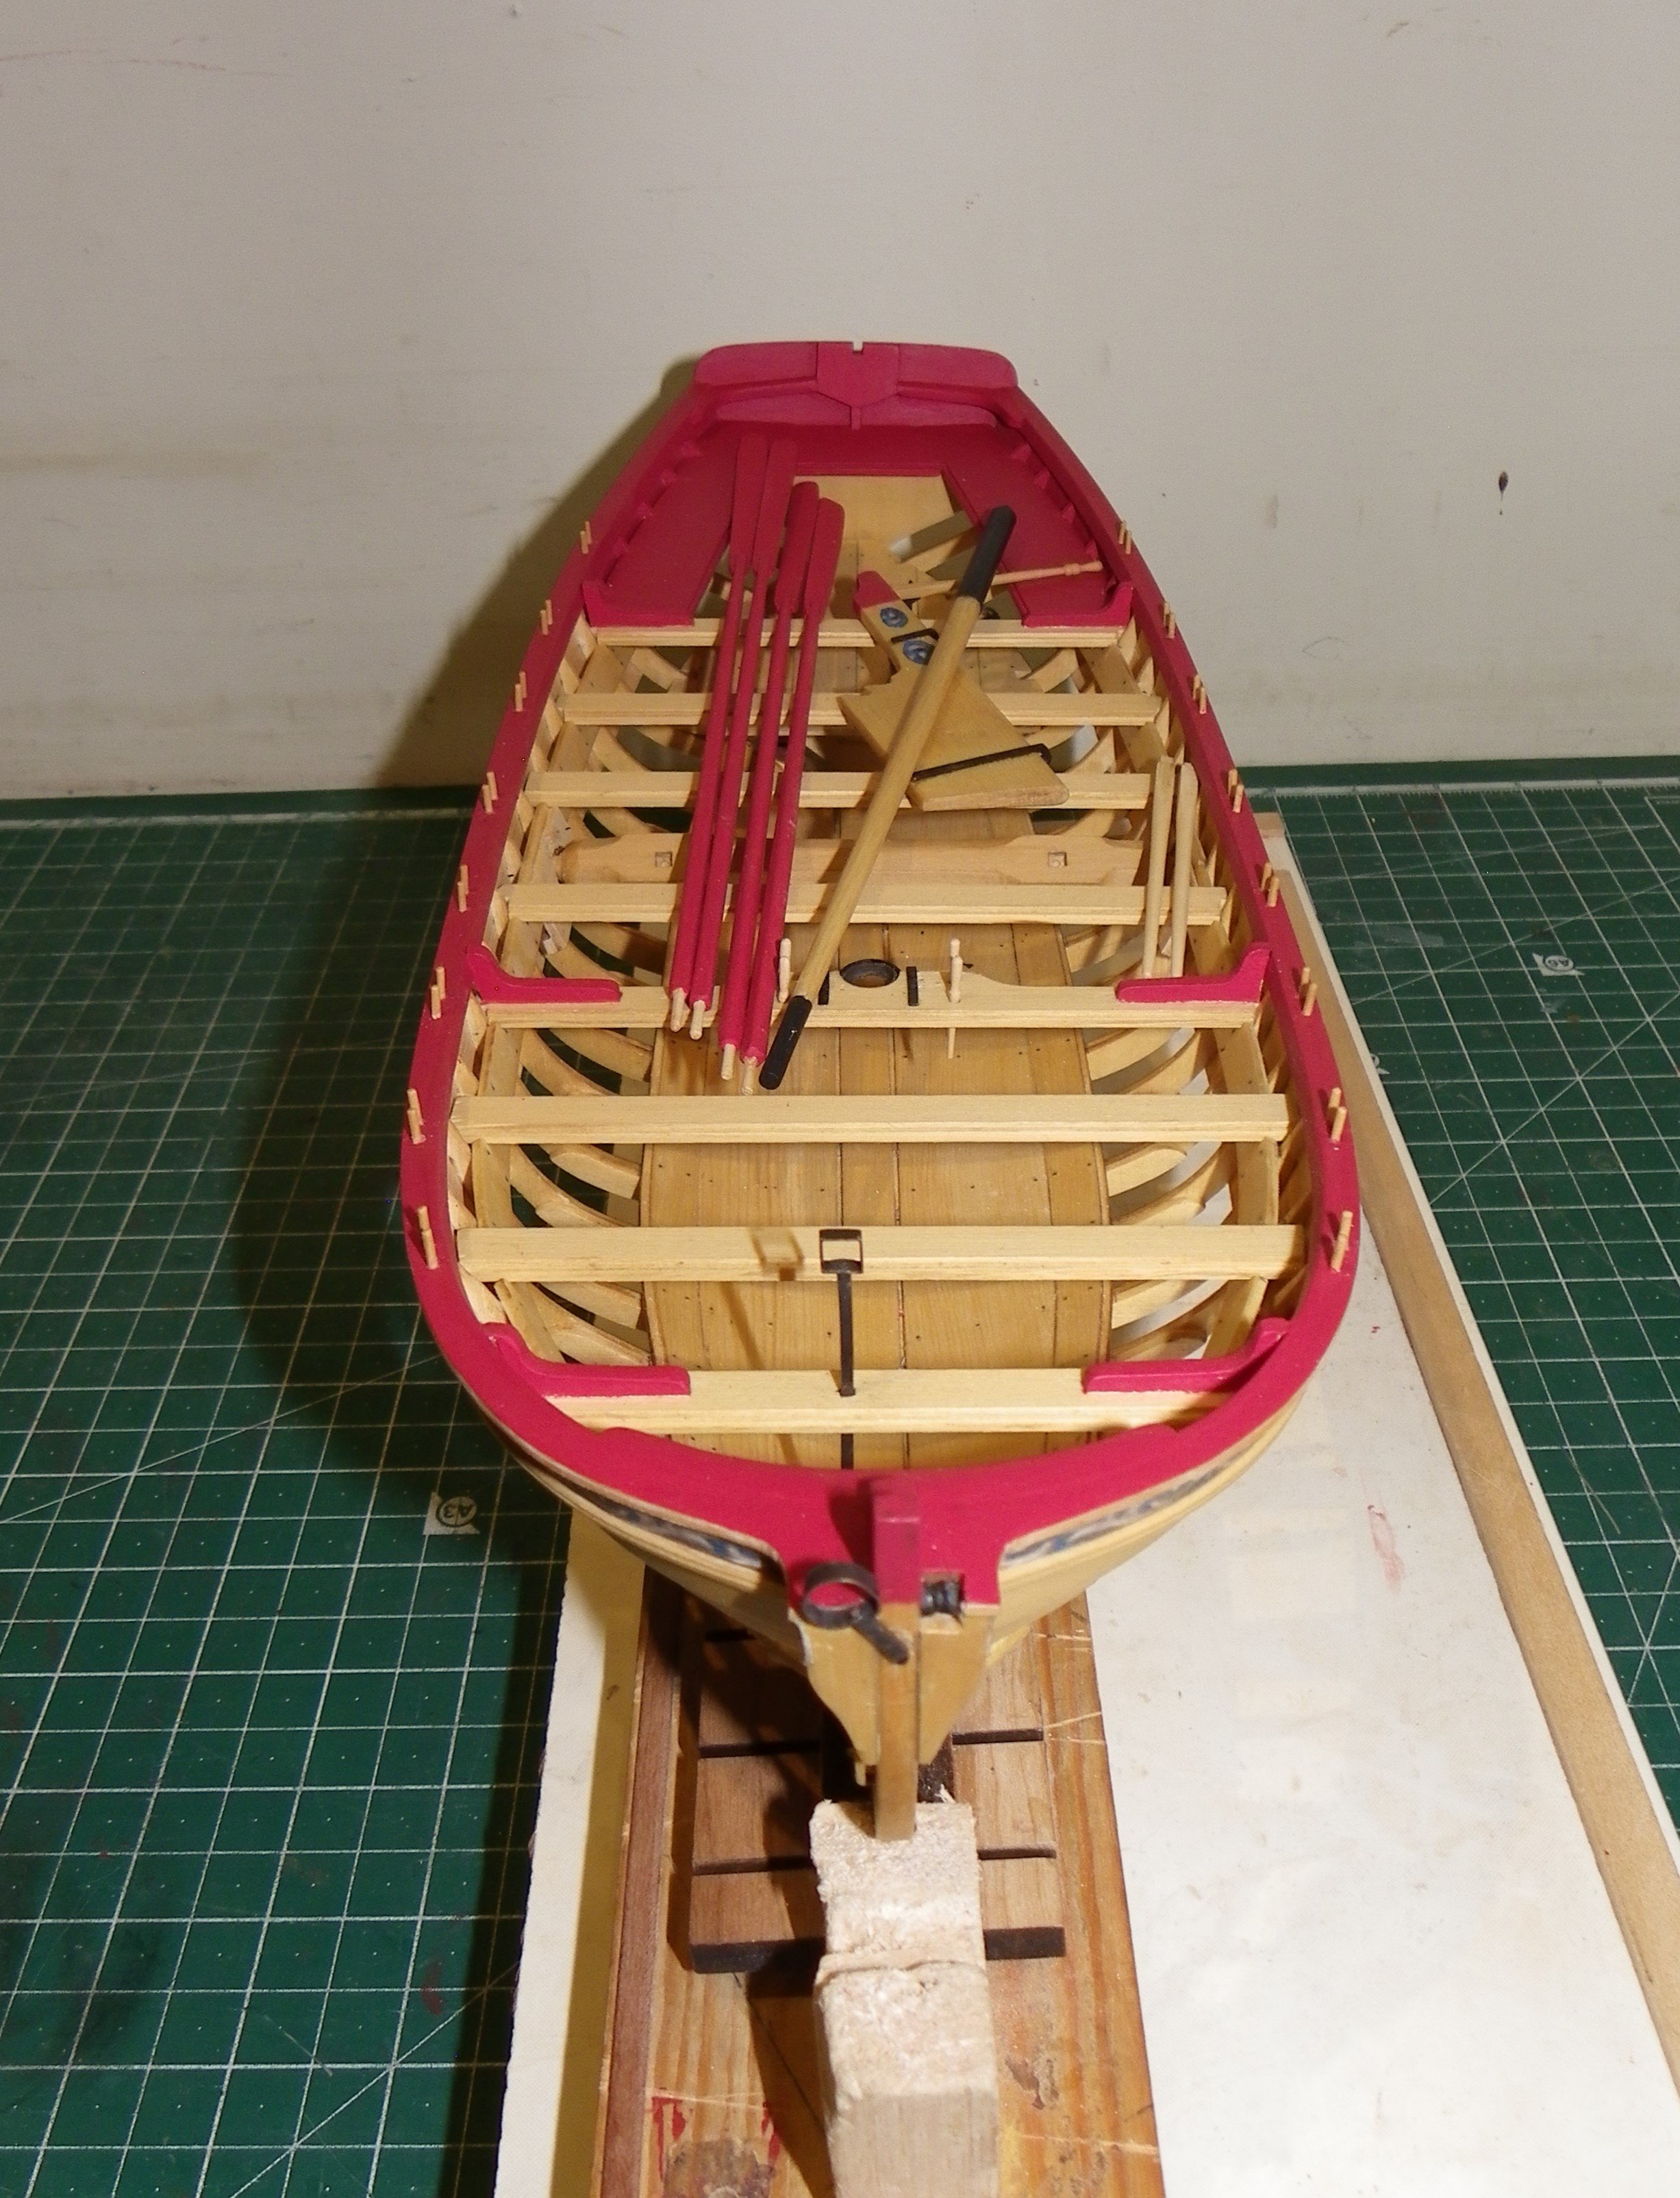
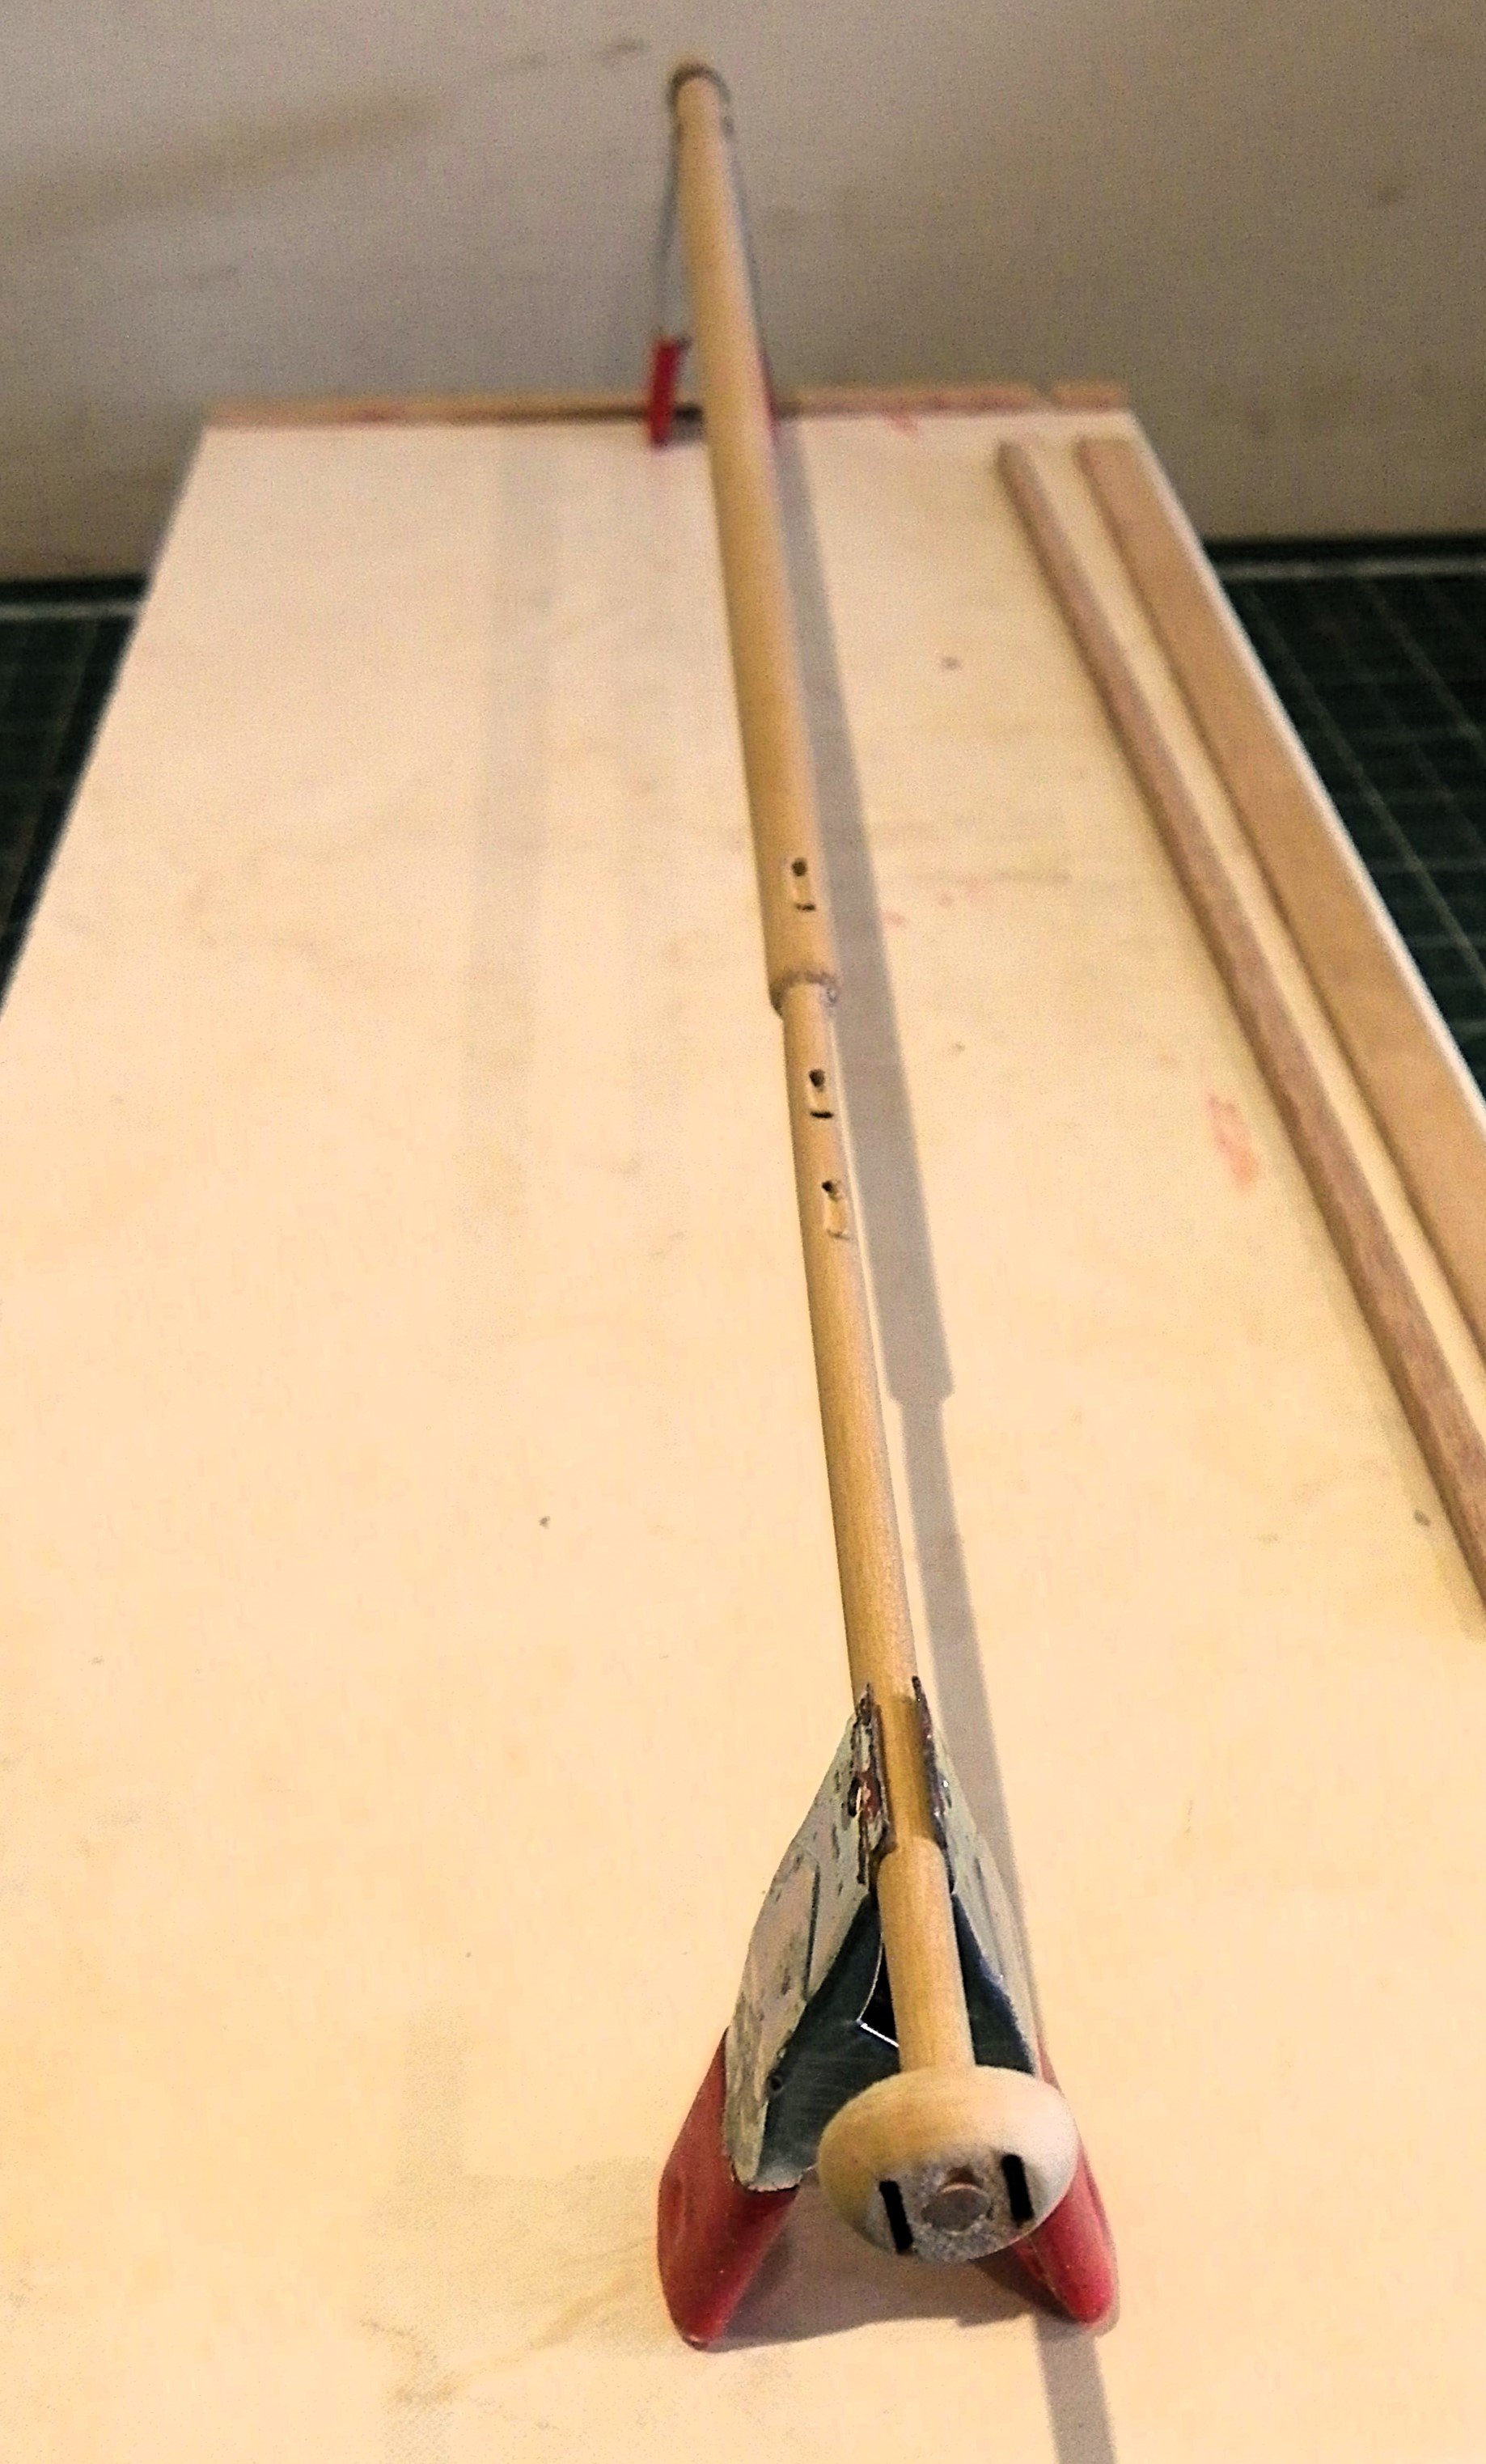
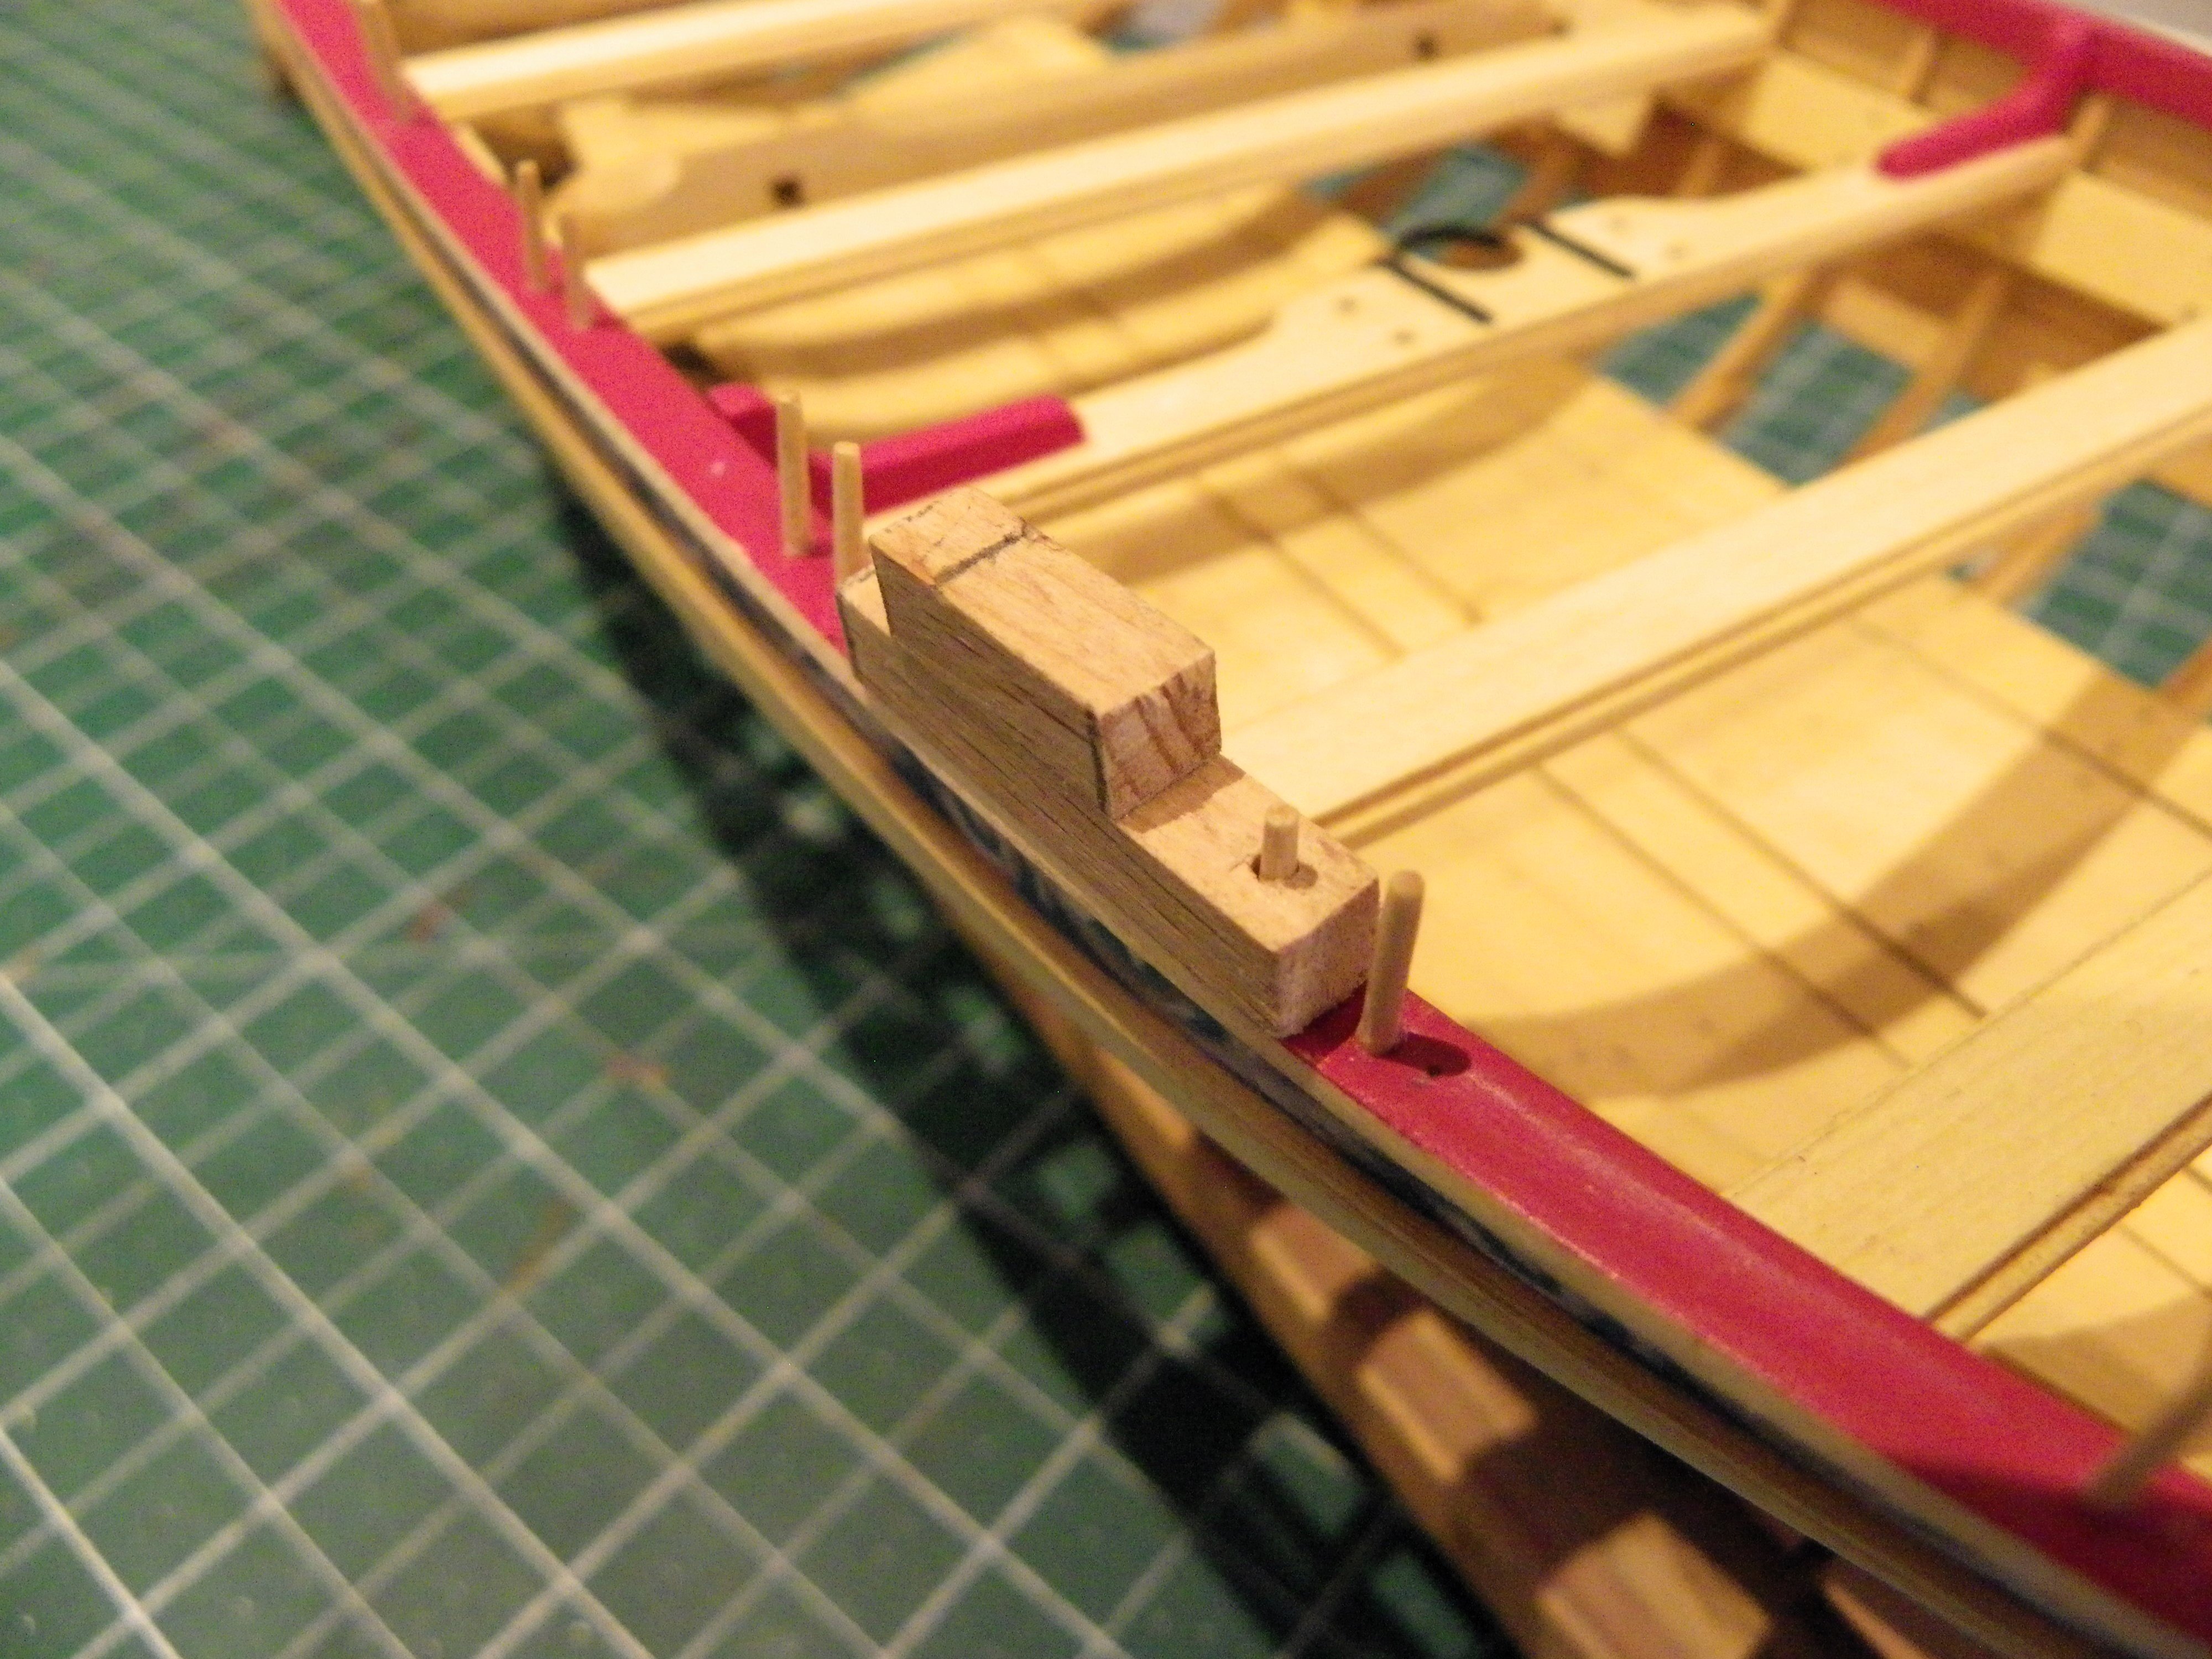
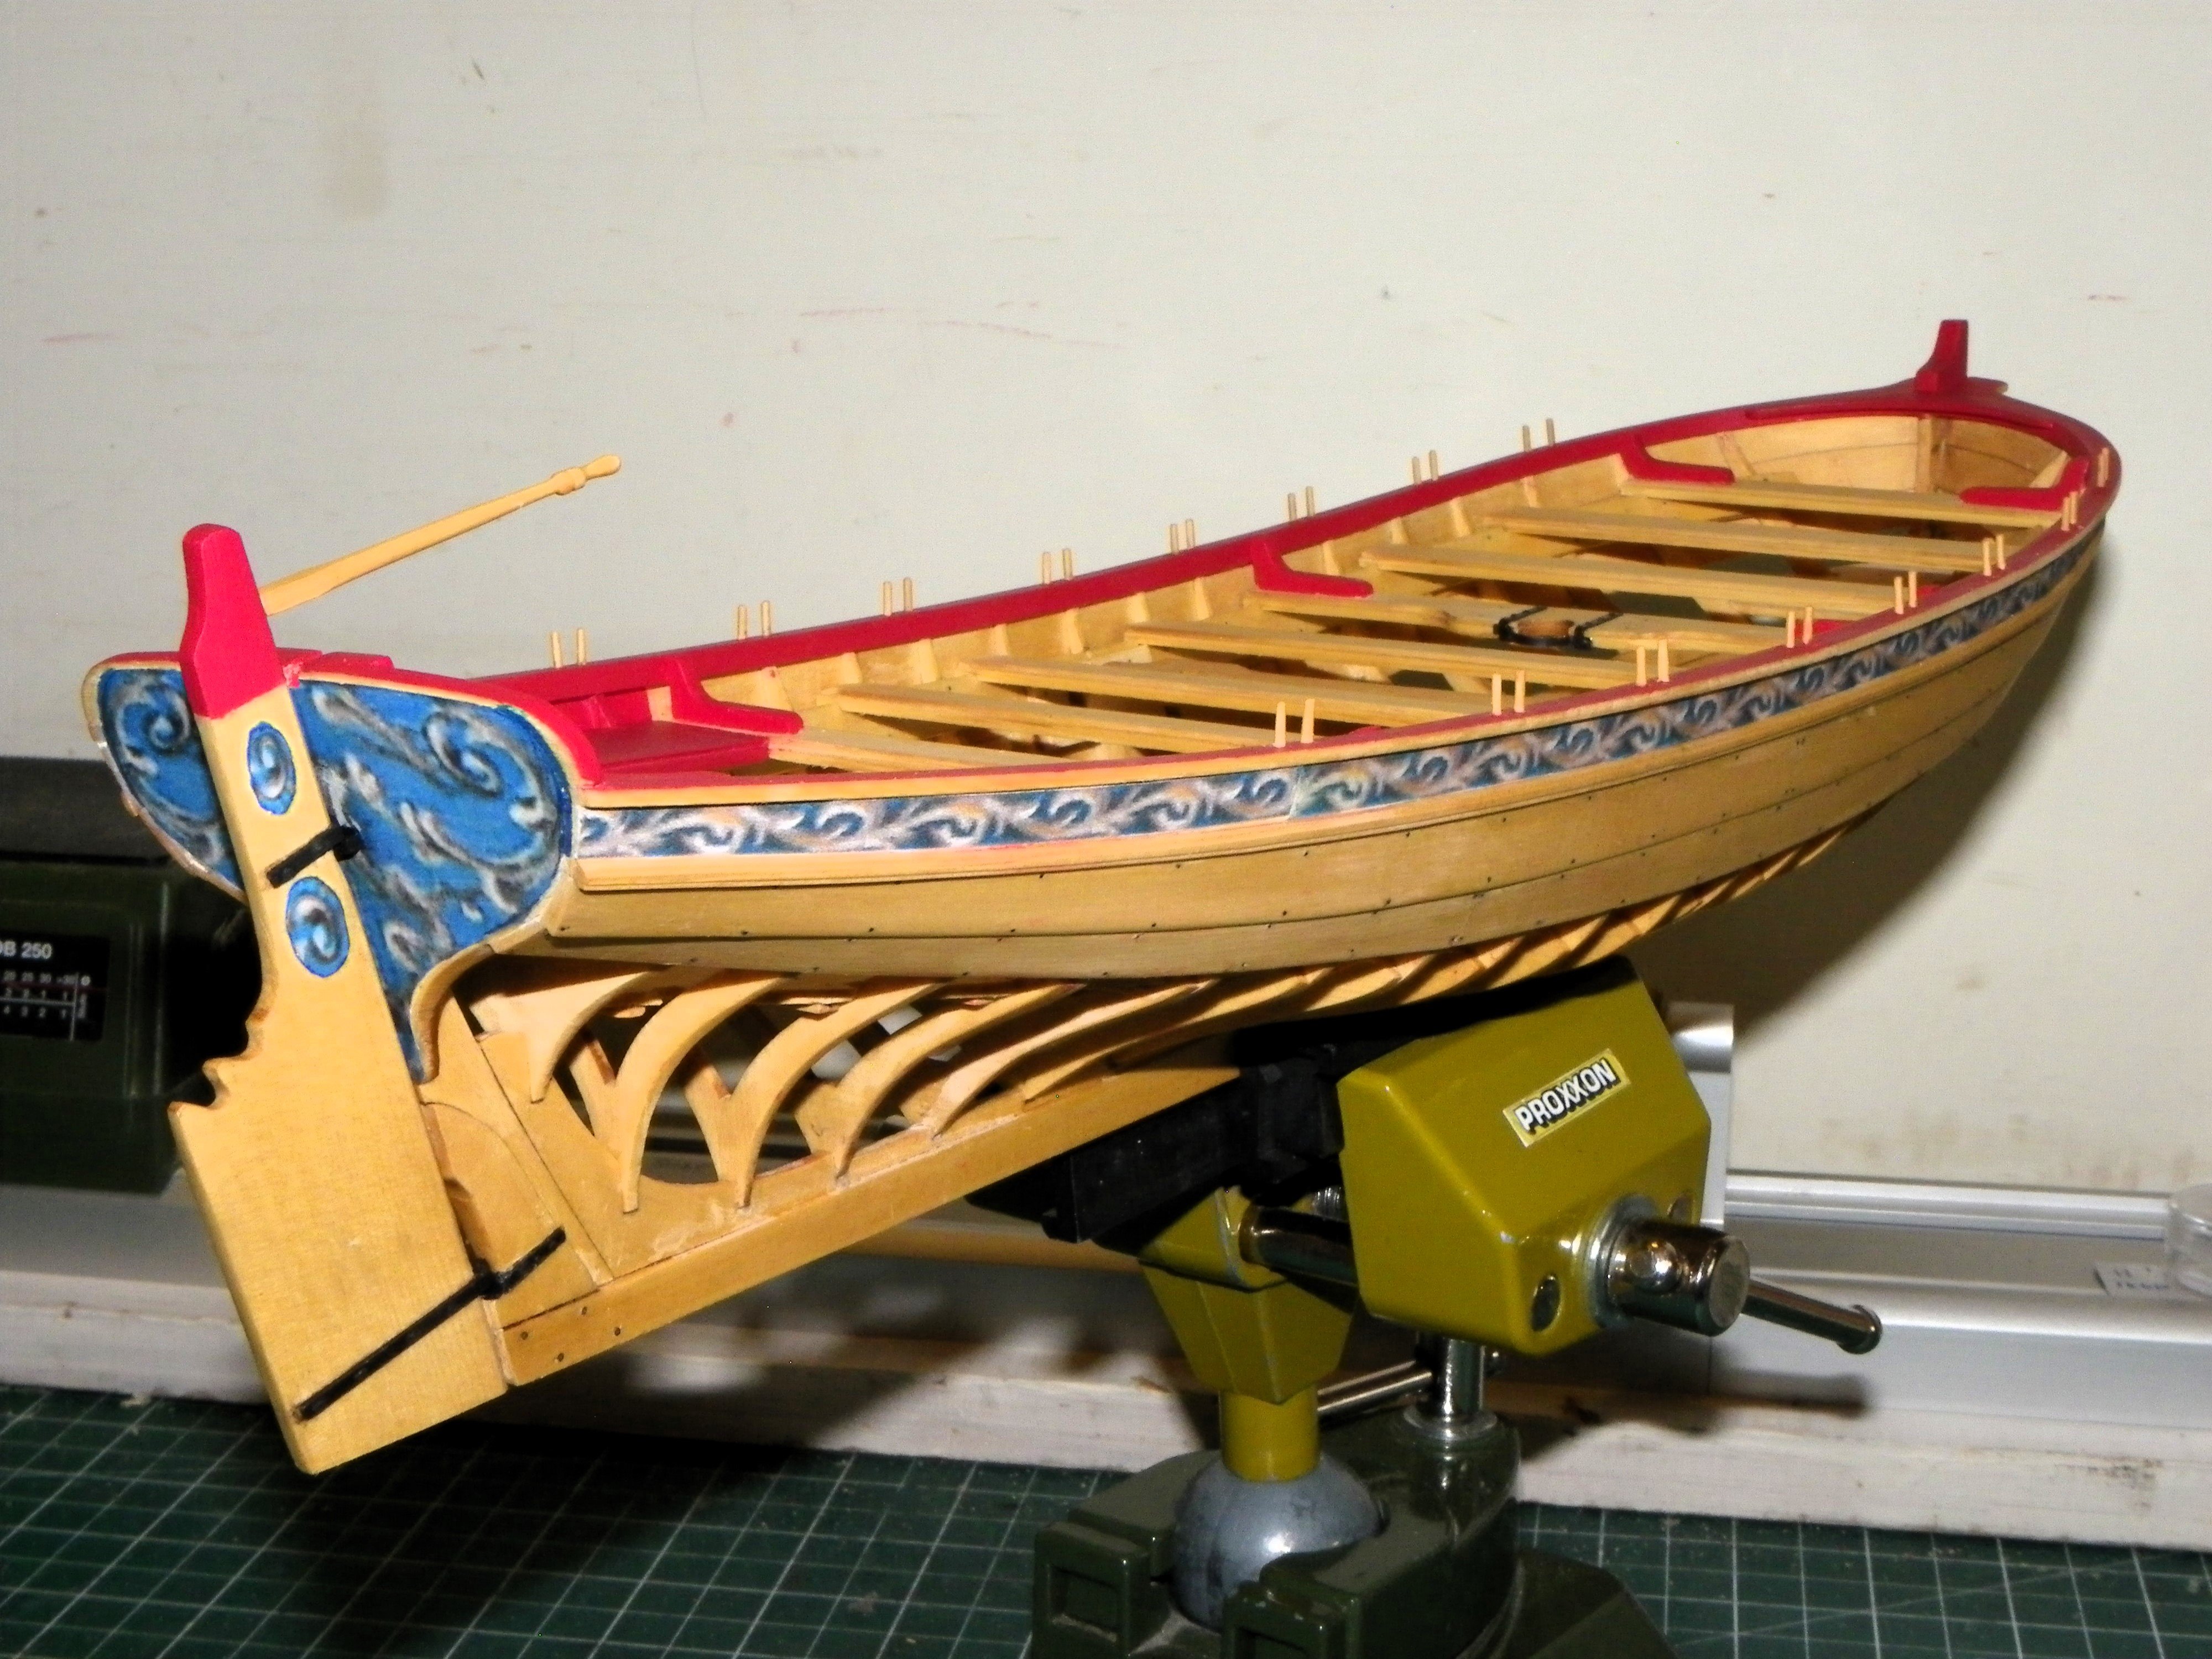
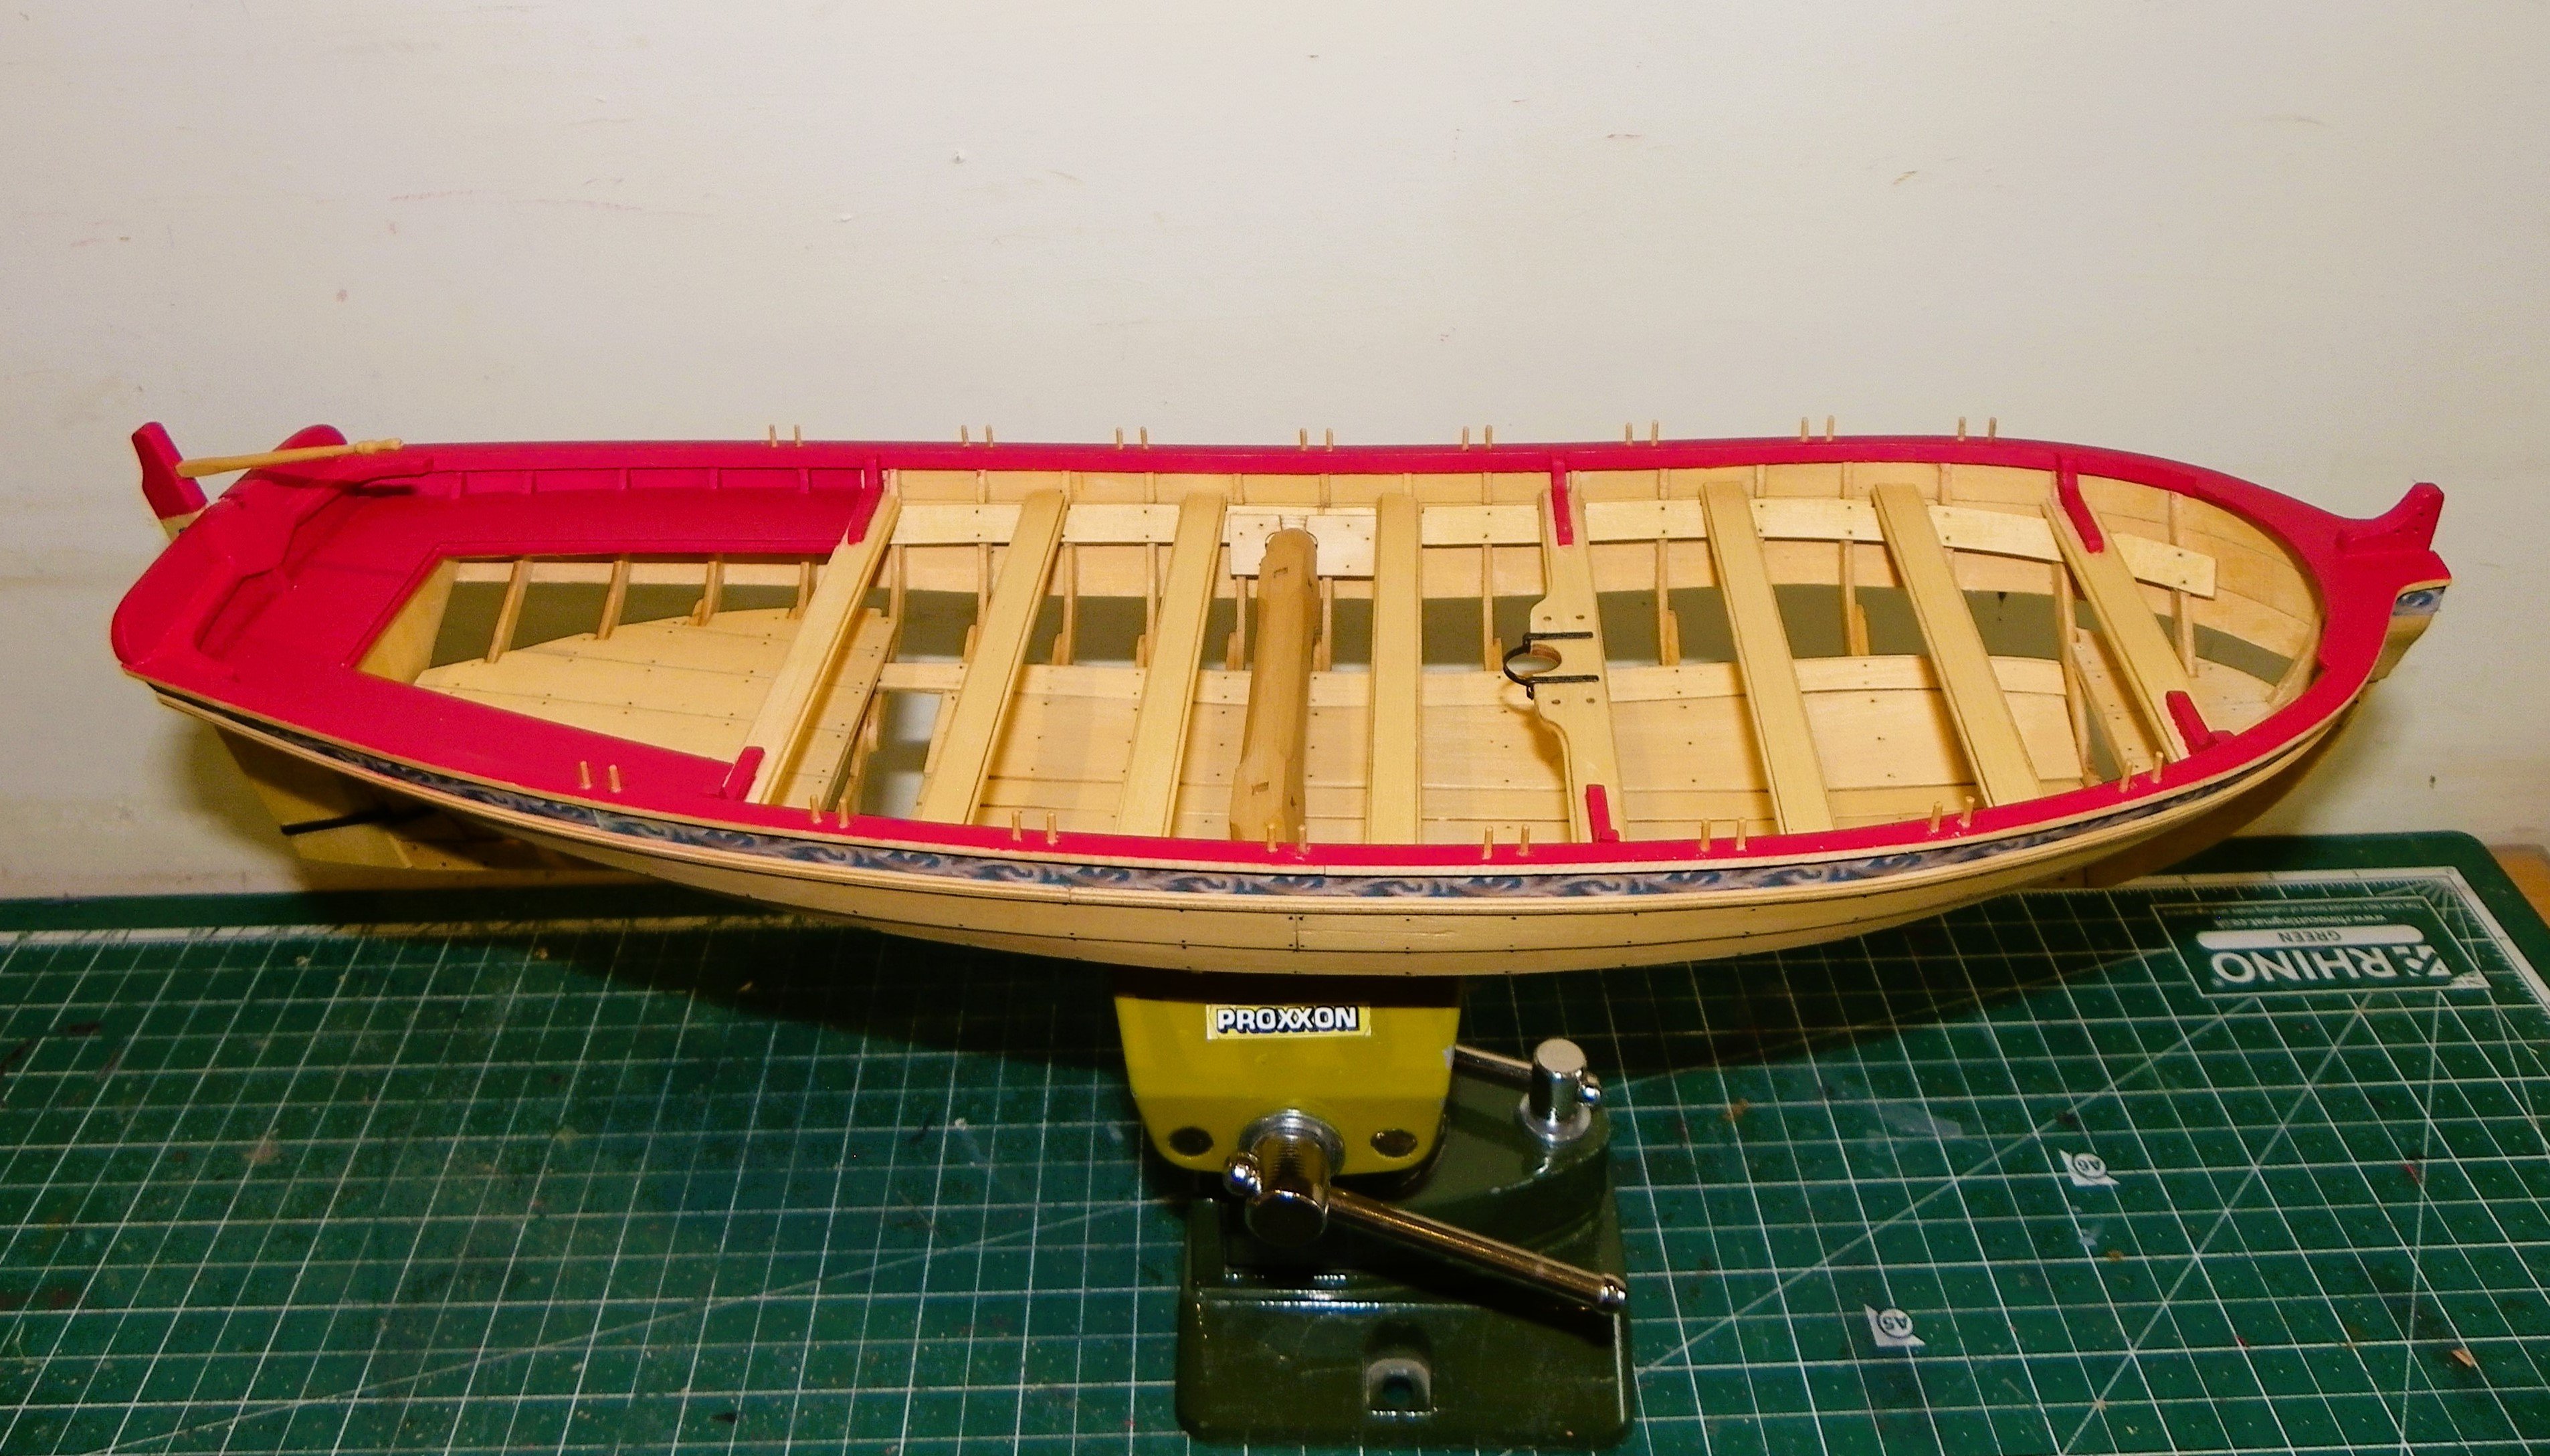
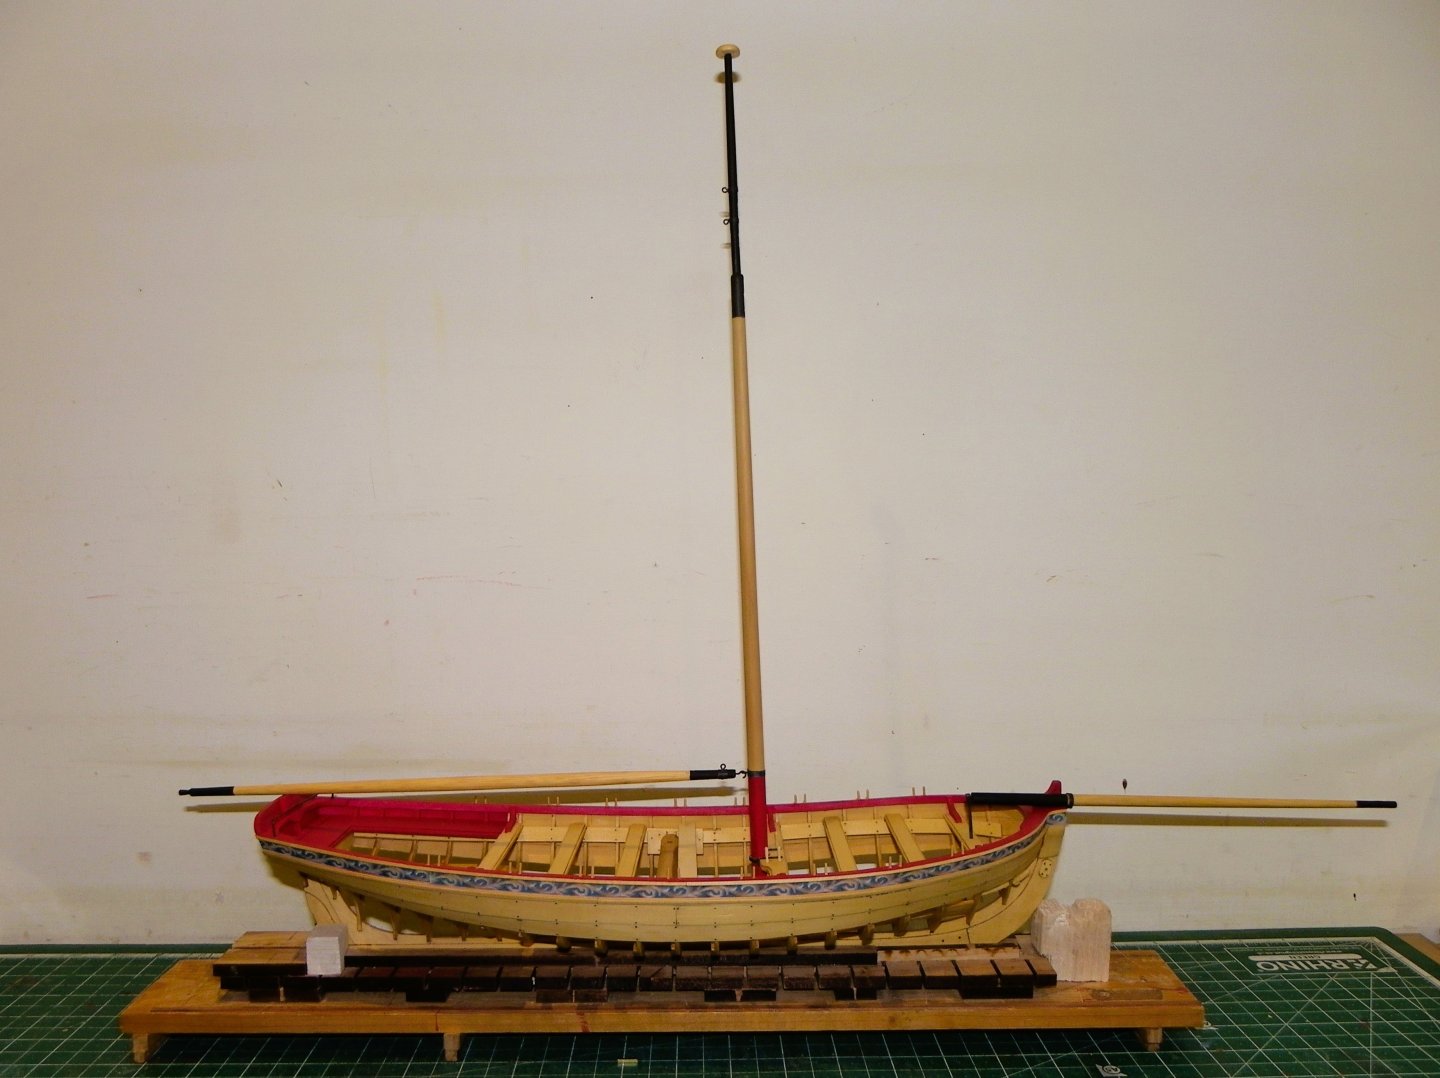
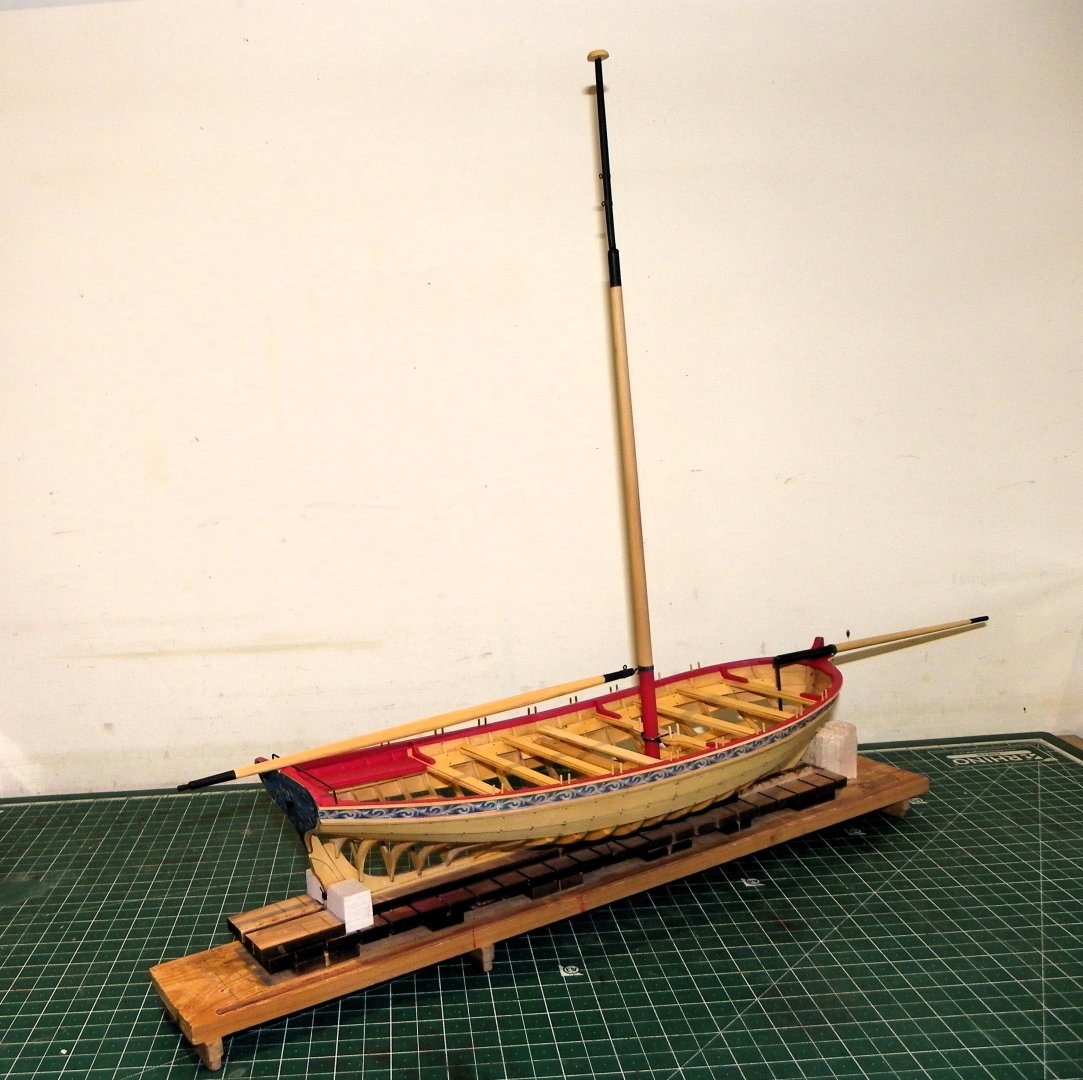
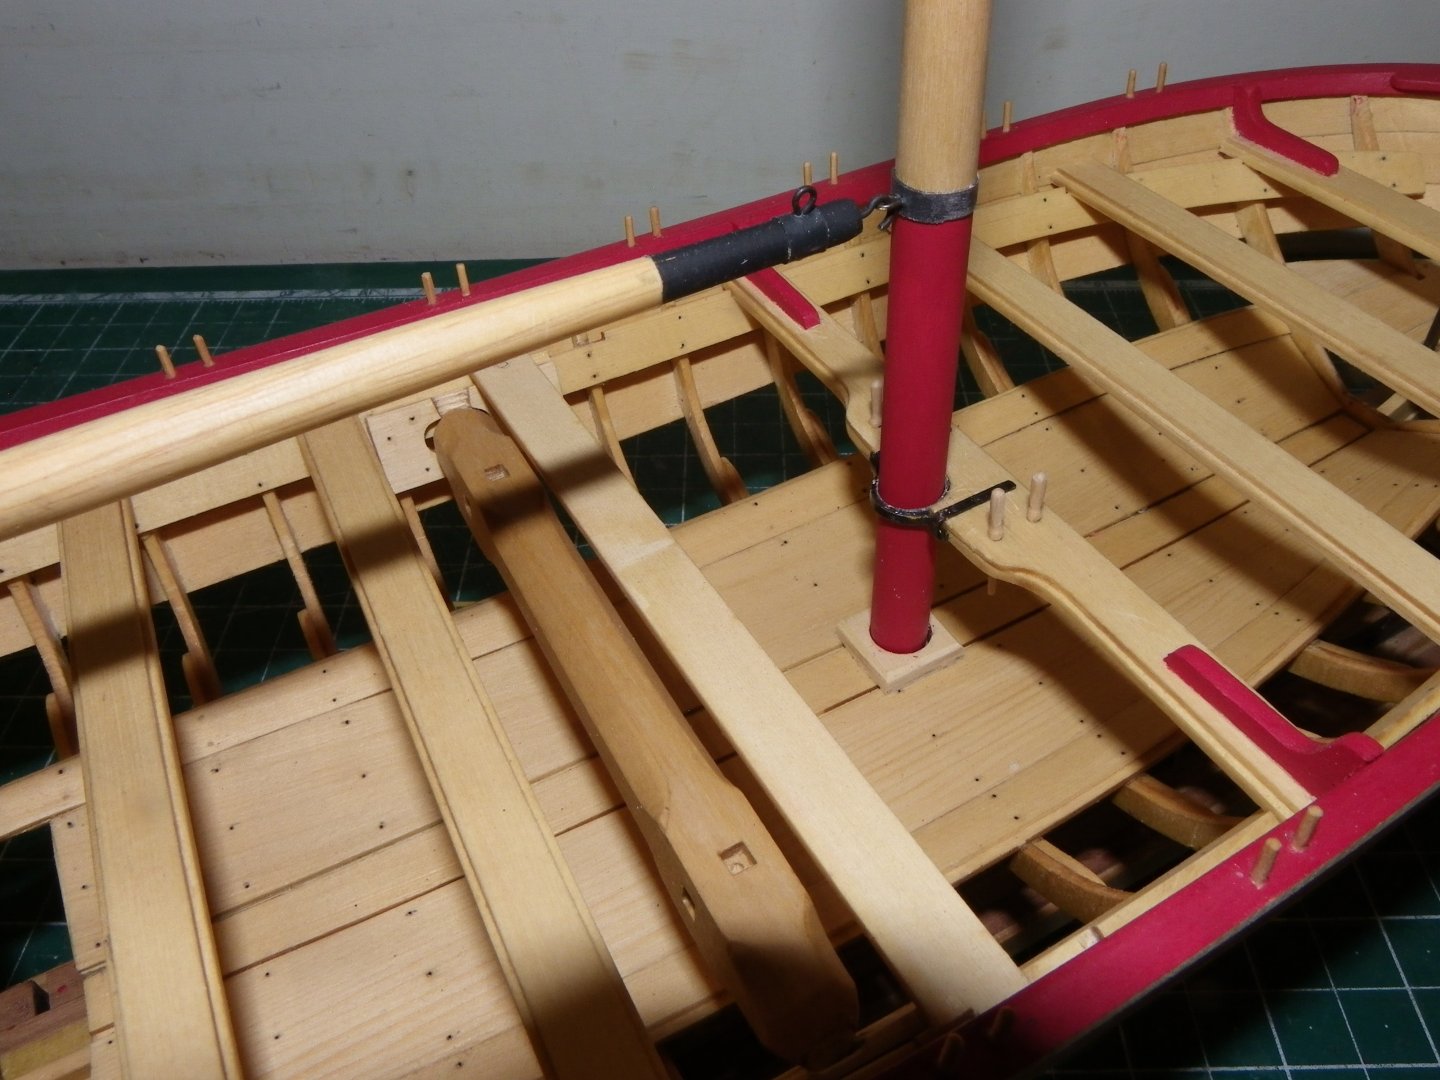
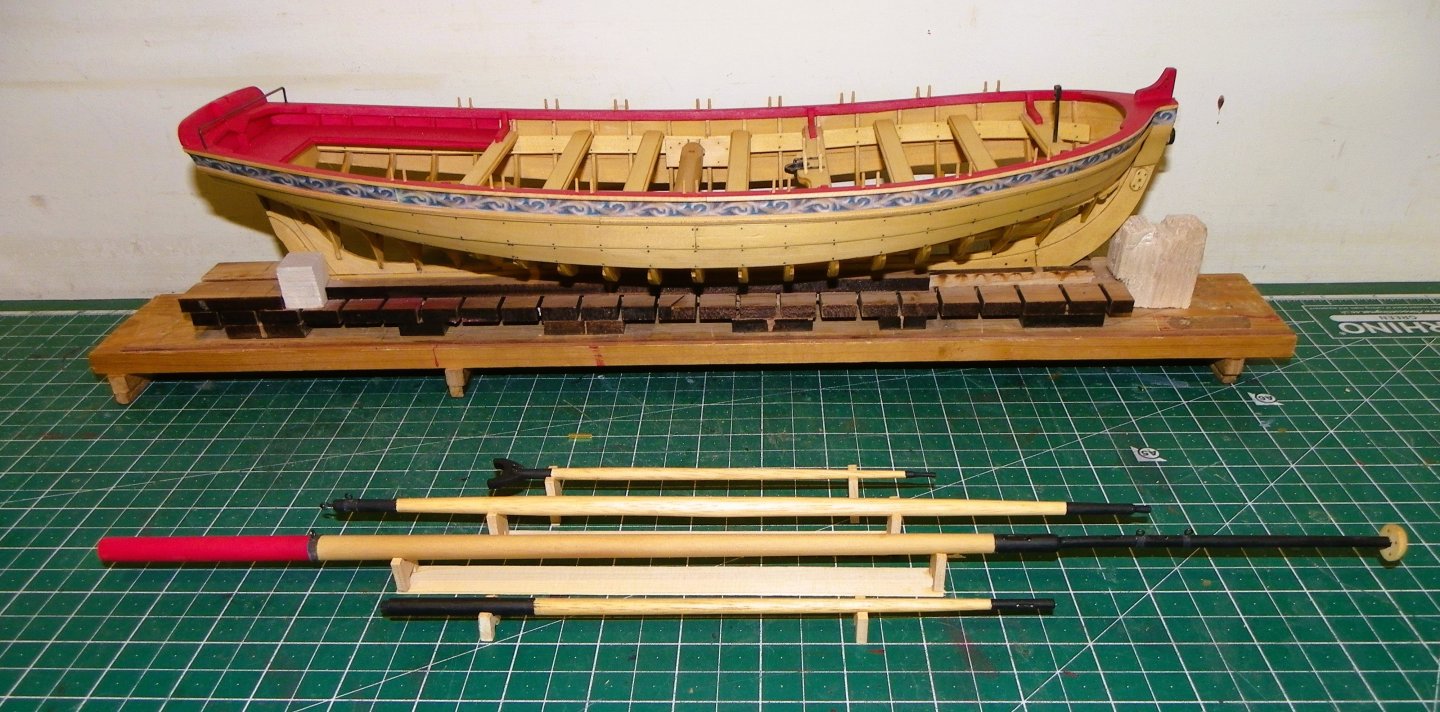
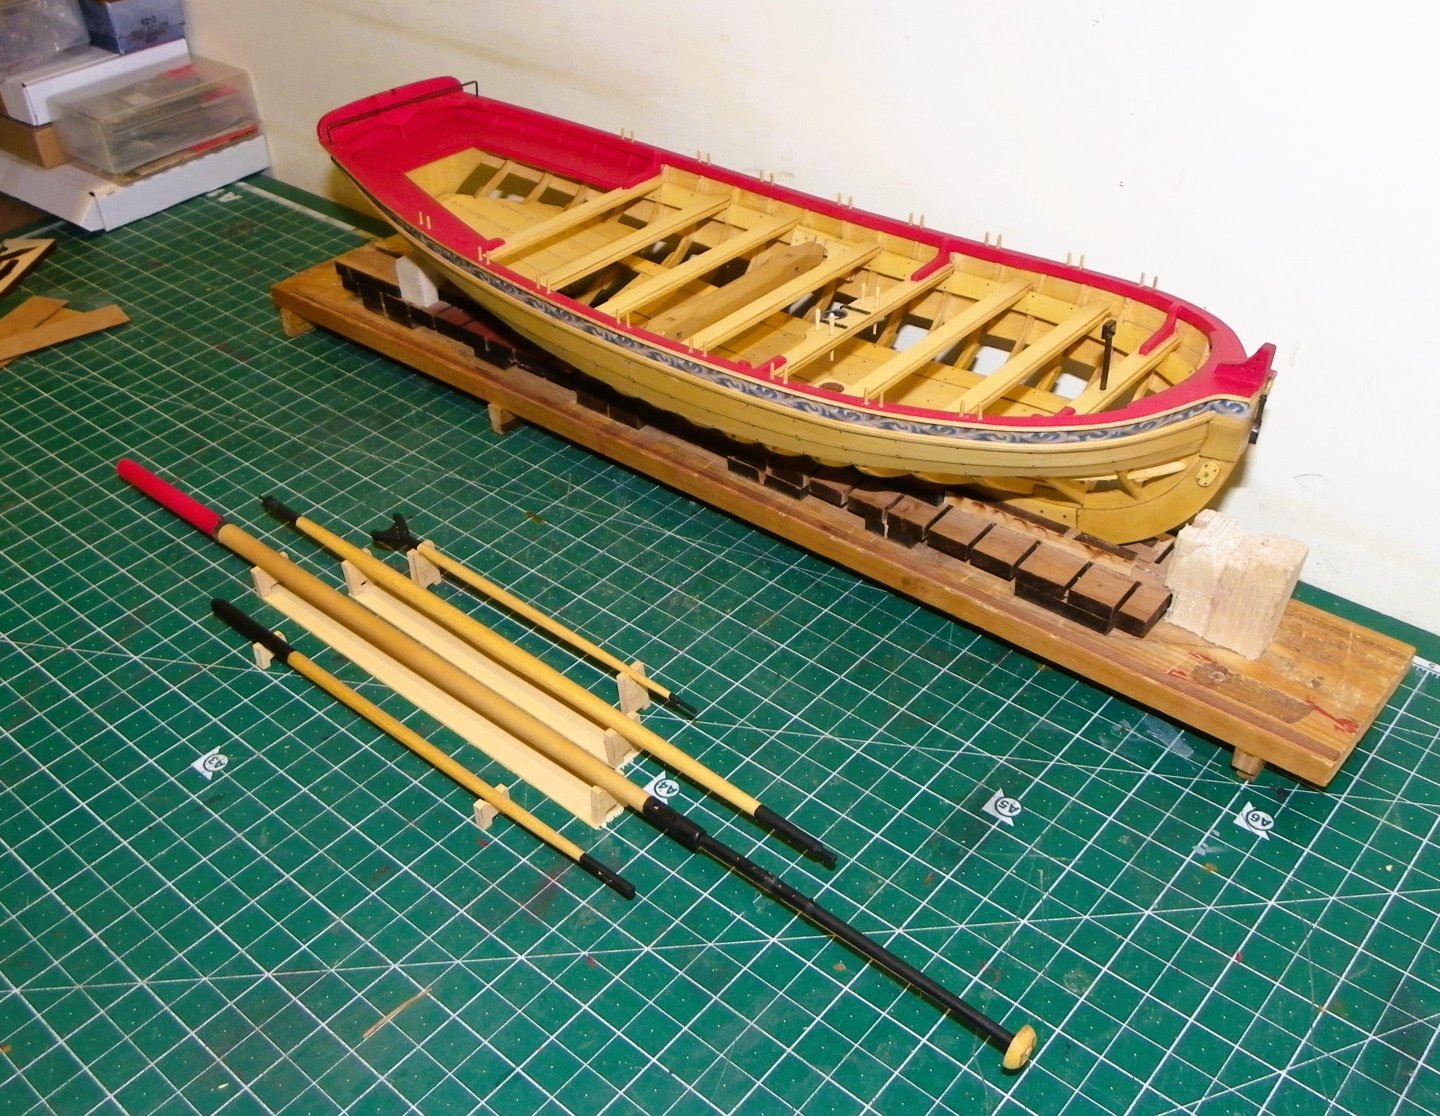
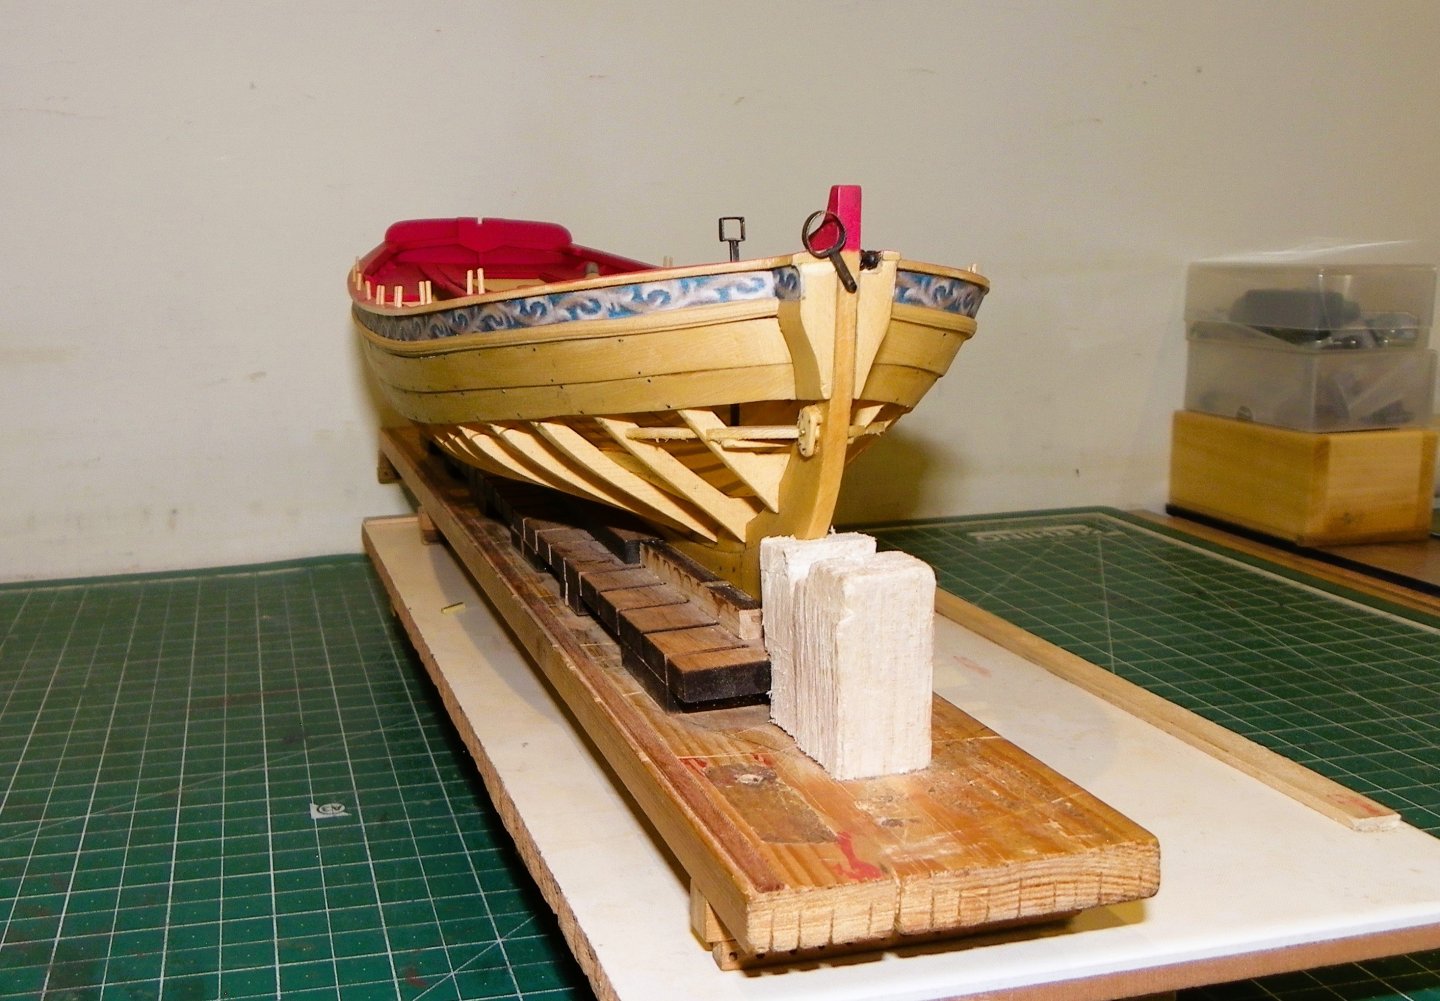
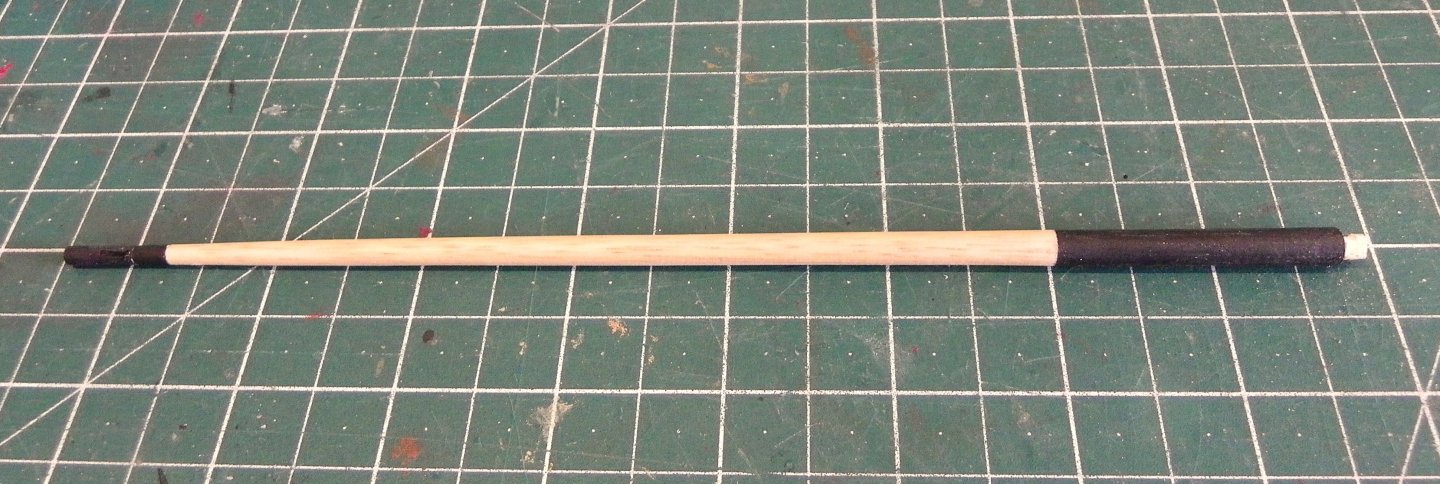
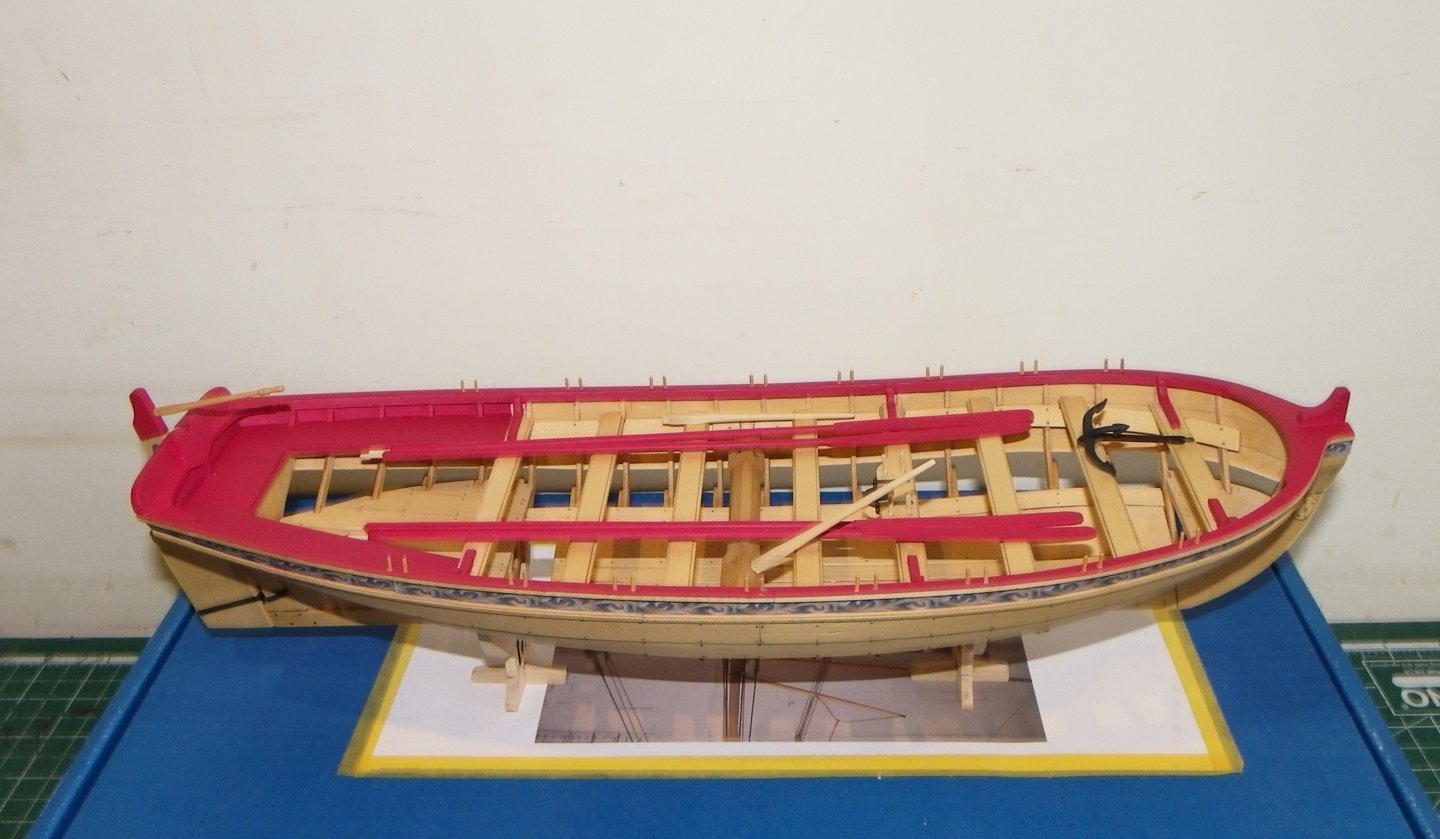
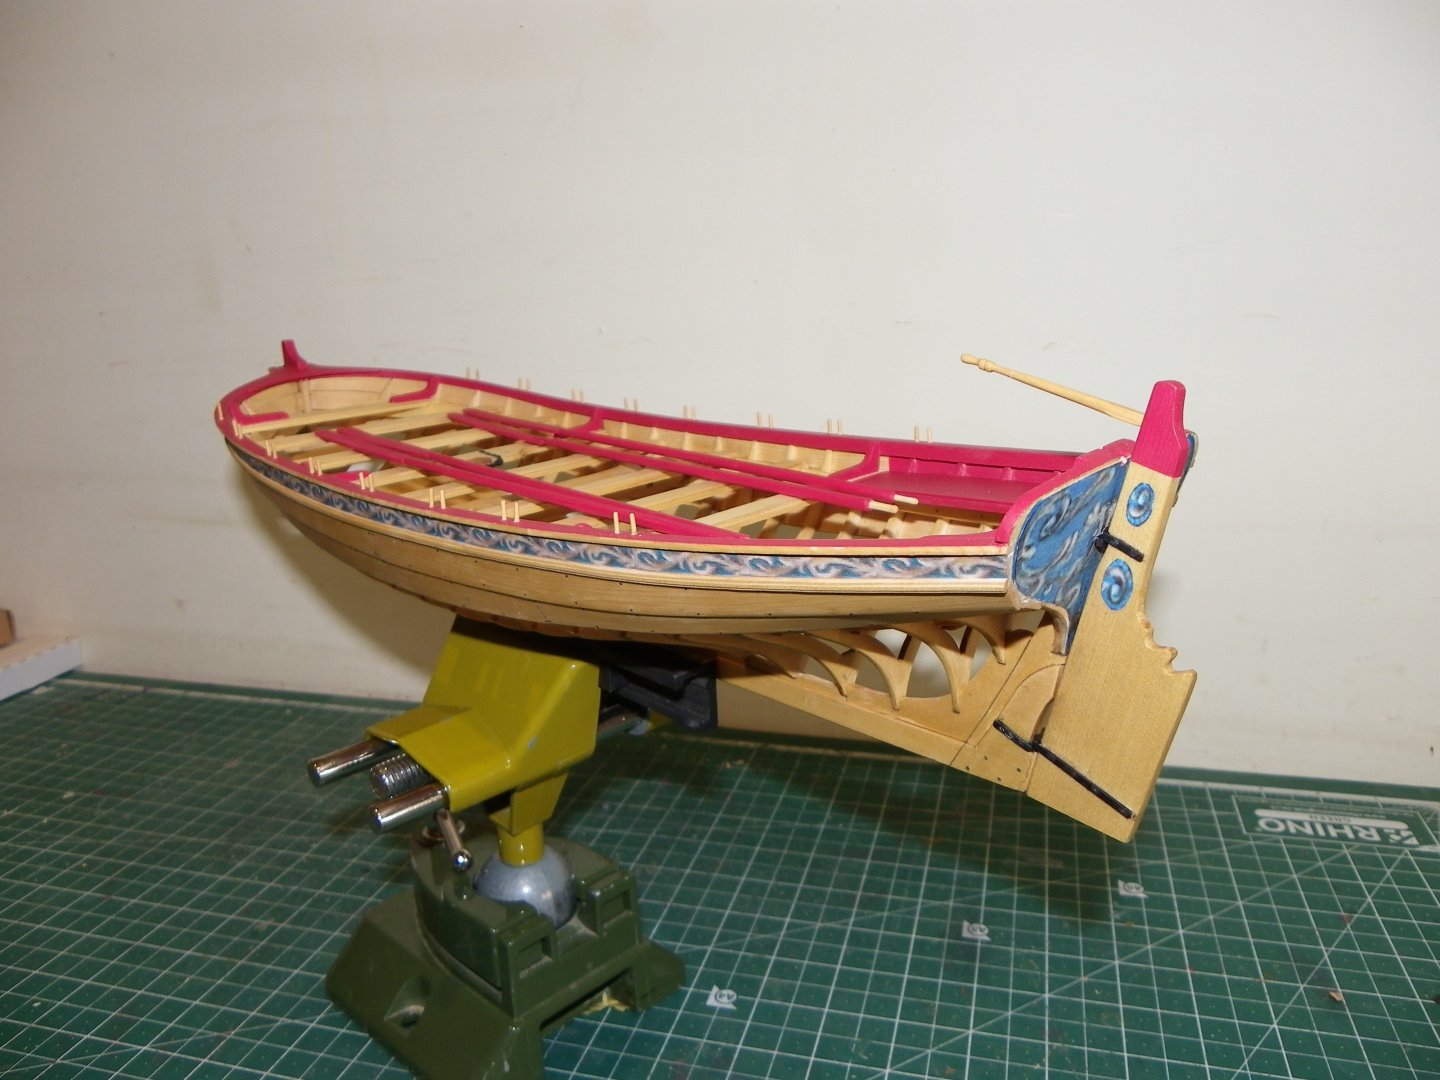
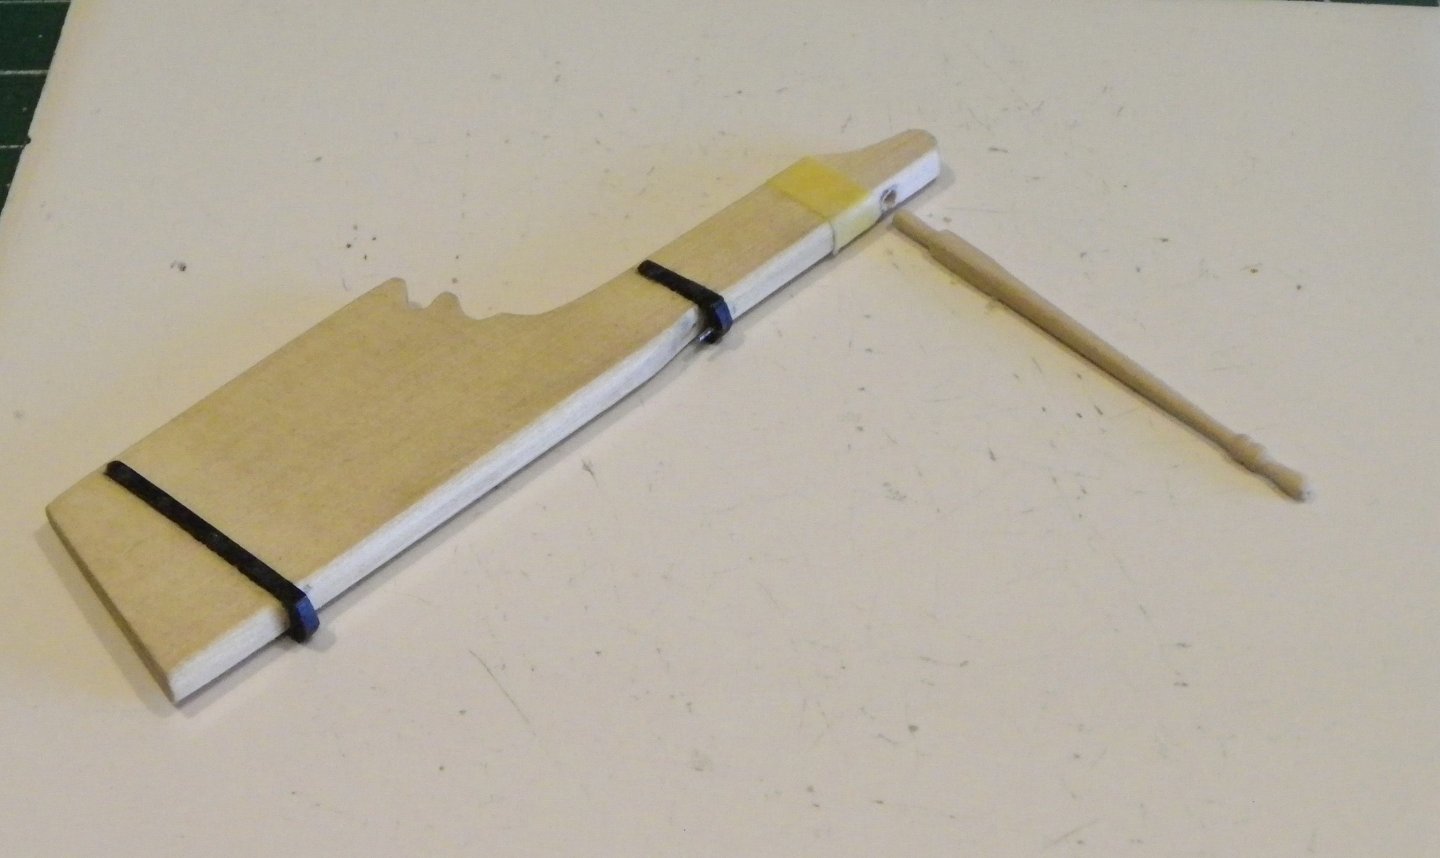
 Peter Goodwin in his book The Cutter Alert makes reference to Admiralty orders specific to the provision of boats for cutters. He cites an order of December 1763 that during winter only one small 4 oared boat should be allocated and that it should be carried rather than towed to avoid being lost. An order of June 1779 mentions 16' boats for cutters, another in July 1783 recommends the addition of a second boat, and in September 1793 an order decreed that cutters employed against smuggling should replace their 18' boat with one of 20' The Cutter Alert book by Peter Goodwin indicates a boat stowed on the centre line but from the plans there is room only for a 13' boat. Cheerful would certainly have carried at least one, probably two, but space onboard is severely restricted. There is not room between the winch and the pumps, and storage of even a modest 14' four oared boat stored on deck either port or starboard would effectively fill the deck space. The Model Shipways kit of a 1:48 scale Longboat would be in scale but is far too large for a deck stowed boat, and at 26' is on the large size for a towed boat. On Cheerful only a small boat could be carried on deck so it is more than likely a larger one was towed. In the Alert book there is a photo of the model of the cutter Hawke carrying a small boat on the starboard side of the deck. For my build I knocked up a version of a 14' cutter to assess whether I like the look of a boat on the Cheerful deck . 8426 8429 8431 For the purpose of the exercise I used a Caldercraft Resin hull, with added Boxwood fittings. B.E. 07/11/24


- 11 replies
-
- 10
-

-

-
- cutter
- ships boats
- (and 1 more)
-
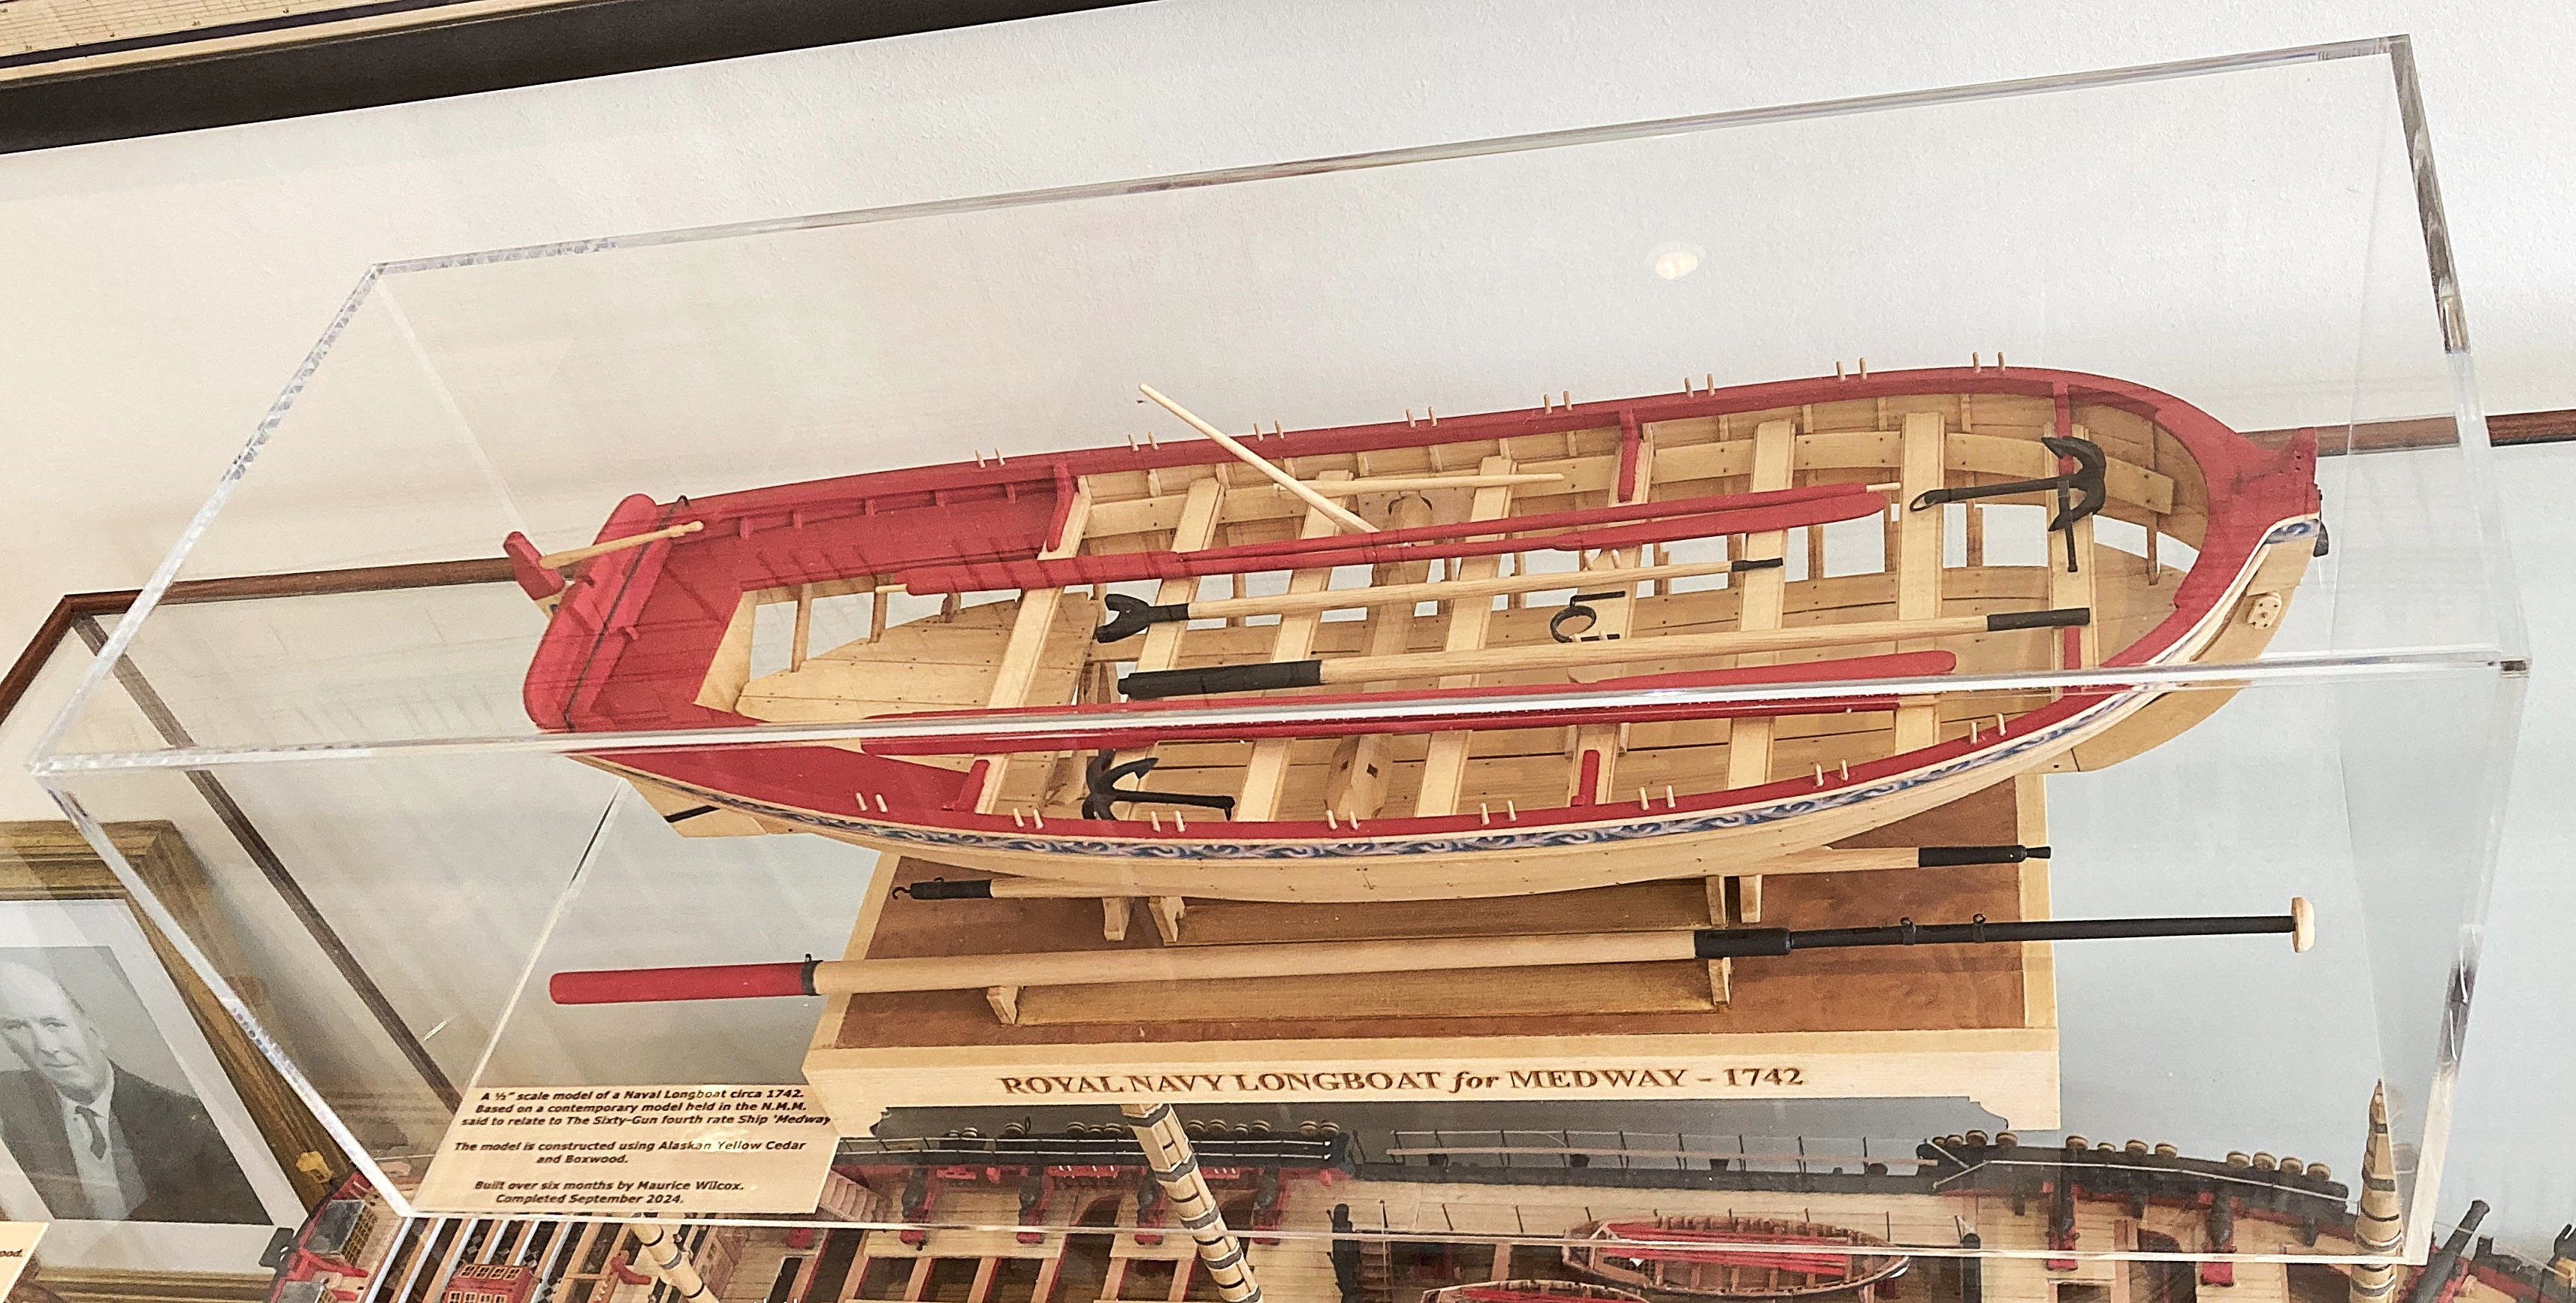
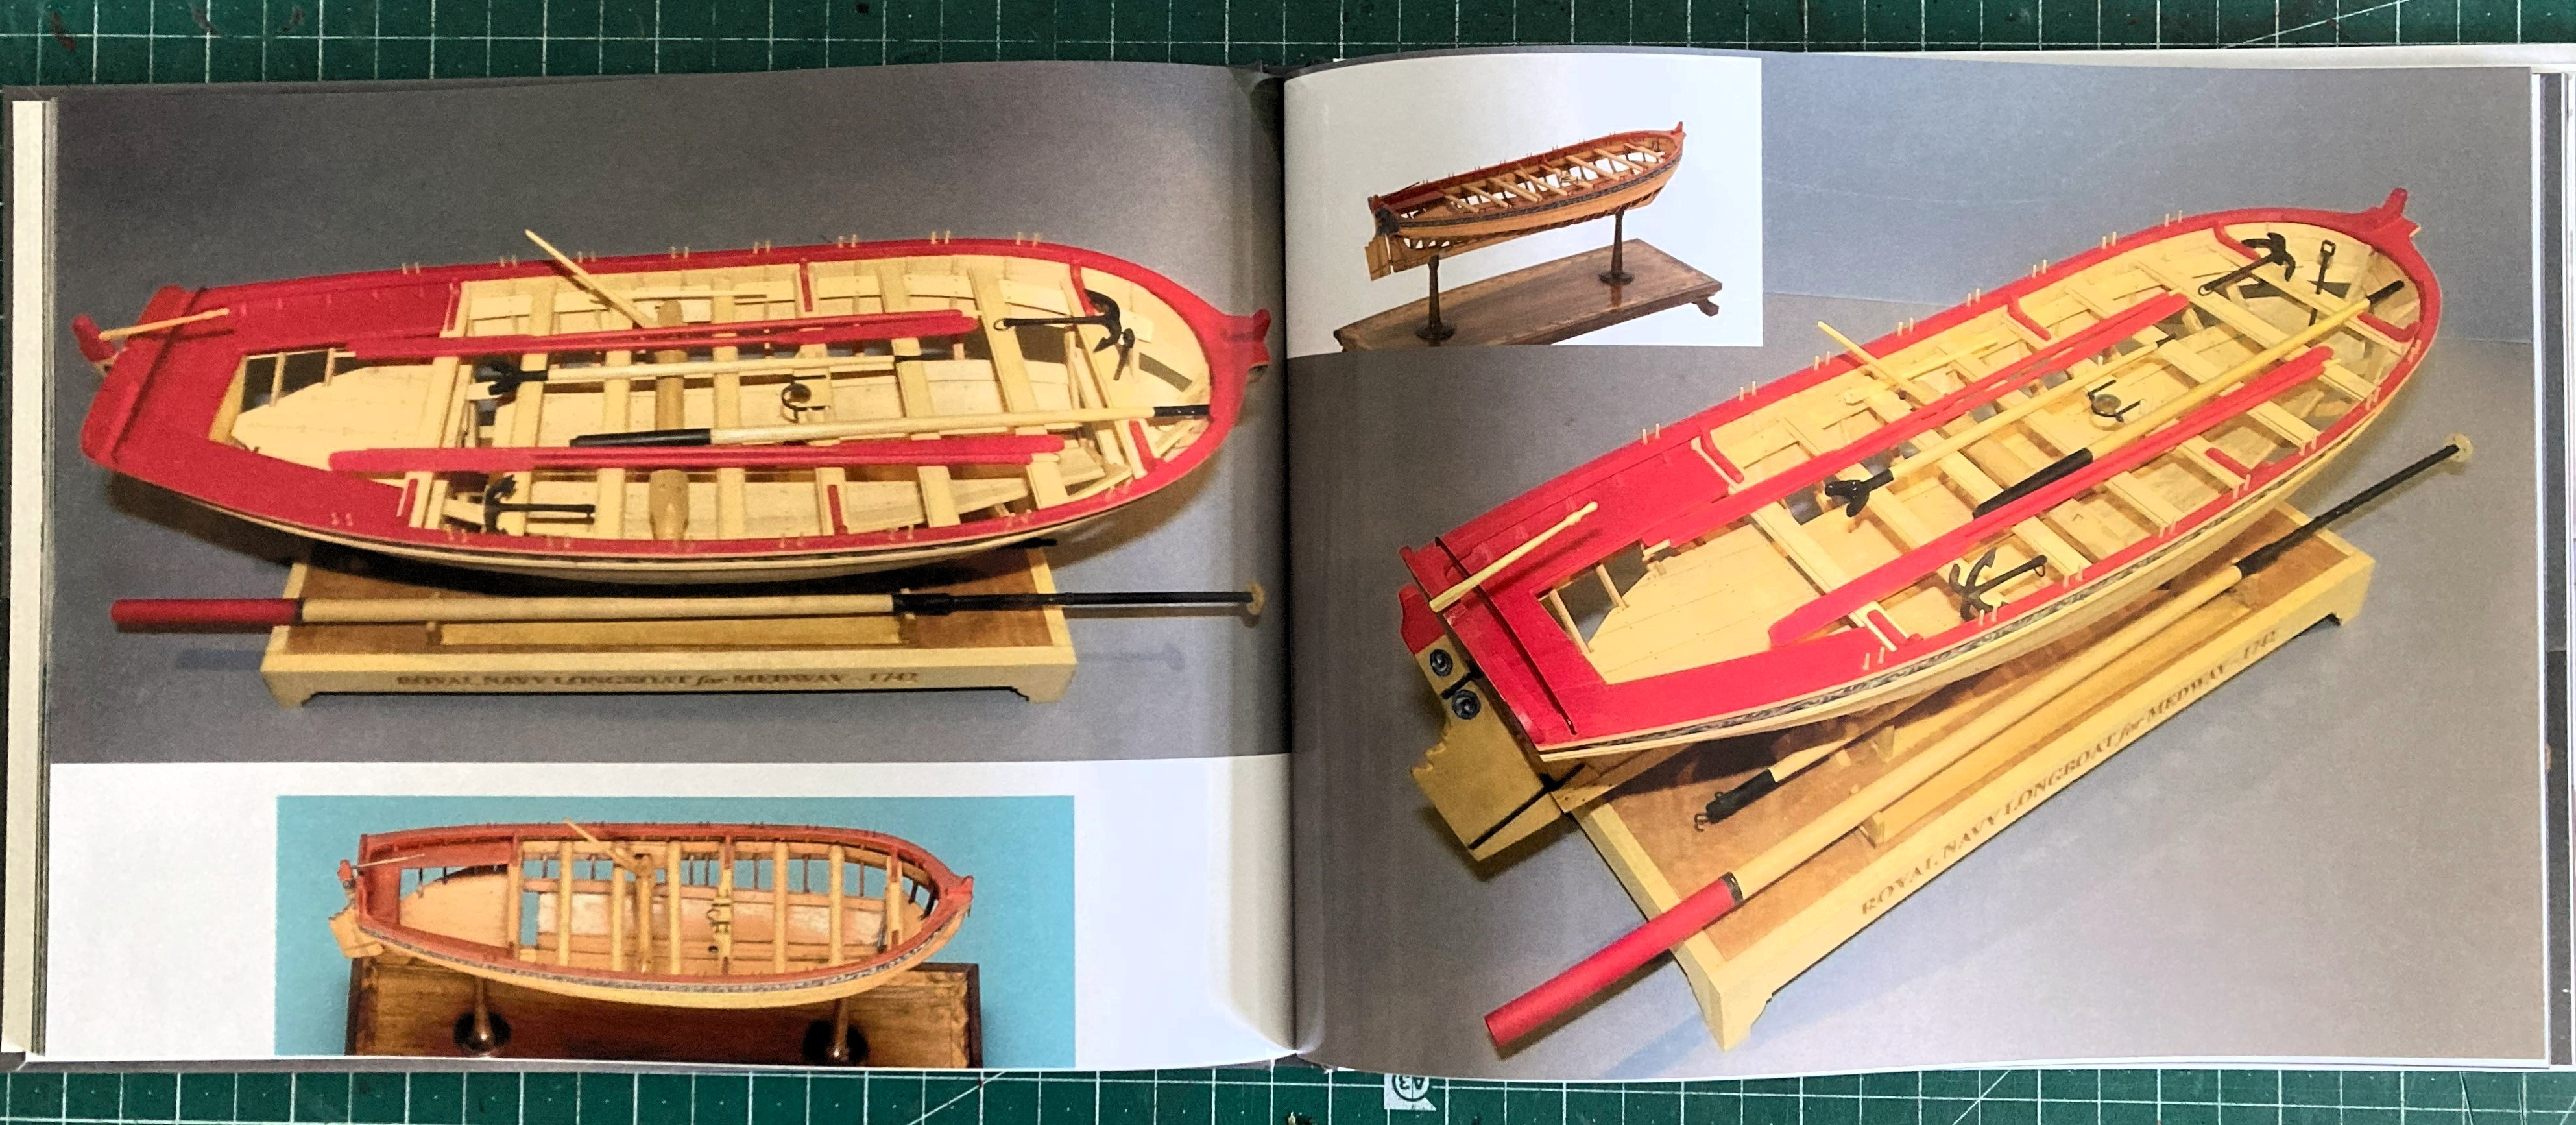
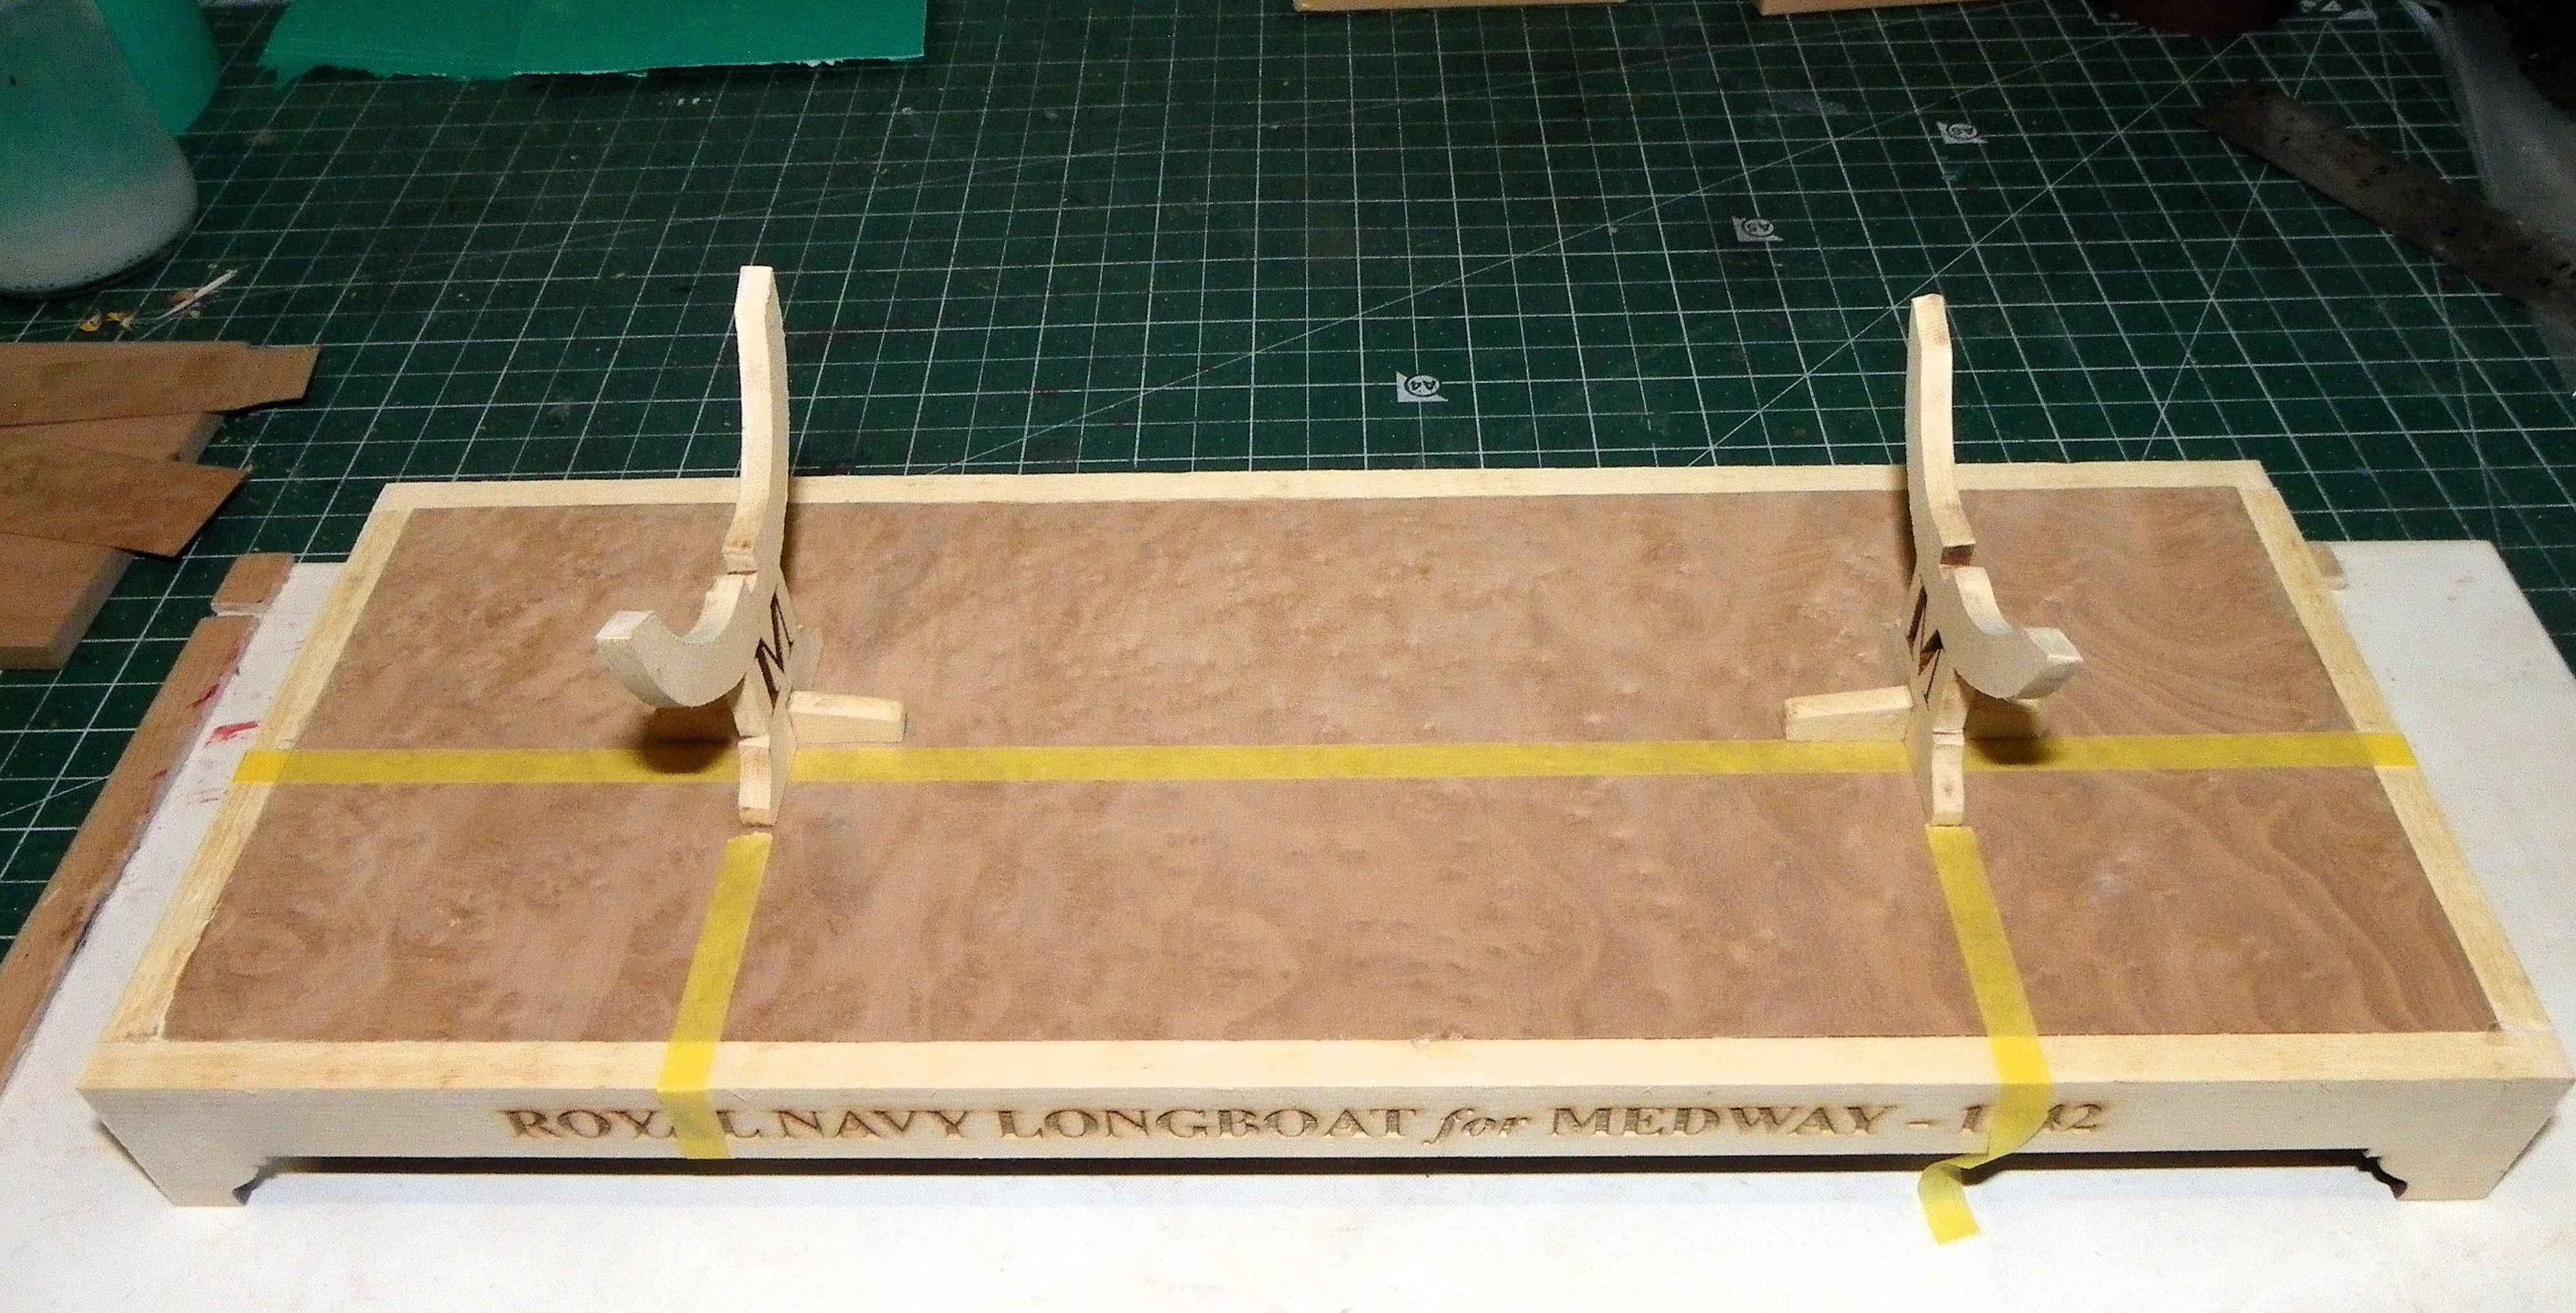
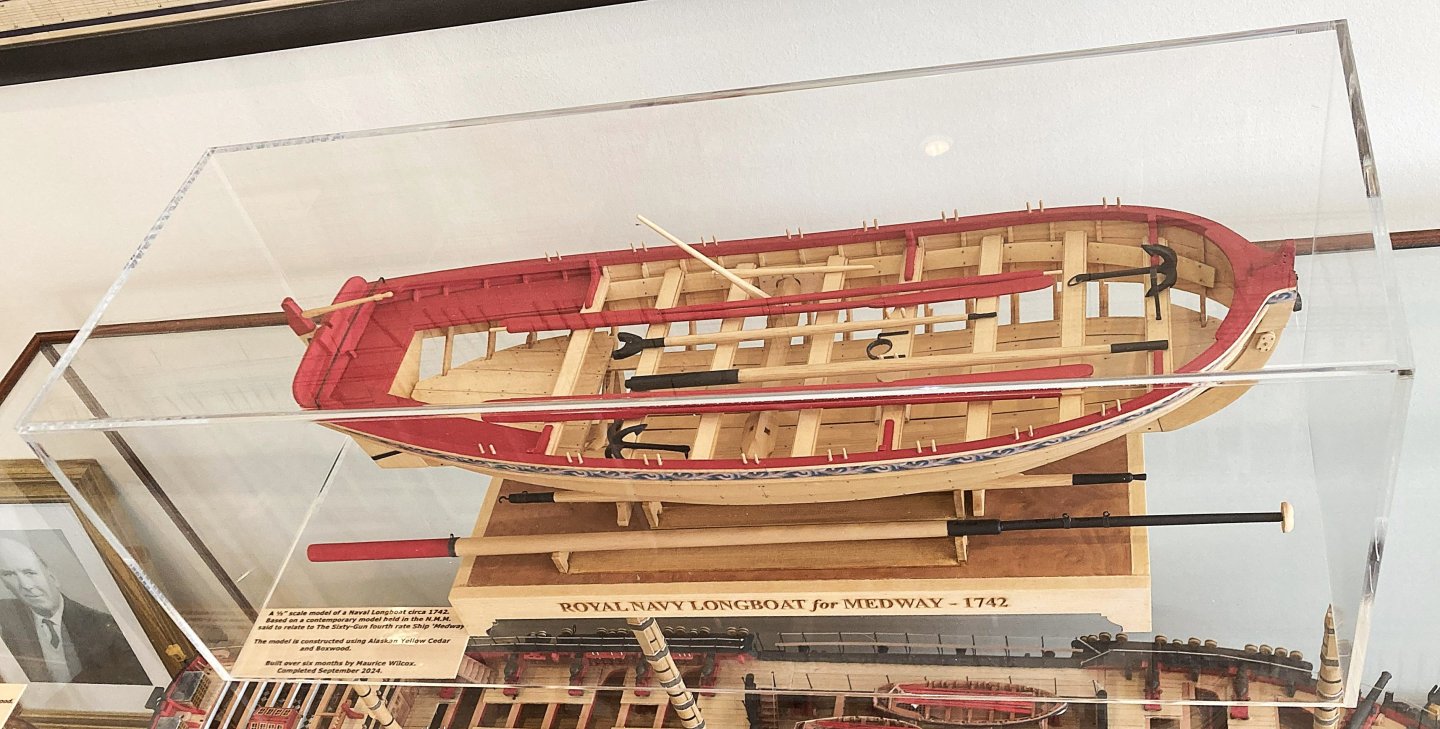
A Display cover for the Medway Longboat. I thought I would give a heads up for the Acrylic cover I ordered for the model. The dimensions: Thickness 4mm Internal Length 490mm Internal Depth 180mm Internal Height 170mm The cover was obtained from: Custom Display Cover | Tielo The company is based in Hull, Yorkshire, and the delivered cost was £42.64 (free delivery) 2992A 2993A Difficult to get a good shot of the cover but it is very nicely made and at a competitive price compared to other UK suppliers I checked out. B.E. 11/10/2024

- 131 replies
-
- 7
-
-
-
- Medway Longboat
- Syren Ship Model Company
- (and 1 more)
-
Thank you Clark, Rusty, and Glenn, I do have a 'dio' in mind to while away the dark winter days. B.E.
-
The way the sheet is rigged on the contemporary model looks typical of the period, but it is difficult to believe that sailors would adopt such an impractical arrangement as the horse below the tiller. The NMM which holds the original model makes no reference to this. Our kit is a model of a model and individuals can decide to 'tweak' it as they wish. Regards, B.E.
- 131 replies
-
- 1
-
-
- Medway Longboat
- Syren Ship Model Company
- (and 1 more)
-
Cheers Guys, Sitting in my office/workroom I am surrounded by eleven models (and there are another eight around the house) not including those lying in ordinary in the loft. This disjointed view around my office gives you the effect. I can't imagine at the moment where I would put another, the desire is still there, but I will have to see how long that can be suppressed.🫤 Thanks again for the interest shown. B.E.

- 131 replies
-
- 7
-
-
- Medway Longboat
- Syren Ship Model Company
- (and 1 more)
-
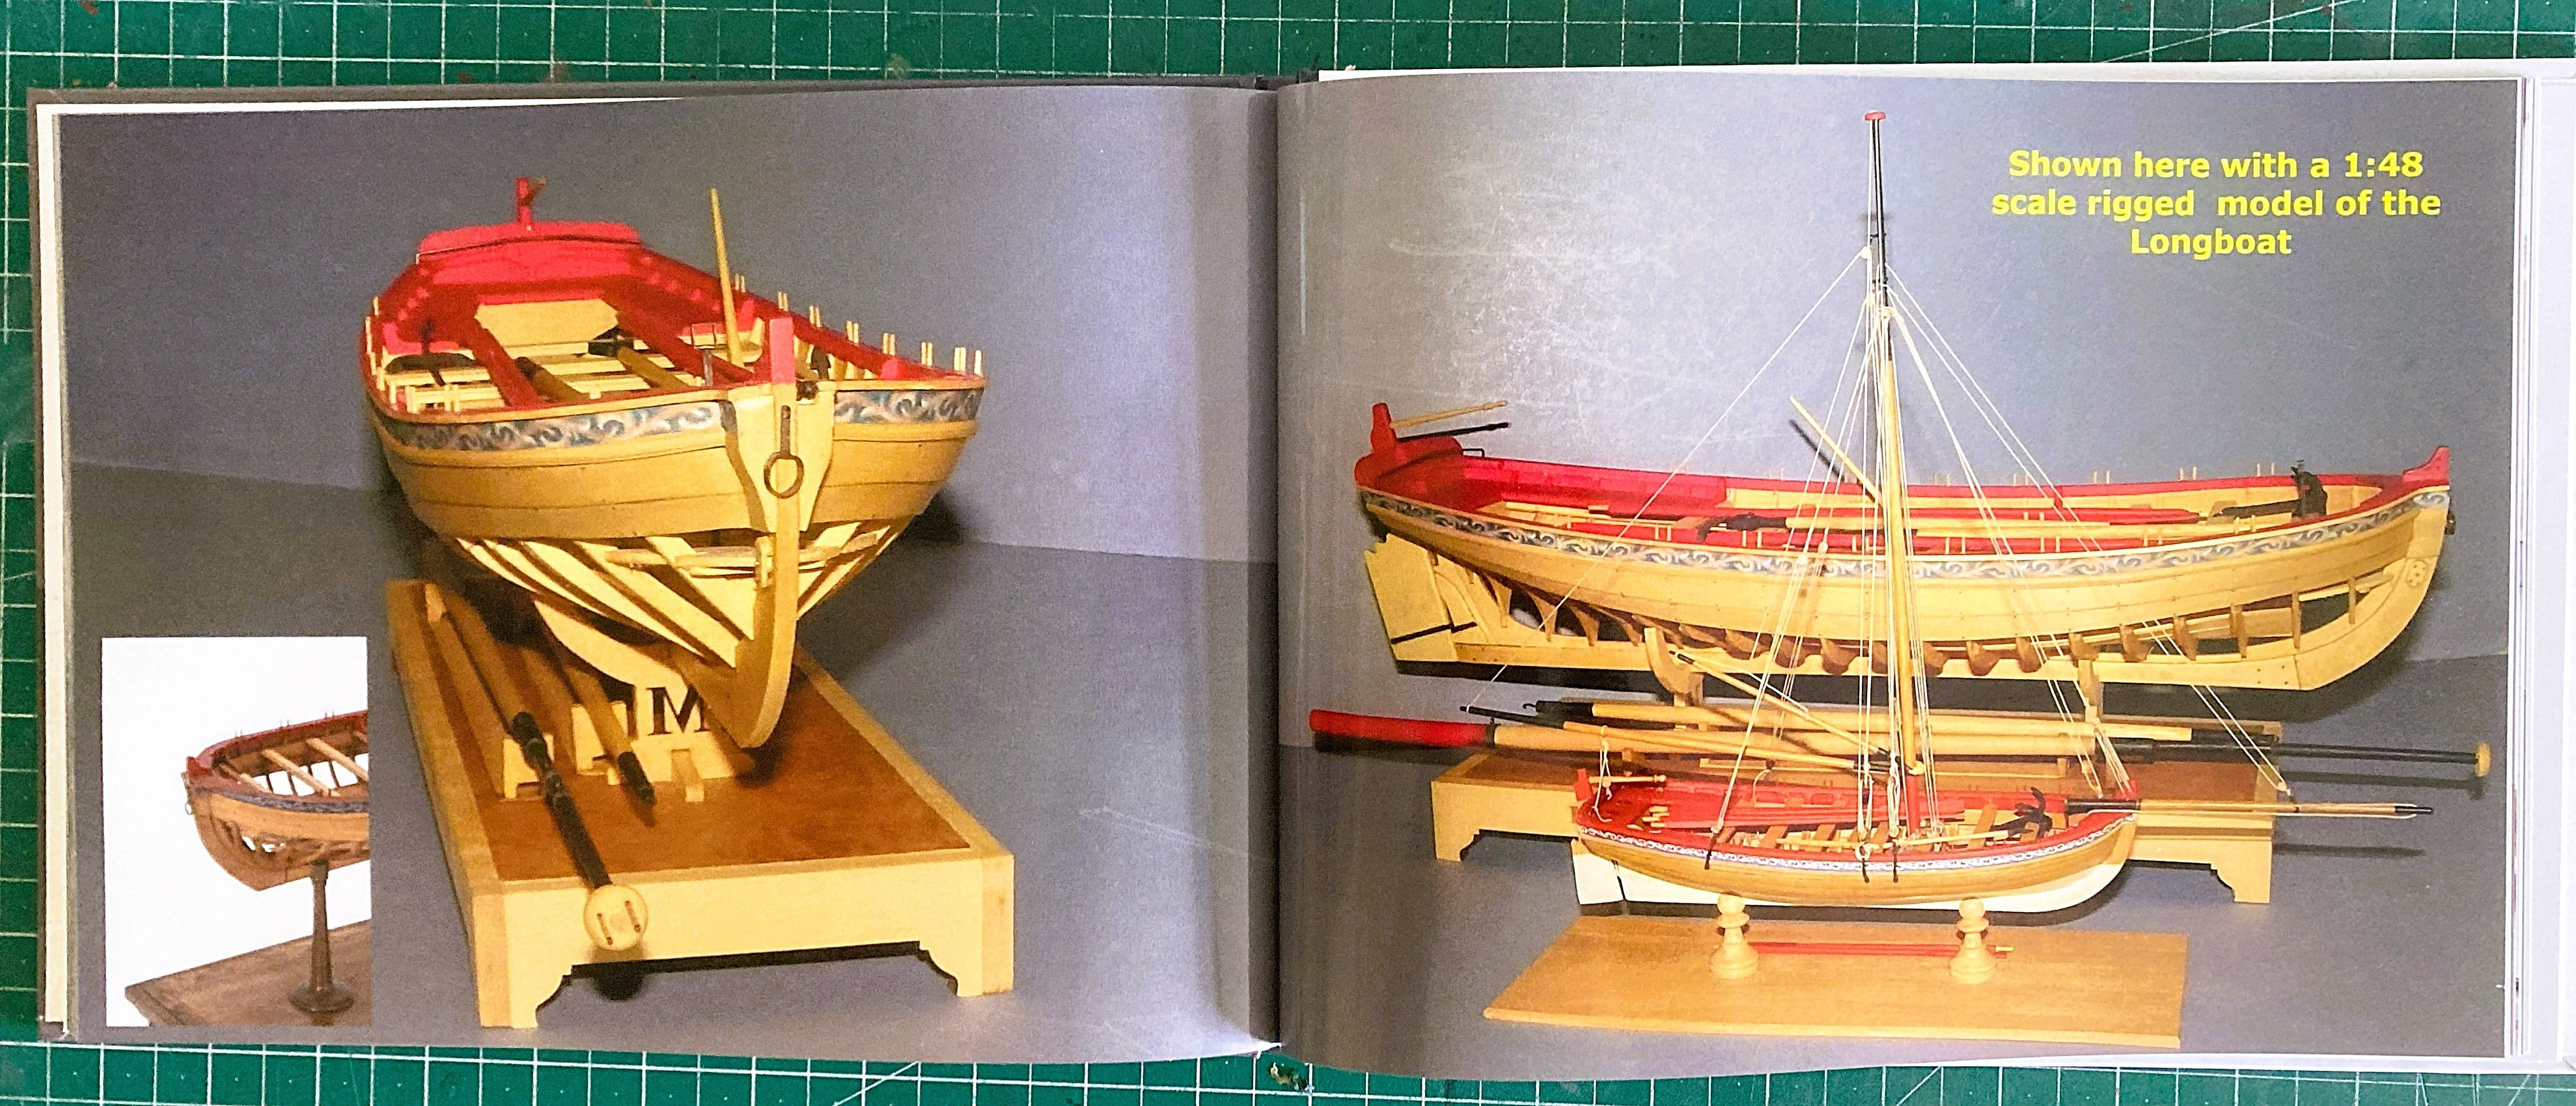
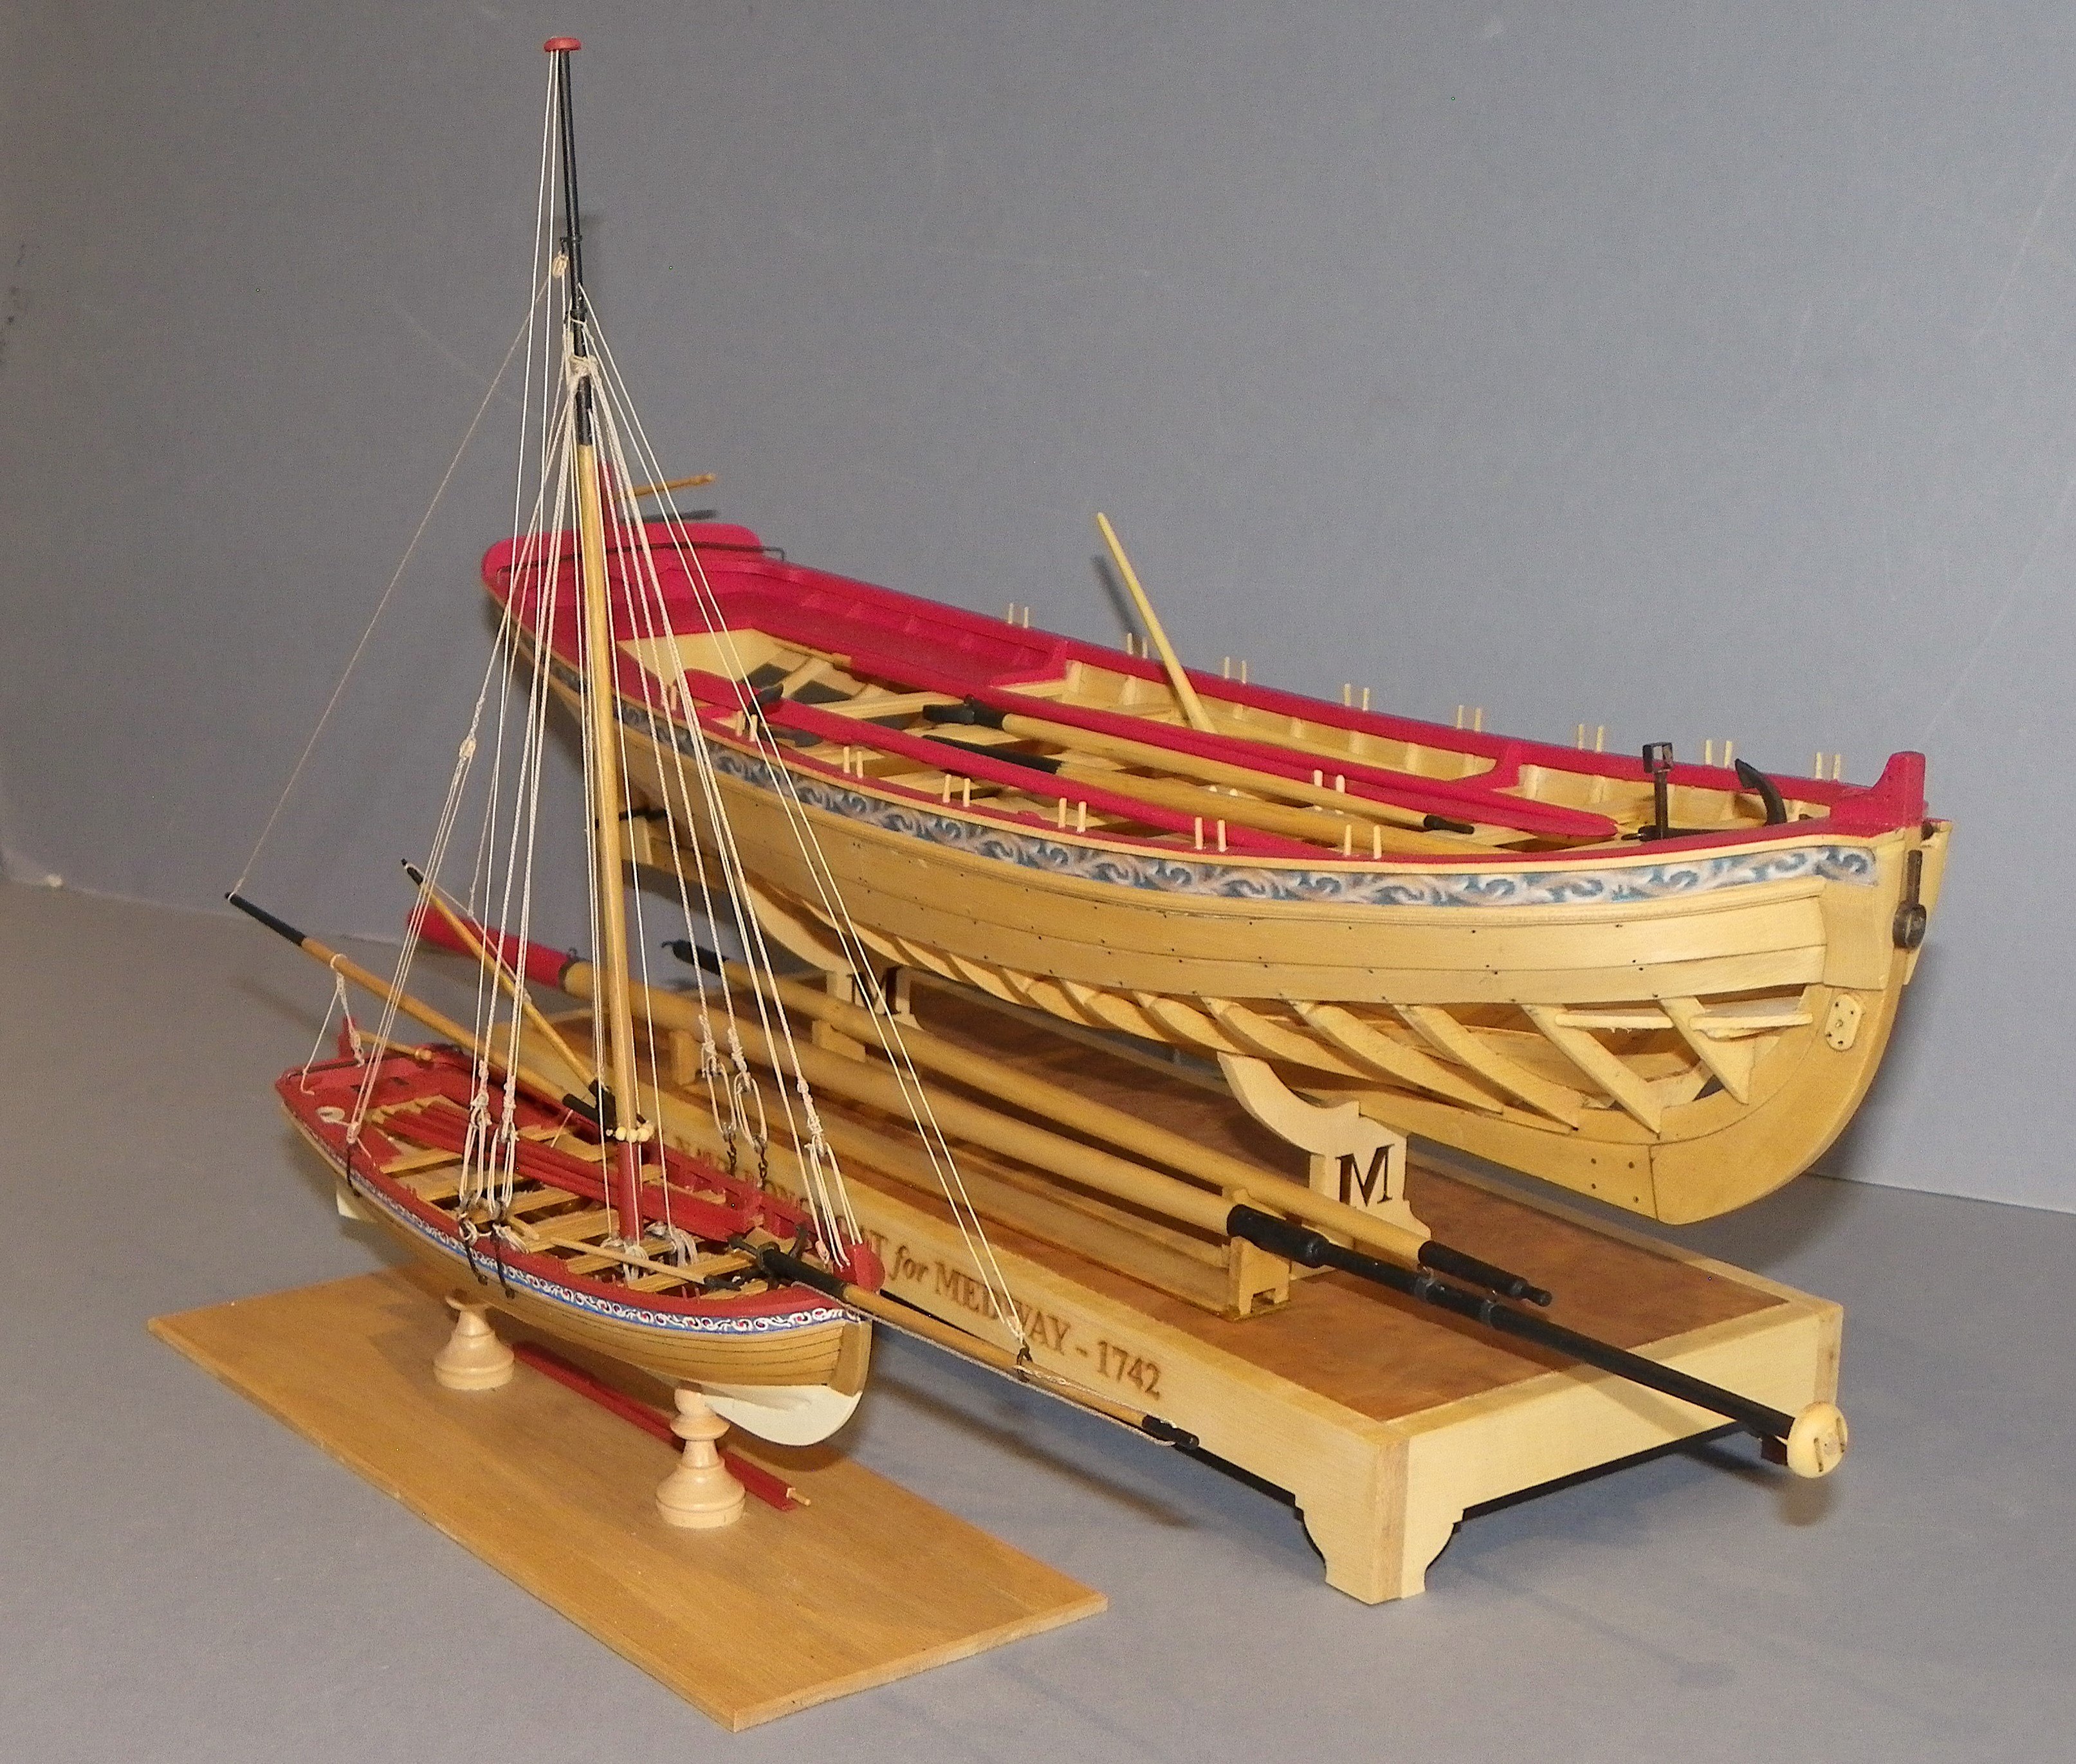
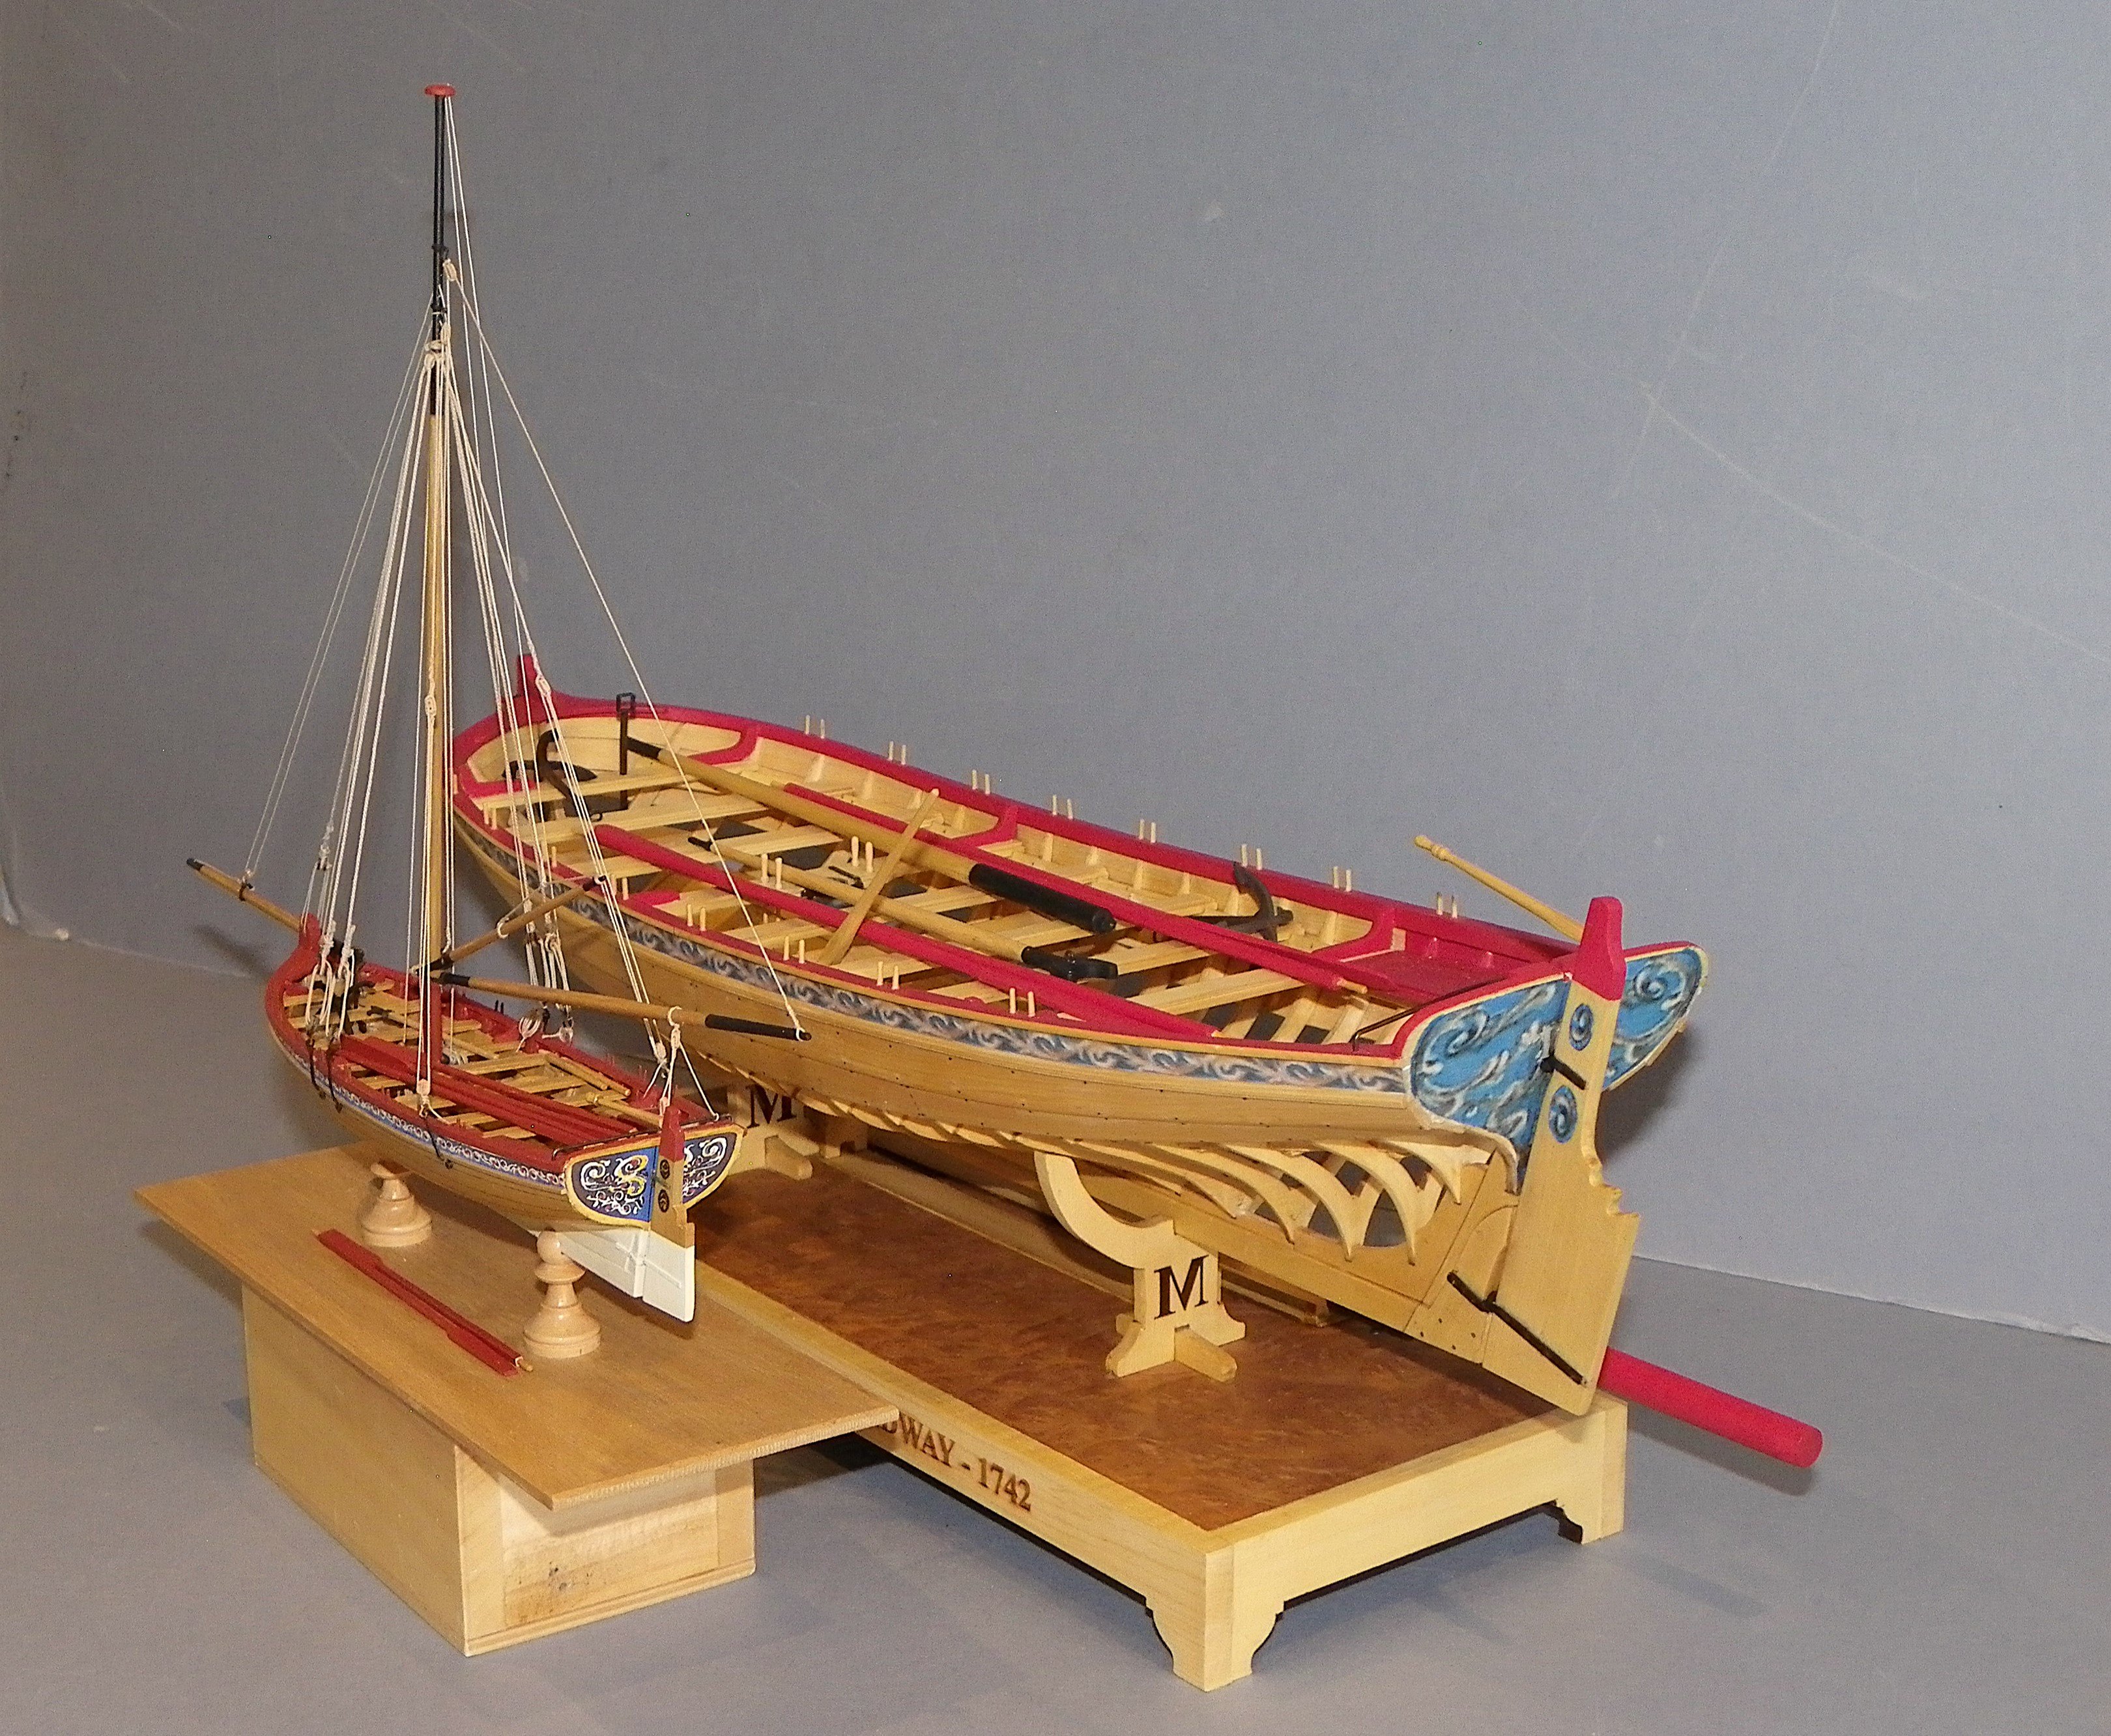
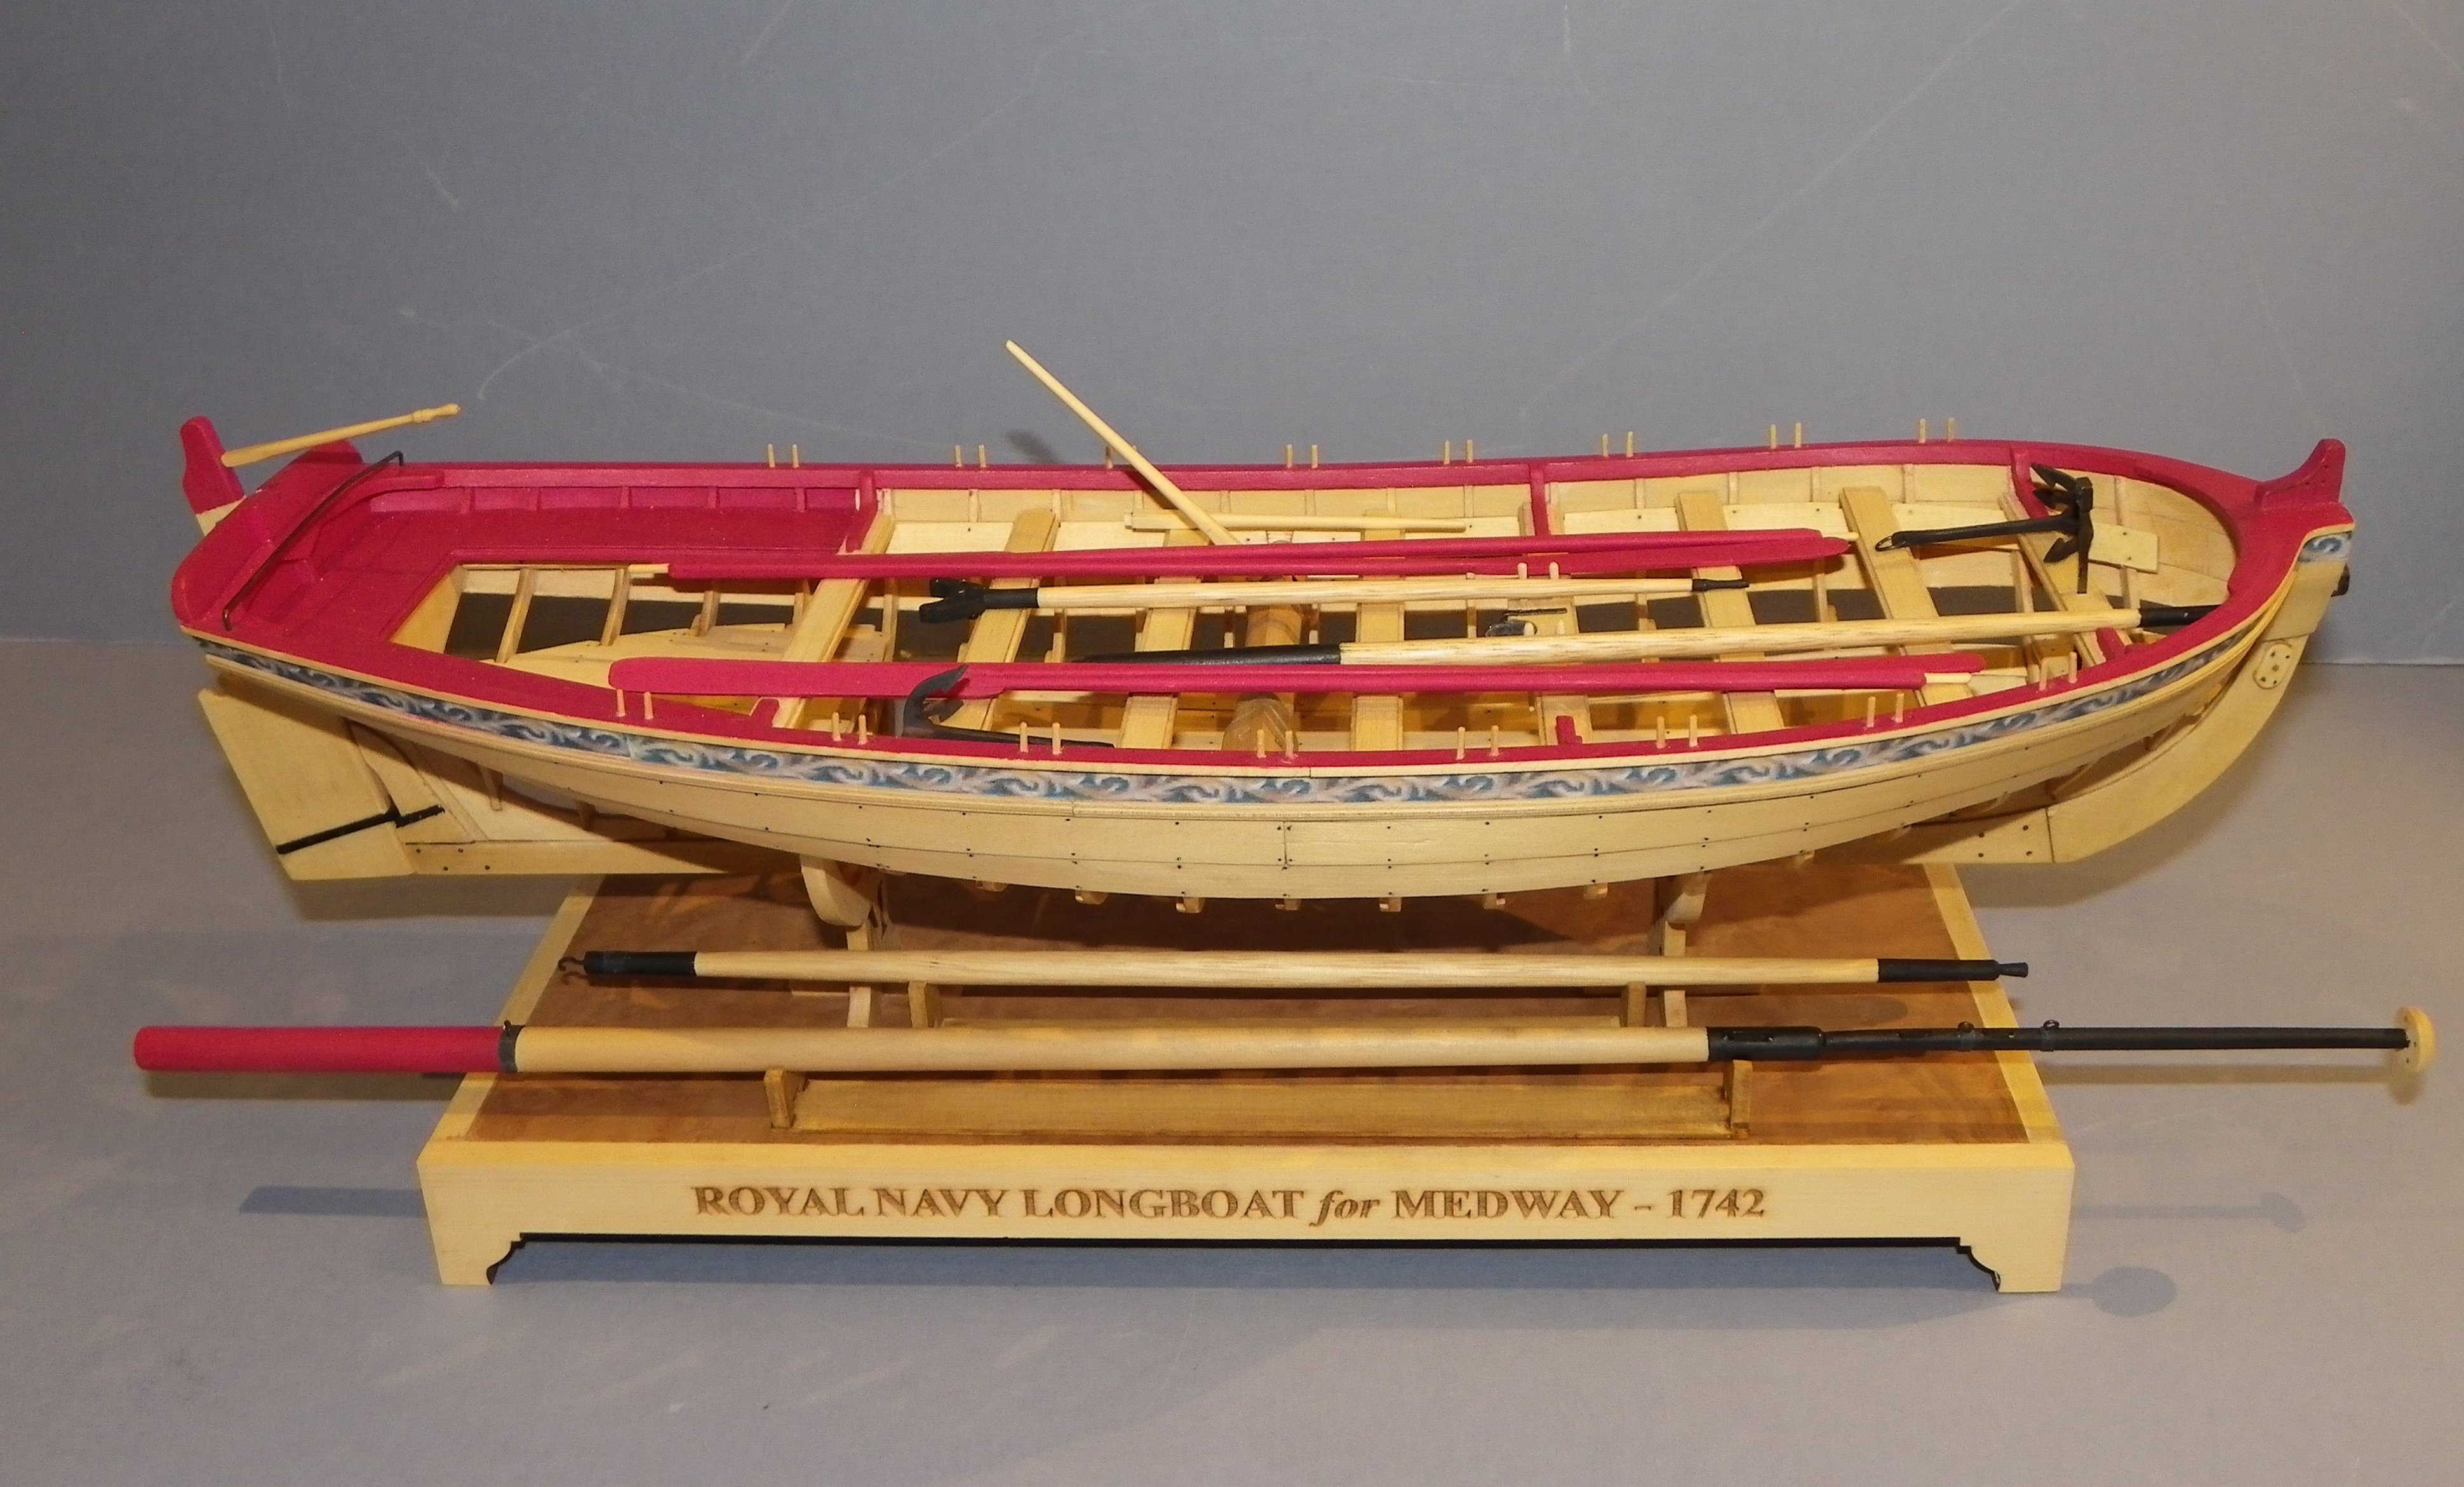
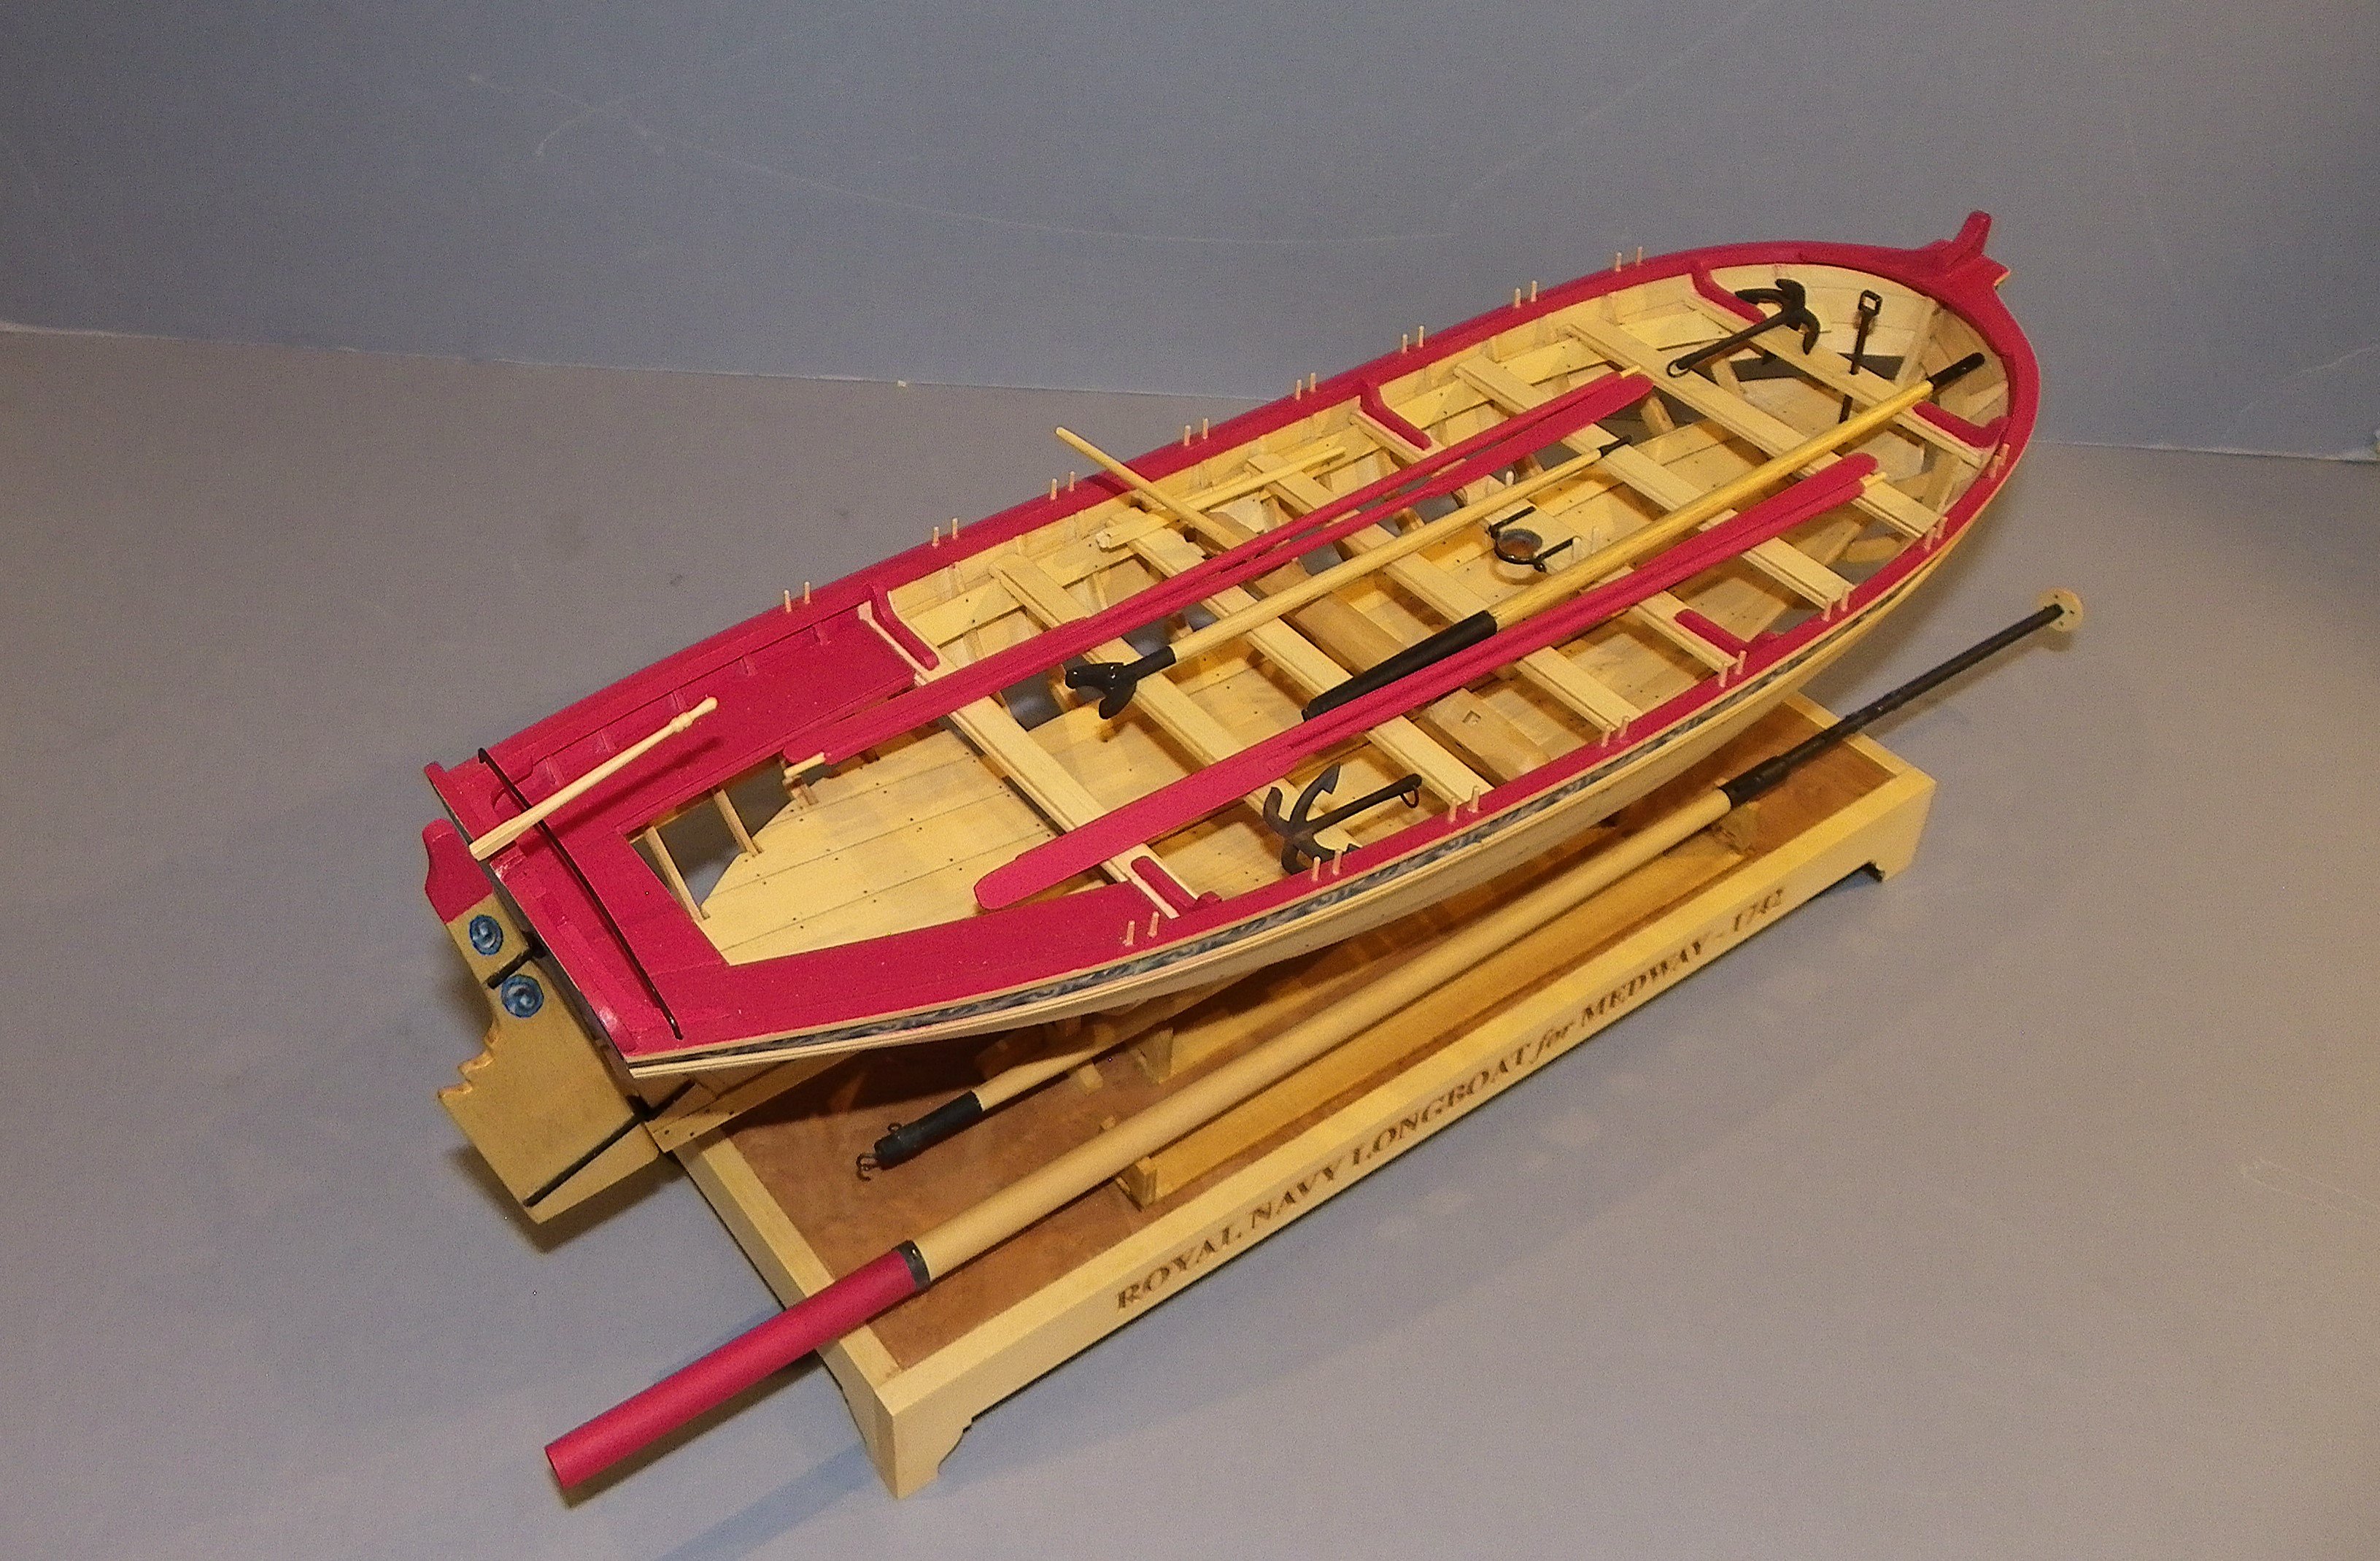
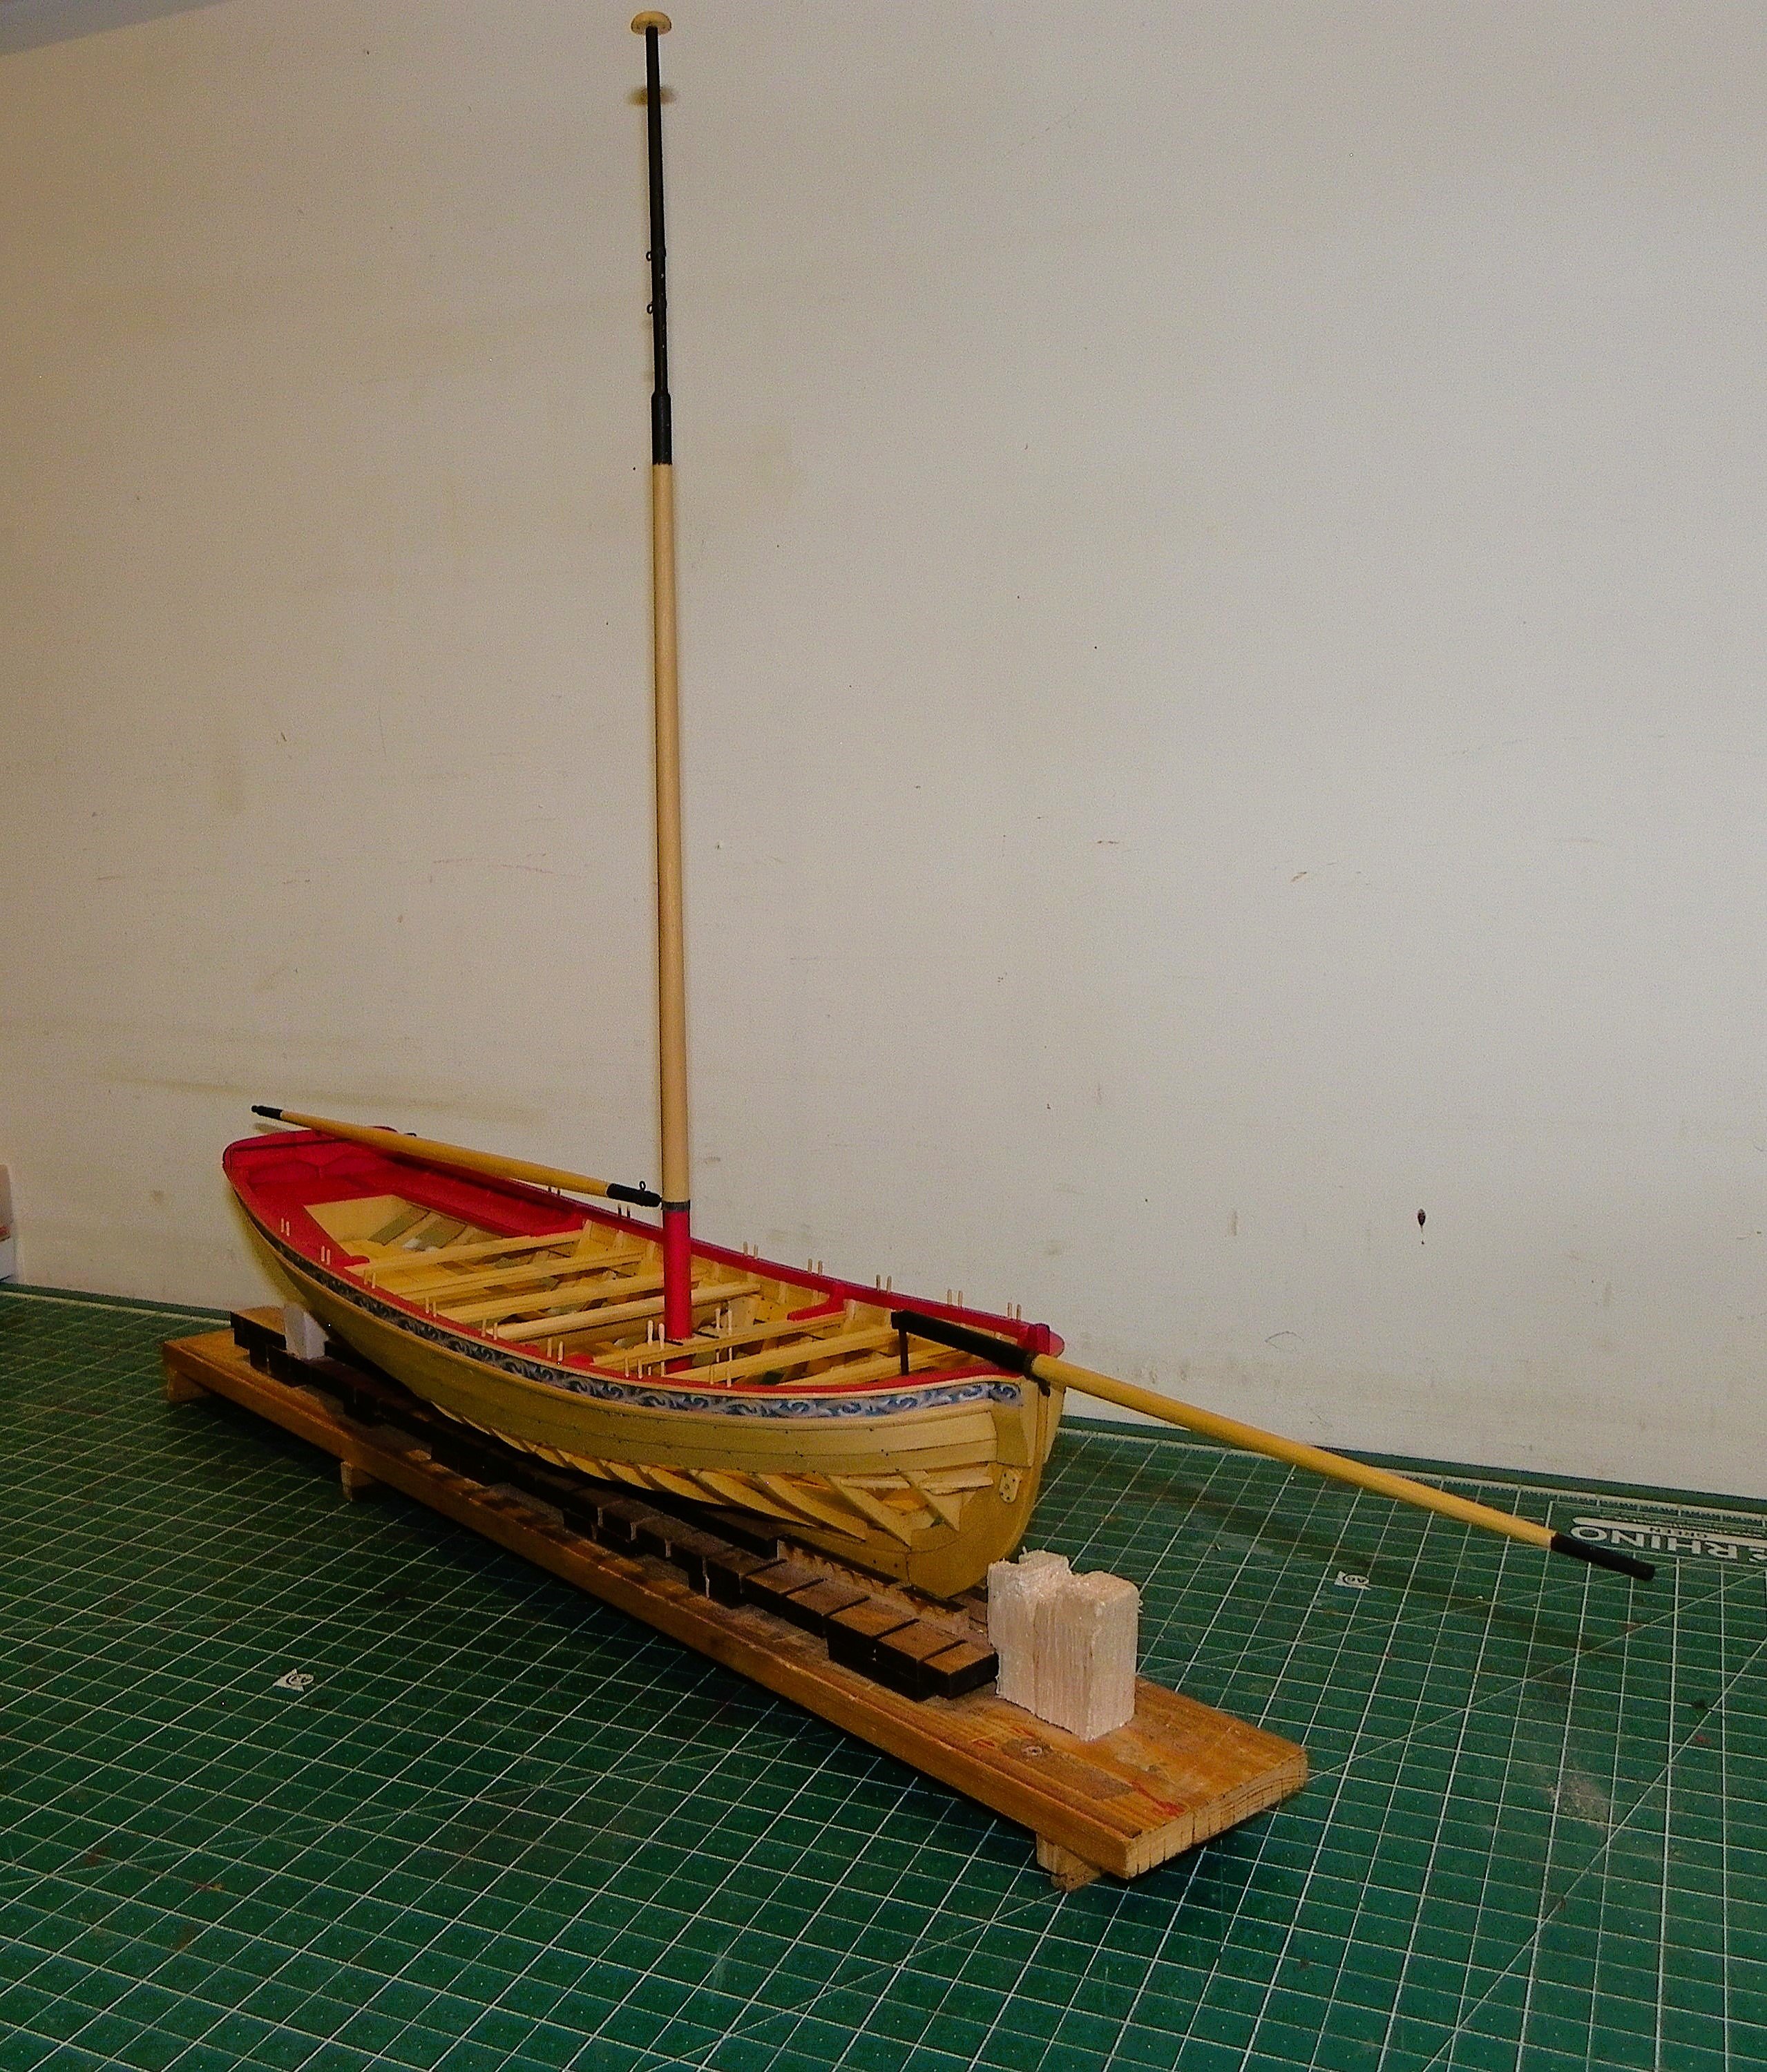
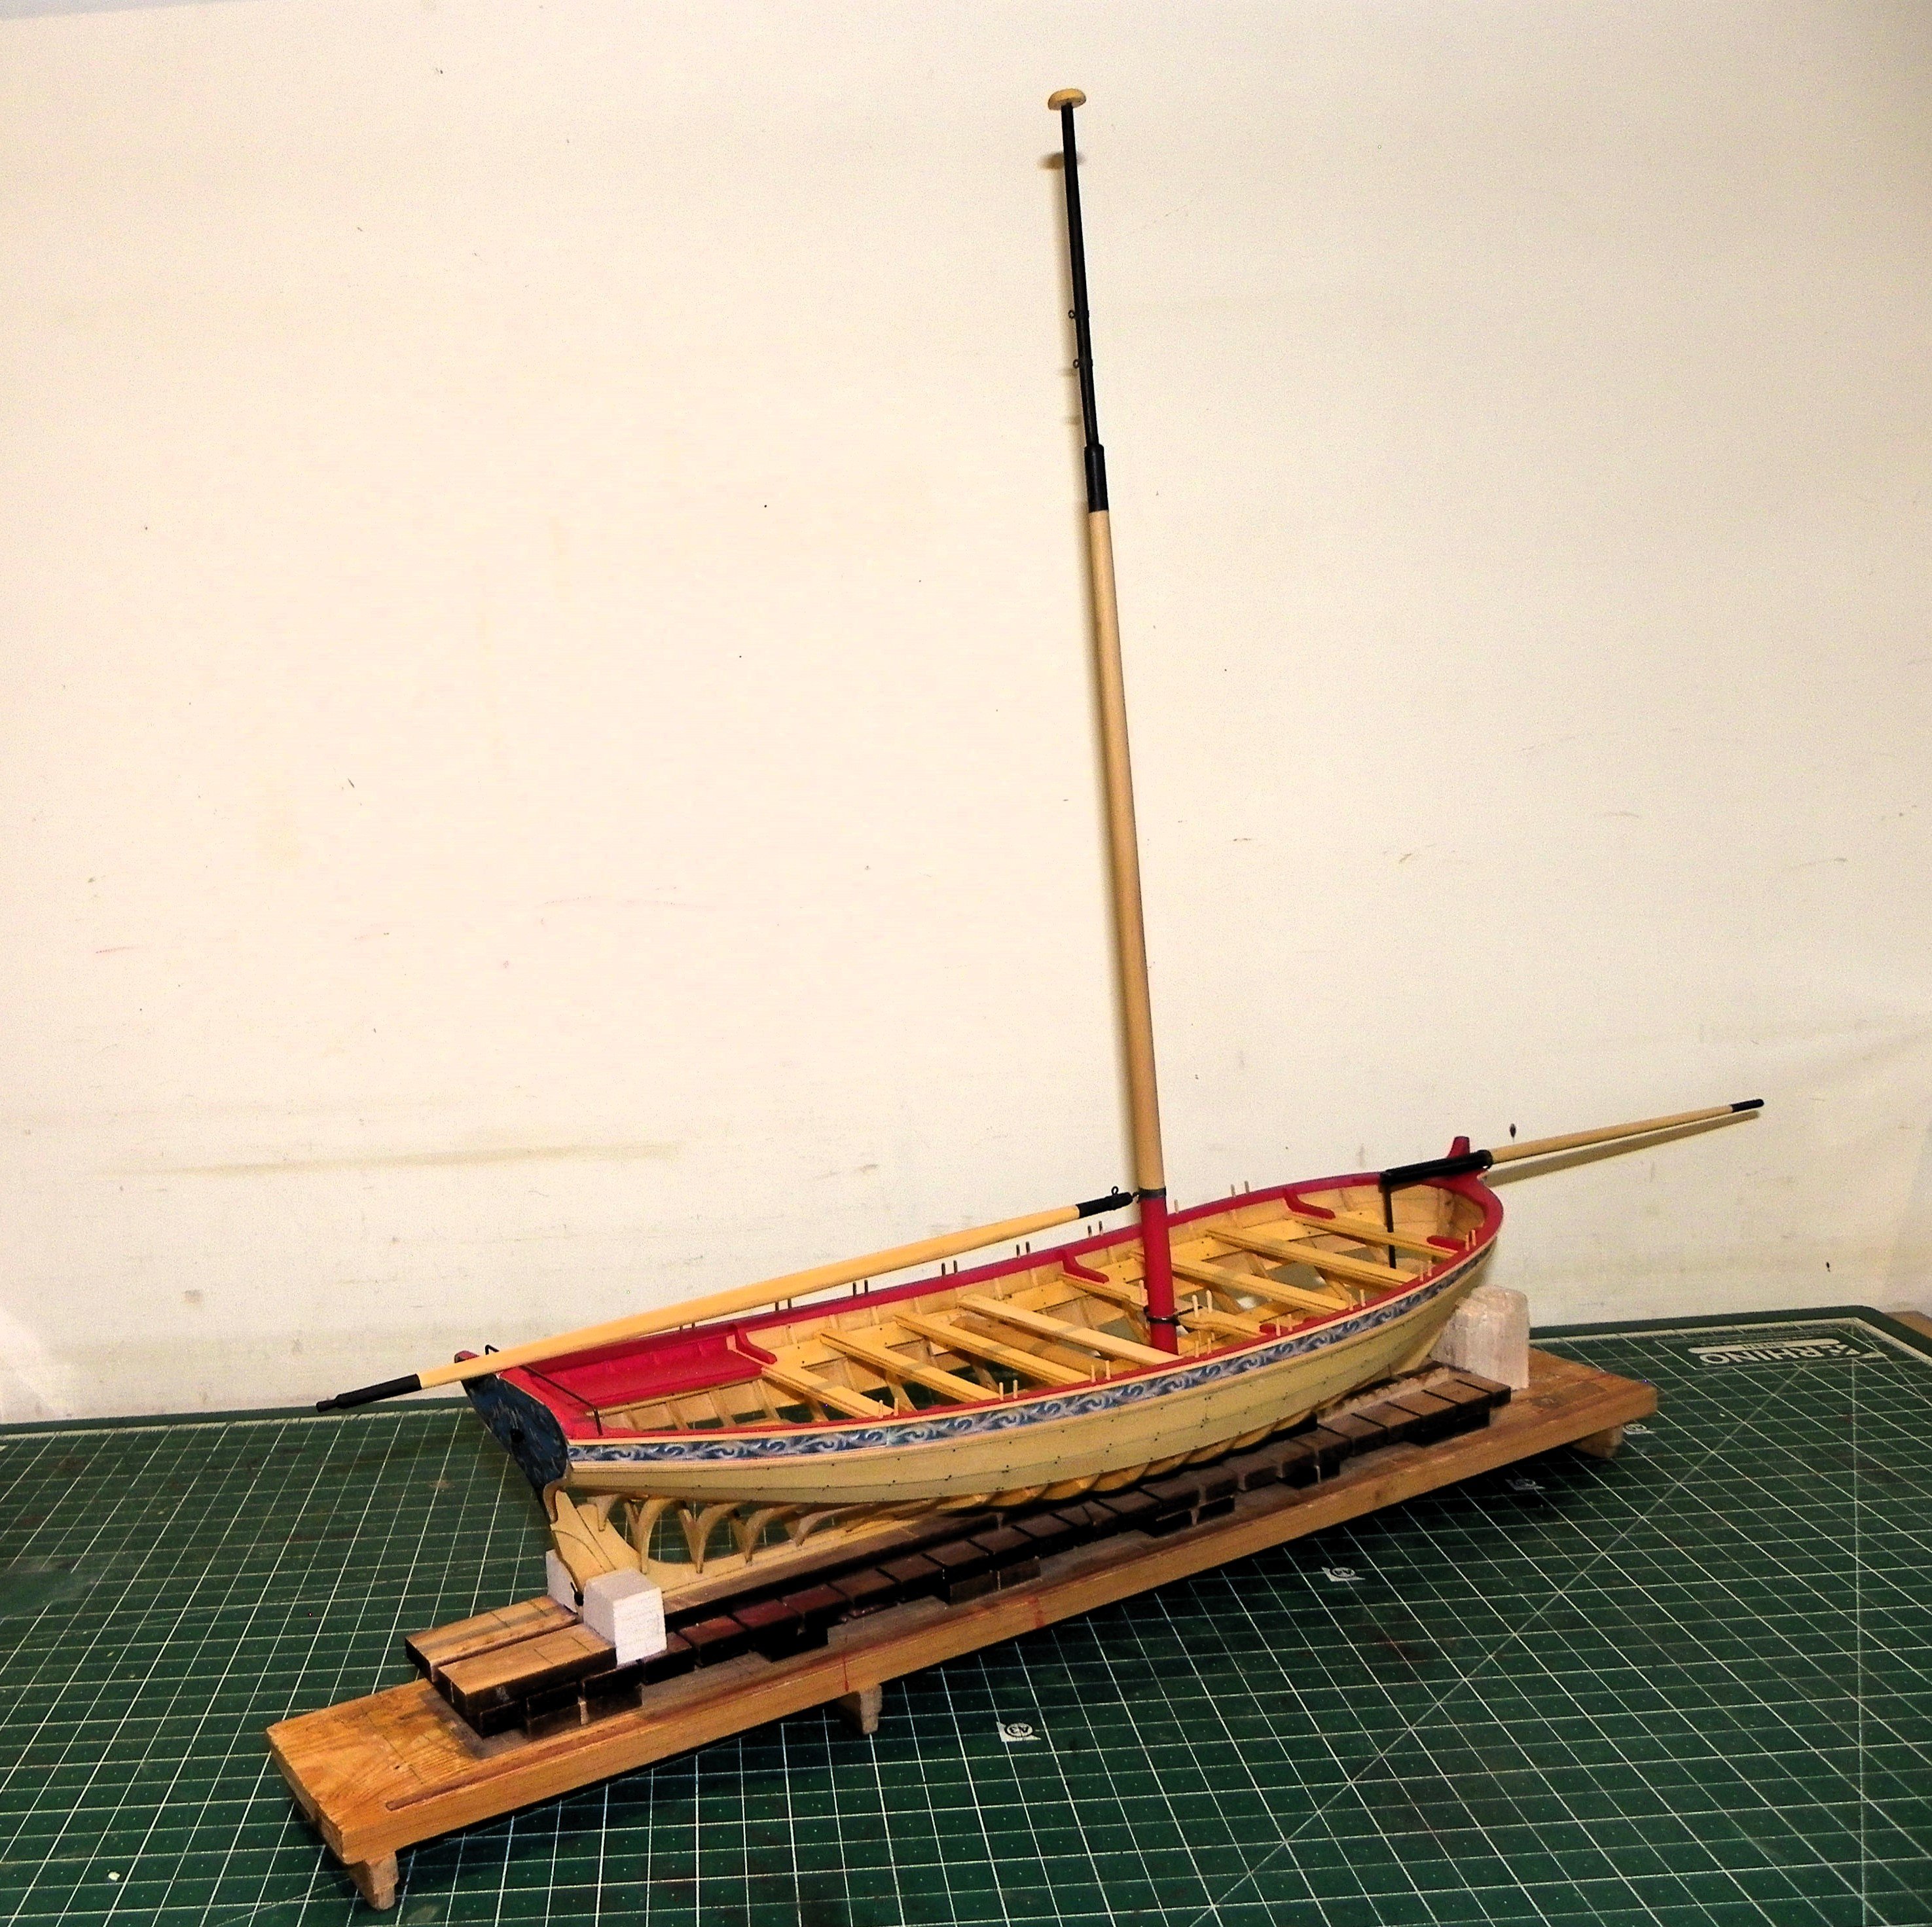
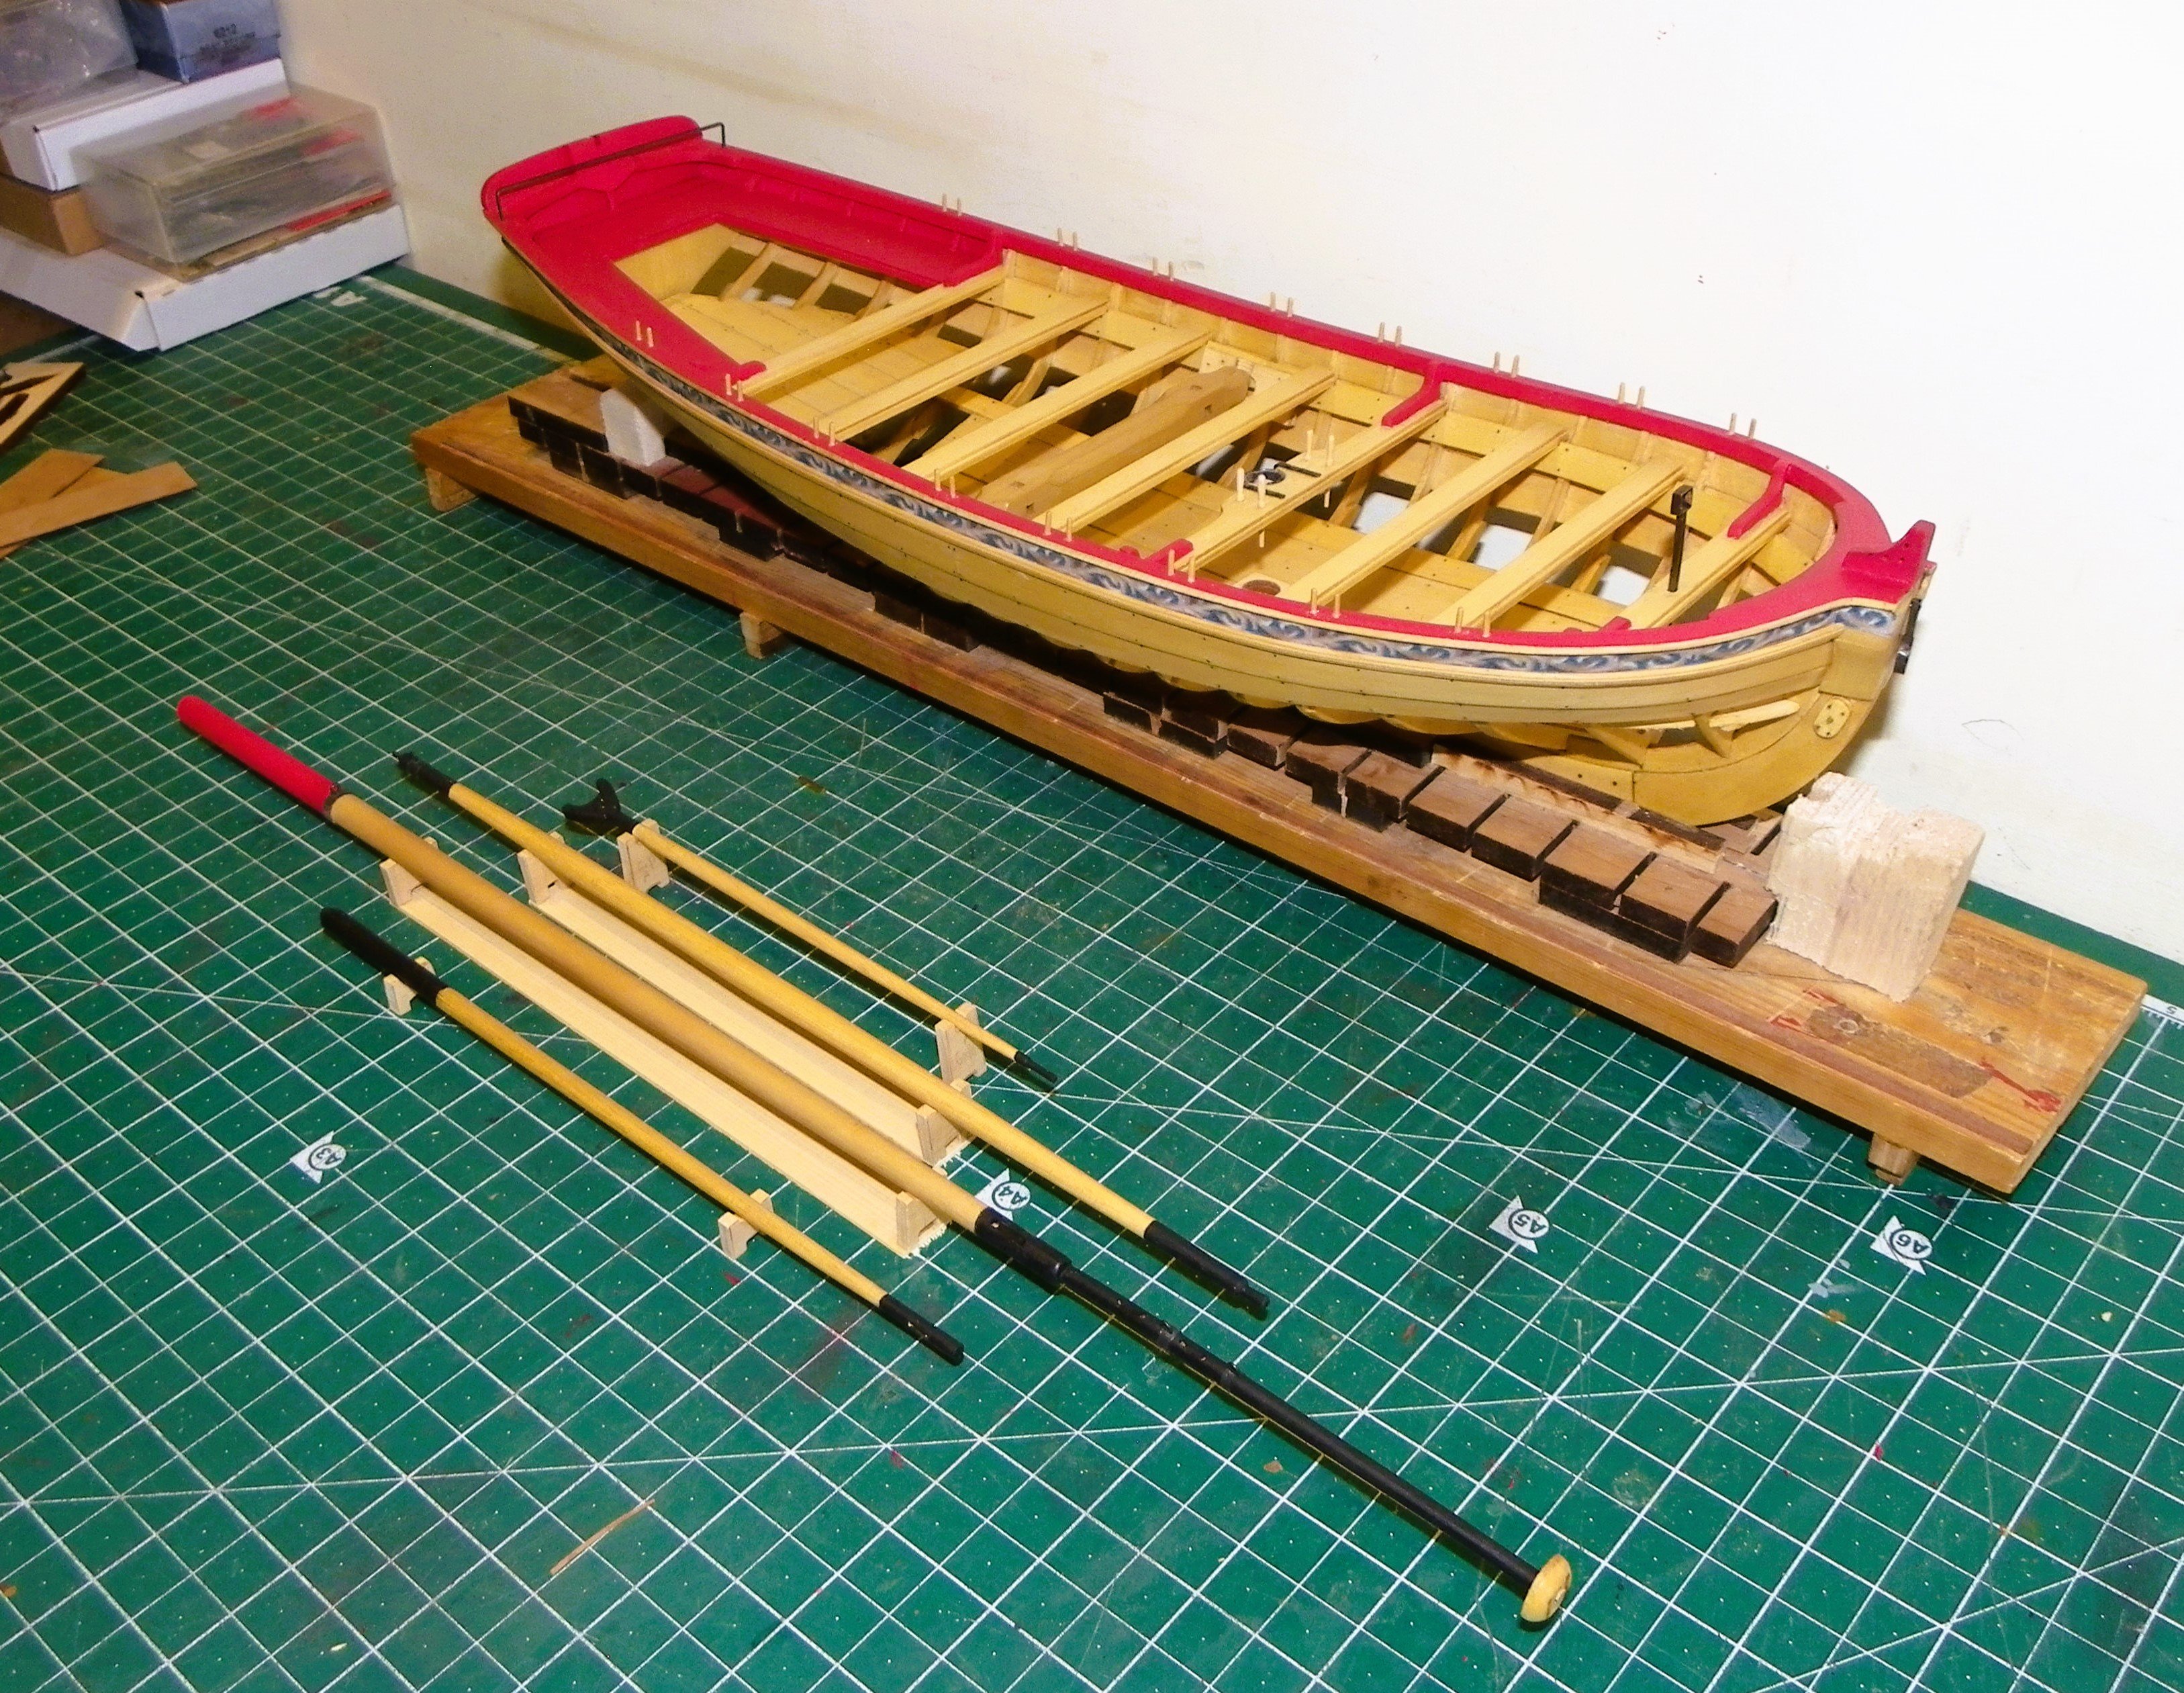
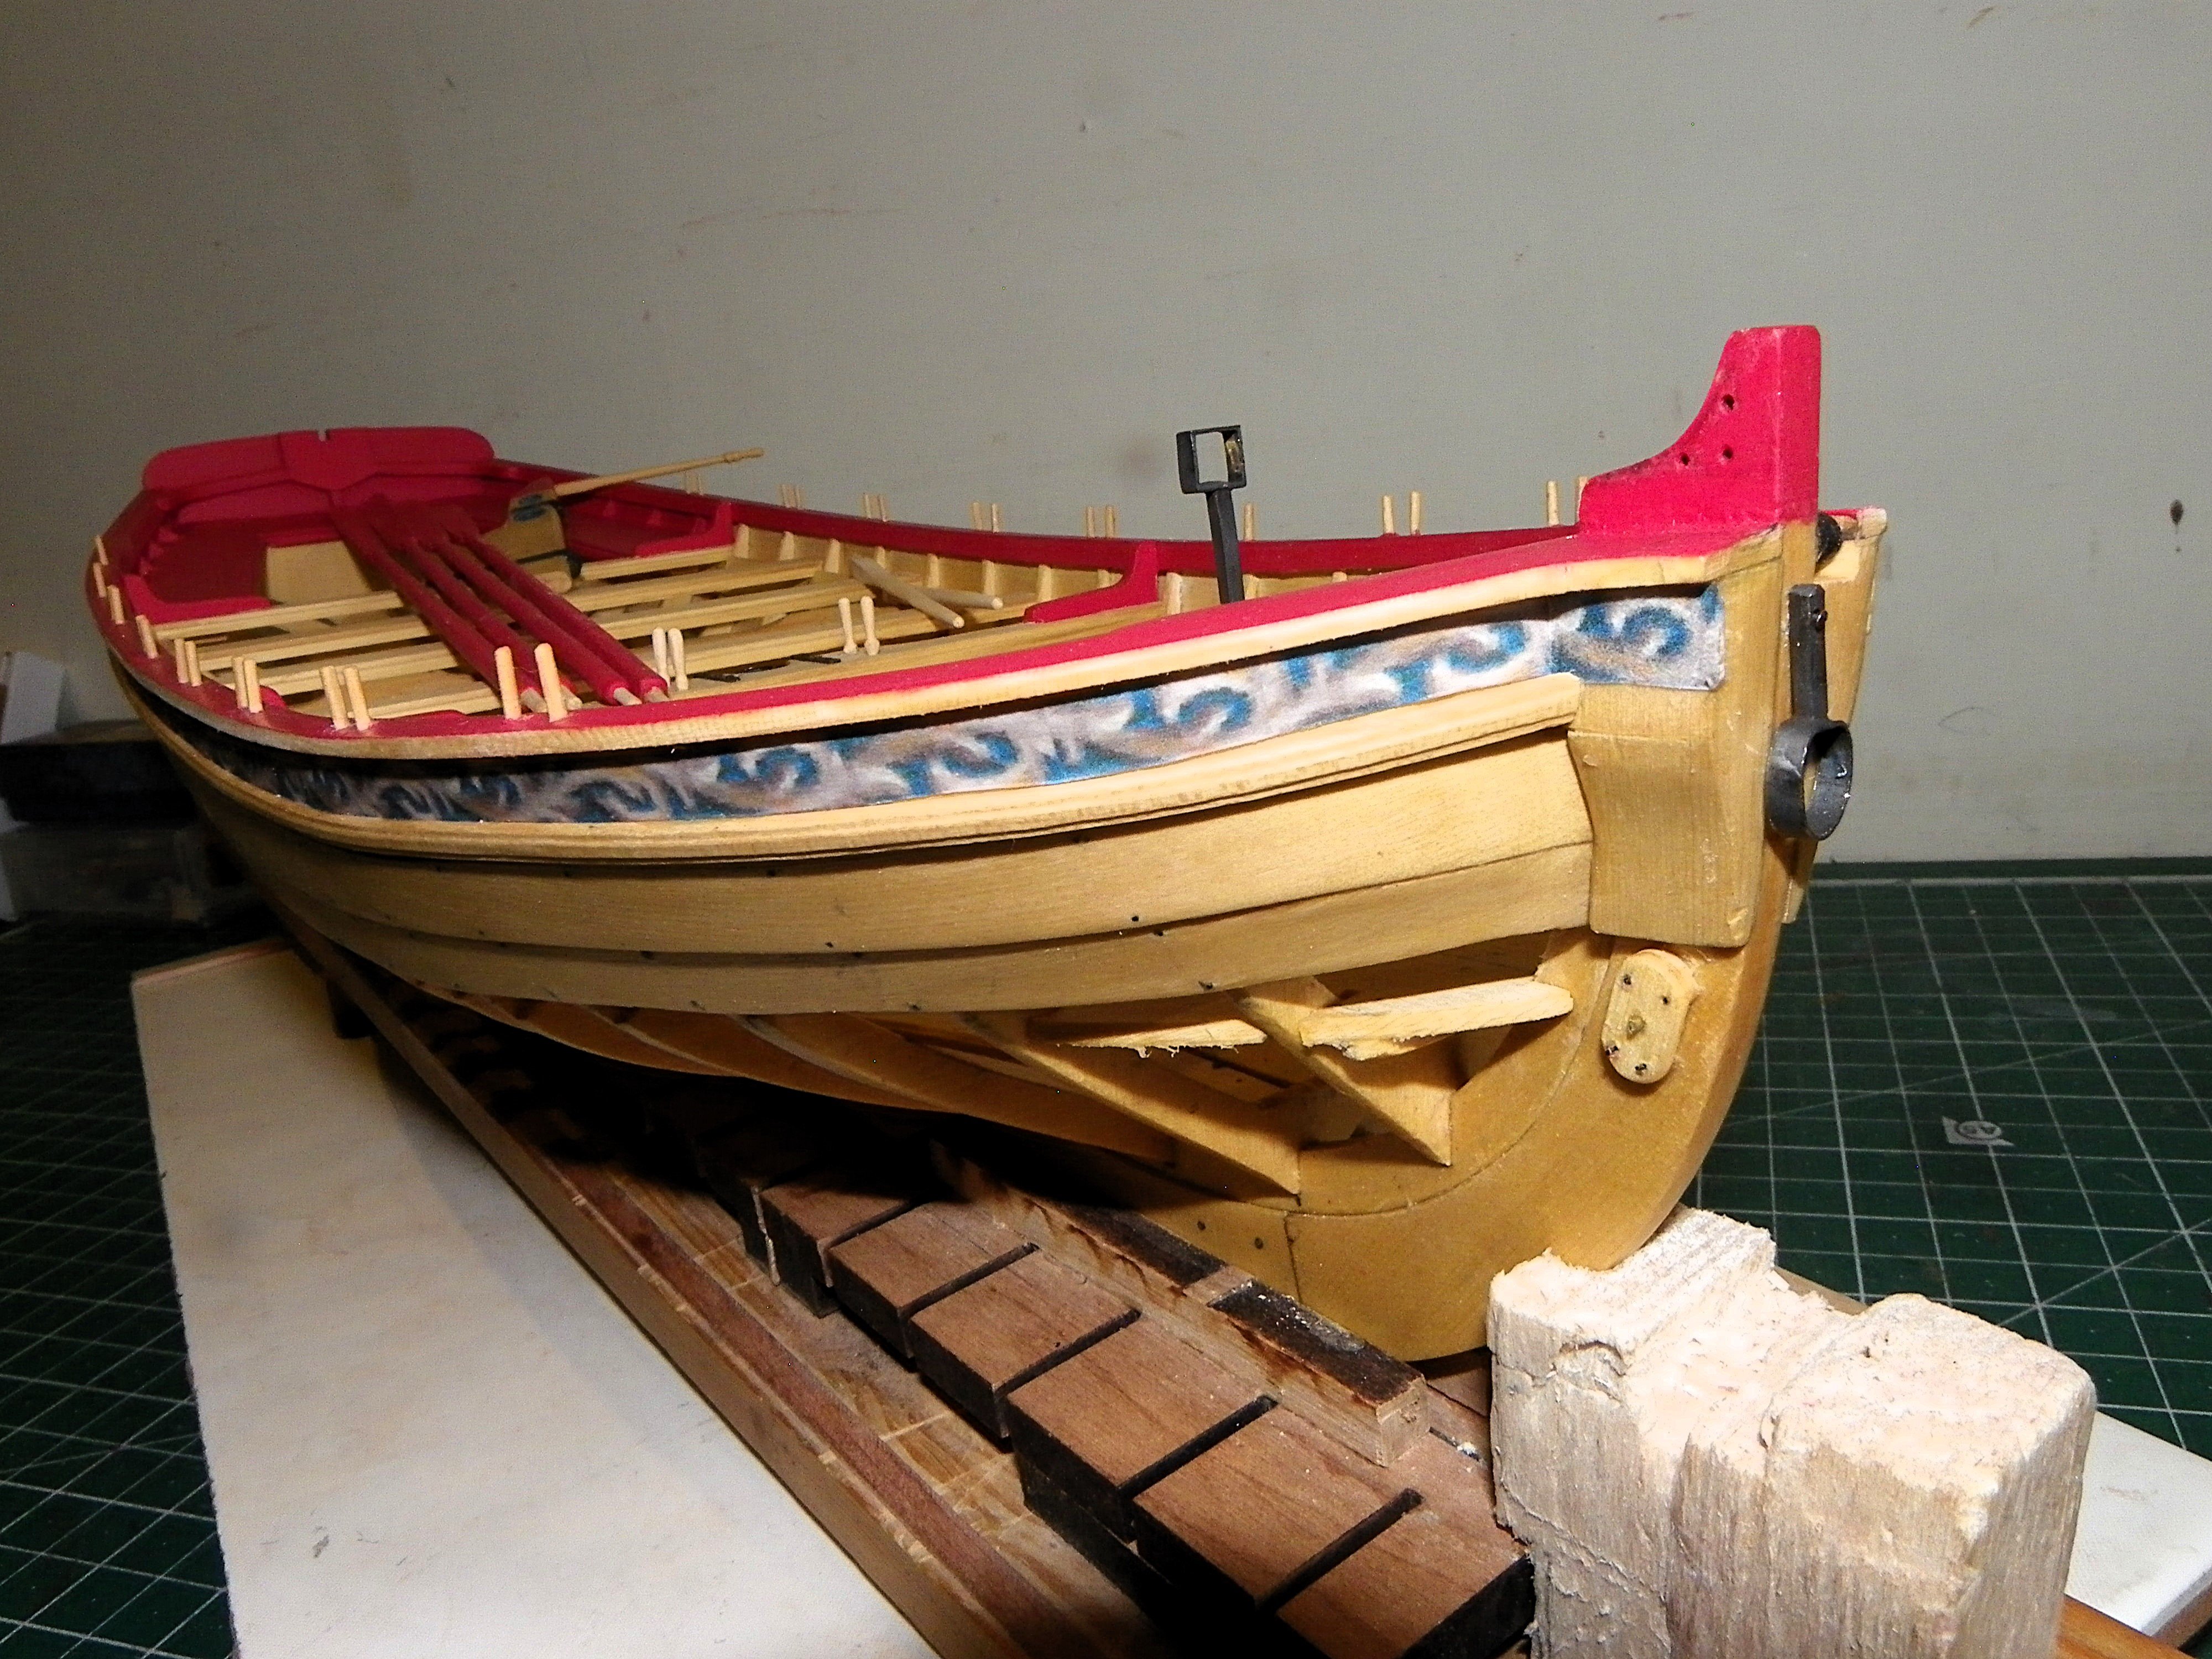
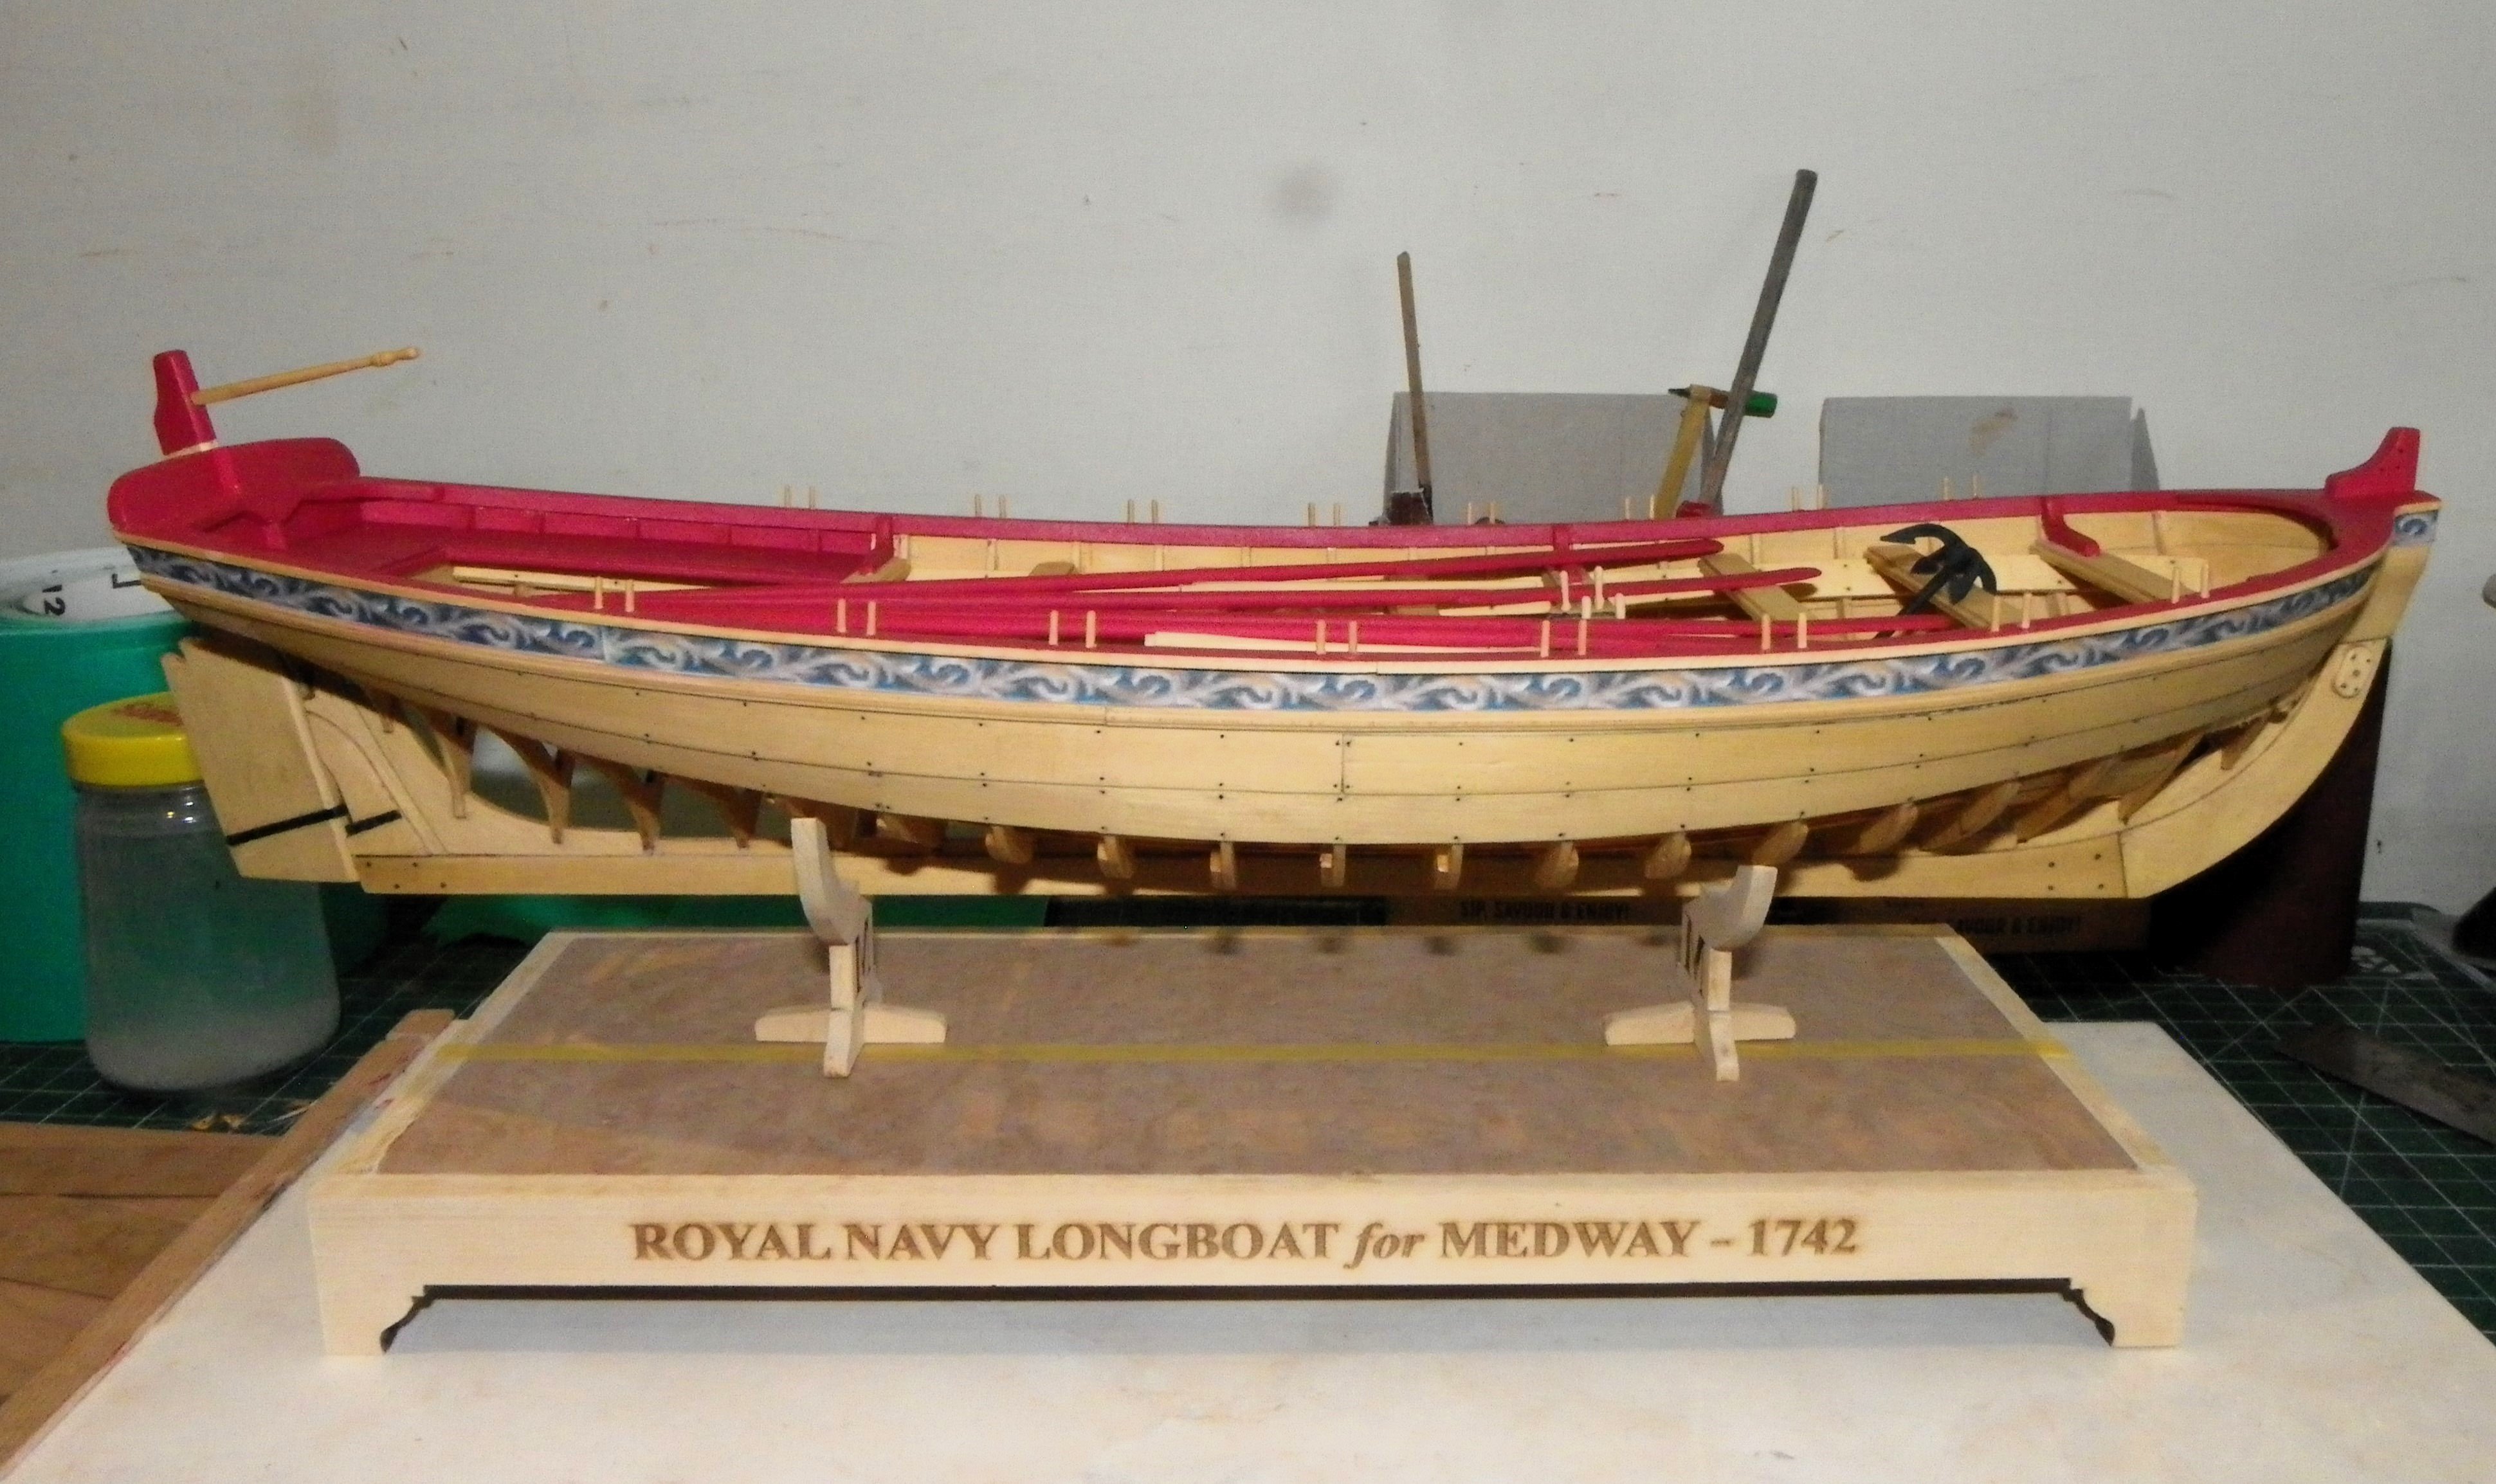
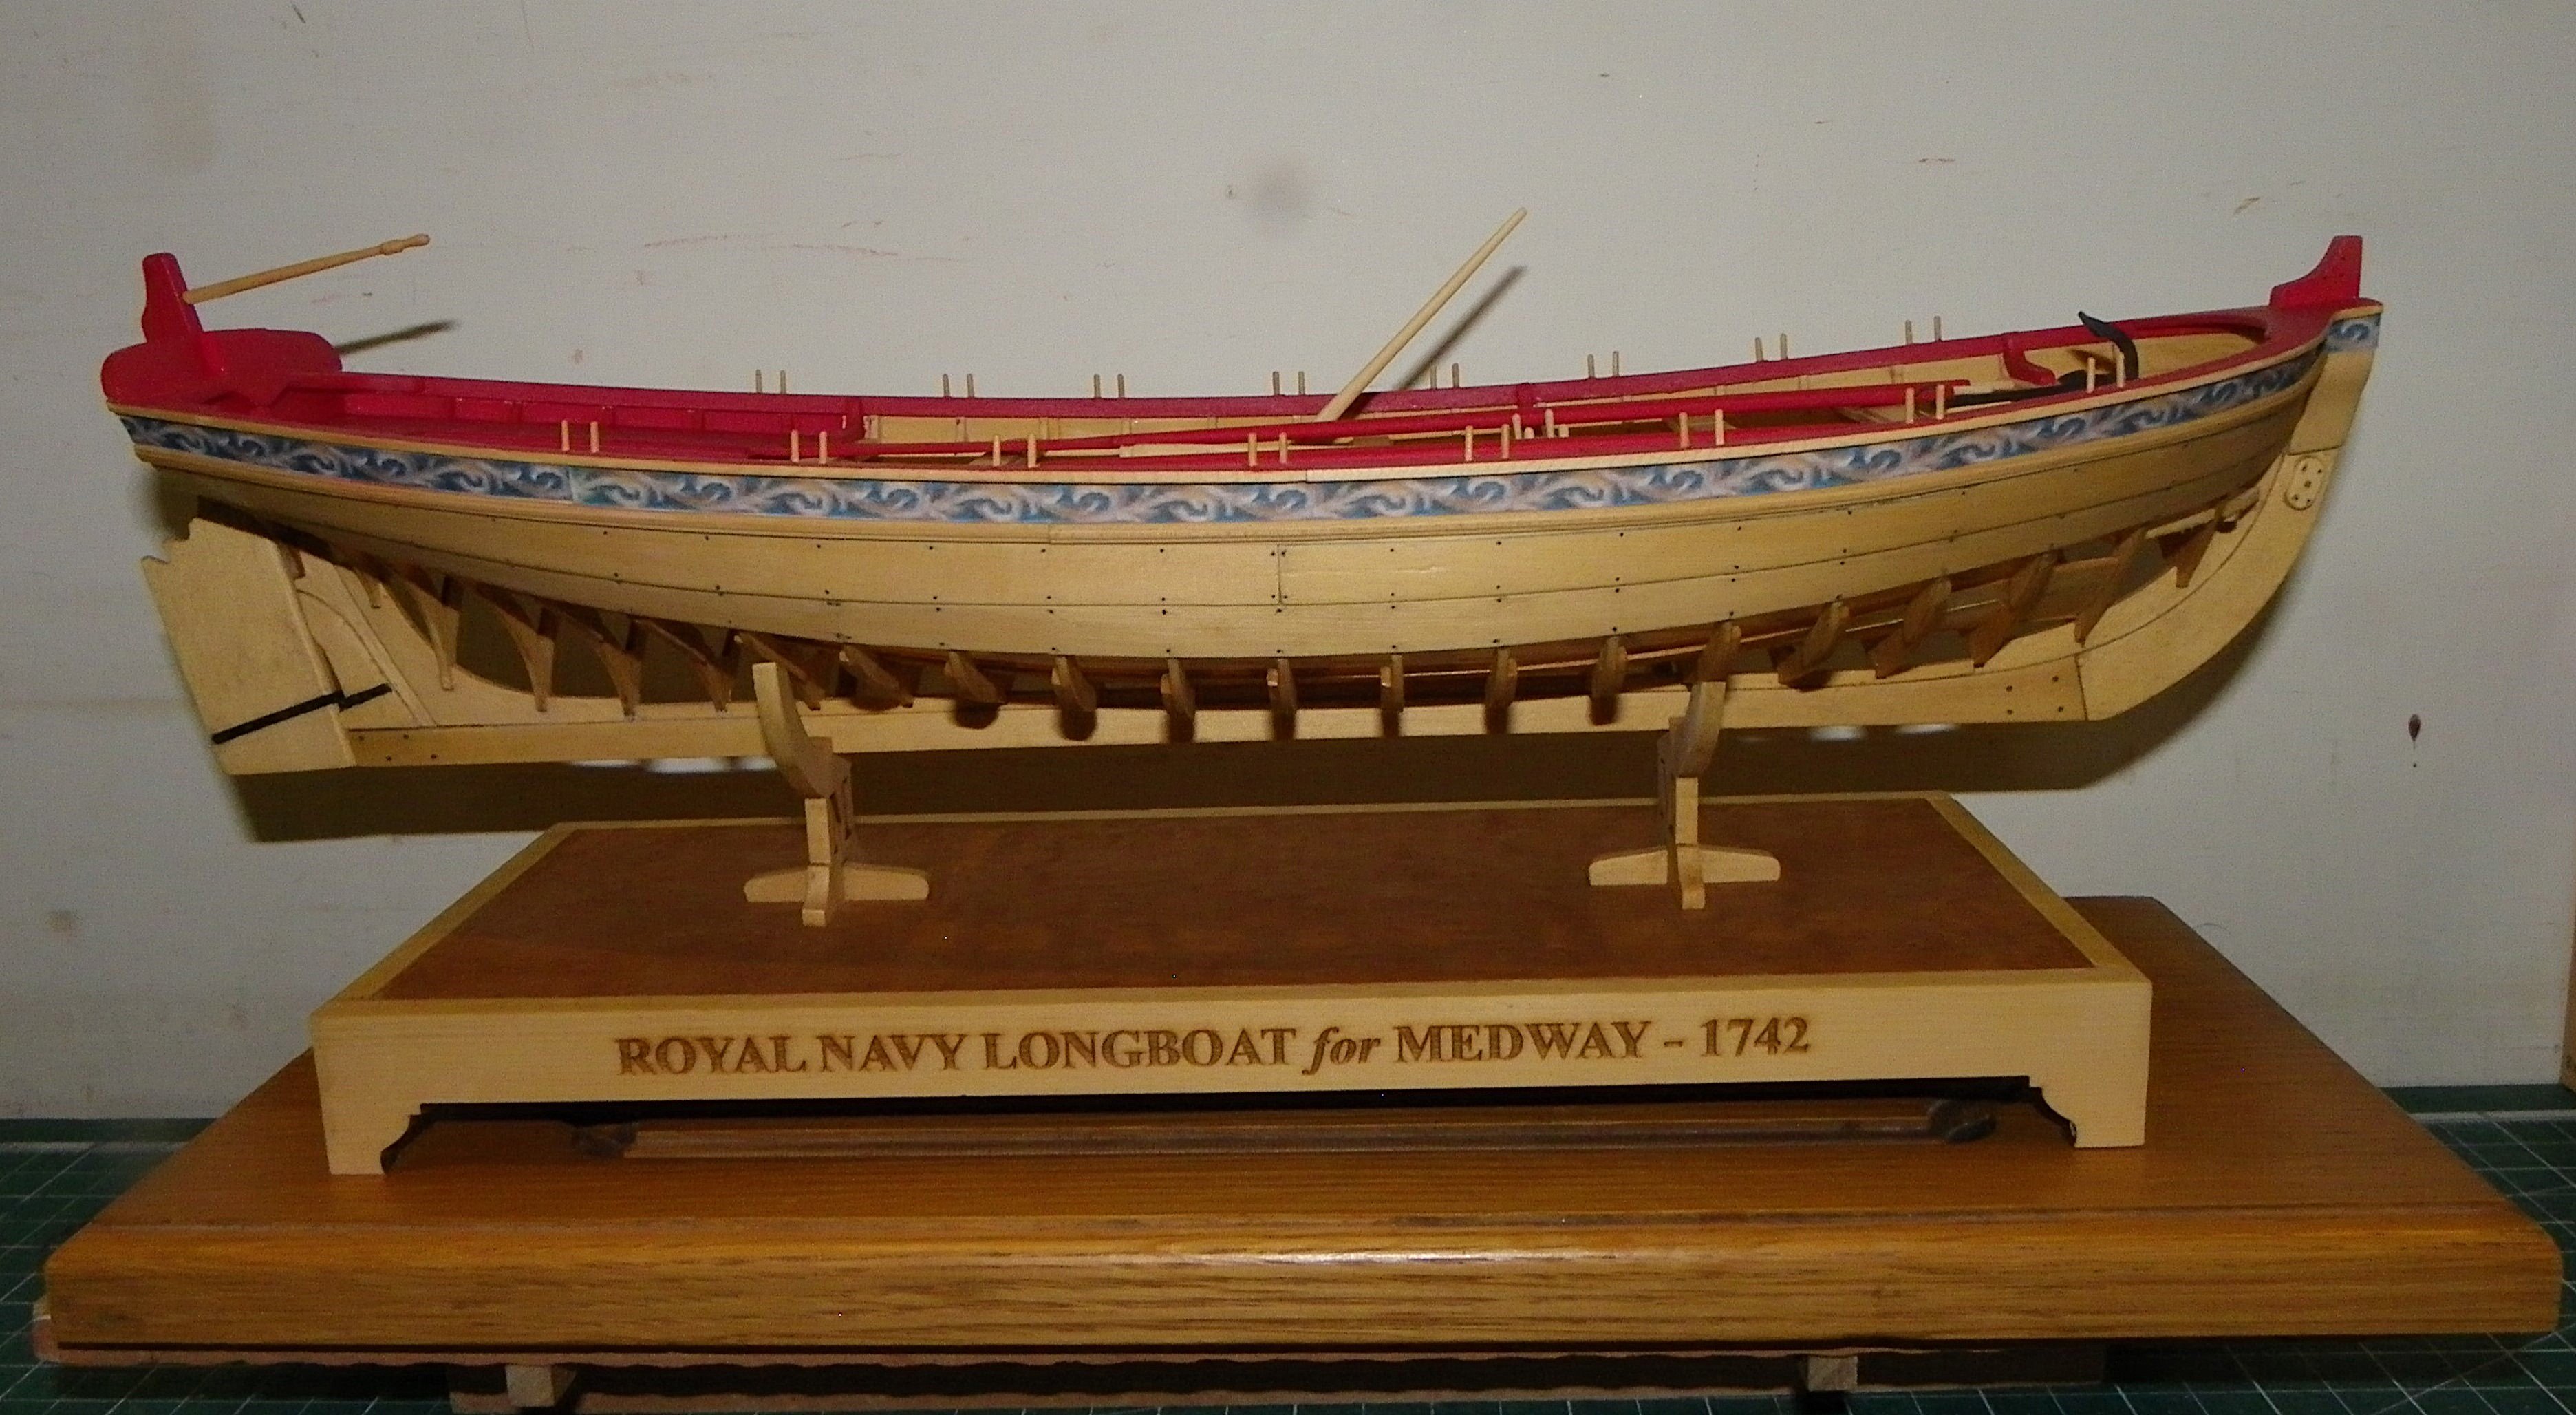
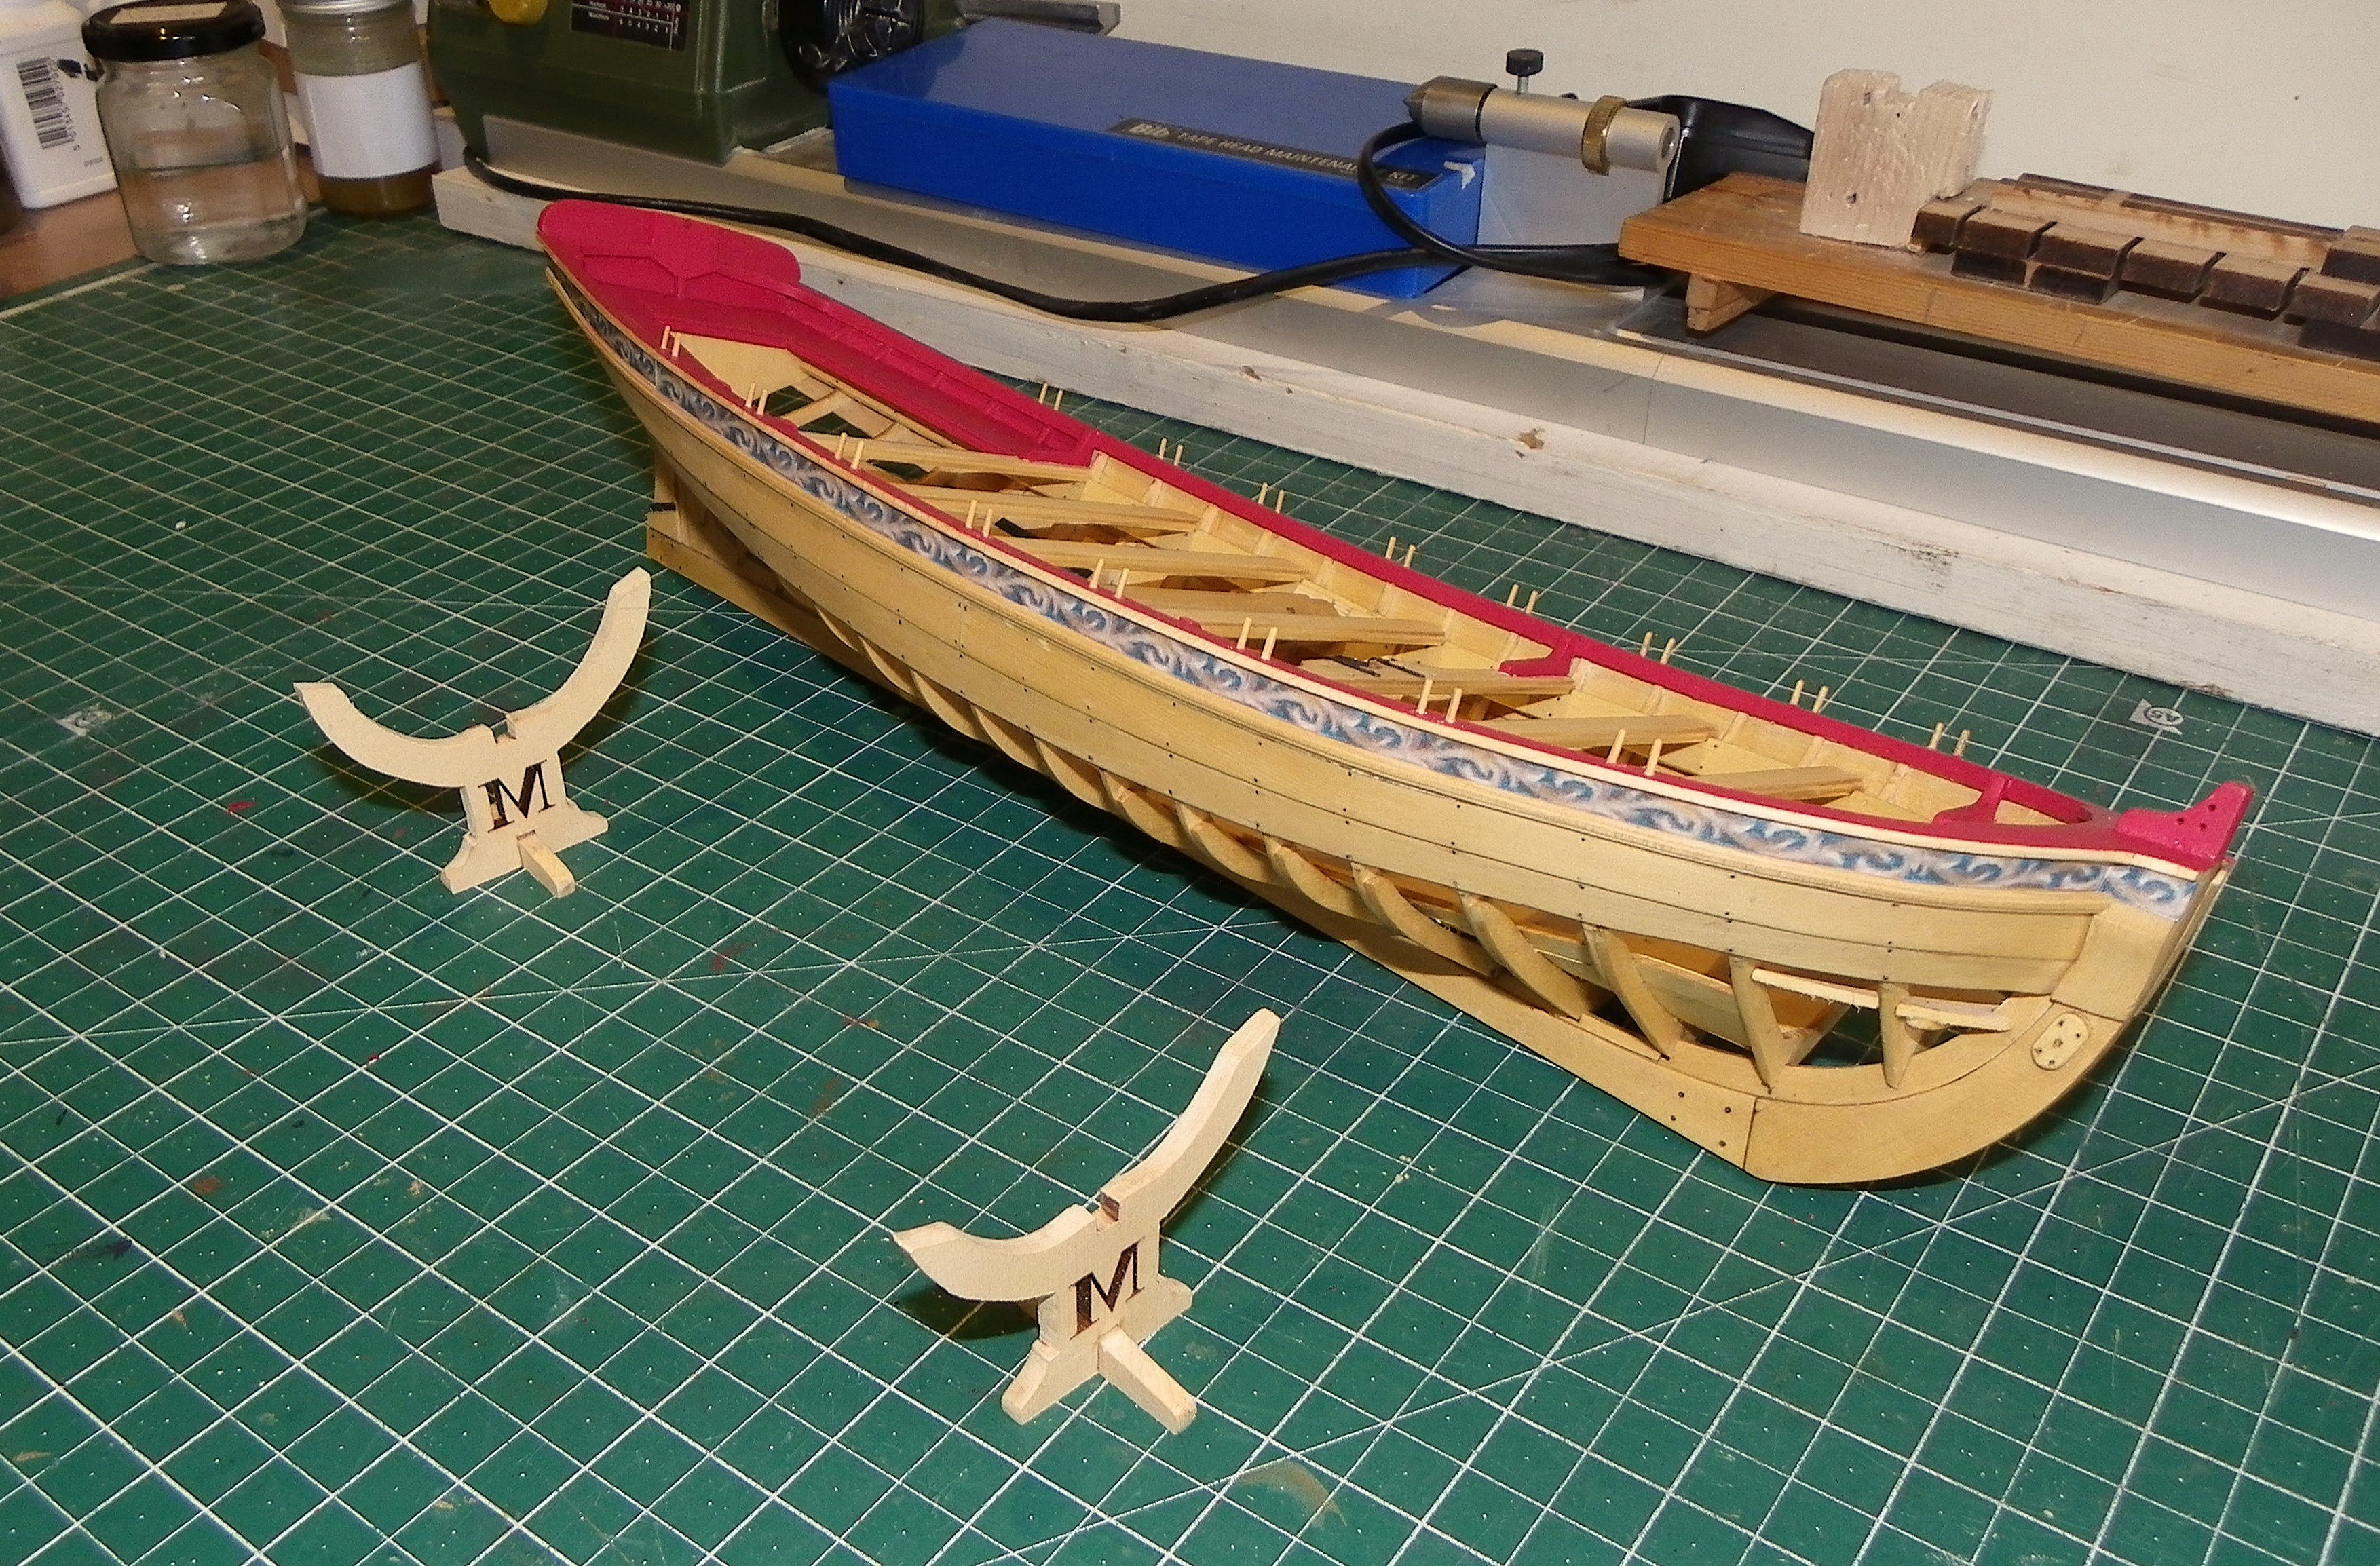
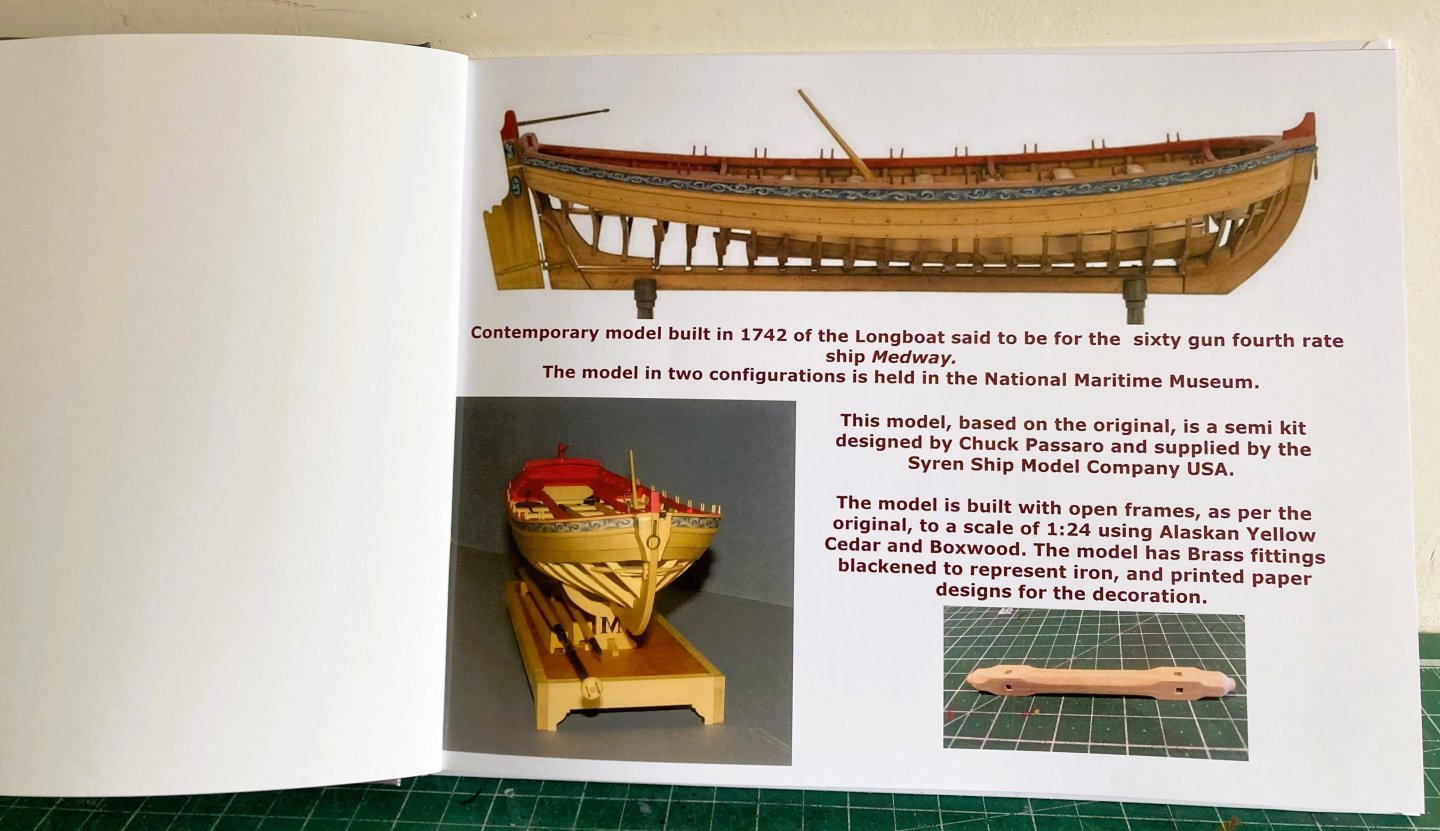
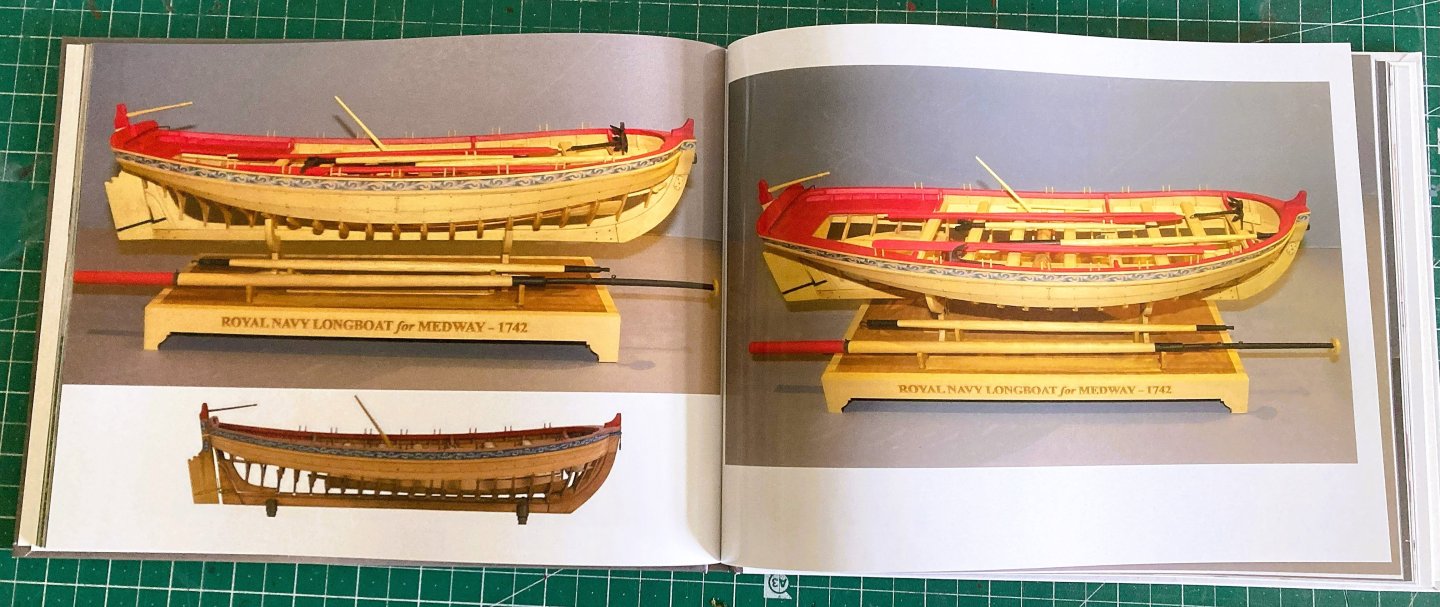
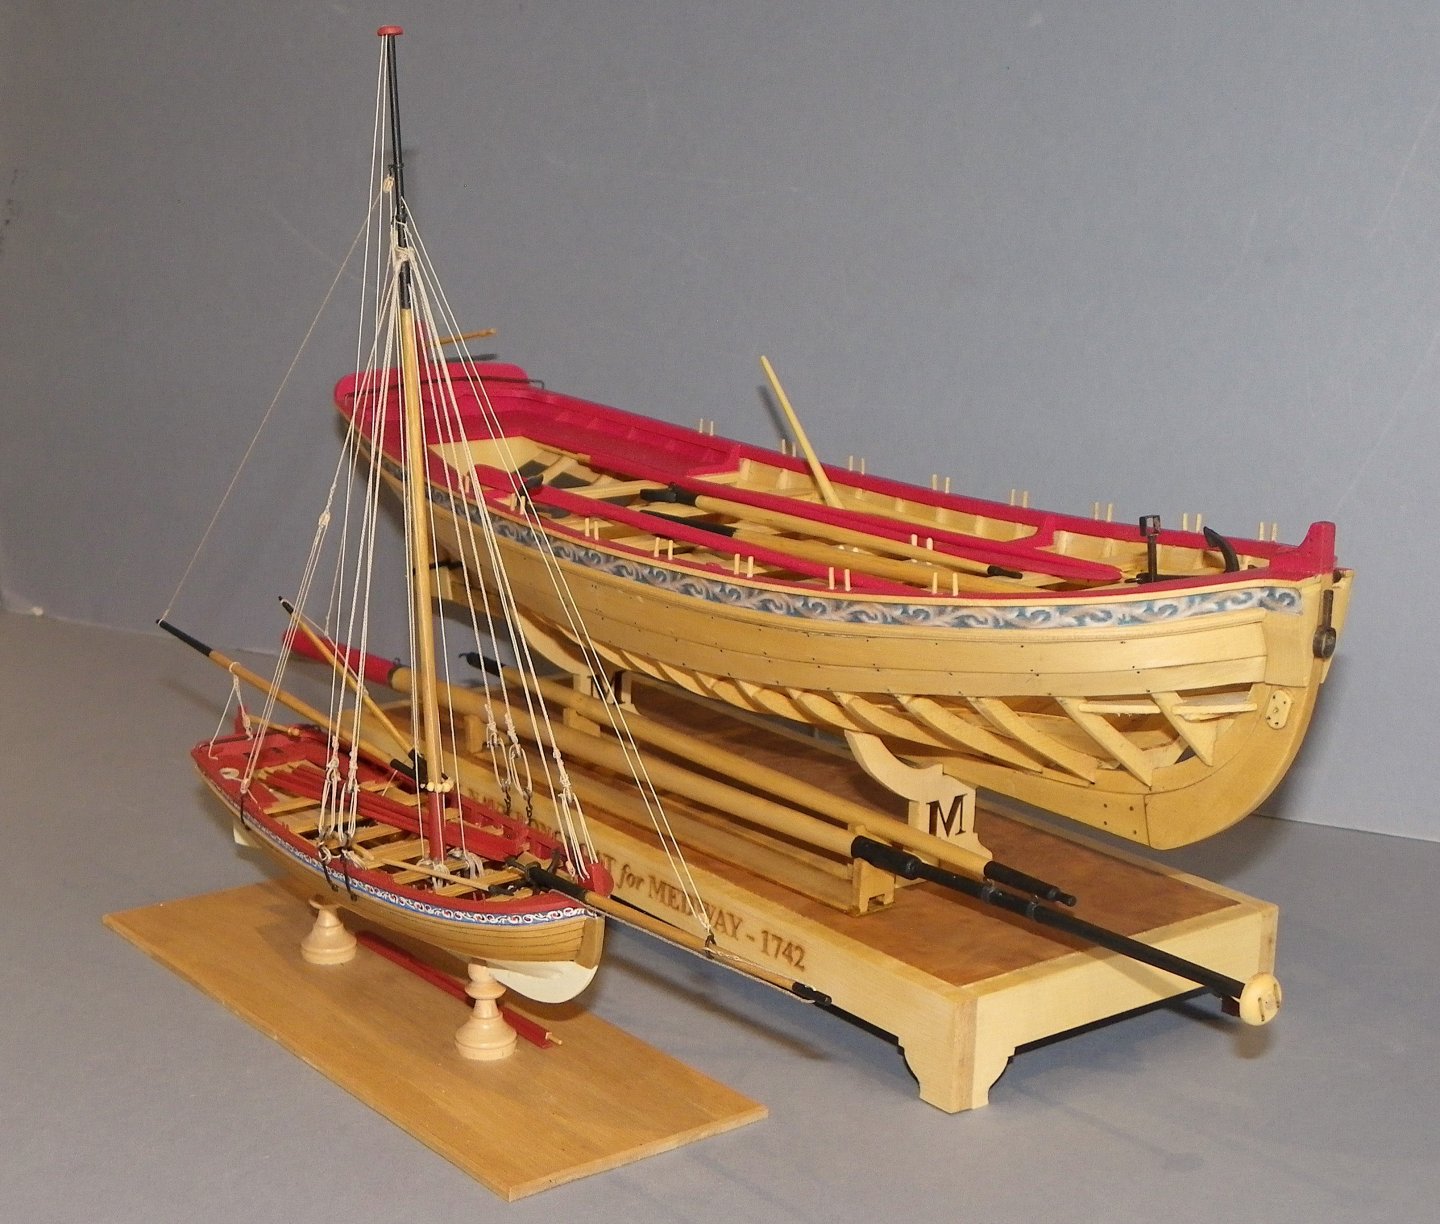
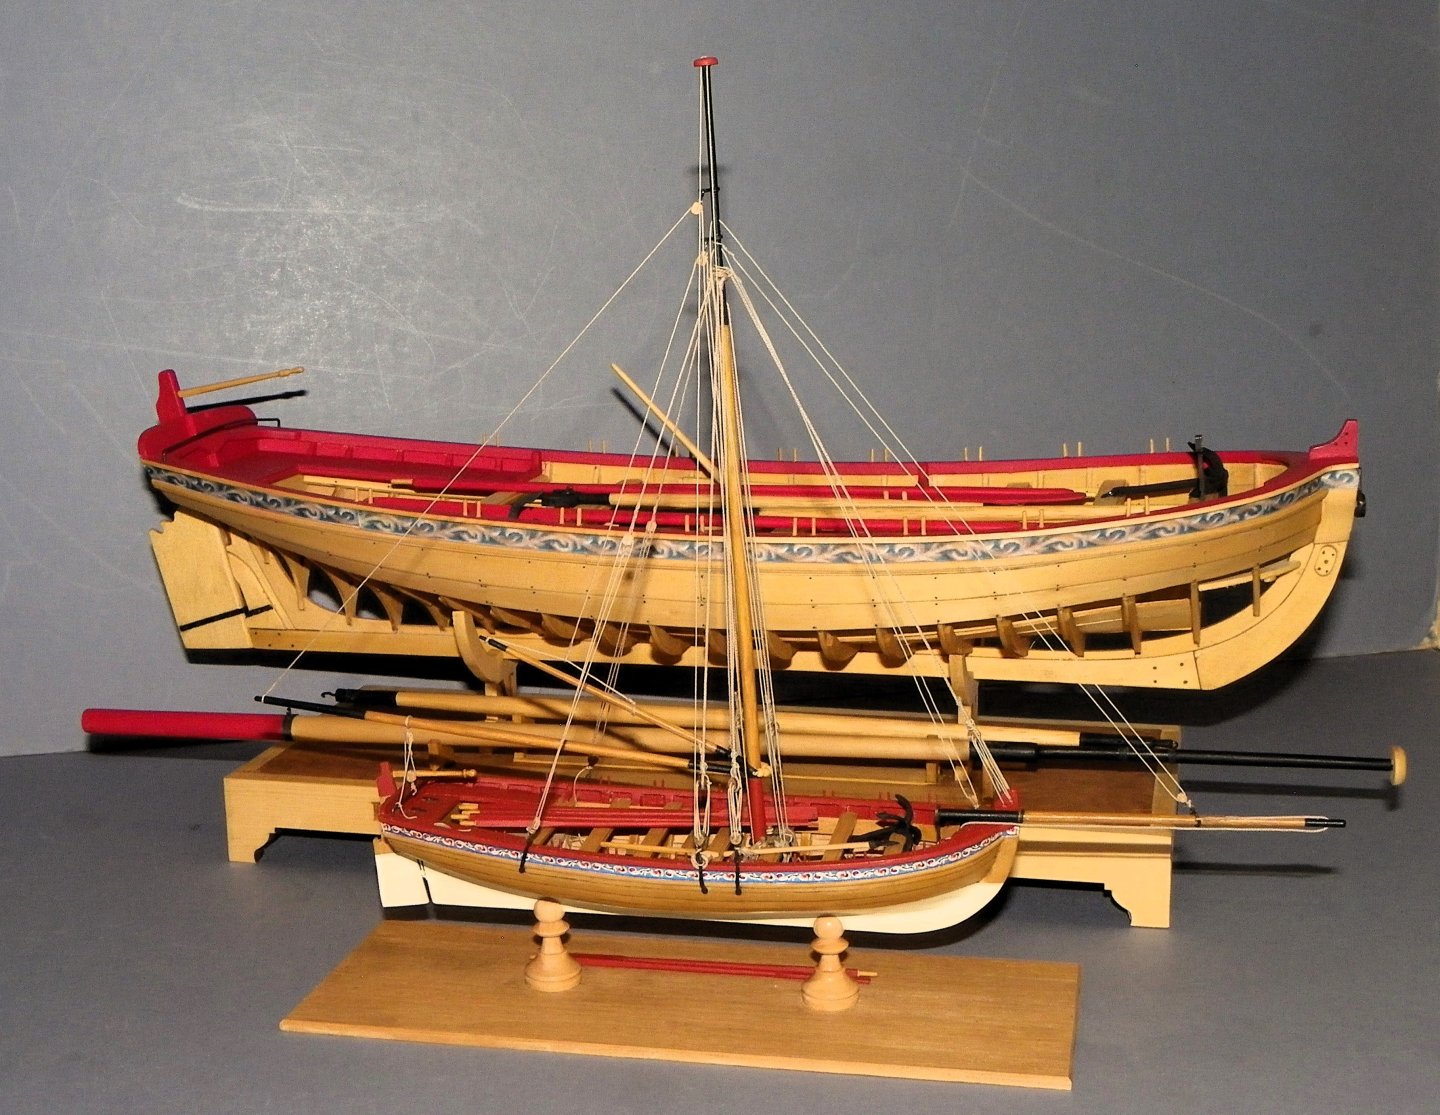
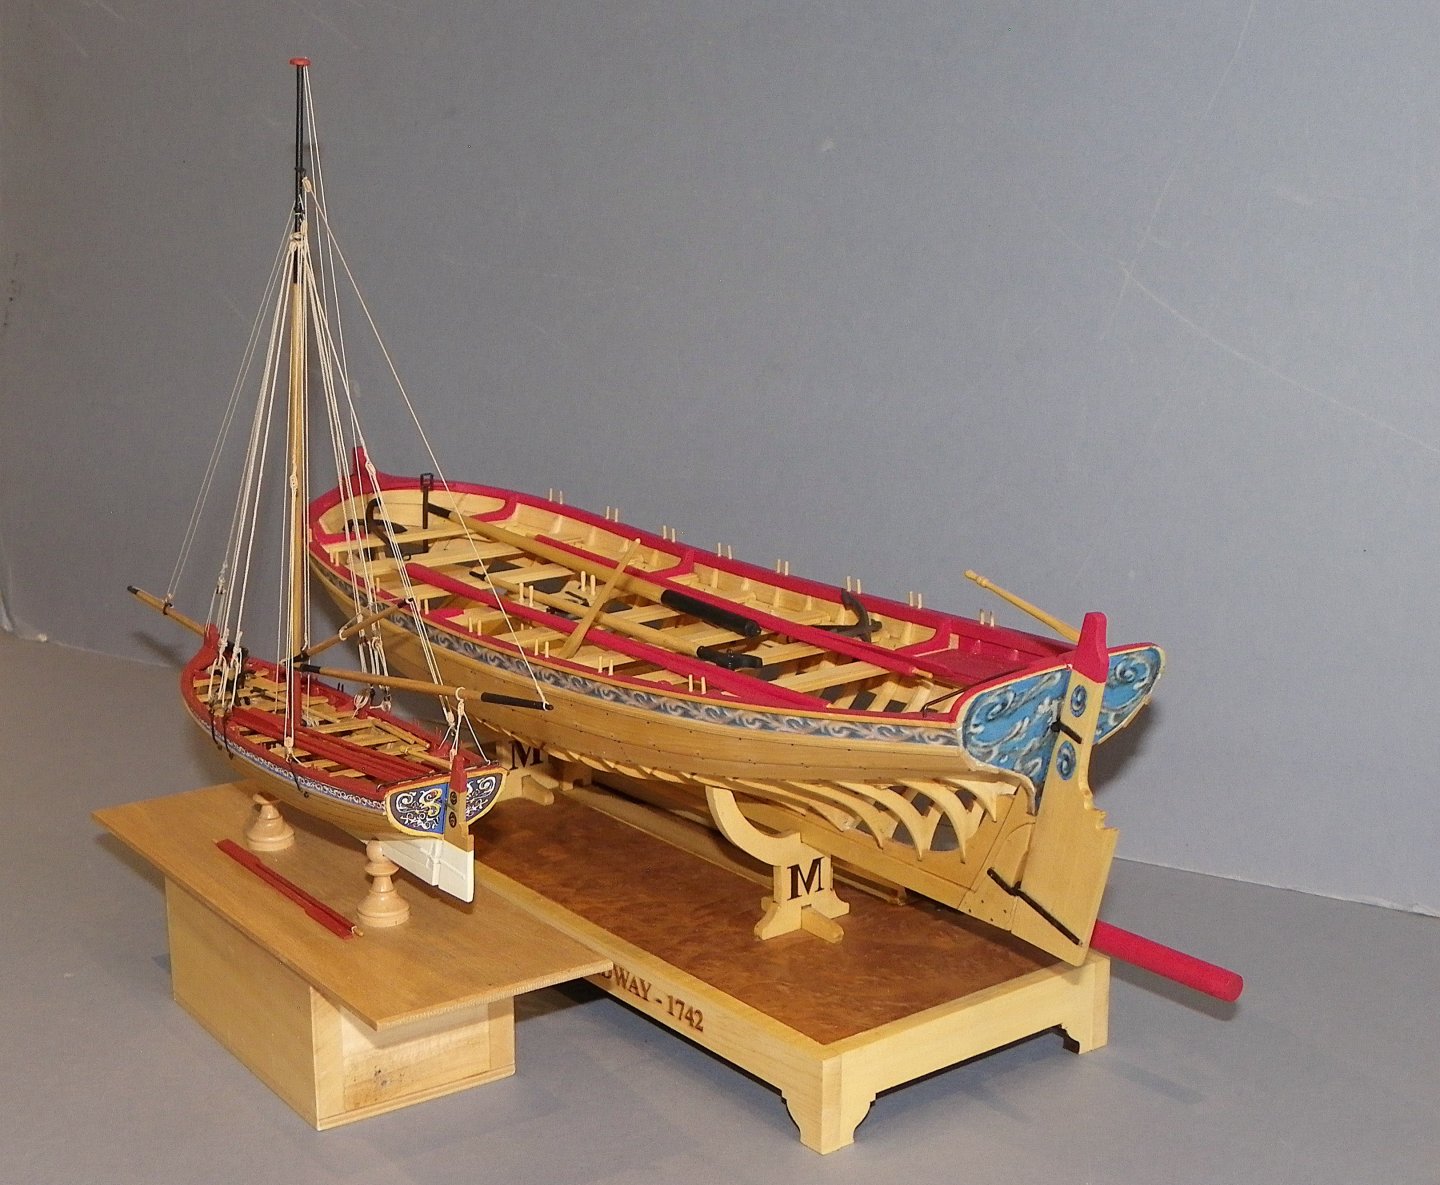
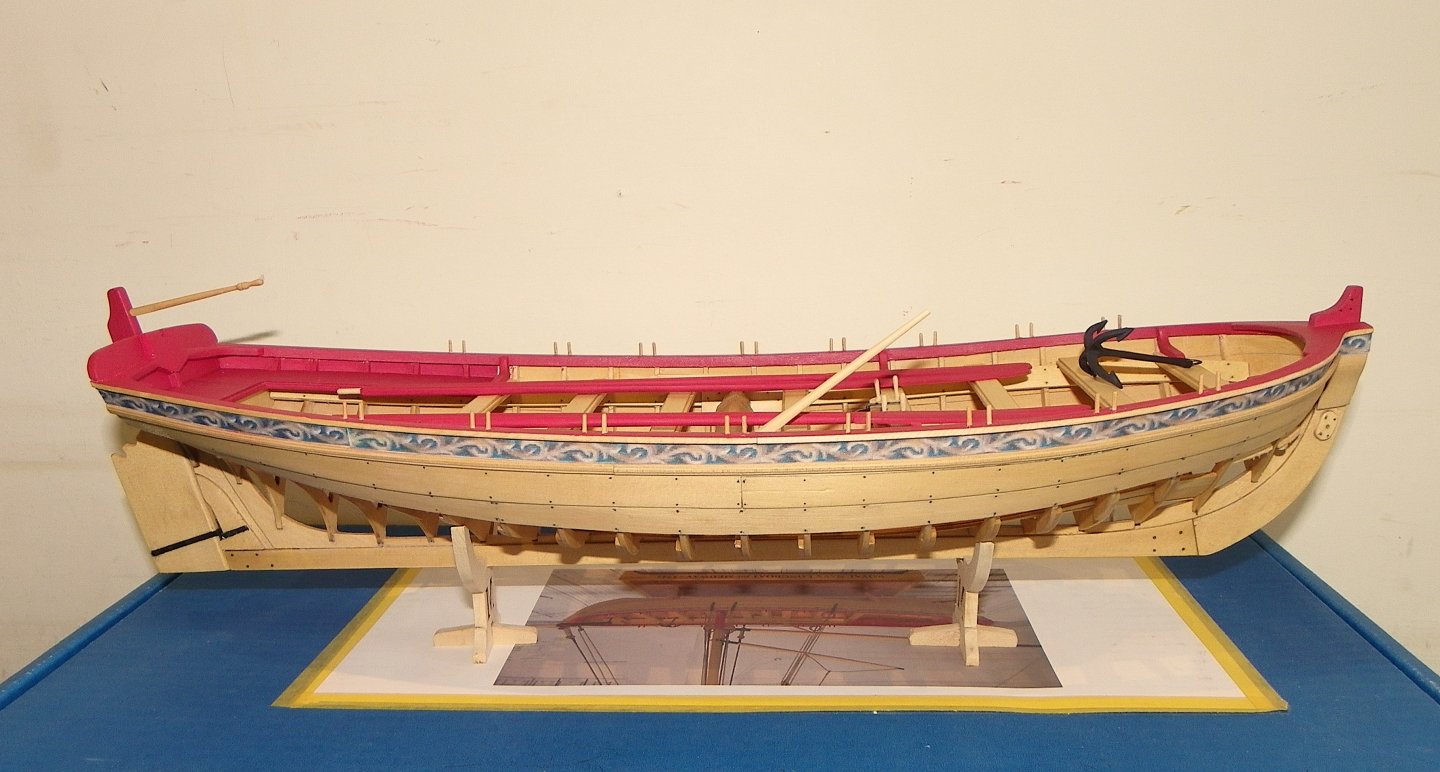
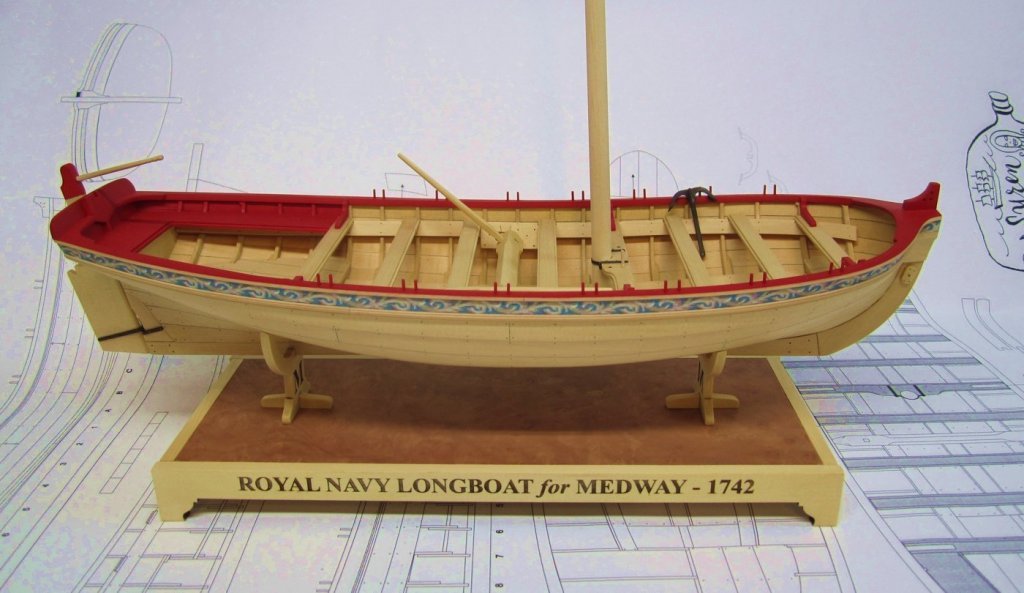
And finally….. Those familiar with my logs will know that I create a build photo book for my builds. The one for the ‘Medway’ Longboat has just been received. 2932a 2933a 2936a 2938a 2939a Purely for my own satisfaction but it is nice to have a ‘hard copy’ recording one’s efforts. One of the reasons I didn’t mast and rig her apart from space considerations is that I also have the Chuck designed Model Shipways Longboat at 1:48 scale, fully rigged. 0318 0319 0324 My eyes find it hard to believe the scale difference between 1:48 and 1:24 for basically the same boat, but I love the look of them both. 0343a I’m currently taking a break from ship modelling, for how long I don’t know. Regards, B.E. 24/09/2024


- 131 replies
-
- 19
-
-
-
- Medway Longboat
- Syren Ship Model Company
- (and 1 more)
-
They are supposed to represent Top rope scuttles, top ropes were used to raise the topmasts, but were usually taken down once the task had been completed. Did the kit not have small gratings to fit these openings? Even so, personally, I find the arrangement unconvincing and prefer to display them as flush scuttle board covers with lift rings. B.E.
-
An interesting project, and quite a step up, I wish you well in your endeavours Daniel. 👍 B.E.
-
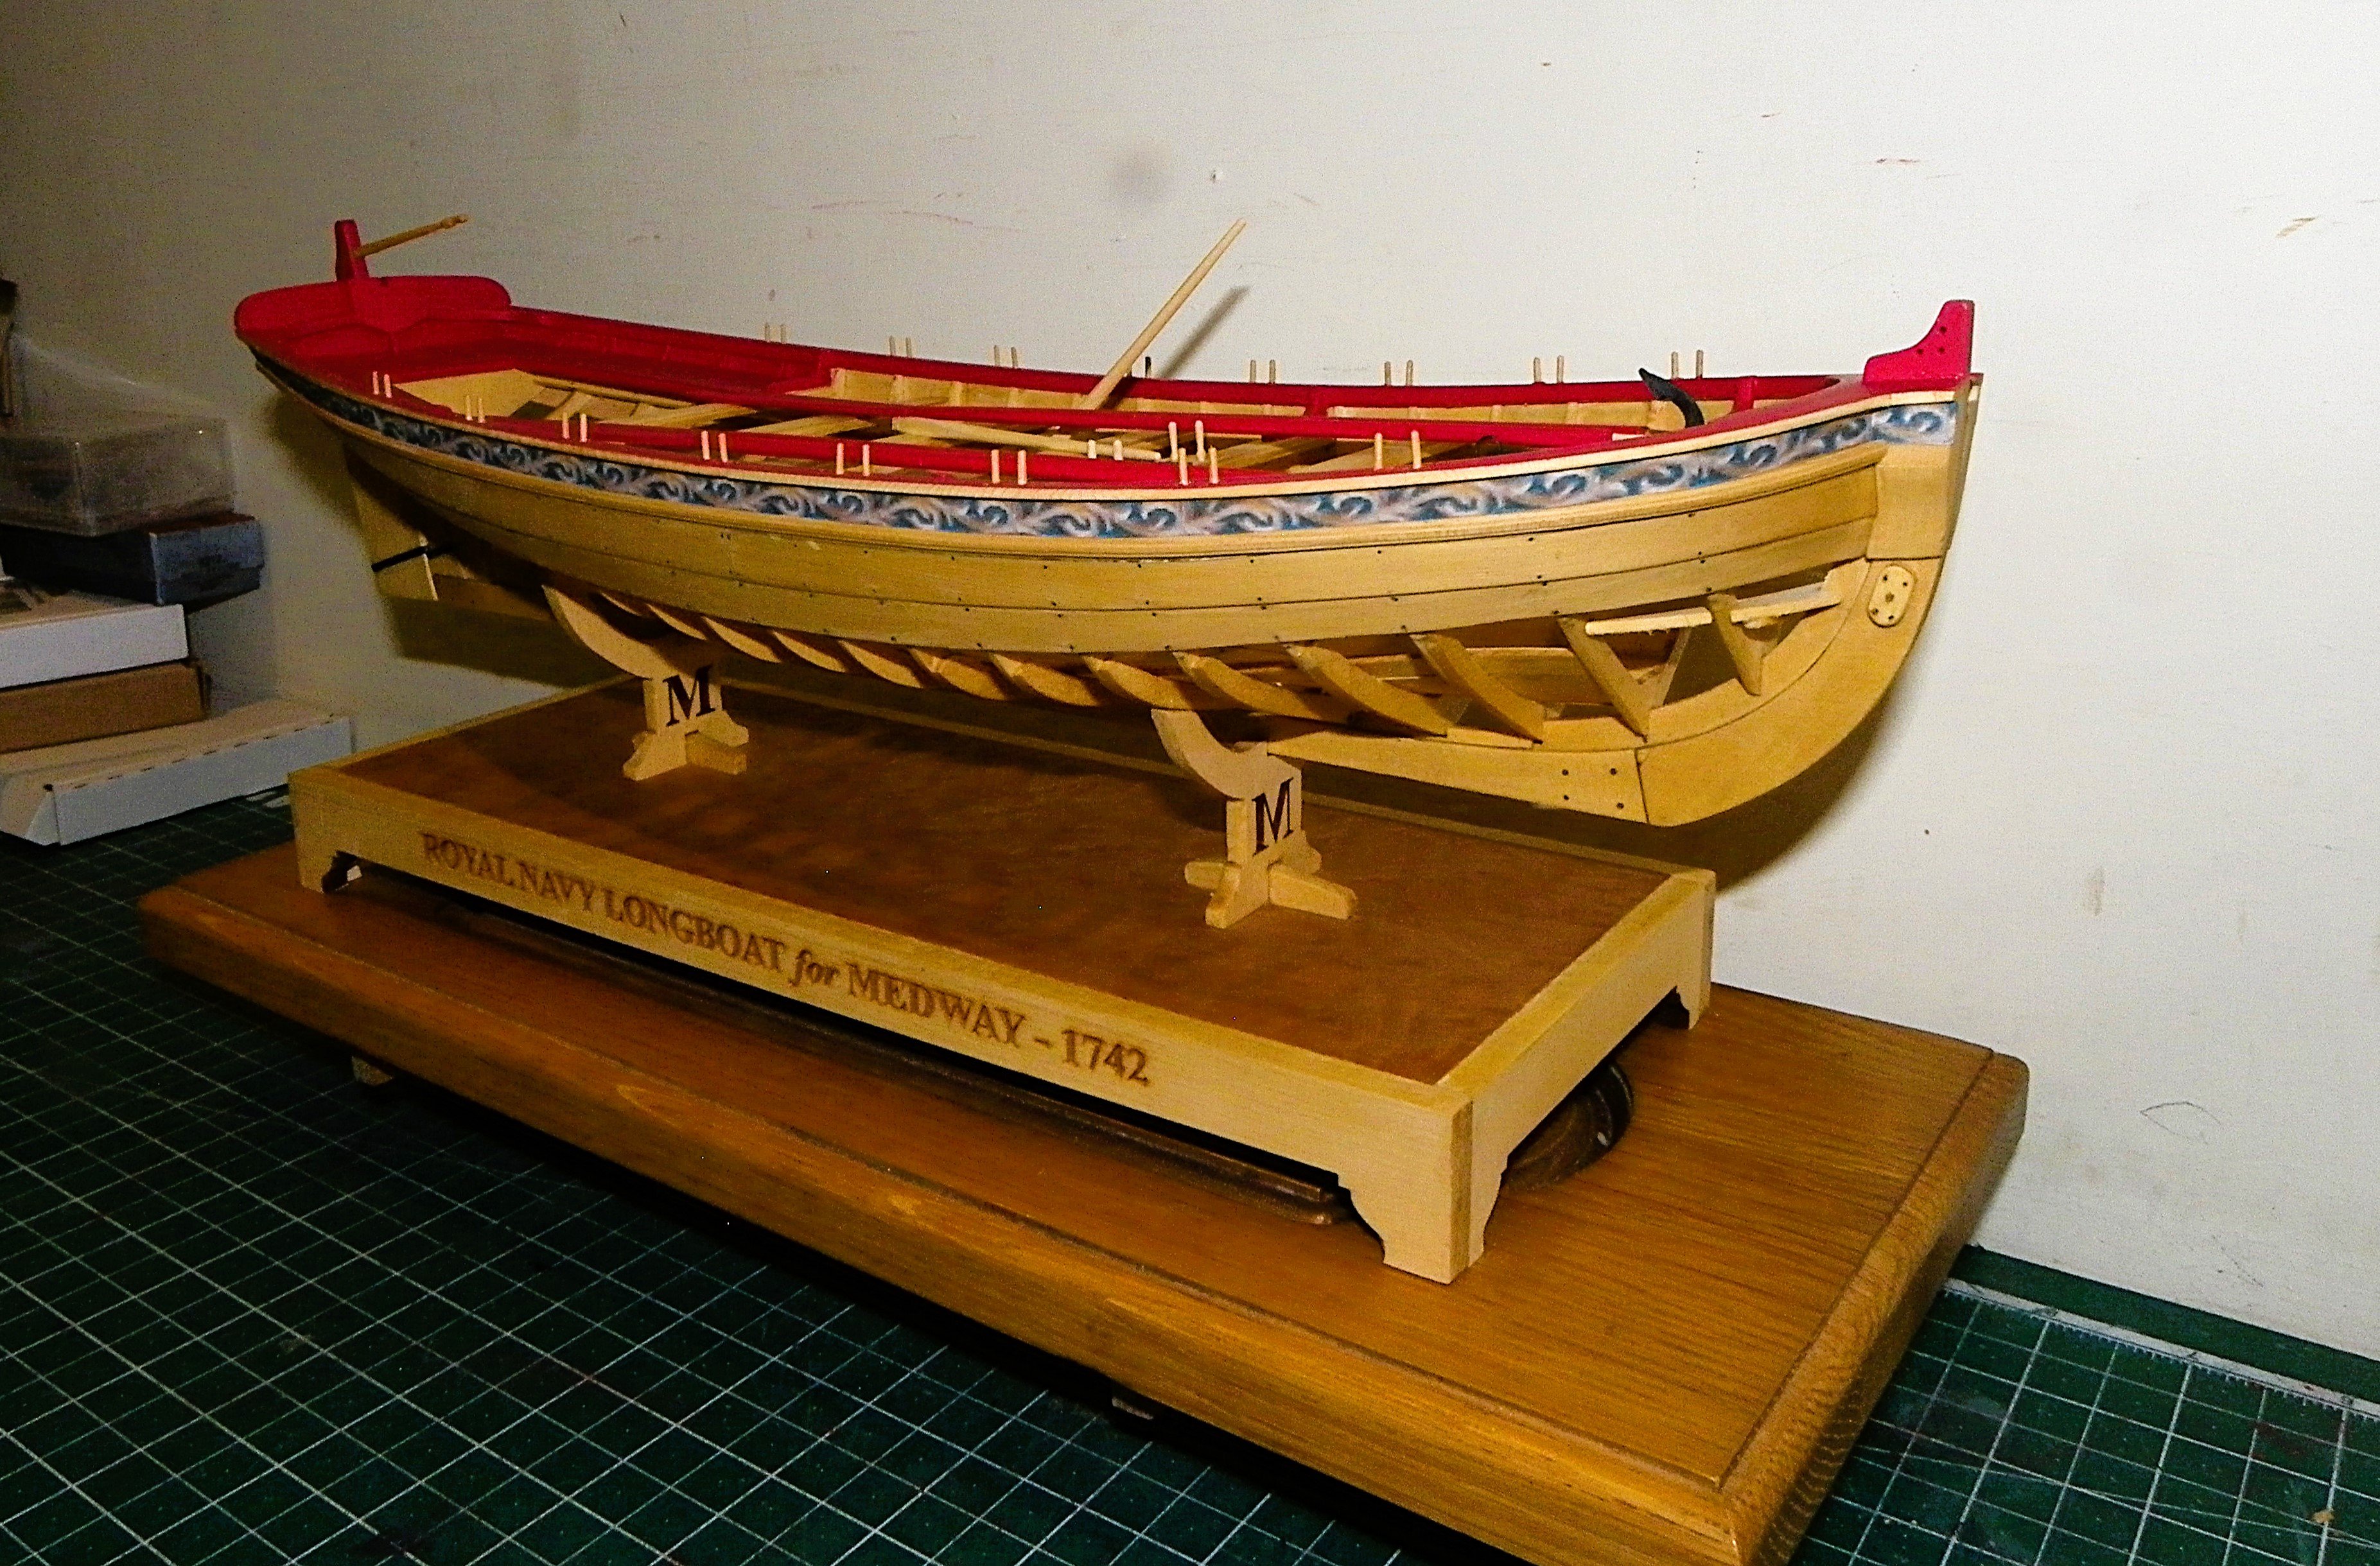
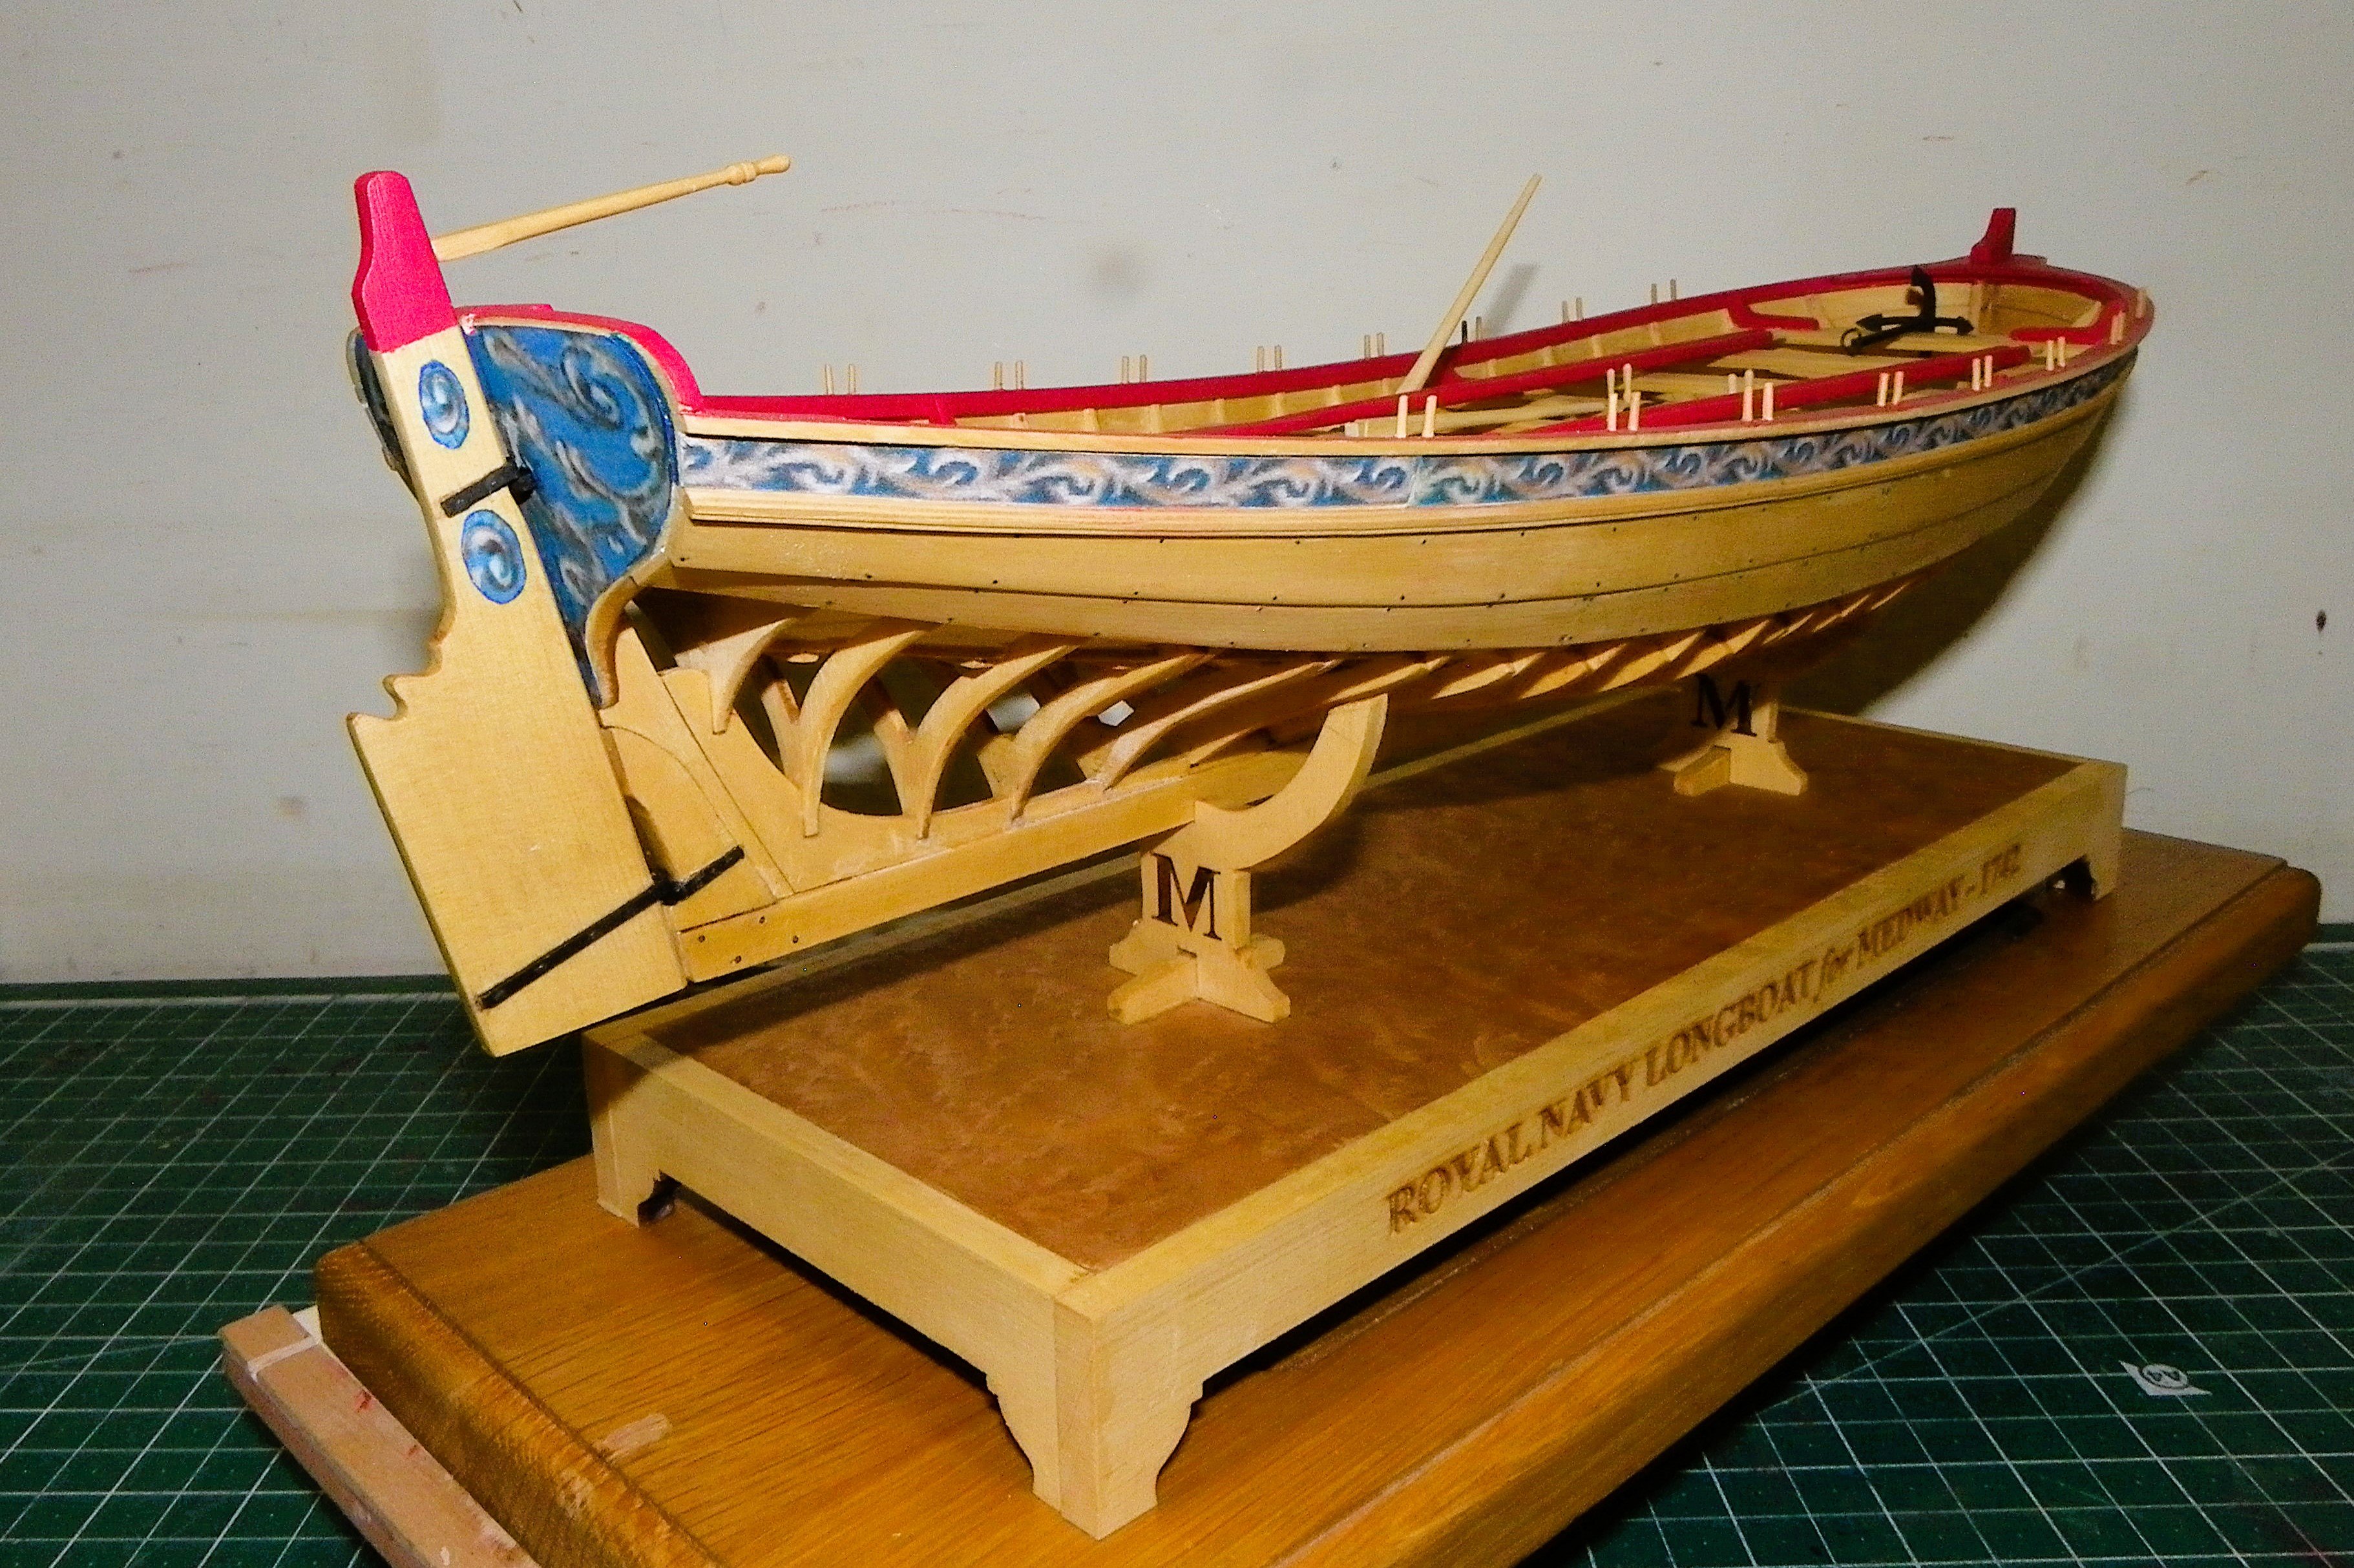
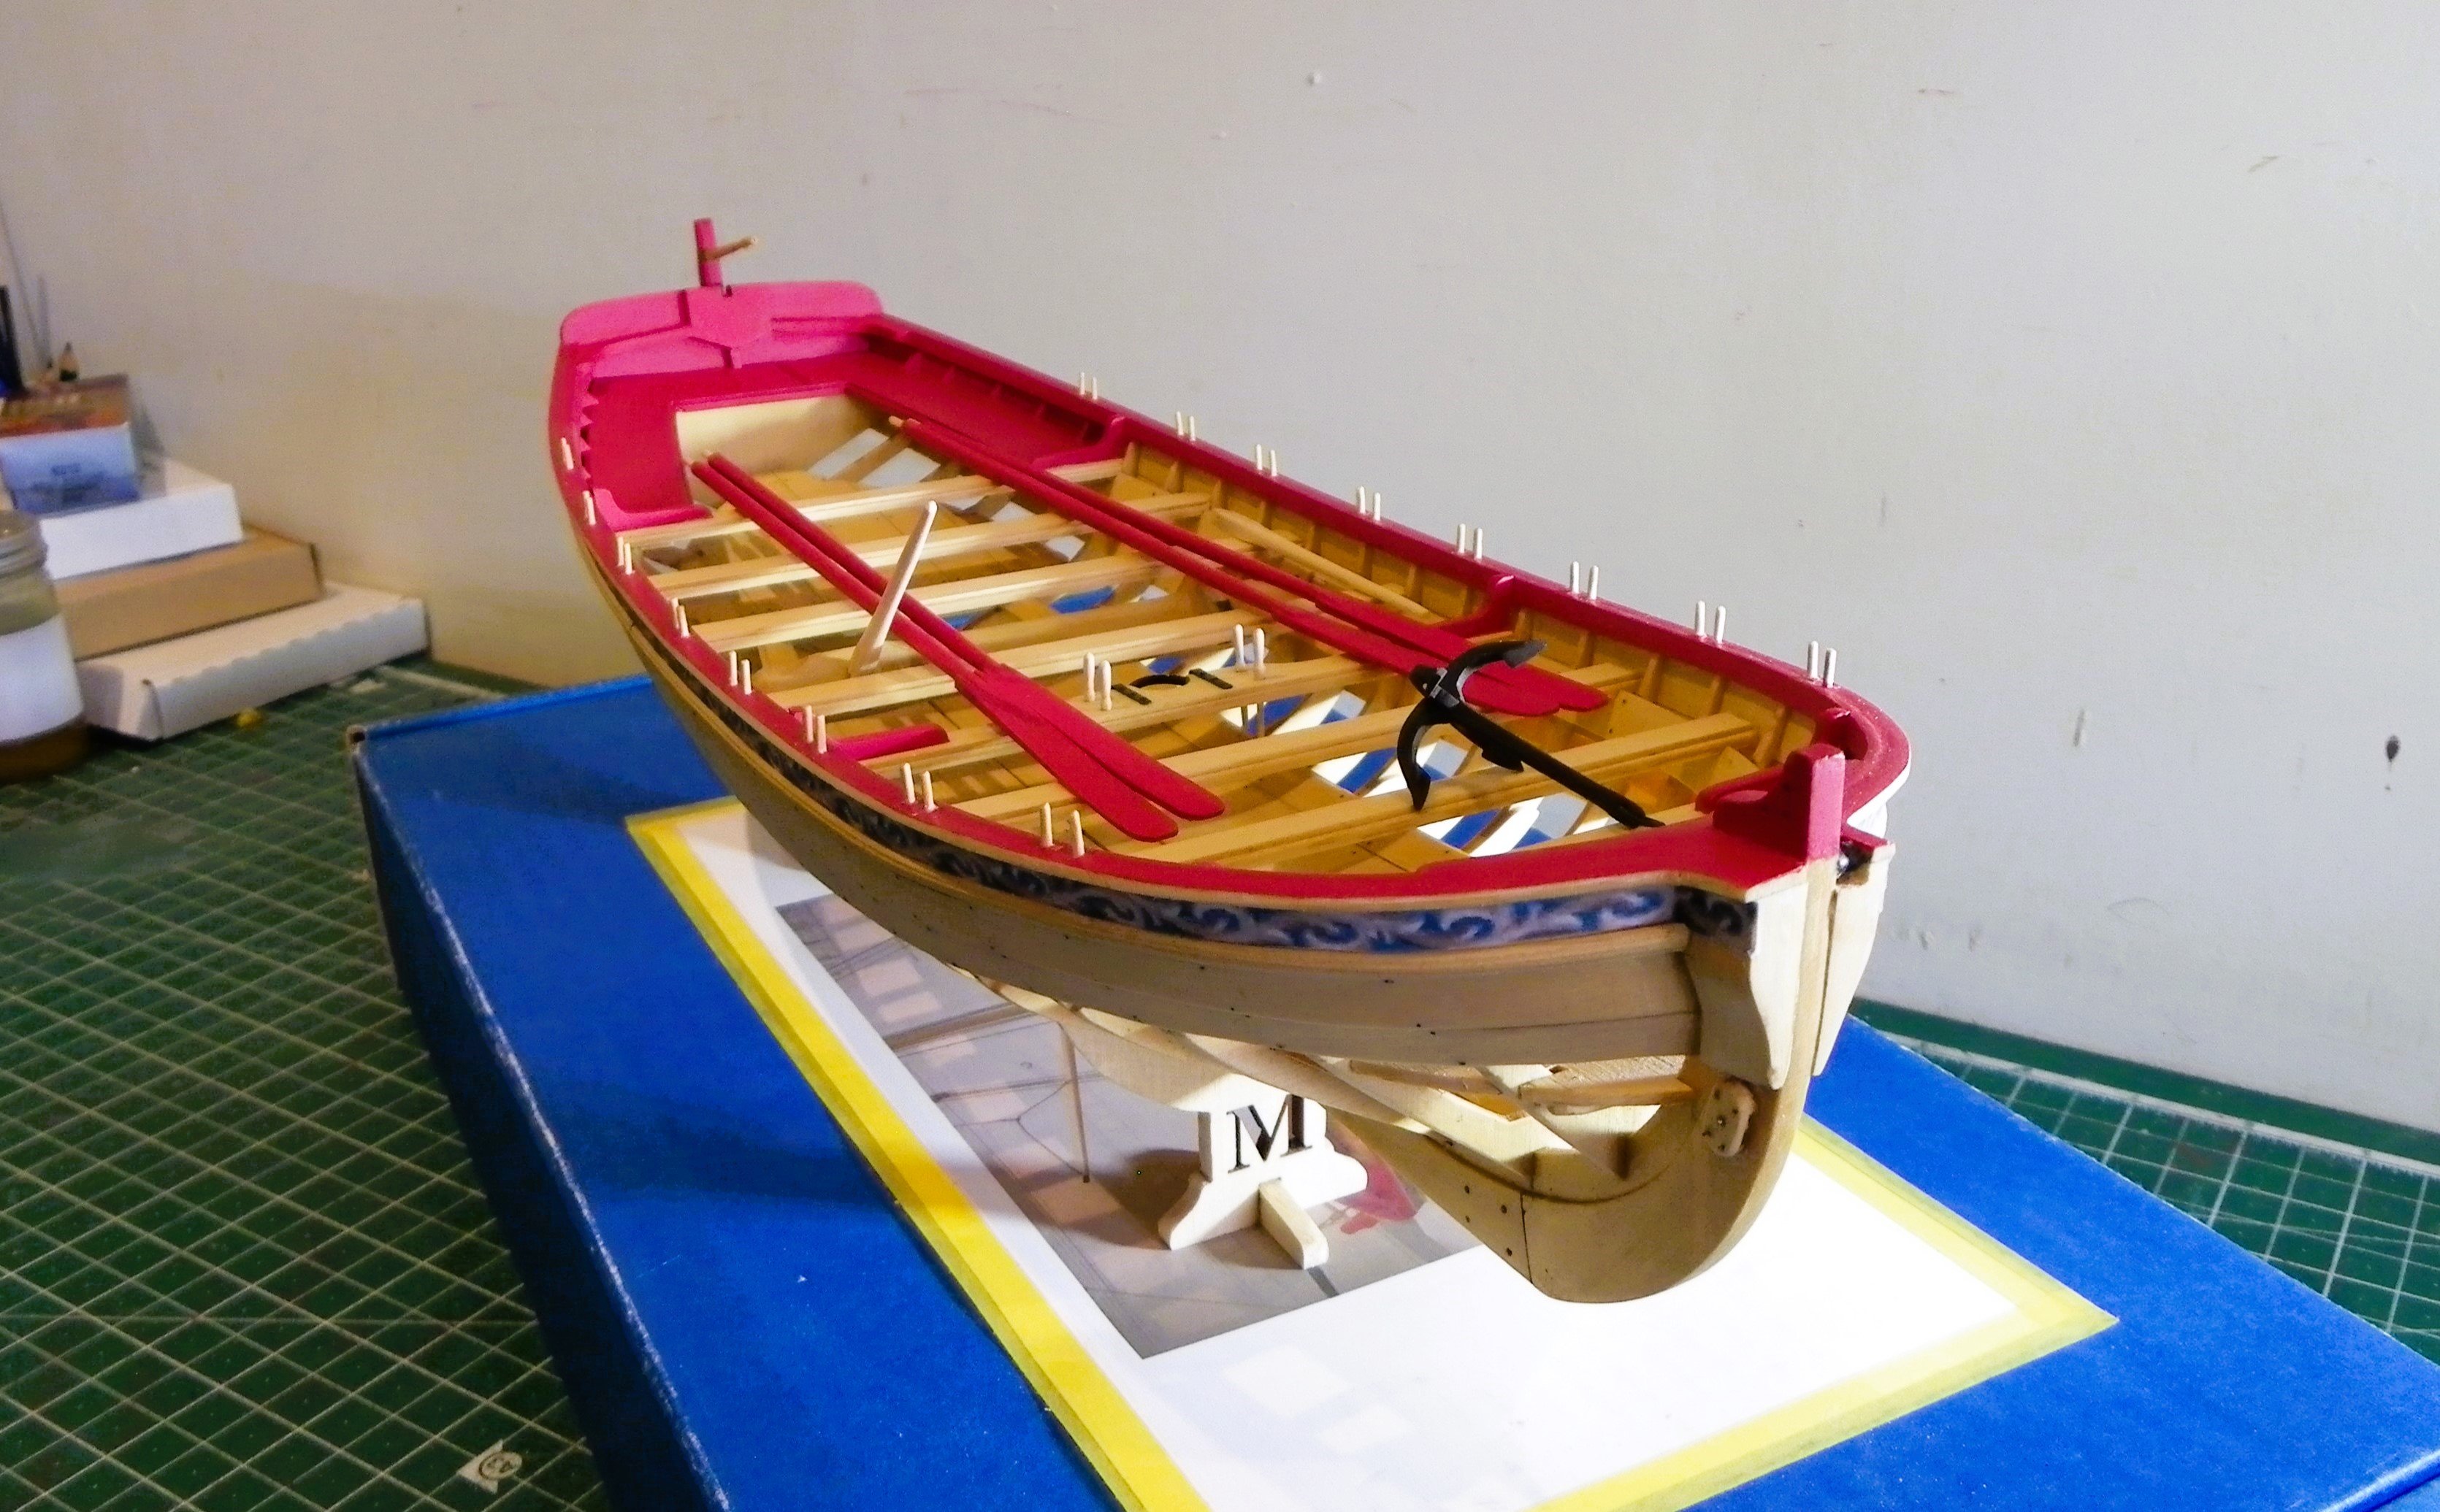
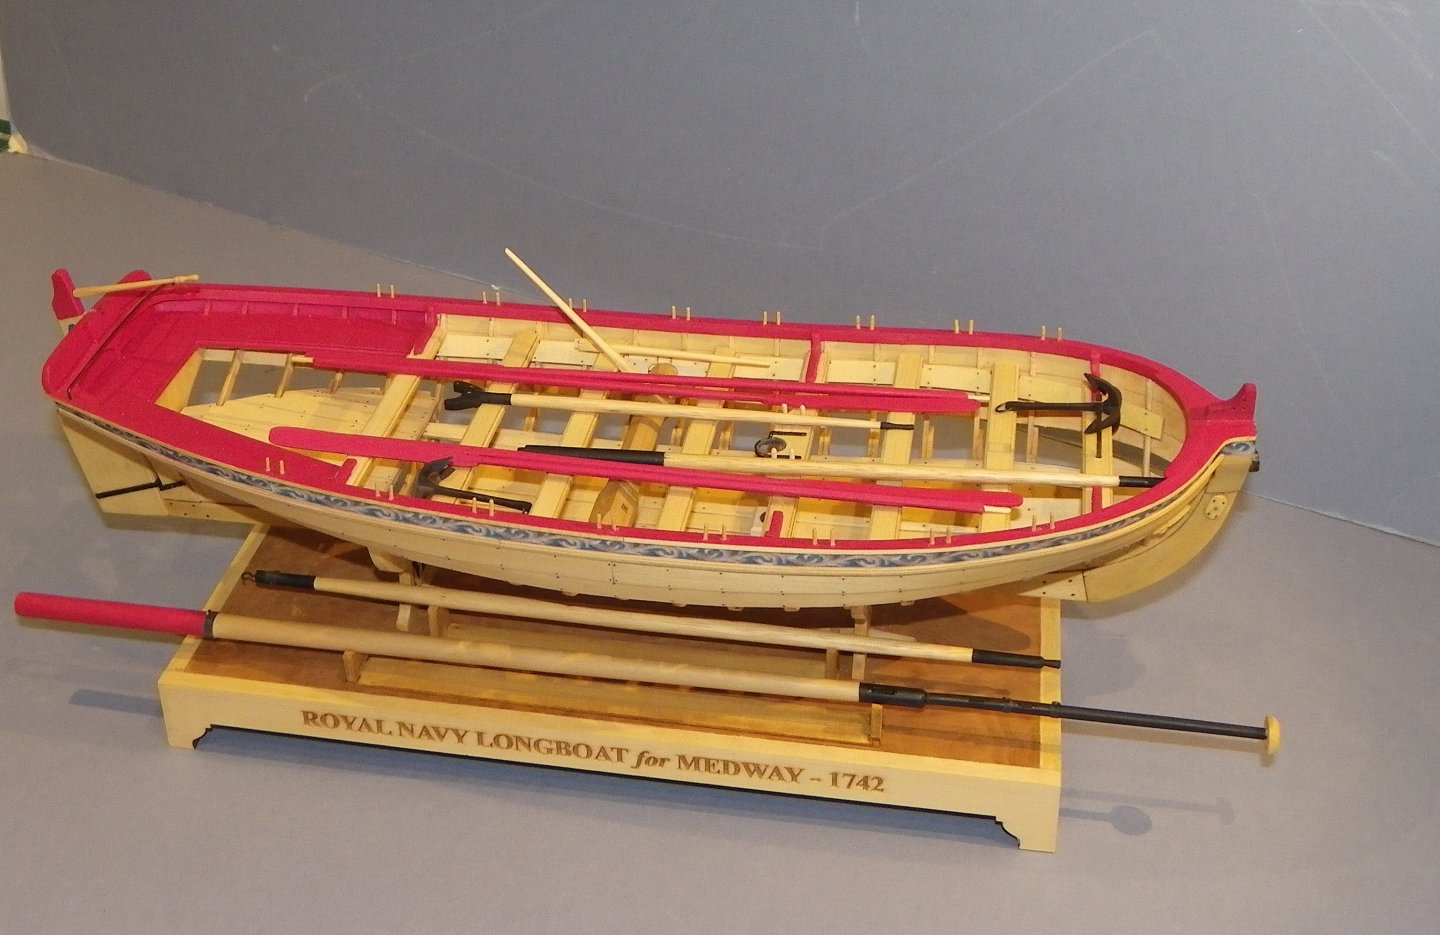
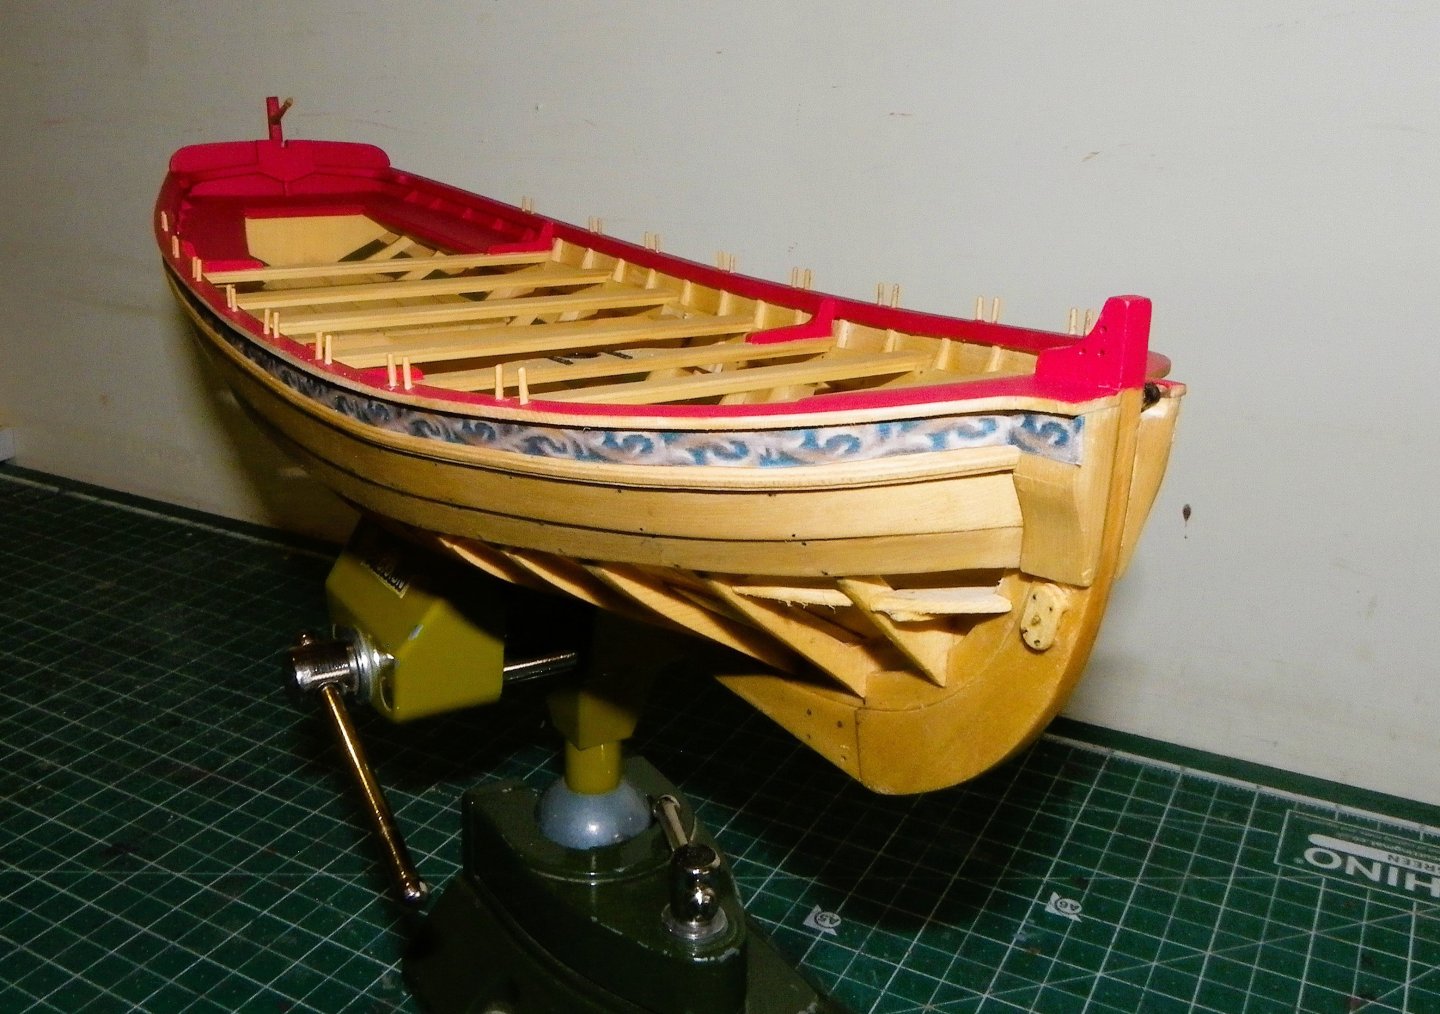
Post 44 A final fussing and faffing around the model, touch-ins here and there, and a final coat of w-o-p. I have tried various combinations to display the mast and spars alongside the model but arrived at having the Mast and Boom on the display base, and the Bowsprit and Gaff onboard the boat. This avoids having to have a wider display base which I don’t really want. So, here are the completion photos. 0271 0276 0280 0283 0284 0288 0291 0292 0295 0296 0300 0279 As with the Queen Ann Barge and Cheerful the ‘Medway’ Longboat has been a pleasure to build. The combination of quality materials, excellent designs, and elements that test your ingenuity and skill provide a high level of build satisfaction. Thank you, Chuck for the makings. I do have a few more related photos that members may find of interest; I will add these in a separate post. B.E. 06/09/2024.


- 131 replies
-
- 11
-
-
-
- Medway Longboat
- Syren Ship Model Company
- (and 1 more)
-
Thank you Cisco, with w-i-p shots I just tend to use my old Pentax Bridge, hand held, and not too fussy about the light, as long as it shows clearly the detail I want to get over. I take more care when setting up for the completion shots. B.E.
- 131 replies
-
- 1
-
-
- Medway Longboat
- Syren Ship Model Company
- (and 1 more)
-
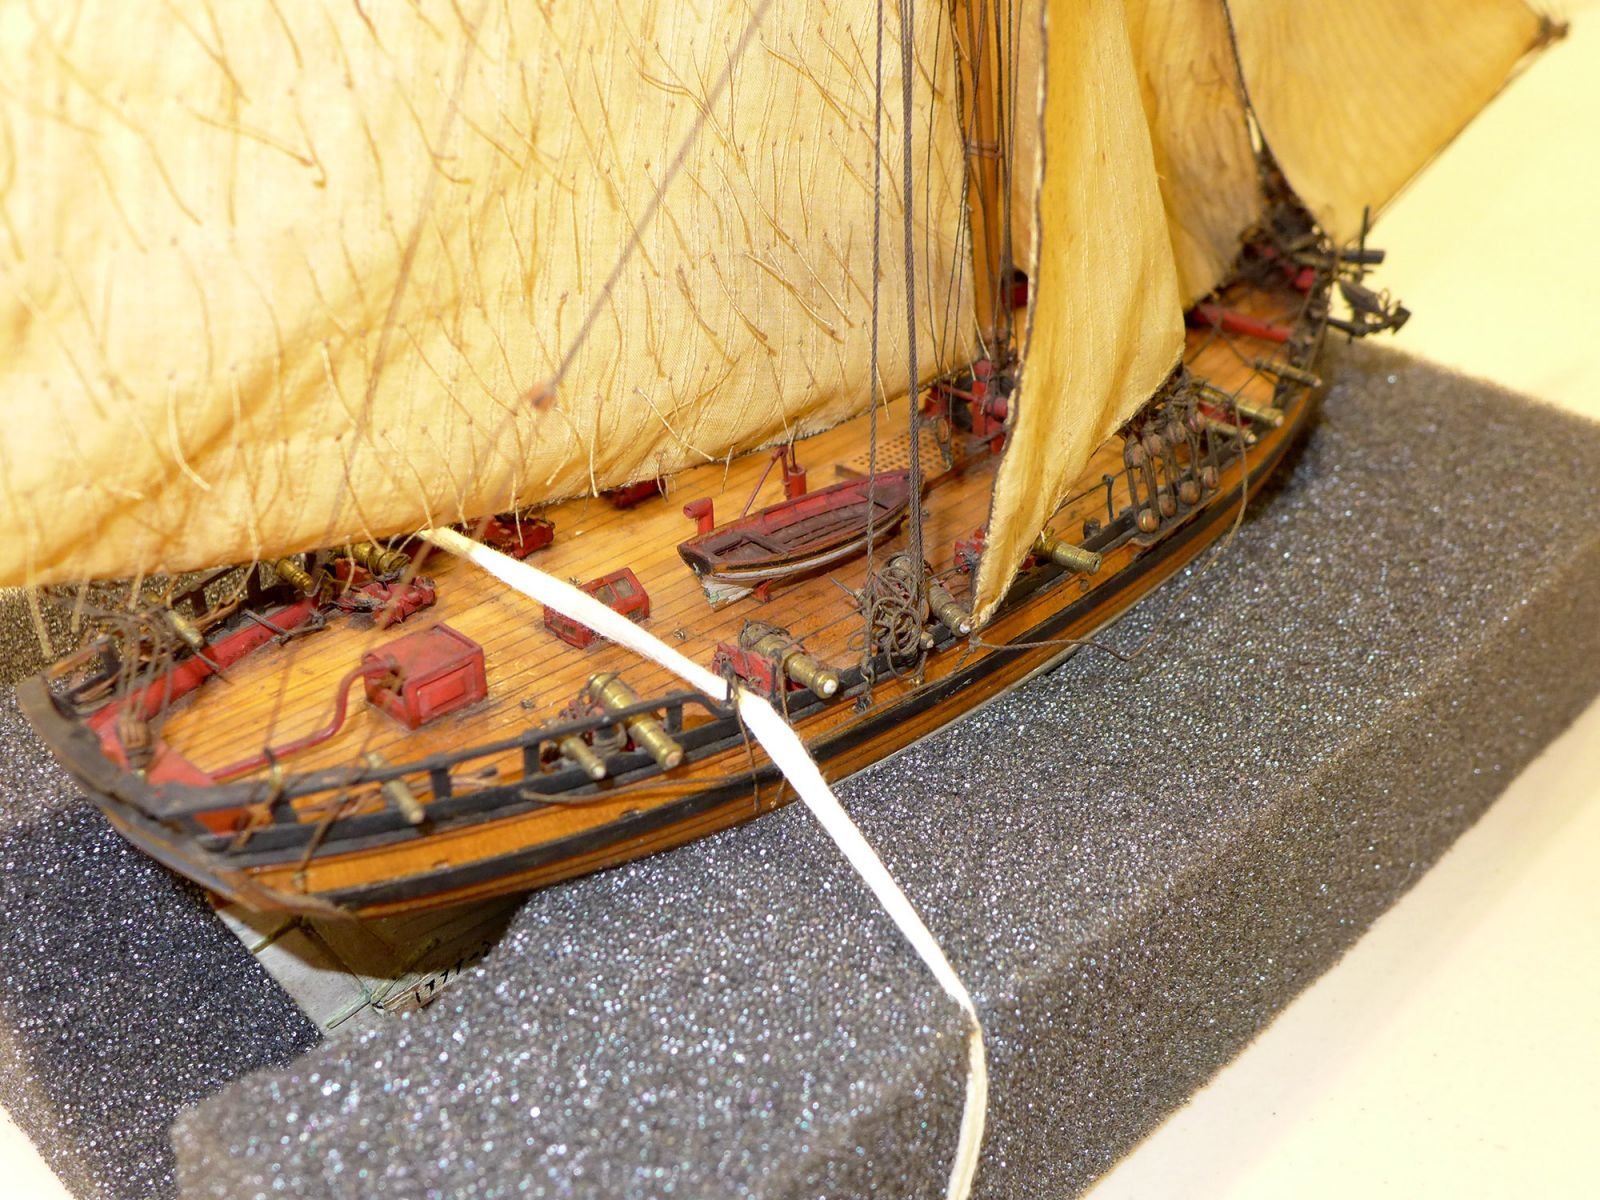
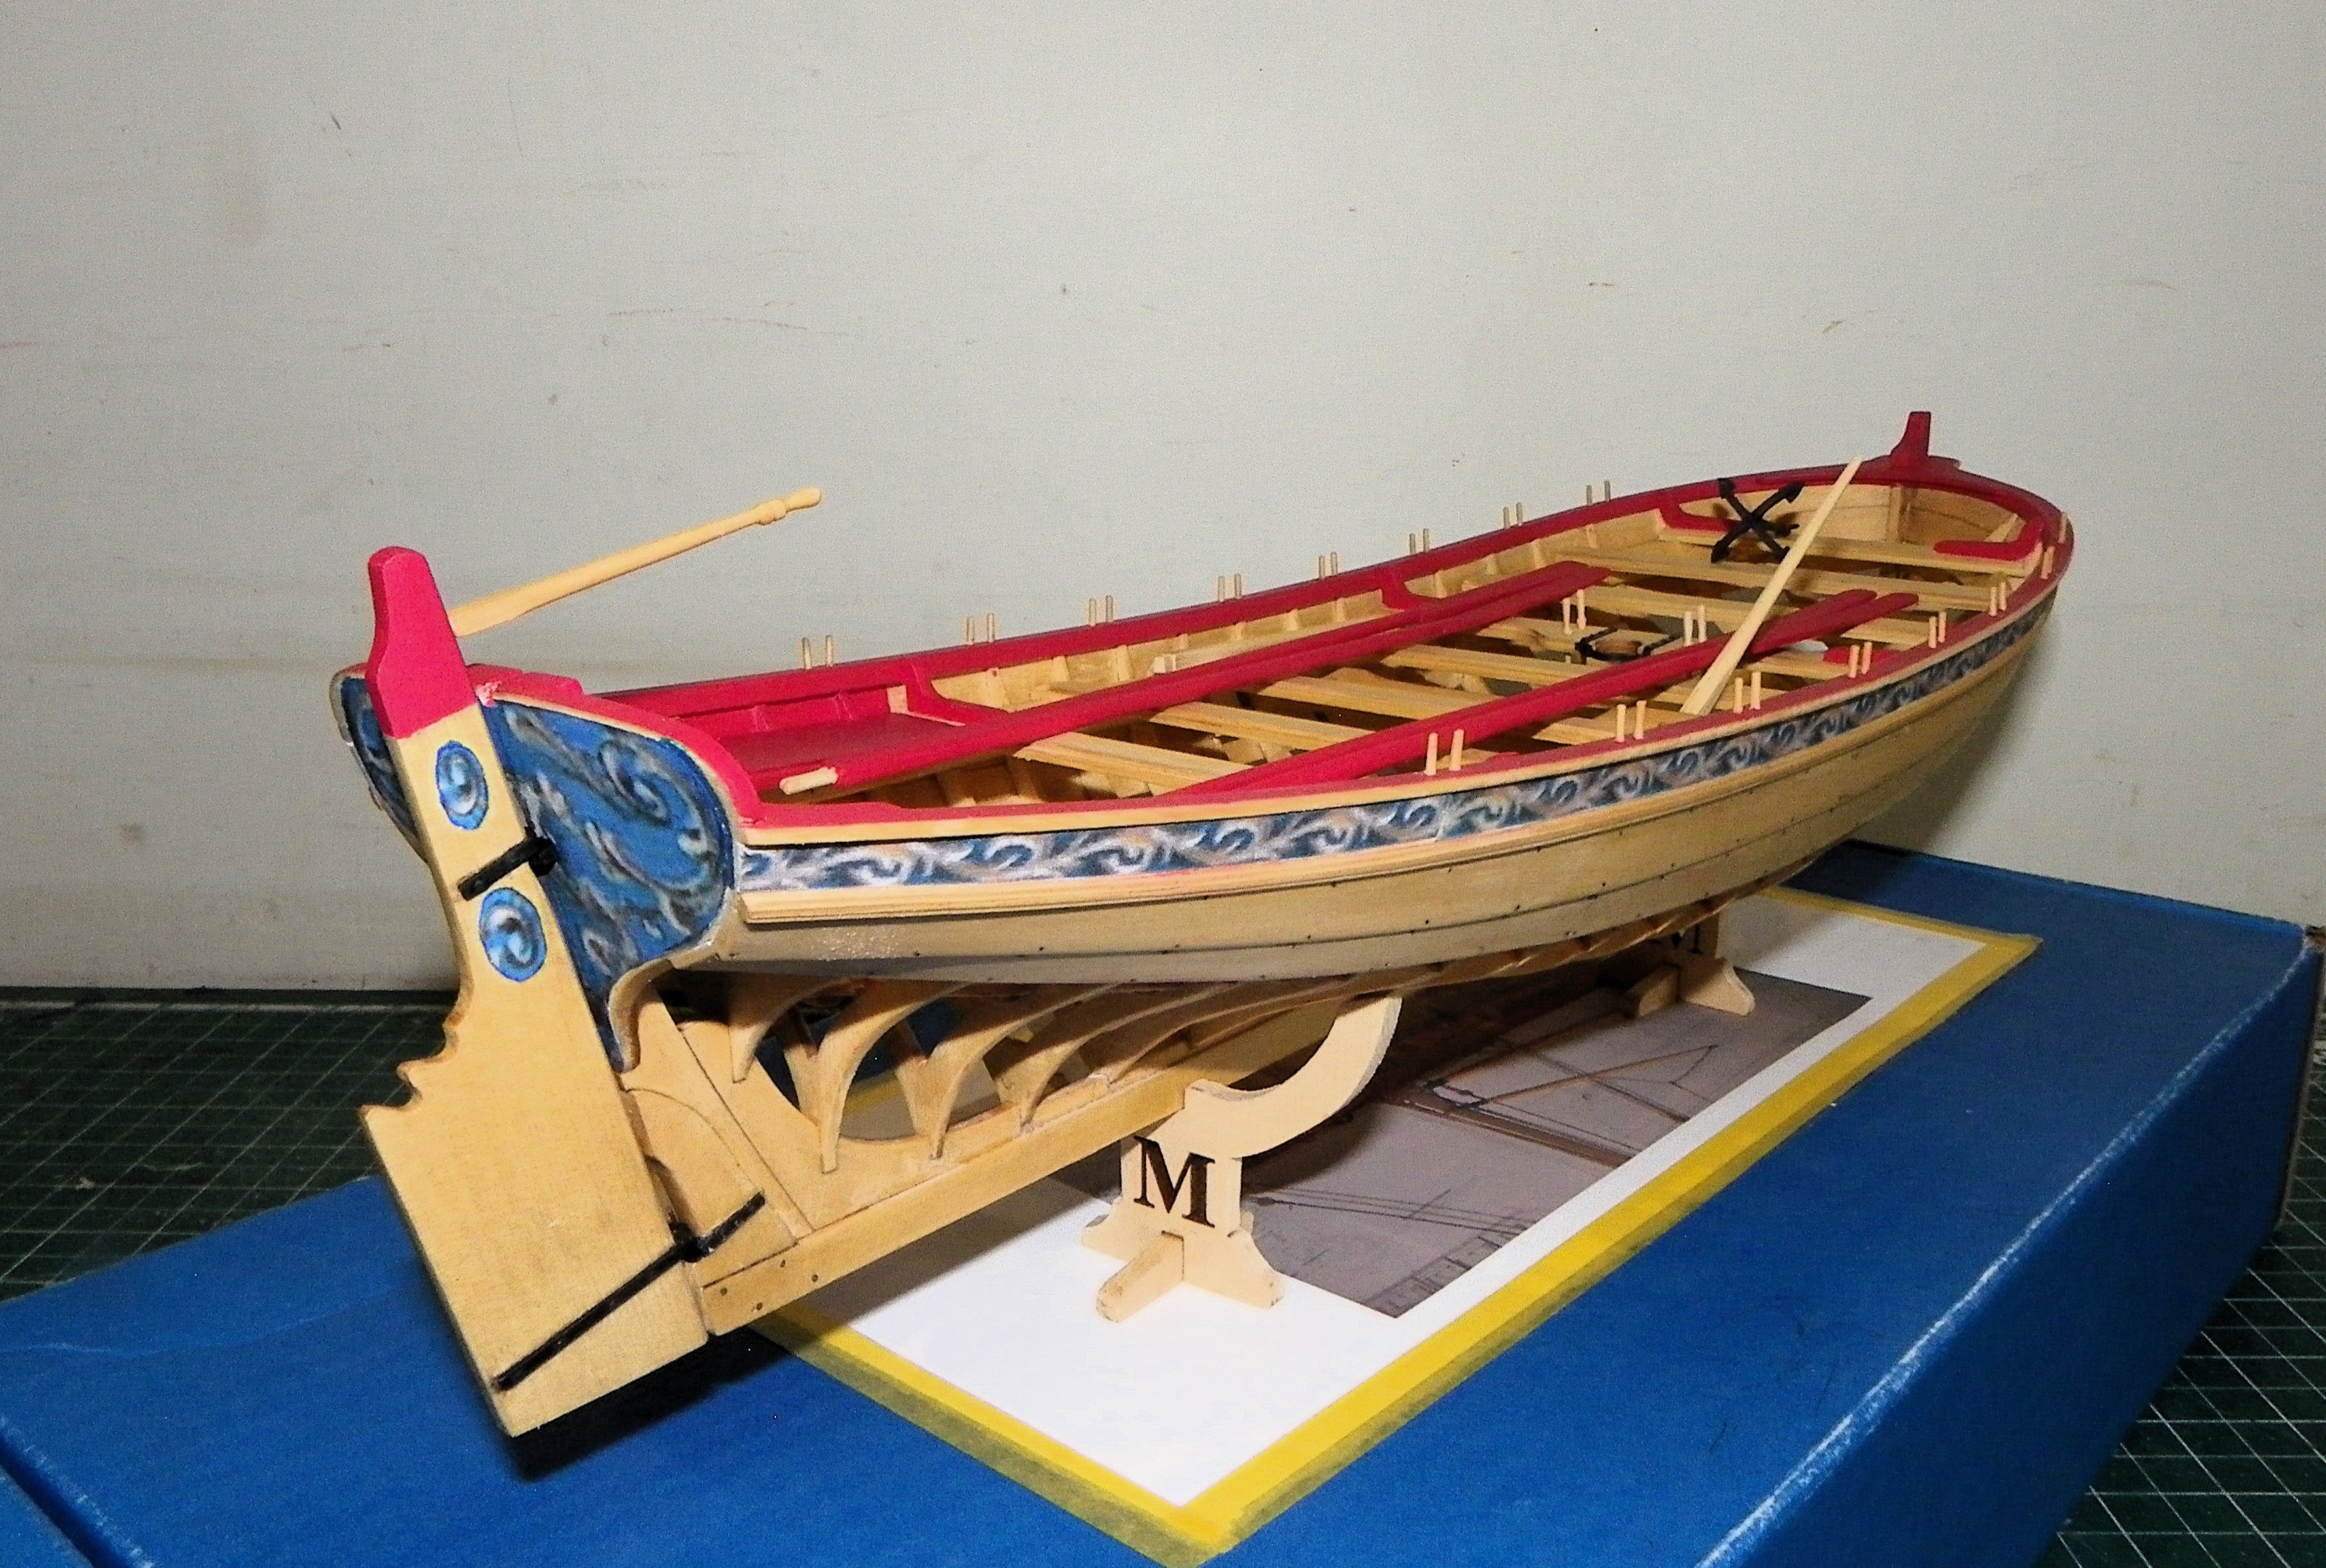
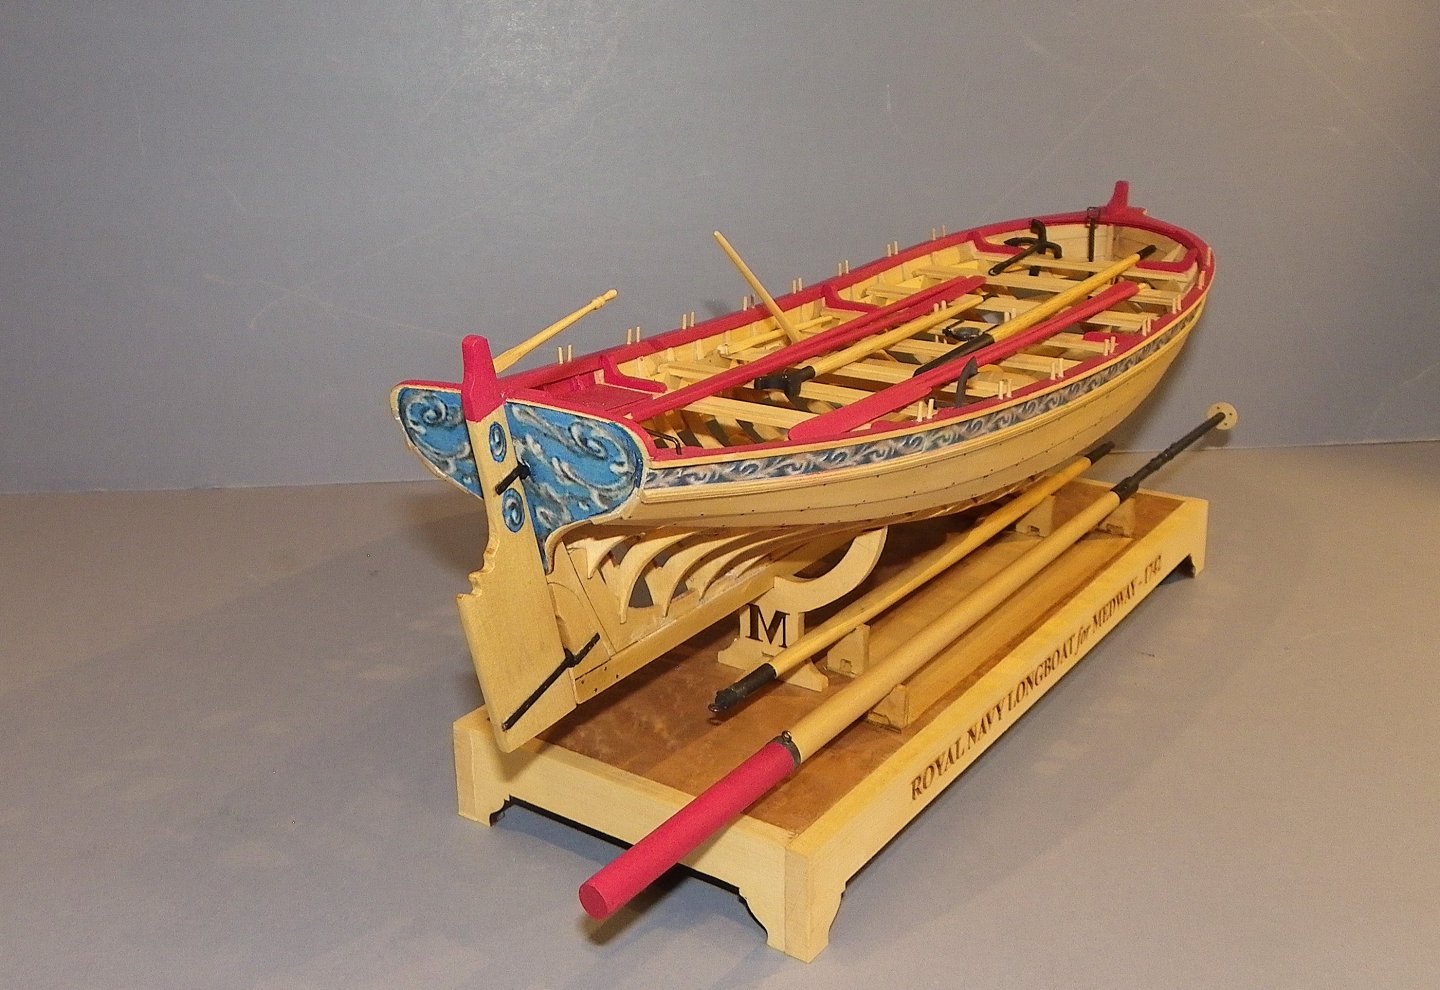
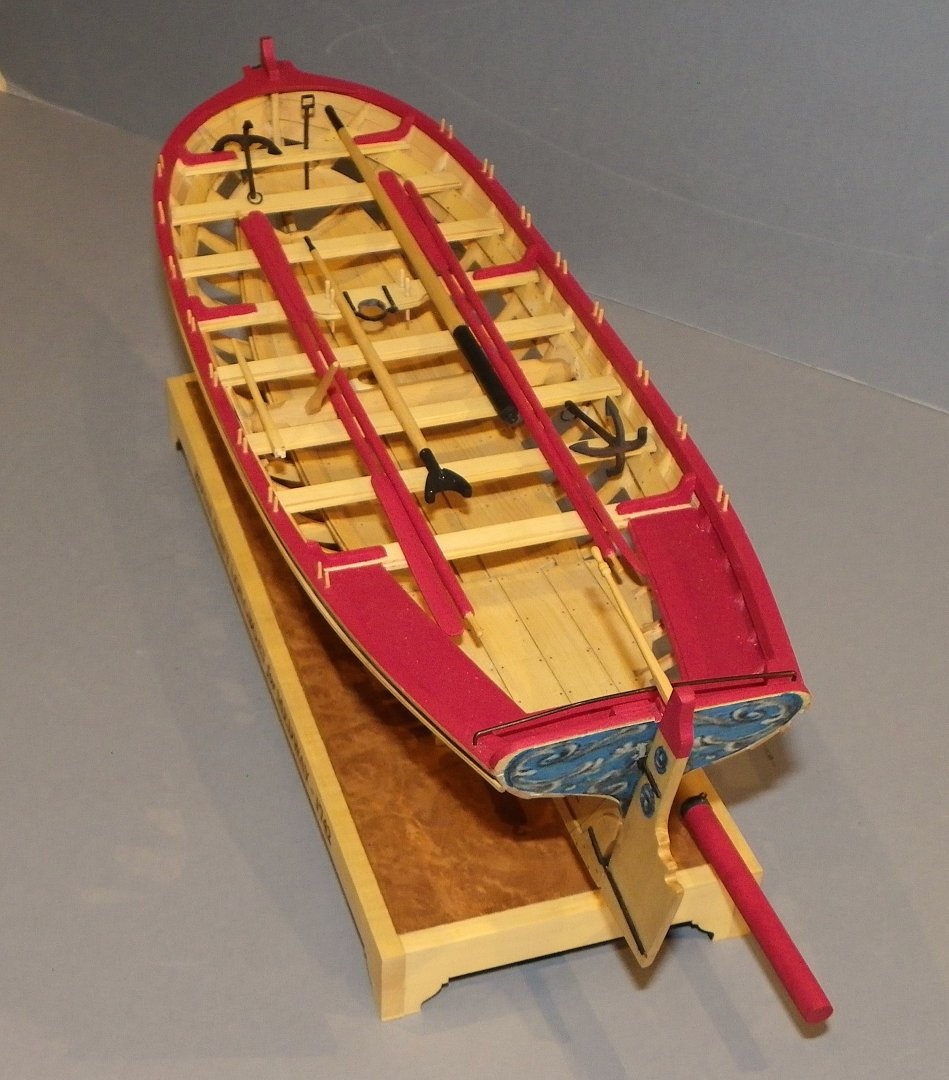
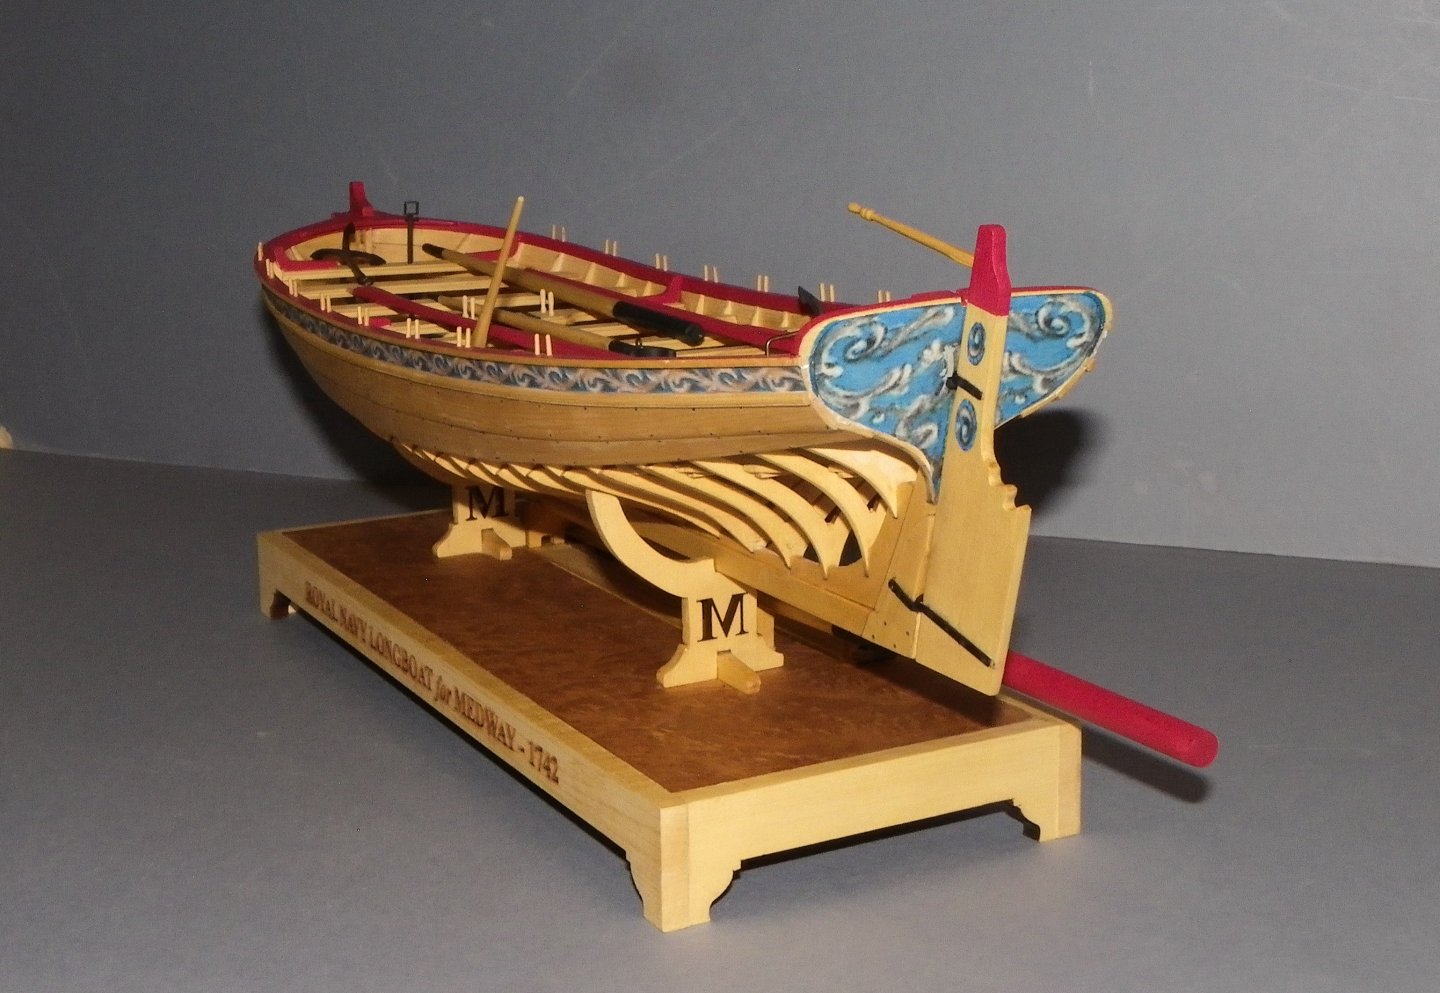
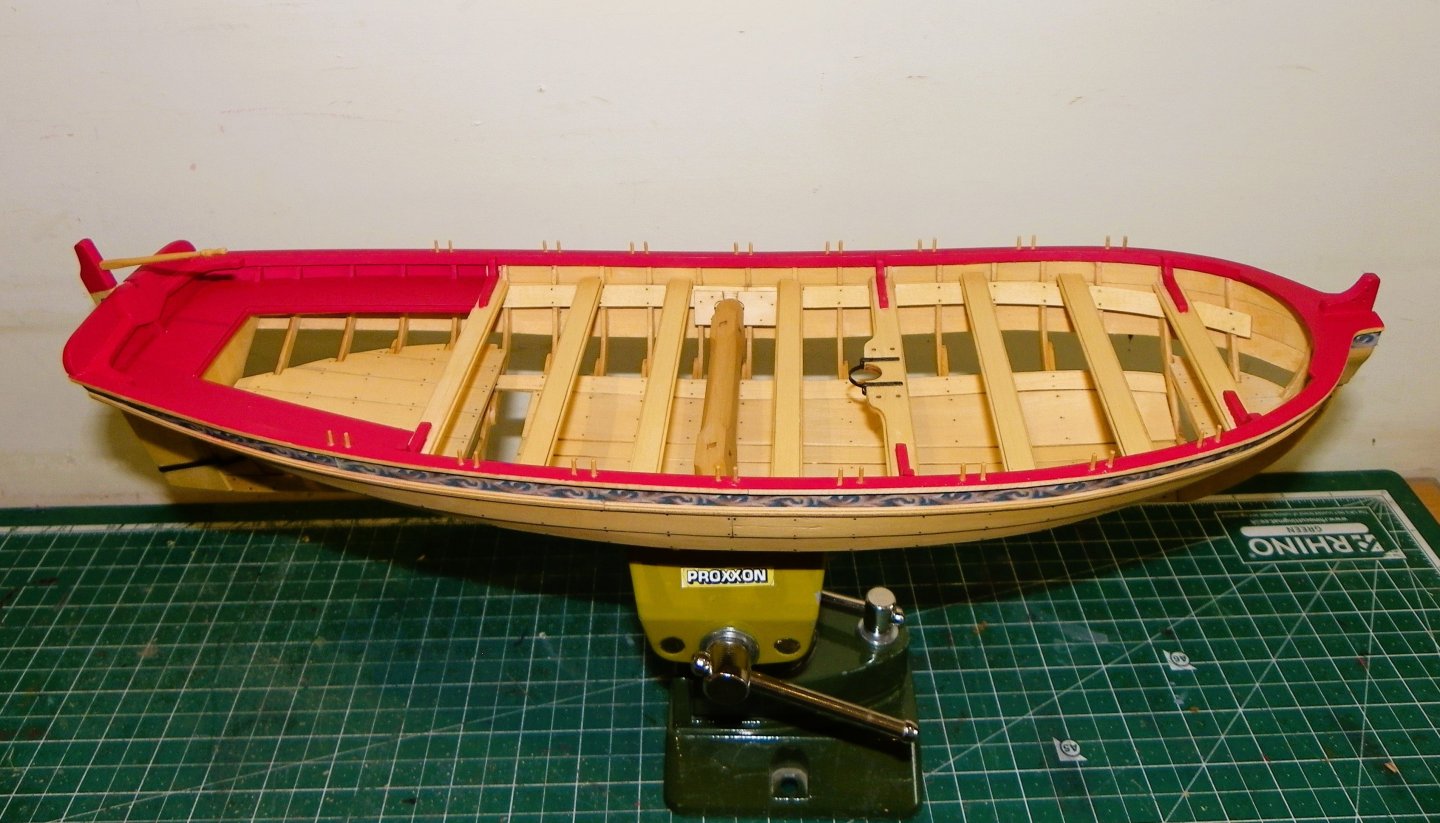
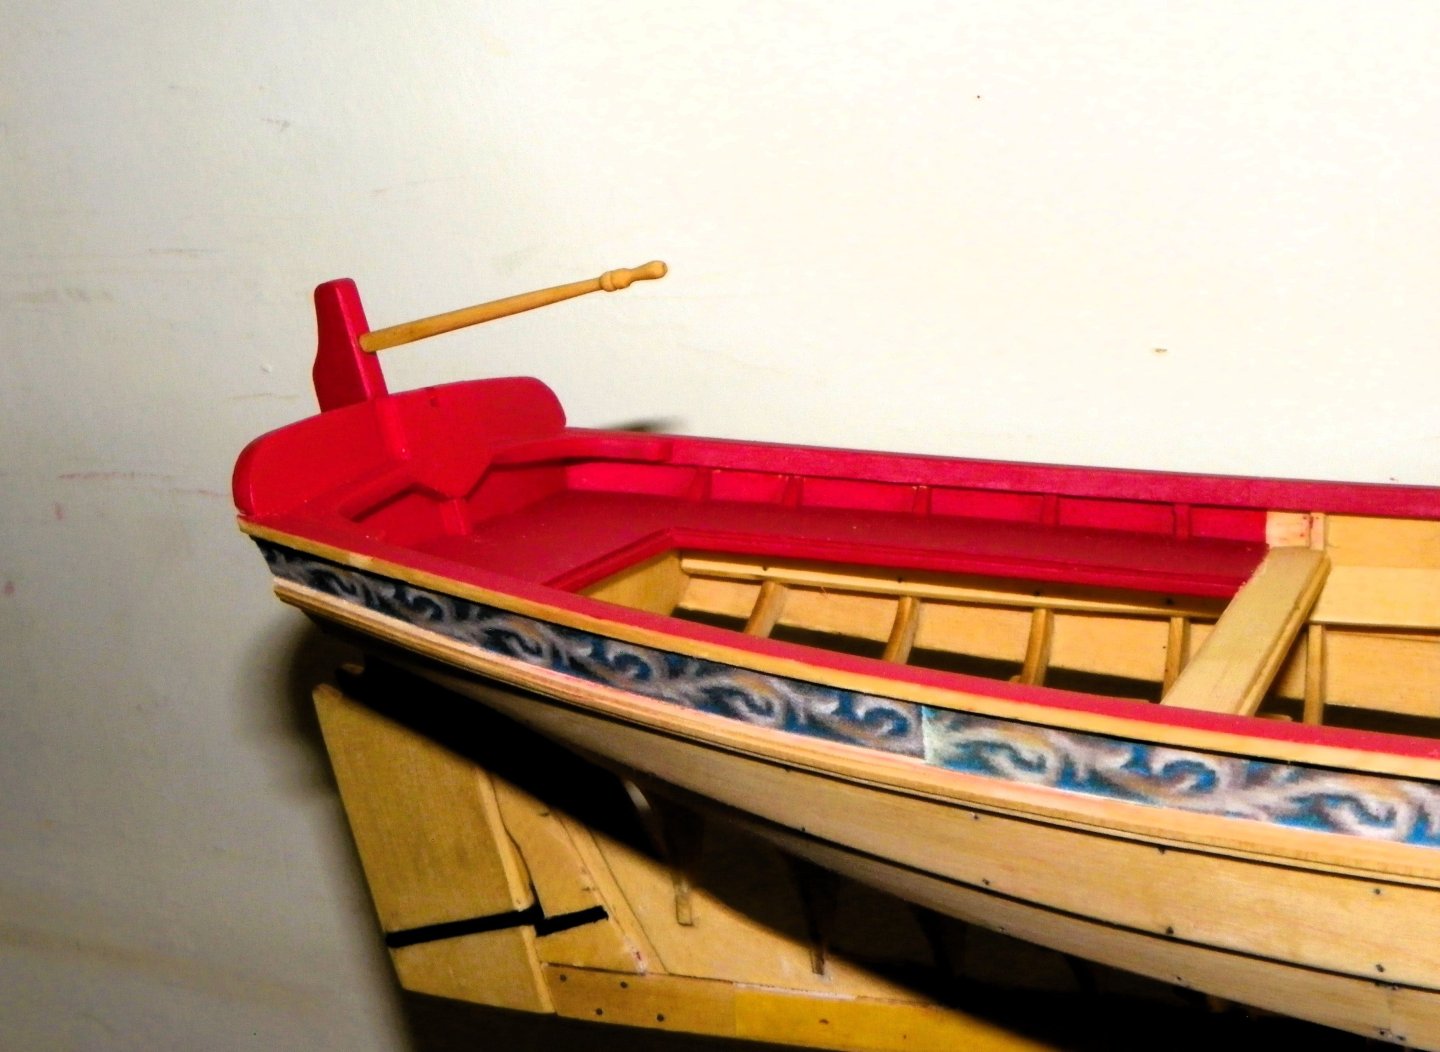
Post 43 Finishings - bits and pieces. The rigged contemporary Longboat has an iron horse athwartships at the stern, along which the main sheet runs. 109crop This sits below the Tiller which naturally begs the obvious question. It is a question asked and discussed many times in this forum, but that is how the contemporary craftsman back in 1742 did it, so monkey see, monkey do. The contemporary unrigged model does not include it, so I could dodge the issue and follow suit. Still, I like such fittings on a model so I have included it. A length of 1mm brass wire was used for the purpose. 0263 There is a slight round-up to the Horse. The spar set is now complete. The Boom is unusual in that it tapers from the centre both fore and aft. The taper is slightly less forward to a finished diameter of 4mm. The Bowsprit and Gaff are straightforward to make turning and tapering on the wood lathe. 0252 I used Ramin dowel for the spars rather than the square stock Box I used for the mast. 0253 I will need to work out how to display the mast and spars off the model. Mast step Chuck has provided a pre-cut step as a simplification; one that I am happy to accept. In practise the mast heel would have been located in the keelson. I doubled up on the pieces as I thought it looked better than the single thickness. 0219 Positioning the step is another testy little exercise and I had left the thwart aft of the mast unfixed to aid this process. I used a dummy mast stub to hold the step for position and I used tape to mark the lines and to prevent any glue spread. 0225 Small weights are used to ensure a good bond. 0239 The thwart aft of the mast is not properly positioned in this shot As I’ve made the sticks might as well see how they look in position. 0234 It is very tempting to mast and rig her, but she does have quite a large footprint. 0233 0237 Not quite done yet. B.E. 04/09/2024


- 131 replies
-
- 13
-
-
- Medway Longboat
- Syren Ship Model Company
- (and 1 more)
-
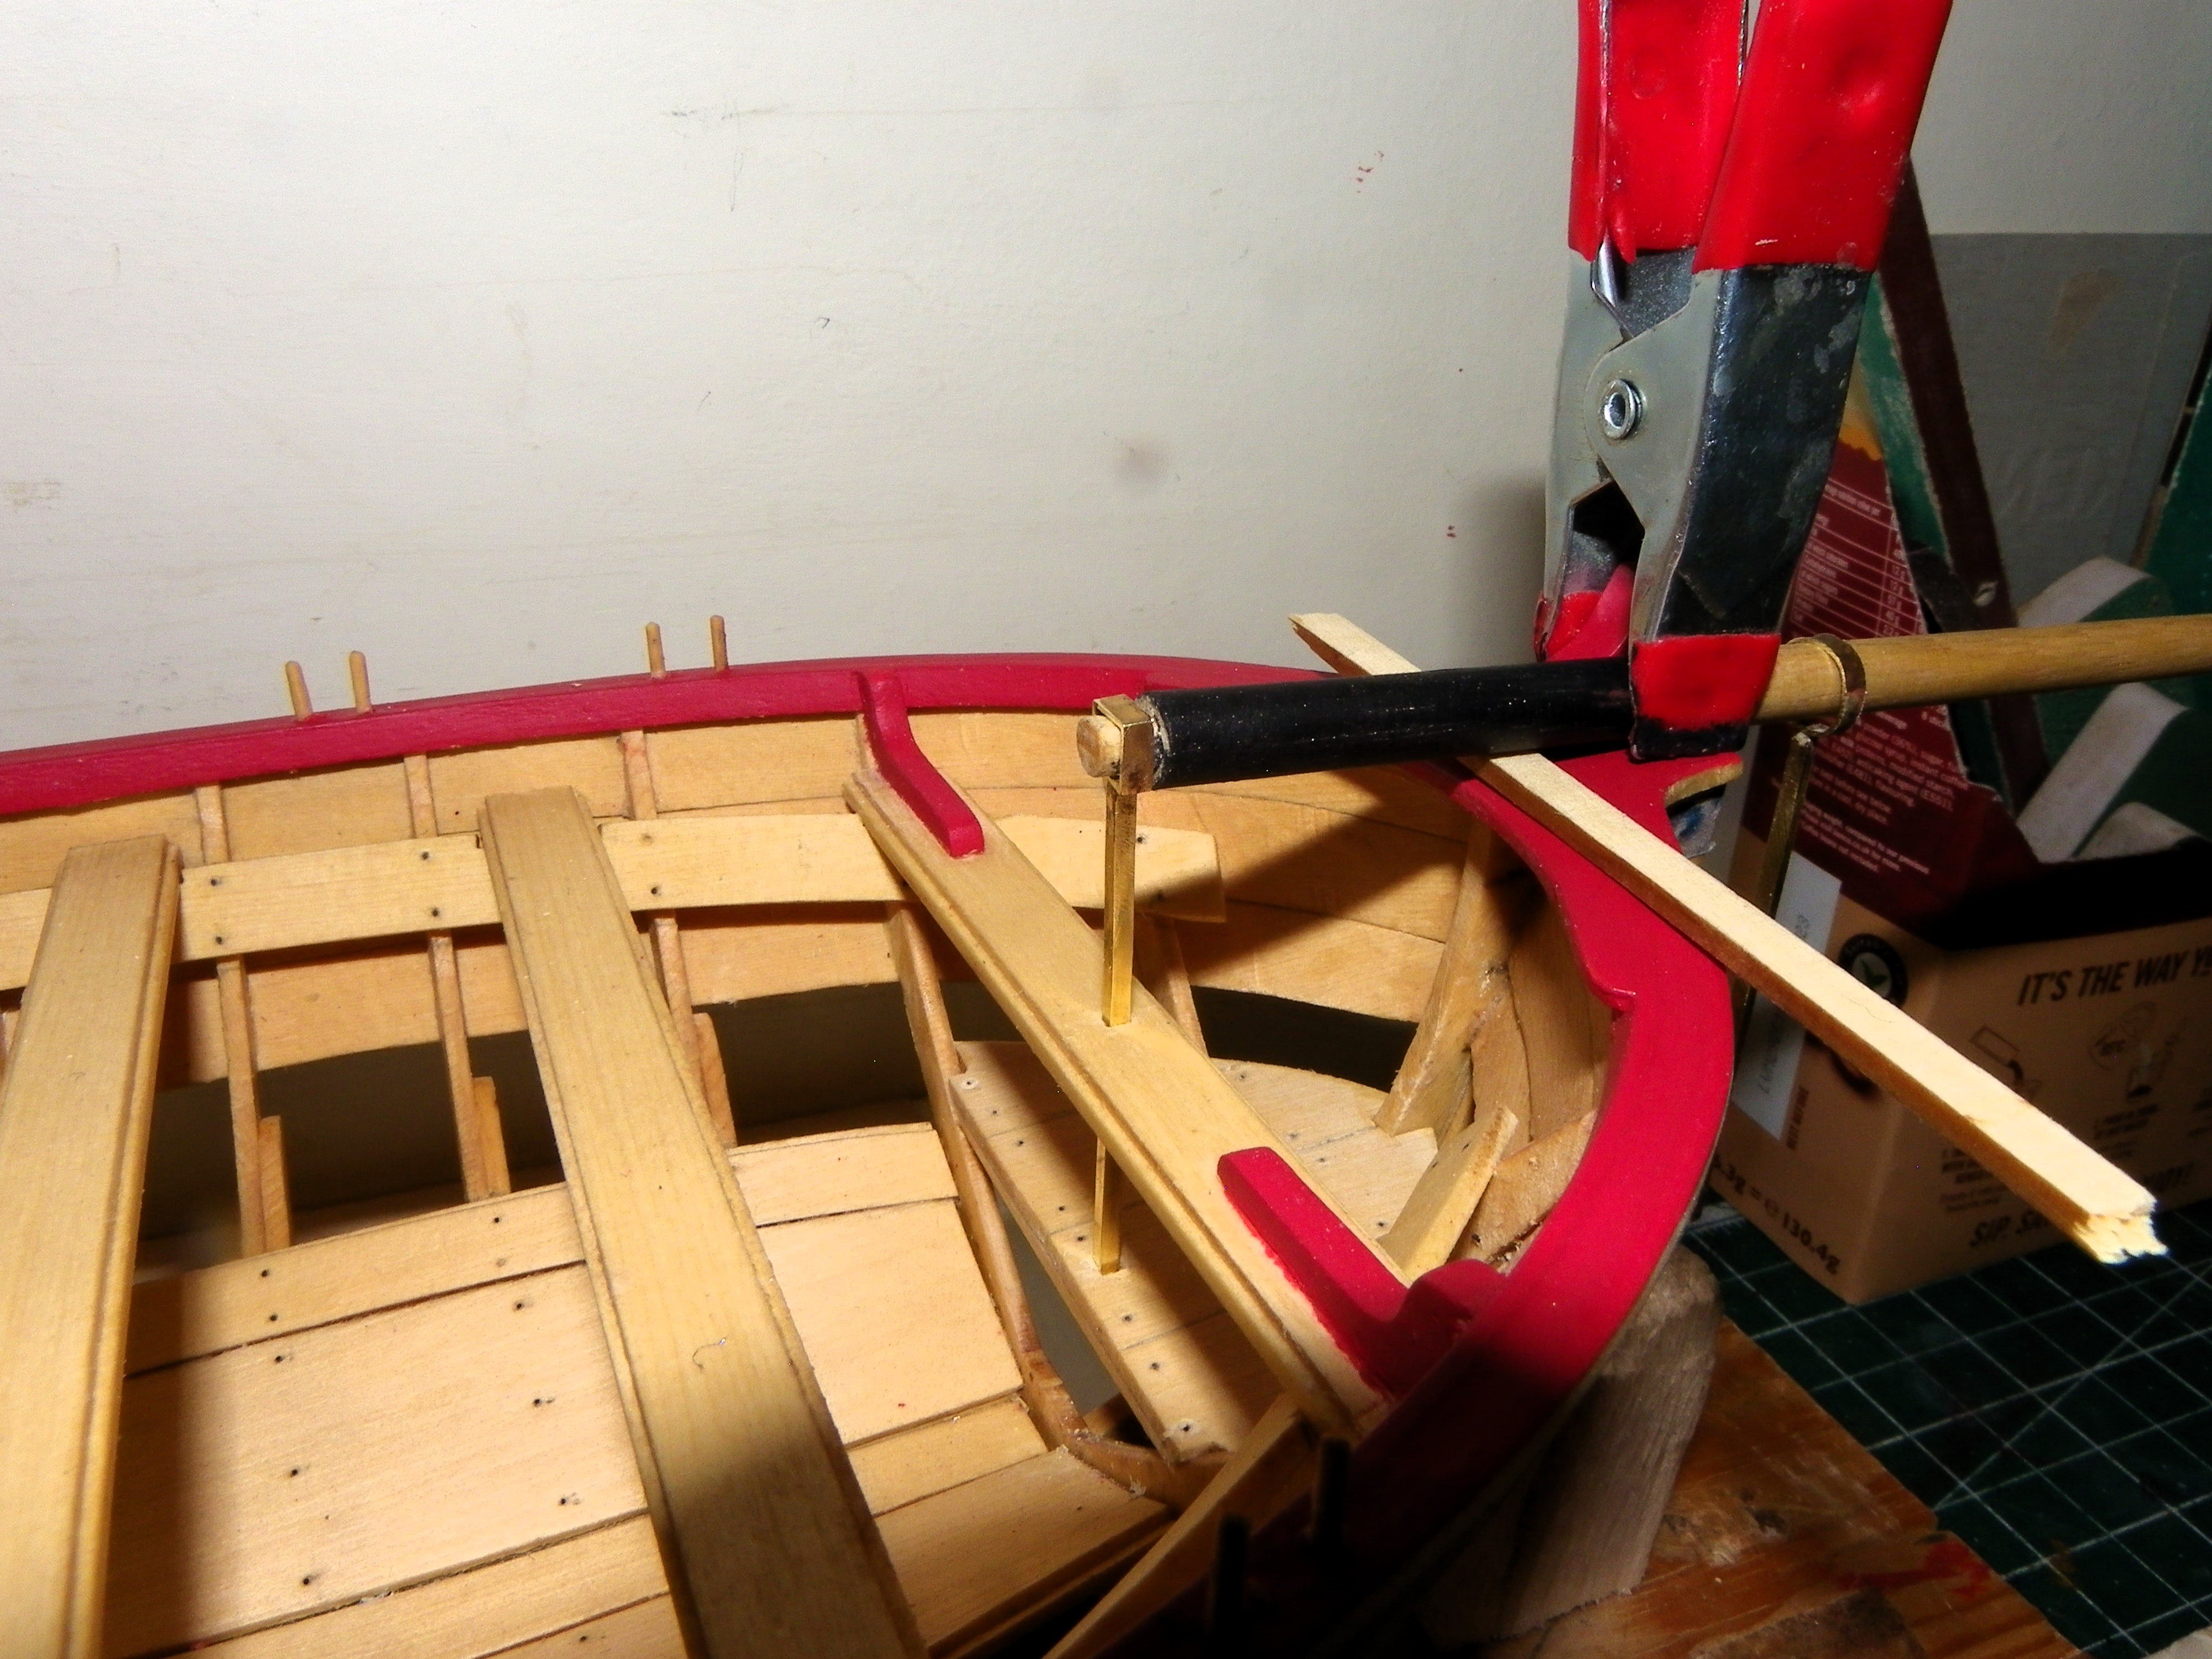
Post 42 Bowsprit fixings (Part Two) Now comes the tricky bit - getting the aft support in the correct position and correct length, because the forward thwart must be drilled. l approach this job with Chuck’s warning you only have one shot at this seared into my mind.😬 I can almost sense that index finger 🫵 pointing from across the big water. A scary thought as I have already glued the thwart and knees in place. With the Bowsprit temporarily held in place adjustments are made by degrees to both length and position of the shaft on the thwart. 0113 0114 I used a short length of rod and tape to determine where the thwart hole is to be drilled. 0160 0169 0178 Note that the Bowsprit does not sit flush with the capping rail but has a slight downward angle created by the height of the aft support. If it followed the capping rail it would have an upward angle. 0216 Love the sheer line on this model. 0211 0141 0197 0152 I have decided to leave the aft support in place. Getting close to completion now but there are some cosmetic flaws to be attended to and a few bits to make. B.E. 02/09/2024


- 131 replies
-
- 8
-
-
- Medway Longboat
- Syren Ship Model Company
- (and 1 more)
-
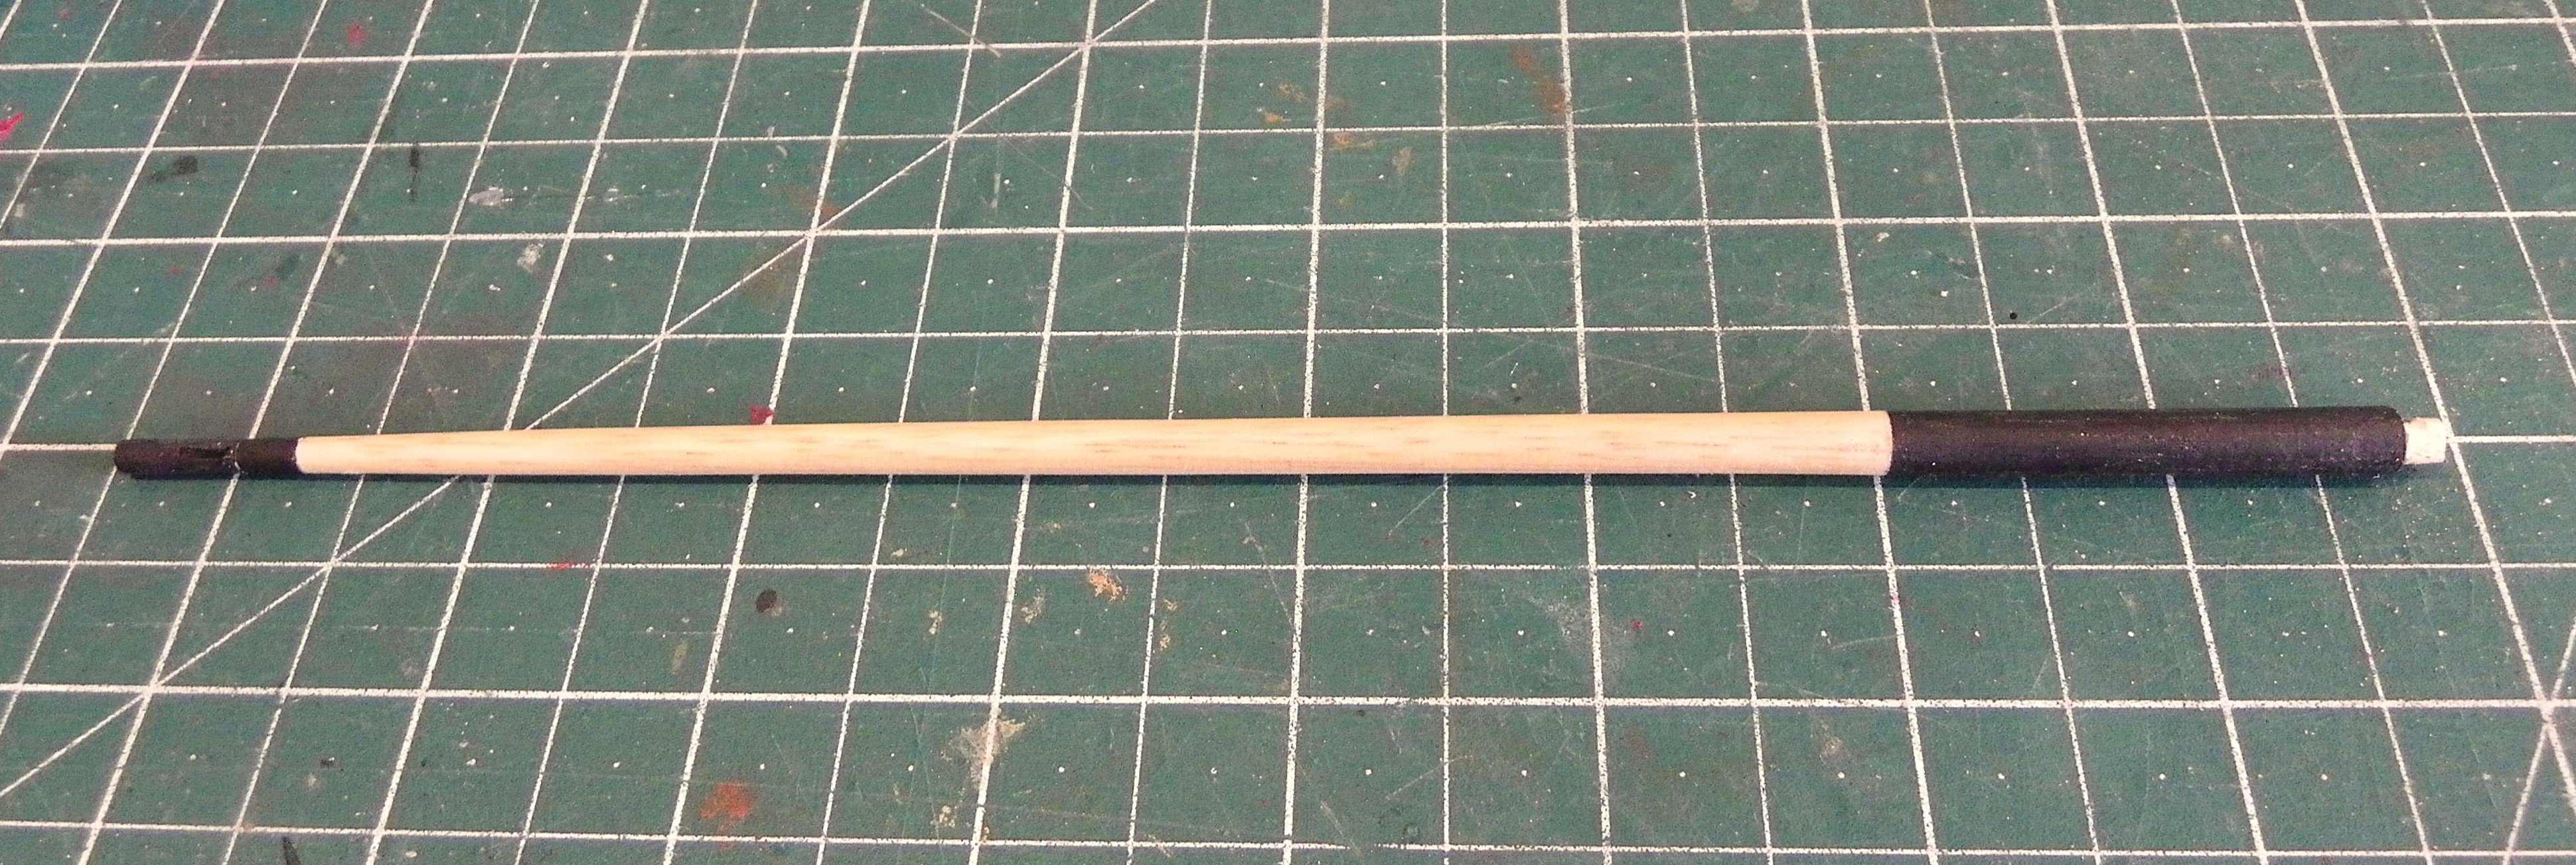
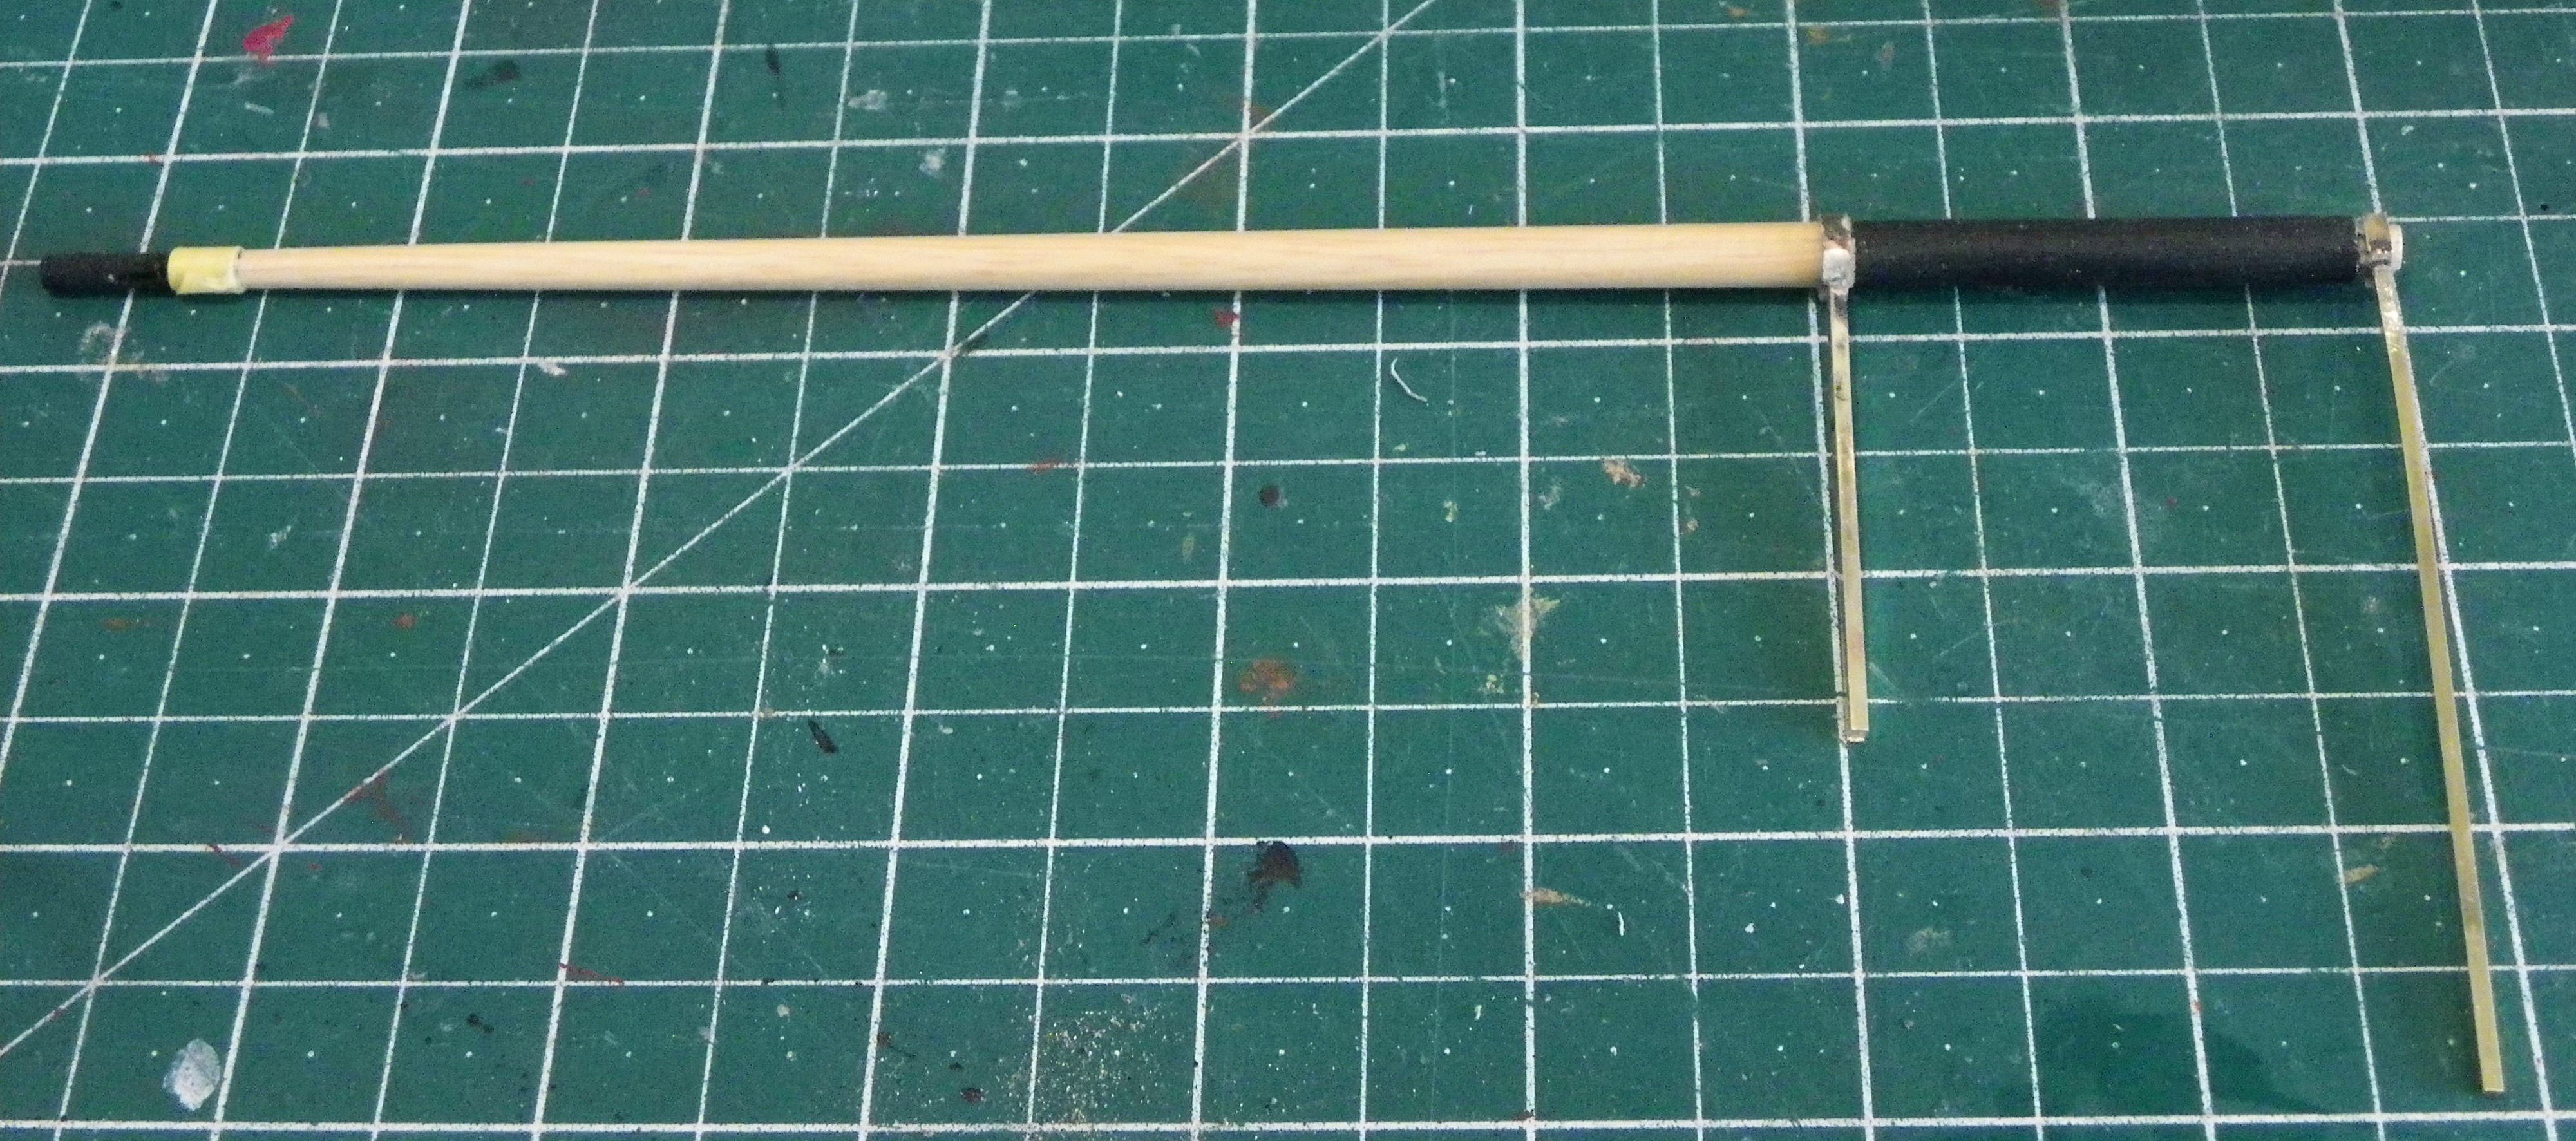
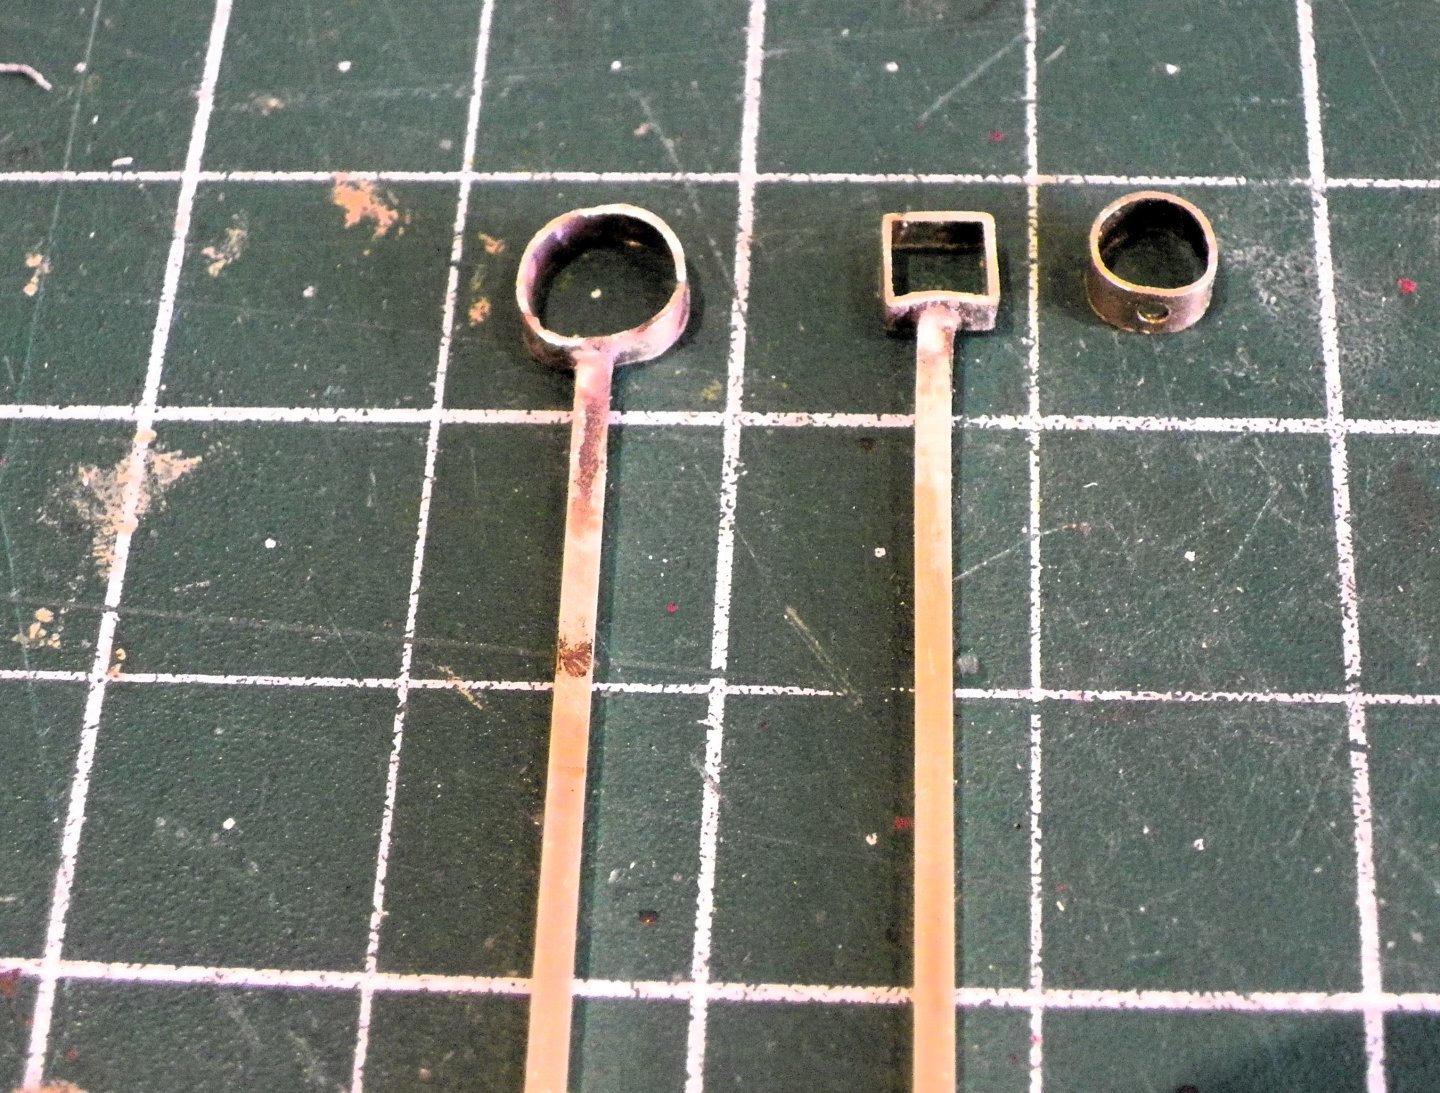
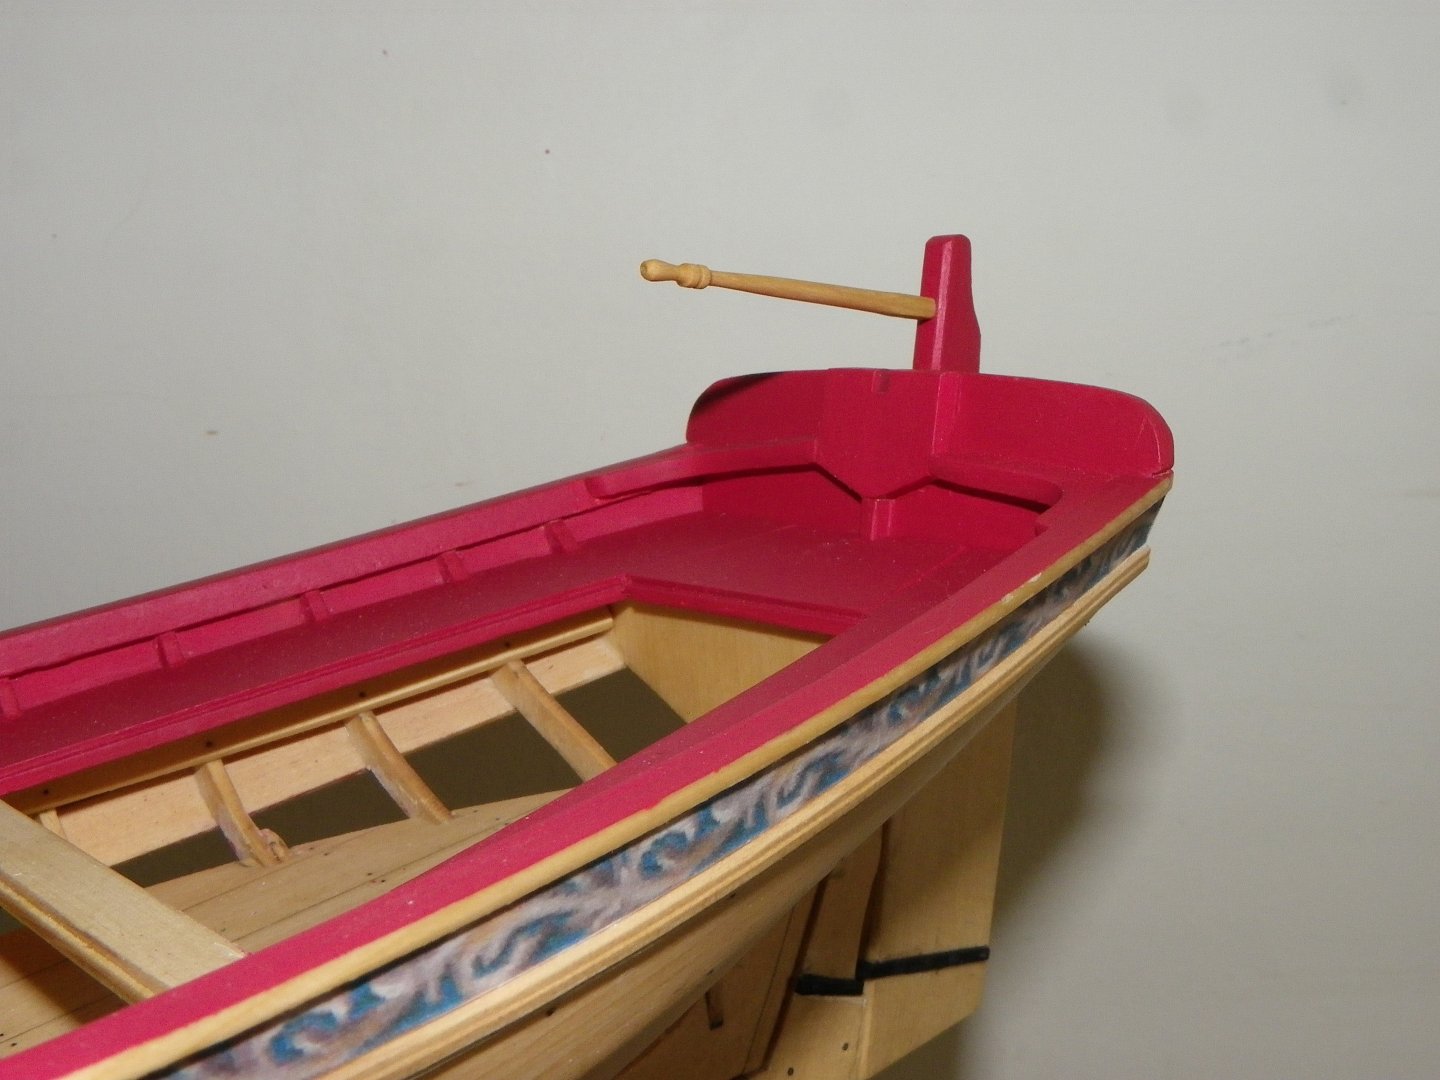
Post 41 Bowsprit fixings (Part One) With the unrigged version I need to adopt a different approach to that used by Chuck. 002a As can be seen the stem ring hangs loose so the use of tape to simulate the ring is not an option. I would in any case opt for heat shrink tubing for this item. I will use a brass ring silver soldered to the stem bar for the purpose but I first need to make up the Bowsprit to gauge the fit of the rings. 0102 For speed I did the turning using 5mm ø Ramin dowel. 086 For the ring I used 7mm ø Brass tubing for the Bowsprit stem support. 089 1/16th" wide slices were taken from the tube. The support bars for the rings were cut from 1/16th" square section brass rod. 094 A pin was filed into one end to fit a small hole drilled into the rings before cutting. 04a I noticed looking closely at the contemporary model that the aft Bowsprit support is of rectangular section rather than round which makes better sense. 098 I remade a square section ring for the aft support. This shot shows the items after silver soldering but before cleaning up. 0100 With the fit to the Bowsprit established I can move onto the fitting of the ‘ironwork’. B.E. 02/09/2024


- 131 replies
-
- 6
-
-
- Medway Longboat
- Syren Ship Model Company
- (and 1 more)
-
That's the puzzlement John, the deadeye set simply hooks into the straps, in fact all the rigging is designed for a quick set-up /take down. It seems to me that the straps would be left in place, maybe angled flush with the capping rail when not in use. They do not feature on boats set-up for rowing, either in art or models as far as I can see. B.E.
- 131 replies
-
- 2
-
-
- Medway Longboat
- Syren Ship Model Company
- (and 1 more)
-
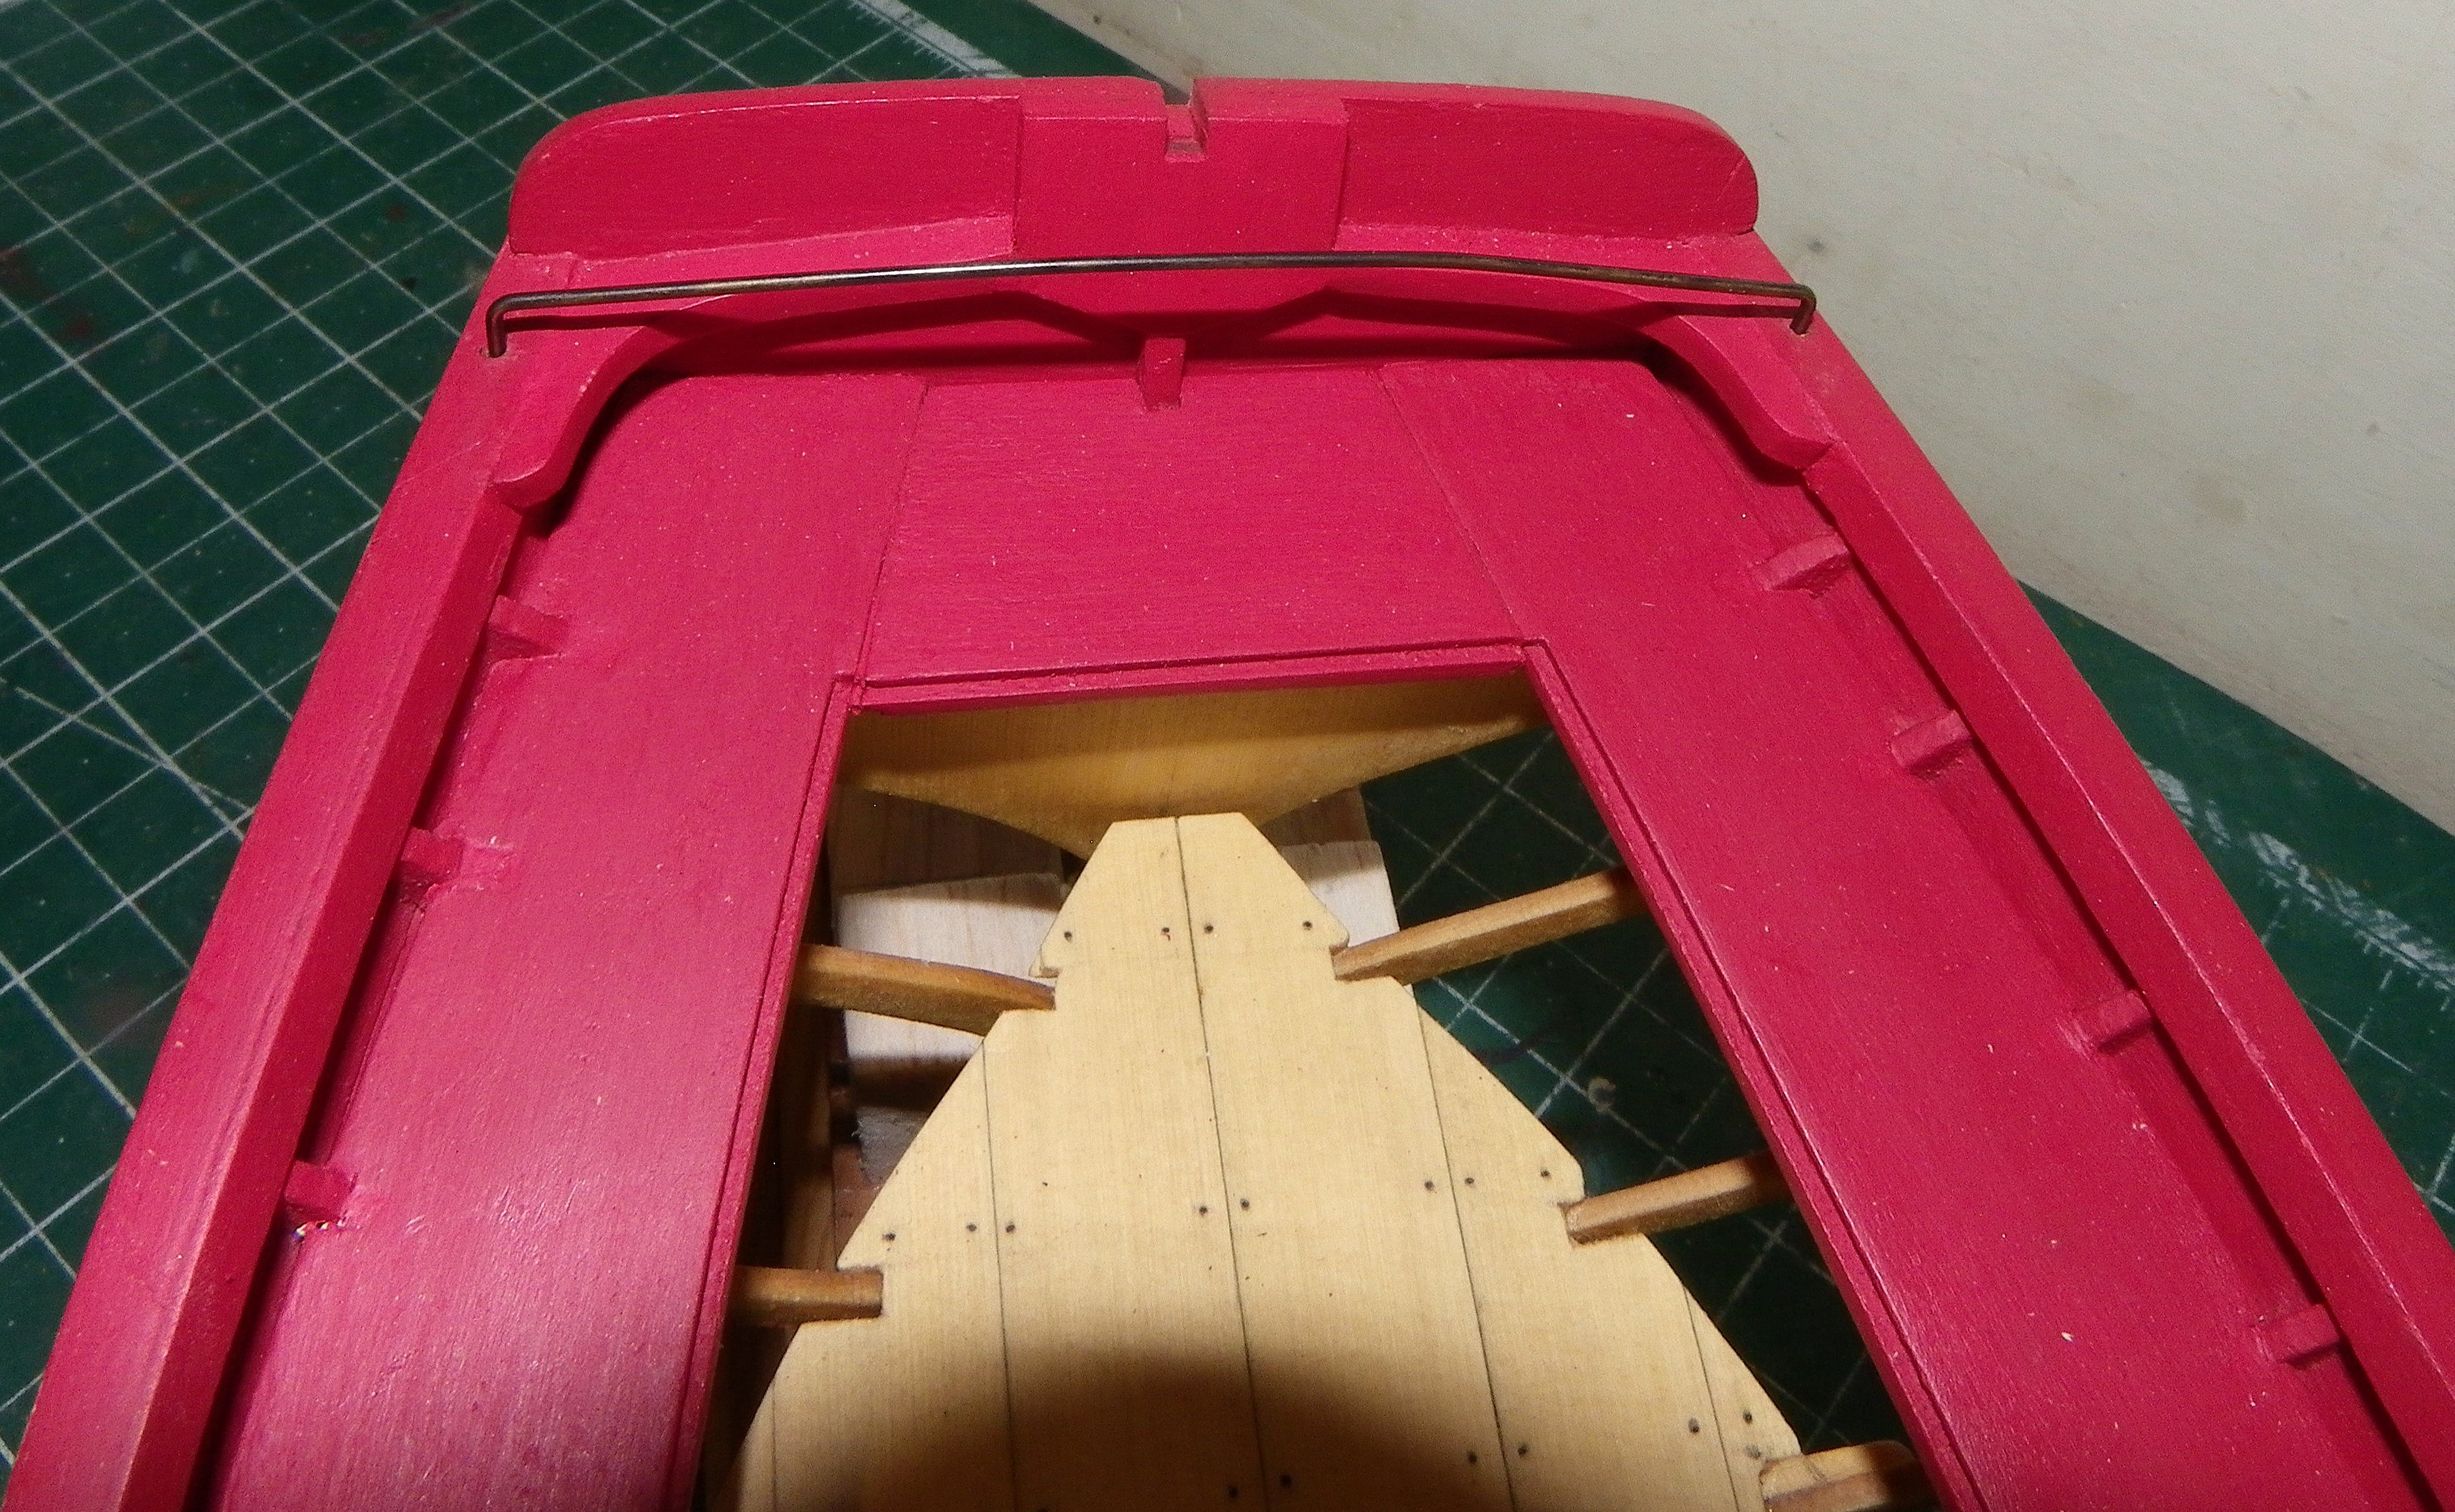
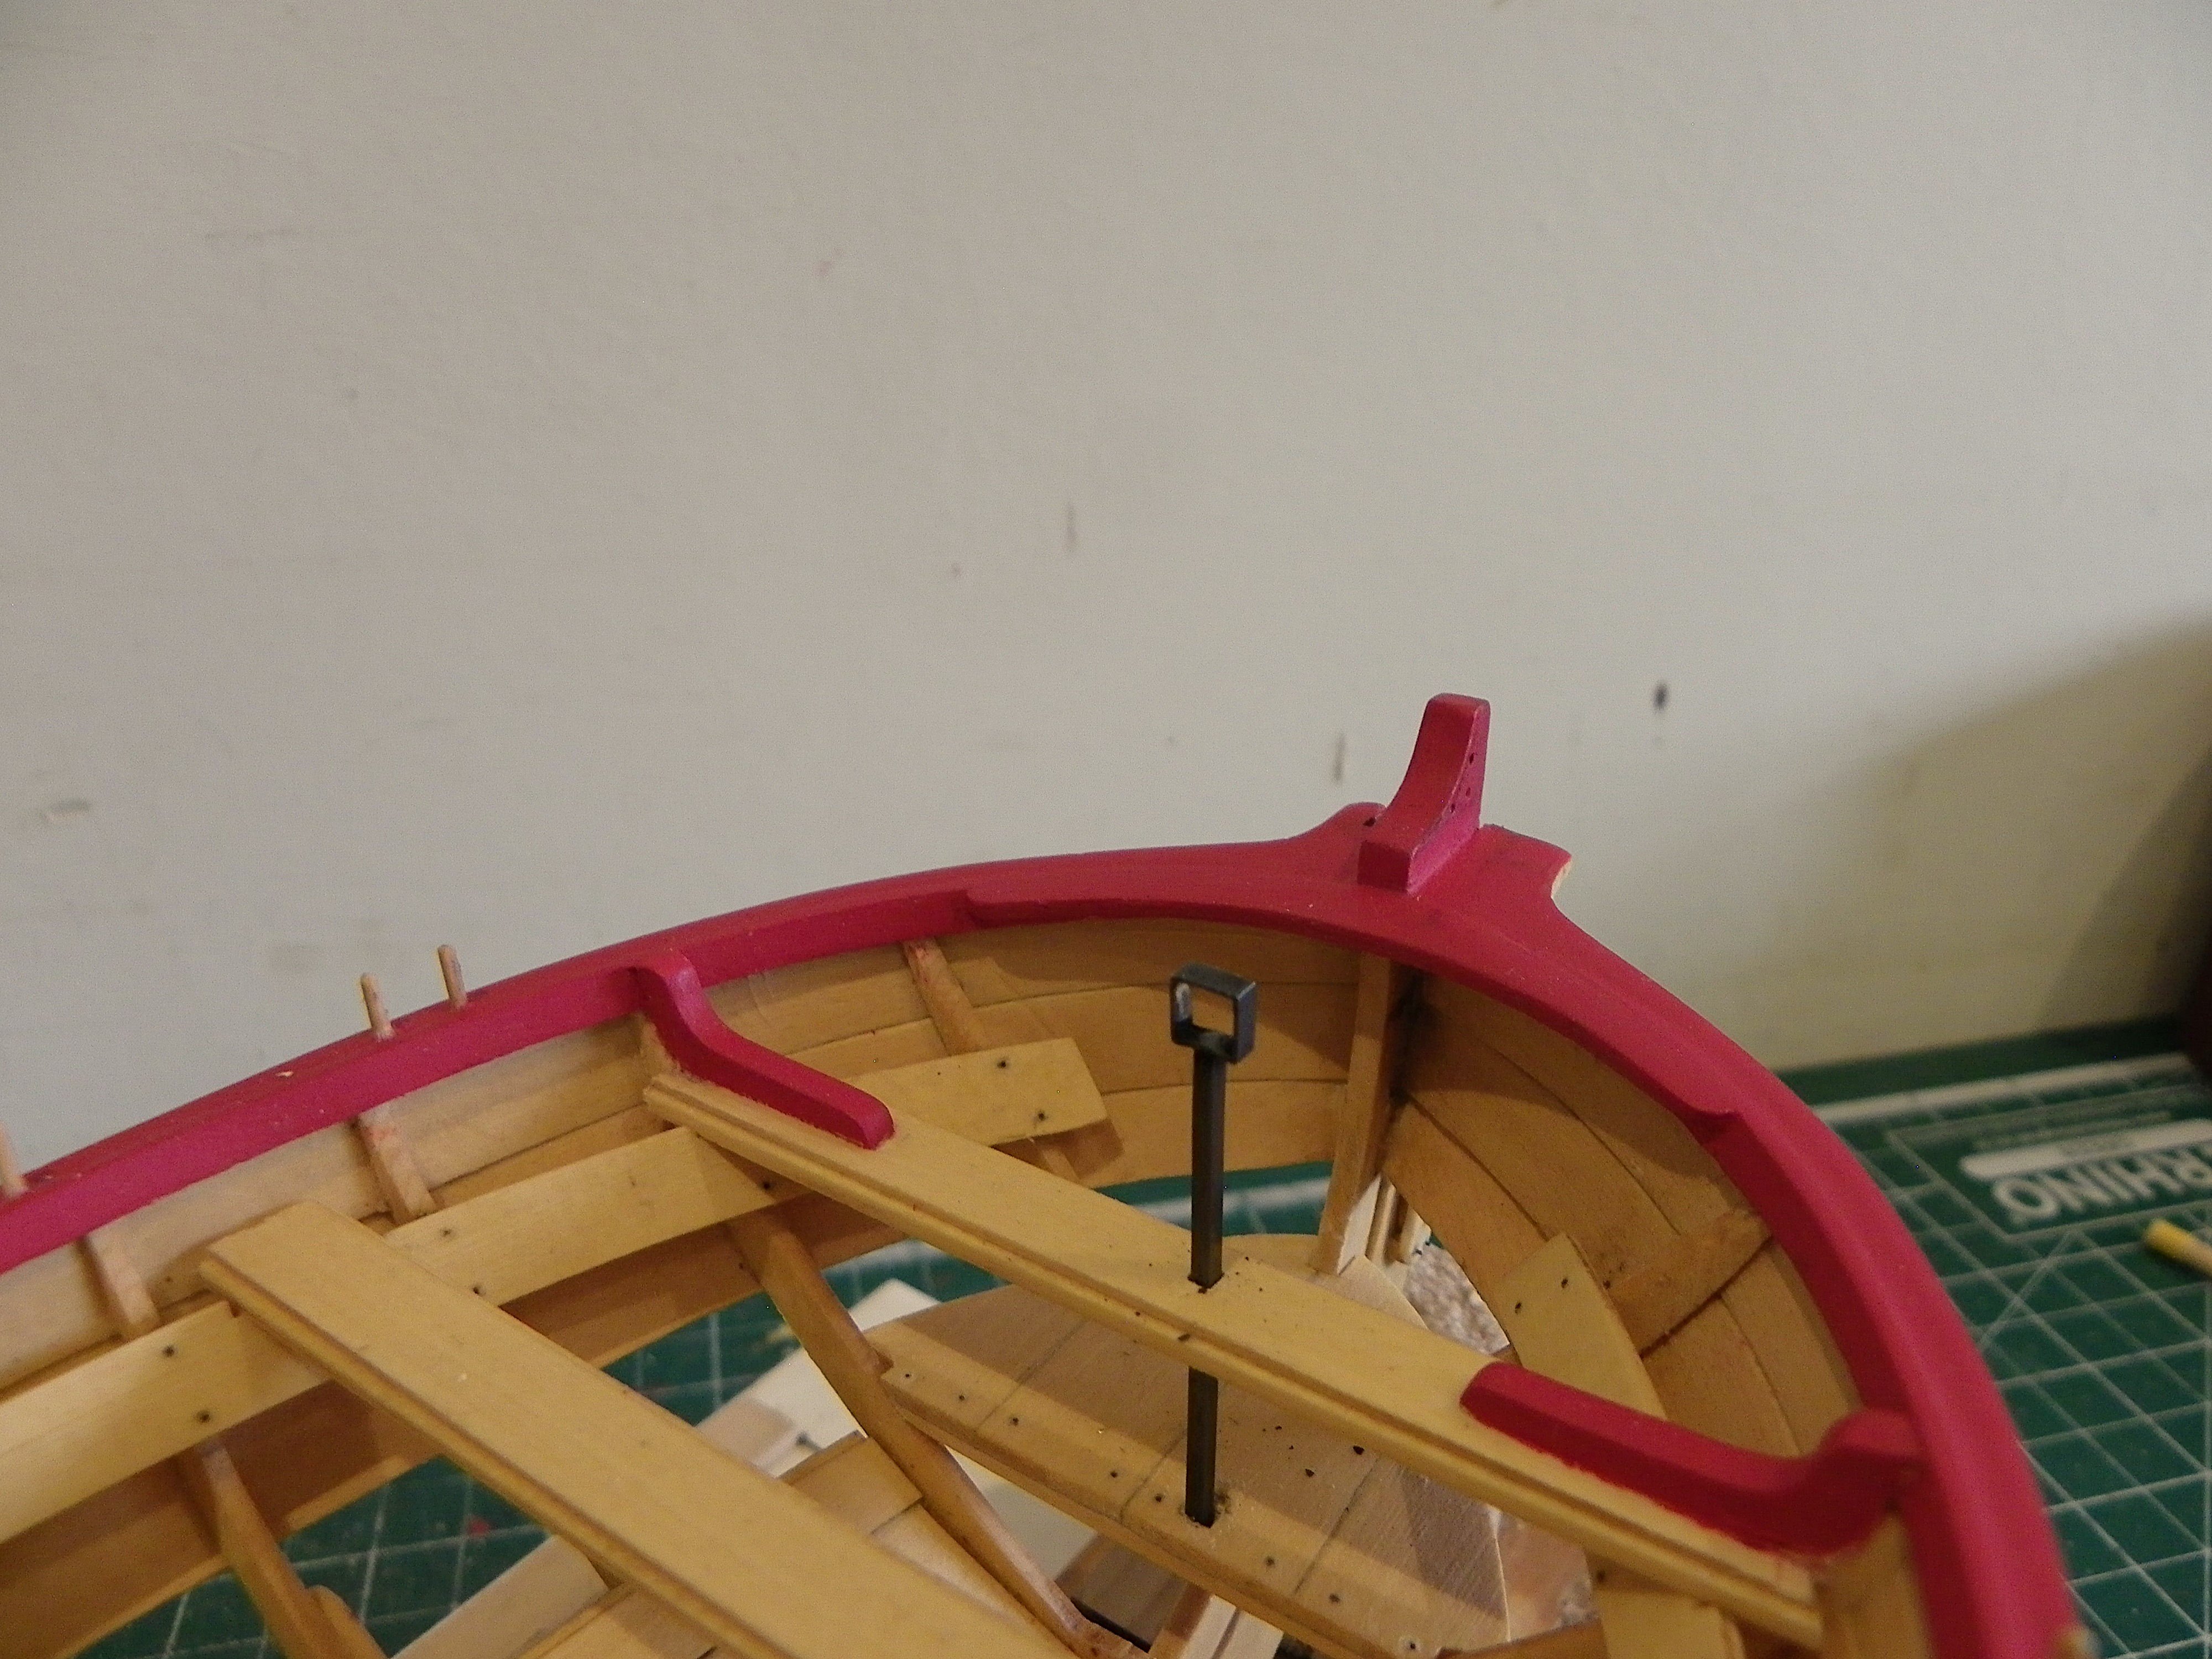
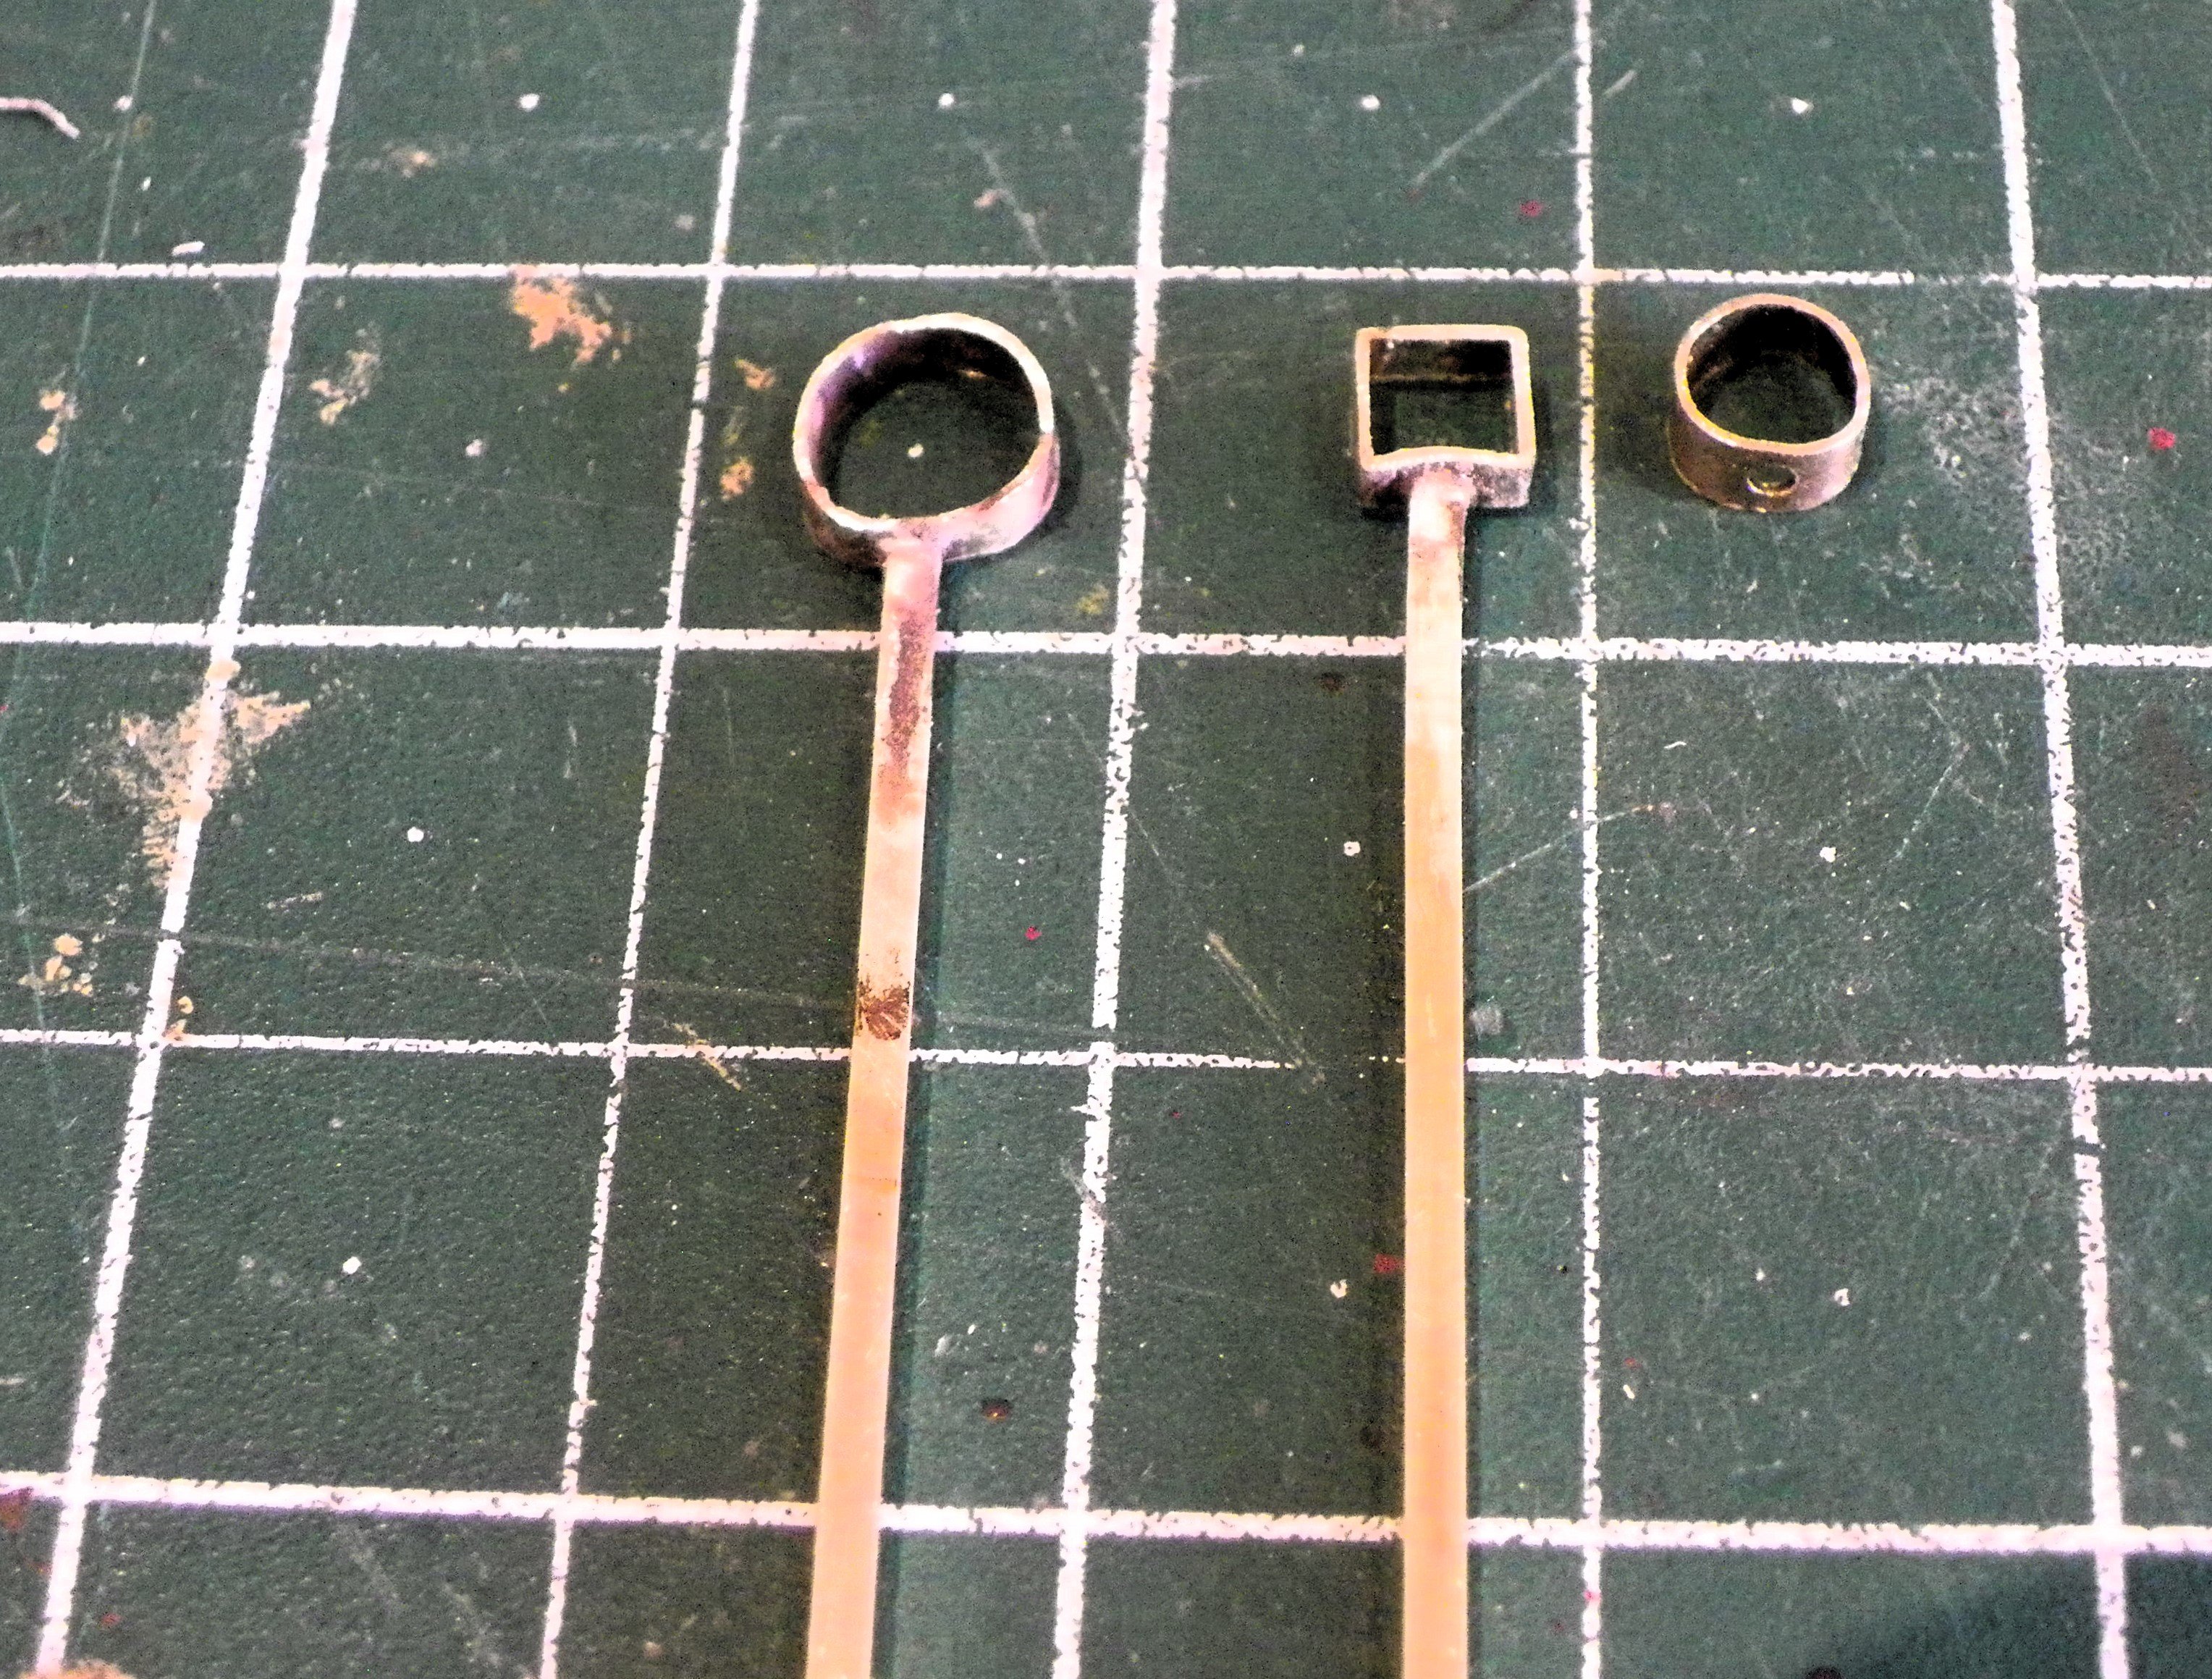
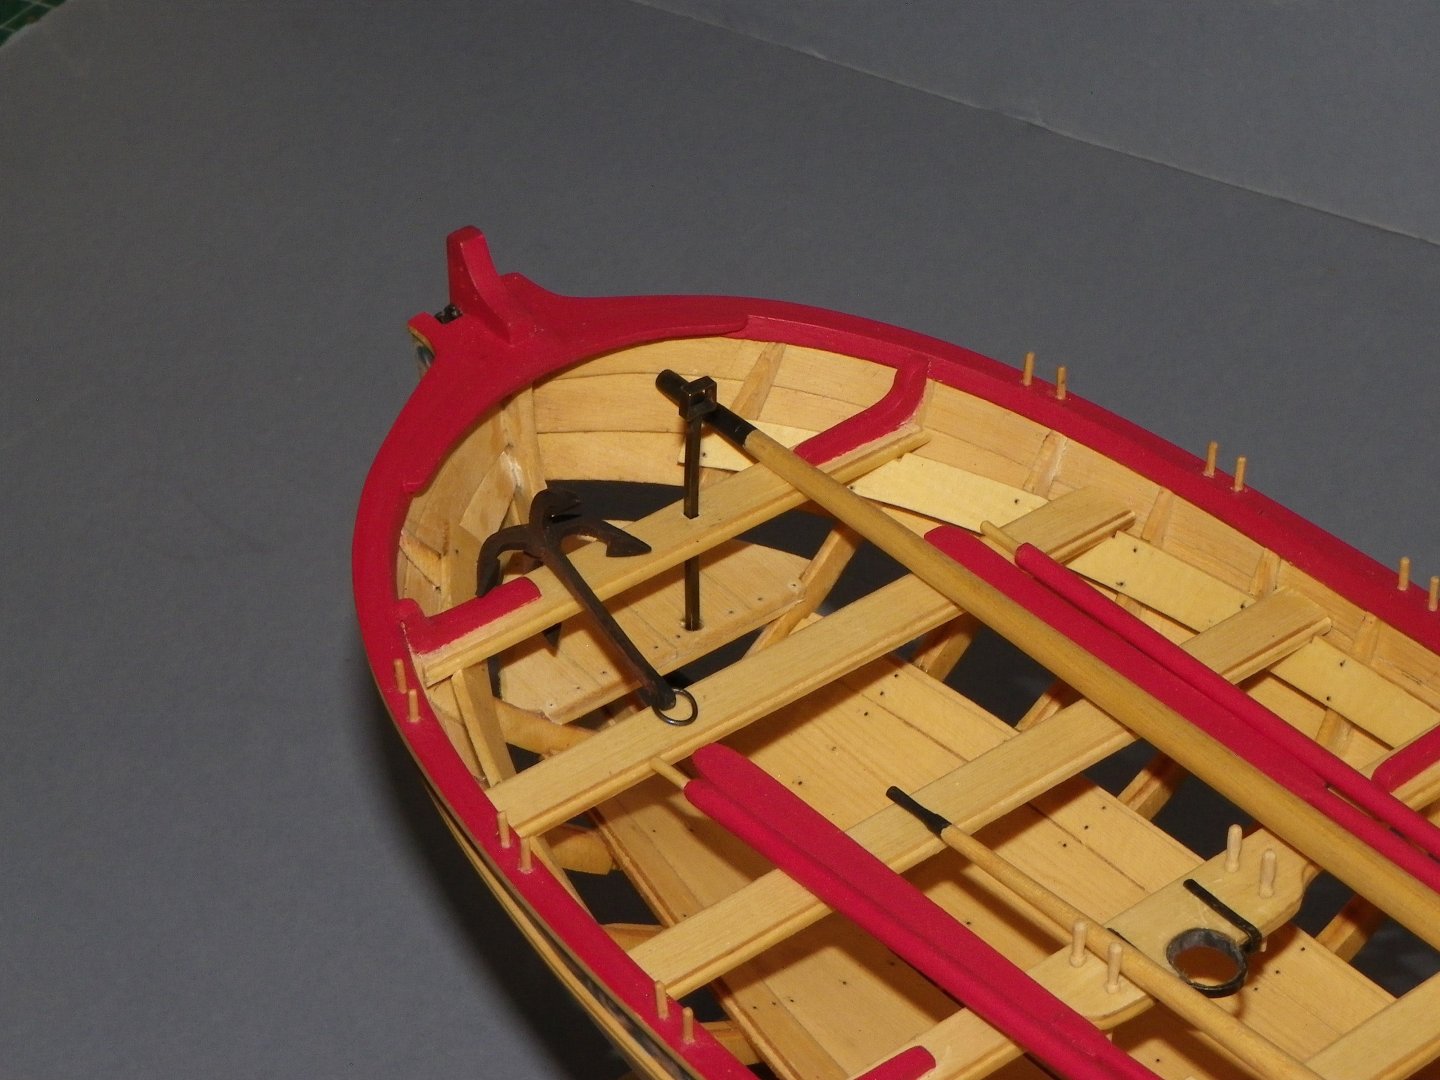
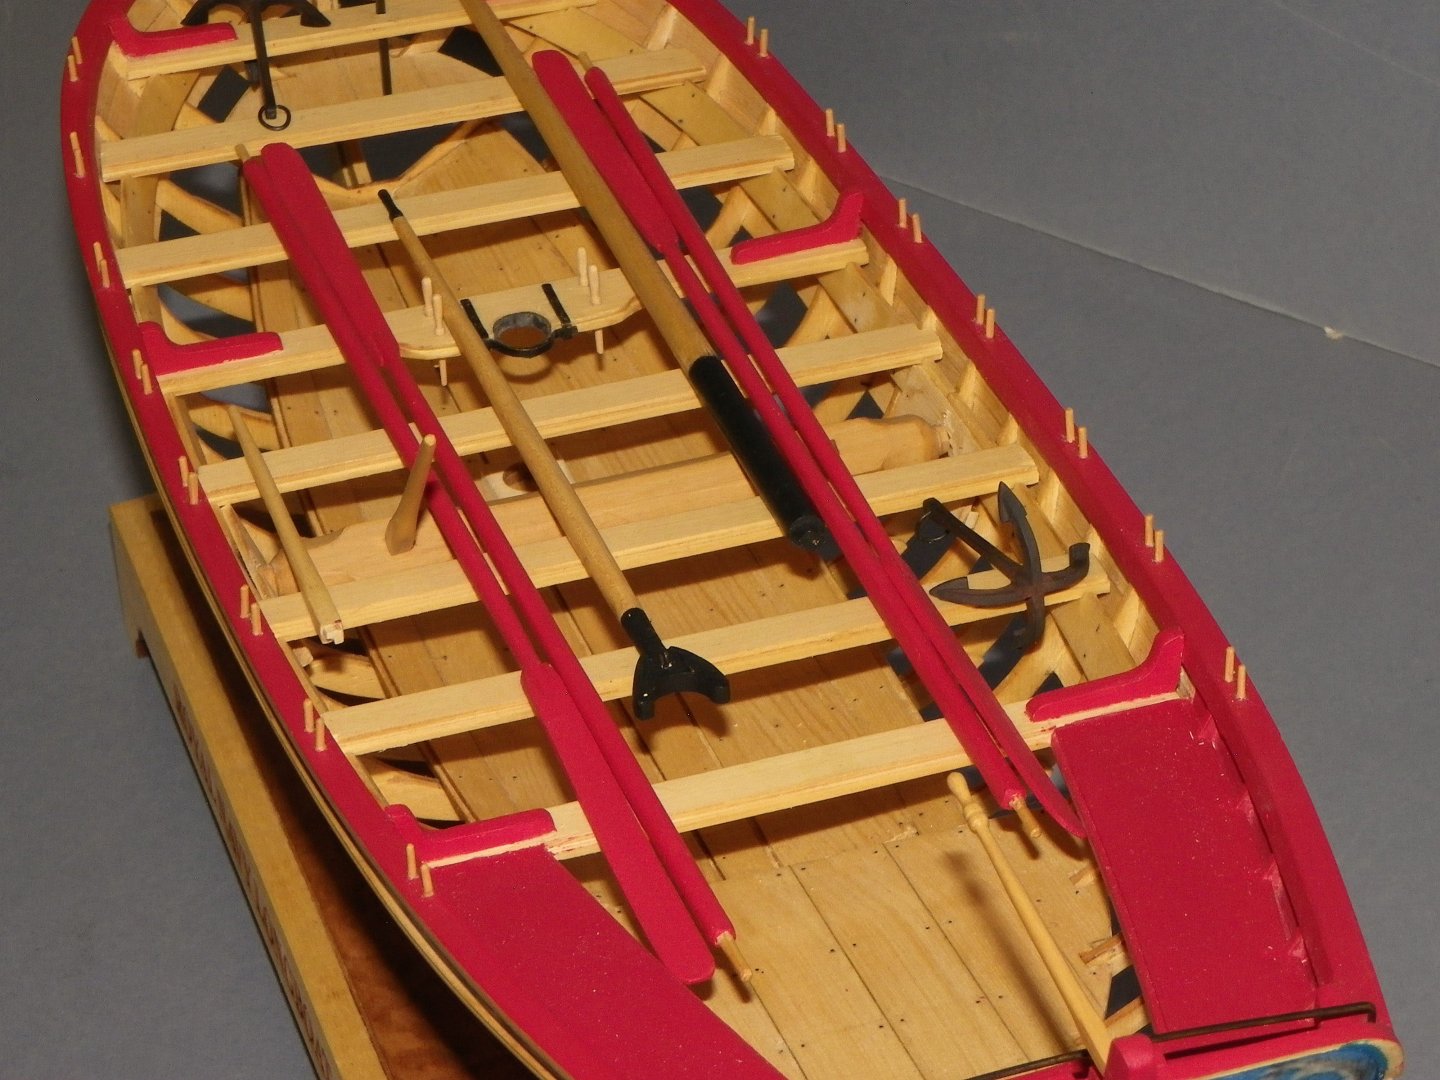
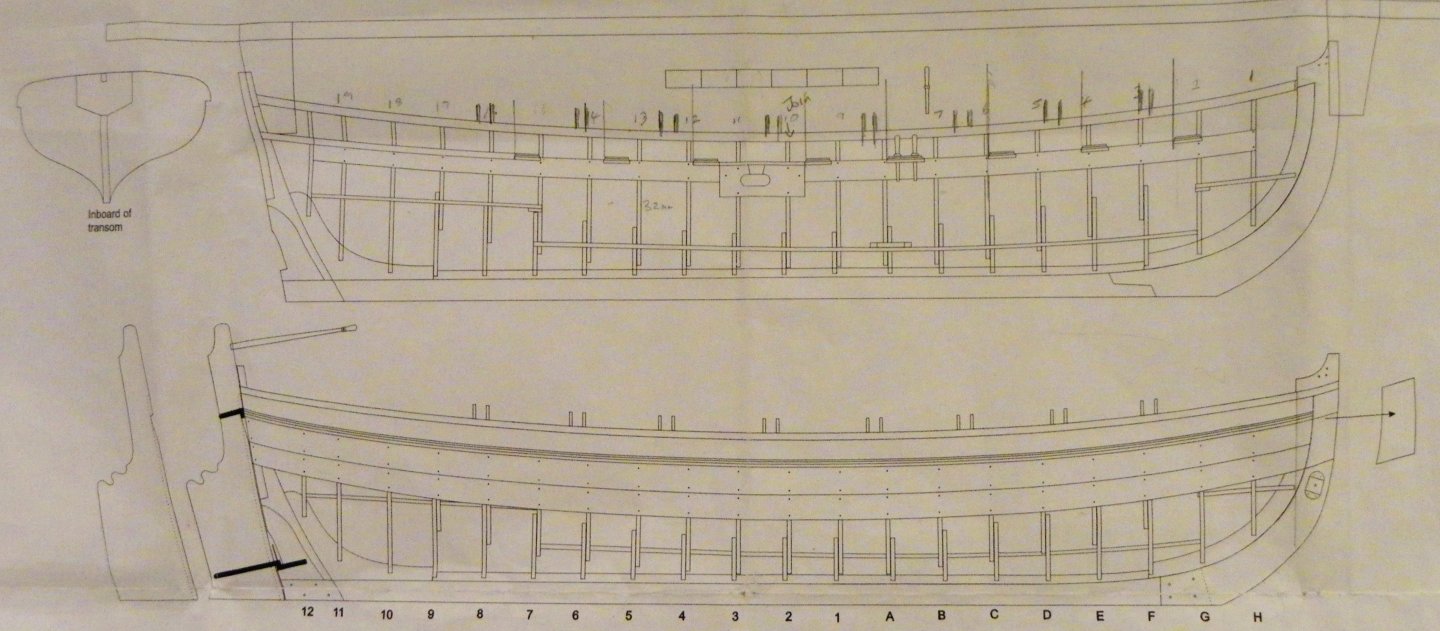
Post 40 Thinking aloud - The question of rigging fittings, and what to do about the iron work. I am thinking about whether to attach the rigging fittings to the boat in the absence of actually masting and rigging her. We know that ships boats were all rigged for sailing as well as rowing, some with one, some with two masts, and a variety of sail plans. The Medway Longboat is perhaps a rare exception of a contemporary model shown as rigged, most boat models and plans don’t have these details. The fittings are quite simple, a couple of deadeye straps and ring supports for a bowsprit. 002a 003 The contemporary unrigged model does not have these fittings, apart from the Bowsprit ring at the stem, and the mast support clamp on the thwart. There is no indication of the location points where they would otherwise be fitted. 003(1)a The deadeye straps would need to be firmly fixed, how was this done; presumably bolted to the side thro’ the wale; were they left insitu when the boat was being rowed or fitted as required? in that case surely the fixing points would be apparent. It begs the question whether the 18th century modelmaker had simply left these things off, but why not the hole thro’ the forward thwart when you’ve bothered to show the stem ring. I have found no other contemporary models of boats that show deadeye fixings, and none of the complement of boats set on HMS Victory have any indication of fixing points for rigging. I think I will certainly add the stem ring but am less certain about the deadeye straps which may spoil the lines without the masting and rigging in place. The aft Bowsprit support ring also may look odd without the Bowsprit in place. It could of course be made and placed across the forward thwart. Enough of these musings, I need to do it to see it. B.E. 31/08/2024
a.jpg.08418b8f045783d8a83958adfde63480.jpg)
- 131 replies
-
- 4
-
-
- Medway Longboat
- Syren Ship Model Company
- (and 1 more)
-
Well done for your perseverance Cisco, silver soldering is a useful skill to have. I find that holding the pieces in the correct position for soldering is the trickiest part, sometimes you have to get quite inventive. I'll be getting my set out shortly to make Bowsprit support rings. Your sloop is looking wonderful, just love that planking. B.E.
-
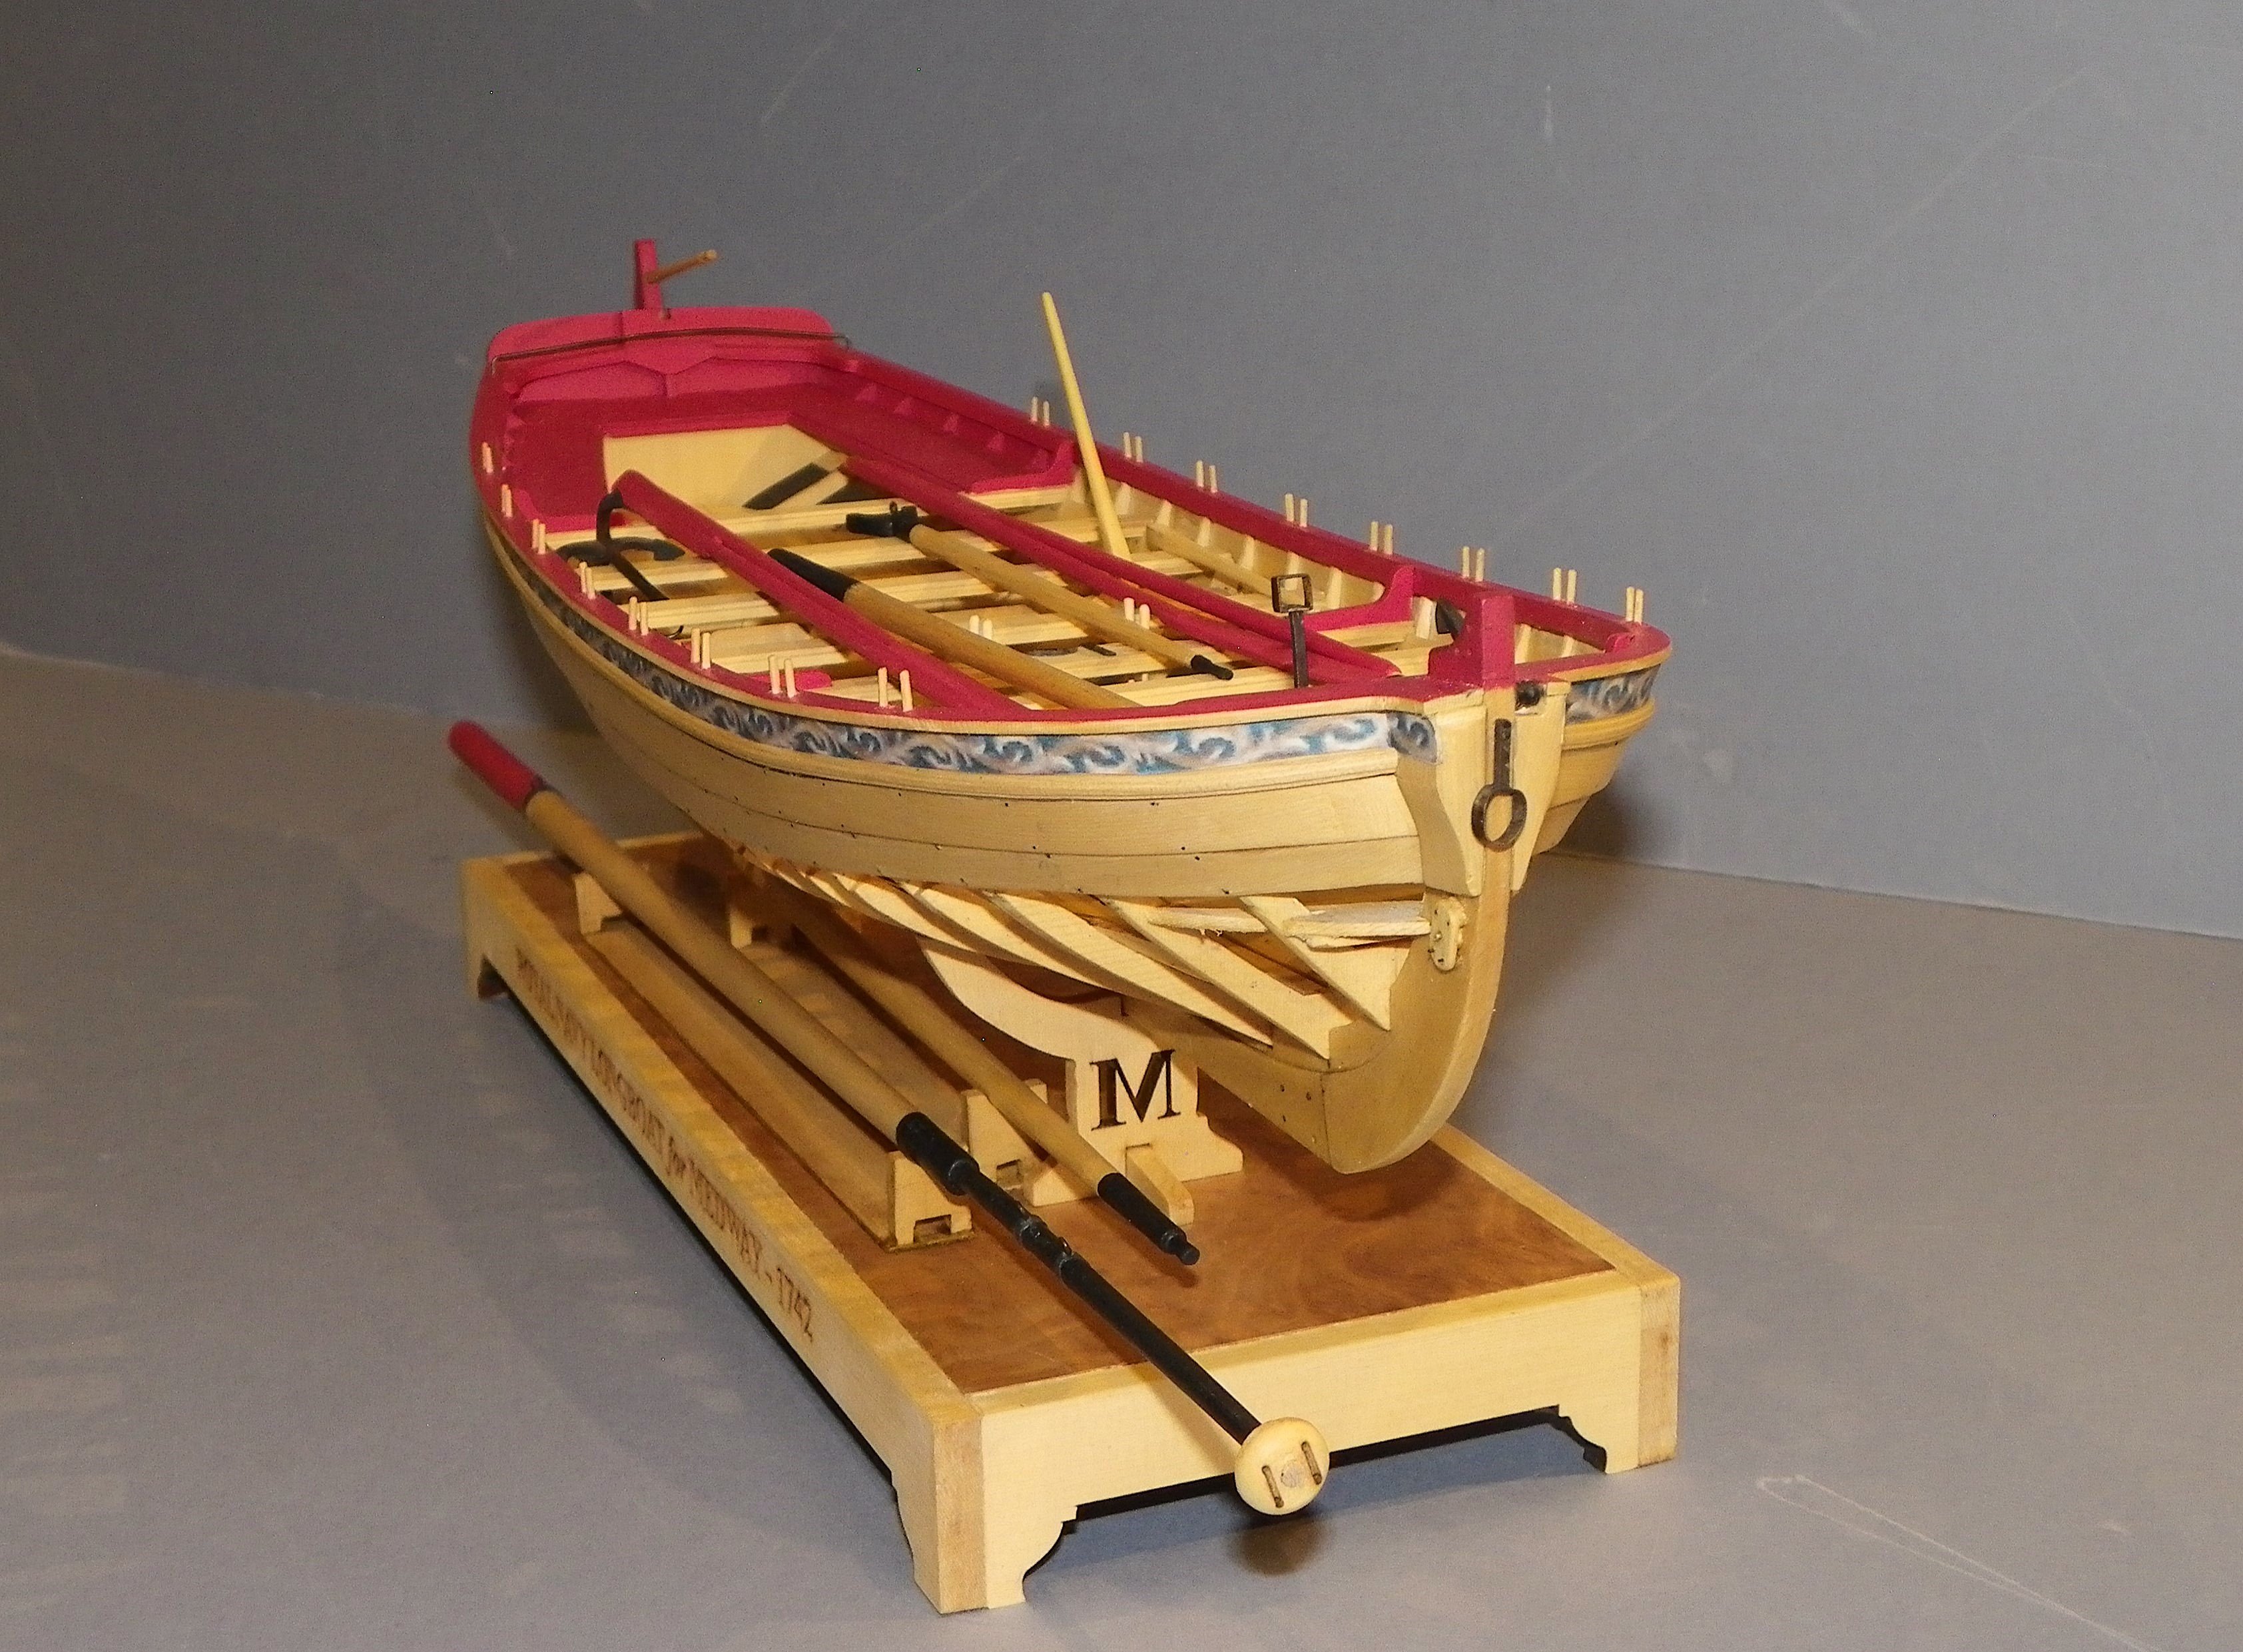
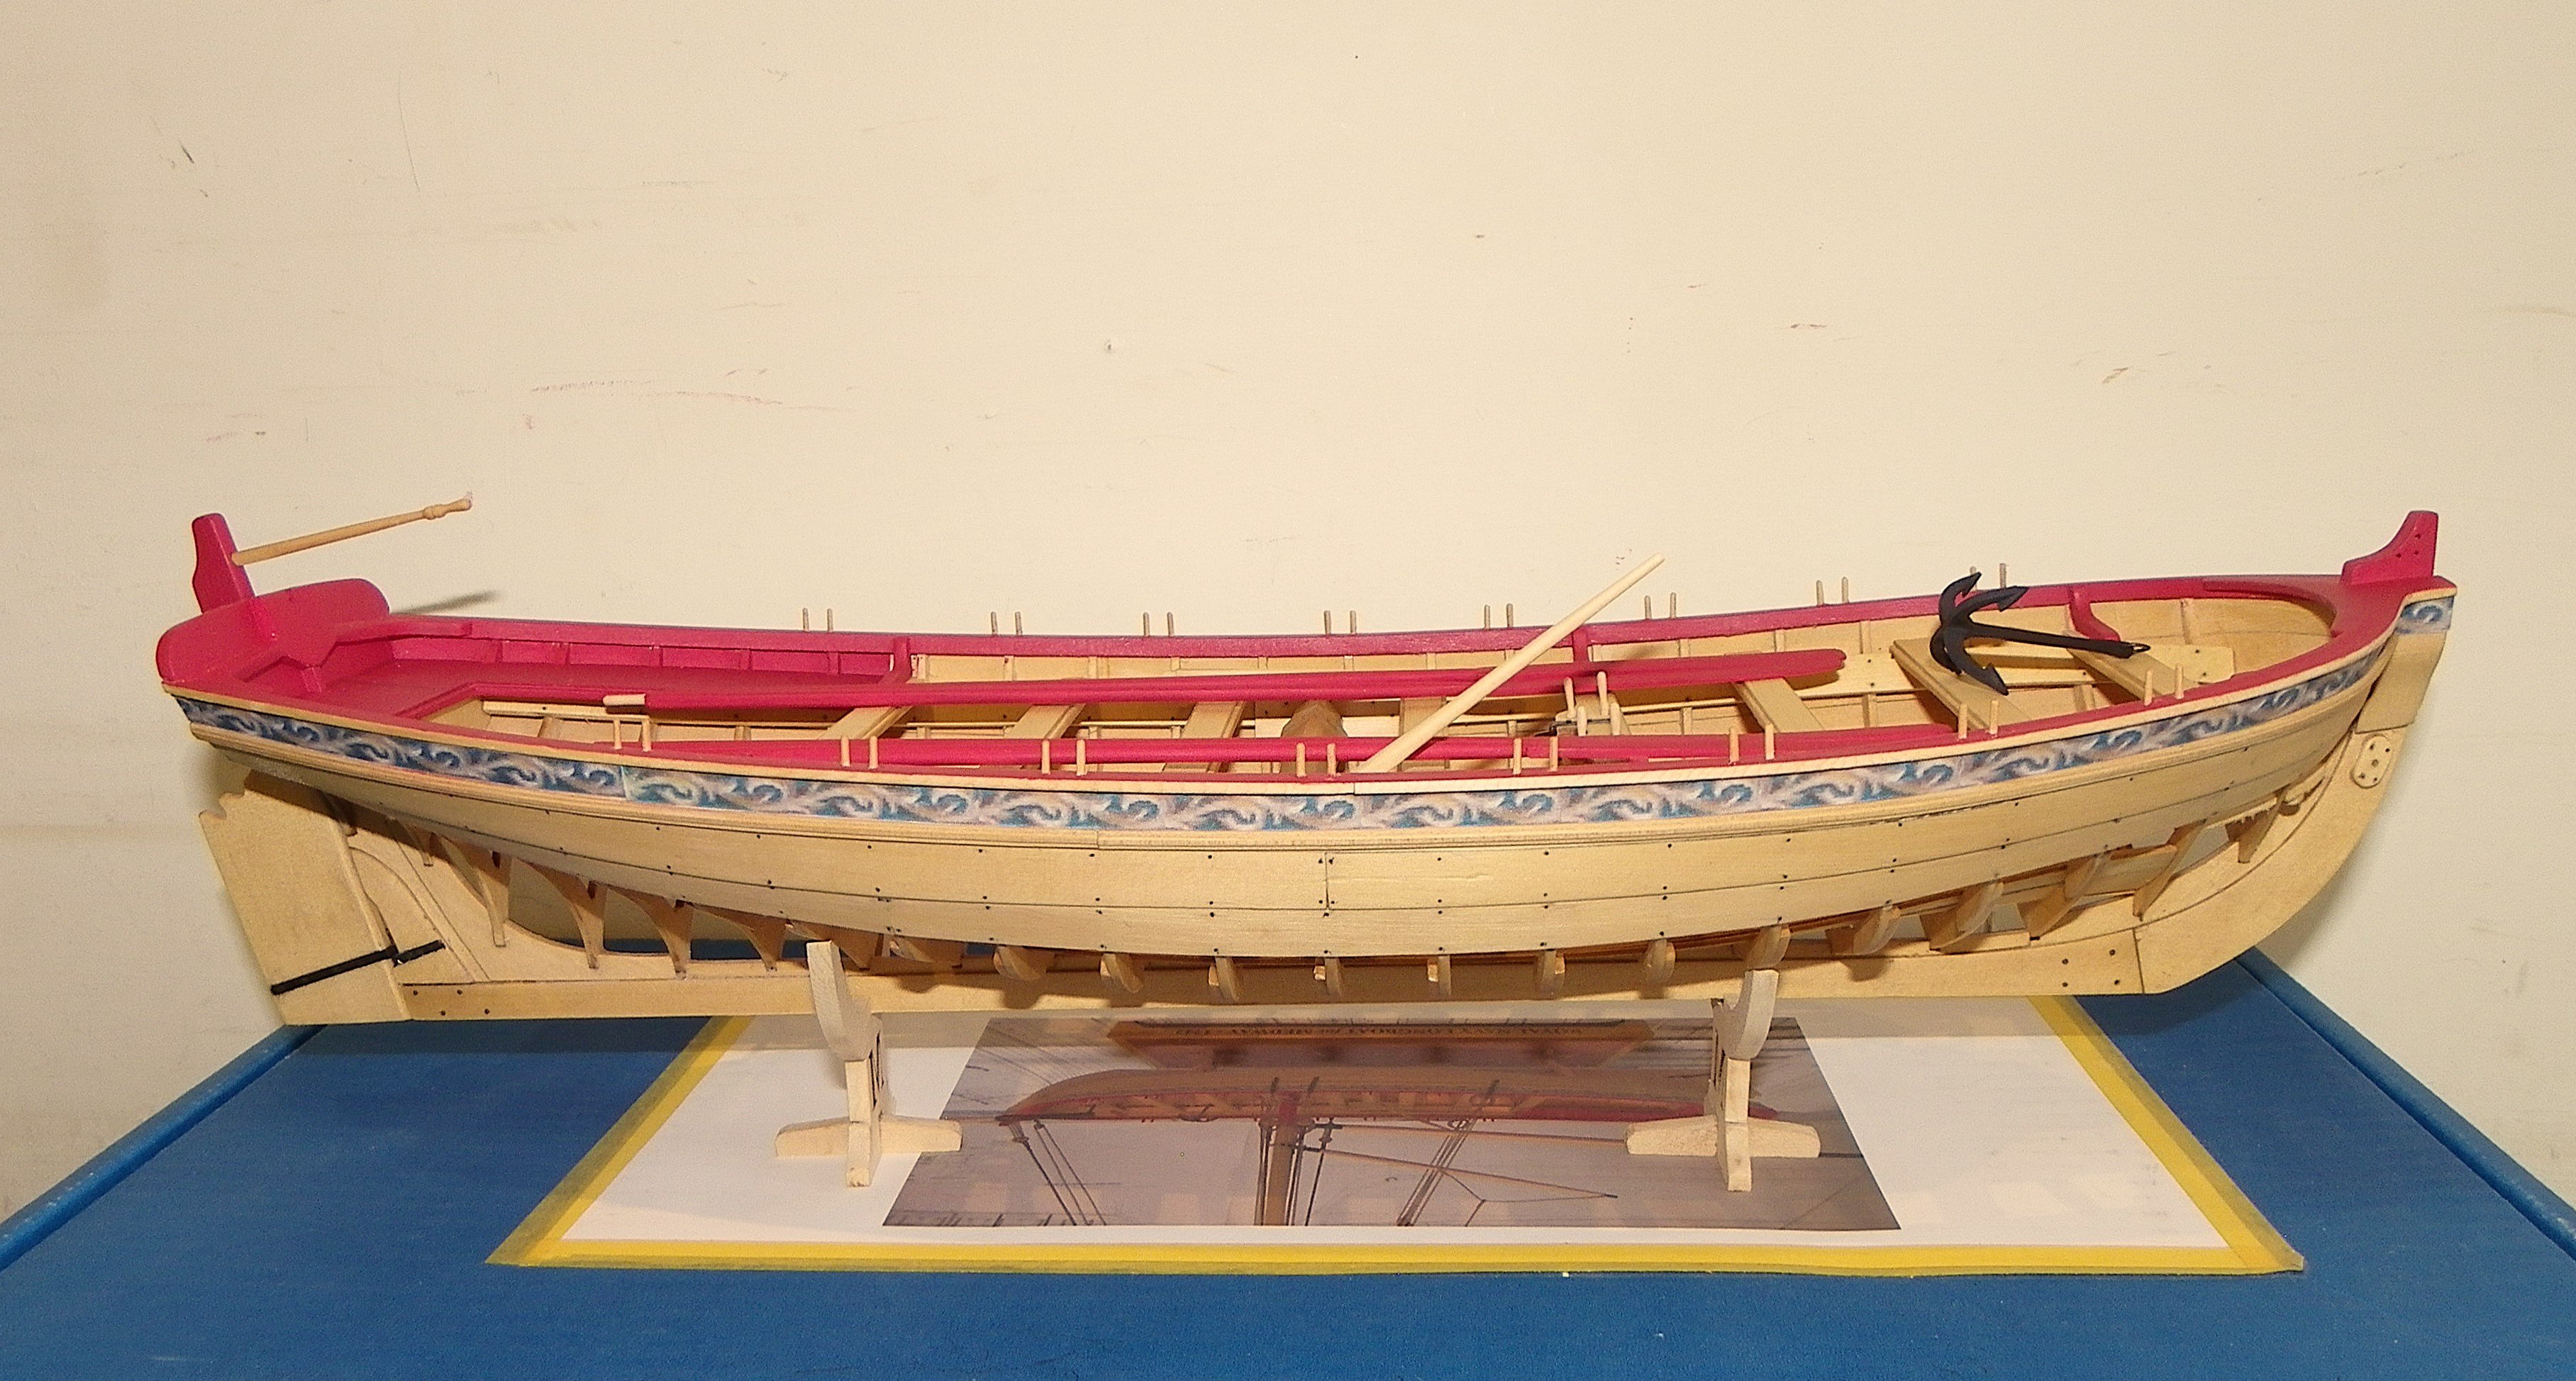
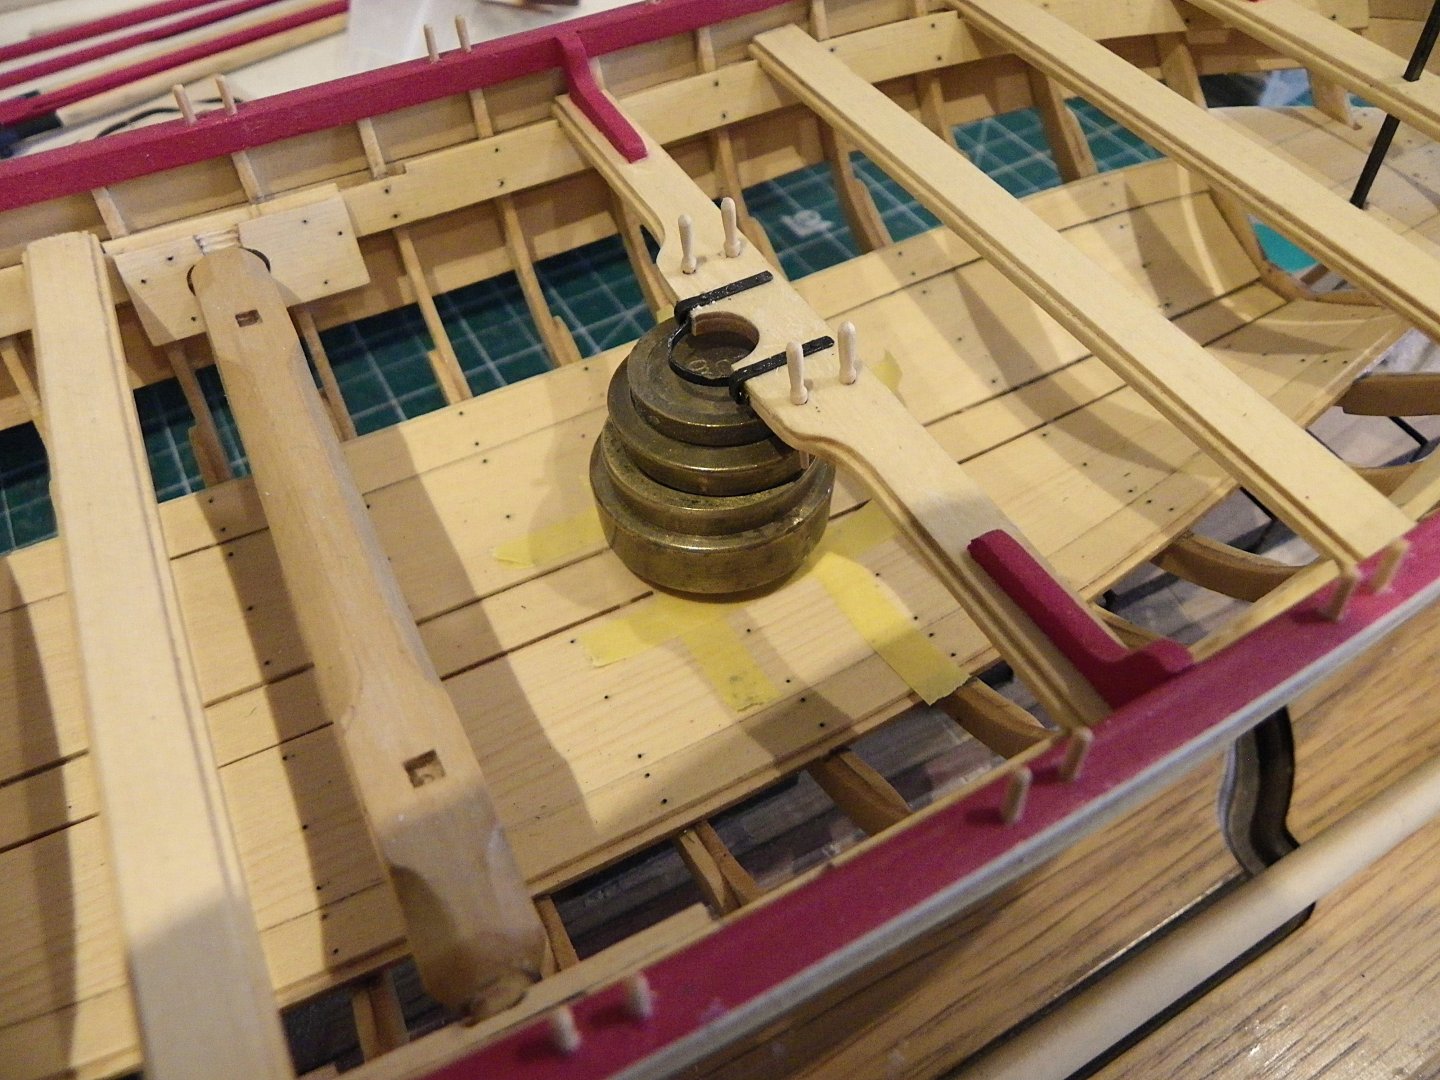
Post 39 Making the display base I had an initial look back in Post 37 but now seemed a good time to make up the base. Assembly is straightforward after careful cleaning up of the char. 044 I did add three lateral wood strips beneath the base to counter any tendency for warp. These also provide handy clamp points on the vice for the application of w-o-p. 041 The tricky part is the placing of the keel supports. I made careful measurements with the boat in situ and marked these with Tamiya tape. 043 I decided to varnish the supports before fitting, and glue them into place before applying varnish to the veneer. I was careful not to get any pva on the veneer surface. 060 065 067 069 073 075 B.E. 29/08/2024


- 131 replies
-
- 10
-
-
-
- Medway Longboat
- Syren Ship Model Company
- (and 1 more)
-
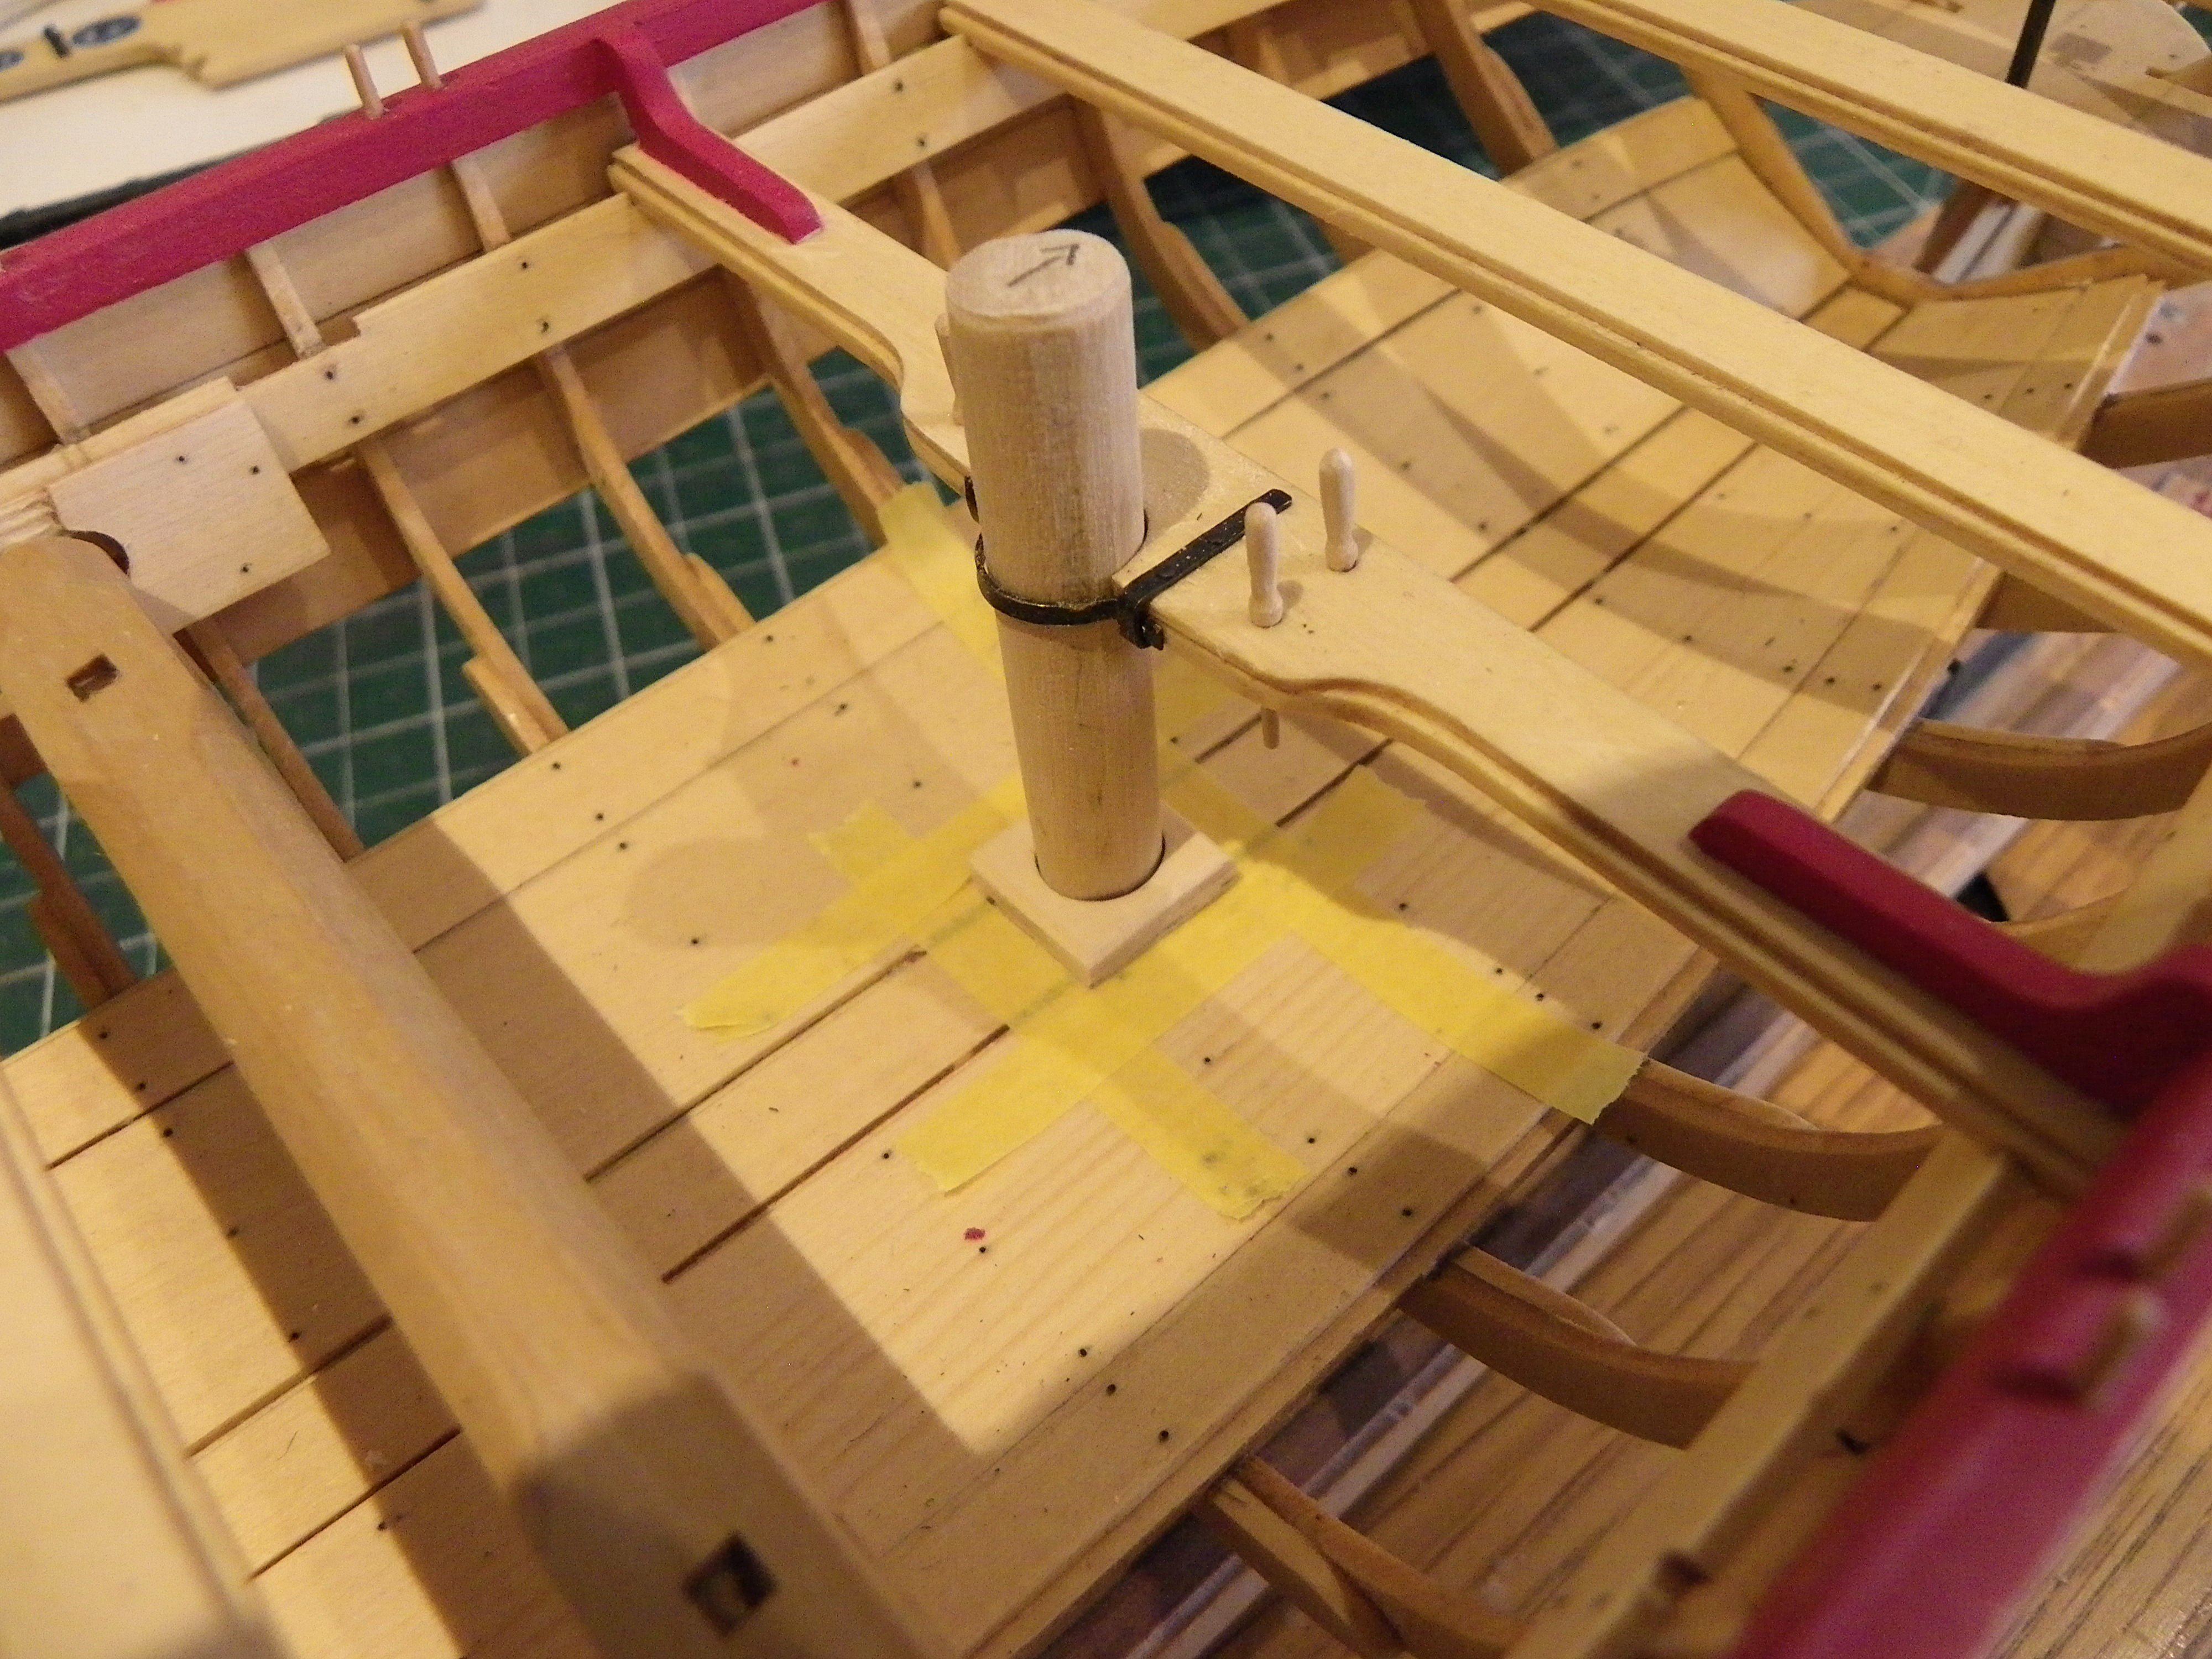
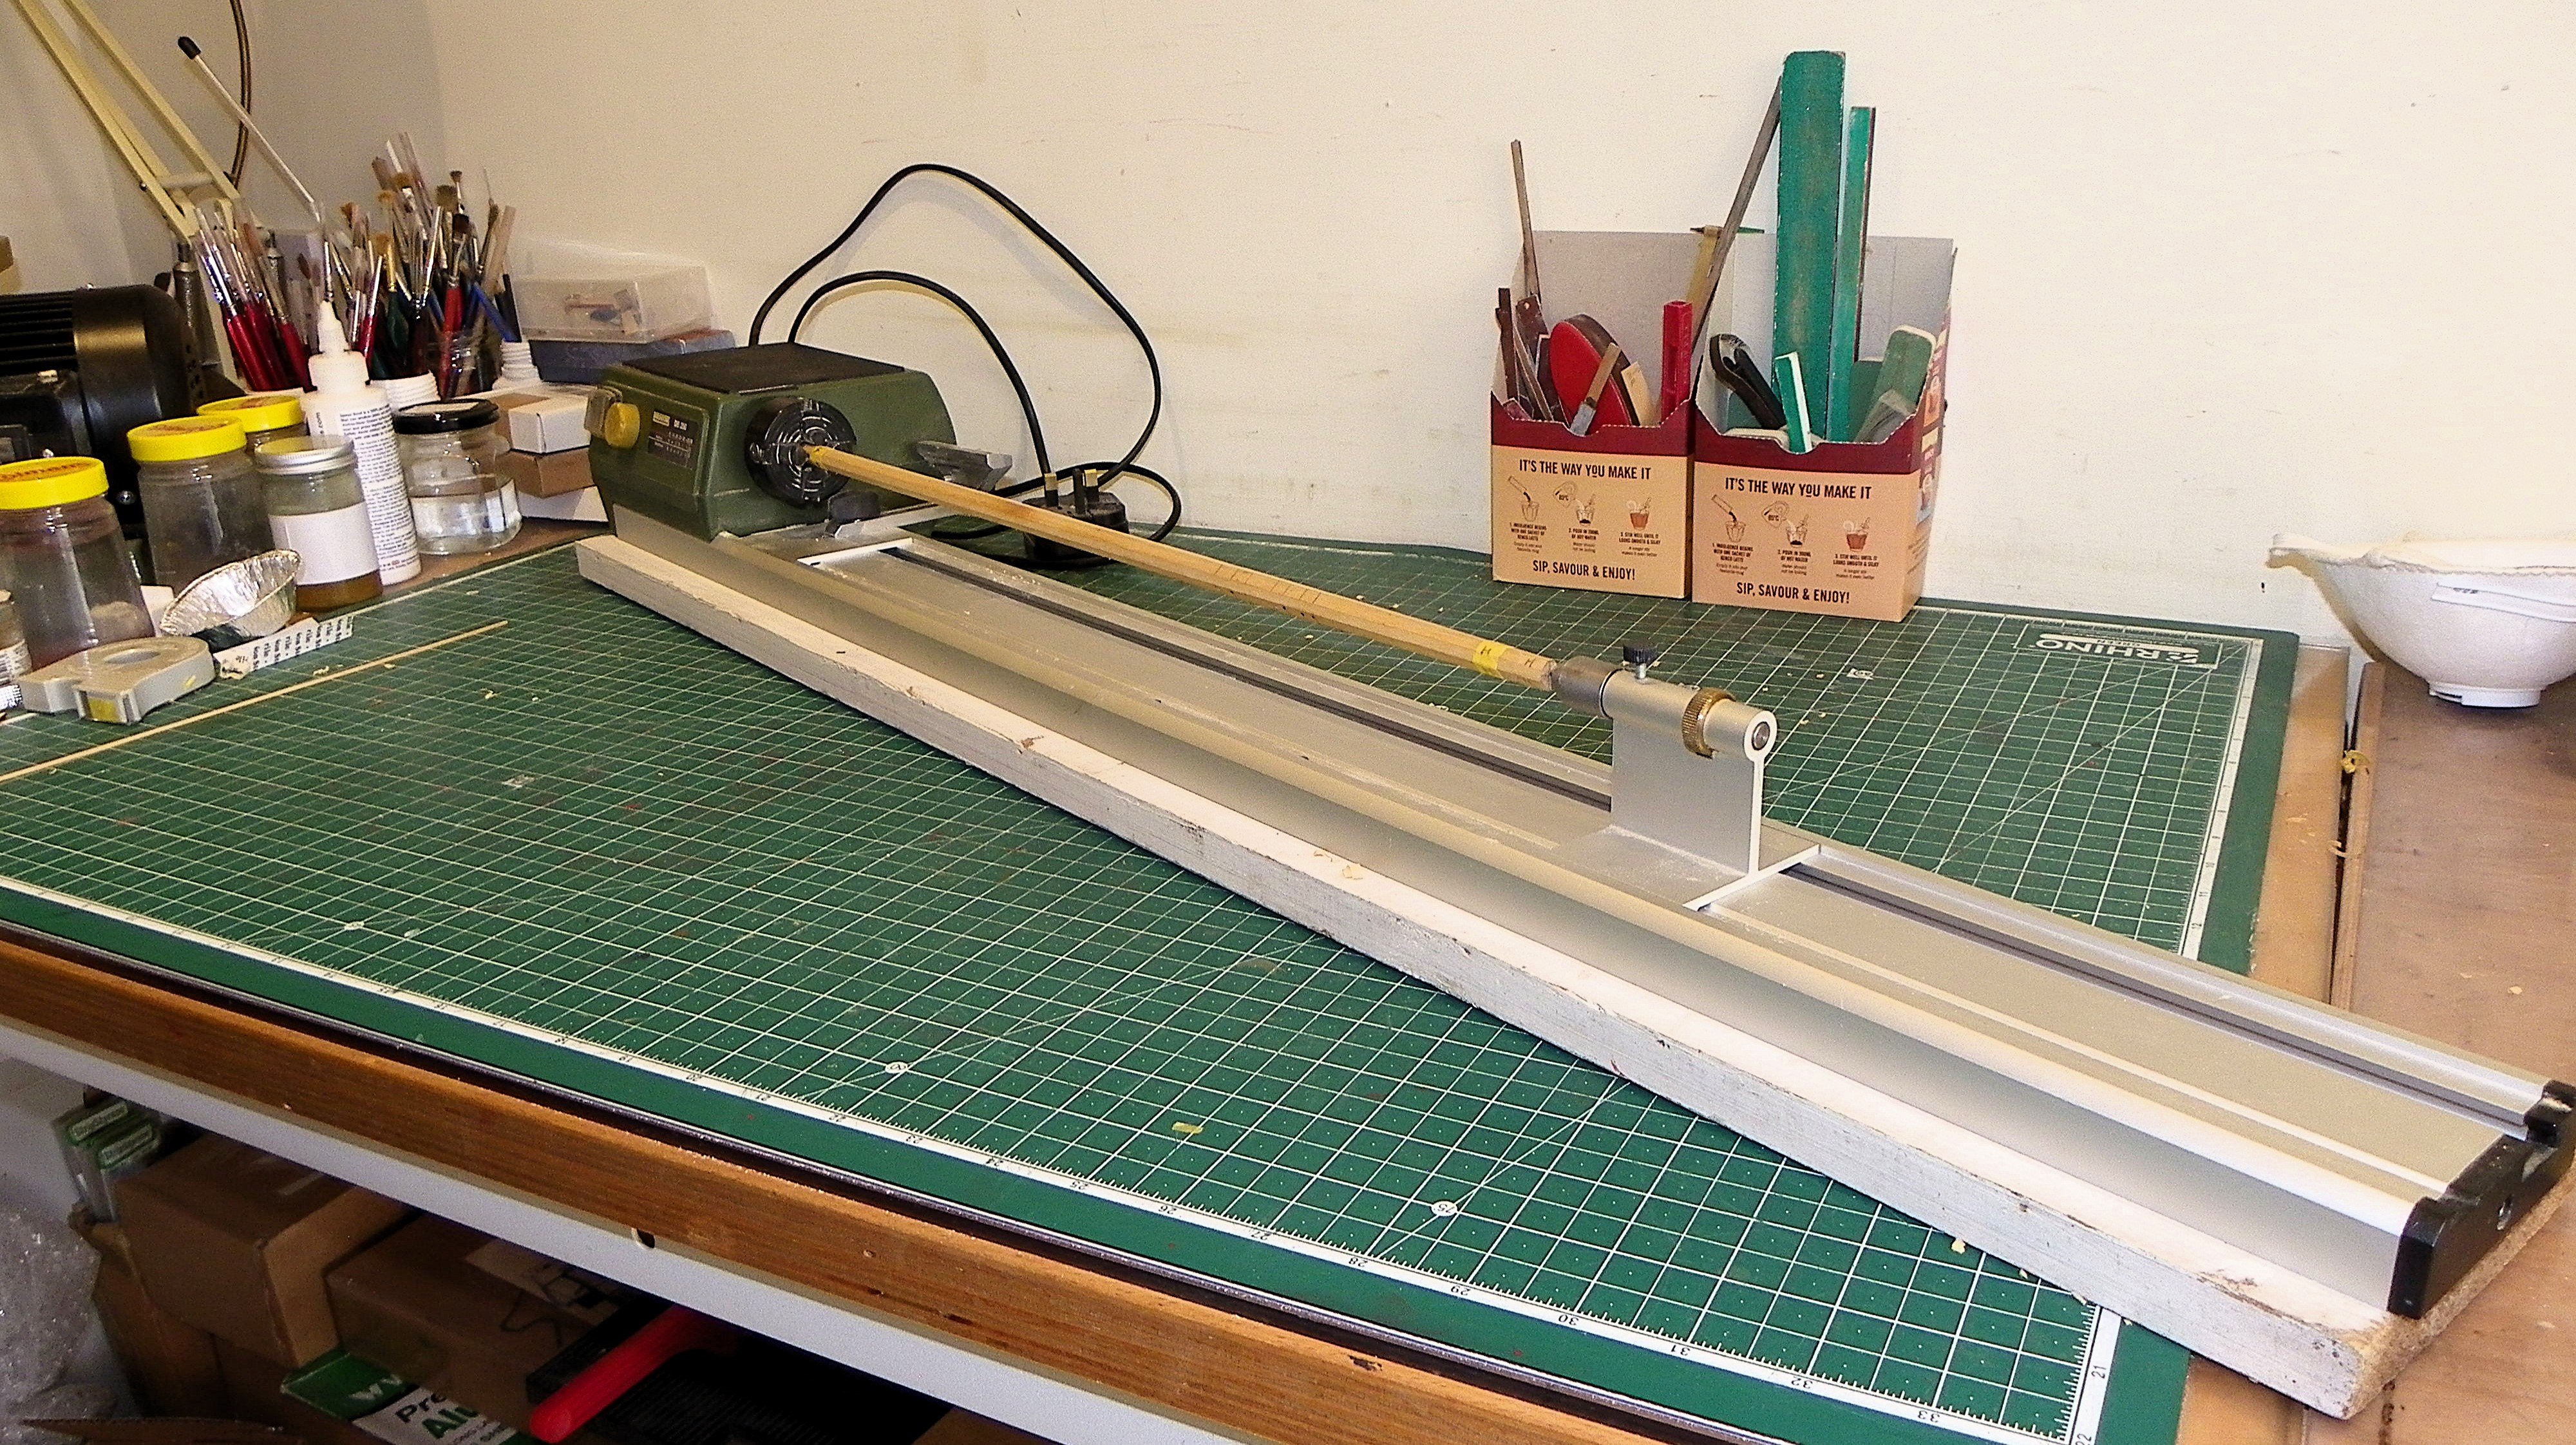
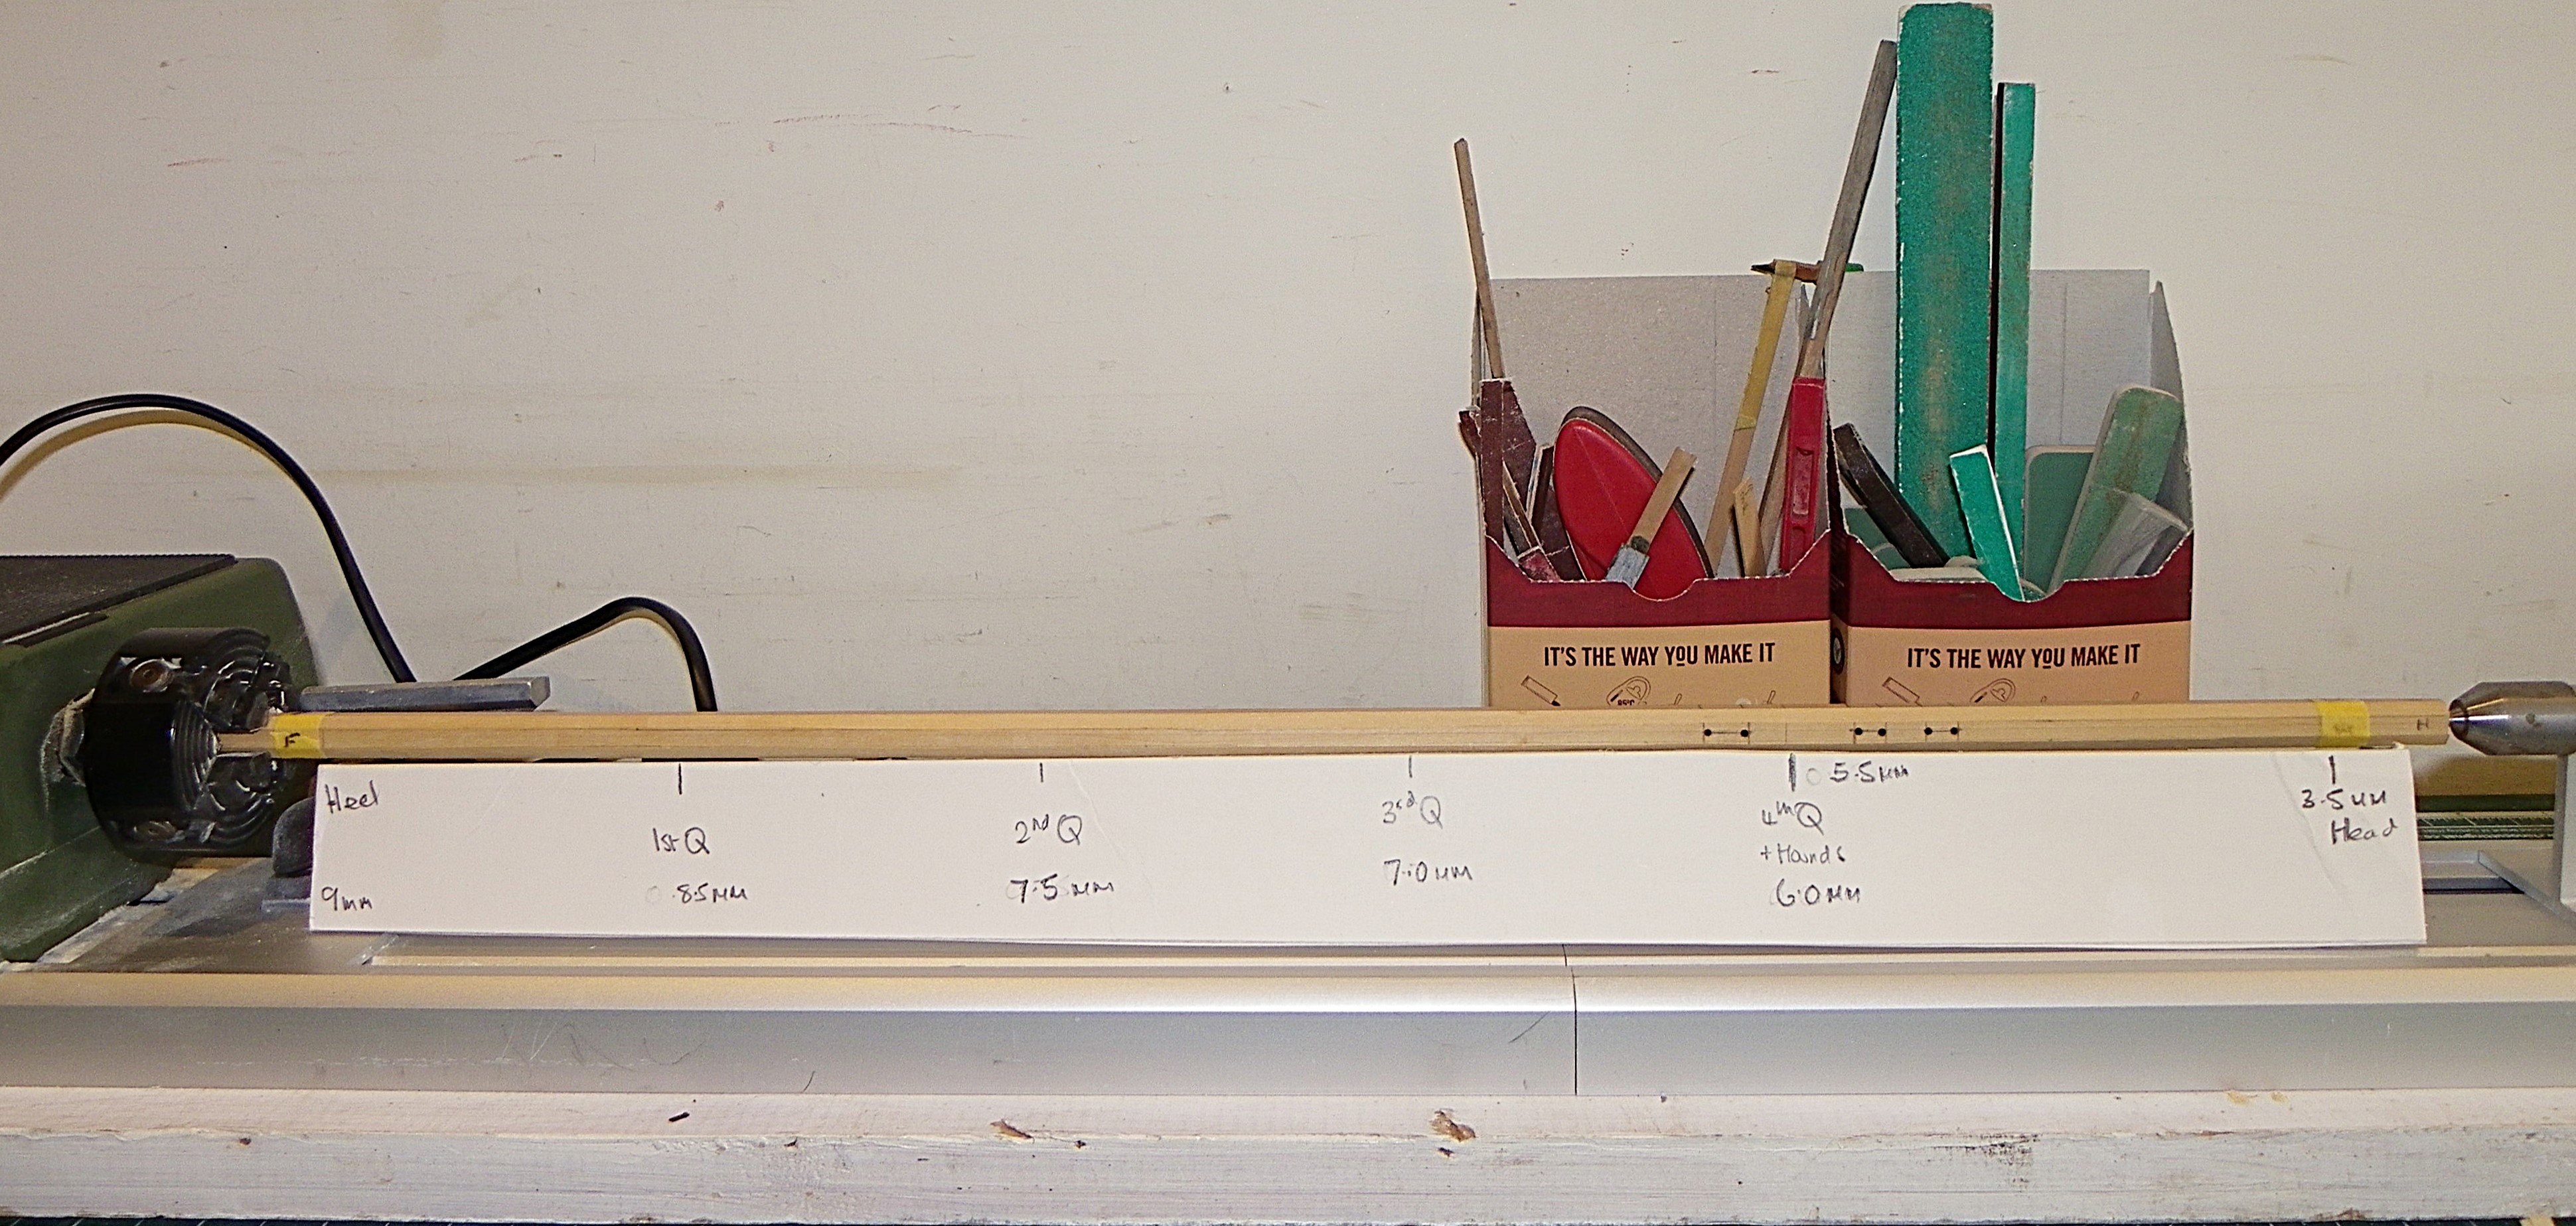
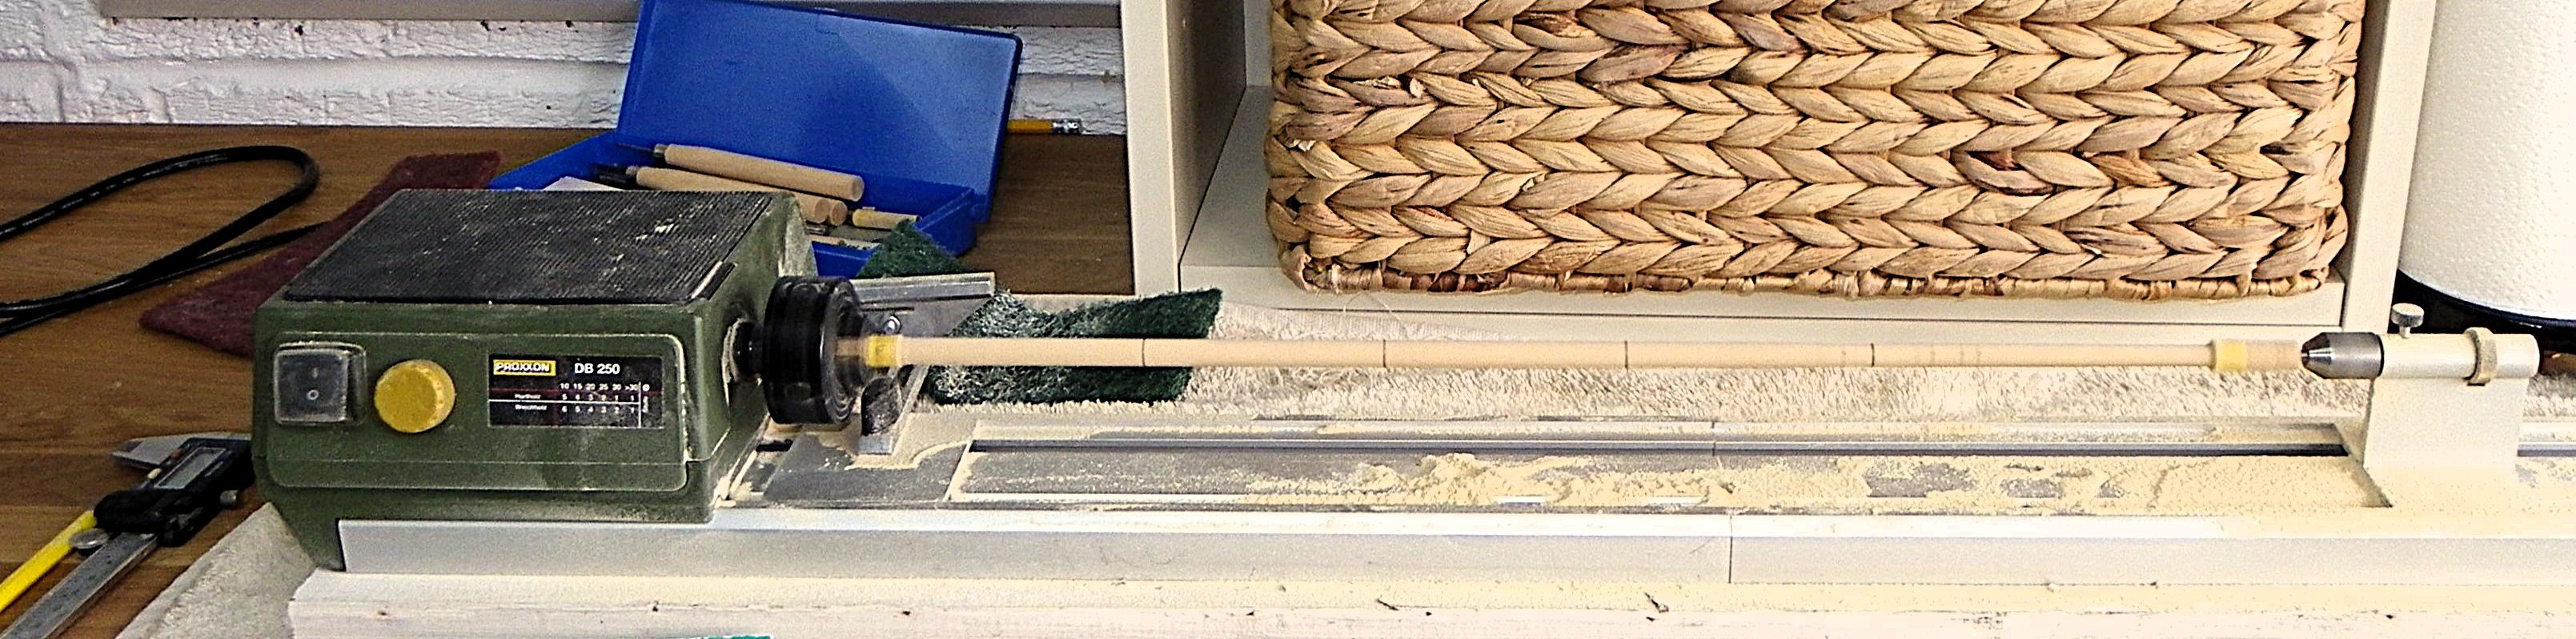
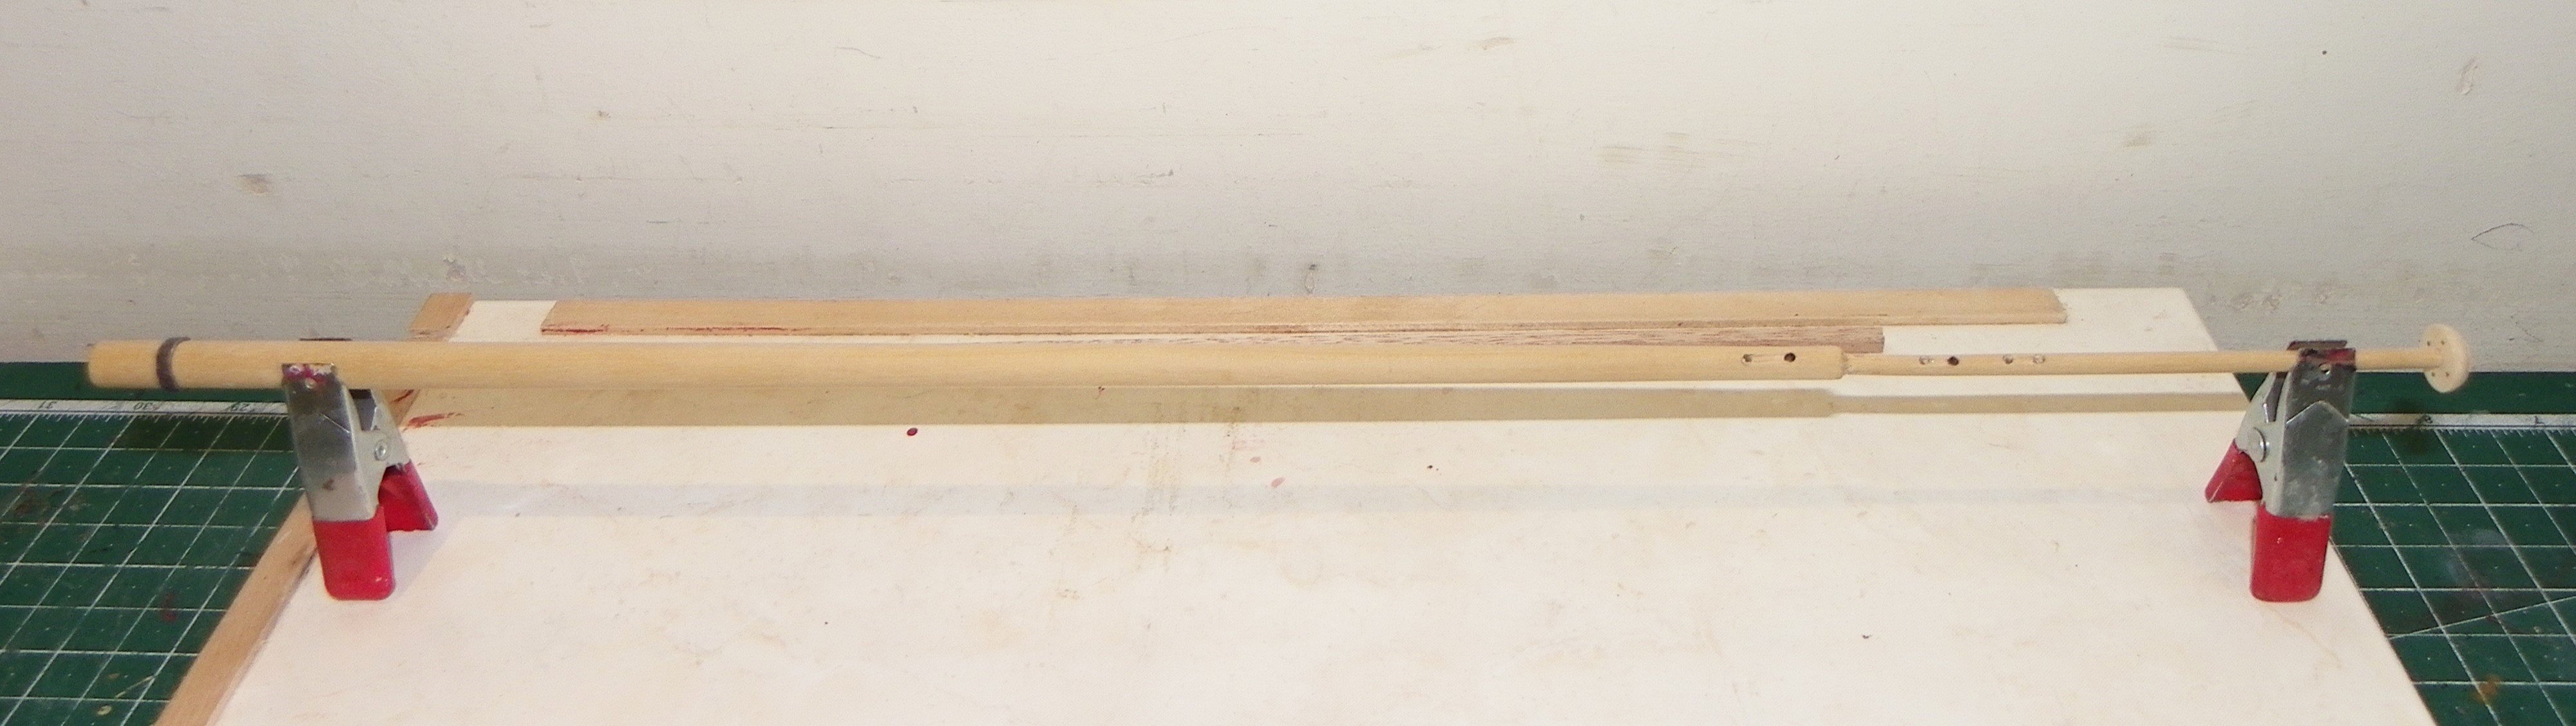
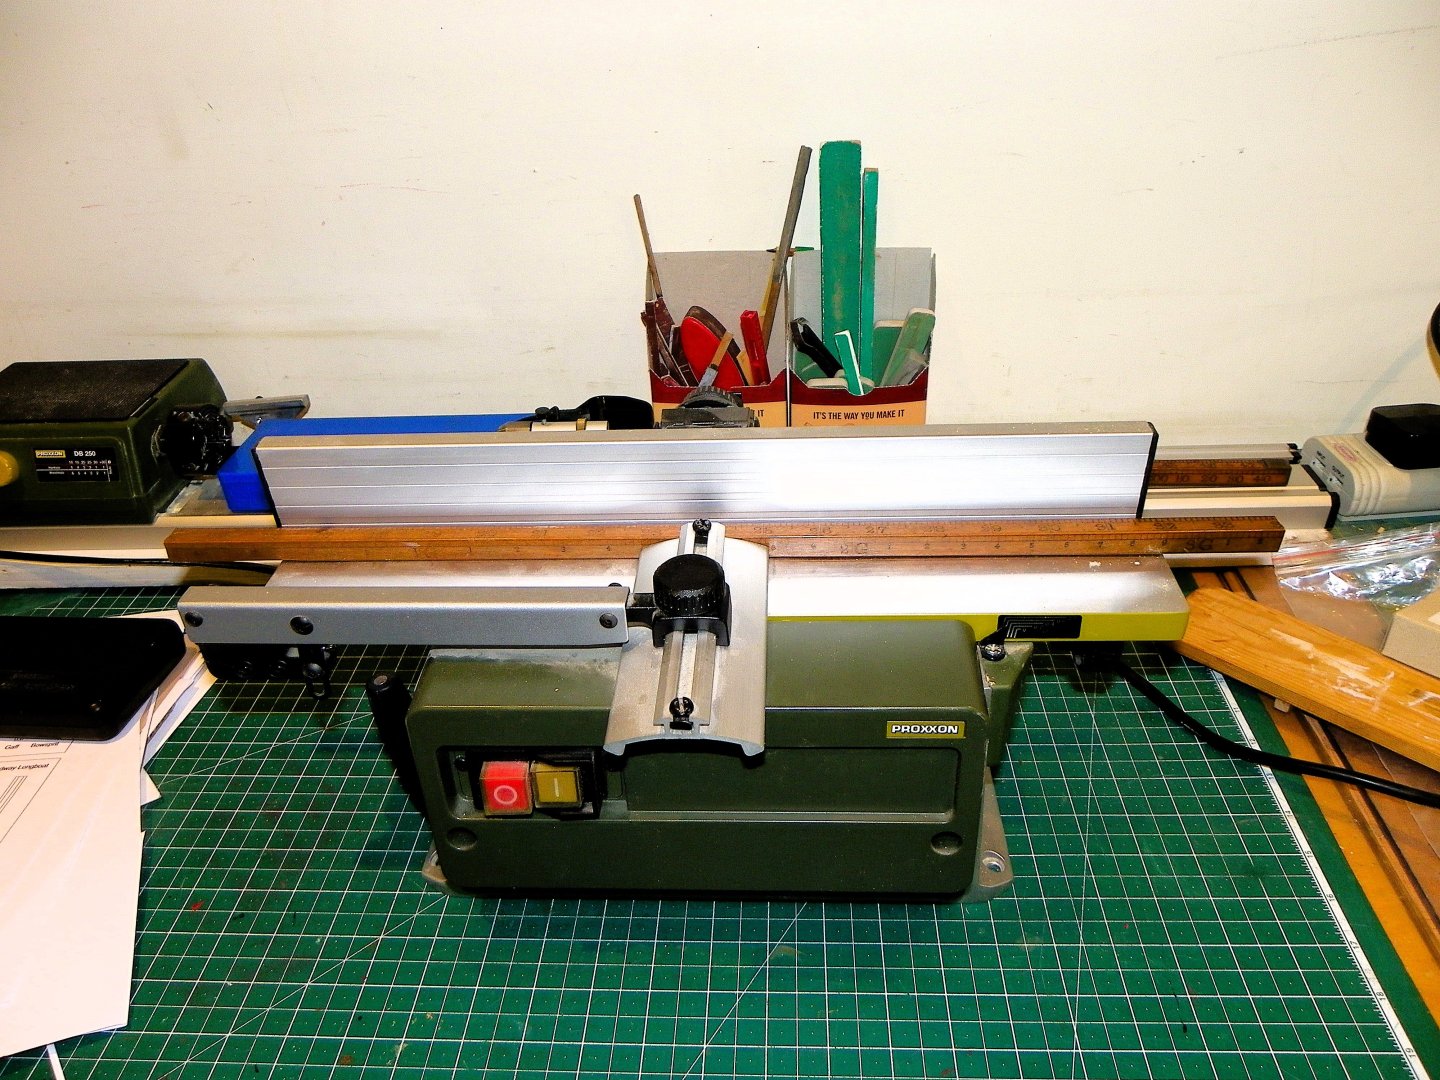
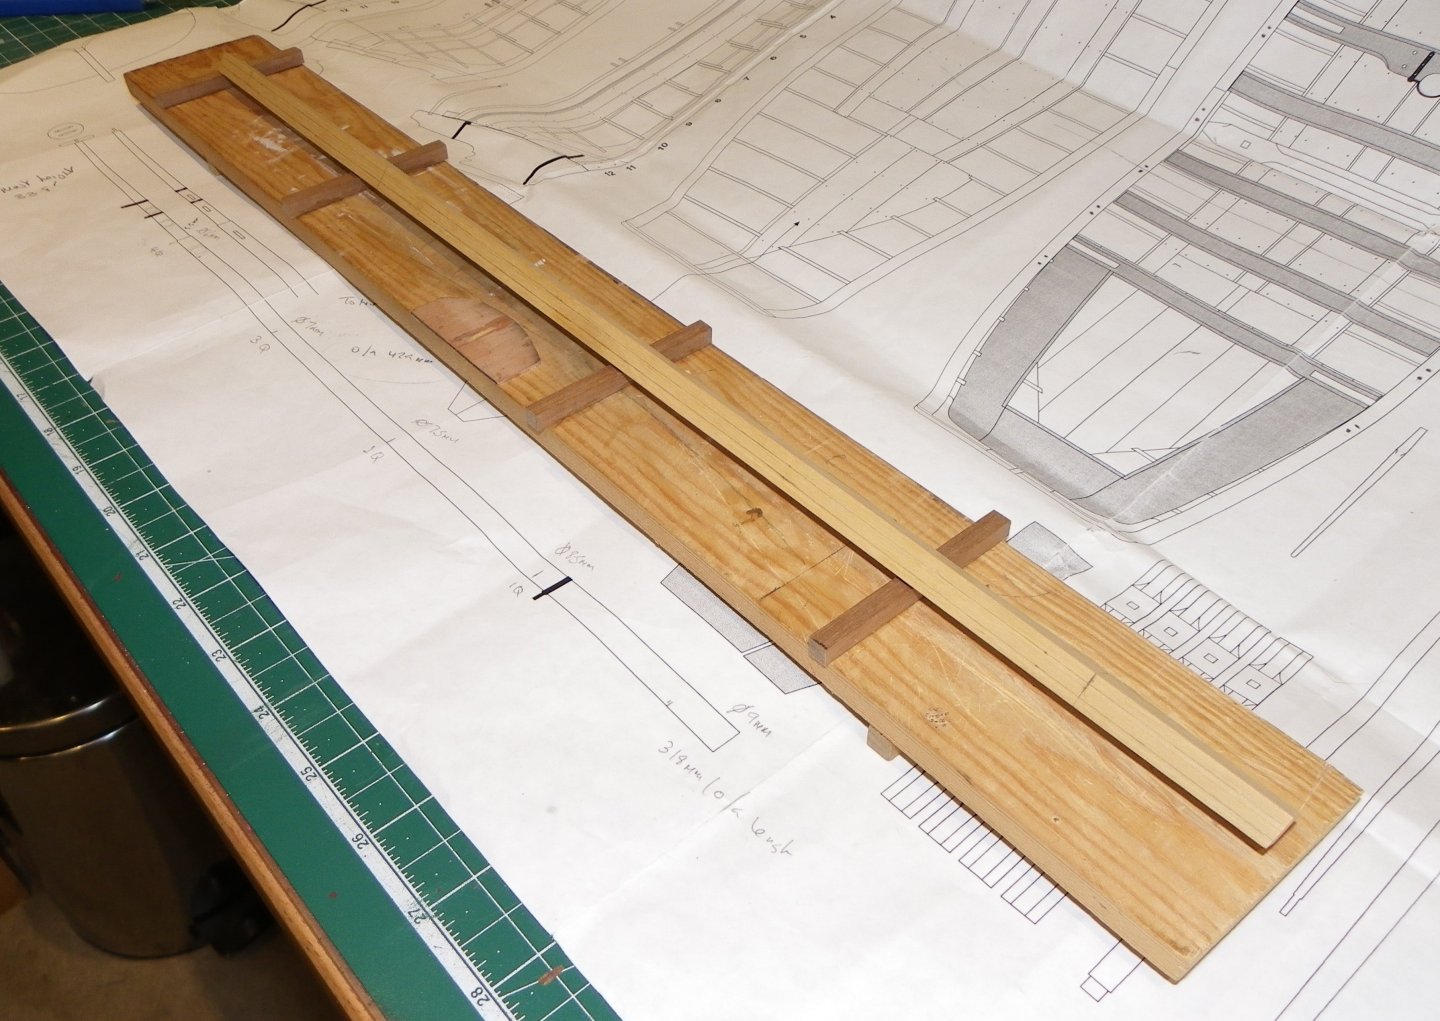
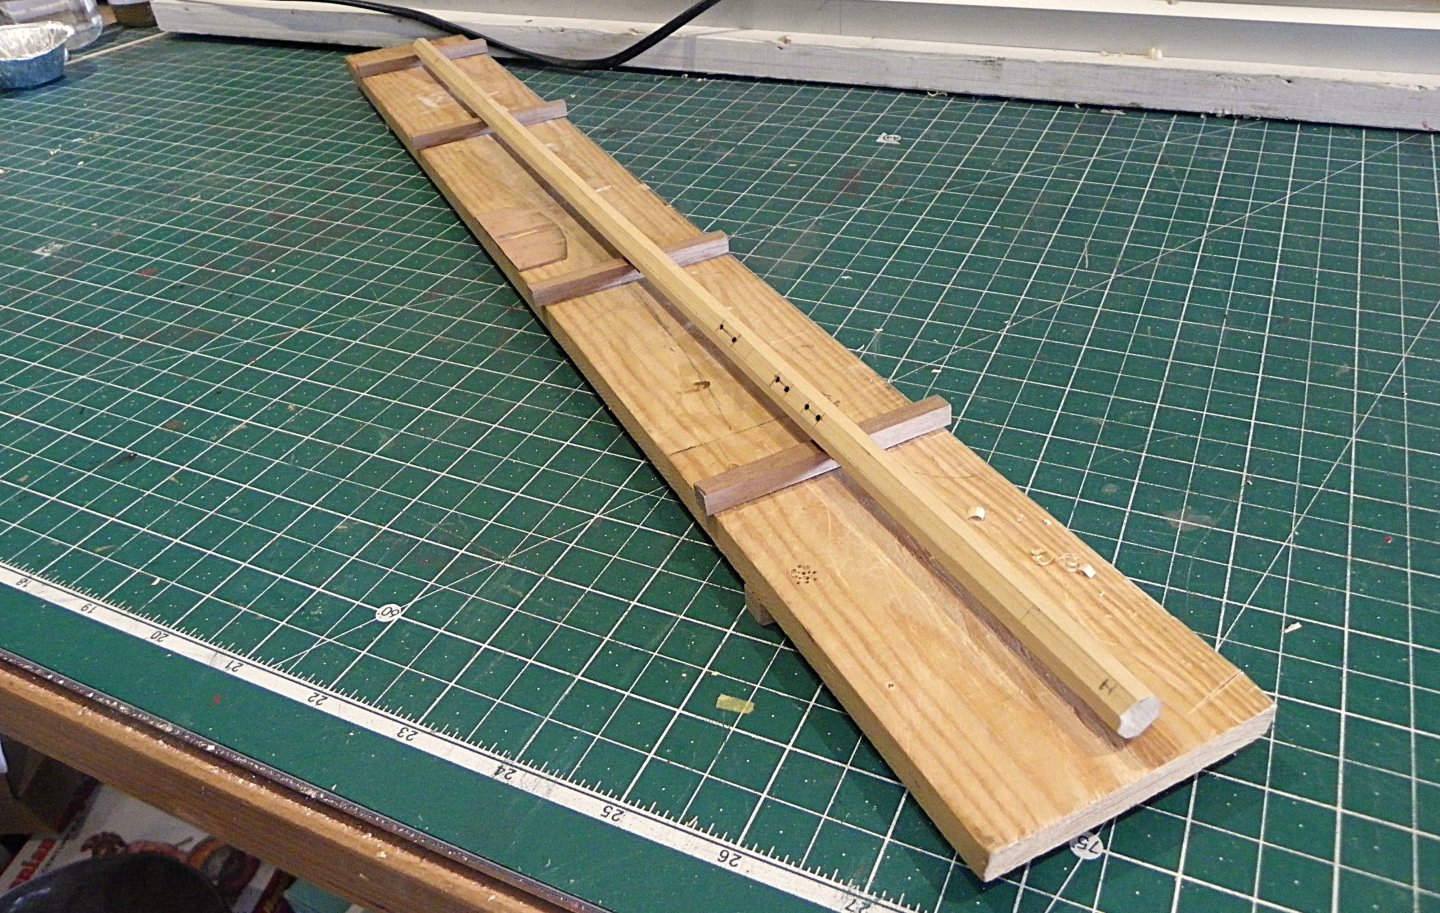
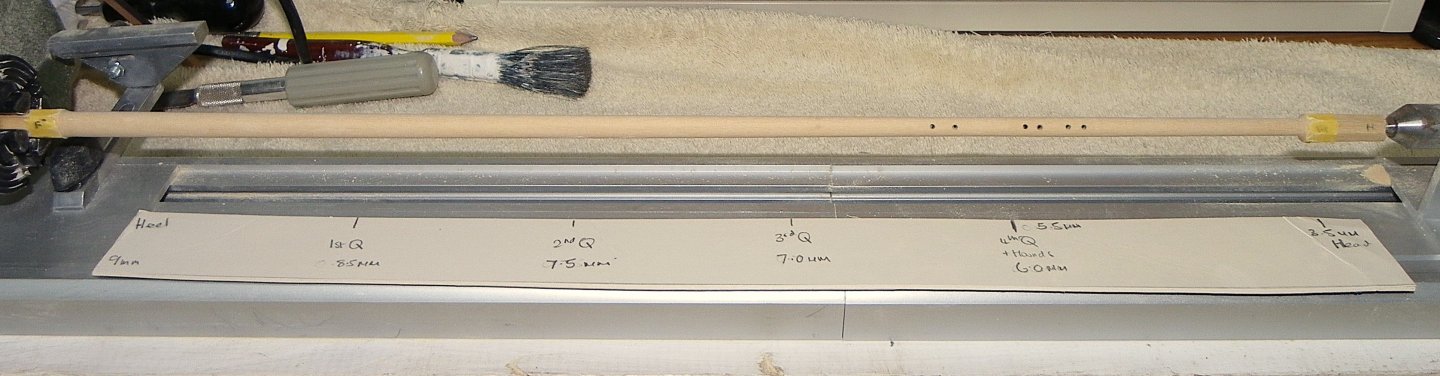
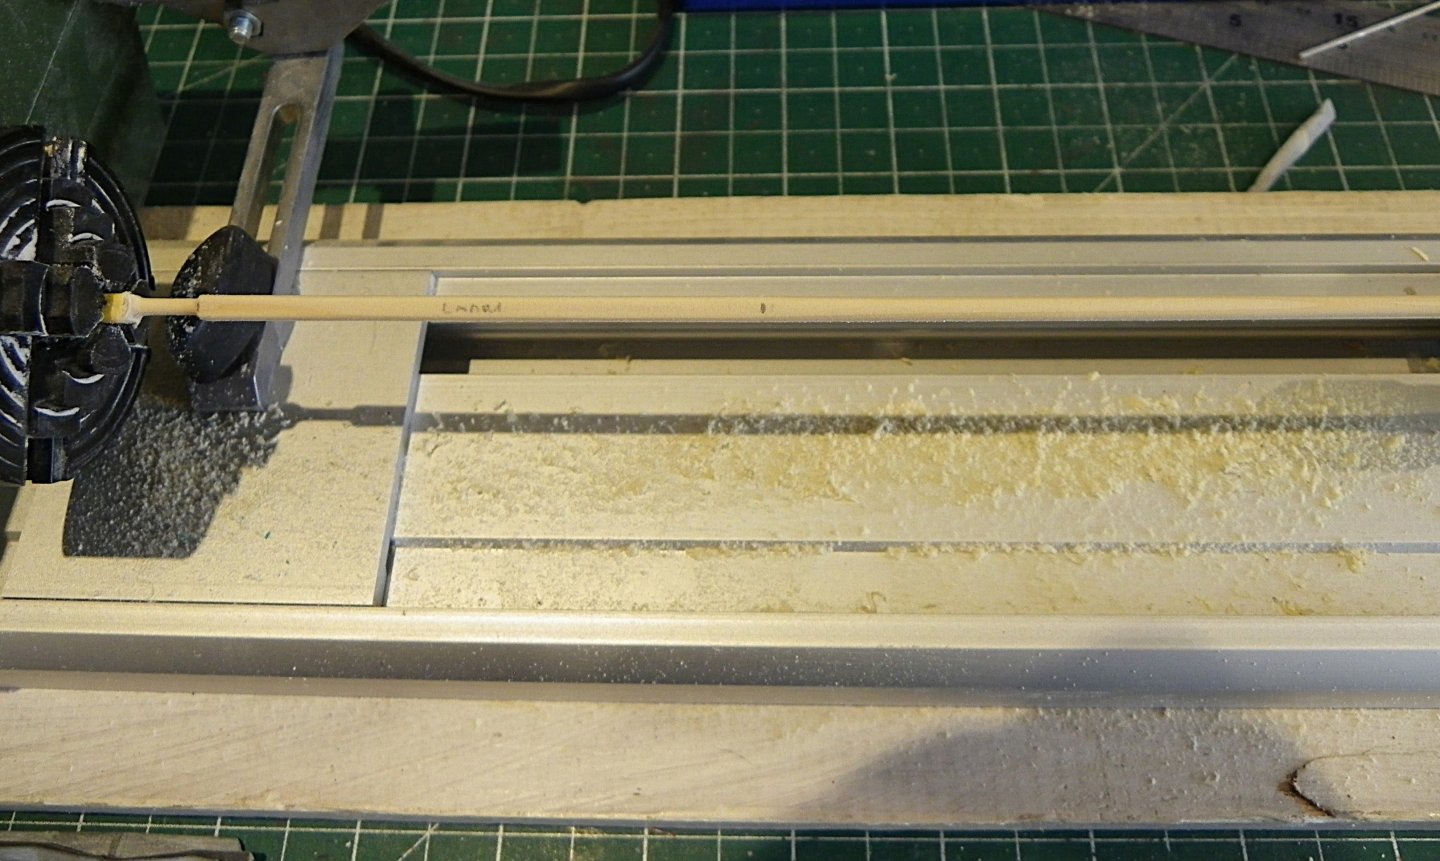
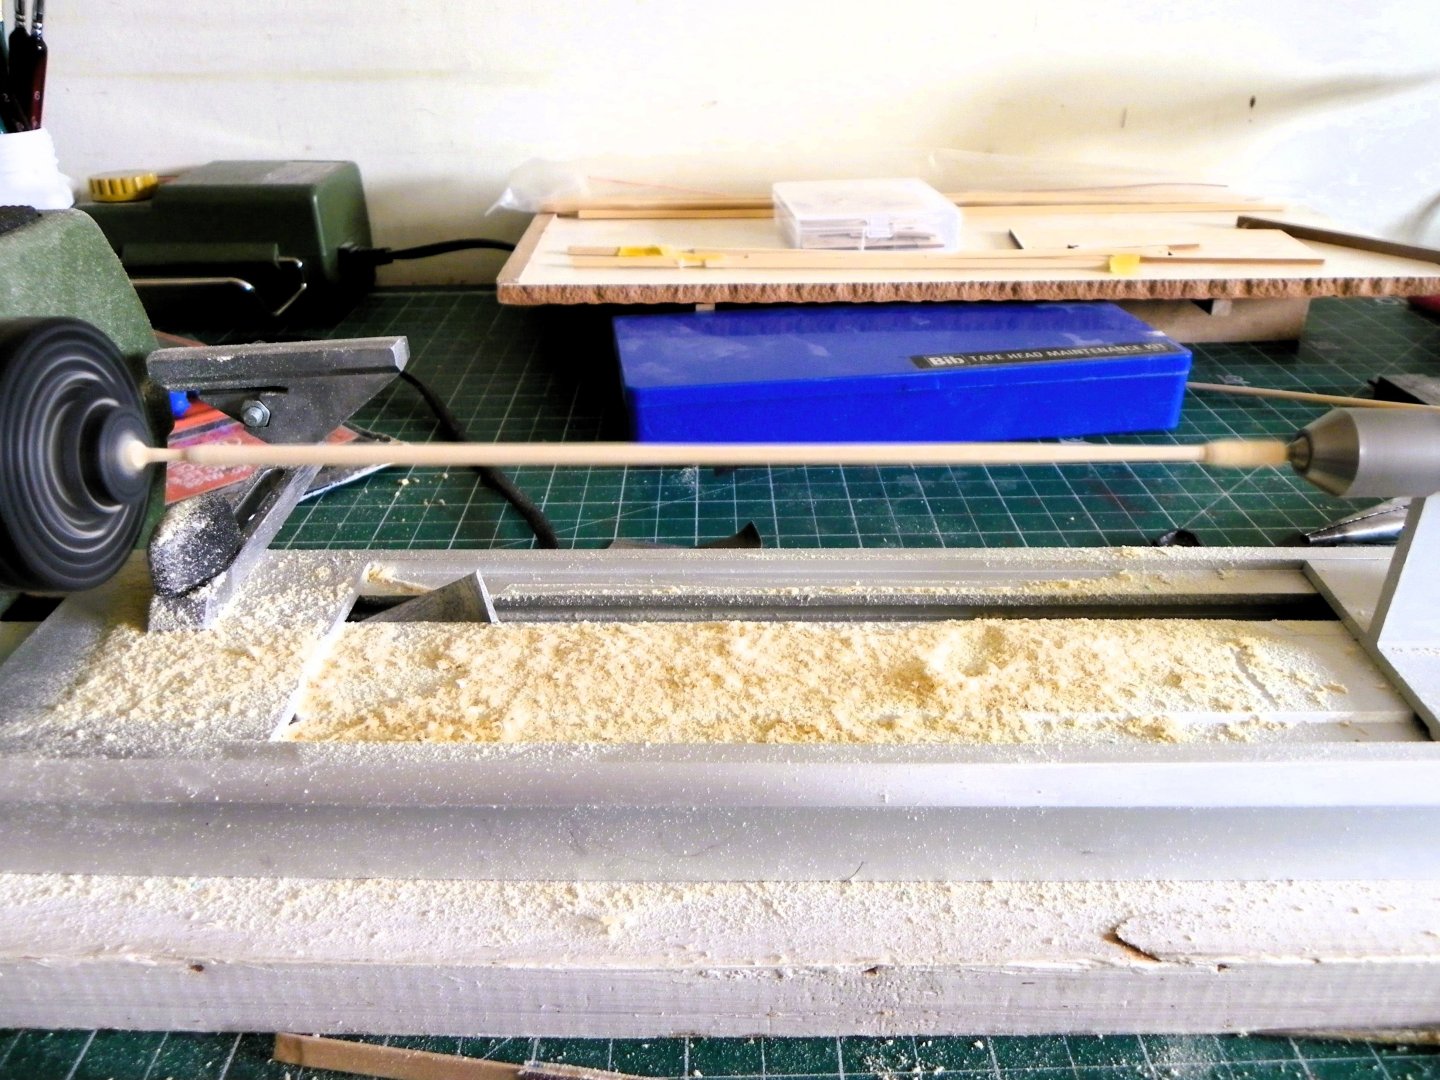
Post 38 Looking at Masting. I am going to make up the mast and spars and even if I do not fit them on the boat, they will form part of the display. I also quite enjoy making masts. 002 I begin with the Mast and I am using Boxwood cut from the same section as I used for the Windlass. 004 Something satisfying re-purposing old Boxwood, and seasoned English Box is hard to beat. The first step is to mark up the stick for the start of the rounding process using the template kindly provided by Chuck. This provides easy marking of the 7/10/7 ratio used for creating an initial octagon shape to ease subsequent rounding on the lathe. 007 I also make up a cradle board to support the stick during the cutting of the octagons. 009 The sheaves are transferred from the plan and drilled out on the mill. 012 Far easier to do with the stock still square, and now ready to form the octagon. 019 My Bullnose plane is my go to for the purpose, hand planing is such a very satisfying activity. 022 The actual process is fairly quick. 028 I have my Proxxon lathe permanently set up with the bed extension in place, just as well with this mast. The distance between chuck and tailstock is 18½” 033 The diameter at the quarters up to the hounds is taken from the plan and marked on a gauge card to check progress as the turning progresses. Time to make some dust. 035 Speaking of dust this fine Boxwood stuff is like gold, I always keep as much as I can, comes in very useful. 039 After around 2 hours the taper is becoming obvious, but still a way to go. I constantly re-mark and check the quarters. 048 Finishing off the Top section of the mast was a little fraught, I was concerned that as I tapered it towards the finish of 3.5mm ø it might break and given the length of the piece result in it whipping around on the lathe. 051 055 I completed the finish off the lathe, and added the Truck. B.E. 27/08/2024


- 131 replies
-
- 10
-
-
- Medway Longboat
- Syren Ship Model Company
- (and 1 more)
-
Kind of you to say so Glenn, but I know your work remember, and I don't think you need any tips from me. There are some quality builds for 'Medway' on here that have been well thumbed thro' by me.😊 B.E.
- 131 replies
-
- 1
-
-
- Medway Longboat
- Syren Ship Model Company
- (and 1 more)
-
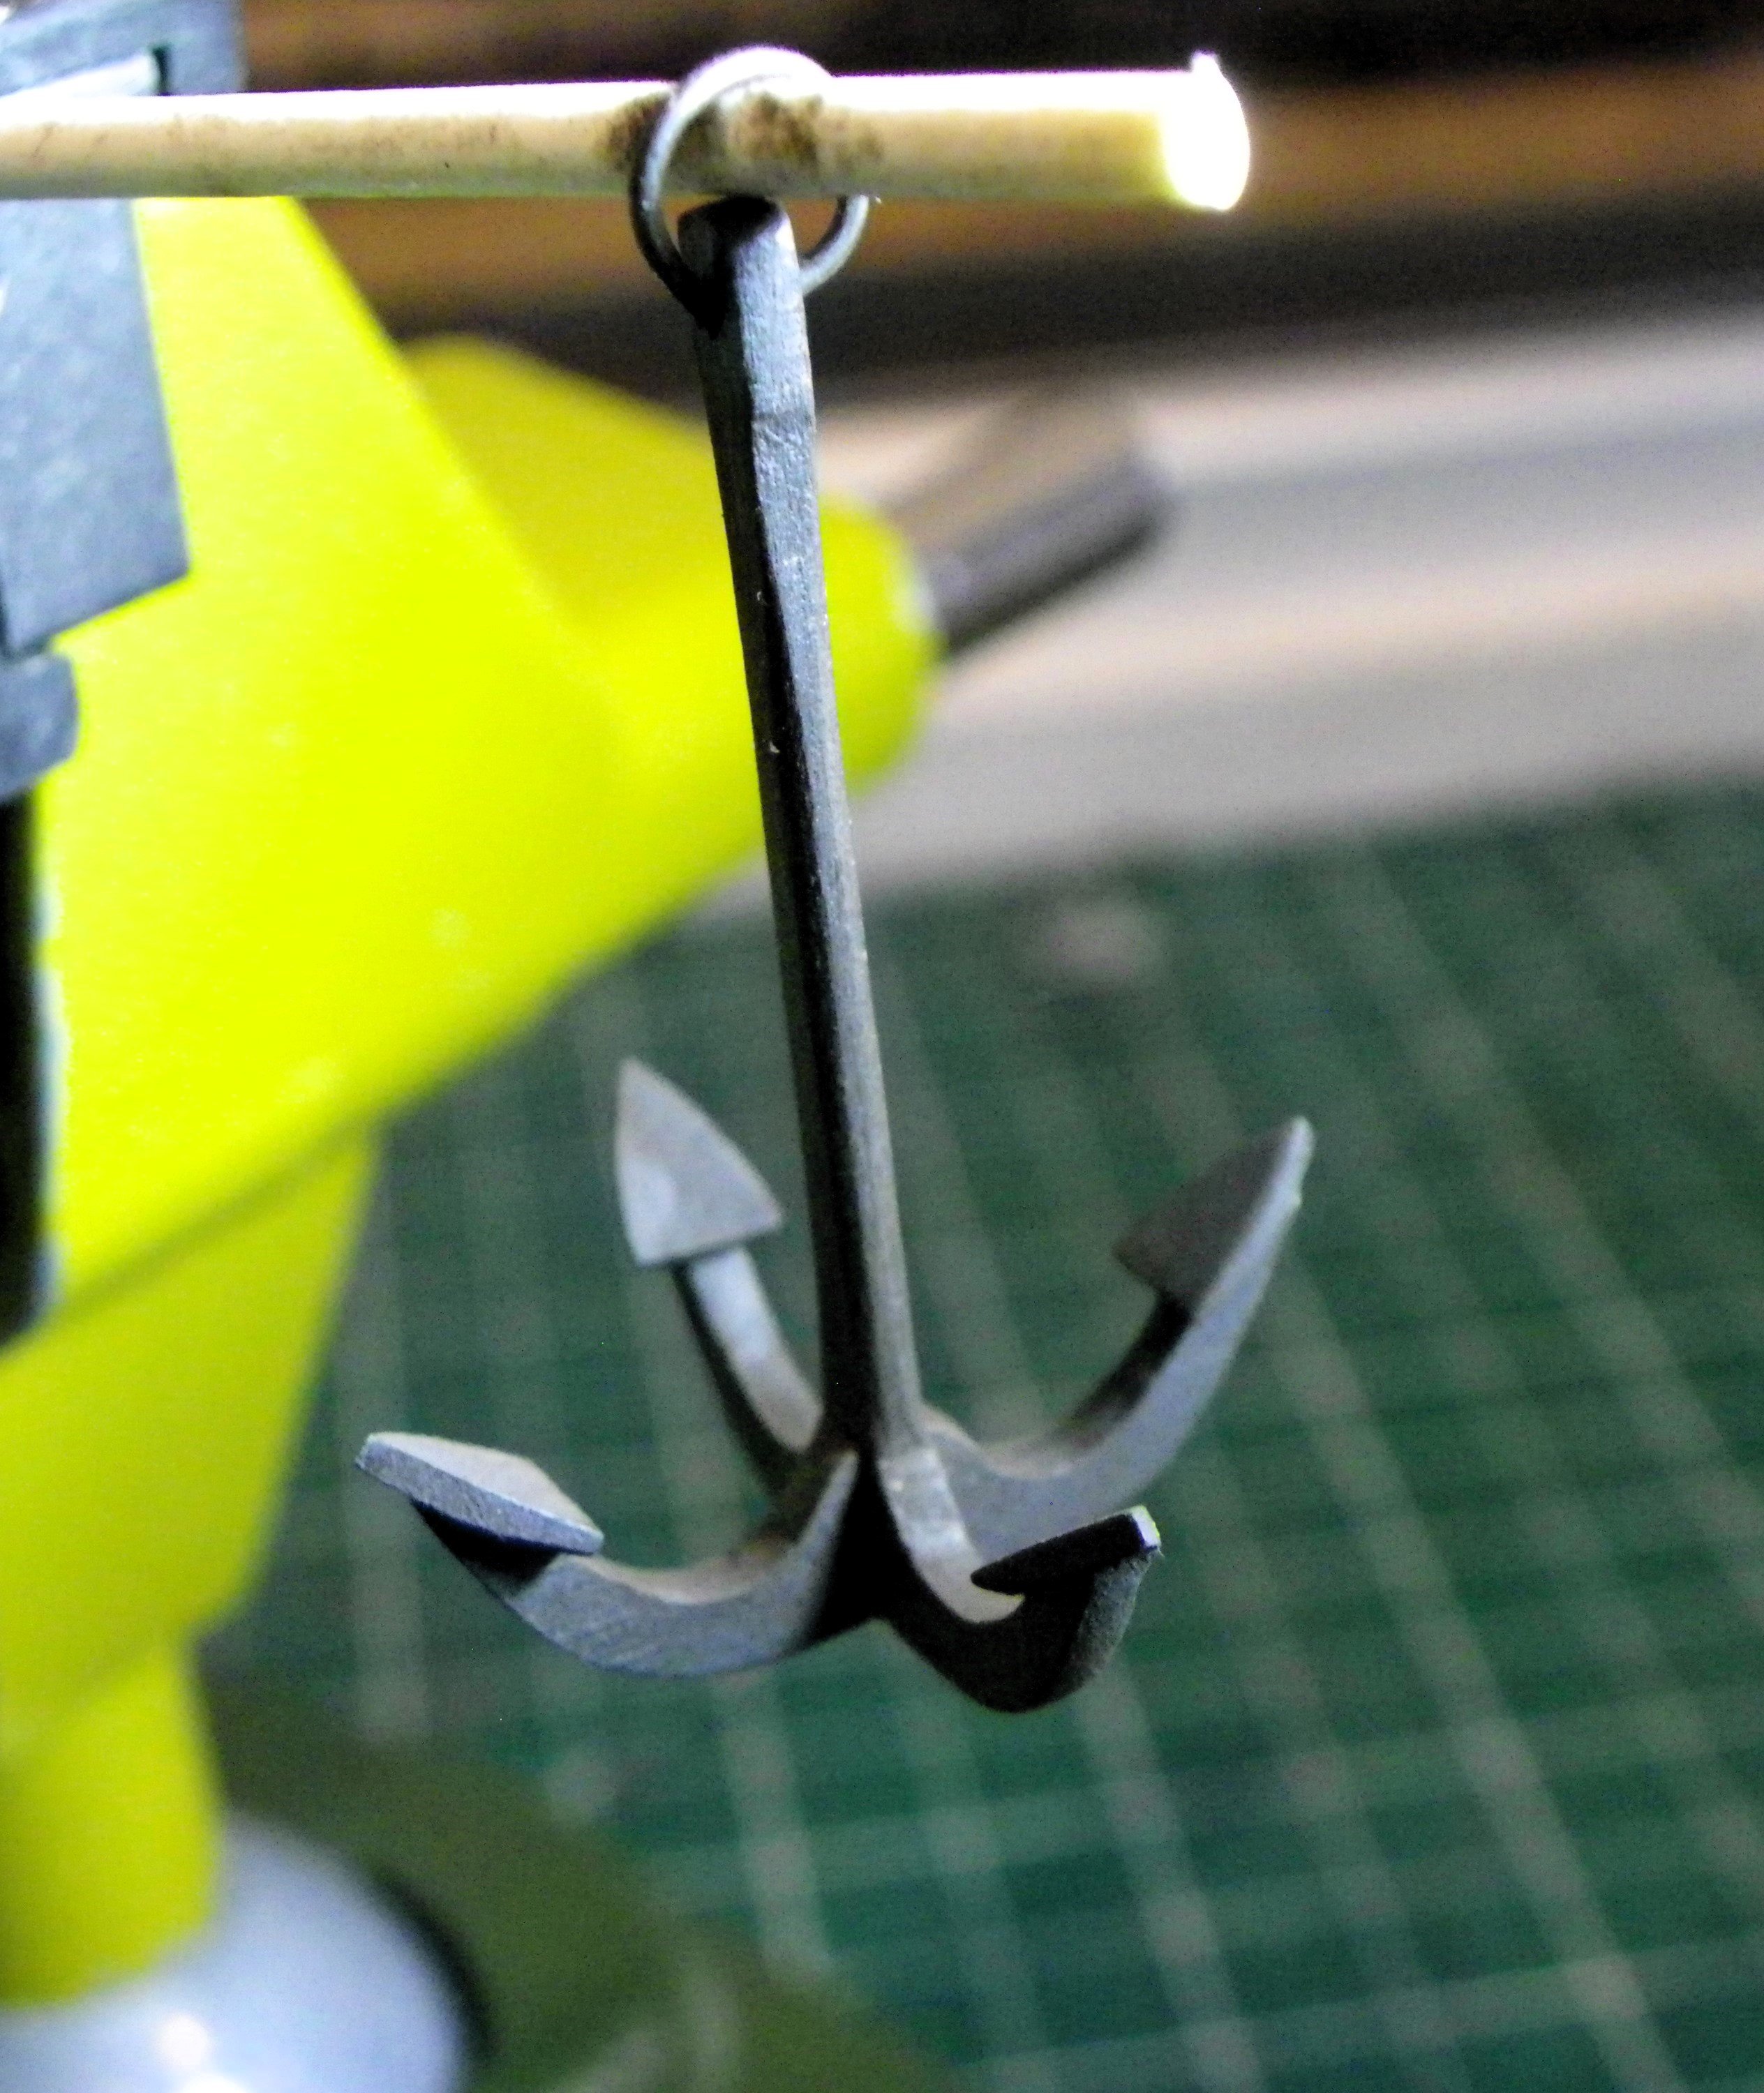
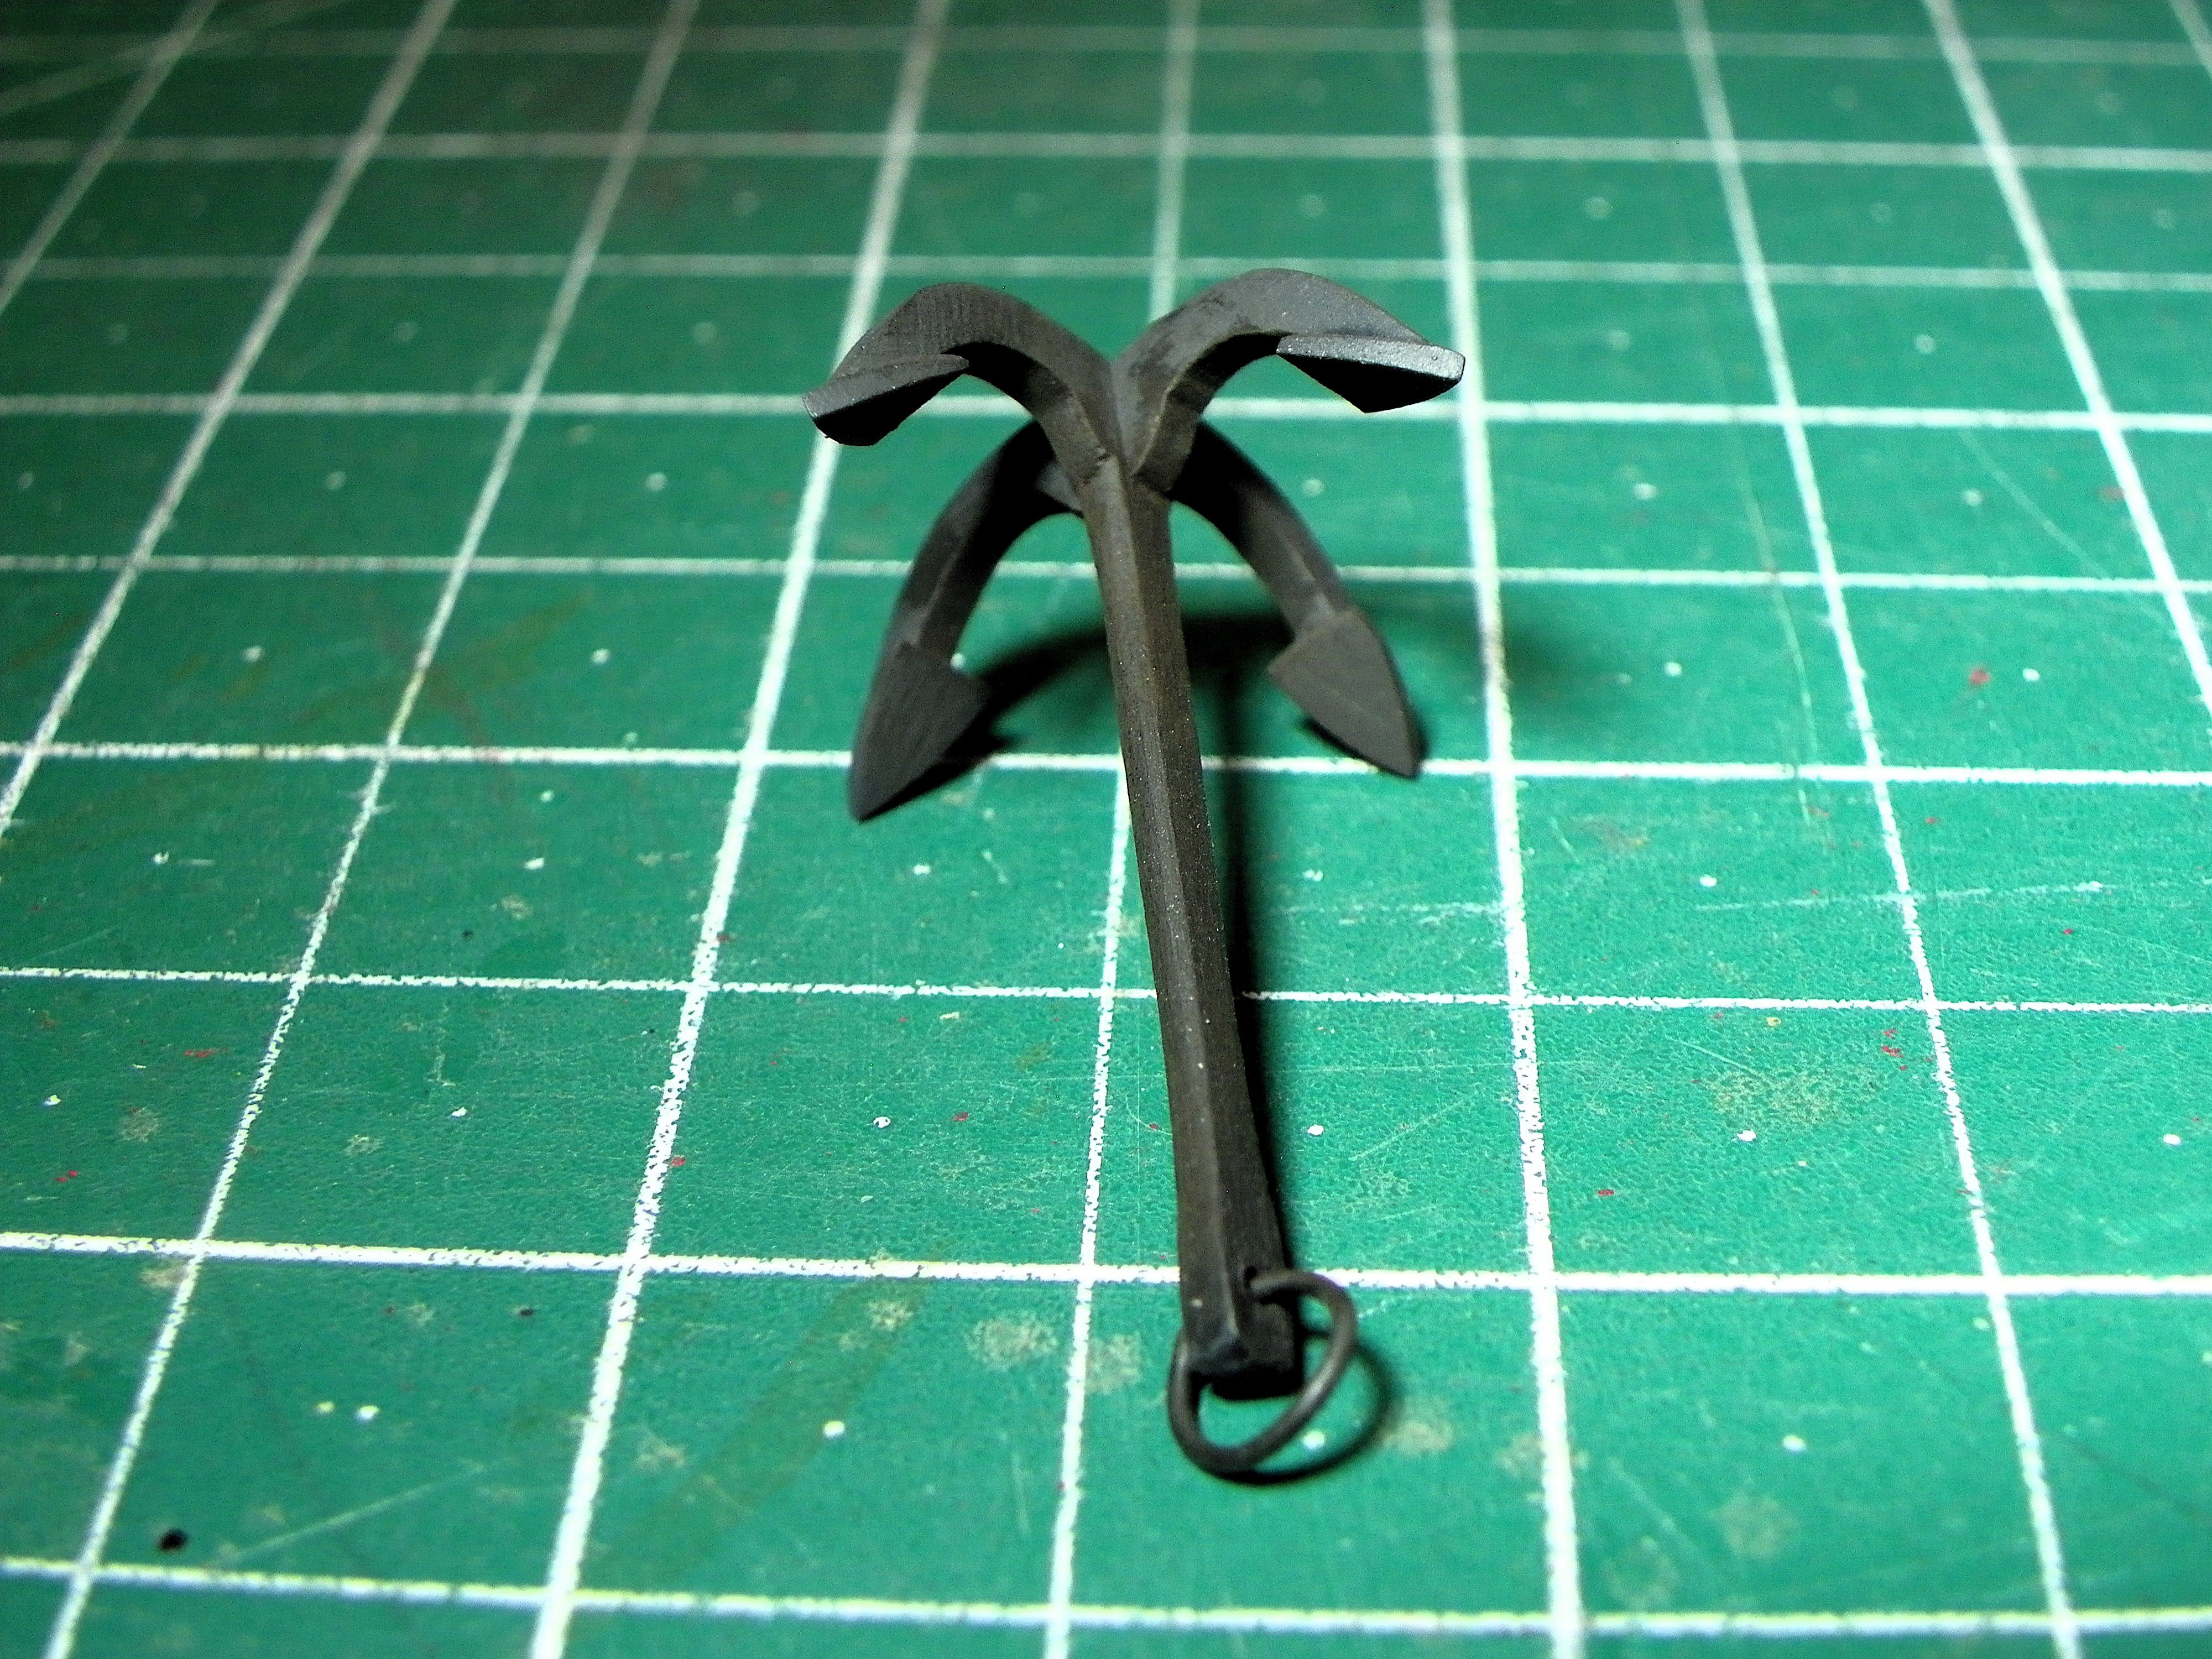
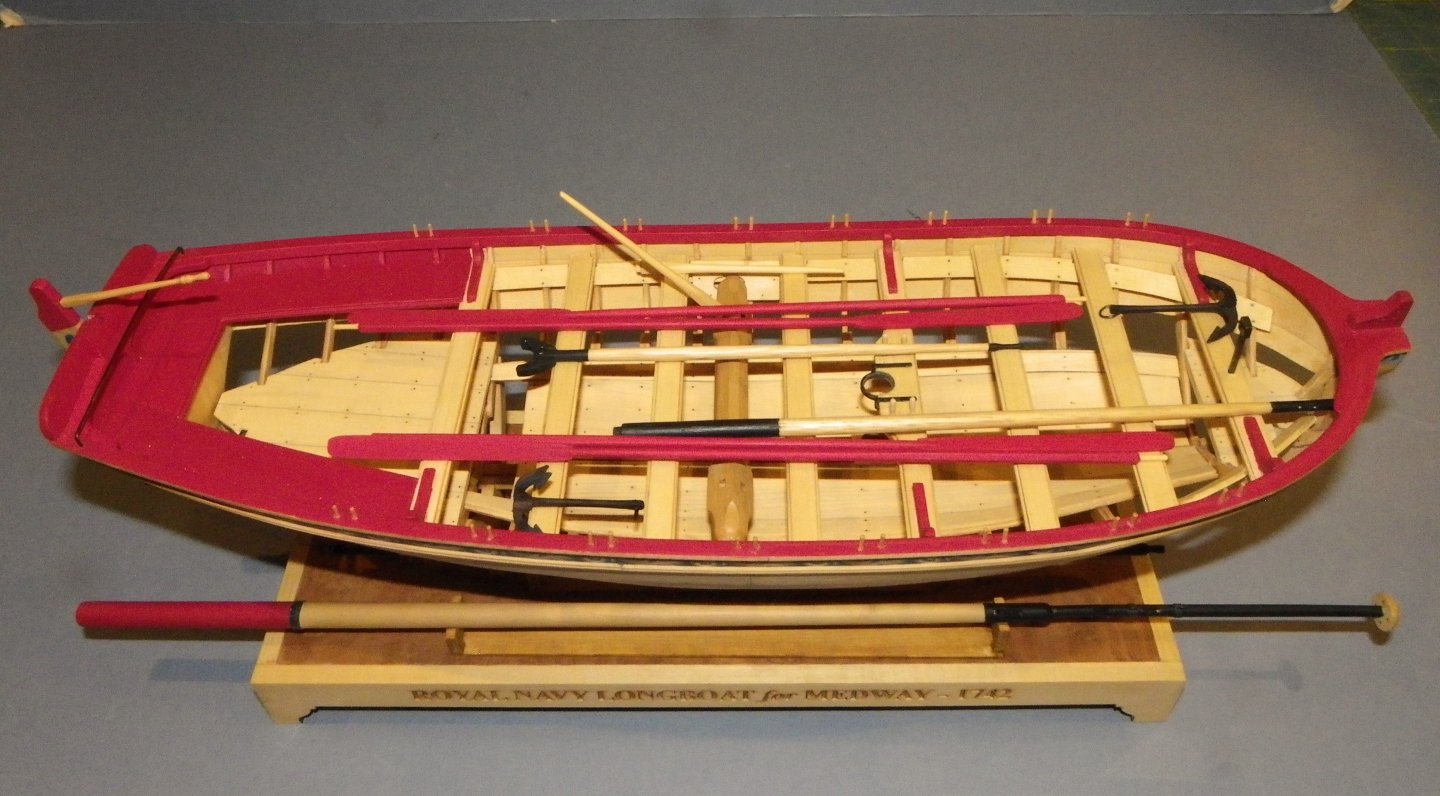
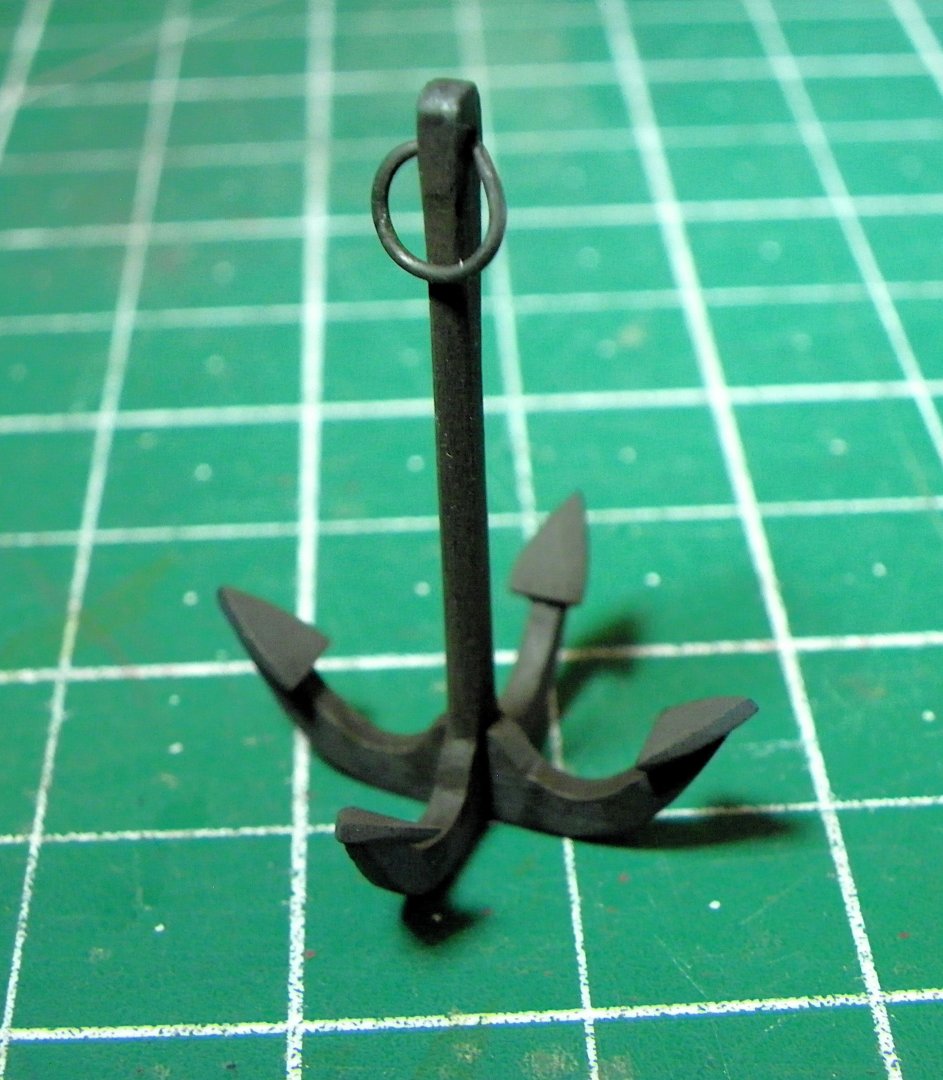
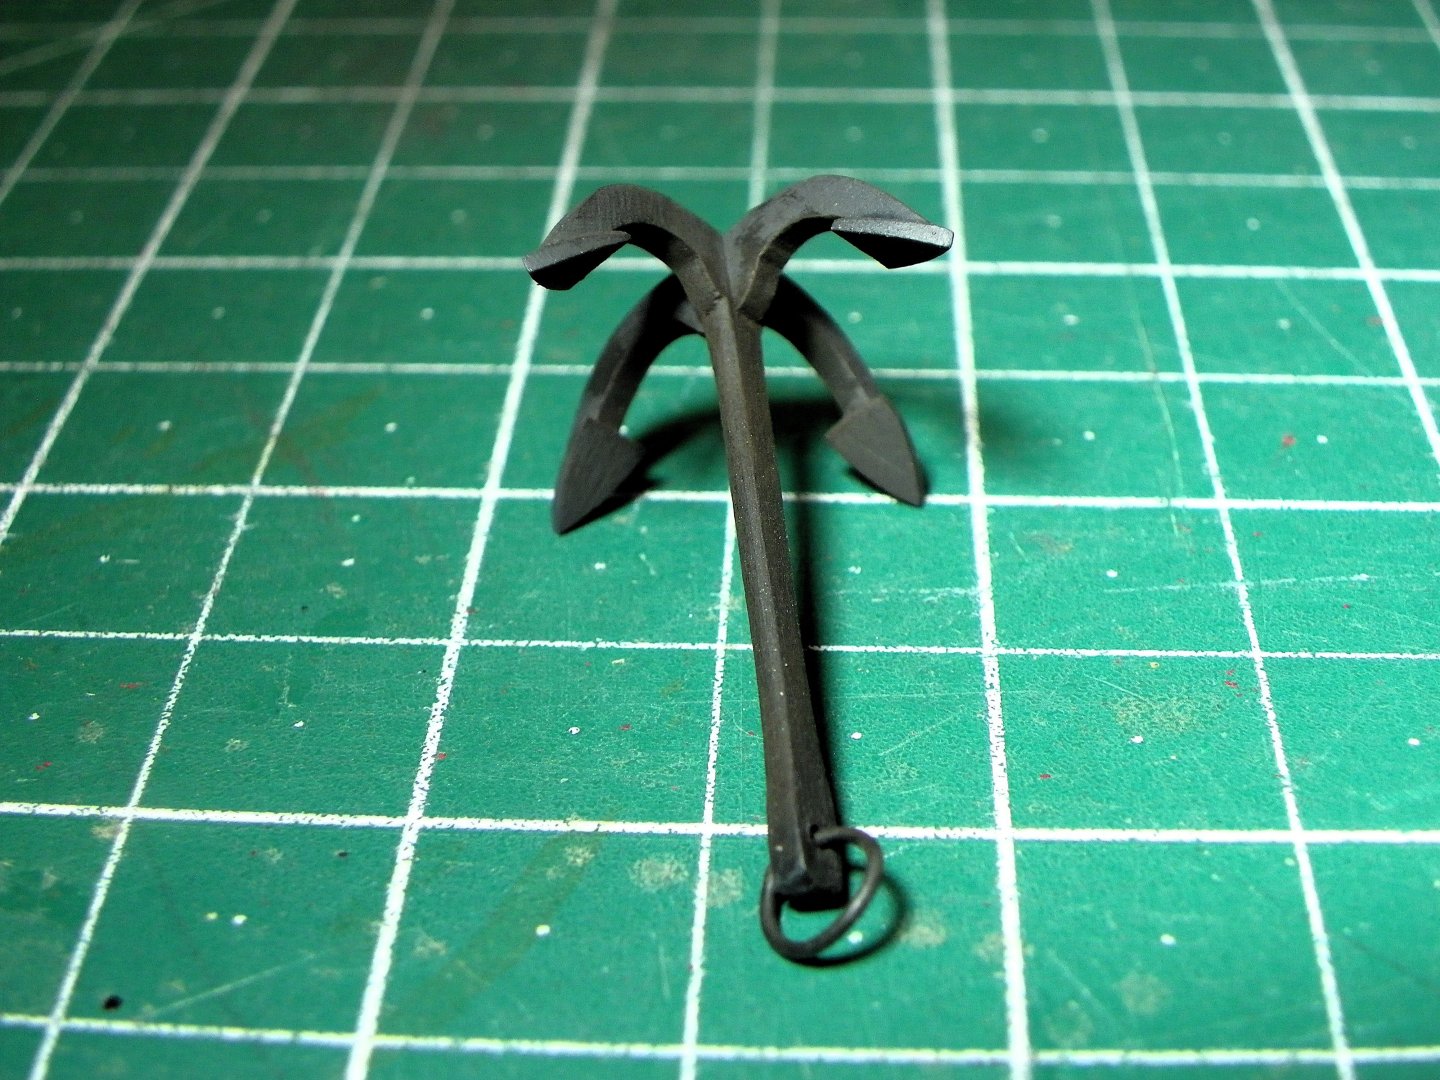
Post 37 Display stand. Chuck has provided a handsome display stand for the Longboat, but an open framed version presents stability issues. 0450 The fore (lower) support sits ok beneath the fifth frame from the bow. 0449 The aft support fits best beneath the sixth frame from aft but requires some trimming to contact both the keel slot and the frame. 0451 Fairly easily done by siting the support behind the frame and marking the line. At this point the char has been removed but the w-o-p finish will be deferred until the base is made. As built by Chuck. The provided base is nicely presented with a burr veneer top and engraved text. I am keen to utilise this but as I wish to display the mast and spars with the model, I may need a longer sub- base to accommodate them. This can wait for the time being. Grapnel The Longboat kit contains two grapnels which as with the Cheerful anchors are supplied in wood. I don’t have an issue with this and a realistic finish can be obtained with the use of weathering powders. Even so the current trend is for Resin anchors, such as now supplied by Vanguard models, which will surely replace both metal and wooden versions in the fullness of time. The Grapnel is nicely made but I did tweak it slightly adding a bevel down the shaft, a slight thinning of the arms, and a thinning of the palm edges. A ring was made using 0.7mm wire chemically blackened. 0464 0468 0471 Vallejo Matt black paint was used for the colour followed by Dark Brown weathering powders. 0472 0473 0478 0480 0482 0483 0486 Moving onto the Masts and spars B.E. 23/08/2024


- 131 replies
-
- 11
-
-
-
- Medway Longboat
- Syren Ship Model Company
- (and 1 more)
-
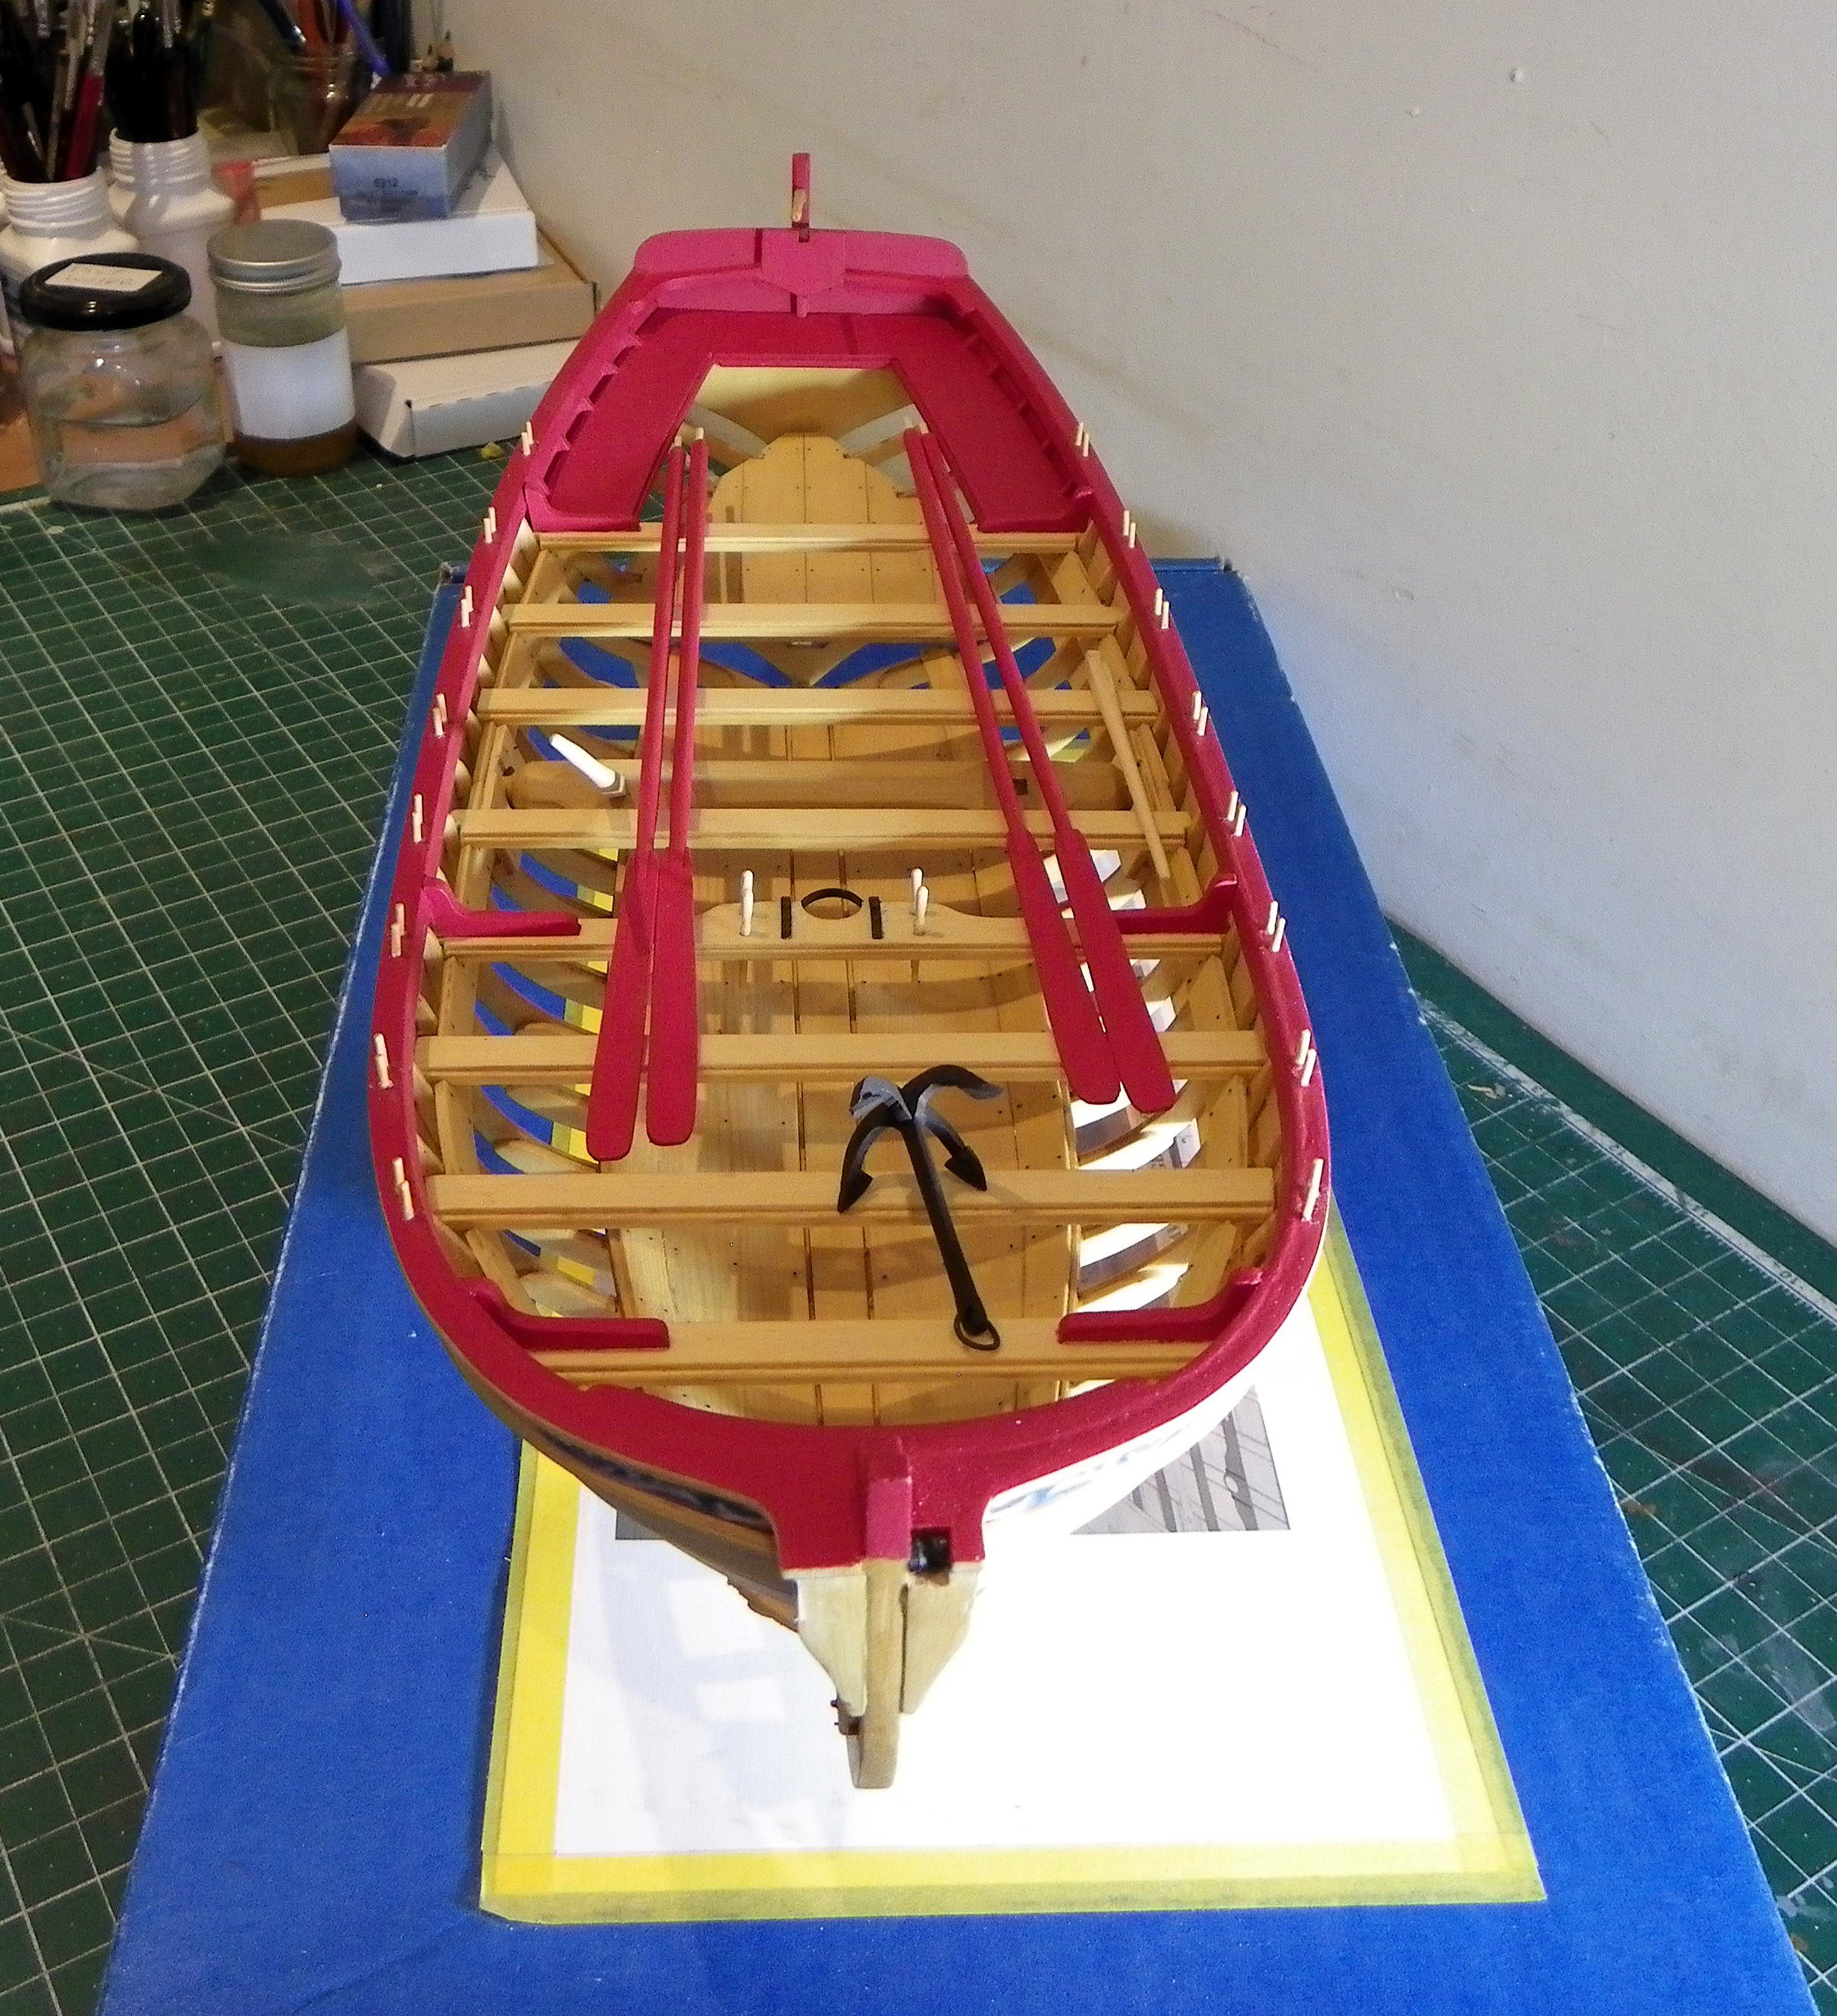
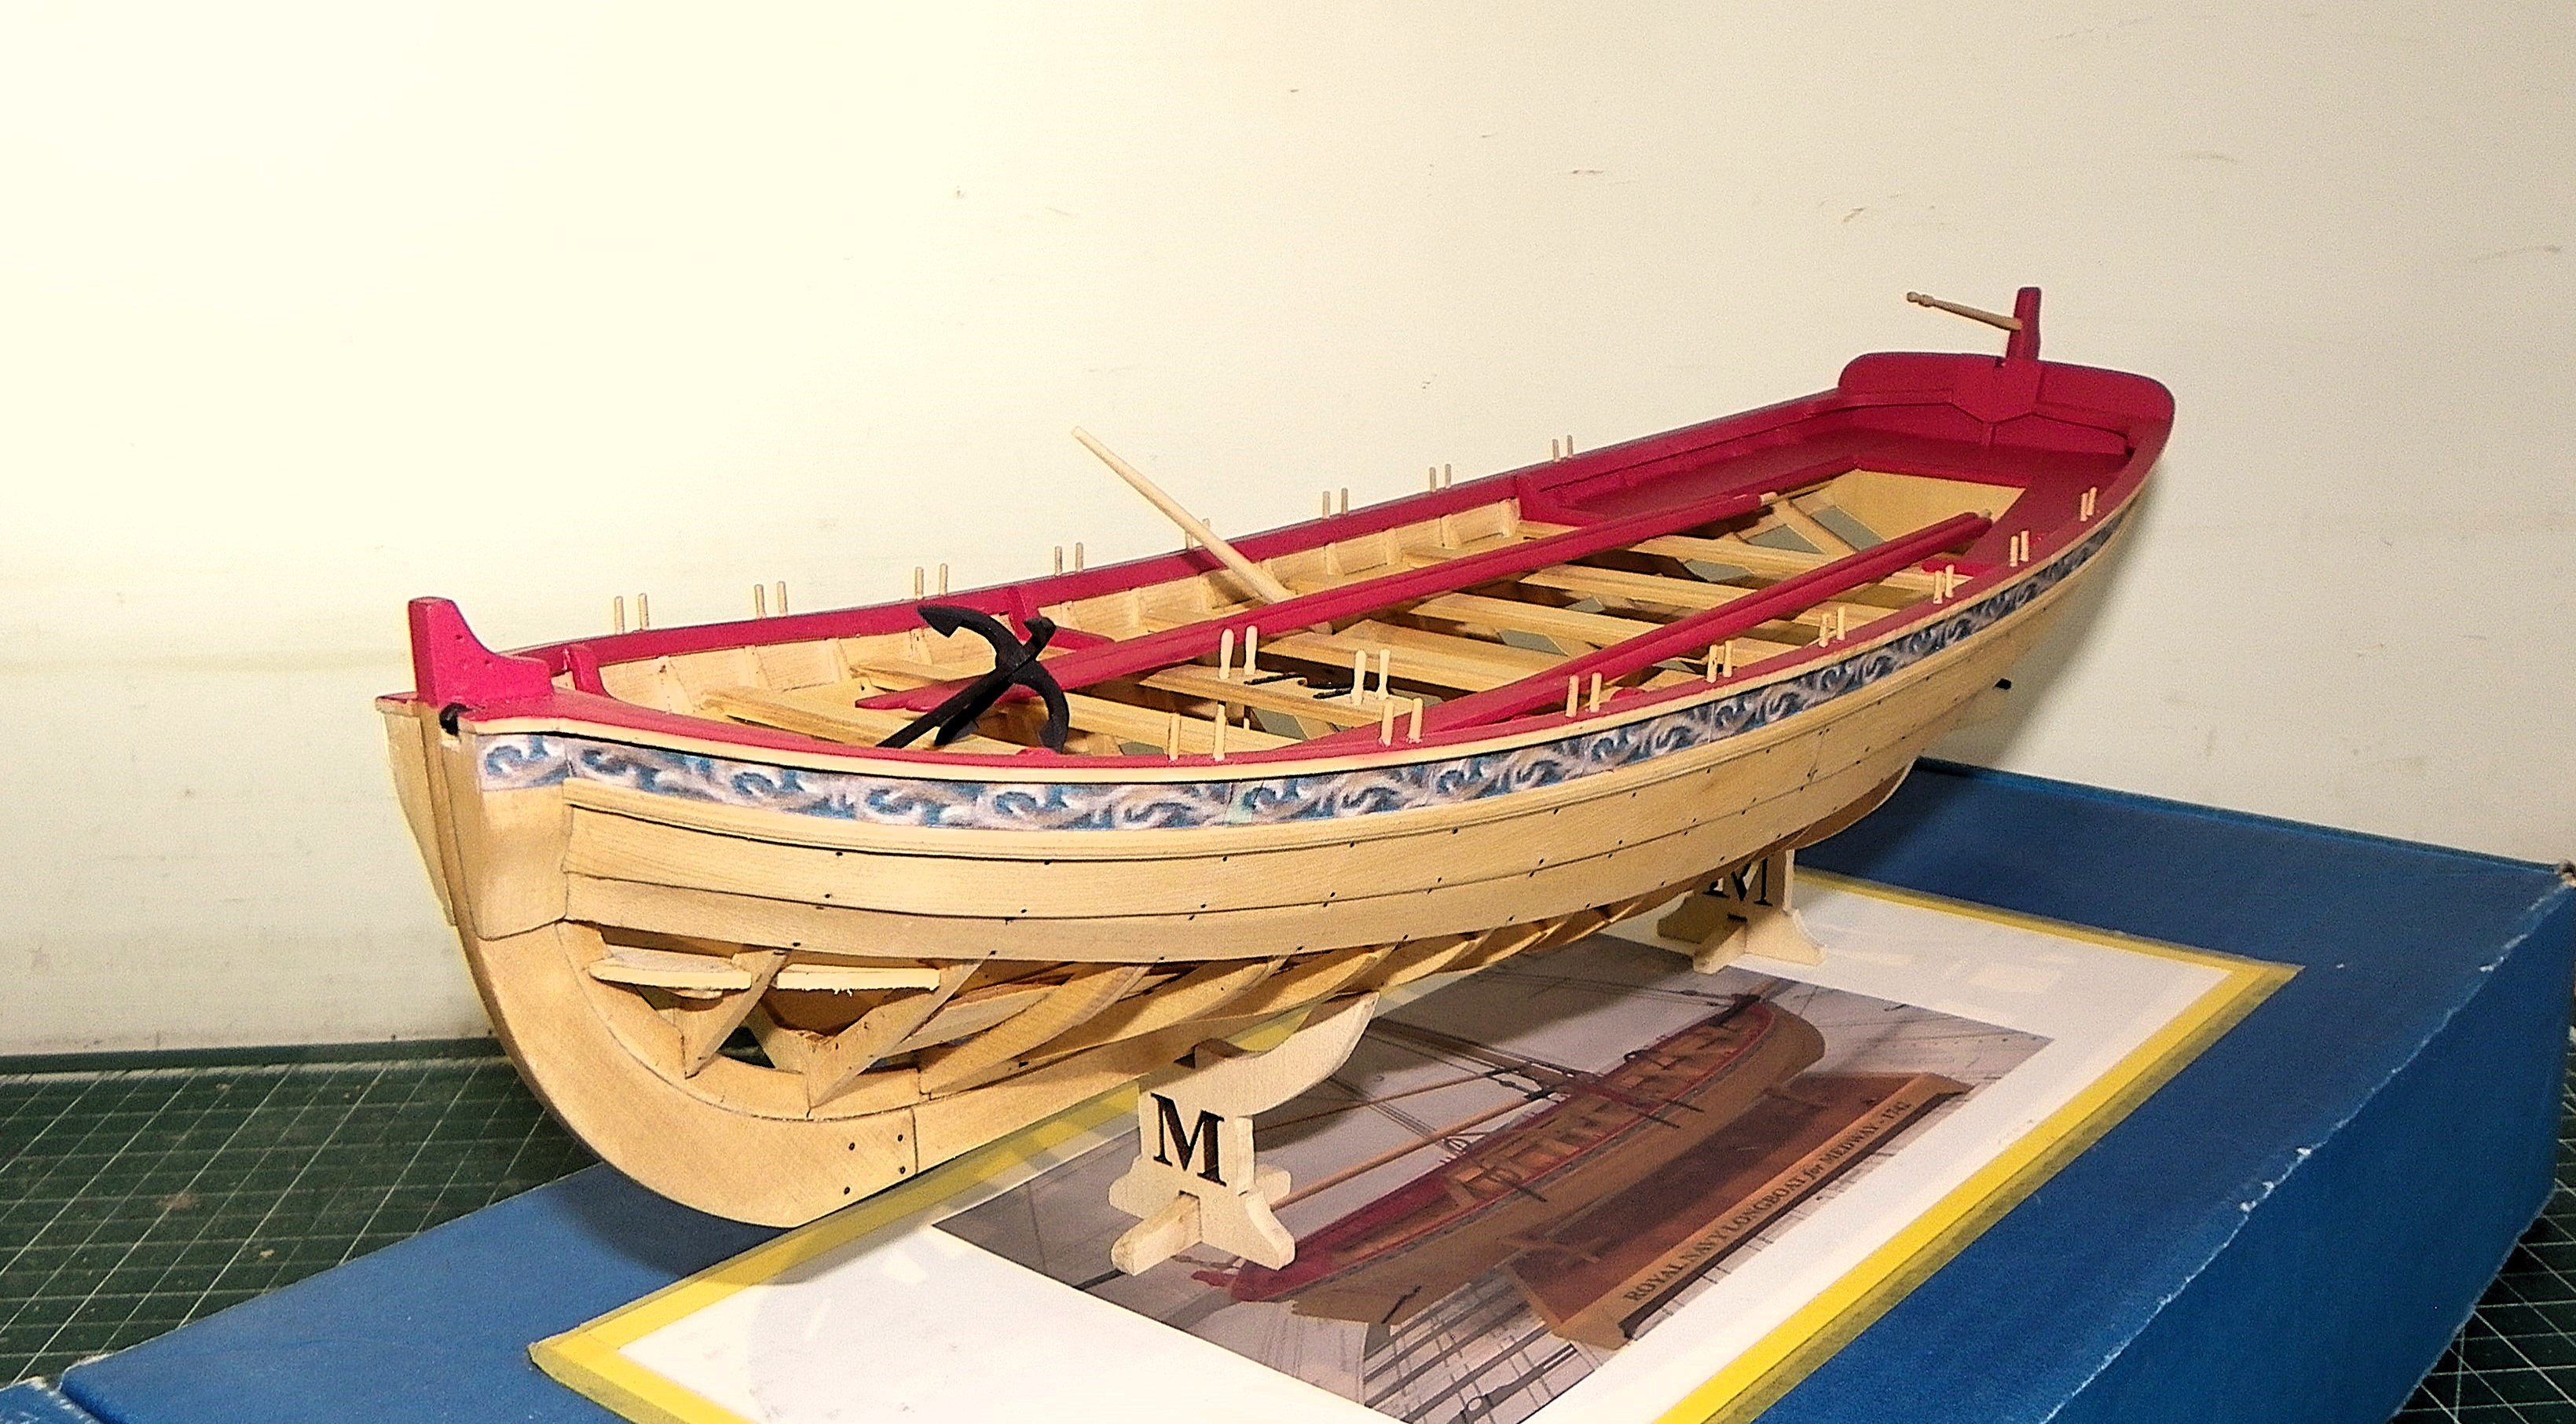
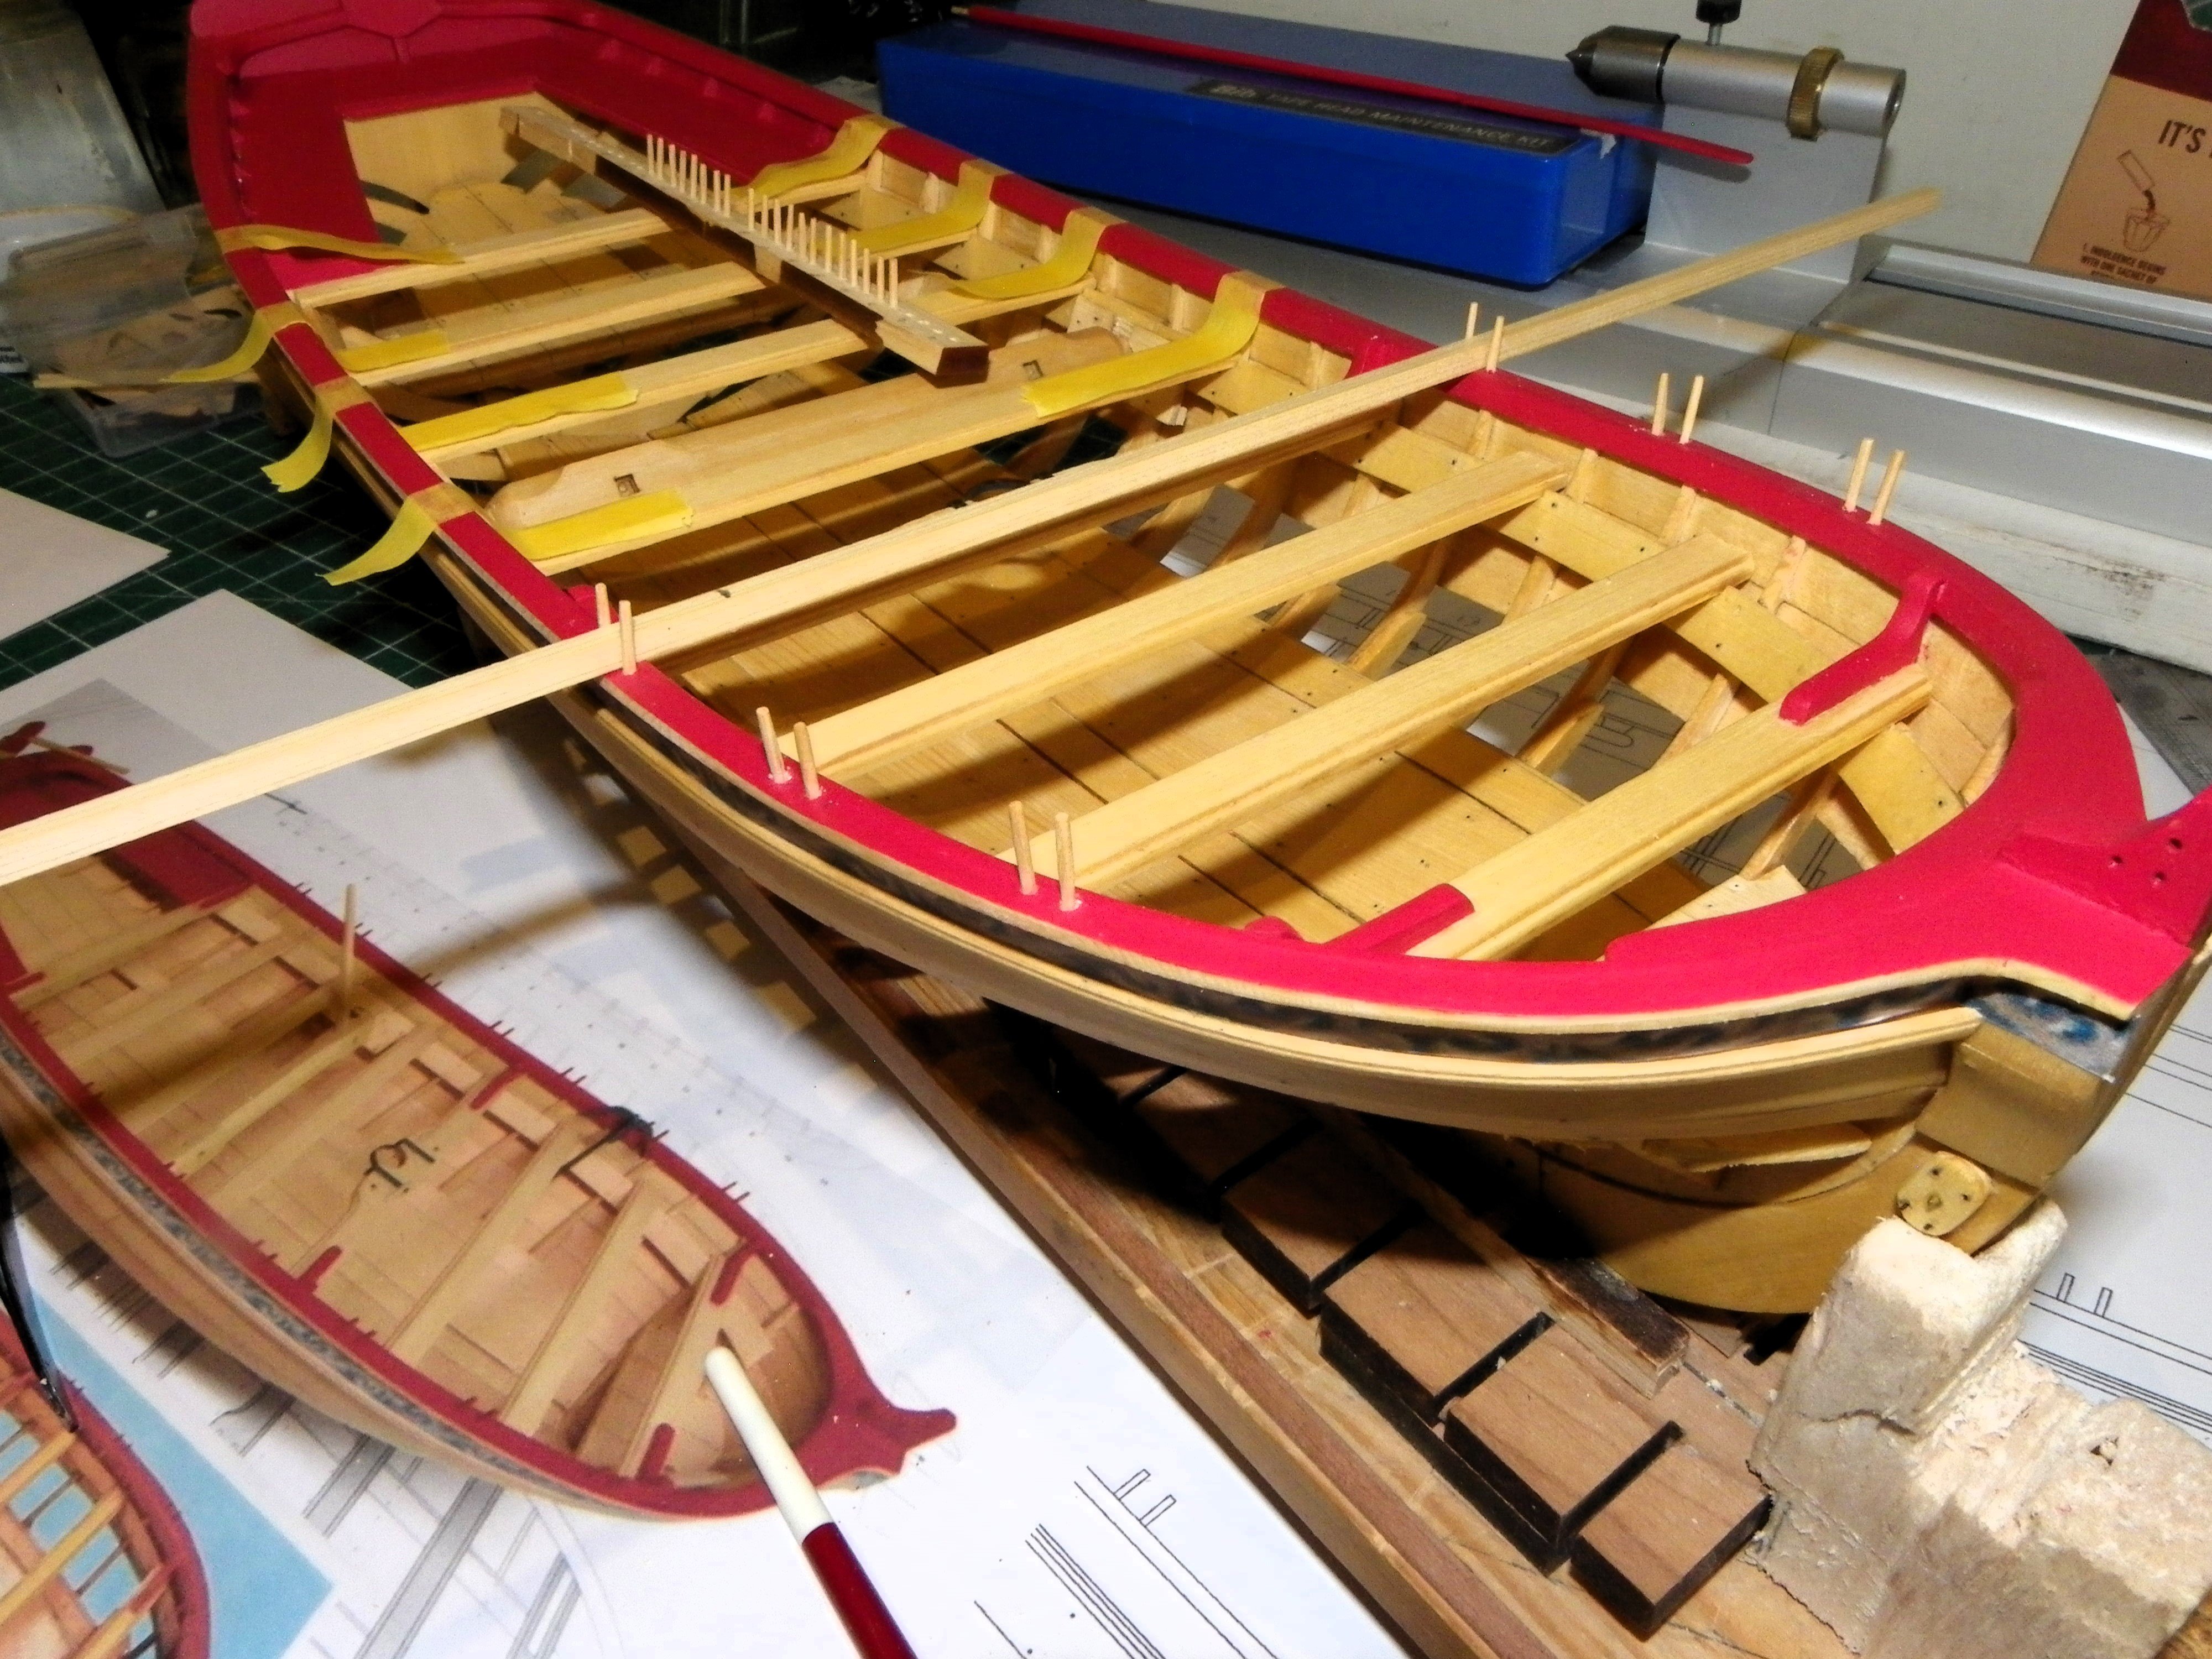
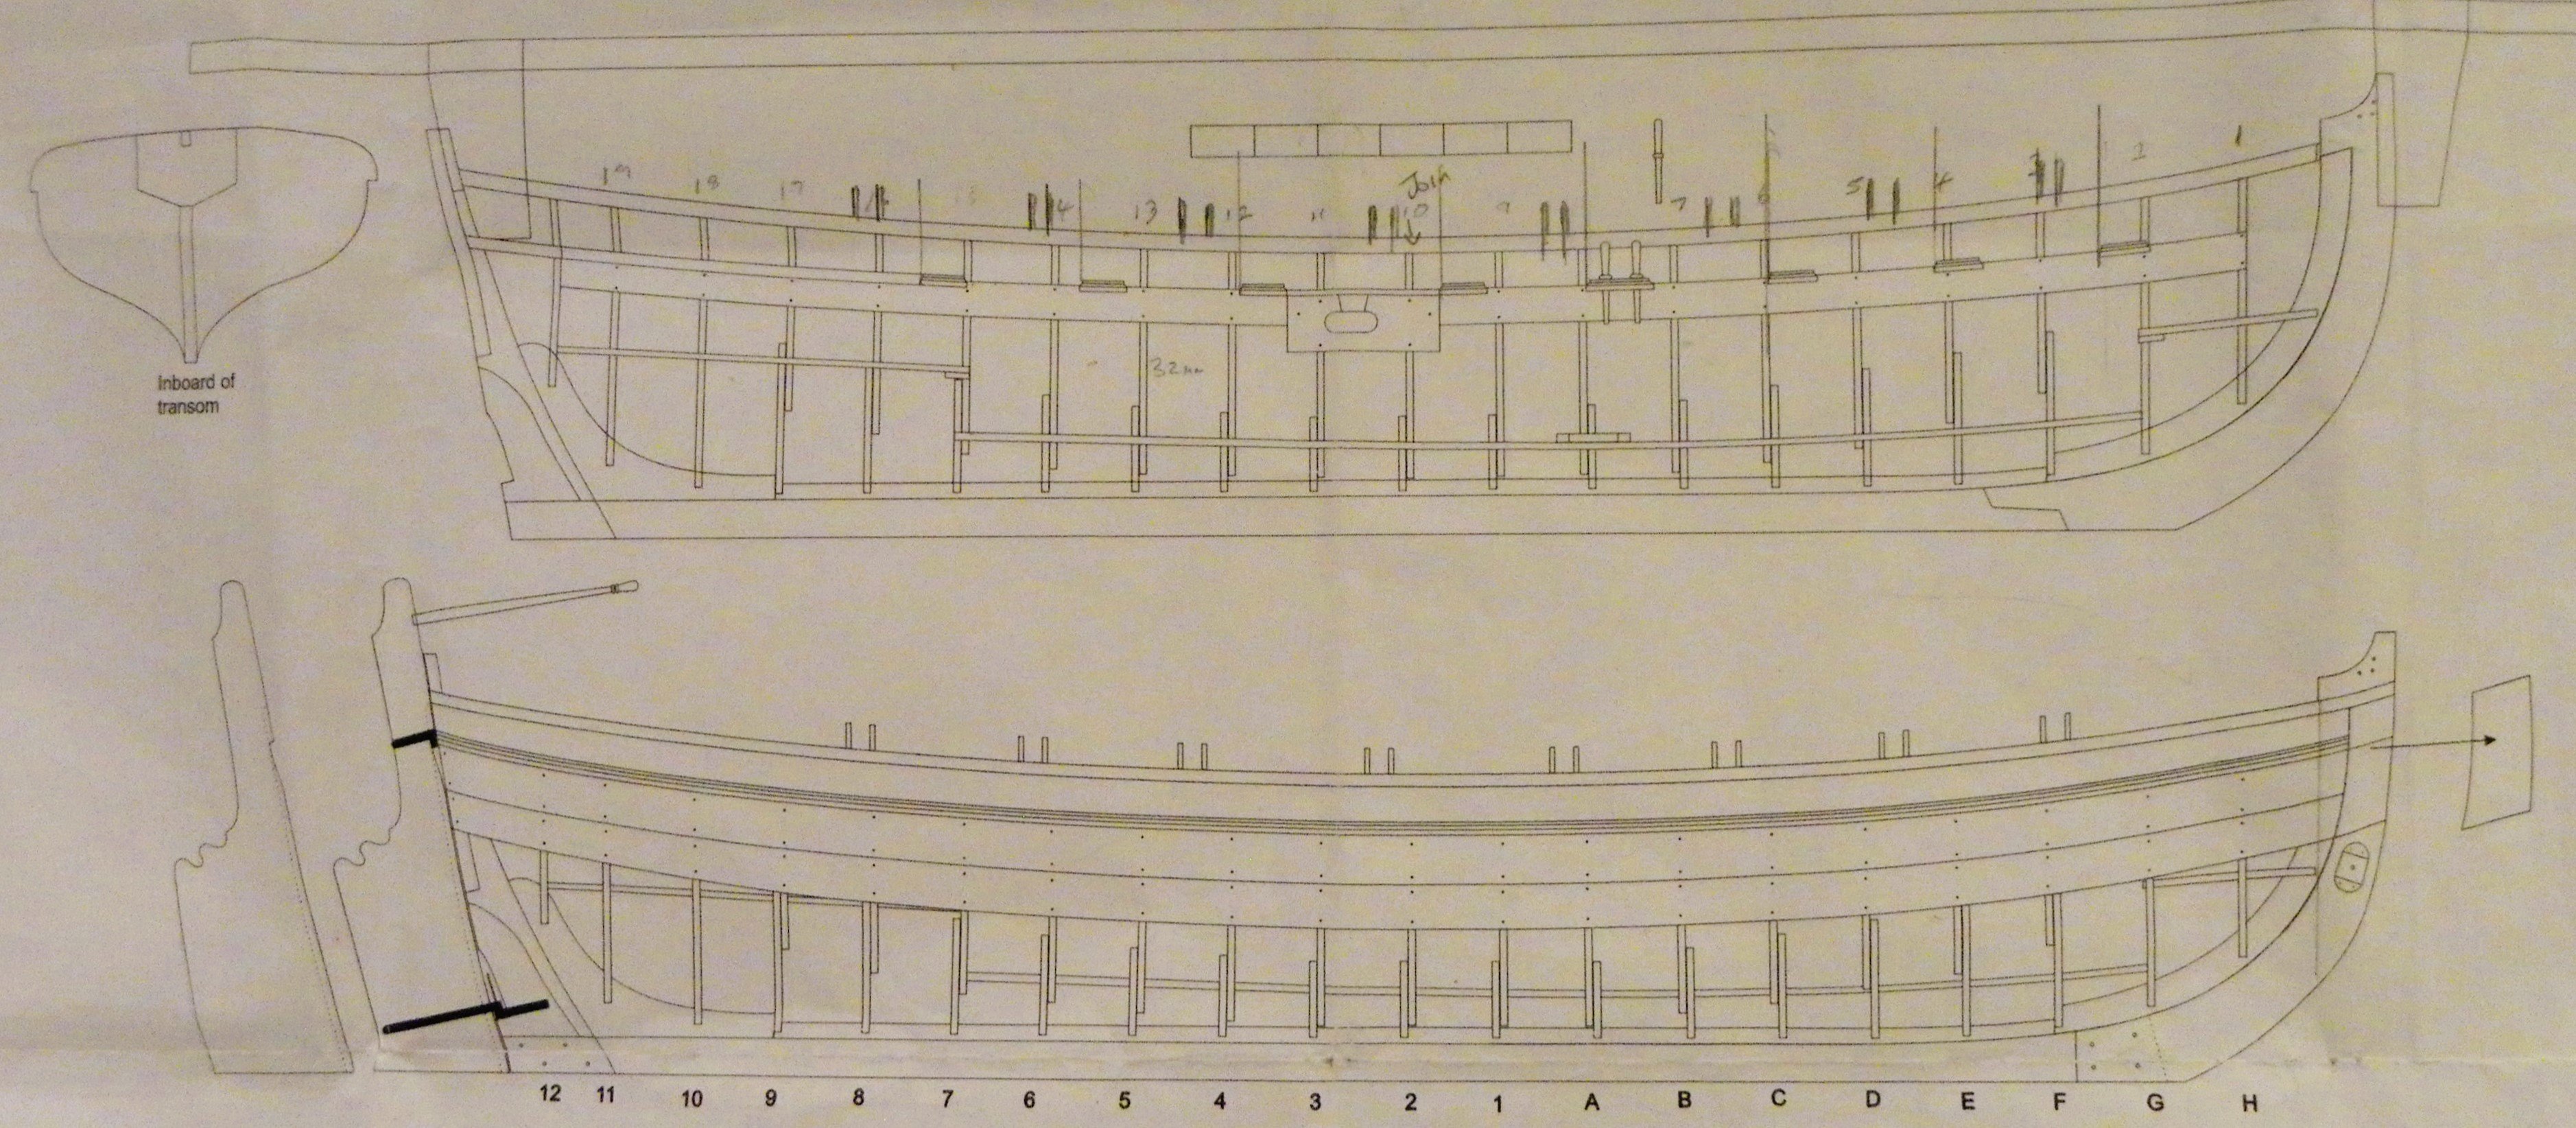
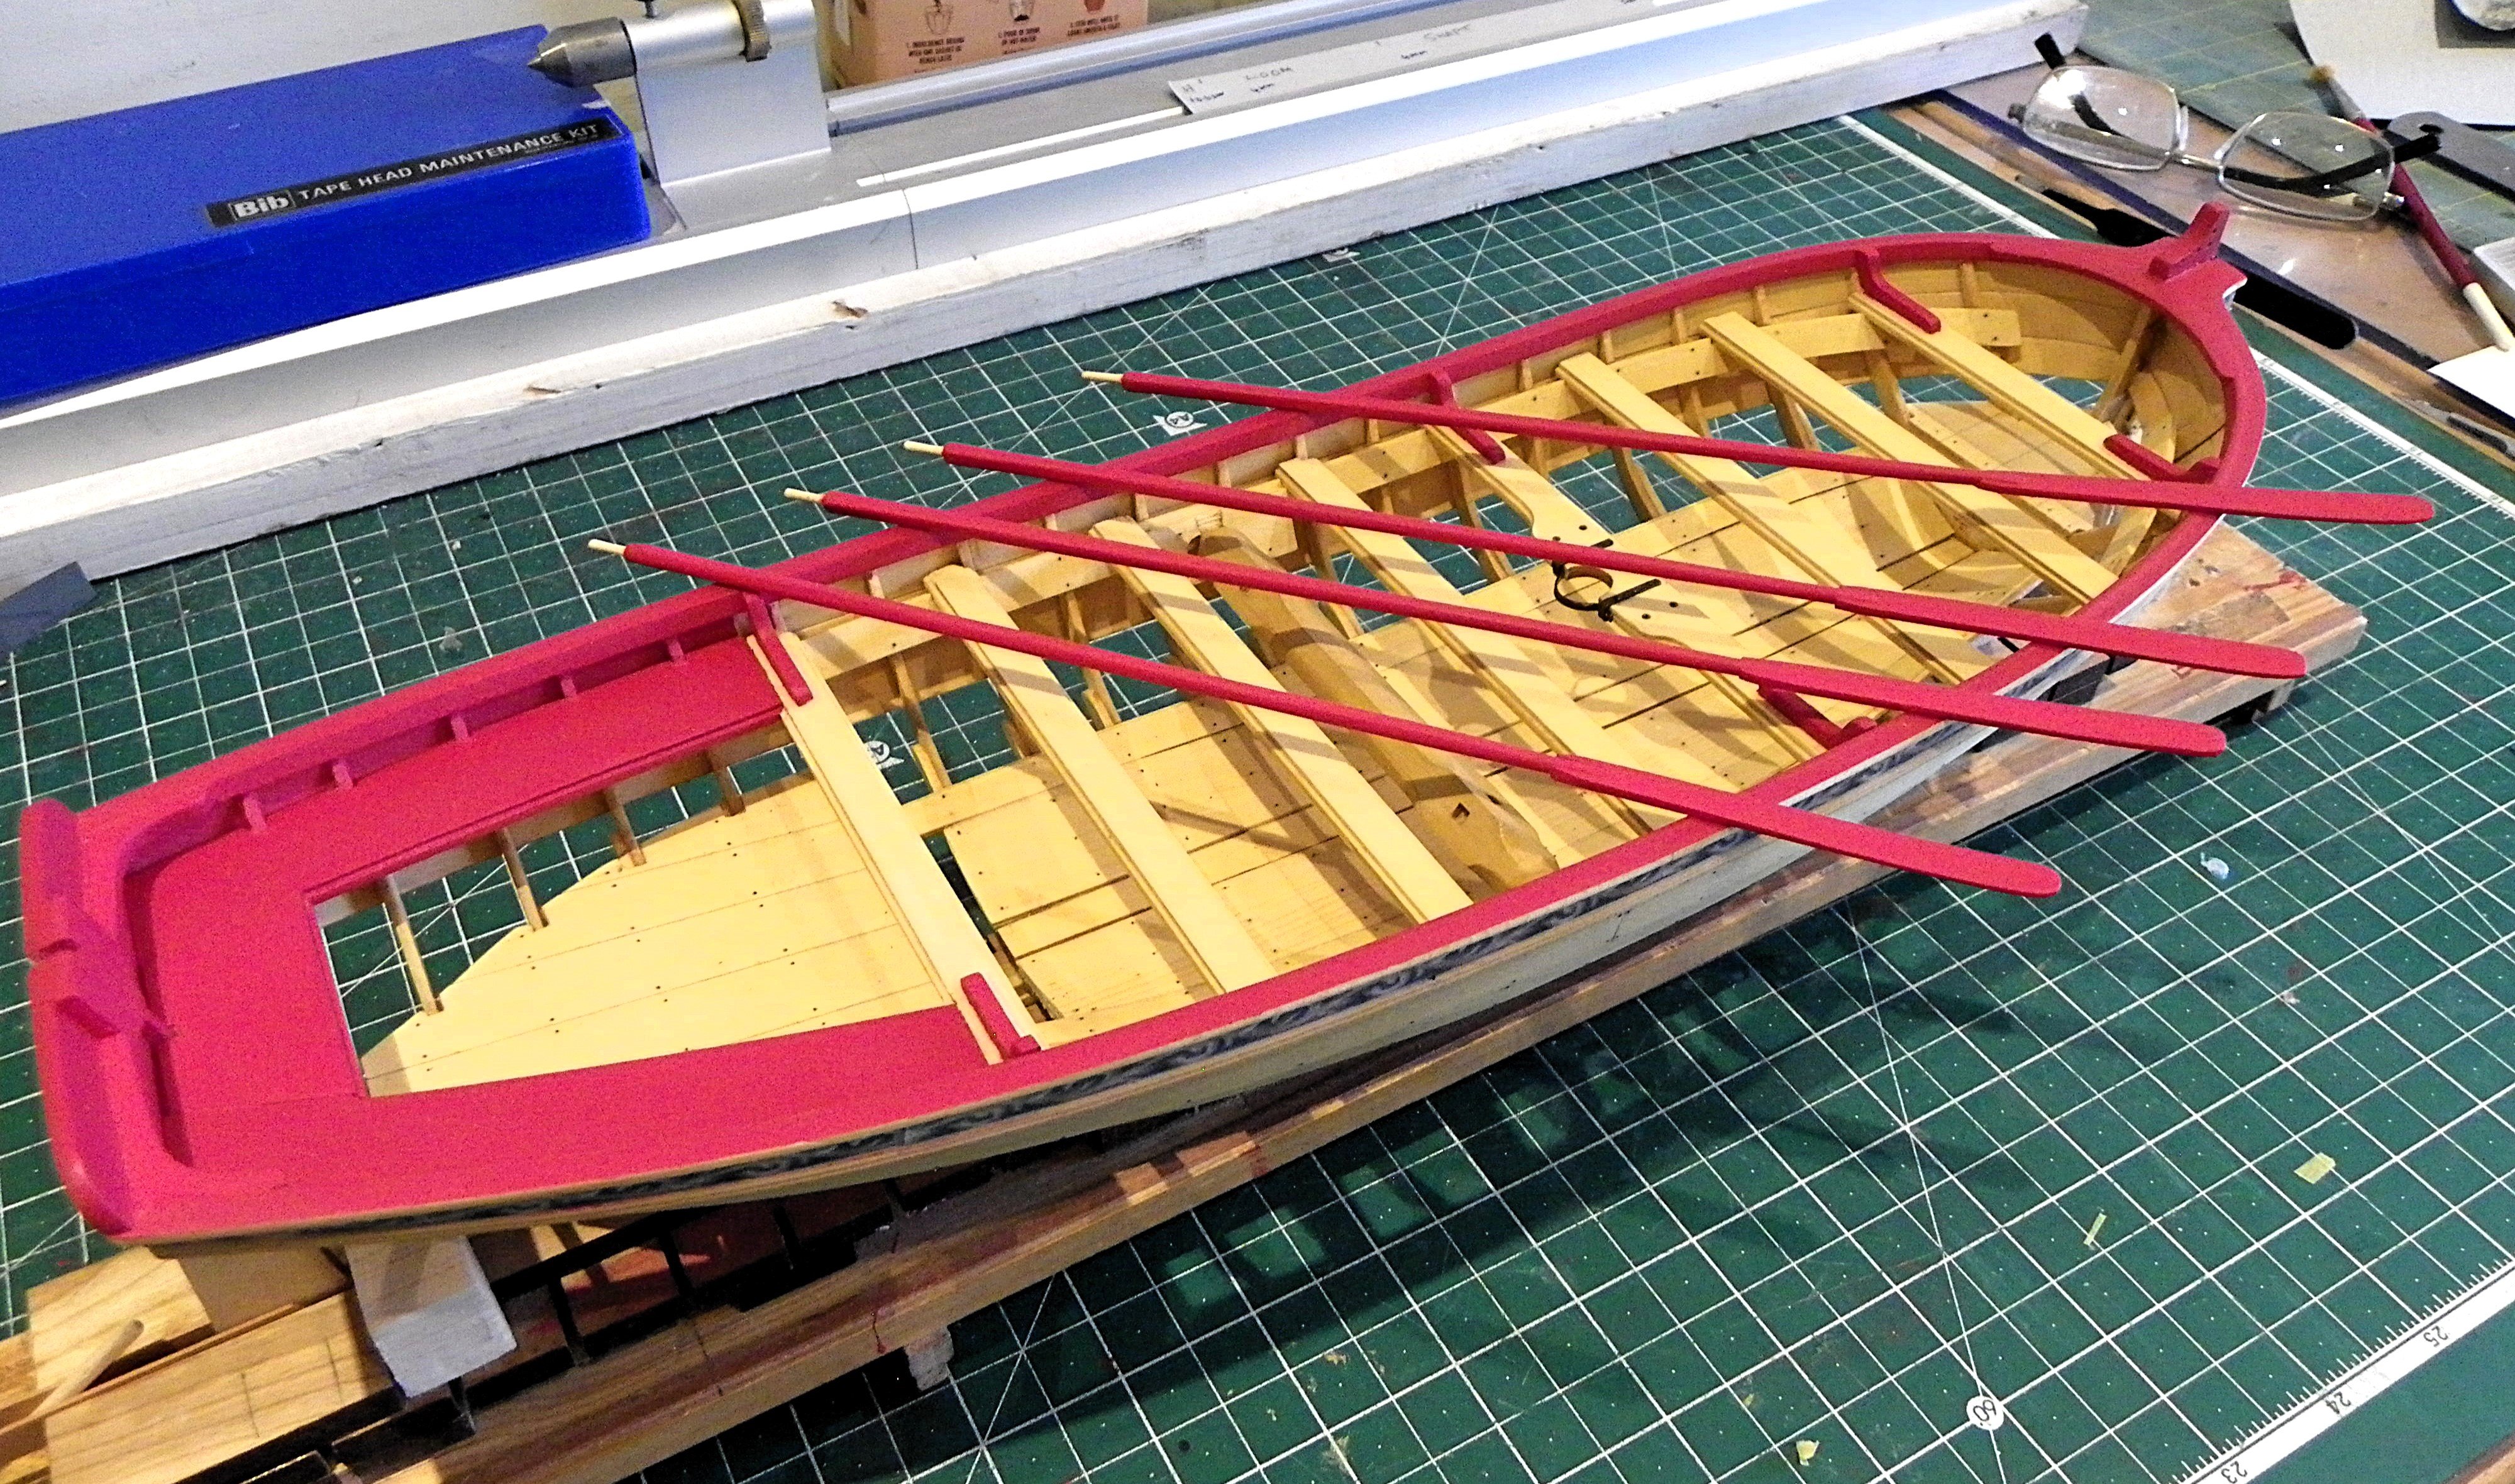
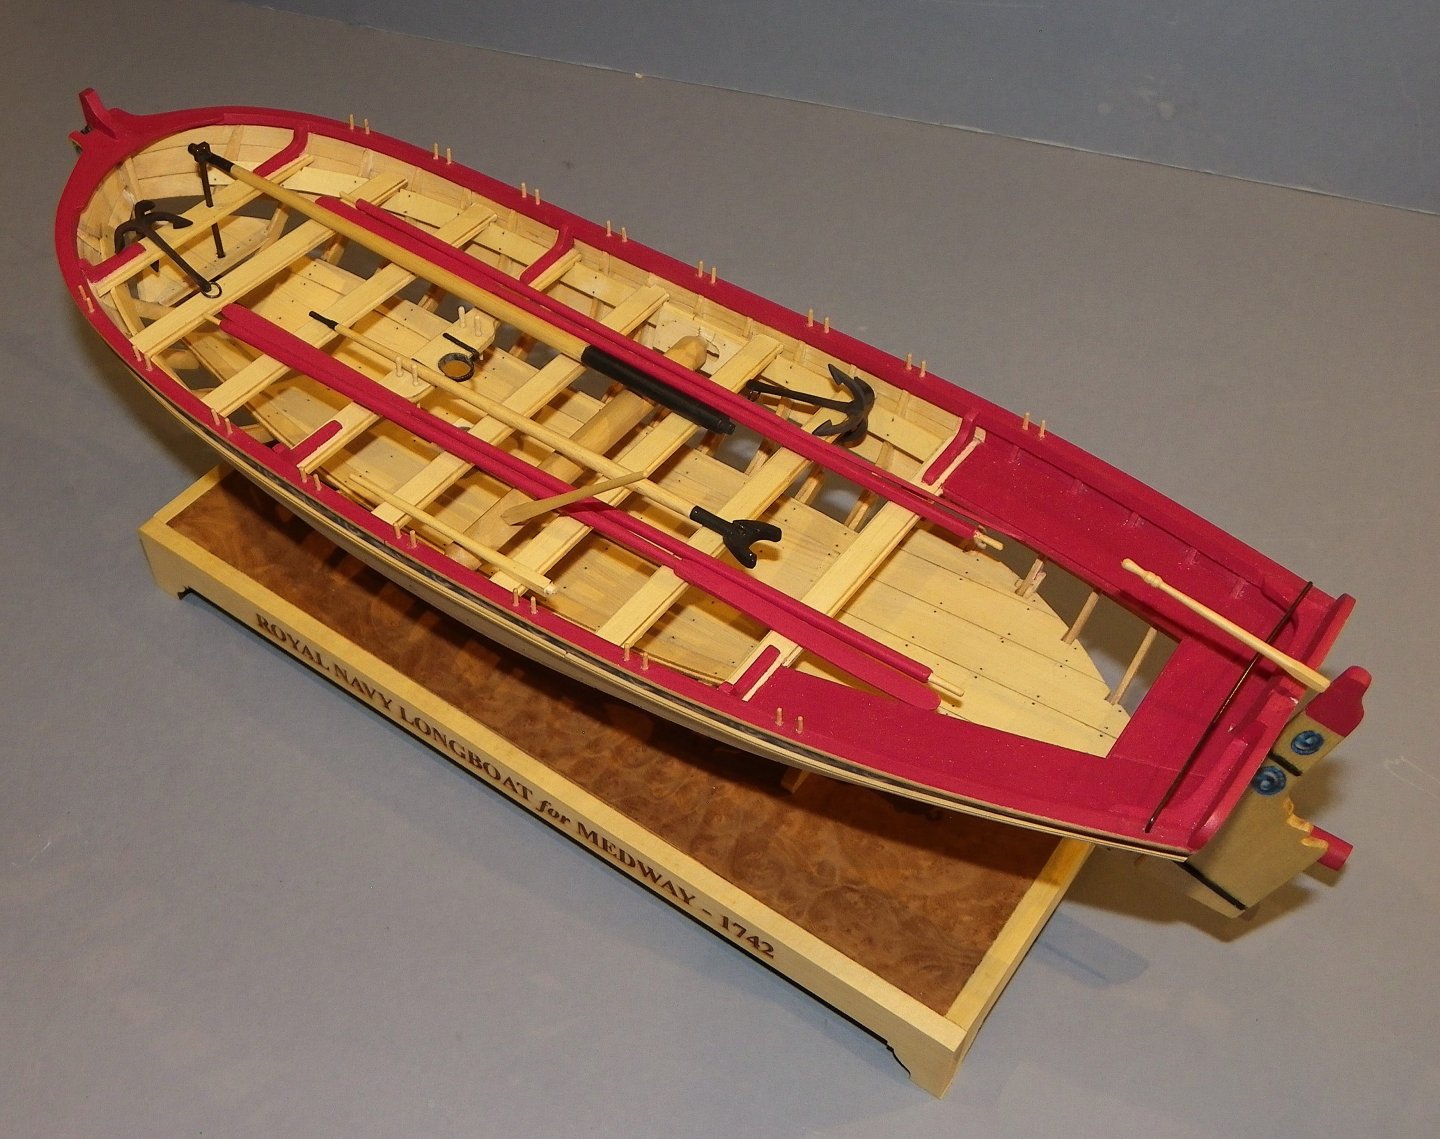
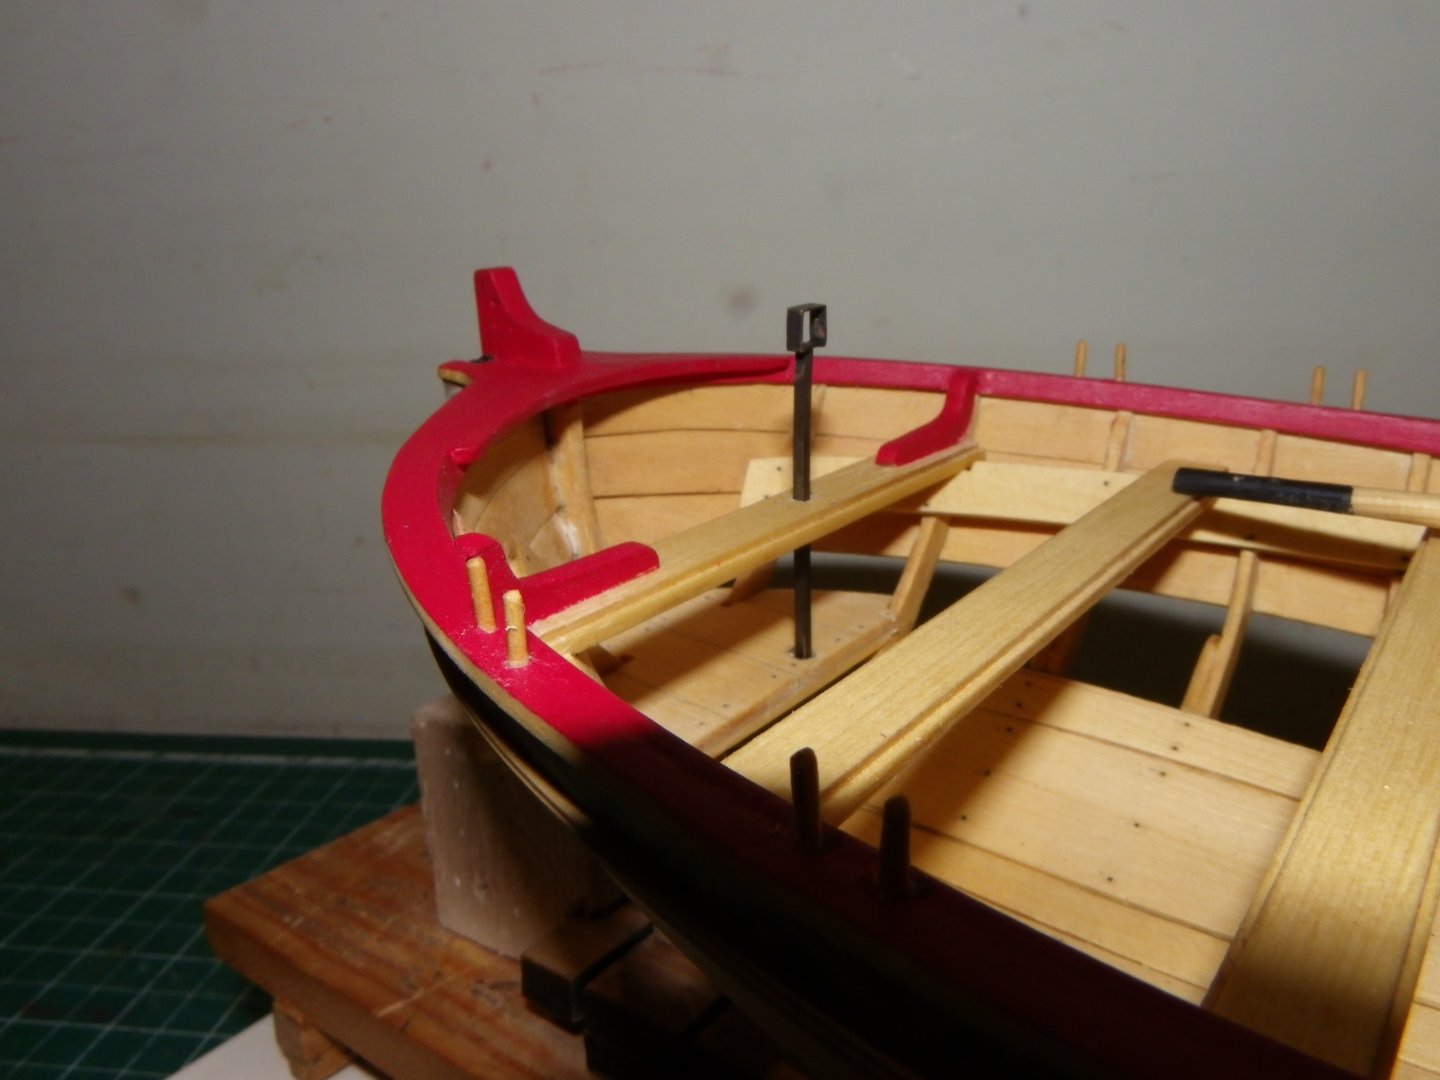
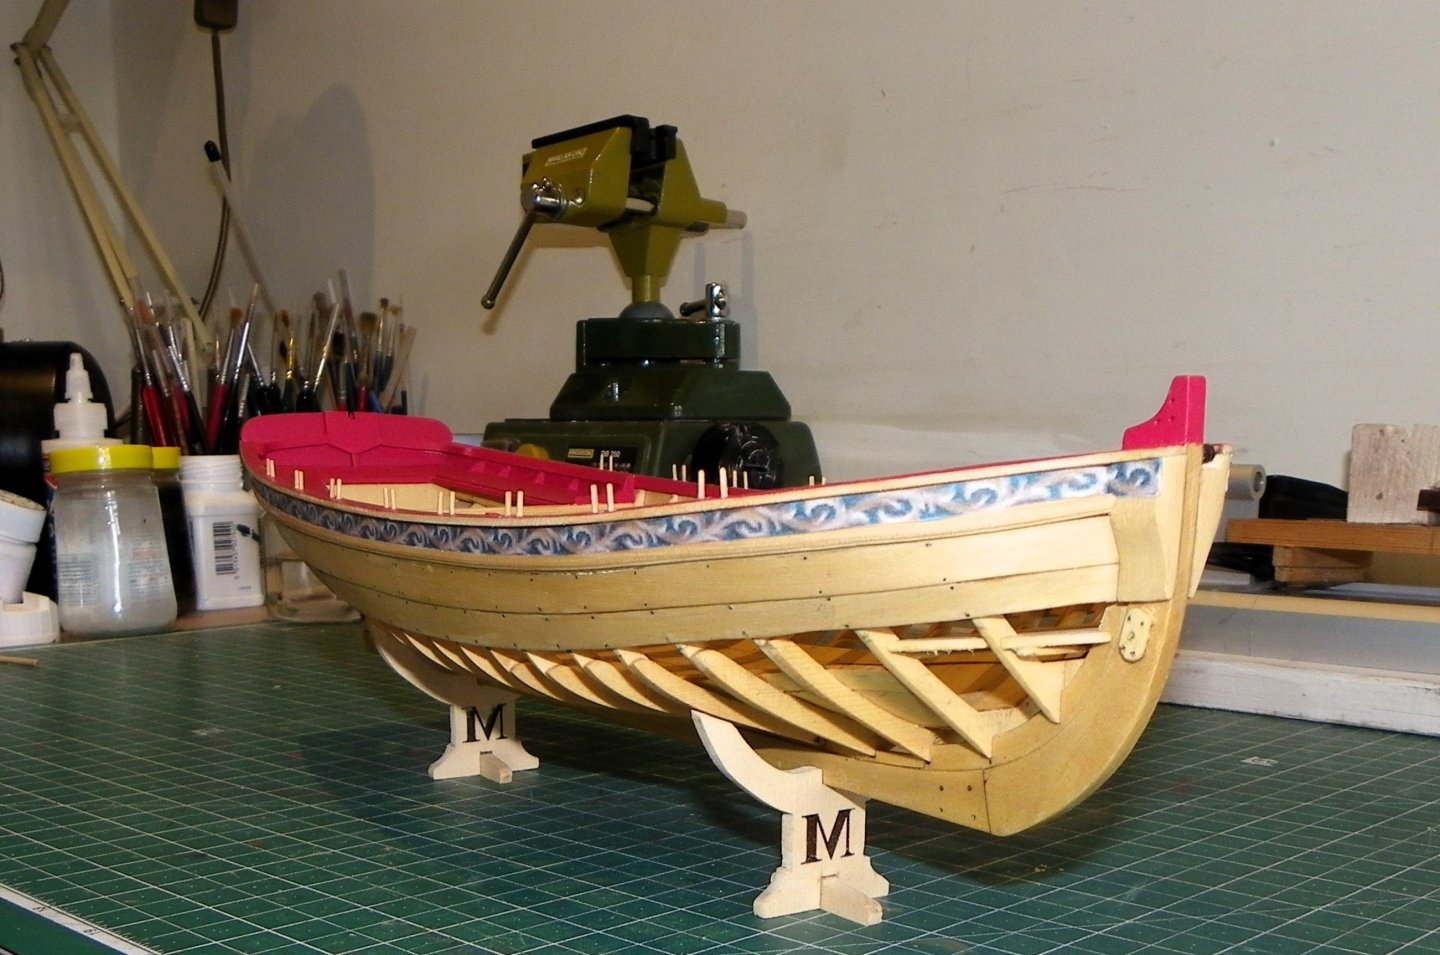
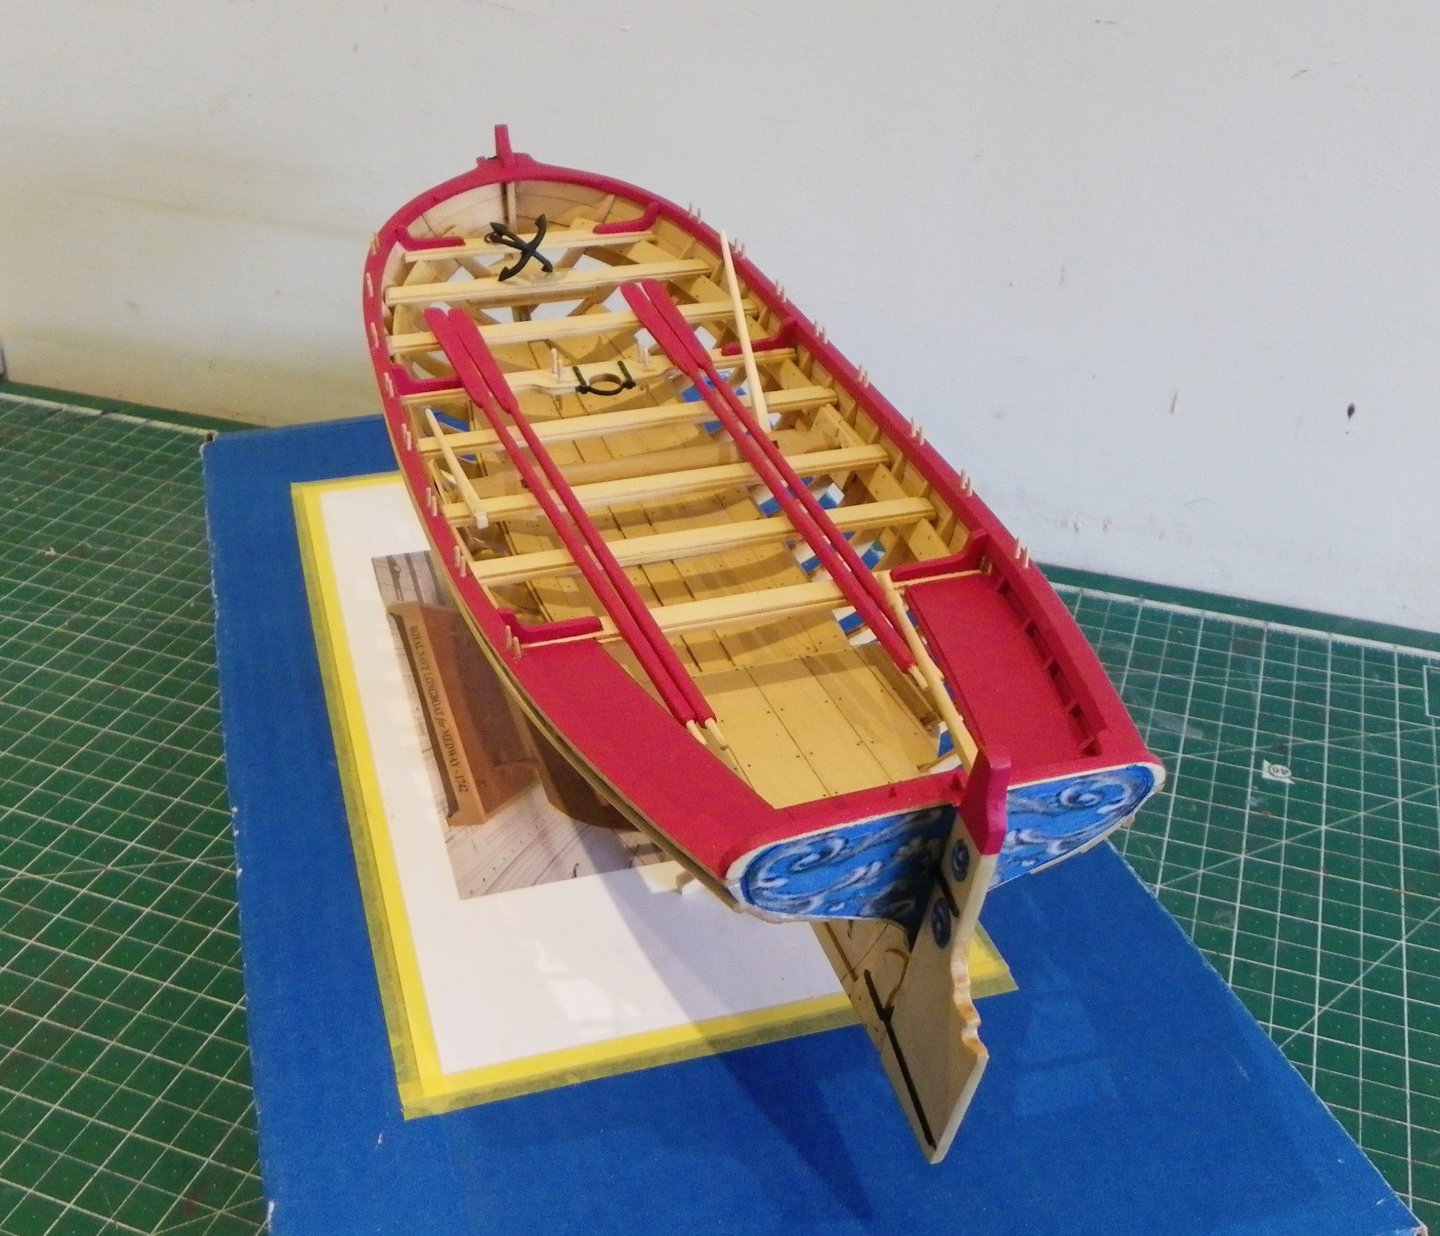
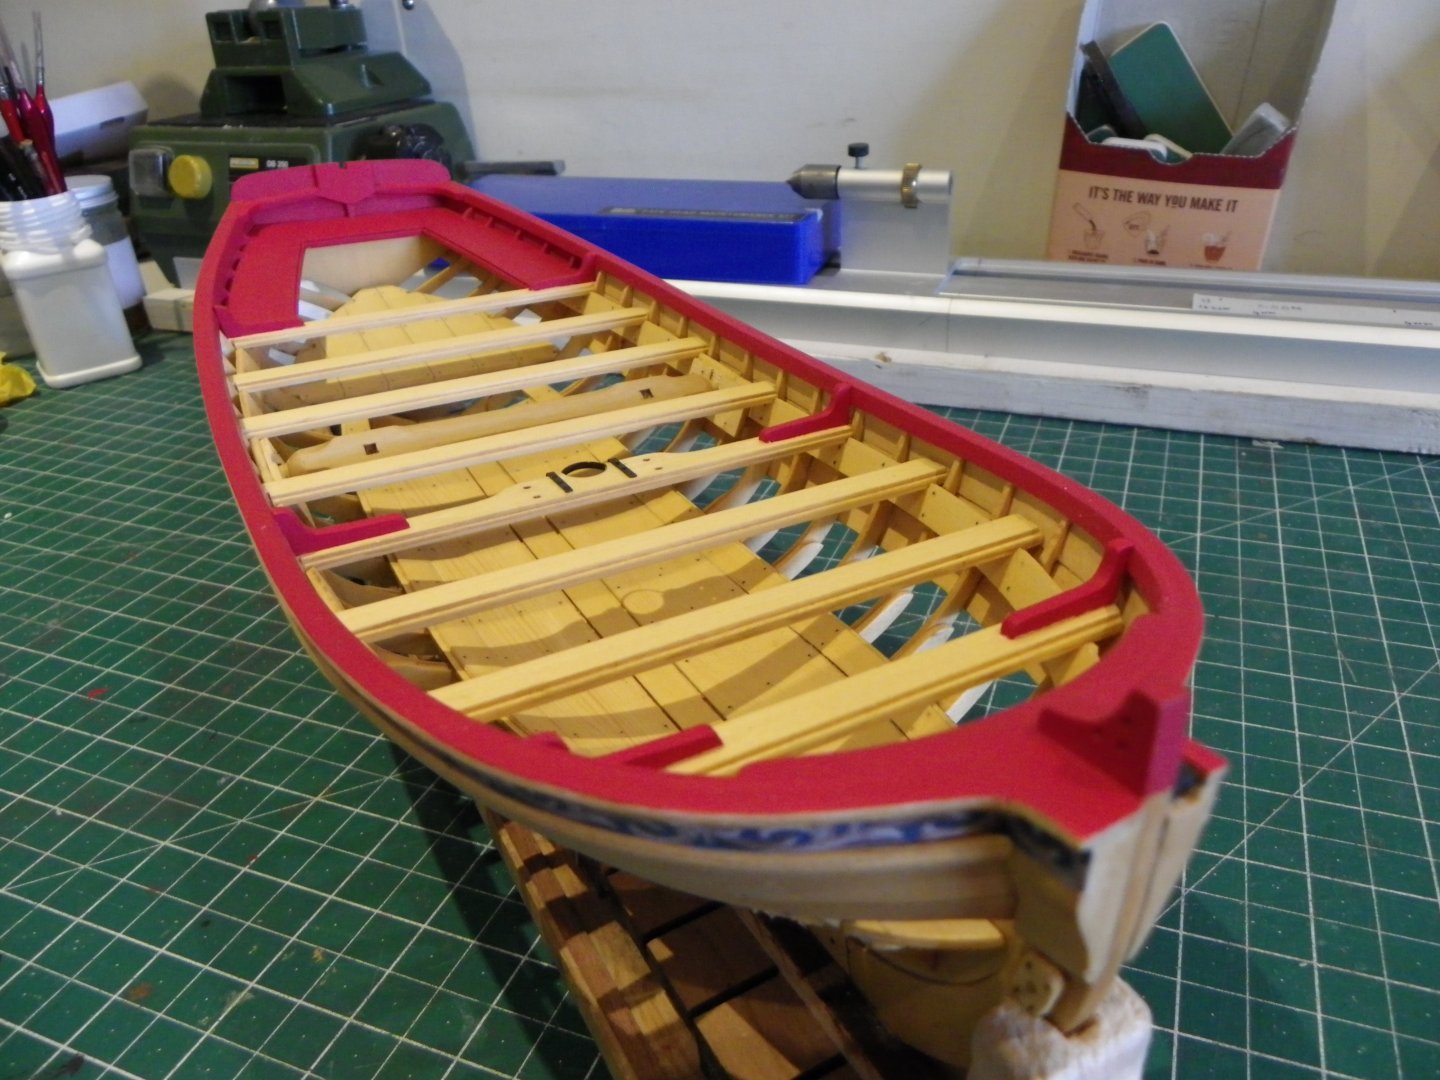
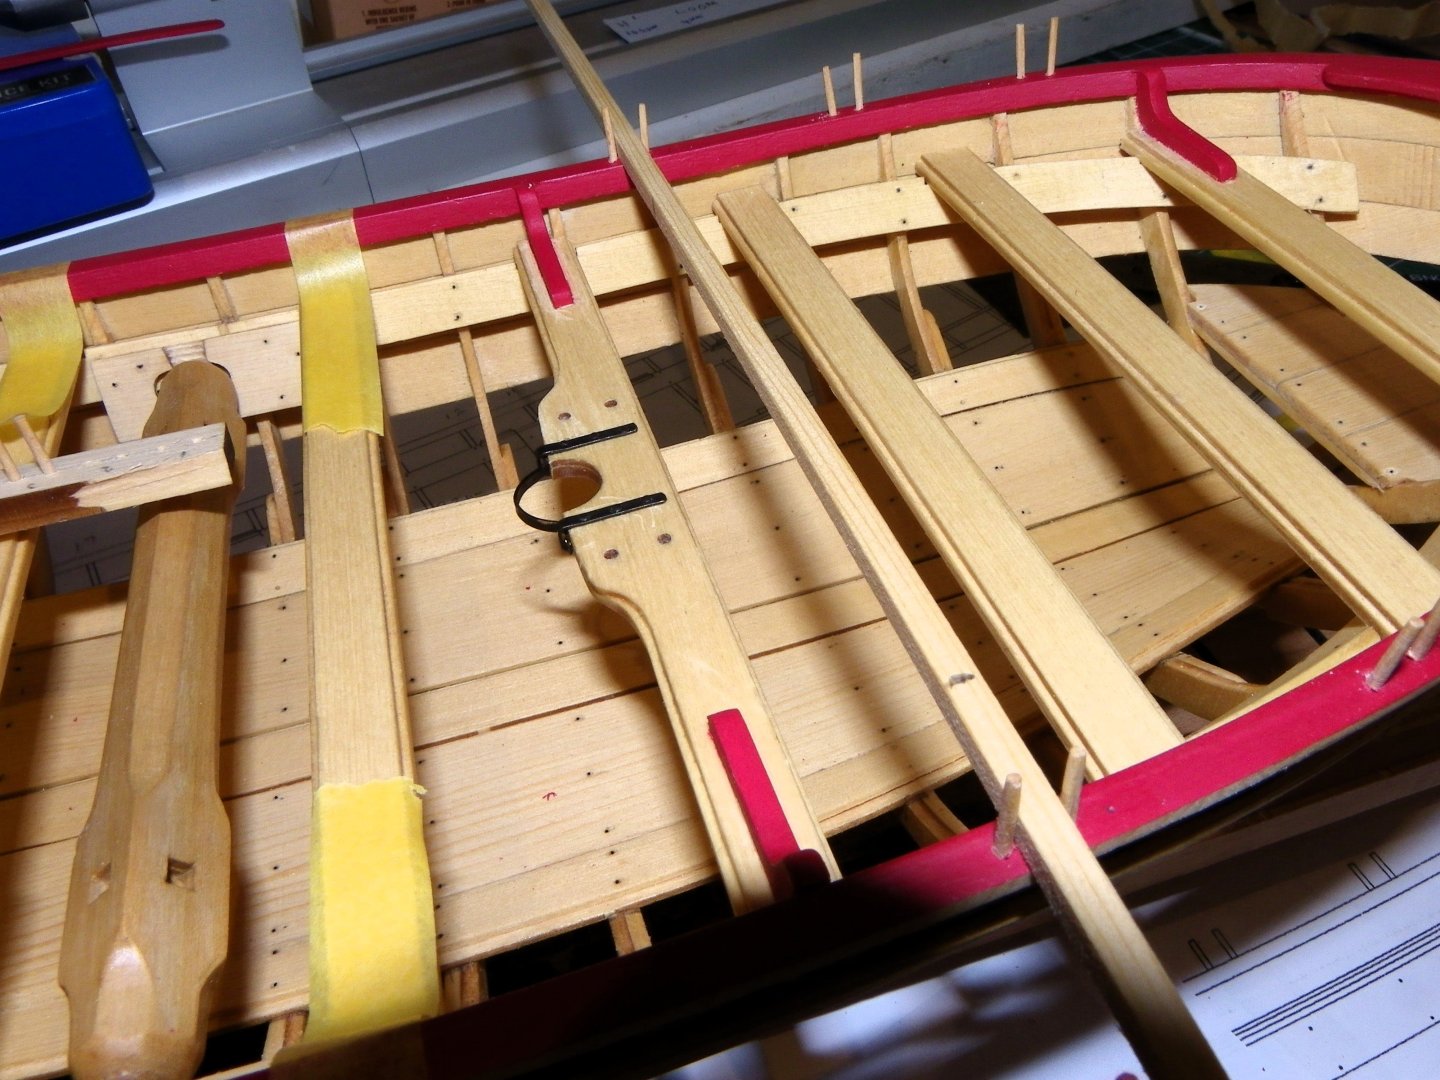
Post 36 A clean-up and further coats of w-o-p have been applied to the hull. The thwarts have been lightly glued into place except for the one aft of the Mast thwart which will allow removal for easier fitting of the mast step. 0378 0377 The thwart knees have been shaped and fitted as required. Careful bevelling is required particularly for the Bow thwart knees. Thole Pins. Innocuous little sticks you may think, easy to make, but quite tricky to fit uniformly into the pristine cap rail. The spacing between the thole sets, each aft of the thwarts, and the line along the cap rail need careful attention. There is no template for this, I think marking the positions on the plan drawing, would have been useful. The tholes are marked on the elevations, and a line can be struck between the two elevation drawings to transfer the positions to the elevation showing the thwart positions in place. 0391 This results in the positions relative to the frames. The tholes are placed ⅛” apart, which is the thickness of the Oar section. The ‘master’ version. I fitted the tholes by sight using the above and by reference to this photo from Chuck’s build. Pins were cut to 15mm lengths for chucking and allowing for a final fit of 5mm above the cap rail 3mm below. 0389 0390 I used a length of ⅛” section cedar strip to provide both the space between the pins and a square line between the two sides. 0396 A couple of the pins required re-positioning but once I was happy, they were glued into place and levelled by means of a 5mm section drilled to fit over the pin. 0402 The capping rail inevitably takes some wear during the fitting and gluing process, but I mask it for the final sanding and rounding of the pins. 0411 0415 0419 I have at least for the present decided to leave the pins bright with an application of w-o-p. 0437 I have included the thole pins in the cockpit area as represented on the contemporary open frame model. The boat is almost complete now, just a few bits and pieces to complete and tidy up. I’m not thinking of masting and rigging the model at this point but I do intend to make all the spars for inclusion with the display. B.E. 22/08/2024


- 131 replies
-
- 11
-
-
- Medway Longboat
- Syren Ship Model Company
- (and 1 more)
-
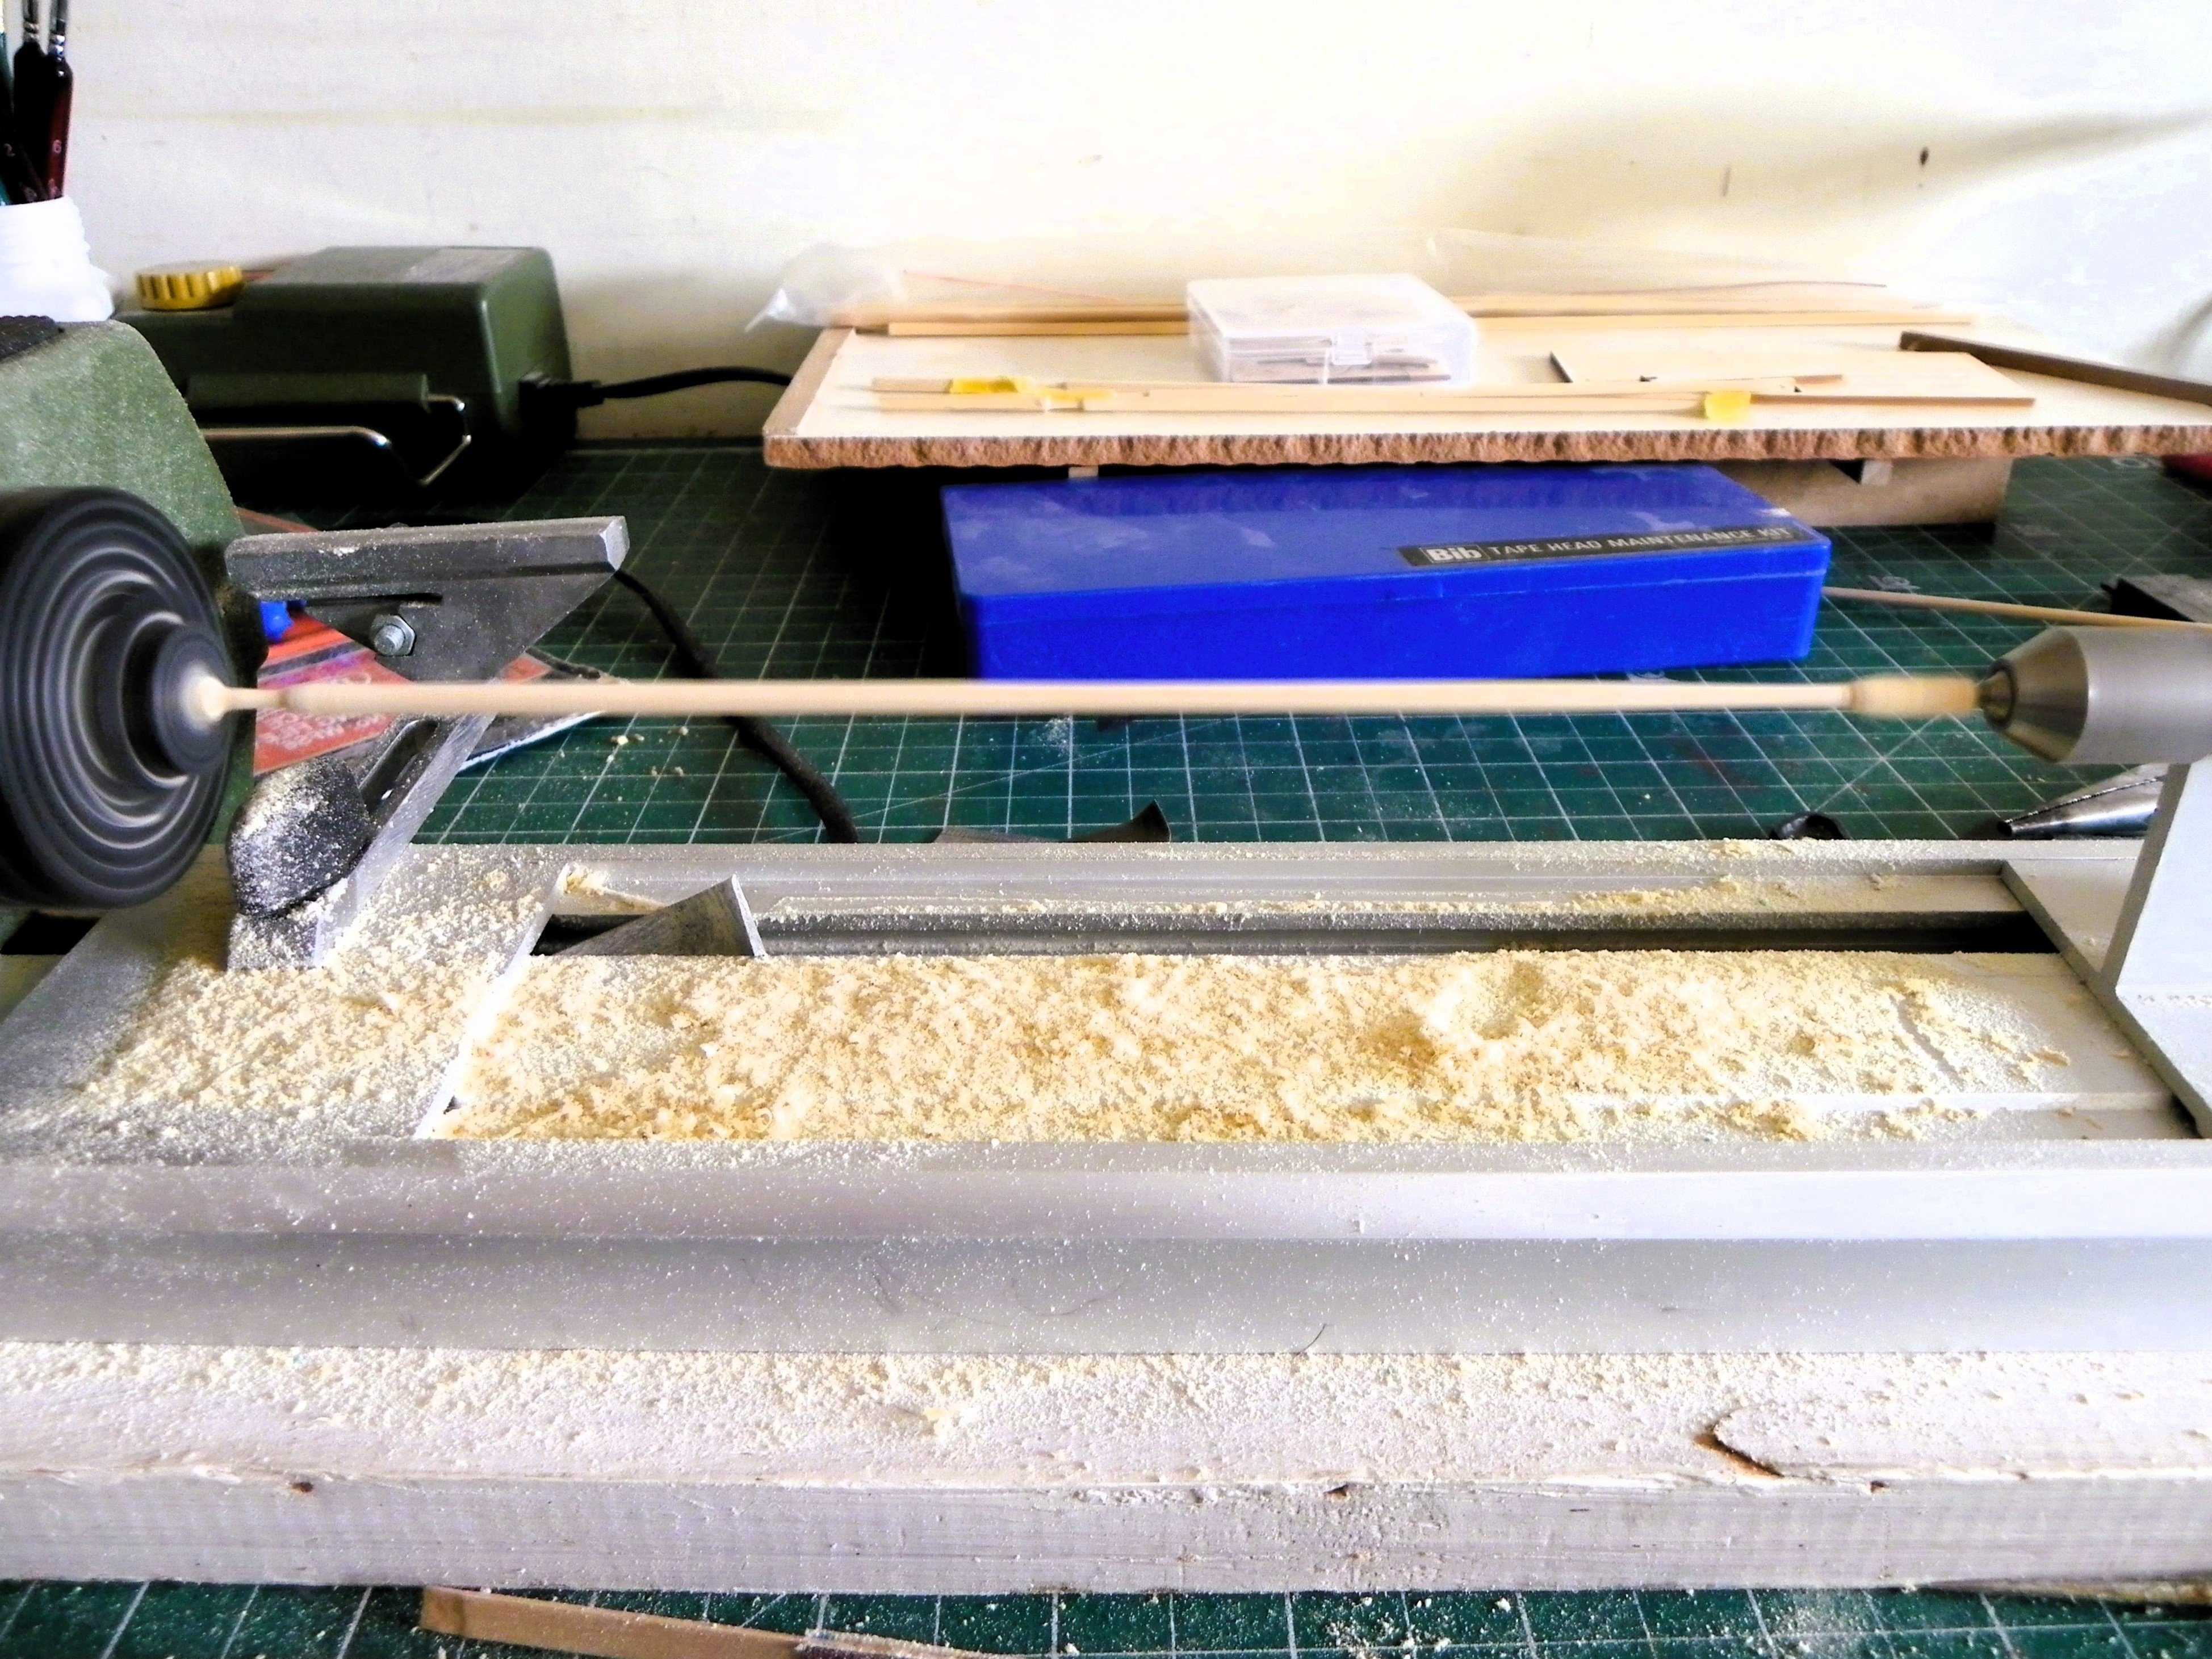
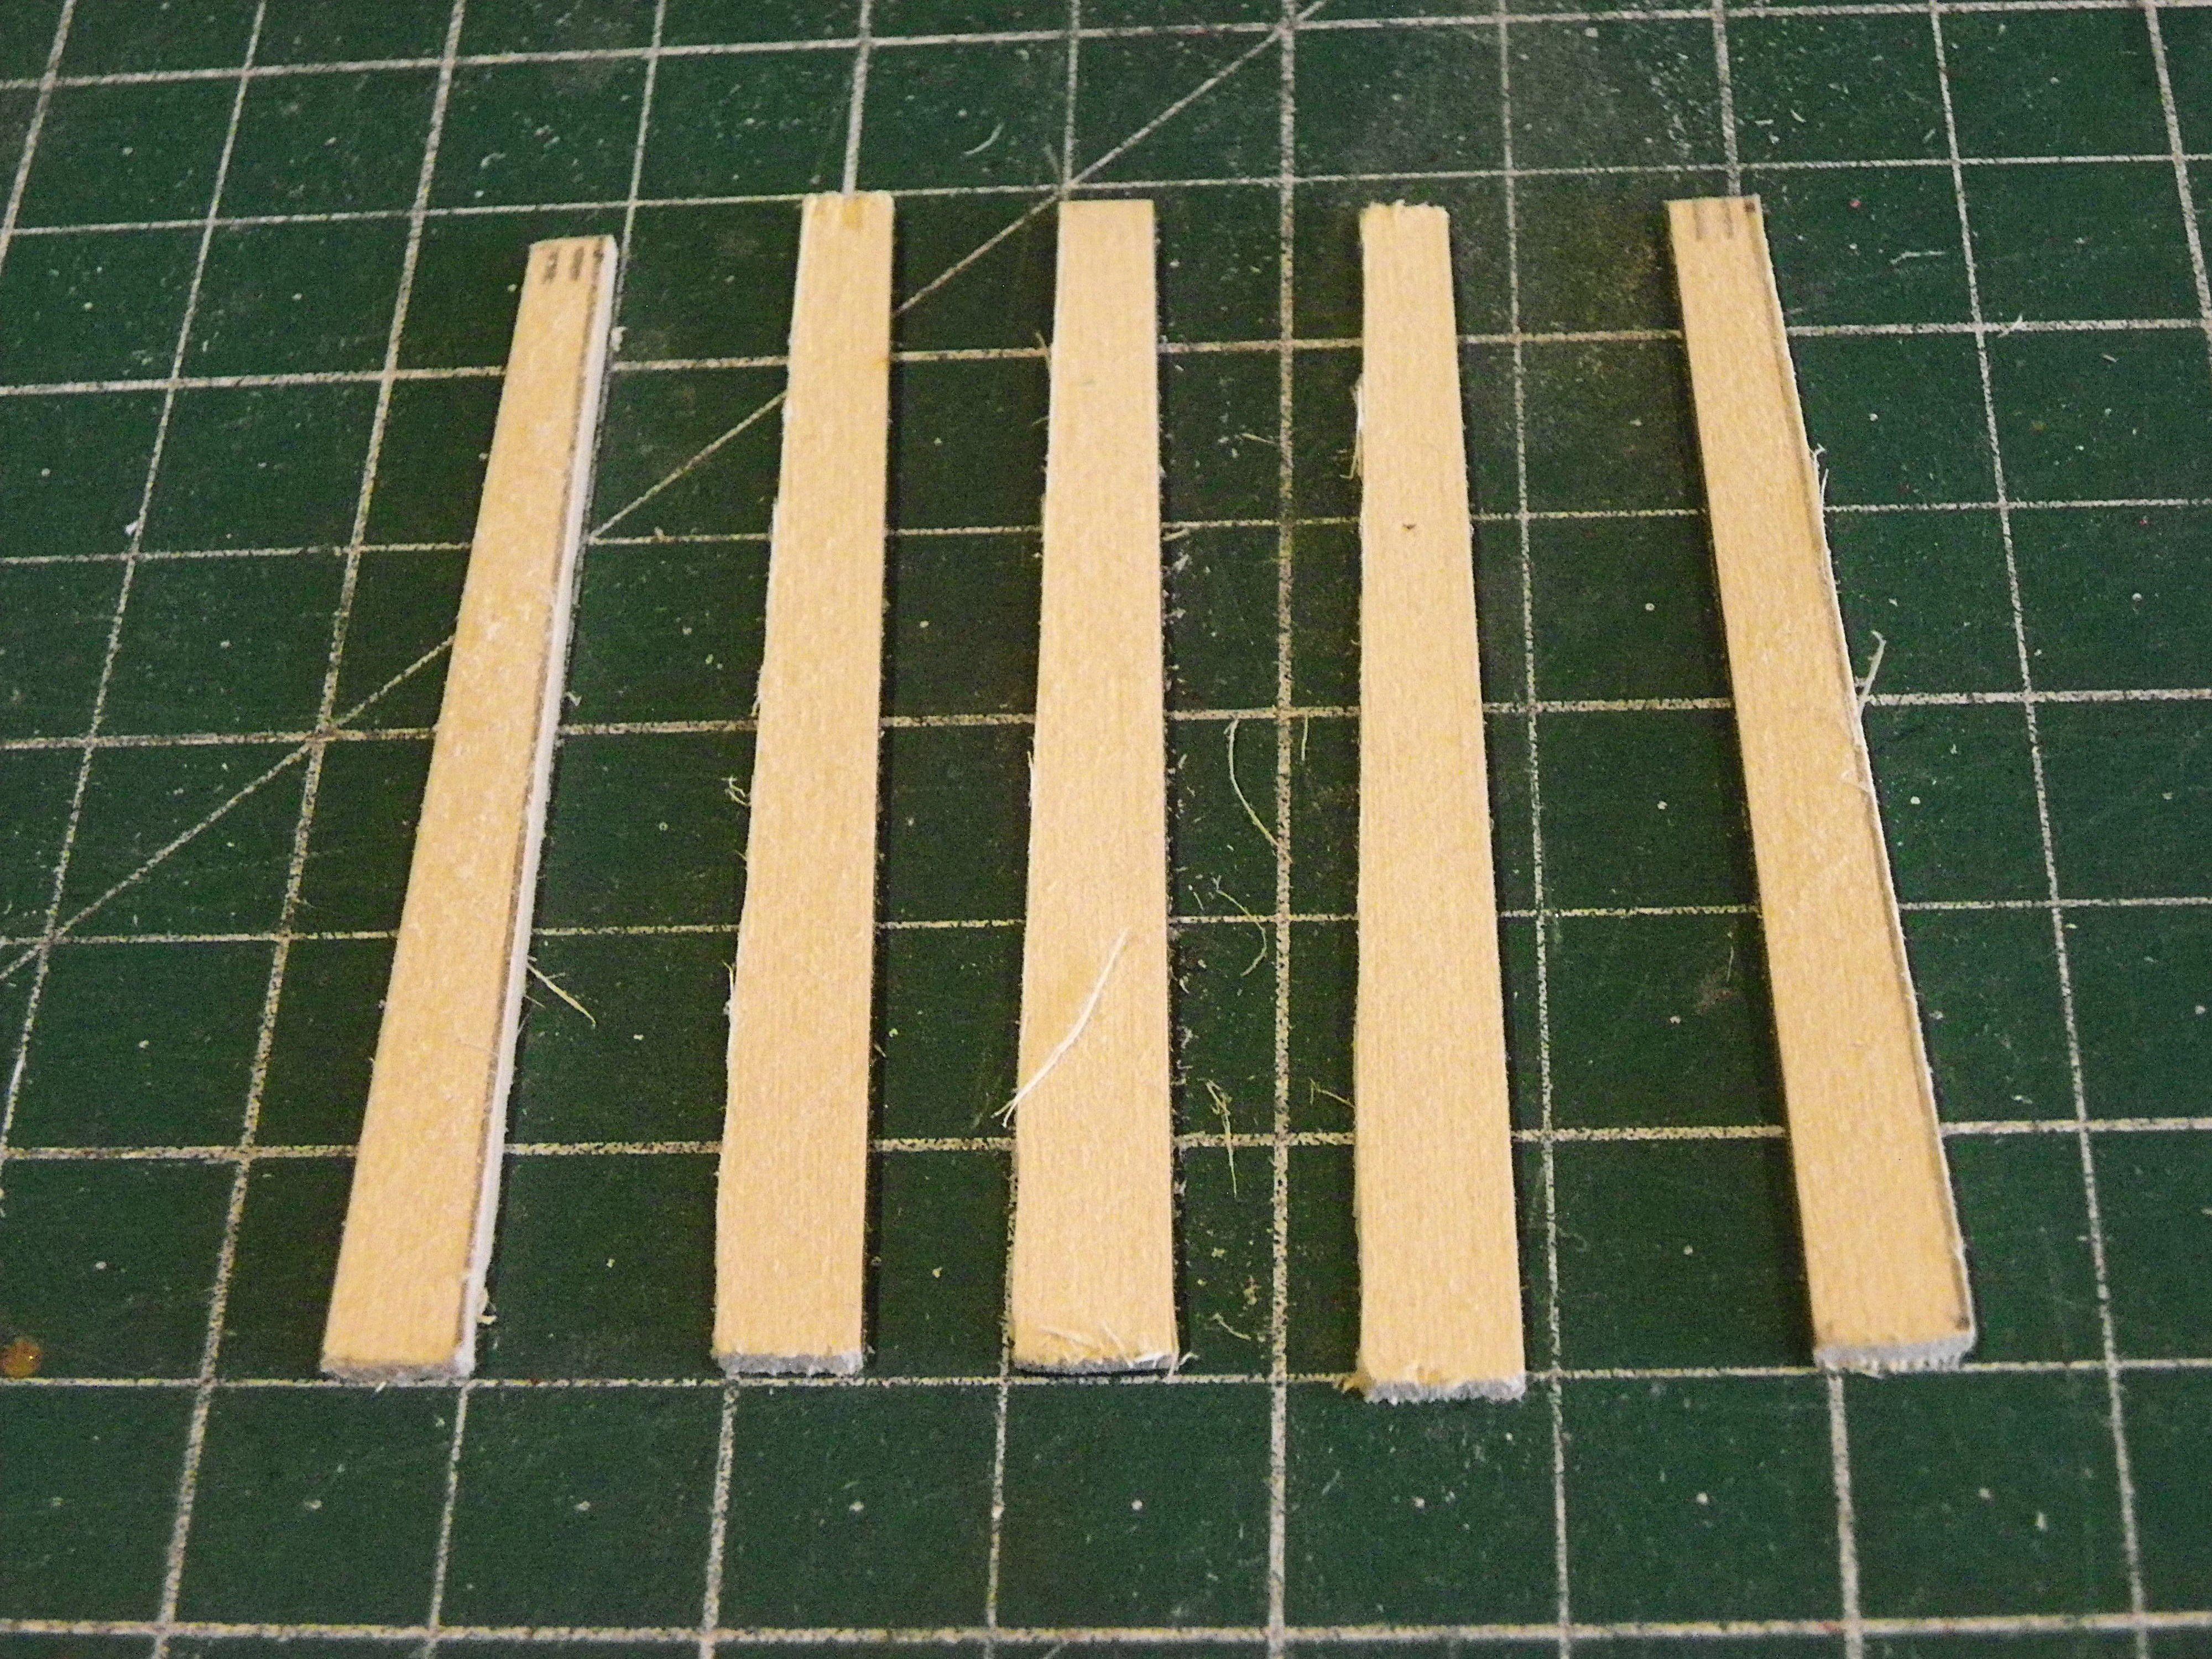
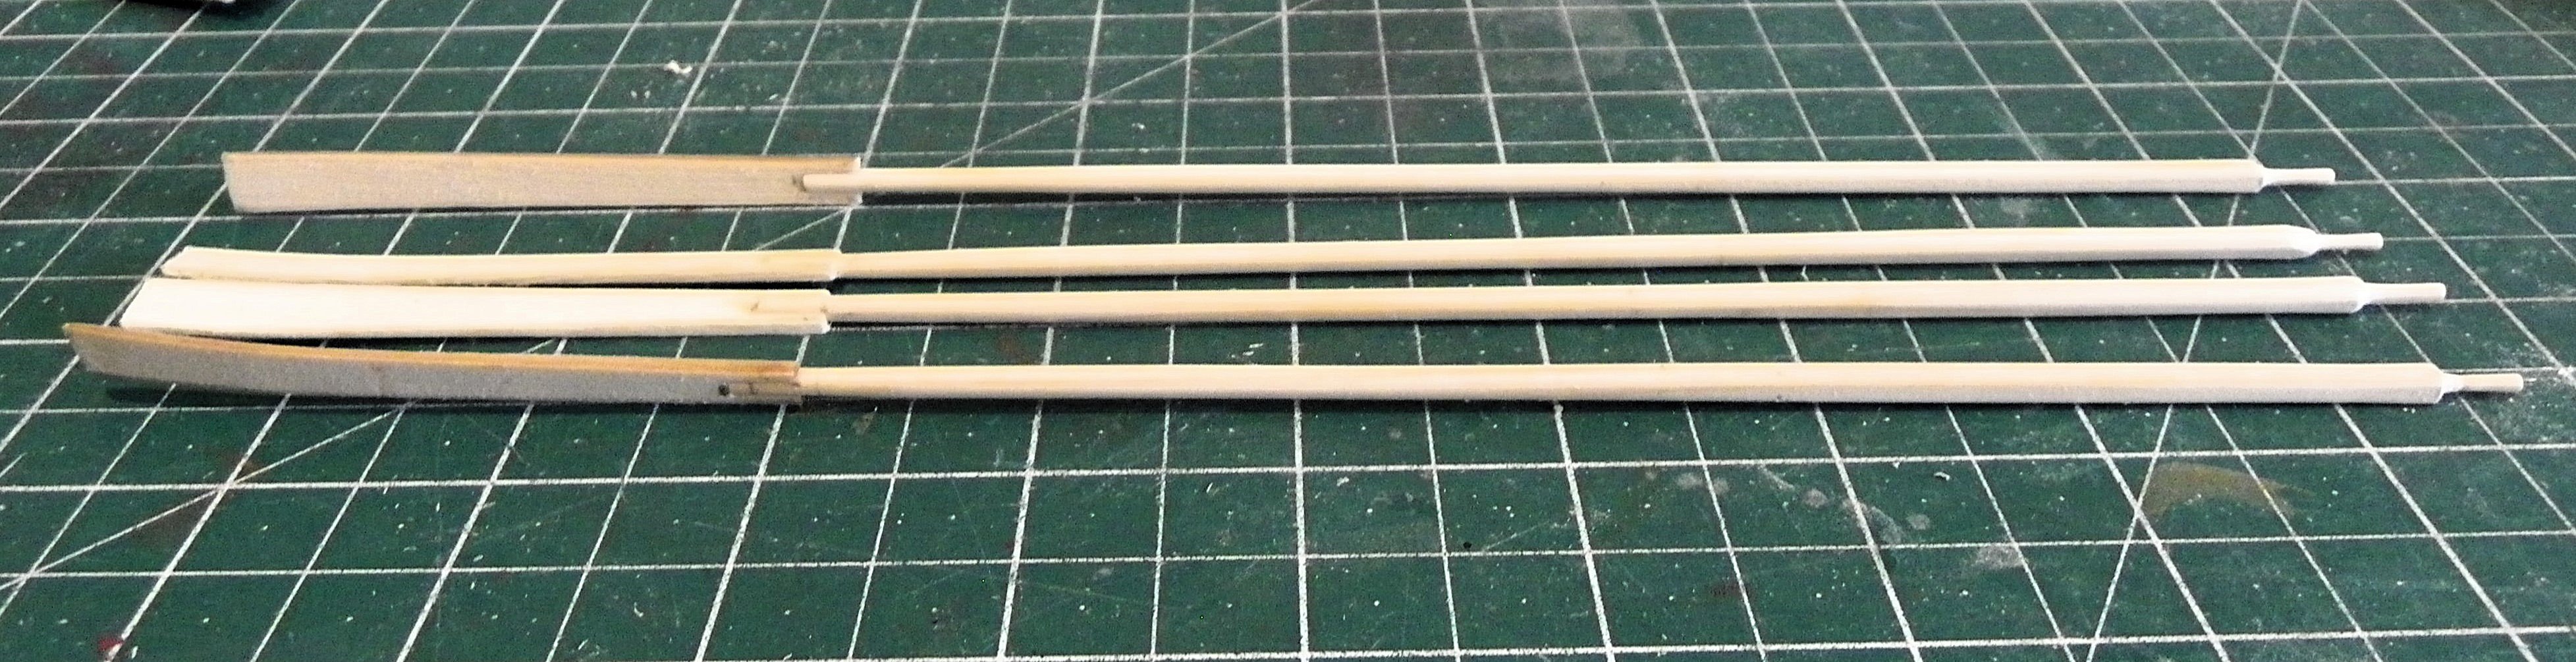
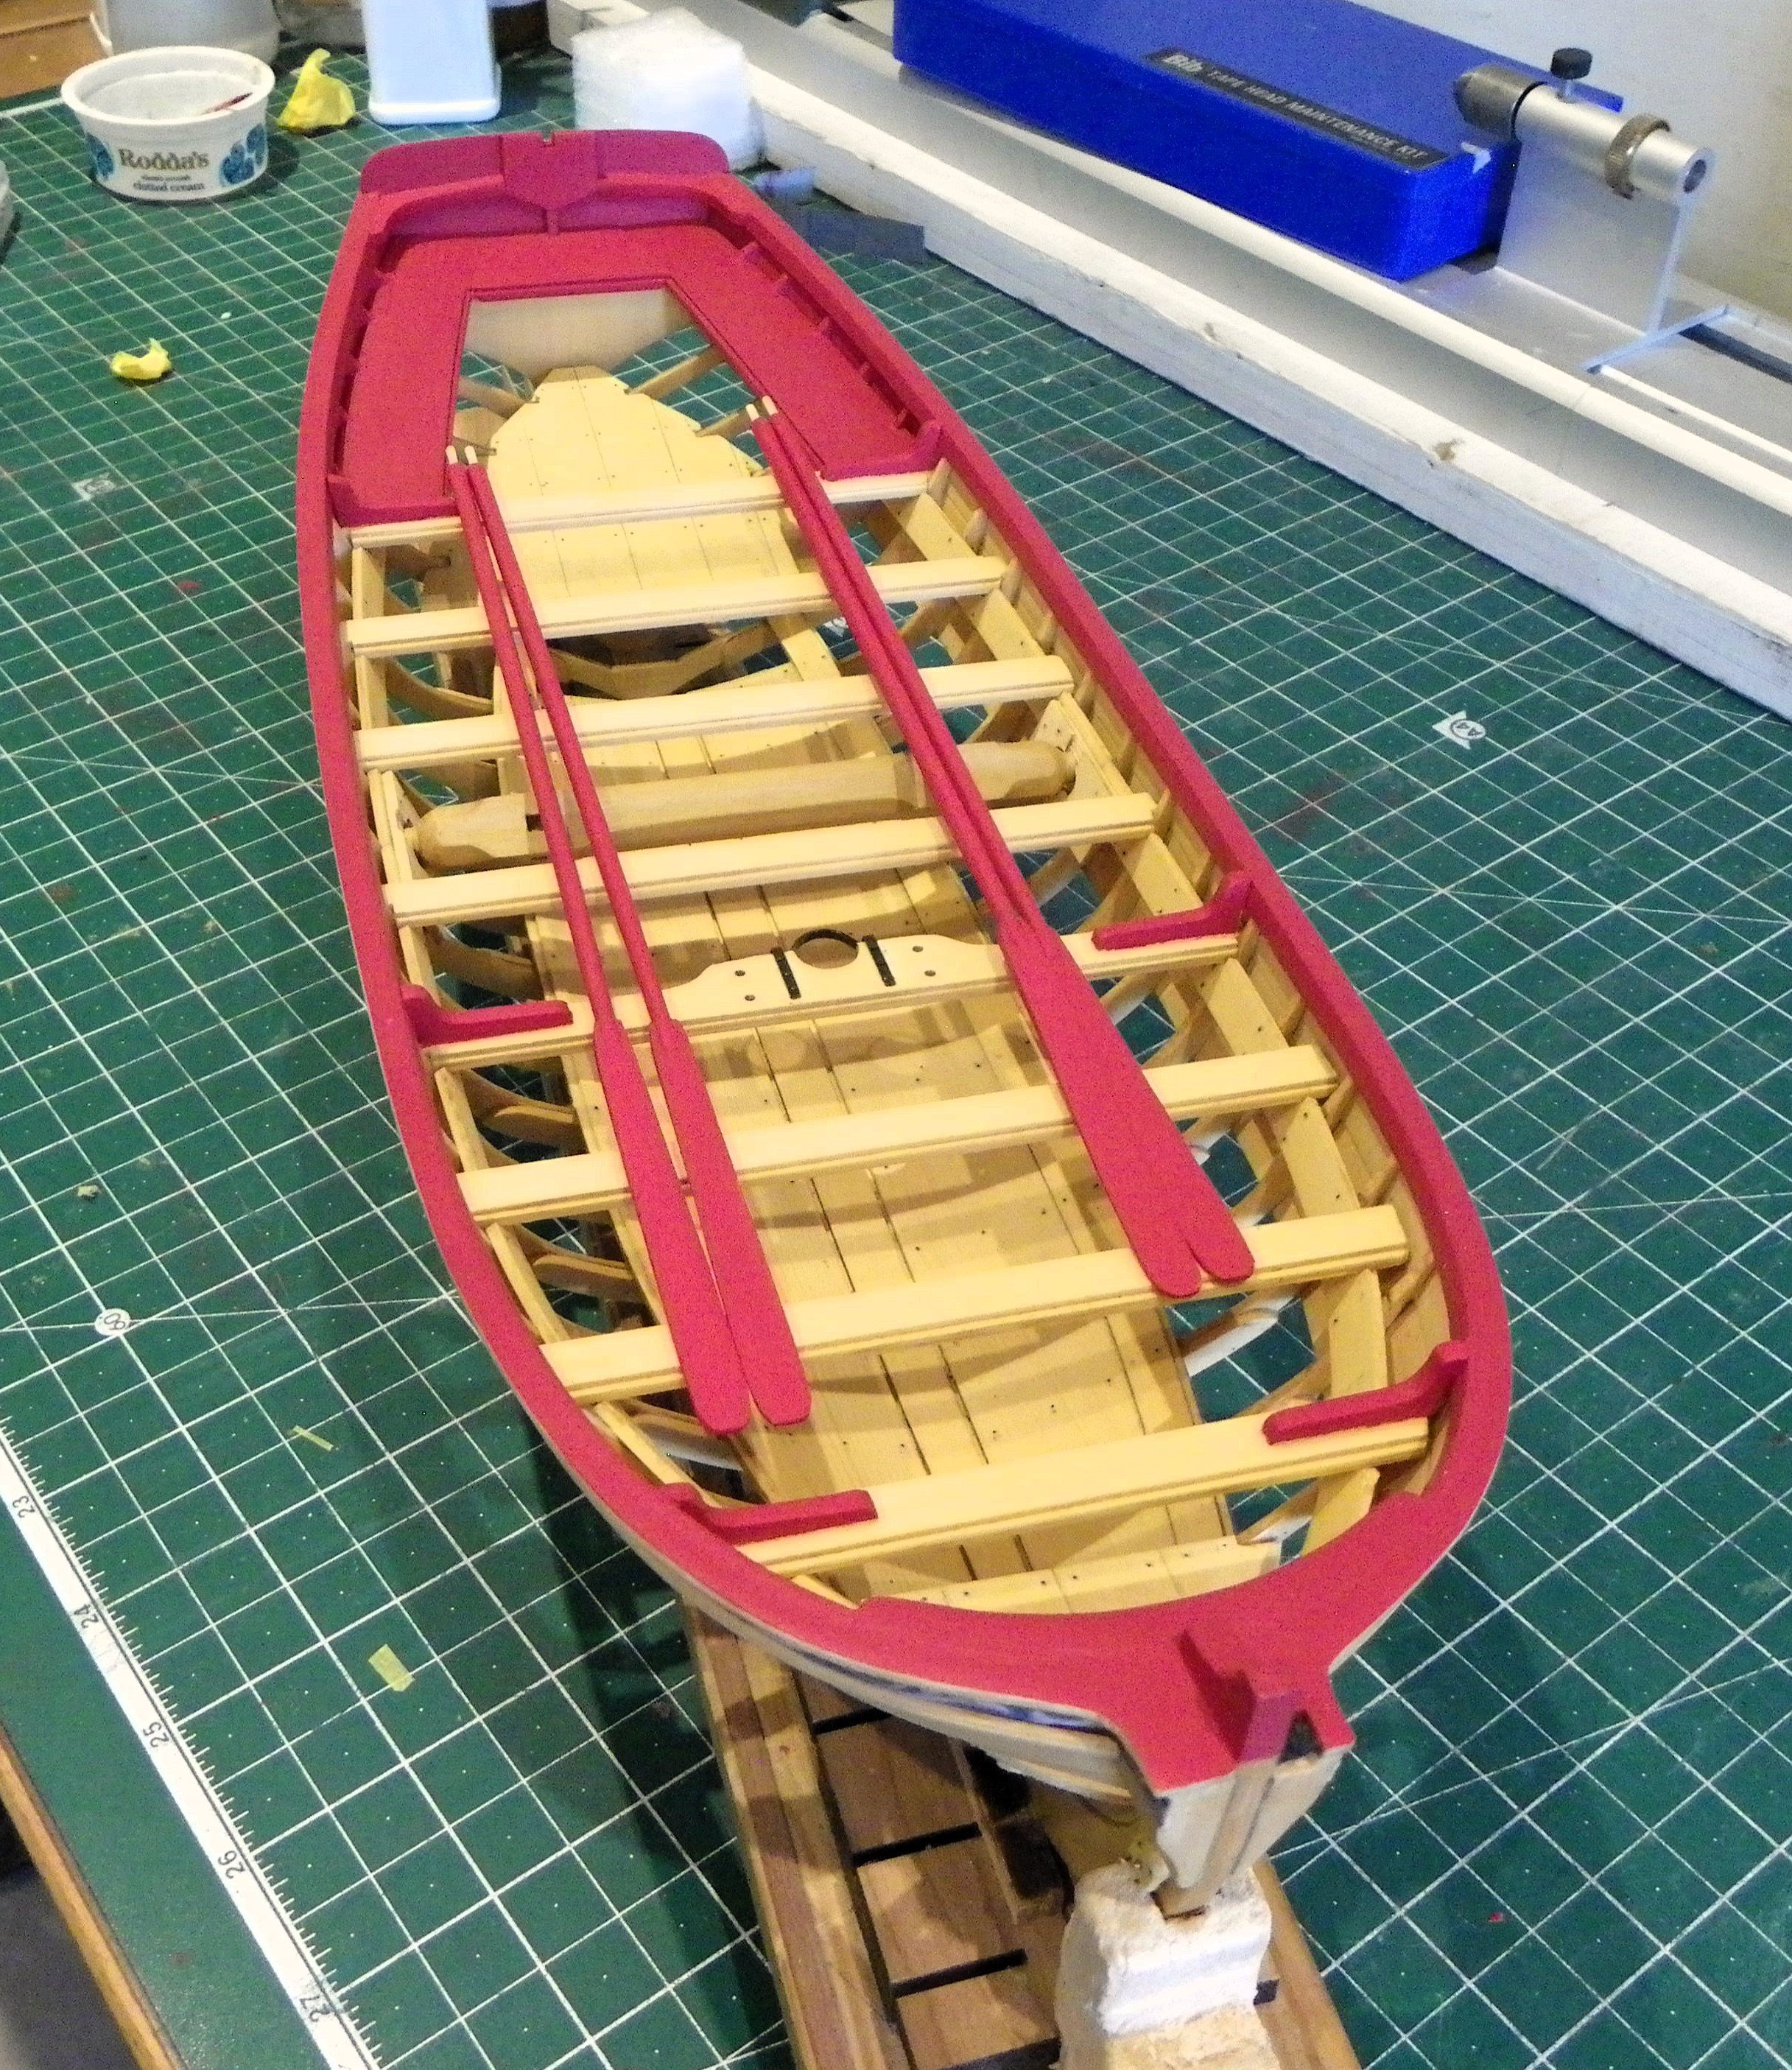
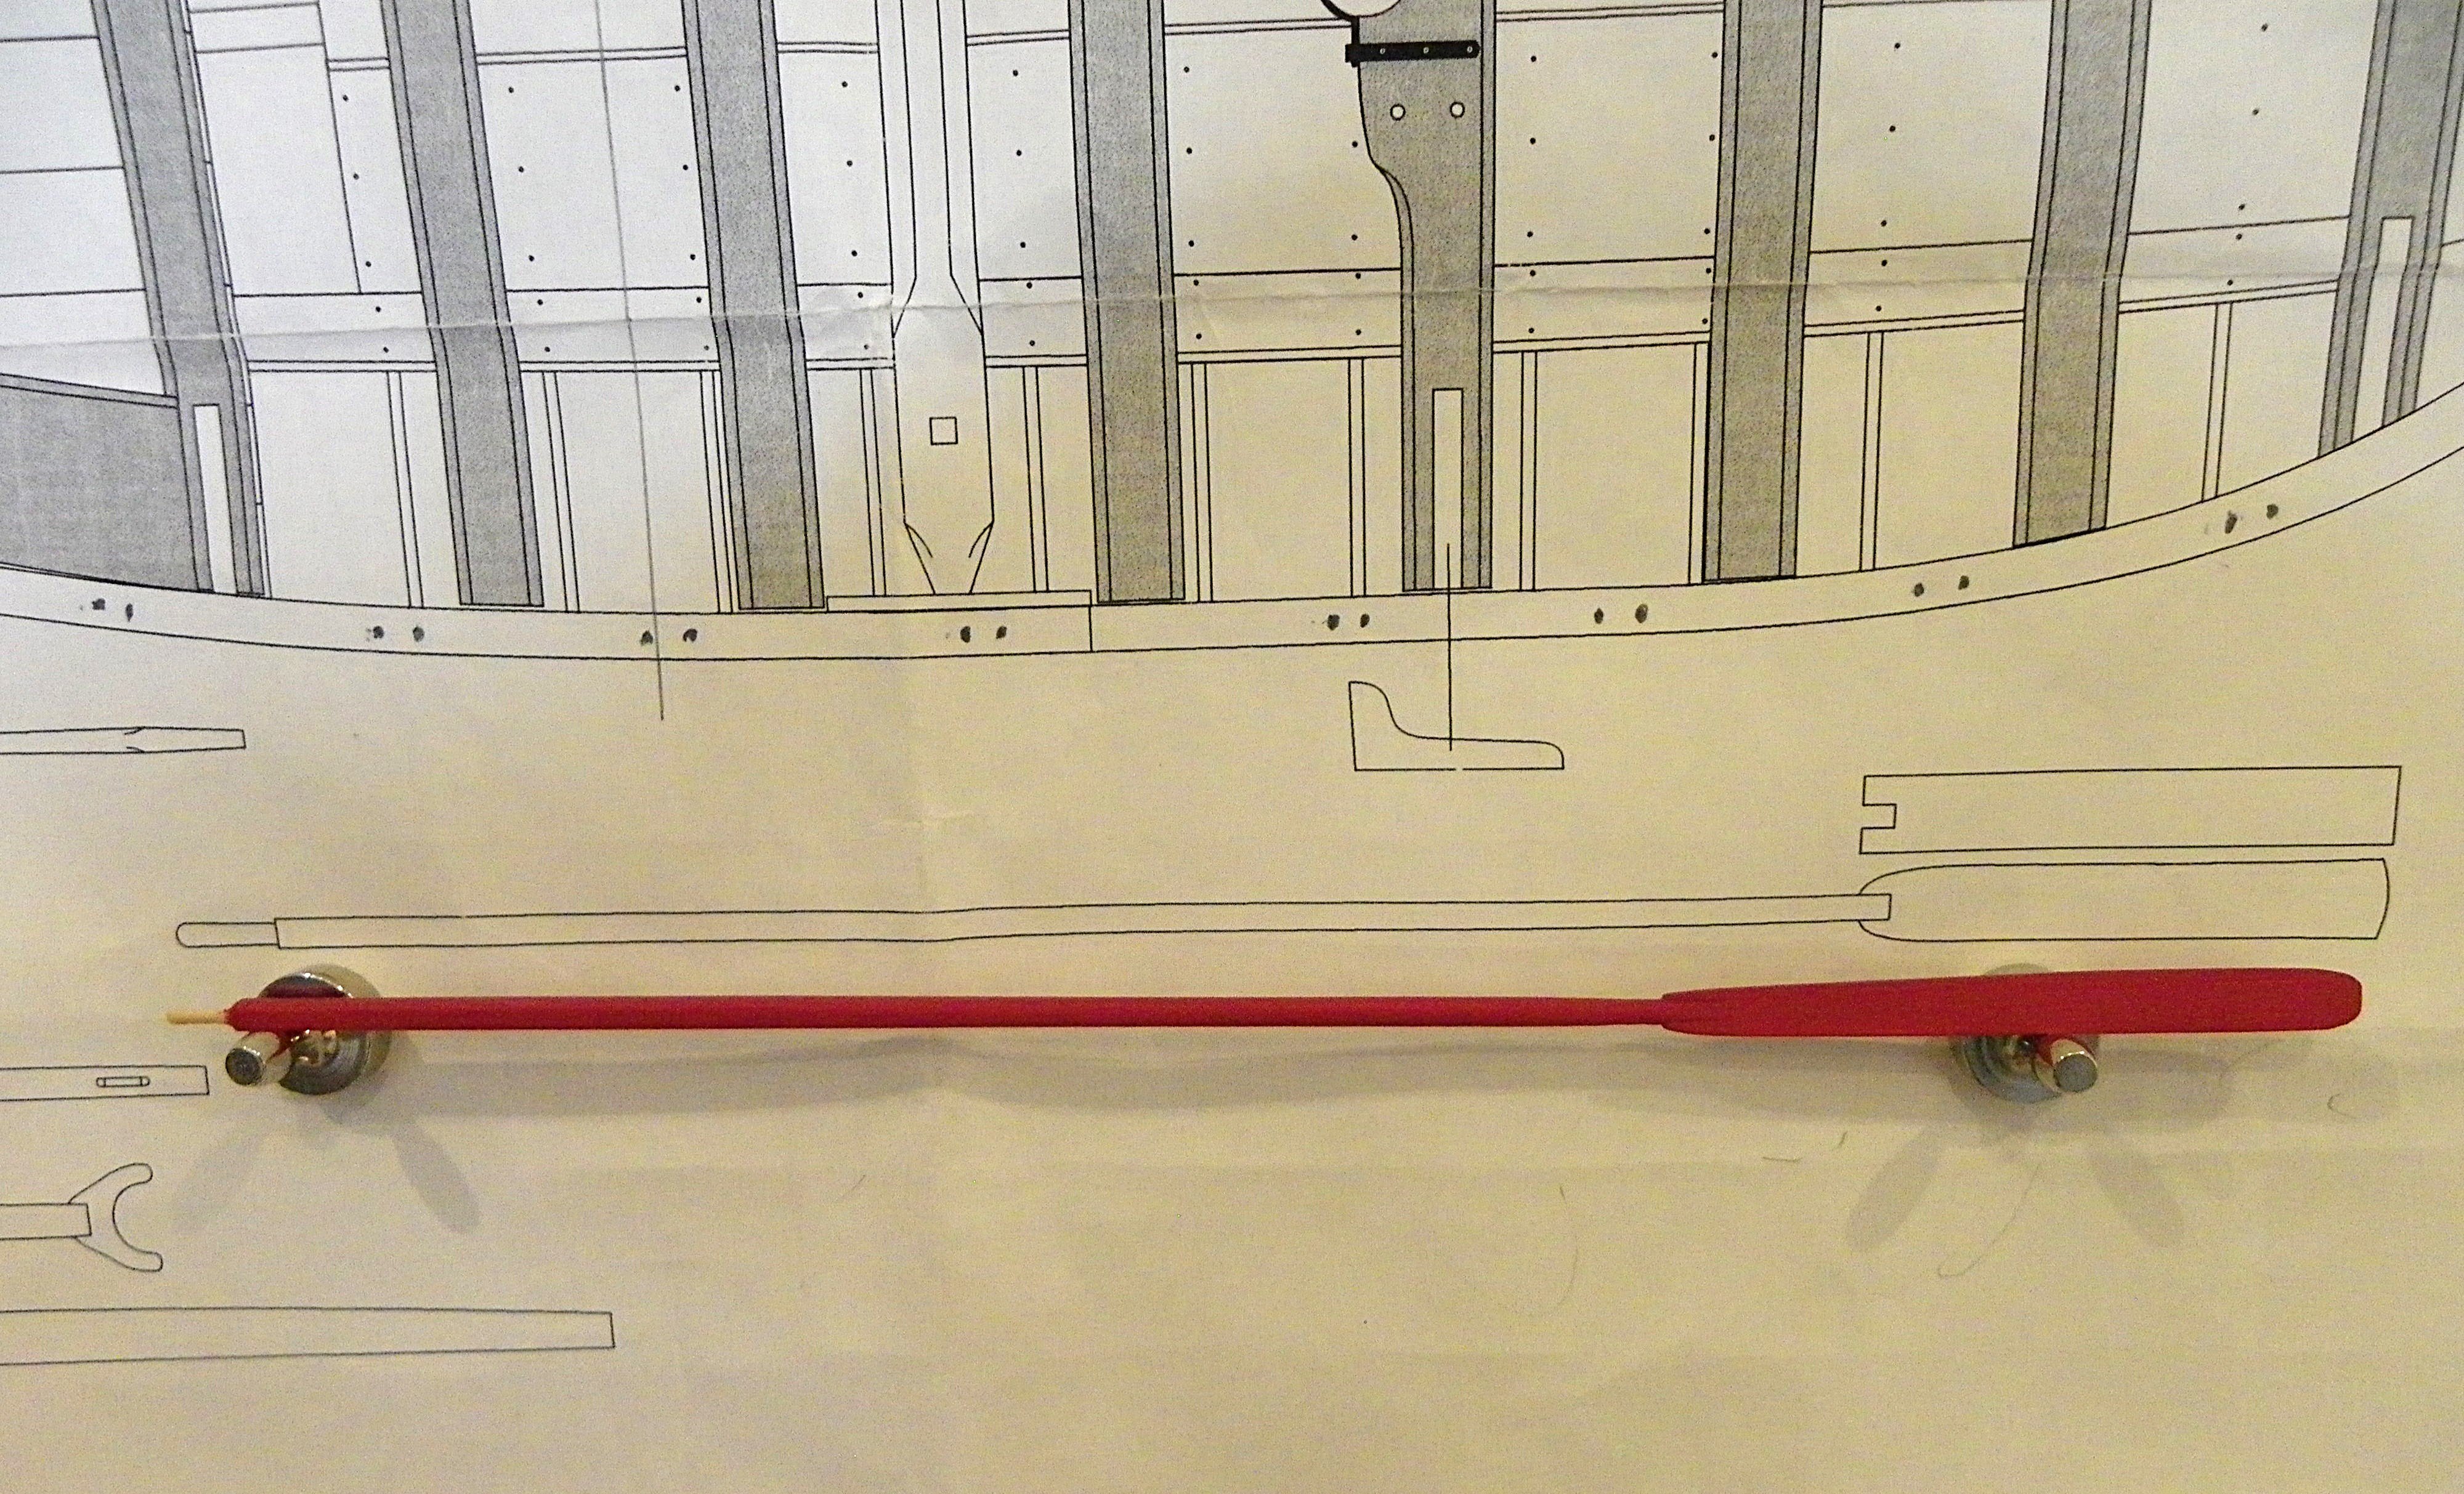
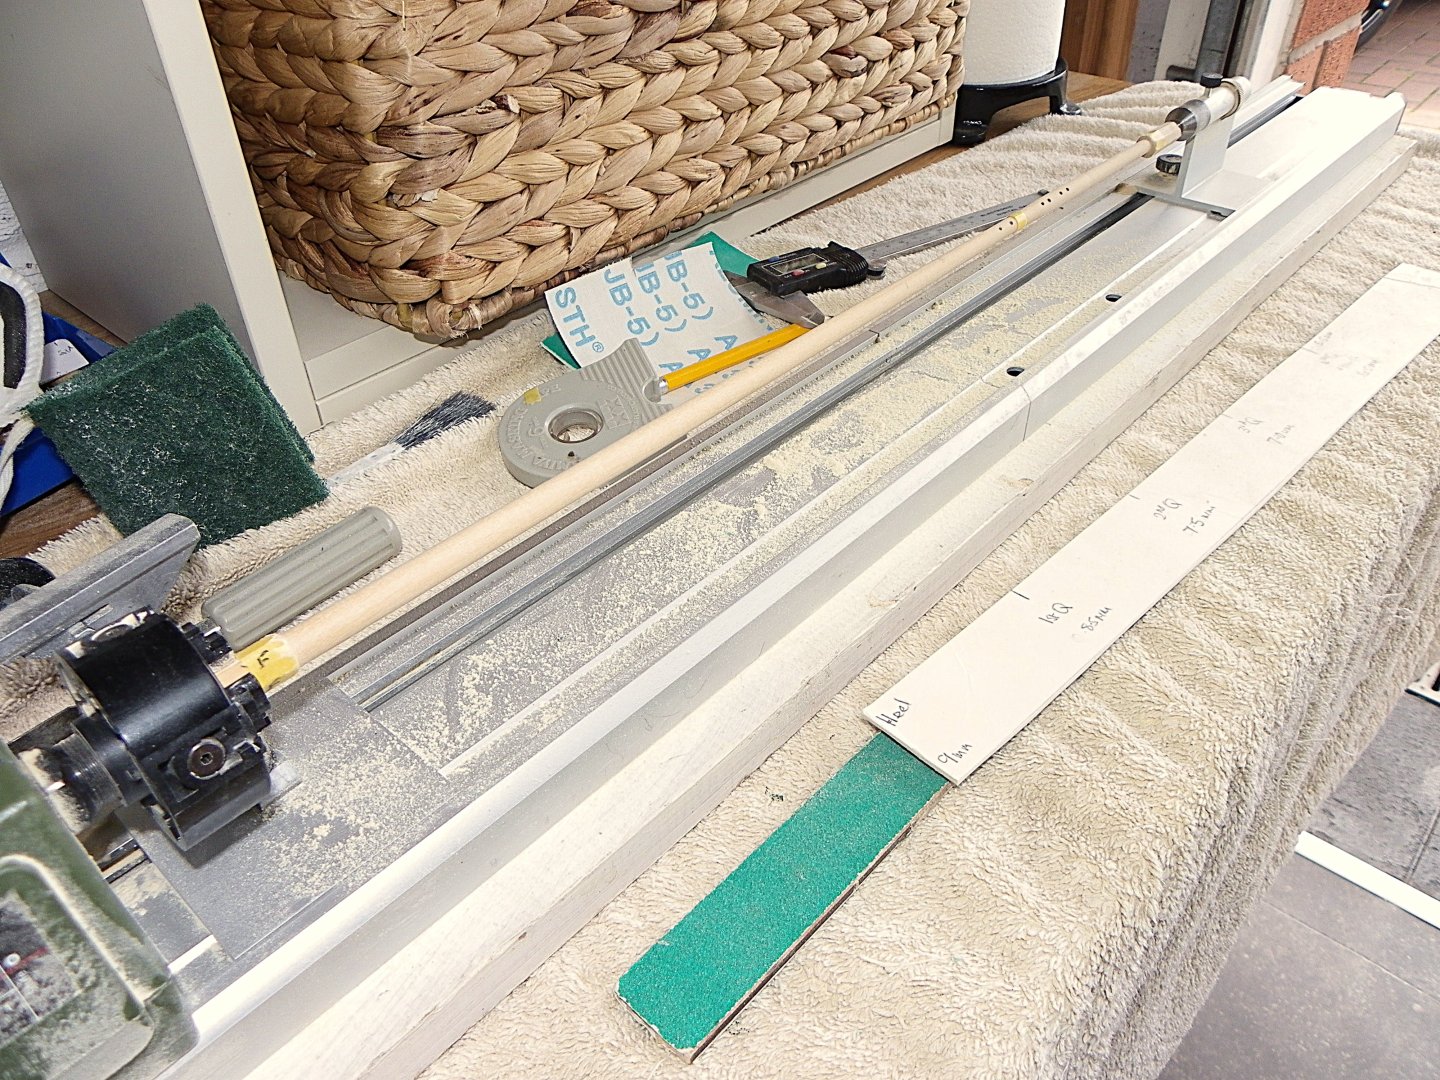
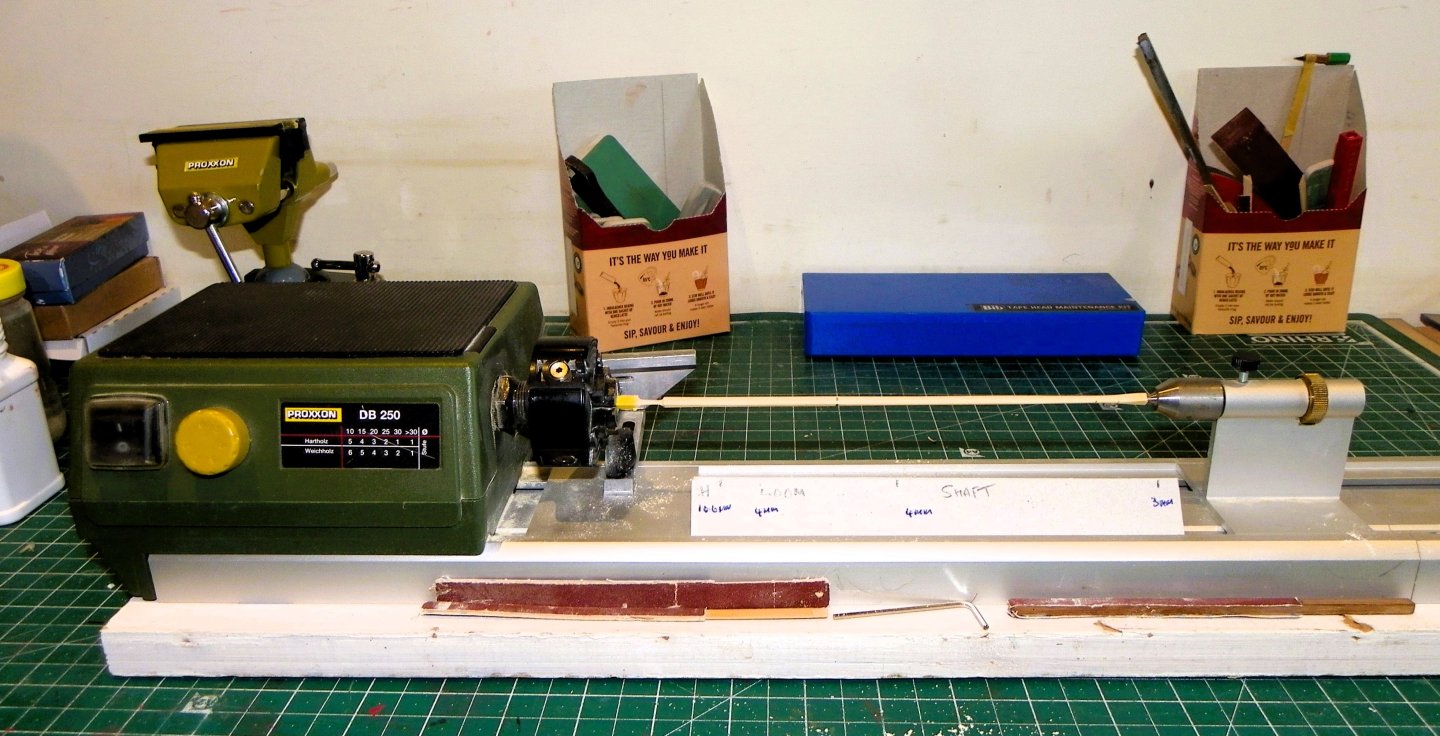
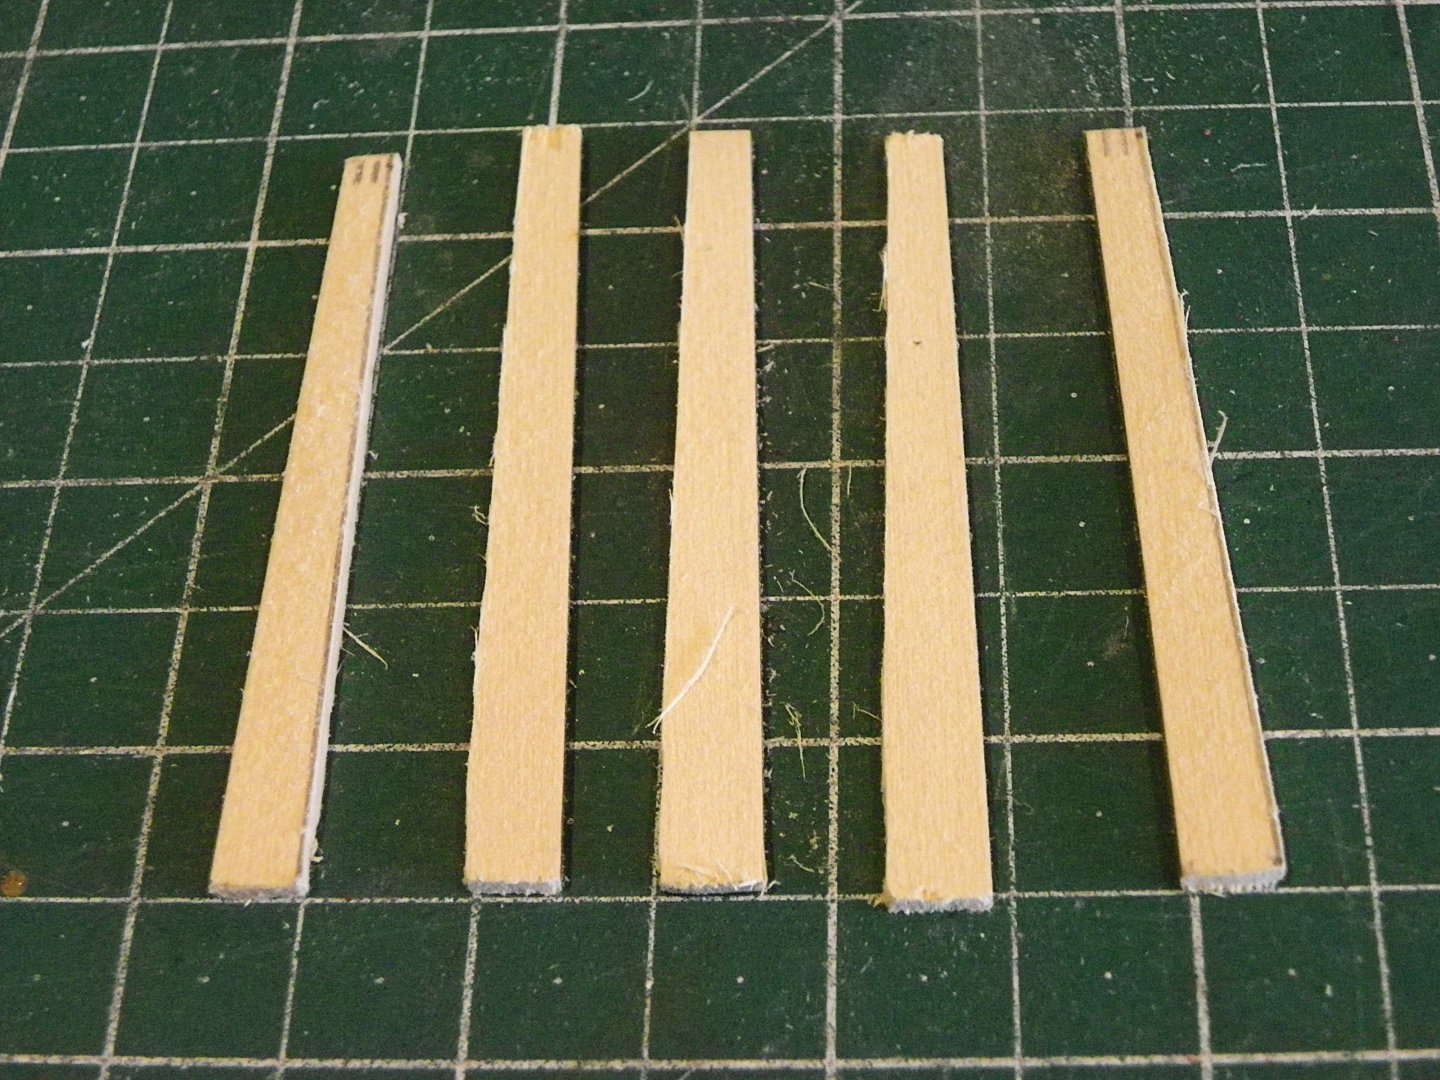
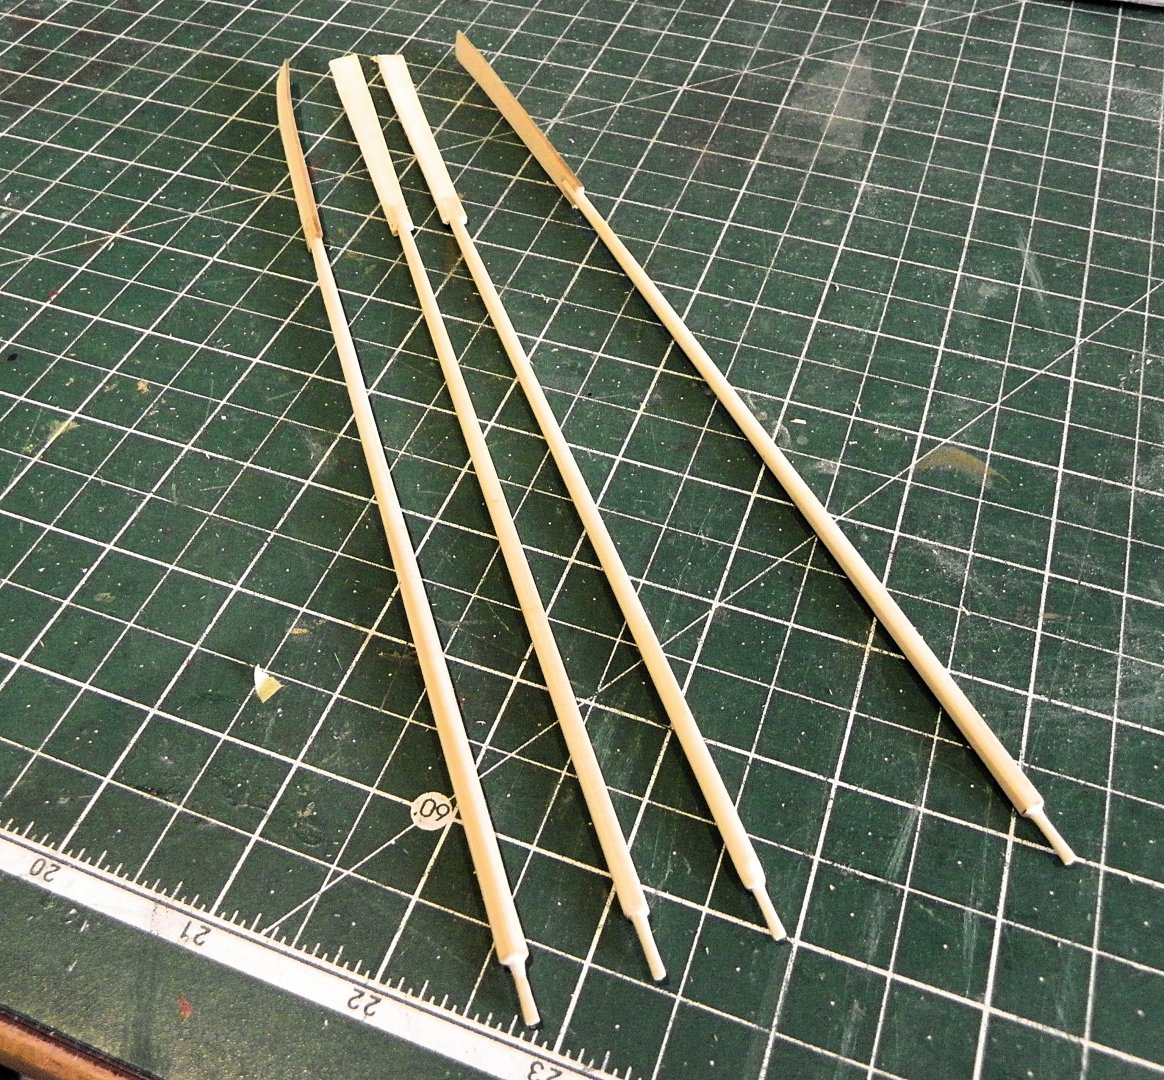
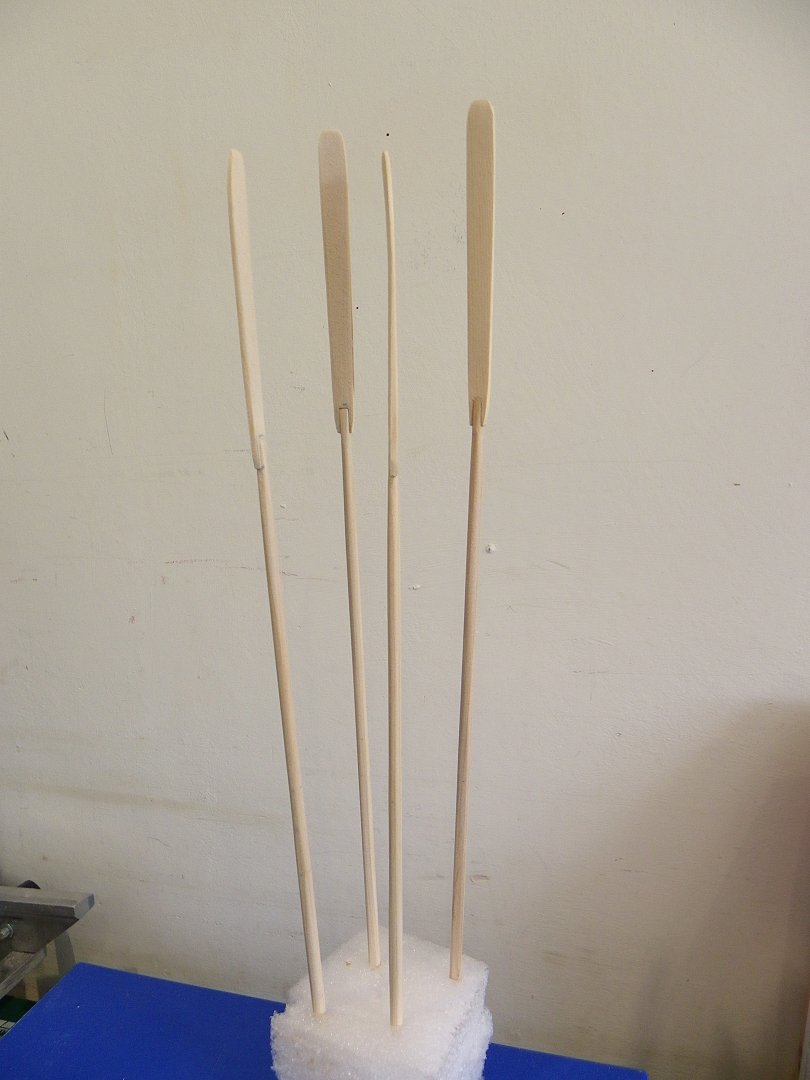
Post 35 - Oars. As a small diversion I have been looking at the oars. The kit provides ⅛” square stock in cedar plus oar blade blanks for the oar makings. The oars require quite a bit of fettling to improve their authenticity. The oars properly consist of a handle, loom, shank, and blade, each of which has a proportion relative to the overall length. The kit oars have a scale length of 253mm which equates to a near 20’ When I built the 1:48 scale version of the Longboat I used the following formula to determine the oar length for double banked rowing. Divide the span by 2, and then add 2 to this number. The result is called the “inboard loom length” of the oar. Multiply the loom length by 25, and then divide that number by 7. The result is the proper oar length in inches. The span (breadth) between the tholes of the 1:24 scale boat is 130mm, scaling to 122.8”. Applying the above formula results in a figure of 226.50” =18.9’ overall length. Using Steel’s tables for a 19’ oar I calculated the requirements for the individual sections. Section L scale equiv Thickness Handle 10" 10.6mm 1.85mm Ø Loom 60" 63.5mm Thick: 4.1mm Depth: 4.1mm Shank 91" 95.25mm Blade 72" 76.2mm Breadth. Inner end: 3.2mm Outer end: 6.35mm Thickness Inner end: 2.91mm outer end: 0.92mm These are the proportions and finished sizes I am using. mm Handle Loom Shank Blade Length 10.5 50.8 95.3 72.0 Thickness 1.9mm ø 4.0 4–2.75mm 1.75 mm Inner 0.90 mm Outer Breadth 3.2 mm Inner 6.4 mm Outer The wood lathe is required for the turning and the sections are marked along the length. 0345 I am using a combination of files and sanding papers, but a light touch is required given the length and flexibility of the Cedar section. 0344 I am aiming to show the subtle thickness of the loom before it runs into the shank. 0347 It helps to have a simple card gauge to check the sizes at the different points. 0352 The Blade The kit provided blade blanks can’t be used with this arrangement they are too short. 0355 I remade the blades out some scrap 1.75mm Cedar. They are 72mm long with an inner breadth of 4mm (unfinished) and outer breadth of 6.4mm. 0357 The blades taper to a thickness of 0.9mm at the outer end, and a shallow curve has been induced to the blade. 0364 0360 The blades are glued into place before final shaping. 0368 0387 Compared to the plan, the swelling of the Loom is subtle but evident, and the blade is significantly narrower at the shank end giving a more graceful line. 0371 0373 Back to the main event. B.E. 21/08/2024


- 131 replies
-
- 10
-
-
-
- Medway Longboat
- Syren Ship Model Company
- (and 1 more)
-
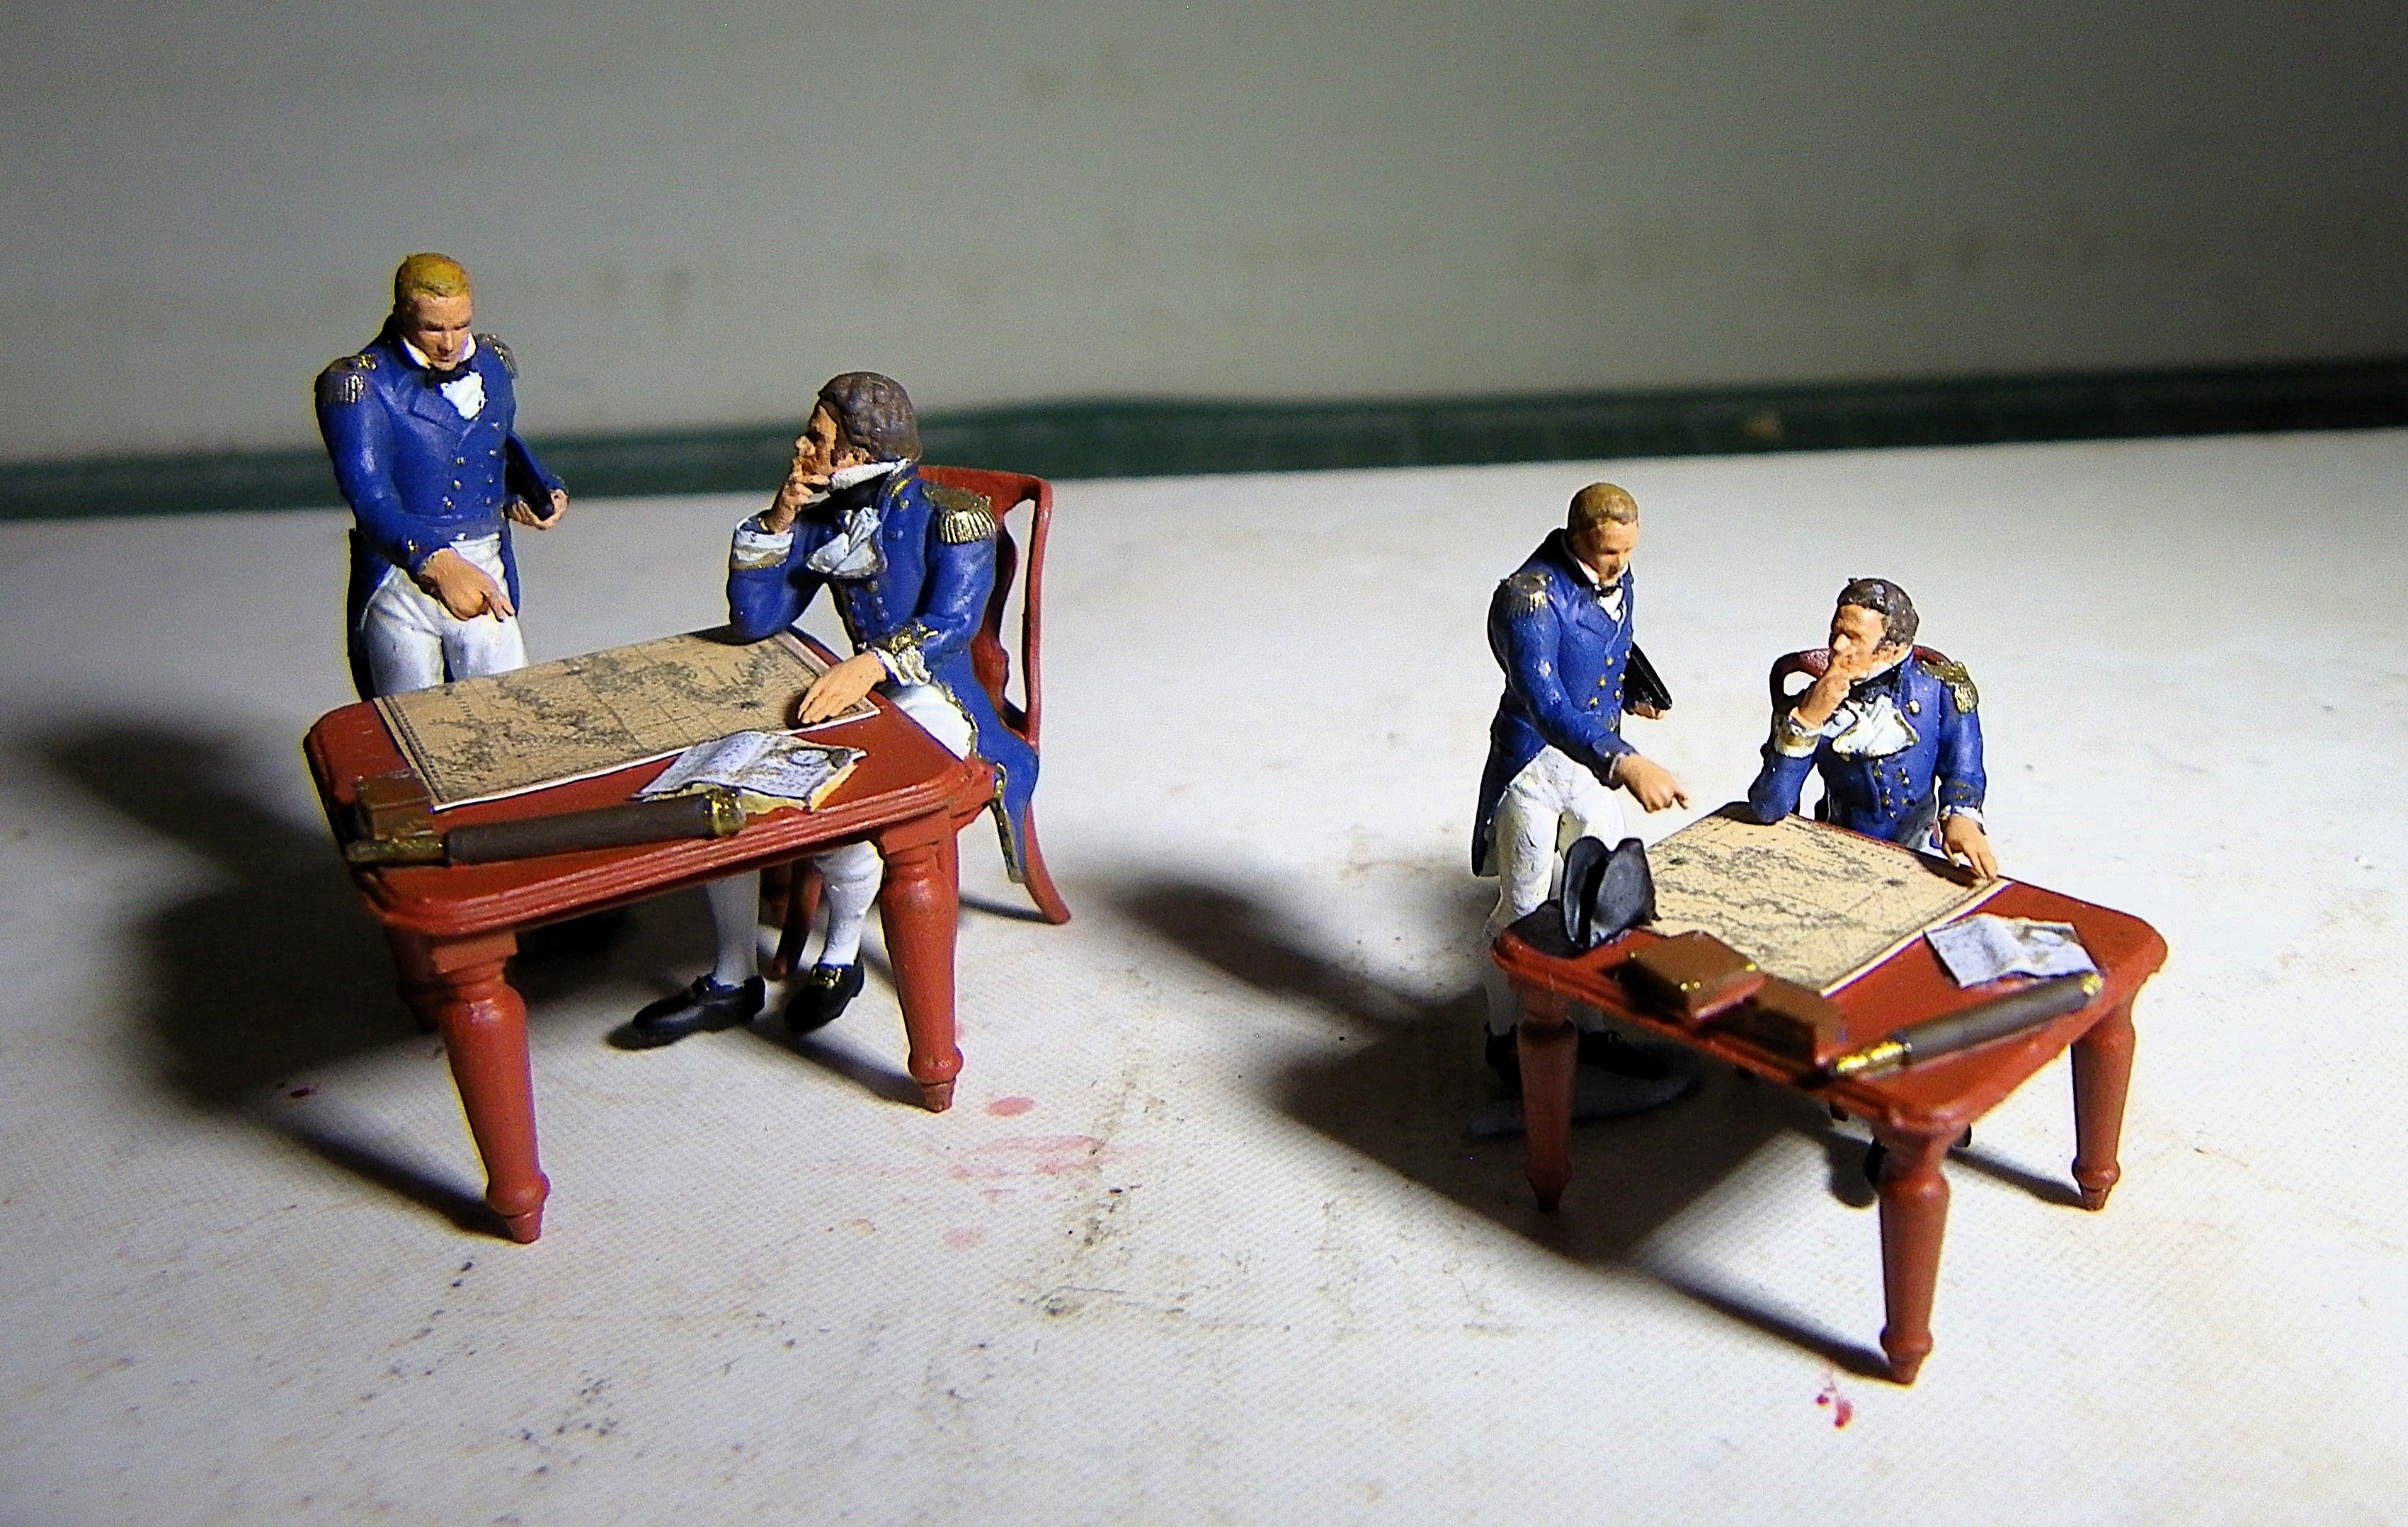
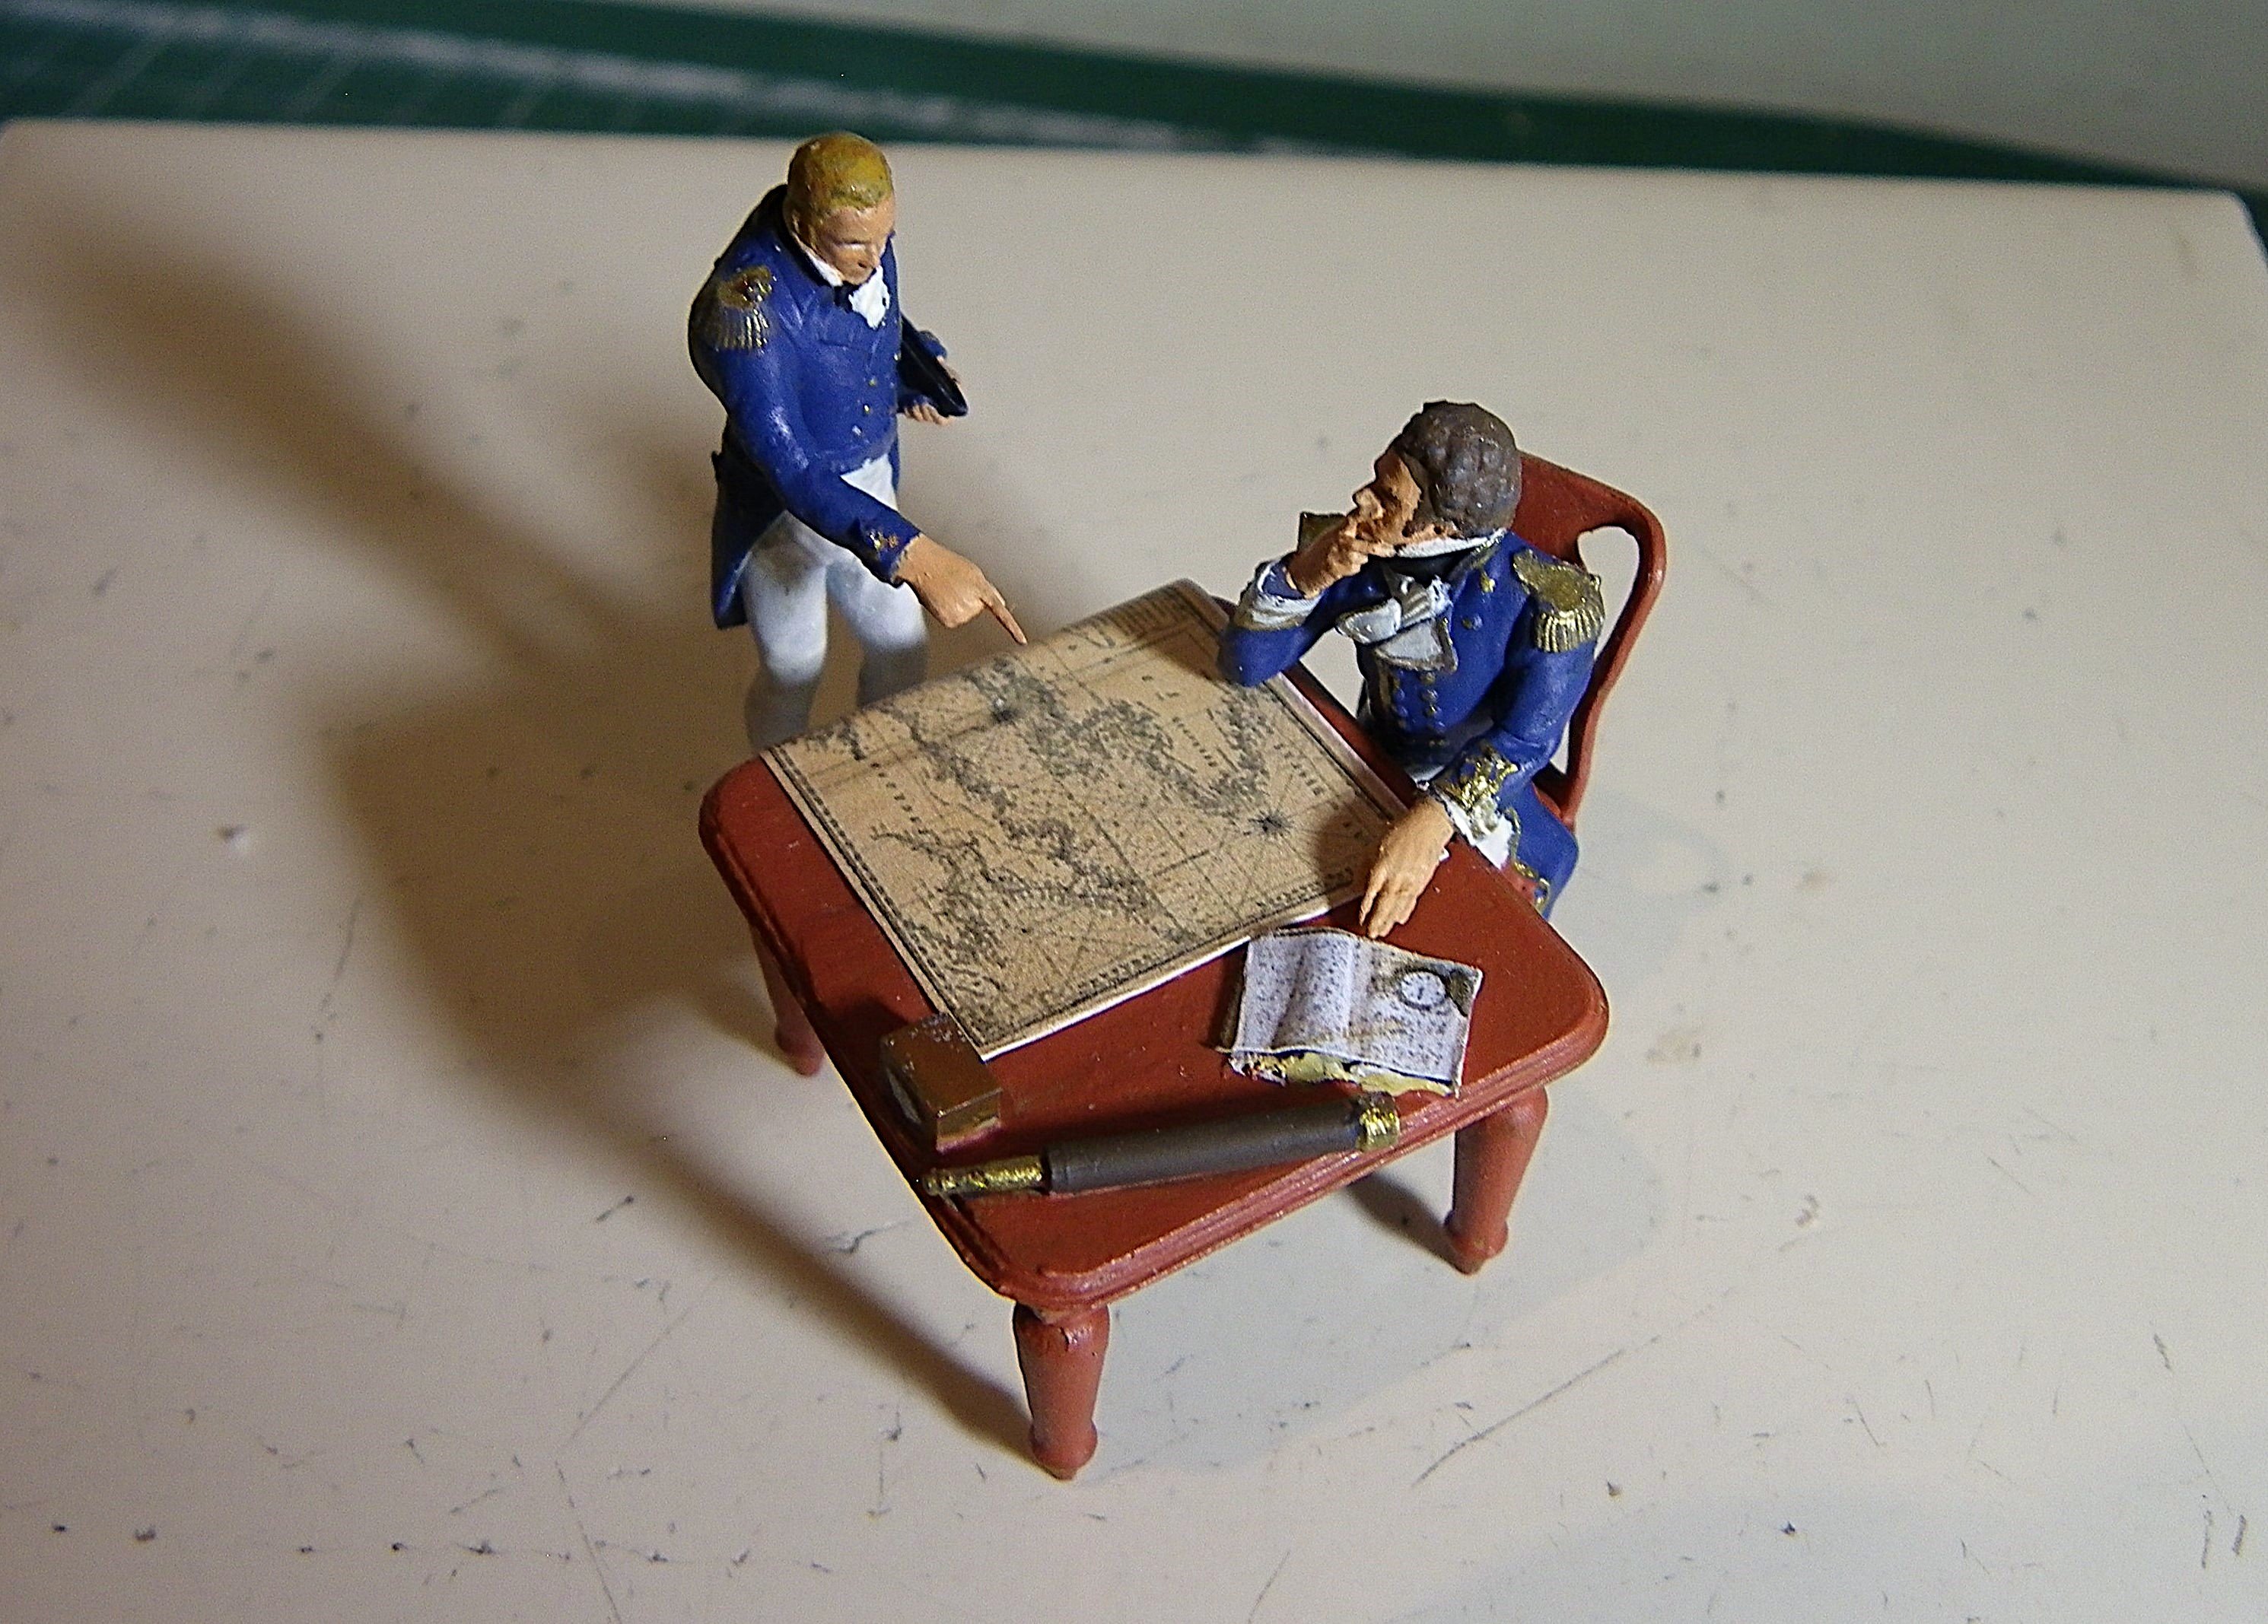
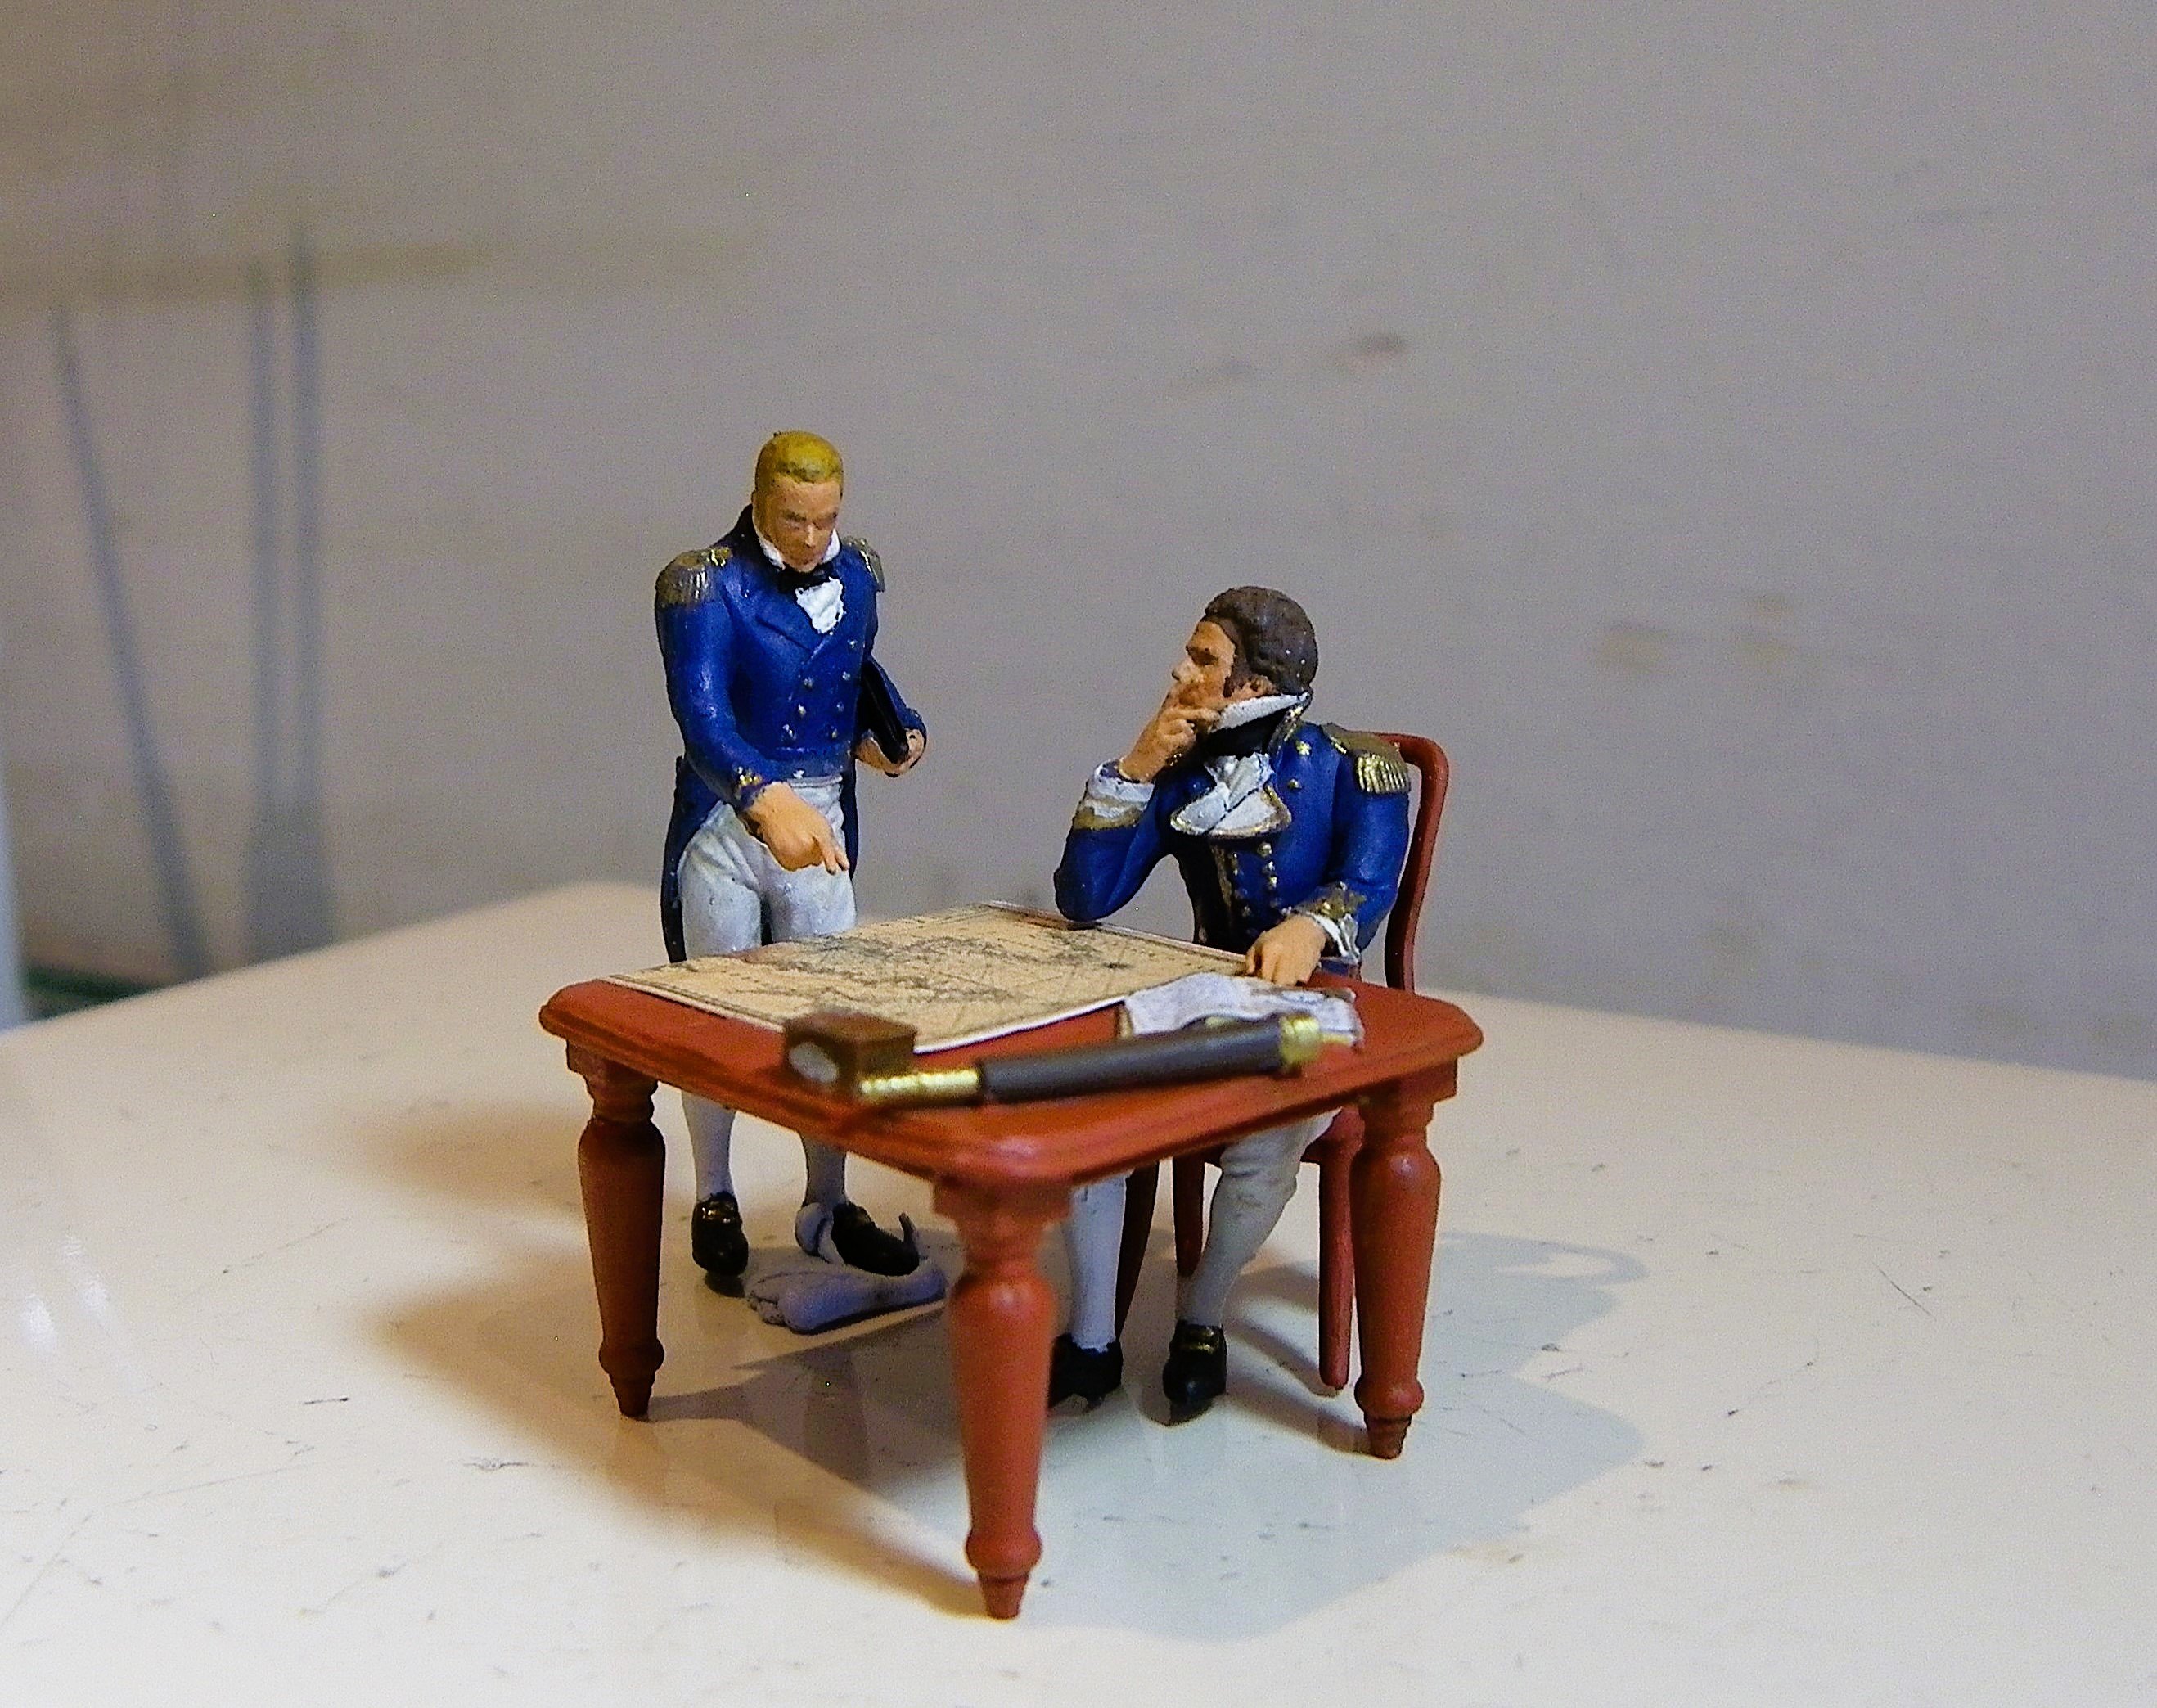
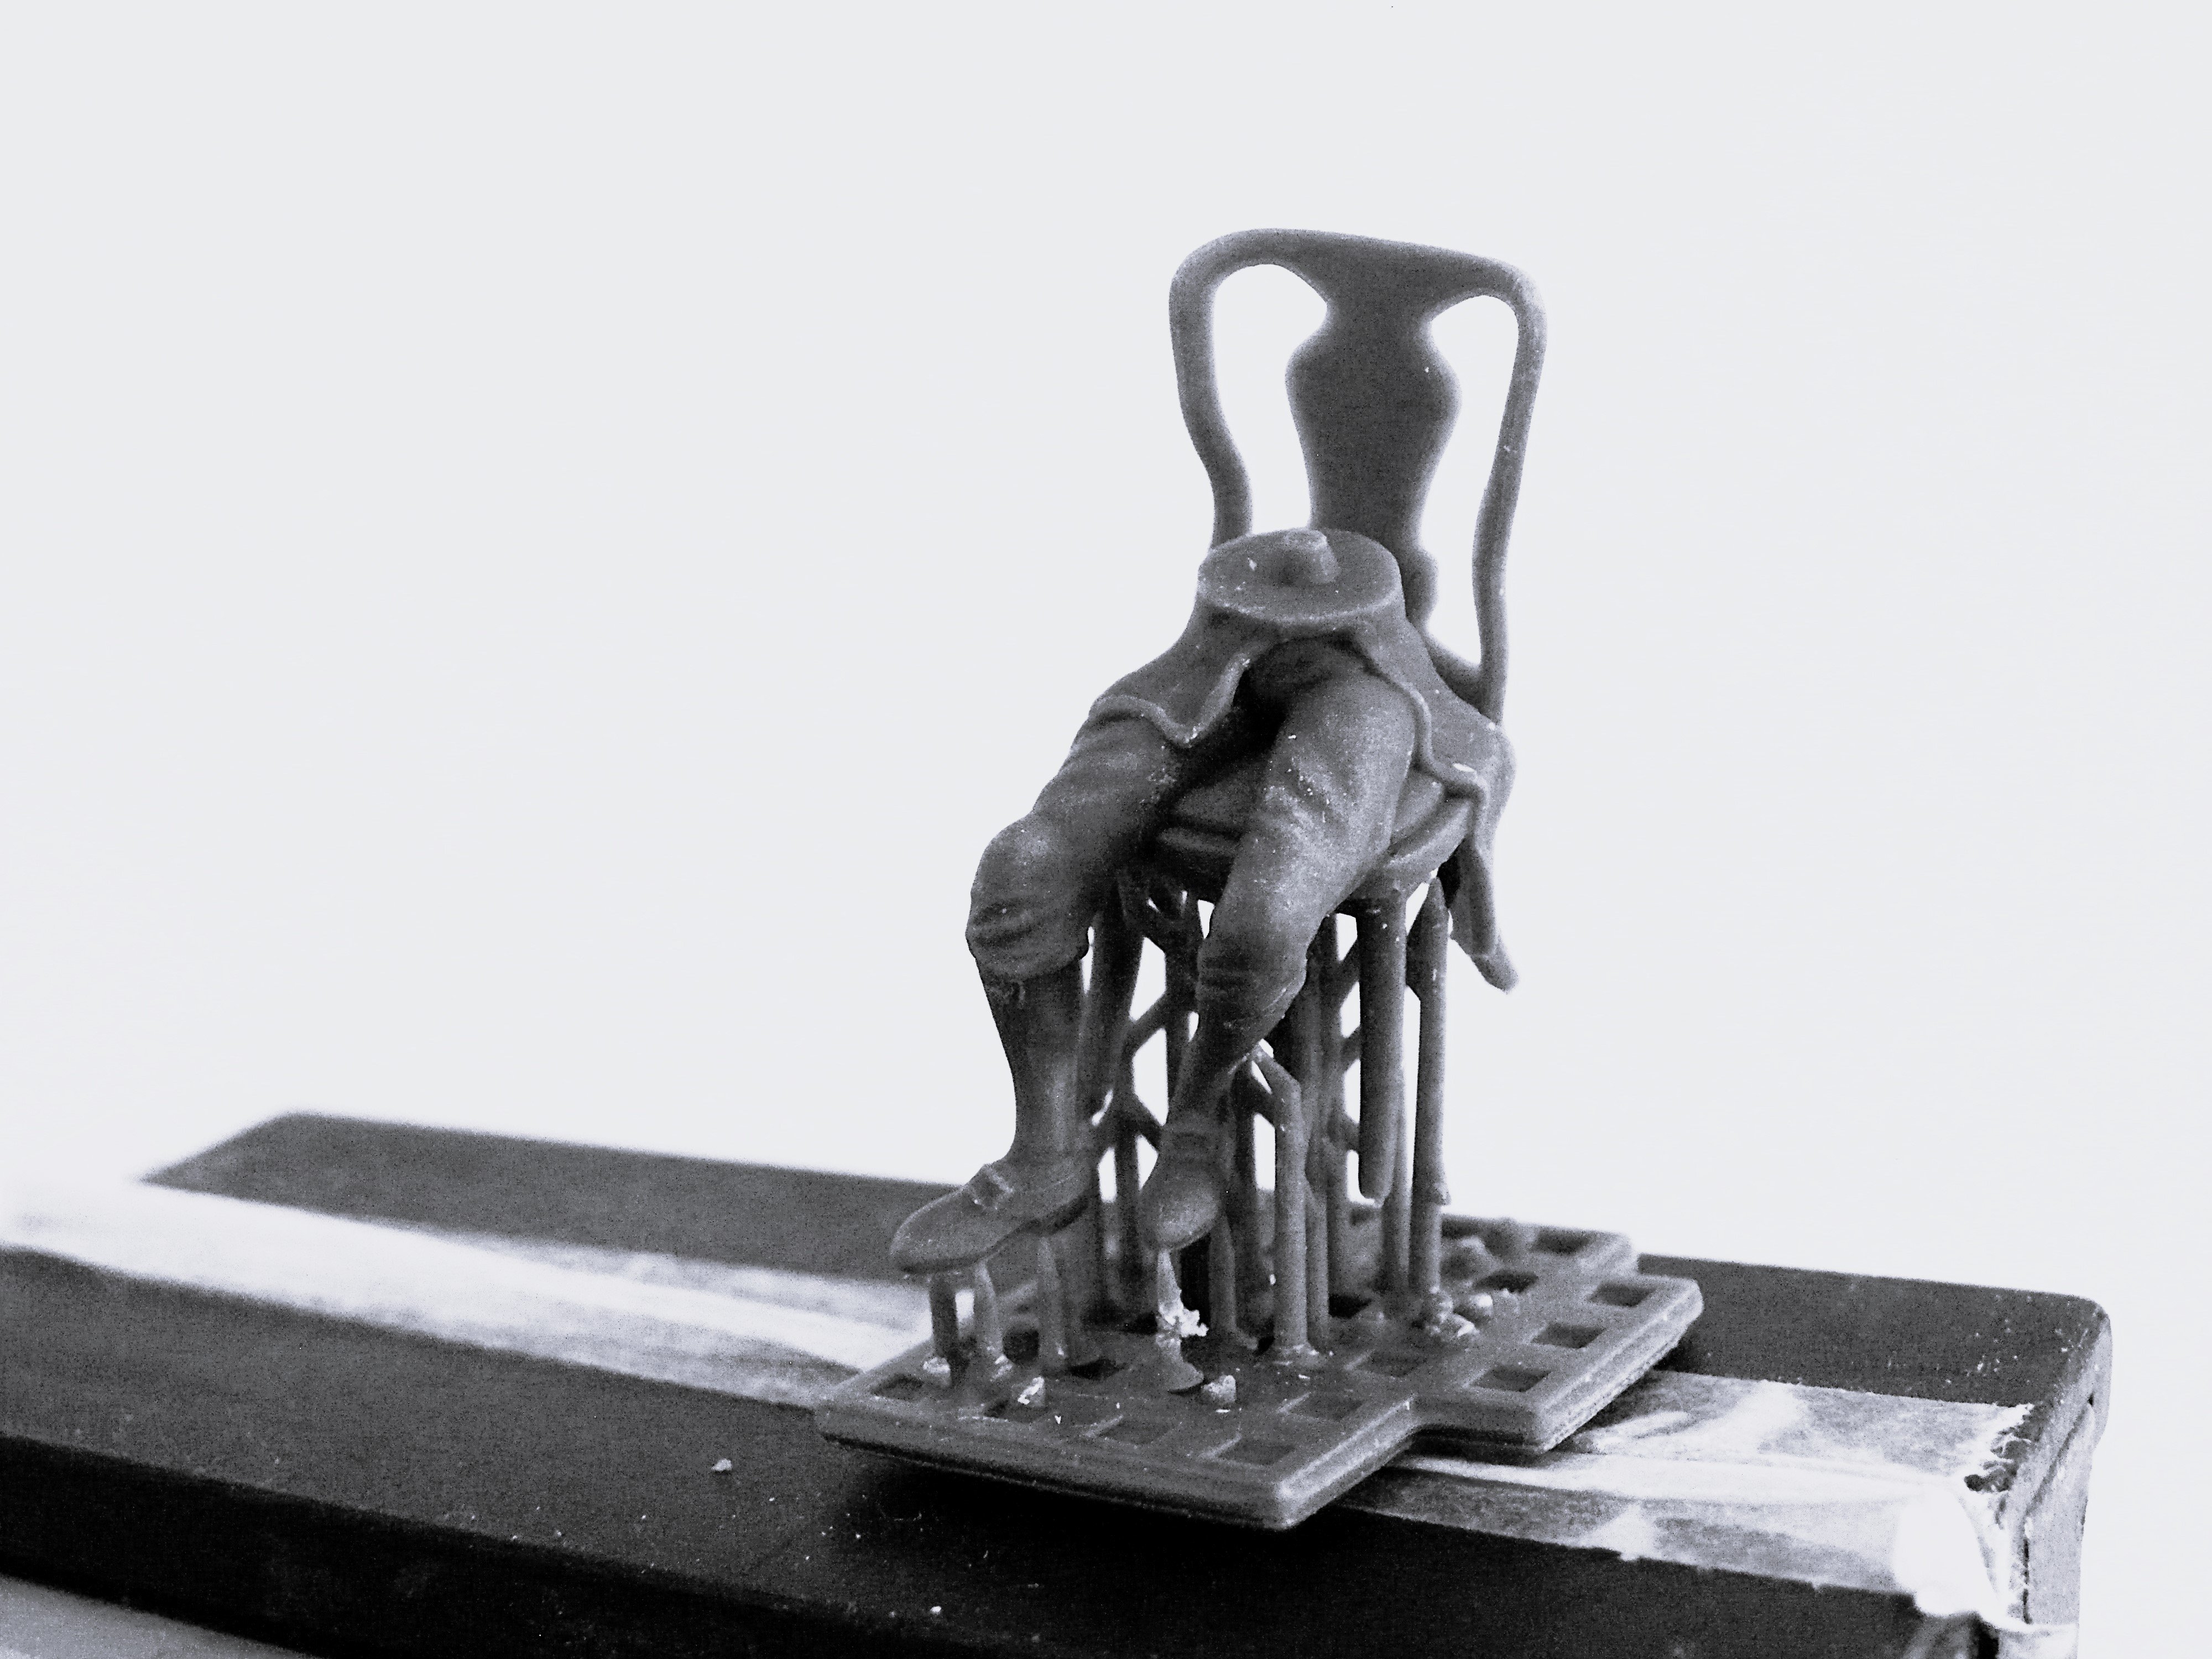
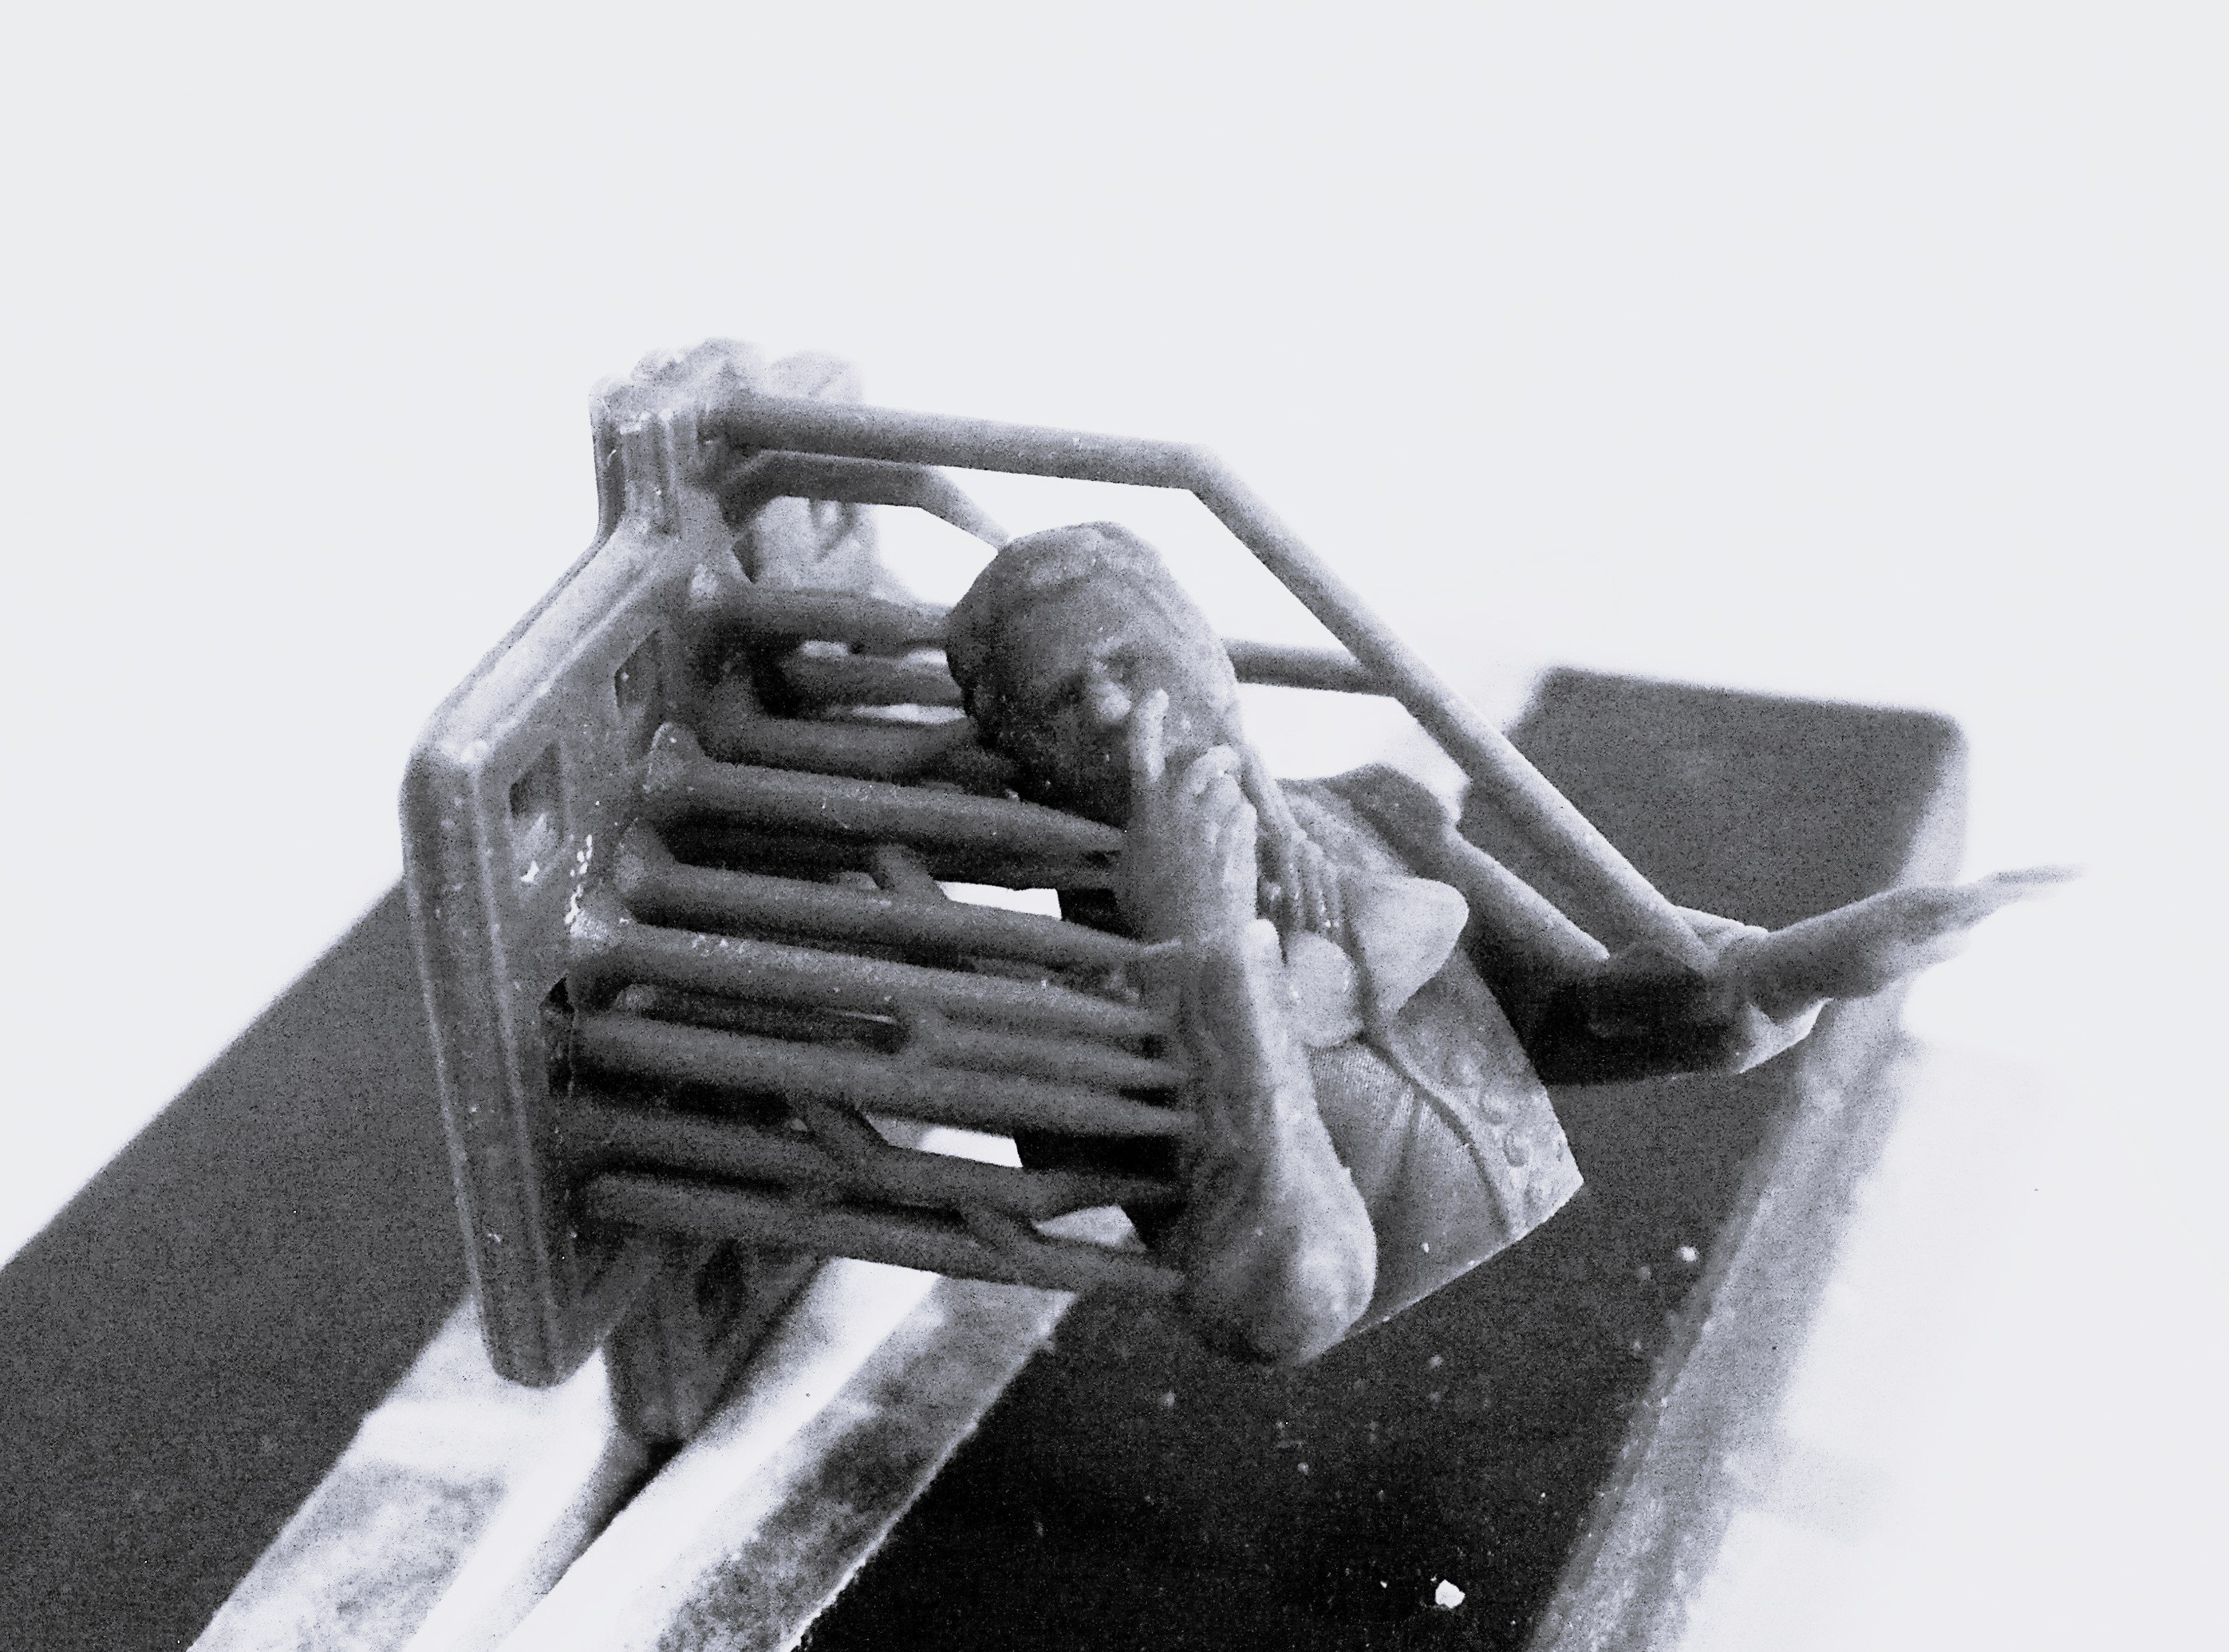
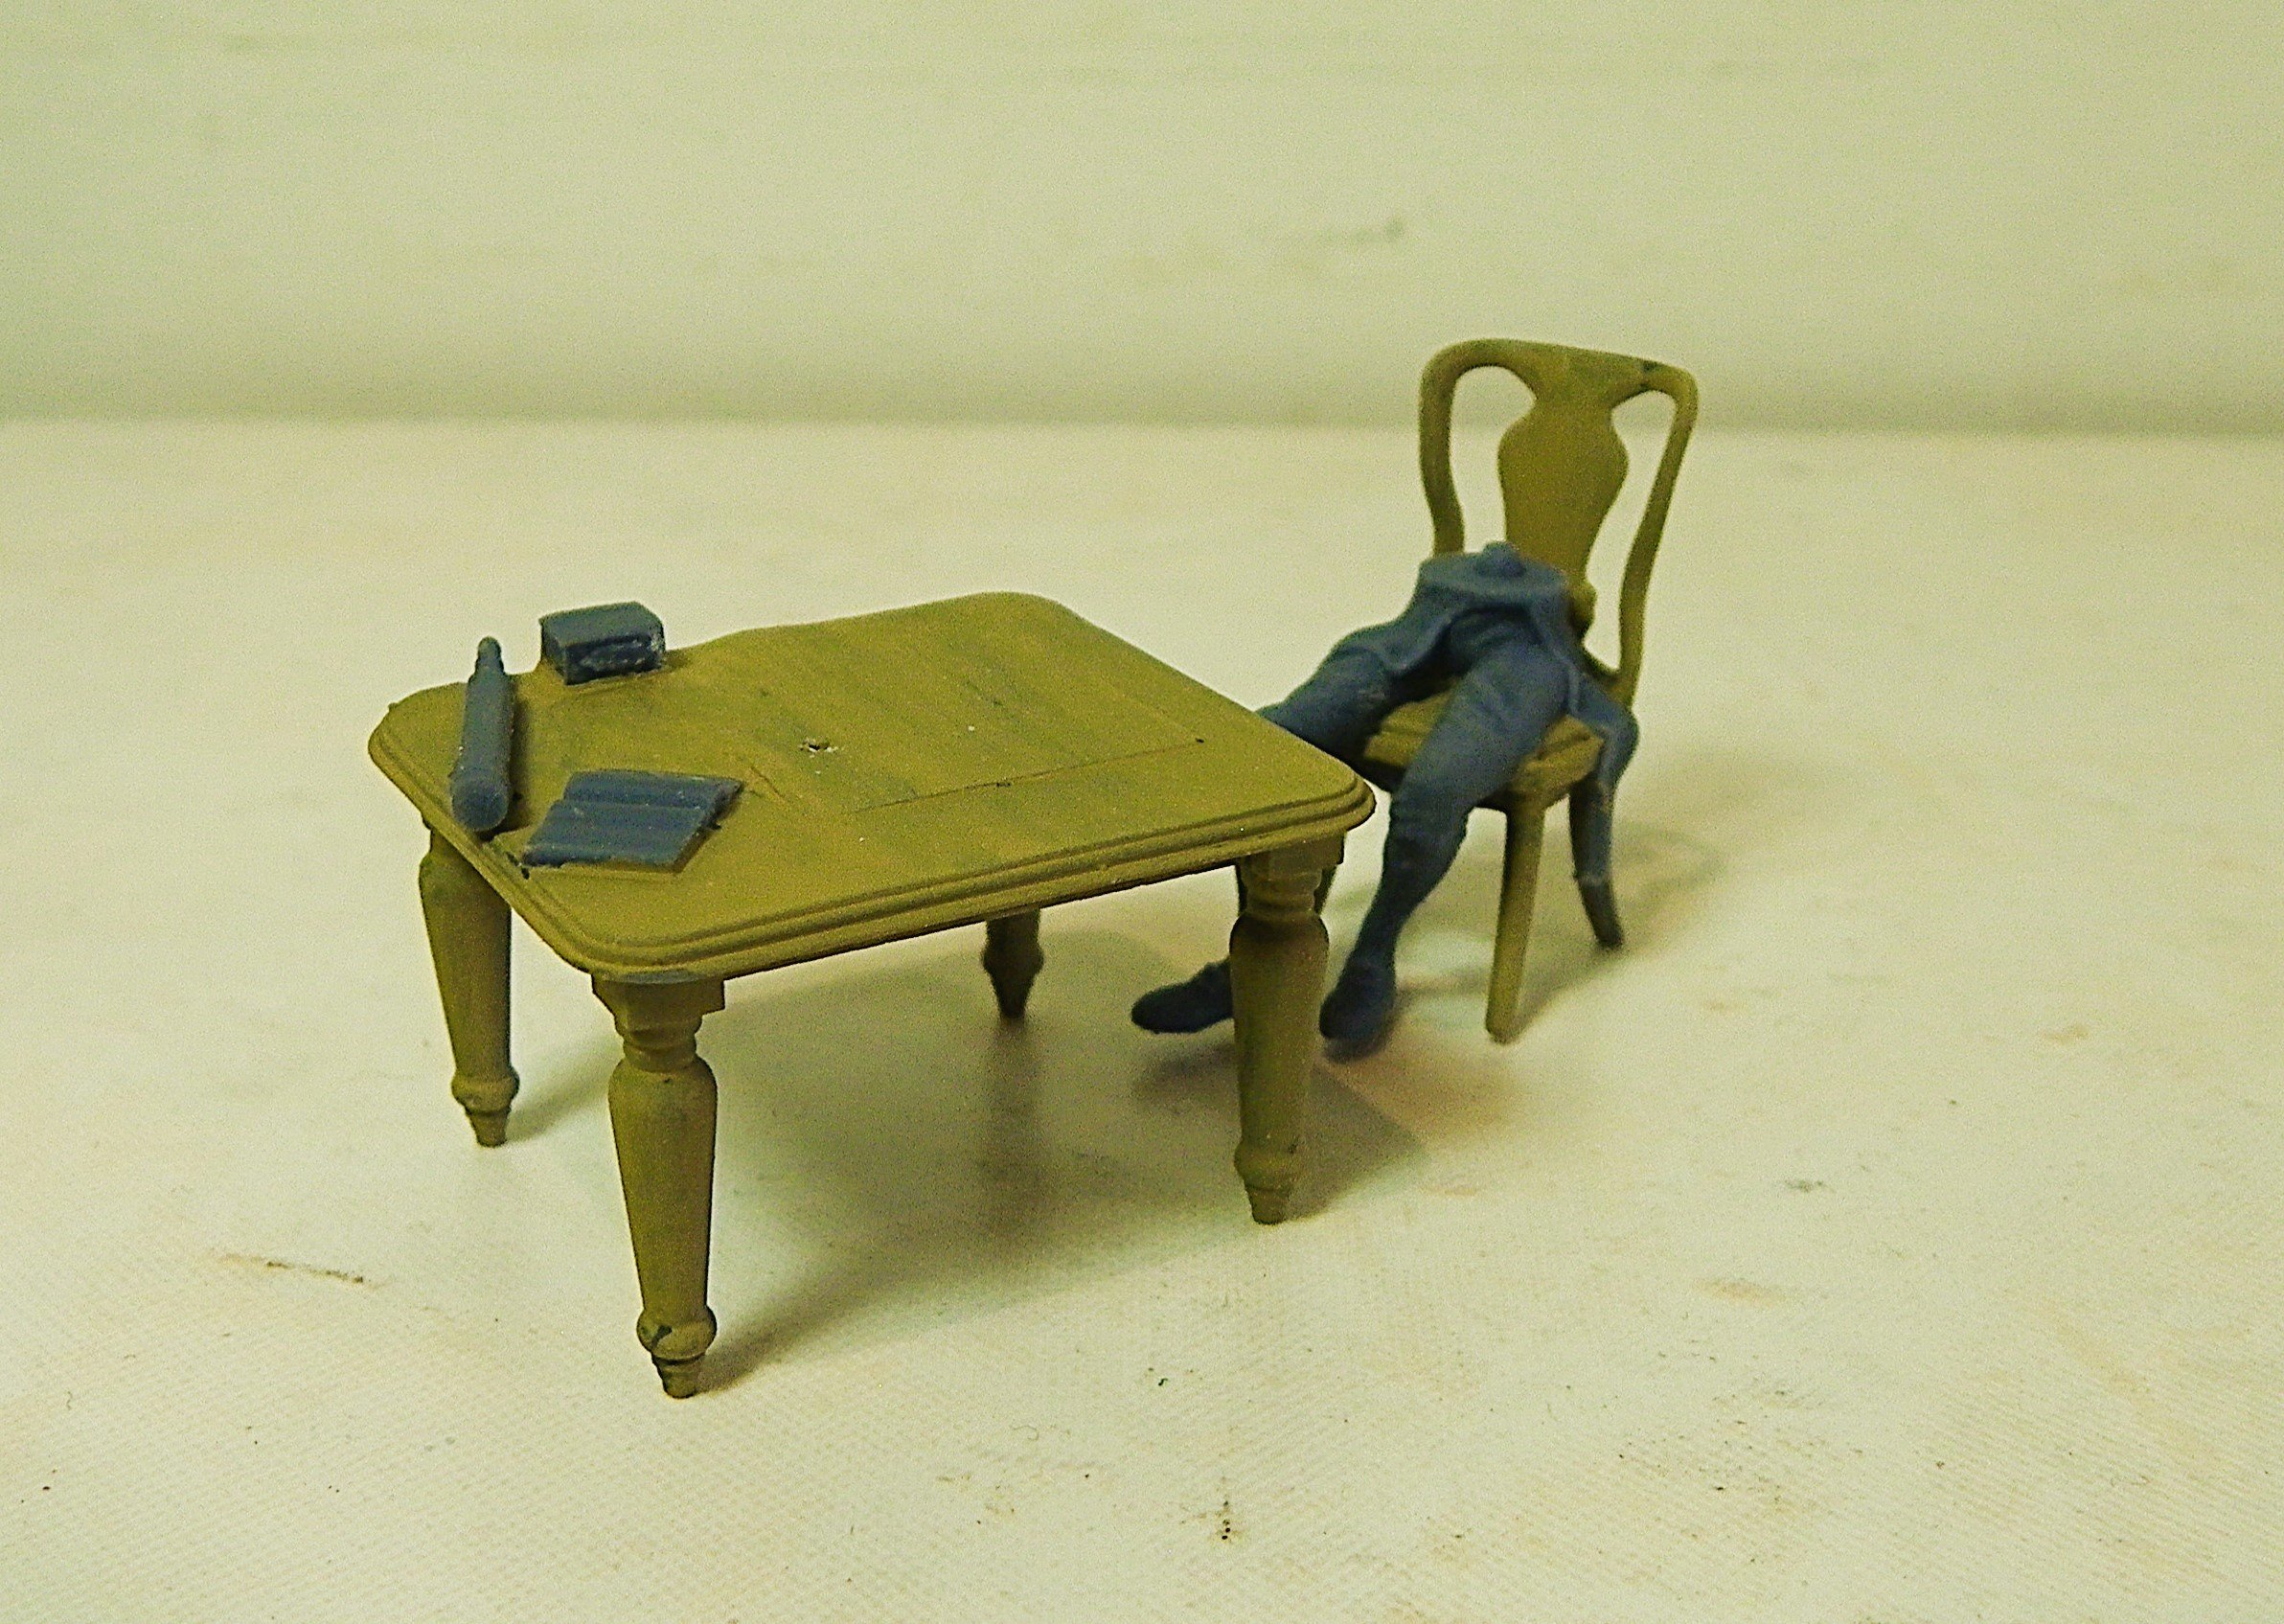
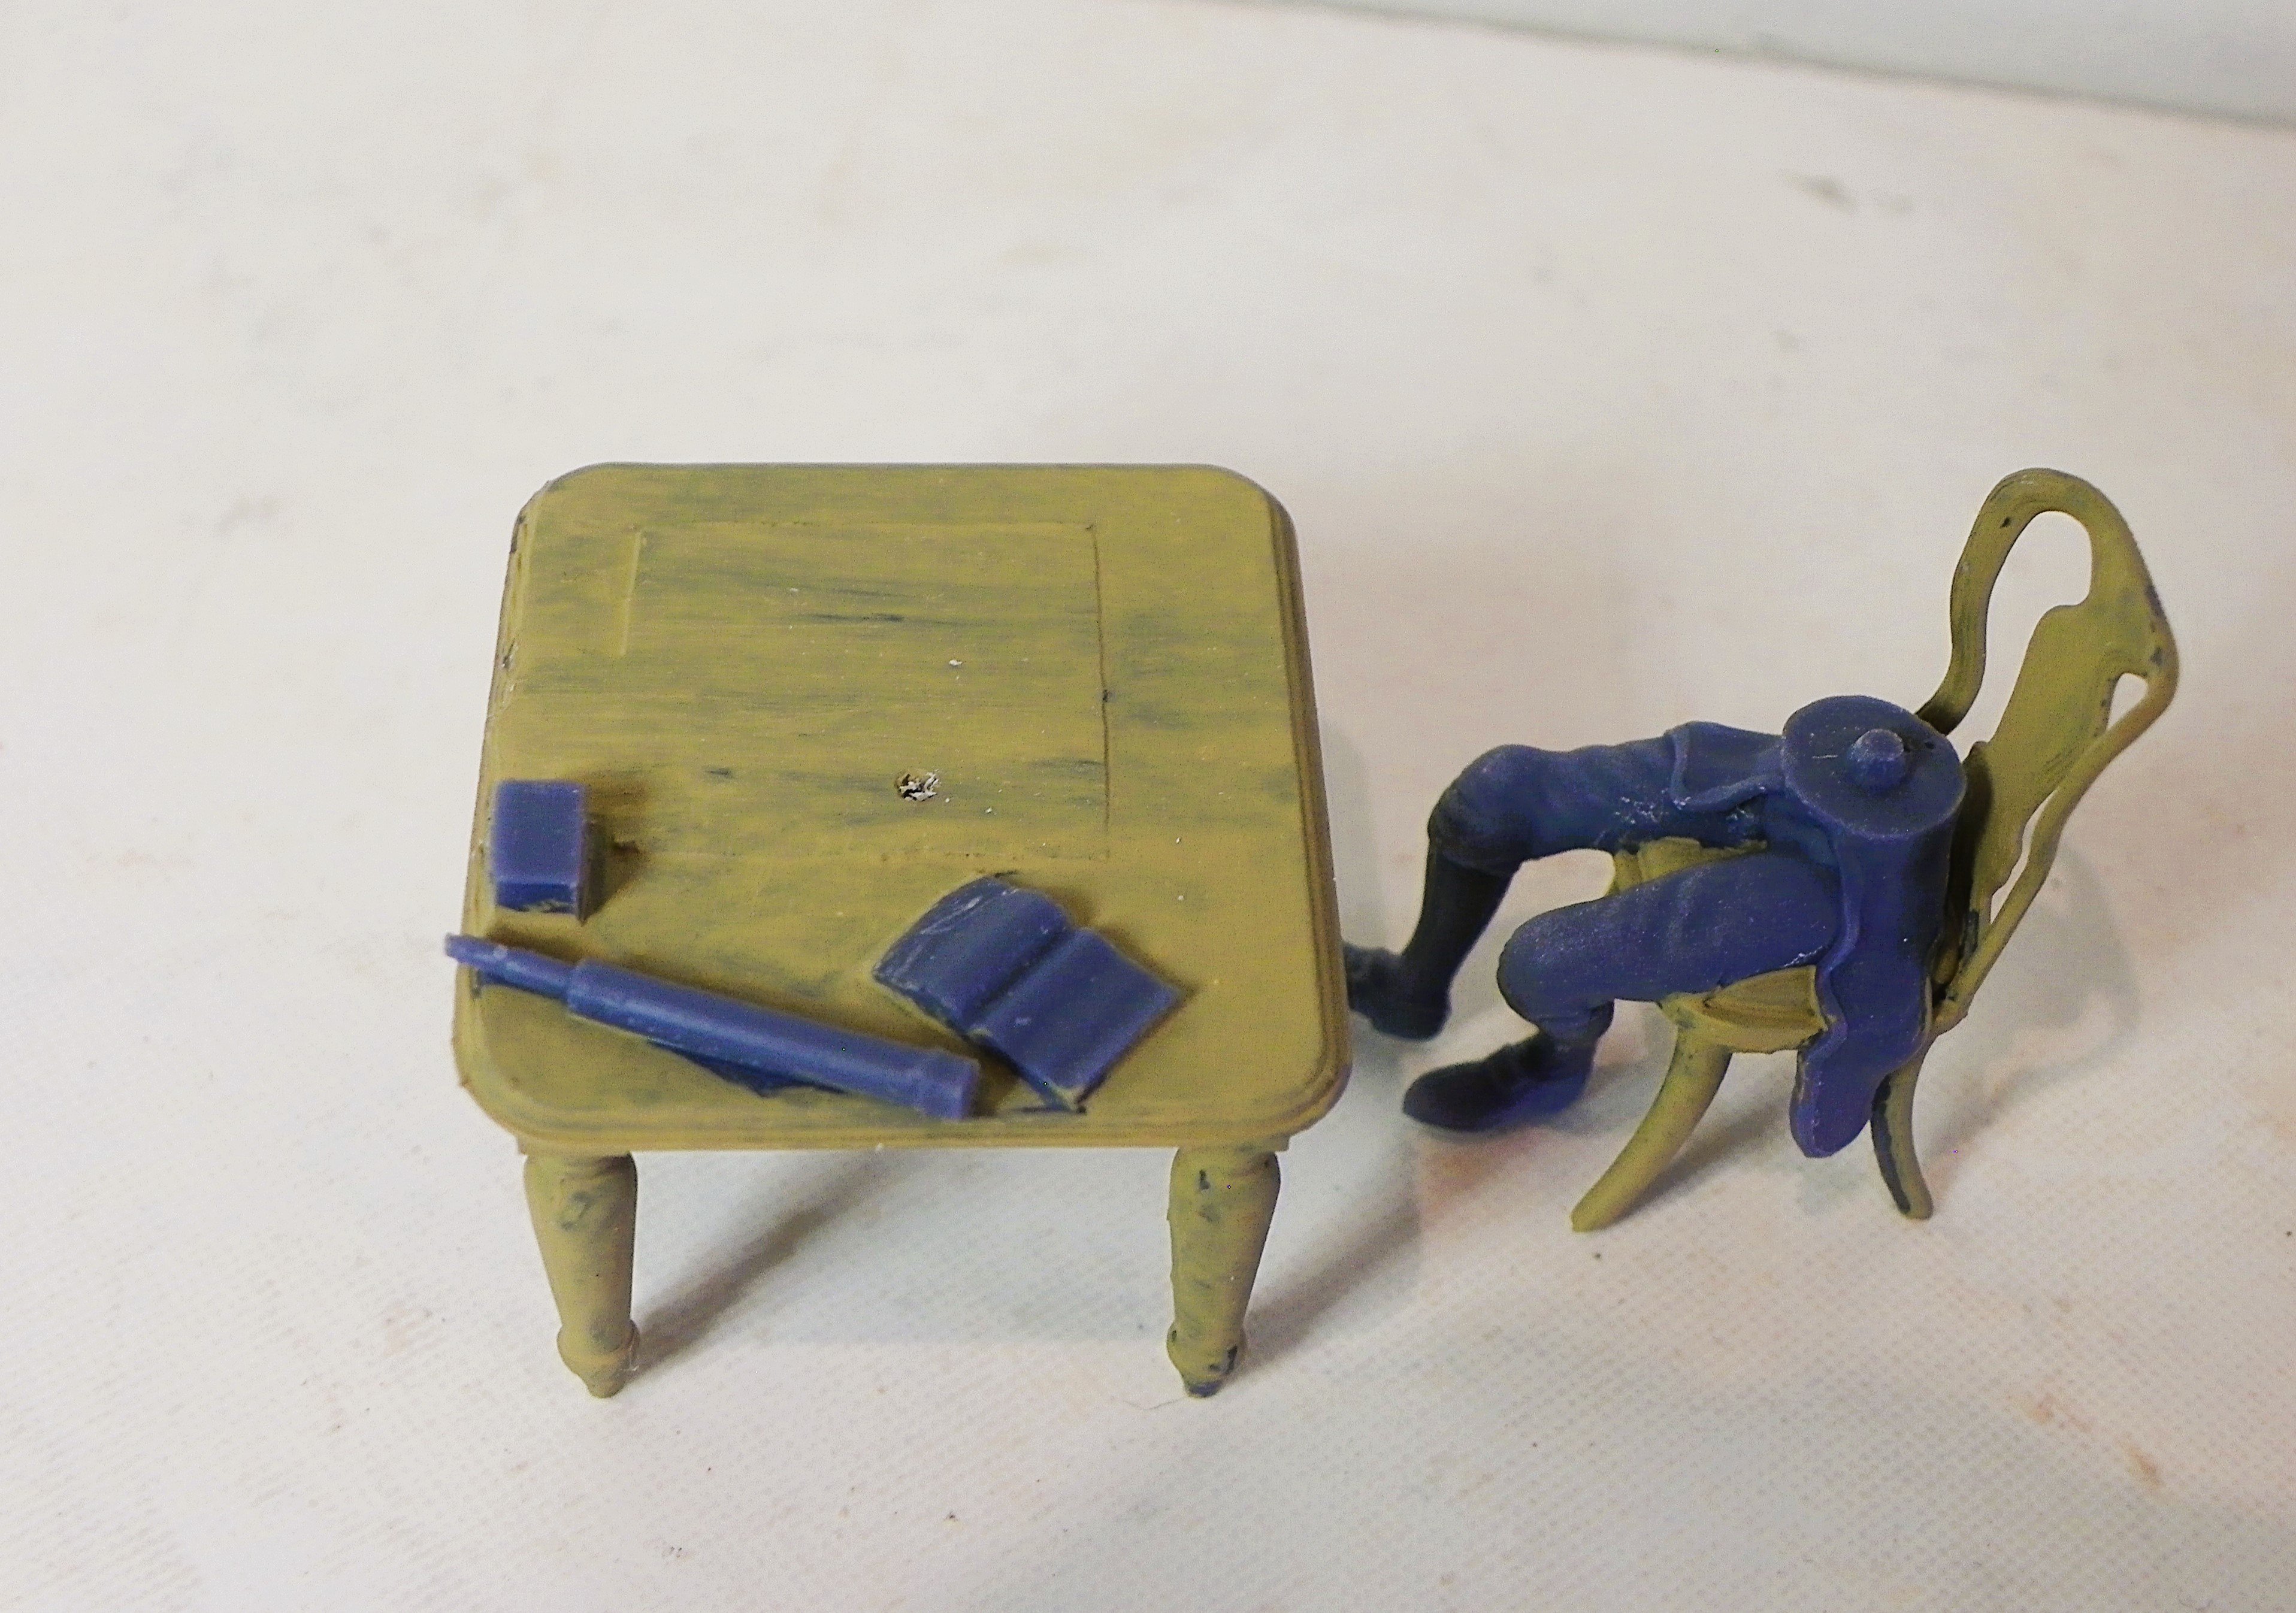
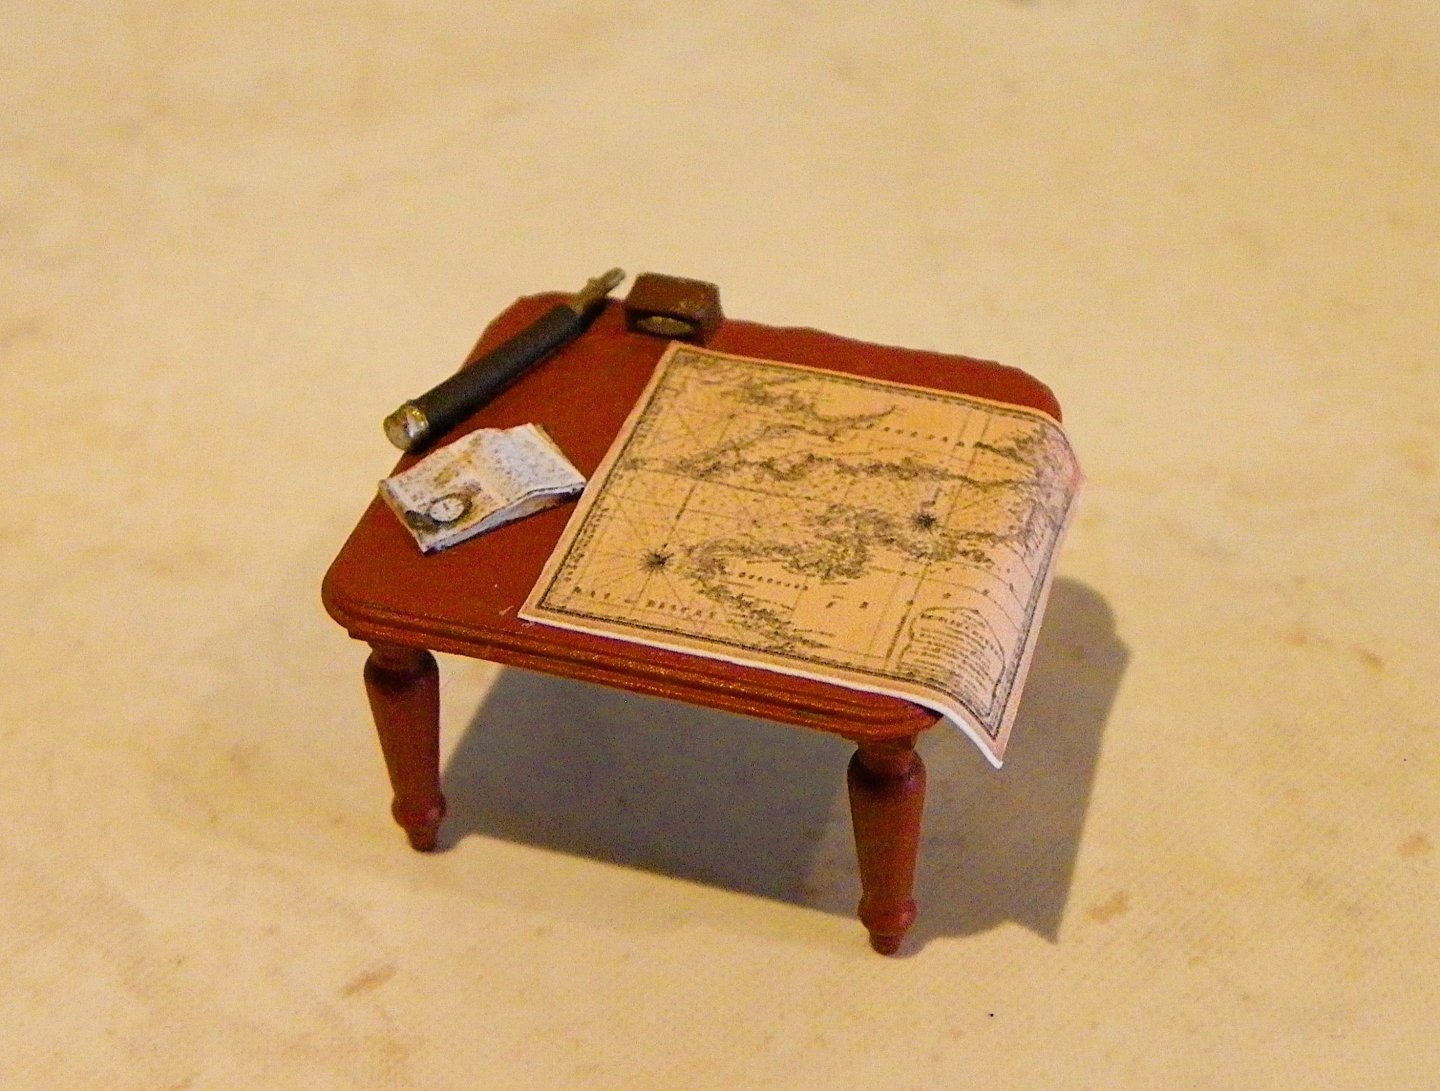
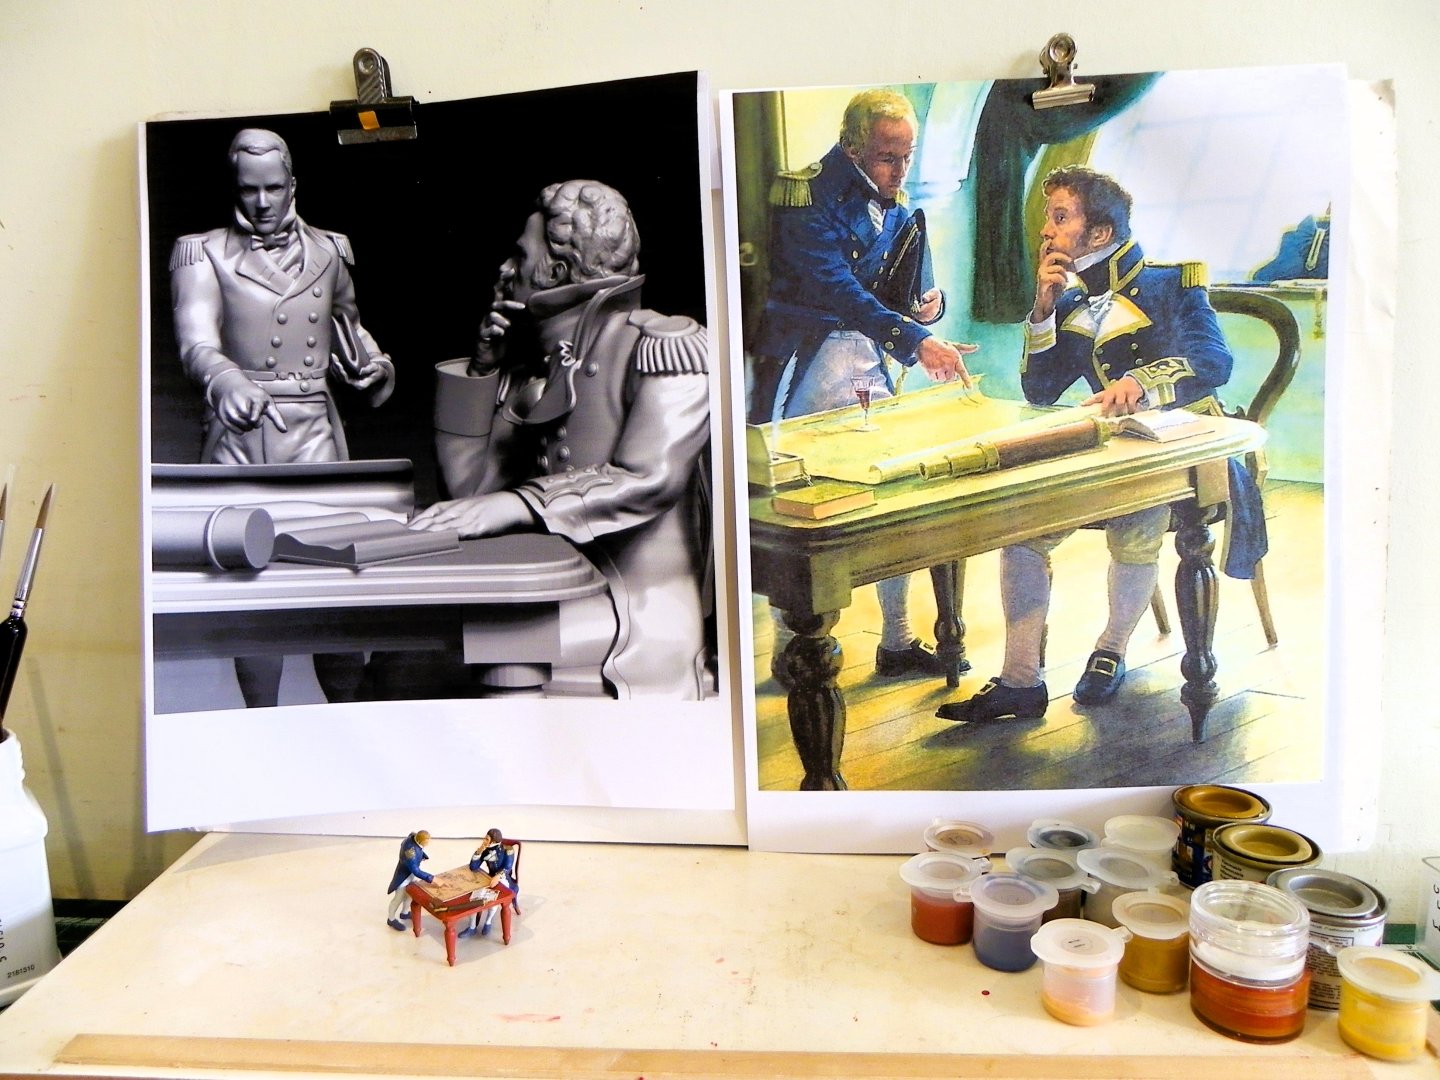
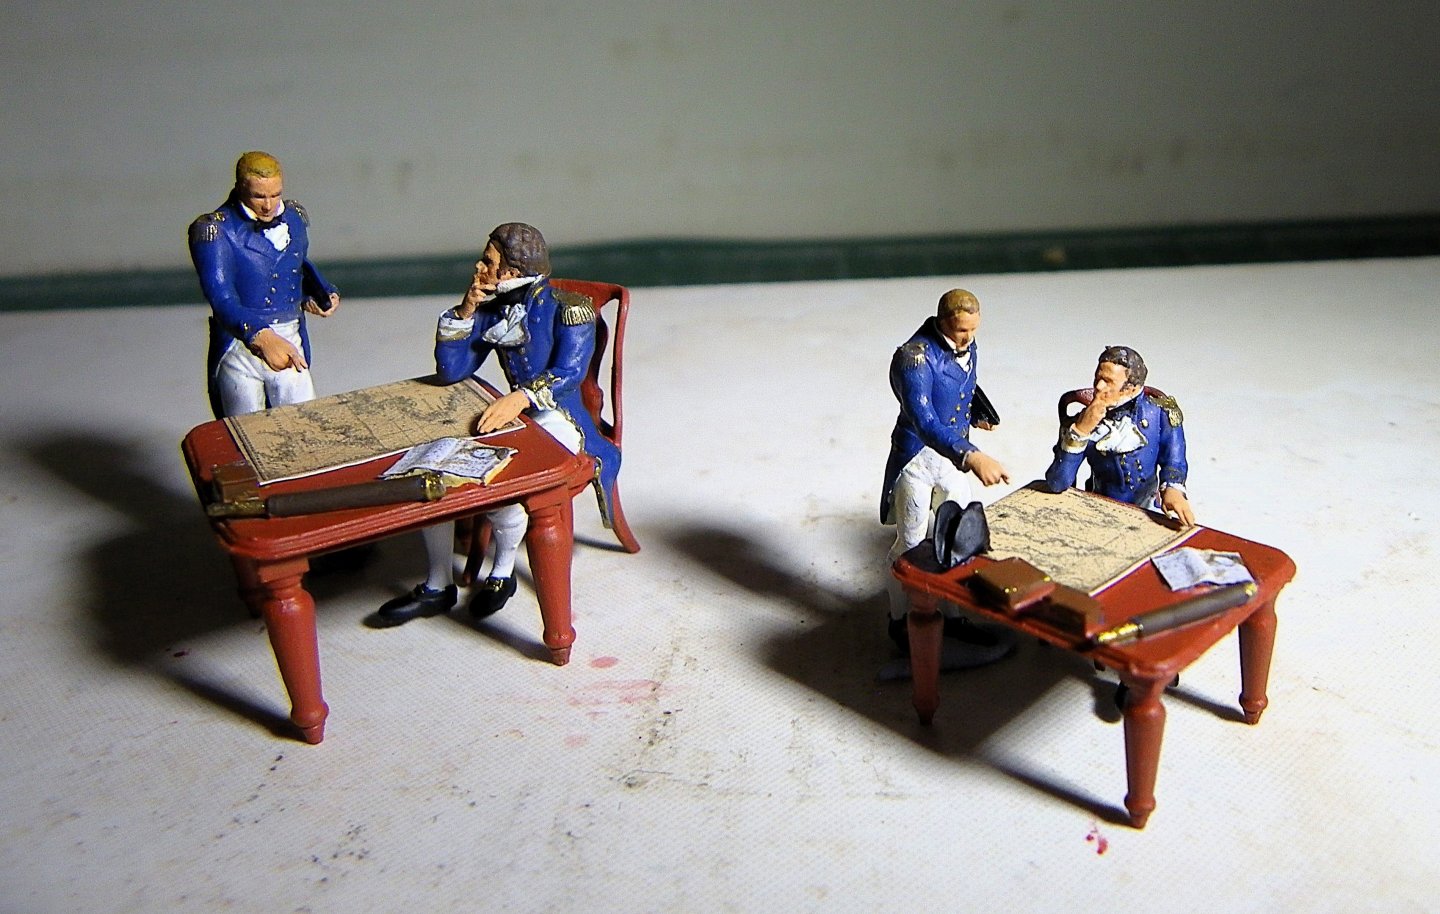
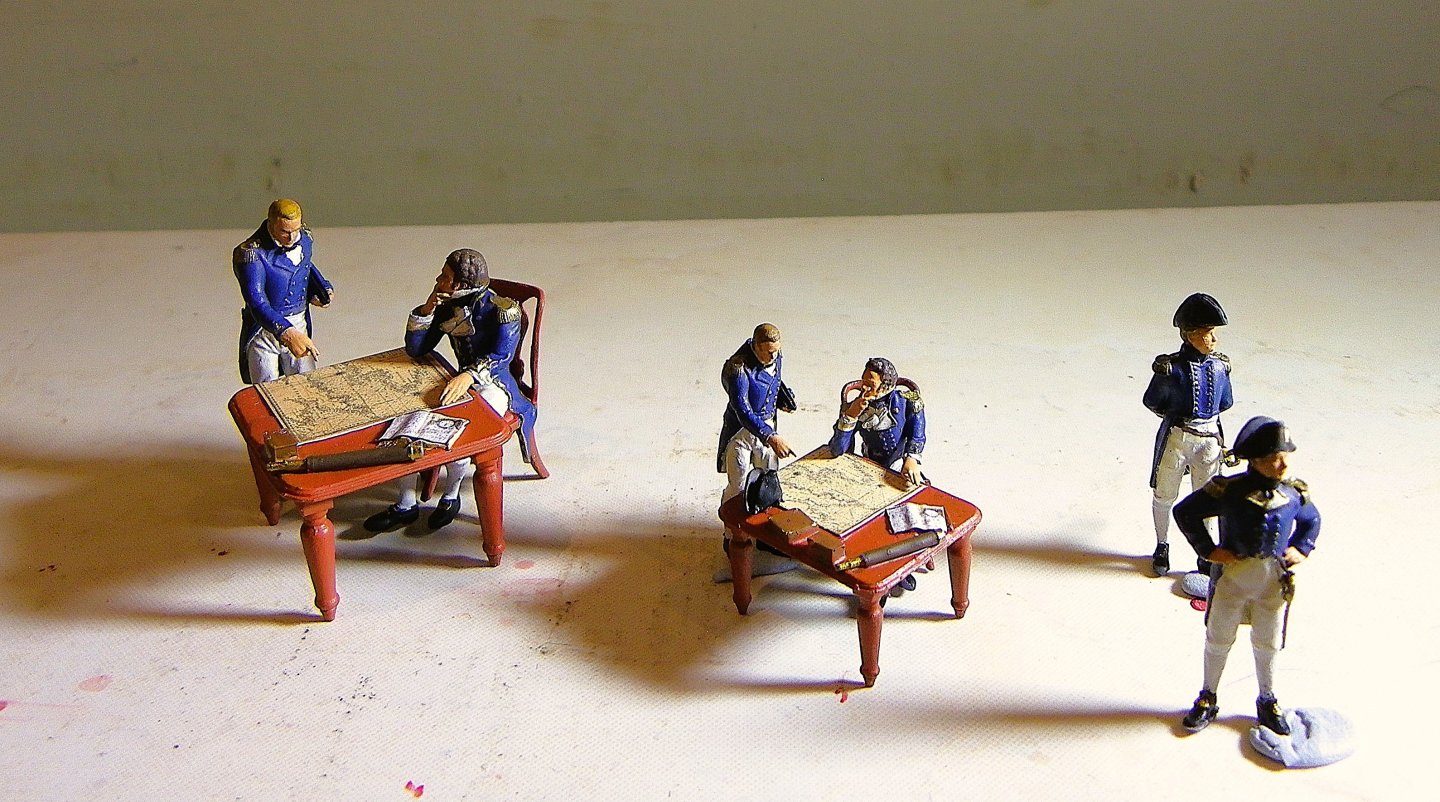
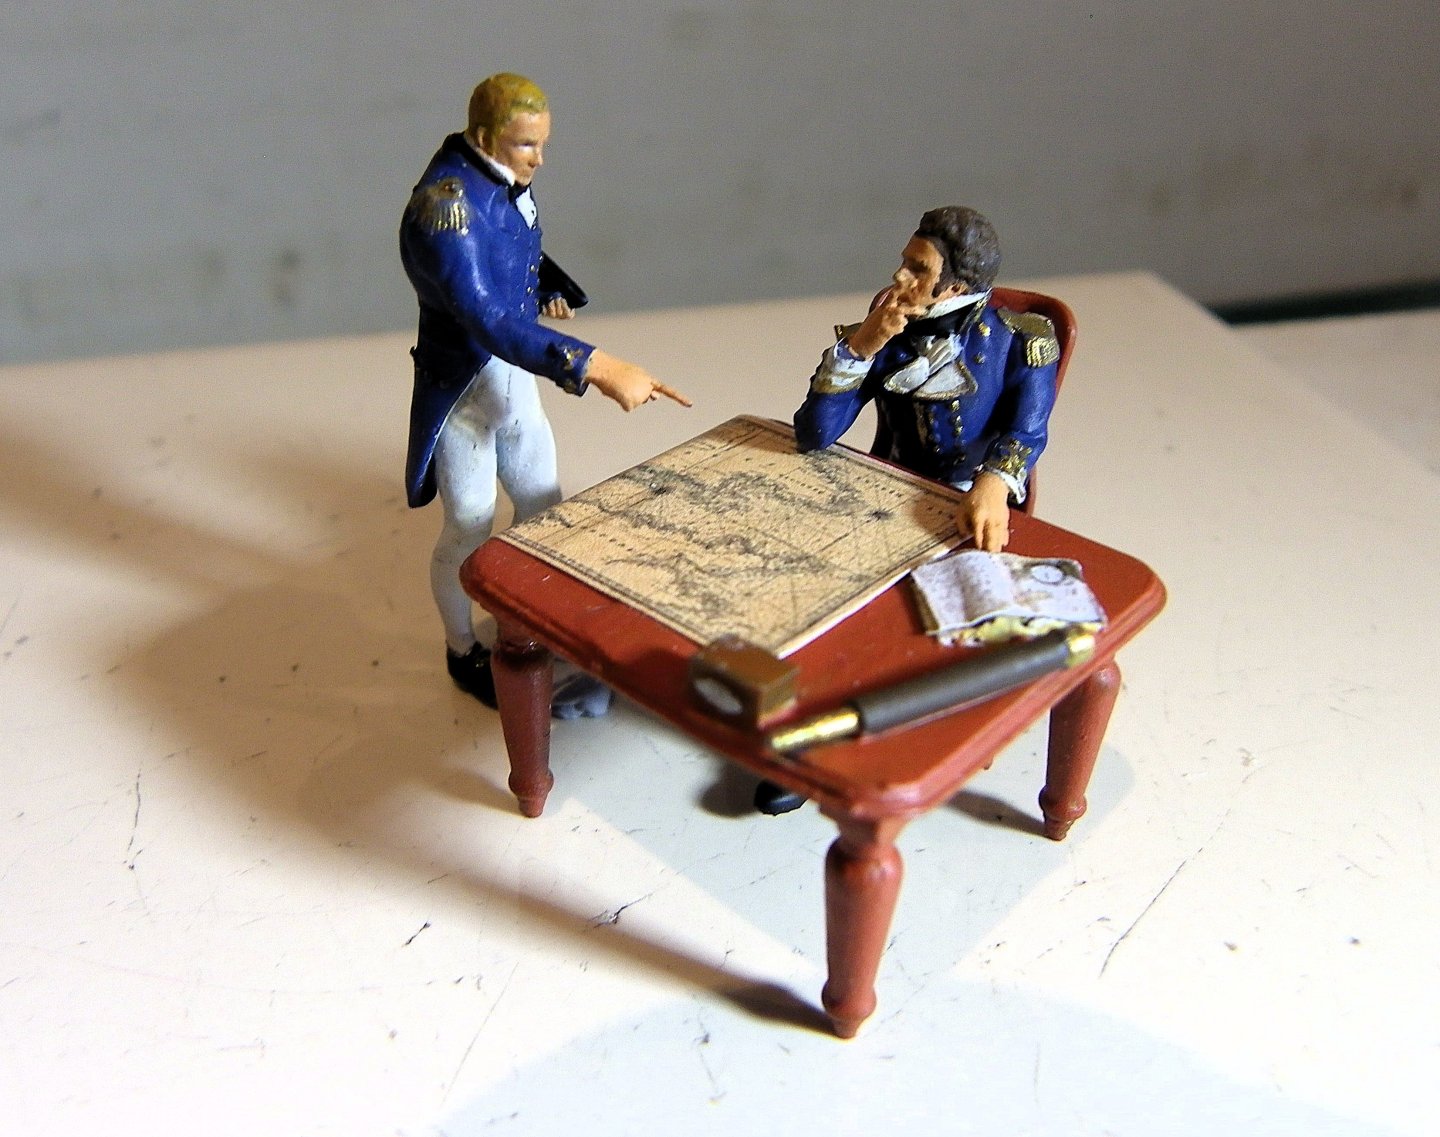
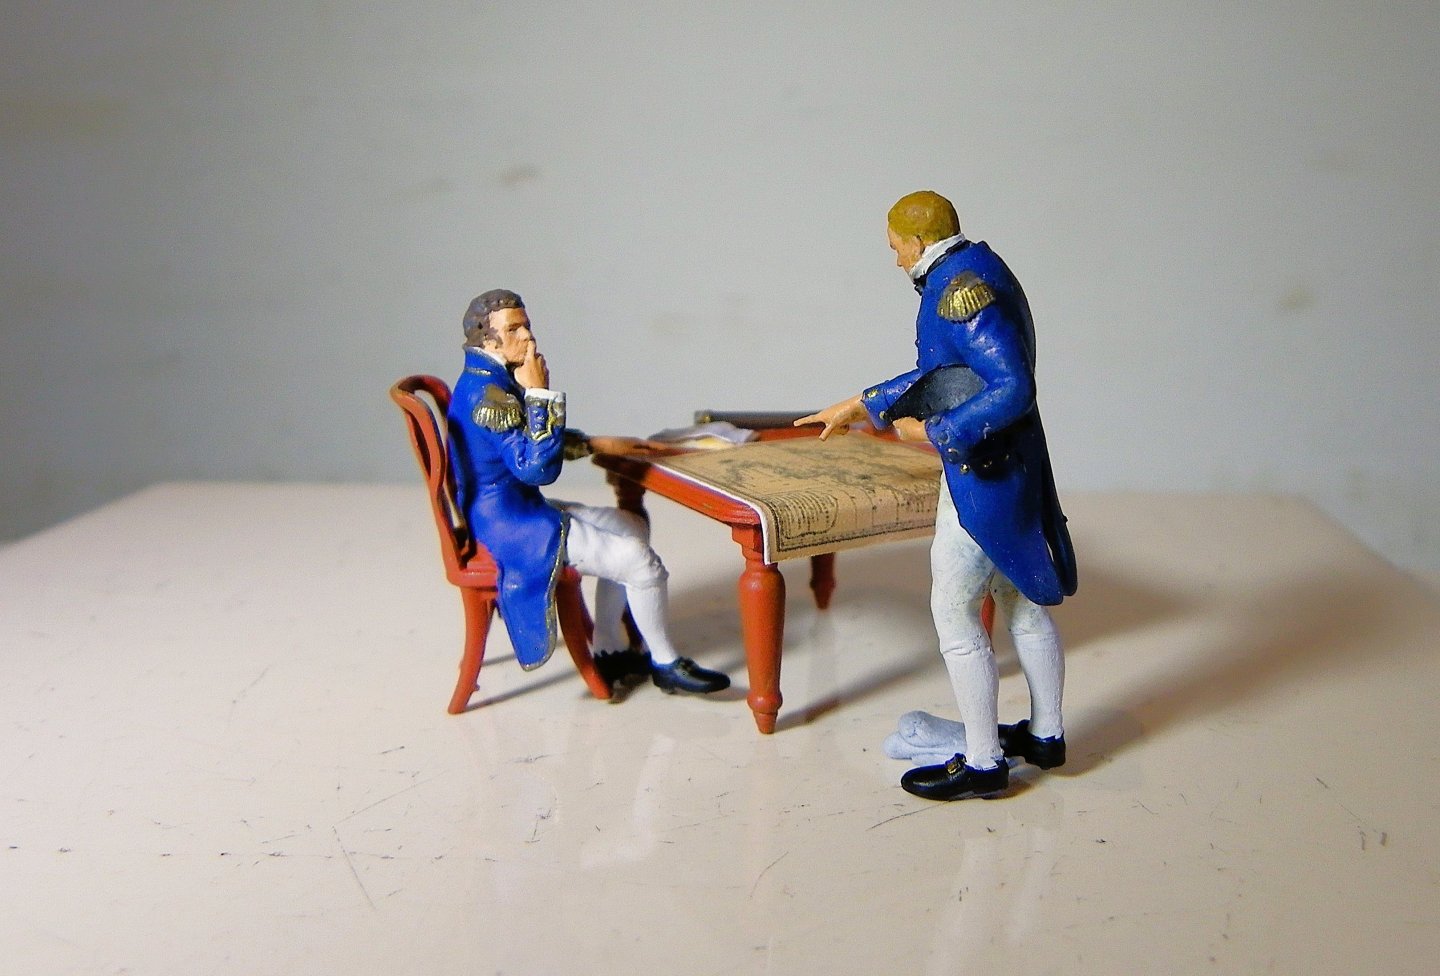
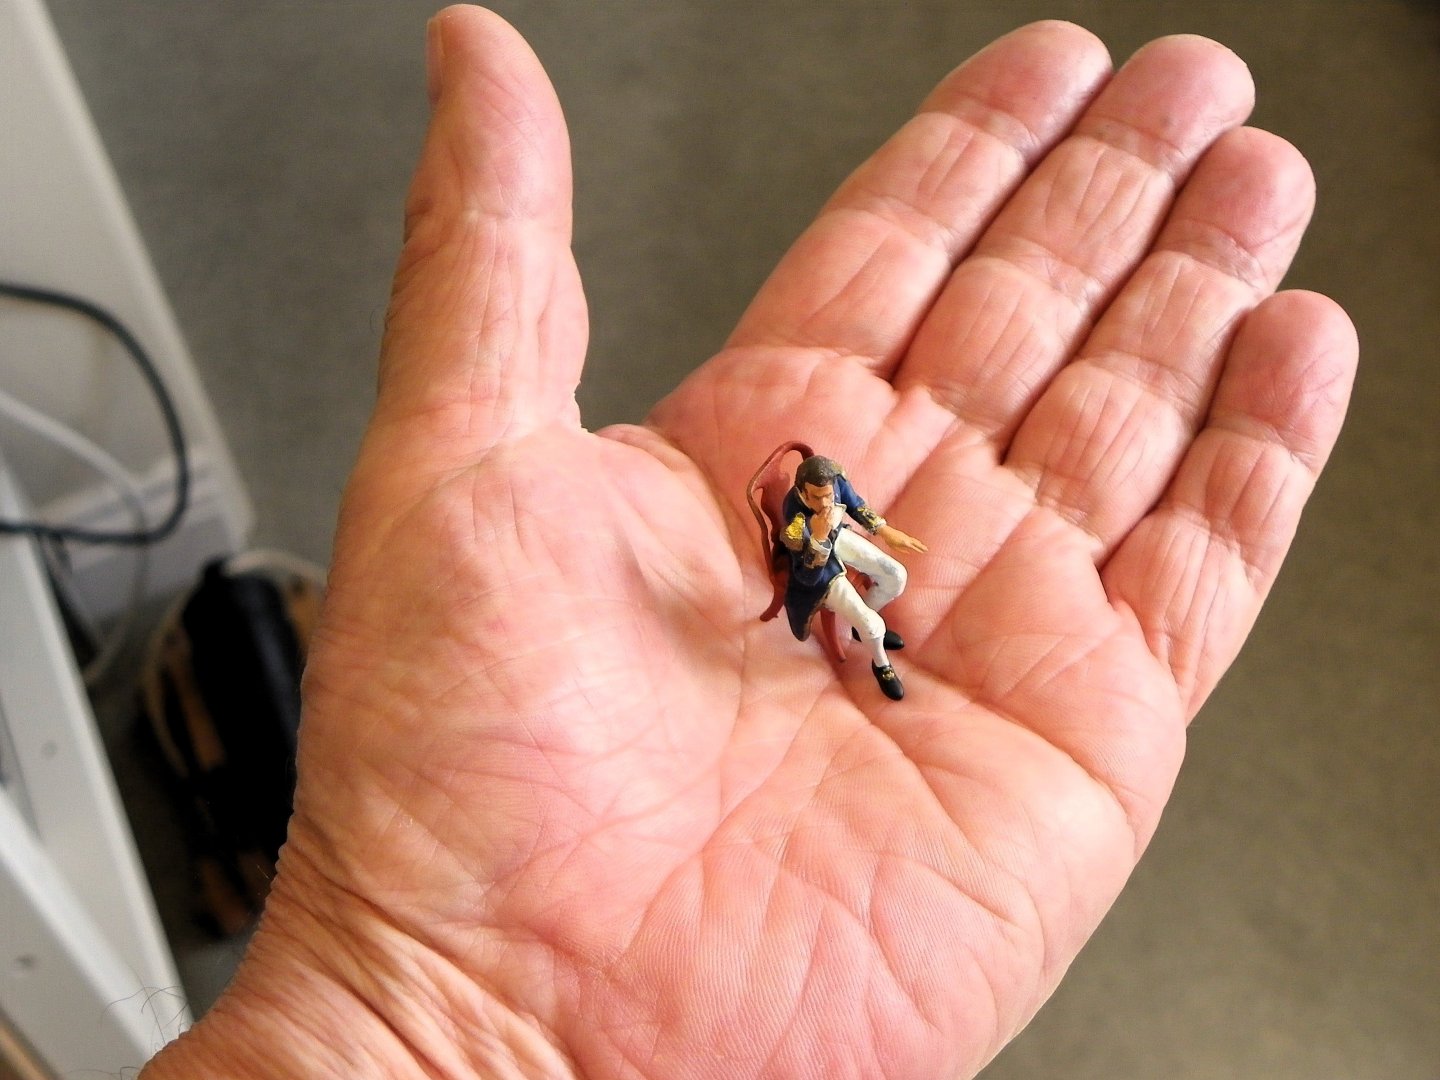
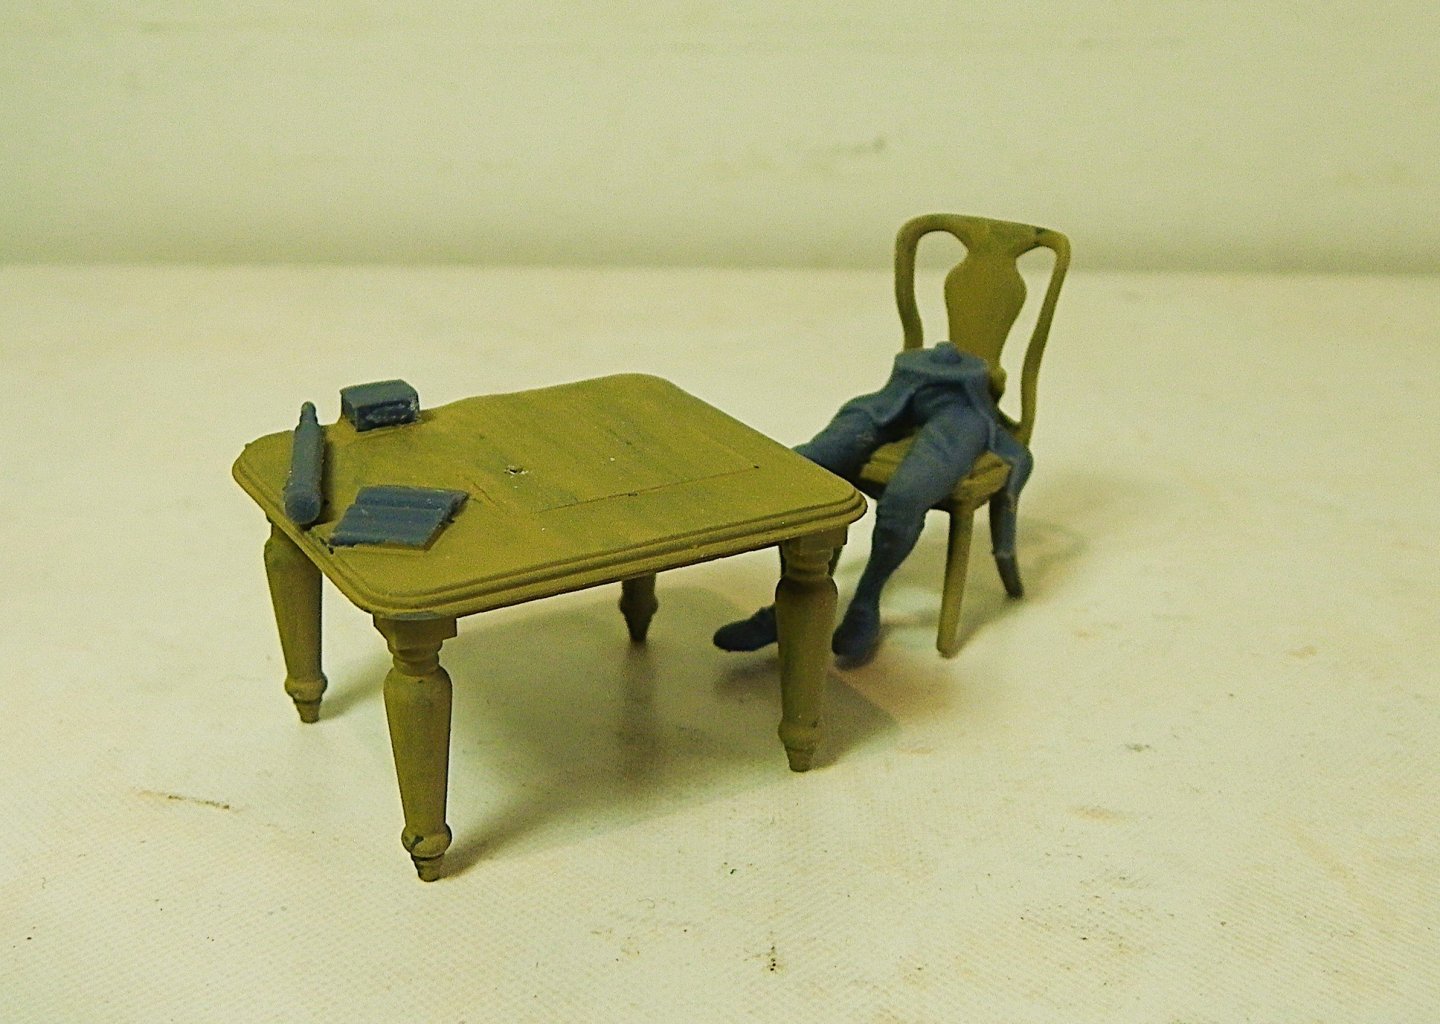
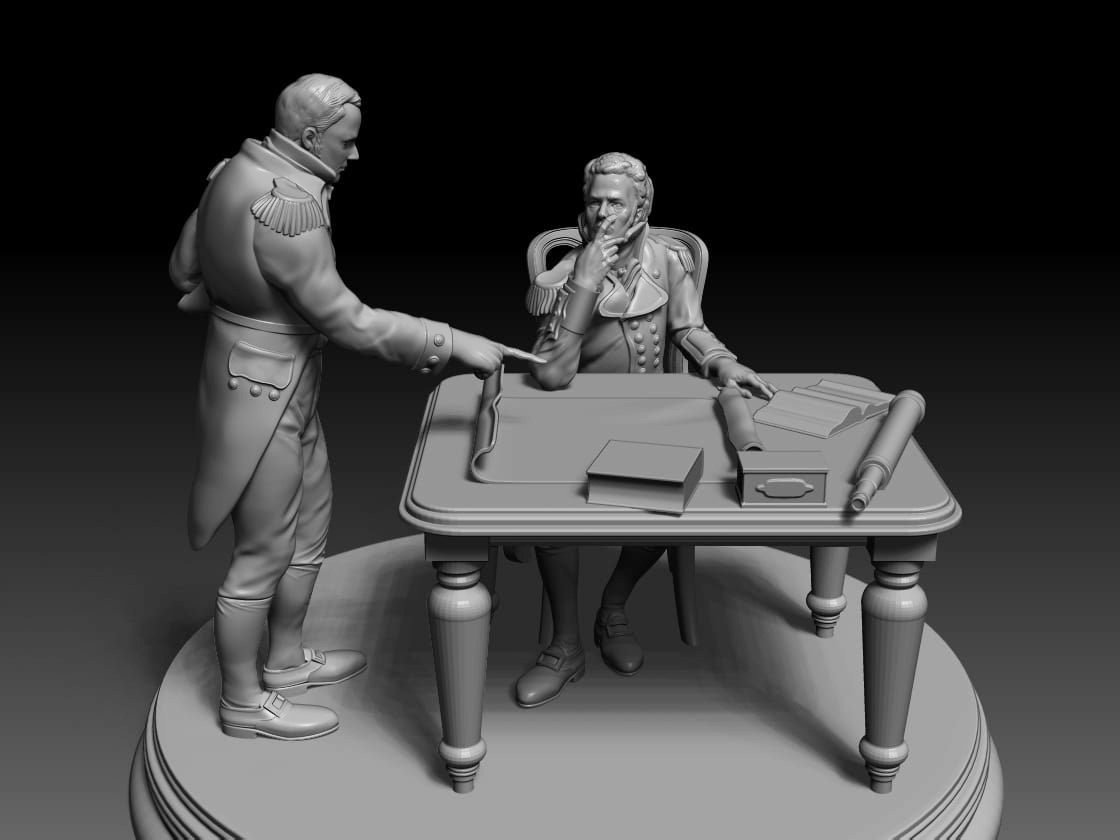
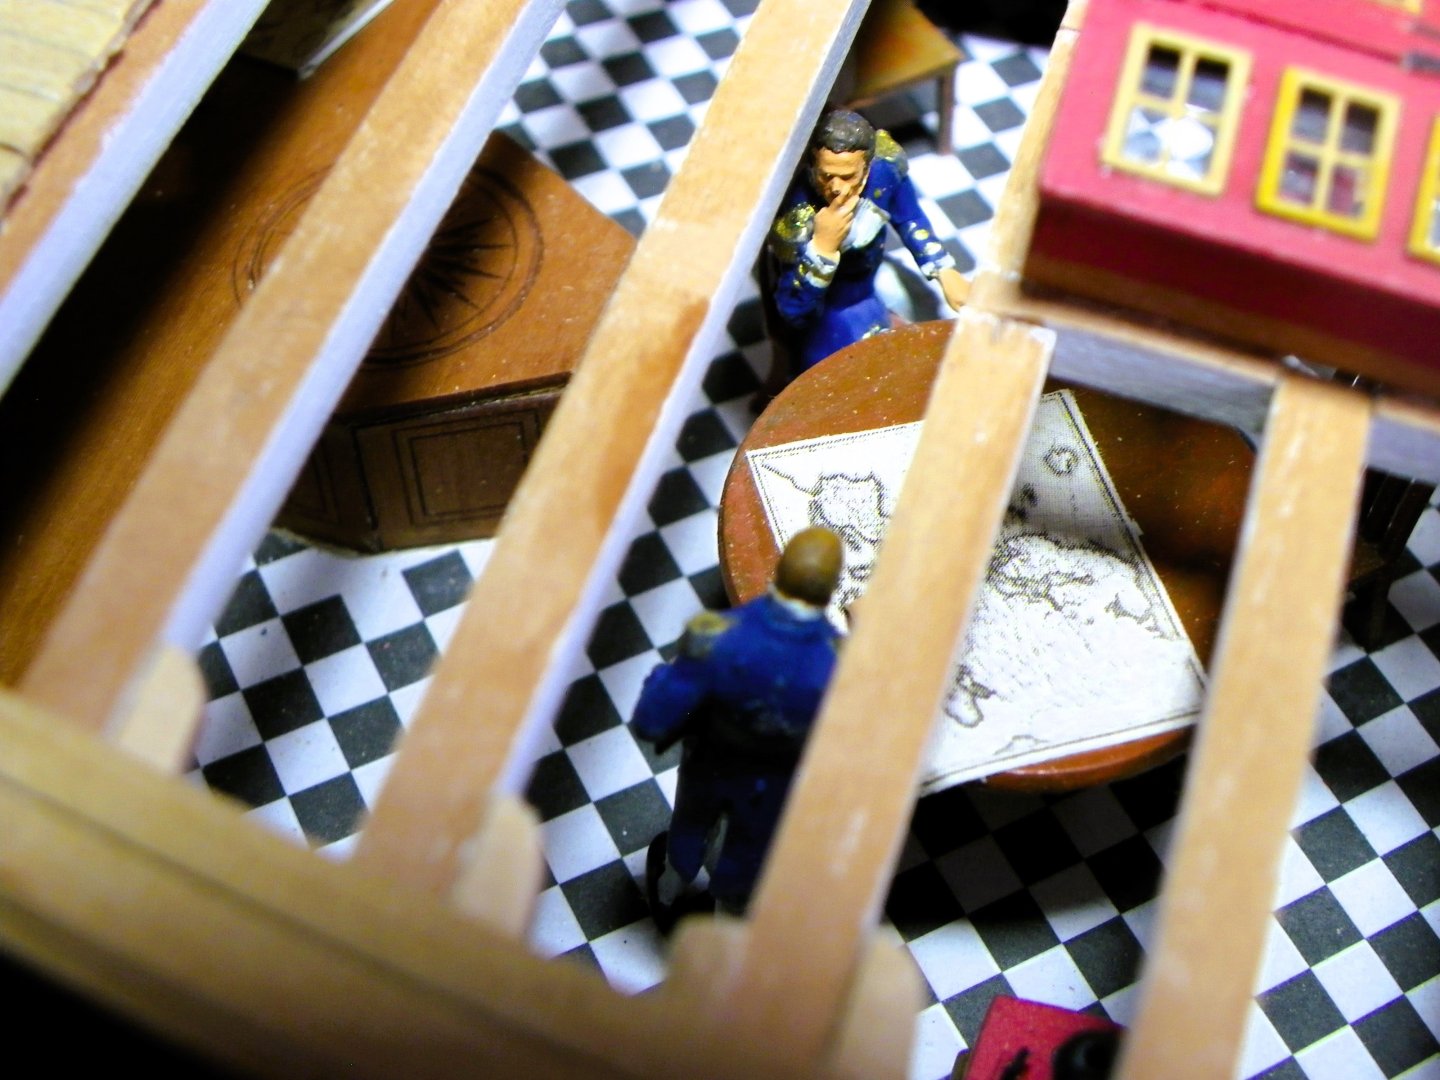
Vanguard Naval Figure set . I have long wished for a seated figure to include with my Navy board style builds that reveal interior detail thro’ the unplanked decking, altho’ I would use them even for a closed in deck, a little hidden secret of a model. Thankfully Chris has come up with such a figure, and I have taken no time to have a play around with this resin figure set. This is a pre-final production set. The set I am looking at is the 1:48 scale version. 0275 0279 The seated figure comes in two halves, and very careful removal of the supporting struts is required, it would be so easy to snip away part of the piece in error. The table is a separate part, and I modified it slightly for my purpose. 0313 The moulded in map was sanded flush, and one of the square shapes that represents a closed book, I think, was removed. For the woodwork I am using enamel paints rather than my usual acrylics. 0307 Here the table and chair have been primed using Humbrol Matt desert yellow 93. 007 To complete the wood effect I used Revell satin wood brown 382 darkened with Humbrol matt scarlet. For the items on the table, telescope, and inkwell/quill stand box, I used Vallejo acrylic paints. For the open book, and sea chart, I found images on the net; these were reduced in size on a word doc and printed out. I think a nicely printed out scale sea chart beats any moulded in feature. The sitting figure It made sense to me to paint the separate upper body part before attaching it to the lower body and chair. The sitting figure seems to be of a Senior Captain (double epaulets) wearing a style of uniform around 1812. It proved to be quite a challenge to pick out the detail and paint the uniform at this scale with its gold braid trimmings and brass buttons. 010 As an aid I printed out A4 photos of the figures, and the artwork on which they were based. Eight different colour shades of Vallejo acrylics were used to complete the figures. 0073 0077 For those curious about such matters the chart covers the English Channel and western approaches. 0083 0093 The very fine detail of these figures required many touch-ins, and I used interim macro shots to highlight deficiencies in my painting. 0118 1:48 scale figure I tend to only satisfy the macro monster to the extent of 9” viewing distance thro’ reading glasses. I moved directly onto detailing the 1:64 scale set which is somewhat more of a challenge. 0065 Here is a comparison of the two scales. 095 The 1:64 scale figures have been added to the Great Cabin of Indefatigable. Fortunately, access thro’ the skylight made this retro fit possible. The standing figure is spot on for scale, with the top of his head just below the deck beams. 0069 Whilst I was on a roll, I also completed the ‘Hornblower’ and ‘Pellew’ figures for scale comparison use on both Indy and Sphinx. If you like a scale figure on your models these Vanguard offerings perfectly fit the bill, finely detailed and I particularly like the realistic pose of the sitting figure. I think for a standalone tableau model I would opt for the 1:32 scale option which allows for more clear detailing. This is something I intend to pursue. B.E. 21/08/2024


-
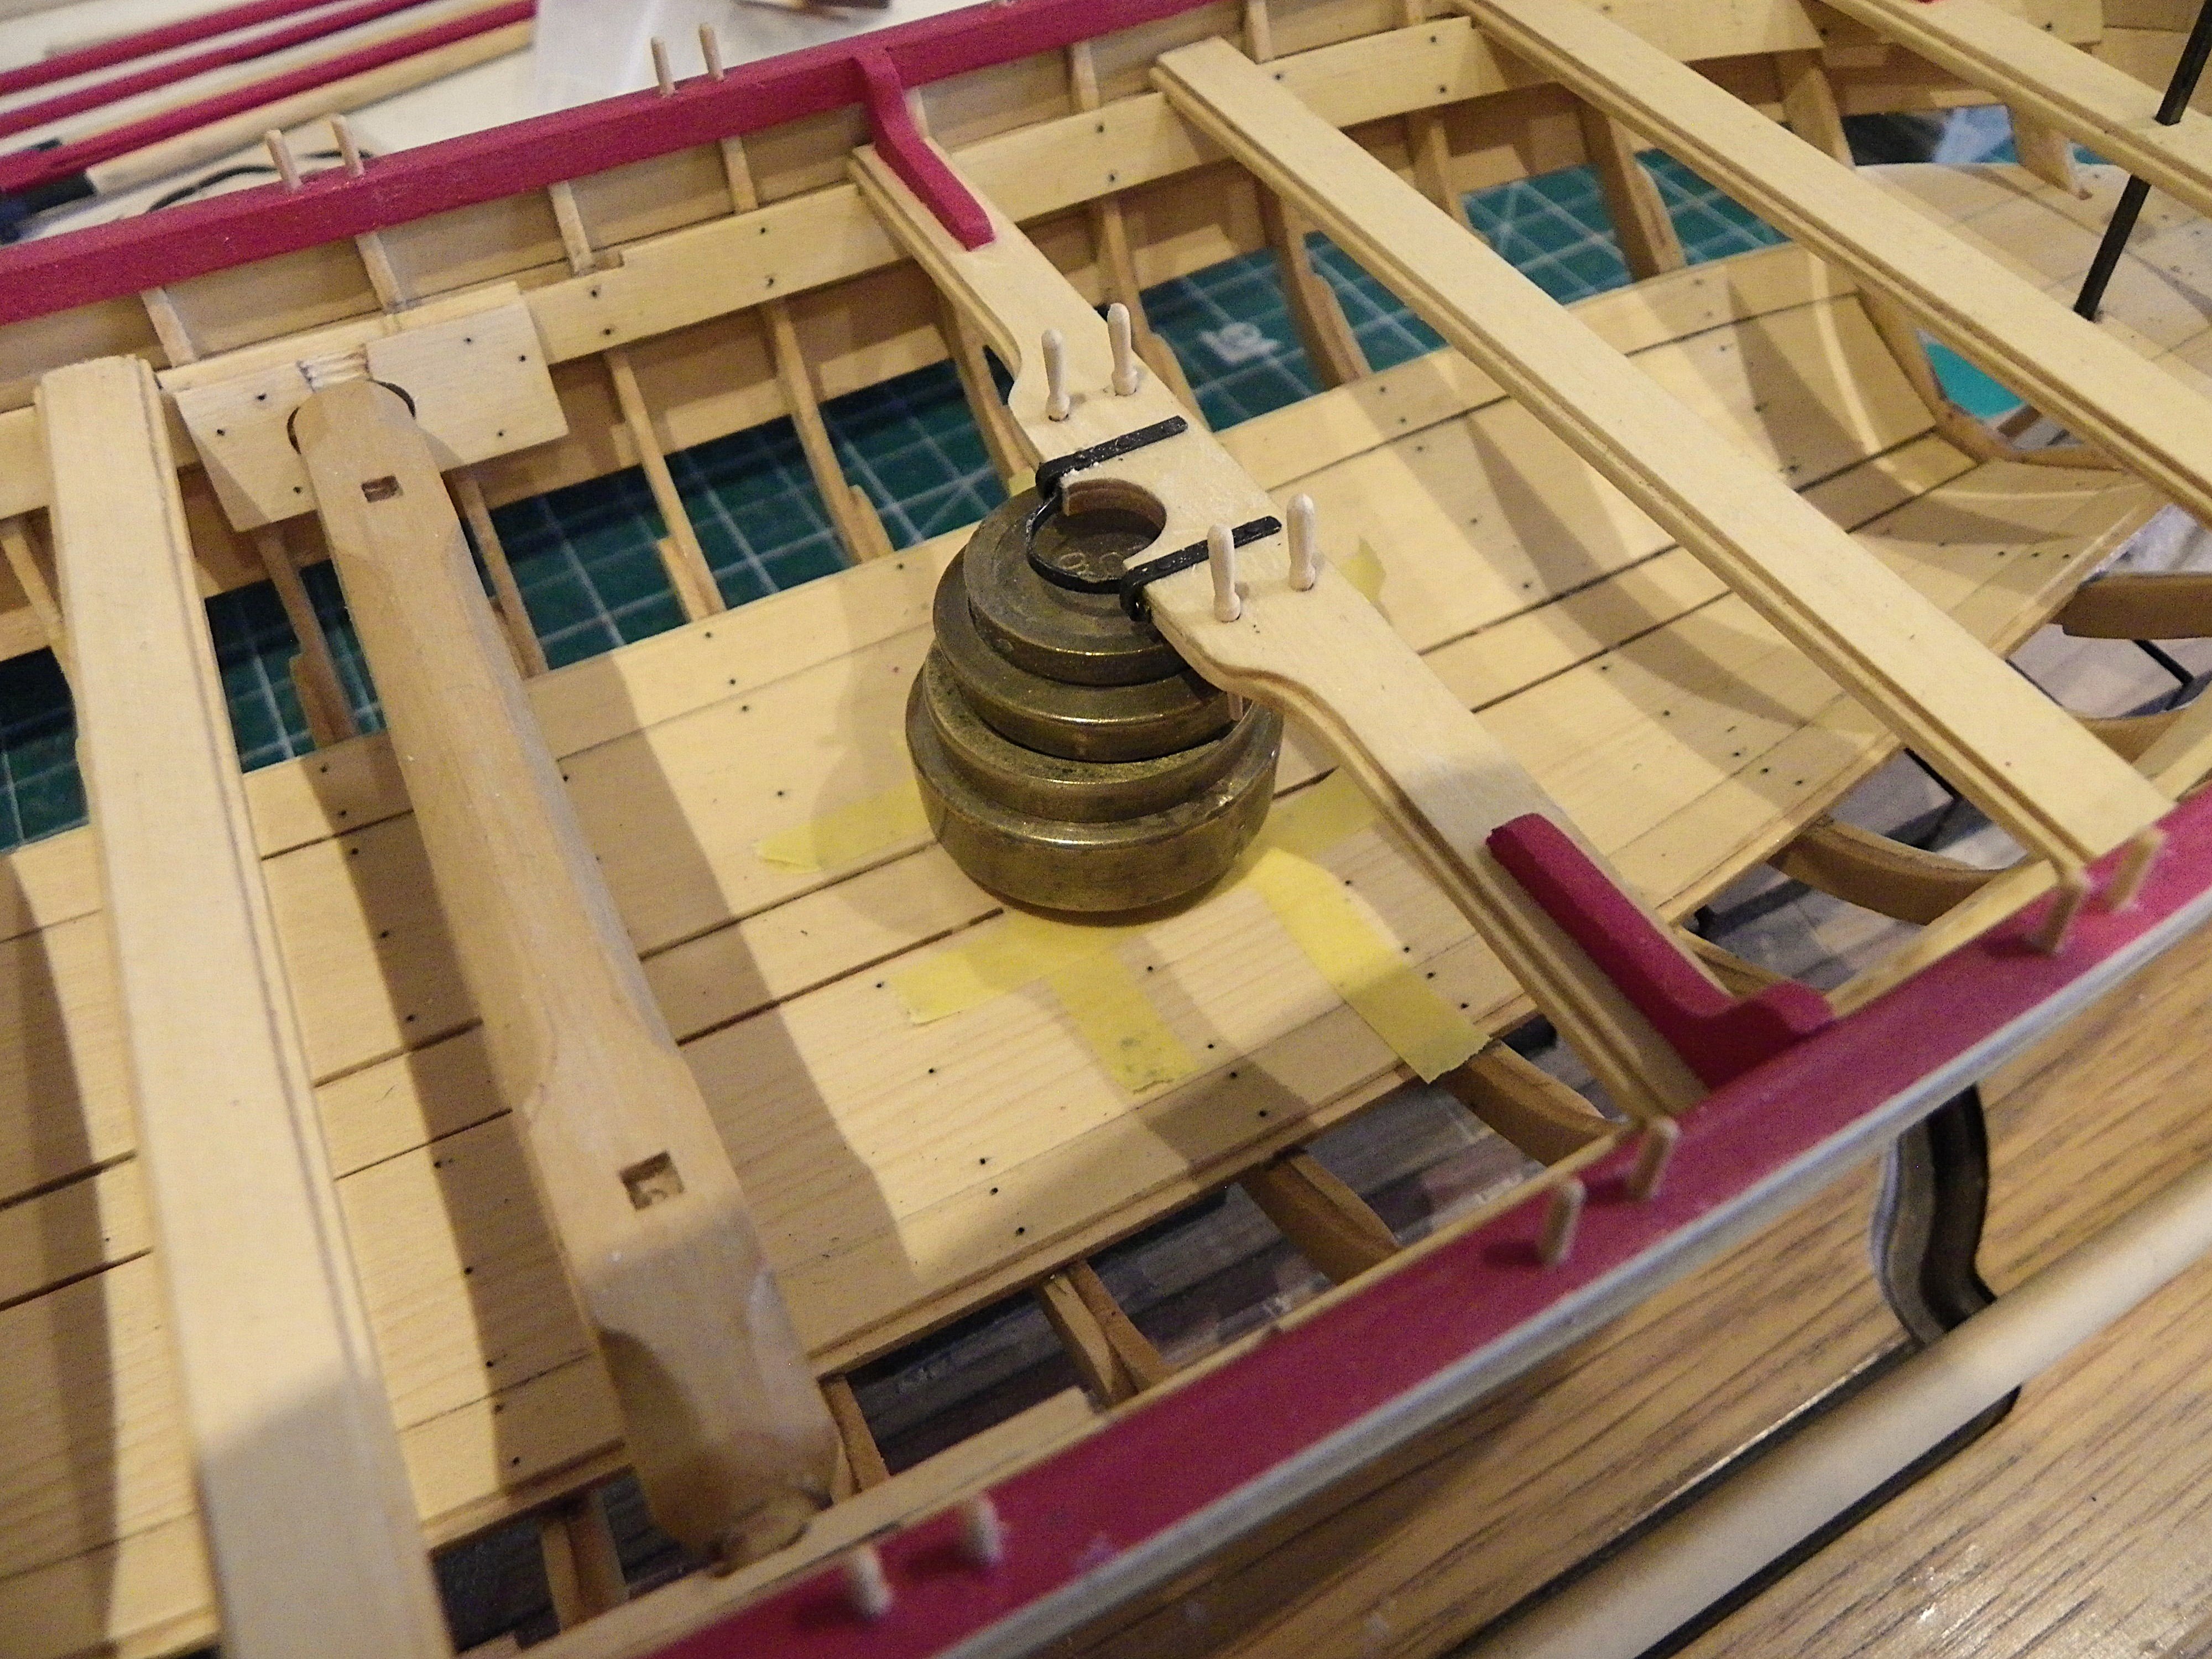
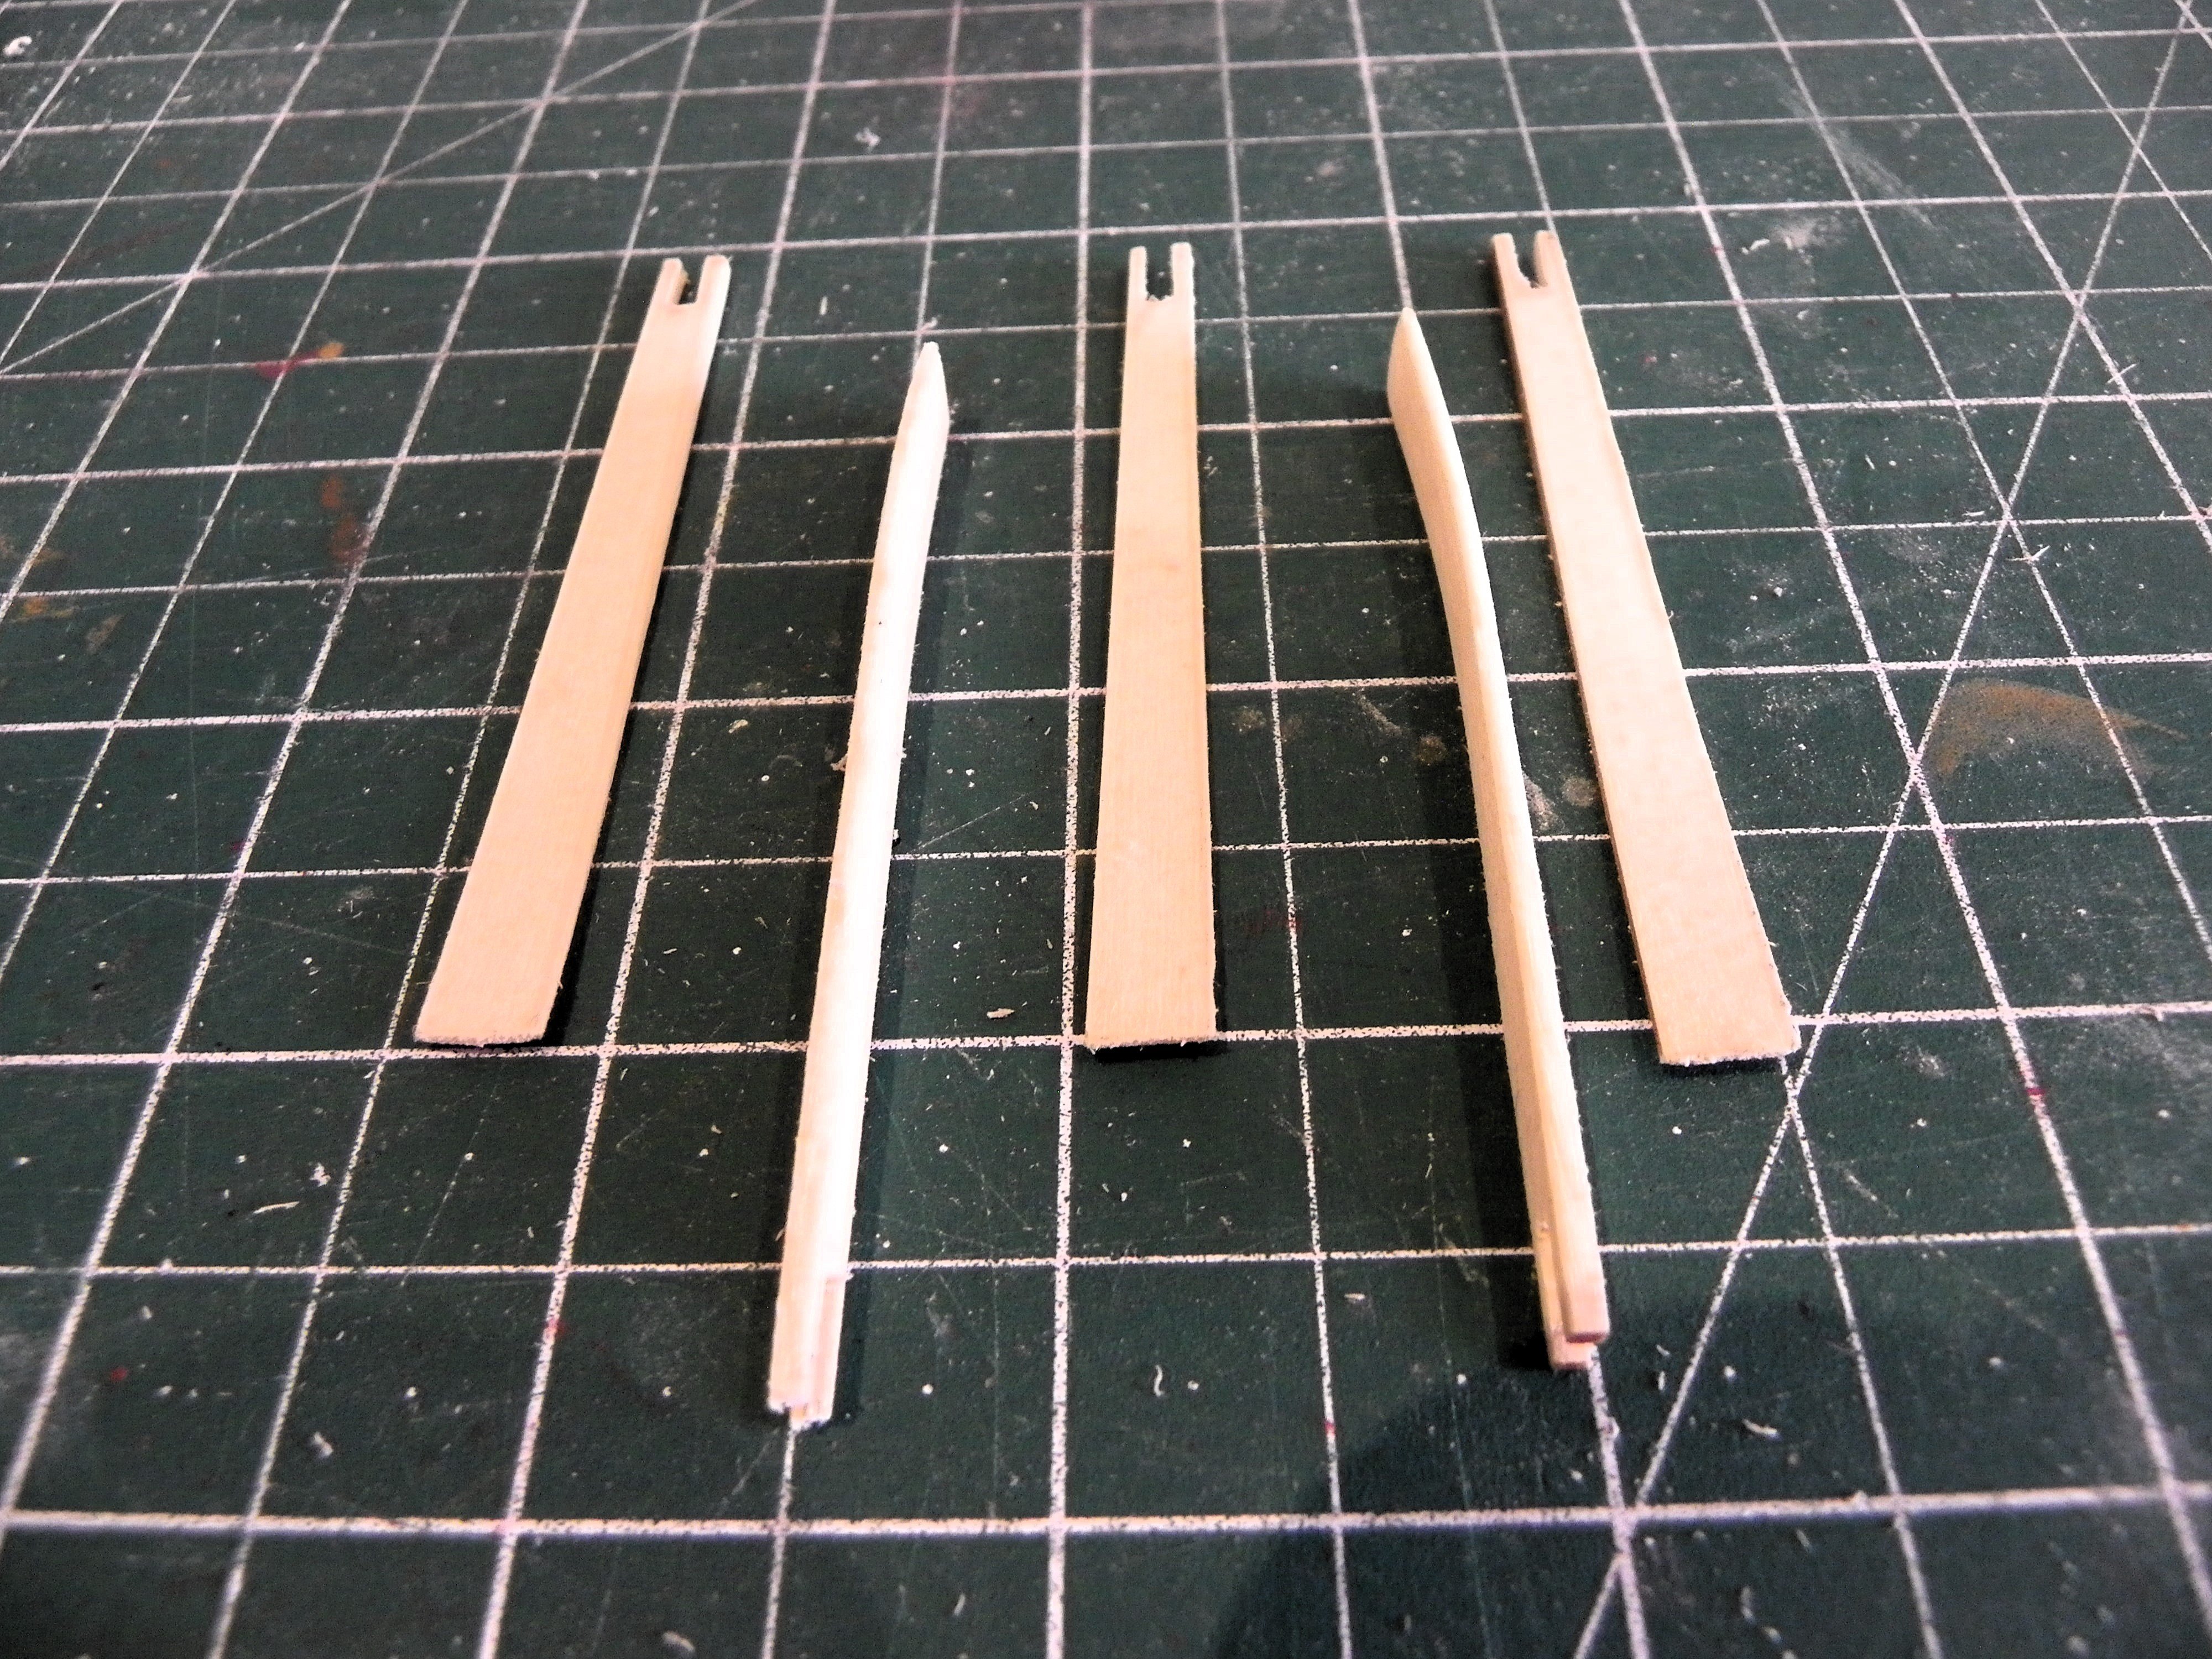
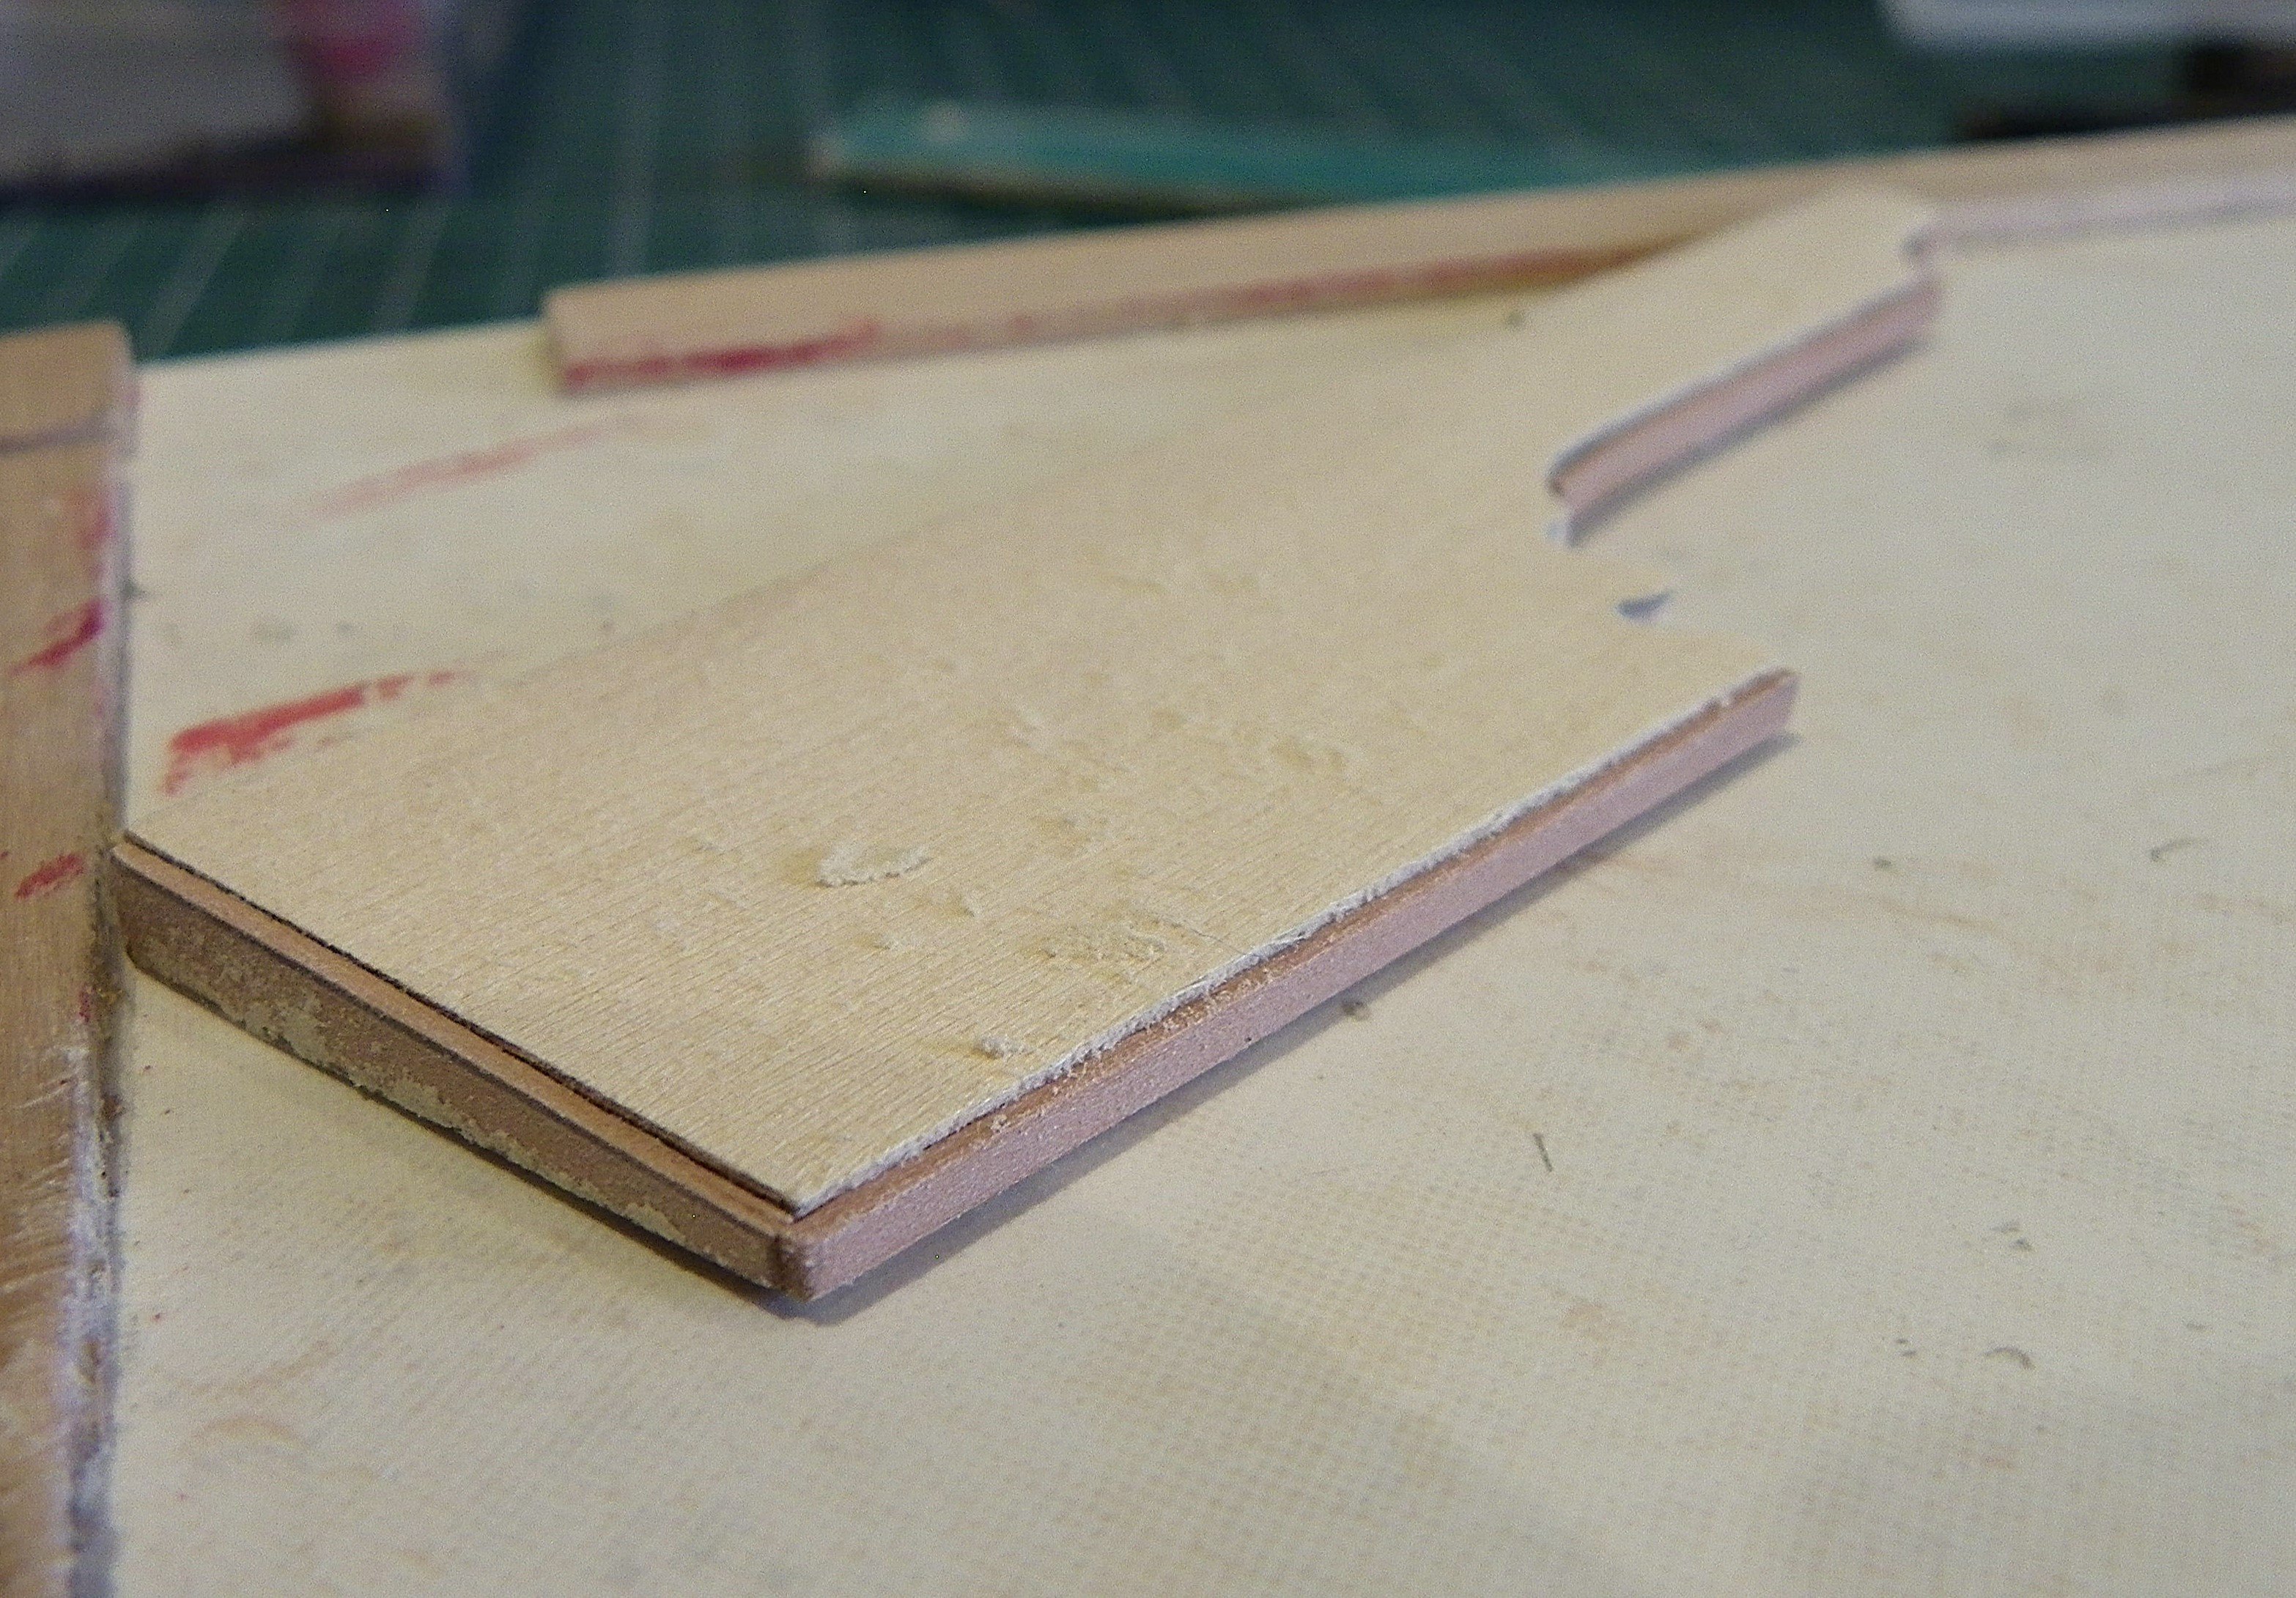
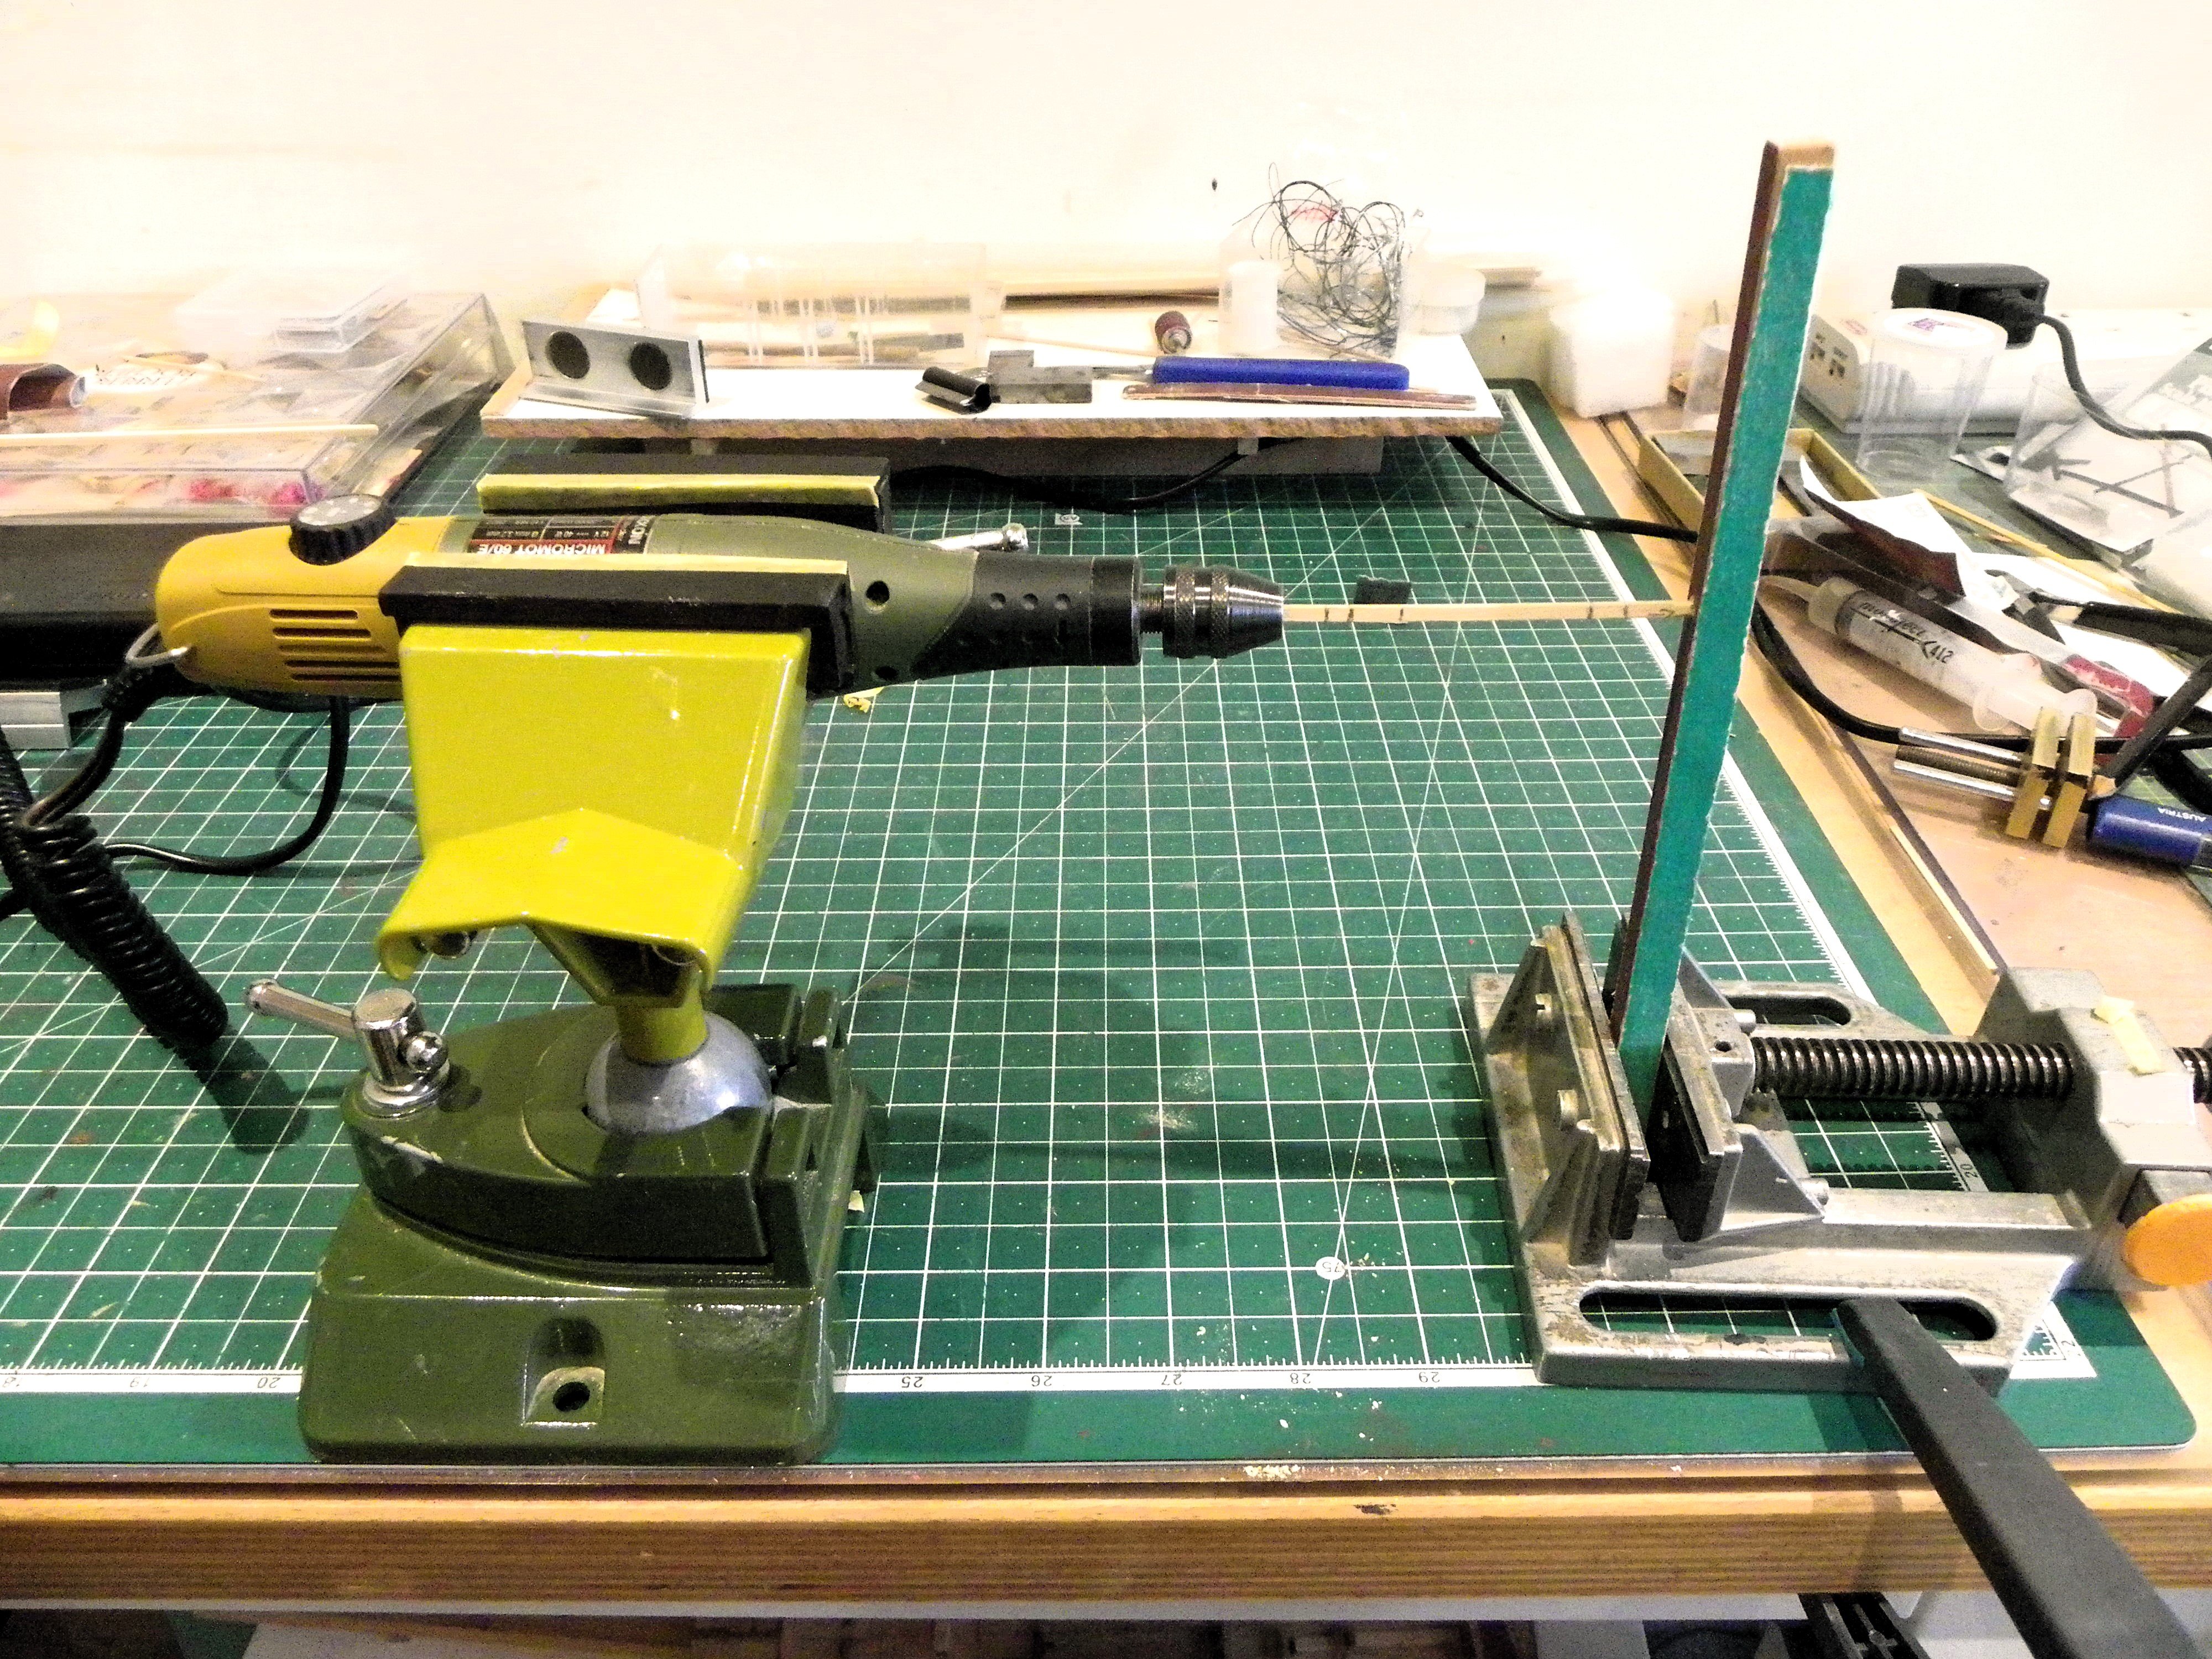
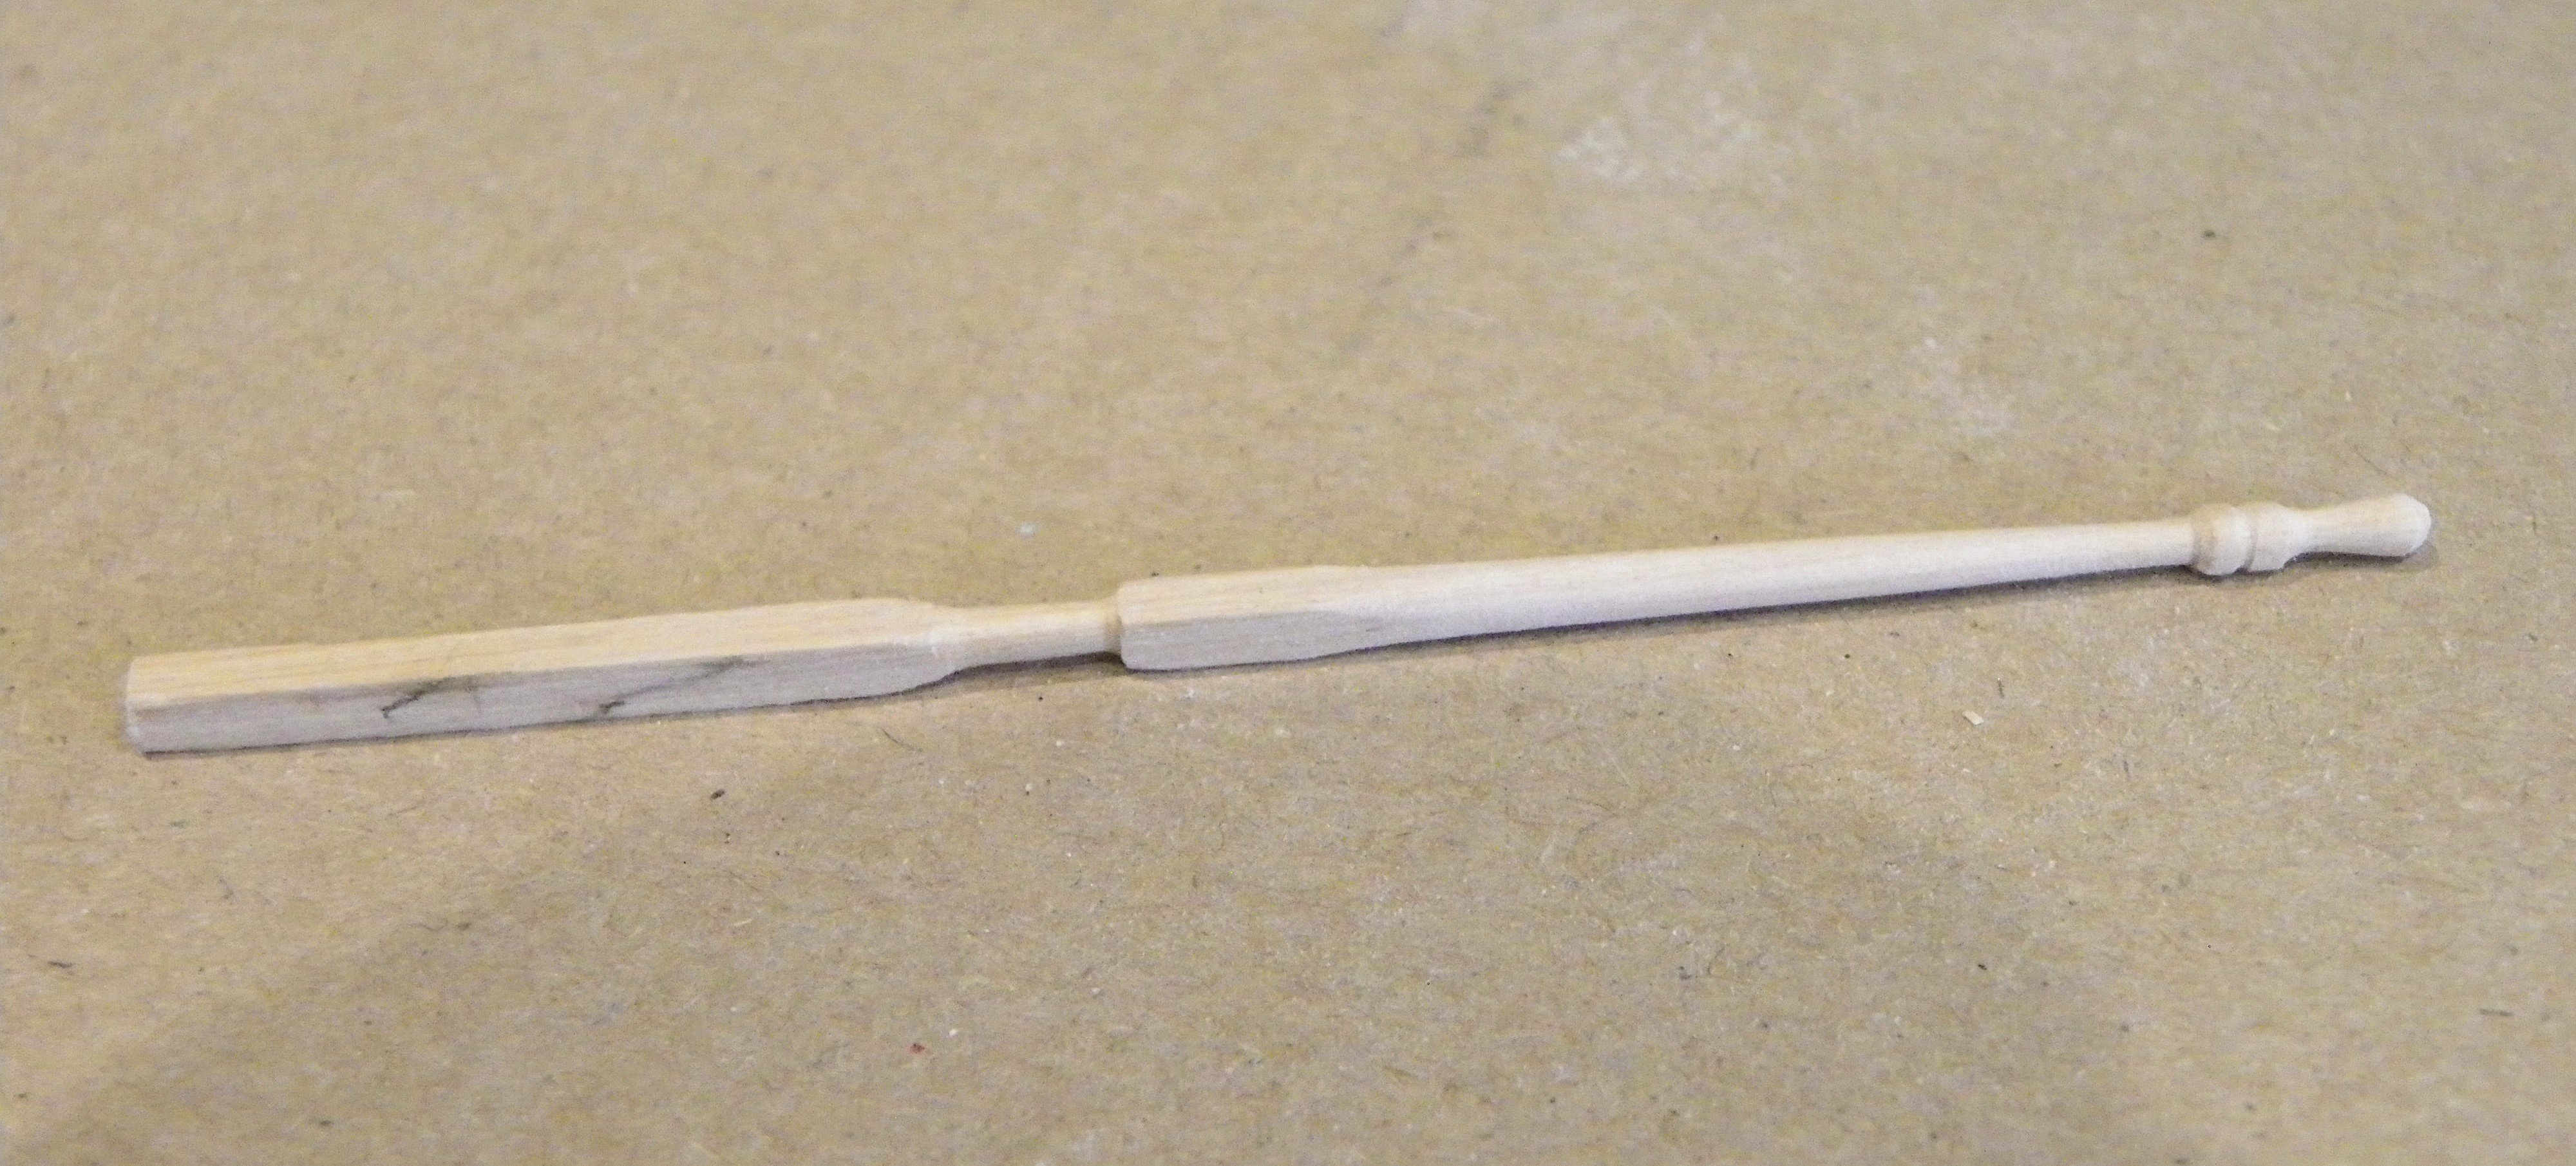
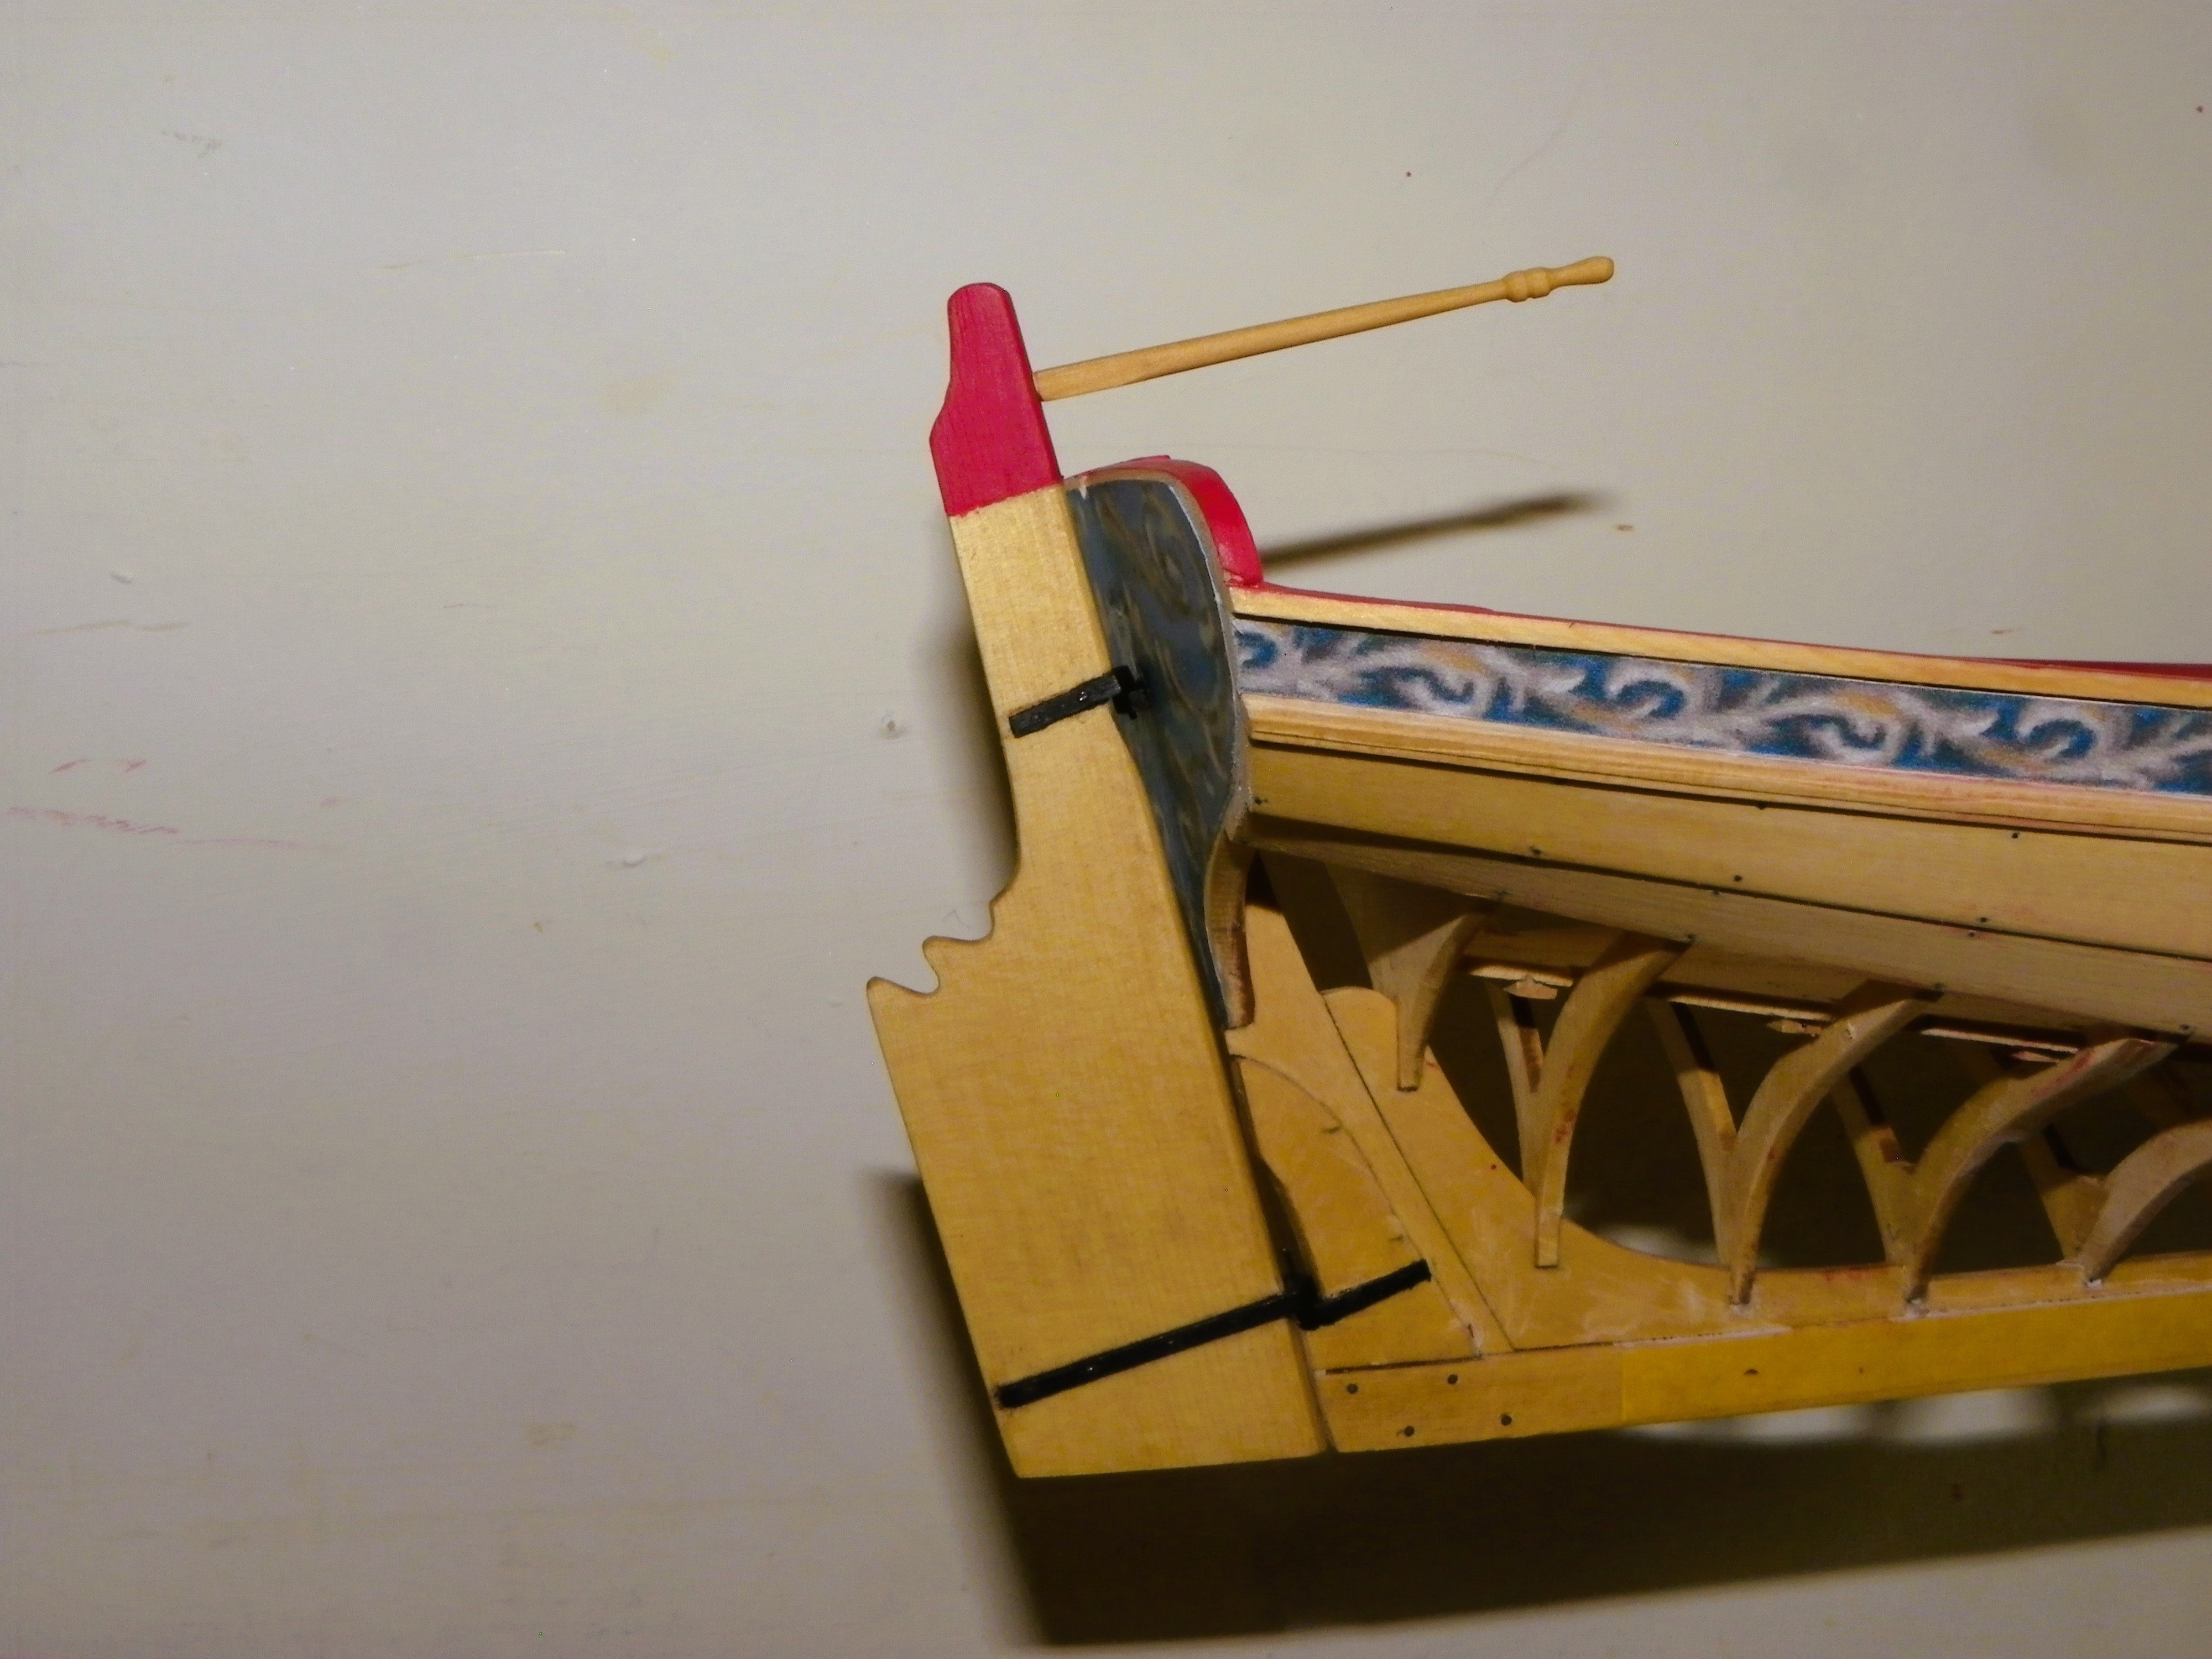
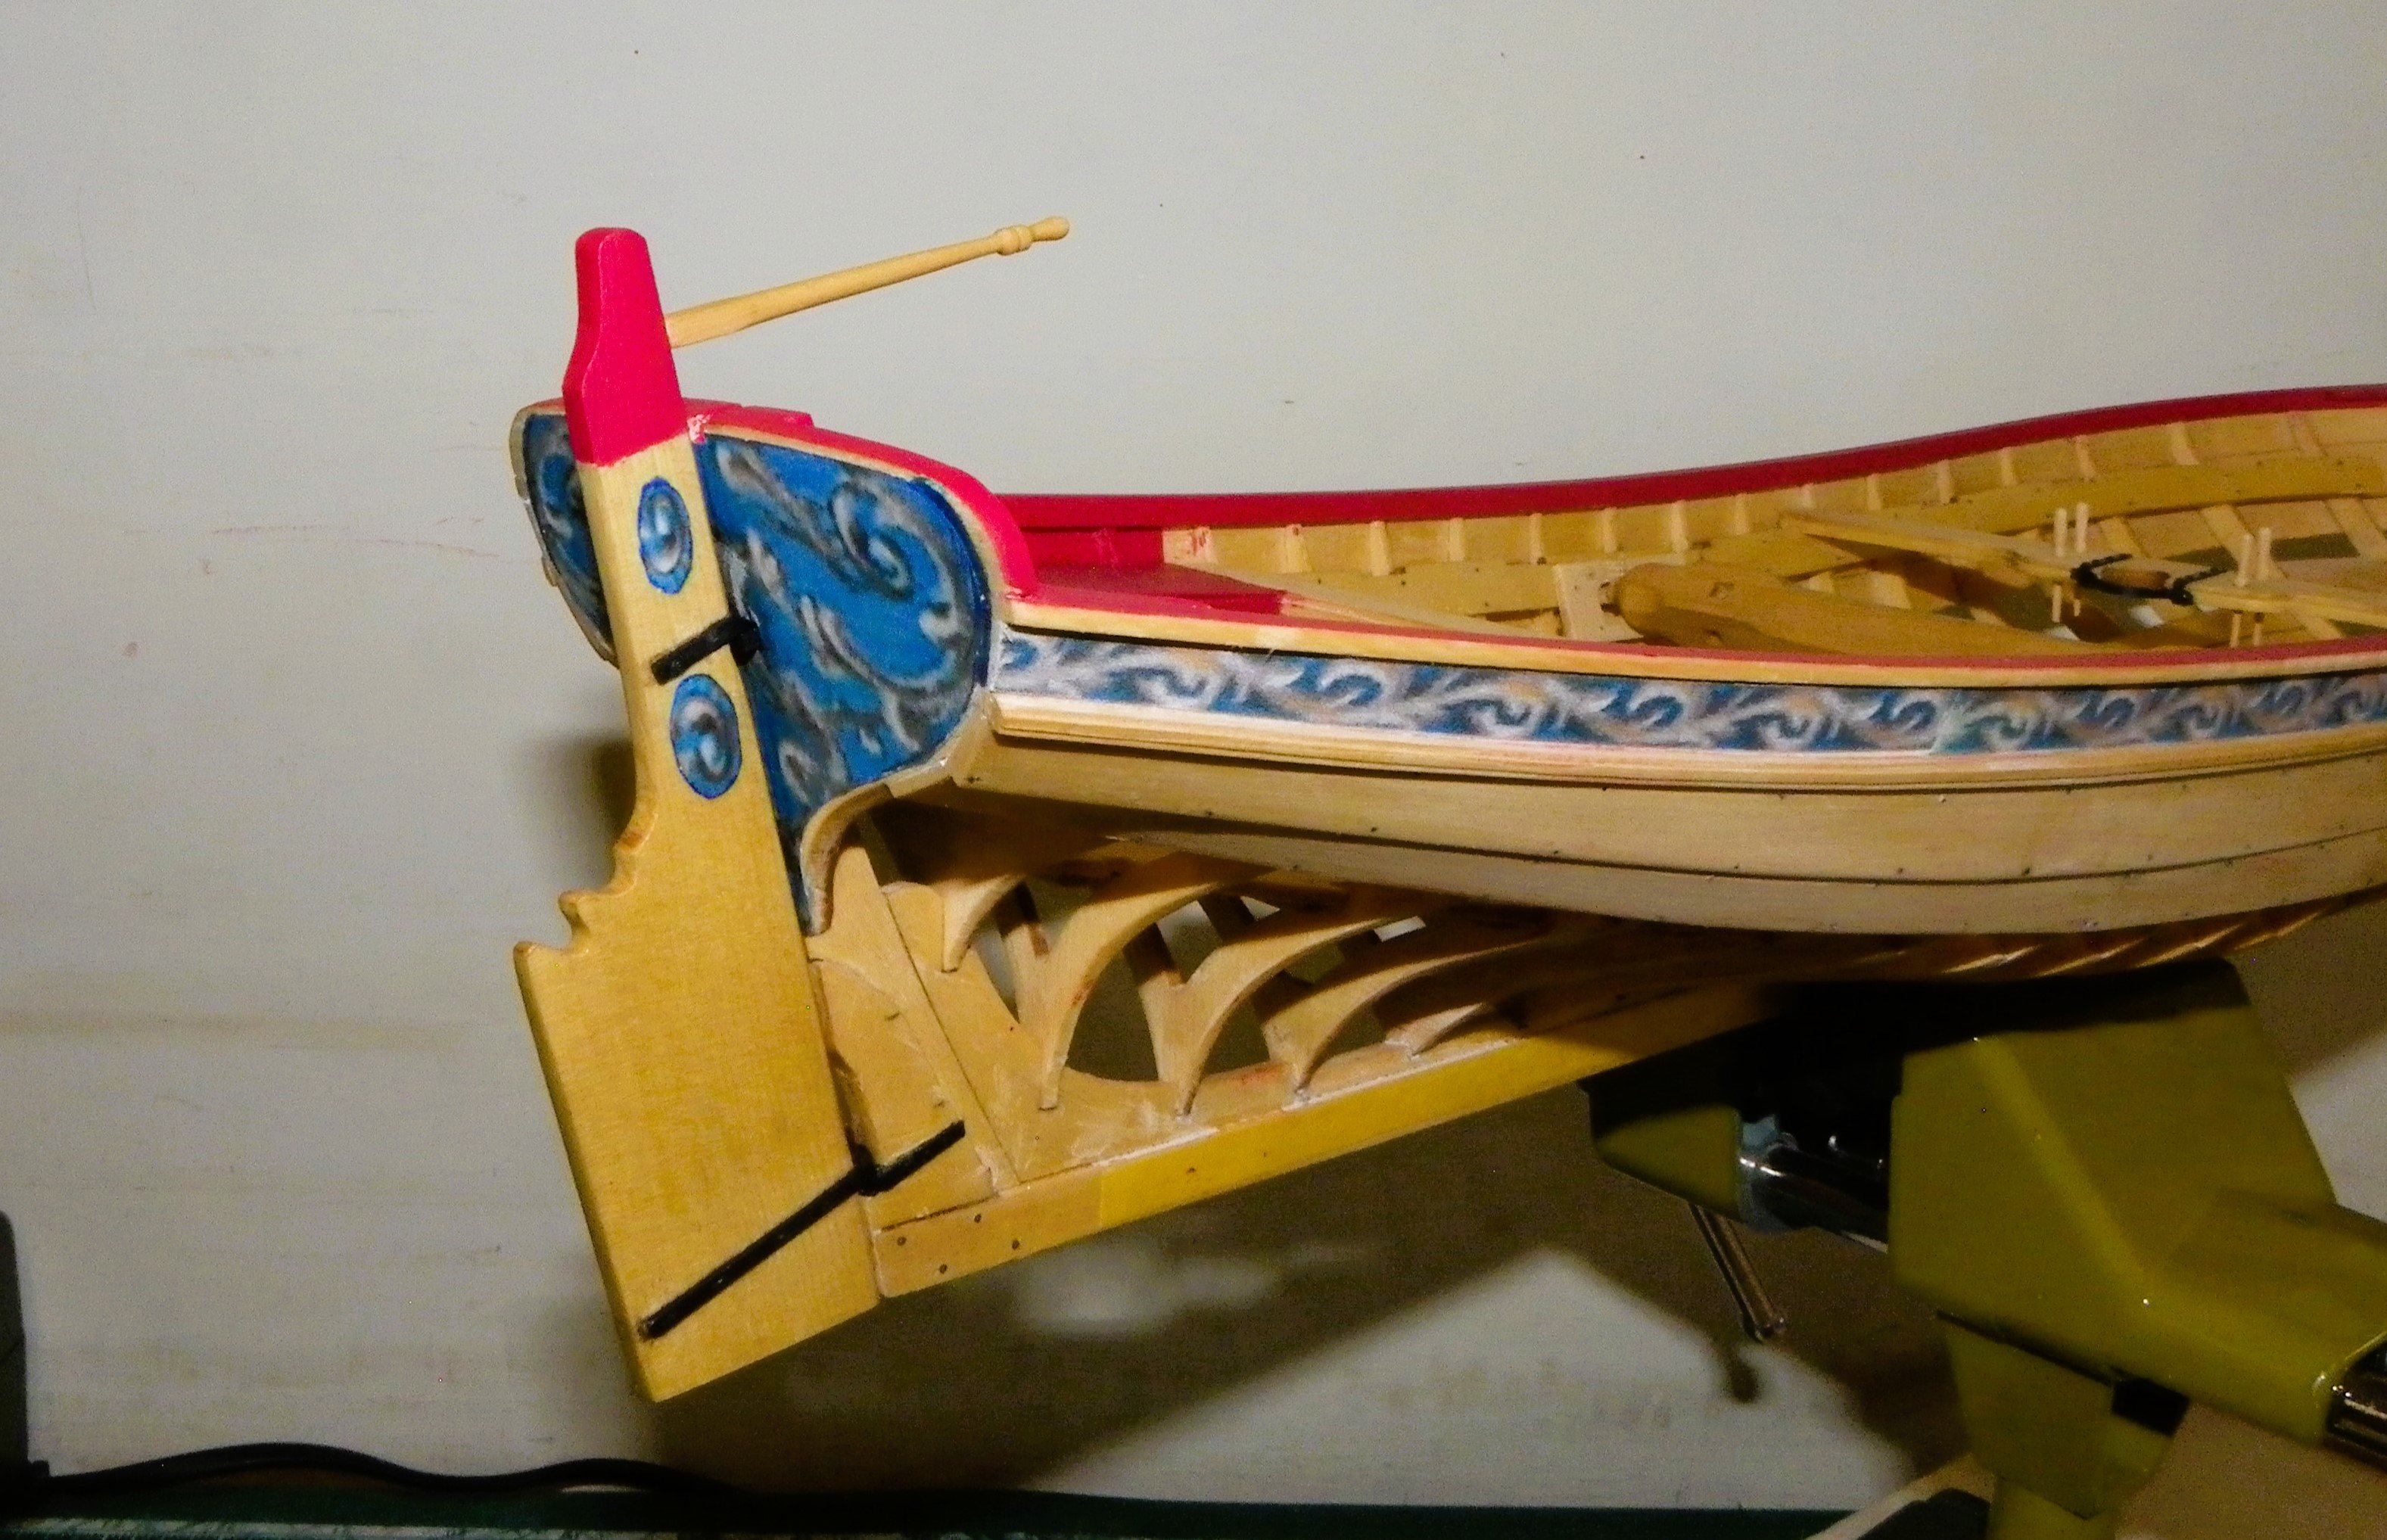
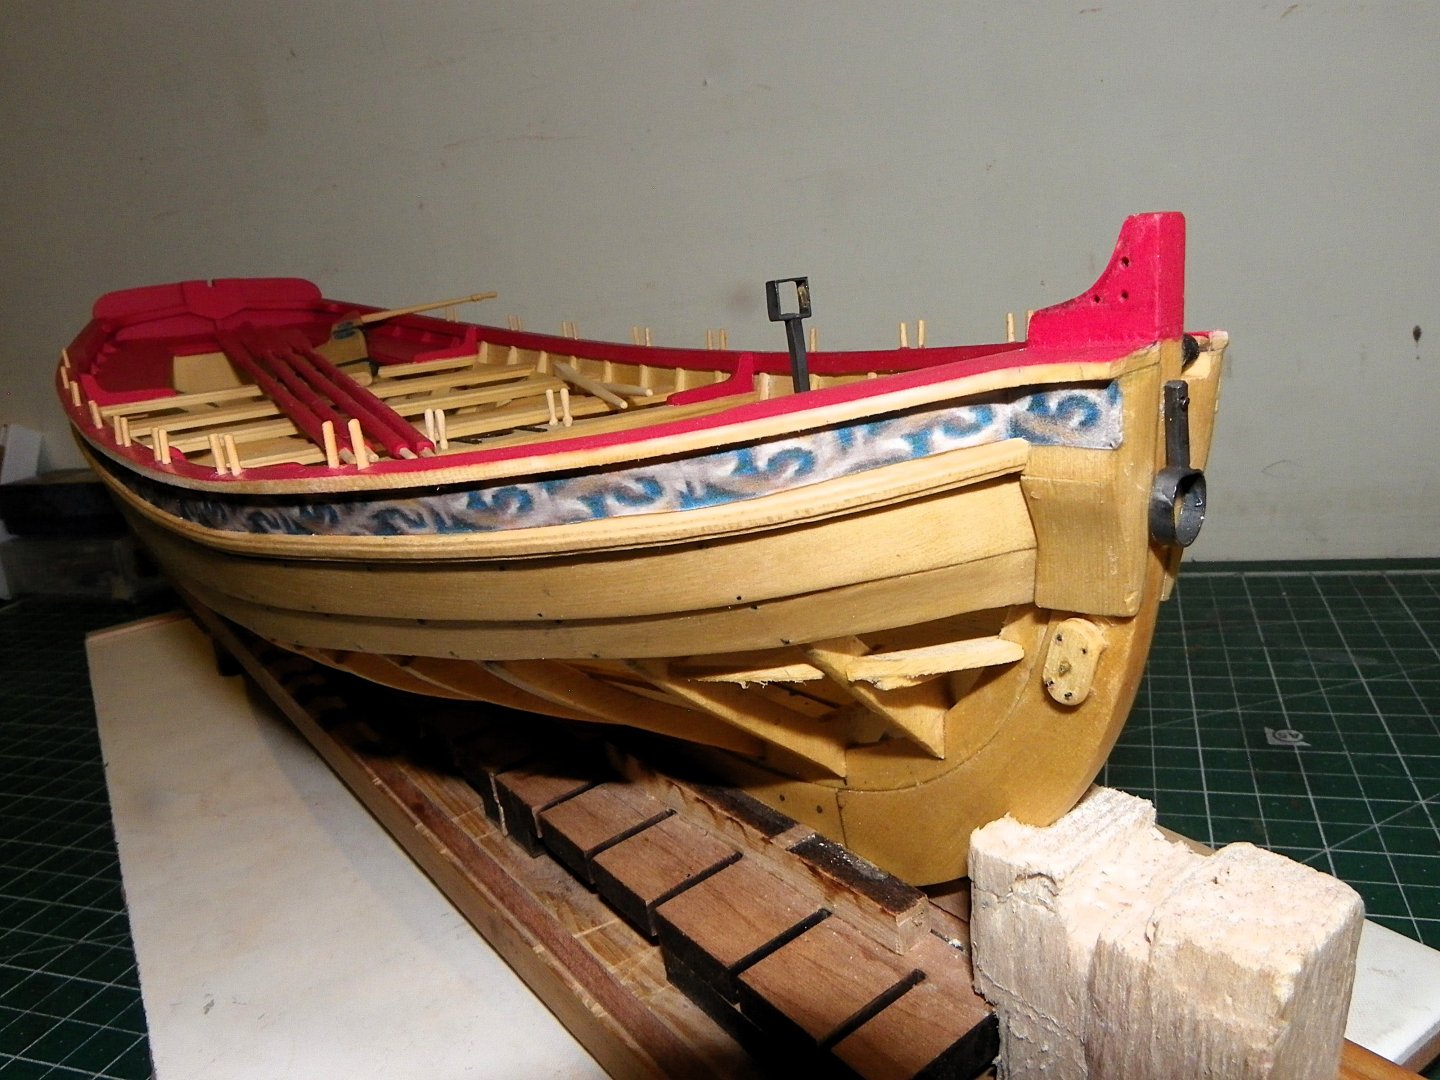
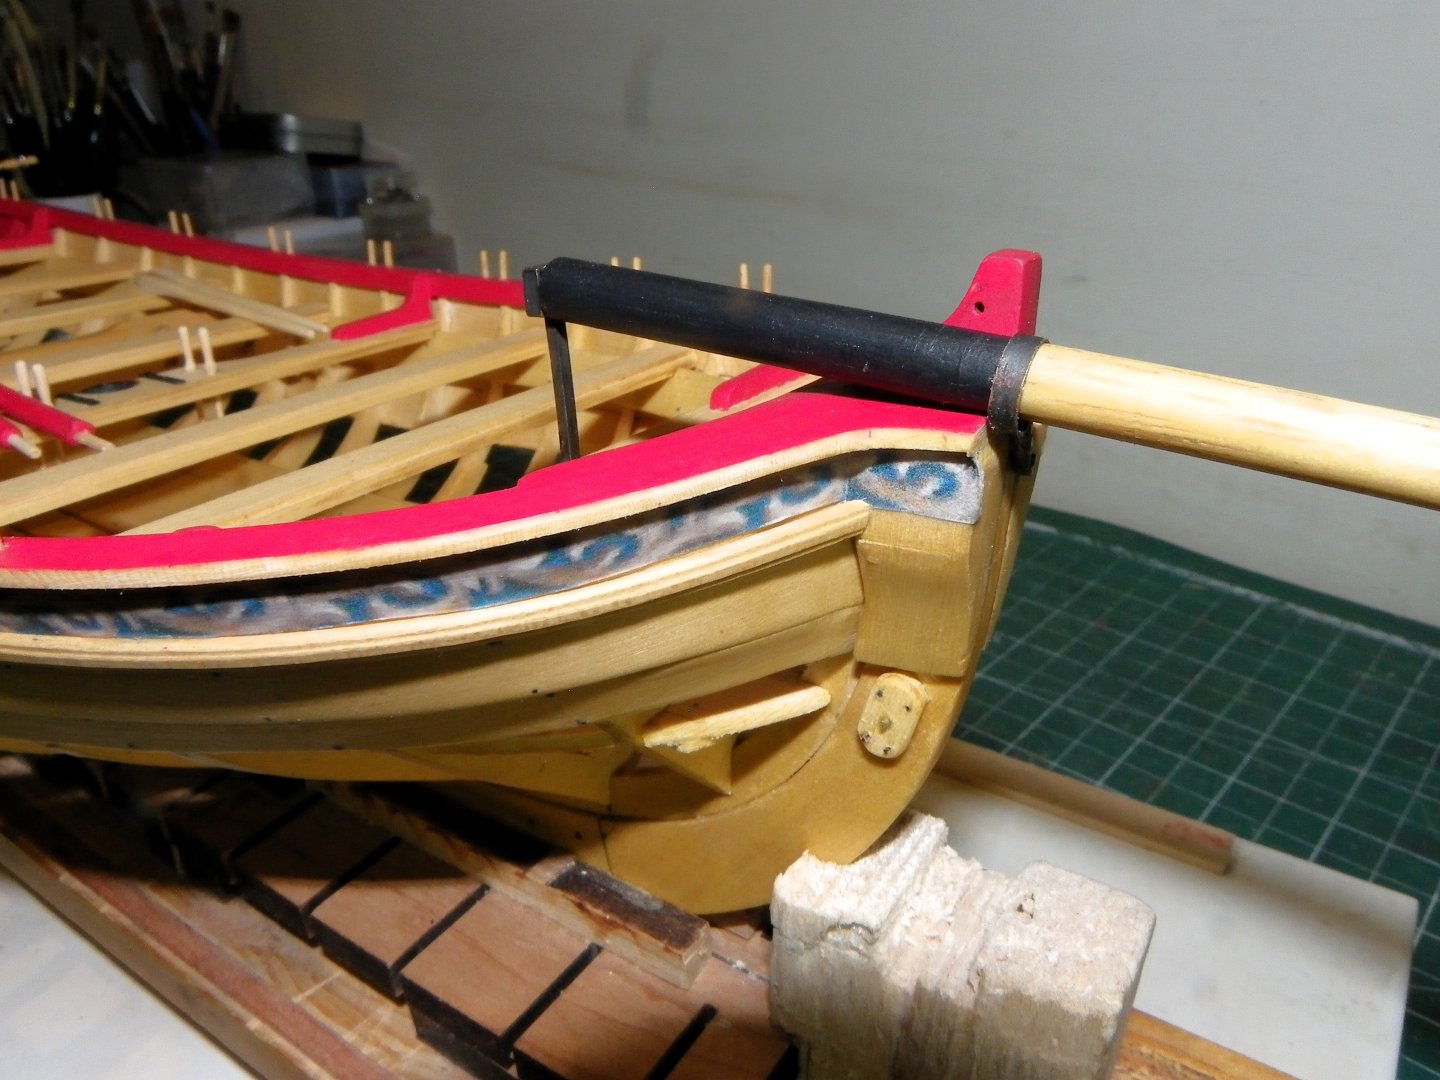
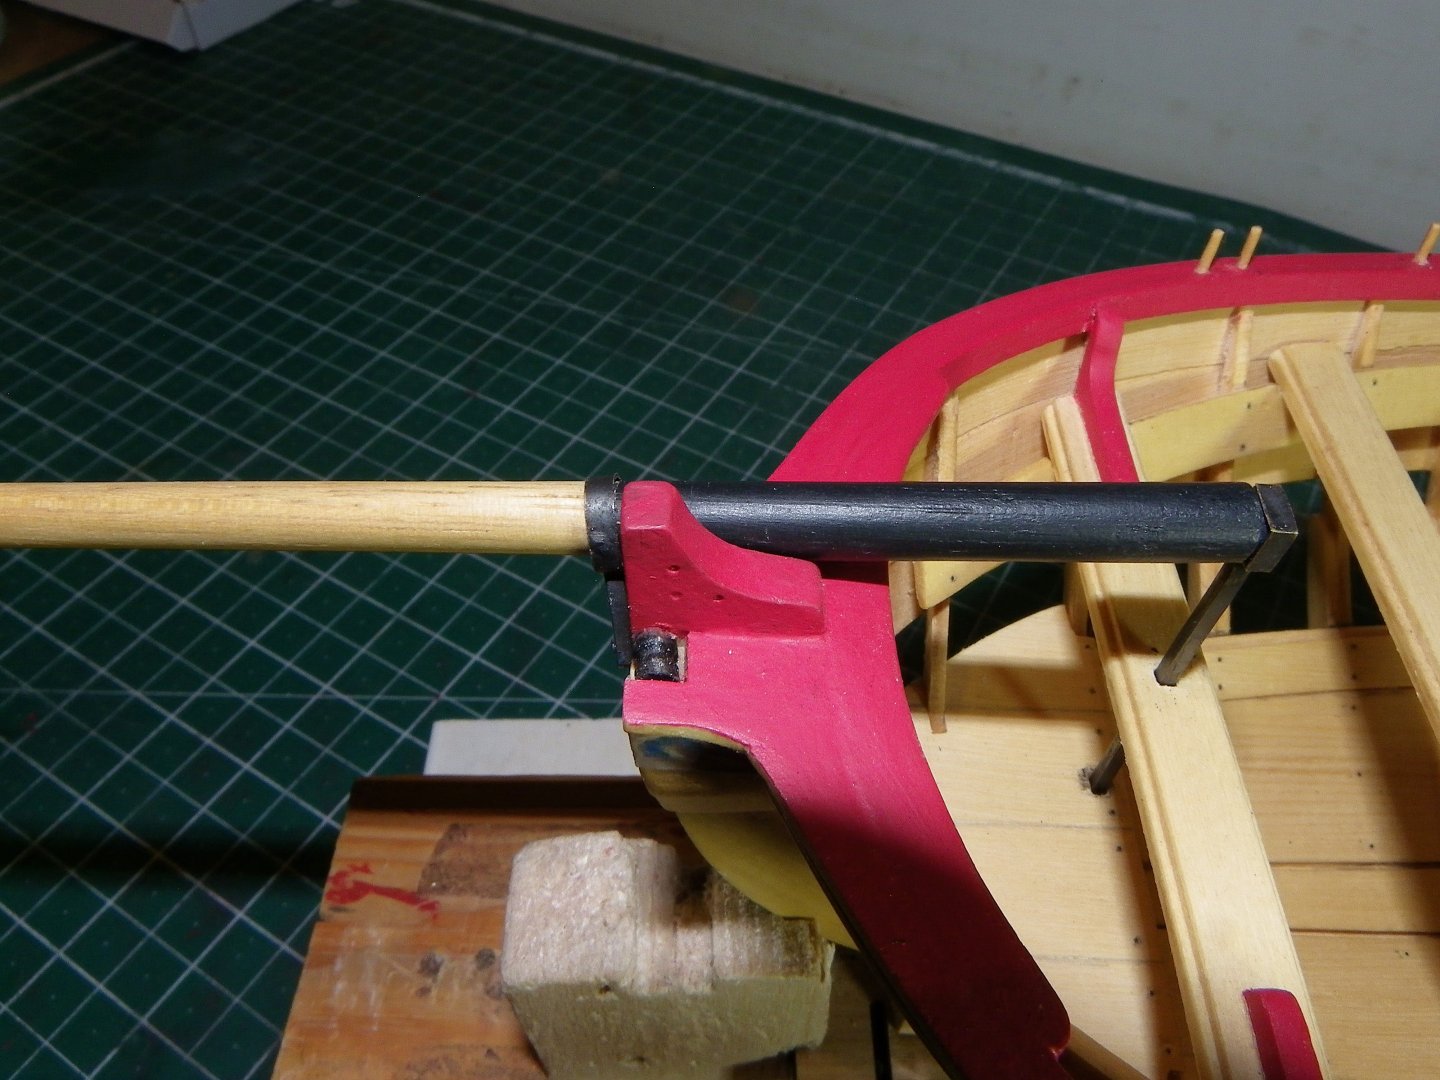
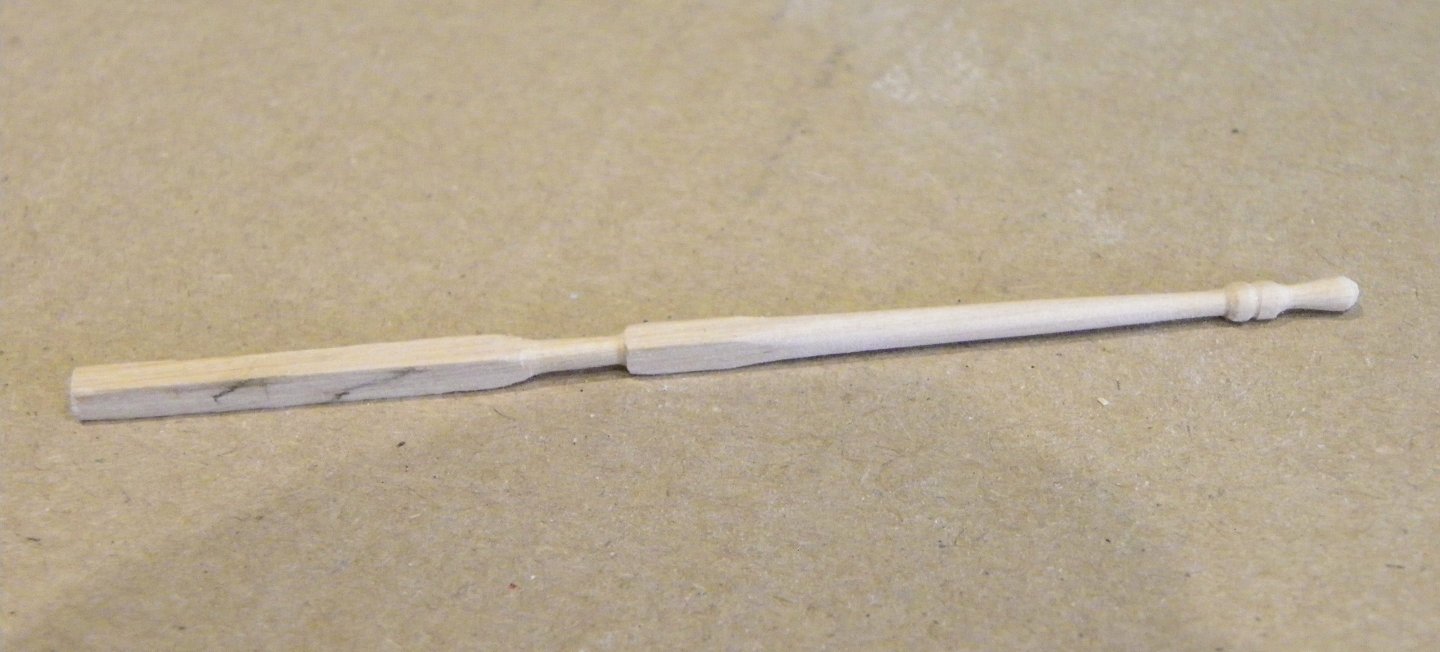
Post 34 The Rudder A Cedar blank is supplied but requires some tapering fore to aft and shaping to get it to the finished article. The precise degree of taper is not covered in the guide, but the rudder piece is 4mm thick overall, and I am initially working to a 2mm thickness at the aft edge. Chuck’s rudder dimensions are a close fit to Steel, who for a 30’ Longboat circa 1800 gives the following. Breadth at heel. 1’10” - at scale =23.3mm Breadth at Hance. 1’3½” - at scale =16.4mm Breadth at head. 8½”- at scale =9.0mm The thickness of the rudder is given as 1½” but doesn’t say at what point, I have taken it to be the aft edge. 0227 To this end I temporarily fix a 2mm Pear strip to guide the taper. 0230 Gudgeons and Pintles. I have always been a fan of Chuck’s rudder fixings, and this is no exception. A neat if delicate little Boxwood set is provided. The standard setting for rudder set up on boats is a long lower pintle on the sternpost, with a long-braced gudgeon on the rudder. The upper set are reversed with a gudgeon fixed to the transom, and a short pintle to the rudder. This set-up facilitates easier removal and replacement of the rudder at sea, where it may need to be removed during anchor handling operations. Before I attached the fittings, I dry fitted them to make sure that the pintles would easily and properly engage. The trickiest part is fixing the Transom Gudgeon in position which is glued over the decorative pattern. As little movement as possible is desirable to avoid marring the decoration. 0233 My approach was to fix the lower pintle first on the sternpost, followed by the rudder fixing. 0236 The Gudgeon for the transom was then placed in position on the upper rudder pintle, held in place by tape. A smear of Ca was applied to the inner face of the Gudgeon, and having set the lower rudder gudgeon on the pintle the rudder was pressed into place keeping it vertical. 0269 With ca the set is quick, and the rudder can be removed leaving the transom Gudgeon in place. Tiller This is cut from a 2.5mm square Boxwood section. 0239 I couldn’t be bothered to get the large woodturning lathe out; this Heath Robinson set-up worked perfectly well for the size of the turning. 0242 0245 The tiller has a circular tenon shaped on the inner end. 0274 A Mortise is cut in the rudder to take the Tiller. This is of a 2mm ø Rudder finish 0303 The straps are thinned down on rudder and hull and fine brass pins used to represent the bolts. 0295 0302 The final part is to add the small decorations to the rudder head. I found these tricky little beggars to get a clean oval shape, and had several goes at it. 0311 I found that small, curved nail scissors worked best for me. 0328 0333 Moving on…. B.E. 17/08/2024


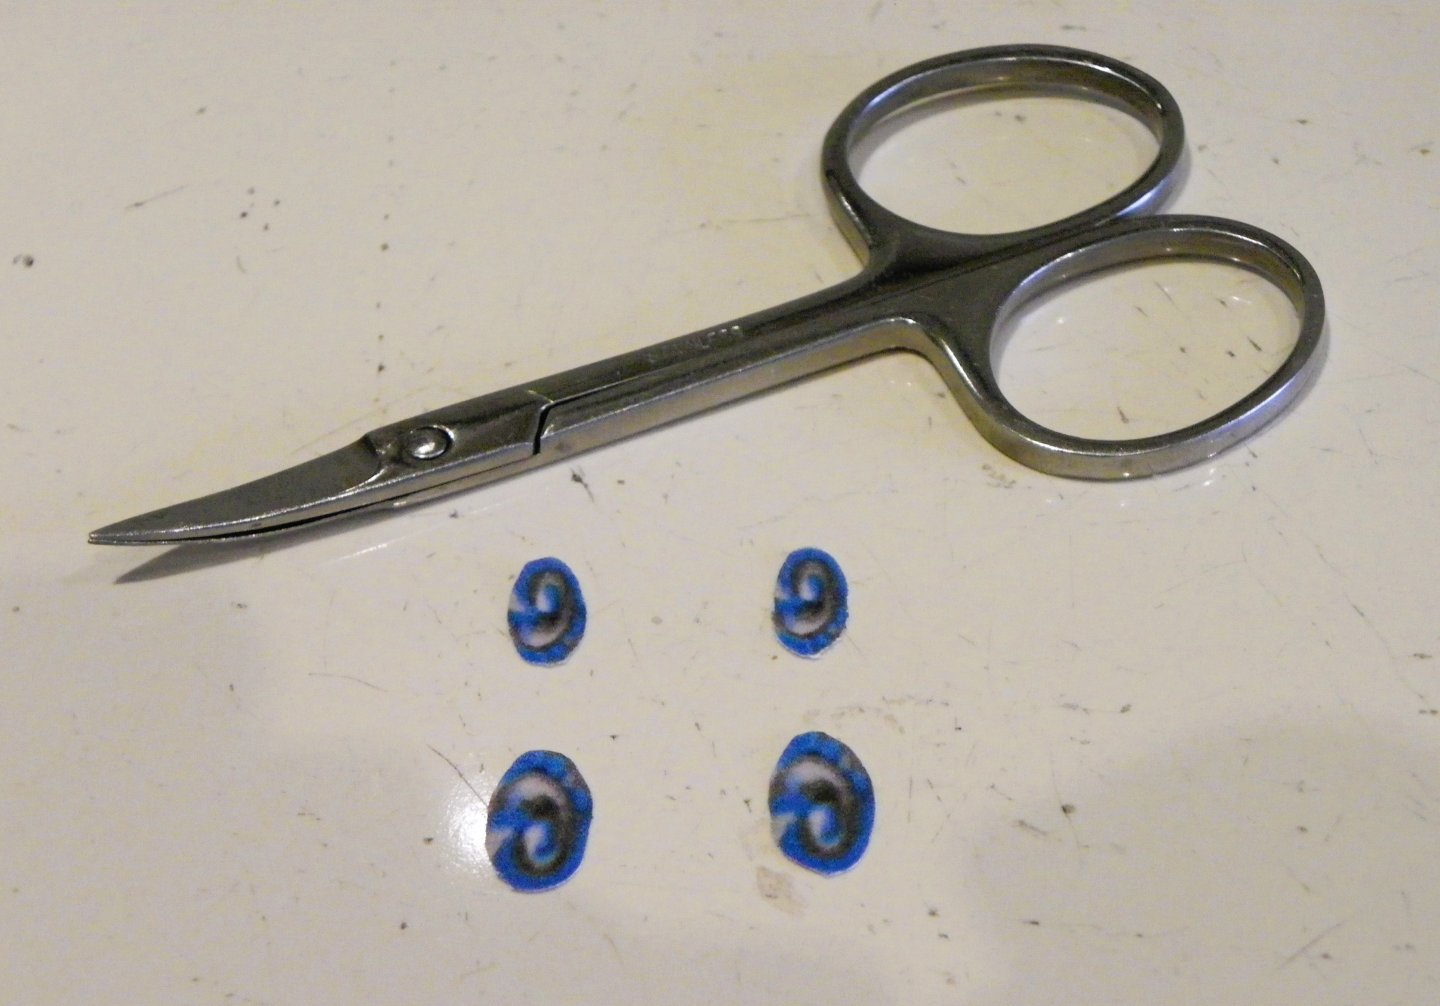
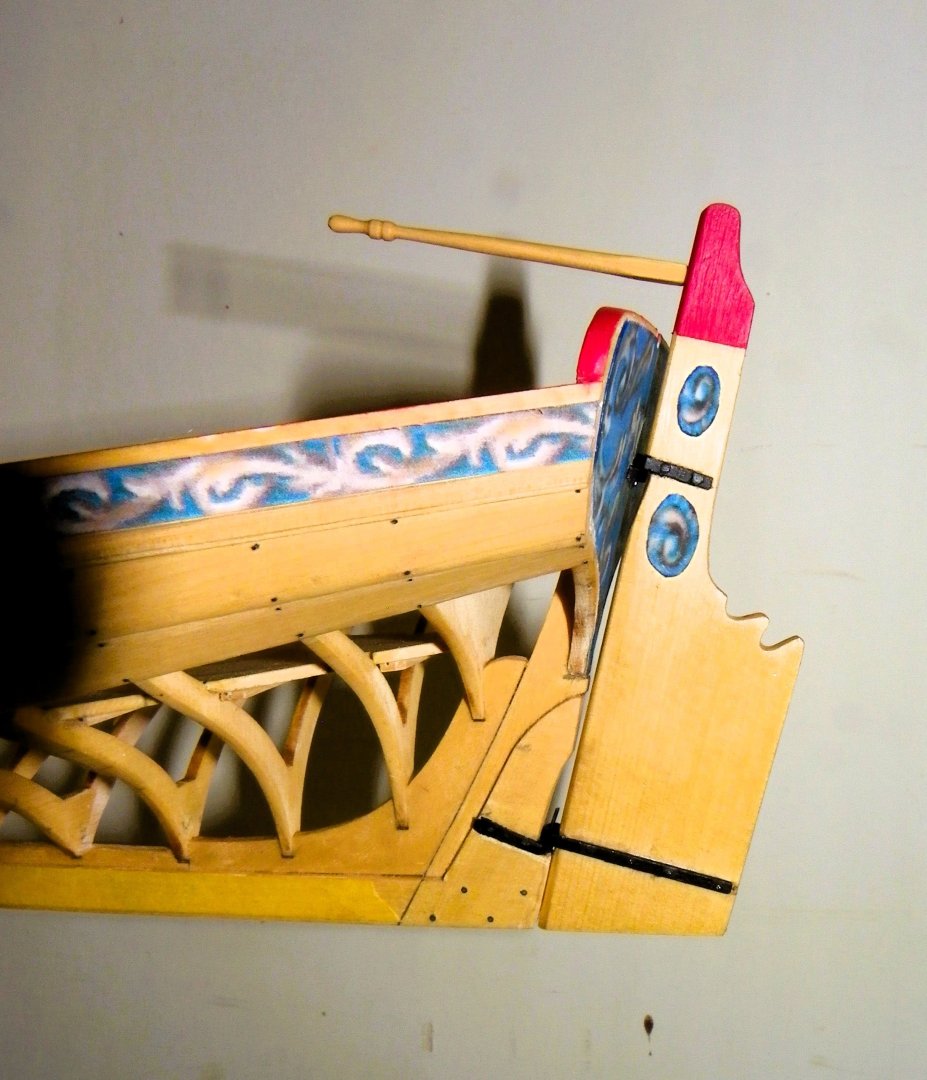

- 131 replies
-
- 8
-
-
- Medway Longboat
- Syren Ship Model Company
- (and 1 more)
-
Well done Ivo, You have created a very attractive model, and a nice display. I agree with Bob, if you still have the desire you should continue, perhaps one of the smaller Vanguard kits. I'm well past my first flush of youth, and altho' I have completed my last large project (Indefatigable) I hope to keep my hand in with smaller less complex works. Thank you for the acknowledgment, I'm in very good company there. Regards, Maurice. (B.E.)