HOLIDAY DONATION DRIVE - SUPPORT MSW - DO YOUR PART TO KEEP THIS GREAT FORUM GOING! (89 donations so far out of 49,000 members - C'mon guys!)
×
.JPG.ca33079f5815b861e67b9c2cccd37982.JPG)

Blue Ensign
-
Posts
4,566 -
Joined
-
Last visited
Content Type
Profiles
Forums
Gallery
Events
Everything posted by Blue Ensign
-
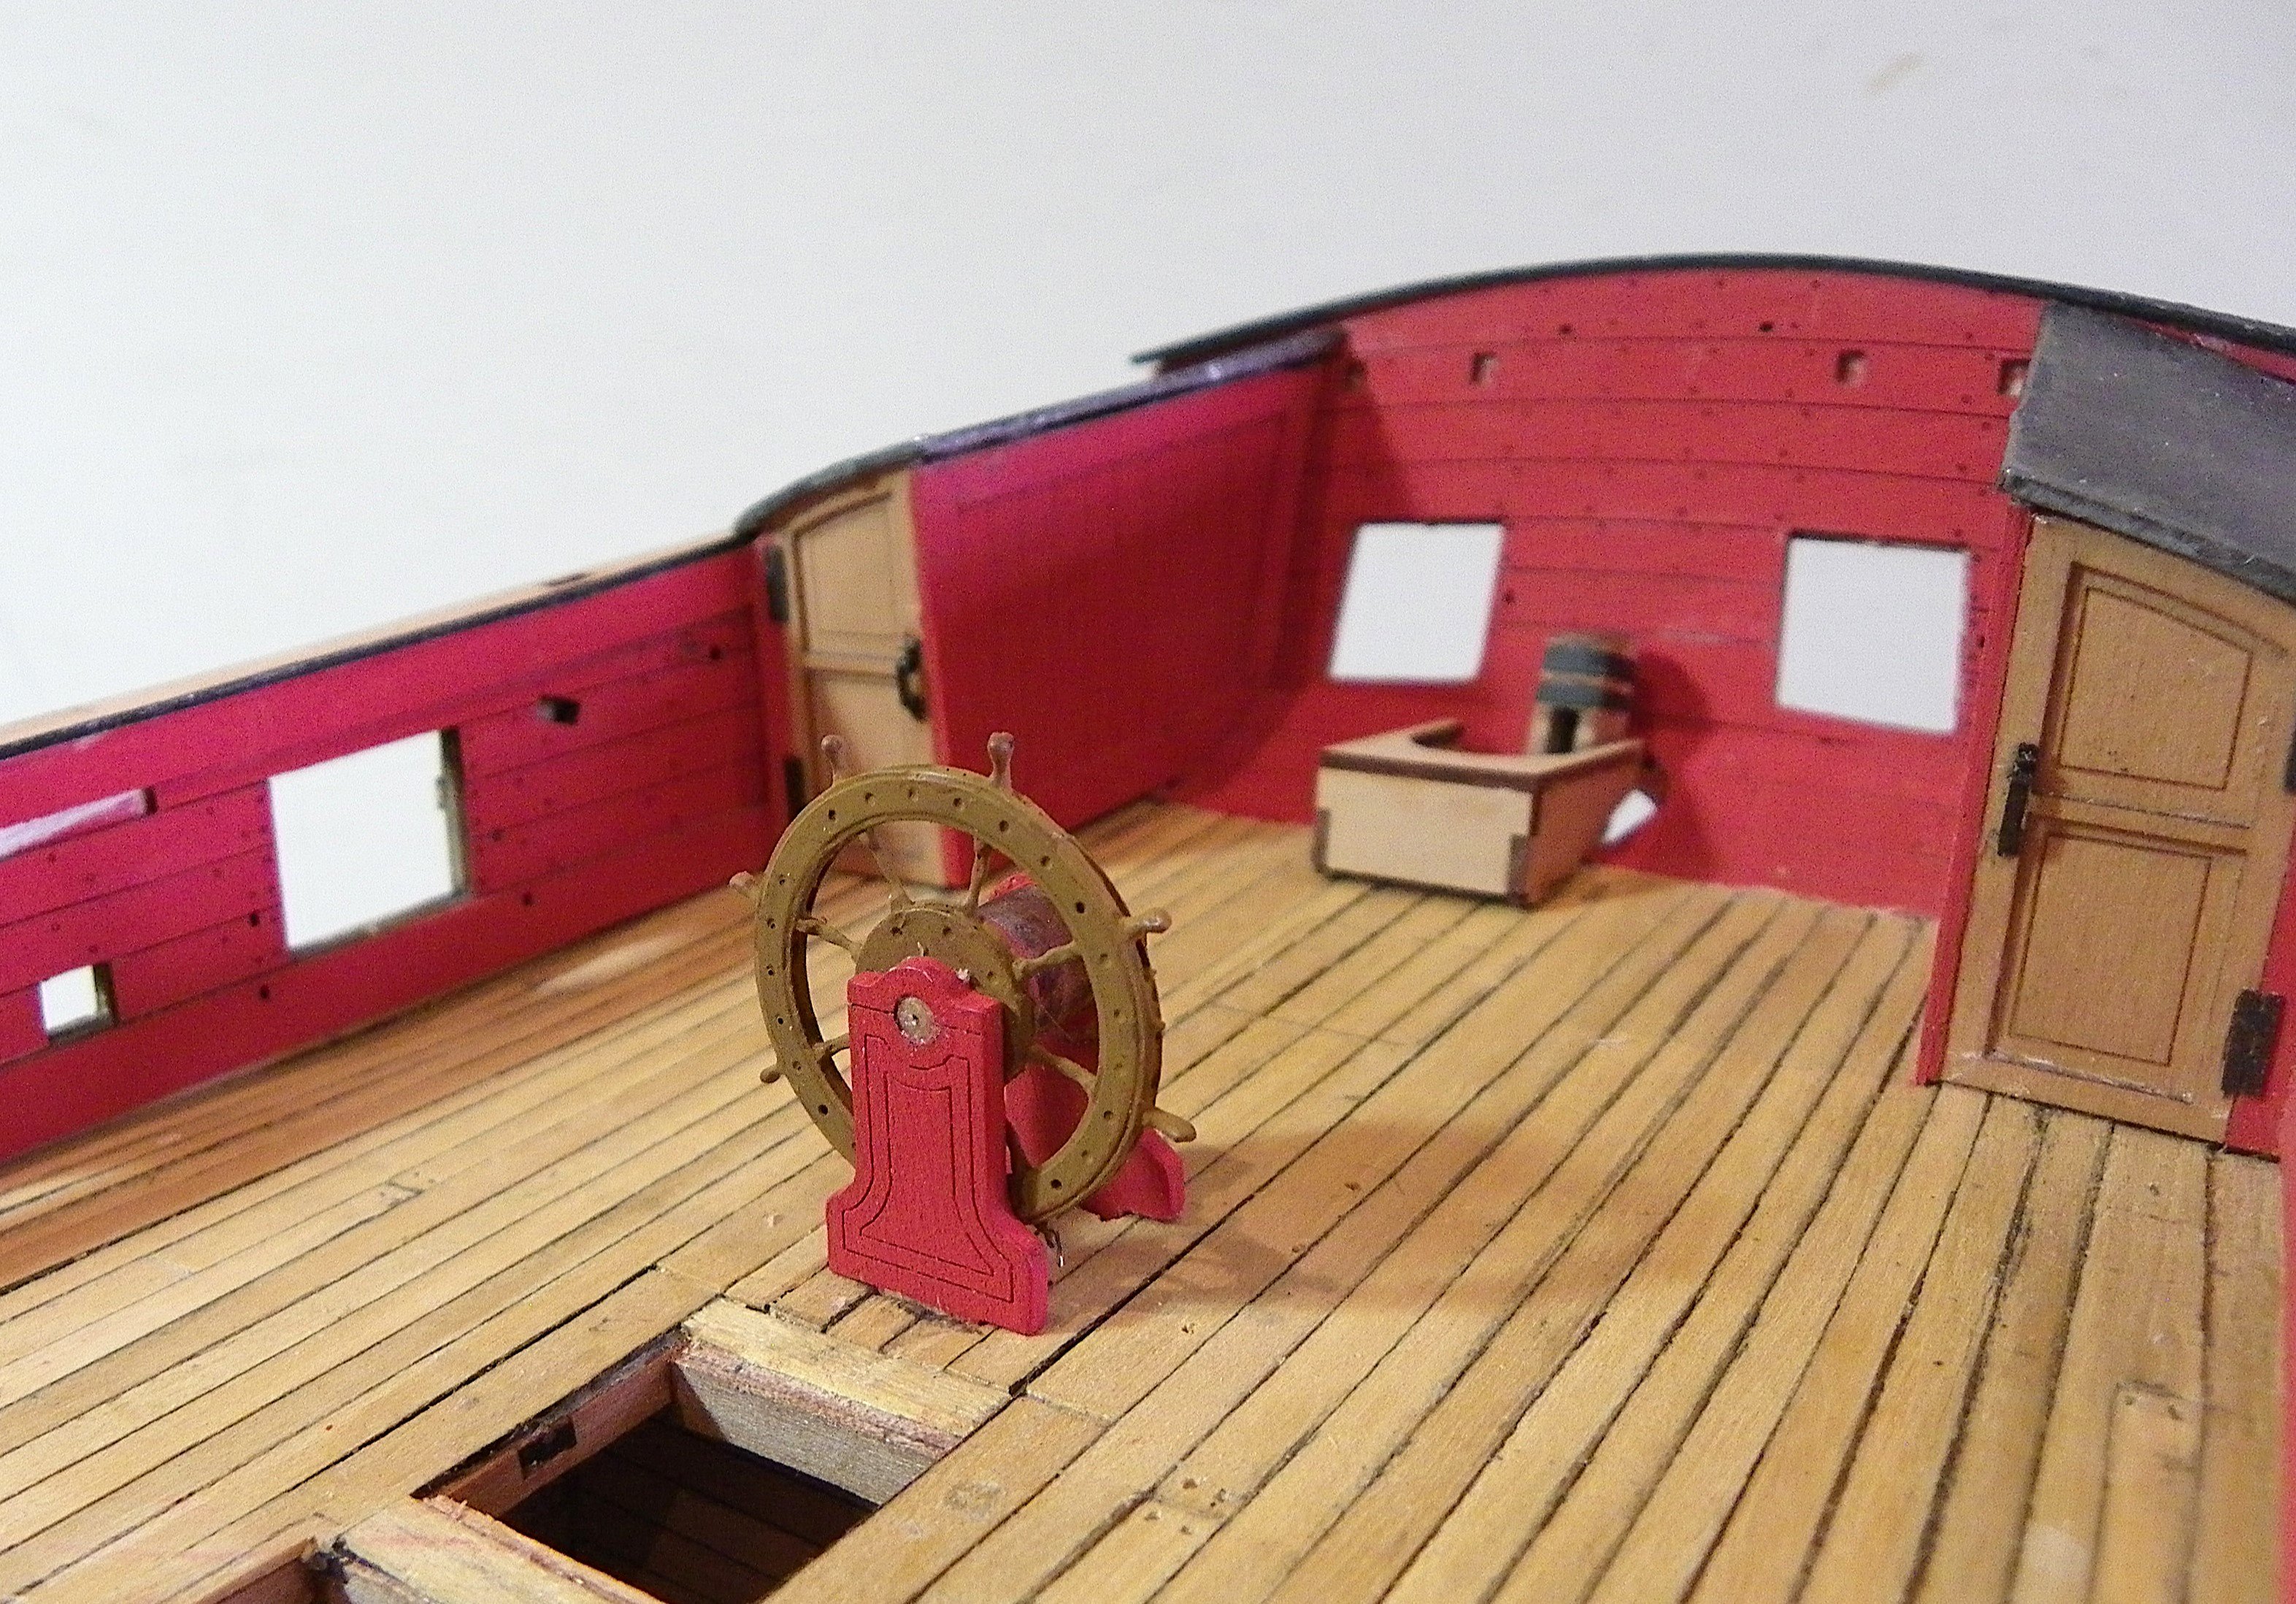
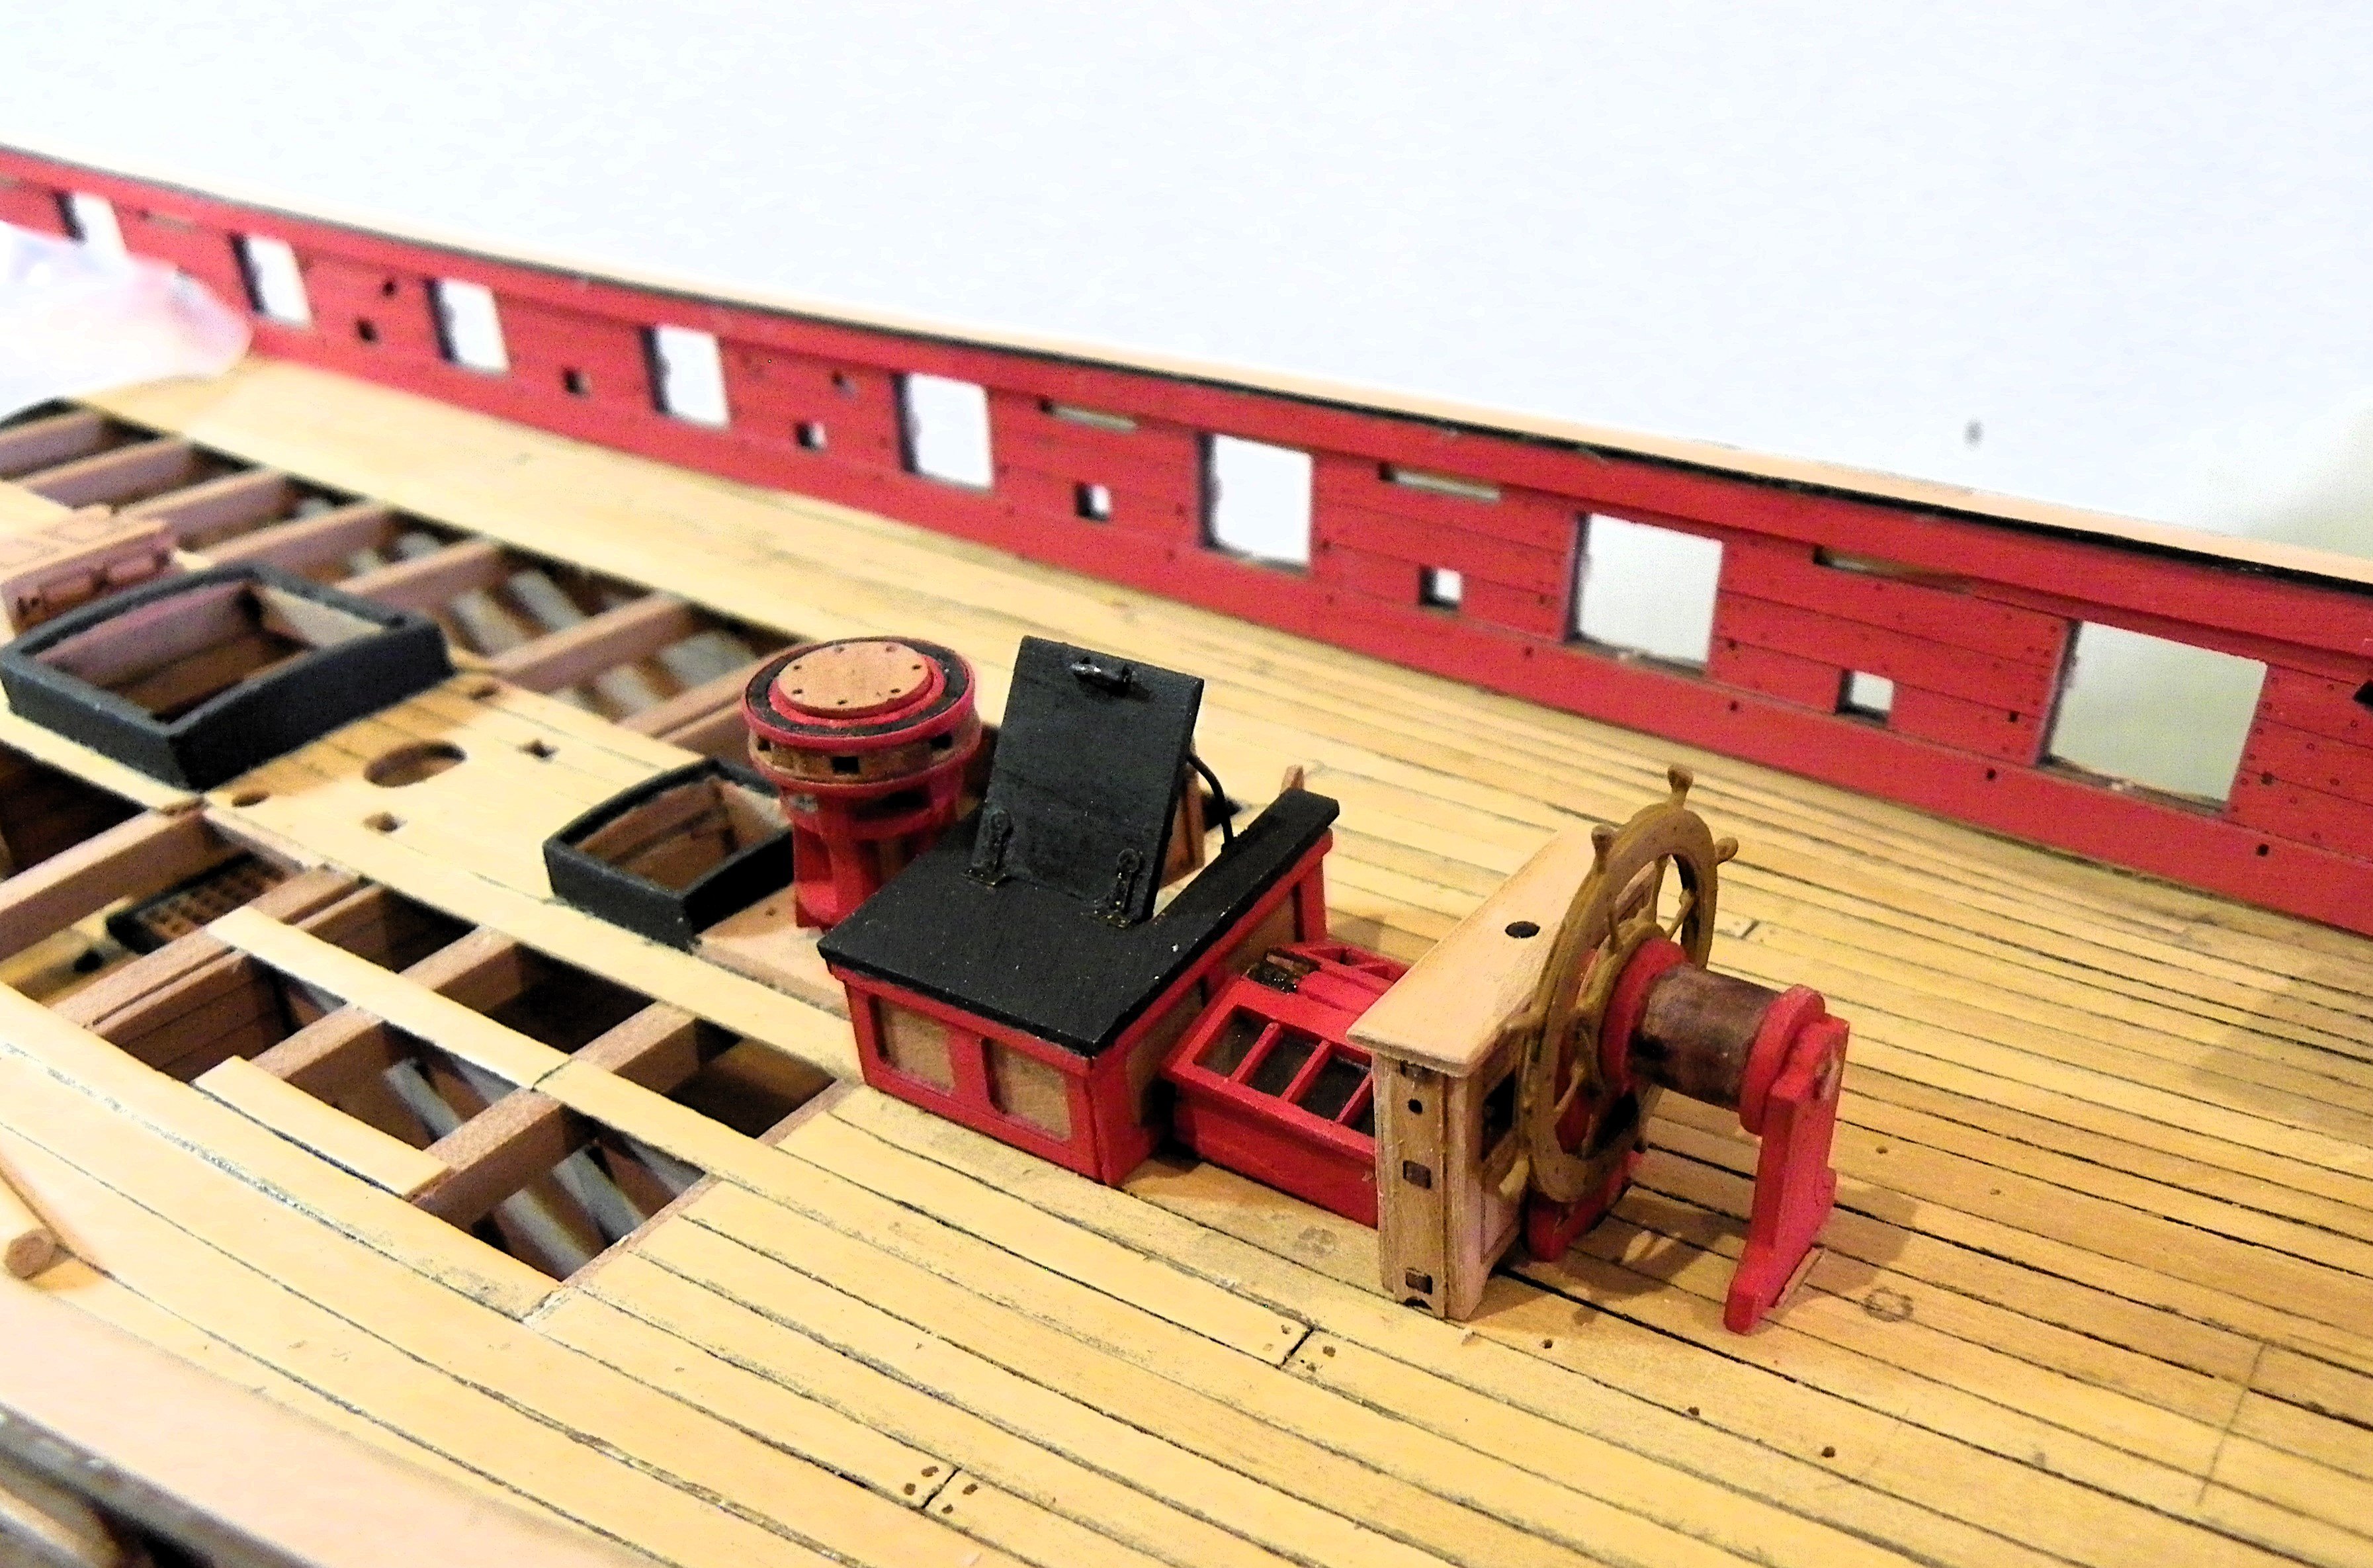
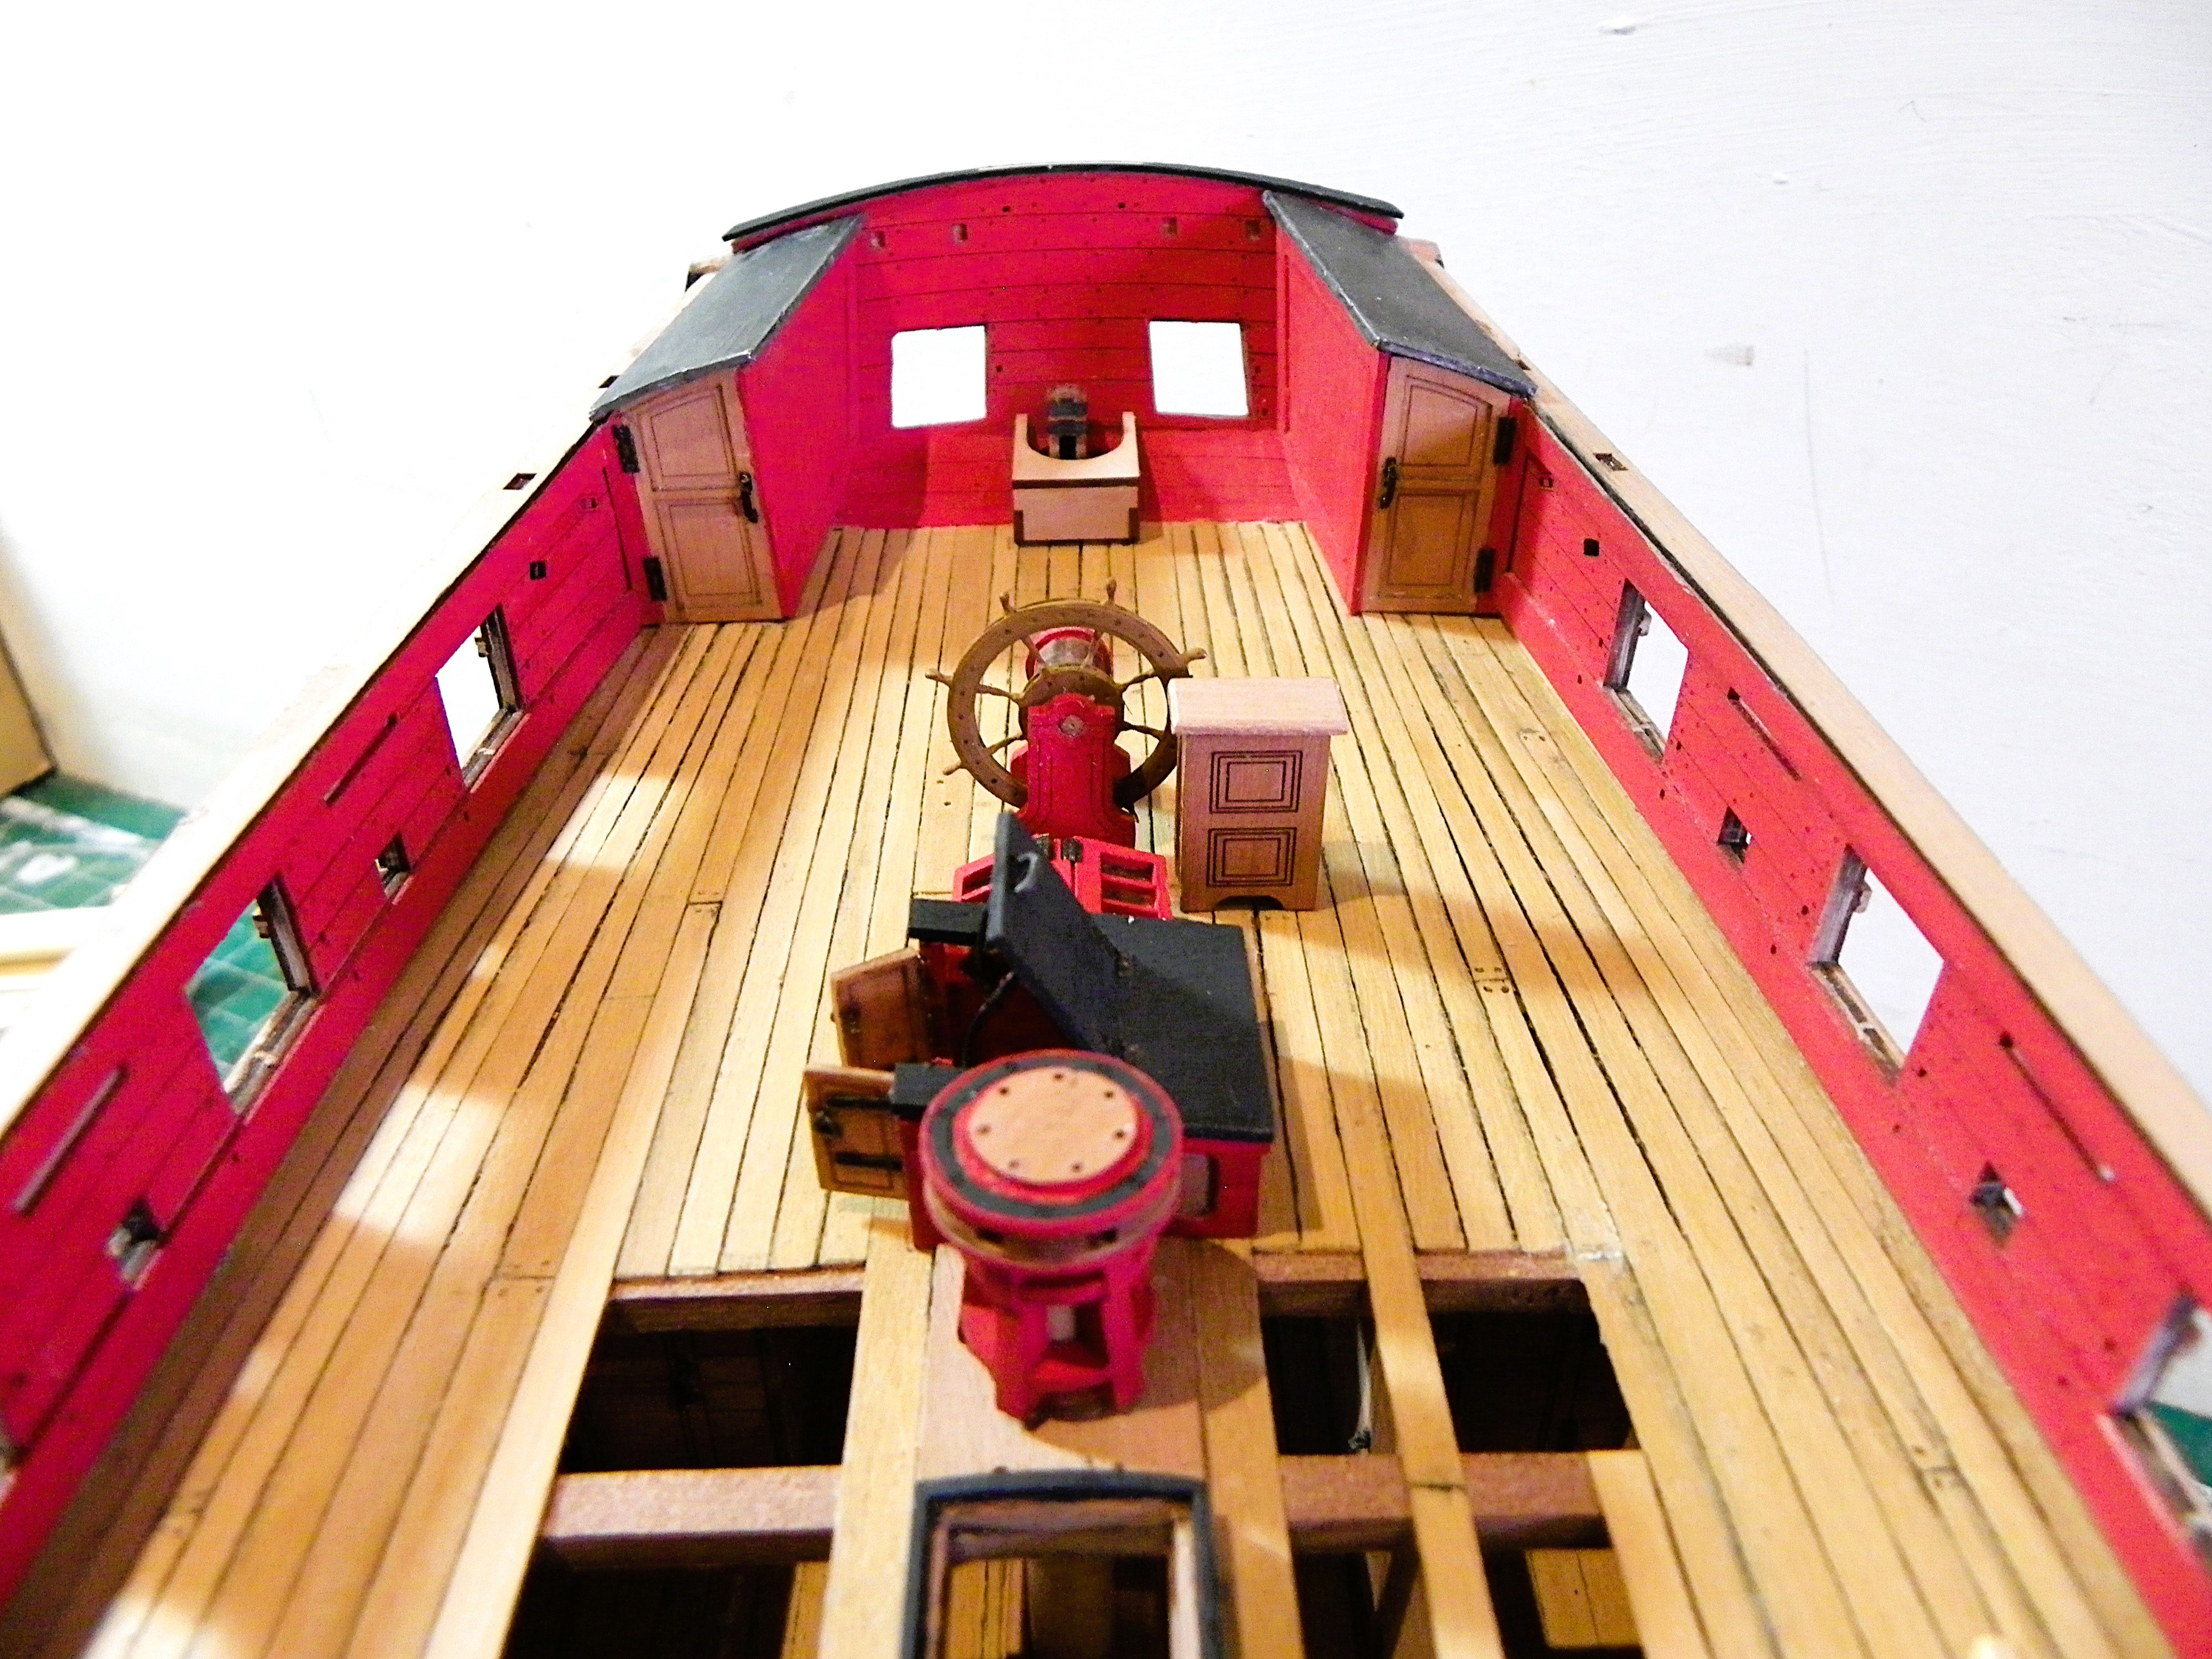
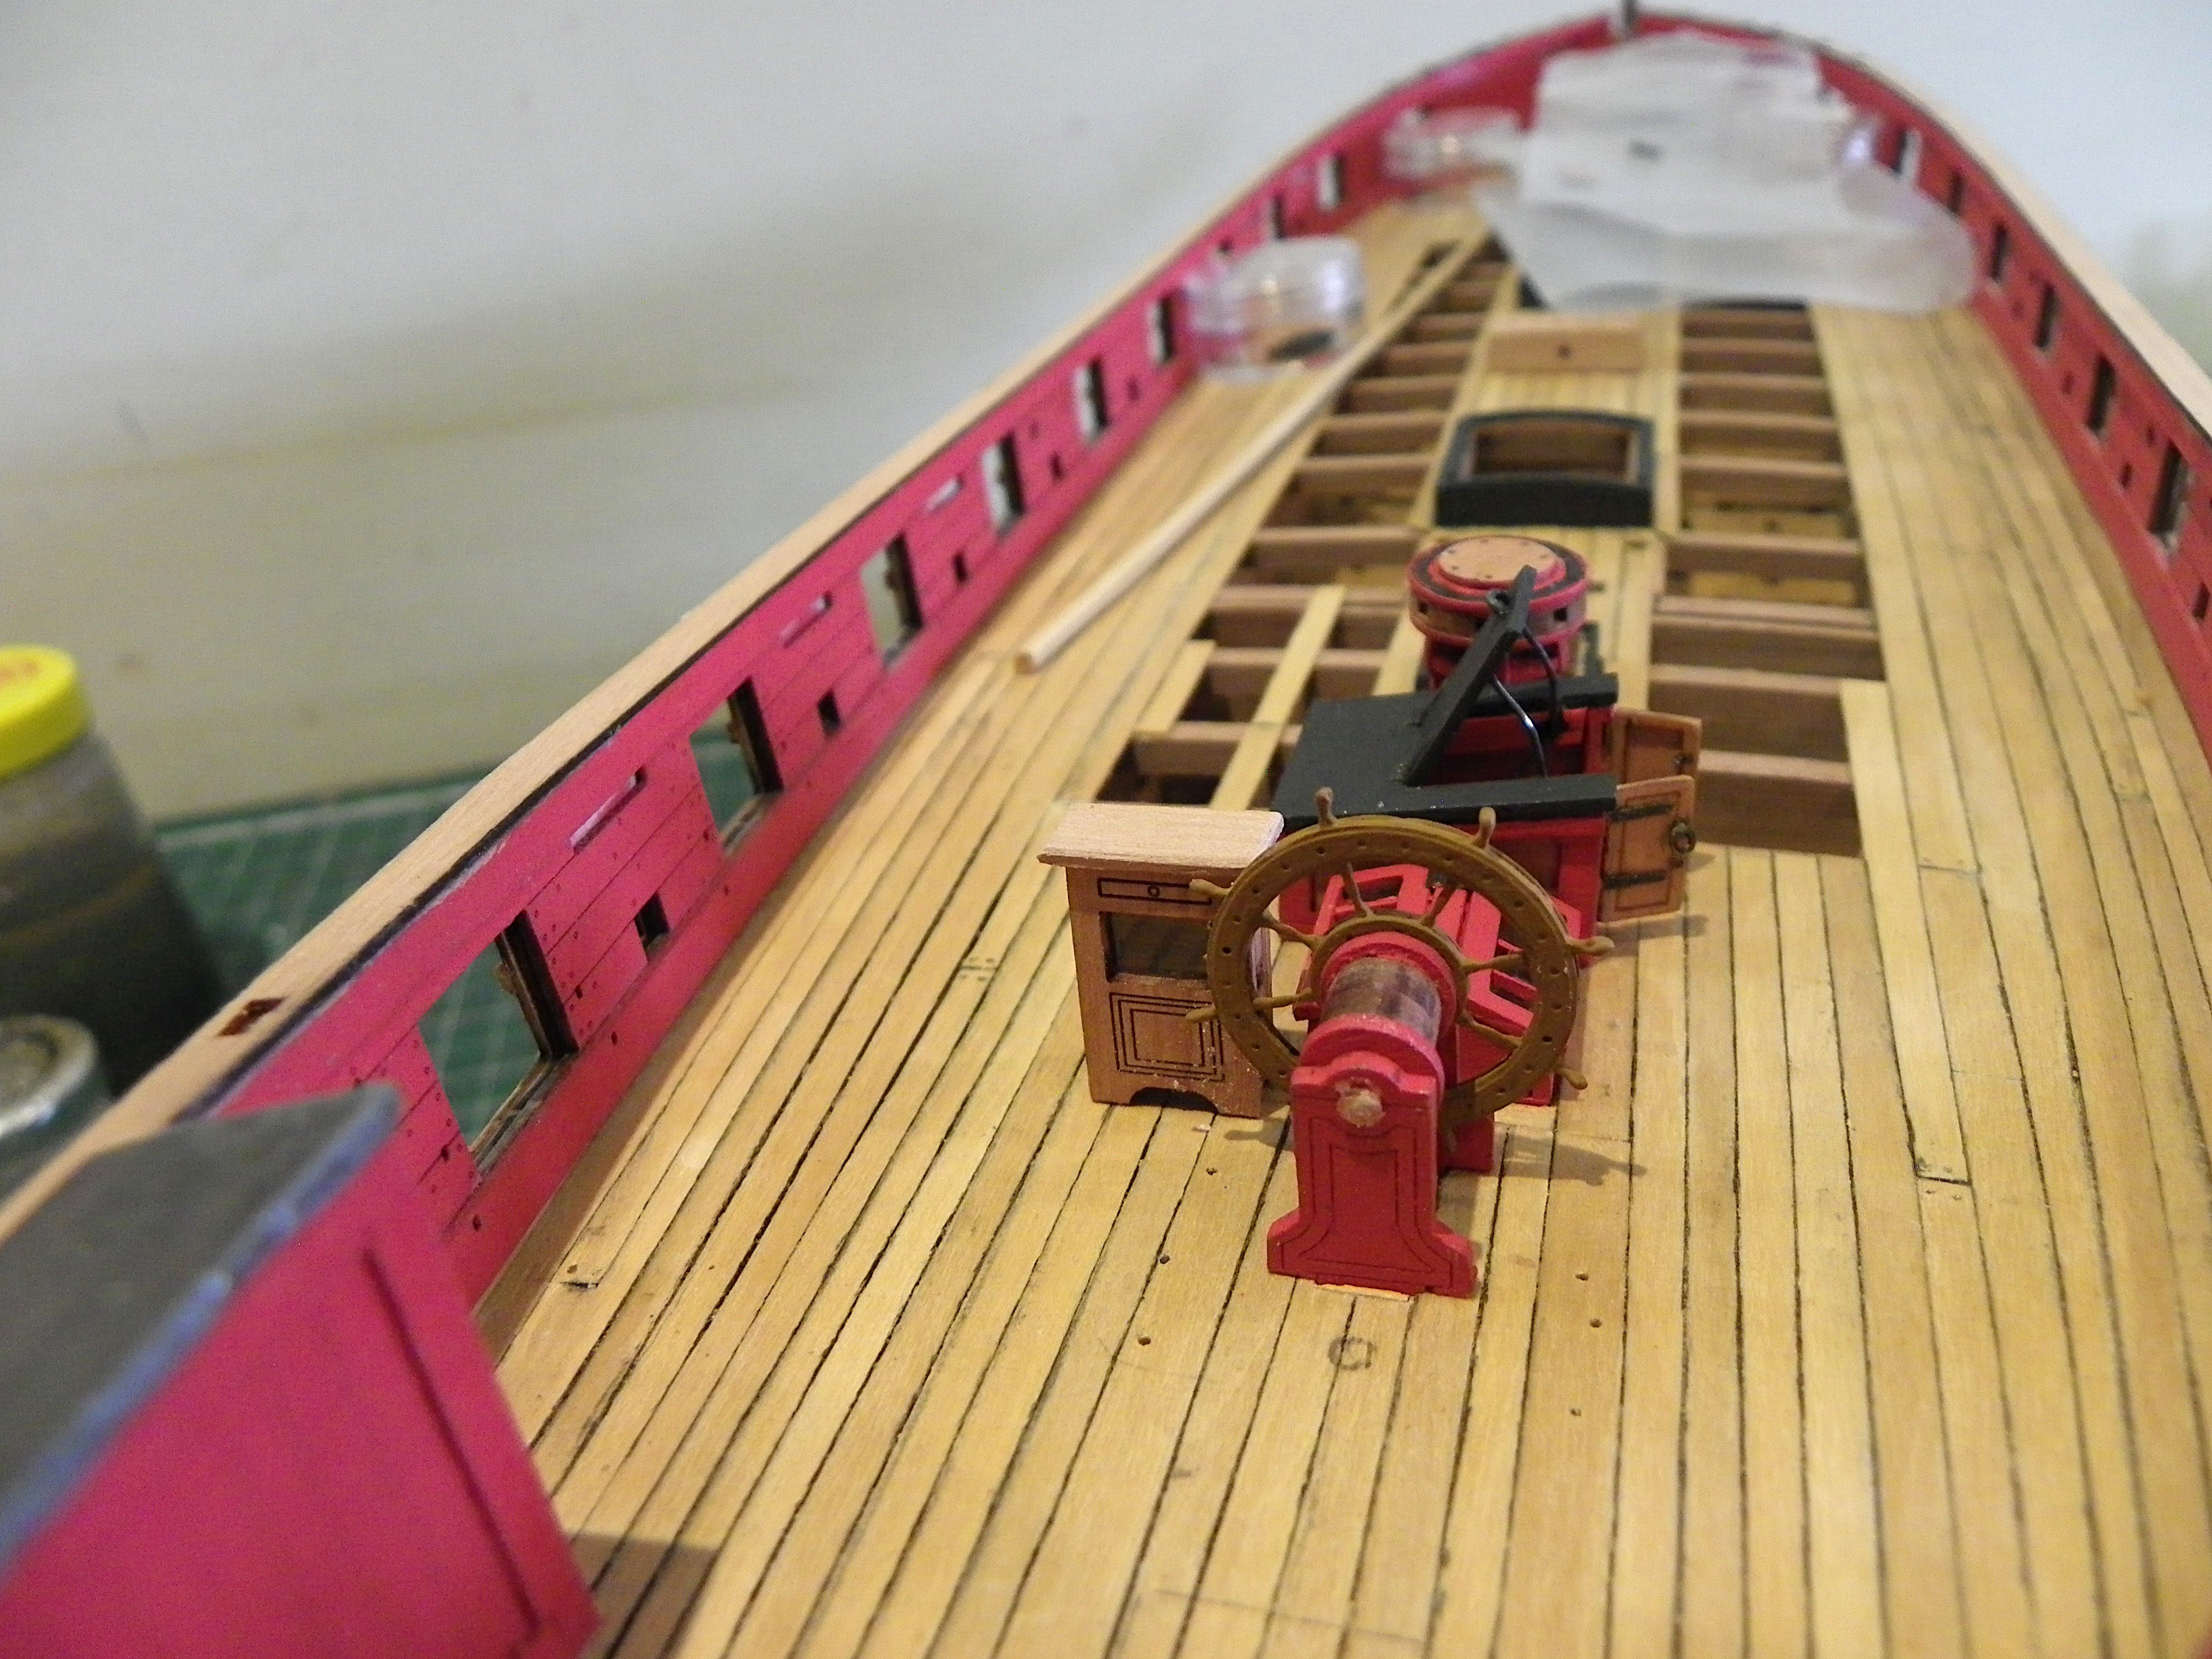
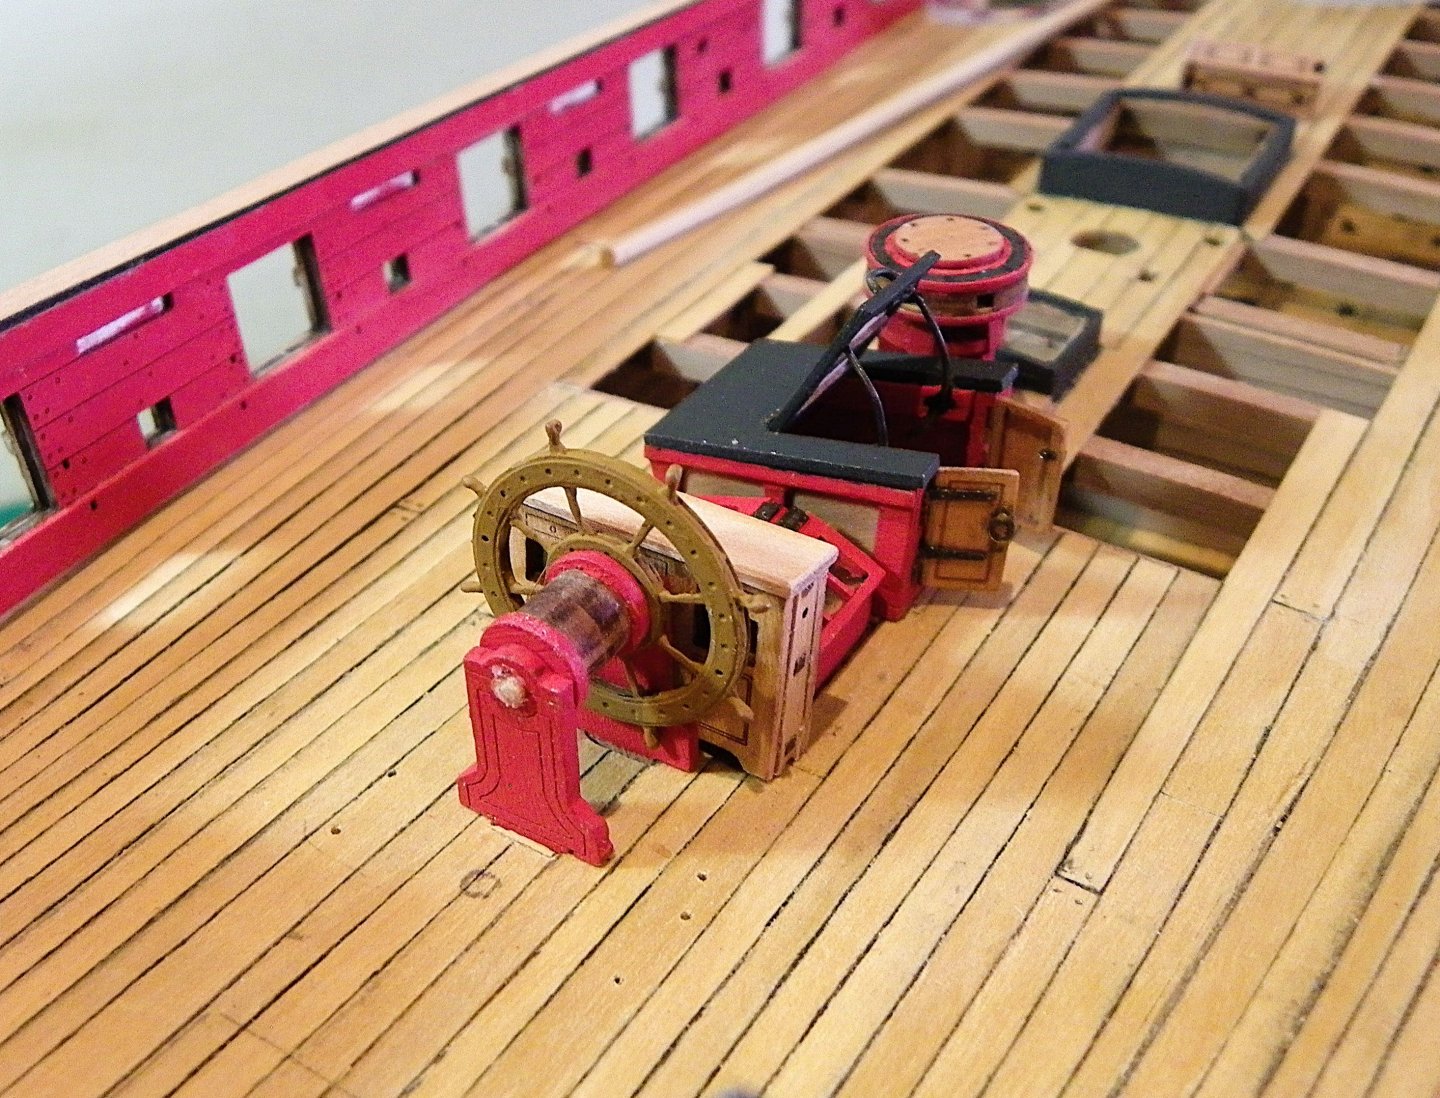
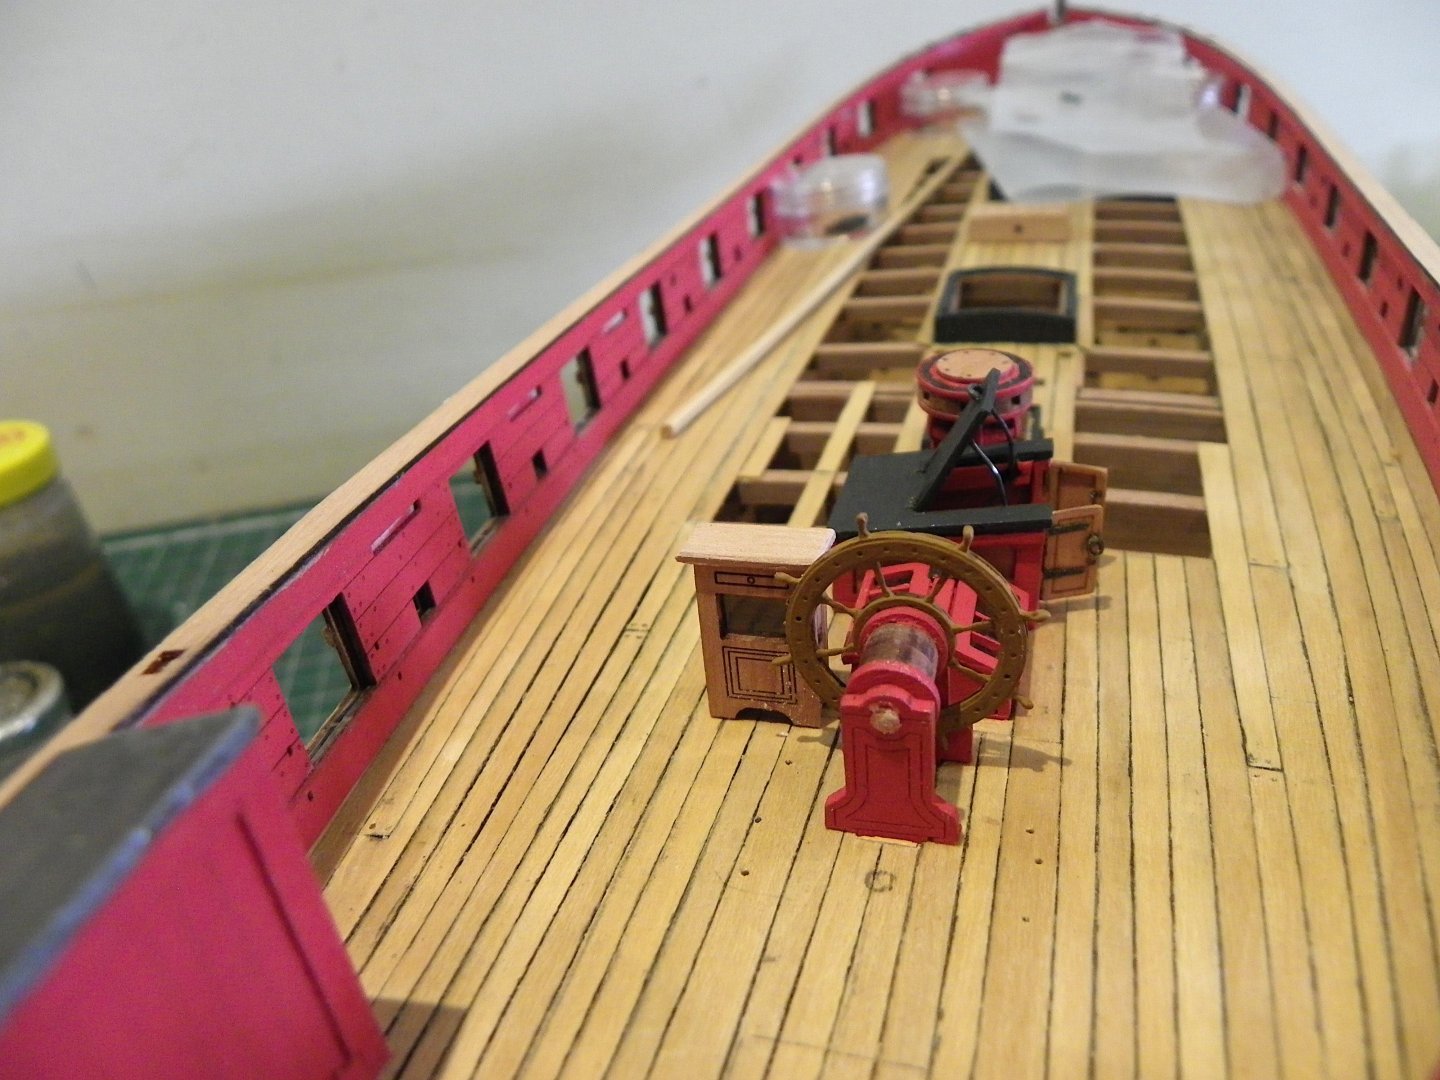
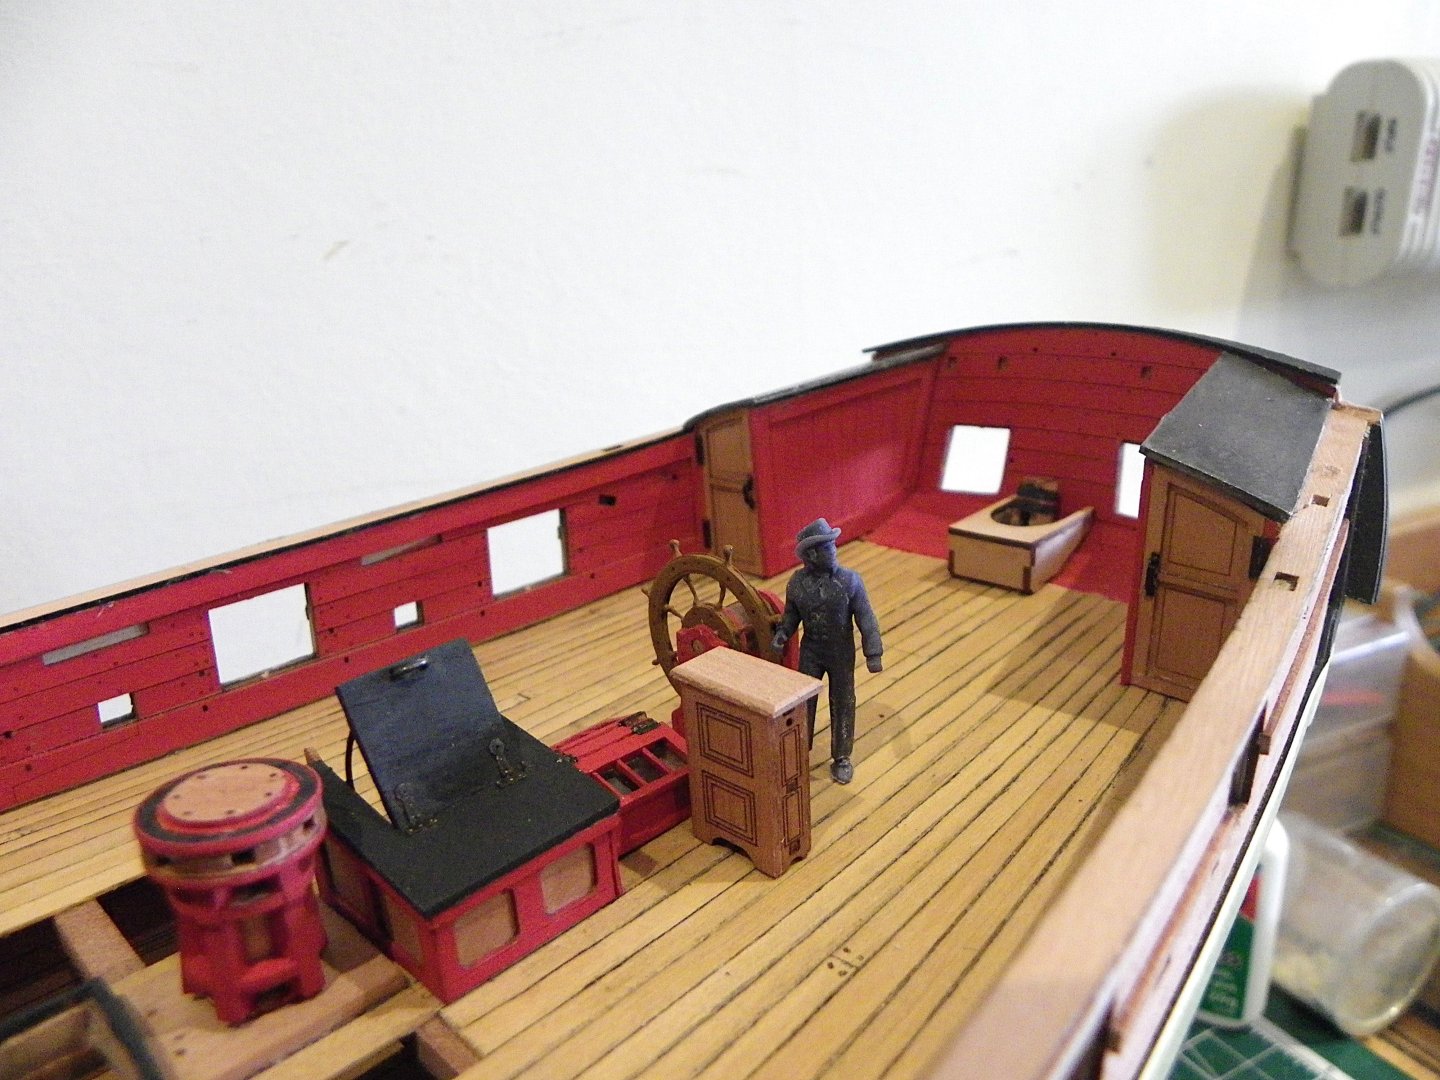
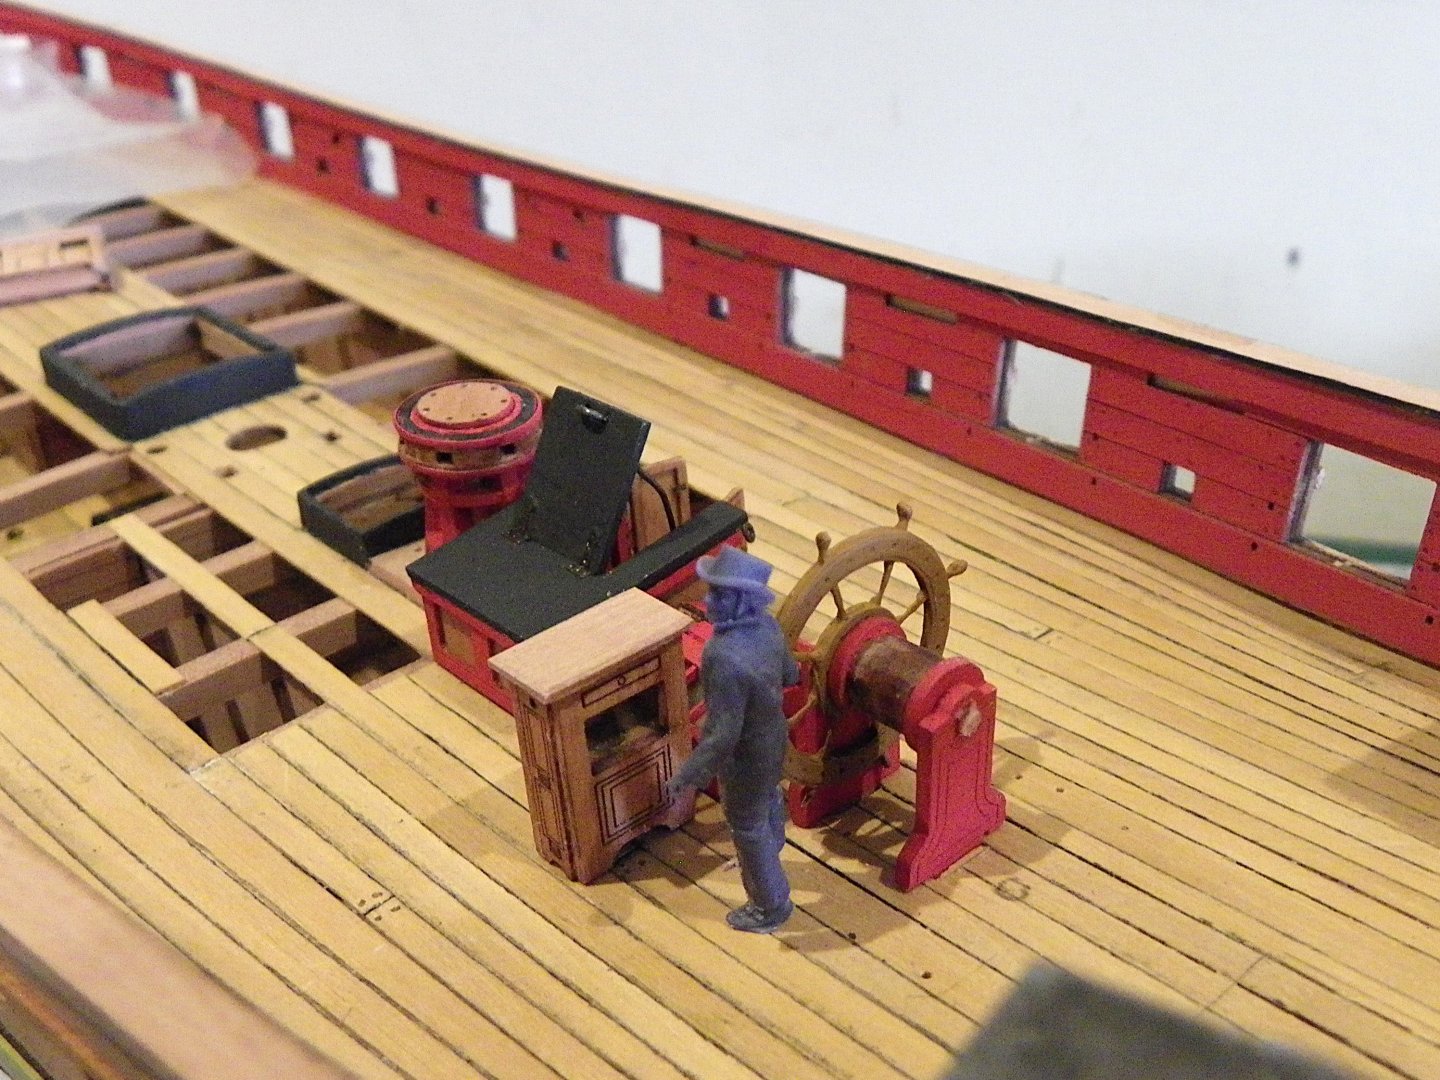
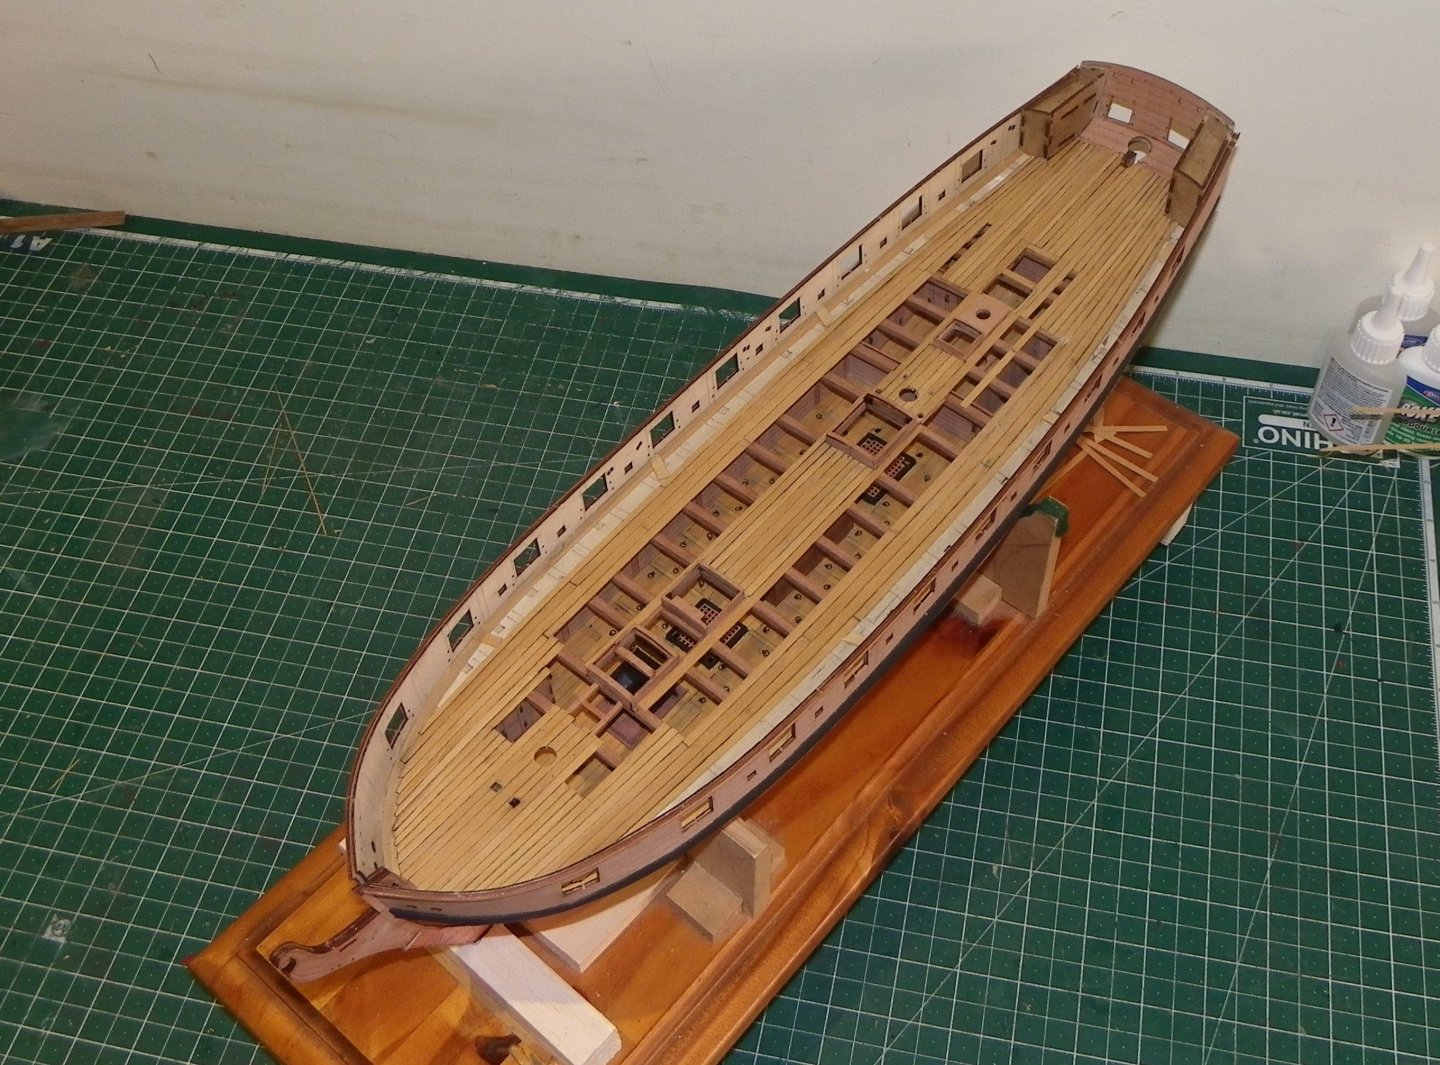
 Post 54 Fittings (Part 3) Wheel As with other recent kits the wheel is a photo-etched assembly. Having cleaned the wheel parts it was assembled using cyano. 0782 It was then chemically blackened to give it some tooth, following which primer was applied. I have been quite happy with Vanguard wheels and have not felt the desire to replace them with something more traditional. If they have one weakness it is that the handles are invariably very fine, and susceptible to damage. The stanchions for the wheel are a matched pair but given the rise in the deck towards the stern the aft stanchion should sit a tad lower to keep the barrel and wheel level. This distinction is clearly shown on the Adm plan. 0825 0824 I took 1mm from the bottom of the aft stanchion to bring the wheel level. 0827 The wheel needs a lot of cleaning up but I wanted to get the set on the deck correct first. Closely associated with the Wheel is the Binnacle. In this case a single compass cabinet, pretty little thing, but a couple of questions do come to mind.🤔 There is a centrally located chimney, presumably relating to the internal lamp used to light compass cabinets at night, but where would the lantern be? Such lamps were usually in a separate compartment with a glazed screen separating it from the compass.(s) The placement of this Binnacle between wheel stanchion and skylight would effectively block any view of the compass by the Helmsman. The kit arrangement shows the open section facing forward, a position that would also not afford the Helmsman a view. 0838 With a single compass cabinet it would make sense for the Binnacle to be offset to port or starboard. With smaller cabinets is it likely there would be two, one each side of the wheel. 0841 In assembling the cabinet I glazed the compass section using acetate, and re-made the top sans the chimney hole. I do like this Bijou Binnacle but I would set it slightly outside of the wheel, glazed side facing the wheel. With this set-up it would be nice if the kit had two binnacles. Purely out of curiosity I ordered a Pearwood double Binnacle at the princely sum of £2.80 just to see if I preferred it. 0834 0835 A bit of basic fettlin’ – blocking off the central section where the lamp would be, glazing the compass compartments with acetate, and filling in the viewing panels on the forward side. 0832 Even with this arrangement the cabinet is so close to the wheel that there is barely a view of the compasses. On balance I think I like the single cabinet look better, but would have preferred to have two. 0850 0851 This particular figure from the Vanguard collection does pass muster as a helmsman, and I may well use him as a scale indicator. B.E. 15/03/2025


- 332 replies
-
- 23
-

-
- Harpy
- Vanguard Models
- (and 1 more)
-
Thanks Chris, can't help these things cropping up in my mind. There is around 9ft 6 inches of space available between the capstan and the wheel and that would mean stepping over the companion light on the aft side, unless of course the light was removed and the ladderway boarded over during use of the Capstan. There is just about enough room on the forward side before the winch becomes an issue. B.E.
- 332 replies
-
- 2
-
-
- Harpy
- Vanguard Models
- (and 1 more)
-
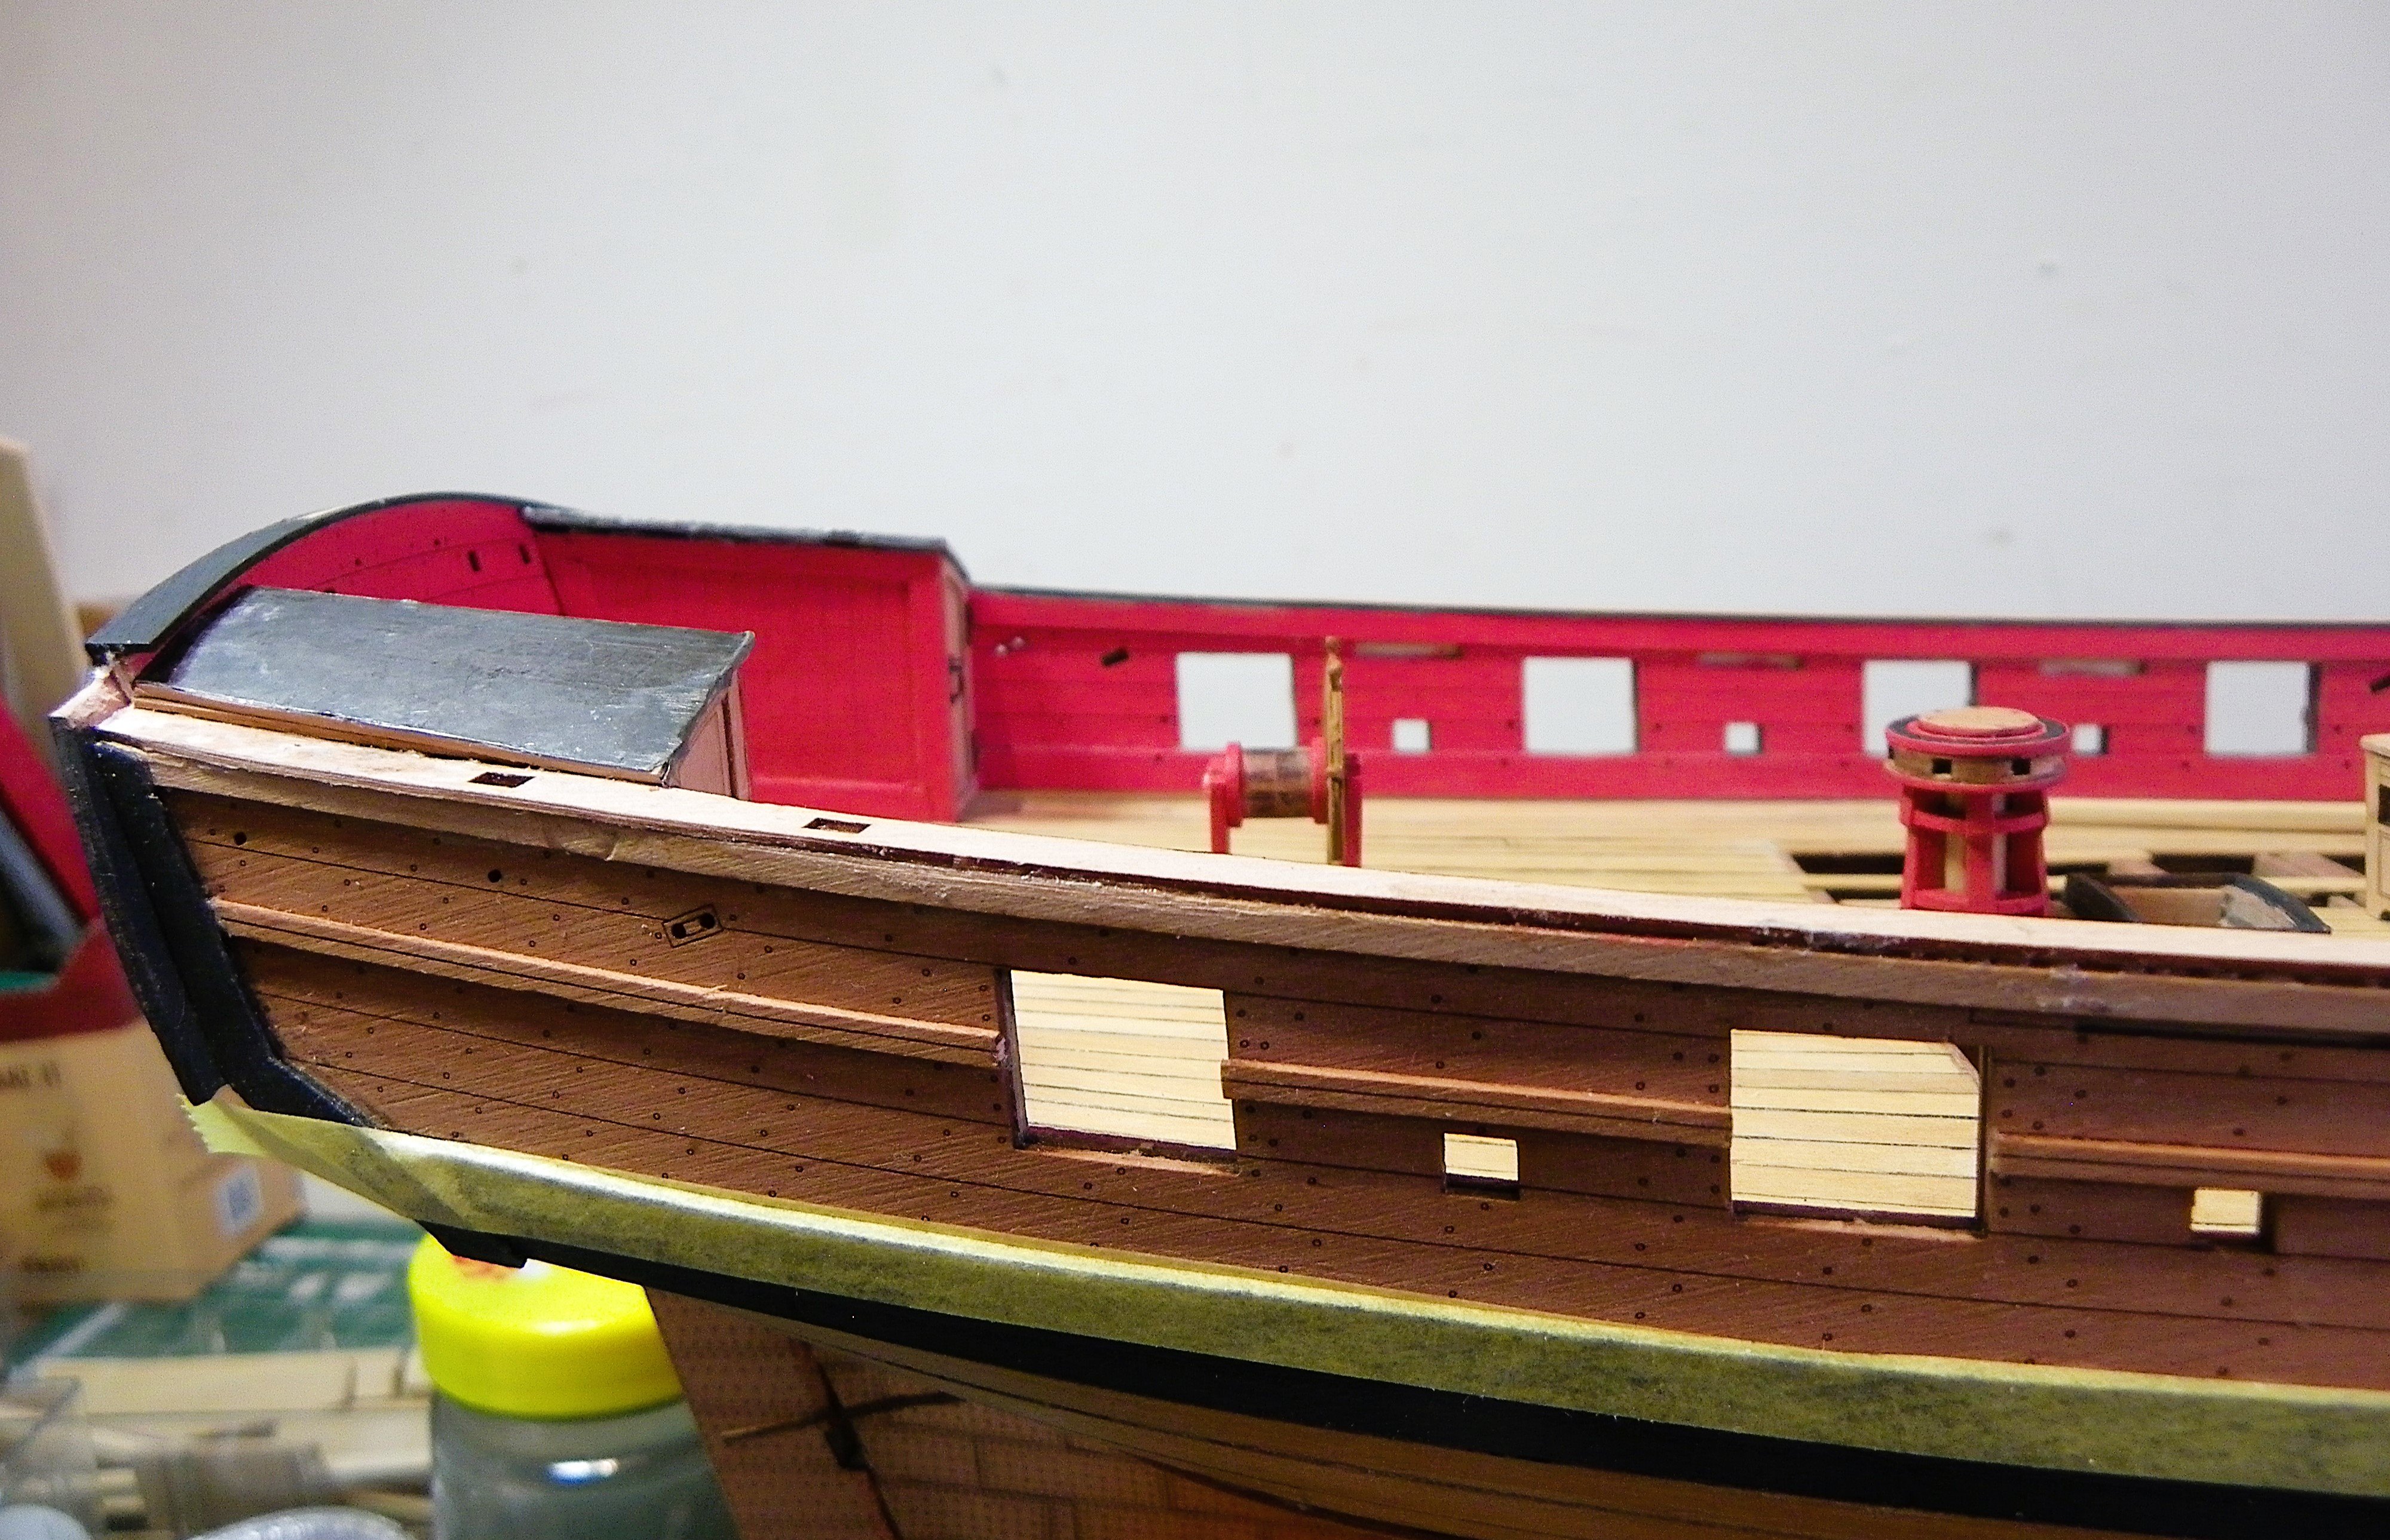
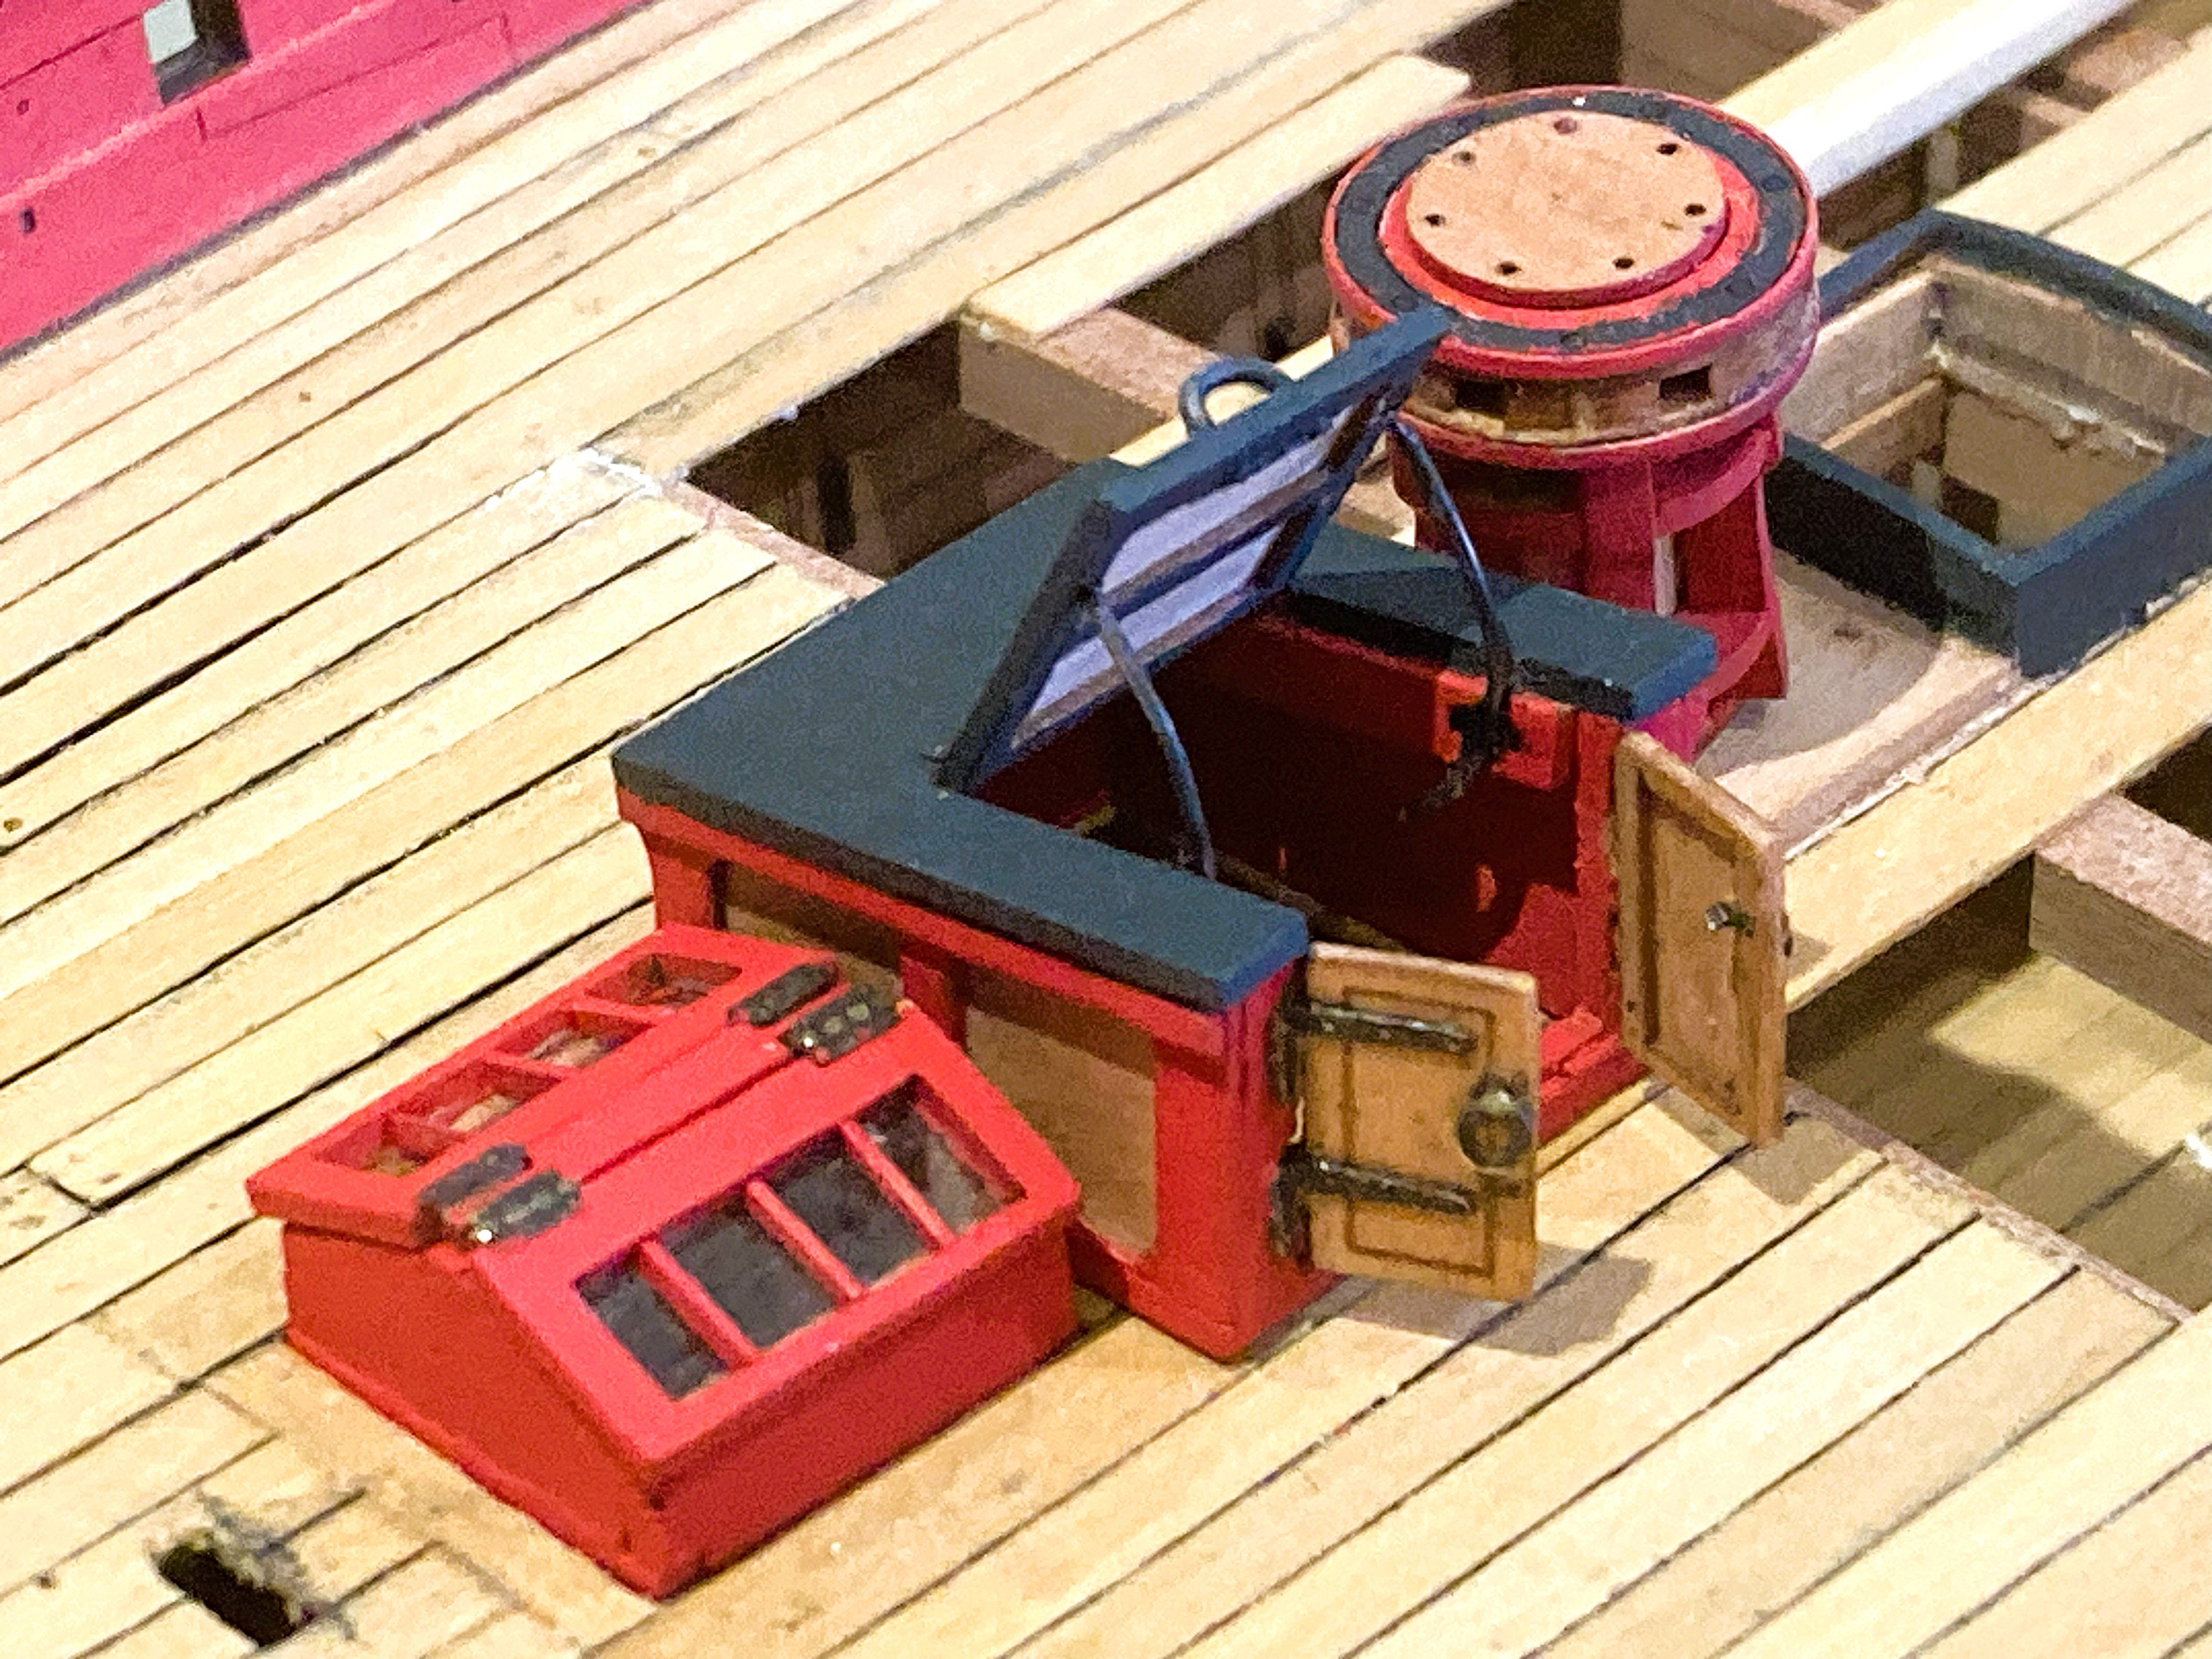
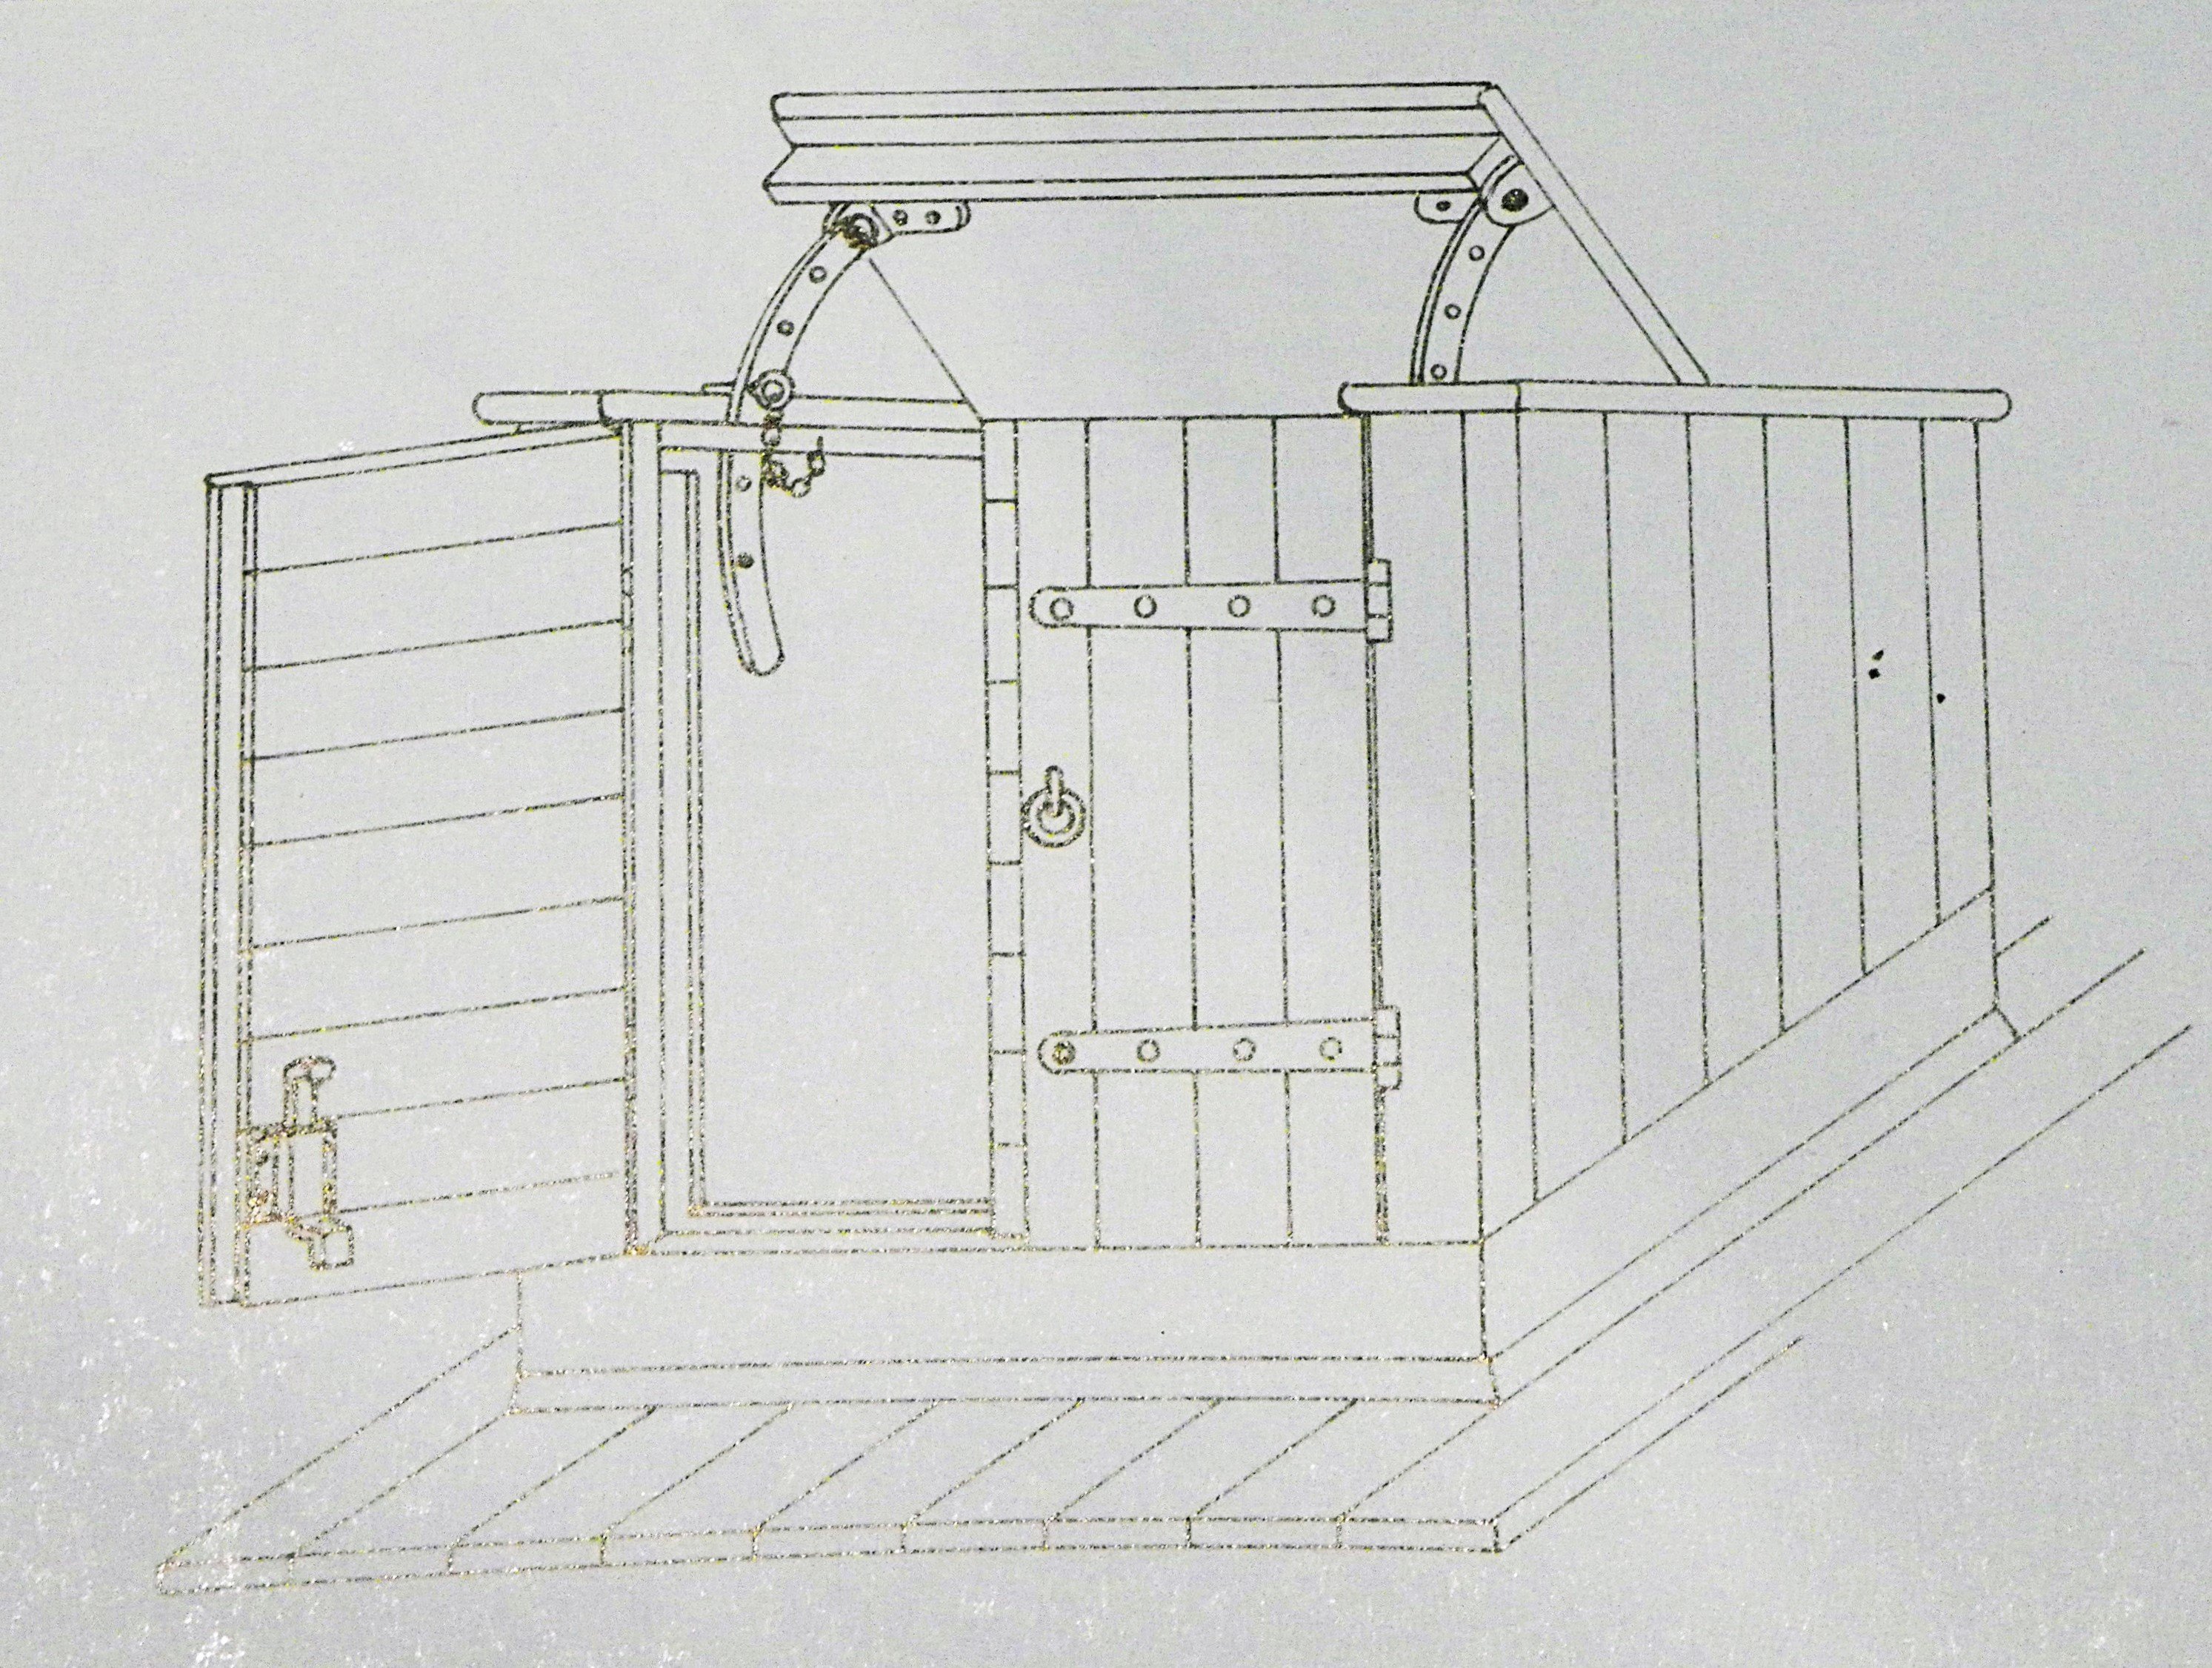
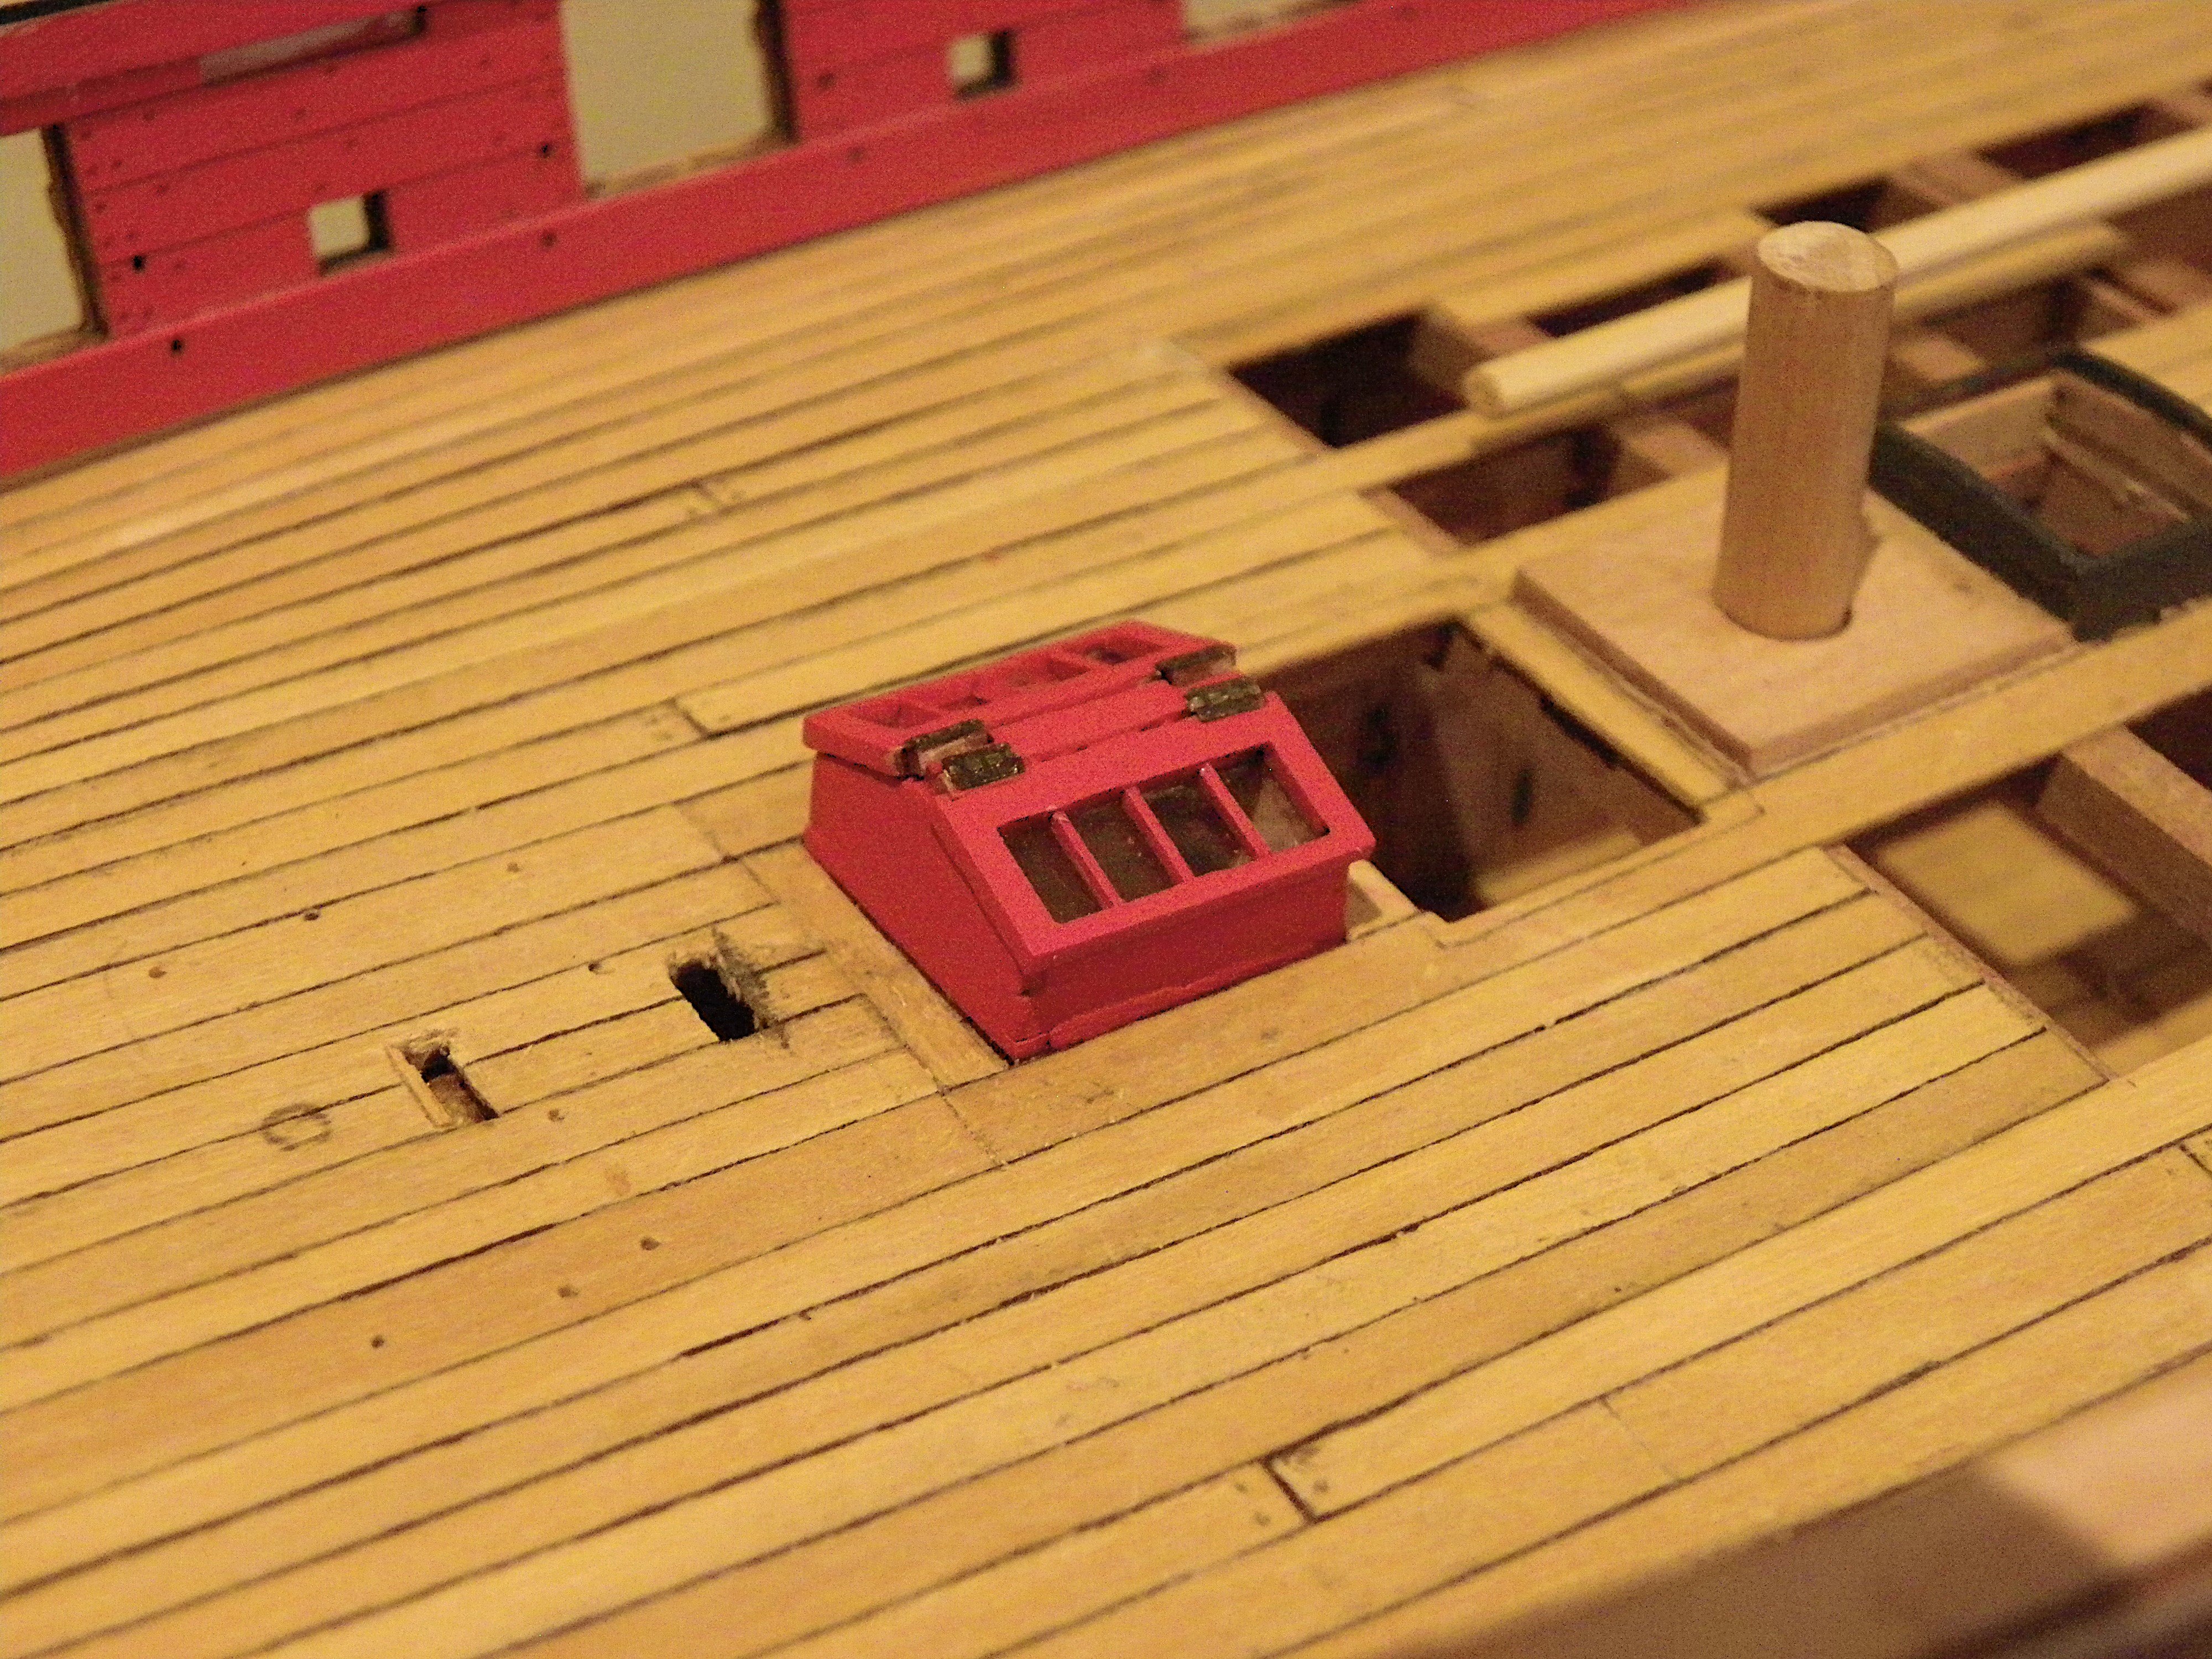
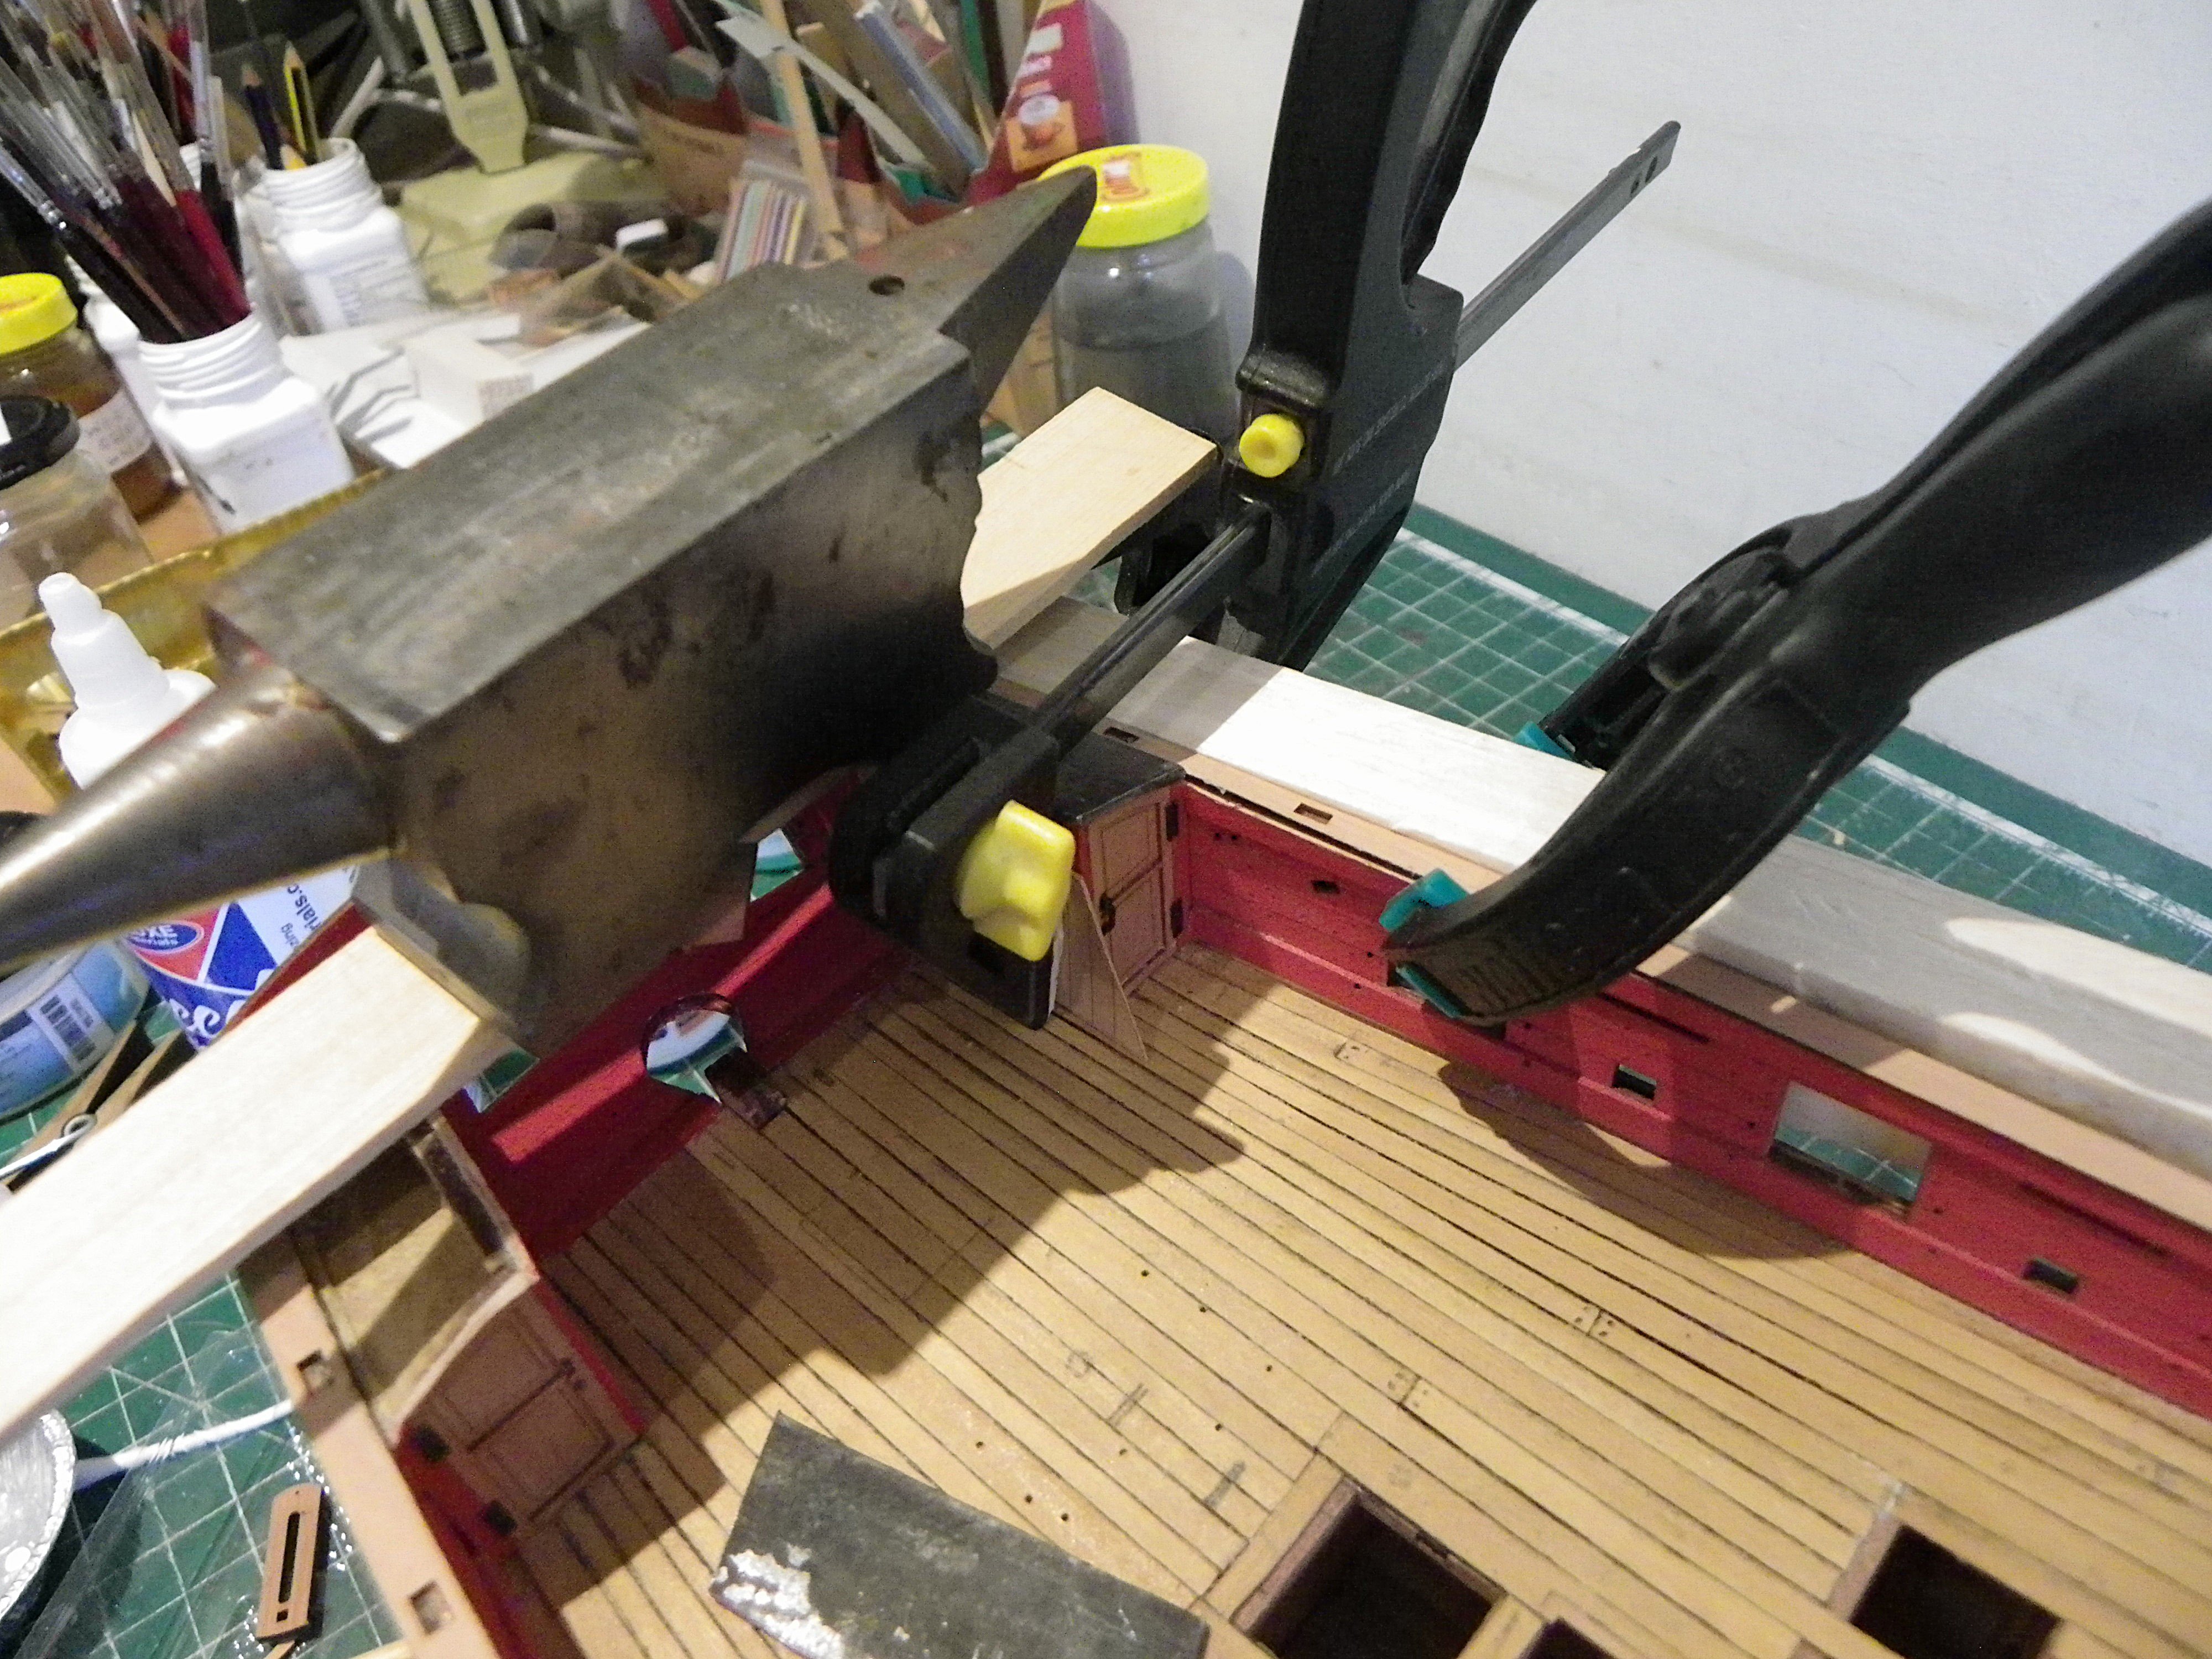
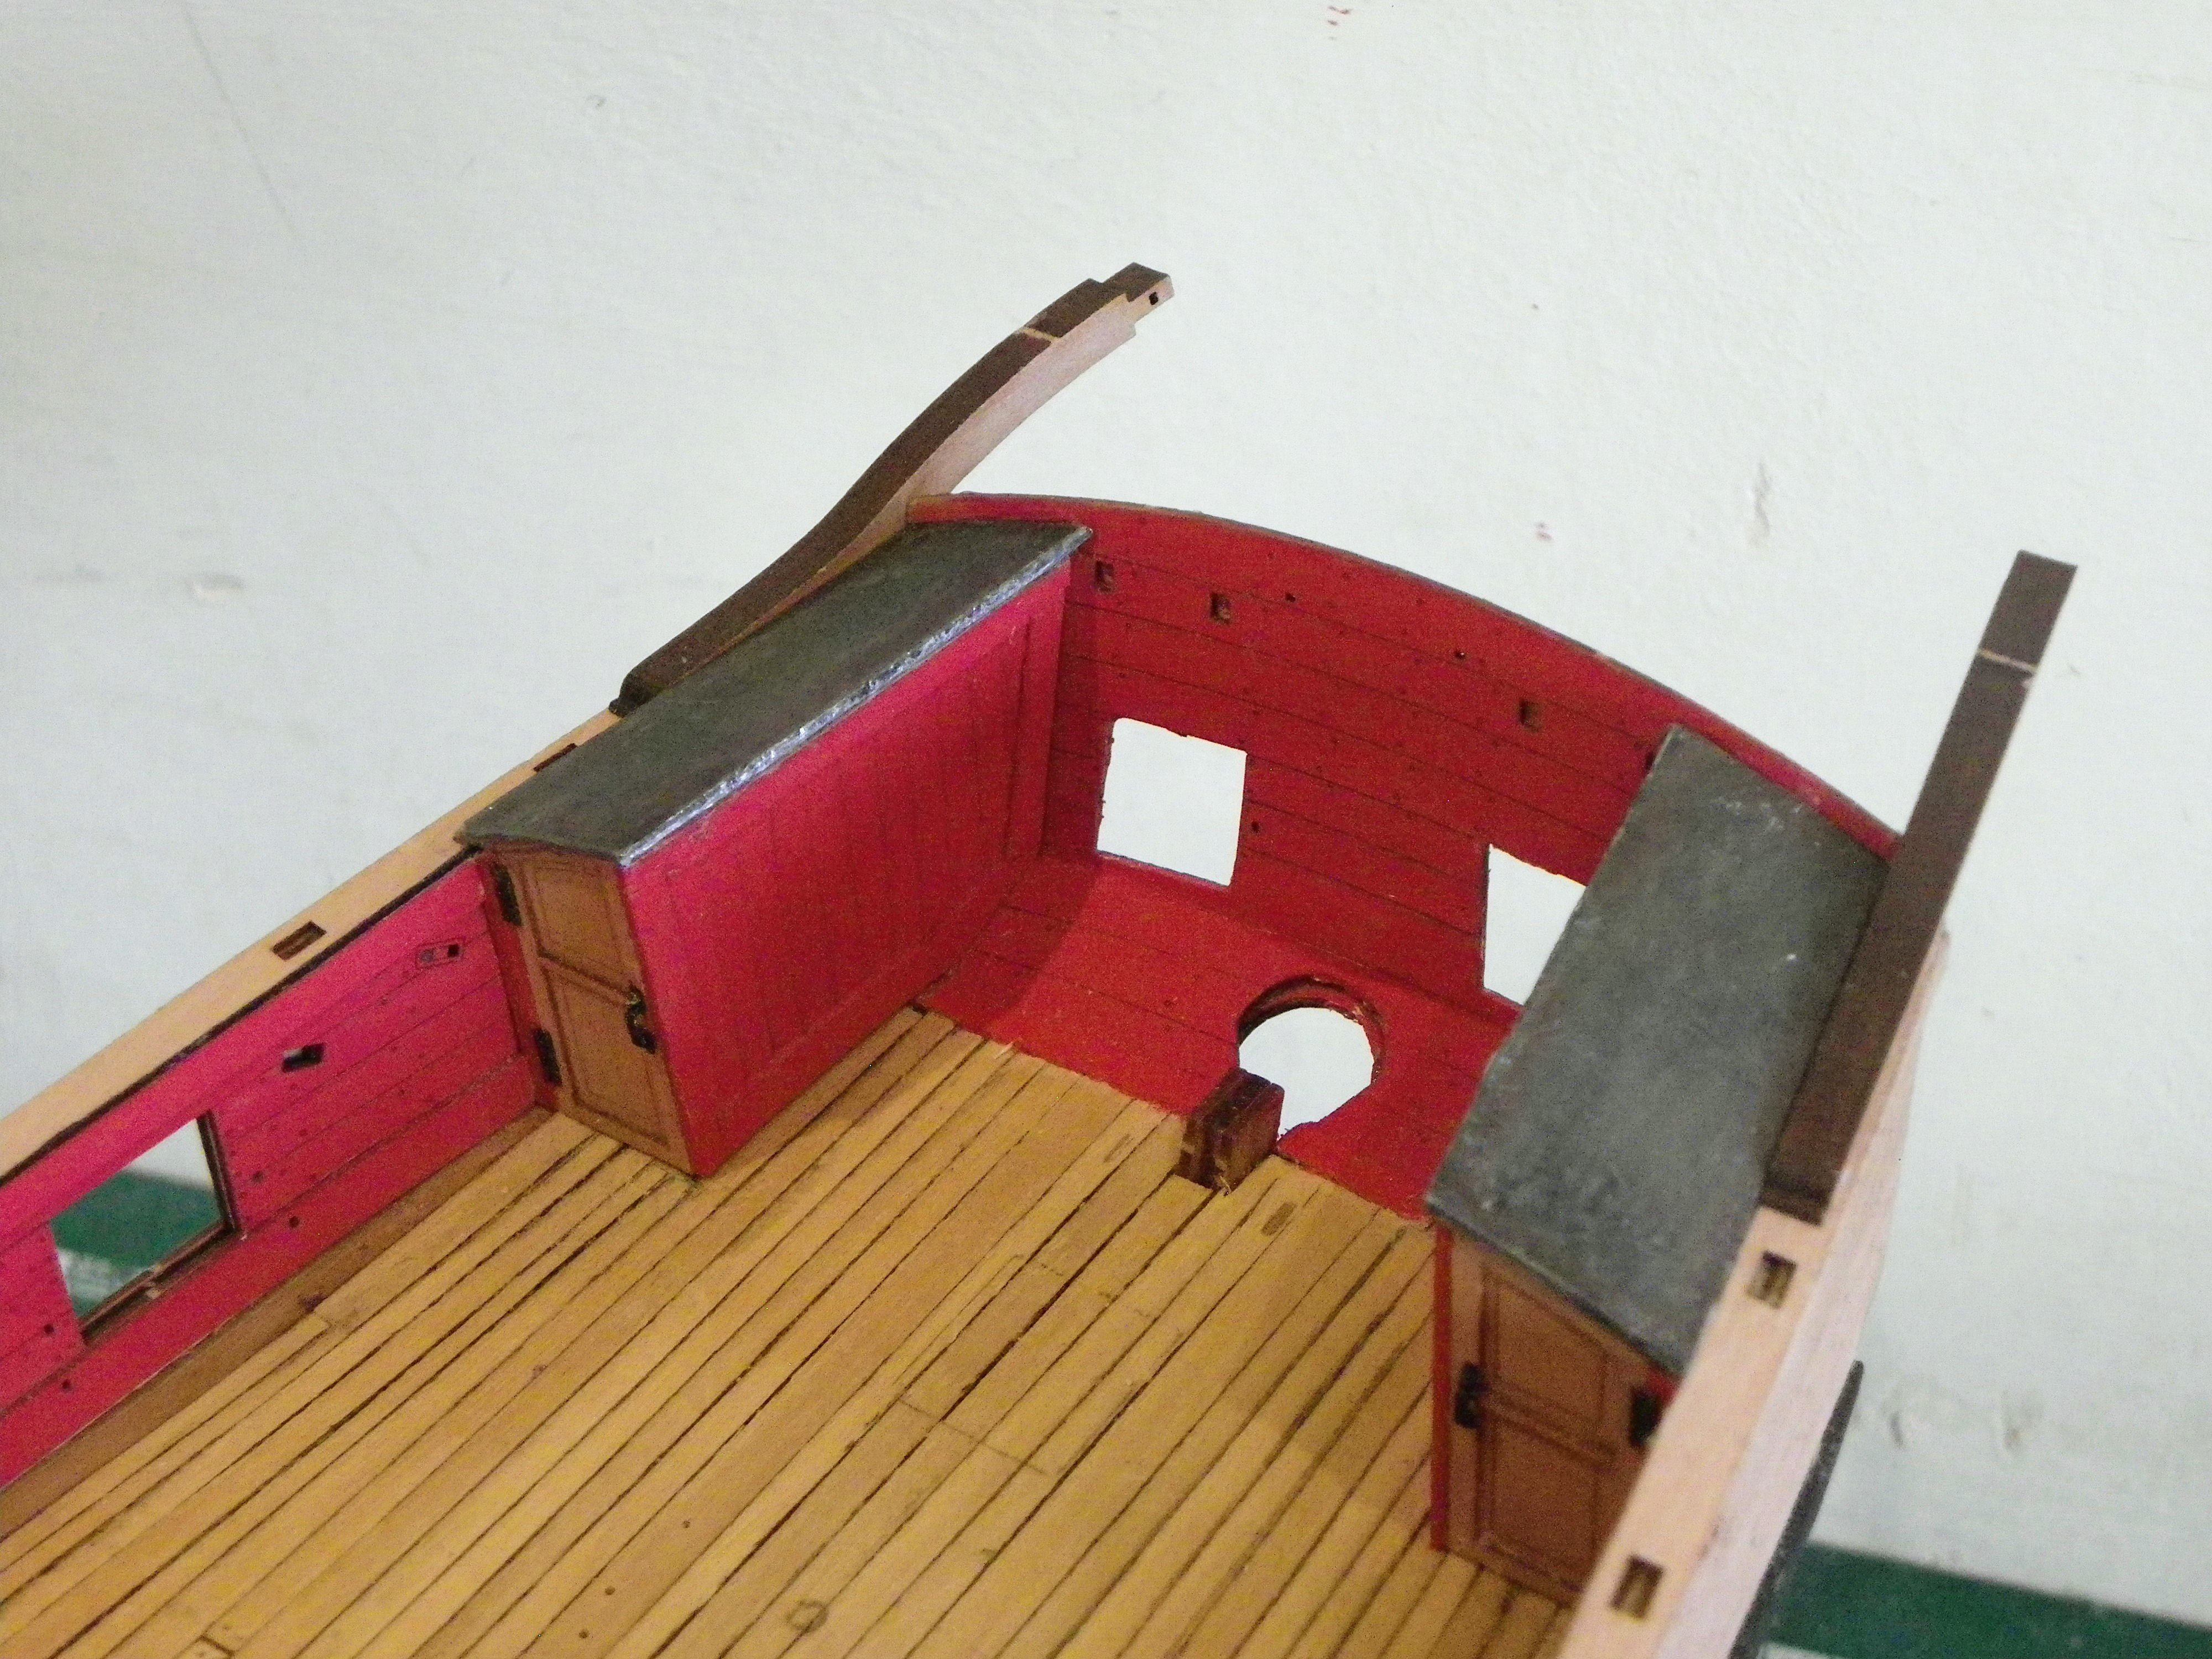
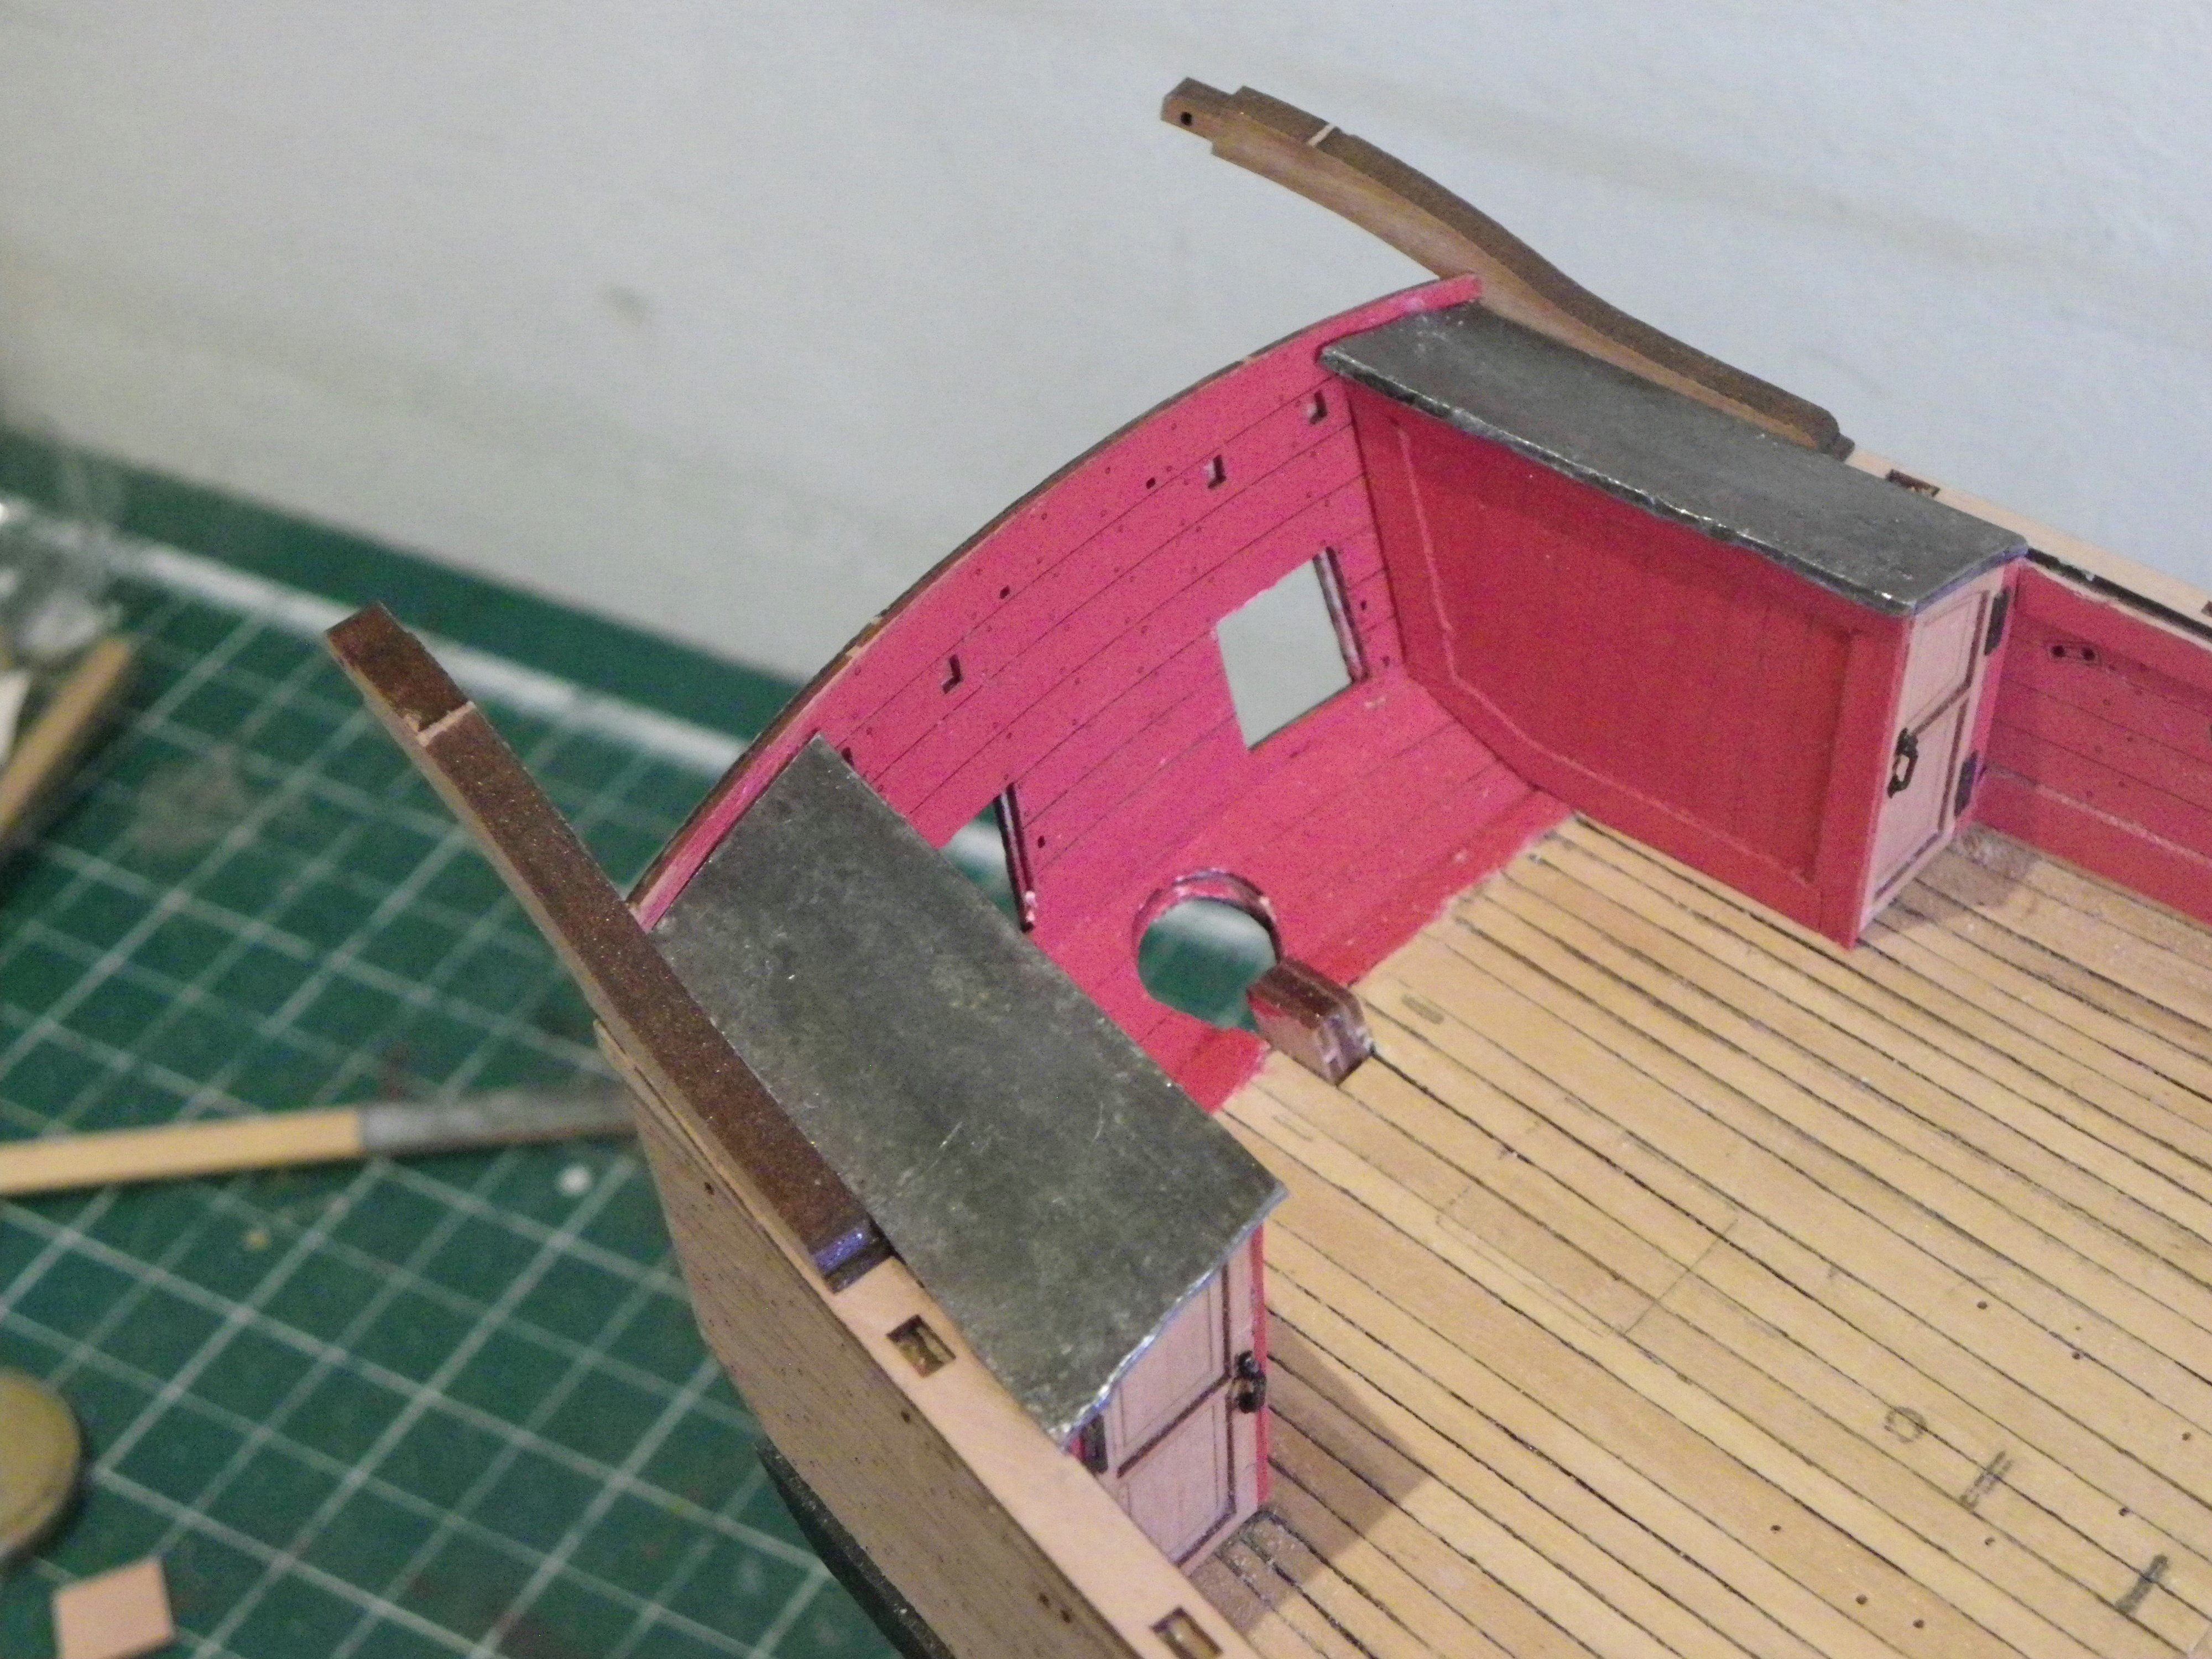
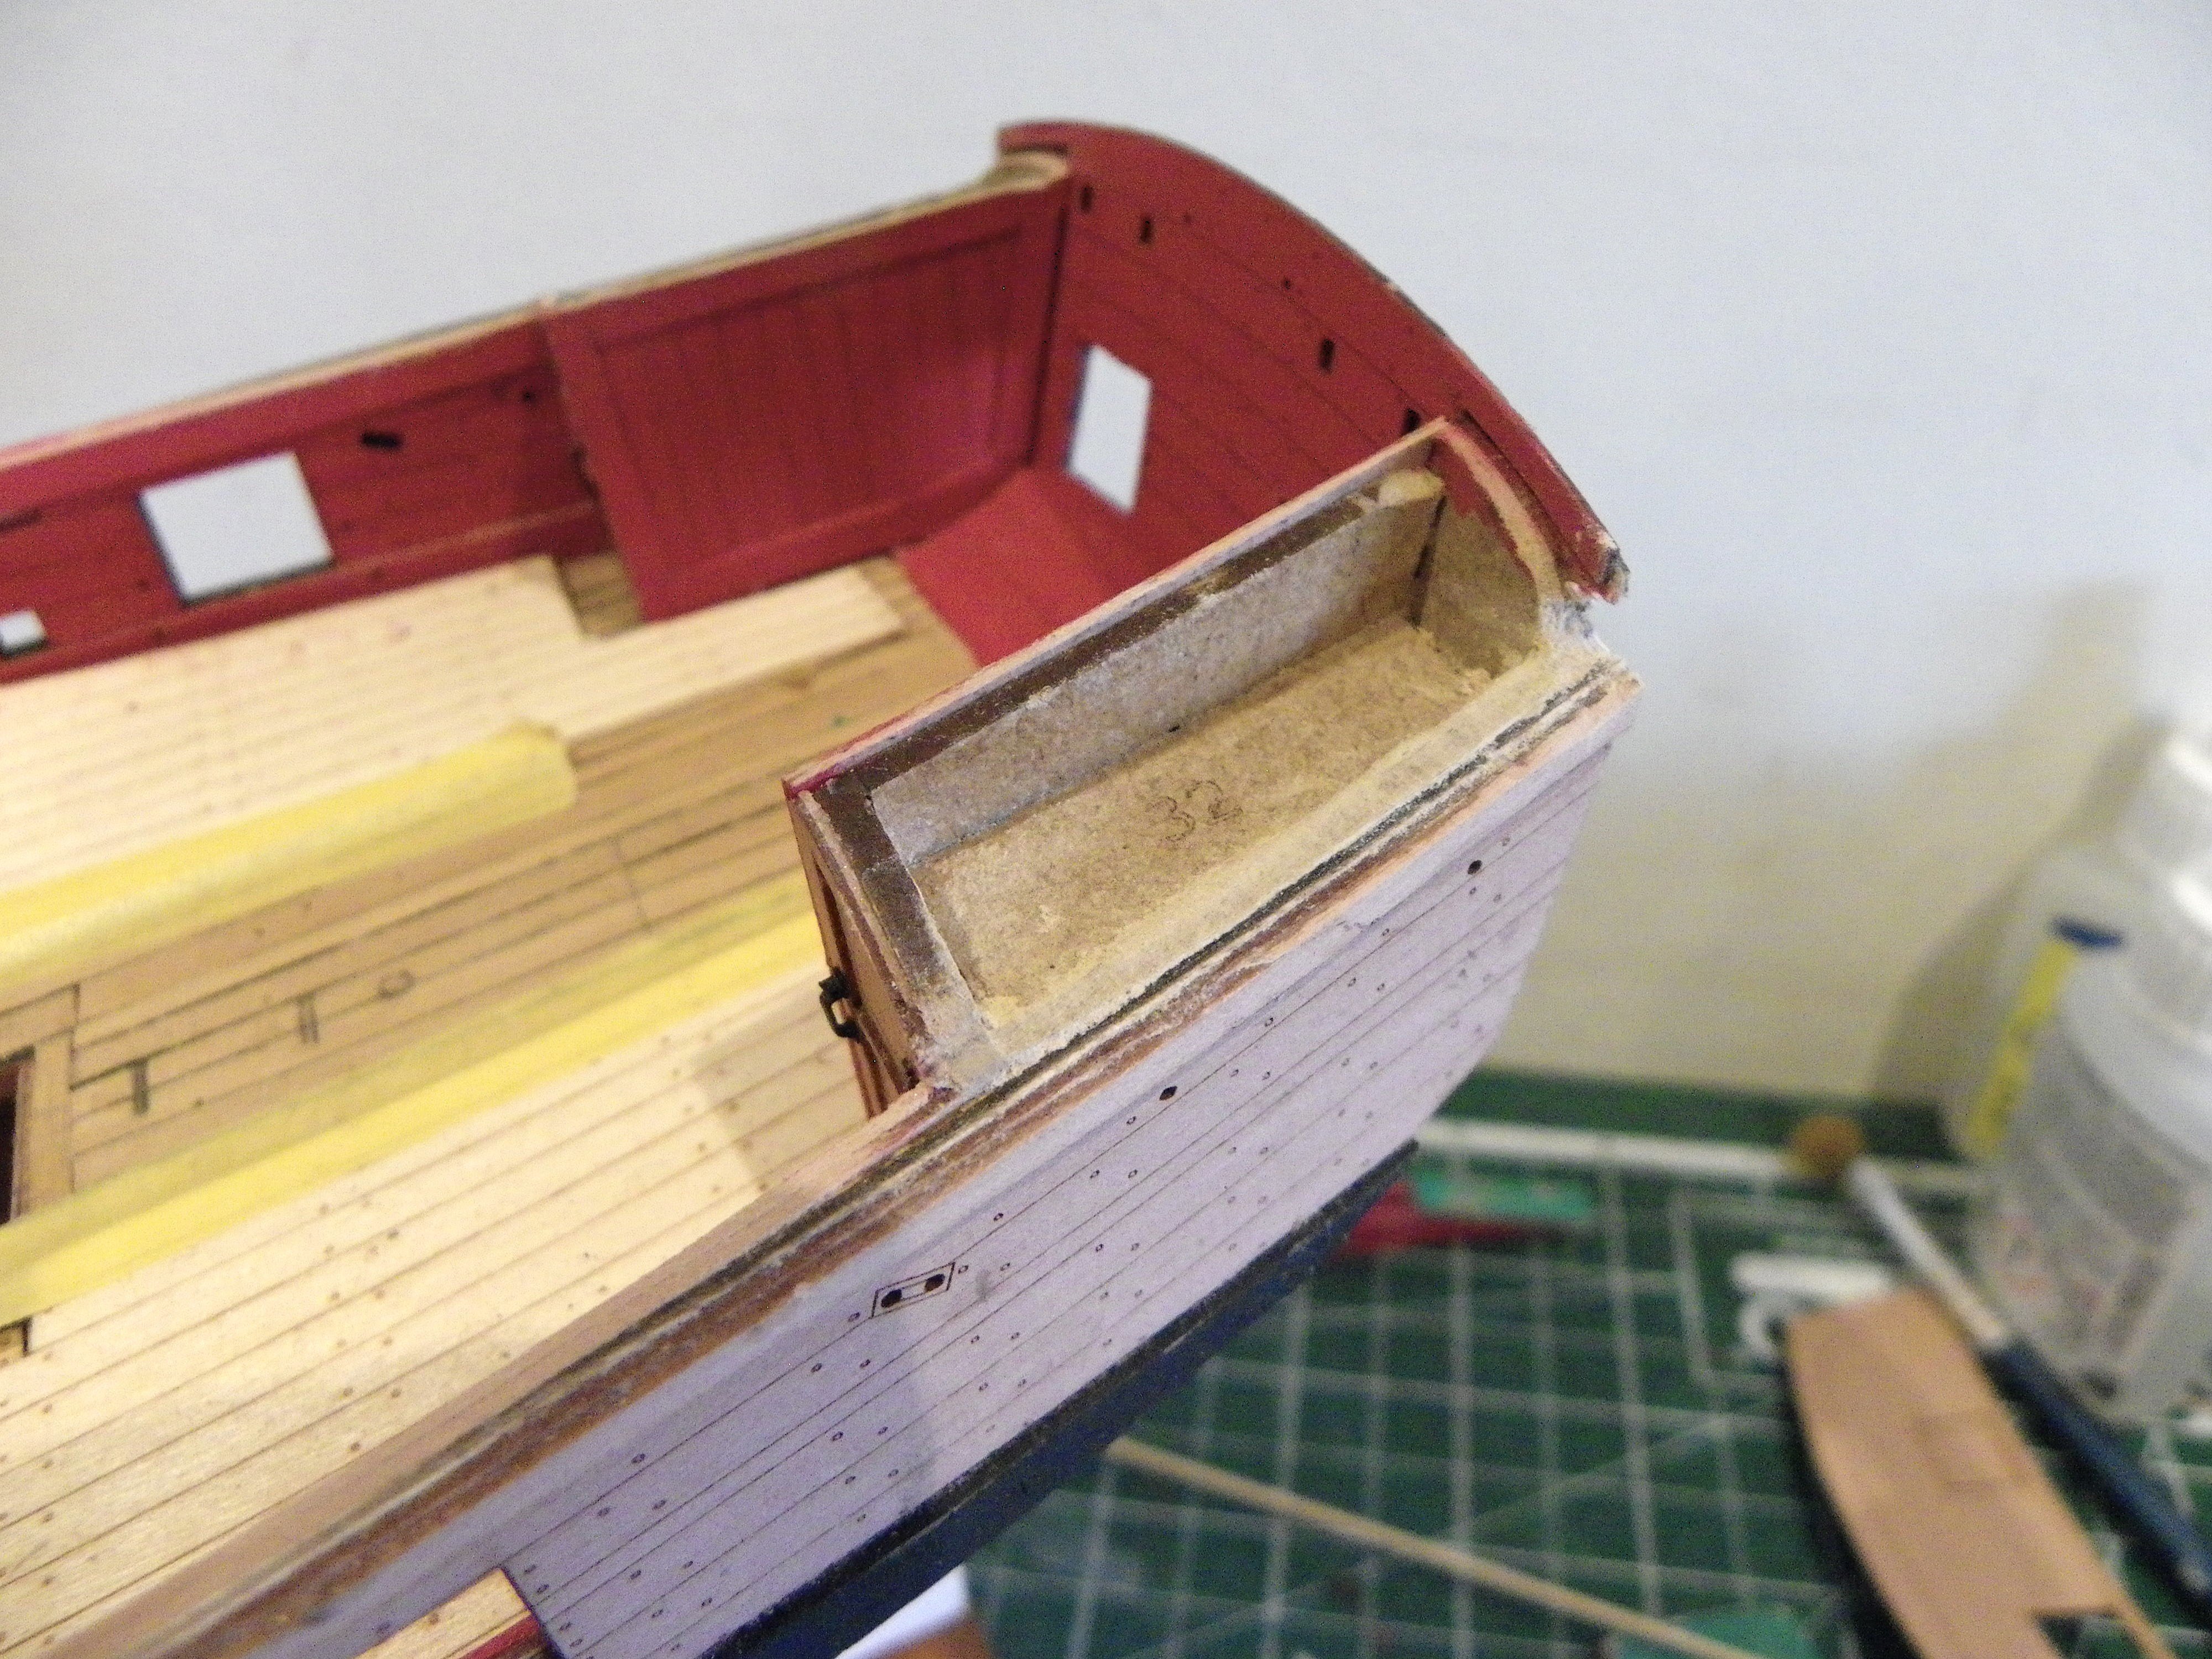
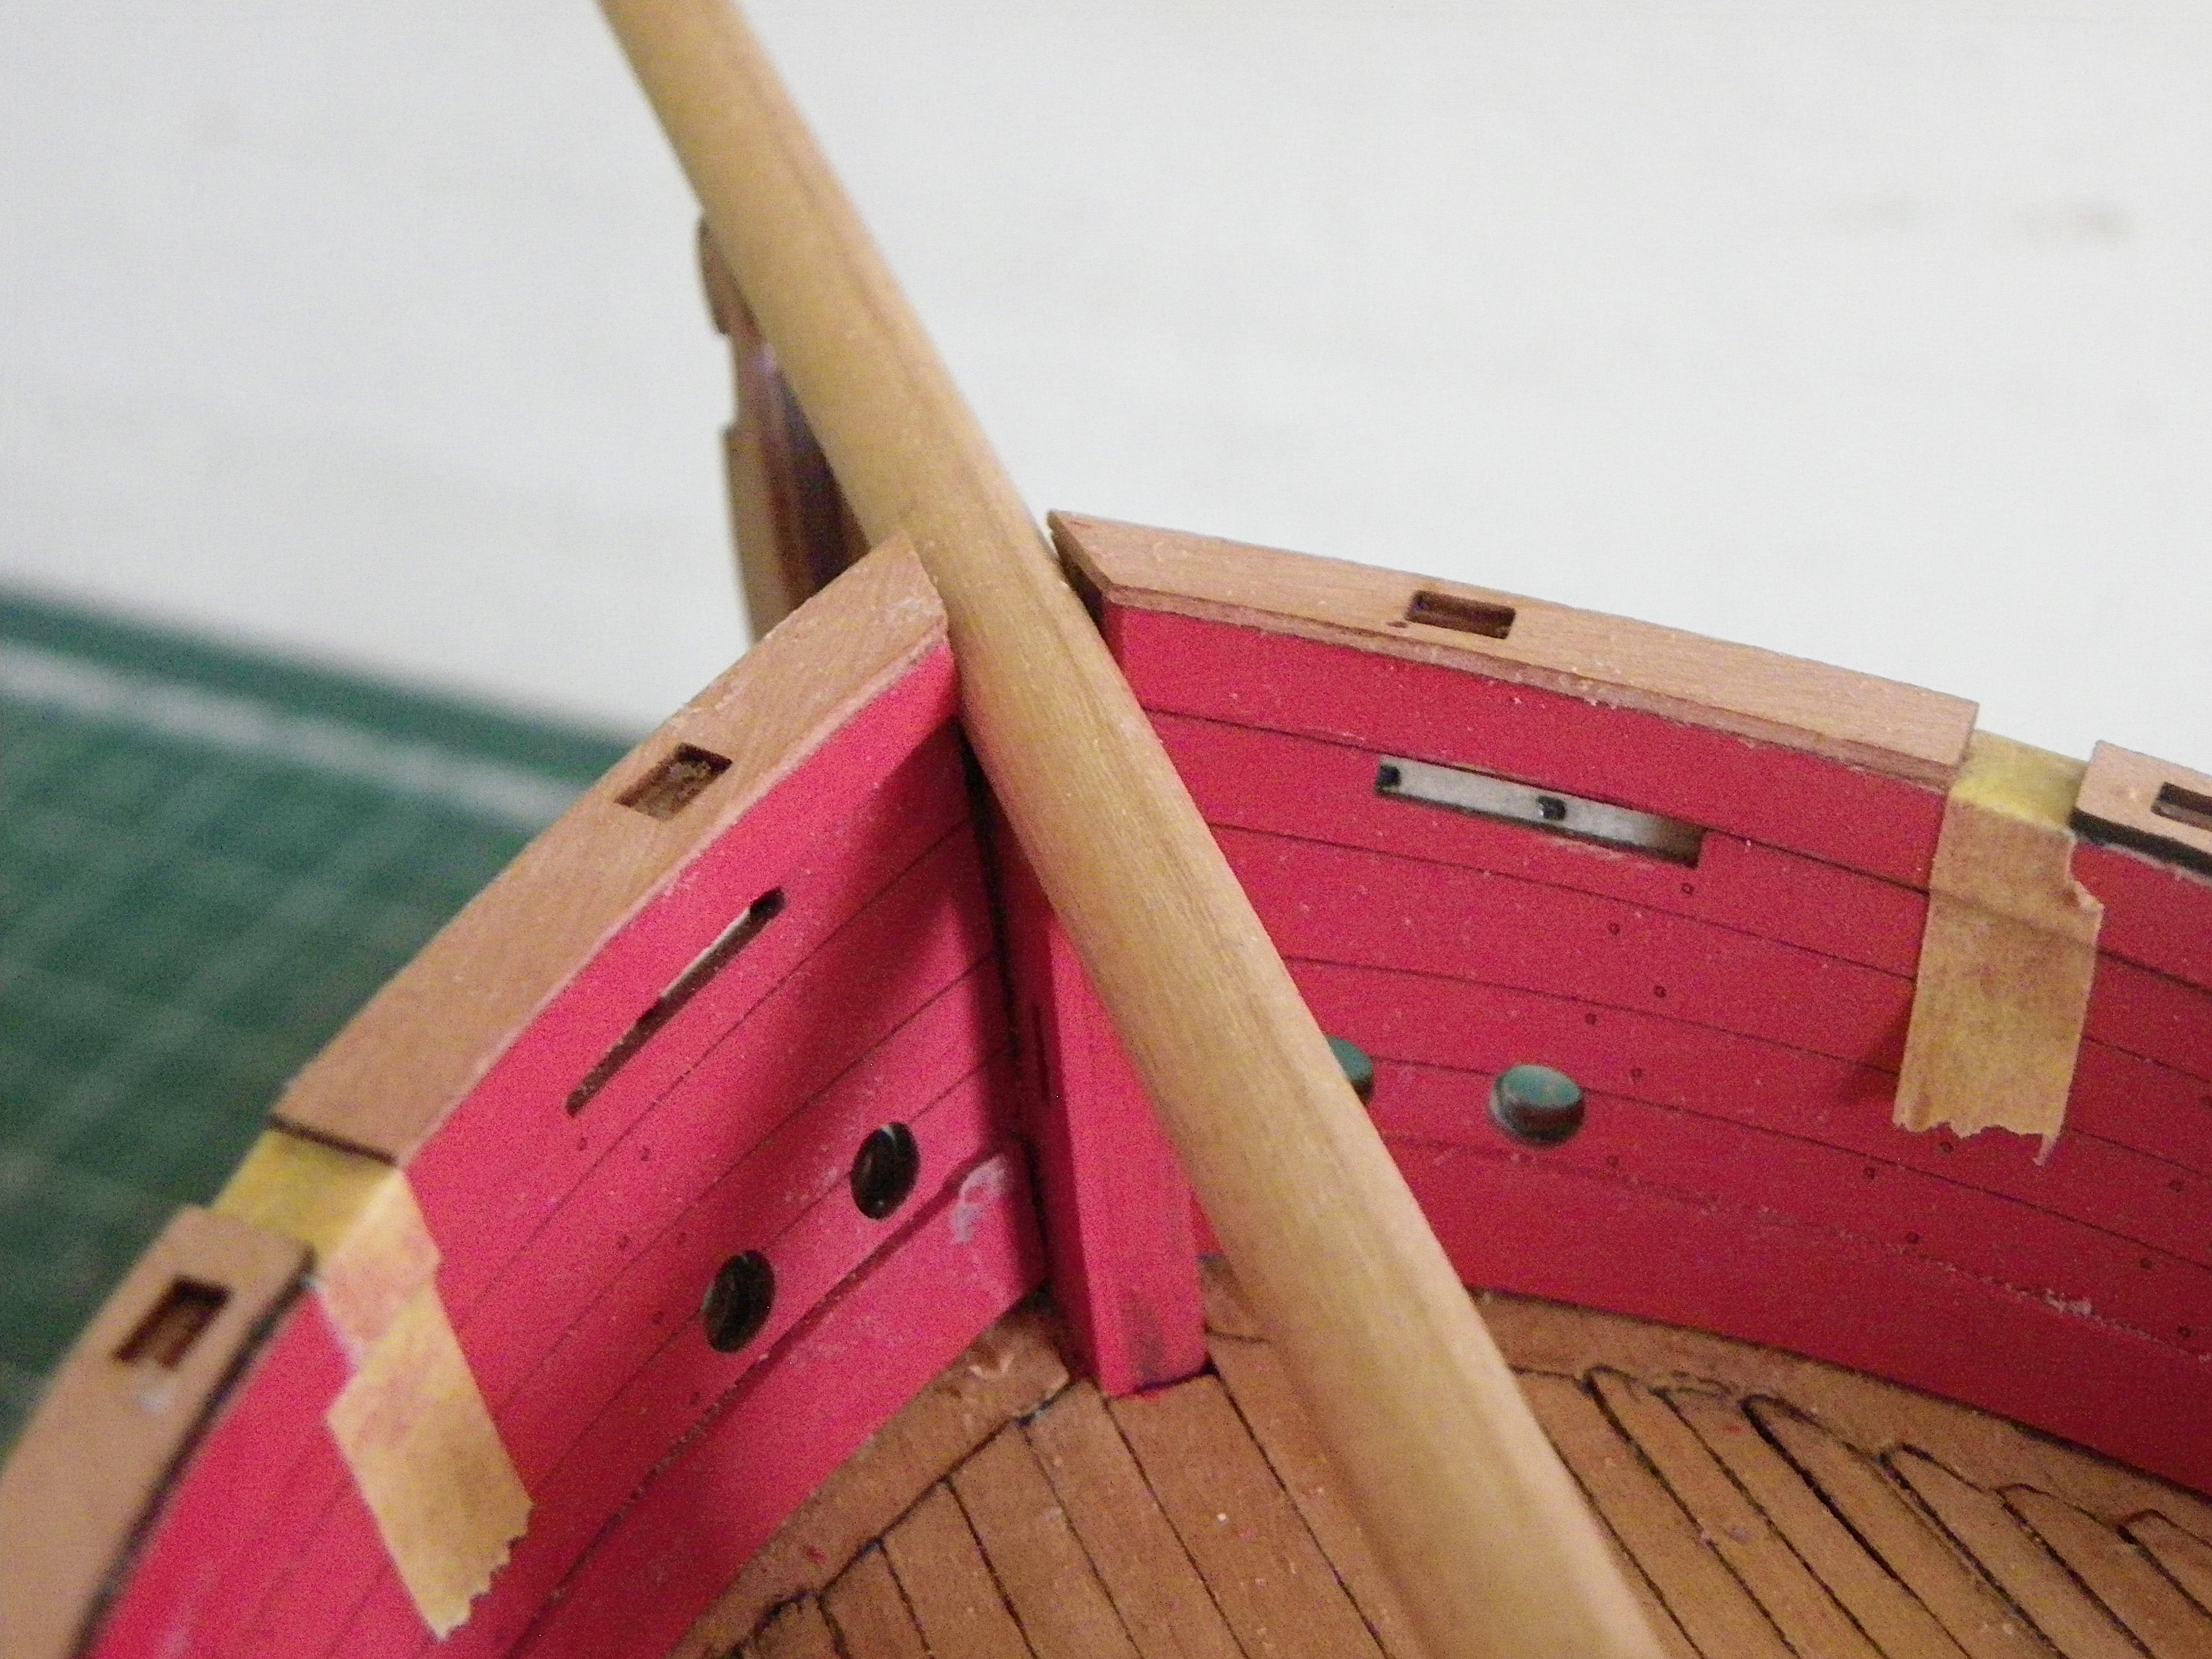
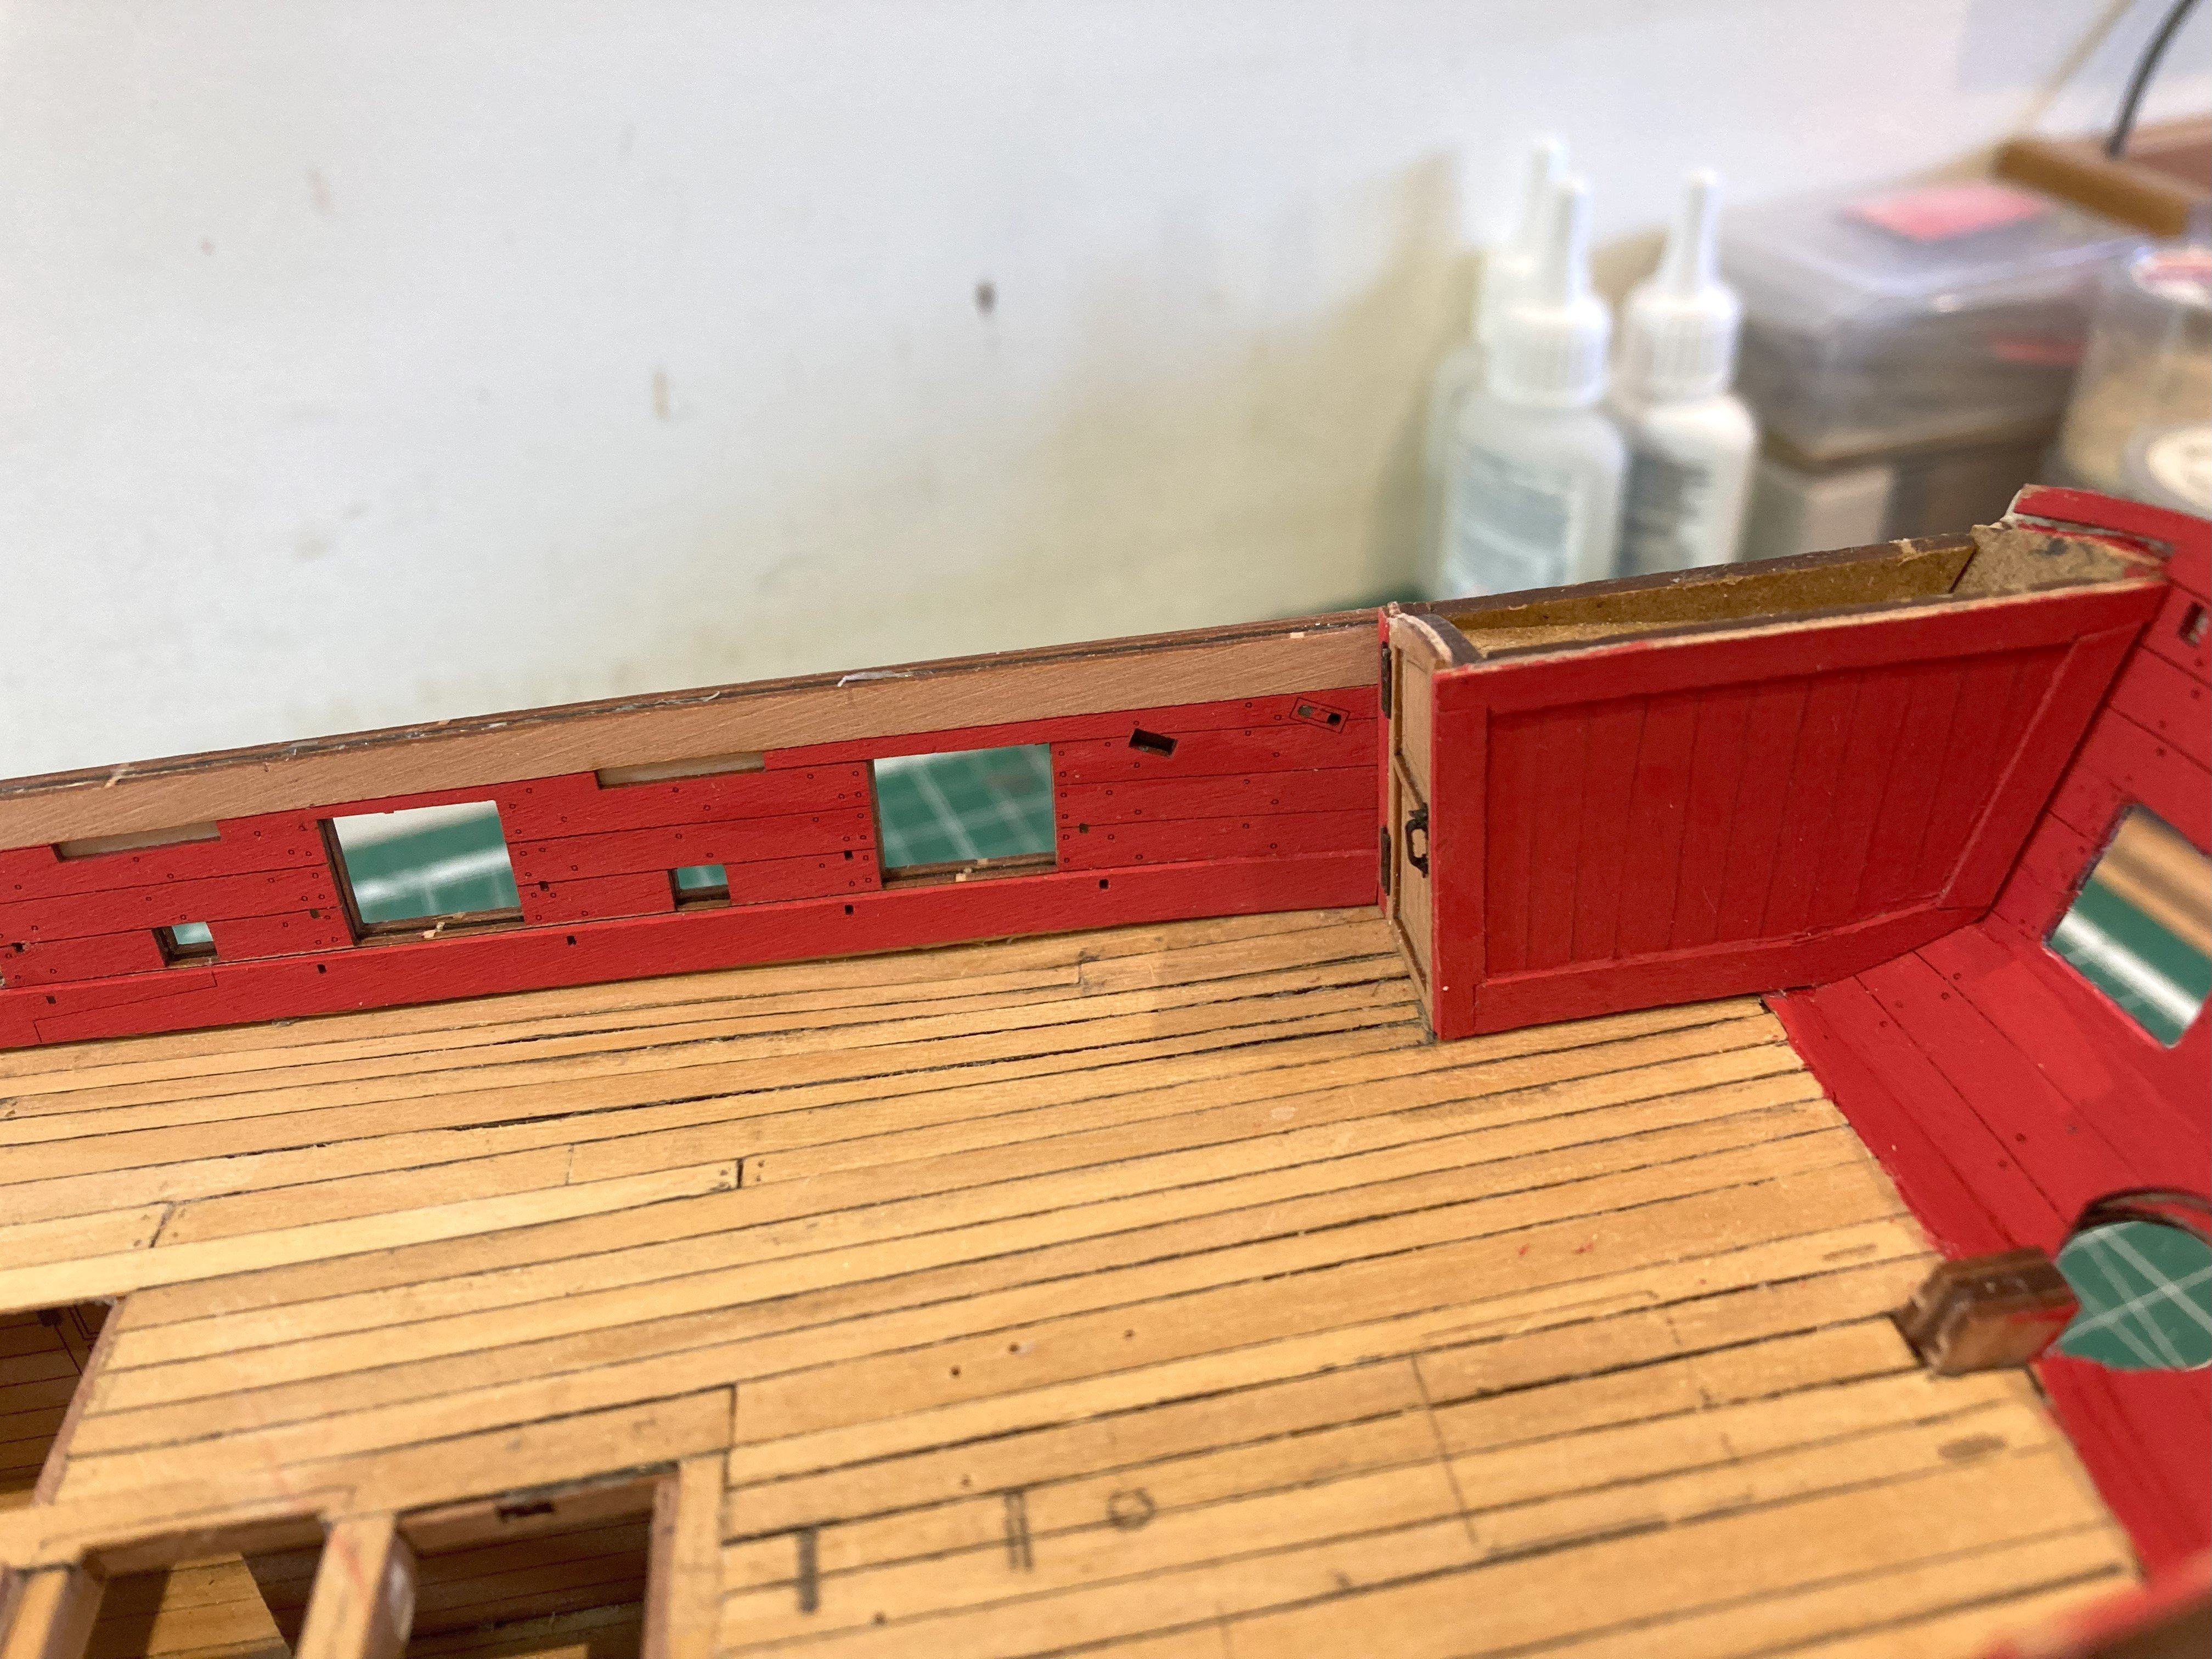
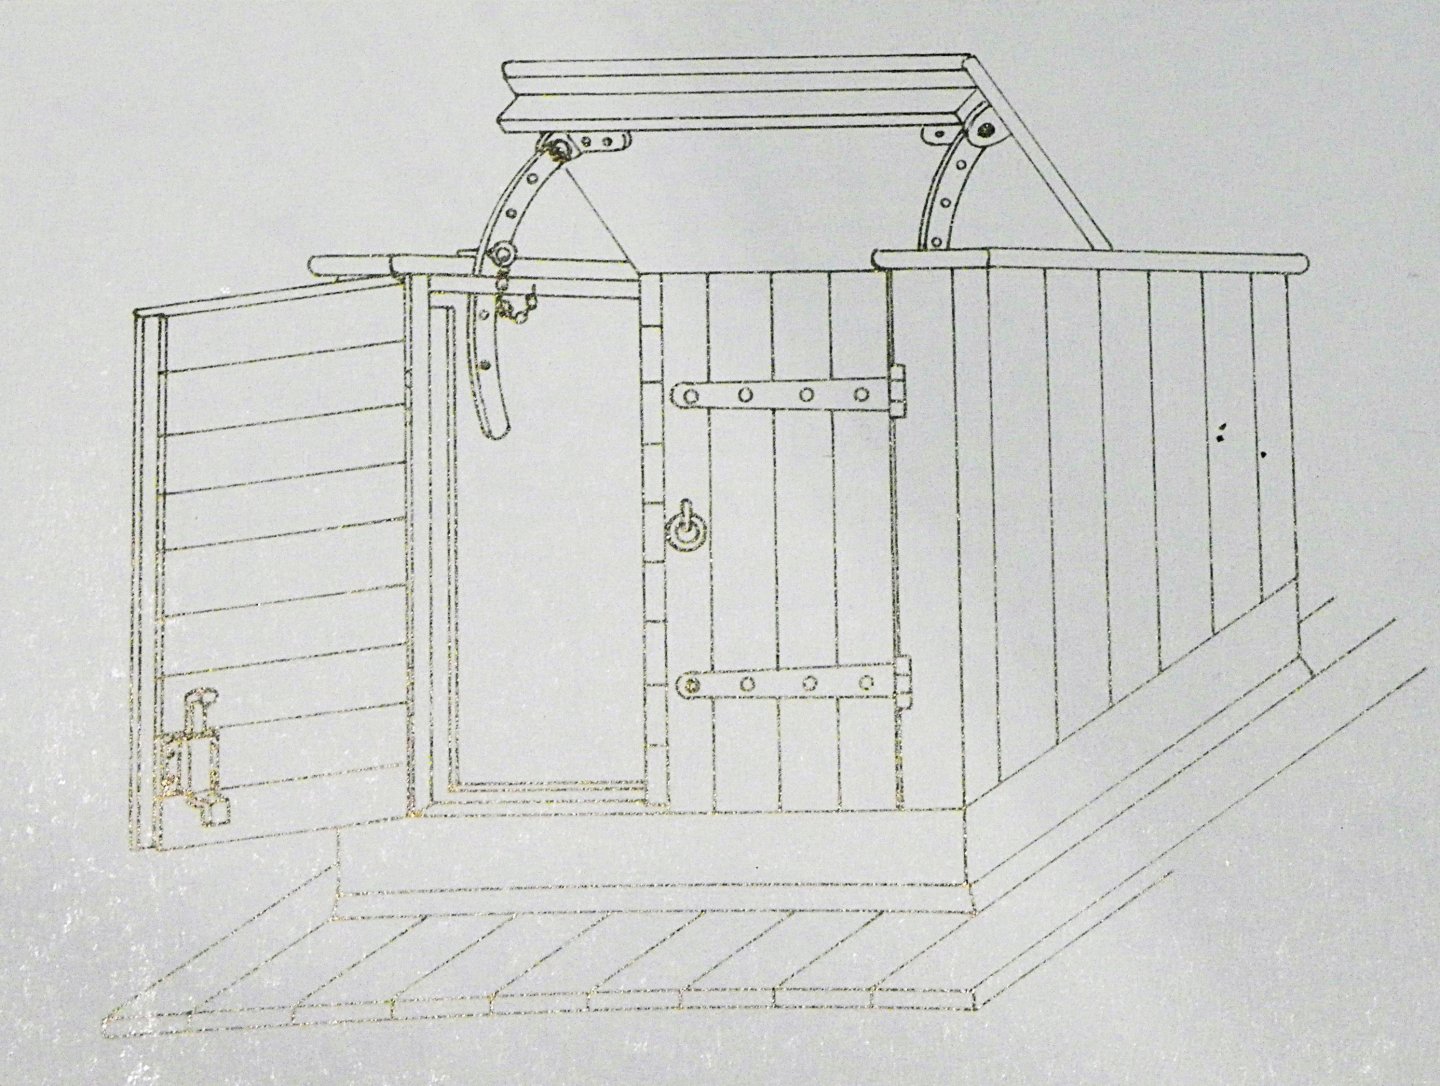
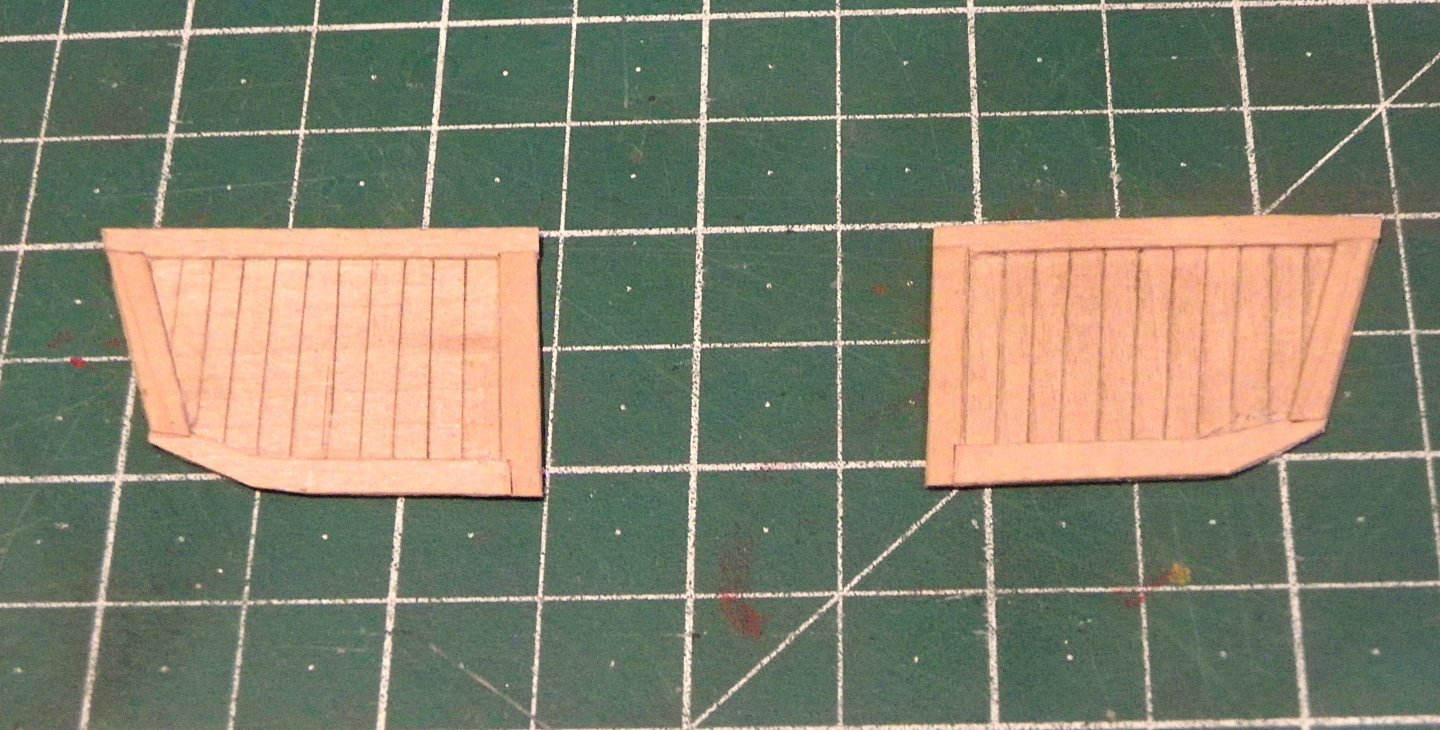
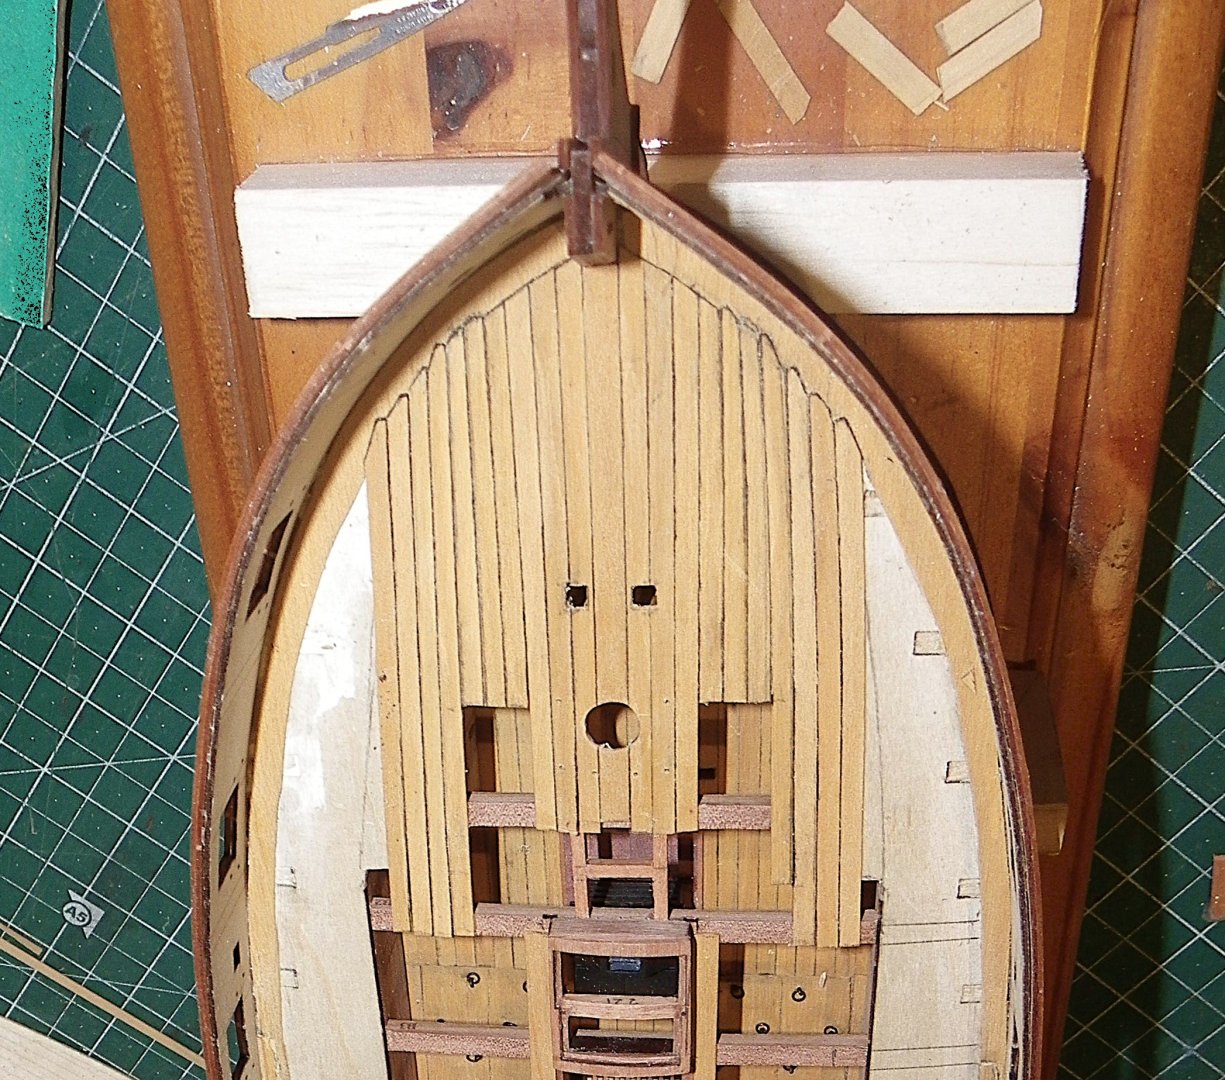
Post 53 Fittings (Part 2) Companion Light Immediately aft of the Companionway is the light which sits over what would be part of the Captains cabin area. The kit item is of standard design at this period but I felt the glazed areas were little less than convincing with two small Georgian squares. These are provided without glazing so if that is desired, sections of thin acetate or perhaps one of the glazing stuff products will need to be obtained. 0485b I chose to modify the glazing by reference to the Adm. plan which shows a run of four rectangular panes much in the style of the Cutter Cheerful. 0787 I removed the broad central pillar from the frames, added thin acetate at the rear, and inserted bars cut from 0.6mm pear fret. 0794 0797 Companionway This cover over the aft ladderway is a common feature on smaller vessels, but is not shown on the Adm plan for Harpy, which doesn’t mean the absence of one during Harpy’s career. It is a nicely detailed piece with hinged roof section and double doors. The sides are nicely panelled but fitting those tiny pe hinges tested my eyesight and dexterity to the limit. The only puzzlement I have is what kept the lid open, it surely needed a support method which is absent from the kit. I wanted the hatch open to give a view of the ladderway but felt that a lid at an angle without support looked odd. 0789 This arrangement taken from The Global Schooner by Marquardt is what I’m thinking of. This book is also a valuable addition to the library of anyone interested in ship modelling. I firstly added ledges to support the lid when closed using 1mm square section. 0804 Wire was used to represent the supports when the lid was open. Finally the doors were fitted another testy little exercise featuring tiny hinges. I did try Syren handles on the doors, but felt that ring latches suited better in this case. 03579a When dry fitting it on deck it did strike me that this cover appears to present a significant obstacle to working the Capstan. Perhaps that’s why the Adm. plan only shows a ladderway that could be covered by boards or a grating. Always more questions than answers…. B.E. 14/03/2025

- 332 replies
-
- 16
-
-
- Harpy
- Vanguard Models
- (and 1 more)
-
Understandable that your mind may have been elsewhere Glenn, hope things go well. The Mk 2 version plating looks a great improvement.👍 B.E.
- 241 replies
-
- 6
-
-

-
- Vanguarrd Models
- Harpy
- (and 1 more)
-
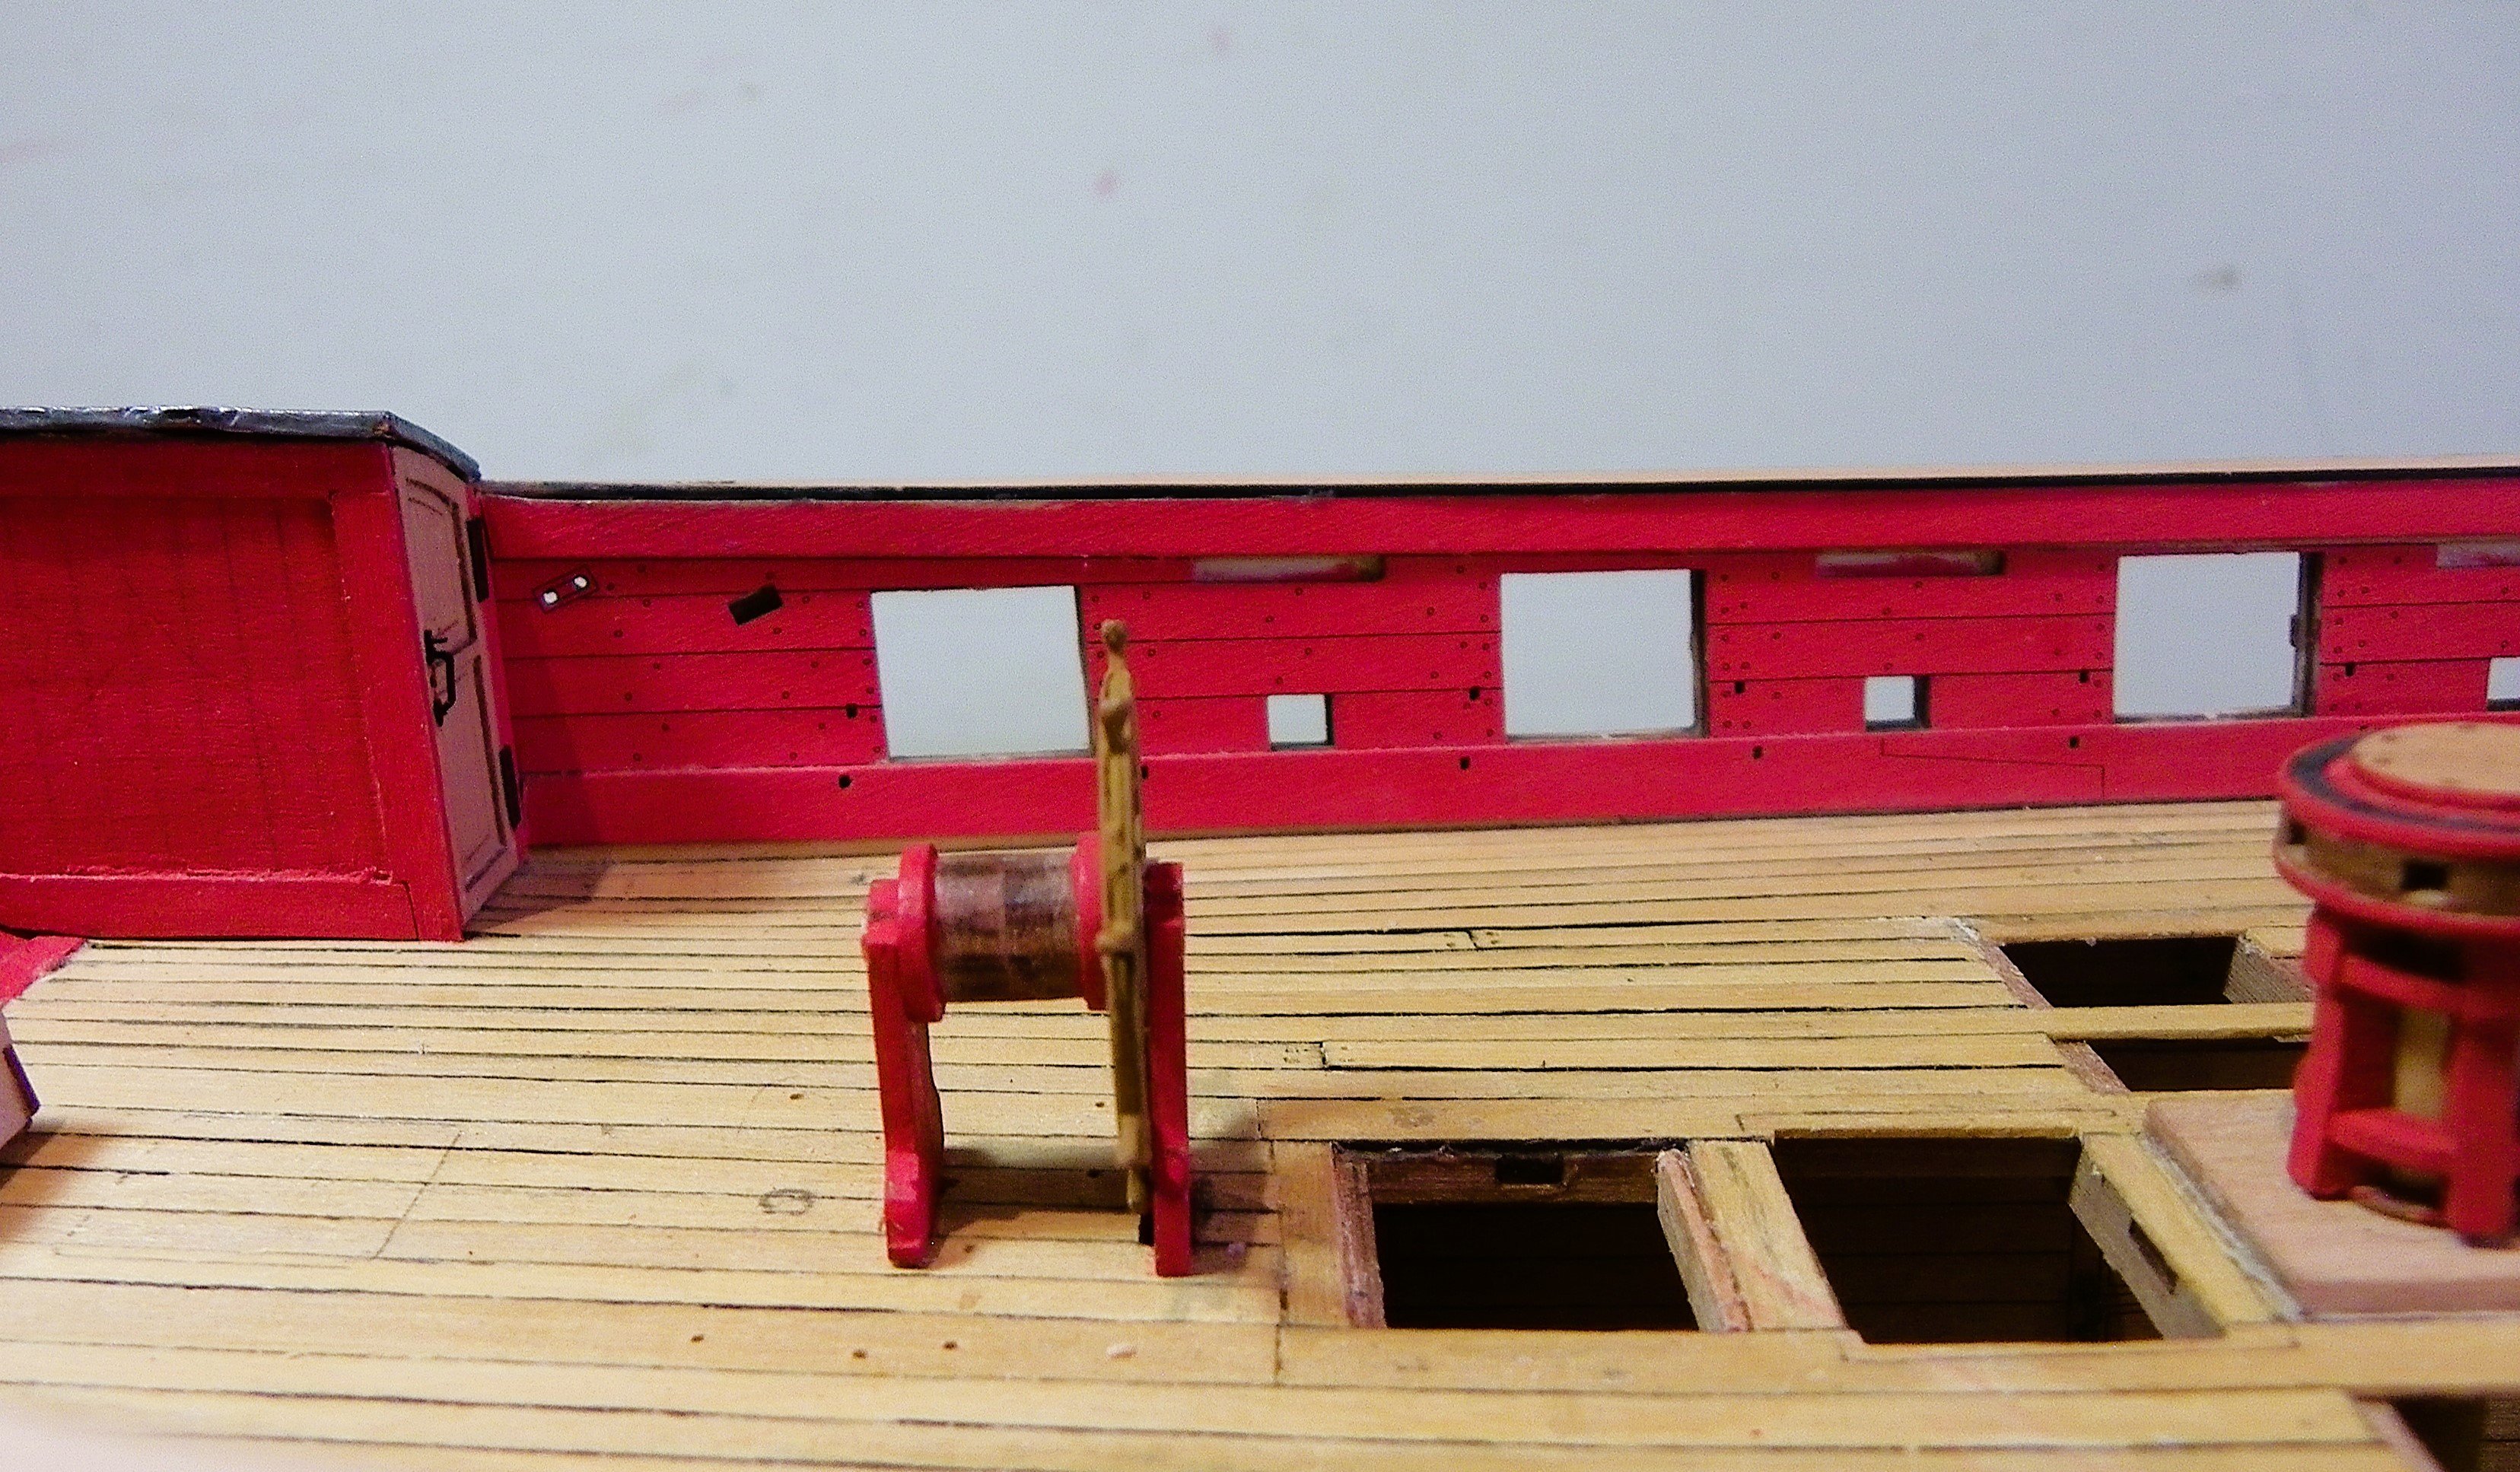
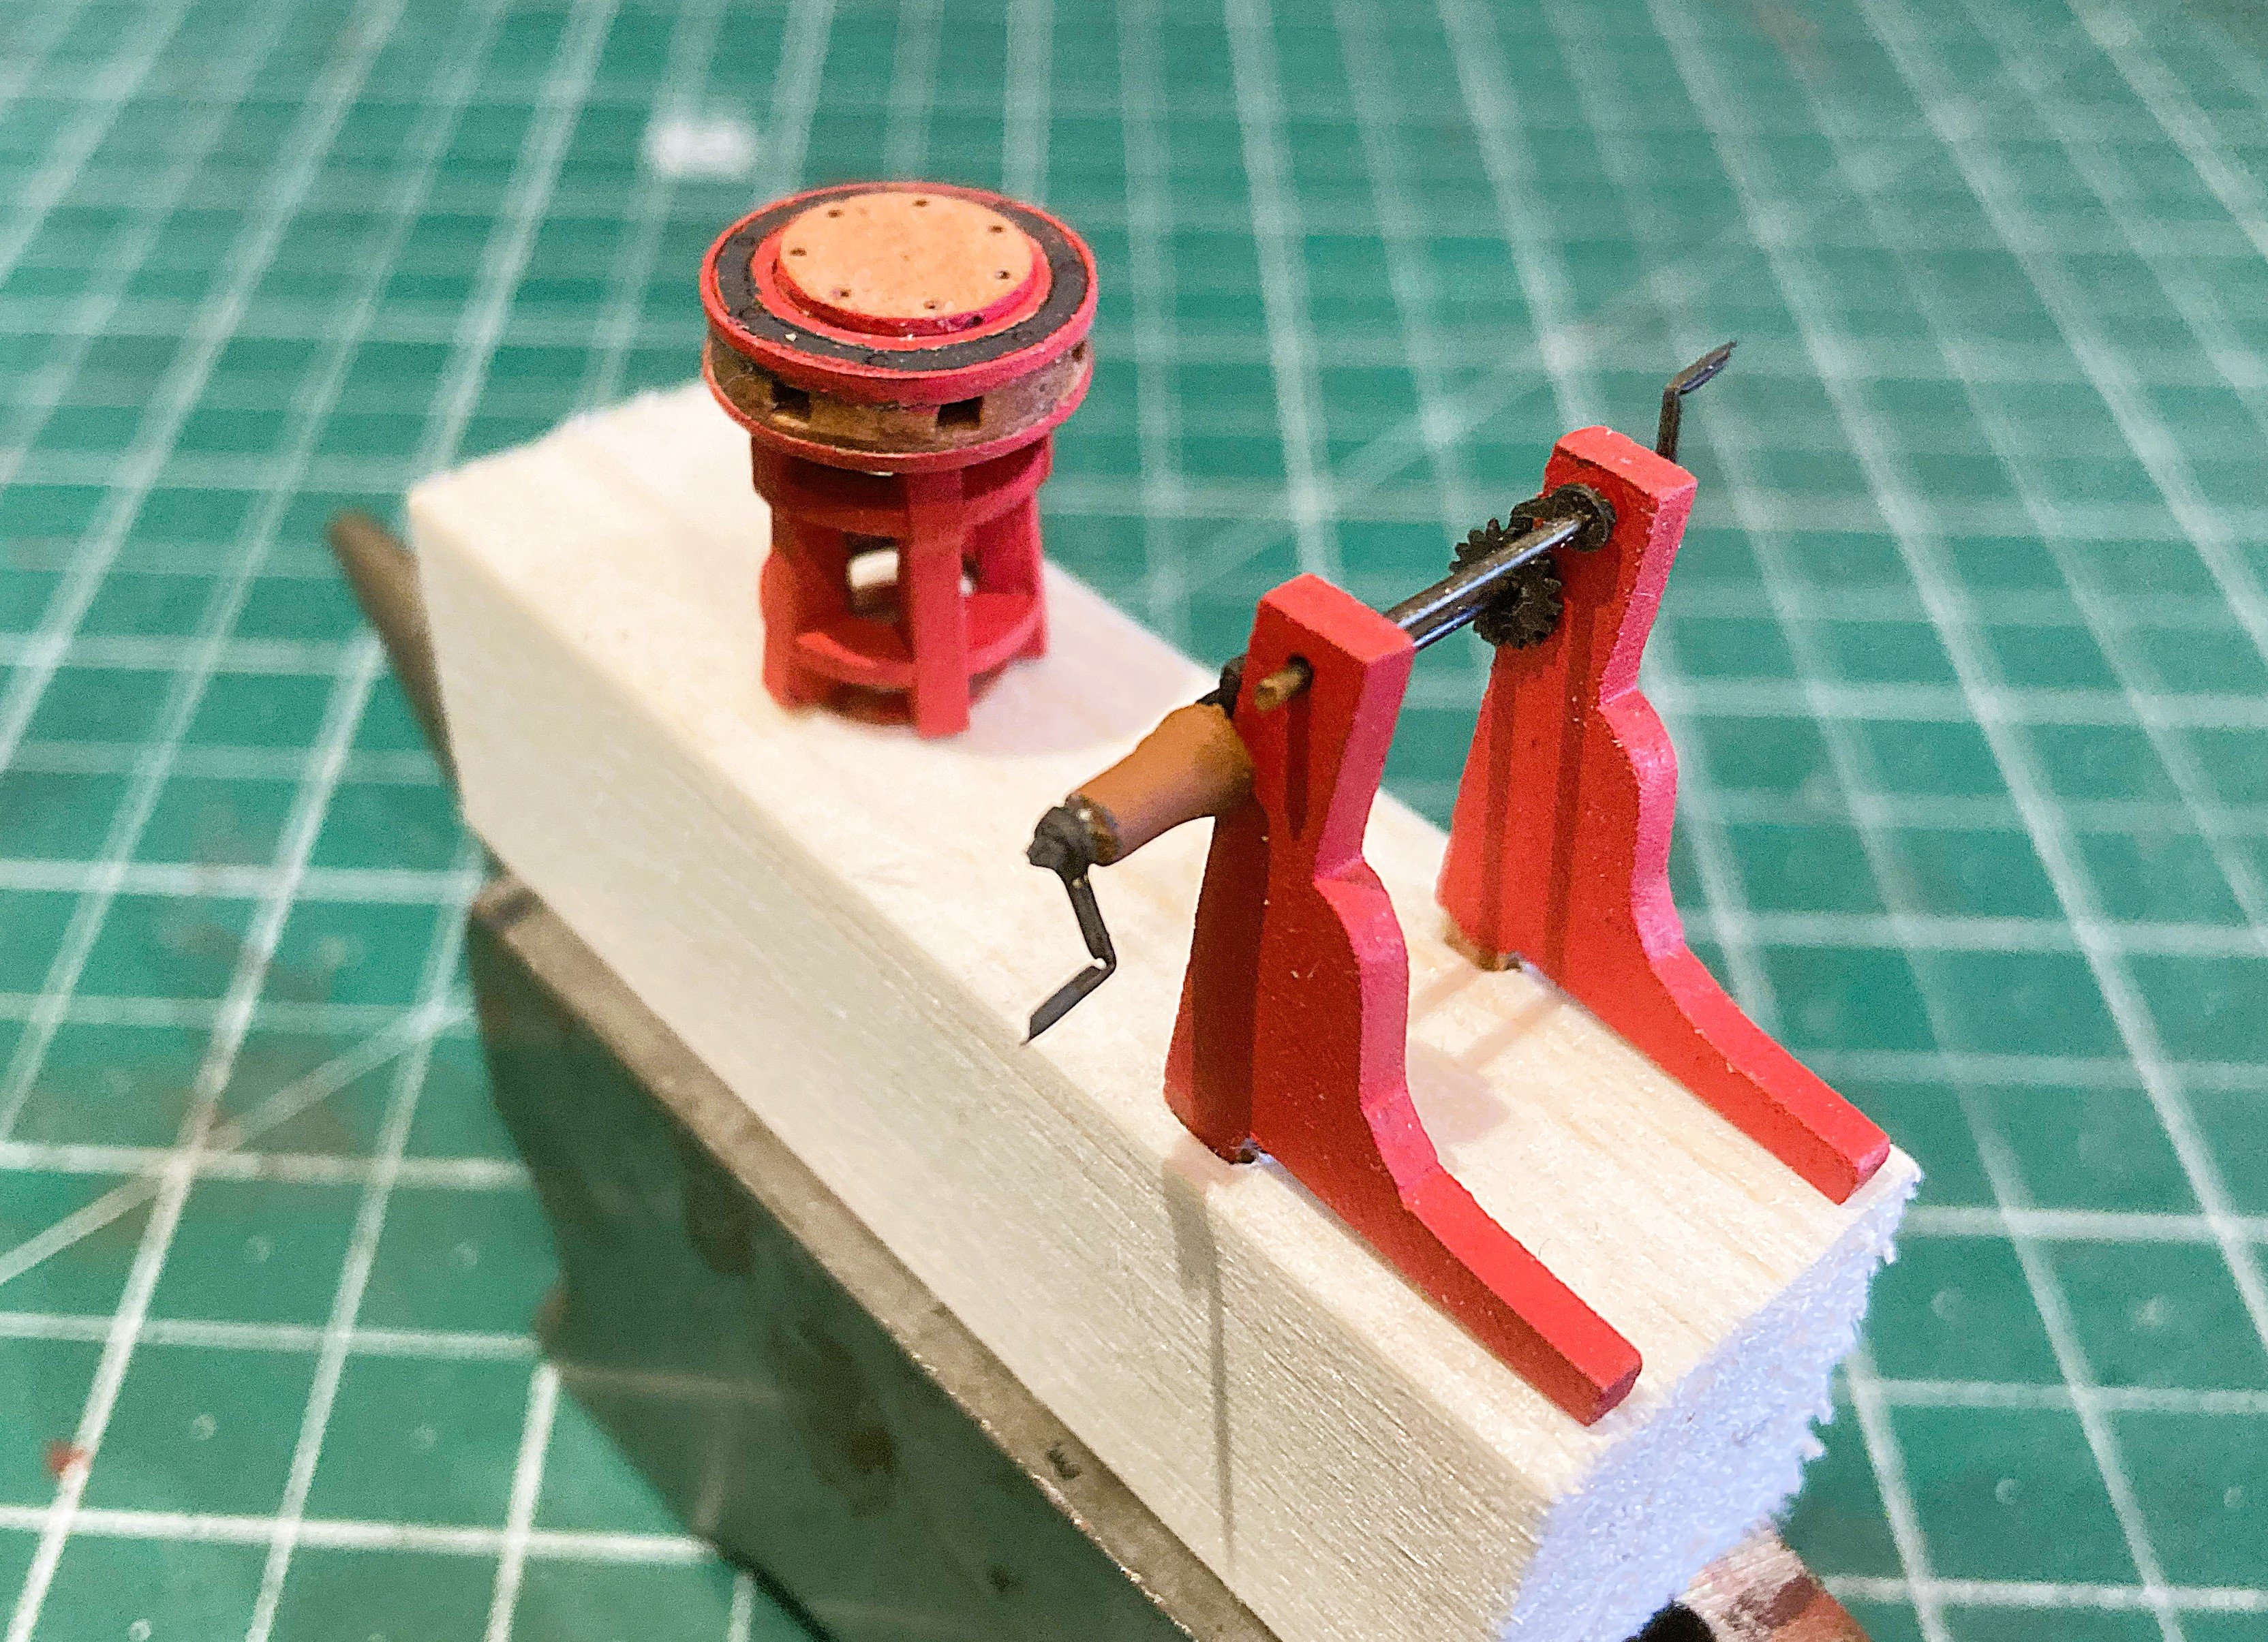
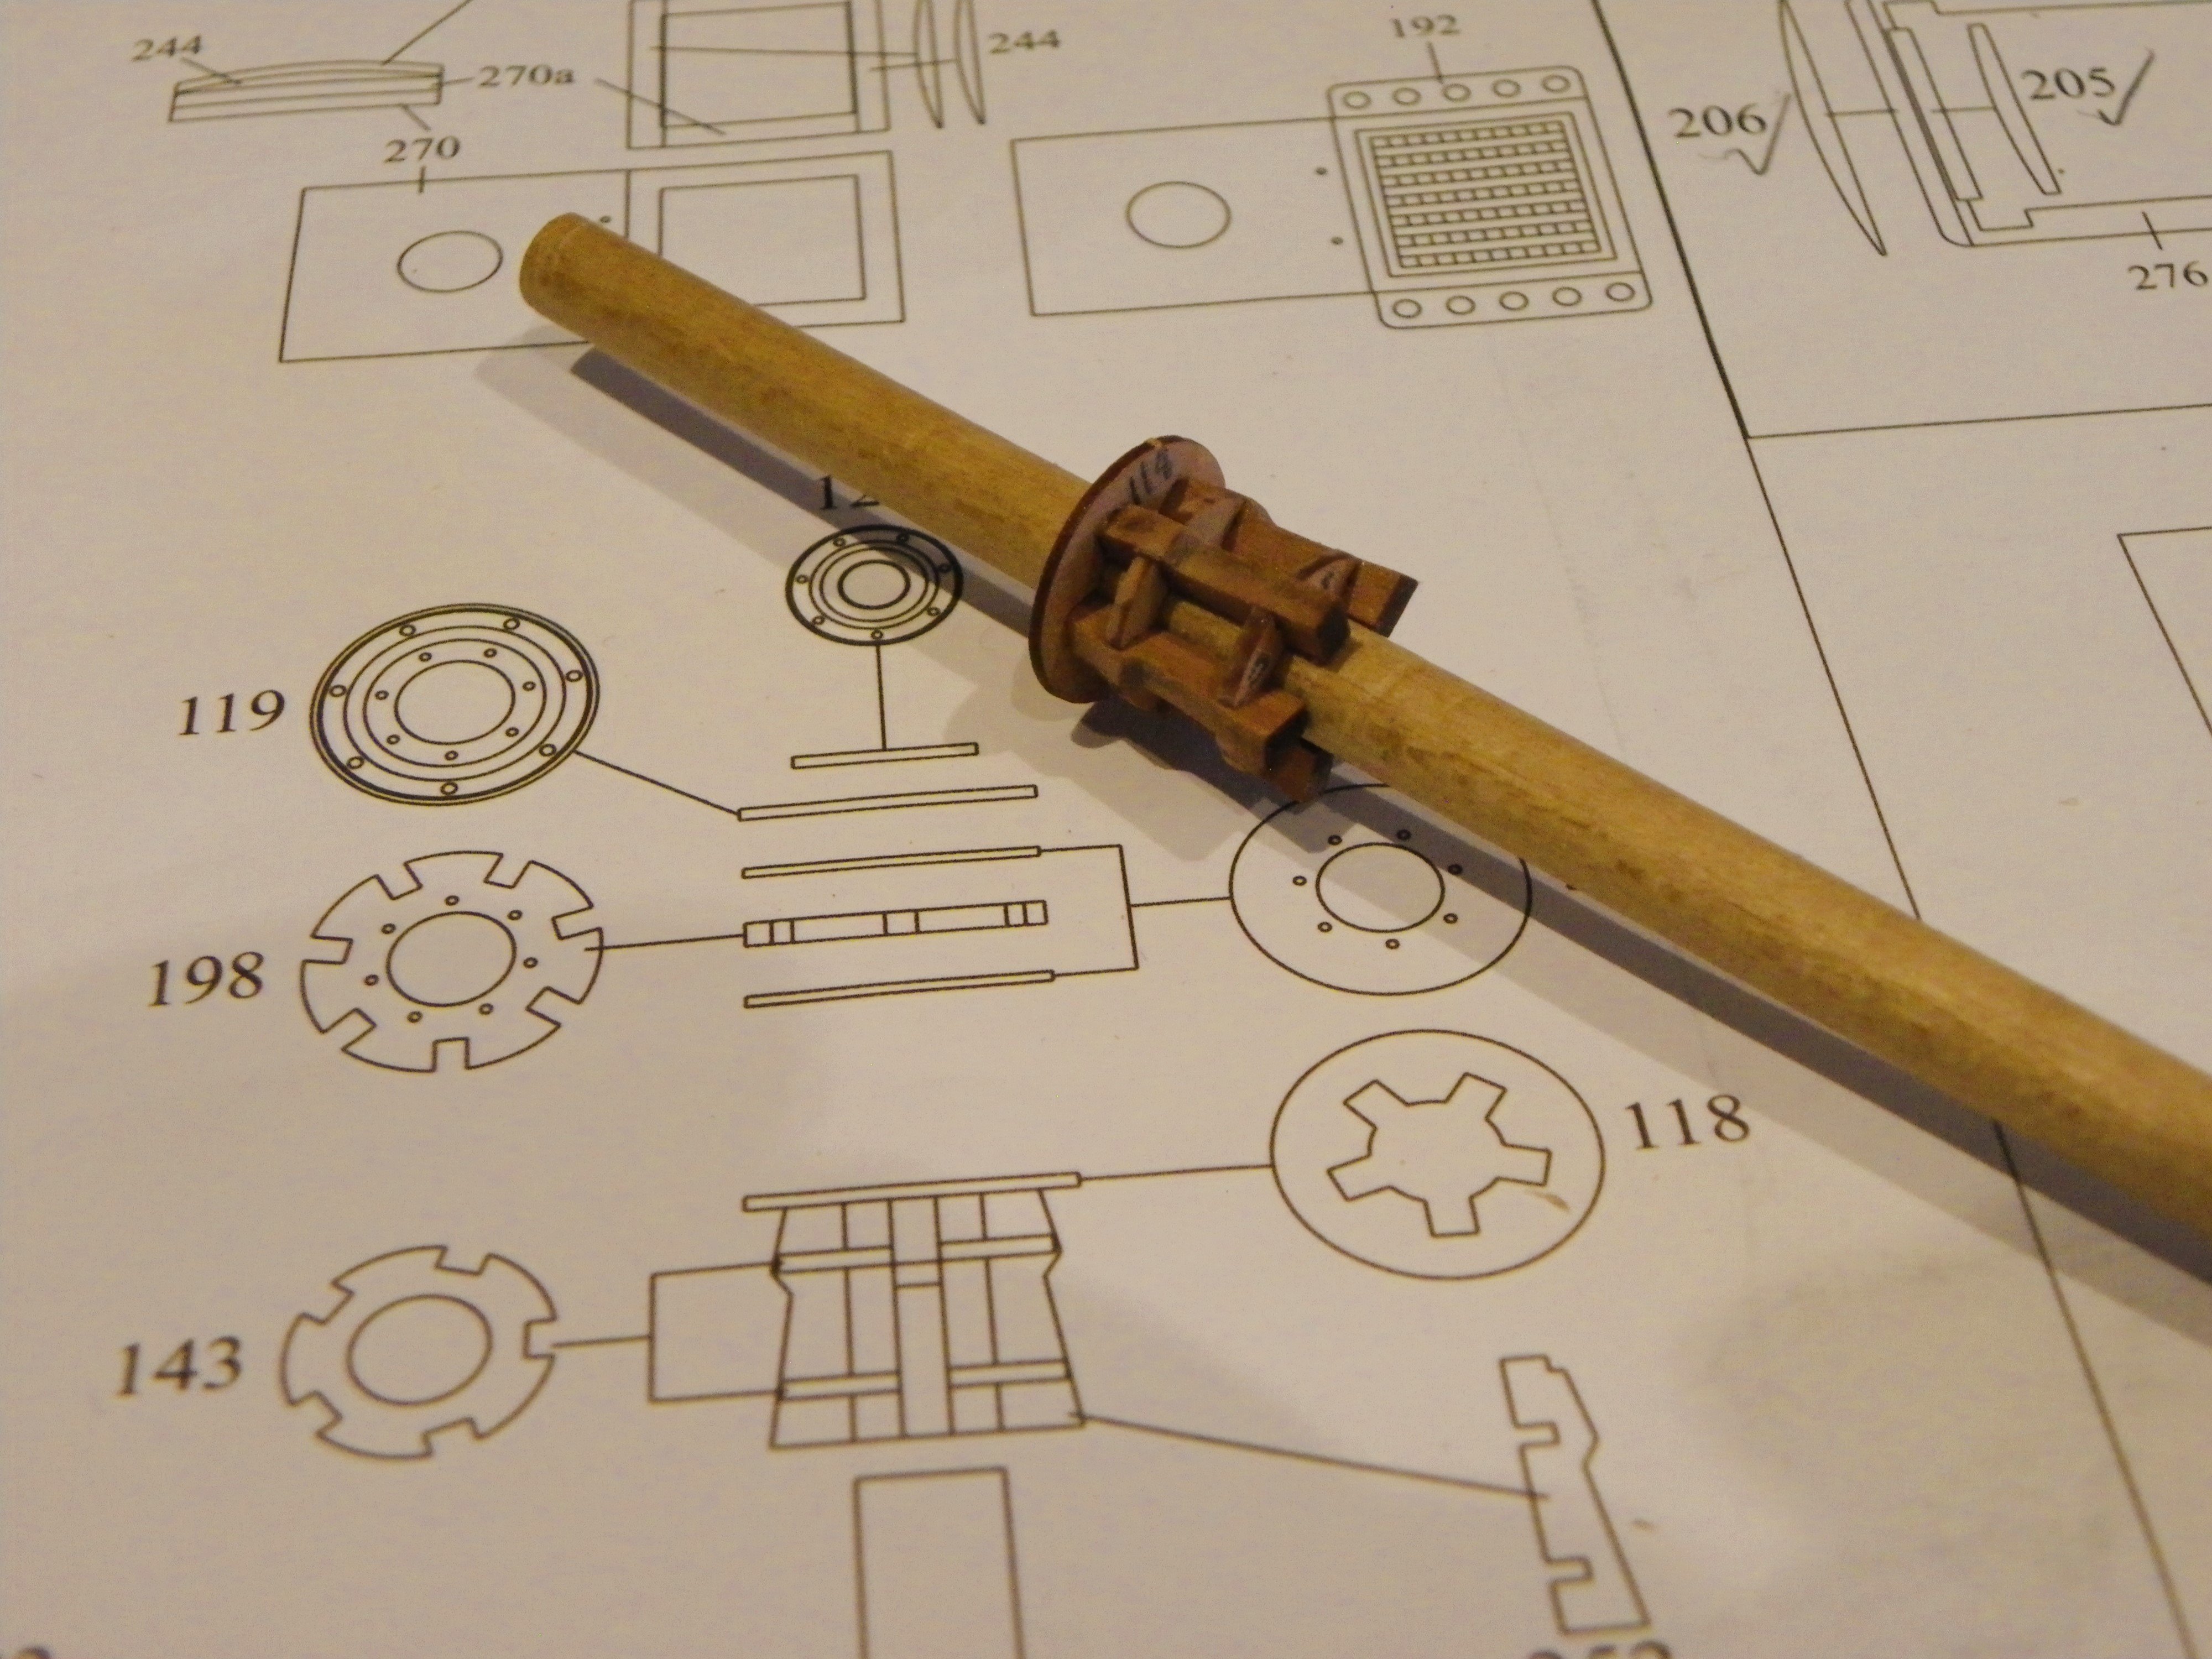
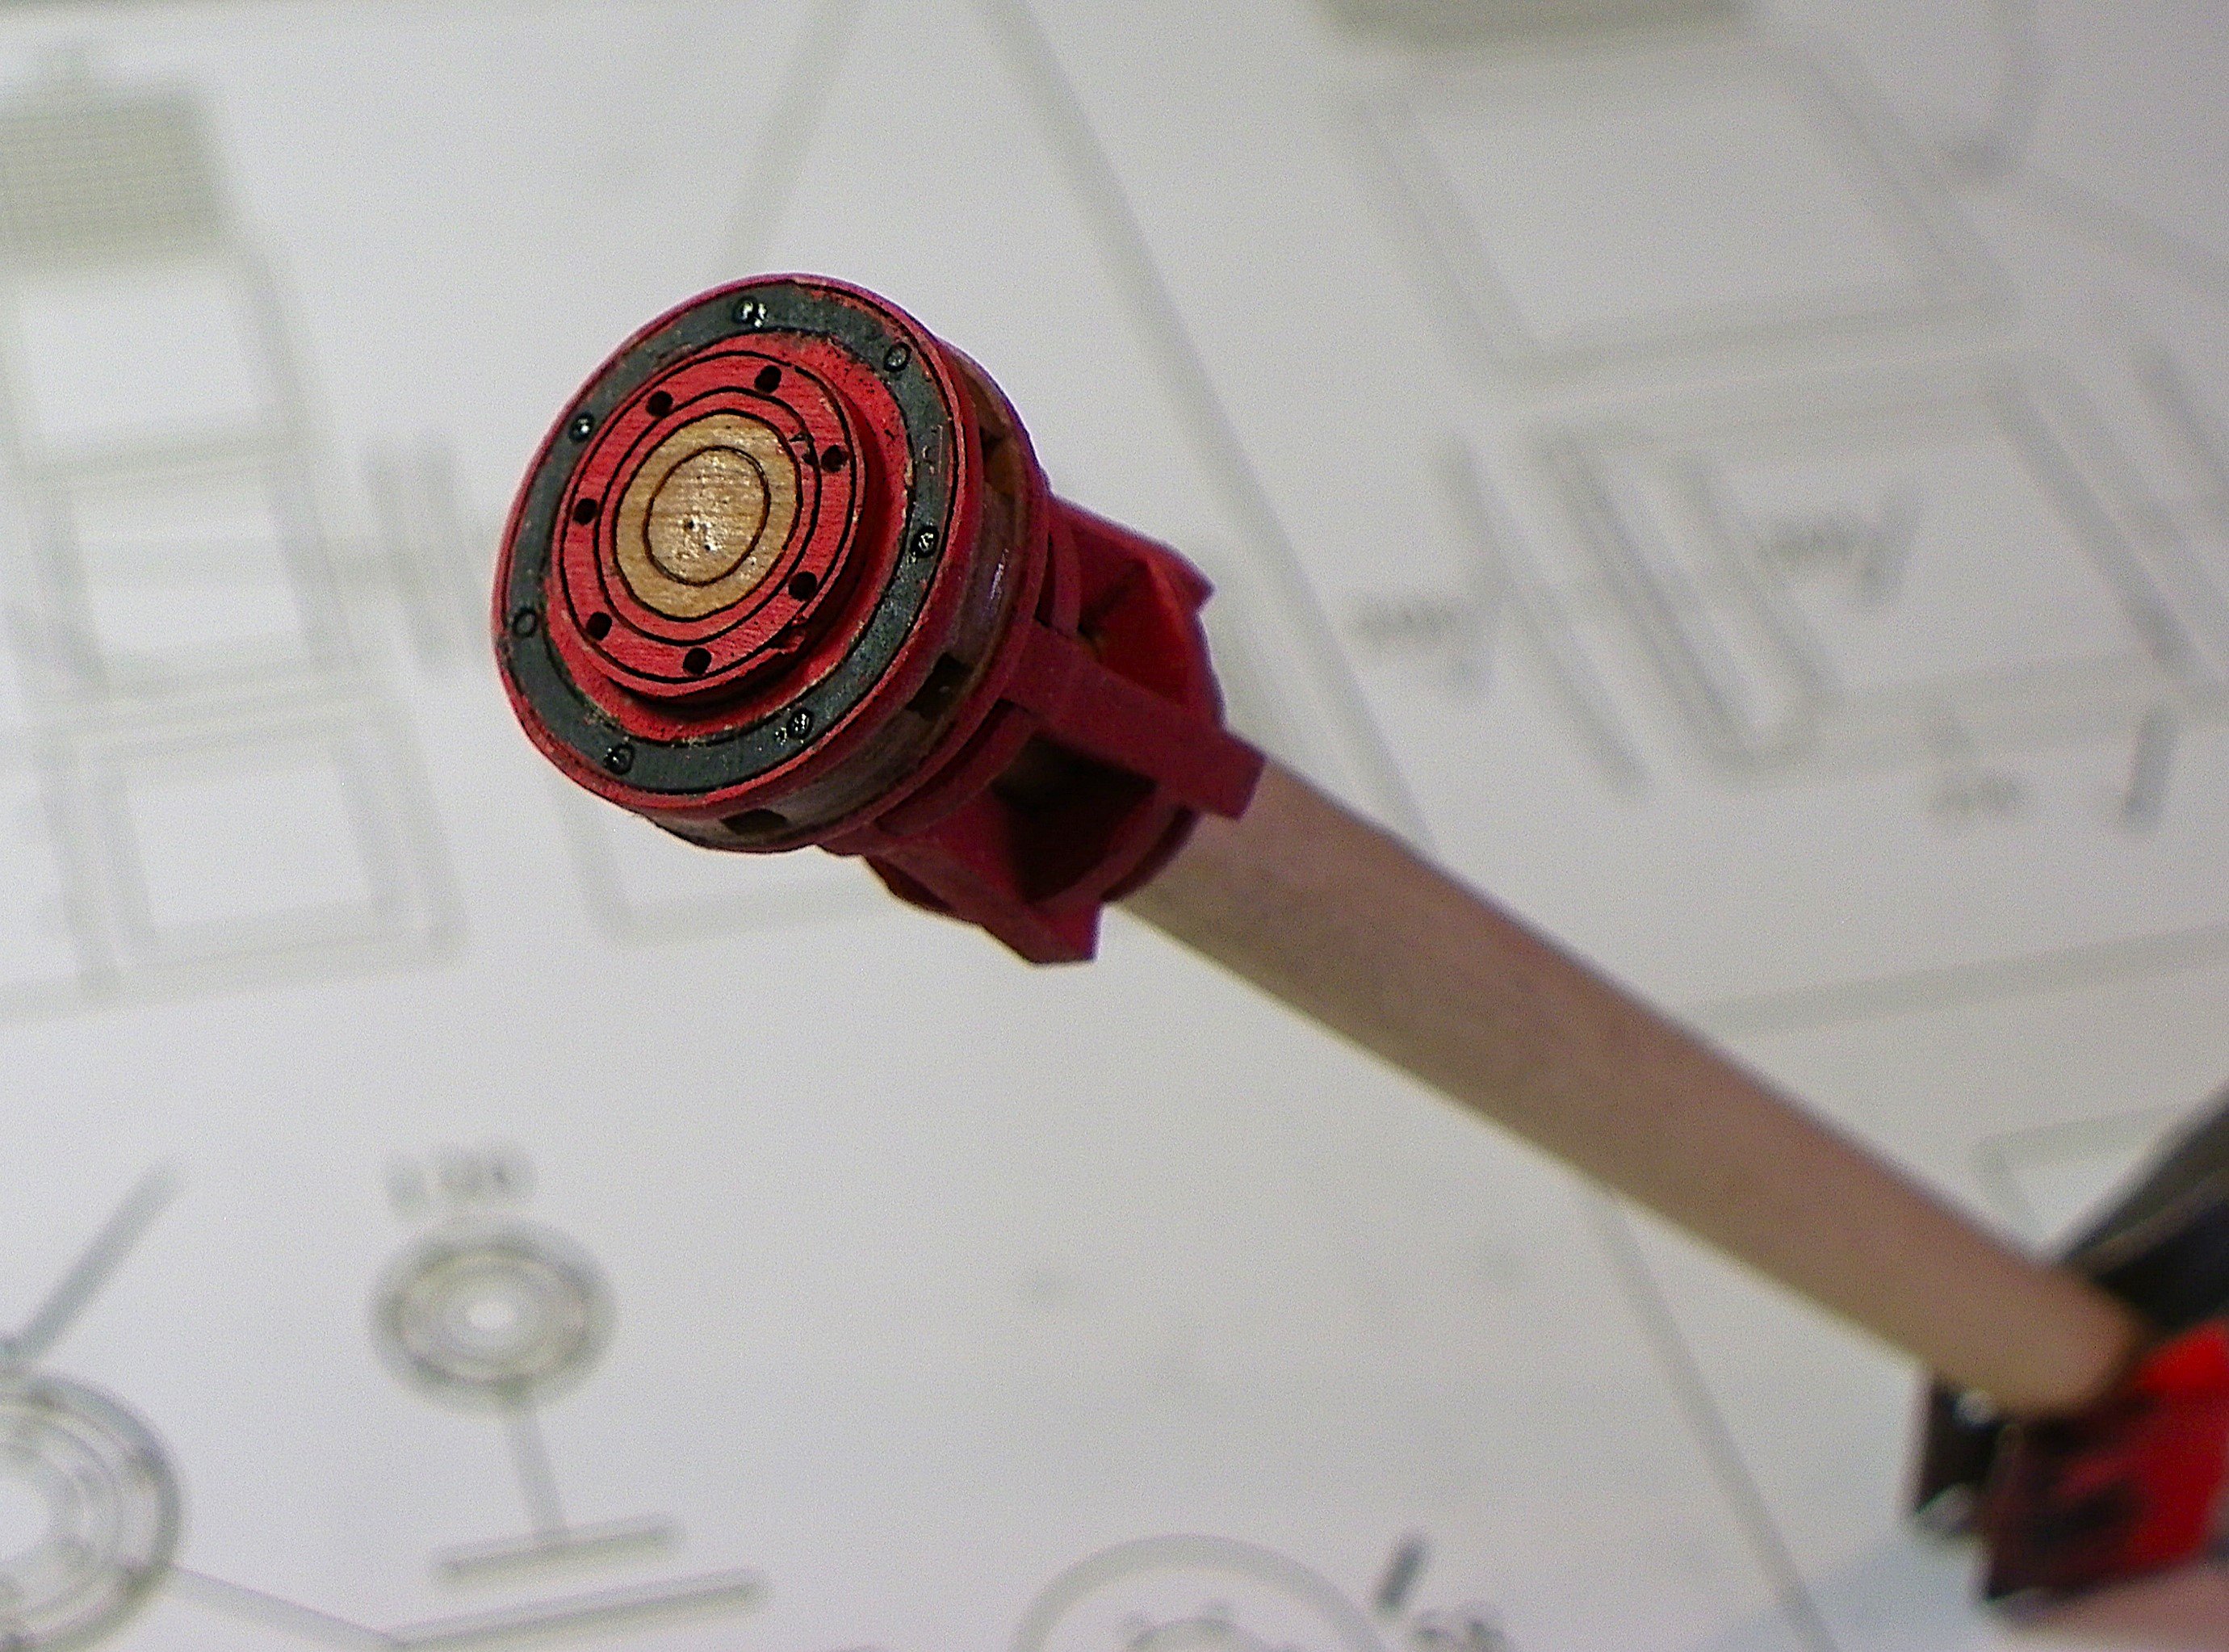
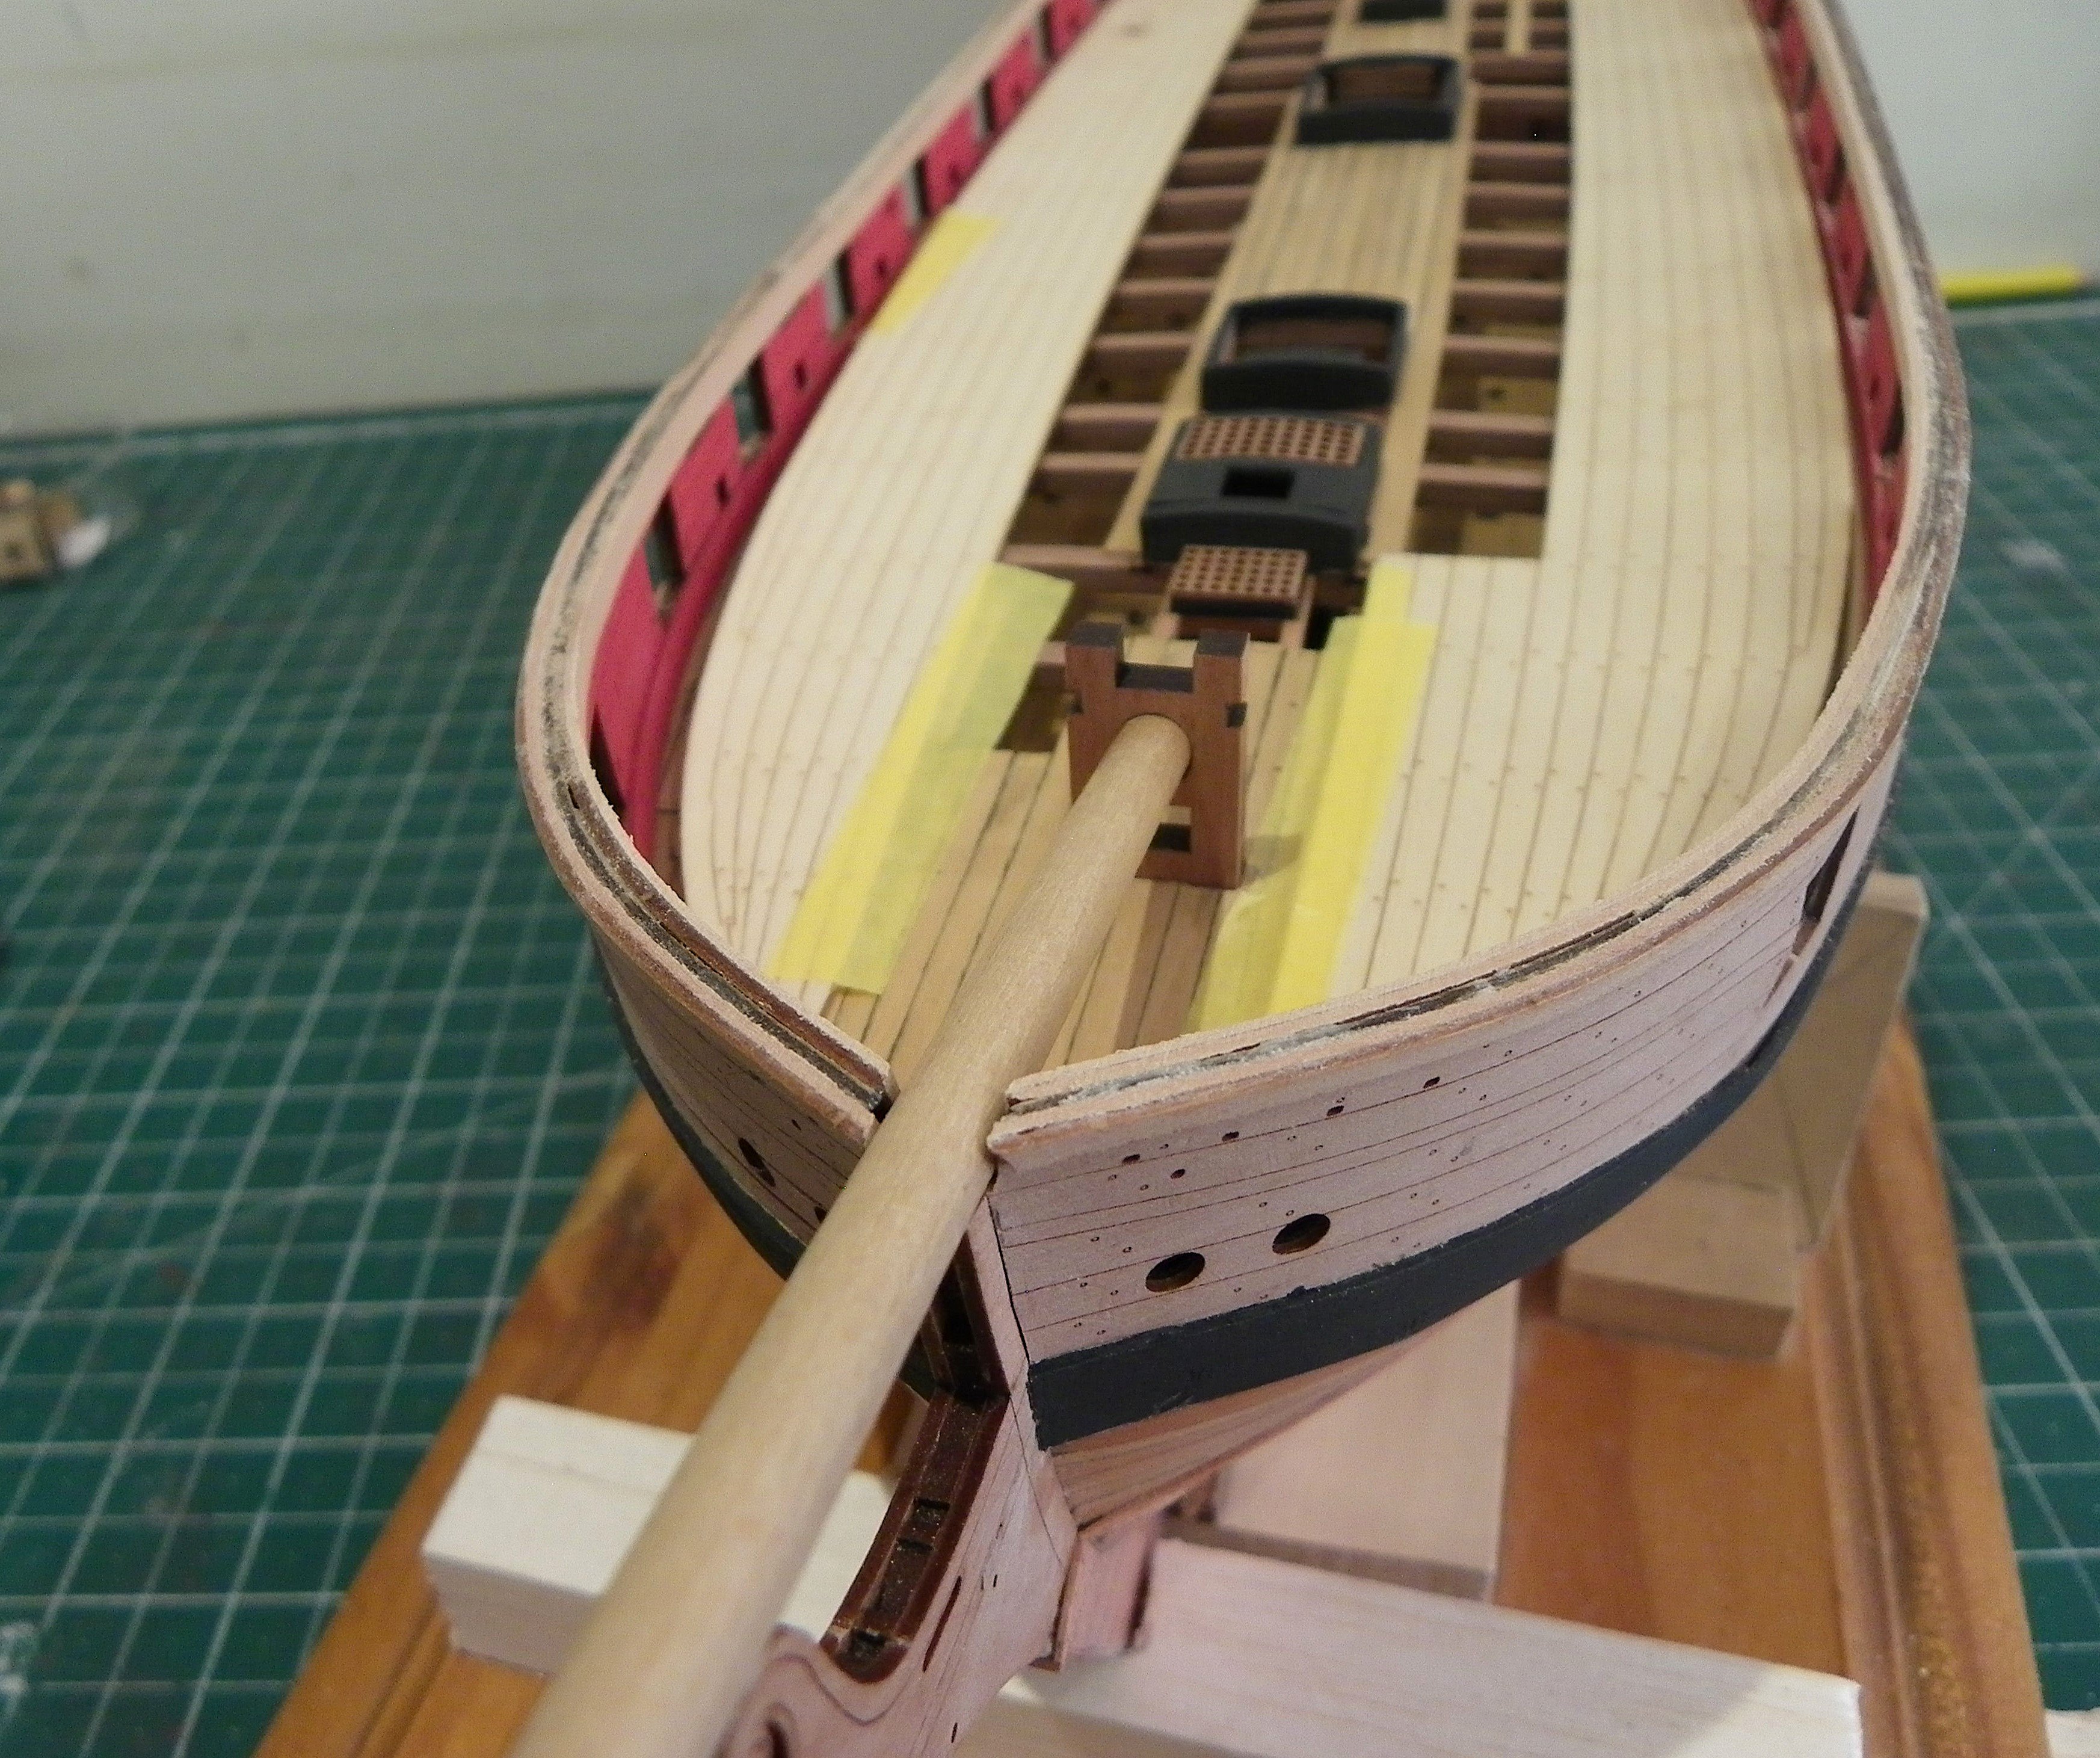
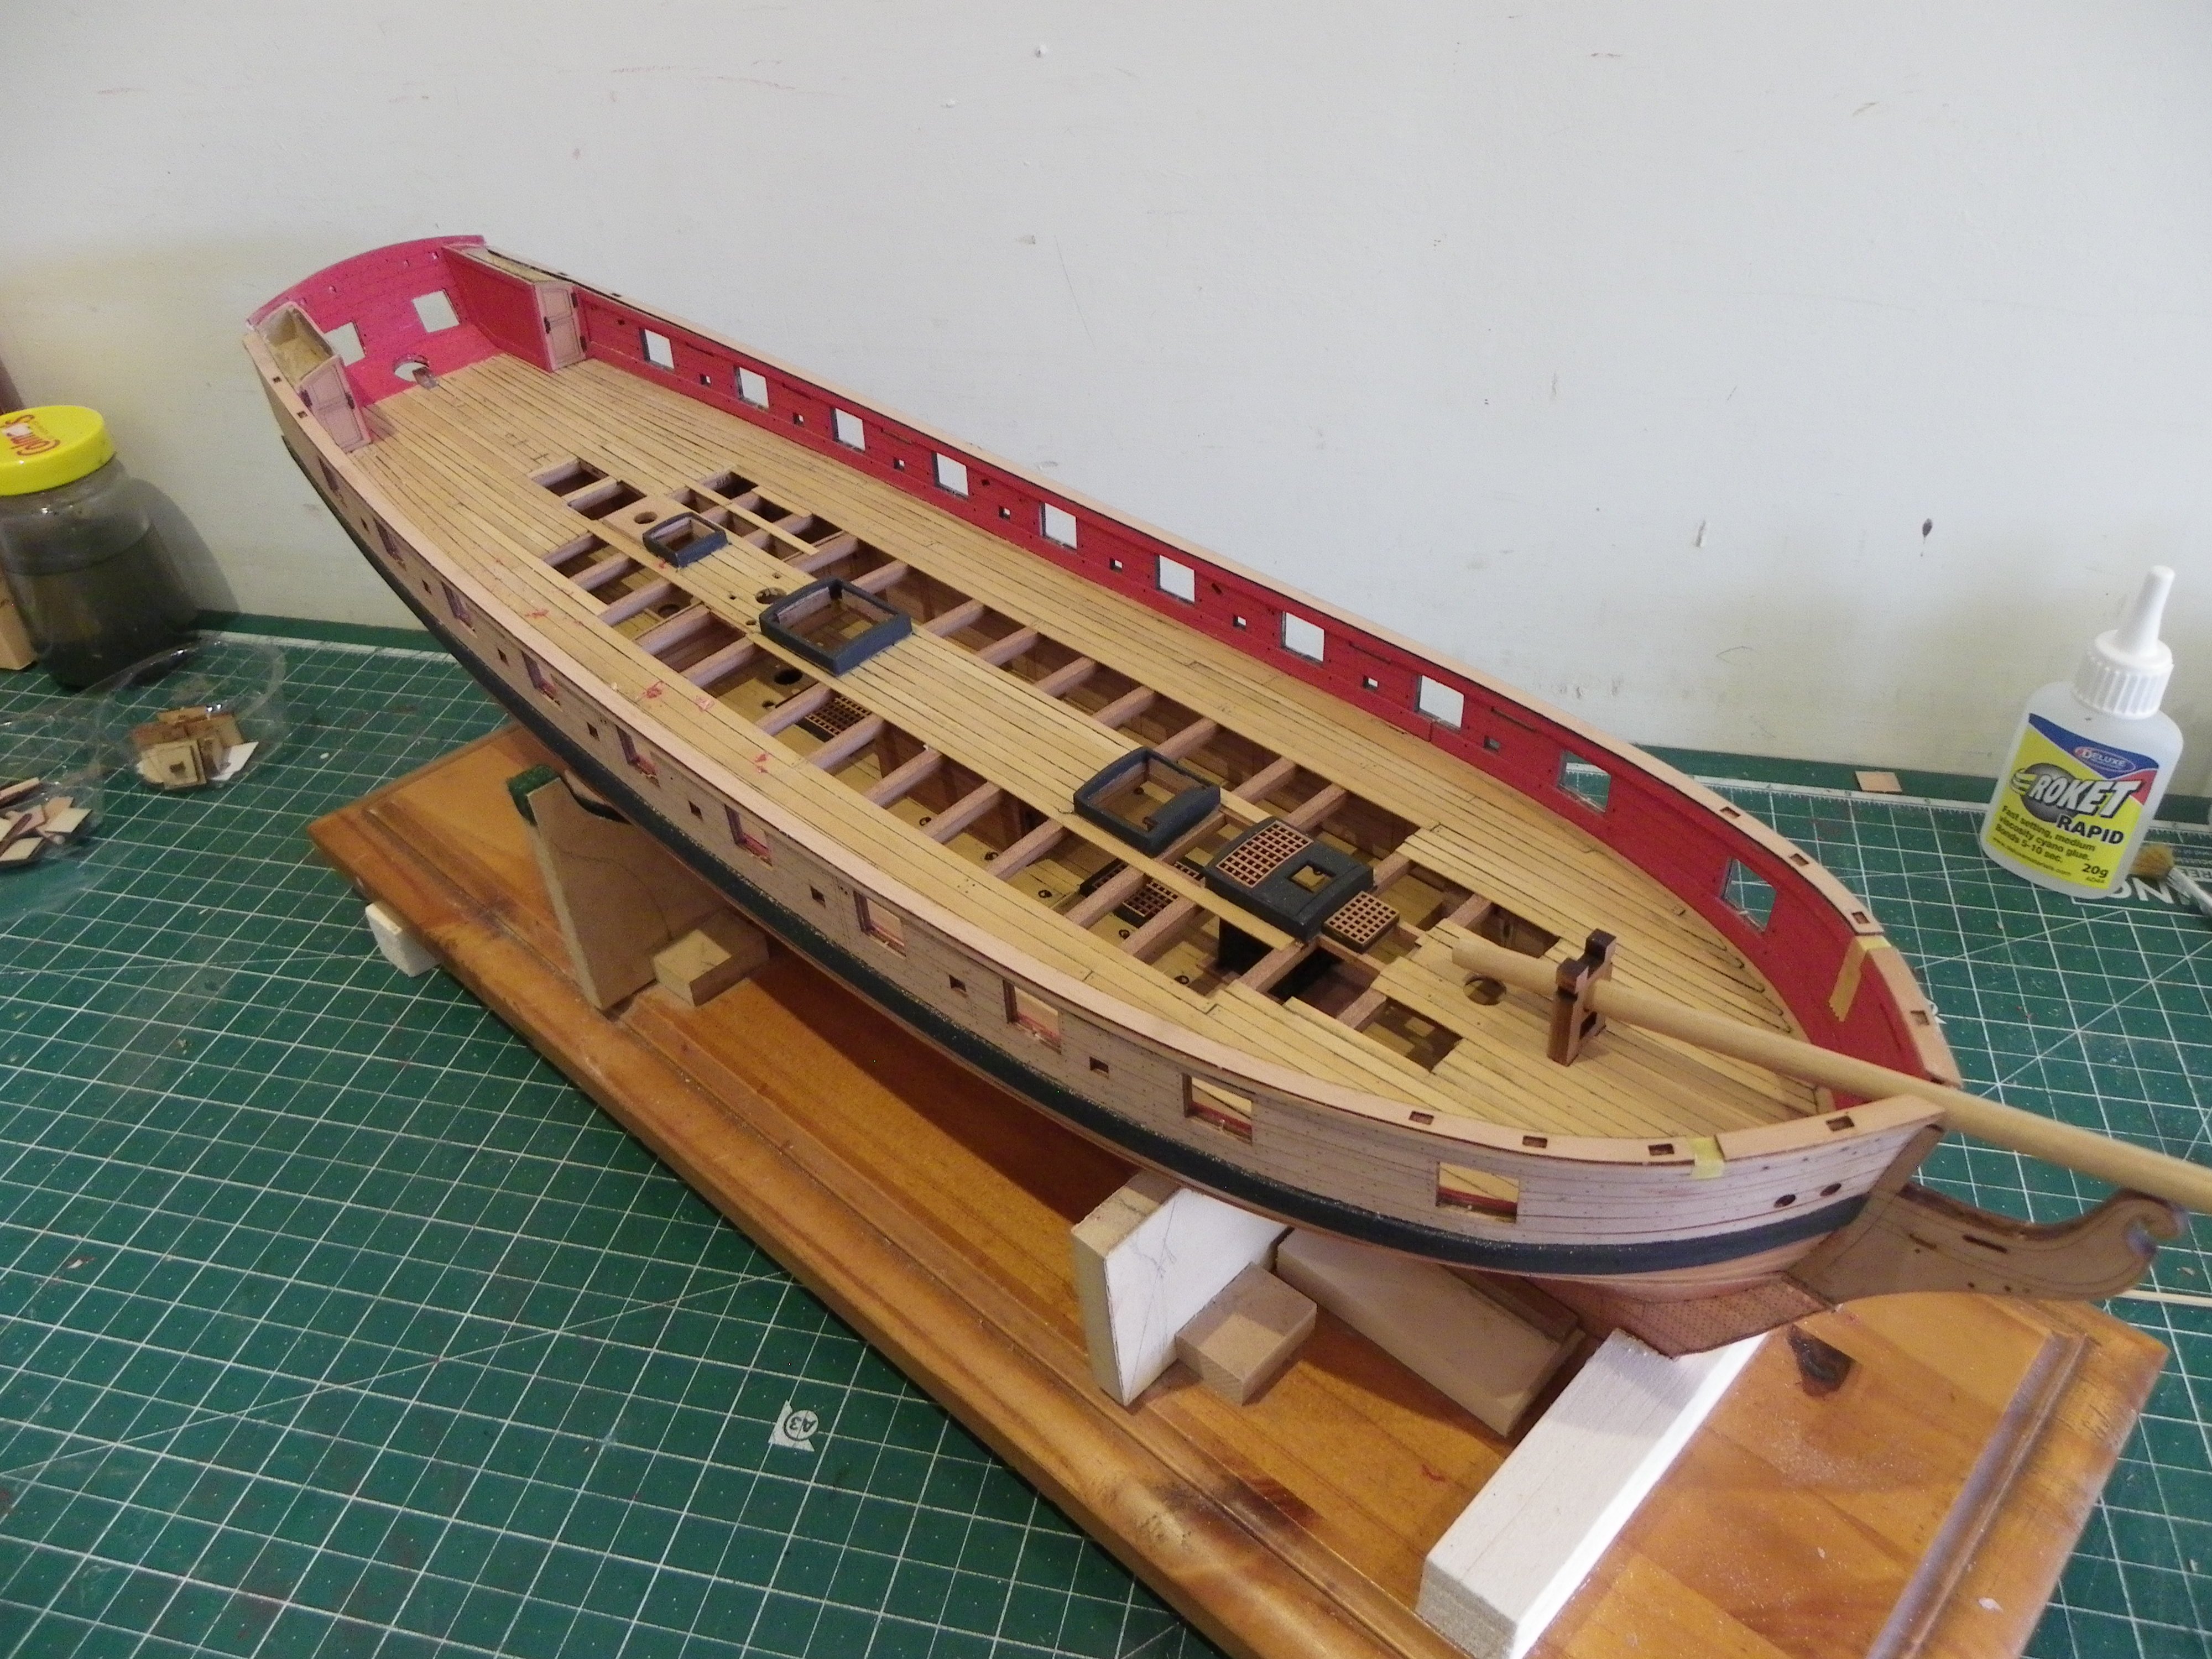
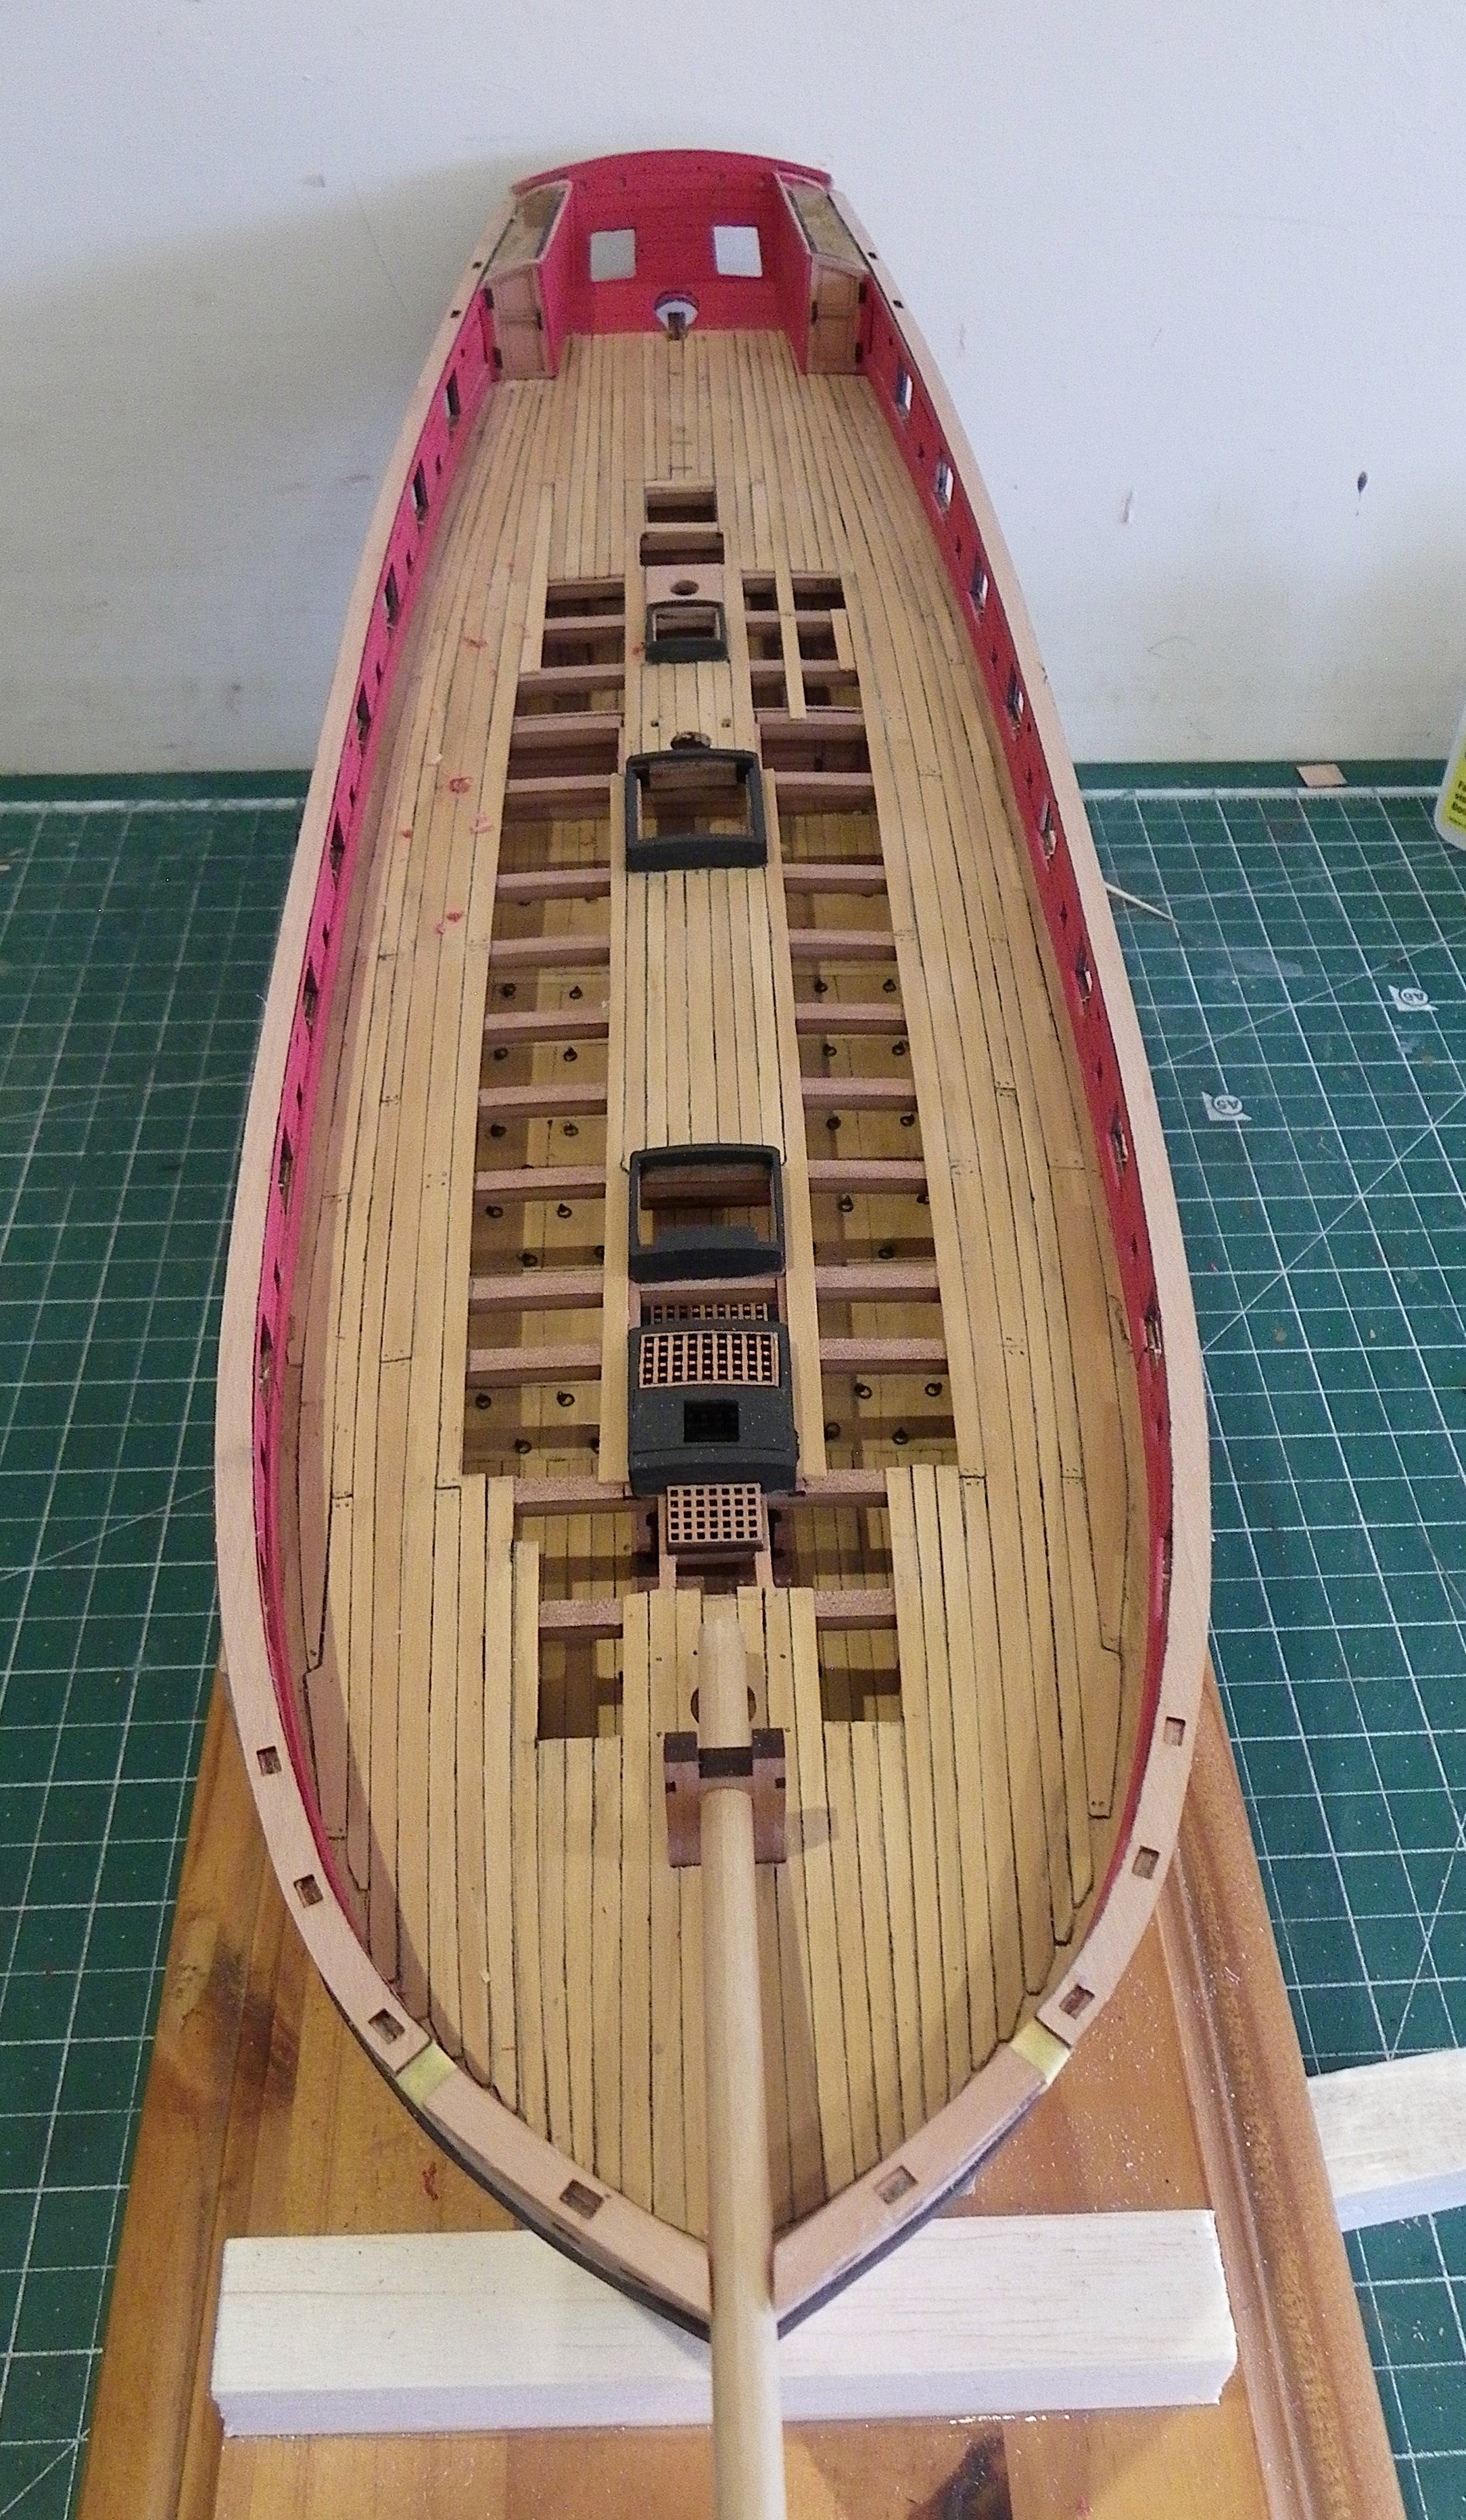
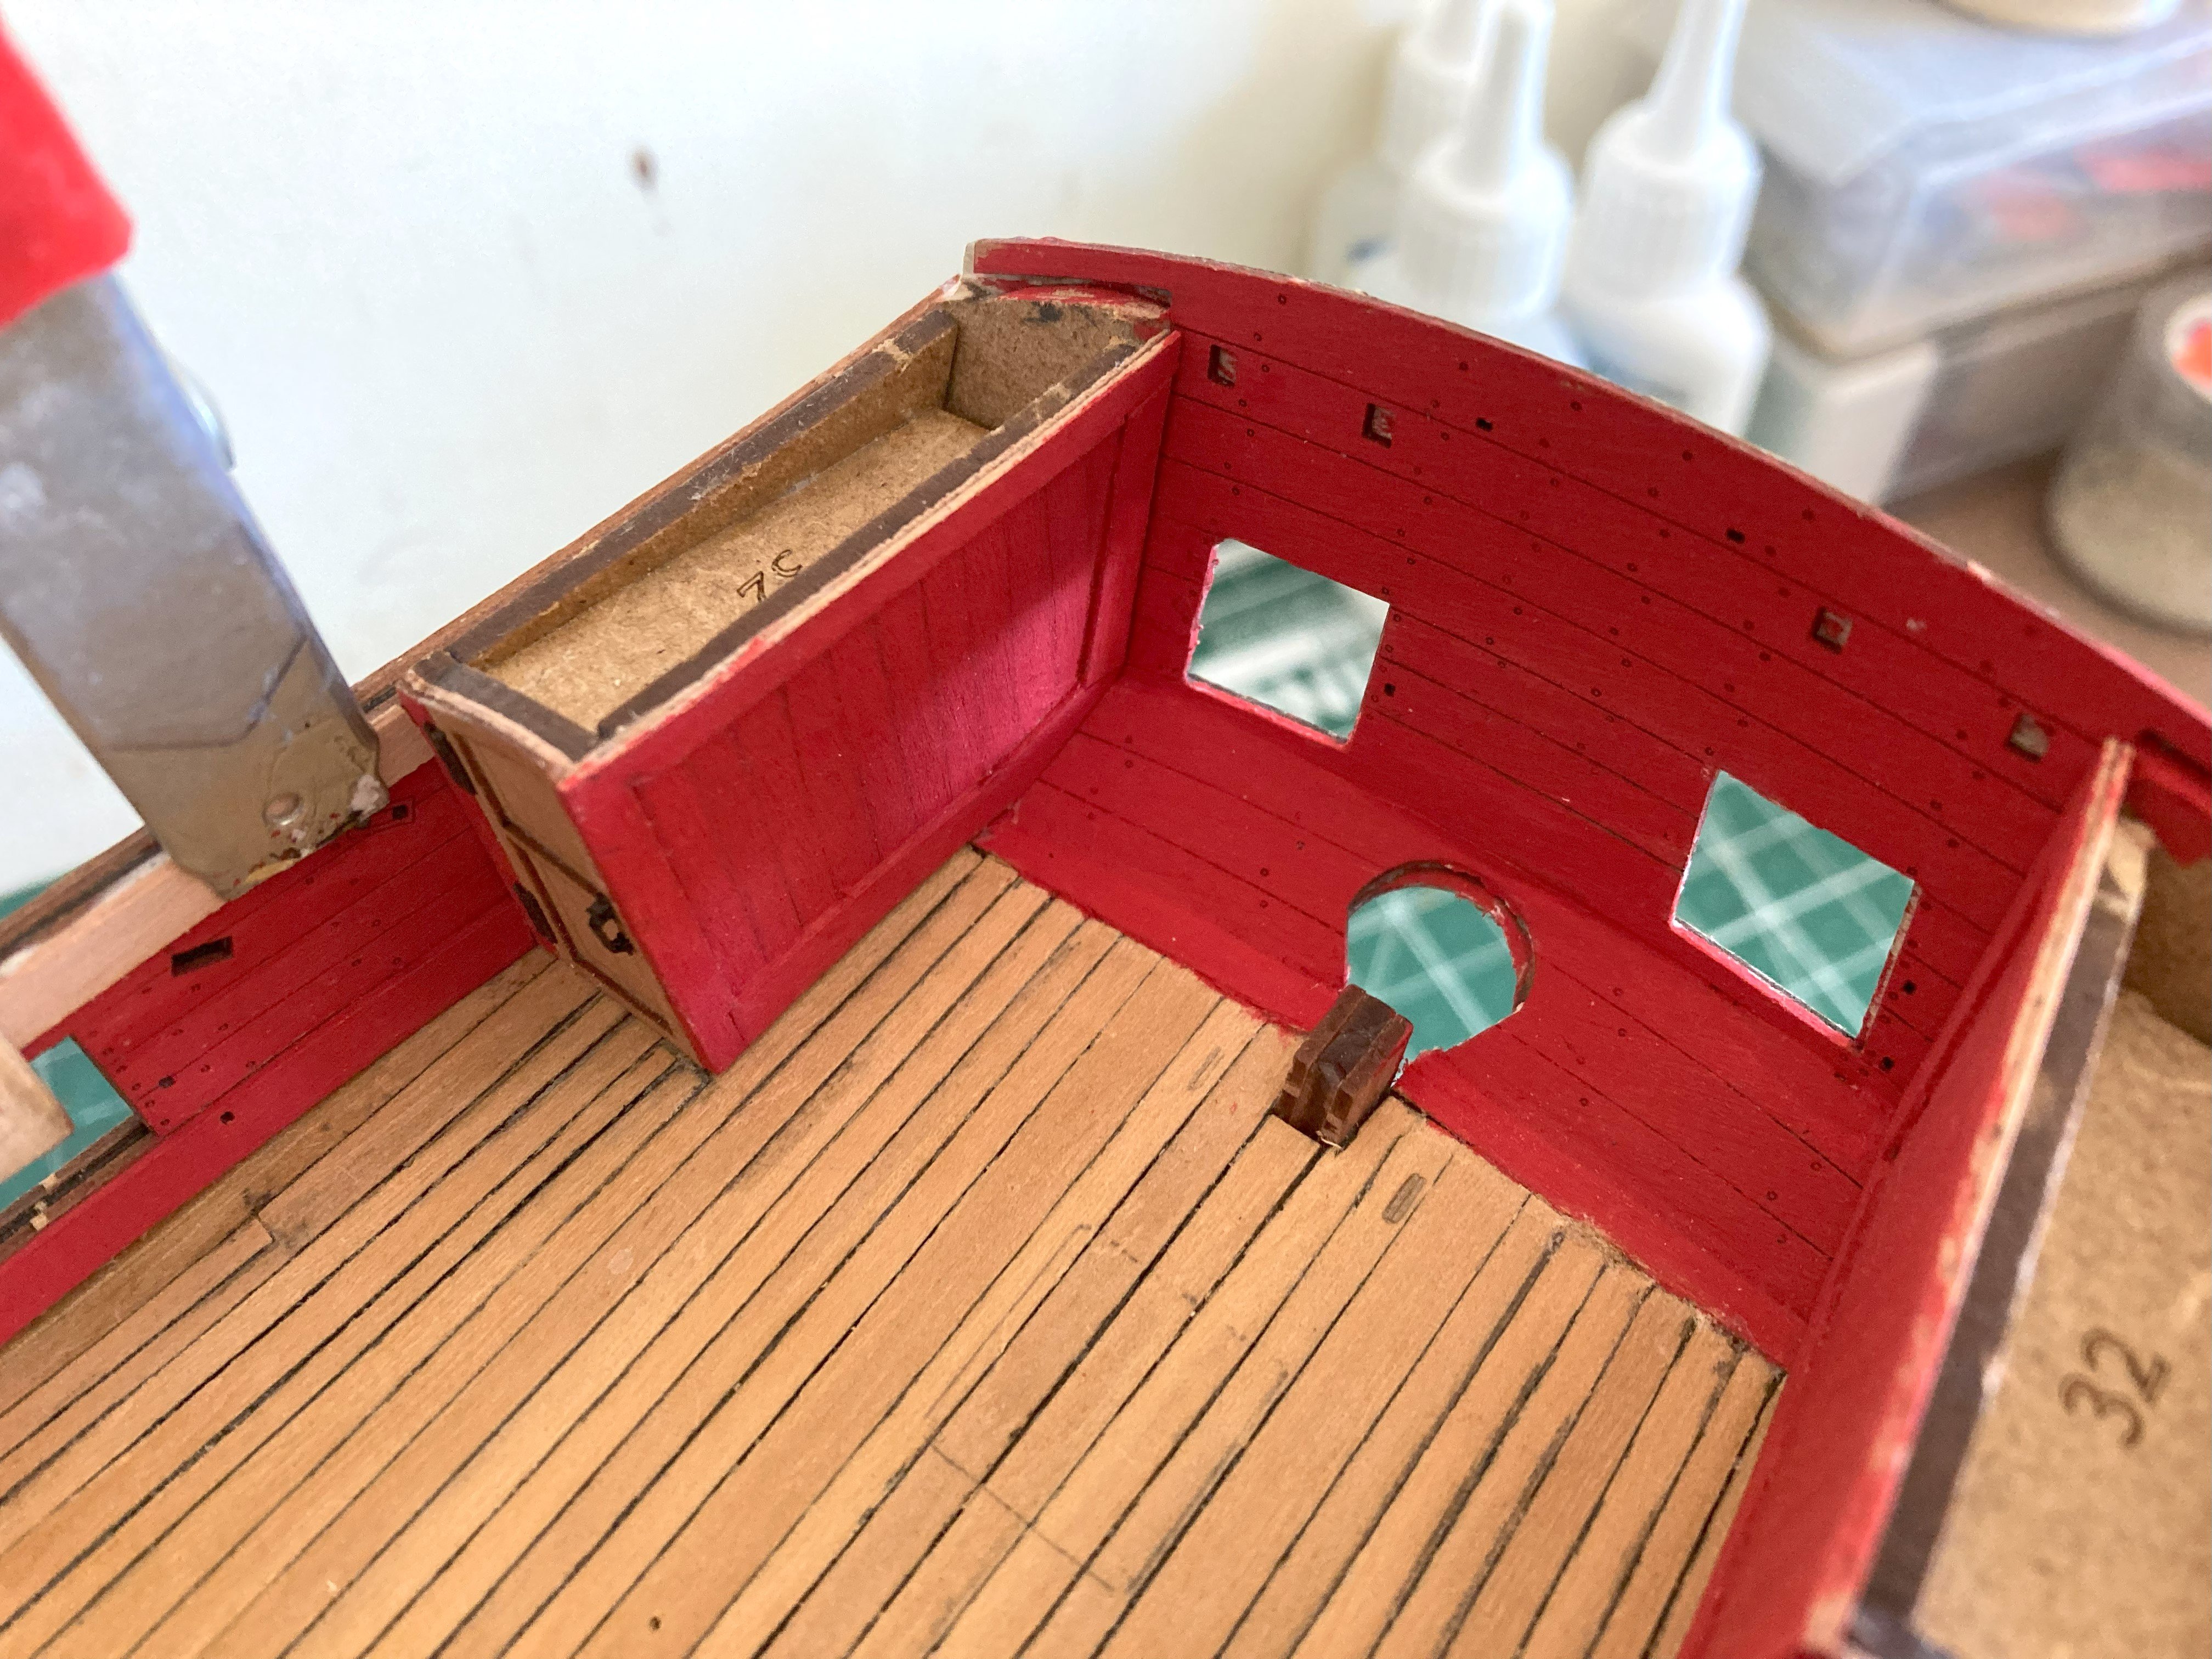
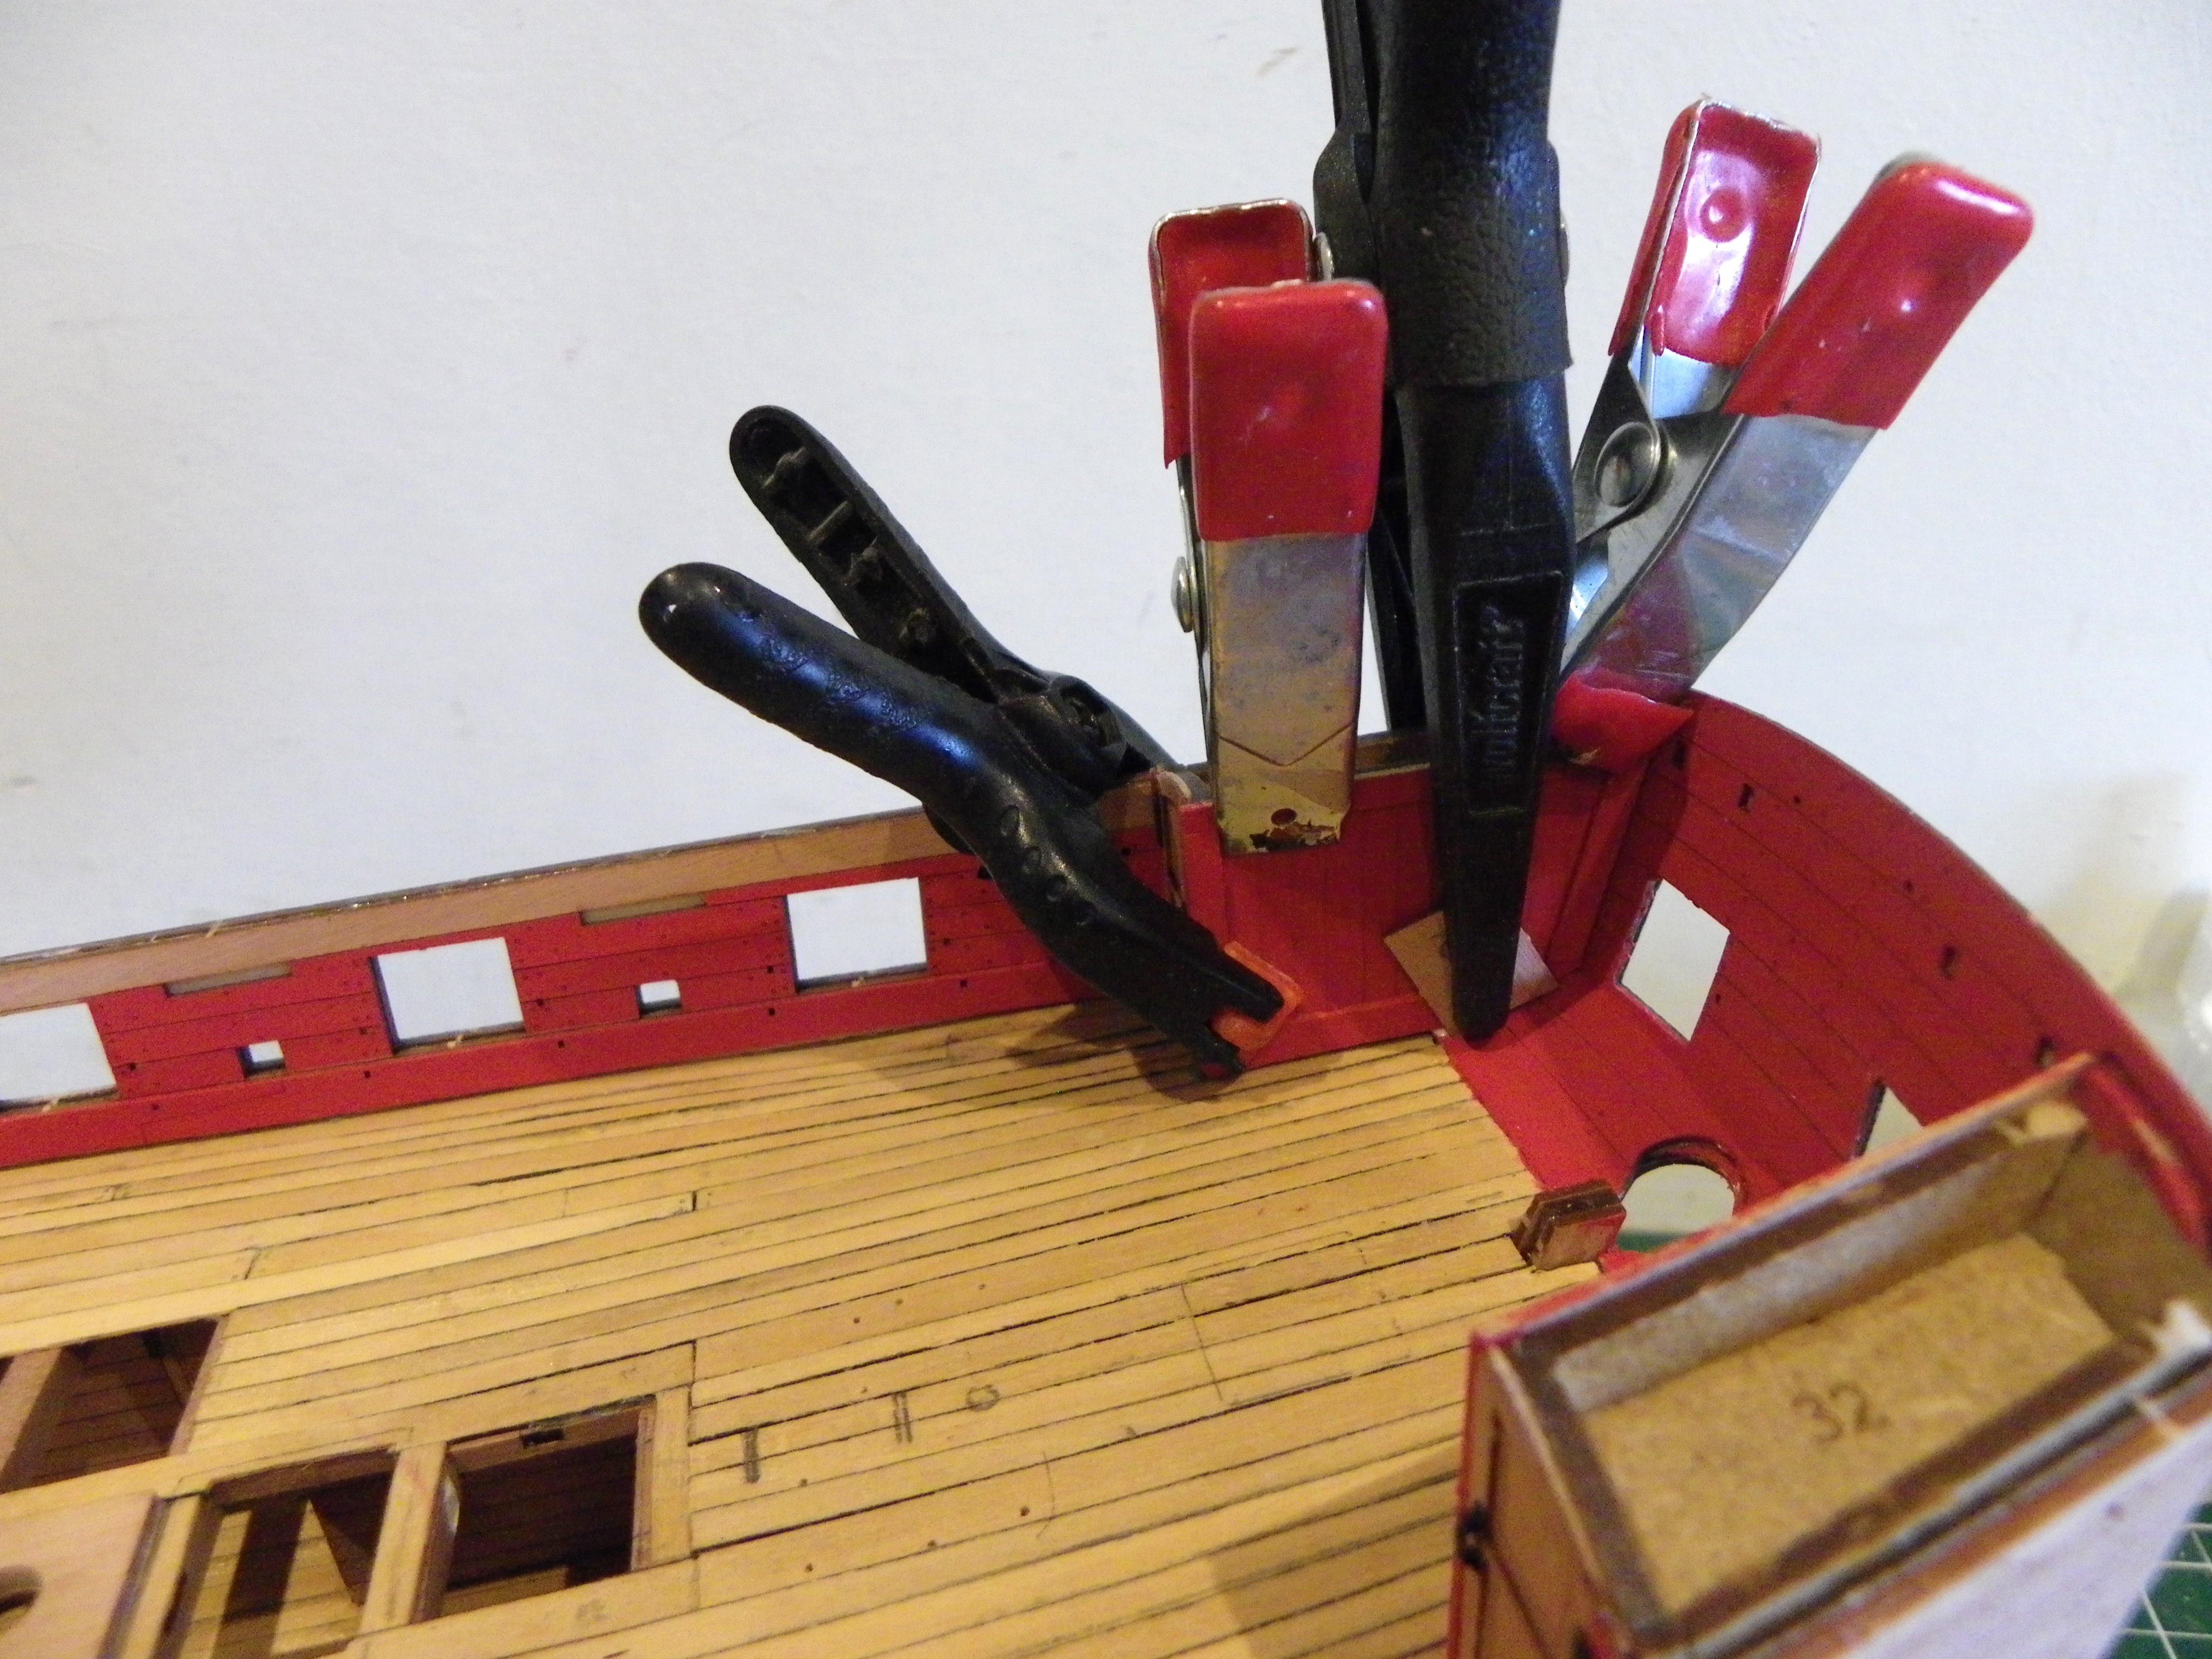
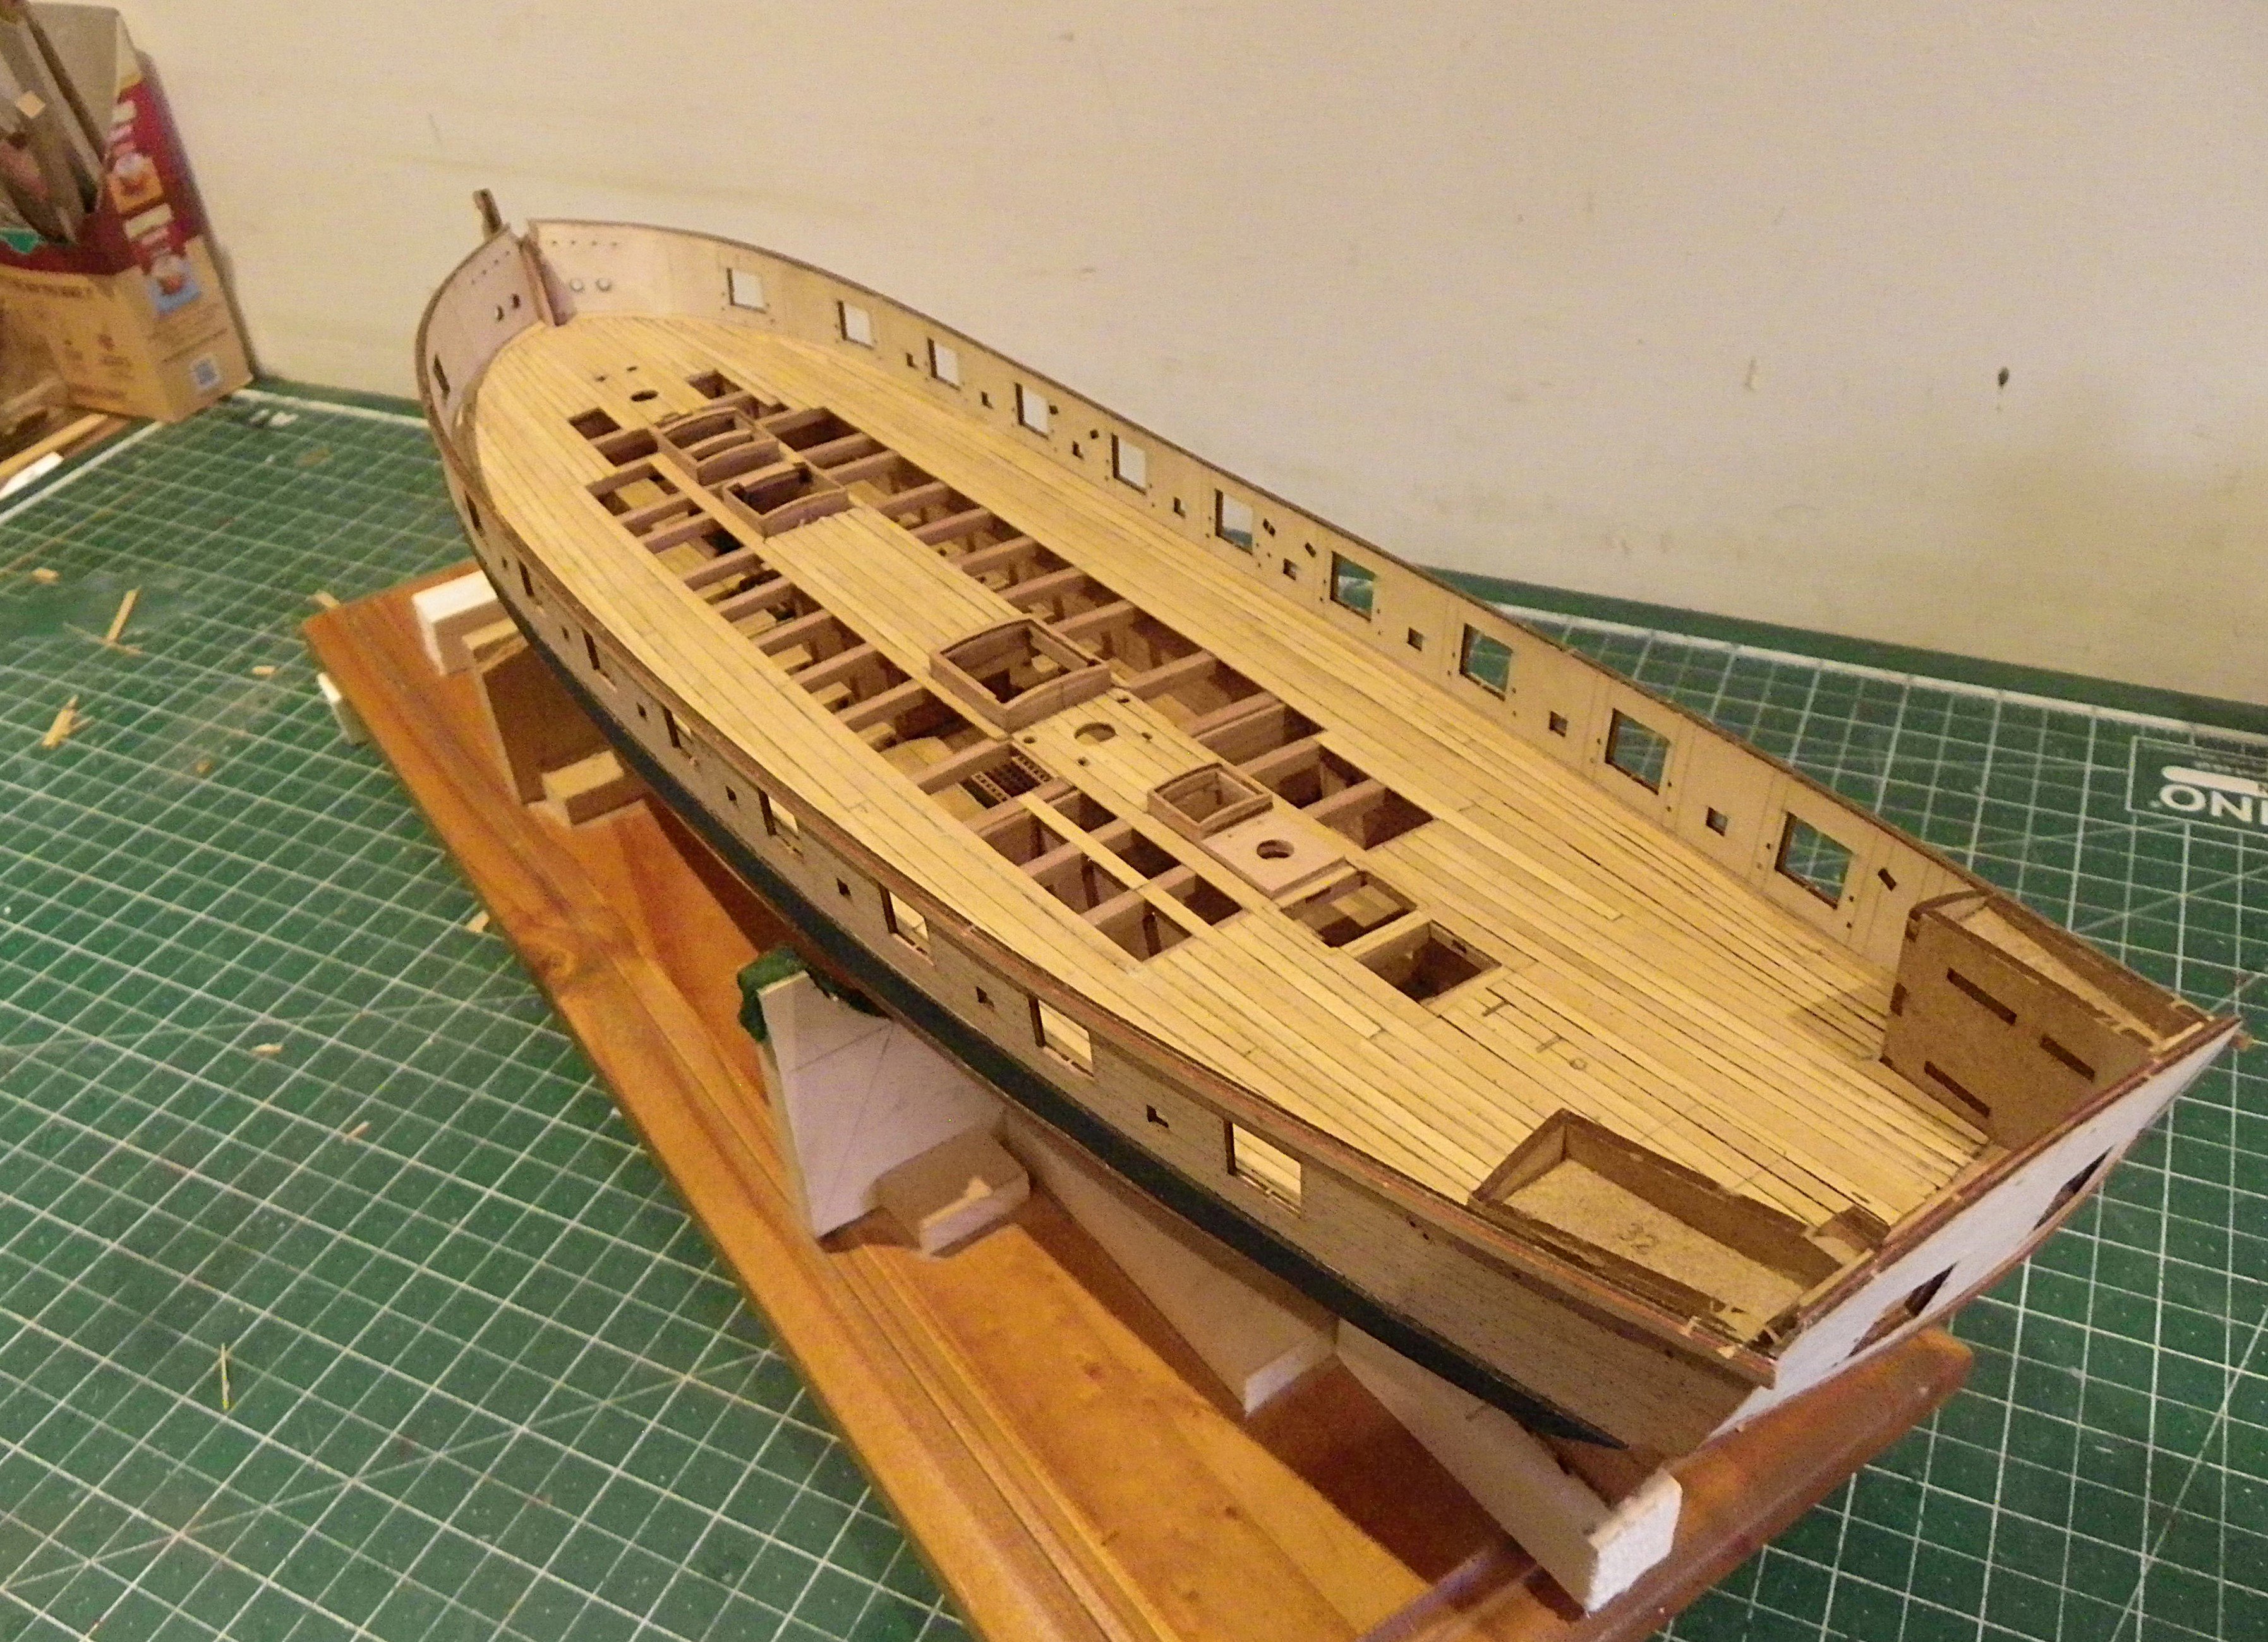
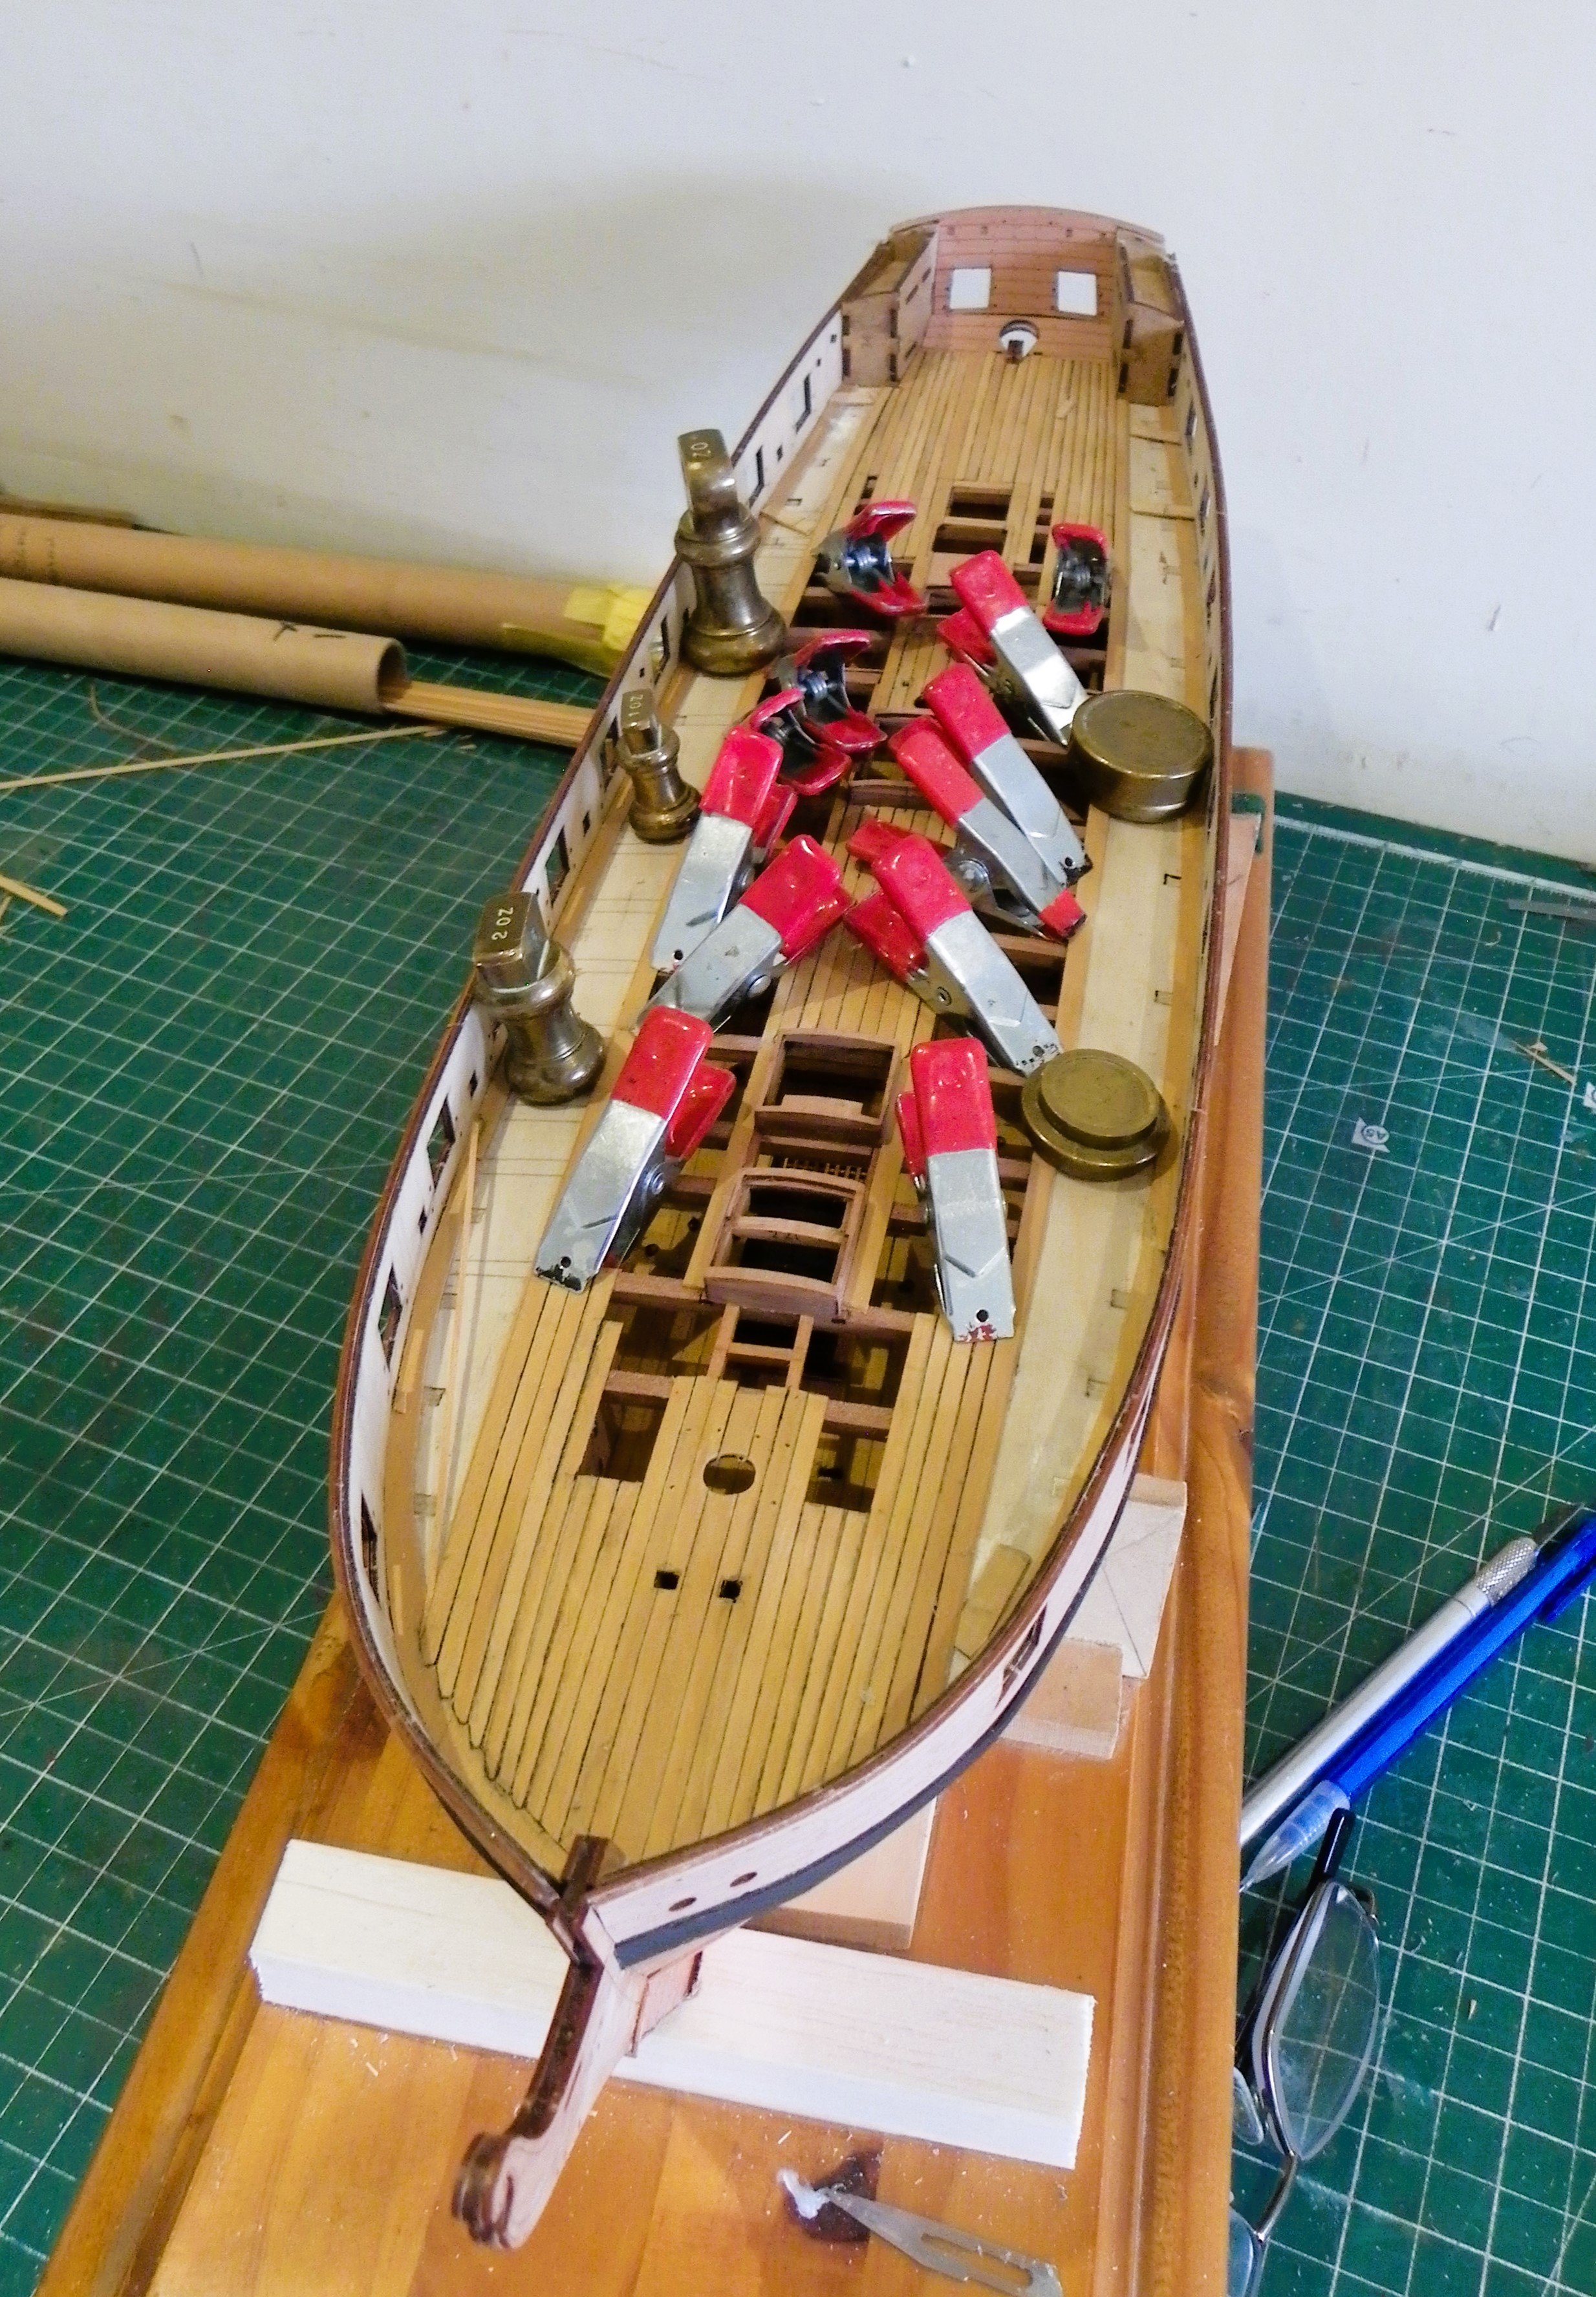
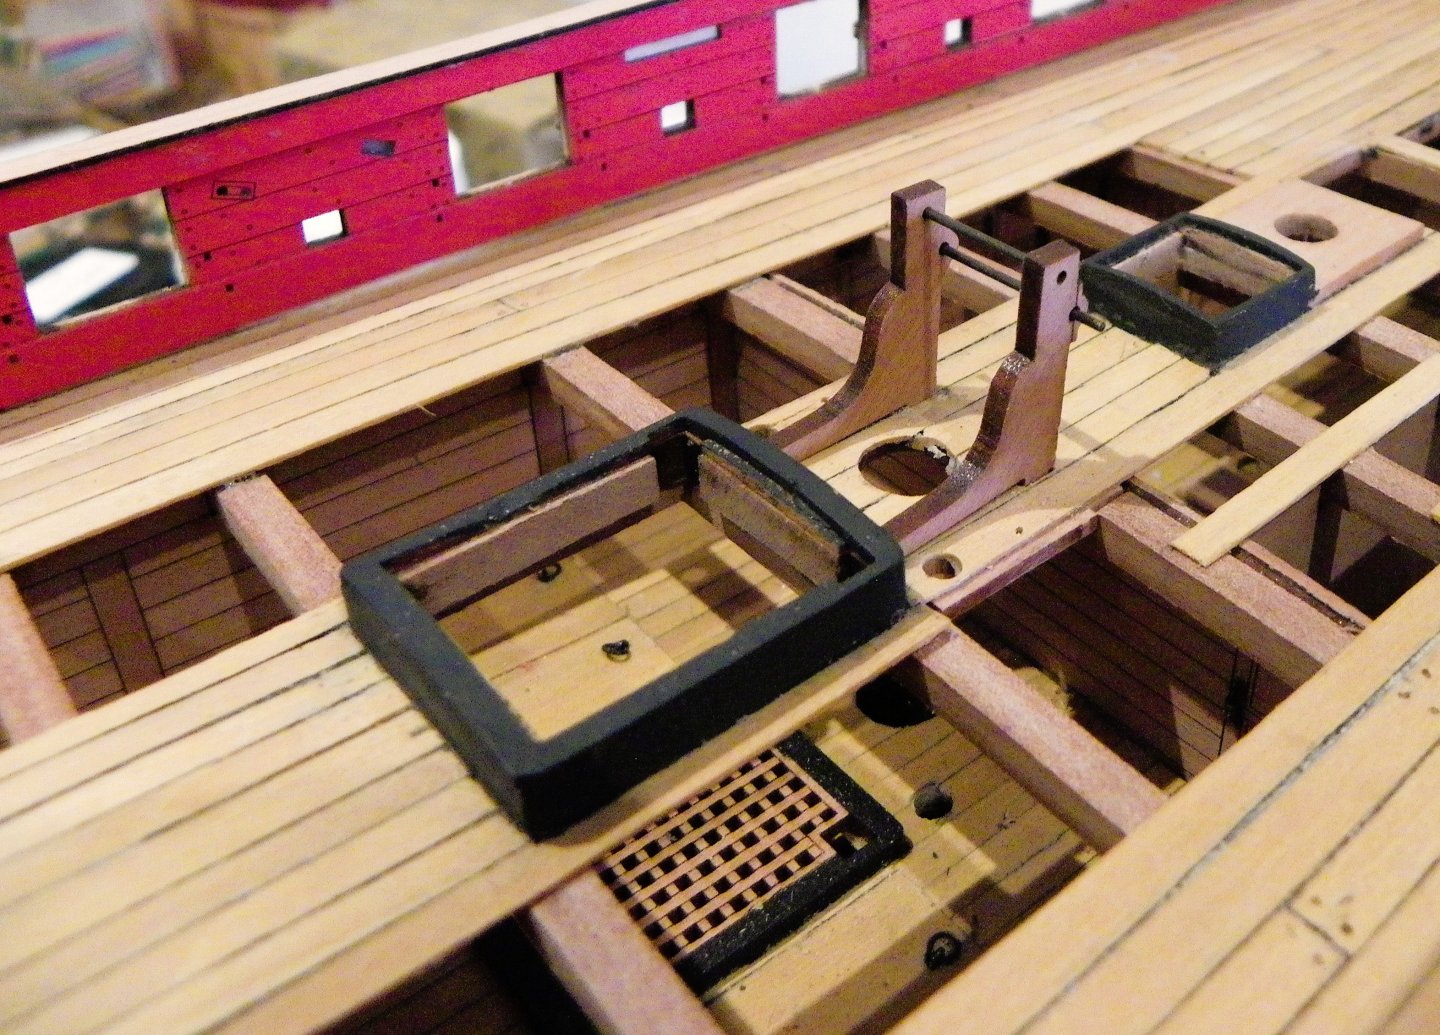
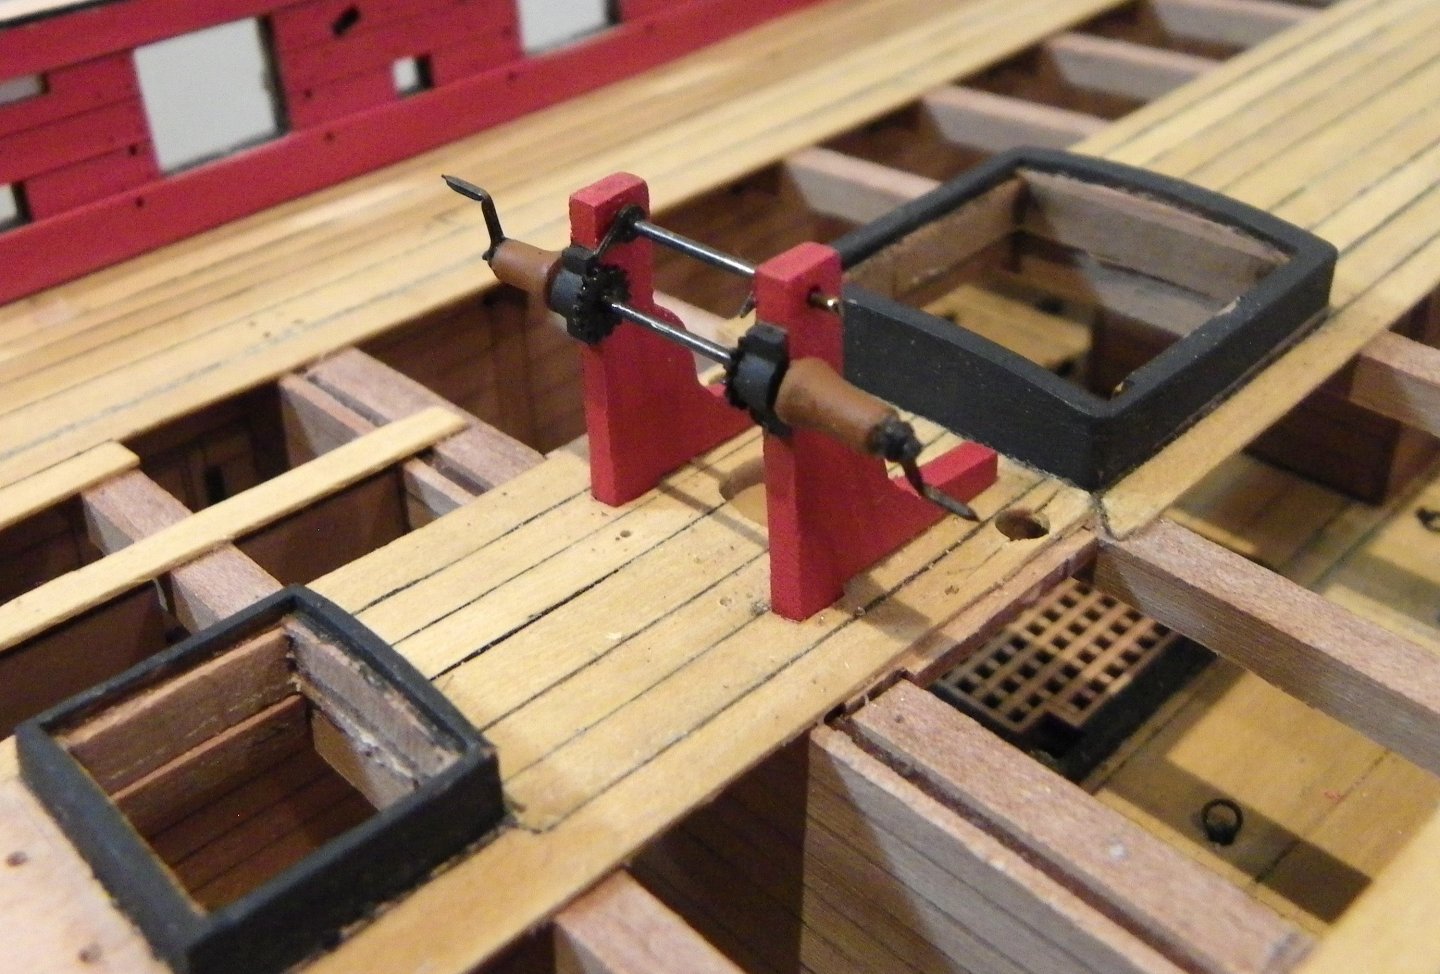
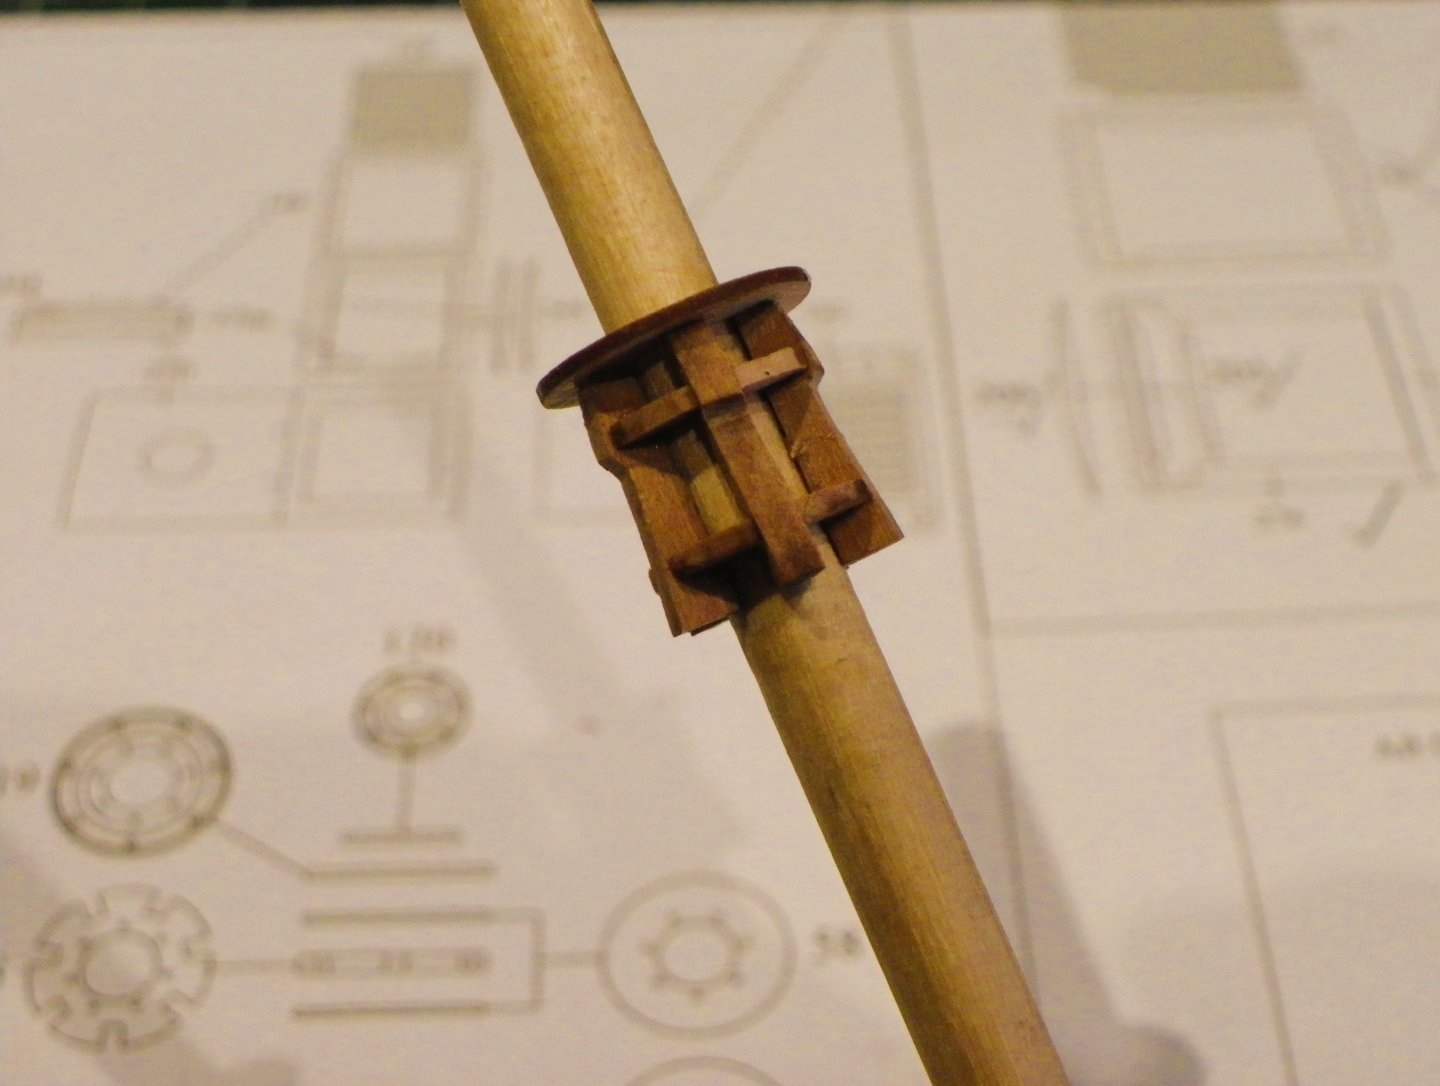
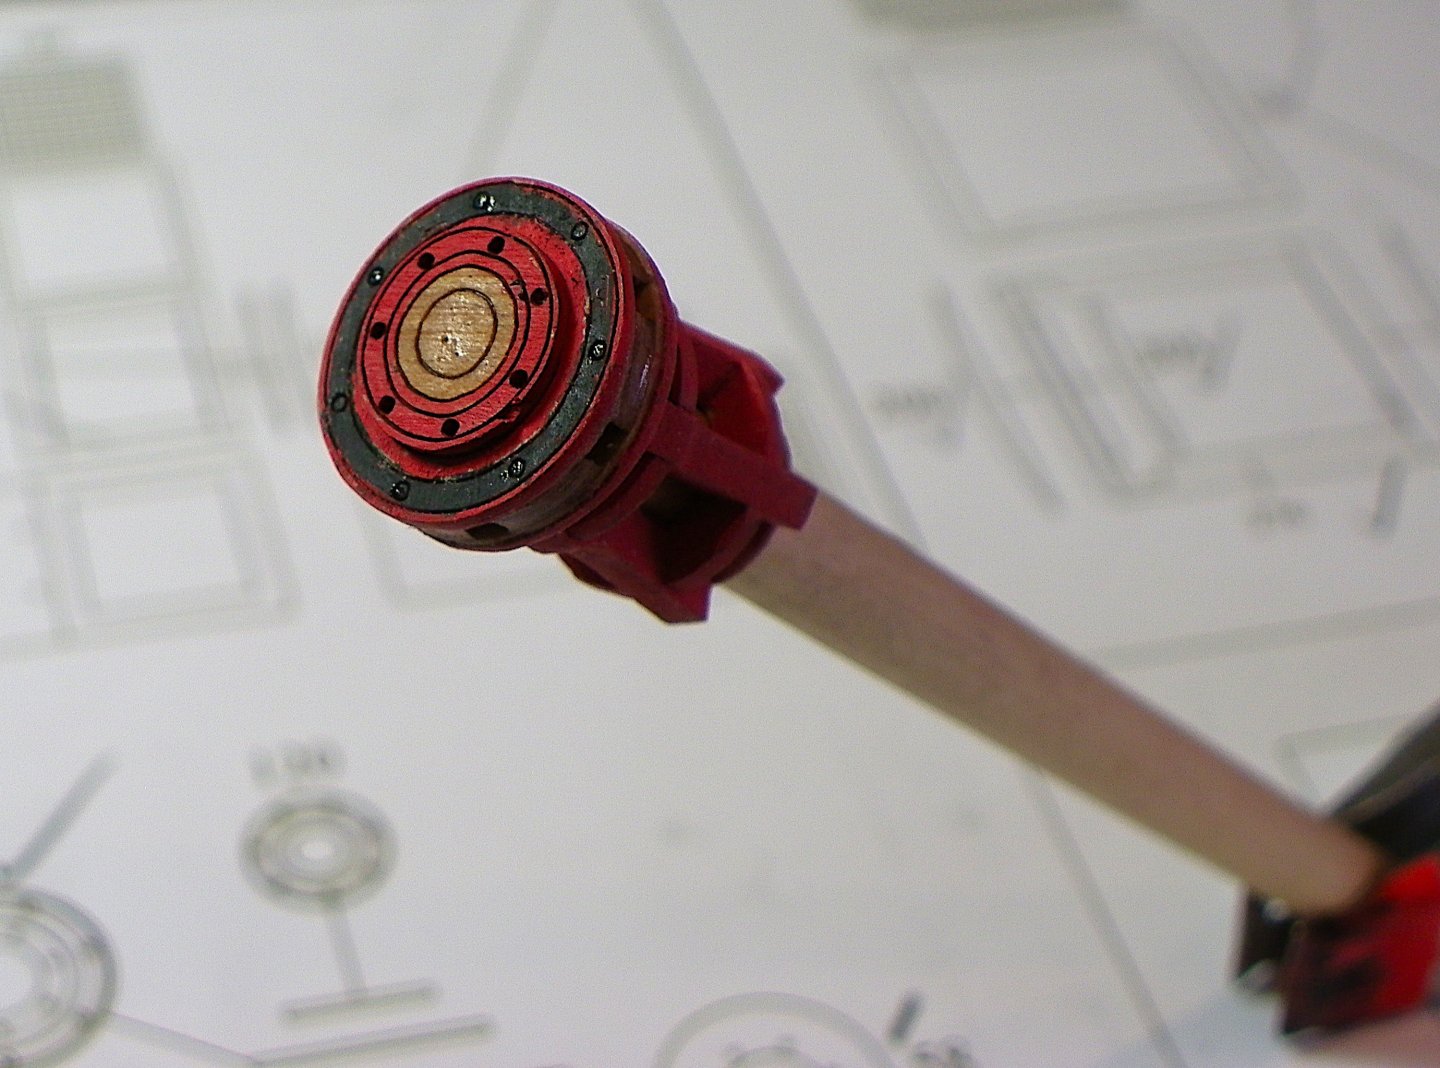
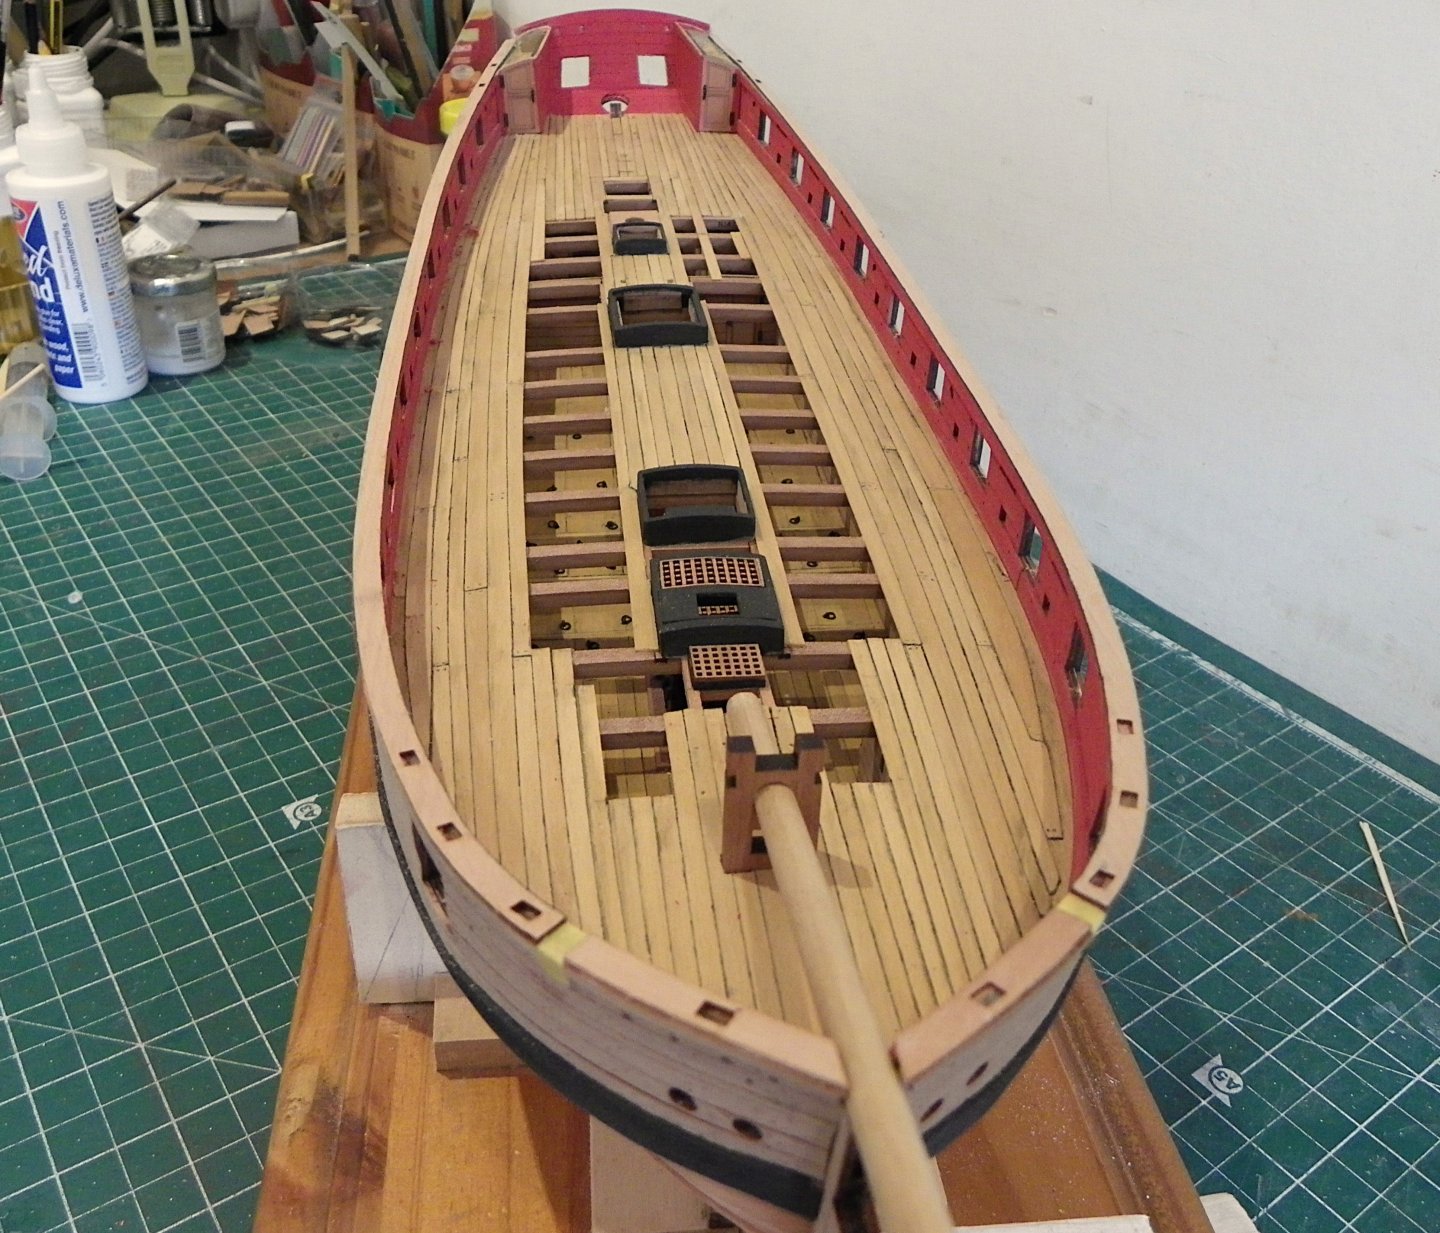
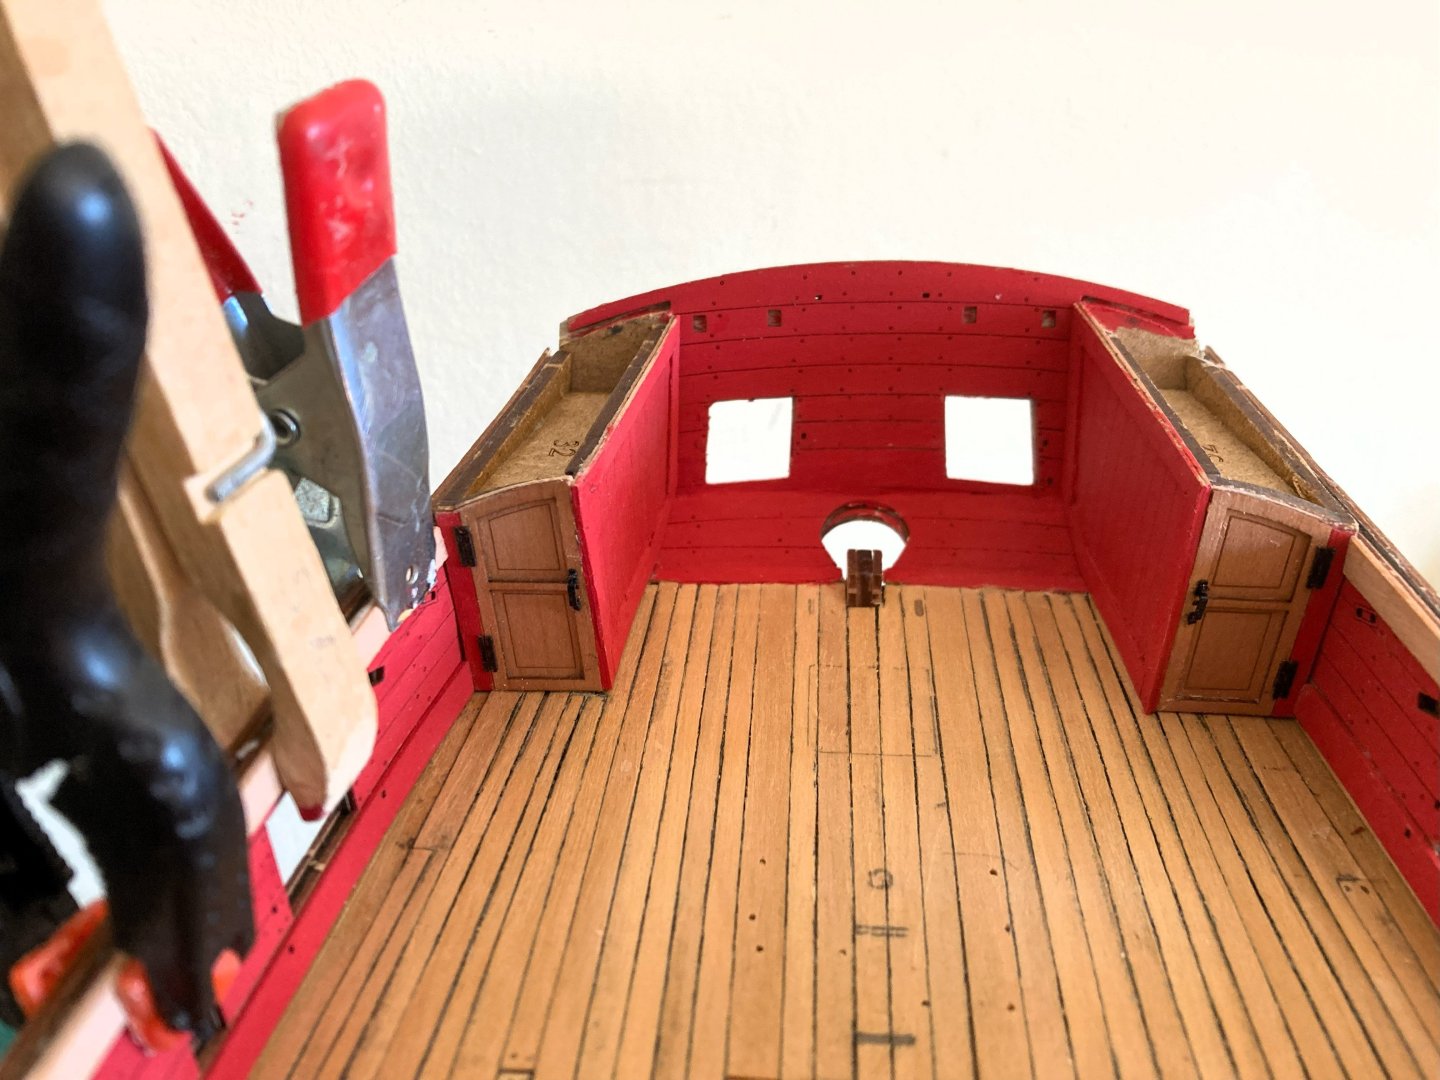
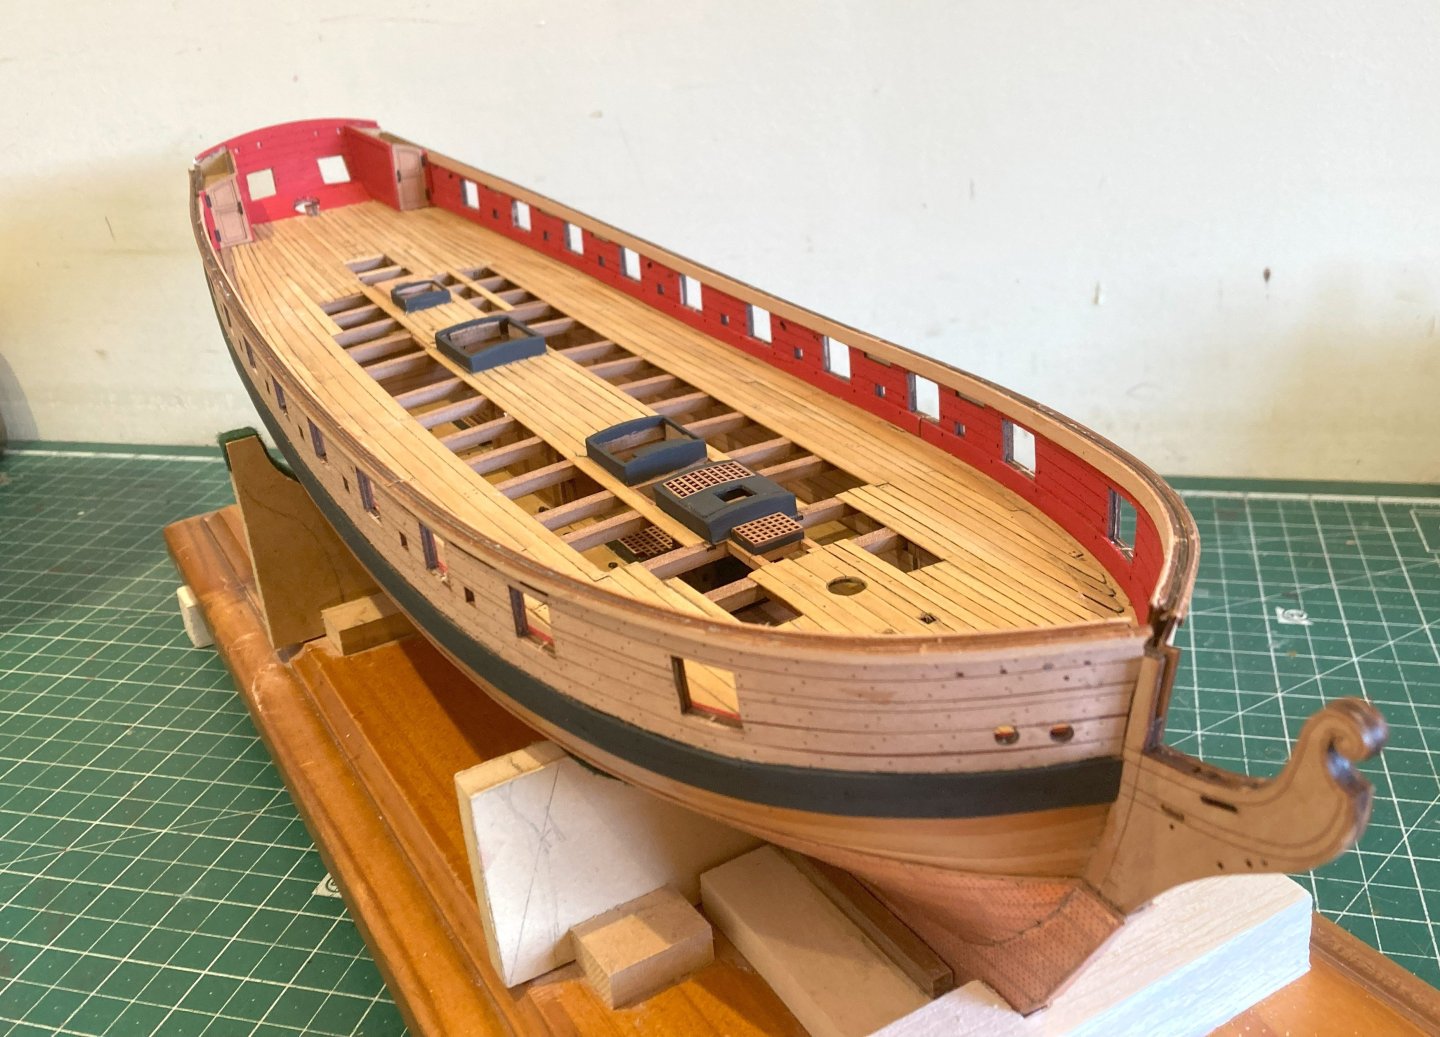
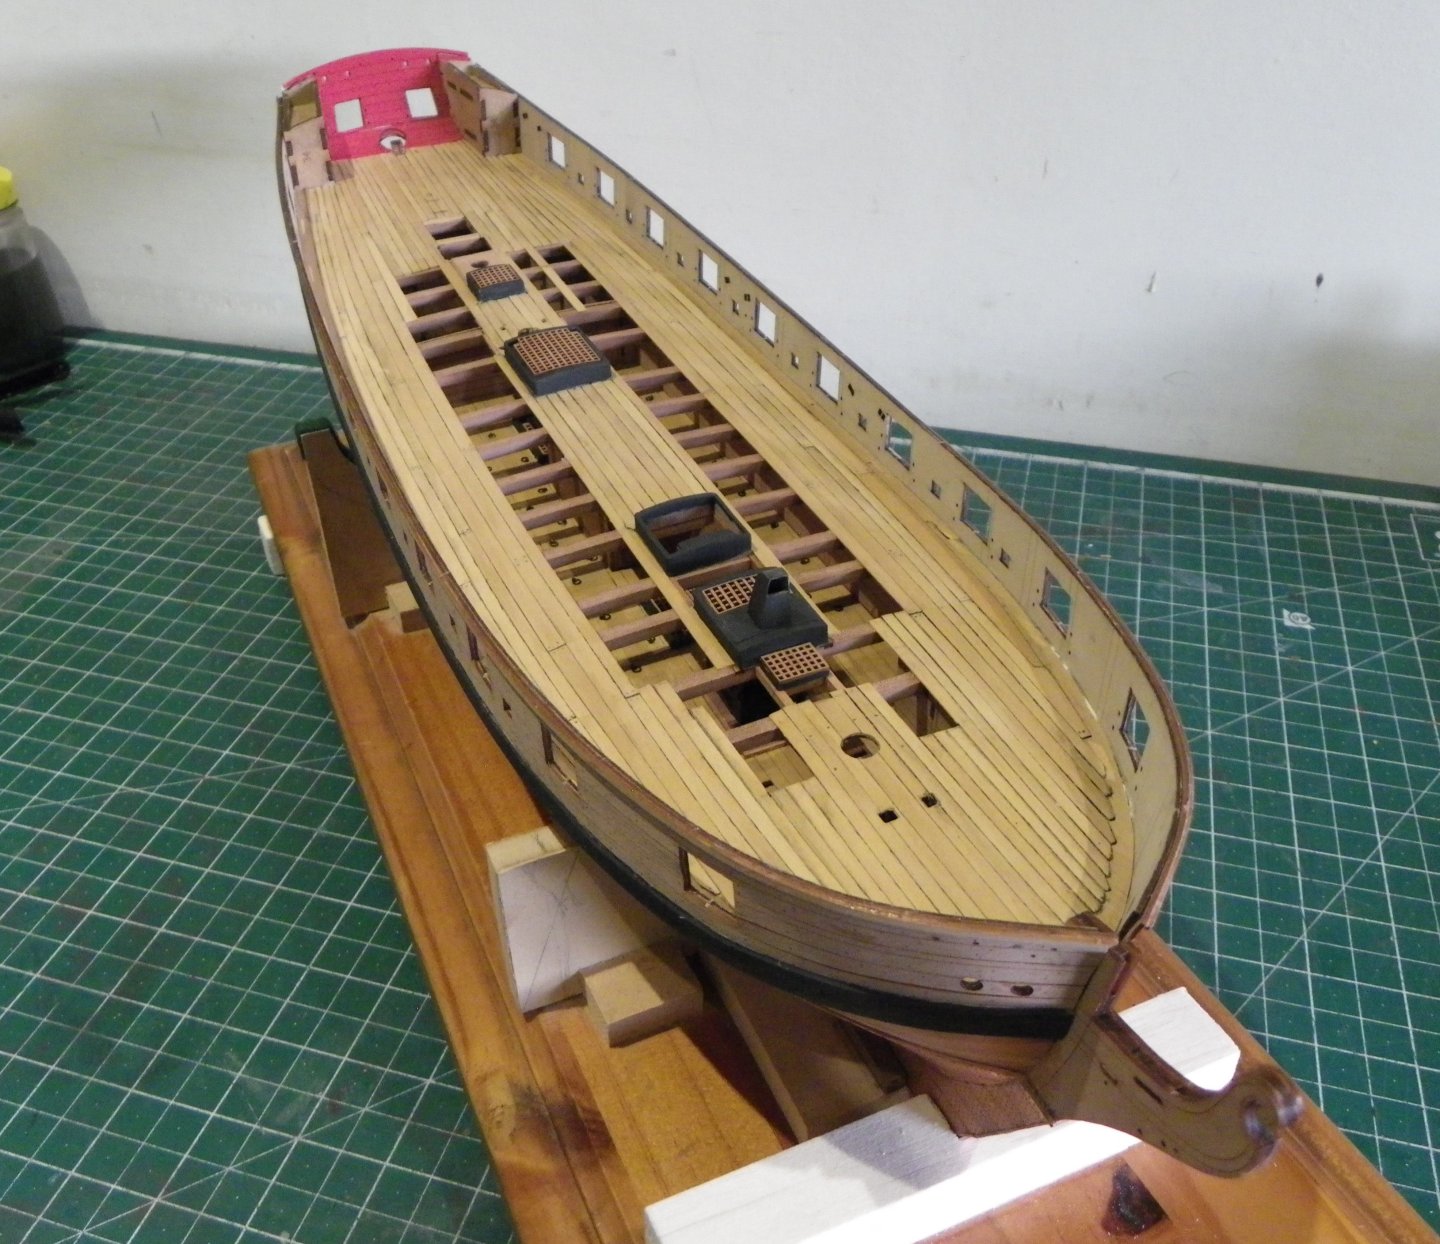
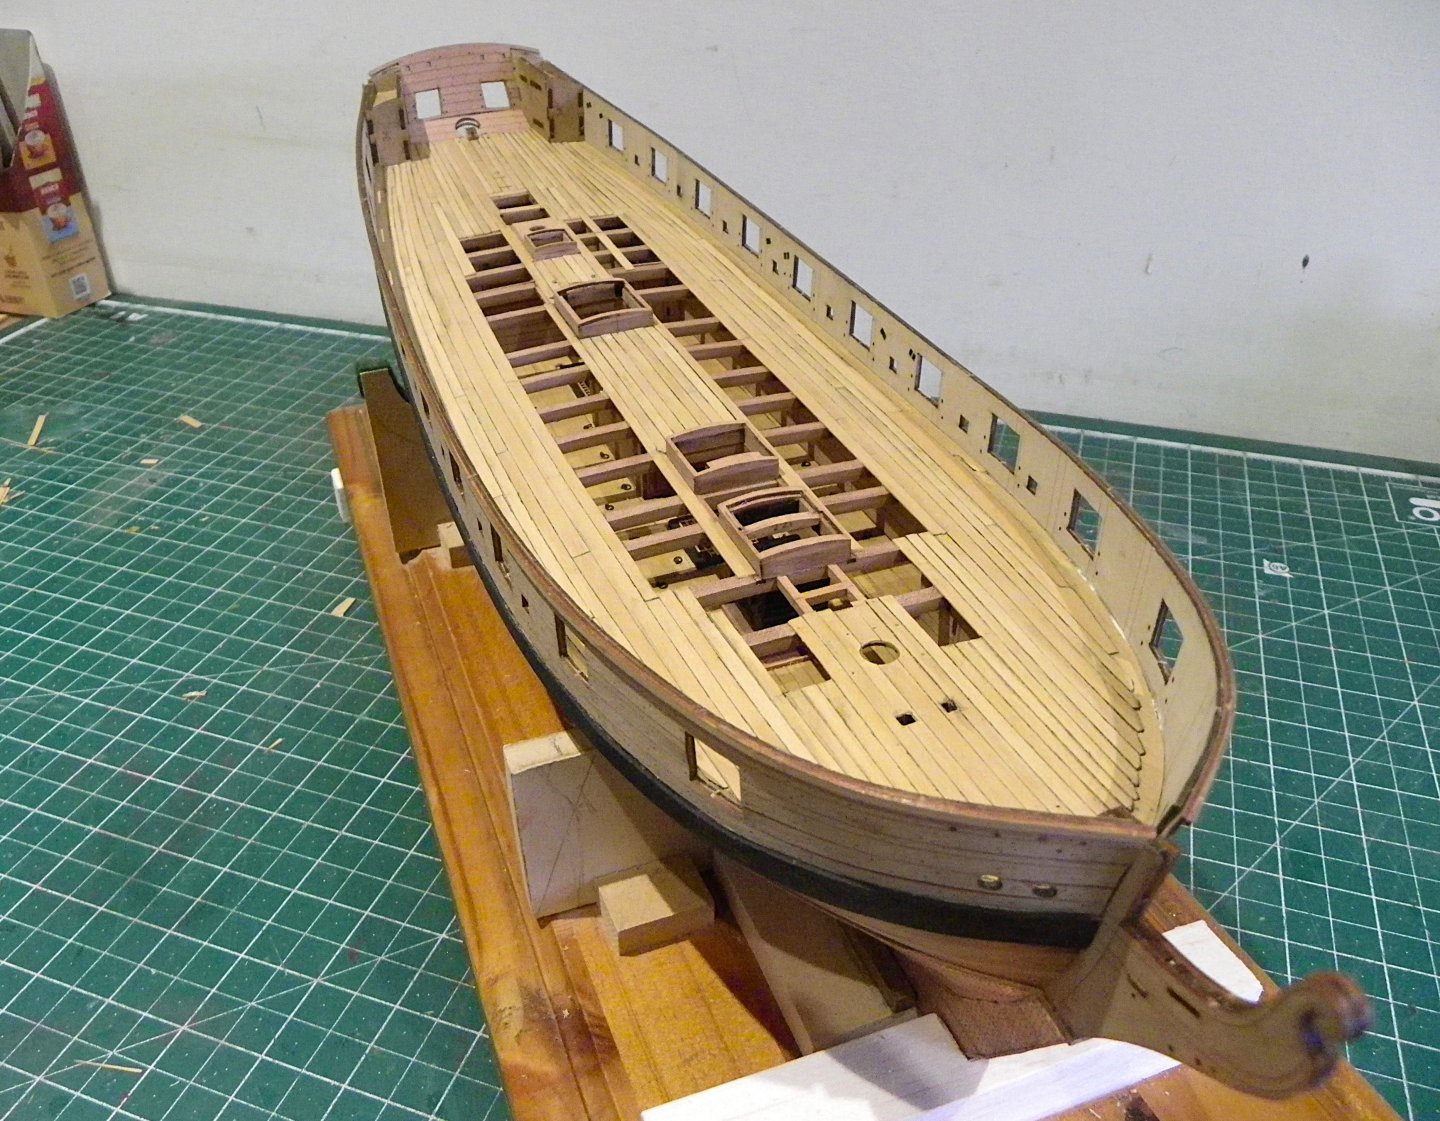
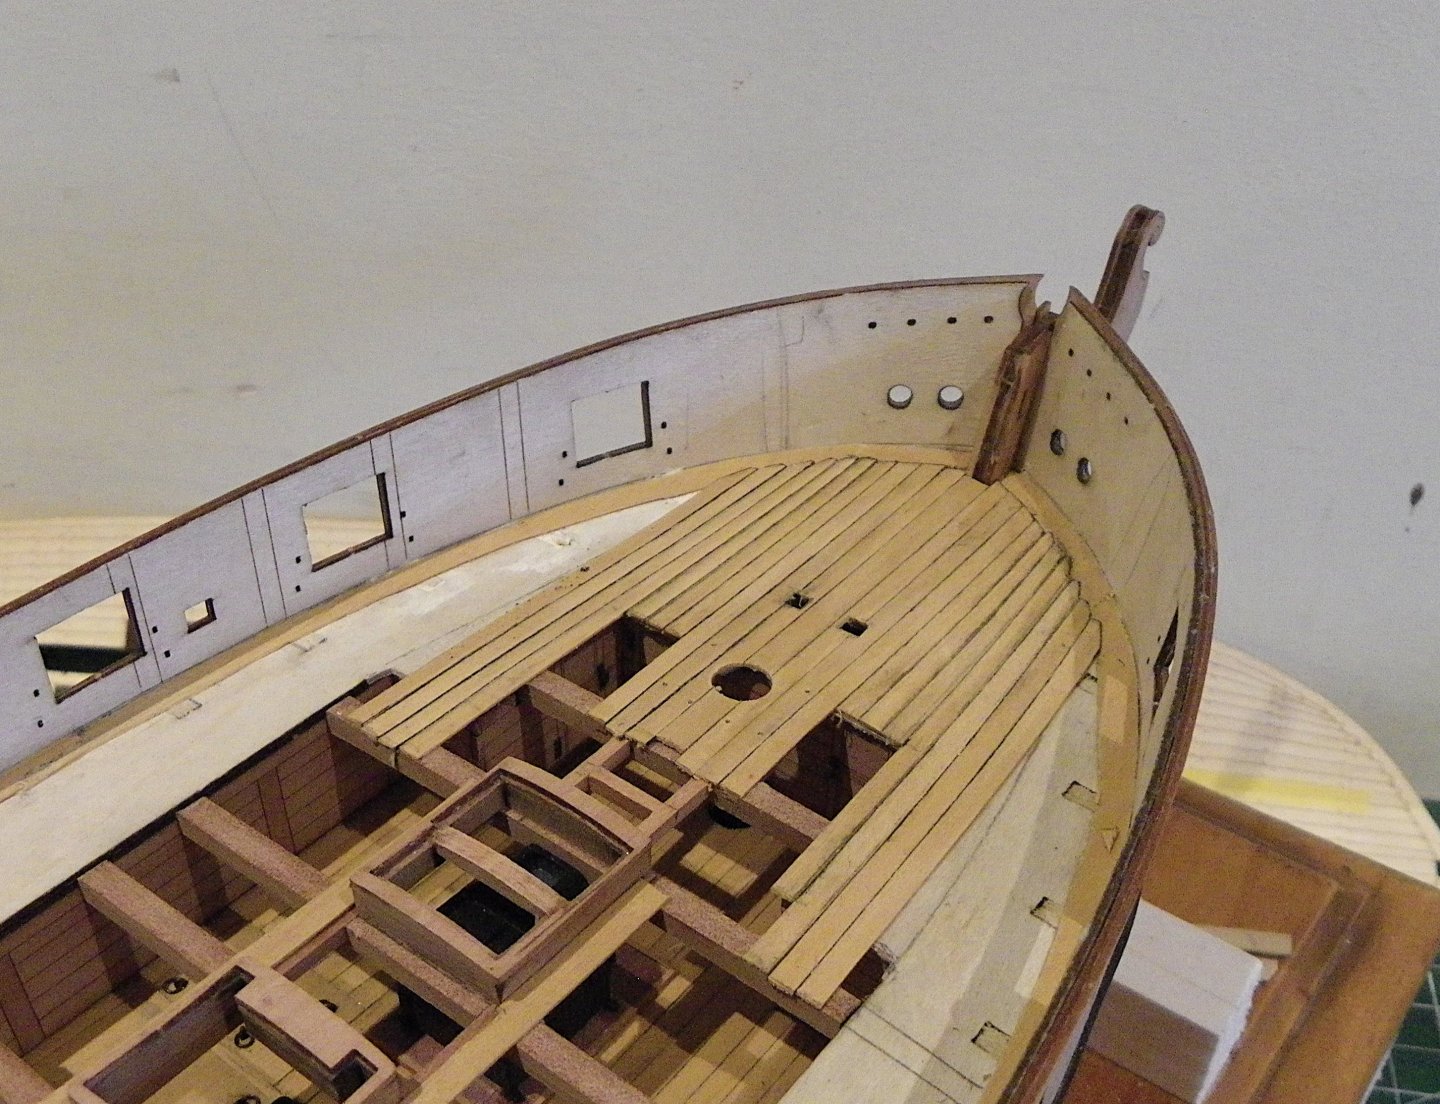
Post 52 Little gem fittings (Part 1) As a change of scene I have turned my attention to assembling the deck fittings, which are more time consuming than you may think, at least for me they are. I start with the Winch. 0733 Tiny brass photo-etched parts that need blackening and which try to escape at every opportunity. Pearwood parts that require careful cleaning up before assembly and painting. 0734 The deck slots need checking for fit. 0742 The winch is conveniently assembled on the model following painting. Capstan Need to refer to the plan for assembly to ensure that the various sections are added in the right order. 0752 The Capstan is assembled on 6mm ø dowel which represents the spindle, and everything fits perfectly. 0753 The spindle extends down to the lower deck where the heel slots into a step. In reality the spindle tapered below deck but that’s a detail I haven’t followed on this build. I decided to bring out some of the detail on the drum head, by painting in the iron reinforcing ring. 0759 When adding the final topping piece to the Drumhead, the holes for the Capstan bar retaining pins should align with the bar mortises. 03576a 0374a Having assembled it, I wasn’t too keen on the engraved Drumhead patterns, so I reversed the cap to show the plain side. B.E. 13/03/2025


- 332 replies
-
- 23
-
-

-
- Harpy
- Vanguard Models
- (and 1 more)
-
Nice work on the stern facia and Quarter galleries. 👍 B.E.
-
Even with the use of proper Gudgeons and wire pintles the rudder remains vulnerable. It's usually the Gudgeons that break away from the sternpost with that set-up. Using a small bulldog clip to secure the rudder and keel helps. B.E.
- 332 replies
-
- 1
-
-
- Harpy
- Vanguard Models
- (and 1 more)
-
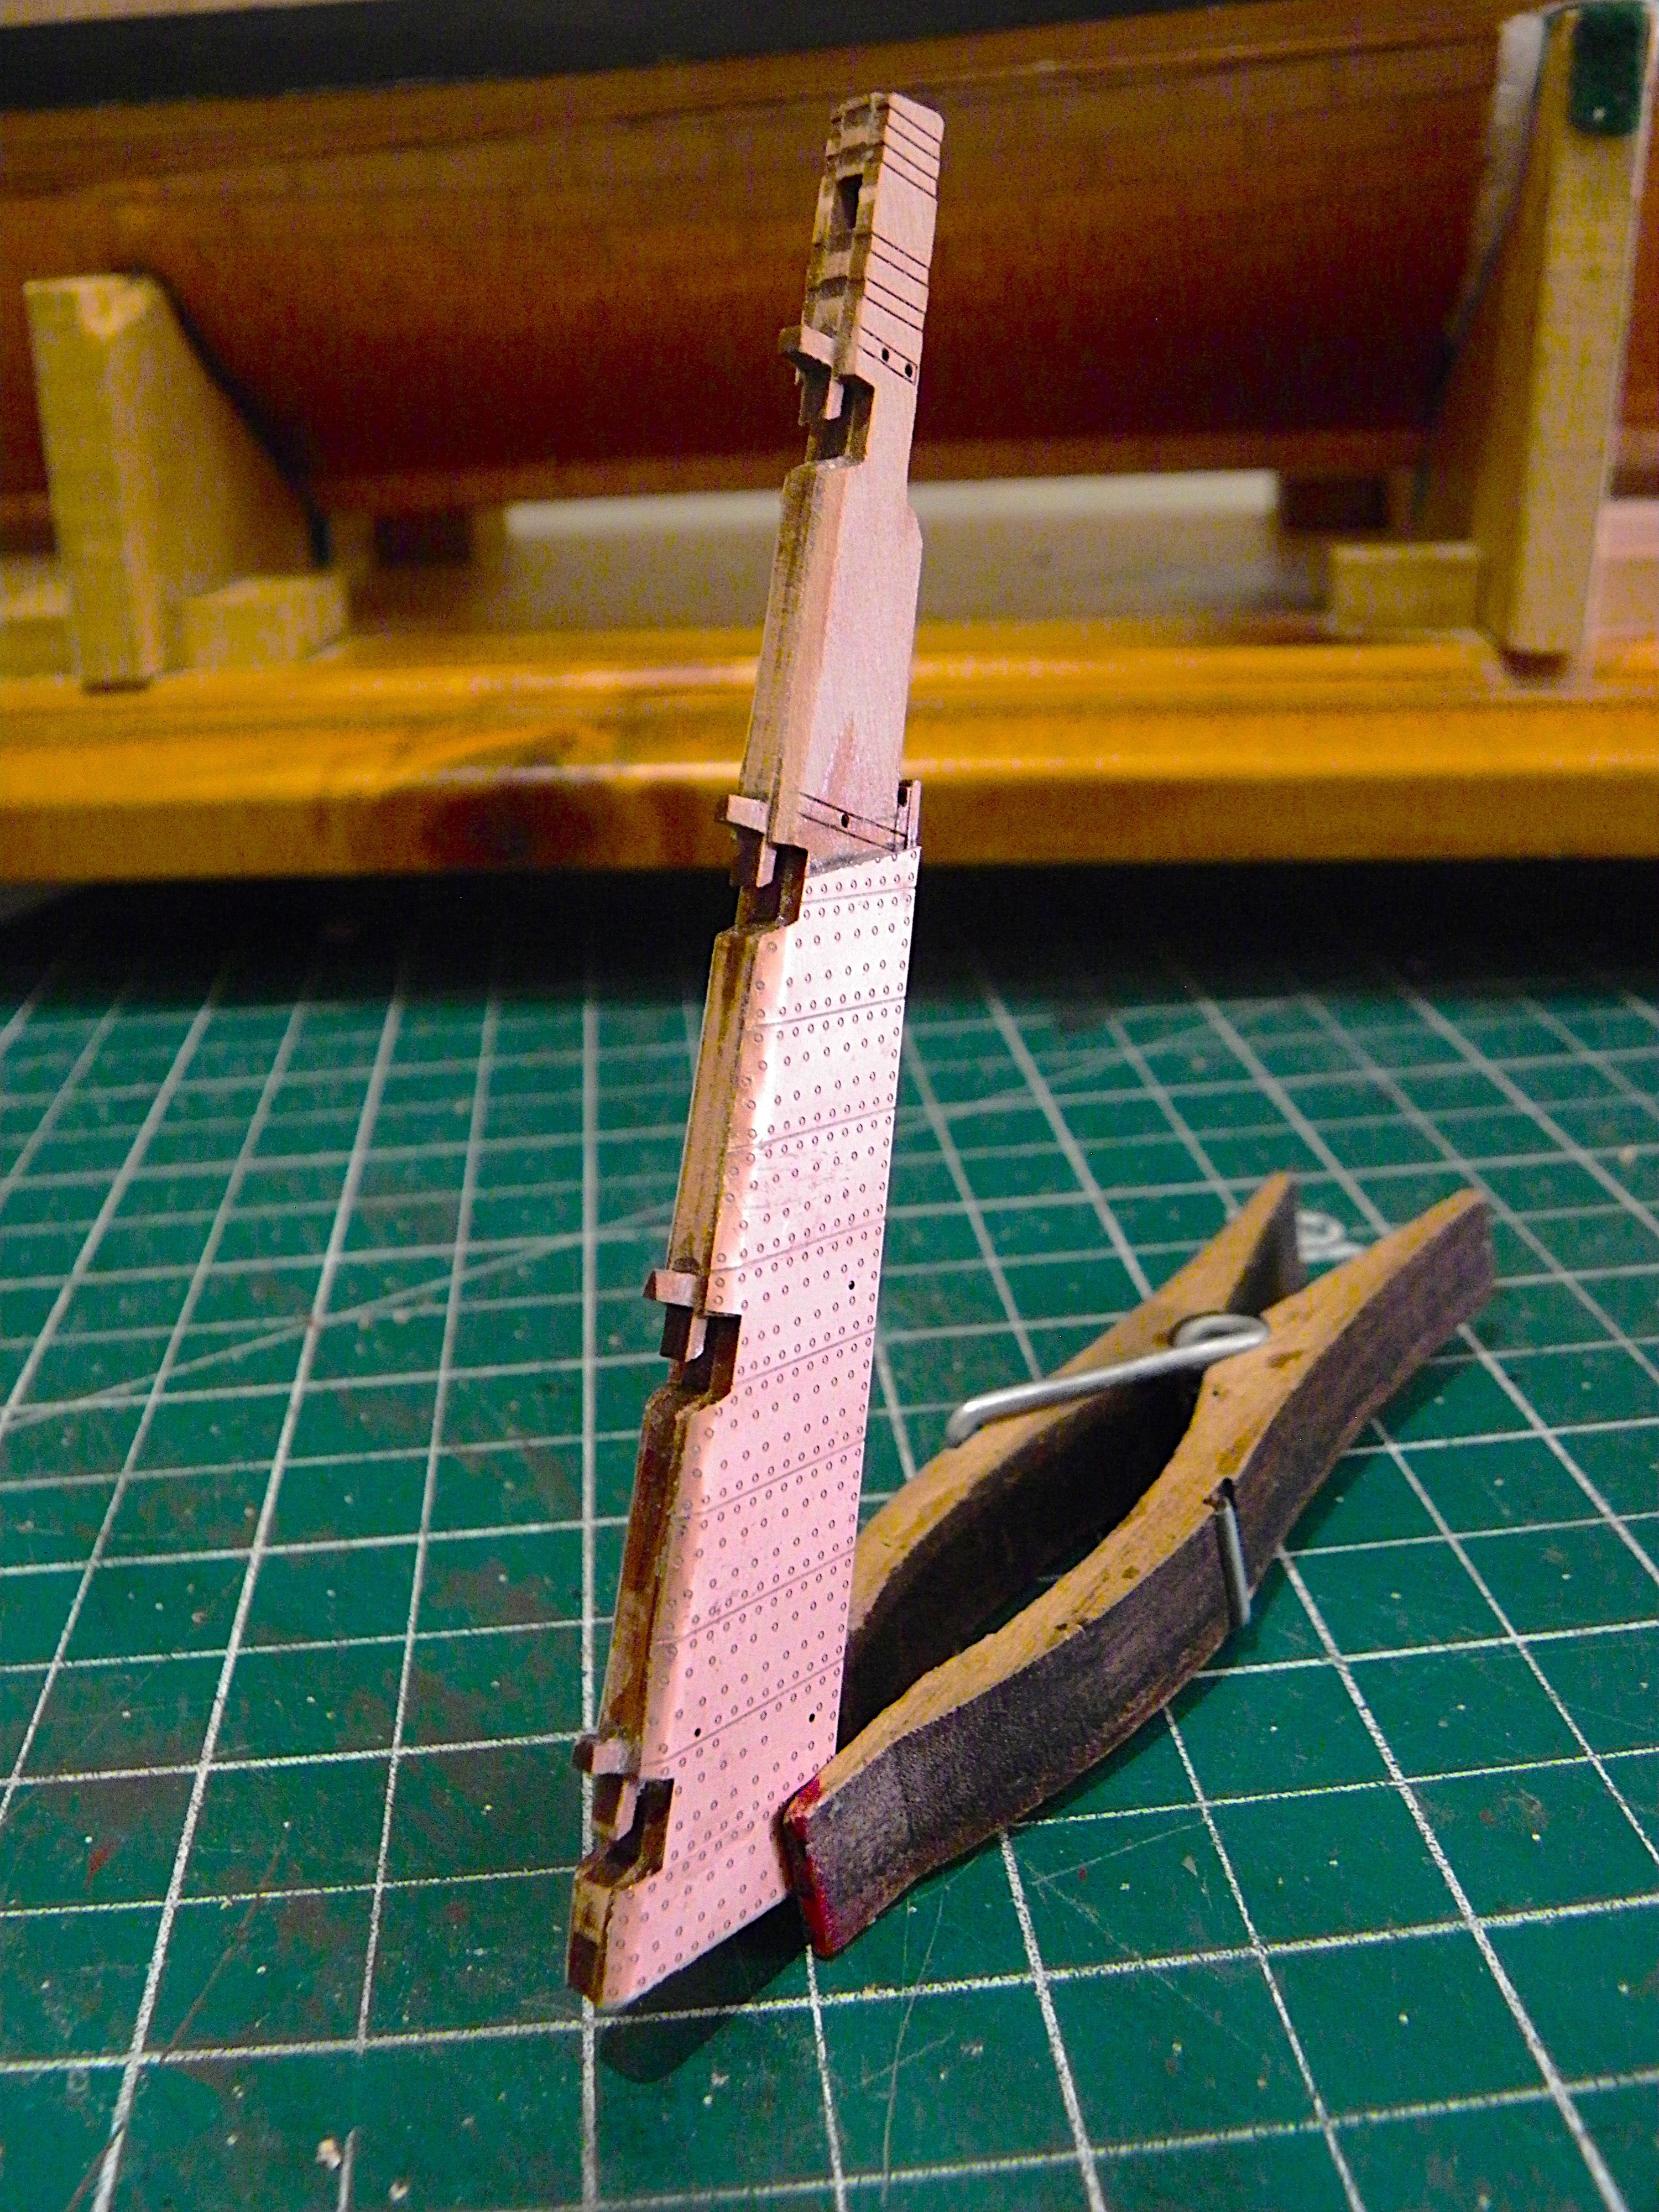
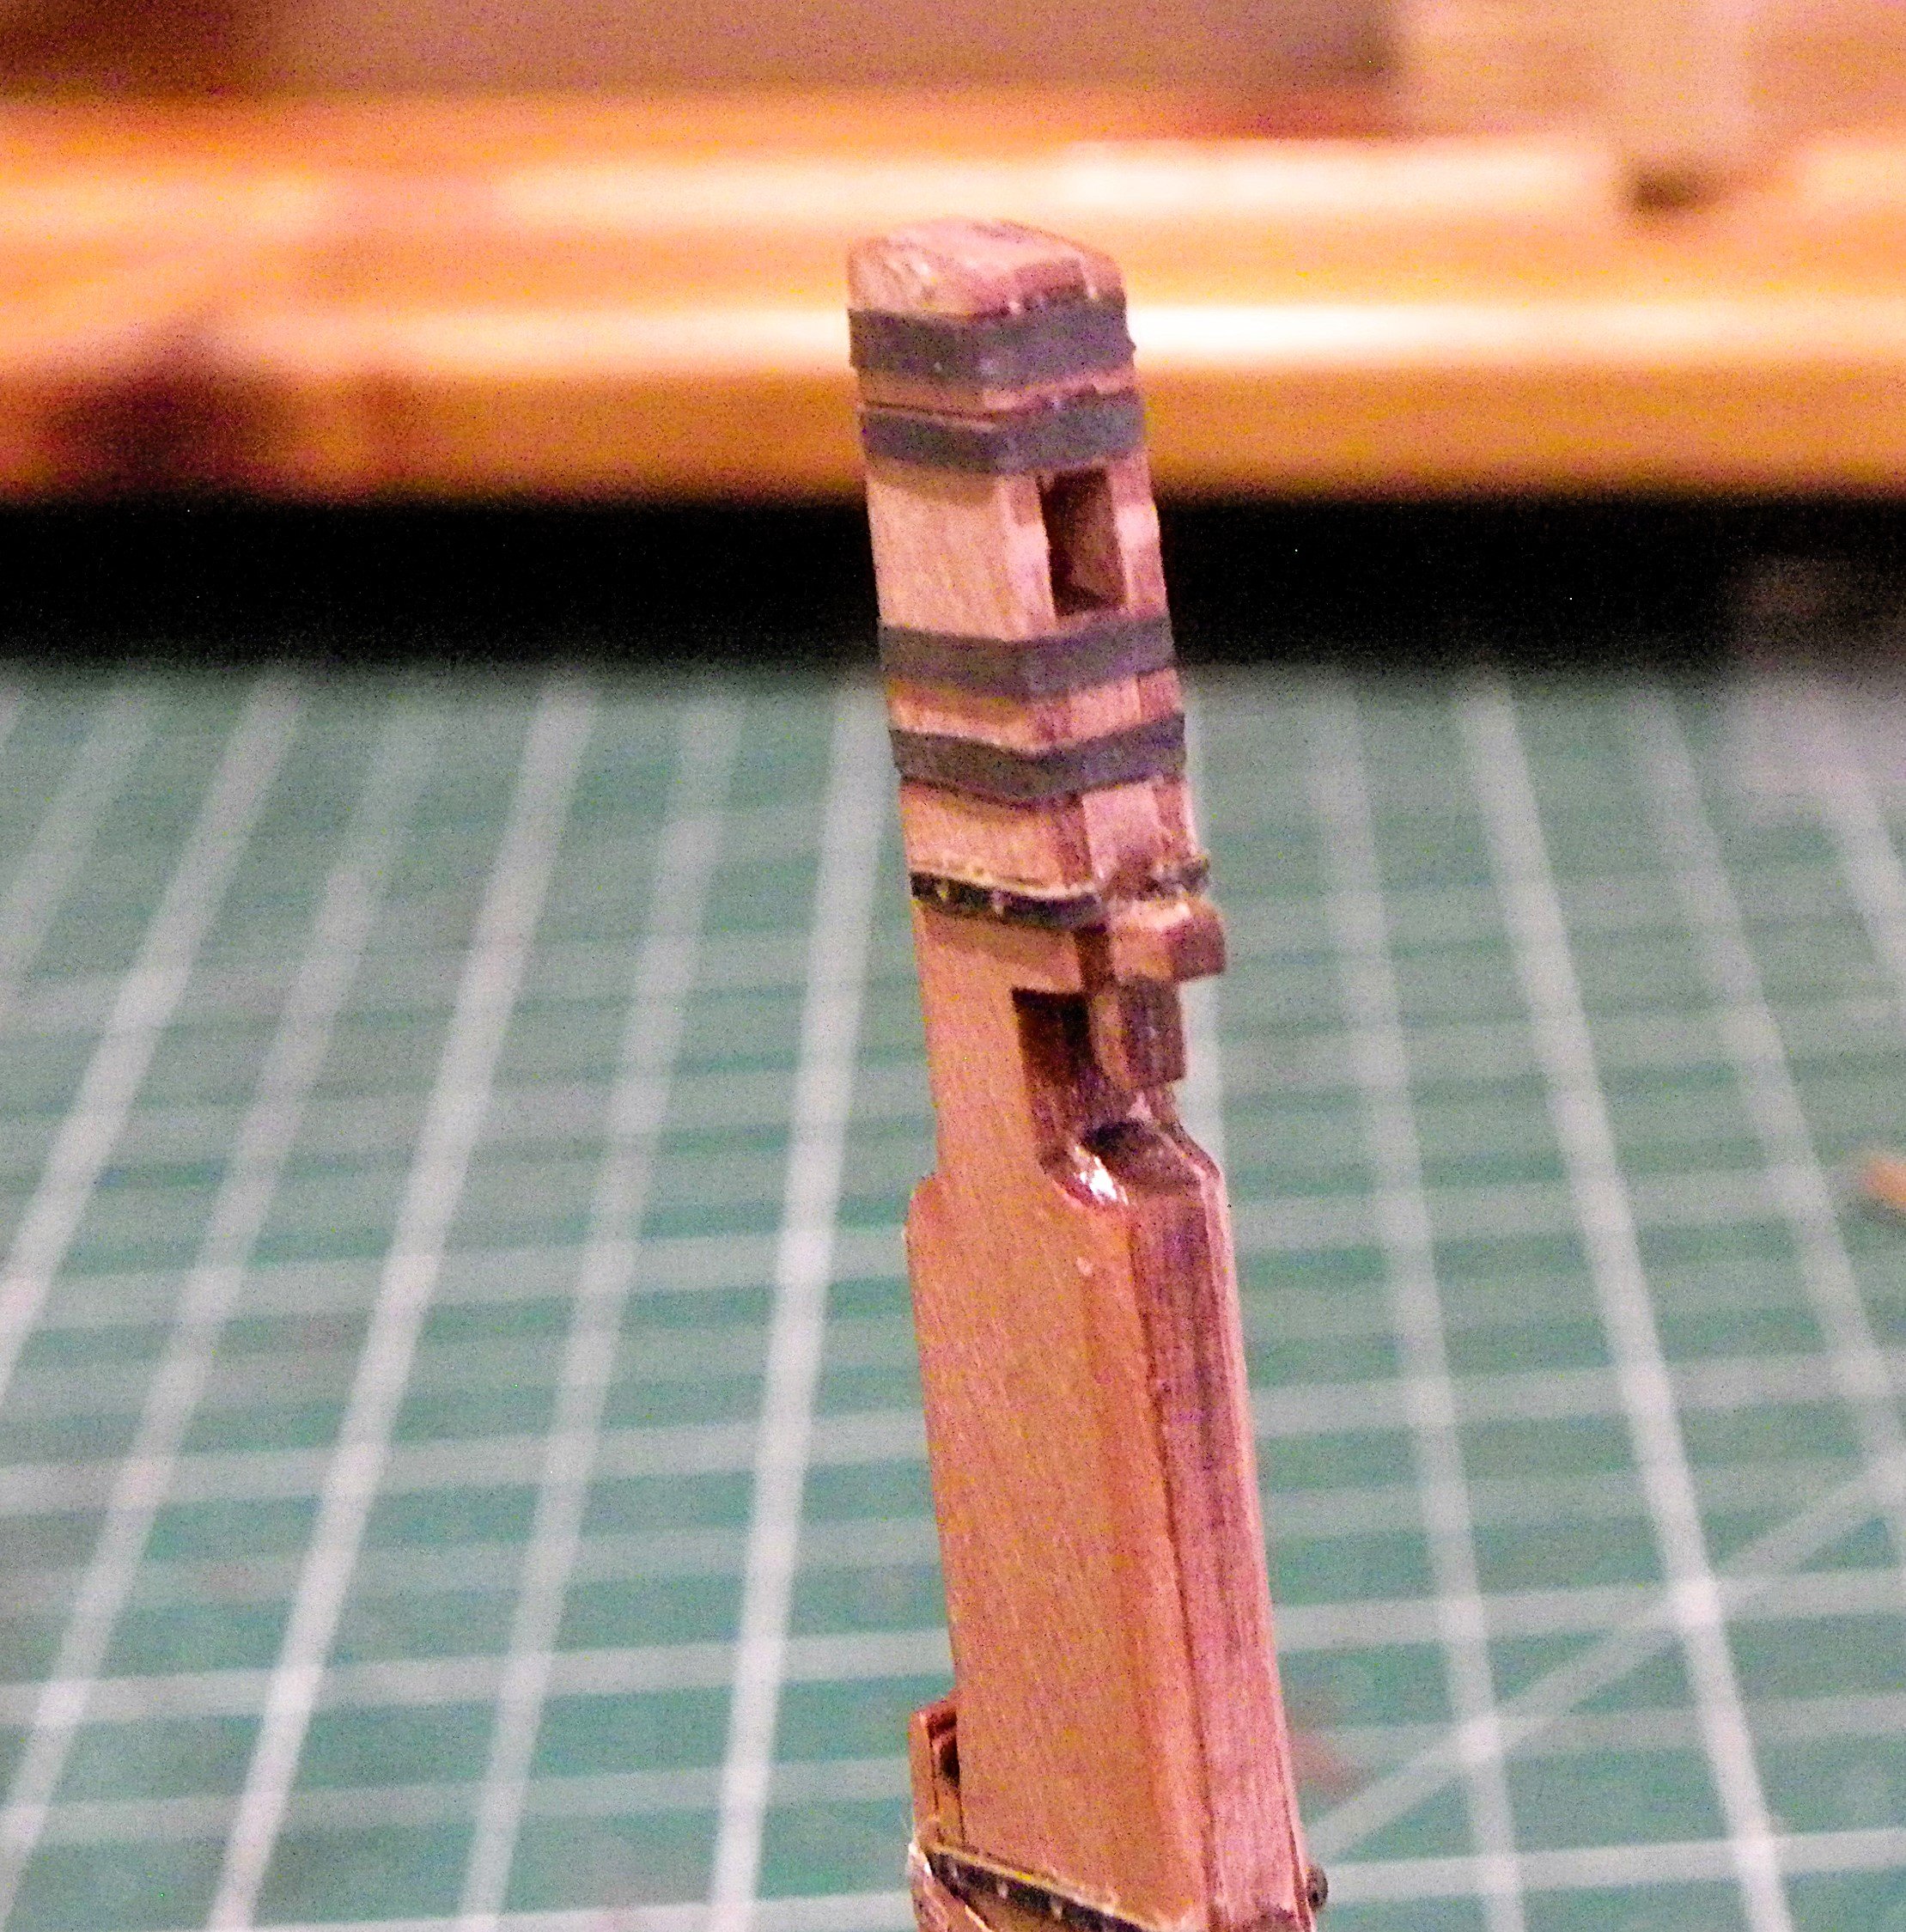
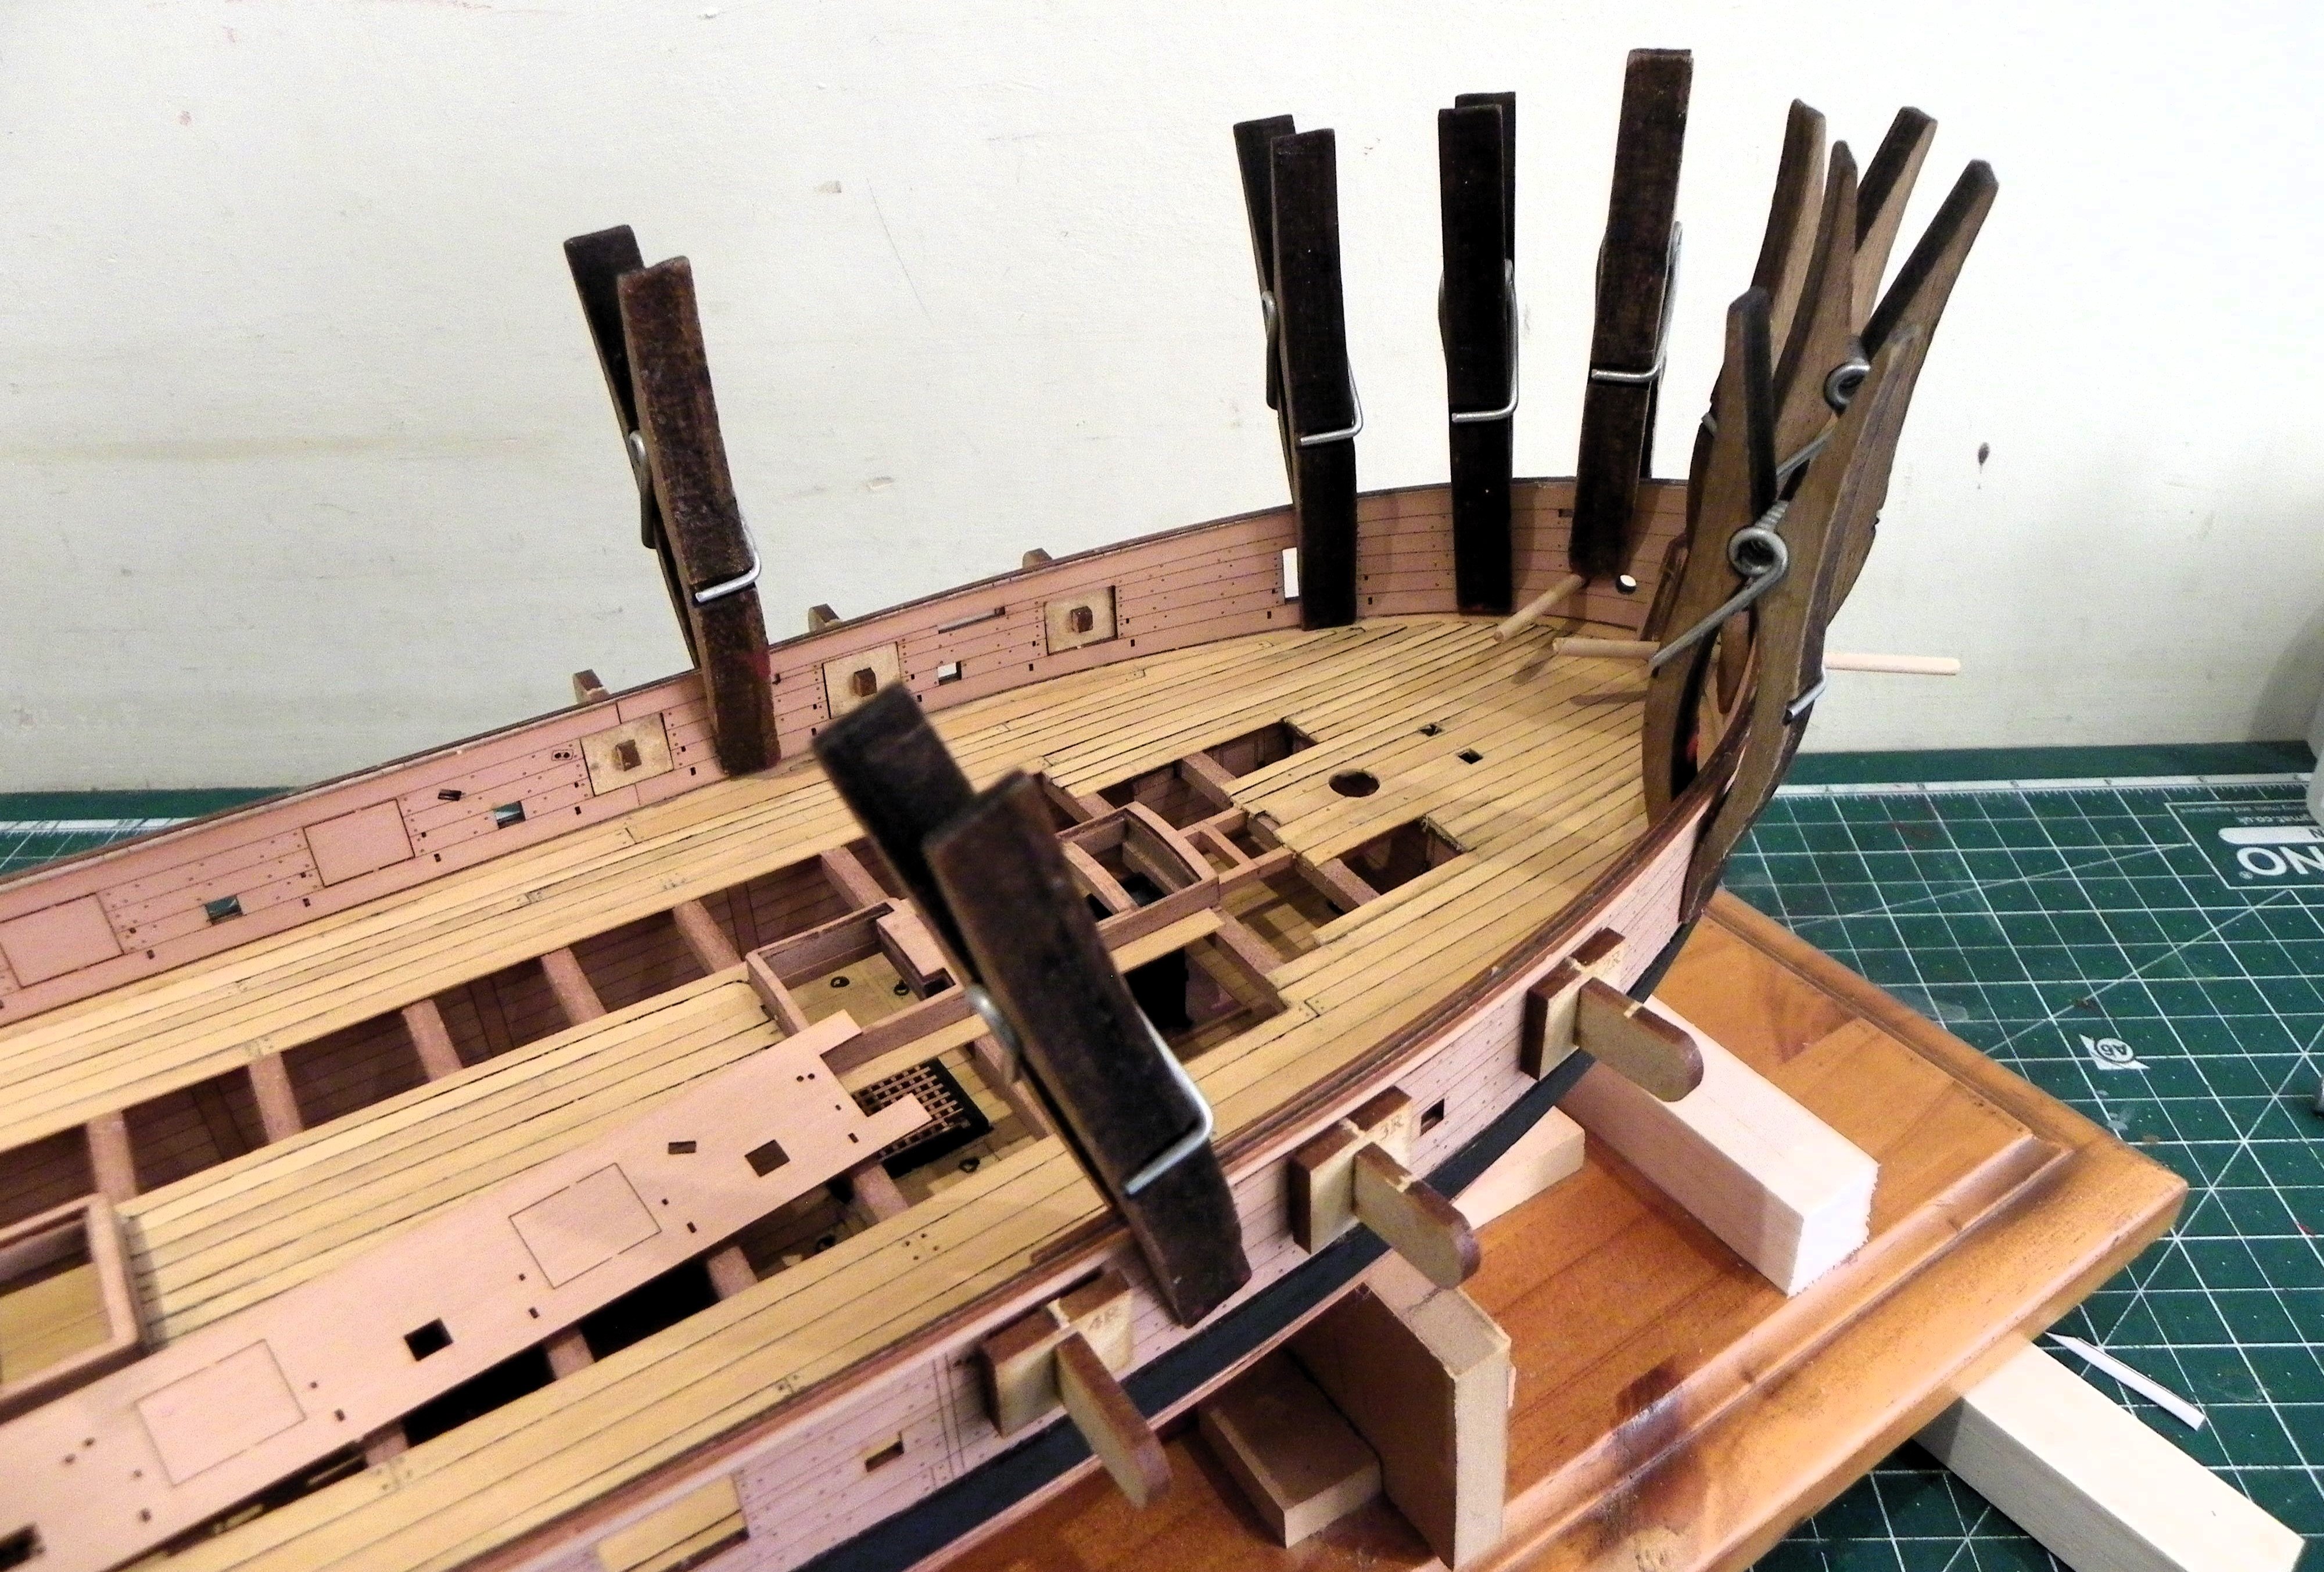
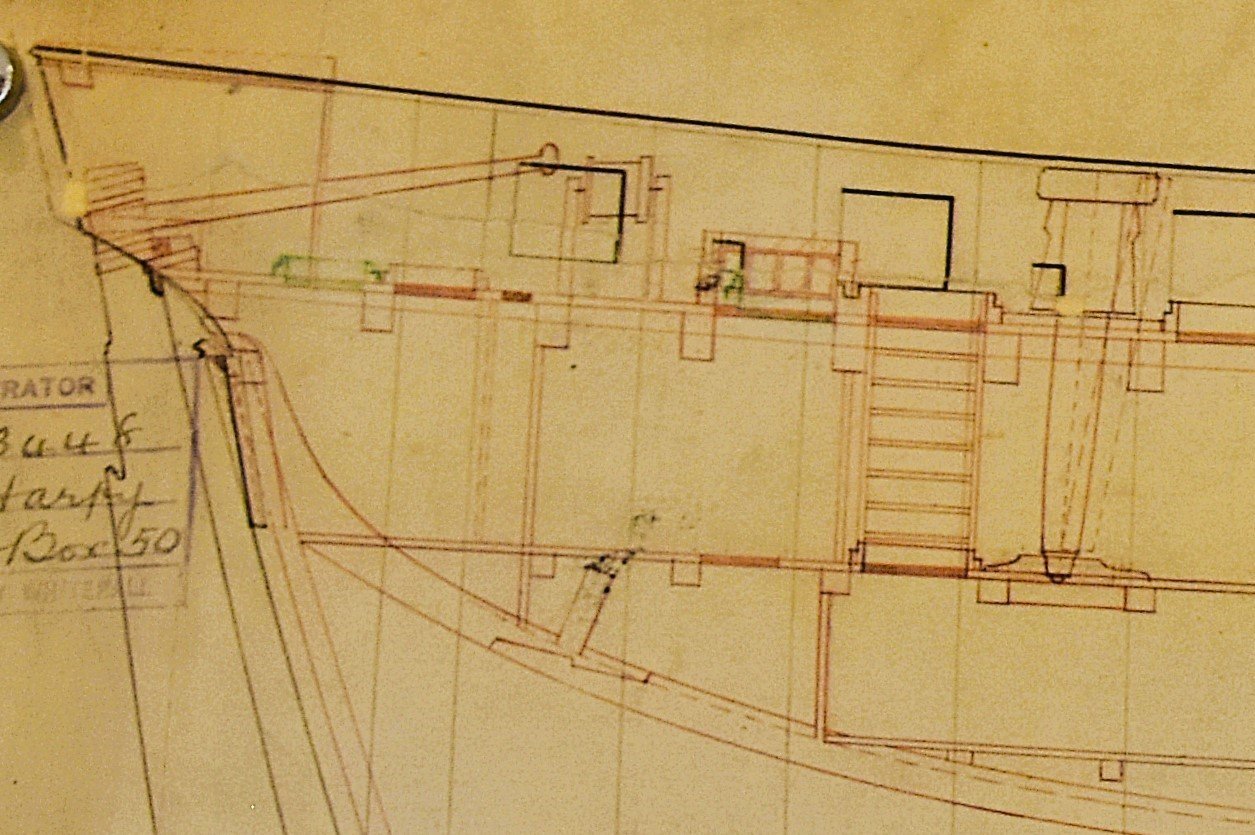
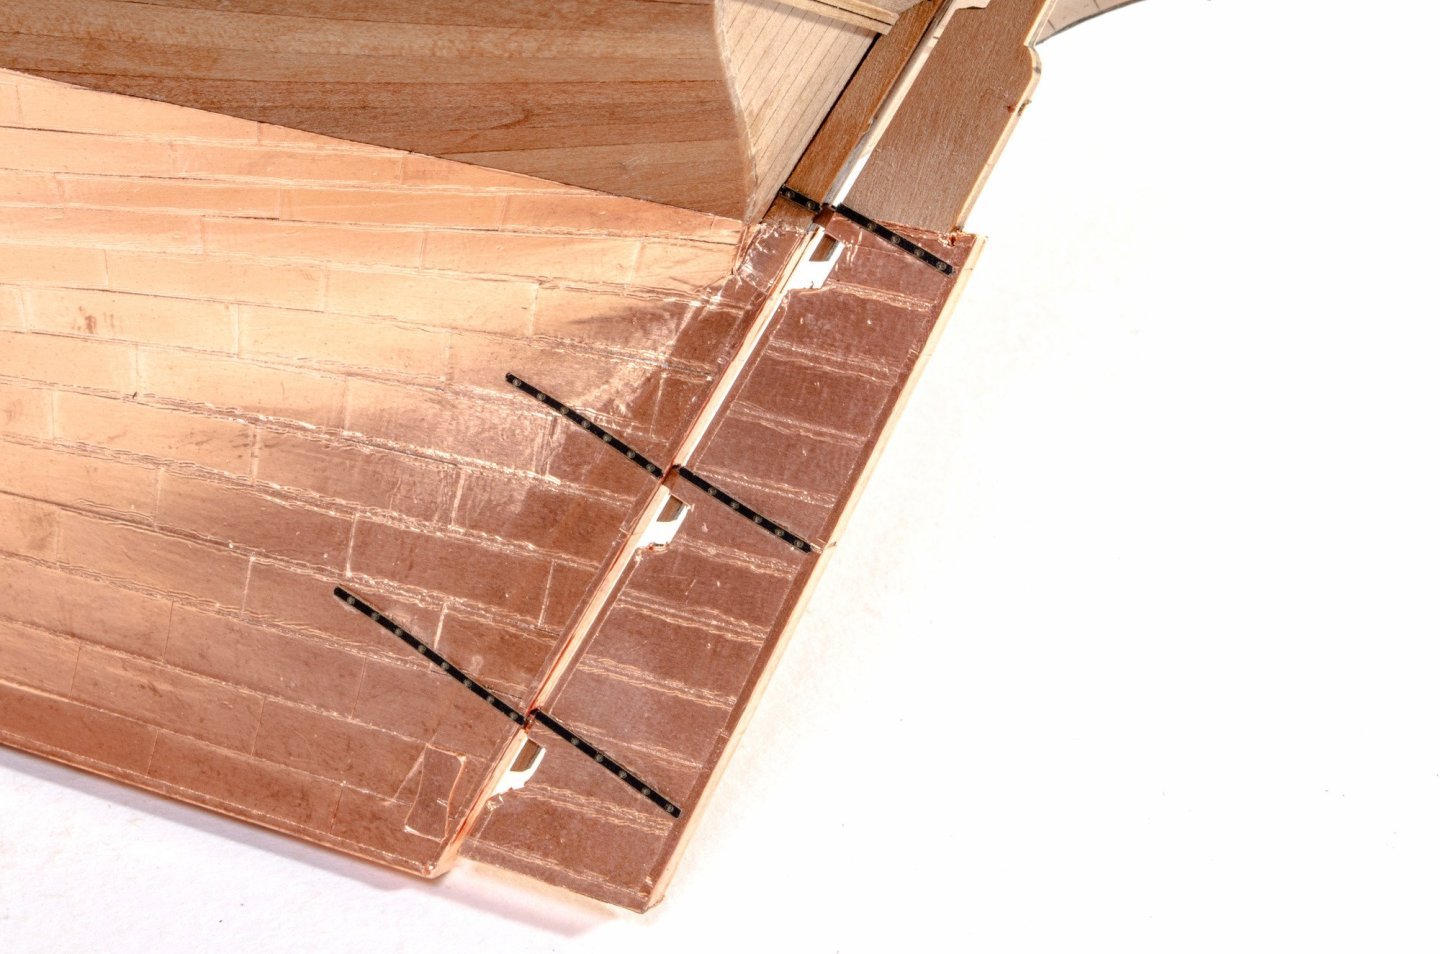
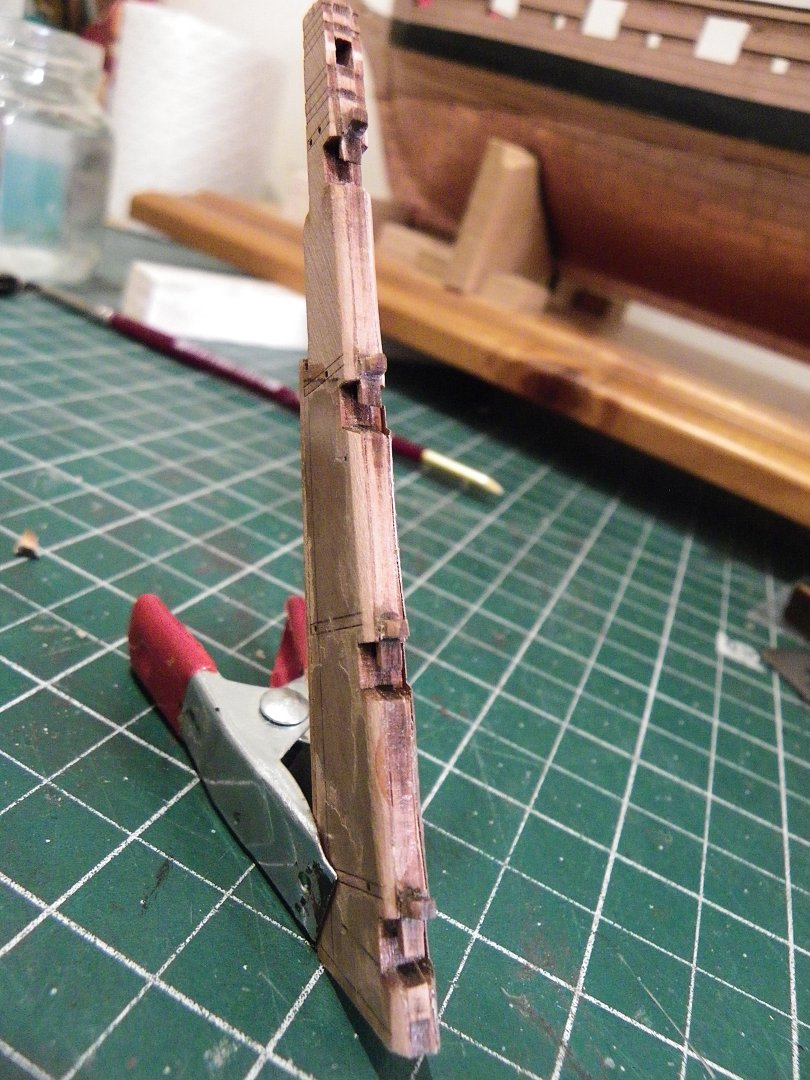
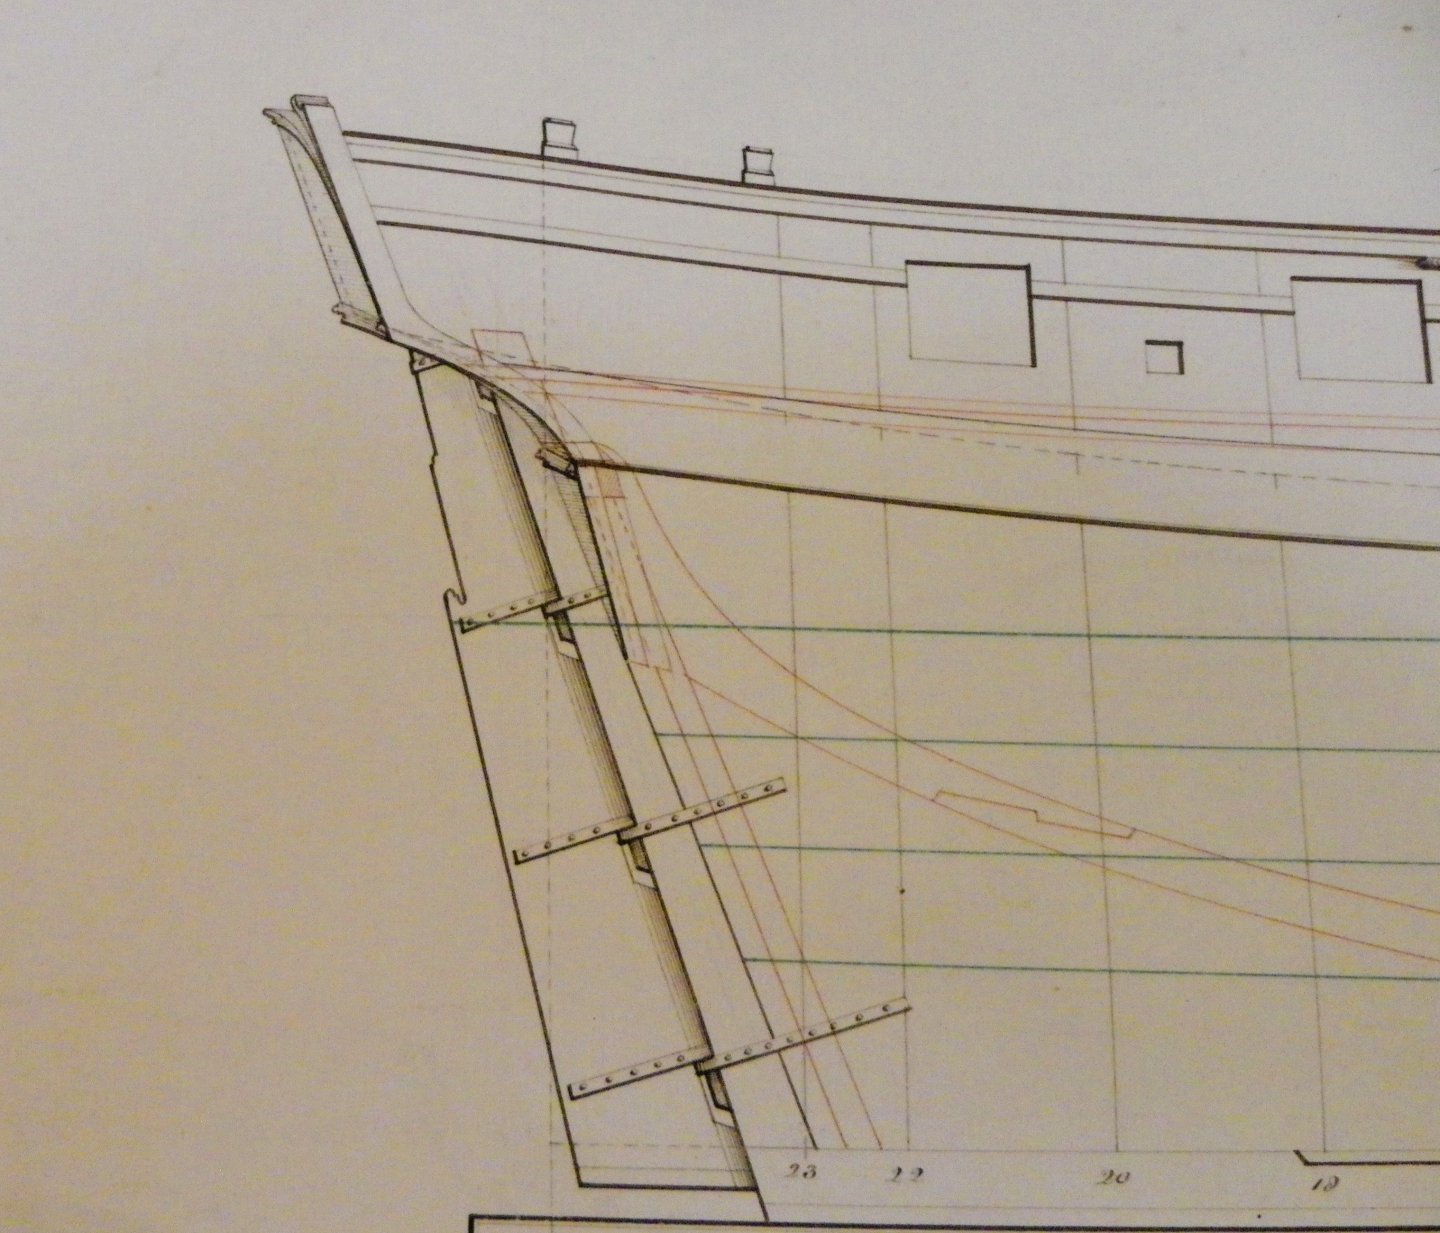
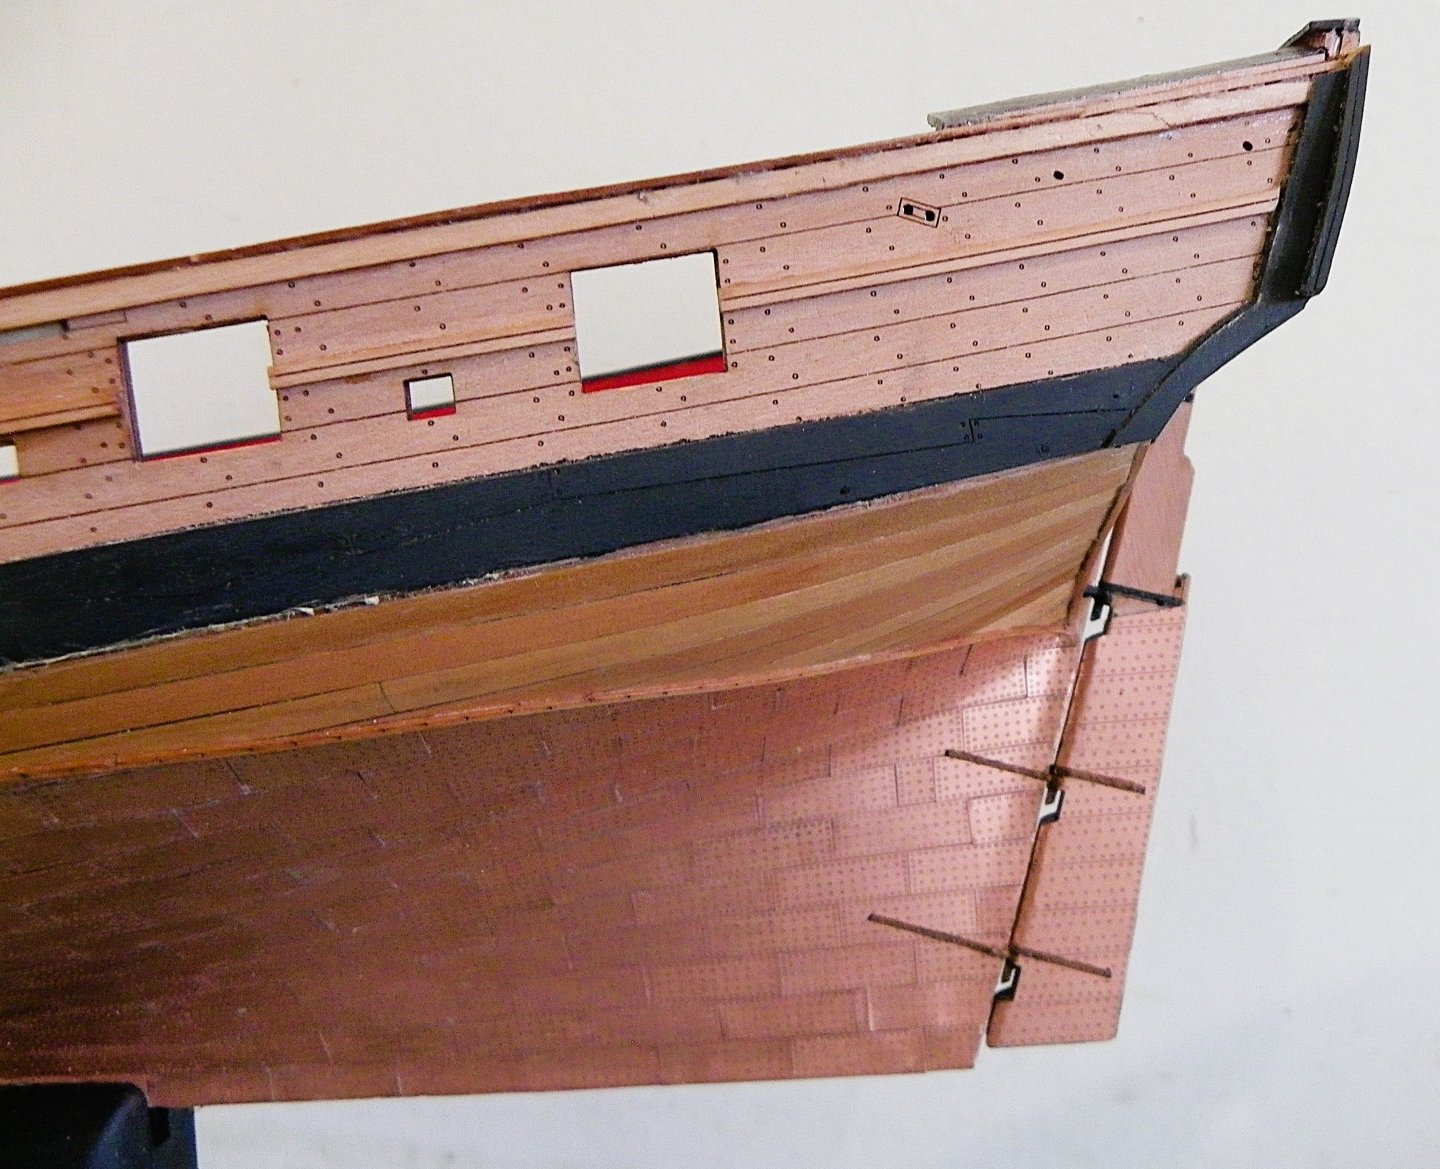
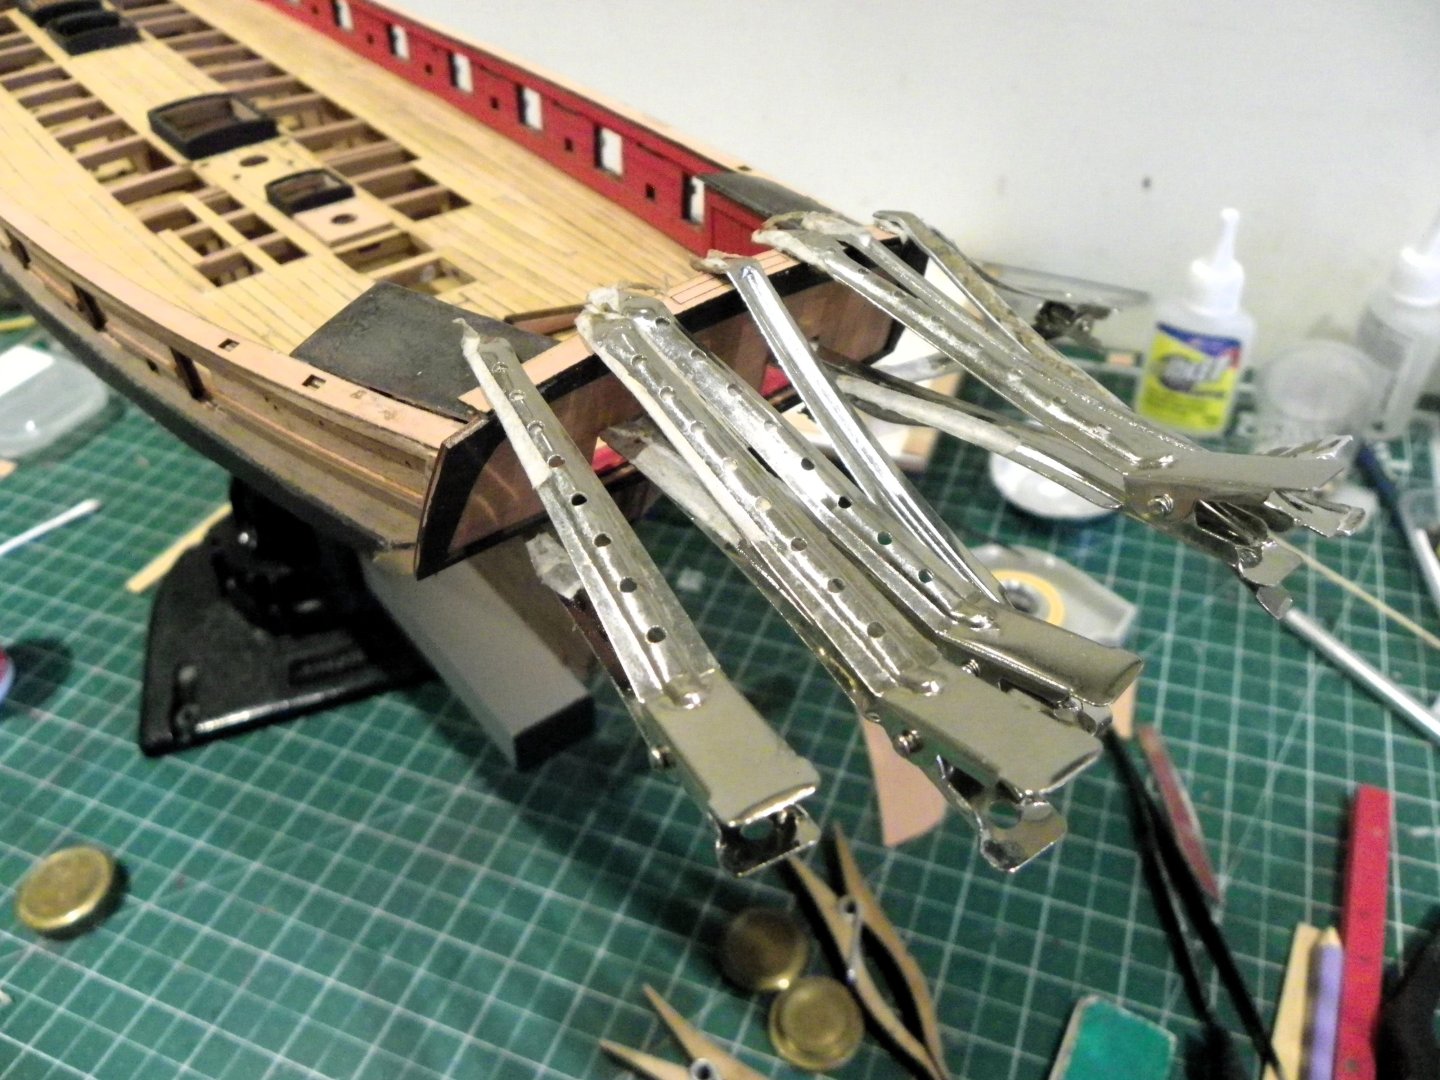
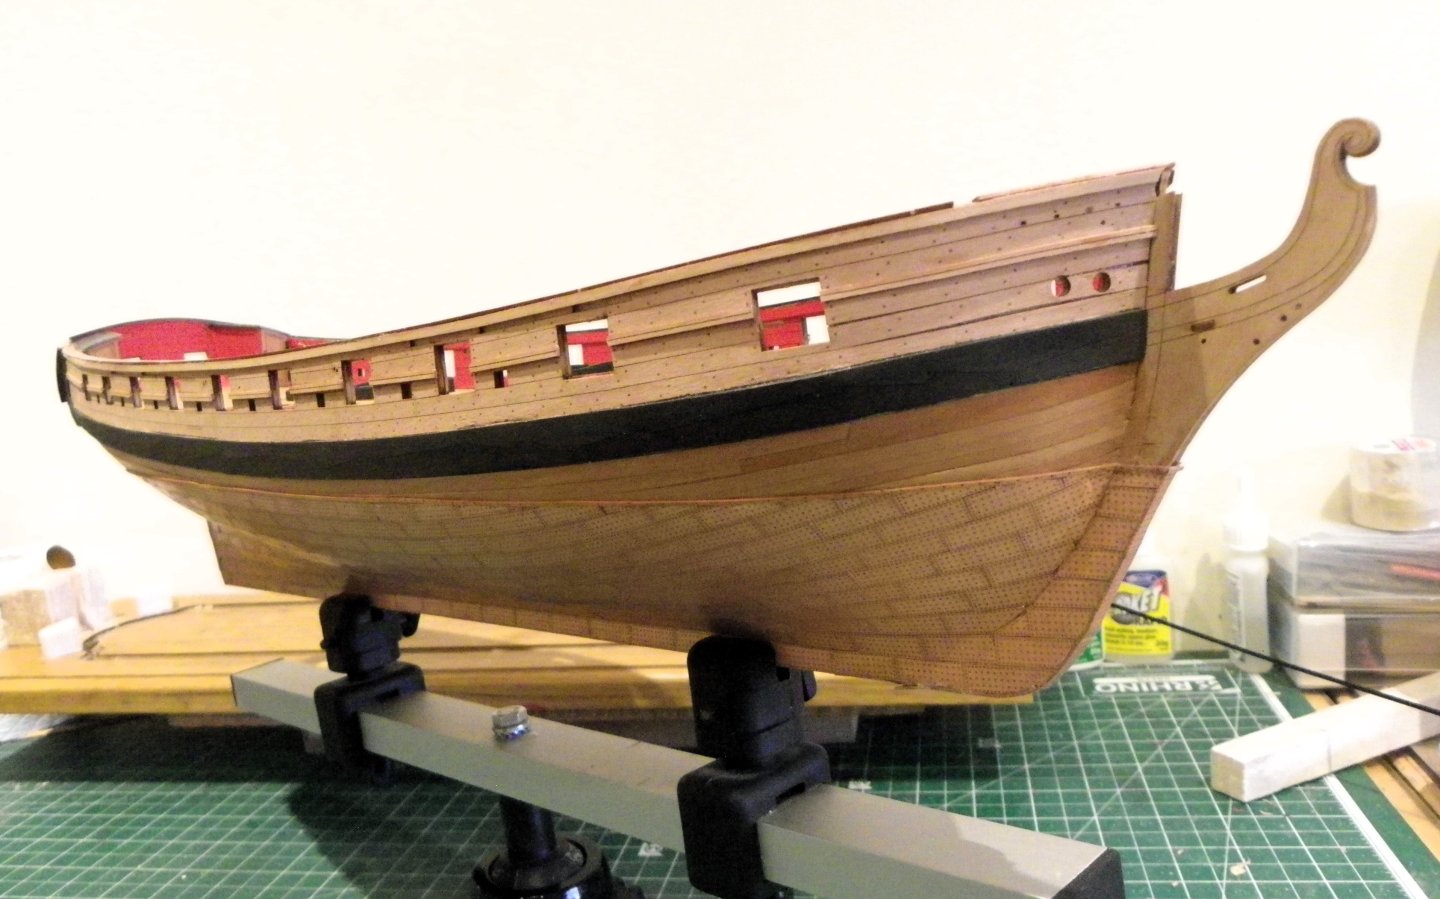
Post 51 The Rudder This is a nicely made Pearwood item with outer veneers, also of Pear, marked with the appropriate engravings for those who don’t intend to copper the hull. With the Copper plate set comes a rudder specific section of plates. These can be added as a unit rather than individual plates and are designed to fit the rudder profile. A separate strip fits to the aft rudder face. For this kit Chris has supplied laser board versions of the straps and pintles, a far better option than pe for this purpose. The pintles on the rudder are an integral part of the rudder formed in Pearwood. The Gudgeons are also part of the rudder structure represented by pegs that fit into slots on the Sternpost. If the rudder is to be attached in ‘working’ mode attaching the Gudgeons to the sternpost would be necessary. Altho’ I’ve had working rudders on many of my builds, using Chuck’s Syren parts, I’m going with the kit arrangement on Harpy, with a few tweaks. 0712 A small modification I made to the rudder was to file a bearding line down the inner edges of the rudder which for practical purposes allow better movement and gives a more authentic look. Strictly the copper plates should be folded inwards on the inners side, and folded over by about a scale mm on the outboard side. 0711 The provided set is too short to fully do this, but sufficient to follow and cover the bearding. 0715 For the rudder head straps rather than fiddle around with thin pieces of Laser board card I used heat shrink tubing. Hanging the Rudder. The rudder fits perfectly into the designated slots, nice and close to the stern post. 0718 The fit is so good I didn’t find it necessary to glue it into place The straps to the Gudgeons can now be fitted to the hull. 0721 Where fitted over the copper plates I have painted the straps a Copper/Bronze colour to represent the cuprous alloy from which they were cast. The bolt heads, barely noticed, are represented by spots of thick paint mix applied with the point of a wooden cocktail stick. The kit set-up for rudder hanging no doubt makes what can be a tricky exercise a simple operation, but there is a cost in authenticity. Photo from Build manual. It caught my eye that there is an obvious disconnect between the gudgeon straps on the sternpost which end short of the gudgeon and the pintles that fit into them. 0717 Adm plan detail. The difference can be seen here, the Gudgeons stand proud of the sternpost and the Pintle cut-outs in the rudder allow the pintle to engage with the hole in the Gudgeon. Once you see it the eye is drawn to it. 0729 The look can be enhanced to an extent by turning the Gudgeon straps around the sternpost, and using a spot of paint just below the Pintle straps in-line with the Pintles. Still a couple of things to finish, the Spectacle plate in particular, which should fit just below the Hance. B.E. 09/03/2025


- 332 replies
-
- 18
-
-
- Harpy
- Vanguard Models
- (and 1 more)
-
Don't know about you Chris but I struggle to relate that painting of Harpy to the Adm Plans. but that doesn't negate the use of stern davits on Brigs of the period. There seems to be a lot of freeboard above the Gunports on that painting. I like the look of your Harpy much better. Cheers, B.E.
- 332 replies
-
- 3
-
-
- Harpy
- Vanguard Models
- (and 1 more)
-
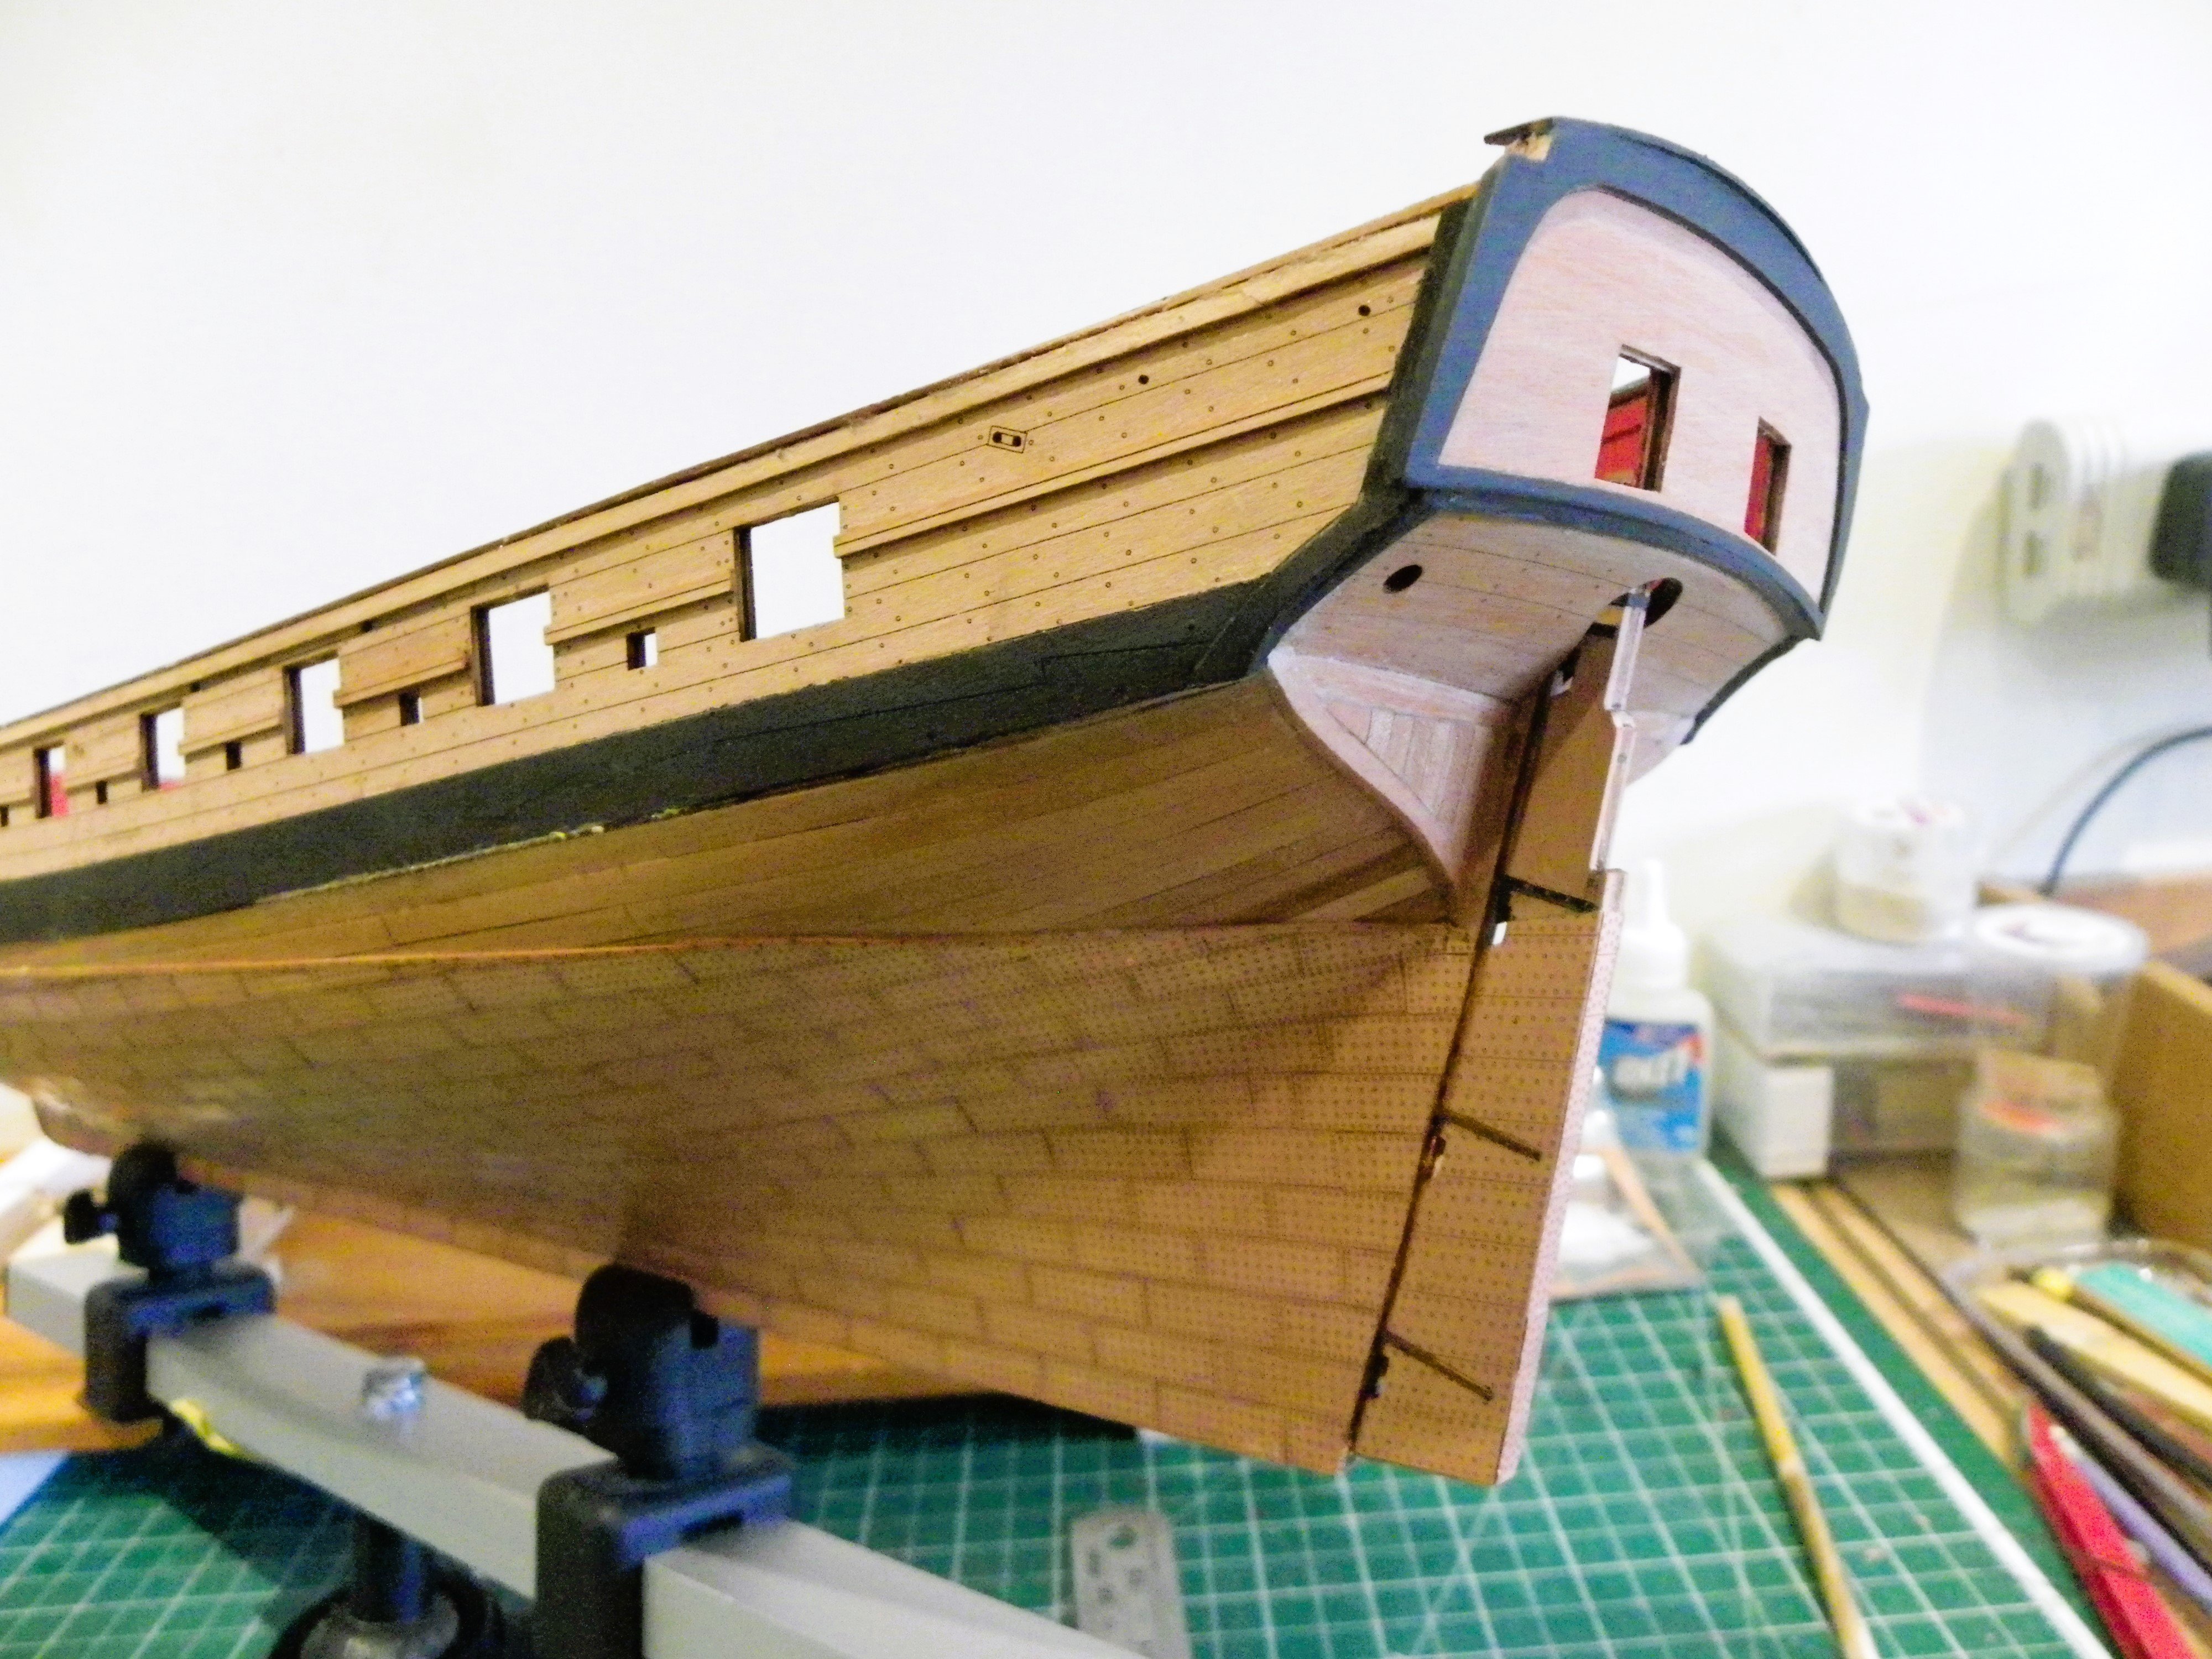
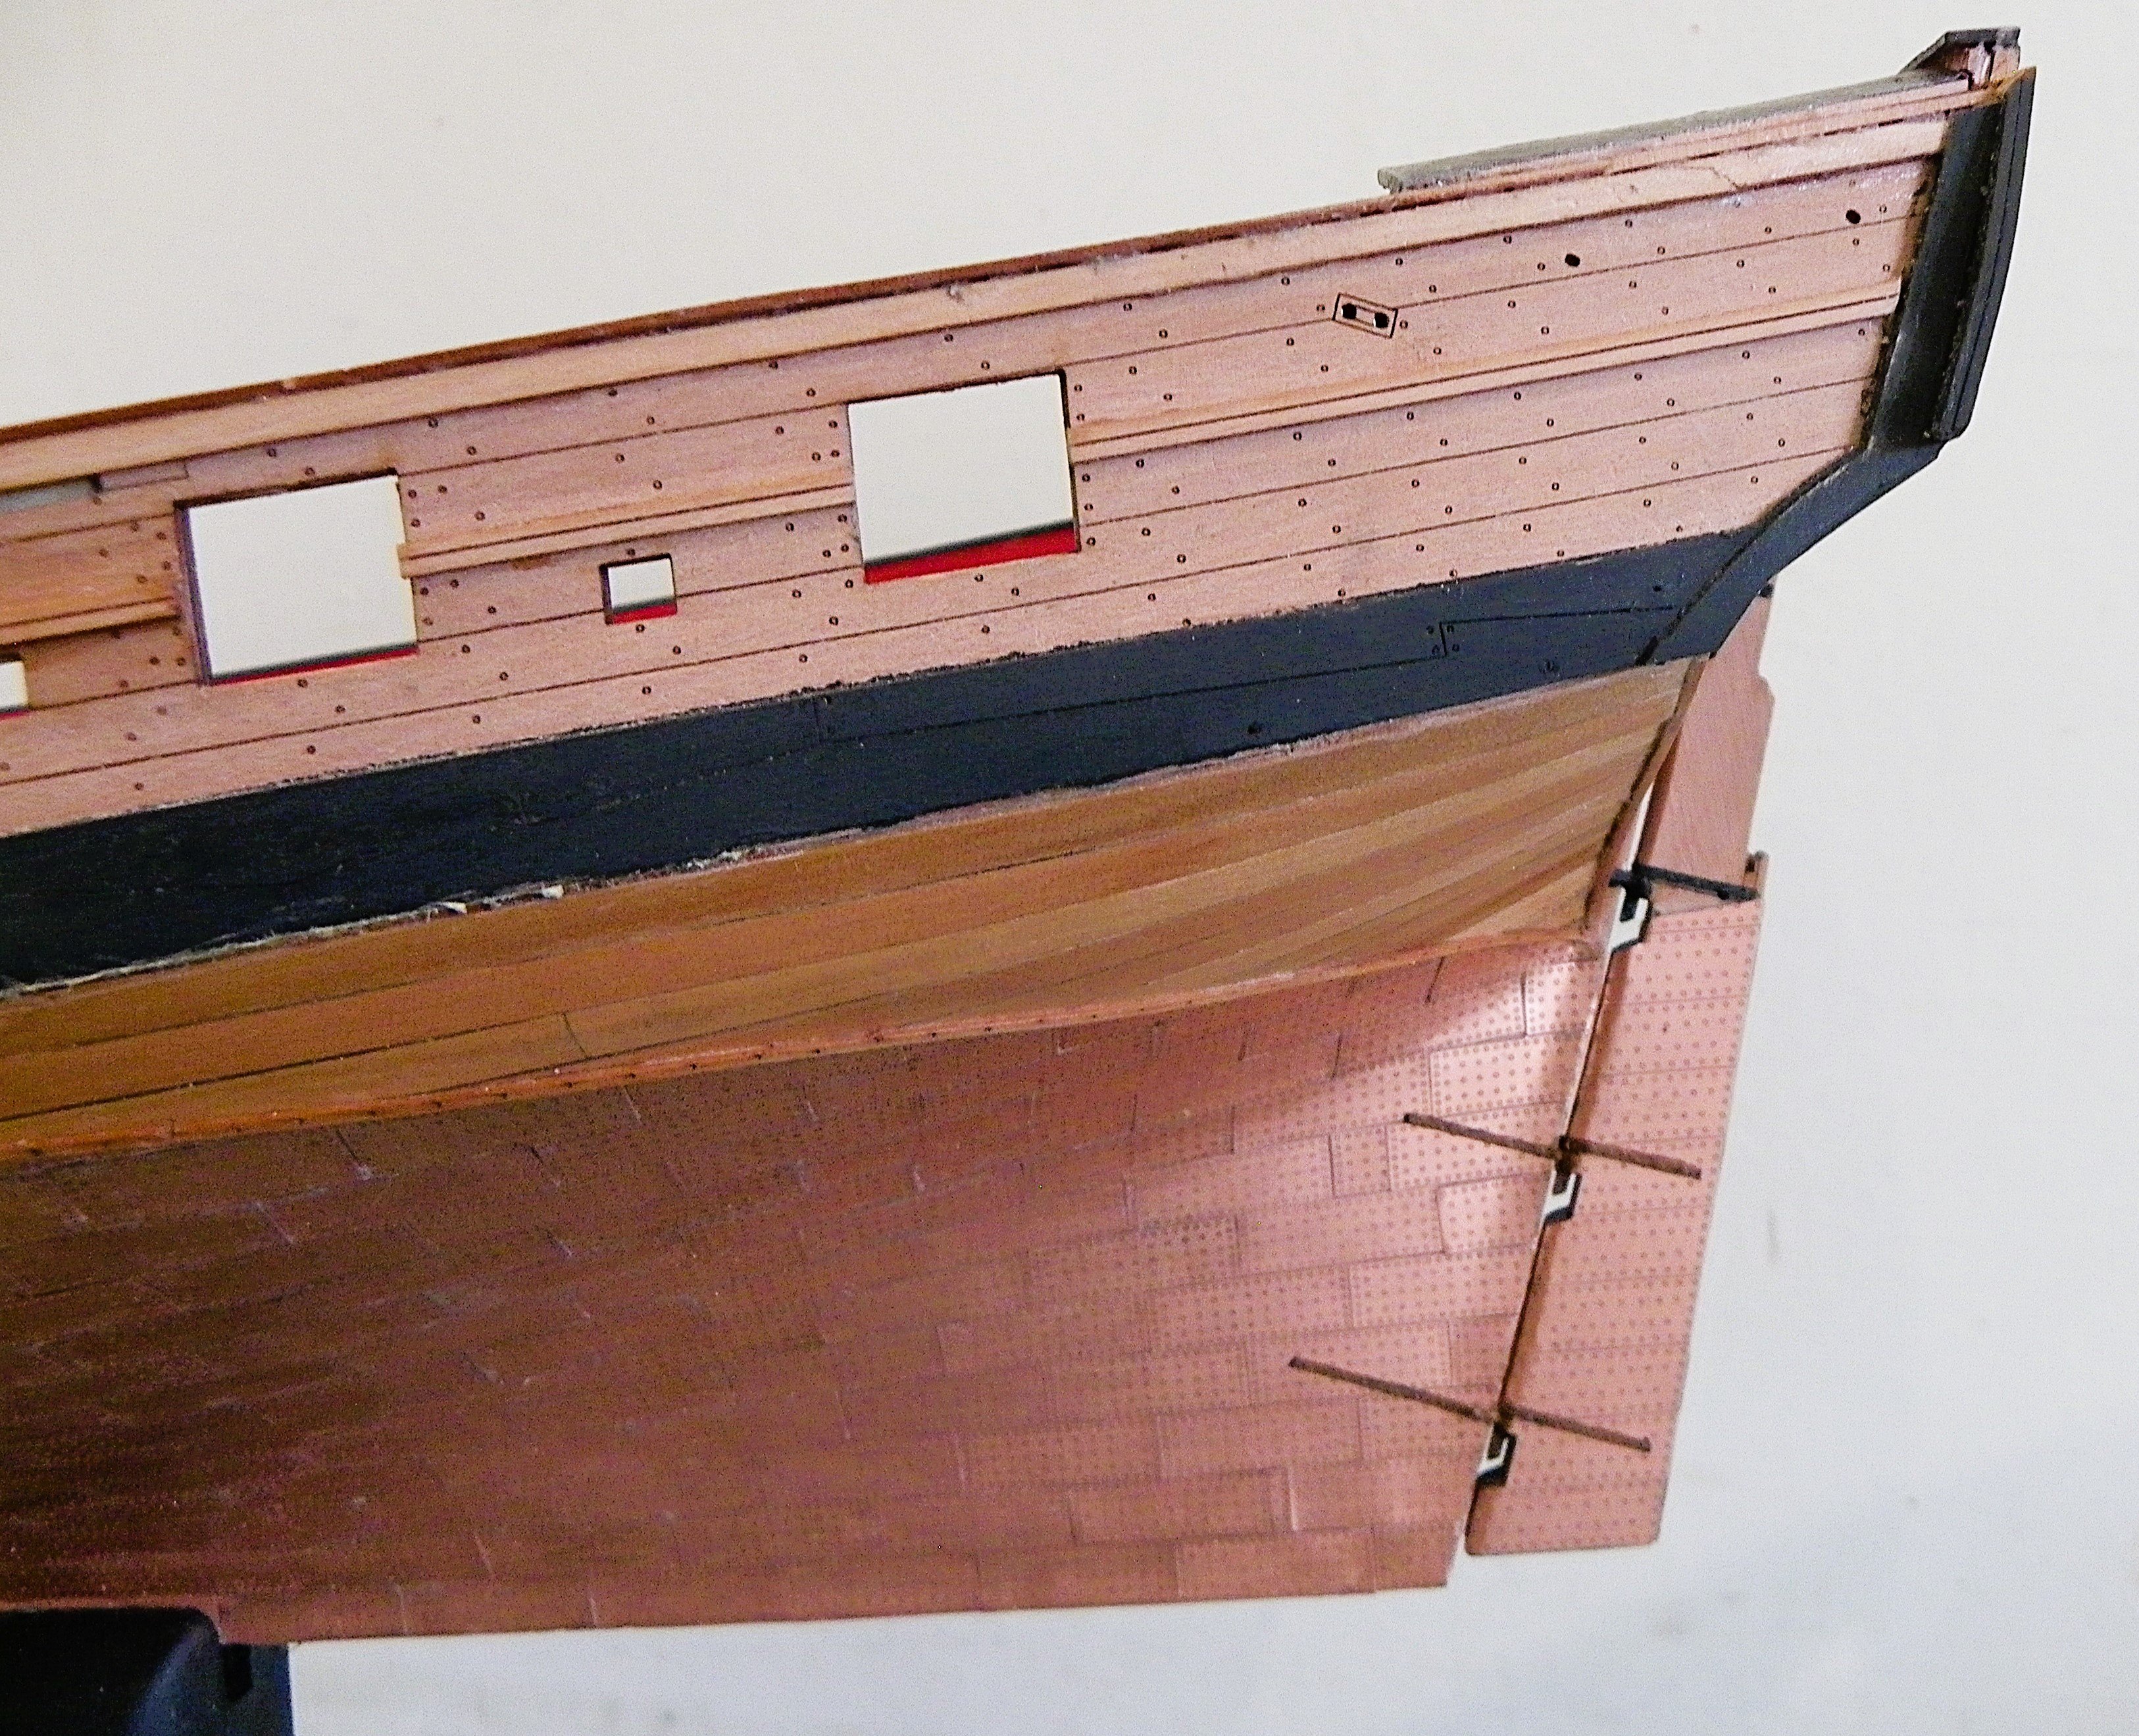
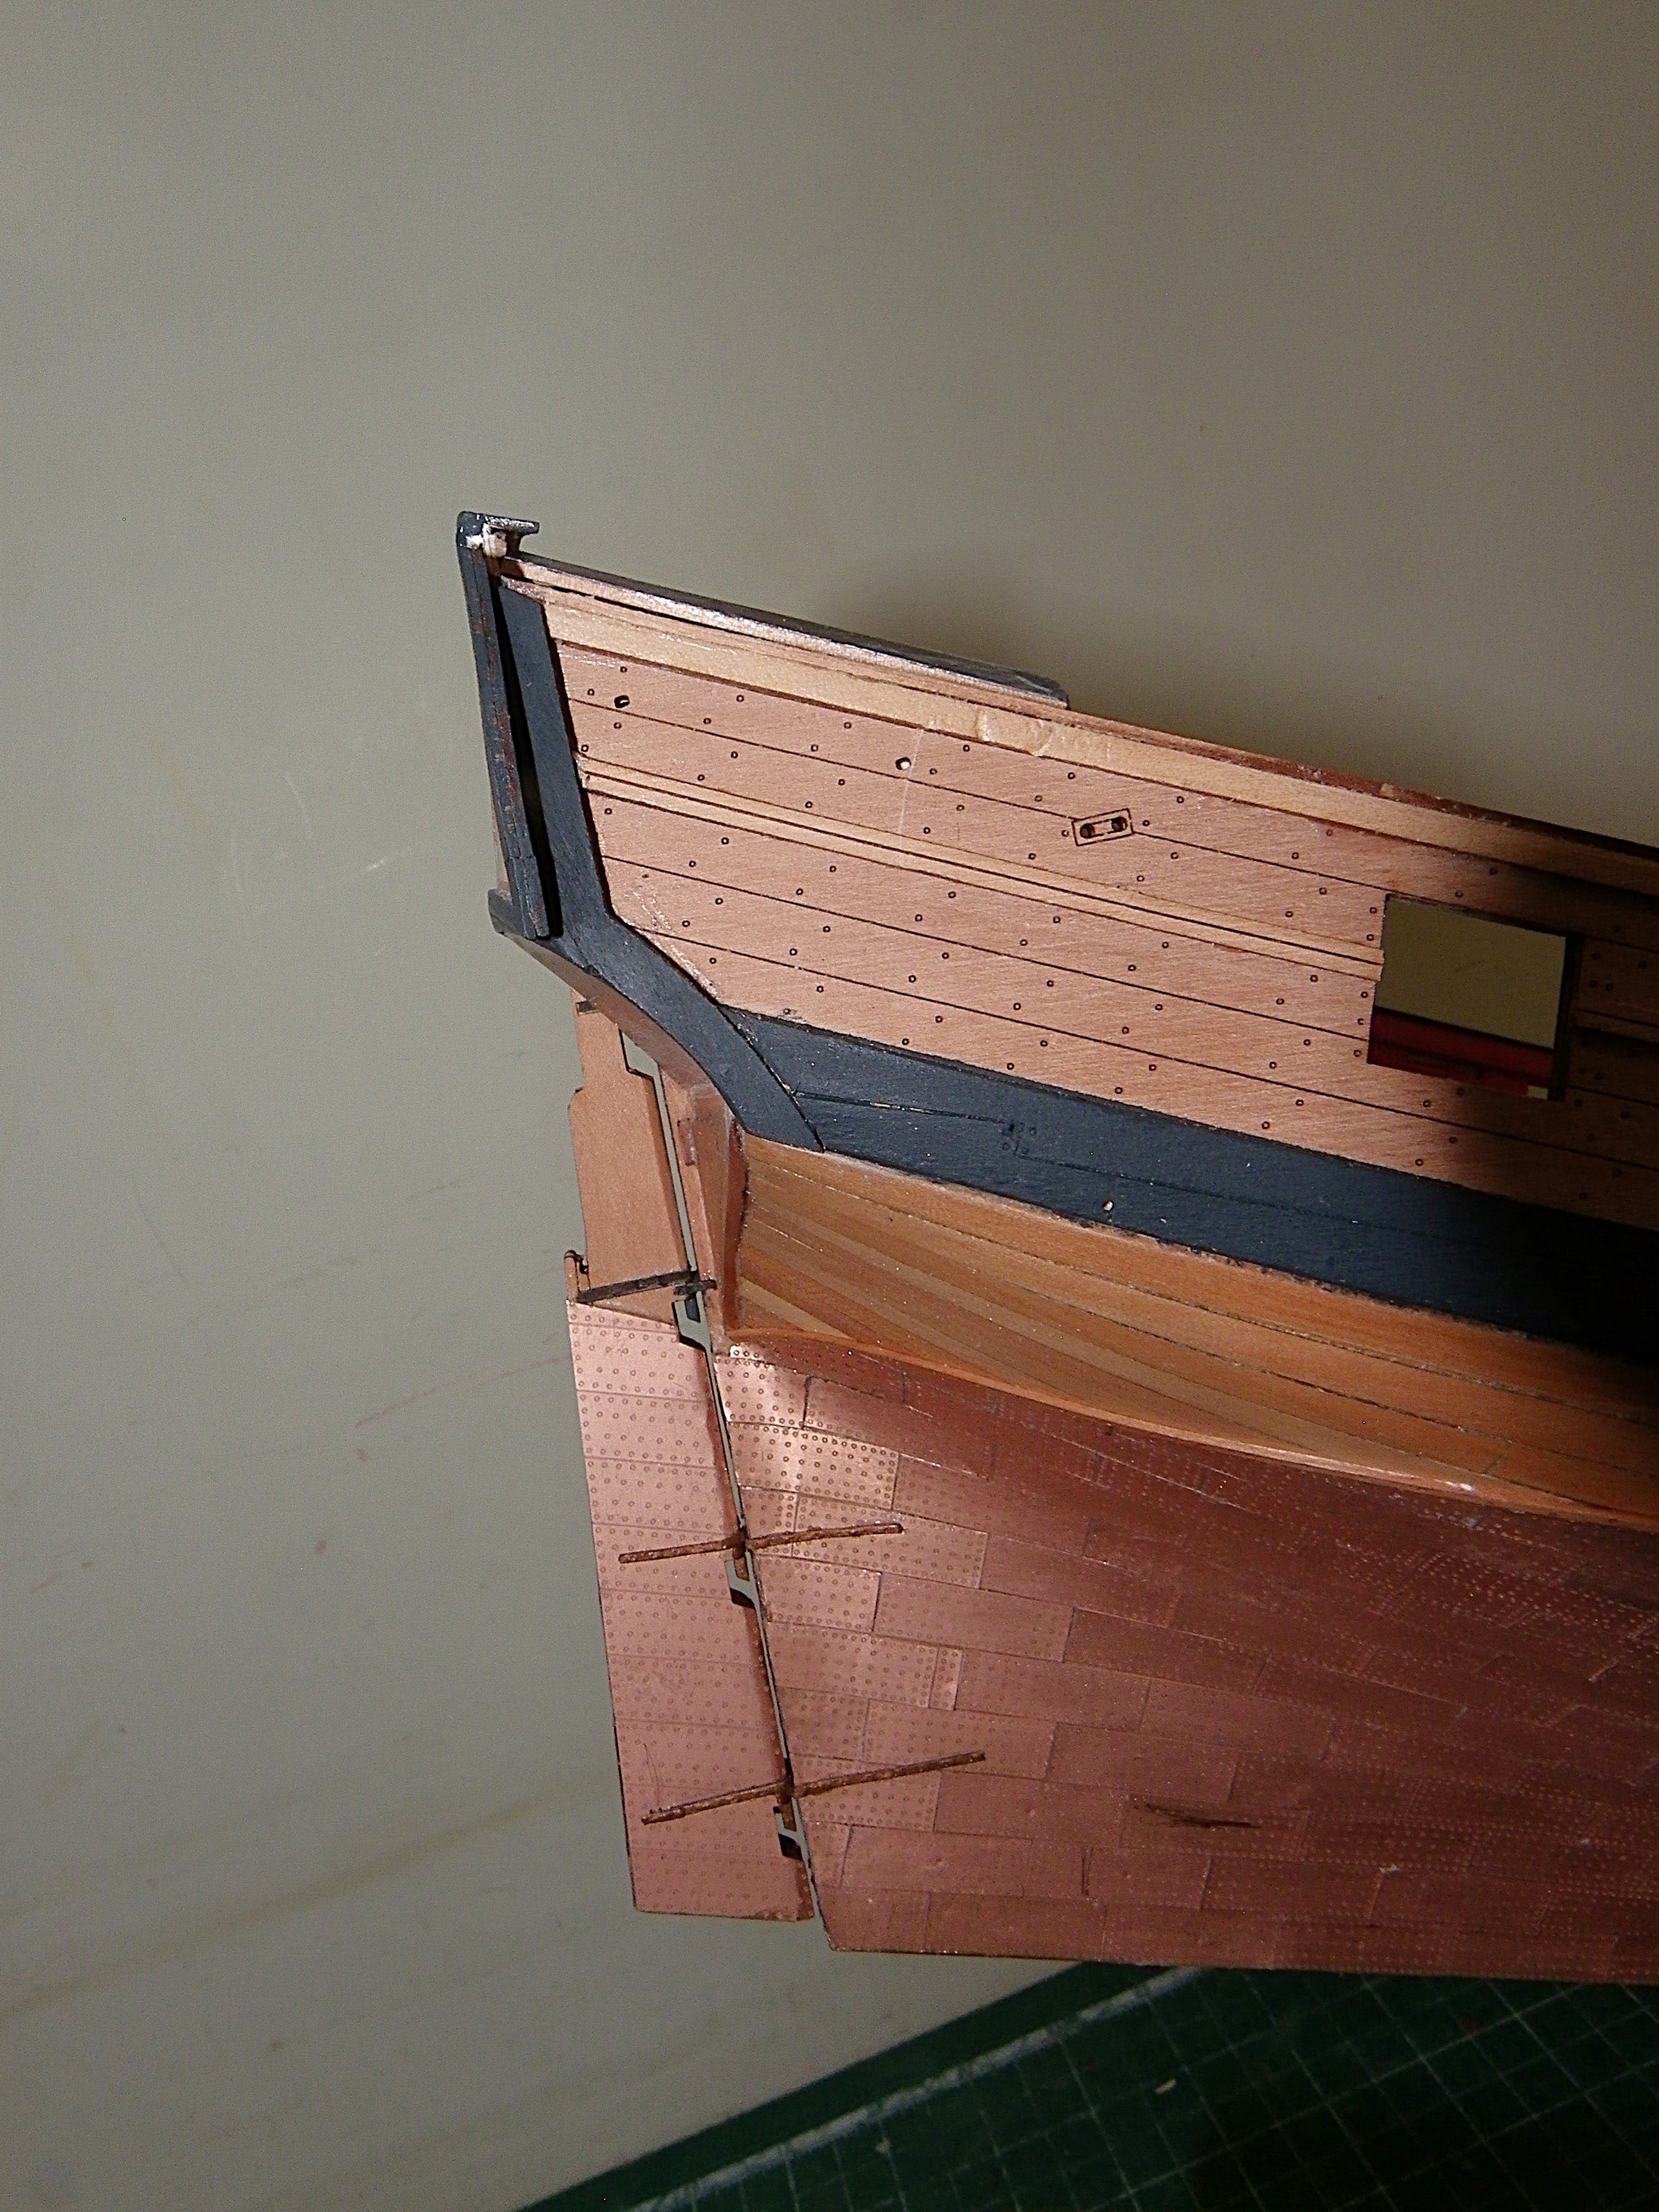
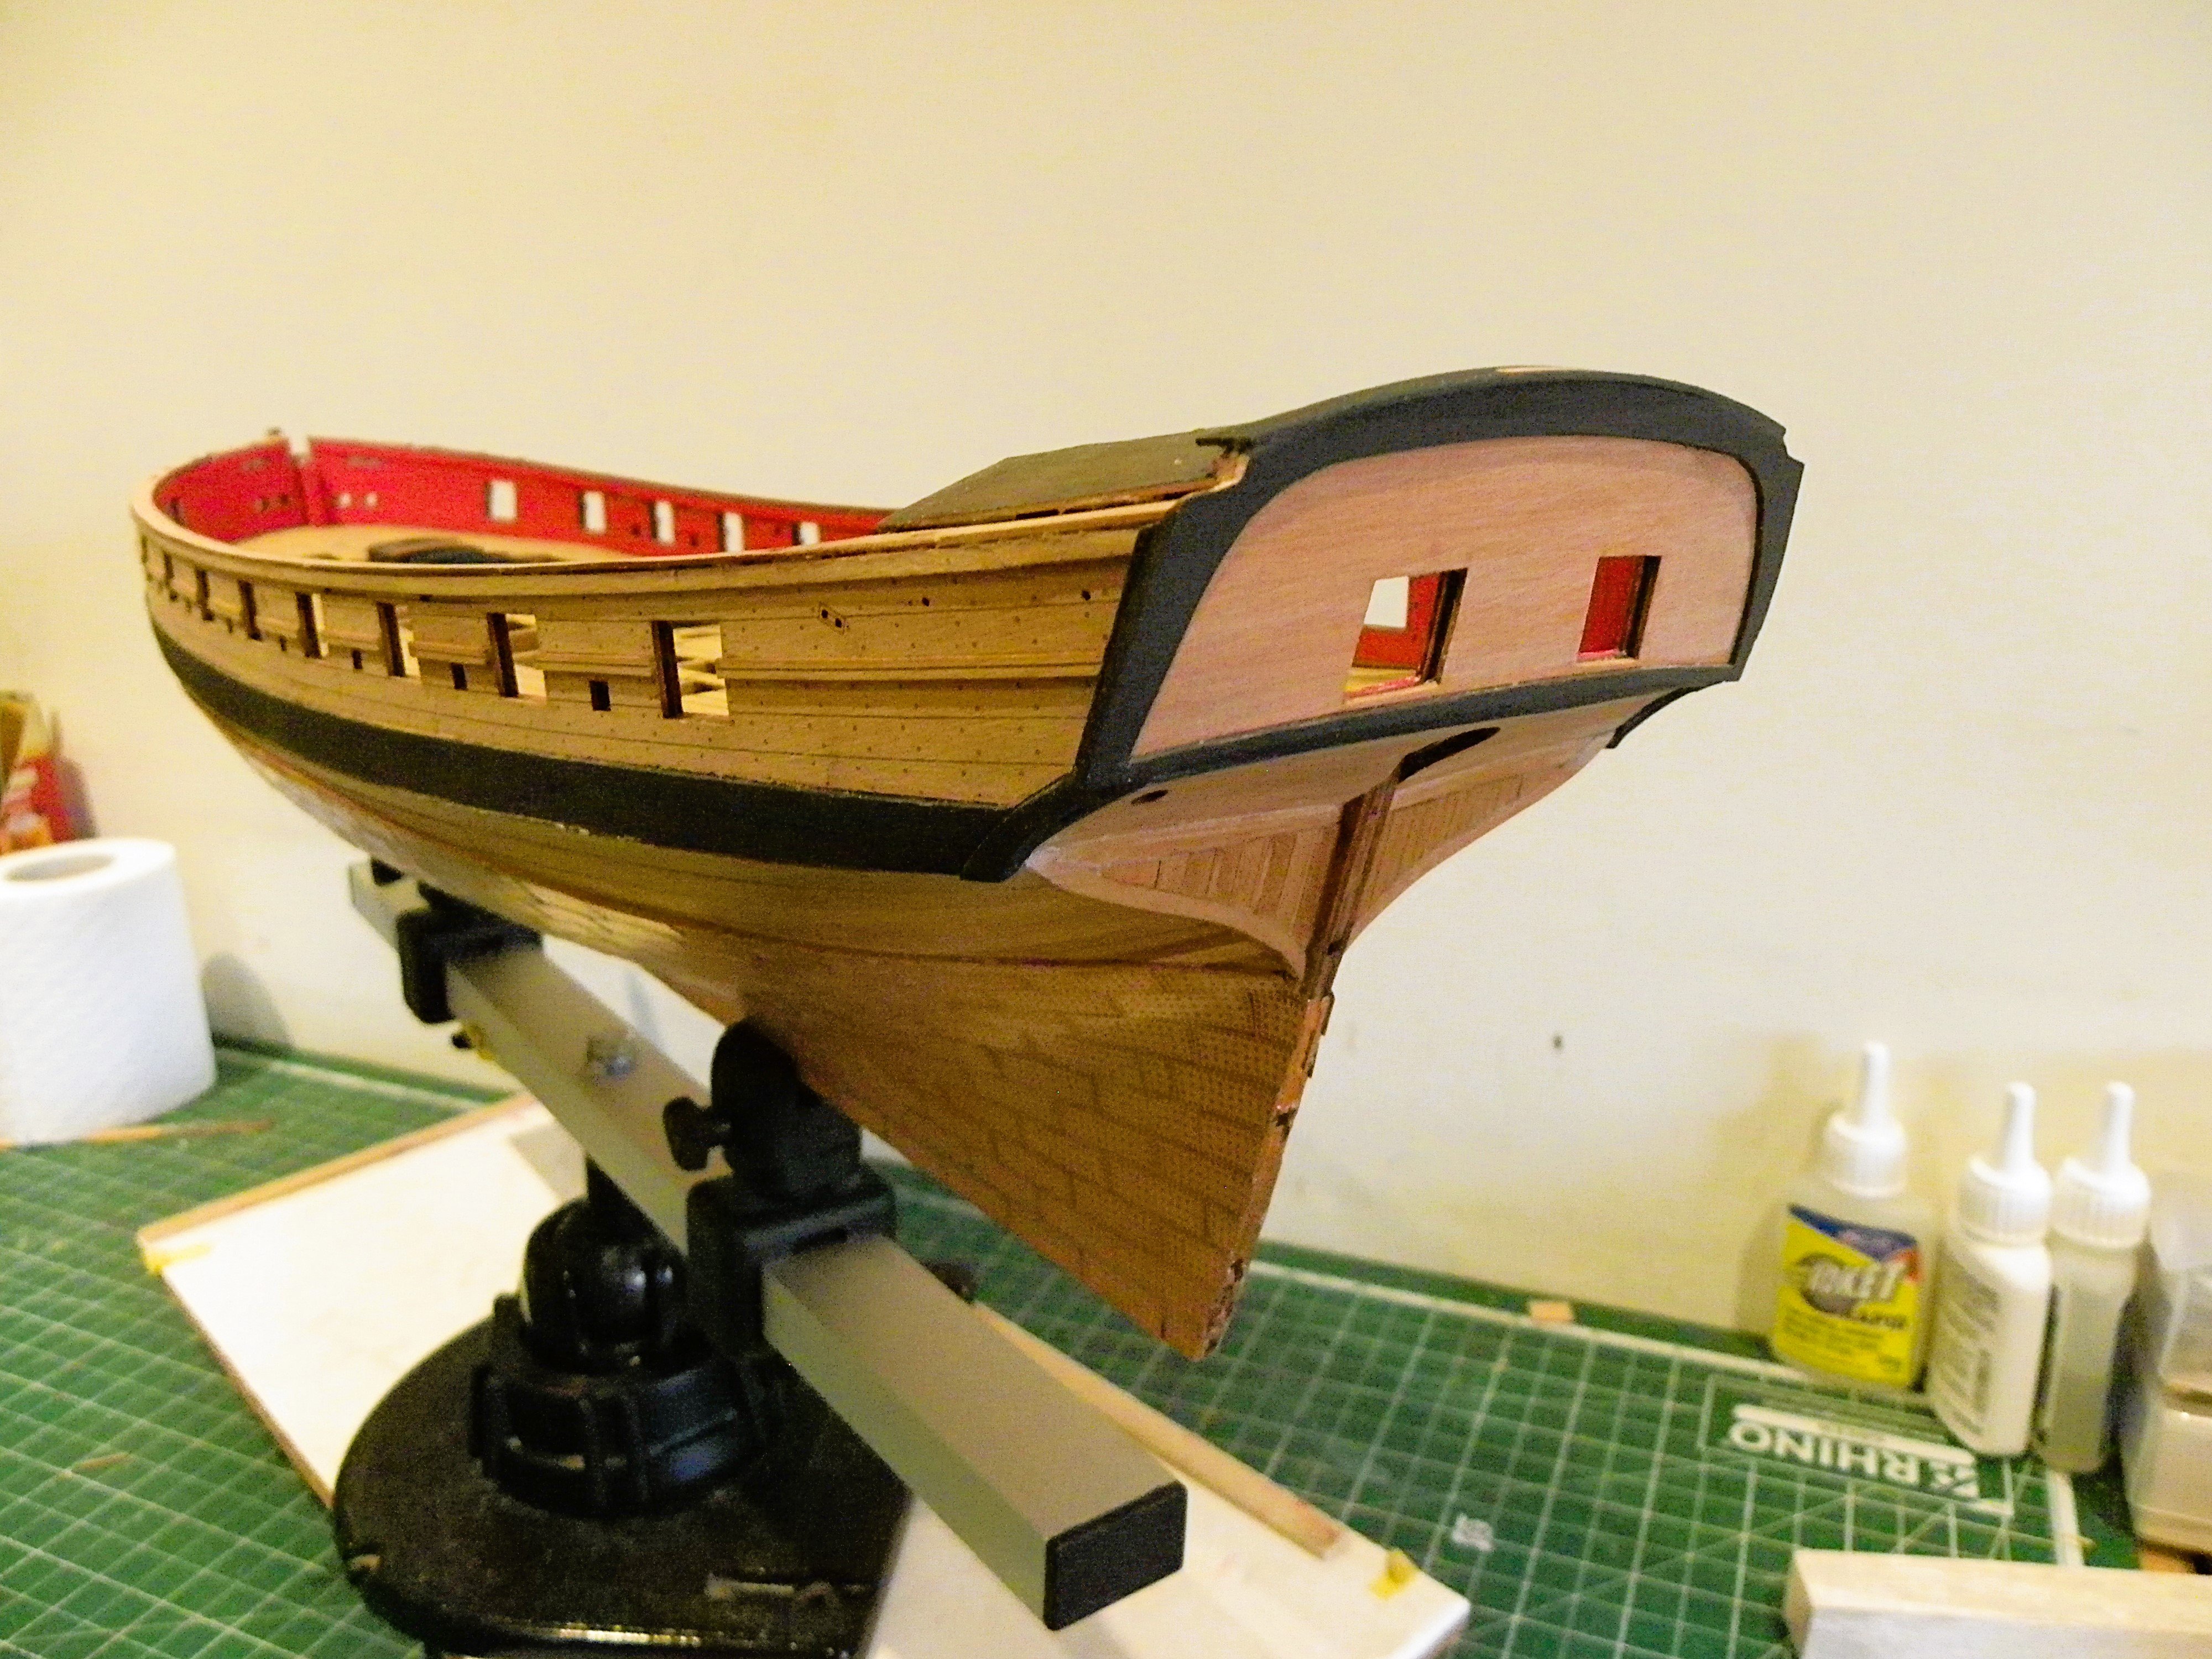
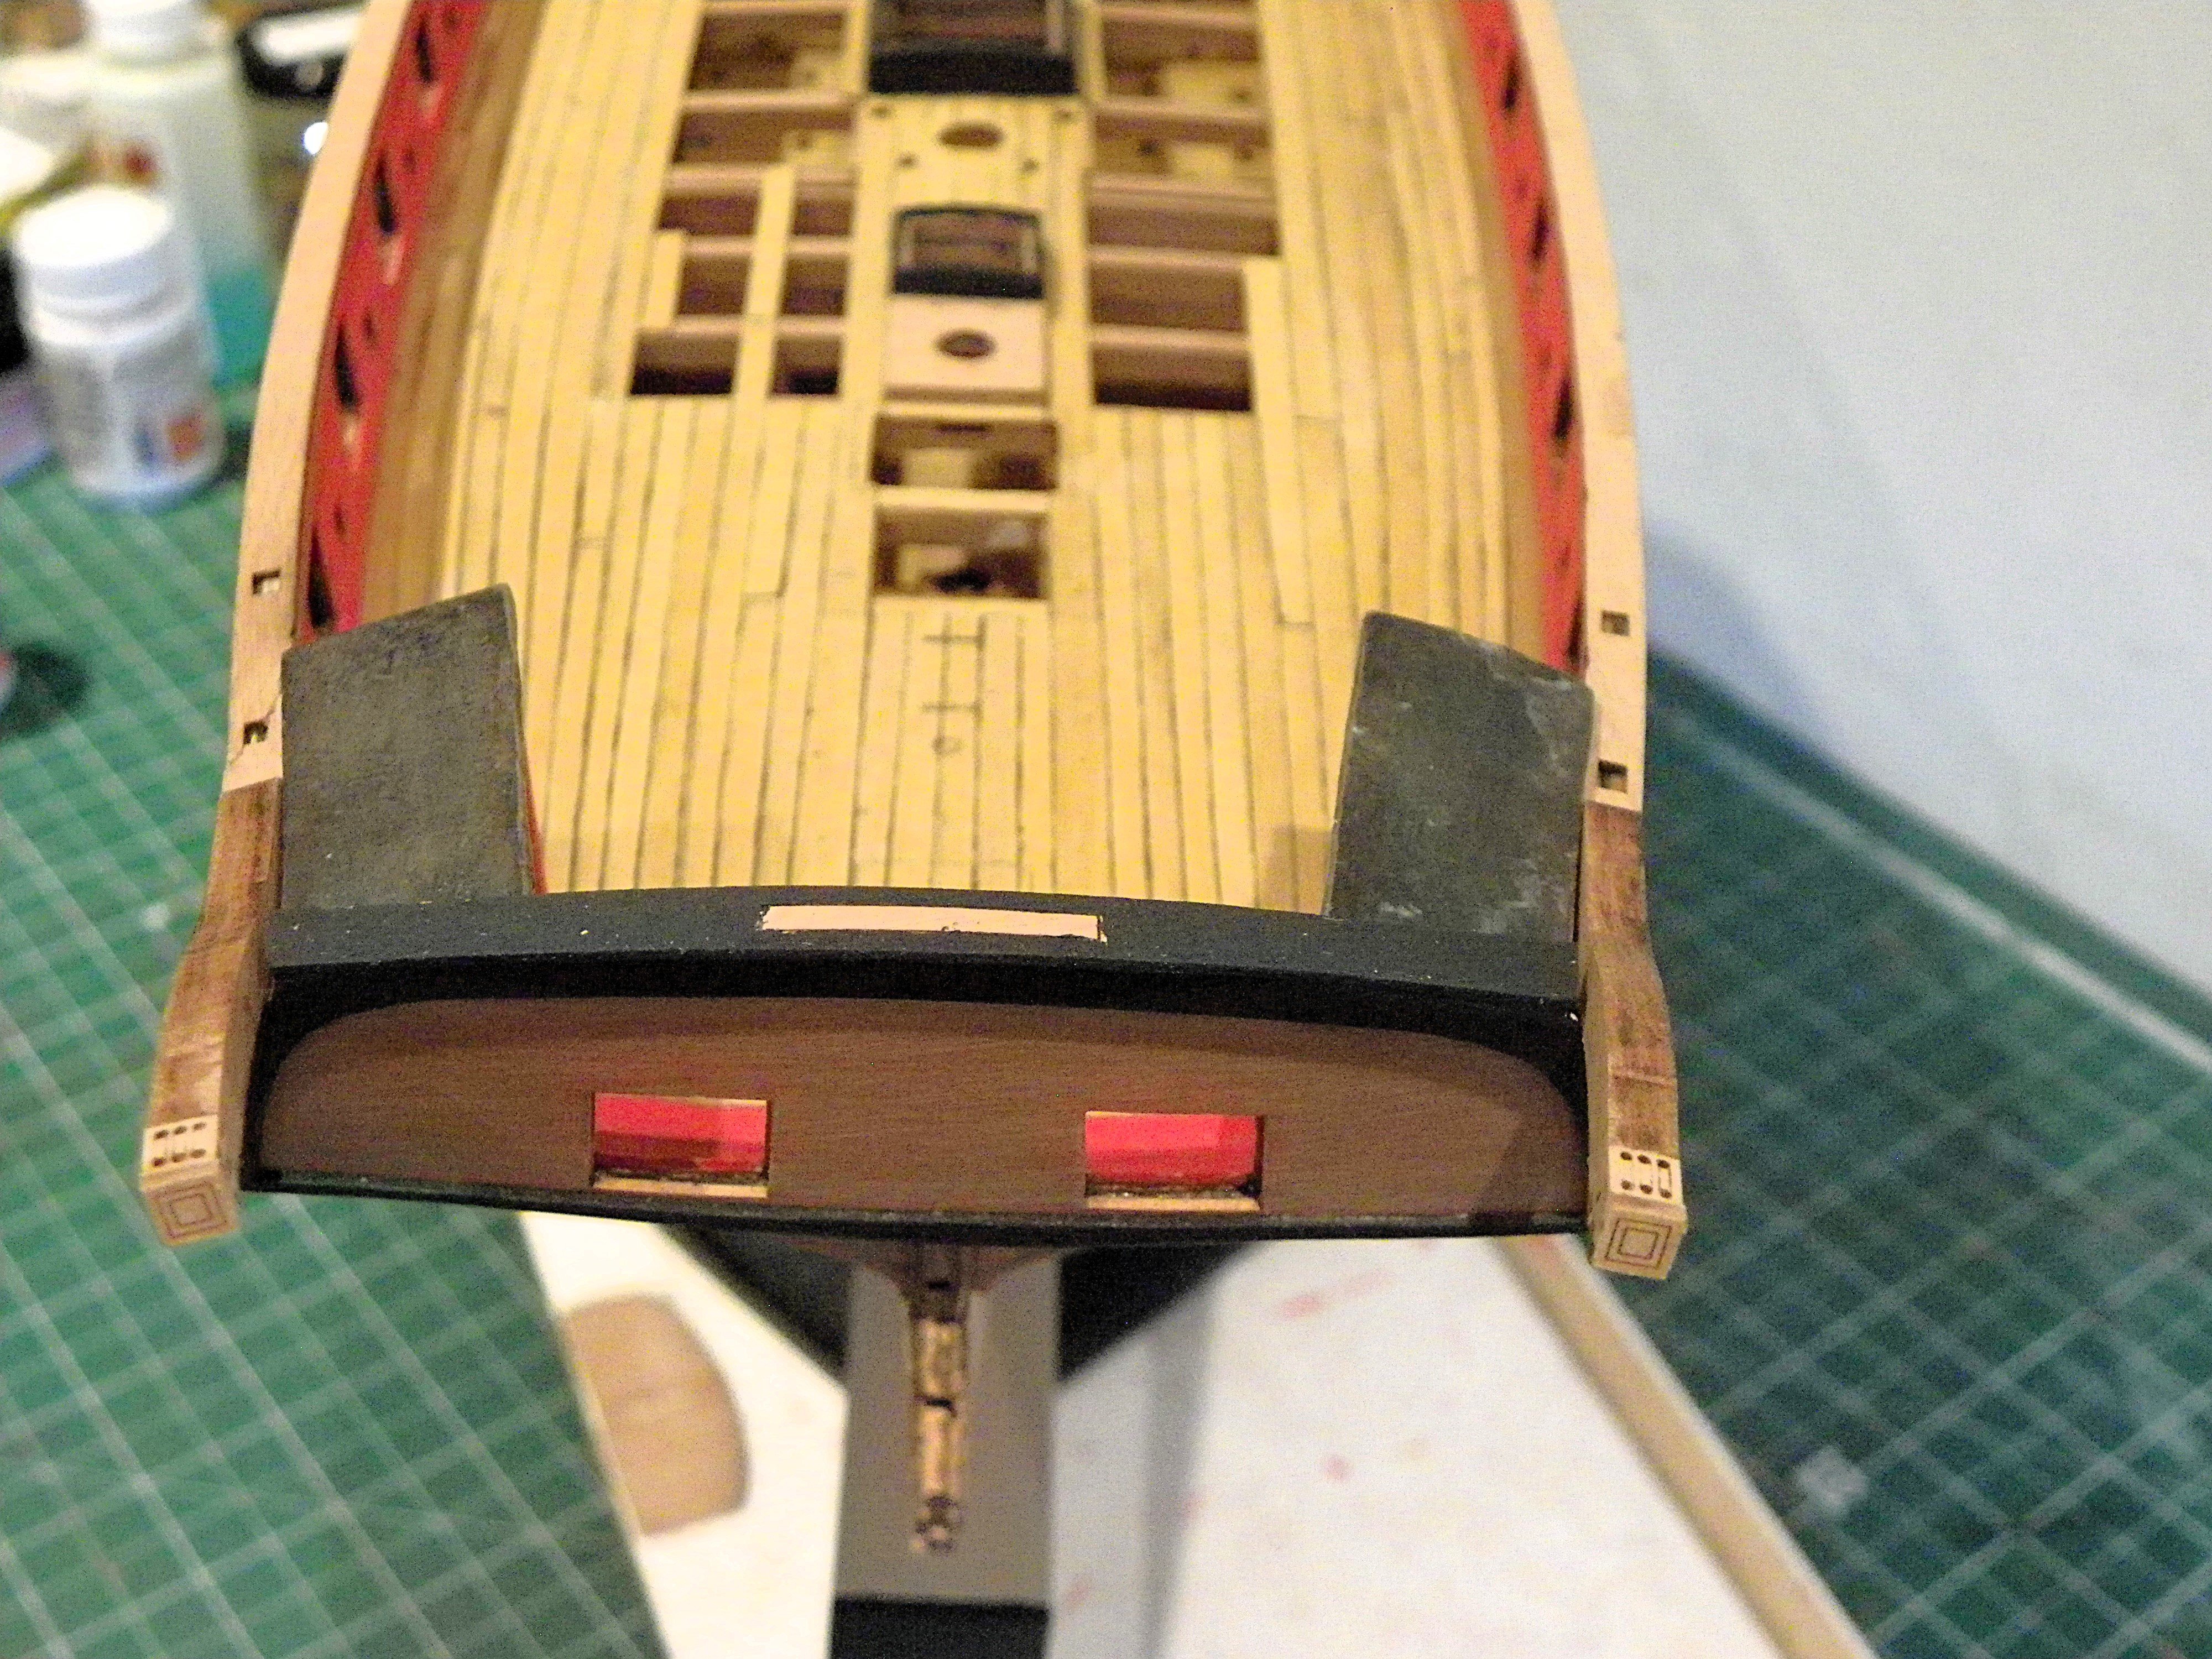
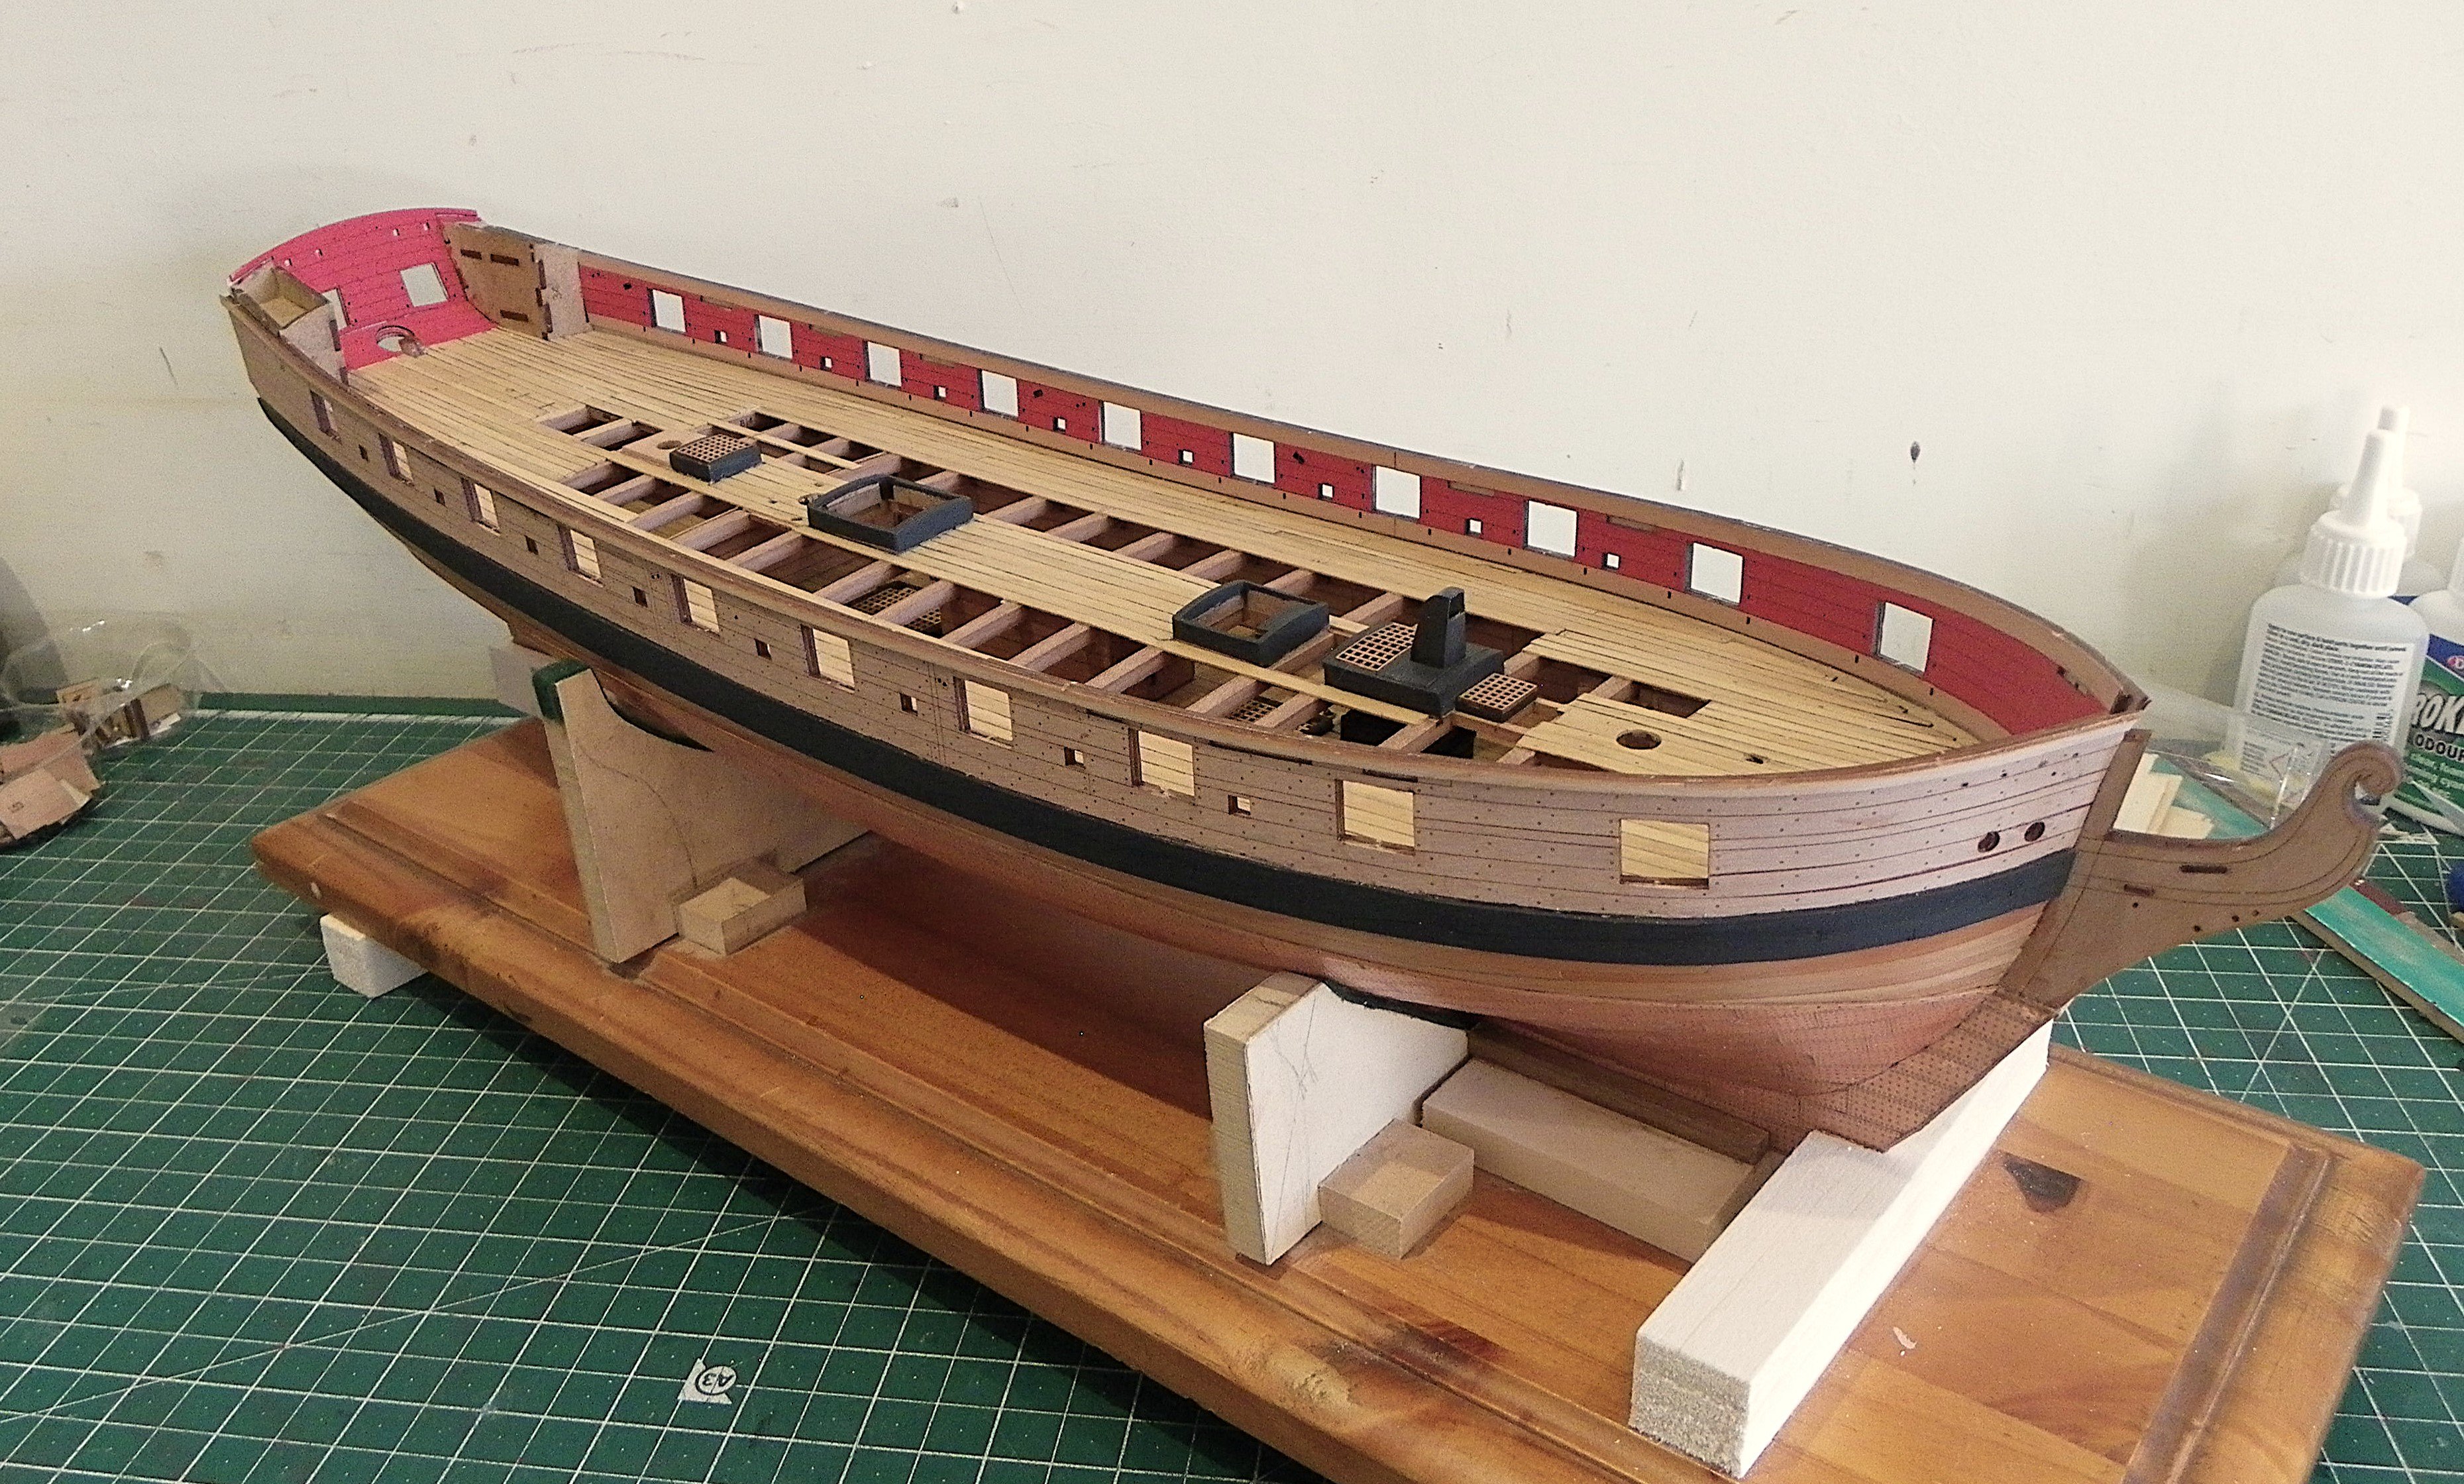
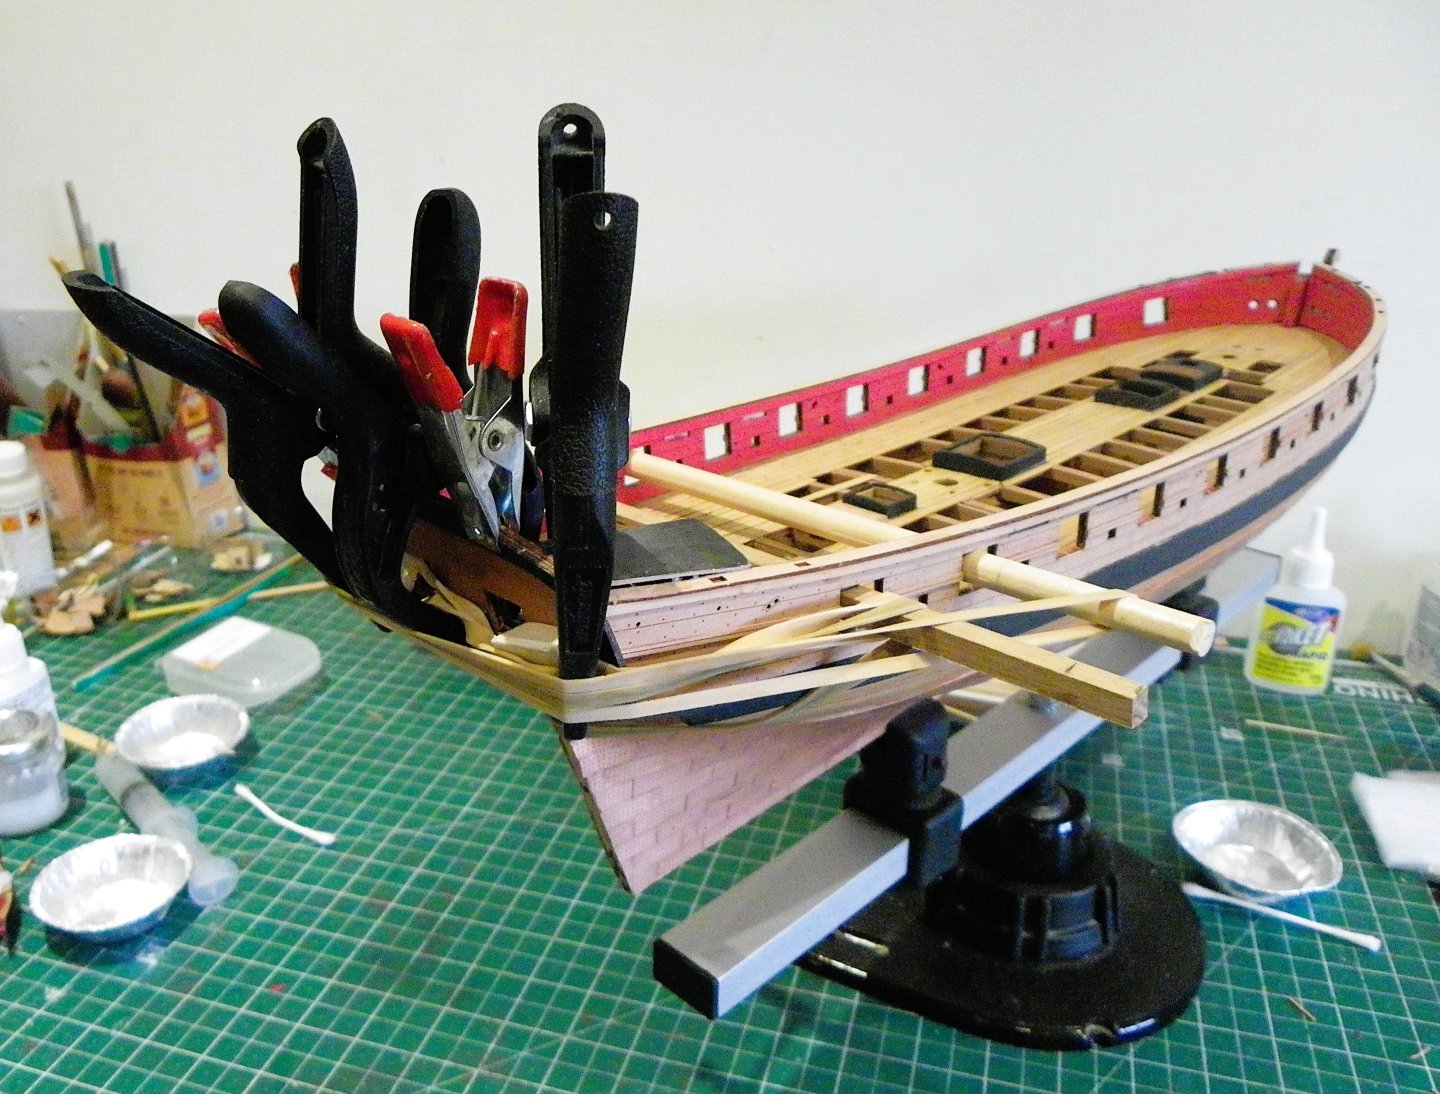
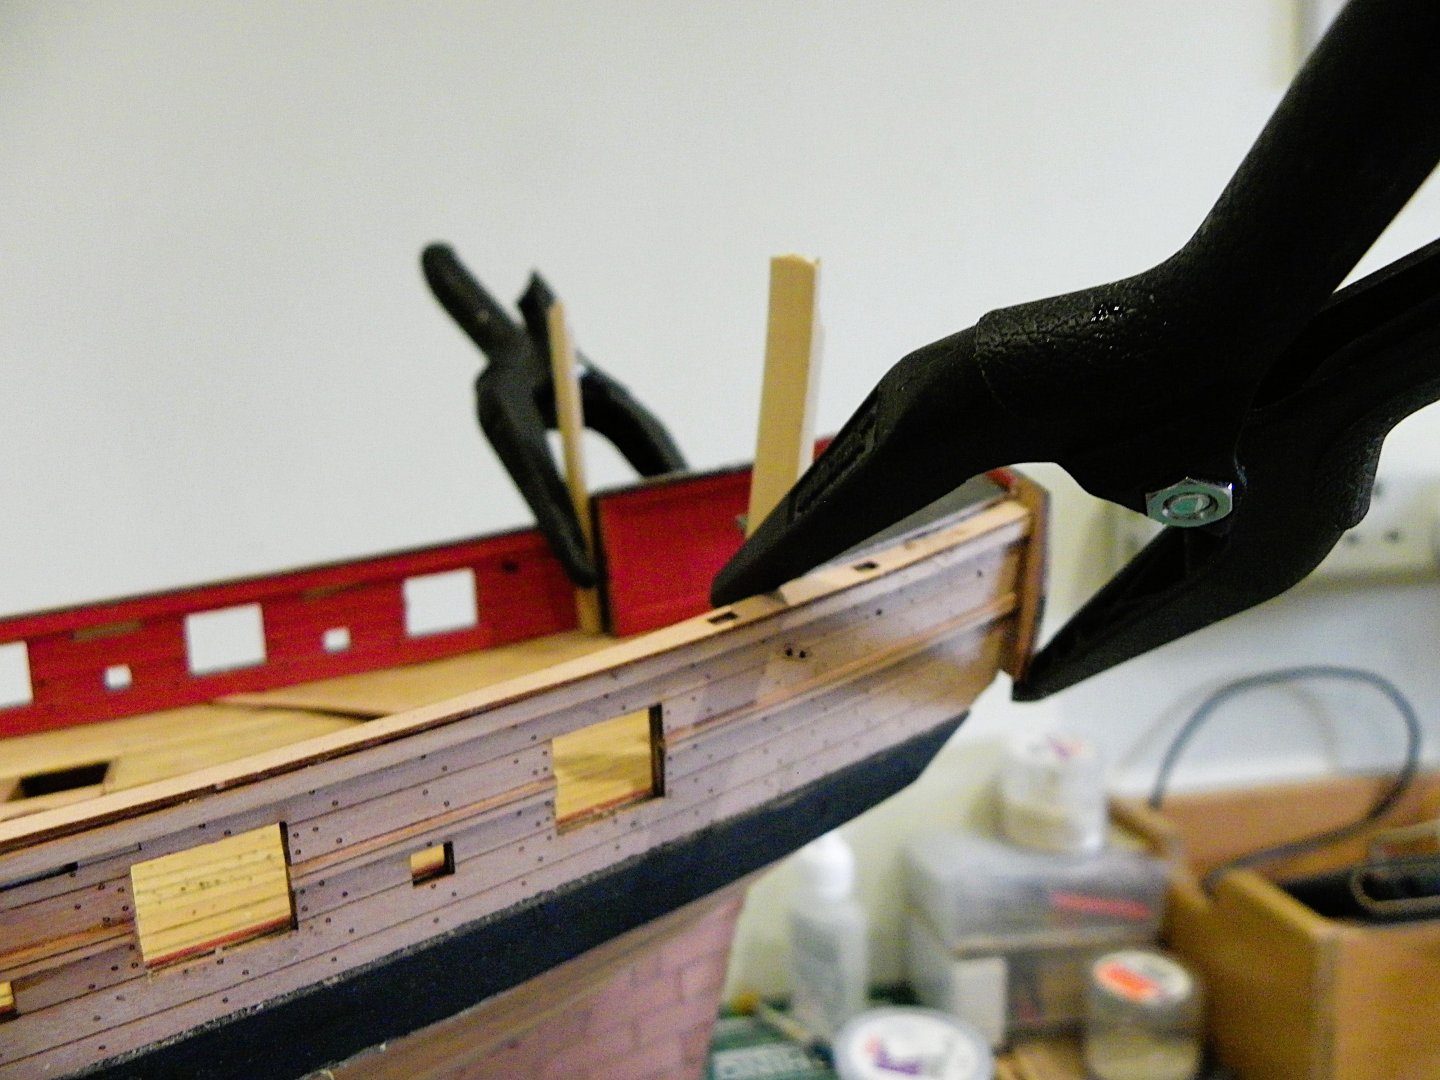
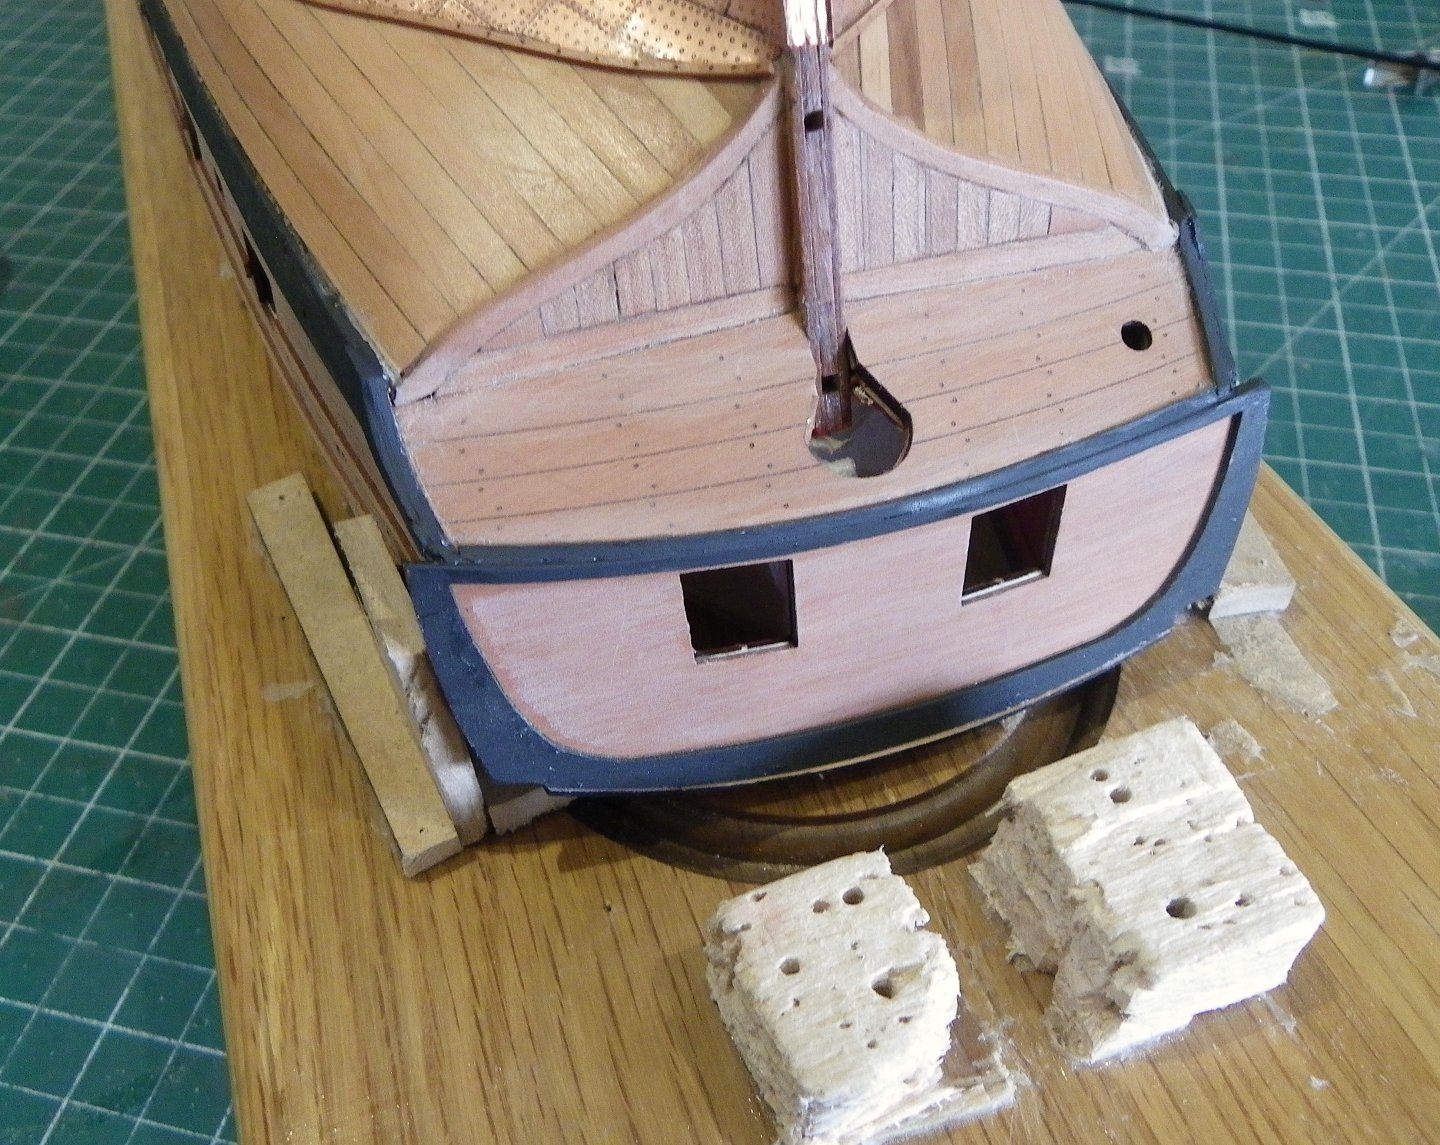
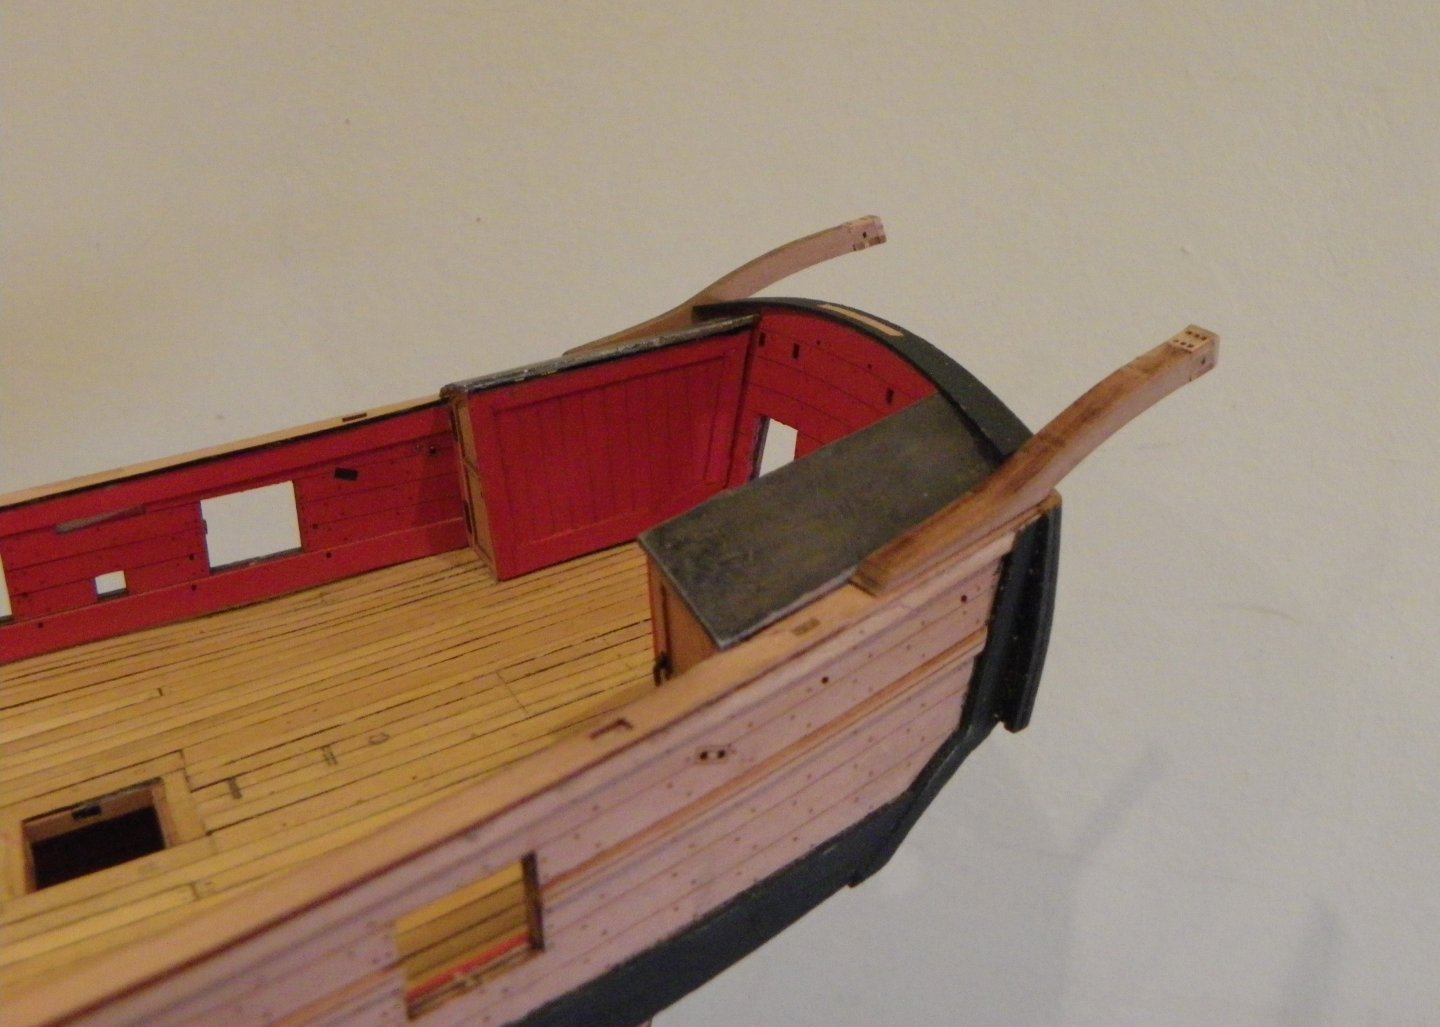
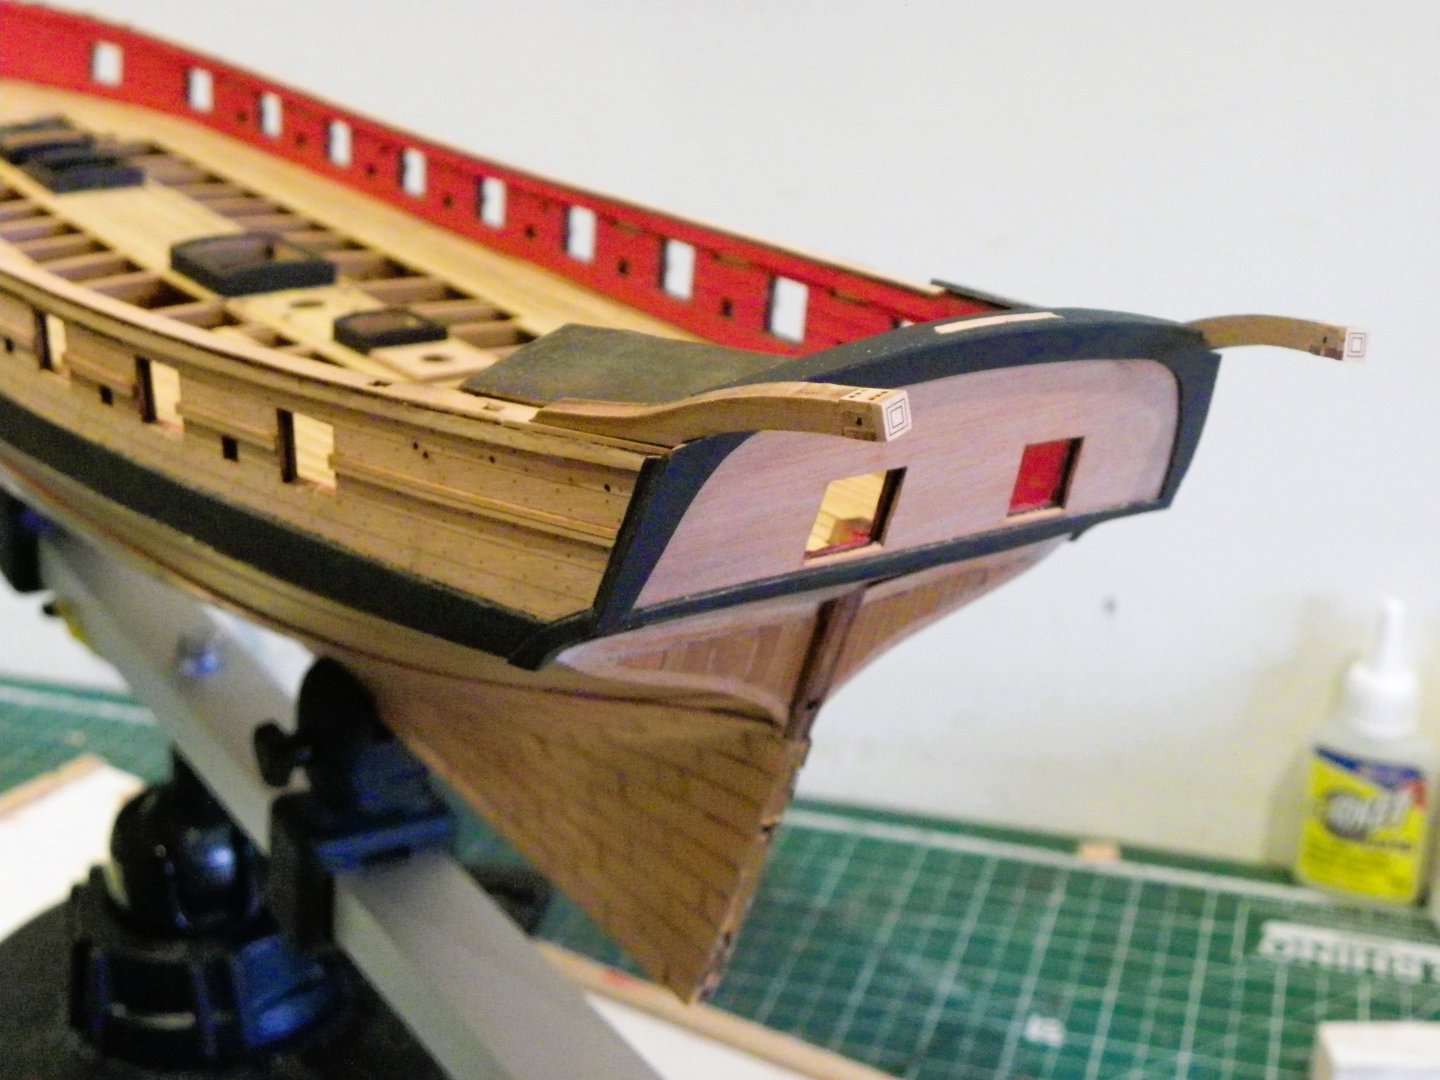
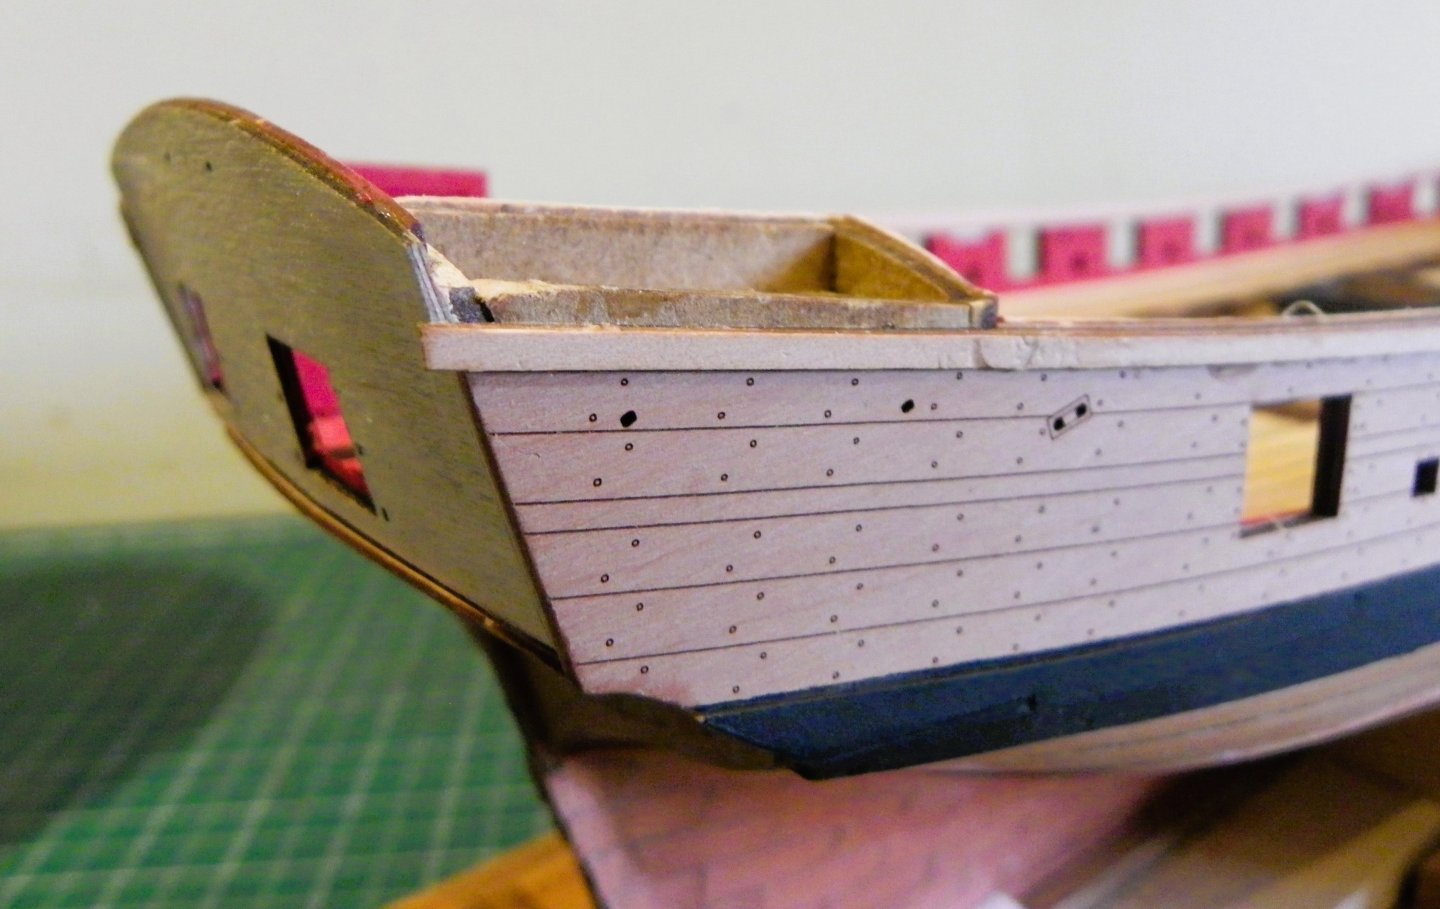
Post 50 Fitting out continues Looking at the stern area. Overall I found this section difficult to get how I wanted it, and several dry fits, re-fits and decontructions were involved. Stern board This a tricky part to attach as it is awkward to clamp whilst ensuring the part is properly aligned. 0668 Again, I had to get inventive to secure the board in place. 0670 Having most of it glued, I separately re-clamped the lower quarter corners which were the most difficult to conform to the stern. 0672 0680 Finally, the Capping rail to the Tafferal is glued into place. The Aft davits were used to ensure alignment. Quarter pieces These are represented by a two layer arrangement so that the finished look is of the Lower Quarter piece extending down to the Square tuck. 0675 I spent a fair bit of time fiddling with the set-up for these, and once fitted I thought they could use some beefing up on the aft side where they meet the lower counter and the wale. 0691 An afternoon of tweaking to arrive at a look I was happy with. The kit differs slightly from the Adm plans. 0696 0705 The kit has stern davits with a crutch for the Boom placed centrally on the tafferal. 0706 The kit usefully includes laser cut patterns for the sheaves both top and bottom. They need to be carefully drilled thro’ (0.6mm drill) from both sides. The Adm plan does not show davits, instead the counter timbers are extended above the rails to provide port and starboard boom crutches. It is more than likely that during her long career Harpy would have been fitted with stern davits, and for a model they do provide a feature of interest, particularly when fitted with one of the sweet little cutters supplied with the kit. Waist rails 0682 Chris has designed a ‘string’ of rails that fit seamlessly between the ports. Finely cut with a central groove to represent a moulding they are easy to attach using spots of cyano. I had thought of making my own, scribing a profile, but I didn’t think I could get down to scale size, and the kit ones look fine to me, given the size and class of the vessel. B.E. 08/03/2025


- 332 replies
-
- 21
-
-
- Harpy
- Vanguard Models
- (and 1 more)
-
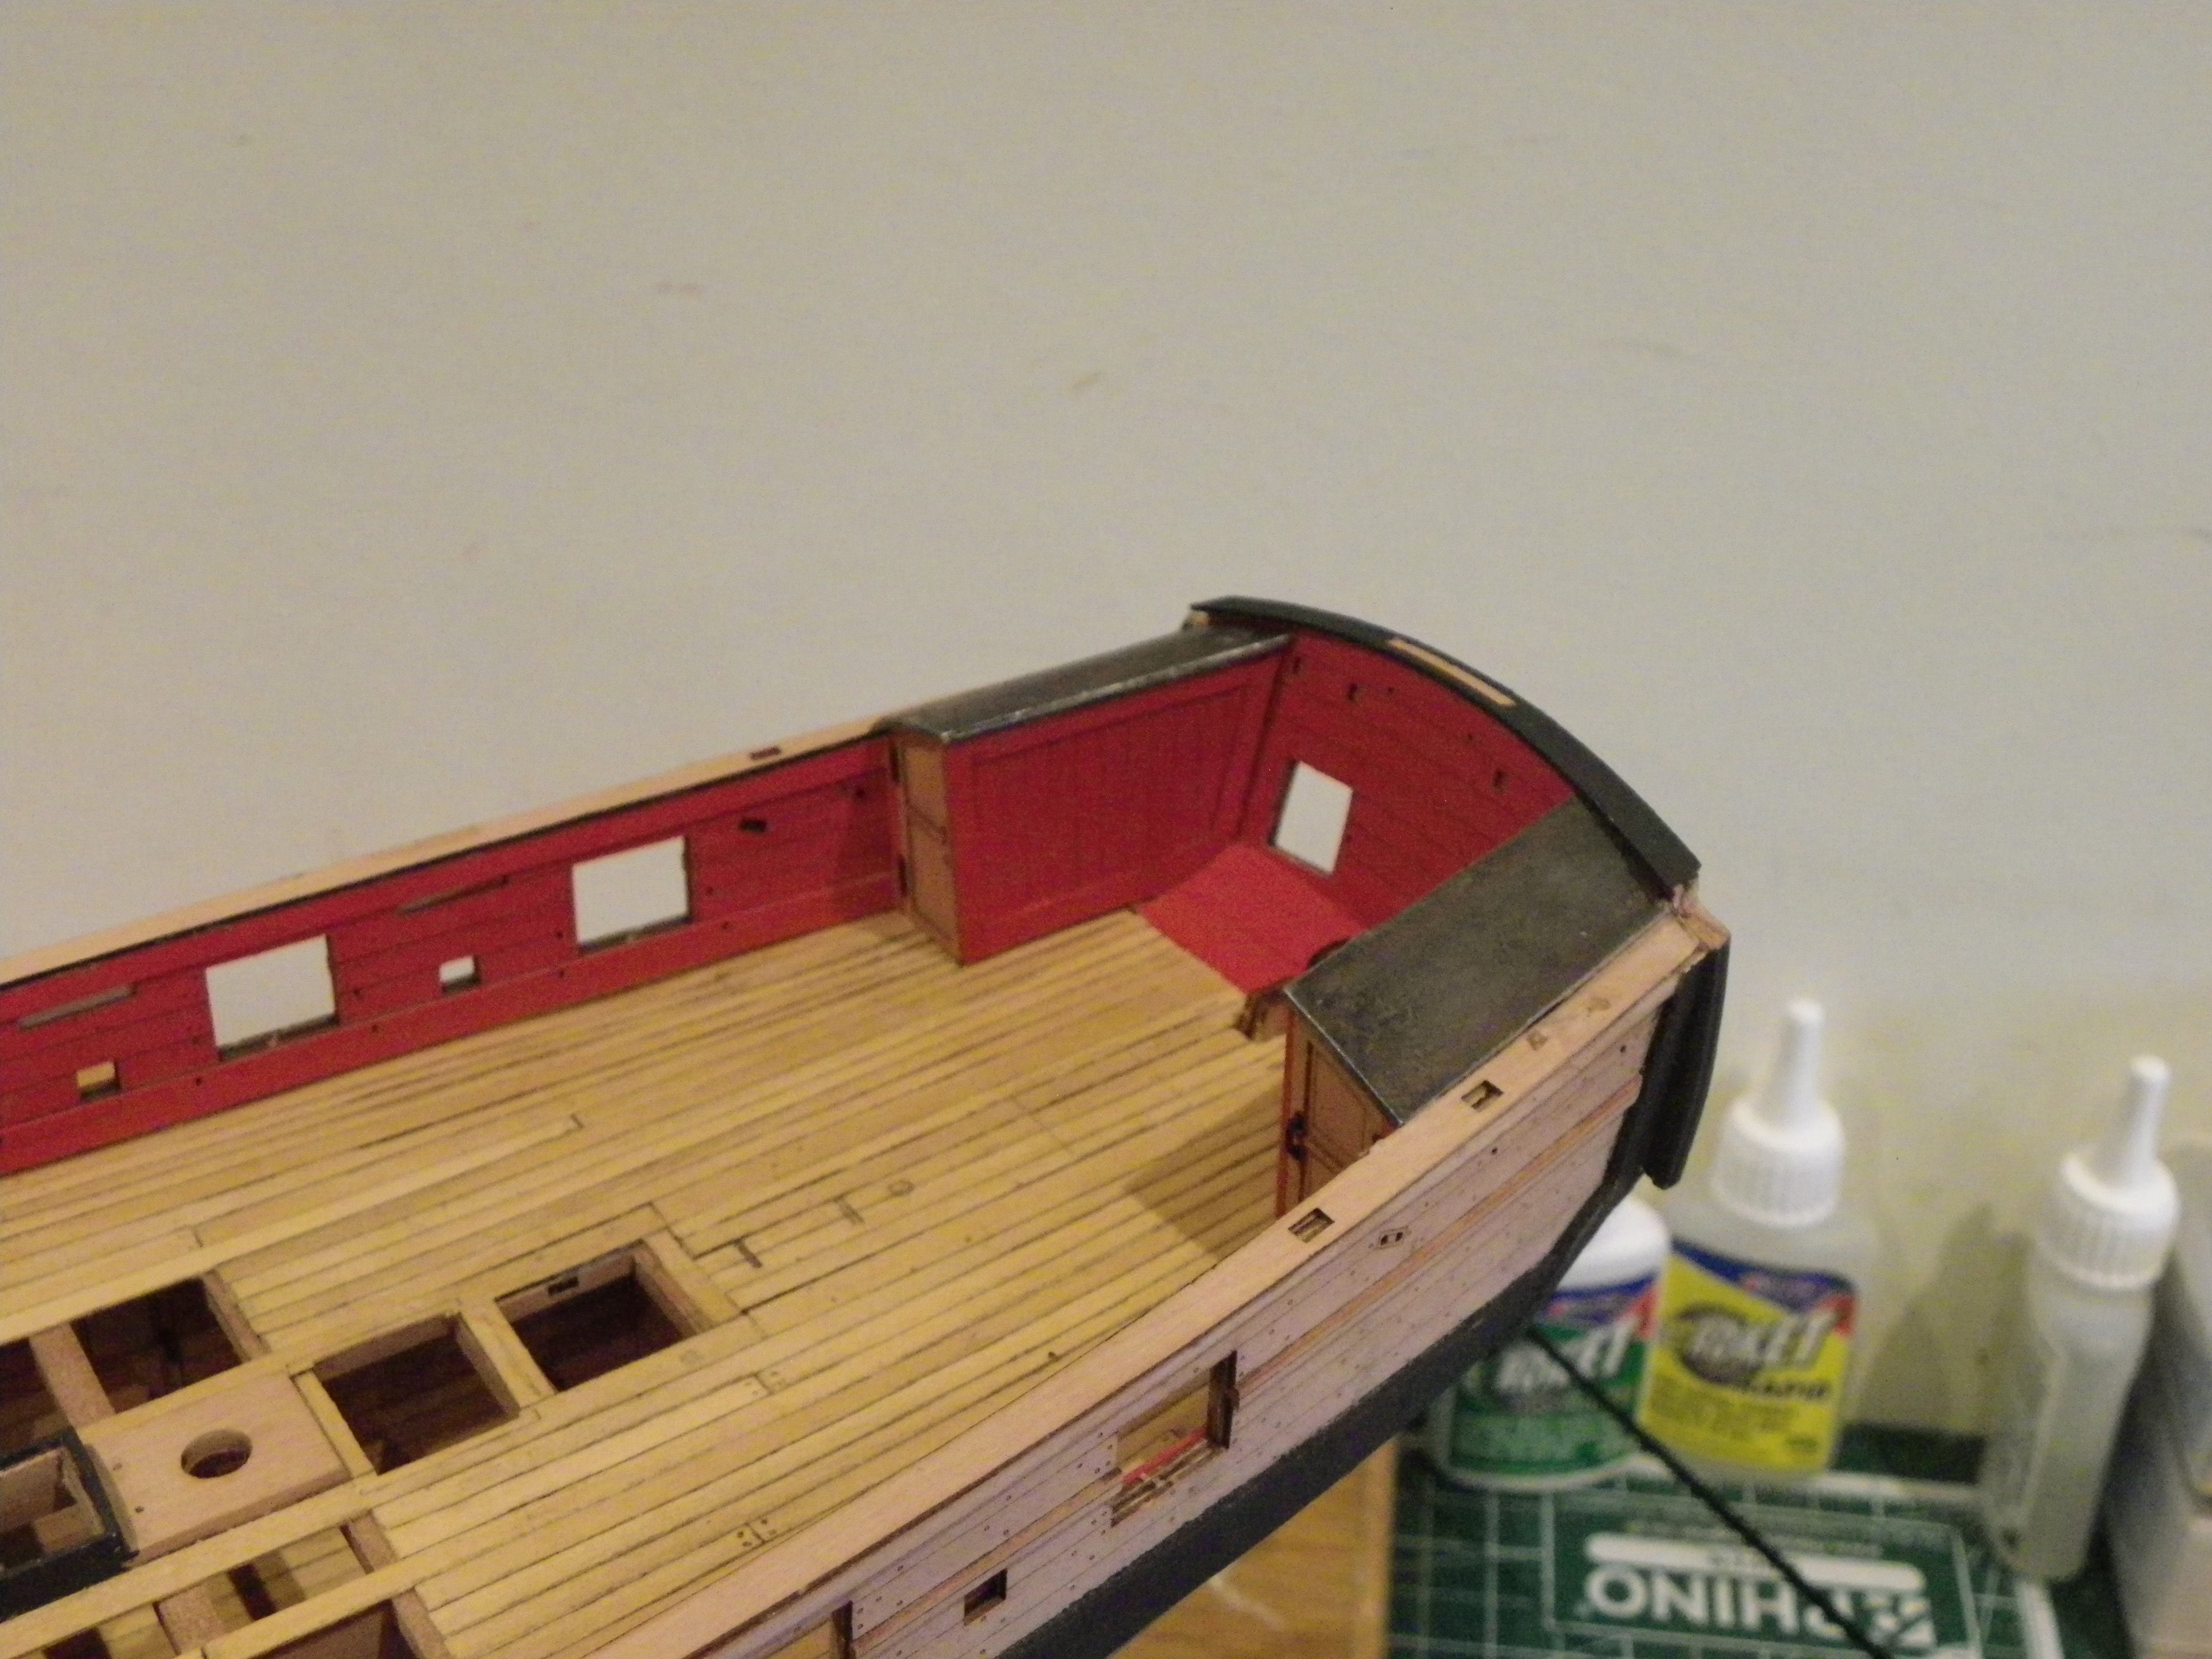
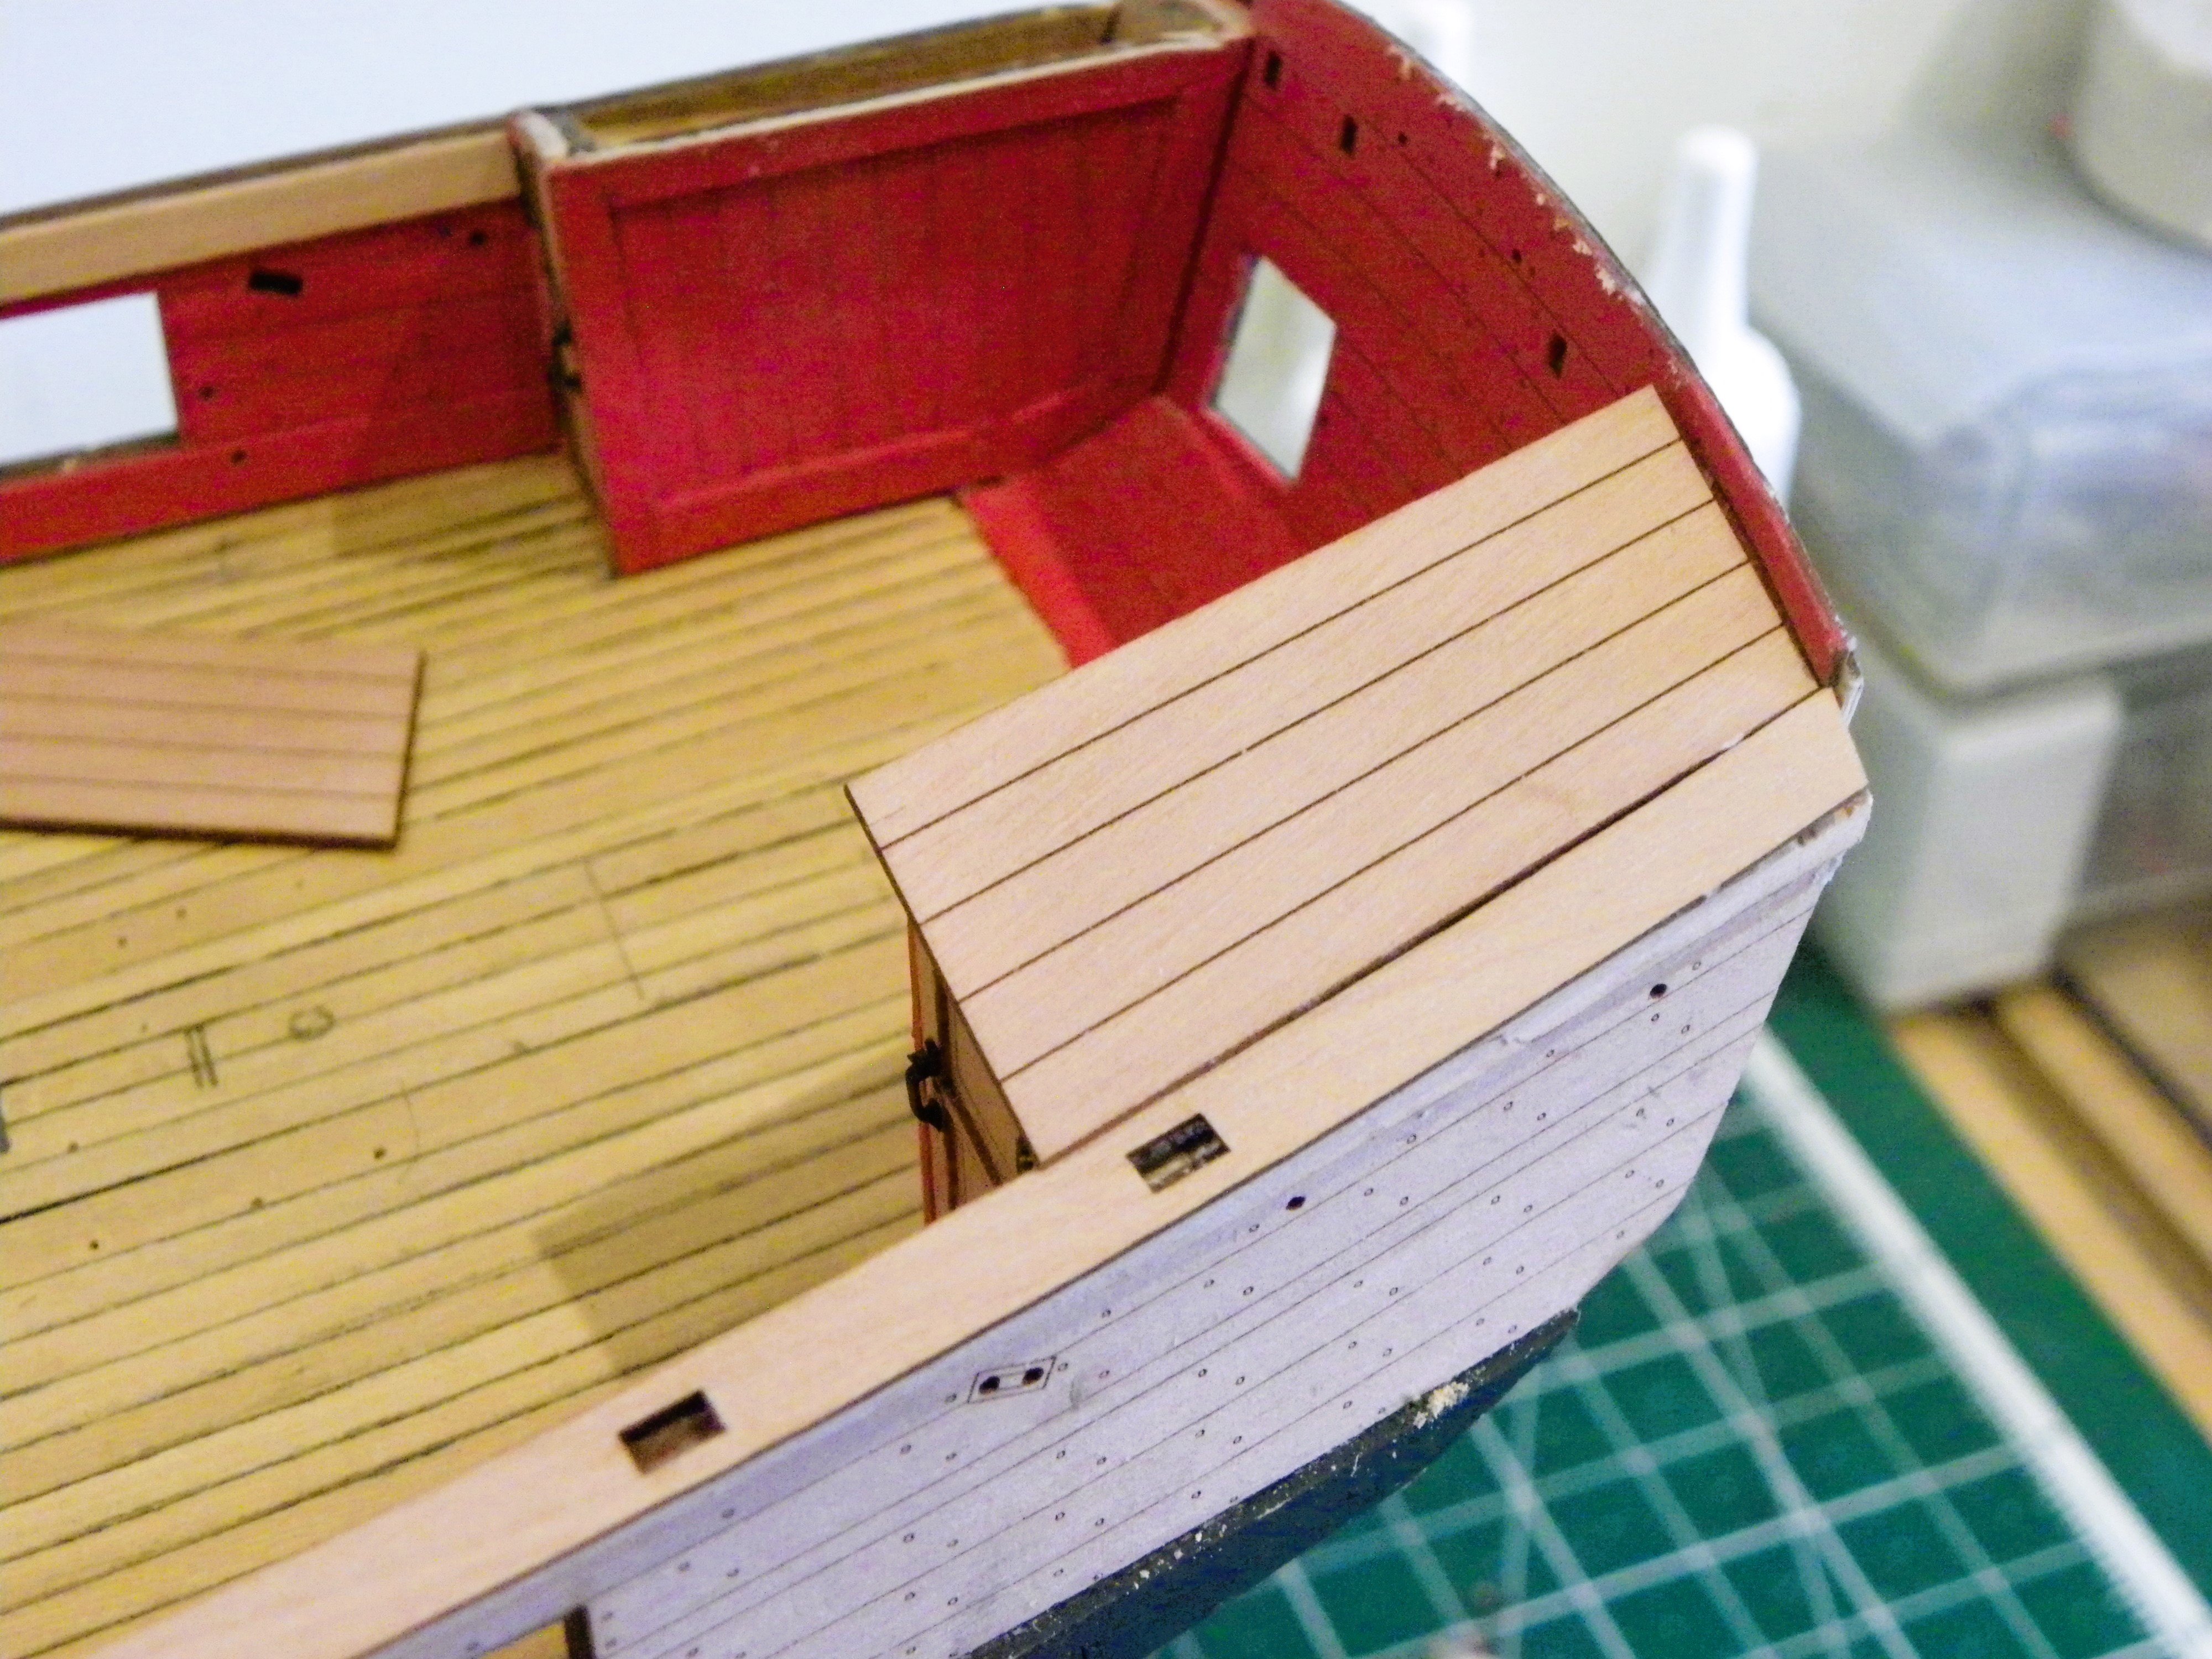
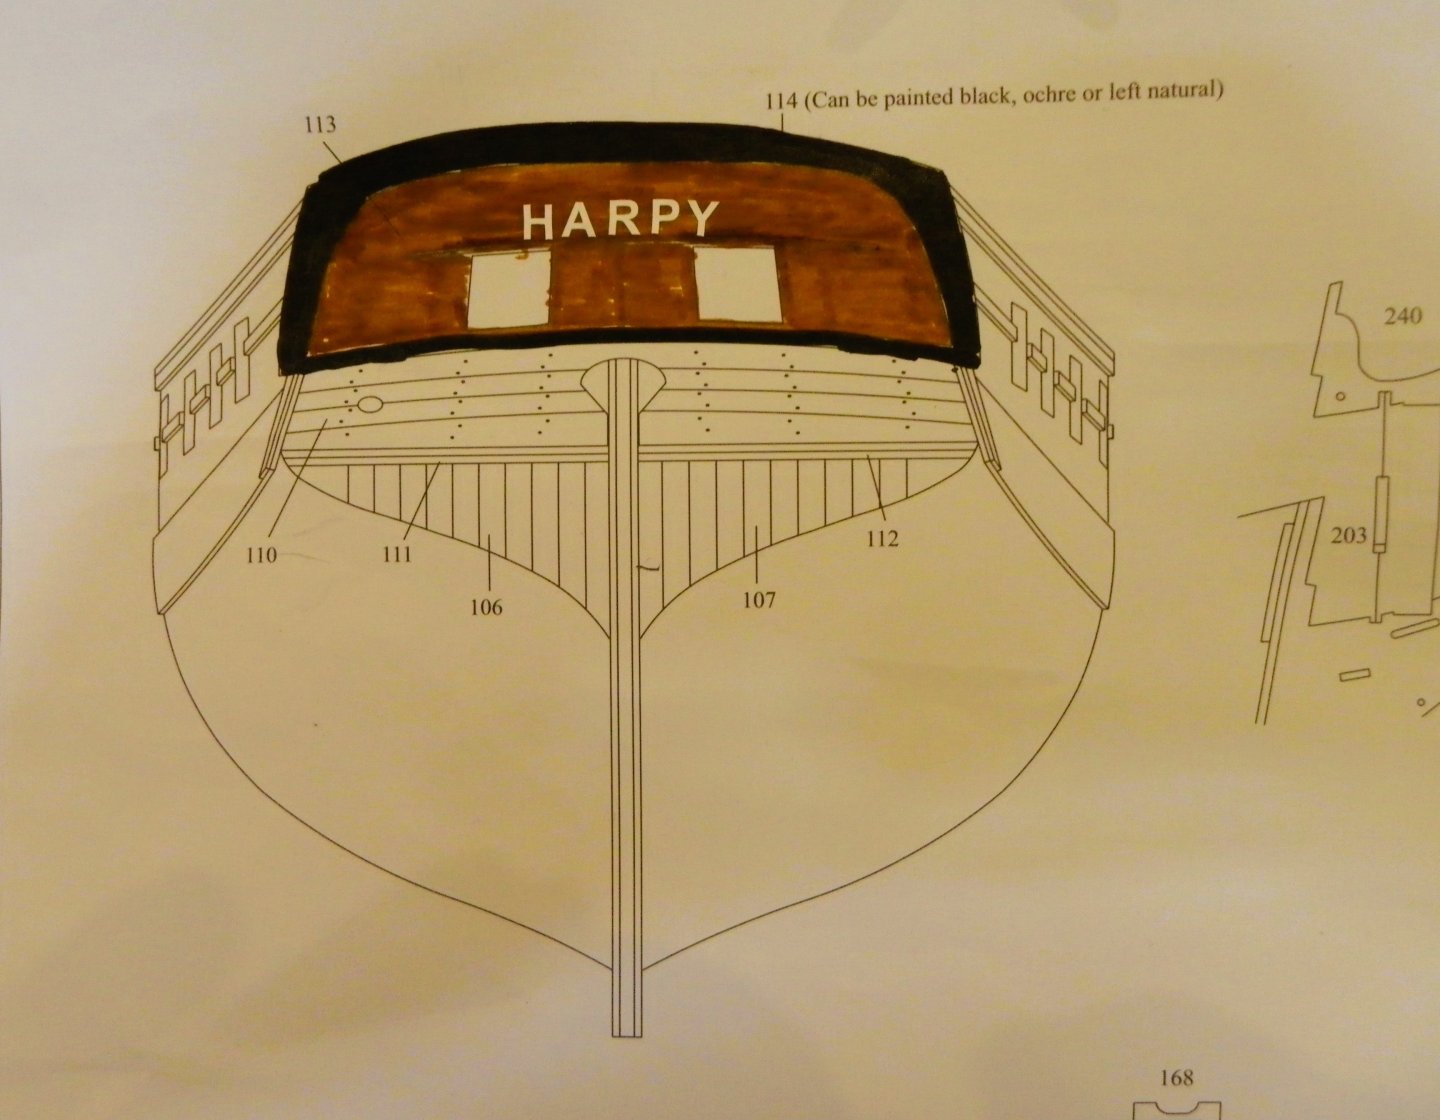
Post 49 Roof boarding The painted roof boards look attractive, but I suspect in reality they would have been tarred or sheathed in lead to prevent water ingress particularly for the starboard side Pantry. I have decided to Lead the boarding as a contrast to the paintwork. 0656 The lead foil is patinated using Pewter Patination fluid following a dip in white vinegar. 0657 I trimmed the boards a little to reduce the overhang at the front and longside. 0653 It proved quite tricky to secure the roof and I had to get inventive with a clamping arrangement. I did pre-bend the boards before gluing using pva. I didn’t want to use Cyano in case any got on the paintwork or lead. 0661 0664 It is useful at this point to check the fit of the stern davits that sit atop the capping rail. While I was waiting for glue to dry I had a play around with naming Harpy. The kit doesn’t include lettering for the stern, and it’s debateable whether these Brigs even had name plates. 0654 However, that’s no reason not to have a look; I used 5mm stick on vinyl lettering in the only practical place on the transom. I do rather like a name on the stern even if it stretches credulity. I’ll ponder it a while, but application of the name is best done before the outer transom piece is glued into place. B.E. 05/03/2025


- 332 replies
-
- 24
-
-
- Harpy
- Vanguard Models
- (and 1 more)
-
Post 48 Adding the Capping rails Following on from Post 47 I am adding the Capping rails, but there a few preliminaries to attend to. The spirketting and top rails have been fitted and painted. The Gunwale tops have been levelled and sanded smooth. 0627 The Bowsprit opening at the Bows has been fettled and a Bowsprit section along with the stop have been temporarily put into place. 0637 The short forward sections of Capping rail are then glued into place. I next assemble the Catheads and use them to mark the distance for the placing of the long section of capping. I am not fitting them at this point. 0633 At the stern I have levelled off that area of the deck cabin structures to allow fair run of the capping rail to meet the transom. I notched the transom to allow free passage of the rail, it splintered a little but that is of no consequence as the outer transom pieces fit over. 0642 0641 Easier without the boarding in place to line up the capping at the stern. 0646 0651 0649 0645 I didn’t think it necessary to paint the rail prior to installation but I did run the edge of a chisel tipped waterproof marker along the inside edge. Movin’ on… B.E. 04/03/2025


- 332 replies
-
- 18
-
-
- Harpy
- Vanguard Models
- (and 1 more)
-
Thank you ECK, those photos are very useful, and a nice job you have done on the roof boards.👍 B.E.
- 332 replies
-
- 4
-
-
-
- Harpy
- Vanguard Models
- (and 1 more)
-
Hi Mark, A quarter round may have been an option had the lower counter had a more convex shape, but sadly not.🤔 Post 47 Roof boards and Capping rails – which is the chicken, which is the egg. I had been thinking of adding the roof boarding at this point. Again this is a slightly oversize pre-printed shaped board. 0621 However, the plan would indicate that the Capping rails run directly over the outer edge of the mdf roof line, but….. 0618 On my build the mdf deck structure rises above the Gunwale on the outer side. Whether this is an expected thing or a peculiarity of my build I’m not sure. 0623 The instructions are not expansive on this aspect, but it appears that the outer edge of the structure need to be flush with the gunwale to allow a fair run of the capping rail. There is no indication of trimming the capping rail at its aft end. 0625 Some trimming of the board will be necessary. It strikes me that it may be better to fit the capping rail before the roof boards. This does not concur with the build sequence where adding the boards is some 34 steps before the capping rails are added, but it makes sense to me. I can’t think why the cappings shouldn’t be added at this point, and it is the route I will take, having made the outer roof line edge flush with the gunwale. B.E. 03/03/2025

- 332 replies
-
- 18
-
-
- Harpy
- Vanguard Models
- (and 1 more)
-
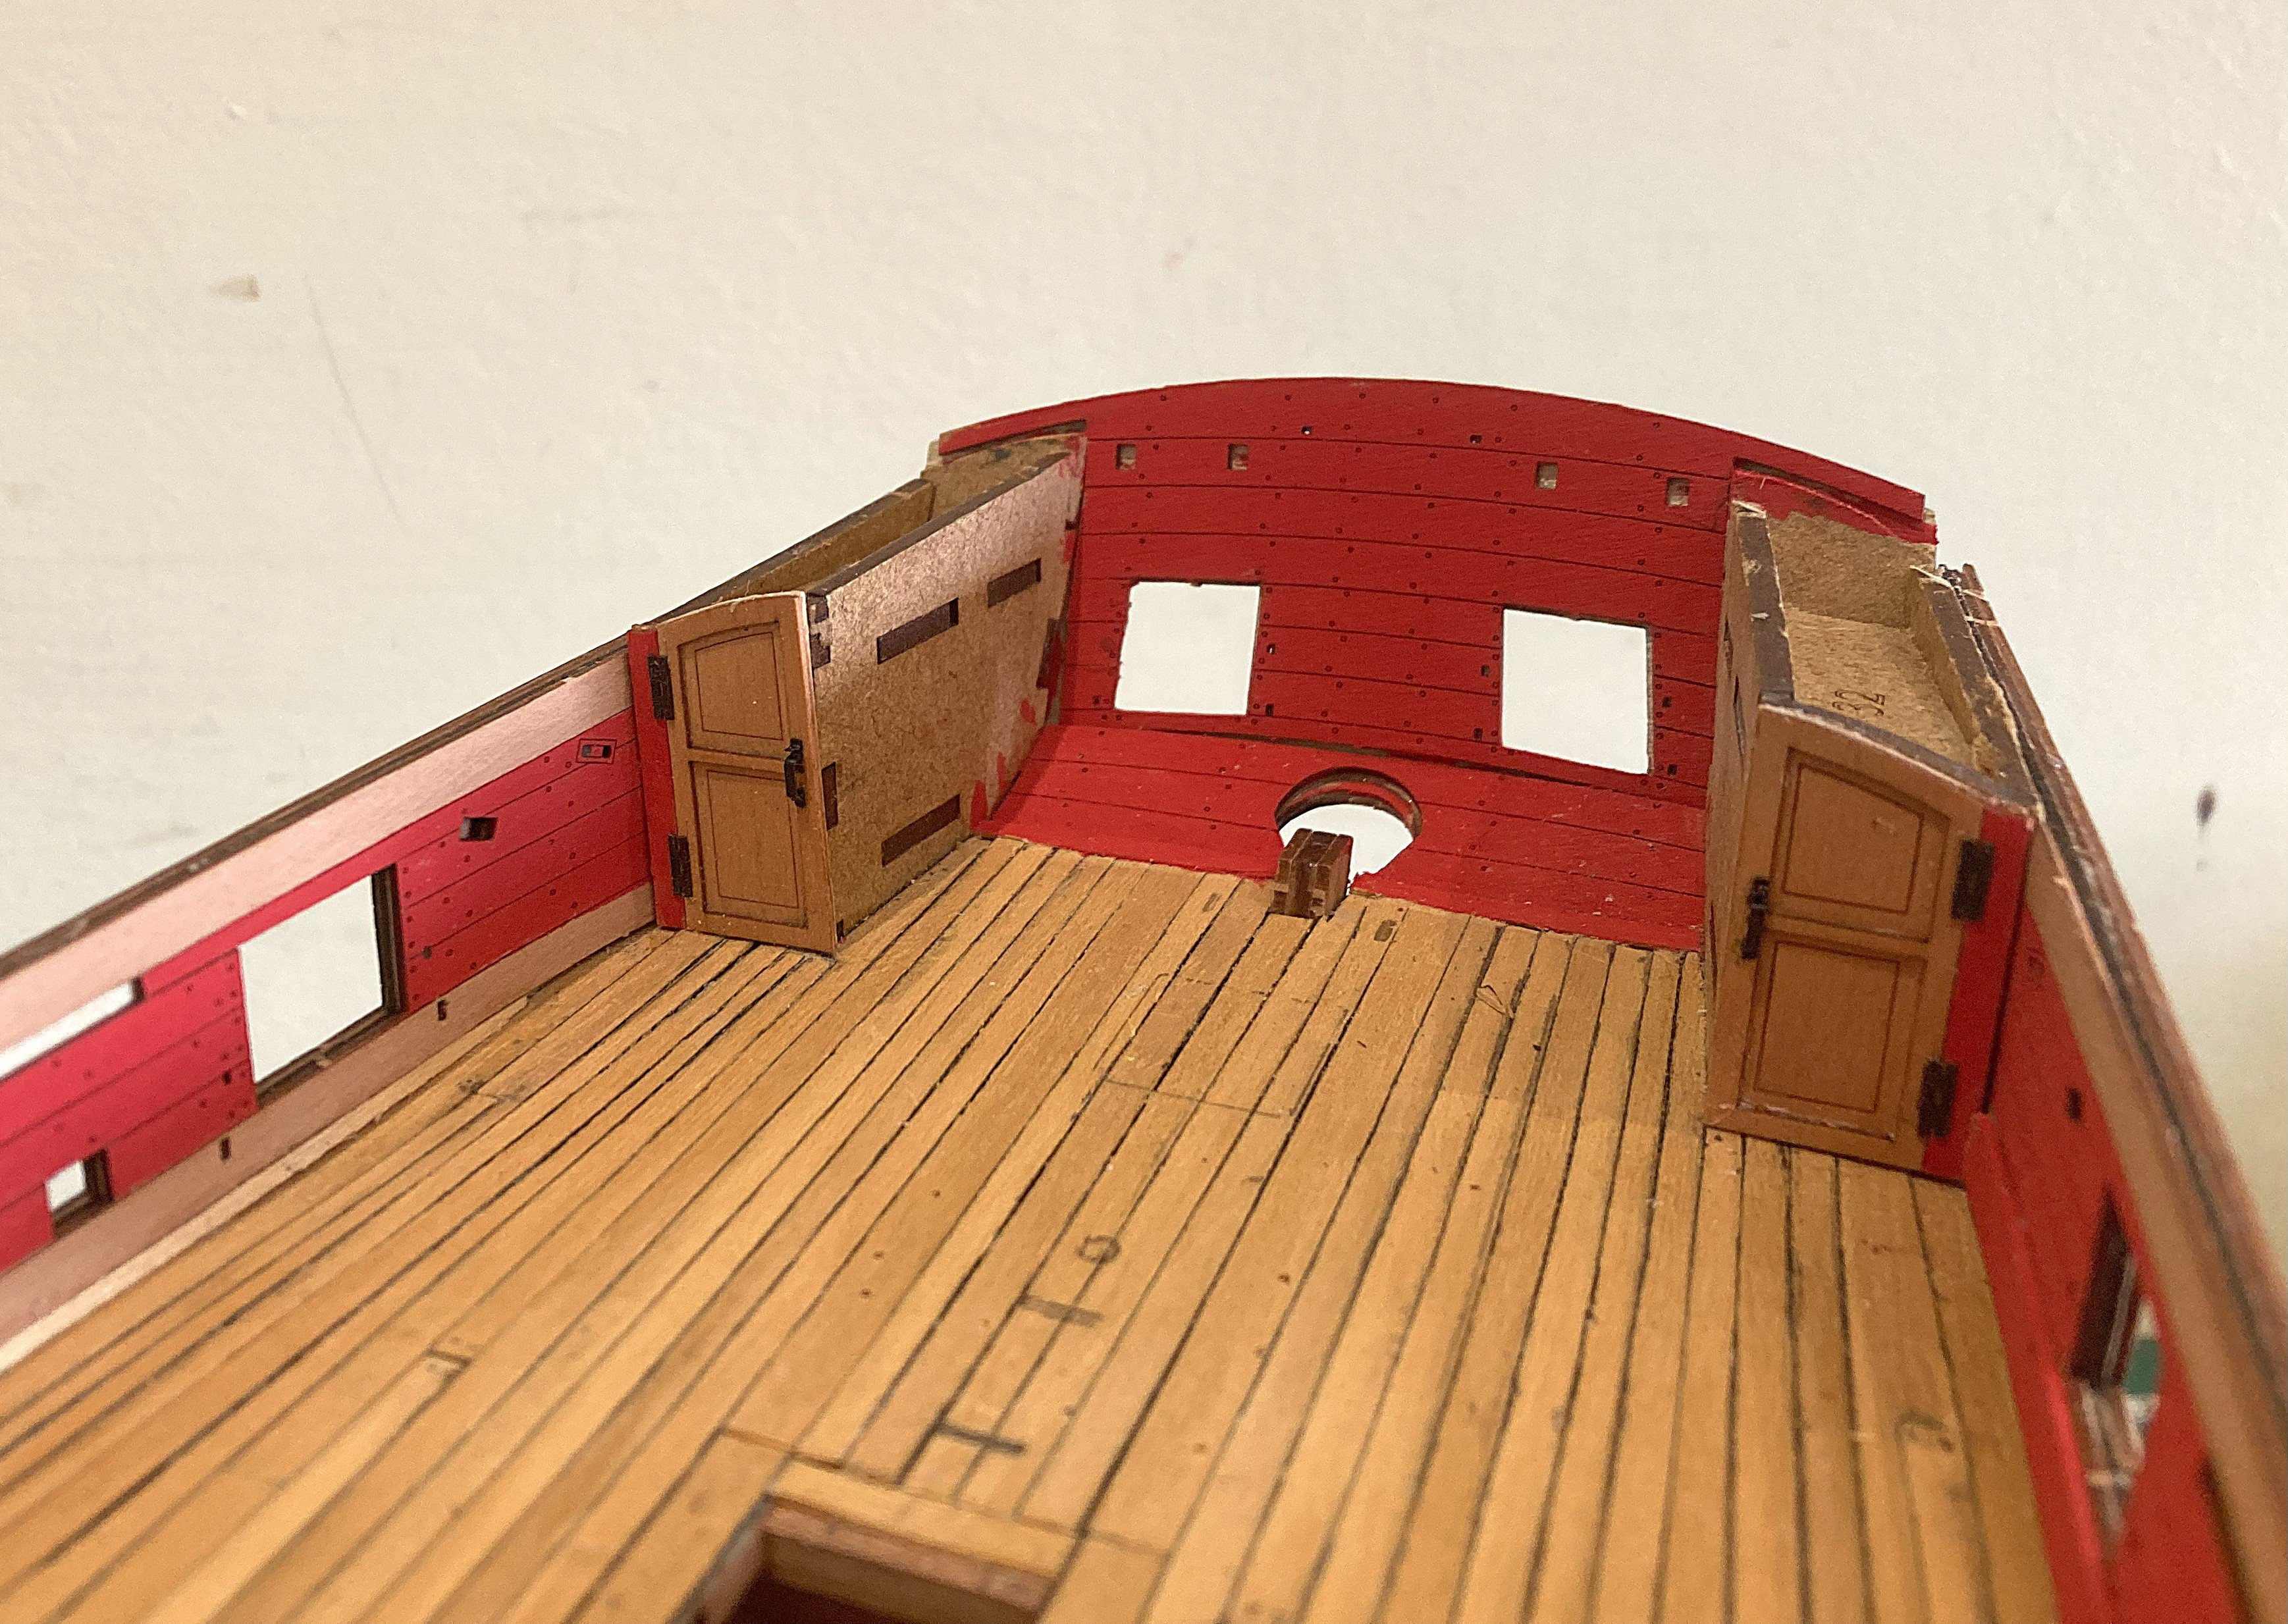
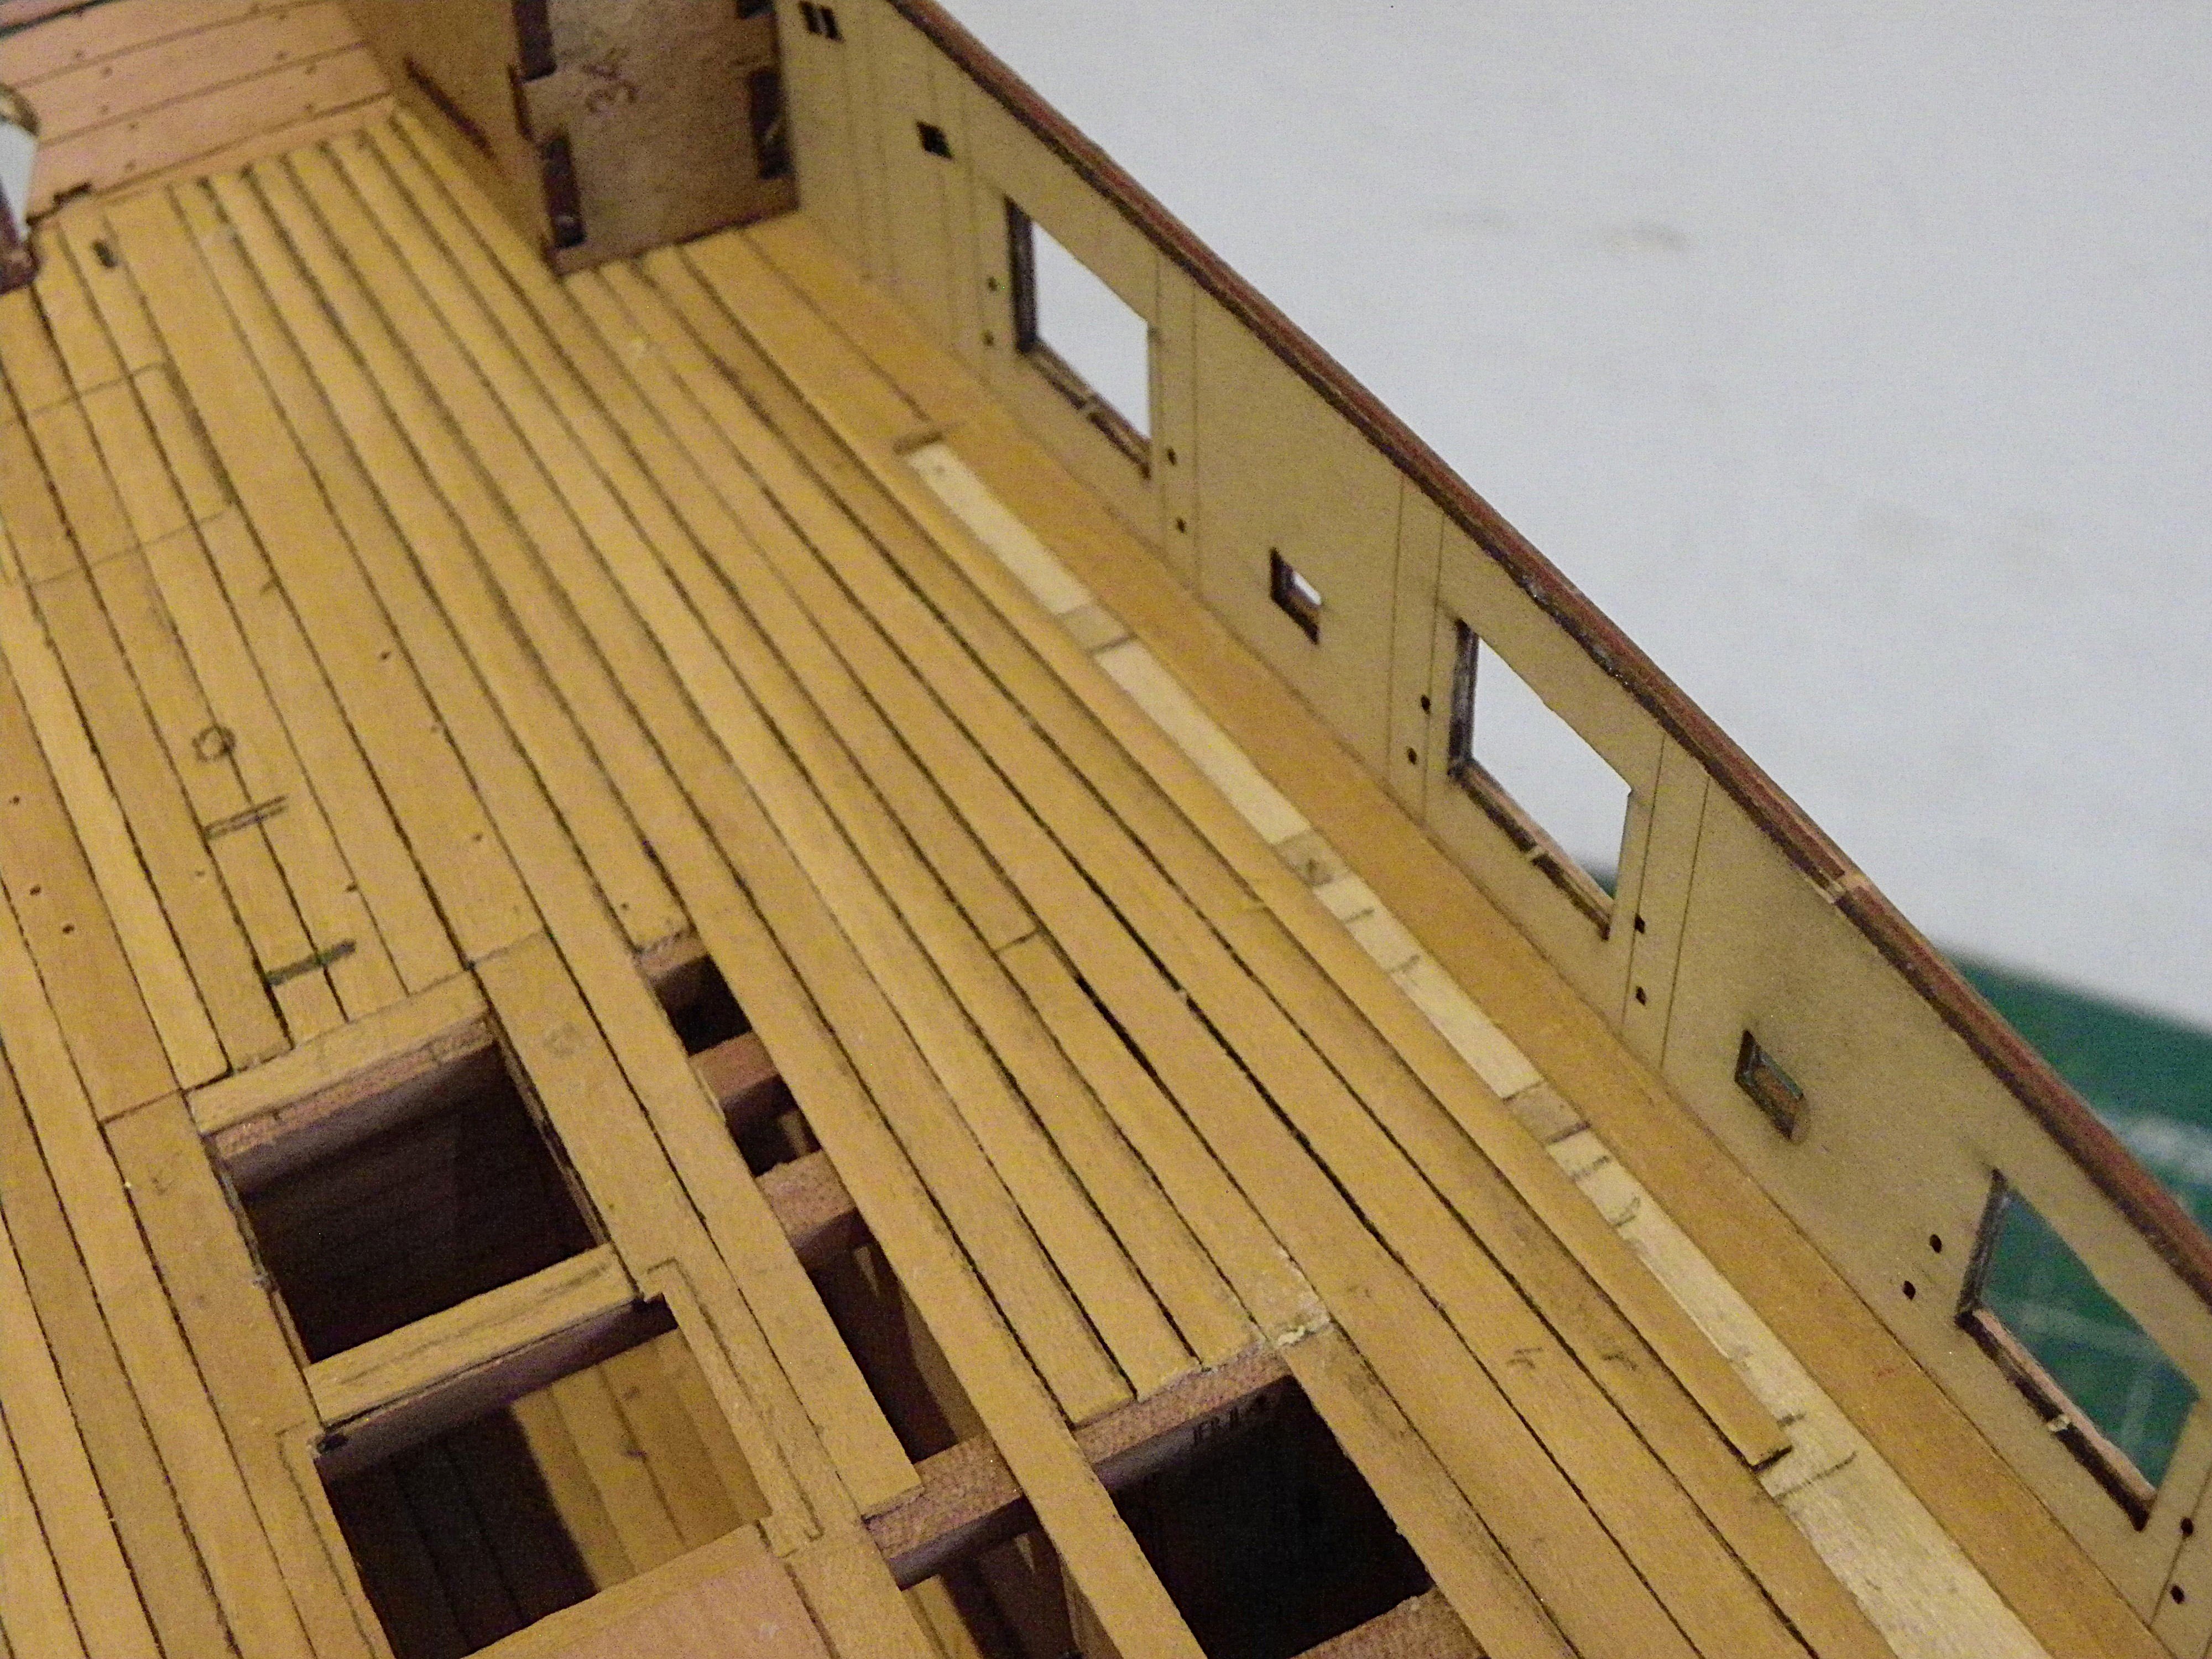
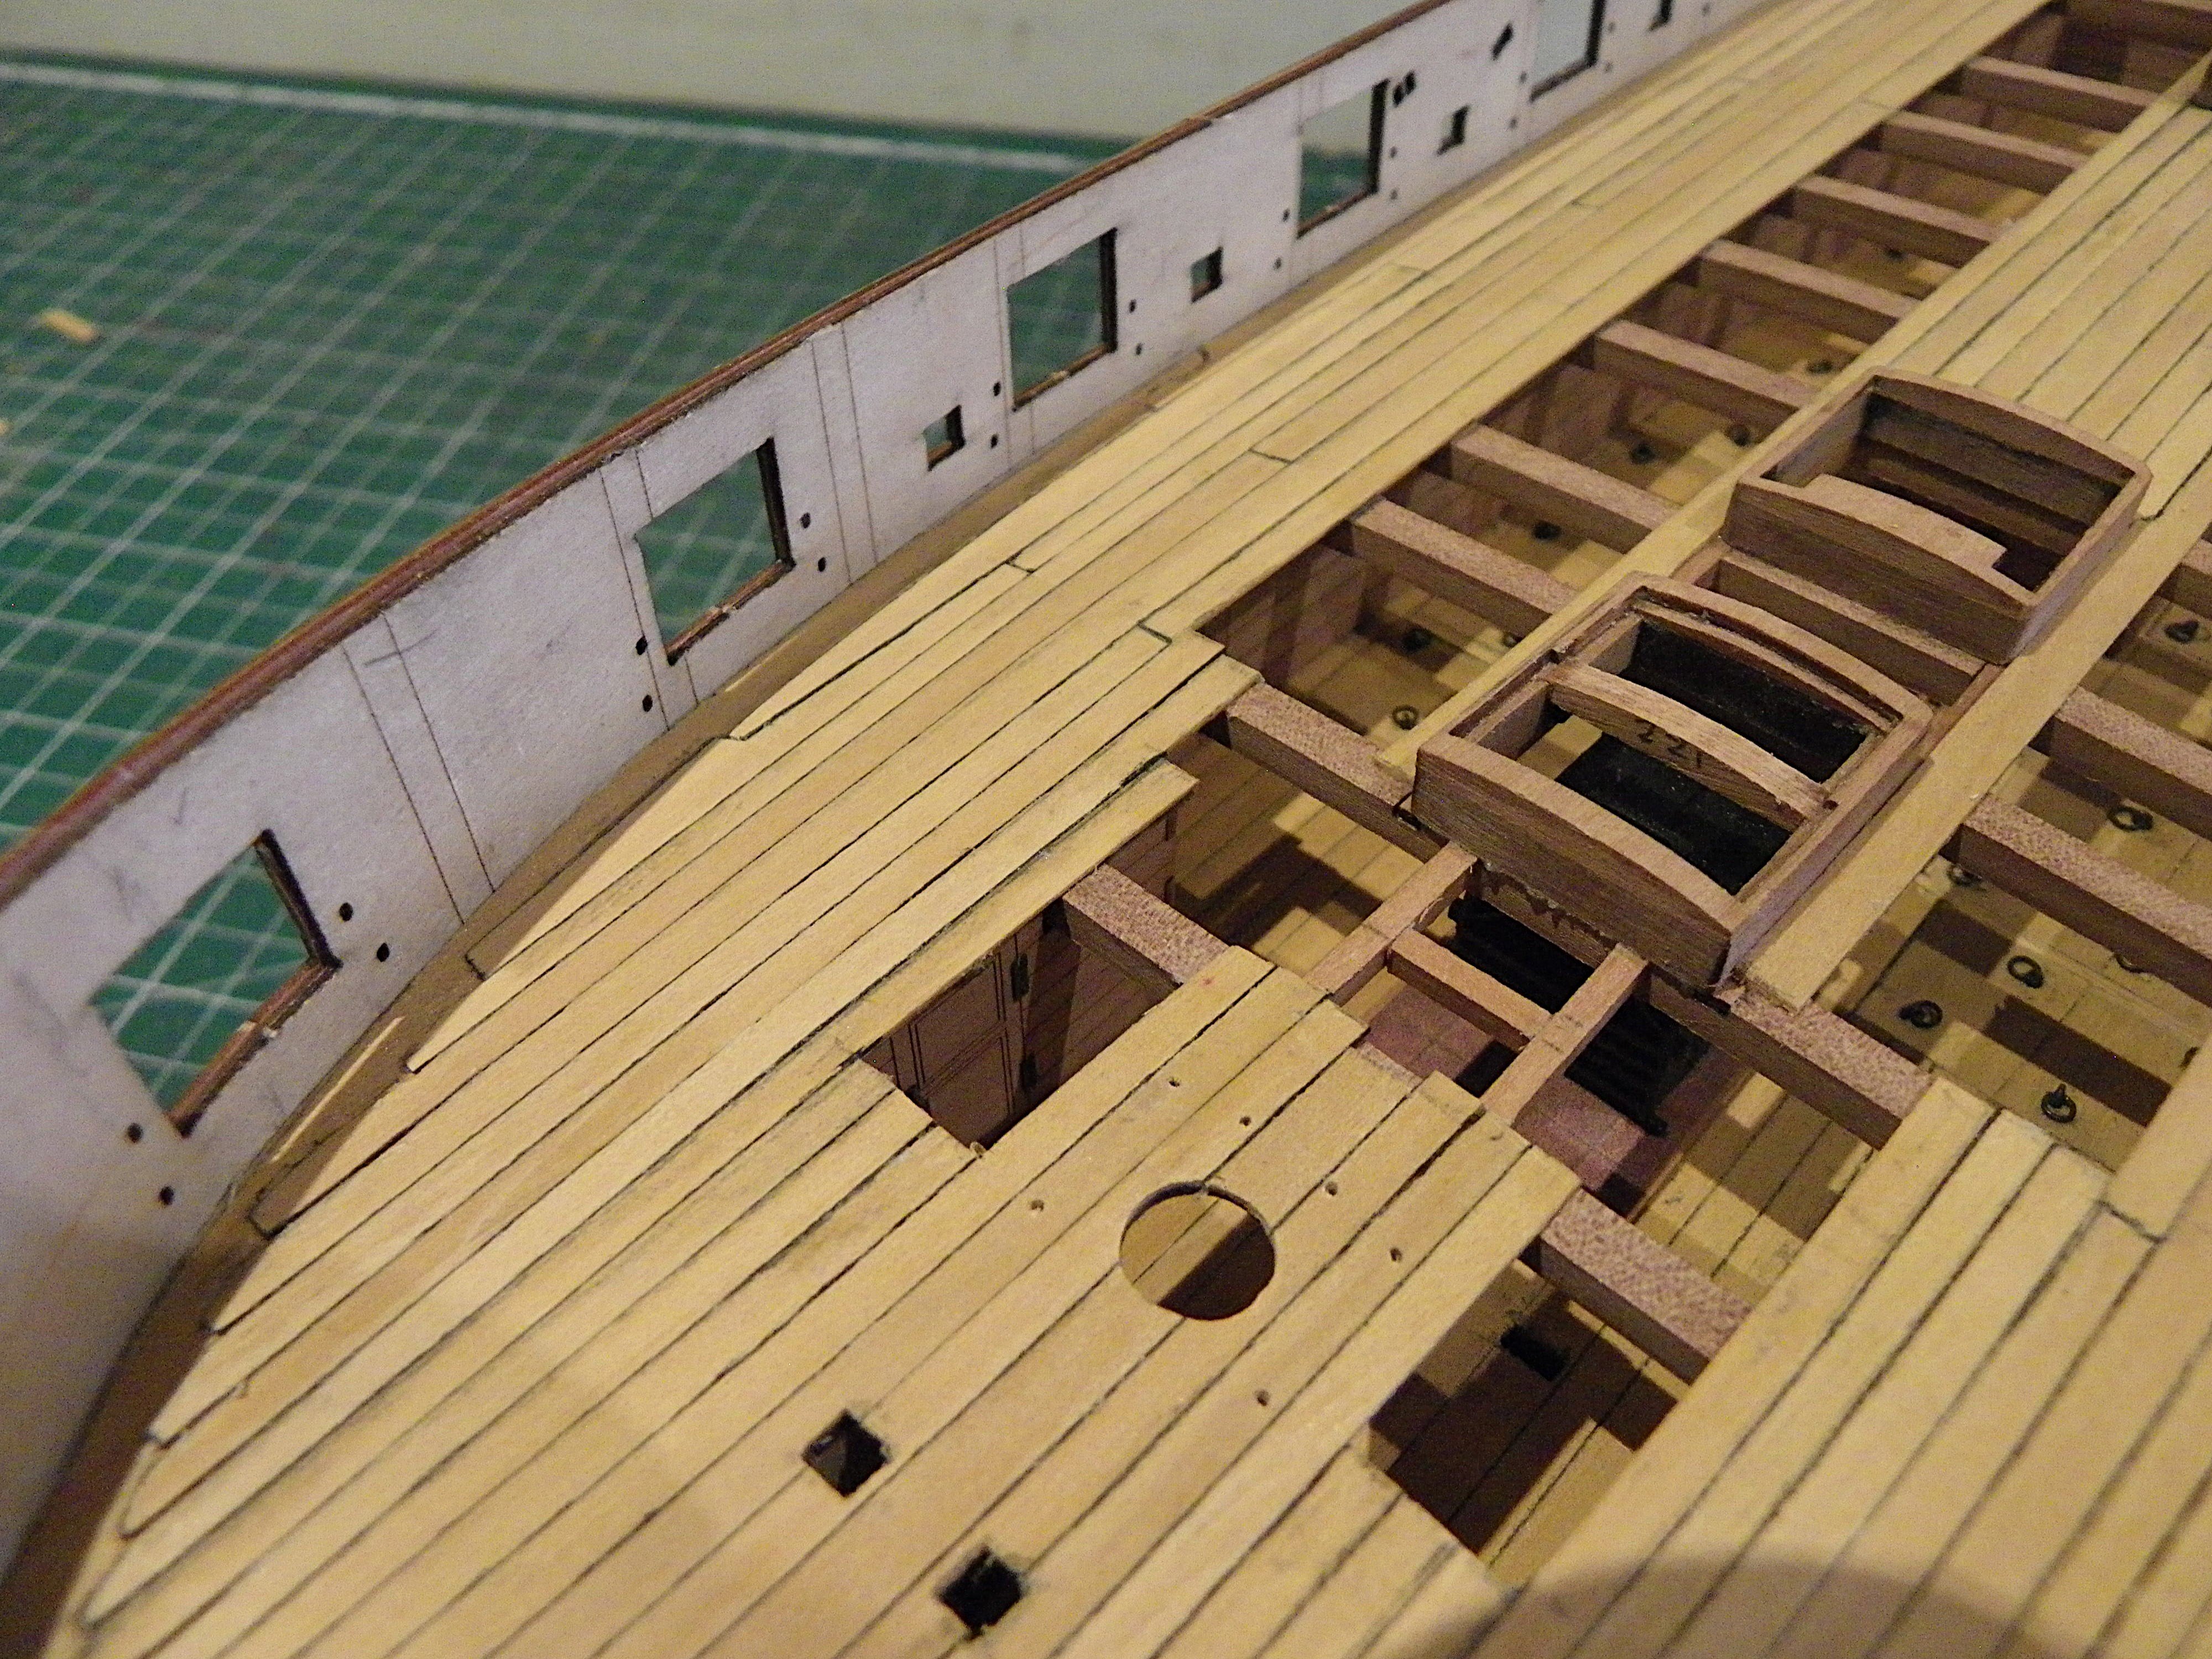
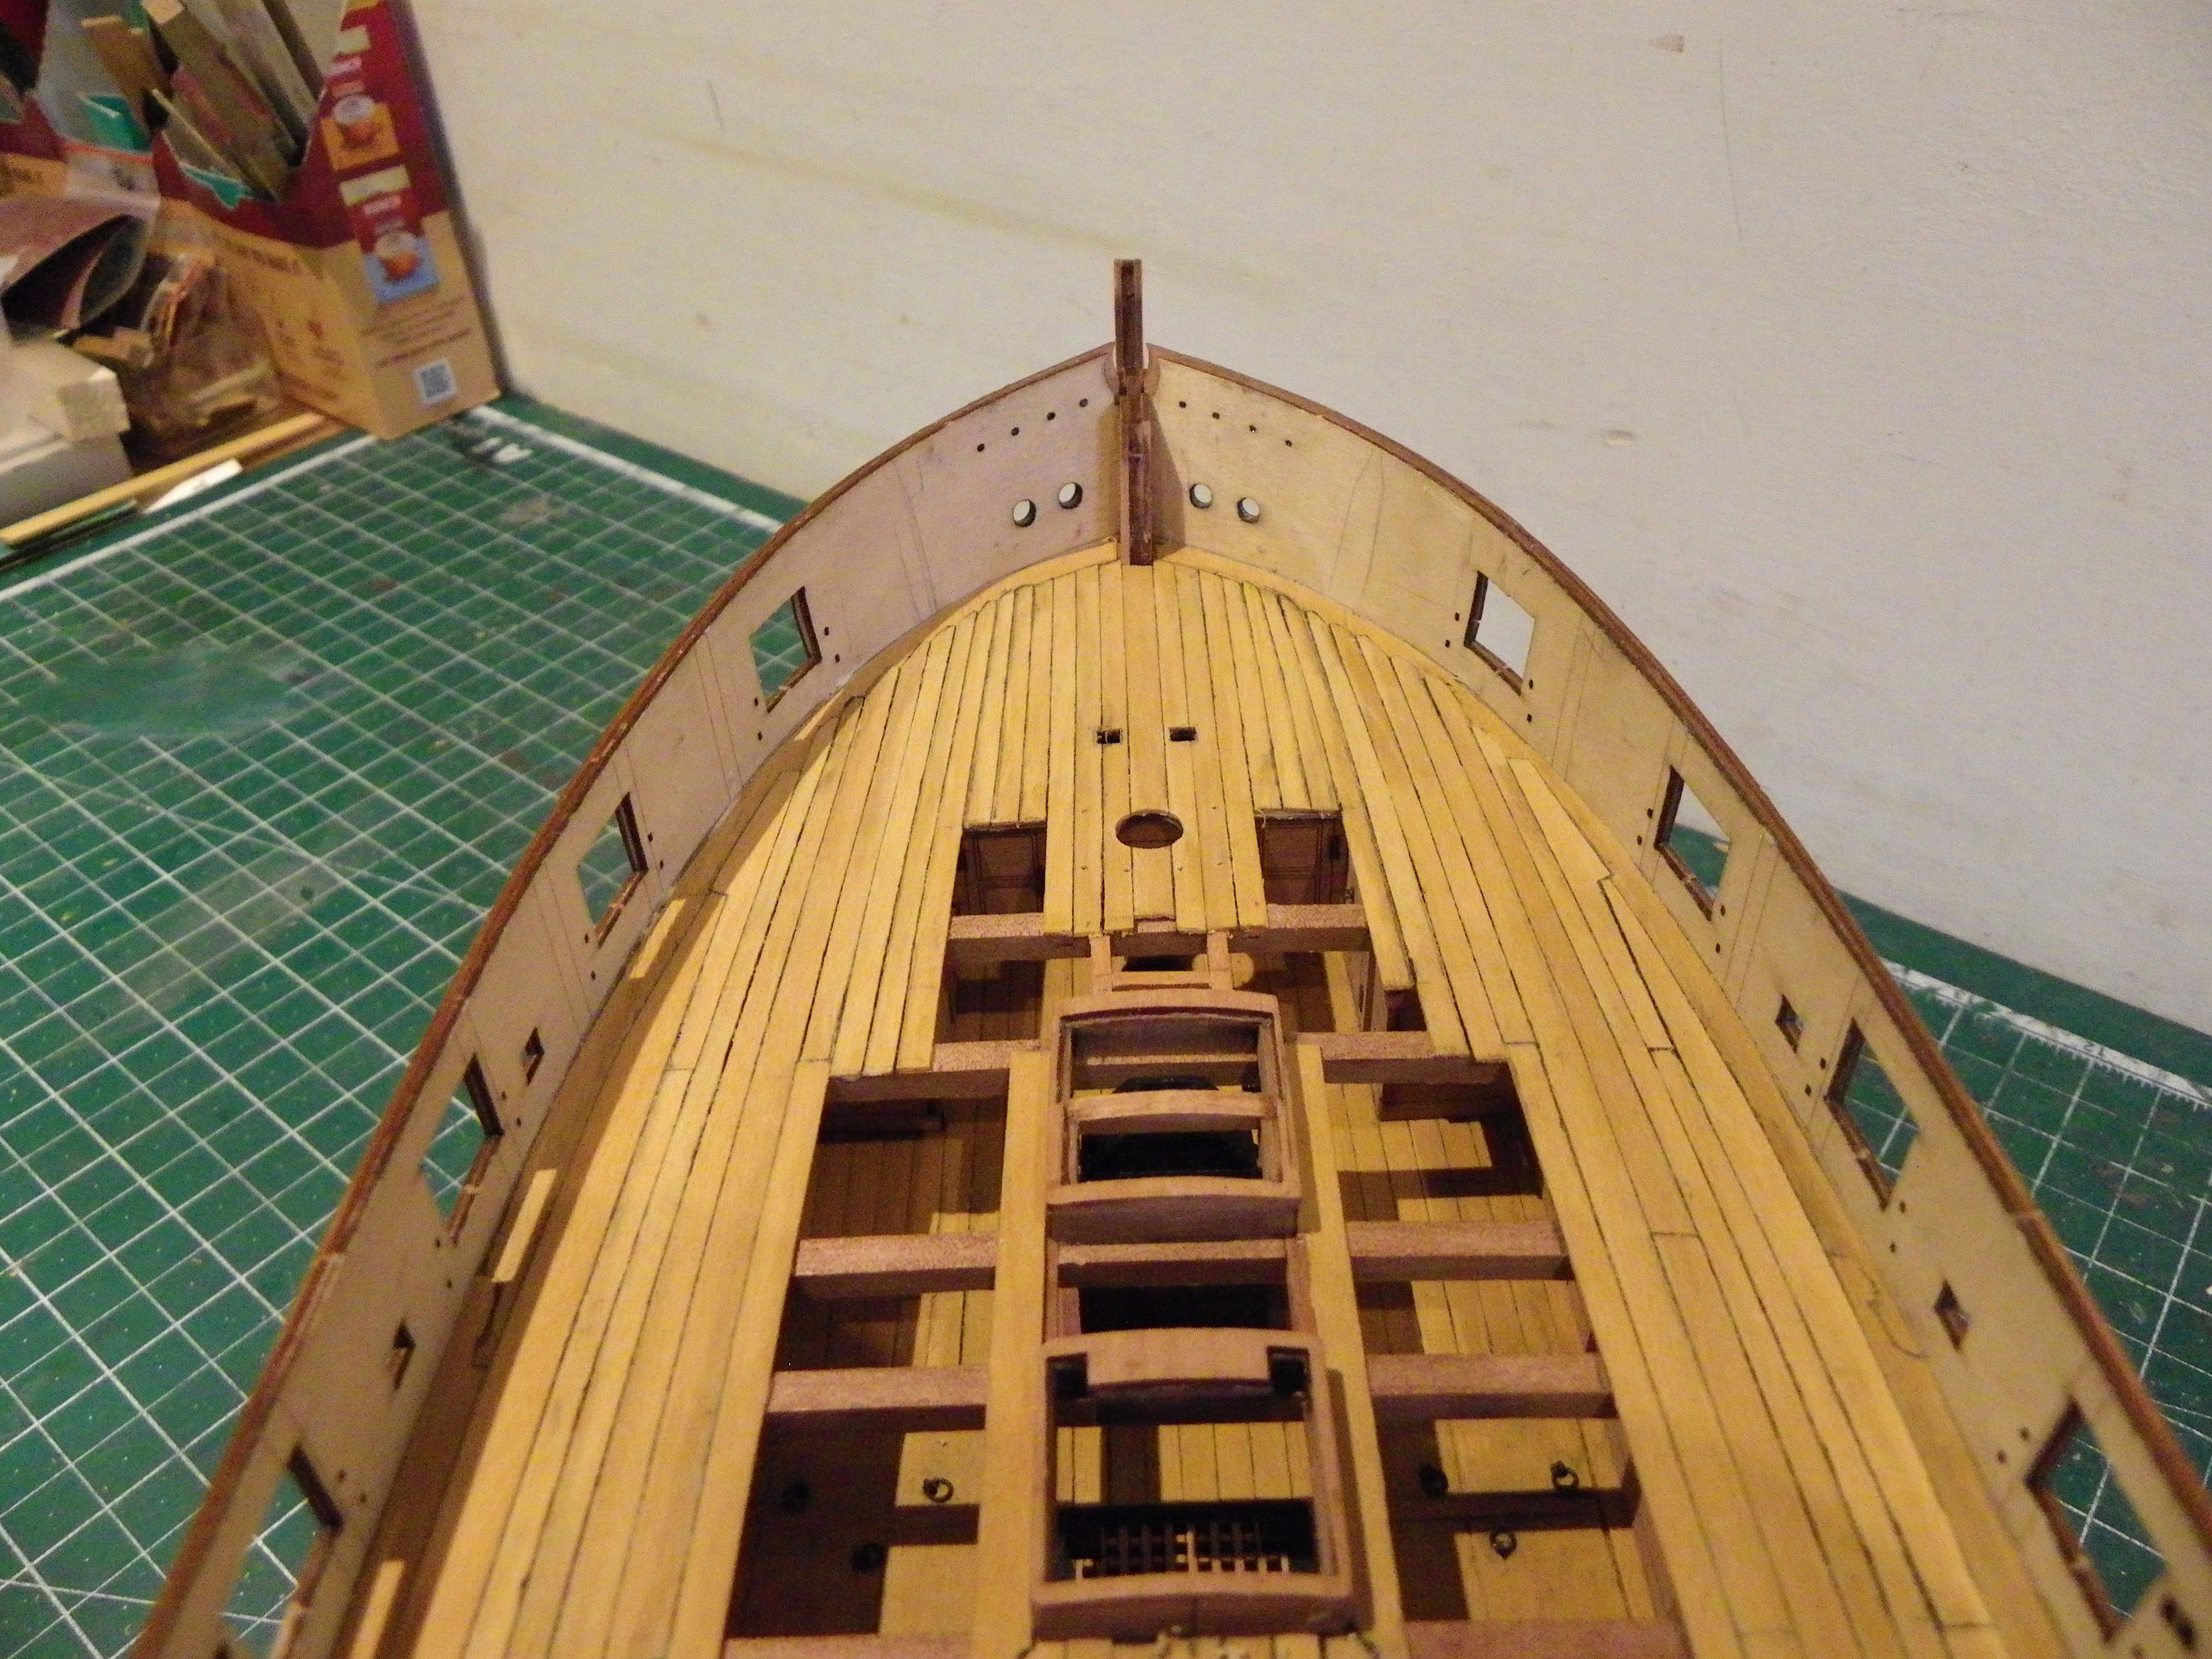
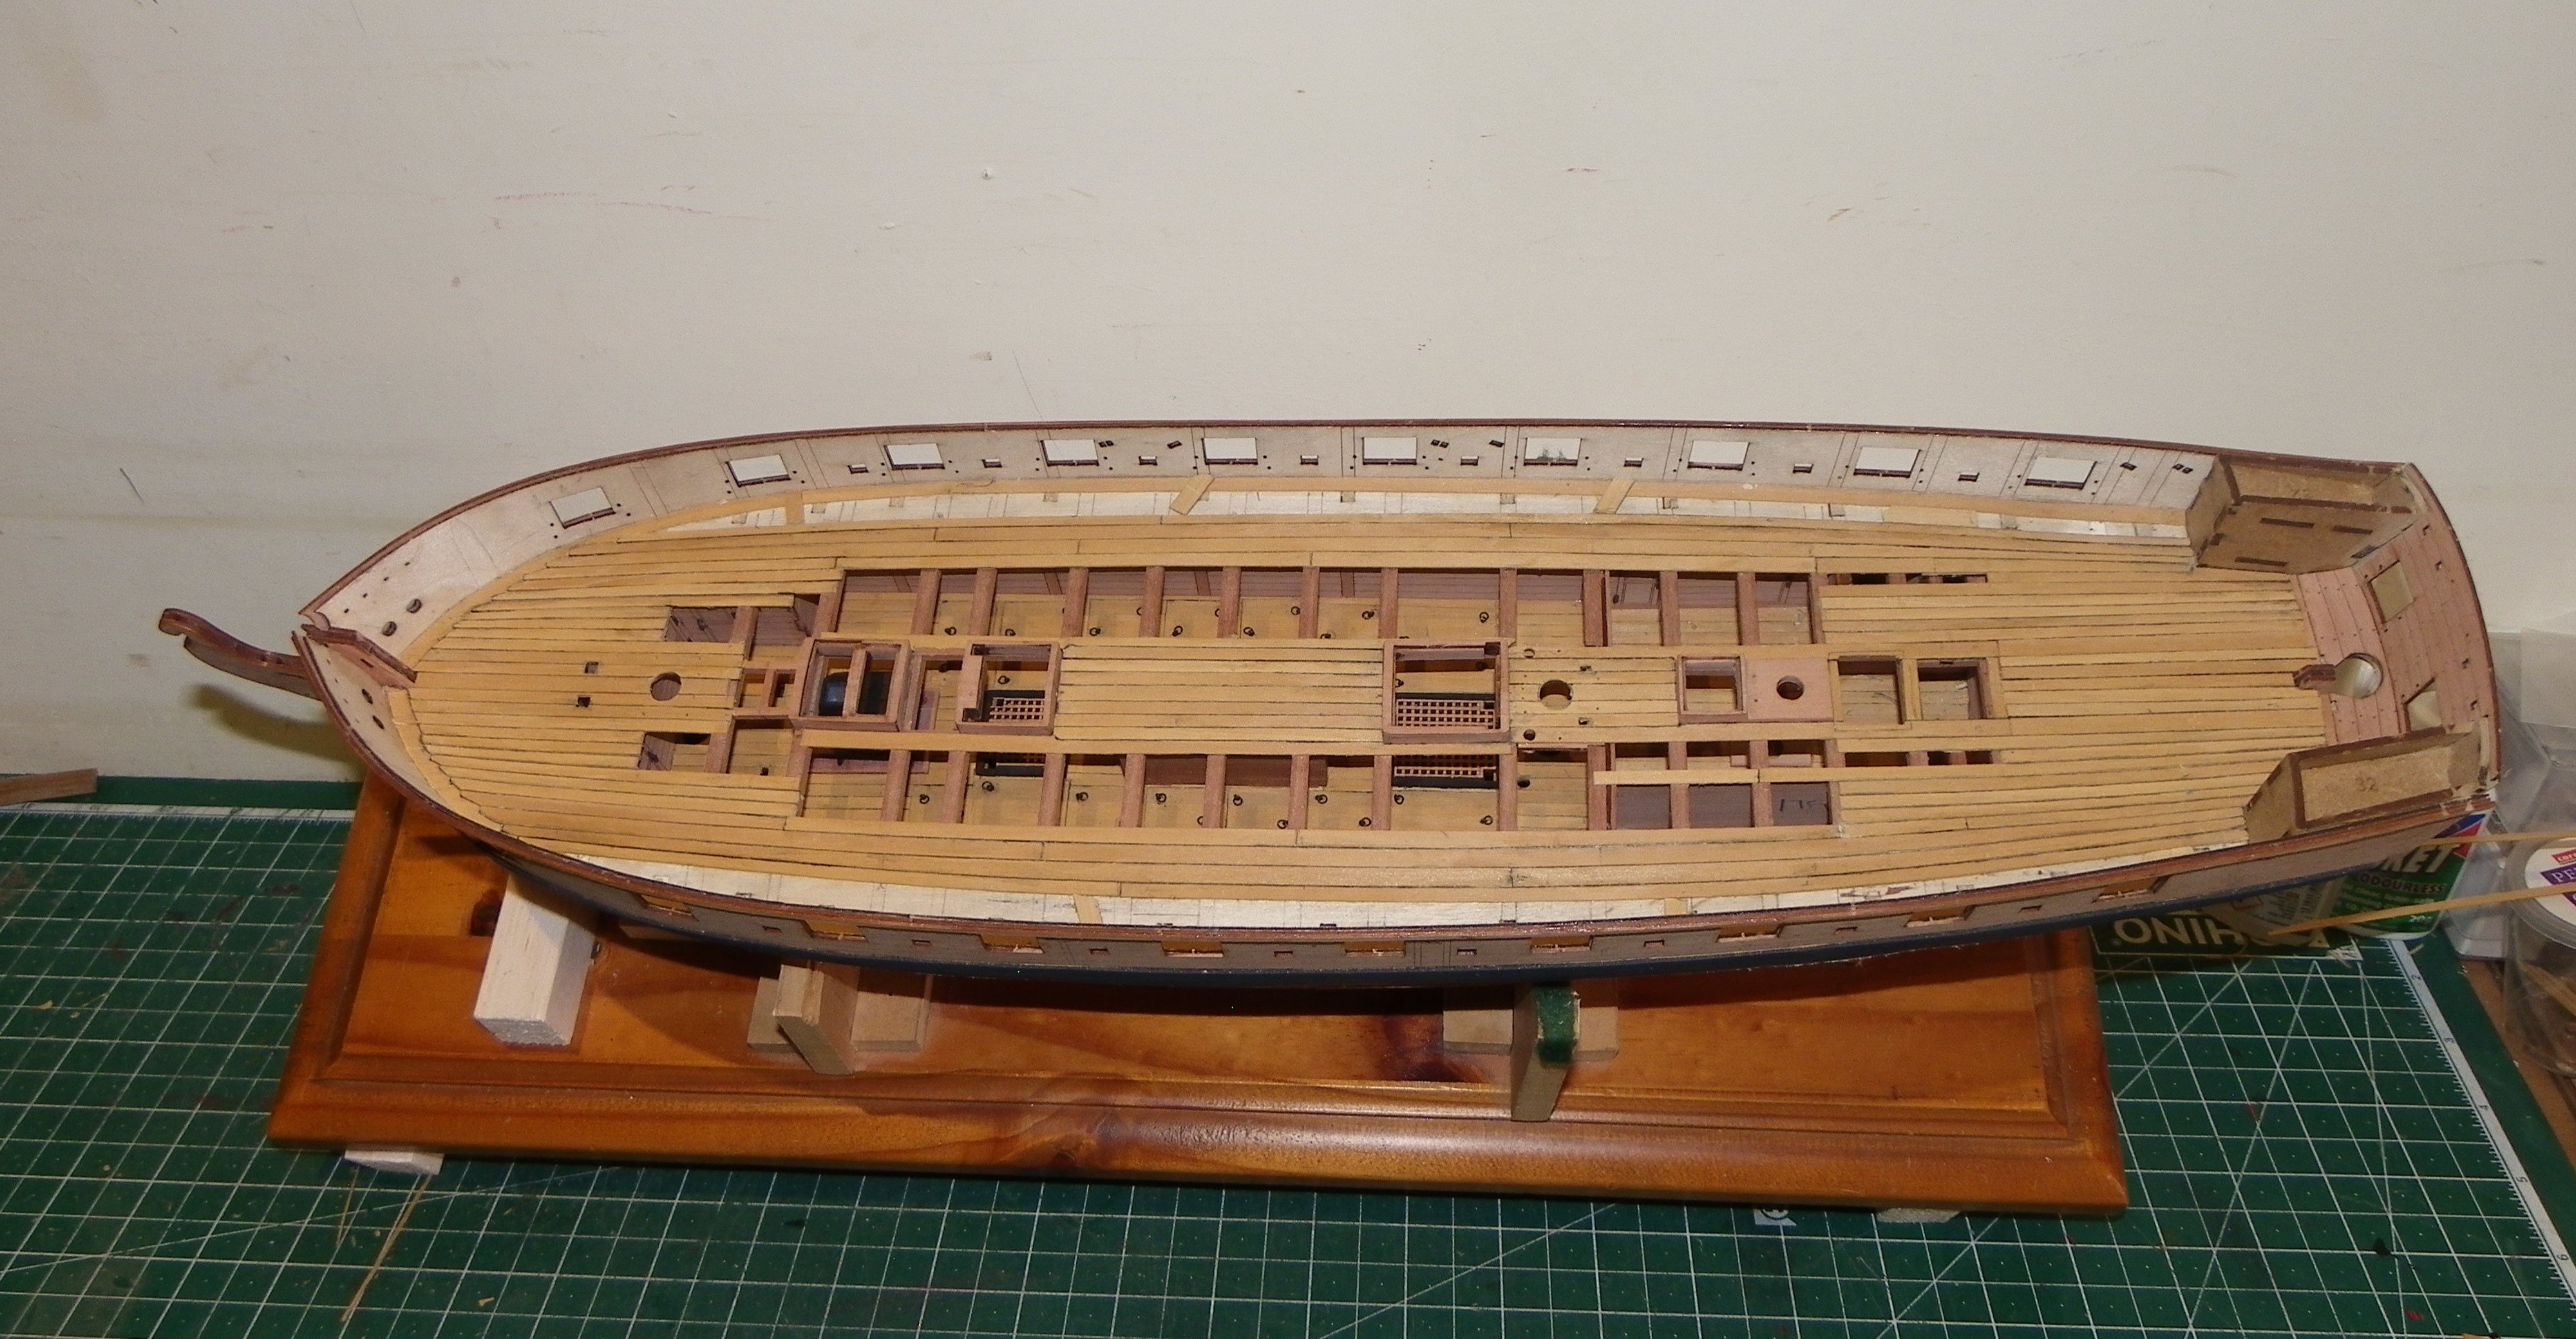
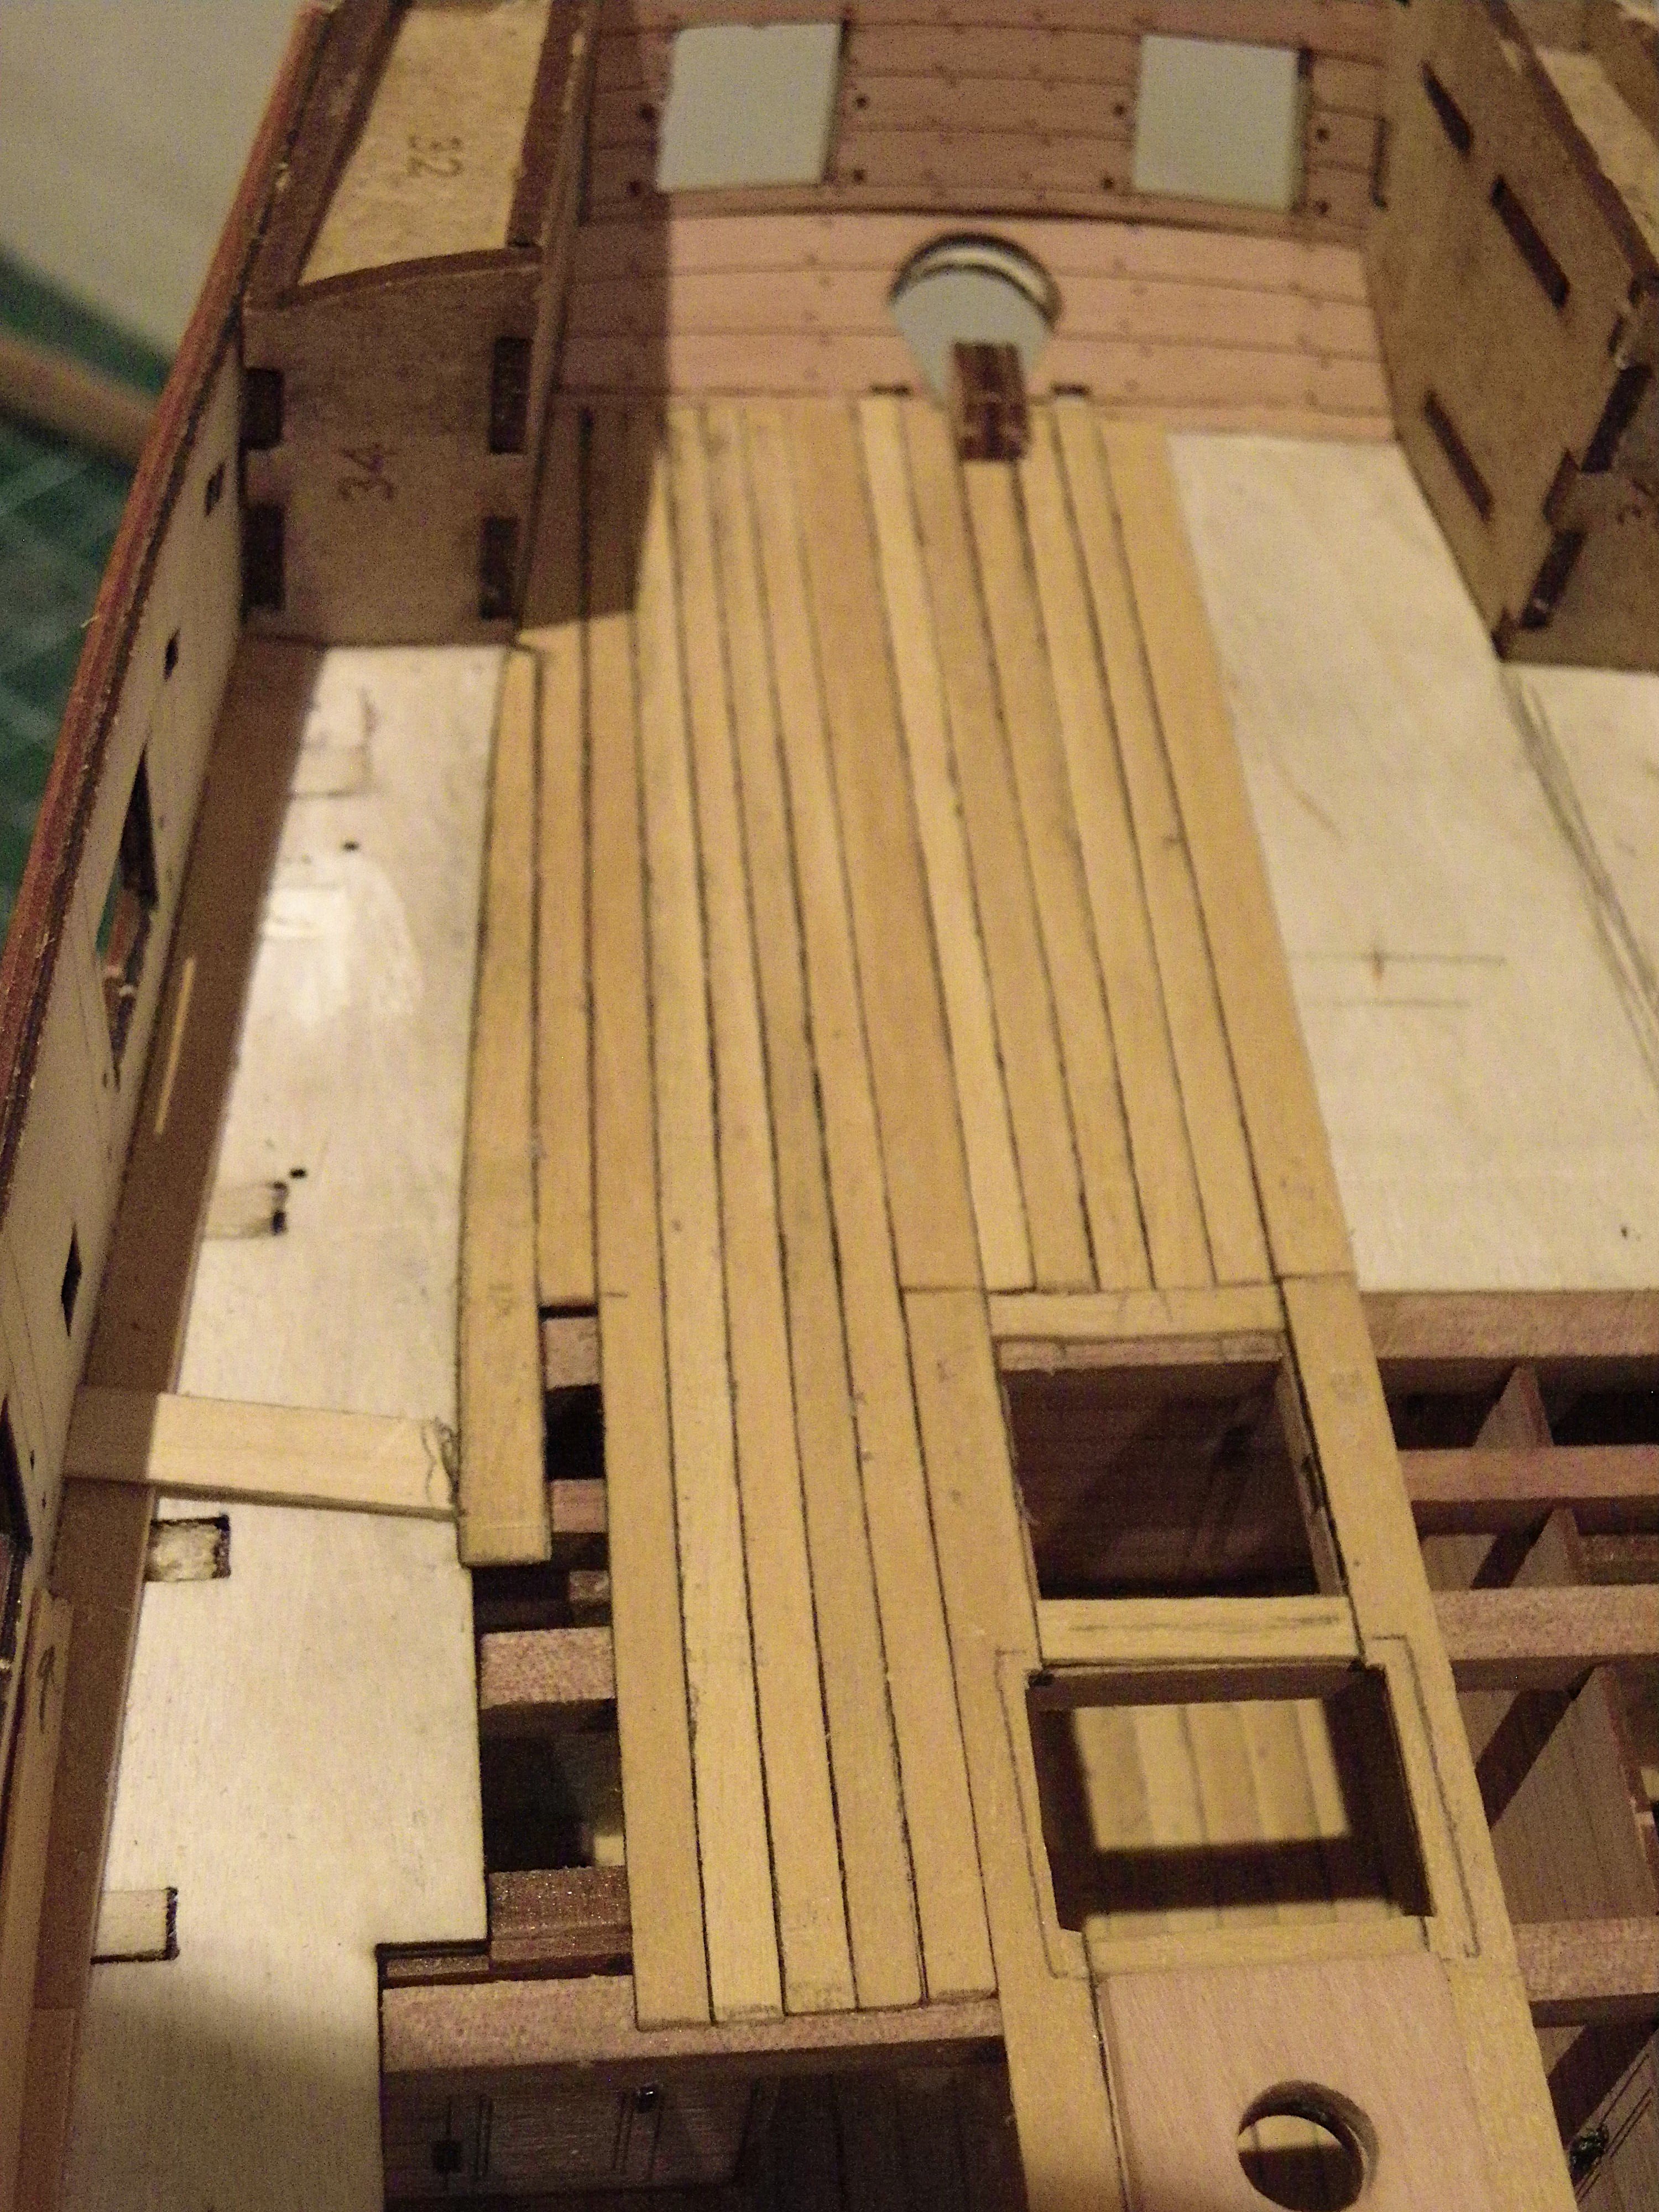
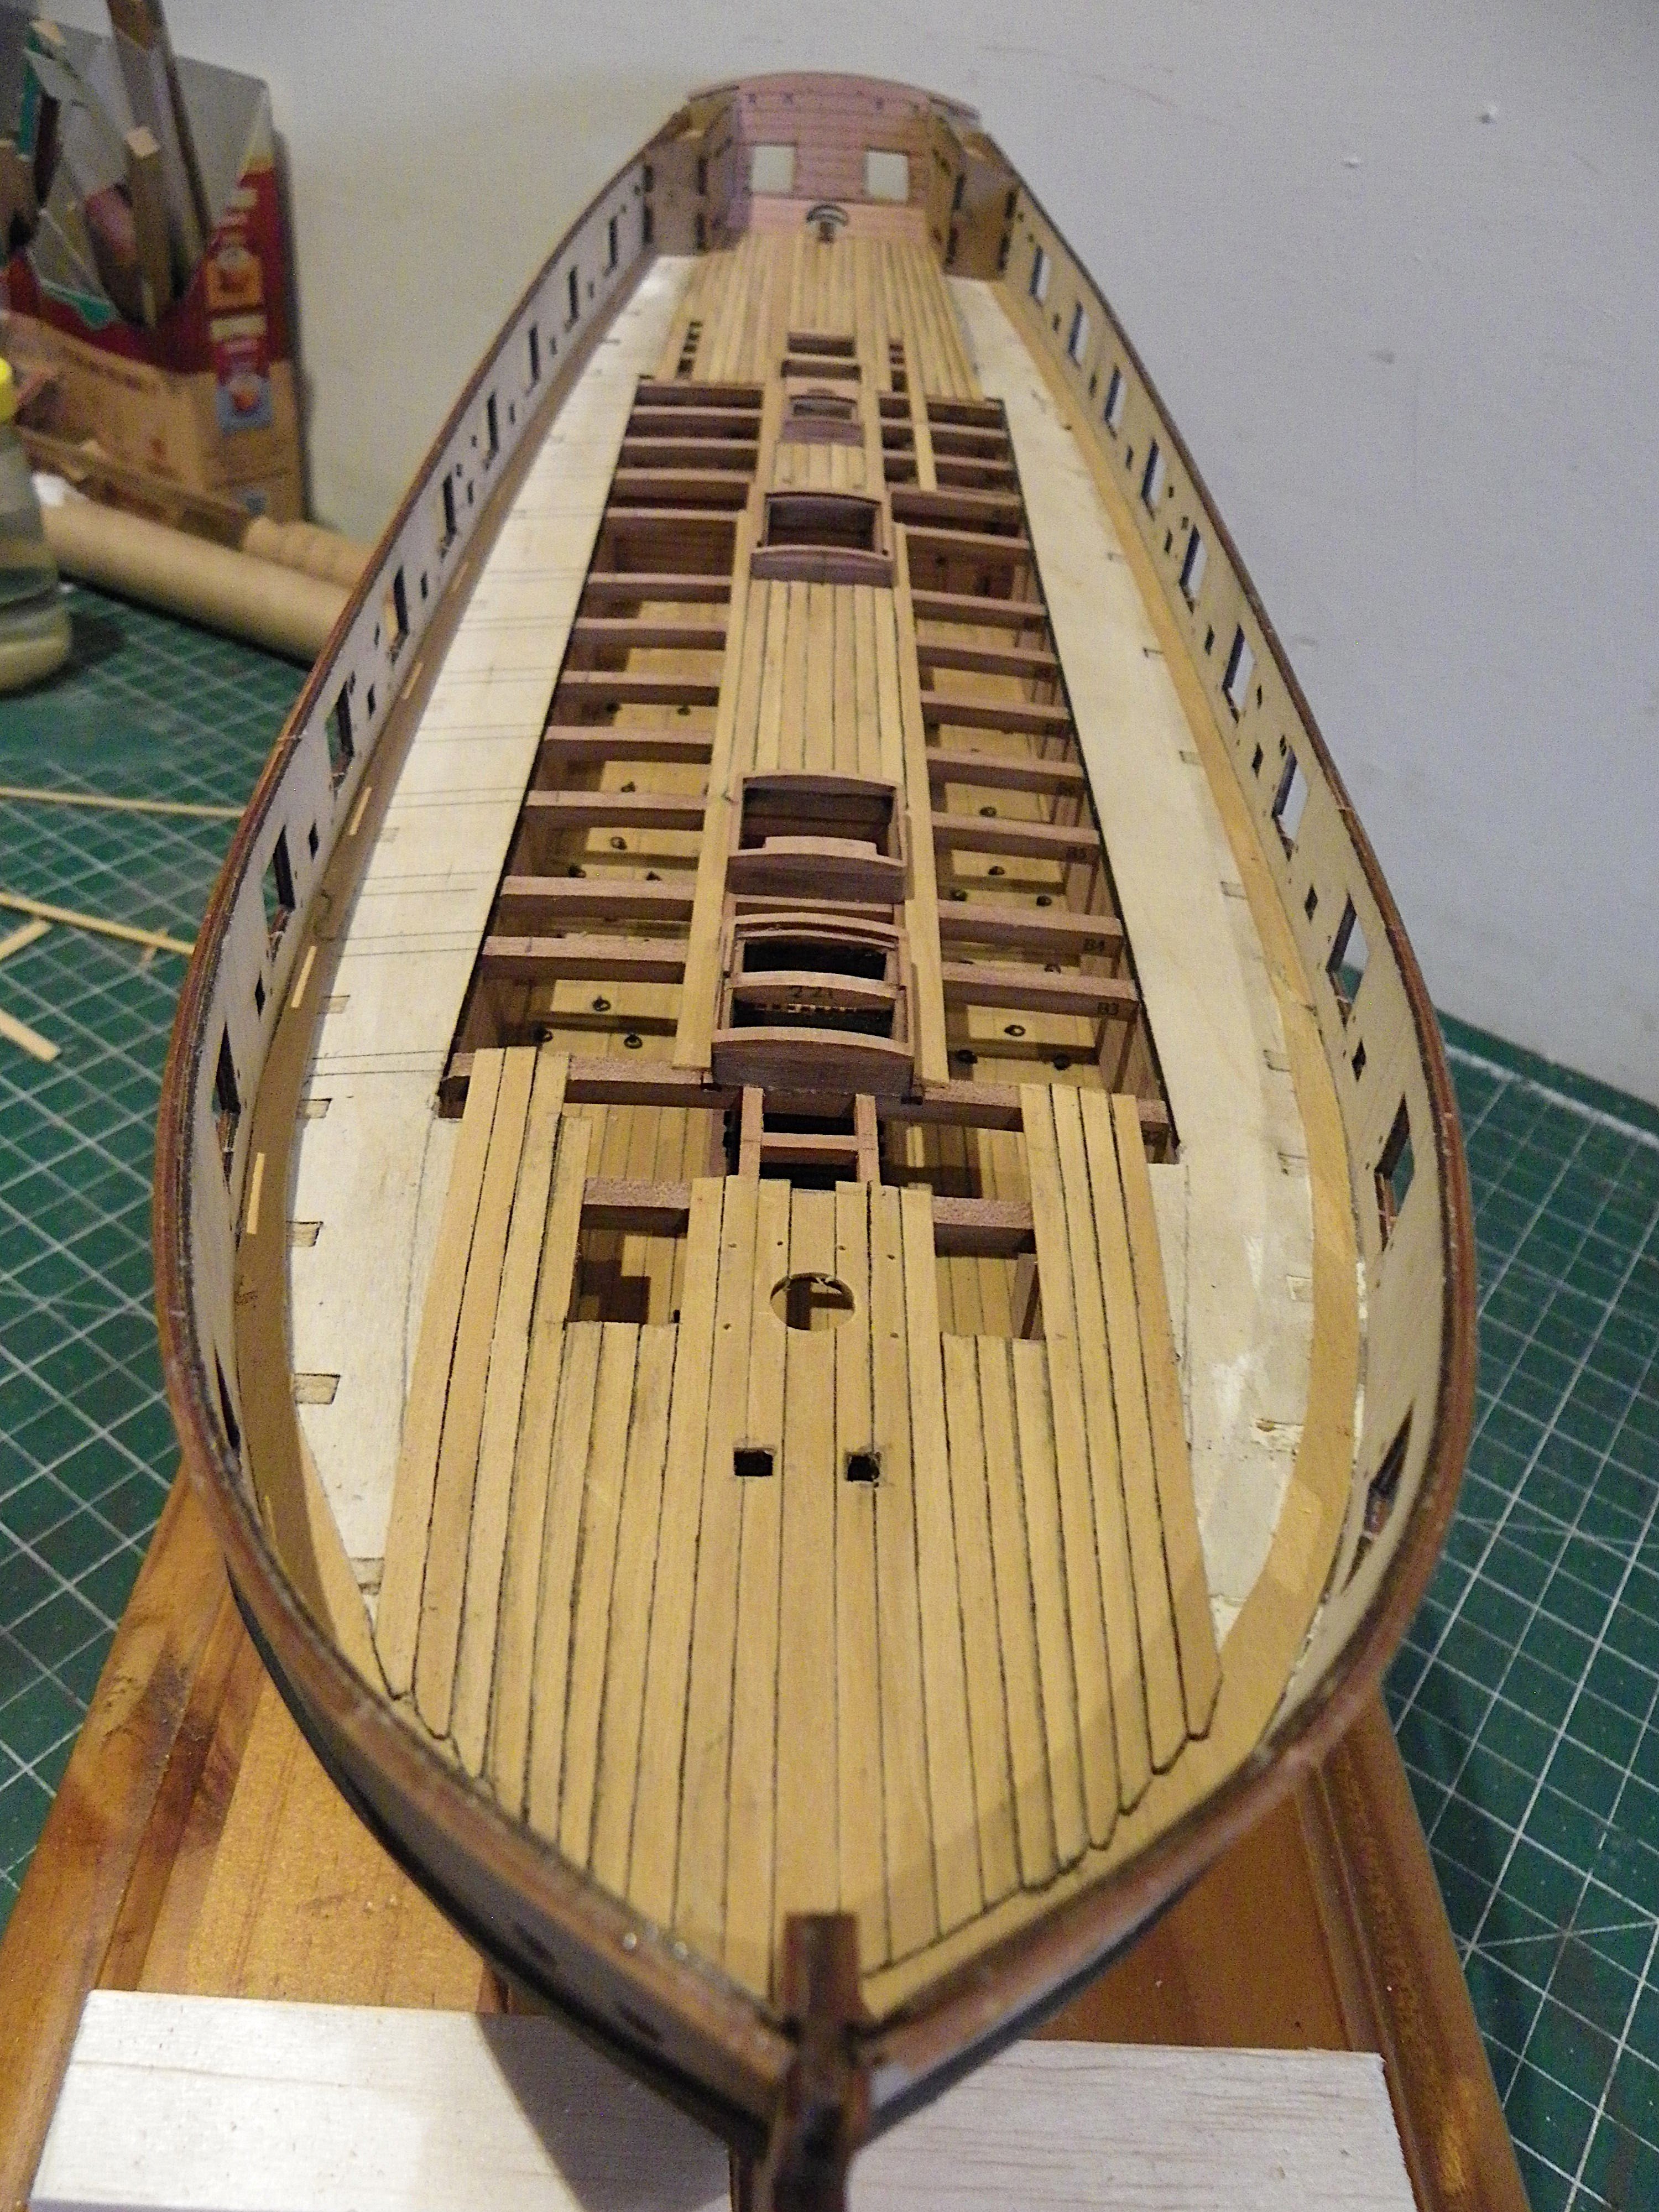
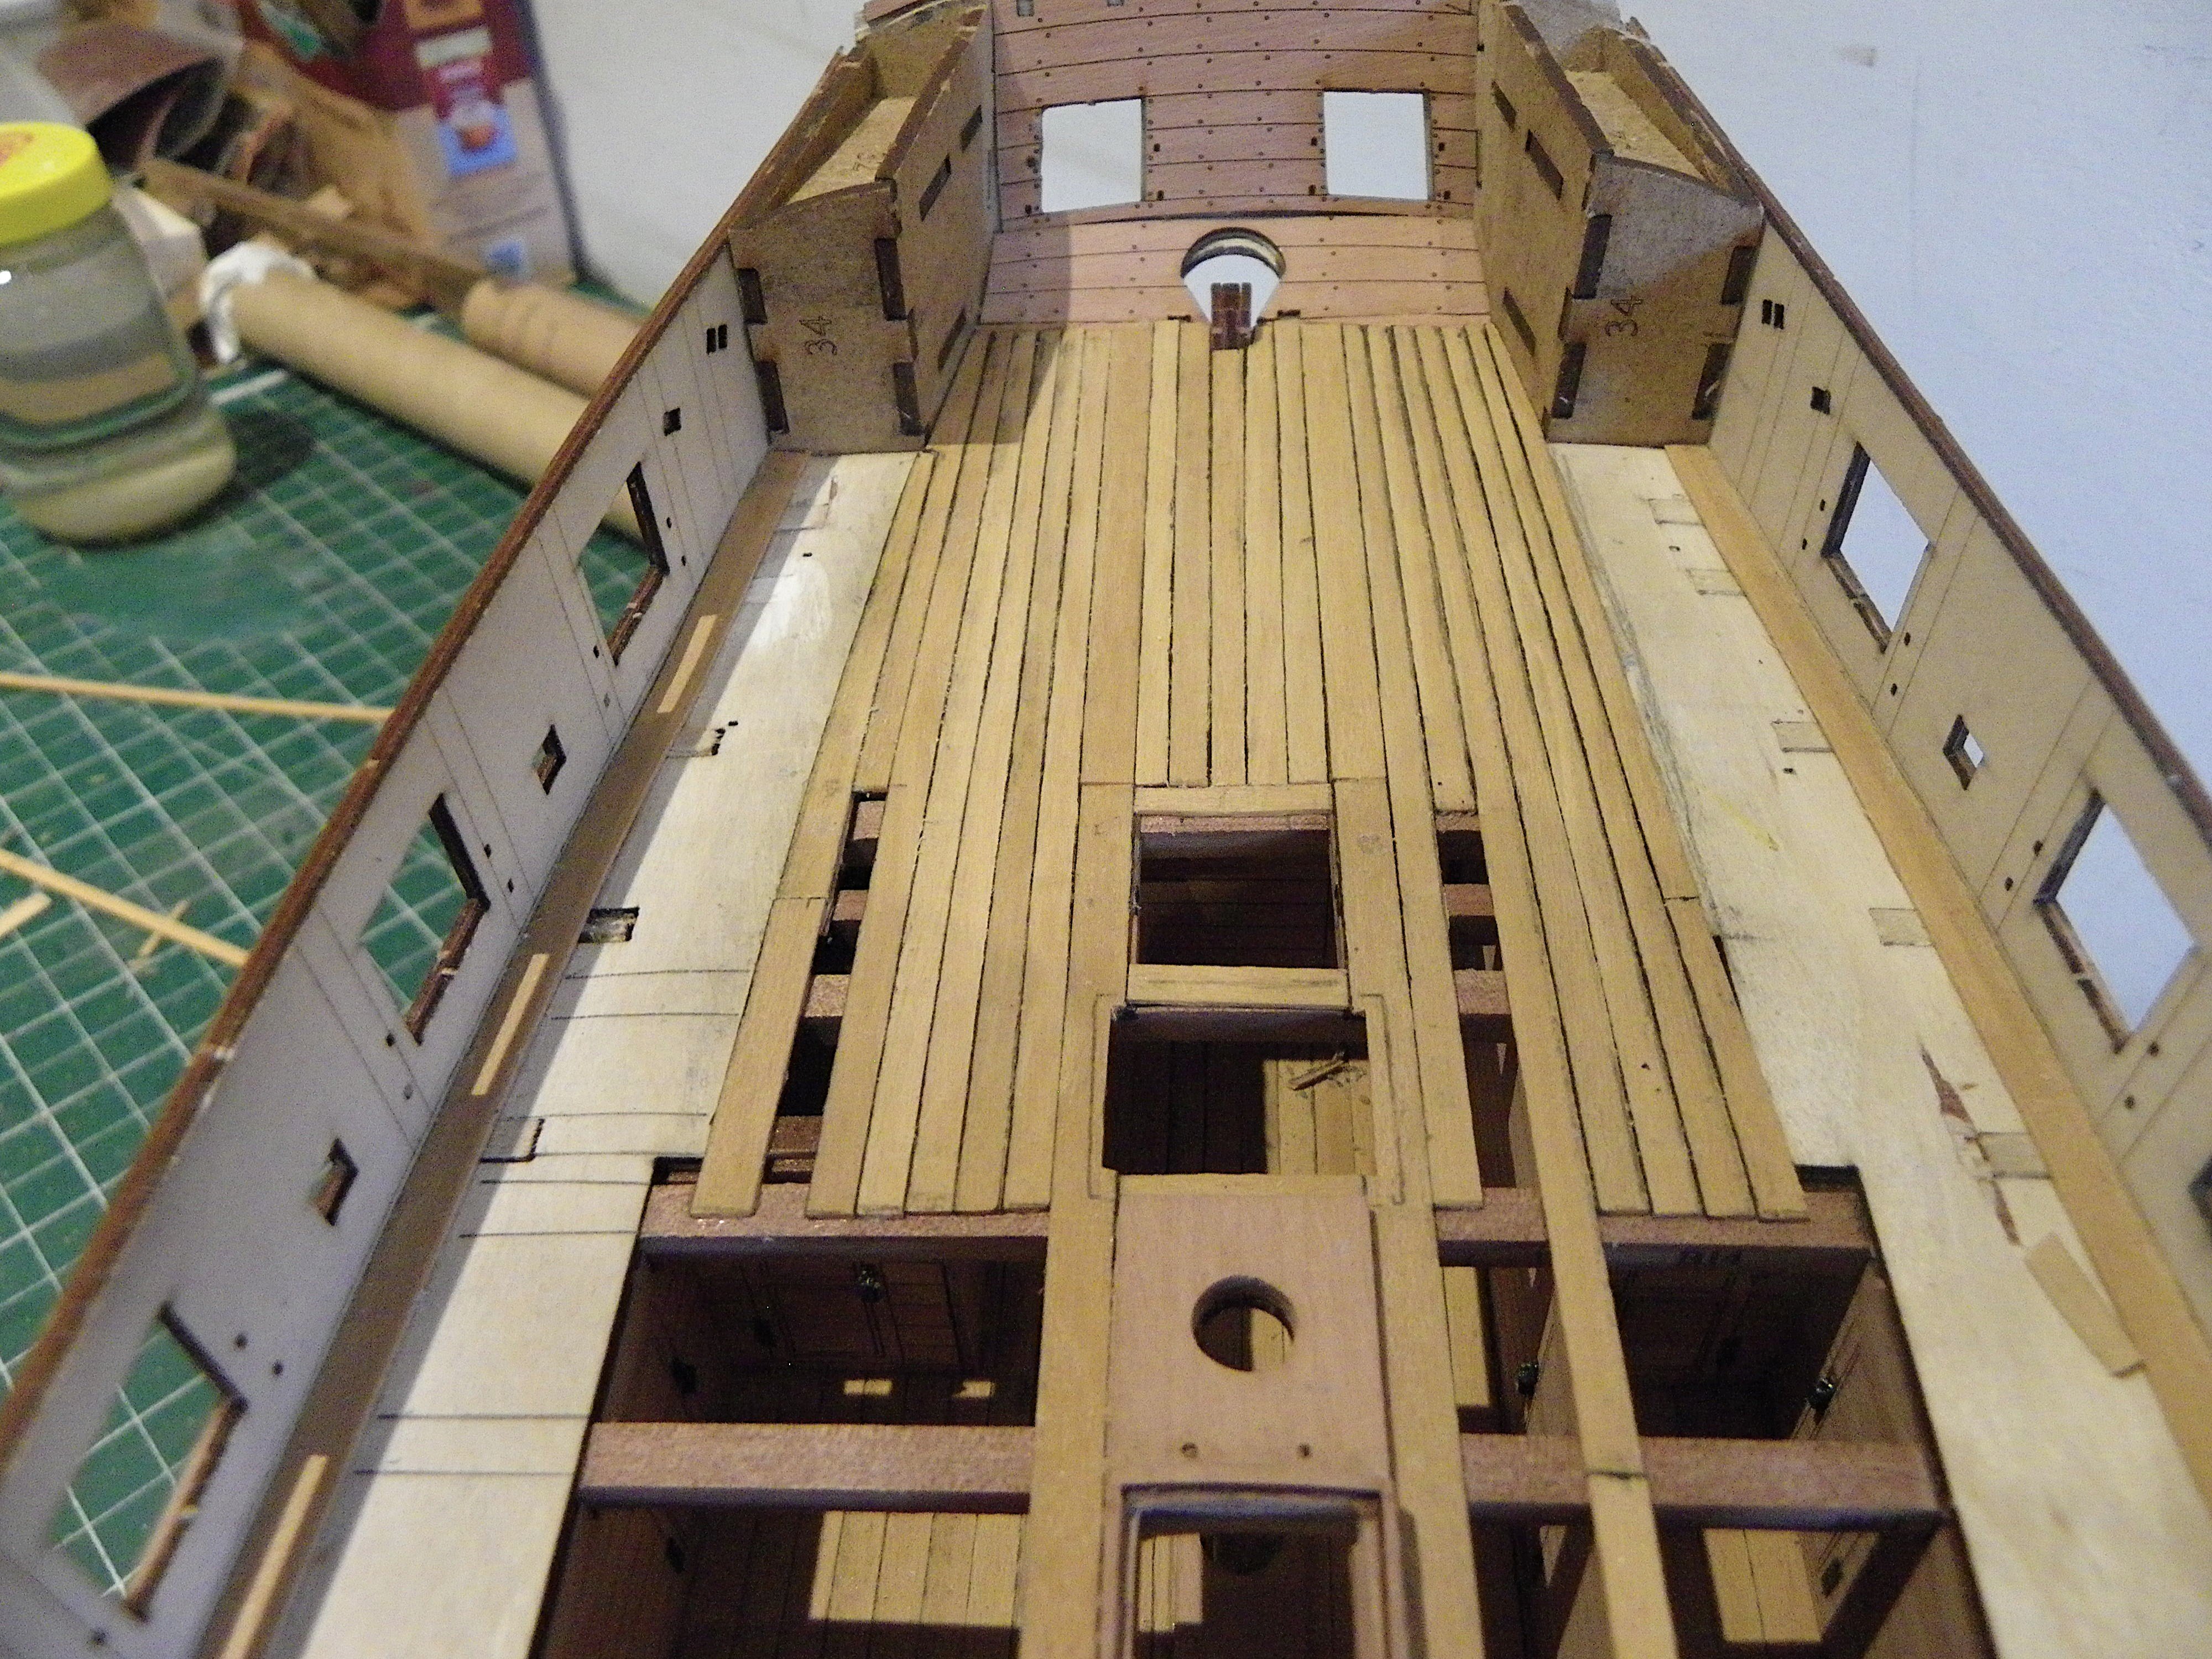
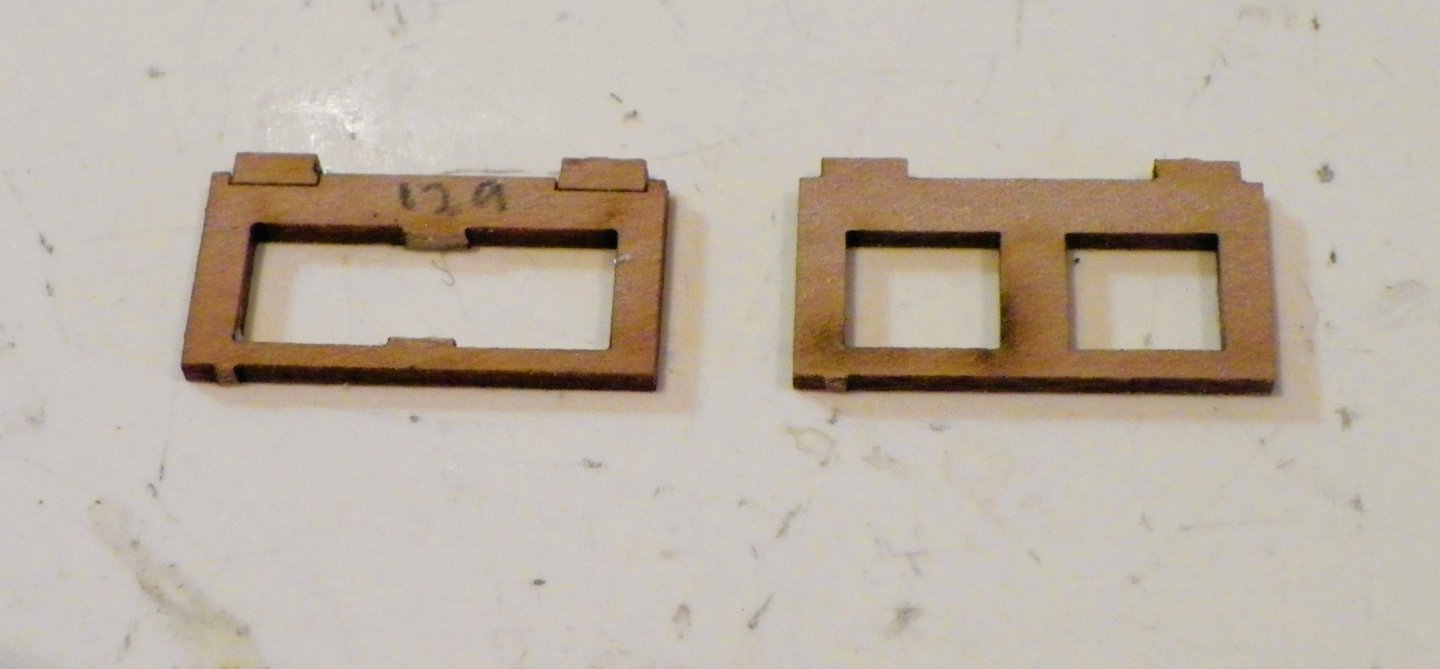
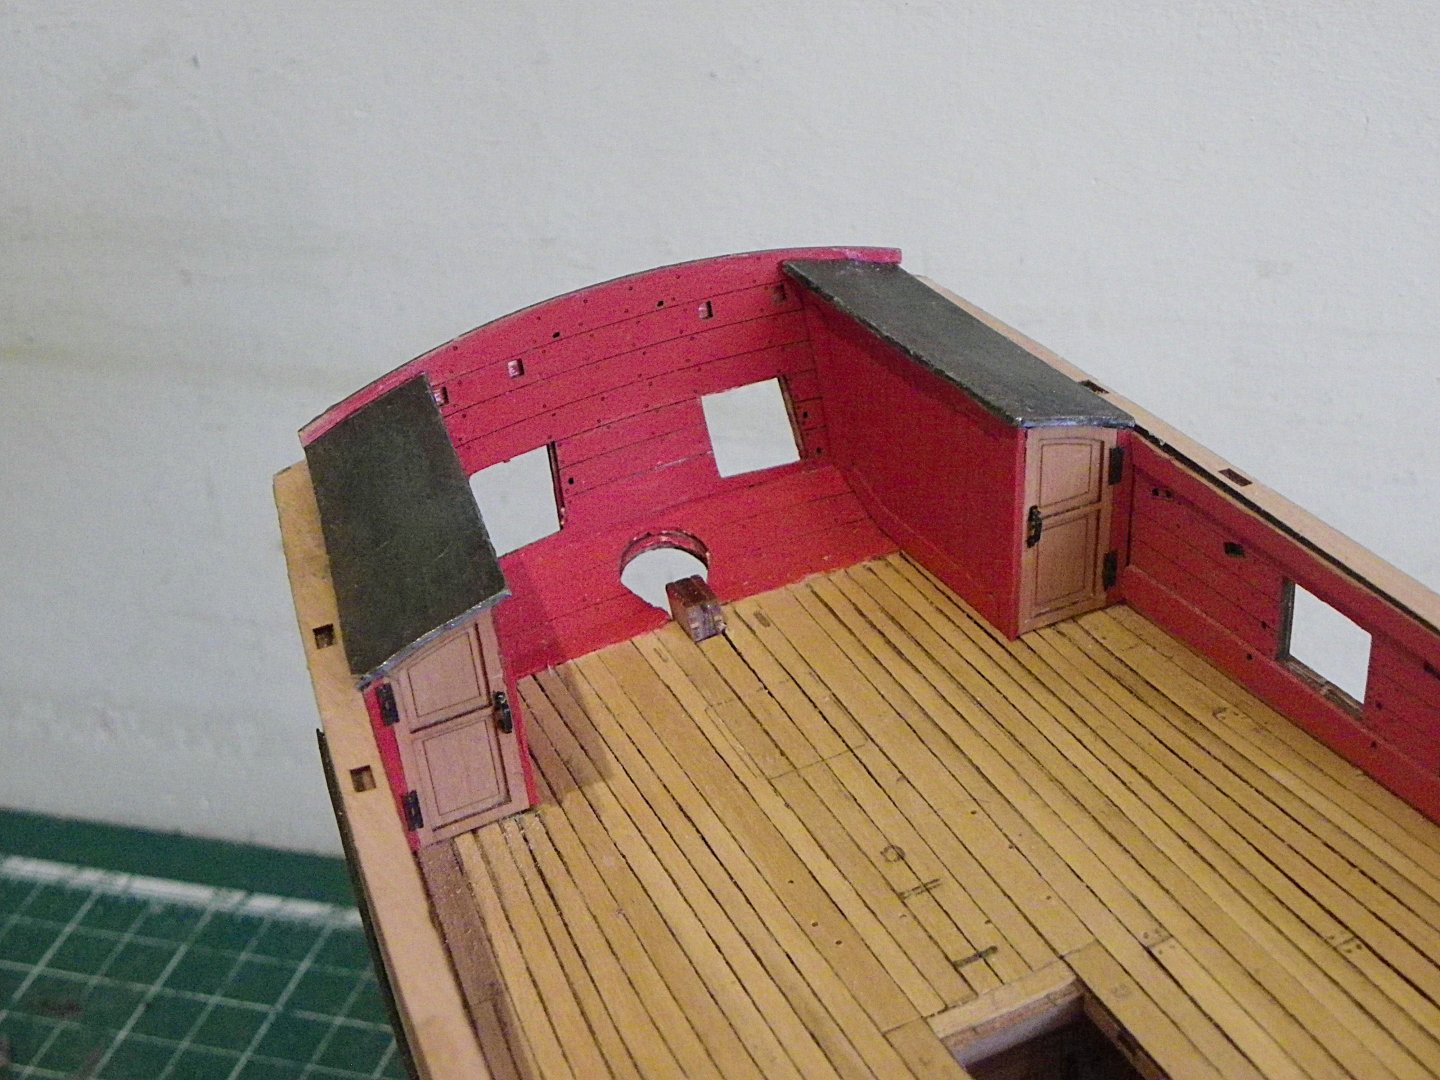
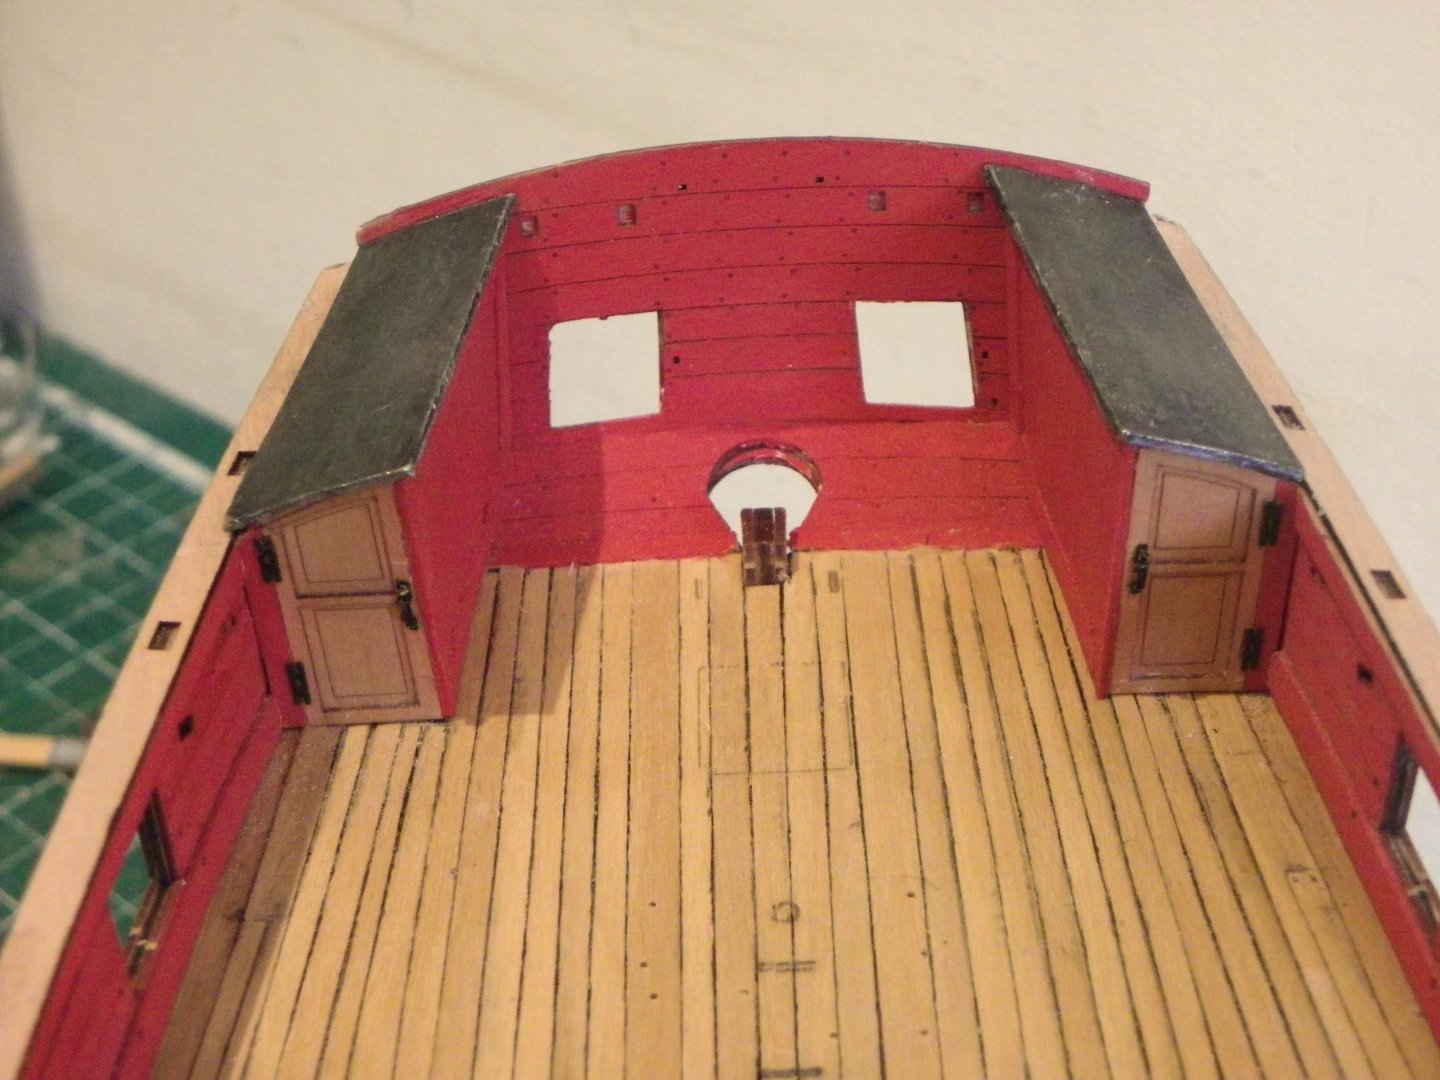
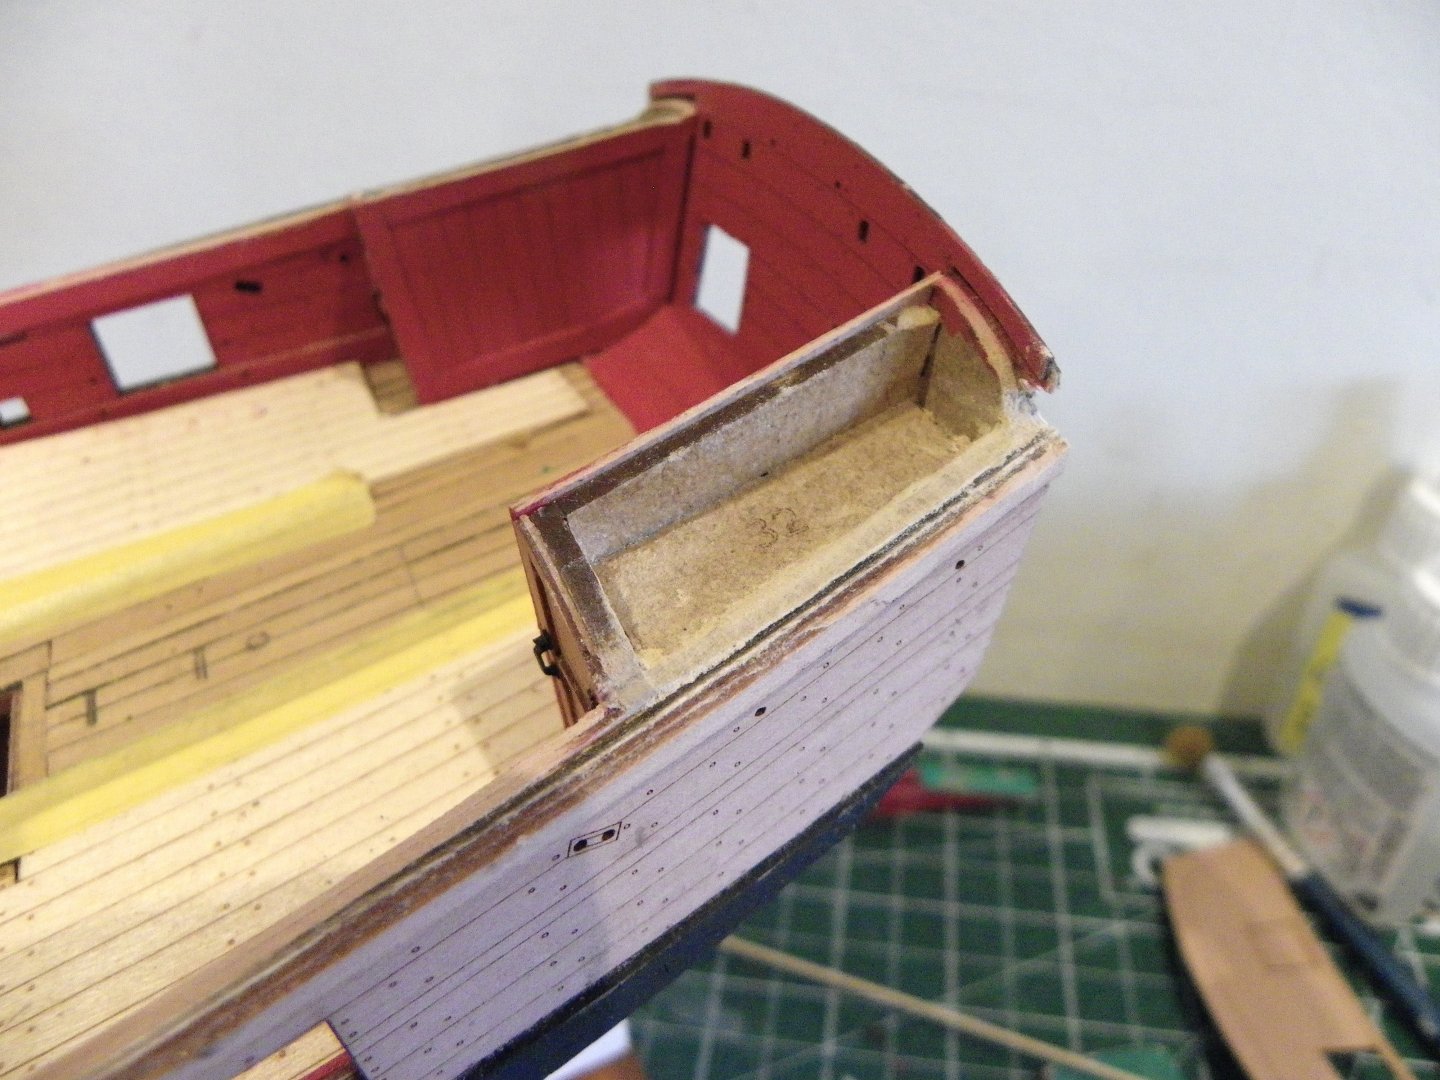
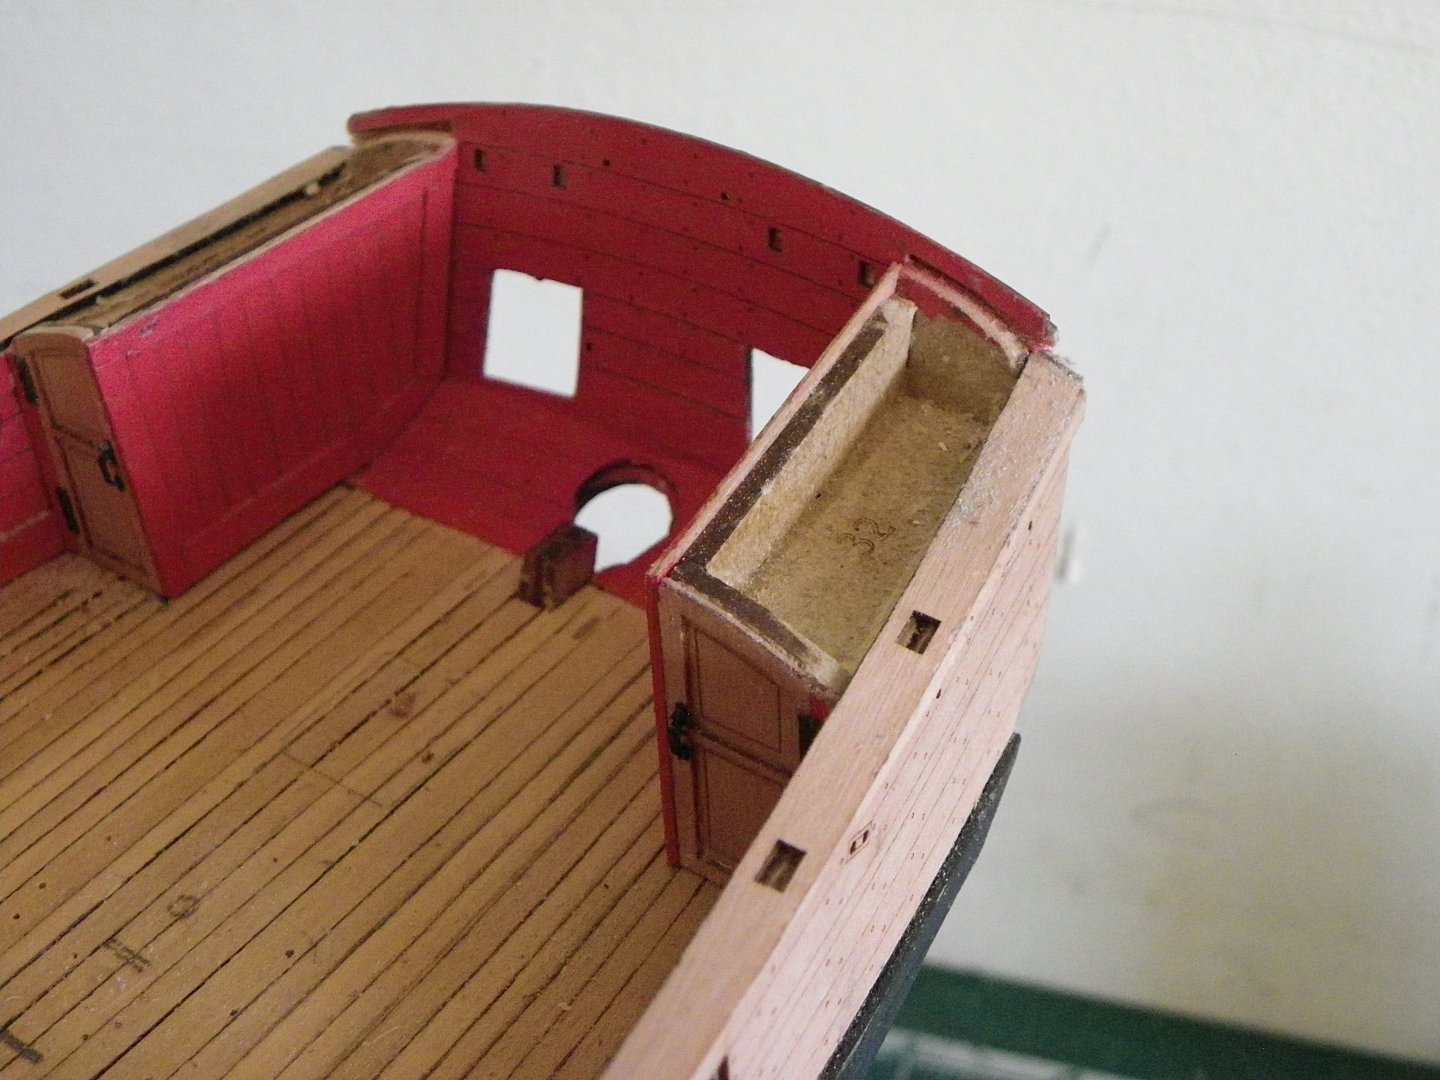
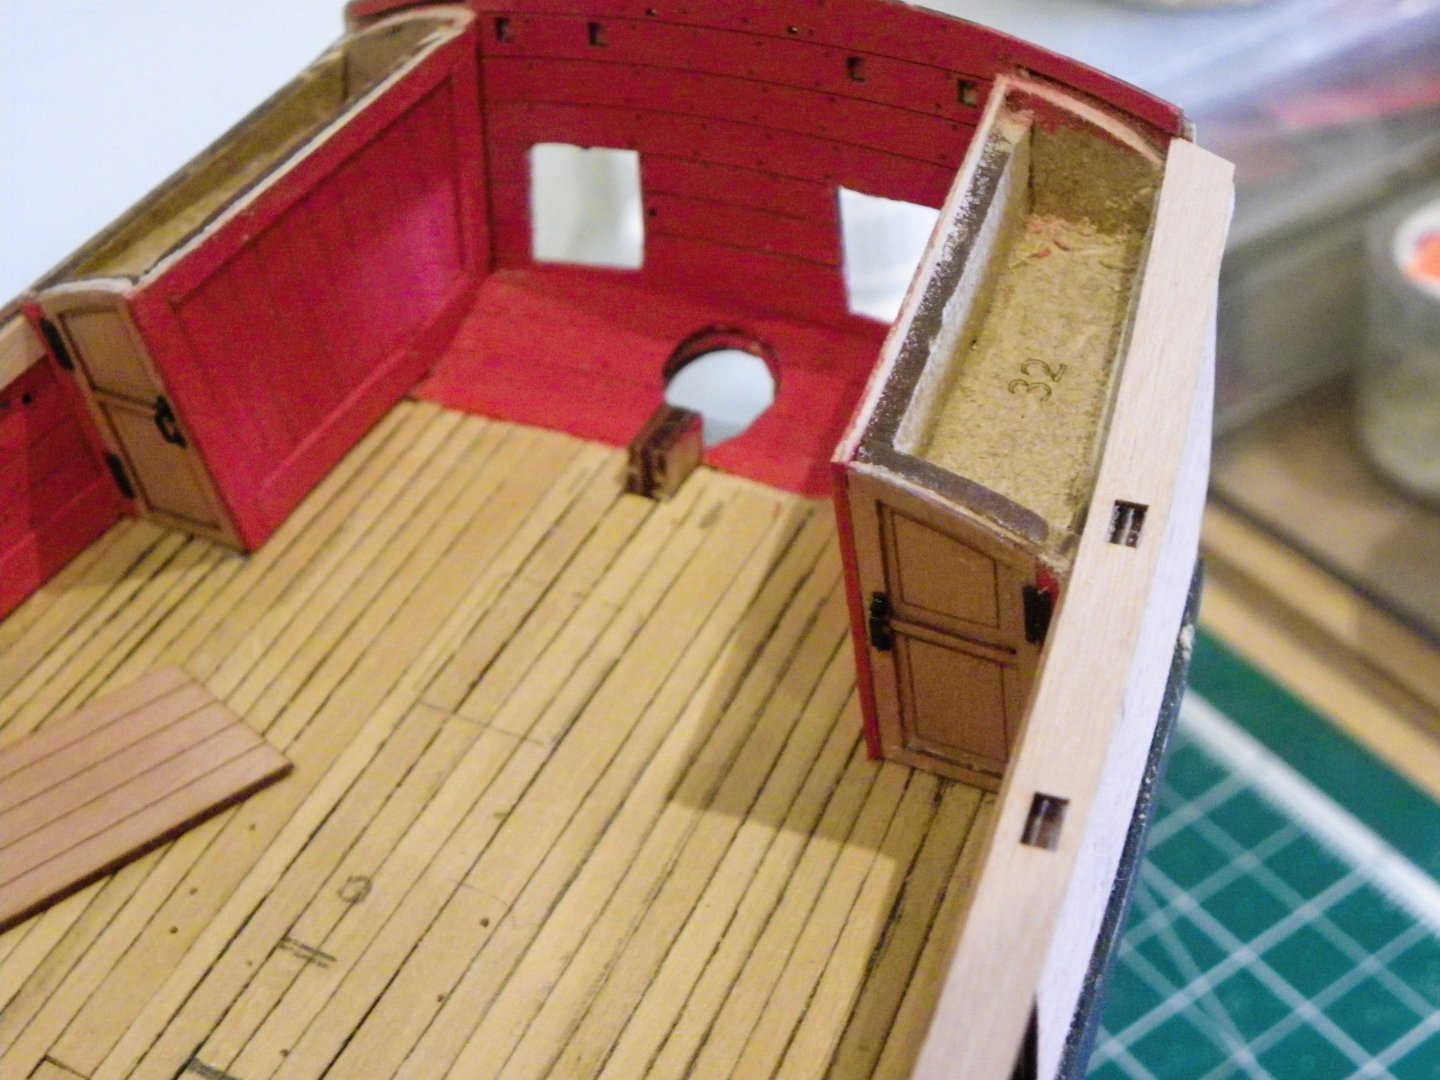
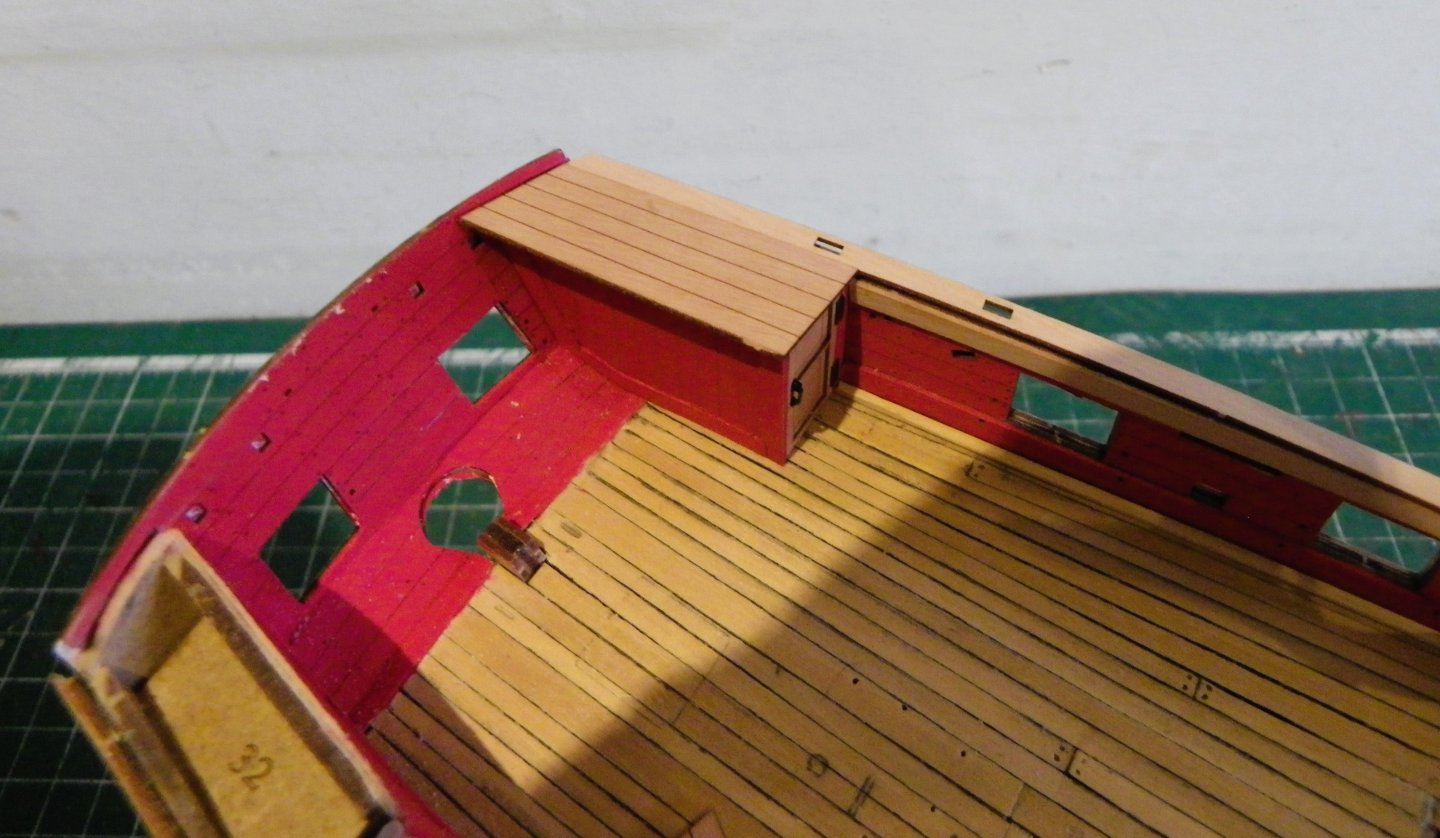
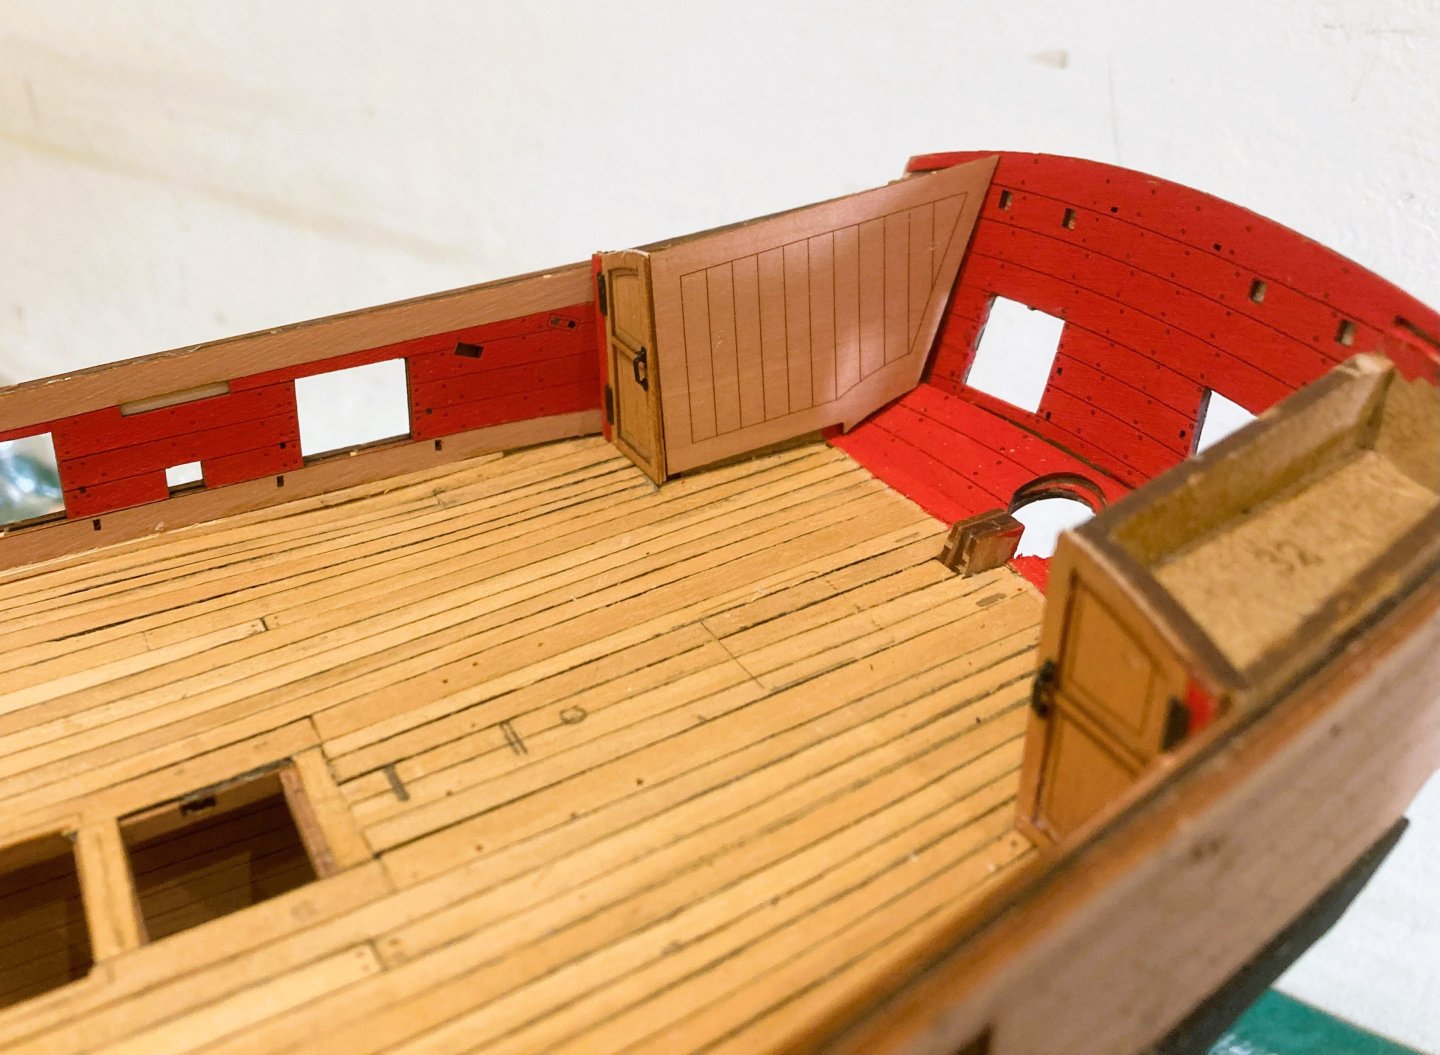
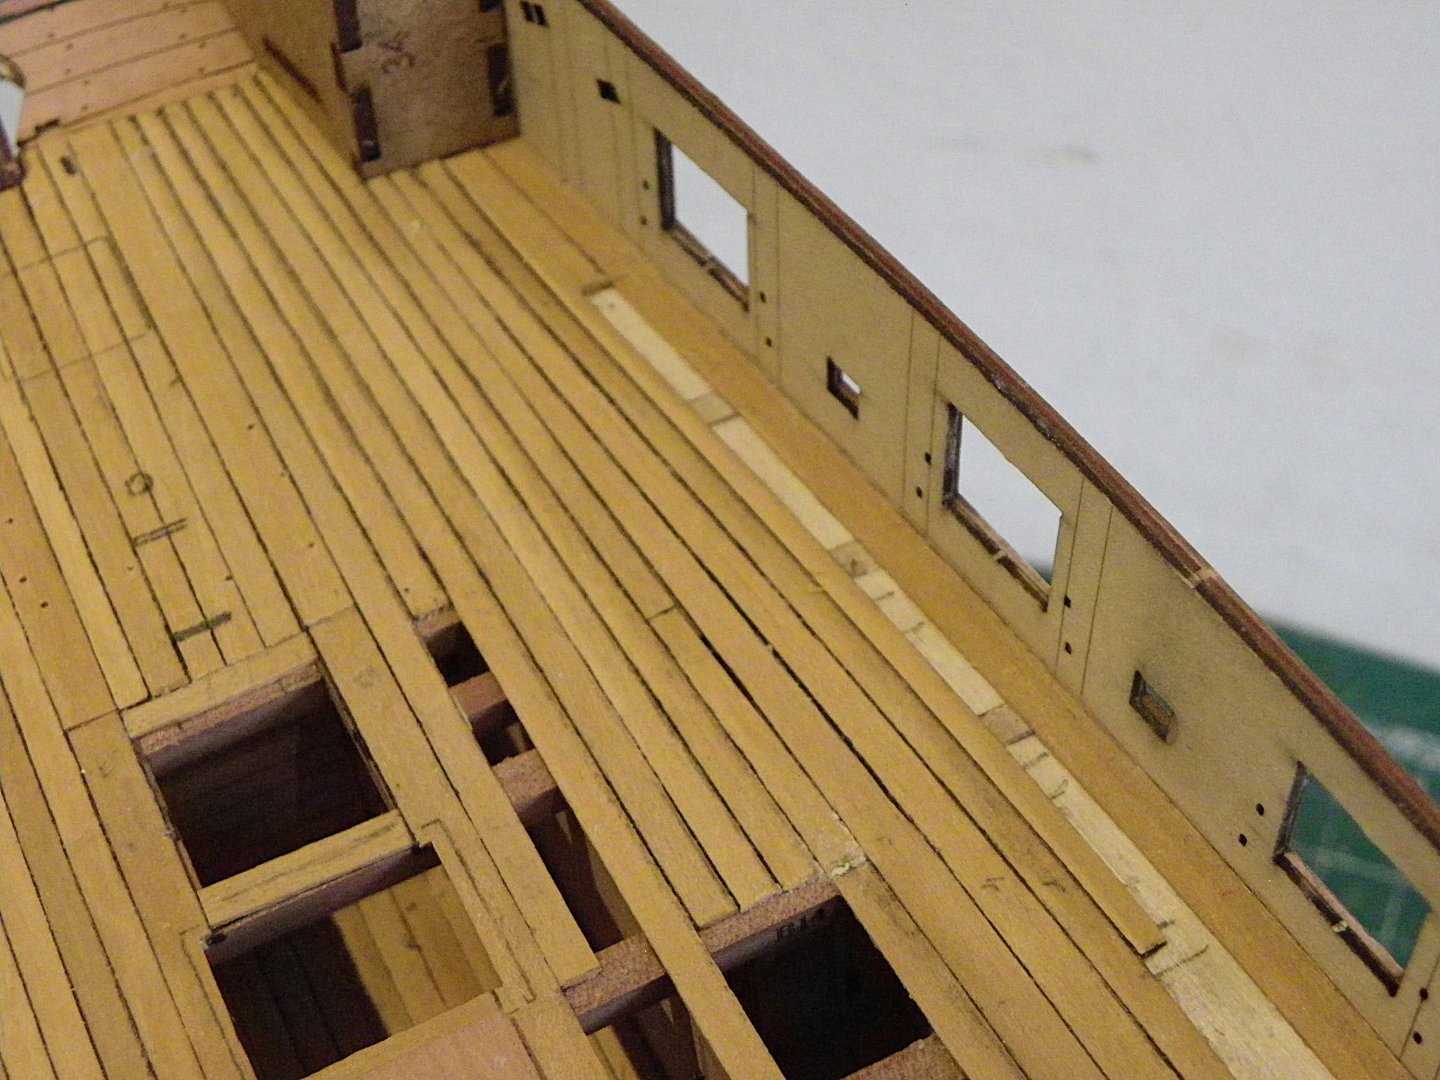
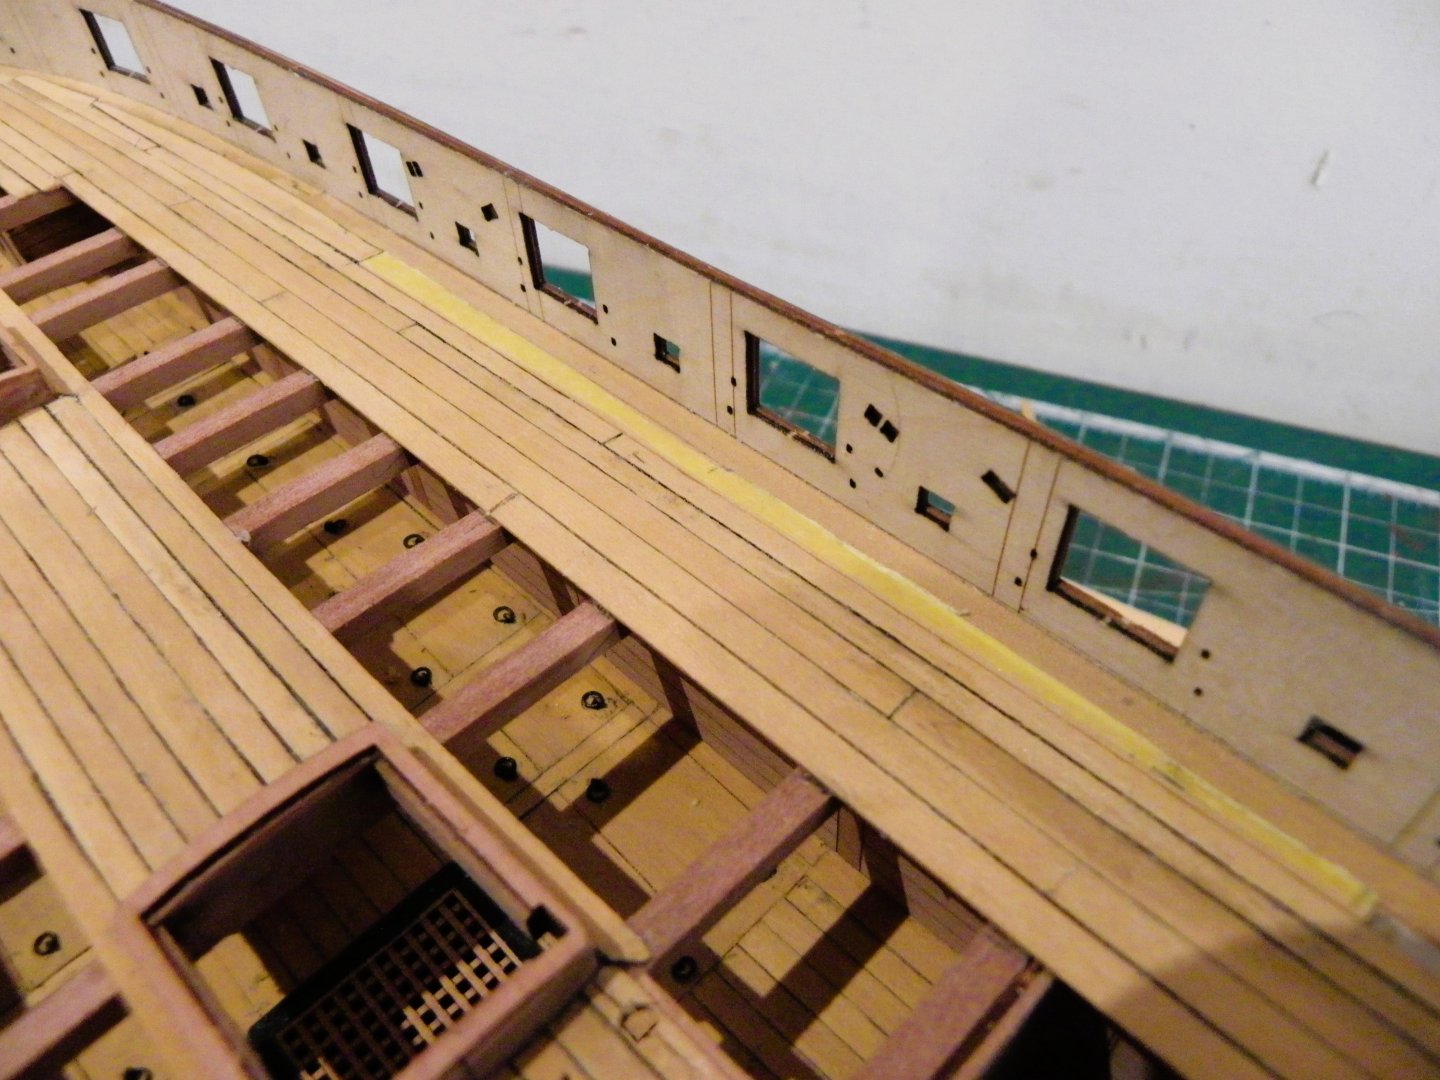
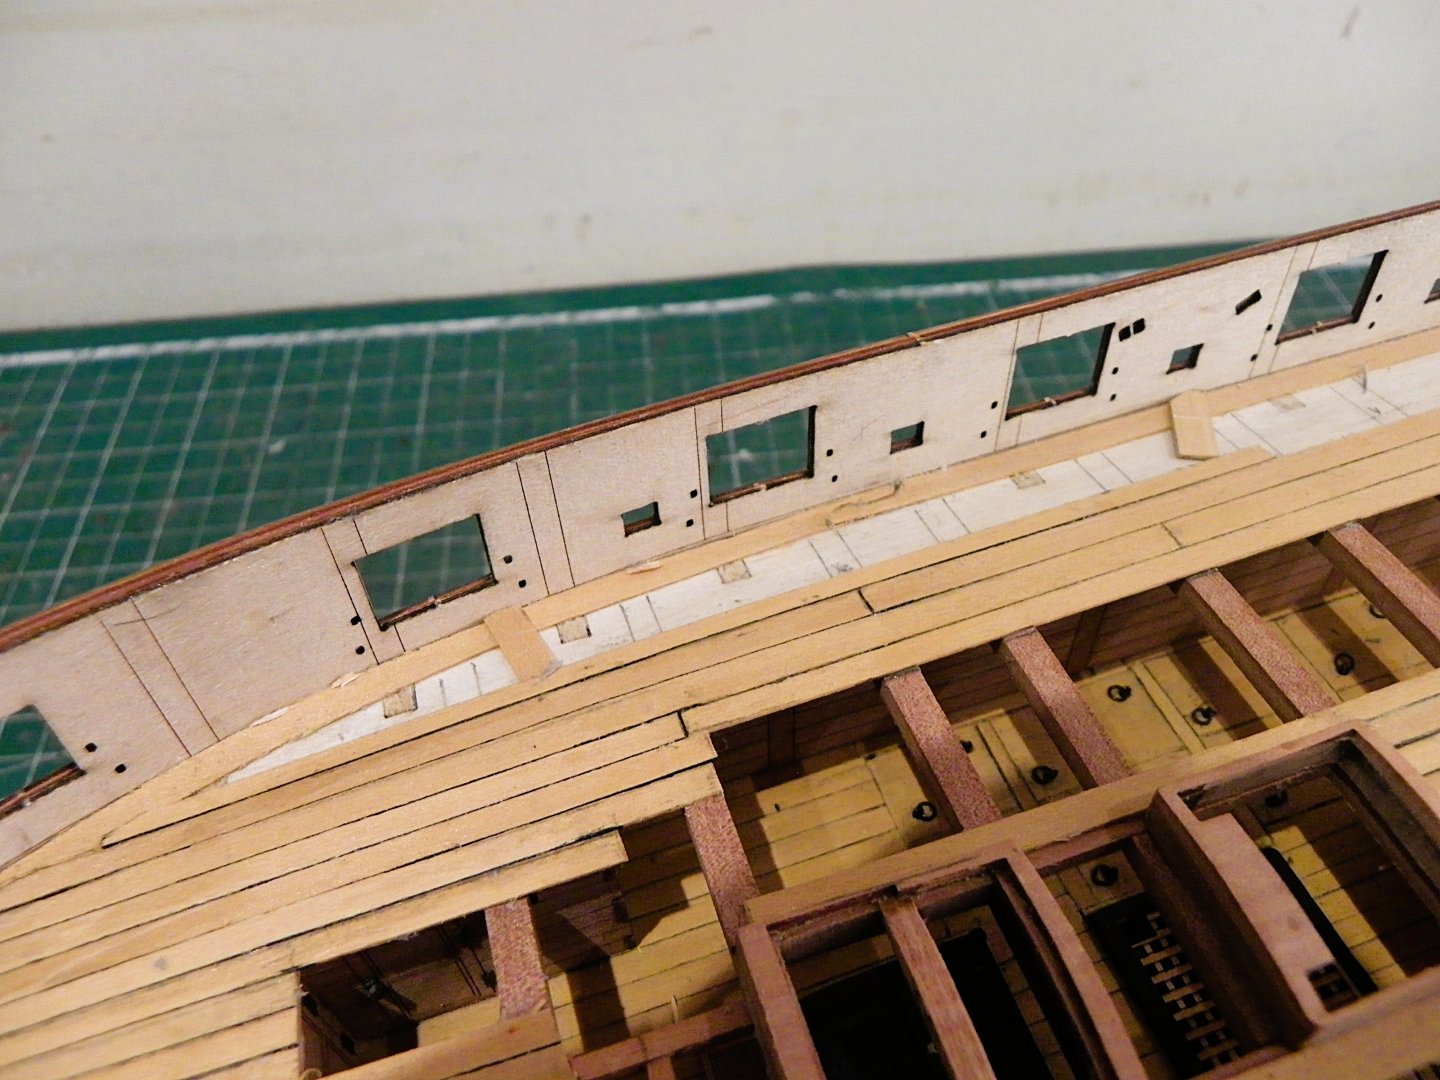
Post 46 Detailing the deck cont’d Before the spirketting is fitted it is necessary to fit the doors to the aft deck structures. 3532a These have been fitted out with Syren hinges and handles. Side panels for the deck structures (Parts 60/61) 3533a Any hopes for a close fit were quicky dispelled, no doubt due to the peculiarities of my build. 0560 A card template was used to get the required shape which due to the differences precludes use of the outer framing pattern in its supplied form. 3534a The shape was cut out of 0.6mm fret and lines drawn to represent the boarding at 3mm intervals. These were scored with a scalpel blade, and lined with pencil. 0604 The frames were made from 3mm strip also cut from the fret. 3541a Trimming of the forward edge. 0609 3545a Lower Counter I wasn’t happy about the fit at the stern where the decking meets the lower counter; it looked unfinished and from a practical carpentry aspect was a poor arrangement. 3547a I added a shaped Margin to butt against the plank ends and fayed into the lower counter. This part has been painted along with the counter. 3551a Onwards…. B.E 02/03/2025


- 332 replies
-
- 20
-
-
- Harpy
- Vanguard Models
- (and 1 more)
-
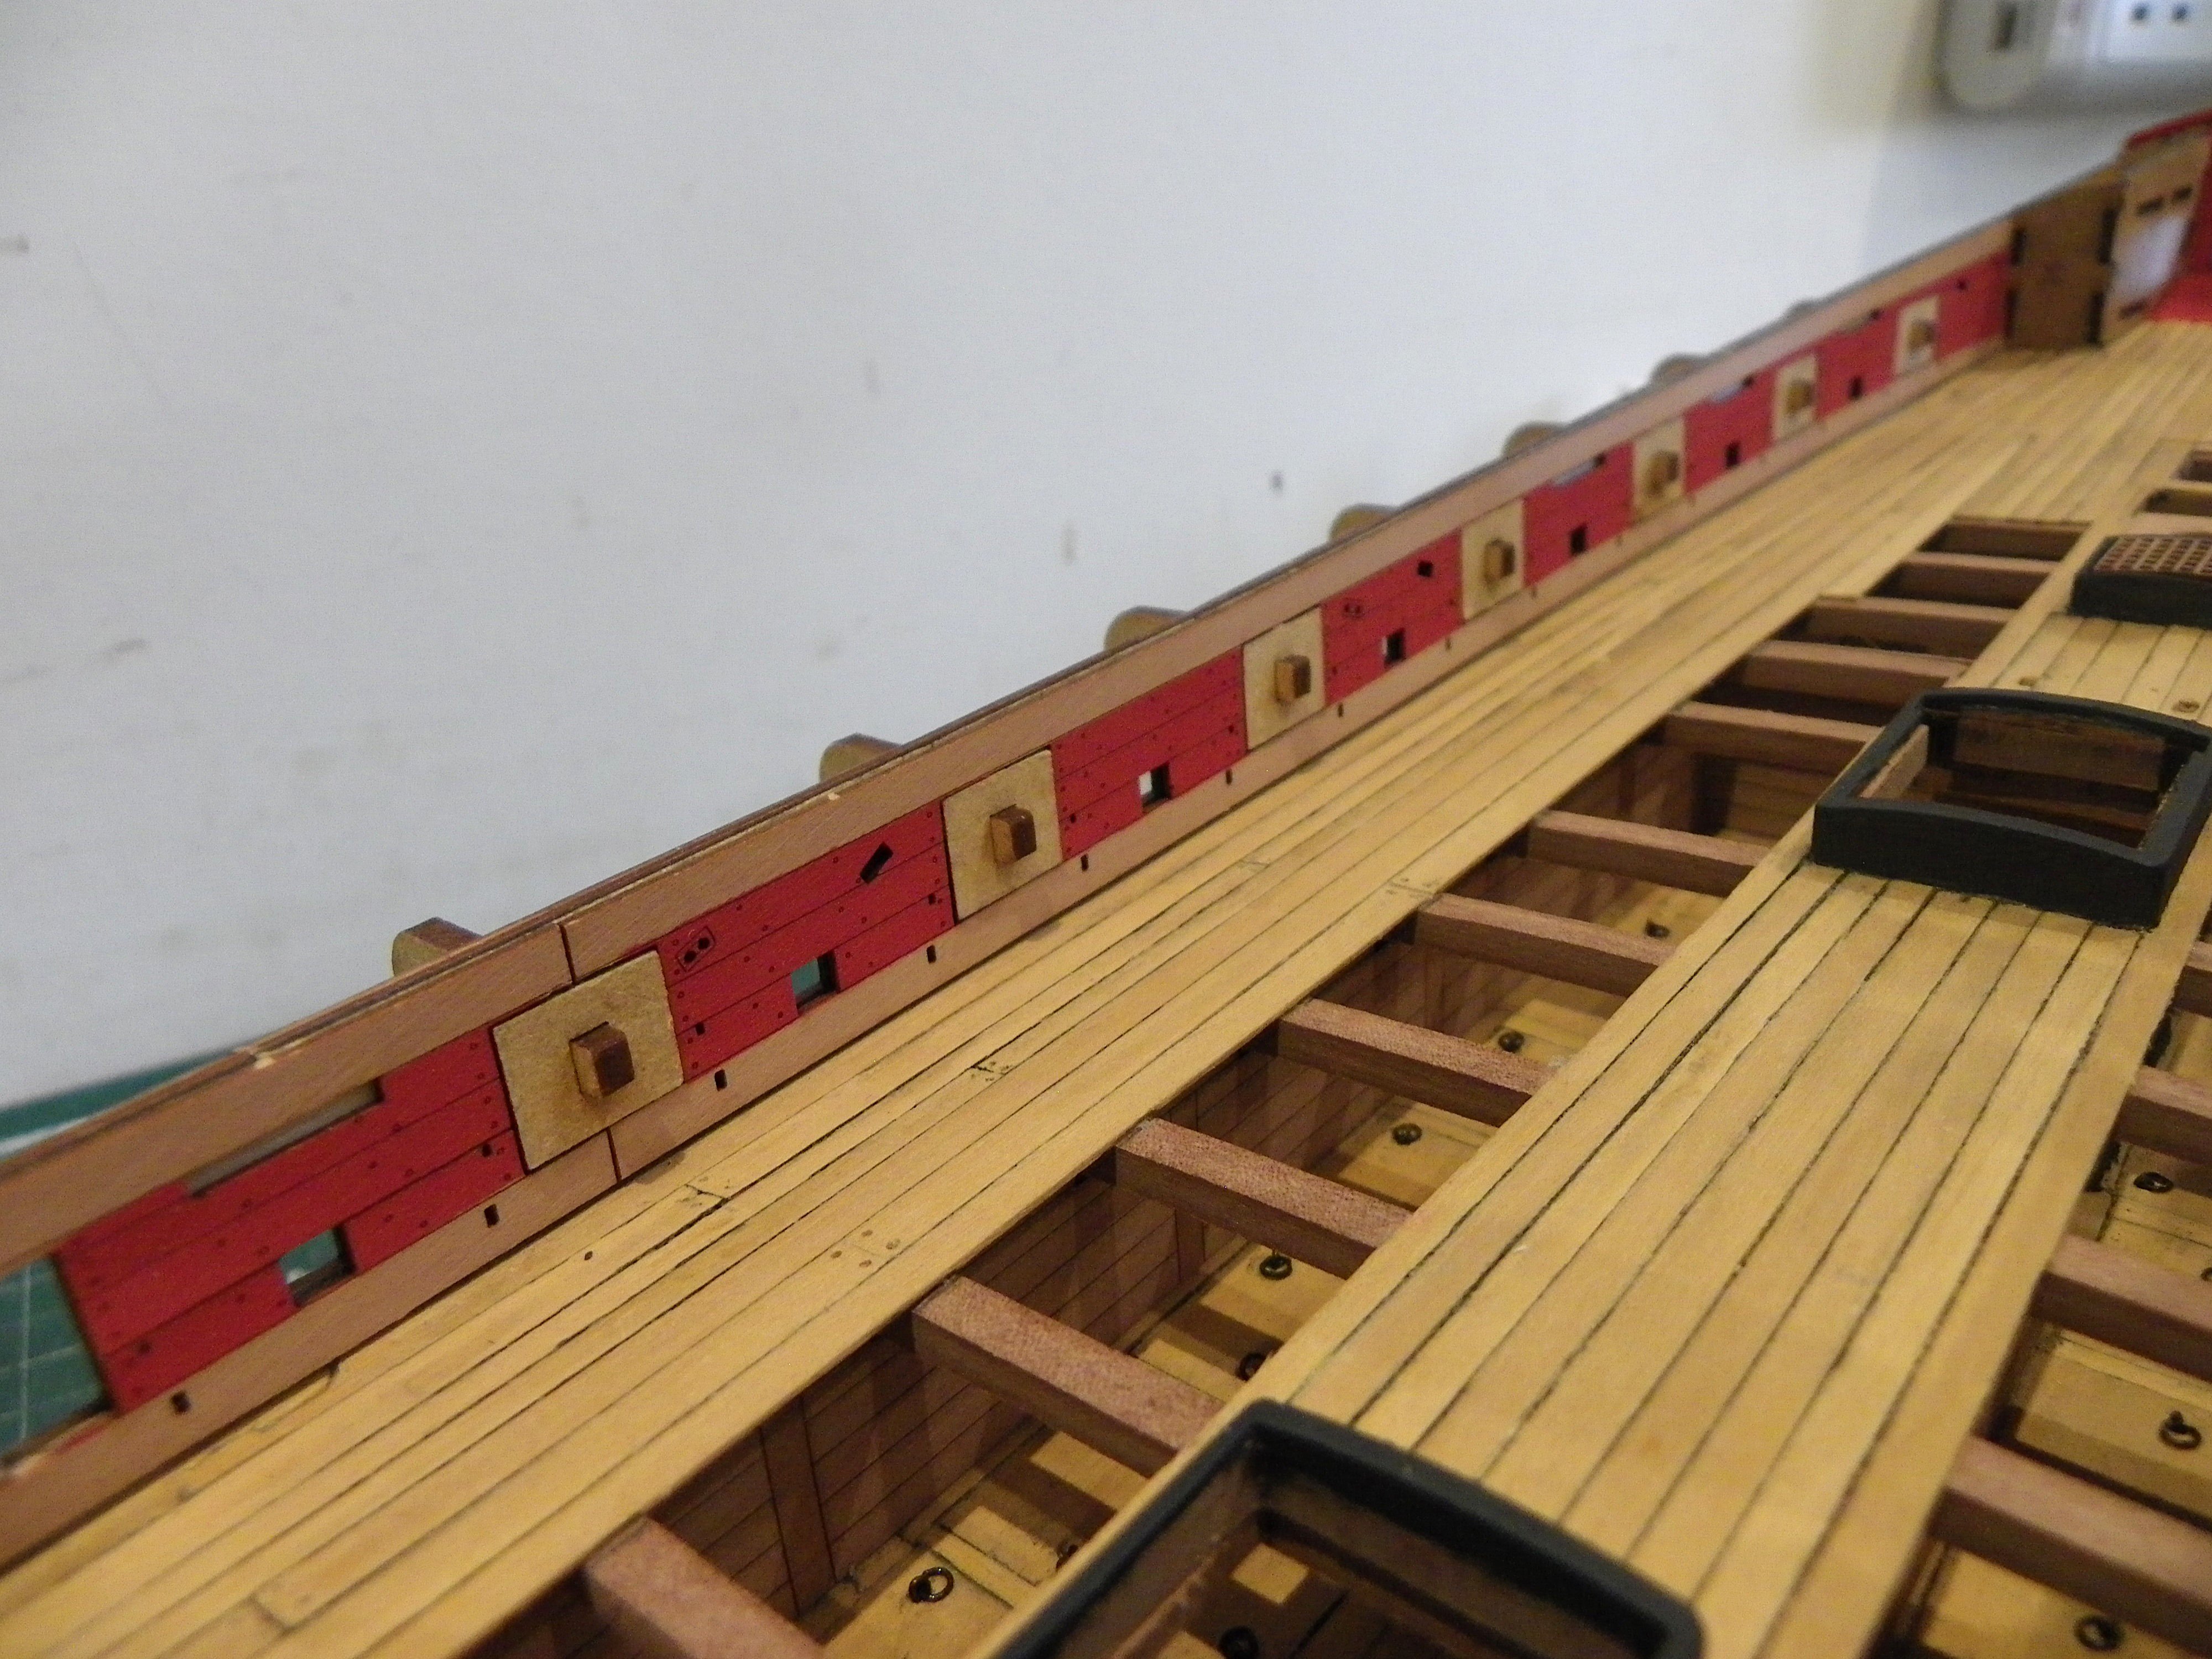
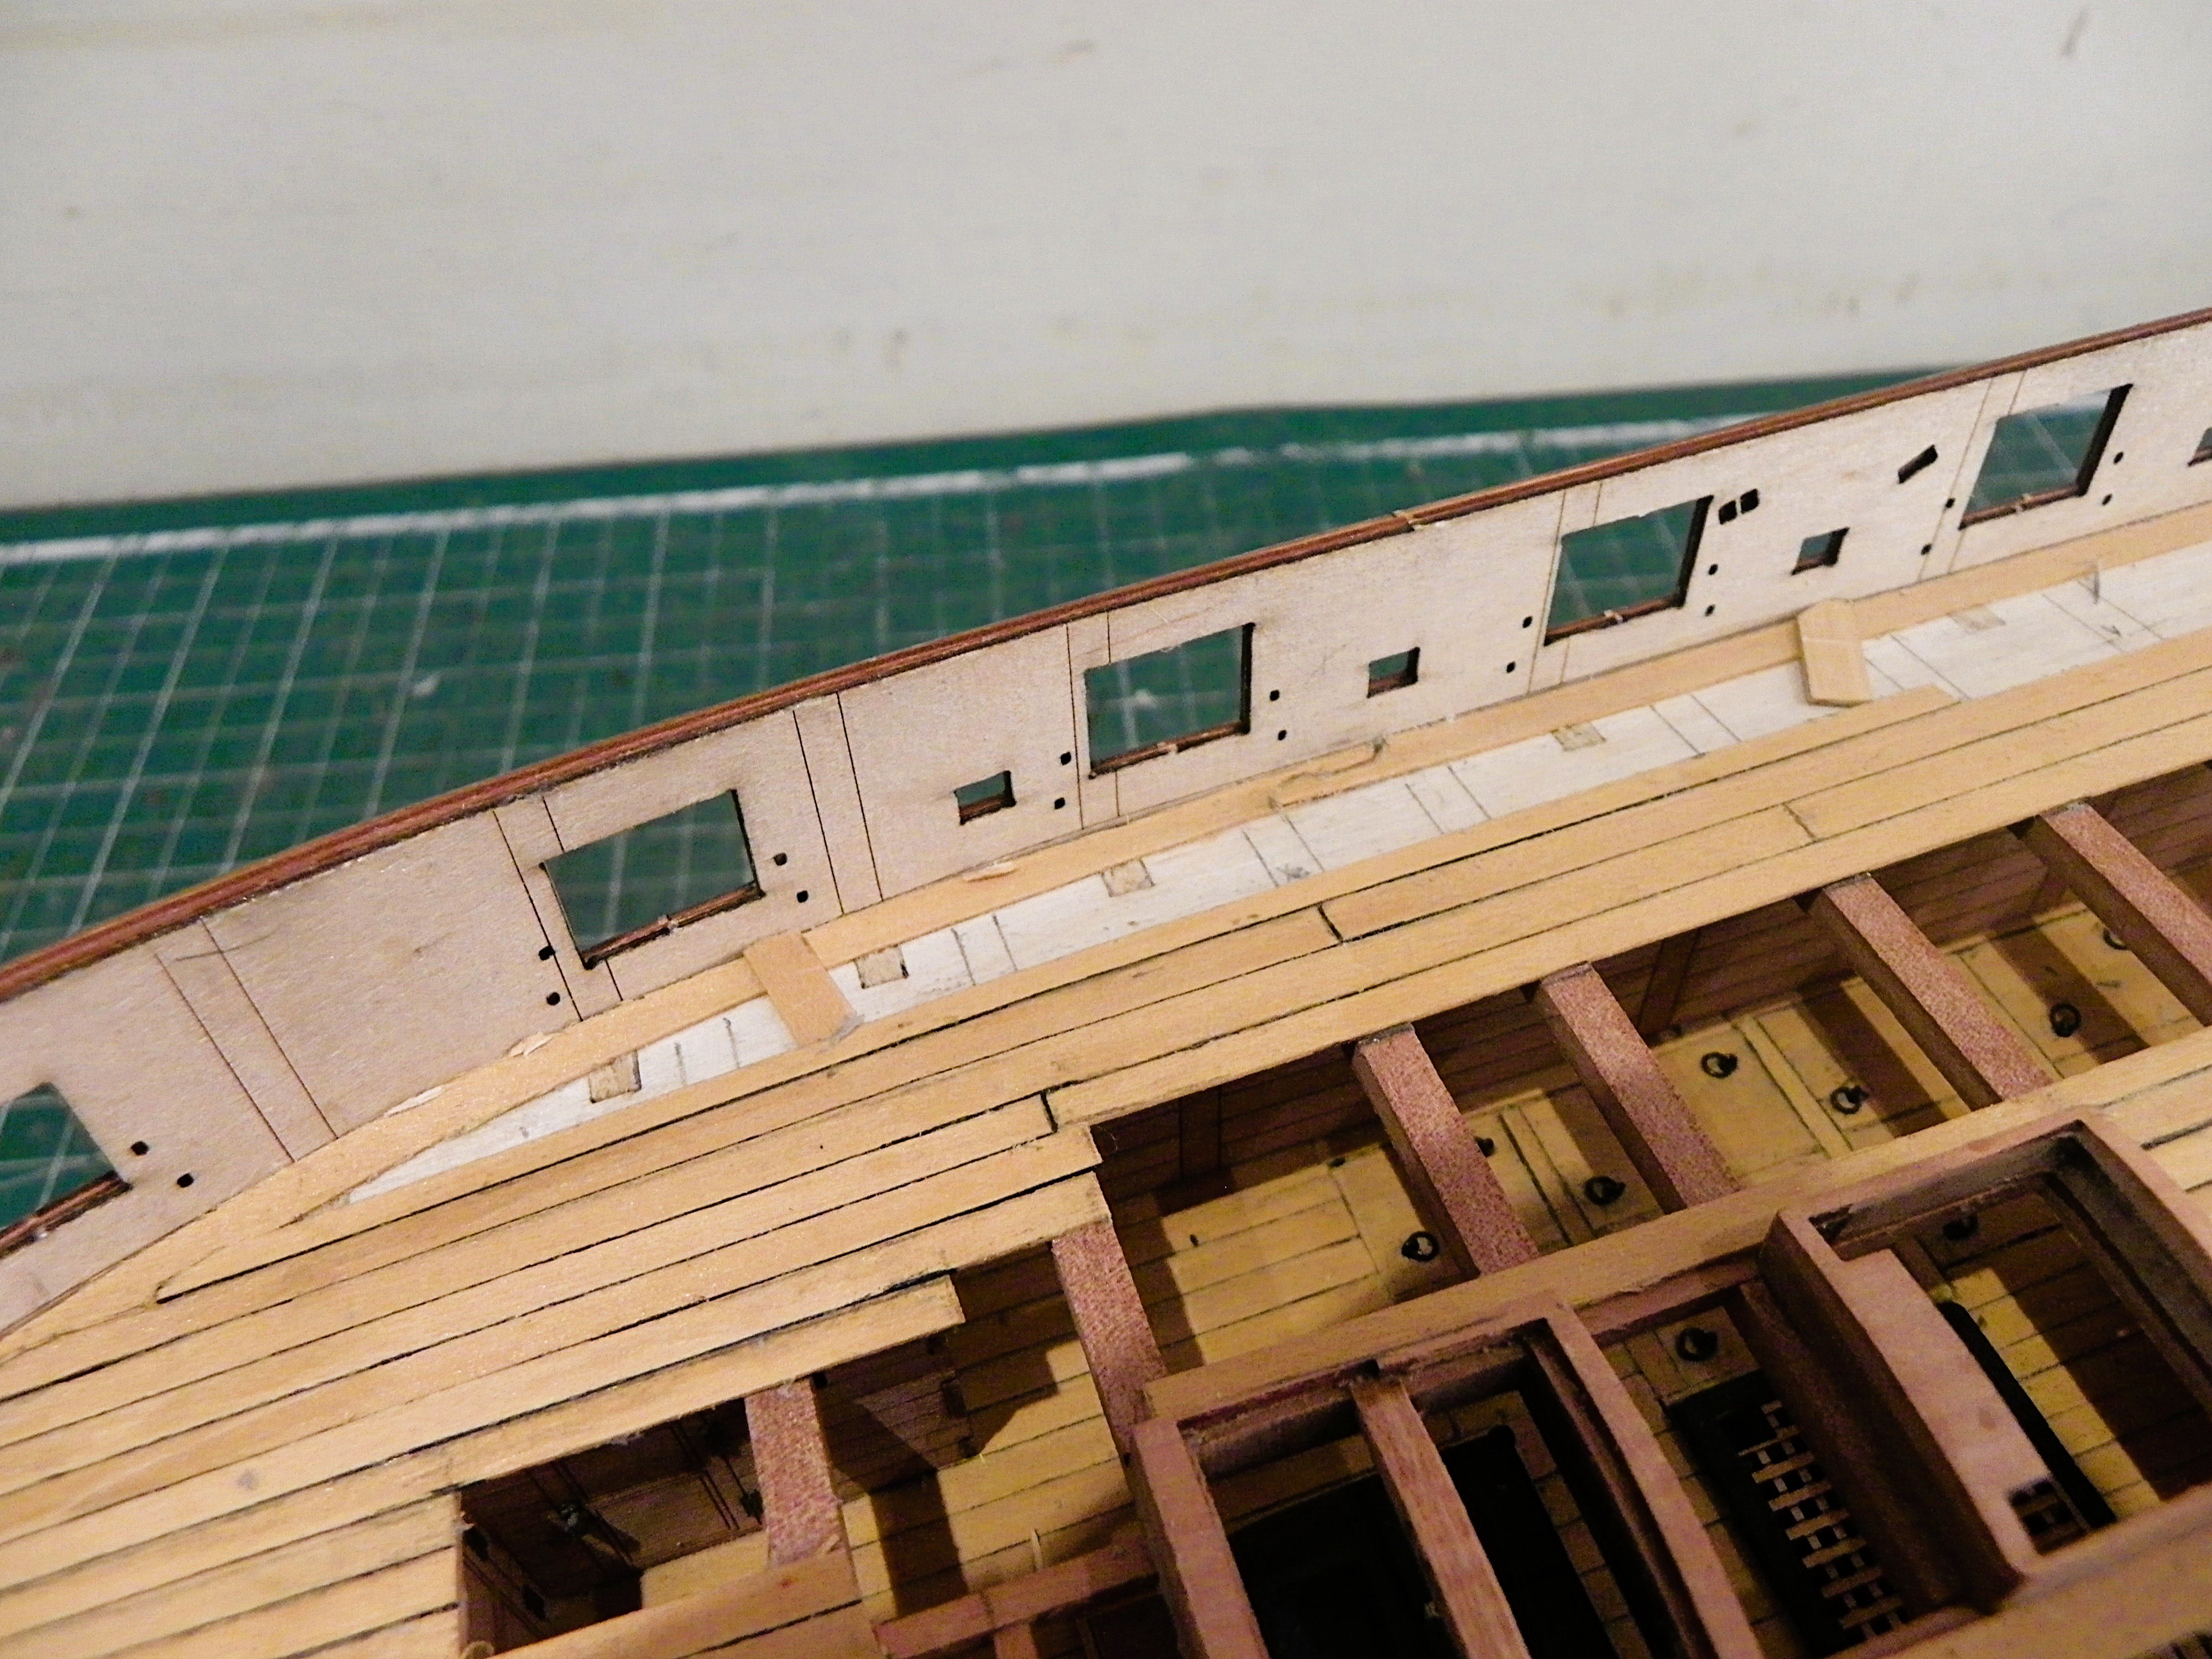
Cheers Guys. @ Fritz, thanks for looking in, separate spirketting and Quick works panelling is provided in the kit, but I've not seen a kit that supplies a waterway. I usually do a representation of a waterway including scuppers, but I've yet to reach that stage. Post 45 Detailing the deck Time to get some paint down. 0573 0563 I used Vallejo Black/grey(168) for the coamings. The slightly pinkish look to the Counter isn’t representative of the true colour. 0562 Dry fitting the inner bulwarks, forward section an excellent fit. I used the gunport jigs to ensure alignment. 0577 I pre-painted the inner bulwarks before fitting. I used Vallejo Flat Red (031) The longer aft section was trickier to fit, getting it into place before the glue set, whilst aligning it with the ports, and sheaves that run thro’ the hull. 0583 Again the port jigs proved useful. Towards the stern I did note that the run of the bulwark didn’t quite meet the deck, but it’s more important to get the ports lined up. Any adjustment will be done once the Spirketting is fitted. 0593 0594 Only one thin coat of paint has been applied prior to fitting. B.E. 28/02/2025


- 332 replies
-
- 19
-
-
- Harpy
- Vanguard Models
- (and 1 more)
-
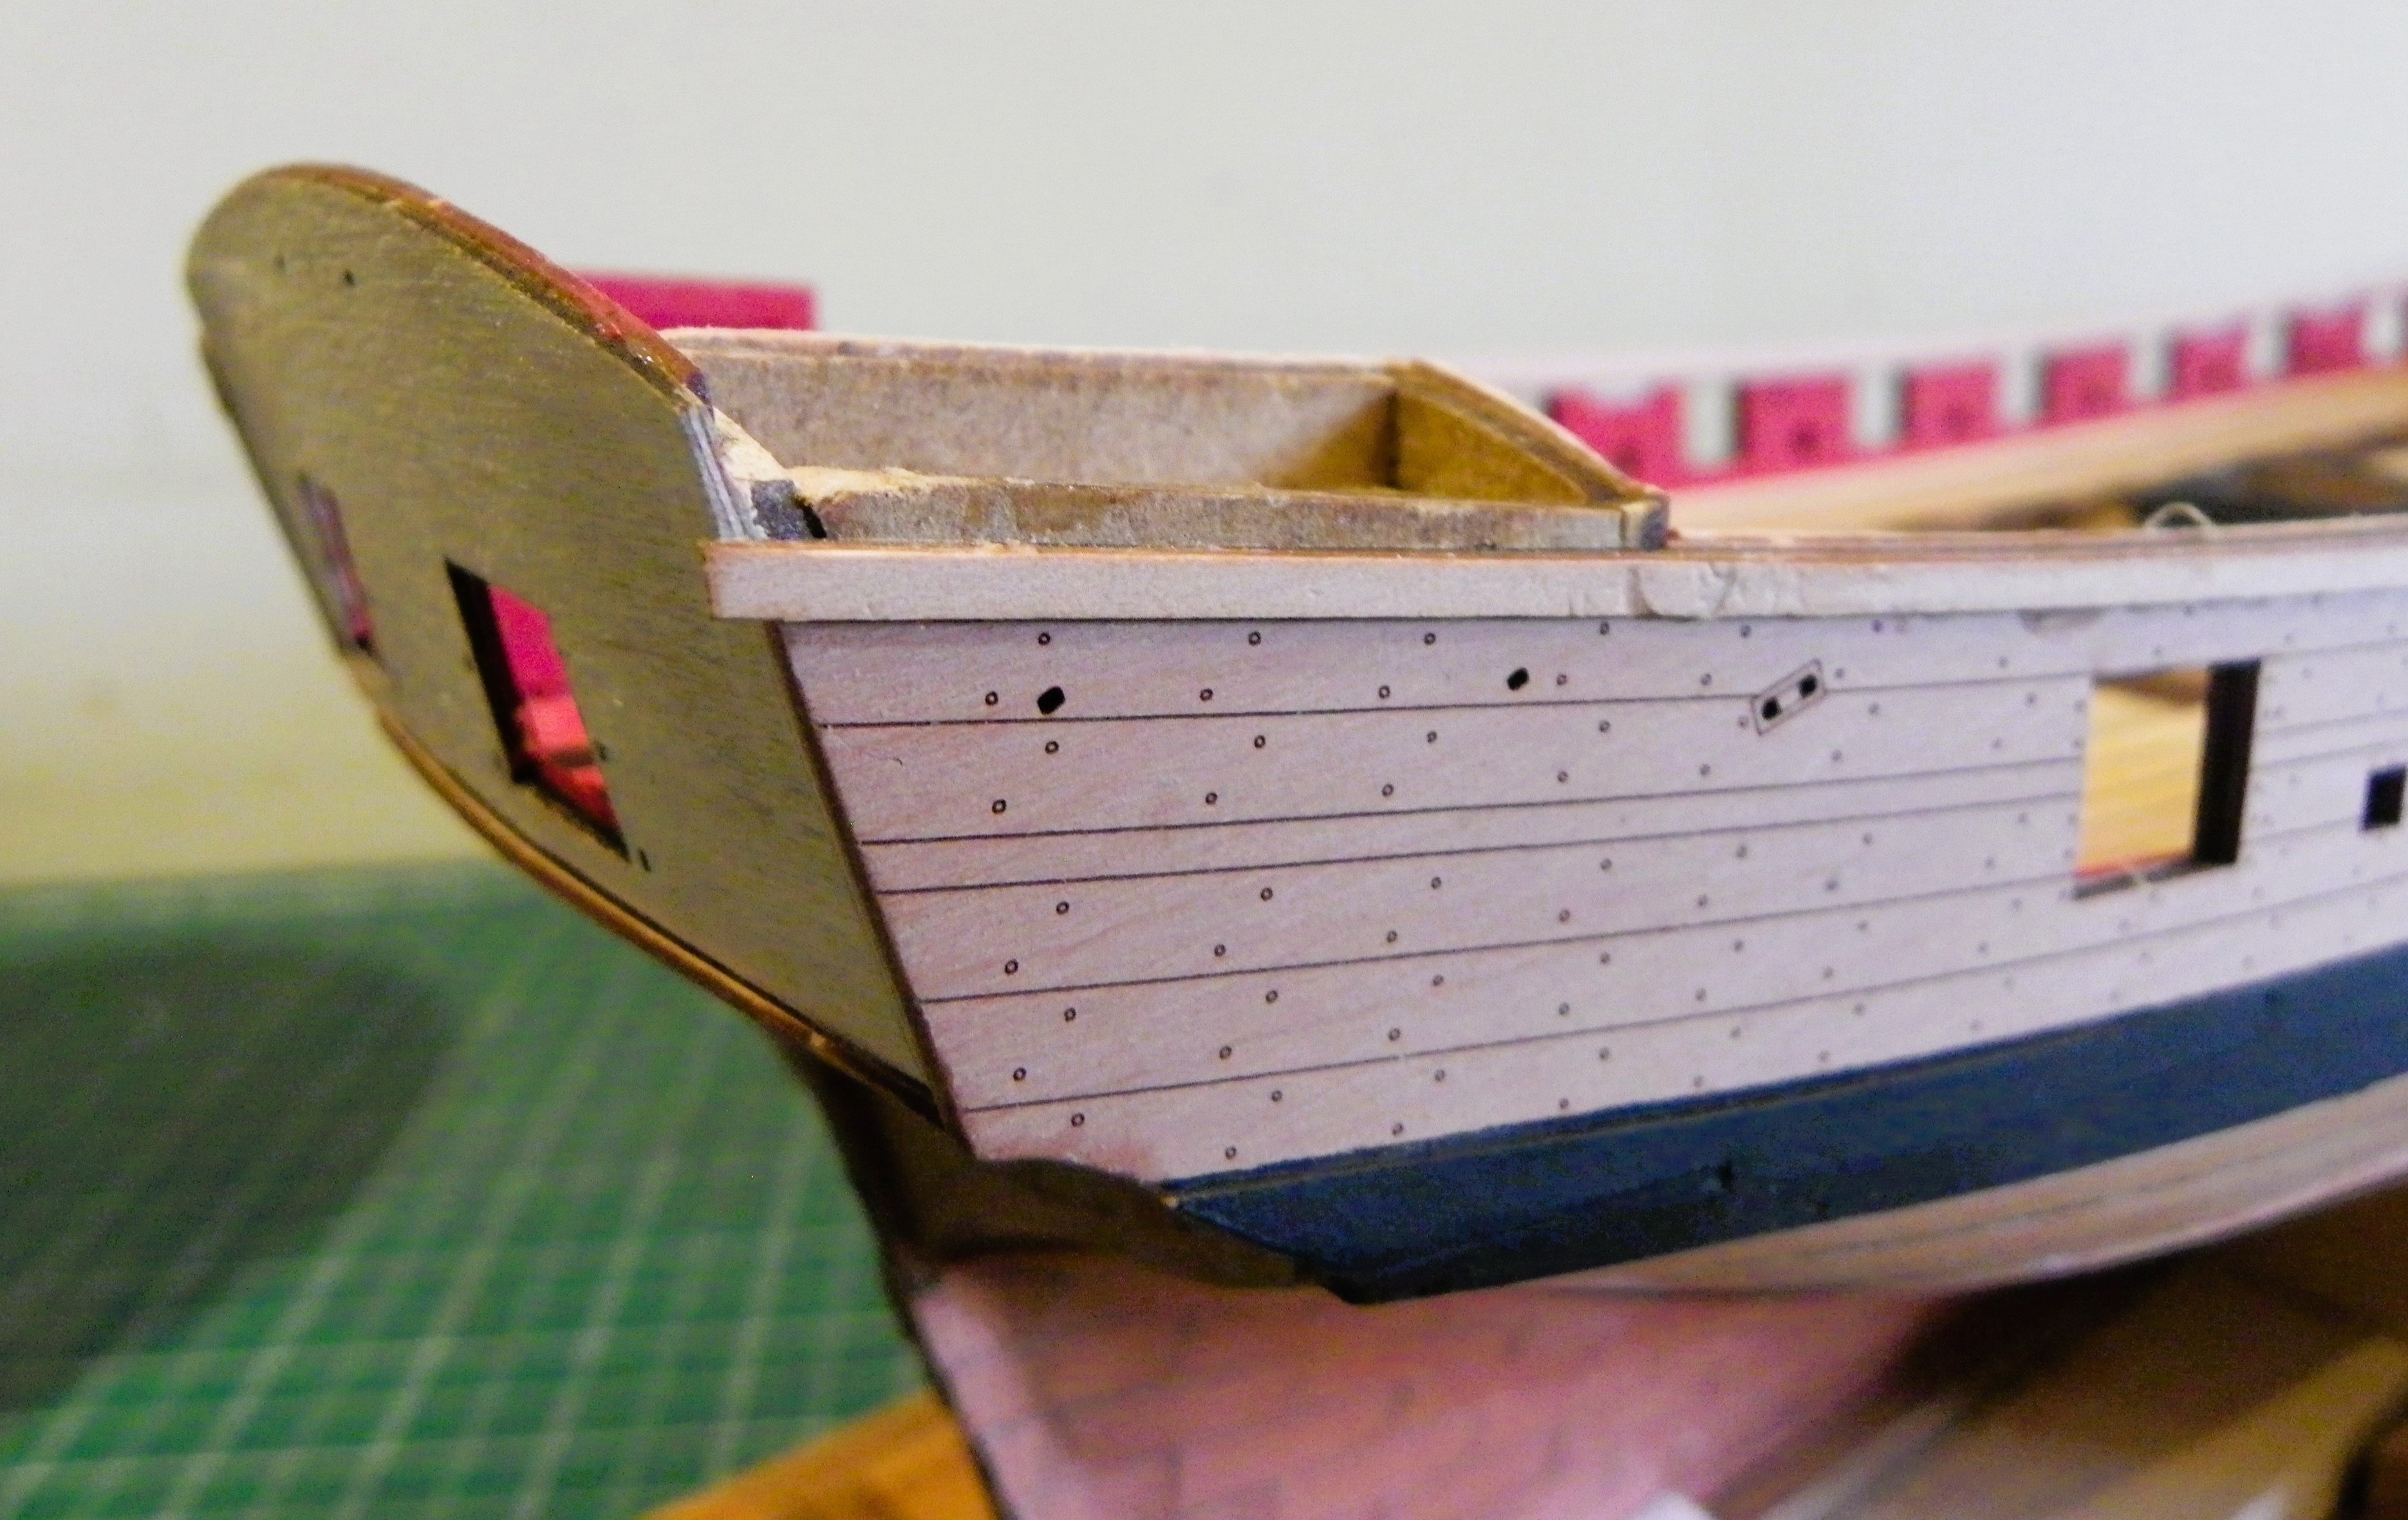
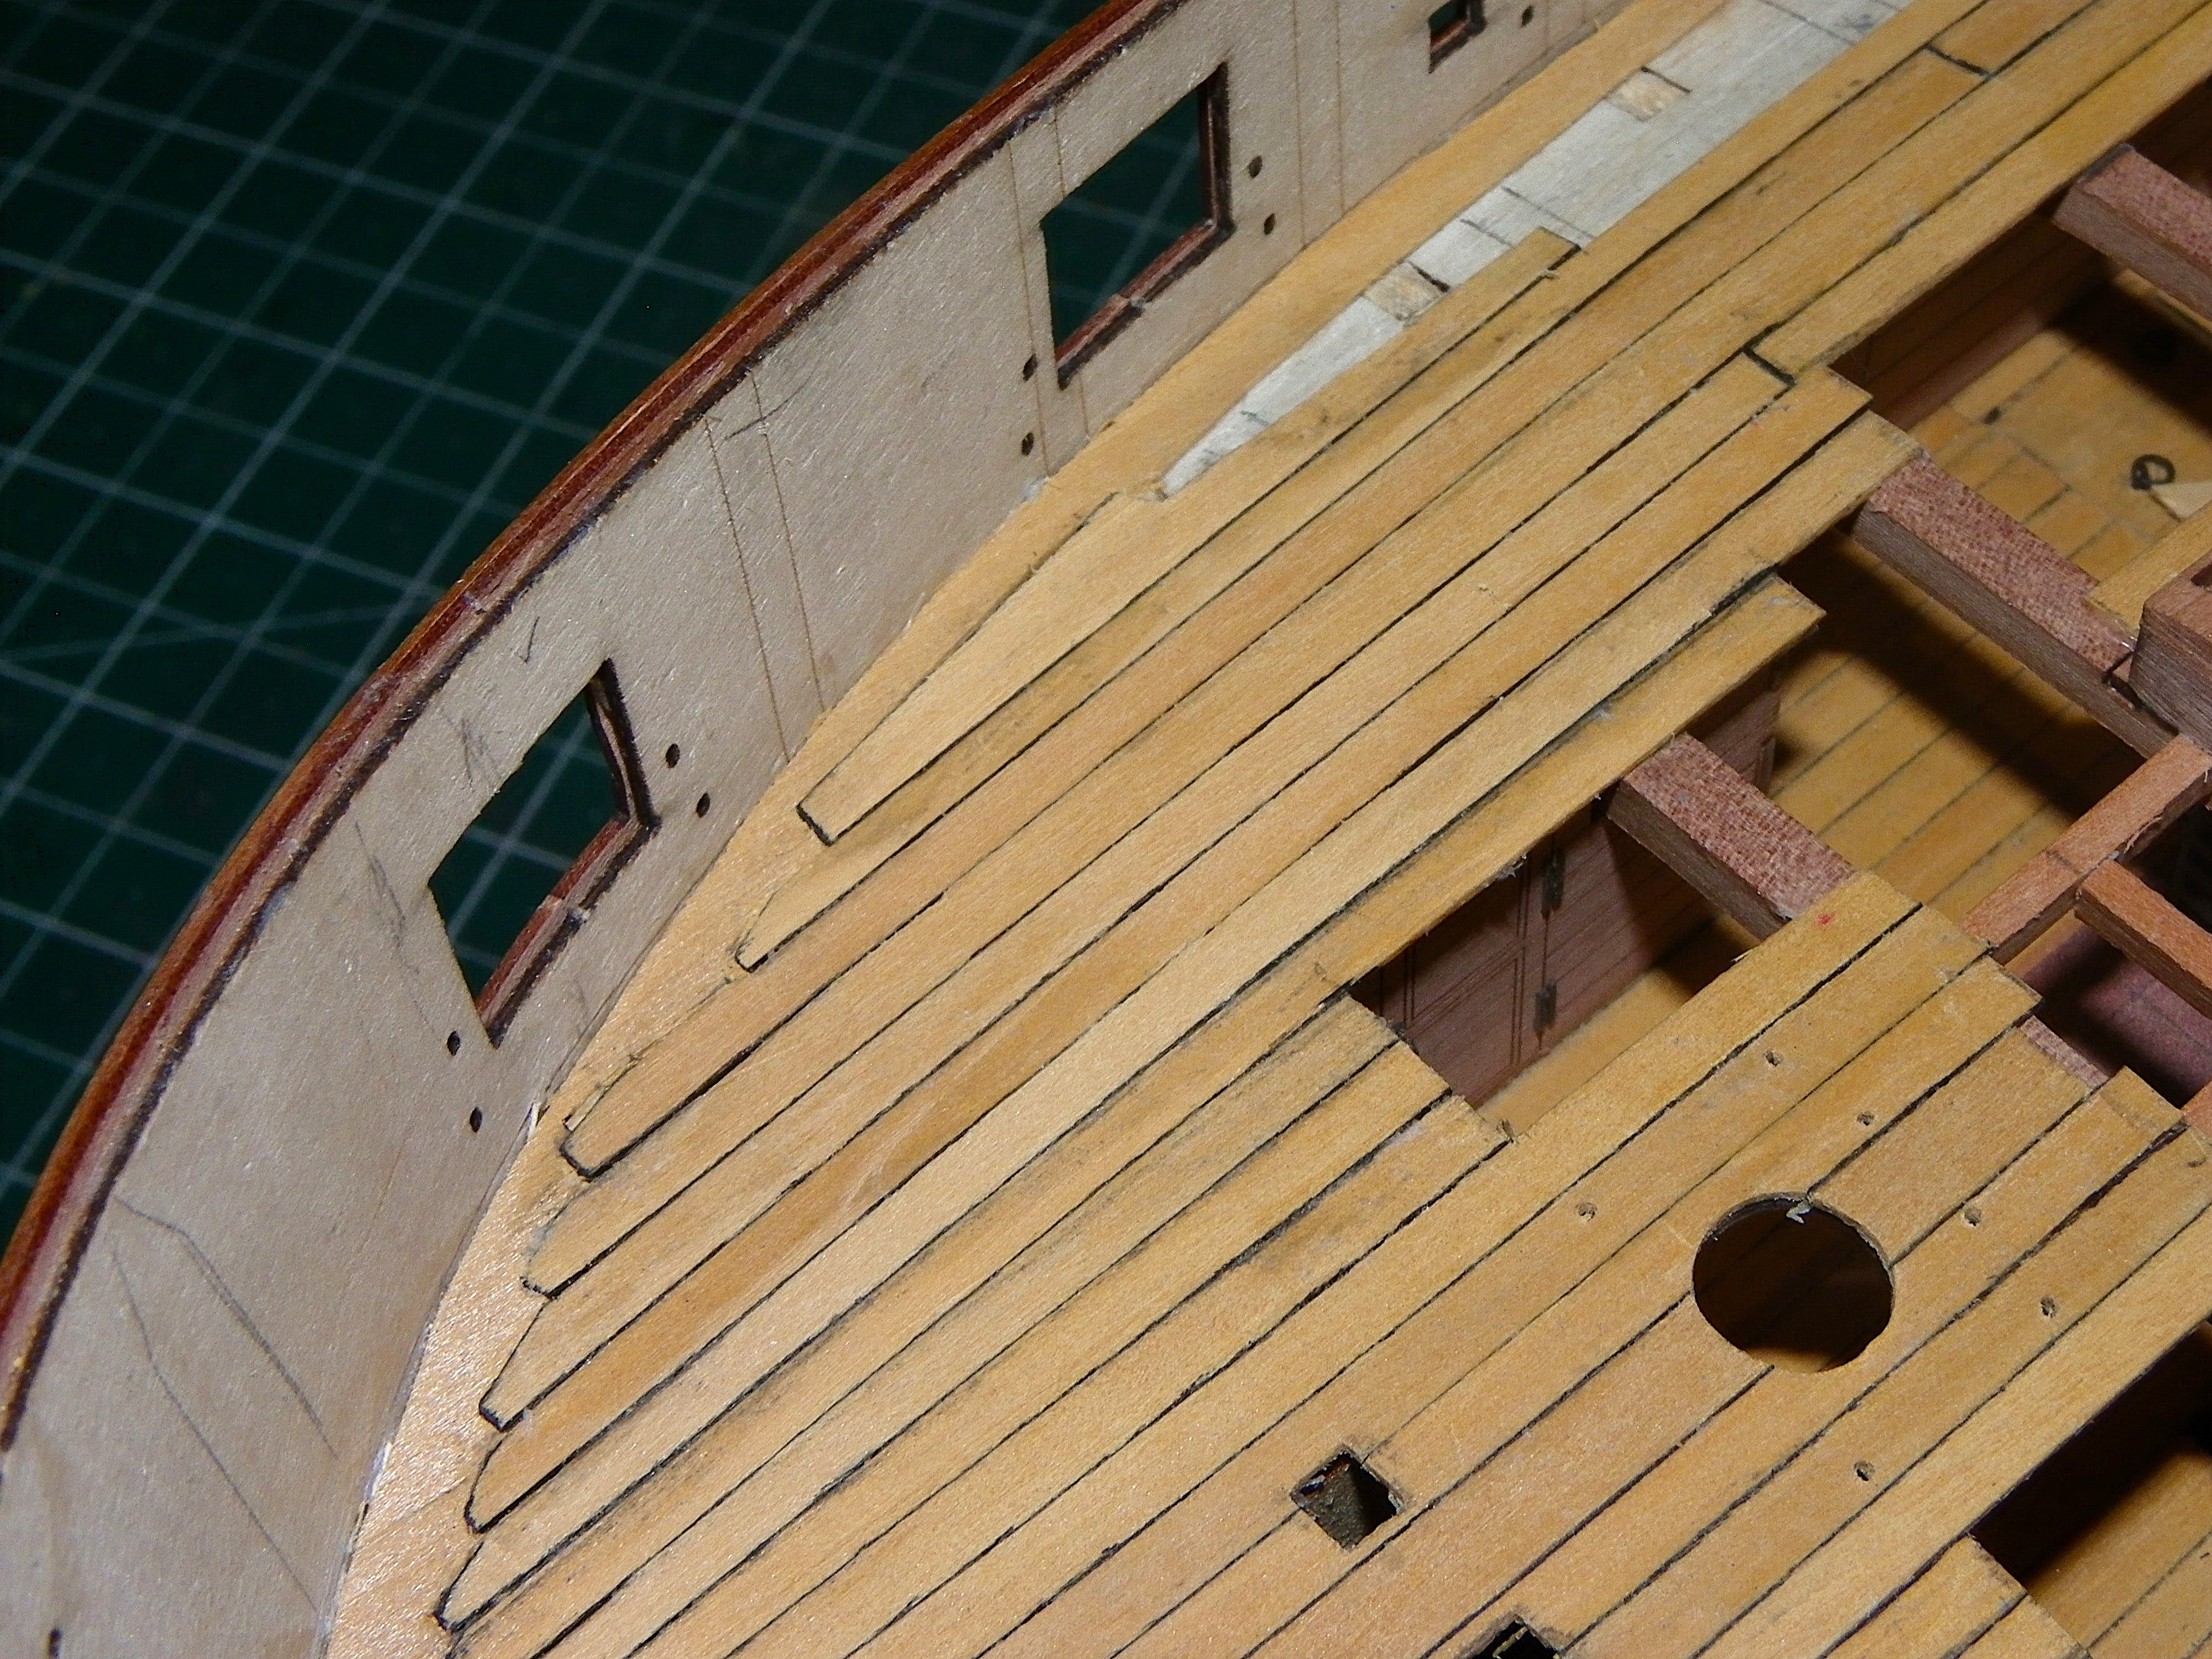
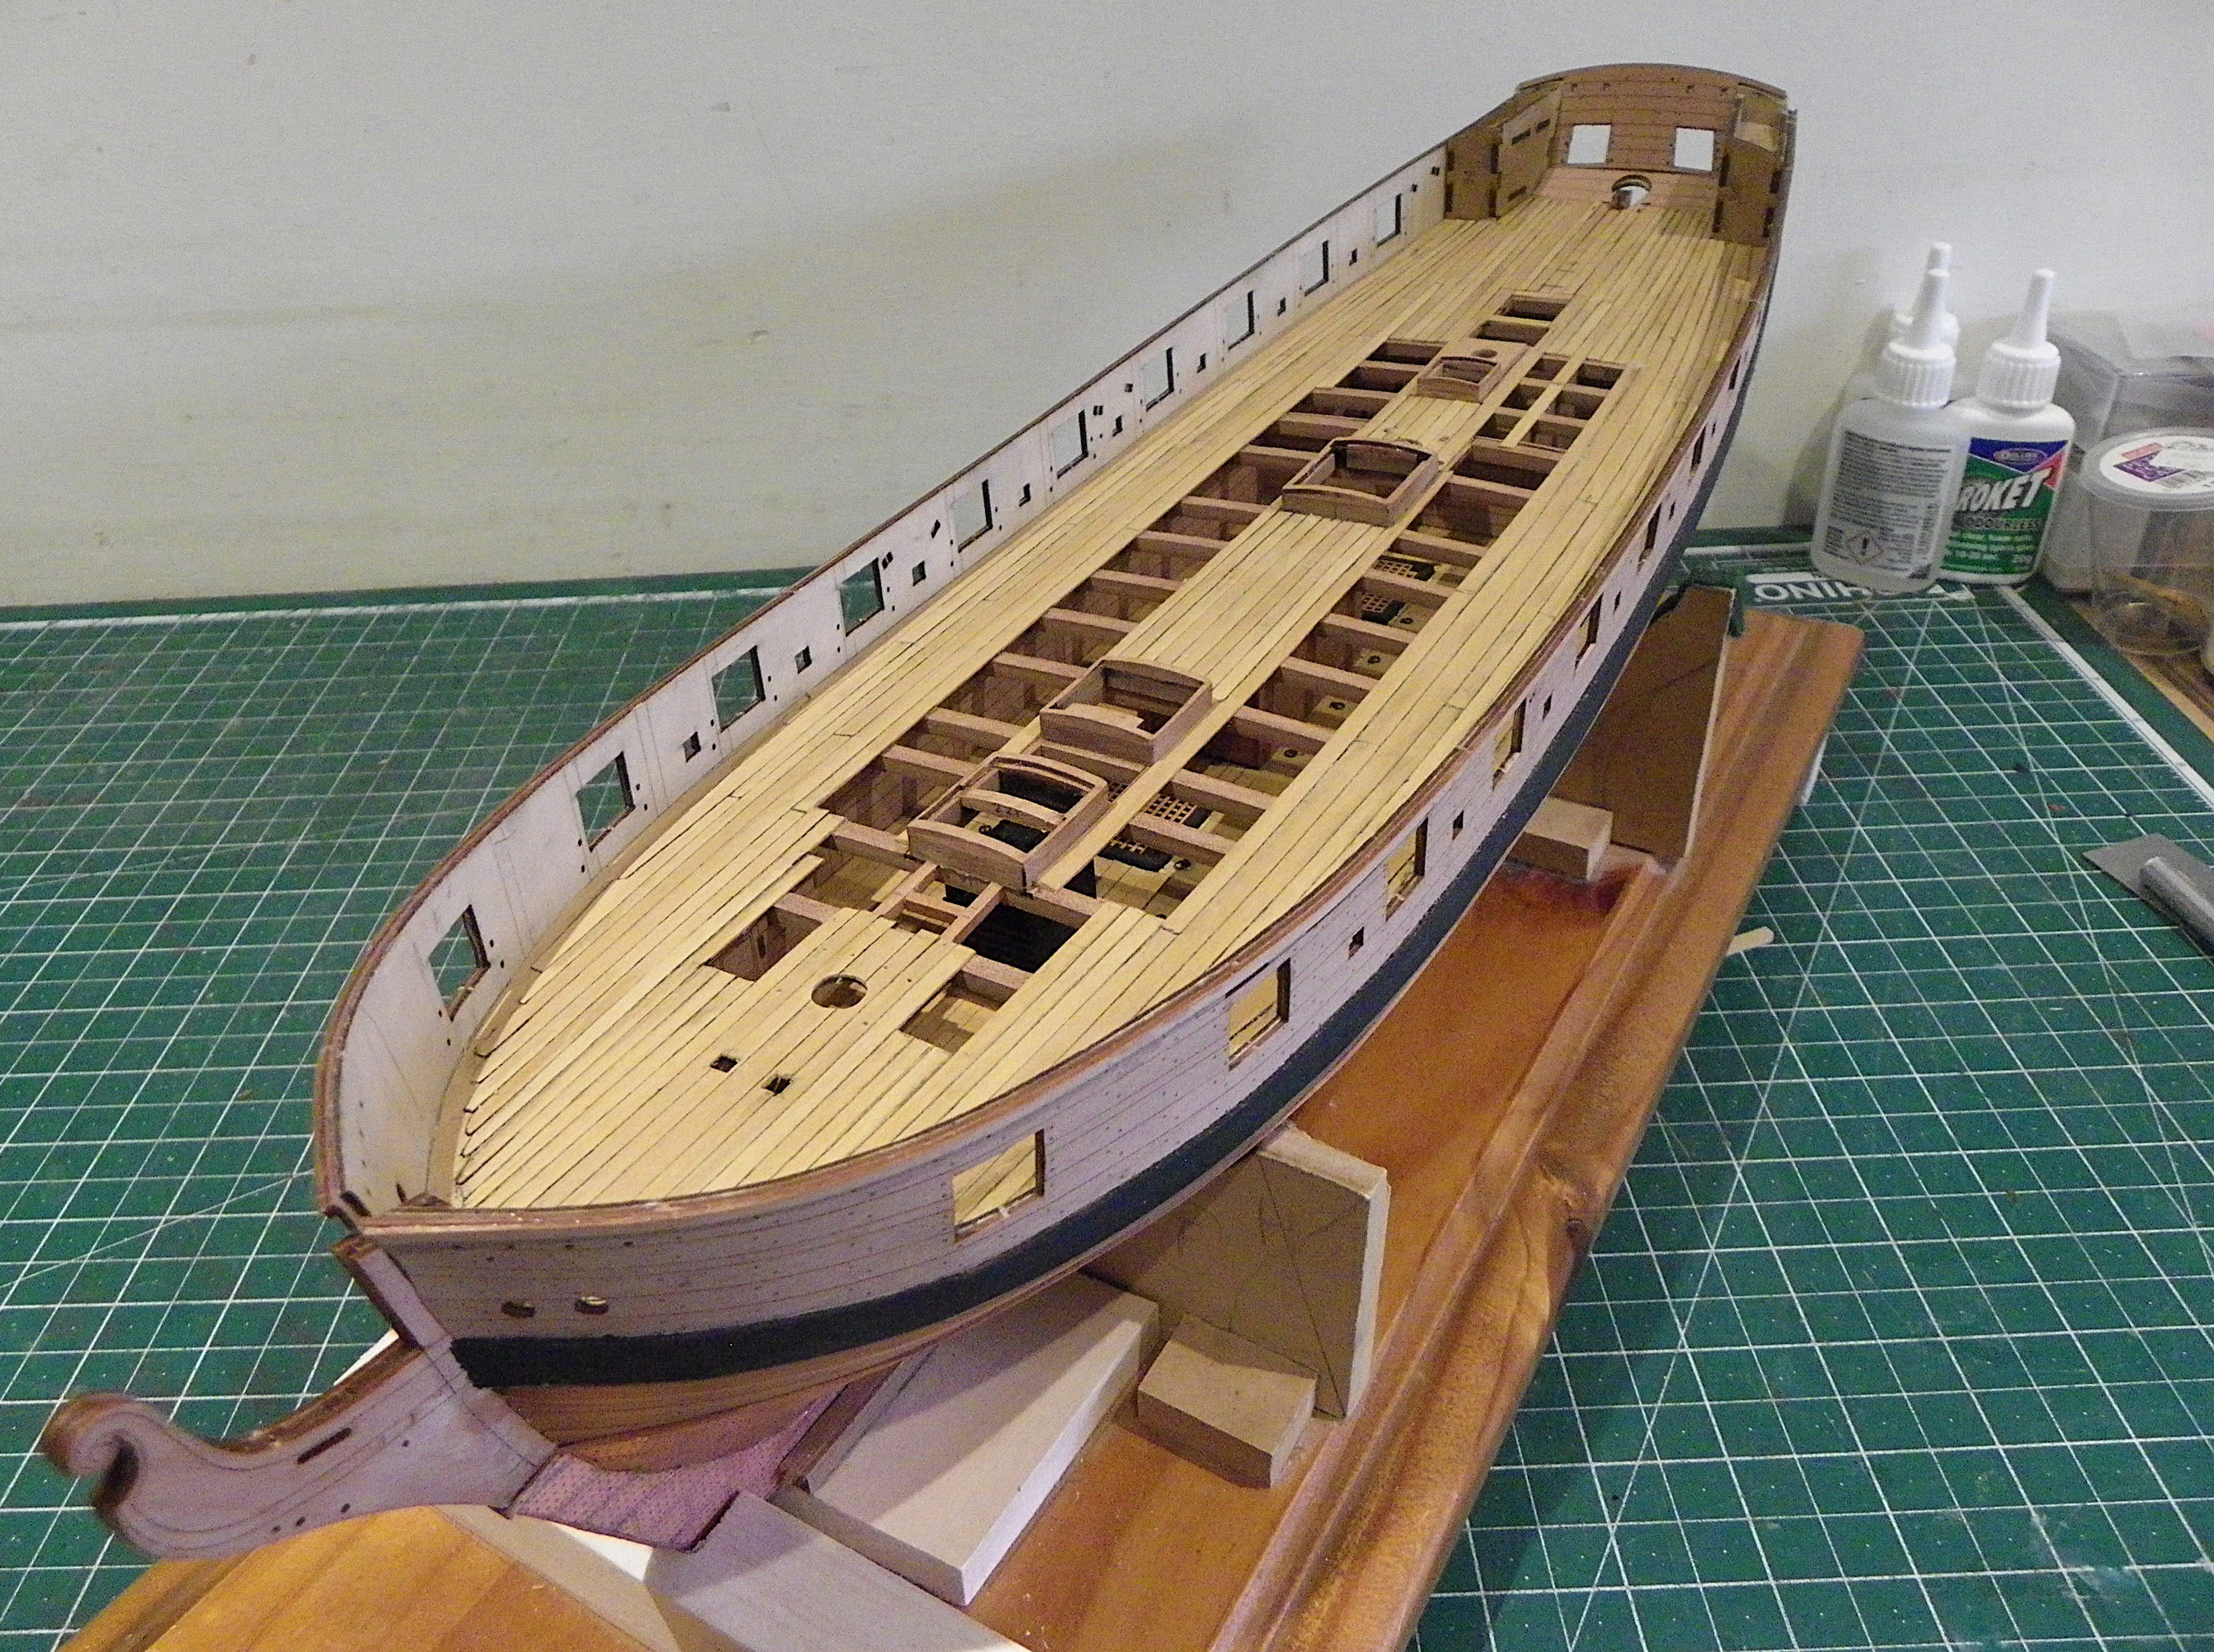
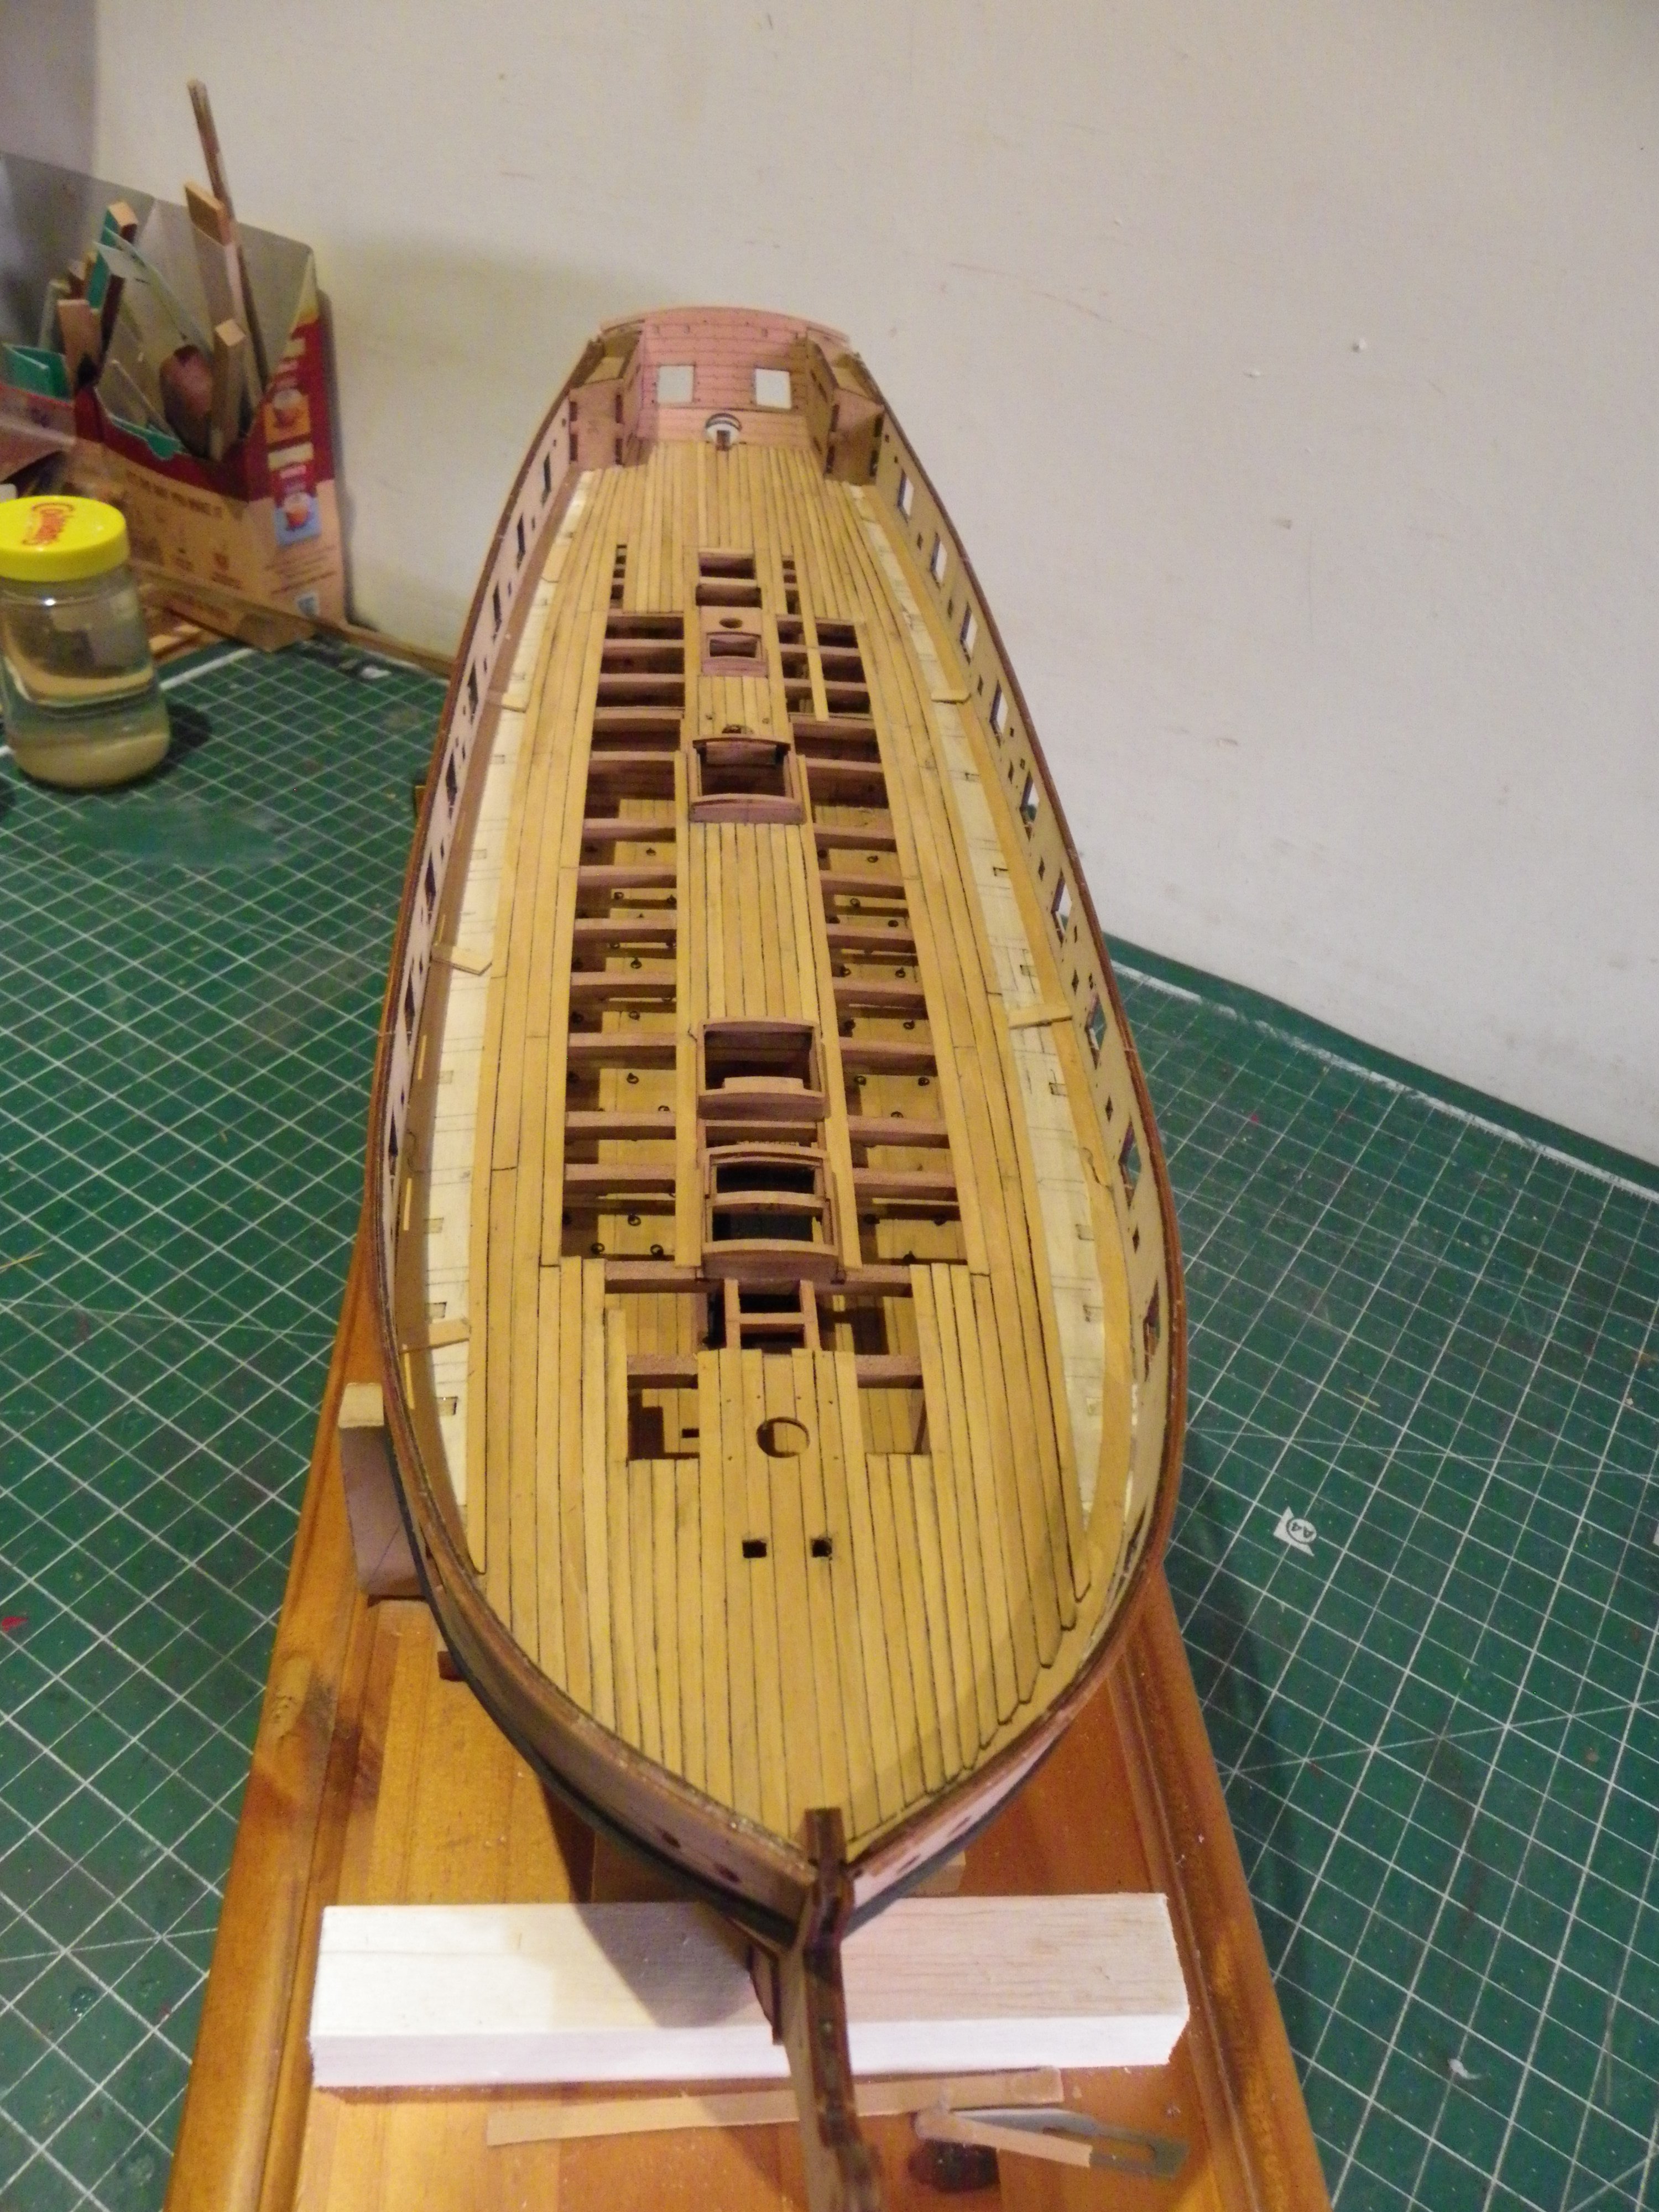
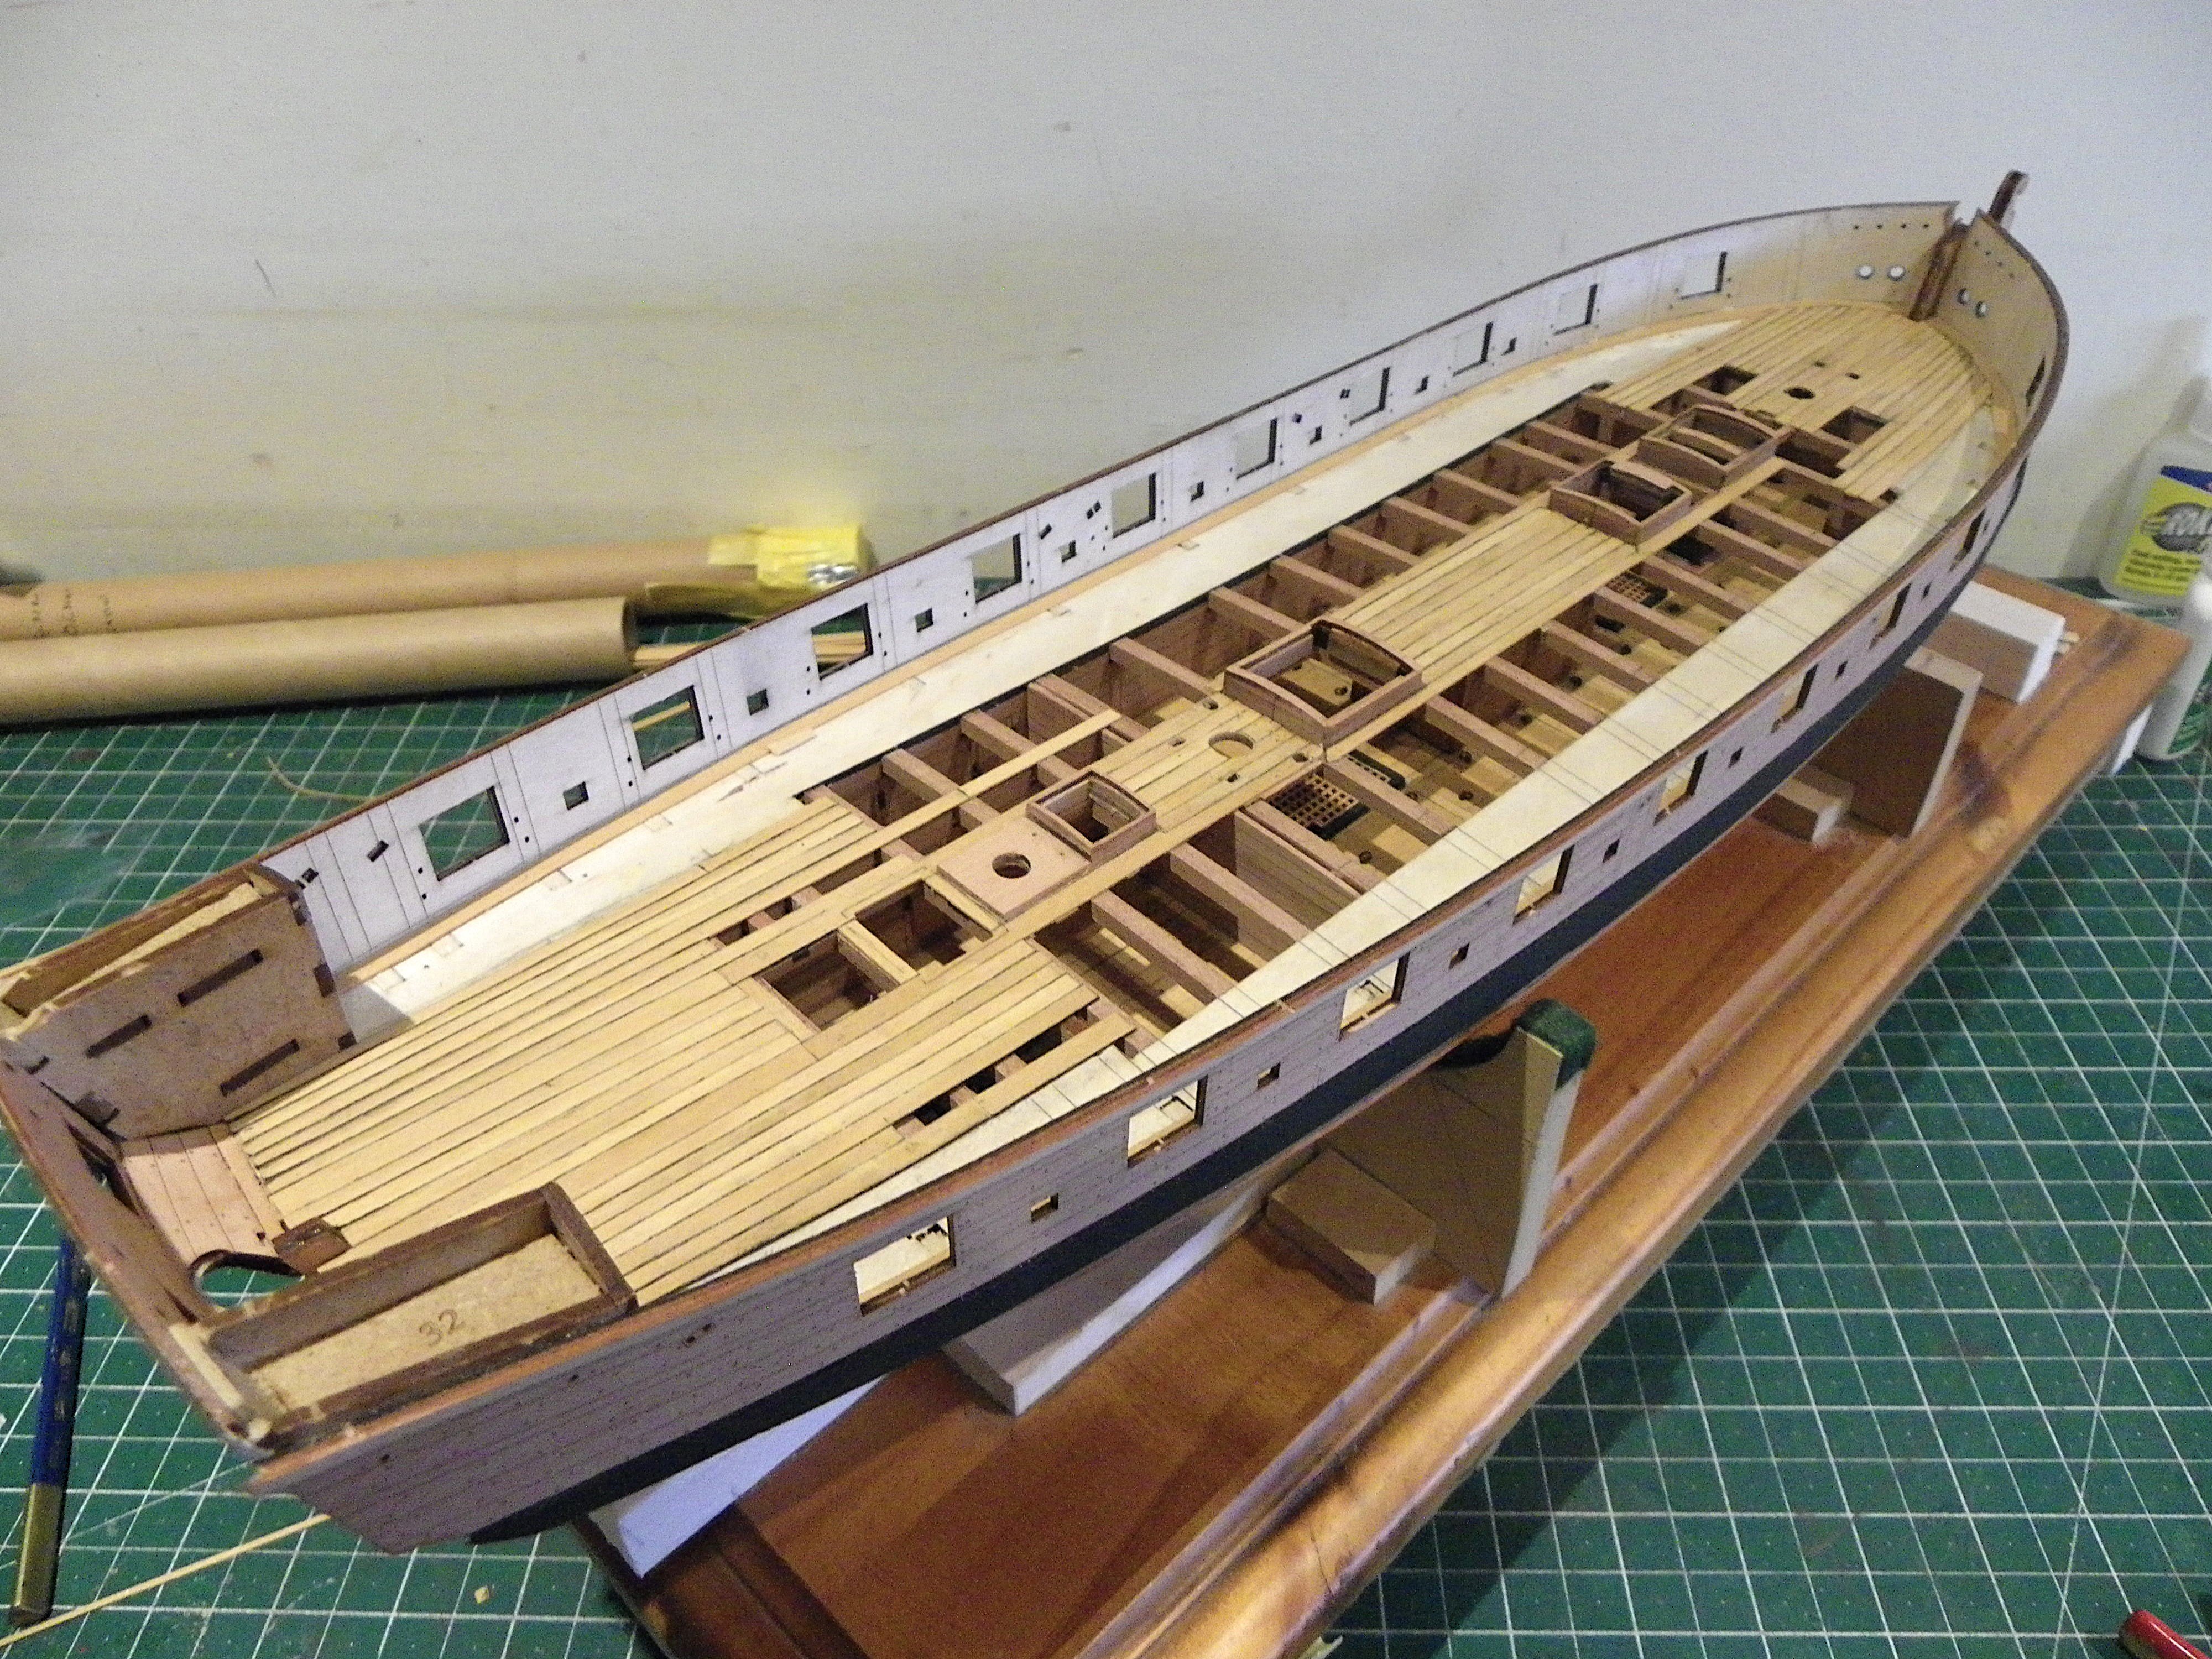
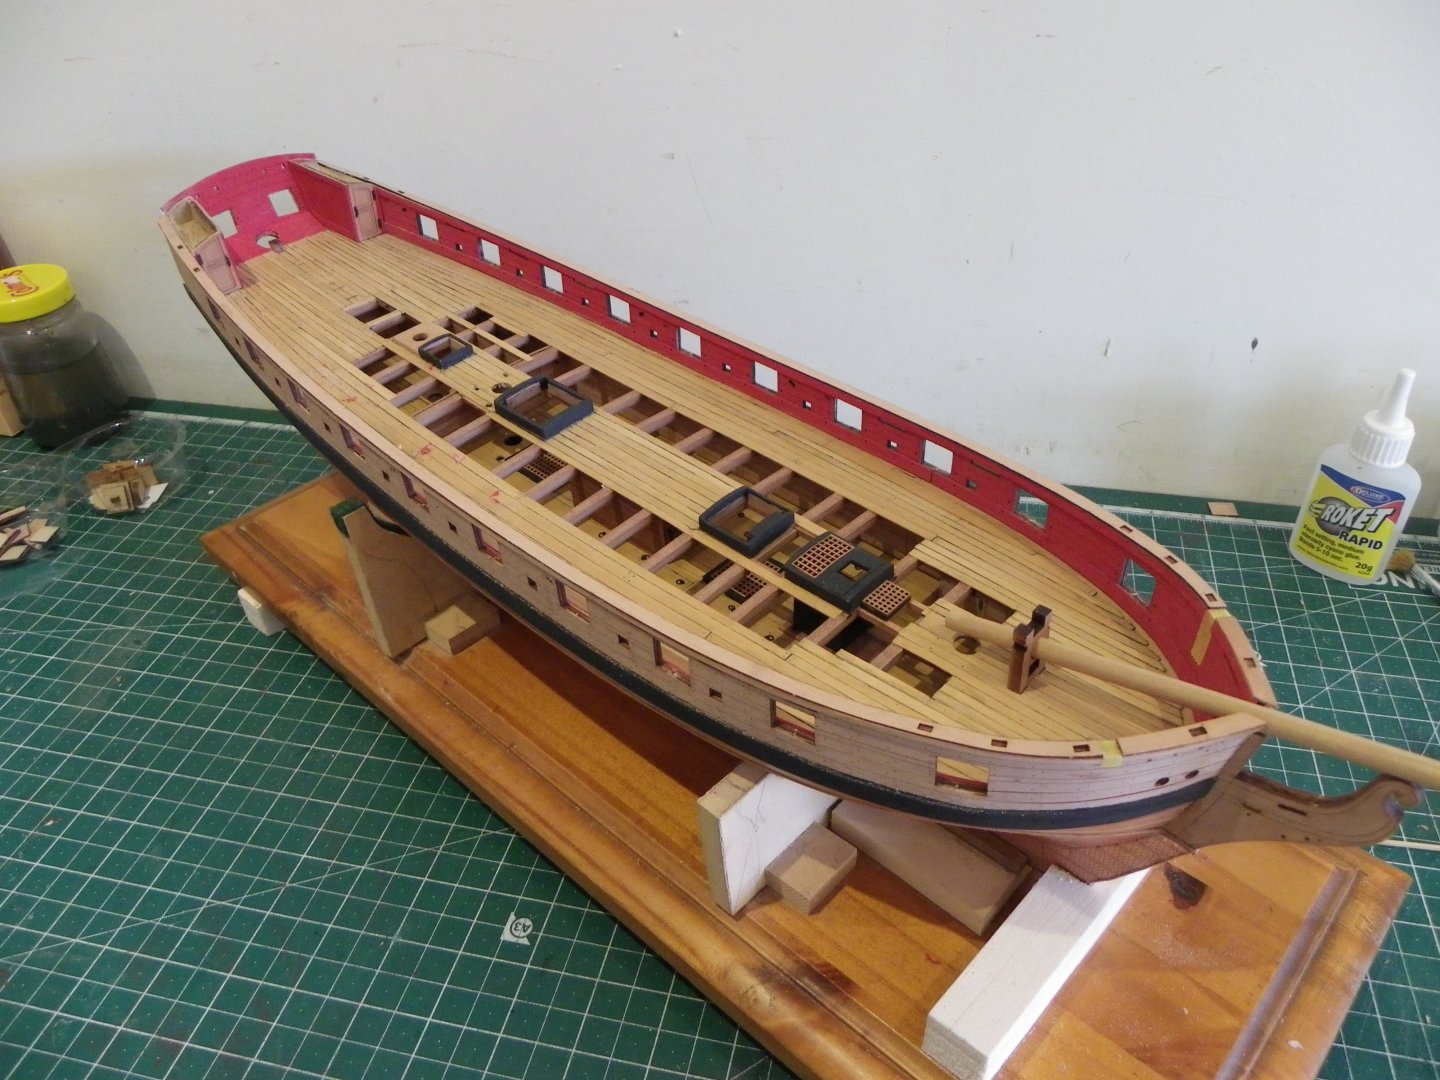
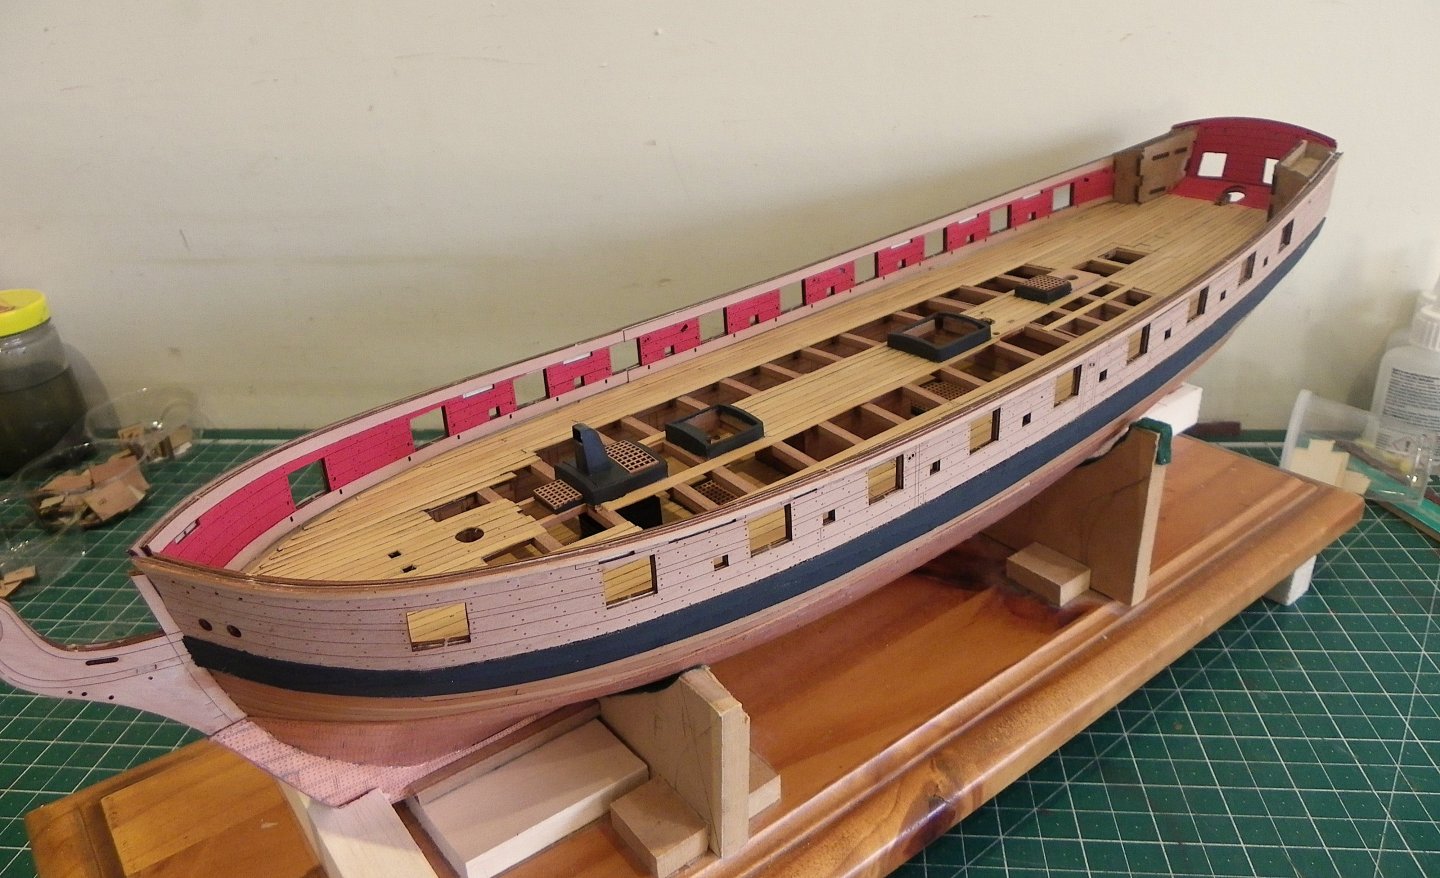
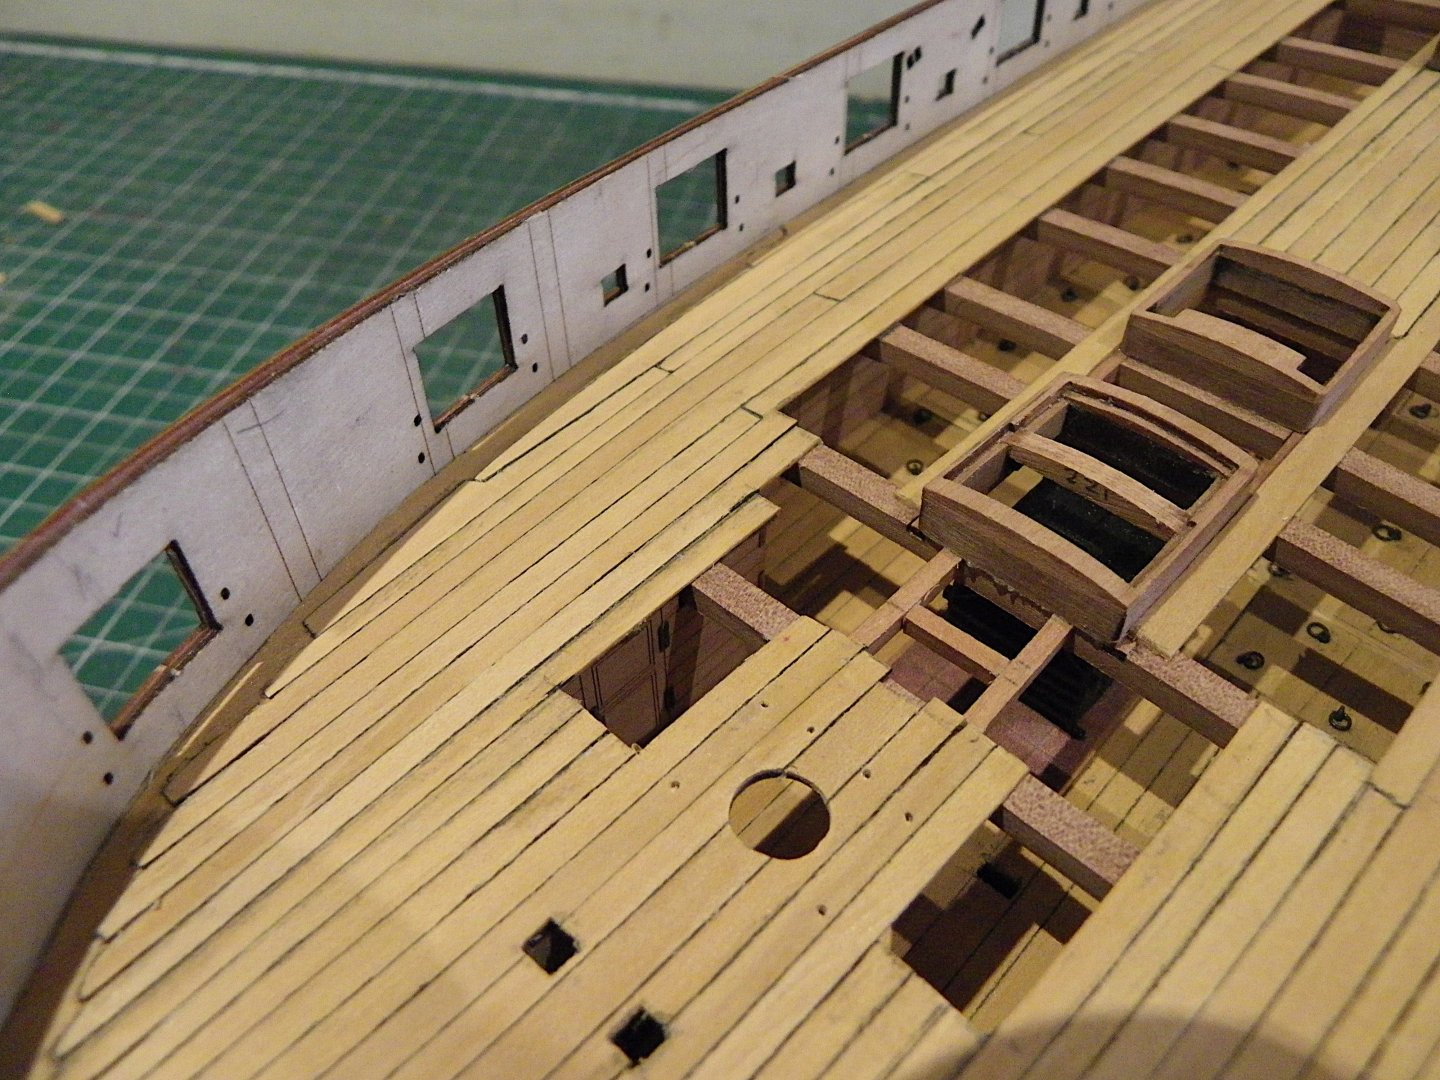
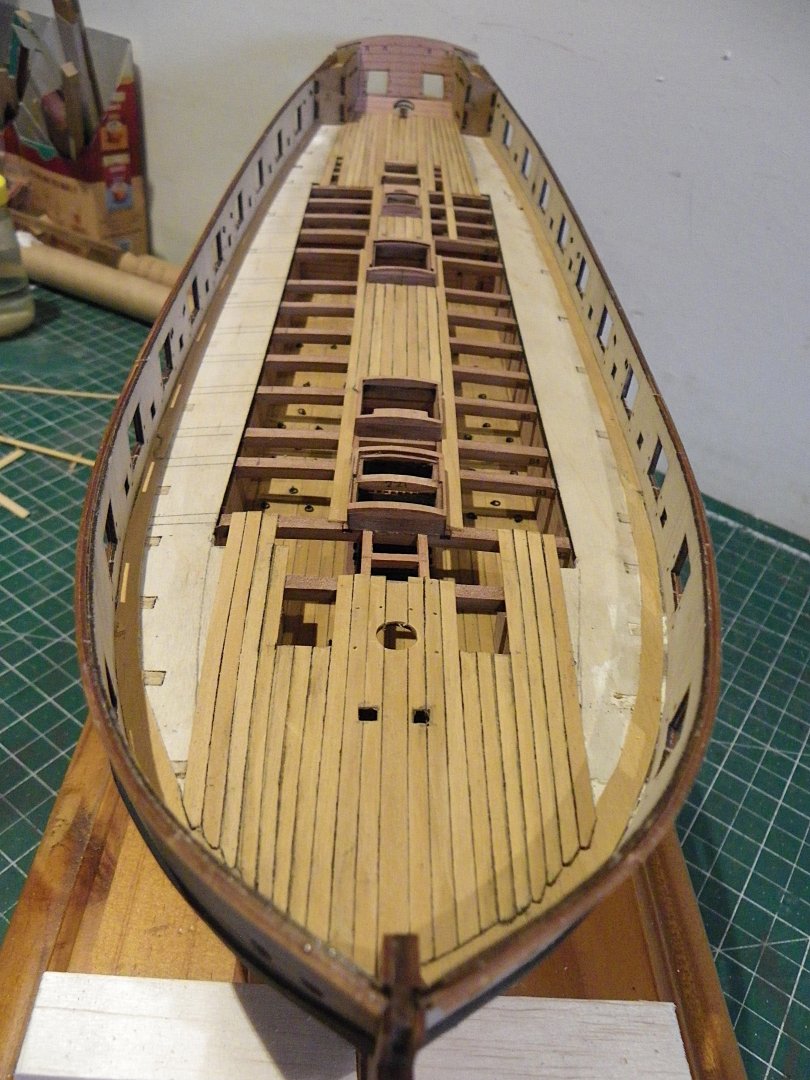
Post 44 Completing the deck planking. I firstly fit Hooded planks for the penultimate strakes at the Bow and Stern. 0535 0537 This provides better spacing for the final strake against the Margin plank. 0538 The final plank requires spiling for which Tamiya tape is used to provide the shape. 0553 0552 0554 0542 0551 0549 0540 A full day to fit the final planks, and around six days in total. Not quite finished as the deck requires scraping and sealing with a flat varnish. B.E. 27/02/2025


- 332 replies
-
- 22
-
-
- Harpy
- Vanguard Models
- (and 1 more)
-
Tricky area that stern arrangement, I haven't got around to looking at it yet. It is a good idea to use a card template to work out the angles for the side panels to the Pantry and the quaintly named 'Necessary' structures. Don't want to mess the actual pieces up. I will be adding a margin strip where the deck planking at the stern meets the lower counter. The existing set-up would allow water to run down the counter and work its way between deck and the frames below. B.E.
- 241 replies
-
- 2
-
-
- Vanguarrd Models
- Harpy
- (and 1 more)
-
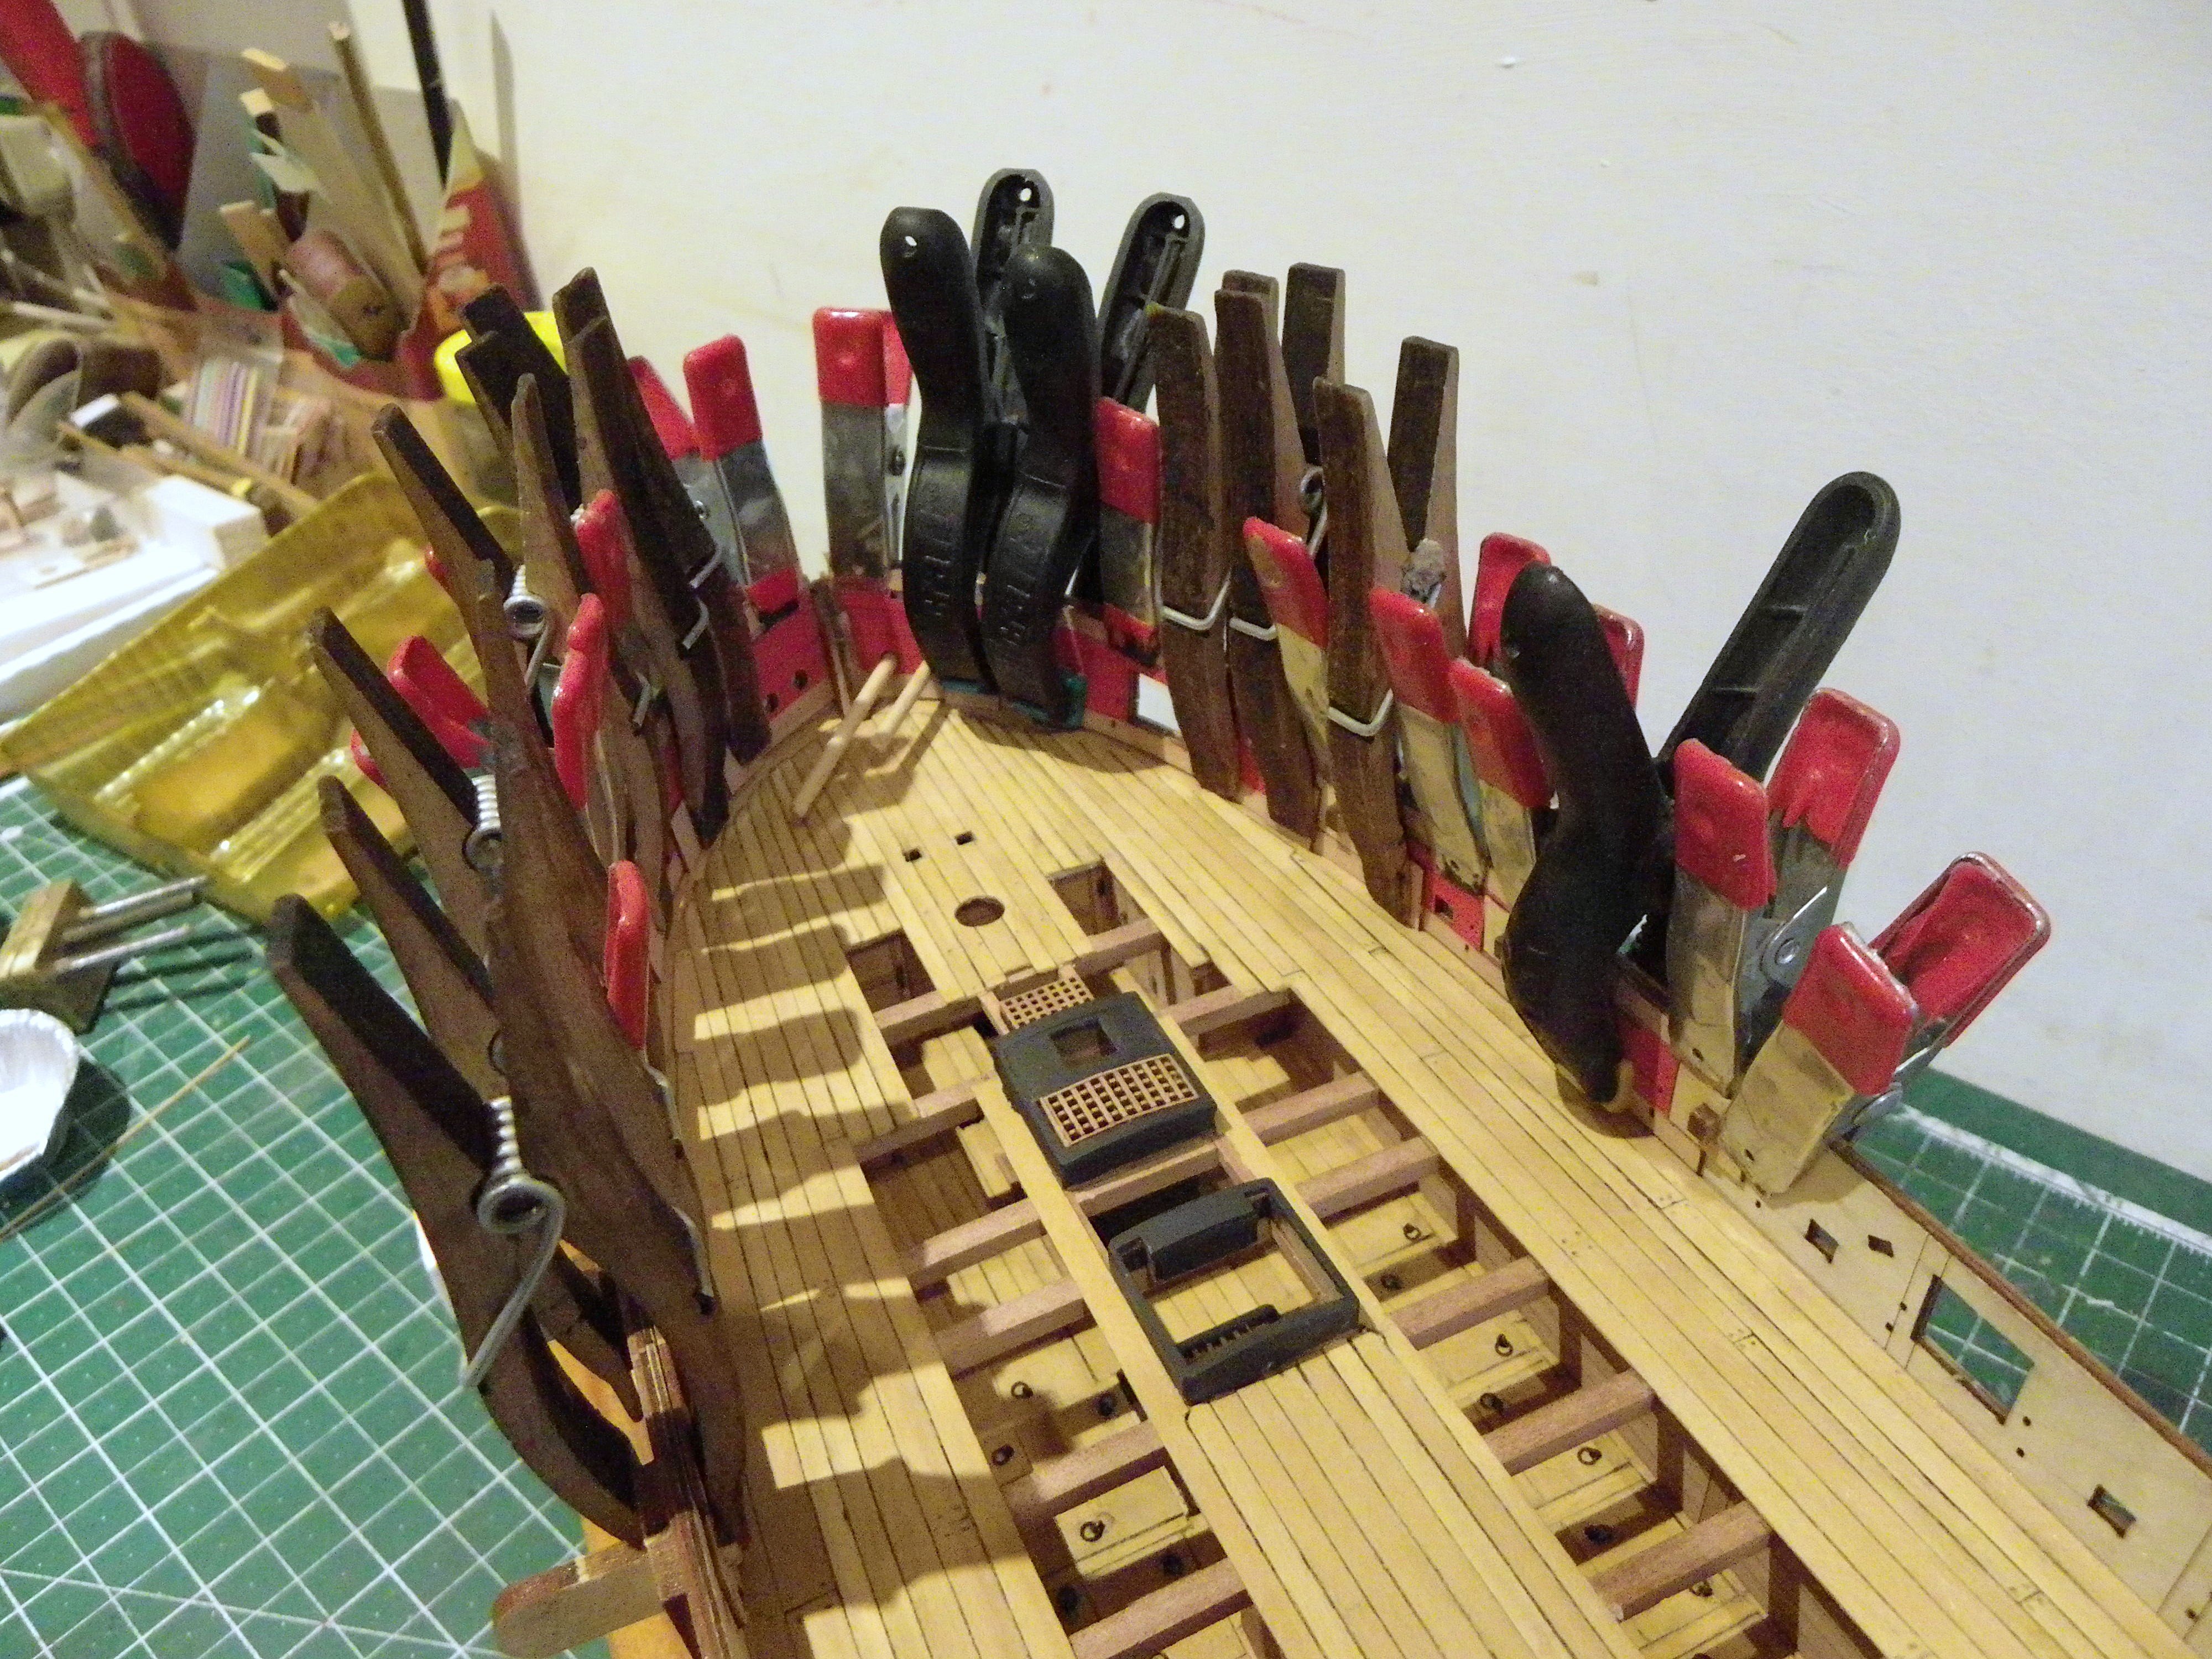
Post 43 Deck Planking Part 3 The first full length planks port and starboard that run along the unplanked area are put into place. 0520 They are fitted in one piece bow to stern in order to maintain the subtle curve fore and aft. Butt joints at a scale 30’ are marked post fitting. 0521 Planking progresses outwards, tapering towards bow and stern, wedges are used to hold planks in place. 0522 0526 Two strakes remain to be fitted each side. 0533 Another day should see completion of the deck planking. B.E. 26/02/2025


- 332 replies
-
- 24
-
-
- Harpy
- Vanguard Models
- (and 1 more)
-
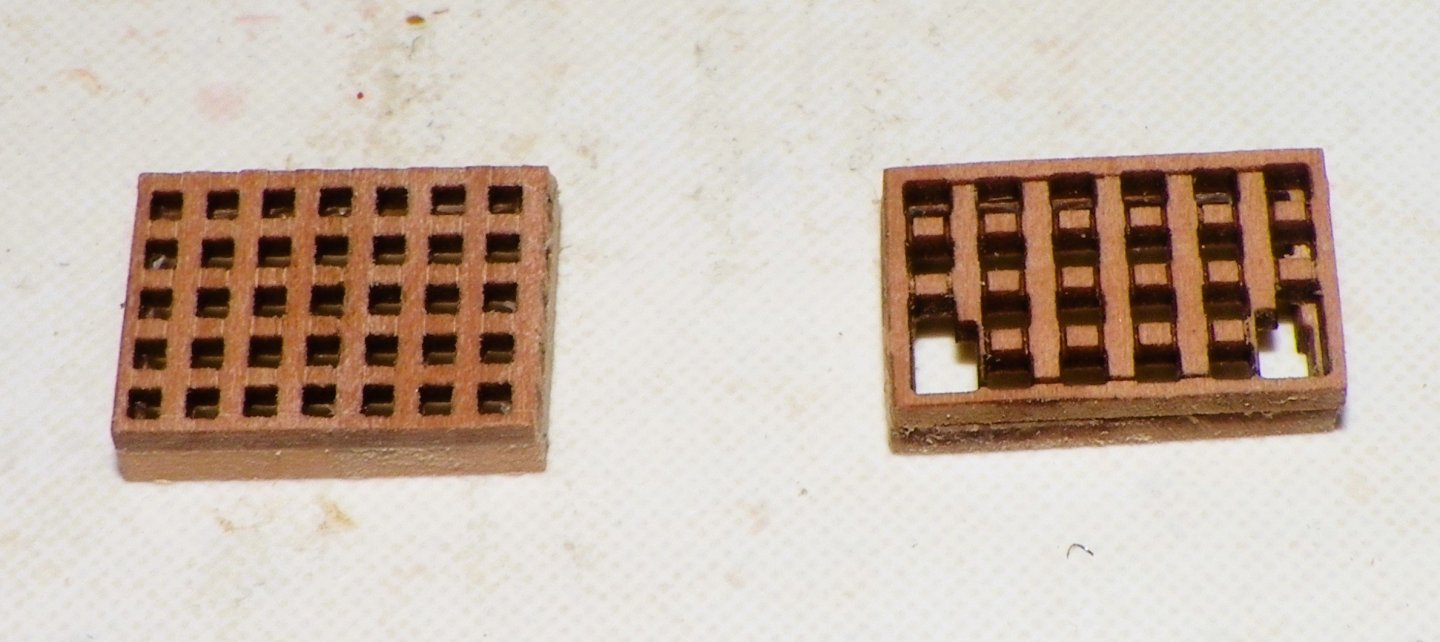
Hi Chris, if you look at my part (above) compared with the Manual photo you posted I think you may see why I originally thought it was a ‘fault’ in production rather than an error in authenticity. Some tiny sections appear to be missing. I already had what I thought were the hawse spaces in the Main hatch gratings. No problem, I will stick with my replacement fitting. Cheers, B.E.
- 332 replies
-
- 2
-
-
- Harpy
- Vanguard Models
- (and 1 more)
-
Thanks Chris, for the clarification. I initially thought of that but discounted the idea for passage of the Hawse because immediately below is the Galley stove hearth. Didn’t seem a good idea to have wet and messy 4½” cables rubbing around the stove – to where? Or indeed with the ship at anchor fouling the grate. Did you have specific evidence for that being the entrance point for the cables? But your post has had an unintended benefit in that it has highlighted an error I have made related to the hawse. No one seems to have picked up on it, but I placed the Main Hatch the wrong way around, mistaking the holes for the Gallow timbers for Hawse access holes. On every ship model I have built the anchor cables run back to the main hatch before going below to be stowed, and I instinctively placed the gratings to suit that arrangement. That issue has now been rectified. Regards, B.E.
- 332 replies
-
- 1
-
-
- Harpy
- Vanguard Models
- (and 1 more)
-
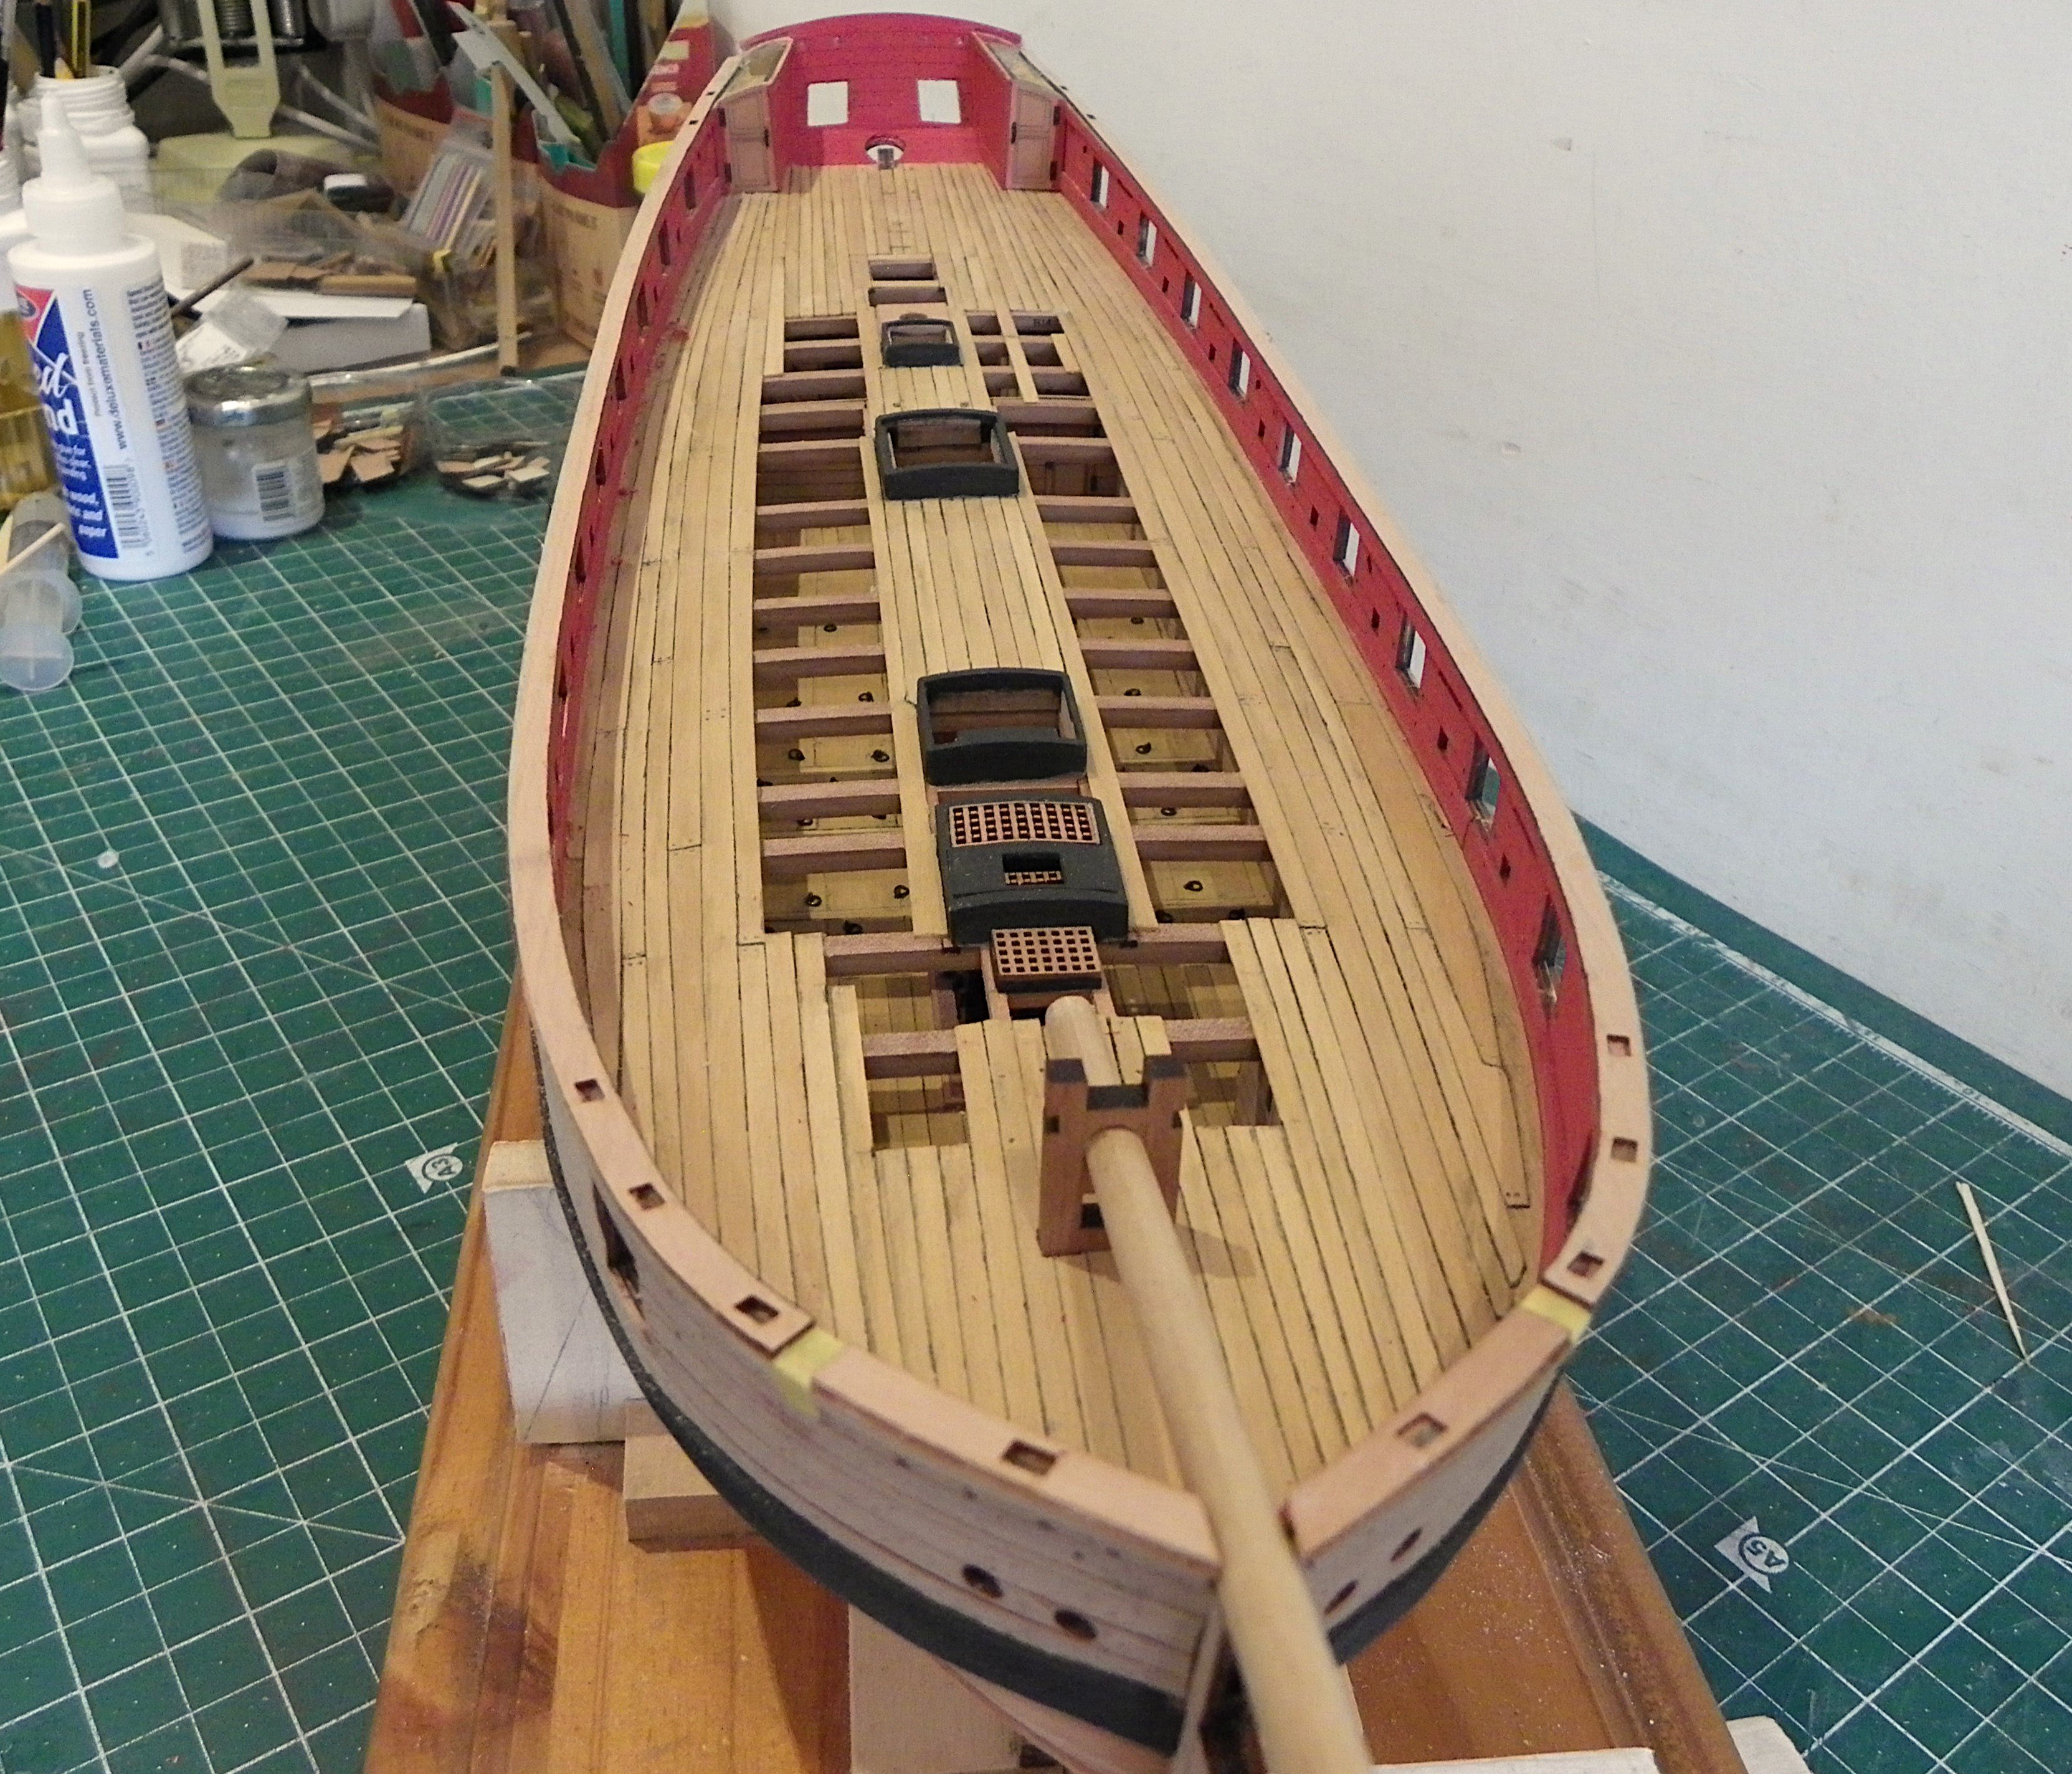
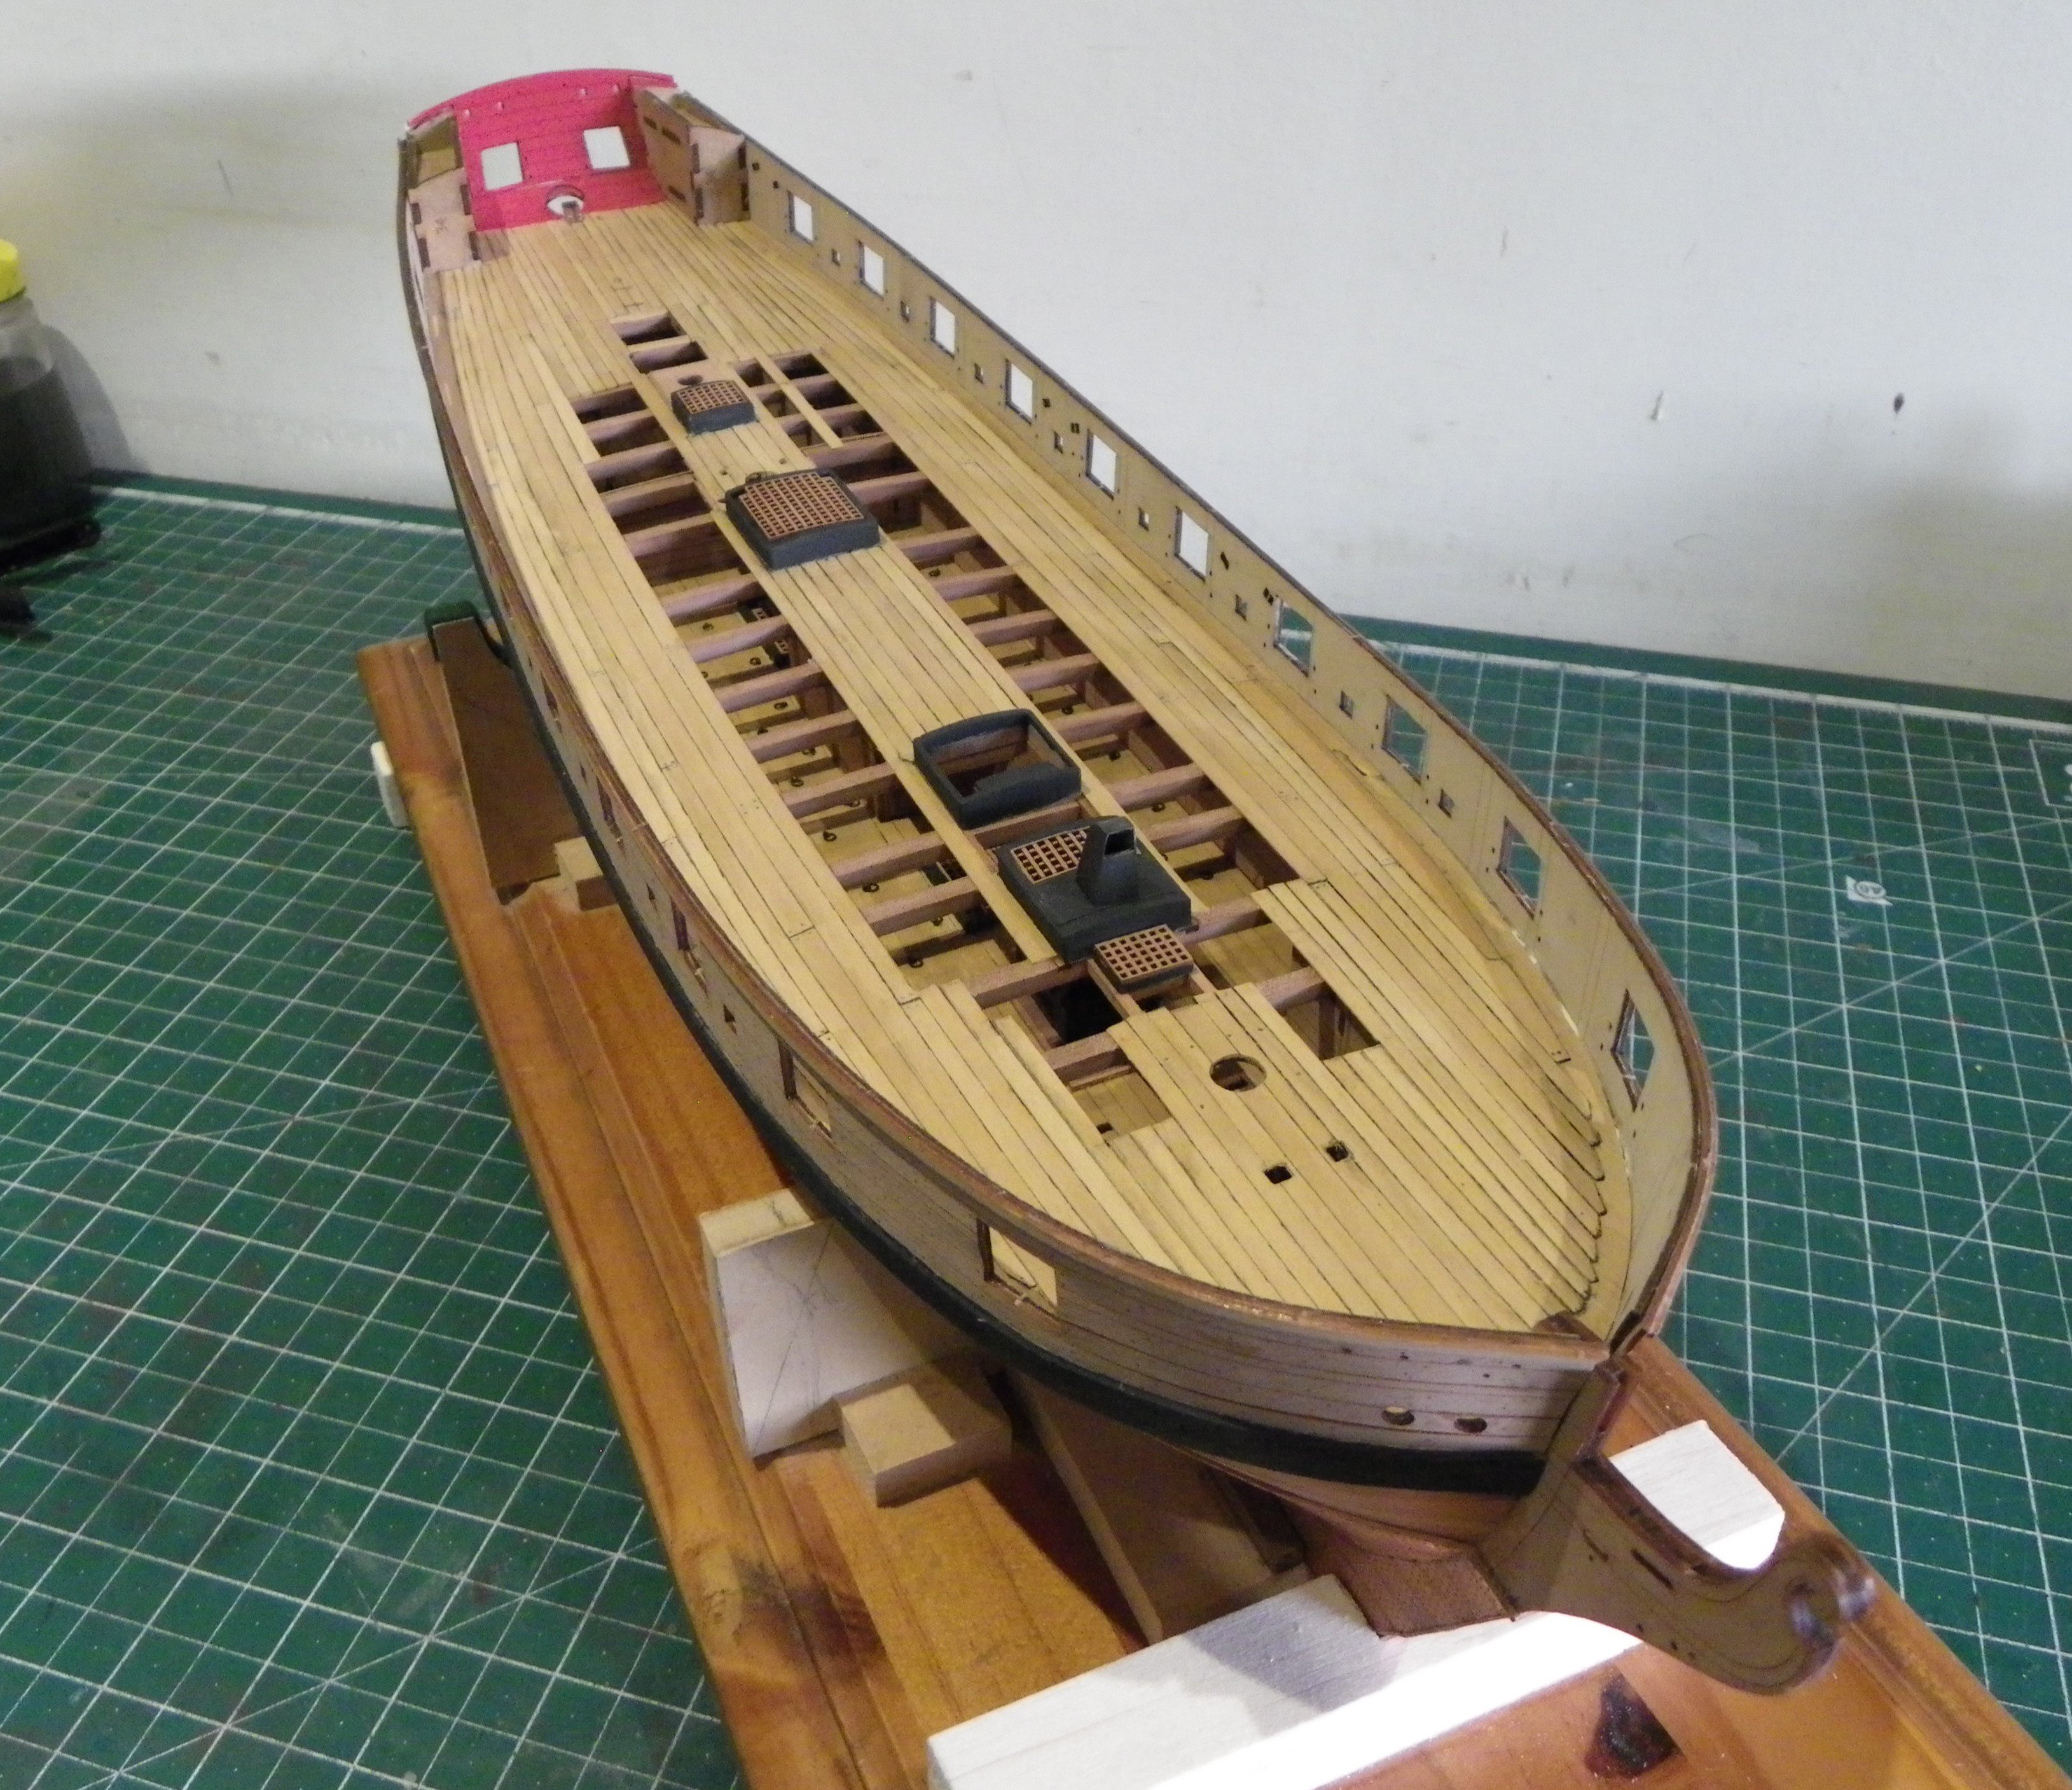
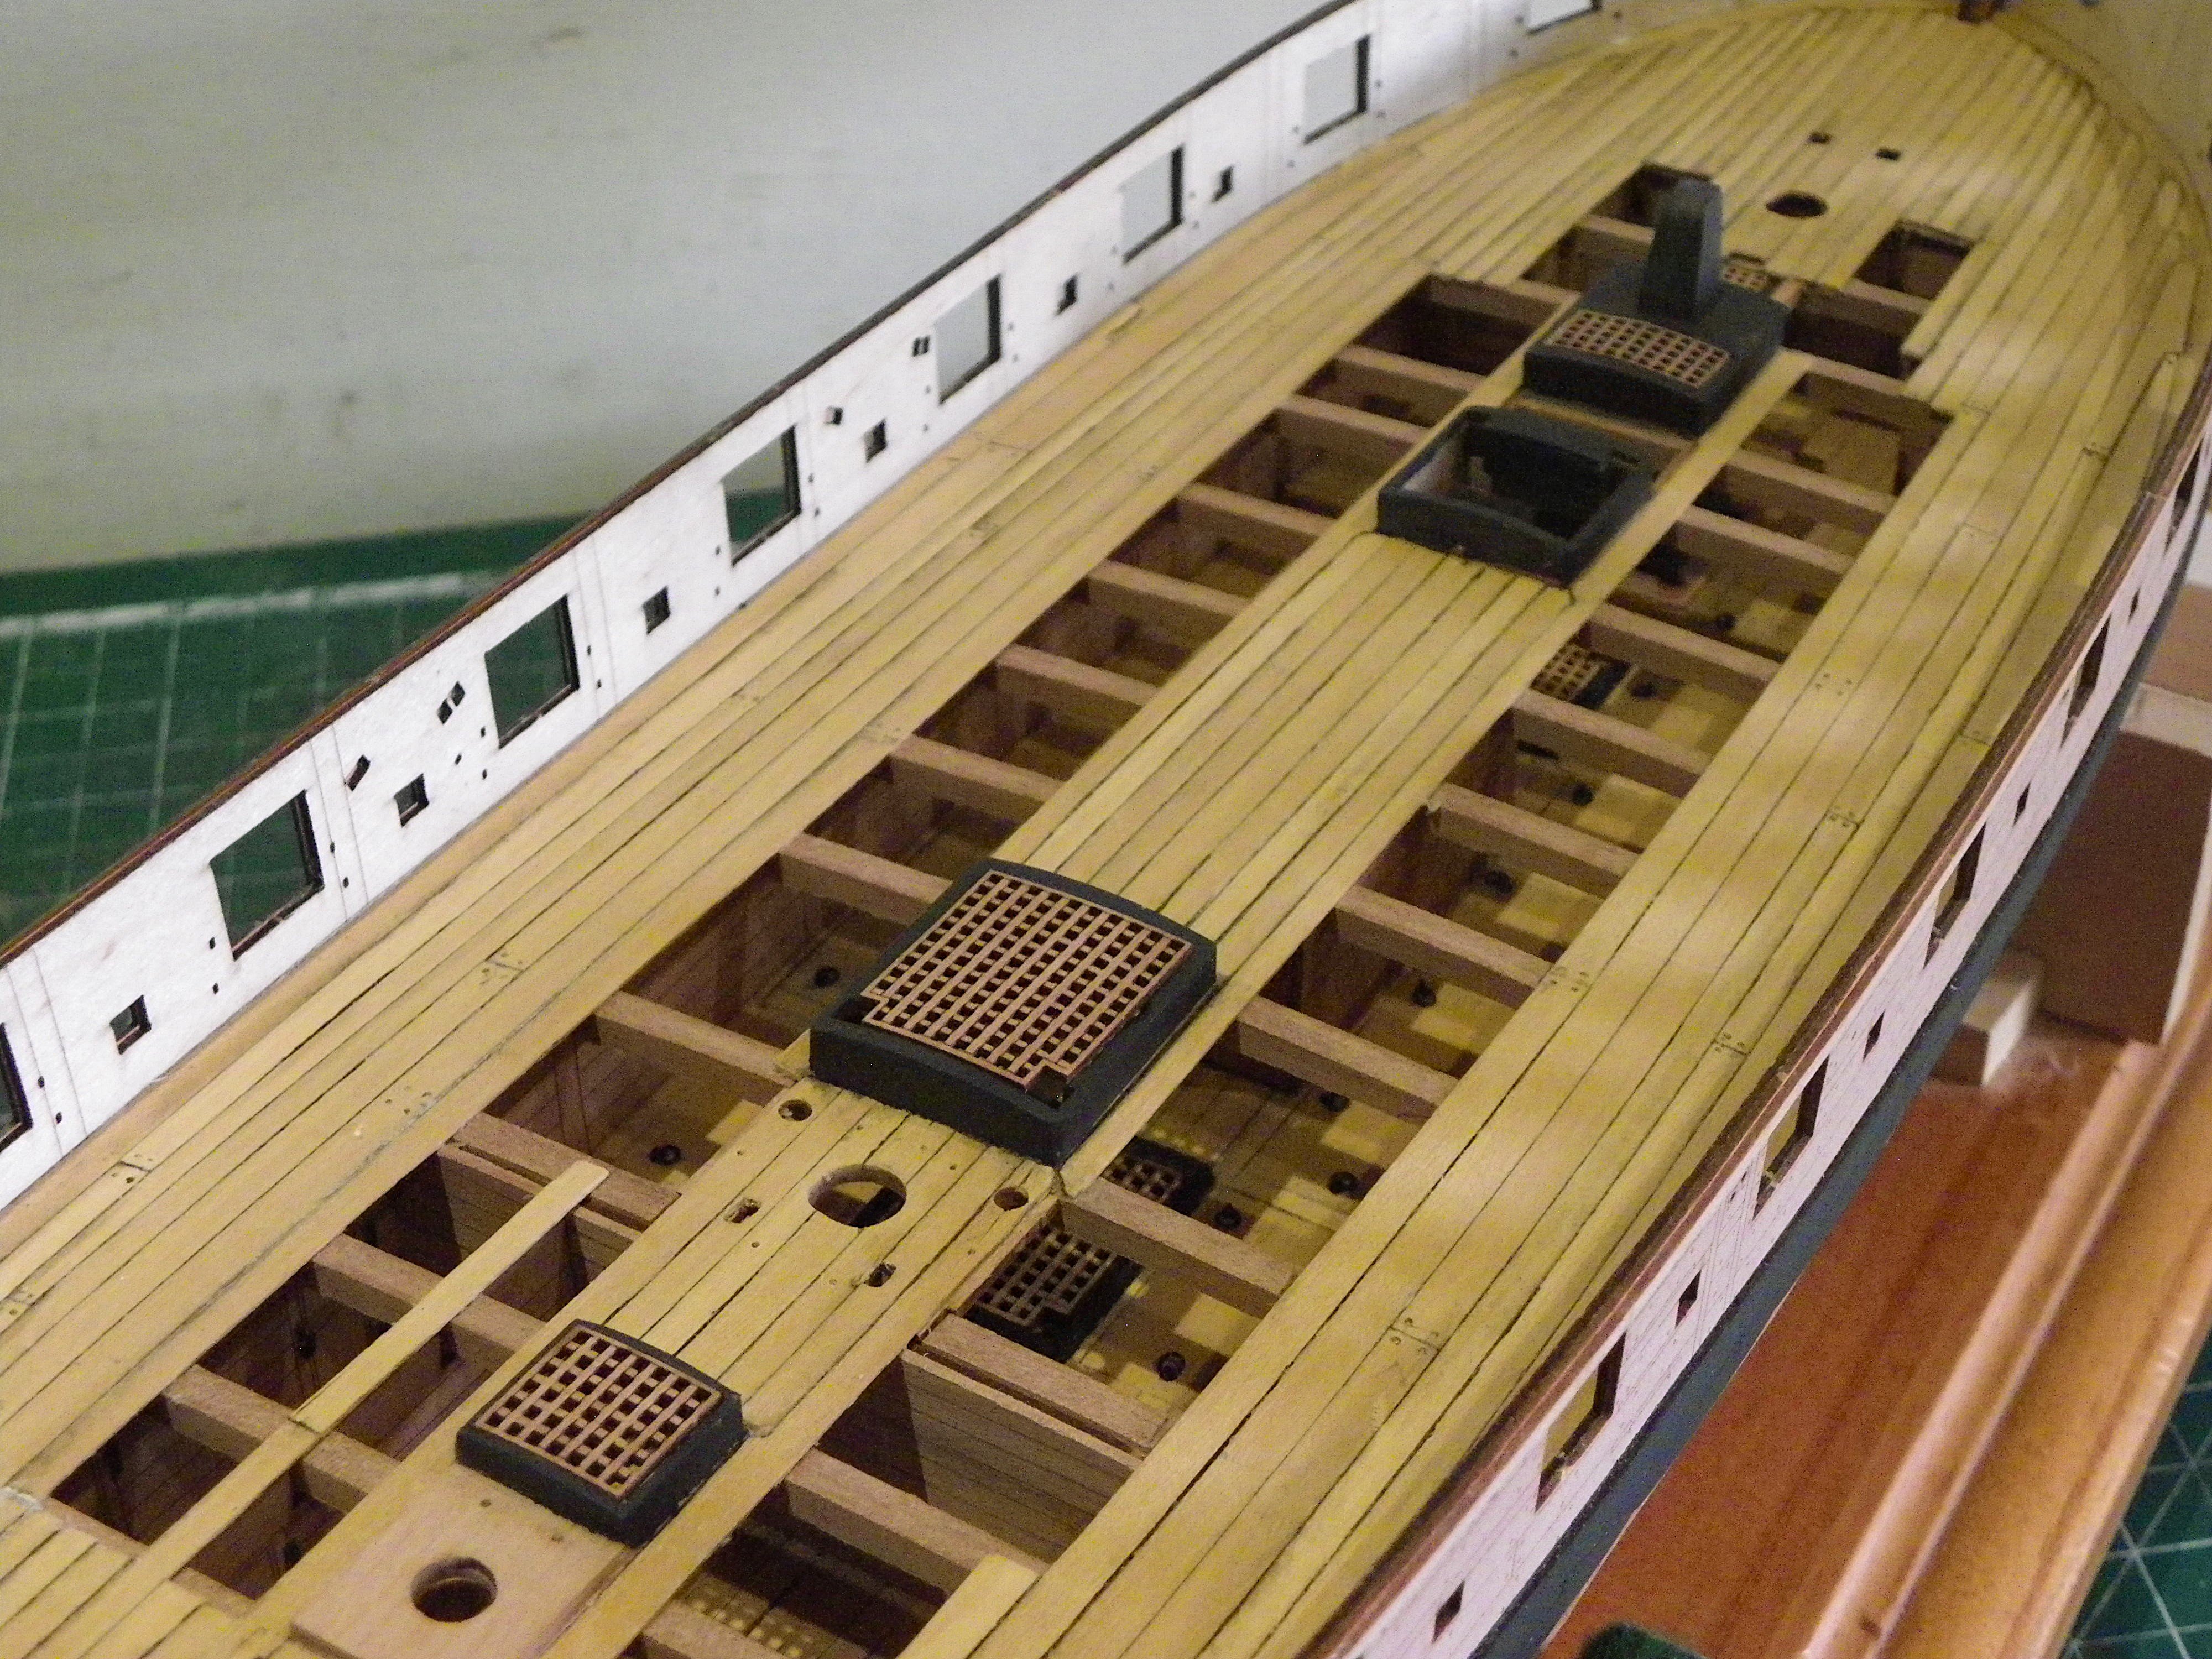
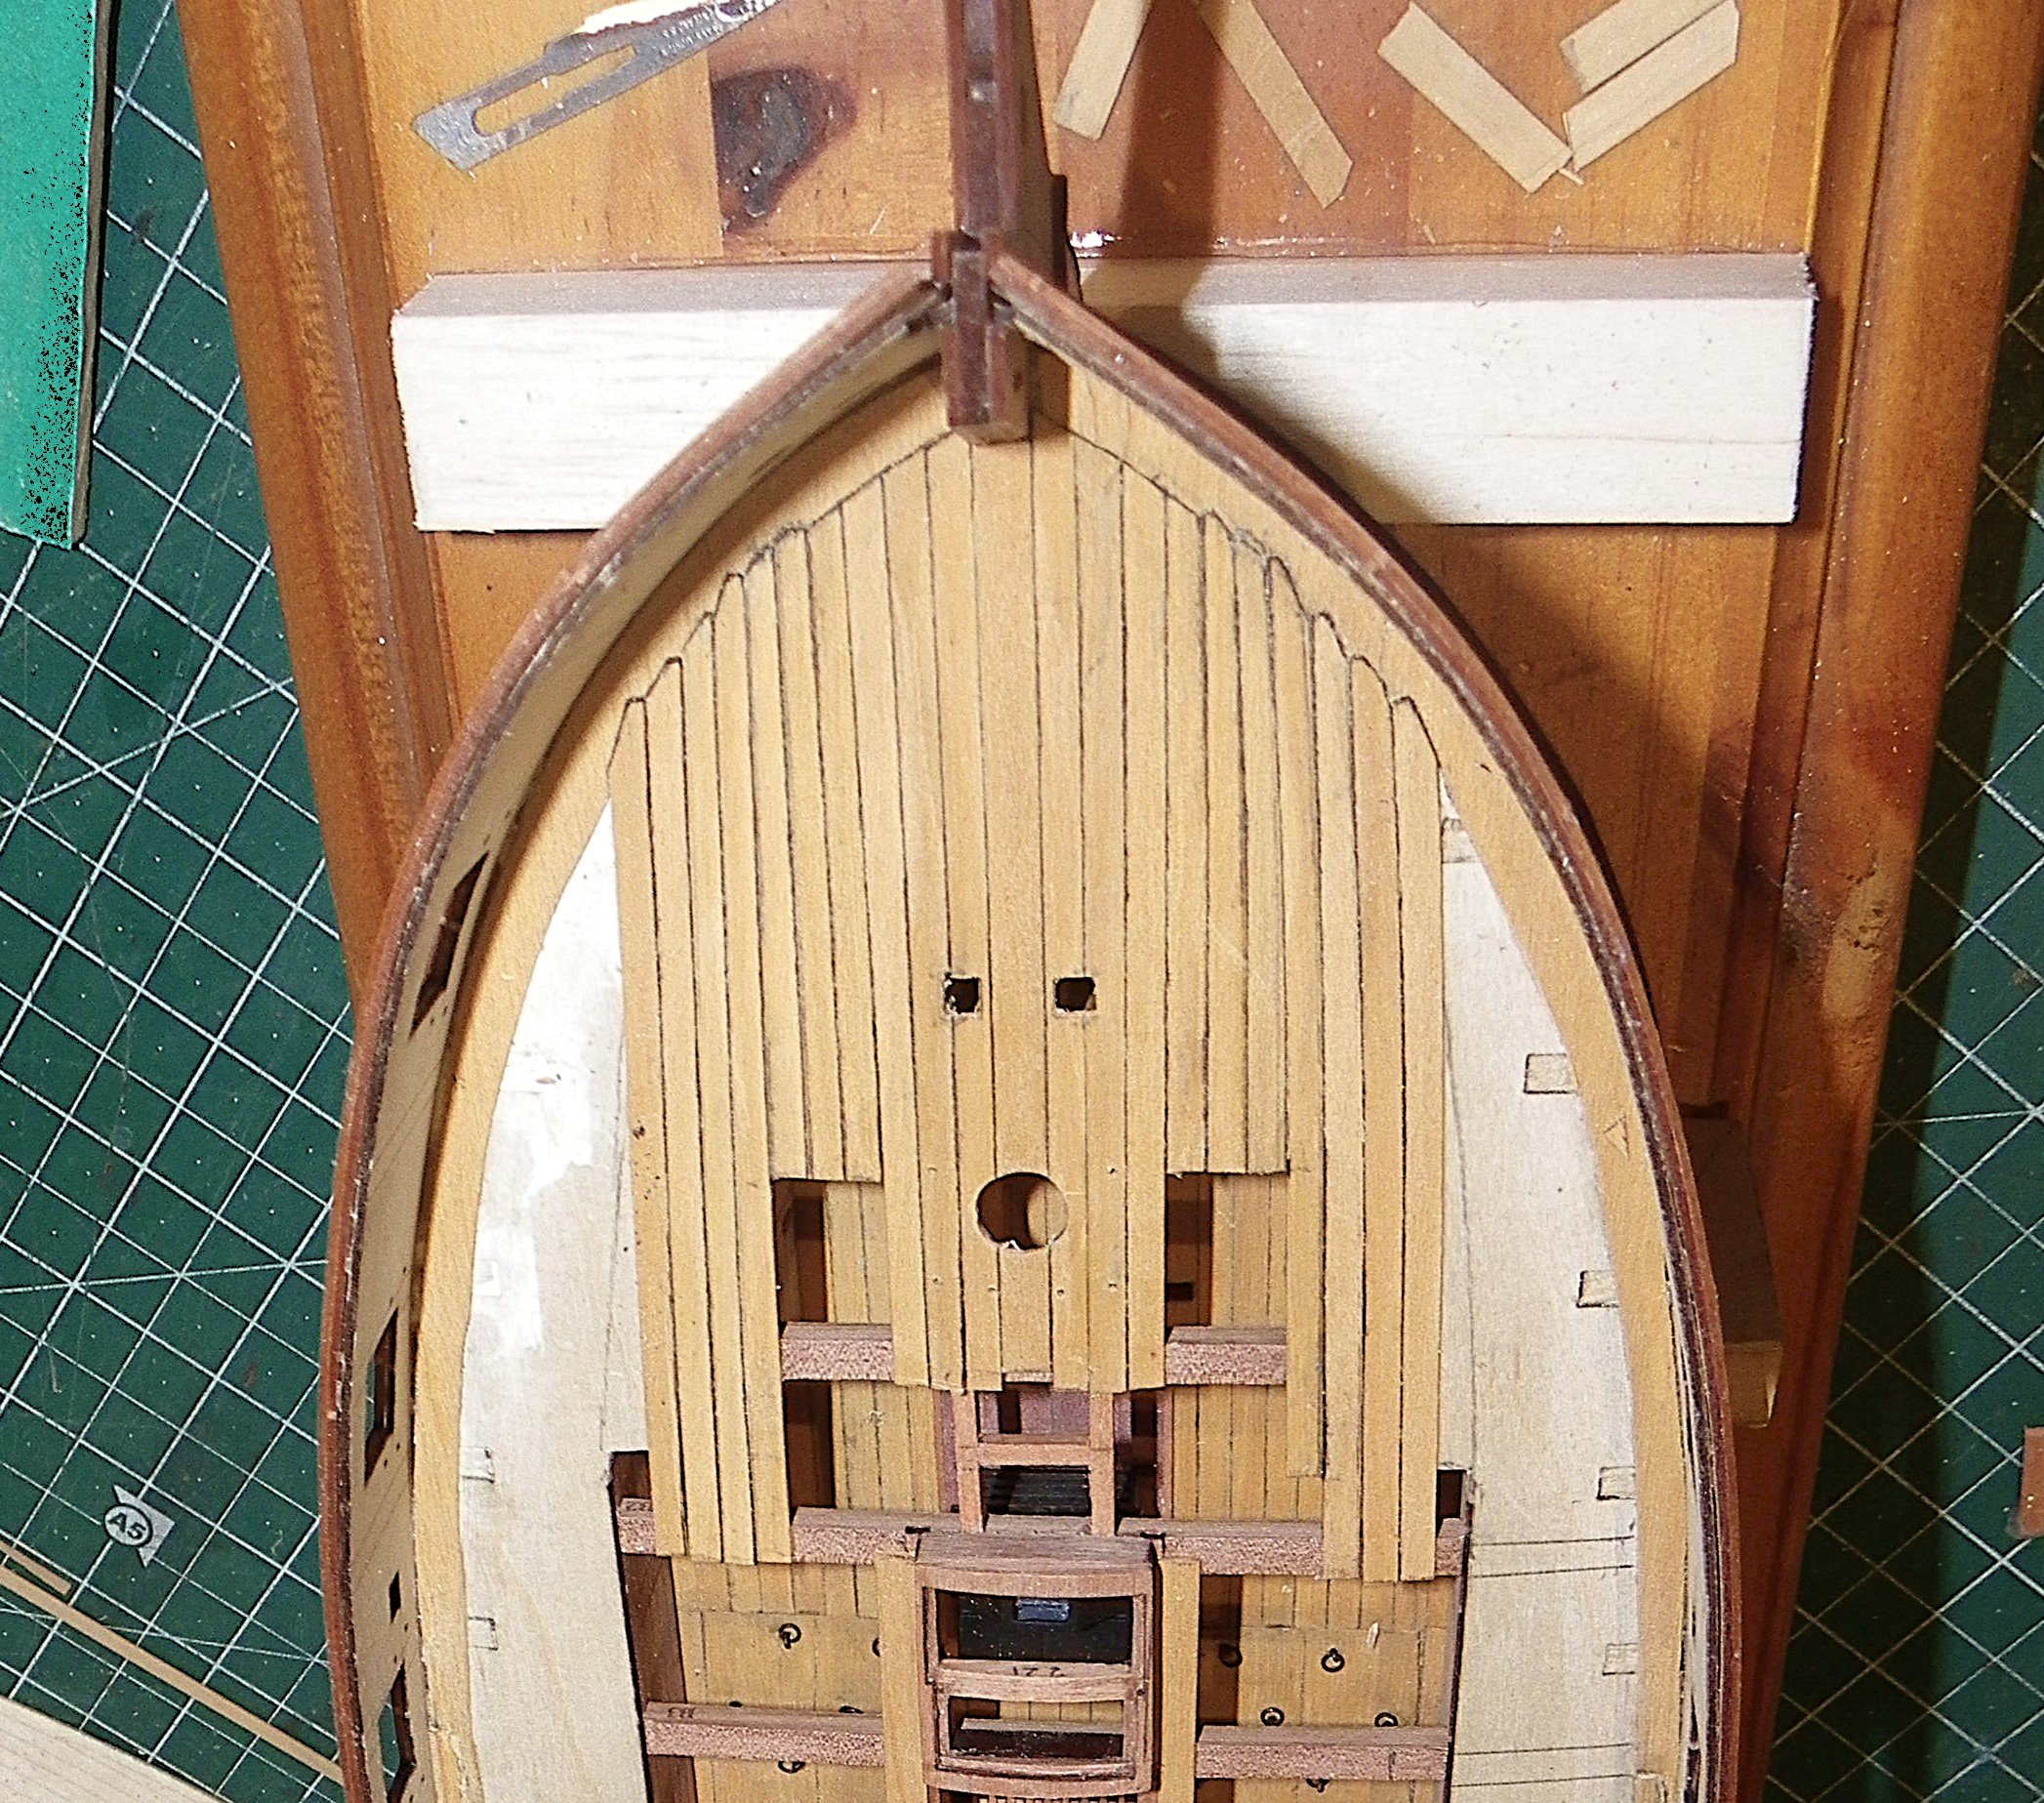
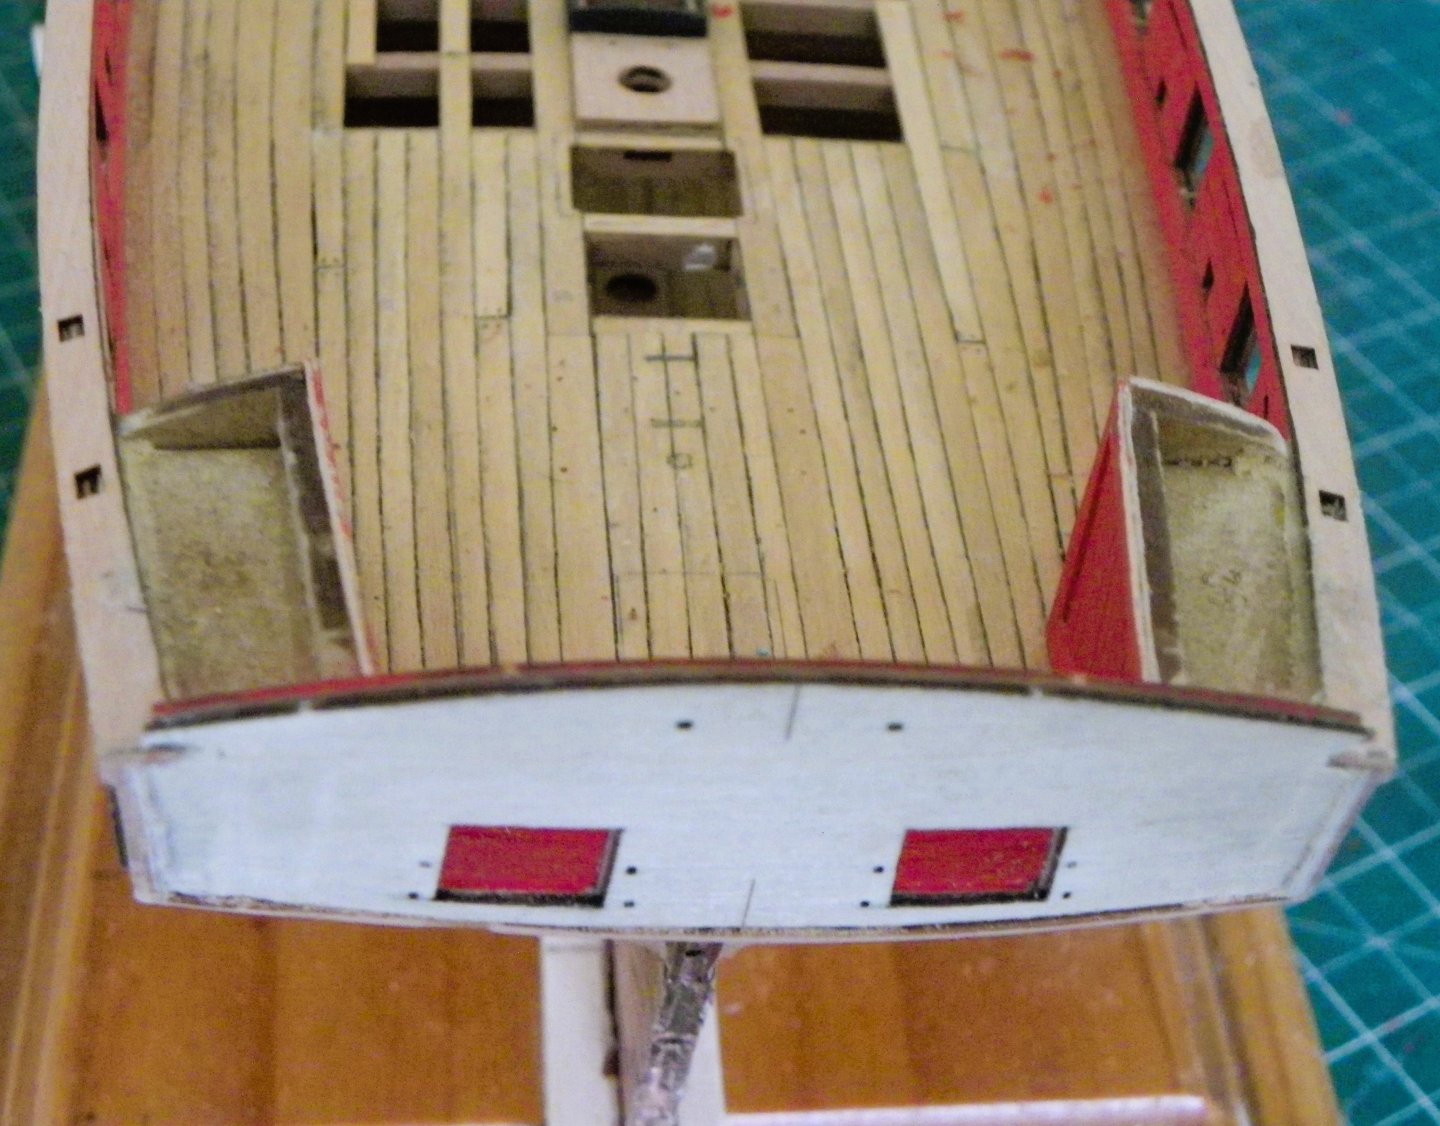
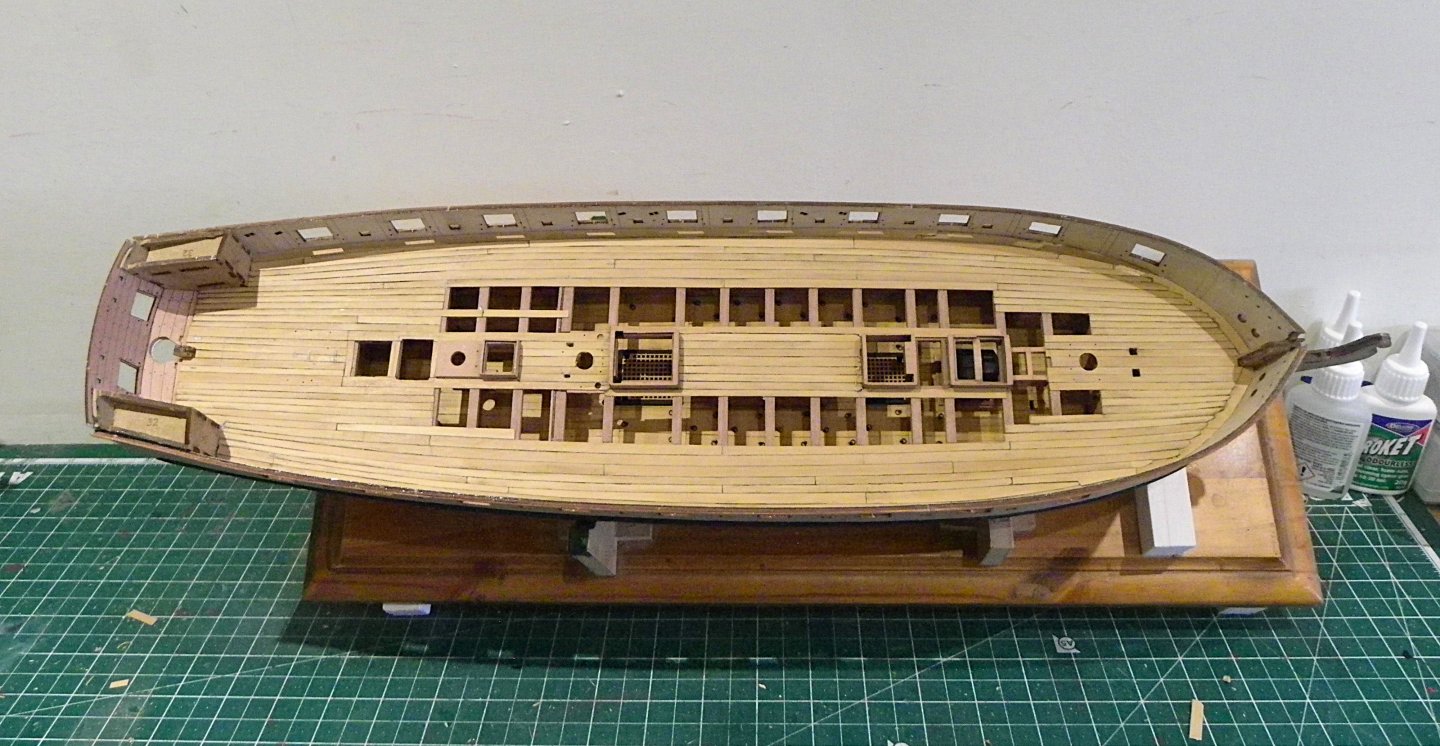
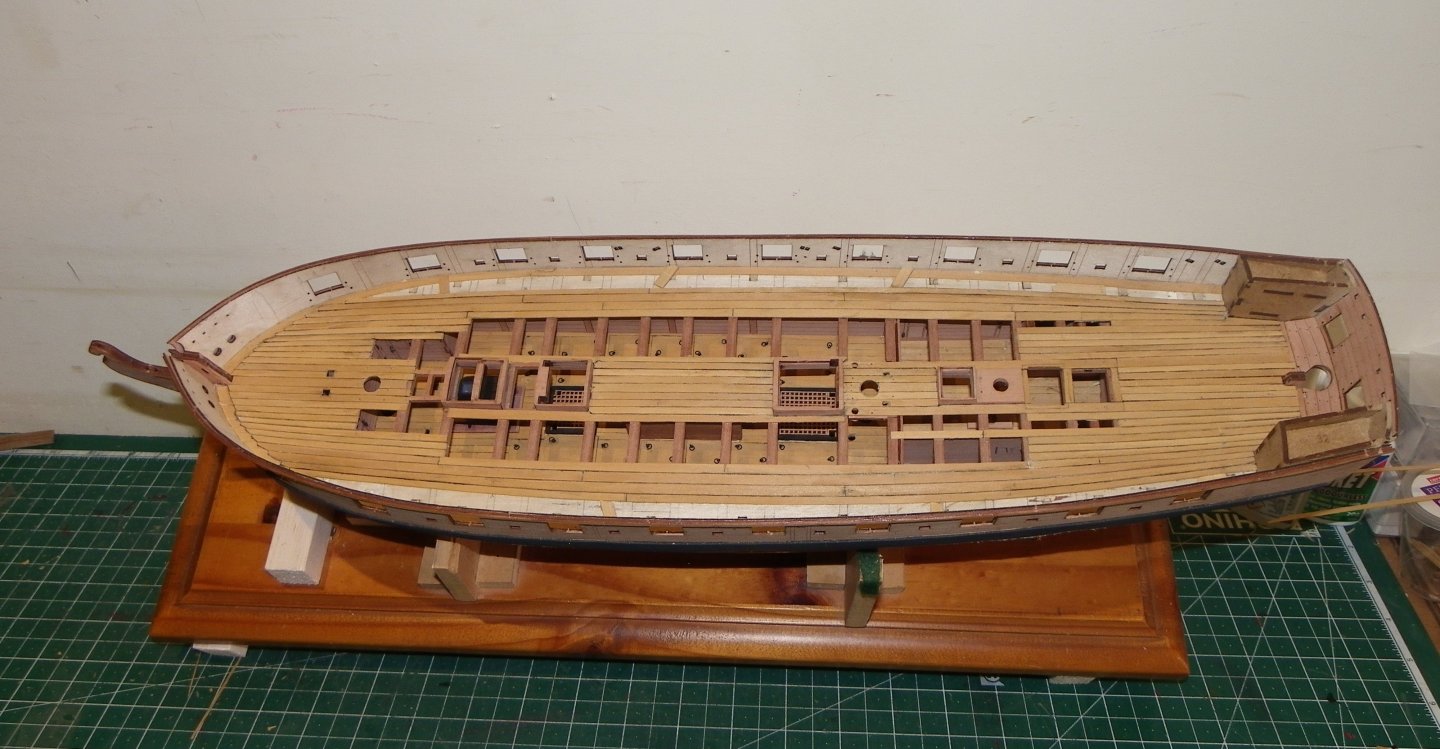
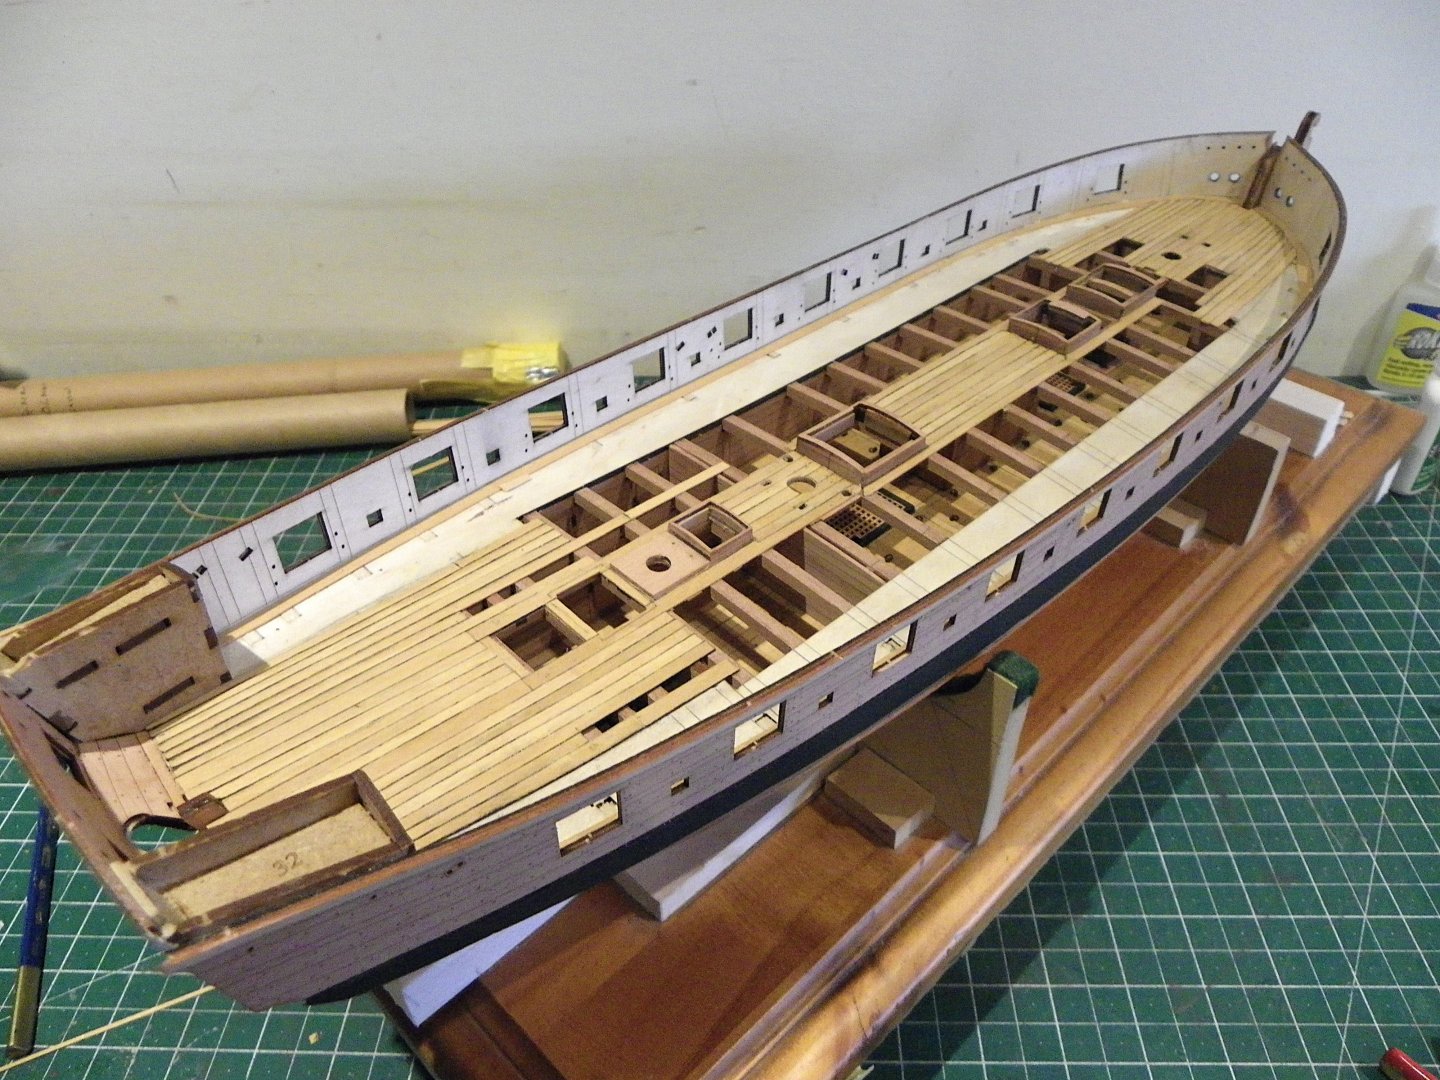
Post 42 Deck Planking Part 2 With the counters in place I concentrate on the aft deck section. Once the centre planks are in place I begin to taper the planks. 0500 0513 This is done by eye, the objective to get a curve that runs parallel to the outer deck line. At this point I move to the Bow section. 0503 0505 Apart from the four planks either side of the centre, the other are all tapered and nibbed into the Margin planks. 0509 The area of the sub-deck remains to be planked but the indication is that a fair run of planking will follow.🤞🤞 0511 Looking a bit rough at this stage and very much w-i-p. Hopefully this belies the end result once the deck is scrubbed, or rather scraped up, to a reasonable finish. B.E. 24/02/2025


- 332 replies
-
- 23
-
-
- Harpy
- Vanguard Models
- (and 1 more)
-
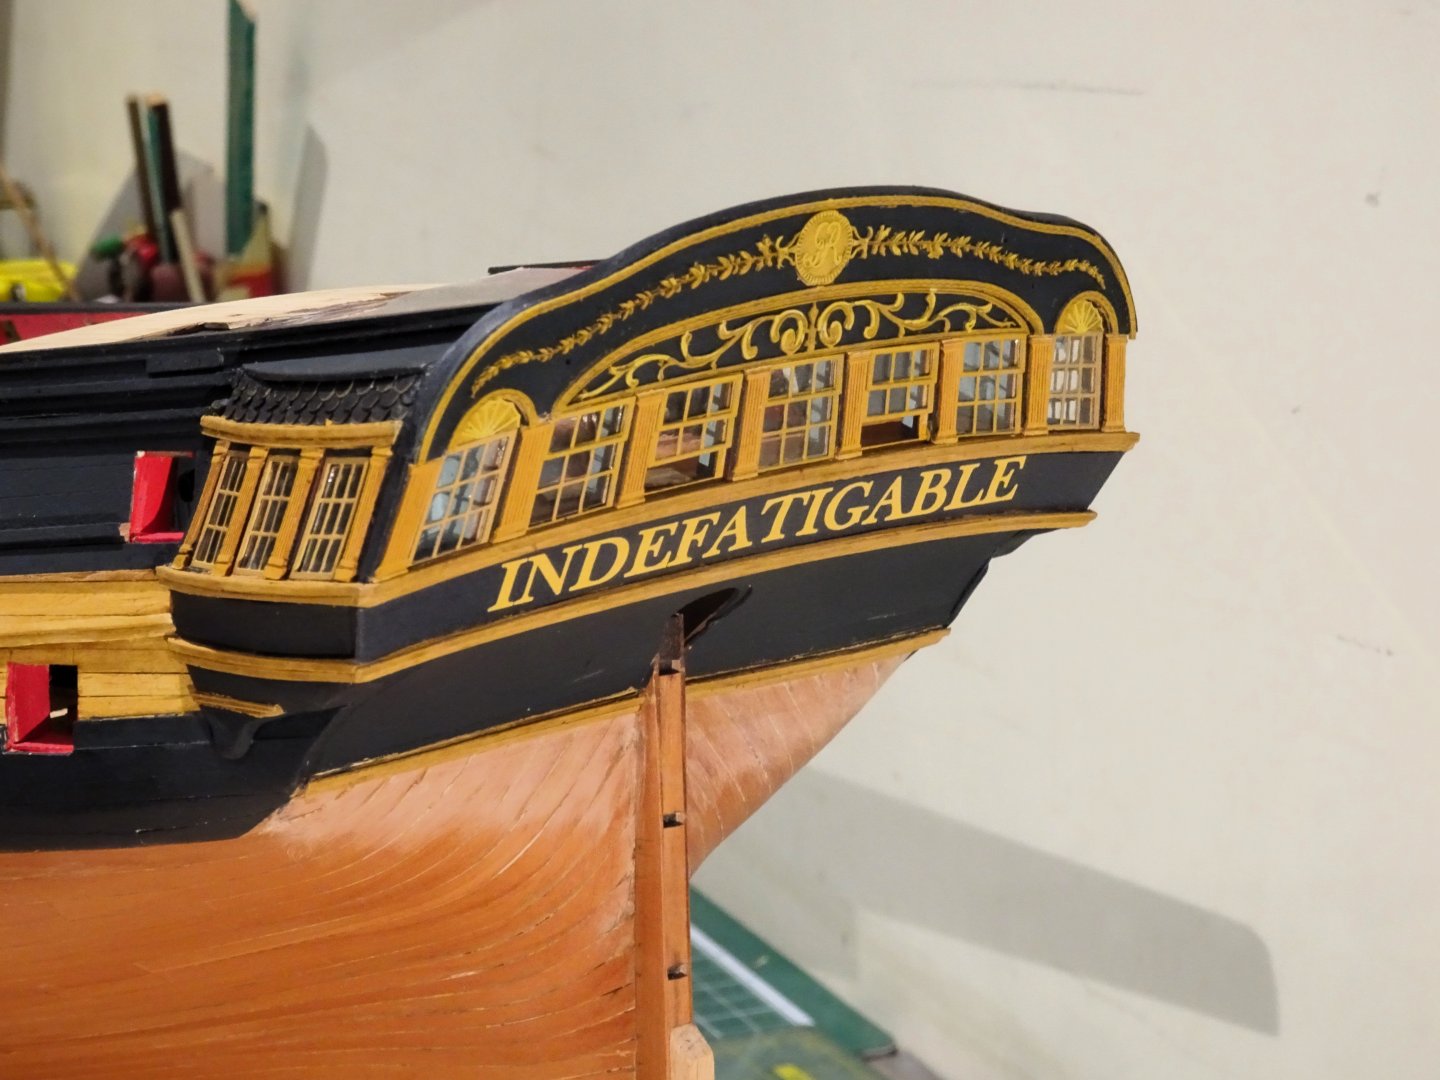
Hi Walter, For what it's worth, with Indefatigable I created a paper version on Word. I didn't like the colour of the decal provided with the kit. 3162 I used a black coloured base which suited the counter, selected a font I liked, tweaked for size and curvature, and cut out to fit the full counter exactly. I printed out on quality paper, and sprayed with Artists Fixative before cutting out. I used the counter template to provide the print boundary. 3170 You can't really see the the join and paper decoration was the go to on historical models, and still today if you refer to Chuck's wonderful Syren kits. Hope this helps. B.E.
-
Amazing progress ECK., at this rate you'll be finished before I complete the deck planking. B.E.
- 73 replies
-
- 2
-
-
- Harpy
- Vanguard Models
- (and 1 more)