Moonbug
-
Posts
1,028 -
Joined
-
Last visited
Content Type
Profiles
Forums
Gallery
Events
Everything posted by Moonbug
-
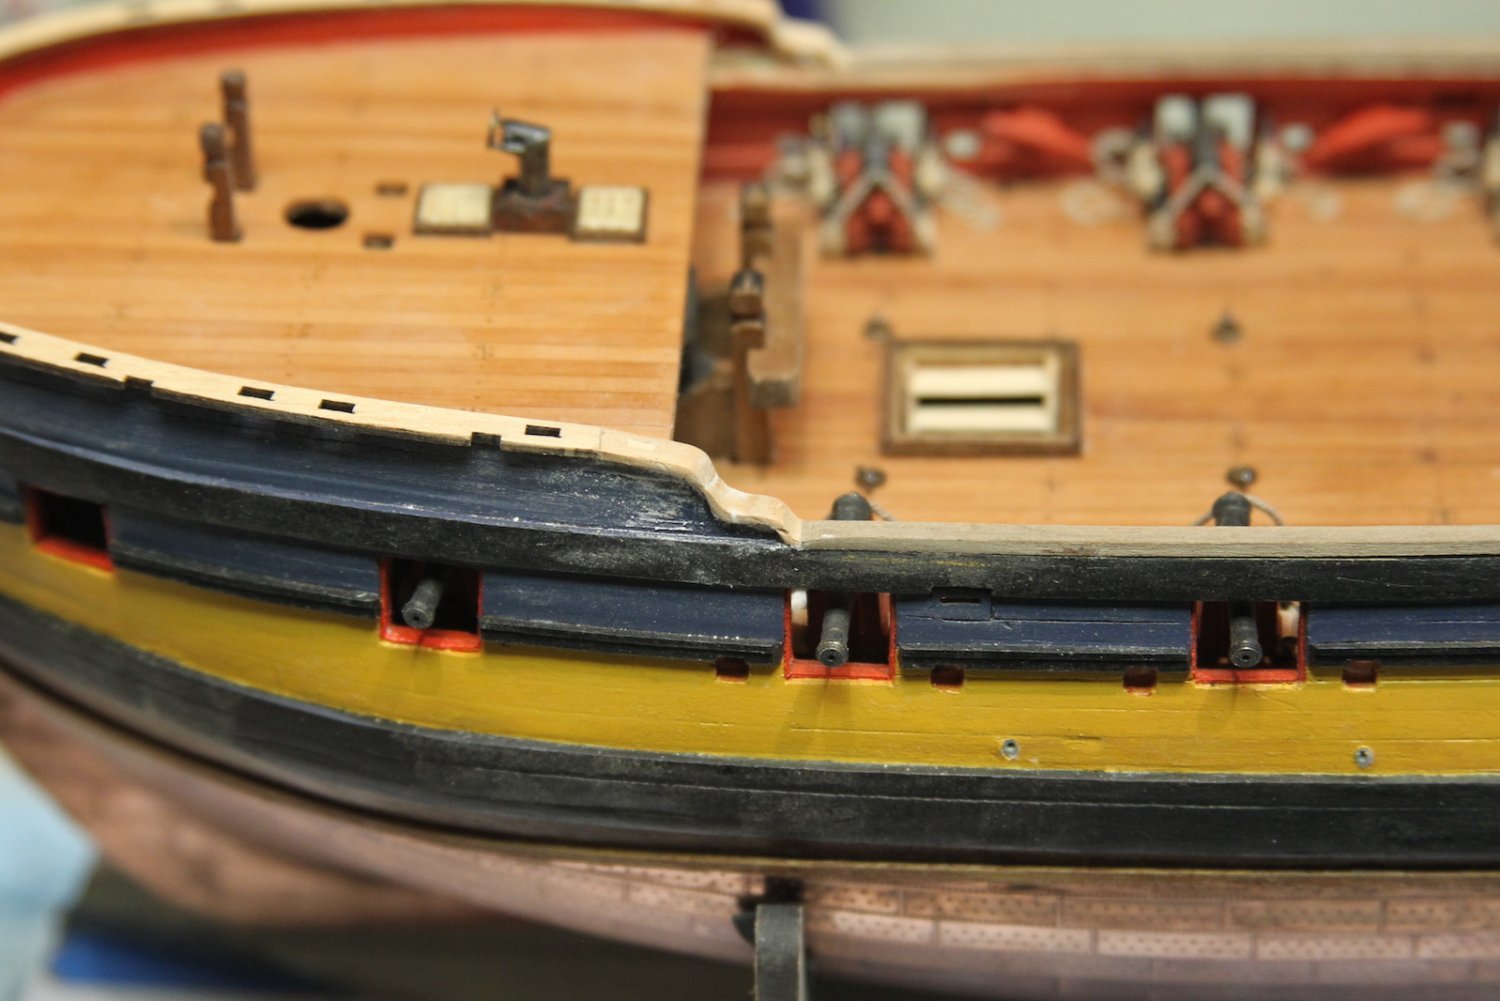
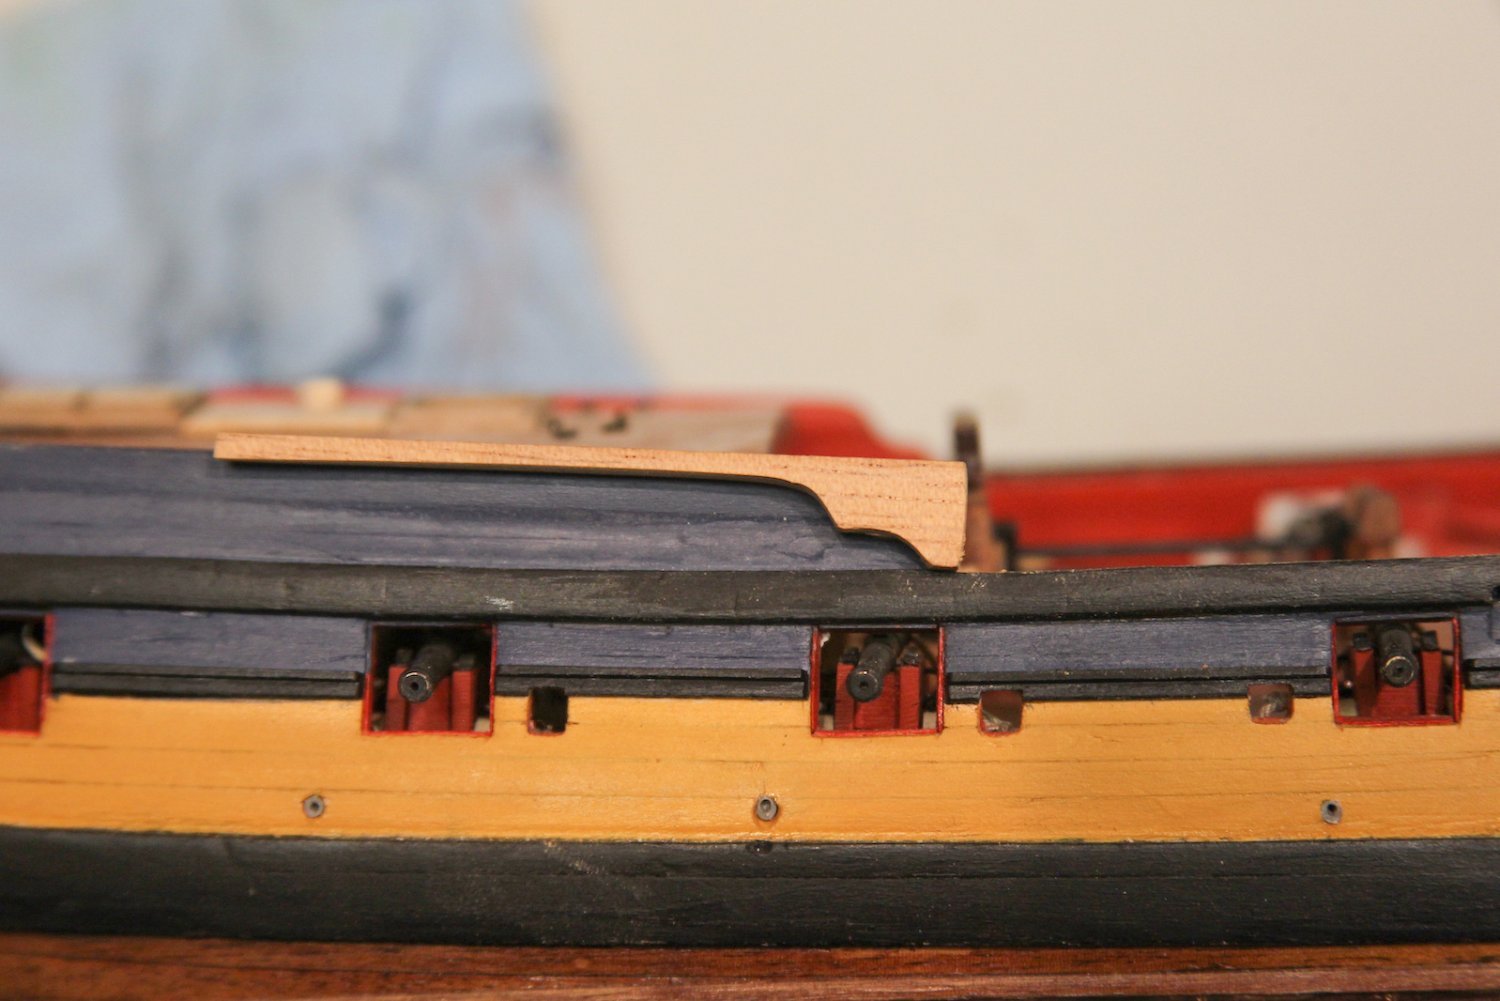
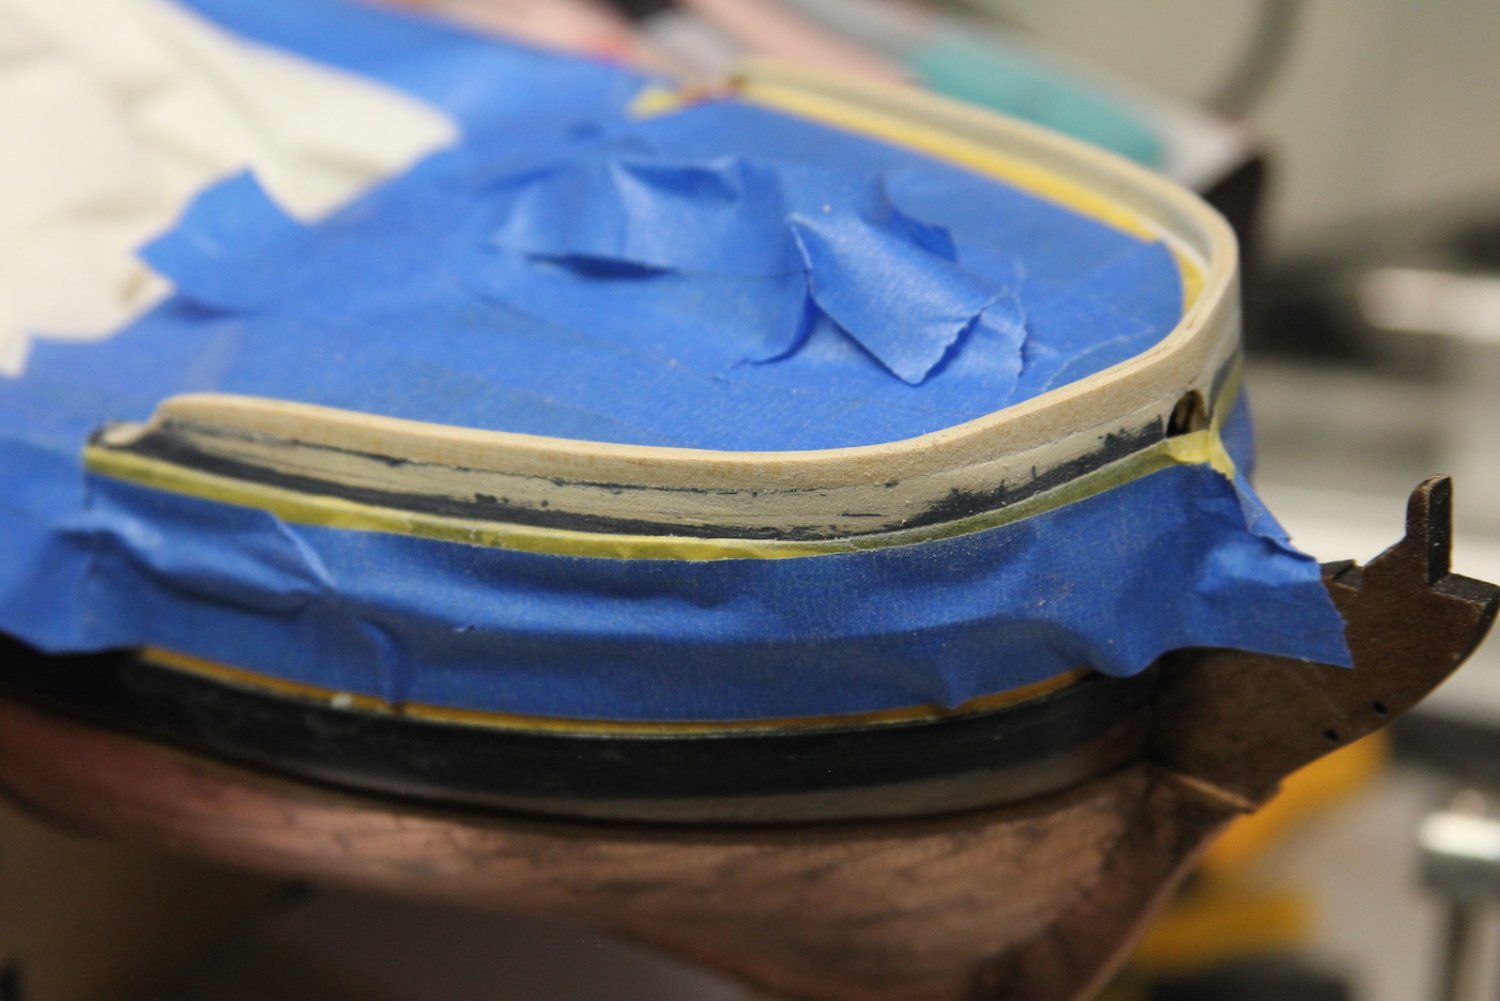
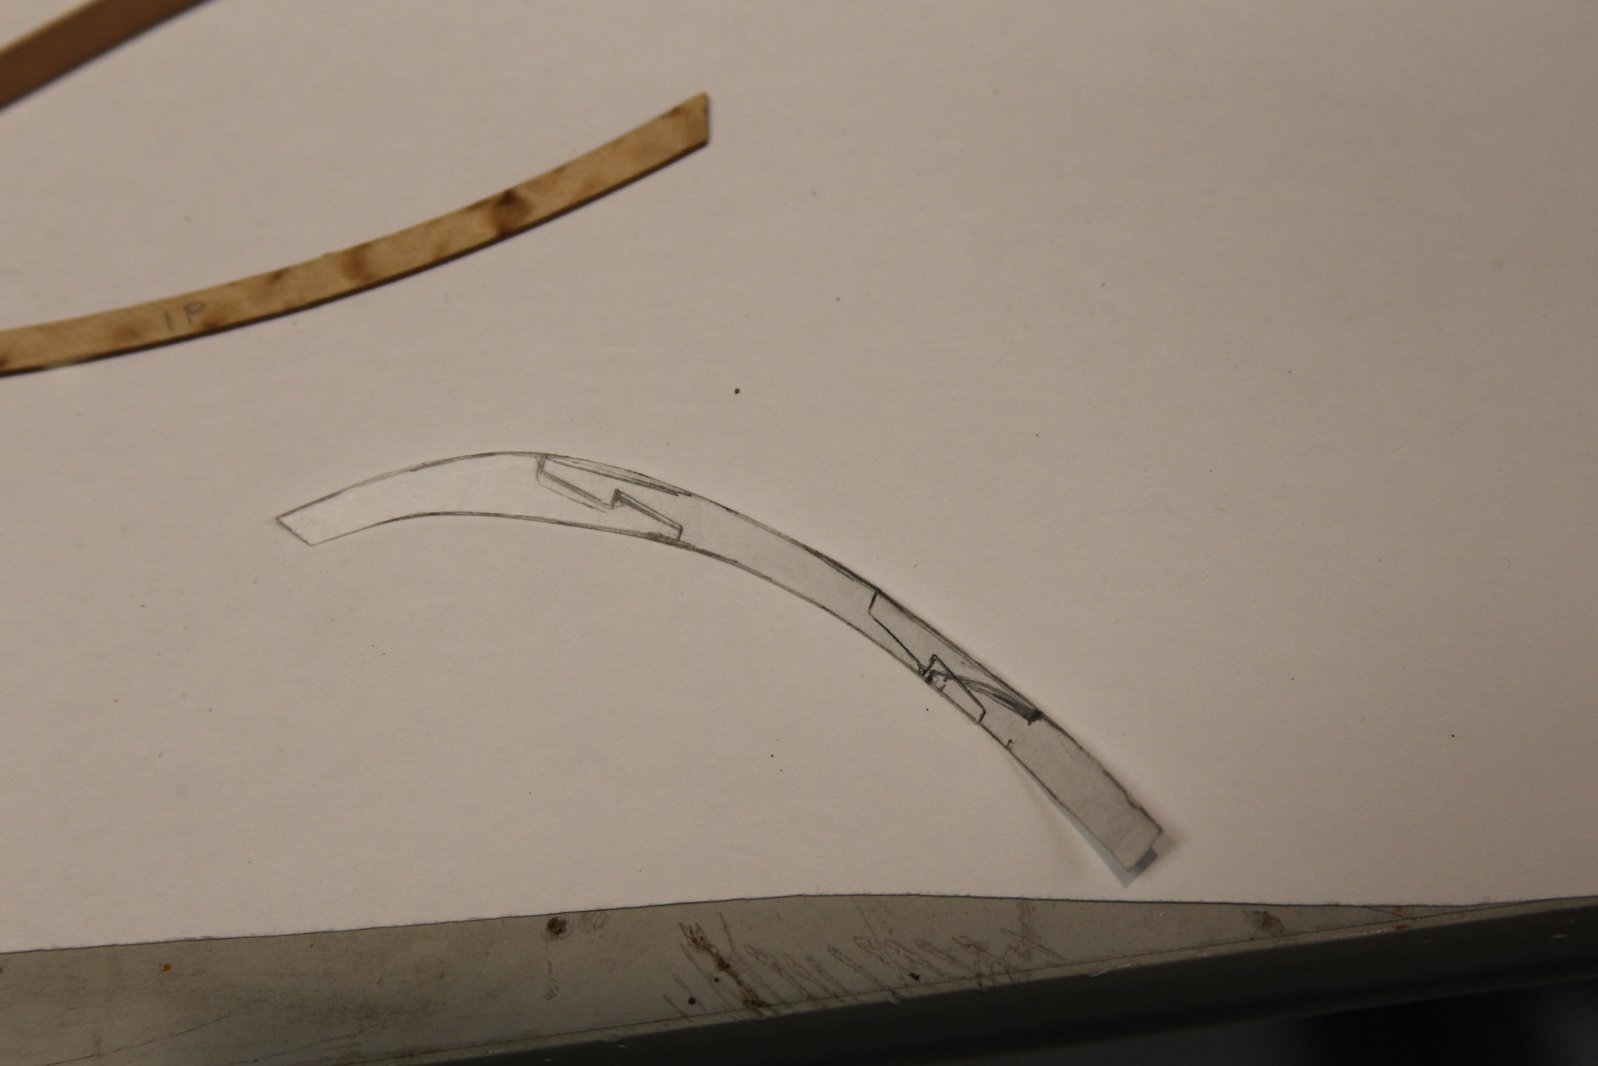
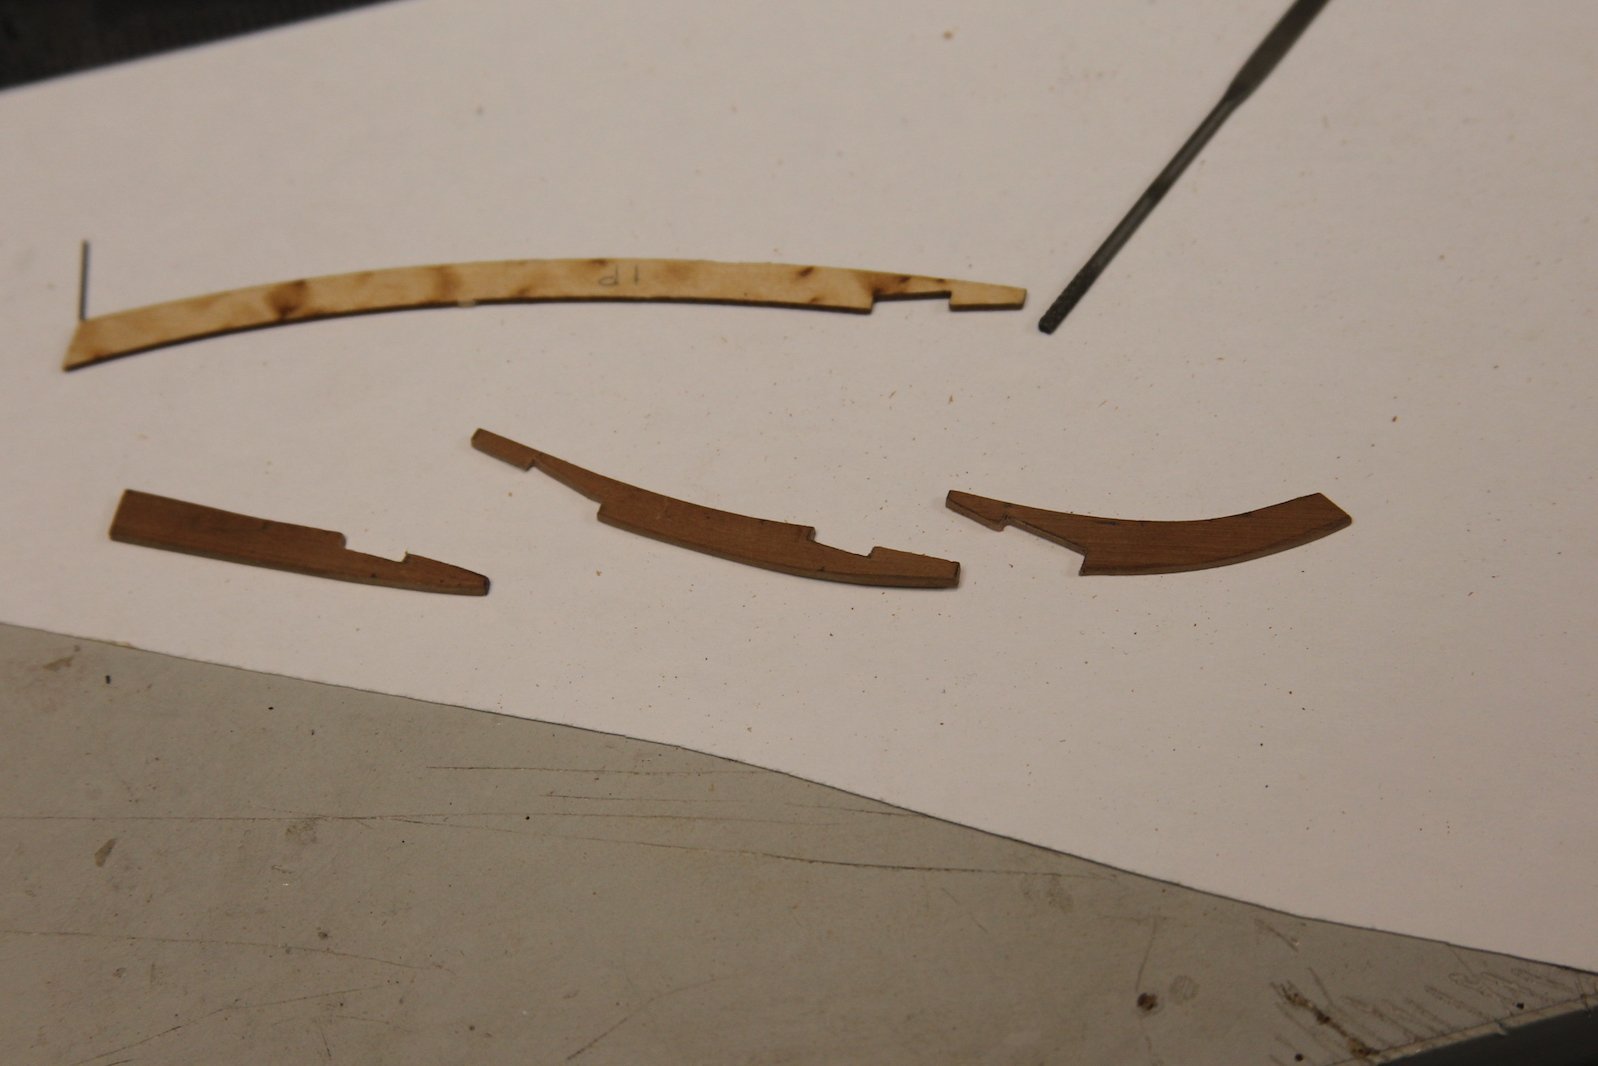
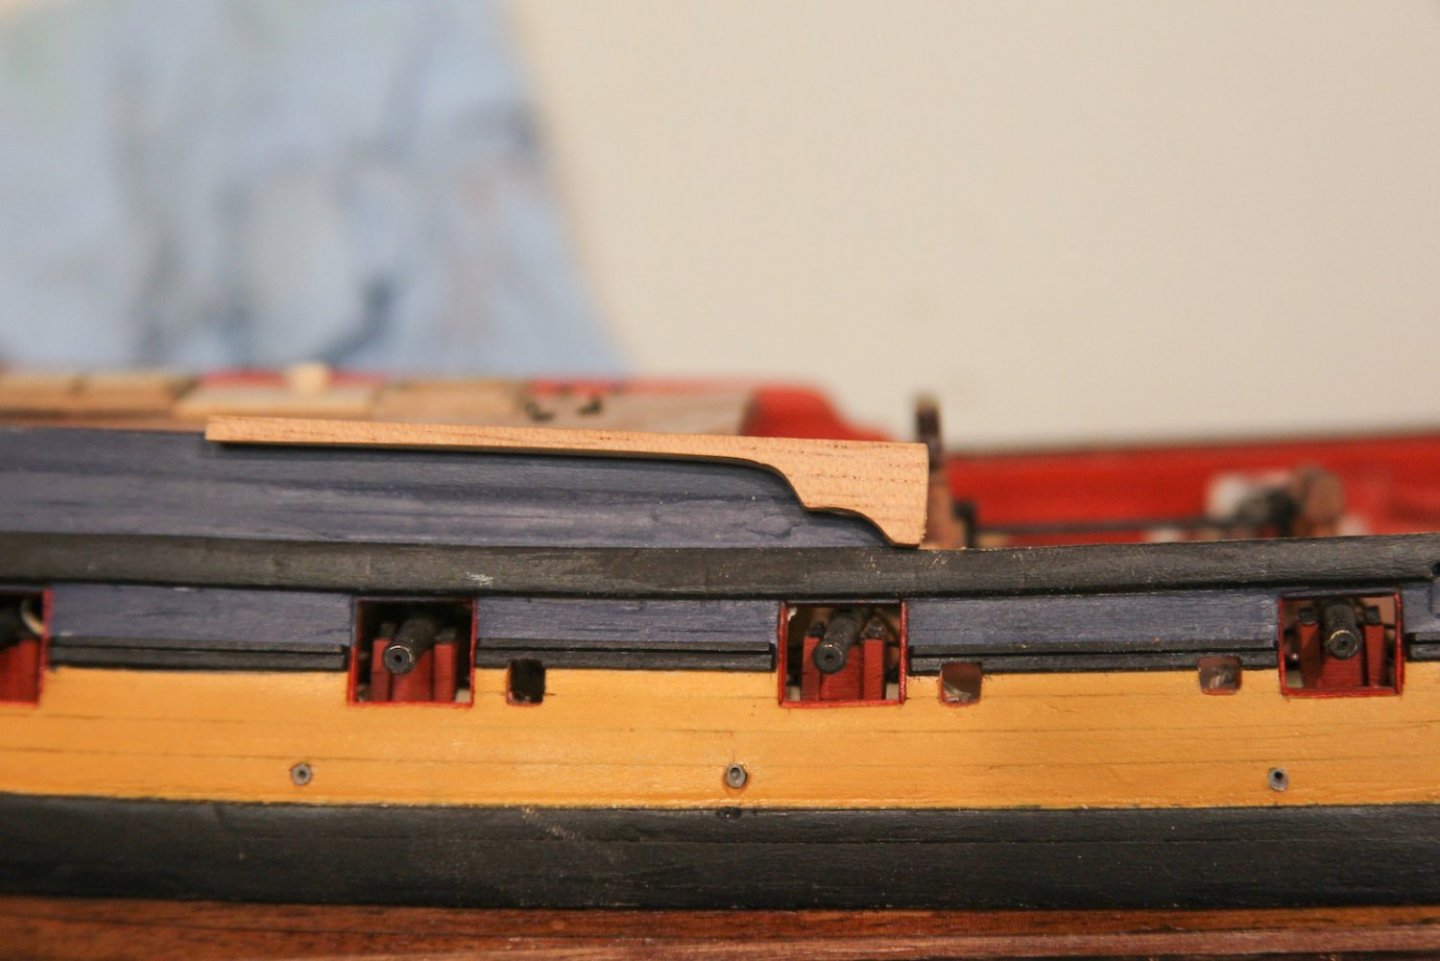
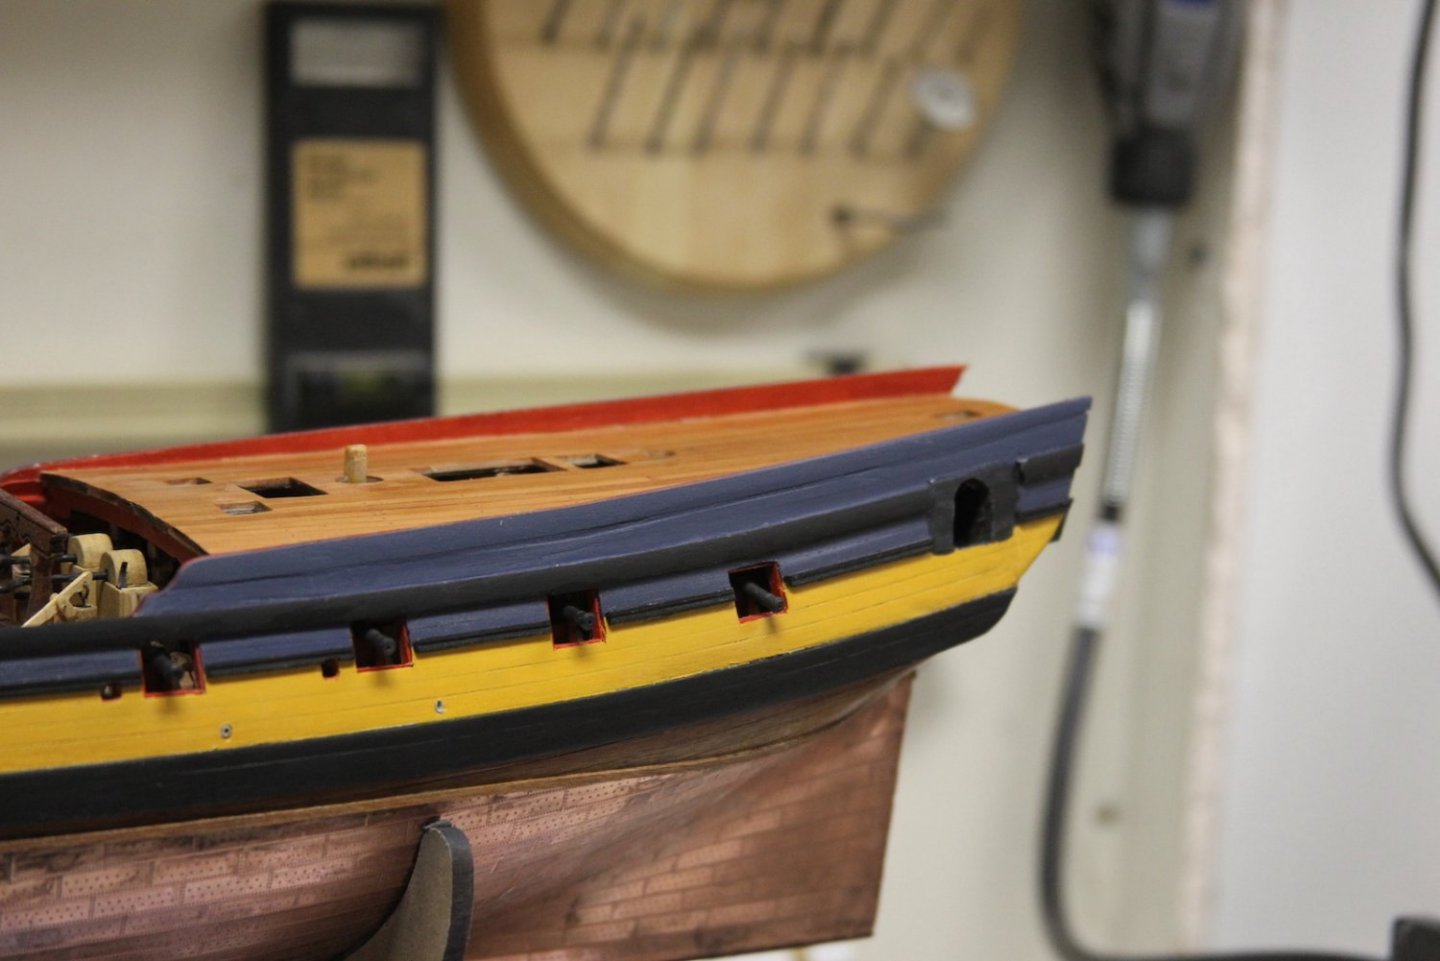
 Though I've clearly been negligent with posting, I've been working on a few things simultaneously over the holiday break. I'll have more updates soon on the rudder and transom. But I've also been catching up on some of the miscellany of bitts and rails and other items. As always, everything ties together - so using a thicker deck and increasing the bulwarks affected the roll of top rail that sweeps into the waist. Instead of trying to match it to the plans, or even match it identically to the FFM or other sources, I instead took what the build gave me and worked with that. I used a solid piece of cedar scrap to draw out what the rail would look like, then carved/sanded the pieces to fit. Admittedly, I'm not much of a wood carver, so my little bit of saving grace is that it'll all be painted black so my inevitable flaws will hopefully be covered. For the strips along the side I sanded down some make-shift scrapers. The strips themselves are boxwood, split and sanded to match. I sanded them thinner then painted them before they were mounted. After all the bitts are added along the top rail, I filled in all the little gaps before painting. During this process I've been keeping the decorative etchings in the back of my head, as I know I'll have to work with those. I realize I painted myself (no pun intended) into a corner by using a full size main wale as per the FFM, etc - which gives me much less space for decorations and other elements. So - I'll likely finish up as much of the sides including the swivel mounts, side ladders and other ornaments (and maybe even the channels) before attempting to decorate the sides.


- 419 replies
-
- 11
-

-
- Victory Models
- Pegasus
- (and 2 more)
-
NAIAD 1797 by Bitao - 1:60
Moonbug replied to Bitao's topic in - Build logs for subjects built 1751 - 1800
Dude definitely has some envious equipment and tools. -
Thanks B.E. - these are the kinds of small items where one appreciates the research from those who've done the build before; that way I'm not duplicating effort. Definitely appreciate all your notes along the way, which at the least gives me the opportunity to decide if I want to take the same route.
- 419 replies
-
- 4
-
-
- Victory Models
- Pegasus
- (and 2 more)
-
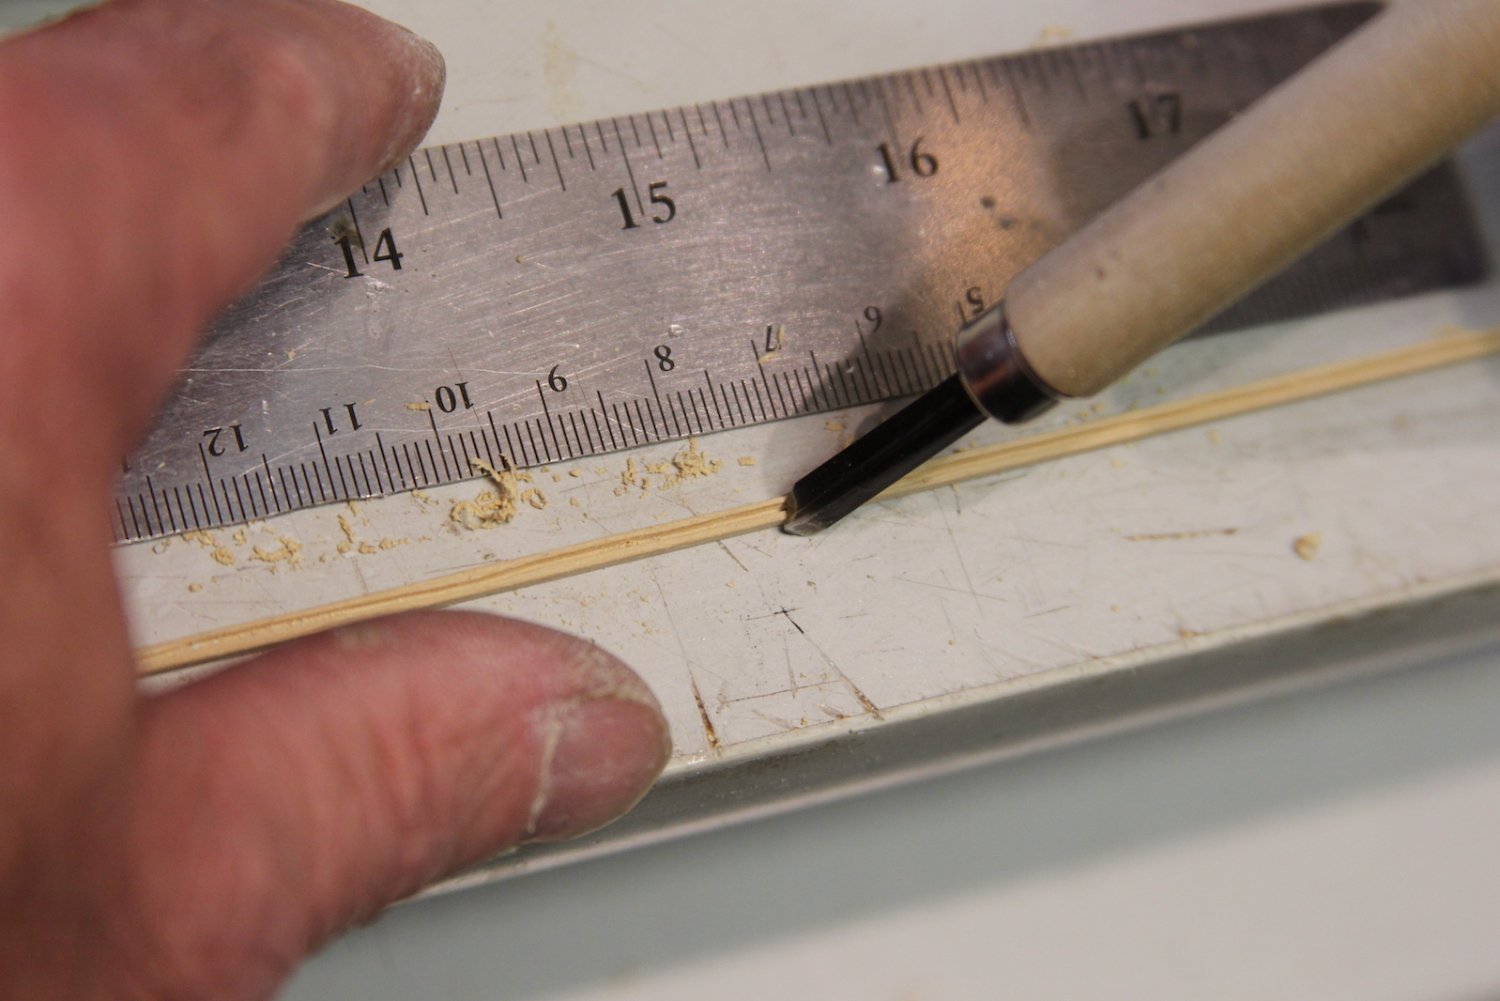
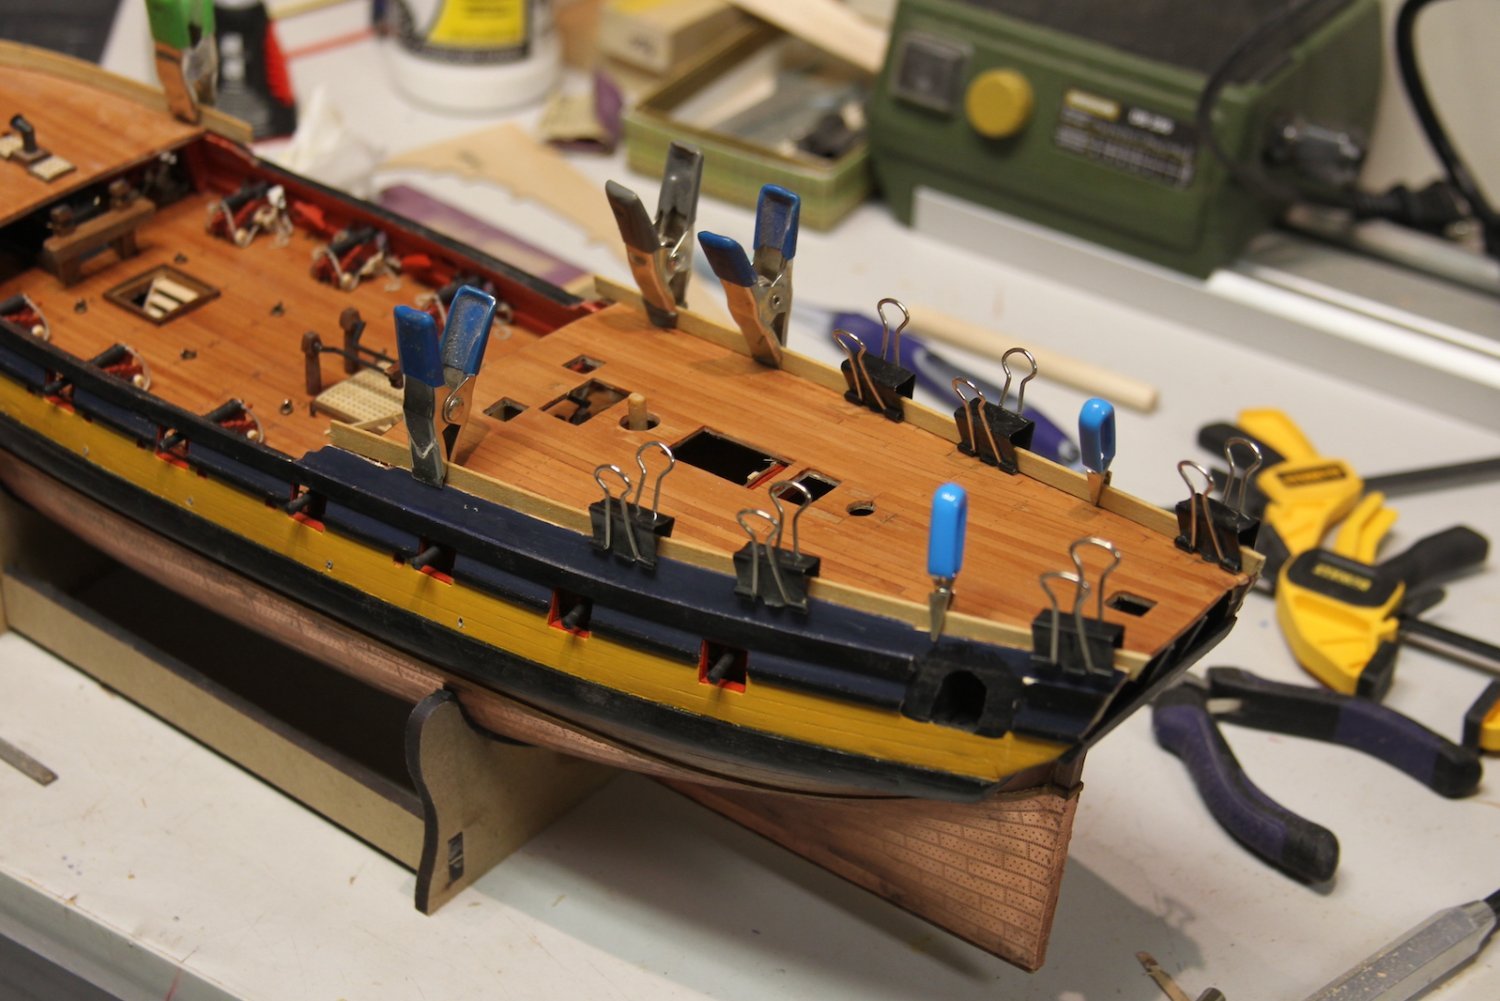
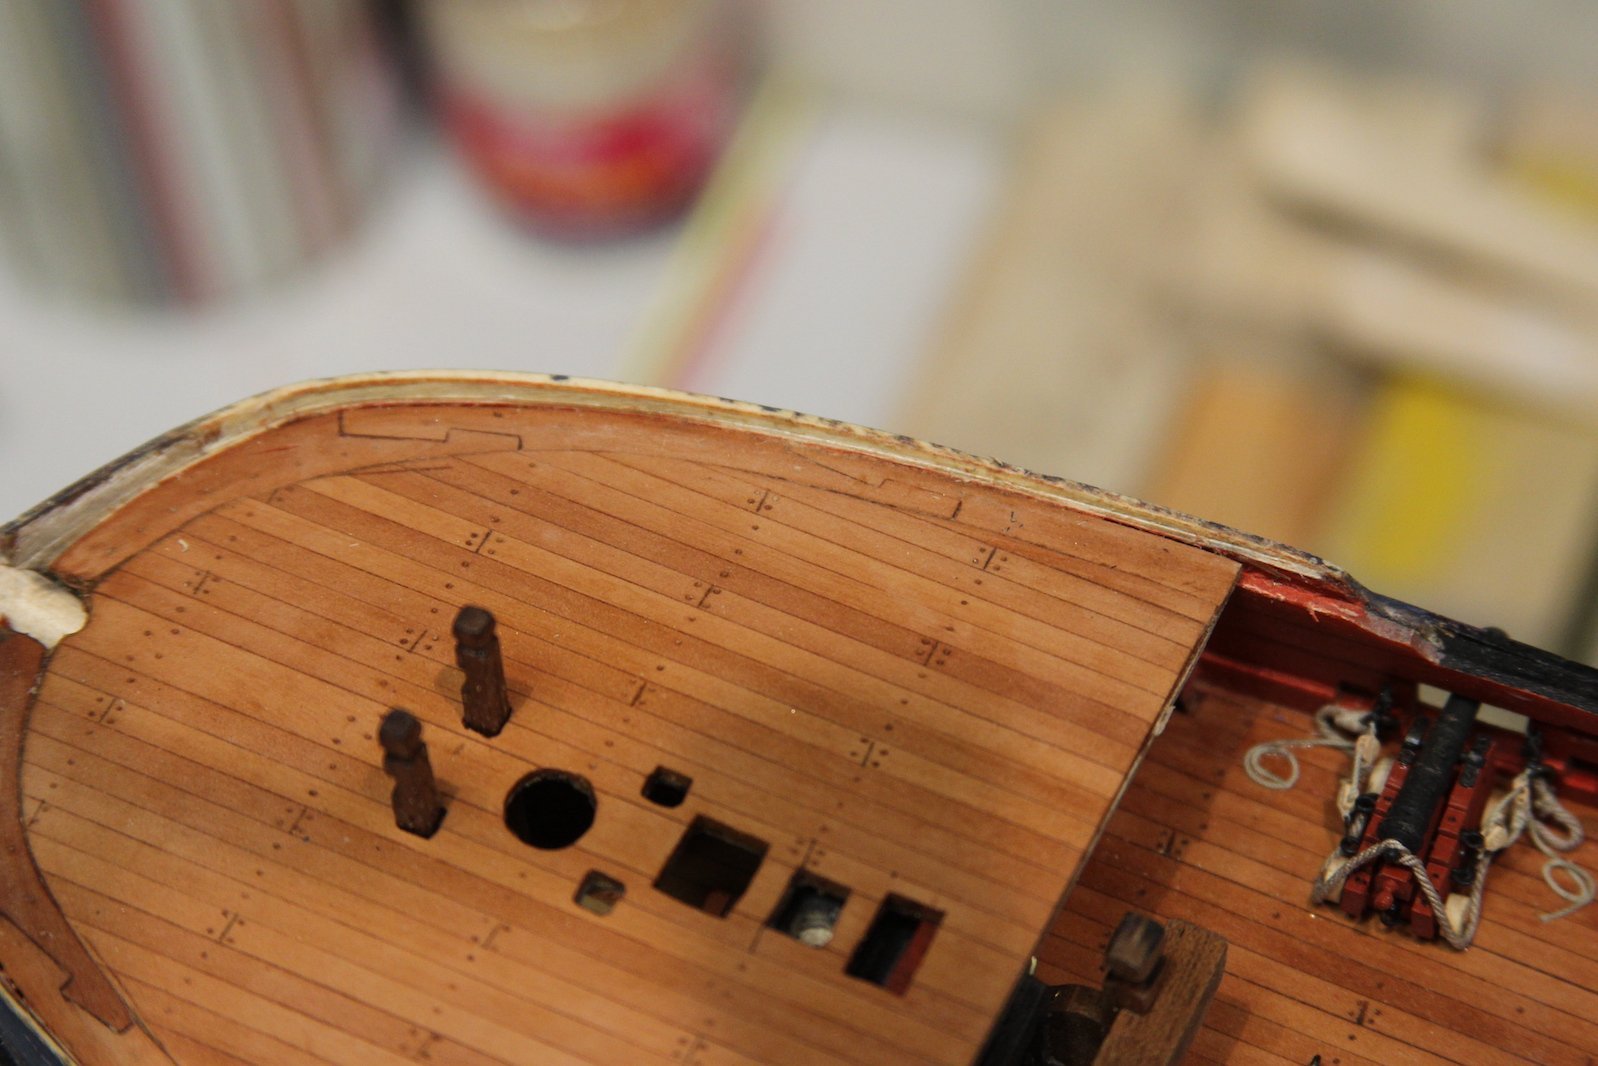
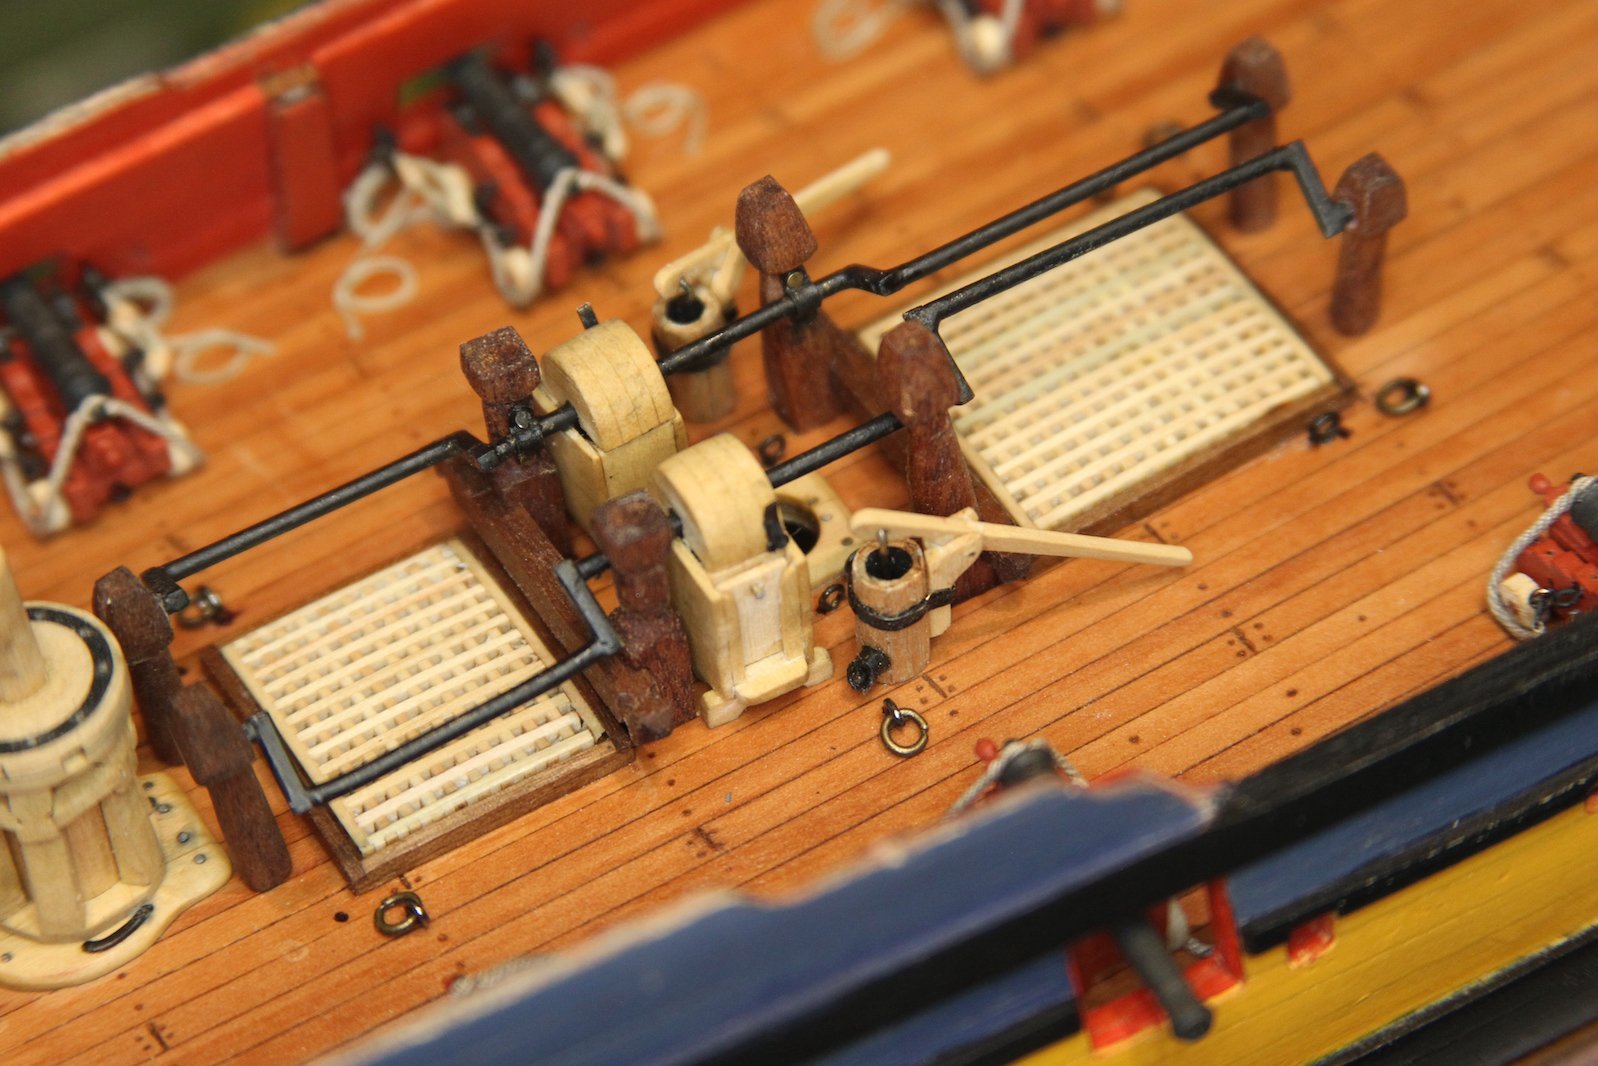
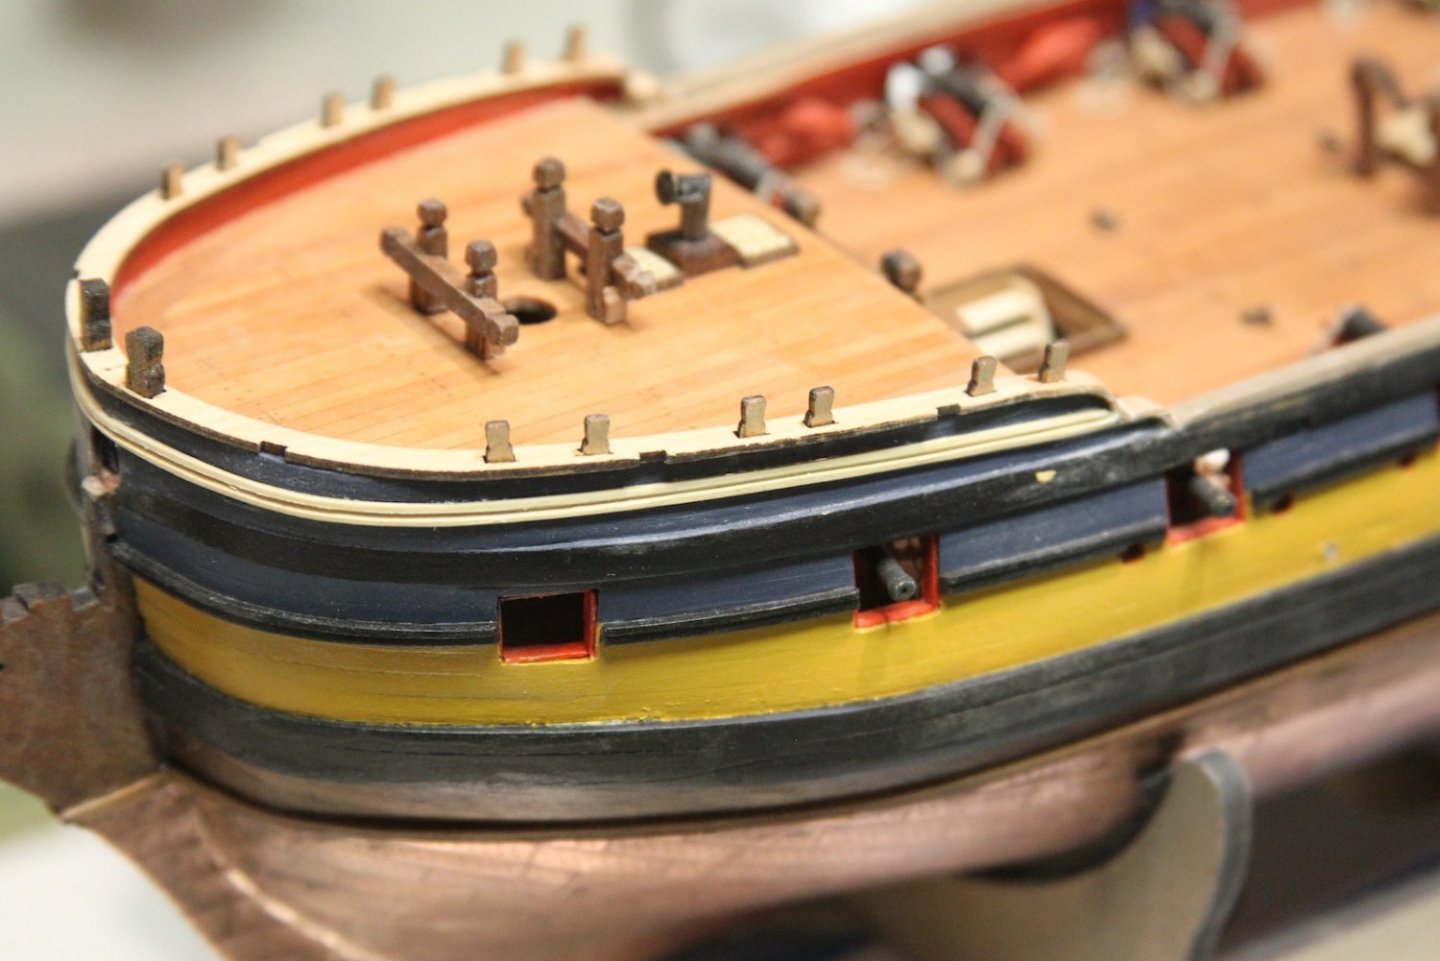
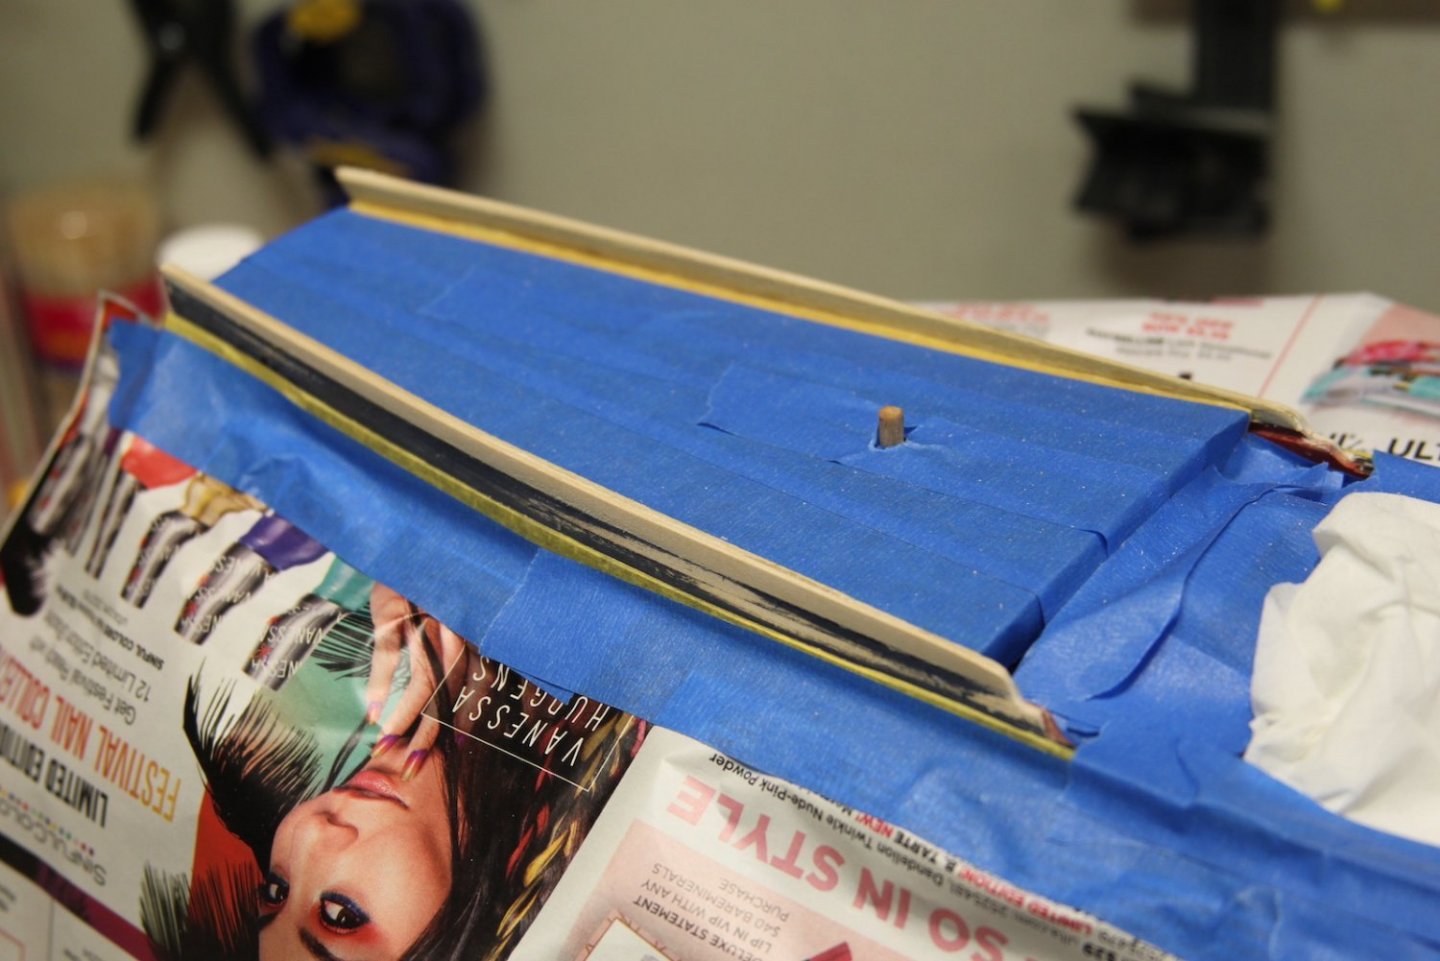
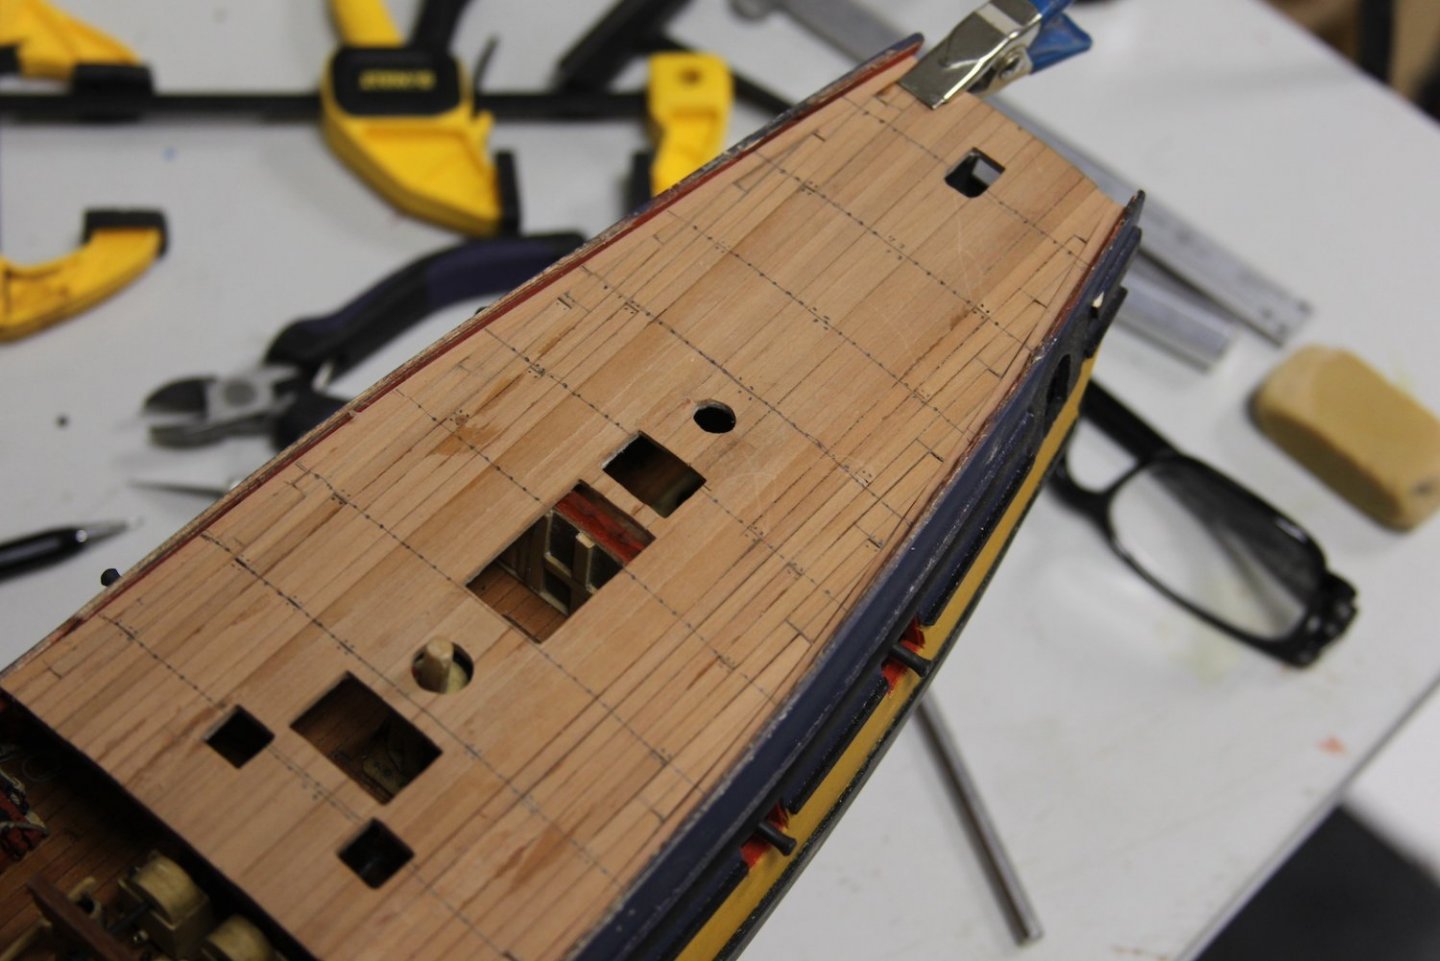
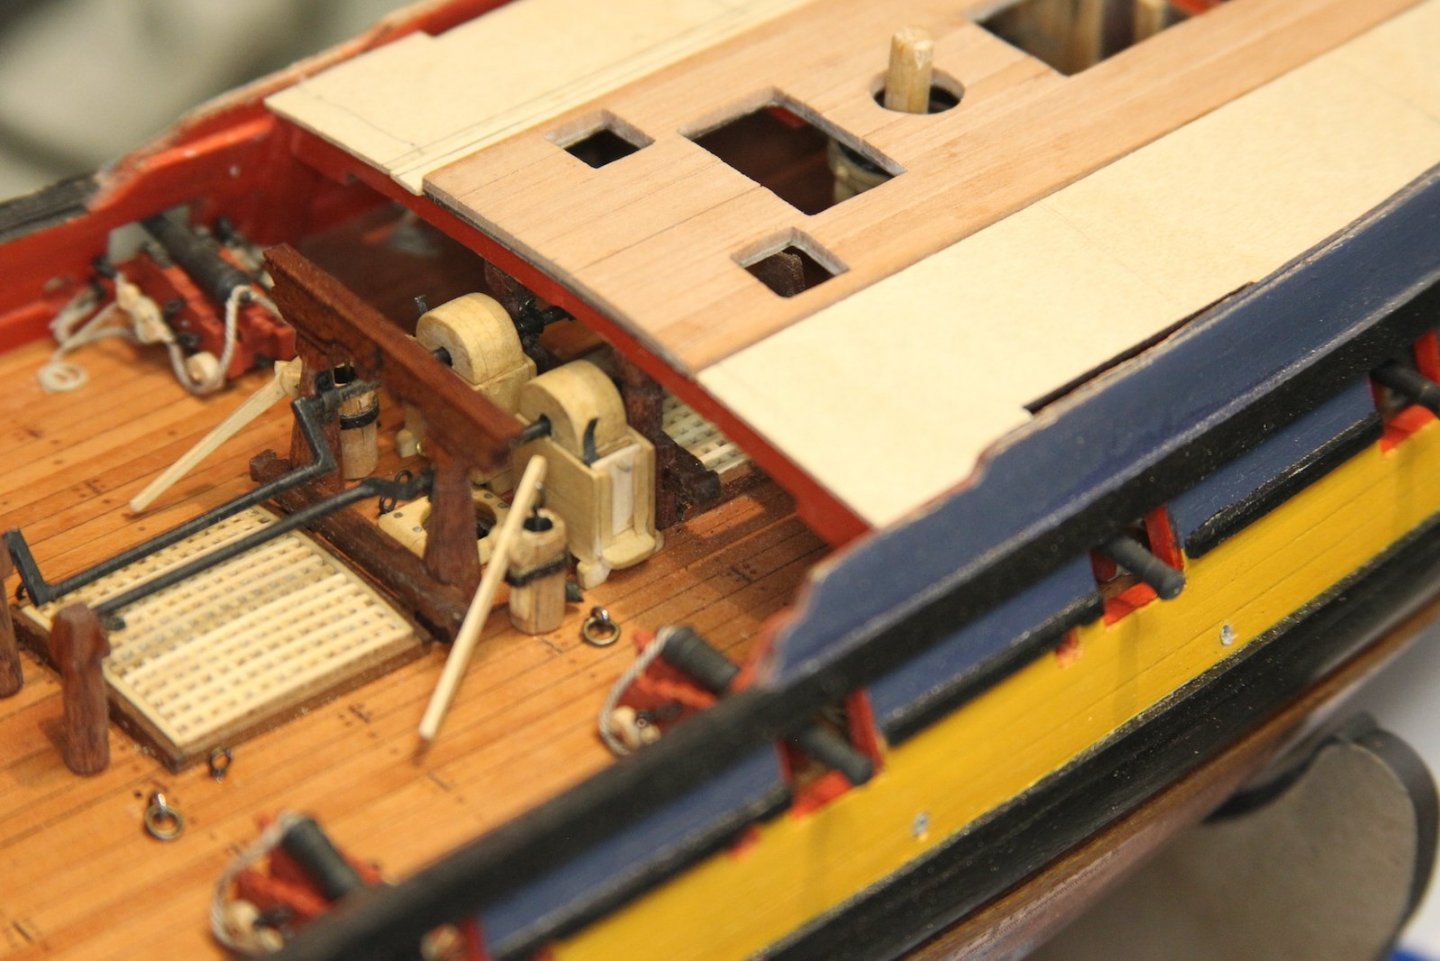
Here are the results of my bulwark boosting. Added inner and outer planking, then sanded it down to provide the proper height both fore and aft. Then I sanded everything flush, and then repainted. For the bow I used one continuous plank bent all the way around rather than butting it at the bowsprit hole. Once again, this is primarily the result of using deck planking that is much thicker than supplied by the kit. Also - an update to the aft hatchway / stair situation. Turned out to be a successful fix. You'll notice my scuttle lids are flush planking as opposed to grates. I got this idea from @Blue Ensign's build and prefer it. Partly because it's probably more likely how the scuttle lids were - but also because as I noticed with the smaller stove vent grates on the foc'sle - I can't get the grating thin enough to look the way I want. It just looks a little thick and chunky when the grates are smaller. This is all still pretty rough also, and will look much smoother once I finish sanding and give it a coat of tung oil.


- 419 replies
-
- 9
-
-
- Victory Models
- Pegasus
- (and 2 more)
-
Proceeding with the aft deck planking now that the 'fix is in'. Nothing earth-shattering here - your typical staggered planking with a margin plank. Then I am bending and mounting a couple of strips to heighten the bulwarks.


- 419 replies
-
- 10
-
-
- Victory Models
- Pegasus
- (and 2 more)
-
Nicely done Jack - I remember those little 'half cannons' from my San Juan AL kit. They're pretty handy for the lower deck guns. But I had to be sure and paint the insides of the gun ports black to make sure you couldn't tell they were nubs. Not sure that'd work if one is sticking with the natural brass though.
-
Beautiful job! Nothing to critique from me.
-
Thanks fellas - much appreciated. And Mark- you're definitely right, it is part of the fun. However - there is also that moment where I think to myself... "Well, I COULD just cover it up with a grate..." heh.
- 419 replies
-
- 2
-
-

-
- Victory Models
- Pegasus
- (and 2 more)
-
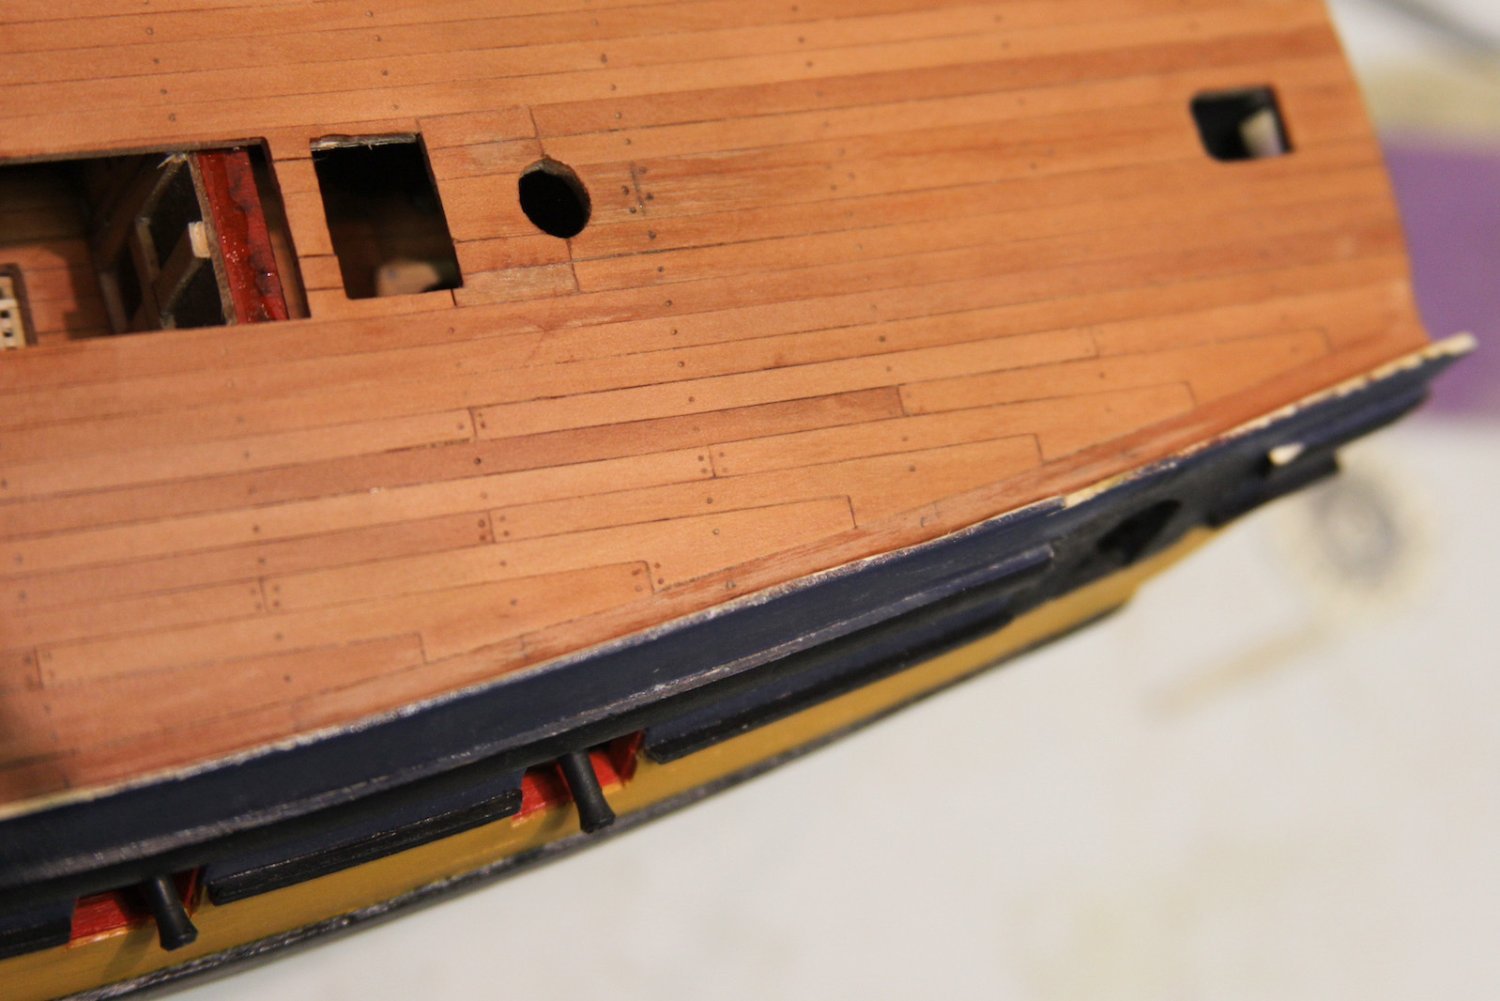
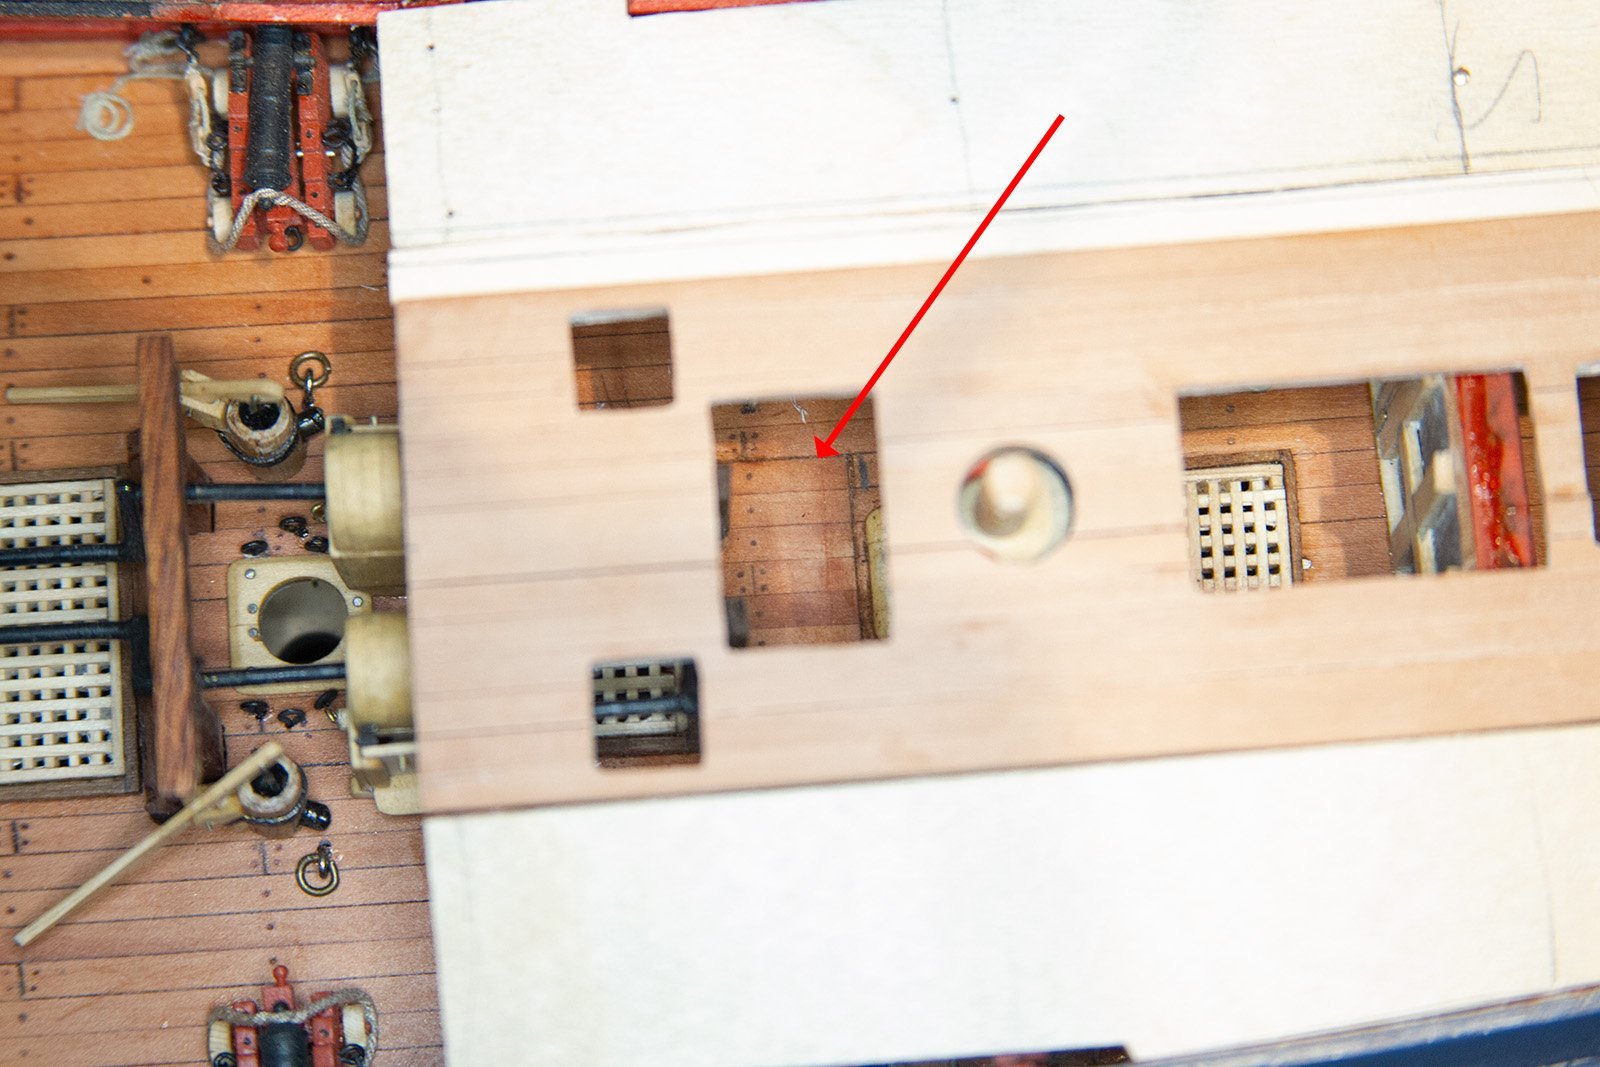
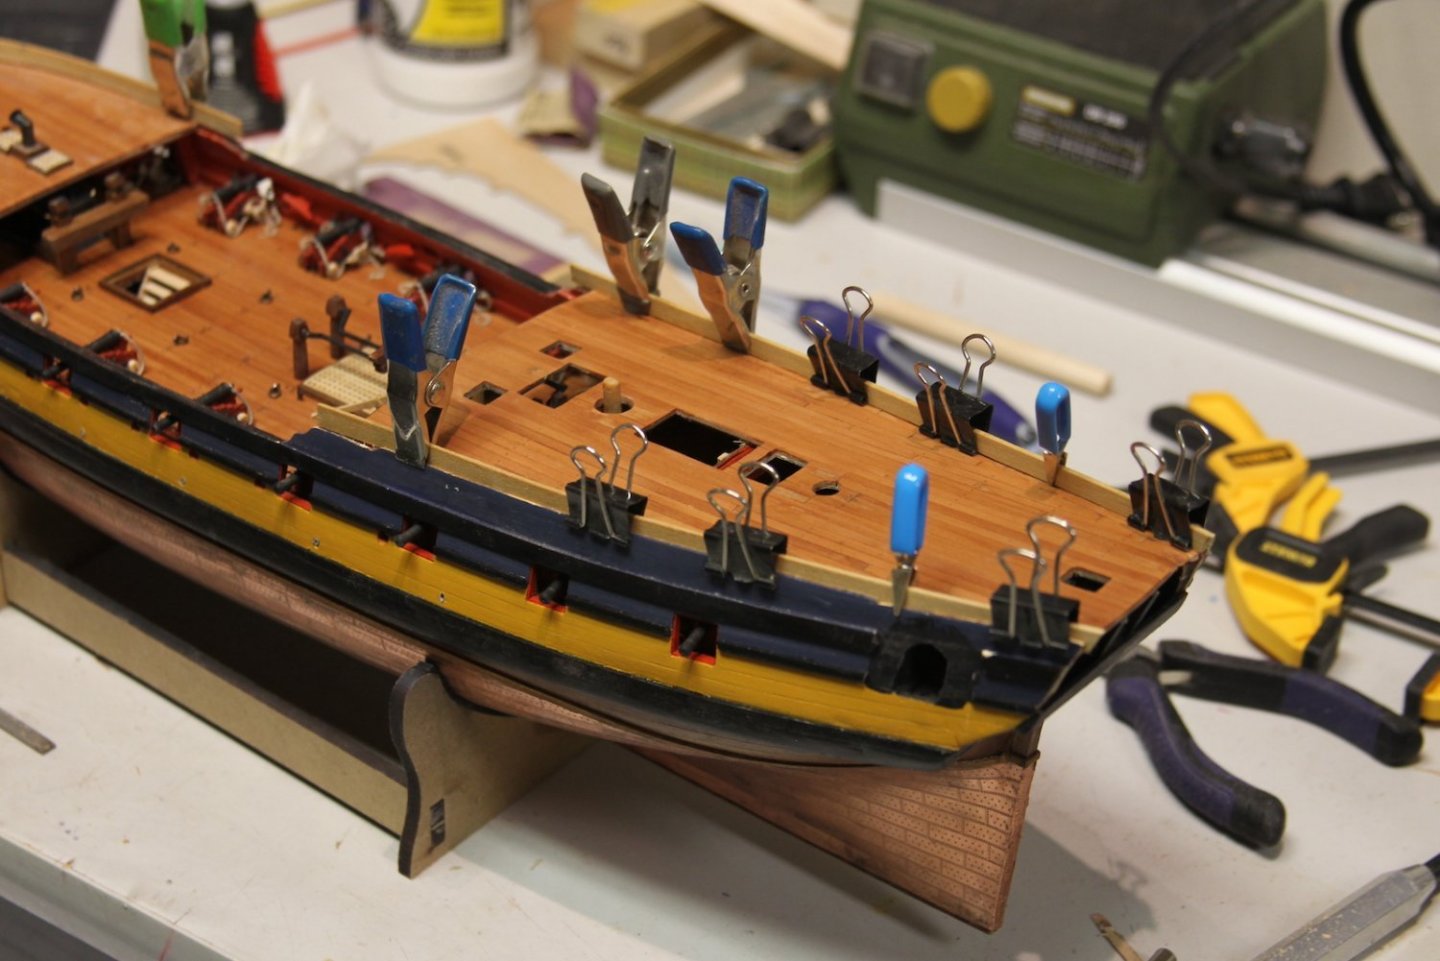
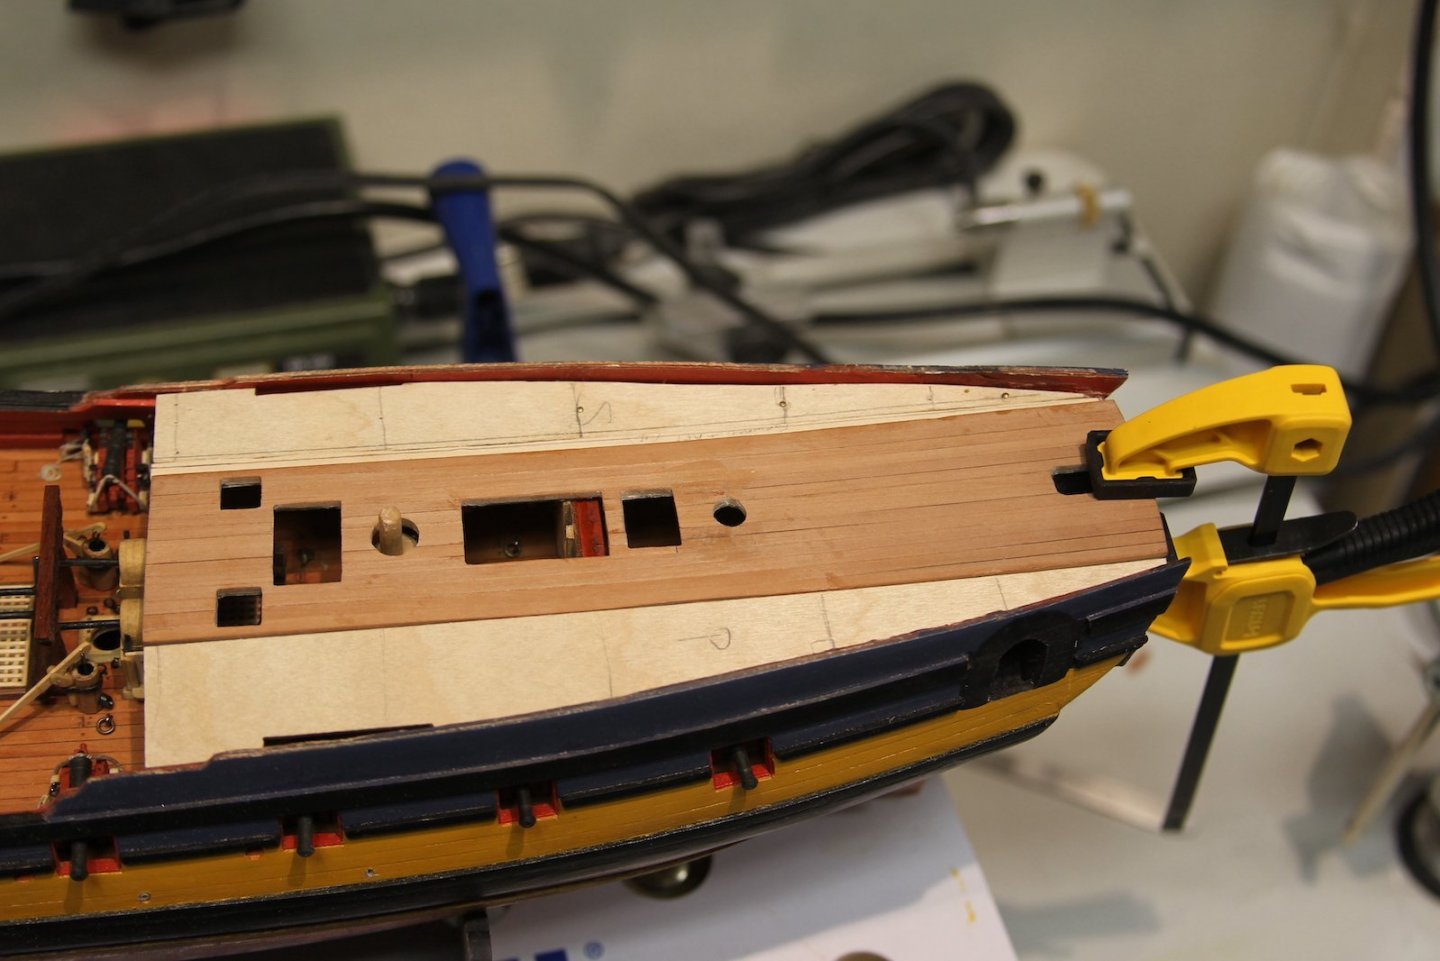
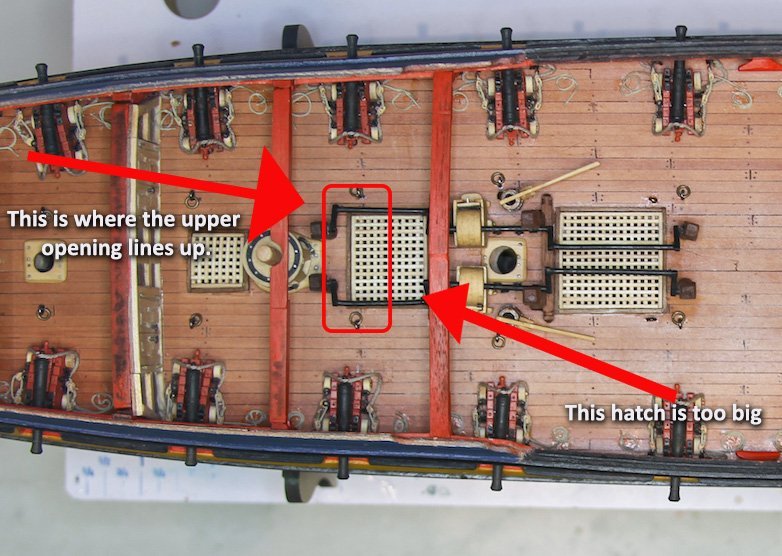
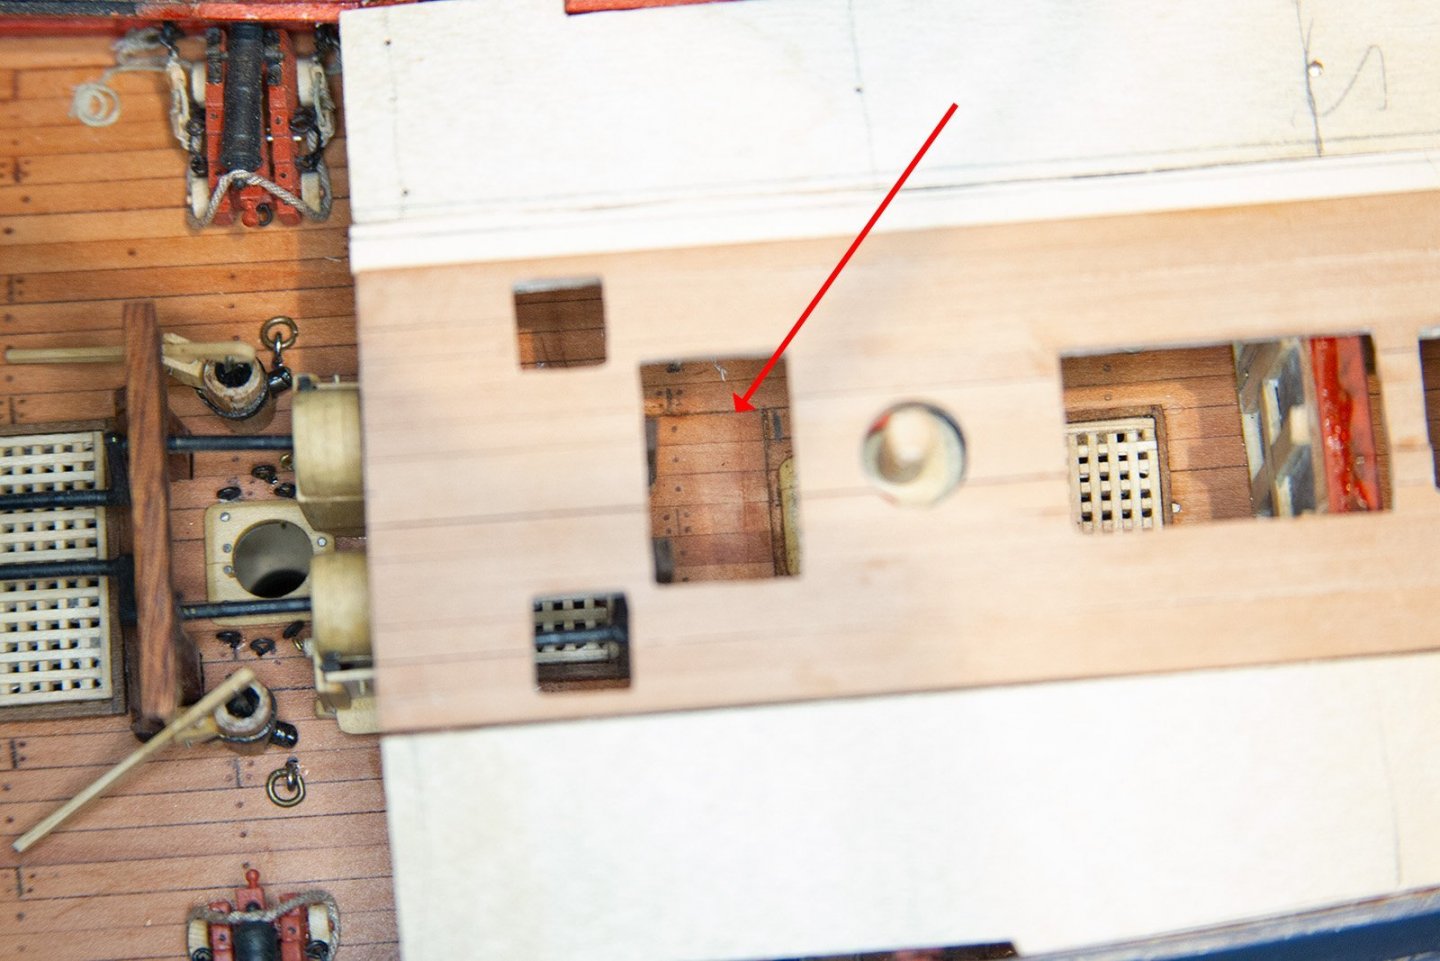
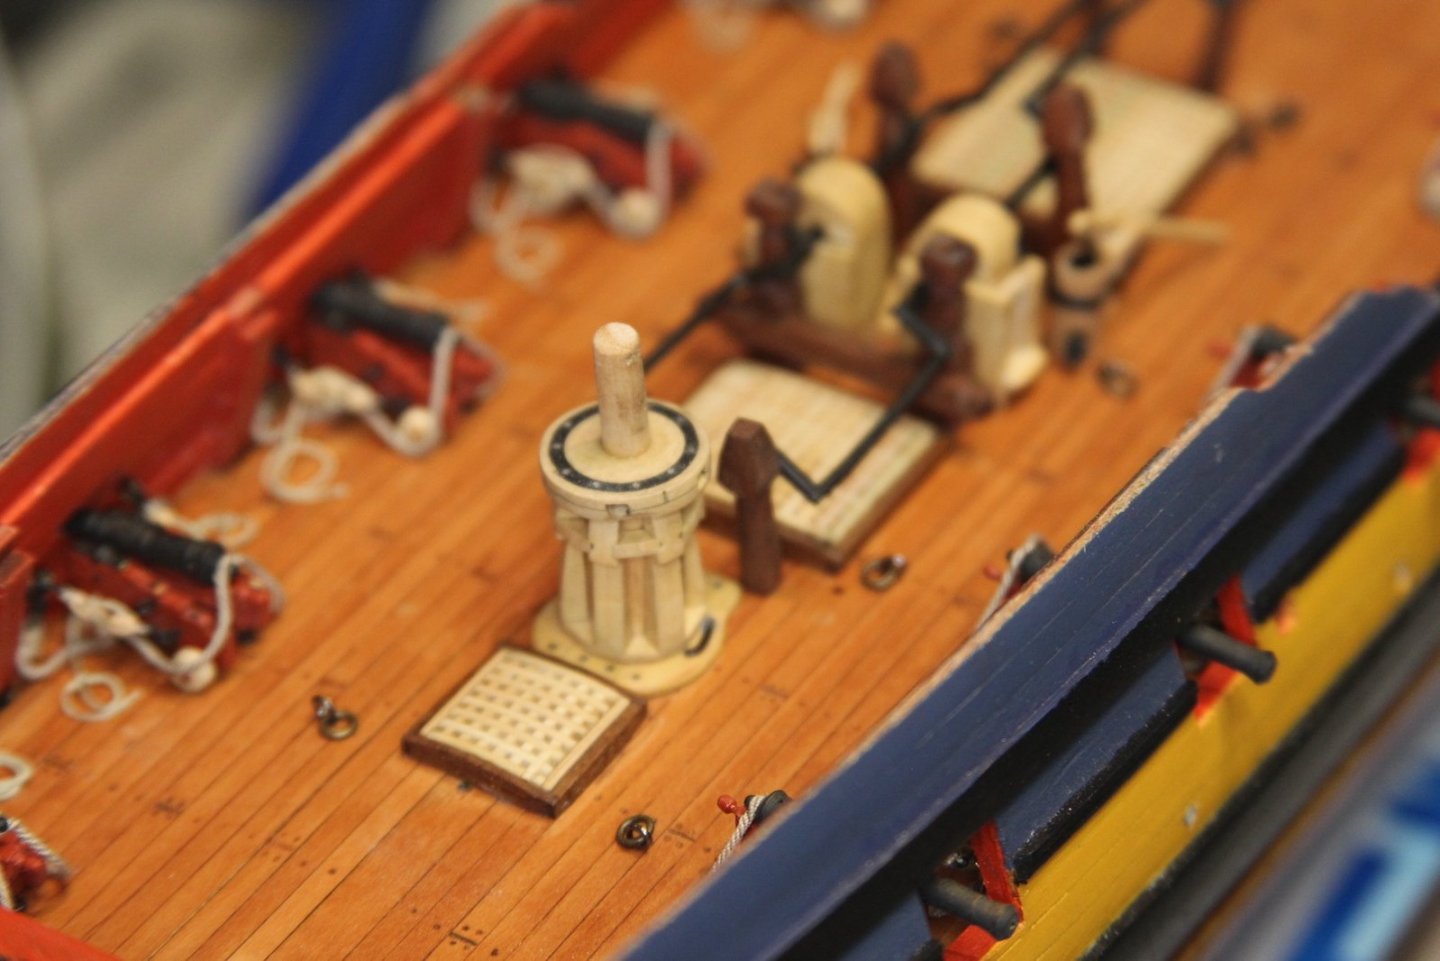
So... remember I said that I tend to do things a little unconventionally in terms of timing, etc? Well - here's the downside: I totally screwed up the spacing of deck elements because I didn't think far enough ahead - an error I discovered when I placed the upper deck in the aft of the ship. As I'm sure most of you know, there can be a pretty big downside when it comes to half following the kit plans and half following the FFM and other builds. My particular problem occurred with the pumps. My big mistake - was following the kit template / false deck with it came to the locations of all the hatches - but then following Dan's more accurate build/locations when it came to putting in the pumps. I wish I took more 'before' pictures - but I was too irritated and just started fixing. But basically, when I test fit the upper deck in place then looked down through all the holes/hatches - the larger grate just aft of the pumps is about two times too large - so the the pump handles extending over it go RIGHT underneath the upper hatch that's supposed to be fitted with a ladder. Doh. So - even if I were able to fit a ladder in there - folks would be descending right into the pump handles. Many "potty words" were uttered as I tore up deck planks and fittings. I reduced the size of the hatch by half, patched the deck to fill in the gap, shortened the aft pump handles and remounted them into the posts. The good news is - the view of all of this will be severely obstructed by the pumps, subsequent ladder once it's installed, and various rigging and accouterments. I may even throw in a pump dale or two to further obscure my screw up. Once again - the reminder here (that we all already know) is - when you're doing a mish-mash of a kit bash that combines the ease and efficiency of a pre-fab kit with other added elements - you can NEVER, ever, think too far ahead.
- 419 replies
-
- 12
-
-
- Victory Models
- Pegasus
- (and 2 more)
-
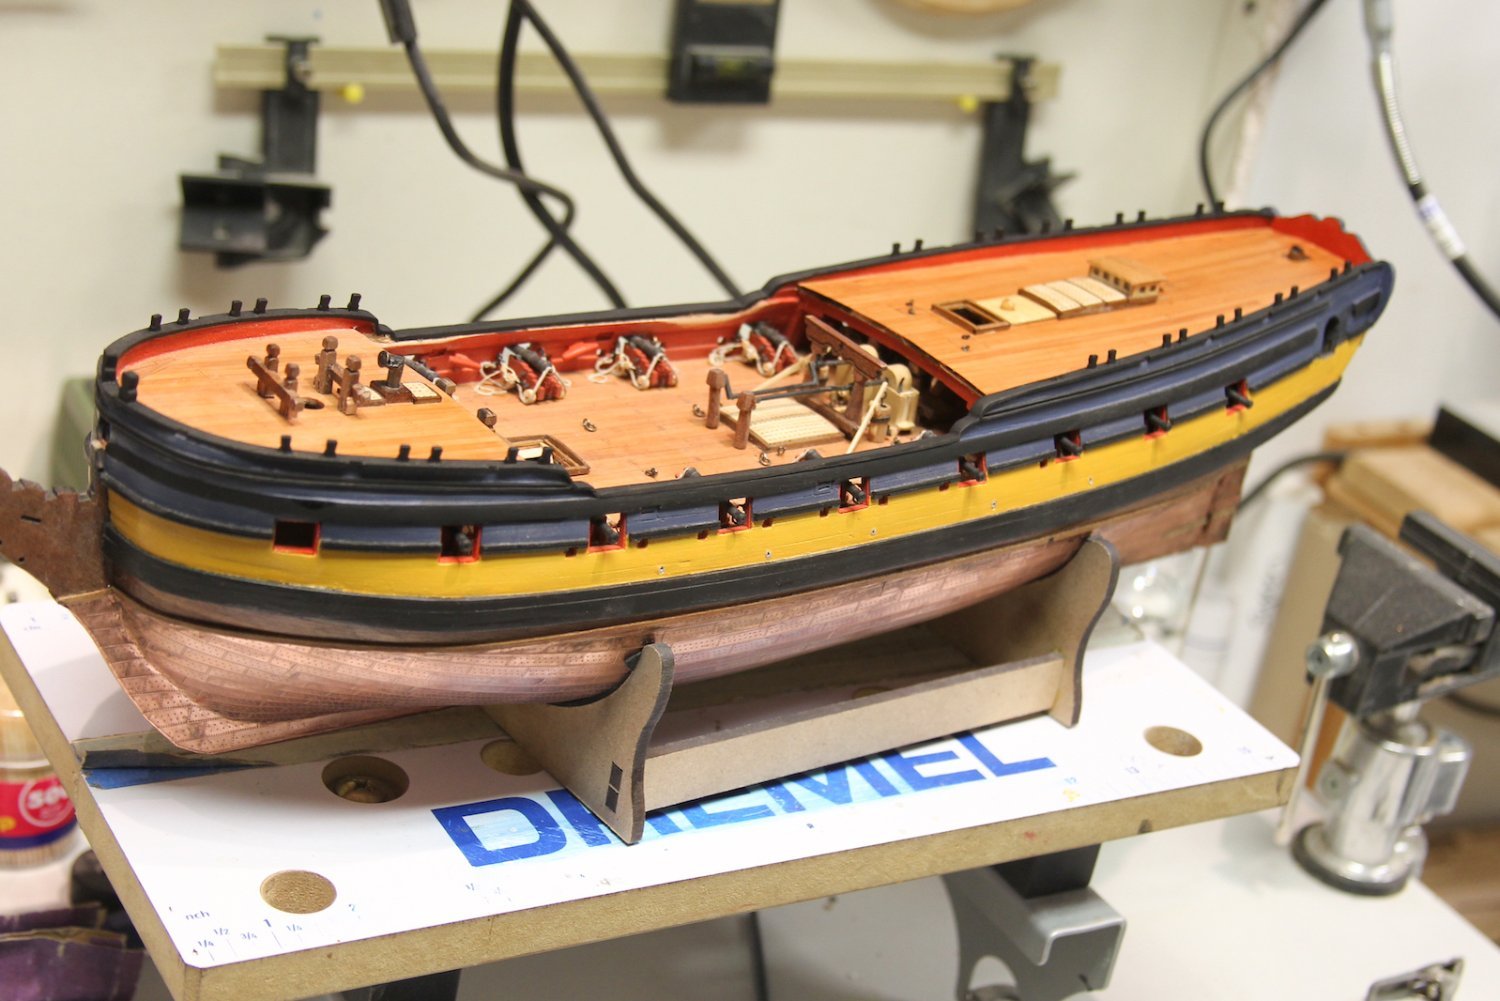
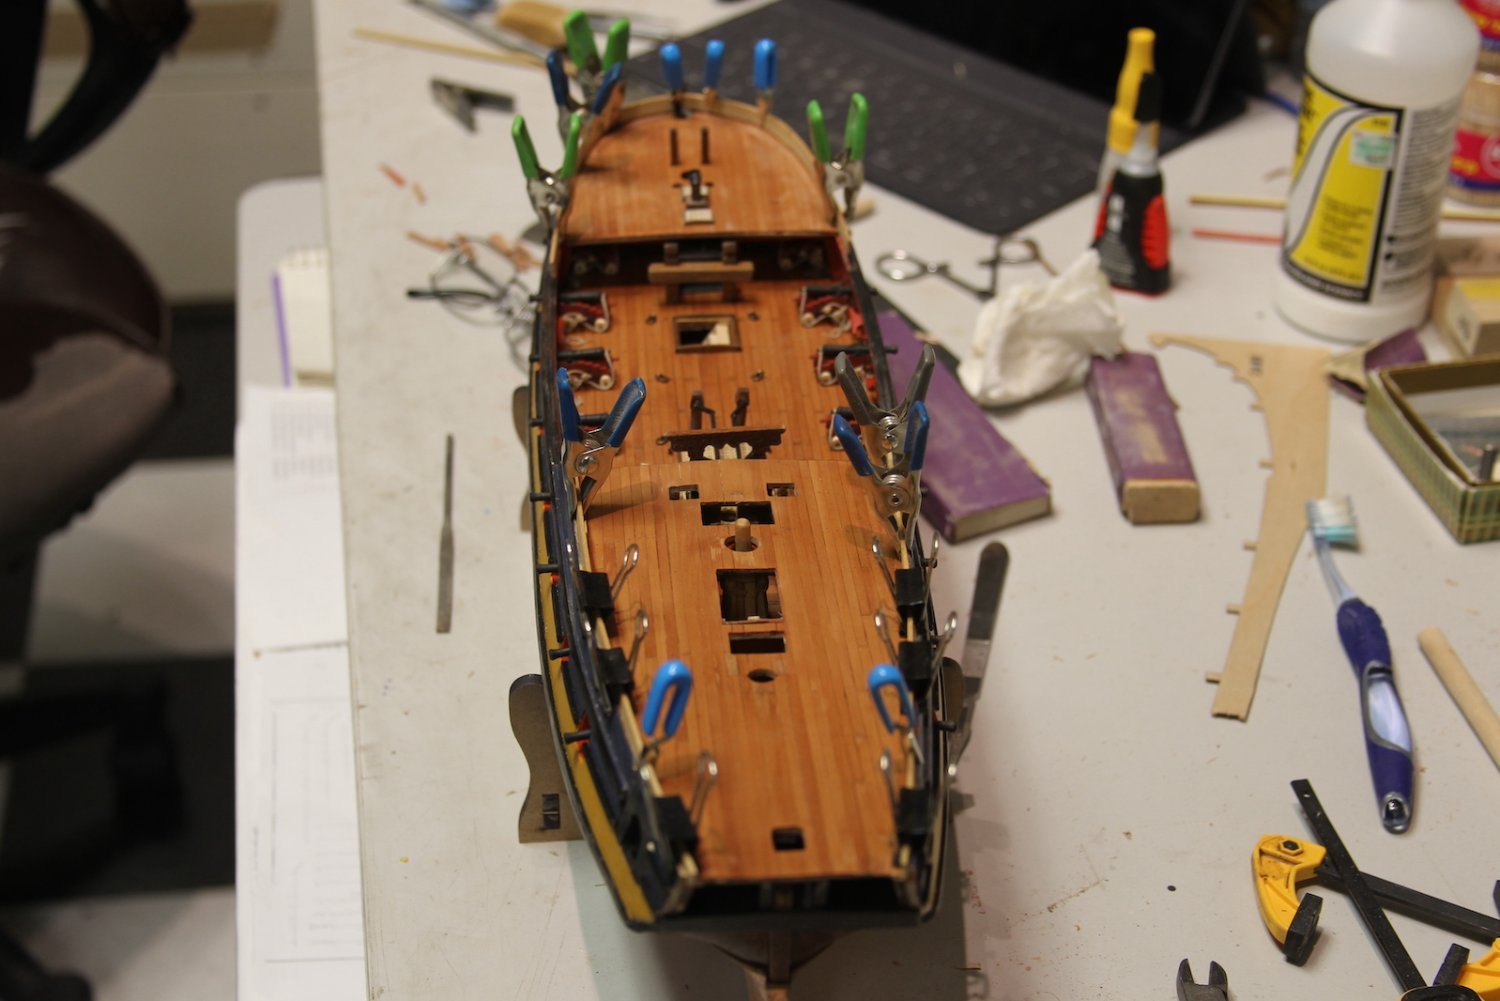
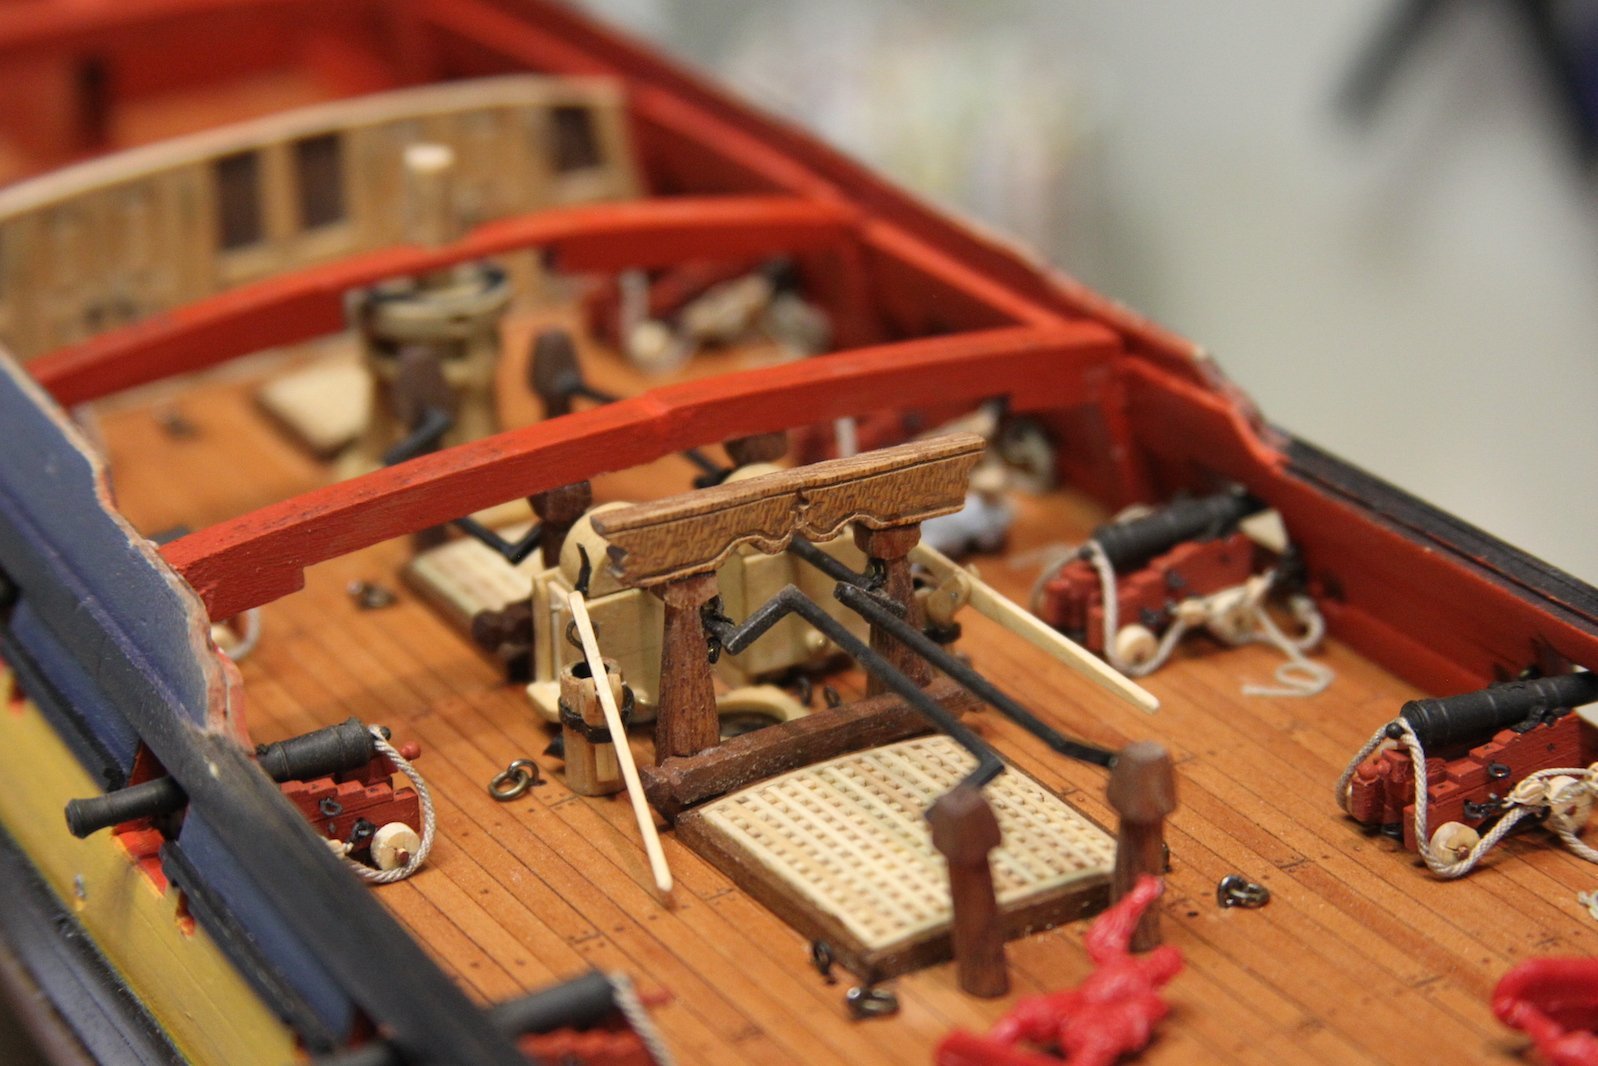
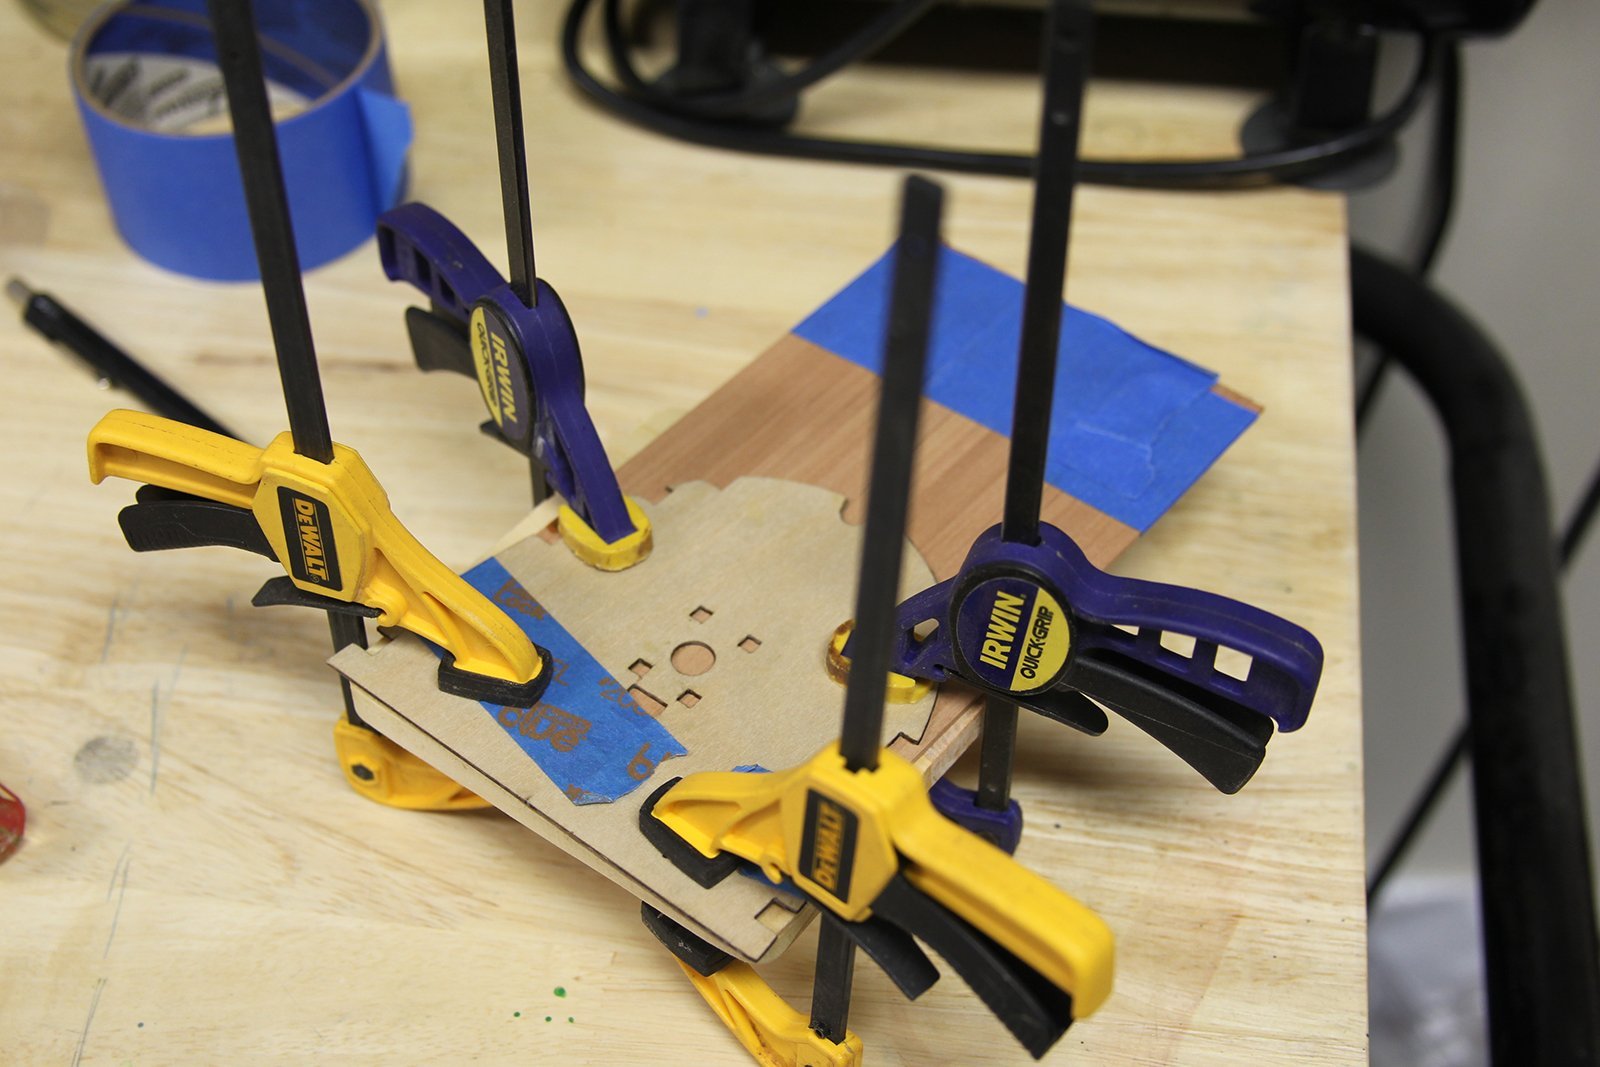
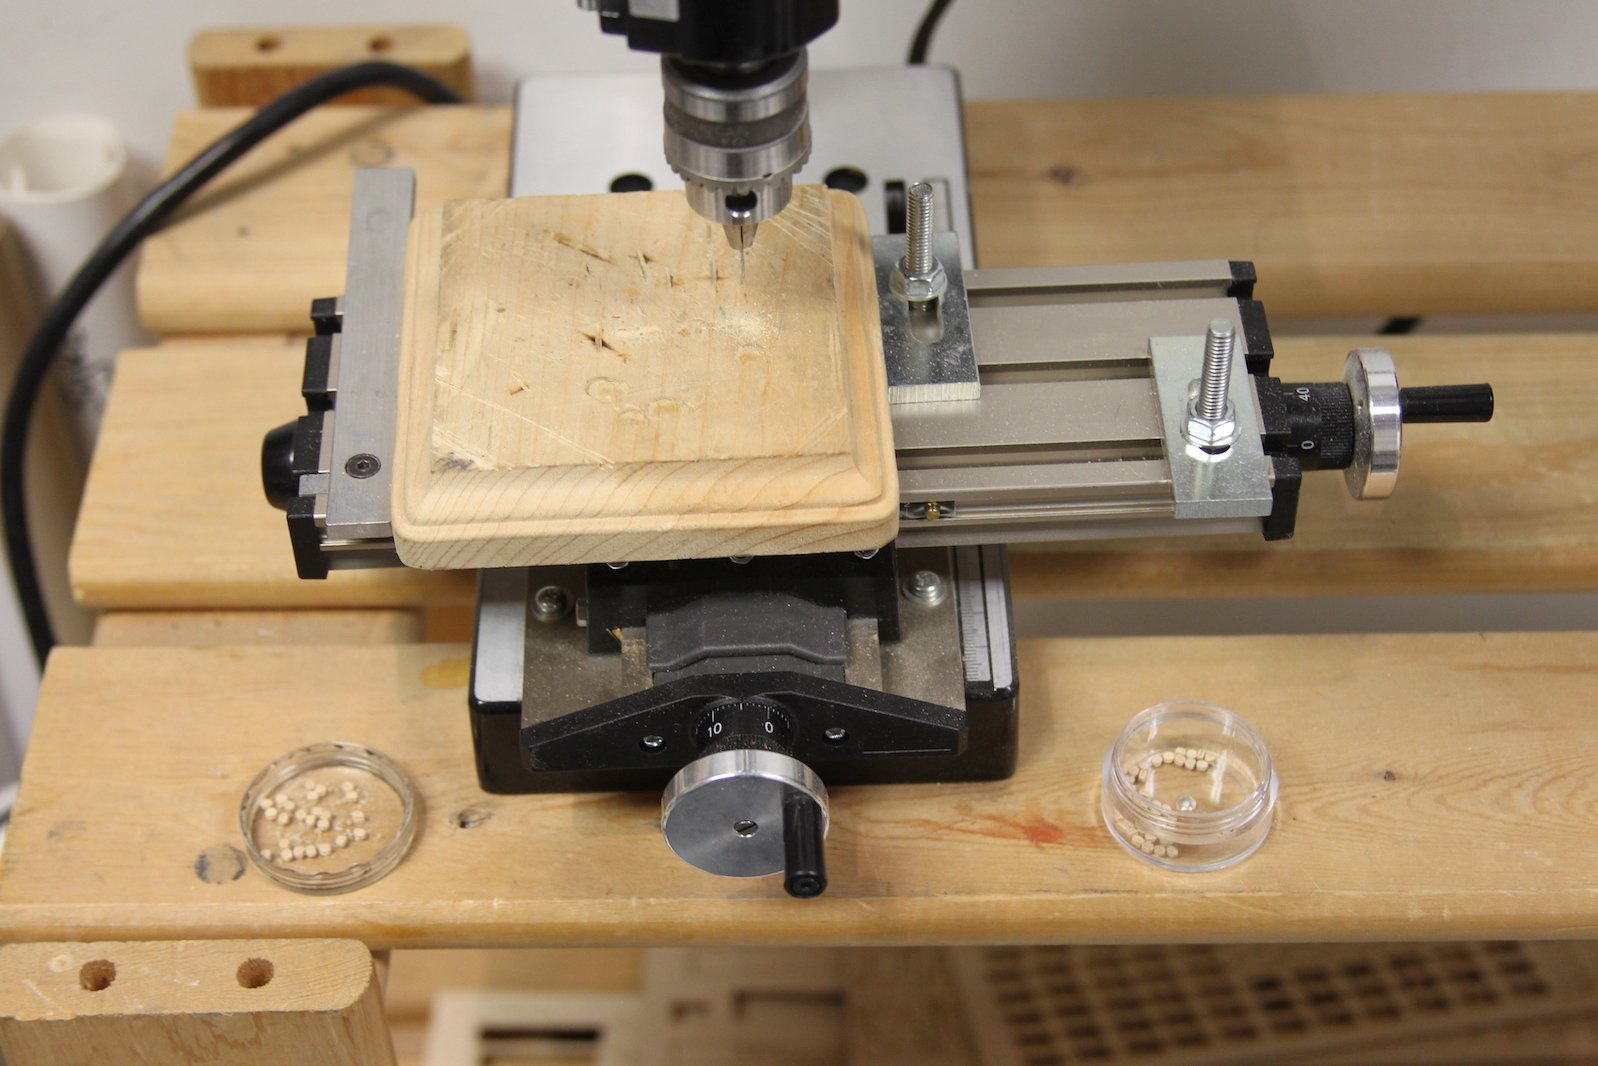
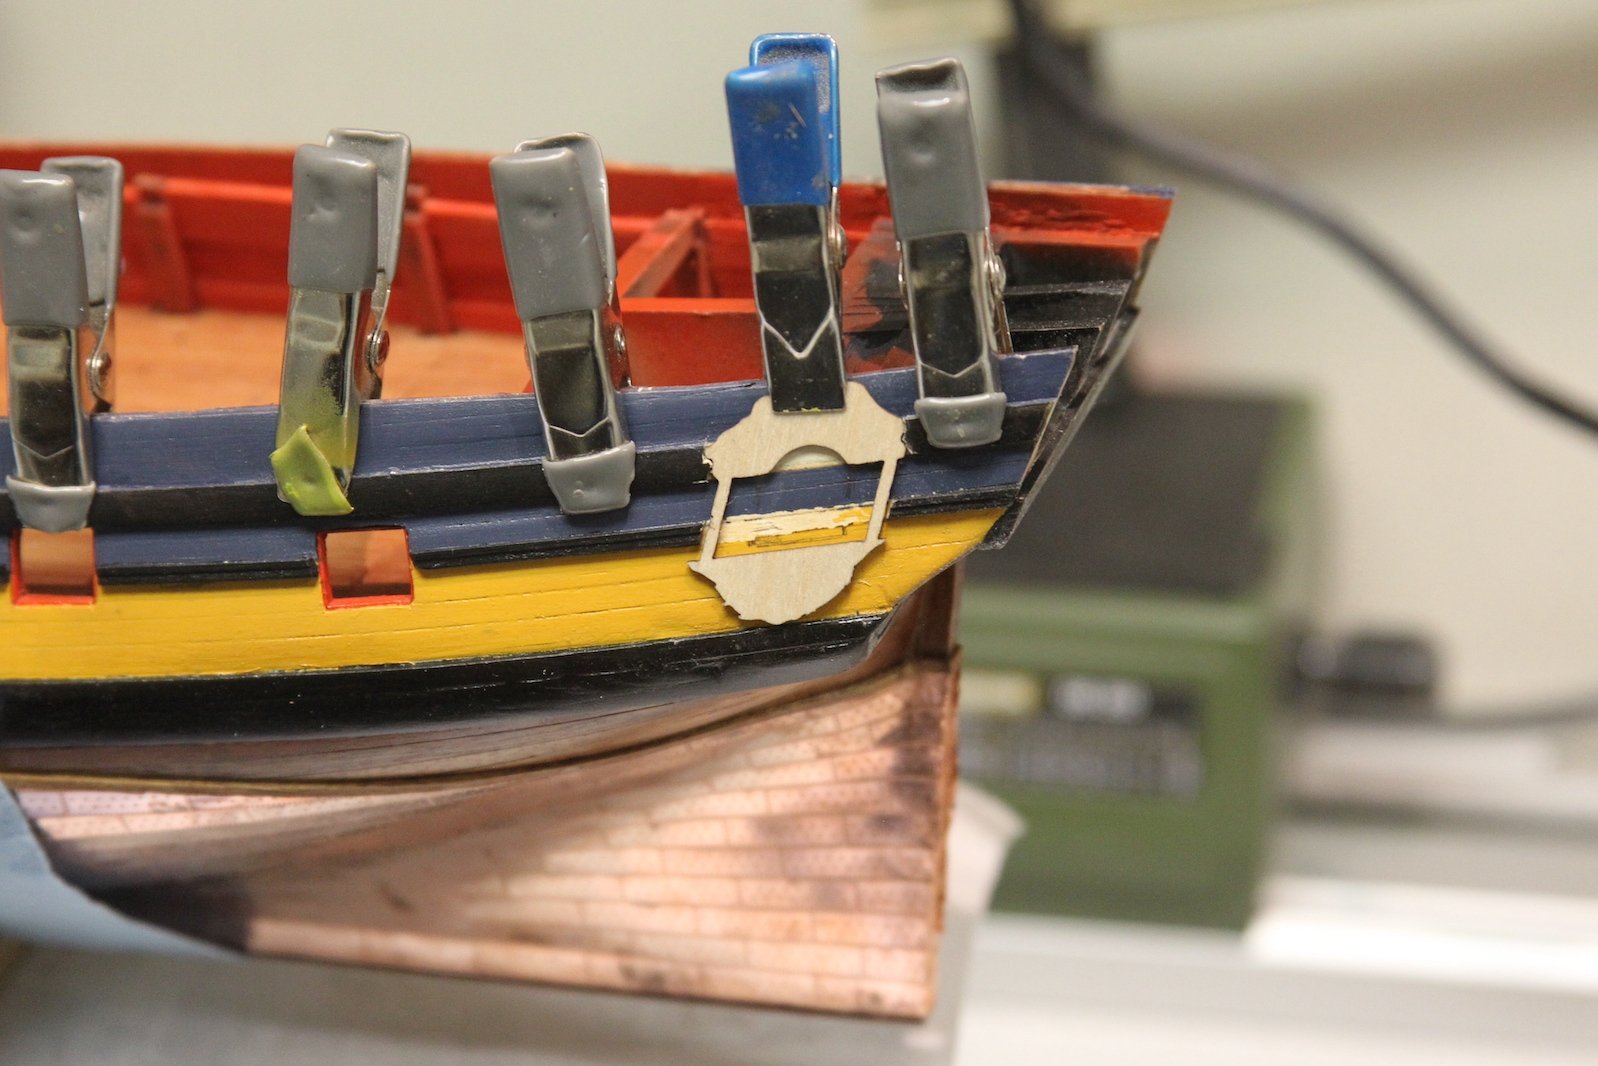
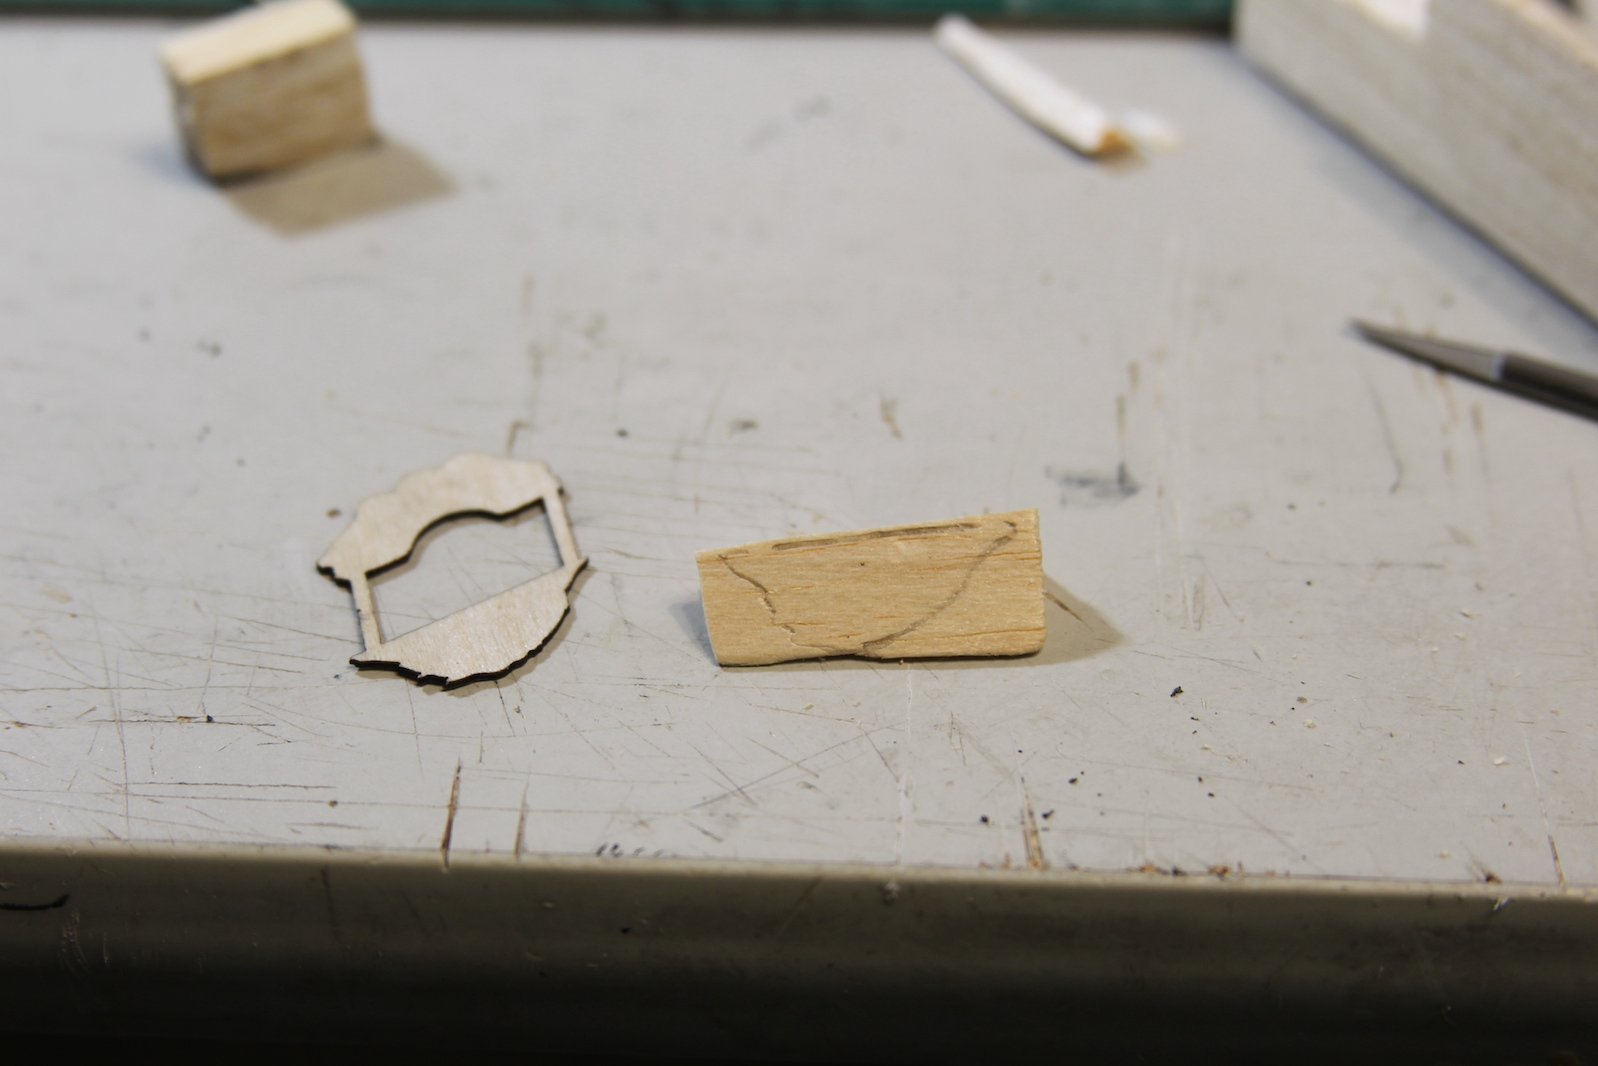
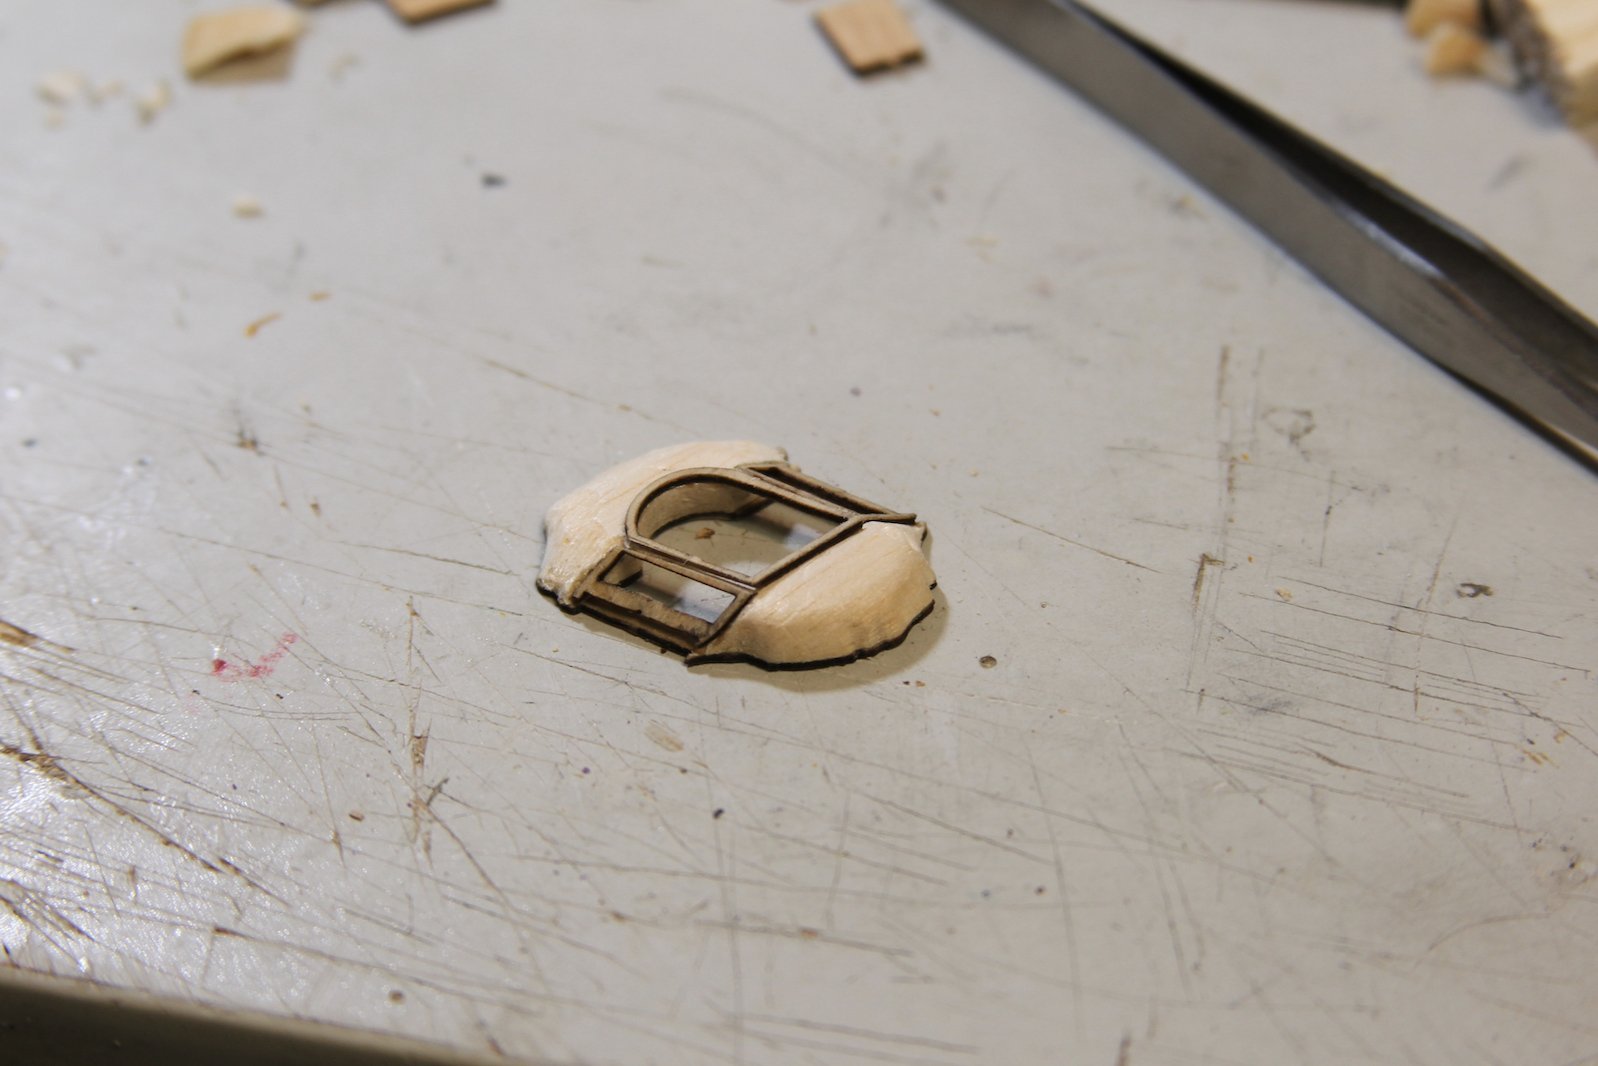
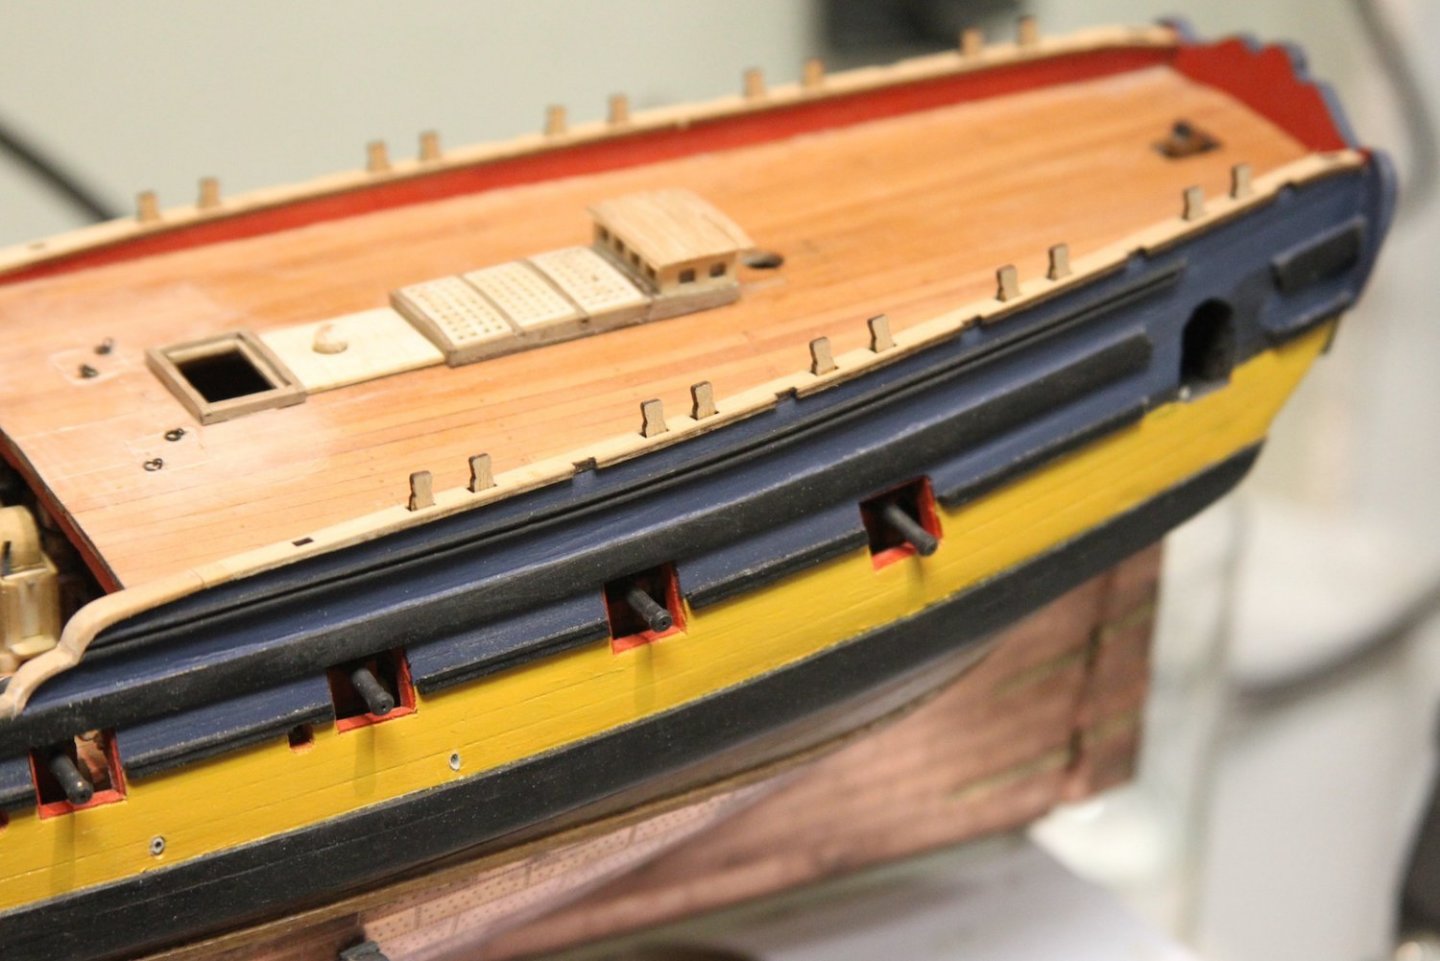
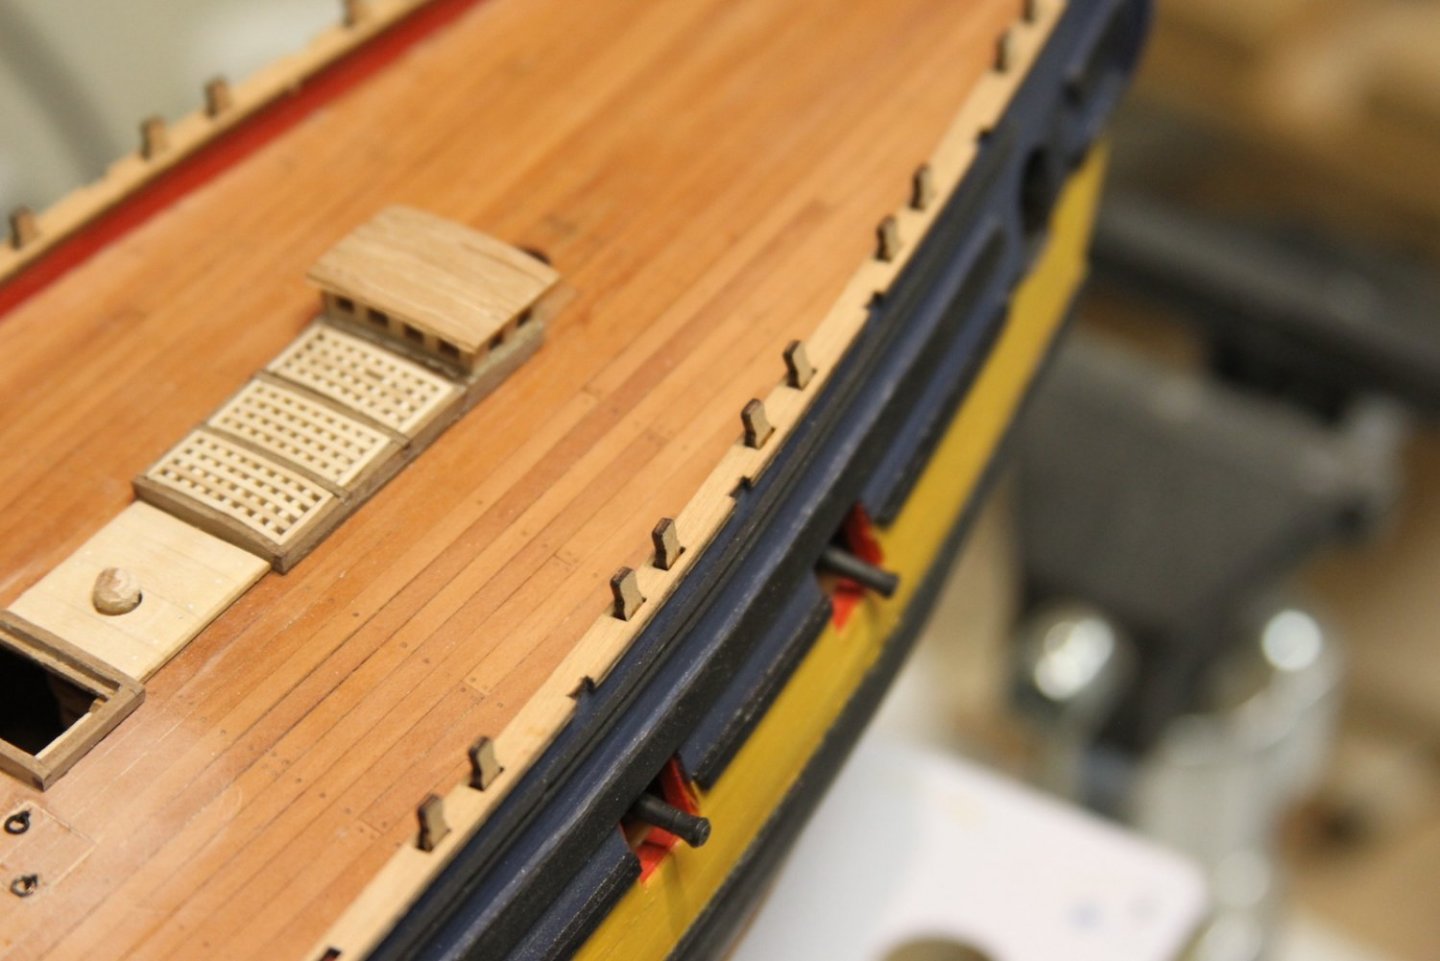
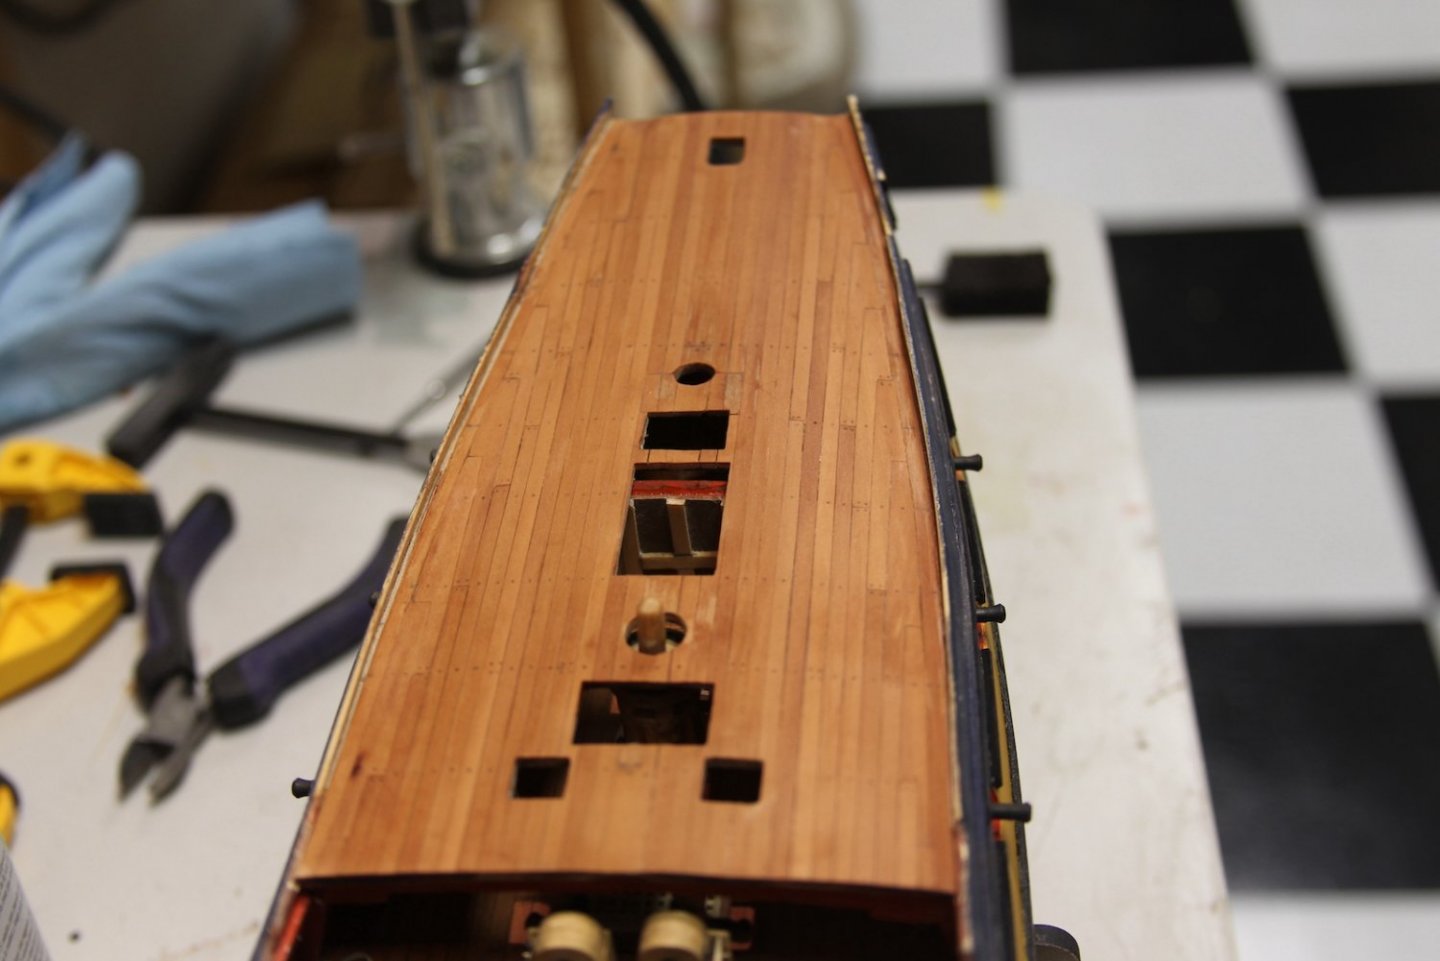
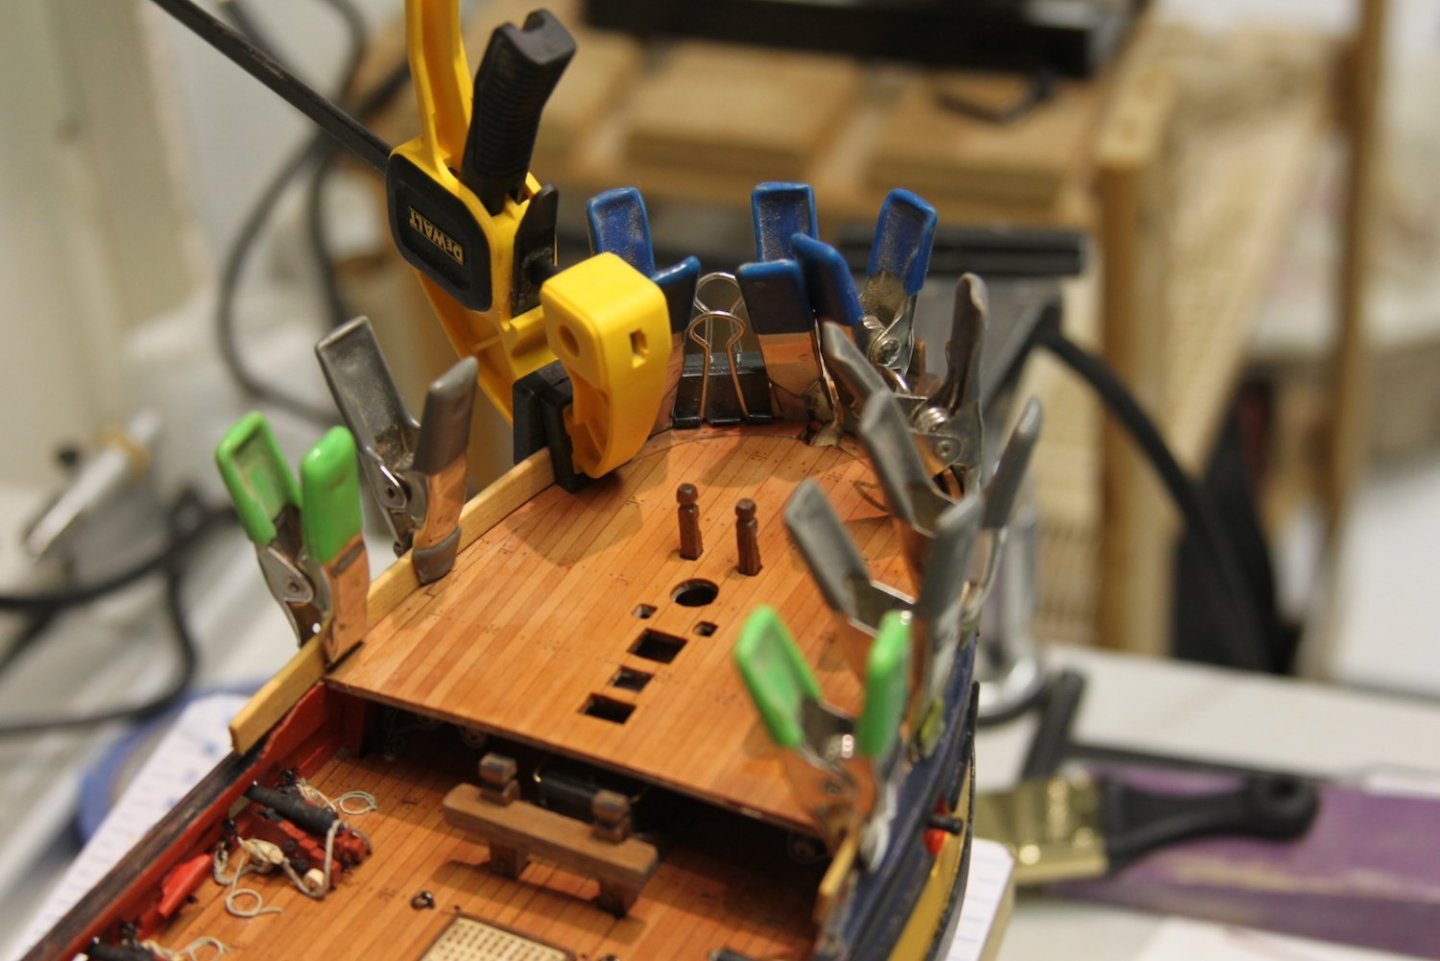
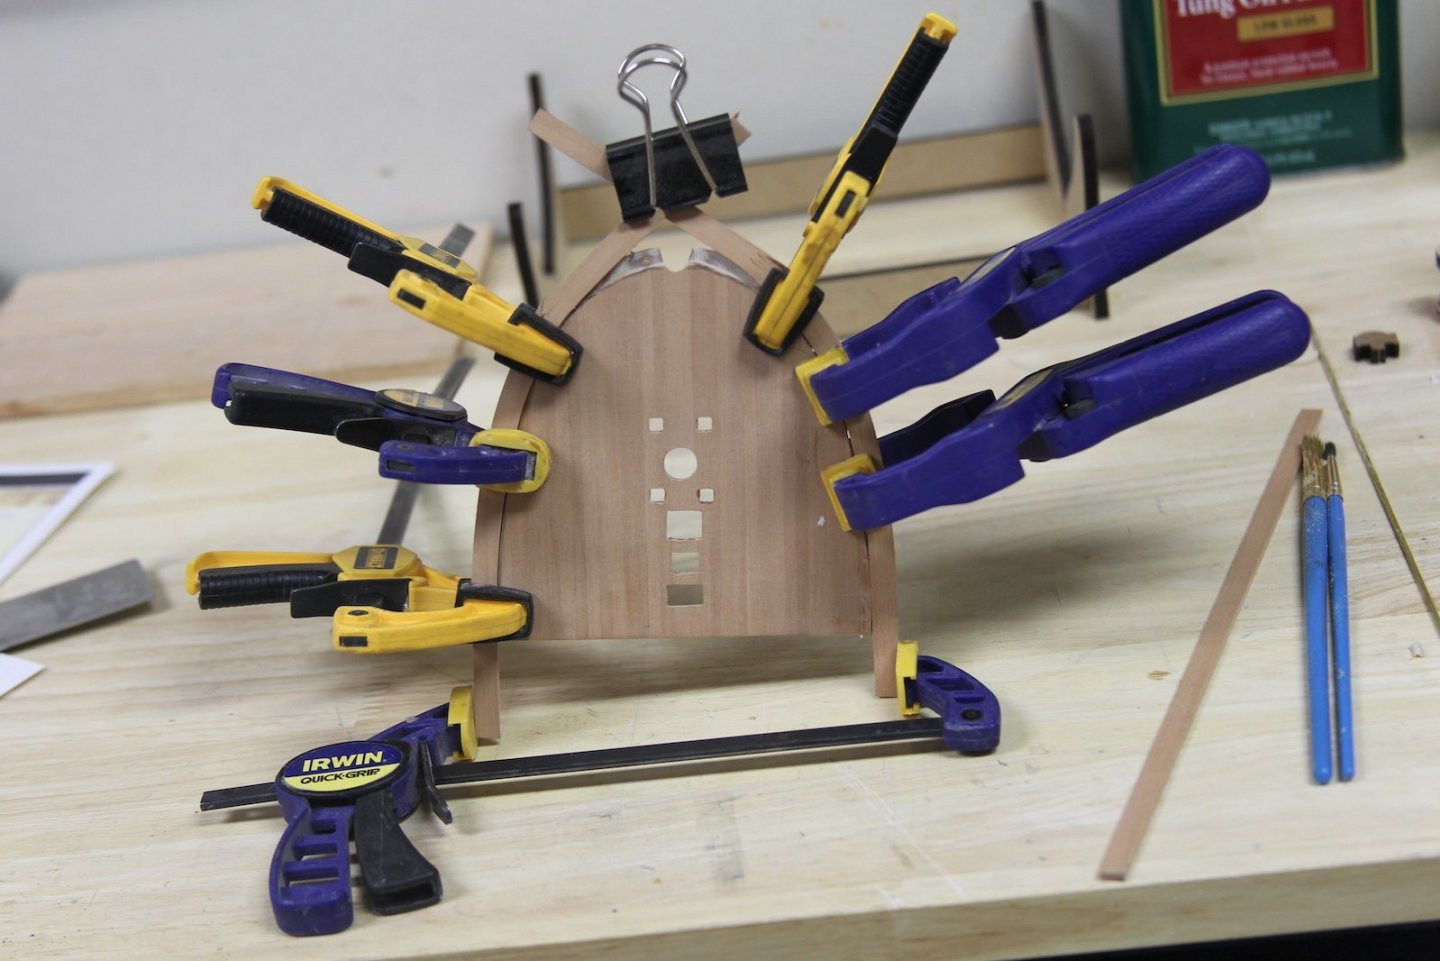
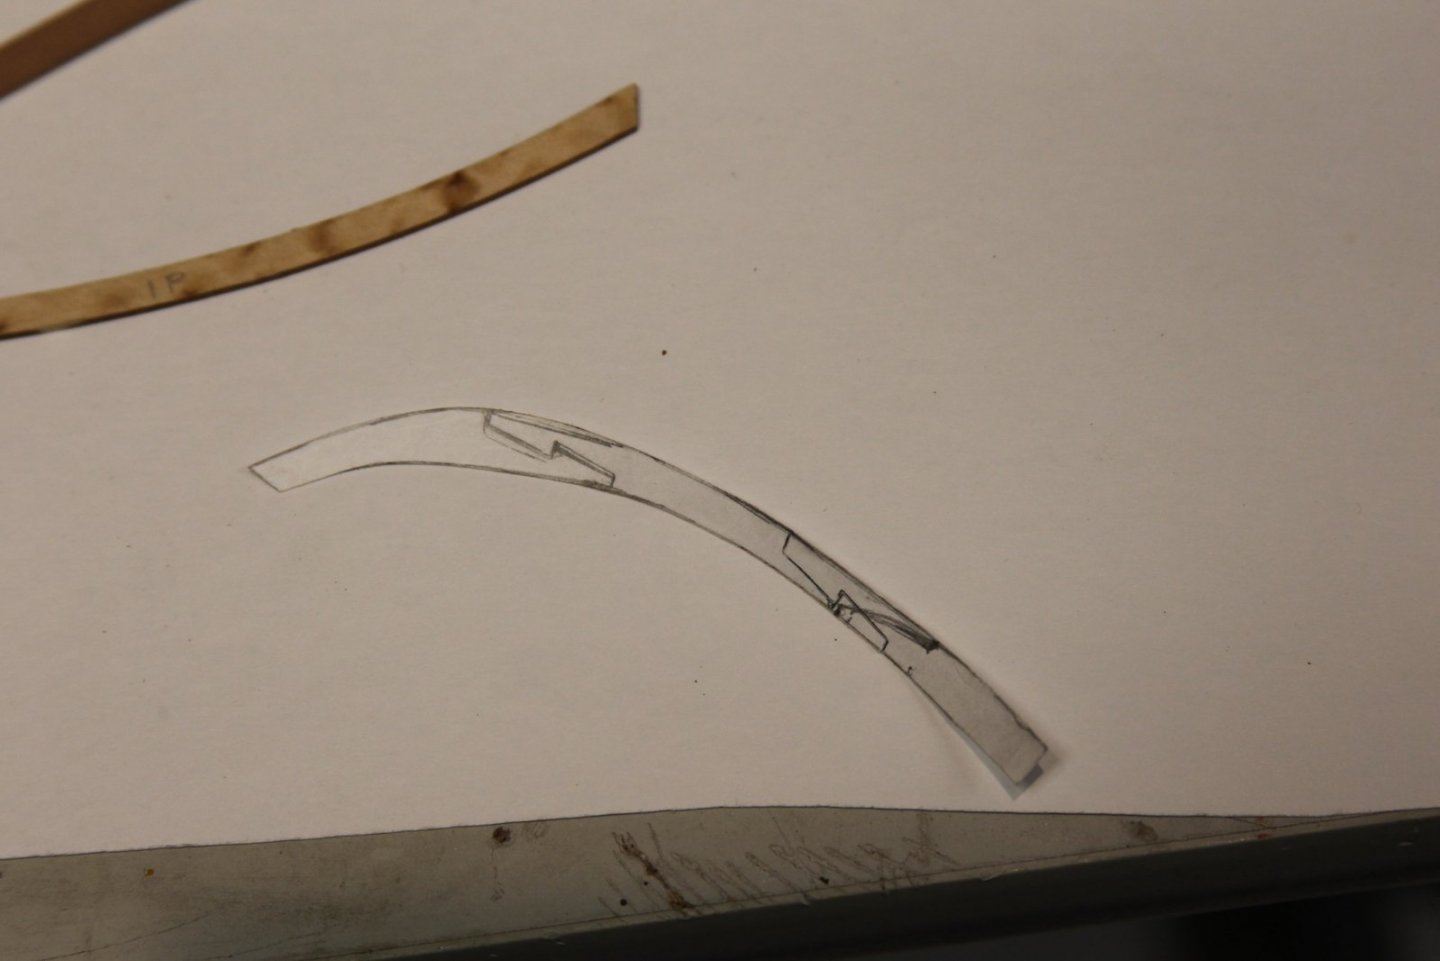
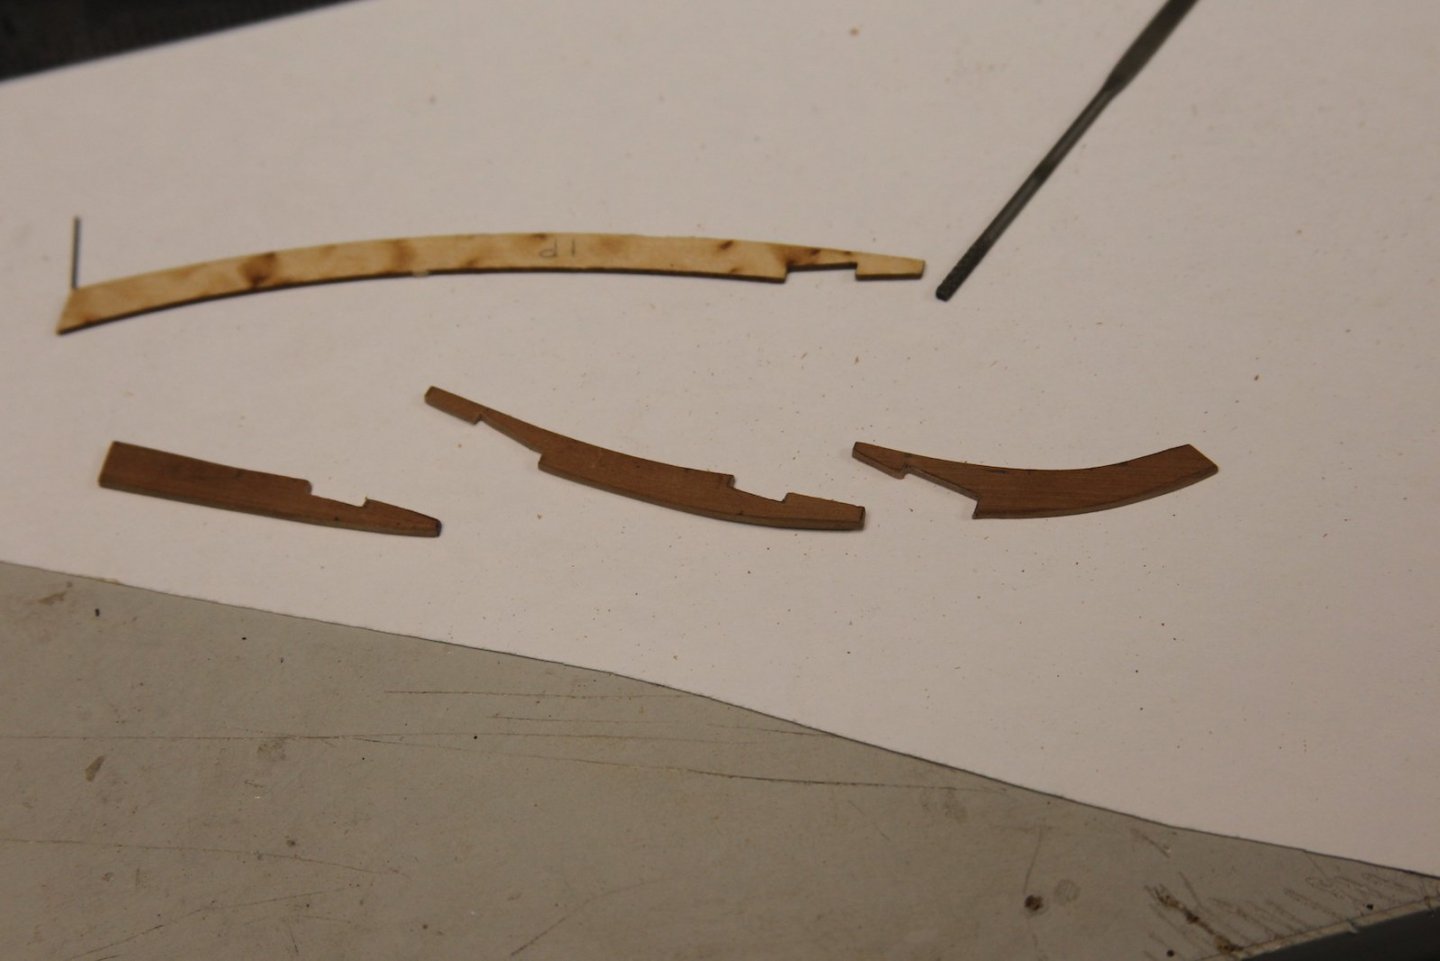
Been doing some fiddling over the holidays to get the upper decks going. First, I knocked out the gallows. I say 'knocked out' - but in reality it took a couple of efforts and a few hours to get the decorations the way I wanted them. I saw it as another opportunity to add a bit of embellishment without (hopefully) being too over the top. This is a piece of scrap mahogany. Then I started work on the foredeck. As most of you know - I tend to do things in some unconventional ways and sometimes in unconventional order. In this case, I decided to try and 'pre-plank' the fore deck before I mounted on the ship. My thinking here is that I wanted to drill the treenails with the drill press. I don't have quite as stead a hand as I used to, and although my lower deck treenails look ok - they're not perfectly straight. Hopefully using the drill press would achieve that. So, I glued my planks to the false deck, and then left some room around the edge of the deck to soak and start bending a bit of Swiss Pear to fit the margin planks. Then I mounted the deck. I missed a couple pictures of measuring and drilling out the treenails, but it's your standard fair - filled in with diluted PVA and sawdust. The margin plank was fitted by using some card stock as templates, then cutting out and puzzling together the pieces. Obviously this is a bit tedious and requires cutting and sanding at little bit at a time until they fit together snug. After lots of test fitting, I glued/fitted the margin plank together first, then put it in place. One thing to bear in mind if you're using anything other than the stock planking strips from this (or really any) kit. The Swiss Pear is considerably thicker than the thin planking strips provided. Even after sanding the heck out of it, it's still at least double or triple the size. So I'll need to beef up the foc'sle bulwark inner planking a bit to make up for that.


- 419 replies
-
- 8
-
-
- Victory Models
- Pegasus
- (and 2 more)
-
Love these old school paint combinations!
-
Error code 200
Moonbug replied to Blue Ensign's topic in Using the MSW forum - **NO MODELING CONTENT IN THIS SUB-FORUM**
Hi All - I too have had this problem. For what it's worth, I took the photos that failed to load, put them in Photoshop and re-exported them as .jpgs. Similar to BE and Glenn's "twin" technique. I didn't realize this was a site wide problem and thought perhaps it was an issue with my formatting - I mostly use a pretty high end Canon EOS 1D Mark IV. -
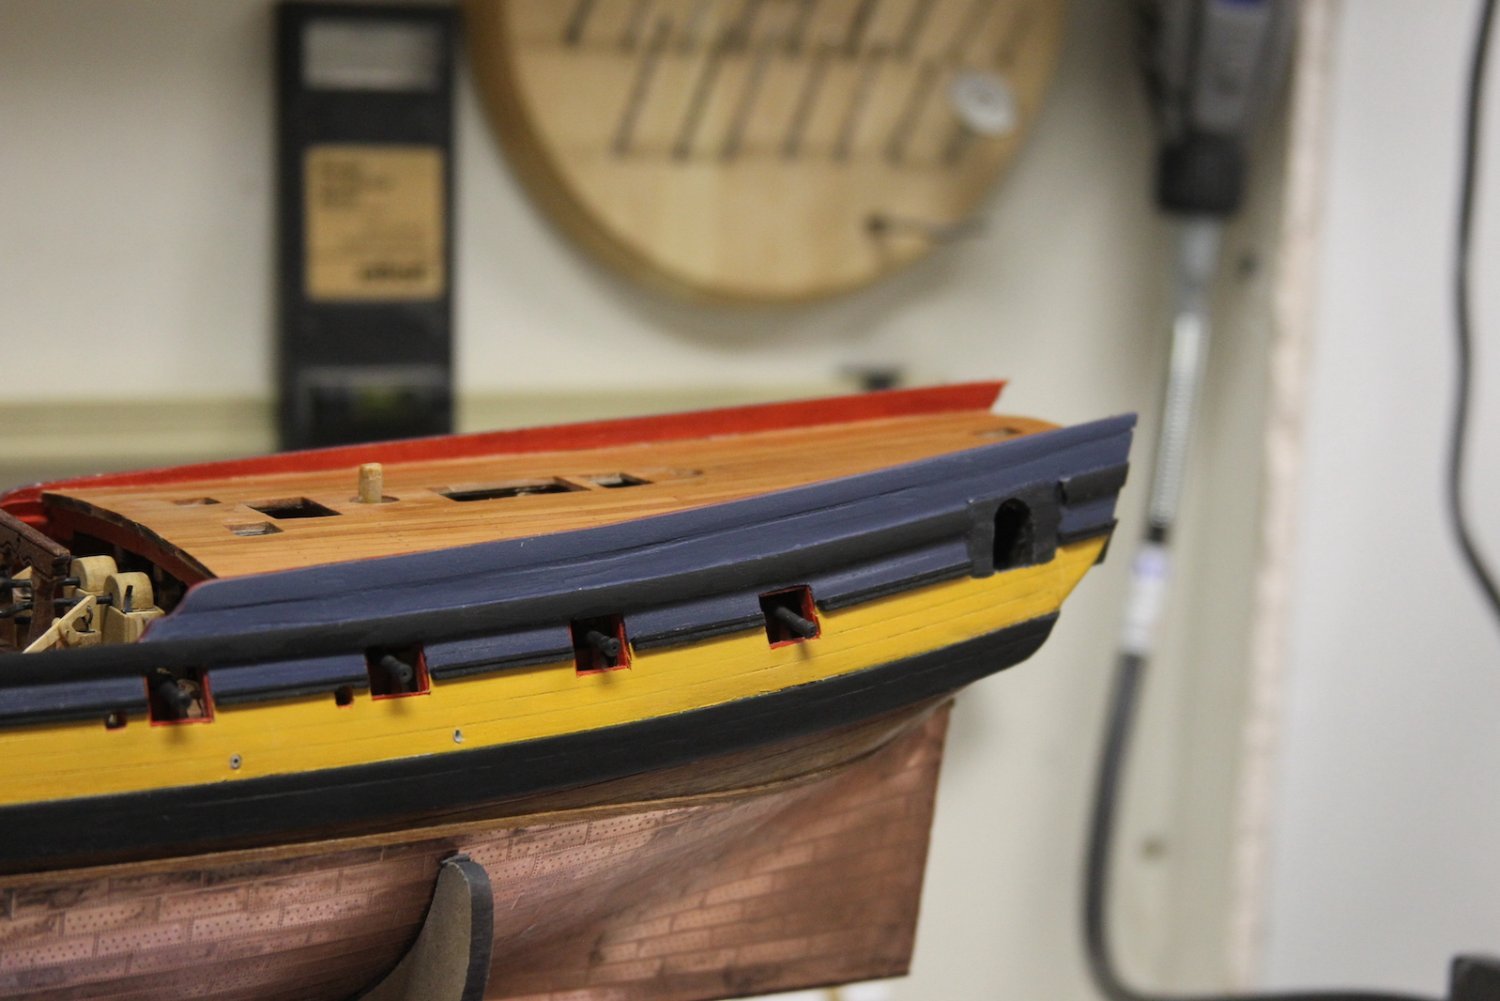
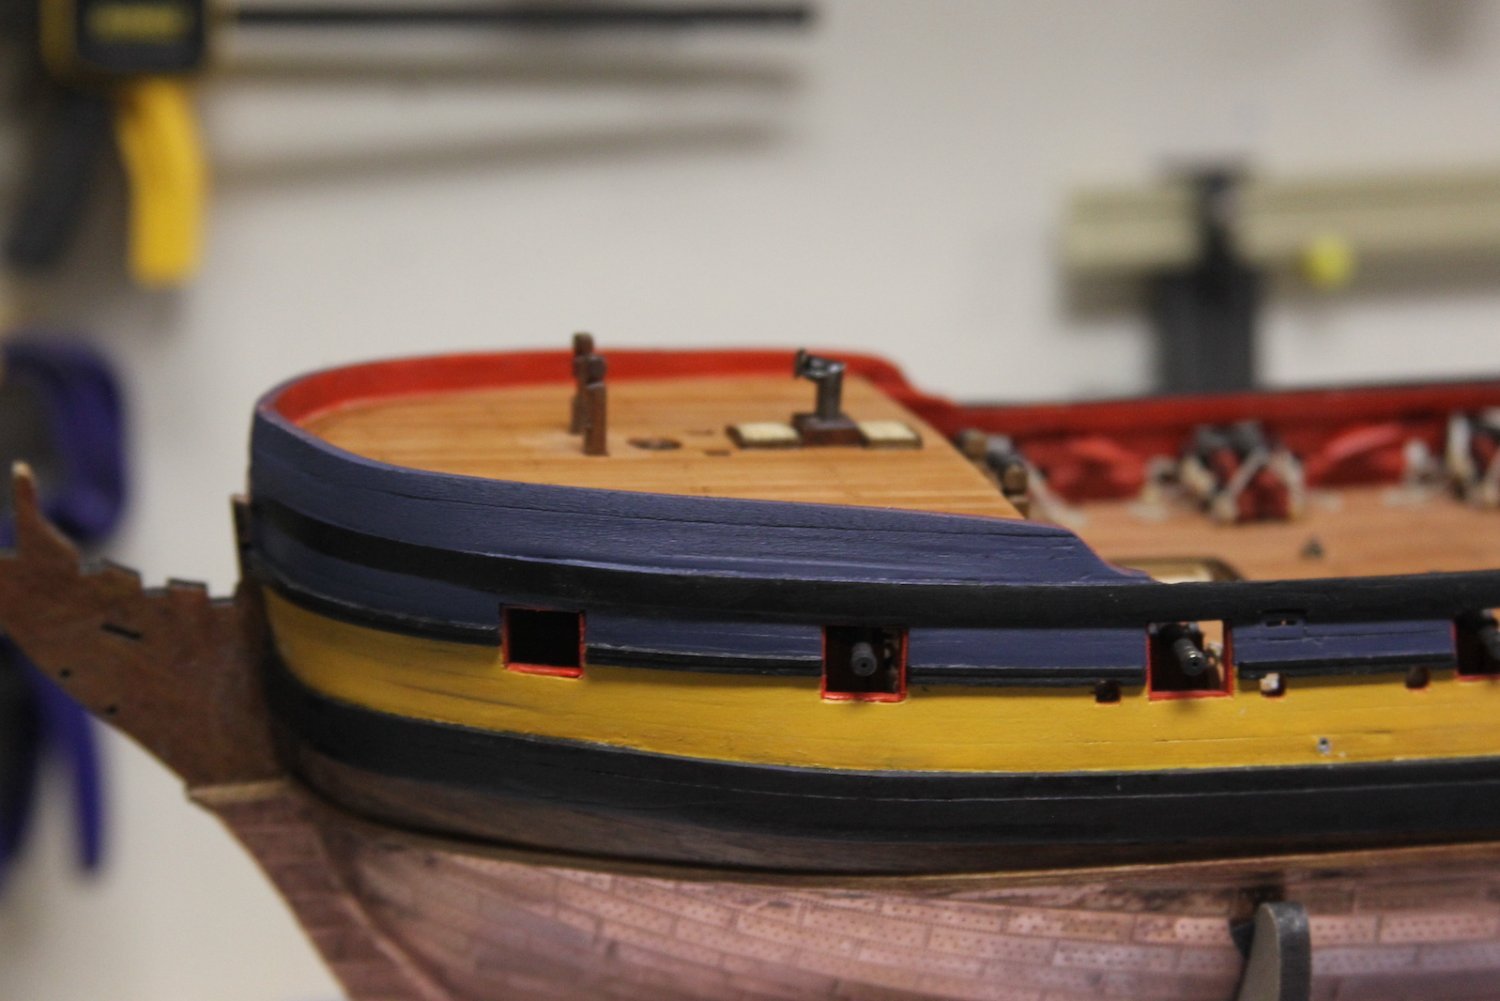
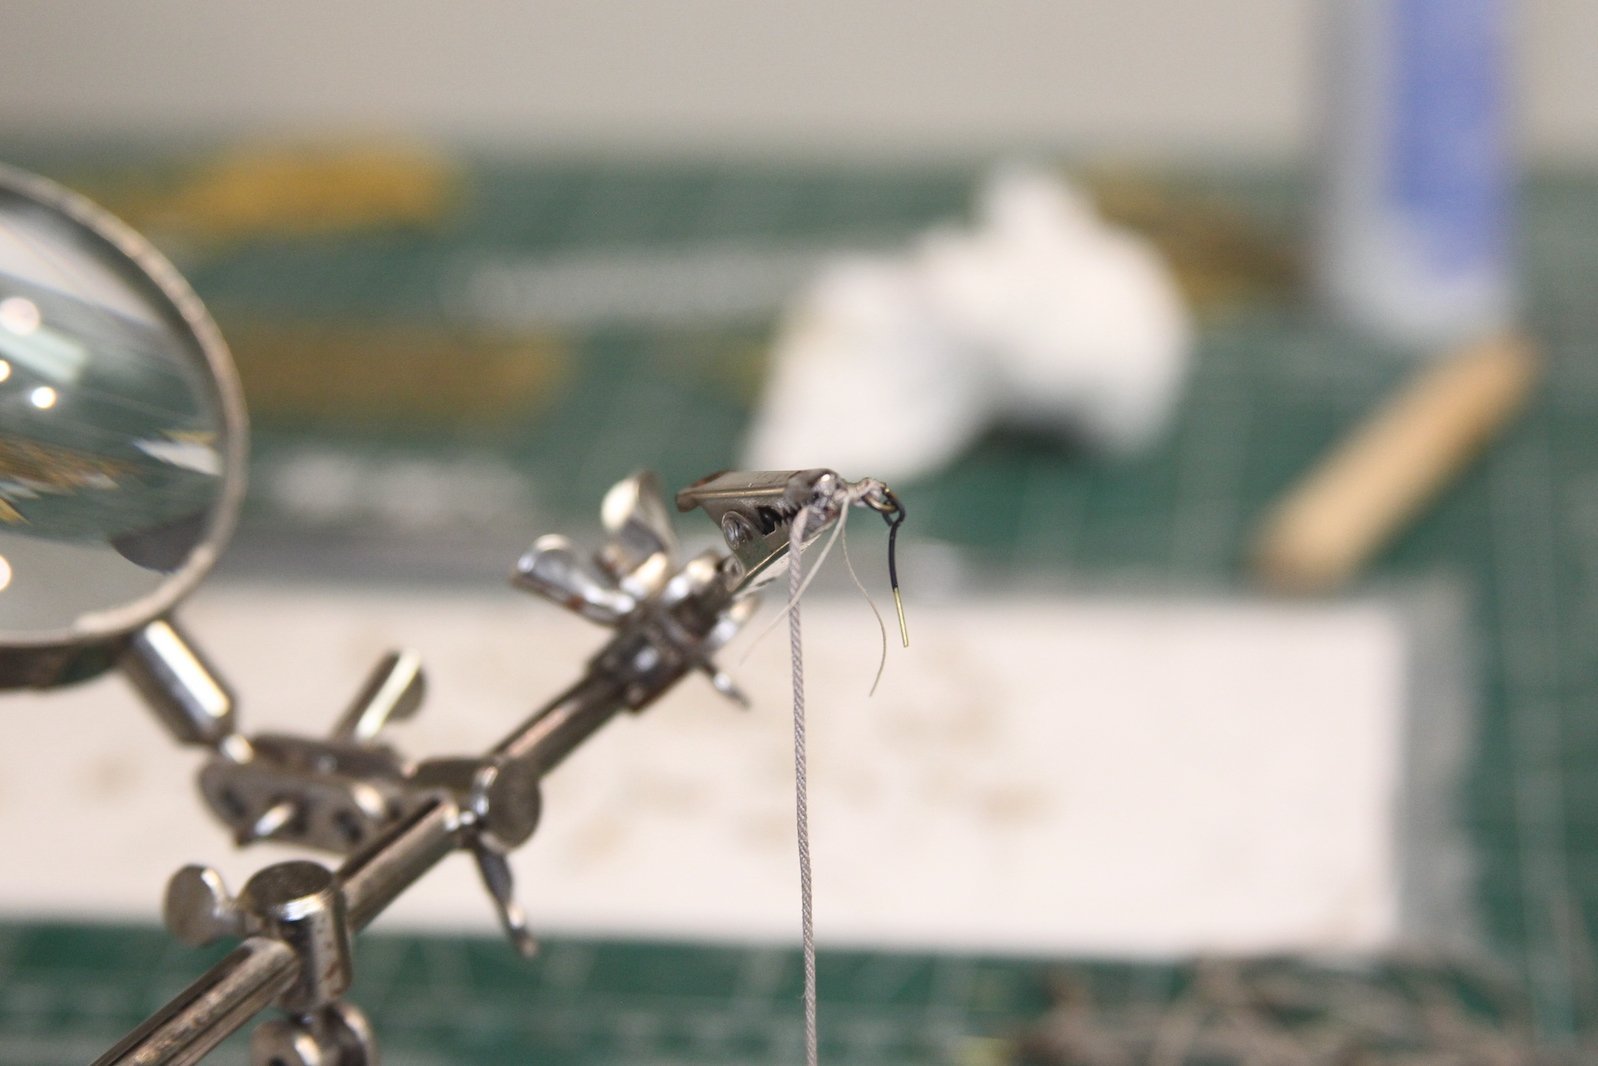
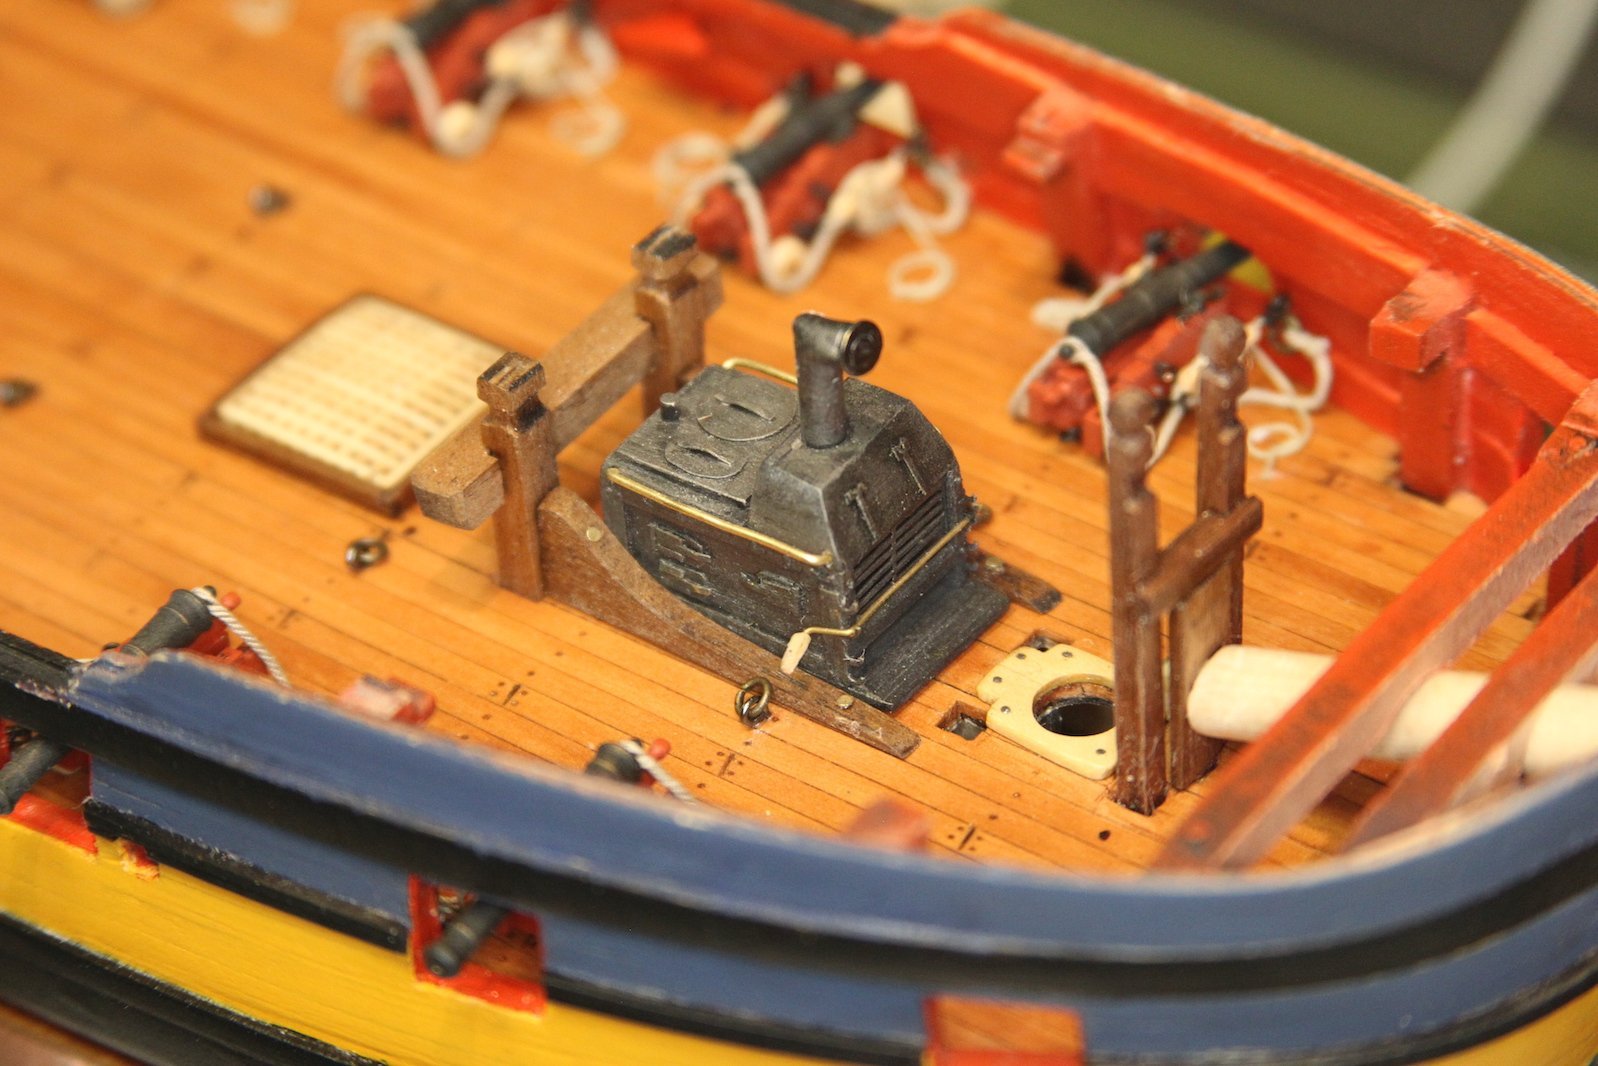
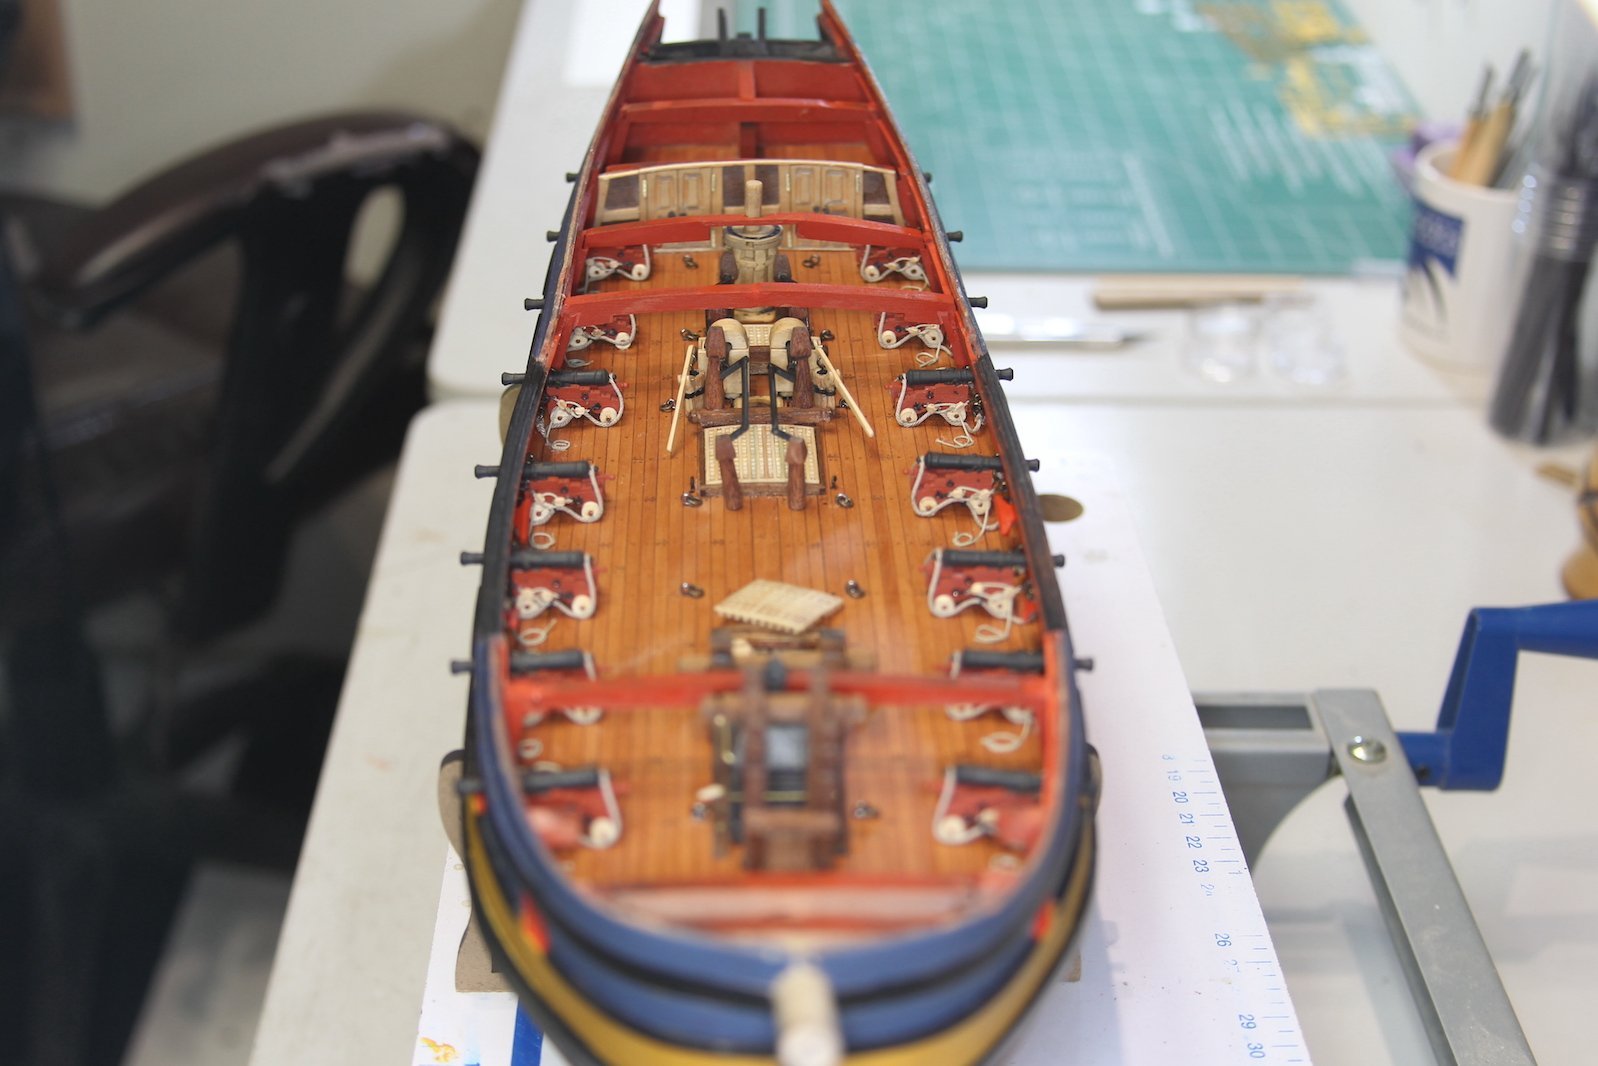
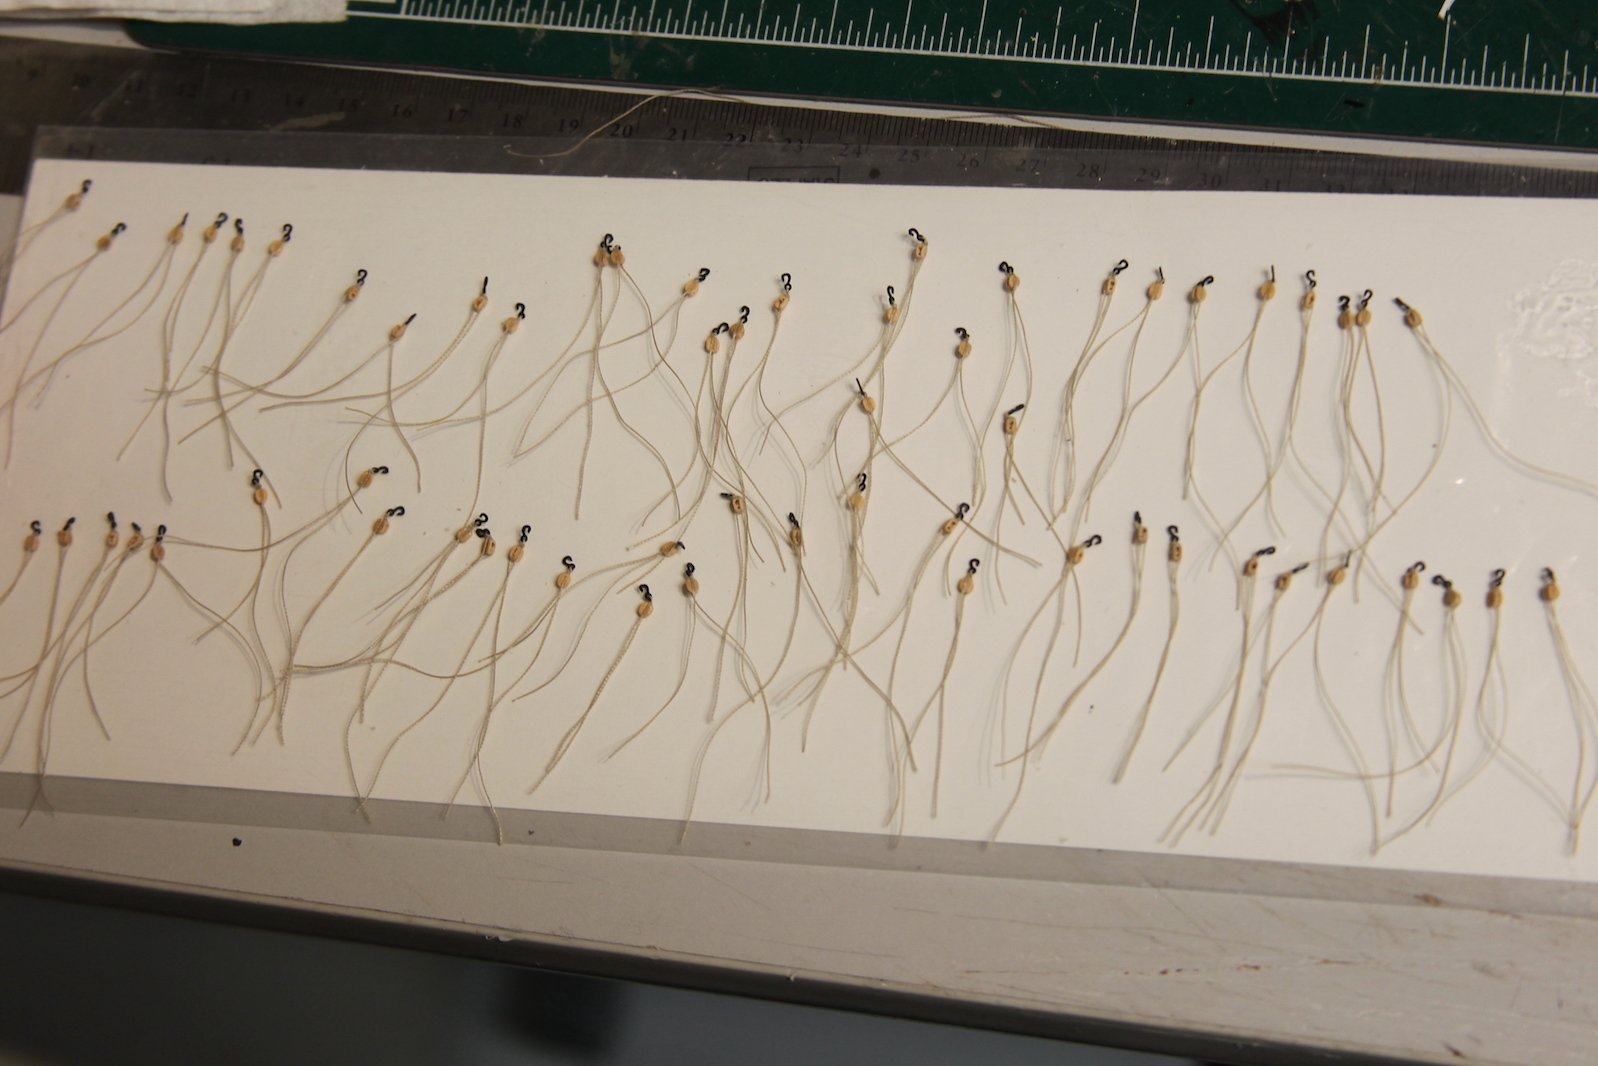
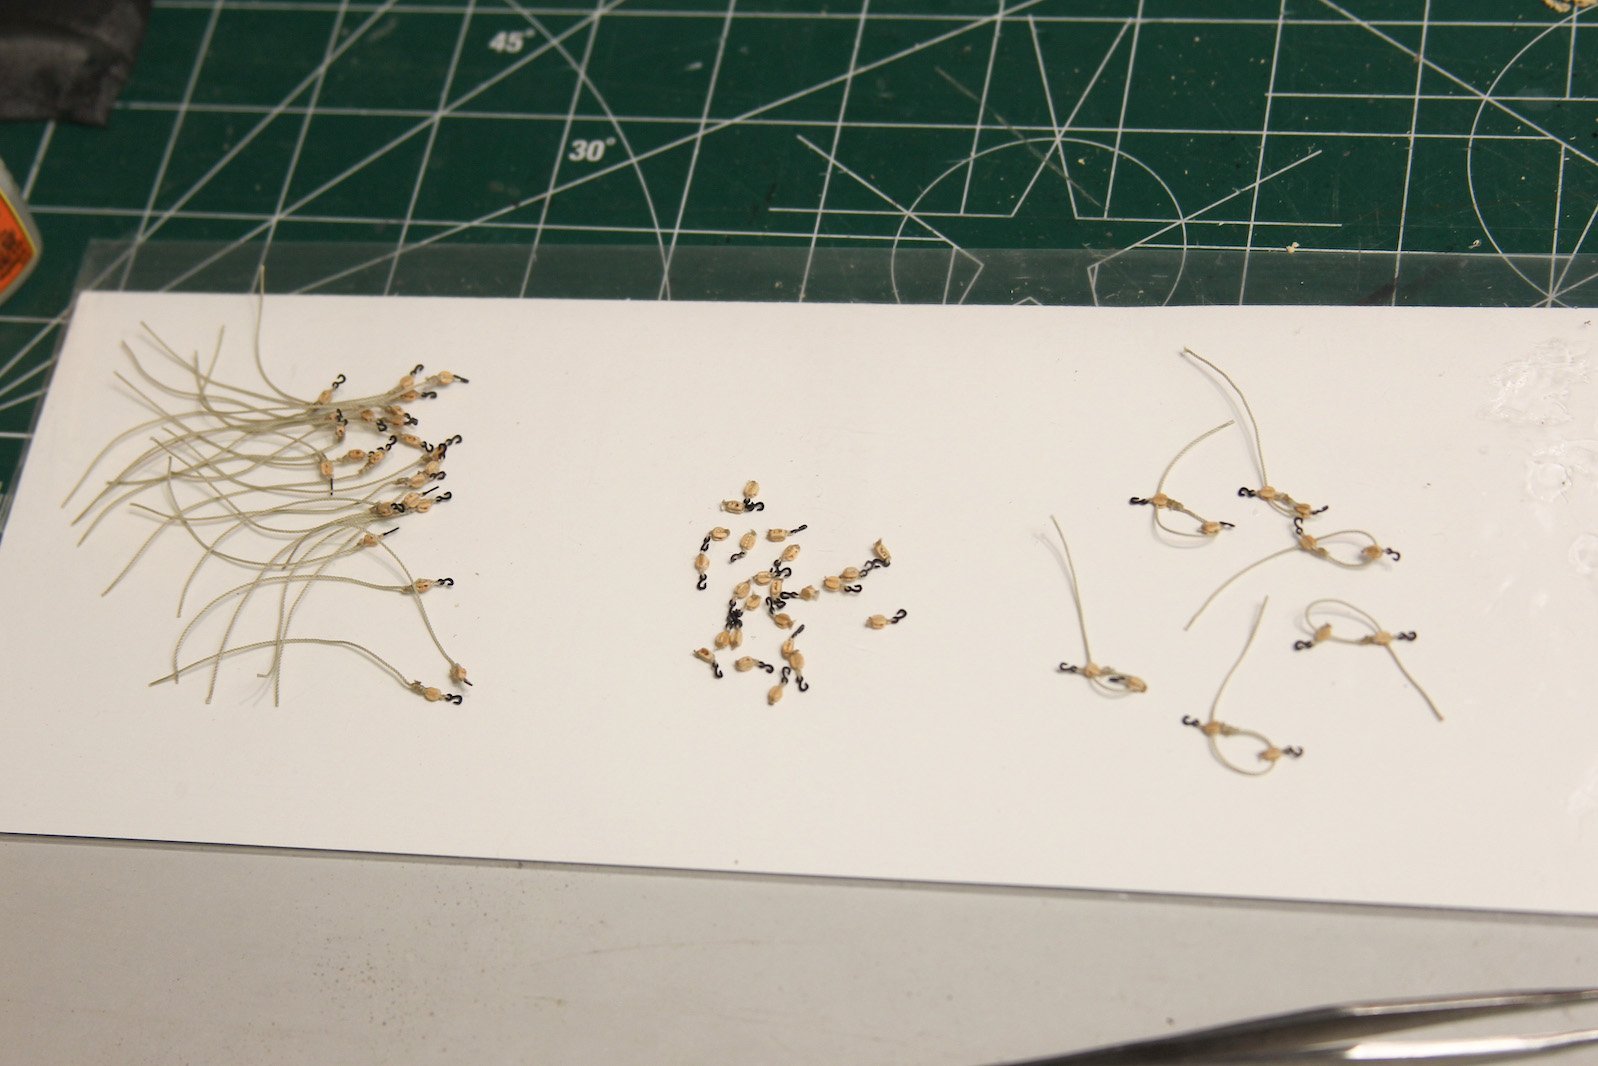
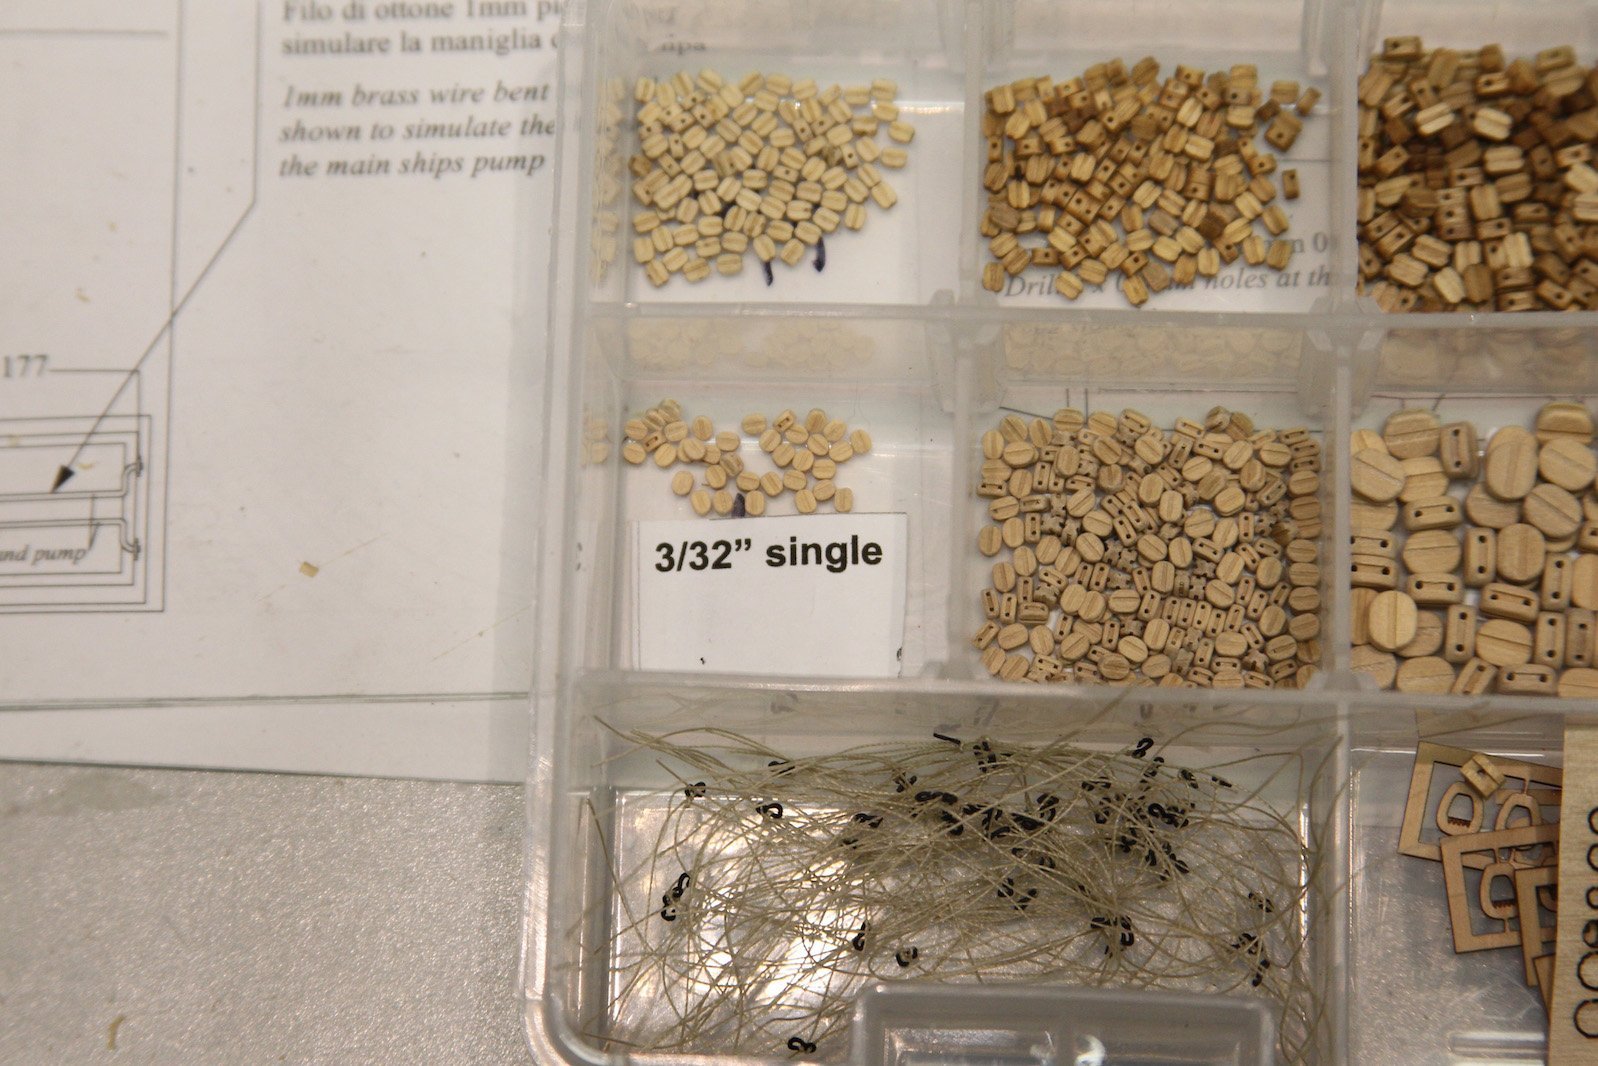
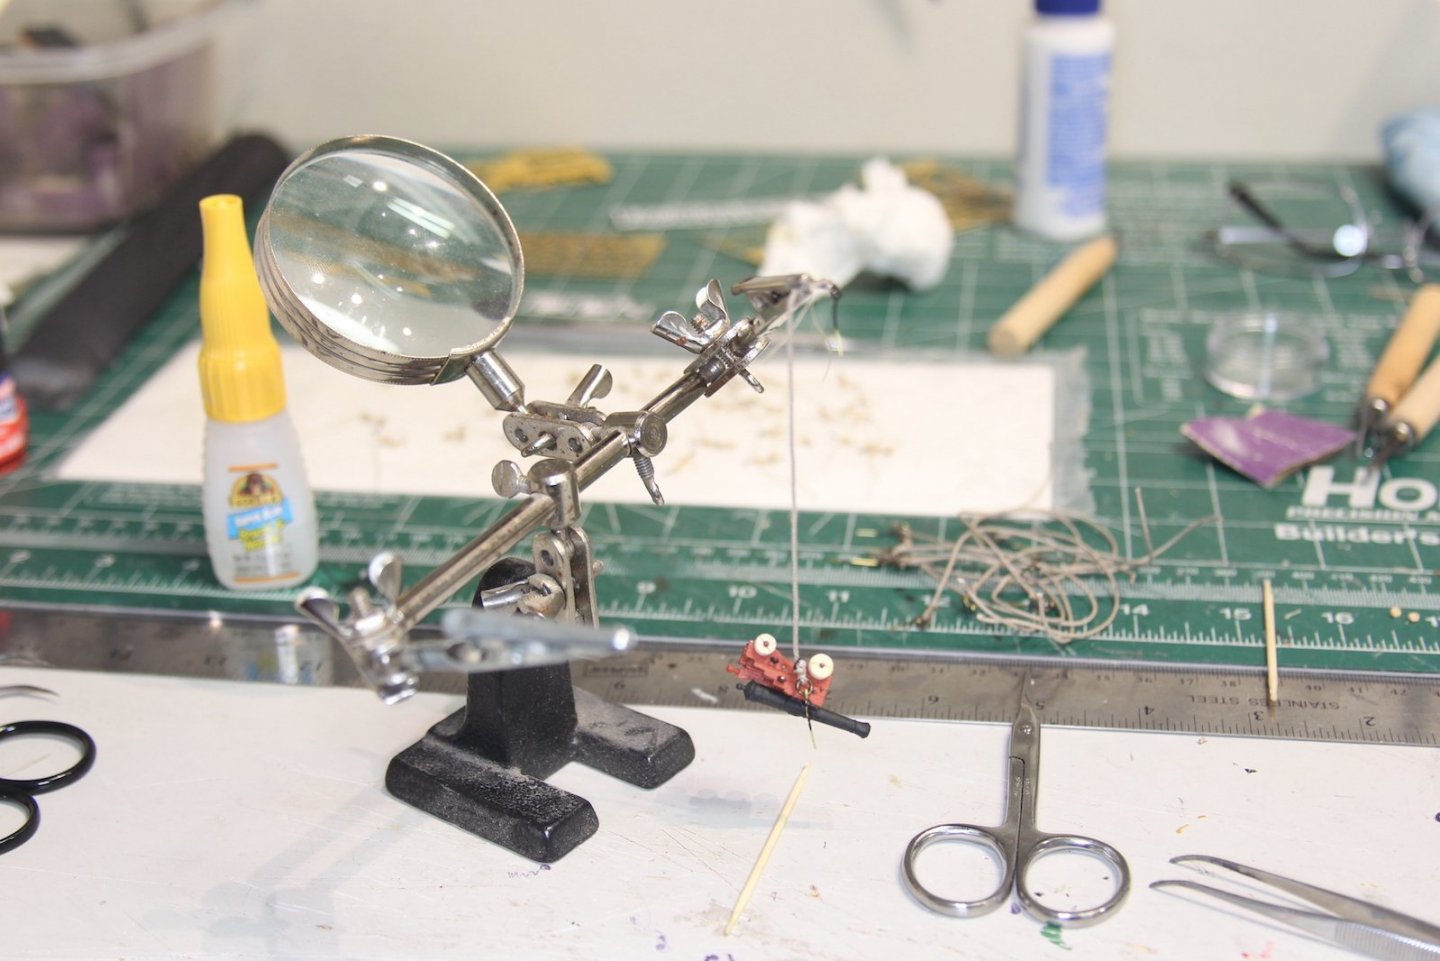
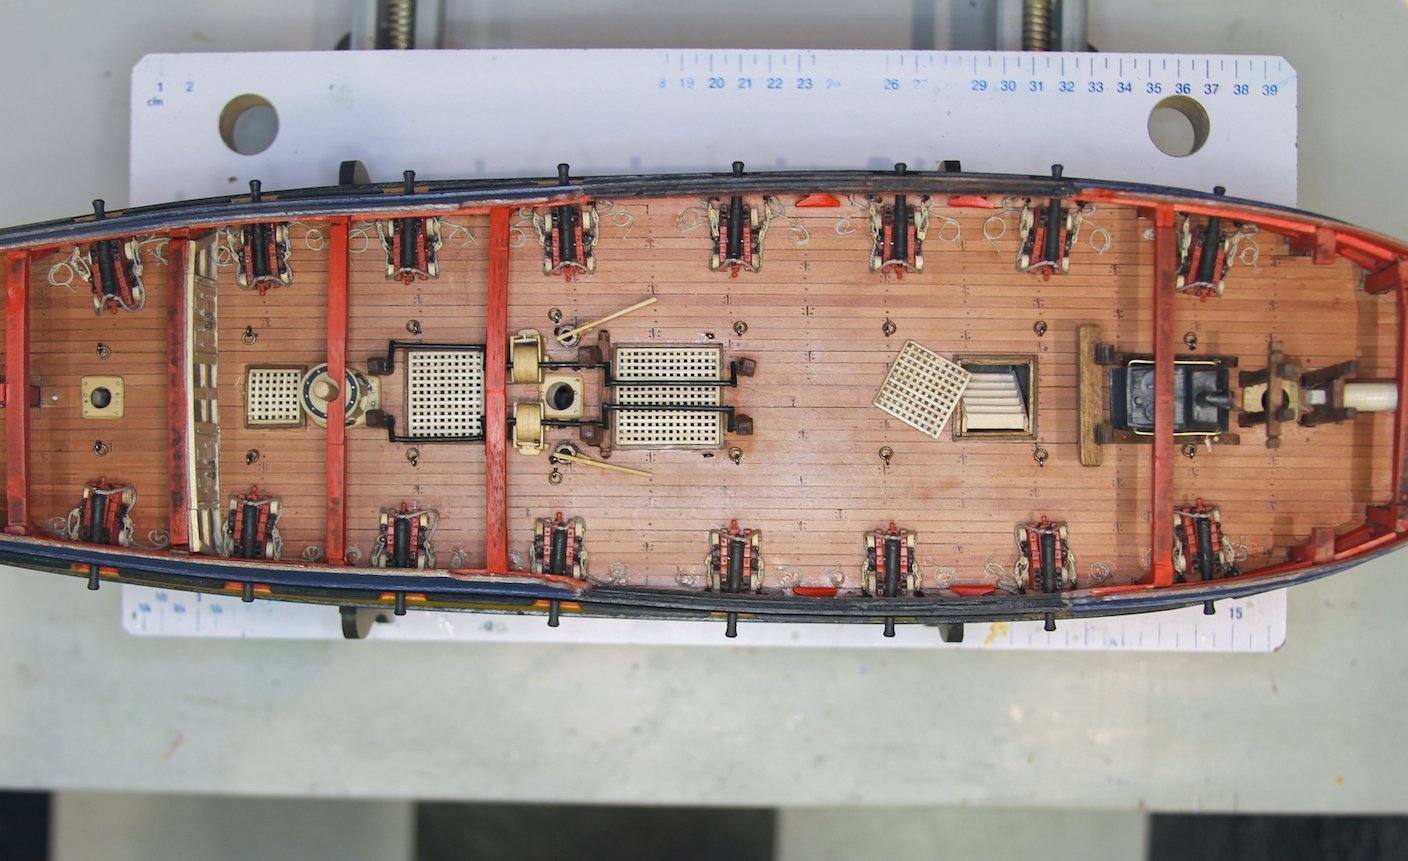
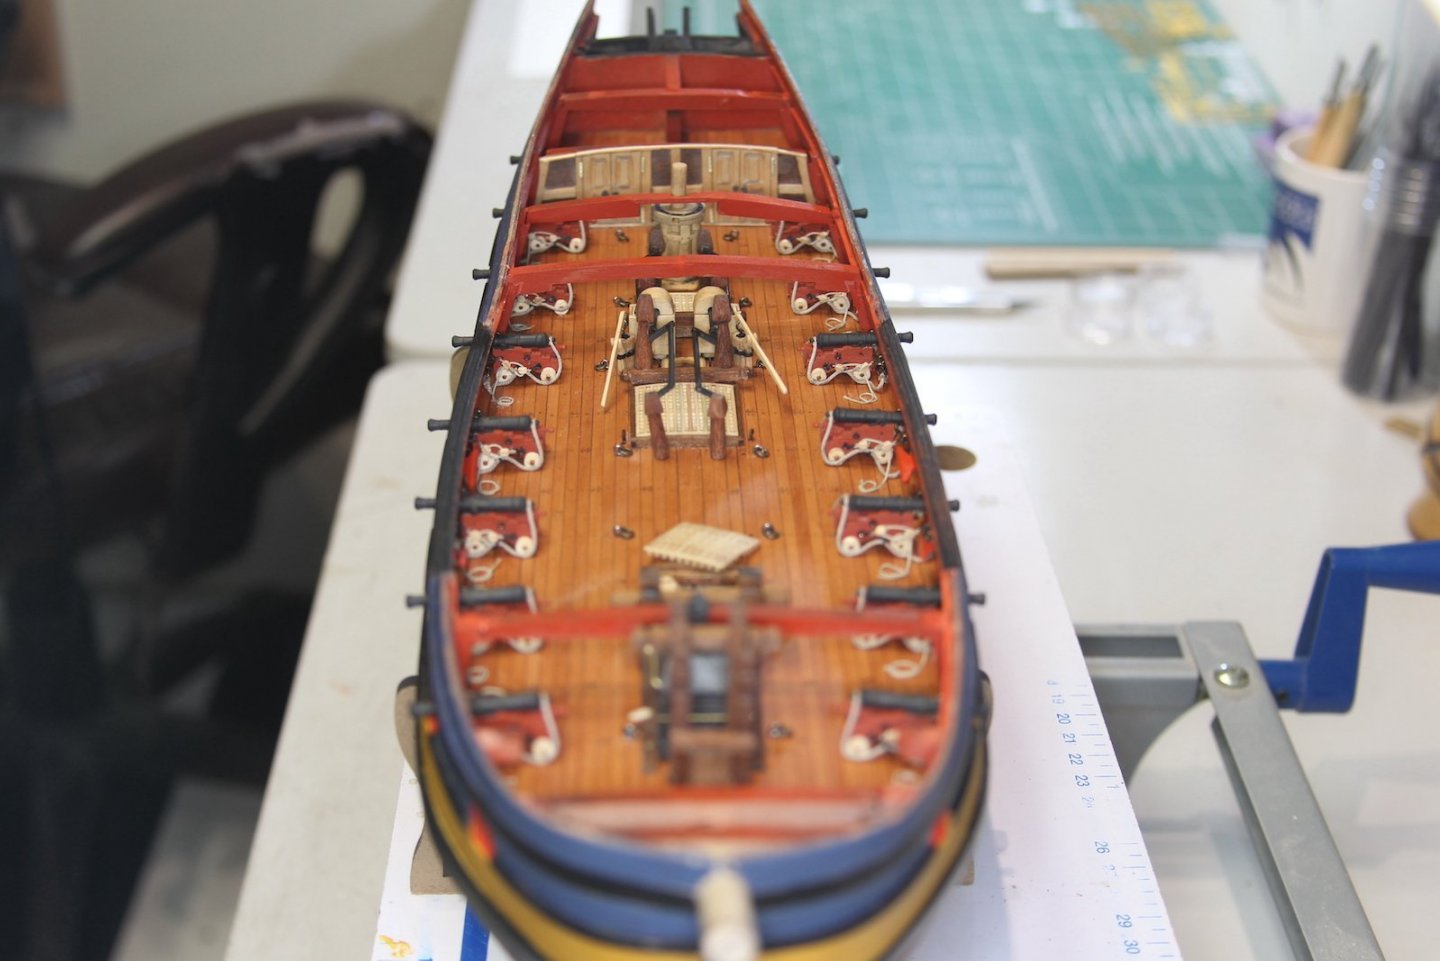
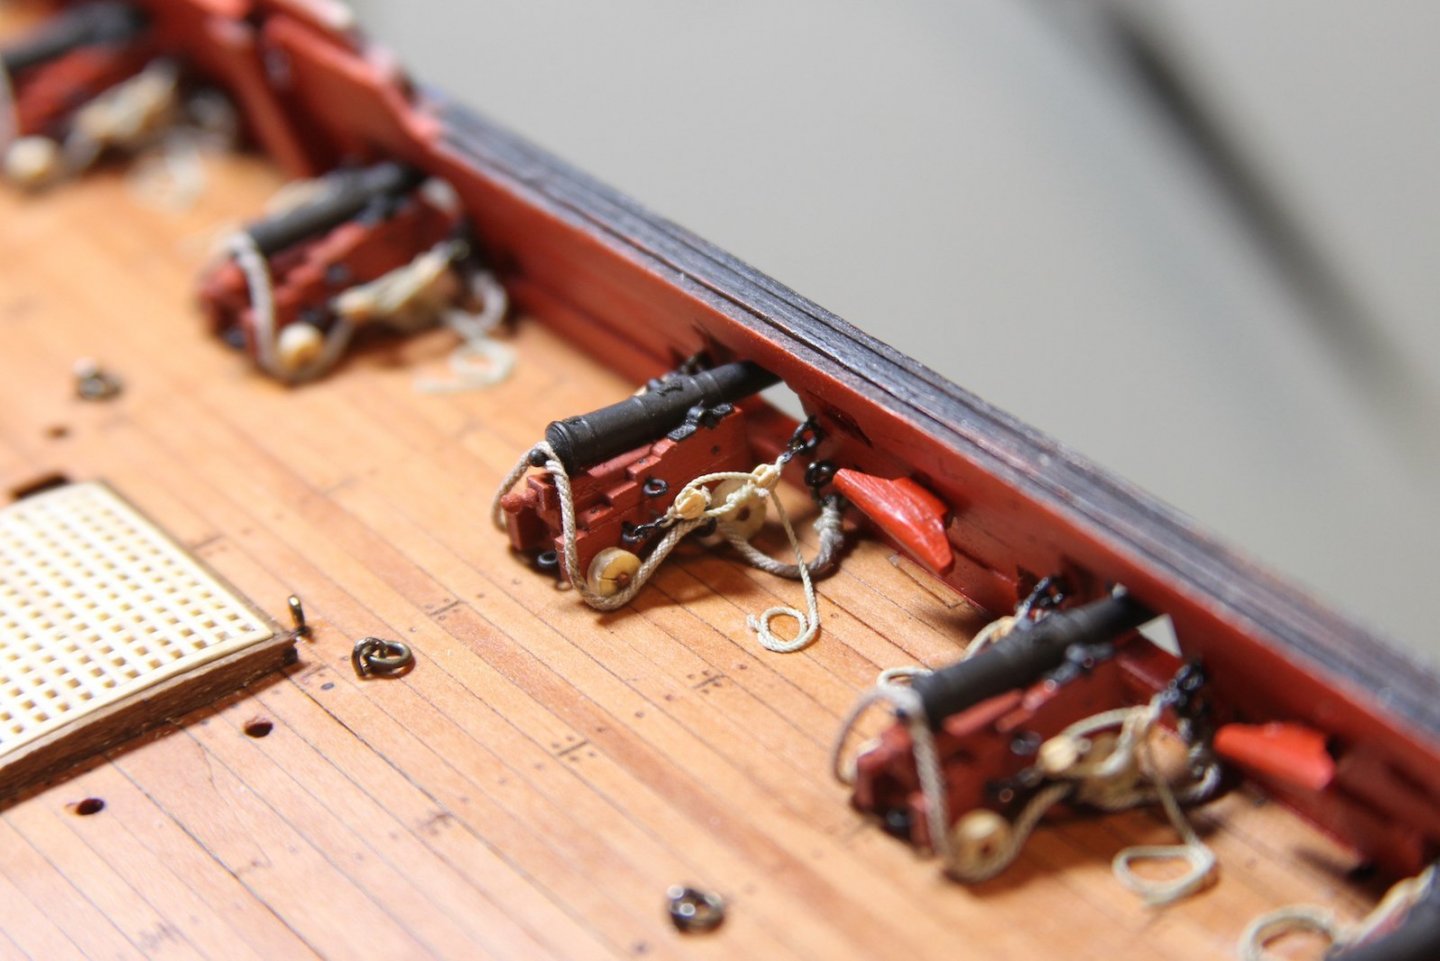
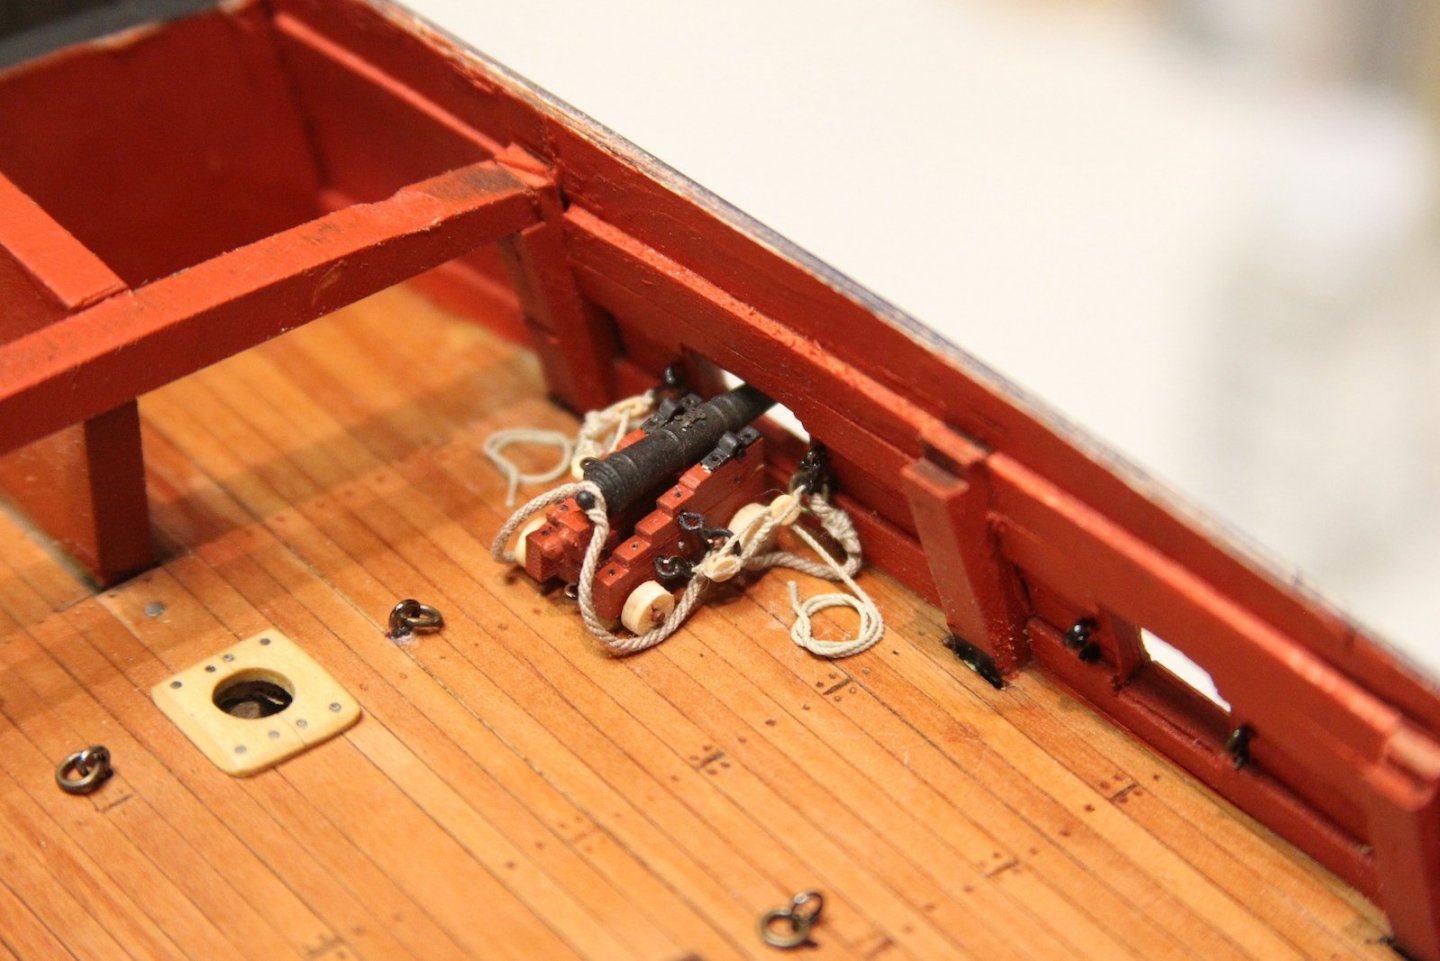
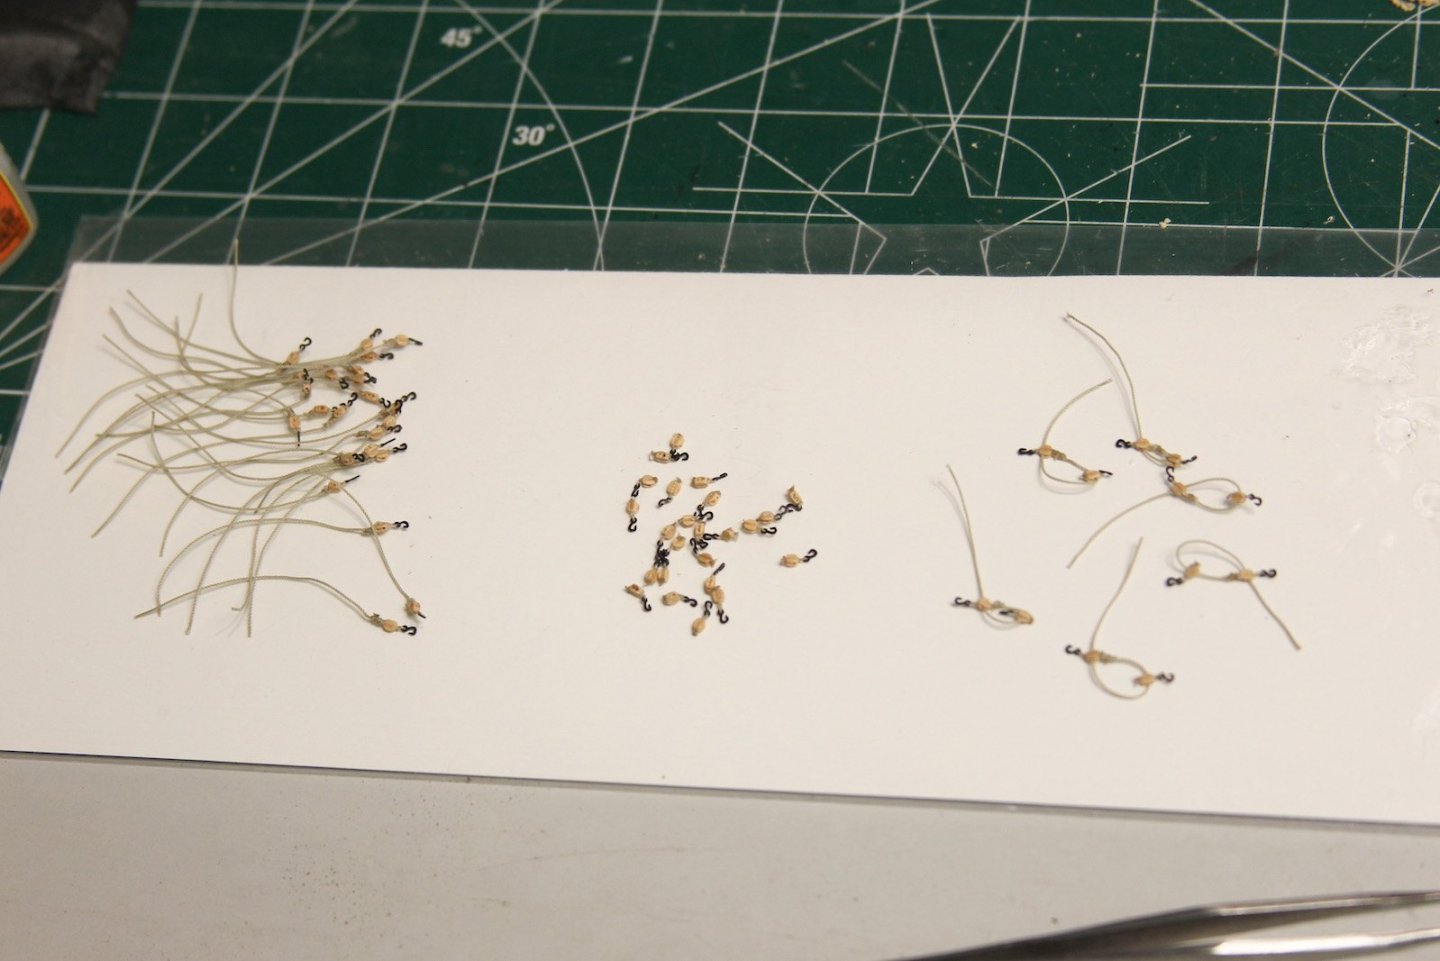
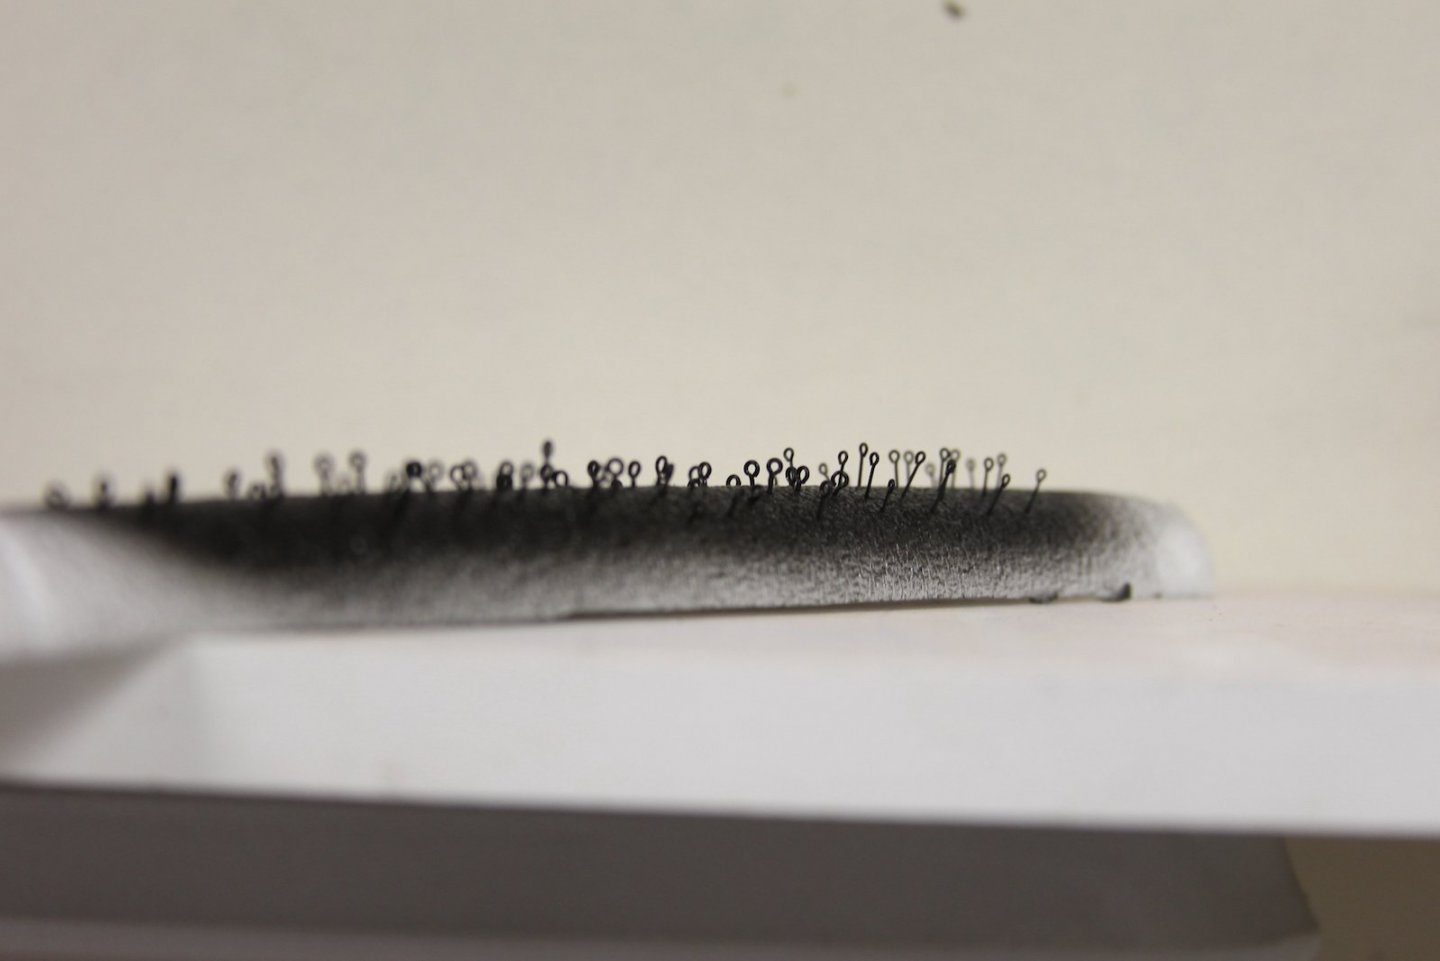
I've been plugging away at the cannon rigging. Everyone has their little methods / jigs, etc, for getting the tackle together, so here's mine. I went through and attached one end of the breech rope to an eyebolt and ring, fed it through the rings on the carriage, then clipped it in the soldering holder to tie up the loose end and clip off the extra bits. I briefly flirted with the idea of feeding it through the carriage bolts/rings, then attaching the entire thing to the carriage - but in a weird way, this actually helped me keep a good measure on the lengths, etc. I also opted for the "feed the button into the rope" method as opposed to the wrap the breech around the button - even though the latter is more accurate. It just looks SO bulky to me that I don't care for it. After the guns were rigged, I went through and tried to touch up any blackened/painted areas that got scrapped off; a pretty tough gig. I've tried a variety of types of paints and other methods of fixident, but still have a heck of a time getting the black to stay on eyebolts and rings. You'll also notice that I went with all 16 guns rather than the 14 the Peg calls for. What can I say, I like a full compliment. Getting the guns in place then allowed me to add the lower deck fittings that I had completed up until this point.


- 419 replies
-
- 13
-
-
- Victory Models
- Pegasus
- (and 2 more)
-
Wait… wut? How did I not know about these? What are they? I’ve got a ‘67 Camaro in the garage that would love to meet some kin!
-
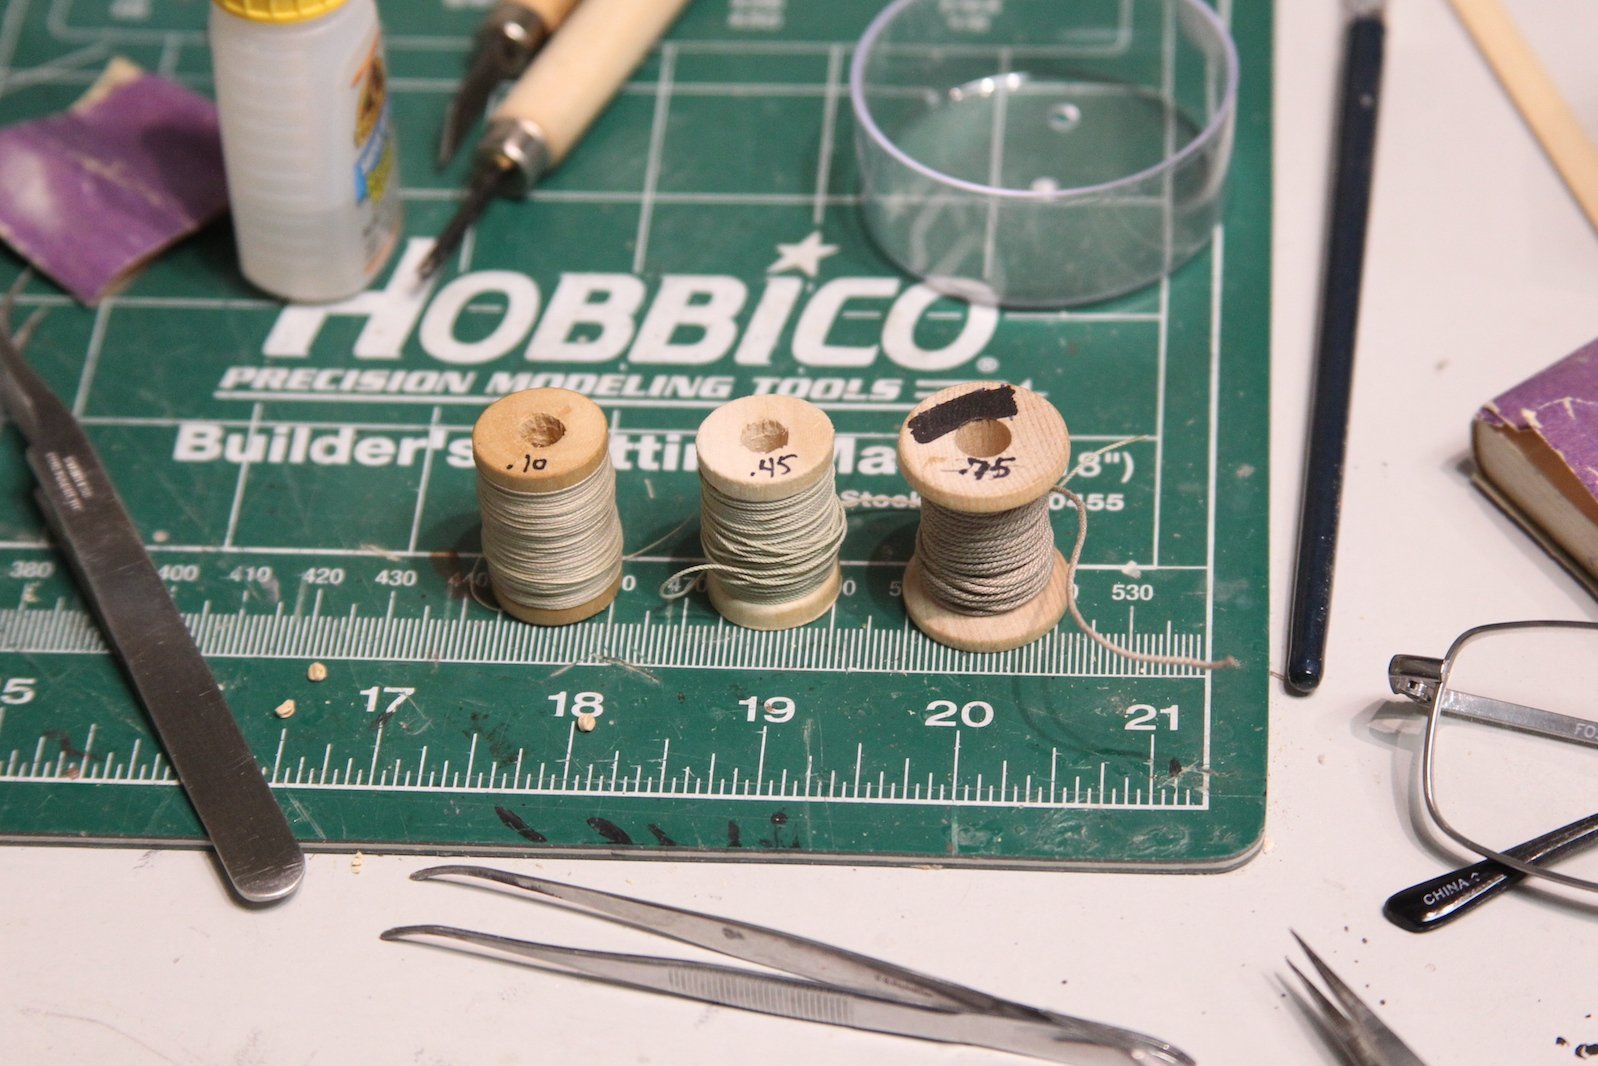
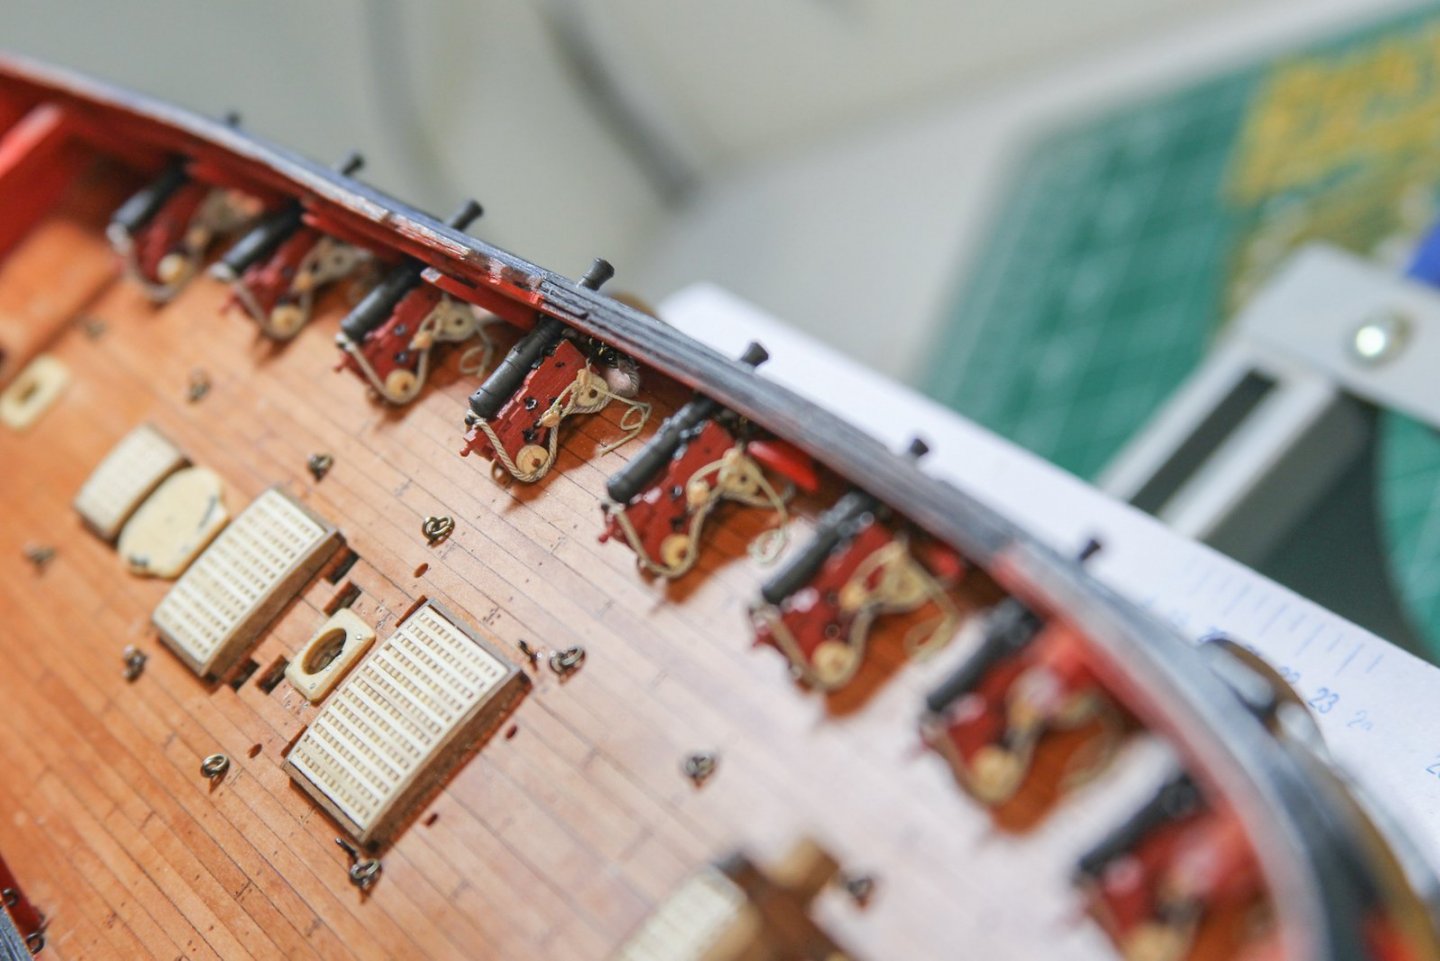
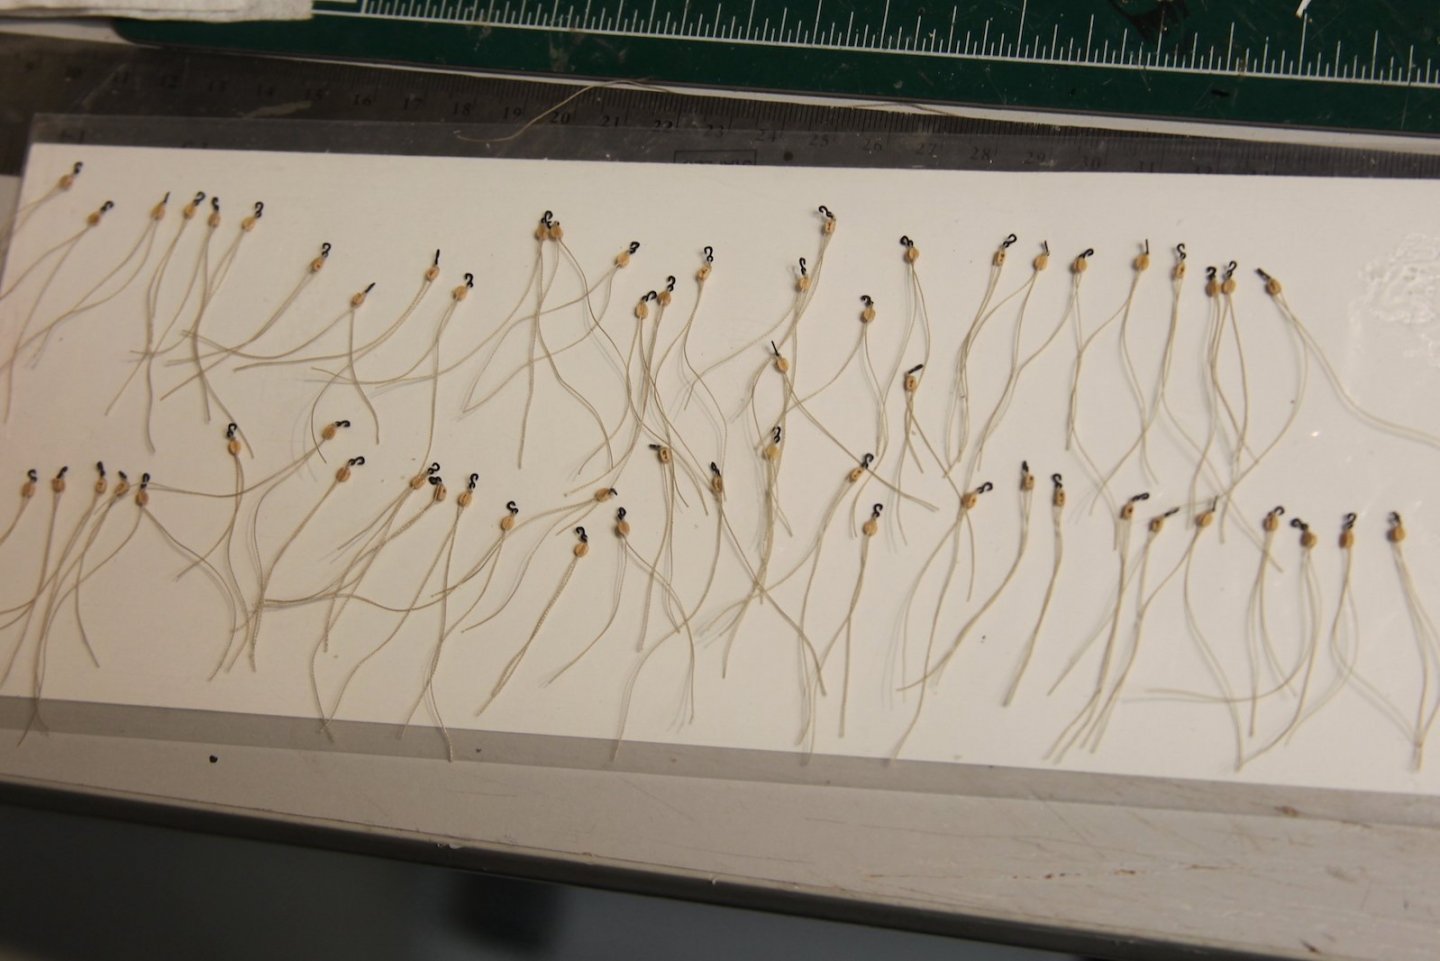
Thanks a lot Greg - appreciate the look-in! I also got a chance to get rolling on the guns this week. I started out with a test rig of one gun. Yes, I know the eye bolt is way too close to the rear of the carriage, but this gun is safely hidden under the aft deck and that will never be seen - hence the "test area." Then the all too familiar assembly line process begins. I honestly have no idea from where these small hooks are leftover - but I'm putting them to use again. Eye bolts are all painted, two of the three sizes of rope are from @Chuck's Syren shop as are the 3/32 boxwood blocks. I did have to drill out the boxwood blocks to a slightly larger diameter hole to accommodate the rope. Most gun rigging I've seen always comes across as a little bit chunky to me when it comes to the bocks, so I wanted to use the smallest blocks I could get away with that are still manageable with a rope that maintains some realism. 64 hooks tied with the .10 rope, 32 of which are tied to the .45 rope to create the out-haul tackle. Of course the ultimate goal here is to get all the rigging to lay in a quasi-natural looking state. As an additional note on the above test rig: I added a tiny dab of glue to adhere the breeching ropes to the sides of the wheels both for aesthetics and ease of mounting. I have not yet made a final decision on whether or not I'll do the in-haul train tackle. I'm pretty sure I don't want to rig them all, and I kind of dig what Dan did with his Vulture where he rigged one train tackle as an example. But I'm not sure my brain can live with that lack of symmetry. We shall see. More to come.


- 419 replies
-
- 7
-
-
- Victory Models
- Pegasus
- (and 2 more)
-
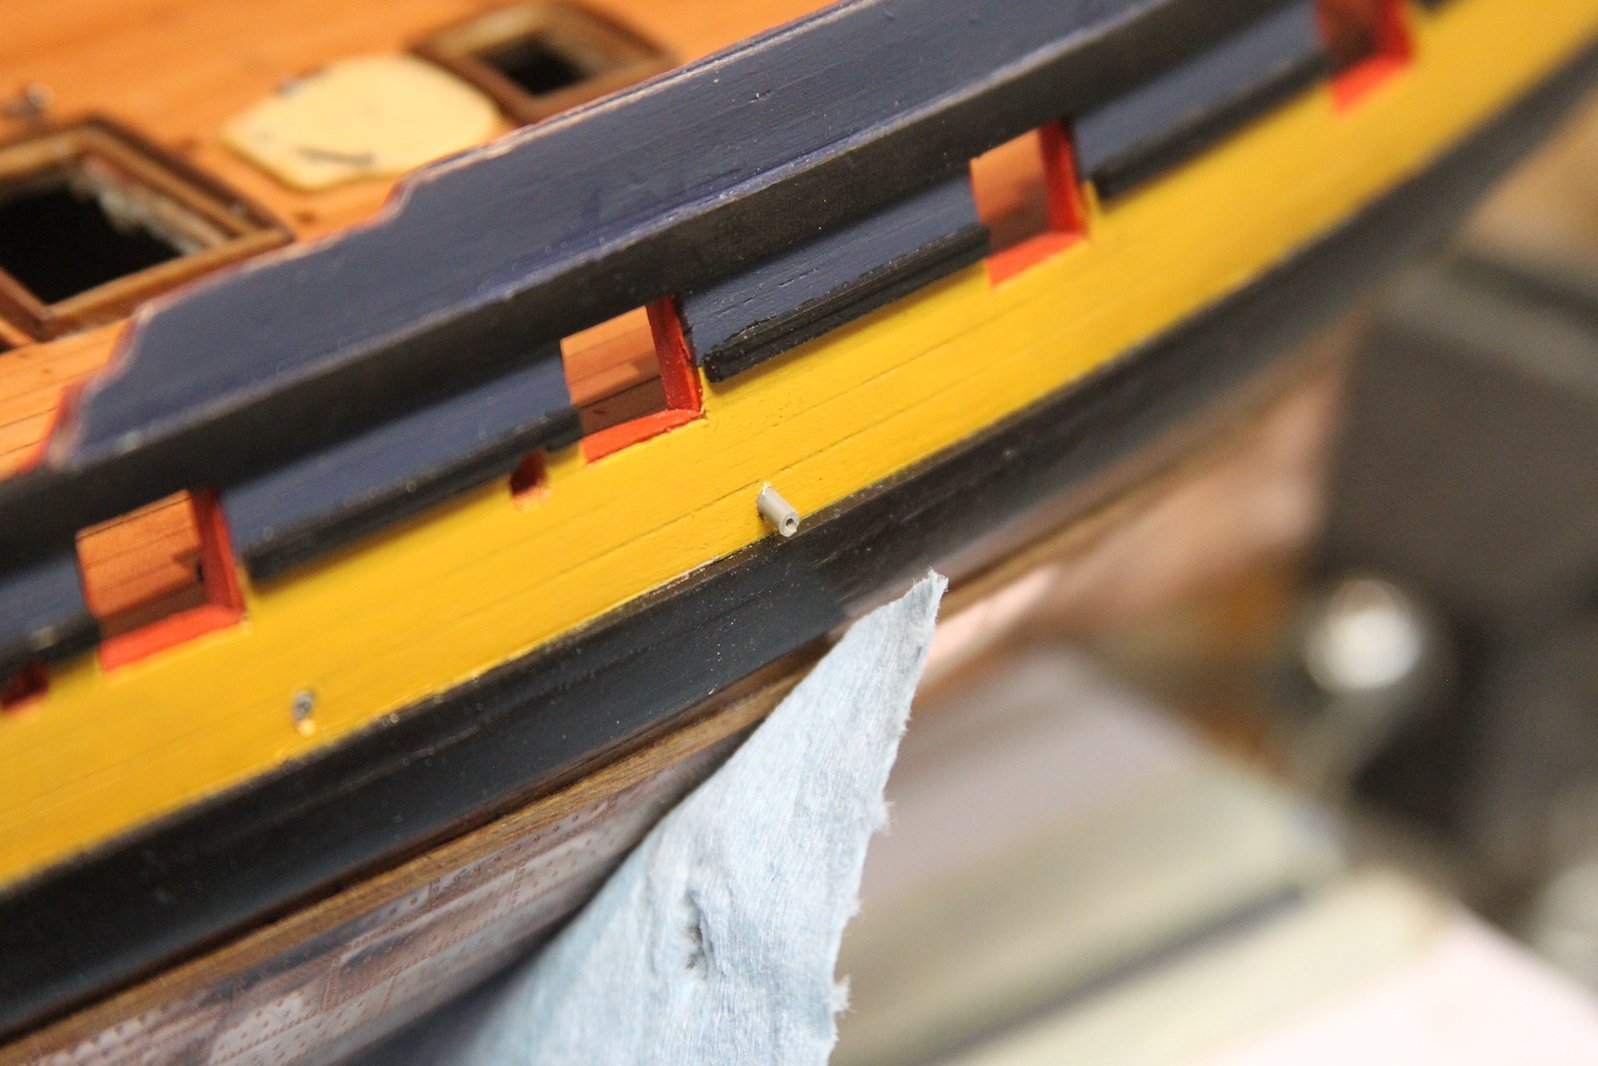
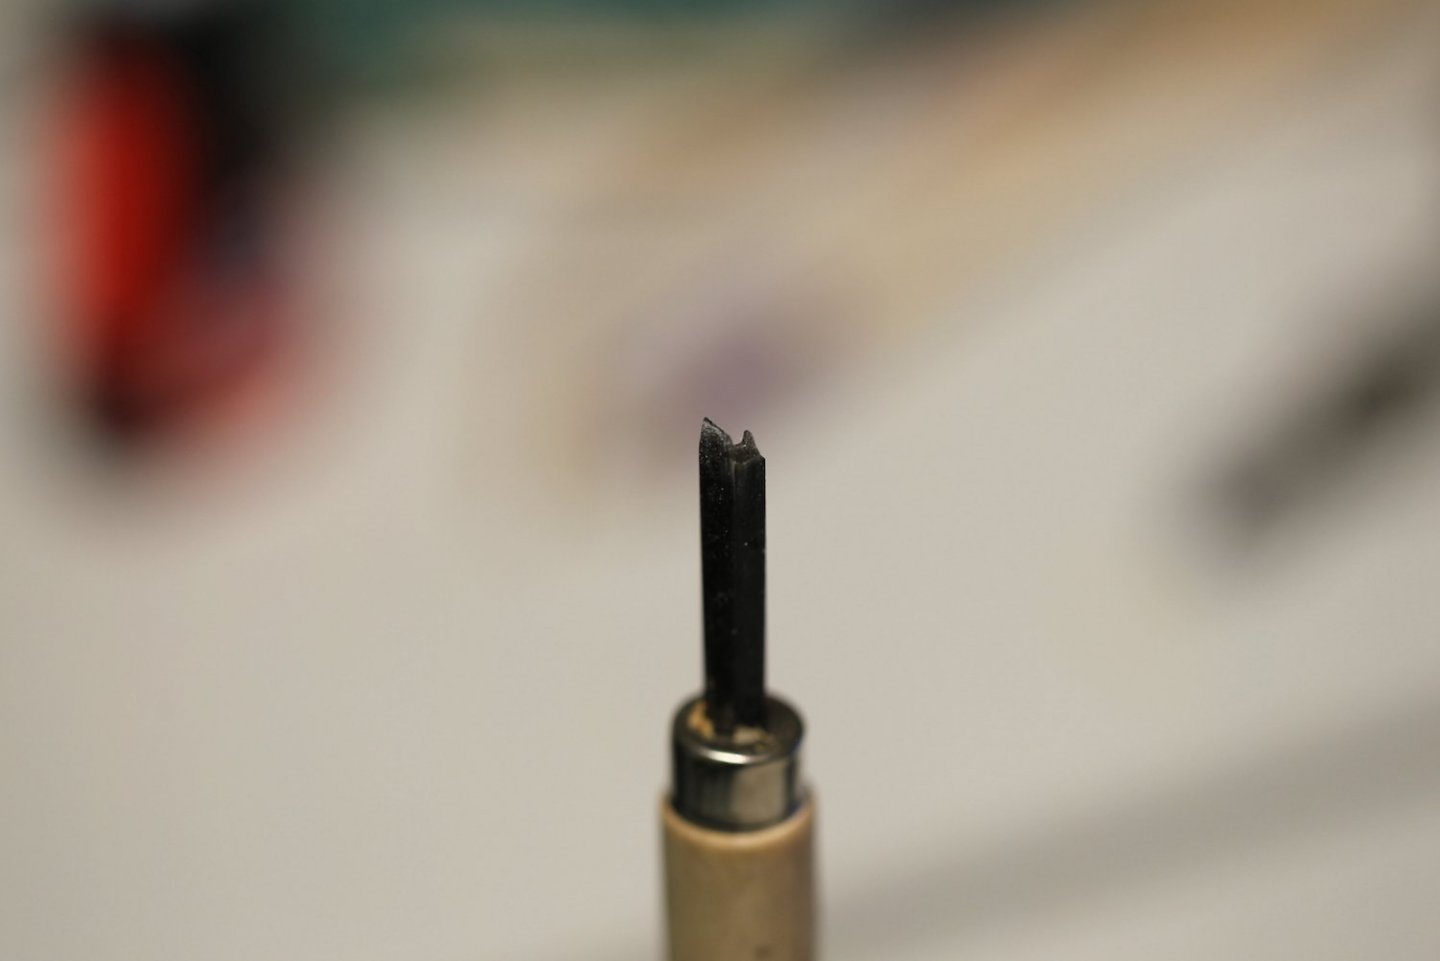
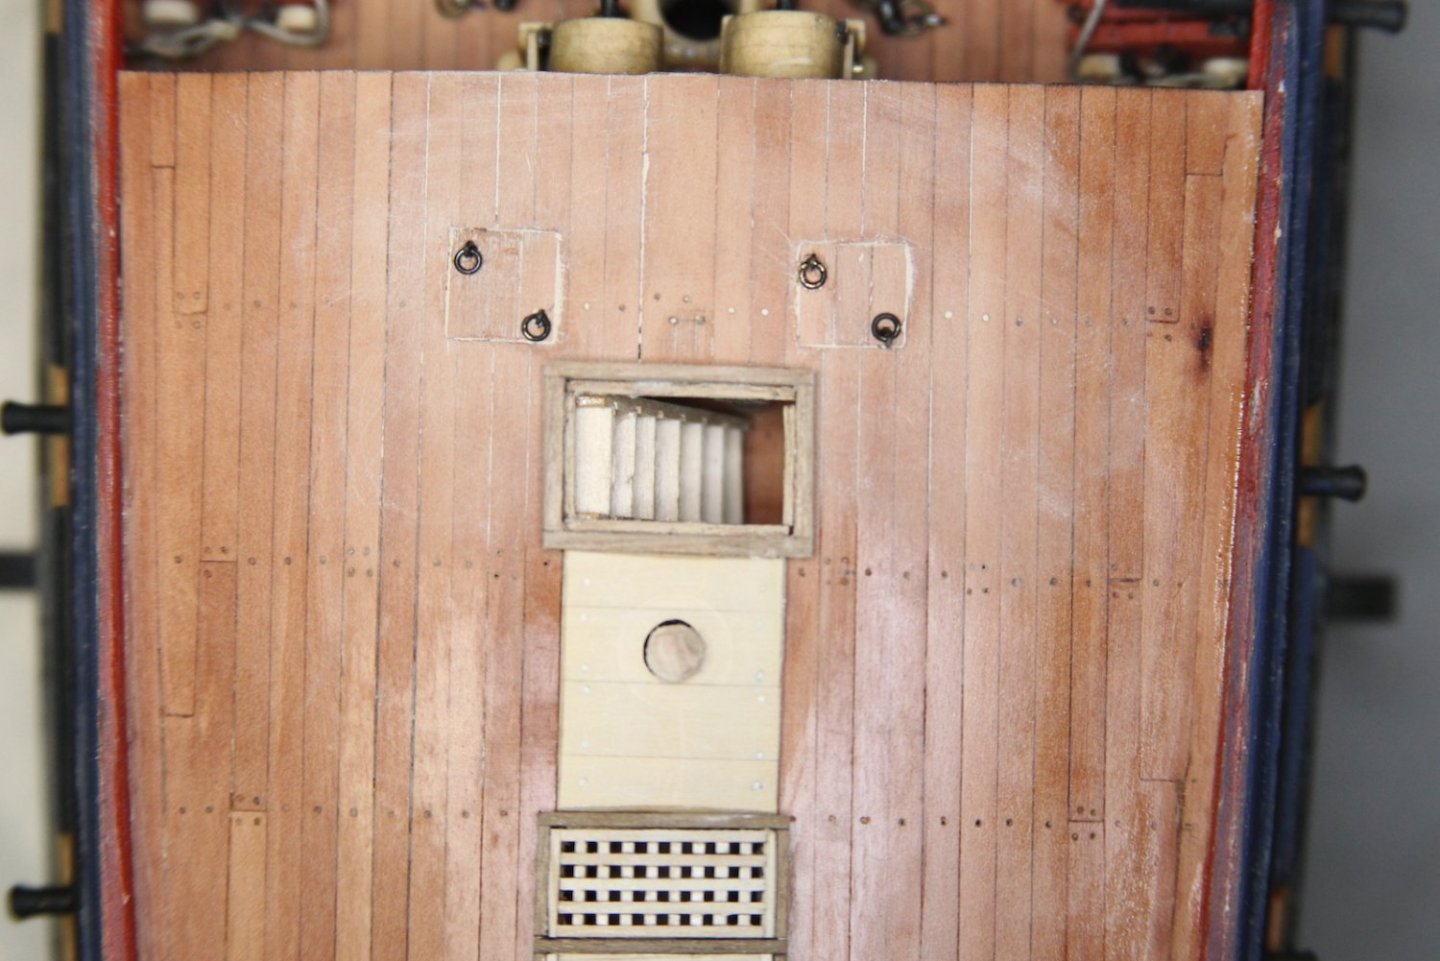
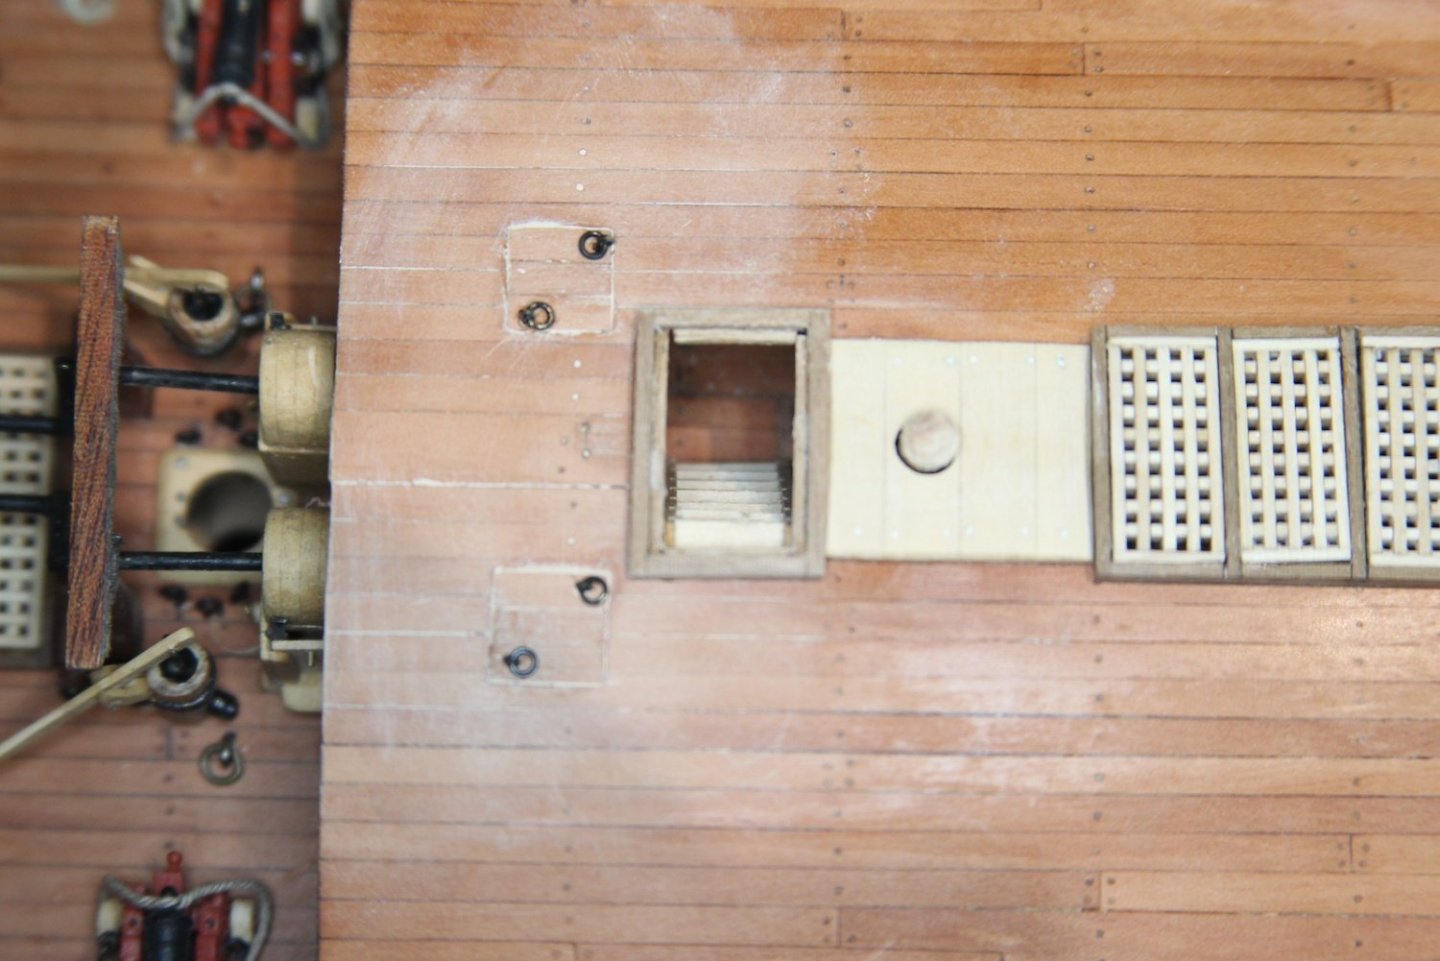
A quick update on scuppers. I decided to fill them in after all. After a pretty exhaustive search on random little things lying around the house and shipyard, I settled on speaker wires. After finding the closest size, I just stripped out the wiring and used the insulation. I did have to widen the hole a bit with a dental pick at the end of this process.


- 419 replies
-
- 9
-
-
- Victory Models
- Pegasus
- (and 2 more)
-
Thanks everyone for the comments and likes - very much appreciated. Got a bit of stuff done today, but nothing really worth photographing - finished up the port side quarter gallery, a lot of eyebolts, a cleat or ladder here and there - mostly just getting some stuff out of the way so I can start rigging the guns.
- 419 replies
-
- 1
-
-
- Victory Models
- Pegasus
- (and 2 more)
-
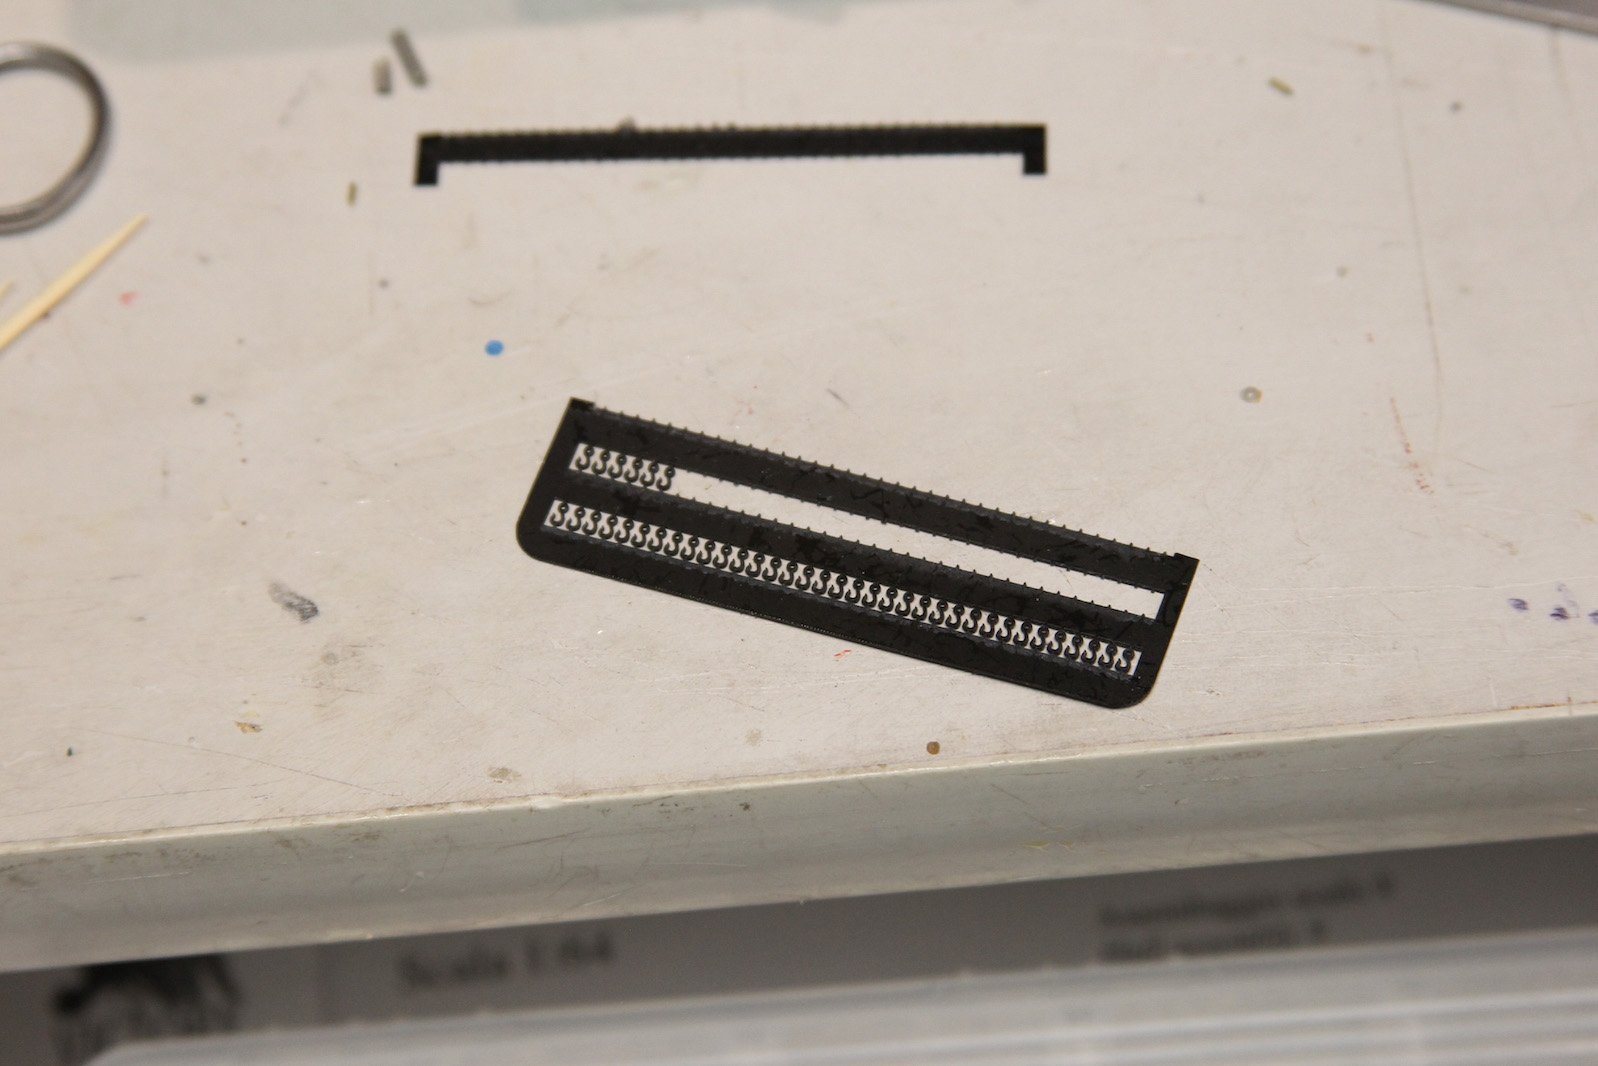
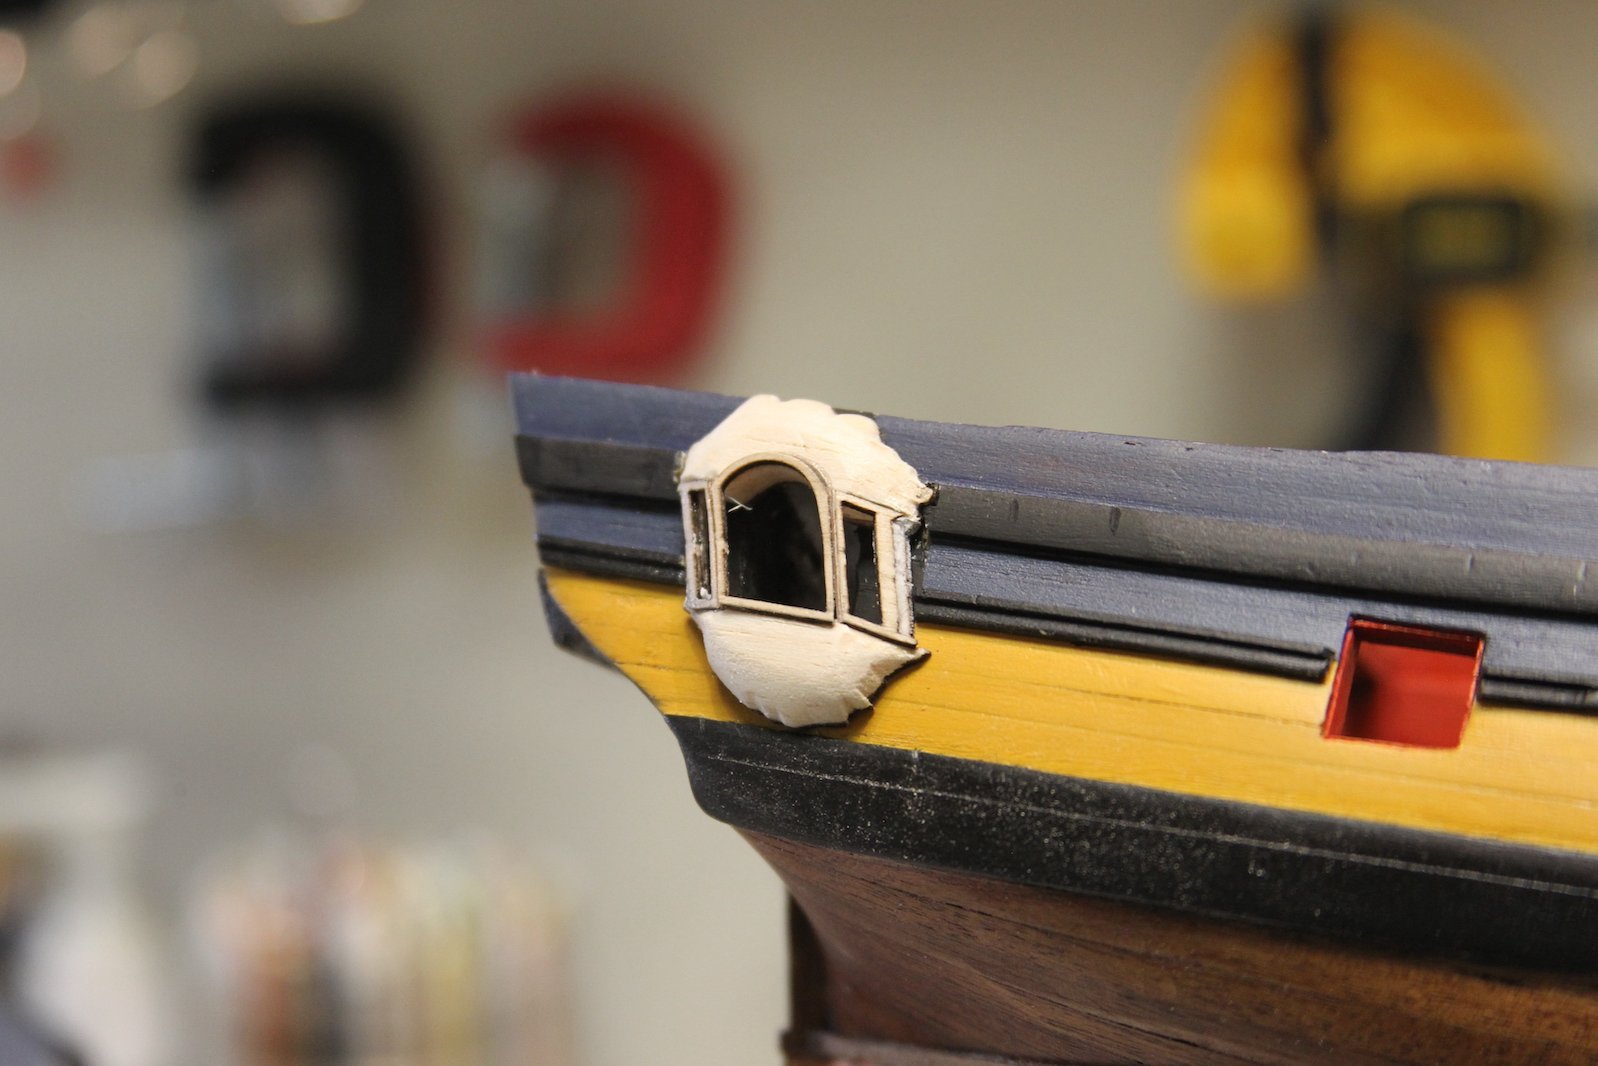
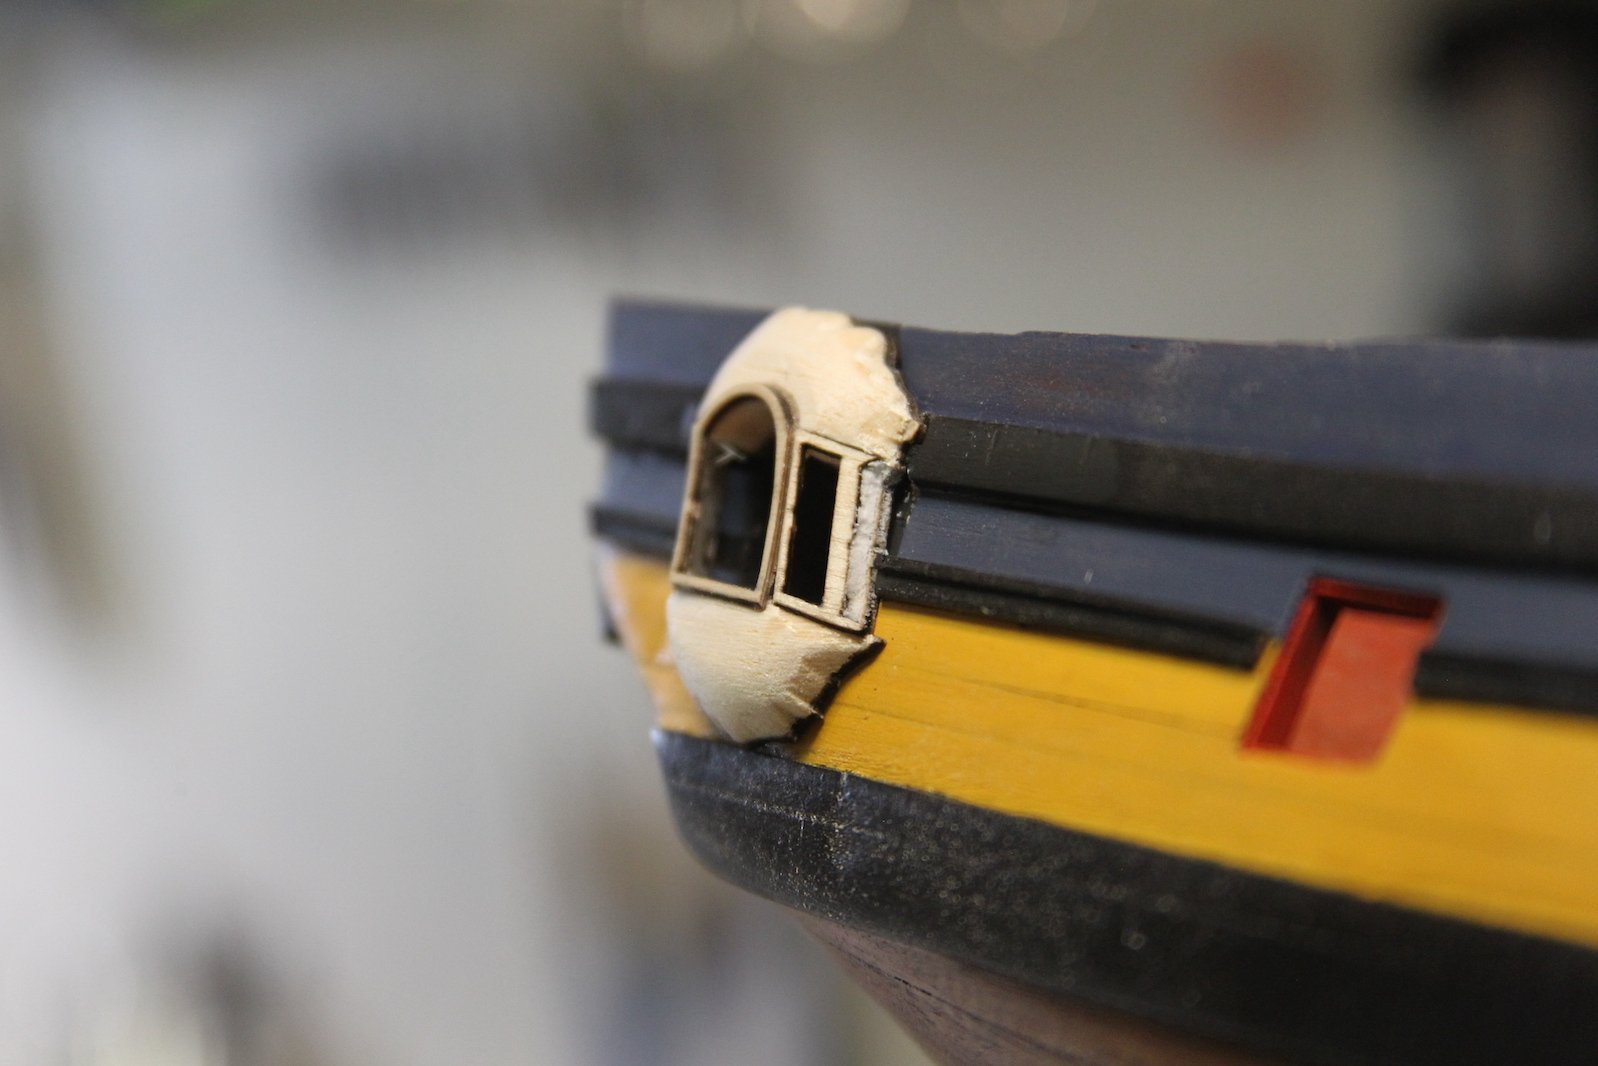
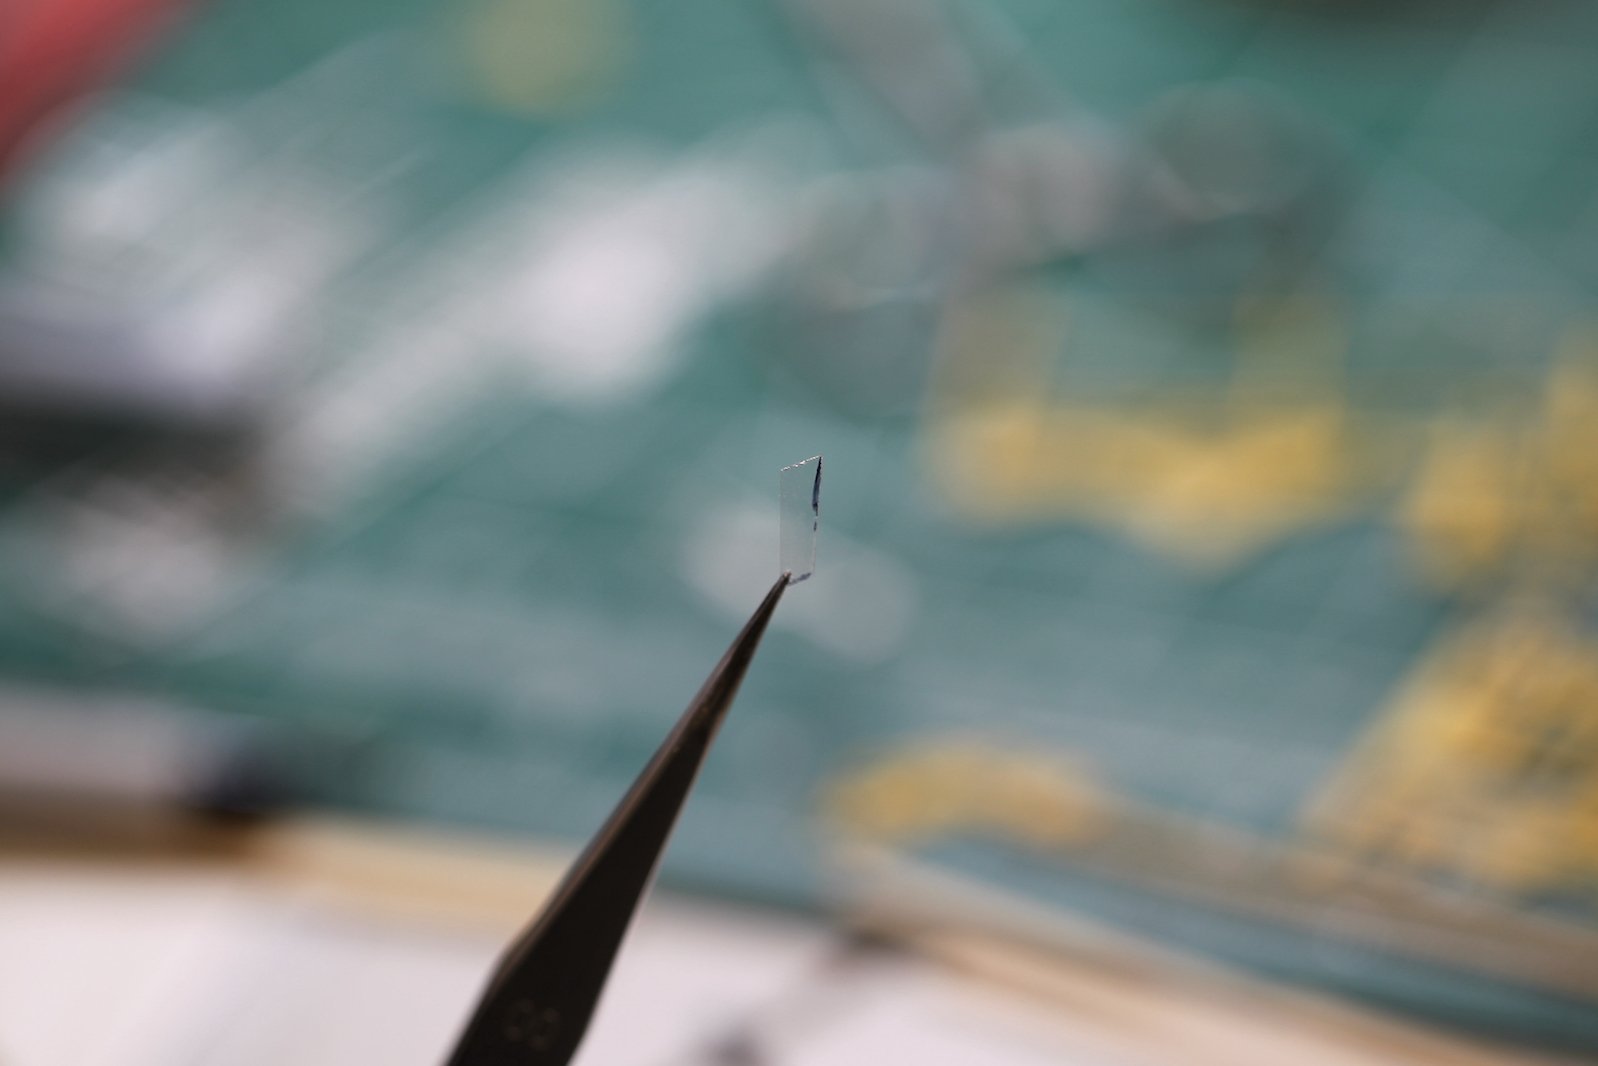
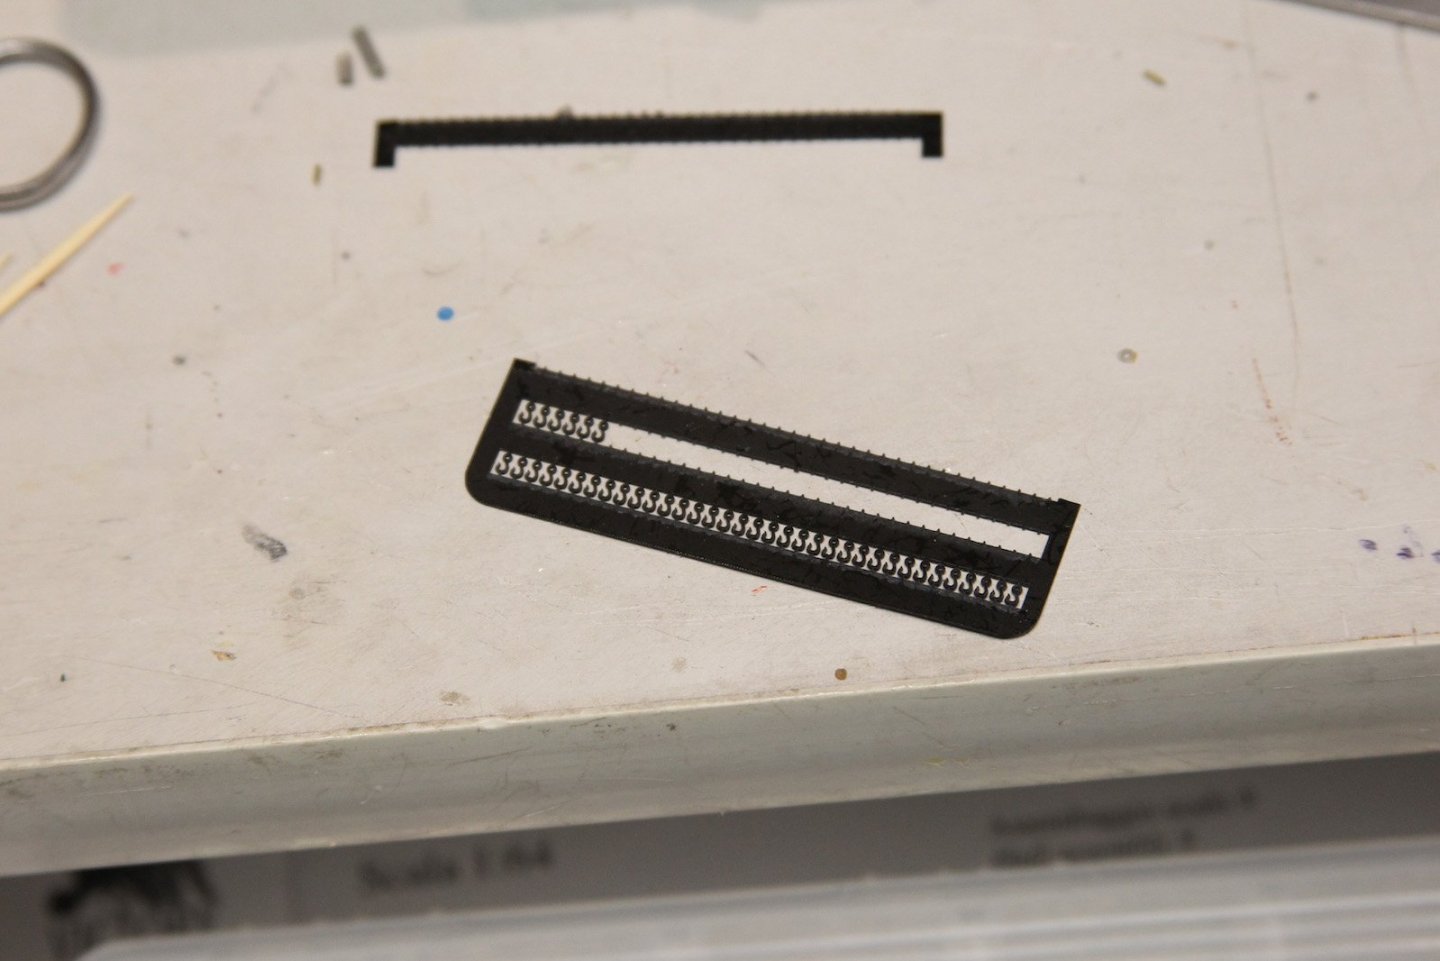
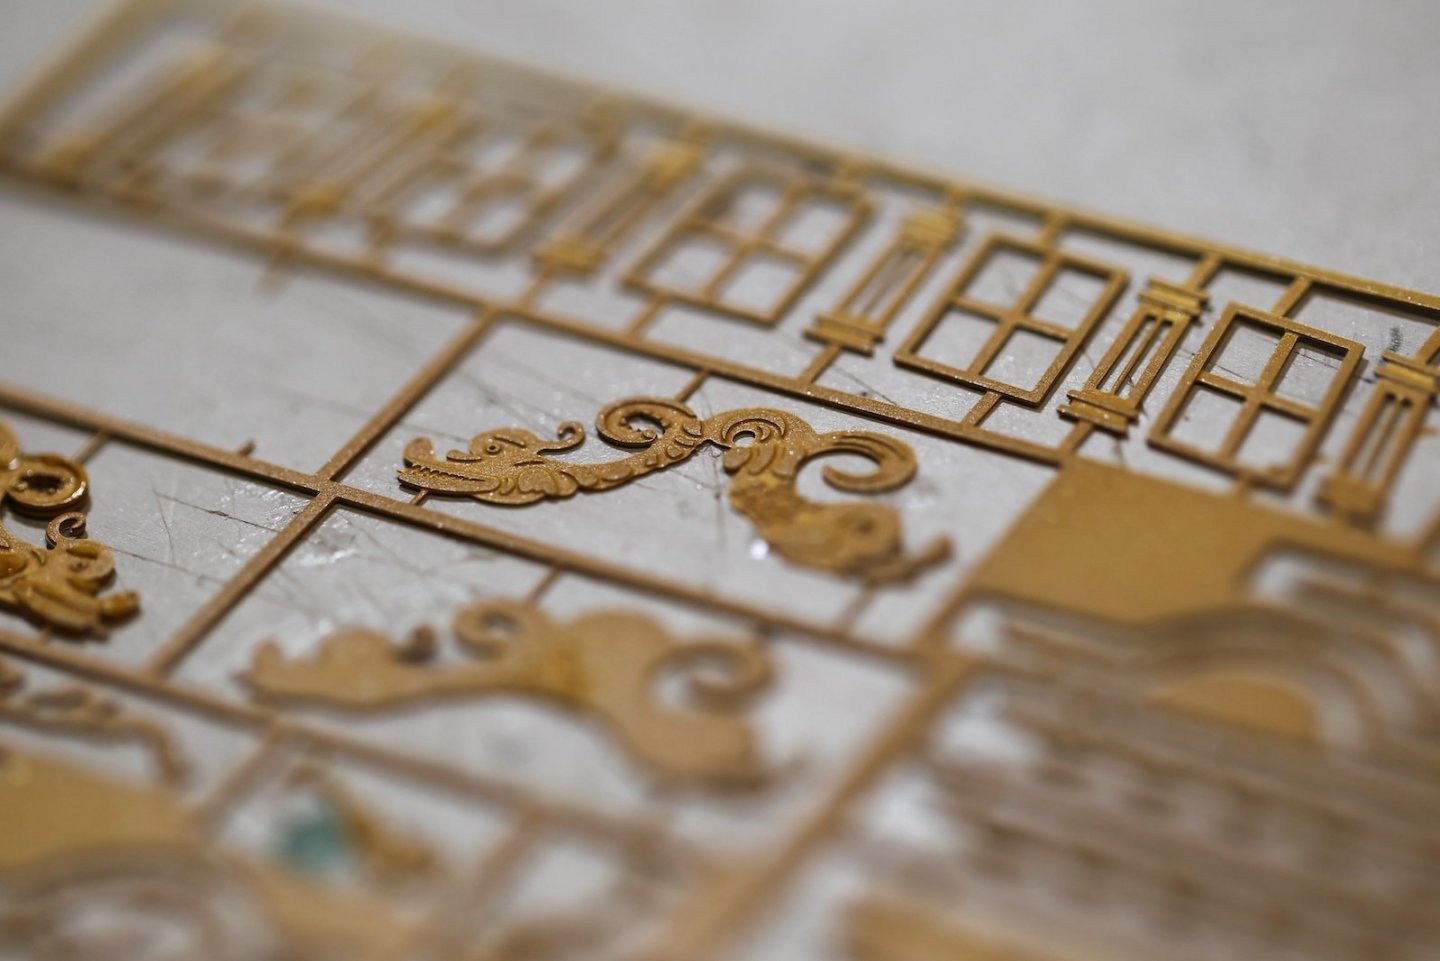
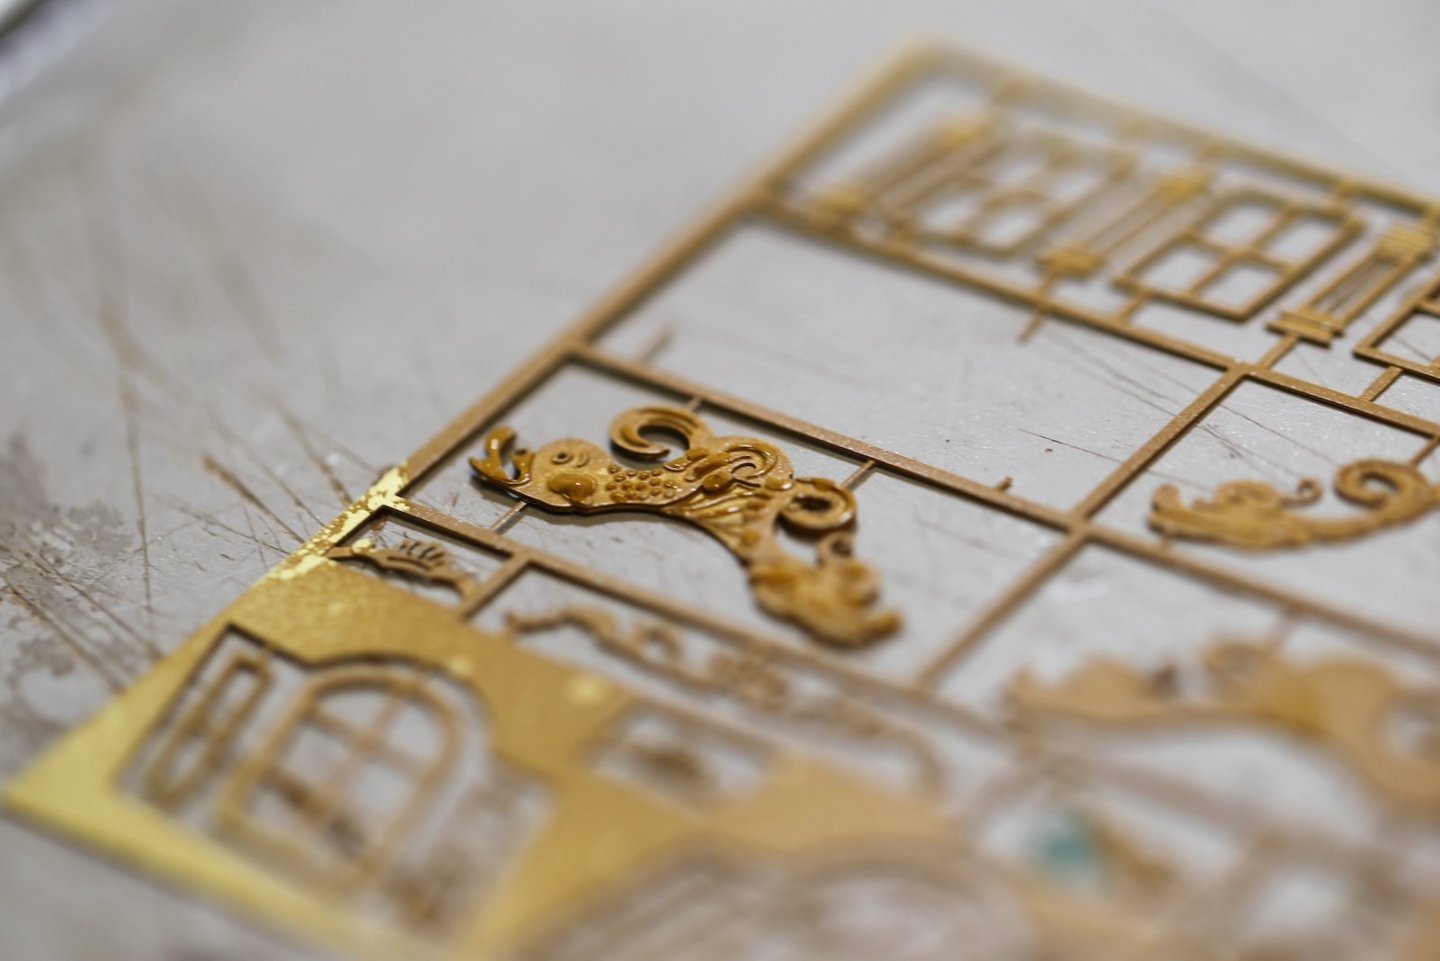
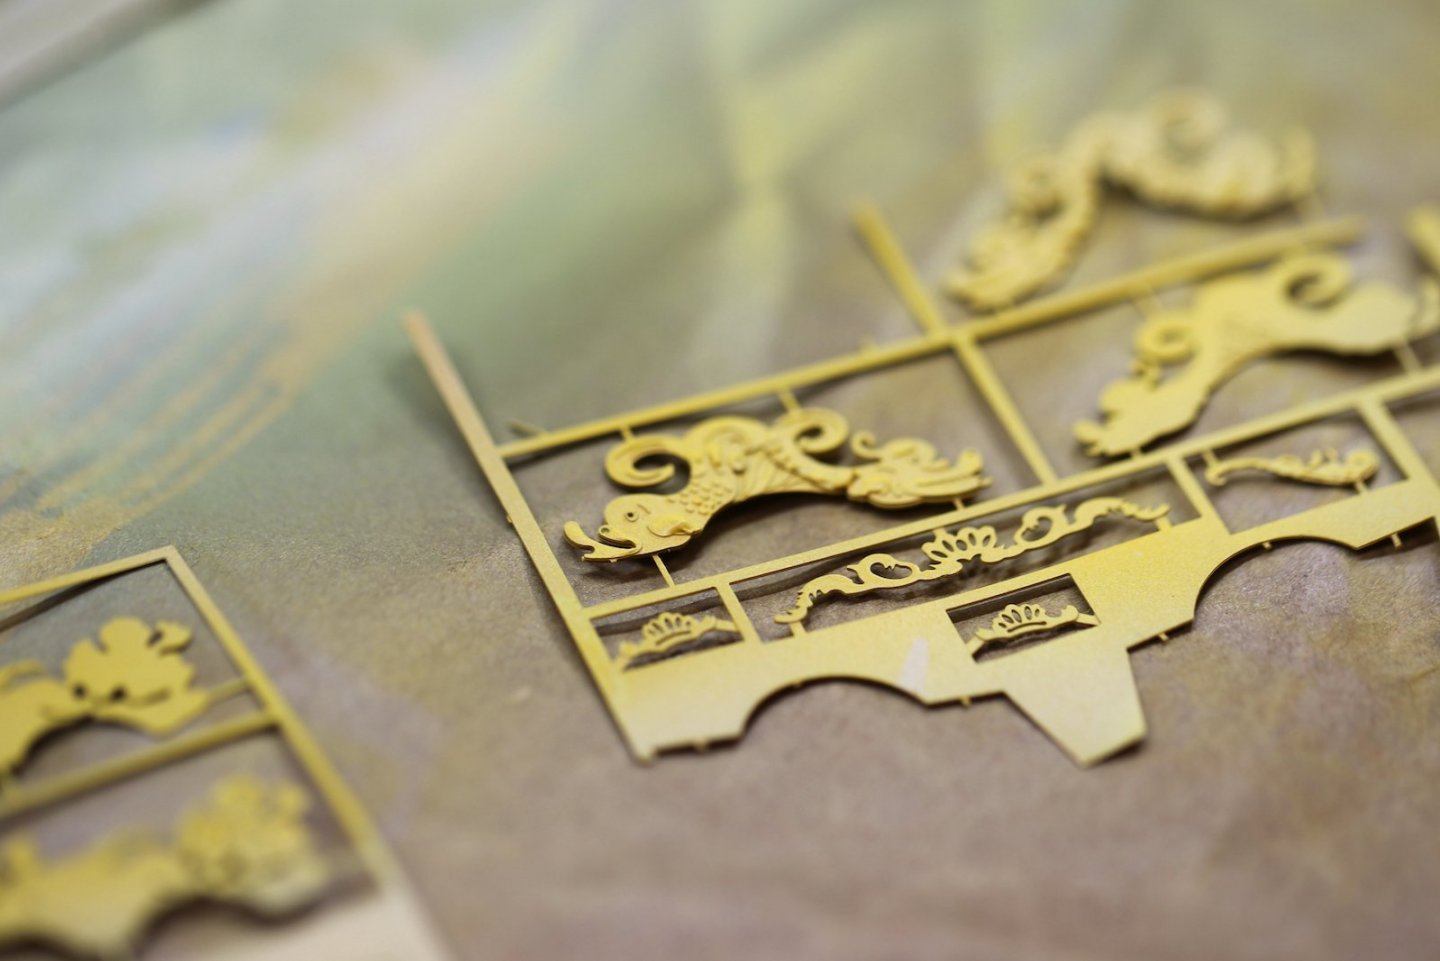
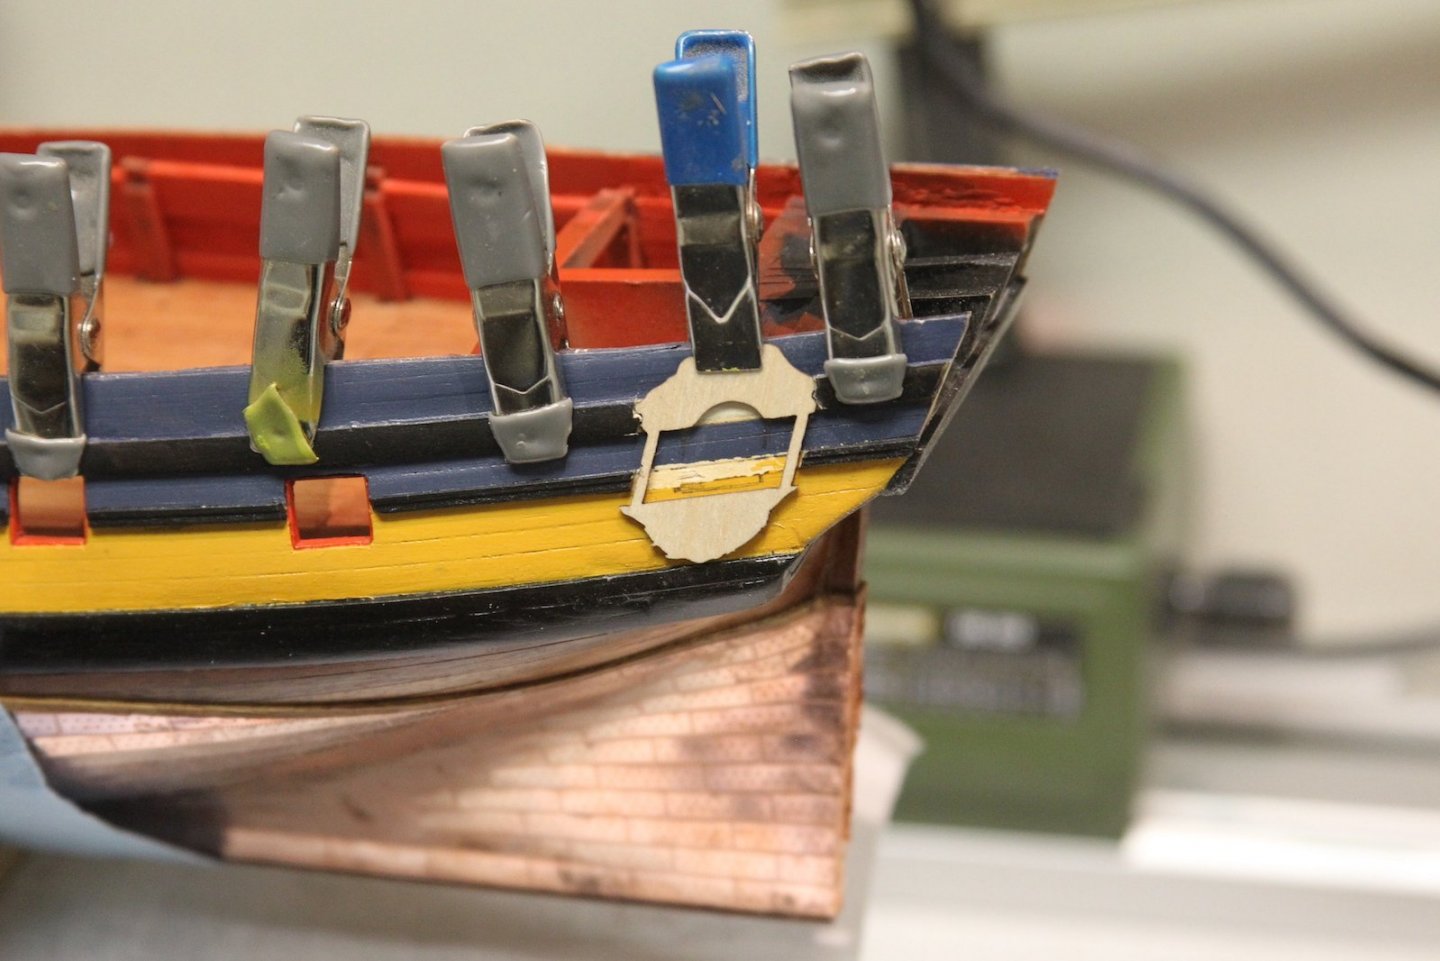
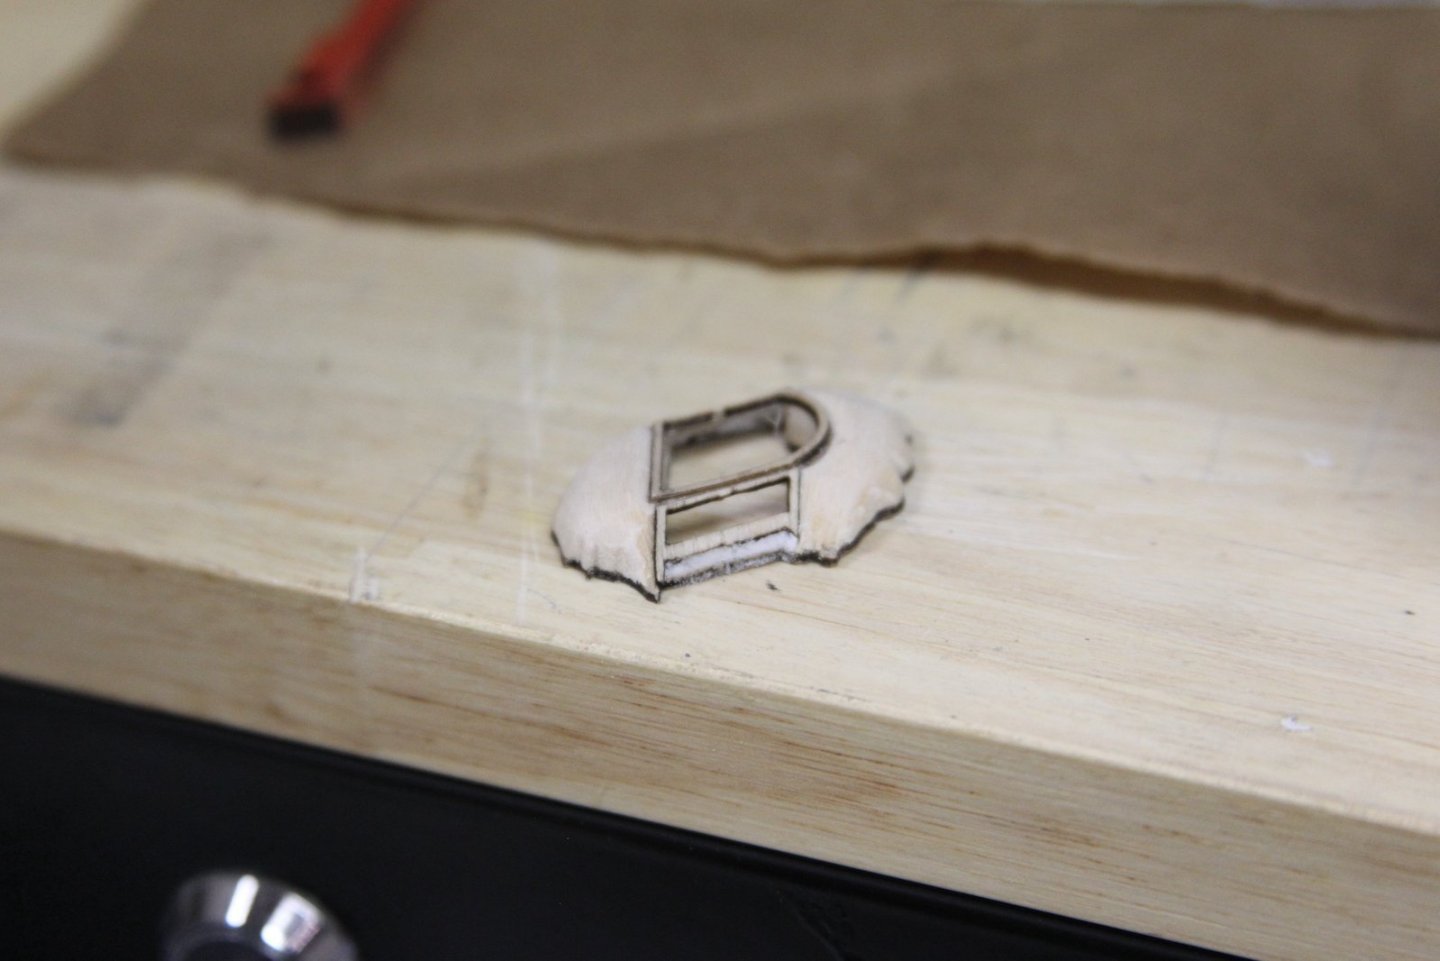
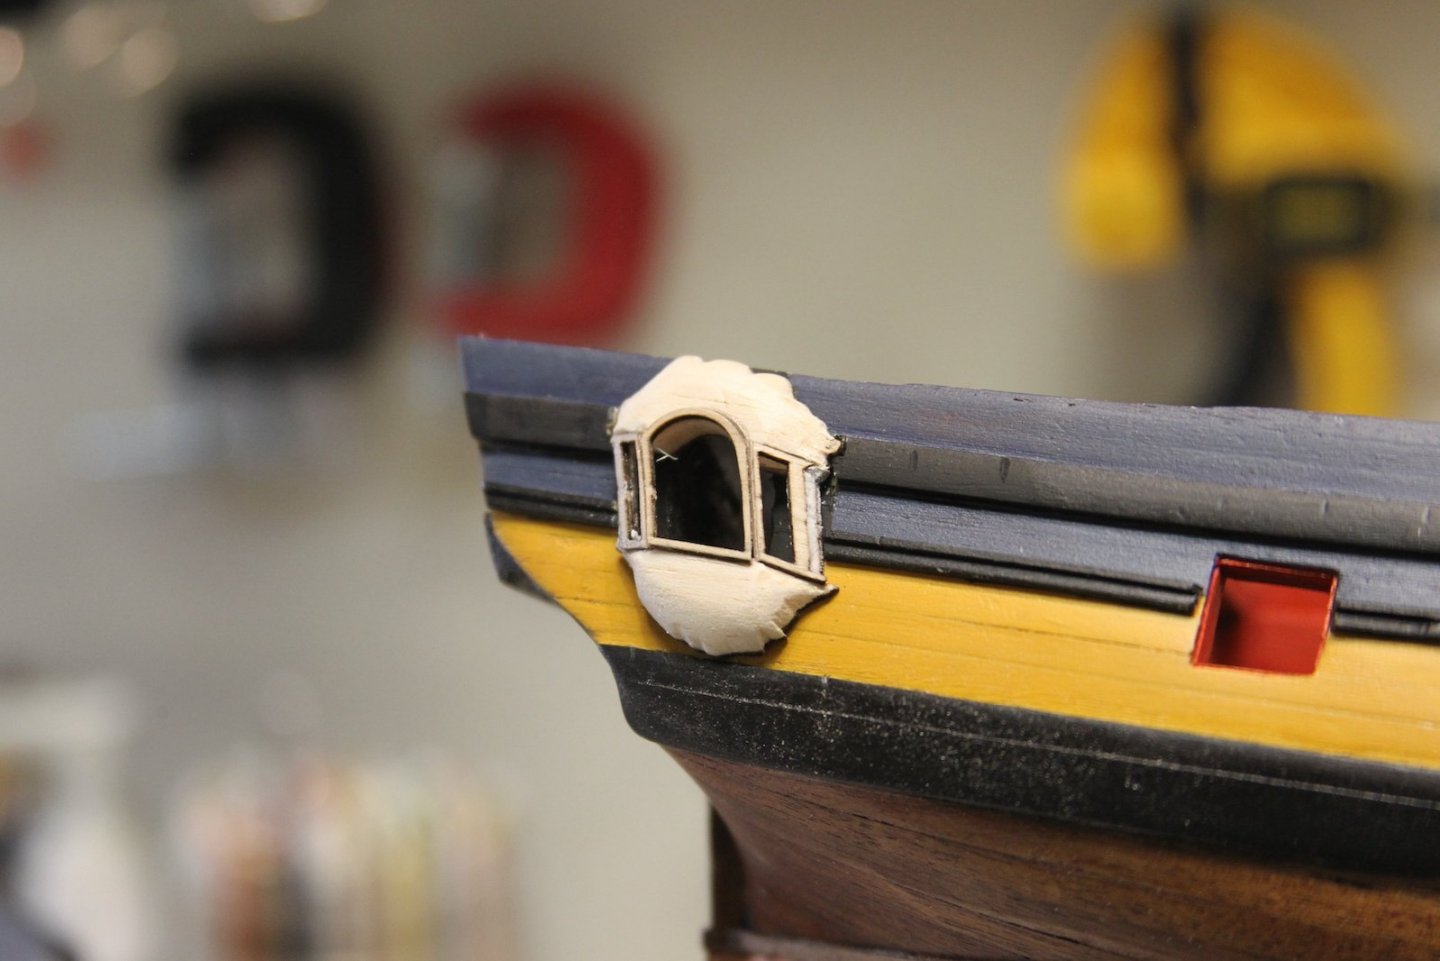
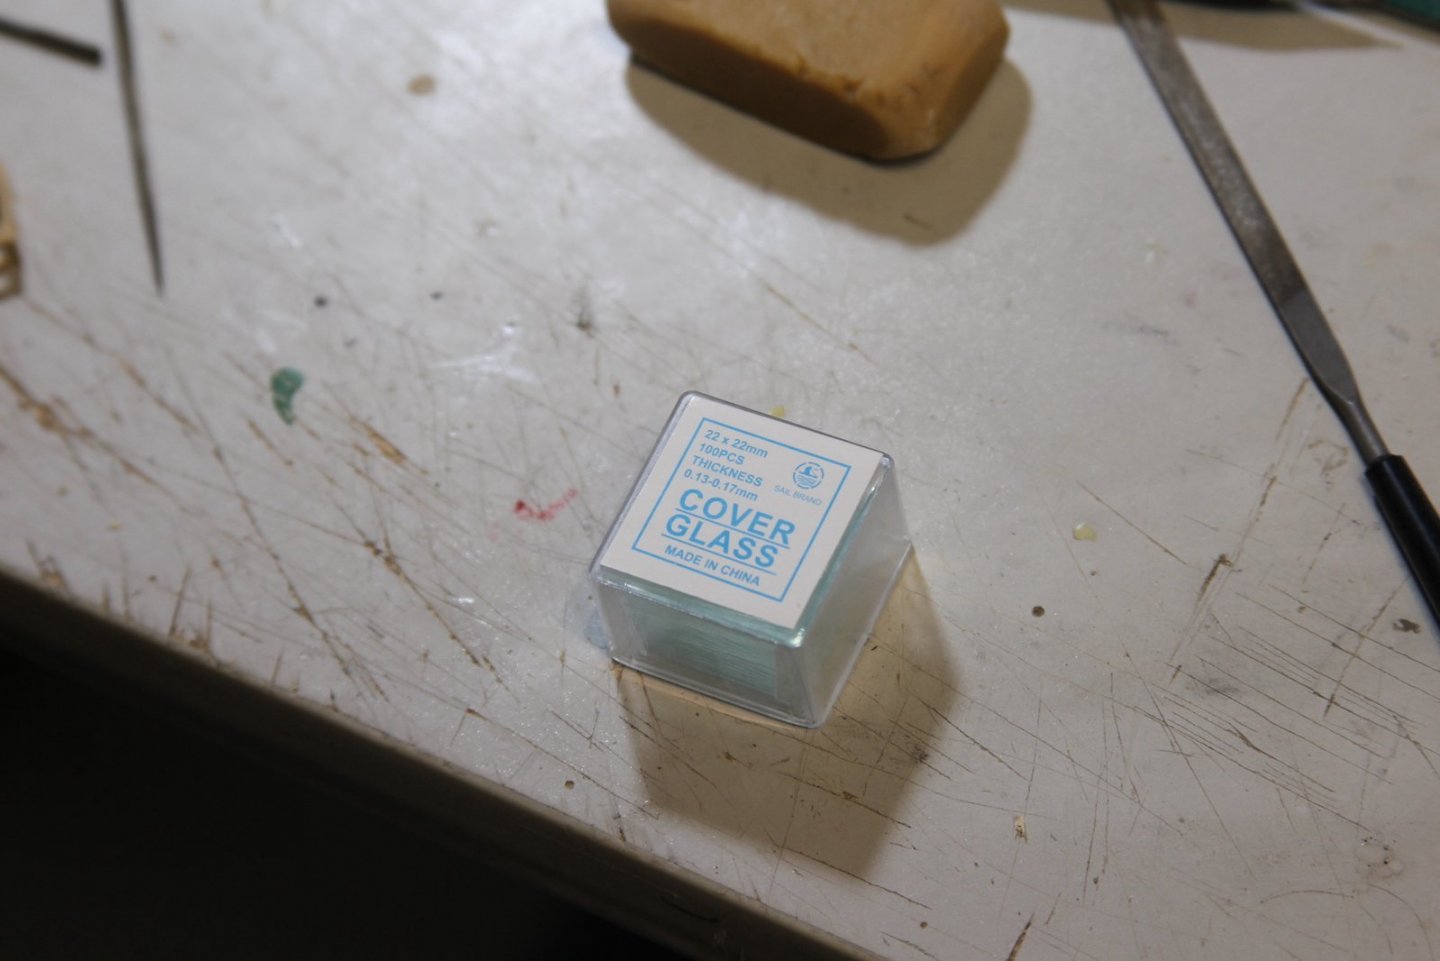
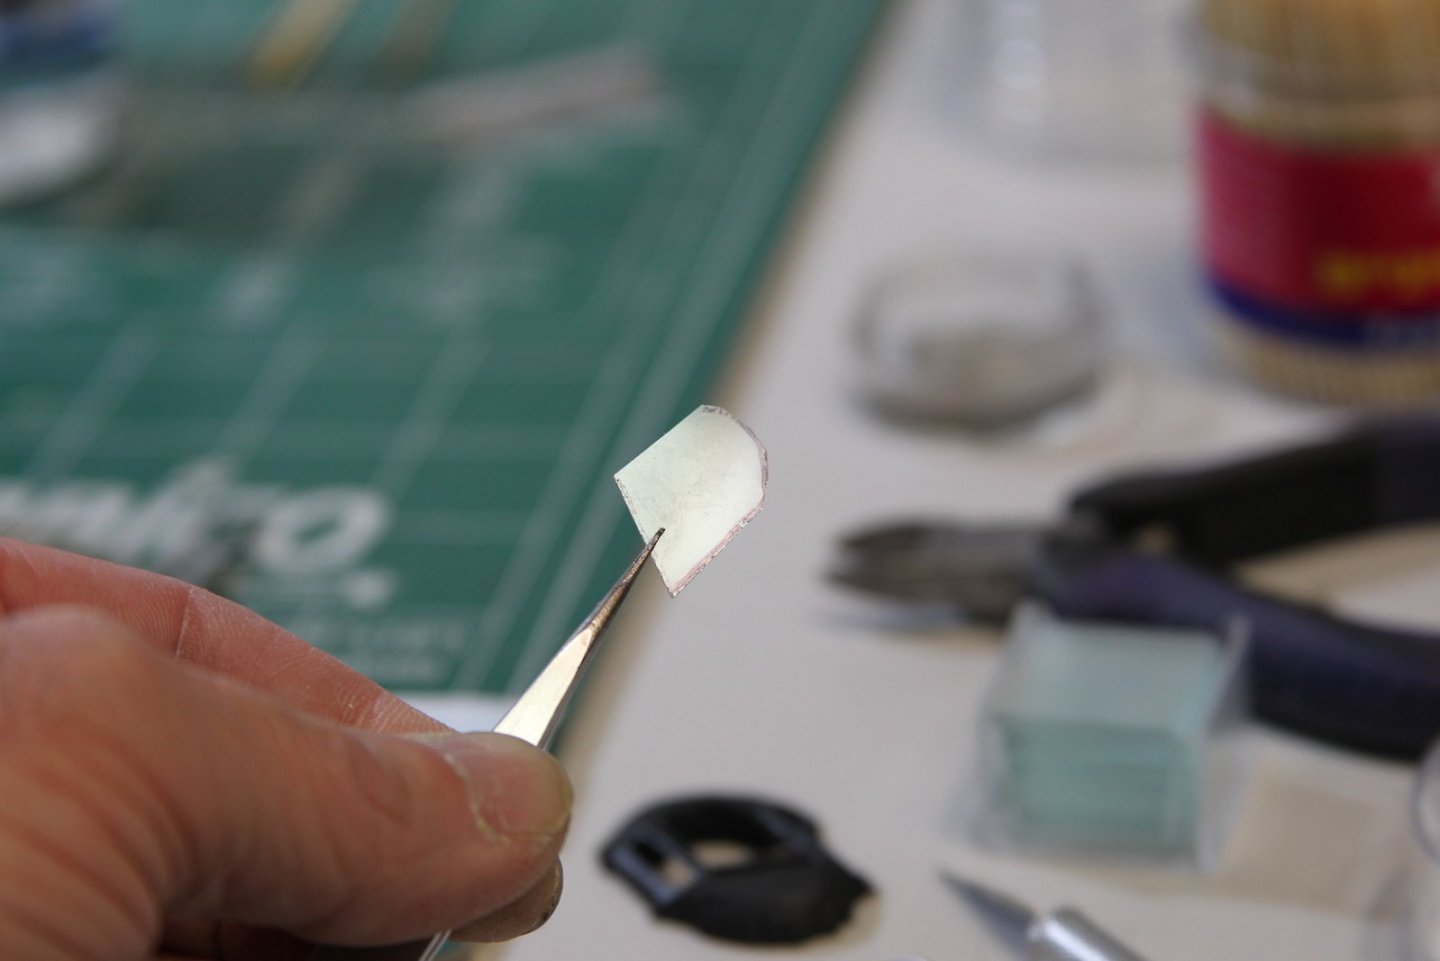
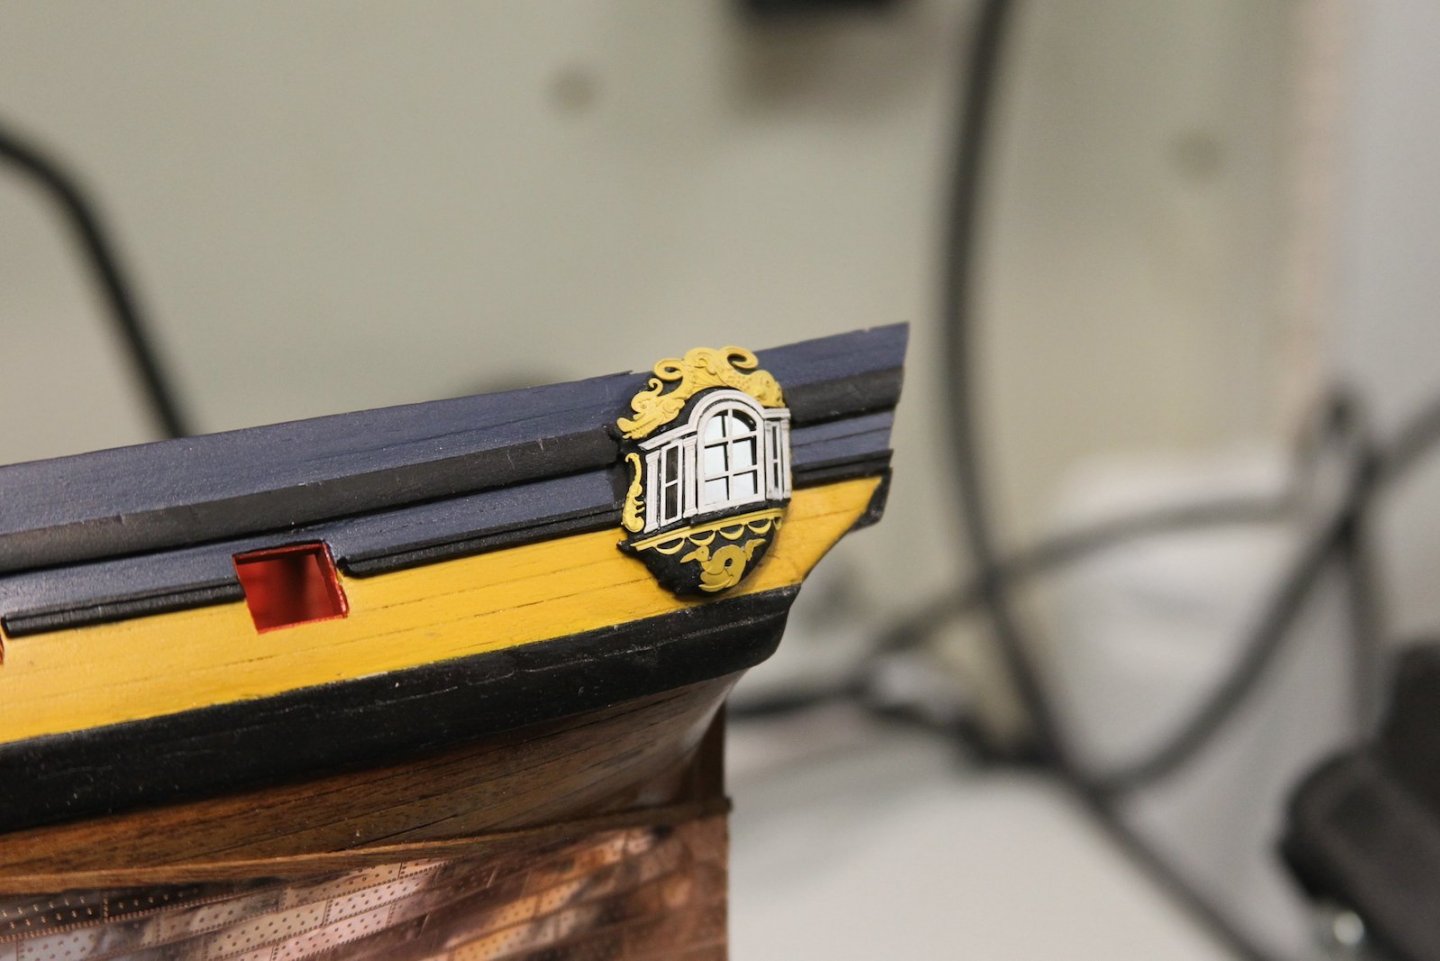
Today I worked on the quarter galleries. I still have a few other things to do before they get mounted, but I've been a little excited to get to them. Mostly because I was really impressed with the way @realworkingsailor crafted a more three dimensional version for his Pegasus Build and I couldn't wait to try it - with a bit of my own flair of course. I started by adding some additional dimension to the frieze and carvings. The Amati kit uses a couple different layers of photo etch to try to create carvings, but I felt I could add a little more - so I coated the photo etched pieces with yellow ochre, then I went through and carefully dabbed some areas with bits of yellow ochre acrylic and then let it dry. Then I went through and air brushed a VERY light coat of white, then back over it with Vallejo's yellow ochre "air". On to the quarter galleries themselves. First step, mark out where they're going to be, then make room with the trim and drill out the space creating a cabin inside and paint it black. Next up, I cut out and shaped some balsa (just as Realworkingsailor did) to give dimension. One of the most difficult and delicate parts of this operation was separating the window frames which are laser cut as one piece. I used a jeweler's saw with my thinnest blade and very gentle cutting. Any little gaps are filled with "wonderfill" filler and then the whole thing is painted black and the photo etching is added. I didn't take photos of that bit, but extra care is needed to bend the pieces to fit the now three dimensional gallery. Now, my favorite part! I finally figured out that the best way to shape my little microscope slide covers is to carefully hold them against the belt sander! I marked the shape I needed with a sharpie, and the belt sander worked great. It was fast enough not to shatter the piece and also half melted half sanded the glass into shape. It was then glued in place using white glue that dries clear. I actually prefer fabric stitch glue here because it's tackier. The galleries are just sitting in place for the moment and will be permanently mounted later. The glass is a bit of a pain obviously, but it looks really good. I purposely took pictures with an angle where the light reflected so you can see it, but the photos don't really do it justice. Really clear straight on, then catches the light. As I said, I picked up the tip from a guy on a train model forum and he was right: nothing looks quite like glass, like glass looks like glass. Next up - Starboard side.


- 419 replies
-
- 15
-
-
- Victory Models
- Pegasus
- (and 2 more)
-
Yves, Grant, Mustafa, and Pete thanks so much for the kind words, very much appreciated. Pete - @SpyGlass nailed it - and that Vulture is my reference for elements of the Peg as well. It always felt like Danny spent just as much time answering questions and responding to others as he did on his awesome builds. Along with what Spyglass said (and this is just my opinion) What I still love most about Dan's building is that I honestly don't think he had some sort of huge cache of raw artistic talent - but what he did have was a brilliant mind when it came to how to build something - whether it be jigs he came up with or little tools he crafted himself. His innovation was just as valuable as his perseverance - and that combination always made me feel as though maybe I could do some of those things too. I mean ... turns out I can't, but he always made me FEEL that way. 😆
- 419 replies
-
- 4
-
-
- Victory Models
- Pegasus
- (and 2 more)
-
Welcome Rico - looking forward to seeing what you build. I have no doubt that your personal sailing experience will be a great contribution when it comes to noodling through certain aspects of a build.
-
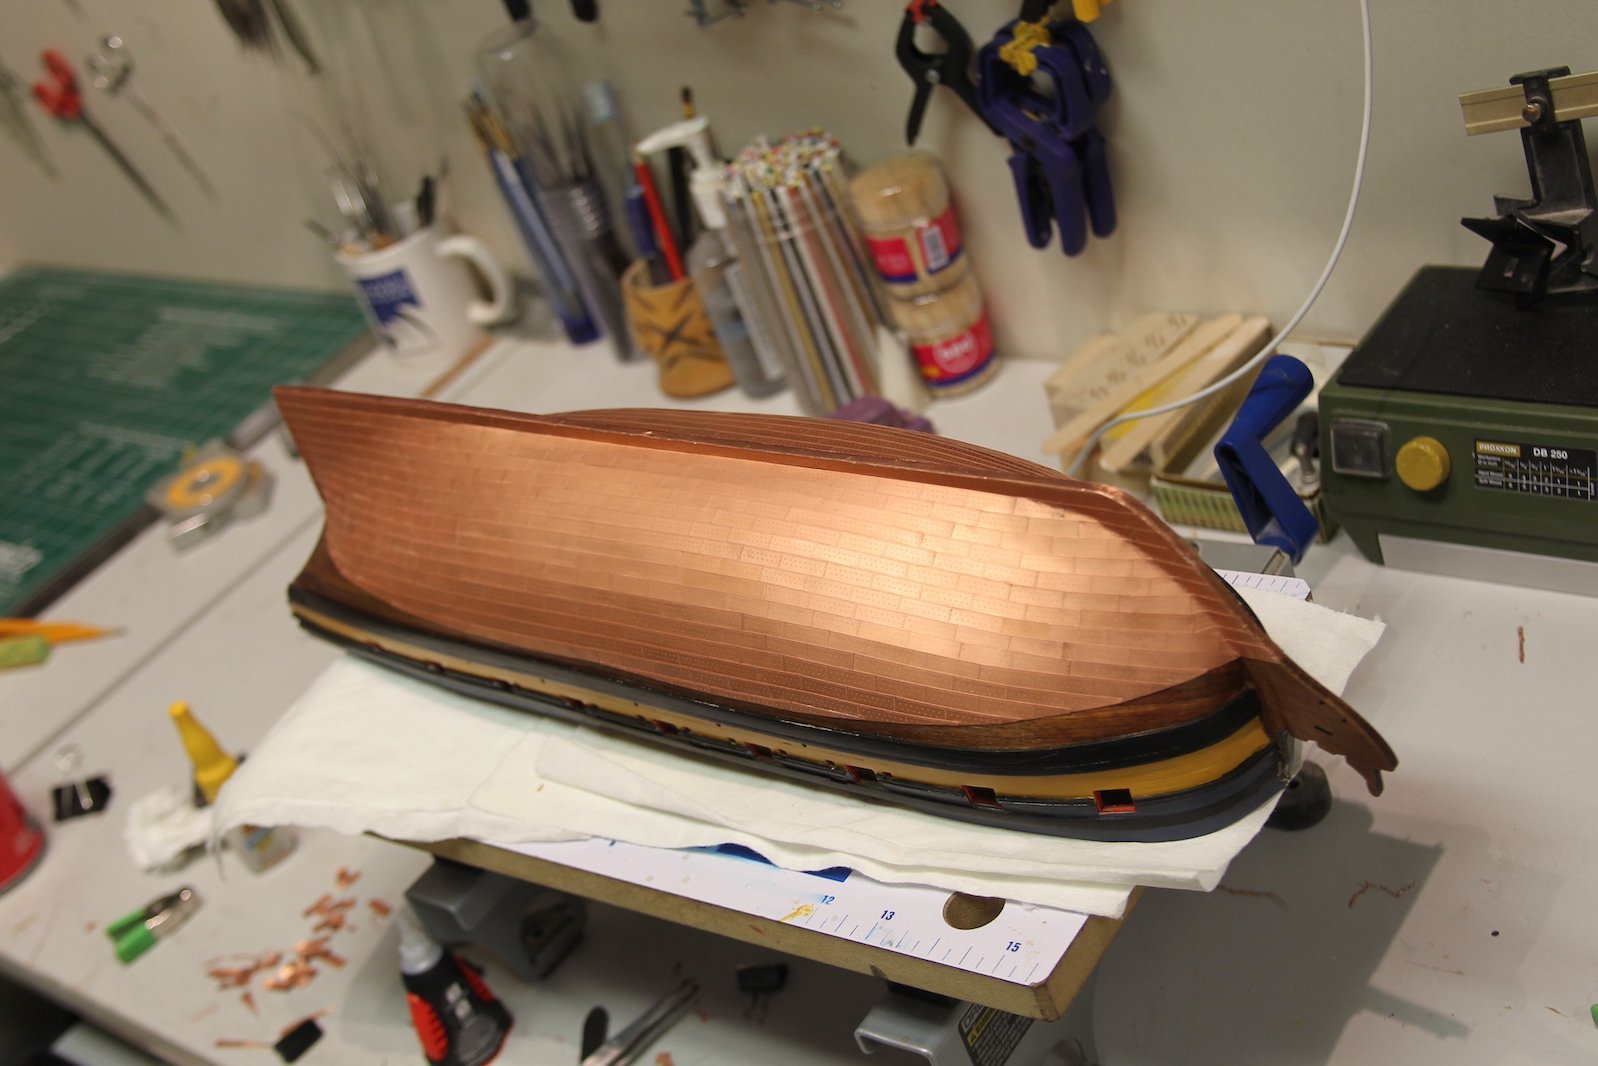
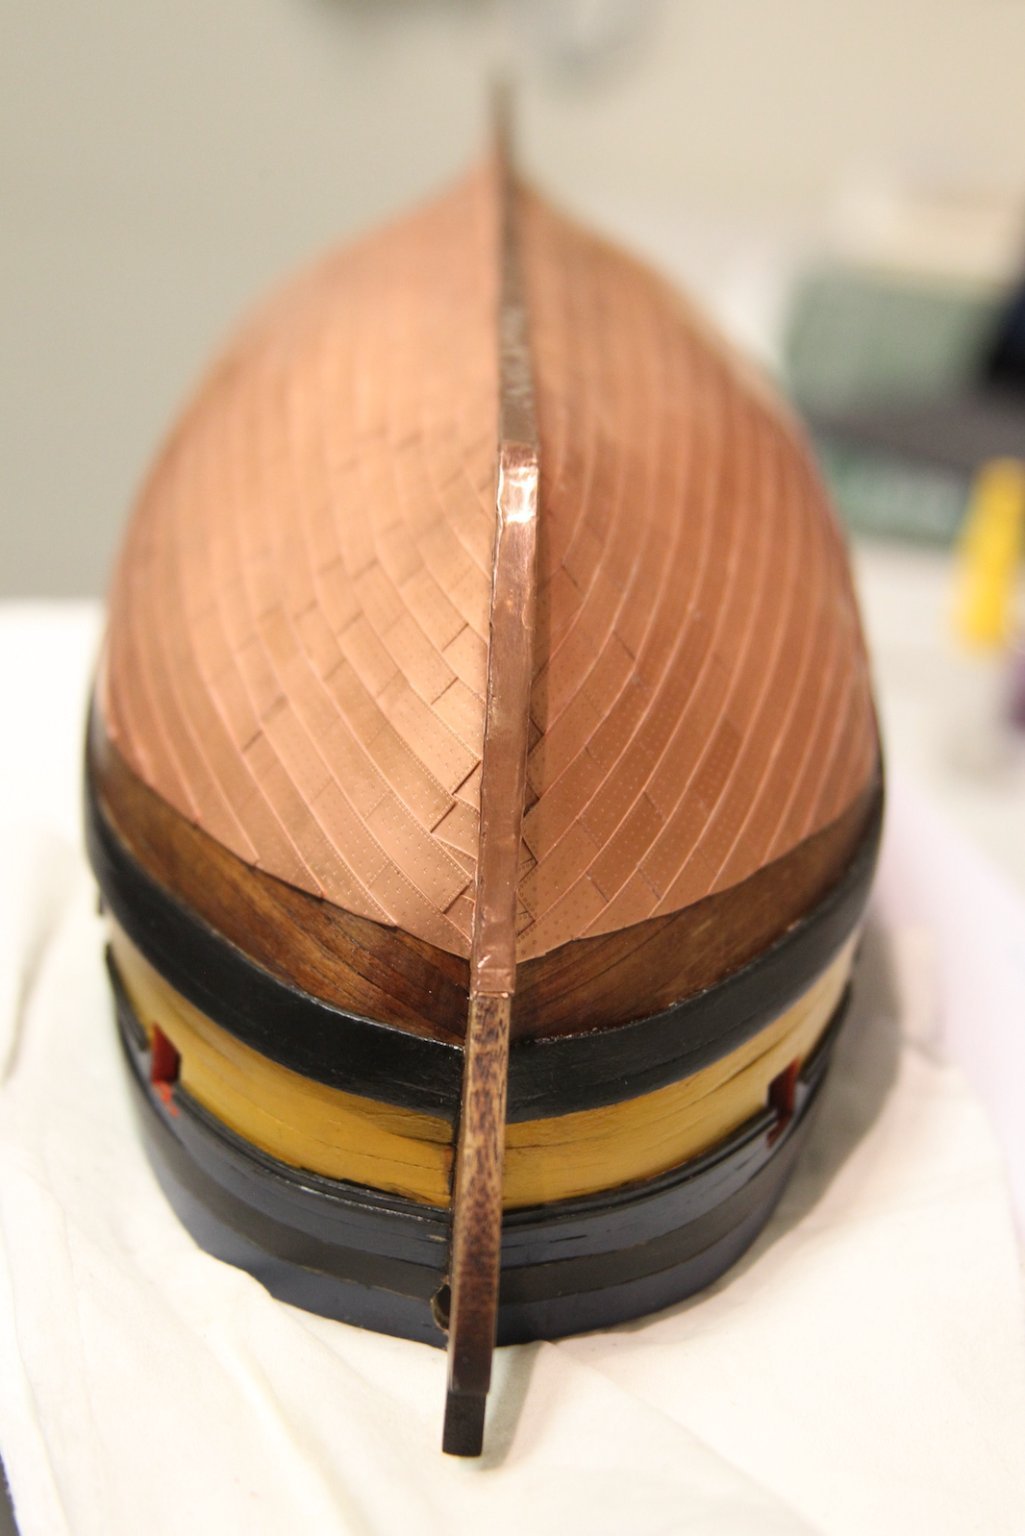
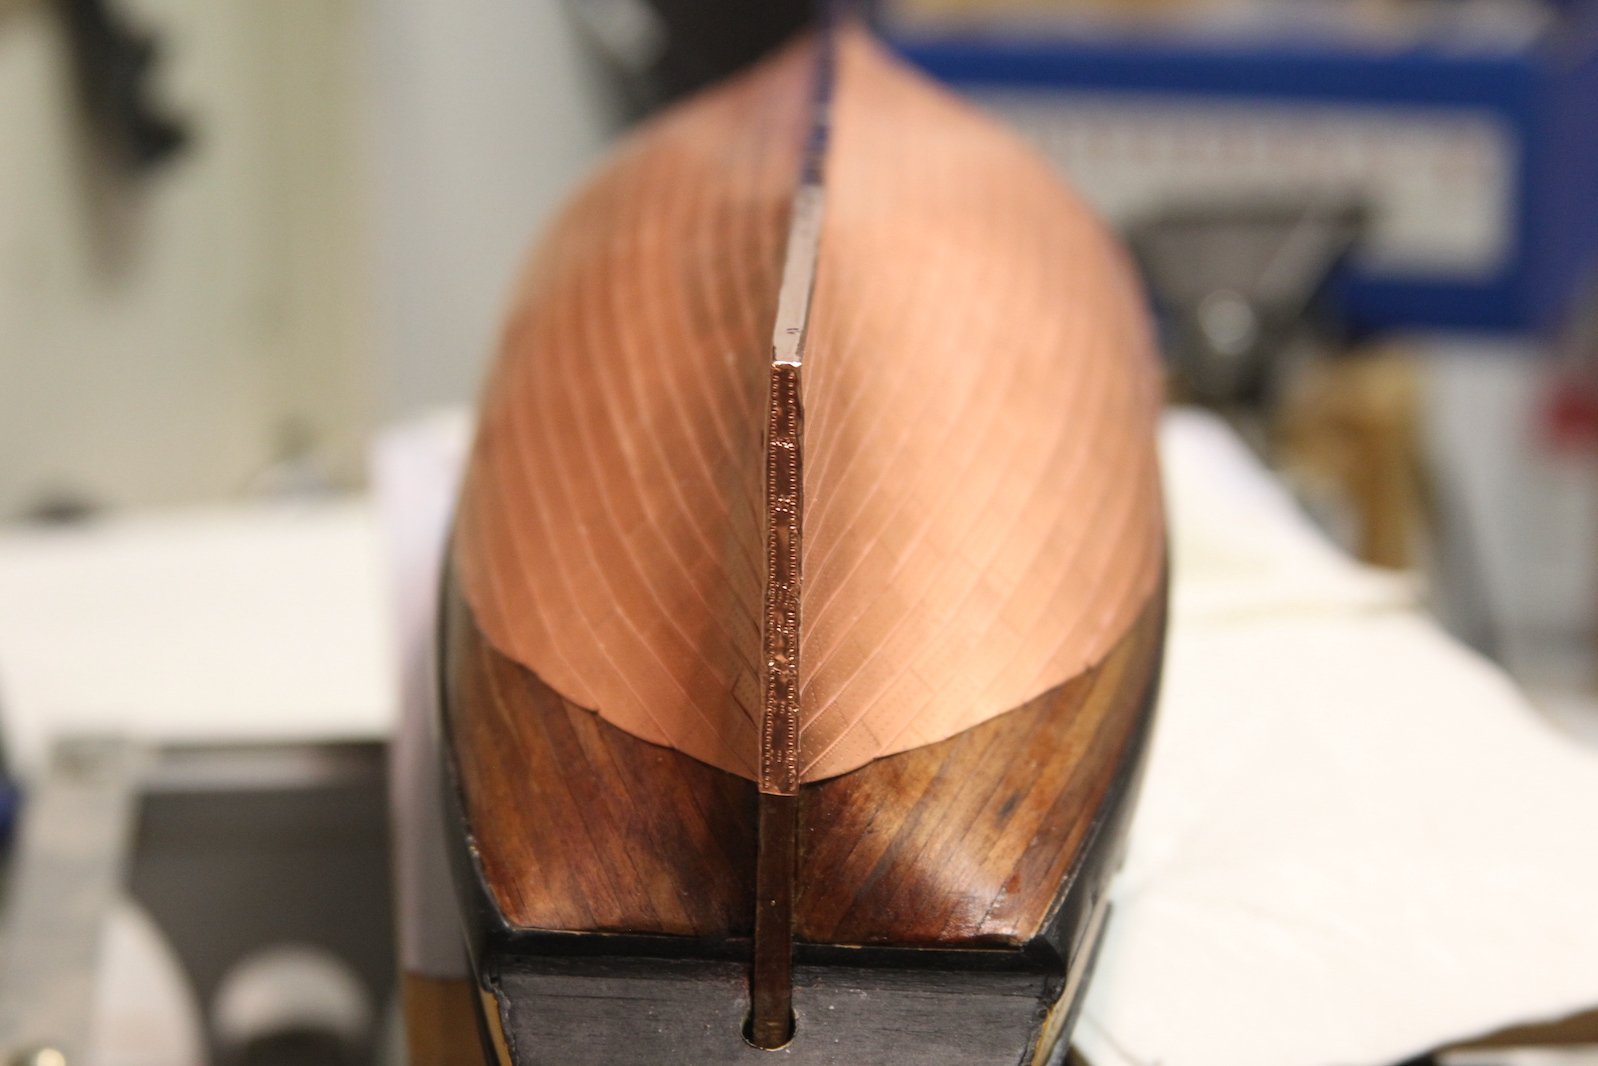
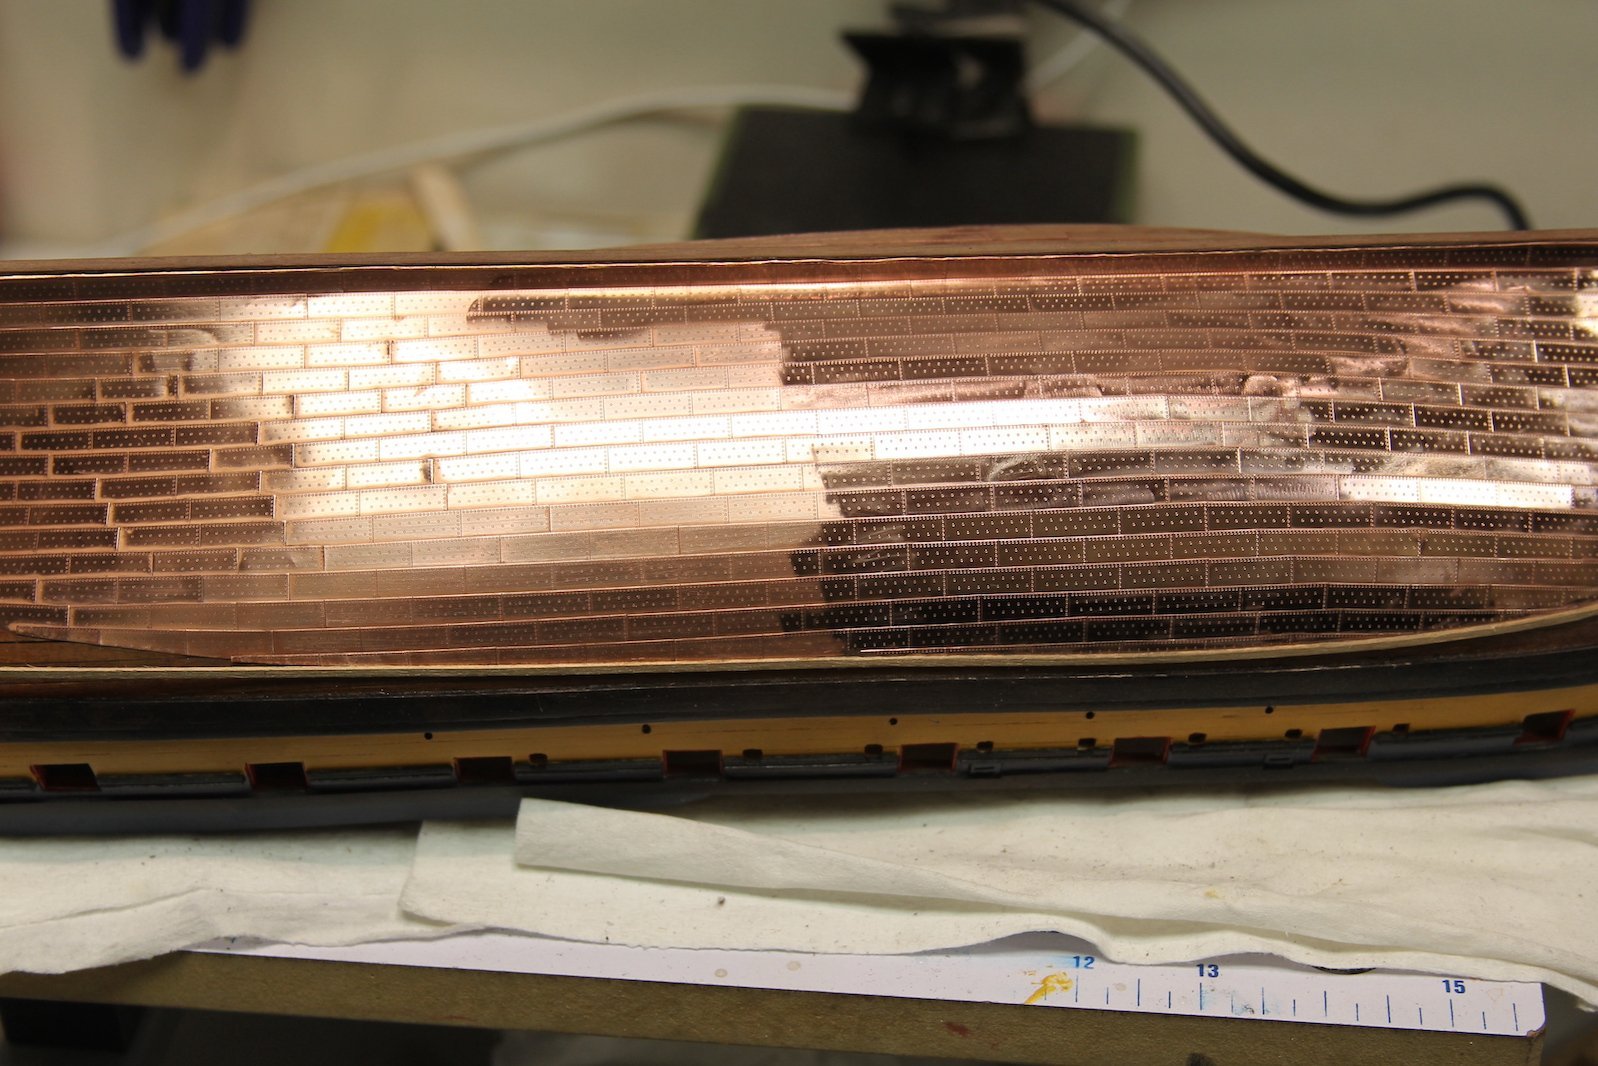
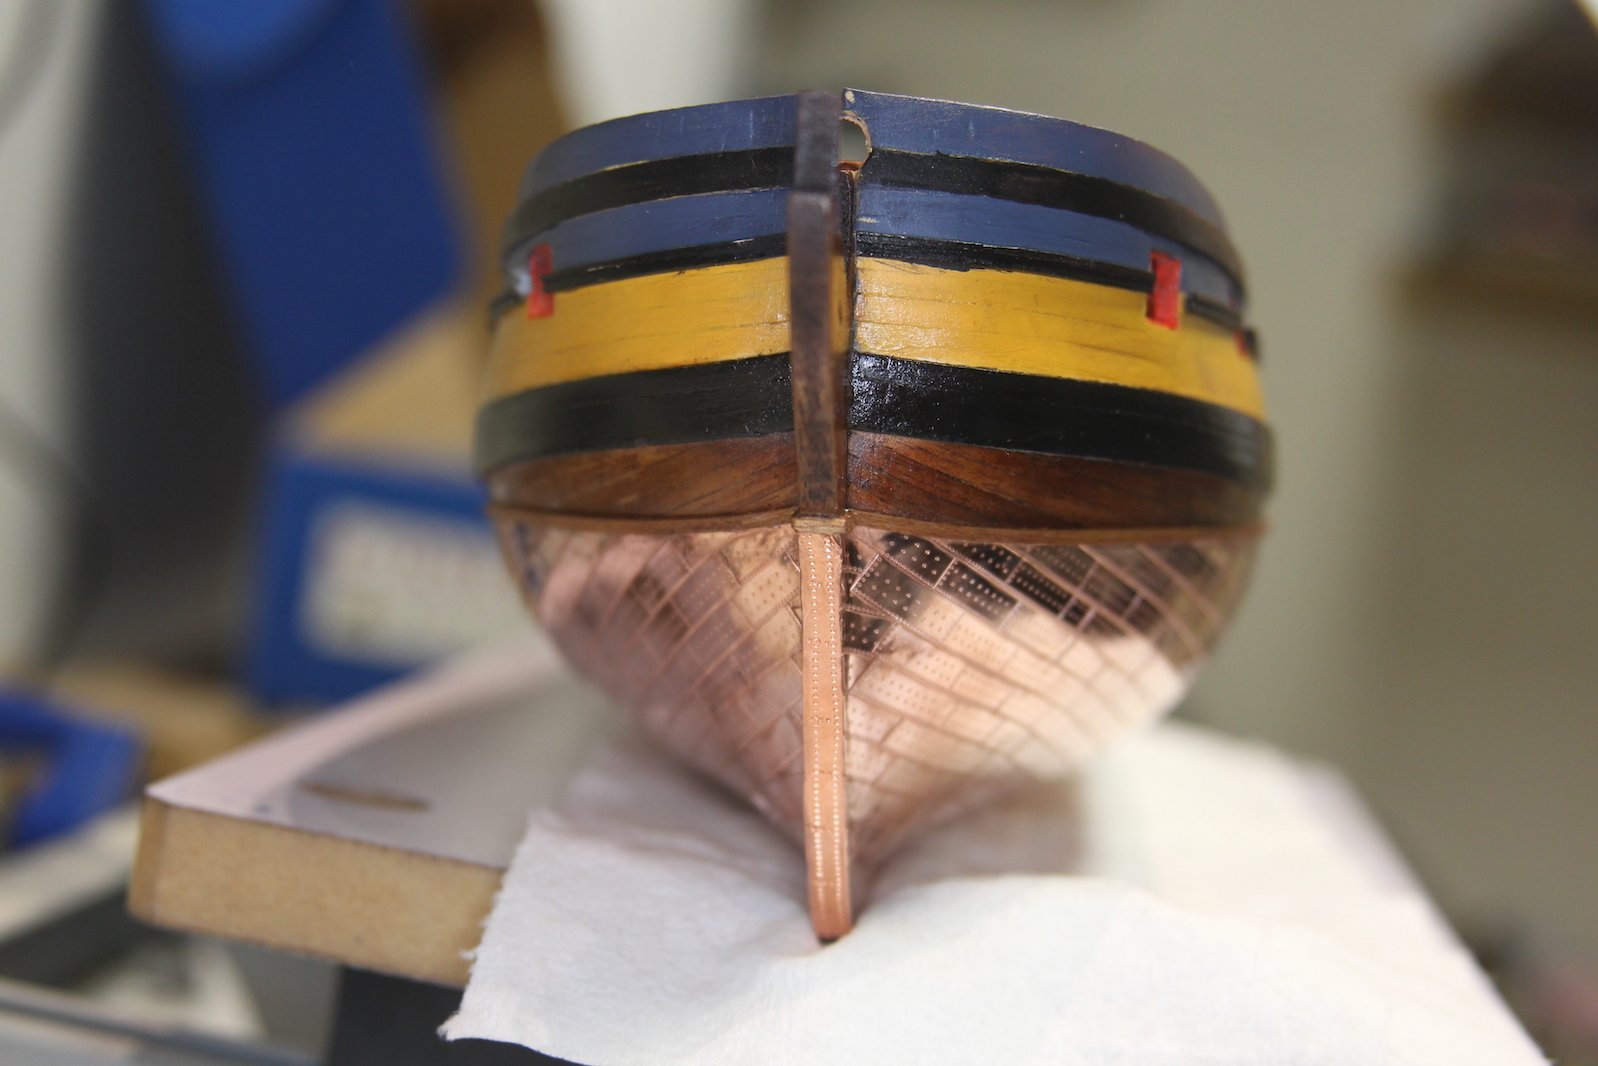
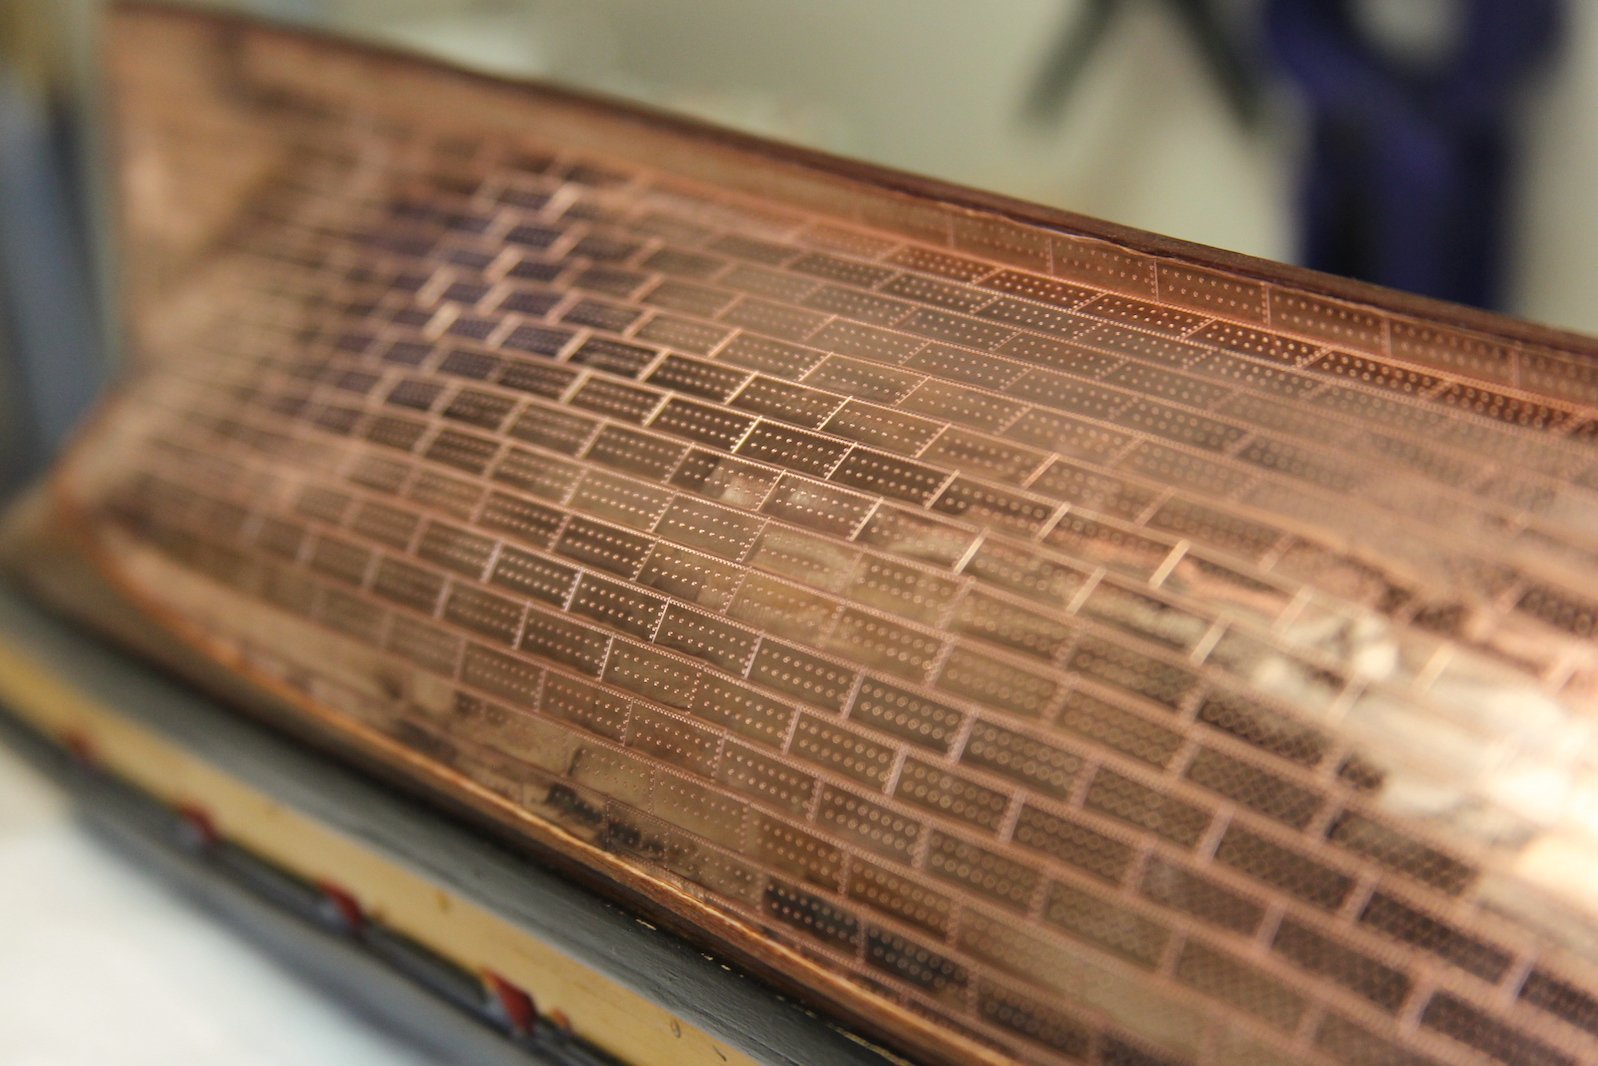
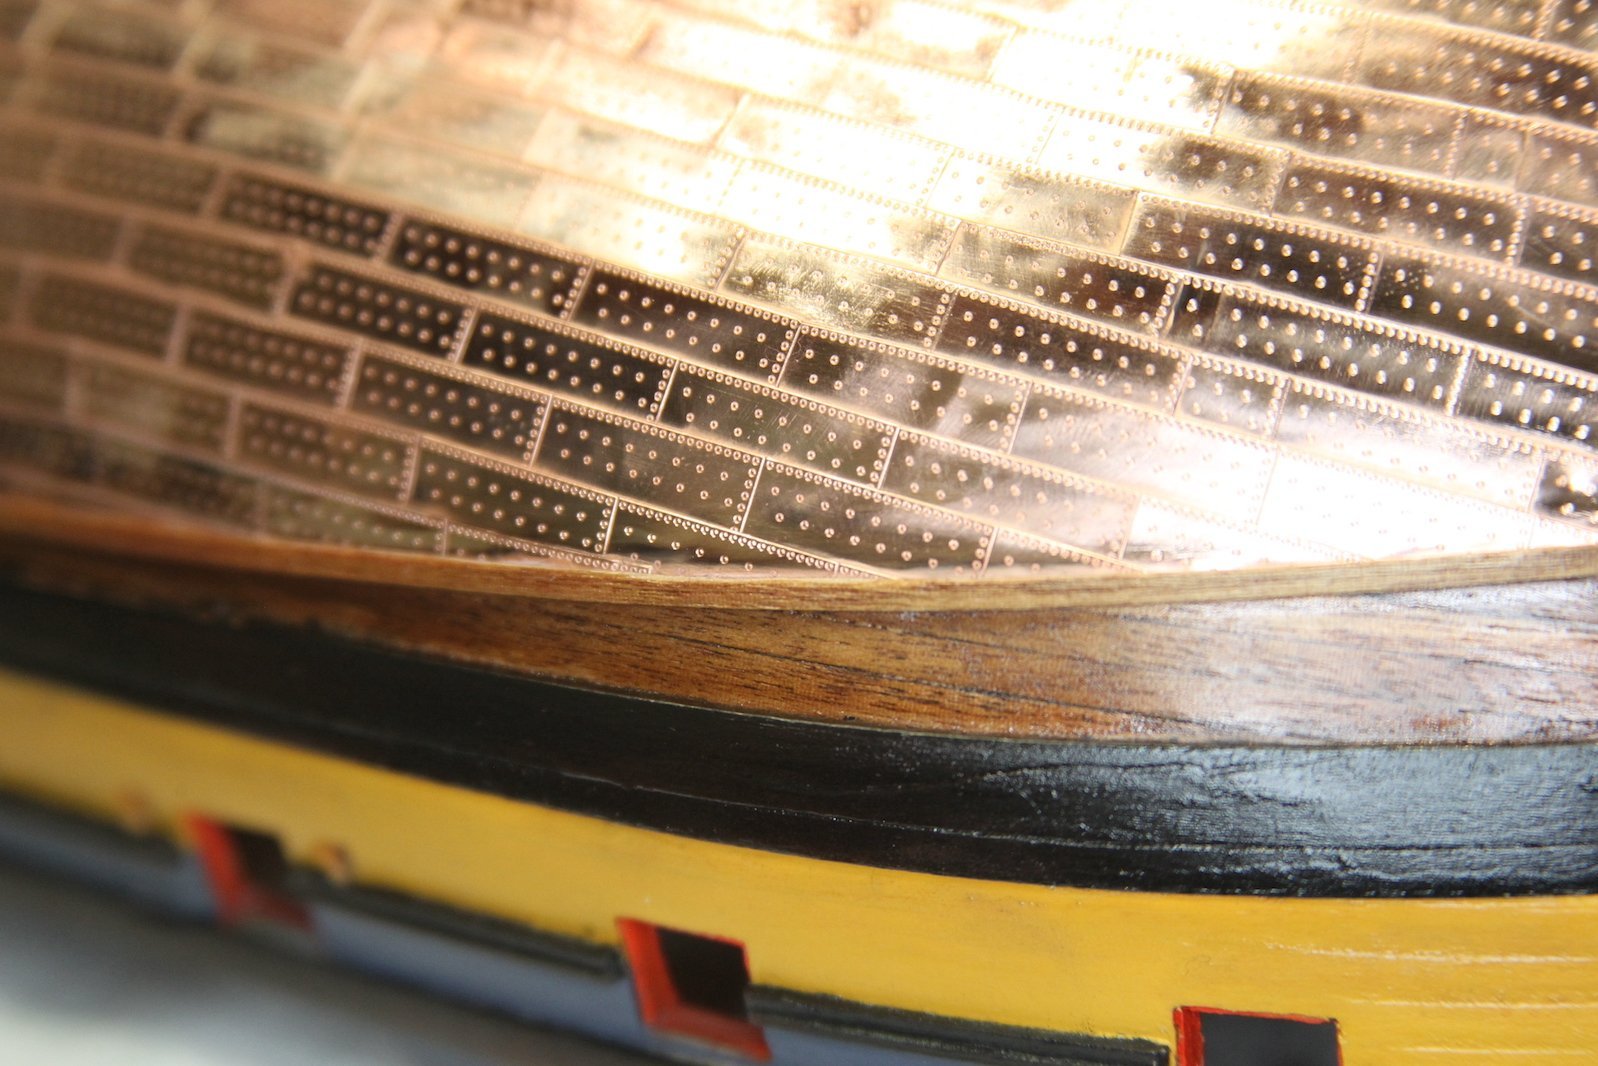
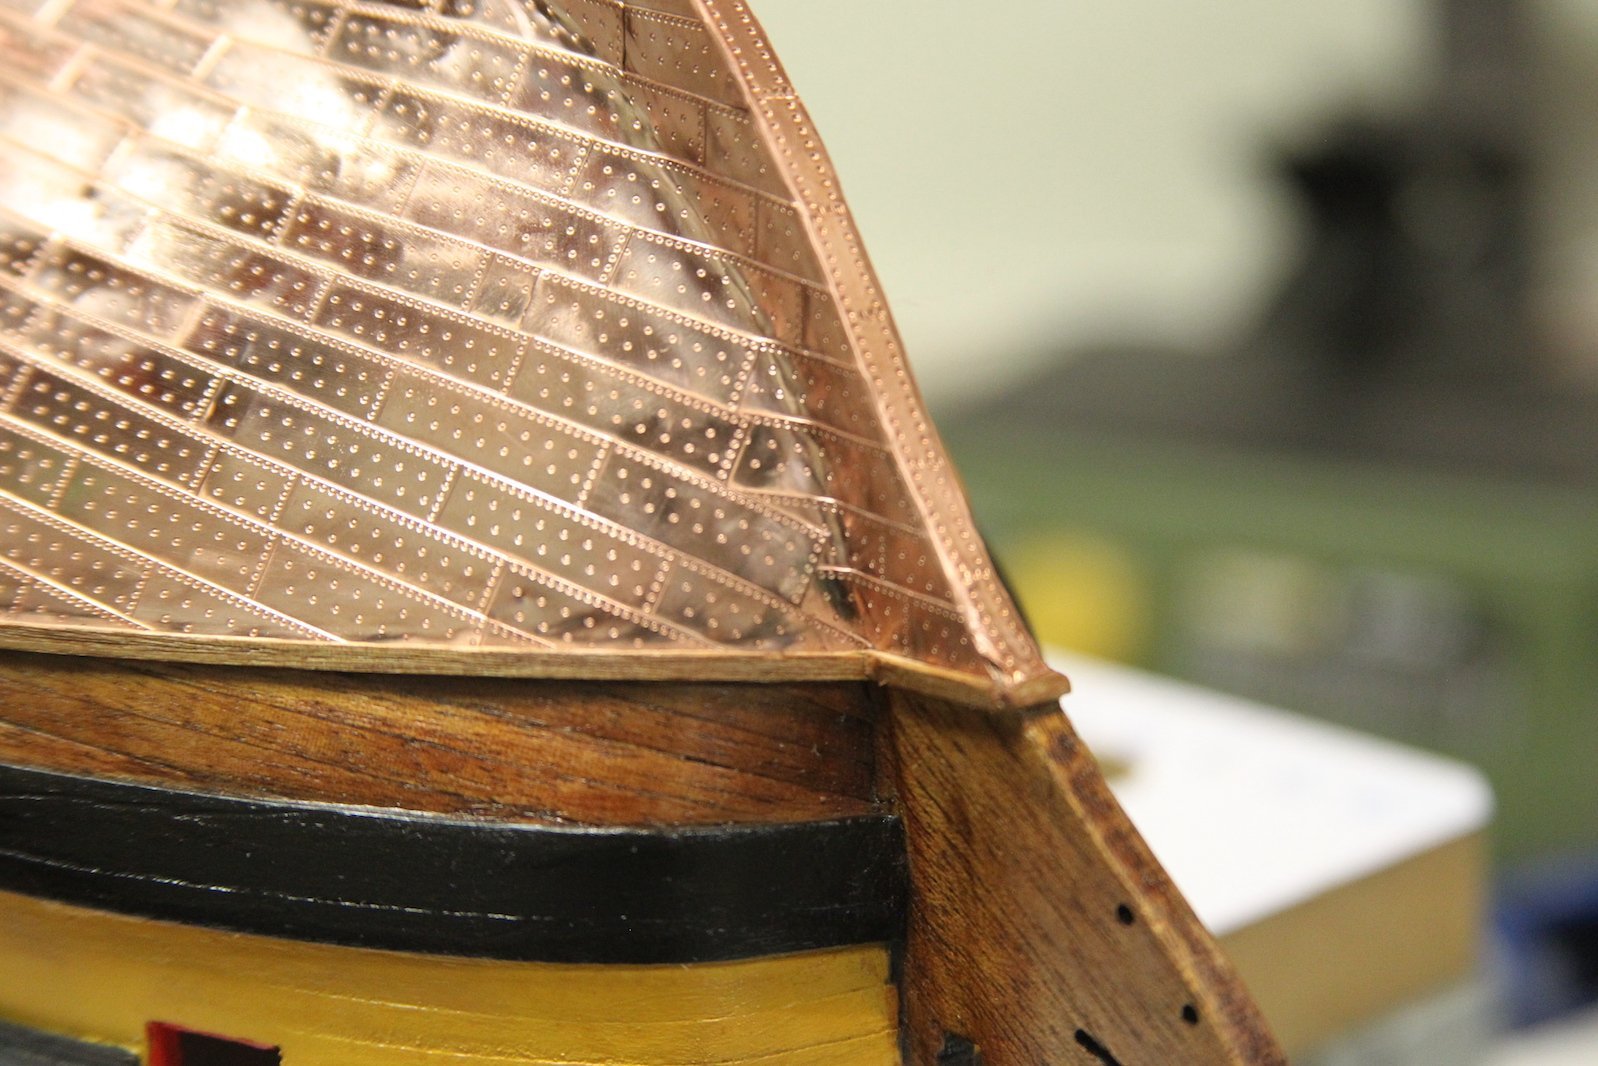
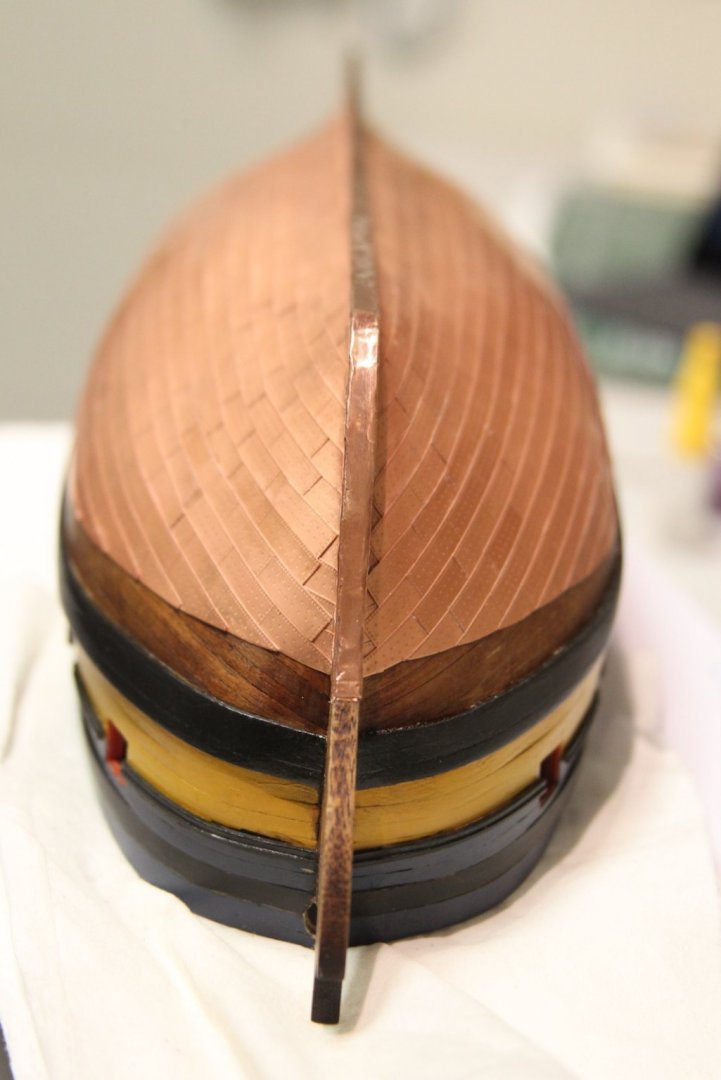
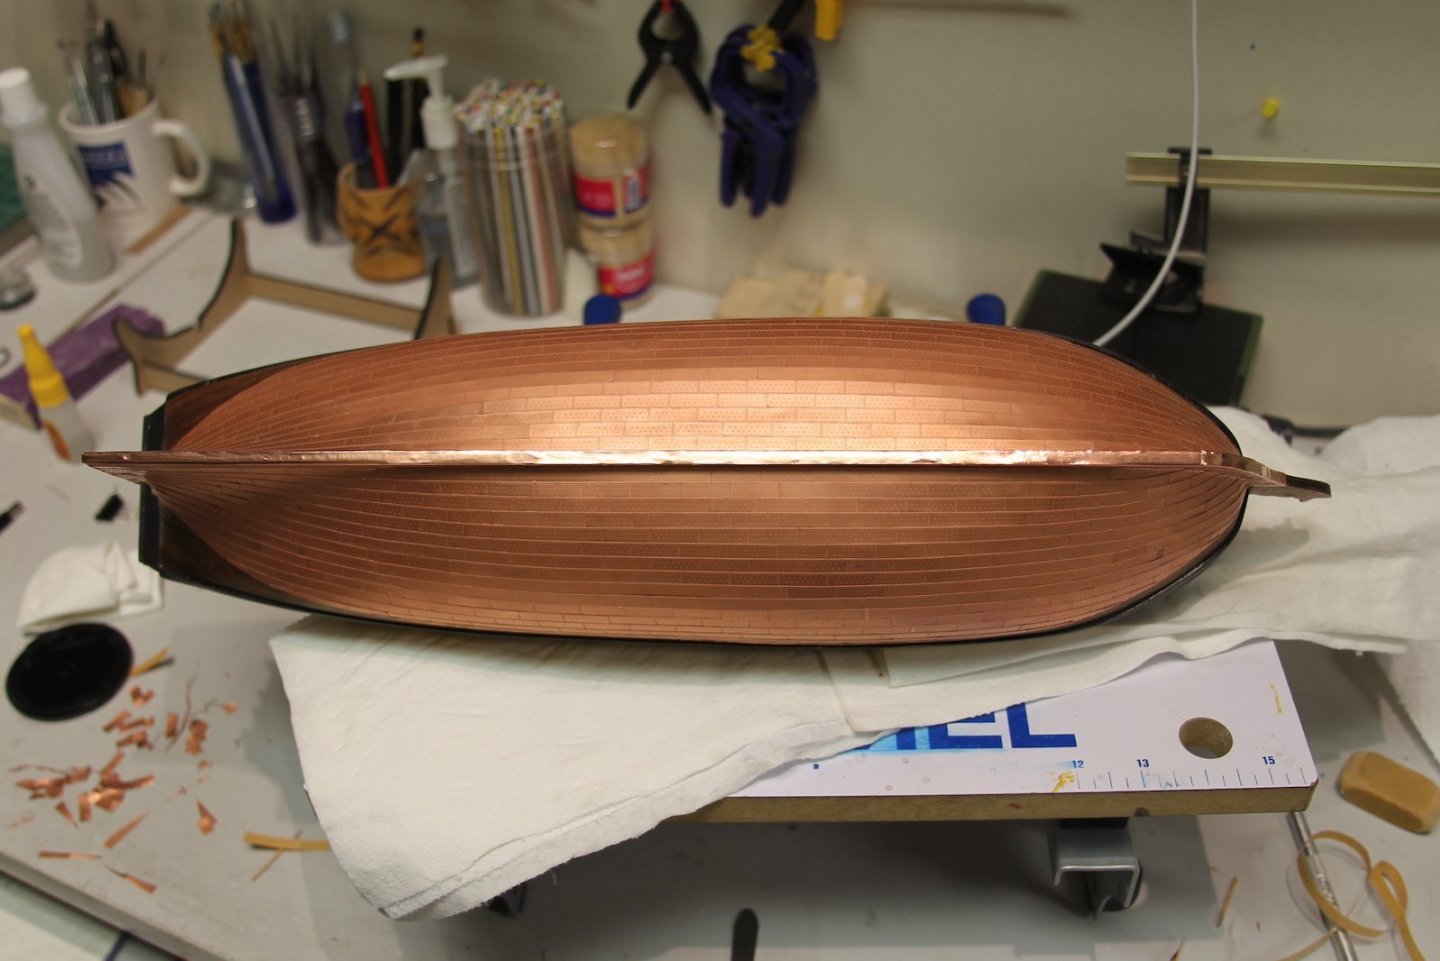
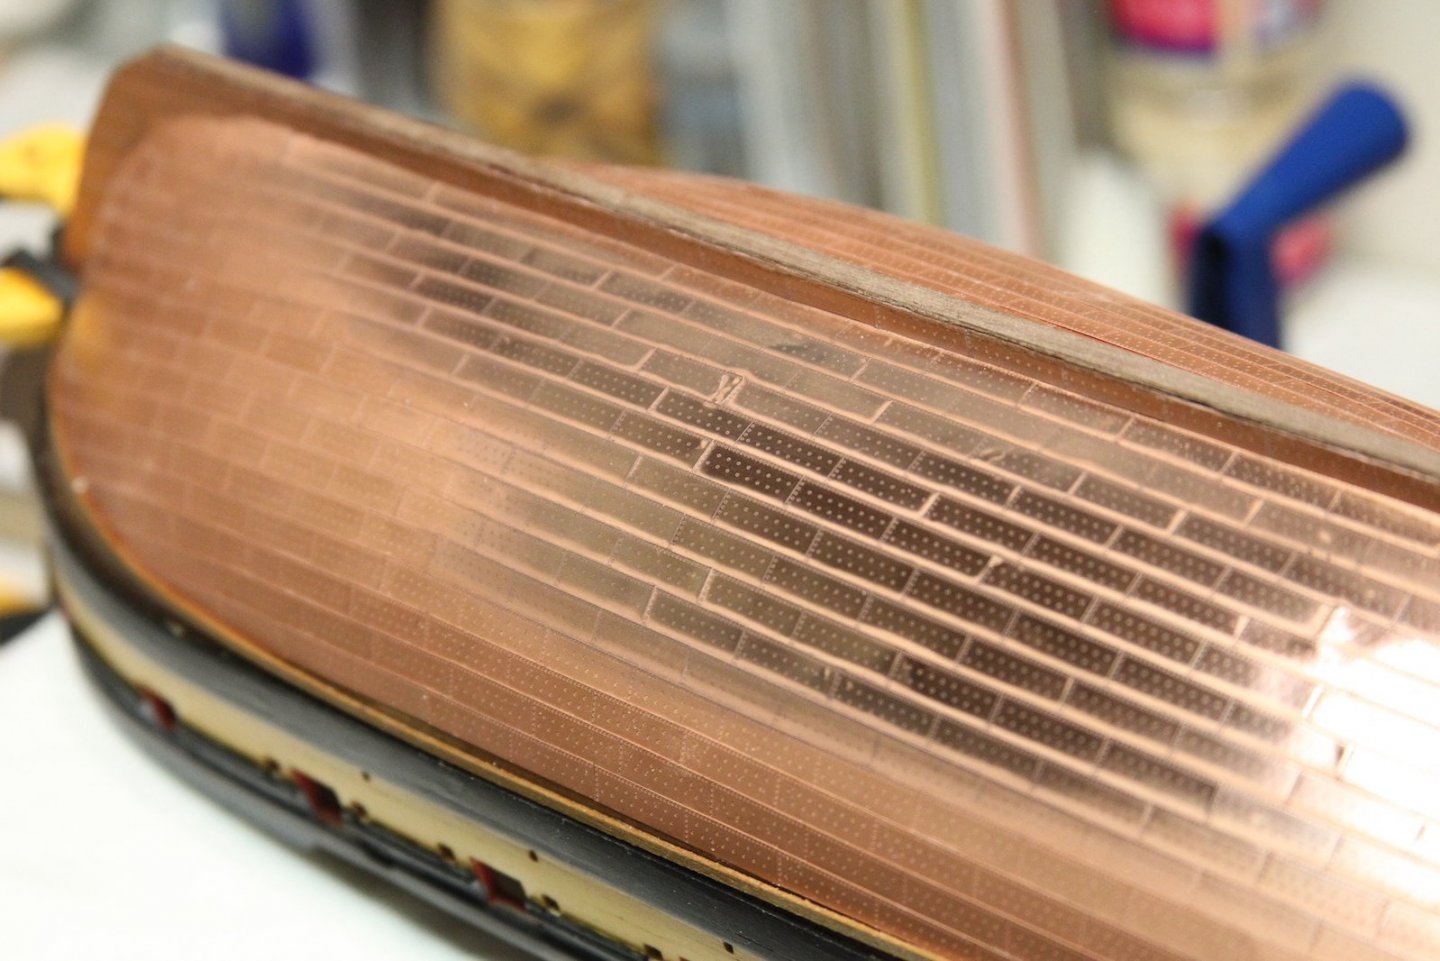
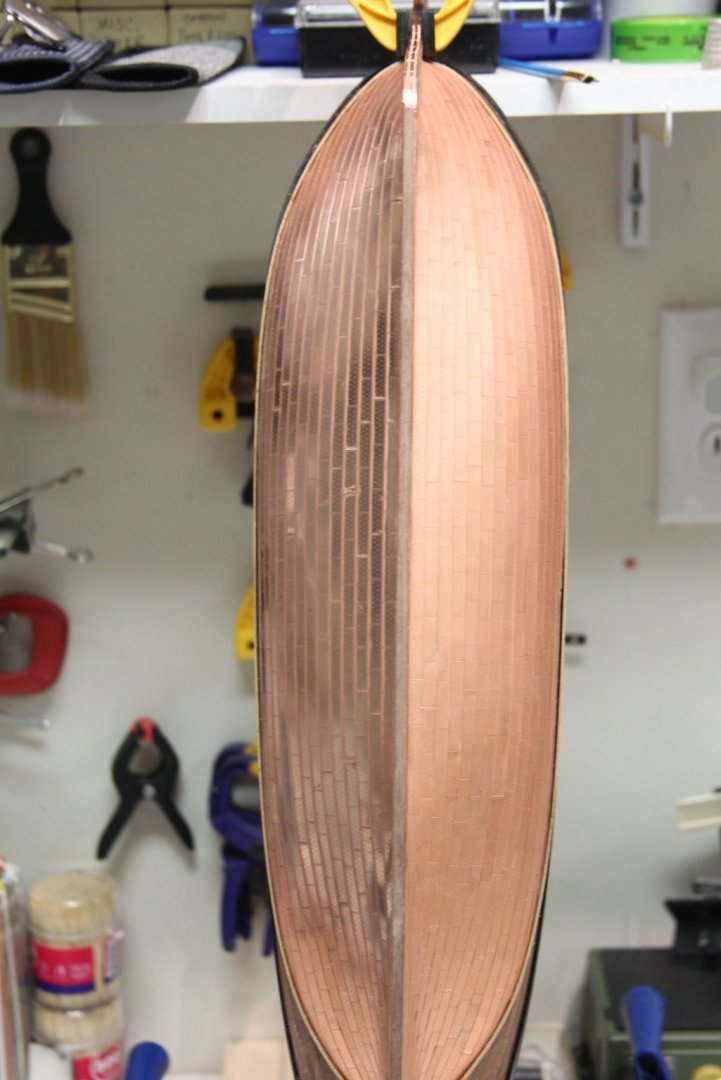
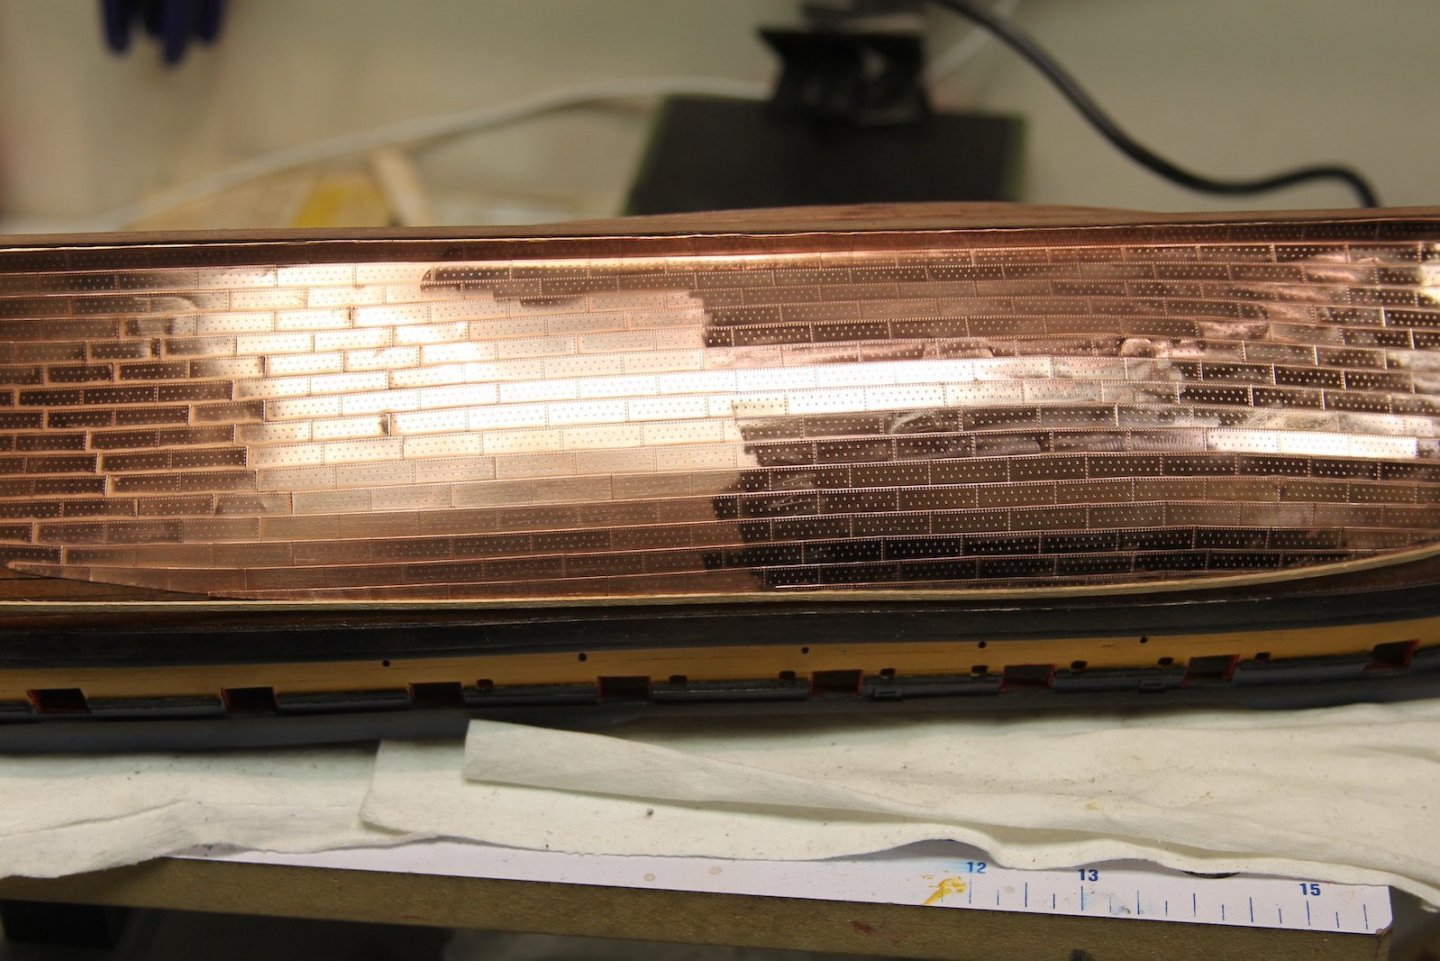
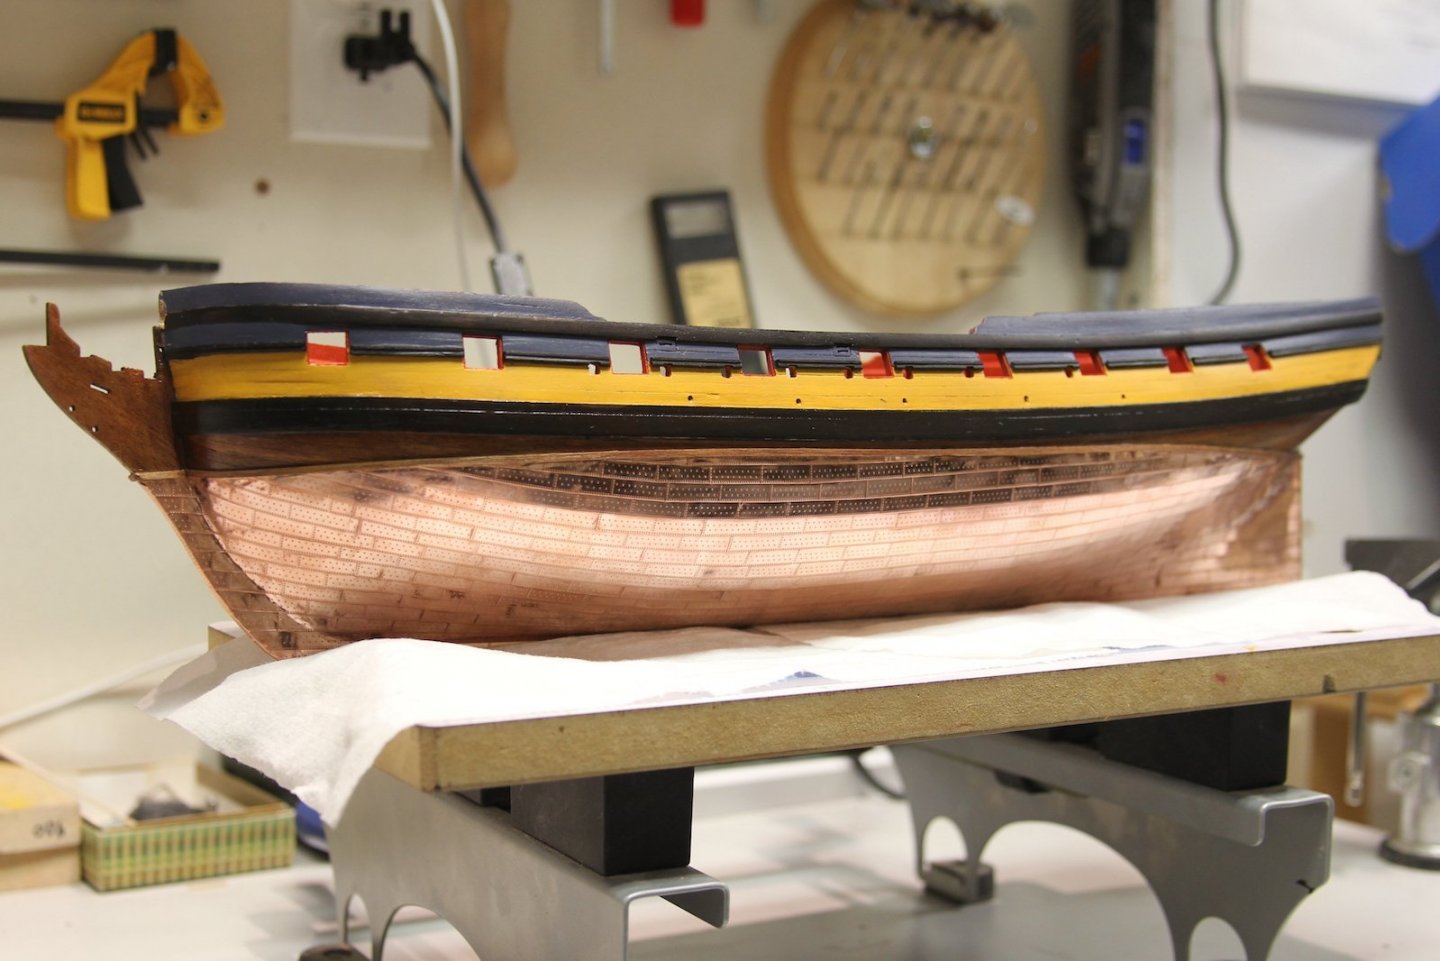
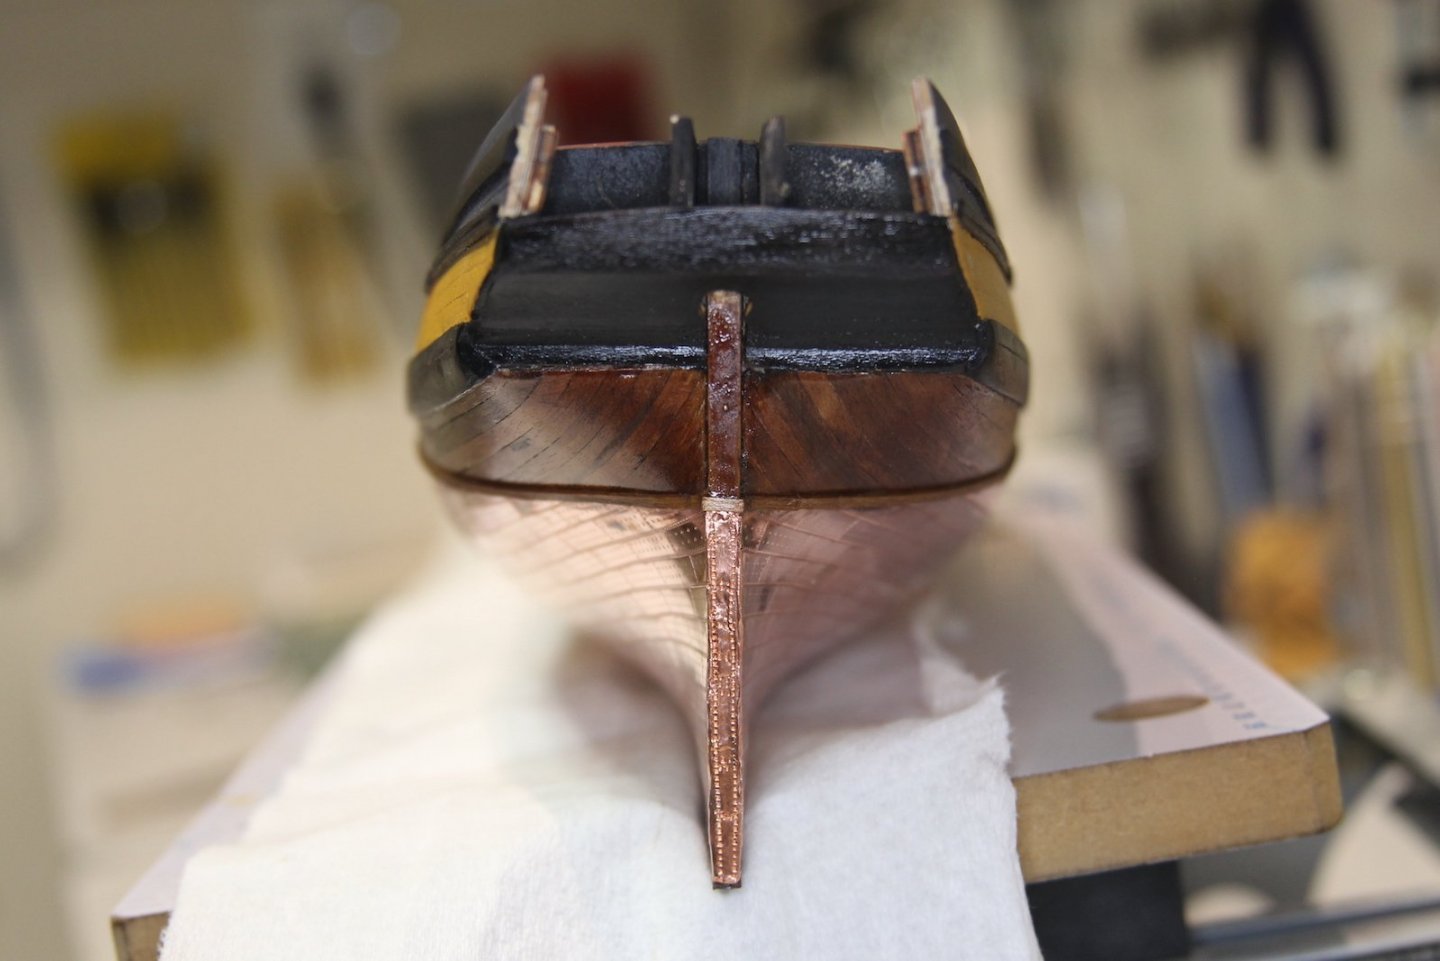
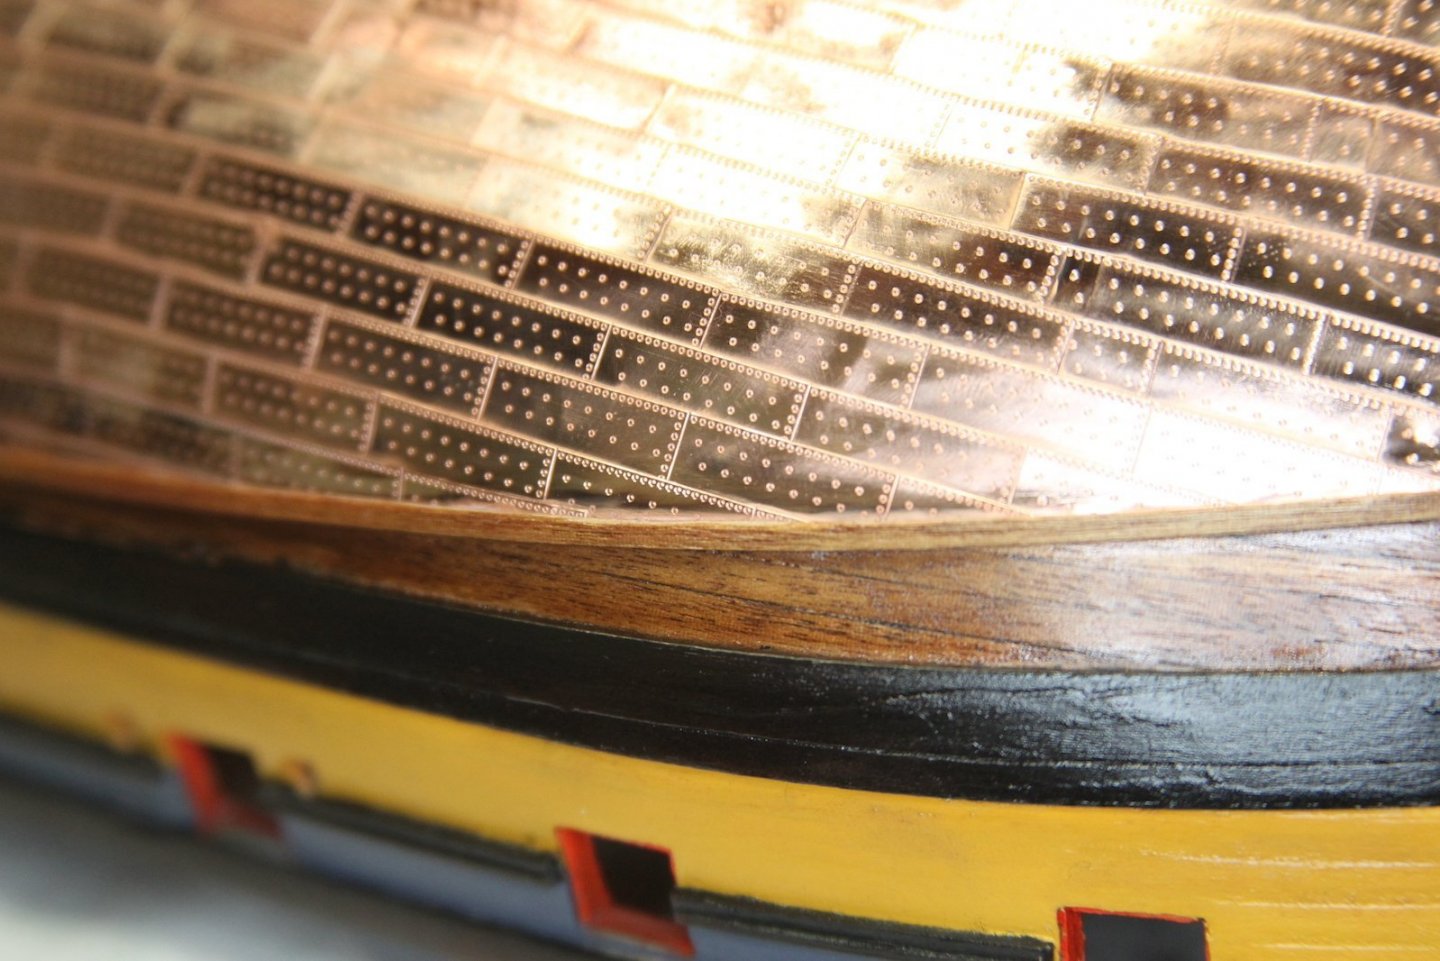
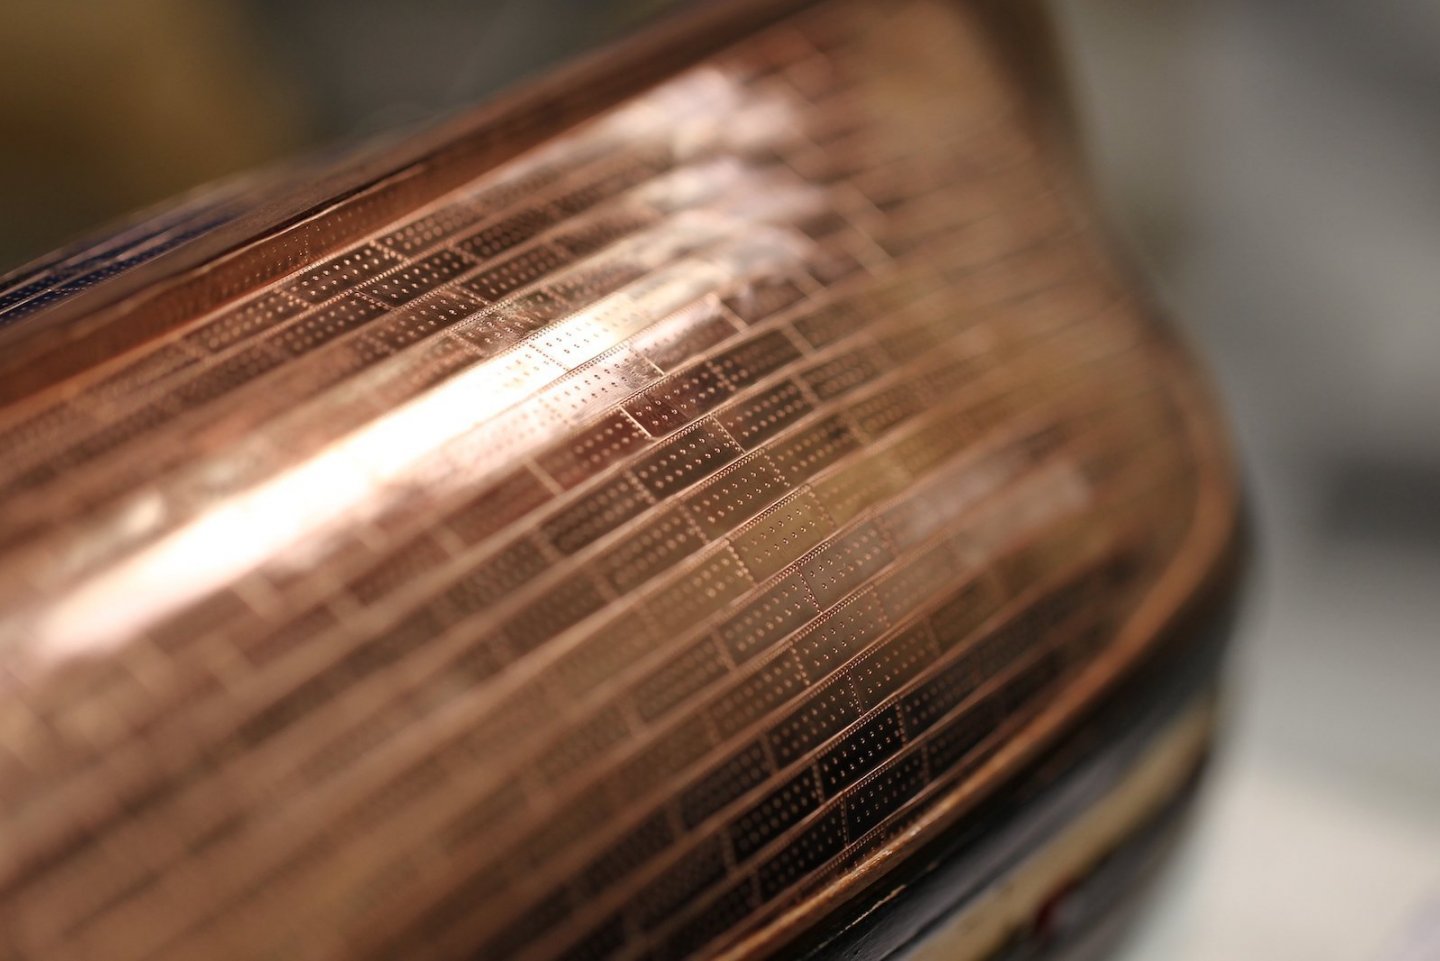
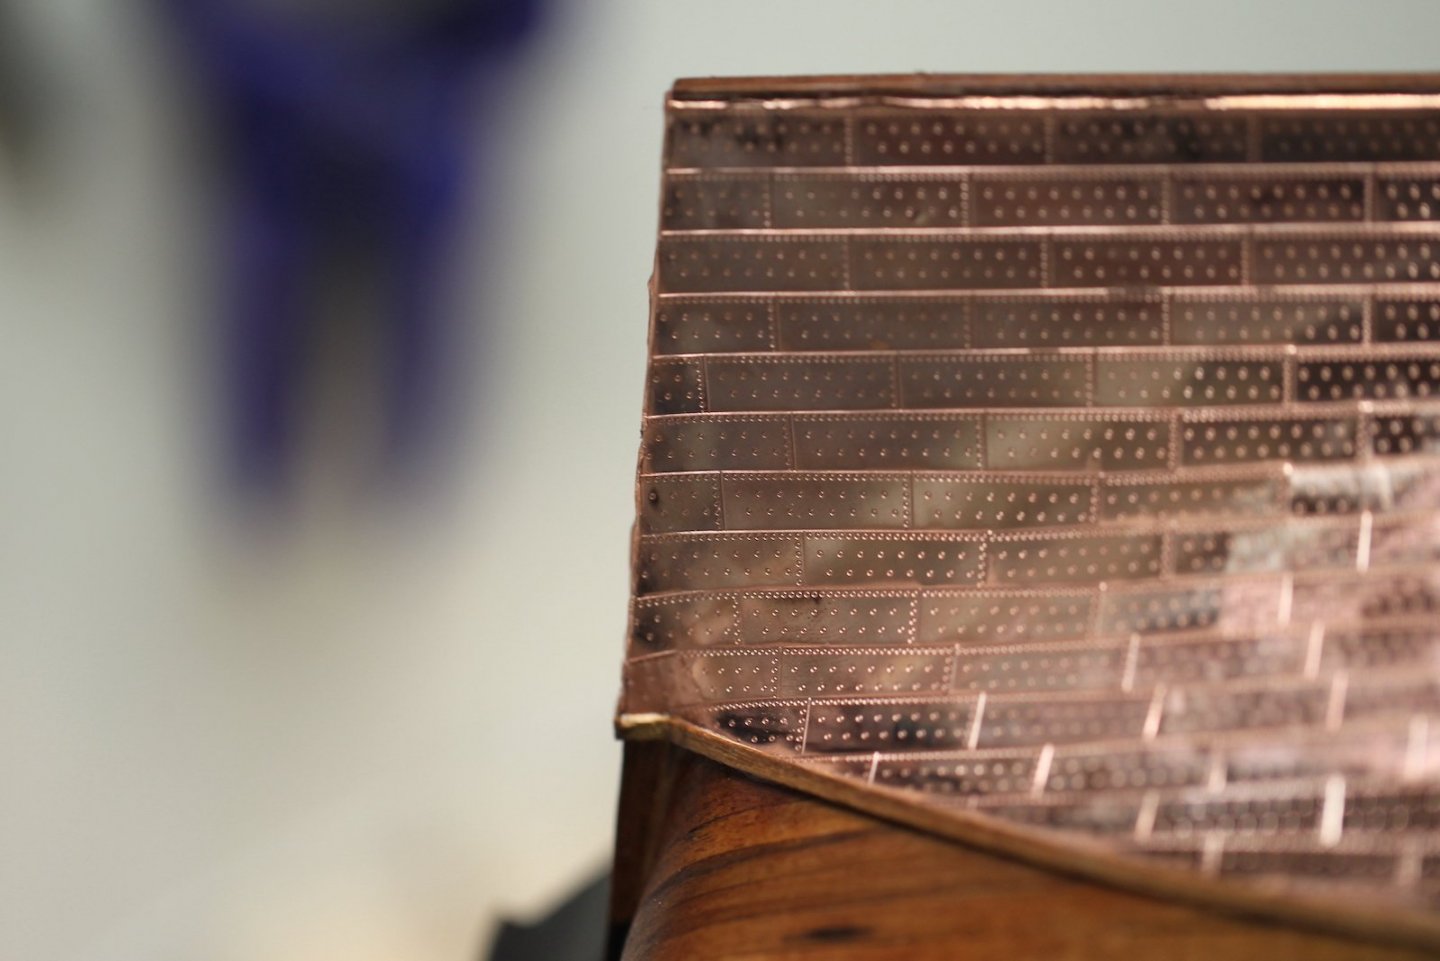
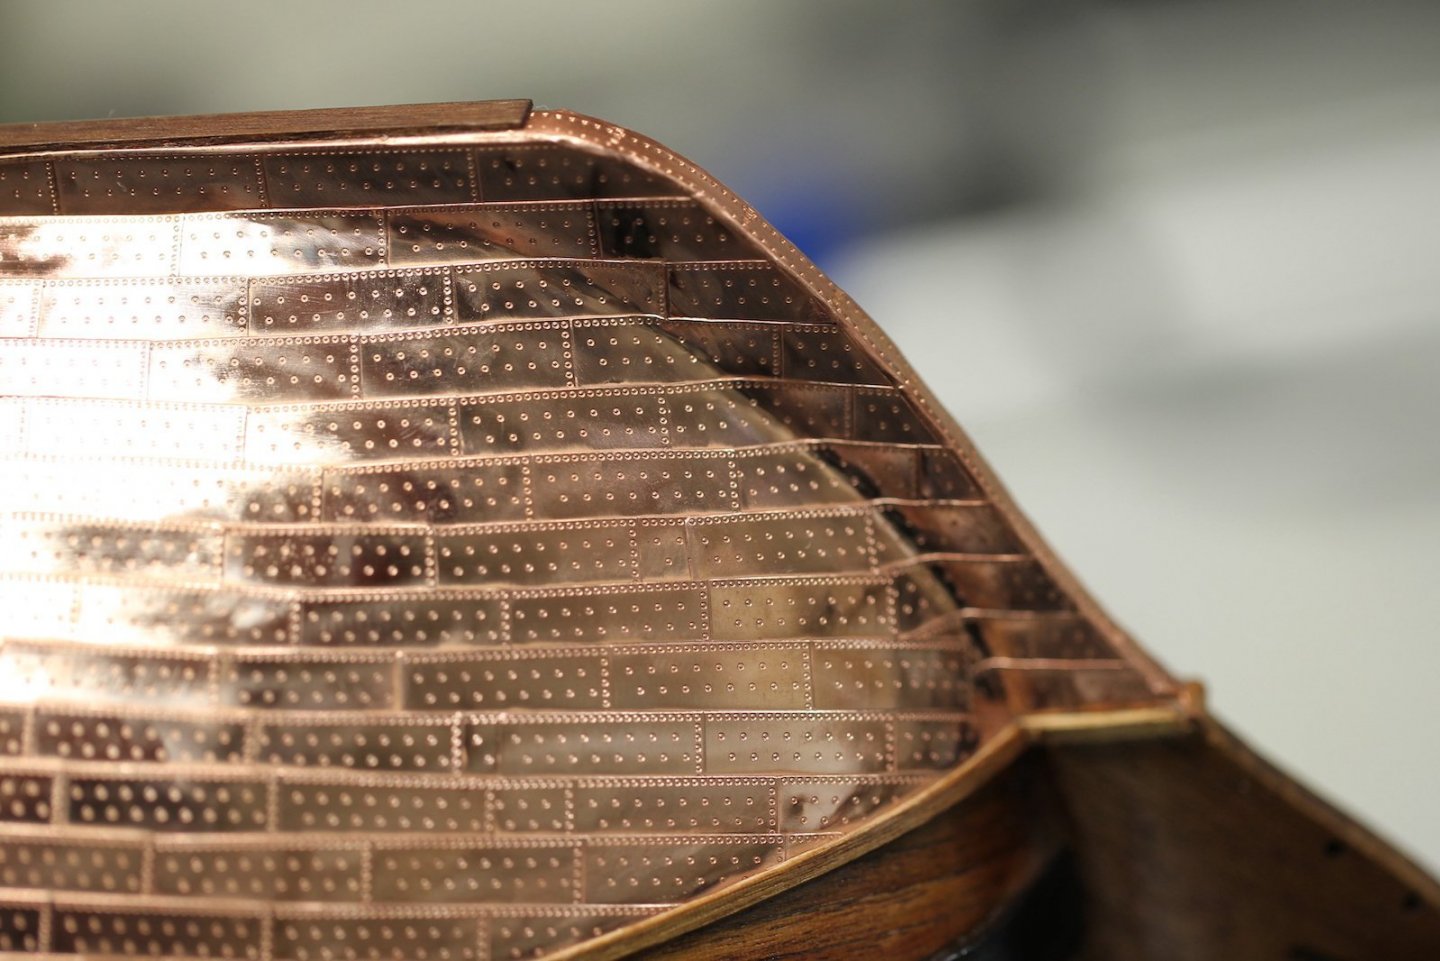
Wrapped up coppering the hull last night and I've got to say - I'm much more pleased with the results than I anticipated. The lines ended up pretty even throughout - of course I had to make a couple of adjustments nearing the waterline and wales as well as the adjustment of the bow angles. But, I made those fixes based on what I thought was logical. No pictures of it - but the second side went better than the first (of course), so I pulled off some of the bow and stern plates on the Starboard side and redid them to match the Port side. First pictures are finished plating without treating/cleaning the copper and after I added new copper strips to the keel. Second set of pictures is during the cleaning / polishing process. I lightly sanded down the copper with a 600 grit sponge sander. I bent it up so there were no sharp edges as it was very difficult not to catch the copper plate corners and fold them up. This sanding was SUPER light and often only in the same direction in which the plates overlapped. As you can see - pretty difficult to get into the areas where the plates meet/overlap. So - second effort was with this handy wire brush Dremel attachment. I have a couple of them, and this is the softest. I also have a plastic Dremel brush which did nothing. This one however worked like a champ! I went over the entire hull on Medium speed - stern to bow, very slowly and barely letting the brush make contact with the plates. Here's the difference before/after. After the brush, I wiped it down with a metal polishing cloth. Here are some shots of the hull after it's all buffed. Notice that I did go ahead and go with a false keel on the bottom - however, I kept the copper plate on the bow and stern because I'm happy with the way it turned out. My waterline strip is walnut to match the little bit of planking that's still showing. I've already decided I'm going to leave this natural - as opposed to painting it black - because I want the main wales to stand out. Also - there's a Rolling Stones joke in there somewhere but just can't make it happen. Next up - how to protect the copper. I've looked into a few things already - including versions of the Everbrite and protectclear stuff (which sounds a little involved). I've even looked at couple of academic journal studies that talk about chemical elements of copper coloring and deterioration. I'm actually just thinking a couple cotes of wipe on poly. Any thoughts here are welcome.


- 419 replies
-
- 11
-
-

-
- Victory Models
- Pegasus
- (and 2 more)
-
Great looking colors man - love it. And I wish I kept a log of how much time I've spent trying to revitalize paints in various manners... hehe
-
Thanks Grant, that's quite a compliment! And yeah - definitely have Dan's build's bookmarked. And endless source of not only great builds, but no end to innovative jigs and ideas.
- 419 replies
-
- 2
-
-
- Victory Models
- Pegasus
- (and 2 more)
-
Thanks Peter - I'll get the other side coppered then make a final decision on the keel. Meantime, good timing as I was just looking at your rudder from the Bellerophon earlier this year and dig the rework on the bolt heads. I'll be swiping that idea for sure!
- 419 replies
-
- 3
-
-
- Victory Models
- Pegasus
- (and 2 more)