Moonbug
-
Posts
1,028 -
Joined
-
Last visited
Content Type
Profiles
Forums
Gallery
Events
Everything posted by Moonbug
-
 Nice work on the doors Danny. The doors on the AL kit ended up being so thick that it took quite a bit of work sanding and maneuvering to fit them somewhere between being able to function, and having too much gap between the door and the door 'jam'.
 -
Beautiful painting Sjors - that's an unbelievable amount of patience...
-
Hey Eddie, Welcome to the Wagon Train! Looks like we're onto a new trend here for the Sailors who hit the shore leave. Good luck with the kit! I've pointed out some challenges over in my build - my biggest advice would be to soak just about all the wood if it needs to be bent, even it just slightly. It's pretty brittle (to say the least). Also, keep an eye on inventory, not all the quantities, etc, seemed to match up and I've had to dip into my back stock for few pieces. Good luck!
-
Hey Dan! I just noticed the build in your link. Ack! Can't believe I didn't see it. Glad to catch up though. Definitely liking the look of this kit's quality over the AL kit - that's for sure. Having fun doing something of such a different scale?
-
Brilliant work, obviously B.E. A very richly earned Congratulations. You must be extraordinarily proud. I look forward to milking your log and the knowledge contained therein when I pull the Peg down from the shelf and get her underway. Thanks for sharing your journey with all of us.
- 366 replies
-
- 4
-

-
- pegasus
- victory models
- (and 2 more)
-
Yay!! Very nicely done my friend! Congratulations!
- 1,616 replies
-
- 6
-
-
- caldercraft
- agamemnon
- (and 1 more)
-
Very nicely done. Those of us who have been around for a bit are used to your re-works - and the always improved result they produce.
-
I'll echo what the other folks have said - looks good so far. Nice job on making the necessary adjustments early on. Well done.
- 55 replies
-
- 2
-
-
- confederacy
- model shipways
- (and 1 more)
-
Welcome back Michel - glad you've returned!
-
Welcome aboard Dan!
-
Looks great Sjors! spaghetti sure - but well coordinated spaghetti!
- 1,616 replies
-
- 8
-
-
- caldercraft
- agamemnon
- (and 1 more)
-
Thanks Thomas, I appreciate the words and the look-in!
- 2,191 replies
-
- 3
-
-
- confederacy
- Model Shipways
- (and 1 more)
-
Congratulations john, really nice work! (I missed the "finished" post - still figuring out how to find content on the new update.)
- 745 replies
-
- 2
-
-
- francis pritt
- mission ship
- (and 1 more)
-
Nice build thus far! As to your question, my method is to grip the brass in the flat (not grooved) part of my older needle nosed pliers, the hit the pliers with a hammer several times. Loud, but effective. Just did it today with my Stagecoach build.
- 84 replies
-
- 1
-
-
- swift
- artesania latina
- (and 1 more)
-
Thank you, thank you, thank you for doing this. Like most here, I'm heartbroken that it was necessary, but with the Peg on my shelf I couldn't be more grateful. As it has been said many times, your build is the gold standard for this kit and modifying it.
- 366 replies
-
- 3
-
-
- pegasus
- victory models
- (and 2 more)
-
How did I not know you were building this? this tiny stuff is so awesome!
- 453 replies
-
- 7
-
-
- thermopylae
- sergal
- (and 1 more)
-
Welcome aboard Matt - Nice work thus far. This is a great project to start with because it not only allows for a fair learning curve, but it also offers some good flexibility to either 'enhance' the kit, or just go along straight with the instructions. Since you've gotten through the planking so cleanly, I'm confident the rest of the build will be a breeze!
- 50 replies
-
- 1
-
-
- artesania latina
- Virginia
- (and 2 more)
-
Off to a good start Pierre. This is an interesting kit - looking forward to seeing how she shapes up.
-
Nice work Sjors! It's exciting getting close the the finish. I love the blocks spread all over - looks like little bug-sailors crawling around at work on the rigging. ;-)
- 1,616 replies
-
- 5
-
-
- caldercraft
- agamemnon
- (and 1 more)
-
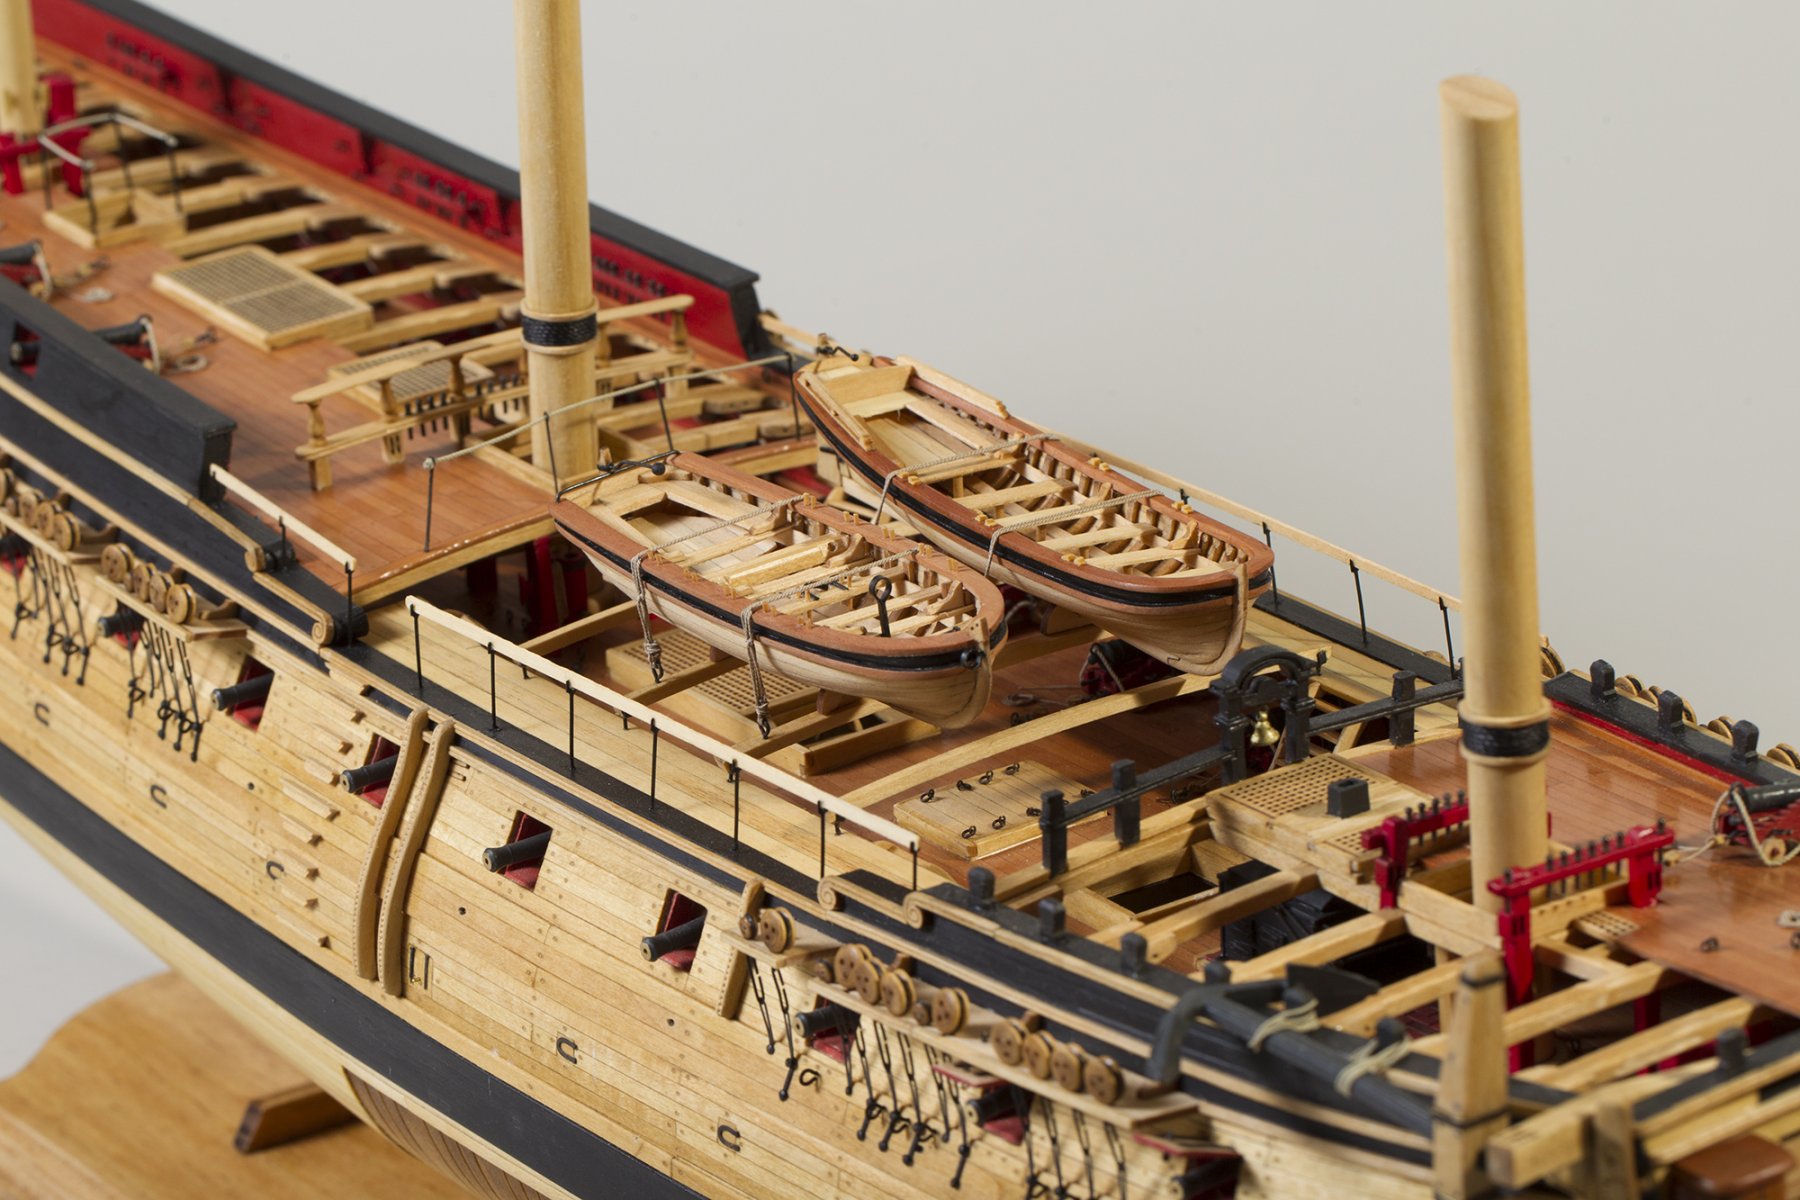
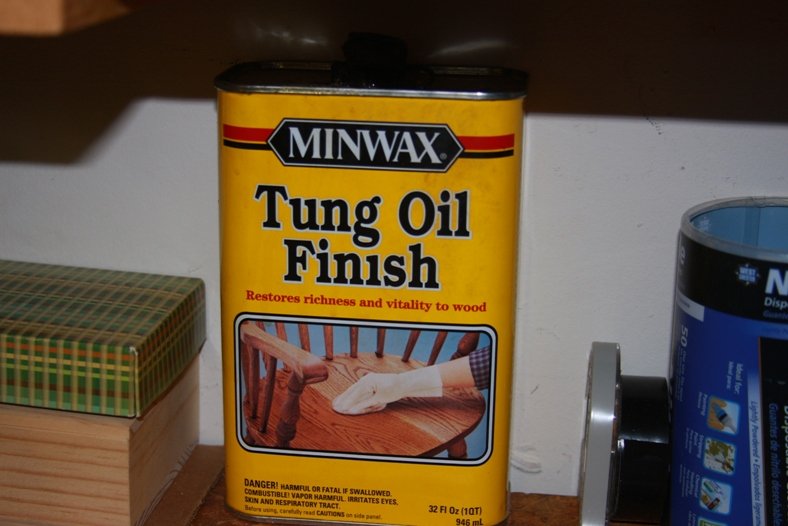
Hi Jax! Thanks for the comment. The warmer wood on the deck is Swiss Pear. Augie substituted some of the original wood with the swiss, and a couple of smaller deck fittings with Boxwood. When I did a little bit of refinishing early on after taking over the build, I re-sanded much of the deck, then really rubbed in a couple of coats of Tung oil. Then, I used a little bit more Swiss Pear in a some smaller areas (particularly the ships boats) to try and tie some of it in artistically.
- 2,191 replies
-
- 8
-
-
- confederacy
- Model Shipways
- (and 1 more)
-
Anja! I'm late to the party! I didn't realize you started a new build. I blame Sjors, he Should've told me.
-
Thank you so much for the likes, and especially comments everyone! I'm quite overwhelmed and humbled at the responses - truly.
- 2,191 replies
-
- 9
-
-
- confederacy
- Model Shipways
- (and 1 more)
-
Thanks again, very very much every one. Got the other images loaded into the Completed Build Gallery (Thanks Chuck and Dubz for your help!) here:
- 2,191 replies
-
- 10
-
-
- confederacy
- Model Shipways
- (and 1 more)
-
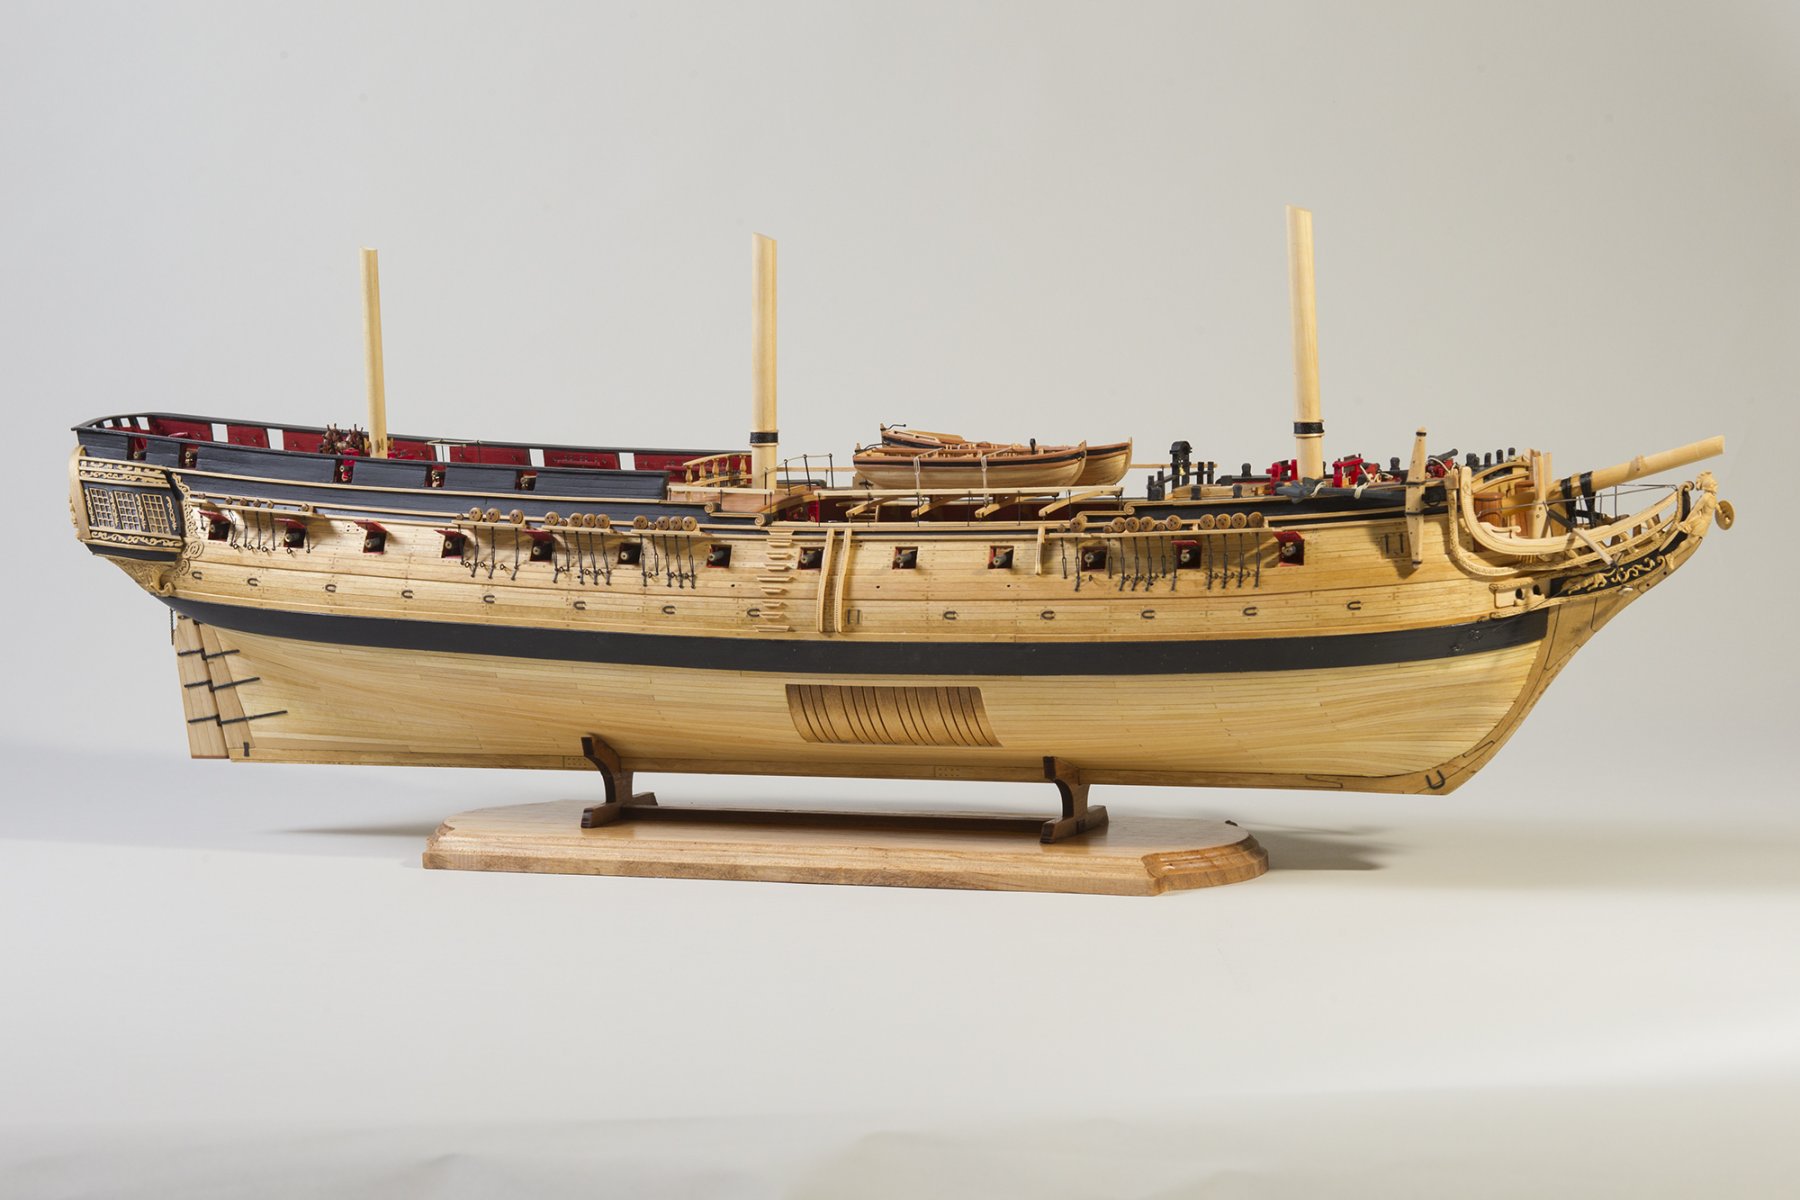
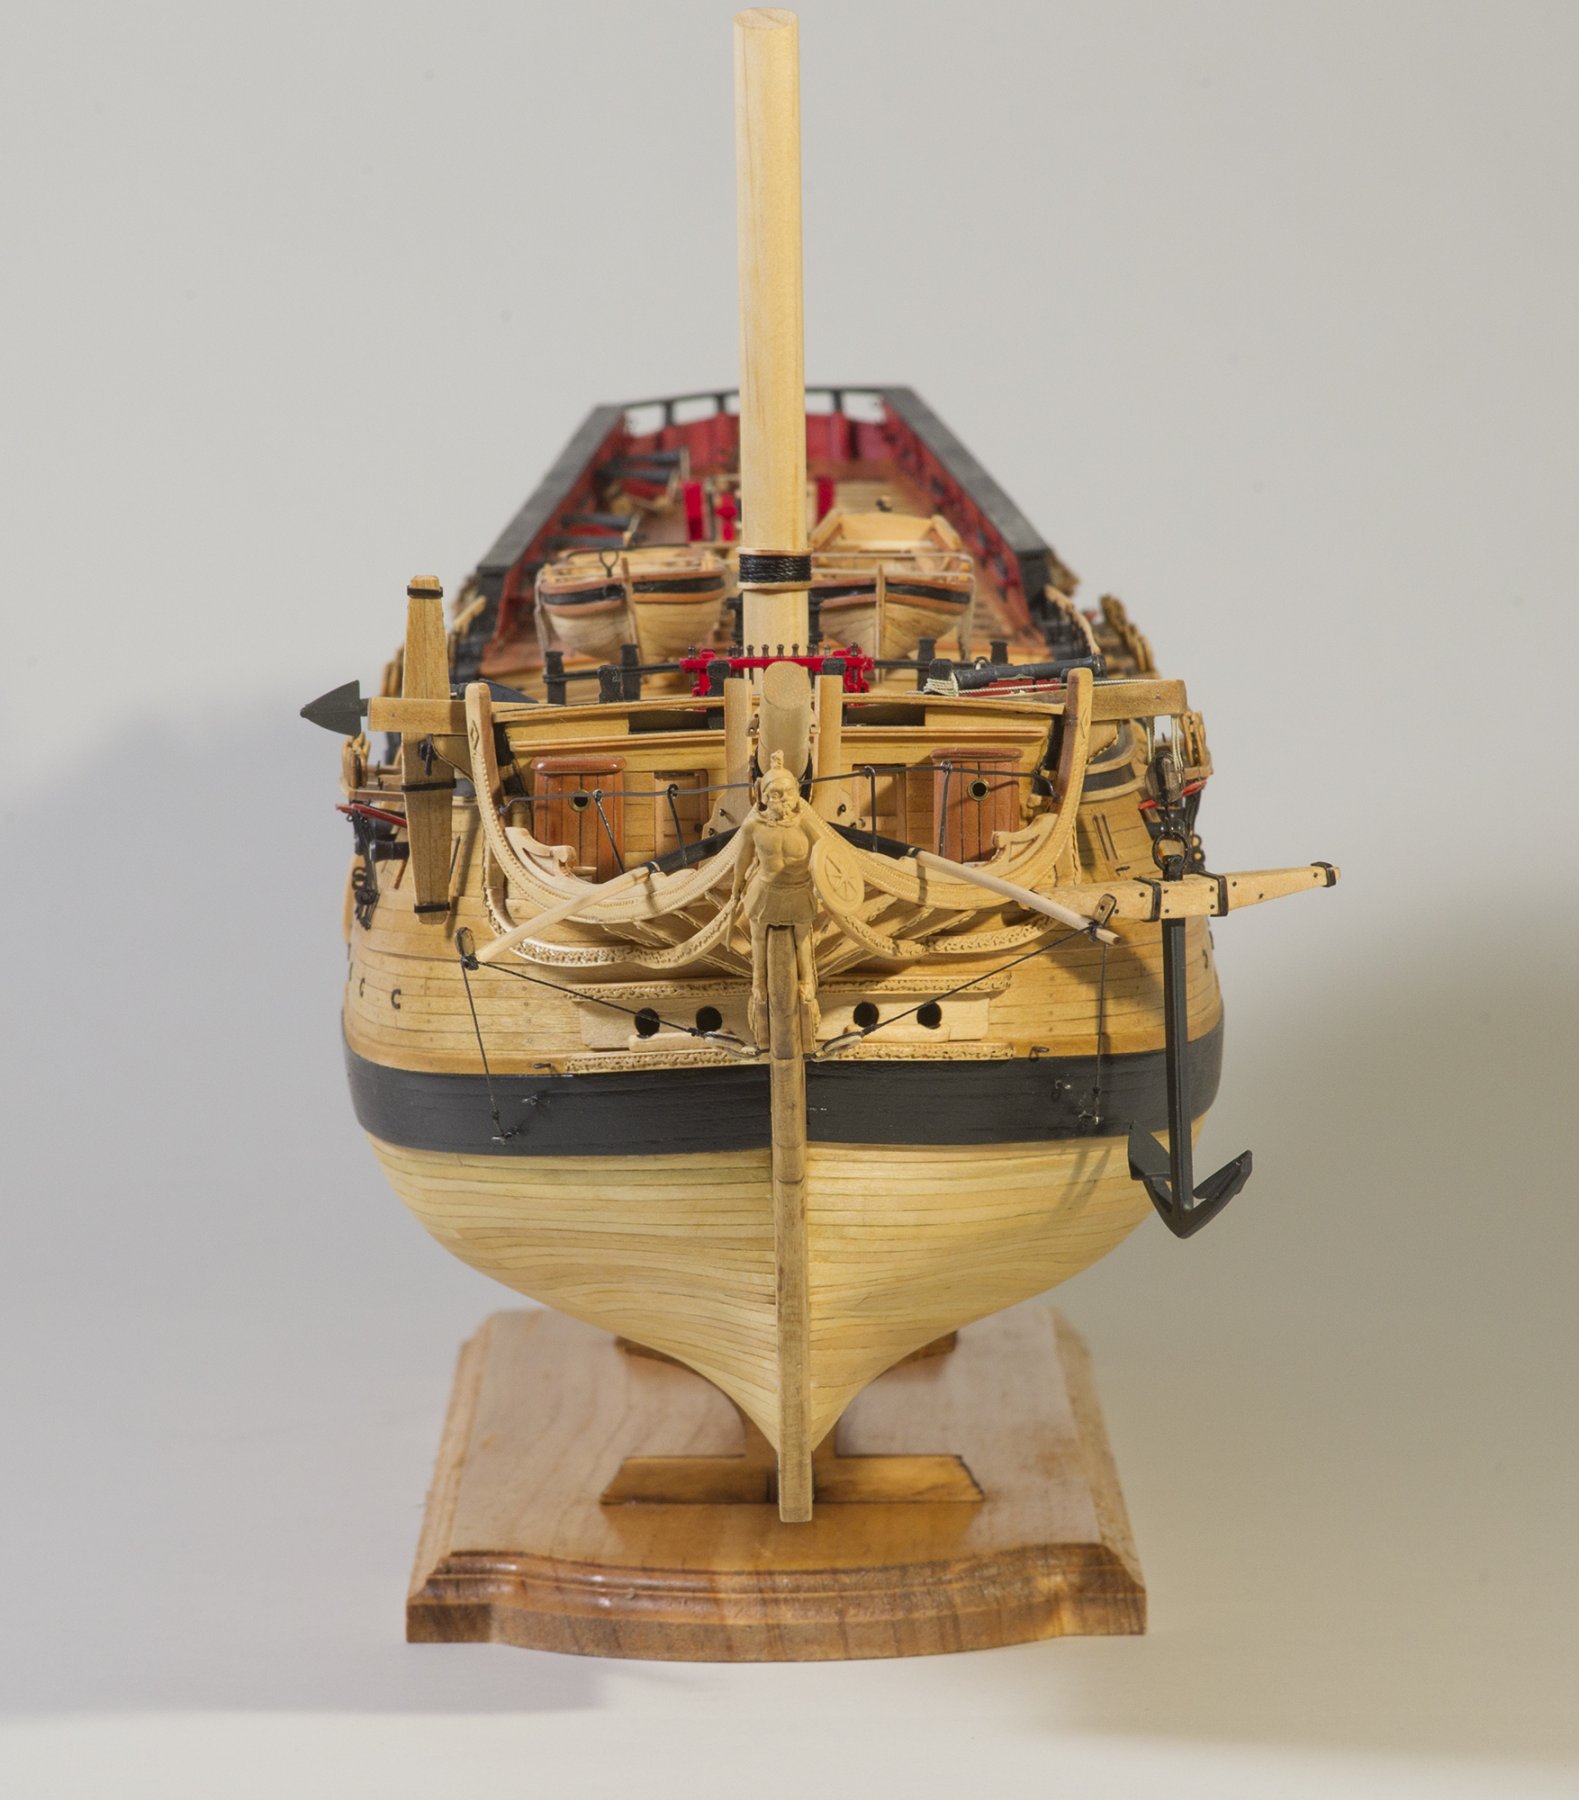
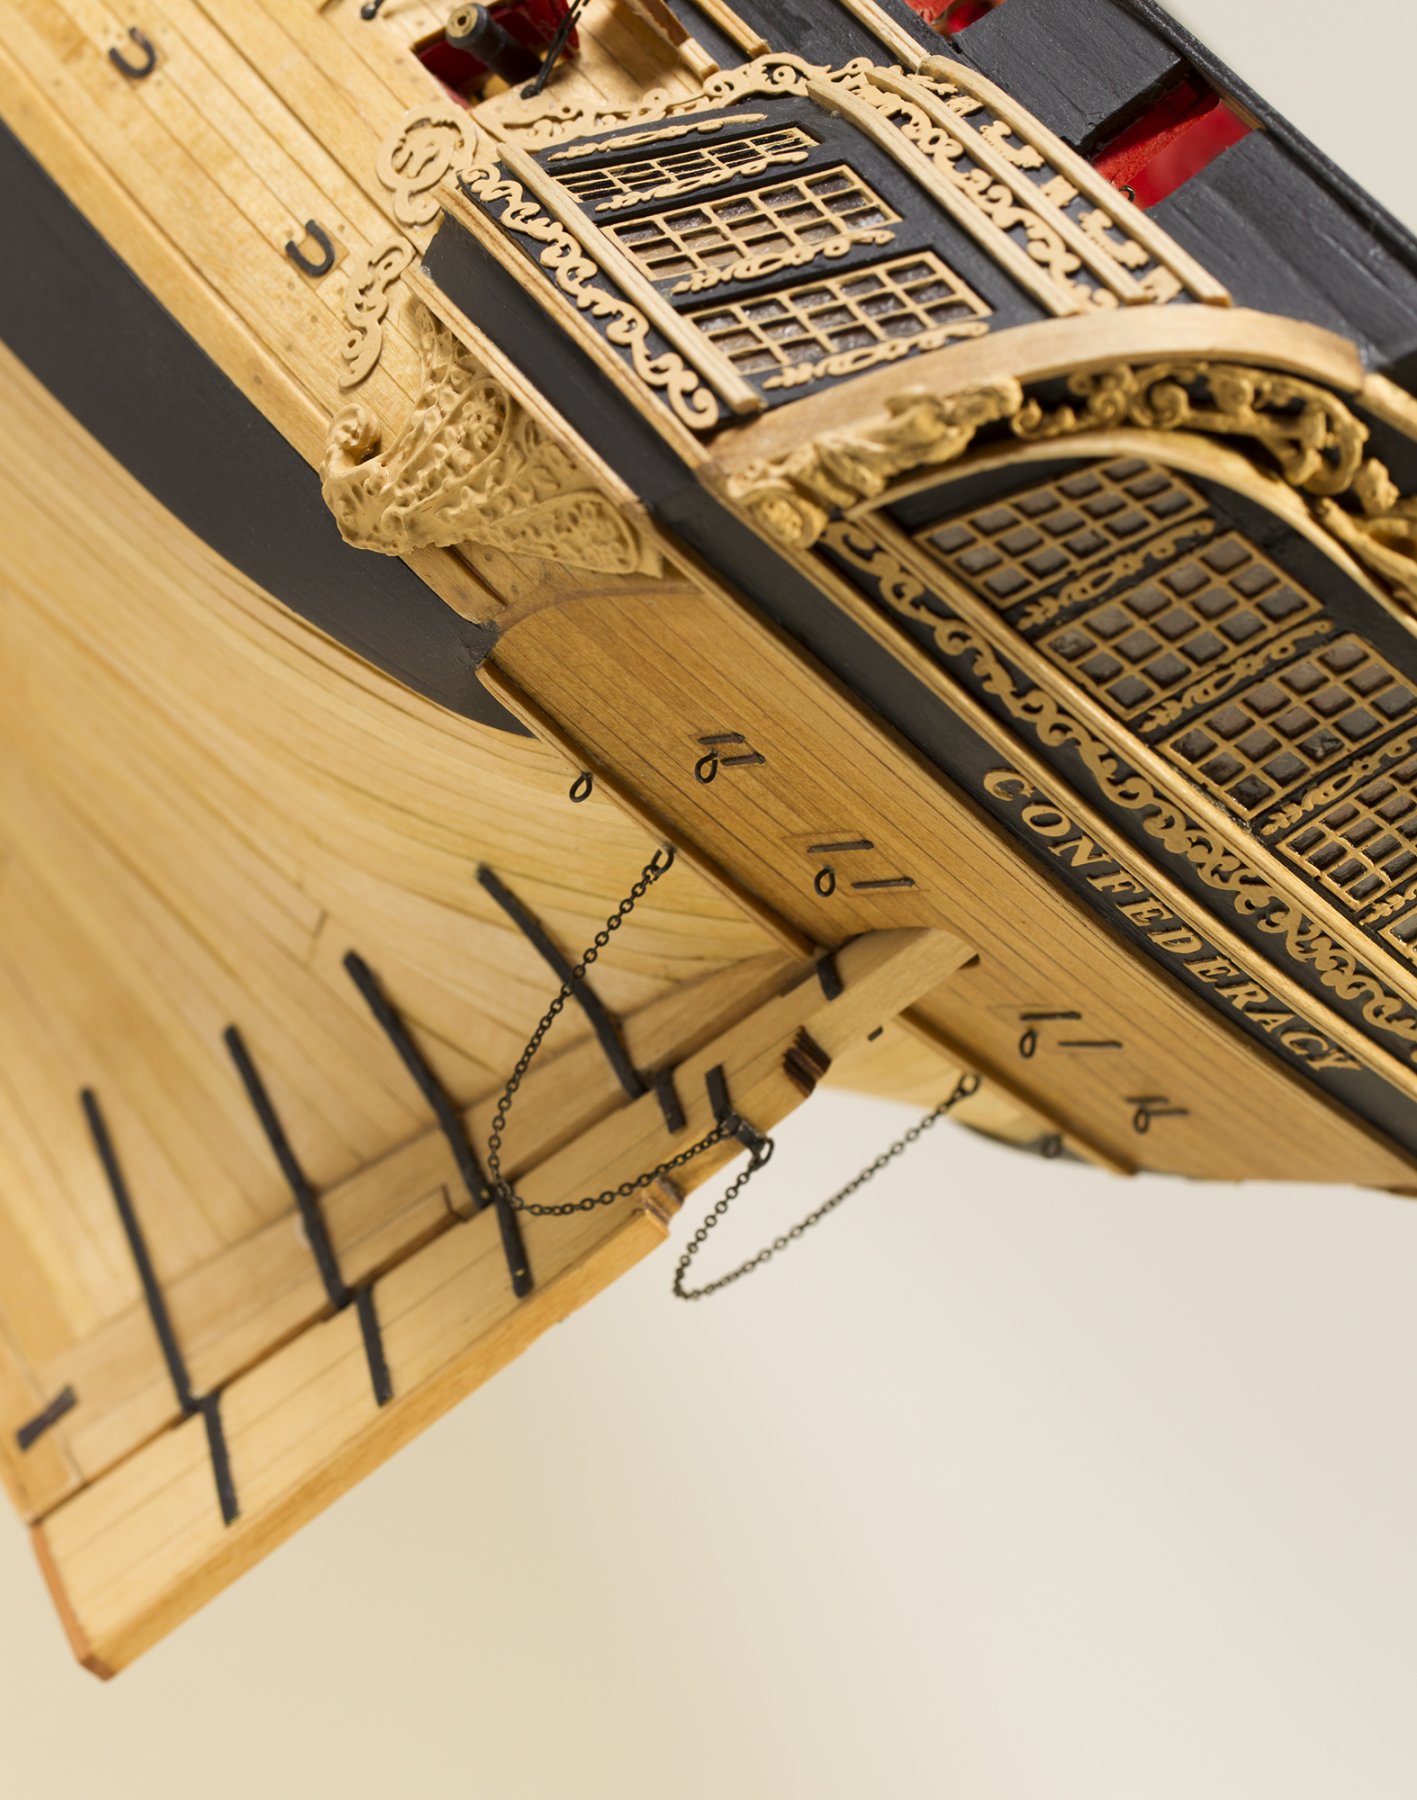
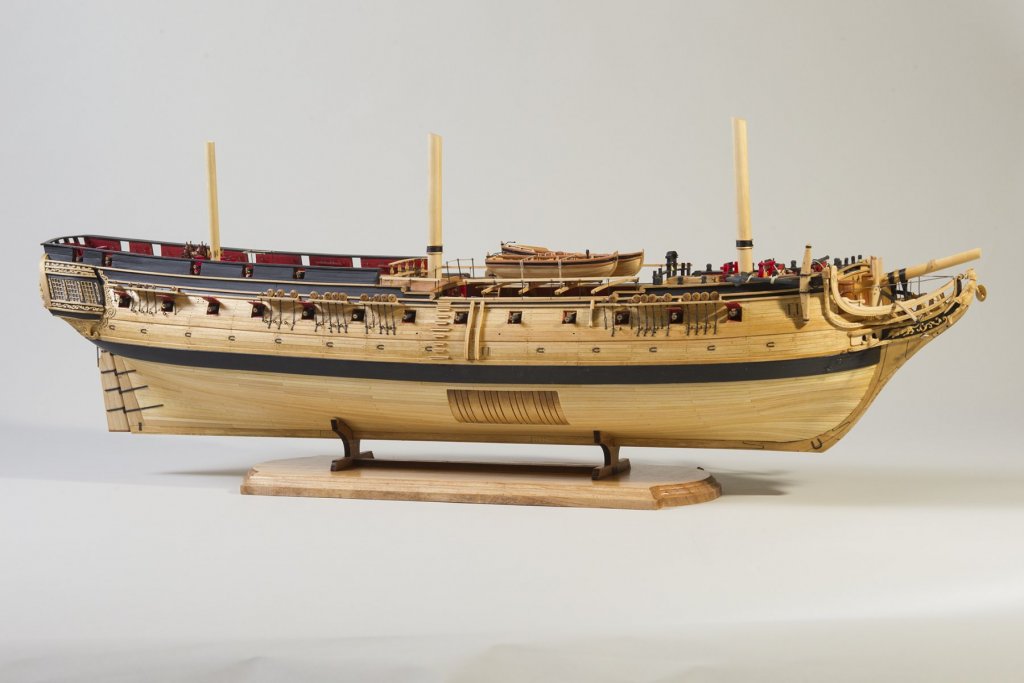
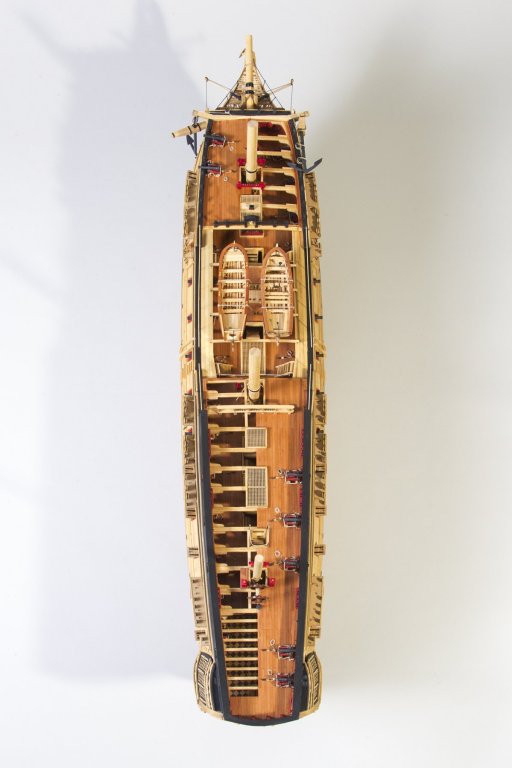
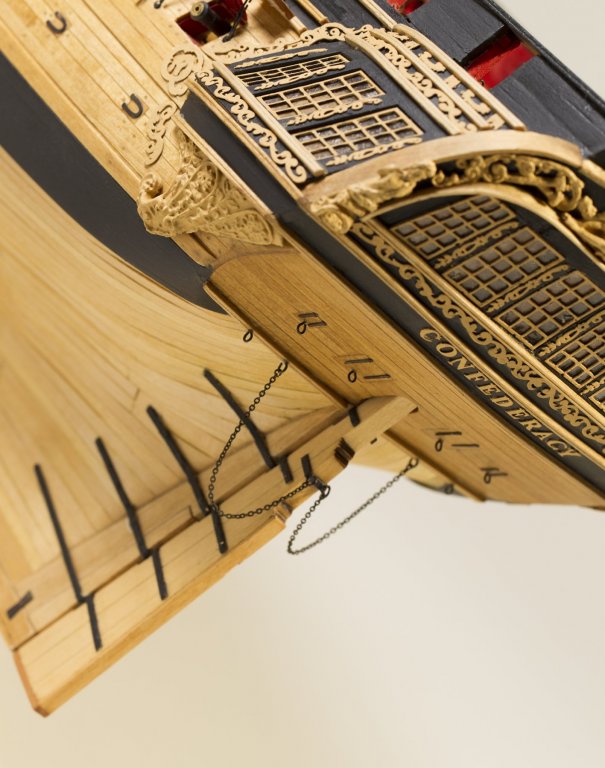
Obviously it was extraordinarily humbling and intimidating to have been asked to complete Augie's Confederacy. Aside from his excellent work, Augie was an extremely popular gentleman on the forum, and for all the right reasons. Quite simply, he was just a great guy. I can honestly say, I did my best for him, and I hope he's happy with the end result. Thank you all SO much for following along and providing such great support. Here are a couple of shots of the finished ship. More images will soon be up in the Gallery of Completed Builds, and once that is done I'll update this log accordingly.


- 2,191 replies
-
- 36
-
-
- confederacy
- Model Shipways
- (and 1 more)