

prutser
-
Posts
33 -
Joined
-
Last visited
Reputation Activity
-

 prutser reacted to popeye the sailor in The M&M Fun Ship by popeye the sailor - FINISHED - 1:33 scale - the lost log
9-26-2012
it took a while to cover all of the lounge chairs.......I made a couple more too.
one more thing to add to the interior of the pilot house........some rolled up maps in the cubby compartment.
oh..........and a picture of the gang above the door
now......I think the roof got cemented on
the black box in the center is the junction box for the lights. a hole was drilled into each side to accept the thread.
the nav lights are cemented in place now.
-
-
prutser reacted to Ondras71 in Roter Löwe 1597 by Ondras71
Somewhere I read that the pins are like Braille... I guess it is true, I quite enjoyed reading these lines ..
The polished left side.. After waxing the pins are well noticeable..
-
prutser reacted to popeye the sailor in The M&M Fun Ship by popeye the sailor - FINISHED - 1:33 scale - the lost log
10-2-2012
it's odds and ends time folks.........time to give it that lived in look we worked late last night on the model...didn't clean up after ourselves. left our soda cans strewn about.
note the holes in the center of the tables......now what's that all about?!?!?!?!
I know that the last session.......we kinds forgot about the life preservers.......we'll get to them in a bit.
the antenna part of the forward mast was painted a darker gray, as was the aft mast
I saw these too in Hobby Lobby.......I thought this would be kinda interesting......a record player for the disco booth
HA....HA.....preservers got a haircut! ......just a really good tip from Jim Ladd {John}
more lights and radar....I'll be prepping them up
I made up a couple of decals for the forward mast. here again, now that I look at it, I should have made them red and green {like the nav lights}, not red and blue. it's the little thing one thinks about after the fact
the light lenses were filled with the window maker
one of the light ended up on the forward mast
then the forward mast was rigged with communication wires
then it was rigged to the aft mast.......you might see small beads on it that I will use as insulators......
both sides were strung and the insulators were cemented in place
a stern light was added as well
insulators were added for the forward wires too
I bought a package of these umbrellas........they were cemented in the open position. Ms. Green seemed to like them....she had the nerve to have me paint the poles to match the umbrellas........she's bossy
-
prutser reacted to Javier Baron in Two miniature moliceiros by Javier Baron - scale 1:110 - Finished
Both moliceiros together
-
prutser reacted to Javier Baron in Two miniature moliceiros by Javier Baron - scale 1:110 - Finished
The second moliceiro is already painted...
-
prutser reacted to popeye the sailor in The M&M Fun Ship by popeye the sailor - FINISHED - 1:33 scale - the lost log
8-15-2012
along with the easel, I made a seat
the moldings I had made were painted and cemented in place.
I will need three doors......one for the pilot house, and two for the aft cabin, which is nothing more than a changing room for the guys and gals. the doors were assembled.
with the handles, it gives me one left and two right handed doors. the two for the aft cabin needed some signage on then to denote the gender. I though this was kinda cute
I like to think I meant to do this, but I had goofed. the opening was too tall. since I didn't plan it with any form of step up, I will close the open area with a piece of flat stock.
I'll do that later........I was having more fun making a disco booth for the deck layout.
I'll go with that for now........hmmmmmm decals are fun.........I'll do those next!
the doors are in place now on the aft cabin. I did some simulated hinges to finish them off.
along the bottom of the cabin, I painted some 1/4 round molding and ran it across the deck edge. the progress so far...........
the cap railing is just dry fitted at the moment. I still need to make the rest of it. the opening above the pilot house door was closed up, and I began to shape the roof.
I like the idea of the large windows......the interior can be seen quite well. I plan on adding a lot of detail....probably the most I've ever done. I hope I get to do all that I want to do more to add tomorrow
-
prutser reacted to popeye the sailor in The M&M Fun Ship by popeye the sailor - FINISHED - 1:33 scale - the lost log
8-2-2012
the aft section of the pilot house was going through it's own changes as well
the additions to the fore deck got some accents in mahogany
then it was time for the main deck to get planked. the center mahogany strip continued there as well.
as can be seen, the mahogany stripping bordered off the dance floor.
the planking was finally reaching the pilot house........it stops leaving the structures a well to fit into.
-
prutser reacted to marktiedens in Nuestra Senora del Pilar de Zaragoza by marktiedens - FINISHED - OcCre - scale 1:46
Hi everyone - more progress! Fist, the anchor davits were made from the supplied wood - the simulated sheaves were formed with a small round file after drilling the holes. Then the openings were made in the bulwarks & the davits were glued in place along with the knees. Next, I thought it would be a good time to do the roundhouses. The parts list showed them as pre-formed pieces,but darned if I could find them,so I made them from a walnut dowel cut in half & added some brass eyelets from the fabric shop. Finally the mouldings were added - they were made from some leftover brass moulding from another build
The caprails were then made from the supplied wood(sapelli). Since this wood is 2x12mm it was pretty much impossible to bend around the tight curves. The tightly curved areas were done by cutting small pieces to go around the curves,then after a lot of filing & sanding the joints they were painted black. You can see the joints in the close-up,but at arm`s length they look just fine. I think they pass the running horse test.
Mark
Mark
-
prutser reacted to ferarr in Dos Amigos by ferarr - per Chapelle drawings
Hello everyone:
I have finally started the "Dos Amigos".
I'm using the plans included in the book "The history of American Sailing Ships, Chapelle."
I have also found some documentation in the book "Global Schooner, Marquardz", and searching, the original plans of the "Fair Rosamund" in the museum of Greenwich (It is how they renamed the boat, once captured, and the plans of the house Assembly "Golden Kits" back in the 70s / 80s.
The differences between the first three planes is minimal, I believe that produced by deformations in the copies. Of the rooms the biggest difference is that the length is 2/3 cm. minor, otherwise they are quite similar.
The scale is 1:50.
Well, I put some photos.
A greeting
(Hola a todos:
Por fin he comenzado el "Dos Amigos".
Estoy utilizando los planos incluidos en el libro "The history of American Sailing Ships, de Chapelle".
También he encontrado algo de documentación en el libro "Global Schooner, de Marquardz", y rebuscando, los planos originales del "Fair Rosamund" en el museo de Greenwich (Es como renombraron al barco, una vez capturado, y los planos de la casa de montaje "Golden Kits" de allá por los años 70/80.
Las diferencias entre los tres primeros planos es mínima, considero que producida por deformaciones en las copias. De los cuartos la mayor diferencia es que la eslora es 2/3 cm. menor, por lo demás son bastante similares.
La escala es 1:50.
Bueno, os pongo algunas fotos.
Un saludo)
-
prutser reacted to popeye the sailor in The M&M Fun Ship by popeye the sailor - FINISHED - 1:33 scale - the lost log
I guess I spoke too soon about the pages all these pictures are in about 54 folders....roughly 54 sessions working on the model. I wonder how many pages it will take to tell the tale
7-30-2012
those pieces of paper were used to form these singles for the edges. the fillers were stacked up according to color.
all lined and ready to go!
the edge will have a length of drip molding across the front. {I guess I was dry fitting the deck planking?!?!?!}
-
prutser reacted to CharlieZardoz in 19th Century 31-ton Revenue Cutter by CharlieZardoz - Scale 1/64 - building as USRC Active based off Doughty plans and BlueJacket Shipcrafters kit
Thanks Mark. I am really liking the way its looking so far. Here you can see the curve up to where the transom pieces will be. Also using walnut shade wood filler I've been filling in any tiny spaces left between the planking. Thin it out with some water and you it does the trick. Next up is to finish the planks in the front. To make the spiled pieces I will use cardstock forst to make the shapes then transfer over on a veneer sheet.
-
 prutser got a reaction from Piet in Genesis by Omega1234 - FINISHED - 1/300 - 49 m Mega Yacht
Hello Patrick. Good luck with your new build! I'll follow with intrest. Regards, Richard
-
 prutser got a reaction from popeye the sailor in Genesis by Omega1234 - FINISHED - 1/300 - 49 m Mega Yacht
Hello Patrick. Good luck with your new build! I'll follow with intrest. Regards, Richard
-
 prutser got a reaction from Elijah in Genesis by Omega1234 - FINISHED - 1/300 - 49 m Mega Yacht
Hello Patrick. Good luck with your new build! I'll follow with intrest. Regards, Richard
-
 prutser got a reaction from cog in Genesis by Omega1234 - FINISHED - 1/300 - 49 m Mega Yacht
Hello Patrick. Good luck with your new build! I'll follow with intrest. Regards, Richard
-
 prutser got a reaction from mtaylor in Genesis by Omega1234 - FINISHED - 1/300 - 49 m Mega Yacht
Hello Patrick. Good luck with your new build! I'll follow with intrest. Regards, Richard
-
prutser reacted to EdT in Young America 1853 by EdT - FINISHED - extreme clipper
Young America - extreme clipper 1853
Part 282 – Main Yard Rigging 3
Bowlines were used to control the leeches on large sails. When the sails were bent, bowline bridles were lashed to cringles on the sides (leeches) of the sails. On the model without sails, the bridles are tied off to the jackstays where they would be accessible to topmen when rigging the sail. The first picture shows the bowline gear.
The bowline bridles, in this case two-legged, have eyes spliced in each end and pass through bullseyes at one end of each "lizard". The bowlines, themselves, pass through the bullseyes at the opposite ends. The standing ends of the bowlines are made fast to the lower ends of the topmast stays, pass through the lizard eyes, and are belayed on the foremast fife rail. To avoid the falls rubbing on the roof of the main cabin, the two lead blocks shown in the picture were secured to the stay below the standing end fastening. The attachment of the bridles and the upper ends of the lizards are shown in the next picture.
These lines serve well to square the model main yard and assist in holding it down. The bridles are tied off at locations on the yard near where the cringles on the sail would be when it was raised as a rolled up package. These and the other lines would then be fastened before the sail was loosed.
I have expected that belaying lines in the confined space between the cabin and fife rail would be one of the major rigging challenges on the model. I wasn't disappointed. The next three pictures showing this work and the belaying of the main topmast staysail downhauler illustrate the problem.
First, the staysail halyard and downhauler were rigged. The halyard may be seen running parallel and below the topmast stay. Its lower block is shackled to the downhauler that passes through a smaller lead block on the stay and belays on the athwartship fife rail just forward of the cabin. The two bowline lead blocks are also fastened to the stay legs below the downhauler block. These are then also belayed on the fife rail. The next picture shows the tangle of lines involved and the small working space.
Apart from the difficulties of belaying lines in this small space with interferences from the shrouds and other obstacles, the two bowlines had to be tensioned together to hold the yard square. Both were looped under their pins, adjusted to square the yard, then each belayed on top. Finally, another view of the work in progress.
This job took special tools, quite a few hours, and a number of expletives. The last picture shows this stage of the main yard rigging completed.
You may note in this picture that the shroud lanyards that have been seen loose in previous pictures have now been wrapped and secured. Some rope coils have begun to be fitted forward where belaying is complete. There is still much of this to do and also quite a bit of ratline work on the upper main mast and mizzen.
Ed
-
prutser reacted to YankeeD in De Zeven Provinciën 1665 by YankeeD - Scale 1:50 - according to drawings by Mr. O. Blom - First wooden scratch ship build
Well another month passed and some holidays in between and a bad eye infection thatkept me from working on the ship. But we still had some progress.
I found a discrepancy on the gunports. Both side the same. So I decided to first correct that and then to fix the stern and the missing frames to the stern.
After that I intend to start the hull planking upwards.
I know the white line of the (Rahout??) is not correct but its on purpose to get the correct lining for the frames. Once the frames are ok I will return to the correct line.
Have a nice weekend all.
-
prutser reacted to LFNokia in Robert E Lee by LFNokia - FINISHED - Amati - 1:150
A friend dug up a project that was starte quite some years ago and never finished and gave it to me
The 1st inspection was about trying to see if there was any missing parts, seems a few wooden pieces are missing, all i've see so far can be replicated easily from the scraps i have arround.
Some tears in the instructions along with some water damage, still everything is readable.
2nd inspection on what has been built already, news are not so great, this piece is wrong
The main piece of the deck is not centered
And the castle already made didn't take into consideration that the is inclined
So, the work started, mostly about correcting or minimizing the mistakes
more updates soon, the build is already a bit further ahead than this post
-
-
prutser reacted to Thedeacon in Fair American by Thedeacon - Model Shipways - 1/48 scale
I just got started on my Fair American. It is my first build. I chose this model as I felt it would be a good learning experience and I have a great support group to turn to here on this forum. I am also a member of the Ship Model Society of NJ. I began by inventory of all pieces. I then got up the courage to cut the rabbet. I then remopoved the bulkheads and checked for proper fit. My question is, If the bulkheads dot not land precisely on the bearding line, how should I go about to adjust? Should I bring the Rabbet up higher? Should I drop the bulkheads down to meet the bearding line? Should I add woodfiller to the bulkheads to meet the bearding line? My idea is to bring the bulkheads down by adjusting the joint but I then have a bulkbhead that is not quite fluch with the centerkeel pieace. I could add material to bring it flush but that changes the height of the bulkhead rails.
Your help is greatly appreciated.
-
prutser reacted to Baker in Golden Hind (ex-Pelican) by Baker - FINISHED - scale 1/45 - Galleon late 16th century
Thanks Geert,
The bottom of the balcony is painted and provided with bolts.
The side of the balcony could be open with pillars or closed with planks.
With me it becomes open with pillars. It looks that this was the most common at that time. An example is made as a template.
4 pillars can be made together with a simple holder.
A first test (not yet glued)
Start gluing
Backside "work in progress" Planks are provided between the pillars. The question: 2 planks or 3 planks?
My wife says :I want 3 planks
I think 2 is better, compared to the drawing (2nd photo)
Does anyone have an idea ??
Thanks for following
-
prutser reacted to Siggi52 in HMS Tiger 1747 by Siggi52 - 1:48 - 60 gun ship from NMM plans
Hello again,
and thank you for your likes and comments.
Hubac, now and then you see it in this forum. Also my Dragon has these staples.
After sanding the whole forenoon, I think the lower hull is ready now. I should have started with the first drop plank at the 1. diminishing strake. But later you are always smarter
The next thing to do is, I think the ruder. Then I know how large the opening in the lower counter must really be.
But because here the spring came from one day to the other, I think my garden needs my attention first. The week before Easter we had two snowstorms with each 10 cm snow here. More north they had over 50 cm! One of my oaks lost a big branch then, and the experts will come Friday to cut it out. But also for me is enow left.
-
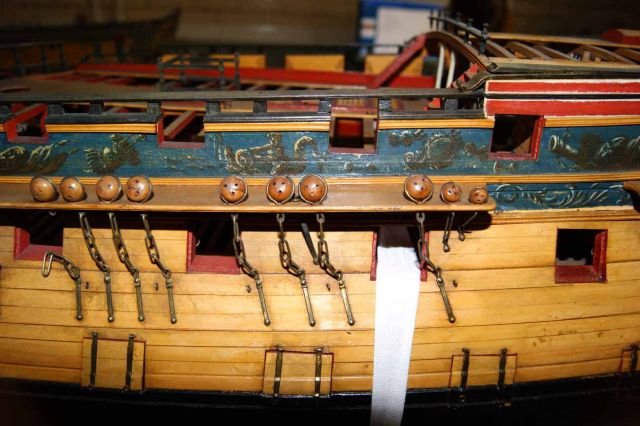
prutser reacted to DORIS in HMS ROYAL KATHERINE 1664 by Doris - 1/55 - CARD
Current status
Have a great time and enjoy the pics.