

prutser
-
Posts
33 -
Joined
-
Last visited
Reputation Activity
-

 prutser reacted to yamsterman in WASHINGTON GALLEY by yamsterman - 1/48 scale - POF
HI ALL
I DECIDED TO REDO THE WATERWAYS TO INCLUDE A SCARF JOINT RATHER THAN A PLAIN BUTT JOIN.
THE SHAPE OF THE WATER WAY WAS ATTAINED WITH A PROFILE SCRAPER FASHIONED FROM A STANLEY BLADE.
CURRENTLY IN THE PROCESS OF BEING FITTED.
CHEERS FOR NOW....MICK
-
prutser reacted to Siggi52 in HMS Tiger 1747 by Siggi52 - 1:48 - 60 gun ship from NMM plans
Hello,
and many thanks for your likes.
Today I finished the wales. That was harder as first thought and the next days I need to get the notches out of my thumbs, from pressing down these stubborn strakes
-
prutser reacted to Siggi52 in HMS Tiger 1747 by Siggi52 - 1:48 - 60 gun ship from NMM plans
Hello,
Paul, if you have strong glasses and sharp knifes, I think you can do it too Leo II is sitting here at my computer desk and would't leave it.
Today I'm started with planking. At first the wales. I made the lower strake and half the thick stuff at both sides.
I made first the butt and hook joints and glued them together. But if the joints are sanded and painted black, you would hardly see them
So far for today. The rest will follow tomorrow.
-
prutser reacted to dvm27 in HMS Winchelsea 1764 by Stuntflyer (Mike) - FINISHED - 1/4" scale
Lovely work, Mike. There's something about this hull that has always appealed to me. Lot's of planking ahead!
-
prutser reacted to Stuntflyer in HMS Winchelsea 1764 by Stuntflyer (Mike) - FINISHED - 1/4" scale
Made a bit more progress today by simulating the lower stem and keel bolts. Holes were drilled with a #76 bit and filled with .017 black monofilament and PVA glue. I'm not a big fan of CA as it has a tendency to discolor the wood.
I anxious to see what the Cherry will look like after a coat of W-O-P. I should know soon enough.
Mike
-
 prutser got a reaction from FrankWouts in HMS ROYAL KATHERINE 1664 by Doris - 1/55 - CARD
Hey Doris. Still going strong ? Very interesting build! Regards,Richard
-
 prutser got a reaction from DORIS in HMS ROYAL KATHERINE 1664 by Doris - 1/55 - CARD
Hey Doris. Still going strong ? Very interesting build! Regards,Richard
-
prutser reacted to G.L. in Oostends schipje by G.L. - scale 1:20 - Ostend shrimper - first POF - Edition 2
15.10
Then it is time to glue the sheer rails together.
-
 prutser got a reaction from Piet in HMS ROYAL KATHERINE 1664 by Doris - 1/55 - CARD
Hey Doris. Still going strong ? Very interesting build! Regards,Richard
-
prutser reacted to SJSoane in HMS Tiger 1747 by Siggi52 - 1:48 - 60 gun ship from NMM plans
Siggi,
Your figurehead looks great, so early in the project. It gives a strong indication of the quality yet to come. I imagine it also keeps you thinking, "everything needs to be as good as the figurehead"!
Best wishes,
Mark
-
prutser reacted to Siggi52 in HMS Tiger 1747 by Siggi52 - 1:48 - 60 gun ship from NMM plans
Hello,
first I have to say many thanks for your likes, comments and help. Second I have to announce, that the raw hull is mostly ready. Only the inside is not really ready. But that will come after the outside is planked, for a better stability.
So the next work is to make the wales and then plank the upper part of the hull.
-
prutser reacted to Stuntflyer in HMS Winchelsea 1764 by Stuntflyer (Mike) - FINISHED - 1/4" scale
In preparation for making the false keel, the keel bottom was sanded 90° to its adjacent edge and smooth across its bottom face. To do this, I first raised the bulkhead former/keel assembly off the flat surface with 1/4" flat sheet. I used a square sanding block, gliding along the flat surface of the board to sand the edge.
The false keel was ripped on the table saw from some scrap Cheery that I had lying around. It's made in three sections joined with what I think is called a "Harris joint". As you can see, I located the joint far enough away from the keel joint.
In preparation for adding the bulkheads I made the build board that will hold everything upright and straight.
Mike
-
prutser reacted to Jim Lad in Meteor 1851 by Jim Lad - Scale 1:96 - Immigrant Ship
Another update at last. Things have been moving even more slowly than usual due to the renovations at the museum and the consequent disruption that's been caused, but at least I've got a fair bit of fairing done to the forward frames - especially inside the hull. It might not look like much in the photos, but I'm really pleased with the progress I've been able to make with cleaning up - especially on the forward few frames.
John
-
prutser reacted to vossy in Mississippi 1870 by vossy - Sergal - 1:50 - Riverboat
so, here is some further progress. finally finished planking and sanding out the windows and door frames of the second deck structure. at the moment it has only 1 coat of paint and is just sitting there. not glued down yet, hence its not really level in these pics, plus I reckon it will be a lot easier to place the windows and doors before its stuck in place. I need to put some fine filler between some of the planks, but I may also leave a few as I think it adds to the rustic character of the boat. also, I am brushing all the paint work to achieve a more realistic look for the period. the only medium I am spraying on this is the final clear matt coat as I finish each section.
when I get the windows and doors all in, complete with curtains, I want to see just how visible the interior of this structure will be from the outside when the third deck is also attached. if I can see fairly clearly inside this space I will install a floor and add carpet, dining tables, and a gambling area down aft.
cheers
chris
-
prutser reacted to marktiedens in Nuestra Senora del Pilar de Zaragoza by marktiedens - FINISHED - OcCre - scale 1:46
Update - the poop deck,stem&keel,and the lower gunport frames have been added. The keel & stem are plywood,pre-stained,so I lined the edges with a veneer stained to match. Also,the planking has begun.
Mark
-
prutser reacted to archjofo in La Créole 1827 by archjofo - Scale 1/48 - French corvette
Hello
Albert, Carl, Nils, Paul, Micheal,
thank you for always checking my report, and all others for the LIKES too.
The guide blocks are now on the model at the place at the main mast and the foremast.
Here are a few pictures.
Before I work on the standing rigging, I have to make a few blocks for the backstays. These are fixed on the channels.
-
prutser reacted to SJSoane in HMS Bellona 1760 by SJSoane - Scale 1:64 - English 74-gun - as designed
Thanks, John, your comment means a great deal to me.
Work proceeds on the port wales, using the old clamps at midships to grab from below where the deck is too high relative to the wale for a clamp from above. The second photo shows hanging the clamps on the starboard side to keep them level when tightening.
And a view of both wales from the bow, although the lower two strakes are not yet installed and the battens are not yet removed.
Mark
-
prutser reacted to garyshipwright in HMS Tiger 1747 by Siggi52 - 1:48 - 60 gun ship from NMM plans
Hi Sigi. Nice job on the ports sir and seeing your work am sure they will come out just as good as the ones in the photo. As far as gun ports I just finished up the ones on Alfred which has taken me a while to do. Hum come to think of it 17 years. ;o). Look forward to seeing your next update. Gary
-
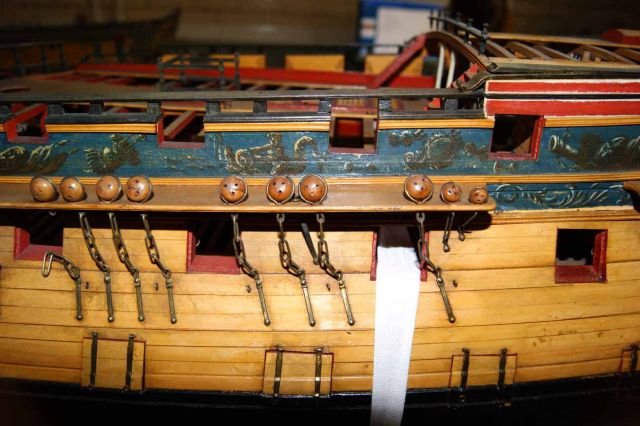
prutser reacted to Derek C in HMS Triton Cross Section by Derek C - FINISHED
Today I worked on planking the gun deck . I used the same technique. That I used on all the other planking . Cutting my strips a bit larger than needed with a razor knife, then clamp them all together and sand them down until they reach the desired size and they are uniform . I then burned the edges to simulate the caulking .
i them proceeded to glue them down . Once the glue cured I did my tree nailing . I also got another gun port installed , I would have gotten both installed but I broke one of my assembled gun piers and had to make another.
here is how she’s looking
Thanks for checking her out.
Derek C
-
prutser reacted to Siggi52 in HMS Tiger 1747 by Siggi52 - 1:48 - 60 gun ship from NMM plans
Hello,
and many thanks for your likes and comments.
Today I finished the first ten gun ports at the Gun deck. These one are not so complicated, but the next will be. The next one I have to do manually for each port.
I think I must not to explain the pictures.
At the inside I made them nearly flush with the hull, so that I have not so much to file and sand later.
At the last picture the outside of the port frames are cleaned up and are flush with the outside of the hull.
The next time you will hear not so much from me, because I'm busy doing the rest of the ports.
-
prutser reacted to BANYAN in MONTAÑES by Amalio
Beautiful joinery; beautiful details - what more can one say!
cheers
Pat
-
-
prutser reacted to shipmodel in SS Michelangelo 1962 by shipmodel - FINISHED - 1/350 scale
Hi again to my amigos who are following this journey. I hope you all have romantic plans for Valentine’s Day. Dinner with my first mate in the main salon is always a good start. But enough mushy stuff, here is the latest segment.
When I last ended the log, the bow superstructure had been finished up to the Sun deck rail, its deck house built but not detailed or installed. Above that, the Belividere deck had its deck laid and solid railing applied, but little else.
I first installed the PE railings around the perimeter of the Sun deck, having them meet the railings of the aft stairways. This was a mistake. I realized that there was now not much room to work on the main pool which will fit between the arms of the Sun deck. Although the pool area will be built as a separate assembly off the model, it requires a hollow in the deck to accept the depth of the pool box. But I had forgotten to plan for it when laying out the Lido deck and now had to cut it in with all the railings, stairways and other fragile details nearby. I did not want to chance using a power tool since the odds of a catastrophic mistake in the confined space were pretty high. I therefore took a mini-chisel and slowly dug away at the wood, being careful not to let the handle touch the PE railing or any of the other details, till I had the hollow needed. I figure I added almost two hours of nervous, unnecessary work to make a hole no one will ever see.
I made up a test pool and its surround to check that I had adequate depth. The pool looks OK, but I was not happy with the color or surface of the surround, so Mk.1 will be used only as a pattern.
From there I used my usual techniques to detail the Sun deck house with its windows, doors, handrails and stairways. On the Belvidere deck the PE railings were installed, along with the staircases at the aft end and their guardrails. On deck there are two features. The simple one is, I believe, the radio shack. The radio antennae and masts sit on its top surface, while the sides are ringed by ridged features that seem to be ventilation louvres that would be needed to cool the equipment.
Forward is a ‘D’ shaped raised platform that I would call the ‘monkey deck’ for the ship’s officers, but neither the plans nor the photographs show a wheel or binnacle here. In fact, unlike earlier ships, there are no telegraphs or other control devices anywhere on deck, even on the bridge wings. I guess walkie talkies were already in use. There is a tall searchlight platform that will go on top of the monkey deck, and the large foremast mounts just aft of the radio room, but these are details for later.
This would have been the finish of this segment, but that monkey deck worried me. Even though its height had been correctly taken off the plans, from most angles it sure seemed too tall.
Looking at an enlarged photo I compared the height of the deck with people who appeared to be standing next to it. From this it looks about 6 feet tall, or 5mm, rather than the 6.5mm measured from the plans.
Although the piece was already glued down, fortunately the PVA glue was still not fully cured and I was able to pry it up without damaging the railing around it. I took off the PE stairway and, using my Preac table saw, very carefully removed 1.5mm from the bottom of the piece. The lowered piece was reinstalled, then the stairway was trimmed at the bottom and reattached.
I think that the piece looks much better, and closer to the photos, even if it is further away from the plans. Here are the Sun and Belvidere decks as finished.
In this shot from the stern you can see that the aft stairways have solid walls around them which make convenient storage spaces under the stairs.
So here is the completed forward superstructure, with a dime tucked against the rail for a bit of size comparison.
With these last decks the basic structure of the ship is complete. The funnel cages show some of what still needs to be done.
Next the detailing begins with the three pools and the bar that looks like a space ship. More soon.
Be well.
Dan
-
-
prutser reacted to toms10 in HMS Leopard by toms10 - FINISHED - 1:85 scale POF/POB
Hi all,
I've been busy working on gunport lids, hinges, nails and eyes. I thought the little brass brads I had left over from my Constellation build would be fine. Unfortunately, the heads looked gigantic on the small hinges. So I ended up filling down 120+ nail heads from 1/16" diameter to .040" and the head height from .060 to .015". Not the most exciting thing I done. I made the eyes using .010" diameter wire with a .015 inside diameter for the 6 and 12 pounders and .015 wire with a .020 inside diameter for the 24 pounder.
Above is a close up of one of the 12 pounder lids.
Along the same lines I need to file down about 100+ nails for the rudder hinges. That sounds like what is next on the agenda.
Tom