


jack.aubrey
-
Posts
1,268 -
Joined
-
Last visited
Content Type
Profiles
Forums
Gallery
Events
Posts posted by jack.aubrey
-
-
Thanks Yves and Zoran for your very encuraging and positive comments.
Jean-Pierre, regarding your comment . .
I am a little concerned about the rigidity of a hull like this. Planks and wood sticks will I think, always try and recuperate some of their original form after they have been bent. So I wonder if your hull ribs will not push the hull sides a little further apart than they should. I am sure that you have considered this possibility. How will you fix it?
. . As I wrote, after I've bent the ribs with the method I described, the wood strips are really stable.
This happens because after having soaked them in hot water, bent them using the template, I let them stabilize for a while, let's say at least half a day.
After this treatment the shape obtained doesn't change at all: I made some test before starting this current task and I can confirm it. Maybe it depends by the wood used. I used dry beechwood and it works fine. I cannot assure the same result with walnut or other timber and this is one of the reason I used beechwood, the other is that walnut is less easy to bend and probably less stable.
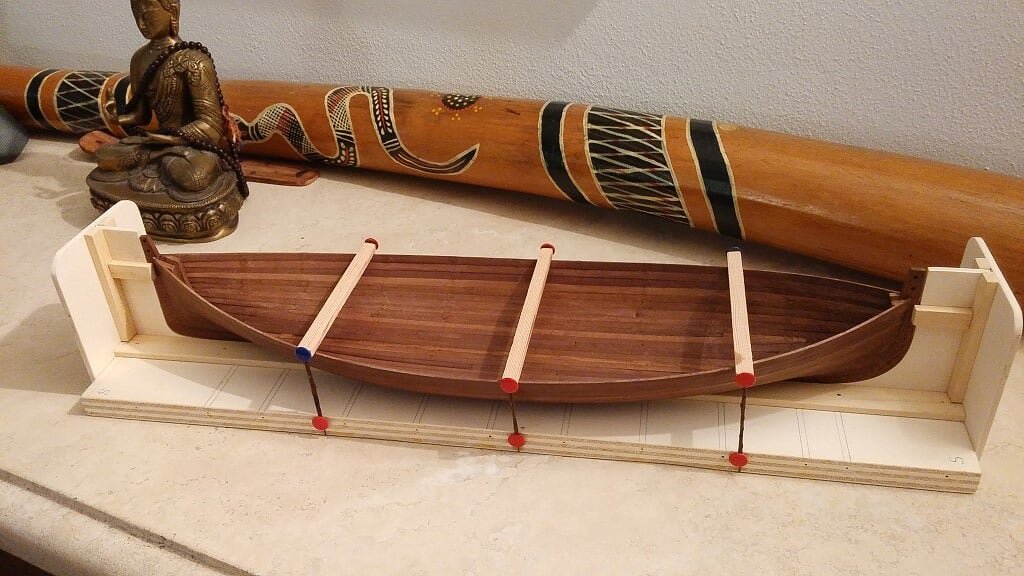
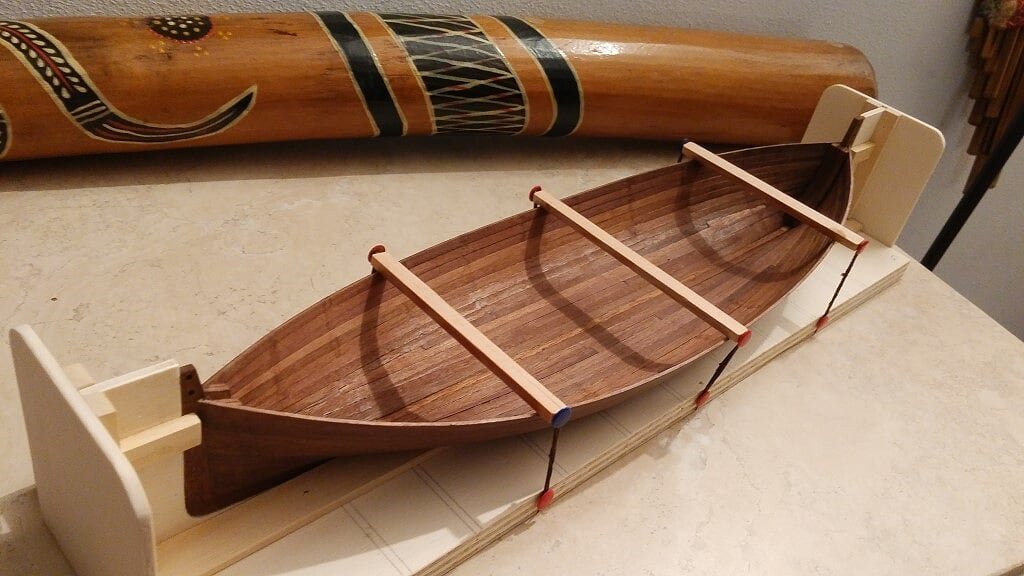
Anyway, as you can see from the images, I'm using three cross wood bars whose objective is to keep in the right position the hull until this task will be finally completed. Next there will be a kind of partial internal hull planking that will enforce definitely the whole.
I hope I've clarified this matter.
Regards, Jack.
- MarisStella.hr and mtaylor
-
 2
2
-
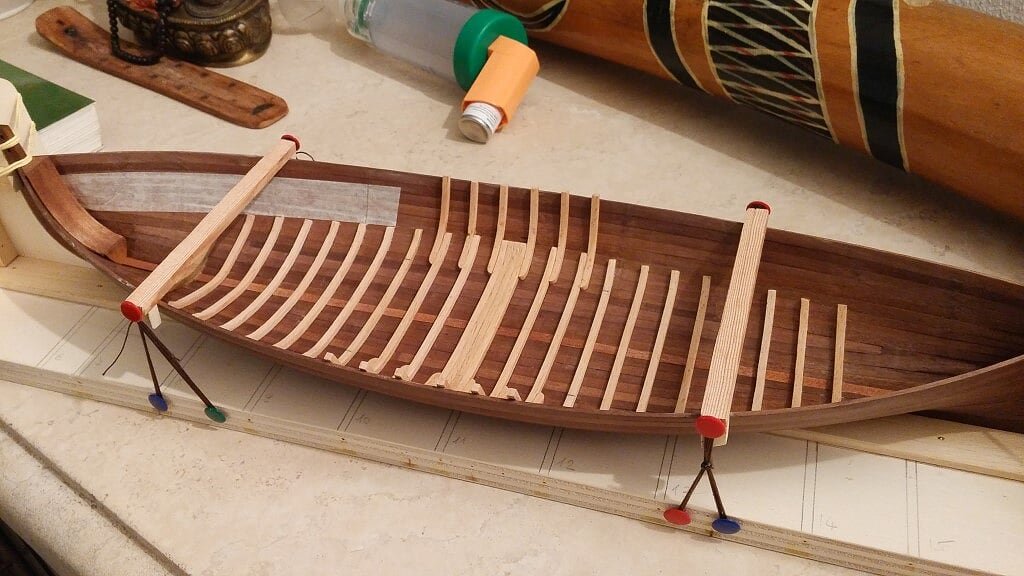
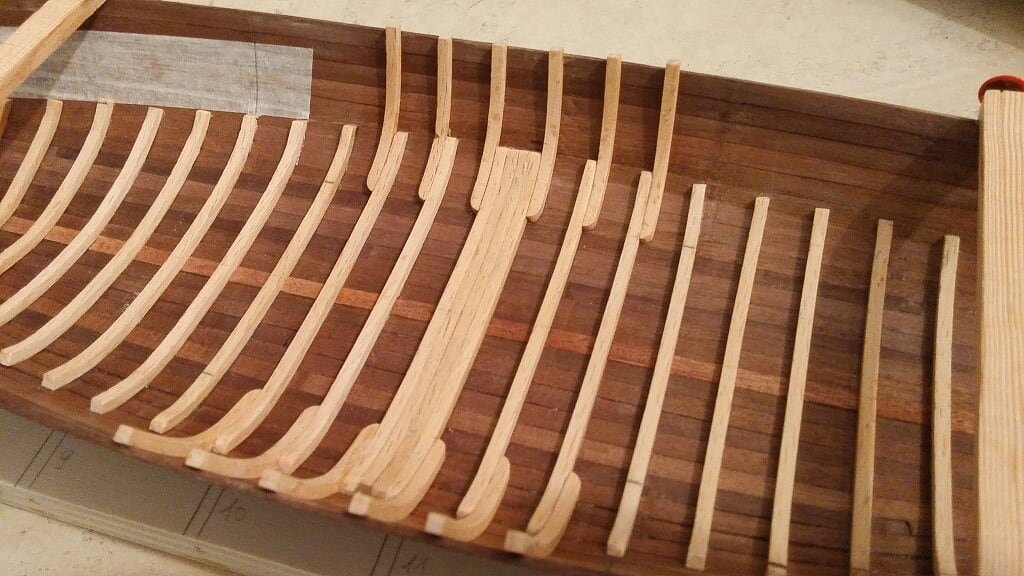
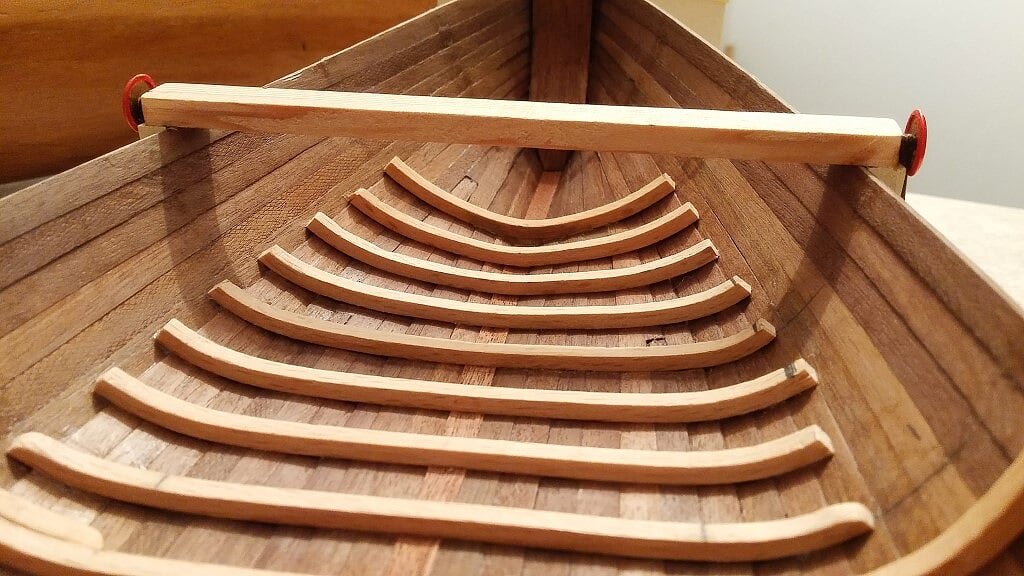
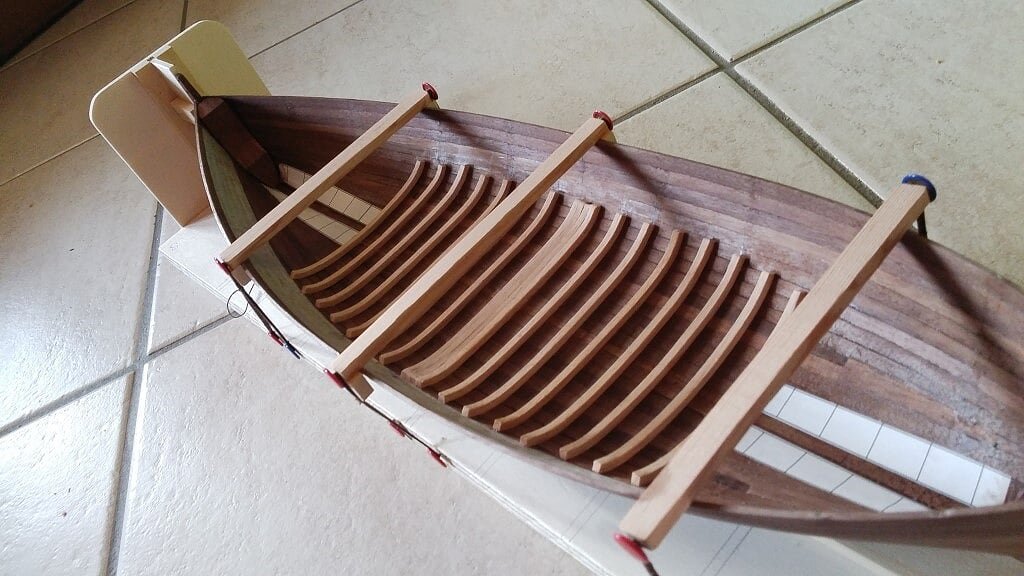
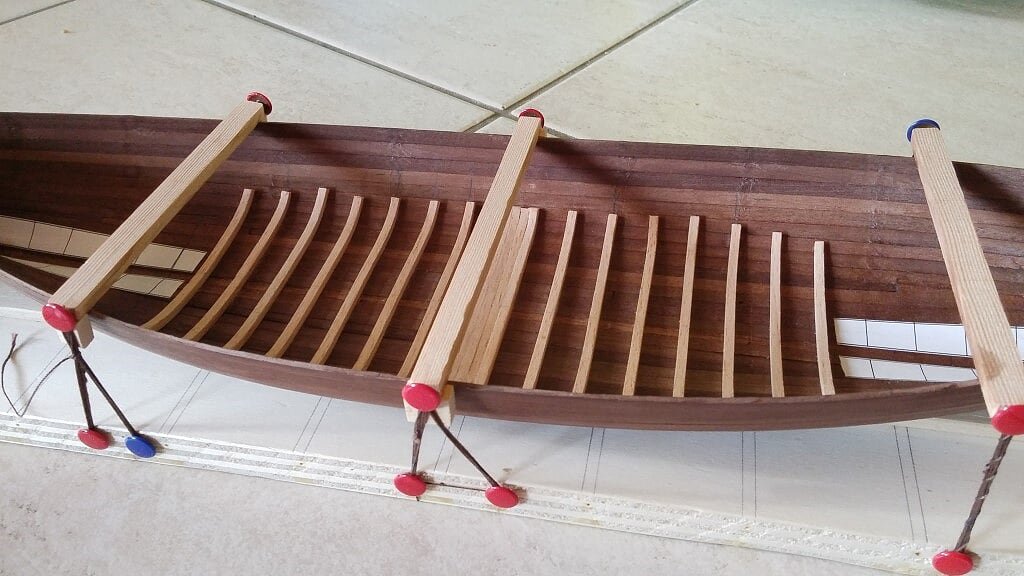
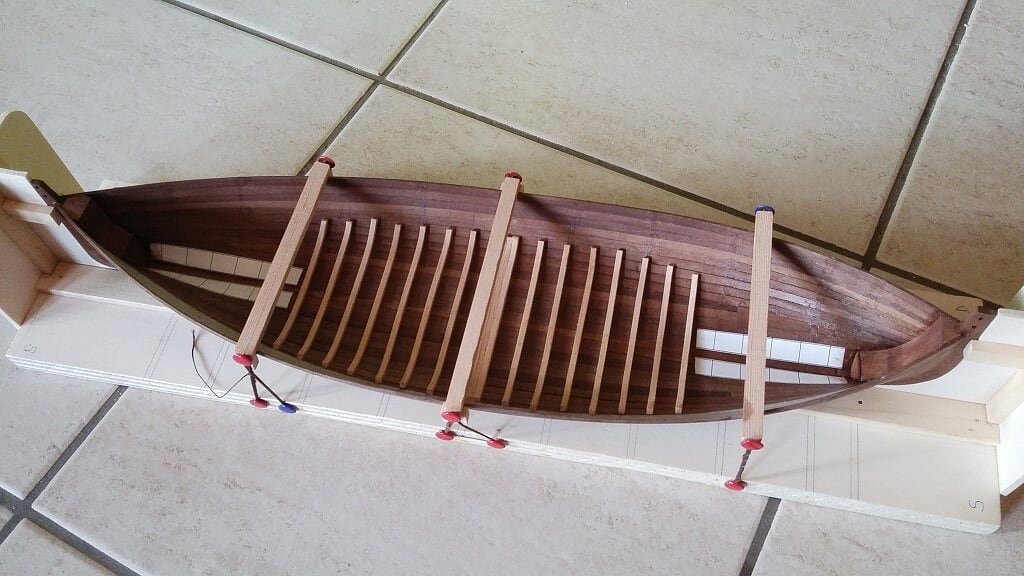
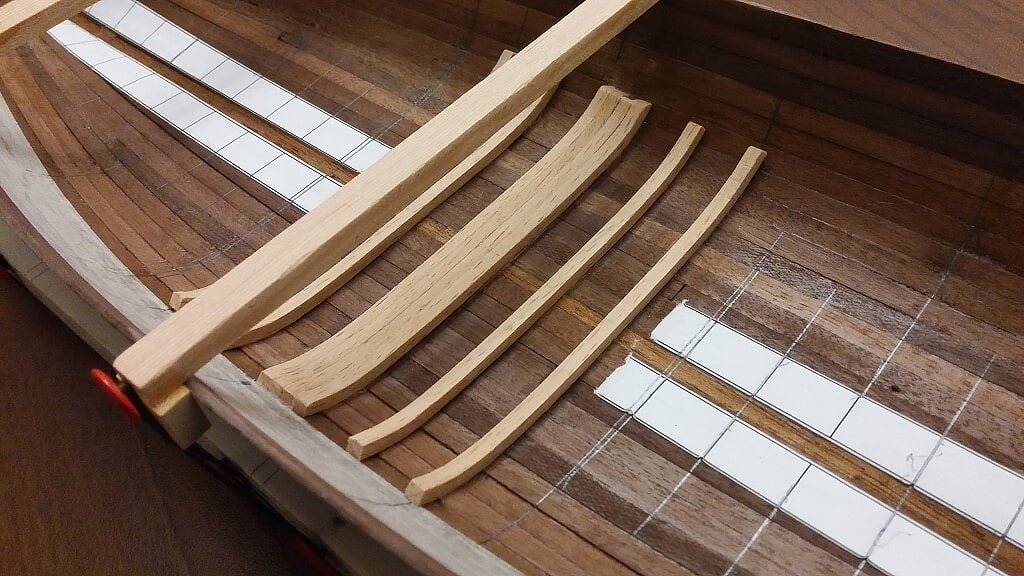
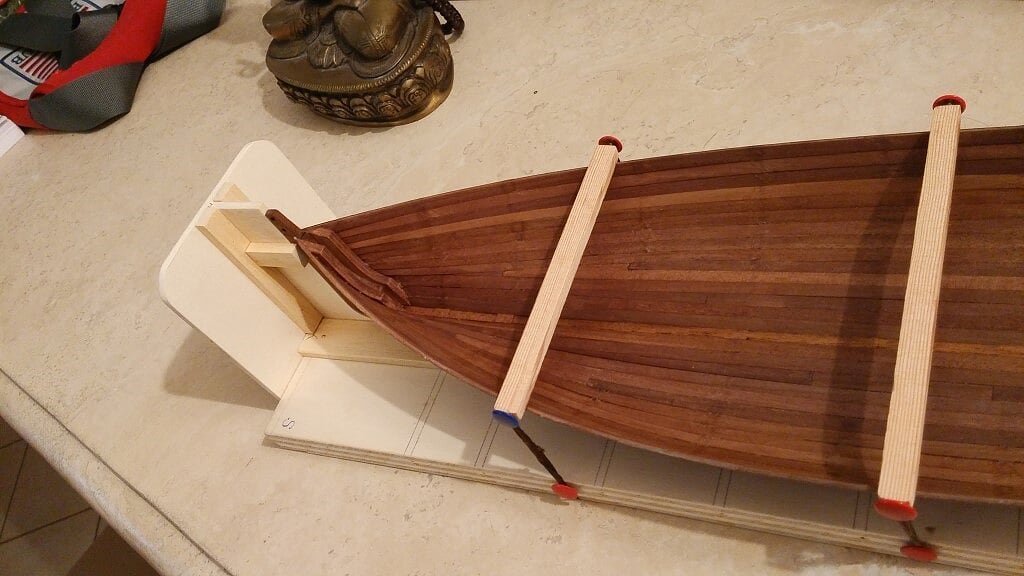
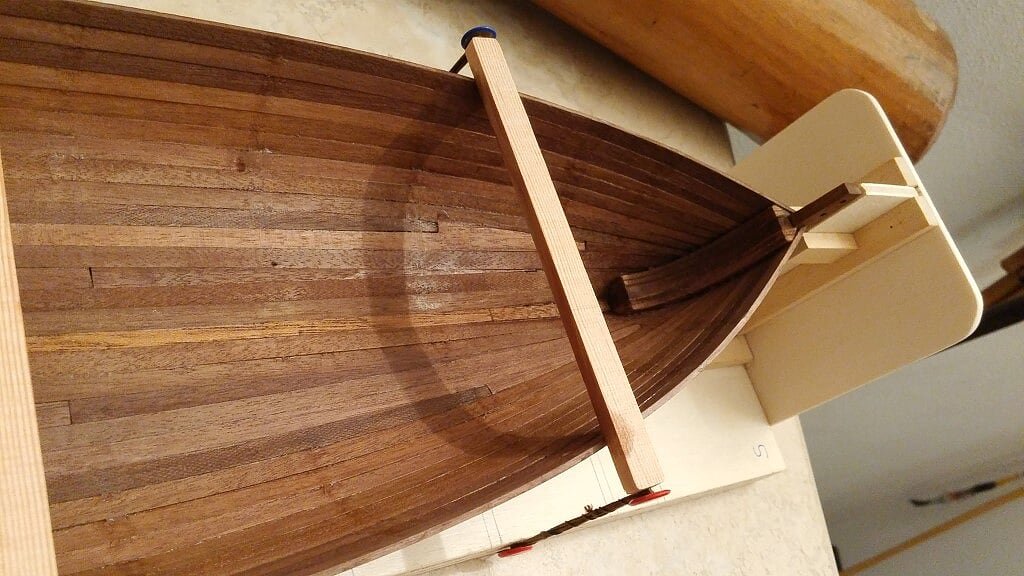
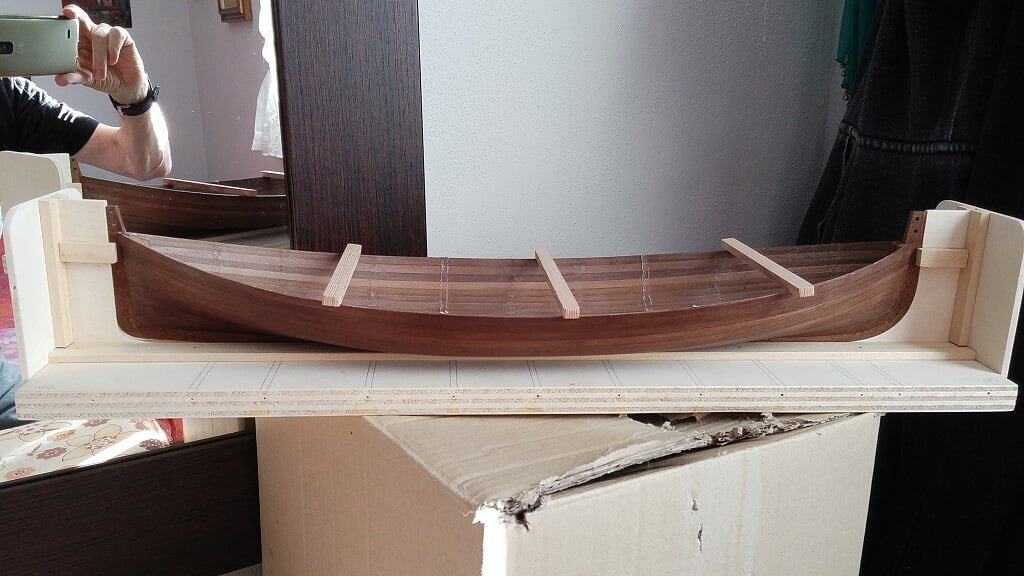
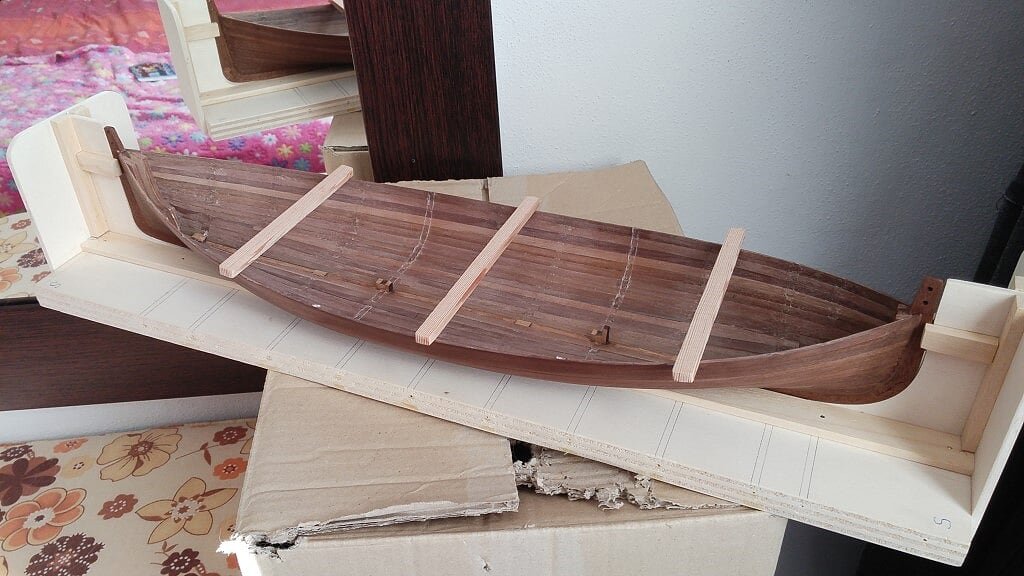
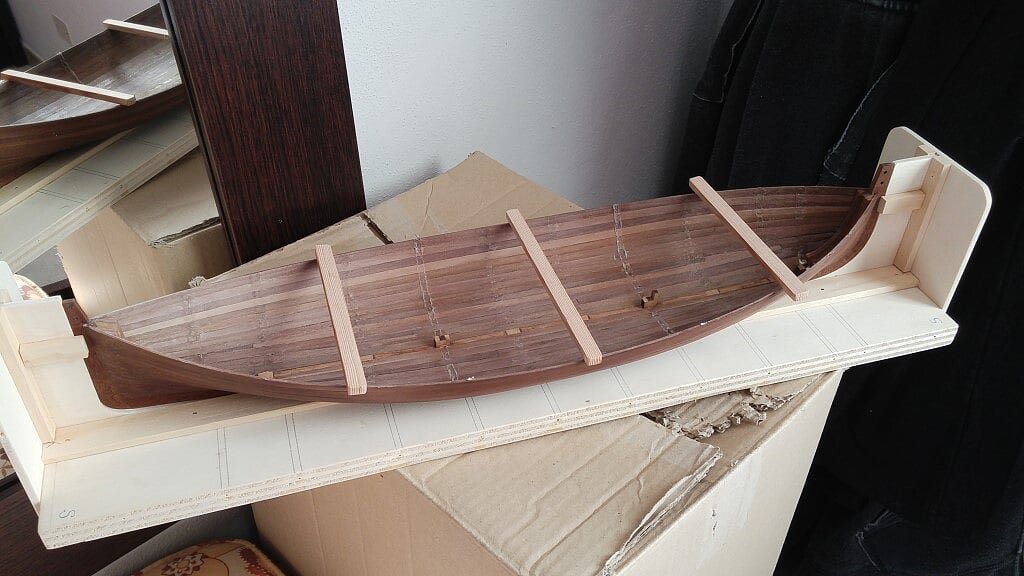
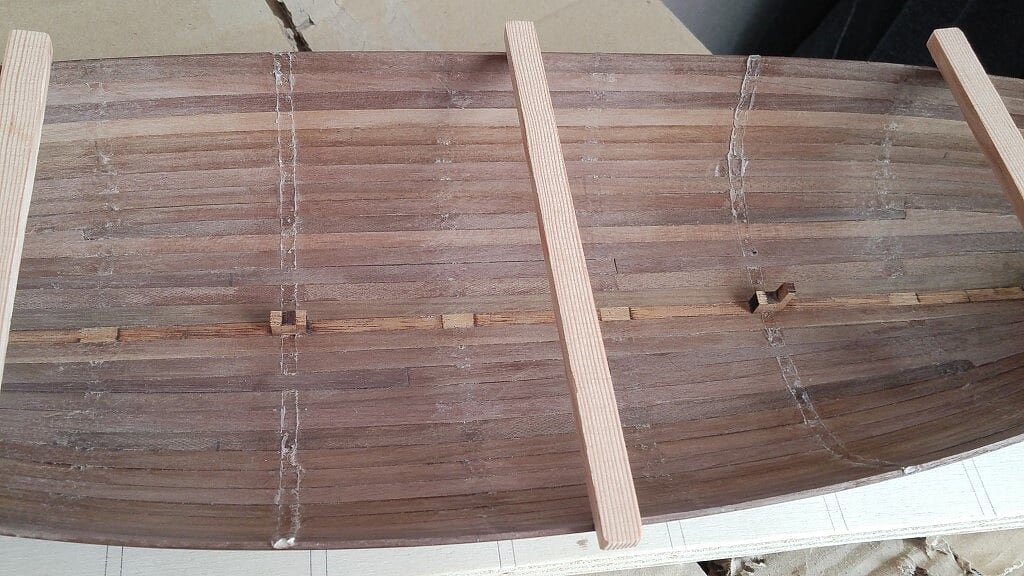
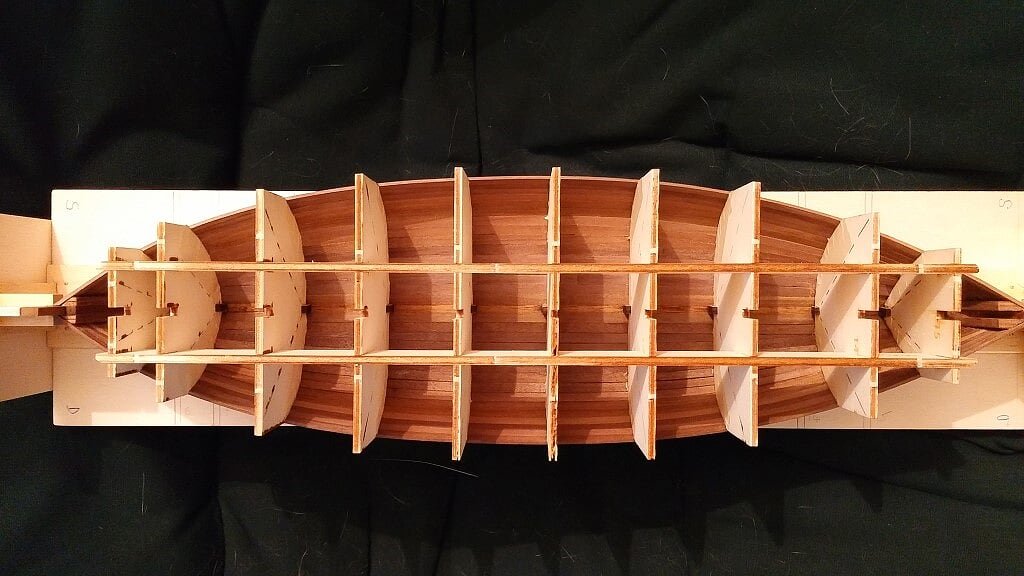
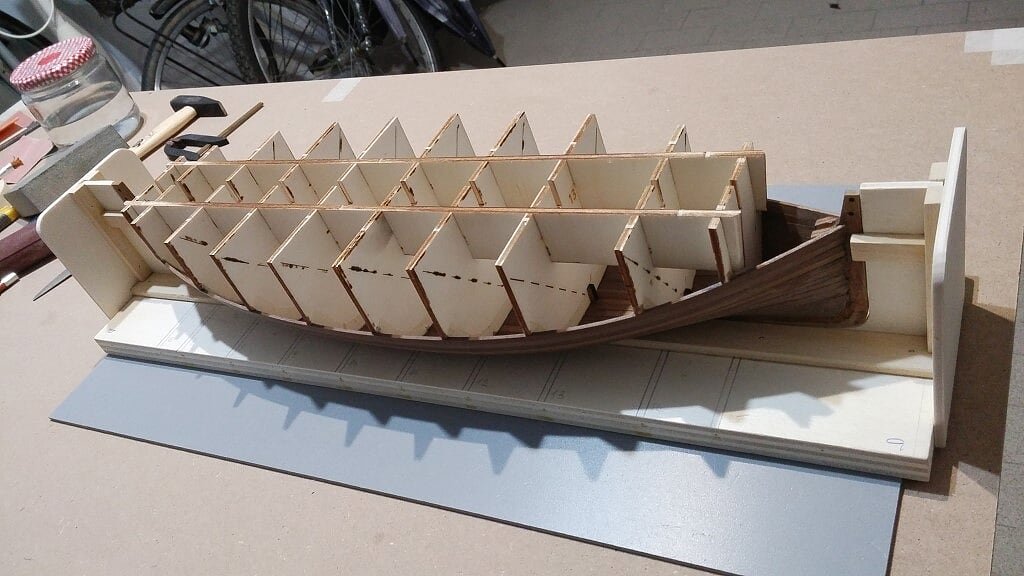
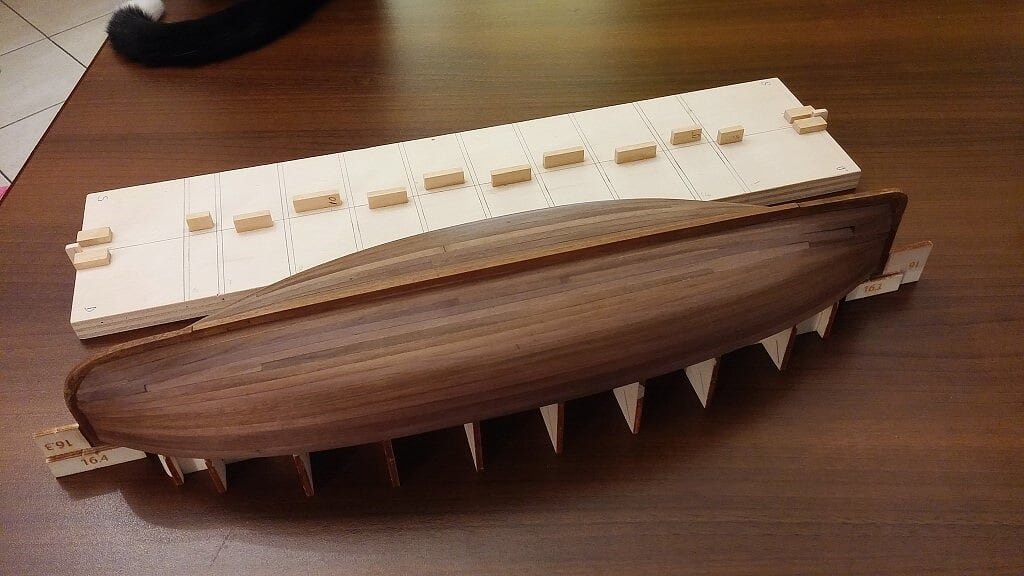
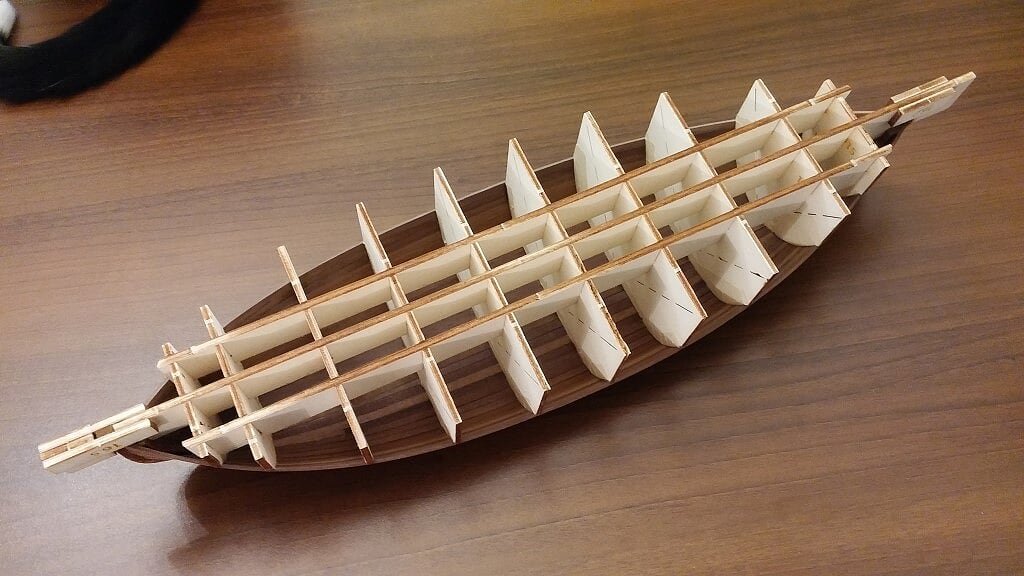
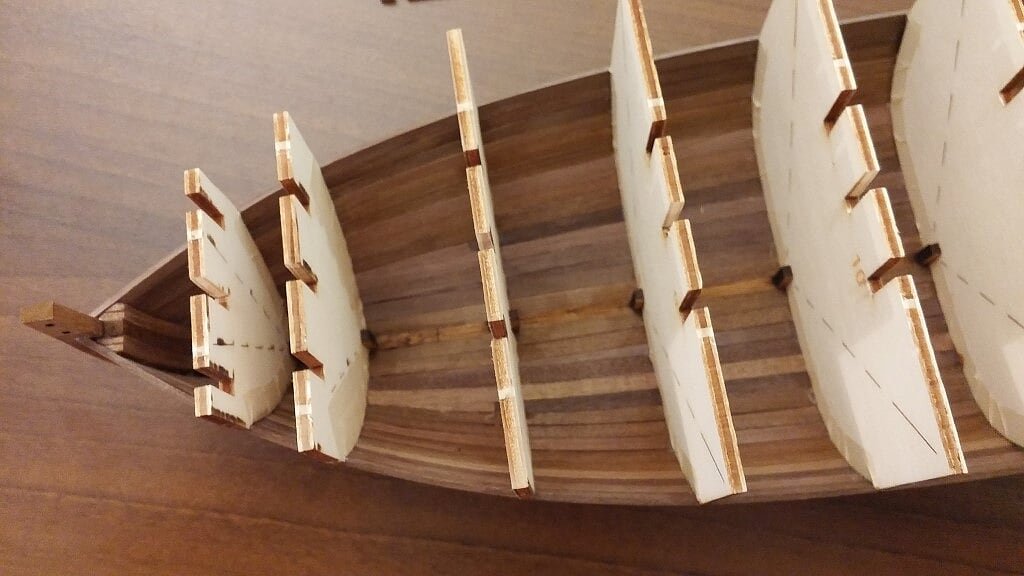
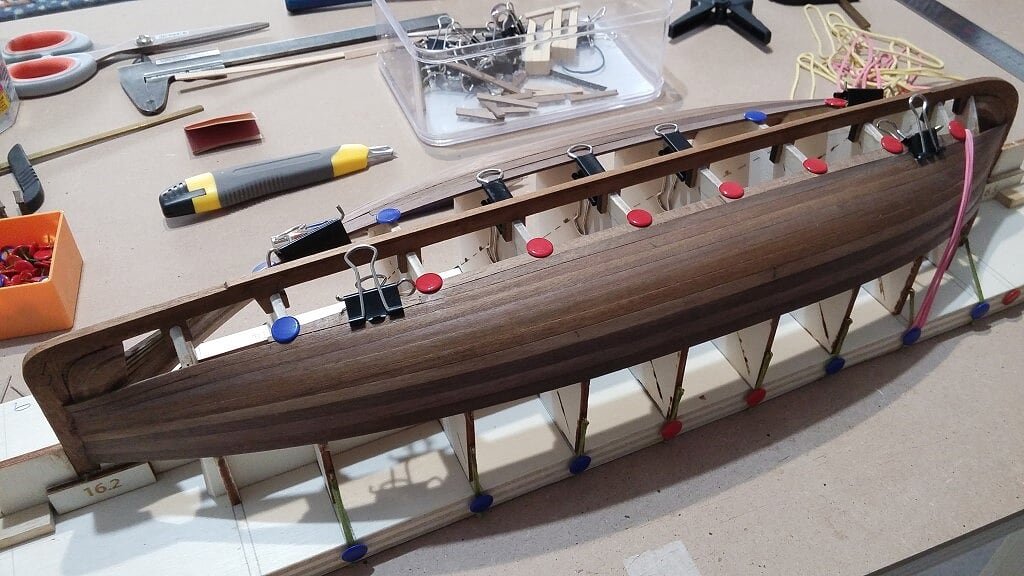
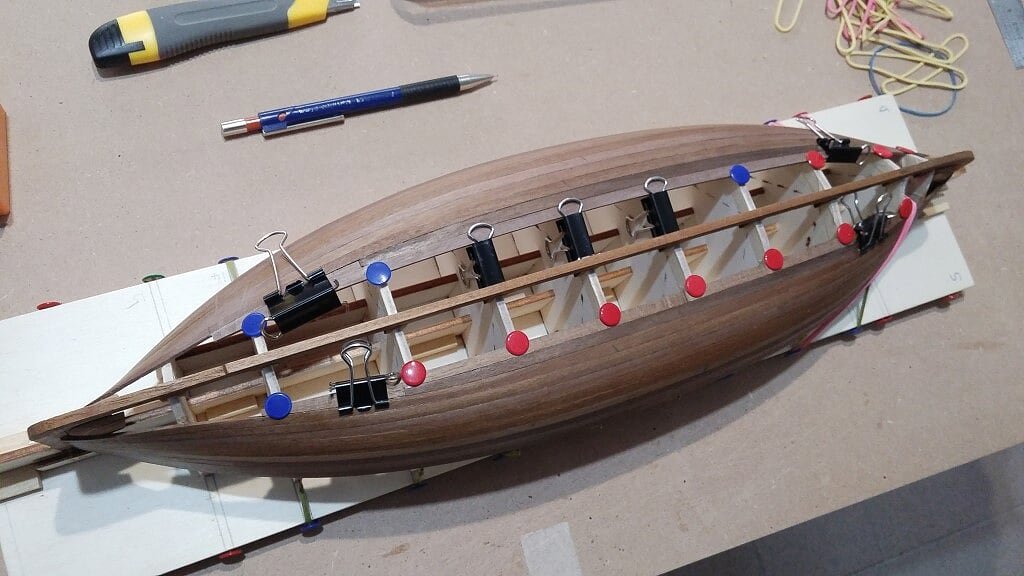
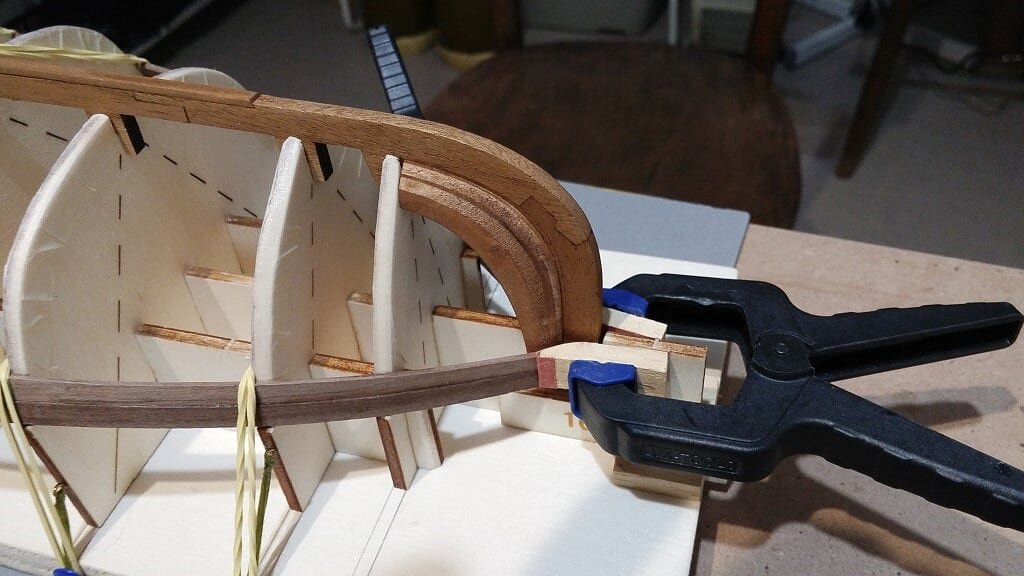
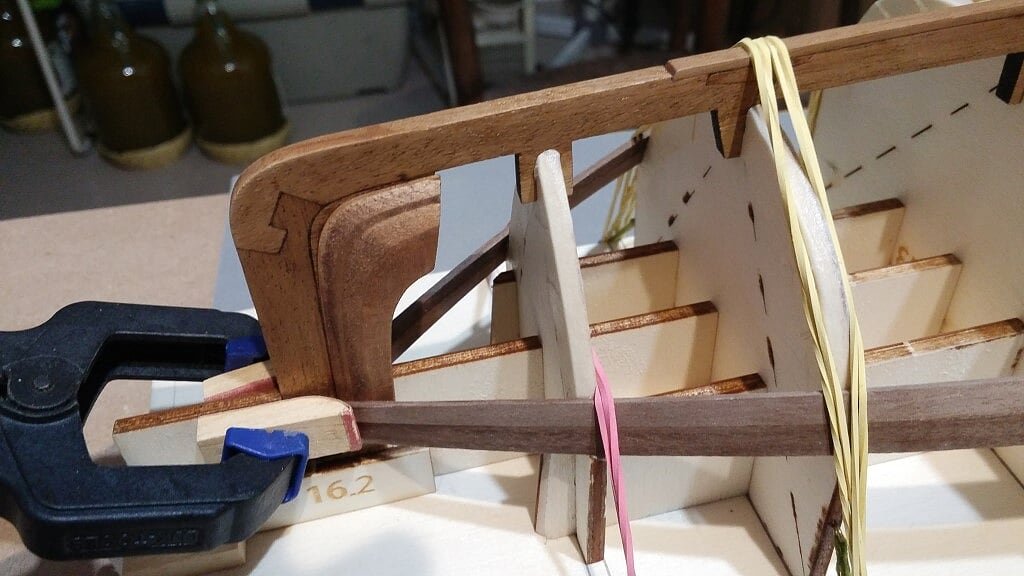
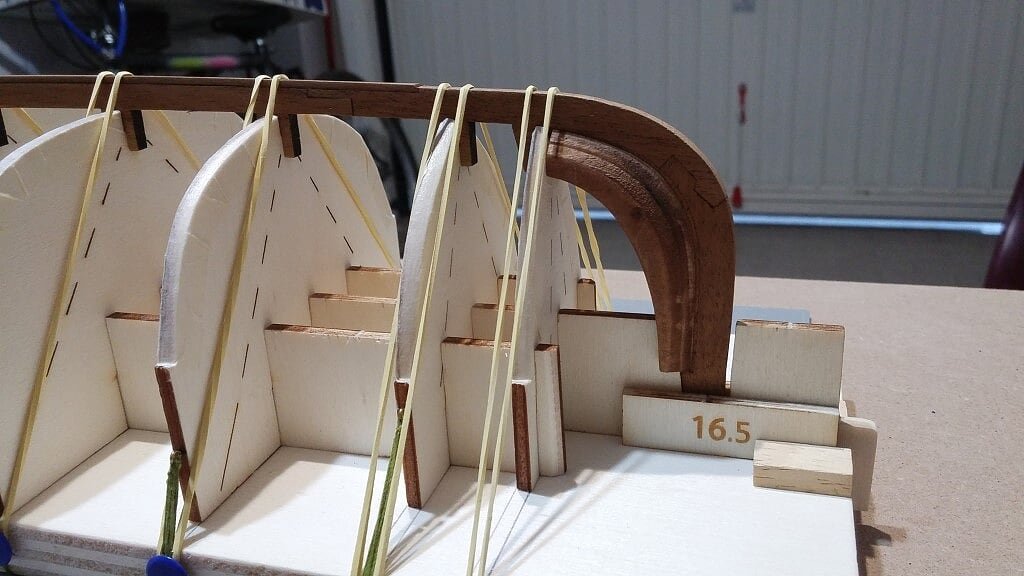
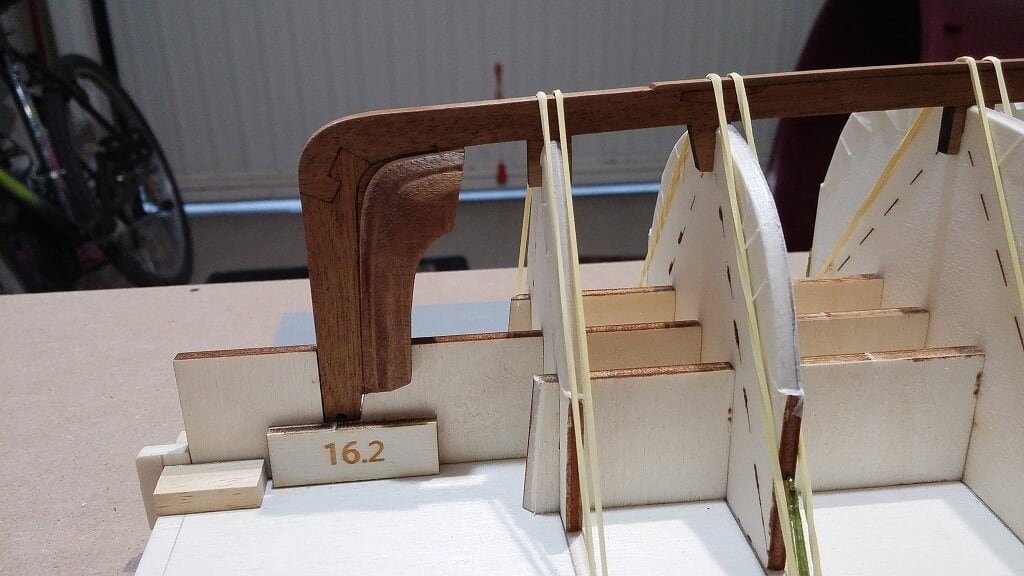
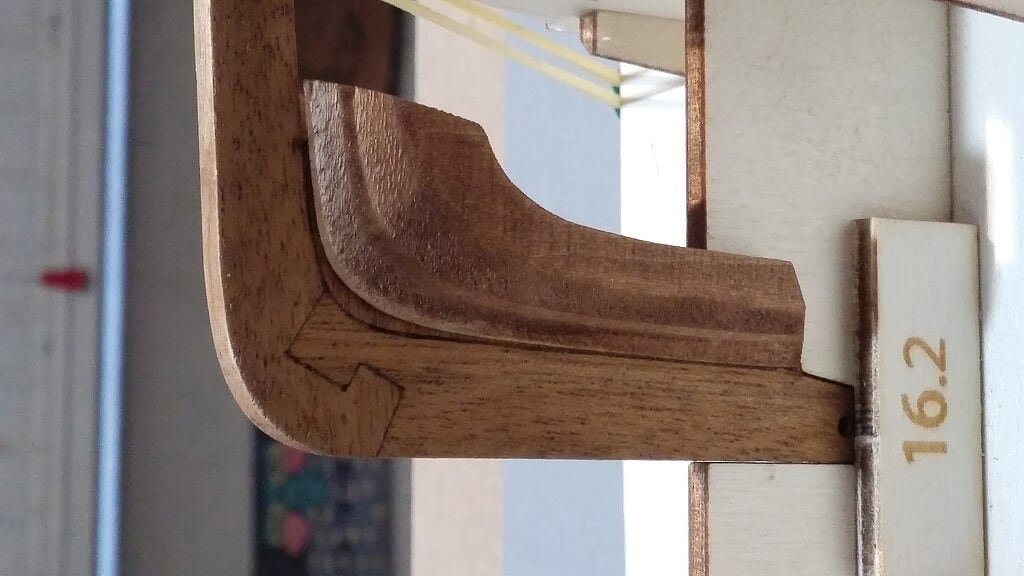
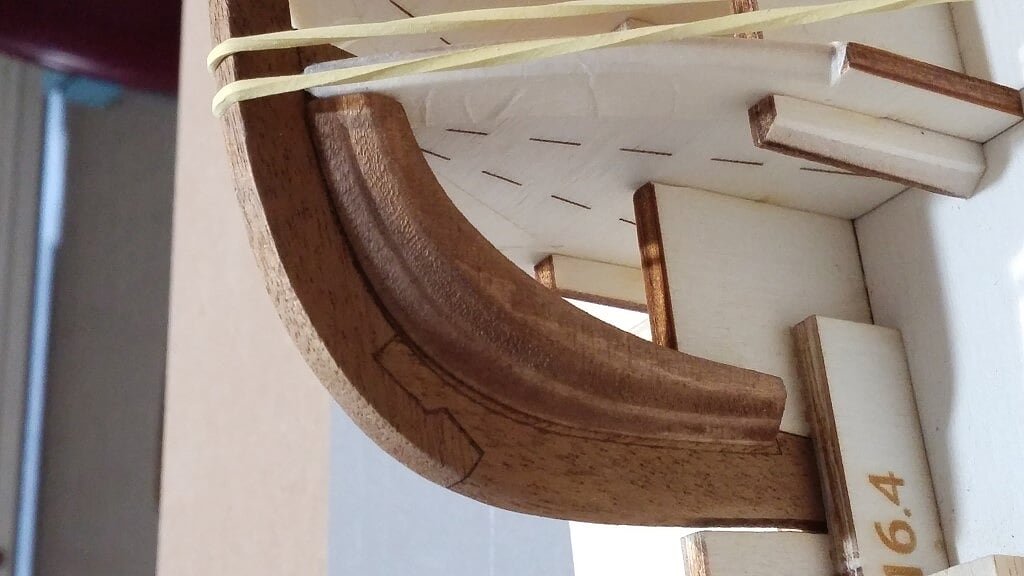
Tuesday, January 24, 2017Some further step forward: now only five/six floor timbers are missing at bow and stern, but since I can wait, I decided to start installing the futtocks, starting from midship.
The bending templates used for the floor timbers are now useful for the futtocks.
The task proceeds pretty well, quietly though not very fast.
However, I am quite satisfied.01 - 20170123_195807.jpg
02 - 20170123_195814.jpg
03 - 20170123_195839.jpg
Cheers, Jack. -
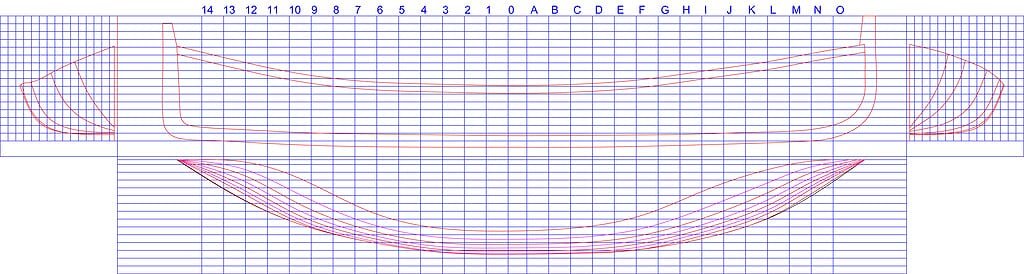
Quote. . . I have to say a few words about this method ... The first of all, our models, build from the kits, have one very important mark : this is that , when the model is finished, You would never say that it was a build from a kit ... This is very important in the ship modelling world ... This model has open hull , uncoloured from inside, so any laser cut frame would be recognizable . . .Hi Zoran,I'm very happy you decided to participate to this discussion. Be sure I got your post in the right way. It was my hope you let us know the reasons of your choices and now it is clear without any doubt. I don't want to raise any criticism about your decision, the market will establish who is right or not.I think you agree to categorize the ship modeller into three main groups:1) the scratch builders2) orthodox kit users3) modellers that start from kits but want to improve them.The first group doesn't buy kit, the second usually expects to find all it need included and to have all the problems that may arise solved, the third has probably other different needs, but is ready and able to integrate the kit insufficient features.Honestly it is the first time I hear a kit manufacturer speaking about a model from a kit that will not, when finished, appear originated from a kit . . . it's a nice idea but remember that modellers community knows the kits available on the market very well. In addition the kit manufacturers trends seem to go in the opposite direction: take as example the Chuck production or Amati last products; they produce packages as complete as possible. Others produce also admiralty models as kits. Anyway these points do not reduce the value of your work, simply make the kit modeller job harder but also surely challenging. And challenge is usually my objective.In addition we have to consider the reason a modeller decides for a kit or scratch build. For example, my personal situation forces me to live sometimes in Milan and sometimes in Pisa. The two sites are +/- 350km far. My main workshop is in Milan, where I have everything to setup scratch build models, I take often four/five years to complete, while in Pisa I do not have a similar facility and, for this reason, I prefer to select a kit, with an expectation to finish the model in maximum one year. The reason is quite simple: all what I need should be included in the box while what isn't included should be easyly found locally, and another important expectation is to avoid working on elements that may be ready.So, to conclude, do not think I want to criticise your kit, from the other side I'd like to think I'm trying to integrate my work into your in order to let other modellers find simpler building this model. A last example: in order to determine the hull shapes in different stations other the 10 bulkheads, I worked with a CAD software to produce another plan that helped me to properly bend the floor timbers.A proper kind of this plan, if added to the current kit plans, could improve very much the calculations needed to build the internal framing of this boat.
 Please feel free to expand or continue this discussion, if you like. I appreciate it.Kind regards, Jack.
- MarisStella.hr, AntonyUK, Leo-zd and 1 other
-
4
-
Now I also understand that both Marisstella and Dusek are really top notch manufacturers, together with Victory Amati and the Chuck creations for Model Shipways. Not only are (apparently) the explanations better or equal to their competitors, but the provided materials look excellent as well (your hull looks beautiful). They surely deserve to be even better spread. Maybe their choice of subjects, although beautiful, is not want is commercially easy to sell to a wider public.
I had the opportunity to work with Dusek kits and now with Maristella kits and, in general, I am well satisfied with their quality and accuracy. I've some concerns, for both, about assembling instructions but in general I do not follow them too much; I generally have my own approach that often differs from them.
Regarding this kit, much better instructions are now available, much better than the version included in the kit. Maristella boss sent me a copy by email. Probably they are now standard in the kits.
Anyway, I've some concerns with the material provided for the floor timbers and futtocks: many walnut and limewood strips 3x3mm. Considering we are speaking about a kit, I expected laser cut elements. As I explained in my previous messages, this fact forced me to adopt a radical and different approach: use dry beechwood strips instead of walnut/lime, more easy to bend, and build many templates to properly shape the timbers before installation. My thought on this matter is that a couple of days of work with a CAD software was enough to produce these pieces directly in the kit, saving days of work by the modeller.
And this achievement should be the goal of a kit, other I select a scratch build. Don't you think ? From another point of view this may be an additional challenge for the modeller, but in general I prefer to stay comfortable than uncomfortable.
Rgds, Jack.
-
-
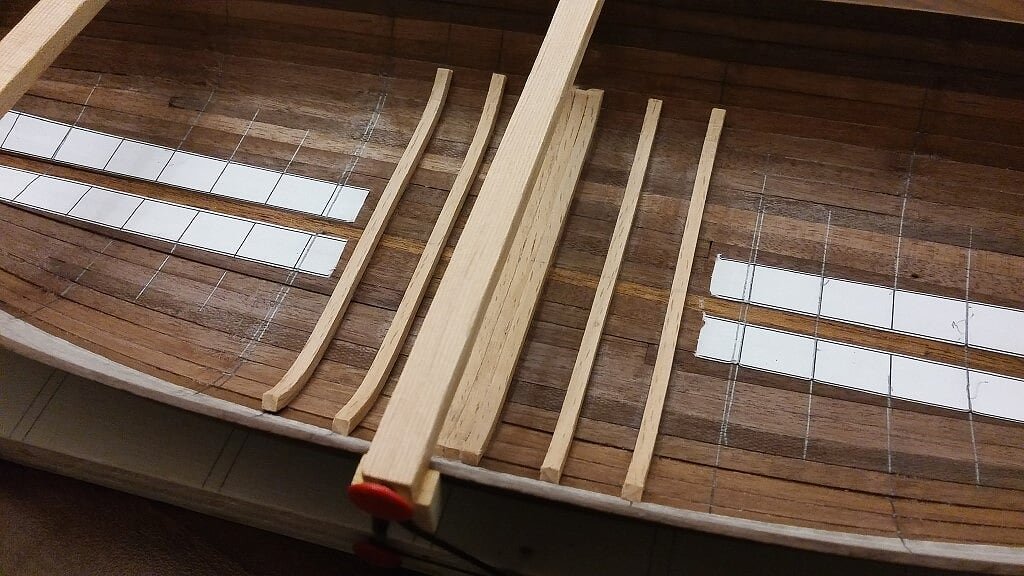
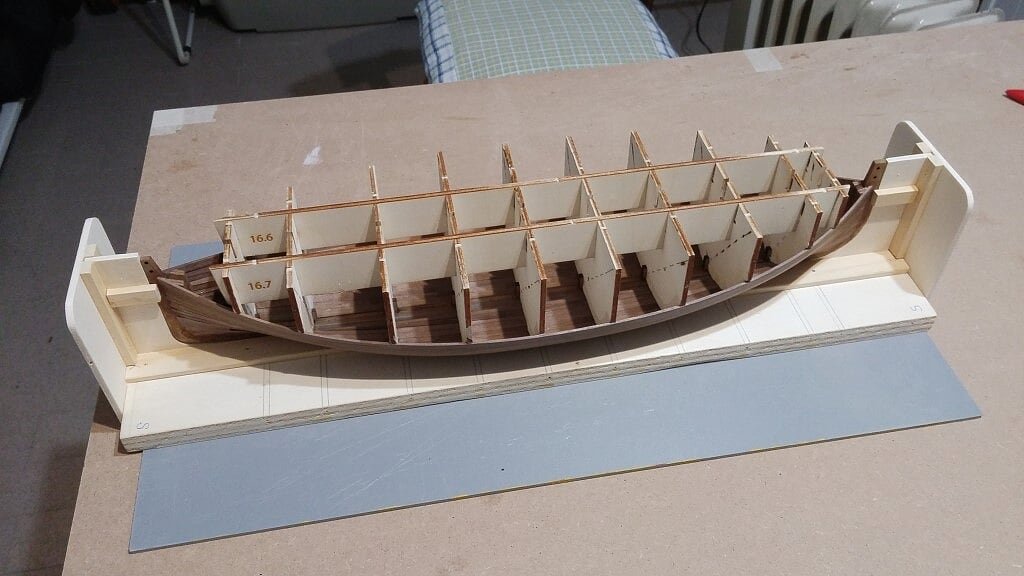
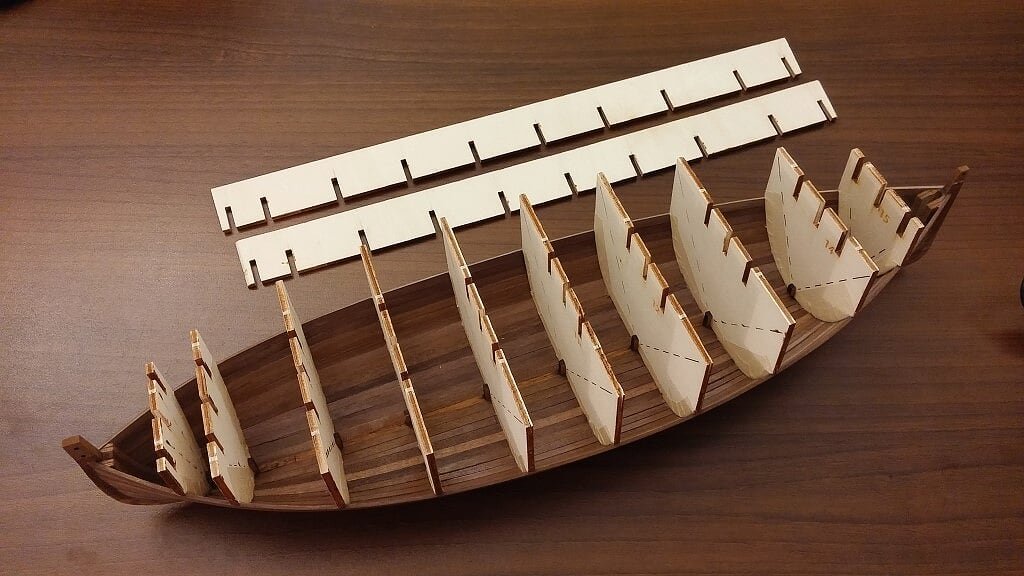
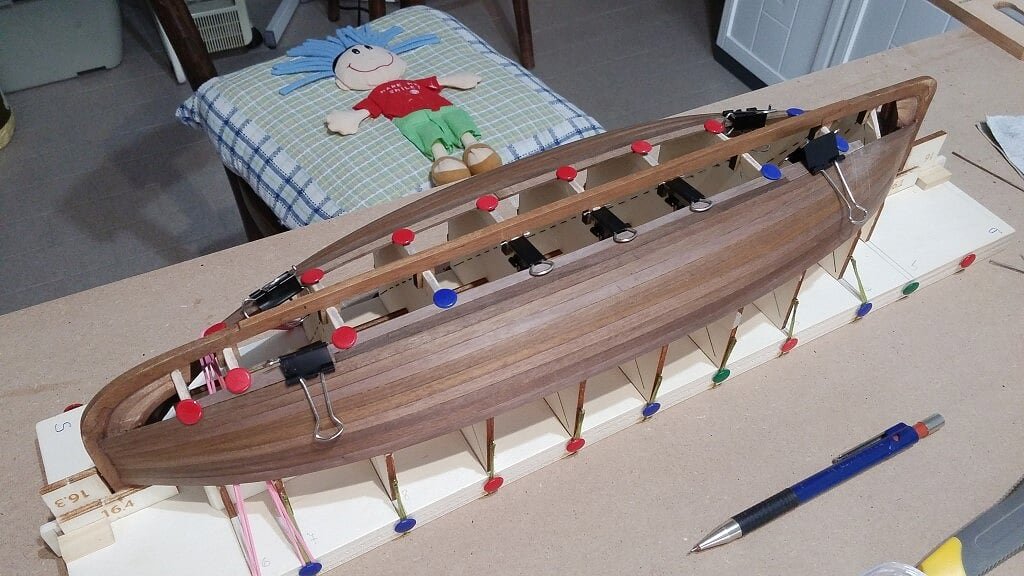
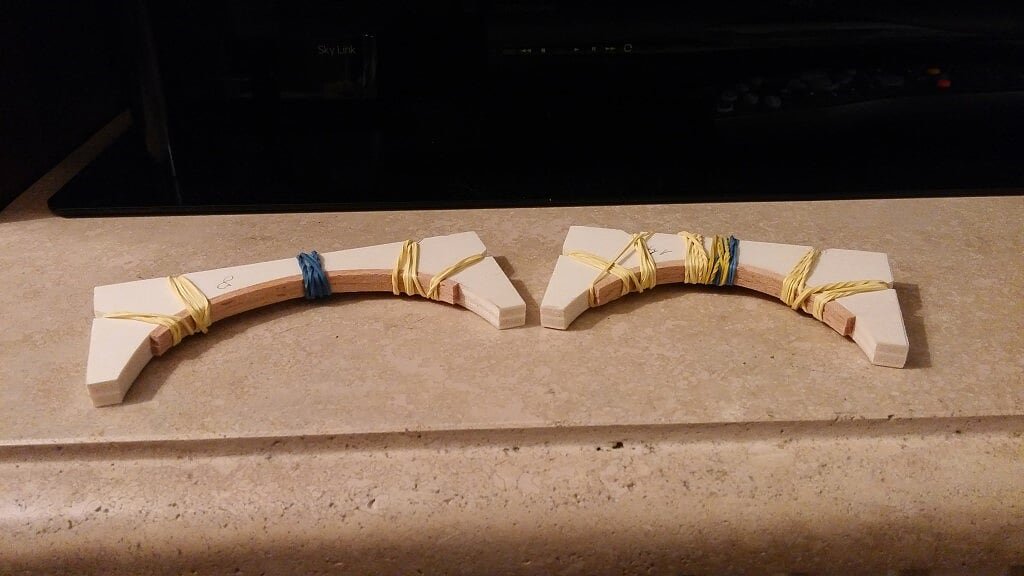
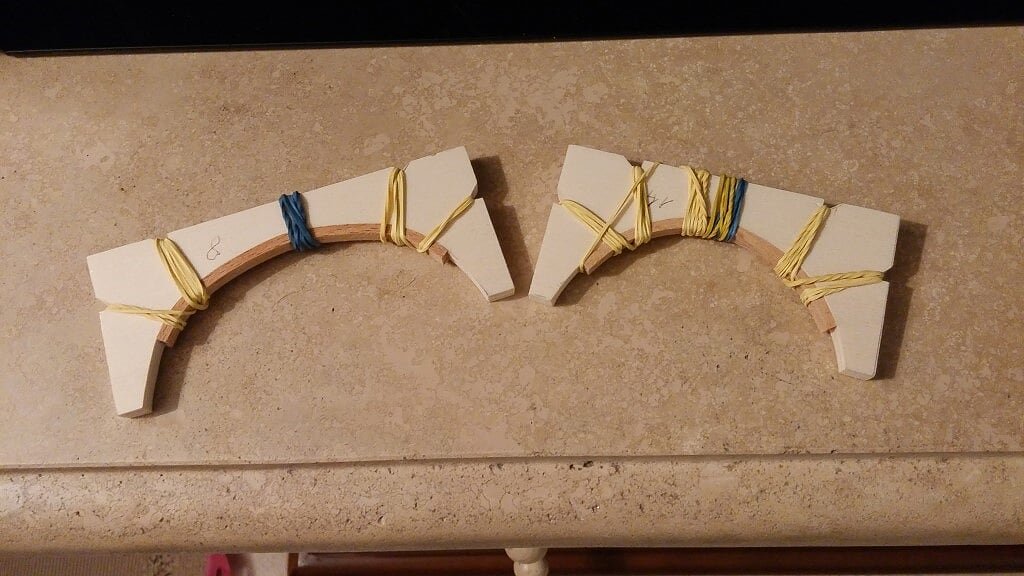
Tuesday, January 17, 2017The activities to install the floor timbers are still in progress, but proceeding quite slowly: each timber must be bent in the right shape in relation to its position inside the hull, and this makes me to loose some time to prepare the appropriate template.And every two floor timbers a new template must be prepared.The remaining is then a quite normal/simple task: soak the timber for a while in water, then bend and shape using the template, let dry the wood, possibly naturally, and finally leave everything to stabilize for at least half a day, better for a whole day.Then install.
The templates that I prepared will be reusable when I'll finish with the floor timbers and I'll start with the futtocks.
01 - 20170117_150823.jpg
02 - 20170117_150815.jpg
03 - 20170117_150804.jpg
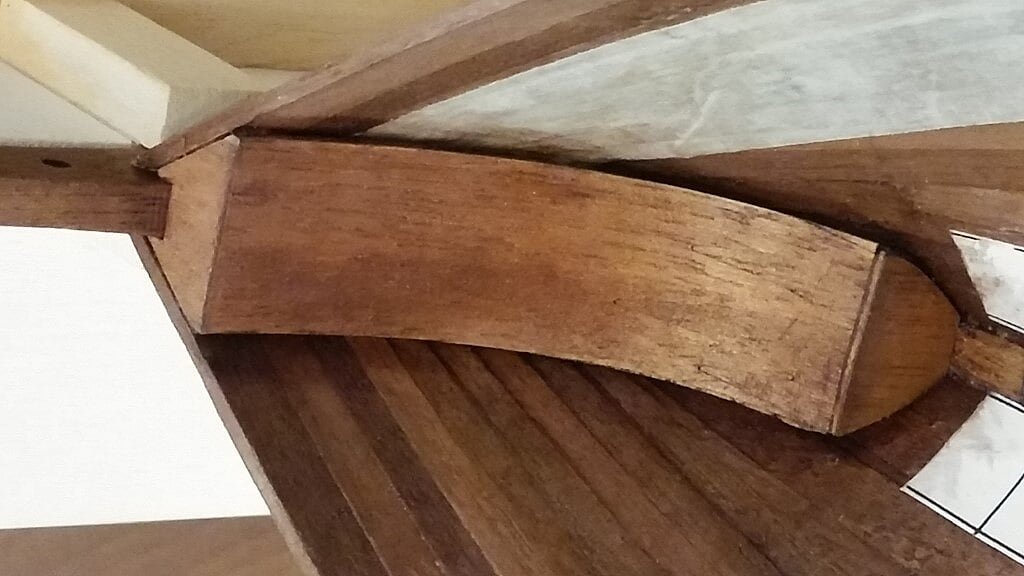
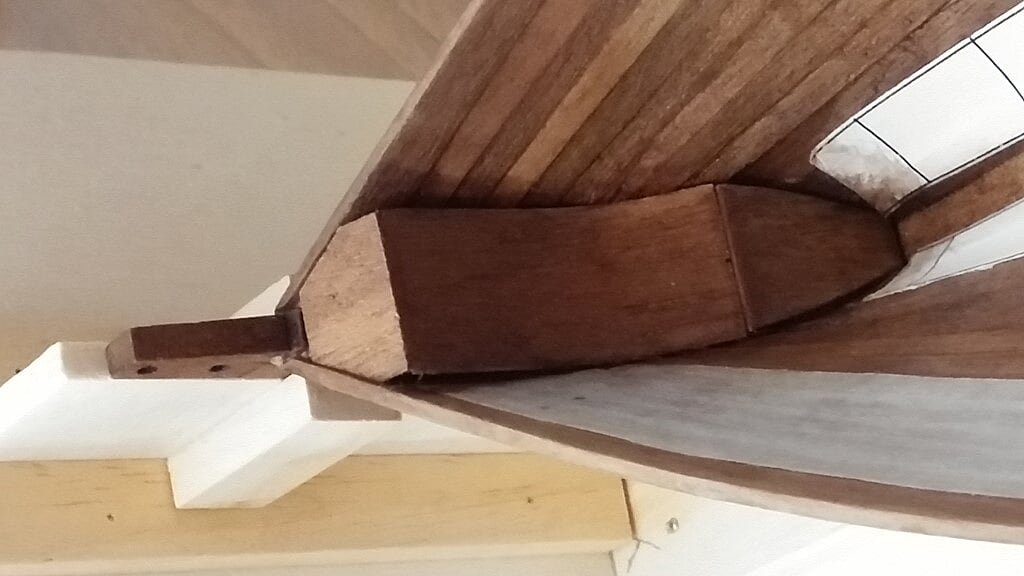
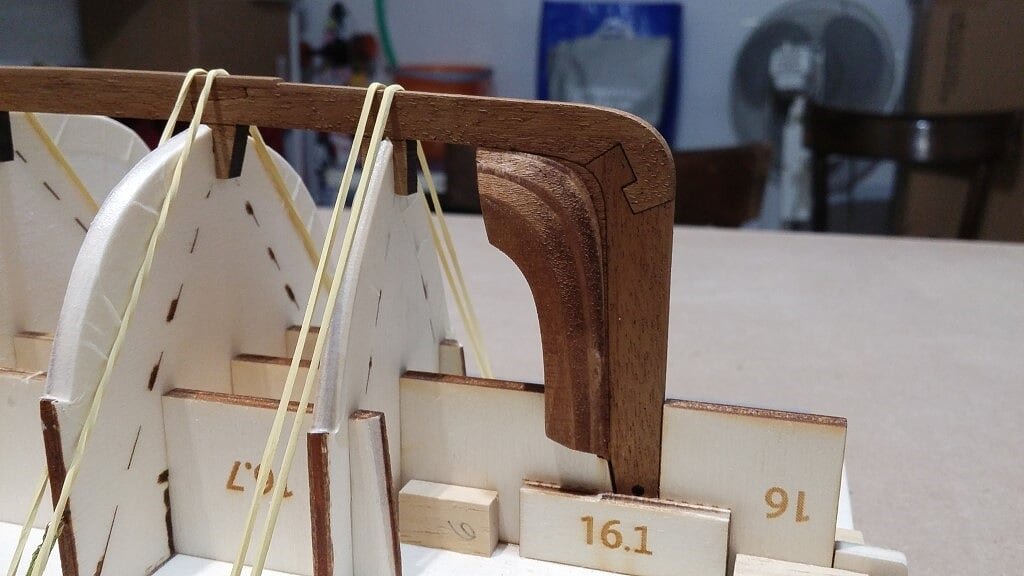
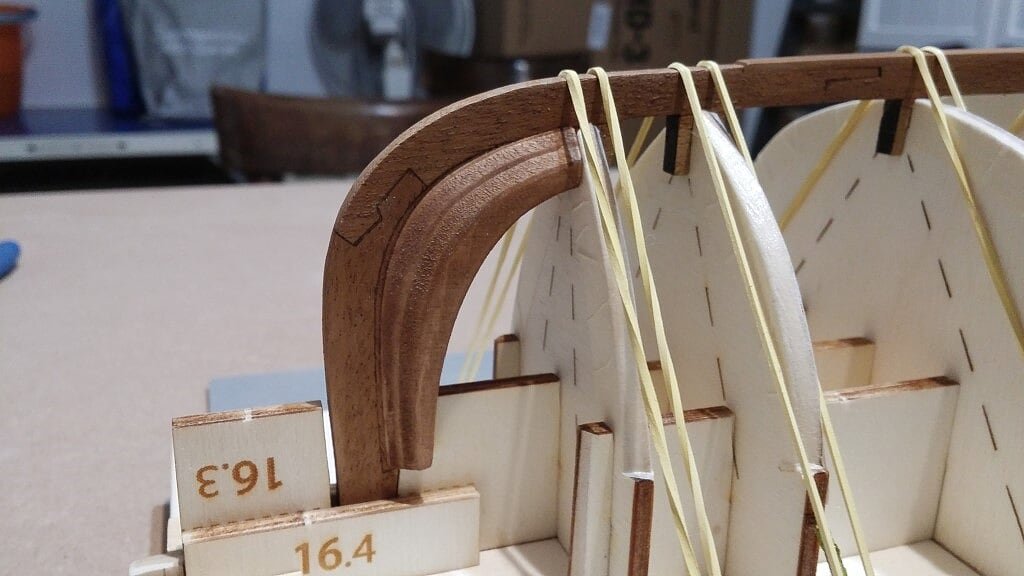
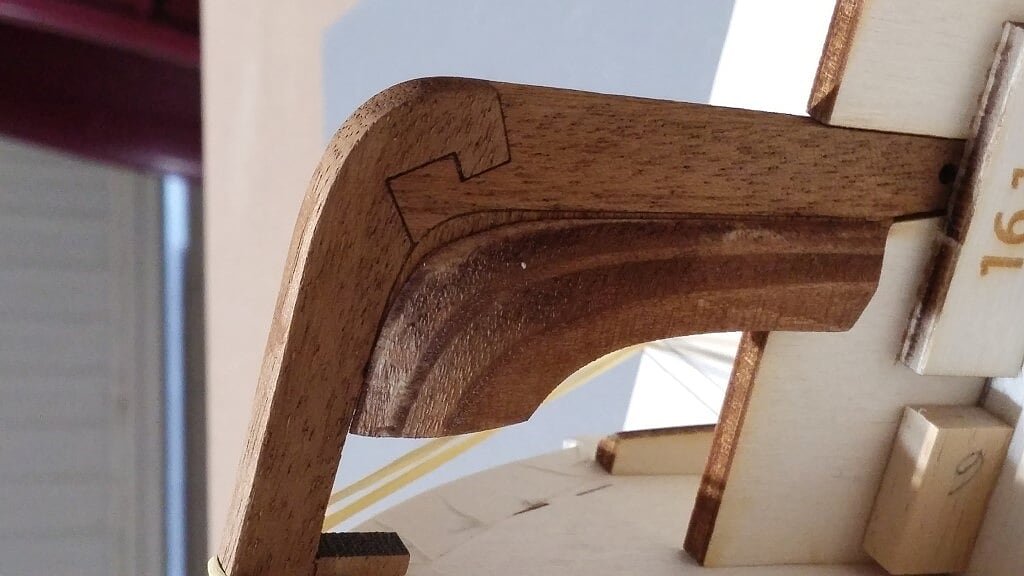
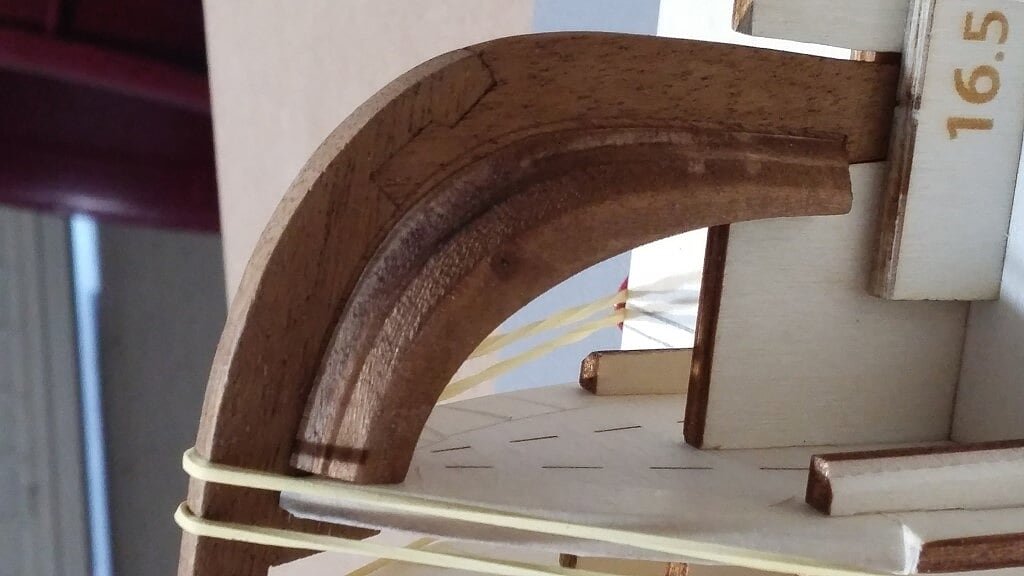
 In the dead time I try to better refine certain details, in the two pictures below are the bow and stern blocks, even if the finished model will be covered by small decks and thus they will not be visible.
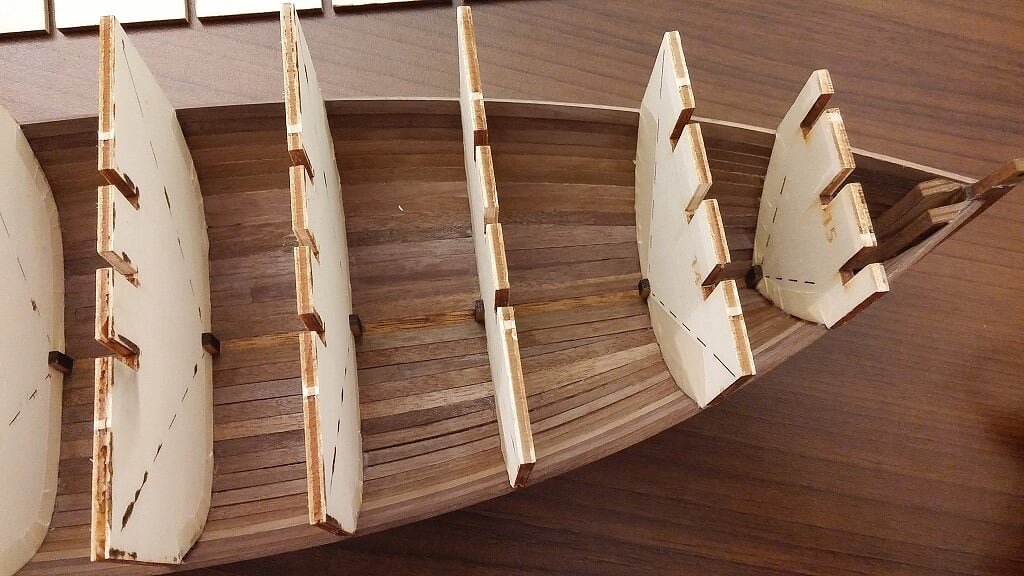
And again, the tips of the floor timbers need to be properly aligned by removing the excess and rounding a side of the tip, for now cut to 90°.
In the dead time I try to better refine certain details, in the two pictures below are the bow and stern blocks, even if the finished model will be covered by small decks and thus they will not be visible.
And again, the tips of the floor timbers need to be properly aligned by removing the excess and rounding a side of the tip, for now cut to 90°.04 - 20170117_151007.jpg
05 - 20170117_150956.jpg
See you next time, Jack.
-
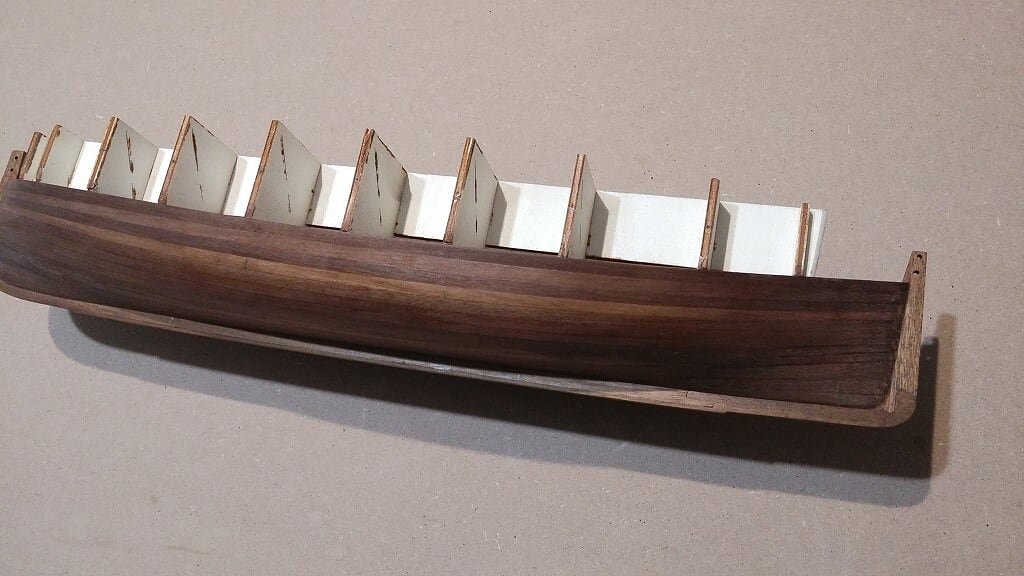
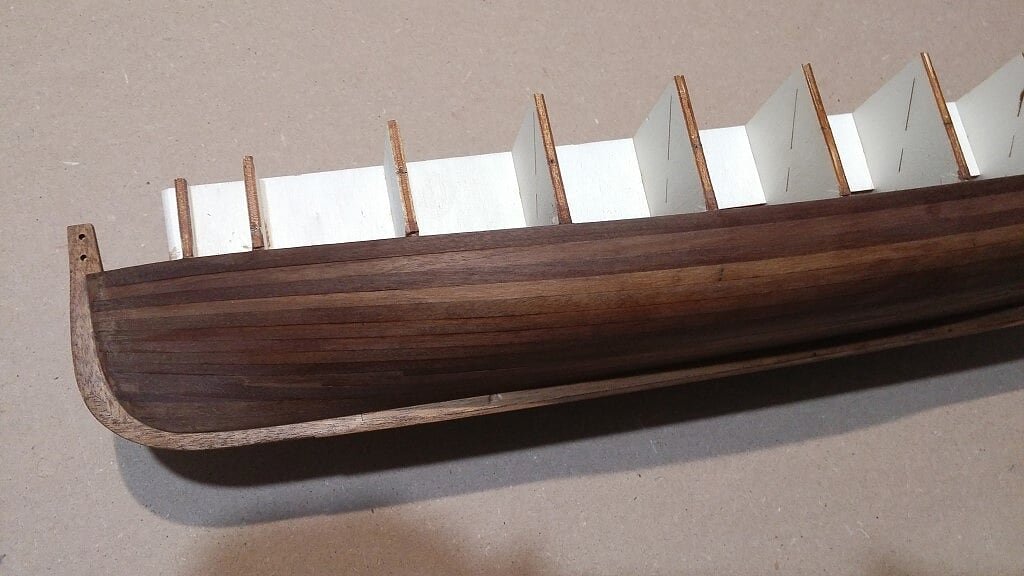
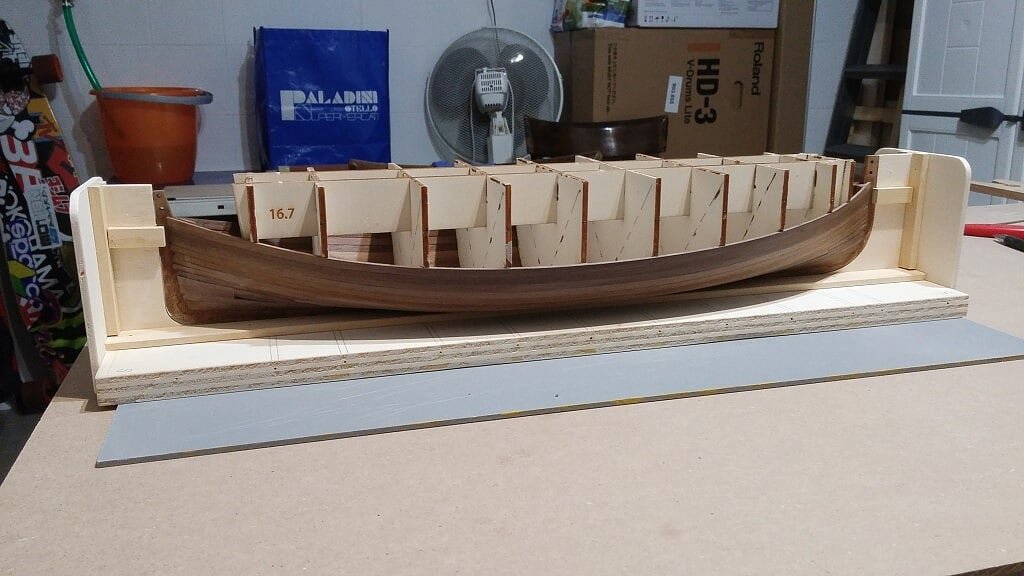
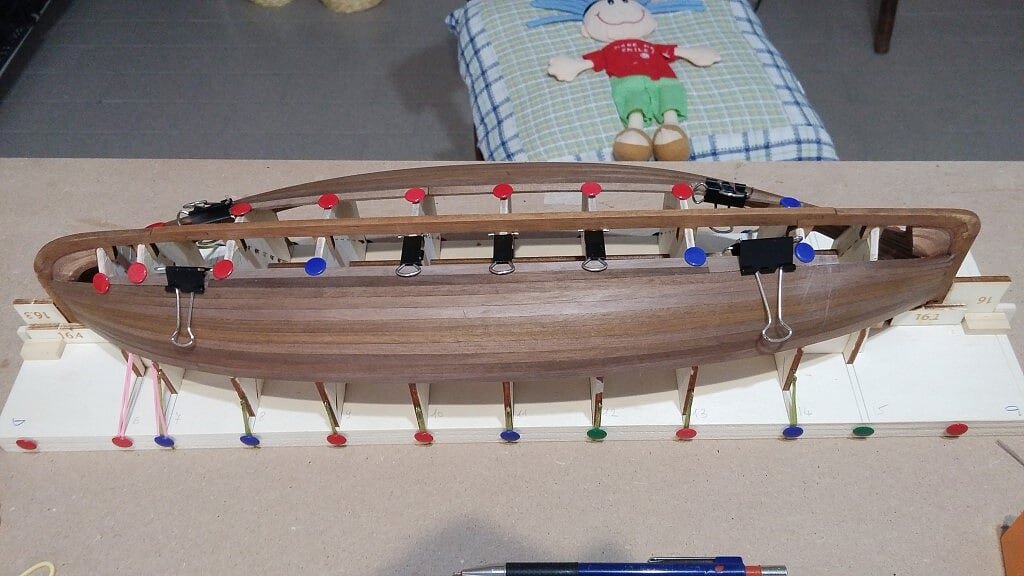
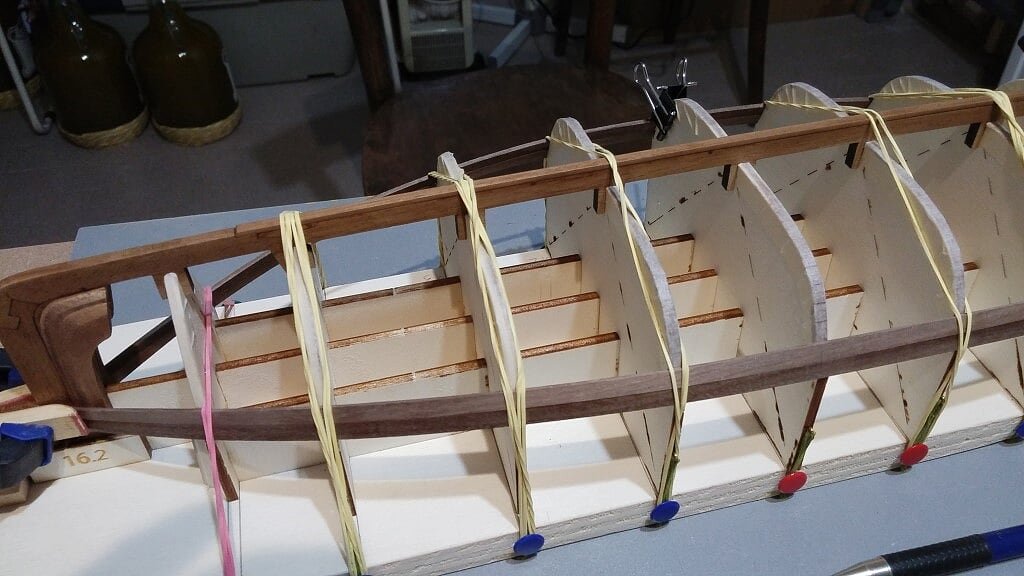
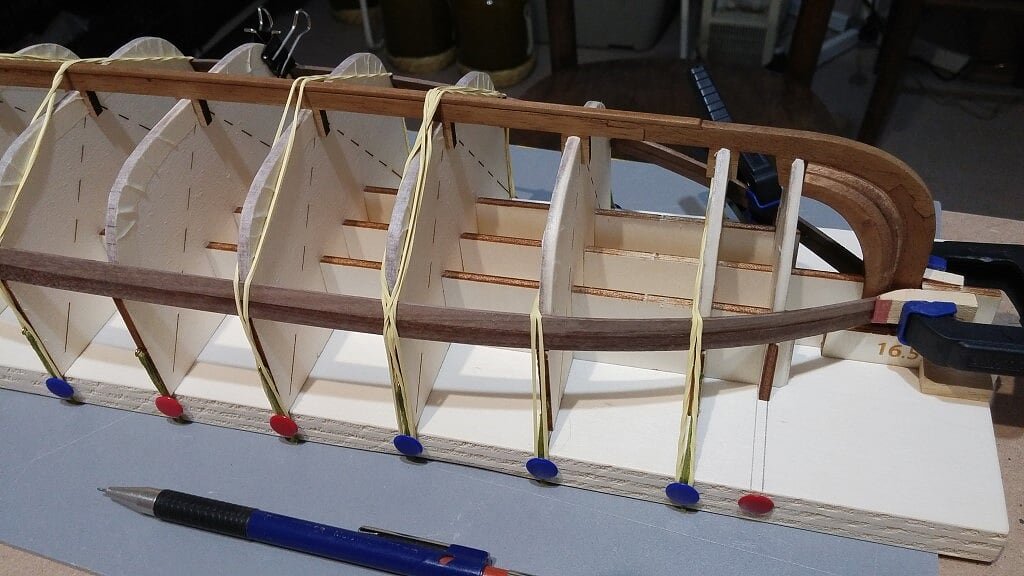
Thursday, January 12, 2017Cold or not cold I decided to resume the model and in these two/three days I developed the technique to install the boat ribs. It will be a rather long task and I do not know when I'll finish. Right now I'm just at the very beginning . .
01 - 20170112_181521.jpg
02 - 20170112_181515.jpg
See you soon, although I cannot foresee when. Jack.
- Leo-zd, Robin Lous, mtaylor and 2 others
-
5
-
Monday, January 9, 2016Apart from the last days of these holidays time, I could not progress on anything due to the pretty frozen weather of these days.Because here in Tuscany my lab is located in a garage where there is no heating, I find rather difficult to work in the cold of this year beginning. I hope in a weather and temperature improvement for the next few days, otherwise I'll be idle. And this is a pity: I should now start an interesting task, having to work inside the hull to install the frames.Cheers, Jack.
-
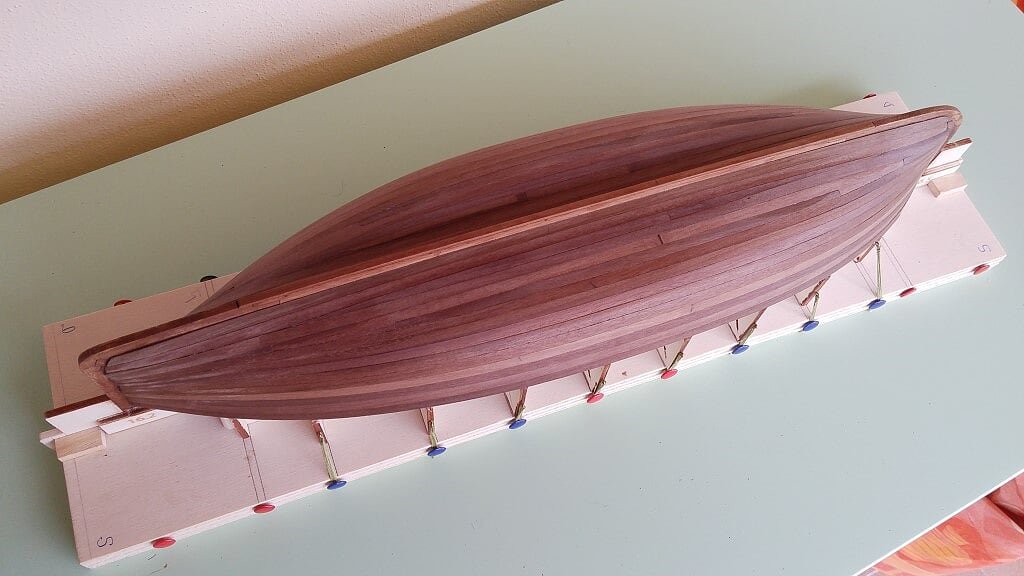
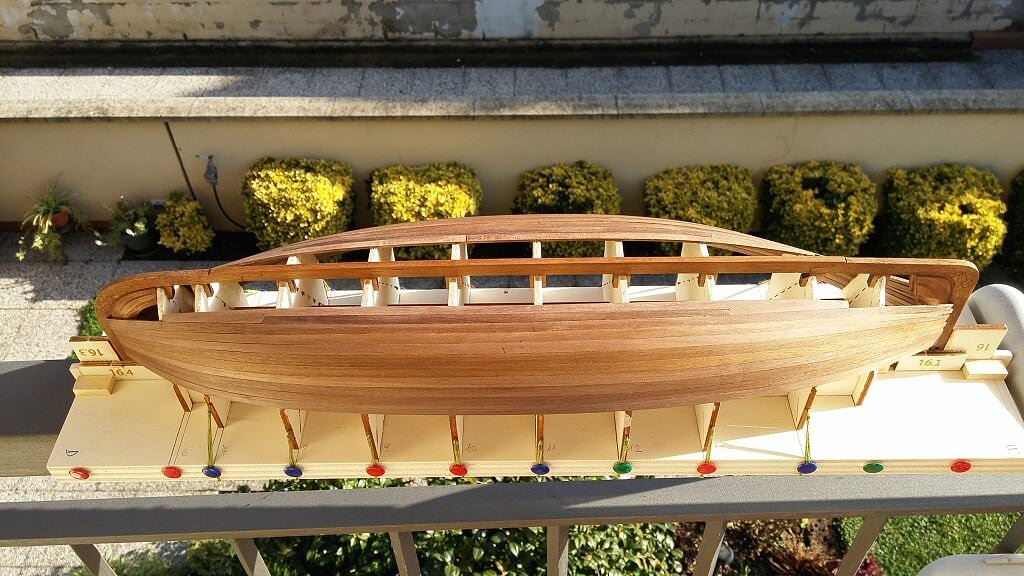
Monday January 2nd, 2017I better refined internally the hull and I proceeded to hold "strongly" the nutshell to its building slip, in view of the the upcoming activities.
01 - 20170102_104556.jpg
02 - 20170102_104709.jpg
03 - 20170102_104638.jpg
04 - 20170102_104702.jpg
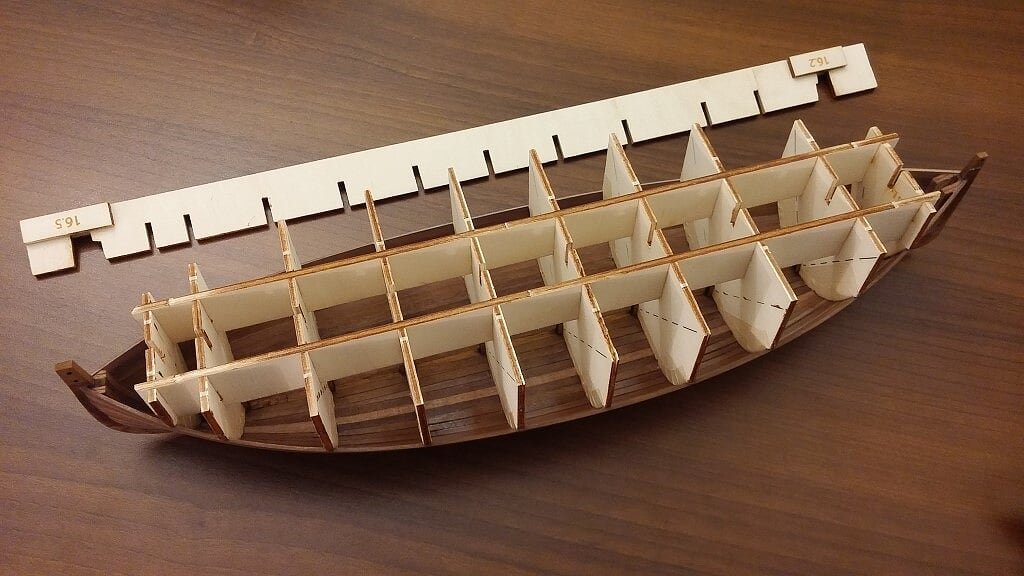
I am now tracing the various positions for the ribs. Once I finished I think it will be mandatory a deep check of all measures to verify my work, because the data in the running are many, too many. The risk of making a mistake somewhere seems high to me. We'll see.05 - 20170102_164903.jpg
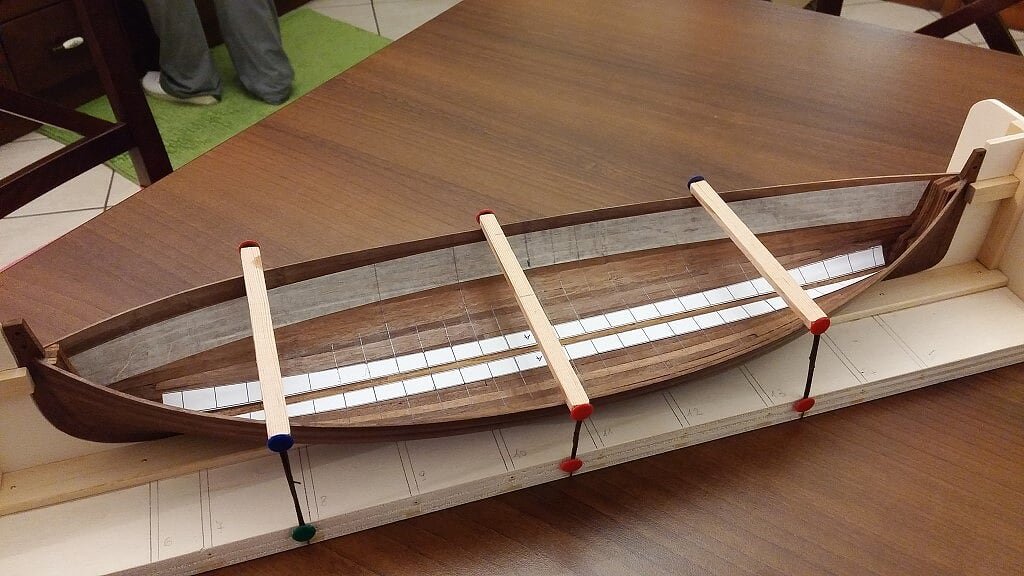
PS: Just as example, to place the masking tape that you see in the last picture I took an hour and a half . . .
-
-
Sunday, January 1st, 2017The new year had a good start . . and, to be honest, I also finished the old one quite well.Yesterday I was on the seaside, but when I was back I could spend a couple of hours working around the Gajeta. More precisely, I proceeded to remove the bulkheads that served to build around them the planking. Planking that I want to remember, was glued quite weakly to the bulkheads, placing between the bulkhead and the plank a film of masking tape.I had still some doubts about the term "weak" because, having no previous experience, I could not know what I was going to meet. Would it be a simple task or not ? In the Maristella's project the kit manufacturer foresaw some diagonal cuts on the bulkheads, cuts designed to be completed with a cutter knife or similar tool to remove the central bulkhead area and allow operating easily, but it was to be proved in practice. I therefore prepared various tools and different approaches. Anyway I almost immediately realized that it was enough to appropriately manage the bulkheads to remove them very easily without the need of any tools. Perfect.For safety I left two central bulkheads still stuck just to make sure that the hull doesn't collapse or distorce. Then the work left was to remove the excess glue where there originally was the bulkhead. Here too the operation was quite simple: I used the mini drill with a spherical grinding tool and a bit of patience. Finally, a smoothing task, albeit provisional, with sandpaper.Before removing the remaining two bulkheads I thought to add some strips of strong wood in three hull points to assure me that the "shell" will not change shape. These strips, simply glued with PVA will be kept until I'll finish the installation of the internal frames. I don't know until when . .
01 - 20170101_104331.jpg
02 - 20170101_104323.jpg
03 - 20170101_104316.jpg
I intentionally left the glue excess left after I removed the last two bulkheads to show what it looks like the inside of the "nutshell" and giving so an idea of the cleaning work that I had to do. Today I'll try to further clean up the inner hull and then . . . I will begin a new phase, that must be carefully planned and set up.
04 - 20170101_104339.jpg
A cordial greeting and a sincere Happy 2017 to all of you, Jack.
-
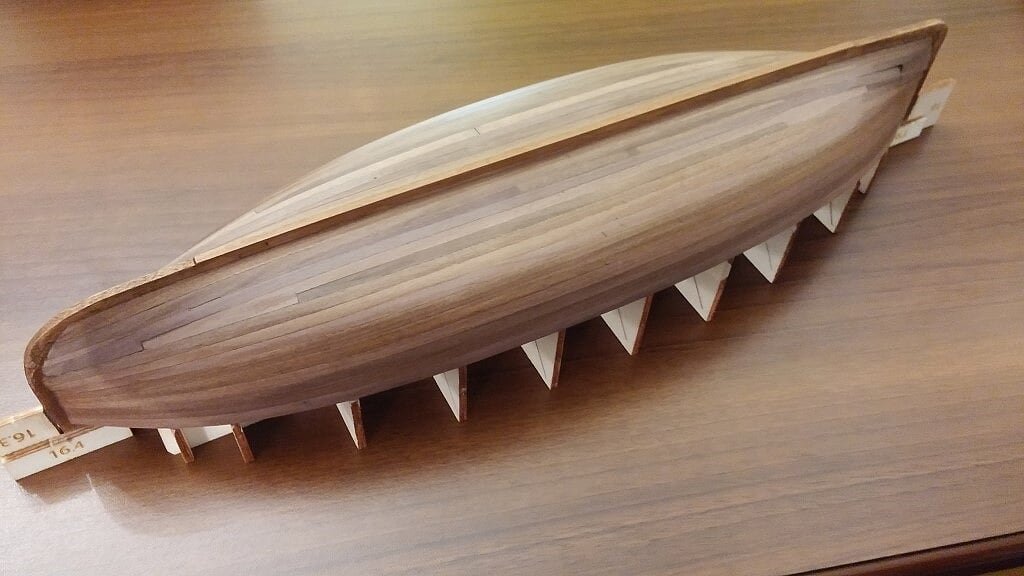
Monday, December 26, 2016In recent days, I proceeded to finish the hull on the external side, taking a special care to the bow and stern areas. The walnut wood is quite hard to work with, ergo was sometimes necessary to use "hard methods". Now it's approaching the moment to remove the bulkheads in order to be able to work inside the hull, first with a cleaning and finishing job, later installing the +/-30 planned ribs.
A first top view of the inside of the boat:
The external planking finished with sanding blocks and sandpaper.
Then I applied a couple of coats of very diluted stain, which has changed the color tone of the original wood, making it slightly more reddish. Operation that I know will be useless because the outside will be painted black, but in my heart I could not bear the many different colors of the strips for many weeks or months . . .
To finish, a final sanding and a coat of very diluted PVA glue to fix the dye.

See you next time, Jack.
-
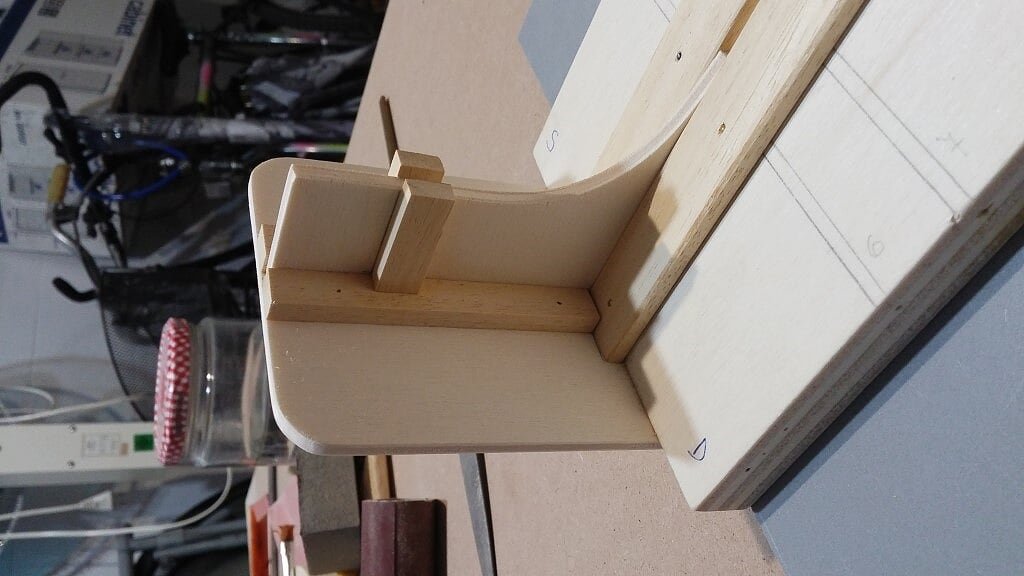
Tuesday, December 20, 2016
Today I do not feel to make wood dust for finishing the hull, so I did other.
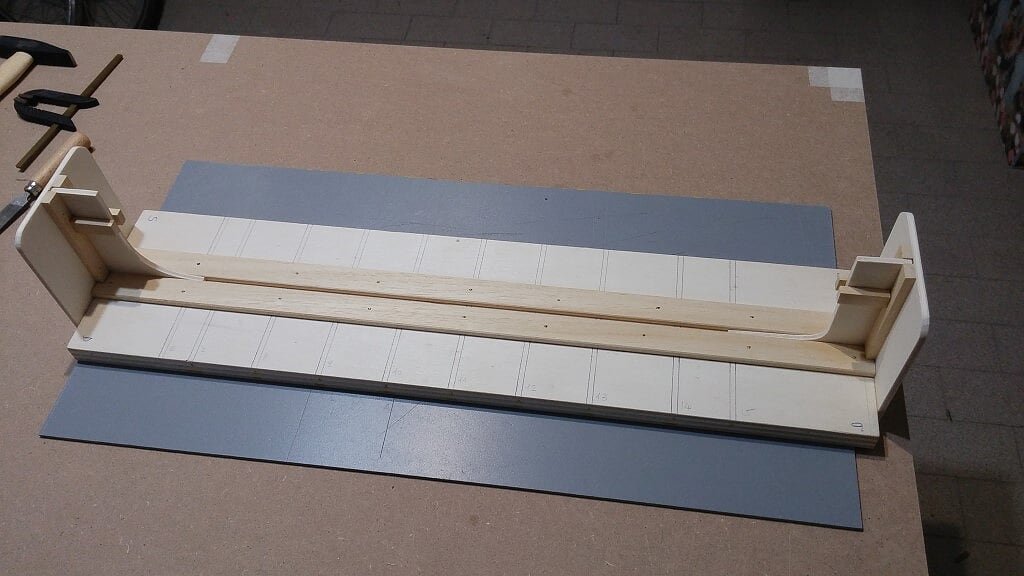
I recovered the material of the first building slip, which is no longer usable, and I prepared the second building slip, which I hope will be really useful in a few days, when I'll start working inside the hull.
Making these components is always pretty fun, and this is still true for this one . . .
With this slip the model stays in its normal position.The images that follow show the slip with an overall view and two detailed views.
01 - 20161220_174625.jpg
02 - 20161220_174647.jpg

03 - 20161220_174634.jpg
More images with the model lying at the basement, although the not yet removed skeleton severely limits the internal view of the hull.
04 - 20161220_174604.jpg
05 - 20161220_174540.jpg
06 - 20161220_174547.jpg
Best wishes to all of you and Merry Christmas, Happy 2017 and happy holidays, Jack.
-
Monday, December 19, 2016It's been a while since my last post. It seemed me that little work was missing to complete the planking but other commitments prevented me from proceeding faster. Also what I am going to show today dates back almost a week ago but, due to various commitments, I find only today the time to post it.The cause of these delay in the work are many, from a one week break due to my return to Milan to vote yes/no at a referendum to some problems associated with setting up and how go further with the next tasks once planking will be over. We will discuss in detail later.Below two images of the completed planking (not yet finished). The whole is still firmly attached to the assembly building slip that I prepared, demonstrating really helpful so far. The fifth strake on the foreground side in the two photos seems broken and jointed but it is not right: by a strange nasty surprise of the wood grain, and also due to an oversight from me in the choice of the wood strip, it seems to be interrupted.
01 - 20161219_113801.jpg
02 - 20161219_113805.jpg
I then proceeded to detach the hull and its internal structure from the building base. The next two images show better than words. In both pictures, but especially in the latter you can see a minor problem I had in the assembly of a strip aft: while bending the strip it splintered and then I had to stop it before reaching the end. Now the junction shows a moderate difference in height that I need to fill. This will take place later, during the refining of the shell. So finishing is the next field activity.
03 - 20161219_121654.jpg
04 - 20161219_121707.jpg
Finally now I could capsize the boat and give a look to the inside!
Also in the inner size of the hull there will be quite a cleanup job to run, even though I expected to face a worse situation.
The sequence here below shows how the various pieces that make up the internal skeleton are just stuck and not glued.
01 - 20161219_121717.jpg
02 - 20161219_121741.jpg
03 - 20161219_121824.jpg
Even the bulkheads are glued to the shell in a weak way. In fact, between the wooden planks and the bulkheads there is a plastic tape film, which should allow me to remove the bulkheads without special efforts.
04 - 20161219_121835.jpg
05 - 20161219_121829.jpg
But now I must achieve the complete refinement of the outside hull.
Until next time, Jack.- Robin Lous, hexnut, mtaylor and 5 others
-
8
-
-
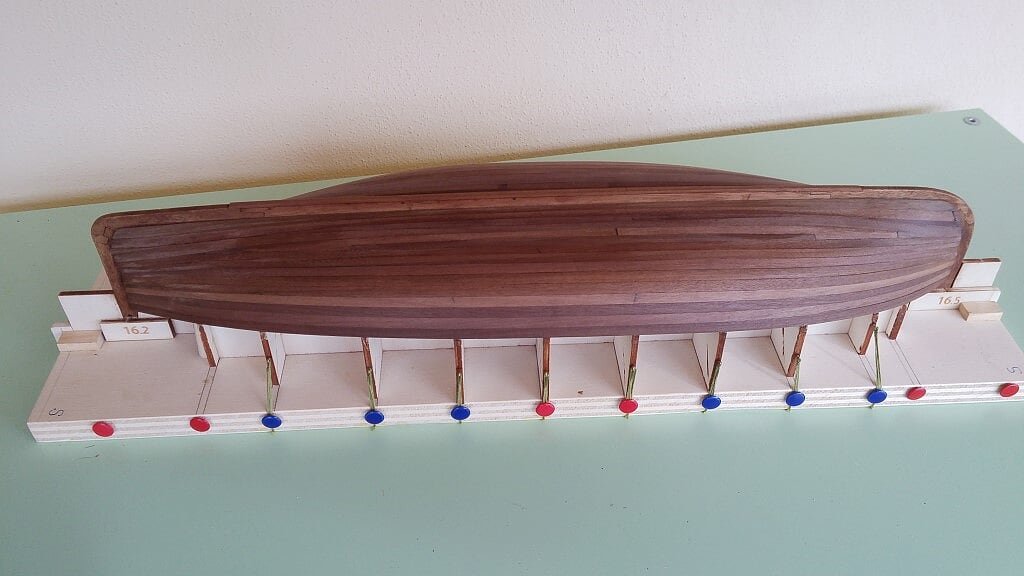
Saturday, November 26, 2016A couple of images without all the pins, the rubberbands and the clamps shown yesterday . .
01 - 20161126_134148.jpg
 02 - 20161126_134037.jpg
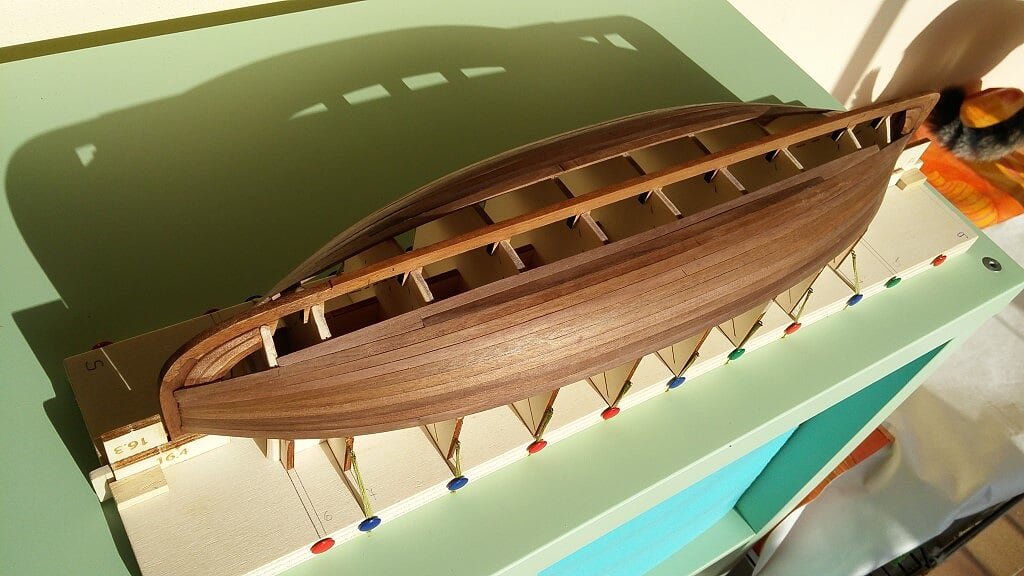
- coxswain, Robin Lous, hof00 and 5 others
-
8
-
Friday, November 25, 2016The task of installing the planks is proceeding but slowly . . . Now there are only four strips missing.Tomorrow I'll install another one but then I need to stop for a while because this Sunday I have to come back in Milan, where I'll stay for about a week before returning to Tuscany.
01 - 20161125_160736.jpg
02 - 20161125_160743.jpg
03 - 20161125_160727.jpg
04 - 20161125_160708.jpg
05 - 20161125_160701.jpg
Cheers, Jack.
- hof00, Robin Lous, coxswain and 3 others
-
6
-
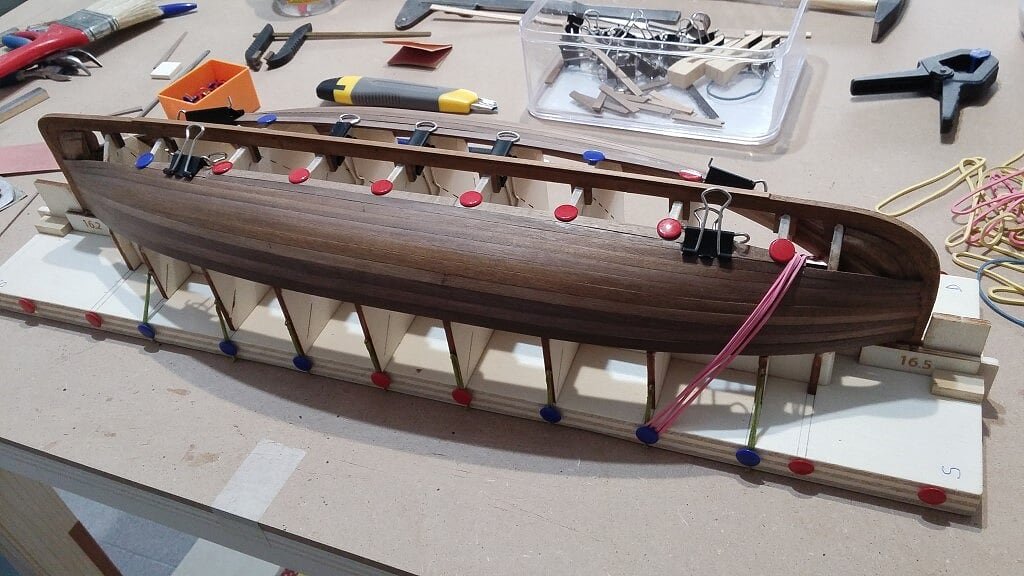
Thursday, November 17, 2016The planking task is going on . . slowly
As I anticipated in a previous message this activity, for this particular model, is proving more boring (in terms of time) than difficult.
Since I can't use nails and similar to hold the strakes, I need to work using exclusively clamps, so I have to wait for the glue to dry before going on further.
In this way, as I dedicate to my hobby a (part of a) day, usually the afternoon, I proceed at a speed of a strake per side per day.
Today I applied the sixth plank, so then, to complete the hull planking, I need to install other 8 strips: almost two weeks from tomorrow.
Here below a picture of the model taken this morning, before installing the sixth strake.01 - 20161117_104955.jpg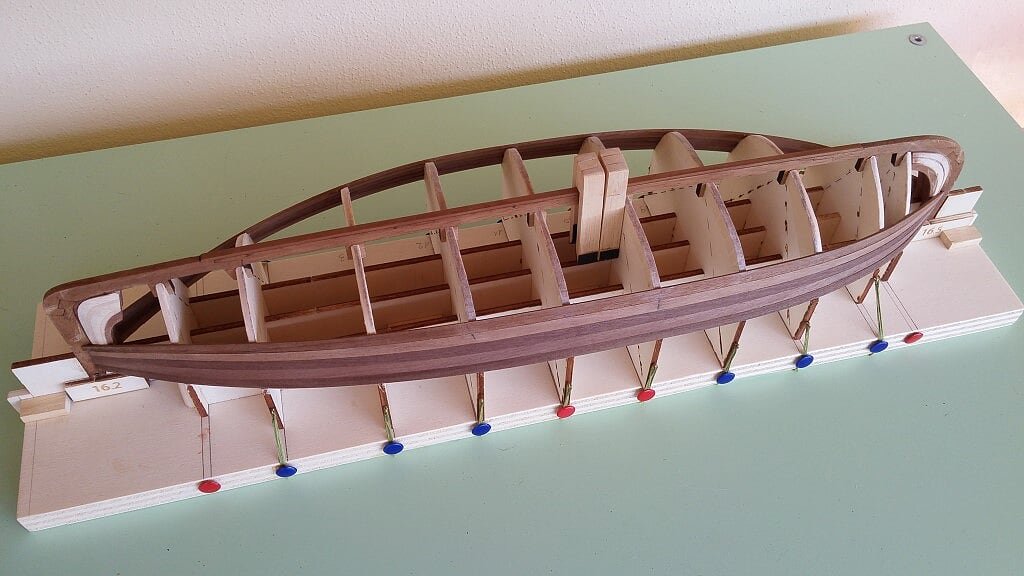
In the next image, in the foreground, two clamps specially made to hold the tips of the planks at bow and stern. They are proving invaluable in their function. The sandpaper applied at their tips is thought to avoid sliding on the keel; the pressure is exerted on the other hand via a common clamp as shown below in image 03.
02 - 20161117_105027.jpg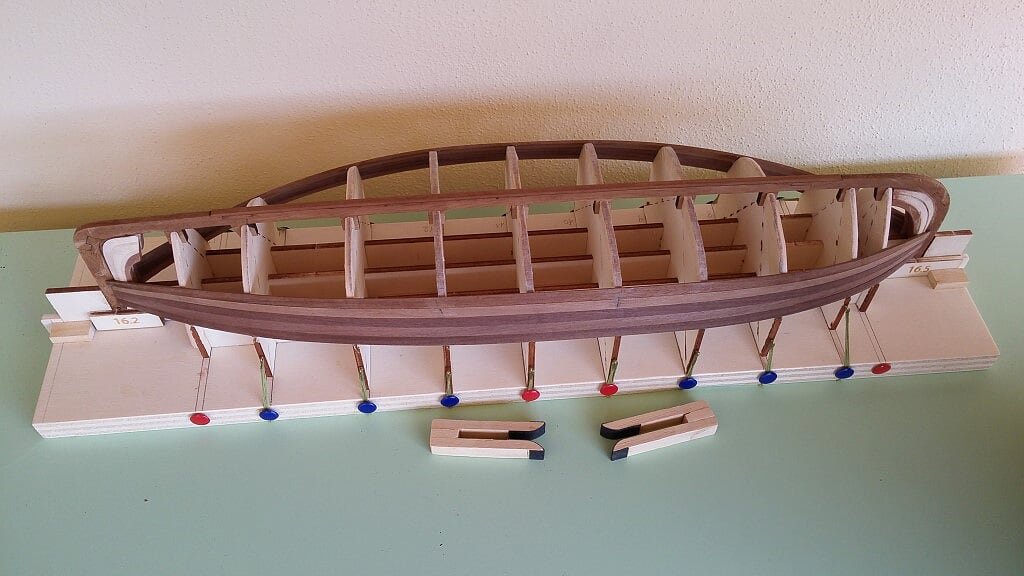
In this picture a "catalog" of all the clamps I have to use during this task, here waiting for the glue makes its duty.
See you next time, Jack.
- coxswain, aviaamator, yvesvidal and 6 others
-
9
-
Friday, November 11, 2016
I finally started to apply the planking . . I say finally because, as I was ready a week ago, due to adverse weather conditions and other unforeseen commitments, I could just start yesterday.
From the first, although limited, experience, the matter seems to appear long enough, as I expected. Due to the impossibility to use nails to hold the strakes, I can install a strip per side a day; then I have to stop and wait for the glue to completely dry. So it will be a work of great patience, a exercise of self-control at a high level.
According to my expectations, after applying these two first courses, it's still needed to install 13 strakes to reach the keel. So if I install one strake per day I'll need at least 13 sessions (but let's call them "days") to finish.
In each session, the sequence of operations is:
1) cut the two strips to the correct length with high precision;
2) taper a strip according to a scale table that I'm going to prepare on my pc;
3) apply the tapered plank of step 2 on one side of the hull; the bonding is with the bulkheads but especially with the other adjacent plank;
. . . . . then, while the glue in the meantime dries a little, giving me the possibility to operate on the other side . .4) taper the second strip as in step 2;5) apply the tapered plank of step 4 on the other side of the hull;
6) end of the session, bring the dog to **** hoping it's not raining.
Special tricks for the bending of the planks weren't necessary, and I believe will be the same also for the future, .Now, some photos of the result of two days of work. . Regards, Jack.01 - 20161111_155313.jpg
02 - 20161111_155318.jpg
03 - 20161111_155322.jpg
04 - 20161111_155329.jpg
-
Friday, November 4, 2016
Since I do not foresee the use of nails during the planking of this model, I thought about alternative solutions that do not require stinging somehow the walnut strips, which are known to break down in an attempt to push through tacks or pins without drilling the strip in advance.
I decided to use the method below that will be using clips for paper, suitably modified.Below some of these clamps ready for use, even if their use at some point will have to be supplemented with something else at the moment I do not know . .Below is an example that clarifies how you must use these clamps to hold the planks in position while the glue is drying.
See you next time, Jack.
- mtaylor, aviaamator, yvesvidal and 5 others
-
8
-
Friday, November 4, 2016Now all the preparatory tasks for the planking are completed . . .The missing elements were the four bow and stern components, properly shaped, where underlie the strips of the planking; without them it would be difficult to glue the planks to the keel.These components are laser pre-cut in the kit with the same material of the other keel elements, ie walnut. But a approx 45° bevel is to be made and I found serious difficulties to achieve this job due to the pieces of wood quite small, made in addition with a hard wood such as walnut. So I redid them using good birch plywood of the same thickness, but working before on the part to be beveled and only later by cutting out the inside of the piece. . it was another way of life !!Only inconvenient was the need to subsequently dye with mordant these redone pieces, of different color.Below a quite abundant overview showing these four elements definitely glued to the keel.Now everything is ready to begin the installation of the planks: walnut strips 5 x 1.5mm. Please wish me good luck, thank you.01 - 20161104_165225.jpg
02 - 20161104_165215.jpg
03 - 20161104_165159.jpg
04 - 20161104_165132.jpg
 Aft, figures 5 and 7, I slightly changed the shape of these original elements. This because it was not possible to get the bevel, more than 45°, on the original form . . after checking on the plans I decided for this change as these items will not be visible. Infact there is a small deck that will hide them from viewing.
05 - 20161104_165505.jpg
06 - 20161104_165252.jpg
07 - 20161104_165241.jpg
08 - 20161104_165453.jpg
 To the next issue, Jack.
 -
Wednesday, November 2, 2016
Although visibly there are few things new, in fact, since my last message, I had a heavy working session, in particular:
1) shaping of many bulkheads to obtain the correct camber; unlike my previous experiences, here I could just remove the bulkhead away and work on it comfortably on the table; this fact simplified tasks in some ways but complicated for others, i.e. having to remove and reposition the bulkheads each time I had to run a check;
2) application on the thikness of the bulkhead, on which the planking will rest, of a adhesive tape to make sure that the bulkheads bonding becomes strongly weakened in order to facilitate the detachment of the hull shell at the end of the planking task; in the past I used the technique to rub the wax of a candle on the bulkhead thickness, but it worked partially well; I think this system should work better.
The result of this work is shown in the two pictures that follow.3) Fixing the bulkheads (and consequently the whole hull structure) to the building slip with cotton wire using the pins and rings, previously installed on the building slip and on the bulkhead. A drop of cyano-acrylate on the wire ensures that knots last forever.Now the "march" towards the beginning of the planking task is almost complete. Only two small details at the bow and two at the stern are missing; I am beginning working on them.
See you soon, Jack.Aubrey.
-
Saturday, October 29, 2016The approaching steps for the task of planking are continuing . .I have completed the keel, applying the walnut 1,5x5 strip which constitutes the false keel. Then, after cleaning the whole by sanding, I tested the dry mounting of this piece: perfect.A due tribute to the laser cutting technology and the kit manufacturer . .Then I run some additional changes to the building slip to allow to hold the hull structure, which I remember, is not glued together but stays only thanks to the many joints.With these slight changes, in due course, I will fix everything in a stable and robust way to the building slip and I hope to avoid many worries. At the end of planking, I'll need just a scissor to detach eveything without efforts.
Detail of the metal rings and pins, all elements glued to the slip with cyan-acrylate to insure strenght; they will serve to firmly hold the bulkheads to the building slip.
See you next time . . Jack.
- Robin Lous, hexnut, yvesvidal and 4 others
-
7
-
Hi Jack, congratulations on your new build and I know you will enjoy it. Having watched your last build I have no reason to believe you will have any problem making this a beautiful boat.
Having some experience, but far from an expert, with these kits my best piece of advice is to follow the plans very closely. Unlike many others these are very precise and by all means take your measurements from them. Look very close at them, a problem I keep having, and you will find all the information you will need.
The instructions are a little vague at times and hard to understand( I am finding it is getting easier as I go along) but what they lack the plans make up for. If you do have problems give Zoran a email, he is a great guy and has always come through for me and most times the same day.
It is my understanding that they are in the process of re-writing all of their instructions for their kits so they may very well appreciate your help in re-writing these.
In the meantime enjoy your build and I will gladly follow along.
Hi Don, many thanks for your suggestions.
Regarding the assembling instructions I am in contact with Zoran who sent me a (for the moment) unofficial new version of them. In addition to the Croatian and English language, this version contains also instructions in Italian language.
The new document is much better than the old one, the English has been revised and the Italian seem to be written by an italian man . . surely it better clarifies some not clear sentences contained in the old text.
Many thanks for this gift to Zoran, very good behaviour from him . . greatly appreciated.
Regards, Jack.
- Robin Lous, mtaylor, MarisStella.hr and 1 other
-
4


Gaeta Falcata (Gajeta Falkusa) by jack.aubrey - FINISHED - Marisstella - 1:20 Scale
in - Kit subjects built Up to and including 1500 AD
Posted
A friendly greeting, Jack.
01 - 20170207_104732.jpg
02 - 20170207_111047.jpg
03 - 20170207_111022.jpg
04 - 20170207_111032.jpg
05 - 20170207_111027.jpg
06 - 20170207_111036.jpg