DONATION DRIVE - SUPPORT MSW - DO YOUR PART TO KEEP THIS GREAT FORUM GOING!
×


Landlubber Mike
-
Posts
4,541 -
Joined
-
Last visited
Content Type
Profiles
Forums
Gallery
Events
Everything posted by Landlubber Mike
-
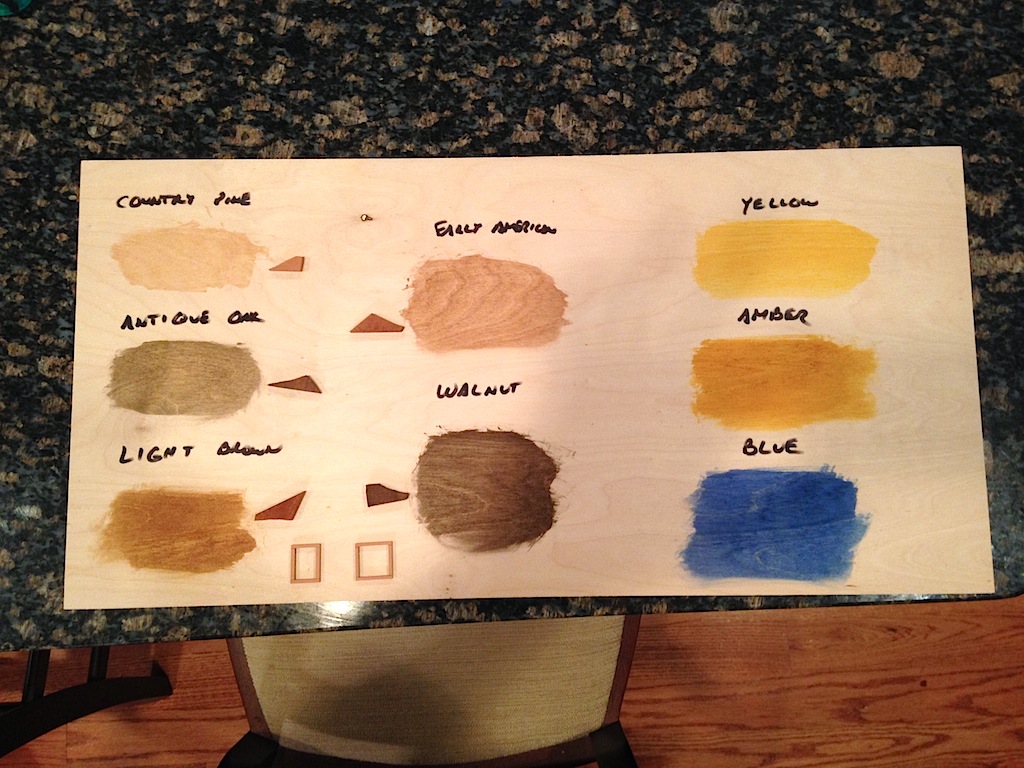
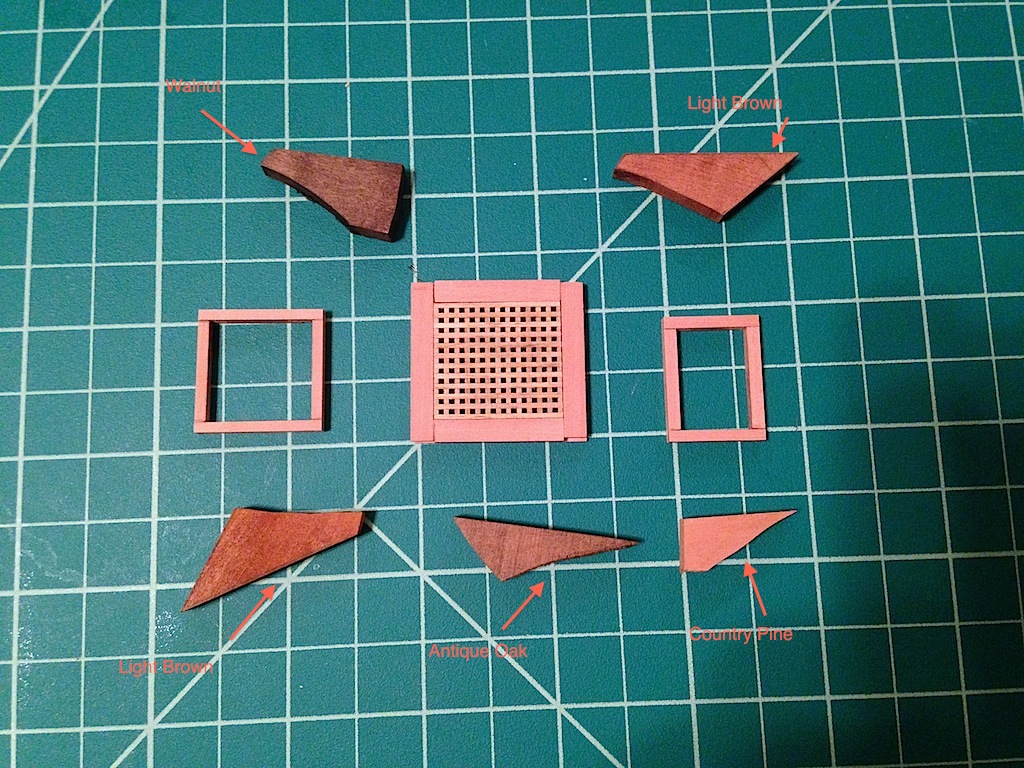
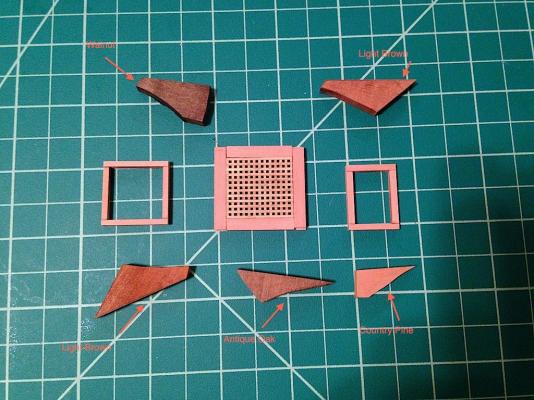
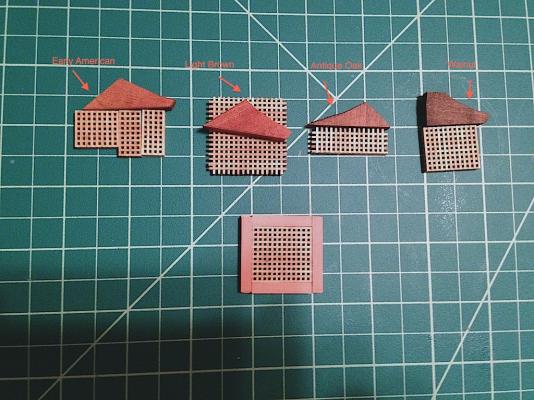
 I've been slowly working on the deck hatches and companionways. In the meantime, I thought I would share the results of some General Finishes stains that I tested on plywood (first pic) and on pieces of scrap pear. The reason for the stains is that I'm hoping to go a little darker on my build, and the pear is a bit light for my liking. Included in some of the pics are two companionway coamings and a grating that still needs to be sanded back, corners rounded, etc. I thought about going with walnut, but with pear having superior characteristics and workability for modeling, I thought I'd try staining pear a little darker. You can see the stains I tested in the pictures above. I also tried out a few colored stains as you can see - Yellow, Amber and Blue. Yellow is fairly yellow, but the Amber might be an interesting stain to lay over boxwood if you want to darken it a bit. I was very interested to see the results of Blue. Some Pegasus builds use a bluish color on the upper hull. I thought about possibly going with a french blue, but didn't want to use paint. It looks like the blue stain could work nicely. Back to the brown stains. The country pine barely changed the color of the pear, but did darken it slightly similar to what pear treated with tung oil looks like. The others worked very nicely on pear, darkening it considerably. I'm still undecided on which to use. I plan on matching up the upper hull planking with the hatch coamings - walnut might be too dark, but I think Light Brown and Antique Oak could work out very nicely. I have a little more time, so I'll mull it over before making a decision. I'm quite excited by my results though.
-
Nice work, looking forward to following your build. Very nice Unicorn - a number of us on here are building the same kit at the moment.
-
Wow, this is really incredible work Kees. Thank you for sharing your journey and techniques with us - I've learned a lot today reading your build log
-
Very nice work Vince. I like the dark walnut for the hatch coamings.
-
Nice work Joe. Cannon rigging is tricky business, I'm sure you're glad to get the 2mm blocks behind you A week of golf and ship modeling sounds ideal. I'm jealous!
- 302 replies
-
- 1
-

-
- granado
- caldercraft
- (and 1 more)
-
That's my preference as well. On my first build, I loved where I used stains and oils, but was less satisfied where I used paints - to me, it seems to impart a more "plastic-y" look to a build, and you lose the wood quality. Not saying that the painted/clean look isn't nice, but I just like models that have more of an aged, patina look. I look forward to your guide, thank you for sharing!
-
For my Badger sails, I relied heavily on Lees and TFFM Vol. 4. TFFM Vol. 4 cites to Lees often (and Steel if I remember correctly), so it was more like a compilation of sources based on the author's research. Both were very helpful
- 431 replies
-
- 2
-
-
- pegasus
- victory models
- (and 1 more)
-
Chris, thanks very much for sharing your info on this post. I agree 100% that what distinguishes the really amazing models out there from the very good is the finish and decorations (at least that's my relatively novice opinion). I'm testing out some of these techniques on my Pegasus and Lyme using stains and oils for woods, and plan to test out undercoats/washes/dry-brushing highlights and lowlights onto the decorative pieces - eventually, I'll try carving. I saw that folks in Europe were using bitumen, and I've always been curious as to what it is, how it is applied, etc. Hope you're getting some sleep these days. My twins are a year and a half now, and I feel like we've finally turned the corner.
-
This is really great work Chris. I especially love your technique for the cast metal parts - I'm planning on using the exact same approach on my Pegasus, and love the Warhammer colors and inks that you used. I'll have to check them out . For the wood sections, I was planning on using stains to get a more aged look, which seem to give a similar effect to the inks you are using. I was wondering how all these techniques would look on a model ship, as I used them to relatively good effect when I painted miniatures as a kid Sorry about your issues with the parts and the plans. I ran into the exact same issue with my Corel Unicorn kit where even the plan sheets disagreed with each other. Interestingly, from the colors and shapes and plans, it looks like Mamoli and Corel are using very similar woods and parts for the skeleton of the build (keel and bulkheads). I've pretty much had to scrap the Corel plans and just go figure things out on my own. I'm subscribed to your log - looking forward to future updates, and thank you very much for sharing your techniques!
-
It's interesting - the wood cuts very cleanly and seems to be tightly grained, but it just broke without much stress at all. Makes we want to get the gunport pattern on as soon as possible to give the extensions added stability. On a more positive note, I got an email from Woodcraft that my order of General Finishes stains has been shipped.
-
Hi guys, thanks very much for all the responses, I really appreciate it! BE and Alistair, that's very helpful information, thank you! Alistair, I know what you mean about hiding the details. I figure that I'll actually cheat a little with the run of the planks under the forecastle and quarterdeck, but try to accurately show the planking pattern at the waist. Even though the planking will be hidden, it will be good practice for when I plank the fore deck and quarterdeck, and for planking in general. Spyglass, I still need to go ahead and fair the bulkheads. I'm not really looking forward to this task, which is why I've delayed and have been working on the upper deck. I'll probably start that soon though - the picture on your log is very helpful, thank you! Martin, I think I might cheat a bit at the ends when it comes to curved planks. I'll probably just keep them as straight tapered planks, mostly to save on wood stock. We'll see how it goes though. One thing on the redheart - it might be a little more fragile than it looks, even as a close-grained wood. I picked up my Pegasus by the hull as well as one of the bulkhead extensions, and the redheart extension snapped in two (maybe it was just the piece I used that had some kind of structural defect). I was able to glue it back, but I'm a bit concerned about it's structural integrity when it comes down to fairing the bulkheads and planking (of course, it was bulkhead 1). Anyway, just have to be careful I suppose. Thought I would pass that along.
-
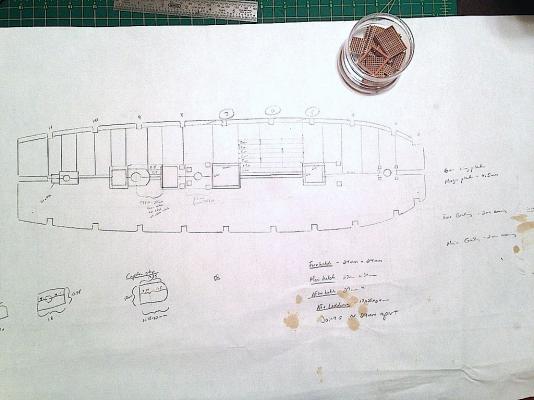
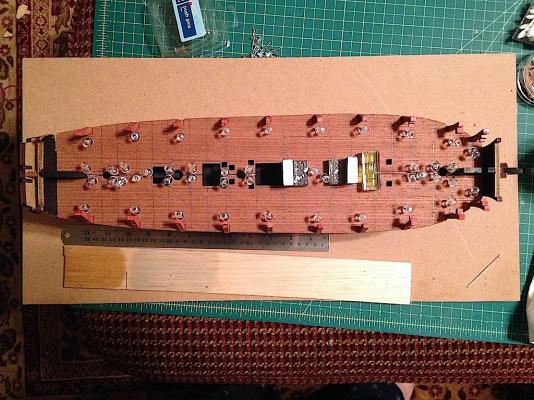
I spent the day plotting out the upper deck. I'm going to attempt to plank it as in TFFM, with curved planks and all. I'm also going to try and add the mast partners, which should add a nice touch as in Alistair's log. Excuse the mess - I got a little stain on it the other day. It took a bit of time, as I'm using both the kit's plans, TFFM and the NMM plans. In a few areas, I'm deviating slightly from the measurements of the hatches in the kit plans - mostly, to conform to TFFM and so that I can butt the planks against the hatches, rather than lay the hatches on the deck planking. So, it does take some planning. I plotted out the deck items, the king plank, and the seven or so planks between the king plank and the start of the anchor planking. In the waist area between the fore hatch and the main hatch, the planks are relatively straight, so I marked them out as the base for the rest of the planking. The lines perpendicular to the planking are frames on which the butts of the planks will sit. Aside from the planking run, I'm making one pretty big change from the kit plans. The kit has the after hatch immediately behind the bitts. From TFFM and the NMM plans, however, it looks like the bitts actually ran through the after hatch. It makes things a little more complicated, but hopefully it shouldn't be too bad. After transferring the plans over to the upper deck template, I went ahead and glued it to the hull. The extra supports I added were of great help - thanks very much to all who recommended adding them. Without the supports, the template would have a tendency to "tent" up at the seam in those open areas. I used plenty of push pins as you can see in the picture below, and also some weights in some of the unsupported areas. All in all, a bit of progress and I can finally start planking the deck Question for the other Swan class builders out there. I was looking at Volume 3 of TFFM today, and the author built his Pegasus adding a full bulkhead under the aft portion of the forecastle. Has anyone else considered doing this? I'm not sure that I want to go that route, but just thought I'd ask to see if anyone else considered it.
-
Gorgeous picture John. You're right, I did visit her after she returned. I'll have to find my pictures and send them to you in case you want others. I tried taking a lot of pictures of the deck items and the outside, but at the same time had to keep an eye on my 4-year old who loved running around the "pirate ship."
-
Thanks Martin, hope that means that they will turn the order around quickly I think my last order with them arrived within a week.
-
The new windlass color looks like a much better match. Nice decision to bite the bullet and build a new one. Preparation of the cannons takes forever, especially if you rig them. Nice in some ways in that it's a repetitive task that you can get into a rhythm doing, but I'm still glad my models have fewer guns than some of the big ones out there.
- 302 replies
-
- 1
-
-
- granado
- caldercraft
- (and 1 more)
-
Thanks very much Spyglass. At this scale, I think it's beyond my capabilities to come up with an angled miter joint - would be more historically accurate, but I think the box joint should suffice. If this was an admiralty model, maybe I would try to use angled lap joints, but the deck will be busy enough that I went with box joints. On the camber thing, I'm probably going to sand a very slight camber of 0.5-1mm into the hatch. The hatch will sit on the deck template and not on top of the planking, so with 0.5mm planks, the top and bottom tongues of the joint will roughly match - at least that's the plan Thanks Martin - I'll let you know the results of my stain tests. I'm a little annoyed at Woodcraft in that I ordered the stains last Sunday, and last night got an email that the order is "in process." So, I might not get the stains for another week which is a bummer. On the ladders, I should take a better look at TFFM - maybe they say something about the orientation.
-
Hi John, glad to see you're back! Hope you had a nice trip. Your Morgan looks fantastic - I was able to visit her a month ago, and can't wait to start building her. Looking forward to checking out your website. That sounds like a very handy one-stop-shop for all things Morgan related. Thanks for doing that!
- 2,250 replies
-
- 1
-
-
- model shipways
- Charles W Morgan
- (and 1 more)
-
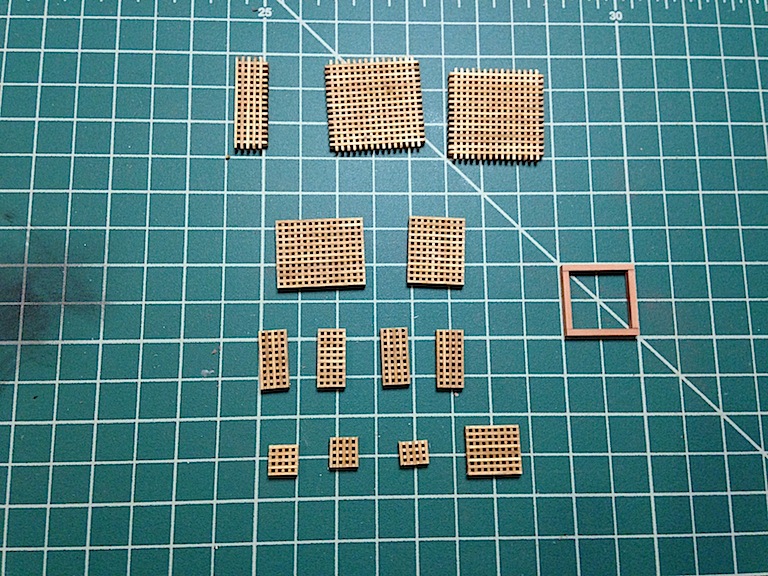
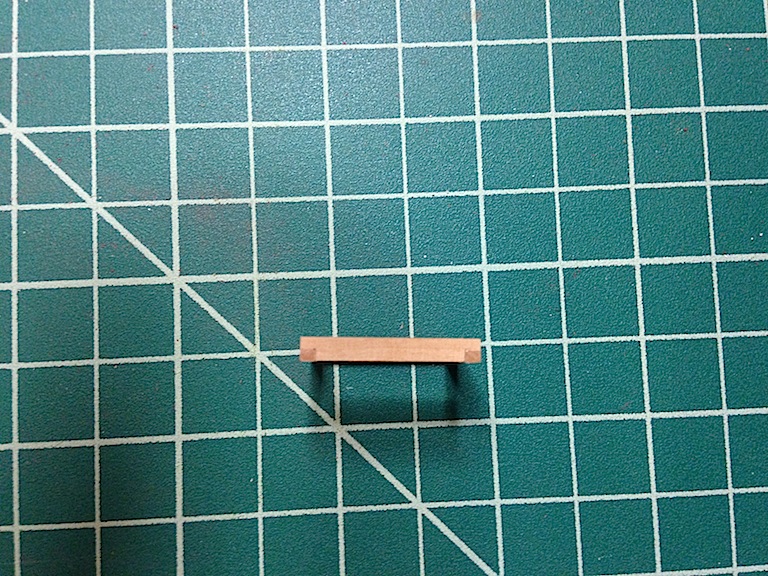
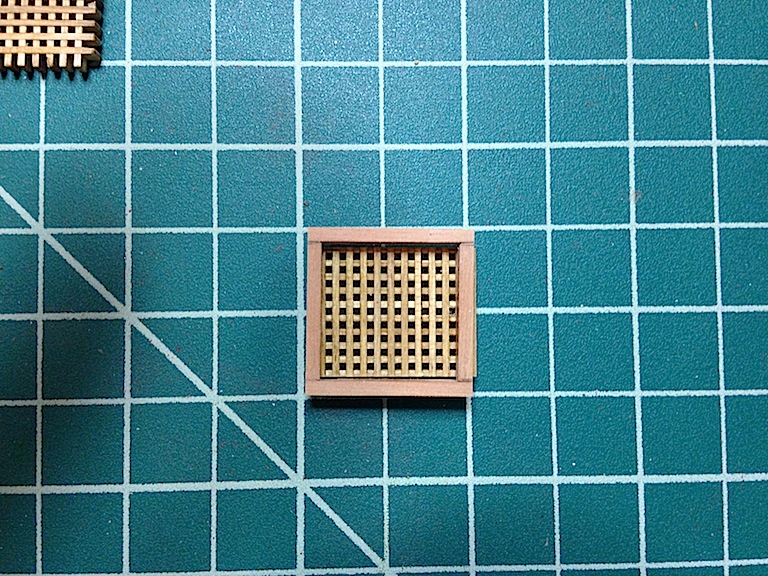
I've made a little more progress on the Pegasus this past week. After putting together the grating pieces, I cut them to the appropriate size (or thereabouts) using a small X-acto saw blade, and then used my disc sander to square the pieces. You can see that the kit gives you plenty of extra grating pieces, which was nice. I used Minwax "golden oak" to darken them a bit. I like the color, but man, that Minwax stuff stinks. The stains from General Finishes seem to not have much odor to them, or at least the odor doesn't persist like the Minwax stuff. I've also been plotting out the upper deck planking pattern, and started to work on the hatches. I made the fore hatch which will have a ladder down to the lower deck. I decided to use the TFFM measurements, and went with a 24mm x 24mm size. The kit plans have the hatch a bit more rectangular (I think 21.5 x 23.5mm or so). On my Badger, I think I just glued four wood strips together (I might have gotten fancy and mitered the corners, I forget). Here, I decided to use box joints like my fellow Swan class builders. I think the joints came out fairly well. I first marked out the joints on the four wood strips, then used a small Xacto saw blade to the the vertical part of the joint, and then finished with chisels, needle files, and sanding blocks. I still need to round the corners above the deck level, but otherwise, the first hatch came out pretty well. I have to say that it was fun cutting out the hatch. Using my Byrnes table saw and disc sander, I had a great time, and better yet, I think I'm getting pretty good results. The picture below shows the hatch (in pear) on top of the stained gratings. I don't think the colors work very well together. The pear will turn a warm light brown when treated with tung oil, but not dark enough I don't think. So, I'm waiting for some General Finishes stains to arrive and I can test out what would work. I'm thinking a more darker medium brown (like walnut) would look much better. Just out of curiosity, does anyone know how the ladders are positioned in the companionways? The plans show them running athwartships, but I didn't know if it mattered whether they went down from port to starboard, or from starboard to port.


-
Really nice work Bill. Glad your arm is feeling better
- 335 replies
-
- 1
-
-
- Constitution
- Mamoli
- (and 3 more)
-
Mini Table Saw DVD
Landlubber Mike replied to capt-j's topic in Modeling tools and Workshop Equipment
Hey J Sherrod, did you have a chance to watch the DVD? I'm curious what you thought. I have a table saw book as well, but I think seeing what you can do with the table saw, as well as safety issues and tips, would be a very good thing. -
Dewalt 788 Scroll Saw Steal
Landlubber Mike replied to FlounderFillet5's topic in Modeling tools and Workshop Equipment
Nice score I bought the same scroll saw a year ago off of Craigslist as a "used once for 5min" deal. Paid a bit more that you did and got the stand (nice) and light (not as necessary), but it's a very nice tool. I've used it quite a bit the last few months and it does the job nicely. -
Byrnes Thickness Sander?
Landlubber Mike replied to Stefonroman's topic in Modeling tools and Workshop Equipment
You won't regret it I was originally planning to just buy the disc sander and table saw, but thought why not buy the thickness sander and ordered it. I've used it a few times already, and it, like his other machines, is built like a tank and very precise. The sandpaper drum can use two different grits at the same time, or one longer sandpaper sheet. I was sanding larger stock so I replaced the sandpaper with a larger sheet, and was very impressed not only by the quality and fit of the parts, and the simplicity and elegance in the design. One other point is that Jim provides great customer service. I sent him an email because of some issues I had with the table saw (user error), and he actually called me over a holiday weekend in response (when I was just expecting a reply email) to walk me through things and make sure I got back on track. You can't beat that. I don't know if there are videos of it in use, but you can probably watch videos of similar hobby thickness sanders from Micromark and maybe Proxxon to get a good idea. -
Really nice work Joe as always. Your planking and painting are super crisp. I can see what you mean by the windlass. It does look a bit darker than the other walnut you used elsewhere. I'm running into similar issues with my Pegasus, where the walnut is all over the place in color - very frustrating!
- 302 replies
-
- 2
-
-
- granado
- caldercraft
- (and 1 more)
-
Thanks Mark, that's great information. I bought some maple and holly from Hobbymill - you're right, the maple is not quite as light, and has a little more grain. I want this build to be a little darker and grainier, so I figured maple might fit the bill nicely. I'll have to test out some finishes on it before the final product though. The swiss pear I got from Jeff is a pinkish color. I tested out tung oil on it, and it turned a nice medium brown color. ChrisLBren's Confederacy shows what a well-oiled pear hull will look like - absolutely gorgeous build in my opinion. I'm using General Finishes black stain on my Pegasus build - the walnut seems to take it very nicely, so I'll stick with that finish rather than go the shoe leather dye route. I'll use the shoe leather dye on my Lyme build though, to hopefully get results close to Chris' Confederacy.