Landlubber Mike
-
Posts
4,554 -
Joined
-
Last visited
Content Type
Profiles
Forums
Gallery
Events
Everything posted by Landlubber Mike
-

Micro-Mark Sand-It
Landlubber Mike replied to RichardG's topic in Modeling tools and Workshop Equipment
I have the Northwest Short Line version - it's pretty good, and definitely is better than hand sanding. I don't use it much though, as I find the Byrnes disc sander to be my go-to option. Frankly, I can't see how I would ever be a decent modeler without the disc sander - if you have the money and space, I would highly recommend it. -
Thanks guys. Alistair, thanks for pointing out the technique of butting the planking against the hatches. I think it makes for a very clean look, and you don't run into the issues of having the hatches sit halfway on a plank. BE, your build is the gold standard of the Swan class builds. I think I speak for most of us builders that if our builds came out half as nice as yours, we would be very happy.
-
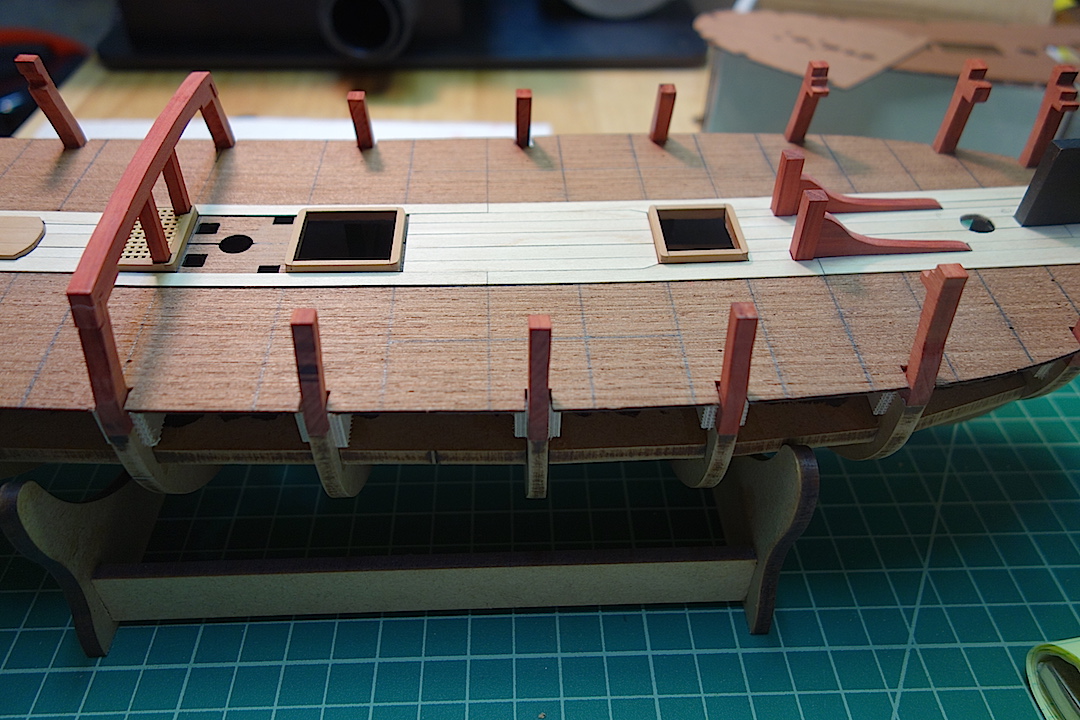
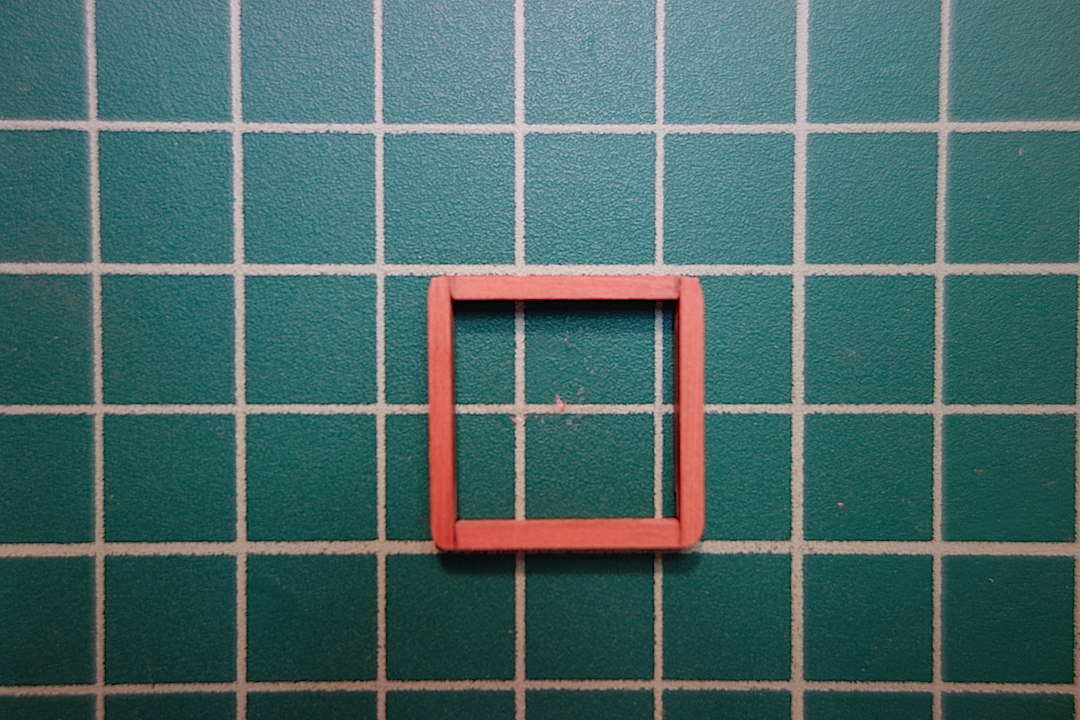
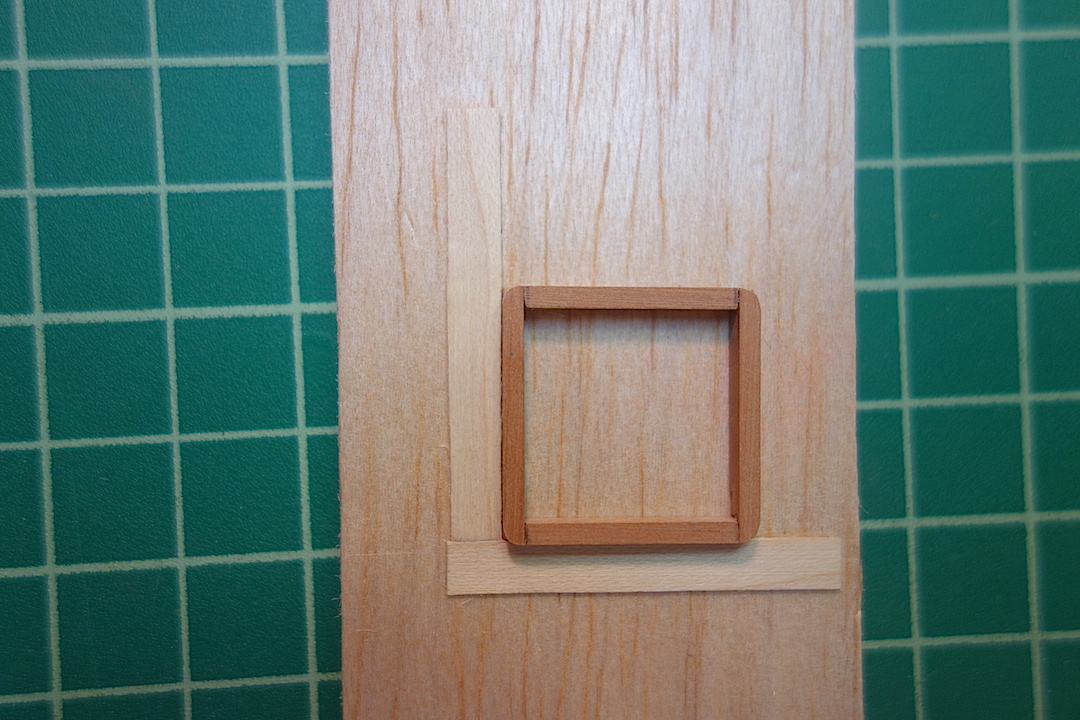
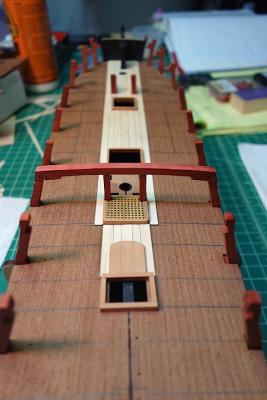
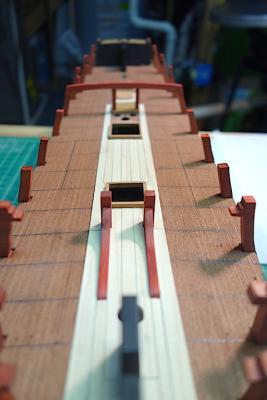
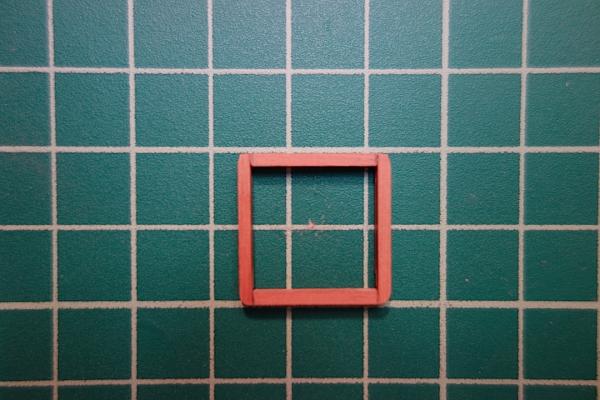
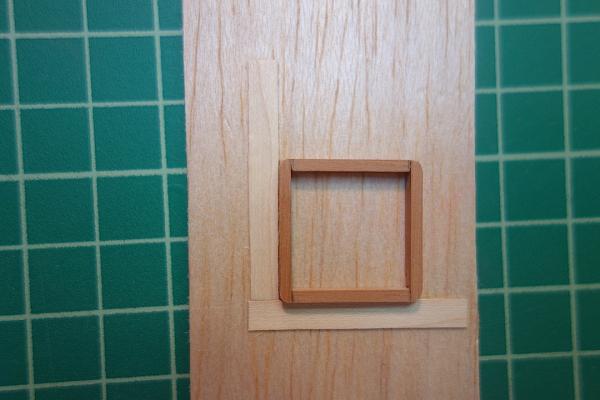
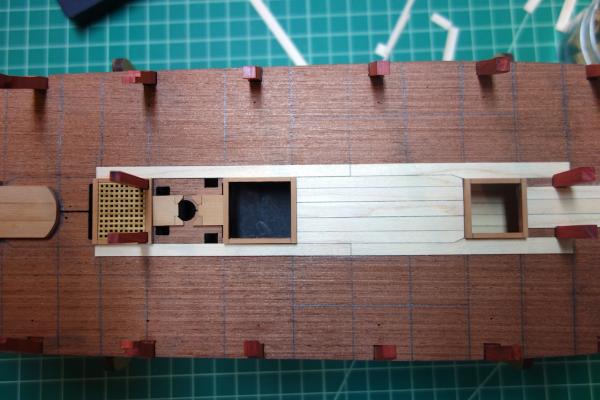
It's been a while, but I've made a little progress (work and kids are taking a lot of my time these days). I've managed to get some additional planks down, and have been adding final touches to the hatches and capstan step. Also have been slowly tweaking the main jeer bitts and riding bitts. Things are coming along pretty nicely I think. Here are some pictures - nothing aside from planks has been glued down to the deck yet. I started rounding the corners of the hatches. With the planks butting up against the hatches, the hatches are square at and below the level of the deck planking, and have rounded corners above the deck planking. So, here is my incredibly complex jig that I came up with to round the corners. Essentially, all it amounted to is adding two pieces of planking material at 90 degrees to each other, dropping the hatch into the corner, and using a sanding block to round the corner. I still need to sand camber into the tops, which will come next. On the deck planking in general, my plan was to add curved planks as in the TFFM model planking pattern. I'm not sure my skill level is up to the task, so I nixed that idea and thought I would take a short cut by using angled planks under the forecastle and quarterdeck. But in thinking a little bit more about it, different rows of planks in the TFFM pattern start to curve at different points along the deck. I started thinking that if I had them all become angled at the same point, then the deck would have an odd look to it. So, I've decided to use straight planks instead, but will use the TFFM pattern for locations of ends of planks, the anchor stock planking, etc. I still need to gear up the courage to work on the decorative details of the bitts, and figure out whether I want to use stains on the hatch coamings and upper hull planking. I go back and forth, but I think the hatch coamings at the least will need to be made darker in some fashion.


-
Landlubber Mike's technique for furled sails
Landlubber Mike replied to Landlubber Mike's topic in Masting, rigging and sails
Hi Shaun, Not sure exactly at the moment, I'd have to take a look at some of my books (the Harland book has a lot of great pictures of sails in various positions). Maybe take a look here - I think there is a picture of a furled staysail in the first set of pictures: http://www.charleswmorganmodel.com/cwm-museum---as-she-is-now.html -
Landlubber Mike's technique for furled sails
Landlubber Mike replied to Landlubber Mike's topic in Masting, rigging and sails
Unfortunately I don't. If I had to do it again, I'd search for even thinner material, like the thinnest handkerchief material I could find. On your earlier flag comment, I didn't add a flag pole to my Badger. I just attached the flag to the end of the gaff, with, if I remember correctly, lines that ran down to cleats on the bulwarks. Either way, with the sails furled, the ship could be viewed as at harbor. -
Since you're planning on planking over it with boxwood anyway, can't just just lay the plank flat, and fill any gaps with stealers? It's interesting - you read that you shouldn't bend planks laterally against their width, not have planks less than half of their width, etc., but when dealing with kit wood with equal strips I think it's very hard to plank fully by all those rules. Even on my Badger, I found I needed custom planks for a clean look. But of course for custom planks you usually need wider pieces of wood than your standard planks (I ended up buying some wider walnut strips for my Badger). Big reason for why I decided to buy sheets and cut my own planks.
- 467 replies
-
- 1
-

-
- fly
- victory models
- (and 1 more)
-
Hi Peter, nice start. Looking forward to seeing your work on this beautiful ship.
-
Yeah, looking really great Eamonn. Very clean work, this is coming along very nicely.
- 1,039 replies
-
- 1
-
-
- ballahoo
- caldercraft
- (and 2 more)
-
Martin, I love the look of an all boxwood hull. There are a bunch of builds on here that took that approach (including Alistair at one point), and I believe that many of the famous old models primarily used boxwood. I think it will look great on your Fly - go for it! I painted the lower hull of my Badger "dull white" using Admiralty Paints, and I thought it looked a little too garish for my tastes. I also primed the hull before painting, which made the painted area look thicker/heavier, which was also one thing that I didn't particularly care for. The again, someone on here used a different white for their hull, and I thought it looked really good. After seeing Toni's Atalanta build, however, I'm thinking of using holly to represent the white stuff on my Lyme build - otherwise, I'm just planning to plank it all in pear. For my Pegasus, I'm planning to copper the hull. I plan to use pear above the waterline (still thinking of dying it a bit darker), but the kit's walnut below the waterline to save money (since it will be covered up anyway). Wow, very nice stove! Great job! Can I ask what color/brand of paint you used?
- 467 replies
-
- 1
-
-
- fly
- victory models
- (and 1 more)
-
That's a great tutorial, thank you very much Russ!
-
First, just wanted to wish your pup a speedy recovery. It breaks my heart to see a furry companion in discomfort like that, but hopefully she is on the mend Looks great Martin. Taking the time in the beginning really helps. I think I spend 90% thinking, planning, more thinking, second and third guessing, and planning, and only 10% actually building Like SpyGlass, i was wondering about your use of the walnut. The lime is probably easier? I figured by using the walnut you were just going with one planking layer. Also, just wondering if you decided to paint the hull white or copper it? In either case, you probably don't need to be as precise lower on the hull. Though, I'll probably try to do my Pegasus as precise as possible just for practice for future builds.
- 467 replies
-
- 1
-
-
- fly
- victory models
- (and 1 more)
-
Oh I see - that makes a lot of sense. I remember my dad when I was little using a soldering iron - I figured the irons got fairly hot and gave you a little more control of where you are soldering. After reading BE's soldering efforts, I think I'll try and go down that path as well.
-
Thanks guys, this is very helpful. I am still a biit confused about torches versus irons, but I'm slowly picking up on things. The warnings on cadmium I've seen elsewhere are very appreciated. BE, it's funny, I was thinking about how to modify the stanchions, but forgot that you had gone down that route. It looks like you gave me a very nice tutorial to follow - hope I can get results half as nice as yours!
-
Man, those are games from a long time ago, aren't they? As in like 25 years ago? I think I remember playing them in high school Very nice work on your Fly!
-
Christmas tool and equipment list
Landlubber Mike replied to schnu's topic in Modeling tools and Workshop Equipment
How about Jim's hopefully forthcoming oscillating spindle sander? -
Hi everyone, I was thinking about trying out metal working on my builds, but am very much a novice. I've read the tutorial and some of the threads on here to help give me a better idea of what the process entails. For the equipment though (soldering iron, etc.), I was wondering if folks had recommendations on the tools to buy that would be most helpful for this hobby - manufacturers, model numbers, vendors, etc. I'm not looking to spend a fortune here, but do want to buy stuff that is of good quality and will last. Thanks in advance!
-
Hi guys, this is great information, thanks. BE, I should have taken a look at TFFM IV to see how the rigging lines would run. Hopefully keeping the cross piece aft of the pins will work on my modified pins, as the cross piece will sit forward a bit more than had I went with the kit's 5mm pins. My pins are around 3.75mm, so the cross piece will be 1.25mm or so forward. Some more research that I'll need to do tonight I suppose Couple of my questions for my fellow Swan class builders: 1. It sounds like I should start thinking about rigging line, especially if I need to pre-rig some of these areas that will be hard to reach in the future. For those building from the Amati kits, is the Amati line nice to work with? Since I'm already upgrading a lot of the kit, I might just go with Chuck's line - but thought I'd check with others on their experience with the kit line. 2. What is the best way to create the decorative features (for lack of a better term) on the bitt pins and cross pieces? I've been thinking about what technique to use, whether by hand or to try out my mill. Being new to mills, it seems a little bit of a complicated shape to try and mill out by machine, but maybe with a little practice I can do a decent job. I just worry about getting straight lines by hand, which has always been an issue for me - a reason why Jim's disc sander and table saw have been a godsend for me. Thanks in advance!
-
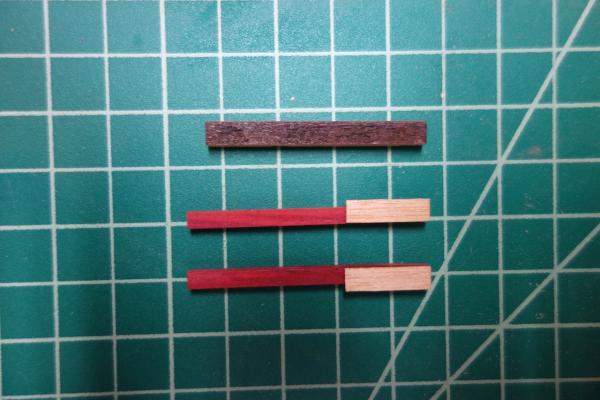
Thanks Martin. The redheart is beautiful, isn't it? I think it will be a nice touch to the build. I'm looking forward to seeing how it looks after treatment with tung oil or wipe-on poly. It should look nice against the eventually stained pear and the maple deck. I'm not sure if I'm going to stain the deck or stick with the light golden brown finish from tung oil. I have three kids under the age of 5 - the only time I have for modeling is late evening, that is, if I don't fall asleep on the couch after the oldest goes to bed
-
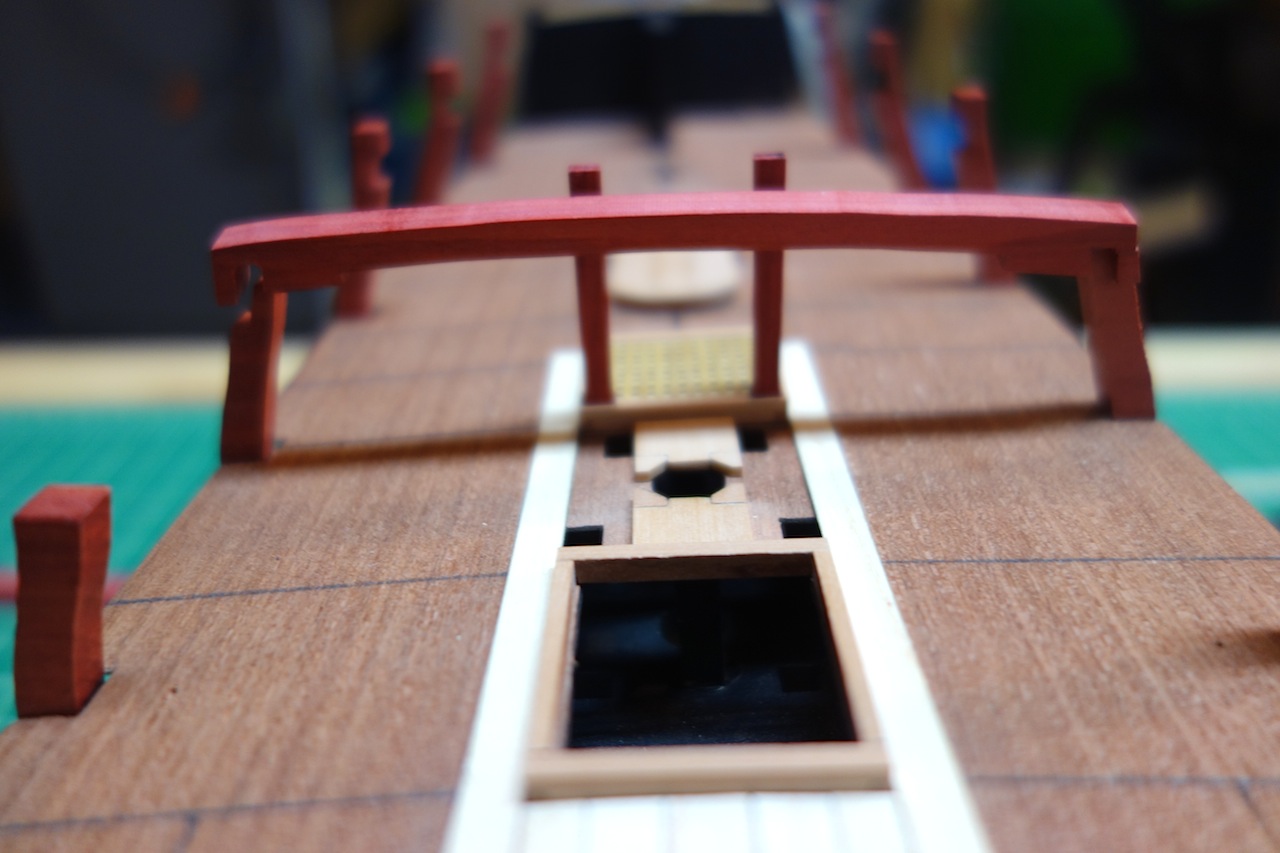
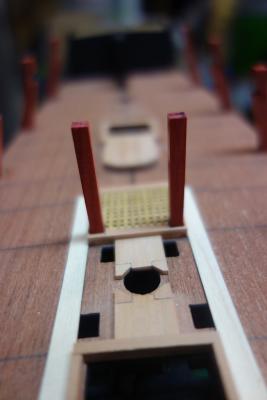
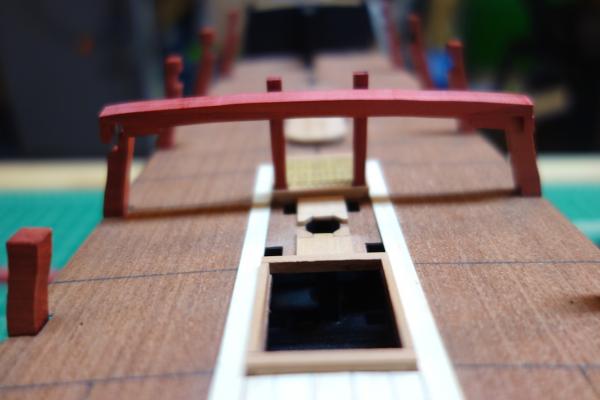
***Note on the main jeer bitts*** So I went back to the kit plans, and the kit has you install the cross piece for the main jeer bitts on the fore side of the bitts (the kit refers to it as the "rear main mast bitts"). I doublechecked the NMM plans and TFFM, and the cross piece is on the aft side. I'm not crazy after all, but that will teach me to work on my build when I should be in bed Aside from possible historical accuracy, I think a more practical reason to put the cross piece on the aft side is to free up a little space in an otherwise crowded area around the main mast. In particular, a few members on here have noted the very cramped fit for the cisterns, which are between the main mast and the aft hatch/main jeer bitts. So, moving the cross piece to the aft side has the added benefit of freeing up a little more space in that area.
-
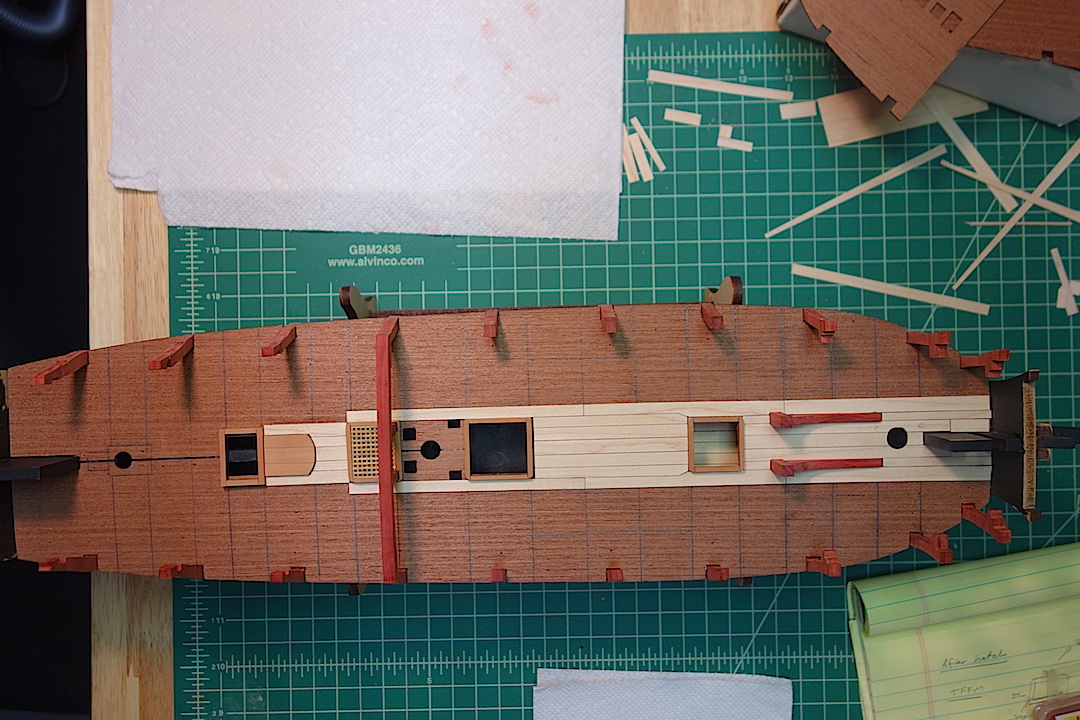
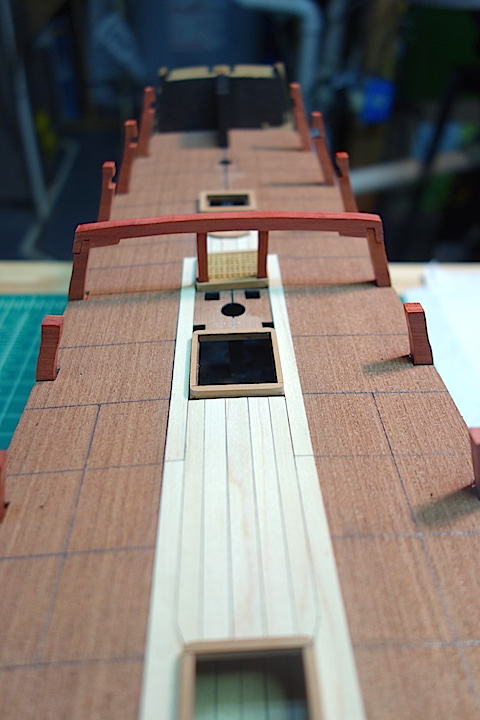
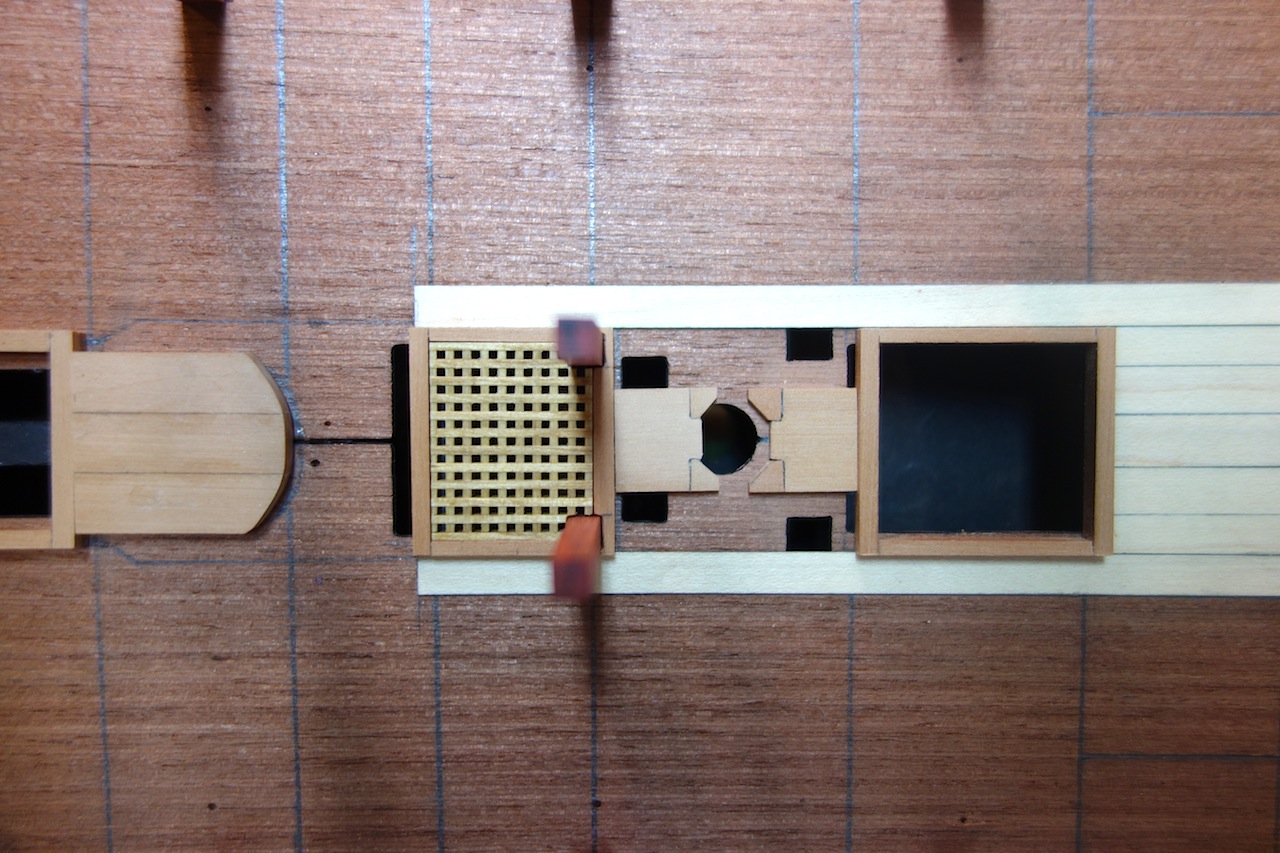
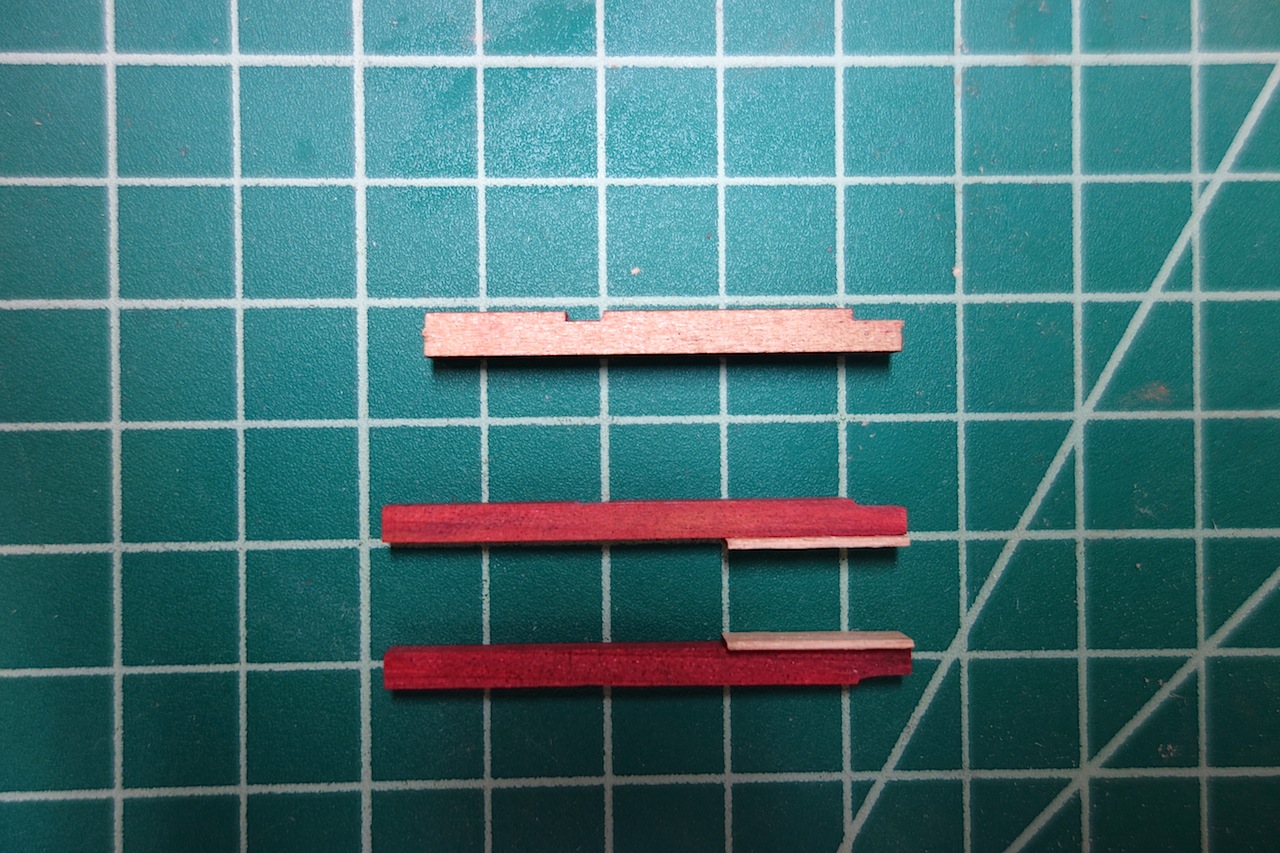
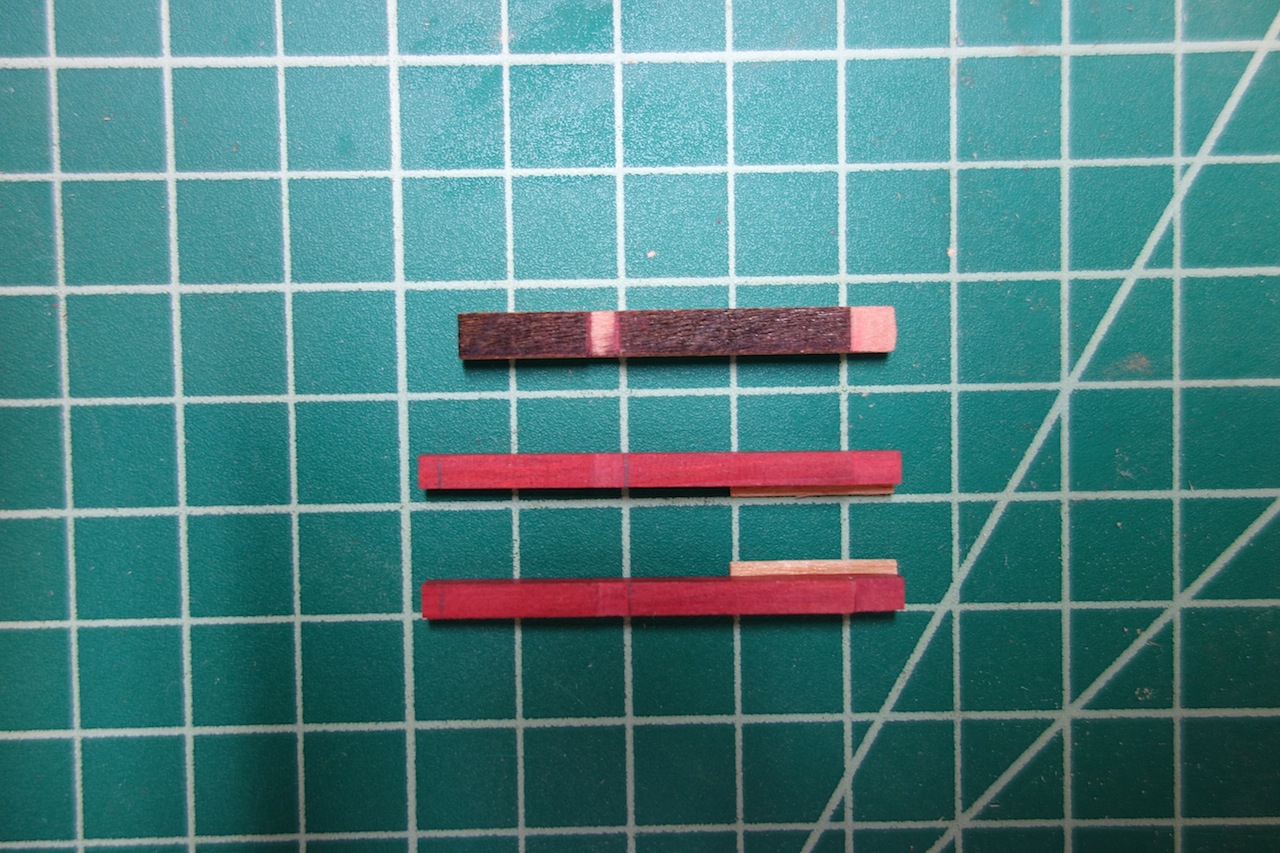
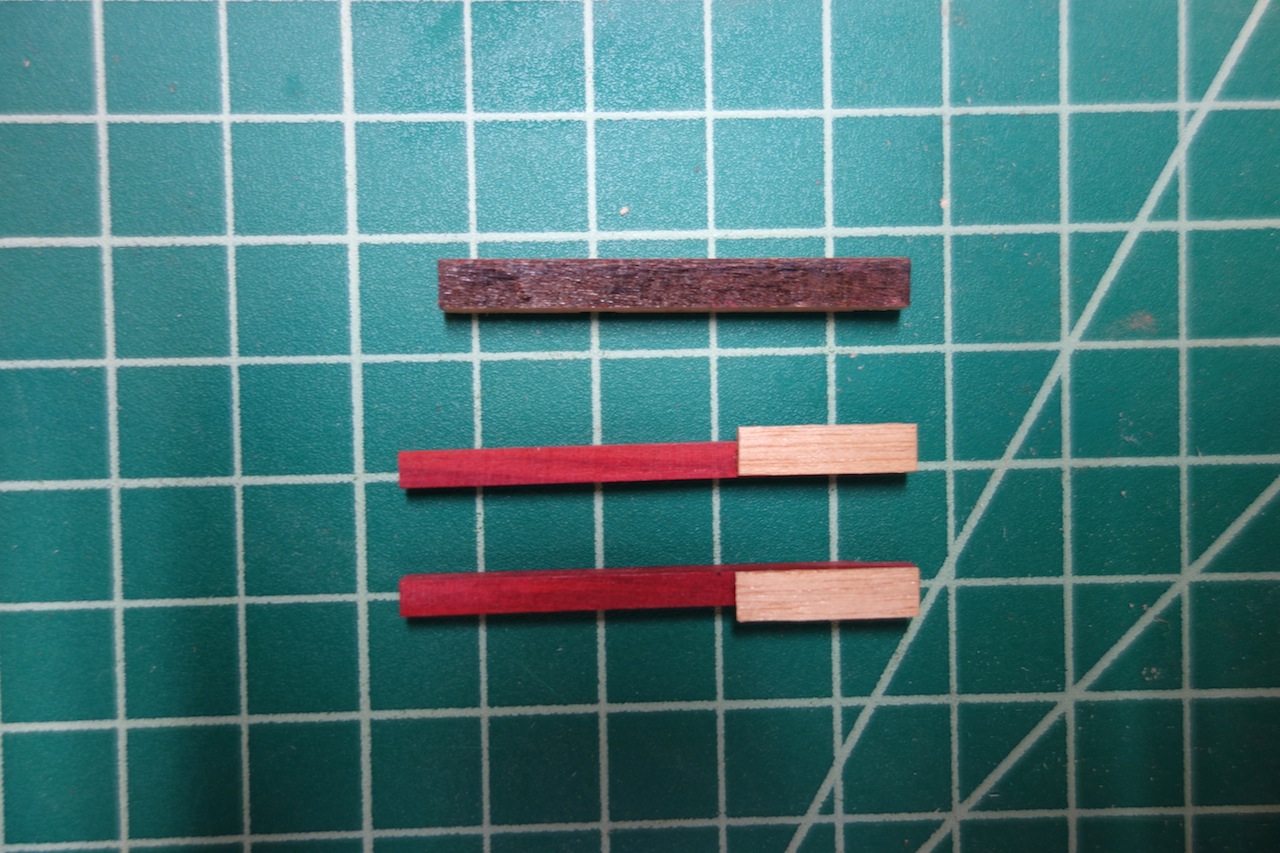
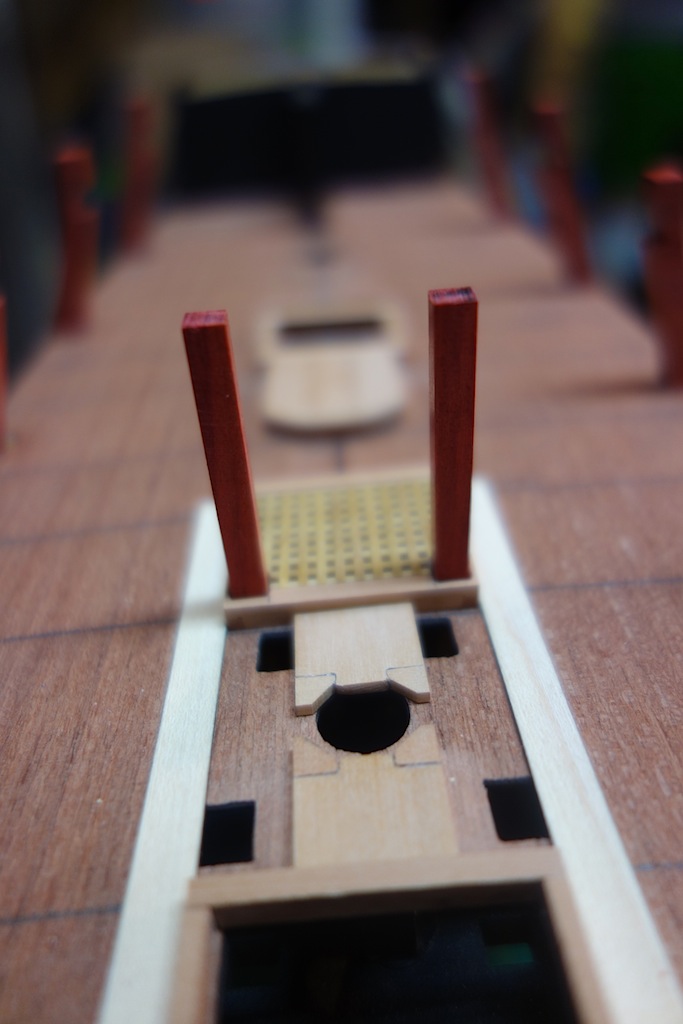
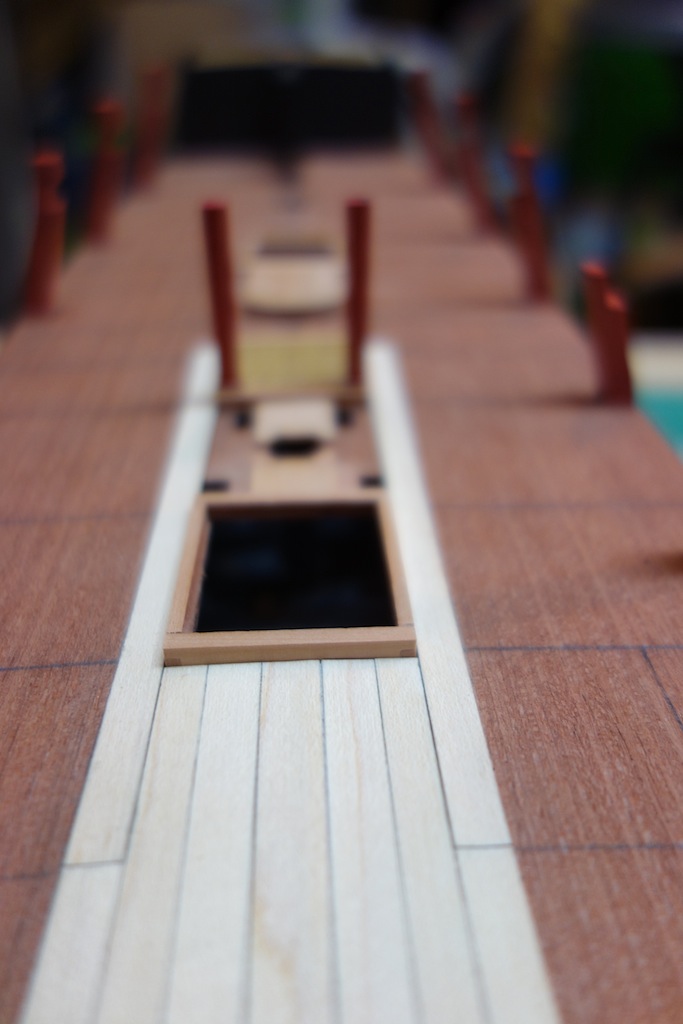
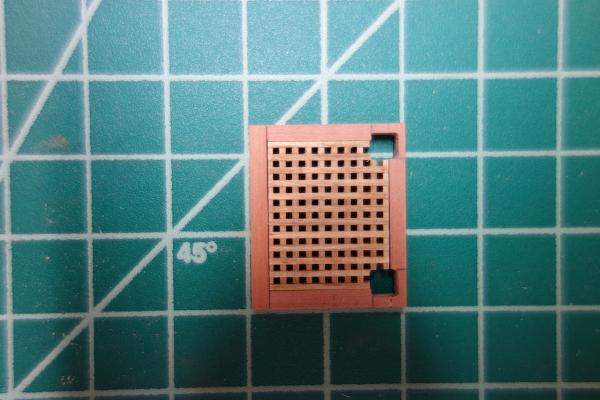
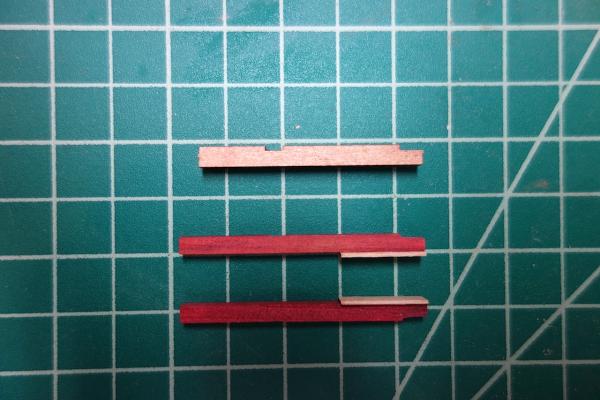
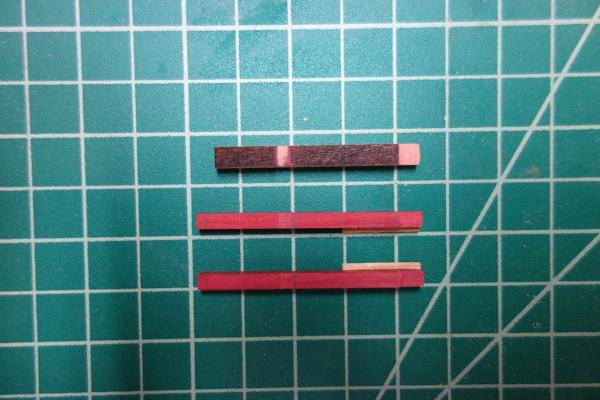
I've made a little more progress the past few days. I've extended the binding strake back to the aft hatch, worked on the aft hatch, and started working on the riding bitts, main topsail sheet bitts and main jeer bitts. So far the planking (the little of it there is thus far) is going nicely, with no drift. Having the planks butt up against the hatches really makes for a nice clean look. My approach was to first lay the planking, and then sand back the hatches until they fit between the planking rows. This middle section of the upper deck is very tricky. I'm using the NMM plans and TFFM for size and location of the hatches, etc. -- all of which of course complicates things down the road. The Pegasus kit is very close to being in accordance with the plans, but there are some simplifications that the kit took as to the location of the main and aft hatches, and the location and size of the main topsail sheet bitts and main bitts. You can see in the picture below that I've moved the main hatch slightly forward, and the aft hatch further forward so that the main jeer bits pins are located in the fore corners of the hatch. Moving the aft hatch forward has the added benefit of making it clear of the ladder coming down from the quarterdeck. The aft hatch was pretty easy to prepare. I removed some of the grating, and using needle files, slowly filed back the hatch coamings to fit the main jeer bitts pins. It still needs some finishing work, rounded corners and camber, etc. The next bit (pun intended) took some planning. The pins for the main topsail sheet bitts and main jeer bitts are slightly over scale. The kit simplifies things by using 5mm stock, when by my calculations, they should be 4.5mm and 3.75mm for the main topsail sheet bitts and main jeer bitts, respectively (the riding bitt pins at 5mm are fine). So, these were cut out to these sizes. The really nice thing about the kit is that the pins are inserted through the upper deck holes, and the bottoms of the pins, which are slotted, sit into cut-outs on the lower deck template - this help ensures alignment of the pins and is a very, very nice feature. The fit is perfect as with everything on the kit. With the modified main jeer bitt pins though, I was working with 3.75mm stock and so there was a lot of play in the slots. So, I went ahead and added a 5mm piece to the back of the pins, off-center so that the pins would be pushed forward and athwartships. This all worked great, until I realized that the notches I had started cutting for the cross piece were on the wrong side - they should go aft I should have known better, but I just wasn't thinking. Also, for some reason, the cross piece sat a little lower than it should. Of course I realized all this at 1am, and rather than go to bed annoyed at myself (which is usually the best approach), I decided to fix things. So, I sanded off the 5mm piece, added a new one to the other side, and also built up the bottom a bit so that cross piece should fit closer to where it needs to go (no pictures of this embarrassing process). All in all, this seems to have worked. I need to refine the height for the final location of the cross piece, as well as the overall height, as the tops sit under the quarterdeck beam. But, so far so good I think.


-
Really nice work Joe. I like the touch of adding the blue within the rails and other components, looks really sharp.
- 302 replies
-
- 2
-
-
- granado
- caldercraft
- (and 1 more)
-
That's really great work Frank. I'd love to weather a fishing or whaling vessel down the line one day. Can I ask how you weathered the hull?
-
Thank you very much Aldo, that clears things up completely. I probably wasn't very clear in my post, but I had been wondering if the mast wedges extend down to the deck. Since that's the case, I can't just cut a ring that I lay on top of the main mast partners, but have to figure out how to extend the ring down to the deck in the gaps between the corner chocks. Thanks Allan for the diagrams - they are very good illustrations on how the various components are put together.
-
Hey Collingwood, looking forward to watching you progress on this build. Just out of curiosity, which Lyme are you building? The 1695 version? I'm building the 1748 version by modifying the Corel Unicorn kit according to plans from the NMM. The Unicorn and Lyme were both of the "Lyme class" and very similar, except that the Unicorn wasa beakhead ship and the Lyme a rounded bow ship.
- 455 replies
-
- 1
-
-
- slightly modified
- greyhound
- (and 1 more)
-
Looking great Bill. You're really moving along.