DONATION DRIVE - SUPPORT MSW - DO YOUR PART TO KEEP THIS GREAT FORUM GOING!
×


Landlubber Mike
-
Posts
4,541 -
Joined
-
Last visited
Content Type
Profiles
Forums
Gallery
Events
Everything posted by Landlubber Mike
-
 This is going to be awesome - looking forward to following your build Mobbsie!
- 255 replies
-
- 1
-

-
- granado
- bomb ketch
- (and 2 more)
-
Thanks B.E., that's very helpful! I looked through all my books as well and couldn't find anything on ladder orientation either. I'll flip a coin
-
Thanks very much guys. Lou, thanks for the suggestion on bubinga - it looks like a very nice wood. I'll have to add it to the wood stock pile on future builds. For this build, I think I'll stick with pear and stain it a bit darker. Your Harvey looks fantastic by the way - perfect representation of painting with wood, I love it! Alistair - that's very helpful, thank you. I think the NMM plans for the Pegasus at least had a slightly wider (fore to aft) fore hatch, which is why a bit of the plywood will end up showing through the hatch. So, at a minimum, I might need to open up the fore hatch hole in the plywood template. I'll work on getting better resolution pictures. i was using my iPhone, but I have a point and shoot camera with macro capabilities that might do a better job. B.E. - gorgeous hatch and railings. Thanks for posting the picture - did you add the ledging on the side where the top of the ladder ends up? I was wondering if there would have been ledging on that side as it might have made going down the ladder a little tricky. Here's another question - do the ladders run down from port to starboard, or from starboard to port, in the companionways? Does it matter? I would think that all the ladders in companionways have the same orientation, but I haven't been able to find a definitive source that specifies the orientation. Thank you all again!
-
Thanks Alistair. Did you shave back the plywood template at all under the coamings? My plywood might be a little more exposed as I've modified the hatches a bit to conform to the NMM plans. So maybe fore and aft I sand back the plywood, but athwartships, use the small piece of framing like you did to cover those sides up. From a structural integrity standpoint, you probably only need two sides of the hatch to sit on the plywood - so, as long as I have enough plywood for the port and starboard sides, the fore and aft sides could freely float.
-
It's been a while since I last posted any progress - I had family staying with me the past couple of weeks, and unfortunately the guest room is in the basement next to my workshop. So, I couldn't play with my power tools much during that time unfortunately. I did manage to hang a fluorescent fixture over my workbench (what a difference good lighting makes!) and hung an air filter unit from my ceiling joists in my workroom. On top of that, I also did sneak in some progress on my build: The hatches for the upper deck have been cut and assembled, and now I just need to round the corners, add camber, and sand them back slightly to fit the eventual deck planking. On the planking, I've added a few more planks. If I went with straight planks, I'd be a lot further along. But, I'm going to attempt to plank the upper deck as per the TFFM sample deck plan, so I'm trying to gear myself up for the challenge of cutting and fitting curved planks. I made the capstan step, which will be sanded down a bit to fit within the planking. i plan on also adding the main mast partners, but probably won't do the fore mast and mizzen mast partners, since these won't be seen once the quarterdeck and forecastle are up. Question for my fellow Swan class builders - aside from doing the hatch coamings for the fore hatch/stairway, did you add framing or other covering so that the plywood deck under the coamings was not visible? I believe that when I did the companionway for my Badger, I added small strips of wood on three of the sides of the companionway (each side except for the side that the ladder touched the companionway). I'm more interested in covering up the plywood than historical accuracy, but is it correct to add some framing on some or all of the sides? Thanks in advance!
-
I'm speechless after seeing the precision of your rigging. Incredible!
-
Hi Toni, using holly for the lower planking is a really nice touch. I was planning on planking my Lyme fully in pear, but I might switch to holly under the wales. Hmm….
-
Just Wishing ...work benches (edited)
Landlubber Mike replied to BubbleHead's topic in Modeling tools and Workshop Equipment
I use two of the Harbor Freight benches, put back to back to form a workplace island. For lightweight work like modeling, I don't think you can find a cheaper bench of that relative quality (you can find them at HF for about $125-130 on sale). Those benches in the original post looks really nice though -
I have my workshop in my basement utility room. I have a shop vac attached to my Byrnes power tools, and recently bought this Rikon air filter which was on a big sale recently at Woodcraft: http://www.woodcraft.com/product/857601/RIKON%203Speed%20Air%20Cleaner%20with%20Remote%20Control%20Model%2062100.aspx I know that you are in the UK, but maybe they have a comparable product. This unit is made to sit on your workbench or suspended from the ceiling. I have limited bench space, so this weekend I hung it from hooks screwed into the joists in my utility room's ceiling. The shop vac does a good job of pulling out most of the wood dust, but I feel better knowing that the filter should hopefully take out the very small dust particles that the shop vac didn't get. As Jud said, you can make your own as well.
-
Really nice work Timmo. Coming along very well.
-
That's some very crisp work Augie. Well done!
- 2,191 replies
-
- 1
-
-
- confederacy
- Model Shipways
- (and 1 more)
-
Thanks Bill - I love the look of finished walnut. I'm using pear at the moment on the deck items of my Pegasus, but I'll probably stain it darker to get that kind of color.
- 335 replies
-
- 2
-
-
- Constitution
- Mamoli
- (and 3 more)
-
Nice work Bill. I love the look of the deck planking against the hatch coamings in your last picture. Can I ask what woods/stains/paints you used for the deck planks and the coamings?
- 335 replies
-
- 1
-
-
- Constitution
- Mamoli
- (and 3 more)
-
Wow, very nice looking deck. Can I send you my Pegasus decks to do for me?
-
Table Saw Hand Safety
Landlubber Mike replied to rtropp's topic in Modeling tools and Workshop Equipment
Let us know what you think Grant. I'm very much a novice at table saws, so I'm sure folks with more experience might be comfortable with featherboards, push sticks, etc. I just had a hard time getting that to work, so tried this thing out and it's made a world of difference for me. I should add I have no connection with this company. Just a very happy customer. -
Table Saw Hand Safety
Landlubber Mike replied to rtropp's topic in Modeling tools and Workshop Equipment
I guess for me, 1/8" or more picks up a lot of wood cuts. If you wanted something smaller, I suppose you could always run the cut off the side of the blade opposite the fence? -
I suppose another thing you could try to do is have the cut pieces come off the side of the blade opposite the fence so that you are not limited by the 1/8" leg. You would still run the Grip-rrr against the fence for a straight cut - the downside of doing this is that you would have to continually adjust the fence after each cut if you wanted to cut identical strips - a bit hard to do with precision.
-
Hey Tom, The Gripper works by keeping one leg against the fence and then another leg on the other side of the blade. You can't cut pieces any thinner than the leg against the fence. I suppose you could modify the leg to be thinner (though, it's tough plastic so I'm not sure how easy that would be) or not use the leg against the fence and hope that you can use the block to push the wood stock on a straight path through the blade. You could maybe use some kind of spacer I suppose the same thickness as the wood you are cutting and put it in between the fence and the wood to be cut, but I'd have to think about it and wonder if that would work. If you're looking for pieces thinner than 3mm, I suppose you could always try cutting them by hand?
-
Hi Martin, I bought mine from Amazon. It's actually marketed for full-sized table saws, but I found a youtube video where someone used it on a mini table saw which made me feel comfortable buying it. I bought the 200 model which allows you to do a little more, but just installed the components for the standard 100 model. I also bought the optional 1/8" leg to rip narrower planks (the 100 and 200 models come with a 1/4" and 1/2" leg standard, which are a bit too large for some planks). Having seen pictures of table saw injuries and experienced kick back myself, I have been very nervous about using the table saw. I tried using feather boards, push sticks, etc., but nothing really seemed to work well enough. The Grr-ripper really is a game changer. It's important to maintain a healthy respect for the saw, but using this device makes using the saw almost foolproof when it comes to safety.
-
Thanks SpyGlass, we'll see if the stain approach looks good, or if I end up treating the model as kindling On the mast holes, I did test the holes during the deck template installation and they seemed to work fine. I can always expand the holes a bit if necessary, but you're raising a good point in that I should confirm that things are ok. Installing the deck template is a bit nerve wracking - you have a lot to glue, and not much time to keep things centered, the deck pinned down to the tops of the bulkheads and spine of the keel, etc. I'm not looking forward to the gunport patterns which are much harder to install
-
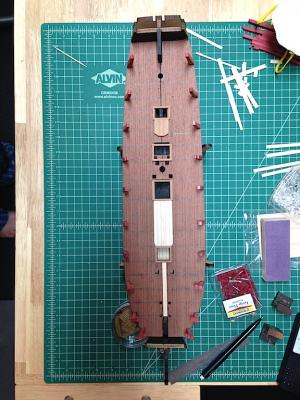
Thanks very much Alistair for this advice. Now that you mention it, I think you noted this on your build log. I considered doing this, but I didn't want to cut a full length plank for a variety of reasons - and given the issues I had with cutting straight planks, I would have potentially wasted a lot more material. The main reasons for not taking that approach were (1) I'm planning on going with the TFFM deck planking layout, which uses a lot of custom cut planks (with curved planks, anchor stock planking, etc.), and (2) the only portion of the deck that will be visible is in the waist area (the area under the forecastle and quarterdeck are more for practice, and I'll probably cheat in not fully adhering to the TFFM layout in those sections). I used my iPhone to take pictures, and given the angle, etc., I think there's just an artifact in the picture where it appears that there is some drift. I'll measure again tonight, but I was very careful and actually reinstalled the plank after I found it had some slight drift on the first installation. It's also a bit hard to see in the pictures, but what I did to avoid further drifts in the waist area was to draw lines parallel to the center line in the waist area. Those will help me to keep the planking from drifting too much. As long as the waist is centered, I won't care if there's much drift in the other areas where the planking won't be seen anyway. We'll see if it all works out in the end. The nice thing about using custom planks as opposed to straight planks is that I can account for small differences and drift. The bad thing about using custom planks is that I'll have to cut custom planks
-
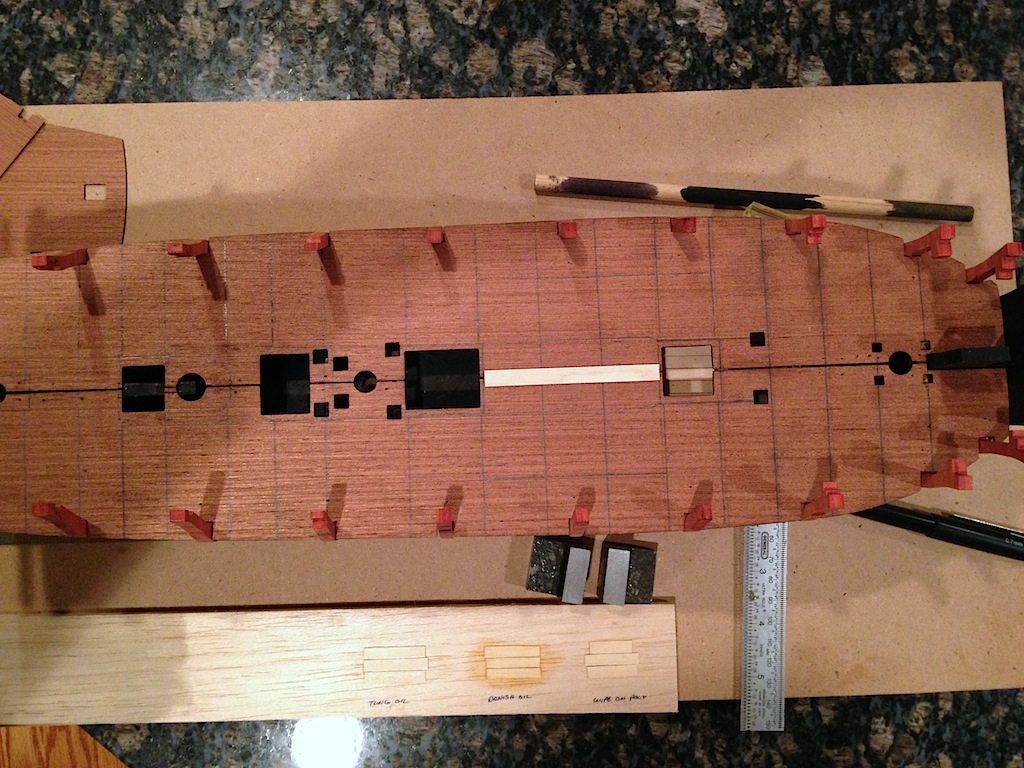
I made some more progress tonight - I installed one whole deck plank between the main hatch and the fore hatch! Actually, a lot of work has gone into just making this one plank. I am using 0.5mm maple for my deck planking. I was having a lot of trouble cutting straight planks with my Byrnes saw, as the wood is close to paper thin and would at times slide under the fence or even ride up over the saw blade. I tried hand cutting the planks with a little better success, but still not good enough. So, I tested out the Microjig Grr-Ripper with the 1/8" leg option. Man, that device is a godsend. It supports the wood piece perfectly, so you don't have to worry about adding fingerboards, using push sticks, etc. This plank is 6mm, but with the 1/8" leg, I think I calculated that I could cut planks down to about 3mm in width. I wholeheartedly recommend it, and I'm actually surprised that more people aren't using it on MSW. It's not cheap, but for the added safety, it pays for itself many times over. Here is a picture in case people are interested: I should be able to zip along a little faster now that I've worked out my plank ripping issues. I'm just about done with making the upper deck furniture (made the capstan step last night), but I still need to decide on whether to stain the pear a little darker. In the meantime, I tested wipe-on poly, Danish oil and Tung oil on some test maple pieces. Wipe-on poly barely impacted the finish, and Danish oil made it a bit too yellow for my taste. Tung oil gave a nice richness to the maple, so I will likely go with that. I used Tung oil on my Badger build, and really liked how it brought wood to life.

-
Table Saw Hand Safety
Landlubber Mike replied to rtropp's topic in Modeling tools and Workshop Equipment
Funny you should mention that Bill. Tonight I used the Microjig Grr-Ripper for the first time with my Byrnes saw and absolutely loved it. I am surprised more people on here aren't using it. It is fantastic - easy to use, keeps your hand away from the blade, and you no longer need to deal with featherboards, etc. Well worth the money in my opinion. I used it to saw 0.5mm maple sheets for deck planking. I was having trouble cutting straight planks due to the fact that the wood was thin as paper and would slip under the fence at times, or even ride up over the blade. The Micro jig worked like a charm and made cutting straight planks a breeze - and with 100% safety. I wholeheartedly recommend it. Here is a picture of it in case people are interested.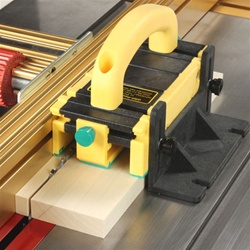
-
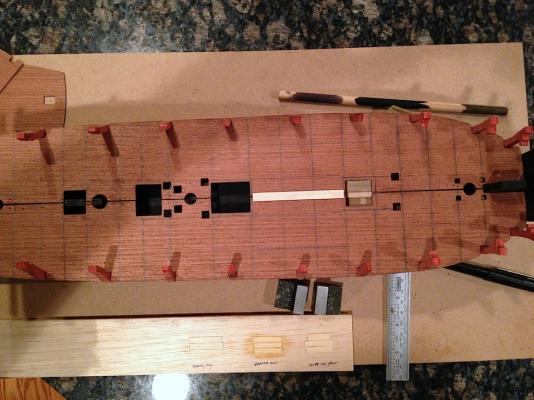
Hi Martin, Sorry about the labels - I see that on the second pic I labeled two pieces the same color. If you need clarification, let me know I actually stained the gratings to make them slightly darker. The gratings in the pictures show the effect of the stain. I used Minwax but a week or two later, the gratings still stink. Since I have to sand in the camber, I might just restain the gratings with the General Finishes Country Pine or Early American. It's a bit tricky to put together the gratings and hatches, as I'll be using two different stains and when I sand in the camber, I'll need to re-stain the gratings. So, I haven't glued in the gratings into the hatches yet. It's also tricky in that I want to butt the deck planks against the hatches - it's probably easier to run the planks, and then sand the hatches back to size. Alternatively, I could finish the hatches and glue them down, and then run the planks. The latter approach is probably easier to get a perfect line of planks running fore to aft between the deck items (i.e., the planks butting up against the head ledges), but the first approach is probably the easier way to get the planks to butt against the coamings. Fun times.
-
Hi Alistair, thanks for looking in. I really was intending to build the kit mostly out of the box, but my goal of not using any paint forced me to down the path of replacing some of the kit wood given that the walnut was all over the place in color. It's been a bit of a detour, and it forces me to think three steps ahead, but it's been an interesting process. I'm not in any rush to complete models, as the journey to me is more interesting than the destination (and my wife isn't too keen on me turning our house into a ship model museum). That being said, I think on my Lyme build I'm just going to stick with pear and boxwood, and not try to stain anything aside from ebonizing the pear for the wales, spars, etc. That build is complicated enough given that I'm almost completely scratch building it