DONATION DRIVE - SUPPORT MSW - DO YOUR PART TO KEEP THIS GREAT FORUM GOING!
×


Landlubber Mike
-
Posts
4,541 -
Joined
-
Last visited
Content Type
Profiles
Forums
Gallery
Events
Everything posted by Landlubber Mike
-
 Hi Martin, It's good to have a partner in crime on this painting with wood stuff I haven't tried staining or oiling the maple yet - I did try the stain on some scrap basswood (which is roughly the same color as my maple) to get an idea of color changes. You can find that post here: http://modelshipworld.com/index.php/topic/7267-hms-pegasus-by-landlubber-mike-amativictory-models-scale-164/?p=245802 Ultimately, I'll test different finishes/stains on the maple I got from Hobbymill. It's good to know that oiling the maple did bring out a nice rich color to it. I just haven't seen too many gray decks on here (I think I've only seen one on a weathered build, but I forget which build log that was on). By the way, I really like your holly deck. Holly was a bit too white for the look I was going for, so I figured that I would try maple out. Along with the color of the decks, I've been thinking about the planking patterns. The TFFM books show a very unique pattern that mostly uses curved and tapered planks, along with a few rows of anchor stock planking. The benefit of the pattern is that you don't need to create nibbling joints at the margin planks, but otherwise, you're customizing every plank. I don't know if I can pull it off or if it is otherwise worth the effort, but like you (from what I read on your log), I see this as an opportunity to improve my woodworking skills.
 -
Thanks very much guys. I think when you look at some of the master modelers out there, they may be using some type of product that has stain-like properties. Their wood looks like it has a touch of patina to it, which leads me to wonder what they are using. Pear with tung oil turns a very nice lighter shade of brown. I'm planning on using pure natural woods on my Lyme build (pear, boxwood, ebonized pear, and probably redheart) to go with the look that ChrisLBren has with his Confederacy. My Lyme won't be coppered, and so I think Chris' approach would work very well on my Lyme build. For my Pegasus on the other hand, it's going to be coppered, and so the hull won't have much of the base wood exposed. I wanted to go with a darker palette on the build (with dark browns, blacks and reds accented by the maple decks and boxwood railings and masts) - and while I like the look of oiled walnut, the walnut in my kit is all over the place in color. I might try and see if I can salvage enough walnut with uniform color for the upper hull planking and deck items. If not, I will use pear and stain it. Do you guys have any thoughts about using that antique oak stain to get a more grayish hue on my decks? Most decks I've seen for builds on here go with a very light color or a yellowish/light brown color. Thanks!
-
The Byrnes Saw "inside and around"
Landlubber Mike replied to nobotch's topic in Modeling tools and Workshop Equipment
Hi Mark, this looks great. Just so I'm reading the pictures correctly, you are using the high fence pre-cut, and then on the exit side of the blade, you now have extra space between the blade and the standard fence? Very interesting idea. This leads me to ask - is it necessary to have a fence that runs the full length of the table? I have a Byrnes saw, and used to experience kick back until Jim suggested I push the back end of the fence slightly further out. That seemed to work pretty well, but kick-backs are a pretty scary thing. Has anyone asked Jim or Micromark the reason for not including a splitter? I'm just curious as safety books videos seem to say to use a splitter. -
I'm probably the king of indecisiveness at this point. After staining the gratings last night and thinking about stains in general, I'm wondering about using stains more throughout the build. I was planning on replacing some of the kit walnut with pear (the parts that won't be black), since the walnut is all over the place in color. I actually wanted a darker color like walnut for the hull planking and hatch coamings, which led me last night to think about staining the pear a little darker. I sourced my pear from Jeff, so it's a very uniform color and grain and should stain very evenly. Has anyone used stains/dyes other than black on pear? I know some people prefer painting and/or using wood with very tight grain, but I'm thinking that on this build that I want to actually highlight the grain a little so that the ship comes out darker, and more aged looking if that makes sense.
-
Good point. I think I'm going to cut out the various gratings now, and then glue them together. I already stained them, but I am going to need to sand them for shape and camber anyhow so will just need to re-stain them.
-
Thanks Mark - I wondered about that. By my calculations, I think I have plenty for all the gratings on the build, but I should double check before I start gluing things
-
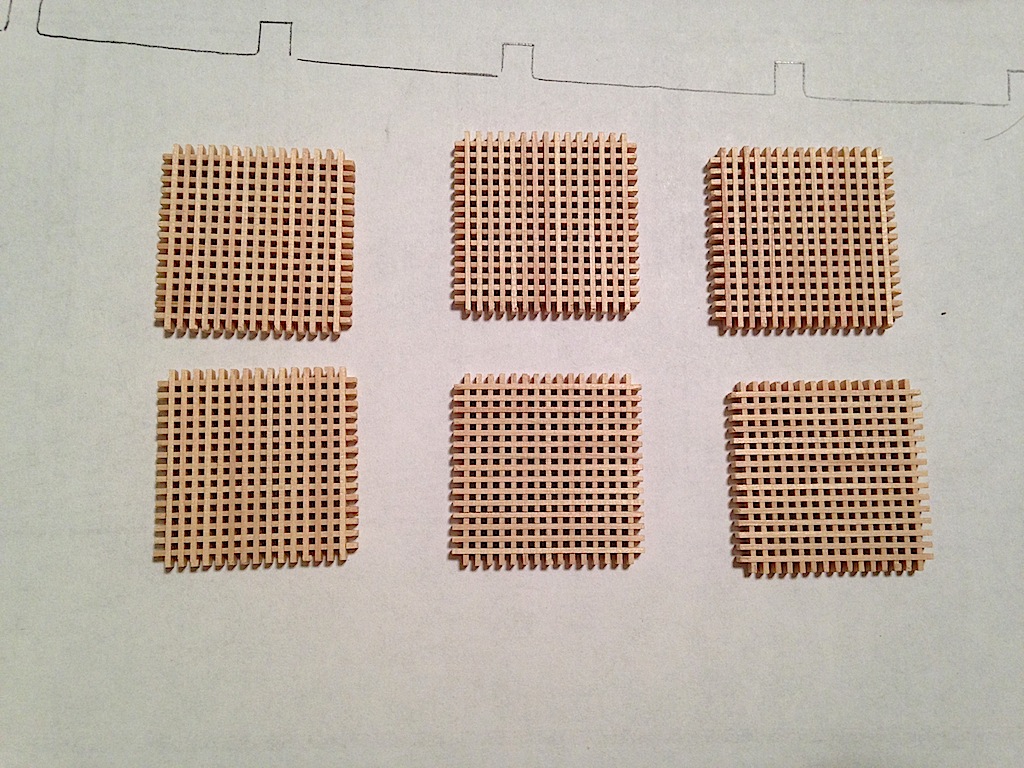
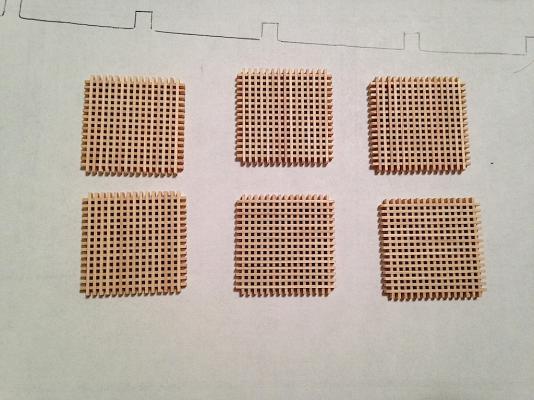
I spent some time last night mapping out my upper deck planking pattern. I realized that it might make more sense at this time to build the hatches, since I will butt the planks against the hatches (as opposed to sitting the completed hatch on top of the planking). So, I started putting together the gratings. Like other kits, the kit gives you enough to create six full sized ones (with two extras), which you then cut down to size to fit the grating you need. The quality of the gratings seems very good. The pieces are clean and fit together very well. I think the wood for the gratings is a little on the lighter side. Since I'm going to use pear or redheart for the coamings (probably pear), I think I'm going to darken them with a little stain. I ended up buying Minwax "Golden Oak" and "Antique Oak" this afternoon, and tested them out on some scrap basswood, which is close to the natural color of the gratings (and the maple I got from Jeff). Golden Oak is on the right: I like the look of the Golden Oak so will use that for the gratings. I'll probably stain the gratings first, then use a very dilute glue wash over them, as I'm not sure if the stain will penetrate the glue wash coating. The Antique Oak surprised me, as it came out more gray than what I thought from the picture on the can. I actually like the look of it for deck planks, as I think decks took on a more gray hue. The Charles Morgan's deck was gray, and so I was wondering whether I needed to use one of the wood ager products out there to get that color hue once I get to that kit. I might test it on some maple scrap to see if I like it. I'm more interested in a darker model with more patina on it than a crisp model, so I'm wondering if the natural maple will end up looking too light. Anyway, just thought I'd share my experiments on here. Back to the shipyard I go.
-
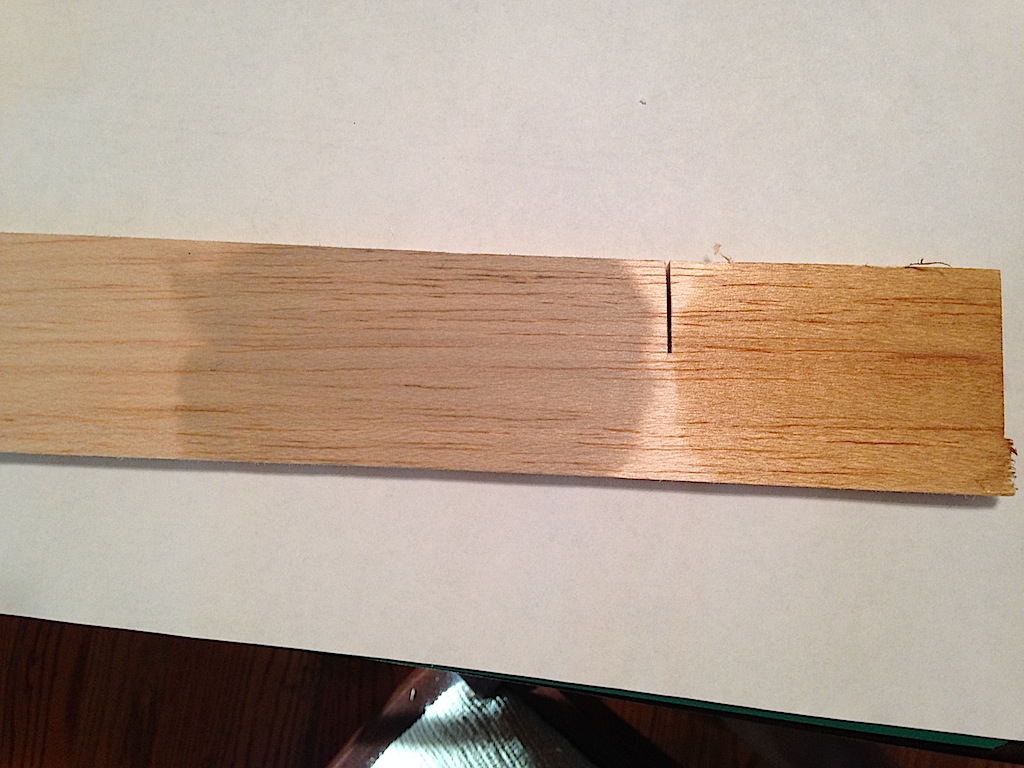
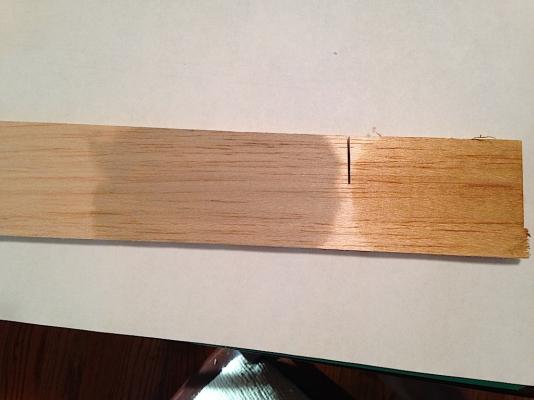
It's been a few days since I last posted, but not too much progress here. I did end up adding some planks to the lower deck under the upper deck fore hatch (which is open with a ladder). The planks were probably not necessary, but they add a little detail if one looks at the right angle. For the lower deck planks, I ended up using a single lime strip from the kit. I was originally planning to use the tanganyika, but it's a bit more yellow and the lime matches the maple that I'm ultimately planning to use for the decks much better. The size of the lime strips (at 5mm) is probably a closer match to the width I plan to use for my deck planks in general (the tanganyika in the kit is 3mm). The lime in the kit is actually very nice - clean, nice edges, etc. Aside from it being 1.5mm thick, I would almost think that you could use it for the deck planking in general it's that nice. Most of my time has been spent researching the size of planks, how to run the planks on the upper deck, etc. The TFFM series has nice pictures of deck planking plans that one could use. The plans, however, use curved planks, anchor stock planks, etc., making planking a little more complicated than using straight, square planks. At the same time, the TFFM plans are easier in that they don't use nibbling planks into the margin planks. The TFFM plans also have thicker planks with fewer runs (11 or so per side between the king plank and margin plank, versus 18 or so if you use 3mm straight planks per the plans), but require more customization of the planks. I might do a bit of a hybrid by using straight planks for as many runs as possible, then switch over to the TFFM plans. Most of the lower deck planking will be covered up, but it will give me a little practice for the quarterdeck and fore deck planking if I go the TFFM route. In the meantime, I'm going to start preparing the hatches. I plan to attempt to butt planks against the hatches, rather than sit the hatch on top of the planking, so it might make sense to build them and install them first, and then determine the run of planks that will but against them.
-
I'd say Petersson as the first as well. TFFM is very good if you are planning to add sails to your build. On my Badger, I started with Petersson to get a visual of the rigging, and then used TFFM for the details. For what it's worth, I think Petersson is available on the web somewhere - not sure if it is a permitted or otherwise authorized publication or not, but I think I've seen people post link to those sites here.
-
Gorgeous work! I love the look of furled sails as you know. I think I'm going to add a mix of furled and full sails on my Pegasus build, modifying my furled sail technique with your improvements. Thanks for sharing!
- 431 replies
-
- 1
-

-
- pegasus
- victory models
- (and 1 more)
-
Thanks guys. I took a look at Dan's log, and he uses a king plank that is 12" wide (4.76mm scaled) and the remaining planks 8" wide (or 3.17mm scaled). Interestingly, it looks like he used a wider king plank for the lower deck, quarterdeck and forecastle planking, but hard to tell if he used a wider plank for the upper deck. Alistair, I liked your approach on your log (though BE's approach of dropping the hatches onto the deck works nicely also). I'm leaning towards doing it your way, which means that I'll need to do a little planning to make sure that things line up properly.
-
Thank you!
-
Hi folks, I posted this on my Pegasus log, but was hoping that maybe posting here I would get other thoughts and opinions. I've been doing a little thinking and research on planking the upper deck. I plan to plank a portion of the lower deck under the fore hatch ladder in the waist using the kit supplied tanganyika, since it will barely be visible. Otherwise, the upper deck, the quarterdeck, and the forecastle will be planked with maple. I don't think I'm going to try and precisely line up the butt joints with the supposed locations of the frames from the NMM plans. A big thank you to Ulises and AEW for putting together the deck planking practicum and calculator (available at the link below). Now I understand what a four-butt shift of 1324 means http://modelshipworl...d-downloads.php I had a few questions on the proper deck plank dimensions. The build is at 1:64 scale, and I'm planning on using the four-butt shift from the template in the Ulises practicum. Width of standard planks. I was planning on using 4mm wide planks. At full scale, this results in planks approximately 25 cm wide (or about 10 inches). Length of standard planks. I couldn't seem to find the general range for standard plank lengths. Somewhere in the deep recesses of my brain I recall that planks were something like 12-25 feet in length, but I could be off. The Excel scale planking calculator on the list of resources here suggests using 3.75" long planks (or 95.3mm), which would scale to a length of 20 feet/6 meters. The Bob Hunt practicum says to use 4.5" long planks (or 114mm), which would scale to a length of 24 feet/7.3 meters. For simplicity, I might just go with a length of 100mm. Margin planks. I think I read this information in Goodwin last night, but it sounds like the margin planks are 1.5 times the width of the standard planks. That results in margin planks that are 6mm wide. King plank. I didn't use a king plank on my Badger, but for that kit, the deck template was one piece. Given the Pegasus deck template is in two pieces, putting historical accuracy aside, I'm thinking that a good reason for adding a king plank will be for the mere need to cover the seam between the two halves. Does anyone know if the king plank is generally wider or longer than the standard planks? I read last night (in TFFM I think) that the king plank was a bit taller than the other planks, but at this scale, I don't think that getting into such detail would be visible or otherwise worth it. Do these measurements seem reasonable? Does anyone know if the king plank tended to be wider/longer than the standard deck plank, and if so, by how much? Also, do any of these measurements need to change in planking the quarterdeck and fore deck? Thanks very much in advance!
-
Thanks guys, this is all very helpful. Alistair, I printed out your templates this morning - hope you don't mind if I shameless steal your work Any sense from anyone about whether the king plank should be wider than the standard planks or not? Maybe I'll post in the planking section as well.
-
Thanks Steve for chiming in and the pictures. Nice feet I like the pictures of the planking running into the margin planks. Very helpful to see. It also looks like the planks ran straight in the middle and then the ones to the sides started curving in. I'm probably just going to keep my runs with straight planks.
-
Another question on adding mast and capstan partners. Hopefully Alistair sees this post - I'm not sure if I'm going to build the partners like you did (they are a cool little detail to add), but I read up on them last night and was wondering how you constructed them. Did you build them per TFFM where the bottom middle section was a little deeper and the bottom ends sat a little higher to sit right on the deck (it's hard to describe in words, but it looked like the partners sorta slotted onto the deck). Or did you just build it flat and sit it on top of the deck? The latter seems much easier, and the difference probably wouldn't be noticeable anyway. Also, any sense as to whether the partners were the same wood/color as the deck? To build them, I think I would need slightly thicker wood than used for the deck planks, but I didn't think ahead to order thicker sheets of maple from Jeff. If I went ahead and added them, I might use the same wood that I used to build the hatch coamings and other deck items. Thanks!
-
Hi folks, I've been doing a little thinking and research on planking the upper deck. I plan to plank a portion of the lower deck under the fore hatch ladder in the waist using the kit supplied tanganyika, since it will barely be visible. Otherwise, the upper deck, the quarterdeck, and the forecastle will be planked with maple. I don't think I'm going to try and precisely line up the butt joints with the supposed locations of the frames from the NMM plans. A big thank you to Ulises and AEW for putting together the deck planking practicum and calculator (available at the link below). Now I understand what a four-butt shift of 1324 means http://modelshipworldforum.com/ship-modeling-articles-and-downloads.php I had a few questions on the proper deck plank dimensions. The build is at 1:64 scale, and I'm planning on using the four-butt shift from the template in the Ulises practicum. Width of standard planks. I was planning on using 4mm wide planks. At full scale, this results in planks approximately 25 cm wide (or about 10 inches). Length of standard planks. I couldn't seem to find the general range for standard plank lengths. Somewhere in the deep recesses of my brain I recall that planks were something like 12-25 feet in length, but I could be off. The Excel scale planking calculator on the list of resources here suggests using 3.75" long planks (or 95.3mm), which would scale to a length of 20 feet/6 meters. The Bob Hunt practicum says to use 4.5" long planks (or 114mm), which would scale to a length of 24 feet/7.3 meters. For simplicity, I might just go with a length of 100mm. Margin planks. I think I read this information in Goodwin last night, but it sounds like the margin planks are 1.5 times the width of the standard planks. That results in margin planks that are 6mm wide. King plank. I didn't use a king plank on my Badger, but for that kit, the deck template was one piece. Given the Pegasus deck template is in two pieces, putting historical accuracy aside, I'm thinking that a good reason for adding a king plank will be for the mere need to cover the seam between the two halves. Does anyone know if the king plank is generally wider or longer than the standard planks? I read last night (in TFFM I think) that the king plank was a bit taller than the other planks, but at this scale, I don't think that getting into such detail would be visible or otherwise worth it. Do these measurements seem reasonable? Does anyone know if the king plank tended to be wider/longer than the standard deck plank, and if so, by how much? Also, do any of these measurements need to change in planking the quarterdeck and fore deck? Thanks very much in advance!
-
Those rails are really sharp. Very nice work! Thanks for sharing the technique!
- 302 replies
-
- 1
-
-
- granado
- caldercraft
- (and 1 more)
-
Can i live without a BYRNES TABLE SAW
Landlubber Mike replied to shihawk's topic in Modeling tools and Workshop Equipment
I think like everything else there are trade-offs. I bought Jim's table saw, disc sander and thickness sander earlier this year. Are they essential? Probably not if you like building models straight from the kit. I'm moving more towards scratching/bashing, and each of these tools have been of immense help to me thus far. I especially love the disc sander, which is one of those items where I wonder how I could ever do modeling without it. Once you decide if you have have the need for a tool like these, then there's always the price/quality factor. You pay a premium for these tools (in my opinion, not too high relative to comparable machines from Proxxon and Micromark), but I have to say that they are built like tanks and should be the last tools like these I will ever need to buy. Plus, Jim provides incredible customer service. Case in point, I sent him an email asking a few questions a few months back, and he called me over a holiday weekend, without prompting, to walk me through things. It's really hard to find that level of customer service these days. I don't know if these tools will make me a better modeler, but now I can't blame my tools (or lack thereof) -
We'll see how it all ends up Martin. This painting with wood thing requires you to think ahead quite a bit. Jeff's redheart has been very nice to work with, as it has similar workability to pear. I'm curious, though, to see what it looks like when it is finished with tung oil or wipe-on poly. Interesting about the Fly deck. It seems most people like Spyglass have found their Fly kits have had a single piece. Having it in two pieces didn't bother me, especially now that I've reinforced the centerline. I'll have to keep track to make sure it's symmetrical on both sides though, thanks for the heads up!
-
Thanks Spyglass. I started dry fitting the mast dowels last night. It's a nice snug fit, but you're right, better to get it sorted out now!
-
I should mention the color scheme that I decided for the build. Essentially, the overall color scheme will be very close to the colors used on the kit box: - Pear for the visible upper hull planking and some of the deck items - Boxwood for the masting and rails - Maple for the decks, upper masting and studding sail booms - Redheart for the bulwark planking, forecastle and quarterdeck supports, cannon carriages, and some of the deck items - Bottom of the hull will be coppered and aged, using Alistair's, uh, natural formula - For items that will be black (like the mast tops, spars, capping rails, etc.), I plan to use the kit's materials as much as possible. The black stain from General Finishes seems to work very well and evenly across different woods. - For the small boats, and possibly the window frames, I might try scratching both by using holly. I'm not a big fan of white paint on models (too bright, usually have to add many more coats to get an even color), at least the way I paint I haven't figured out whether I want to add a different color (like blue or red) to the upper hull planking. For the frieze decorations along the hull, I think I'm going to try to use a combination of washes, lowlights and highlights to get more of a darker, patina'd look. I haven't figured out what I want to do with the figurehead or the stern decorations. I might try and paint them to match the boxwood used in other areas of the build.
-
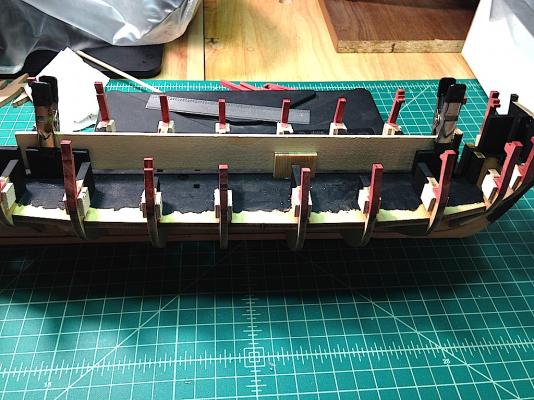
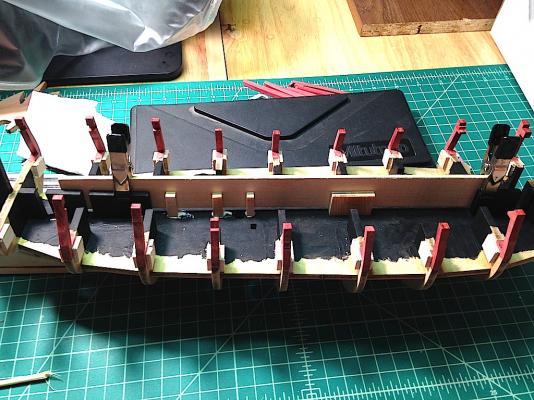
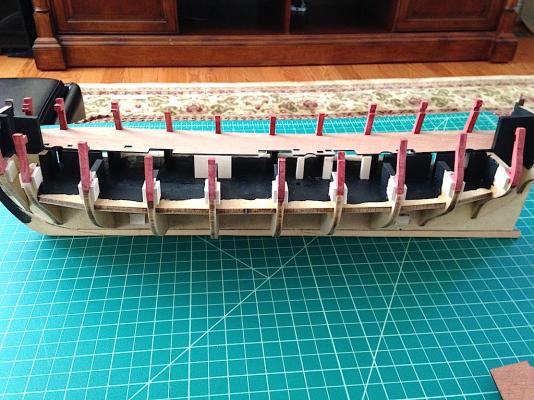
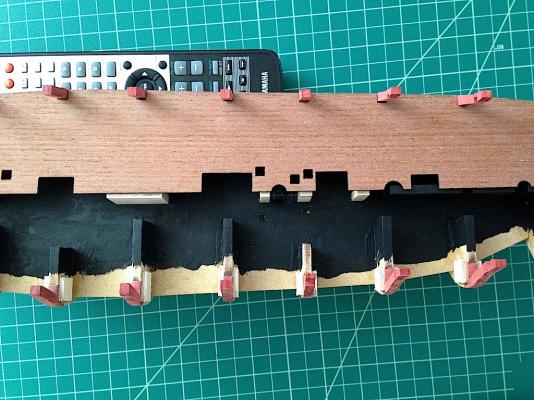
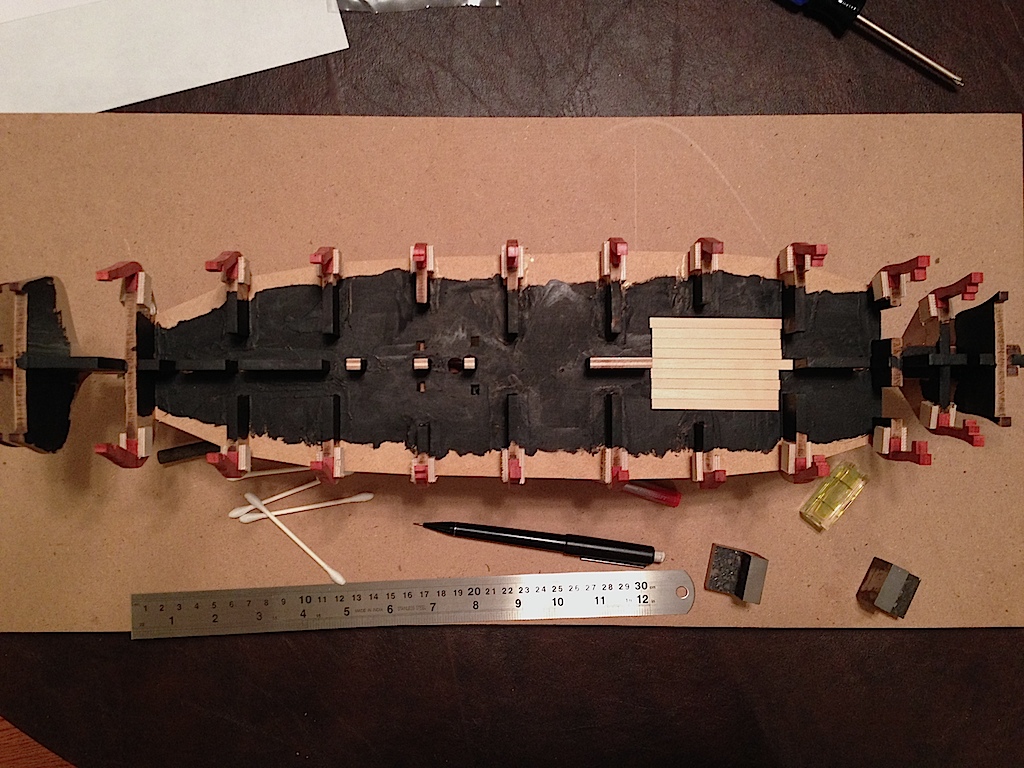
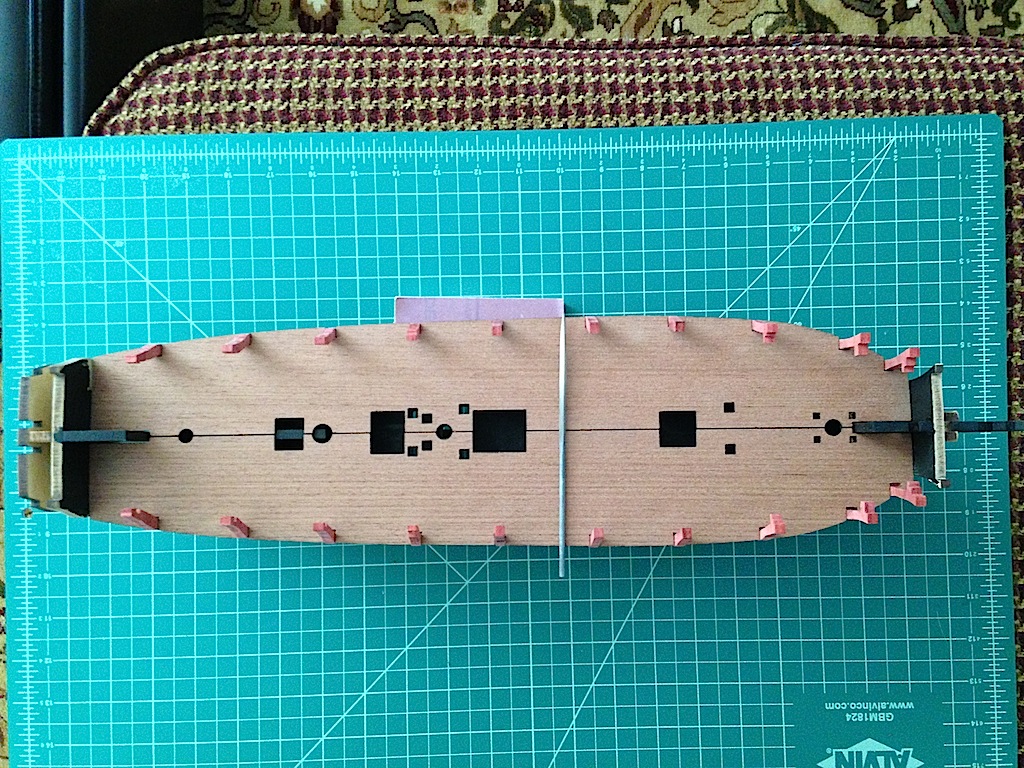
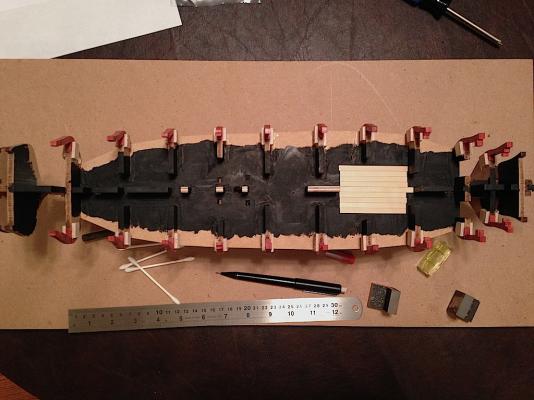
I decided to go ahead and reinforce the upper deck template with a few pieces of plywood. Essentially, what I did was test fit the template, and figured out which areas could use a little reinforcement. From what I could tell, the template needed reinforcing near the main mast (as Spyglass and others have pointed out), as well as in the waist (between the stair hatch to the lower deck and the big grating in front of the main mast). The pictures below hopefully show what I ended up doing. Around the main mast, I constructed three relatively narrow supports - essentially, because of all the holes in that area, I couldn't do a longer piece. In the waist area I added a fairly long support. I wanted these to perfectly align with the supports along the spine of the keel, so I sanded the width of the supports to 5mm to match the width of the keel. As you can see in the first picture below, I ran a wooden ruler along the spine as a guide for where to position the new supports. The ruler is slightly above the lower deck so that the extra glue didn't run onto the ruler and glue it to the lower deck as well The supports seem to really help the stability of the deck. If you were really worried about the stability of the supports themselves, running pins between the support and the lower deck might be a good idea - but I just glued them on with plenty of glue. Spyglass - my upper deck templates don't seem to be as crumbly as yours. They did start to splinter when I sanded them against the grain, but nowhere near the issue that you had. The next bit of business was to get the two halves of the ply templates to sit properly on the bulkheads. I had a slight issue in the beginning with the pieces overlapping in the center by about 1-2mm. Most of that was probably due to my new bulkhead extensions being slightly wider in some cases than the kit's extensions. After filing the template bulkhead notches slightly deeper, the two halves fit much better. I also sanded down the front and back of the templates very slightly (maybe taking off 0.5mm or so) to also improve the fit. As you can see in the picture below, the two template halves are fitting very nicely when dry fit. Once I pin and glue them, the seam will pretty much go away. I'm not having any of the bubbling issue that I think some other builders experienced (though, that might have been on the Fly and not the Pegasus), and the new supports actually seem to do a very nice job of maintaining a consistent camber across the deck. Next up I'll go ahead and stain the new supports, and will add some planking on the lower deck for the stair hatch in the waist. Even though I plan to use a different wood for deck planking (maple from Hobbymill), I'll probably just use the kit's tanganyika as the planking will not be very visible. Before I glue down the deck template, I'll probably go ahead and figure out the planking pattern and what details to add (scarpf and hook joints along the perimeter, mast partners as Alistair added, etc.). As an aside, according to the NMM plans, it looks like the hatch under the quarterdeck near the capstan is a stair hatch, whereas the kit has you construct a grating. I'll probably just do a grating as I expect that either won't be visible.