


Landlubber Mike
-
Posts
4,099 -
Joined
-
Last visited
Content Type
Profiles
Forums
Gallery
Events
Posts posted by Landlubber Mike
-
-
Looking great Jason! Very crisp work as usual. i thought the mast construction part was a lot of fun on my build.
You've probably already thought about this, but look ahead at the plans and instructions to figure out whether it makes sense to attach some rigging now, so that you can access the blocks fairly easily (though, it looks like you're not attaching the blocks right now). Going through the running rigging on my build now, I might have approached the build a bit differently than the instructions.
-
Thanks very much everyone. It was a long detour, and I probably would have already been done with the build had I not gone the furled sail route, but I'm liking how the ship is turning out with the furled sails. They are actually turning out better than I expected.
-
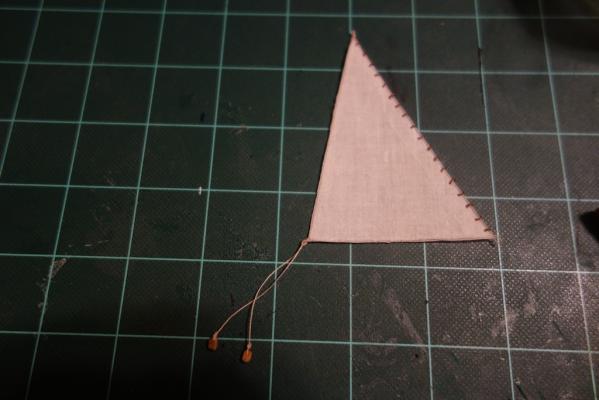
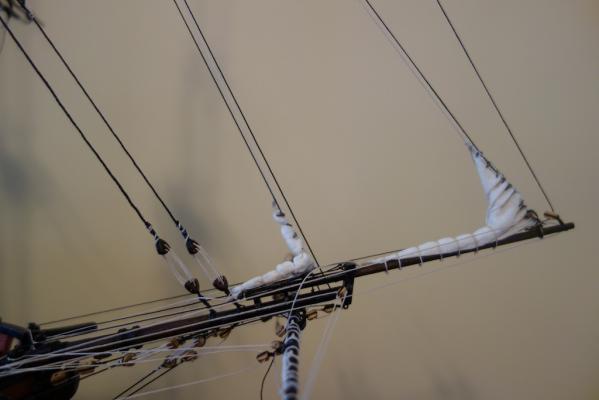
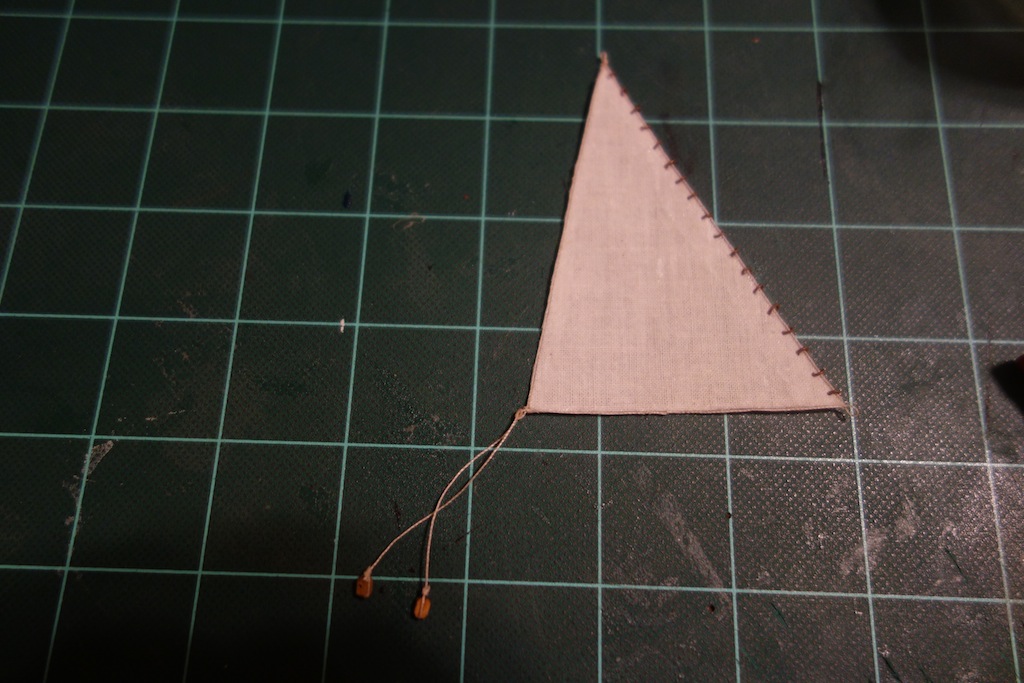
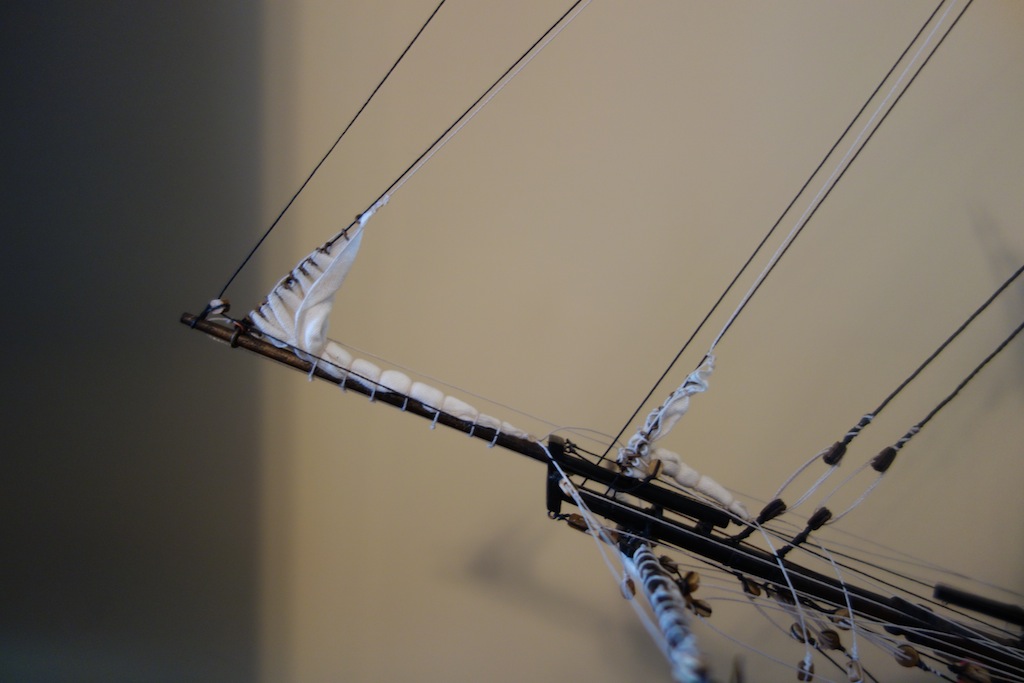
Jib sail.
The jib sail was simpler in some ways (not requiring the netting/horses or figuring out what kind of stay to use), but requires a special piece of hardware called a "traveler" which is detailed below.
Similarly to the staysail, I had to cut down on the size of the jib sail to ensure a tight furl. Looking at pictures of ships with furled sails, as well as the pictures in the Harland book, it's amazing how tightly these sails were furled. The jib had more running room, so I went with a larger sail than the staysail - I also wanted to run it up the jib stay a bit higher than the staysail, so I needed more cloth to work with.
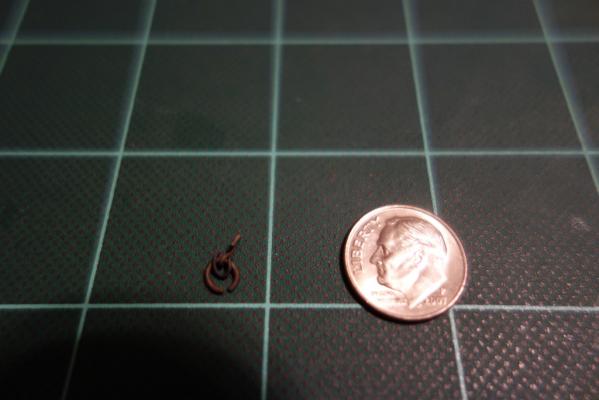
Construction was very similar to the square sails on the yards - using fabric glue I added bolt ropes and cringles. As mentioned above, for the hanks I used very thin beading wire which is much more flexible than using brass wire. The wire was looped around a brass rod in a spiral shape, painted, then cut as needed and shaped into a loop. Real hanks had a more complicated shape which I couldn't duplicate at this scale, so I just went with simple loops. I also painted them brown because it seems like these tended to be wood. The pictures below show the sail (with the sheets installed), as well as bent to the jib stay. The pre-furled shape of the sails is probably a bit different in the angle at the tack is the angle formed by the jibboom and the jib stay. I figured that this would make furling the sails down to the jibboom a lot easier.
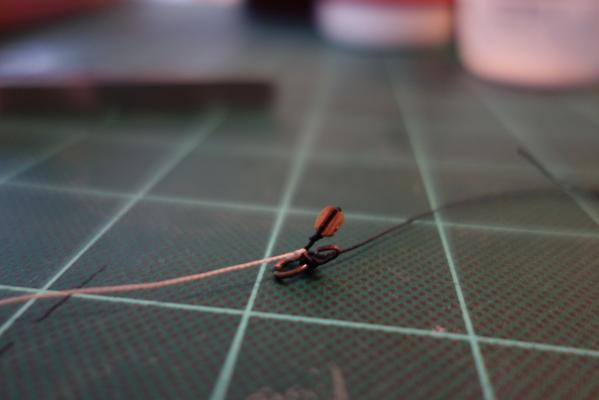
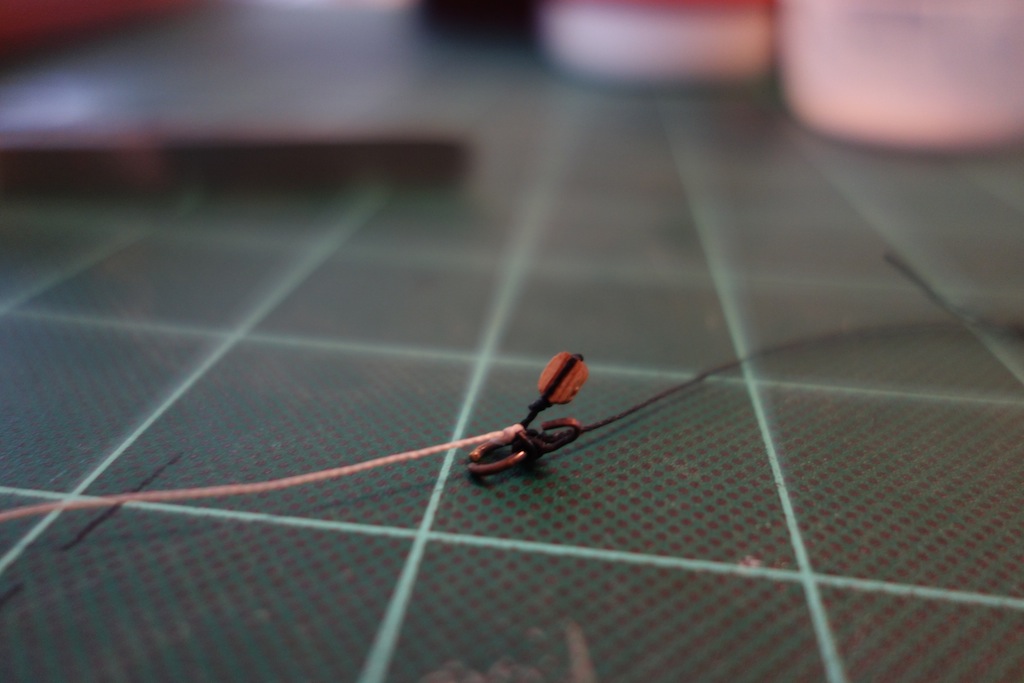
Setting up the jib was a lot easier than the staysail, except to the extent that I needed to built a traveler. The traveler has three main pieces: the main loop that goes around the jibboom, the shackle that runs forward to the end the jibboom on which the outhaul is attached, and then a hook to which the jib's tack cringle is attached. These were created using brass wire and a hook from the kit. A block is also attached to the traveler for the downhaul. The traveler itself (minus the shackle) was covered in leather for protection. I didn't bother to simulate it as such but just left it as blackened brass.
Here is how the rigging proceeds:
1. Jib stay: The jib stay is attached to the traveler ring, through the hanks on the sail, up through the top sheeve on the cheek block on the starboard side, and down to the aft end of the starboard fore channel. Given the size of this ship, it seemed correct to tie it off directly, rather than use a block and tackle arrangement as in larger ships.
2. Outhaul: This line is tied to the shackle of the traveler, runs forward along the jibboom through a sheeve, to a timberhead on the starboard side. This functions similarly to the tack for the staysail in that it establishes a fixed position for the sail along the jibboom.
3. Downhaul: Similarly to the staysail, it attaches to the peak cringle, runs through a few hanks, down through the block attached to the traveler, and belays to a starboard timberhead.
4. Haliard: Similarly to the staysail, the haliard is run from the peak cringle but up through the lower sheeve of the starboard cheek block, and belays to a timberhead opposite by the aft end of fore shrouds, starboard side. As with the staysail, I ran these without a block and tackle for two reasons. Historically, it seemed smaller ships did not use a block and tackle. From a practical standpoint, and probably more importantly, adding a block and tackle would have been very hard to achieve given the scale and general size and busy-ness of the ship. So, I felt comfortable not using block and tackles.
5. Tack: The tack is attached to the hook on the traveler.
6. Sheets: The sheets are run just like for the staysail.
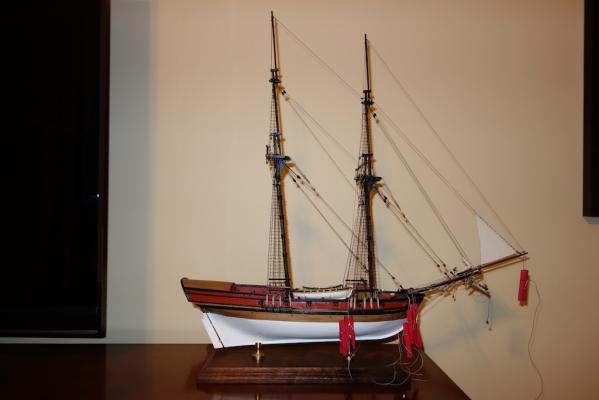
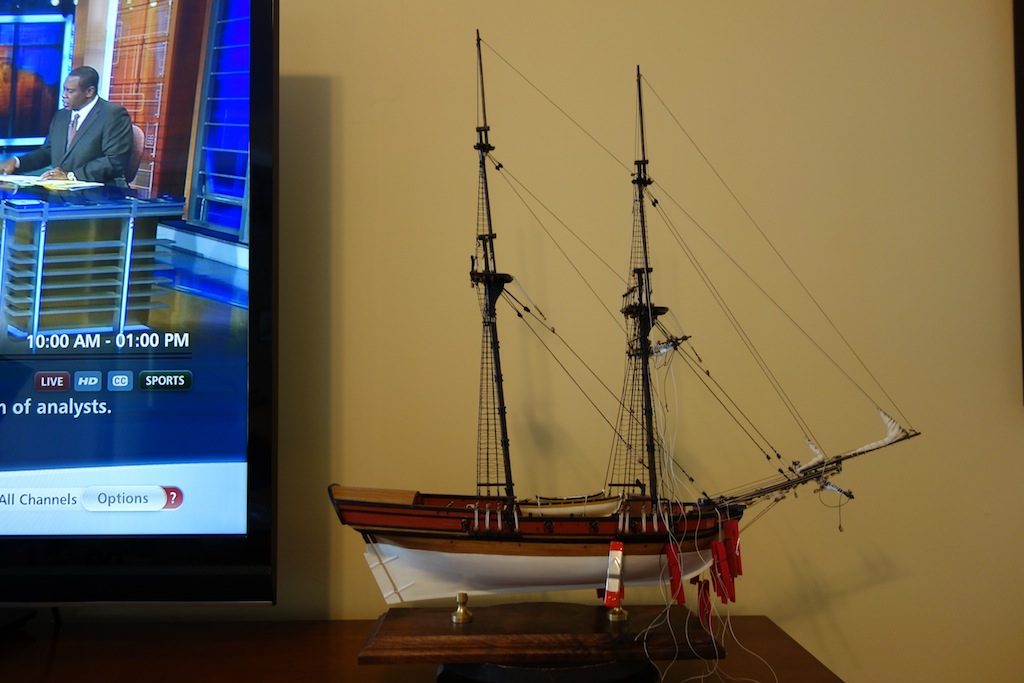
Here's the end result (sorry, had the TV on in the second):


Hope all this is helpful (and accurate and correct!). I found that there was a lot of information online for furling and adding square sails, but not much really on the fore and aft sails. I spent many hours trying to figure all this out from the resources mentioned above, and at least to my eye, I think they really improve the ship. So, if I can give back to others for all the help I've received on here in the past five years, I'll feel very happy.
Next, I'm going to finish the rigging of the bowspirit, and work my way aft on the model. I still need to create the spanker, and furling it shouldn't be too difficult, but I'm a bit burned out after furling the square sails and fore sails

- Ferit, Beef Wellington, Blue Ensign and 6 others
-
 9
9
-
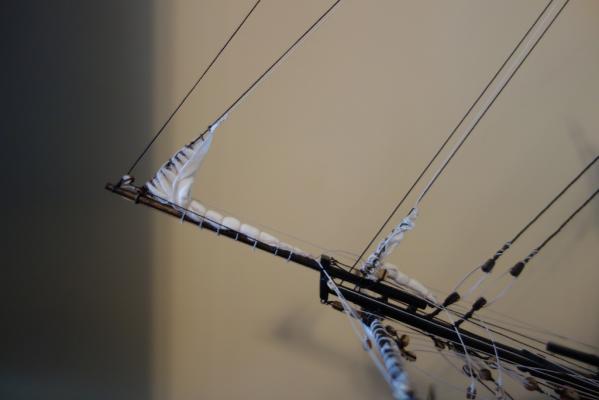
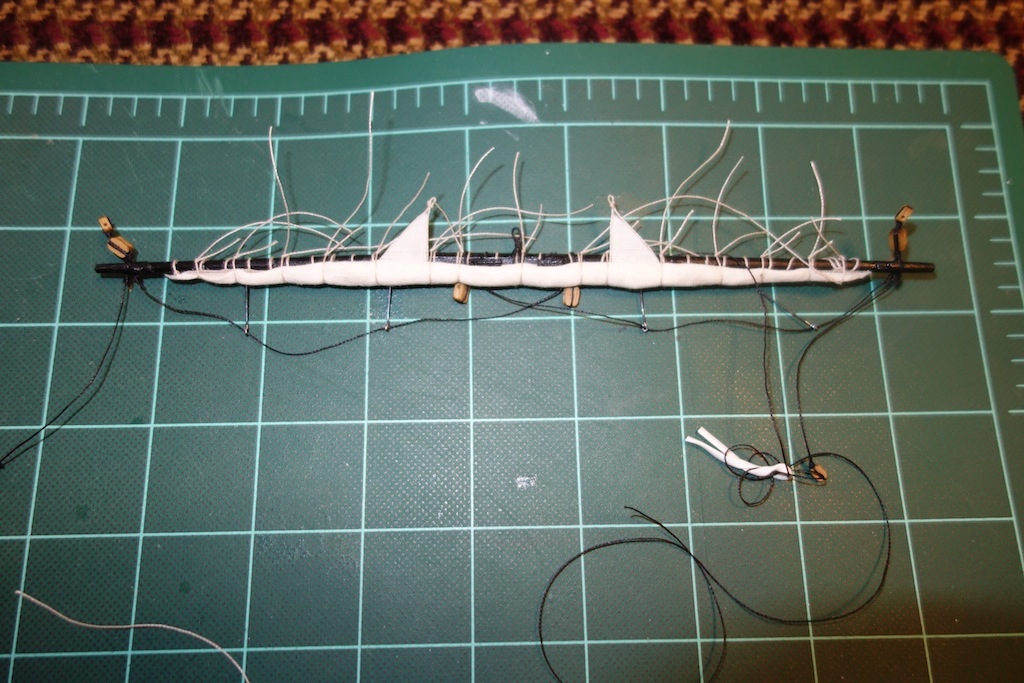
Fore topmast staysail.
This sail took a ton of planning as there are a number of ways that these could be installed on a ship - bent to a fore topmast preventer stay, bent to a fore topmast staysail stay, and I think they could also be set flying (no stay at all). Then there was the question of how to run the haliards - single, double, etc.
Based on Lees and TFFM, I decided to add a fore topmast preventer stay and bend the sail to it. Not sure if this was 100% historically accurate, but this route helped simplify things a bit as the preventer stay would use the existing bee sheaves in the bowspirit, and the running end would end in an eye and mouse around the mast, rather than have a running end that ended in haliards somewhere down the mast. It also added a sense of symmetry with all the rigging, which is more artistic than anything.
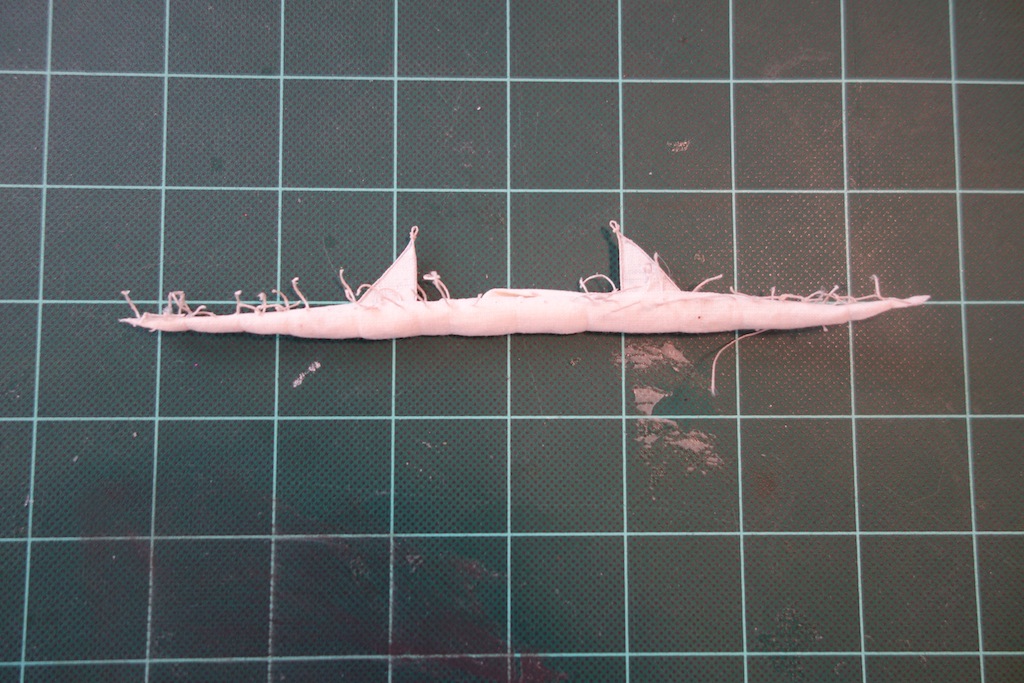
Another reason to go with the preventer stay over a staysail stay was that there was not much room to furl the sail as it was given the proximity of the fore stay and fore preventer stay, but using the bees gave a couple of millimeters of extra space. As you can see in the picture below, the staysail is probably only 25% of what the full sized staysail would look like. This was to ensure a tightly furled sail and keep the sail in front of the fore stay and fore preventer stay.

Two other things I had to add to the model for the staysail. First, I needed to add a cheek block on the port side of the fore topmast head (I also added one for the jib sail on the starboard side). Second, from Lees, Petersson, and TFFM, the staysail was not laid on top of the bowspirit, but instead was laid on top of a netting between the bowspirit horses. So, I added the horses and a simplified netting run between two staves that the horses went through. I unfortunately don't have a picture of this, but the staysail covers all of it so I didn't go all out with a very detailed netting.
After all that, the rigging of the staysail is fairly simple. The staysail is triangular in shape with a peak cringle at the top, the tack at the fore bottom corner, and the clue cringle for the sheet pendant at the aft bottom corner. After threading the fore topmast preventer stay through the hanks on the sail (constructed of beading wire from a local craft store and painted brown):
1. Peak cringle: The haliard (to pull the sail up the stay) is run from the peak cringle up through the lower sheeve of the port cheek block, and belays either to the foot of the fore mast or to a timberhead opposite the after fore shrouds, port side. Also attached to the peak cringle is the downhaul (to pull the sail down the stay). The downhaul is threaded through a few of the hanks, through a block attached to the foot of the stay, and belayed at a port timberhead.
2. Tack: The tack is tied to the cringle. This is the one fixed corner of the sail.
3. Clue cringle: The sheets are attached to the clue cringle, which in turn split into pairs of whips. The sheets go to each side, ending in a block. The standing end of the whips are attached to an eyebolt, run through the block on the sheets, and the running end is belayed to a timberhead (I haven't done this step yet).
That's it for the staysail. Next the jib.
-
It's been a few weeks but I've been busy in the shipyard. I managed to get the fore topmast staysail and jib attached and furled. Before I get too far, let me mention the resources that were of immense help in figuring out what to do:
1. Lennarth Petersson - Rigging Period Ship Models - pictures say a thousand words, and this book really simplifies the mysteries of rigging. Helpful to see the pictures of how the rigging for these sails works, but I would say that it shows rigging for larger ships so, for example, the haliards would be more simple than the block and tackle arrangements shown in this book. Still, very highly recommended.
2. The Fully Framed Model (TFFM) Vol. 4 - This Swan series book is an incredible resource for anyone that wants great detail into rigging period ships. Antscherl compiles a lot of research into this book, with excellent pictures, to help one go step by step.
3. Lees - The Masting and Rigging of English Ships of War - Good detailed historical account and narrative description of these sails and their rigging.
4. Harland - Seamanship in the Age of Sail - Excellent descriptions of the actual mechanics of bending, raising, furling, etc. sails. Very helpful discussion of what went into furling sails, particularly how the sails were gathered and then a "skin" was draped over the entire bundle. The remaining 2/3rds of the book goes into fantastic details on how the sails operated in various conditions, etc.
Here are the pictures of where I am now, and I'll set up the next couple of posts to talk about the construction of both sails. Needless to say, for what ultimately looks like rolled up wet tissues, these things took a while to figure out how to construct and to install. But, I very much like the end result, which to me anyway looks better than a ship bare of sails. The staysail needs a bit more positioning, which I will do once the sheet whips are installed.
-
-
-
Hi folks, I've been working on laying the running rigging lines on my Badger, and have come to the point where I need to start finalizing the lines that belay to the knightheads and timberheads. Is there any particular way in which lines were belayed to these items? I've looked at my reference books and various build logs here, and it seems like there is a variety of ways to approach them (though most times it is very hard to see from the photos exactly how the builder approached them).
One approach I've been thinking about is to treat these lines similarly to belaying lines to pins, where the line is run around the timberhead or knighthead about two to three times, and then a separately prepared rope coil is added over the timberhead/knighthead. The end result would be something similar to what my friend Aldo prepared on his Badger as can be seen here:
http://modelshipworld.com/index.php?/gallery/image/2424-msw101medium/
http://modelshipworld.com/index.php?/gallery/image/2423-msw100medium/
Other models I've seen appear to show the line wrapped around the timberhead and knighthead a few times, and then cut without any additional rope coil added. I would think in some cases, the crew would have wanted an extra length of line to work with, hence the added rope coil.
Any advice would be greatly appreciated! Thanks!
-
Looks great ZyXuz, paint job came out very well. I'm sure you're glad to get that step behind you

-
-
Looking great Kester. It's quite a busy little vessel, isn't it?
-
Hi Andy, my deepest condolences. Take care.
-
-
Those tops look fantastic Jason. Really nice job!
-
Hi Ian, thanks very much for the kind words. Hopefully they end up looking ok in situ
There are times when I think to myself that I could have been done with this build a long time ago. I've probably easily spent over 50 hours in the aggregate studying how rigging works, how to create sails, how to best furl them, etc.
It's all been worth it though, as I now have a better appreciation and understanding of the operation of these ships, where I might not have gotten that had I just followed the directions and attached line A between points B and C. Now I can see why people really get into improving their kit or moving totally to a scratch build. -
Thanks very much Peter - these pictures are very helpful. Your furled sails came out very nice indeed
The spanker in particular looks perfect. I see you included the clew, which I think most furled spankers fail to include - nice job!I spent a few hours yesterday evening studying and preparing how I will go about furling the jib and the fore topmast staysail. From my reading of I think Lees, it looks like smaller ships had a less complicated halyard set-up at the peak cringle. Rather than running a block at the peak cringle (where the line is first attached to the stay and then runs through the block and then reeved through the chocks on the mast), it sounds like smaller ships had a more simplified structure where no blocks are attached to the peak cringle - instead, the line is attached to the cringle directly, then it runs up to the chock. Since the Badger is a brig, not sure if that qualifies it as a "small ship" for purposes of going with the single halyard. I might just rig it as a double, as it doesn't add much extra work.
I also learned from Lees that the fore topmast staystail had a netting over the bowspirit so when furled it didn't sit directly on the bowspirit. Add another thing to the list I suppose
-
-
Hi again Zyxuz,
Since I've been thinking about color schemes too, I took a look through my Gardiner book which uses pictures of models at the RMG, and have been picking out some color schemes that I think can work well with the Unicorn. Since you're thinking about this too, I thought I would pass them along - hope they are helpful.
1. Sloop c. 1710: http://collections.rmg.co.uk/collections/objects/66358.html
2. Sloop c. 1710 (very similar to Corel's scheme for Unicorn): http://collections.rmg.co.uk/collections/objects/66359.html
3. Gualaloupe (very similar to Unicorn): http://collections.rmg.co.uk/collections/objects/66470.html
4. Thames (white painted under thick black wale): http://collections.rmg.co.uk/collections/objects/66457.html
5. Lowestoft (gorgeous ship with white under black wale): http://collections.rmg.co.uk/collections/objects/66300.html
6. Mermaid: http://collections.rmg.co.uk/collections/objects/66279.html
7. Minerva (uses blue and red accents like you were thinking): http://collections.rmg.co.uk/collections/objects/66278.html
8. Diana (also uses blue and red accents): http://collections.rmg.co.uk/collections/objects/66533.html
Just for fun, this Samarang is incredible - one of my favorite models in the Gardiner book:
-
Hi Zyxuz,
I'm fairly certain that copper plates were not in use for the Unicorn you are building. The Unicorn was launched in 1748, and from my Gardiner book on Frigates, it looks like coppering started in 1761 and was more commonplace in the late 1770s. Just wanted to throw that out there. If you want to paint it white below the water line, a good Unicorn can be seen on the thread I posted this summer that became a compendium of ideas about the Unicorn kit (there are other ships posted that could serve as other possible samples of color schemes that might work for you):
http://modelshipworld.com/index.php?/topic/2444-quality-of-corel-kits/?p=66398
I'm thinking about going with a color scheme similar to the Pandora build here - with a thick black wale, more black on the ship, like on the rails, spars, and stern, and red for the bulwarks and some of the deck fittings (no coppering of course).
http://modelshipworld.com/index.php?/topic/2444-quality-of-corel-kits/?p=66523
I'm not really a fan of how Corel has the area around the gunports without a thick wale. I think if you look at the plans for the Unicorn in the Chapman book, they seem to contemplate a thick wale. Click here, and then click the picture to zoom in and you can maybe see what I'm talking about:
http://www.sjohistoriska.se/ImageVaultFiles/id_3085/cf_1803/55.JPG
Let us know what you decide
Aside from that, I think I'll explore adding small boats and lanterns to my build as another modification.
-
Nice work, and nice save on the planking
Did you decide on the color scheme yet? -
Looks great Robert. Not sure if you had this issue with your kit, but the carriages and trucks on my Badger were of very poor quality walnut that splintered just by looking at it - Caldercraft kits are great, but the walnut is a big disappointment. It's probably a bit tedious to scratch the components, but the results look to be well worth it!
-
-
One other issue that I need to work though - the Badger sail plan in the Chapelle book shows the main/spreader yard below the gaff, with the modified main course above it. See the sail plan below.
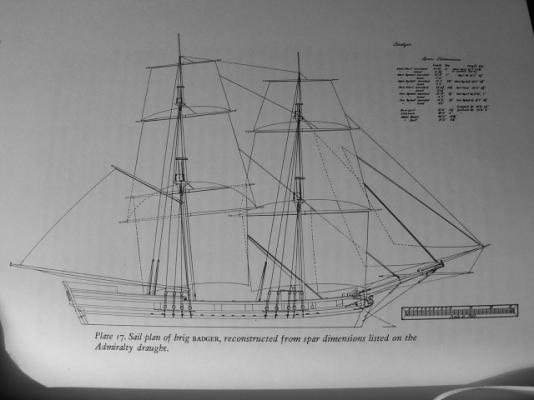
The kit instructions, however, have the main yard where Chapelle has the modified main course, which I think is incorrect. The kit configuration seems to be consistent with other brigs that did not use a modified main course, such as the Swift sail plan which is also in Chapelle (p. 105).
Decisions decisions. Right now I'm leaning towards leaving the main yard as per the kit instructions - I think moving it down will make it look out of balance relative to the fore yard. Of course, I'm open to suggestions as I'm just fumbling my way along.
-
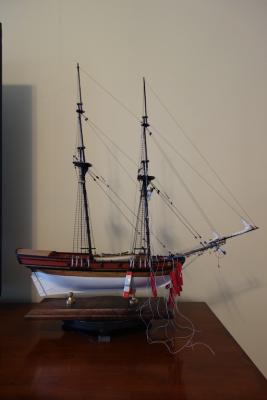
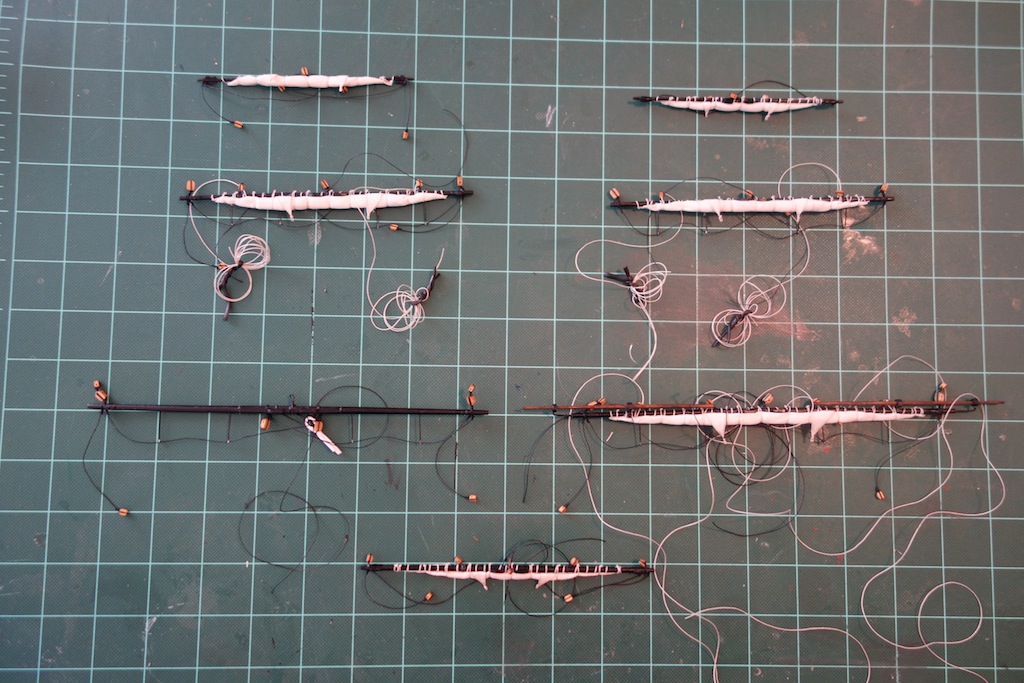
Finally finished the furled yards for the square sails. They take quite a bit of work (literally hours per yard), but I think they will improve the overall look of the ship.
I started with the topgallants, and worked my way down. I got to the main yard, and was like, wow, this came out pretty nice.

Then I was tying myself in knots trying to figure out how the main course was supposed to be rigged. The instructions said it was rigged as a crossjack yard, and it didn't have all that many blocks attached. It wasn't until I looked back at Chapelle's "Search for Speed Under Sail" which has a section on the Badger that Caldercraft's kit appears to follow closely, and with some help and guidance from Jim Lad (thanks John!) at the link below that I realized that I made a mistake in attaching a furled sail to that yard.
http://modelshipworld.com/index.php?/topic/4120-crossjack-yard-generally-did-not-carry-a-sail/
Essentially, the Badger's main yard was a spread yard to sheet the topsails on the main mast, and the Badger also carried an improvised main course that was fitted to a crossjack of almost the same length and secured to the main mast only by halyards. The kit instructions just have one "main yard," so I'm assuming that it accounted for the spreader yard. So, after hours of effort on the main yard, I was left with this nice souvenir

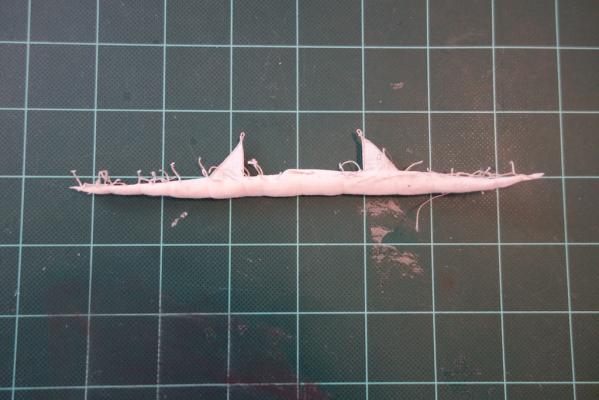
All in all, my complaining aside, I think everything came out pretty well. Here are the final products:
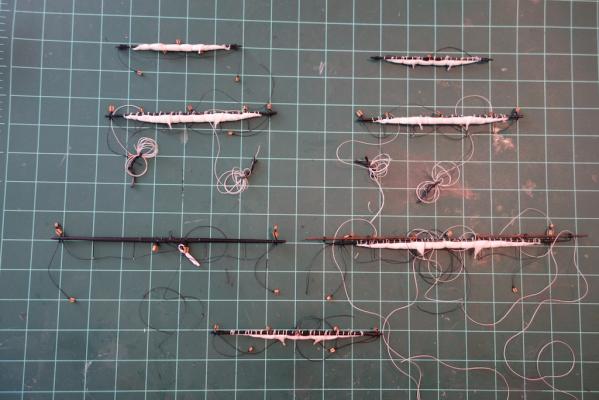
You'll see that I tried to pre-rig the lines attaching the yards to the masts and the buntlines. I figured it would be easier to do that before the sails were added. Since the buntlines come from the foot of the sail, I glued the line on the pre-furled sail and ran it through the appropriate block. They should be locked in pretty right after furling.
Next up are the jibs and spanker. Not really looking forward to doing them - the jibs need jib stays and halyards, along with extra rigging for the inhaul and outhaul (I think). The spanker is tricky in figuring out how to cut the sail back to reduce bulk, yet leave enough in spots to be true to the brail lines. Also, per the zu Mondfeld book, there are a number of ways of attaching the spanker to the mast, so I need to pick one and figure out how to execute it.
- shark bait, riverboat, Gregor and 3 others
-
6


HMS Unicorn by ZyXuz - Corel - Scale 1:75
in - Kit build logs for subjects built from 1501 - 1750
Posted · Edited by Landlubber Mike
Really nice work - I'm planning on scratching the stern on my Unicorn as well as the cast pieces are very disappointing. I bought a spare set of the cast pieces to see if I could modify them in any way to improve them, but I think I'm going to forget that idea and just build them from scratch. Your method, along with the Naiad method, will be bookmarked for future reference!