


Justin P.
-
Posts
991 -
Joined
Content Type
Profiles
Forums
Gallery
Events
Posts posted by Justin P.
-
-
Looking great. I’m enjoying this build, makes me want to pull my documents out from when I built it and give it a go as a small scratch build.
-
I’ve never used Syren billets or sheets, but generally use the Byrnes thickness sander as a step prior to ripping sheets on my Byrnes saw, not after.
Based on Syrens own description of their products, I assume they will come ready to rip without needing an additional thinning unless you need a specific dimension not offered.
-
-
Great Job so far. Now the fun begins, as you can go in any direction. There a lot of traditional design elements to play with on these Peterboroughs.
Wefalck, The museum may have been there but maybe not in its new building. It was a really fantastic museum though, highly recommend.
- BobG and Duanelaker
-
 2
2
-
On 5/13/2016 at 11:19 AM, popeye2sea said:
Hi Chuck,
Here is how to serve and set up your shrouds and deadeyes.
Strop and attach your lower deadeyes to the channel. The channel is the platform that sticks out from the side of the ship. Depending on which ship and when it was built will determine the shape and style of the chains (the extensions of the strops that secure the deadeyes to the hull).
Measure the distance from the masthead to where the upper deadeyes will be. The distance, or drift between the deadeyes was usually about 2 times the diameter of the deadeye. Now double your measurement. The shrouds are going to be put on in pairs. Do not cut to the final length yet. You need to leave extra length for setting up the shrouds.
Now serve the middle 1/3 of each shroud, calculated from your doubled measurement above. This will be the portion that forms the loop around the masthead. If you have calculated the length of the service correctly it should end slightly below the point where the futtock shrouds meet at the futtock stave. The forwardmost shroud on each side of the mast was usually served its entire length to prevent chafe from the sails and their gear.
Middle the shroud pair around the mast head and clap on a seizing to form the loop around the mast head. The seizing should come just below the bolster on the trestle trees (the bolster is a quarter round molding placed next to the mast on top of the lattice of beams that supports the top platform. It's purpose was to ease the angle for the shrouds passing over the trestle tree. For each succeeding pair the seizing should lie just below the previous one. This would prevent the seizings from chafing against each other.
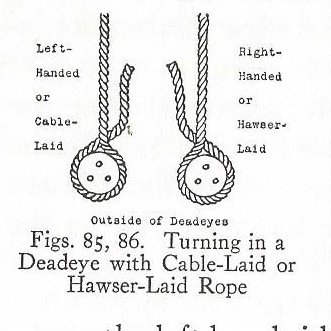
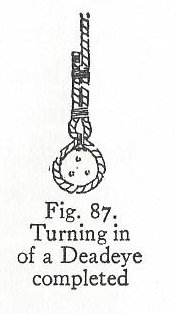
Next, turn the upper deadeyes into the ends of the shrouds. Some find it helpful to make a jig that will position the deadeye at the proper spacing. The shrouds go around the deadeyes in a specific way that is determined by the lay of the rope. Looking from the outside of the ship, if you are using right hand laid rope the shroud will pass counter-clockwise around the deadeye, behind the standing part (that is to say more inboard) and then the end is seized to the standing part with three seizings. For left-hand laid rope the shroud runs the opposite, clockwise around the deadeye.
The first seizing to be put on is called a throat seizing and it is put on where the two parts of the shroud cross above the deadeye. The next, the middle seizing, is a short distance up the shroud and the third, the end seizing, an equal distance above that.
The rope that runs between the upper and lower deadeye is called the laniard. The laniard should be a bit less that half the diameter of the shrouds. It always starts on the upper deadeye in the hole furthest away from the end of the shroud. The stopper knot will be on the inboard side of the deadeye.
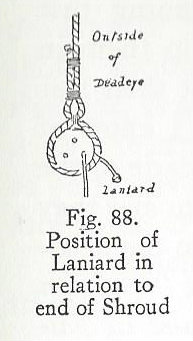
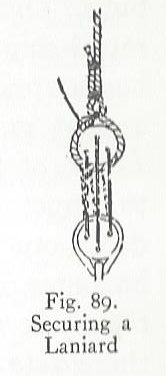
Pass the laniard from outboard in through the corresponding hole in the lower deadeye then up and from inboard out through the middle hole in the upper. Continue passing the laniard through the remainig holes. You will end up with the laniard passing from outboard in through the last hole in the lower deadeye. The end of the laniard is then hitched around the shrouds where they cross above the deadeye.
It is best to leave some extra length on the shrouds and laniards so that final adjustments can be made later in the rigging.
Set up the shroud pairs starting with the forward most and alternate sides until all of the shroud pairs are done. If you have an odd number of shrouds on each side the final one will go on single.
I hope that helps,
.
Regards,
Great explanation here, thank you (many years later). If this were done inappropriately would one observe twisting in the alignment of both deadeyes? I’m trying to isolate the cause of twisting in my own current shrouds, it seems I may have a few details out of sync.
-
-

The Castaway: The extraordinary survival story of Narcisse Pelletier
by Robert Macklin
Hatchet Australia, 336 Pages
Review:
For anyone looking to take a break from the monotony of field manuals and reference materials, this lovely story traces the life and experiences of a truly extraordinary young man during the late 1850's, who through the rather normal circumstances of life at sea, becomes stranded on the Australian coast. I don't want to share too many details of the story, other than to say that it is an extremely well written and an engaging story. Its not particularly long, so a great weekender.
There are two stories being told, one of Narcisse and the other of the Aboriginal experience as British colonists move ever slowly across the island continent. The culture clash and abhorrent treatment of the Aboriginal people is a stark contrast to the treatment and care that Narcisse receives as an adoptive member of the Night Island People. The story overall is light on sailing, exploring or other details of life at sea but is heavy on the mindset and realities of the young sailor and vastness of the world at that time.
I highly recommend this book.

-
Just stunning. Another one of those "God I hope to get there one day..." builds. Really, really nice.
-
2 hours ago, MEDDO said:
I listen to tons of podcasts and just added the Preble Hall one thanks!
I consume them between audiobooks. My work, long commute and hobbys all allow plenty of listening time. I’m not sure how I’d pass a day otherwise.
-
Another I came across after it was originally shared by someone on a Facebook group for wood ship models. This is a great episode of Preble Hall, and this episode is entirely on Model Ships. https://www.usna.edu/Museum/PrebleHall/index.php#panel6. Episode 13.
Also, a bit more on the volunteers who work in the Ship Model Shop... I suspect some members of MSW might be working there.
https://allhands.navy.mil/Stories/Display-Story/Article/1839521/ships-built-to-scale
-
8 hours ago, stuglo said:
All very interesting but MY main problem is how to replace the irish linen thread I found in a haberdashery shop over 25 years ago( large spools manufactured pre-war). I substituted this for all the ropes supplied in kits, but have now run out. The modern stuff I received, natural or synthetic, is a poor second. Anyone out there with a secret source?
You can still get linen thread.... https://www.colophonbookarts.com/binding
-
Oh dear! Yes, those frames are delicate, but thankfully, easily mended! I actually didn't fair this one too much, partly for this reason but also it just really didn't seem necessary.
-
4 hours ago, tkay11 said:
Welcome to the club of self-inflicted errors of which I am a member. I am sure there is a very large (though uncounted) membership. It's one of the best ways of learning as such errors burn so deep. And take heart: it reveals an independent or perhaps an experimental mind. Some of the world's most remarkable discoveries have been made by ignoring centuries' old advice, though admittedly such discoveries are very rare.
Tony
Wiser words are rarely spoken.
-
A lot of great tweaks on this build. I also note you had the foresight to build in the interior details on the lower deck as you go. I'll never understand why the AL instructions for this kit have you install details later. It makes it sooo much harder!
-
3 hours ago, Ponto said:
From his description in the original post I would gather that his planking has already been completed and the query is over how to establish a reference for the gun port openings.
It was not as obvious to me, but still is good advice for the next build. At the very least Ive found it a very helpful approach after going through the process of cutting holes in a planked hull.
-
1 hour ago, Duanelaker said:
The biggest two problem with all the kits I bought are that 1) they take up an incredible amount of space and 2) it makes it nearly impossible to decide which one is next 😞
The worst too is that by the time you finish one, you likely bought three others to make deciding even harder!
-
40 minutes ago, Duanelaker said:
Also, that last model expo sale ended up with me purchasing a USS Constitution kit for about 215$. Which I thought was a steal lol.
Model Expo has a tempting sale like every week. They got me too with their 40 year anniversary sale.
- BobG and Duanelaker
-
2
-
This may be a more technically difficult approach for a newbie, but I’ve found it easier to add scratch built gun port framing according to where they should be, and then plank around that. Otherwise it gets finicky to drill/file and cutout holes in a nicely planked hull.
- mtaylor and Jim Rogers
-
2
-
17 minutes ago, bartley said:
There seems to be a bit of confusion here with the chemistry. It is a bit pedantic but I think it helps in trying to classify these products.
PVA stands for poly vinyl acetate (not acrylate) Titebond, Elmers and book binders glue are all PVA's but the exact formulation gives rise to different or pH's or acidity. The significant thing about Bookbinders glue and some other "craft" glues is that they are neutral (pH 7). CA is cyano acrylate. This is a very different animal as we know from its properties. Note it is not a polymer in the bottle but polymerizes on contact with moisture. Many acrylates are lachrymatory ((they make us cry) However, Perspex and the polymer in water based paints are also acrylates but they have a different chemical structure and are less harmful.
Hope this iis not too confusing,
John
Yes that's correct, I think Im getting my cyano-acrylate and my poly-vinyl acetates mixed up
")
-
11 hours ago, Duanelaker said:
I discovered eBay for the first time about a month ago and went a little nuts and bought every Midwest kit I could, in the mix I have a Chesapeake bay kayak, an Indian girl canoe, a 24” Canadian canoe and a Chesapeake bay two seater kayak. My single seater is missing the instructions however. I also have their John Alden sloop, day sailer, flattie, pea pod, Boston tender, life boat dory, lobster boat, steam boiler, cat boat, lobster smack...lolMan you DID go nuts!
-
2nd on the Titebond, do not use CA. I love this kit, it was one of my firsts. I recommend also making a visit up to the Canadian Canoe Museum sometime, its not far from you (5 - 6 hrs drive). Great place, and they stock all the great canoe kits in their gift shop. Also check out https://www.amazon.com/Peterborough-canoes-Canoe-Company/dp/096982422X
You can make some great water-slip decals to add a bit of realism too. There are a couple really easy mods you can implement later in the build that would really make it shine.
-
4 minutes ago, AON said:
I read an excellent article by Peter E Demarest in NRG Vol 56, Spring issue 1 (2011) pgs 57-58 regarding CA glue attacking white metal, copper and cotton/linen fibres (scale rope).
There was a followup letter by the same fellow in the next issue pg 117.
Concerns for off gases over time in a confined space (display case) ?
I've also read online (https://en.wikipedia.org/wiki/Cyanoacrylate) that it can have an exothermic reaction with wood and leather! But then it is sold to be used on wood (?).
Any search I've done list the pH of CA glue as "not applicable".
I've always thought yellow and white wood glue to have a pH of about 4 to 5.5
I've also seen and read about the white glue being diluted and used in rigging (i.e. making faux splices).
Your comments are food for thought.
I am now looking into book binders glue.
Thank you Allen Ed for the additional info on Bees wax.

Bookbinders glue is a poly-vinyl acrylate, so not much different than wood glue. Wood glue and/or PVA is will be your most inert adhesive over the long-term. There are other more stable adhesives out there that we rare book conservators use as alternatives to PVA for longevity, but those are impractical for use in ship-modeling.
- Duanelaker and mtaylor
-
2
-
1 hour ago, druxey said:
Leave enough pass space for a chair with you seated on it!
Indeed! I use a stool actually, and it should fit nicely under the bench when not in use. While seated, yes it might get tight, but one of the reasons I use a stool is that it is easily moved here and there to get out of the way.
-
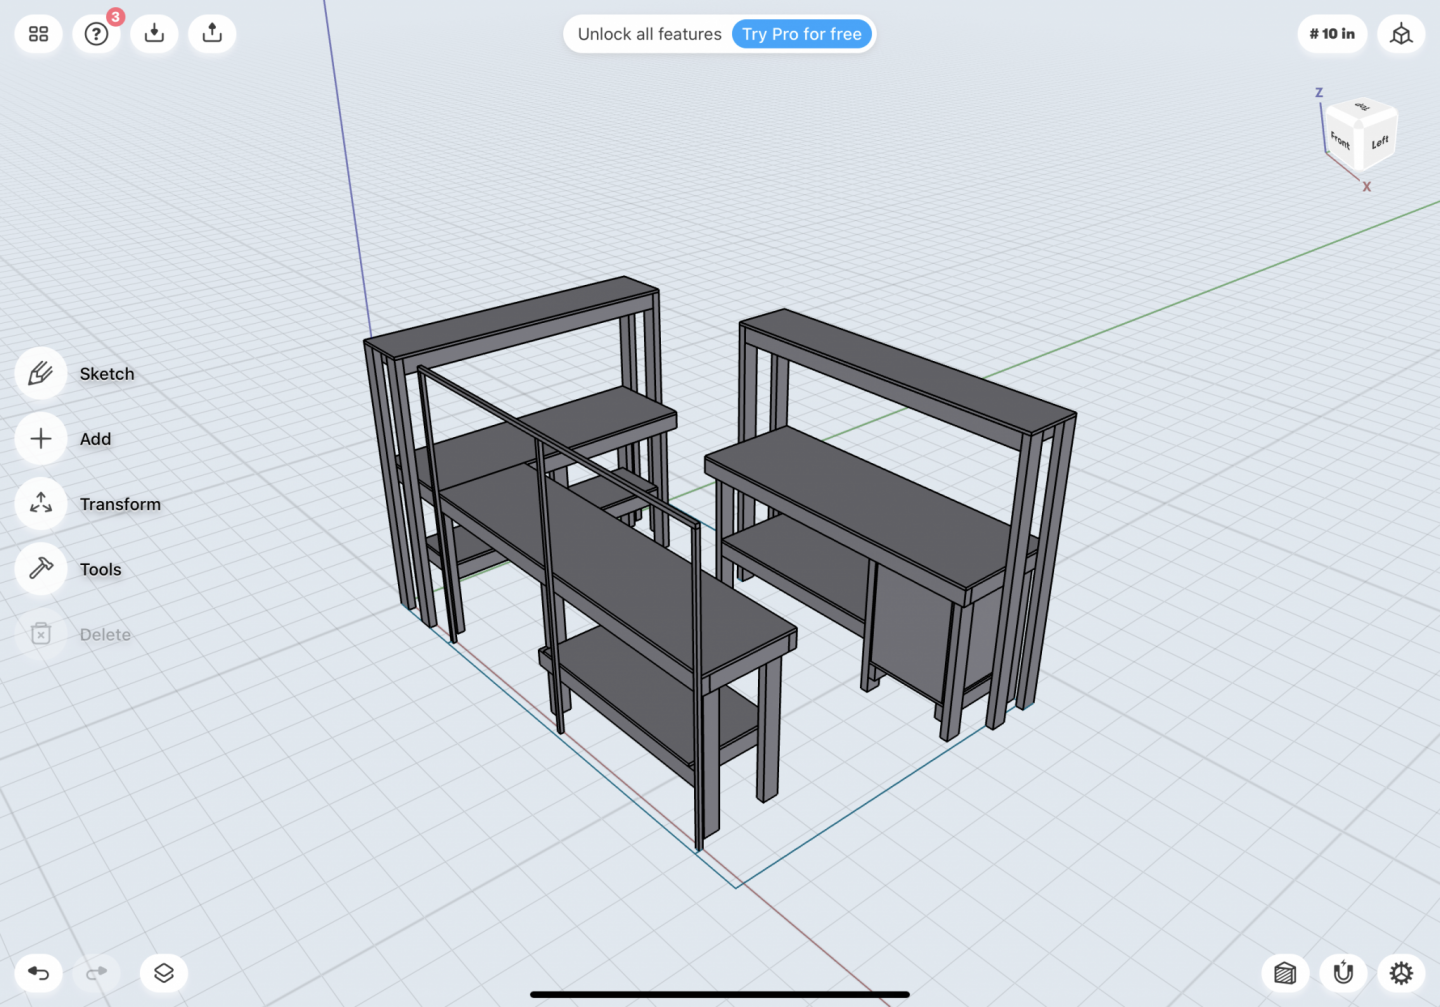
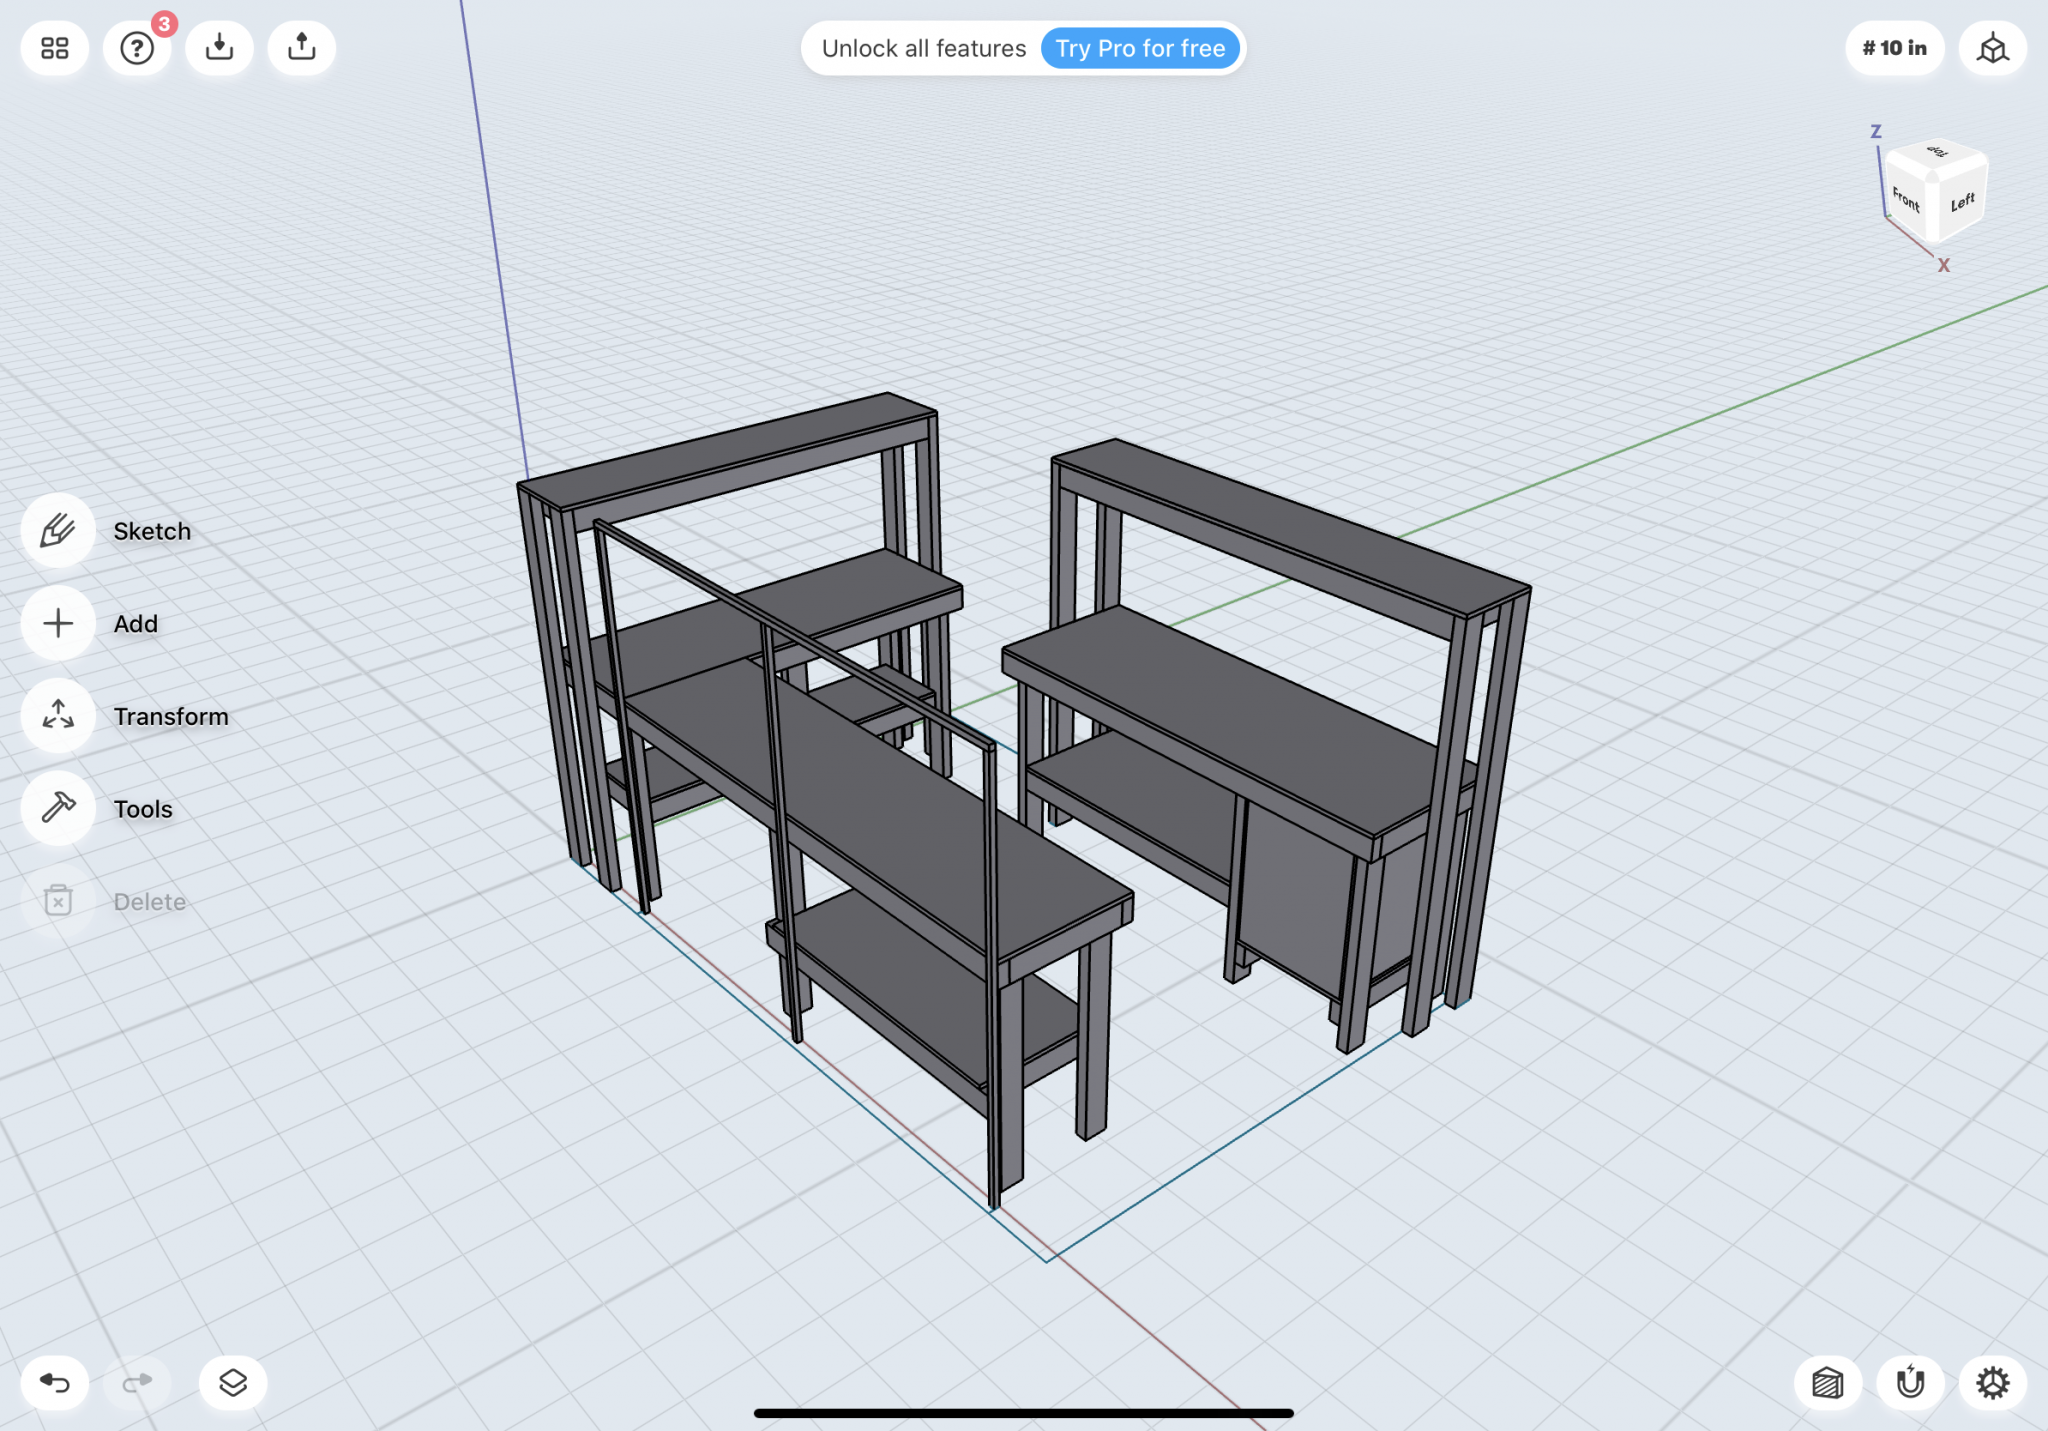
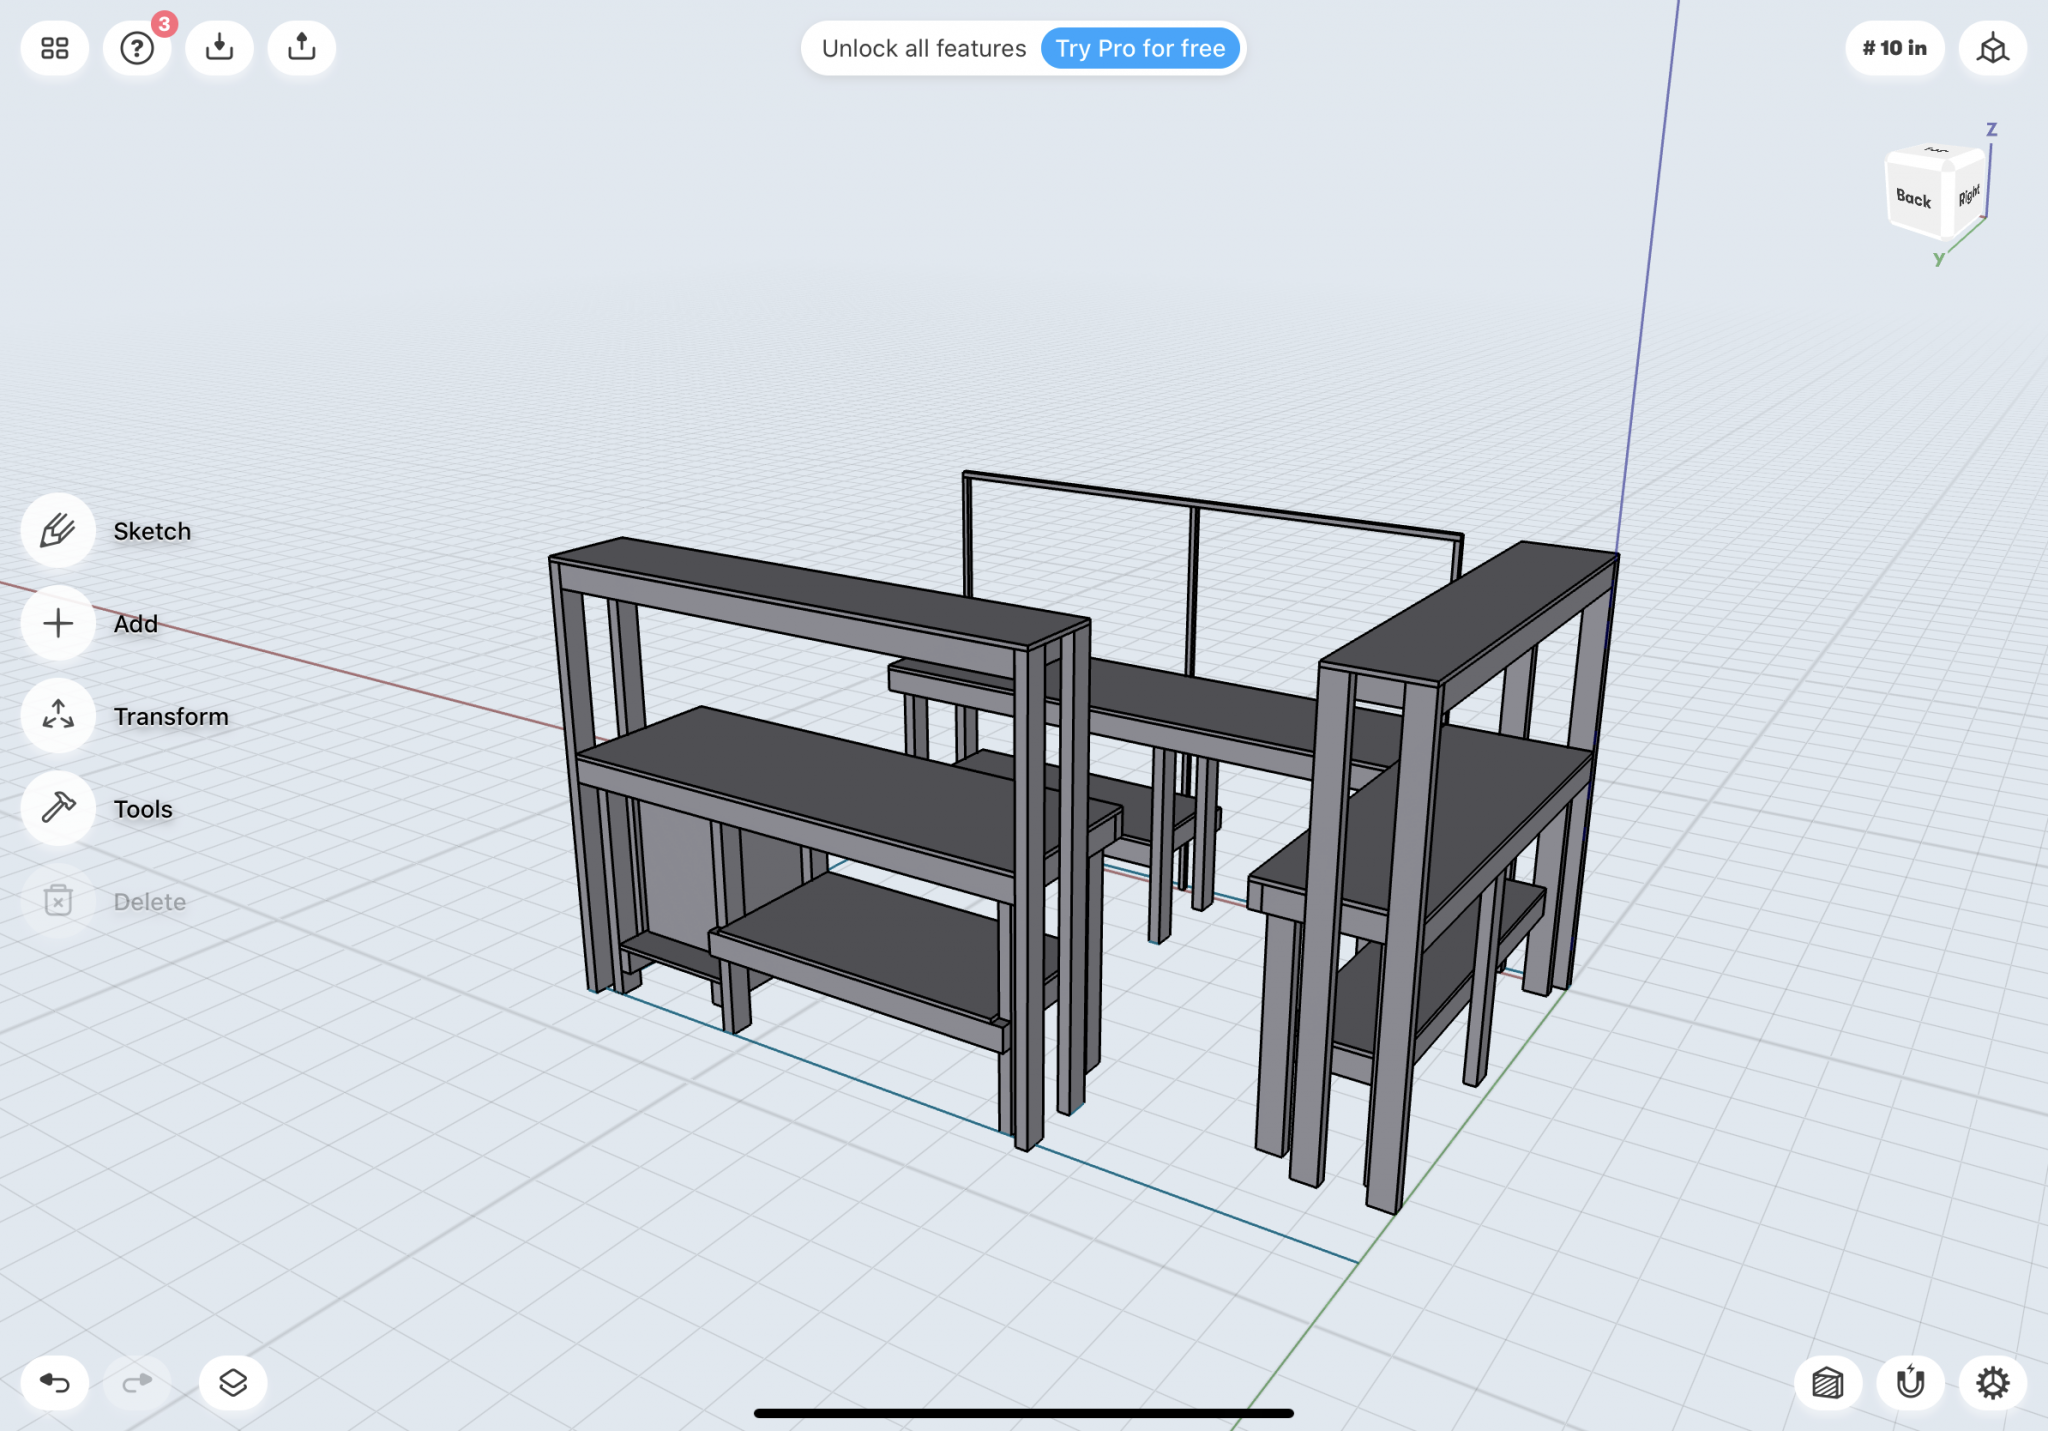
Thanks for all the great ideas. Ive been working on a draft design for new benches and plan to price that out once I work up a lumber list. For now, Ive got to translate the blueprints to a cultist, then to a lumber list.
As Ive said previously Ive got very limited space, roughly 11' x 7' 4" (in the garage). What I want is a LOT of surface, place for plans (out of the way) and plenty of peg board, shelving.
In these plans there are two built in overhanging shelves mainly to mount shop lights to. On the far wall, framed in 2x2 will be half custom cork board for plans measuring under 30 x 40" (I've yet to see plans at 40 x 60" but I may have to cross that bridge when I get there. This may already accommodate that. All surfaces are 24" deep, stand at 41.5" high (I mainly work standing at 6') with one sitting area (kneehole).
I used Shapr3d (Free Version) on an iPad to work this up. I found it amazingly versatile, powerful with a very quick learning curve. Ive never used CAD anything before, granted this is all building with blocks so how hard could it be. Also, the entire thing is 2x4 and 3/4" plywood.


Airbrushing without external exhaust
in Painting, finishing and weathering products and techniques
Posted · Edited by Justin P.
Ill weigh-in as someone who uses airbrush techniques in my work all the time. During a recent studio renovation we had our university Environmental Health and Safety come do a instrument based analysis of our use of hobby-grade airbrush using solvent based, water based and lacquer based materials. We DO NOT use a spray booth. Our EH&S people found that the level of airborne particulates and fume exposure were below the minimum threshold to require any more PPE (personal protective equipment) than Goggles and an N-95 rated respirator (with a good seal; i.e no beard). This was important as anything more than that would have required a higher degree of PPE and thus medical clearance to wear. To be clear they tested us during a typical use scenario of up to 30 minutes of continual spraying in a confined space (approximately 14 x 20' room) using hobby-grade equipment.
Most of the advice here meets the recommendation that you have good airflow (at least a fan) and lung protection (essential). The spray both really only protects your working areas from over-spray. For you bearded guys... the straight forward opinion we received was that your beard basically ruins the effectiveness of the N-95 mask, and you should consider something more substantial.