
HOLIDAY DONATION DRIVE - SUPPORT MSW - DO YOUR PART TO KEEP THIS GREAT FORUM GOING! (89 donations so far out of 49,000 members - C'mon guys!)
×


Louie da fly
-
Posts
7,989 -
Joined
-
Last visited
Content Type
Profiles
Forums
Gallery
Events
Everything posted by Louie da fly
-
 Well, it's a bit of both. But books are the best way of gaining the theoretical information (depending on the book - some are pretty useless - but there's a whole section of the MSW forum that deals with masting, rigging and sails, and I just used the search function for "books on rigging" and found this which would be appropriate to ships of Thermopylae's period and there's probably others among the search results if you care to look further. Then building the models gives you the practical experience and you get to see the inter-relationships of all the ropes, and how it's all a balance of forces - some pull this way, others balance them by pulling the opposite way - for example, the stays keep keep the masts from falling backwards, the backstays keep them from falling forwards and the shrouds stop them falling sideways (and forwards). If you're doing a clipper, the above book is probably ideal. Other books are more appropriate to other periods. If you have further questions, it's probably best to ask them in the "masting rigging and sails"section (but first do a search - your question may already have been answered); then you don't have to worry about hijacking someone else's thread (which is not recommended - but heck, you have to find out somehow).
- 74 replies
-
- 4
-

-
- mantua
- thermopylae
- (and 1 more)
-
WalrusGuy, ask away - there are no "stupid questions", and those who know about this stuff are probably checking on this log every now and then. I'll leave it to those more knowledgeable to give the proper information, but I'm pretty sure that for a start those braces (the ropes at the ends of the yards) should lead aft, not forward, on the fore and main masts. [Edit] Damn! Jim Lad beat me to it! That's the trouble with both being in the same time zone . . . [/Edit]
- 74 replies
-
- 3
-
-
- mantua
- thermopylae
- (and 1 more)
-
Translation help needed - Renaissance German
Louie da fly replied to Louie da fly's topic in Nautical/Naval History
Aha! Did an image search for Sibenik 1486, and voila! Not perfect, but certainly better. -
Liteflight, General Sir Charles Napier, when he subdued the Indian province of Sindh, is reported to have sent to headquarters the single word "peccavi" - I have sinned (a pune or play on words, as Terry Pratchett says). Turns out someone else really came up with it, but why let the facts spoil a good story? Intertwingled - I like it. 1mm=1 inch - well, almost - that would be a scale of 1 to 25.4. Close enough, I suppose . . . Having been raised on Imperial then having had to convert to metric later in life - and working as a building designer, having to convert drawings from 1"=8 feet (1:96) to metric 1:100 (so close and yet so far . . .). And converting links to metres on Site Plans (as everybody knows, 100 links equals 1 chain, because there are 100 links in a surveyor's chain, and a chain is 66 feet, the length of a cricket pitch, and so 1 link equals 1/100 of 66 feet = 66 x 0.3048 metres, divided by 100 = 0.201 metres - or about 8 inches in the old money - oh, it's all good fun till someone loses an eye!) And don't get me started on avoirdupois! Sorry, rambling again. Spending too much time at home. Back to the subject at hand, laser cutting your own scrollwork sounds like a plan. Metal might have its advantages, but it would be harder to round the edges than it would if you used timber. Not impossible, just more work. It might well be worth investigting the veneer greeting card method - assuming it wasn't prohibitively expensive. I'm not sure, though, whether greeting cards come under "essential services" in the current climate . . . Still think it’s a strange place to have an opening, but probably there was so much water everywhere it made little difference. To me it all seems very sensible and practical. It seems to me that it would be impossible to make the area under the forecastle deck watertight, and having water under there would affect the trim of the ship quite badly. Trying to access that space to bale out would be murder, so why not just let the water slosh around into the main body of the hull where you could get at it?
-
Thanks, Bigpetr. I don't need it at the moment (too busy manufacturing arms!), but I'll keep your kind offer in mind for later.
-
Hi Devildog.Looks like you're making good progress, and I agree with the assessments of the others. One point is that with that very tight curve at the stern you might find planking there a bit of a challenge. Steaming should help a lot, but you might find you have to try it several times before you get it exactly right. If that's the case, then do it over and over again, rather than settle for "almost right". You'll be glad down the track, because otherwise it will sneer at you every time you look at it, and remind you that with a bit more patience you could have got it right - don't ask me how I know. And this applies to every aspect of the model.Patience and persistence are what it's all about (it's not a race).
- 74 replies
-
- 5
-
-
- mantua
- thermopylae
- (and 1 more)
-
I am very impressed by your ability to think "outside the box" regarding materials and techniques. I've used toothpicks occasionally, but you've incorporated so many everyday things into your build, giving them a whole new life, instead of relying on the stuff that everybody else uses. I applaud your initiative and ingenuity, and I'm looking forward to seeing your further progress..
- 19 replies
-
- 2
-
-
- golden yacht
- card
- (and 1 more)
-
The pictures certainly suggest that's how they were made, but until we find a real one, we can only use "best guess".
-
No, not Celtic! This is an early Viking style - gripping beasts, not knotwork. (Though perhaps Celtic-influenced). Back in my re-enactment days I did a bit of knotwork. It's amazingly difficult to get it all to work together, and just as you think it's all ok you find this piece of tendril is supposed to go under that piece but goes over instead, and there's no way you can fix it without starting all over again! Oh, come on now. Only 48, really! We still say that in my family. And I love "God in His wisdom made the fly And then forgot to tell us why."
-
Looking good, Andrew. Nice that the venetians have turned out to be useful. We threw out a whole bunch of these at one point, but I think they were MDF. I'm not sure which are the access holes - are they the ones the red fabric is draped through? And are these frames the same ones you can see right up at the bow in the top photo of the ship itself , or are they the second frames that support the back of the small decks? Lubricity? Yes, I know what it is, but I would probably have said viscosity, though if it's for lubrication I suppose that's a more appropriate word . . .
-
Well, I'm glad you've worked out a sequence of actions. Did my suggestions make any sense at all? Just be aware that the figurehead on the actual ship isn't squared off, and in fact it's in the form of a serpent, head and all. And the other end is the tail. I think the first photo is quite instructive as to the actual form and layout of the decoration. The source I got the second photo from (Pinterest, I'm afraid) had a note that the figurehead had been "restored" (which could mean anything, I suppose - depends on the condition the figurehead was in when found). But when uncovered the ship looked like this: Presumably the figurehead was somewhere among the spoil pile . . . PS: I grew up with the Ogden Nash book "Versus". It contained such gems as the poems about Isobel and Pendelson Birdsong (a wise child - he knew his own father), and of course the animal poems - "Who wants my jellyfish - I'm not sellyfish" and "The camel has a single hump, the dromedary two: Or else the other way around - I'm never sure, are you?" [Edit: You're probably already aware of the discussion on the Oseberg ship going on at [/Edit]
-
Thanks Andrew. I'll keep this tip in mind.
-
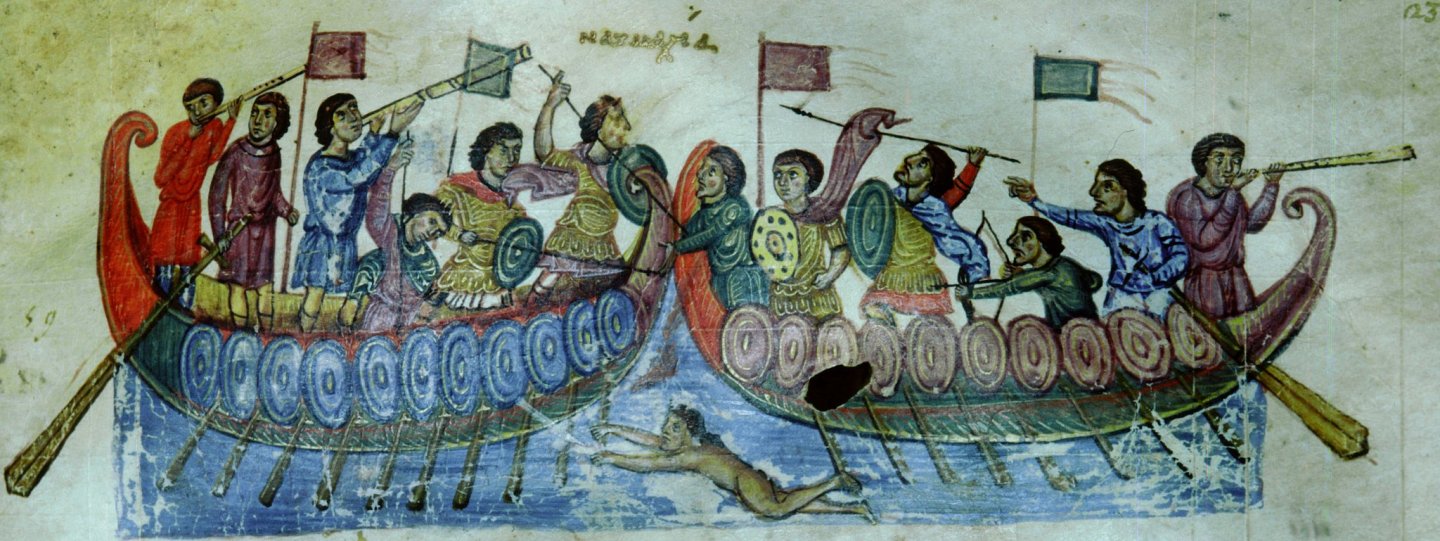
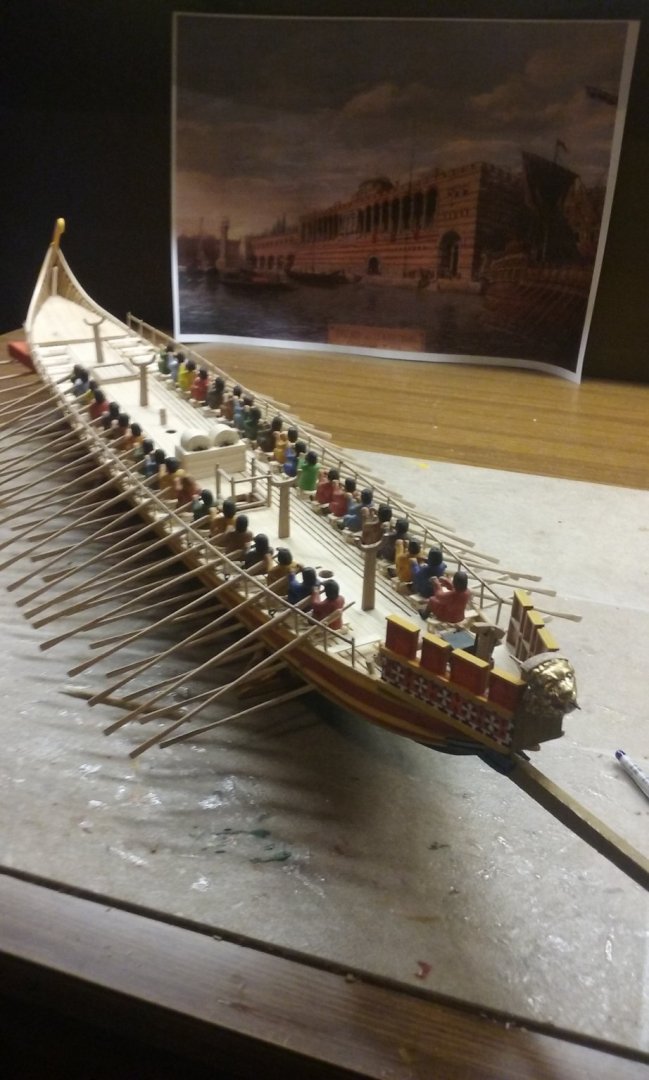
Thanks everybody for all the likes and comments. Christos, glad you like the background. There was a discussion earlier in the build regarding the oarblade width - I was also worried they were too narrow, but (i) they had to fit through the oarports which are copied from one of the Yenikapi galleys, (ii) they were based on Byzantine illustrations (though if I had to do it again I'd make the blades taper more slowly, so the blade would come higher up the shaft as shown here) and (iii) I was assured that this is a representative width for an oarblade propelling a decent sized vessel - I've had a quick look for it in the (45 pages of) my build log but can't find it at the moment. Banyan, that's a tempting thought, but I think I'd be happy just to blow the picture up bigger so it forms a background. There's another one that's even nicer (got it off Pinterest) which I'd like to use even more than the one above. But each of them contains a picture of a dromon that I don't believe is correct. I could probably photoshop it out, though, or just put the model in front so it can't be seen.
-
I like the blue-red-blue-yellow-blue, 7th from the top. I hadn't thought of the Bayeux Tapestry for a colour guide, but of course all the ships have alternating colours in the planking. Doubt has been cast on th "reality" of the colours in the BT (which has green and blue horses, among other things), but every now and then a discovery comes up that confirms its accuracy - such as the horizontal stripes on the mound (known as a motte) that the Norman fort at Hastings is built on - Turns out that when they excavated one, it was built with alternating layers of different materials . . . By the way, IIRC they found yellow (orpiment) paint on the head of the steering oar of the Gokstad ship.
-
Translation help needed - Renaissance German
Louie da fly replied to Louie da fly's topic in Nautical/Naval History
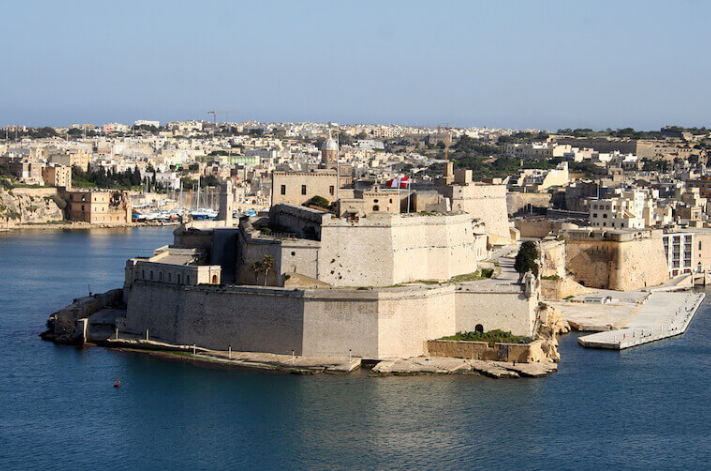
Thanks, Matle. Von Grünenberg, as is to be expected from a member of the mediaeval/renaissance ruling class, was almost obsessed with heraldry, and I'd be prepared to believe that every coat of arms portrayed is accurate. Yes, that one I knew from the text. But the fortifications shown are not as they are now. Either the artist got it wrong or (more likely) they were rebuilt to cope with the new more powerful cannons coming into use at this time. Tall walls and tall towers were vulnerable, and new, more compact forms were coming in - see the fortifications of Malta which were built in the first half of the 16th century. [Edit]Compare this with the marine gate at Rhodes, built when artillery wasn't such an issue, and the main thing to guard against was people scaling the walls. So walls were built very high, with battlements to deter climbers and infantry. Cannons changed all that - one of the main reasons the Turkish conquest of Constantinople succeeded. And here's some information about von Grünenberg himself - https://www.petersommer.com/blog/another-view/gruenenberg-1486-croatia-greece - apparently he was the artist! And you can find the whole book at https://digital.blb-karlsruhe.de/blbhs/content/thumbview/7681 - amazing! I'm very glad I followed this up. Strangely, one of the pics I'm most interested in - of Sibenik in Croatia (because it has a great picture of a carrack in it) in this version the ship is different. This is the one I'd like to get in more detail: it's attributed to von Grünenberg And this is what the above archive has: Same city, same configuration, same coat of arms (though reversed out), but different. Presumably they re-drew the pic for another edition. Dammit! Oh, and if you want some more carracks, the Peregrinatio in Terram Sanctum (Pilgrimage in the Holy Land) by von Breydenbach has some good pictures; https://www.alamy.com/stock-photo/von-breydenbach.html [/Edit]
-
And it's a particularly good reproduction of the "Chinoiserie" style of lion fiurehead that was so popular at the time, right down to the expression on its face.
-
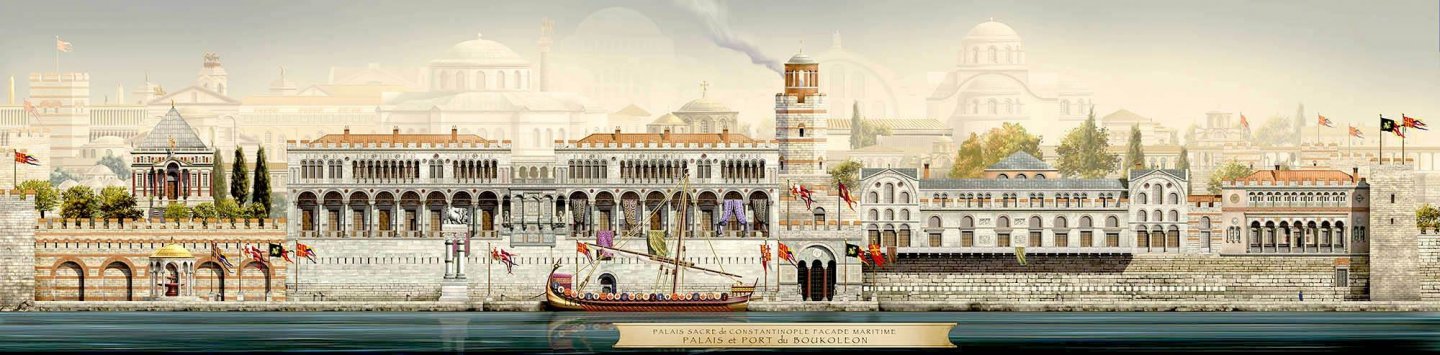
Some more oarsmen, and a nice background picture. It's a reconstruction of the Byzantine harbour of Theodosius (where the Yenikapi ships were found). It would be good to make one of those background pictures big enough to look like it's a real background, but I'll have to wait till lockdown is over so I can get to a shop that does it. My wife tells me I have to stop making these figures, otherwise I'll go blind. I've decided I'll only do it till I need glasses. Oh.
-
I'm following your log. Coming along well already. That's a very cute photo of your daughter and grandson.
-
I'll pull up a chair, if you don't mind.Looks like an interesting project, and you're off to a good start. Regarding the orientation of the photos, I've had success saving the photo to a file on my computer, then rotating it and re-saving it if its orientation was wrong, and only then uploading it to the build log. Sometimes it's up the right way in the file but wrong in the build log. If that's the case, I delete the uploaded one from the log and go back and rotate it again till it all comes out right. Others who are more tech savvy might have a better way to do it, but this seems to work for me. Regarding rigging, there's a whole section in this forum just related to it. Just go to the home page and you'll see it about halfway down the page. Rigging is very date-specific - twenty years can make a big difference. There are books out there which others should be able to refer you to (not my field - I know nothing baout the rigging of this period) which should be able to help you a lot. Also look at other Thermopylae build logs, and perhaps others from ships of the same time like Cutty Sark, which should give you some pointers. BTW, just a bit of historical interest, "Thermopylae" means "hot gates" in Ancient Greek. The "gates" were the narrow pass across the mountains, the "hot" was because there were hot springs there. Looking forward to watching progress on this one.
- 74 replies
-
- 3
-
-
- mantua
- thermopylae
- (and 1 more)
-
new member from Hillsboro Oregon USA
Louie da fly replied to bruce1946's topic in New member Introductions
Well, certainly no problems with your ship modelling abilities - I'm impressed! I agree with Bruce D - once you've settled on a powerplant you will narrow down the list of kits considerably. You could also consider scratch-building if there are no kits that fit the bill sufficiently. But that means going over to the Dark Side . . . Nothing to do with the subject, but I remember the Two Ronnies TV show back in the 70s, where Ronnie Barker answered "viewers' mail". A Barking viewer wrote in to ask how to stop barking. He was referred to a Tooting viewer with a similar problem . . . -
You may already have these, and not so much to change anything in your model, but for additional information that might be of use in resolving questions about construction details, you might like to look at https://www.academia.edu/19499820/Construction_Features_of_Doel_1_a_14th_Century_Cog_found_in_Flanders?email_work_card=view-paper https://www.academia.edu/27506746/Doel_2_a_second_14th_century_cog_wrecked_in_den_Deurganck_Doel_Belgium https://www.academia.edu/40371597/The_IJsselcog_project_from_excavation_to_3D_reconstruction
-
Very true. I have to force myself to stay focussed on my current build - otherwise I'd be starting all kinds of new ones. I have a list a mile long of models I'd like to make, and it takes a considerable mental effort to keep on the same one and get it finished, particularly when I'm doing something repetitve and boring, but necessary to finish the model. Even now I've got two under way rather than one, but I've at least put one on hold till the other is finished.
- 179 replies
-
- 7
-
-
- shipyard
- wütender hund
- (and 1 more)
-
That's a very nice bit of planking, Lapinas. You can be justly proud of it.


