


Louie da fly
-
Posts
7,991 -
Joined
-
Last visited
Content Type
Profiles
Forums
Gallery
Events
Everything posted by Louie da fly
-
 Making good progress, Charlie. And a lot of thought going into the configuration of the model. But I hadn't realised the cutter's masts had been made of Q-tips! Admit it, though - you just wanted a Byrnes table saw, whether the build required one or not . . .
- 362 replies
-
- 1
-

-
- active
- revenue cutter
- (and 1 more)
-
Very good work, Rodolfo. It's good to see that you're not just accepting what the kit manufacturer tells you, but changing the model where it doesn't agree with historical evidence. It's looking very good. Nice crisp work.
-
Of course there are girl dragons! Otherwise we'd never have the pitter-patter of little dragon wings! BTW if you want to reduce a photo size once it's inserted in your log, double click on it and a menu will come up allowing you to reduce the size - you can't increase it but that's not usually what's wanted anyway. To keep the ratio of vertical to horizontal sizes the same, click the appropriate box in the menu. And if you don't like it you can cancel -or else hit the undo symbol in the task bar at the top of your post.
-
Nice work, Balclutha!
-
New Member - Ranger, Spruce Goose, Tippecanoe, The Dinghy
Louie da fly replied to Chuck L's topic in New member Introductions
Me too. My wife saw the footage and immediately said TOO exciting! -
New Member - Ranger, Spruce Goose, Tippecanoe, The Dinghy
Louie da fly replied to Chuck L's topic in New member Introductions
I really don't know if there are models available, but your question prompted me to look here - What a ride! -
Pulling up a chair to watch! If you have any questions, as a Viking period re-enactor in a previous life I may be able to help with detail questions (like - no horned helmets, please!) The Oseberg ship is apparently the funeral ship of Queen Asa (Oseberg is named after her), and archaeologists found two women's bodies on board - one presumably the Queen and the other probably a servant woman, probably killed as a sacrifice to accompany her mistress to the other world. I haven't revisited the information recently, but last time I looked they didn't know which woman was which, but one was quite old and had mis-shapen feet, and wore custom-made shoes to compensate. Not sure if you already knew but when the Sutton Hoo ship was unearthed nothing remained of her timbers and they had to very carefully dig out her shape by the stains in the sand caused by the (vanished) iron nails. I've been twice to see the Sutton Hoo treasure in the British Museum - amazing stuff - the gold and garnet work looks like it was made yesterday! By the way there is now a group in the UK building a full-sized replica of the Sutton Hoo ship - see https://saxonship.org/ Though the kit has inscribed decorative carving you might like to look at photos of the original, which is even more complex and amazing (via a google image search) - though I don't know how possible something that intricate would be to duplicate at 1:25! Oh, and when you get to the decorations on the shields, you might like to look at http://members.ozemail.com.au/~chrisandpeter/shield/shield.html - Christobel and Peter are friends of mine from way back. Their home page is worth a visit, too. They're very hot on historical accuracy. Have fun with it. BTW, where in Melbourne are you? (Not that I can visit at the moment anyway, you understand . . .).
-
Thanks, Andrew. I've set myself up to follow your build for the Oseberg ship. Looking forward to seeing your progress!
-
Welcome to MSW, John. I second JJT's advice to start a build log for your model. A great way to get help, advice and encouragement.
-
Hi Swallowtail and welcome to MSW. Packing out a bulkhead is something that often becomes necessary in a build. Much as we would like to believe kits came from the manufacturer completely without faults, unfortunately this is not so, and corrections "on the run" are sometimes needed. What you're doing looks very good. I would strongly suggest you start a build log - it's a great way to get feedback from other modellers, plus encouragement, help and advice, often from those who've already encountered and solved the problems you may face. Instructions on starting a build log are at Looking forward to seeing your further progress. Best wishes,
-
Oh, that makes sense. I thought you were planning to do a bit of your own extra decorative work. Regarding figureheads, it was apparently a very bad thing to have dragon heads attached to the ship in your own home waters - it angered the local spirits/trolls. OK when you were attacking someone else - who cares what their trolls think?
-
Looking good so far. I'll leave it to others more experienced to give advice on the twisted deadeyes, but I'm sure there's a known solution to the problem.
-
A very nice job of restoration that keeps the spirit of the original. Looking forward to the rigging.
-
By the way, there's some really good stuff in the Maritime Museum in Malta (in Birgu, facing Senglea) - https://www.modelships.de/Museums_and_replicas/Malta_Maritime_Museum/Malta_Maritime_Museum_eng.htm
-
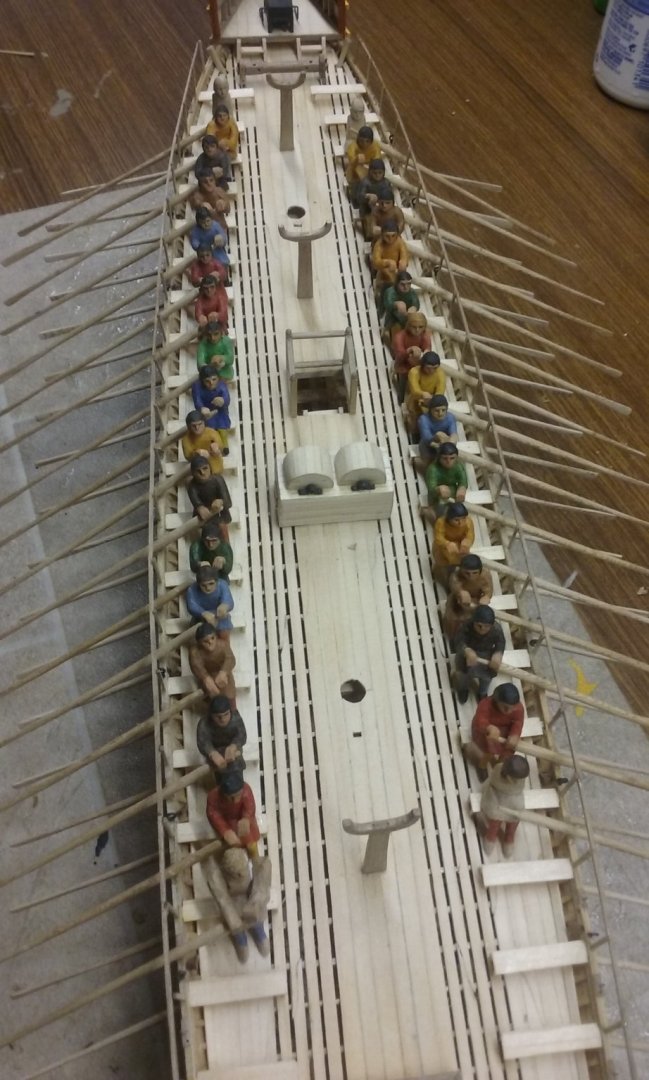
(Blush) You say the nicest things . . . It's more like pain-killers to my left hand (which holds the fiddly bits while I carve with the right). Only 9 more oarsmen to carve arms for. I hope I haven't done myself irreversible damage . . .
-
Very nice work, Glenn. It looks very good.
- 778 replies
-
- 4
-
-
- cheerful
- Syren Ship Model Company
- (and 1 more)
-
I'd say yes - have a frame. The stabler the shape as you plank, the better off you're likely to be. And better to be safe than sorry - it'd be terrible down the track to regret not having a frame.
-
Hi, Bigpetr. What kind of carvings are you planning on? There was quite a lot of difference between the Viking decorative styles of different periods - Broa, Oseberg, Borre, Jellinge, Mammen, Ringerike, Urnes. As the Gokstad ship dates to c. 890 AD, it would most likely have had either Borre or Jellinge style decoration - see http://www.hurstwic.org/history/articles/manufacturing/text/norse_art.htm - a google image search will show lots of examples of each style. And except for the Oseberg ship, there haven't been any actual Viking figureheads found in archaeology- some carved bed-ends, posts and a few other things, but never a proper ships' figurehead. What most reconstructions do is base their figureheads on what has been found in archaeology. It's good to see that the theory and practice are working well together. It's looking good.
-
Greetings from Southern California
Louie da fly replied to Allamagoosa's topic in New member Introductions
-
Thanks George. Your own Byblos ship is very impressive too. Another 4 oarsmen complete and another 4 started . . .
-
Very nice crisp work, Jonathan.
-
Hi David and welcome to MSW. Some suggestions for a first build that will introduce you to the techniques but won'toverwhelm with complexity (and time to complete!) is at https://modelshipworld.com/topic/18657-new-to-ship-modelling-but-what-do-you-build-first/?tab=comments#comment-573653 These are all tried and true kits with clear instructions that won't tie you up in knots. I've always wanted to visit Malta. It has an amazing history - and of course those castles!
-
Welcome, Liteflight. A good time to be ship modelling. To start a build log (I take it yours is a scratch build, rather than a kit?), go to and follow the instructions. (Kit logs are similar, but include the name of the manufacturer in the title). You've already succeeded in posting a photo, so you're well on your way.
-
Welcome, Articce. Yes, any type of ship model is very welcome and we even have a place for non-ship models (it's in the "Shore Leave" section). And there are also quite a few ship models made of card, so you're among friends. A build log would be very welcome
