
Supplies of the Ship Modeler's Handbook are running out. Get your copy NOW before they are gone! Click on photo to order.
×


Louie da fly
-
Posts
7,982 -
Joined
-
Last visited
Reputation Activity
-

 Louie da fly got a reaction from Schrader in 10th-11th century Byzantine dromon by Louie da fly - FINISHED - 1:50
Thanks for all the likes and the comments.
PhilB, glad to be of service - but be aware that my ship is lateen rigged, while yours would be square rigged, and the rigging plan is different. And I don't believe you need to have that kind of adjustment at the lower end of your shrouds. I've added some info regarding this to your build log.
Making the blocks was rather difficult - at that scale (remembering that these are copies of real ones from archaeology) I couldn't get a drill bit the right size - the holes had to be drilled with a dressmaking pin with the head cut off. And they don't have real sheaves (pulleys) in slots - I just drilled two holes and carved a fake slot and "sheave" between them. Five sets done so far - another 7 to do; then I'll have enough to set up the shrouds.
In the meantime I've also been working on the guys hoisting the after yard. I got a legth of wire to approximate a straight rope (rope's too flexible) so I could get them all in line. Not a perfect job - some of their feet don't touch the ground! -but when I glue them to the deck and replace the wire with a rope there should be enough flexibility to allow everything to work without the slight deviation from a straight line being noticeable. I don't know if you can see that the hands are based on the photos above of me hauling on the garden hose, but I put a lot of work into that and I'm pretty happy with the result.
-
 Louie da fly got a reaction from Larry Cowden in Oseberg Ship by KrisWood - 1:25 - Vibeke Bischoff Plans
Sounds good. Apart from anything else, you'll be the only one who knows (apart from all of us, of course) that you've deviated from an exact copy of the original.
In my view, they probably didn't get too fussed with exact placement (unless there really is some reason for the frames to be off-square) - all they wanted was something to keep the sides from being squoze inwards by the pressure of the seawater. I doubt that a Viking would get upset with you for doing it this way. On the other hand . . .
-
 Louie da fly got a reaction from Cathead in 10th-11th century Byzantine dromon by Louie da fly - FINISHED - 1:50
Thanks for all the likes and the comments.
PhilB, glad to be of service - but be aware that my ship is lateen rigged, while yours would be square rigged, and the rigging plan is different. And I don't believe you need to have that kind of adjustment at the lower end of your shrouds. I've added some info regarding this to your build log.
Making the blocks was rather difficult - at that scale (remembering that these are copies of real ones from archaeology) I couldn't get a drill bit the right size - the holes had to be drilled with a dressmaking pin with the head cut off. And they don't have real sheaves (pulleys) in slots - I just drilled two holes and carved a fake slot and "sheave" between them. Five sets done so far - another 7 to do; then I'll have enough to set up the shrouds.
In the meantime I've also been working on the guys hoisting the after yard. I got a legth of wire to approximate a straight rope (rope's too flexible) so I could get them all in line. Not a perfect job - some of their feet don't touch the ground! -but when I glue them to the deck and replace the wire with a rope there should be enough flexibility to allow everything to work without the slight deviation from a straight line being noticeable. I don't know if you can see that the hands are based on the photos above of me hauling on the garden hose, but I put a lot of work into that and I'm pretty happy with the result.
-
 Louie da fly got a reaction from BANYAN in 10th-11th century Byzantine dromon by Louie da fly - FINISHED - 1:50
Thanks for all the likes and the comments.
PhilB, glad to be of service - but be aware that my ship is lateen rigged, while yours would be square rigged, and the rigging plan is different. And I don't believe you need to have that kind of adjustment at the lower end of your shrouds. I've added some info regarding this to your build log.
Making the blocks was rather difficult - at that scale (remembering that these are copies of real ones from archaeology) I couldn't get a drill bit the right size - the holes had to be drilled with a dressmaking pin with the head cut off. And they don't have real sheaves (pulleys) in slots - I just drilled two holes and carved a fake slot and "sheave" between them. Five sets done so far - another 7 to do; then I'll have enough to set up the shrouds.
In the meantime I've also been working on the guys hoisting the after yard. I got a legth of wire to approximate a straight rope (rope's too flexible) so I could get them all in line. Not a perfect job - some of their feet don't touch the ground! -but when I glue them to the deck and replace the wire with a rope there should be enough flexibility to allow everything to work without the slight deviation from a straight line being noticeable. I don't know if you can see that the hands are based on the photos above of me hauling on the garden hose, but I put a lot of work into that and I'm pretty happy with the result.
-
 Louie da fly got a reaction from Binho in Oseberg Ship by KrisWood - 1:25 - Vibeke Bischoff Plans
Sounds good. Apart from anything else, you'll be the only one who knows (apart from all of us, of course) that you've deviated from an exact copy of the original.
In my view, they probably didn't get too fussed with exact placement (unless there really is some reason for the frames to be off-square) - all they wanted was something to keep the sides from being squoze inwards by the pressure of the seawater. I doubt that a Viking would get upset with you for doing it this way. On the other hand . . .
-
 Louie da fly got a reaction from BLACK VIKING in Oseberg Ship by KrisWood - 1:25 - Vibeke Bischoff Plans
Sounds good. Apart from anything else, you'll be the only one who knows (apart from all of us, of course) that you've deviated from an exact copy of the original.
In my view, they probably didn't get too fussed with exact placement (unless there really is some reason for the frames to be off-square) - all they wanted was something to keep the sides from being squoze inwards by the pressure of the seawater. I doubt that a Viking would get upset with you for doing it this way. On the other hand . . .
-
 Louie da fly got a reaction from usedtosail in 10th-11th century Byzantine dromon by Louie da fly - FINISHED - 1:50
Thanks for all the likes and the comments.
PhilB, glad to be of service - but be aware that my ship is lateen rigged, while yours would be square rigged, and the rigging plan is different. And I don't believe you need to have that kind of adjustment at the lower end of your shrouds. I've added some info regarding this to your build log.
Making the blocks was rather difficult - at that scale (remembering that these are copies of real ones from archaeology) I couldn't get a drill bit the right size - the holes had to be drilled with a dressmaking pin with the head cut off. And they don't have real sheaves (pulleys) in slots - I just drilled two holes and carved a fake slot and "sheave" between them. Five sets done so far - another 7 to do; then I'll have enough to set up the shrouds.
In the meantime I've also been working on the guys hoisting the after yard. I got a legth of wire to approximate a straight rope (rope's too flexible) so I could get them all in line. Not a perfect job - some of their feet don't touch the ground! -but when I glue them to the deck and replace the wire with a rope there should be enough flexibility to allow everything to work without the slight deviation from a straight line being noticeable. I don't know if you can see that the hands are based on the photos above of me hauling on the garden hose, but I put a lot of work into that and I'm pretty happy with the result.
-
 Louie da fly got a reaction from Chuck Seiler in Nef by PhilB - scale c. 1:50 - Early Medieval Ship
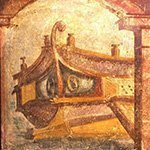
I found some very interesting pictures for how the shrouds were attached to the hull before the advent of deadeyes:
1225-1250 MS. Bodley 764 Bestiary 1256 bibliotheque municipale de Lyon, MS 172
Bodleian Library MS. Bodl. 764 f.74v 1226-1250
I also find it interesting that at least some of the castles are coloured.
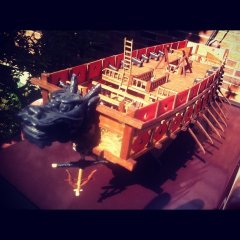
But the great majority of ships of this period don't show shrouds fixed to the outside of the hull - they seem to be fixed to the inside of the planking - so you can't see what the fixings actually are. But perhaps they were done the way the model below has them (though I don't agree with the castles coming to a point at bow and stern - there's enough evidence to show that though they may have tapered inward, they didn't come to a point - it's a pretty model, though).
Yarmouth Saint Nicholas Town Seal Late 13th Century
-
Louie da fly got a reaction from Cathead in Nef by PhilB - scale c. 1:50 - Early Medieval Ship
That was the first thing I thought when I saw the photos (though I was calling them the stempost and sternpost). Yes, as it's balsa you shouldn't have too much trouble trimming them down. You might be best not trying to make them much thinner - too much hassle, though you could make them get gradually thinner and thinner as they rise from the planking and that would probably look good - in fact I think that's what Viking ships did. And I agree, the mast looks too thick. You're committed to the thickness at the base because of the hole the mast sits in, but you could "step" the mast inward at the top of the crossbeam supporting it, and make it thinner from there up, tapering it toward the top.
The headroom on a sailing ship varied but yes, it was always a compromise between headroom on one hand and on the other hand economics (cost of materials) and stability of the ship (too high a ship becomes more likely to capsize) - the smaller the ship the less headroom. The Royal Navy traditionally allows the loyal toast (Gentlemen, the King/Queen, God bless him/her) to be drunk sitting down because of the danger of bashing heads on the deck beams above.
I think having castles would add to the look of the ship, bearing in mind that as this is a fantasy game, historical considerations don't really matter too much and castles look cool - and anyway, there is a style of ship which I call a nef (because it doesn't really have a proper official name and nef meant ship in Mediaeval French), which was effectively a Viking ship with a castle at each end. The earlier type had the castles as pretty much completely separate structures just sort of bunged on, and sitting within the length of the hull - and had a steering oar.
Unknown manuscript illustration of sea battle - source unknown. Seal of the city of Wichelsea, 1274 AD
The later ones had the castles incorporated more into the hull (and sticking out at each end), and some (but not all) had a stern rudder.
British Library Egerton MS 3028 f. 118 1338-1340 Seal of Dover 1305
In this case cardboard is your friend - I have used cereal box cardboard to work things out for my own build with great success, and I have several rice bubbles boxes flattened out waiting to be used for future models.
If you add castles, I'd recommend you extend the deck to cover the midships section (unless you're unreasonably attached to that mast step you did so much work on) - which would also allow you to hide the place where the thickness of the mast changes - and have the castles high enough off the deck to give headroom for people to stand under them - which would probably mean the earlier style of nef which seemed to have higher castles.
It's all coming together nicely. Keep up the good work.
-
 Louie da fly got a reaction from FriedClams in Viking longship by Cathead - Dusek - 1:35 - FINISHED
This really is terrible, and you deserve better for all the work you've done. The only thing I can think of is to cut yourself some new planking from matching timber - if you can get hold of any in the current global situation.
However, firstly it looks like most of plank 24 is ok. So maybe you could cut it back to the nearest frame to where it goes wrong and keep the bit that fits. If 25 and 26 are so far off that the remaining gap (between them and 23) is far wider than a plank should be, then perhaps cut them back as well and replace their ends with something that has a curve which allows 24 to fit properly.
But that all depends on being able to get timber that matches the existing strakes.
That's all I've been able to think of. I hope it's of some help to you.
-
Louie da fly got a reaction from Cathead in Viking longship by Cathead - Dusek - 1:35 - FINISHED
This really is terrible, and you deserve better for all the work you've done. The only thing I can think of is to cut yourself some new planking from matching timber - if you can get hold of any in the current global situation.
However, firstly it looks like most of plank 24 is ok. So maybe you could cut it back to the nearest frame to where it goes wrong and keep the bit that fits. If 25 and 26 are so far off that the remaining gap (between them and 23) is far wider than a plank should be, then perhaps cut them back as well and replace their ends with something that has a curve which allows 24 to fit properly.
But that all depends on being able to get timber that matches the existing strakes.
That's all I've been able to think of. I hope it's of some help to you.
-
 Louie da fly reacted to KrisWood in Oseberg Ship by KrisWood - 1:25 - Vibeke Bischoff Plans
I just read the chapter on how the planks were made in the Saga Oseberg book. Mr Finderup pretty thoroughly lays the debate to rest on the positioning and dimensions of the frames and the plank clamps.
1. There is no systematic pattern to where the plank clamps are located, except that they line up perfectly with the frames. Some are riveted on.
2. The frames are neither perpendicular to the keel nor the centerline. Mr Finderup theorizes this is because it is very difficult to find trees that are exactly symmetrical with branches at exactly the correct angles.
3. The Vikings must have known at least approximately where the frames would cross each plank, otherwise they would not line up with the clamps.
4. Given the above, the builders of Saga Oseberg tried out a few different ways of making the planks. Only two worked. One was to cut a series of somewhat wider clamps along the length of the plank, and then the location of the frame was determined after the plank was attached to the hull, the extra clamps were trimmed off. The other was to identify the exact location of the intersection of the frame with the plank before cutting any clamps, then cut a slightly larger clamp than is needed and fine tune it when placing the frame.
This tells me a few things about how to proceed with my model.
1. Sourcing trees with the correct curves to their branches is not an issue, so I can place my frames however I want as long as the curves of the hull remain the same and I don’t mind sacrificing authenticity for simplicity.
2. Unlike the Vikings, this means I have complete control over the placement of my frames, and therefore I can calculate the locations of the clamps ahead of time.
3. The book goes into great detail about how to actually make the clamps and their dimensions in general (they vary with no rhyme nor reason but can be averaged).
from here on out I think I’m going to go down the artistic license rabbit hole to make a good looking seaworthy model inspired by the Oseberg ship rather than agonizing over getting every detail historically accurate.
This should be fun. 😁
-
Louie da fly reacted to mbp521 in Viking longship by Cathead - Dusek - 1:35 - FINISHED
Eric,
Sorry for all your troubles with this build so far. I’ve had major issues with other builds in the past, but nothing on this scale. Unfortunately this boat is way out of my wheelhouse to offer up any good suggestions as to how to remedy the situation.
One would think that with the way the frames were notched to accept each plank that it would work as a bend and overlap guide as the planking progresses. Obviously this is not the case, and to me seems to be an engineering flaw in the design.
Without having the instructions in front of me it makes it difficult even attempt to understand how things fit together, but from your pictures it looks as though if plank 23 (I think) were wider toward the stern instead of tapering under 22 and 24, things would fit together a little better. Again this is just an assumption on my part going off of the pictures.
However, not to make light of your struggles too much, you could take the Viking approach to this and beat the planks into submission.
Hopefully things will sort themselves out and you’ll soon have a hull to be proud of.
-Brian
-
Louie da fly got a reaction from FriedClams in Viking longship by Cathead - Dusek - 1:35 - FINISHED
You are getting the job done (despite the rotten instructions) and it looks like the end result is going to be very good indeed. But I won't be recommending Dusek to anyone who wants to build a model of a Viking ship.
Keep at it, mate. Every time you come up against one of these problems and overcome it, you not only achieve something with this model but you gain experience, skill and judgment for your future builds.
-
Louie da fly got a reaction from usedtosail in 10th-11th century Byzantine dromon by Louie da fly - FINISHED - 1:50
I've been working on the shrouds and the tackle for them. Woodrat was kind enough to send me drawings of the upper fastening of shrouds on various mediaeval Mediterranean lateeners, and I've based mine on these and other contemporary representations.
I used a clothes peg to hold the calcet upright so I could glue the shrouds at right angles to the sheave (i.e. on the sides of the mast)
It was a bit more difficult on the foremast because I'd already glued it in place, so I had to deal with it standing up instead of lying on the bench. And then I wrapped wooldings around mast and shrouds as in the contemporary representations above.
The next thing was to work on the tackle for the lower ends of the shrouds. Deadeyes were an Atlantic invention, and they didn't come into use in the Mediterranean until the 16th century. Instead, shrouds were held to the hull, and tension adjusted, by pairs of blocks - the lower block single-sheaved and the upper block double-sheaved. Single-sheaved blocks have been found on Byzantine wrecks, but I haven't come across any equivalent finds of double-sheaved blocks. However, triple sheaved blocks have been found, so I extrapolated/interpolated between the singles and triples to create what I believe a Byzantine double-sheaved block would have been like.
Threading these things is very fiddly, and they often act like fencing wire - they have a mind of their own and fly off in all directions right in the middle of the process, and get twisted so you thread through in the wrong direction and have to do it all again. So I adapted a method I've seen in setting up deadeyes, which get the tackles the same length and reduces the problem with twisting.
Rather than strops, the main rope is secured by passing through a hole in the block. I've then glued the rope in an eyelet to approximate the look of an eye-splice, which I believe is most likely how they were attached. The rope for the double-sheaved block is short and ends in a toggle. This will pass through an eye-splice in the main shroud, acting as a quick-release mechanism (this technique is still used on Mediterranean lateeners, though I haven't seen it used on shrouds). The free end of the rope from the single-sheaved block will pass through a ringbolt attached to the side of the hull and be tied off. This leaves the tackle between the blocks, which is used to adjust tension. The free end will be belayed to a cleat near the ringbolt.
When I started organising all this I realised I'd made a mistake. There are in fact three different single-sheaved cleats that I've made copies of. The ones in the shroud tackle have a small through-hole at the end (see photo immediately above) to which the tackle between the blocks is belayed. Unfortunately, I used these ones for the tacks and vangs on the yards, when I should have used the other ones I'd made (which were identical except for the little hole in the end). So I had to undo all that work and swap the blocks around. Annoying, but it had to be done.
As I removed a pair of blocks I replaced it with the correct pair and then moved to the next pair. That way I didn't get things mixed up (very easy to do). I used a clothes peg to keep the yard upright, so the blocks would be hanging vertically from the ends of the yard.
And when the blocks had all been removed I was able to re-use them on the shrouds, which is where they were supposed to have been all the time.
More to come in due course.
-
 Louie da fly got a reaction from lmagna in SS Edmund Fitzgerald by JKC27 - Scale 1/16" = 1ft - as she appeared before sinking on Lake Superior Nov 1975
The song was a hit in Oz as well. I didn't know what it was all about until years later - I thought it referred to some sailing ship or other, not a modern carrier (I never really listened to the words in detail - otherwise the "twenty-six thousand tons" line would have told me I was wrong).
-
Louie da fly got a reaction from FriedClams in Wütender Hund by ccoyle - FINISHED - Shipyard - 1/72
I can't "like" that, but I do know the feeling. But it's retrievable, and it's a beautiful model. Maybe just take a break, have a coffee, come back to it later.
-
 Louie da fly got a reaction from mtaylor in SS Edmund Fitzgerald by JKC27 - Scale 1/16" = 1ft - as she appeared before sinking on Lake Superior Nov 1975
The song was a hit in Oz as well. I didn't know what it was all about until years later - I thought it referred to some sailing ship or other, not a modern carrier (I never really listened to the words in detail - otherwise the "twenty-six thousand tons" line would have told me I was wrong).
-
 Louie da fly got a reaction from Canute in Wütender Hund by ccoyle - FINISHED - Shipyard - 1/72
Good idea. I think I'll make use of it for my own build.
-
 Louie da fly got a reaction from ccoyle in Wütender Hund by ccoyle - FINISHED - Shipyard - 1/72
That's such a beautiful looking ship.
-
 Louie da fly got a reaction from EJ_L in 10th-11th century Byzantine dromon by Louie da fly - FINISHED - 1:50
I've been working on the shrouds and the tackle for them. Woodrat was kind enough to send me drawings of the upper fastening of shrouds on various mediaeval Mediterranean lateeners, and I've based mine on these and other contemporary representations.
I used a clothes peg to hold the calcet upright so I could glue the shrouds at right angles to the sheave (i.e. on the sides of the mast)
It was a bit more difficult on the foremast because I'd already glued it in place, so I had to deal with it standing up instead of lying on the bench. And then I wrapped wooldings around mast and shrouds as in the contemporary representations above.
The next thing was to work on the tackle for the lower ends of the shrouds. Deadeyes were an Atlantic invention, and they didn't come into use in the Mediterranean until the 16th century. Instead, shrouds were held to the hull, and tension adjusted, by pairs of blocks - the lower block single-sheaved and the upper block double-sheaved. Single-sheaved blocks have been found on Byzantine wrecks, but I haven't come across any equivalent finds of double-sheaved blocks. However, triple sheaved blocks have been found, so I extrapolated/interpolated between the singles and triples to create what I believe a Byzantine double-sheaved block would have been like.
Threading these things is very fiddly, and they often act like fencing wire - they have a mind of their own and fly off in all directions right in the middle of the process, and get twisted so you thread through in the wrong direction and have to do it all again. So I adapted a method I've seen in setting up deadeyes, which get the tackles the same length and reduces the problem with twisting.
Rather than strops, the main rope is secured by passing through a hole in the block. I've then glued the rope in an eyelet to approximate the look of an eye-splice, which I believe is most likely how they were attached. The rope for the double-sheaved block is short and ends in a toggle. This will pass through an eye-splice in the main shroud, acting as a quick-release mechanism (this technique is still used on Mediterranean lateeners, though I haven't seen it used on shrouds). The free end of the rope from the single-sheaved block will pass through a ringbolt attached to the side of the hull and be tied off. This leaves the tackle between the blocks, which is used to adjust tension. The free end will be belayed to a cleat near the ringbolt.
When I started organising all this I realised I'd made a mistake. There are in fact three different single-sheaved cleats that I've made copies of. The ones in the shroud tackle have a small through-hole at the end (see photo immediately above) to which the tackle between the blocks is belayed. Unfortunately, I used these ones for the tacks and vangs on the yards, when I should have used the other ones I'd made (which were identical except for the little hole in the end). So I had to undo all that work and swap the blocks around. Annoying, but it had to be done.
As I removed a pair of blocks I replaced it with the correct pair and then moved to the next pair. That way I didn't get things mixed up (very easy to do). I used a clothes peg to keep the yard upright, so the blocks would be hanging vertically from the ends of the yard.
And when the blocks had all been removed I was able to re-use them on the shrouds, which is where they were supposed to have been all the time.
More to come in due course.
-
Louie da fly got a reaction from Chuck Seiler in 10th-11th century Byzantine dromon by Louie da fly - FINISHED - 1:50
I've finished re-making both the castles.
I had to juggle the spacing between the castles and the pump - basically by slotting the inboard columns further into the body of each castle. Note that I've taken off the rear uprights of the side "walls" and moved them inward, and cut a slot into the back of each column where it crosses the floor structure, so the column sits flush with the back of the "wall".
But now there's (just) enough room for someone to get between the pump and the castles on each side. I thought about removing the capitals from those columns so people wouldn't bash themselves against them, but when it's a contest between aesthetics and practicality, aesthetics has to win (ask Frank Lloyd Wright about his beautiful - but leaky - flat roofs!)
I decided to move the castles a little aft to allow more room for the oarsmen to swing, as mentioned by Landrotten Highlander above, and cut into a couple of the benches a little to allow the columns to slot in. It seems to be the best solution.
Unless you look really carefully you can't see that it's been done, and the oarsmen look better without their reach being obstructed by the columns. I'm not quite ready to glue the castles in place - there are other things that need to be done first - but it will be soon.
But in other ways it hasn't been my day. I discovered I'd miscalculated the number of sheaves necessary for the halyard knights - I'm really rubbish at this sort of thing - the halyard block has three sheaves, but the knight needs four so the downhaul can be pulled horizontally back to the bitts. So I had to start again from scratch to make new knights each with 4 sheaves instead of three. That's three versions of each knight I've had to discard as the build has evolved.
And the fore knight was all finished - in fact it had been glued in - when I realised there was something wrong. In drilling the sheave holes (with a hand drill) I'd somehow got them a bit skewiff so the rope which went into hole number three came out the other side at hole number two! And the same with holes four and three. There was nothing I could do about it - I had to pull the knight out (fortunately the glue was still wet ), trash it and start again. So that's yet another knight I've had to discard and re-make!
But now I've finally completed the fore knight - everything's now all square and ok - installed the tackle from it to the halyard block, glued the foremast in place and temporarily strung the block to the mast. The halyard itself and the rest of its tackle will be added later, but the knight and its tackle had to be done before the mast was glued in place.
I think I should have added the shrouds to the mast before I put it in, but in all the excitement I forgot. I think that can be remedied without too much trouble.
Finally, I've decided to go back to "version two" of the sail configuration, with the foresail hoisted and crewmen clinging to the yard unfurling the sail with the after sail, also furled, in the process of being hoisted up. So I get to use those figures I carved after all.
Today I asked my lovely wife to take photos of my hands as I pulled on a garden hose, pretending it was the halyard downhaul, so I could get the hands correct on the carved figures.
That's it for now. Next I have to make a new 4-sheave knight for the after halyard. Wish me luck!
-
 Louie da fly got a reaction from Boxbuilds in 10th-11th century Byzantine dromon by Louie da fly - FINISHED - 1:50
And some more - the front face of the port castle is done. I re-used the arches -once I'd separated them I just had to trim them a bit to fit.
And here's the castle dry fitted in place. Doesn't look too shabby at all . . . you'd never know I'd stuffed up.
Still working on the back of the castle - If it sticks out too much inboard the crew won't be able to get between the castle and the pump assembly.
And here are the blocks for the tacks and the vangs in place on the yards.
I've made four bitts to take various bits of rigging (halyards, sheets).
And here they are in place. (The aftermost one is a bit hard to see because it's mostly hidden behind the aft crutch for the yards.)
-
Louie da fly got a reaction from Boxbuilds in 10th-11th century Byzantine dromon by Louie da fly - FINISHED - 1:50
I've finished re-making both the castles.
I had to juggle the spacing between the castles and the pump - basically by slotting the inboard columns further into the body of each castle. Note that I've taken off the rear uprights of the side "walls" and moved them inward, and cut a slot into the back of each column where it crosses the floor structure, so the column sits flush with the back of the "wall".
But now there's (just) enough room for someone to get between the pump and the castles on each side. I thought about removing the capitals from those columns so people wouldn't bash themselves against them, but when it's a contest between aesthetics and practicality, aesthetics has to win (ask Frank Lloyd Wright about his beautiful - but leaky - flat roofs!)
I decided to move the castles a little aft to allow more room for the oarsmen to swing, as mentioned by Landrotten Highlander above, and cut into a couple of the benches a little to allow the columns to slot in. It seems to be the best solution.
Unless you look really carefully you can't see that it's been done, and the oarsmen look better without their reach being obstructed by the columns. I'm not quite ready to glue the castles in place - there are other things that need to be done first - but it will be soon.
But in other ways it hasn't been my day. I discovered I'd miscalculated the number of sheaves necessary for the halyard knights - I'm really rubbish at this sort of thing - the halyard block has three sheaves, but the knight needs four so the downhaul can be pulled horizontally back to the bitts. So I had to start again from scratch to make new knights each with 4 sheaves instead of three. That's three versions of each knight I've had to discard as the build has evolved.
And the fore knight was all finished - in fact it had been glued in - when I realised there was something wrong. In drilling the sheave holes (with a hand drill) I'd somehow got them a bit skewiff so the rope which went into hole number three came out the other side at hole number two! And the same with holes four and three. There was nothing I could do about it - I had to pull the knight out (fortunately the glue was still wet ), trash it and start again. So that's yet another knight I've had to discard and re-make!
But now I've finally completed the fore knight - everything's now all square and ok - installed the tackle from it to the halyard block, glued the foremast in place and temporarily strung the block to the mast. The halyard itself and the rest of its tackle will be added later, but the knight and its tackle had to be done before the mast was glued in place.
I think I should have added the shrouds to the mast before I put it in, but in all the excitement I forgot. I think that can be remedied without too much trouble.
Finally, I've decided to go back to "version two" of the sail configuration, with the foresail hoisted and crewmen clinging to the yard unfurling the sail with the after sail, also furled, in the process of being hoisted up. So I get to use those figures I carved after all.
Today I asked my lovely wife to take photos of my hands as I pulled on a garden hose, pretending it was the halyard downhaul, so I could get the hands correct on the carved figures.
That's it for now. Next I have to make a new 4-sheave knight for the after halyard. Wish me luck!
-
 Louie da fly got a reaction from Edwardkenway in SS Edmund Fitzgerald by JKC27 - Scale 1/16" = 1ft - as she appeared before sinking on Lake Superior Nov 1975
The song was a hit in Oz as well. I didn't know what it was all about until years later - I thought it referred to some sailing ship or other, not a modern carrier (I never really listened to the words in detail - otherwise the "twenty-six thousand tons" line would have told me I was wrong).