HOLIDAY DONATION DRIVE - SUPPORT MSW - DO YOUR PART TO KEEP THIS GREAT FORUM GOING! (Only 20 donations so far - C'mon guys!)
×


David Lester
-
Posts
678 -
Joined
Content Type
Profiles
Forums
Gallery
Events
Everything posted by David Lester
-
 Hi Everyone, Here's an update of where I'm at at the moment. The deck is refinished and most of the details have been added. Missing from this picture are the skylight, capstan and wheel, all of which are all ready and just need to be added. I'm going to build the horse blocks too, but will wait until the rail has been added, because they attach to it. I'm still undecided about the flemish coils. I might make a few and set them in place without gluing them before I decide. David
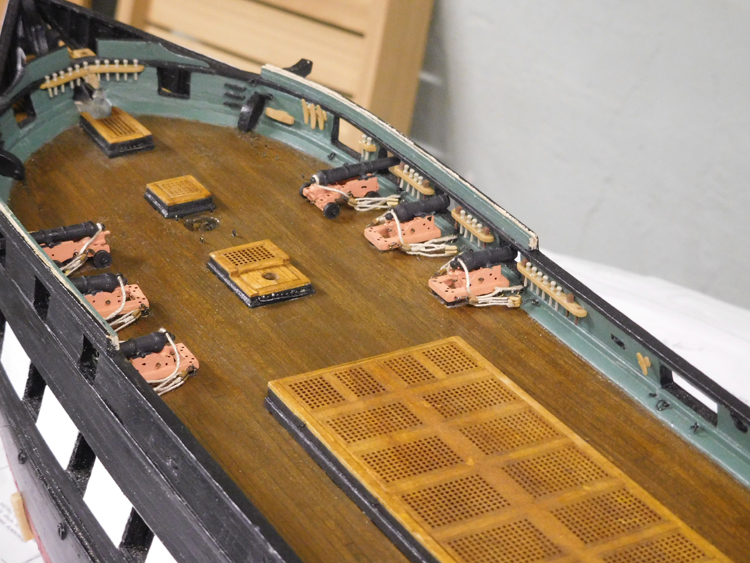
- 117 replies
-
- 8
-

-
- constitution
- model shipways
- (and 1 more)
-
That looks really beautiful Dave. I also took a good look at Clare Hess' build log which you referred to. It's a very nice build too. I'm probably a good year away from finishing Constitution, then I have the Rattlesnake waiting in the wings and now you're causing me to think about my next one after that. Oh dear. David
-
Looks like you're in great shape. Those chisels (and the skill to use them) are ideal for this job. David
- 117 replies
-
- 5
-
-
- constitution
- model shipways
- (and 1 more)
-
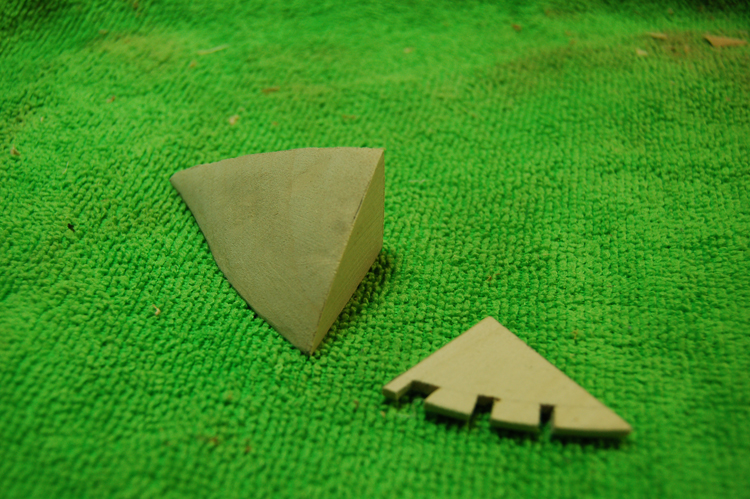
Hi Matt, The notches on the bow blocks are a pain to do, but there is another approach that I discovered and it works well. Make the blocks about 1/8" too short, then make a new piece 1/8" thick with the same profile as the top of the block and cut the notches into this separate piece. After the notches are cut, just glue it on top. That way you'll get very crisp edges on the notches. The picture below shows what I mean. David

- 117 replies
-
- 8
-
-
- constitution
- model shipways
- (and 1 more)
-
Thanks Brian, I'll do a little experimenting and see what I can do to improve the appearance of my pictures. I've been reducing them in size to 650 px x 488 px and then choosing "save for web and devices." This takes them way below the 2mb size maximum. I'll try reducing them less next time. David
- 117 replies
-
- 4
-
-
- constitution
- model shipways
- (and 1 more)
-
Hi Dave, The mast top is just basswood. It all gets painted white and gray. For my camera, I've been using my Nikon Coolpix which is a very little camera with a zoom lens. It's about the size of a pack of cigarettes. I bought it in Venice (Italy) after my old camera bit the dust our first day out. When I was posting at LLS it seemed I needed to reduce the size of the pictures substantially which is what I have still been doing here by force of habit. Maybe I don't need to. I'm still having trouble getting a clear focus for up close pictures. Maybe I'll try my ipad; I haven't been much in the habit of using it for taking pictures, but I'll give it a try next time. David
- 117 replies
-
- 3
-
-
- constitution
- model shipways
- (and 1 more)
-
Hi Don, The trellis turned out well. Thanks for asking. I used a plan I've had kicking around for a long time. It's a pyramid freestanding trellis, technically call a "tuteur", but that seems a bit too lah-di-dah, so I'm just calling it a trellis. David
- 653 replies
-
- 3
-
-
- trabakul
- marisstella
- (and 1 more)
-
Hi Dave, Your planking is looking great. I really like the look of this ship. For some reason I'm always most drawn to the American ships of this era. With your attention to detail this will be a really beautiful model. David
-
Hi Don, I've been following along with interest. I noticed your comments about balsa vs basswood. I prefer basswood regardless of the price. I ordered some balsa for my Constitution filler blocks, but quickly abandoned it. I find it hard to carve, despite its being soft. It tends to break off in chunks unless you're very careful. I went back to the basswood which isn't hard to carve and gives pretty nice results. David
- 653 replies
-
- 6
-
-
- trabakul
- marisstella
- (and 1 more)
-
Hi Matt, You'll find a couple of things like this throughout the build where the plans don't seem to line up with reality exactly right. I had a bit of trouble with the profile of the counter and another area where you will find this problem is the side galleries. They aren't especially difficult to build, but the piece that is the roof of the gallery is too short as shown on the plans. I debated what to do and in the end decided to make and add a filler piece at the aft end of the roof. It's about 1/8" if I remember correctly. I decided I wanted the front end of the roof to line up more or less where I thought it should in relation to the gunport that it's very close too. Overall though, I agree with you that it's a pretty nice kit and it gets easier as you find the "work arounds" for these little issues. Davdi
- 117 replies
-
- 5
-
-
- constitution
- model shipways
- (and 1 more)
-
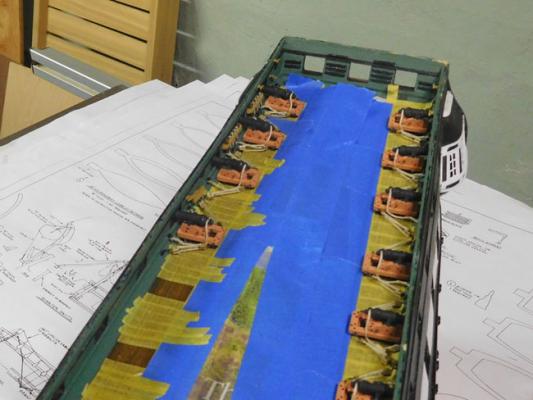
Hi All, Here are a couple of pictures of what I've been doing lately. As I mentioned earlier, while I was contemplating what to do about my deck, I worked on the main mast top which you can see below. When I got back to the deck, got it all stripped down and refinished, I began to add the details back in. I'm working on the gun carriages. As you can see I've become overly cautious about getting glue on the deck again, so I am masking it like crazy, exposing only the areas where the carriages sit. I'll work my way through the whole process like this, and like a surgeon, only expose the immediate area that I'm working on, whatever that might be. Knowing me (and quite unlike a surgeon) as I remove the final bit of masking tape I'll probably drag my sleeve across the deck having just inadvertently dipped it in some glue. But I try not to let me mind go there. David

- 117 replies
-
- 9
-
-
- constitution
- model shipways
- (and 1 more)
-
Breakage of the bulkhead extensions is a pretty common problem and can (and probably will) occur anytime until they are planked. Fortunately it isn't a difficult one to repair. Often the break will have a ragged edge in which case you can even glue the original piece back in place without any problem. David
- 117 replies
-
- 5
-
-
- constitution
- model shipways
- (and 1 more)
-
Hi Brian, Thanks for your imput; very much appreciated. I'm quite interested in the micro saw and mitre box you mention. I have a very old (40+ years) xacto saw and mitre box, but they have seen much hard and inappropriate use over the years and are not functioning at their best. It looks like I could add these two new ones without breaking the bank. David
- 117 replies
-
- 4
-
-
- constitution
- model shipways
- (and 1 more)
-
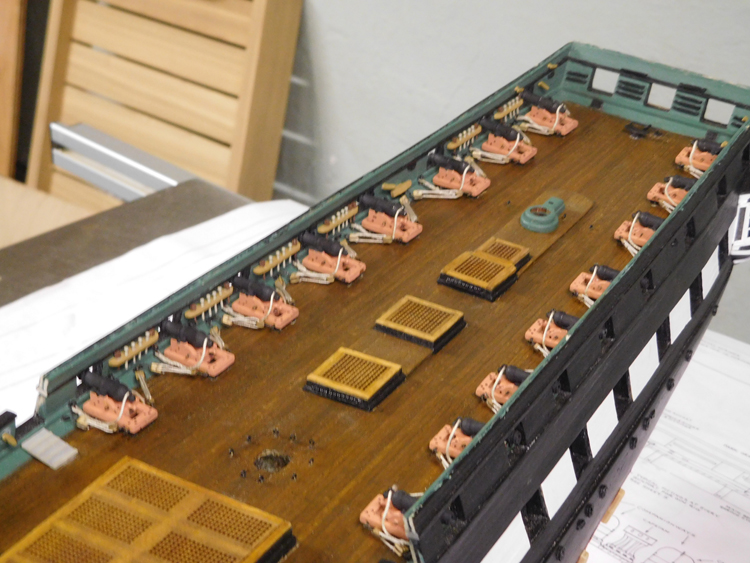
Good Morning All, Just a brief update. I've done quite a bit of backtracking, so no pictures util my next post. I added the four rear gun carriages on the port side and just to compare with the starboard side, I left the flemish coils off. I now had some decisions to made and factors to take into consideration. 1. I was torn between which look I preferred. 2. My rigging on the second set of four was considerably cleaner than on my first set of four 3. If I decided on going without the coils, it would mean removing the first four which would leave quite a mess on the deck where the glue was. 4. I had been a bit sloppy and had two dabs of glue on the deck which I covered with some paint. It was passable but not really very nice. 5. If I was going to make any changes, it had to be now before I had any more details in place. All of this was rolling around in my mind and it seemed to leave me with two options - either carry on as is and add coils to all of the lines and live with the two dabs of glue and so-so rigging on first four carriages or (shudder) remove the eight cannons, strip the finish off the entire deck, refinish it and then start over, being much more careful with the glue. So, I set all that aside while I considered my options and built the mast top for the main mast which was quite an enjoyable diversion until I reached my decision. In the end I removed the carronades, masked the entire model from stem to stern and removed the finish on the deck with paint stripper. I've applied a new finish, which turned out to be better than the first one and I've now masked most of the deck to help ensure a tidier job as I reinstall the carronades. As for the coils, I'm going to install all of the guns without them and will decide whether or not to add them later. I've have a couple of pictures in my next posting. David
- 117 replies
-
- 9
-
-
- constitution
- model shipways
- (and 1 more)
-
Hi Matt, I believe the stem and stern pieces should be beveled, but not the keel. This is what I did on my model. Bevel them to about 1/8", leaving them full thickness (1/4") where they meet the keel. The bevel extends pretty much the full length of the stem piece and the leading edge of the stem piece is rounded over. The stern piece is beveled from the point near the top where it curves in slightly all the way to the bottom but the edges are left square. On both pieces just blend the bevel in where they meet the keel piece. Hope that's of some help. David
- 117 replies
-
- 2
-
-
- constitution
- model shipways
- (and 1 more)
-
Hi Matt, I wouldn't worry too much about the bulkheads not matching the drawings perfectly. The main thing is their relationship to each other and that after fairing you have a good smooth contour. I paid no attention to the bevel lines on the plans and just glued the bulkheads in place on the keel and only then began to fair them, frequently holding a test strip of planking across them until I was satisfied with the contour. Something that is important is that they line up properly with the top of the keel and that they meet the bearding line. I think it's best to make them line up flush at the top first and do any fixing that's needed at the bottom. If one or more of them falls a bit short of the bearding line, which might happen, just glue a strip of wood along the edge of the bulkhead from about the middle point down and sand it into shape. I had to do that on a couple of mine. If one seems a bit too long, just sand it back. Similarly, as you're fairing and you hold a test planking strip along the side, if a bulkhead seems to cause a low spot, you can glue a strip to its edge and then sand it into shape. I think you'll find that approach will give you a satisfactory result and save some frustration trying to reconcile the parts and the plans. David
- 117 replies
-
- 8
-
-
- constitution
- model shipways
- (and 1 more)
-
Hi Matt, I'm not really at the mast stage yet. I have been skipping around a little bit. I still have much to do on the deck and hull. While the sequence for the build is important in many areas, there are still many aspects that can be treated like separate projects, worked on for a while and set aside without interrupting the flow of the work. For example I started working on the four boats ages ago, but still don't have any of them finished yet. Also, I build the set of gun carriages long before they were needed. I think I'll complete one mast and then set it aside and return to the deck details. It's just nice to have something else to turn to when the mood strikes. Of course, by the time you're at the rigging stage, most alternative options are gone and it's just rigging until the end. I wouldn't worry too much about the rigging though. I generally don't find it very hard to do but there sure is a lot of it on this model and it can be finicky and requires lots of patience. The main knots you need are the clove hitch for the ratlines and a seizing knot (I think this is the same as the hangman's) for pretty much everything else. I'm not brave enough to start making modifications to the kit, so I have left that sort of thing for others; I'm happy enough to get through the build as it is. Using styrene for certain components would never have occurred to me, but I've been working with the Bob Hunt practicum and he suggests it in several places, so that's why I've been using it. I find that I really hate using it too, but have to admit that it does seem ideal for some of the ship's features - detailing on the stern and head rails primarily. I have also made a couple of other very small components from it, when they're going to be painted anyway and the basswood would be hard to cut cleanly in such small sizes. I was really doubtful that I'd have satisfactory results with it for the chafing fish, but I was actually pleasantly surprised. I think it's a matter of what's going to work best for you. I am really not in a position to share "advice" with anyone as I'm fairly new to the hobby myself and there are many more qualified people out there. So please understand that I'm just sharing my experience which I'm happy to do if it's of some use. David
- 117 replies
-
- 5
-
-
- constitution
- model shipways
- (and 1 more)
-
Hi Matt, Welcome to the forum and especially to the Constitution group! I've been working on mine for about 10 months. Parts of the model are challenging, but so far I've found it to be all doable and very enjoyable. It looks like you're off to a good start; I'm looking forward to following along. David
- 117 replies
-
- 5
-
-
- constitution
- model shipways
- (and 1 more)
-
Hi Dave, I continue to marvel at how precise and crisp your work looks. This model is just amazing. I, on the other hand, continue to be the master of fuzzy edges. Nevertheless, it's a real pleasure and inspiration to see the results of your skills. David
- 306 replies
-
- 3
-
-
- armed virginia sloop
- Patrick Henry
- (and 2 more)
-
Hi All, I'm still just barely started on deck and hull details, but nevertheless felt like a change of pace, so I started shaping the lower masts. I was curious to find out how well the styrene would work for the chafing fish. I find that styrene very unpleasant to work with generally and it seemed to me that the .03 sheet would be very resistance to bending around the masts. However I was pleasantly surprised to find that it worked like a charm and wasn't even too hard to do. The secret is to do it in stages and to hold it in place with large paper clips and leave it for a long time. I often make the mistake of thinking CA glue is instant, but for something like this it needs to set for quite a long time. I first applied glue only to the lower narrow part of the piece and clamped it in place. Then to the centre only of the upper wider section. Then to one side of the wider section and finally the other side. That's four separate steps to the process and for the one mast it was actually five as I needed to give the extreme outer edge on one side another gluing and clamping. I sanded the edges and once it's all painted it should be just fine. As always, thanks for checking in. David

- 117 replies
-
- 8
-
-
- constitution
- model shipways
- (and 1 more)
-
Thanks Geoff, That's very helpful information. David
-
Thanks Dave, When I was doing some google research on Flemish coils, most of the references I found were to modern sail boats rather than old war ships. It seems there is a school of thought that overuse of these coils can be considered "yachty" which is evidently a pejorative term. I don't know enough about sail boats to have an opinion one way or the other, but I guess to some I will have a very "yachty" Constitution! David
- 117 replies
-
- 3
-
-
- constitution
- model shipways
- (and 1 more)
-
Hi Geoff, Thanks for your quick response. I will use the mast sizes directly off the plans too. I think what I'm seeing in the practicum is a small error, there are a few in this practicum. My dowels don't seem to be too bad, except for one, which is quite different than the others and is some kind of very coarse grained wood which I recall from my AVS and had to replace. It was almost impossible to shape and had huge rough grain. All of the others are very smooth grained, not sure if they're basswood or just what they are (look like maple, but I somehow doubt that.) They're very light in colour and seem ok to me. Running rigging always seems to present me with a problem. I bought a lot of cotton line from Blue Jacket to replace the kit supplied, (I did that too for my AVS) and it seems to be quite good. The black presents no problem, but the white is very white. I dyed it for my AVS but was only somewhat happy with the colour and found the dying process a real pain in the neck and a bit of a crap shoot. I bought some crochet thread online this time which seems ok. I could find it in size 10, 20 and 30 which corresponds to much that's required. I can't find a conversion chart anywhere to know what sizes it actually is; I'm just going by eye. I think I need something a little smaller than 30, so have located a different supplier and ordered some size 80 which should be quite thin. I think those four sizes should cover it more or less. The colour is a sort of taupe-y shade which looks great on the spool, but seems a bit too light on my deck (gun rigging). It will probably be ok as the running rigging though. I'm nowhere near ready to get involved with rope walks and such at this point in my ship-building career. I might order some more crochet thread in a darker colour, but it's quite a nuisance ordering online, not knowing for sure what the colour will look like and having to wait for it. I wish I could just pop into a store and see the colours for myself. Anyway, thanks again for your input, much appreciated. David