David Lester
-
Posts
679 -
Joined
Content Type
Profiles
Forums
Gallery
Events
Everything posted by David Lester
-
 Hi Geoff, Thanks for your quick response. I will use the mast sizes directly off the plans too. I think what I'm seeing in the practicum is a small error, there are a few in this practicum. My dowels don't seem to be too bad, except for one, which is quite different than the others and is some kind of very coarse grained wood which I recall from my AVS and had to replace. It was almost impossible to shape and had huge rough grain. All of the others are very smooth grained, not sure if they're basswood or just what they are (look like maple, but I somehow doubt that.) They're very light in colour and seem ok to me. Running rigging always seems to present me with a problem. I bought a lot of cotton line from Blue Jacket to replace the kit supplied, (I did that too for my AVS) and it seems to be quite good. The black presents no problem, but the white is very white. I dyed it for my AVS but was only somewhat happy with the colour and found the dying process a real pain in the neck and a bit of a crap shoot. I bought some crochet thread online this time which seems ok. I could find it in size 10, 20 and 30 which corresponds to much that's required. I can't find a conversion chart anywhere to know what sizes it actually is; I'm just going by eye. I think I need something a little smaller than 30, so have located a different supplier and ordered some size 80 which should be quite thin. I think those four sizes should cover it more or less. The colour is a sort of taupe-y shade which looks great on the spool, but seems a bit too light on my deck (gun rigging). It will probably be ok as the running rigging though. I'm nowhere near ready to get involved with rope walks and such at this point in my ship-building career. I might order some more crochet thread in a darker colour, but it's quite a nuisance ordering online, not knowing for sure what the colour will look like and having to wait for it. I wish I could just pop into a store and see the colours for myself. Anyway, thanks again for your input, much appreciated. David
 -
Hi Geoff, I'm enjoying your build log. I believe you have the LLS practicum as I do and I've been reading ahead in it a little bit. I have a question that maybe you've already come across as you're ahead of me in the build. It appears to me that Bob only addresses the mast measurements for the fore mast and skips over the main and mizzen and furthermore it appears to me that there's a discrepancy between his measurements for the fore mast and those in the plans. Specifically he says to measure up 4" from the top of the mast boot, whereas the plans say to measure up 4" from the deck (or bottom of the mast boot.) Did you find that to be the case, or am I misreading something. It appears that we must take the measurements for the main and mizzen from the plans and if that's the case then I'm inclined to take the measurements for the foremast directly from the plans too, rather than the practicum. I'm just curious as to how you handled this part of the build. Thanks, David
-
Thanks Skip, Now I'm fussing that the line is too white. It isn't actually white at all; it's a real taupe colour but it looks white against the deck. It seems I'm never happy unless I'm unhappy about something! I noticed in the picture you indicated (I can't imagine that there's a copyright problem with simply including a link) has quite light coloured rigging too. Thanks again, David
- 117 replies
-
- 4
-

-
- constitution
- model shipways
- (and 1 more)
-
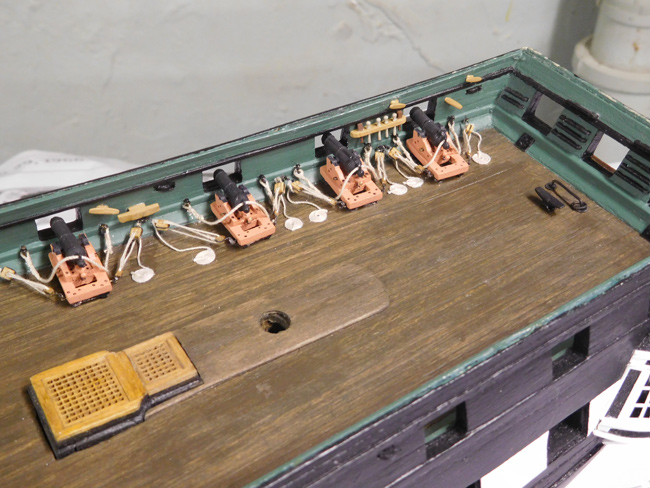
Good Moring All, I have a brief update. I've pretty much finished preparing all of the components for the deck and have begun installing them. I'm working from the stern to the bow and completing all the elements for each area as I move along. I've eliminated some of the rigging on the carronades. There are supposed to be two sets of tackle on each side, but I'm just modeling one of them. The scale of the blocks seems too big to me and when I tried to include the shorter set of tackle I ended up with the two blocks sitting very close together or even touching. It just looked too crowded and messy to me, so I've stripped it back a bit and leaving it at one set of tackle plus the breech line. I'm not sure if coiling the ends of the rope on the deck is historically accurate or not, but I'm doing it anyway for two reasons - I like the look of it and it's not hard to do and it tends to draw the eye away from some of my less skillful detailing. David

- 117 replies
-
- 13
-
-
- constitution
- model shipways
- (and 1 more)
-
Hi Skip, Thanks for checking in. It's the miracle of out of focus photography that makes my skylight look ok, but thanks for your comment nevertheless. The decking is painted - it's just basswood. In Bob's practicum he tries to approximate the way the decking looks today, which is quite dark, but I'm not sure if that's the way it was intended to look or if it's just the result of thousands of tourists walking on it. I suspect the latter. In some photographs of the actual ship you can see areas where it isn't worn and it appears to me to be more of a honey colour. Bob mixed brown and gray paint, applied it and then rubbed much of it off. The photos of his model match the current appearance of the decking quite closely. (I should say until recent appearance, as the Constitution is now in dry dock, having another restoration.) I was afraid to apply paint as that seemed to me like a heavy handed treatment, so I tried a number of times to stain it. I had every colour under the sun on it at one time or another and they all looked terrible. The basswood doesn't seem to take stain very nicely. I stripped each one of them off and then went the paint route. I mixed some orangey-brown paint I had kicking around with some medium gray, painted it on and rubbed most of it off. It actually worked quite well. If it isn't perfect, it's certainly better than anything else I had tried and isn't too bad a match for it's (until recently) current appearance. David
- 117 replies
-
- 6
-
-
- constitution
- model shipways
- (and 1 more)
-
Thanks for the input guys. Mark, I was pretty sure this tackle was in place only when needed and Mike, I agree with you about the scale of the model. For these reasons I am going to leave it off. Depending on how many of my eyebolts vanish into the abyss that is my basement floor, I may install the eyebolts on the deck though. I've already added them to the carriages. Thanks again, David
- 117 replies
-
- 4
-
-
- constitution
- model shipways
- (and 1 more)
-
Hi Again, Let's begin with the premise that "there is no such thing as a stupid question." With that in mind, I have a question (but it's possibly a stupid one even so.) What are people's thoughts on rigging the gun carriages with the train tackle (I believe it's called), the one that connects the back of the carriage to the deck? I notice some modelers include it and others don't. My inclination is to omit it, simply because there is so going on the deck as it is, it seems it might be adding too much clutter. On the other hand if it should be there then perhaps I should add it. I realize that my question is naïve as I don't really have a clear understanding of how much of the equipment on a ship such as this was actually used. If I understood how and when this tackle was used I would be able to answer my own question. Was this tackle in place all the time, or was it removed and replaced depending on whether or not the guns were in use? If it wasn't a permanent fixture, then there's justification for modeling it either way. If it was a permanent fixture than there's a stronger case for including it. Many thanks in advance for any input. Also, thanks for checking in and the likes. David
- 117 replies
-
- 3
-
-
- constitution
- model shipways
- (and 1 more)
-
Hi Tim, Thanks for checking in. I just stuck the copper plates on and plan to leave them alone. I can live with whatever happens to them. I don't know if the copper tape I used has a finish or not but I'm thinking it doesn't, because when I opened the roll of tape, the first outer bit of the tape was tarnished and rest of it was bright and shiny. So I anticipate that the hull will darken down some and that's fine with me. I did take one precaution though. Through my reading I learned that the one roll of tape included in the kit was not likely to be enough to do the whole hull and several people found that when they finished the hull with the second roll, there was a noticeable colour difference. To avoid that I ordered a second roll well in advance of needing it and when I did the coppering, I worked from both rolls at the same time. So if it does change colour it should all change at the same rate. You definitely need the second roll. It might be possible to cover the whole hull with one roll, but you would need to not waste one single plate. That was not the situation in my case - I have quite a bit of copper bits stuck to my basement floor. I probably have the only coppered basement floor in all of Cobourg if not the county! David
- 117 replies
-
- 3
-
-
- constitution
- model shipways
- (and 1 more)
-
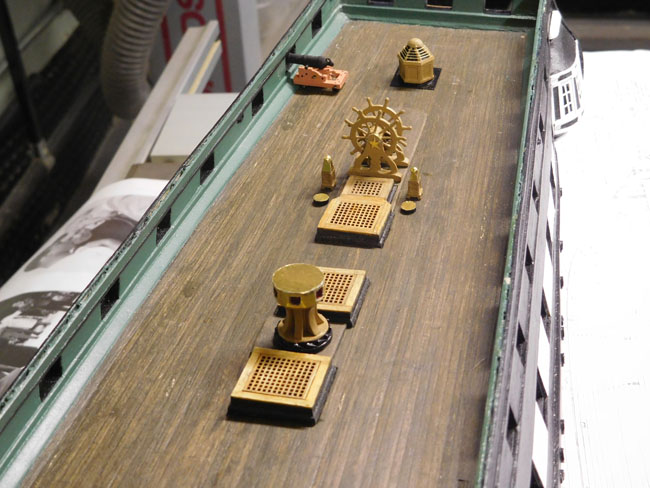
Happy Wednesday Everyone, Just a quick update today. It doesn't look like much progress, but for some reason it has taken a lot of time. I'm working away on the components for the deck, so I've been working off the model. I'm almost finished and ready to start attaching things. I've finished the gunport lids, made the pin rails, prepared all my cleats, made the skylight, binnacles, wheel, ammo scuttles and capstan and the carronades and cannons are all ready for rigging. I've just placed a few of these on the deck for the picture. None of them is actually installed yet. Throughout the build, I am approached various jobs with fear and trepidation, only to find they weren't too bad after all. On the other hand from time to time something jumps up and catches me off guard. The latest in this category was the skylight. I found it to be one of the hardest parts to make yet. My final result is nothing to write home about, but it's about my sixth iteration, and it's as good as it's going to get. I tried forming the hexagon from individual pieces and I tried cutting it from a sold block. I tried using wood and I tried using styrene and most attempts ended in an amorphous blob covered with glue. I don't have any miniature machine tools; only hand tools. This final version is cut from a single piece of basswood with styrene trim and I can live with it, although the six sides and not exactly even. The trim on the upper portion is half round styrene and flat strips on the base. The bars on the windows are very fine brass rod. I wasn't sure what to use for the cap, so went searching through my basement and in my drawer of lamp parts I found a hollow brass ball which was on the end of a lamp's pull chain. I filed it down until only about half of it was left and popped it on top. The tops for the binnacles are the same. I tried using a couple of the brass beads from the lamp chain, but they were just a bit too big. This morning I went into a local jewelry making supply store we have in town and found these very small hollow brass beads which I was able to use in the same way by filing them in half. I only needed a couple, so the owner of the store just gave them to me - the advantages of small town living! That's it for now; soon on to rigging the cannons. David

- 117 replies
-
- 11
-
-
- constitution
- model shipways
- (and 1 more)
-
These Japanese saws are amazing. I have one dozuki (not sure if the brand is Hishika or not) and it has become almost indispensable. David
- 306 replies
-
- 2
-
-
- armed virginia sloop
- Patrick Henry
- (and 2 more)
-
Looking really beautiful Ken, David
-
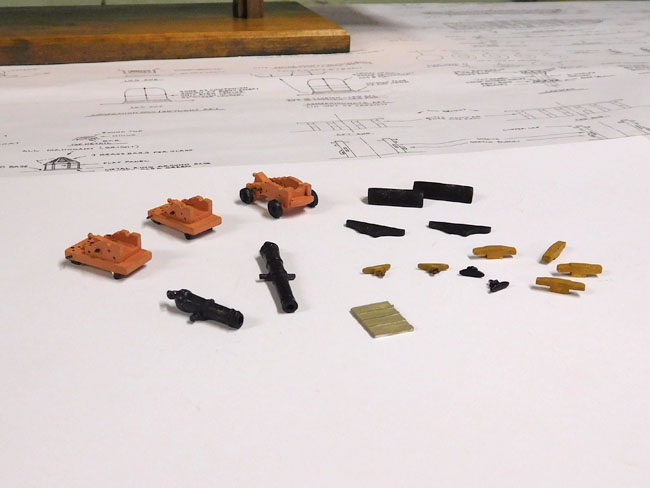
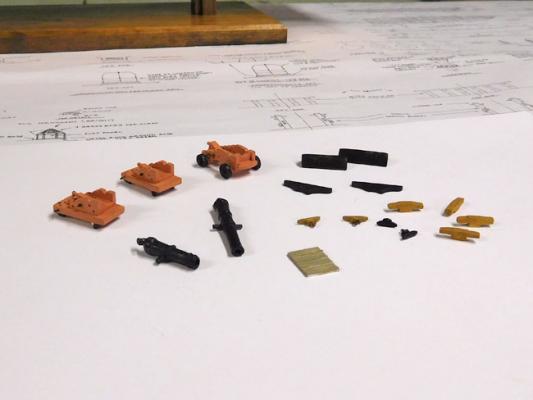
Happy Wednesday Everyone, I'm still working away, although in for the past while it's been lots of work, but little evidence of progress. I'm using the LLS practicum and Chapters 10, 11 and 12 all concern the many details on the outside of the hull, on the deck and on the bulwarks. I'm grappling a bit with the sequence. I don't care for the sequence outlined in the practicum, but it goes against the grain for me to deviate. I tend to be "compliance oriented" and if it says to do it a certain way, then that's the way it should be. I need to be more like Captain Barbossa in Pirates of the Caribbean, who interprets the Pirate's Code as "more what you call guidelines than actual rules." The practicum has us add much detail to the outer hull first, then all the detail to the centre of the deck and finally detail to the bulwarks. I'm worried about knocking gunport lids and davits and what have you off as I work on the interior stuff and I can't see cluttering up the centre of the deck before I have to drill holes in the bulwarks for the eyebolts, cleats etc. So I'm going to "live on the edge" and do the bulwark stuff first, then the more central deck details followed by the outer hull details and then finally to top rail. I'm currently working on completing all the many components - gun carriages, gunport lids, horse block, ramps, binnacles etc. etc. A few of them are included in the picture. David
- 117 replies
-
- 8
-
-
- constitution
- model shipways
- (and 1 more)
-
Hi Greg, I've just discovered your build log. Your detail work is amazing! It's a very beautiful model. By the way, where do your Lesters hail from? My dad and I were both born in Canada, but my grandfather emigrated from County Cavan, Ireland as a teenager just before WW1. David
-
Hi Dave, Your filler blocks look great. It's hard to imagine that you wouldn't need them given the blunt shape of the bow. I'll be interested to hear how difficult the bow planking is to do. David
-
Hi Ken, That's a great trick with the drill bit extension. With the very small size drills, I find I often just slowly rotate the pin vise by hand anyway, so no reason why this system wouldn't work beautifully. As you may know I'm following the Bob Hunt practicum and he suggests making the stars out of styrene plastic. He recommends using a strip .010" x .188" Of course they could be cut from any width material, but the .010" thickness seems about right. He even includes star shaped graphics in the practicum which you can print out. You then glue them onto the styrene and just cut the stars out with a knife. If you have a graphics program or Microsoft Word on your computer it's very easy to make a star yourself. It's just a matter of experimenting until you have the right two sizes David
-
Hi John, I didn't know the Revenge was a container ship! Your decking looks great. David
-
Hi Ken, Looking great! David
-
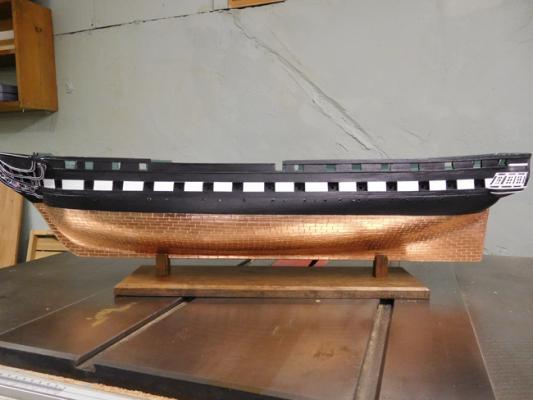
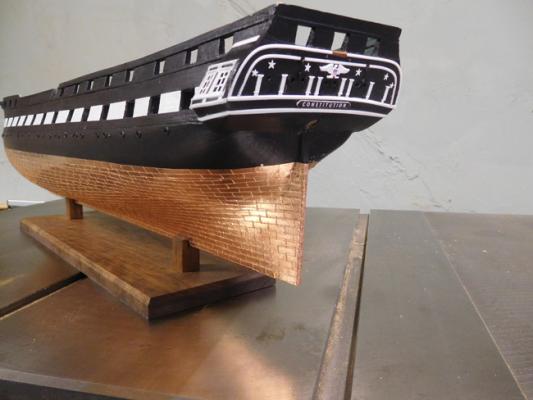
Hi Everyone, As tense moment this afternoon when I removed the masking tape from the copper plating, but I was relieved to see that it worked very well. My red line is reasonably crisp. There were a couple of places where there was very slight bleeding, but I was able to scrape most of the paint away without damaging the copper. If you look closely enough they are still slightly visible, but when all the many details are added to the hull, nobody's eye will be drawn to them. I now just have to add the fenders to the starboard side, give them a final coat of poly and touch up the black in a couple of places and I will have Chapter 9 of the practicum behind me. Chapter 10 of the practicum deals with many of the outer hull details. In preparation I've been working ahead on some of the components - gunport lids, channels etc. There are sheaves set into the side of the hull and the practicum suggests simulating these with thin slices of dowel. It suggests a 1/32" slice of a 3'16" dowel for each one. I don't have a miniature table saw, so all of my efforts to slice them off with an xacto saw or knife only resulted in their crumbling into bits. My solution was to cut off a thin slice of styrene tubing that I had. (It's 7/32" but I think that's close enough to 3/16" for this purpose.) I then filled them with filler and polyed them. I think this will work, but I'll know better when I actually try to insert them. I included a picture of them below, but when I look at it I realize that I might as well have just photographed eight aspirin tablets - maybe I should just use eight aspirin tablets! That's all for now, and many thanks for comments and likes. David

- 117 replies
-
- 10
-
-
- constitution
- model shipways
- (and 1 more)
-
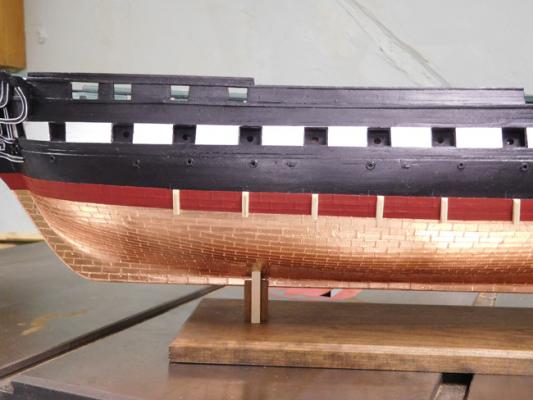
Hello All, I brief update tonight - I have finished the copper plating, both sides as well as the rudder and all the annoying little edge pieces. It feels like a real milestone and I'm pleased enough with the results. When I removed the masking tape from the waterline on the port side, I noticed for the first time a pretty big dip in the waterline at the stern end. It was easy enough to fix by stripping back a few rows in the immediate area, replacing the masking tape to a better position and replacing the plates. Later today I applied masking tape to mark the red stripe. I experimented with it first and it lifts very nicely off the plates without causing any damage, so my concerns in that area were unwarranted. I took Ken up on his suggestion of applying a clear coat to the plates first which should have the effect of sealing the line between the plates and the masking tape. I did that, but simply used some polyurethane. I have now added the red paint, but it will need a couple of more coats before I remove the tape and find out how successful I was. The pictures below are of the finished copper, and I'll add some of the red stripe as soon as it's ready. David
- 117 replies
-
- 18
-
-
- constitution
- model shipways
- (and 1 more)
-
Hi Tom I find that photographing models is pretty like photographing anything else. For example, I believe myself to be incredibly good looing in real life, but always look like hell in pictures. Nothing but flaws and imperfections. By what can I do? I guess I can take comfort in small mercies and be glad that despite my frequent and protracted periods of inactivity, I never appear as though I actually need to be dusted in my pictures! But seriously, I don't know what the answer to the dust issue is but your model is looking good nevertheless. David
- 1,354 replies
-
- 3
-
-
- constitution
- model shipways
- (and 1 more)
-
Hi Ken, Thanks for your thoughts. Your approach seems like a very good one. My thought about painting just the first two rows freehand is ok, but only just ok because even though the rows are quite straight, they aren't perfectly straight. It would be nice to get a crisper line, but I was just trying to avoid the problem of the paint bleeding. I hadn't thought of your clear coat idea. I'll make up a test area with some copper plates on a piece of wood and have a practice run first. I think this might be the answer. David
- 117 replies
-
- 4
-
-
- constitution
- model shipways
- (and 1 more)
-
Thanks for the comments, likes and suggestions guys. I've looked at several other build logs and thought about the red stripe and I think I've decided what to do. On the build log at knightdreamers.com he found that he was able to lift the masking tape off the copper without it damaging the plates ok which is good, but I noticed that he had quite a bit of paint find its way under the masking tape and the line isn't very crisp. So I think I won't mask it at all and just paint it freehand down to the bottom of the top two rows. There is a band of two rows of full plates going around the top. The stripe is supposed to be 1/2" and the total width of the top two rows on my model is about 7/16". That's close enough for me. I should be able to get a good crisp line using the edge of the plates as a stopping point. David
- 117 replies
-
- 5
-
-
- constitution
- model shipways
- (and 1 more)
-
Hi Greg, Your windows look quite well placed to me and should look great when planked. David