


David Lester
-
Posts
679 -
Joined
Content Type
Profiles
Forums
Gallery
Events
Everything posted by David Lester
-
 Thanks Scott, I too spent a bit of time earning the Italian terms for the parts. On-line translation was only partially successful because some of the terms are as unexpected in Italian as others are in English. For example, a 'caviglia' is literally an ankle, which turns out to be a belaying pin (I'm glad I figured this out before I started the rigging!) and 'bigotta' means bigoted, but in context is a deadeye. 'Bozzello' was easy - it translates directly to block. So it was a combination of inference and on-line reference. Not too hard to learn, but more difficult to retain! David
- 67 replies
-
- 1
-

-
- rattlesnake
- mamoli
- (and 1 more)
-
Good Evening Everyone, It was a rainy day all day today, so perfect opportunity to work in the shop. A little progress to report. Thanks for the vote of confidence Dave, but I think I'm going to paint this model nevertheless, probably similar to the MS version. I've finished planking the bulwarks and they're in the process of being painted. (I planked the main deck earlier and have put down some tape over it to protect it from paint, glue and coffee while I'm working on the rest of the model. I installed the bulkhead and I've planked the upper hull with the finish layer, have it sanded and the gunports cut out. We'll see what the weatherman brings tomorrow - if it's sunny I'll be edging gardens. I hate to hope for rain, but sometimes it's hard not to. David
.JPG.34753ad79e504ffa09bb9ae8ef3f2175.JPG)
.JPG.c6c5258e9b3db3337c5001410894c99b.JPG)
- 67 replies
-
- 8
-
-
- rattlesnake
- mamoli
- (and 1 more)
-
Breaking things as you go is par for the course for me. I snapped two of the masts off my Constitution after they were rigged on two separate occasions! I had to strip off the upper rigging in each case, repair the mast and re-rig it. The culprit was my swing arm light, which I swung across my workspace at too low an altitude. Have you ever watched the show Veep? The language on that show couldn't hold a candle to what I came up with, especially the second time. But you're right, almost everything is repairable, so no real harm done. Your Bluenose is coming along beautifully. David
-
Adjustable height table.
David Lester replied to Ulises Victoria's topic in Modeling tools and Workshop Equipment
I couldn't agree more that it's better to stand rather than sit for much of your model building. When I built my workbench many years ago, I built it very high, so it's really comfortable for working when standing. I also have a stool, rather than a chair, so I can sit at it comfortably as well. I would say that I spend my time about 50-50 standing vs sitting when I'm working. The only problem I discovered when it came to rigging my Constitution was that the workbench was too high for some of the upper rigging. I had to move the model to a card table. An adjustable table for your bench sounds like a great idea to me. David -
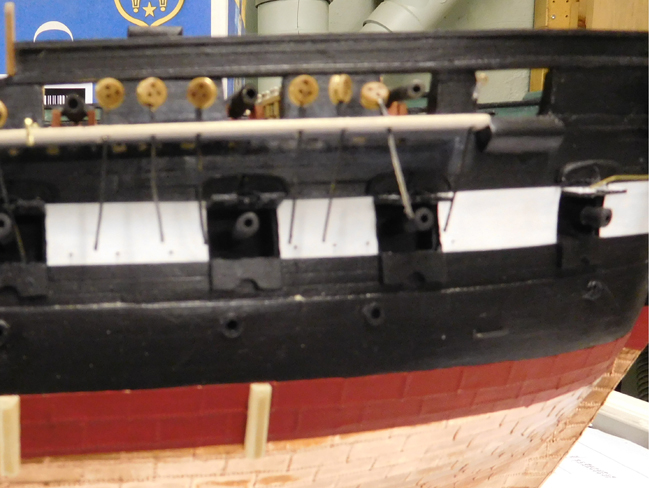
Good Morning All, I've been doing some deck work as you can see in the pictures below. Choosing paint colours for this model has been harder than I expected. I know many have built this ship leaving it for the most part natural, with only minor painting and this is the way it's shown on the Mamoli box cover. However, I do not yet have the woodworking skills to produce a natural model that I will be happy with and I'm afraid I will again be resorting to paint (and lots of it!) But discovering the "right" colours is easier said than done. The MS version shows a black hull, off white below the waterline and with a pale yellow strip along the gun ports, which looks quite pleasing to me, but does that shade of yellow seem right? In the MS instructions they talk about yellow ochre, but that certainly isn't yellow ochre in their photo. They also suggest gray for the bulwarks. I don't recall having seen that colour used before. Does that sound right? It's moot in any case anyway, as I've settled on red for the bulwarks and gun carriages. I also recall seeing photographs of a reproduction of the Rattlesnake with a largely yellow ochre hull (as opposed to a black hull) with some black and lots of blue accents. Is this one of those cases where nobody really knows what colours it might have been, so it doesn't matter too much what I choose, or are there indicators out there somewhere that I am missing that would strongly suggest one scheme over another, or am I overthinking it altogether? Any thoughts would be most welcome. David
.JPG.bba0b1e0c7c11d1f0a7ddbd8cfee2e0f.JPG)
.JPG.5b84e1bb41b5a8c6947a2ee2ea9a7837.JPG)
.JPG.0b878112b00df8997ed7fcd88a71ffbb.JPG)
- 67 replies
-
- 4
-
-
- rattlesnake
- mamoli
- (and 1 more)
-
Hi Dave, Thanks very much. Yes, I just started a build log for the Rattlesnake. And I'll try to be a little more diligent about keeping it up to date than I was for this one! David
- 117 replies
-
- 2
-
-
- constitution
- model shipways
- (and 1 more)
-
Have you seen this google maps "tour" of the Constitution. I know it represents a different configuration than the version you're building, but you still might find it helpful. I referred to it all the time. https://www.google.ca/maps/@42.3725618,-71.0567171,3a,75y,29.78h,66.99t/data=!3m7!1e1!3m5!1sF1i4AxBGxW4AAAQZLBJ9WQ!2e0!3e2!7i13312!8i6656?hl=en&hl=en For my gun carriages, I just bought paint at the hardware store in a sample sized container. I know that's not good modeling practice, but I figured for only the gun carriages how big a problem could it be. This way, the colour selection was endless and if I didn't like the first one I tried, I could easily try another, (without another 40 mile drive to our nearest hobby store, or wait for an on-line order) and the price is about the same as for model paints. My black and white paints are Model Master and I found a Tamiya colour - Desert Yellow - which worked well when I needed to simulate a natural wood finish. David
- 106 replies
-
- 4
-
-
- constitution
- revell
- (and 2 more)
-
Hi Doug, Just getting caught up on this build log (although I'm familiar with your PdeN.) It's coming along nicely. Fun to see the differences between the AL and Billing kits. David
-
Thanks for the likes and comments; much appreciated. I don't know about a case for it. I don't even know where it's going to go at this point. It's currently sitting on the mantelpiece, but it is tending to overwhelm the room. It might go to my daughter's office, we'll have to see, then dusting will be her problem. David
- 117 replies
-
- 5
-
-
- constitution
- model shipways
- (and 1 more)
-
Thanks Doug and thanks for the tips on the Rattlesnake instructions Doug. I did something similar. I didn't transcribe them, but I made enlarged photocopies of the English part of the instructions, the parts lists and rigging sections and am working from them along with the plans. I agree, as printed, they are very difficult to read. David
- 67 replies
-
- 2
-
-
- rattlesnake
- mamoli
- (and 1 more)
-
So, spurred on by my return to the forum with my Constitution, I'm starting a build lot for my Mamoli Rattlesnake. I bought this kit through Cast Your Anchor in Toronto who were able to track one down for me. At this stage, I have the first layer of planking on the hull, the false decks in place and some of the planing on the bulwarks done. This is my first non-Model Shipways kit and so far it seems to be ok and so far so good. I needed to shim a number of the bulkheads, but that doesn't seem to be out of the ordinary. I had a bit of trouble getting the transom set correctly. The tabs in the rear deck didn't seem to want to line up with the slots in the transom. If I forced it, things didn't look quite right, so I cut them off and measured carefully against the plan and I think things are ok. I have the Bob Hunt practicum for this kit, but have to admit I'm not actually using it. For this particular kit, his practicum involves much kit-bashing. I chose not to go that route, because it involved ordering Hahn plans, changing their scale, ordering special wood etc. all of which I didn't want to get into. While the practicum claims to be helpful if just building the kit out of the box, it really isn't as all of the pictures only show the kit-bashed version. The kit instructions (which appear to have been translated out of the Italian by machinery) are actually quite good, once decoded as are the plans and I think I'll do just fine with them alone. Despite essentially building the kit out of the box, I am making a few minor "kit-bashing" choices nevertheless. There are cast metal parts representing the windows in the transom, the doors under the quarter deck, the head rails and the crosstrees, all of which are pretty crumby. I'll be making all of these from scratch. I have started the doors in the picture below, but they are not completed yet. I think I'll use the cast metal part for the curving scroll work around the transom, as it will look ok once painted and for sure a whole lot better than any carving attempt I might make. I read about a painting technique in a Blue Jacket newsletter that looks like it might work well. One picture below shows the cast metal windows which I'm discarding and the start of my alternative windows in the transom. I'll try to do better than with my Constitution build log and post another update before a year has passed. David
.JPG.89cb9112db07b5fa87f5bb494c58c278.JPG)
.JPG.6be93f2193d537765cb1ed0f265b09e8.JPG)
.JPG.7338c8c6ffd99705cad3e56e1e50a48a.JPG)
- 67 replies
-
- 5
-
-
- rattlesnake
- mamoli
- (and 1 more)
-
Hello Everyone, I've been feeling a bit embarrassed about my build log for some time now which I've allowed to become virtually non-existant. I became very lazy about taking photographs and making updates, and then the more time that passed the less inclined I become to update. Nevertheless, I finished my Constitution in April, so if I upload photos of it now, I hope you'll forgive me for the huge gap in the middle. I pretty much had the hull and its details finished when I last checked in, so it's primarily the masts and rigging that I haven't reported on. The rigging end of things went quite well generally. Making the masts and yards was very enjoyable and not particularly difficult. I didn't find the rigging too difficult either, but at times the shear volume of it and its finicky nature were a bit daunting. It was very frustrating to stop for lunch (and a quick fix of CNN) only to return to my shop and discover that I had tied a whole set of lines on the wrong side of something. I'm sorry to report that this happened to me more than a few times. However, every time it did happen, I tore it out and redid it. I am certain that there are many errors in my rigging, but at least I can say that none that were apparent to me went unaddressed. This was my second build and I couldn't have enjoyed it more. It was the model I wanted to do from the outset, but I chose to build the AVS first as a practice piece and I'm glad I did. I didn't find the Constitution to be especially difficult (although it had plenty of challenges), it's really more a matter of the volume of the work it requires that might be overwhelming as a first kit. I used Bob Hunt's practicums for both the AVS and the Constitution. The one for the AVS is excellent and as a complete novice, I don't believe I could have worked my way through the model without it. For the Constitution, the first half of the practicum is also excellent and I found it an invaluable resource. However, when it came to the rigging, it was quite a different matter. This part of the course is so full of errors and omissions and with a confusing approach that in many ways it hindered rather than helped. I did buy the Lennarth Petersen Rigging Period Ship Models and it was a very helpful resource. I know for a fact that my family is glad this project is done. They seem to take great delight in teasing me about how much I tend to talk about it and at what great length. At Christmas, my sister-in-law innocently asked "how's the model coming along?" at which point my son jumped in with "Oh my god, whatever you do, don't ask - do not engage - do not make eye contact - do not show fear!" But their respite is to be short lived as I have now started on the Rattlesnake. Here are some pictures of my completed Constitution.
.JPG.417afbb705ba53deb7b14ab8ccaa9e55.JPG)
.JPG.7776ba0fc7a6ac2d25302431fcaeba2e.JPG)
.JPG.149b2ee9da452fd7b38481bfc1ef76a1.JPG)
.JPG.47f0fe86db5c8553ed50f3217116f4bd.JPG)
.JPG.3422933e3637e03fe1a6dca809efe9e6.JPG)
.JPG.fa48674c1f5fc452d84949432fc44503.JPG)
.JPG.1b70135a2a5a4423d632966104c46145.JPG)
.JPG.4a8f1c89b75901edcb339f50e605823d.JPG)
- 117 replies
-
- 23
-
-
- constitution
- model shipways
- (and 1 more)
-
Doesn't sound so bad, Dave. It's hard to beat a good panda steak! David
-
I realize that this will seem like a stupid question to many of you, but it's one that I haven't been able to discover the answer to on my own. I'll soon be starting the hammock netting on my Constitution. In the Bob Hunt practicum he shows the netting as two separate pieces, each one running along one side of the double stanchions. However in some pictures in various build logs, it appears as though the netting might in fact be one continuous piece, running along one row of stanchions, then across the bottom (just above the rail) and then up along the other row of stanchions. But I haven't been able to find a definitive picture one way or the other. It's not clear to me from the kit's plans either. Can anyone shed some light on this for me? Many thanks, David
-
Hi Jon, I've been buying a lot of my bits and pieces, including these nails from Cast Your Anchor in Toronto. www.castyouranchorhobby.com. They have a pretty decent inventory and I like the fact that they give very detailed descriptions of the sizes of things. While their website is well laid out and descriptive, it never seems to work all that well if I try to order through it, so I always phone. You always deal with Sandra and she's great. If I get the answering machine she always calls back. Even though they're based in Toronto, most of their customers are in the US so they price in US dollars. I'm not sure how they charge for US shipping, but here for small items they just pop them in an envelop, stick a stamp on it and mail it without any extra charge. It's pretty hard to do better. David
- 117 replies
-
- 2
-
-
- constitution
- model shipways
- (and 1 more)
-
Don, you're unstoppable! I'm looking forward to this build because Pegasus is what I am planning to build myself after my Rattlesnake after my as yet unfinished Constitution. Displaying them is a concern. My Constitution is going to my daughter's office, so that's the big one dealt with and we'll see about the others. David
-
Beautiful decking! David
-
Hi Dave, I like you're idea of pinning the gun carriage. Looks like it works well. David
- 306 replies
-
- 3
-
-
- armed virginia sloop
- Patrick Henry
- (and 2 more)
-
Very nice Ken! David
-
Hello All, It's been a while since I last posted or even worked on my model. There are just too many outdoor demands on my time and it never feels right holed up in my basement when the weather is absolutely glorious. Nevertheless I have a little progress to report. I have almost finished the chainplates. The biggest problem I had with them was getting their length correct, but I developed a little system that worked well enough. Working one channel at a time, I pinned them in place temporarily and let them protrude up through the holes in the channel. (This of course brings me to my frequent complaint about all those little brass nails they include in the kit for no reason that's apparent to me. On this build I actually need little nails to attach the chainplates, but the ones included in the kit are about three times too big to fit the holes in the chainplates. I had to buy new ones. They're about the size of a #75 drill. Why do they do these things?) Working one chainplate at a time, I snipped it off flush with the top of the channel and then removed it. I then snipped about 1/16" more off of it and then soldered on the deadeye. I slipped them back into position, let them hang loose and painted them below the channel before attaching them permanently. Once all are in place, I'm painting the channel and deadeyes and touching up black and white paint where necessary. I'm also planning ahead for the netting along the railing. I had bought some tulle at a fabric store some time ago, but I'm beginning to think the little diamond openings are too big for the scale. I don't know whether tulle comes in different "gauges" or not. (At any rate, gauge is certainly not a word to use at a fabric store; I got a very odd look.) Today I took a stroll through a dollar store to see if I could find anything else that might work. I did find two different cheap black mesh zippered bags which I can cut up. One also seems a bit too big, but the other looks like it might be ok. I'm going to experiment with all three. That's all until next time. We're told to expect beautiful weather right through the weekend and then plenty of rain on Monday, so maybe I'll be able to have indoor recess all day! David

- 117 replies
-
- 9
-
-
- constitution
- model shipways
- (and 1 more)
-
Hi Dave, That is one gorgeous model. Bob's design is first rate and your building is exemplary. I'm anxious to try this Jax Pewter Black, and I discovered I can buy it in Toronto! I had been using gun bluing but it isn't very satisfactory - it tends to rub off and just makes a mess of everything, (well actually, mostly my fingers, which in turn make a mess of everything) so I've been painting things black instead. I'll get some ordered today. David
- 306 replies
-
- 3
-
-
- armed virginia sloop
- Patrick Henry
- (and 2 more)
-
Hi Dave, Just a suggestion, but instead of the picture you added to the wall, how about a picture of the Patrick Henry containing a picture of the Patrick Henry, containing a picture of the Patrick Henry.... and so on All kidding aside, that's a really beautiful model. David
- 306 replies
-
- 4
-
-
- armed virginia sloop
- Patrick Henry
- (and 2 more)
-
Hi Mike, Check out Cast Your Anchor (www.castyouranchorhobby.com) They have walnut and boxwood belaying pins in several sizes and give very precise measurements - length, diameter and length above the rail. They're really great to deal with too. David
-
Hi Everyone, Thanks Tim for your comments. I don't have too much progress to report at this time. I've been working away very slowly. There are too many outdoor maintenance demands on my time now that the warm weather has arrived. What little modeling I have been doing has been very frustrating. I seem to be in some kind of hellish loop where everything I touch turns to *#@! I'm still working on deck and upper hull details and it has become downright sisyphean. Why do anything once, when you can do it twice or three times over? Right? Those little components called the horse blocks have really tried my patience and only after I had both of them glued in place did I decide to rip them out and start over. I notice in Bob Hunt's practicum that he omits them. In fact he doesn't even refer to them and I now understand why. At first I thought he forgot them but now I believe he chose to "forget" them. (The latter, of course, is a time honoured technique and one that I have frequently employed to my advantage throughout my life) I'm currently soldering the chainplates for the starboard side and here my skills seem to be getting worse with practice with several attempts needed for just about every one of them. (You've heard about the carpenter who cut the board twice and it was still too short, well I literally did that in one case!) I don't really have much new to show in pictures at this point and sorry for all this kvetching, but as soon as I have evidence of progress I'll get some new pictures up. It won't be until next week at least as we have a very big weekend coming up. My wife Nancy is retiring. She's an ordained minister in the United Church of Canada (a liberal denomination, similar to the United Church of Christ in the US) and they have a big dinner and special services planned for her and we have relatives coming from far and wide so it will be chaos around here for a few days. It should be a great weekend though. Perhaps with a little break and my preoccupation with the upcoming weekend over, I will return to the Constitution next week with fresh eyes and more nimble fingers and get past this Groundhog Day loop that I'm currently in. David
- 117 replies
-
- 4
-
-
- constitution
- model shipways
- (and 1 more)