


David Lester
-
Posts
679 -
Joined
Content Type
Profiles
Forums
Gallery
Events
Everything posted by David Lester
-
 Hi Matt, I wouldn't sweat the fairing on this model too much. The MS Constitution is only my second build, so I'm hardly an expert, but I found that there wasn't really that much fairing required, certainly not when compared to my MS Armed Virginia Sloop which is a much smaller model. I think it's because the model is so large that the majority of the bulkheads through the central portion of the hull need minimal attention. I agree that the plywood bulkheads are a nightmare to sand. They were solid basswood on the AVS and were very nice to work with. I haven't built a kit by another manufacturer yet, so I can't legitimately comment on the quality of MS kits when compared to others, but from what I gather reading many different build logs is that none of them is perfect. I have a Mamoli kit waiting in the wings, so I'm looking forward to finding out how building it compares. David
- 117 replies
-
- 6
-

-
- constitution
- model shipways
- (and 1 more)
-
Question on MS Constitution kit - Channels
David Lester replied to usedtosail's topic in Wood ship model kits
Hi Tom, I believe the channels should be 1/2" deep. I used 3/32" x 1/2" stock and tapered it to 1/16" at the outer edge, leaving it at 3/32" against the hull. It's very hard to find, but there is a little illustration showing it on page 7 of the plans. It's just up and to the right of the centre of the page. I had to shape a slight contour on the inside edge of the fore channels to get them to sit tightly against the hull, and I guess I shouldn't have been surprised to find that the two contours were not perfect matches for each other - close, but not identical. They certainly seem to be secure enough without supports once the chain plates are added. Hope that's of some help. David -
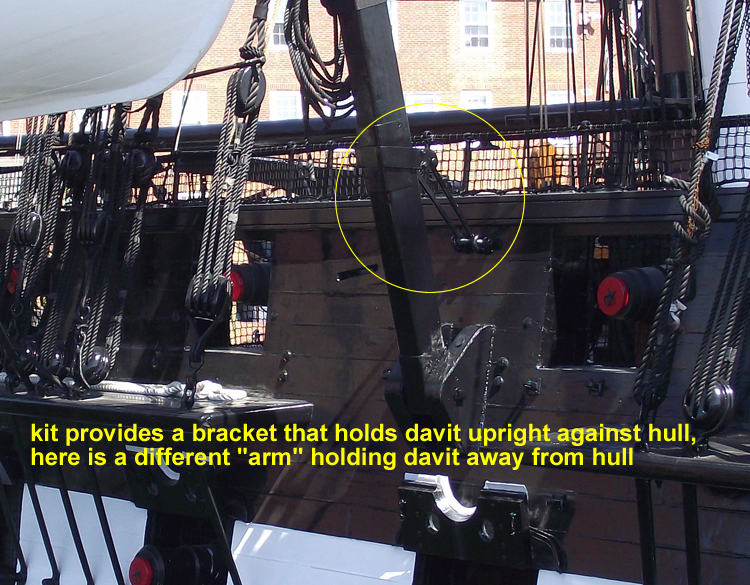
Hi Again, I may have just answered my own question. I took a closer look at the plans and it shows the metal strap which holds the davit to the upper bracket to be long enough and with enough "slack" to allow the davit to pivot away from the hull whereas the practicum shows the metal strap to be short holding the davit tight against the hull which causes the problem I outlined in my earlier posting. I think this longer metal strap might be the correct solution without having to reinvent the upper bracket. In any case, I'll wait until I have the mizzen shrouds in place before I install the davits, that way I can better gauge how far away from the hull the davits need to be. Anyway, I'm still very interested to hear your take on this. Thanks again, David
-
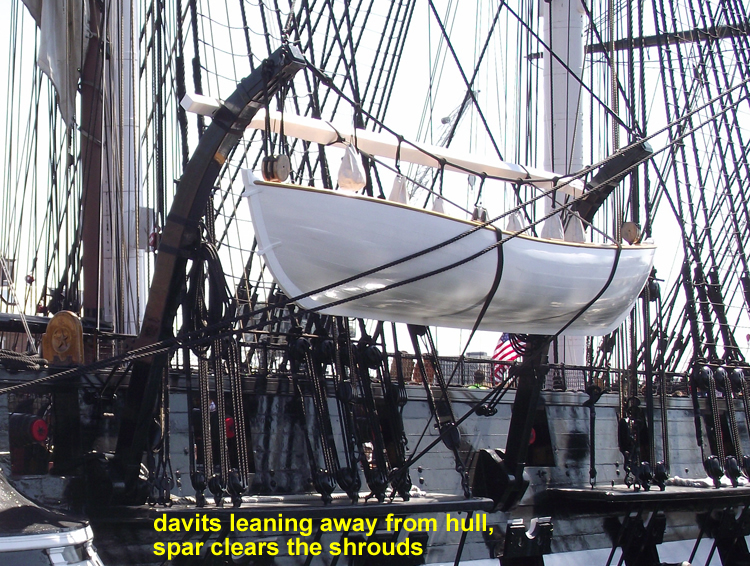
Hi Ken, I have a question about the quarter davits (yours look great by the way.) I've been getting mine ready to install and it appears to me if they are mounted upright against the hull of the ship as the plans show and the spar is installed across the top of them, that it will interfere with the mizzen shrouds. Does it look that way to you too? Is there a potential problem here and is there a good way to deal with it. In the Bob Hunt practicum, he just left the spar off which appears to be one approach. In the pictures below which I took when I visited the ship a couple of years ago, the spar is in place, but the davits are pivoted outward with quite a different arrangement where the kit supplied upper bracket would be. Of course I realize that the Constitution as I toured it is a different version in many respects than the model, but if I followed the model plans to the letter, I'm pretty sure the problem will present itself. I see two possible solutions, the first being to leave the spar off as Bob did or to pivot the davits away from the hull and change the upper bracket. I would be interested to know how you plan to deal with this little issue. Many thanks in advance for your thoughts. David
-
Wow, if I was from Newfoundland and saw only that first picture, I'd say "that's some shockin' b'y!" It looks good in the end though Don and that's what matters. Looks like it will be a terrific base for the planking. David
- 653 replies
-
- 6
-
-
- trabakul
- marisstella
- (and 1 more)
-
Hi Frank, You're doing really beautiful work and I'm enjoying watching your progress. I am still just getting comfortable with POB kits so I am greatly impressed with the complexity of a scratch build POF model. David
- 649 replies
-
- 4
-
-
- dunbrody
- famine ship
- (and 2 more)
-
Hi John, I've seen different build logs for models that employ those pre-cut plywood panels for the gunport area of the hull and they always look to me as though they're a bit tricky to bend and position correctly. It must feel good to have that particular task finished. Your gunport liners look great. David
-
Great work on the capstan, and have a great party on Sunday. Those family milestones are very important. David
- 1,354 replies
-
- 1
-
-
- constitution
- model shipways
- (and 1 more)
-
Hi Matt, My experience with the two MS kits I've had is that you can literally throw the so-called instruction booklet away. (However I don't believe that's the case with MS models where Chuck Passaro has written the instructions.)Pretty much everything you need seems to be in the plans, but as a very inexperienced modeler, the problem for me is how to read the plans and what is the best order in which to do things. This is where I have relied on my Bob Hunt practicums. I know there are two schools of thought on his courses, but from my point of view they have been fabulous. The primary advantages for me have been following the logical sequence they outline and confidence building. There are many elements that are common to all POB models and with a couple of builds under my belt following Bob's practicums, I feel quite confident that I could tackle almost any POB model on my own now and get a half decent result. I know I couldn't have otherwise. So while I'd like to take credit for the idea of holding off on installing the topgallant rail, really, I must give credit where credit is due and tell you that it's Bob's suggestion and it's proved to be a good one. I also learned that once that copper is in place you need to get the model in a stand or cradle right away and not move it any more than you have to as the copper plating is very fragile. You are doing a beautiful job and braver than I would have been. David
- 117 replies
-
- 4
-
-
- constitution
- model shipways
- (and 1 more)
-
Hi Matt, Everything is looking pretty good to me.(I'm not expert of course, but I think it's looking good.) You mentioned the topgallant rail. Do you mean the actual rail itself, because if you do, you might want to consider adding it at a much later point. I still haven't added mine and I've almost finished all the upper hull details and deck details. I have found that the model undergoes quite a bit of manhandling up until this point and I was concerned about bashing it too much, which almost certainly would have been the case if it were in place. It's going to be the very last thing I do before adding the horse blocks, davits and anchors. Just a thought. David
- 117 replies
-
- 4
-
-
- constitution
- model shipways
- (and 1 more)
-
Matt, that looks like a great way to address the bolt/rivet issue, but it's a big job to undertake and once started, it pretty much has to be finished. It's a subtle detail on the actual ship and needs to be subtle on the model too. It looks as this should achieve that effect. It also looks as though you've hit on a good colour for the bulwarks. The green on the ship is actually quite a bluish green rather than a bright Kelly green. Yours looks pretty close to the real thing. What are you using? I'm sure I broke every rule in the book by buying sample sized containers of house paint from a hardware store. But it seemed like an acceptable approach for this bit of the model as I knew there would be a fair bit of experimenting. My options for model paint are either order on line and wait for it to arrive or drive about 45 minutes away - neither of which seemed practical when I knew there would be multiple stabs at it, and there were because with every attempt to match it, it seemed to come out too turquoise. I'm happy enough with my final colour, but it's not quite a dead match. I don't recall now where I stumbled across that link to the Google maps tour of the ship, but I'm glad you're finding it helpful. You can really zero in on many different details. I use is almost constantly. We toured the ship a couple of years ago and I took some pictures, but they're not particularly helpful as I didn't take them with modeling in mind so they seem to never show what I need to know. David
- 117 replies
-
- 5
-
-
- constitution
- model shipways
- (and 1 more)
-
Hello Frank, This will be a very interesting model. I don't believe I have seen any other models of an Irish famine ship or coffin ship. Have you seen the bronze memorial at Westport in Ireland? It's a moving sight and very interesting artistically. Here's a picture I took when we were there a few years ago. Notice how the "rigging" and other parts of the ship are represented by skeletons. Like many others, I'm of Irish ancestry - County Cavan in my case. I'm looking forward to following your build log.

- 649 replies
-
- 13
-
-
- dunbrody
- famine ship
- (and 2 more)
-
Hi Matt, I mitered my waterway at the transom, though I think it could also be coped. Bob Hunt suggests mitering the waterway in his practicum and it seemed to me the best way to go. Do you have the link to the Google Maps "tour" of the ship. Even though some of the details are different than in the kit, I still find it to be an invaluable resource. Here's the link if you don't have it already. https://www.google.ca/maps/@42.3724197,-71.0564018,3a,75y,96.03h,75.28t/data=!3m7!1e1!3m5!1sY3hsBHFmwkkAAAQZN-nfoQ!2e0!3e2!7i13312!8i6656?hl=en&hl=en It includes a clear shot of the waterway corner at the transom, but it's still a bit difficult to tell how it was done, although my guess is that it is a coped joint. David
- 117 replies
-
- 3
-
-
- constitution
- model shipways
- (and 1 more)
-
Hi Dave, That's great looking work and attention to detail. David
- 306 replies
-
- 3
-
-
- armed virginia sloop
- Patrick Henry
- (and 2 more)
-
Hi Matt, Your transom is going to be just fine. I didn't think I had any pictures of mine at that stage, but I took another look and found this one. It's a bit blurry, but it shows how mine looked. I installed the four interior transom frames first, just as you've done and then I tilted the two outer ones inward in two planes. You can see where I added a filler block on the outside of the frames and sanded it into a smooth contour. I know I worried about this aspect quite a bit, but it actually came together fairly easily as it turned out. The only real discrepancy I found and I think I mentioned it in an earlier post was the length of the galleries from fore to aft. They needed to be a bit longer than the plan indicates to line up where they should with respect to the first gunport on each side. What I'm finding as I gain experience, (this is only my second attempt at a model) is that the aspects of the build that I worry about and approach with trepidation, I don't need to and the things that I don't give a second thought to tend to jump up and bite me in the behind, such as my chainplates. So in a sort of convoluted George Costanza-style logic, I think I'd be wise to start only worrying about the things I don't worry about and stop worrying about the things I already do! I'm not sure I quite fully understand yet your plan for the bolt heads on the bulwarks, but I will be very interested to see how it unfolds. I would love to have done something on mine, but I think the plastic rivet heads seemed a bit overscale and I didn't think the benefit outweighed the effort and I couldn't come up with another alternative, so just left them out. David
- 117 replies
-
- 5
-
-
- constitution
- model shipways
- (and 1 more)
-
Hi Matt, Thanks, but you're being a bit too kind. The biggest problem is controlling their length, because you don't want to cut off the end with the hole in it at the bottom, but once you cut off the top end and solder it to the deadeye, it's pretty much a done deal if it's too short. For my future ones, I'm going to actually pin the strap in place without glue to measure it rather than just holding it up to the approximate location on the hull. Then remove it, solder it and then put it back in place permanently. If I have enough left over when I've finished them all, I'll redo the most egregious ones. I used small nails to attach them with a small dab of glue. There are a number of small brass nails that came with the kit, but as I alluded to in any earlier post, I don't know what the heck they're for. They're way too big for this application. So, I ordered a bunch of steel pins from Blue Jacket which are just the right size. (If they're of interest to you, they're the ones identified as corresponding to a #75 drill size.) The small head on the pin looks like a bolt head. The only problem is, I ordered them ages ago and only ordered 100 of them which seemed like a lot. I hadn't actually counted the number needed and I have discovered that it's well over 100. I don't really have need of anything else from Blue Jacket right now and ordering more of these and nothing else is just not cost effective. The shipping costs to Canada for a minor purchase are staggering. This morning I went in to a local sewing store and it appears as though they can help me out. They have pins in many different sizes, including ones small enough, but those ones had big round heads, so they won't work. They offered to order some for me with the small flat head which I should have by next week. So that should solve my problem. Now that I know I can get them easily, I think I'm going to add another detail that's not in the plans, but I saw someone else do and I kind of like. Have you found this build log? http://www.knightdreamers.com/HomePage/Ships/00.htmThis guy, Greg Meyer, using pictures of the real ship as a guide, added pins to represent bolt heads to the outside of the hull which secure the breach lines on the gun carriages. You'll be able to find it in his log. David
- 117 replies
-
- 4
-
-
- constitution
- model shipways
- (and 1 more)
-
Hi Everyone, I have only a minor update today. I haven't been working on my model much over the past week. My daughter and son-in-law listed their house for sale yesterday and I've spent the last week helping them to hide all its flaws... er, sorry, I mean helping them to get it ready to show! I'm off the hook for the time being, but their new house suffers from much deferred maintenance, so it looks like I will have a lifetime of home improvements ahead of me. On the Constitution, I've finished all the gunport lids. I opted for thread instead of wire. At first I thought wire would be best, but no matter how hard I tried I couldn't get the two pieces of wire to join at the "Y" without a large ugly mass of twisting. The thread however worked quite well; I coated each piece in CA glue first and it was easy to handle and I got a decent join at the "Y". I used one size for the piece that attaches to the lid itself and a thinner piece leading back to the hull. I doubled that piece around the first piece which gives a smooth joint and glued it tight to itself. I've started the chainplates and am finding that this is very difficult and finicky work. I have the ones for the main mast on the port side finished. They are less than perfect, but I'm hoping for better results as I go along. As of my last post, the starboard side was going against the wall. As of now, the port side is going against the wall. I'm thinking of running a betting pool for members to guess which side wins in the end. David
- 117 replies
-
- 10
-
-
- constitution
- model shipways
- (and 1 more)
-
Hi Matt, Those two outer transom frames are quite tricky to locate, however I don't recall having to scribe theminto place when I did them. They do sit at a compound angle. They lean inboard at the very top of the extensions and they lean inboard at the rear. I believe the distance from outside edge to outside edge of the two outer frames is just shy of 4" at the very top and the distance is about 4 1/4" across at the bottom. I made my lower forward corners meet the last bulkhead (R I think?)flush. As the two frames move inboard at the rear, some of the length of the frame was taken up. Moving them inboard in the two directions left an irregular shaped void on their outsides. I glued a filler block on the outside of each frame and sanded it to create a smooth flush surface. Before I installed them, I tacked a piece of wood across the two extensions at the right distance apart and another one at the bottom. I then set this unit in place and skewed it back and forth until it was sitting correctly and then glued it (and of course removed the two temporary braces. I'm sorry I don't have any pictures that show all this but hopefully you can get my meaning nevertheless. David
- 117 replies
-
- 6
-
-
- constitution
- model shipways
- (and 1 more)
-
That's interesting Matt. Getting paint to stick to those castings has been a real pain for me too and even priming doesn't seem to help all that much. I'll tuck this gesso idea away for the future. On my cannons for this build I bought a can of flat black spray paint that the manufacturer calls "camo coat." It's not acrylic; it needs solvent for clean up. They told me at the hardware store that hunters use it for a non-reflective surface. It's dead flat. It actually adheres extremely well and is quite satisfactory where flat black is called for. David
- 117 replies
-
- 2
-
-
- constitution
- model shipways
- (and 1 more)
-
Hi Ken, I was just kidding about my hometown - I couldn't resist the urge to use the pun, and to reference my extended family would have been too mean, so I said hometown. Wow, Marathon - that's really up there. It's about 1200 km (750 miles) northwest from where I am. I've been there, driving through on a road trip to western Canada but I haven't made it to California yet. It's on my list. David
-
Hi Ken, Looking very nice. I prefer boomkin too; bumpkin reminds me too much of my home town! David
-
Hi Ken, This is amazing. I've been a little remiss in not commenting sooner, but I am hesitant because it feels to me a little like my telling Michelangelo he's not a bad sculptor. You're in a different league than I am but it's a pleasure to follow along. David
-
Thanks for the comments and likes. And Thanks Tom and Ken for the offer of cannons. I appreciate it but I think I'm ok as it is. David
- 117 replies
-
- 2
-
-
- constitution
- model shipways
- (and 1 more)