


GuntherMT
-
Posts
2,213 -
Joined
-
Last visited
Content Type
Profiles
Forums
Gallery
Events
Posts posted by GuntherMT
-
-
She looks great with the sails Bob, the effort has paid of nicely I do believe.
-
They are called 'mast hoops', and like George posted, they should be on this ship it seems. The hoops are what allowed the fore and aft rigged sails to move up and down the mast when the gaff was raised or lowered. The sails are attached to the hoops which slide along the mast.
Edit:
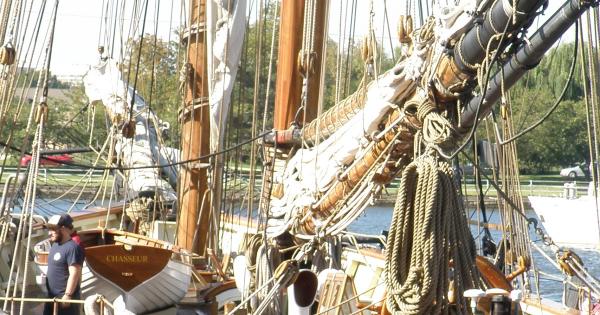
Here is a shot from the stern of the Pride of Baltimore II, showing how the rings work quite nicely. The forward mast has the sail furled against the mast with the gaff remaining raised, so you can see how the hoops are spaced along the mast attached to the sail, while the closer mast has the gaff lowered to the boom, and you can see all the hoops stacked up between them.
- mattsayers148, Jack12477, mrangus and 1 other
-
 4
4
-
Thanks everyone for the feedback. I'm actually sort of leaning towards option 1, so as to keep the hull as visible as possible, but what I may do is build all three supports for one side and just not glue them in place so I can compare them visually and make up my mind. It probably takes close to an hour to get one fit right, but that's really nothing in the greater scheme of how much time I've got invested in this little boat!
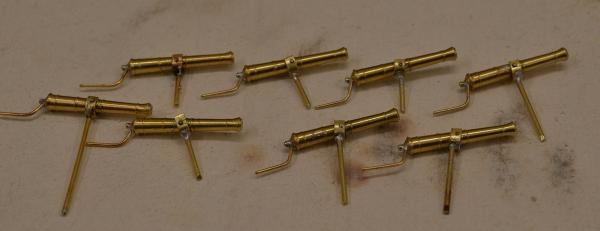
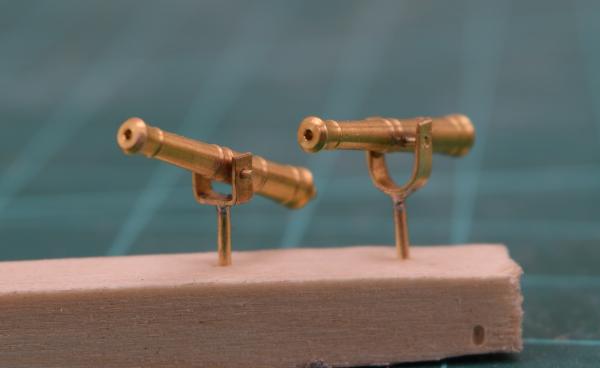
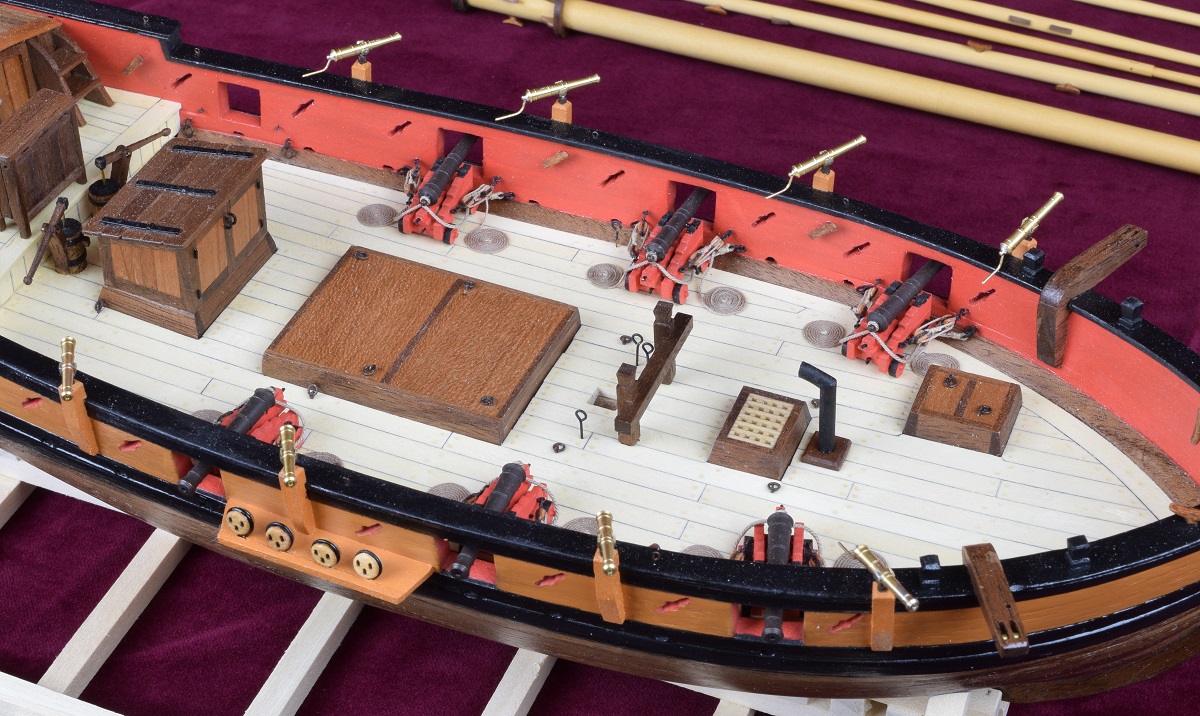
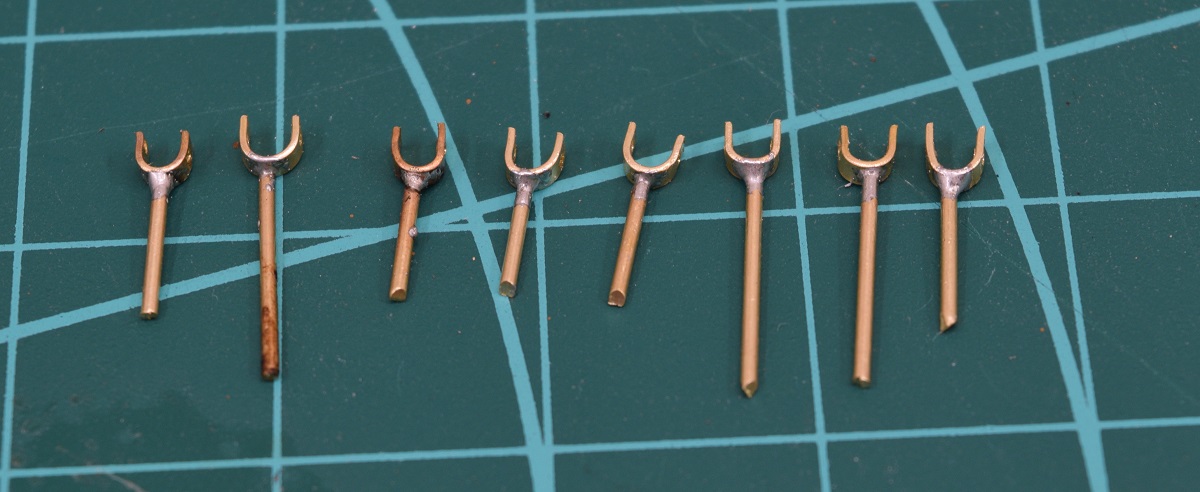
Back to the swivel guns, after making the yokes, it was time to solder on the handles.

Next I soldered the base rods onto the yokes. This was a pretty good imitation of the keystone cops, as I kept getting the handles too hot and making them fall off, followed by doing the same to the yoke rods when re-attaching the handles. In the future I'm going to invest in some different silver solders that melt at different temps. You do the first joint with high-temp, next one with medium, and the last (if you need three) with low temp solder. They also make some heat-sink compounds that you can place between joints to help keep the one cool.
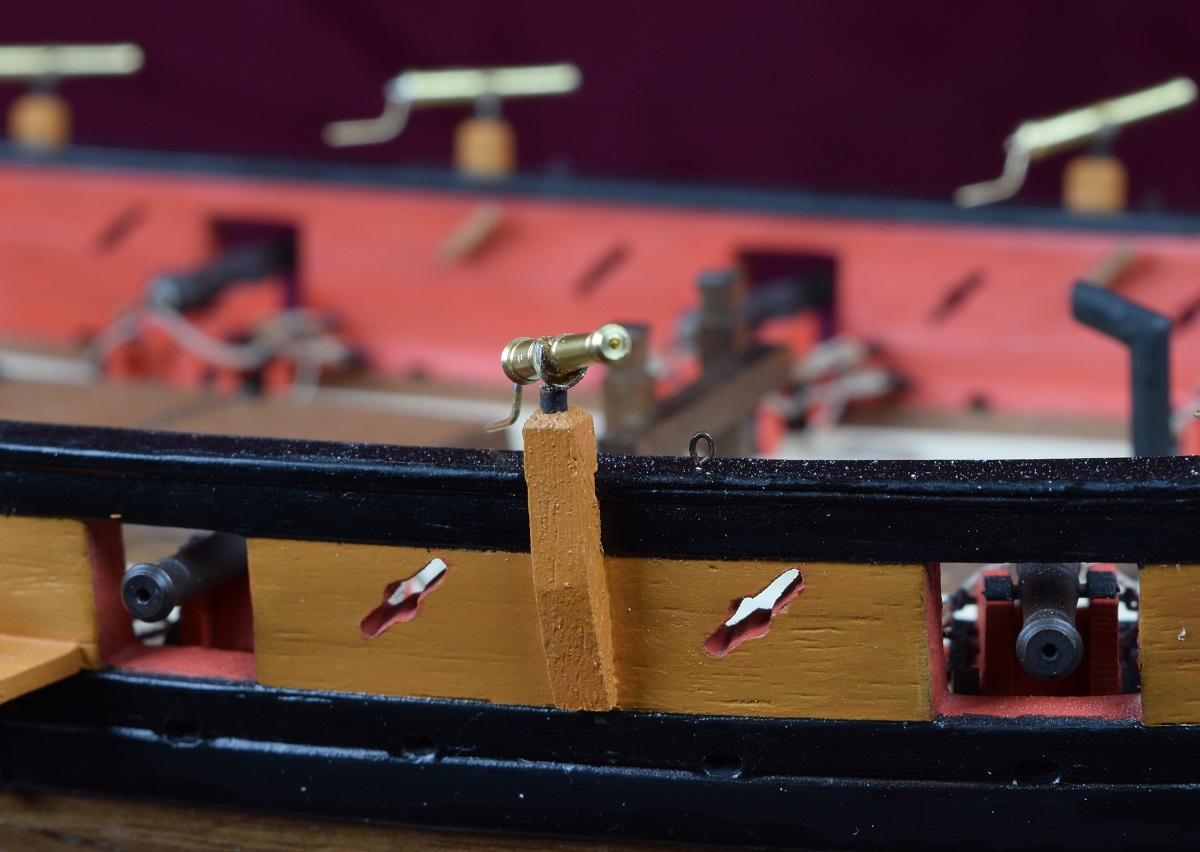
After filing/cleanup, stuck them on the ship for the pictures.
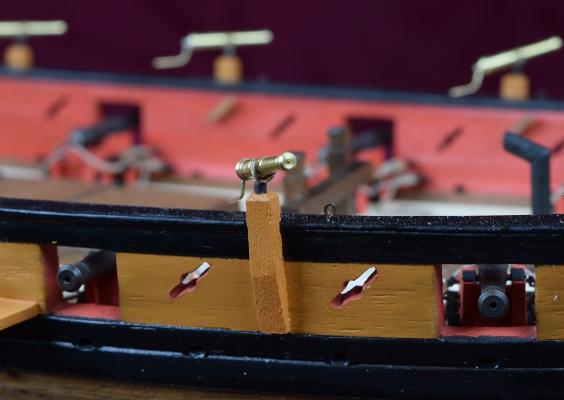
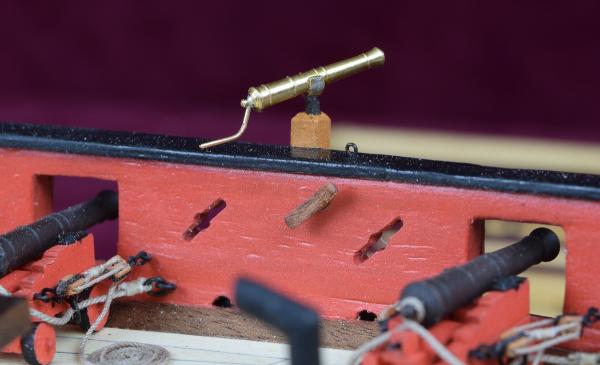
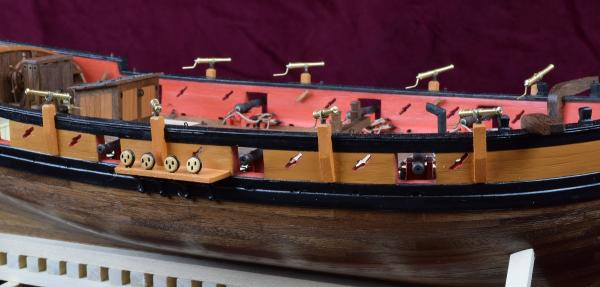

These will be blackened, and a knob added to the handle end. Obviously they are just dropped into their mounting tubes at this point and are not secured, or that would be pretty interesting!
Going to try JAX chemicals Pewter Black (and brass cleaner) since it should also blacken the solder, whereas the Birchwood Casey Brass Black leaves the solder a gorgeous silver. Thanks to Frank for letting me try his chemicals!
- mort stoll, Dimitris71, NMBROOK and 18 others
-
21
-
Being fairly new to ship building I was wondering what building boards are used by our more experienced members. I saw numerous posts on other sites about the "Fair a Frame" and how terrible it is. Then I see on this site that someone recommends it. I'm easily confused so if someone can enlighten me as to the best one, kind , or type to use I would appreciate it. Thanks
I've actually never seen anything good posted about the 'Fair a Frame' by anyone who actually got it, so I must have missed the recommendation here!
A basic building board is just a flat board (MDF shelf is what I used) and a couple of strips of wood to hold the keel.
- CaptainSteve, Canute, AntonyUK and 2 others
-
5
-
Brian ,what is your opinion not paint the cannon carriage just stain it walnut and some poly,I playing with that option?Just waiting for the package from Syren.
My opinion is to do whatever you think will look nice! Worst case, if you don't like the stain, you can always paint over it. No different from my decision to use different woods for deck furniture and the deck, and of course leaving the hull natural instead of finishing it. One of the cool things about this hobby is how different each builder can make the exact same kit.
"Natural" looking gun carriages might look great.
- Bobstrake, Canute, thomaslambo and 2 others
-
5
-
-
I started using a product called "Blacken-It", which worked well, but apparently is no longer available as the company went out of business and I've been unable to locate any more.
I then used some Birchwood Casey "Brass Black" which works pretty good on brass, but doesn't touch the cast metal or solder, so it's not an ideal solution depending on what parts you need blackened. For eye-bolts and such it's fine, and it's readily available.
I tried Liver of Sulphur, and it didn't work at all.
I am going to try some products by a company called JAX Chemicals that come highly recommended by Frank (Mahuna here) and is supposed to blacken both the brass and solder without any problem, but I haven't gotten it yet.
- grayarea and zoly99sask
-
2
-
Thanks for the input everyone. I'm still somewhat torn between leaving the view of the hull as uncluttered as possible with option1, and the visual appeal of the stand itself with option 2. I'm terrible at decision making!
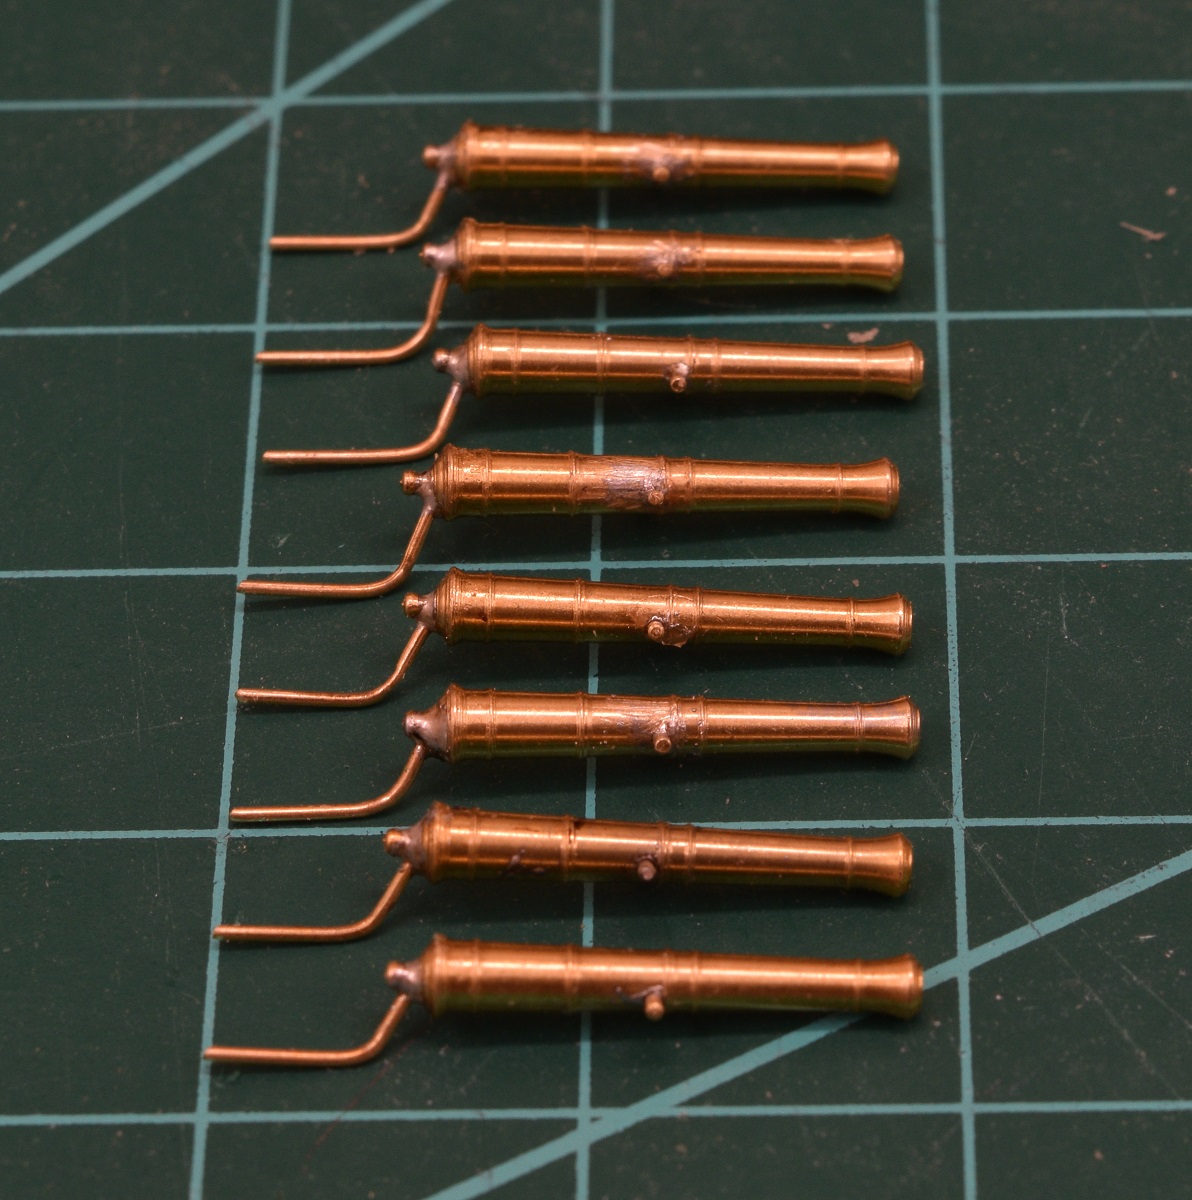
I did finish the swivel guns except for some final filing and cleanup. They need to be blackened, and then have the 'ball' on the end of the handle added, but that will come after the blackening is completed. I'll get some pictures up later.
-
-
Everything is glued at this point except the bitt in front of the mast which won't go on until it's needed for rigging as some rigging needs to belay to an eyebolt that's almost underneath of it.
- zoly99sask, Canute and GLakie
-
3
-
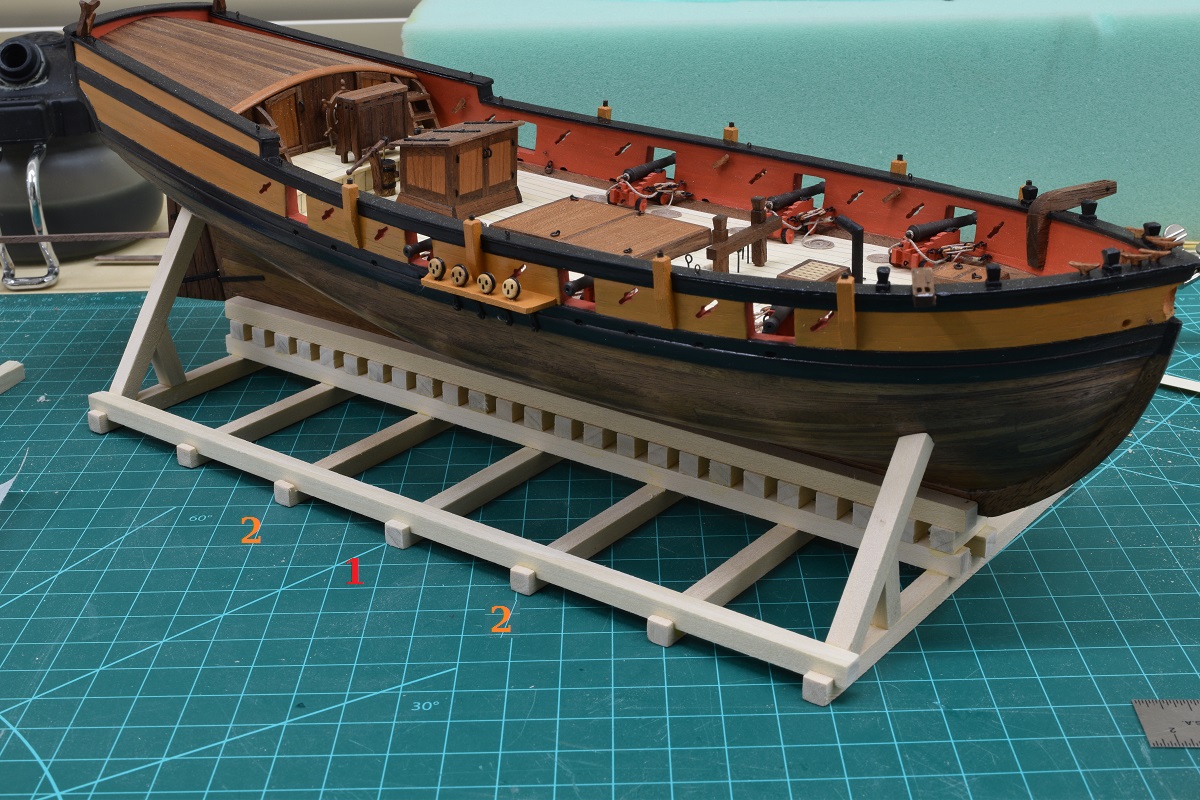
Since the last opinion poll went so well, time for another one!
I'm now working on the base, inspired by Mobsie (sp?) and another more recent build whose name is completely escaping me at the moment (sorry man).
I'm wondering how many hull supports I should add.
Option 1, just the center one.
Option 2, add two more at the positions marked.
Option 3, all locations.
Thoughts?
- canoe21, mrshanks, Salty Sea Dog and 10 others
-
13
-
Looking good!
The brass vs. iron thing is really something that is all about your personal taste I think. I did brass on the Carmen, and I'm doing all black iron on the AVS, although I'm using chemically blackened brass rather than painting as much as I can.
-
It's a Proxxon MF70 Dave. I'm happy with it for what it is and what I paid for it (I got what I believe was a very good deal on it used).
My preference, and what I will have eventually is a Sherline, but they are not easy to find used, and whether new or used, they are considerably more money than the Proxxon (new or used).
The MF70 does a good job for me, but it's not really even in the same class as the Sherline for either solidity or variety of available accessories.
So eventually the Proxxon will be replaced, just depends on when it works for me financially (or a good deal shows up on a used one). It's on the list will all the fine Byrnes tools!
-
All of the above is good advice. I used far too much glue when I started this hobby too!
I use a syringe for almost all my glue application, it allows great control.
For cleanup, pretty much as soon as the glue has 'tacked' so you don't have to hold the pieces together, I just use a #11 blade and carefully 'scrape' the excess glue off (I'm using Titebond). When it's tacked up but still fresh like this, it comes off very cleanly and easily, as it tends to 'ball up' when you are scraping it and I've had very good luck doing this. If you let it dry, then it needs to be sanded/filed, which is more work, and also can be difficult to get into hard corners to do properly, so I always try to do the glue cleanup on each joint as it's glued.
- Canute, Ryland Craze, antanasp and 3 others
-
6
-
-
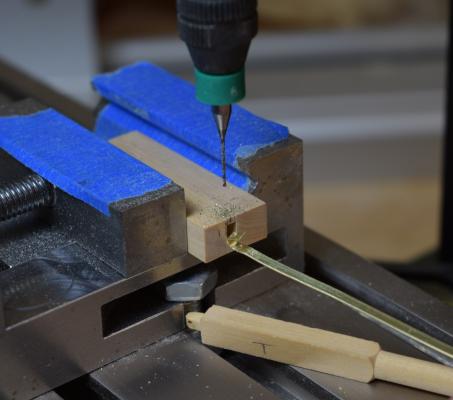
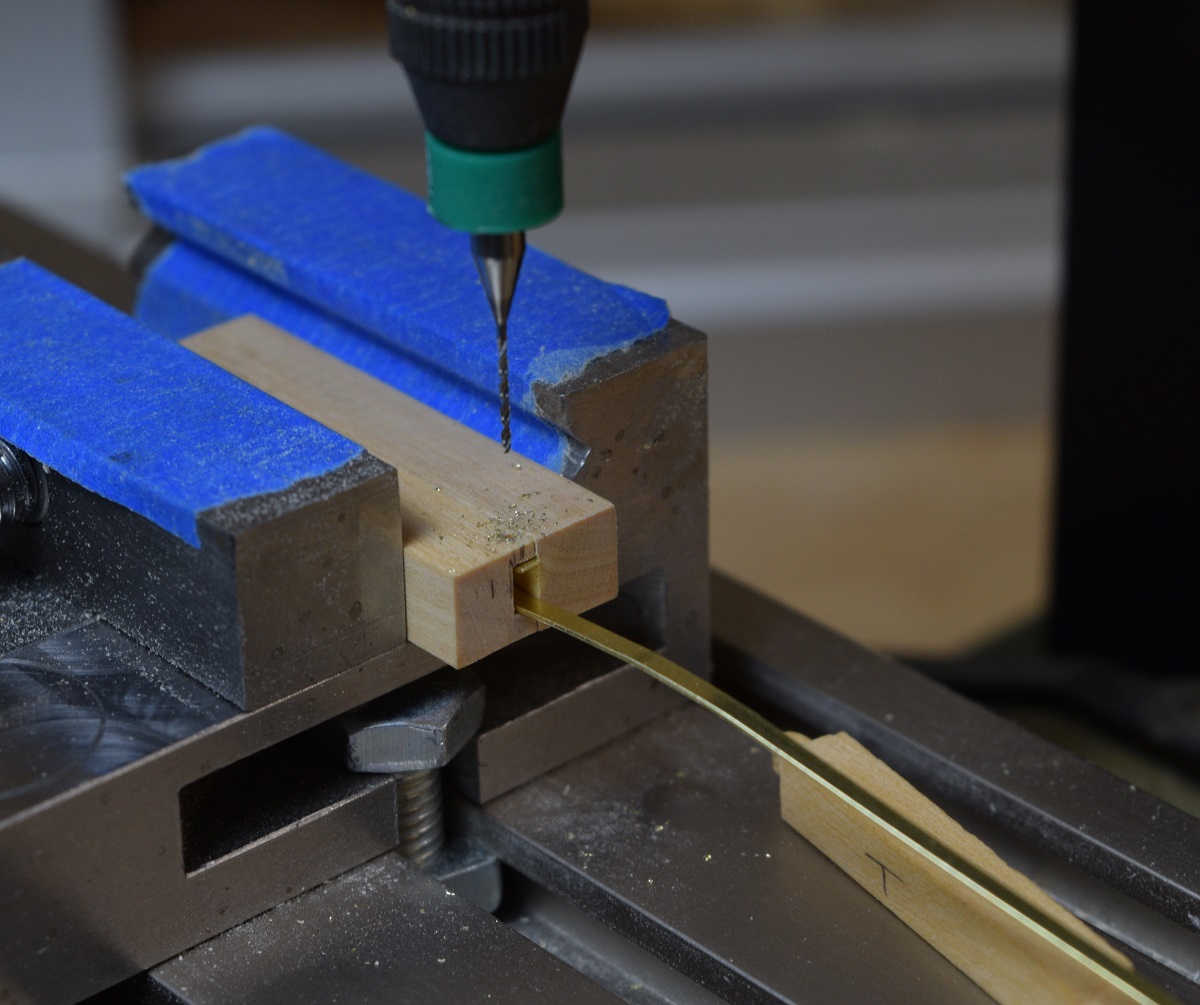
For Frank. Jig stuff!
So when it came to making the yokes for the swivel guns, one of the biggest challenges to my thinking, would be how to drill the holes through the soft brass evenly so that the trunions would be level, and consistent. Secondary issue, making the 'U' shape consistently the same size.
After messing with a few different techniques I decided that really the only satisfactory solution was some sort of a jig, so I started playing with wood to make something, and what I eventually landed on was this solution which used some of the left over bits from the boxwood I used for the masting. I used the boxwood instead of scrap basswood because of it's hardness.
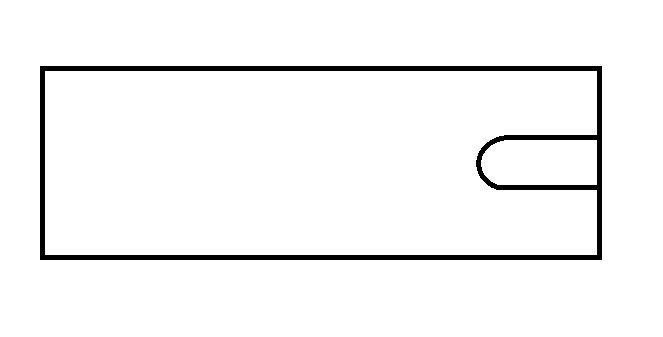
Step 1 (no photo, just a terrible paint drawing) was to mark the depth and width of the "U" shaped hole that I wanted as the outside edge of the jig former on the end of a piece of boxwood. I then found a cutting bit for the mill that was the right width, and placed the wood flat on the mill floor in the vise, and simply ran the mill into the wood creating a 'slot' on one edge of the wood, with a natural "U" shape due to the round nature of the cutting bit.
Here is a paint drawing illustrating what I mean, as seen looking down on the cut.

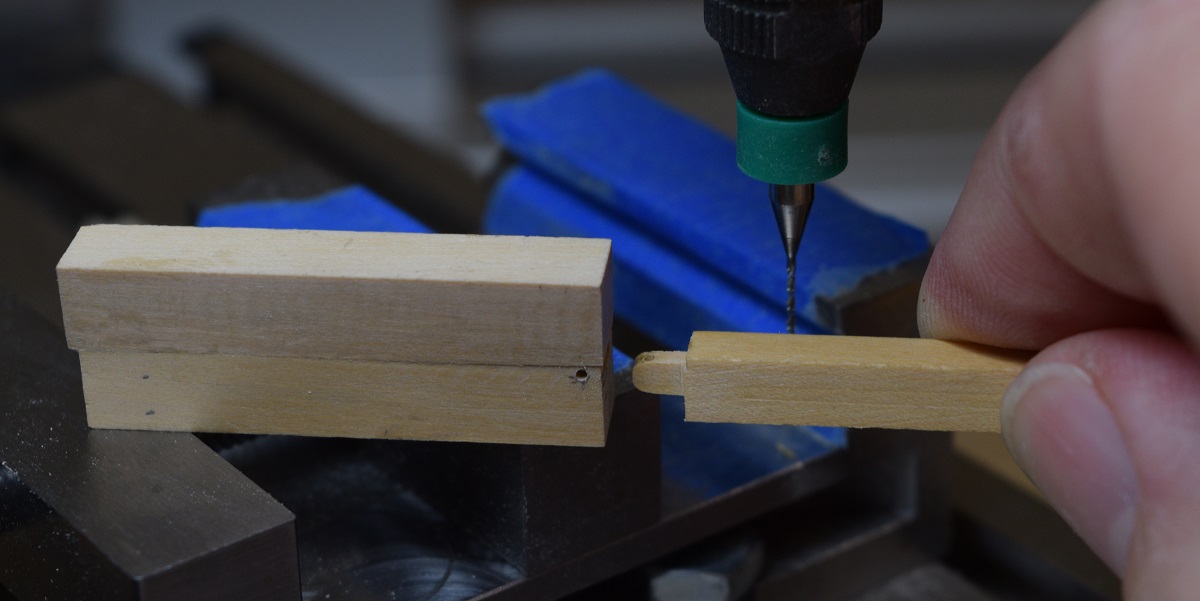
I then took a smaller piece of boxwood (again, scrap that was cut off after shaping the masts) and milled the end to a rectangular shape that would barely fit inside of the above slot, filing it so that it was the exact same thickness, and then sanding enough to allow for the brass strap to fit along both sides at the same time. I then used a file and filed the inside of the "U" shape into this piece.
Finally, I glued another piece of boxwood on top of the slot I'd cut into the first piece. Bam, jig!
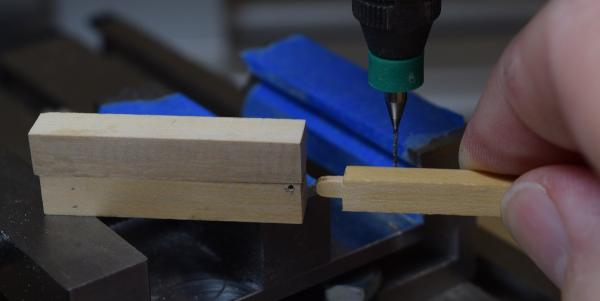
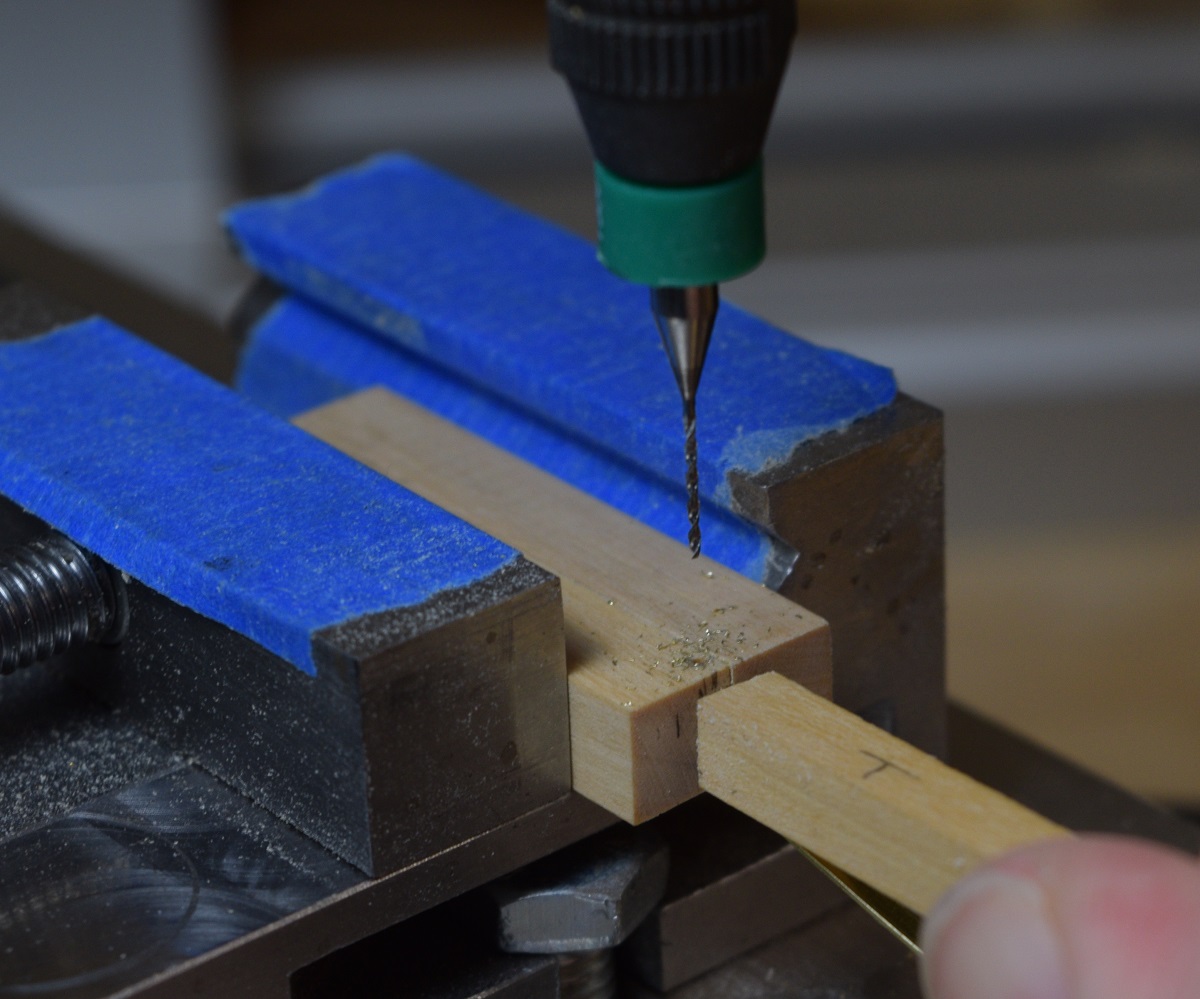
I laid the jig on it's side and clamped it into the mill vise. The "T" on the insert piece is so that I would have the same side 'up' on every use for consistency.

Using a small pair of the pliers with the round ends for making rings, I formed a small "U" in the brass strap, made sure it was as perfectly even as possible, and then stuck the "U" into the jig.

The insert piece is then pushed firmly into the jig inside of the brass "U" to force it to shape.
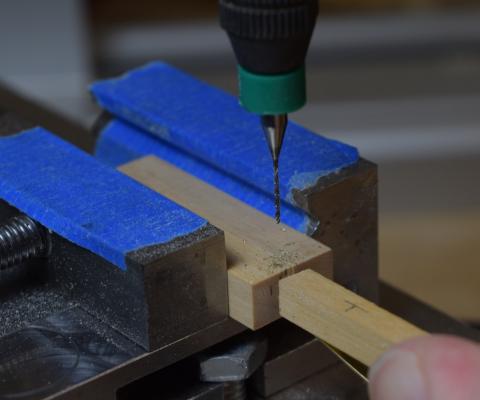
The mill head was positioned to drill into the center of the brass strip, and while holding the insert firmly, run through the jig and the brass. This was the touchy part, as if I moved the insert I could have easily snapped the drill, and I only have one bit this size. Need to get some more, I use this size a lot (#74).
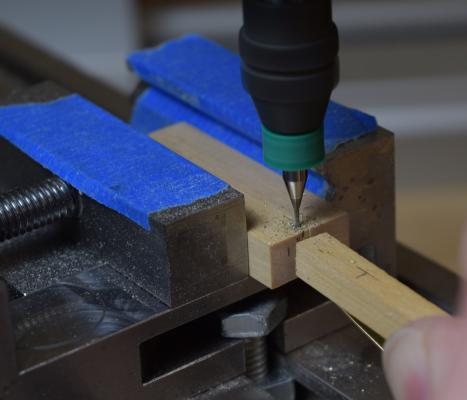
Remove the insert, which usually pulls the brass strip out with it. When it doesn't, just pull it out with the long end.
All that's left is to trim the ends with a Xuron precision end cutter, and solder it to the base rod.
And that's my super-amazing scrap-wood "U" jig.
- thomaslambo, NMBROOK, zoly99sask and 14 others
-
17
-
-
Thanks for pointing him to the right place George.
Zoltan,
I am using an incredibly precise system for choosing the block sizes. I call this system "That looks about right".

One of the problems I have with the kit blocks, is that for some parts (like the cannon blocks), they are massively oversized and look terrible. For the cannon tackle, I used 3/32" single blocks from Syren.
The Swivel Guns are the 23/32" size.
The Main Guns are 1-11/64" size (1/64 scale 6 pounders).
The carriages are the ones for the 1-11/64" barrels.
The hooks used on the cannon rigging are 3mm.
The cleats are 7mm.
The dead-eyes are 5mm.
I realize that not everyone can do this, but what I did was simply purchase a package of every single size of single and double blocks, from the smallest up to 3/16" (I think), and as I proceed with the model, I'm selecting the blocks based on my previously mentioned precision block size selection system. I'm sure Chuck likes my system!

I did the same thing with the cleats and the dead-eyes, which I just compared to the kit parts and selected the closest match.
For the rope, I simply looked at the parts list, and ordered the closest size to the rope that's listed in the kit, but always sizing down, as in general I feel that the rope on most model ship kits is oversized for scale. I then ordered a few extra in the most common sizes, and a few of each in-between size so I can again just re-size as I go when I feel like something just doesn't look right. For quantities, I used 20' per package, even though I know you get more than that, so I would err on the side of having too much, rather than not enough.
Be aware, that even though I am downsizing the rigging, the blocks will still need to be drilled to accept whatever size rope you are using, so you'll want a good selection of tiny drill bits from #80 up to #60 or so. The most common ones I use are in the #70-#75 range.
-
Hi Brian
Just catching up on your build again, great job on the masts and booms. You must have a little milling machine as the slots for your sheaves are just great. Also just love your swivel mounts, ENJOY.
Regards Lawrence
Lawrence,
Yes, I have a Proxxon mill.It has been fairly handy a few times!
-
Zoltan,
Replying from my phone, so pardon any typos.
I printed out the cannon PDF from the Syren page and compared the gun sizes. I am fairly sure I used the 1/64 scale 6 pounders, as they were almost identical in size to the kit guns, which are 1/48 scale 4 pounders.I then selected the appropriate carriage from the list. Probably the smallest one.
I got the following things from Syren:
Cannon and carriages
Swivel guns (smallest)
Blocks & Dead-eyes
Rigging line
Hooks (see cannon rigging)
Cleats
I think that's everything, but I'll try to remember to check when I get home tonight.
Feel free to ask any specific questions and I'll be happy to provide any answers that I can.
I'm quite certain that my little ship would look much worse without Chuck's great products.
- antanasp, Jack12477, zoly99sask and 2 others
-
5
-
-
-
Thanks for all the input everyone.
I would probably go with the one they show in the plans, if it is shown. If not, I think the U-shape would have been easier for their blacksmith at the time to make.
The plans for the swivels are crap. Specifically they are brittania cast metal guns with a post sticking straight out of the bottom of the gun to mount them into a hole. I've tossed the guns and already installed brass tubes for the brass mounting rod to drop into. There is no way that I'm just soldering a rod straight to the bottom of my pretty brass cannons.
- GLakie, zoly99sask and Canute
-
3
-
Opinion poll time!
Assuming that I make the U shaped mount the right size (i.e. about the same size as the 'square' mount and both of them slightly narrower), which style of swivel gun mount should I go with? Square, or U?
- GLakie, Dimitris71, Canute and 1 other
-
4


75mm boat by antanasp - FINISHED - Master Korabel - Scale 1: 72 - SMALL - Russian fleet boat
in - Kit build logs for subjects built from 1751 - 1800
Posted
Great looking boat, thanks for the log.