


Keith_W
-
Posts
1,145 -
Joined
-
Last visited
Content Type
Profiles
Forums
Gallery
Events
Posts posted by Keith_W
-
-
-
Just superb, Mark. Everything looks so neat. You must fastidiously clean up your boat every time you take a picture of it. I don't see any dust anywhere!
-
Thanks Keith,I will keep that in mind. By side strakes do you mean the wales?
Mark
No Mark, I mean the vertical strakes (whatever they are called!). The wales tolerate a bit of error. But if you space the gunports incorrectly, like I did, you won't be able to fit them in. If you look at my build log, I had to correct this mistake by moving some of the gunports after I cut them - this involved enlarging the holes sideways and gluing planks in!
 Fortunately I realized this mistake before the second planking, so I was able to hide the mistakes under the second planking.
 - joske and marktiedens
-
 2
2
-
A little tip for you, Mark. Make sure you mark out the position for the side strakes while you are cutting the gunports. If you have enough space for the side strakes, you are good.
- marktiedens and cristikc
-
2
-
-
That is beautifully neat, Mark. Yours will be the RW to beat, I am sure.
-
Julie, please let me assure you that your time spent doing this is very worthwhile. As others have said, this process will simply result in your frames sitting better. If ever any doubt creeps into your mind, you will be reminded what a good idea this exercise was when you start planking. Keep it up. I and others are watching your build progress. I think it looks great!
-
-
-
I am in awe of the beautiful parts you have managed to fabricate with your CNC setup. This has convinced me, I need to acquire one of these for myself. If you don't mind, could you tell us what you are using?
- dgbot, Canute, Dimitris71 and 1 other
-
4
-
That is fantastic work! How do you operate your mill? Is it CNC controlled, or do you hand crank it like the rest of us?
- mtaylor, Dimitris71 and Canute
-
3
-
I am sure someone else will probably chime in Mark.As you know I have the plans and did scratchbuild the stem,keel and a few frames before putting the build on hold until my domestic situation resolves itself.From memory(the parts are in my storage unit)the prow tapers in both directions,downwards and towards the figurehead.I believe the section at the top touching the hull should be 8mm thick,but this tapers working downwards and forwards.This explains why your kit parts didn't match up.From memory (again) this is shown on the bow view on the sheer plan.
Kind Regards
Nigel
I agree, Nigel. In my build log, I remarked that Frame F was too low compared to Frame E. I shimmed mine, but later on in the build I realized that it was deliberately stepped to allow for the installation of the front railing decoration. It was no issue for me, since I ended up scratchbuilding my own. But if you plan to use the Euromodel supplied part, you may have an issue.
-
I know that this is a ship modelling forum. But I am aware that there are many good projects that don't get posted to this forum because they are not ship models. e.g. I know someone (who normally posts on this forum) is making a wooden framed WW1 aircraft. And if someone else were to attempt this model, I would love to see it on MSW. Perhaps the mods might consider making a separate subforum for these types of projects ... maybe "other woodworking model projects" or something like that.
-
This thread is starting to turn into a wish list of models I want to make!
I came across this a few days ago: http://www.derekhugger.com/
Derek Hugger designs and builds kinetic display models. Illustrated below is a mechanical hummingbird that will flap its wings and dip its beak into the flower when you turn the crank. There are a number of other models on the website, along with Youtube videos showing how they work and move.
Downside - these are not kits. He will sell you the plans only. You have to own a bandsaw, scrollsaw, drill press, and a whole bunch of other tools. Even then I am not sure how to cut those parts so precisely.

- mtaylor, Captain Slog, Mike Y and 5 others
-
8
-
Great to see another RW log starting up. I agree, you really should study the other build logs. You will come across many problems with your build. I'll keep an eye on your log and see if I can help

- zoly99sask and marktiedens
-
2
-
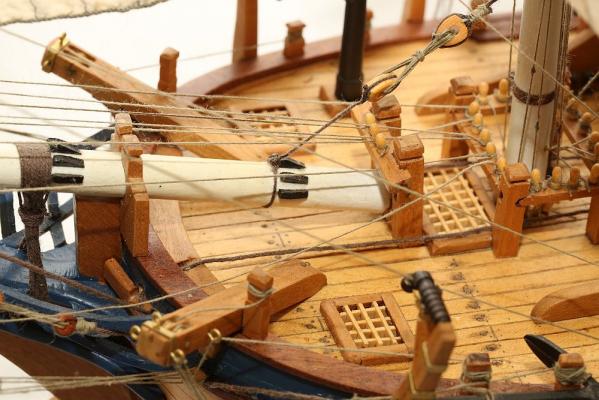
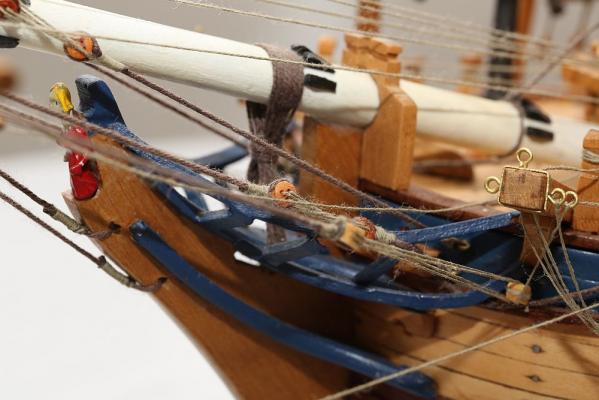
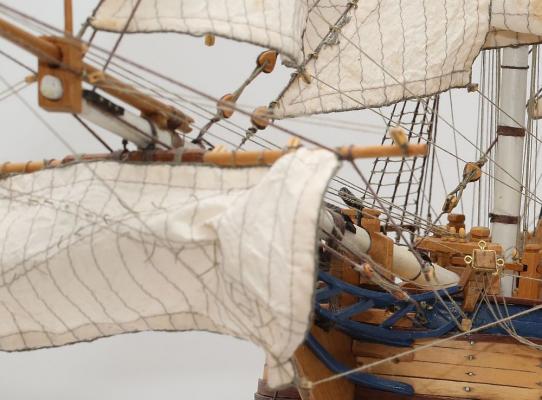
Not sure what photos you wanted to see of the bowsprit, but here are a few of mine.

-
-
-
Good luck with your build! Love the beard, can I touch it?

- CaptainSteve and Philthy
-
2
-
Gentlegiant, Greg, Keith and Dimitris...thanks very much for the kind words.
Keith, yours and Captain Al's Bounty builds is what motivated me to build this model. I also liked the fact that you left off the Jollyboat and added details to the Launch.
Thanks for the many detail ideas I got from you
Thanks Boyd. The reason I left off the jolly boat was because it turned out to be a disaster. It was NOT a creative decision on my part!
-
Very neat, Boyd. I like it.
-
Hi GG, it looks good ... but I am not sure if balsa is a good choice of material for this application. Those frames will be subject to a lot of force as planking builds up, and I am not sure if they will hold the frames without breaking. Plywood may have been a better choice. If I were you, I would consider planking both sides of that balsa or consider remaking the part in ply. Good luck!
-
-
Nice progress, Denis. What's happened to "pink"? Did you get married?


HMS Royal William by KeithW - Euromodel - 1/72
in - Kit build logs for subjects built from 1501 - 1750
Posted
Hi all, i'm back! I took a break because I was frustrated by the first galley on the stern. Having decided to scratch build the stern, and not use the metal plates supplied by Euromodel, I had to come up with a method to make the windows and still let the internal lighting shine through. I thought about building a wooden frame and cutting holes in it, but in the end I decided to make the part out of acrylic and veneer over it.
This is what I am talking about:
This is a surprisingly complex part to make! The part curves in three directions, and must be precisely cut to fit the lower transom, the deck above it AND the side strakes. You can see my various failed attempts ... I made and remade this part four times. I FINALLY managed to fabricate a piece that I liked.
This is how it sits on the stern.
The upper deck will be built together as a unit.
I have also made a start on the next cabin piece. This one is a little more complex, it protrudes out into the deck. Once again, I decided to scratch build the piece myself instead of using the Euromodel supplied plates.