HOLIDAY DONATION DRIVE - SUPPORT MSW - DO YOUR PART TO KEEP THIS GREAT FORUM GOING! (Only 69 donations so far out of 49,000 members - Can we at least get 100? C'mon guys!)
×


DesertWolf
-
Posts
130 -
Joined
-
Last visited
Content Type
Profiles
Forums
Gallery
Events
Everything posted by DesertWolf
-
 Hi Ferit Your rigging is crisp, perfect and precise like the rest of your beautiful build. In this hobby, you are a grand master indeed!
 -
Hi Robbyn, that Morope sure looks nice! I also saw Chuck is selling rope from his Syren company. It looks amazing, doesn't it? Do you think he'll send me 100 yards as a free test sample? And I agree with Sjors... more pics of your beautiful build please!
- 773 replies
-
- 2
-

-
- san francisco ii
- artesania latina
- (and 1 more)
-
Nice work Augie. I agree with David, the heat shrink is a fantastic idea - and it yields superb results!
- 1,668 replies
-
- 1
-
-
- syren
- model shipways
- (and 1 more)
-
Hi Randy Hope you had a fantastic birthday. If I got a penny for each time I tried to blacken something that wasn't properly cleaned I'd have... well, uhh.. a couple of pennies I guess. Sometimes I feel like I spend more time cleaning up mistakes than making actual progress. Hang in there!
- 384 replies
-
- 1
-
-
- san francisco ii
- artesania latina
- (and 1 more)
-
Dry fitting and installing more doors...


-
Thanks Matti, encouraging comments from a true master such as you is always inspiring! Since I replaced the metal gun port lids that came with the kit, I decided to replace the metal doors as well. To make a door, I stuck pieces of left over deck planking on electrical insulation tape to form a base and give the door some depth. I cut left over mahogany veneer in 1mm strips to simulate door planks and glued it on the deck planking base (Luckily I kept every bit of scrap veneer when I lined the bulkheads that the doors are positioned in – I do not have a lot of spare pieces). After cutting out the door, I placed a metal door from the kit on the cut-out and filed the whole door flush with the metal piece. (The electrical tape is flexible and keeps the whole assembly nicely together during the shaping process – I only pull it off right at the end when a door is finished.) The final step is to make hinges and a door handle from copper wire, then blacken it and sticking it on the door. Homemade vs kit-supplied The doors are located on bulkheads that are planked clinker style. Due to the overlapping planks, it looks odd if you follow the kit instructions and merely stick the door onto the bulkhead, since you can see in behind the door when looking at the door from the side. To get a more realistic look, I rather made a hole for each door in the bulkhead. Bowsprit door


-
Thanks Randy, Hamilton and Lawrence. Much appreciated!
-
Caroline, Thank you for all the detail and going through all this trouble to recreate your SF log. Your SF is an absolute masterpiece! I'm looking forward to seeing more pics.
- 122 replies
-
- 1
-
-
- finished
- artesania latina
- (and 1 more)
-
I've said it a hundred times, but I have to say it once more... that is the best paint job I've ever seen! I wish I could give all my builds such a realistic weathered look. Absolutely brilliant! Time for me to go and braai (barbeque) as well.
-
Thanks Caroline! I truly appreciate all the effort.
-
... says master model shipwright Randy. May I remind you that I steal all the good ideas from your superb work? Your build really is an inspiration for me.
-
Thanks Sjors. Like I told Augie, it’s a photo of Canis Lupis Lupaster, or the Egyptian Wolf. They are critically endangered and the sheer tenacity needed for them to survive in an arid region (and man's brutality) captivates me. I hope they survive us all. Your cannons look fantastic! Where do you find all the time to build?
-
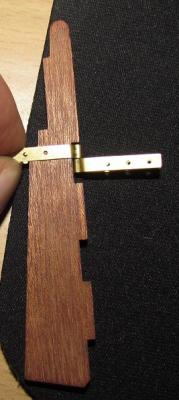
I blackened the hinges (2 rounds of about 60 seconds each in Birchwood Casey Brass black, diluted 50% with water) I first glued the hinges to the rudder. Once the glued dried, I drilled 0.8mm holes halfway into the rudder through the holes in the brass strips. I snipped off some pins that came with the kit, blackened them and hammered them into the holes. In hindsight, I should have filed the heads of the pins a bit thinner I think - they do stick out a tad bit more that what I would have thought is optimum, but I'm pleased with the result. Hammering in the pins removed some blackening from their heads, so I touched it up by applying blackening agent with an ear bud. Below is a picture of the rudder after a coat of varnish to seal everything nicely.


-
Hi Sjors, your San Ildefonso is a masterpiece! Beautiful work indeed!
-
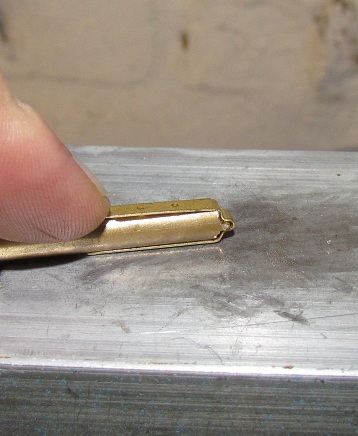
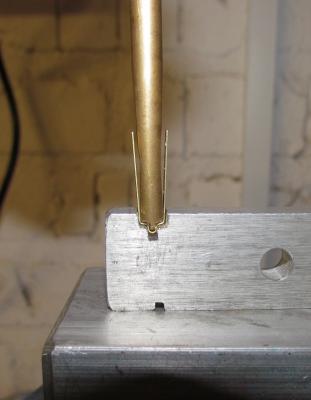
I finally made progress with my rudder pintles and gudgeons. I struggled to crimp the brass strip provided with the kit tightly enough around the brass wire to form the pintle. When I did crimp it tightly, the pintle did not fit in the notch provided in the rudder. Instead, it protruded a mile behind the rudder, resulting in a huge gap between the rudder and the transom. I asked for help over in the Tips & Techniques section and Jack Tar shared his fantastic technique to fasten rudders. It results in natural looking pintles & gudgeons without the crimping pains. (Thanks again Jack!) I was going down that route when the Admiral’s father suggested a simple jig to solve my problems. I filed a 5mm slot in a piece of aluminium. At the bottom of the slot I filed another narrow slot (2mm) – just wide enough for the wire forming the bolt of the pintle plus twice the thickness of the brass strip. From a piece of brass rod I filled a “negative” template that fits into the slots I made in the aluminium. From here the process was easy. I placed the brass strip in the aluminium slot, placed the brass rod in and tapped the whole contraption with a hammer. Voila. For final adjustments, and to get the edges nice and square, I placed the brass strip over the brass rod and tapped it lightly with a hammer on all sides. The result is a tightly formed partial pintle that holds the wire forming the bolt tightly, even before any glue is applied. The pintle also fits neatly into the notch provided for it in the rudder. The next step is to blacken the brass parts before attaching it to the rudder.


-
Cheers Matti! And thanks for the good advice Augie. Randy, I will first have to find some decent thread to make my own rope with. I'm not sure if that will be a problem or not. I don't want to go through a whole dye exercise, so the colour must be right from the start. (And don't forget that I will need to prepare a 100 slide powerpoint presentation to explain to the Admiral why I'm building another contraption that will take up some of her shoe space on the top shelve... )
-
Hamilton, I agree with Ian M, one gets a lot of inspiration from your build for one's own efforts and kit bashing. Superb work!
-
Hi Caroline Am I mistaken, or did your original build log on MSW1 include more details of your rigging process? I remember photos with colourful arrows that showed how you adapted the rigging to suit the period better. I got a copy of R.C Anderson's book, and although he explains everything in detail, your original build log was just a lot easier to follow! If you ever find the time to upload some more photos and details, disciples like me following your original log will greatly appreciate it.
-
Thanks Augie, much appreciated! But my skill is not even close to your caliber. I’m planning on sending my San Fran to you for rigging… I don’t think there is enough beer in Africa to calm my nerves before that step. I will also have to solve my tread problem in the coming months. The AL tread in the kit is too fluffy (well, the tread for the stays and shrouds at least. Tread for the running rigging and rat lines may just be okay) If I order good quality tread from overseas, I will have to sell a kidney and take a second mortgage on the house just to cover the shipping costs – and then I still have to pray that the package does not get “lost” at customs. I know in the end I will probably have to make my own tread… or stop complaining at least
-
Still struggling with the rudder pintles and gudgeons... Mark Taylor will forgive me for paraphrasing "the Artesania Latina instruction writer is slow, but the modelshipwright is patient"
-
The words absolutely magnificent do not do justice to your build! It's beautiful!
- 161 replies
-
- 1
-
-
- pegasus
- victory models
- (and 1 more)
-
Hope you get well soon Matti. Thanks for the description of your painting technique. Airbrushing a light coat of varnish to bound the pastels is a great tip! I would have thought that it will mess with the pastel washes applied afterwards.
-
Jim, I would not change a thing. Your planking is excellent! Working from the bulwarks and keel towards the middle does create a challenging last plank, but I still think this is better than ending up with a super challenging garboard plank as your last plank. But then again, I guess the last plank will always be a challenge, whether at the bulwarks, keel or in the middle. Good luck with the port side planking!
-
Thanks Augie. It’s a photo of Canis Lupis Lupaster, or the Egyptian Wolf. They are critically endangered and the sheer tenacity needed for them to survive in an arid region captivates me.
- 1,668 replies
-
- 2
-
-
- syren
- model shipways
- (and 1 more)