


Bob Blarney
-
Posts
467 -
Joined
-
Last visited
Content Type
Profiles
Forums
Gallery
Events
Posts posted by Bob Blarney
-
-
I'm a big fan of bandsaws, My remarks may not be fully applicable to your needs (a 14" with 12" depth of cut, and a 12" with a 6" depth of cut. ), but I think a couple of observations might be useful to you.
I watched the sales video of the Axminister AC1400B and read through the manual. It appears to be a decently built machine for the price ($225USD) and the manual is well written . But I'm skeptical that it could properly tension a 13mm blade - that's a bit difficult even on my 1940s-50s era 14" Delta with a cast iron frame. Insufficient blade tension will be manifested by bowed and wandering cutting. I think the standard 6mm/6TPI is appropriate, or at most possibly an 8mm blade would be ok (By the way, one rule of thumb is that 3 or 4 teeth should be in the wood when cutting, although an additional 1-2 teeth won't be problem if the rate is slow enough to eject the dust from the kerf.) Other than that, perhaps modern blade metallurgy has improved the flexibility of bandsaw blades. In earlier times, blades broke quite often on saws with less than 12" wheels.
Finally, if the blade tension, tracking, and guides are properly set, then it should be possible split a pencil line without a fence or miter gauge. Indeed, very fine work can be done - look at this 6cm tall reindeer that Alex Snodgrass (see above) cut out freehand for my young daughter, all the while conversing with the audience at a woodworking products show.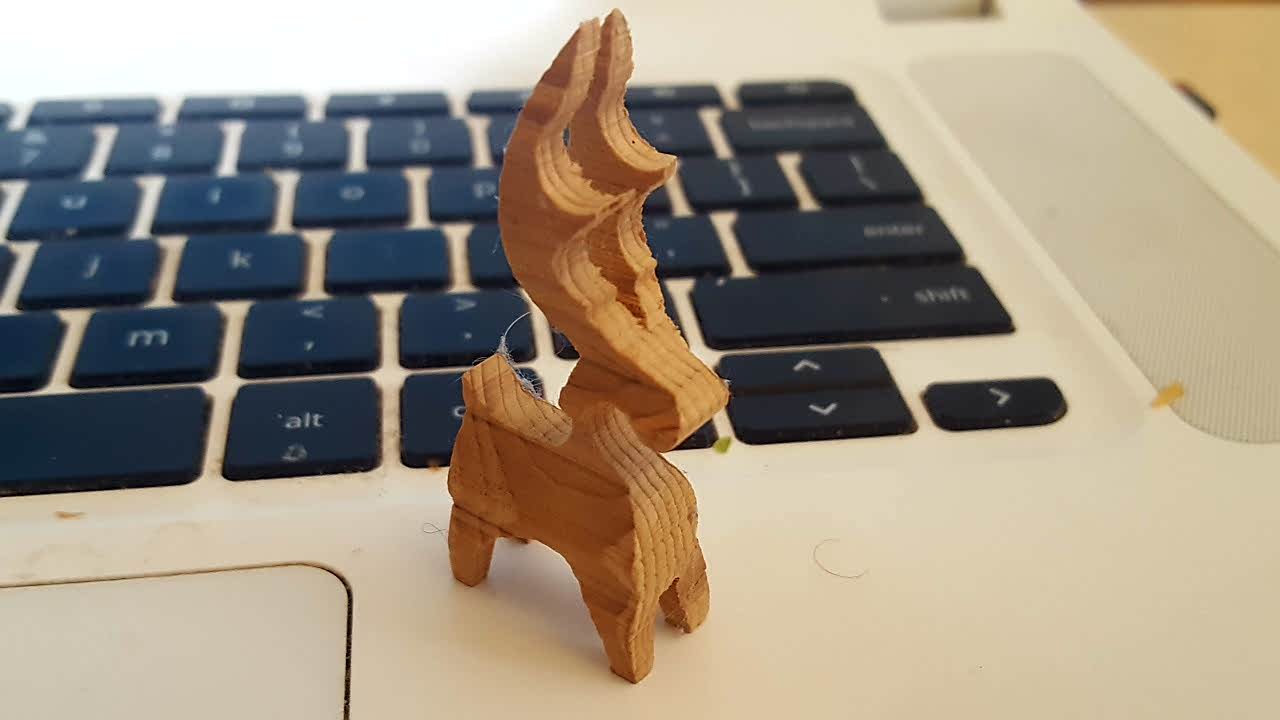
- Roger Pellett, mtaylor, Michel L. and 2 others
-
 5
5
-
1 hour ago, Bob Cleek said:
Go for it. From what I gather, though, the machine time it takes to make the cuts costs more than they can be sold for.
Ah, but there are people who teach about how to use it. Here's the equipment list
https://www.i3detroit.org/wiki/Category:Equipment -
16 minutes ago, Bob Cleek said:
I do the same with mine by putting a piece of masking tape or Post-it note on the top face of the curve and marking that. As for cutting them on a CNC machine, the guy who had the "Go Fund Me" site to do exactly that couldn't generate enough interest to get tooled up and into production. I don't know why beyond that, though.
Maybe I'll take cruise over to i3Detroit.org. It's a art/craft/maker community with just about every tool you could think of, and $50/month gets 24/7 access to it all. But the real value is in the people who participate - every kind of artists, machinists, engineers, designers, you name it. Detroit is still a technological powerhouse
-
Hmm, make a computer scan of the complete set, and then a person with a CNC can make a set for you lickety split, in any size you want.
By the way, I did a very fine sanding on one side of an inexpensive office supply set. This allows me to mark spots along the edge with a pencil if I need to duplicate a curve later or flip it over to trace a matching chiral curve. The pencil mark can be removed with an ordinary eraser.
-
if any other sizes are needed, check out:
www.blocklayer.comThere are also many other items of interest there.
- Bob Cleek, mtaylor and iMustBeCrazy
-
3
-
Yep, they're handy. Clamps can be cut from PVC pipe - slice off rings like baloney and cut the ring to make an opening. The clamping pressure can be adjusted by choosing the diameter of the pipe, the width of ring slice, and the segment cut from the ring (if more than a simple cut).
-
2 hours ago, wefalck said:
Put a dimmer before the machine. You will loose some torque, but gain a cheap speed-control.
In fact, I am running some of my machines from an extension cord with momentary foot-switch and have a 'plug-dimmer' in the socket, into which I plug the machines. Allows you to preset the speed and start/stop the machine with the hands free.
Everything that is effectively a resistor, incandescent bulbs, motors, soldering irons, etc., can be controlled with such dimmers.
Unfortunately that is not advisable or possible. These sanders have induction motors. A 'universal' motor can be controlled by HF router controller ($20). Besides that, dimmers are intended for resistive loads such as incandescent lamps or heating blankets.
-
1 hour ago, Gaetan Bordeleau said:
Belt sander to sharpen knife usually have a belt of 2 inches by 72 inches. It is use for the rough sharpening and the final sharpening is made on a stone.
The speed for a belt sander for metal is faster than the speed used for the wood.
Belt sanding for wood gives a much better finish than a disk sander, especially when you sand in the same direction as the wood grain. For this reason, I do not use disk sander.
A 2x72 is an excellent machine for making knives, but a 1x30 will take away the prize for everyday work in a home/hobby shop. If I really wanted to slow the 1x30 down without spending money for a new motor, then I would make a smaller drive wheel. But doing that might require the addition of another idler wheel to take up the slack. But most hobbyists aren't inclined to make or modify tools - they're interested in pursuing the detailed work of their hobby.
-
A strip sander can be very useful, not only for your hobby. I used mine to sharpen knives, chisels, and plane irons yesterday - scalpel sharp. You can buy a 'knifemaking kit' at woodworkingshop.com for about $40 that includes a large selection of belts and a few other items.
A tune-up and maybe a couple of easy modifications might be a good idea. There is guy who sharpens kitchen knives for a living using these, and he has made a couple of videos about how he tunes his strip sanders. One particular thing he mentions is belt speed, and it may be worth the extra $20 to buy the variable speed RIKON 1in. x 30in. Belt / 6in. Disc Sander. Another alternative is the standard combo 4x36 belt sander & 6" disc sander.
The cutlery guy reviewed several 1x30 machines here, bearing in mind that he use them for cutlery sharpening: -
This might be a useful idea for those who have a vibrating pad sander. It could handle larger pieces:
https://books.google.com/books?id=fdQDAAAAMBAJ&lpg=PP1&dq=strip sander&pg=PA128#v=onepage&q=strip sander&f=false -
2 minutes ago, Bob Blarney said:
Or a vertical strip sander
But the sander that I use most is this one. by far. The belt mechanism can be removed and spindle sanding sleeves installed, from 1/2" to 2" in diameter. It's also possible to make accessory fixtures that accommodate many needs.RIDGID Oscillating Edge/Belt Spindle Sander
https://www.homedepot.com/p/RIDGID-Oscillating-Edge-Belt-Spindle-Sander-EB4424/100061671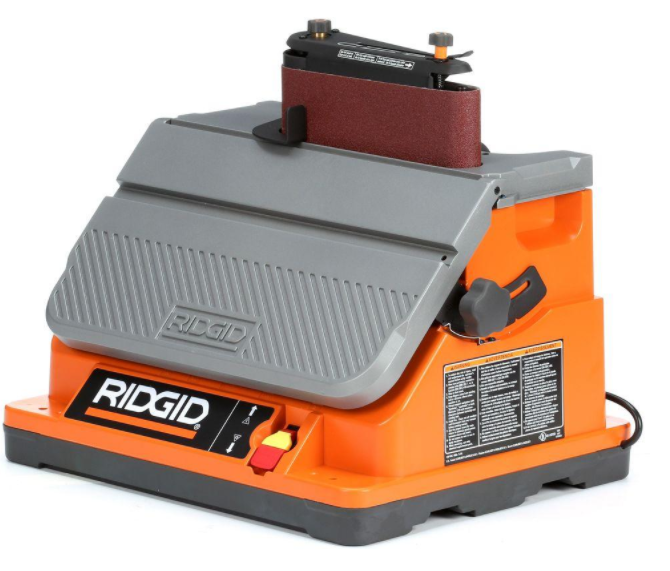 Quote
Quote -
5 hours ago, wefalck said:
Don't know, how you guys use your disc-sander, but normally one moves the work-piece along the disc to avoid scratching marks. So you can work on pieces at least twice as wide as the table of the sander. Of course, if you use the protractor, then there may be further limitations.
Otherwise, you might need to look into belt-sanders.
Or a vertical strip sander
But the sander that I use most is this one. by far. It's possible to make accessory fixtures that accommodate many needs.
https://www.homedepot.com/p/RIDGID-Oscillating-Edge-Belt-Spindle-Sander-EB4424/100061671 -
4 hours ago, Hellmut1956 said:
@Bob: The website you supplied the link to is the closes I have seen so far to what am looking for. But if I have not misinterpreted it, it gives information about the physical dimensions of the bits. What I am looking for is information about the physical dimensions of the recess in the screw heads that would allow me to identify what bit a certain screw requires.
I think you are over-thinking this. As Wefalck wrote above, just keep a set of bits and try them out to see if they fit the screw. With further experience, usually you will recognize the necessary size instantly.
Except for rare instances, the screw size/diameter determines the size of the recess, and therefore the bit size.
-
4 hours ago, stuglo said:
Another example of my not thinking of the obvious. Is there a SIMPLE way of compensating for this when sanding a wide part - without eyeballing?
Unfortunately, it would be difficult with such a small sander. An alternative would be a strip sander, or a drill press 'Robo-sander'
However, upon closer inspection of the pictures from the Menards ad, I don't see a bump on the motor's case that indicates the presence of a starter capacitor. Thus the motor can possibly (likely) be regulated with an inexpensive 'router' speed controller, available at Menards or Harbor Freight for less than $20.
https://www.menards.com/main/tools/power-tools/routers/router-speed-control/80820/p-1444421810442-c-10087.htm
Also, a good place to buy abrasives is Klingspor's woodworking store. Here's a 50 disc sampler ranging from 60-400 grit (5 of each grit)
https://www.woodworkingshop.com/product/sam5x8/
-
2 mm screws : Phillips PH000, PH00 (small electronics)
3 mm screws : Phillips PH0 (small electronics)
4 mm screws : Phillips PH1 (common household appliance items)
5+ mm screws : Phillips PH 2 (common household appliances, construction, automotive)
large screws : Phillips PH 3 (has a blunt tip, and is not so common)
Generally, the 'PH' does not appear on the screwdriver handles.
There are also Robertson (Square) Bits
the most common are #1 (smaller), #2 medium (very common), and there are smaller and larger size that I don't usually seeBitte, hier anschauen:
https://www.mcmaster.com/metric-hex-bits -
1 hour ago, Moab said:
If you have the space it would be great to have one sander using a rough grit for hogging material and fit the Byrnes with a fine finishing grit.
I know “nothing” about motors so can someone explain why the Byrnes sander can’t be made with a different motor that will allow variable speeds?...Moab
There is something else that you might consider.
While the motor RPM are constant, the paper's surface velocity (inches/min) - and therefore the sanding rate - is greatest at the outer edge of the disc (5" x pi x RPM). As a piece of stock is moved towards the center of the disc, the surface velocity drops, and becomes zero at the dead center of the disc. So it is possible to alter the rate of sanding by positioning the piece.
- paulsutcliffe, bruce d, mtaylor and 2 others
-
5
-
5 hours ago, bruce d said:
Having now had a few minutes to try out the new tool I am impressed with smoothly and quietly it runs. It has a super-grippy hook & loop feature straight out of the box (which isn't obvious until you can see it) and I will see how some of my other sanding discs work with it. Is there an advantage in the conversion I am overlooking?
At a glance the hook & loop on the Lidl sander is different from that on my Bosch hand-held disc sanders: the Lidl H&L seems to be a finer grade and exhibits no 'crush' or compression of the abrasive disc.
So far, I am impressed.
Nevermind!
-
-
6 hours ago, mtaylor said:
Check the thickness of the blade Bob. I've found the thin ones really get warm on long cuts and do distort where as the thicker ones seem to work better. I agree with high speed and slow feed. You might also periodically try backing out of the cut an inch or so. Seems to help from I've seen with mine.
I think you may be correct about a thin blade having a tendency to warp as it heats up, and if the blade is dull then heat would build up much faster.
-
-
Hmm, a mystery. I wonder if the teeth on one side of the blade are dull. The usual way to check alignment is to mark a tooth at the table surface near you with a Sharpie and measure the distance to the fence. Then move that particular tooth to the back and measure again. The measurements should match perfectly. If they don't then adjust the fence, and check again at different distances from the blade. I suppose there's also the possibility of a bent arbor shaft, but I think that would be less likely.
- mtaylor, Roger Pellett and Canute
-
3
-
On 11/25/2015 at 7:10 PM, shiloh said:
Looks like a jig saw to me, mounted upside down under a table. Make a table for your jigsaw; make it so you can have zero clearance inserts when using different blades. Most jig saws can be set at an angle or even rotated so the blade direction can be changed, looks like more options than the blade runner has. Have made tables to mount my upside down routers under before the commercial tables came out, worked well, see no reason preventing anyone from doing the same thing using a saw you probably already own and seldom use, probably have a bunch of blades sitting around already. Wonder how many of their existing jigsaw parts they might be using in this new saw.
jud
Yep, it's basically a sabersaw mounted upsided down. It does have a few nice touches such as the blade replacement feature and dust extraction, but without an upper guide bearing I think the quality of cut won't be very fine. For modelers, I think a scrollsaw would be a better choice.
-
13 hours ago, mtaylor said:
If the circuit breaker box is in the garage, trip the breakers for the power. You can have an electrician come in wire in a keyed switch just for the wiring to your work area. Most places will be glad to come out, look it over and give you an estimate. I'm not an electrician so for me, it's call a contractor.
By the way, circuit breakers protect your building's wiring, >not your body<. Which brings us to the idea of installing GFI receptacles. So long as you're in a dry location, then GFI receptacles are not needed - the National Electrical Code only requires them in damp locations or where a plumbing fixture is within an arm's reach of the outlet. It wouldn't hurt to install one, though.
-
Hello again,
I just remembered this outlet strip that has individual switches for each outlet. I use this type of strip for my stationary power tools for safety reasons. I always keep two switches between the power source and the tool, to prevent energizing the tool accidentally while I'm setting it up or changing blades. So when I'm ready to make a cut, I first switch on the outlet on the strip, and then go to the machine and flip its switch to energize the tool.
https://www.amazon.com/Tripp-Lite-Individually-Controlled-TLP76MSG/dp/B0068LACFI
《DIY tools for personal use》Sand disc
in Modeling tools and Workshop Equipment
Posted
very fine workmanship there