


Bob Blarney
-
Posts
467 -
Joined
-
Last visited
Content Type
Profiles
Forums
Gallery
Events
Posts posted by Bob Blarney
-
-
Point taken, thanks
Hmm,, manometer gauge might be useful for development to calculate airflow.- Canute and thibaultron
-
 2
2
-
Hello, the illustration is old-timey, but the concept is still valid. The air jet powered by vac creates a strong draft while also minimizing and exposure to fumes. Additionally it reduces fire/explosion hazards that are probably not a relevant issue in hobby installations. It may likely be possible to miniaturize for benchtop use.
https://books.google.com/books?id=P-IDAAAAMBAJ&lpg=PA599&rview=1&pg=PA785#v=onepage&q&f=false
- thibaultron and Sea Hoss
-
2
-
This might be worth trying out. It's not a failure so long as you can eat the leftovers.
http://islandblacksmith.ca/2015/10/making-sokui-rice-paste-glue/
-
On 2/16/2013 at 5:03 PM, mtaylor said:
I bought one some time ago when it was on sale. Here's the current webpage: http://www.harborfreight.com/power-tools/cut-off-saws/bench-top-cut-off-saw-42307.html
This is similar to the one MicroMark sells for roughly twice the price.
It's a good tool but not a great one. Once the miter guage is calibrated, it cuts crisply and cleanly with no blade wobble. The vise holds the wood firmly. However, the miter gauge will need to be checked anytime it's moved to a new setting due to the slop in the mechanism. Also, use a piece of wood about 1/16" (1 mm) or so behind the workpiece to move it forward otherwise the wood is not completely cut.
Below is a pic of mine with an attachment so can see where the blade is actually cutting. It also provides a precise method ot put a small ruler to get repeatable cuts.
Would I buy another one? Yes. For the money, it's a pretty good deal as long as you're aware of it's limitations
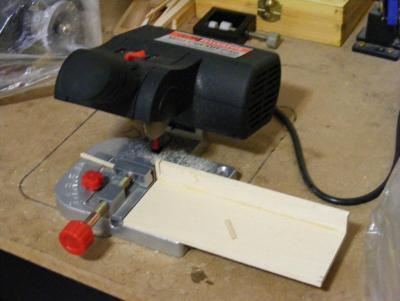
A Wixey digital protractor (for setting the miter gauge) would be a modestly priced ($12USD) and useful addition to your shop. Resolution to 0.3 degrees
- John Allen, thibaultron and Canute
-
3
-
As stated above, a close mechanical fit is essential for the best bond with any glue. One of my favorite glues is old-school hot hide glue. It is quite strong yet reversible, is usually a good color match, and does not not interfere with any kind of finish. The key is mix it properly and apply at the correct temperature, about 145F.
-
6 minutes ago, bruce d said:
The goal is to produce thin strips, 6 to 10 thou thick, from holly and fruit woods.
I think that this is not possible on a bandsaw that a hobbyist could afford, and likely not possible on a bandsaw at all. It would be necessary to rough cut, and work it down further from there. For final thicknessing, I think a handplane fixture might be better than a sanding fixture.
Hmm, standard furniture veneer is now about 0.020". It is typically sliced off with a extremely sharp blade on a big factory fixture that slides from side to side for sequential flitches, or rotates like a lathe for plywood type faces.
-
-
9 minutes ago, KeithAug said:
Hi Bob
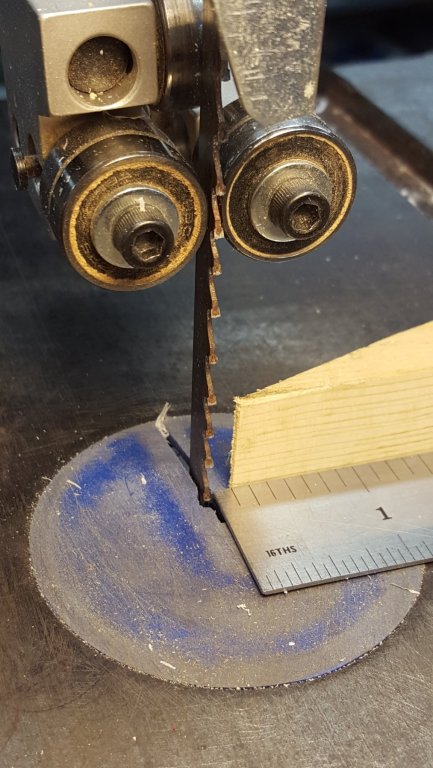
Yes I am aware that this is common practice. Re-setting the fence for each cut is however is a bind when you are ripping a 100 plus planks. Repeatability of thickness is also somewhat of an issue when you are trying to cut to +/- .001" which is typically what I aim for. You are right about the potential for kick back but the use of a sacrificial push stick to push the plank beyond the end of the rule attached to the fence mitigates this problem. The kick back issue is why I only have the rule overlapping the front of the blade by 1/4" once the plank has passed the end of the rule it has clearance and is no longer trapped. I also wouldn't recommend cutting between the blade and the fence if I was working without an attached rule or using anything other than a slitting saw blade.
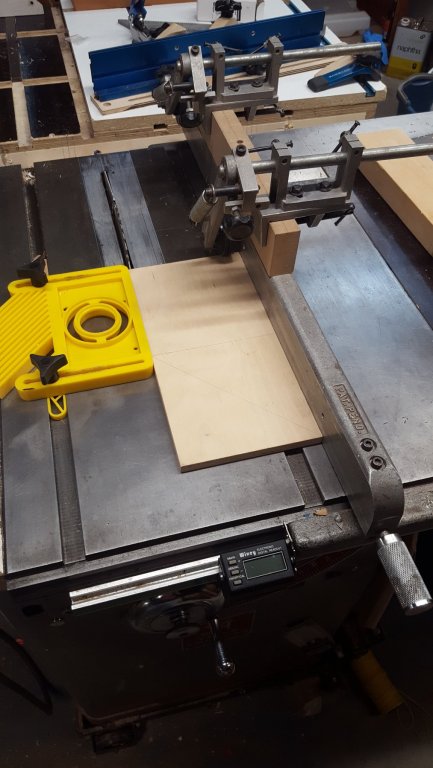
So noted. True, the techniques for working with a full-size saw may not be necessary with a modelmaker's saw, but it's information that might be very useful to someone someday. I suppose a writeup about crosscutting with a miter gauge and stop block (not the fence!) might be a good idea too. But I think a sled is a superior method. The one above can handle pieces of 20" x 20" with ease and safety.
- paulsutcliffe and Canute
-
2
-
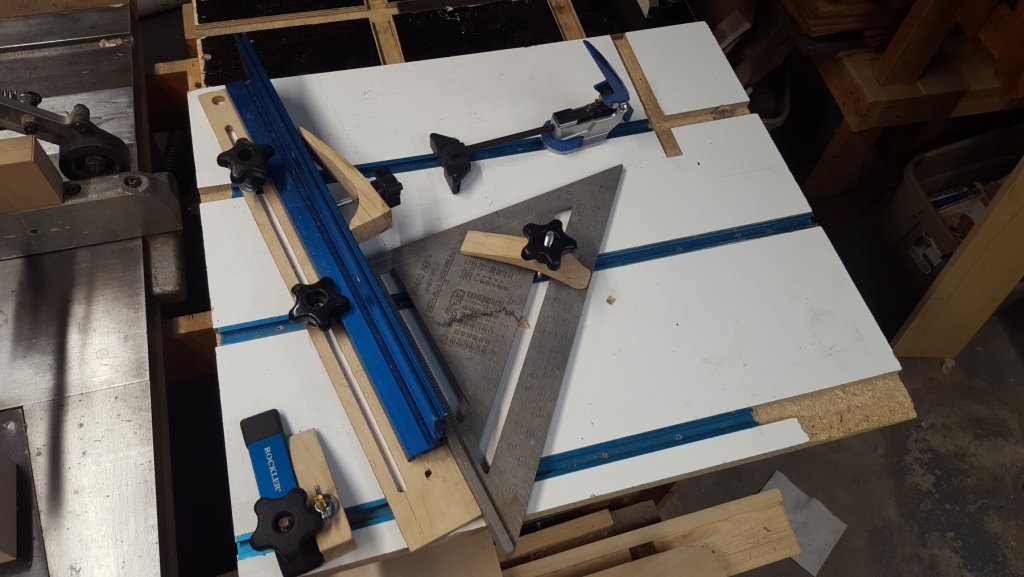
Here's a point fence that is probably appropriate for boards less than 3/4". Just make sure that it's clamped properly.
Incidentally, in the pic of the sled, the carpenter's triangle square is used as stop and support. The angles are set by a digital protractor or by trigonometric calculation and measurement if needed. And by the way, a new plastic triangle would make a good auxiliary fence for a Byrnes saw.
- paulsutcliffe and Canute
-
2
-
27 minutes ago, bruce d said:
Bob,
Many thanks. I take it the same basic idea works for producing thin strips on a small bandsaw? I am about to make my first attempt.
Bruce
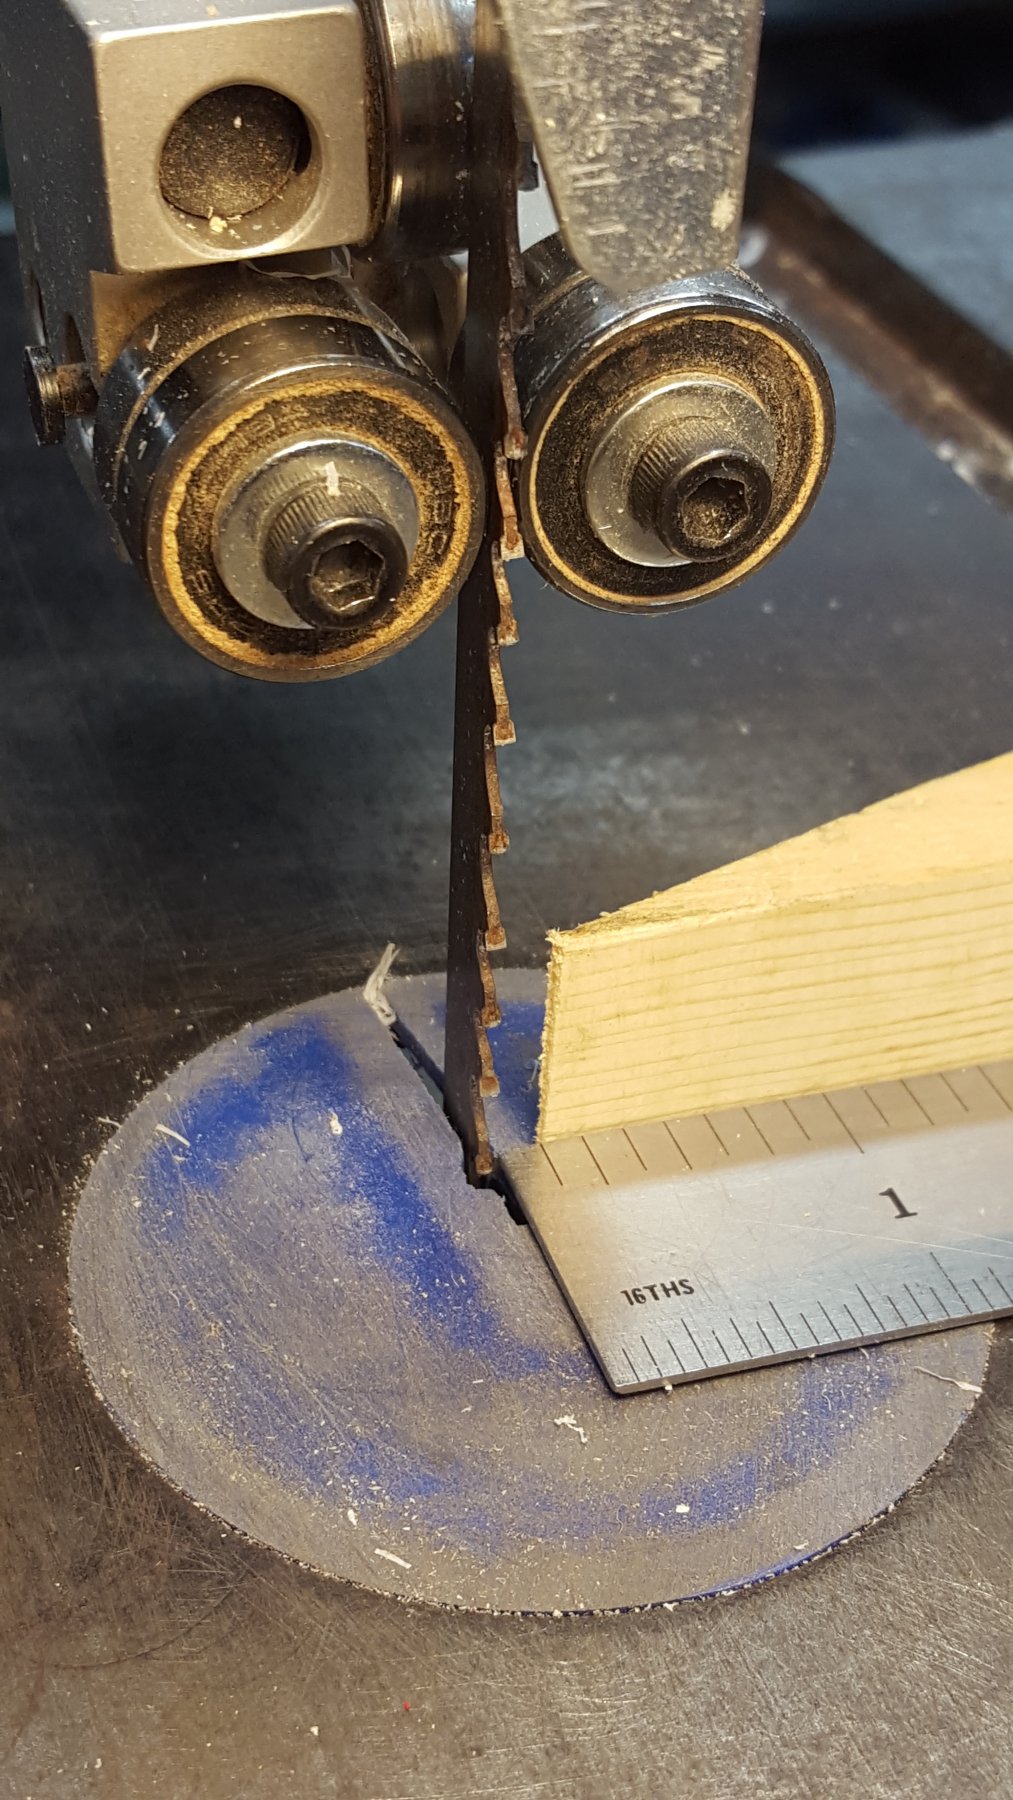
Yes, this can work on a bandsaw as well if the blade is in good condition and the saw is set up properly. I have ripped grandillo (a very hard wood) into 0.10" slices at 10" depth for guitar backs with a very good blade, but it took some tinkering.
But a common difficulty that occurs with bandsaws happens when the blade is dulled on one side. This is usually manifested as a tendency to wander to one side while cutting, and is typically corrected by freehand cutting while skewing the board. If a better blade is not available, then one would use a 'point' fence. This is a piece of wood that is single or double beveled and placed so that the point is at the desired distance from the tips of the teeth. This allows the operator to guide the board at a skewed angle while using the point of the bevel to maintain the desired distance distance from the blade.Another key point about using a bandsaw is to set the tension correctly for the blade (and relieve it when you're done for the day). If it's too loose the blade will wander, and if it's too tight then it may strain the saw's frame and bearings.
I have also considered how to further process the board after ripping. Most persons sand the pieces to thickness, and that's ok. If you have a drill press, look for a 'Robo-sander' accessory. However, I would use a hand plane with a fixture. It would be faster and give a better surface finish while generating no airborne dust. I suppose that I could mock a fixture up for you, if you have a plane a block plane or a No. 3 to No.5 plane.
- Canute and paulsutcliffe
-
2
-
Bearing in mind that my experience is with full-size tools rather than a modelmaker's saw, I think I may have a few comments that might be useful.
Jaager's comments about the number of teeth engaged in the stock is mostly correct, with some exceptions for a particular wood species. Generally 2-4 teeth must be engaged in cutting, with an adequate set and gullet depth, and the correct feed speed to eject saw dust.
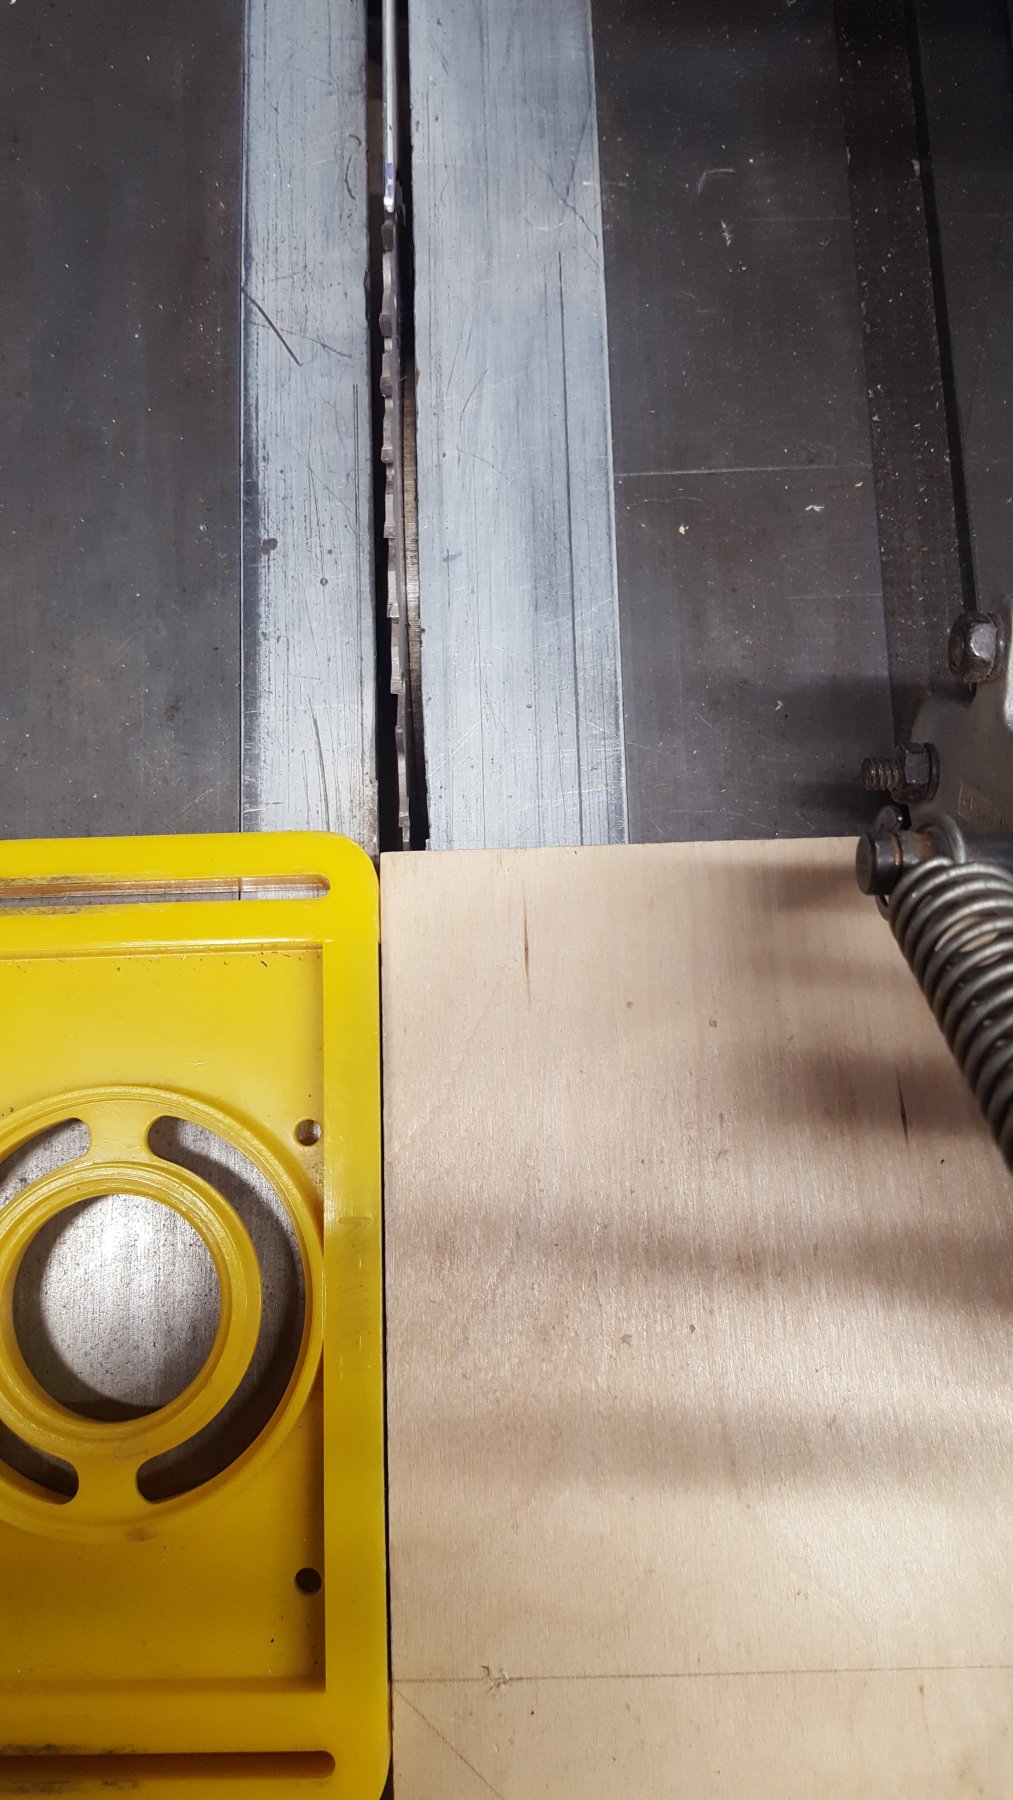
While the wood used in modelmaking is typically quite clear and straight-grained, there may still be internal stresses in the wood that are relieved during ripping, and this may cause the wood to curl and close the kerf behind the blade. For saws with full-length fences (esp common in the USA), skewing the fence in some manner to relieve binding is considered a poor practice, and generally a splitter should always be used. There are also saws which have half-length fences that relieve binding towards the fence (as KeithAug's ruler functions (see #9) , but they do not prevent the kerf from closing behind the blade and so again a splitter should be used. However, at the dimensions typically used in modelmaking, a dangerous kickback is unlikely and the worst that usually happens is a ruined piece of wood.
All that said, when ripping thin slices with full-sized saws, e.g. cutting 1/8" wide strips from a 4" wide board, the fence should never be fixed at 1/8" from the blade and then the thin slices ripped from the wide stock board. If done that way, then the thin slice may become trapped, grabbed by the blade and flung back as a spear at the operator. A much safer practice is to place a stop block on the other side of the blade, at 1/8" from the blade. Then the stock is placed against the fence, and the fence is adjusted so as to abut the stock against the stop block. Then a slice is ripped away, and then the fence is readjusted for each successive cut, again abutting the wide stock against the stop block.
Finally, sacrificial push sticks and blocks are always a good idea. And for many sawing operations at modelmakers' scale, a blunt pencil with a soft eraser makes a good push stick.
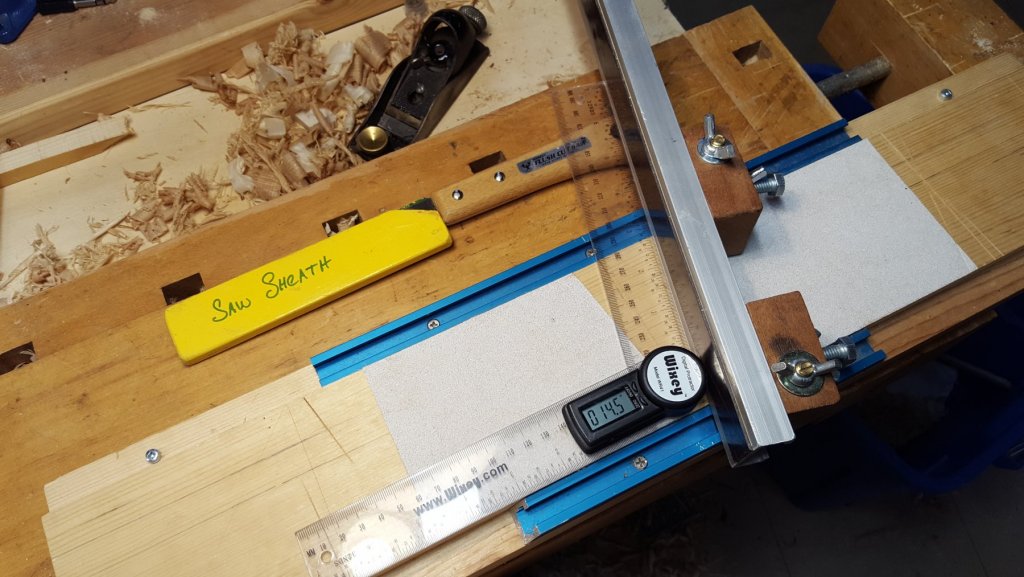
1, the overall setup - note the Wixey DRO, which I find is a great convenience
2. stop block set at ~1/8"
3. my adjustable sled for precision cuts at many angles, up to 20" length.

- paulsutcliffe, FrankWouts, JohnLea and 2 others
-
5
-
they look excellent for use on the nooks & crannies of guitars.
- paulsutcliffe, thibaultron and Canute
-
3
-
27 minutes ago, Bob Cleek said:
I'm not sure what you mean exactly. Drill bits to match taps are certainly convenient when buying blister-packed tap, die, and bit sets in larger sizes....
In the link, you'll see that the drill bit and the tap are one single piece, not two pieces, i.e. a separate drill bit and a separate tap. One drills the hole, stops the drill press or lathe, and then advances the bit by hand and continues the tapping when the bit enters the material.
- thibaultron, Bob Cleek, mtaylor and 1 other
-
4
-
1 hour ago, druxey said:
If tapping on a lathe, surely turning by hand and not under power!
Thanks for mentioning it.
- Canute, mtaylor and thibaultron
-
3
-
I'm not familiar with micro-sized taps & dies, but it would be a good thing if a manufacturer produced combined drill & tap bits such as these that I find very convenient.
https://www.wttool.com/index/page/category/category_id/14558/
Since these do not appear to be available, perhaps a fixture that ensures accurate tapping and threading in these tiny sizes would be useful, although this should be doable on a small lathe such as a Sherline.
- thibaultron, Canute and mtaylor
-
3
-
-
On 3/6/2019 at 8:24 PM, Gregory said:
I don't care too much about the stands, but I would like to hear more about the " vices "..
")
About Vices? What you need to know:
Vises grip firmly for you. Vices grip you firmly.
Just sayin'
- Duanelaker, mtaylor, tkay11 and 1 other
-
4
-
That's an effective solution. If you needed even finer control, perhaps a mechanism with differential threading would offer finer adjustment.
An alternative to a fine screw mechanism would be to use parallel (aka folding) wedges with a long taper as an auxiliaryary fence. A taper of 1:10 would allow that 1.0 mm displacement in the fore-aft direction produces a 0.1 mm displacement in the larboard to starboard direction. Although it may be very difficult to cut them to a perfect taper, one can use a digital caliper or indicator to set the adjustment.
You can see an example if you do a Google search for "Bridge City Tools S-26 Sliding Parallel" . This item is no longer available and does not appear on their list of 'Legacy Tools'.
-
If the parts fit together well, then I'd guess that little clamping pressure is needed - maybe not much more than clothespins.
I'd go with the K&S brass (easy to find too) - homecenter aluminum is too soft, and while steel is more than plenty strong it is more difficult to work. A lubricant such as Tap Magic will make drilling and tapping of metal significantly easier, or 3in1 or other light oil will help too. Also, hardwood such as maple can be drilled and tapped too, and the threads can be strengthened with CA glue.
Guitarbuilders also make spring "C" clamps with PVC pipe of different diameters - just cut off a width and saw a slot to make it.
Here's a clever idea: https://sharing-know-how.blogspot.com/2015/04/clothes-pins-into-modelers-clamps.html
-
I don't think you need tool steel for the bar stock. Mild steel is pretty cheap and available at any hardware store o bigbox - 1/8" or 3/16" should do fine. You'll have a chance to hone your grinding, filing, and thread tapping skills. I'd use socket head screws. A drill press with a vise will make things simpler.
If you want to see the entire process of making fine tools as was done before modern machinery see below. Be warned that you'll be fascinated with the videos and might spend an entire evening watching all of them:
https://www.youtube.com/channel/UCworsKCR-Sx6R6-BnIjS2MA
-
Before I forget - there's another part of these fixtures that may not be obvious. They must be secured to a workbench. Dr. Harry Vars, a very wise professor who was a pioneer of intravenous nutritional support, once told me, "Don't use your shirt tail for a workbench." It was advice well taken.
- Landrotten Highlander, Canute and jud
-
3
-
Hello, I'm a lurker here. I have a nascent interest in modelling, and I'm collecting ideas & information for the future. But in the meantime, I thought that members might appreciate a couple of crosscutting fixtures that I developed after I fell off my bicycle and fractured a wrist/hand in several places. I was leery of operating power equipment with one hand impaired.
These fixtures are for slotting the fingerboards of fretted instruments. One is dedicated for 90d cuts, and the other is for varying angle cuts for multi-scaled (fanned fretted) guitars. Both were made from pine boards that were selected and cut out of No.2 Common boards after allowing the boards to acclimate to the ambient humidity.
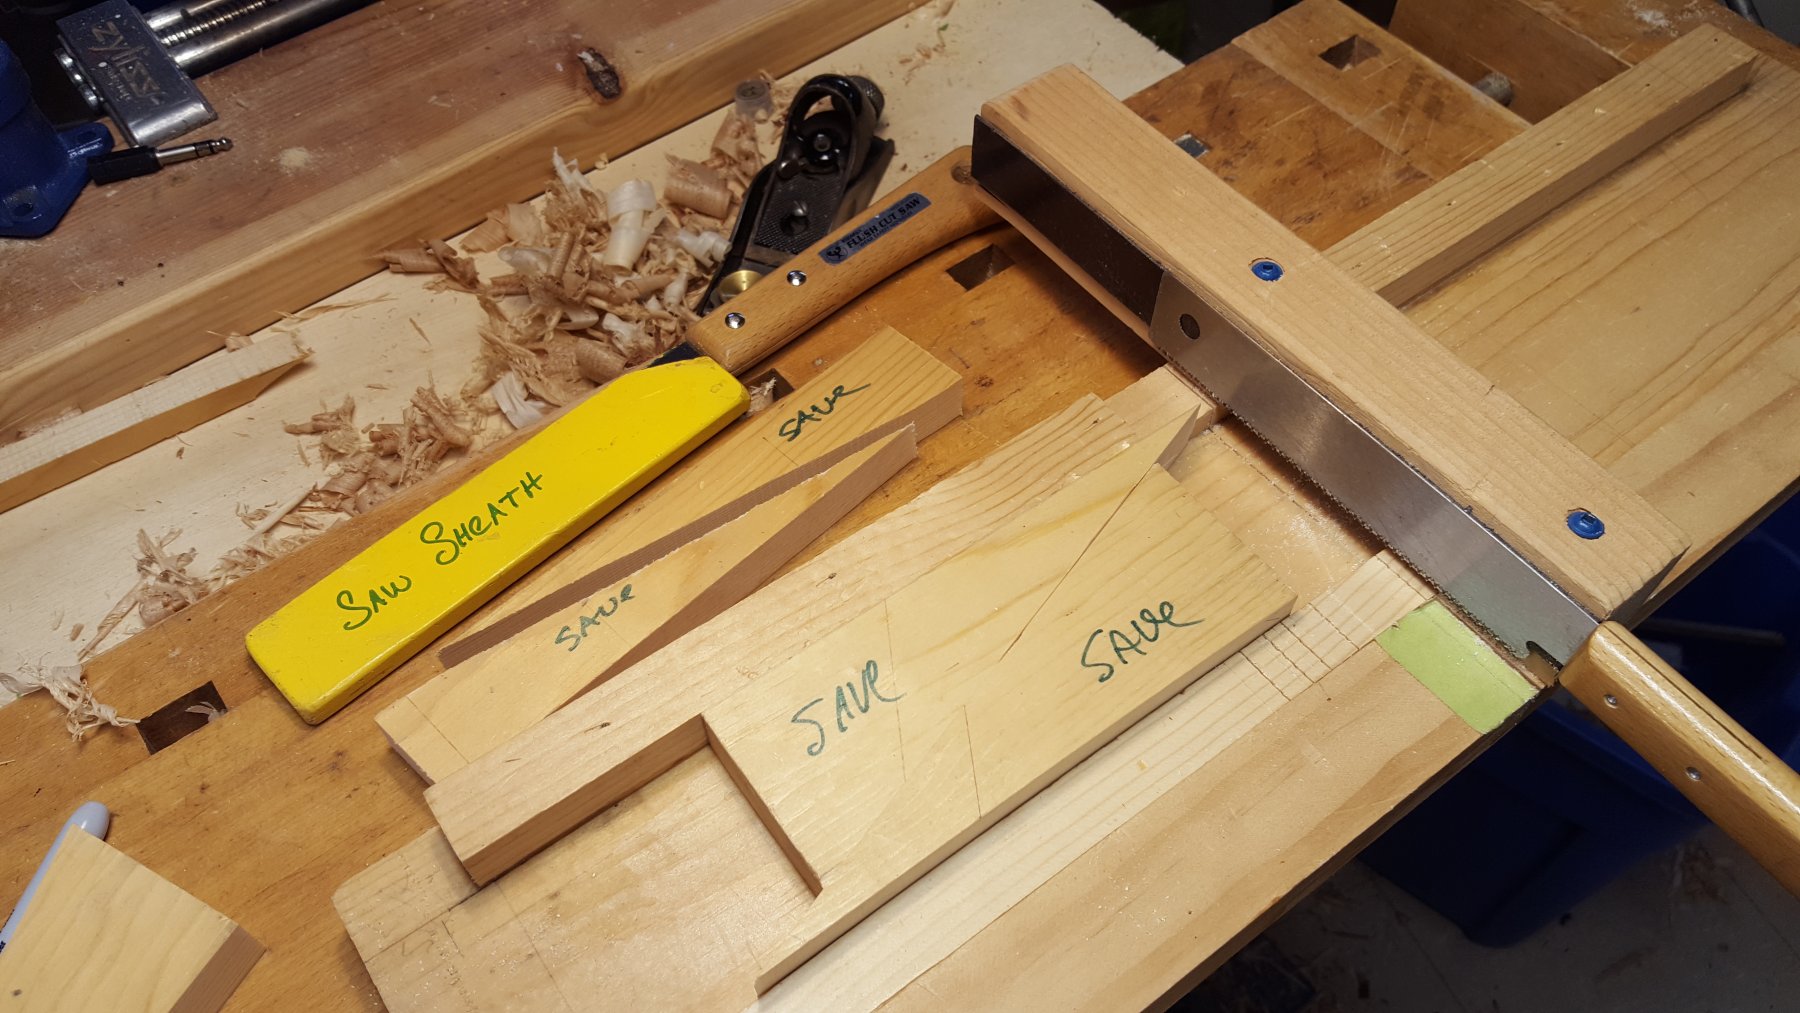
The 90d fixture:
The basic construction is a baseboard with two registration strips that hold the fingerboard securely by means of a pair of matched wedges. The saw guide is fixed precisely at 90d, and has a self-adhesive magnetic strip attached to one side. In use, the fingerboard is laid in the trough between the strips, and then the wedges are snugged to hold it securely. Then the flush-cut razor saw is placed on the magnetic strip and drawn back & forth to cut the slot for the fret. You can see an extended discussion here: http://www.mimf.com/phpbb/viewtopic.php?f=12&t=3378
The variable angle fixture is similar, and I use a Wixey digital protractor (0.1d resolution) to set the fence. A discussion of it may be viewed here
http://www.mimf.com/phpbb/viewtopic.php?f=12&t=4058&hilit=fixture+jig+slot

-
-
20 hours ago, Jaager said:
I forget what is in rubbing alcohol - ethyl - to get it past the federal tax, iso is poison all by itself -- anyway, I was trying to unbond wood that was joined using Franklin Hide Glue. ....
In my opinion, Franklin Hide glue is the work of the devil. The shrinkage is very high, and the additives that keep it liquid at room temperature (possibly urea) seem to ruin it. I never use it. I make up Behlens Hide Glue and store it frozen in ice cube trays, and apply it hot at 145F. Another brand called Old Brown Glue is said to have good properties and is warmed in hot water, but I've never used it.
The alcohols that are commonly available are methanol (1 carbon), ethanol (2 carbons) and isopropyl (3 carbons). Rubbing alcohol is isopropyl alcohol mixed with water, and a 70% solution is used for medical purposes because it is most effective for killing bacteria, where as weaker or stronger are not. Ethanol is the best solvent for shellac, although both methanol and isopropyl will have some effect.
Incidentally, I've found that alcohol-based Purell hand sanitizer is excellent for removing pitch from saw blades.
- mtaylor, thibaultron, Canute and 1 other
-
4


adapt this idea for a small spray both?
in Modeling tools and Workshop Equipment
Posted
O Wise Man - enlighten us as to how you spray in your present workshop.
As a former research scientist in surgery, I've seen the sad results of ignorance (poor training), carelessness (failure to follow training) and equipment failures (which sometimes do happen). I'm aware of how fume hoods are used in laboratories and some aspects of their construction. I'm looking for a practical small booth that would work on the scale that most hobbyists would use, say a cubic space of 24" x 24" x 24". In this setting, I would expect that the most hobbyist would use 'rattle spraycans' which emit far less paint with far less overspray than an automotive or furniture factory installation. I think the most significant hazard would be inhalation of organic solvents in a hobbyist setting, although stupidity is always possible.
As for lathework, here's my current setup - a sand-bedded lathe with excellent lighting (and a great stereo!), high airflow dust collection with accessory shrouds for sanding and finishing. (The dust collection cyclone and filters work down to about 2 microns.) When roughing out logs, I use a logger's helmet with full faceshield, earmuffs, and a leather apron (and a dust mask if necessary). This gear is not usually necessary for most model builders.