Canute
-
Posts
6,402 -
Joined
-
Last visited
Content Type
Profiles
Forums
Gallery
Events
Everything posted by Canute
-
 Try some kraft paper, the stuff they make paperbags with. It does have a very fine grit if you're trying to polish some paint. Test first!
 -
Nicely done Sal. I'll file that change of wood for my builds.
- 659 replies
-
- 3
-

-
- syren
- model shipways
- (and 1 more)
-
Nicely done, Brian. Your Niagara is coming along quite nicely.
- 287 replies
-
- 1
-
-
- niagara
- Model Shipways
- (and 1 more)
-
Ah, my little chickadee - with apologies to W.C. Fields. (I'll go quietly now)
- 203 replies
-
- 4
-
-
- artesania latina
- marie jeanne
- (and 1 more)
-
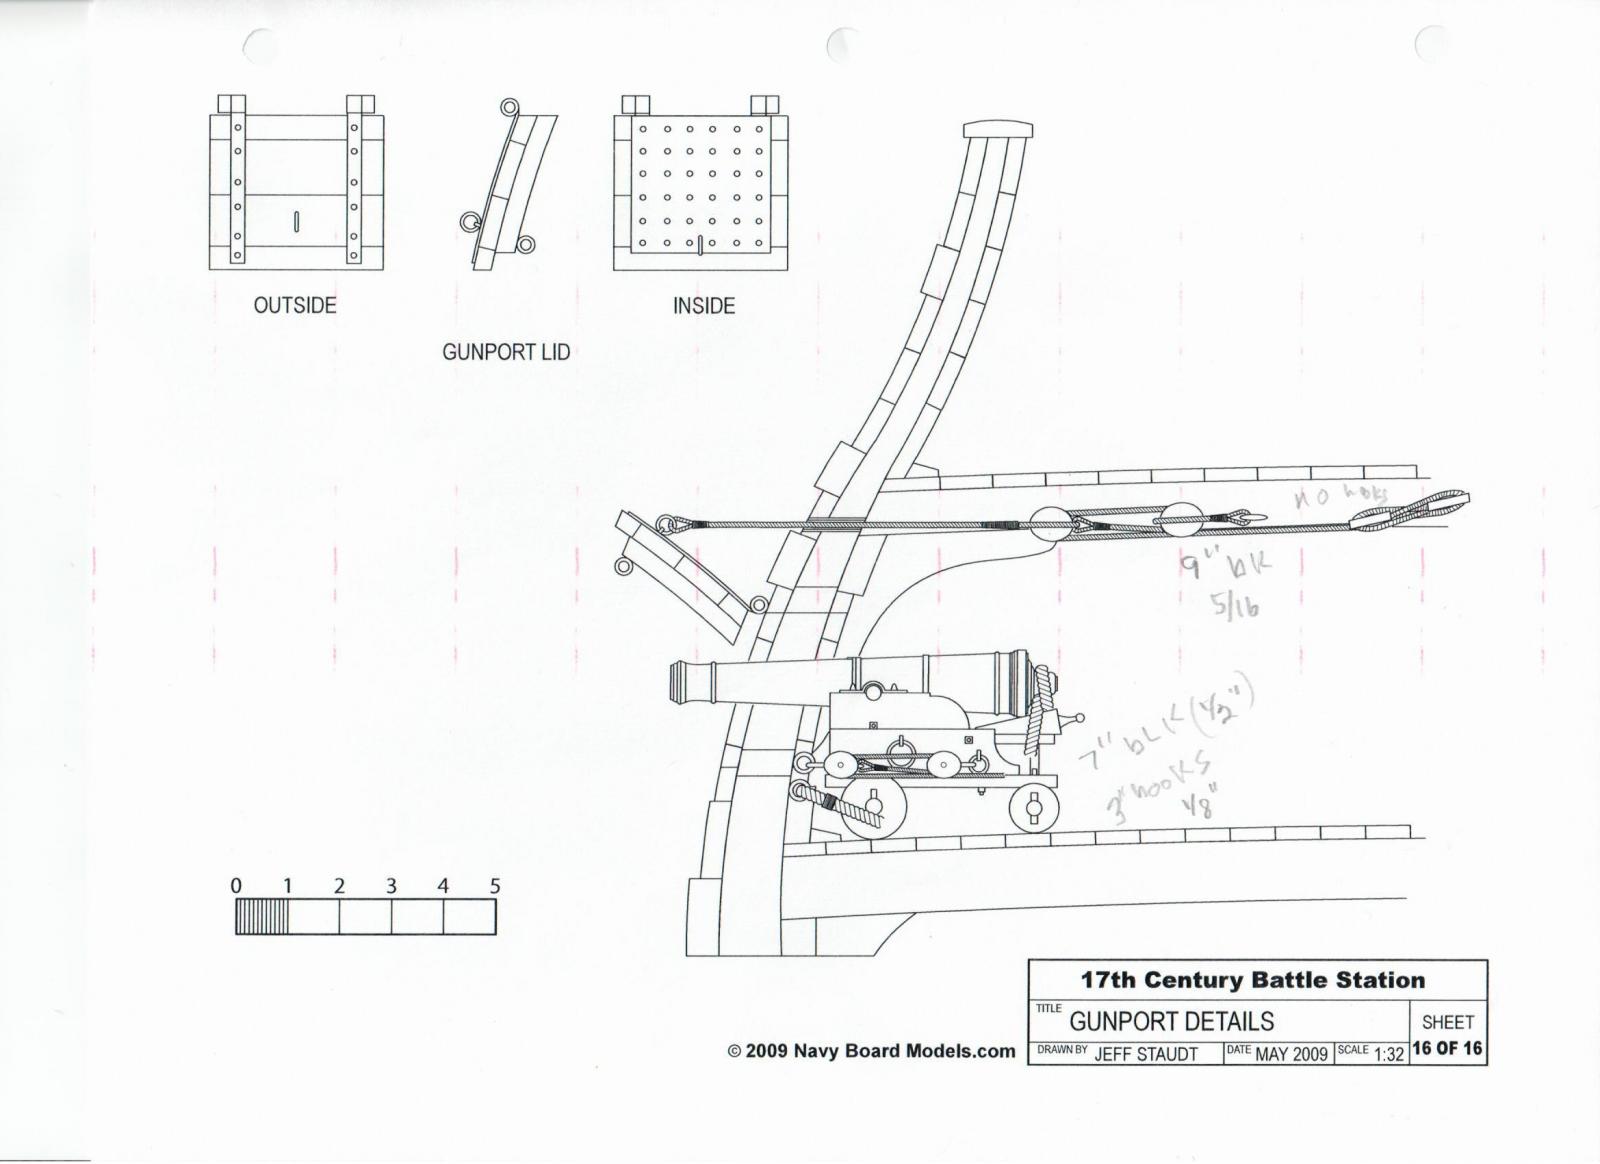
Here you go, Jesse: The notes are mine, sizing the blocks. This plan is part of a practicum over on the MSB site as a Battle Station practicum. It's done in 1/32 scale.
- 1,306 replies
-
- 10
-
-
- syren
- model shipways
- (and 1 more)
-
Wise man, Mark. As somebody said "Happy wife, happy life"!
- 203 replies
-
- 3
-
-
- artesania latina
- marie jeanne
- (and 1 more)
-
I'd like to follow along, too. Gonna hang with Mark, Grant and the rest of the gang.
- 129 replies
-
- 5
-
-
- armed launch
- panart
- (and 1 more)
-
I used to paint brass model railroad engines with a brand called Scale-Coat. The metal had to be clean; even had to strip the clear coat from some engines, since they had bubbles in the clear coating. The Scale-coat worked great, since it was a lacquer and dried glossy. Easier to decal over than flat paints. It didn't need a primer, but if you're painting yellows or reds, you better prime first.
- 222 replies
-
- 4
-
-
- 18th century longboat
- model shipways
- (and 2 more)
-
They may have had some tackle and a tie off cleat in the overhead, between the deck beams and carlines. I have battle station plans and that's where the gunport door operating mechanism "resides". A couple of single sheave blocks is all.
- 1,306 replies
-
- 8
-
-
- syren
- model shipways
- (and 1 more)
-
You should clean and prep the metal (brass?), either dunk it in some vinegar for brass or apply a primer paint for other metals. The vinegar is acid, so it etches the brass and gives some tooth to the part for the paint to stick to. Let the primer, then paint your color.
- 222 replies
-
- 3
-
-
- 18th century longboat
- model shipways
- (and 2 more)
-
Looks good, Jack. Transom is blended in nicely. The hull planking looks smooth. Since this is double planked, the second layer will lay down nicely.
- 203 replies
-
- 4
-
-
- artesania latina
- marie jeanne
- (and 1 more)
-
Well done Dave! The good doctor was suitably wowed.
- 209 replies
-
- 8
-
-
- cheerful
- Syren Ship Model Company
- (and 1 more)
-
I'd like to follow along, too.
-
Grant, I'll join you in the front row. Looking forward to another build by Clare.
- 51 replies
-
- 2
-
-
- wasen
- thermal studio
- (and 1 more)
-
1/10-scale Japanese Fishing Boat kit from Thermal Studios
Canute replied to catopower's topic in Wood ship model kits
Very interesting boat, Clare. Will be following your build. The masking tape looks like the same tape Tamiya sells. Excellent masking tape!. -
How will you keep it level? Guess you could pin the wheels and put one under the trunnion point.
- 572 replies
-
- 2
-
-
- constitution
- frigate
- (and 1 more)
-
Mick, the first few and the ones showing the overall acrylic supports for the cant frames on top of your build board. Wasn't visualizing the supports until I looked at the overall ones. Takes a while to get stuff drilled into this Irish-Sicilian skull.
- 504 replies
-
- 1
-
-
- washington
- galley
- (and 1 more)
-
Click! Light bulb on now. One picture (or in this case a series) does the trick. Thanks, Mick!
- 504 replies
-
- 2
-
-
- washington
- galley
- (and 1 more)
-
That boat's a beauty, Sal. As are the sweeps and oars.
- 659 replies
-
- 5
-
-
- syren
- model shipways
- (and 1 more)
-
Thank you Mike and Dimitris. And the likes from the posse, Matt, George and Cap'n Steve. I hope to jump back into this soon. Cutting paper and card is beginning to pale in comparison to the feel of working in wood. I may end up moving back and forth.
-
Sharp blades and a cutting mat work well. But, balsa is a very soft wood; really only useful as filler for a hull, between the bulkheads. Trying to shape items, like deck furniture, is difficult because the wood is so soft. The edges don't hold up if much pressure is applied, so fine detail is hard to achieve. You may want to try some basswood. It's still soft, but it doesn't have the issues of balsa.
-
Very work on the gun carriages, Grant. Worth a bookmark!
- 456 replies
-
- 3
-
-
- finished
- bomb ketch
- (and 2 more)