HOLIDAY DONATION DRIVE - SUPPORT MSW - DO YOUR PART TO KEEP THIS GREAT FORUM GOING! (Only 72 donations so far out of 49,000 members - Can we at least get 100? C'mon guys!)
×


toms10
-
Posts
929 -
Joined
-
Last visited
Content Type
Profiles
Forums
Gallery
Events
Everything posted by toms10
-
 A quality piece of art. You should be proud. Congratulations. Tom
- 1,350 replies
-
- 2
-

-
- constitution
- model shipways
- (and 1 more)
-
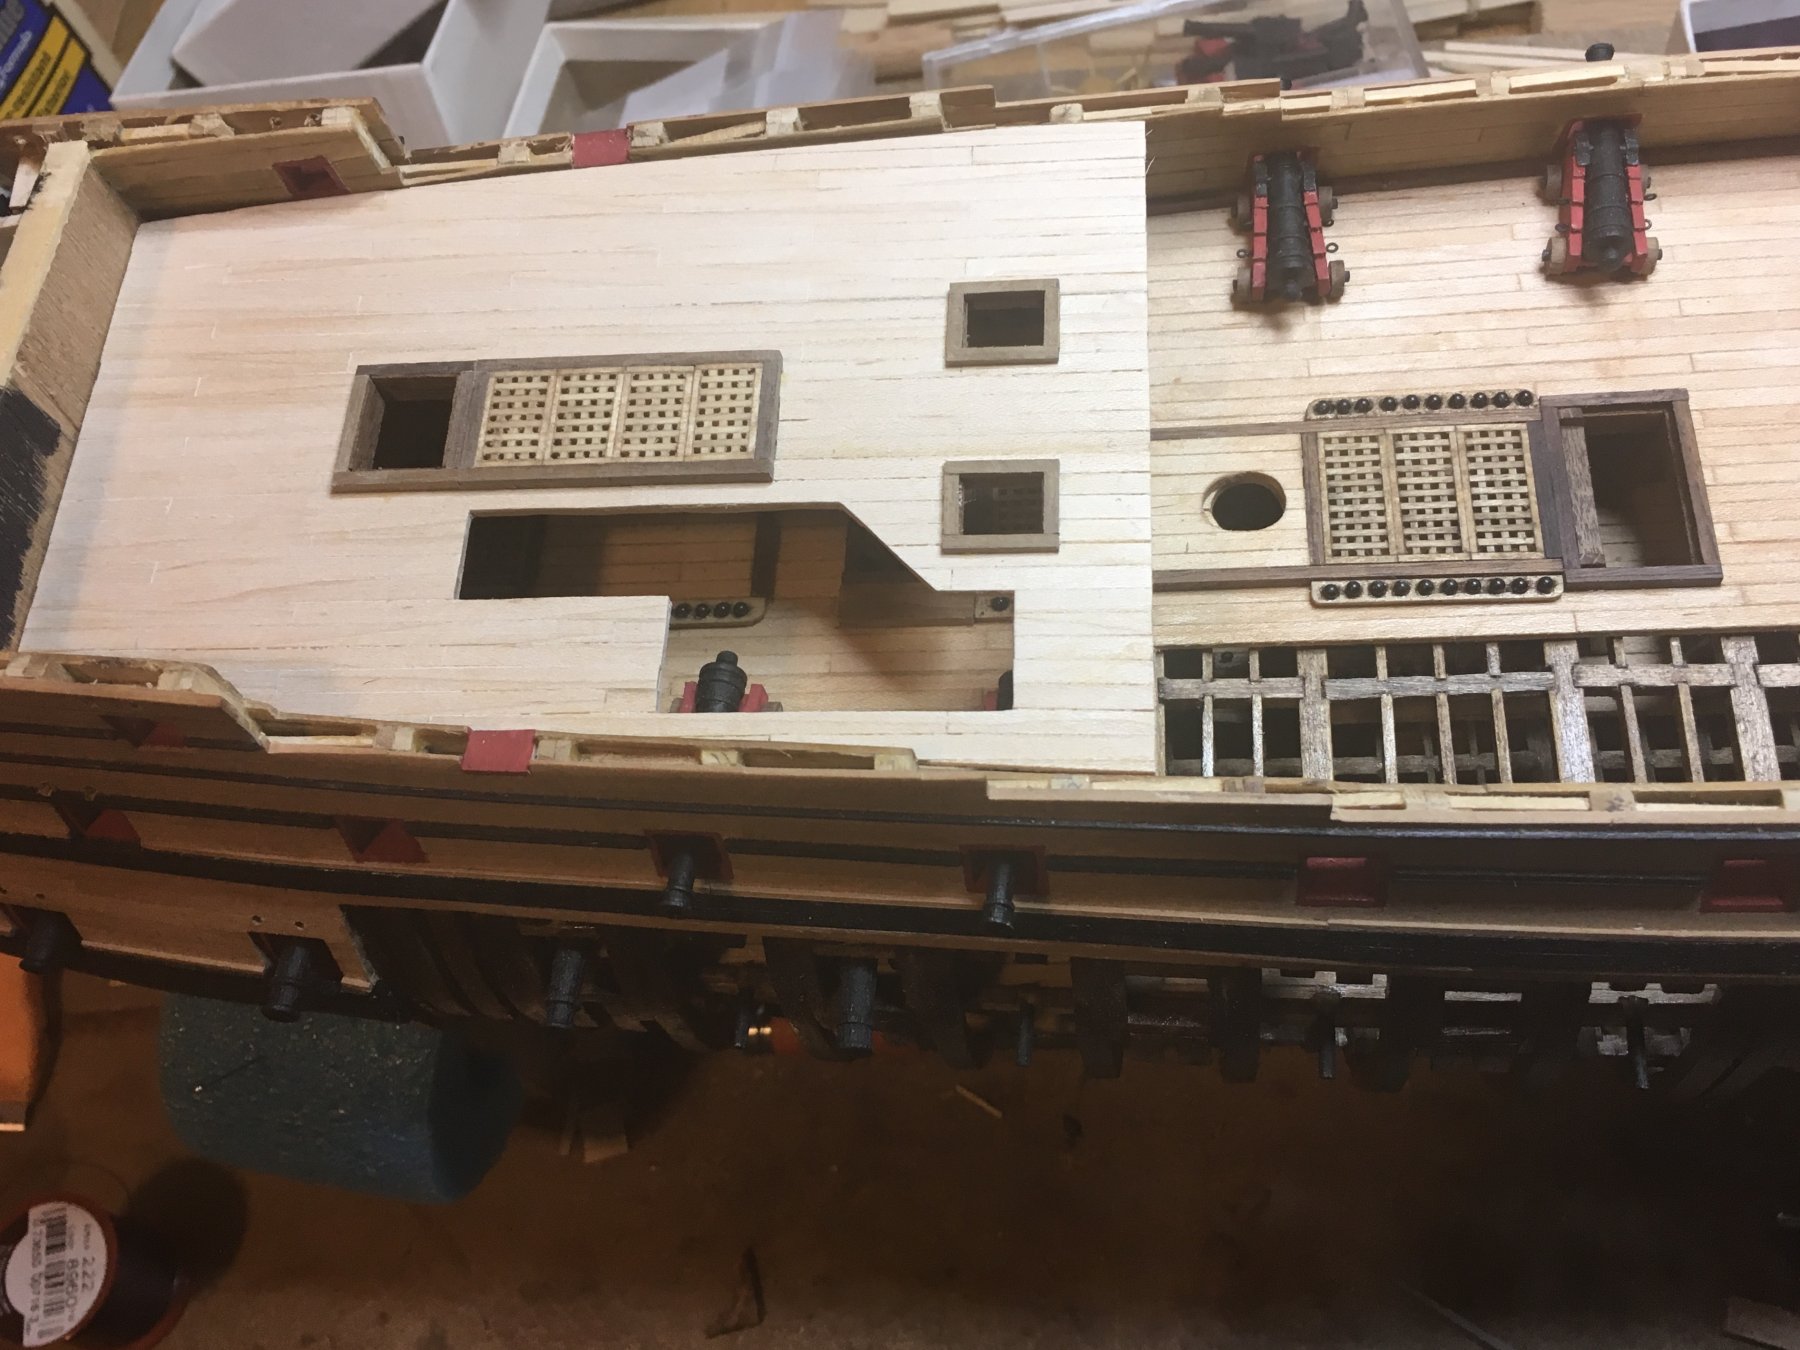
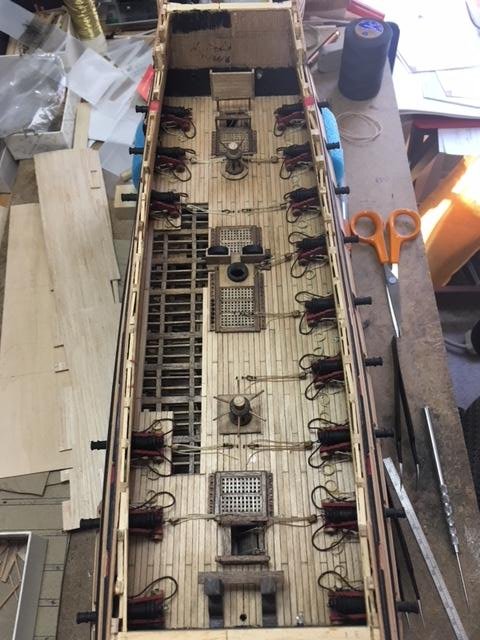
Hello all. I hope everyone who celebrated the Thanksgiving holiday enjoyed themselves. Got a little more done over the Thanksgiving holiday weekend. The quarter deck and gang boards are in place. Now I am making the 6 pounder canons and carriages. Tom Just noticed that I left a couple of temporary supports under the starboard gang boards when I took the pic. Oops. Also not to happy with the gap in the center of the deck boards. Sticks out like a sore thumb in the picture. Luckily that area will be covered by the forecastle deck so it will not be that obvious. I may just put a bit of filler in there to help conceal it anyway.
- 385 replies
-
- 10
-
-
Hi Mark, I don't know about flying along but thank you for the compliment. I seem to be working on it in spurts which I guess is better than not working on it at all. Tom
-
Got the upper deck cannons mounted and rigged. Now I will go back and work on the quarter deck and see how that will fit up with this deck. Tom

-
I am pulling up a chair... this will be a good one I am sure. Tom
- 589 replies
-
- 1
-
-
- le gros ventre
- cargo
- (and 1 more)
-
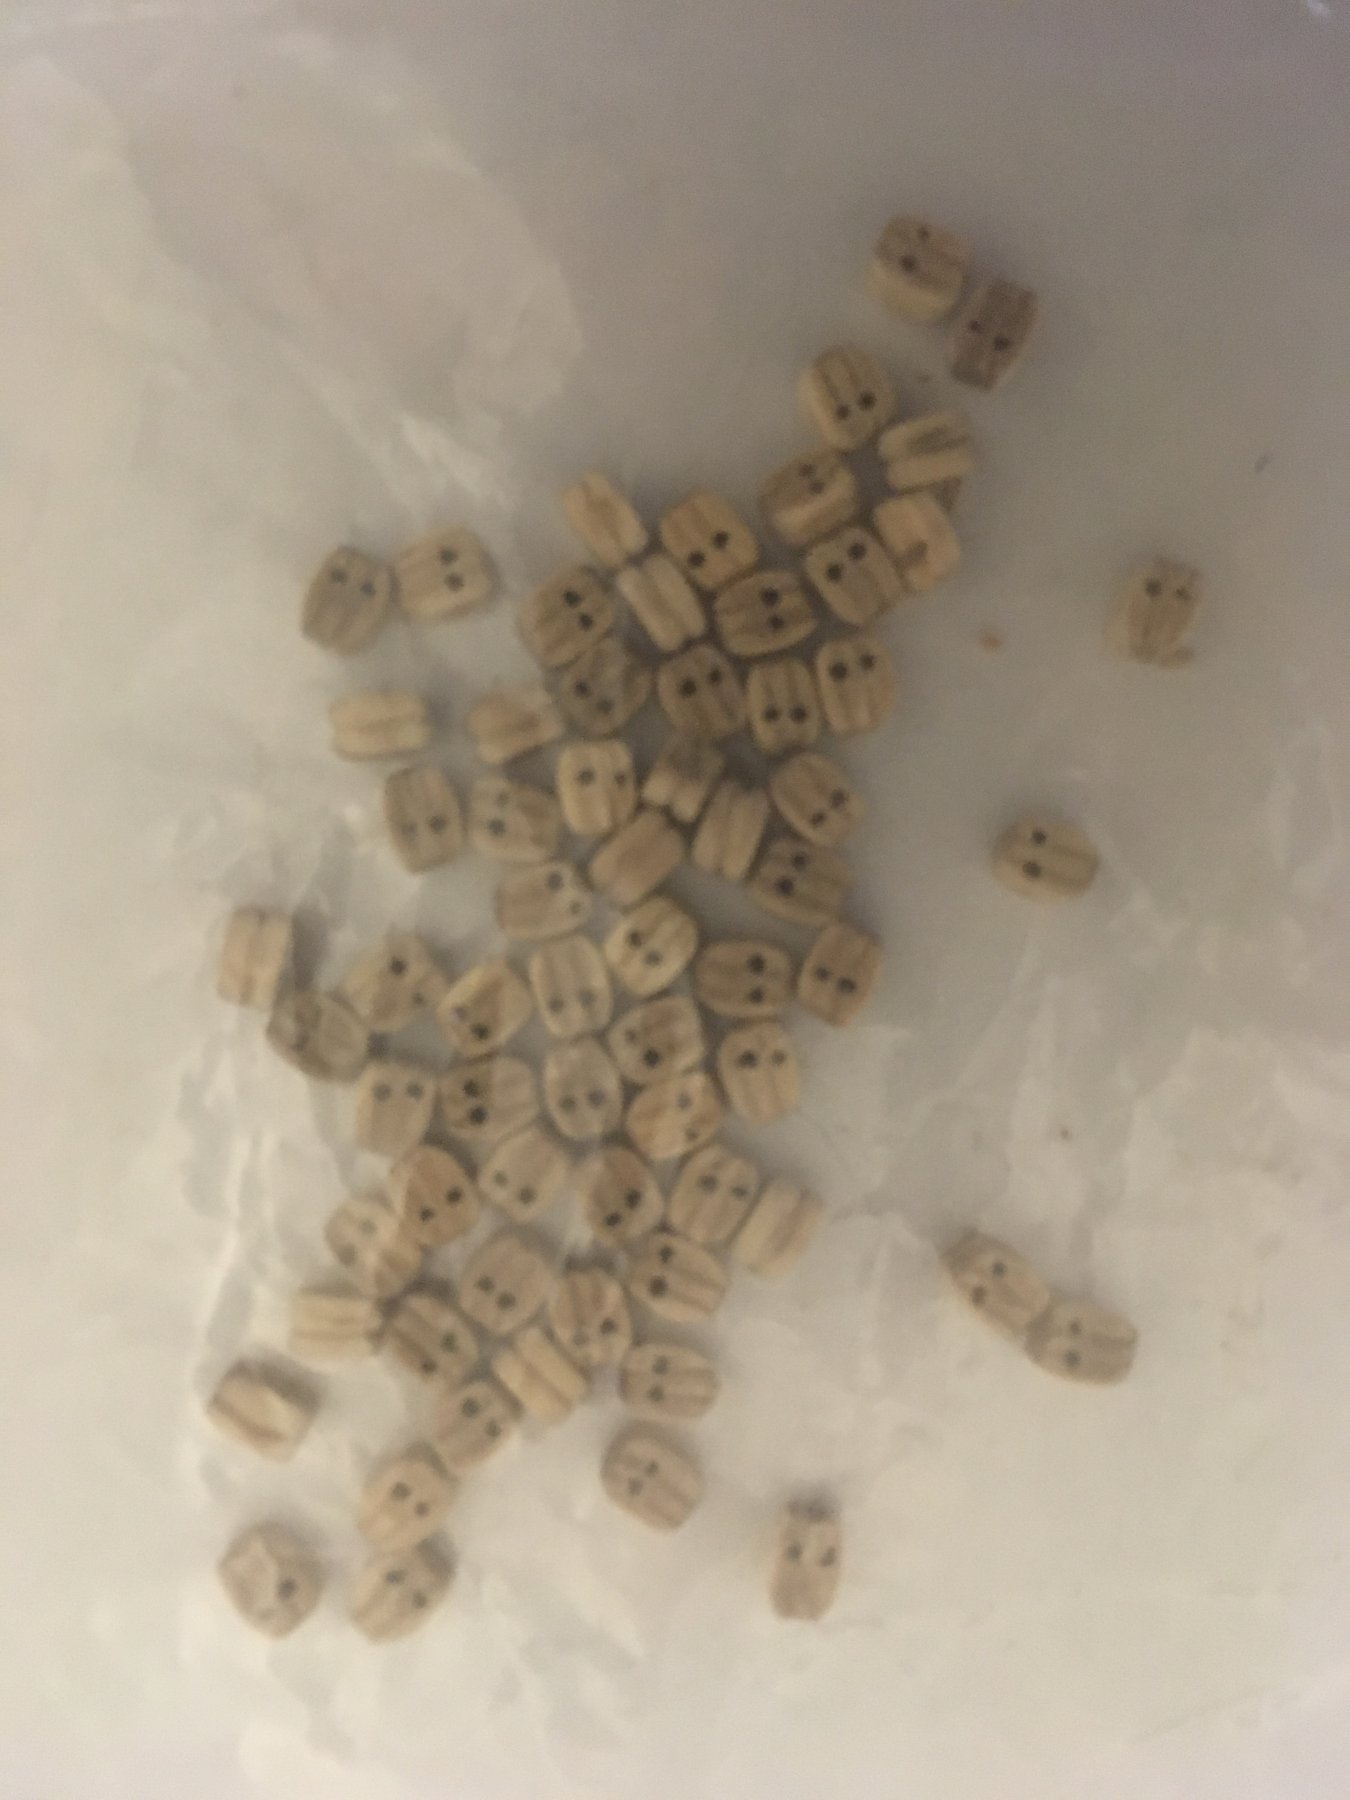
Hello all It has been a while since I updated my log. I have been working on my Leopard in spurts and did manage to get some things done. I made all the cannons for the upper gun deck. They are just dry fit for now. I was busy reworking single and double blocks to make them look “acceptable” along with about 100 eyes for the cannon tackle. Lately I have been spending most of my time making components, tiny components that are time consuming. But that is what scratch building is all about. There will be plenty of assembly later. I also built some of the quarter deck. Still have a lot of work to do there. Progress has been slow but steady. Tom
- 385 replies
-
- 10
-
-
I didn't want to say anything. Didn't want to risk bring the discussion down the gutter and getting a warning. The cats look much better with the lighter color. Tom
-
Hi Jim, Michaelangelo has nothing on you! The figurehead is looking good. I am a bit away from the carving stage and like you I have zero experience. But hey, that is half the fun of this hobby. We get introduced to all kinds of new things. Congratulations on conquering your first carvings. Tom
-
Pandora by marsalv - FINISHED - 1:52
toms10 replied to marsalv's topic in - Build logs for subjects built 1751 - 1800
Congratulations on making a beautiful model and being recognized for it. It was well deserved. Tom -
Hi Jim I just used a standard hardwood dowel you would find at a craft store. Actually, they were not very hard and the package did not say what kind of wood. Cost me about $2 for 4 feet. It just started out as an experiment and I was happy with the outcome so they are now on the model. Tom
-
In my engineering eyes, building a static model is entirely different ball game than building a working boat. Models don't take into account loads and stresses, actual full scale fastening techniques and the list goes on. Tom
-
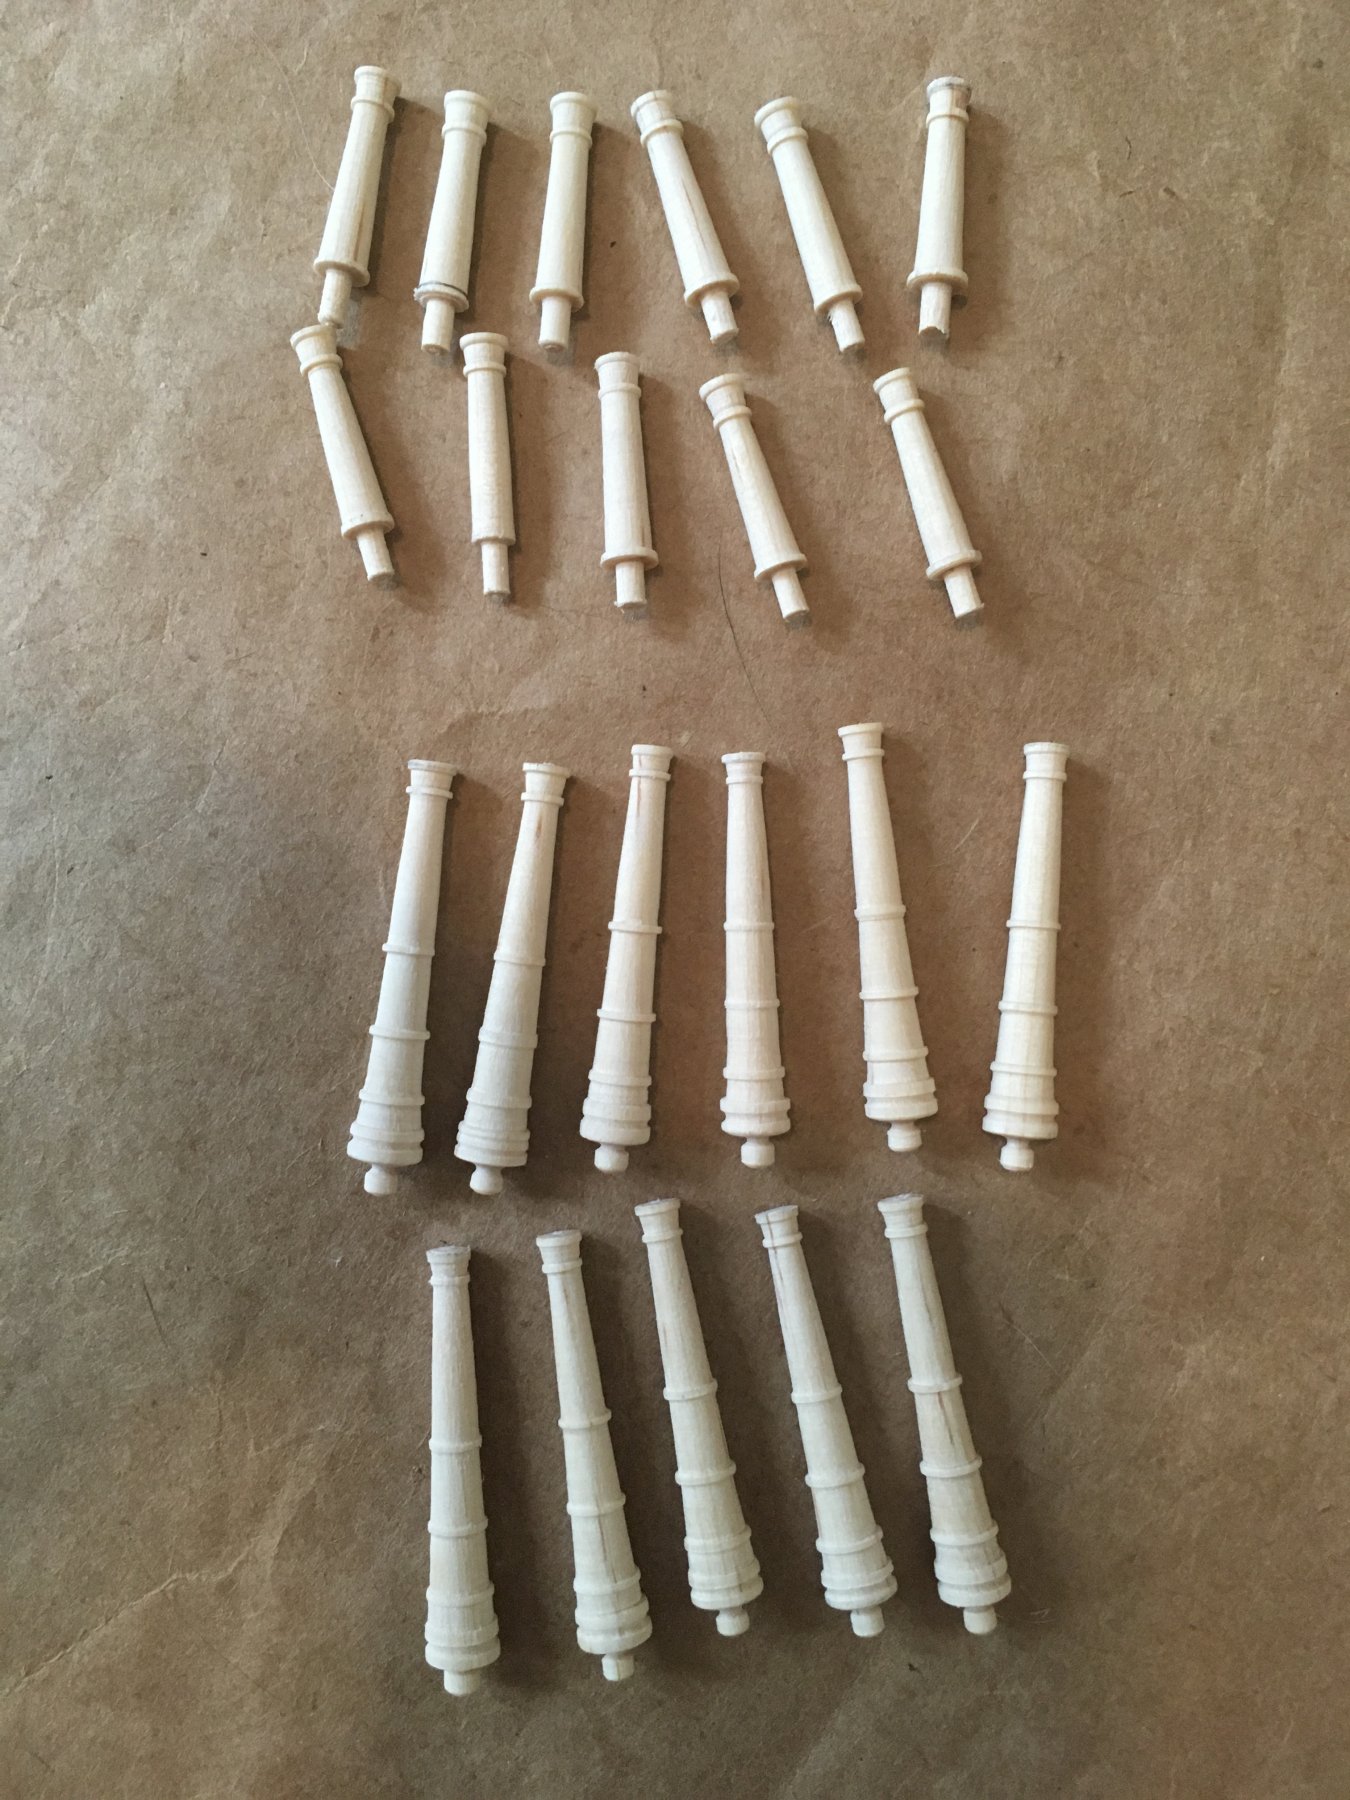
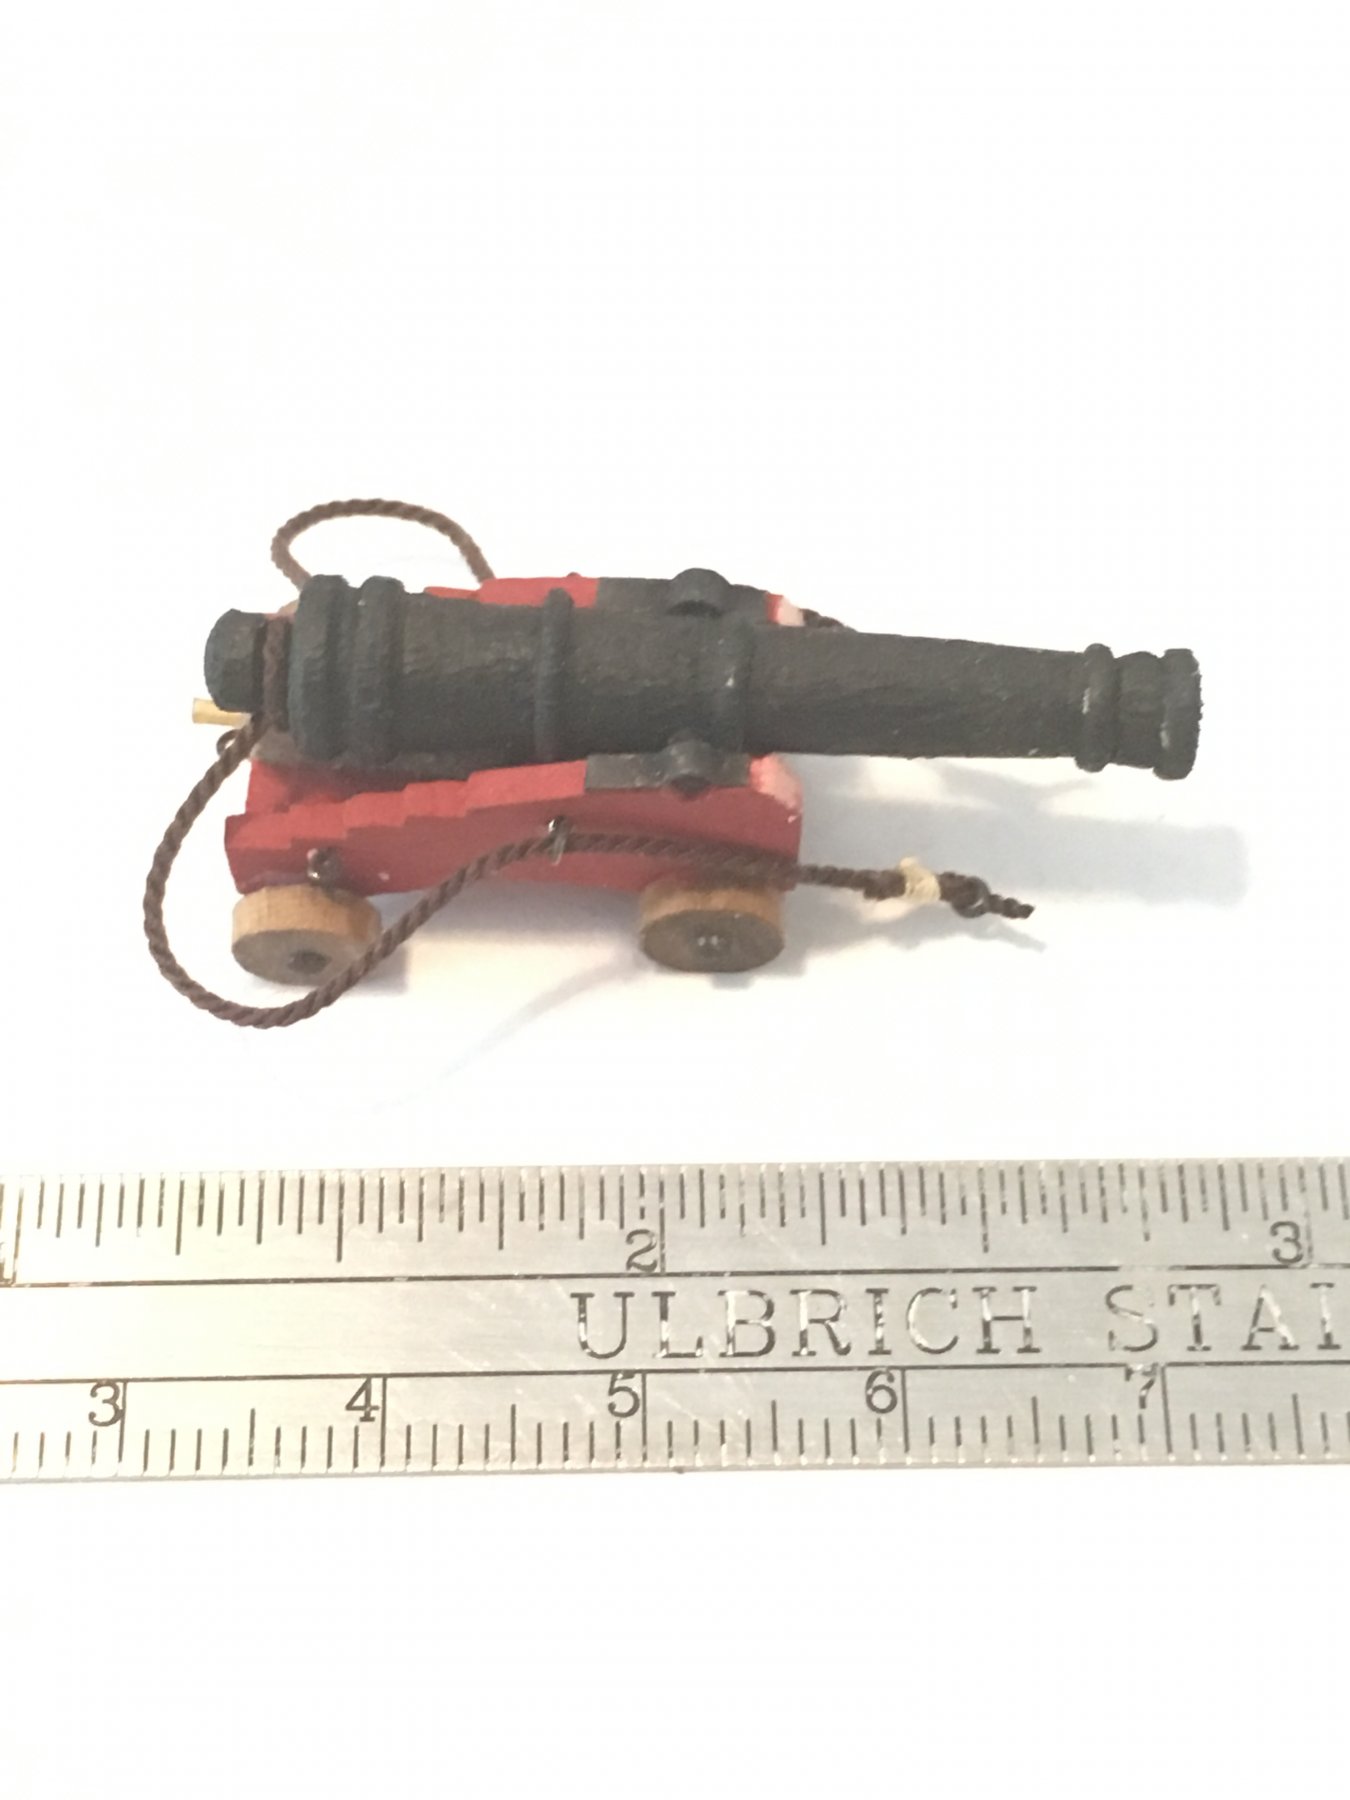
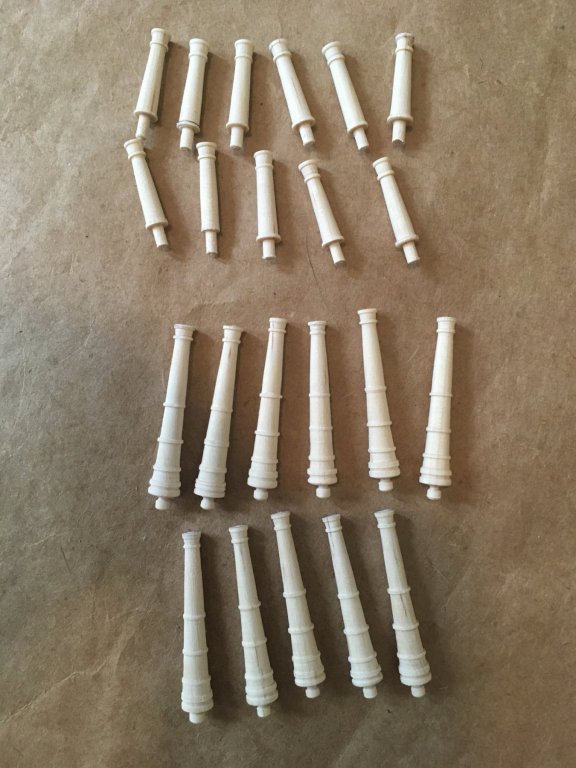
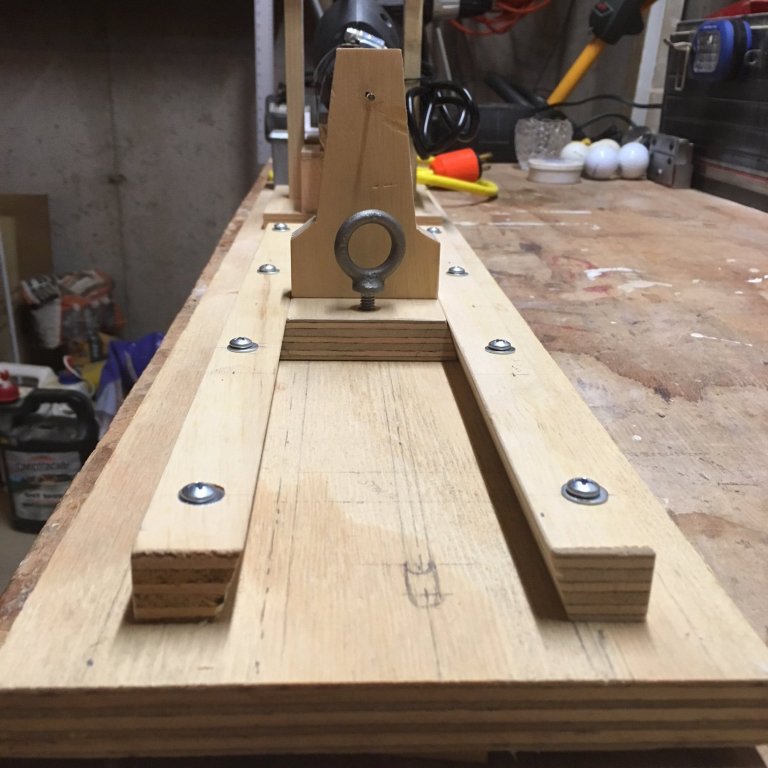
Hello all just got back from a fantastic vacation in Ireland. Problem about having a great time on vacation is eventually it must come to an end. I have now since settled back into reality. I did manage to finish turning my 12 pound wooden cannons on my homemade or should I say poor man’s “lathe”. I am pleased with the results. Just need to bore out the ends and put the pin holes in the full ones, paint them black and the assemble. Tom
-
Pandora by marsalv - FINISHED - 1:52
toms10 replied to marsalv's topic in - Build logs for subjects built 1751 - 1800
Congratulations and thank you. It has been a real treat following this build. The level is skill is something to aspire to. Tom -
Jim Nice work. It is going to be a very nice piece when completed. I am actually spending the last day of a week long trip in Ireland. Your boat looks much nicer close up now that I am here and closer to it. 😀 Tom
-
Making small nails with round head
toms10 replied to Aleksei Domanov's topic in Metal Work, Soldering and Metal Fittings
Alexey, I just found this demonstration. Absolutely fantastic. Thank you for sharing. MSW is a wonderful resource. Tom -
Jim, That is a model for someone who dwells in Dante's unpublicized 8th circle of hell; a special one reserved for us psychotic modelers. Maybe we will meet each other there someday along with a host of other MSW members. Tom
-
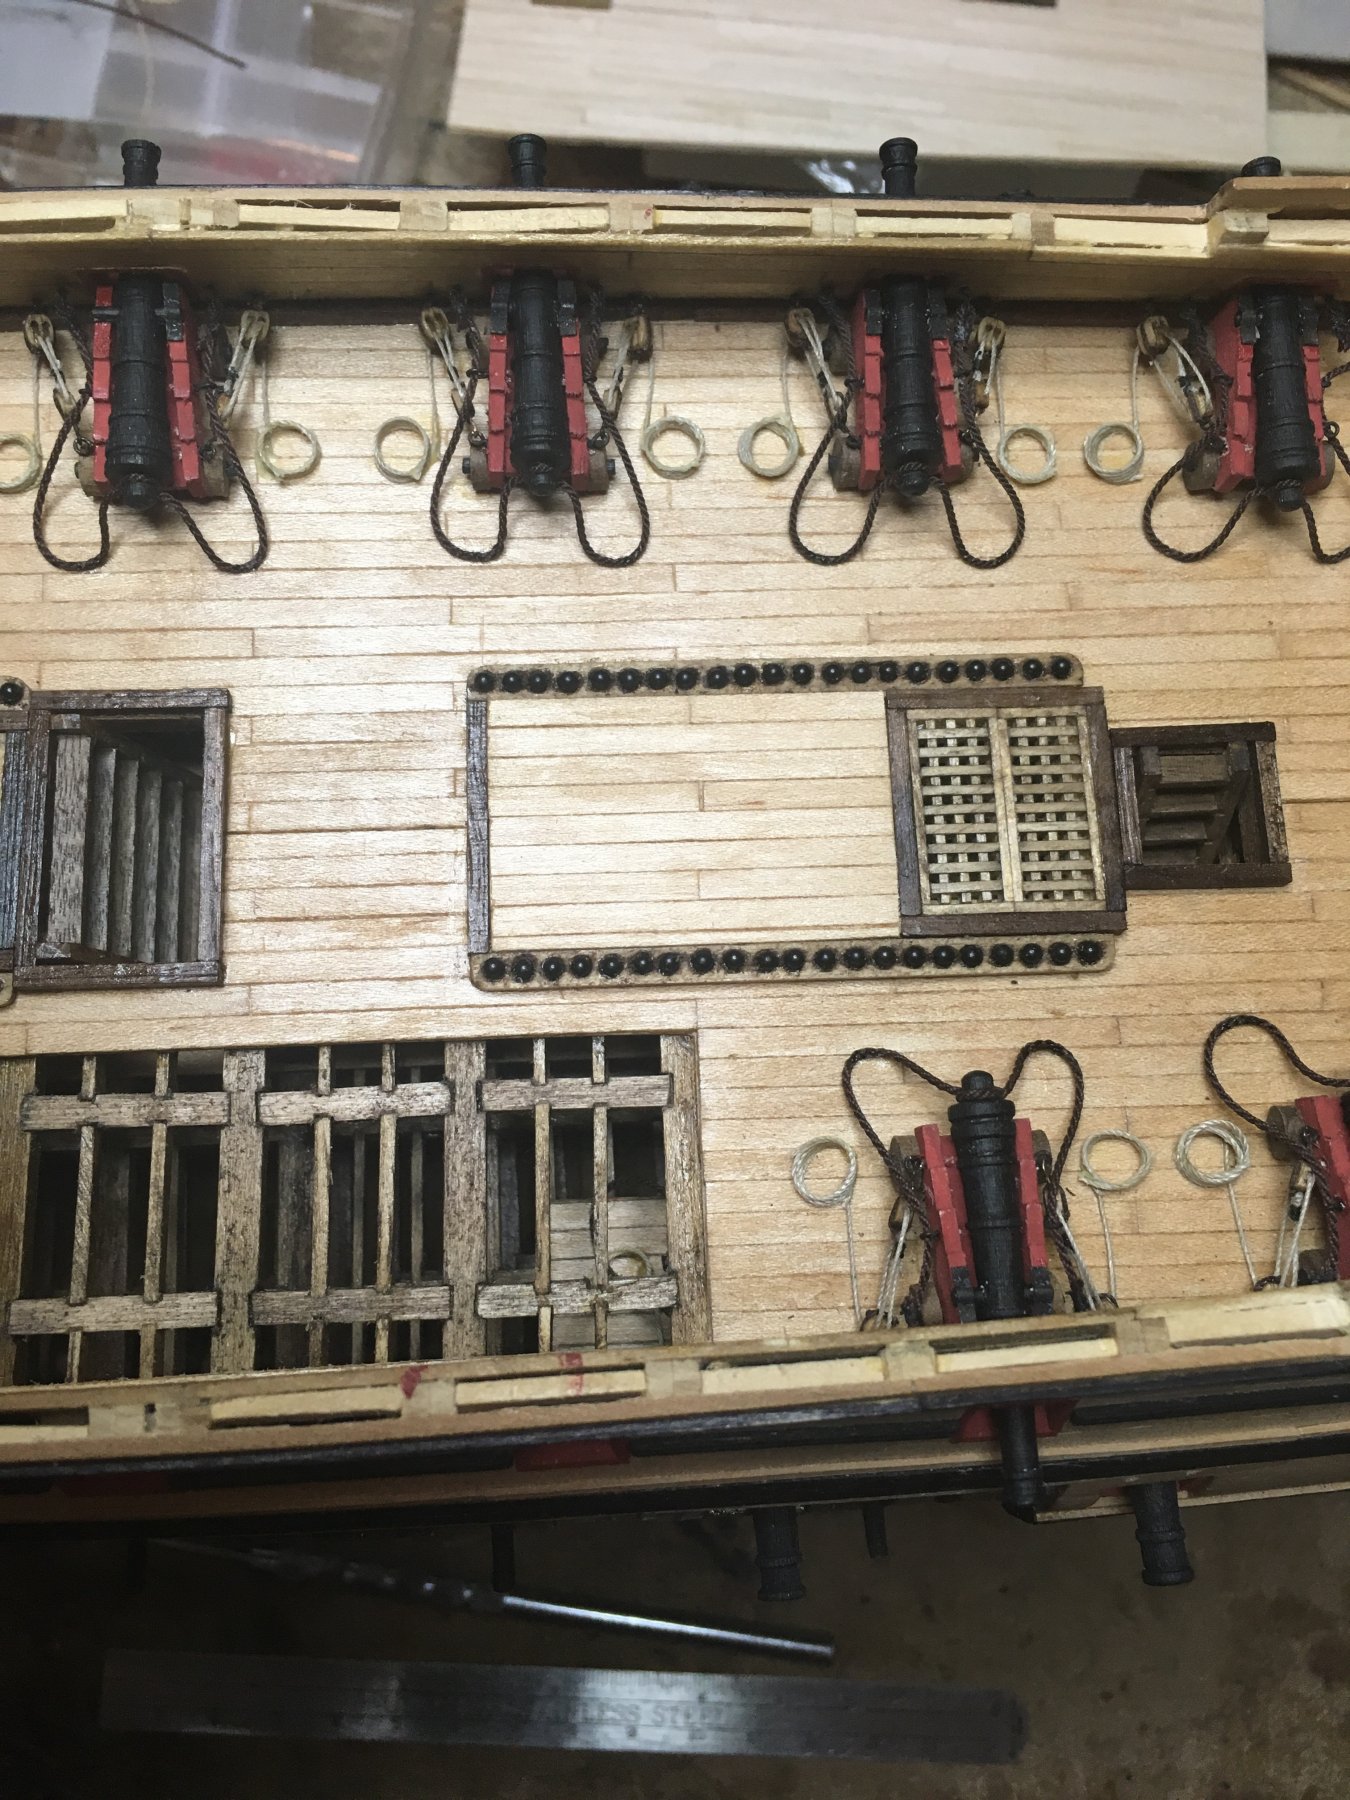
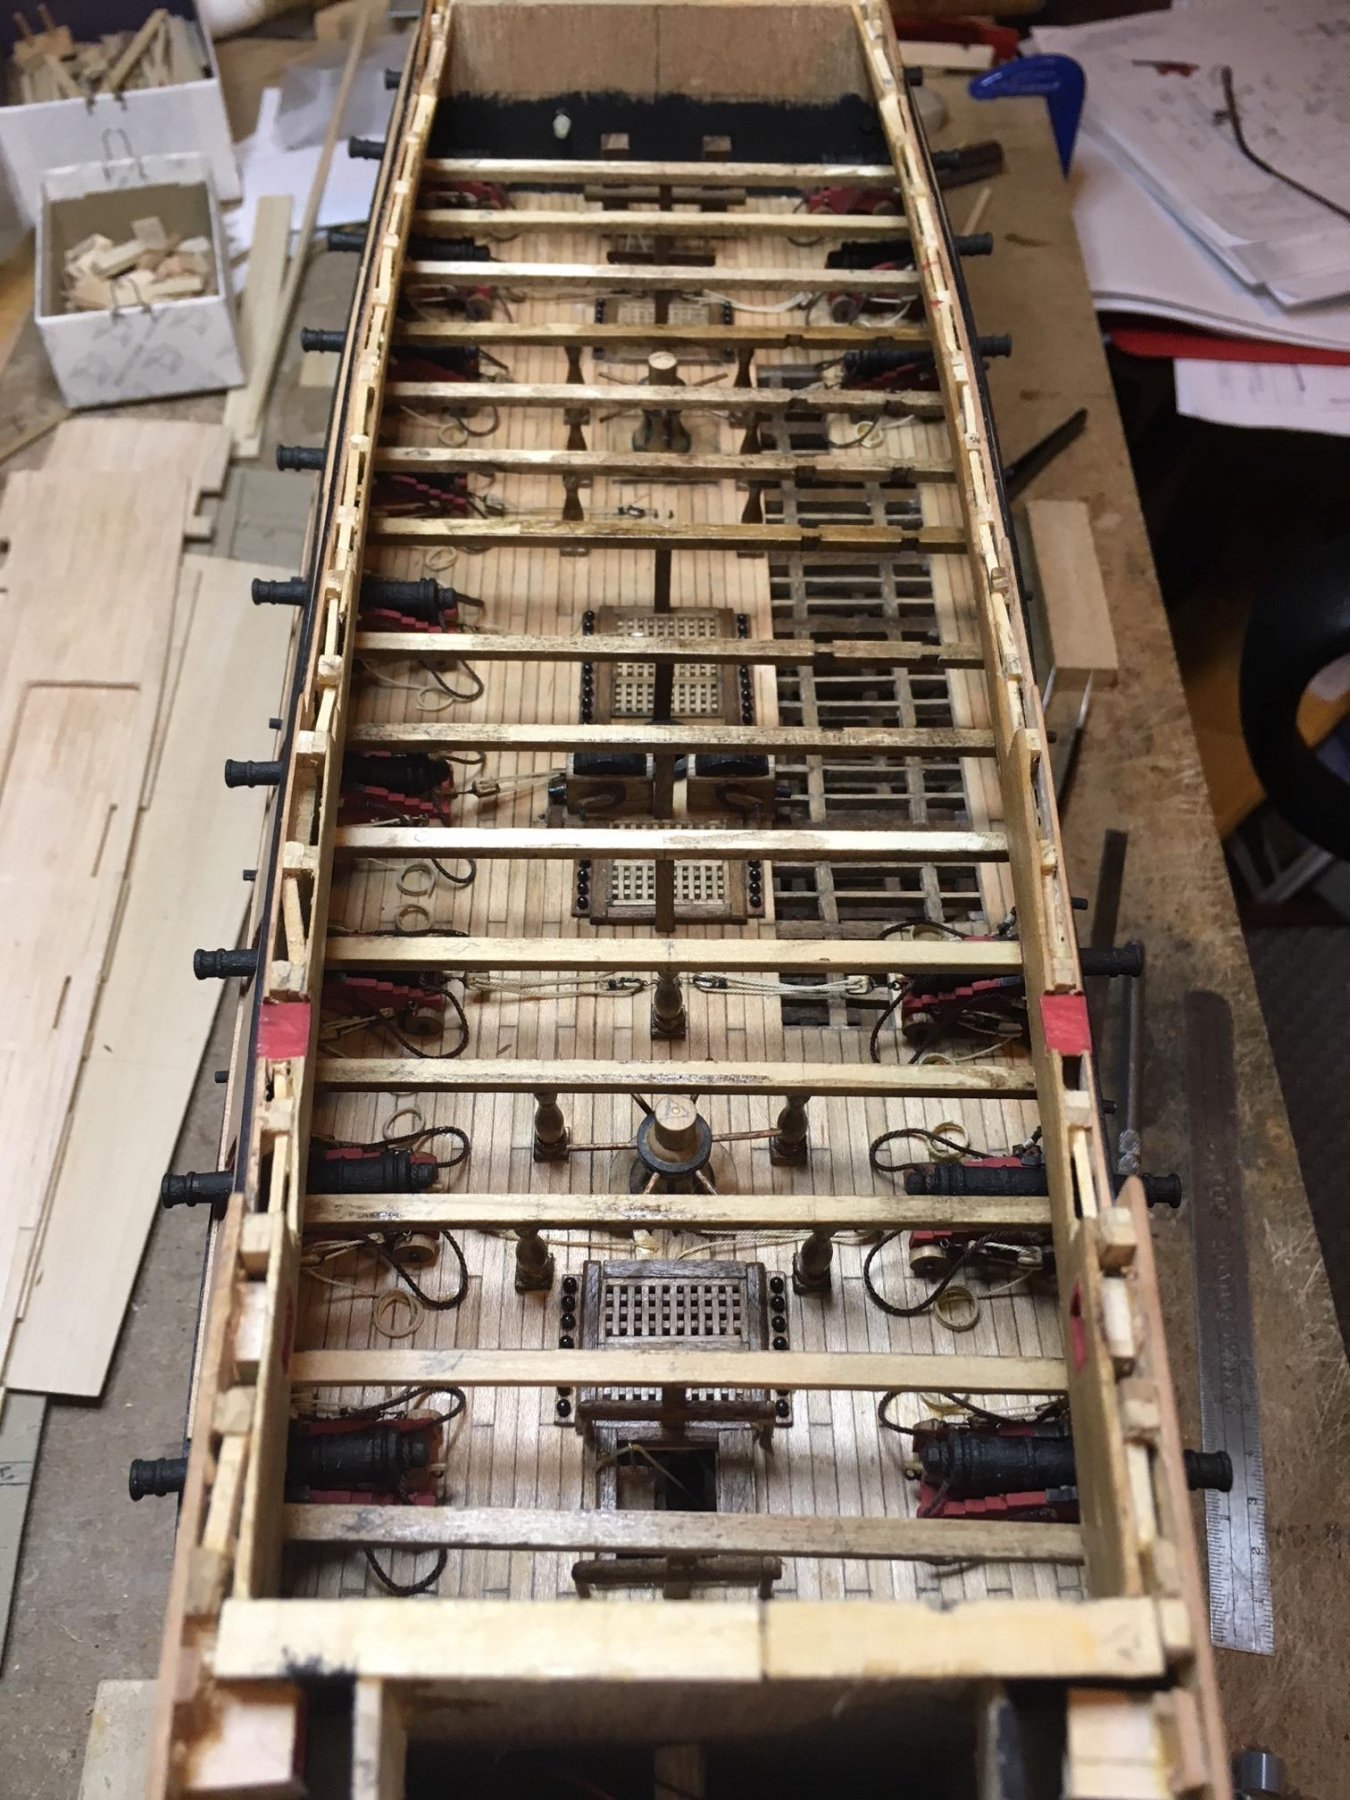
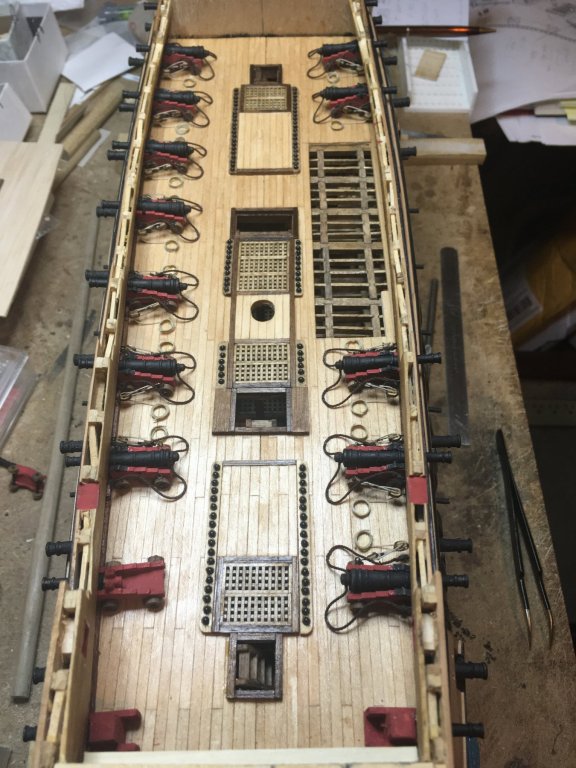
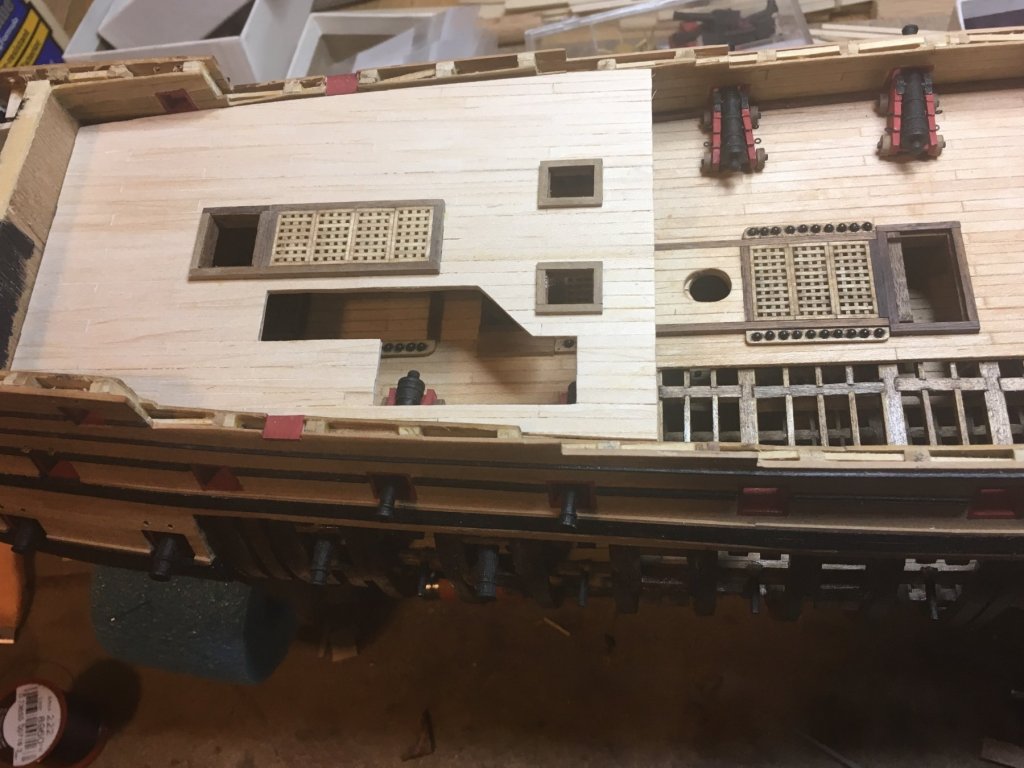
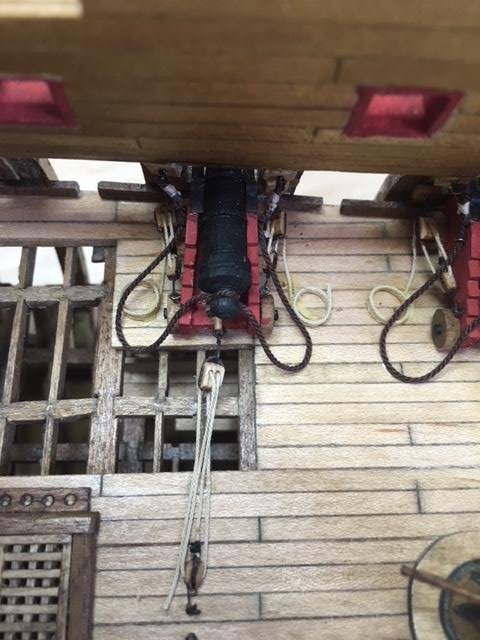
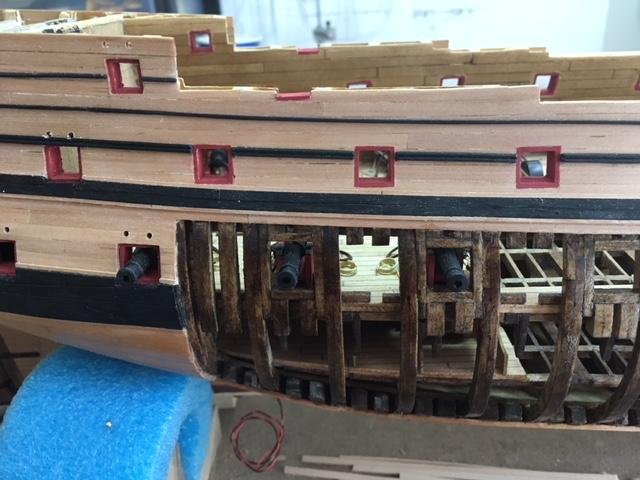
Thanks Jim. I just used my cell phone to take the pics. I agree that these seem more clear... not sure why. I am going to leave the same area blank as in the lower decks so you see straight through from the top. This will also let in more light from the top along with the LEDs in the lower decks. You should then be able to better see the cannon rigging detail below when looking through the side. It was a bit of work to build and rig all the carriages on the lower deck just to cover them over with the upper deck. But when you look through the side I needed to show the detail of what is going on down there. Tom
-
Edited in an attempt to remove the bottom picture which is a duplicate of the 3rd picture in this post - - but failed !!! I have no idea how that photo got in here twice ??? - - - and can't get rid of the unwanted one ! Hi Jim, Don't worry about the extra picture. You can never have to many pictures of nice things. Great work. As for the never ending ratlines it could be worse... a 4 masted ship! Tom
-
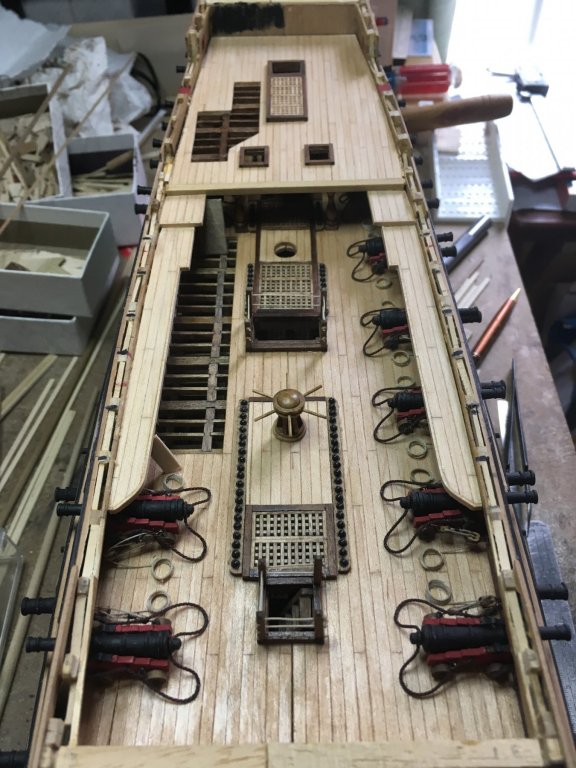
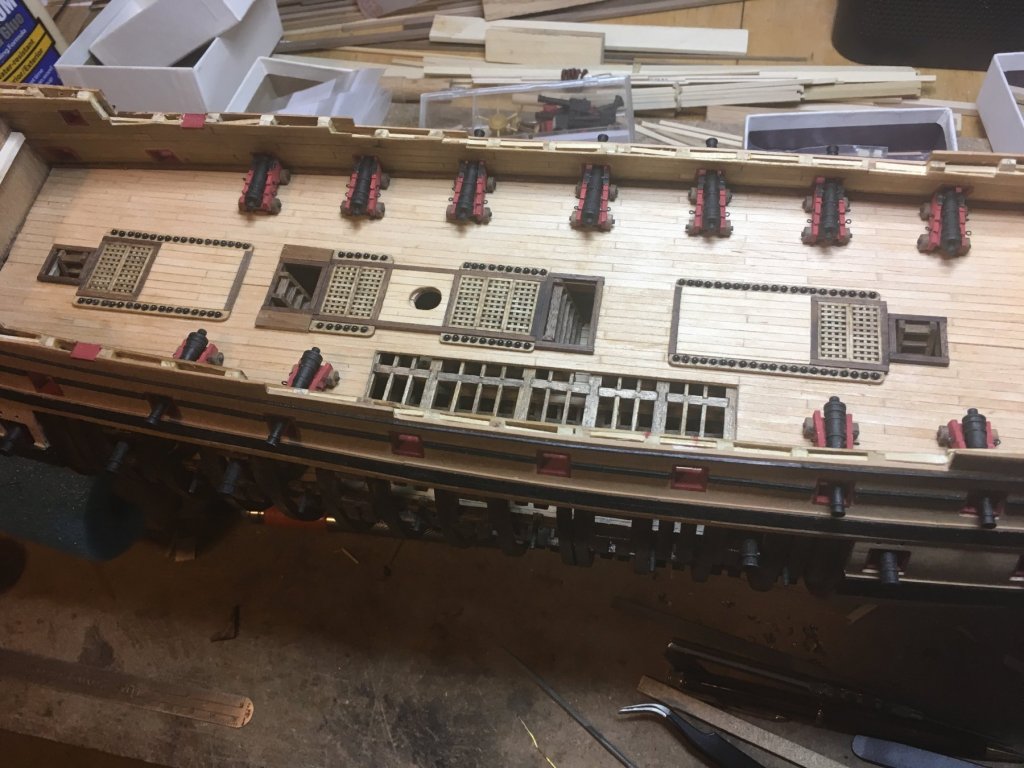
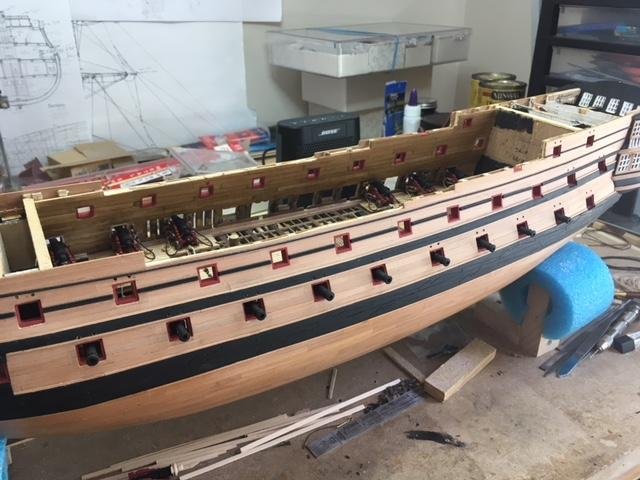
Although the summer weather has been pretty good lately except for a couple of 100 degree days, I did manage to get some work done. The 24# cannons are rigged and now I can start to put the upper gundeck into place. Here are some photos. Some progress is better than no progress or even worse... reverse progress! Starting to look like a warship. Tom
- 385 replies
-
- 10
-
-
Hi Jacek, Thanks for the complements. I bought the Rif Winfield book "The 50 Gun Ship" which contained a copy of the plans. As this is only my second build and first scratch build, the book was very helpful. The book also contains illustrations of each deck although the scales seems to be inconsistent. Since I had all this information I thought it would be a shame to waste it so I decided to do a cutout hull on one side. The only draw back is it is greatly extending the length of the build because of all the extra decking, framing and deck items that normally you would not need. The other thing to consider is lighting. I added the LED lighting on each of the lower decks so the detail could be seen when looking in. Without the lighting it was difficult to see the work that went into each deck. Tom
-
Jack, Very sorry to hear the news about your brother. My condolences to you and his family. Tom
-
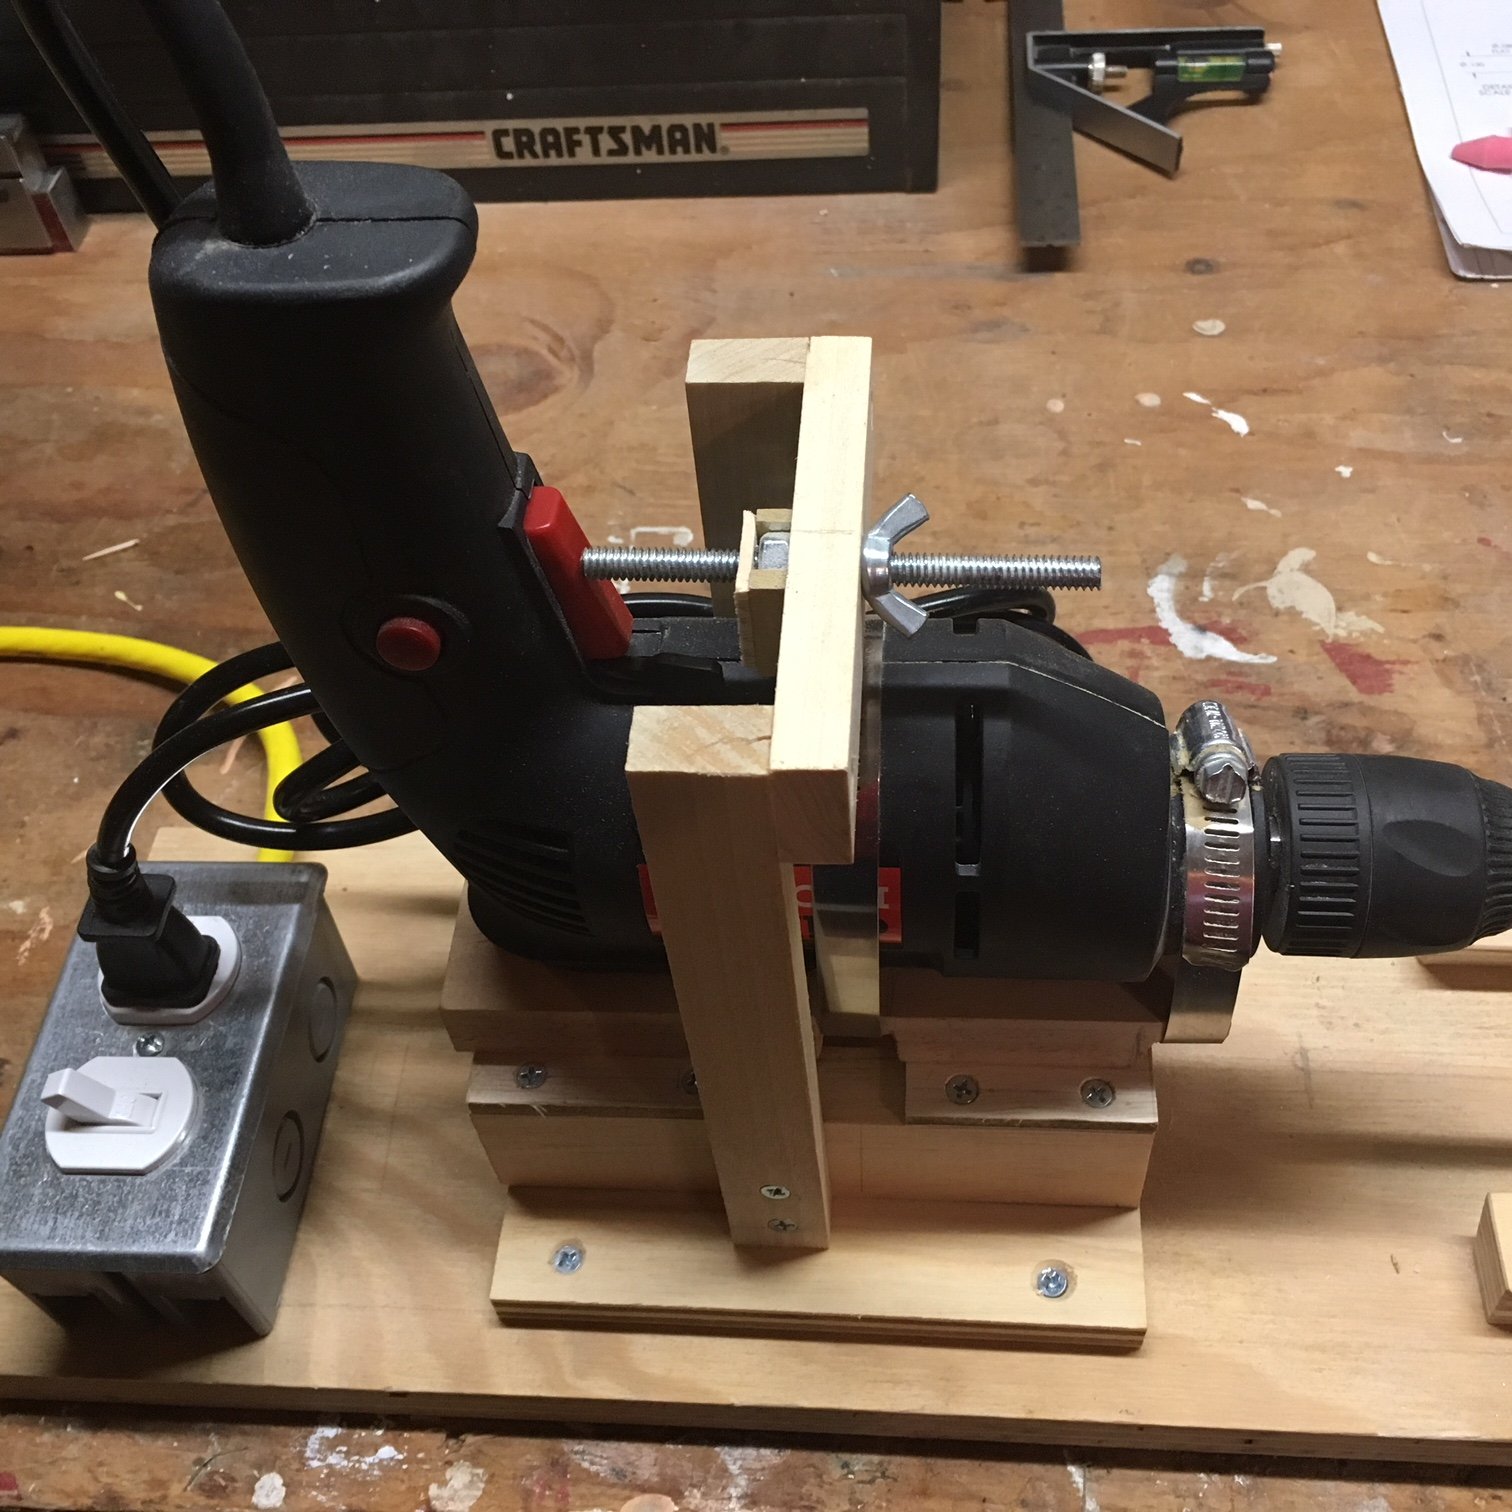
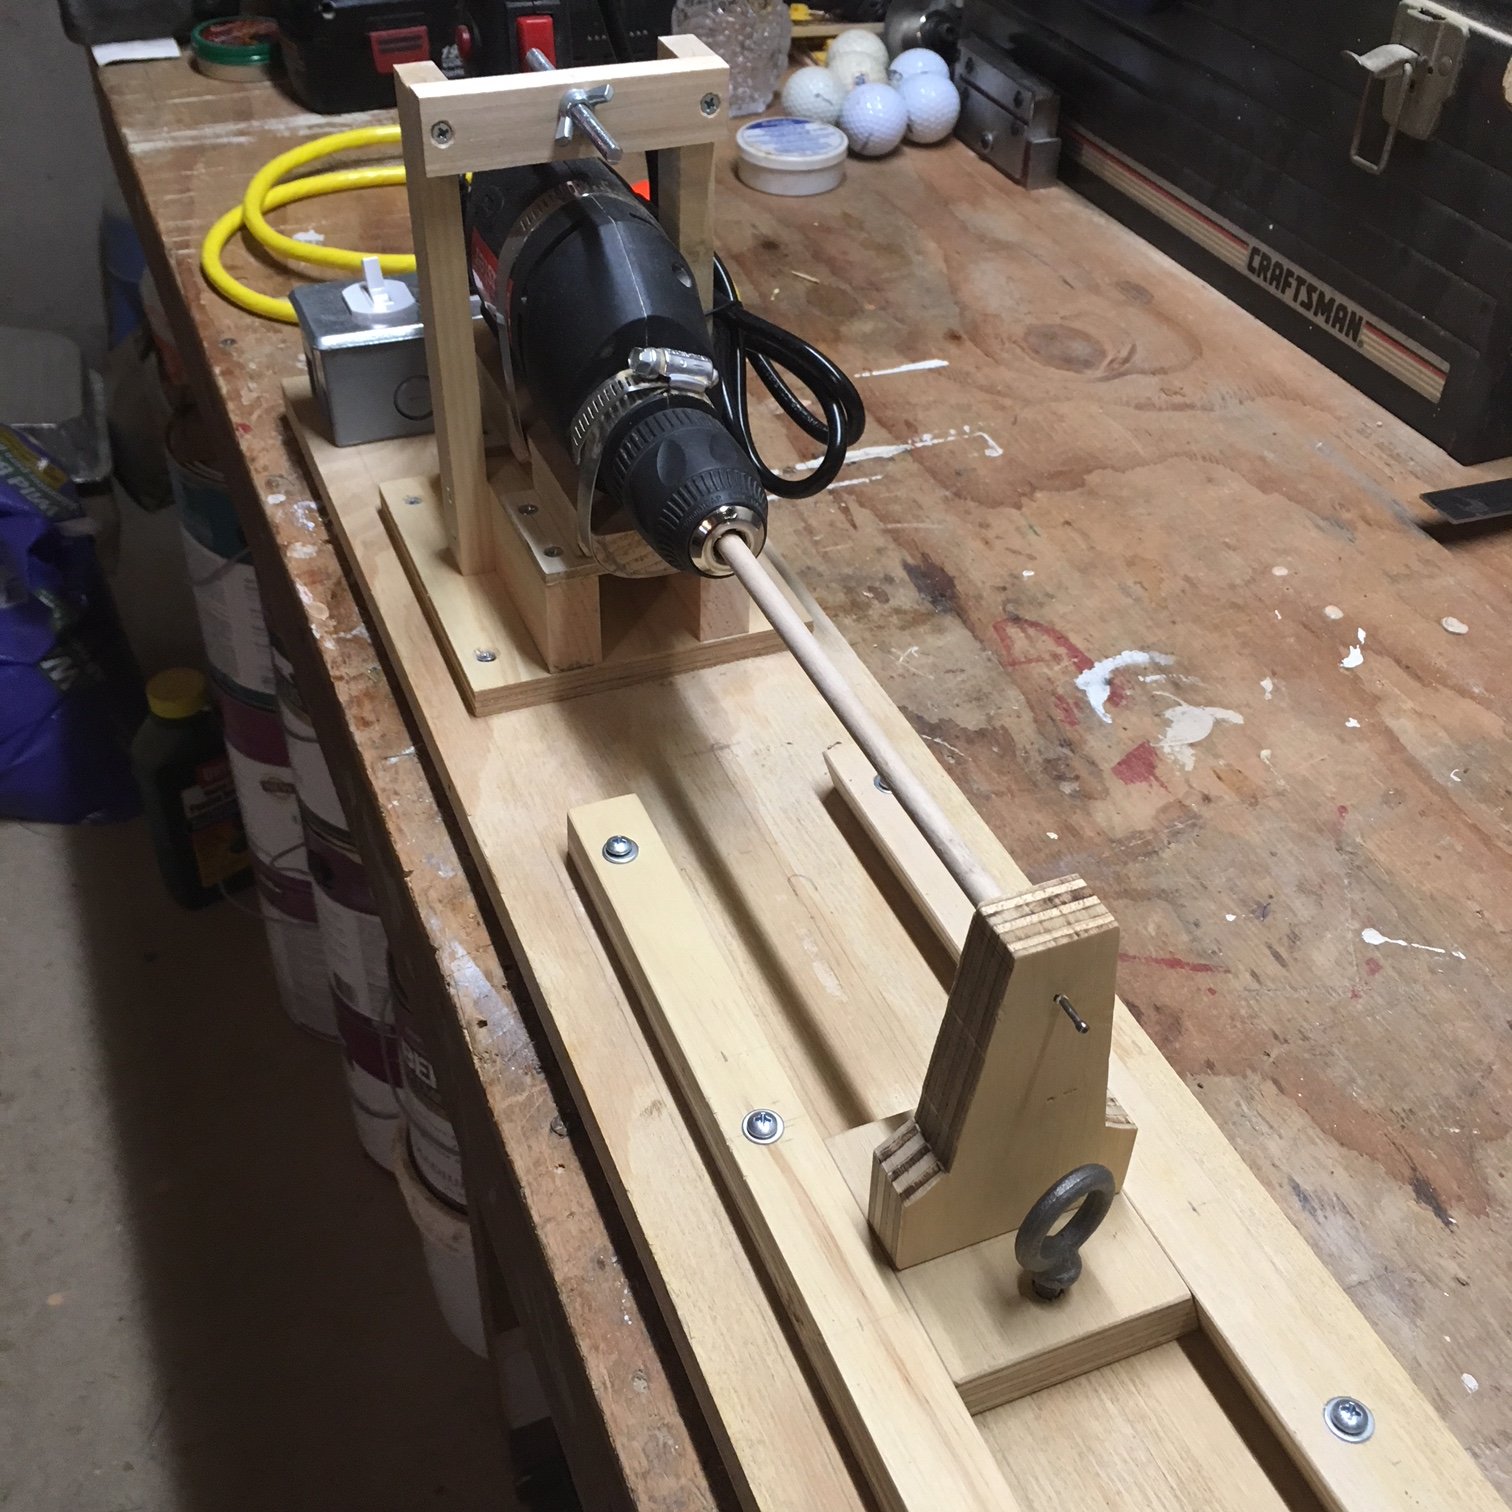
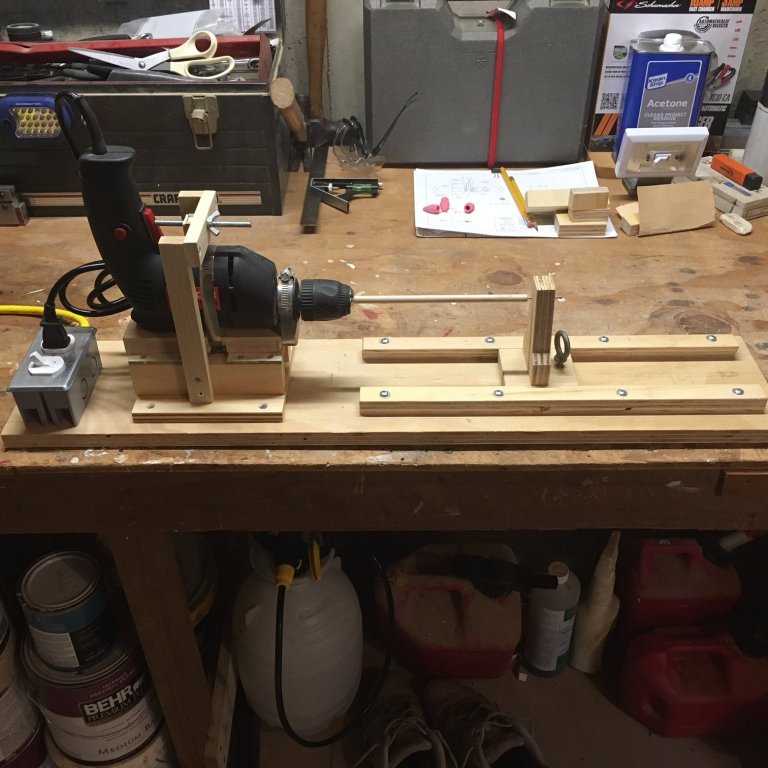
Thanks Louie, Yeah, I can't see spending all that money on a purchased lathe with all the bells when simplicity and basics will more than do. I guess all that design and manufacturing engineering college stuff is finally paying off! The cannon barrels are 24 pounders at 1:85 scale. The pic below is a prototype assembly. After painting with a satin black acrylic paint you can still see the wood fiber if you look close. This barrel was only done with a fine file and minimal sanding. I am sure that with more care sanding with a 320 grit they will come out much smoother. These cannons are first attempt and will be on the main gun deck. They will only be seen through the breakaways in the upper deck and side of the hull so the finish will suffice. Tom

-
I finally got around to finishing up the on/off switch on my homemade lathe. Attached are some pics and a video. As I mentioned earlier, total cost was $15 for the drill from Harbor Freight and a $7 on/off outlet switch. Tom


-
Hi Jim, Really nice idea and job on the cross trees. The overall look of the project is really coming out nice. Someday I will start rigging but not anytime soon. Especially at the pace I am going. On the bright side your log is making a great reference for me. Thanks for sharing. Tom