HOLIDAY DONATION DRIVE - SUPPORT MSW - DO YOUR PART TO KEEP THIS GREAT FORUM GOING! (Only 24 donations so far out of 49,000 members - C'mon guys!)
×


toms10
-
Posts
929 -
Joined
-
Last visited
Content Type
Profiles
Forums
Gallery
Events
Everything posted by toms10
-

Pandora by marsalv - FINISHED - 1:52
toms10 replied to marsalv's topic in - Build logs for subjects built 1751 - 1800
Marslav, If I didn't know better I would think the pictures are of the actual full size ship. The detail is amazing. I have been following this log for a while just to see the pics and what is possible. Tom -
Jim, I think we have all felt the pain. Hopefully it is overshadowed by the joy we get after we have figured out a solution. That is what keeps one going in a hobby. There is a light at the end of the tunnel. I think the journey is most of the fun so "re-beavering" is not a bad thing. Mark, your are right. the proverbial wheels don't stop turning until it is in its case! Thanks to all for the likes, Tom
-
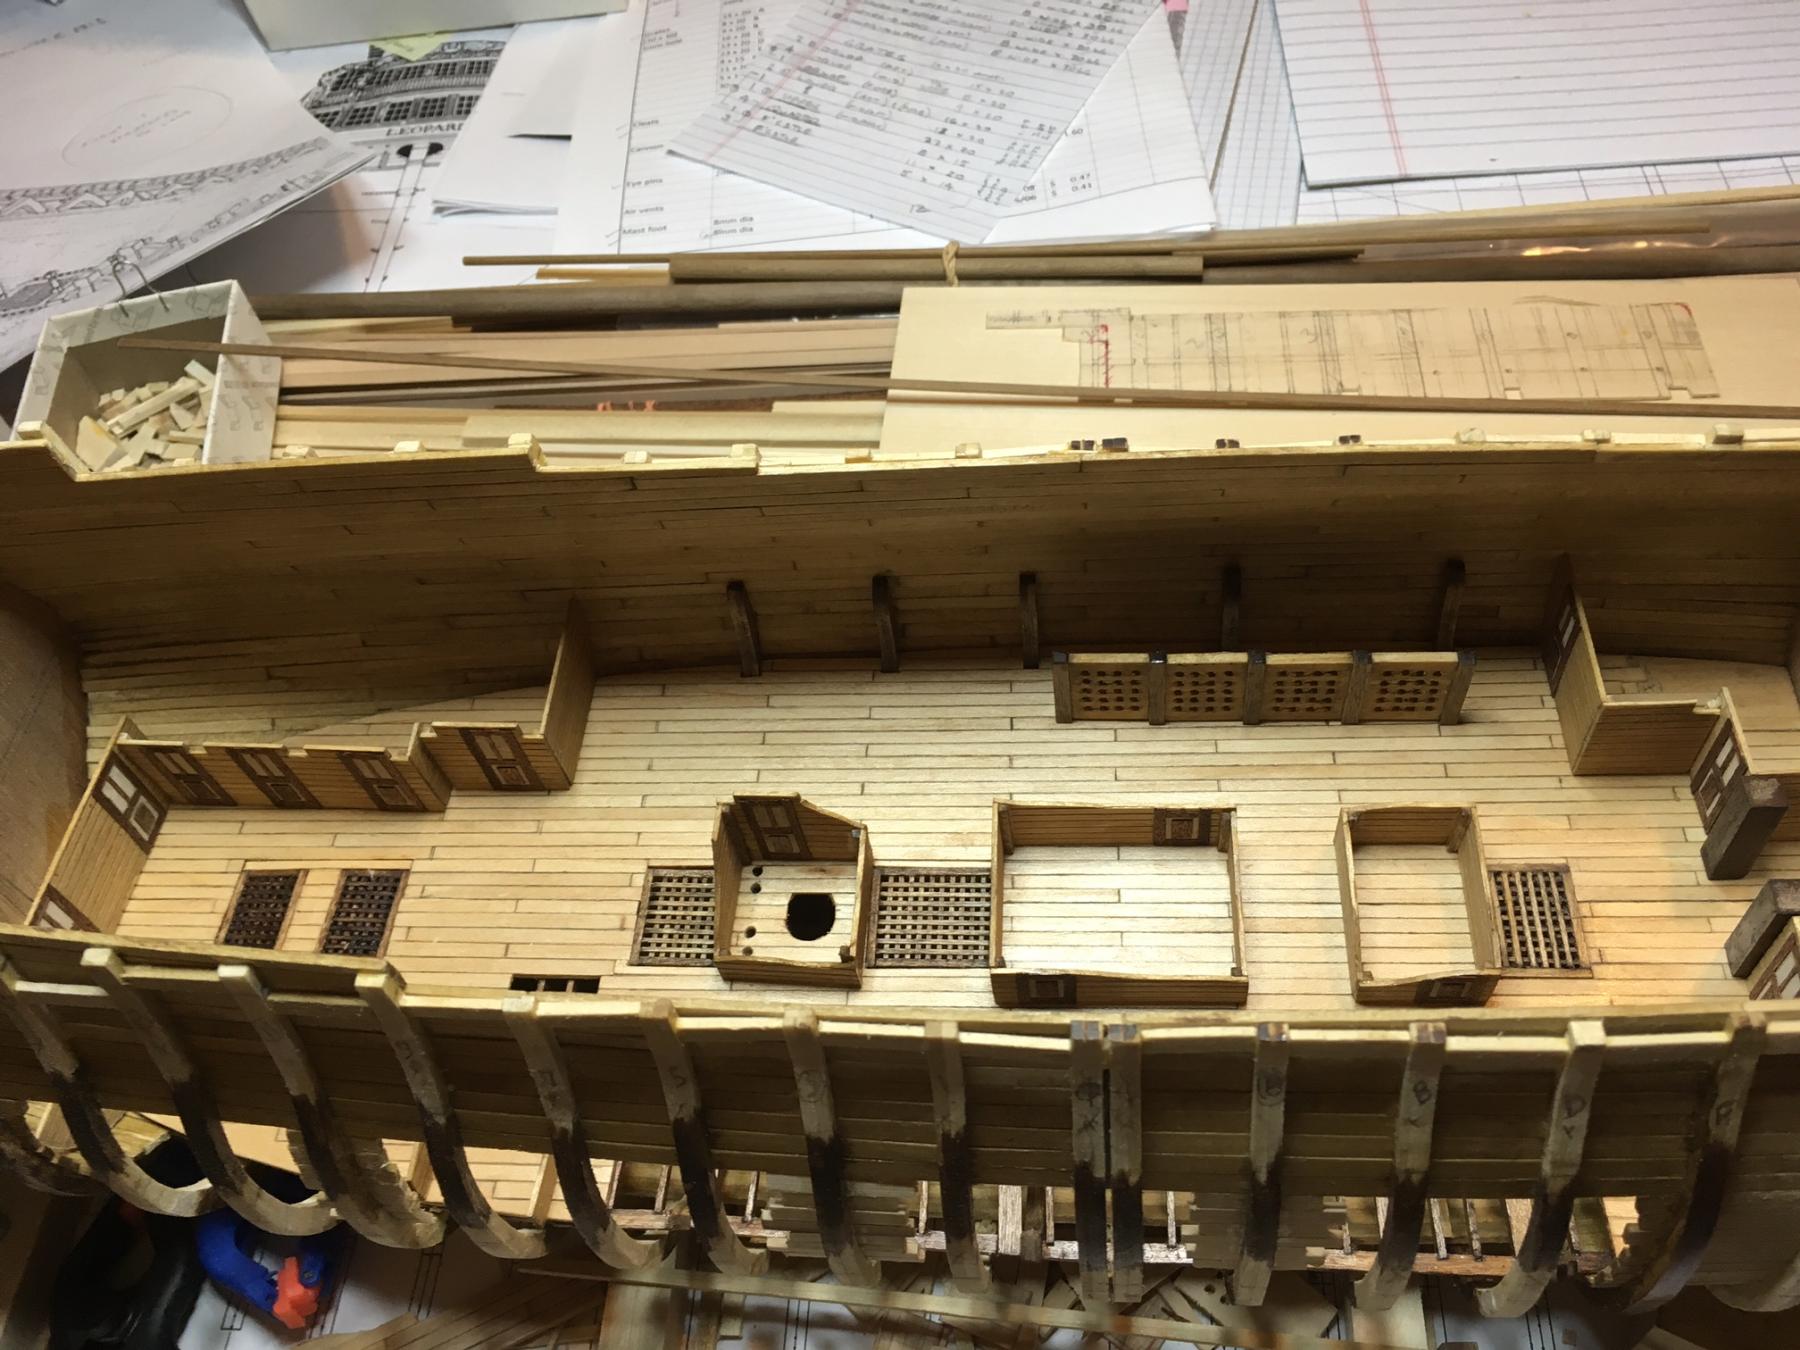
I haven't posted in a bit but I have been picking away at her as well as playing around with a homemade ropewalk with some success but that is a story for another time. I put in the Orlop decking. The rooms are just placed (dry fit) for now. I need to start working on the columns and maybe a bit of furniture for the rooms that you can see directly into near the cut out. I also need to locate at least the lower gun ports to make sure the lower deck goes in at the right height so the cannon will stick out of the gun port.. I will probably also build a test cannon carriage and use that for a location gage. With this being my first scratch build I can really see how important it is to think several steps ahead of what you are actually working on. That is the part that really slows visual progress... but what's the hurry!? Thanks to all for the likes and support! Tom


- 385 replies
-
- 17
-

-
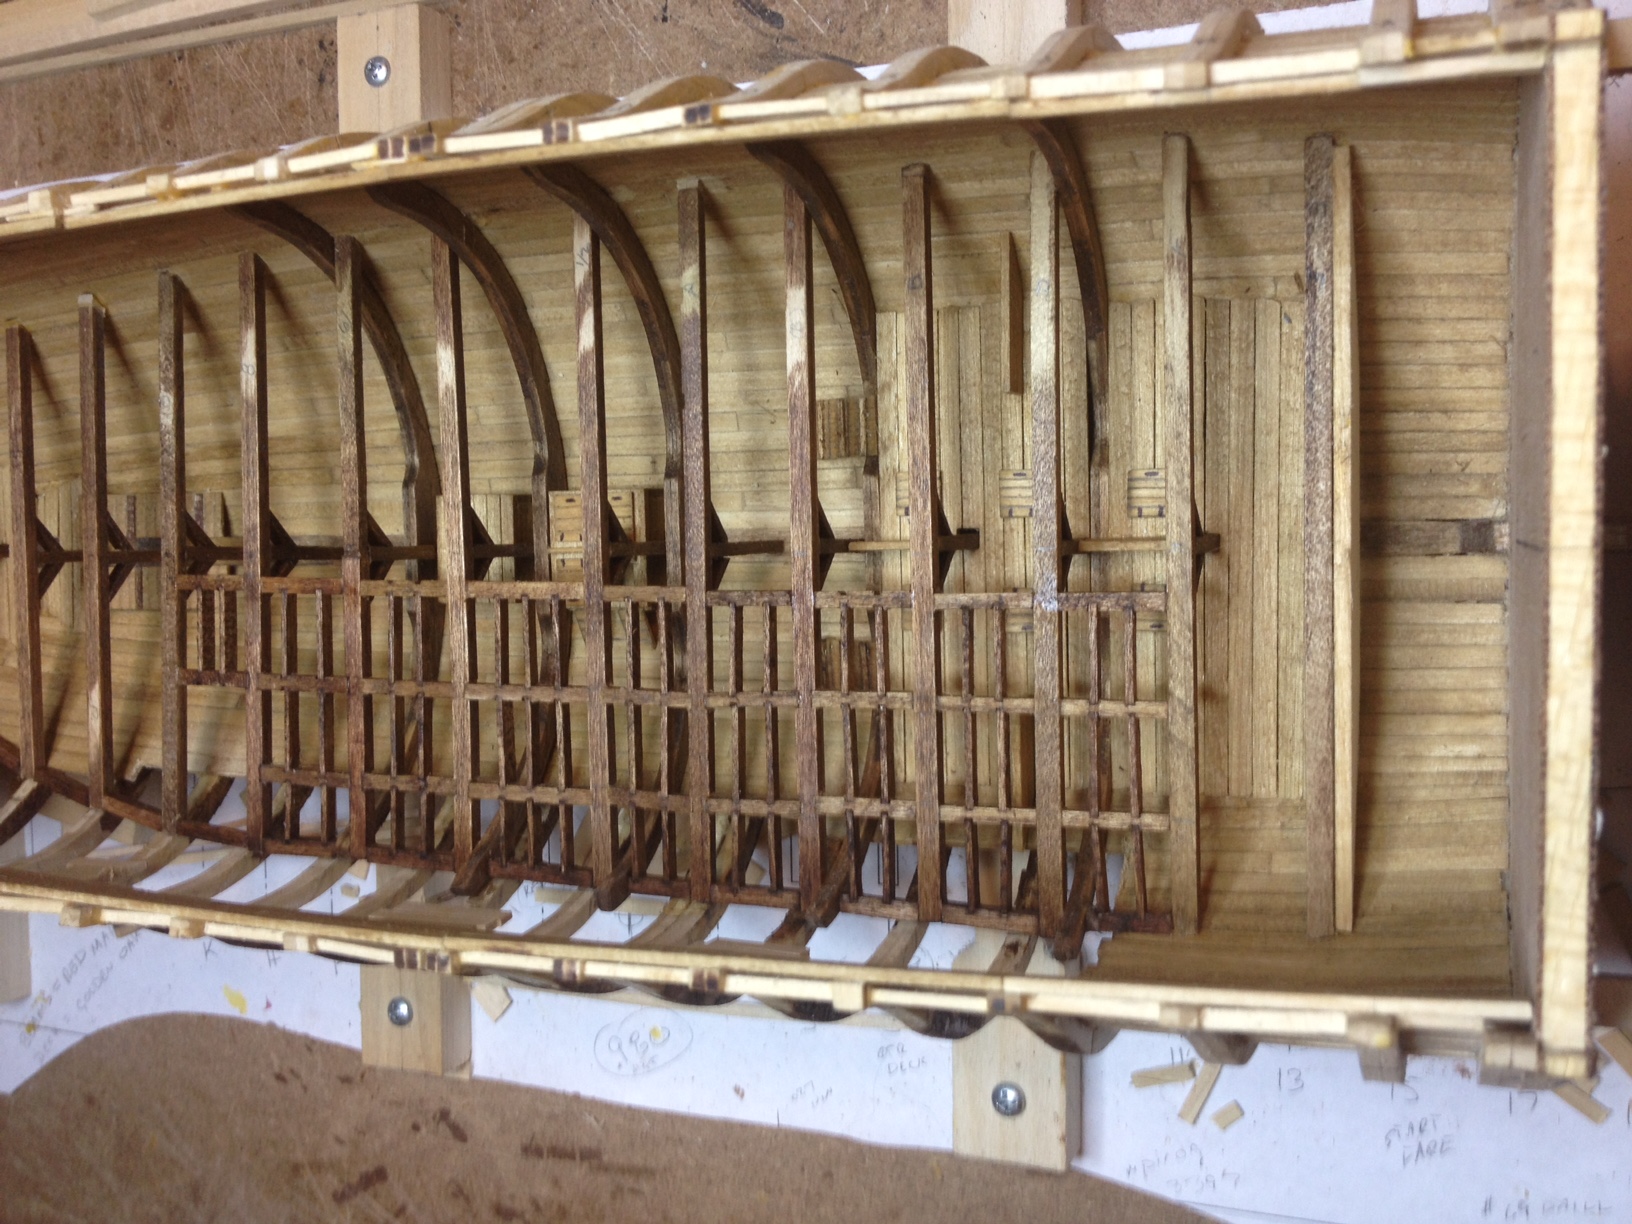
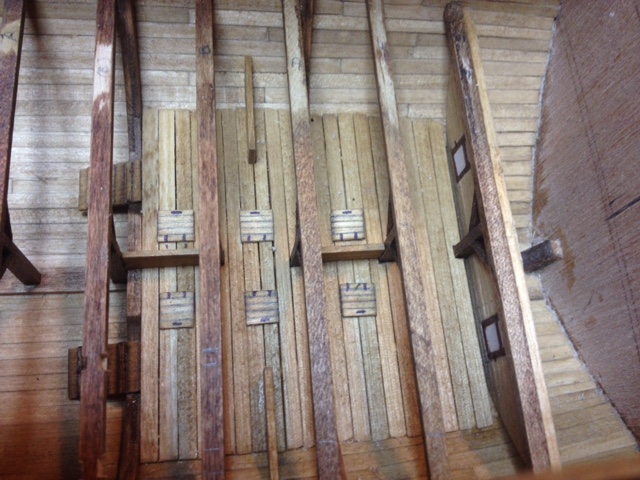
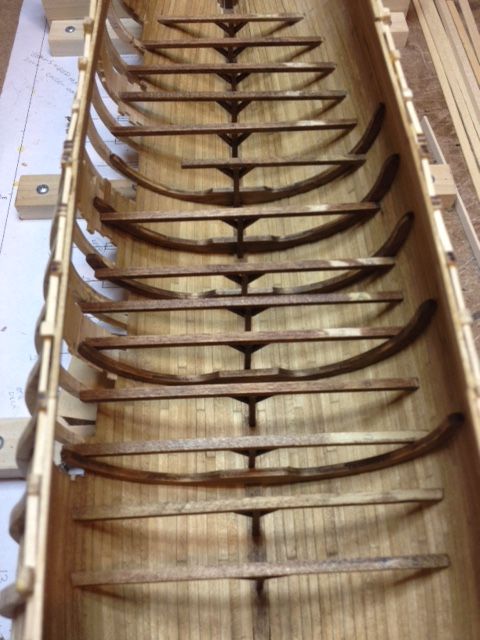
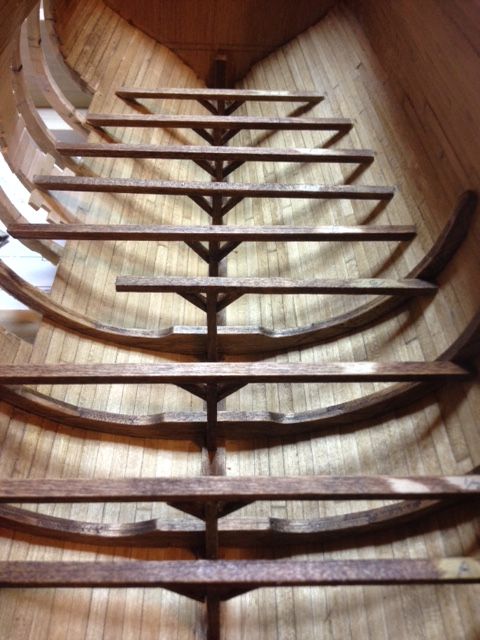
I've been working on the Orlop deck framework. Here are a couple of picks of the carlings and ledges that will be exposed after the deck is planked. I am hoping they will serve a dual purpose, first to show some of the construction and second to allow more light down into the hold to see some of the details. The decks above will also have some planking removed but to what degree I don't know yet. I am making this up as I go along. Couldn't seem to get the pics orientated vertically this time so you will have to turn your monitor on its side. Tom

-
I see patent pending. Necessity is the mother of invention. Every tool is multipurpose if you stare at it enough. Tom
-
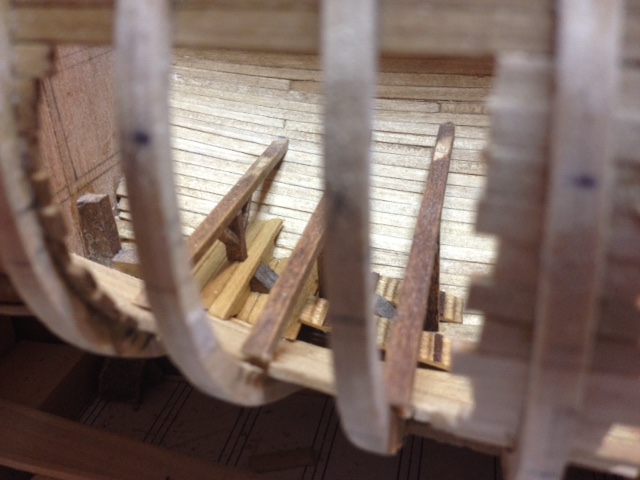
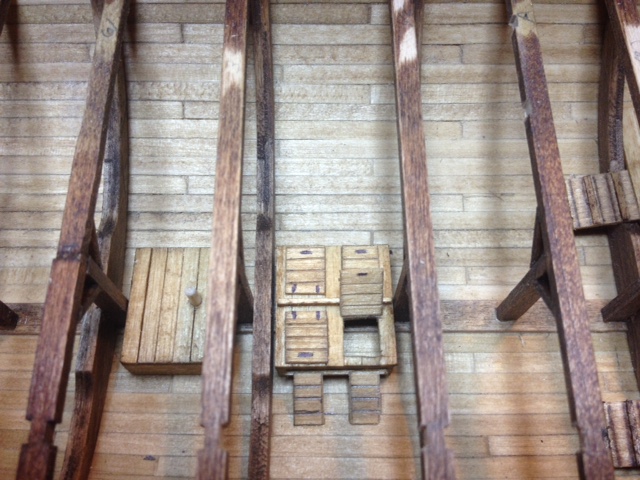
Little more progress. I added some detail to the hold area. A small shot locker at midship and some level areas both fore and aft so the ladders coming down from the orlop have a place to seat. I threw a few hatch doors and a couple of divider 1/2 walls in the in the forward area that you will see through the cutout just to busy it up a bit. I am envisioning this as a supply storage area. Maybe a barrel or two and a few small sacks of foodstuff just for effect. Just made something up since I could not really find any info and will be somewhat difficult to see. I also started cutting some carlings for the orlop deck that you will see in the area that I don't plan on planking. This will allow better sight into the hold as well as show some of the internal construction. Next is back to the orlop deck walls and such. Here is the platform in the aft section. The midship area. The item on the right is a shot locker/ballast. The item on the left is where I will be attaching the main mast. The little platform around where the mast will be was not necessary but I did not just want to stick the mast on top of the keelson by itself. The small dowel pin is actually glued into the keel and will act as a locating and support pin for the lower mast. Finally the bow end of the hold. I just made a large flat area that can be used to store goods as well as hatches to store ballast or non-perishable goods. I also put a wall with 2 doors at the end so you won't see the bulkhead frame. Again, I just made it up because I wanted a flat area for the ladder down from the orlop. And the overview. Thanks for having a look. Tom
-
Yeah, if it was easy then everybody would be doing it. Tom
-
Nice job Mike. I really like the way the stern looks. What did you use for the lettering? It is very crisp. Tom
-
Thanks Jim, Once you get going it takes less than an hour to make one. I need about a dozen or so... yeah it will take a while but I am in no hurry. After a few and when it starts to grate on you, (sorry I couldn't help it) just jump onto something else for a while. Tom
-
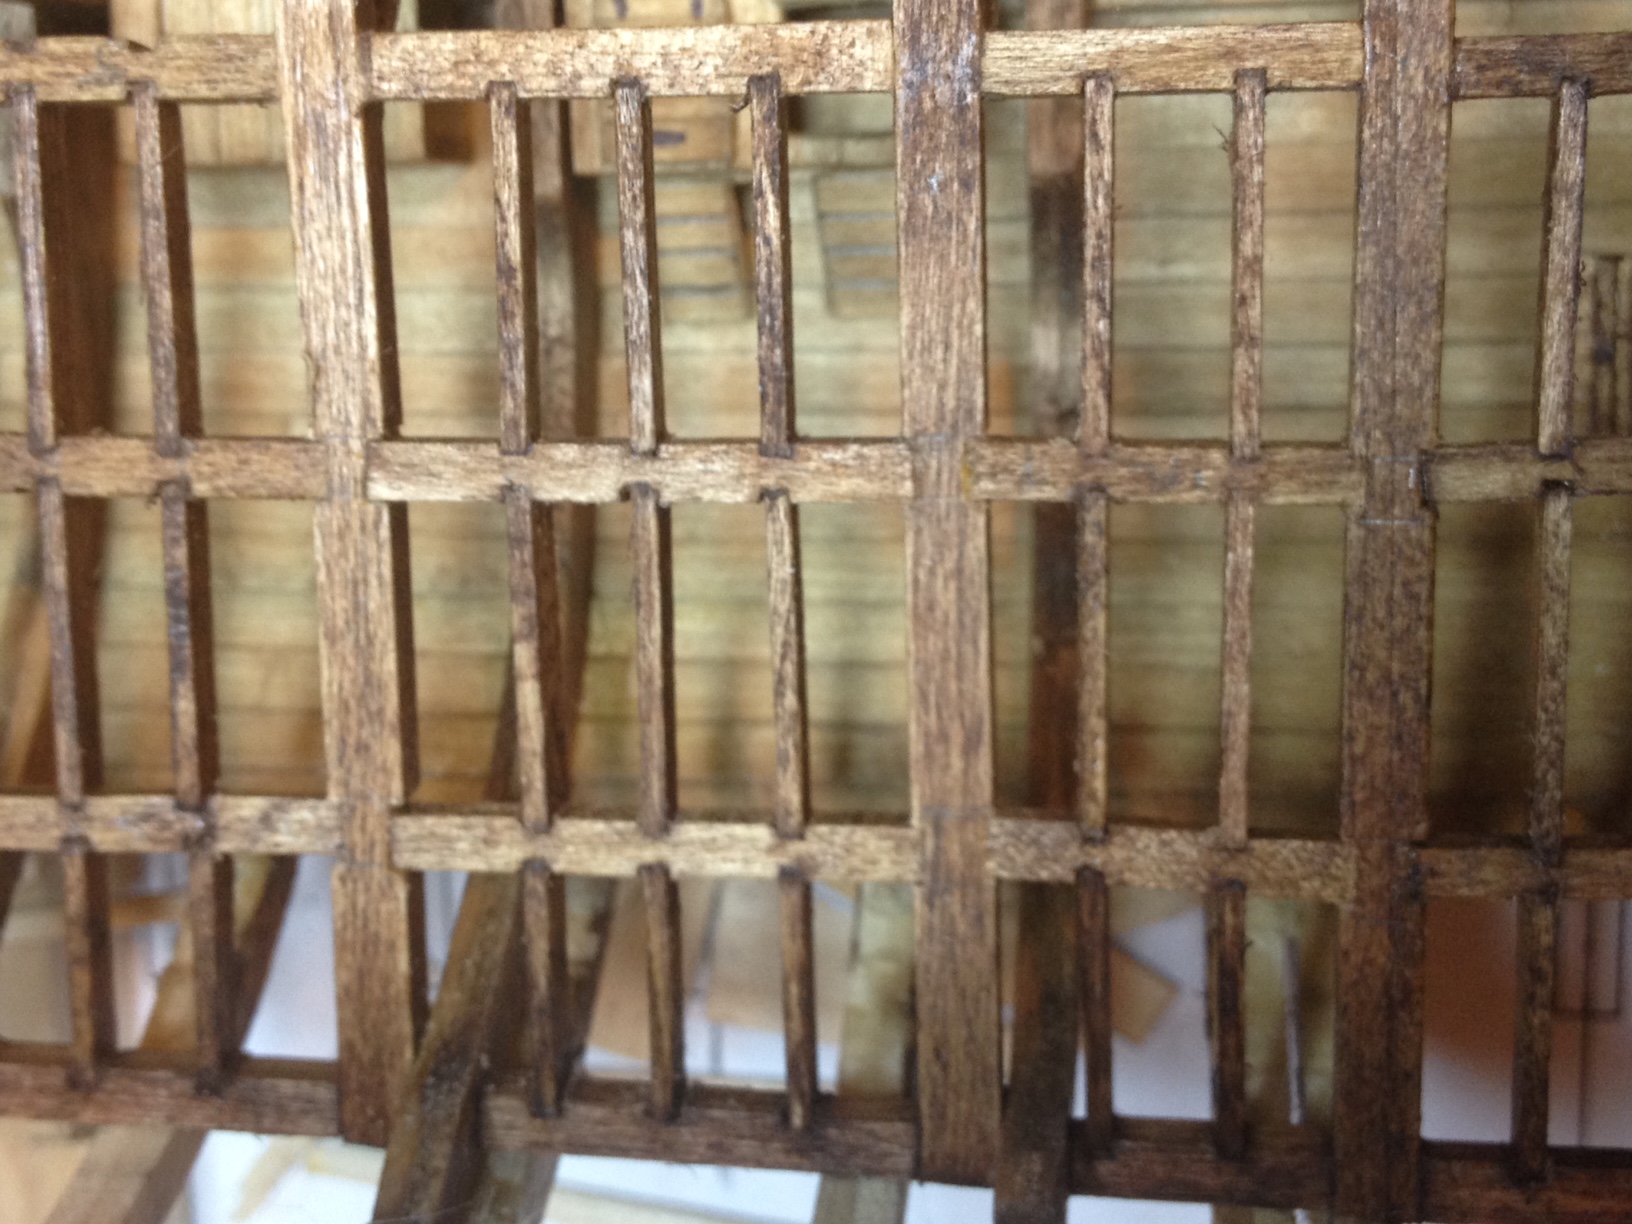
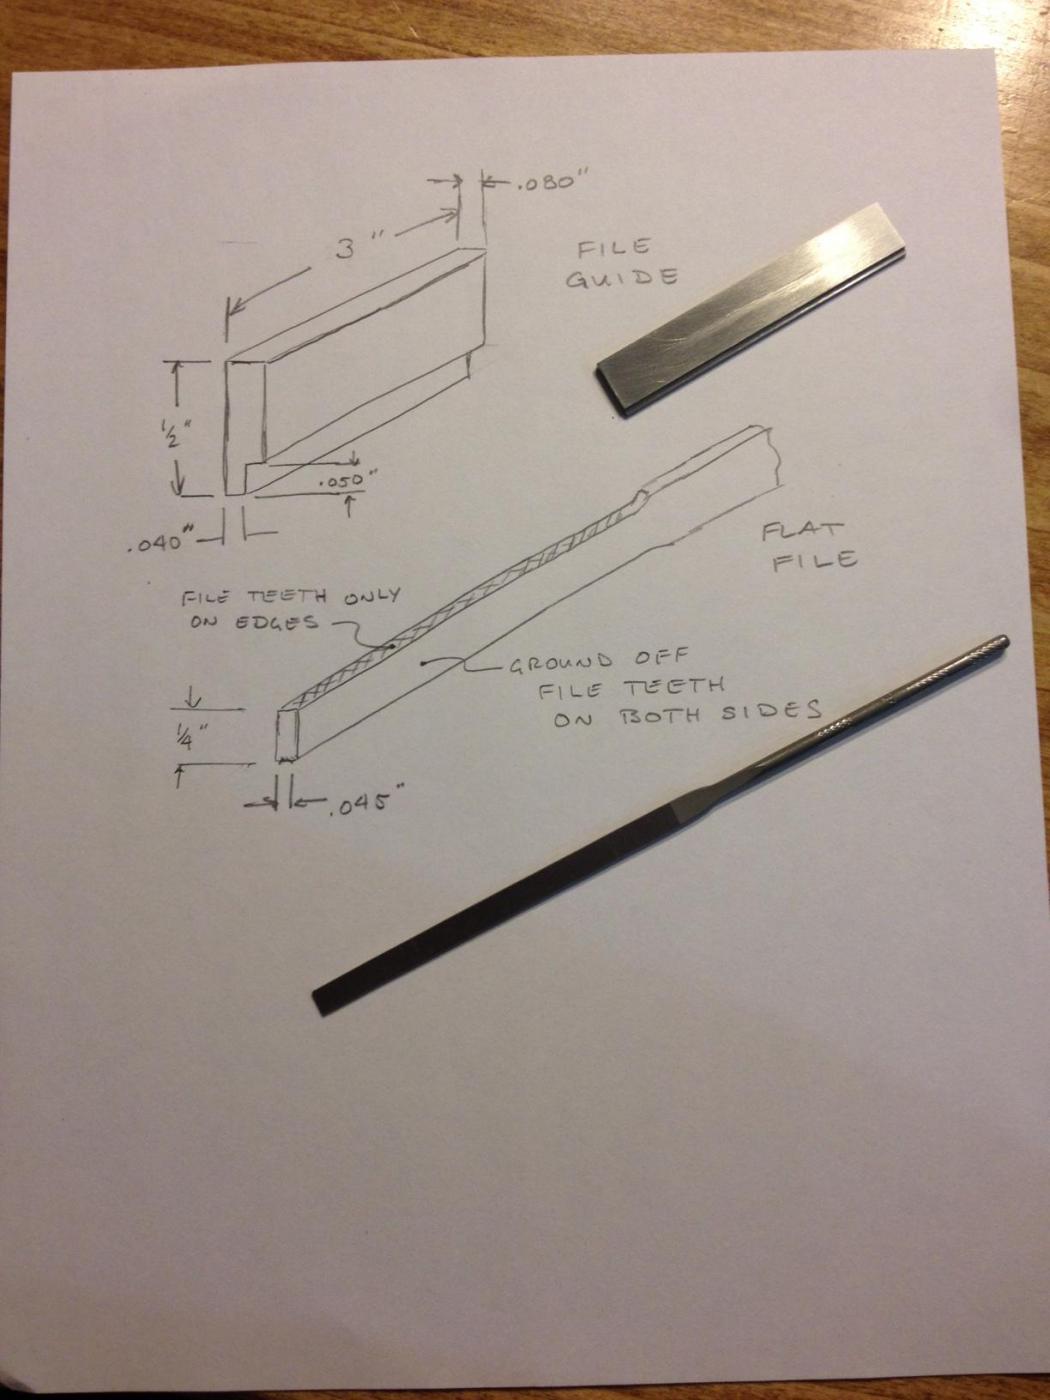
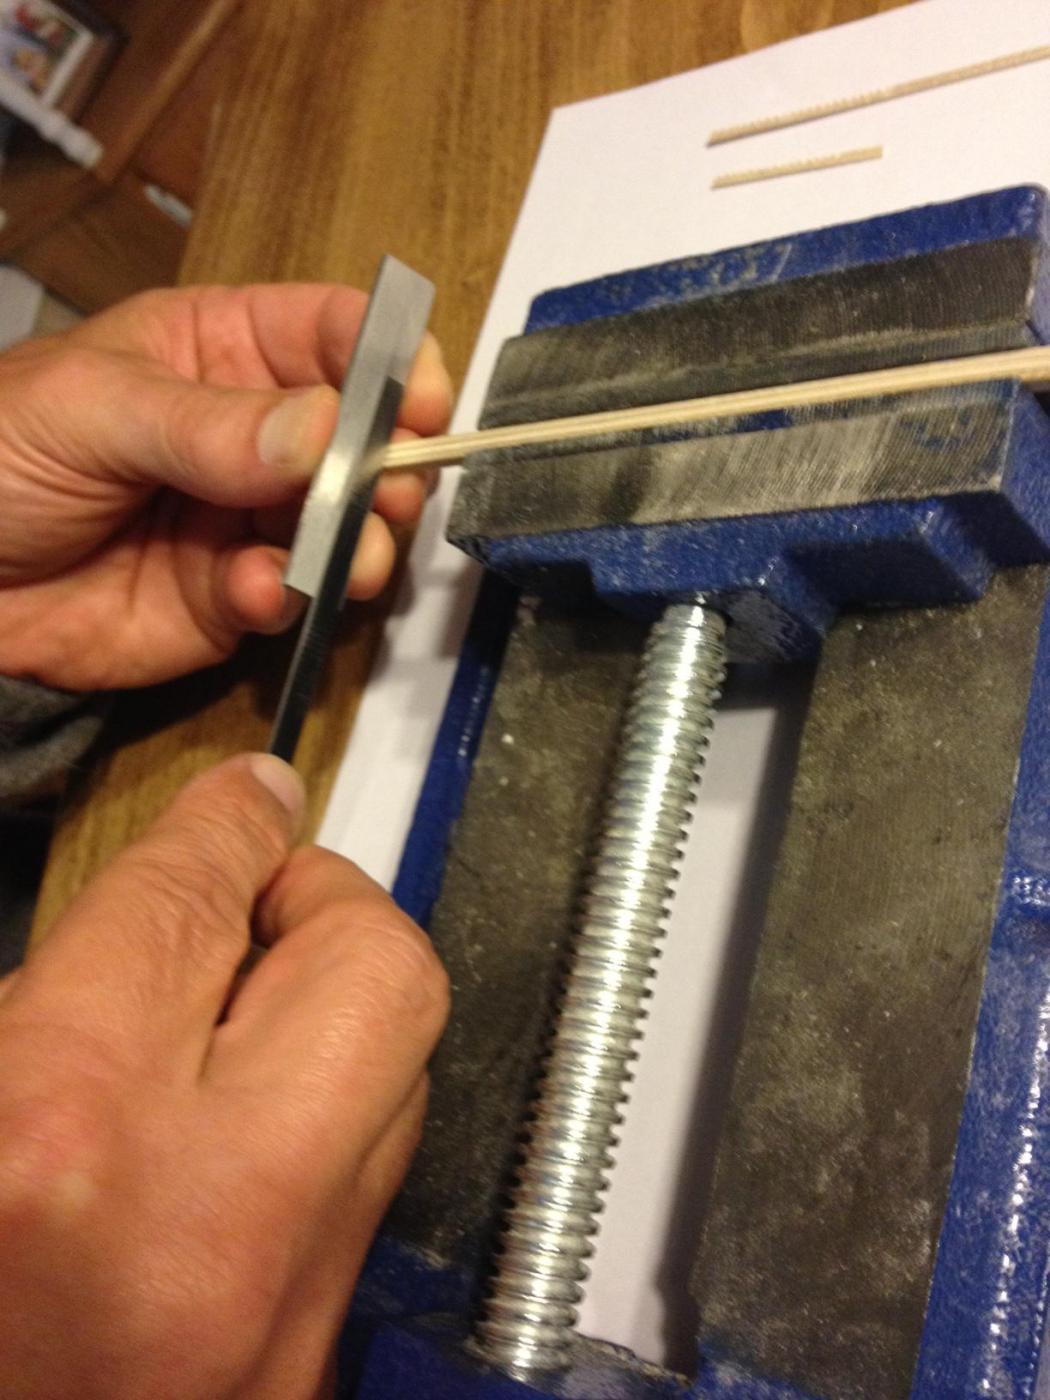
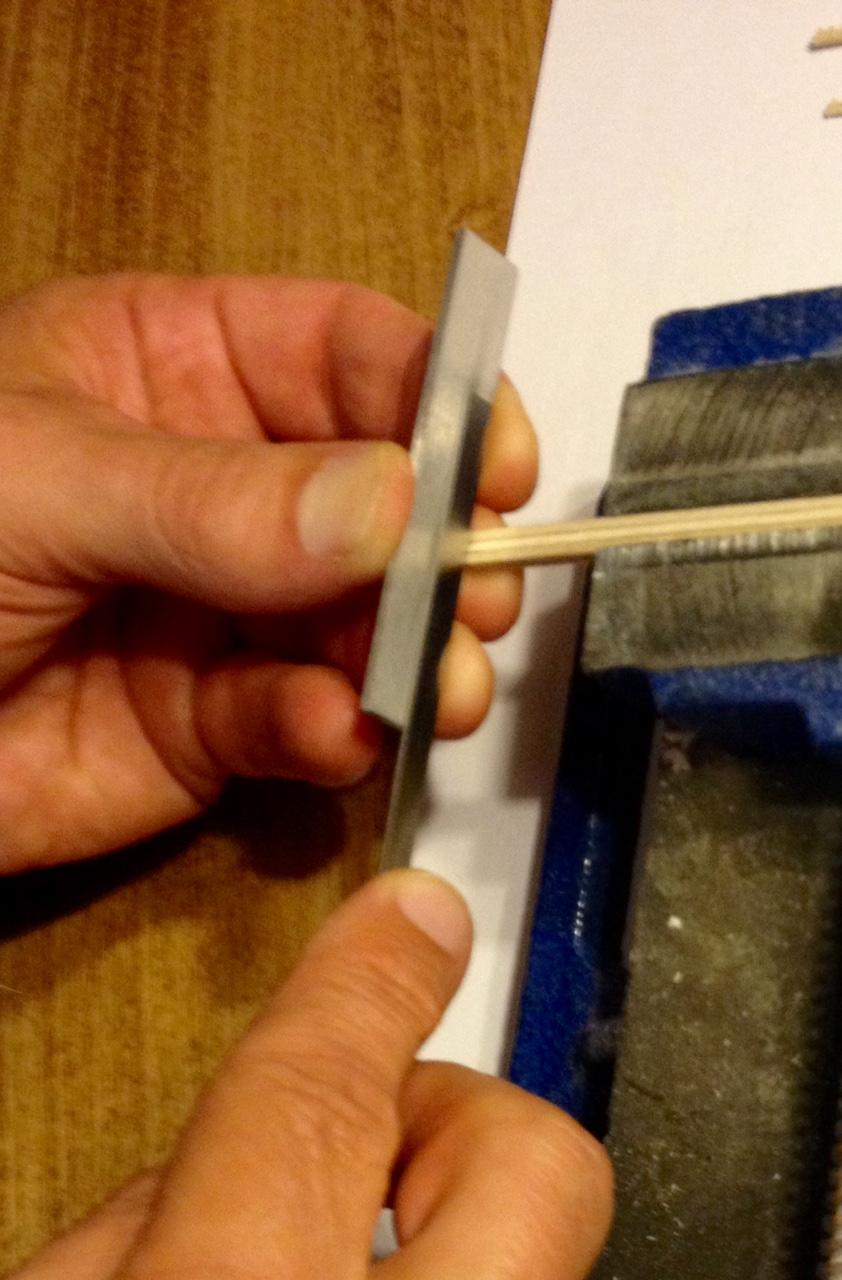
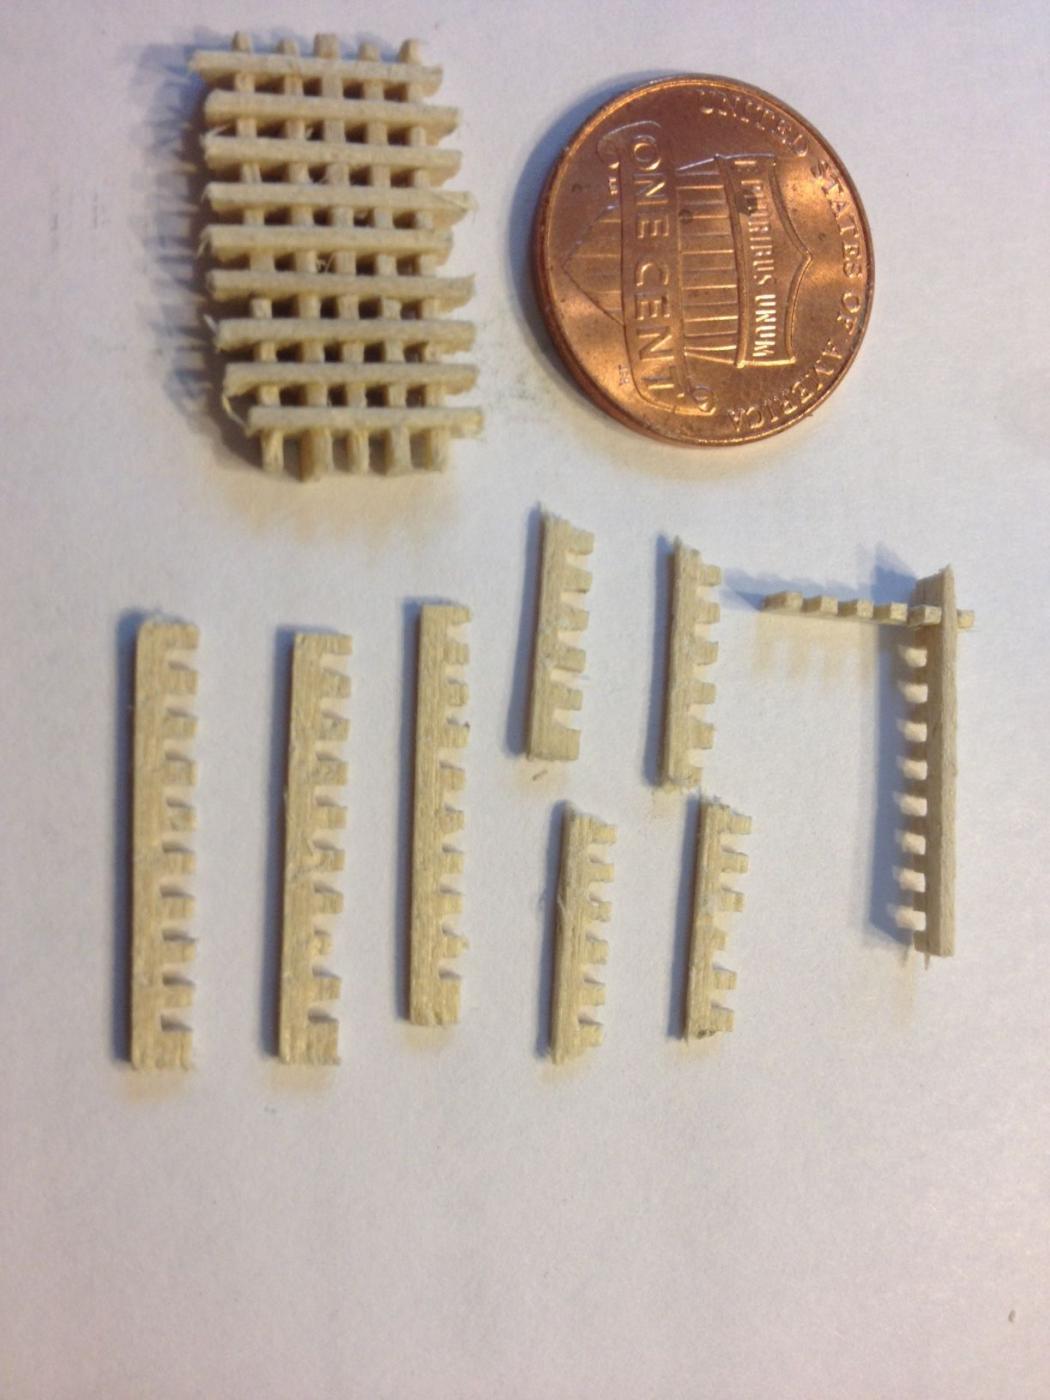
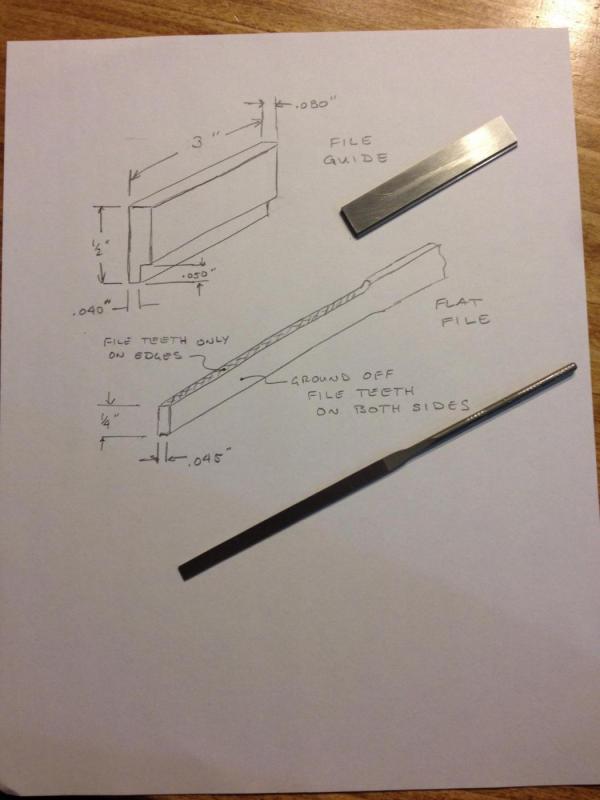
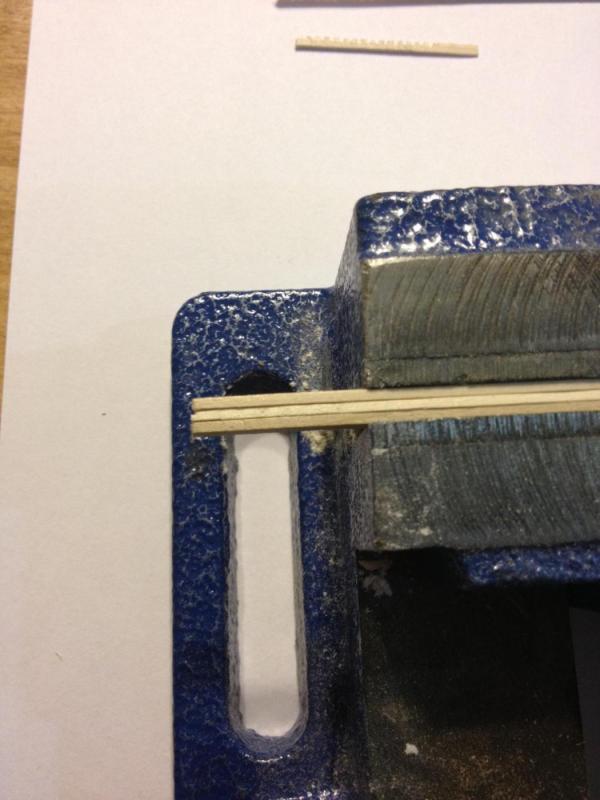
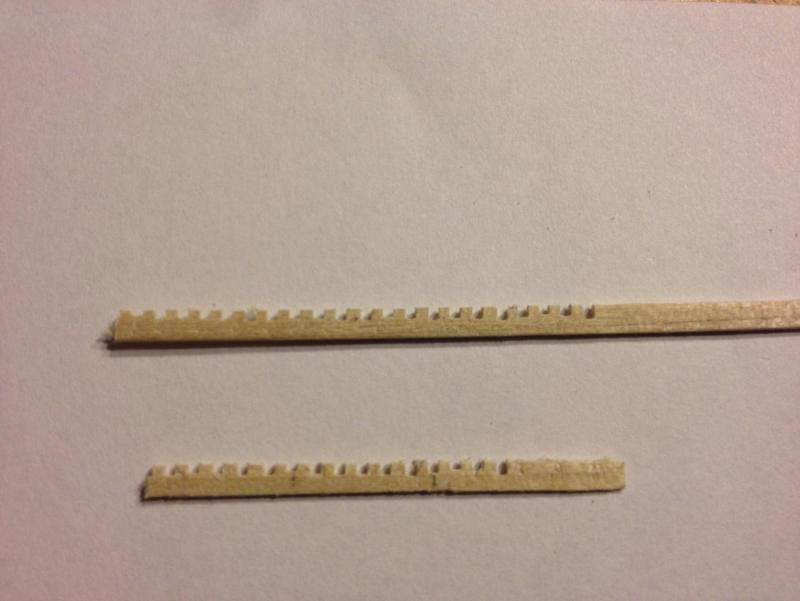
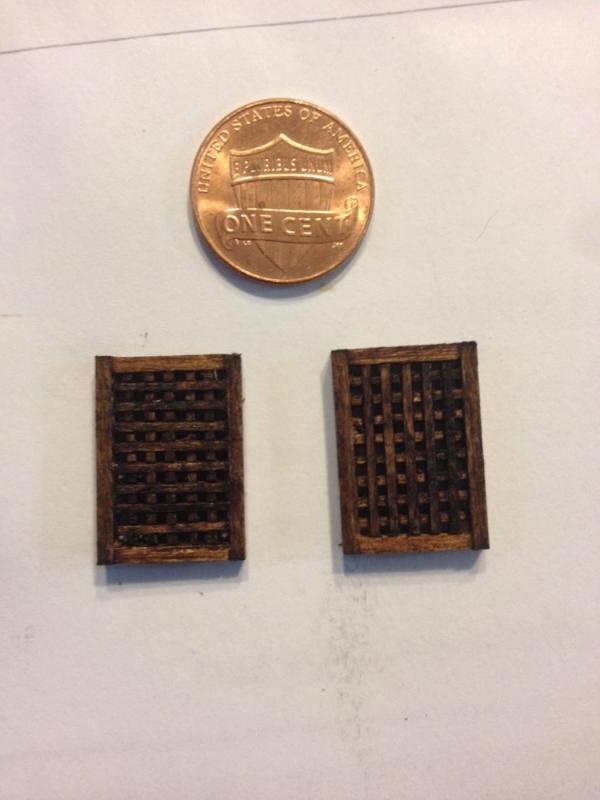
Hi Bluto, don't want you sitting around waiting so here is the jig I came up with to make grates. It is really simple and works pretty well. It consists of a slightly modified file and a flat piece of steel with a small step cut into it. Now I have to admit that being a tool designer and having access to a full tool room helps. Here is a sketch and pic of the two pieces. The step width (.040") should be the same width as the thickness of the wood being used for the grate. The overall width (.080") give me the even spacing (hole size of 040"). The height of the step (.050) is 1/2 the width of the wood. In my case the grating wood was .040" thick by .100 wide. Actually the depth of the filed slot should be more than 1/2 the wood width so the slats fit all the way down without any fuss. These can be adjusted to fit the size of grating you are making. Next step is to clamp 3 or 4 pieces together in a small vise making sure the ends are all flush. It will be easier to hold the guide square if several pieces of wood are clamped together to give the guide more surface to but up against. Finally, place the file guide on top of the wood so the step is sitting on the edge of the wood. Place the file against the guide and file down a slot 1/2 way. Naturally it is important to hold the guide relative firm and square to the wood. Move the guide so the step sit in the slot you just filed and file another slot 1/2 the depth of the wood. Continue on until you have to move the wood in the vise. After moving the wood, carefully line up the last slot so the guide fits into it and continue. This is what you should end up with. When working with very small spacings, if a "tooth" breaks out the piece is still good. It just needs to be used on the top of the grate so the tooth faces downward so nobody sees it. After assembling the filed slats that were cut to size and sanded square, put a frame around them with a little wood glue and voila... scaled grates. Happy grating! Tom


-
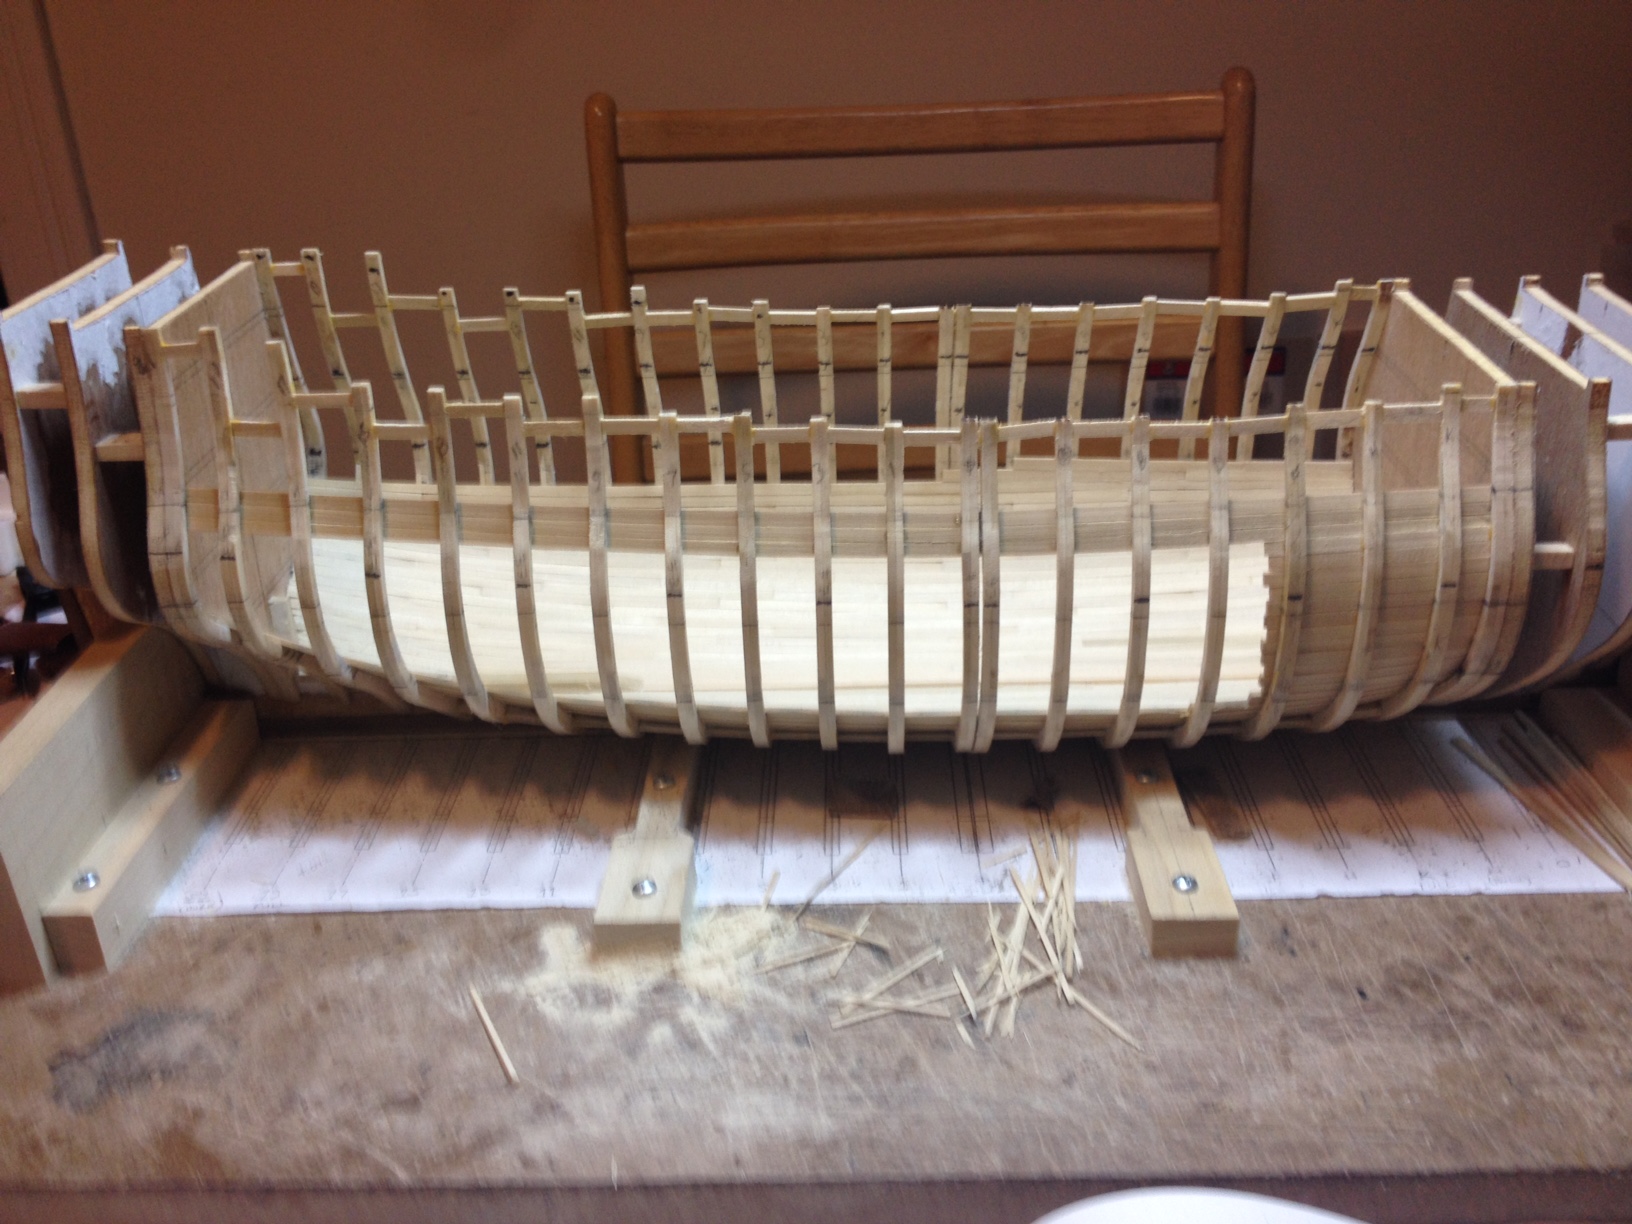
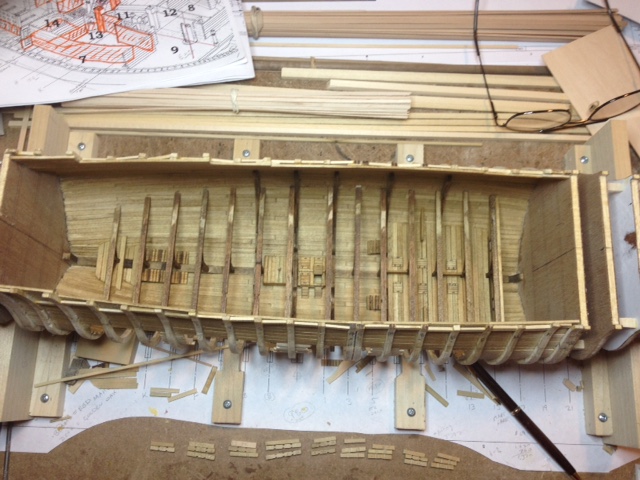
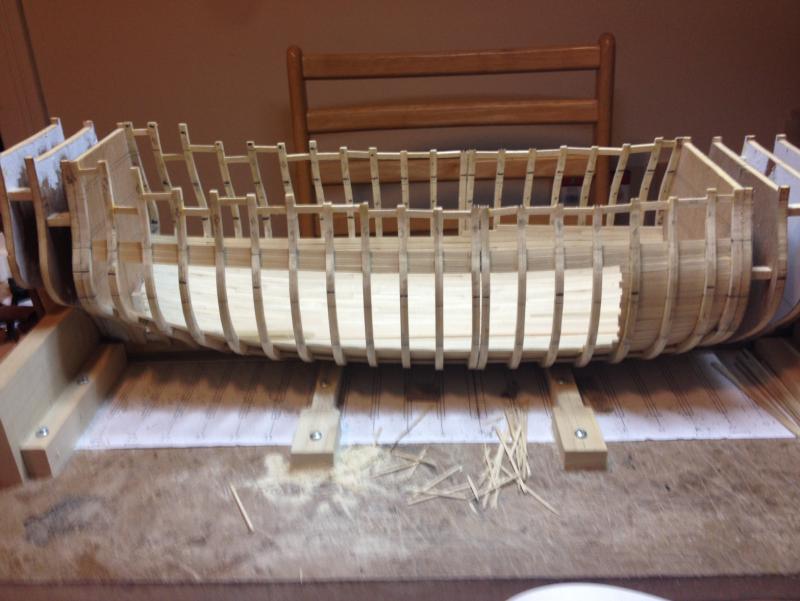
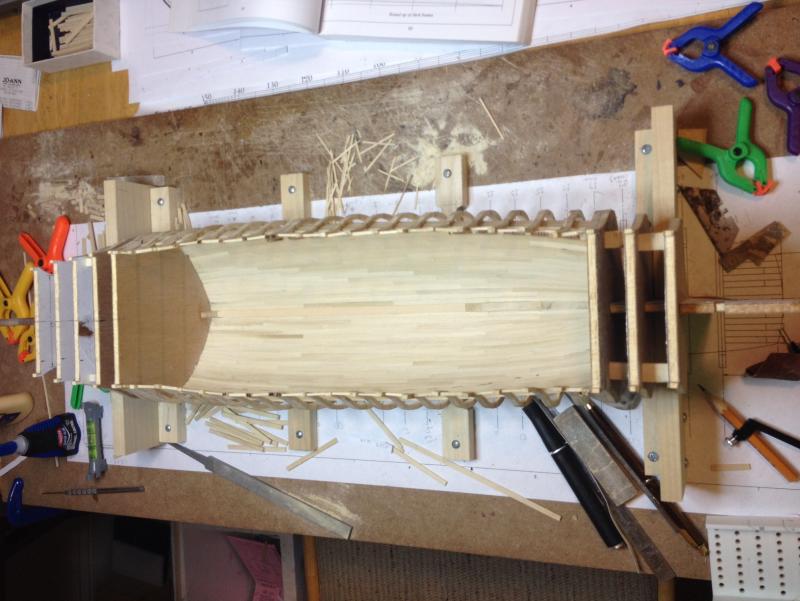
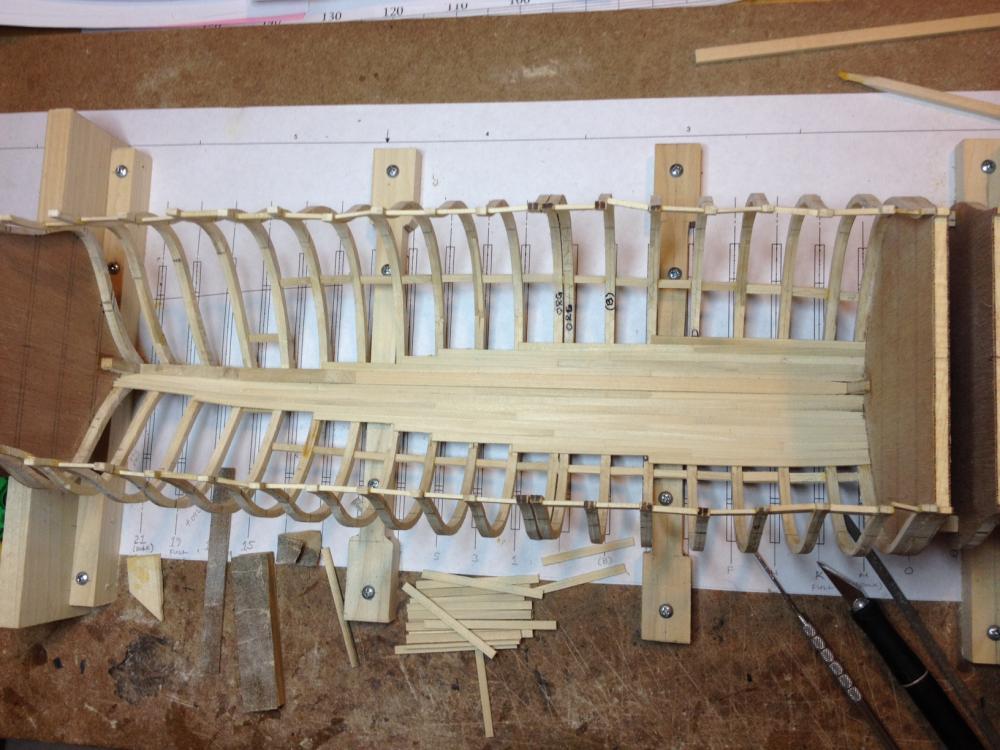
Hello all, I have been a bit lax posting log build pics. Fall weather here has been beautiful so the ship yard has been relatively quite. I did make some progress however. I managed to fare the frames and bulkheads so they are ready for planking. I cut about half of my planking strips from my Swiss pear sheets I bought from Crown. Very happy with the quality of the wood. I made some filler blocks for the stern area so I have a solid base to build upon. I also built and installed the orlop deck beams since you will be able to see some of the hold area through the cutout. It also made for a nice stable base to put the deck on. I am planning to use a 1/32" thick sheet of basswood and covering it with maple strips. Finally, I tried my hand at making grating that is the correct scale. After some fiddling and creative jig making I was able to make these. The holes are about .040" square. Thanks for following, Tom


-
Jason, That is some of the cleanest work I have ever seen. Really a top notch job. Tom
-
Jim, Fantastic work on the hammock cranes and netting. And as an added bonus you won't have to worry about vampires with all that garlic. Tom
-
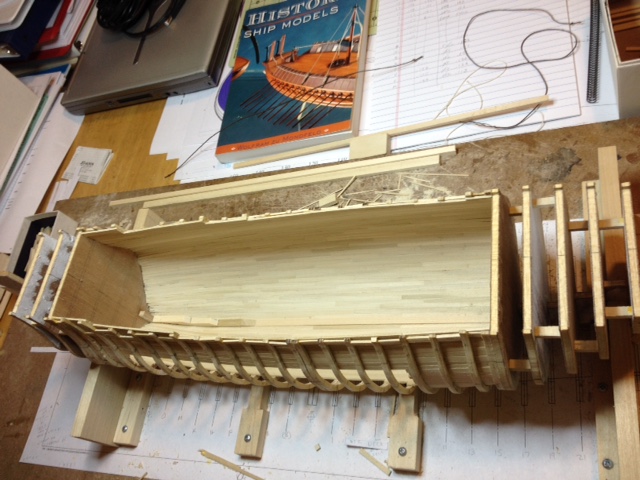
Hello all, Thanks for the comments and likes. So I finished planking the inner side of the hull. I know all of it will not be seen in the cut away view but it seemed much easier just to plank the whole thing than try to figure out what will actually be seen after some of the interior walls are put up. I still need to stain the planking and keelson. Next I will find the positions of the decks and start making beams and supports for the orlop deck. I will also need to make a quick cannon carriage for the 12 & 24 pounders to verify the decks are at the right height with regards to the gun ports. Need to measure twice... no probably 3 or 4 times before cutting holes and gluing anything. Messing this part up means I have been making kindling for the fireplace all this time. Here is the side view of the cutaway. I am planning on removing the frames in the cutout. You will see them between the inner and outer hull. I am going to design the cut out so one can see parts of the framing construction. The outer plank hole will be slightly larger to allow this. I will add 2 simulated frames between the existing ones to give the effect of actual full framing. I have lots of ideas, I just need to figure out how to pull the whole thing off. But that is part of the fun. And the top view Tom
-
Jim, As the saying goes, (at least here in the US), "There is more than one way to skin a cat." I am not sure why anyone would want to skin a cat but you get the idea. Problem solving and being able to come up with a multitude of solutions is part of what makes this hobby fun. The results you are getting look good. Keep on going and keep the pics coming. Tom
-
Jim, First time or not those came out pretty good. I think the opposing ladies look great. Make sure you are happy though otherwise every time you look at the model that is all you will see are the things you are not happy with. Nobody else may see them but they will drive you nuts. If they weren't too much trouble (I don't know, I haven't tried yet) make a couple more and chose the ones you like the best. As for carvings in the "other league", it is something to strive for. Right now I am playing in the recreation league not the pro-league and I am perfectly content if it stays that way. I too am dreading the point when I have to make my first attempt at these carvings. I am also going to take the same approach as you with regards to using a modelling clay and then paint the hardened finish product. I found through some threads on this board that a product called "Sculpey" is popular. It does not harden until you put it in an oven and bake it. I will give it a try. What is the worst that could happen, I don't like the way they came out and I end up making a second... or third.. or fourth... you get the idea. I am thinking if I can only make them look good from several meters away, I will just set up those velvet ropes around the display so people can't get that close!. Tom
-
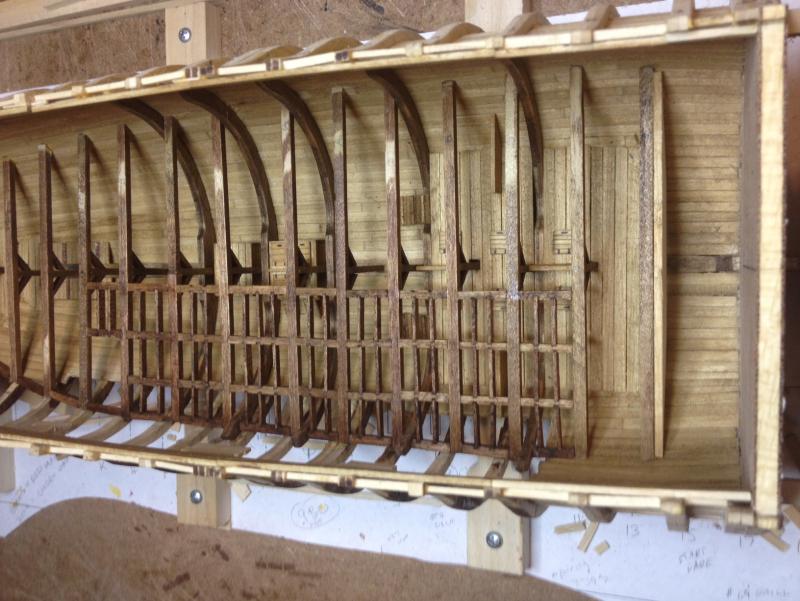
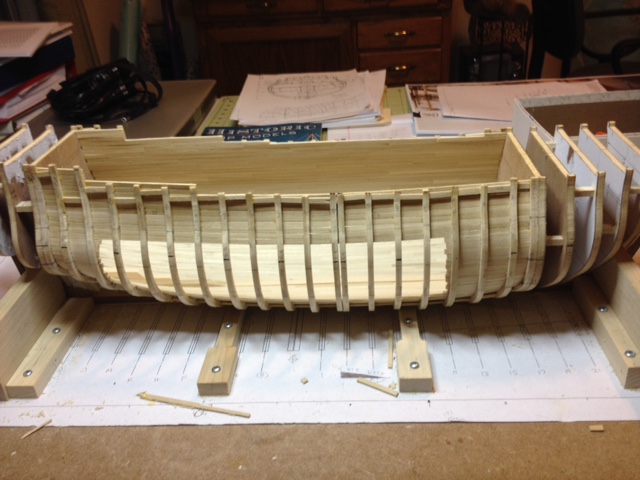
Hi all, I made some more progress on the inner hull planking. I am planking the areas that I believe will be visible when looking through the cut-away in the hull. Actually I probably planked more than I needed to but I will not be able to go back later if I missed an area. I am making up a lot of this as I go along. The cut-away is starting to take shape. I will most likely end up planking the entire opposite side in the middle third of the ship. I am thinking this is the area where you might be able to see if some of the interior walls do not block it. Again, I will see as I go. I am thinking the inner planking will also help support the gun port linings when I get to that point. This will be a slow project as I spend a good deal of time staring at it and visualizing the next steps and what I want the final outcome to look like... but that is where the fun lies. Hold below the Orlop deck planking The outside view of the start of the cut-away of inner planking The inner view of the cut-away When all is said and done, the interior walls will block out the bulkhead faces to keep them from being visible. I plan on not planking the deck areas in front of the cut-away to one can see through the framework and down into the hold. Naturally, I will also need to remove the interior walls in those areas. All these ideas but now I need to make them happen! Tom
-
Hair Spray for Sails and Loose Sail Rigging
toms10 replied to mkmossop's topic in Masting, rigging and sails
To keep the bottom corners of the sails in the right position I tensioned the clew lines to curve the bottom corners of the sail to the correct position. Then I tied up the sheet lines with enough tension to keep the clew line taught. The sail still maintained a realistic curve at the bottom. To get the whole sail to have a billowing effect, I read that some put a wire inside the side hem of the sail and then bend it accordingly. Tom -
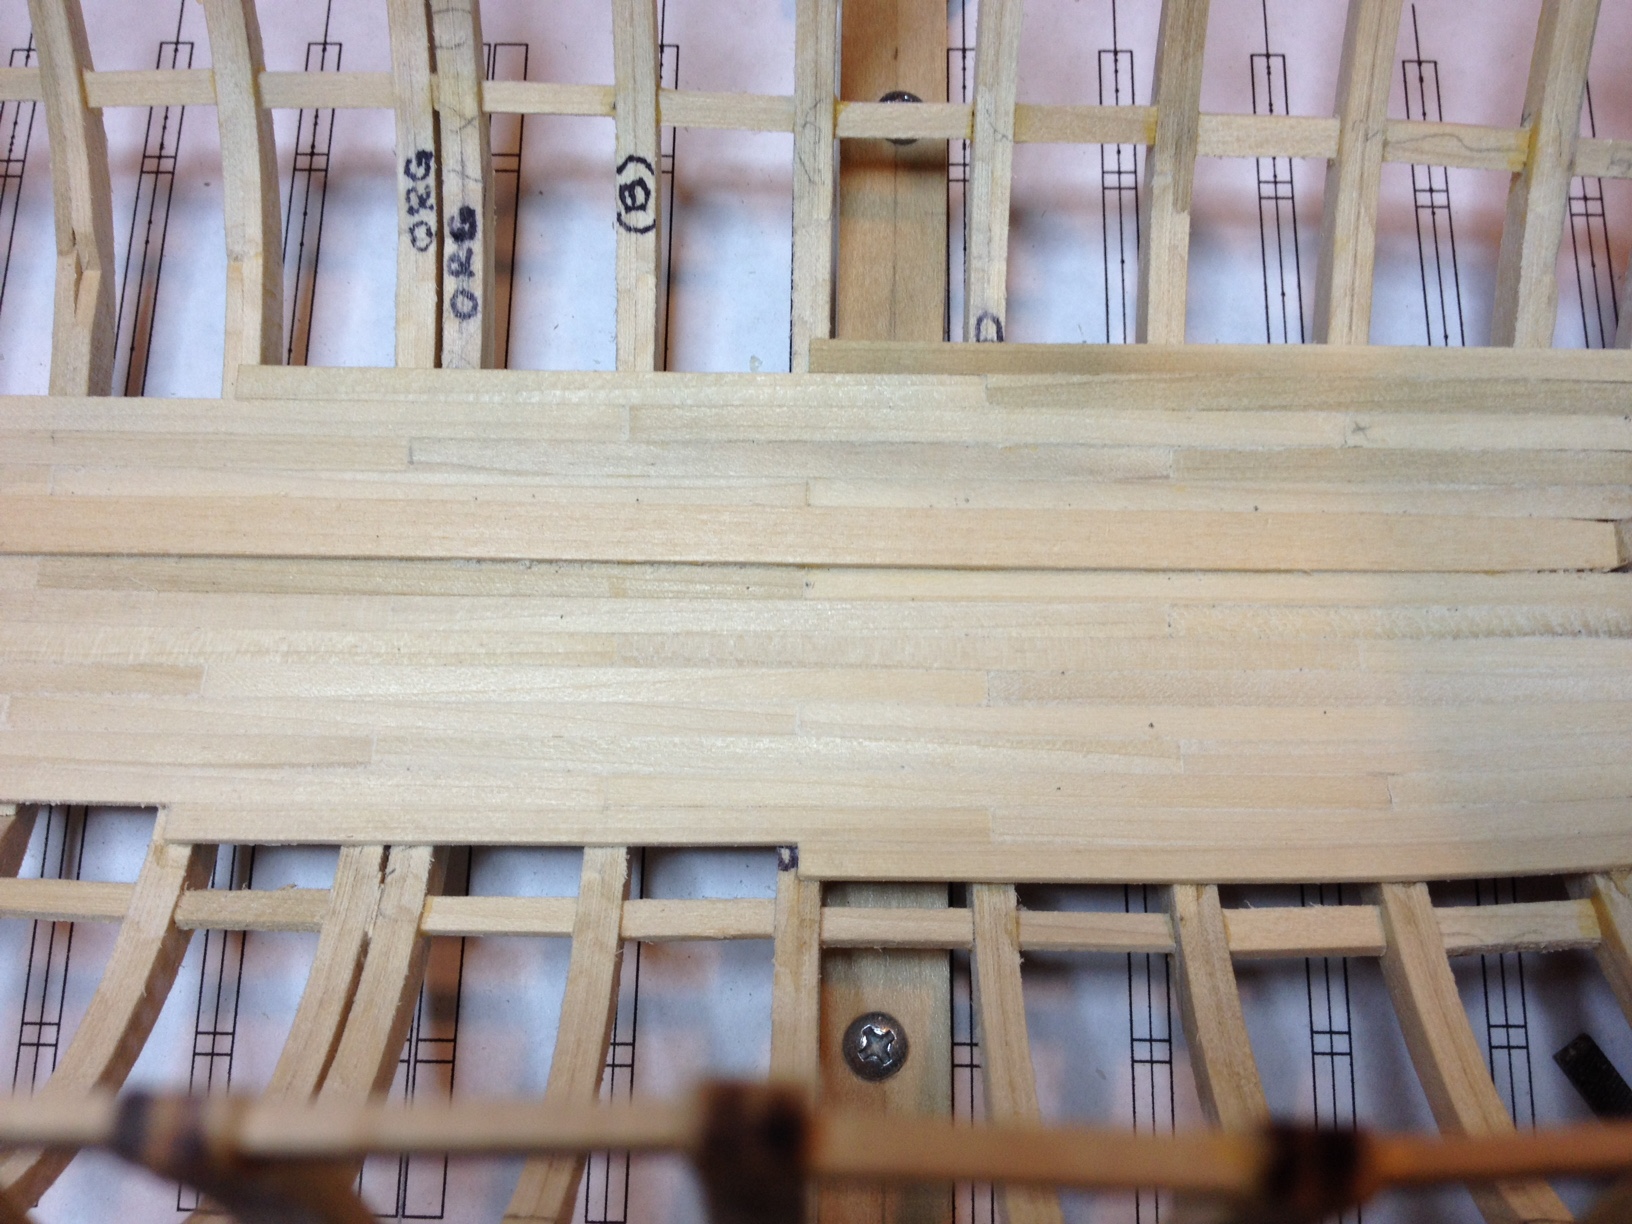
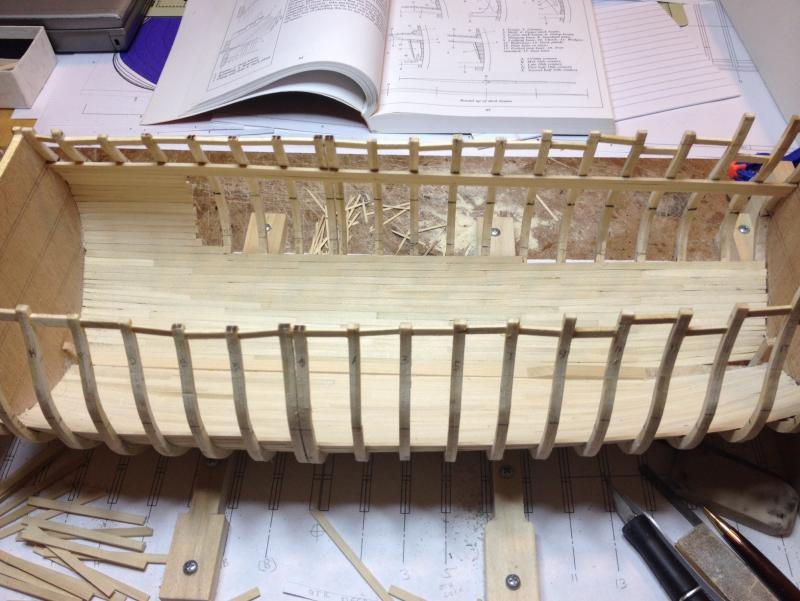
After spending 4 days in our nation's capitol to see the sights, I came back and started planking the inner hull in the areas that will or might be seen through the hull cut away. I made my own planks out of left over poplar from the display case I made for my Constellation. Progress is slow and tedious but I will get there. Faring the inside edges of the frames is much more difficult than faring the outside edges. That is what is taking some time. Tom

- 385 replies
-
- 10
-