


Cathead
-
Posts
3,558 -
Joined
-
Last visited
Content Type
Profiles
Forums
Gallery
Events
Posts posted by Cathead
-
-
6 hours ago, Keith Black said:
If possible I'd like to wait till Billy is finished?
NO! You have to do it NOW!
Of course I'd be happy to do it whenever you want.
")
- Canute, vvvjames, Keith Black and 3 others
-
 6
6
-
1 hour ago, Canute said:
It's good you included the junction in McBain. It will add operating interest for the east end of the layout. Possibly an engine servicing location or at least a water stop for the west bound steamers. How big will your east staging area be?
Yes, it definitely adds balance. In the other (west) direction there's the major yard and division point at Franklin, and without McBaine the mainline run would feel imbalanced in that direction. Not an engine servicing location with Franklin yard and its facilities just 20 miles to the west, but I'll definitely be including the water stop as a requirement in both directions.
In its final form, the layout is actually a closed loop, with the same double-ended staging yard serving both east and west. I'll probably be running 4-6 through trains each direction, but I only have room for a 4-5 track staging yard (one train length per track), so my plan from the beginning has been an active fiddle-style yard where the dispatcher/operator makes up and breaks down trains with the 'ol 0-5-0 (for those who don't know, that's model railroad slang for a hand). That also saves me considerable expense and time in not needing to own (and paint, detail, weather, maintain) as much rolling stock and locomotives since some of it can be reused during a session. I'll make the tradeoff with a few operators who might notice a repeated engine or car number for the much larger benefit of that space- and cost-efficient approach. Short-term, it'll be temporary stub-ended fiddle staging at either end with a reduced load of through trains until I add the full Franklin yard to handle them
48 minutes ago, Rik Thistle said:I had wondered why the buildings were built so close together in your earlier posts, but that is what they did, for some reason.
I also notice (in the 1903 pic) they seem to be built in distinct and quite far apart groups - I wonder why?
As to the first point, aren't most buildings in towns, whether North America or Europe, built close together? I assume it's just efficient land use. Why buy more land than you need or leave a random wide alley between buildings that doesn't serve a purpose? And whoever's laying out the lots makes more money by selling lots of narrow lots than a few wide ones.
As to why the McBaine buildings are clustered like that, here's my best theory. Unlike Rocheport, which dates back to the 1840s, this town pretty much was founded once the railroad came through around 1895. And like most such times, optimism was sky-high that it would become a center of commerce and growth. So there were likely many initial lots for sale, and certain folks bought and built on them, but others went unsold. And when that growth didn't materialize, the town was left with unsold, unbuilt lots leaving a patchwork effect.
And here's one theory for the two main clusters, which I'm going to illustrate using a modern map of the setting, in which the street patterns still maintain their early form even though the town is essentially gone. There's a pre-existing road that comes down out of the hills and heads out across the floodplain toward the river, crossing the tracks at an angle at McBaine (now Rte K in the map below). The depot site is west of that road by a certain distance (near the trailhead in the map). All of the town, such as it was, was on the far side of the tracks from the depot. I know the site very well having been there many times and I can tell you that there's no difference in the ground itself there. It's all the same patch of floodplain.
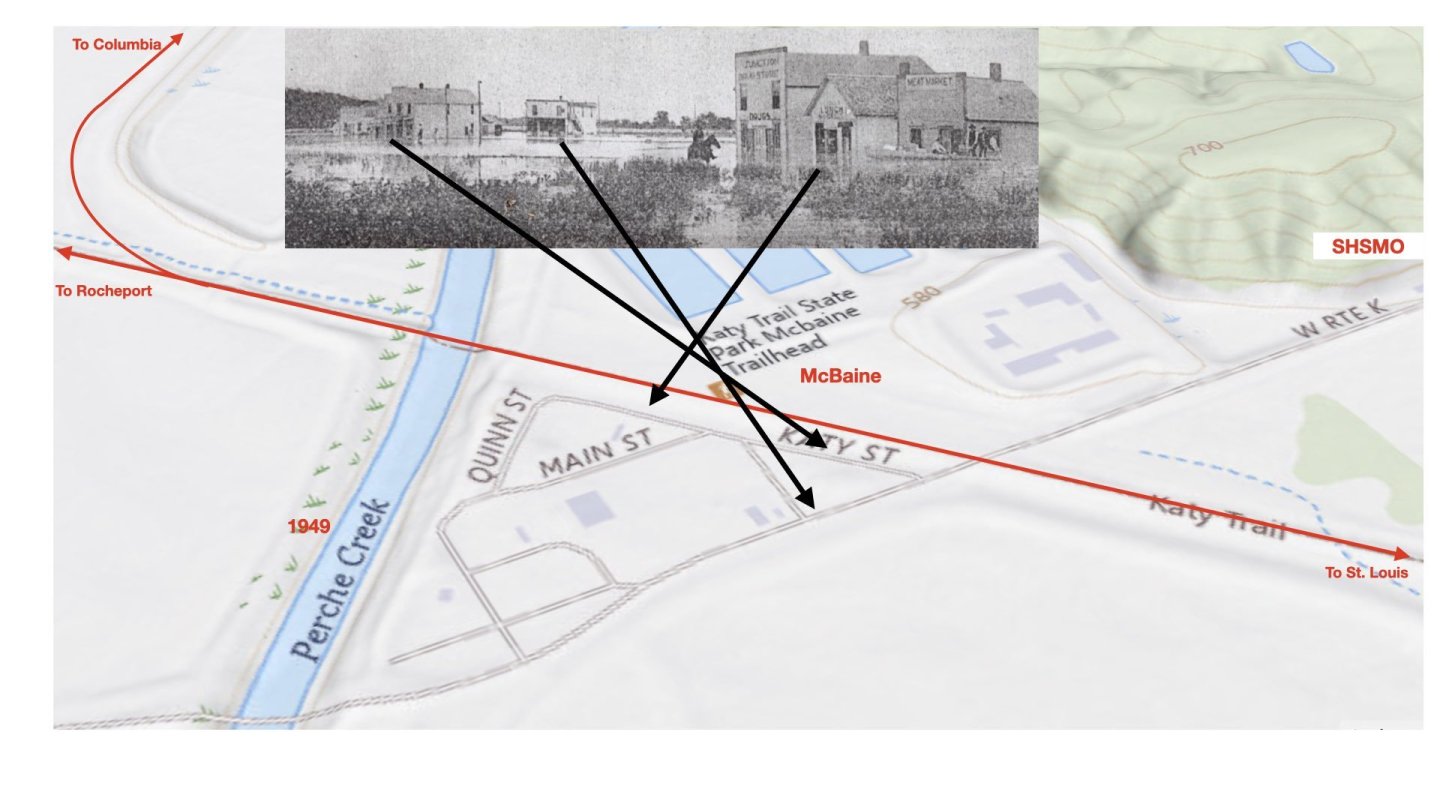
I'm convinced that the 1903 photo is taken on or near the tracks, near the depot, looking across into town. The near cluster of buildings is probably near or right across from the depot, a sensible place to build since it's near the center of railroad economic activity. Business districts often developed that way in American railroad towns. The far cluster of buildings is over by the main cross-country road, another sensible place to cluster. Both these clusters are oriented parallel to the railroad, along what's labeled as Katy St in the map above. This is also a very common layout in American towns that developed along a railroad line (again, different from Rocheport, which was well-established by the time the railroad came through). Yet notice the building on its own, between the clusters, at a different angle. I think that one's along the main road itself, hence the odd angle, another reason to suggest that the far cluster is near that road and the near one close to the depot.
And again, I think it's sensible to suggest that people bought early lots in the most strategic locations (near the depot and along the main road), but when growth didn't pan out, the other less ideal lots didn't fill in (at least not by 1903). There are plenty of examples of American towns like this.
Sadly, this pattern won't show up on the model layout, because this scene has to be very narrow. The modeled version will really only feature the tracks and the depot, with the fascia basically running right along Katy St and all these nice buildings in the aisle. I may add a small building or two along the main road near the crossing, just to hint at the town's presence. But since McBaine WAS much smaller, having the depot scene look a bit empty and isolated does help make a contrast with the more densely built and bustling Rocheport. It really was kind of a waypoint in the middle of nowhere, primarily a transfer point for passengers and freight going to and from Columbia, so it doesn't hurt for the layout to reflect that.
It's subtleties like this that will help the two scenes stand apart. Because in some ways, they're almost too similar. Both have a similar depot facing south, both have a very similar track layout, both have a very similar creek bridge on the west side of town, etc. What differentiates them is the subtle details, like the difference in development, the difference in local scenery (a rugged narrow valley at Rocheport, a much broader and gentler valley at McBaine), and the difference in operations (local switching at Rocheport, junction switching at McBaine). This is another reason I chose McBaine to be the one scene east of Rocheport. There are other small towns along the line in this general area, but they're actually more like Rocheport in being already-established river towns in narrower valleys, with more developed business districts, grain elevators along the railroad, etc. McBaine will actually feel more different despite its surficial similarities.
Man, that got long. Sorry to anyone bored by all the text!
-
OK, here's some more context for both McBaine and the layout plan in general. It's been quite a while since we covered this stuff, so let's step back.
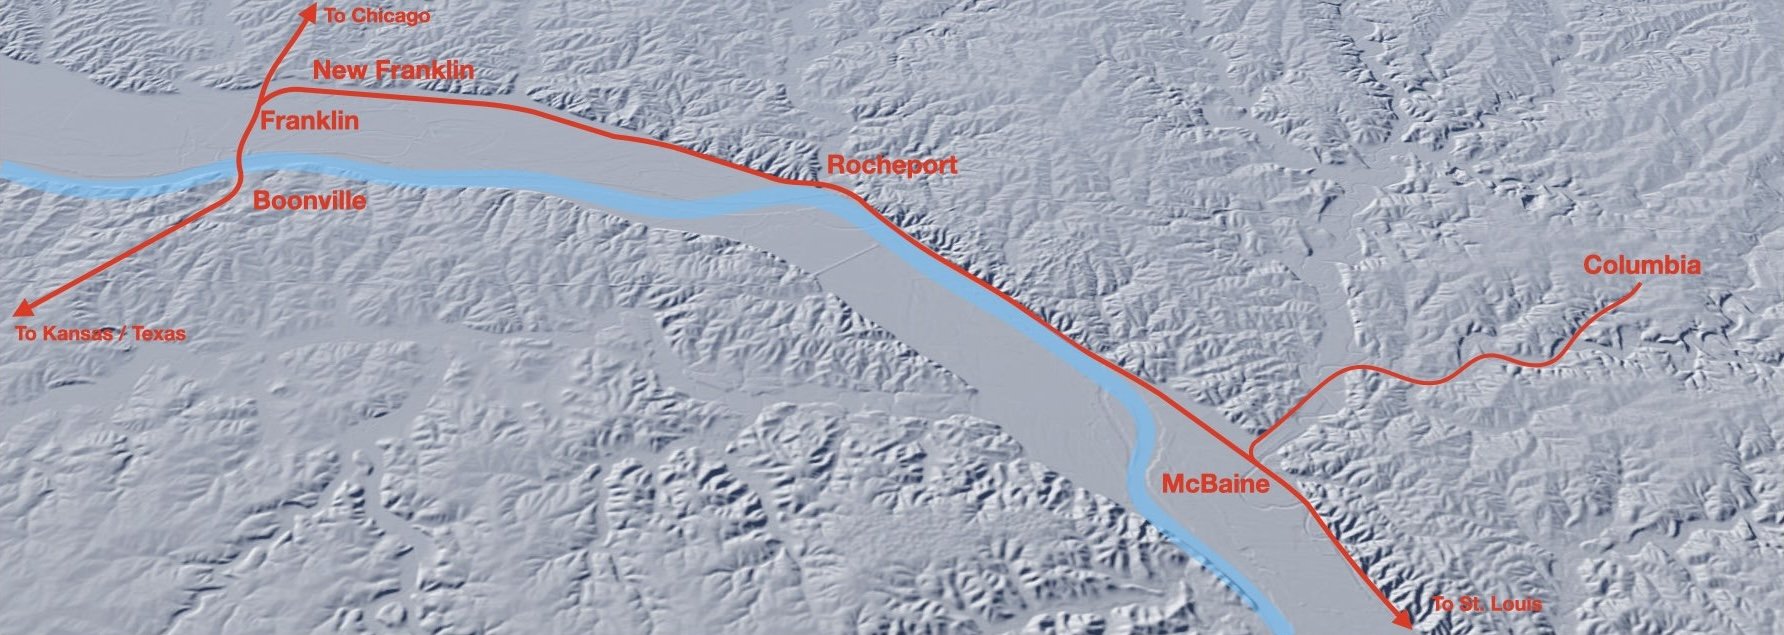
This map shows the entire geographic area covered by the planned layout at its full extent. The main line comes up from Texas, crosses the Missouri River at Boonville, then splits at Franklin. One line goes northeast to Chicago, the other heads east along the Missouri River valley toward St. Louis. I started building in Rocheport, but the full plan goes as far west as Boonville and as far east as McBaine.
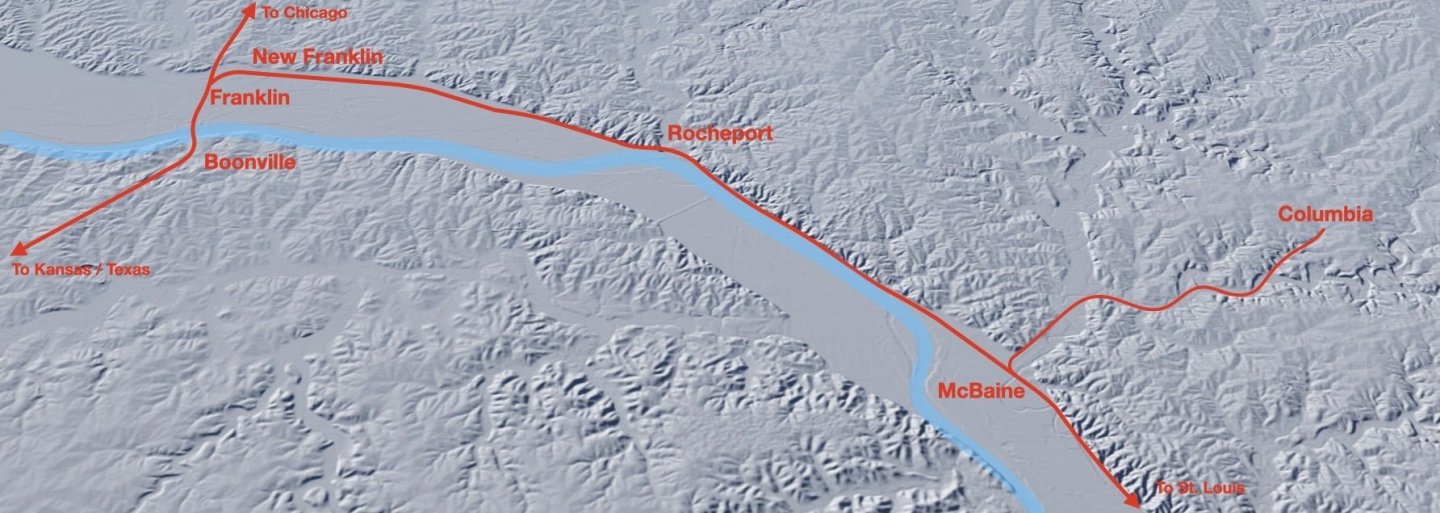
McBaine itself was a tiny town, never amounted to much. It was named Kennard in early timetables but was renamed McBaine after not too long, so that's what I'm using as that's the name everyone around here knows. Its primary value to the railroad was as the junction where a branch line left the river valley and climbed up a tributary valley to reach the much larger college town of Columbia (home of the state's primary land-grant university), which sat well back from the river on high ground. The Columbia branch generated a fair amount of passenger and freight traffic for the railroad (which had another branch line from the north but no through railroad service), meaning a lot of activity passing through McBaine. But McBaine itself was a flyspeck, just a handful of buildings. For a sense of scale in the map above, New Franklin is about 10 railroad miles from Rocheport, which is about 9 railroad miles from McBaine. Columbia is also about 9 railroad miles from McBaine.
Let's take a closer look:
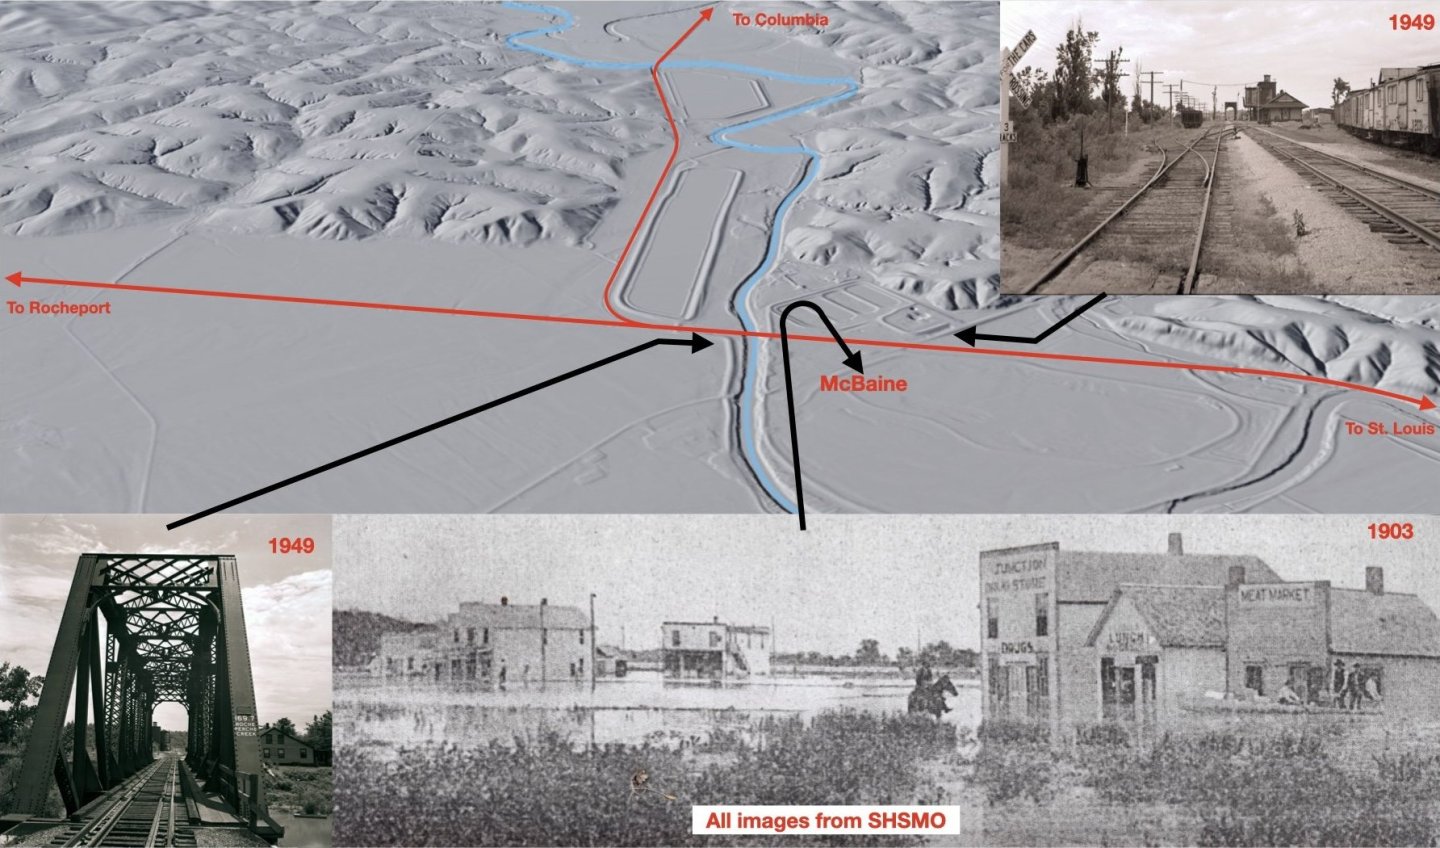
I haven't been able to turn up many old photos, which isn't surprising given the tiny town's obscurity. A rare one from my modeled period actually shows the town during the devastating flood of 1903, which did a lot of damage to the railroad, too. That shot is probably taken from the Katy tracks looking south, since what town there was sat south of the railroad and the tracks are elevated on a fill through this low-lying area. Also, thinking back to the discussion on how local businesses were named and labeled, notice the very plain large-text JUNCTION DRUG STORE, LUNCH, and MEAT MARKET adorning the nearest store. I'd forgotten about those details when we were discussing Rocheport buildings, but they support the simple labeling approach.
The other photos are from 1949. One looks east across the bridge over Perche Creek that still stands today just west of the town/depot site. The other shows the depot site looking west, showing a water tower and a couple sidings, with the bridge beyond. The town site would be off to the left (south) in this shot, off-camera. Even in 1949 you can see that there's not much going on. The only reason it has that nice depot is to accommodate passengers transferring to and from mainline passenger trains to the local connections up to Columbia. That water tower does have a fun connection: Clearly there's a good shallow aquifer there since not only did the railroad use this location as a locomotive watering stop, even today the river floodplain near McBaine is dotted with wells providing modern Columbia with its water supply.
If you're wondering about the weird patterns on the ground near McBaine in the modern landscape map, those are infrastructure for the Columbia sewage treatment plant. It's actually a very cool system that pre-filters and treats wastewater, then releases it to be used in managing a huge conservation area along the river that supported extensive wetlands and other habitat for migrating waterfowl. But it's not relevant to 1900 so ignore it! Those areas were just farms back then.
What you can see in the map above are the essentials. There's the bridge over Perche Creek, and just west of it, the junction to the Columbia branch heads off to the north. Just east of the bridge is the depot site. Also notice that, in contrast to Rocheport, the terrain here is a lot more subdued. The nearby bluffs are lower, and the railroad is cutting across a wider swath of bottomland rather than hugging what bluffs there are. That's because, both then and now, the Missouri River was/is on the far side of the valley here so the railroad could afford to take a straighter path across the bottoms where they widen out as Perche Creek comes in from the north. Refer back to the wider-scale map and you'll see what I mean. Go a couple miles in either direction out of McBaine and you're back to big bluffs over the rails, but here the scenery is actually locally quite mild.
So why model McBaine? It's a tiny town with no industries other than a local stockyard and some agricultural shipments, and it has no locally impressive scenery. There are two answers. One is that junction to the Columbia branch, which again generated extra rail traffic onto the main line. If I were just building this as a static diorama, I wouldn't bother, but from an operational point of view, including McBaine is worthwhile. Two, although the town is completely gone today, it's an important and well-known stop along the Katy Trail. Not only is the Katy's main cross-state line an active rail trail, as discussed before, the Columbia branch is now a ~9 mile connector trail that climbs up right into downtown Columbia along a very scenic route. The McBaine trailhead is a very busy and popular spot along the Katy Trail, and the Columbia connector trail gets a lot of bike and walking traffic. So it's very interesting to me, to bring this location back to life as a busy spot along the railroad. A third reason is that, east of Rocheport, there's no other town/stop for a long distance that would add anything unique to the layout. They're all small agricultural towns like Rocheport. I had room to extend the layout east for one more stop, and McBaine is more distinct and interesting for its context than any other option. So it got the nod.
I know that was kind of a brain dump, so let me know if that made sense or if I need to clarify something. Other details will be forthcoming as the project advances, like the actual track plan and how this fits into the layout's operating scheme.
-
13 hours ago, Keith Black said:
I didn't see expansion this early in the project but that just means more fun photos for us followers
Hopefully! In some ways it may seem redundant as we're about to go through the whole cycle of benchwork, scenery base, track laying, etc. again and you've all read that before already. And this scene isn't dramatically different from Rocheport, in fact it's less dramatic. But hopefully I can invoke enough of the real setting and history to keep it interesting.
1 hour ago, Canute said:having SWMBO urging you on is frosting on the cake. That's major.
She's excited. She enjoys operations and agrees that expansion increases the operating potential significantly. This takes the layout from a one-scene switching layout to a linear setting where trains actually travel between places and do their work. She's also as big a fan of the Katy Trail and the general river corridor as I am, so seeing more of it brought to life is also of great interest.
-
-
Big news! It's time for a significant pivot in focus. I started work on this project in mid-January 2025 by building the benchwork for Rocheport in my garage. I didn't start the build log until March, then went back and caught up with progress, but the first photo I took of any work was on January 14, almost exactly one year ago. Here's Rocheport just getting started:

My hope then was that it would take about a year to complete this scene, then I would be able to decide whether to proceed with expanding the layout or whether this was a nice standalone project. Well, the official decision (with Mrs. Cathead's hearty approval) is that we expand the layout.
So this weekend I got started on building benchwork for the next town to the east, McBaine. I'll need to write up various backstory/history/setting posts with photos and maps, but for now I'm just going to share the work in progress. This will be a narrower and simpler scene than Rocheport, in part because McBaine IS a simpler place (smaller town, no tunnel or bluffs, etc.) and partly because it's slated for a narrower space that limits how much I can build.
The entire scene measure 10' long and 12-18" wide. For comparison, Rocheport is 11' long and up to 24" wide. Here's the basic benchwork being framed out, again using cedar lumber that was harvested and milled here on our property:

And here I've been attaching risers to support the track and scenery base:

As before, I'm working on the floor of my garage as that's a nice smooth level setting to be sure the framing is square and straight. Also, it's too cold to work outside other than doing the sawing out there to keep internal dust down.
And here's the track/scenery base screwed down to the risers. If you remember (or go back and read about) how and why I built Rocheport this way, it'll be very familiar, so I'm not going to repeat a lot of details here.

I realize that without context, you can't quite tell what's going on here. I hope to write up more of that stuff soon. But I'm pretty excited to get started on this, and just had to share.
As for one obvious question, this doesn't mean I stop working on Rocheport entirely, but I am going to pivot my focus for a while. I'm a bit burned out on scenery and buildings, and it feels good to shift back to doing benchwork and track for a while. You may recall, that's one of the reasons I designed this larger project to be modular and built in stages, rather than spending a year just building benchwork and track, then a year just doing scenery, and so on. Doing this in stages has let me shift my focus often enough to keep the work fresh, and it's really showing in my enthusiasm to get this scene going.
So hopefully this new stage keeps your interest too, you've all been very patient through lots of buildings! Thanks for reading and for the support that adds significant value to this long project.
- kurtvd19, _SalD_, Keith Black and 11 others
-
 14
14
-
-
-
-
Personally I think username is better, as that's what's displayed at the top of every post, so that way readers easily know who you're talking to/about. But some MSW users have objected to not knowing a person's real name, so some of us put that in our signatures for those who care. It's less of an issue for those whose usernames overlap with their real name.
Another benefit of usernames is that you can put an @ symbol in front of them, and the system will recognize that's who you referring to and notify the user that you mentioned them. Like this, @Doug McKenzie.
I think you'll enjoy the Bates book! I promise I don't get a commission for these recommendations.
- pmckenzie and Ryland Craze
-
2
-
I wonder if the octagonal arrangement improved visibility by providing a straight-out view at eight different angles? The more "normal" square pilot houses found on typical riverboats would certainly have some more obscured perspectives as you looked through the glass at various angles. This could have been beneficial on lake boats where there could be traffic or obstacles in any direction, unlike riverboats with their more linear paths.
- Jim Lad and Keith Black
-
2
-
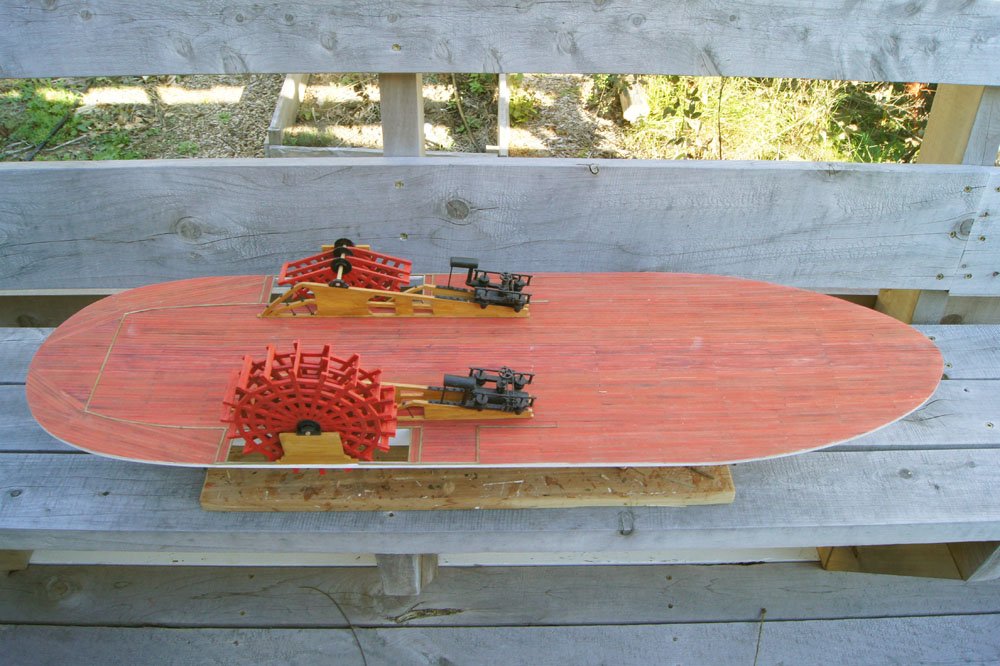
So far your terminology is loosely correct. The cylinder timbers certainly support the weight of the wheel, but the name doesn't quite come from the engines balancing out that weight. It's more that the engines needed to be mounted on very solid beams to absorb their motion and vibration without shaking the lightly built hull apart. In a sternwheeler, these could naturally be projected out to also support the wheel. In a sidewheeler, the cylinder timbers also supported the wheel but in a different way, while still serving their primary function as "shock absorbers" for the engines. See these photos from my Arabia build:
Happy to help with terminology as needed! Learning how things worked is one of the great joys of modeling, as far as I'm concerned. Riverboat jargon is a world unto its own. Wait until you learn that the boiler deck is the one ABOVE the boiler...
If you're really into learning this stuff, you might consider looking for a used copy of Alan Bates' Western River Steamboat Cyclopoedium. It's an excellent but accessible guide to the general construction and workings of these vessels, with an eye to model buildings and a fair amount of illustrations. He has a companion book that focuses specifically on the engines, but the one I list here is a broader reference for the general modeler.
Personally I wouldn't trust much that any AI says. In my experience, far too often when I see a result about something I have knowledge of, it's misleading or outright incorrect. At best it's useful for finding primary resources but it routinely misunderstands, misrepresents, or conflates information.
-
That's a really fiddly shape to work with and I can see why you've made a few tries. This one certainly looks like it's on the right path.
-
Very interesting start to this model so far, looking forward to your unique take on it.
- The Gimps Chimp and Tecko
-
2
-
-
Welcome! Looking forward to seeing your progress. If I wasn't deep in another project this would be at the top of my list.
-
Any further progress on this build?
-
Great start! And I absolutely agree that this is, by far, the most accurate riverboat model kit out there. Most of the rest are toys in comparison. I'm looking forward to following along and seeing how you make this your own. If you want some extra guidance and insights, @kurtvd19 offers a really nice extended guide to this model. I haven't built Chaperon but purchased this guide anyway as it's extremely useful even for other riverboat builds.
-
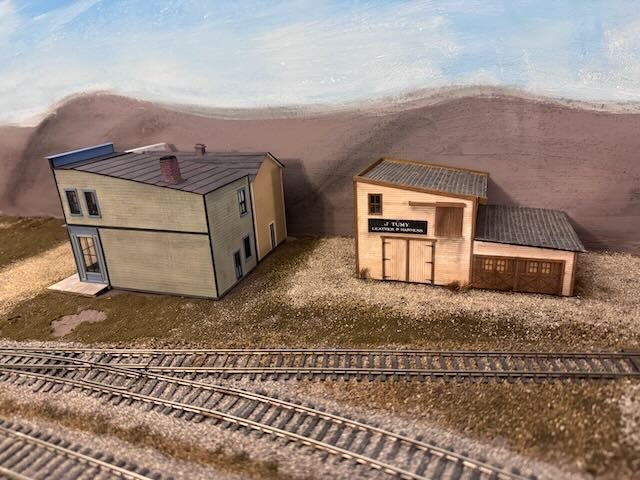
OK, here's this pair of buildings set loosely in place, with their wooden sidewalk. These aren't attached permanently and I haven't done any blending of scenery around them or the sidewalk, but this gives the visual context of their setting.
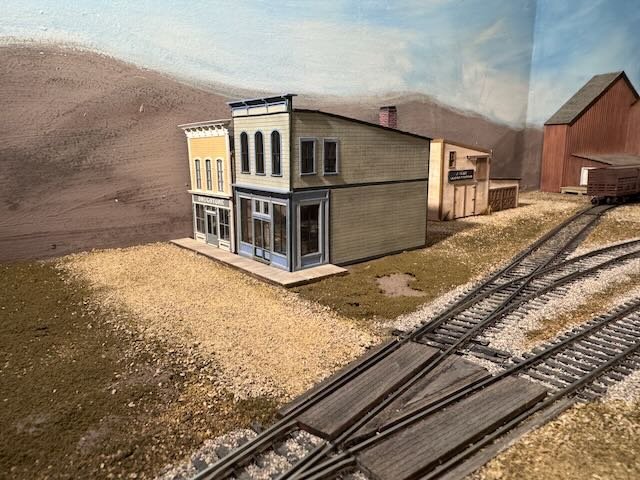
You can see how the drugstore building sort of hides behind the other one, but I want that other one in the foreground because of the larger windows. At least that's been my assumption. Two more views:
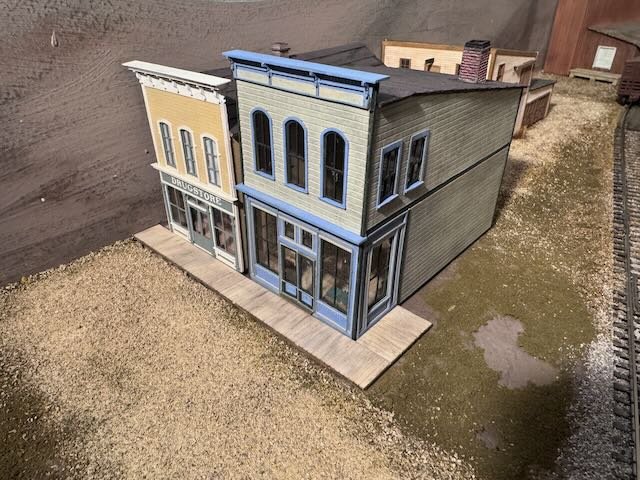
This shows how you can see enough of the interior to tell it's not an empty box:
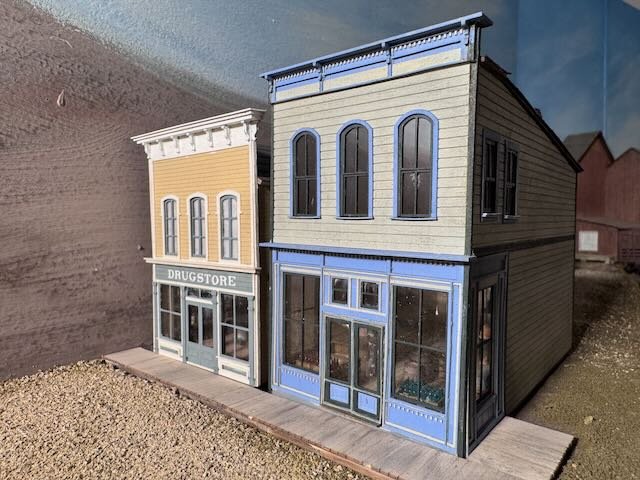
And a view from the back, with a nice alley:
-
Kudos for confronting that challenging question and coming up with a solution that's best for you. I agree that I really like the look of "dockyard" models and they have the advantages of display efficiency and easier viewing of deck details. Arguably they're also easier to keep clean (or to clean). I think you can be justifiably proud of this result and enjoy displaying it! Thanks for sharing the journey.
-
Kurt, good point. I meant the color palette used overall; no paints were directly mixed to create custom shades. I usually don't mix paints for that exact reason! Poor phrasing on my part and thanks for checking on it.
You're correct that I haven't kept a record of which paints were used on which buildings, though, and that's not a bad idea. That'll also be an issue on future sections of the layout, as I made several seat-of-the-pants, on-the-fly color mixes for things like scenery and backdrop, and did not keep records of what I did. So it'll be fun to try and recreate those closely in a new scene! At least in those cases there's no direct overlap so a subtle change won't matter, unlike touching up a specific spot on a model.
- Canute, Old Collingwood, robert952 and 3 others
-
6
-
On 1/7/2026 at 10:04 PM, Keith Black said:
The drugstore turned out great and the colors are perfect, Eric. 👍
Mrs. Cathead gets some credit here as I consulted with her when picking out those colors. She has a good eye for this sort of thing (also very good at flower arrangements) and is also a good reference for how a non-modeler sees a scene. We went through my paint collection in comparison with the other building (which I chose the palette for on my own) and she guided me toward that mix, which I hadn't initially considered. I agree I'm very pleased with it and am mildly disappointed that this is a semi-hidden background building (you'll see what I mean in a future post).
4 hours ago, Canute said:Like the fact you're including interiors from the start.
Only a handful, but it's a fun quirk. I'm glad I'm not doing all of them, and I'm happy with my decision not to light them (which would require more detailed and thorough interiors). It does make an interesting diversion for certain structures. The only one I think I regret not doing an interior for is the depot, and it's too late now as that was another "sealed box" kit. Maybe I'll do a depot interior for McBaine (the next town down the line).
2 hours ago, Rik Thistle said:That is a great pic.... it has scale, detail, good focus, clearly shows all the additions inside the room and a clean background. Good stuff.
Thank you! I've been trying to remind myself to pay more attention to photograph quality at least sometimes. That was taken against the corkboard backdrop of my workbench, which gives a nice neutral background that's well-lit. I think it worked well for the exterior photos, too. Thanks for noticing!
-
Nice job! It's neat to see this assembly coming together.
- robert952, Paul Le Wol, JacquesCousteau and 1 other
-
3
-
 1
1
-
Yes, that's very nicely done. Great combination of scavenging and skill!
- Keith Black, Paul Le Wol, Canute and 1 other
-
3
-
1


Missouri, Kansas, & Texas Railroad along the Missouri River by Cathead - 1/87 (HO) scale - model railroad with steamboat
in Non-ship/categorised builds
Posted
It's interesting you say that. I've never been to the UK, though I consume quite a bit of British literature and other media, and I've always gotten the impression that even small villages were quite densely constructed, especially along their high streets (main streets to Americans). Certainly small-town Germany is that way (I have family there), I'd argue more densely built than US towns and German ones go back many centuries earlier.
A great example of that in Missouri is Springfield (now the third-largest city). It was founded well before the Civil War and quickly became a major settlement with a vibrant downtown. Yet when the first railroad finally came through post Civil War, it chose a route several miles to the north along the outskirts of Springfield. Sure enough, a whole new business district sprang up along the tracks, and they actually had to implement "taxi" service to shuttle people between the depot district and the original downtown until the city finally grew to encompass it all. To this day, the railroad district to the north is a very distinct area of the city, with its own business buildings facing the still-active rail line (now a major and very busy yard and junction for BNSF), while the original downtown maintains its core status a few miles to the south.