


Cathead
-
Posts
3,550 -
Joined
-
Last visited
Content Type
Profiles
Forums
Gallery
Events
Everything posted by Cathead
-

SS Mariefred by captainbob - 1:96
Cathead replied to captainbob's topic in - Build logs for subjects built 1901 - Present Day
Thank you for sharing this news. I had been missing his updates on this model, and his presence in general, and now I know why. -
Roger and Cog capture my feelings on this. Digital is fine for light linear reading, especially fiction, but I cannot stand trying to work through a technical text of any kind (involving figures, illustrations, or the need to move back and forth in the text) in digital form. Plus I, too, spend a lot of work time on the computer and really don't like the additional eye strain of reading for pleasure on a screen. I have a Kindle, but only use it for reading when traveling. Any book or magazine I care about comes in print. And it's not just age, I'm under 40.
-
What a lovely achievement! The work is very crisp and manages to look both accurate and artistic. Thank you for sharing it with us.
- 144 replies
-
- 1
-

-
- surprise
- artesania latina
- (and 2 more)
-
She is looking absolutely gorgeous! Really hits the sweet spot with crisp work and coloring that is both clean and realistic. Apologies for my long absence from Arabia. A variety of life and work conflicts have been keeping me away from that project.
- 69 replies
-
- 1
-
-
- city of monroe
- steamboat
- (and 1 more)
-
Bill, I'm glad it was worth pointing out. Always feels awkward to do so, but it seems that most people would prefer the peanut gallery to ask questions and such.
-
Looks really good. Nice color balance and crisp-looking work. Well done, and thanks for sharing!
- 63 replies
-
- 2
-
-
- chaperon
- model shipways
- (and 1 more)
-
Thanks for the early tutorial in overcoming QC issues. I definitely like your marker stick. Keep up the good work!
-
Looks nice so far. I do have one question: the two gunports in the stern appear to be different widths. Is that intentional, or an optical illusion?
-
I use either a piece of plywood or foam core board. Both are easy to move around and plans can be taped or clipped to them. I lean the plans against the wall behind my desk or place them on the floor, depending on how I'm using them. I'm very cramped for space and this works fine. If I had more space, I like Kurt's approach.
-
Those really are glorious. You hit the perfect combination of detail, weathering, and simplicity.
-
I'm just catching up with you here, and those are some great photos you've shared in the past few posts. I really liked the one laying out all the different blocks: daunting but fascinating. And your explanation of the topmast's shape and fitting was really interesting and educational. Thanks.
- 101 replies
-
- 2
-
-
- L Toile
- Billing Boats
- (and 1 more)
-
The "like" button
Cathead replied to kscadman's topic in Using the MSW forum - **NO MODELING CONTENT IN THIS SUB-FORUM**
I think the unfortunate reality is that this forum has far more questions and topics than everyone can keep up with, especially those with the knowledge to answer every question. Sometimes the person you need is busy; not everyone checks the forum every day or even every week, and it's easy to miss a given question or topic for a little while. There's a real tension between the immediate need of the modeller for an answer, and the delayed response time of other forum members who aren't necessarily on the same schedule. I certainly can't keep up with everything that's happening on here. I'm in central Missouri, a bit north of the river. -
Constitution vs. Guerriere: The contemporary British view.
Cathead replied to uss frolick's topic in Nautical/Naval History
Of course, when using such stats, one should also remember that such a large navy was also spread thin across the globe, performing myriad duties in service to Britain's worldwide empire. It's not like most of that huge navy was just sitting off the American seaboard waiting to pick on the little guys. Citing that without context is like comparing the entire US military to the Taliban or ISIS, rather than the actual ratios of forces and capabilities in-theatre. -
The "like" button
Cathead replied to kscadman's topic in Using the MSW forum - **NO MODELING CONTENT IN THIS SUB-FORUM**
I think it's hard to do unto others as we'd have them do unto us. It's hard for me not to see Likes as somehow lesser than a written comment, yet my personality really struggles with writing lots of generic "Looks nice" posts if I don't have something specific to say, and so I work hard to remind myself that a Like is a completely legitimate response. Also, sometimes nobody knows the answer to your question. I know I've felt bad about not responding to a question in a build log before, but if I don't feel I can add anything helpful, it doesn't feel right to take up space saying "Beats me". Finally, I struggle to decide where the line between constructive criticism and nitpicking is. We all have different standards for "good enough" and photos can often be very unforgiving, so I don't know how or when to point something that looks wrong to me but the builder might be fine with. I'm also not such a good builder that I'm always comfortable attempting to critique others' work, and I'm sure I'm not alone in that regard. It's a difficult situation to parse. This also goes back to the tension between the two roles of build logs: as a live community experience of a model's progress, and as an archive of the work that was done. In the former role, lots of comments are welcome and even psychologically beneficial. In the latter, lots of comments are a PITA, as anyone reading through a past log has to wade through lots of irrelevant content. The only other online forum I frequent (a baseball site) has the opposite problem: all comments are essentially live-streamed (they aren't numbered and tagged as at MSW), making it really easy and fun to interact with people but nearly impossible to find past content again. Neither approach is perfect.- 12 replies
-
- 14
-
-
Hey, Bob, thanks for the nice comments. Sorry for the slow reply but I just returned from vacation. You ask a very good question about the order of standing vs running rigging installation. I, too, had read the same advice as you, but obviously went the other way. I spent a bunch of time thinking through my workflow, particularly as I was adding sails, and I felt that the standing rigging would be in the way of rigging the sails properly. I even set up some "test" rigging to explore this, and kept feeling like the shrouds got in the way. Of course, things ended up getting in the way in my approach as well. So it may or may not have been the right way to do it, but I did very much appreciate being able to tie down all the running rigging on the belaying pins near the mast without having to work around and behind the shrouds. As for the kit, yeah, if you have it already and don't mind the challenge, might as well go for it. Obviously it can be completed into a reasonable finish, and I learned a lot from struggling through it. But I wouldn't purchase it again, there are too many better options.
- 96 replies
-
- 2
-
-
- topsail schooner
- revenue cutter
- (and 3 more)
-
Great job! I like the mix of precision and used look.
- 75 replies
-
- 4
-
-
- model shipways
- picket boat
- (and 1 more)
-
I'll be at a family memorial service near Vicksburg in August, and was hoping to swing by and visit Cairo then if I can find the time. If you still end up needing any additional photos then, I'd be happy to try. Your cylinder timbers look very nice.
-
I'm a latercomer, too, but want to see how it all ends! Looks great so far.
- 227 replies
-
- 1
-
-
- syren
- model shipways
- (and 1 more)
-
John, I just realized this log had been updated, and am so glad you found the pump portion of my Arabia design thread. Reading through the past material, I was starting to compose a reply in my head linking to and explaining my guess as to your mystery pump's function, only to find that you'd found that info already. This is a really neat build and one I'm looking forward to visiting when it's complete (I live in central Missouri).
-
Coincidentally, I've been reading up on the real Surprise and the fictional one. My impression is that all the model kits are based on the real one; no one seems to make a model of the Surprise as described by O'Brian and as rigged by Aubrey. As I understand it, the difference doesn't relate to whether the mainmast is taller than either the fore or mizzen masts; that's generally true regardless. The point is that, in the books, Aubrey added an even longer mainmast, meaning that collectively the entire mainmast assembly towered over the fore and mizzen, instead of being just a bit taller. To my eye, images of the AL kit look like the normal mast/rigging, not Aubrey's altered version.
- 144 replies
-
- 4
-
-
- surprise
- artesania latina
- (and 2 more)
-
If I understand your question correctly, you're asking why the ropes descend through the deck? Anchor cables weren't stored on the winch, there would be way too much cable to fit on there. The machinery is only used to help raise the cables and pass them down to their actual storage location, coiled in the hold.
-
I just discovered this build, and it's lovely. I can't wait to follow it through to completion. Your sails are quite nice.
- 144 replies
-
- 2
-
-
- surprise
- artesania latina
- (and 2 more)
-
Thanks, Gregory, though I have to say I wouldn't recommend this particular kit. HMS Pickle from Caldercraft or the Revenue Cutter from Bluejacket are similar craft and from much better manufacturers. But, hey, it's certainly possible to do a decent job with the Corel kit with patience and cursing, so have at it if you prefer and good luck! Start a log, there are very few completed builds for this kit and your experiences could help others, too.
- 96 replies
-
- 2
-
-
- topsail schooner
- revenue cutter
- (and 3 more)
-
I agree about the brightness, but the overall effect is still lovely. The window curtains are a nice touch.
- 69 replies
-
- 1
-
-
- city of monroe
- steamboat
- (and 1 more)
-
Steamboats and other rivercraft - general discussion
Cathead replied to Cathead's topic in Nautical/Naval History
I recently visited the Steamboat Arabia Museum in Kansas City, Missouri (USA) to take photographs and measurements for my next model project, the Missouri River steamboat Arabia. If you want to read about that project, I'm documenting my research and resources in this thread. However, I wanted to share this non-Arabia feature of the museum: I blew up the sign, but if you still can't read it, it says "World's Oldest Steam Engine known to exist that was made to propel a vessel powered only by steam. Built in Louisville, KY in 1818-1819 for the steamboat Missouri Packet. This was the first steamboat lost on the Missouri River, sinking near Arrow Rock, MO in May 1820." I thought this would be of interest to many of you. Arrow Rock is not far from my farm in central Missouri and is the site of a really lovely Missouri state historic site preserving an early river town.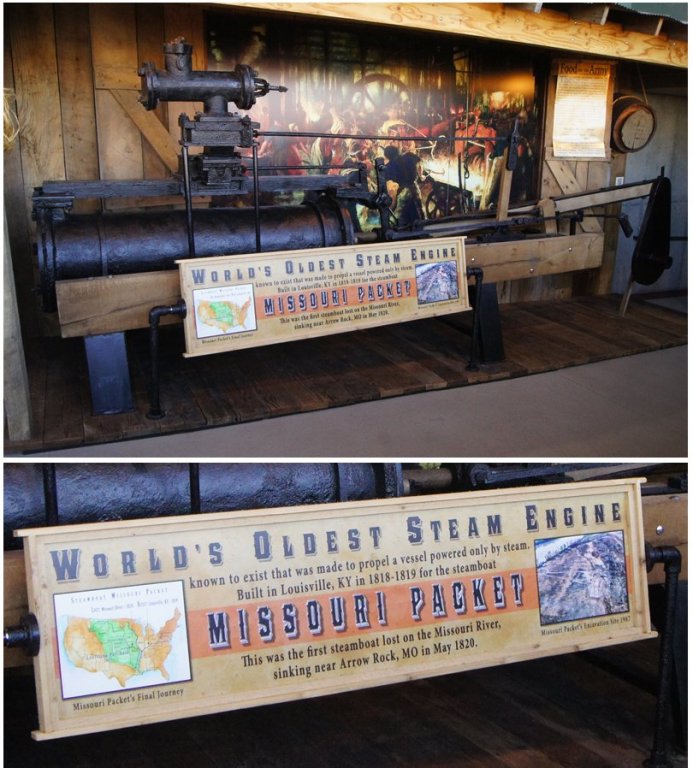
- 281 replies
-
- 4
-
-
- Steamboats
- riverboats
- (and 3 more)
