MORE HANDBOOKS ARE ON THEIR WAY! We will let you know when they get here.
×


thomaslambo
-
Posts
384 -
Joined
-
Last visited
Content Type
Profiles
Forums
Gallery
Events
Everything posted by thomaslambo
-
 Really nice details...where did you pick up the netting...the same place that you gave us the link to? Are you going to wait until the planking is done before gluing all the stuff in?
 -
How would you improve your Byrnes tools?
thomaslambo replied to Keith_W's topic in Modeling tools and Workshop Equipment
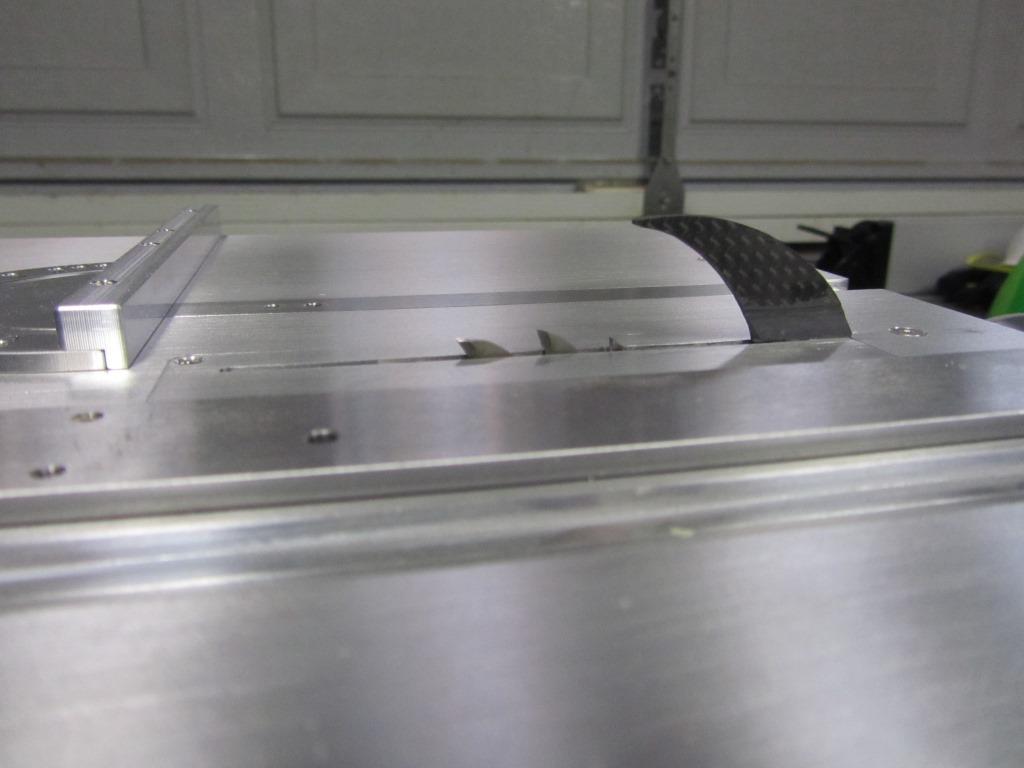
Thanks and same to you And if I wasn't in such a hurry (needed clean strips ASAP) I would have made the attachment removable by drilling two holes in the plate and taping the carbon fiber supports so I could screw it in using the same size/type screws that hold the plate down (much cleaner). I think a splitter might be worth Byrnes time to design and manufacture as an upgrade item? Well, off to the shop to build a nice extension table for the saw Gotta love high quality power tools -
How would you improve your Byrnes tools?
thomaslambo replied to Keith_W's topic in Modeling tools and Workshop Equipment
Well, after I got to planking the main deck (lots of custom width strips needed - same will be true for the hull)...I broke down and purchased a Byrnes Table Saw. After a half hour in the shop I quickly realized I needed a splitter on this baby (similar to others listed here...but using the stock plate). So, I knocked out a quick and dirty splitter from a piece of carbon fiber (CF) sheeting laying around in the shop. I cut the piece out on my saber saw and then used Epoxy to glue it to the plate on the under side (using two CF support pieces). Ten minutes of fine tuning on the width and it works perfectly for knocking out precision strips I've got another stock plate coming in the mail. By the way, I love this saw...incredible build quality and amazing accuracy with the stock miter (bought the extension arm) and rip fence. Well worth the extra cash. My thanks to Keith for starting this thread Here's a picture of the modification (I'm a big Shark fan in case you didn't notice)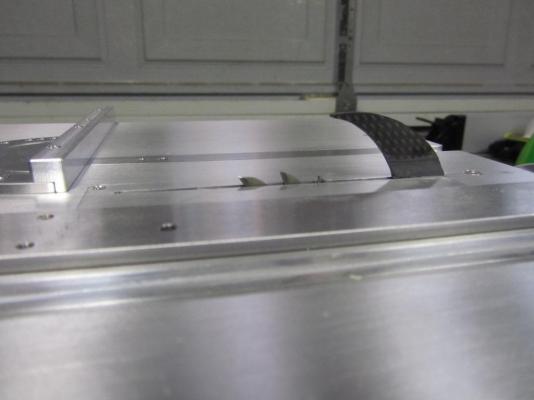
- 62 replies
-
- 12
-

-
Hi Tom, Simply beautiful work/details (love the craftsmanship on the head area and rails) Congrats on the two year mark....building these ships is a long voyage to be sure
- 1,348 replies
-
- 2
-
-
- constitution
- model shipways
- (and 1 more)
-
The crates are looking great...nice details Can you give us links for the mail and potato sacks?
-
Congratulations on a great build...I'll be looking forward to your next voyage
- 212 replies
-
- 3
-
-
- constellation
- artesania latina
- (and 2 more)
-
Thanks for the Kudos John I really appreciate it
-
Hi Peter, I'm a Cutty Sark fan so I'll pull up a chair and look forward to following the build
-
Wow, such high praise I so much appreciate Thanks to Robert, Steve, Tom, GG, Harry, Antony, Bob, and Matt for all your very kind words and taking the time to continue to follow my build log. And thanks to everyone else that hit the like button These kind of comments keep us builders motivated to continue on...and I must say this particular work on the main deck tried my patience to it's limits Steve and Matt, you guys and your mind boggling detail continue to inspire me Capt.Fisher, glad to see you joining my log as your work on the AL Bounty helped motivate me to build this kit...and I wondered why you stopped posting to your very impressive log Lawrence - I'm always happy to have a new ship mate...welcome aboard Cheers to everyone and thanks again for the encouragement
-
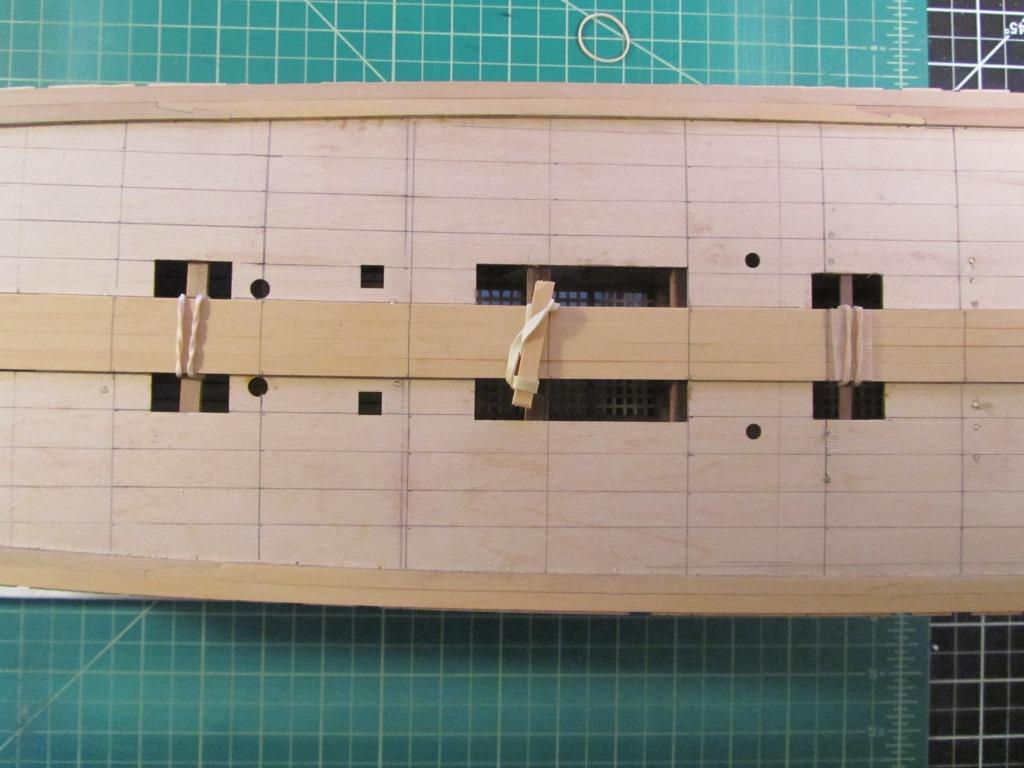
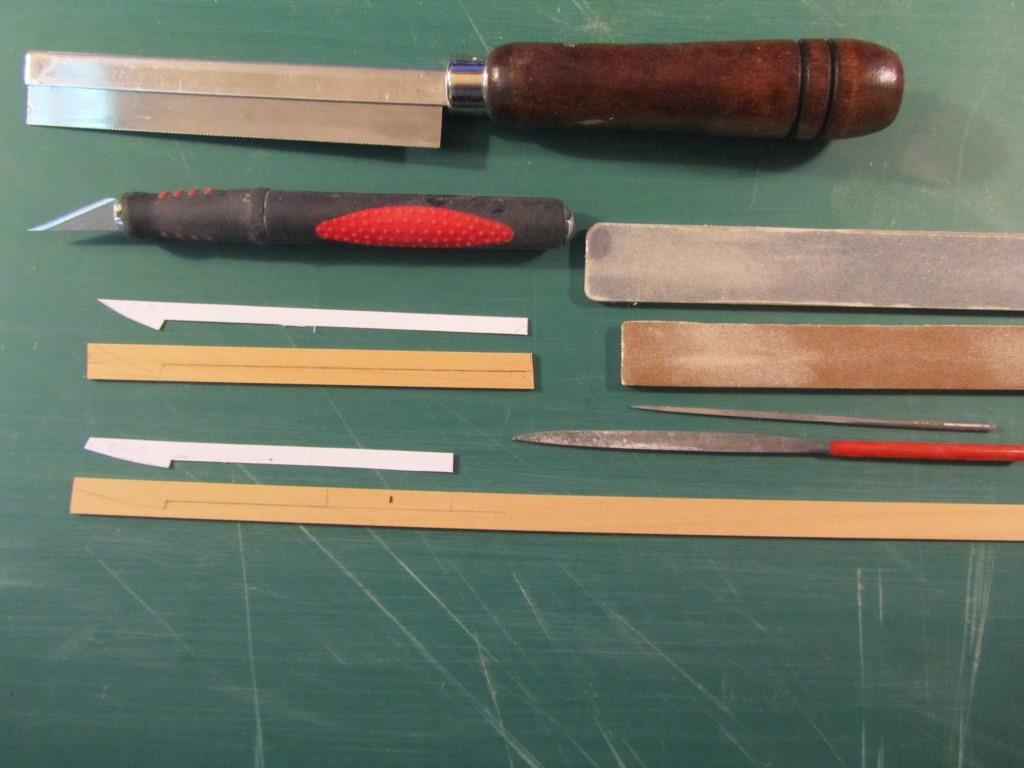
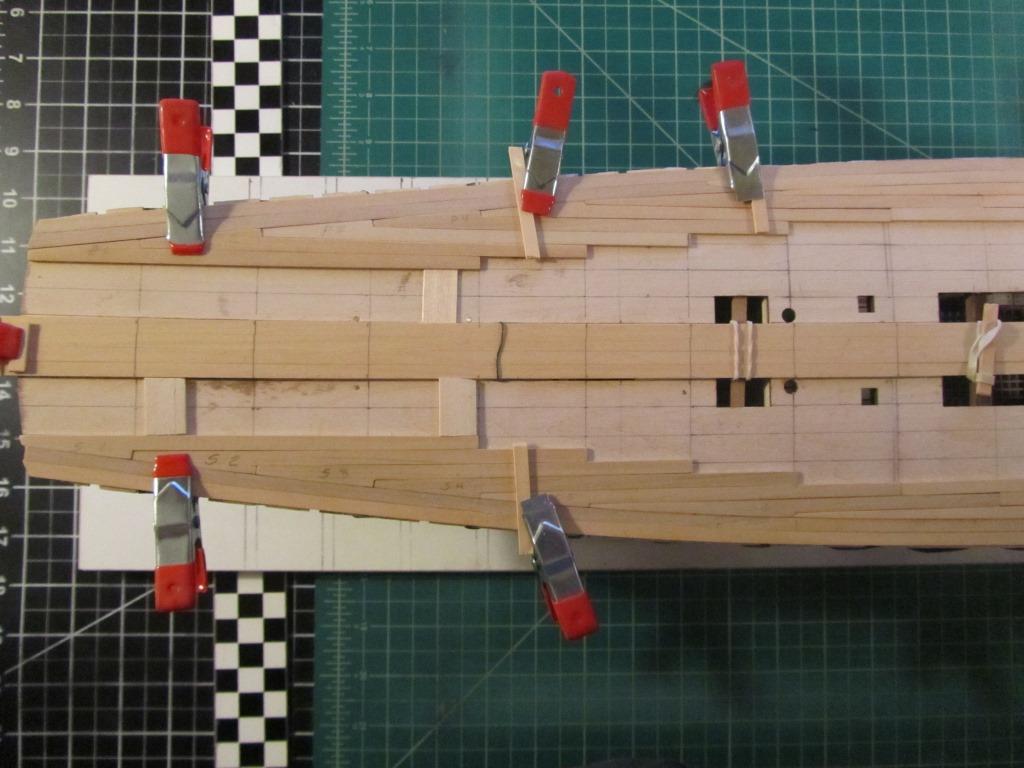
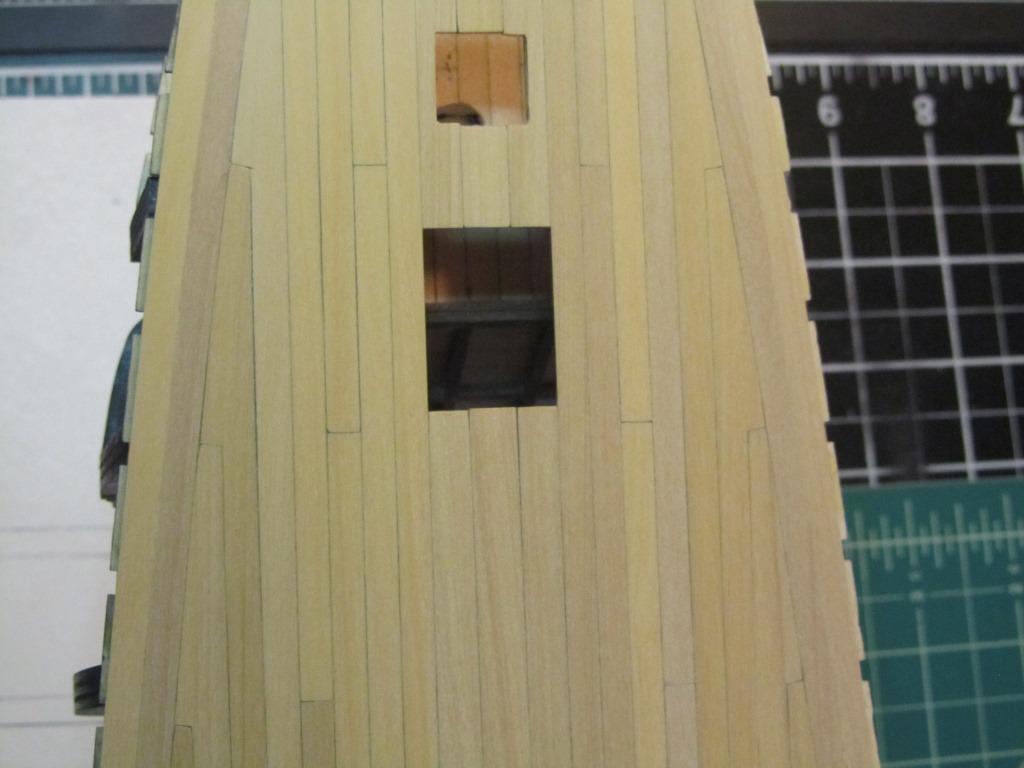
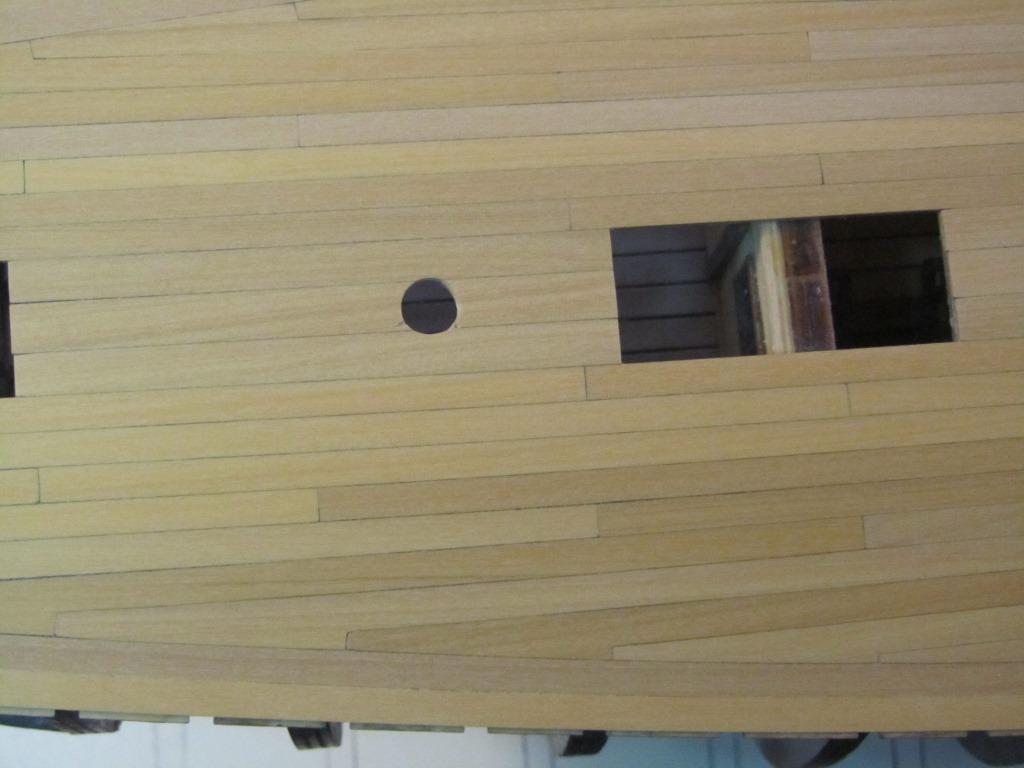
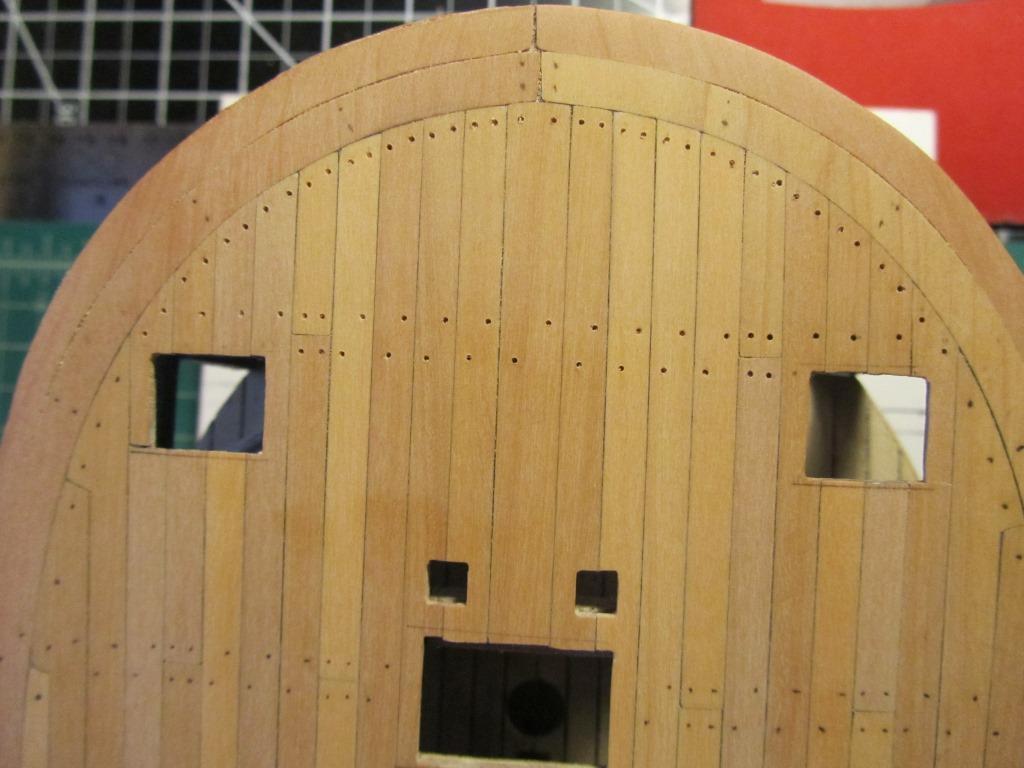
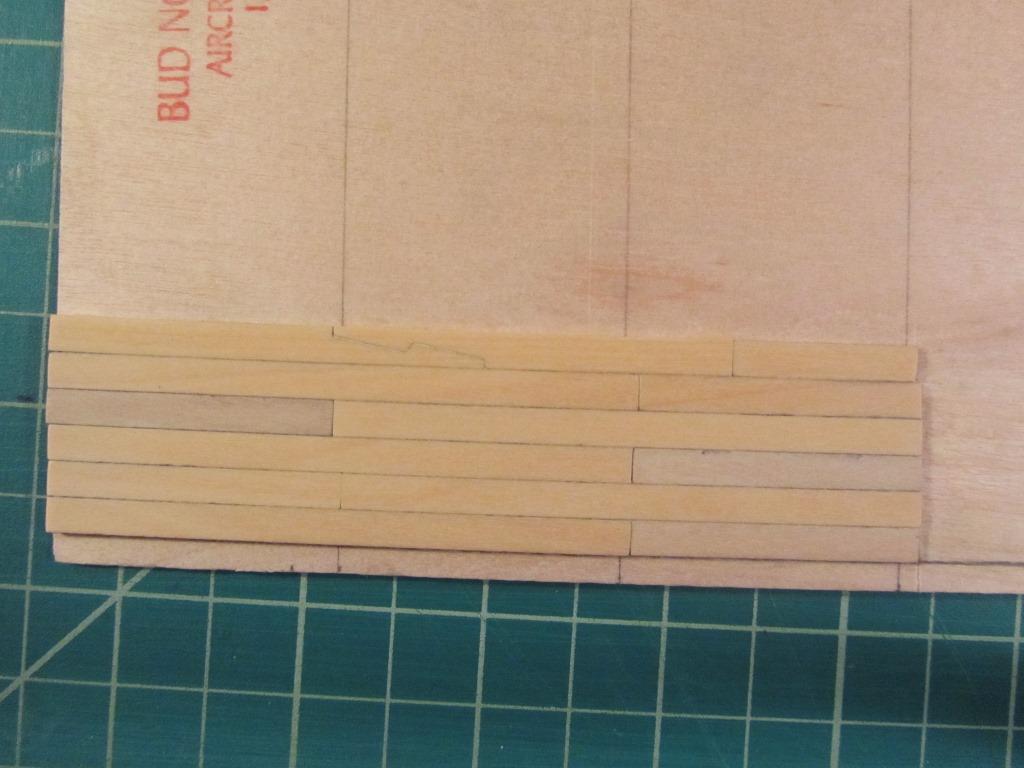
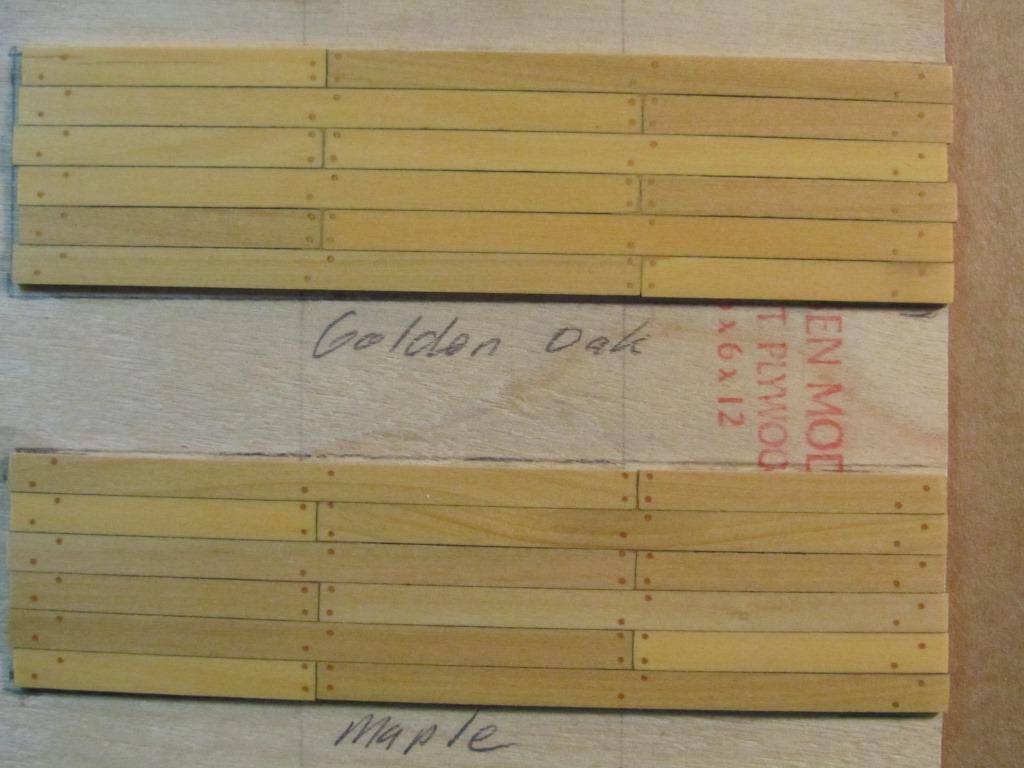
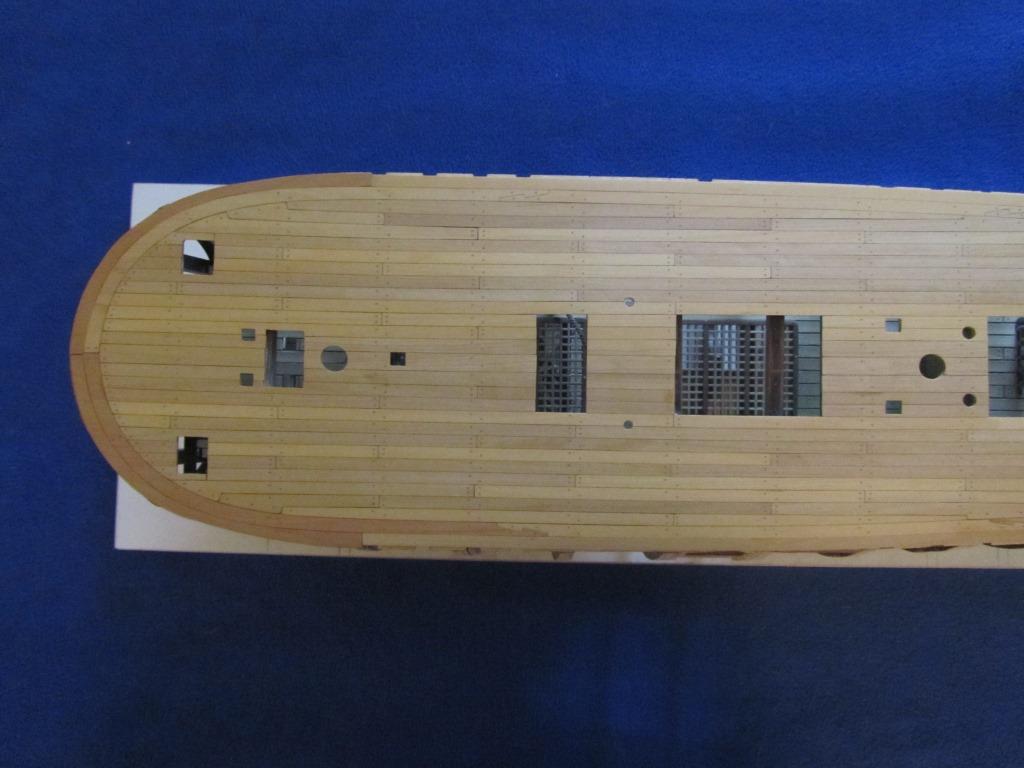
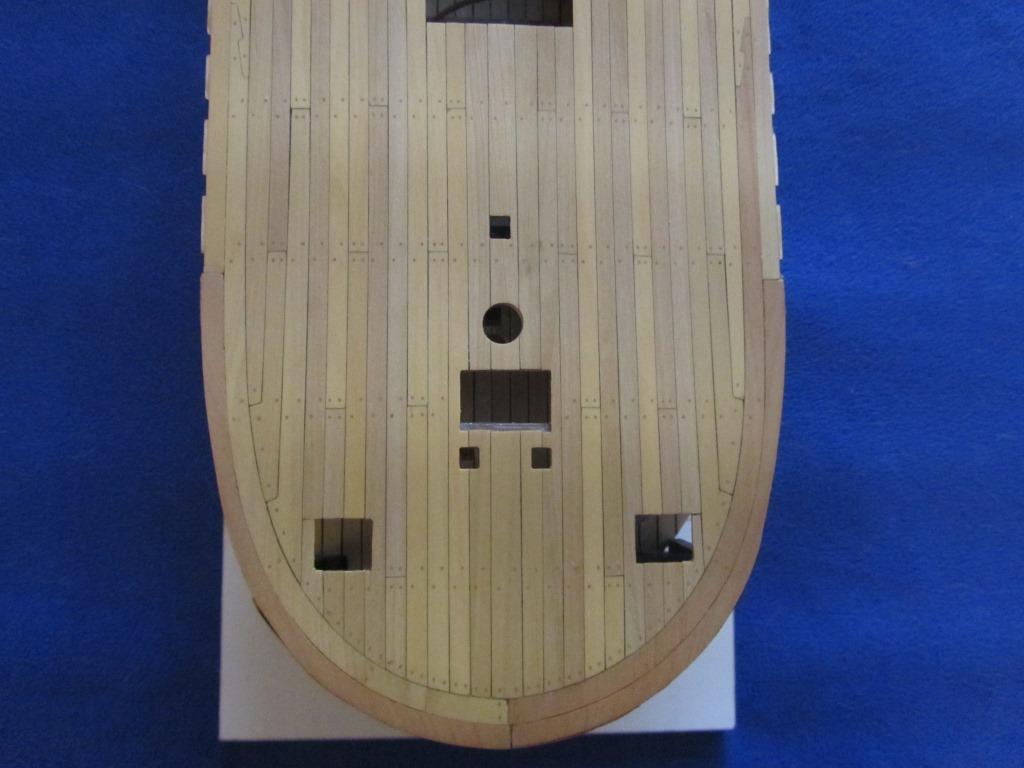
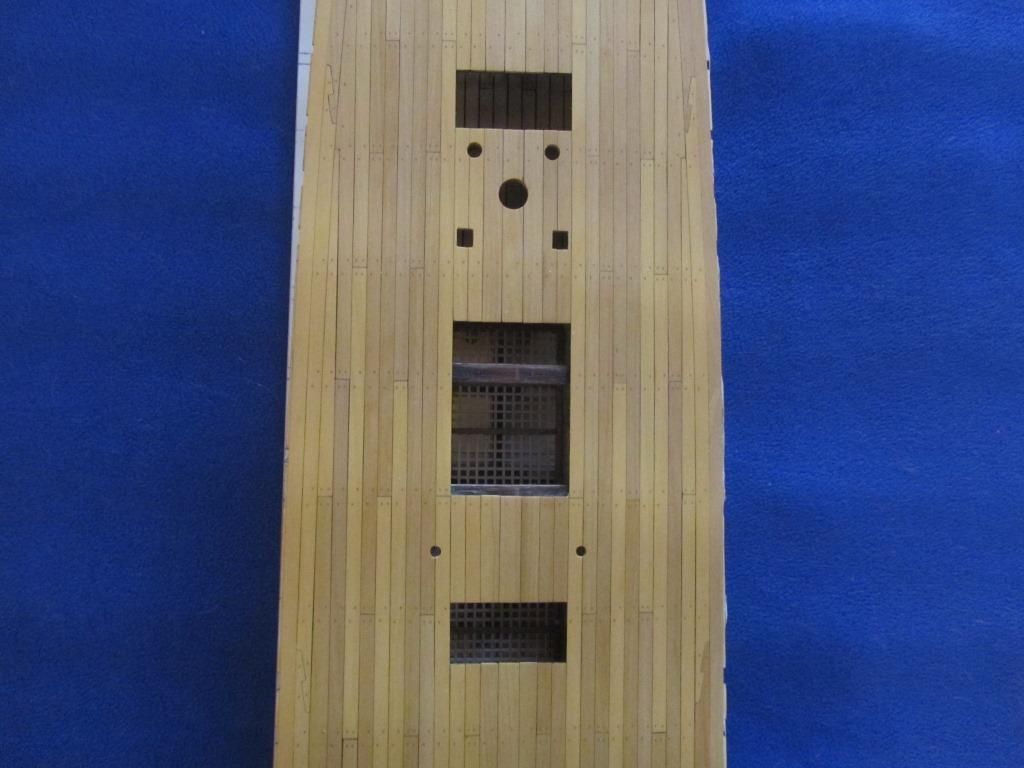
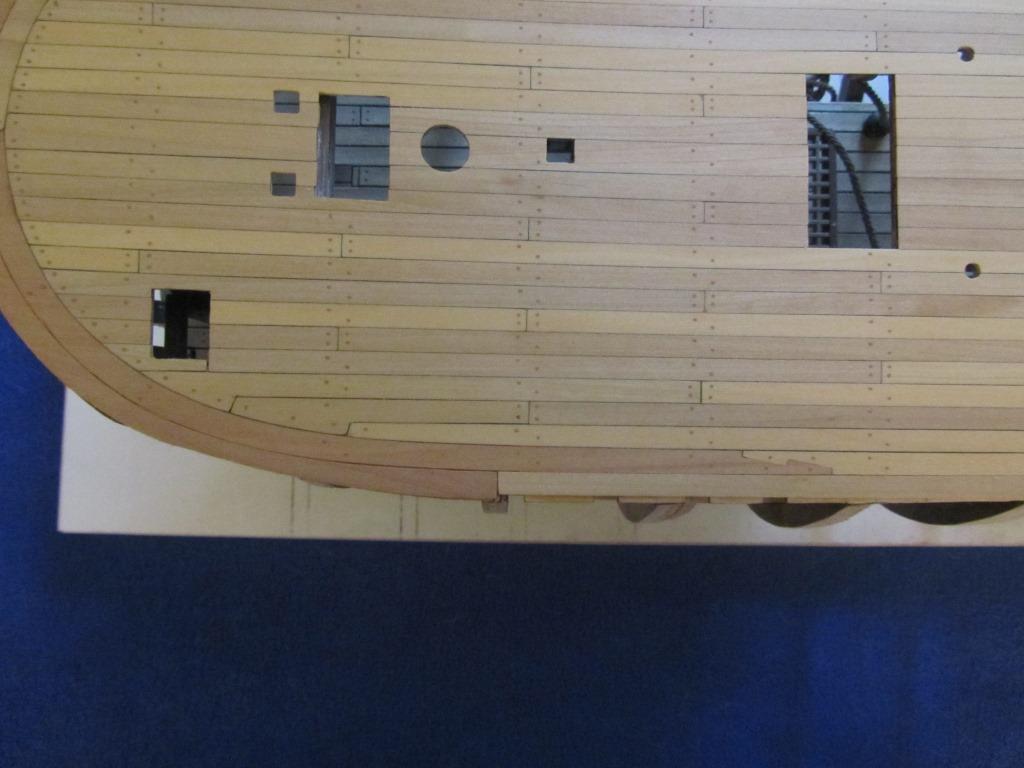
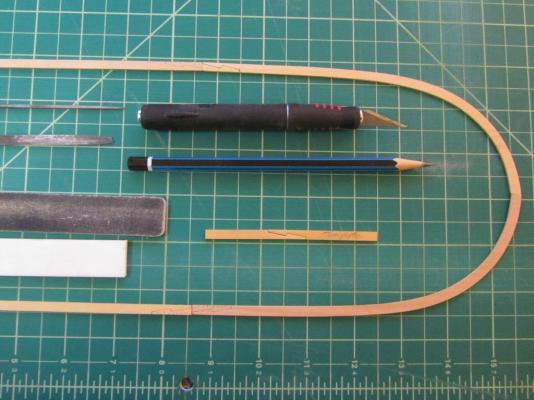
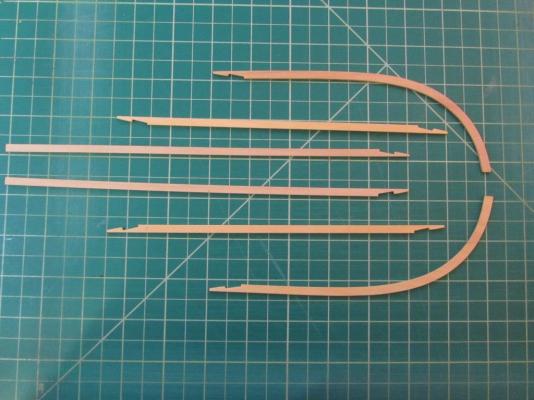
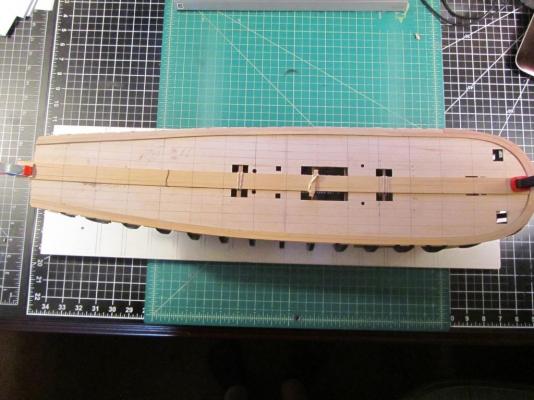
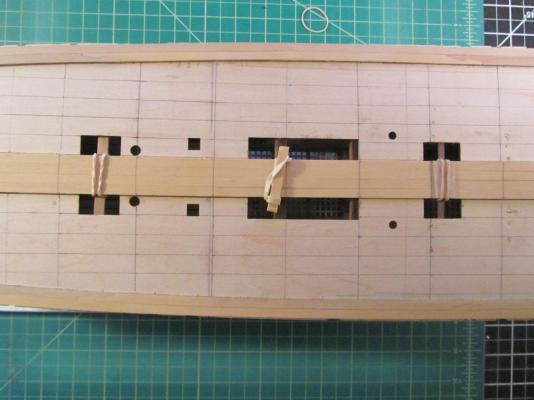
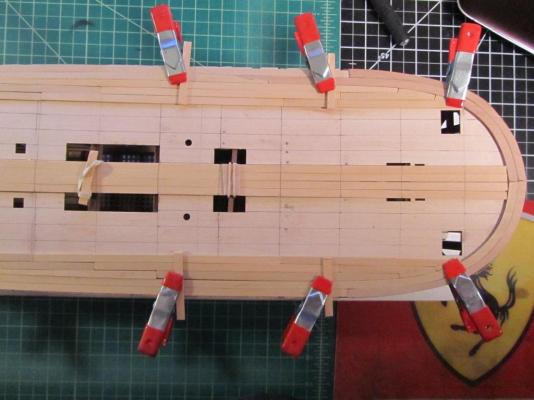
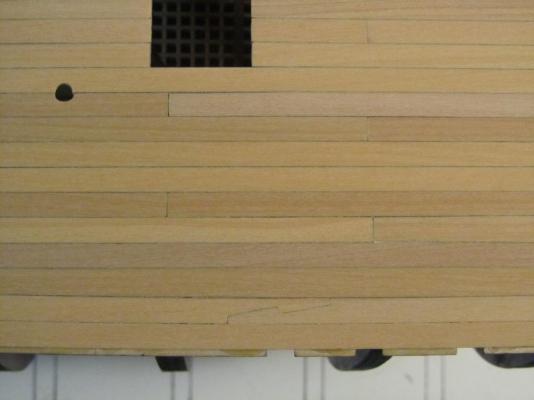
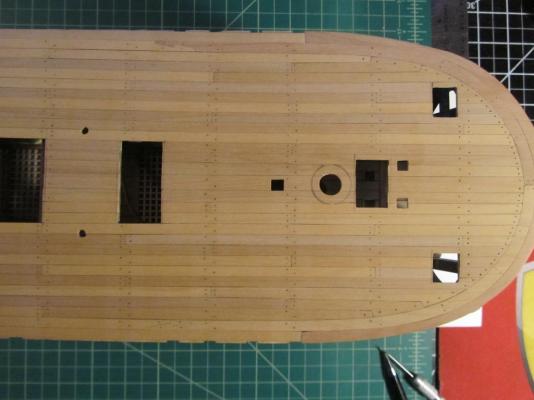
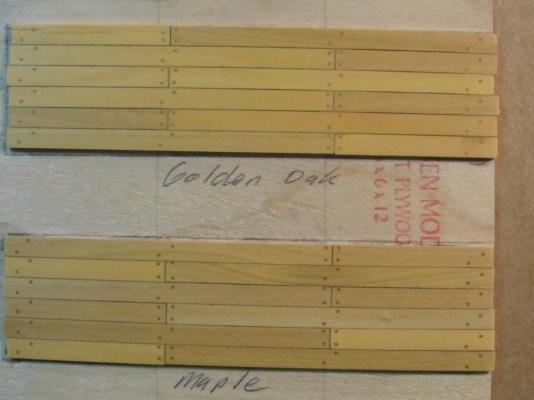
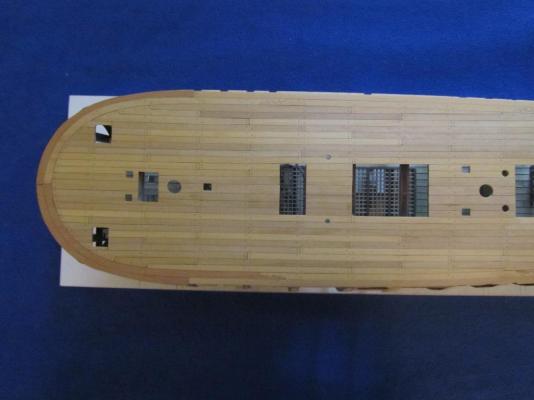
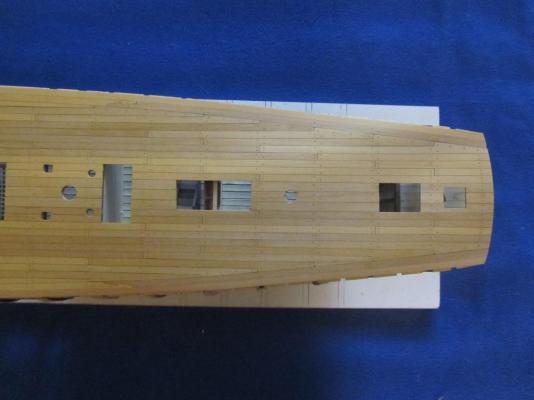
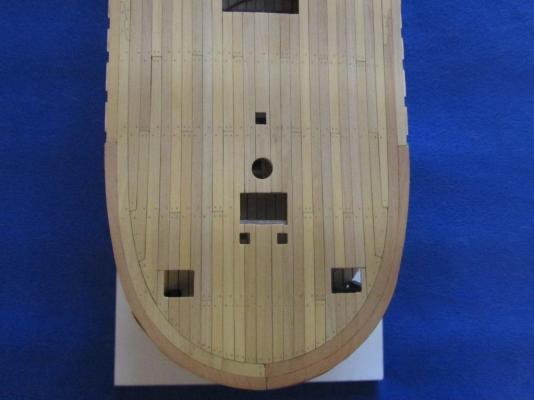
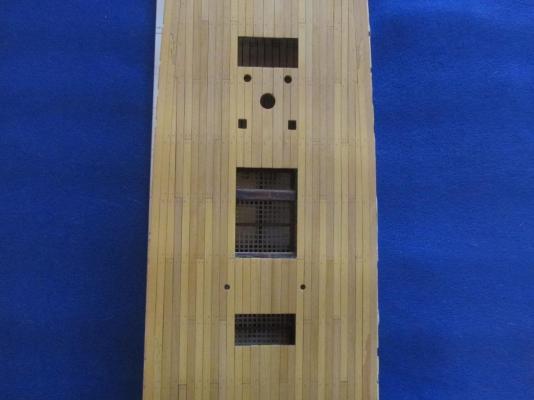
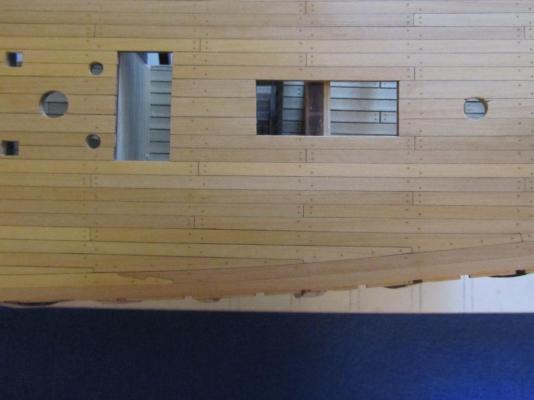
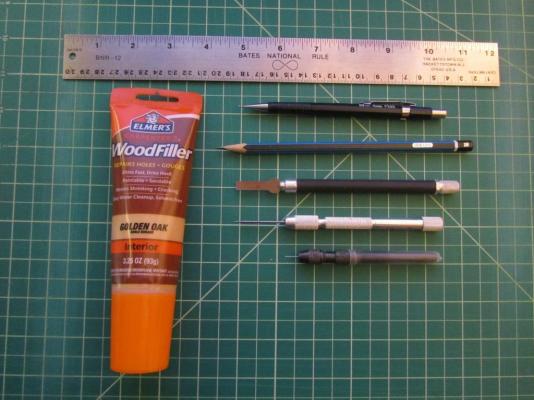
It's been over 8 weeks since I made a post on the log...so here comes a major update Main deck planking – and please forgive my lengthy narrative Before I begin I’d like to thank Chuck and Danny for their inspiring build logs as well as answering a few questions on 18th Century deck planking. Also, thanks to Brian (GuntherMT) and Al (Captain Al) for your help and support Now that I’m starting the exterior (highly visible areas) of the ship I’m going to try and improve the quality of my build. As such, I’ve replaced much of the AL kit supplied materials. This includes the main deck and hull planking material, all the walnut material used for the masts and spars including the pre-cut pieces, the rigging ropes/lines, the cannons and carriages, and the stern lanterns. For starters I purchased Costello Boxwood from Crown Timberyard for the Main Deck. I wanted harder wood and thicker planks to replace the 1mm soft Basswood that came in the kit. This will allow me to better simulate methods used on many 18th century ships. After some reading and several PM conversations with a few of the experienced builders here at MSW….I ended up constructing what I believe is something close to a typical 18th Century deck. The deck incorporates a Margin Strake with Scarph joints and commonly used Hook Planks to accommodate the major curves in the Bounty’s deck. I used hand tools for almost all the work completed, with the exception of the curved Bow planks (used my Proxxon Scroll saw to rough cut the pieces from a Boxwood sheet). Boxwood materials used: 5mm x 2mm strips used for the standard planks, 7mm to 10mm x 2mm strips used for the Margin, Waterway Filler and Hook Planks, and 2mm x (approx. 4 inch wide) sheets used for the curved bow sections of the Margin and Filler strakes. Here are the basic steps I took to complete the deck planking along with a few pictures: Margin and Waterway Filler Strakes; I began by installing the two outside most strakes, a Waterway Filler strake and the Margin strake. I created cardboard templates for all the sections on both strakes and fitted them to the false deck. Once I was happy with the template fit I cut the Waterway Filler and Margin strake pieces out of Boxwood strips and sheets. The Margin strakes have 3 sections on each side (held together with scarph joints), and the Waterway Filler has two planks on each side as it will be covered by a contoured Waterway strake after the deck is completed. I incorporated Hooked Scarph Joints on the Margin strake as this was standard practice in the 18th Century. I first created hardwood templates for making the scarph joints. This insured both sides of the joints were exactly the same shape. I simply traced the template onto the plank ends and then cut them out with a razor saw and X-acto knive. Then I carefully filed the pieces (using jewelers files) until they had a tight fit. Once all the pieces were completed and fitted to my satisfaction I glued them in place (Waterway Filler first, then the Margin snugly up against it). I then laid out a grid pattern on the ply false deck to keep the planks aligned during installation. The Port to Starboard lines are used to align the butt joints for the three shift of butts pattern, and the Bow to Stern lines are used to keep the strakes lined up evenly. Tools used, Scarph template and rough cut Margin planks with penciled scarph joints ready to be cut out Margin Planks with Scarph joints cut out and ready for install Margin and Filler strakes installed Grid lines drawn in for planking alignment Hook Plank Cutting and Fitting; I calculated how many Hook Planks would be needed in the Bow and Stern (4 in the Bow - 2 on each side, and 12 in the Stern – 6 on each side). I then cut out cardboard templates for each hook plank. Note; only 8 templates were needed to create 16 hook planks as the Port and Starboard planks were very close to the same size. I used 10mm strips to cut out all the hook planks (using the template traced lines). Once they were fitted to my satisfaction on each side I glued them up. Tools used, and a couple Hook Plank templates with planks ready for cutting. Stern Hook Plank Fitting Bow Hook Plank Fitting Lay the Planks with #2B Pencil Simulated Tar lines; I installed the hook and standard planks (24 feet or 6 inches to scale). I used 5mm x 2mm planks and a couple of 6mm and 7mm planks in the center, which is fairly close to scale for about an 8 to 10 inch wide plank. Note; every single plank laid on the main deck was beveled on at least one edge and many on both edges. This is due to the curvature across the deck from port to starboard, and also to attain a tight fit between the strakes. Once the planks were cut and filed/sanded to shape I coated both edges with number 2B pencil (a method I saw in Chuck's build log) and then I glued them down with PVA. Also, I only glue the planks on the bottom (not on the edges)....as it allows the wood to expand and contract as the temperature and humidity changes Stern Hook Planks Stern Hook Planks. Note the wider King Plank in the center, I opted not to make it proud (raised) as it would cause issues with all the deck furniture. The two planks on either side are wider as well...similar to Binder Planks but they're placed incorrectly (Binder Planks would be just outside the hatchways with no breaks in the strake other than butt joints). Scarp Joint in the Margin Tree Nail Installation; Prior to laying out the Tree Nails I did some fairly heavy sanding with 120, 150, 200 and 400 grit sandpaper to prepare the deck for tree nail installation and finishing. I proceeded to carefully lay out the nail pattern on the deck with pencil and a ruler (holding the ruler in place with masking tape). After I was satisfied with the pattern I used a sharp punch to set a very small starter hole for each tree nail. Using a hand pen vice drill I then drilled over 600 holes (with a 0.64mm drill bit). Final preparation was to remove any residue in the holes and then very slightly reaming the top of the hole with an Awl to clean up any ragged/fuzzy edges at the top of the holes. Once I was ready to fill the holes I took great care to use as little filler as possible to fill the holes...trying to avoid getting the filler in between the planks. Then a bit of sanding with 400 grit to remove the excess filler. Followed by a nice rub down with a clean cloth to prepare the surface for the Teak Oil (two coats did the job nicely). Tools and material used for Tree Nails. The X-acto makes a great putty knife. Tree Nails Marked Tree Nail Holes....Drilling begins on over 600 holes (note fuzzy edges on hole rims that need to be removed) Tree Nail Method Selection; I spent considerable time testing two different types of tree nail methods; 1) drilled holes filled with wood filler, and 2) bamboo tree nails (using my Byrnes draw plate) stained and pressed into drilled holes. I went with Chuck’s wood filler approach after testing 8 different colors. I ended up using Elmer’s Golden Oak filler. Reason I choose this method; to me the wood filler approach looks more subtle then the tree nail method….I just like the look better. Interesting to note that depending on the wood finish you’re using it can have a profound impact on the final color of any given wood filler. I spent hours messing around with several finishes and different wood filler colors until I came up with the color I liked. I ended up using my personal favorite wood treatment Teak Oil combined with Golden Oak wood filler. Note, I was leaning toward Maple until I used the Teak Oil on the Golden Oak, it darkened it up to exactly what I was looking for. Boxwood Un-treated (no finish) Boxwood Treated (with Teak Oil on left and Poly on the right) Two favorite filler colors (Golden Oak and Maple) finished with Teak Oil Here is the finished Deck Planking


-
Good idea to use the wadding (I think I may do the same) I also prefer a fully rigged model without sails (just my personal opinion). The rigging and mast structures are one of the most beautiful aspects of these ships and I think the sails conceal too much of them. However, I do like sails on schooners and tall ships
-
Hi Bob, Funny you should bring this up. First off, I have the Basswood (part 472) in the kit (long piece that needs to be cut to size), but no cloth (part 473). If I decide to use bales I'll use some sail cloth I purchased for putting spare sails in the hold and building my hammocks. Second, there has been some discussion on exactly what the bales are (cotton, etc), and if they were even on board the Bounty? Either way, it's really the builders option to use them. I think they look cool and will probably use a few of them somewhere in the lower decks and/or the hold. I think Captain Al can give you much more details on these controversial items
-
Tom, Beautiful work...love the way the sails hang
- 212 replies
-
- 3
-
-
- constellation
- artesania latina
- (and 2 more)
-
"Beauty is in the eye of the beholder". So apply whatever finish you think looks good Personally, I like Teak Oil on the darker woods...it gives a rich look with no shine. I seal almost everything with a water based matte polyurethane finish (again no shine). I would highly recommend you do some testing with finishes you like on spare pieces of wood
-
This may help; I found the following information in the book "China Tea Clippers" by George F. Campbell. I believe the planks/strake you describe above is called a Binding Strake and they run on the outside of the hatches from bow to stern. They were wider and thicker than the standard planks. They were also notched or grooved as to be interlocked with the cross frames. In some cases the standard butted edges (tree nailed) were replaced with Scarph joints. Other opening/pierces (like bilge pipes, etc) were avoided. These strakes/planks along with the margin strake/planks (also interlocked with the cross frames) provided longitudinal strength to resist Hogging or Sagging of the hull/keel. Campbell also states that the center planks were not so important from a strength standpoint because they consisted of many short lengths. Here is a link to the definition of Hogging: https://en.wikipedia.org/wiki/Hogging_and_sagging
-
Hi Bob, Welcome to the AL Bounty builders club, and judging from you're very clean start I'm sure you'll have a beautiful build. Thanks for the kind words as well Hi John, Thanks for stopping back in and I appreciate the compliments
-
Nils, Simply beautiful and creative work....always a pleasure to follow your superb builds....congratulations to you sir
-
Hi Bob, Looks like you're well on your way with the build…. and good to hear you're reading the other logs to help avoid some of the pit falls of this kit (most are minor) Cheers
-
Beautiful work Nils Can you direct me to the construction process for your Quarter Gallery? Thanks, and you continue to inspire all of us
-
Just in case you haven't seen the tutorials here on MSW. Link to the planking tutorials: http://modelshipworl...ng-articles.php Good luck....and take your time as the hull planking is quite difficult (particularly on this hull type/shape)
-
Hi GG, Are you having problems with understanding the AL instructions, or deck planking in general?
-
Hi Nils, You continue to amaze...beautiful and creative work, you're an inspiration to all of us I look forward to re-visiting your incredible Pegasus
- 2,625 replies
-
- 5
-
-
- kaiser wilhelm der grosse
- passenger steamer
- (and 1 more)
-
Simply beautiful work Dimitris....I admire your dedication to scale and accuracy I often find myself having a hard time deciding when to re-work and when to say it's good enough....and only an expert will find the error (our minds can drive us mad at times)