HOLIDAY DONATION DRIVE - SUPPORT MSW - DO YOUR PART TO KEEP THIS GREAT FORUM GOING! (Only 13 donations so far - C'mon guys!)
×


thomaslambo
-
Posts
384 -
Joined
-
Last visited
Content Type
Profiles
Forums
Gallery
Events
Everything posted by thomaslambo
-
 Hi Nils, Wow, what a pleasure to come aboard...I just spent a wonderful morning looking through your log All I can say is absolutely amazing work, the details are superb (just love the Props and Ruder as I'm a long time RC guy...I understand your choice about the running gears). You continue to be an inspiration to all of us Nils
- 2,625 replies
-
- 3
-

-
- kaiser wilhelm der grosse
- passenger steamer
- (and 1 more)
-
Nils, Been so busy on my build I lost focus on others. Congratulations on a superb build...you've been one of my inspirations for getting into this hobby I'll be following your next build with great interest
-
Hi Dennis, I just caught up with your very fine build log I have a Titanic plastic kit waiting to be built...so I'm very interested in seeing all the beautiful detail touches you're adding to the ship
-
Hi Bob, I really appreciate the kind words and your continued encouragement Hi Greg, Welcome aboard and it's always nice to hear from someone that took the time to read my log....and I'll continue to give it my best effort mate Really like your Papillon Avatar, we've had the pleasure of loving two of them over the years
-
Yes I do mate, and it's much more comfortable then a wet Hammock
-
Matt and Steve, Thanks guys, your complements mean a lot to me...coming from two of the best it's the kind of motivation that keeps me going I'm very close to completing the middle deck now, then I can get to some fun stuff like planking the main deck and the hull
-
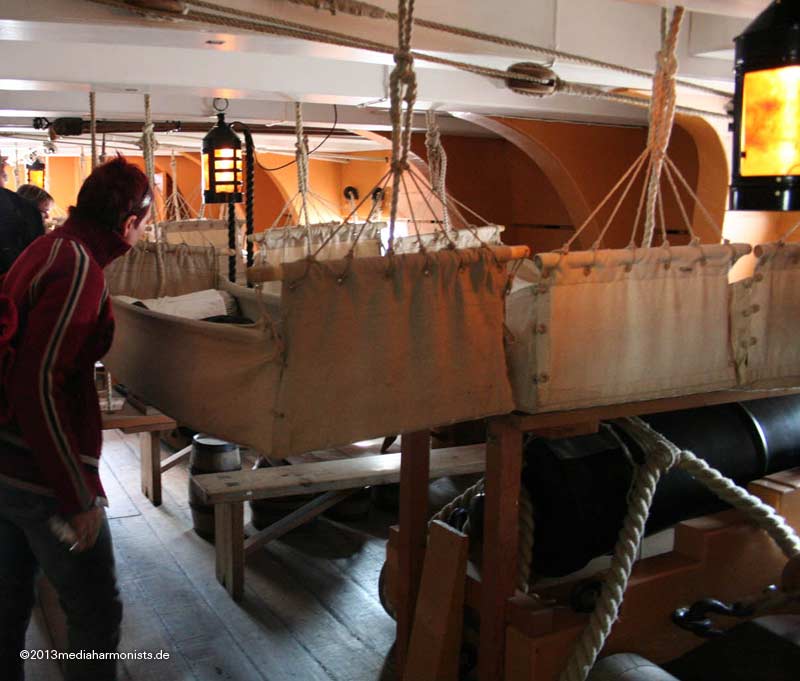
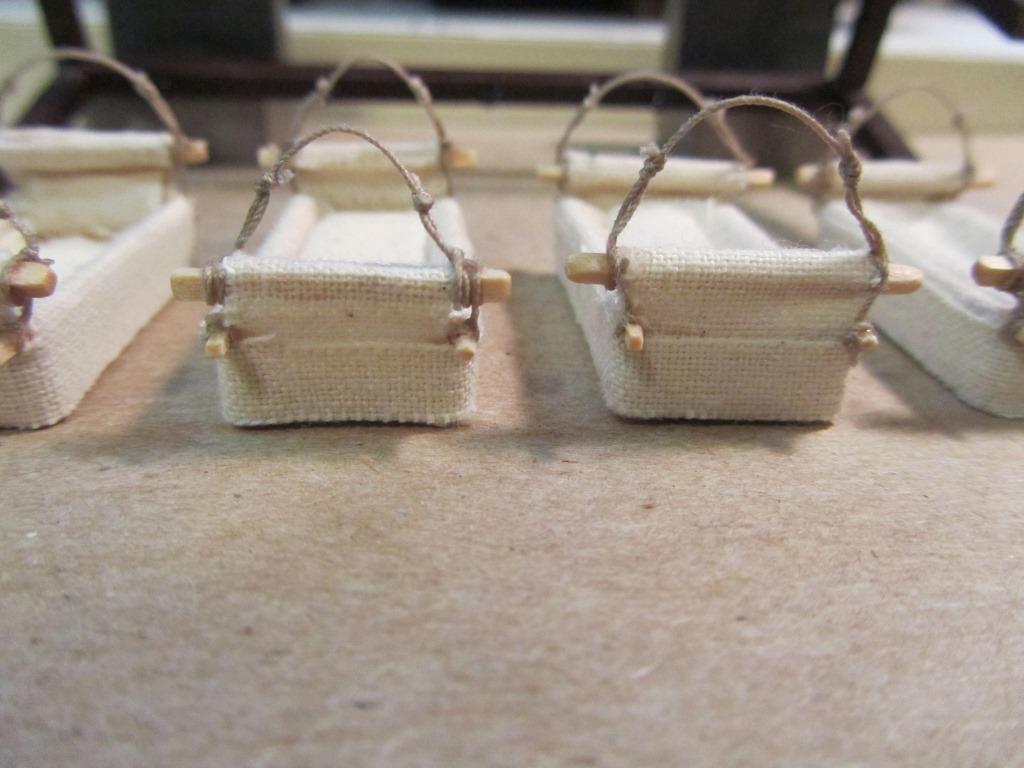
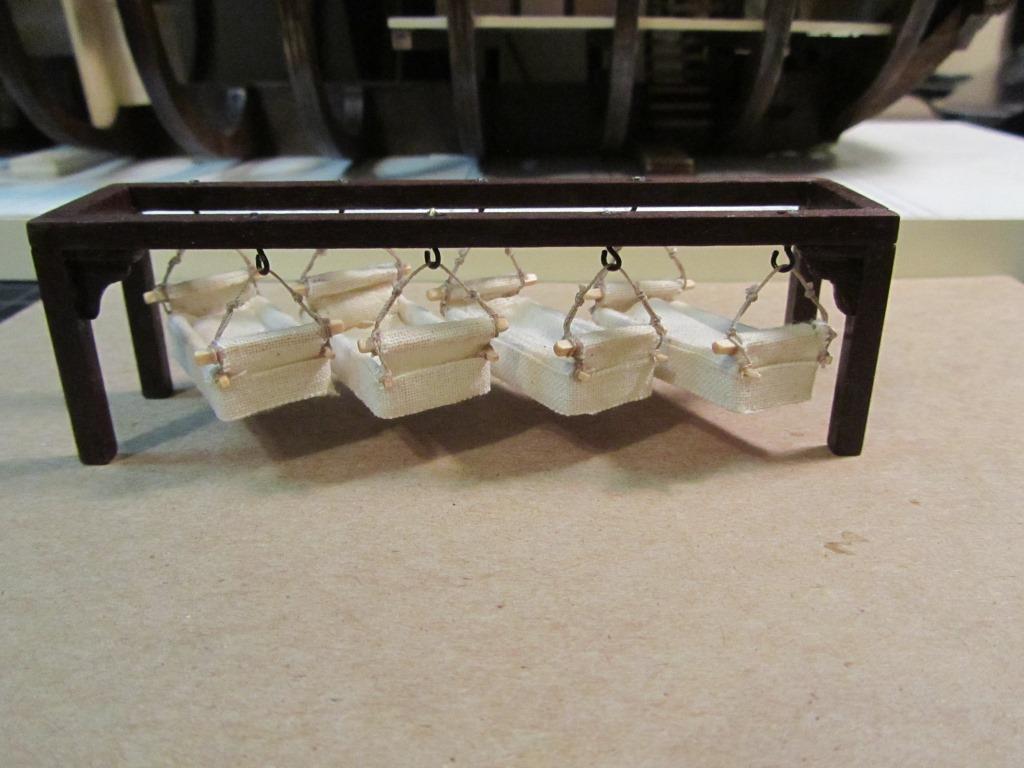
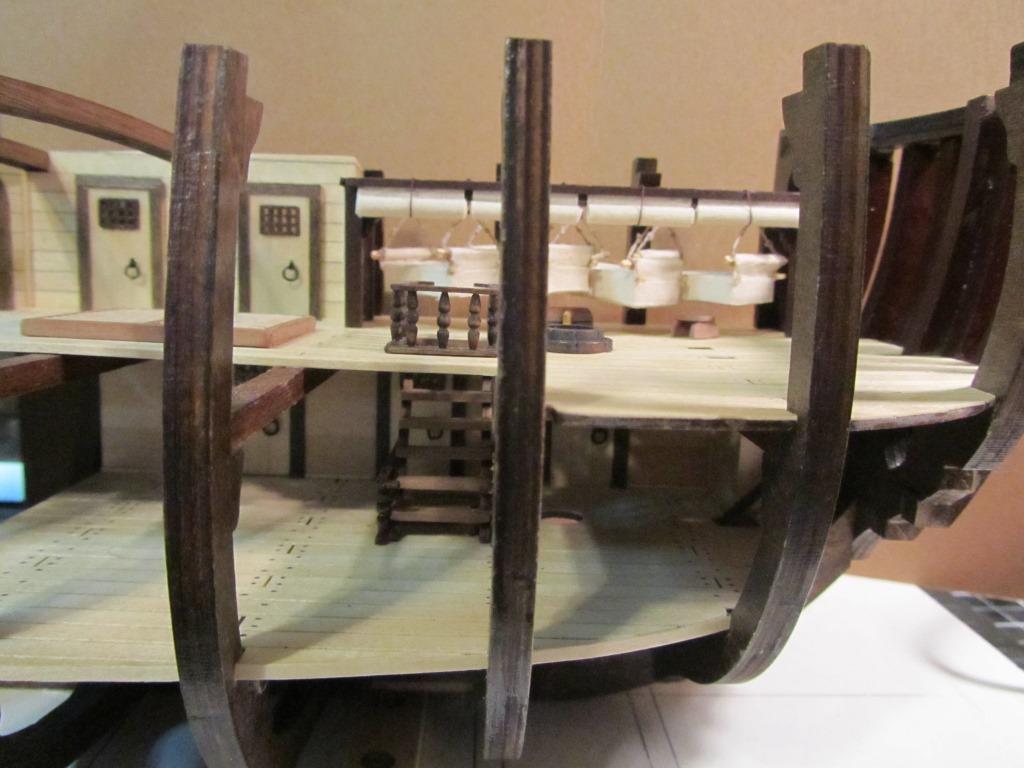
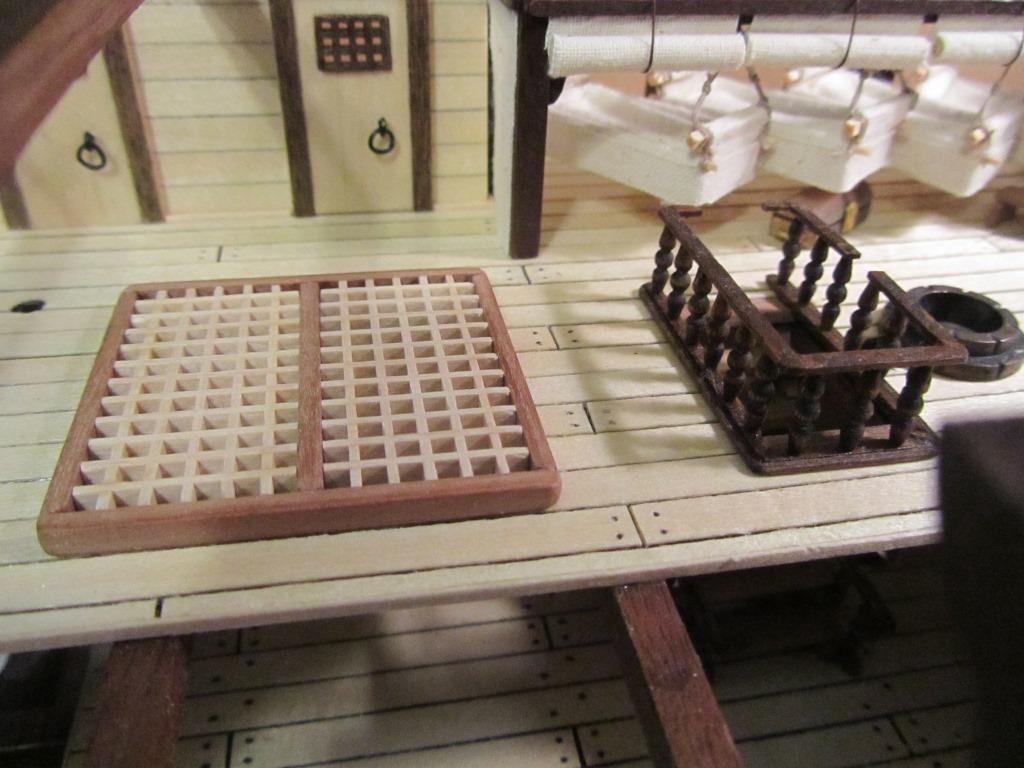
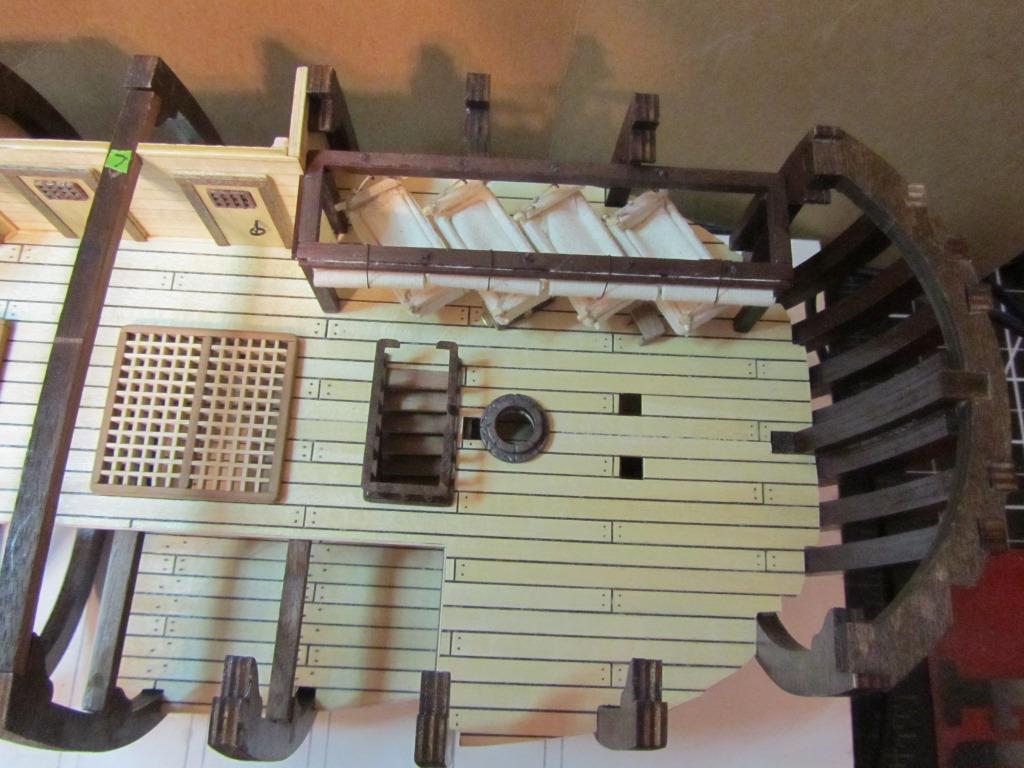
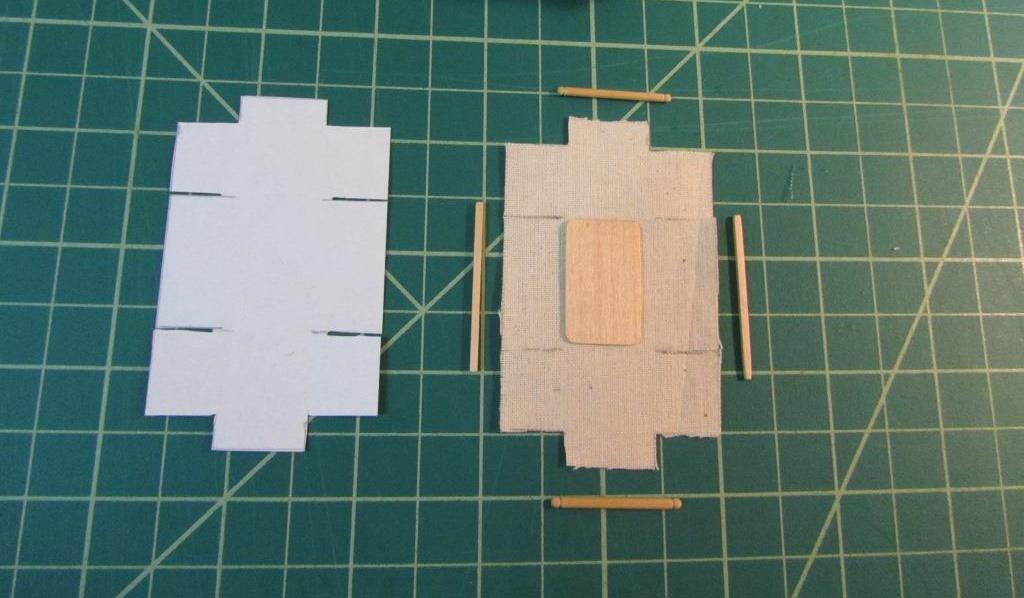
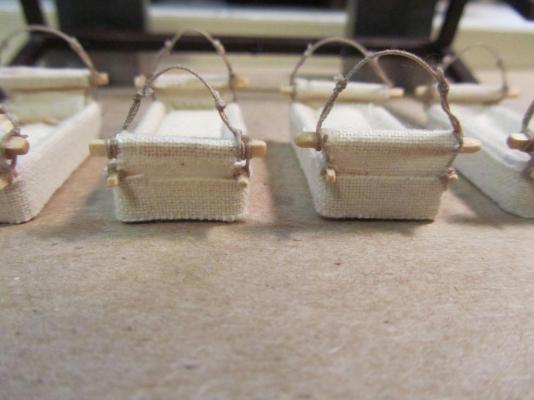
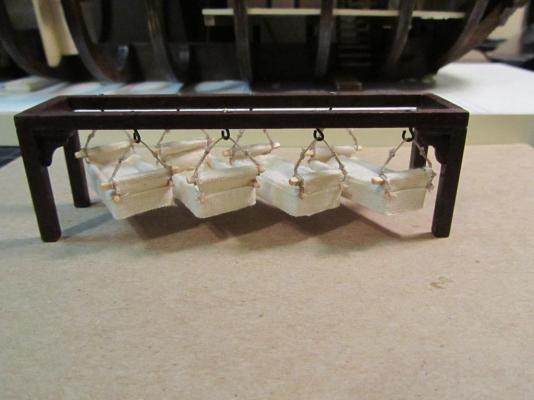
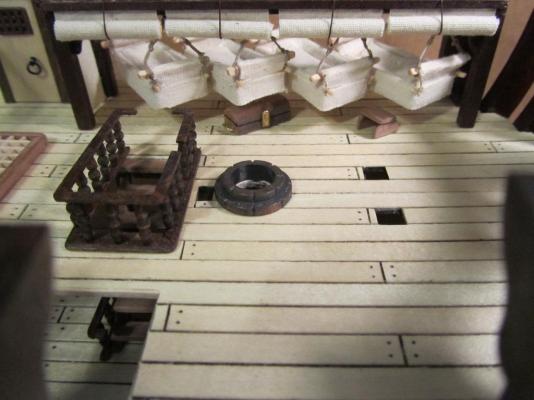
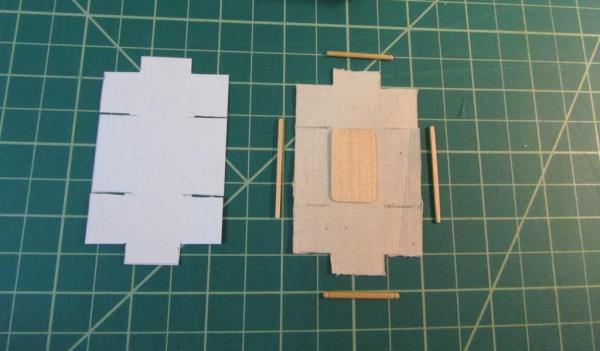
Middle Deck Assembly - continued I completed a few more additions/modifications in the Bow: Hammocks: Prompted by something I picked up from the “Anatomy” book. Apparently the Bounty had major problems with leaking decks that flooded some of the sleeping areas. Between the leaking decks and a general lack of adequate sleeping quarters several Hammocks were installed in various locations on the Bounty. So, I went ahead and took a stab at designing and installing some hammocks in the bow area. I saw this particular design in a picture posted by an MSW member (sorry I didn’t take note of the member name). Apparently this design was typical of a sick bay hammock or perhaps one given to a higher ranking crew member. However, my guess is this style of hammock probably wasn't used on the Bounty... but I think it looks good and will add a nice touch to the display. Hammock Construction: I developed a pattern on paper that could be transferred to a sheet of sail materiel. Then I cut out all the wood frame pieces to support the hammocks. I then sprayed one side of a large piece of sail/hammock material and then laid the adhesive side down on top of a piece of wax paper for ease of cutting. Once I cut out all the patterns I then peeled the pattern off the wax paper and attached the wood parts to the adhesive side of the material. I then added the rope supports and carefully applied some CA to hold everything together. I built the simple hammock frame structure out of 5mm x 5mm walnut material and drilled holes in the top for the hooks that hold all four hammocks. I also attached roll down privacy curtains for each hammock. Note; the hammock assembly is not glued in at this point. Once I lay the main deck and plank the hull I’ll permanently install the hammocks along with many other detail items on the lower decks. Railing System: I went ahead and fitted the previously constructed Railing System, and will glue it up prior to installing the main deck (see page 4 for additional information on the construction). Pictures of the hammock construction: Royal Navy HMS Victory Hammocks. I really liked this design I found here on MSW...so I decided to build my own version. Here is the pattern I developed with paper... and then transferred it to some sail material I had on hand. Note the frame pieces that add support. Picture of the finished hammocks. Held together with adhesive spray and CA glue. The simple frame I built to hold the hammocks. The finished assemble will be permanently installed after I finish planking the hull. Completed hammock assemble temporarily installed...along with the Bow railing system. The open section cut in the right side railing accommodates a support beam that drops from the main deck. The handrails between decks still need to be added. Note the roll down privacy curtains I added for each Hammock.


-
Brian, Yes, you're right now that I look at my log I never included pictures of the actual process. I just used a counter sink to guide the drill (which was taped to control the depth of the hole that got drilled). Once I had the holes drilled I checked to make sure the dowel pushed in snugly but easily. Then I dropped a bit of PVA in the hole and very quickly pushed the dowel in. Then I cut of the excess dowel and sanded it clean.
-
Brian, My pleasure to help...and it looks like you've recovered nicely This may be overkill, but I put dowels through the beams into the frames at a slight angle. After I glued the beams down, with a steady hand and dremel/drill I was able to drill the holes very quickly then glue and push the dowels in. I don't want anything coming loose years down the road. Yes, some of the beams were a bit short (used a small shim to tighten). You can see pictures of the dowel install in my build log if you like. Thanks for the info on the plants
-
Cutty Sark by NenadM
thomaslambo replied to NenadM's topic in - Build logs for subjects built 1851 - 1900
Best wishes Nenad...keep your chin up my friend- 4,152 replies
-
- 5
-
-
- cutty sark
- tehnodidakta
- (and 1 more)
-
Brian, The reason I noticed it was because I came very close to making the same mistake. The good news is you didn't glue down the main deck A sharp razor saw should do the trick if you didn't use PVA (which should come loose with a bit of Isopropyl Alcohol on the joints). Hey, on another subject, what material/product did you use for your plants....I really like the crisp green color? Cheers
-
I may take you up on that offer when I get to rigging. Between the AL plan sheet, the "Anatomy" and a copy of "Rigging Period Ship Models" I'll see how I do
-
Hi Brian, Yes, the bilge pipes aren't addressed until step 40 (way to late IMO) and it says the cross beams "may" need to be cut out...no "may" about it You mentioned you ran out of 5mm x 5mm cross beam material (in every case so far I've had plenty of material...actually extra). What comes to mind is a question; I can't tell by looking at your picture, but the kit supplies laser cut cross beams for the top deck support as they are arched to put a curve in the top deck for water run off (like the real ships). Just wanted to make sure you used those curved beams as opposed to cutting your own?
-
Al, I saw Captain Poison's reply to you...definitely good stuff. Always good to jump around when you're overloaded on another step Hey, Did you see my invitations to "personal conversations" I sent to you? I sent one about 4 weeks back on "Rudder Installation" and another this week on "Rigging". But I never heard anything back from you? I'm thinking you didn't receive email notifications from MSW...it's the same type of notifications (via email) you get when someone posts to your build log?
-
Hi Peter, Just beautiful work...I'm a big Cutty Sark fan so I'll be following the log with great interest
- 92 replies
-
- 1
-
-
- Cutty Sark
- Billing Boats
- (and 2 more)
-
Hi Al, Just wondering how you're doing...I saw a recent post from you on another build log asking about the bowsprit.
-
Hi Bryan, I'm getting ready to glue up my main deck as well and thought I’d make a few comments. Not sure if you’ve already considered these things but just to be on the safe side here’s a few things I learned. Regardless of the time I spent leveling and squaring the frames I’ll still need to shim one side and trim the other on several of my frames (will be done as I fair the frames for hull planking). Most AL Bounty builds I’ve seen all had to do this after gluing down the main deck (Frames tend to shift during construction more than solid Bulkheads). As you test fit your main deck, be sure to check alignment on all the masts, and anything else that drops through the main deck into the lower sections of the ship (bilge pipes, support beams, etc). Also, you’ll need to notch two cross beams (middle and upper deck supports) to get the bilge pipes through to the hold (I found it easier to do this prior to gluing down the middle and main decks – quite large notches need to be cut out). I also spent some time deciding what details I would glue in prior to fairing and planking the hull…most I’ll glue in post planking to avoid dust and knocking things loose. Your build looks great so far and good luck
-
Brian, Simply magnificent work on the shrouds and dead-eyes....it's a pleasure to follow your log
- 831 replies
-
- 2
-
-
- Armed Virginia Sloop
- Model Shipways
- (and 1 more)
-
John, Thanks much....and really liking the new avatar
-
Welcome aboard Nenad. Thanks for the kind words....and it's my pleasure to have you following the build
-
Cutty Sark by NenadM
thomaslambo replied to NenadM's topic in - Build logs for subjects built 1851 - 1900
Hi Nenad, Now that I’m committed to building the Cutty Sark I thought I’d stop in and say hi Actually, I’ve been following your build for some time and must say you have my compliments on the amazing level of research and work you’ve done on the ship. Your build log reads like a wonderful story, I appreciate your candor, all the in-depth research you’ve done as well as sharing the results in great detail….so many fine pictures and narratives (many I’ve archived for future reference) Thanks much- 4,152 replies
-
- 5
-
-
- cutty sark
- tehnodidakta
- (and 1 more)
-
Hi Mark, Glad to see you started the build....I'll be following along with great interest
- 71 replies
-
- 1
-
-
- cutty sark
- mantua
- (and 2 more)
-
Hi Harry, Yes, the bloody scale game "is a foot"...try this on for size The calculations below are in relation to one foot (12 inches) or scale feet if you will. My Bounty is 1:48 (also a popular railroad scale called "O" scale) So 1:48 scale; 12" (one foot) divided by 48 = .25 inches or 1/4" (6.350mm) = one foot on the deck of my ship In your case: So 1:60 scale (slightly smaller): 12" divided by 60 = .20" (5.080mm) = one foot on the deck of your ship My bible for scale conversions: https://en.wikipedia.org/wiki/List_of_scale_model_sizes
-
Hi Bob, The lighter sails provide beautiful contrast against the darker hull and masts/spars....but of course it's your call
- 47 replies
-
- 1
-
-
- carmen
- constructo
- (and 2 more)