HOLIDAY DONATION DRIVE - SUPPORT MSW - DO YOUR PART TO KEEP THIS GREAT FORUM GOING! (Only 36 donations so far out of 49,000 members - C'mon guys!)
×


thomaslambo
-
Posts
384 -
Joined
-
Last visited
Content Type
Profiles
Forums
Gallery
Events
Everything posted by thomaslambo
-
 Great job Denis, it's amazing what a little sand paper can do (especially when the planks are laid correctly)
 -
Hi Harry, Funny, as I anticipate planking the Bounty I asked myself the same question about the Bow Your planking is looking great so far...should be a beautiful base for the second layer
-
I didn't mention it in my build log, but the instructions do suggest using pins. Once I set the deck down with glue I used the smaller pins to hold it down (strengthen the structure). I drilled pilot holes (through the deck into the cross beams) and then dipped the pins in glue and pushed them in. About 6 pins for each cross beam. Later I filed all the pin heads flush with the deck before I started planking.
-
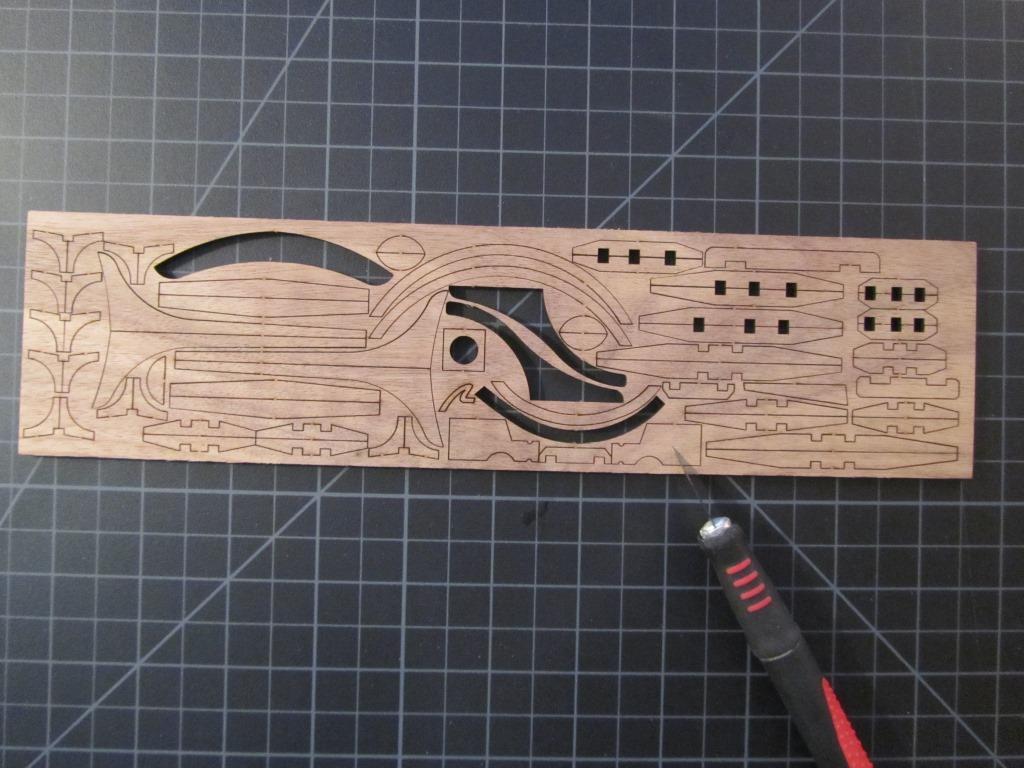
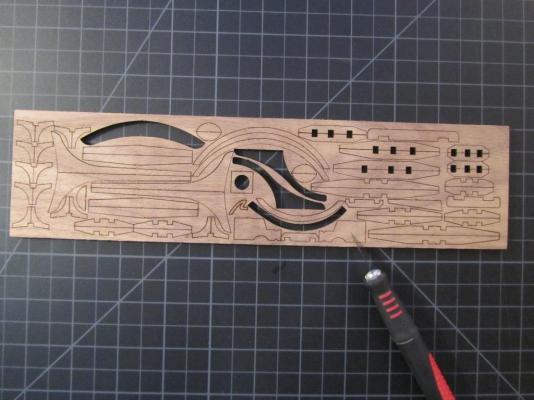
Hi Bryan, I haven’t installed the Bowsprit knightheads yet (pre-cut parts 275) shown in picture book photo 54 (very hard to see). So here's my best guess The assembly is included in what I call the “AL Summary” instructions for steps 48 – 75 (which basically says find the parts, look at the picture book/plan sheets and give it your best shot) Also, from what I can see the plan sheet appears to show the Bowsprit resting on/running through parts 275 (the parts are on laser cut sheet 22810-10). Here is the cut sheet with parts 275 near the bottom
-
Basswood is harder than Balsa wood (Basswood is what AL provides for all our deck and bulkhead paneling/planking), but much softer then Boxwood or Pear (which IMO is a better choice of wood). I'm using Boxwood on my main deck and Swiss Pear for the hull planking (replacing the Basswood and Walnut)...just my personal preference
-
GG, Sounds like a plan. I see you have the "air duster" product, it works well for blowing sawdust away. I've used it many times...just be careful you don't give the plants frostbite This is what I use: http://www.amazon.com/Dust-Off-Compressed-Gas-Duster-Single/dp/B004E2RG34/ref=sr_1_4?ie=UTF8&qid=1447168385&sr=8-4&keywords=dust+off
-
No, I'm afraid that's not normal. My cross beam number 165 was a perfect fit (same as all the other laser cut beams). Are you sure you didn't mix up the beams (or possibly the frames)? Otherwise the frame may have warped...but 7mm is quite a bit of variance? By the way, I really like your creativity on the furniture
-
Hi Captain Steve, I know the re-do feeling. I've been using my Proxxon scroll saw lately as well. I've found scribbling a cut just outside the outline has the blade running nicely along the scribe...it basically guides the blade. It's a great tool once you get the hang of it...and if you're not careful she can have a mind of her own
-
Cutty Sark by NenadM
thomaslambo replied to NenadM's topic in - Build logs for subjects built 1851 - 1900
Nenad, Just beautiful work/details on the deck houses- 4,152 replies
-
- 4
-

-
- cutty sark
- tehnodidakta
- (and 1 more)
-
Hi Nils, She's looking wonderful, love the creative methods used....and so many helpful ideas from MSW folks as well
- 2,625 replies
-
- 7
-
-
- kaiser wilhelm der grosse
- passenger steamer
- (and 1 more)
-
Hi Bob, Congratulations on the completion of an excellent build
- 47 replies
-
- 1
-
-
- carmen
- constructo
- (and 2 more)
-
A masterful piece and something to be proud of Brian
- 831 replies
-
- 5
-
-
- Armed Virginia Sloop
- Model Shipways
- (and 1 more)
-
Hi Nenad, Thanks for the kind words...and in case you missed the original post of the above pictures; here's a link back to page 5 that includes the complete set http://modelshipworld.com/index.php/topic/10059-hms-bounty-by-thomaslambo-artesania-latina-%E2%80%93-scale-148/page-5
-
Thanks much for following the build....and your kind words My pleasure....and I'm glad you're benefiting from my build log Also, a big thanks to everyone that clicked the like button
-
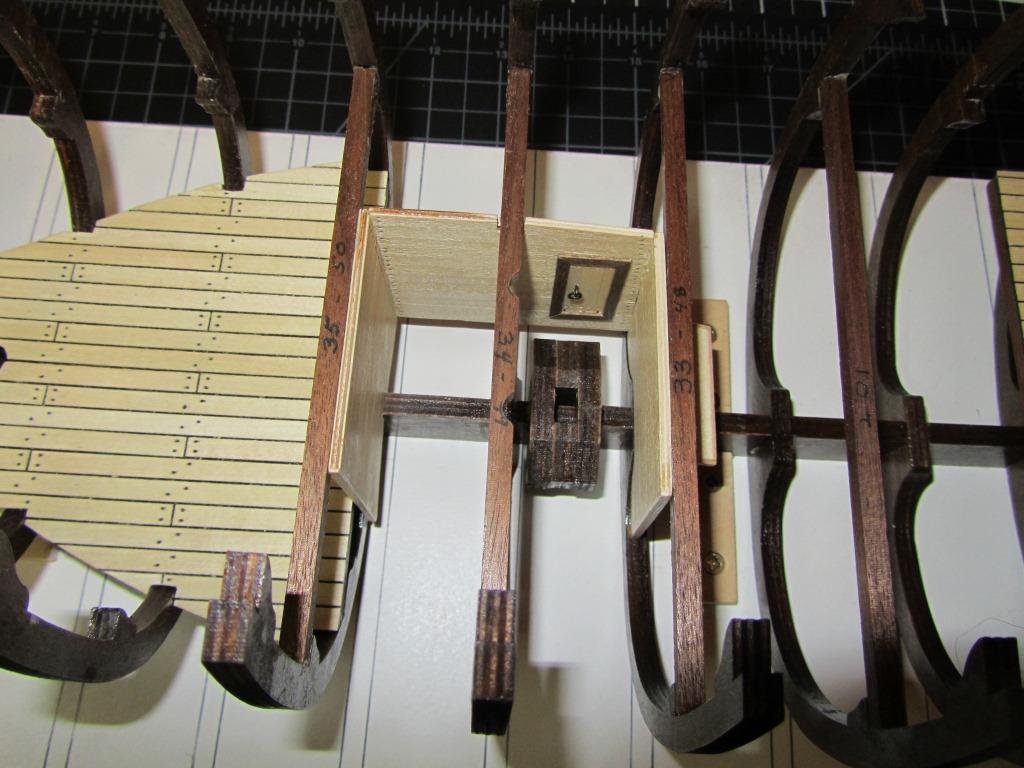
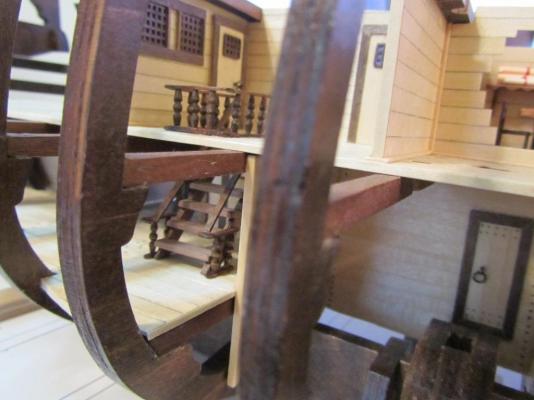
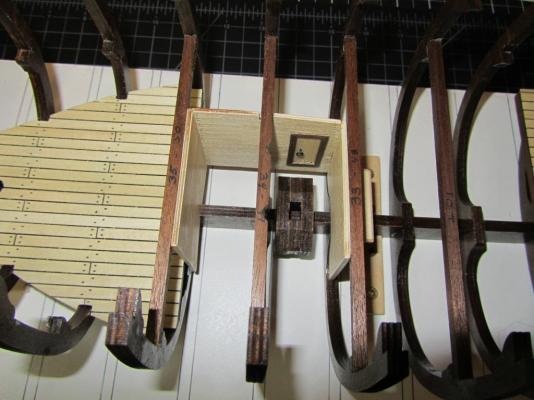
Hi GG, Good eye on your part, and for the most part yes. I realize English isn’t your native language (I applaud you for being multilingual) so I’ll try and simplify the rather lengthy explanation in my log I only used the false bulkhead plywood pieces (parts 100 and 118 fore and aft cabin bulkheads). I replaced part 136 (lengthwise cabin plywood bulkhead) because I needed it ¼ inch wider. The reason was to add more clearance between the aft bulkhead wall and the companion way opening to allow my custom railing system to be installed. Yes, I totally ignored the wall treatments (parts/suggestions in the kit) and used my own custom design (basswood wall planking, grid windows, etc). I also eliminated the door on the fore bulkhead wall that opened into the bilge pipe See the pictures below that shows the added clearance for the railing system (basically the aft bulkhead was moved to the opposite side of crossbeam number 162, frame 36). Note the aft bulkhead is on the opposite side of the crossbeam 162, frame 36 now. If you look closely at the lower right corner you can see the notch that the builge pipe will fit into (this would block the opening of the door I removed - I discovered this during a trip to the Dark Side) Here is the fore bulkhead wall without the door (upper right hand corner)

-
Super job on the yards....and the first sail looks really clean....your homework is paying off
- 212 replies
-
- 3
-
-
- constellation
- artesania latina
- (and 2 more)
-
Hi Tom, Thanks much for the compliment....and I'm enjoying your build as well
-
Thanks for the kind words...and see my response to your PM
-
There are two sizes of pre-cut ladders in the kit; parts 150 (7 step) and 151 (9 step). The ladder in post 65 is the shorter 7 step ladder. Also, IMO AL waits to long in the instructions to have you install the ladders. As you can see in my log I install them early on...particularly if you're going to add a railing system in the lower decks.
-
Hi Nils, I was thinking the same thing....However, the picture is not my build It can be a curve ball when someone else posts there pictures on your log...I'll direct you to Gentel Giants build log of the same model Link: http://modelshipworld.com/index.php/topic/11556-bounty-by-gentlegiant-artesania-latina/page-2
-
Absolutely, and I can't take credit for the idea as many others have done these type of modifications FYI - If you don't have a copy of "Anatomy of the Ship - The Armed Transport Bounty" by John McKay I highly recommend it. This is where many builders get ideas for upgrading the AL Bounty kit. It's one of the most complete sources of information on the Bounty. Good luck
-
GG, As you continue on; be sure to check the alignment of anything (e.g. masts, bilge pipes, etc) that runs through the center of the ship from the main deck. Now that you're getting ready to install the middle deck cross beams. While you can easily access it, be sure to put notches for the bilge pipes in crossbeam 49 (frame 34). The notches will align with holes in the middle and main decks. I believe crossbeam 160 (main deck level) needs notches as well. FYI - I used the middle and main decks for testing alignment on a regular basis. You might want to consider building your middle decks sooner than later. One other heads up just in case you didn't notice, all but one of the main deck cross beams are precut with a curvature for water run off (unlike the lower level beams you must cut yourself). See the notches in cross beam 49 (I actually notched it before gluing it in)
-
Very insightful discussion on cable preservation (aka "serving") Can I assume the above picture that shows the cable preservation steps has the worming slightly exaggerated because there is no "low point" in the cable?
-
Sorry, I'm not familiar with them. All the model airplanes I built were RC.