


Moxis
-
Posts
314 -
Joined
-
Last visited
Content Type
Profiles
Forums
Gallery
Events
Posts posted by Moxis
-
-
-
Quite often I am cutting planks of 50" length or more with my Proxxon, and have no problems at all to do that. I am supporting the stock sideways against fence with a block of wood as described here, and with another hand pushing the stock through. My blade is a Proxxon one with carbide tipped teeth and 1,6 mm kerf. After a little practice everything goes quite smoothly.
-
Very interesting. It begins to be clear that you can electroform or electroplate items relatively easily at home with copper, but us ship model builders would need parts made of, or at least look like made of brass. So I think it is not possible to apply brass surface directly on conductive paint, but you need first to electroplate the part with copper.
But how about gold plating, can it be applied directly on conductive paint? Gold plating could be perfect on small items, it will look like polished brass, never oxidize and very thin layer of gold doesn't cost very much more than plating the parts first with copper and after that with brass.
-
-
-
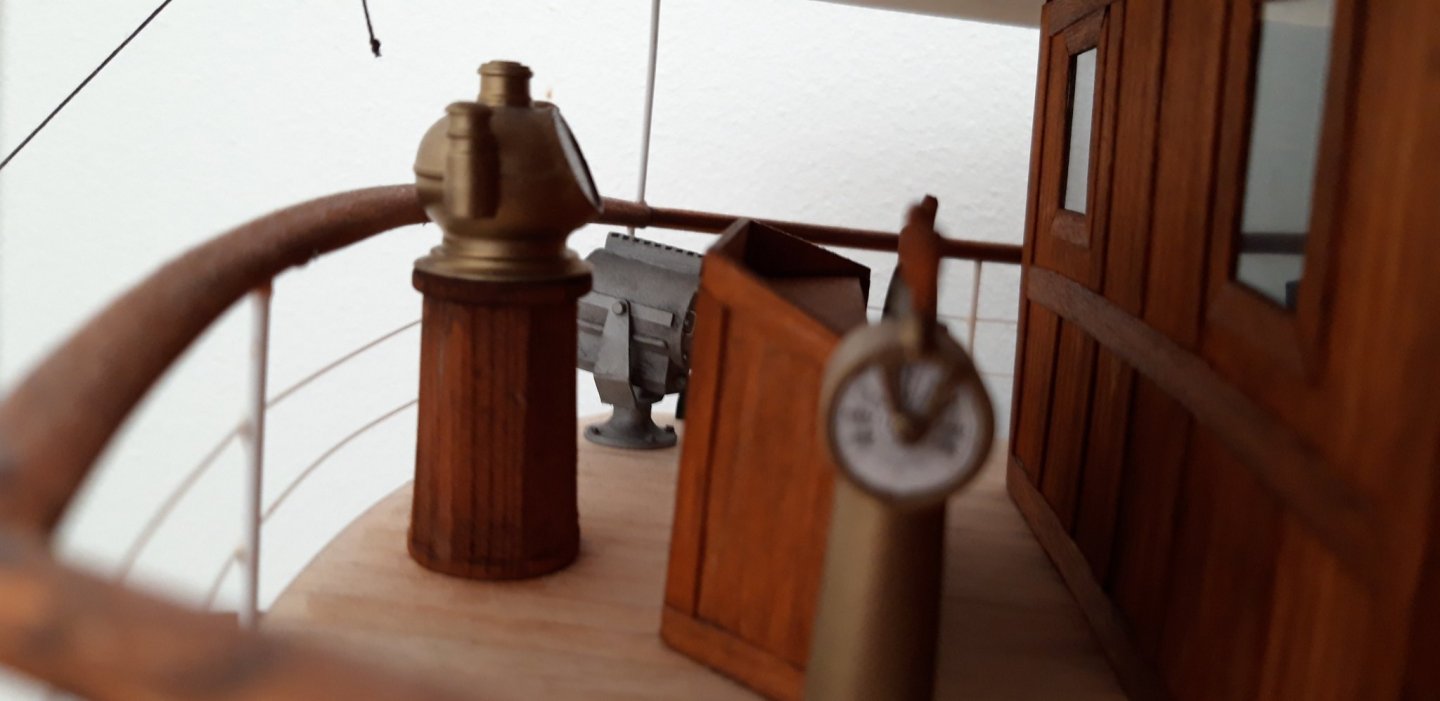
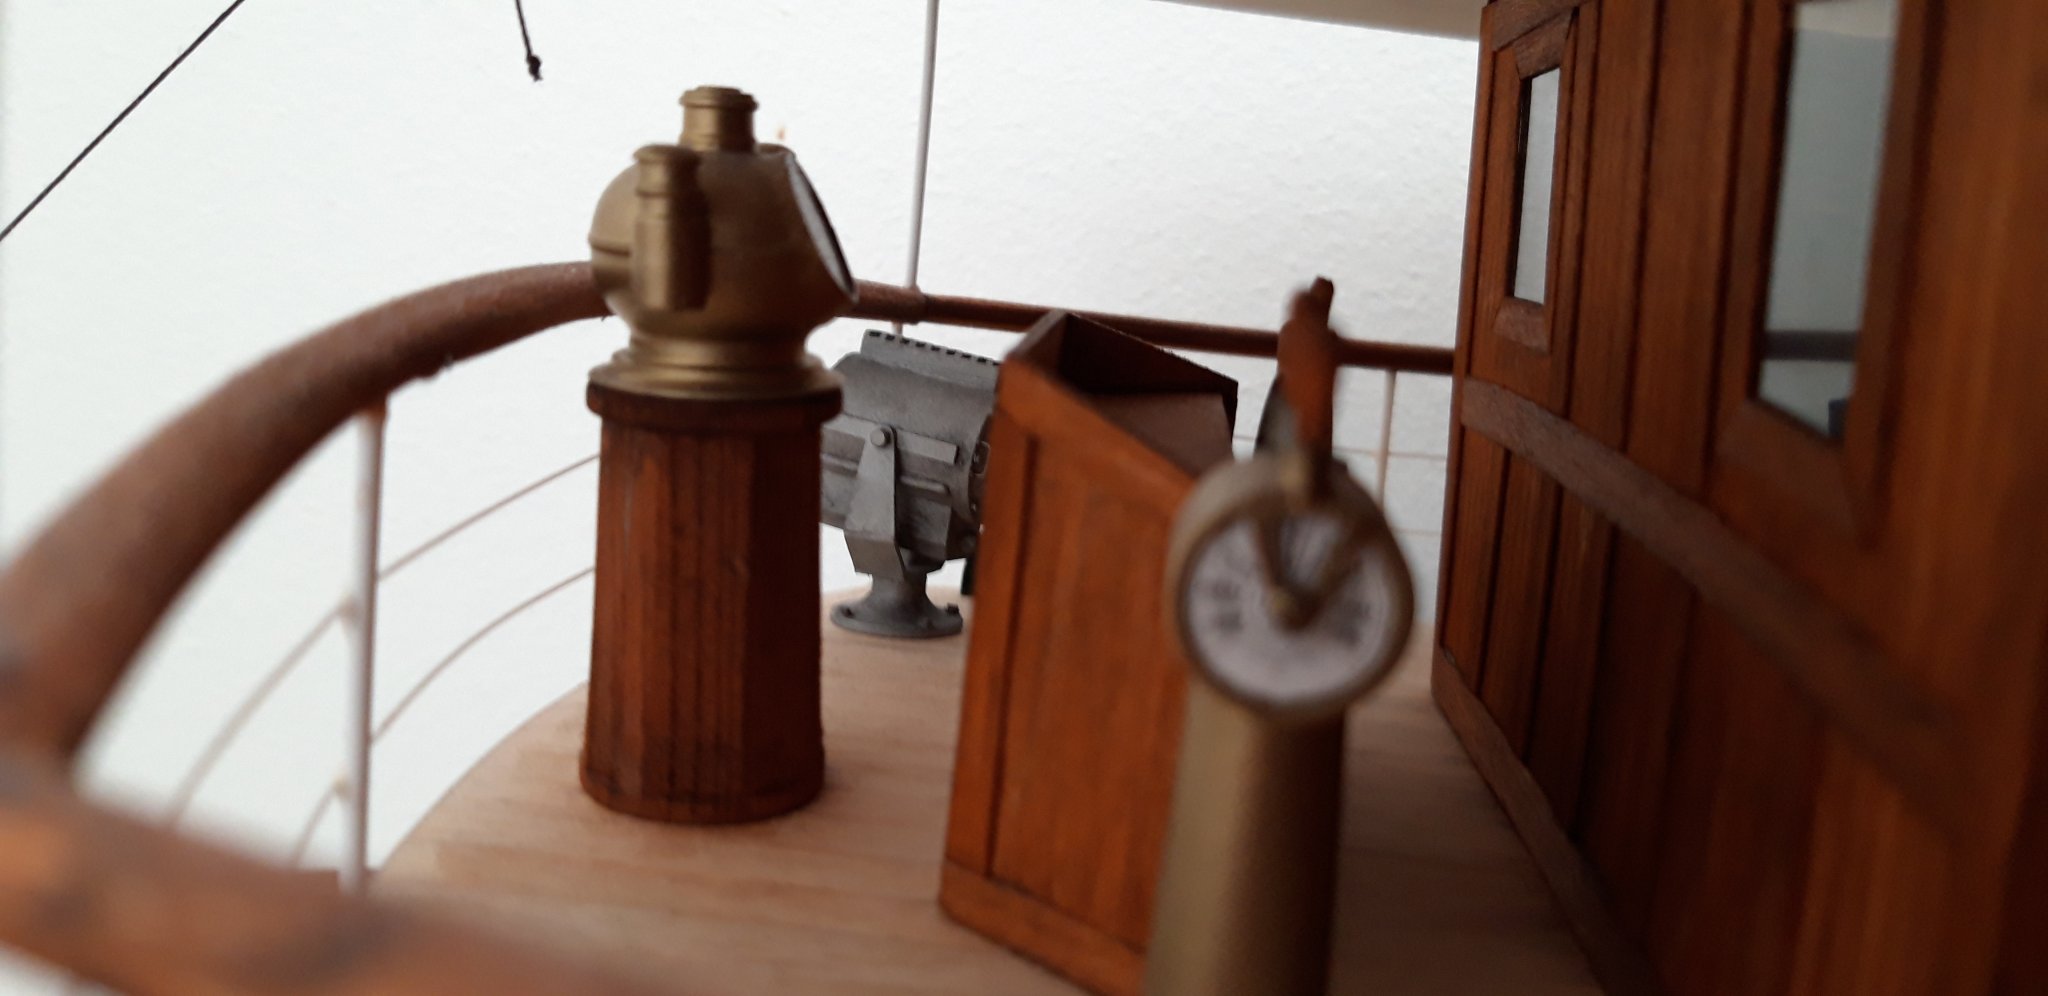
When I was making a round compass cowl for my Maaninka steamer, I first made a suitable sized ovalish ball out of plasticine. On the ball I applied a thin coat of a gel of milled fiberglass and epoxy, but left the underside open. When the epoxy was cured I removed the plasticine so I had a thin ballform coating which was sanded smooth and painted with brass colored Alclad. When weathered with black pigments the result looked quite realistic, although was not shiny polished unit as normal with these things. Thin celluloid plate was glued inside the cowl as a glass and nice compass rose found in Internet was scaled and printed & attached under glass. Then the cowl was glued on top of a wooden pinnacle.
- mtaylor, Roger Pellett, VTHokiEE and 2 others
-
 5
5
-
So far I have thought that the best scroll saw ever is Hegner. https://www.hegner.co.uk/products/machine-tools/scrollsaws.html It could be interesting to see a comparison between Dewalt and Hegner.
-
I have used milled fiberglass mixed with epoxy to a gel like stuff and applied it inside the hull. When cured it strengthens the hull considerably and makes it watertight.
https://www.amazon.com/Great-Planes-Milled-Fiberglass-Ounces/dp/B001BHEGRO
- thibaultron and mtaylor
-
2
-
Thanks Per and Jaager. My Corel version was many years old, I think it was #7 or near. No key or anything left, so I think it is not possible to restart it any more.
GIMP might be nice. I have to study it more carefully. I don't need this software very often, so don't want to invest hard earned money for it.
-
From time to time I need some flags or other graphic drawings for my projects. Earlier I was using Corel Draw which is a vector based program and very useful for these tasks. Unfortunately a few months ago my old computer crashed together with Corel Draw. I was immediately downloading a free trial version but that is accessible only for 30 days. Buying new version is out of question because of high price.
Does anybody know any other free or affordable graphic design software which would have nearly same features as Corel has? I was already testing Inkscape but results are not very promising, even after learning and reading through numerous tutorials available.
-
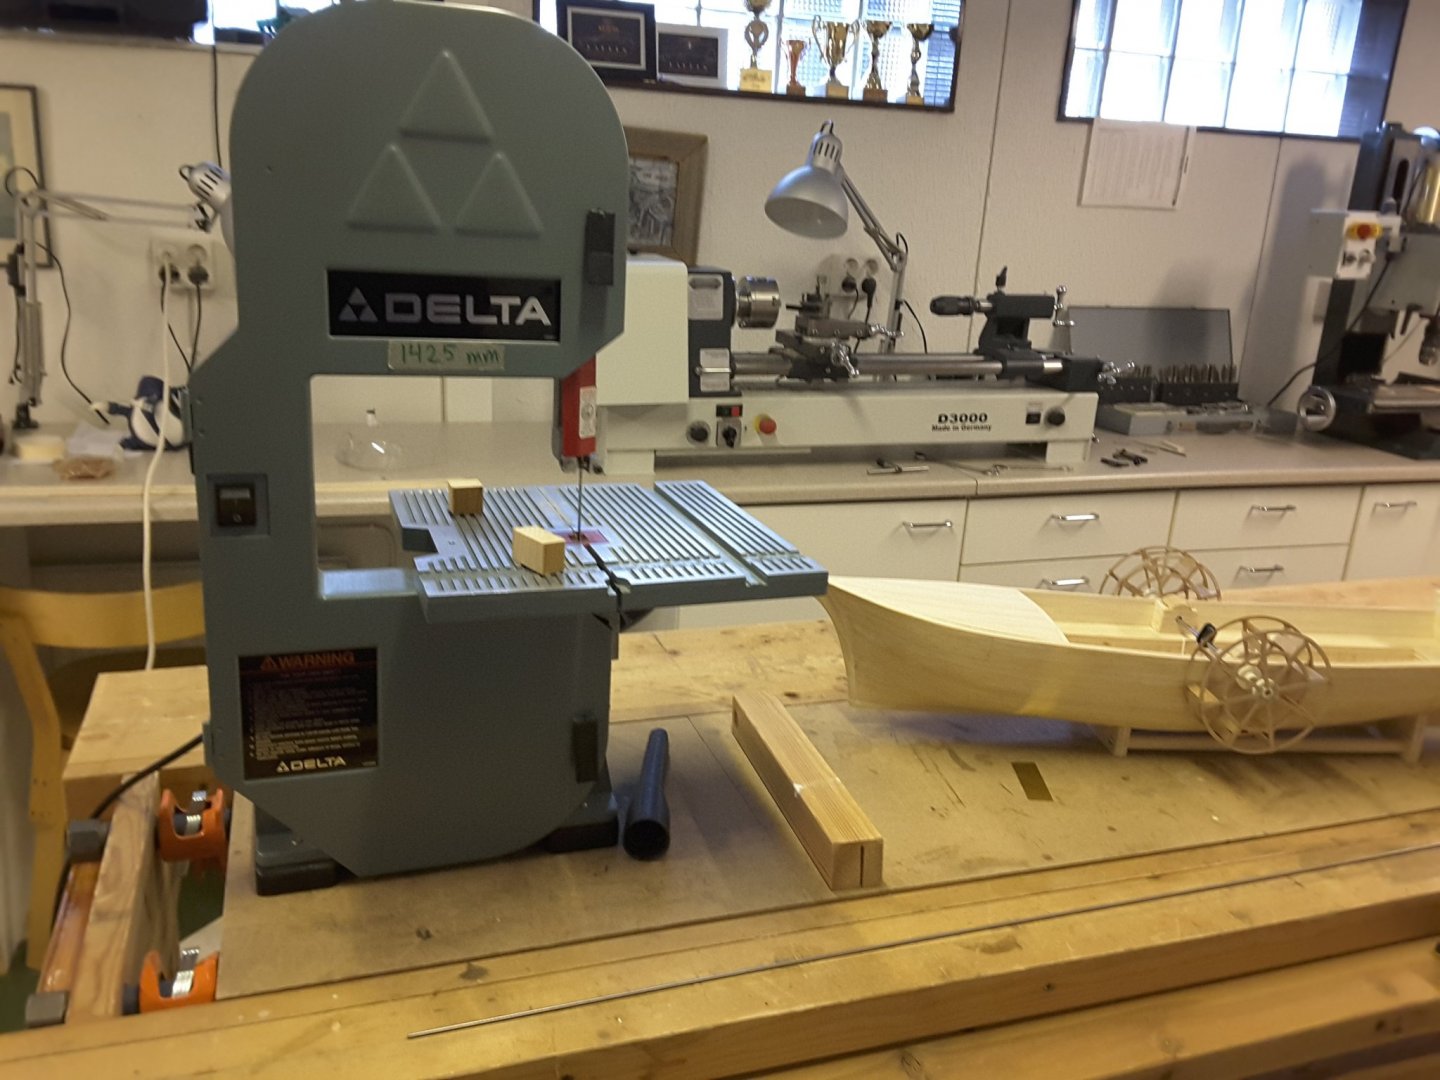
Thank you guys, now I know I have a 7,8" bandsaw (wheel diameter 200 mm), a nice old Delta which could be bigger and more accurate. But with it I have built a lot of models and it fullfills my needs satisfactorily.
I had a Delta scroll saw too, but never learned how to use it properly. Or maybe it just was not the perfect tool, so I let it free to recirculation for somebody else's frustration. A Hegner would be my dream, but too expensive for a retired person. So old school manual jeweler's saw is what I am using to produce small accurate parts. Time I have enough!
-
-
-
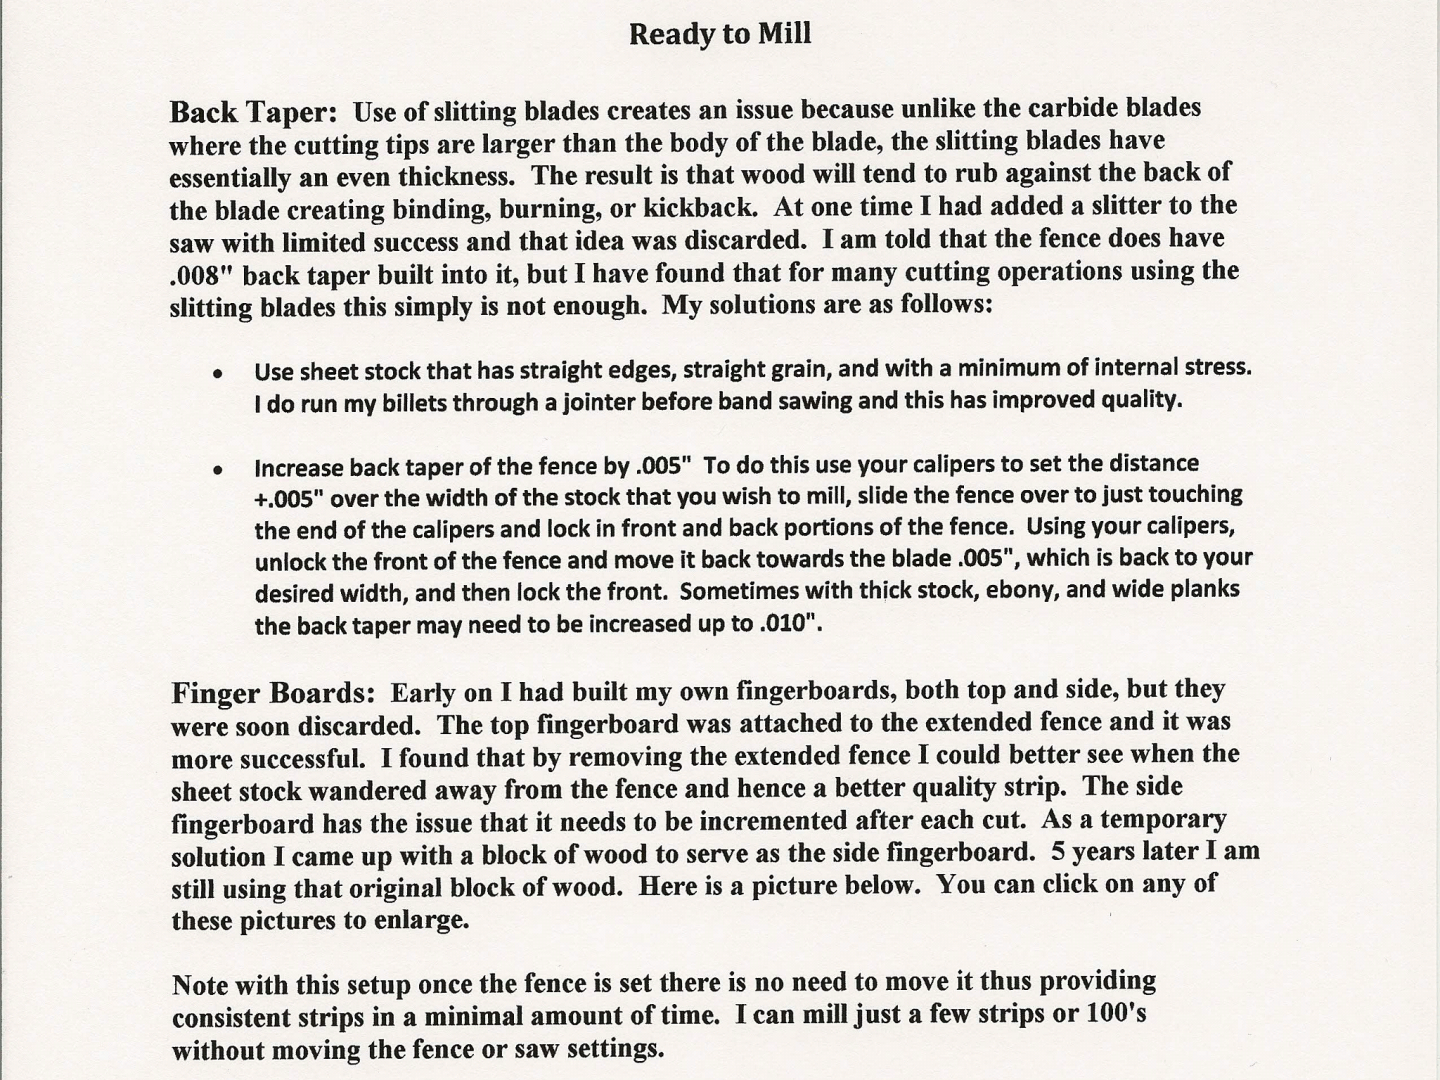
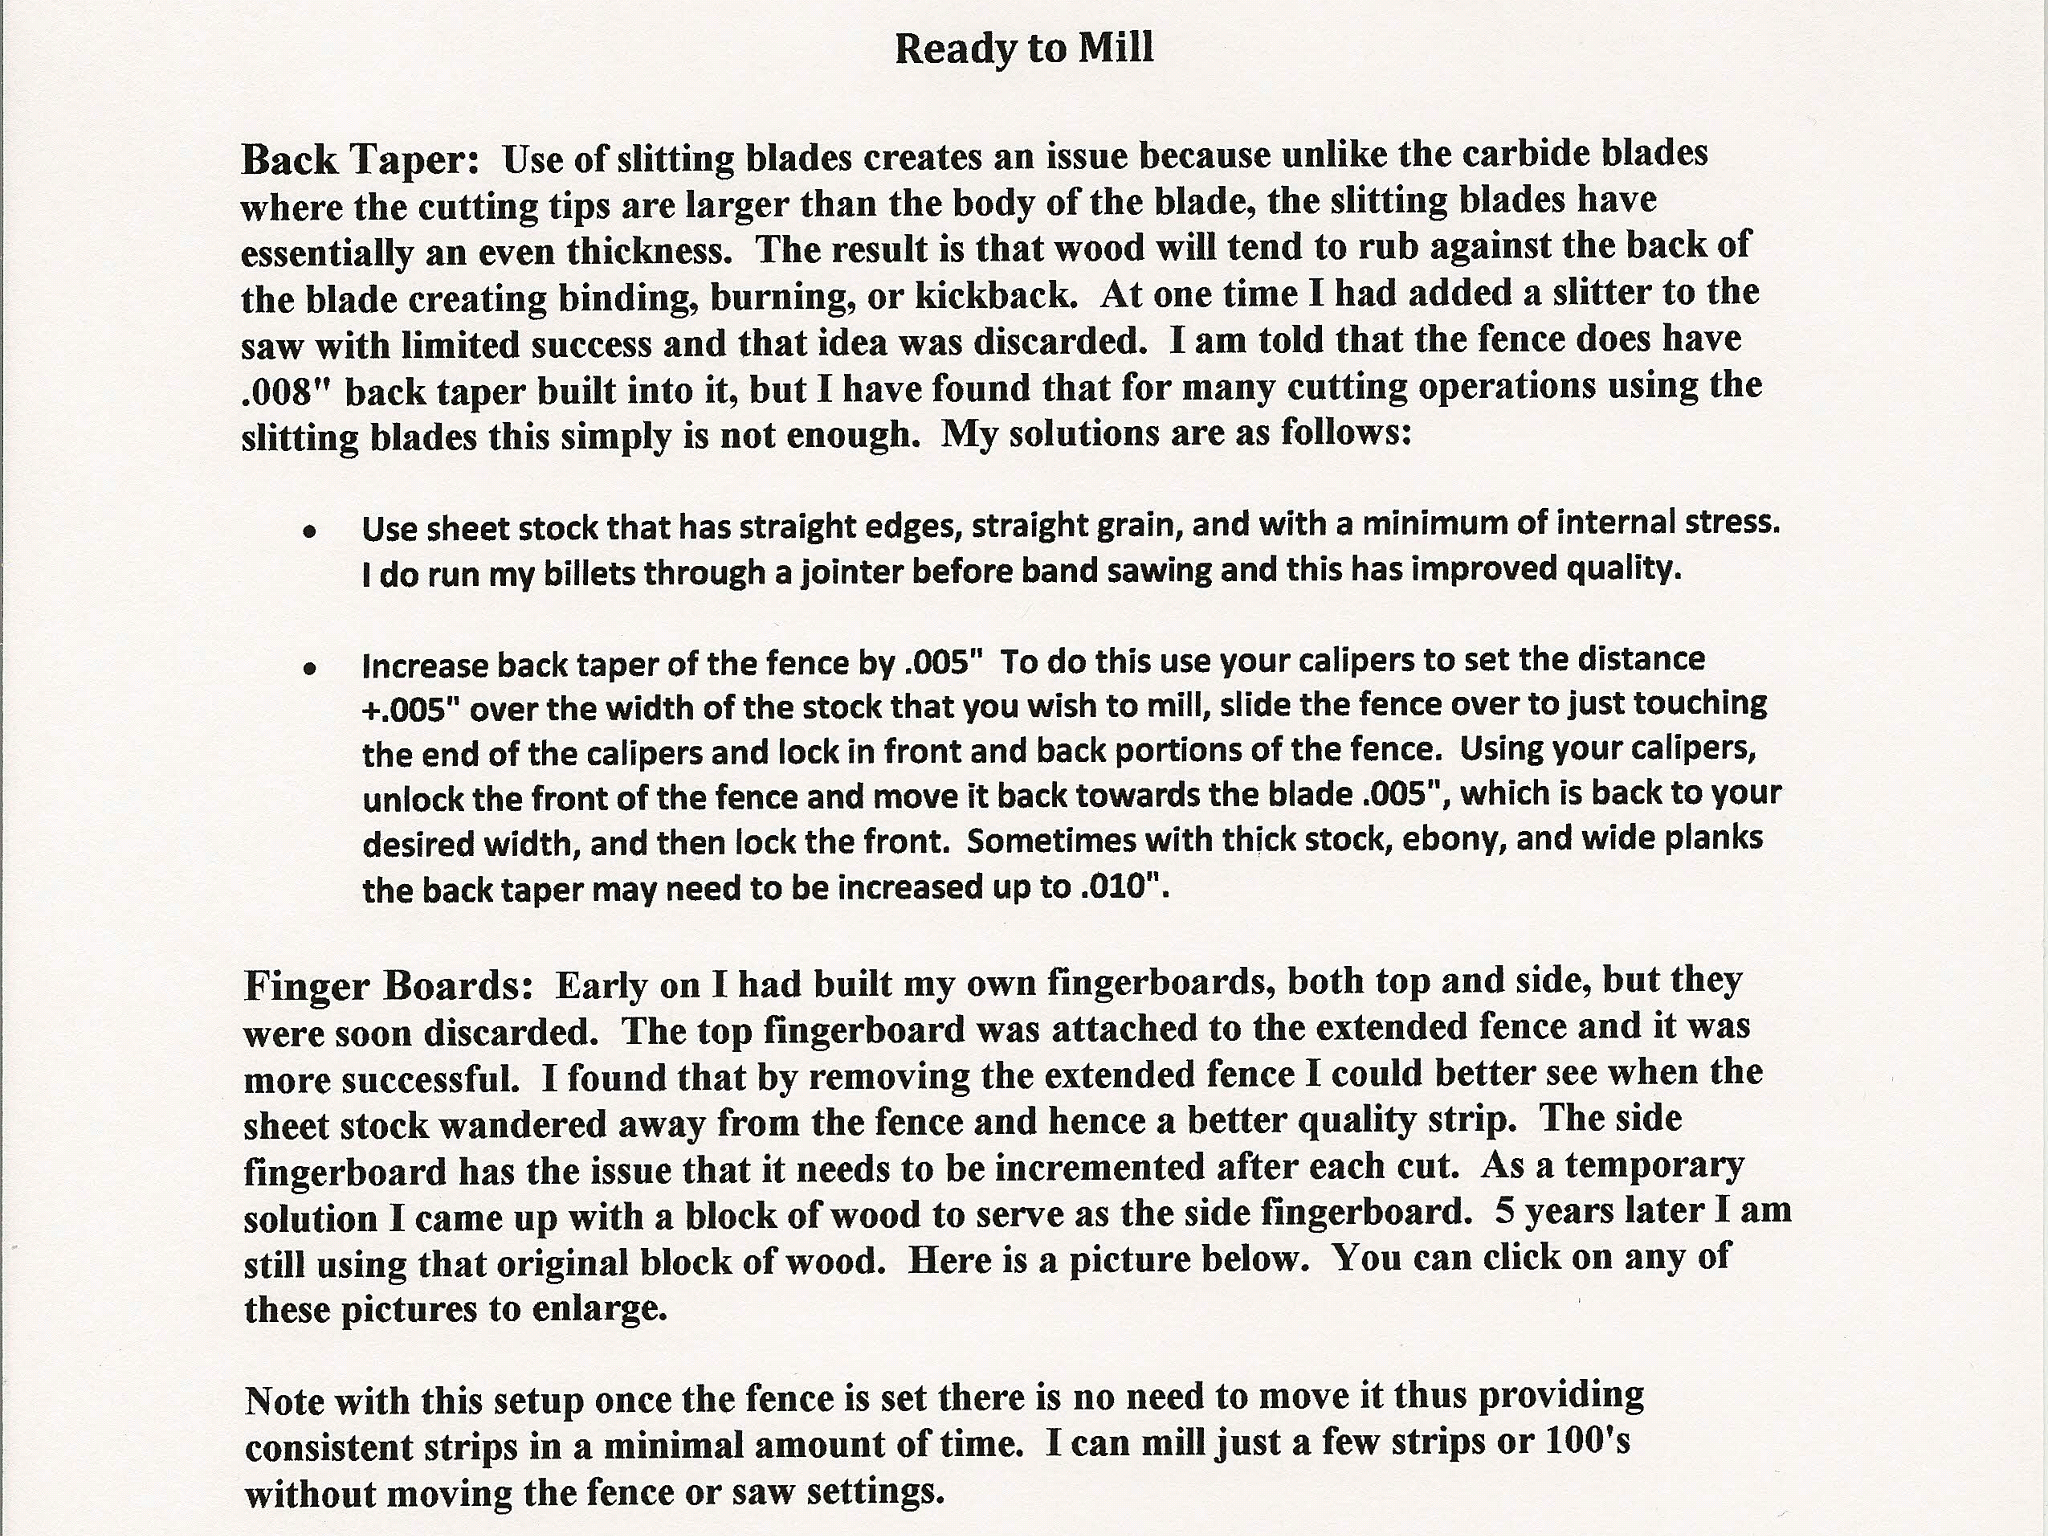
I was reading through the instructions .pdf but didn't quite understand the chapter "back taper". Is it really so that the fence of Byrnes saw is divided in two, the part before blade and the one after blade? And this gentleman is adjusting the part after blade a bit (0.005") differently than the forward part? Or is there something that I just don't understand?
-
Good information about the blades, thanks Mark!
I have tried the slitting saw blades made of HSS for ripping planks but had not very good results. The blades were bending and didn't give straight strips, and width of planks were not at all equal. So this is why I changed into tungsten carbide tipped blades and have had much better results.
But it may be that my blades were too thin, they had thickness of 0,5 mm and 1 mm.
-
I have a Proxxon FET, which is a great little saw which I use every day for scratch building. I am using also a 36 teeth tungsten carbide tipped blade with the saw, which is better for ripping planks & other work than the stock one. But because the saw is already an old model, it has one drawback: It does not have the micrometer adjustable fence which is standard with new saws nowadays.
So if you folks are thinking to buy the FET, (or a Micro Lux alternative) be sure that it has this micrometer adjustable fence. And buy the 36 teeth tungsten carbide tipped blade as well. You won't regret it.
-
1 hour ago, Dr PR said:
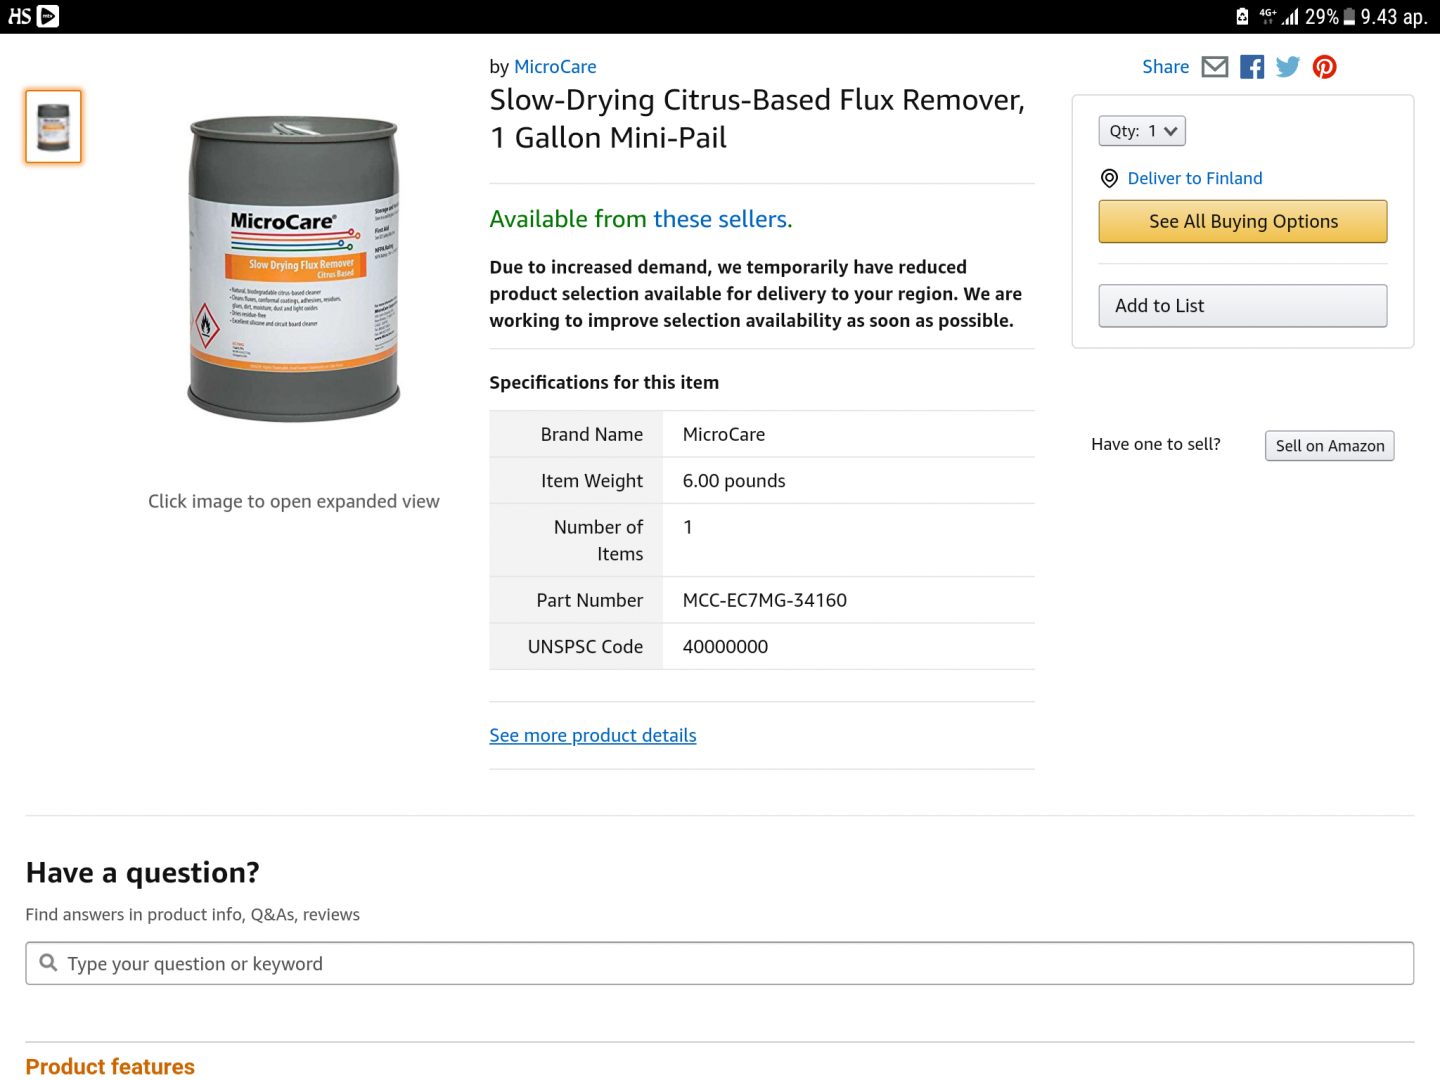
I used to do a lot of micro electronics soldering while designing and assembling prototype electronics assemblies. For that I used the pencil iron with a very tiny tip for solder joints on ICs with 0.01 inch (0.25 mm) wide pins with 0.01 inch spacing. We soon learned that the best flux is the aquatic citrus based flux. It smells like orange juice! It is a liquid and you can paint it on with a small brush. It flows readily between the two pieces to be soldered and draws the solder in for an excellent joint. It flows into extremely tiny holes and cracks. Then, being water based, it is easy to wash off the residue. It works for any type soldering. It is my go-to flux for everything except very high heat soldering with a torch.
I was trying to find this flux from internet but found only the flux remover. Is this the stuff you are referring to?
-
Very interesting topic. Someone was asking where to get screws smaller than 1,0 millimetres. Here you can buy screws starting from M0,6: https://knupfer.info/shop/index.php/deutsch/modellschrauben-messing/messing-hoher-kopf.html
-
1 hour ago, cafmodel said:
1/64 scale warships, super huge👍
I am beginning the build of a model of a Finnish armoured cruiser Ilmarinen in 1/64 scale. It was 93 metres long, resulting to a model length of nearly 1,5 metres, so not really very long. But it would be nice to get a bunch of seamen on board.
-
-
I wonder if it would be possible to create seamen in 1/64 scale and WW 1 or 2 era? If yes, I would need 10's of them for my new warship project. And what would be the approximate cost?
-
-
-
Beautiful building as always Aviaamator!
- mtaylor and aviaamator
-
2


3d printing crew figures
in 3D-Printing and Laser-Cutting.
Posted
This is exactly what I would like to do too. The quality of prints made with resin printers is way better than ones produced with machines using filaments. Also the cost of these printers begins to be acceptable.
But what is still prohibiting me to step on this path is the problem to learn to use a 3D design software so brilliantly that I could be able to produce something that I could be happy with.
I have a hobbyist's free version of Fusion 360 software which I have tried to learn, but still after a few month's practize I am still far from being able to design parts for ship models I would like to print.
So my question is, which software you guys are using to design your parts or crew members, and how have you learned to use it properly so that the quality of prints is acceptable?