


Moxis
-
Posts
314 -
Joined
-
Last visited
Content Type
Profiles
Forums
Gallery
Events
Posts posted by Moxis
-
-
As others have already said, extraordinary work Aviaamator. It is amazing how you are fabricating difficult parts out of solid copper. That demands nerves and a steady hand.
- aviaamator, John Allen and mtaylor
-
 3
3
-
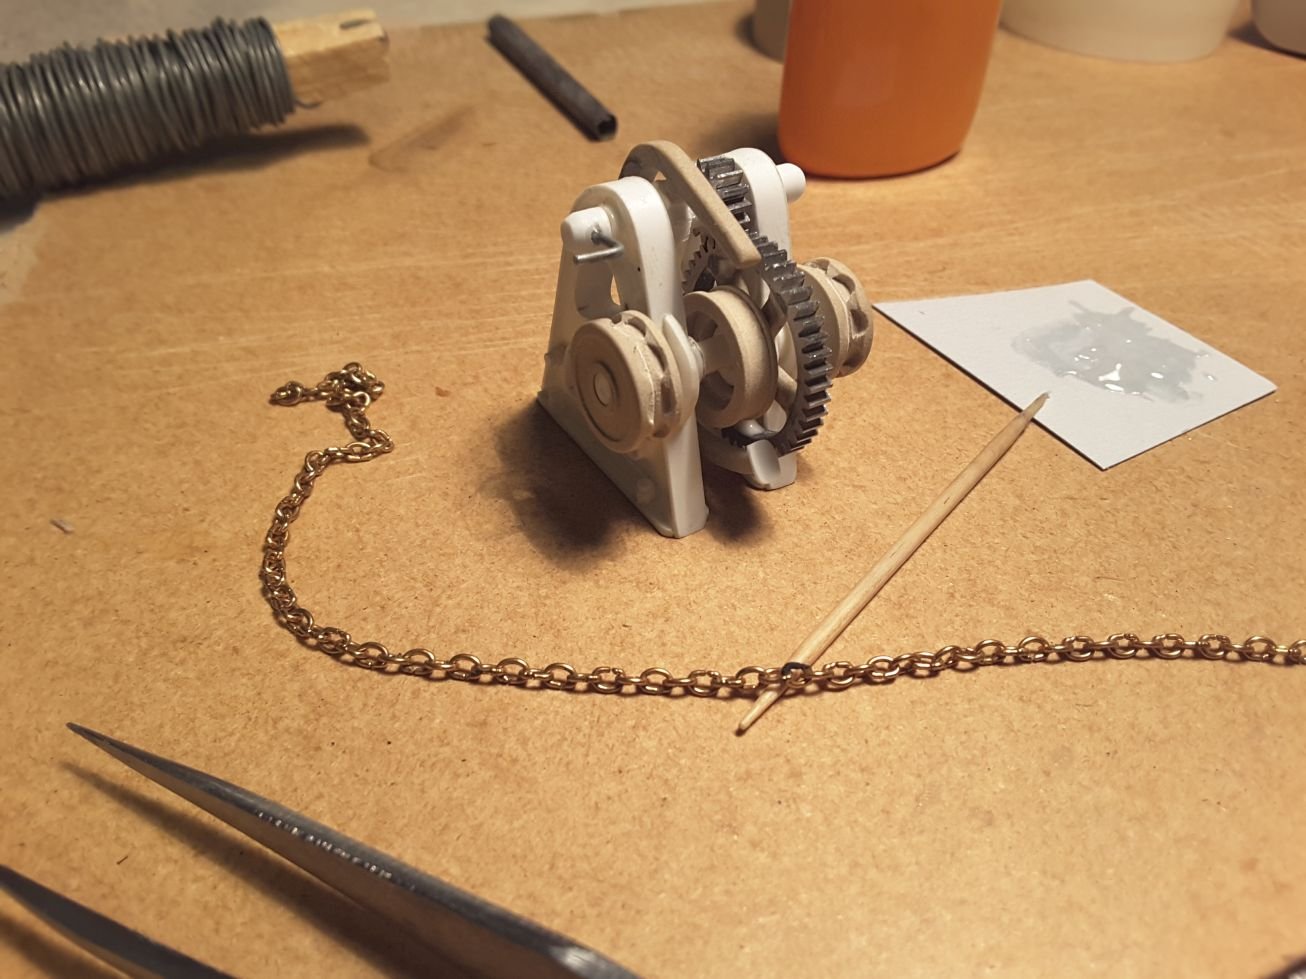
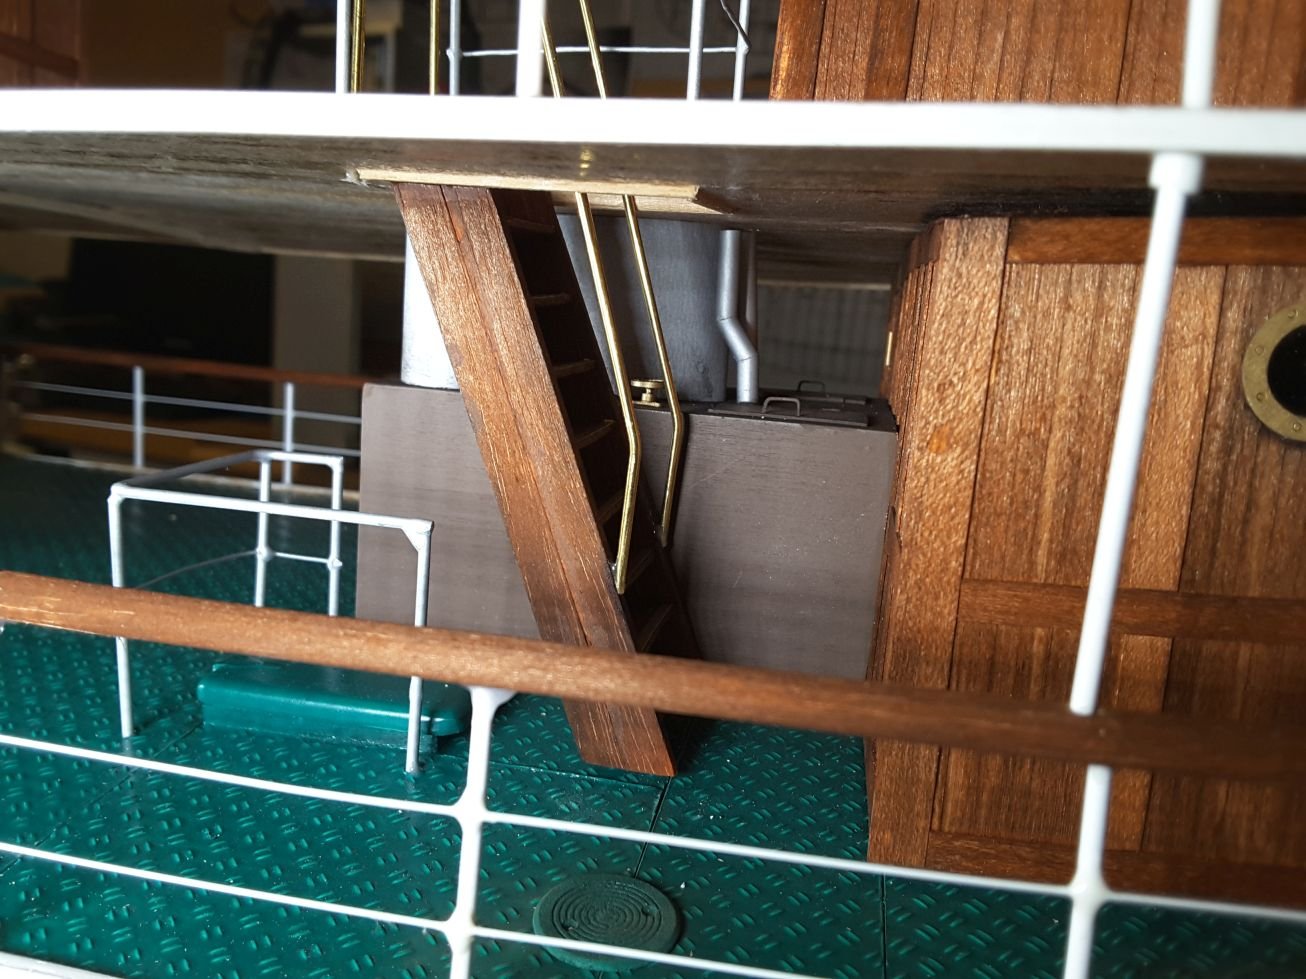
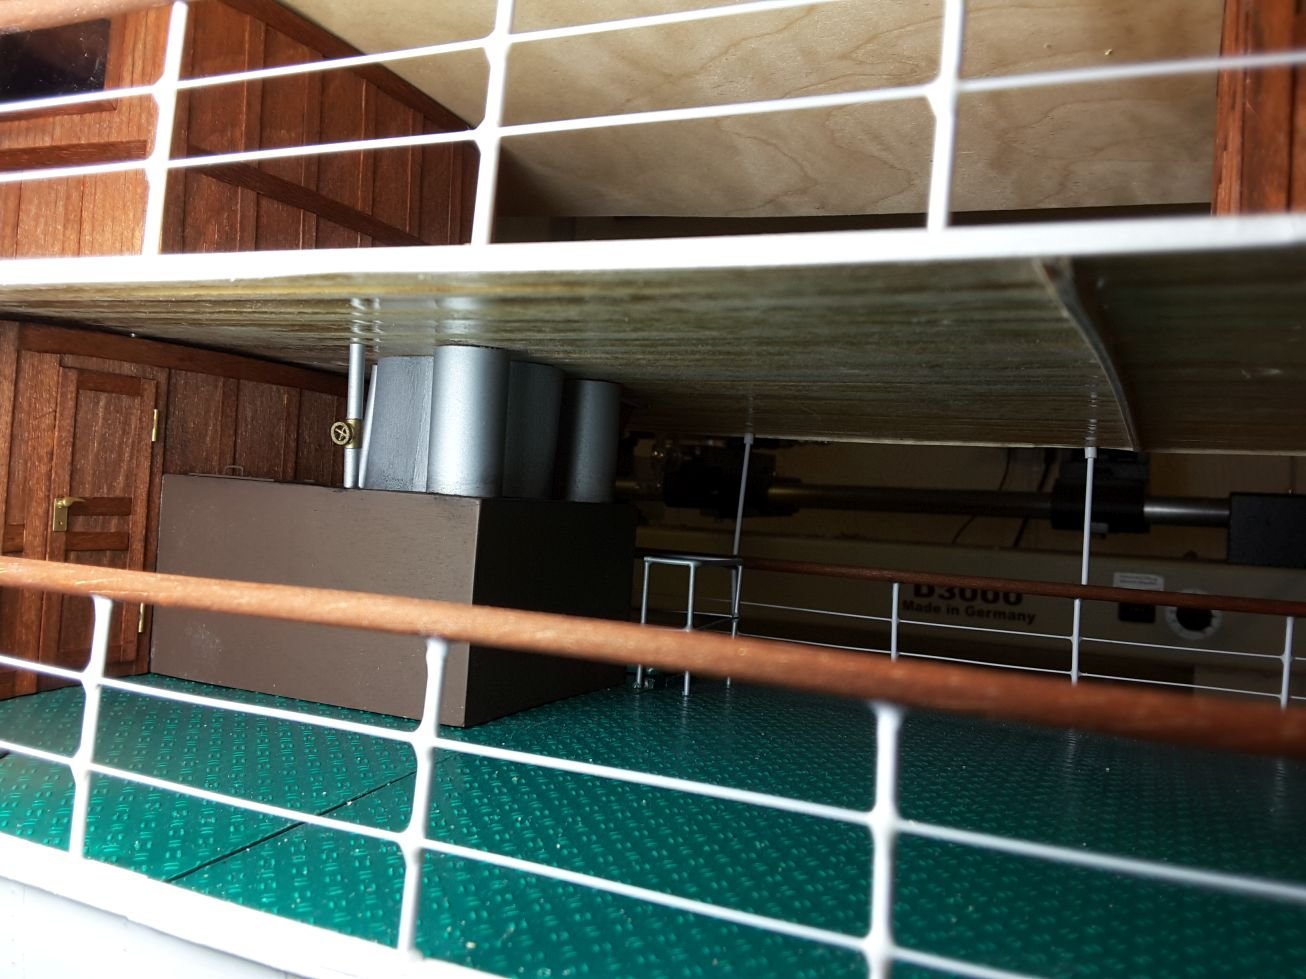
Again it is time to update the project. All details coming on the main deck have been made like bollards and anchor winch on the foredeck & ladders, funnel and some steam pipes at the middle. Those latter parts are difficult to photograph because they are situated in the shadows between decks, but I hope something can be seen.
Anchor winch under construction. It has been made of acrylic sheet, sikablock and a pair of suitable gears from which centrum has been turned away and replaced with new parts.

Anchor winch painted and installed on the foredeck together with bollards and smaller components.
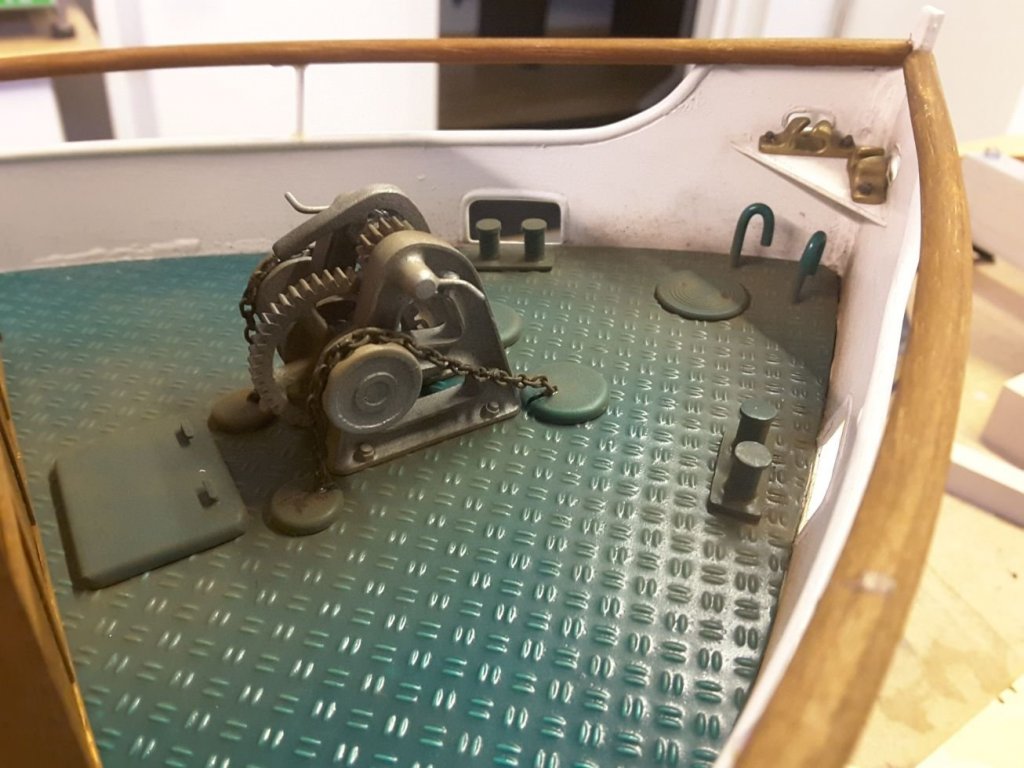
Ladders leading to upper deck with handrails. At the background are the funnel & some steam pipes with valves.
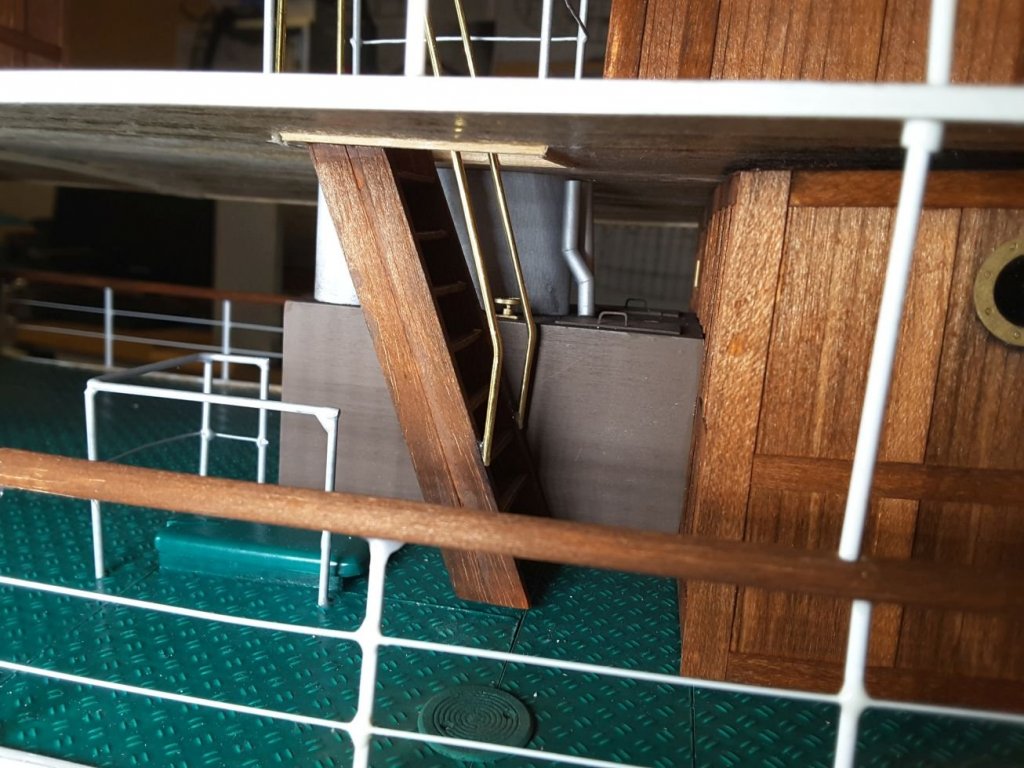
Seen from the other side.

- cog, amateur, paulsutcliffe and 13 others
-
16
-
-
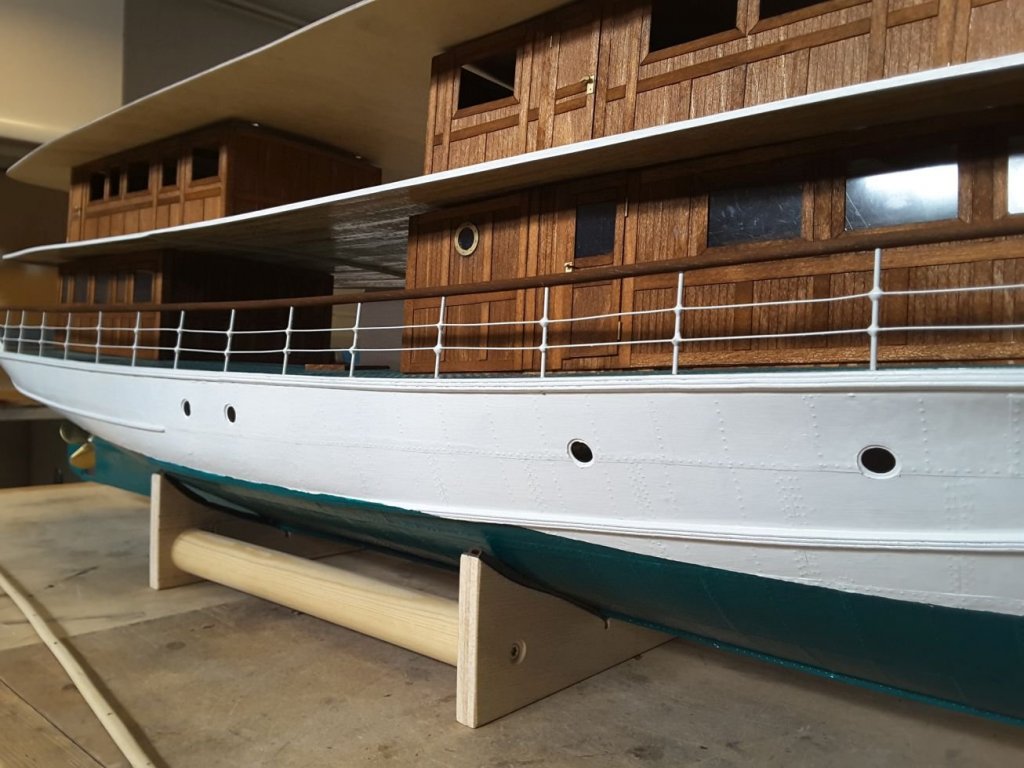
Yes, ratlines is the second difficult task with which I have struggled many many times. Luckily this ship doesn`t have them. But this is how the railings look now. Still not quite perfect but much better than earlier. I won`t change them any more.
-
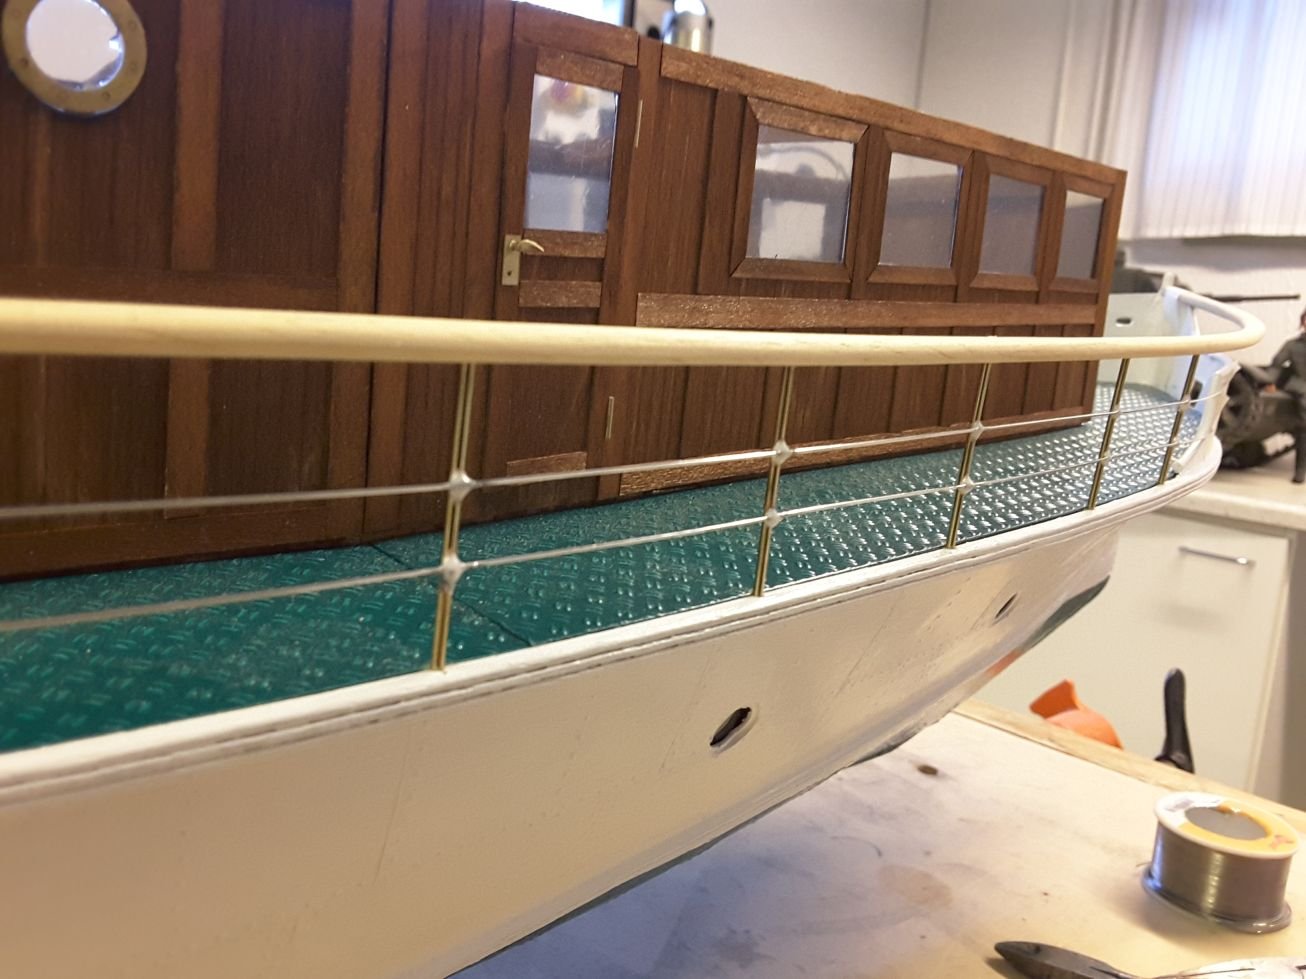
Thanks Amateur for your kind words! Now that I have finished the railings also on the upper deck, I found the ones on the main deck terrible. This is why I dismantled them and am rebuilding them using styrene. Stanchions are 1,6 mm and "wires" 0,5 mm rod. Now it looks much better.
It is always so that when you start to build something, first results are not so good as they should be, but improve when you learn how to work better. And for this reason you just have to dismantle the first ones and try again. It has happened to me several times. And I think I am not the only one who has found the same thing.
-
Thanks for your kind words Nils and Mark. When watching those railings I even have thought to dismantle them and try again. But you have convinced me to leave them as they are and concentrate to new items.
- Mirabell61 and mtaylor
-
2
-
Perfect working Michael. And those methods with a rolled fan and tape to find the right curve are excellent. I have to adopt these for my next build.
- michael101, EJ_L and Mirabell61
-
3
-
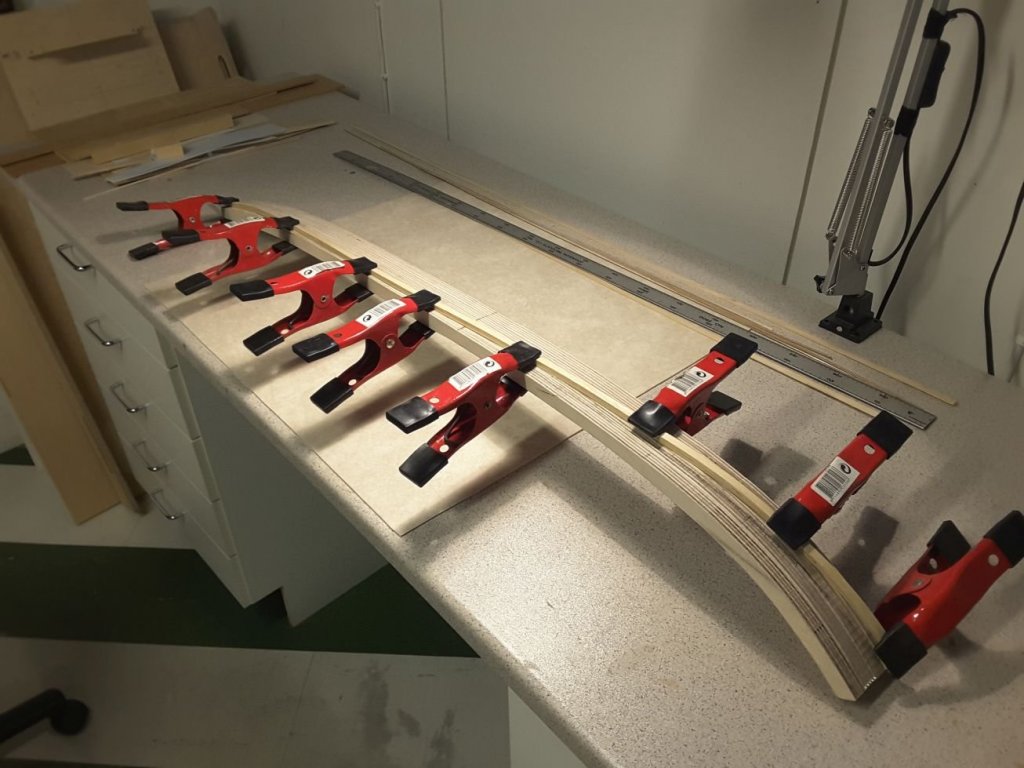
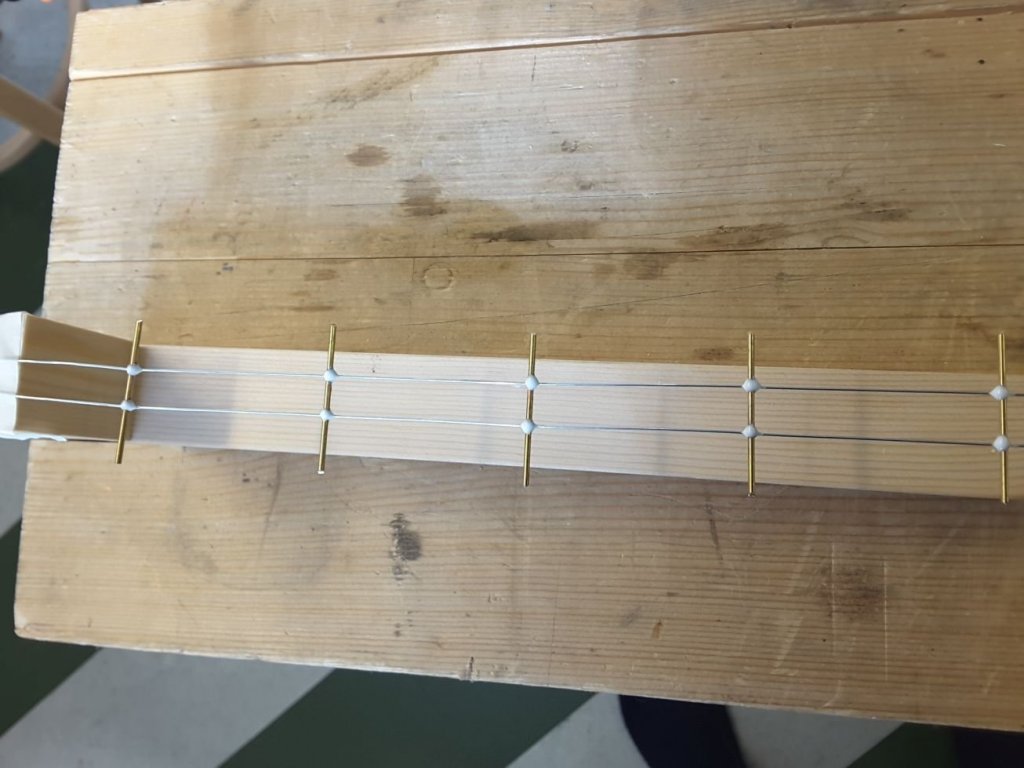
Some time has elapsed since the last update. However it has been busy time at the shipyard. Boat deck has been made by gluing 3 pcs 0,6 mm plywood together on a form. It was much easier and faster to make that the main deck of thin strips.
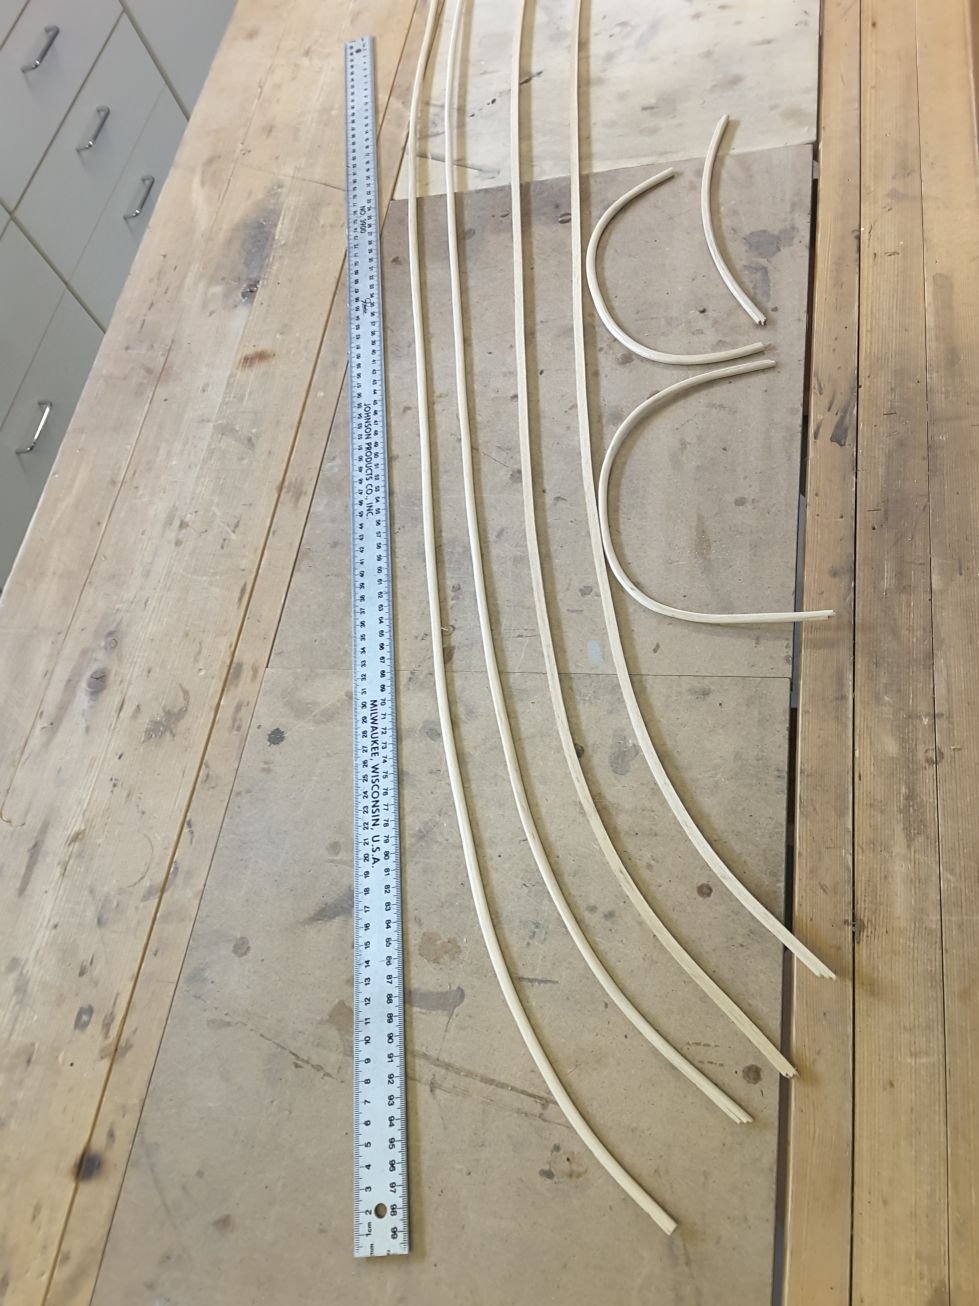
After that I was consentrating into railings. My first idea was to buy all the stanchions ready, because of the "balls", which are difficult to produce. However no suitable ones were found with correct dimensions, so nothing else remained than make them by myself. And after all about 80 pcs are needed, so they wouldn`t have been cheap as well.
But first I had to make the wooden handrails. They were produced after many trials and errors of 3 pcs 2x6 mm wooden strips which were glued together on a form. This was a bit difficult, because handrails are bending in two directions, and after removed from the form they start to straighten a bit, so the curvature of the form must be tighter that that of the ship`s deck. But as said, after three or four errors I finally was satisfied with the result. Not perfect yet, but I can live with that.
The stanchions were made of common 1,5 mm brass rod, and the wires attached to them out of 0,6 mm copper wire. Wires were soft soldered into stanchions, and "balls" were made of putty mixed of microballons and epoxy. And finally painted white.
Handrails glued together on a form. Difficult shape because bending in two directions.
Handrails in different stages of fabrication.

Stanchions of 1,5 mm brass and 0,6 mm wires soldered together and "balls" made of epoxy/microballons putty.
Railings test fitted before painting.
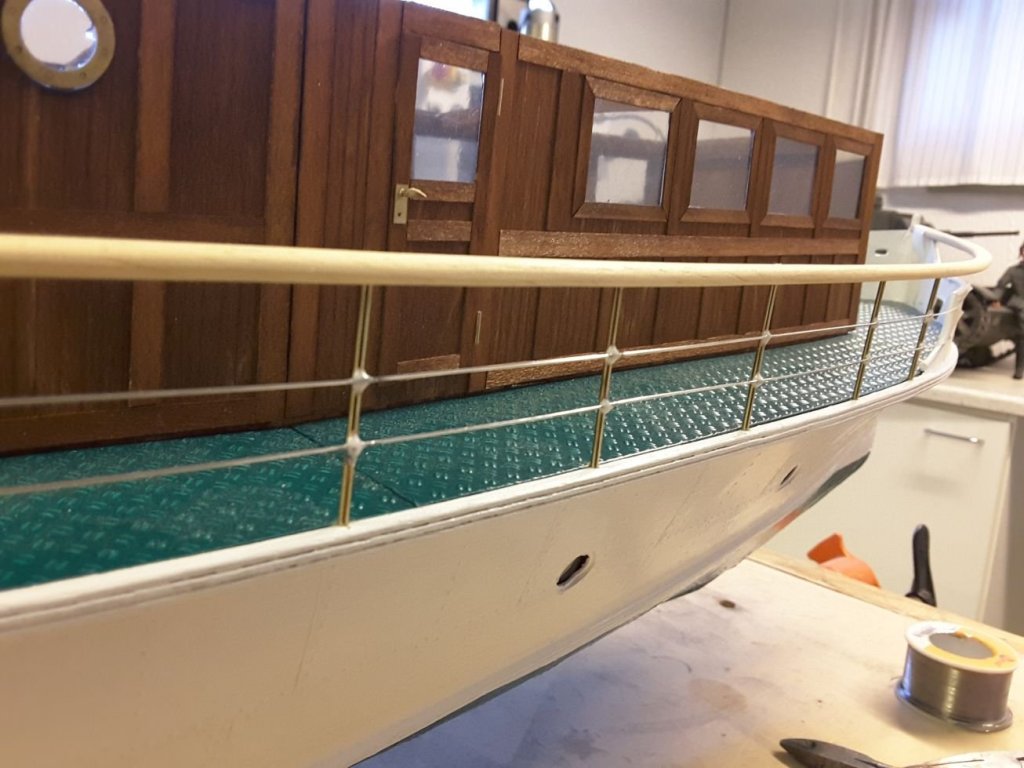
And glued into ship. Not perfect but I can live with that.
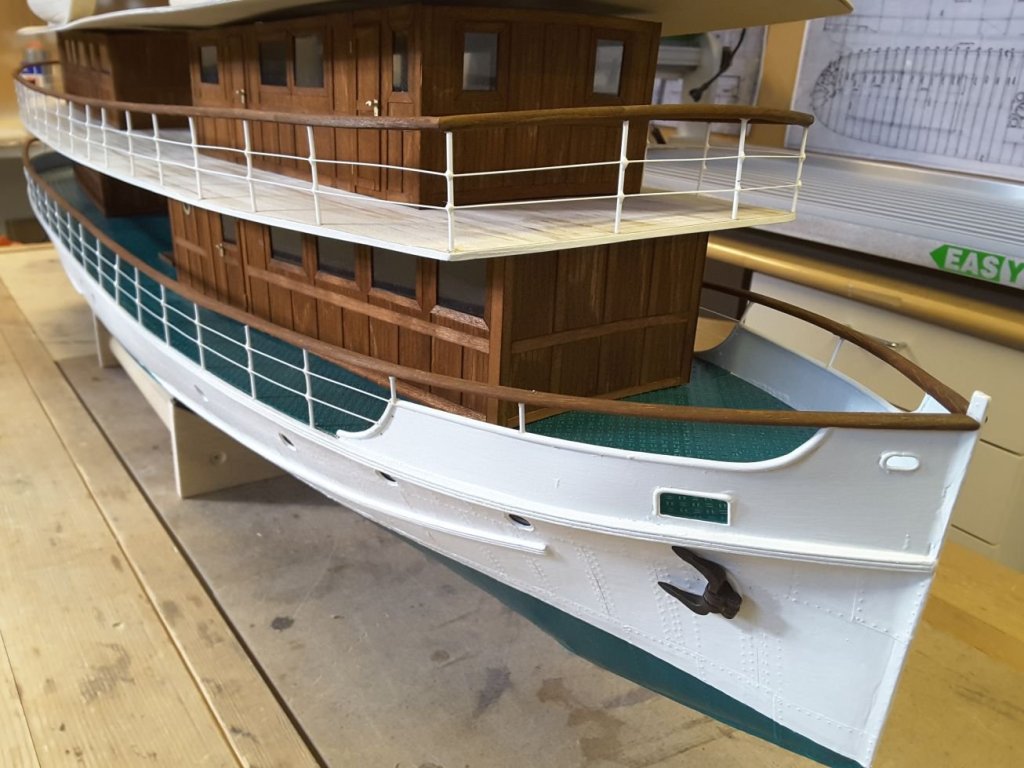
Main deck railings ready.
Seen from front. Next the same thing for upper deck.

- John Allen, cog, yvesvidal and 10 others
-
13
-
Hello Amateur, the scale of those people is 1/24, so almost the same as the ship (1/25). It might be the angle from where the picture has been taken.
- mtaylor and John Allen
-
2
-
Thanks for this idea wefalck!
I thought it too to make only one boat and fabricate a form of silicone rubber or other stuff and then cast or laminate copies of that with fibreglass or equivalent. But this big boats need lot of material, so perhaps they will be more expensive this way than just buy ready plastic lifeboats.
After all it is not a very big work to start series fabrication and build all four boats from scratch. And as said, this is hobby without any schedules, and then I can say to everybody that the whole thing has been made by me.
-
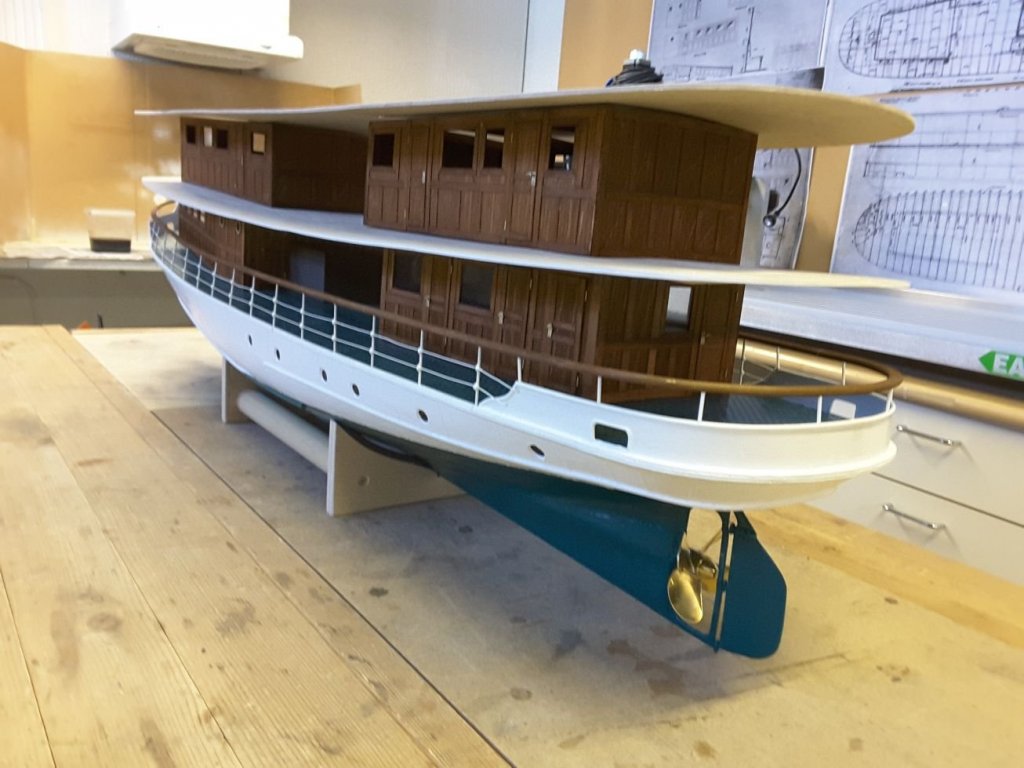
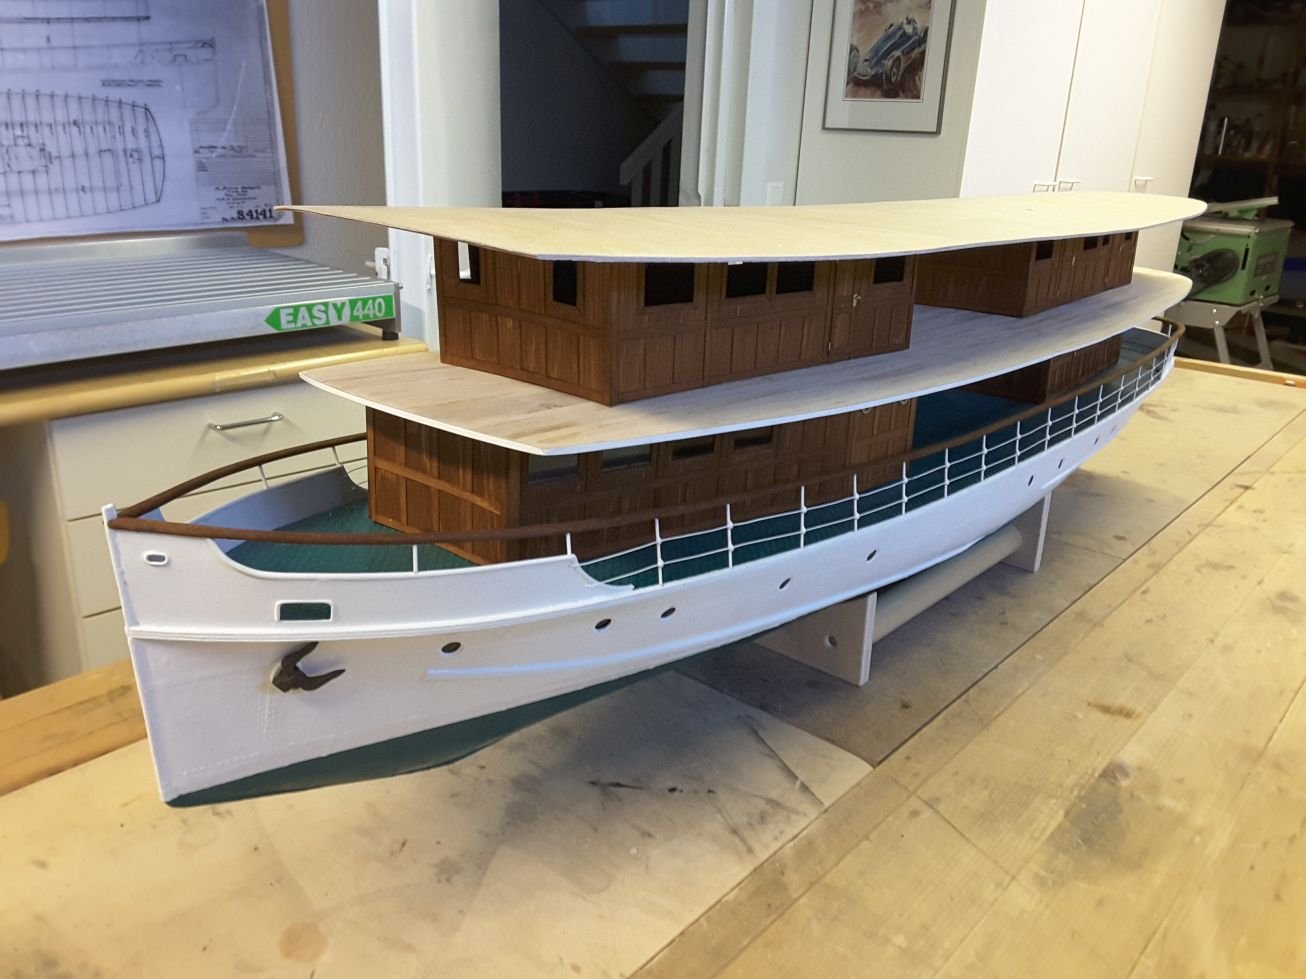
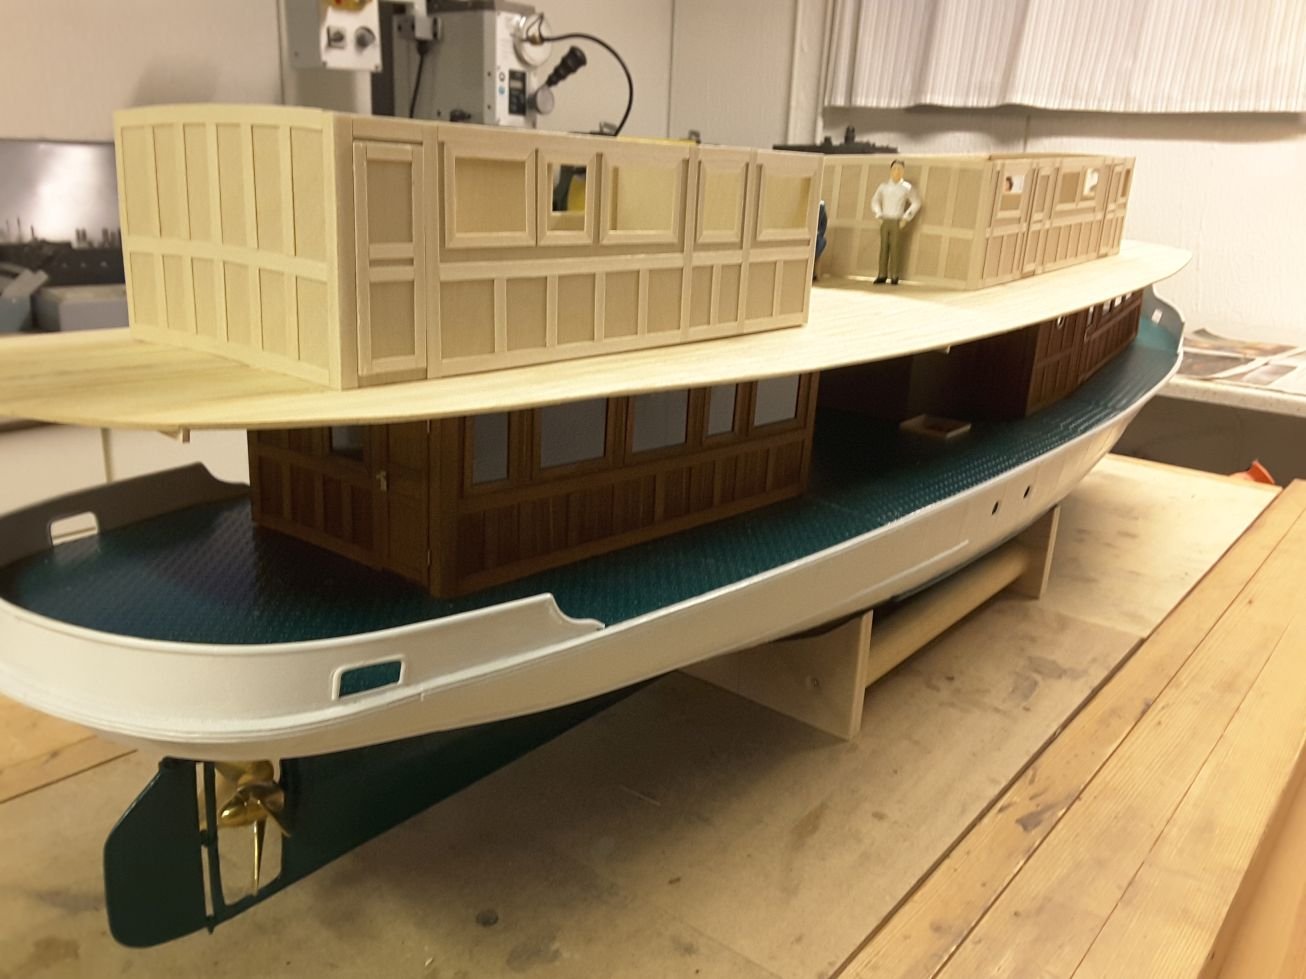
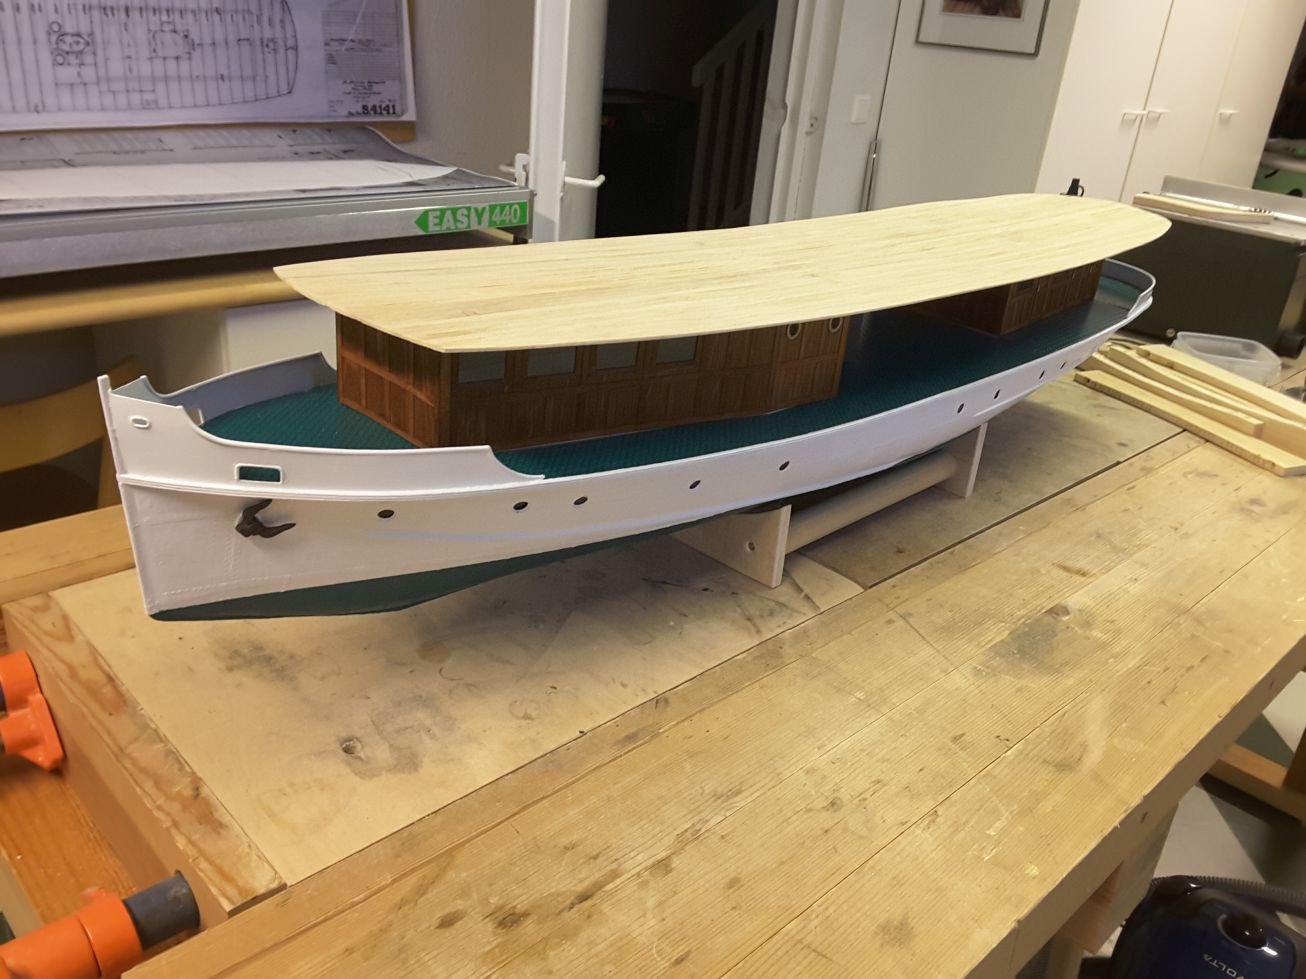
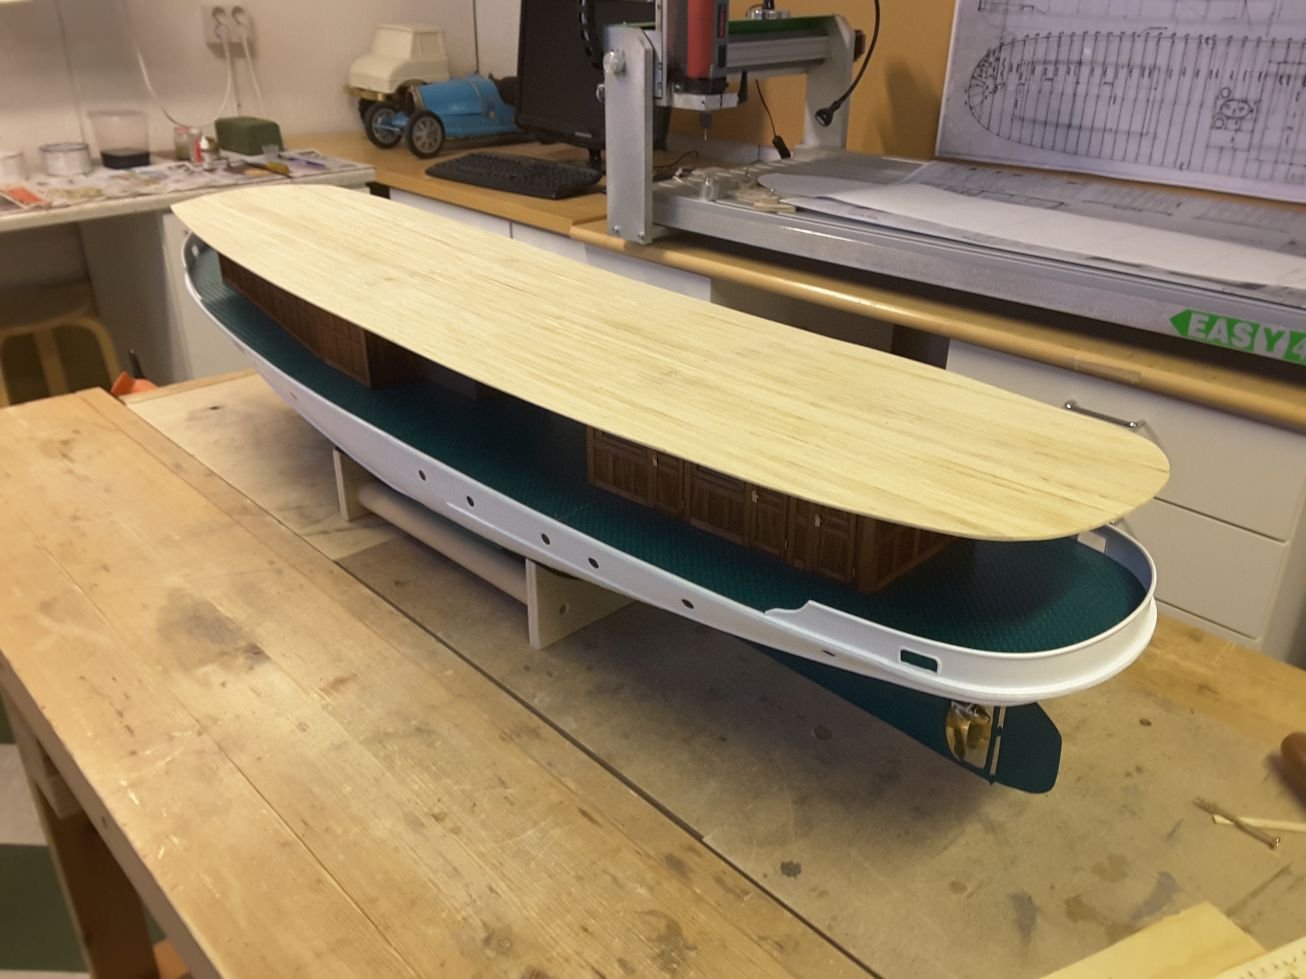
Finally also the cabin structures on upper deck are done. Although I love making models, but somehow I am completely exhausted to build these wall panels one after the other.
The next thing is the boat deck. I am going to build that using only 2 sheets of 1 mm plywood which are then glued together on form giving "bulkheads", I hope that will be successful.
And then starting to make details, which is the work I love most.
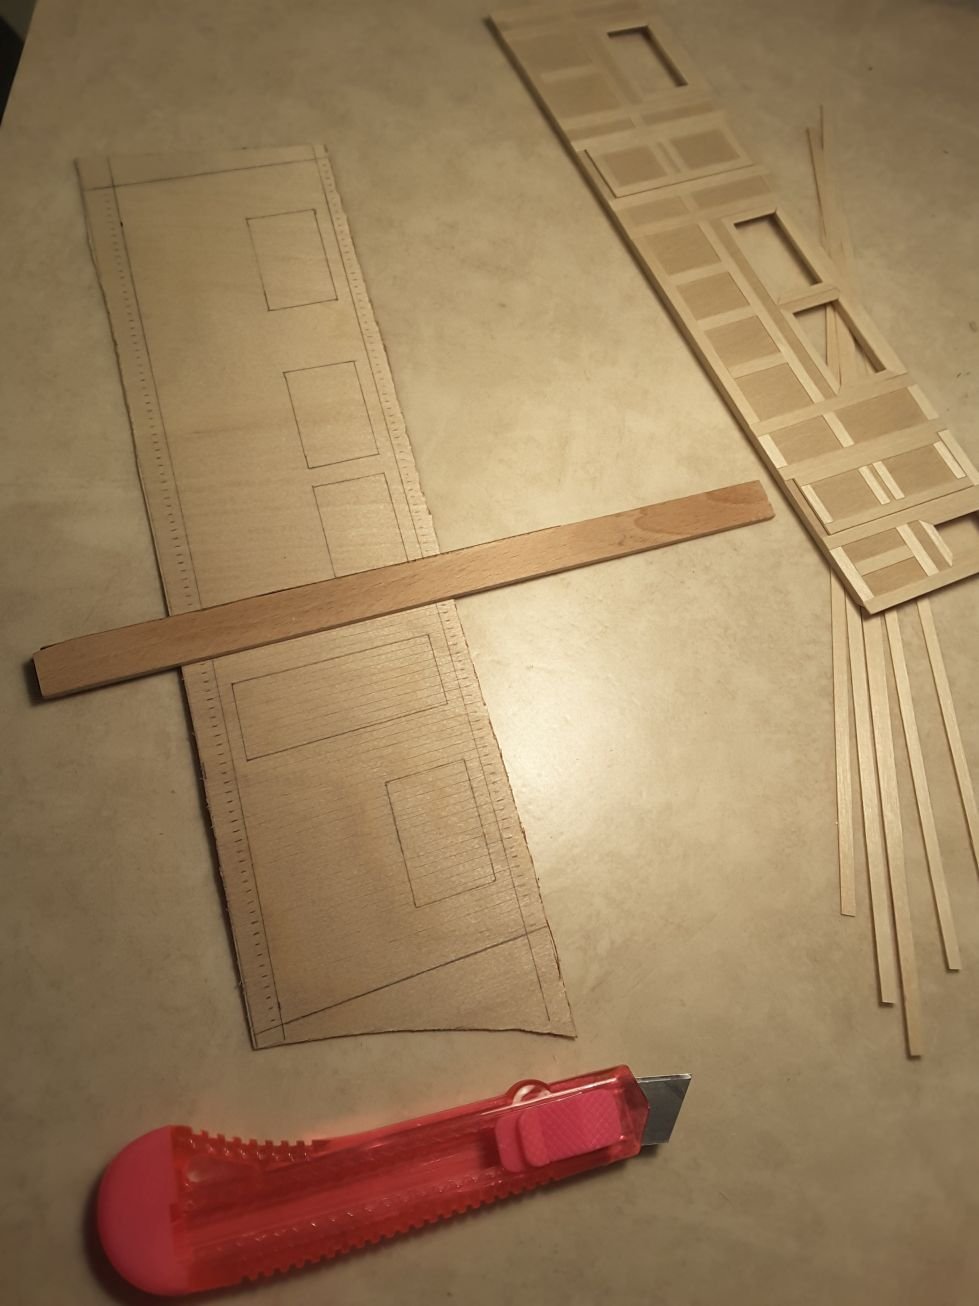
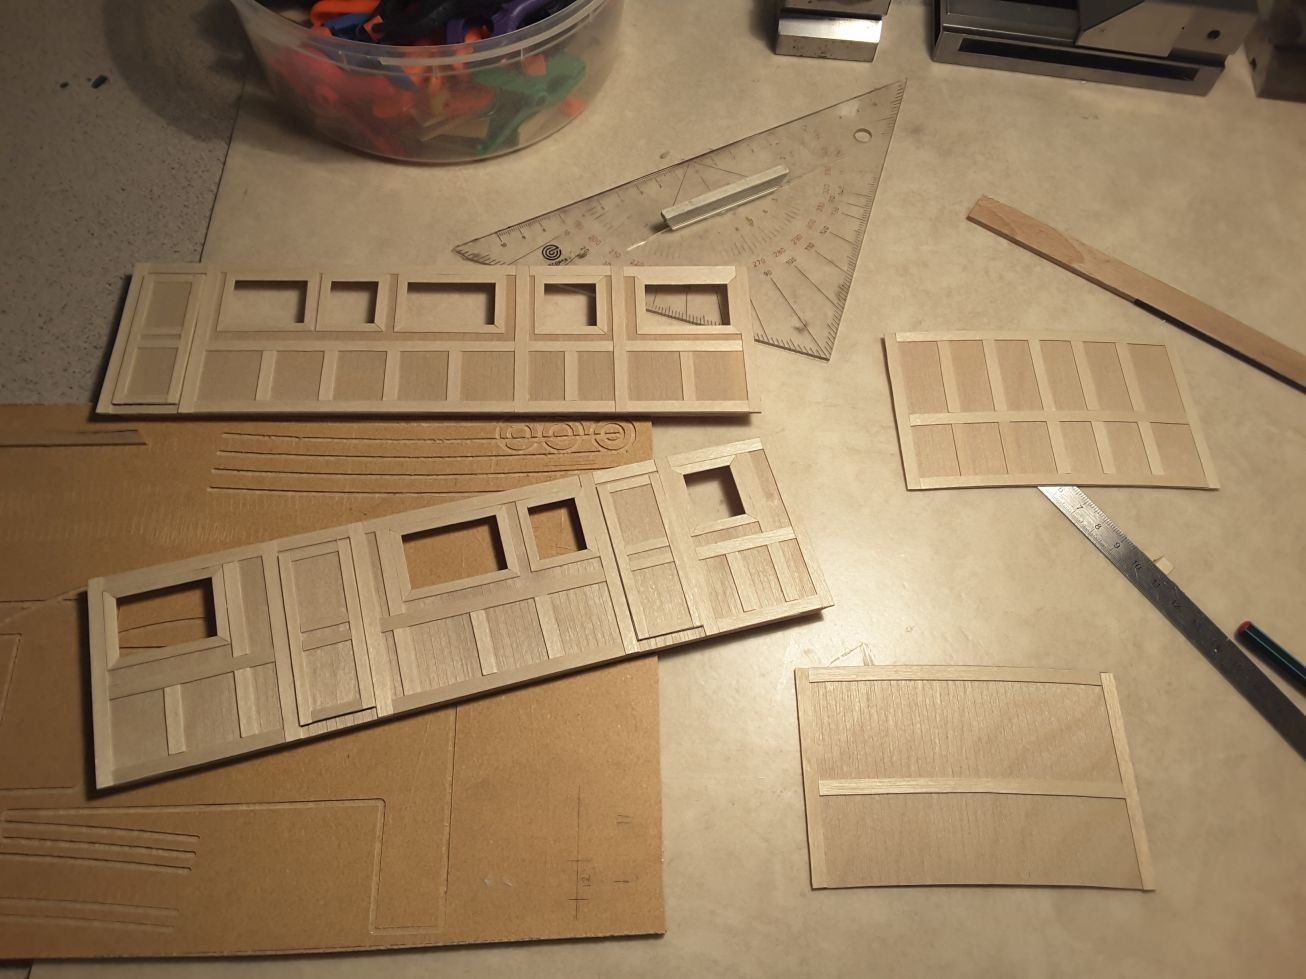
Here once more the making of wall panels. First all windows and doors are marked on 1 mm plywood. After that the grooves within 3 mm division are made with a sharp hobby knife to emulate wooden wall.

And finally all windows are opened and panels & window frames are glued on....
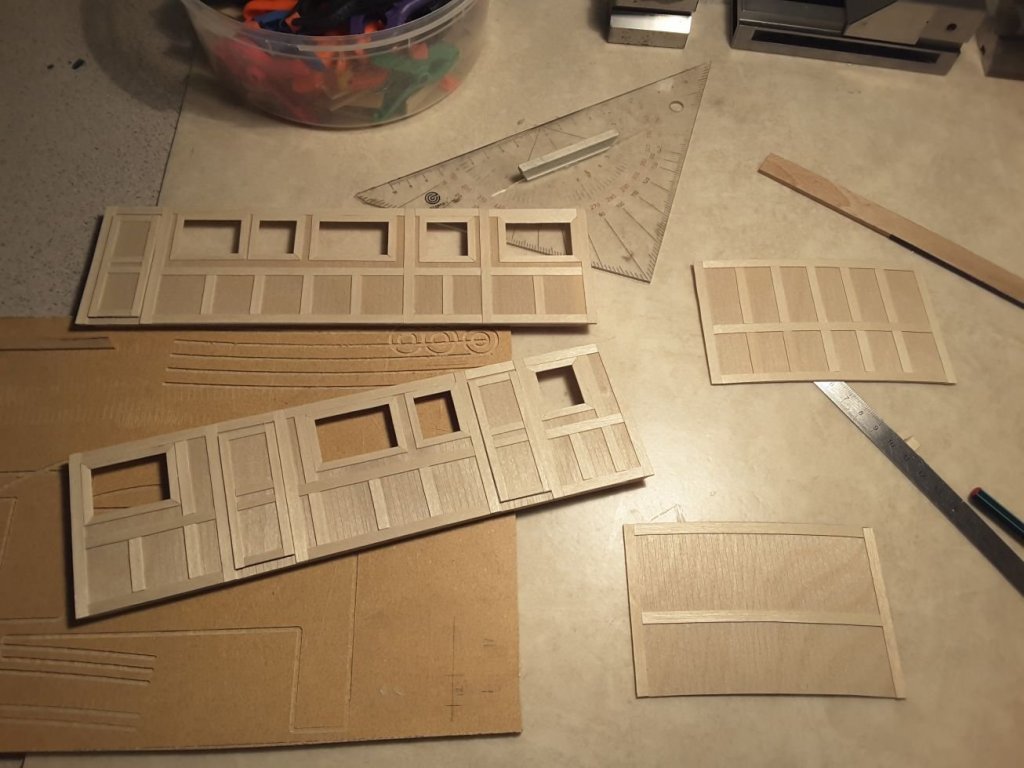
...To build cabin constructions.

Mahogany stain is used to give some colour,
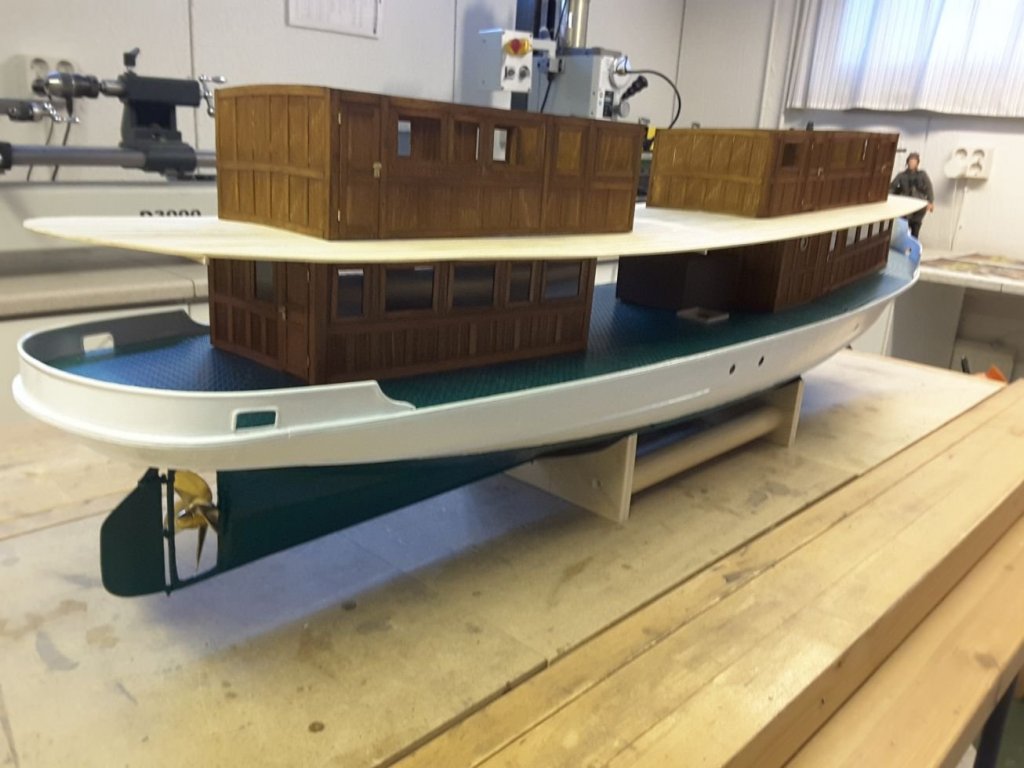
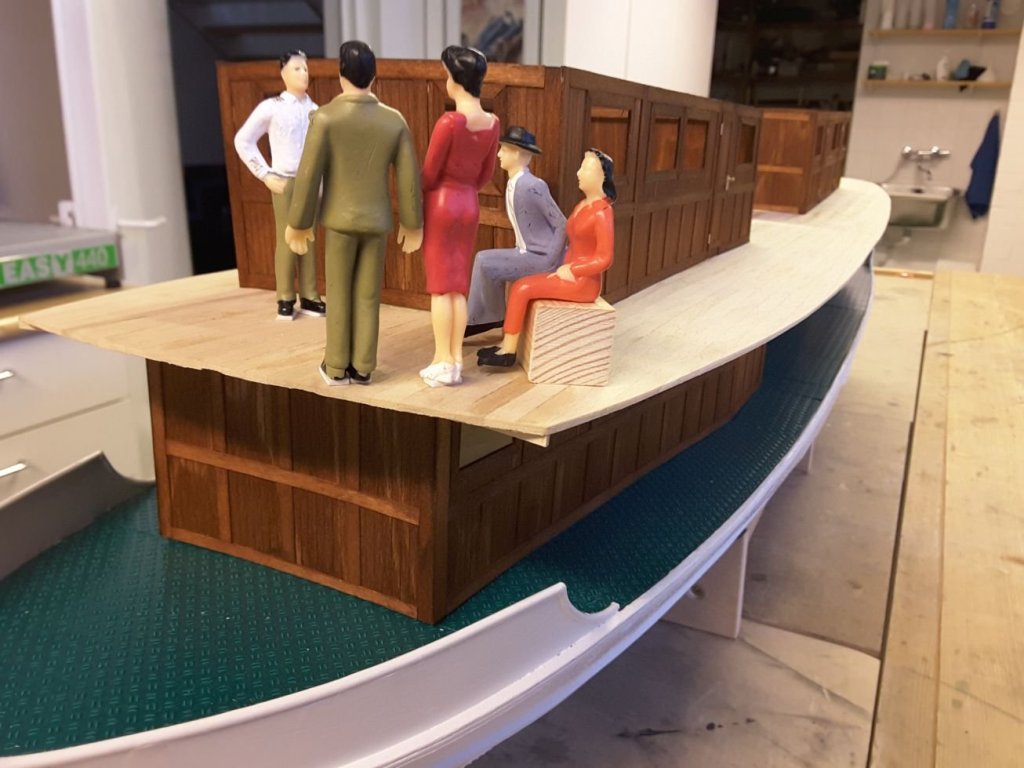
And the captain has also arrived on board to present his ship for honoured quests.....

Who expect already eagerly to get into the virgin voyage.
- G.L., steamschooner, aviaamator and 8 others
-
11
-
After short thinking I decided to buy a plan from Model Dockyard about 30 ft lifeboat drawn in scale 1/48. https://www.model-dockyard.com/cgi-bin/sh000001.pl?WD=lifeboat&PN=Harold-Underhil That results approximately into 185 mm long boat, which is a bit short but acceptable. After shipping & taxation the price is approximately that of one ready made plastic boat. The project has no schedule, no matter if I build these lifeboats for one year longer, after all this is hobby and not work.
- mtaylor and Mirabell61
-
2
-
Thanks Nils I have to consider these. You are right, a bit pricey and not in stock. But on the other hand, I am not in a hurry. But making 4 pcs from scratch, not very appealing. Well, thinking thinking....
- mtaylor and Mirabell61
-
2
-
For my S/S Maaninka project I need 4 pcs lifeboats about 200 mm long and clinker hull. I wonder if I could find them somewhere as ready made or some sort of a kit, I think I have not energy enough to start to build them from scratch.
-
When I was building my model of the Clara May a few years ago I met the same problem. After thinking hard I finally used following method: First I made the form of the compass dome out of plasticine. When ready, I covered it with a jelly mixed of epoxy and milled fibreglass "dust". When the first layer was cured I applied second layer of the same stuff. And finally when everything had cured, I cut an oval hole on the dome where the glass should be situated. Through this hole plasticine was removed and voila, I got a hollow quite strong dome which was then sanded smooth and painted with brass paint. The last thing was to glue a printed compass rose inside the dome and an oval transparent "glass" into the hole and the compass was ready.
-
You have very nice machines Aviaamator. Did you make this small mill also by yourself?
- PeteB, mtaylor and aviaamator
-
3
-
I was interested about zinc chromate which was suggested by Ken as better primer for aluminum as the commonly used etch primer. According to some paint manufacturers and chemical companies it is not used any more because it could cause lugn cancer: https://pubchem.ncbi.nlm.nih.gov/compound/zinc_chromate#section=Top
-
Thank you all for watching and giving the "likes" for my project. This raises motivation greatly to work onwards.
Nils: Thanks for watching and commenting my build. Reinforging of the deck could be even better, if glassfibre laminate would be applied on upper surface too, which I am considering to make.
Steamschooner: Yes, this is my intention. But not sure yet, whether the upper structures will be removable as one part only, or as several parts. The supporting bars at the edges of the decks & hull are a difficult task. Should they be part of the decks or be removable one by one is still under consideration.
Ken: This is good information. I wonder how this zinc chromate is sold, is it the stuff which is available in spray bottles intended for repairing car body weldings to prevent rusting?
- mtaylor and Mirabell61
-
2
-
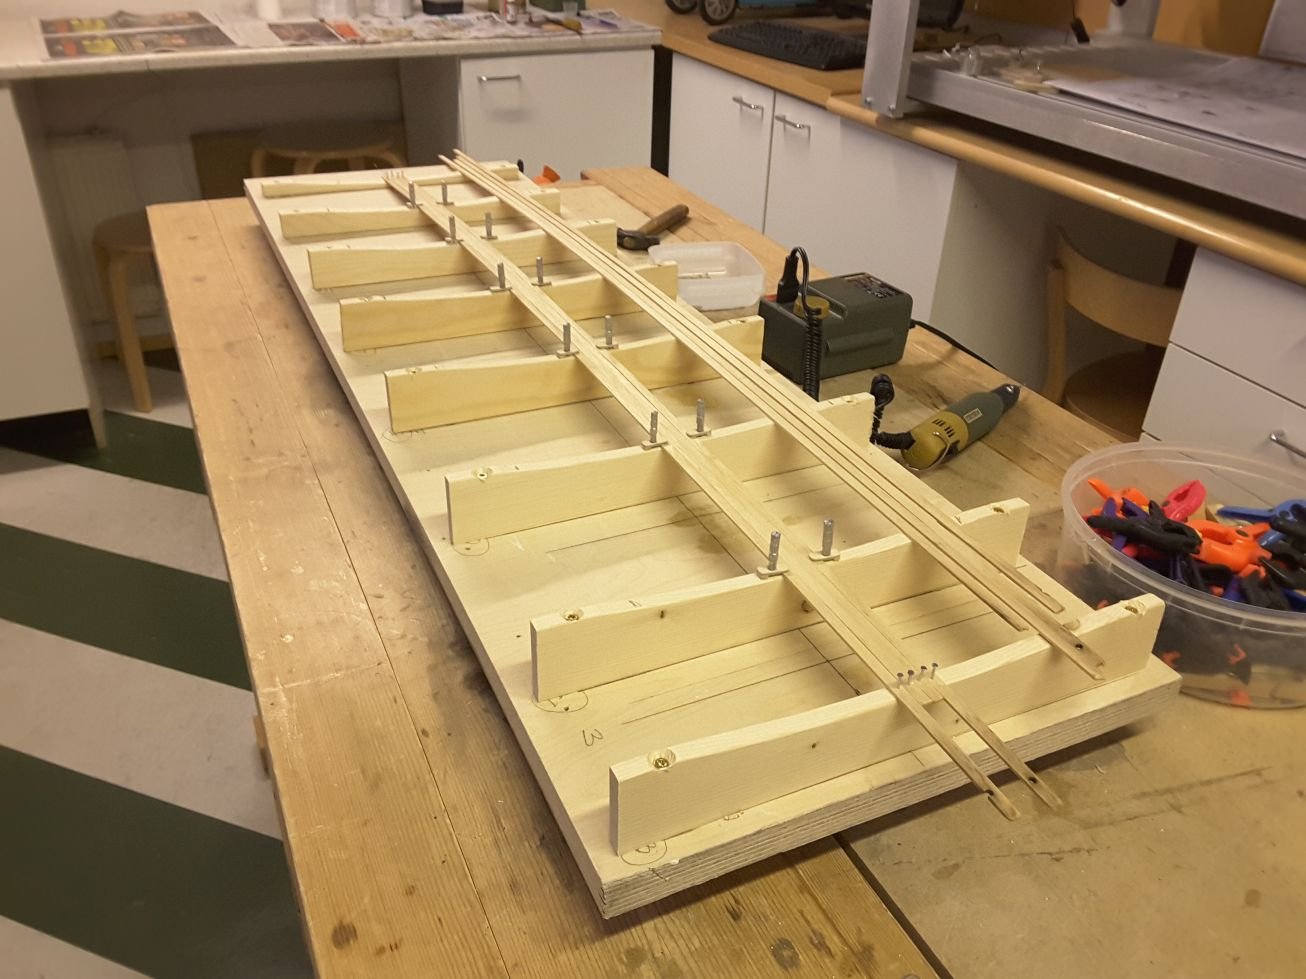
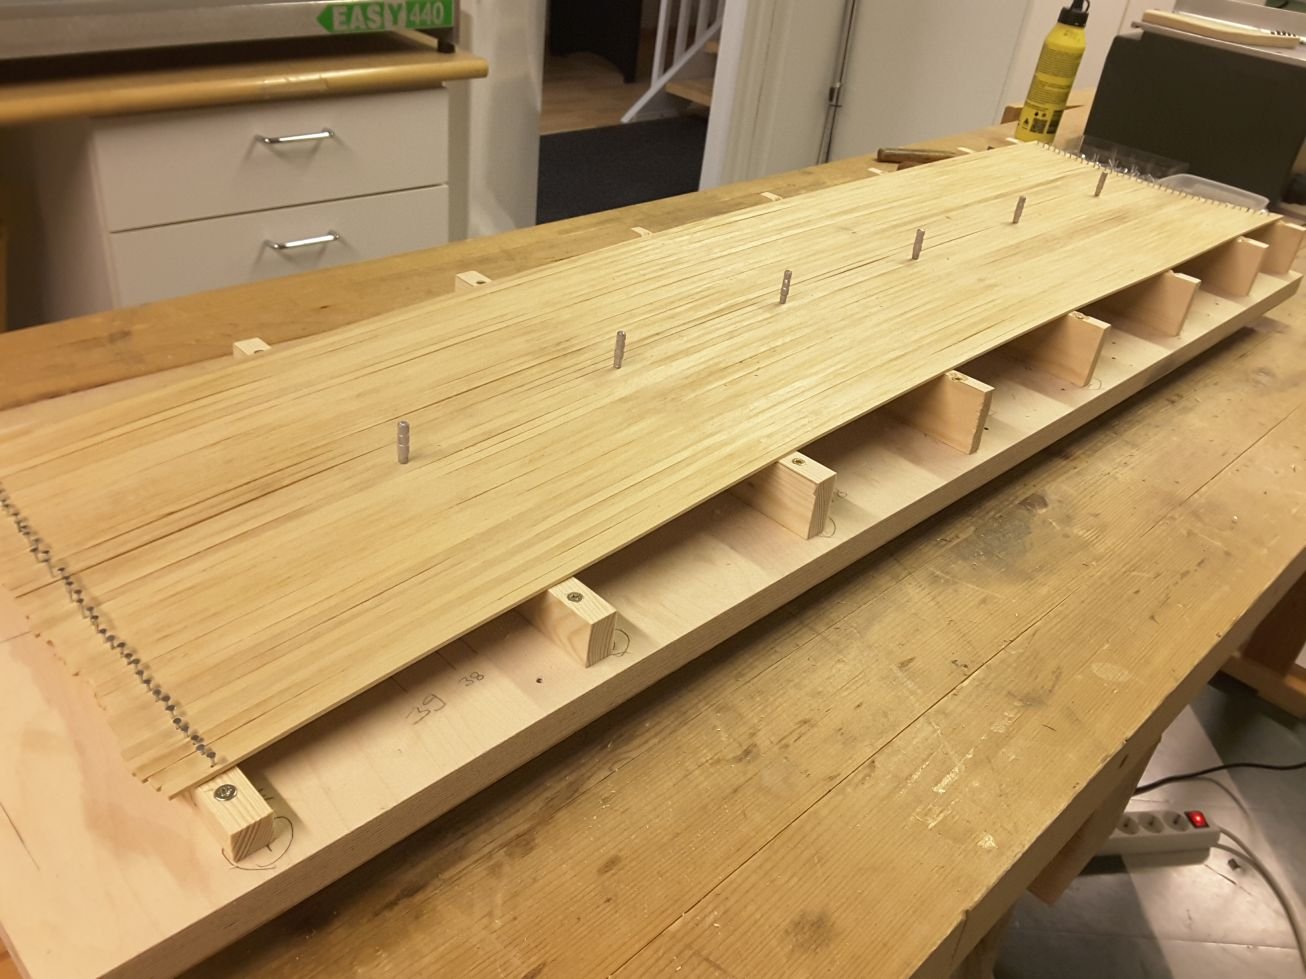
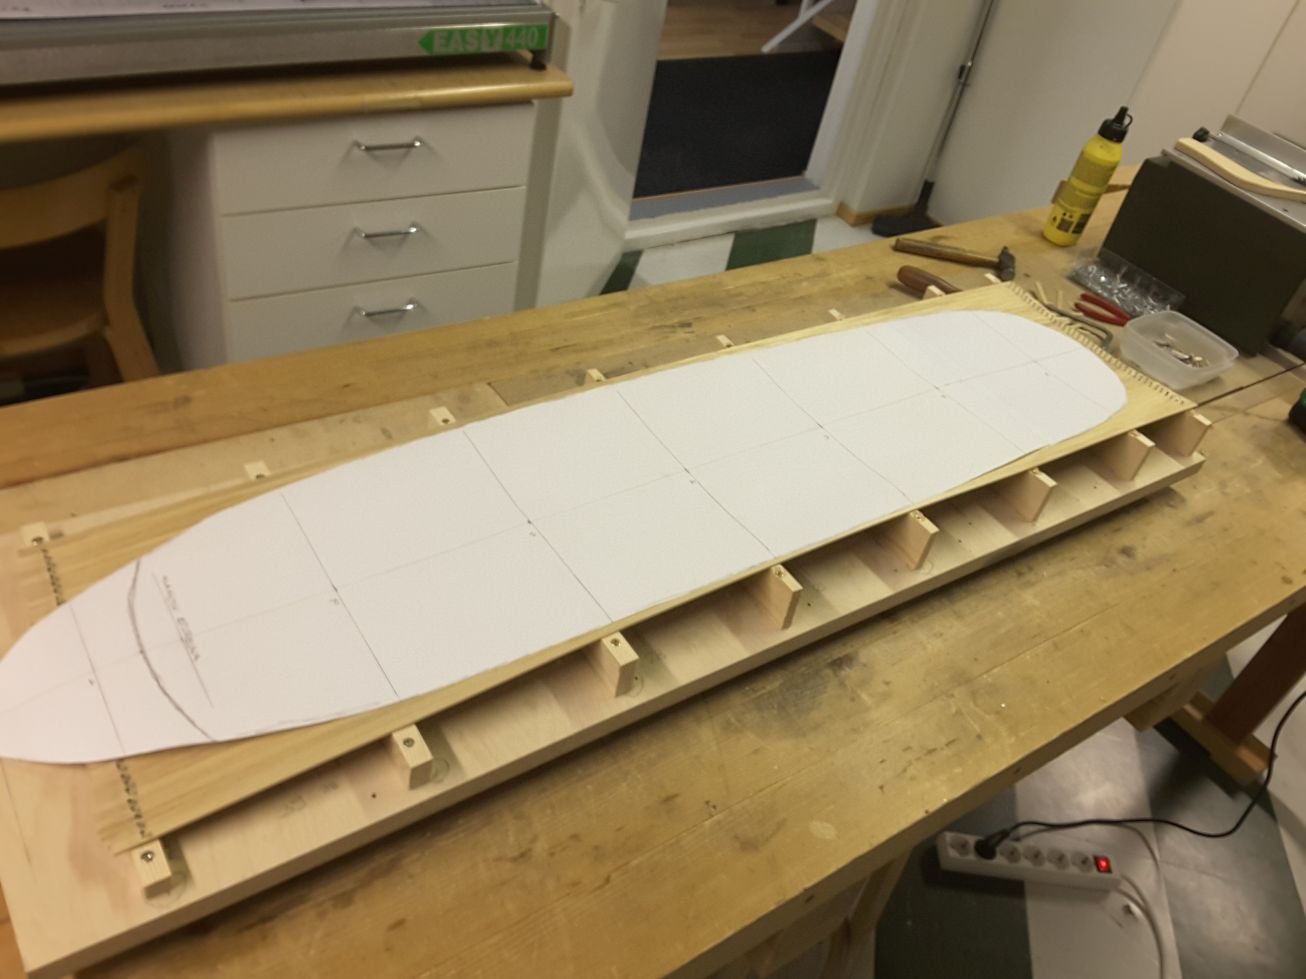
Next I had to think hard, what would be the best method to build both the upper and boat decks above cabin constructions. The challenge is not very tight curvature of the structures, but completely opposite. Crosswise the radius of the deck curvature is only about one metre and lengthwise it is bending about 4 cm on it`s whole length. So almost all materials could be used for this work. But how to keep the form unchanged and still have a light, stiff and thin deck without any form giving frames is a problem. Well, finally I decided to trust into the good old plank-on-bulkhead method and thought to use a jelly mixed of epoxy and milled glassfibres to strengthen it and make it stiffer.
"Bulkheads" made of thin wood. I decided to build the deck upside down, to be able to add epoxy/glass mixture on the underside of the deck.

Bulkheads were attached on the building platform and first 2x6 mm abachi planks were glued on them. Glue was applied only to the planks but not on bulkheads because the deck had to be removed from them when ready.

40 pcs planks were necessary to complete the structure.
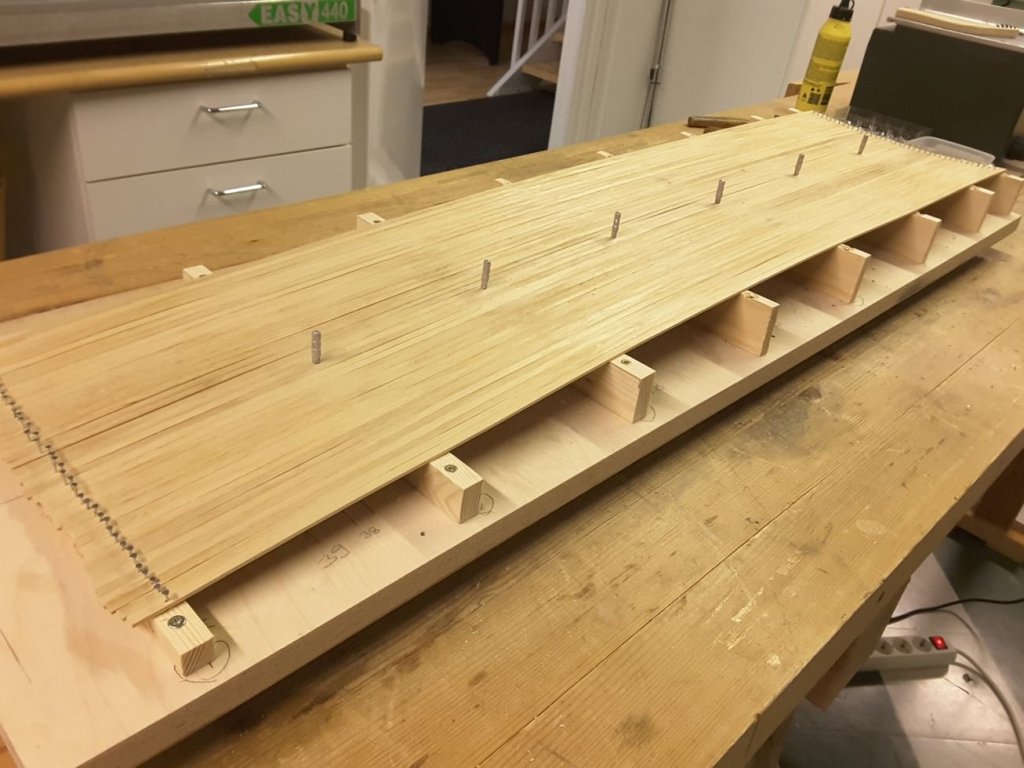
Deck template cut of stiff paper was tried on the plank structure.

Epoxy/glassfibre jelly applied on the underside of the deck.

And finally when it was cured the deck was removed from the bulkheads, sanded on both sides and cut into the correct form. It was noted that lengthwise the deck keeps it`s form nicely, but crosswise a few curved frames underneath the deck are necessary to keep the curvature also in this direction.


- Mirabell61, aviaamator, hexnut and 11 others
-
14
-
For many years I have been using Optimum's BF20 vario, and have been very satisfied with it. It is a heavy and accurate machine, and speed control range is large enough. I have installed also digital readouts for x and y axles, which helps a lot working. As stock it has digital readout for z axle too. I have made a few steam engines, 1/6 scale car & tank, and a few ship models, for which several parts have been made with this mill. My friend has a BF16, and he is also very satisfied with the machine. He is building airplane models. With this experience I could warmly recommend this machine for modeling work.
-
Hello Michael. Very nicely proceeding build. It is easy to agree with comments above.
- zappto, EJ_L and michael101
-
3
-
Thank you John for your extraordinary comment. This is the first time in my life that I am compared to those great individuals of the past days, and I really consider it to be a "tiny" exaggeration. Just a humble retired chap from a strange far north country would describe me much better.
And many thanks for your suggestion to solve my problem with deck construction. Your idea is very interesting, in fact I have also thought something similar, like strips of balsa wood glued together and strengthened with thin glassfibre & epoxy resin might really work.
- John Allen and mtaylor
-
2
-
Thanks Michael for your kind words. I am glad that you follow my build and like it.
-
Thanks Nils, I have to try this composite construction. The problem is that the decks must be very stiff, because there is nothing on the edges that support them. Only some thin bars of metal or plastics, but they do not support the decks, I think it is the other way around. Maybe I have to cover the decks additionally underneath with thin glassfibre & epoxy to keep them stiff.
- mtaylor and Mirabell61
-
2


SS Maaninka by Moxis - FINISHED - 1/25 scale - Lake steamer
in - Build logs for subjects built 1901 - Present Day
Posted
Thank you very much for your kind words Keith, Nils, Carl, Paul and Druxey, and all the "likes" as well. I am very glad and at the same time very surprised that so many of you are following my humble blog. This gives me a lot of motivation to work onwards to have the project finished.