HOLIDAY DONATION DRIVE - SUPPORT MSW - DO YOUR PART TO KEEP THIS GREAT FORUM GOING! (89 donations so far out of 49,000 members - C'mon guys!)
×


exwafoo
-
Posts
64 -
Joined
-
Last visited
Content Type
Profiles
Forums
Gallery
Events
Everything posted by exwafoo
-
Rotary tools - Proxxon and Dremel
exwafoo replied to vaddoc's topic in Modeling tools and Workshop Equipment
A bit late to join the conversation, however, measure the thread on the drill that the collet retainer screws onto and buy an after market mini 3 jaw chuck that will fit. That's what I did. The only adjustment I had to make was to use a small washer in the thead of the the new chuck as a shim to make the jaws travel the full distance when closing, as the threaded portion of the drill is about 1mm short. No problems with it. Hope this helps. Alan -
for small bits - http://www.radubstore.com/index.php?main_page=product_info&cPath=77_122&products_id=434 for PE tools in general - http://www.radubstore.com/index.php?main_page=index&cPath=77_79 Alan
-
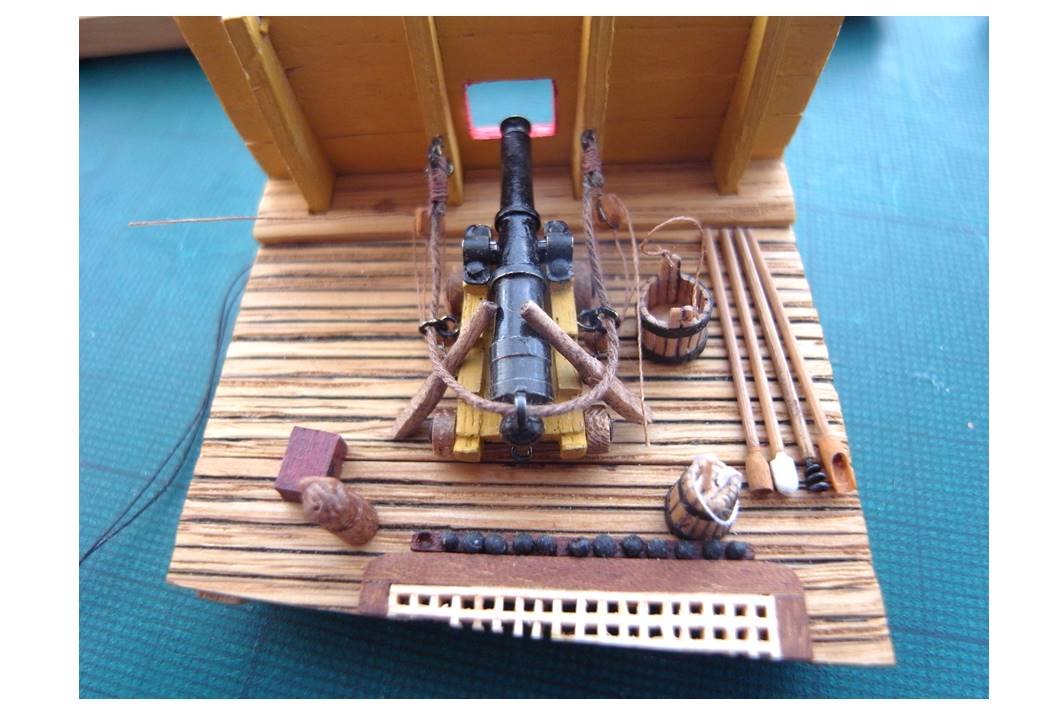
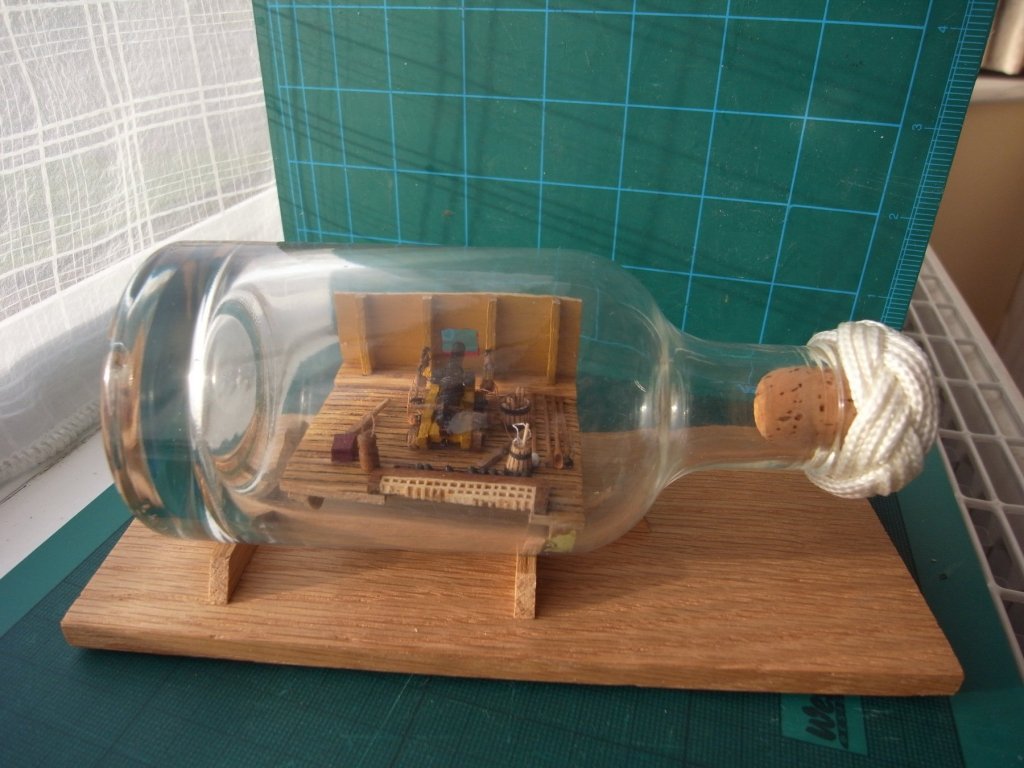
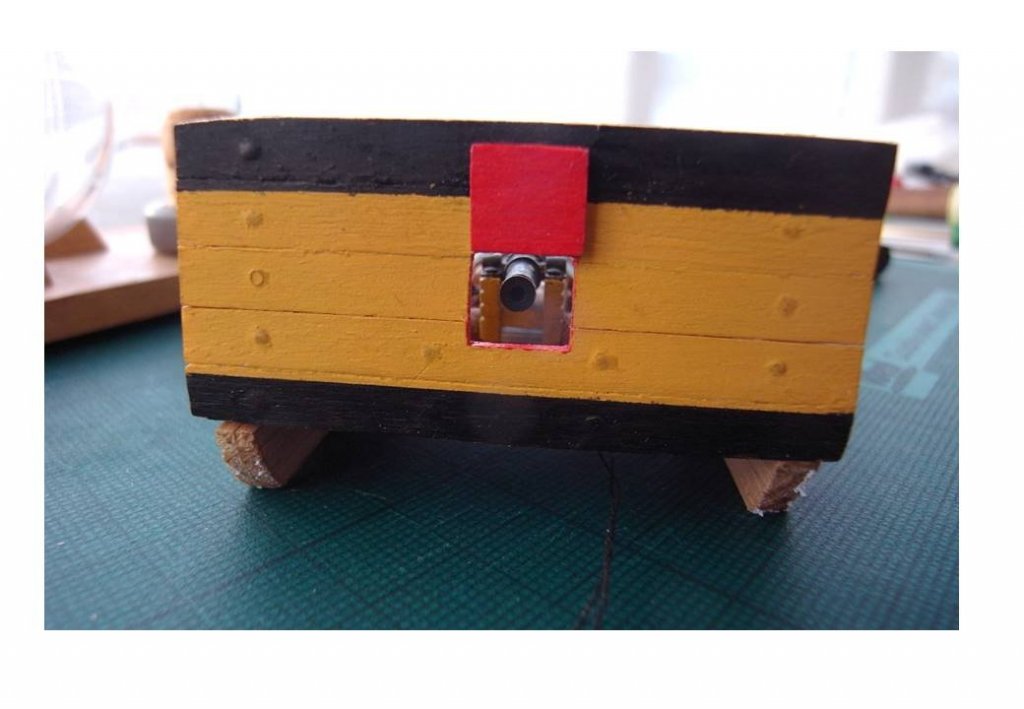
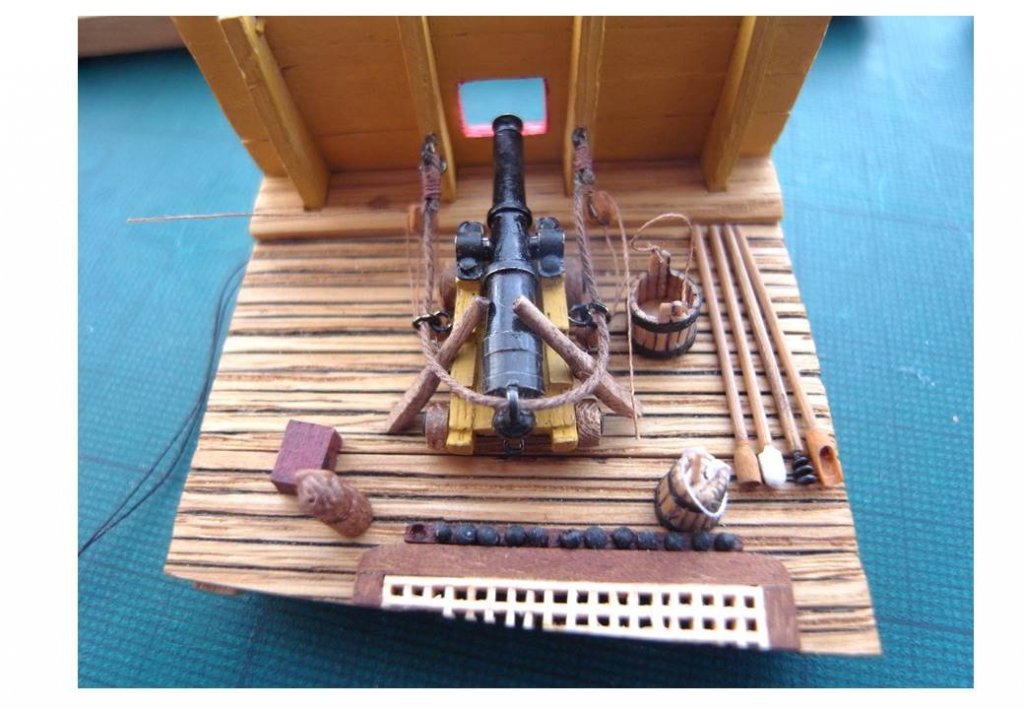
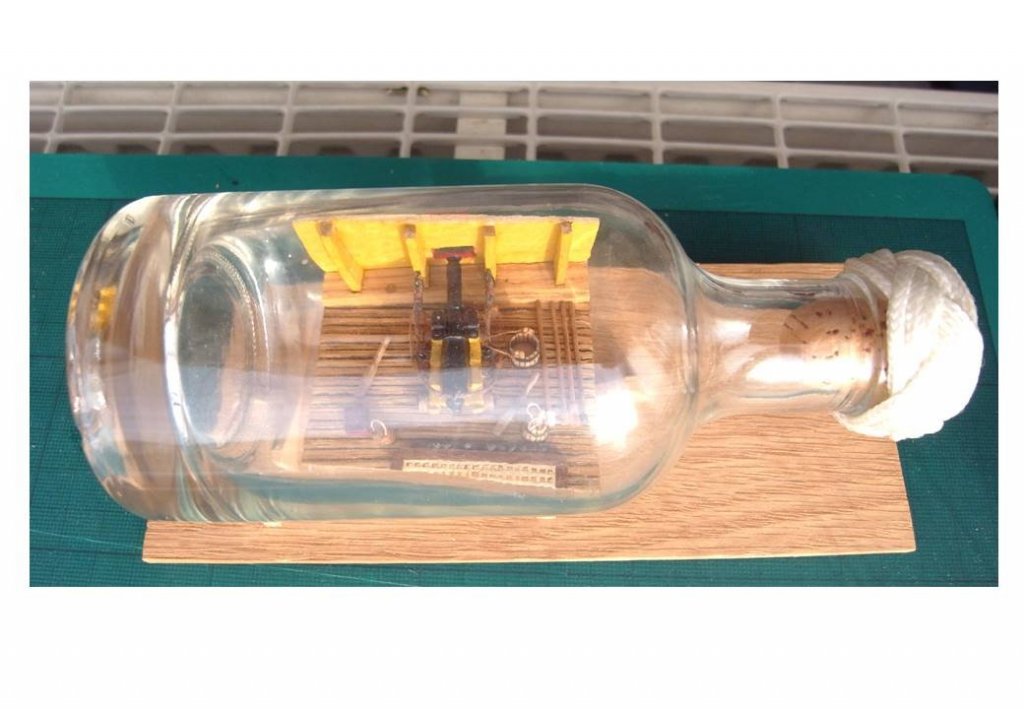
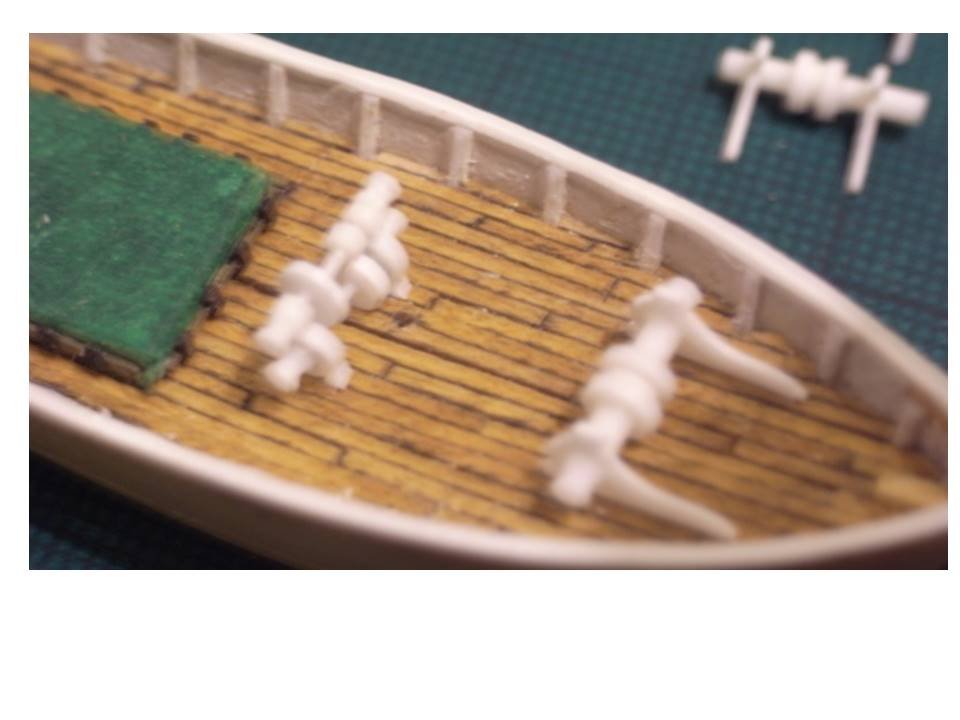
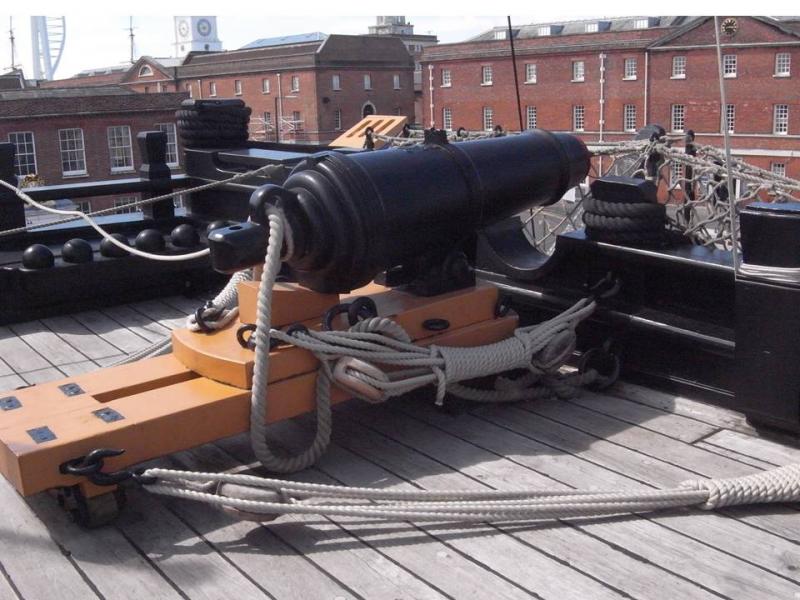
Hi All A number of years ago, I bought the first copy of a part works magazine on building a 1/96 HMS Victory. The reasons were, it was only £1.99 (starter price) and it had some nice colour pictures for reference, some nice pieces of thin plywood (always hard to find in the UK) to be used as bulkheads. It also had a gun kit comprising barrel, carriage (in 3 pieces), trucks, capsquares, a length of brass rod for axles and some small brass nails to hold the capsquares on with. This kit has been sculling around in the bottom of my toolbox for a while now, so I thought I’d have a bash at a bit of a diorama in a bottle as a side project. This was just meant as a general ‘illustration’ of a gun station, no particular ship in mind, and I fully realise that some parts are not to scale or particularly accurate. A bit of fun really. I used oak strip from www.stripwood.co.uk for the deck and hull, and the Salt Box. The Sponge Tub was made from 1mm wide strip cut from a piece of veneer (not sure what wood), coloured black on one side then stained Light Oak. Similarly the Match Tub, although this was easier as it has a solid wood former under the strips. The Handspikes were carved from dowel and stained. The Rammer was bamboo stick thinned down with the Rammer part turned and stained, similarly for the Sponge, however the head was painted white to simulate fleece. The Powder Scoop was bamboo stick with the scoop fashioned from pieces of styrene tubing and then painted; the Worm was bamboo with a coiled bit of wire painted black. I turned the Cartridge Case from a bit of Elm, as I believe the originals were. The piece of Grating was made from some mahogany strip and some white wood strip, the cannonballs were self coloured air drying modelling clay, the rack was a bit of mahogany strip. As to the gun itself, the carriage took a bit of rework to get the parts to fit and then be shaped so that it looked ok. The supplied trucks were enameled metal, so I used them to get dimensions, and used these to turn some new trucks from Elm, as this was used in the real thing. Brass wire painted black was used to make the ringbolts on the gun carriage and for the lashing points on the hull. I carved the blocks from a length of mahogany strip, used some thin brass wire to strop them and used thin thread for the rope. Once in place I soaked the thread with dilute PVA glue to stiffen them in place. I showed the tackle loosened on the diorama. The breeching rope was a thicker bit of thread; it was thick enough so that I could actually whip the eye (with a spot of glue just to make sure) after passing through the ringbolts. The small brass nails supplied to put the capsquares on were far too big so were replaced with smaller ones. The Capsquares were actually too big for the trunnions, (the barrel could fall out), so I shimmed them with some thin walled brass tube. All painted black. The bottle is a small spirit bottle, probably quarter size, about 6 inches long overall. The inside is about 3 inches long, with a top to bottom taper that caused a bit of fettling to get the deck to fit. It then took a bit of trial and error to get the deck fixed in position. CA didn’t want to know, I tried UV cured glue, but that was curing too quickly in the bright daylight (it does happen in the UK sometimes) so I used a couple of bits of Milliput in the end – not the prettiest solution – I would rethink this bit if I ever try something like this again. The stand is a piece of MDF covered in Oak Veneer, and the bottle supports are Oak strip. Turks Head knot to finish off. A work colleague suggested I name the pieces, so from left to right: Salt Box - wooden box with leather hinges to hold a couple of cartridges - the salt soaked up any moisture Cartridge container - lidded wooden container used to carry the cartridges up from the magazine - usually by the ships boys, the Powder Monkeys Handspikes - resting against the cannon - substantial shaped levers used to train the gun carriage around Sponge Tub - filled with water - used to sponge out the barrel after a shot to make sure no burning debris before putting in the next cartridge Match Tub - conical, half filled with water. A fire precaution on ships. The burning ends of the match were fed over the top. If knocked over the water put out the match. The match was used if the flintlock on the gun failed. Rammer, Sponge, Worm and Powder Scoop Happy Modelling All the Best Alan Trial fit with a pen for scale The Bad Guy's View The layout And again All Done


- 2 replies
-
- 9
-

-
- battle station
- bottle
- (and 1 more)
-
yep. Had this book for years. Updated to the latest edition a couple of years back. Cost me about £12 new. Worth every penny. Alan
-
Sorry to hear this Jesse; my condolences to you all Best Alan
- 1,306 replies
-
- 7
-
-
- syren
- model shipways
- (and 1 more)
-
keep going Jesse, its nice work to watch. Sorry to hear about the health. All the best Alan
- 1,306 replies
-
- 7
-
-
- syren
- model shipways
- (and 1 more)
-
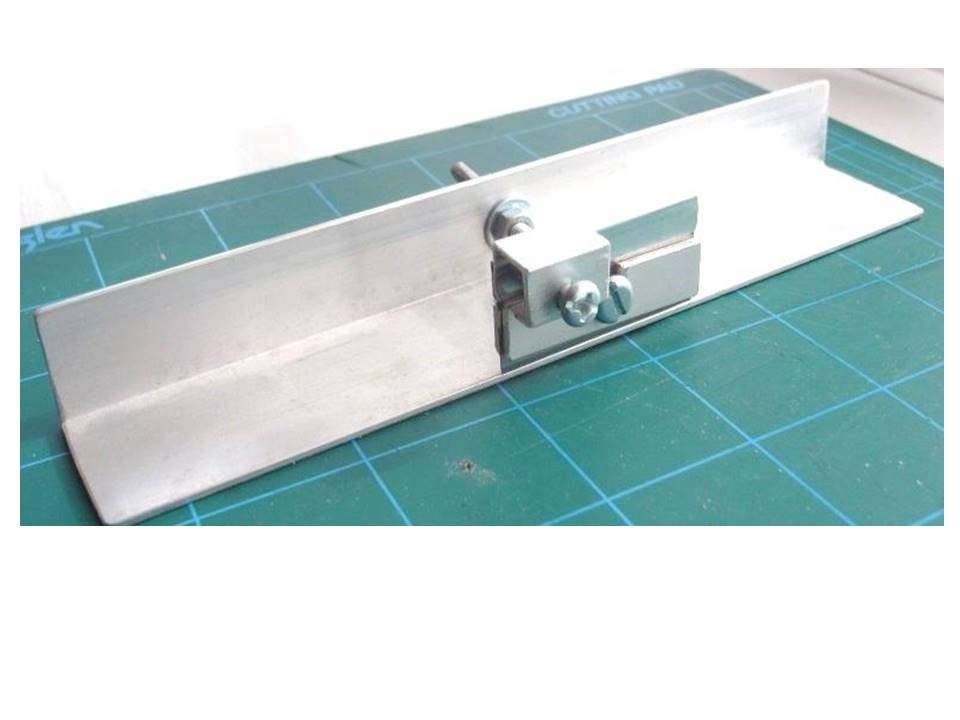
Sorry Doug, Ships in Bottles. Keeps the dust off of the finished model. Adjustment is by slackening the nuts and bolt and moving the blade away/closer to the edge of the right angle strip, using a drill bit of, say, 1 mm as a gauge to set the gap so a 1 mm strip will be cut. Then tighten. May have to do this a couple of times to 'fine tune'. The blade rotates around the bolt so that depth of cut of a pass is adjusted by finger pressure. A couple of attempts will let you know how the wood cuts and how many passes are required to cut through. I've found 3 or 4 light cuts produces nice even strips. The SIB shown has 1 mm decking of a light coloured veneer stained with oak stain. Sorry its a bit blurred. Hope this helps Alan
-
Doug, I model SIBs, for the deck planking, I cut strips 1 mm wide from some light coloured veneer using a strip cutter I made a few years ago from a piece of aluminium right angle, nuts and bolts, and a single sided razor blade. Thickness of cut is set by using a drill bit as a gauge and a bit of trial and error. The only downside is that you need a straight edge on the veneer to start with and the cut strip is what the cutter is pressed against, but a bit of care and two or three light passes works OK. The square section on top of the blade is to allow a bit of pressure without getting a grove in a finger. Cheers Alan
-
Precision router base for Dremel 4000 etc.
exwafoo replied to vossiewulf's topic in Modeling tools and Workshop Equipment
Proxxon do one - search under Proxxon Router Base OFV I've got one - its well made and is certainly worth having Alan -
A number of years ago I thought to buy a set, but cost put me off. So I made a set. Not as accurate maybe, and with fixed ratios, but they worked until I found a 'real' set on ebay at a good price. I wrote it up as an article for 'Bottleship', the quarterly magazine of the 'European Association of Ships in Bottles'. This subject cropped up on 'Bottled Shipbuilder' a few weeks ago as well. If memory serves me, I believe that this article was uploaded to this site as well before the crash, so here it is again. If you want the quick way, skip to the end. Regards Alan Proportional Dividers Kind Of.pdf
-
Jesse, A genius bit of improvisation for a square - far better than standing barefoot on one of the little blighters best Alan
- 1,306 replies
-
- 6
-
-
- syren
- model shipways
- (and 1 more)
-
Prof, Not a USA site, but may narrow the search. http://www.cornwallmodelboats.co.uk/acatalog/mantua_plans.html Alan
-
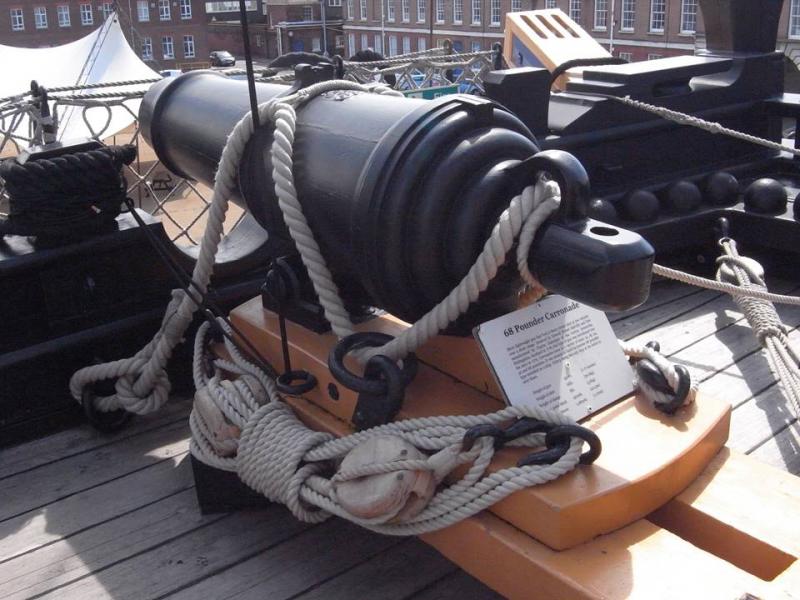
Jesse, These may be of use when rigging time arrives. They are taken on HMS Victory last Summer, so may be different. Super build best Alan

- 1,306 replies
-
- 13
-
-
- syren
- model shipways
- (and 1 more)
-
I started using Proxxon in the late 80's on the recommendation of a friend who ran a small diy shop, on the basis that he never had had to replace a faulty Proxxon whereas Dremels (of the time) came in bust on a regular basis. I still have the original 50E drill, used and abused, without sign of it wearing out. I use the collets, or the Proxxon chuck, or a third party micro chuck held in a Proxxon collet for any drill bit under 1 mm. I have more powerfull Proxxon drills including the mill/drill setup, and table saw, and the sander, as well for use as required. I use the accessories from whichever manufacturer gives the best price at the time. The only beef I have about the Proxxon equipment is the price UK suppliers will charge. Until recently (when the pound fell) I could buy from Europe at under half the UK price and for less shipping the same Proxxon Items, with a power plug adaptor usually thrown in free for charge, The instructions didn't have English as the first language as it opened, but so what, you only have to read it once. Guess where I did my shopping. I have seen recently some Proxxon clones in the supermarkets, vices, drill sets etc, the hobby vice was the same pattern, but the finish was rougher. All in all Proxxon is worth looking at. Alan
-
Hi Jim, I've only just found your build. I've had the book for a number of years, with the idea of scratch building it one day, probably when I retire in a couple of years. I've really enjoyed reading the log and you have come up with a number of ways of getting things done to what I think is a really good standard. Its been a inspiration to me for the future. Love the netting. I've found that when turning wood to small diameters, its a lot better to use small files or pieces of sandpaper with a supporting finger behind the work, instead of chisels. A bit of practice and small diameters are achievable. As for using other materials, my daughter is studying special effects at university (she's going to get payed for doing what we do for fun) and their motto is 'take something cheap and nasty and make it look like the real expensive thing', so use what does the job. I'm going to follow this one with interest. Best Alan
-
Daniel, Lovely job, I don't have any details yet, however a quick email from Alan R says that there were 15 SIBs donated, including a number from outside of UK. Over £2000 was raised and the SIBs 'caused a lot of conversation' at the ball. I'll make a point of obtaining some phots and uploading them. Many thanks again I'll be finishing off my own build log soon. Regards Alan
-
Search on 'Escapement File' for small precision files. Most definitely not cheap and on my wish list. Best Al
-
Tool for Shaping Brass Strip
exwafoo replied to mikiek's topic in Metal Work, Soldering and Metal Fittings
When I was doing the sheet metal part of my apprenticeship we used 'bending bars'. These were a set of hard steel bars about a foot long with each edge a different radius from square to a quarter circle of bar thickness radius. The metal sheet was clamped between the bars, which were held in a vice, and then tapped down over the required radius. There were different thicknesses of bars. Perhaps something like that could be made/bought/ borrowed. Al -
Proxxon TG125 Bench Disk Sander
exwafoo replied to pompey2's topic in Modeling tools and Workshop Equipment
Hi John (texxn5), Thanks for your advice. I've just received one of these sanders from Sat Berlin (I live in the UK, the excesses of Her Majesty's thieving bandits, aka Customs and Revenue, on imports from the USA preclude any thoughts of a Byrnes). Could I ask you a question that may interest others as well? On the underside there are two threaded inserts (look like brass). The manual does not mention these, however could they be used to secure the sander to a bench? Much appreciated Al -
Long Term Paint Storage
exwafoo replied to mikiek's topic in Painting, finishing and weathering products and techniques
The small Humbrol pots of acrylic have good tight press on caps - you actually have to use a small screwdriver (best all purpose tool in the world) to prise them off. I put a couple of drops of acrylic thinners in the pot to replace that lost by evaporation, a final stir, lid on, shake and store. I've had one pot of a light brown for years (very little use) and it's still good. Alan -
Humbrol 31
exwafoo replied to mdulaney's topic in Painting, finishing and weathering products and techniques
You're welcome. I remember reading, a considerable number of years ago, that a group of railway enthusiasts who had renovated a decommissioned locomotive persuaded Humbrol (who were the only manufacturer in the world who made the correct colour) to supply bulk so they could return the loco to its correct livery. Would have taken thousands of half ounce tins. Alan -
Humbrol 31
exwafoo replied to mdulaney's topic in Painting, finishing and weathering products and techniques
Have a look at this site - gives alternatives http://scalemodeldb.com/paintcharts/humbrol Alan -
thanks for that. Veritas sell over here in the UK as well. I'll have a look. I use a diamond hone for sharpening, one of these - http://www.axminster.co.uk/axminster-four-sided-diamond-stone with a drop of water as a lubricant. Lovely edges. Alan
-
I'm intrigued by the small plane on your bench. I have not seen one like that before. Could you post some details please? Would be appreciated. Alan