

Landlocked123
-
Posts
449 -
Joined
-
Last visited
Content Type
Profiles
Forums
Gallery
Events
Everything posted by Landlocked123
-

Clevises - I think?
Landlocked123 replied to Landlocked123's topic in Metal Work, Soldering and Metal Fittings
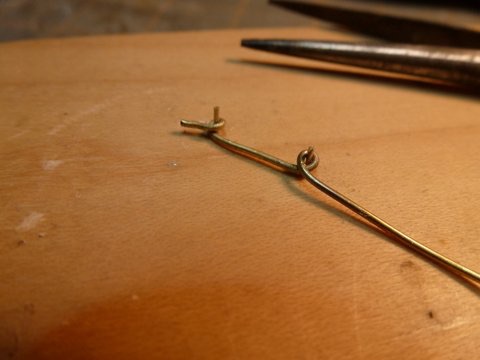
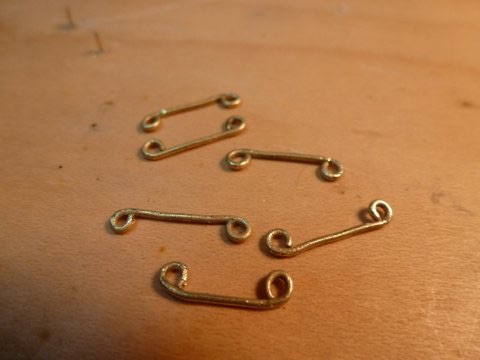
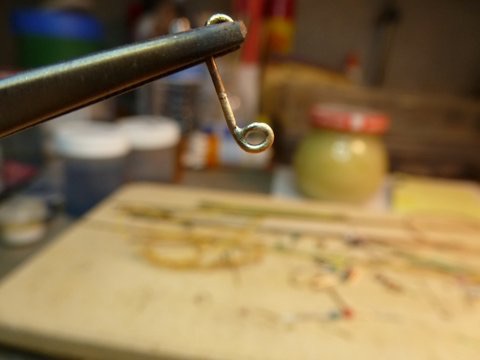
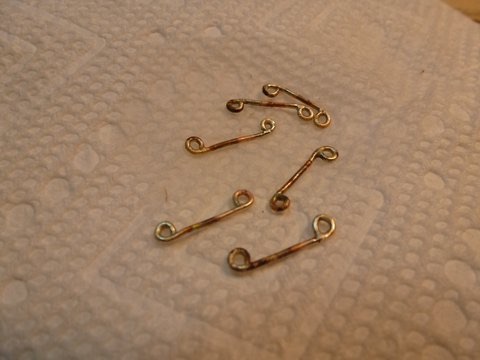
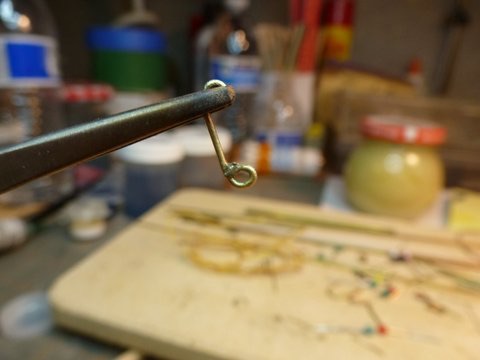
Hi All, Jay, I'm building in 1/48th scale so if I'm doing my math right the 1/32nd wire is 1.5 inches and .020" is about an inch. John, I know Russ cleared up the confusion on my explaination but I did put together a bunch of pictures (with my usual overkill). Since I had them I thought I'd post them. Maybe they'll help someone out. I think I had enough .020 wire shackles (the first post in this topic) but I could some larger ones made from 1/32nd brass wire. I thought it would be a good idea to show the tools I use: From left to right, a small butane torch, medium silver soldering paste, wire cutters, round nose pliers, and needle nose pliers on a scrap of plywood. I then drilled two pilot holes a half inch apart in the plywood tapped in a couple of pins and using a scrap of wood trimmed them to the same height. Be sure to hit the tops of the pins with a file, the cut edges are remarkably sharp. I anneal the brass (heat red hot, immerse in water) and holding the end with the needle nose pliers bend around the pins as shown below. Using the round nose pliers to form more uniform ends I trim the tag ends to form a closed loop. Be sure to file the ends of the wire flat and clean or it is very difficult to get a good solder joint. Also keep in mind that the loops must be COMPLETELY closed, silver solder will not bridge gaps. Place in tweezers, add a tiny bit of solder paste, hit with the torch and then let it drop in a bit of water to cool.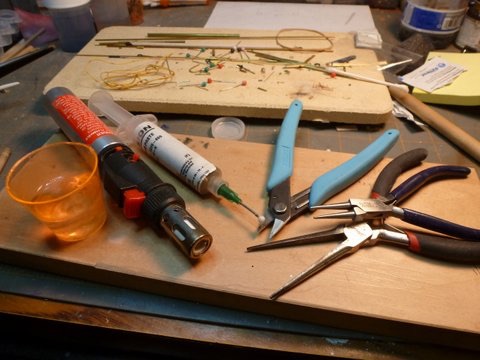

-
Thanks Wayne- I'll check it out. Best, J.
-
Clevises - I think?
Landlocked123 replied to Landlocked123's topic in Metal Work, Soldering and Metal Fittings
Hi John, Making the shackles was actually pretty straight forward, as long as you've had some practice with silver soldering. To make the shackles I drilled two holes in plywood to hold some pins. I used some heavier guage straight pins which I think we're about 0.020" in diameter. I then took some 0.020 brass rod, annealed it and wrapped it around the pins. I trimmed the tag ends, silver soldered the loops and bent them around a mandrel to shape. I just re-read what I've been writing and I think it will make a lot more sense with some pictures. Give me a couple of days. John -
Hi, I just finished a few dories for a Glouchester Fishi ng Schooner. My plans don't show how they were carried on deck. I just spent 40 minutes paging through 600+ pages of Chapelle's "The American Fishing Schnooners" and I didn't see even a reference to dories much less how they were stowed on deck! I ran a bunch of searches on MSW without any luck. Does anyone have a picture, drawing, or idea of how the boat chocks or cradles would look? The only real information I've been able to uncover is that the chock/cradle would not be permanently fixed to the deck. All help truly appreciated! Best, John
-
Danny, I hope you gave Pud a stern talking to and explained that Oz is not very far from places he could end up on the menu!
-
I am basically a newbie and in a few of the sets of instructions I have read by Eric Ronberg he recommends bees wax dissolved in turpentine for finishing lines. I've read about the concerns of some regarding the slightly acidic nature of bees wax, but chances of anything I build lasting centuries, I deem as pretty remote (although I think Gaetan's might
-
Thanks Dan, You're right, of course. It's not like there are not 47 other things to do while I wait! John
-
I'm impressed!!!!!
-
Hi, I use distilled white vinegar as a pickle and to clean parts of flux from paste silver solder. It generally works great and even has a tendency to blacken copper (though not the solder). Being the impatient sot tham I am, is there any way to as Emeril would say "kick in it up a notch". For instance if I simmered it in a non reactive pot, would that concentrate the acetic acid? Is there something else I should use which might be a tad stronger? All and any advice, suggestions, and possibly derision (in a gentle kind of way
-
Clevises - I think?
Landlocked123 replied to Landlocked123's topic in Metal Work, Soldering and Metal Fittings
Hi John, Crazy sounds good, I just don't know if I can get there at this point. I'm not sure I understand what you mean about soldering the pin and splicing around them. Thanks, John -
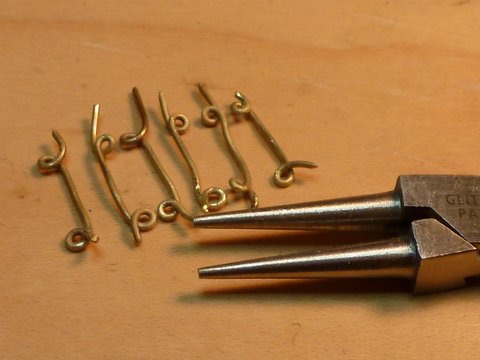
Hi- I am basically a newbie, but I've been practicing silver soldering. The picture below shows a bunch of what I think are called clevises. The plans for the build call for bunches of them. These are made with 1/64th brass wire and just as a temporary measure I've put 1/32nd brass wire with the ends pinched down to act as pins. My question is that when it comes time to do the rigging and finally install them how do I keep the pins in place. All help is appreciated. Best, John

-
Cutting brass sheet
Landlocked123 replied to Landlocked123's topic in Metal Work, Soldering and Metal Fittings
Thanks Wefalck and Duff, I have a Dremel 580 and I guess I need to do some experimentation with different blades and sandwhiching material to get the results I want. They basically come down to simplicity, accuracy, and repeatability. I'm using K&S sheet brass, do you think I need to aneal it first? Thanks, John -
Thanks Ken, I do have one more question. If I am using sealer, do I still need to prime before painting? It seems like a bit of overkill. The other issue with the sealer is that if I apply it after I've assembled something it's hard to get into some of the corners to sand/steel wool. If I seal, sand, and then assemble, the only glue I've found which make a strong enough bond is epoxy. I've yet to find a"win-win". Any suggestions are welcome. Best, John
-
Hi, I'm lucky enough to have acquired a bunch of Floquil enamels, probably about 20 colors. I also have a couple of bottles of grey primer, a couple of retarder, and a pint of Floquil Universal Thinner. In a previous life I was fairly accomplished at using Testors Enamels on plastic models, but I've not yet tried to airbrush Floquil on wood, so I have a few questions. I would really appreciate any pointers anybody can give me to avoid wasting what I have to learn how to use them. First, the bottle recommends thinning paint 75/25 with thinner, with no mention of retarder. Other things I've seen said you need to use retarders to spray Floquil. I was thinking maybe 60 paint/20 thinner/20 retarder. Any thoughts? Should I think about the same formula for primer? Most of the painting I've done so far (by brush) has been on bass wood and I've ended up with a bad case of the "furrys". I've since bought some Aero-gloss Mid-west sanding sealer. I've been using it and after it dries I can sand/steelwool to a glassy surface. I've not yet tried to paint it, but it's the next step. Is there a better way to get a super smooth surface, will it be safe to spray enamel over the sealer (BTW it smells like airplane dope)? I can probably experiment my way through all of this, but I think the Floquil materials are fairly precious, so I want to be careful with them. Any advice/suggestions will be appreciated. Thanks. Best, John
-
Hi All, I don't recall the origins or original use of this phase, but in model ship building as well as other fields of endeavor, "We stand on the shoulders of giants". It is easy to sometimes forget what we owe to the likes of Mr. Crothers and Mr. Chapelle. John P.s. Ditto on Rob's comments on your build, your writings, and contribution. J.
- 3,618 replies
-
- 6
-

-
- young america
- clipper
- (and 1 more)
-
Cutting brass sheet
Landlocked123 replied to Landlocked123's topic in Metal Work, Soldering and Metal Fittings
Very nice! Best, John -
Cutting brass sheet
Landlocked123 replied to Landlocked123's topic in Metal Work, Soldering and Metal Fittings
Very nice! J. -
Hi, I just want to point out that Impressionist paintings command some of (if not) the highest prices in the art world. I truly believe that a lot of what we do is art. The important thing is to present a cohesive "whole", i.e. dont go hyper detailed on one part of the build and gloss over others. Just my 2 cents worth. Best, John
-
Cutting brass sheet
Landlocked123 replied to Landlocked123's topic in Metal Work, Soldering and Metal Fittings
Thanks Nils, I'm going to try that right now. I'll let you know how I do. By the way, I have been following your work on Pegasus and I think what your doing is marvelous. Best, John -
Cutting brass sheet
Landlocked123 replied to Landlocked123's topic in Metal Work, Soldering and Metal Fittings
Hi Druxey, I anneal the strips after cutting and before I use them, but I'm not sure how to anneal the whole sheet before cutting or, for that matter even, the edge I want to cut. I suppose I could use my large Benzomatic torch to heat the narrow edge red hot and then immerse it in a brownie pan of water, but somehow that seems a bit scary. Thanks, John -
Hi, I would be interested in hearing how members cut brass sheet. I've been cutting 0.02" and 0.032" by sandwiching the 3"x12" sheets between two pieces of equal width plywood, sliding the top piece down to expose the width I want, clamping, and cutting using a razor saw. My results have not been terribly accurate or repeatable. I've already ruined one saw and the whole process is rather cumbersome. I would really appreciate hearing any ideas. Thanks John
-
Mark, Thank you for pointing me to this build log. It is truly fabulous. Best, John
- 728 replies
-
- 1
-
-
- le fleuron
- 64 gun
- (and 1 more)
-
Hi Gaetan, I've spent the last few hours reading this build log from the beginning. As a novice modeler, I find the level of your skill unbelievable (not only the modeling but photography as well). One thought I've had looking at your work is that the cherry will only get darker and more rich looking over time! I have two questions; One is where does one buy asphalt? I've seen it also called bitumin in some of the posts. Does it have another name in the U.S. I have been using the beeswax-turpentine mixture as a finish and I would love to make it a bit darker. I thought of using artists oil paints, but I think the asphalt will do the trick. Two, if it is not impertinent, may I ask what was your career before becoming a master modeler? I cannot think of the appropriate adjectives to describe your work, only to say that I aspire to you skills (and workshop! ) and to give you a heartfelt thank you for sharing it. Best, John
- 728 replies
-
- 2
-
-
- le fleuron
- 64 gun
- (and 1 more)
-
Danny, Mine is just one voice adding to a chorus of praise. I don't know if you ever saw the film "As Good as it Gets" but in a key moment Jack Nicholson tells Helen Hunt that she makes him want to be a better man. You make me want to be a better modeler! As they say, "A man's reach should exceed his grasp". You make me want to be a better modeler. I don't know if I can ever reach your level of accomplishment, but I will try and I will always owe you that. Best, John
-
3D Printing - Not Just Yet!
Landlocked123 replied to dvm27's topic in CAD and 3D Modelling/Drafting Plans with Software
Hi, I'm just a newbie thinking about my first build, so I will defer to those who have many, many more years of experience. But it seems to me that a major point which everyone seems to aspire to is excellence in craftsmanship. To my way of thinking craftsmanship is how well one utilizes the tools and materials available to them whether a CAD program and a 3-D printer or a piece of bone and a whittling knife in a British prison. John